owners manual -...
TRANSCRIPT
owners manual 500
ENGLISHSPANISH


contents
Advisory ...................................................................................................................... 4
Acoustics .................................................................................................................... 6
Fabric Cleaning Information .......................................................................................... 6
Installation ................................................................................................................. 7
USB / Power Outlet / Underbed Light / Flat .................................................................. 11
Power Down Operation ............................................................................................... 12
Remote Control Function ............................................................................................ 14
Remote Control Programming ..................................................................................... 15
Troubleshooting ......................................................................................................... 19
Accessories ............................................................................................................... 20
1-3-10 Warranty ........................................................................................................ 21
contents
If adjustable base does not operate or if parts are missing, call:
(844) MATT-FRMDo not contact retail store or dealer.
Spanish translation begins on page 23.La traducción en español inicia en la página 23.

500 Adjustable Base Owners Manual 99301625-d4
important information
READ THE FOLLOWING INFORMATION CAREFULLY BEFORE USING THIS PRODUCT
electrical rating Electrical components are rated for 100-240V, 50/60Hz, 1.5A.
electrical groundingThis product is equipped with a polarized or grounded electrical power cord. The power cord will only fit into a grounded, electrical surge protection device (not included) or a grounded electrical outlet.
warranty warningDo not open any control boxes, motors or remote control devices (with the exception of the remote control and power down box battery compartments). The product warranty will be void if these components are tampered with. Do not attempt to alter component wiring or adjust or modify the structure of the product in any way or the warranty will be void. Any repair or replacement of base parts must be performed by authorized personnel.
lubricationThis product is designed to be maintenance free. The lift motors are permanently lubricated and sealed—no additional lubrication is required. Do not apply lubricant to lift motor lead screws or any nylon nuts or the base may inadvertently creep downward from the elevated position.
Product ratingsThe base lift motors are not designed for continuous use. Reliable operation and full life expectancy will be realized as long as the lift motor operation does not exceed five (5) minutes over a forty-five (45) minute period, or approximately 11% duty cycle. Note: massage equipped bases are not designed for continuous, extended massage operation. massage systems are rated for a maximum of 2 hours of use within any 6 hour period. Any attempt to circumvent or exceed product ratings will shorten the life expectancy of the product and may void the warranty.
The recommended maximum weight (including mattress) is 850 lb (385 kg) distributed evenly across the base. This product is not designed to support or lift this amount in the head or foot sections alone. Note: exceeding the recommended weight restrictions could damage the base and void the warranty.
For best performance, consumers should enter and exit the adjustable base with the base in the flat (horizontal) position. Avoid placing entire weight on head or foot section of the base, including when in the raised position. DO NOT STAND ON BASE AT ANY TIME.
UL (Underwriters Laboratories) recognized components.
CFR 1633 approved for use with most mattresses.
Assembled in USA.
advisory
FOR OPTIMUM ADjUSTABLE BASE OPERATION, USE A GROUNDED, ELECTRICAL
SURGE PROTECTION DEvICE (NOT INCLUDED). FAILURE TO USE A SURGE
PROTECTION DEvICE COULD COMPROMISE SAFETY OR CAUSE PRODUCT MALFUNCTION.
WARNINGWARNING
sMall cHildren / Pets warningAfter the base is unboxed, immediately dispose of packaging material as it can smother small children and pets. To avoid injury, children or pets should not be allowed to play under or on the base. Children should not operate this base without adult supervision.
READ ALL INSTRUCTIONS BEFORE USING

500 Adjustable Base Owners Manual 99301625-d 5
advisory
READ THE FOLLOWING INFORMATION CAREFULLY BEFORE USING THIS PRODUCT
important information
PaceMaker warningThis product produces a vibrating sensation. It is possible that individuals with heart-assist pacemakers may experience a sensation similar to exercise. Consult physician for complete information.
HosPital use disclaiMer This base is designed for in-home use only. It is not approved for hospital use and does not comply with hospital standards. Do not use this base with tent type oxygen therapy equipment, or use near explosive gases.
fcc coMPliance The equipment has been tested and found to comply with the limits for a Class B digital device, pursuant to Part 15 of the FCC Rules. These limits are designed to provide reasonable protection against harmful interference when the equipment is operated in a residential environment. This equipment generates, uses, and can radiate radio frequency energy and, if not installed and used in accordance with the instruction manual, may cause harmful interference to radio communications. However, there is no guarantee that interference will not occur in a particular installation. If this equipment does cause harmful interference to radio or television reception, which can be determined by turning off the equipment off and on, the user is encouraged to try to correct the interference by one or more of the following measures:
- Reorient or relocate the receiving antenna
- Increase the separation between the equipment and receiver.
- Connect the equipment into an outlet on a circuit different from that to which the receiver is connected.
- Consult the dealer or an experienced radio/TV technician for help.
Radio Frequency = 2.4GHz.
PincH Point warning
DURING BASE OPERATION, GAPS (PINCH POINTS) ARE CREATED (ARROWS IN FIGURE
1). A CHILD, A PERSON’S LIMB, OR A PET CAN BECOME ENTRAPPED AT THESE
LOCATIONS. DURING USE, AND WHEN BASE IS IN THE RAISED POSITION, ALWAYS kEEP
GAP AREAS (PINCH POINTS) CLEAR AND kEEP ALL LIMBS ON TOP OF BASE. FAILURE TO FOLLOW THIS WARNING COULD RESULT
IN SERIOUS INjURY OR DEATH.
WARNINGWARNING
FIGURE 1TYPICAL PINCH POINTS
service requireMentsService technicians are not responsible for moving furniture, removing headboards and footboards or any items required to perform maintenance on the base. In the event the technician is unable to perform service due to lack of accessibility, the service call will be billed to the purchaser and the service will have to be rescheduled.
READ ALL INSTRUCTIONS BEFORE USING

500 Adjustable Base Owners Manual 99301625-d6
acoustics
lifting/lowering MecHanisMsThe lift/lower feature will emit a minimal humming sound during operation. This is normal.
During operation, the lift arm wheels make contact with the platform support of the base. This applies slight tension on the moving components and resonance is reduced to a minimum level. If excessive noise or vibration is experienced, reverse the movement action (up or down) of the base with the remote control. This should realign the base’s activating mechanisms to the proper operational position.
Massage oPerationThe massage feature will emit a minimal tone during operation. This is normal. When the massage level is increased, motor resonance will intensify accordingly.
location environMentThe level of sound experienced during operation is directly related to the location environment. For example, when a base is located on a hardwood floor with the massage feature in operation, a vibrating tone will be audible. To minimize this resonance, place a piece of carpet, or rubber caster cups, under each leg or caster of the base.
It is possible to experience vibration or noise from the headboard brackets, headboards or footboards if mounting bolts are not firmly tightened.
fabric cleaning inforMation
Spot clean only with water based shampoo or foam upholstery cleaner. Pretest a small, inconspicuous area before proceeding. Do not over wet. Do not use solvents to spot clean. Pile fabrics may require brushing with a non-metallic, stiff bristle brush to restore appearance. Hot water extraction or steam cleaning is not a recommended cleaning method.
To prevent overall soiling, frequent vacuuming or light brushing with a non-metallic stiff bristle brush to remove dust and grime is recommended. When cleaning a spill, blot immediately to remove spilled material. Clean spots or stains from the outside to the middle of the affected area to prevent circling. Use a professional furniture cleaning service when an overall soiled condition is apparent.

500 Adjustable Base Owners Manual 99301625-d 7
installation
For installation and setup, complete the following procedures, in the order indicated below and on the following pages:
steP 1 Before discarding any packing materials, check the adjustable base shipping carton and verify the following items are included:
• (4) Wood Legs• (4) Plastic Washers (for leg installation)
• (1) Remote Control• (3) AAA Batteries
• (1) Power Supply (includes power brick, electrical feed cord, and electrical power cord)
• (1) Dual Sync Cable (split sizes only)
• (1) Warranty Activation Card• (1) Quick Setup Guide
qUICk SETUP GUIDE
WARRANTY ACTIvATION CARD
REMOTE CONTROL
3 - AAA BATTERIES
DUAL SYNC CABLE(split sizes only)
WOOD LEG(4 pieces)
POWER SUPPLY (power brick, electrical feed cord, and electrical power cord)
factory attached to base, no assembly required
PLASTIC WASHERS (for leg installation)
(4 pieces)

500 Adjustable Base Owners Manual 99301625-d8
installationinstallation
steP 2Remove the hardware box.
steP 3Install (4) legs into the base frame. Place (1) plastic washer over the threaded insert at (1) corner of the base frame (FIGURE 2). Then, screw (1) leg into the threaded insert, keeping the washer in between the insert and leg (FIGURE 3). Repeat at each corner of the base.
LEGS – SCREW INTO
THREADEDINSERT AT
EACH CORNER
FIGURE 2
FIGURE 3
PLASTIC WASHER(placed over threaded insert)
DO NOT ATTEMPT TO SCREW LEGS INTO ANY OTHER INSERTS. THIS WILL DAMAGE
PRODUCT.
CAUTIONCAUTION
READ ALL INSTRUCTIONS BEFORE USING

500 Adjustable Base Owners Manual 99301625-d 9
installation
steP 4 Carefully lift the adjustable base from the shipping carton, keeping the unit top-side-down. Remove and extend out power cord from base.
POWER CORDS MUST NOT INTERFERE WITH ANY ADjUSTABLE BASE MECHANISMS.
DUE TO RISk OF INjURY, TWO PEOPLE ARE REqUIRED TO HANDLE AND MOvE
ADjUSTABLE BASE.
WARNINGWARNING
WARNINGWARNING
steP 7Install batteries in remote control (3-AAA, included) (FIGURE 4). Note: make sure batteries are properly oriented. Briefly activate all functions of the base with the remote control to verify all features are in working order. If base does not operate, refer to the Troubleshooting section of this manual.
BATTERY COMPARTMENT DOOR
PRESS IN ON TAB AND LIFT OUT TO REMOvE BATTERY COMPARTMENT DOOR. INSERT TABS IN TAB SLOTS AND SNAP IN TO REPLACE.
BOTTOM OF REMOTE CONTROL
FIGURE 4
POSITIvE (+) END
TABS
NEGATIvE (-) END
steP 8 Return base to the level position.
steP 5Remove the plastic packaging from the base frame. Carefully rotate the adjustable base over to position the base so it is resting on its legs.
steP 6 Plug electrical power cord into a working, grounded electrical outlet. Note: An electrical surge protection device is recommended (not included).
READ ALL INSTRUCTIONS BEFORE USING
READ ALL INSTRUCTIONS BEFORE USING

500 Adjustable Base Owners Manual 99301625-d10
installation
steP 9 Install mattress on base. Note: mattress is equipped with a micro-Hook™ system to captivate the mattress (FIGURe 5).
FIGURE 5
Micro-Hook™ SYSTEM
FOOT END OF BASE
Micro-Hook™ DETAIL
IMPORTANT!THIS PRODUCT SHOULD NOT BE USED WITH
EITHER A DUST RUFFLE OR A MATTRESS ENCASEMENT. IF EITHER A DUST RUFFLE OR MATTRESS ENCASEMENT IS NEEDED,
THEN A MATTRESS RETAINER BAR IS REqUIRED.
Typical adjustable base installation is now complete.

500 Adjustable Base Owners Manual 99301625-d 11
usb / Power outlet / underbed ligHt / flat
usb / Power outletThe 500 Model bases are equipped with working USB and power outlets located on either side of the base that allow you to charge low voltage electronic devices such as cell phones, tablets, and/or laptops directly from the base (FIGURE 6). Note: USB / power outlet is for charging convenience only. Remove USB charging cord and/or power cord from USB / power outlet before entering or exiting base. If an extended charging period is needed, it is recommended to use the wall outlet.
underbed ligHt / flat featureThe 500 Model bases are also equipped with underbed light and flat switches located on either side of the base. Press in on underbed light switch to turn underbed light on and off. Press and hold flat switch to lower base to level position (FIGURE 6).
POWER OUTLET
UNDERBED LIGHT SWITCHFLAT
SWITCH
USB OUTLETS
FIGURE 6
500 Adjustable Base Owners Manual 99301625-d12
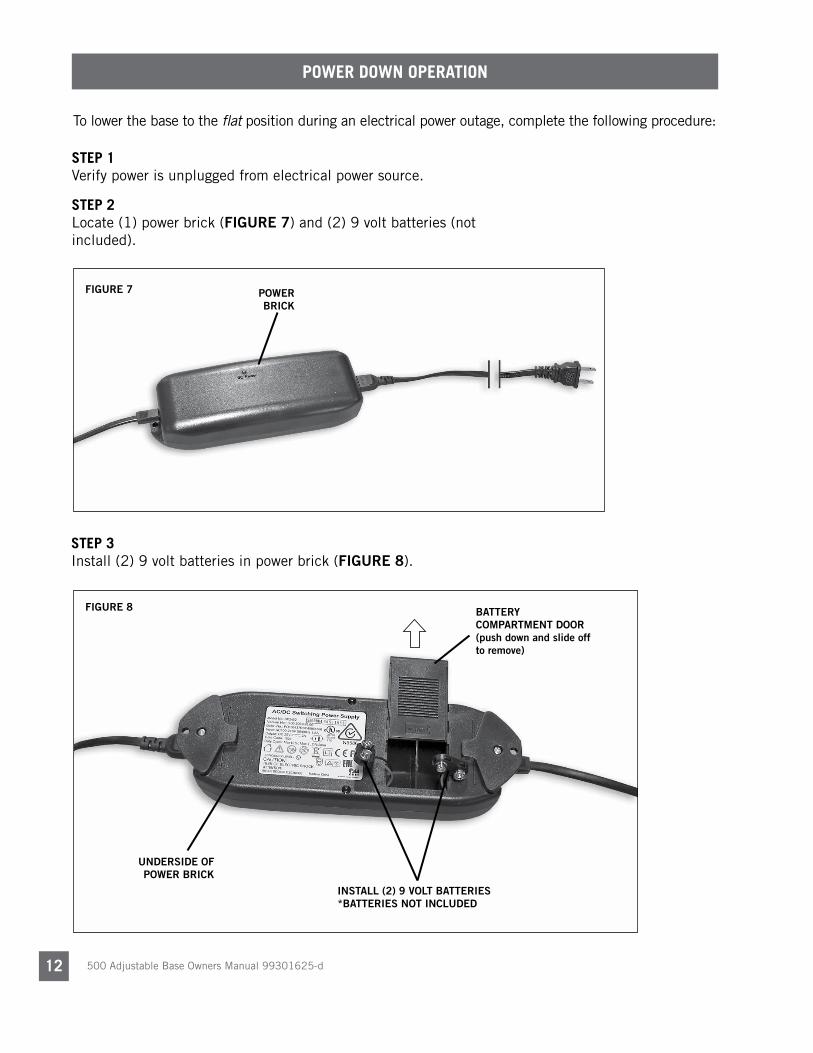
Power down oPeration
To lower the base to the flat position during an electrical power outage, complete the following procedure:
steP 1 Verify power is unplugged from electrical power source.
steP 2 Locate (1) power brick (FIGURE 7) and (2) 9 volt batteries (not included).
steP 3 Install (2) 9 volt batteries in power brick (FIGURE 8).
FIGURE 7 POWER BRICk
FIGURE 8
INSTALL (2) 9 vOLT BATTERIES*BATTERIES NOT INCLUDED
UNDERSIDE OF POWER BRICk
BATTERY COMPARTMENT DOOR (push down and slide off to remove)

500 Adjustable Base Owners Manual 99301625-d 13
steP 4 Press the head down button on the remote control until the head section is flat, then press the foot down button on the remote control until the foot section is flat (FIGURE 9).
steP 5 Remove two (2) 9 volt batteries from power brick. Plug power cord back into electrical power source (FIGURE 10). When power is restored from outage, base is ready to resume normal operation.
HEAD DOWN
BUTTON
FOOT DOWN BUTTON
FIGURE 9
Power down oPeration
FIGURE 10

500 Adjustable Base Owners Manual 99301625-d14
reMote control function
REMOTE CONTROL REqUIRES THREE (3) AAA SIzE BATTERIES (INCLUDED). THE BUTTONS ON THE REMOTE CONTROL ILLUMINATE FOR 2.5 SECONDS WHEN PRESSED AND RELEASED.
NOTE
MASSAGE SETTINGS CANNOT BE SAvED IN PRESET CUST 1 AND CUST 2 BUTTONS.
NOTE
foot down buttonPress and hold to lower the foot section.
underbed ligHt buttonPress to turn underbed light on or off.
foot uP buttonPress and hold to raise the foot section.
Head down buttonPress and hold to lower the head section.
cust 1 buttonPress and hold to adjust base to the
programmed position.
*To program a position, adjust base to desired position, press and hold the set
button until the massage motors and underbed light turn on and off, then
press and hold the Cust 1 button until the massage motors turn on and off.
cust 2 buttonPress and hold to adjust base to the
programmed position.
*To program a position, adjust base to desired position, press and hold the set
button until the massage motors and underbed light turn on and off, then
press and hold the Cust 2 button until the massage motors turn on and off.
Head Massage uP buttonPress to increase massage intensity.
Massage has 3 speeds: Low, medium and high. Massage will automatically
shut off after 15 minutes.
Head Massage down buttonPress to decrease massage intensity.
Massage has 3 speeds: Low, medium and high. Massage will automatically
shut off after 15 minutes.
Head uP buttonPress and hold to raise the head section.
set buttonPress and hold to program Cust 1 and Cust 2 presets.
foot Massage uP buttonPress to increase massage intensity. Massage has 3 speeds: Low, medium, and high. Massage will automatically shut off after 15 minutes.
foot Massage down buttonPress to decrease massage intensity. Massage has 3 speeds: Low, medium, and high. Massage will automatically shut off after 15 minutes.
Massage on/off buttonPress to turn both massage motors on or off.
flat buttonPress and hold to lower the base to the level position.
PRESS & HOLD TO ONE TOUCH
To change remote control functions from “press & hold” to “one touch”, simultaneously press the HEAD MASSAGE DOWN and FOOT MASSAGE DOWN buttons. The massage motors and underbed light will turn on and off confirming the change. Your base is now set to “one touch.”
When in “one touch” mode:Cust 1 and Cust 2 buttonsPress and release (one touch) button. Base will adjust to the programmed position. Press any other button to stop the base during movement.
Flat buttonPress and release (one touch) button. Base will shut off massage motor, if active, and adjust base to level position. Press any other button to stop the base during movement.
To revert back to factory settings, simultaneously press and hold the SET button and the FLAT button. The massage motor will turn on and off confirming the change. Your base is now set to factory settings. Note: Cust 1 and Cust 2 positions will revert to factory preprogrammed positions.

500 Adjustable Base Owners Manual 99301625-d 15
reMote control PrograMMing (1 remote control - 1 base)
Program One Remote to Operate One Base - perform the following numbered procedure.
FIGURE 12
HEAD UP BUTTON
FLAT BUTTON
steP 1Unplug the adjustable base electrical power cord. Wait 30 seconds, then plug the cord back into the power source.
steP 2Locate the control box, attached to the underside of the base (FIGURE 11).
steP 3Using a pointed object, push the learn port in two times in rapid succession. You will hear an audible click after each push. Then, the indicator light and the underbed light will light up (FIGURE 11).
steP 4On the remote control, simultaneously press and hold the HEAD UP and FLAT buttons (FIGURE 12) until the indicator light goes off on the control box.
One remote control is now programmed to operate one base.
FIGURE 11
CONTROL BOx
LEARN PORT
INDICATOR LIGHT

500 Adjustable Base Owners Manual 99301625-d16
reMote control PrograMMing (1 or 2 remote controls - 2 bases)
BASE 1
BASE 2
Program One or Two Remotes to Operate Two Bases - perform the following numbered procedure. NOTe: mAKe SURe BOTH RemOTeS ARe IN “PReSS & HOLD” mODe AND BOTH BASeS ARe FLAT BeFORe BeGINNING PROCeDURe. If Cust 1 and Cust 2 have custom positions saved, revert back to factory settings before beginning procedure.
OR
REMOTE 1 REMOTE 2
steP 1Plug both adjustable bases into electrical power source. Operate both remote controls to verify each remote functions properly with its respective base. NOTe: see 1-to-1 programming procedure if bases do not operate. Using remote controls, adjust both bases to flat position. Unplug both bases from electrical power outlet.
steP 2Choose base 1 remote. Retain base 2 remote control as a spare or use if 2 remotes are desired to operate both bases.
steP 3Position both bases on their sides, in close proximity to each other. CAUTION: AT LeAST TWO PeOPLe ARe ReCOmmeNDeD FOR HANDLING AND mOVING ADJUSTABLe BASe.
steP 4Locate dual sync cable (FIGURE 13).
FIGURE 13DUAL SYNC CABLE
MALE PLUGS(use)
FEMALE PLUG(don’t use)
FEMALE PLUG(don’t use)
steP 5On base 1, plug one of the male sync cable plugs into the sync port of the toggle switch control box, mounted to the underside of the base, near the control box (FIGURE 14).
CONTROL BOx
TOGGLE SWITCH CONTROL BOx
SYNC PORT
FIGURE 14
steP 6Repeat Step 5 with base 2, using the remaining male plug of the dual sync cable. Note: Female plugs of the dual sync cable are not used.
steP 7Turn both bases over so they are resting on their legs. CAUTION: mAKe SURe CABLe IS CLeAR OF BASe AND FRee OF ANy PINCH POINTS.
steP 8Plug both bases into electrical power source.
steP 9Operate both bases with the remote control. NOTe: If bases do not operate in unison with the remote, verify dual sync cable connections are fully seated in both reset ports. Unplug both bases, wait 10 seconds, then plug them back in.

500 Adjustable Base Owners Manual 99301625-d 17
“Press & Hold” to “one toucH” PrograMMing (1 remote control - 2 bases)
to cHange froM “Press & Hold” to “one toucH” PrograMMingsteP 1Adjust base to the flat position.
steP 2Simultaneously press the HEAD MASSAGE DOWN and FOOT MASSAGE DOWN buttons on either of the remote controls. The massage motors and underbed light will turn on and off confirming the change.
WHEN IN “ONE TOUCH” MODE:
Cust 1 and Cust 2 buttonsOne touch button. Base will adjust to the programmed position. Press any other button to stop the base during movement.
Flat buttonFlat button always remains “press & hold.” When pressed and held, base will shut off massage motor, if active, and adjust base to level position.
REvERT BACk TO FACTORY SETTINGSTo revert back to factory settings, simultaneously press and hold the SET button and the FLAT button on either of the remote controls. The massage motor and underbed light will turn on and off confirming the change. Your base is now set to factory settings.

500 Adjustable Base Owners Manual 99301625-d18
reMote control PrograMMing (separating 2 bases)
REMOTE CONTROL 1
BASE 1
BASE 2REMOTE CONTROL 2
Separate Two Bases - for independent adjustable base movement, perform the following numbered procedure.
steP 1Unplug both bases from electrical power outlet. Position both bases on their sides, in close proximity to each other. CAUTION: AT LeAST TWO PeOPLe ARe ReCOmmeNDeD FOR HANDLING AND mOVING ADJUSTABLe BASe.
steP 2Locate the toggle switch control box on both bases. Locate dual sync cable plugged into the sync port of both toggle switch control boxes. Unplug the dual sync cable from the sync ports (FIGURE 15). Remote 1 should now operate base 1 and remote 2 should operate base 2 once the bases are plugged in. If remotes do not operate the bases, proceed to step 3.
steP 3Plug base 1 into electrical power outlet. On the control box for base 1, using a pointed object, push the learn port in two times in rapid succession. You will hear an audible click after each push. Then, the indicator light and the underbed light will light up (FIGURE 16).
CONTROL BOx
TOGGLE SWITCH CONTROL BOx
UNPLUG DUAL SYNC CABLE FROM SYNC PORT
FIGURE 15
FIGURE 16
CONTROL BOx
LEARN PORT
INDICATOR LIGHT
steP 4On remote control 1, simultaneously press and hold the head up and flat buttons (FIGURE 17) until the indicator light goes off on the control box.
steP 5Repeat Steps 3 & 4 with base 2 and remote control 2.
steP 6Turn both bases over so they are resting on their legs. CAUTION: AT LeAST TWO PeOPLe ARe ReCOmmeNDeD FOR HANDLING AND mOVING ADJUSTABLe BASe.
Independent remote control operation is nowrestored (remote control 1 operating base 1; remotecontrol 2 operating base 2).
FIGURE 17
HEAD UP BUTTON
FLAT BUTTON

500 Adjustable Base Owners Manual 99301625-d 19
troublesHooting
If the adjustable base fails to operate, investigate the symptoms and possible solutions provided in the chart below:
syMPtoM solution• Verify power cord is plugged into a working, grounded
electrical outlet. A grounded, electrical surge protection device is recommended. Test outlet by plugging in another working appliance.
• If the base was operated over the rated duty cycle, thermal switch opens. Wait 30 minutes before trying to operate the base. Once the base resumes normal operation, do not exceed the duty cycle.
• Program the remote control (see Remote Control Programming section of this manual for programming procedures).
• Unplug power cord, wait 30 seconds and plug in to reset electronic components.
• Electrical circuit breaker may be tripped. Check electrical service breaker box to verify.
• Defective surge protection device or electrical outlet. Test outlet by plugging in another working appliance.
• Replace batteries in the remote control.
• Base mechanism may be obstructed. Elevate base and check for obstruction. Remove obstruction.
• Head section may be too close to the wall.
• Headboard may be too close the edge of the mattress. Verify a 1.5” (38.1mm) to 2” (50.8mm) distance between headboard brackets and mattress. Adjust if required.
• Verify headboard brackets were removed during installation. Remove headboard brackets if still attached to the underneath side of base.
• If base is located on hard surface flooring, place carpet pieces or rubber caster cups under each leg or caster of the base. (See accessory sheet for rubber caster cup order information.)
• Elevate the head or foot section a short distance (with the remote control) to realign the lift/lower mechanisms with the bed support platform.
• Verify that the base is not positioned against a wall, nightstand, or other object that may cause vibration or noise.
• If base is installed over a bed frame, verify massage motors are not causing bed frame (or bed frame components) to vibrate.
• Verify that headboard attachment hardware is tightened firmly (if used).
Remote control illuminates and appears to be operable, but will not activate base.
No features of the base will activate.
Remote control will not illuminate.
Head or foot section will elevate, but will not return to the horizontal (flat) position.
Excessive massage motor noise.

500 Adjustable Base Owners Manual 99301625-d20
accessories
oPtional equiPMentContact customer service toll free (844-MATT-FRM) to order the accessories indicated in the chart below.
4B8846
4B2284
4B7270
4B8740
4B8524
Headboard Brackets-TXL, FXL-Q
3” Legs (set of 4)
5” Legs (set of 4)
Pin-Adjustable Legs (set of 4)
Mattress Retainer (bushings preinstalled in base)
ACCESSORY DESCRIPTION CODE IMAGE
500 Adjustable Base Owners Manual 99301625-d 21
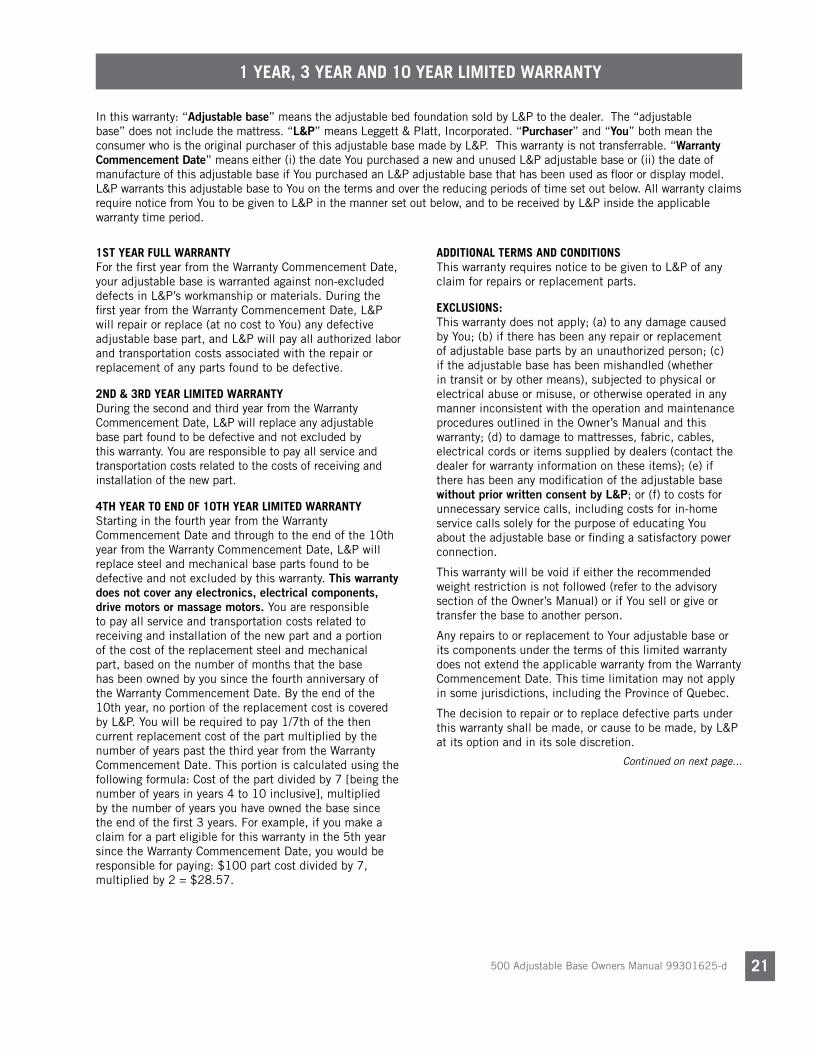
1 year, 3 year and 10 year liMited warranty
In this warranty: “Adjustable base” means the adjustable bed foundation sold by L&P to the dealer. The “adjustable base” does not include the mattress. “L&P” means Leggett & Platt, Incorporated. “Purchaser” and “You” both mean the consumer who is the original purchaser of this adjustable base made by L&P. This warranty is not transferrable. “Warranty Commencement Date” means either (i) the date You purchased a new and unused L&P adjustable base or (ii) the date of manufacture of this adjustable base if You purchased an L&P adjustable base that has been used as floor or display model. L&P warrants this adjustable base to You on the terms and over the reducing periods of time set out below. All warranty claims require notice from You to be given to L&P in the manner set out below, and to be received by L&P inside the applicable warranty time period. 1st year full warrantyFor the first year from the Warranty Commencement Date, your adjustable base is warranted against non-excluded defects in L&P’s workmanship or materials. During the first year from the Warranty Commencement Date, L&P will repair or replace (at no cost to You) any defective adjustable base part, and L&P will pay all authorized labor and transportation costs associated with the repair or replacement of any parts found to be defective.
2nd & 3rd year liMited warrantyDuring the second and third year from the Warranty Commencement Date, L&P will replace any adjustable base part found to be defective and not excluded by this warranty. You are responsible to pay all service and transportation costs related to the costs of receiving and installation of the new part.
4tH year to end of 10tH year liMited warrantyStarting in the fourth year from the Warranty Commencement Date and through to the end of the 10th year from the Warranty Commencement Date, L&P will replace steel and mechanical base parts found to be defective and not excluded by this warranty. This warranty does not cover any electronics, electrical components, drive motors or massage motors. You are responsible to pay all service and transportation costs related to receiving and installation of the new part and a portion of the cost of the replacement steel and mechanical part, based on the number of months that the base has been owned by you since the fourth anniversary of the Warranty Commencement Date. By the end of the 10th year, no portion of the replacement cost is covered by L&P. You will be required to pay 1/7th of the then current replacement cost of the part multiplied by the number of years past the third year from the Warranty Commencement Date. This portion is calculated using the following formula: Cost of the part divided by 7 [being the number of years in years 4 to 10 inclusive], multiplied by the number of years you have owned the base since the end of the first 3 years. For example, if you make a claim for a part eligible for this warranty in the 5th year since the Warranty Commencement Date, you would be responsible for paying: $100 part cost divided by 7, multiplied by 2 = $28.57.
additional terMs and conditionsThis warranty requires notice to be given to L&P of any claim for repairs or replacement parts.
eXclusions:This warranty does not apply; (a) to any damage caused by You; (b) if there has been any repair or replacement of adjustable base parts by an unauthorized person; (c) if the adjustable base has been mishandled (whether in transit or by other means), subjected to physical or electrical abuse or misuse, or otherwise operated in any manner inconsistent with the operation and maintenance procedures outlined in the Owner’s Manual and this warranty; (d) to damage to mattresses, fabric, cables, electrical cords or items supplied by dealers (contact the dealer for warranty information on these items); (e) if there has been any modification of the adjustable base without prior written consent by L&P; or (f) to costs for unnecessary service calls, including costs for in-home service calls solely for the purpose of educating You about the adjustable base or finding a satisfactory power connection.
This warranty will be void if either the recommended weight restriction is not followed (refer to the advisory section of the Owner’s Manual) or if You sell or give or transfer the base to another person.
Any repairs to or replacement to Your adjustable base or its components under the terms of this limited warranty does not extend the applicable warranty from the Warranty Commencement Date. This time limitation may not apply in some jurisdictions, including the Province of Quebec.
The decision to repair or to replace defective parts under this warranty shall be made, or cause to be made, by L&P at its option and in its sole discretion.
Continued on next page...

500 Adjustable Base Owners Manual 99301625-d22
1 year, 3 year and 10 year liMited warranty
Repair or replacement shall be the sole remedy of the Purchaser. There shall be no liability on the part of L&P for any special, indirect, incidental, or consequential damages or for any other damage, claim, or loss not expressly covered by the terms of this warranty.
This limited warranty does not include reimbursement for inconvenience, removal, installation, setup time, loss of use, shipping, or any other costs or expenses. L&P and its service technicians will not be responsible for moving furniture or any other items not attached to the adjustable base in order to perform service on the adjustable base.
It is the sole responsibility of You to provide adequate space and accessibility to the adjustable base. In the event that the technician is unable to perform service due to lack of accessibility, the service call will be billed to You and the service will have to be rescheduled.
L&P makes no other warranty whatever, express or implied, and all implied warranties of merchantability and fitness for a particular purpose are disclaimed by L&P and excluded from this agreement.
Some American States do not allow the exclusion or limitation of incidental or consequential damages, so the above limitation or exclusion may not apply to You.
This warranty gives You specific legal rights, and You may also have other rights, which may vary from jurisdiction to jurisdiction. This warranty is valid in all 50 American States, the District of Columbia, Puerto Rico, and all 10 Provinces and 3 Territories of Canada.
For customer service under this limited warranty, give notice to L&P by mail, phone, email or online to the addresses set out below:
Mattress Firm Customer Service
toll free phone: 844-MATT-FRMonline: mattressfirm.com
PLEASE DO NOT CONTACT YOUR RETAIL DEALER OR ANY OTHER SERvICE PERSONNEL
contents
Recomendaciones ...................................................................................................... 24
Acústica ................................................................................................................... 26
Información sobre la limpieza de tapicería ................................................................... 26
Instalación ................................................................................................................ 27
Enchufe USB / Toma de corriente/ Iluminación debajo de la cama/ Posición plana (horizontal) ...... 31
Operación En Caso De Interrupción Eléctrica ............................................................... 32
Funcionamiento Del Control Remoto ............................................................................ 34
Programación Del Control Remoto ............................................................................... 35
Resolución de problemas ............................................................................................ 39
Accesorios ................................................................................................................ 40
Garantía 1-3-10 ........................................................................................................ 41
contenido
Si la base ajustable no funciona o si hay partes faltantes, llame al:
(844) MATT-FRMPor favor no contacte a la tienda minorista o al distribuidor.

Manual del propietario base ajustable 500 99301625-d 24
informaCiÓn importantE
LEA DETENIDAMENTE LA SIGUIENTE INFORMACIÓN ANTES DE USAR ESTE PRODUCTO
caracterÍsticas elÉctricas Los componentes eléctricos están previstos para un voltaje de 100-240, 50-60Hz, 1.5A.
coneXiÓn a tierraEste producto está equipado con un cable eléctrico conectado a tierra o polarizado. El cable de alimentación encaja sólo en un dispositivo de protección contra sobretensión eléctrica puesto a tierra (no incluido), o en un tomacorriente puesto a tierra.
advertencia de la garantÍaNo abra ninguna caja de control, motor ni dispositivo del control manual (con la excepción de los compartimentos de baterías del control manual y de la caja de desconexión eléctrica). La garantía del producto perderá validez si se alteran estos componentes. La garantía del producto perderá validez si se alteran estos componentes, si se altera el cableado de los componentes, o si se ajusta o modifica de manera alguna la estructura del producto. Cualquier reparación o reemplazo de las partes de la base debe ser realizado por personal autorizado.
lubricaciÓnEste producto está diseñado para no necesitar mantenimiento. Los motores de elevación están permanentemente lubricados y sellados, no se necesita lubricación adicional. No aplique lubricante a los tornillos de avance del motor de elevación ni a las tuercas de nilón, de lo contrario la cama puede deslizarse accidentalmente hacia abajo desde la posición elevada.
esPecificaciones del ProductoLos motores de elevación de la base no están diseñados para uso continuo. Logrará un funcionamiento confiable y una expectativa de vida útil completa siempre que los motores de elevación no funcionen durante más de cinco (5) minutos en un período de cuarenta y cinco (45) minutos o aproximadamente un 11% del ciclo de trabajo. Nota: Las bases equipadas con masaje no están diseñadas para una operación de masaje continuo y extendido. Los sistemas de masajes han sido diseñados para un máximo de 2 horas de uso en un período de 6 horas. Cualquier intento de evadir o exceder las especificaciones del producto acortará la vida útil del mismo y puede invalidar la garantía.
El peso máximo recomendado (incluyendo el colchón) es de 385 kg (850 lb) distribuido uniformemente a través de la base. Este producto no está diseñado para soportar o elevar esta cantidad sólo en la sección de la cabeza o de los pies. Nota: exceder las restricciones recomendadas en cuanto a peso podría dañar la cama y anular la garantía.
Para un mejor desempeño, los consumidores deben entrar y salir de la base ajustable con la base en la posición plana (horizontal). Evite colocar todo el peso en las secciones de la cabeza o los pies de la base, incluso cuando esté en la posición elevada. NO SE PARE EN LA BASE EN NINGÚN MOMENTO.
Componentes fabricados conforme a UL (Underwriters Laboratories).
CFR 1633 aprobado para el uso con la mayoría de los colchones.
Ensamblado en los Estados Unidos.
recoMendaciones
advertencia sobre niÑos PequeÑos y MascotasDespués de sacar la base de la caja, deseche de inmediato el material de empacado pues puede asfixiar a niños pequeños o mascotas. Para evitar lesiones, no debe permitir que niños y mascotas jueguen abajo o encima de la base. Los niños no deben operar esta base sin la supervisión de un adulto.
PARA UN FUNCIONAMIENTO ÓPTIMODE LA BASE AjUSTABLE, UTILICE UN DISPOSITIvO
DE PROTECCIÓN CONTRA SOBRETENSIÓN ELéCTRICA CONECTADO A TIERRA (NO INCLUIDO). NO UTILIzAR TAL DISPOSITIvO PODRíA PONER EN
RIESGO LA SEGURIDAD U OCASIONAR EL MAL FUNCIONAMIENTO DEL PRODUCTO.
ADVERTENCIAADVERTENCIA
LEA TODAS LAS INSTRUCCIONES ANTES DE USAR

Manual del propietario base ajustable 500 99301625-d 25
recoMendaciones
LEA DETENIDAMENTE LA SIGUIENTE INFORMACIÓN ANTES DE USAR ESTE PRODUCTO
informaCiÓn importantE
advertencia Por MarcaPasosEste producto genera una sensación de vibración. Es posible que los individuos con marcapasos experimenten una sensación similar a cuando realizan ejercicio. Consulte al médico para obtener más información.
liMitaciÓn de resPonsabilidad en usos HosPitalarios esta base está diseñada para uso en el hogar únicamente. No está aprobada para el uso en hospitales y no cumple con las normas hospitalarias. No use esta base con equipo de terapia de oxígeno tipo tienda de campaña ni use cerca de gases explosivos.
conforMidad con la fcc (federal coMMunications coMMission) Se han realizado pruebas al equipo y se ha encontrado que cumple con los límites para un dispositivo digital de Clase B conforme a la Parte 15 de las normas de la FCC. Estos límites están diseñados para proporcionar una protección razonable contra interferencia dañina cuando el equipo se usa en un entorno residencial. Este equipo genera, usa y puede emitir energía de radiofrecuencia y, si no está instalado y no se usa de acuerdo con el manual de instrucciones, puede causar interferencia dañina en comunicaciones de radio. Sin embargo, no se garantiza que no habrá interferencia en una instalación en particular. Si este equipo causa interferencia dañina en la recepción de radio o televisión, que se puede determinar al apagar y encender el equipo, se aconseja al usuario que intente corregir la interferencia con una o más de las siguientes medidas:
- Vuelva a orientar o ubicar la antena receptora.
- Aumente la separación entre el equipo y el receptor.
- Conecte el equipo a un tomacorriente en un circuito que sea diferente al que está conectado el receptor.
- Para obtener ayuda, consulte al comerciante o a un técnico de radio/TV con experiencia.
Frecuencia de Radio = 2.4GHz.
advertencia de Punto de PelliZco
FIGURA 1PUNTOS DE ATRAPAMIENTO TíPICOS
requisitos de servicioLos técnicos de servicio no son responsables de mover muebles, quitar cabeceras y pieceras o cualquier otro artículo requerido para realizar el mantenimiento a la base. En el caso de que el técnico no pueda realizar el servicio debido a falta de accesibilidad, la llamada de servicio se le cobrará al comprador y el servicio se tendrá que programar para otra fecha.
DURANTE LA OPERACIÓN DE LA BASE, SE CREAN ESPACIOS (PUNTOS DE PELLIzCO) (FLECHAS EN LA FIGURA 1). UN NIÑO, UNA ExTREMIDAD DE
UNA PERSONA O UNA MASCOTA PUEDEN qUEDAR ATRAPADOS EN ESTOS LUGARES. DURANTE EL USO Y CUANDO LA BASE ESTé EN LA POSICIÓN ELEvADA, SIEMPRE MANTENGA LAS ÁREAS DE ESPACIOS (PUNTOS DE PELLIzCO) DESPEjADOS Y MANTENGA TODAS LAS ExTREMIDADES EN LA
PARTE SUPERIOR DE LA BASE. SI NO SIGUE ESTA ADvERTENCIA PODRíA OCURRIR UNA LESIÓN
GRAvE O LA MUERTE.
ADVERTENCIAADVERTENCIA
LEA TODAS LAS INSTRUCCIONES ANTES DE USAR

Manual del propietario base ajustable 500 99301625-d 26
acÚstica
MecanisMos de elevaciÓn/descensoLa función de elevación/descenso emitirá un zumbido mínimo durante la operación. Este sonido es normal.
Durante la operación, las ruedas del brazo de elevación tienen contacto con el soporte de la plataforma de la base. Esto aplica un poco de tensión a los componentes móviles y la resonancia se reduce a un nivel mínimo. Si se experimenta ruido o vibraciones en exceso, invierta la acción de movimiento (arriba o abajo) de la base con el control manual. Esto debe realinear los mecanismos de activación de la base a la posición de operación apropiada.
oPeraciÓn de MasaJesLa función de masajes emitirá un sonido mínimo durante la operación. Este sonido es normal. Al incrementar el nivel de los masajes, la resonancia del motor se intensificará en consecuencia.
entorno donde se encuentra ubicado el equiPoEl nivel de sonido experimentado durante el funcionamiento de la cama se relaciona directamente con el entorno en el que se encuentra ubicada. Por ejemplo, cuando una base se coloca sobre un piso de madera con la función de masaje en operación, se escuchará un tono de vibración. Para minimizar esta resonancia, coloque un pedazo de alfombra, o discos protectores de caucho a las ruedas, debajo de cada pata o rueda de la base.
Si los pernos de montaje no están ajustados firmemente, es posible que se produzca vibración o ruido en la piecera o en la cabecera de la cama, o en los soportes de la cabecera.
inforMaciÓn sobre la liMPieZa de taPicerÍa
Limpie las manchas usando únicamente shampoo a base de agua o limpiador en espuma para tapicería. Haga una prueba en un área pequeña y que no llame la atención antes de proseguir. No humedezca demasiado. No use solventes para limpiar las manchas. Puede ser necesario cepillar las telas afelpadas con un cepillo de cerdas rígidas no metálicas para recuperar su apariencia. La extracción con agua caliente o la limpieza con vapor no son métodos de limpieza recomendados.
Para evitar la suciedad en general, se recomienda aspirar con frecuencia o cepillar ligeramente con un cepillo de cerdas rígidas no metálicas para eliminar el polvo y la mugre. Al limpiar un derrame, absórbalo de inmediato para eliminar el material derramado. Limpie las manchas desde la parte externa hacia la parte del medio del área afectada para evitar que se impregnen. Utilice un servicio profesional de limpieza de muebles cuando sea aparente una condición de suciedad generalizada.

Manual del propietario base ajustable 500 99301625-d 27
instalaciÓn
Para la instalación y configuración, complete los siguientes procedimientos en el orden que se indica a continuación y en las páginas siguientes:
Paso 1 Antes de desechar cualquier material del empaque, abra la caja de envió de la base ajustable y verifique que incluya los siguientes artículos:
• (4) Patas de madera• (4) Arandelas de plástico (para la instalación de la pata)
• (1) Control remoto• (3) Baterías AAA
• (1) Fuente de alimentación (incluye bloque de alimentación, cable eléctrico de la base y cable de alimentación eléctrica)
• (1) Cable de sincronización doble (solo tamaño de dos piezas)
• (1) Tarjeta de activación de la garantía• (1) Guía de configuración rápida
GUíA DE CONFIGURACIÓN RÁPIDA
TARjETA DE ACTIvACIÓN DE LA GARANTíA
CONTROL REMOTO
3 - BATERíAS AAA
CABLE DE SINCRONIzACIÓN DOBLE
(solo tamaños de dos piezas)
PATA DE MADERA(4 piezas)
FUENTE DE ALIMENTACIÓN (bloque de alimentación, cable eléctrico y cable de
alimentación eléctrica)conectada de fábrica a la base; no requiere
ensamble
ARANDELAS DE PLÁSTICO (fpara la
instalación de la pata)(4 piezas)

Manual del propietario base ajustable 500 99301625-d 28
instalaciÓn
Paso 2Retire la caja de ferretería.
Paso 3Instale (4) patas en el armazón de la base. Coloque (1) arandela de plástico sobre el inserto roscado en (1) esquina del bastidor de la base (FIGURA 2). Luego, atornille (1) pata en el inserto roscado manteniendo la arandela entre el inserto y la pata (FIGURA 3). Repita en cada esquina de la base.
PATAS – SE ATORNILLAN EN EL INSERTO
ROSCADO EN CADA ESqUINA
FIGURA 2
FIGURA 3
ARANDELA DE PLÁSTICO(colocada sobre el inserto roscado)
NO TRATE DE ATORNILLAR LAS PATAS EN NINGUNA OTRA PERFORACIÓN. ESTO DAÑARÁ
EL PRODUCTO.
PRECAUCIÓNPRECAUCIÓN
LEA TODAS LAS INSTRUCCIONES ANTES DE USAR

Manual del propietario base ajustable 500 99301625-d 29
instalaciÓn
Paso 4 Con cuidado levante la base ajustable de la caja de envío mantenga la unidad con la parte superior hacia abajo. Retire y extienda el cable de alimentación desde la base.
Paso 7Instale las baterías en el control remoto (3 baterías AAA, incluidas) (FIGURA 4). Nota: Asegúrese de que las baterías estén orientadas de manera correcta. Brevemente active todas las funciones de la base con el control remoto para verificar que todas las características están funcionando. Si la base no funciona, consulte la sección de resolución de problemas en este manual.
CUBIERTA DEL COMPARTIMIENTO DE LA BATERíA
OPRIMA LA LENGÜETA Y LEvANTE HACIA AFUERA PARA RETIRAR LA CUBIERTA DEL COMPARTIMIENTO DE LA BATERíA. INSERTE LAS LENGÜETAS EN LAS RANURAS CORRESPONDIENTES Y PRESIONE PARA vOLvER A COLOCARLA.
PARTE INFERIOR DEL CONTROL REMOTO
FIGURA 4
POLO POSITIvO (+)
LENGÜETAS
POLO NEGATIvO (-)
Paso 5Retire el embalaje de plástico del armazón de la base. Con cuidado gire la base ajustable para posicionarla de manera que se apoye sobre las patas.
DEBIDO AL RIESGO DE LESIONES, SE REqUIERE DE DOS PERSONAS PARA
MANIPULAR Y MOvER LA BASE AjUSTABLE.
ADVERTENCIAADVERTENCIA
LOS CABLES DE ALIMENTACIÓN NO DEBEN INTERFERIR CON NINGÚN MECANISMO DE LA
BASE AjUSTABLE.
ADVERTENCIAADVERTENCIAPaso 6 Enchufe el cable de alimentación eléctrica a un tomacorriente que funcione y esté conectado a tierra. Nota: Se recomienda utilizar un dispositivo de protección contra sobrevoltaje (no incluido).
LEA TODAS LAS INSTRUCCIONES ANTES DE USAR

Manual del propietario base ajustable 500 99301625-d 30
instalaciÓn
Paso 9 Instale el colchón en la base ajustable. Nota: el colchón está equipado con un sistema micro-HookTm que lo captura (FIGURA 5).
FIGURA 5
SISTEMA Micro-Hook™
ExTREMO DEL PIE
DE LA BASEDETALLE
Micro-Hook™
! IMPORTANTE !ESTE PRODUCTO NO DEBE UTILIzARSE CON
UN vOLANTE O UN CUBRE COLCHÓN. EN CASO DE qUE SE NECESITE UN vOLANTE O UN CUBRE COLCHÓN, SE REqUIERE UNA
BARRA DE RETENCIÓN DEL COLCHÓN.
Ha completado la instalación típica de la base ajustable.
Paso 8 Vuelva a colocar la base en la posición horizontal.

Manual del propietario base ajustable 500 99301625-d 31
encHufe usb / toMa de corriente/ iluMinaciÓn debaJo de la caMa/PosiciÓn Plana (HoriZontal)
encHufe usb / toMa de corrienteLas bases del modelo 500 están equipadas con enchufes USB y tomas de corriente que funcionan ubicados en cada lado de la base que le permiten cargar dispositivos electrónicos de bajo voltaje, como teléfonos celulares, tabletas o computadoras portátiles directamente desde la base (FIGURA 6). Nota: el enchufe USB/toma de corriente es solo para comodidad de carga.Retire el cable de carga del USB y/o el cable de alimentación del enchufe USB/toma de corriente antes de colocar o sacar la base. Si se necesita un período prolongado de carga, se recomienda el uso del tomacorriente de pared.
iluMinaciÓn debaJo de la caMa/PosiciÓn Plana (HoriZontal)Las bases del modelo 500 también están equipadas con iluminación debajo de la cama e interruptores de posición plana ubicados a cada lado de la base. Presione el interruptor de la iluminación debajo de la cama para encenderlo y apagarlo. Oprima y sostenga el interruptor de posición plana para bajar la cama a la posición horizontal (FIGURA 6).
TOMA DE CORRIENTE
INTERRUPTOR PARA LA ILUMINACIÓNDEBAjO DE LA CAMA
INTERRPUTOR DE POSICIÓN HORIzONTAL
ENCHUFES USB
FIGURA 6

Manual del propietario base ajustable 500 99301625-d 32
oPeraciÓn en caso de interruPciÓn elÉctrica
Para bajar la base a la posición plana durante un apagón, realice el siguiente procedimiento:
Paso 1 Verifique que el cable de energía esté desconectado de la fuente de alimentación eléctrica.
Paso 2 Localice (1) bloque de alimentación (FIGURA 7) y (2) baterías de 9 voltios (no incluidas).
Paso 3 Instale (2) baterías de 9 voltios en el bloque de alimentación (FIGURA 8).
FIGURA 7 BLOqUE DE ALIMENTACIÓN
FIGURA 8
INSTALE (2) BATERíAS DE 9 vOLTIOS *BATERíAS NO INCLUIDAS
PARTE BAjA DEL BLOqUE DE
ALIMENTACIÓN
CUBIERTA DEL COMPARTIMIENTO DE LA BATERíA (empuje hacia abajo y deslice hacia afuera para removerla)

Manual del propietario base ajustable 500 99301625-d 33
Paso 4 Presione el botón cabeza abajo en el control remoto hasta que la sección de la cabeza esté plana, luego presione el botón pies abajo en el control remoto hasta que la sección de los pies esté nivelada (FIGURA 9).
Paso 5 Retire dos (2) baterías de 9 voltios del bloque de alimentación. Vuelva a conectar el cable de energía a la fuente de alimentación eléctrica (FIGURA 10). Cuando se reestablece la energía después de la sobrecarga, la base está lista para volver a operar normalmente.
BOTÓN PARA
BAjAR LA CABEzA
BOTÓN PARA BAjAR LOS PIES
FIGURA 9
oPeraciÓn en caso de interruPciÓn elÉctrica
FIGURA 10

Manual del propietario base ajustable 500 99301625-d 34
funciÓn del control reMoto
EL CONTROL REMOTO REqUIERE TRES (3) BATERíAS AAA. LOS BOTONES DEL CONTROL SE ILUMINAN DURANTE 2.5 SEGUNDOS CUANDO LOS PRESIONA Y LOS SUELTA.
NOTA
LA CONFIGURACIÓN DE MASAjES NO PUEDE SER SALvADA EN LOS BOTONES CUST 1 Y CUST 2 PRECONFIGURADOS.
NOTA
botÓn Para baJar los PiesOprima y sostenga para bajar la sección de los pies.
botÓn Para la iluMinaciÓn debaJo de la caMaPresione para encender o apagar la iluminación debajo de la cama.
botÓn Para subir el PieOprima y sostenga para subir la sección de los pies.
botÓn Para baJar la cabeZaOprima y sostenga para bajar la sección
de la cabecera.
botÓn cust (PersonaliZado) 1Oprima y sostenga para ajustar la base a
la posición programada.
*Para programar una posición, ajuste la base a la posición deseada, oprima y
sostenga el botón de configuración hasta que los motores de masaje y la iluminación
debajo de la cama se enciendan y se apaguen, luego oprima y sostenga el botón Cust 1 hasta que los motores de masaje se
enciendan y se apaguen.
botÓn cust (PersonaliZado) 2Oprima y sostenga para ajustar la base a
la posición programada.
*Para programar una posición, ajuste la base a la posición deseada, oprima y
sostenga el botón de configuración hasta que los motores de masaje y la iluminación
debajo de la cama se enciendan y se apaguen, luego oprima y sostenga el botón Cust 2 hasta que los motores de masaje se
enciendan y se apaguen.
botÓn Para increMentar MasaJe de cabeZa
Presione para incrementar la intensidad del masaje. El masaje tiene 3 velocidades:
baja, media y alta. El masaje se apagará automáticamente después de 15 minutos.
botÓn Para disMinuir MasaJe de cabeZa
Presione para disminuir la intensidad del masaje. El masaje tiene 3 velocidades:
baja, media y alta. El masaje se apagará automáticamente después de 15 minutos.
botÓn Para subir la cabeZaOprima y sostenga para subir la sección
de la cabecera.
botÓn Para el aJusteOprima y sostenga para programar las preselecciones de Cust 1 y Cust 2.
botÓn Para increMentar MasaJe de PiesPresione para aumentar la intensidad del masaje. El masaje tiene 3 velocidades: baja, media y alta. El masaje se apagará automáticamente después de 15 minutos.
botÓn Para disMinuir MasaJe de PiesPresione para disminuir la intensidad del masaje. El masaje tiene 3 velocidades: baja, media y alta. El masaje se apagará automáticamente después de 15 minutos.
botÓn Para encender y aPagar el MasaJePresione para encender o apagar los motores de masaje.
botÓn de PosiciÓn Plana (flat)Oprima y sostenga para bajar la base a la posición nivelada.
DE “OPRIMA Y SOSTENGA” A UN TOqUE”
Para cambiar las funciones del control remoto de “oprima y sostenga” a “un toque”, presione simultáneamente los botones DISMINUIR MASAjE DE CABEzA y DISMINUIR MASAjE DE PIES. El motor de masajes y la iluminación debajo de la cama se encenderá y apagará confirmando el cambio. Su base está ahora configurada a “un toque.”
En el modo de “un toque”:Botones Cust 1 y Cust 2 (personalizado)Presione y libere el botón de (un toque). La base se ajustará a la posición programada. Presione cualquier otro botón para detener la base durante el movimiento.
Botón de posición planaPresione y libere el botón de (un toque). La base apagará el motor del masaje, si está activado y ajustará la base a la posición plana. Presione cualquier otro botón para detener la base durante el movimiento.
Para volver a la configuración de fábrica, presione y sostenga simultáneamente el botón para EL AjUSTE (SET) y el botón de POSICIÓN PLANA (FLAT). El motor de masaje se apagará y encenderá confirmando el cambio. Ahora su base está ajustada a la configuración de fábrica. Nota: Las posiciones Cust 1 y Cust 2 se revertirán a las posiciones preprogramadas de fábrica.

Manual del propietario base ajustable 500 99301625-d 35
PrograMaciÓn del control reMoto (1 control remoto - 1 base)
Programe un control remoto para operar una base - realice el siguiente procedimiento numerado.
FIGURA 12
BOTÓN PARA
SUBIR LA CABEzA
BOTÓN DE POSICIÓN PLANA (FLAT)
Paso 1Desenchufe el cable de la fuente de alimentación eléctrica. Espere 30 segundos, luego enchufe el cable nuevamente a la fuente de alimentación eléctrica.
Paso 2Ubique la caja de control, que está unida a la parte inferior de la base (FIGURA 11).
Paso 3Con un objeto puntiagudo, empuje el puerto de aprendizaje dos veces, en sucesiones rápidas. Usted oirá un clic audible después de cada pulsación. Luego, la luz indicadora se encenderá (FIGURA 11).
Paso 4En el control remoto, oprima simultáneamente sin soltar los botones de botón para SUBIR LA CABEzA y botón de POSICIÓN PLANA (FIGURA 12) hasta que la luz indicadora desaparezca de la caja de control.
Ahora, un control remoto está programado para operar una base.
FIGURA 11
CAjA DE CONTROL
PUERTO DE APRENDIzAjE
LUz INDICADORA

Manual del propietario base ajustable 500 99301625-d 36
PrograMaciÓn del control reMoto (1 o 2 controles remotos - 2 bases)
BASE 1
BASE 2
Programe uno o dos controles para operar dos bases - realice el siguiente procedimiento numerado. NOTA: ANTES DE COMENzAR EL PROCEDIMIENTO, ASEGÚRESE DE qUE AMBOS CONTROLES REMOTOS ESTÁN EN EL MODO DE “PRESIONAR Y SOSTENER” Y qUE AMBAS BASES ESTÁN HORIzONTALES. Si Cust 1 y Cust 2 tienen posiciones personalizadas guardadas, revierta la configuración de fábrica antes de comenzar con el procedimiento.
O
REMOTO 1 REMOTO 2Paso 1Conecte ambas bases ajustables a la fuente de corriente eléctrica. Opere ambos controles remotos para verificar que cada control funciona apropiadamente con su respectiva base. NOTA: Ver procedimiento de programación 1-a-1 si las bases no funcionan.
Usando los controles remotos, ajuste ambas bases a la posición plana.
DESCONECTE ambas bases de la toma de corriente eléctrica.
Paso 2Elija control remoto base 1. Retenga control remoto base 2 como repuesto o úselo si se desea utilizar 2 controles remotos para operar ambas bases.
Paso 3Coloque ambas bases sobre sus lados cerca una de la otra. PReCAUCIÓN: Se ReCOmIeNDA QUe AL meNOS DOS PeRSONAS mANeJeN y mUeVAN LA BASe AJUSTABLe.
Paso 4Localice el cable de sincronización doble (FIGURA 13).
FIGURA 13CABLE DE SINCRONIzACIÓN DOBLE
ENCHUFES MACHO (utiliza)
ENCHUFE HEMBRA
(no se utiliza)ENCHUFE HEMBRA(no se utiliza)
Paso 5En la base 1, conecte uno de los enchufes macho del cable de sincronización en el puerto de sincronización de la caja de control de interruptores alternadores montada en la parte inferior de la base, cerca de la caja de control (FIGURA 14).
CAjA DE CONTROL
CAjA DE CONTROL DE INTERRUPTORES ALTERNADORES
PUERTO DE SINCRONIzACIÓN
FIGURA 14
Paso 6Repita el paso 5 con la base 2, utilizando el enchufe restante macho y hembra en el cable de sincronización doble. Nota: Los enchufes hembra del cable de sincronización doble no se utilizan.
Paso 7Dé vuelta a ambas bases de modo que se apoyen en sus patas. PReCAUCIÓN: ASeGúReSe De QUe eL CABLe eSTé DeSPeJADO y LIBRe De PUNTOS De PeLLIzCO.
Paso 8Enchufe ambas bases dentro de una fuente de energía eléctrica.
Paso 9Opere ambas bases bien sea con uno o ambos controles remotos. NOTA: Si las bases no funcionan al unísono con el control remoto, verifique que las conexiones del cable de sincronización doble estén completamente insertados a ambos puertos de reinicio. Desenchufe ambas bases, espere 10 segundos, y vuélvalas a enchufar.

Manual del propietario base ajustable 500 99301625-d 37
PrograMaciÓn de “oPriMa y sostenga” a “un toque” (1 control remoto - 2 bases)
Para caMbiar la PrograMaciÓn de “oPriMa y sostenga” a “un toque”Paso 1Ajuste la base a la posición plana.
Paso 2Presione simultáneamente los botones para DISMINUIR MASAjE DE CABEzA y DISMINUIR MASAjE DE PIES en cualquiera de los controles remotos. El motor de masajes y la iluminación debajo de la cama se encenderá y apagará confirmando el cambio.
EN EL MODO DE “UN TOqUE”:
Botones Cust 1 y Cust 2 (personalizado)Botón de un toque. La base se ajustará a la posición programada. Presione cualquier otro botón para detener la base durante el movimiento.
Botón de posición plana El botón de posición plana (flat) siempre permanece “presionado y sostenido”. Cuando está presionado y sostenido, la base apagará el motor del masaje, si está activado y ajustará la base a la posición plana.
vOLvER A LA CONFIGURACIÓN DE FÁBRICAPara volver a la configuración de fábrica, presione y sostenga simultáneamente el botón oara el ajuste (SET) y el botón de posición plana (FLAT) en cualquiera de los controles remotos. El motor de masajes y la iluminación debajo de la cama se encenderá y apagará confirmando el cambio. Su base está ahora configurada a la configuración de la fábrica.

Manual del propietario base ajustable 500 99301625-d 38
PrograMaciÓn del control reMoto (separación de 2 bases)
REMOTO 1
BASE 1
BASE 2REMOTO 2
Dos bases separadas - para ajustar el movimiento independiente de la base, siga los siguientes procedimientos numerados.
Paso 1Desconecte ambas bases ajustables de la fuente de energía. Coloque ambas bases sobre sus lados cerca una de la otra. PReCAUCIÓN: Se ReCOmIeNDA QUe AL meNOS DOS PeRSONAS mANeJeN y mUeVAN LA BASe AJUSTABLe.
Paso 2Ubique la caja de control de interruptores alternadores en ambas bases. Ubique el cable de sincronización dual que se encuentra conectado en el puerto de sincronización de ambas cajas de control de interruptores alternadores. Desconecte el cable de sincronización dual de los puertos de sincronización (FIGURA 15). Control remoto 1 debe ahora operar base 1 y control remoto 2 debe operar base 2, una vez que ambas bases estén conectadas. Si los controles remotos no hacen funcionar las bases, proceda con el paso 3.
Paso 3Enchufe base 1 dentro de una toma de corriente eléctrica. En la caja de control para base 1, empuje el puerto de aprendizaje hacia adentro dos veces, en sucesiones rápidas. Usted oirá un clic audible después de cada pulsación. Luego, la luz indicadora y la iluminación debajo de la cama se encenderá (FIGURA 16).
FIGURA 16
CAjA DE CONTROL
PUERTO DE APRENDIzAjE
INDICADOR DE LUz
Paso 4En el control remoto 1, oprima simultáneamente sin soltar los botones de botón para subir la cabeza y botón de posición plana (FIGURA 17) hasta que la luz indicadora desaparezca de la caja de control.
Paso 5Repita los pasos 3 y 4 con la base 2 y el control remoto 2.
Paso 6Dé vuelta a ambas bases de modo que se apoyen en sus patas. PReCAUCIÓN: Se ReCOmIeNDA QUe AL meNOS DOS PeRSONAS mANeJeN y mUeVAN LA BASe AJUSTABLe.
Ahora, se ha restablecido la operación independiente de cada control remoto (el control remoto 1 opera la base 1 y el control remoto 2 opera la base 2).
CAjA DE CONTROL
CAjA DE CONTROL DE INTERRUPTORES ALTERNADORES
DESCONECTE EL CABLE DE SINCRONIzACIÓN DOBLE DEL PUERTO
DE SINCRONIzACIÓN
FIGURA 15
FIGURA 17
BOTÓN PARA
SUBIR LA CABEzA
BOTÓN DE POSICIÓN PLANA (FLAT)

Manual del propietario base ajustable 500 99301625-d 39
resoluciÓn de ProbleMas
Si la base ajustable no funciona, investigue los síntomas y las posibles soluciones que se proporcionan en el cuadro a continuación:
sÍntoMa soluciÓn• Verifique que el cable de alimentación esté enchufado a
un tomacorriente conectado a tierra y que funcione. Se recomienda utilizar un dispositivo de protección contra sobretensión eléctrica puesto a tierra. Pruebe el tomacorriente enchufando otro aparato que funcione.
• Si la base se hizo funcionar durante el ciclo de trabajo nominal, se abre el interruptor térmico. Espere 30 minutos antes de intentar operar la base. Una vez que la base vuelva a su funcionamiento normal, no supere el ciclo de trabajo.
• Programe el control remoto (vea la sección de programación del control remoto de este manual para los procedimientos de programación).
• Desconecte el cable de alimentación, espere 30 segundos y conéctelo para restablecer los componentes electrónicos.
• Se podría activar el interruptor eléctrico. Revise la caja del interruptor del servicio eléctrico para verificar.
• Dispositivo de protección contra descargas eléctricas defectuoso o la toma de corriente. Conecte la toma de corriente a otro aparato que funcione para probarla.
• Reemplace las pilas en el control remoto.
• El mecanismo de la base puede estar obstruido. Eleve la base y revise si hay alguna obstrucción. Retire la obstrucción.
• La sección de la cabeza puede estar muy cerca de la pared.
• La cabecera puede estar muy cerca de la orilla del colchón. Verifique que exista una distancia de entre 1.5” (38.1 mm) y 2” (50.8 mm) entre los soportes de la cabecera y el colchón. Ajuste si es necesario.
• Verifique que los soportes de la cabecera fueron retirados durante la instalación. Retire los soportes de la cabecera si aún están sujetados abajo de la base.
• Si la base está localizada en un piso de superficie dura, coloque pedazos de tapete o portavasos de hule debajo de cada pata o rueda de la base. (Vea la hoja de accesorios, incluida con este producto, para la información sobre cómo ordenar los portavasos de goma).
• Eleve la sección de la cabeza o los pies a una corta distancia (con control remoto) para realinear los mecanismos para subir/bajar con la plataforma de soporte de la base.
• Verifique que la base no está posicionada contra la pared, buró u otro objeto que pueda causar vibración o ruido.
• Si la base está instalada sobre un marco de base, verifique que los motores del masajeador (o los componentes del bastidor de la base) no estén provocando que vibre el bastidor de la base.
• Verifique que las piezas adjuntas de la cabecera están apretadas de modo firmen (si se utilizan).
El control remoto se ilumina y parece operable, pero no activa la base.
No se activan las características de la base.
El control remoto no se enciende.
Se elevan las secciones de pies y cabeza, pero no regresan a la posición horizontal (plana).
Ruido excesivo del motor para masajes.

Manual del propietario base ajustable 500 99301625-d 40
accesorios
equiPo oPcionalLlame al número gratuito de servicios al cliente (844-MATT-FRM) para ordenar los accesorios que se muestran en la tabla siguiente.
4B8846
4B2284
4B7270
4B8740
4B8524
Soportes de cabecera-gemelas TXL, doble XL/Q
Patas de 3” (juego de 4)
Patas de 5” (juego de 4)
Pata ajustable con pasador (juego de 4)
Retenedor de colchón (casquillos preinstalados en la base)
DESCRIPCIÓN DEL ACCESORIO CÓDIGO IMAGEN

Manual del propietario base ajustable 500 99301625-d 41
garantÍa liMitada Por 1 aÑo, 3 aÑos y 10 aÑos
En esta garantía: “Base ajustable” significa la base de la cama ajustable que vende L&P al comerciante. La “base ajustable” no incluye el colchón. “L&P” significa Leggett & Platt, Incorporated. “Comprador” y “Usted” ambos significan el consumidor, quien es el comprador original de esta base ajustable fabricada por L&P. Esta garantía no es transferible. “Fecha de inicio de la garantía” significa (i) la fecha en la que Usted compró una base ajustable L&P nueva y sin usar o (ii) la fecha de fabricación de esta base ajustable si Usted compró una de L&P que ya haya sido usada como modelo de piso o de exhibición. L&P le garantiza a Usted esta base ajustable conforme a los términos y condiciones y por los periodos estipulados a continuación. Todas las reclamaciones de garantía requieren de una notificación que Usted debe entregar a L&P tal como se indica a continuación, misma que deberá ser recibida por L&P dentro del periodo aplicable de la garantía. garantÍa coMPleta Por 1 aÑoDurante el primer año a partir de la Fecha de inicio de la garantía, su base ajustable está garantizada contra defectos no excluidos de fabricación o materiales de L&P. Durante el primer año a partir de la Fecha de inicio de la garantía, L&P reparará o reemplazará (sin costo para Usted) cualquier parte defectuosa de la base ajustable. Asimismo, L&P pagará todos los costos autorizados de trabajo y transporte asociados con la reparación o reemplazo de cualquier parte que esté defectuosa.
garantÍa liMitada Por el 2do y 3er aÑoDurante el segundo y tercer año a partir de la fecha de inicio de la garantía, L&P reemplazará cualquier parte de la base ajustable que esté defectuosa y que no esté excluida conforme a esta garantía. Usted es responsable de pagar todos los costos de servicio y transporte relacionados con los costos de la recepción e instalación de la parte nueva.
garantÍa liMitada del 4º aÑo al final del aÑo 10Comenzando en el cuarto año contado a partir de la fecha de inicio de la garantía y hasta el final del año 10 contado a partir de la misma fecha, L&P reemplazará las partes de acero y mecánicas de la base que estén defectuosas y no excluidas conforme a esta garantía. La presente garantía no cubre partes electrónicas, componentes eléctricos, motores de accionamiento o motores de masaje. Usted es responsable de pagar todos los costos de servicio y transporte relacionados con la recepción e instalación de la parte nueva, al igual que una porción del costo de la parte de acero y parte mecánica de reemplazo, con base en el número de meses que la base haya sido propiedad de Usted desde el cuarto aniversario de la fecha de inicio de la garantía. Al finalizar el año 10, L&P no cubrirá ninguna porción de los costos de reemplazo. Usted pague 1/7 parte del costo de reemplazo que esté vigente en ese momento para la parte en cuestión, multiplicado por el número de años que hayan transcurrido desde del tercer año a partir de la fecha de inicio de la garantía. Esta porción se calcula usando la siguiente fórmula: El costo de la parte dividido entre 7, [incluido el número de años entre el año 4 y el 10],multiplicado por el número de años que Usted ha sido propietario de la base desde el final de los primeros 3 años. Por ejemplo, si hace una reclamación por una parte elegible para esta garantía en el 5º año a partir de la fecha de inicio de la garantía, Usted será responsable de pagar: el costo de la parte en cuestión $100, dividido entre 7 y luego multiplicado por 2 = $28,57.
tÉrMinos y condiciones adicionalesEsta garantía requiere que se haga un aviso a L&P por cualquier reclamación de reparaciones o partes de reemplazo.
eXclusiones:Esta garantía no aplica: (a) para cualquier daño causado por Usted; (b) si se ha realizado alguna reparación o reemplazo de partes de la base ajustable por parte de una persona no autorizada; (c) si la base ajustable ha sido maltratada (ya sea durante su traslado o por otros motivos), ha estado sujeta a abuso o mal uso físico o eléctrico, o ha sido operada de alguna otra manera incoherente con los procedimientos de operación y mantenimiento descritos en el Manual del propietario y en esta garantía; (d) en casos de daños a colchones, telas, cables, cables eléctricos o artículos suministrados por los comerciantes (comuníquese con el comerciante para obtener información de la garantía sobre estos artículos); (e) si se ha realizado alguna modificación a la base ajustable sin el consentimiento previo por escrito de L&P o (f) por costos de llamadas a servicio innecesarias, lo cual incluye los costos por llamadas a servicio a domicilio con el solo propósito de enseñarle a Usted acerca de la base ajustable o encontrar una conexión eléctrica adecuada.
Esta garantía quedará anulada si no se sigue la restricción de peso recomendada (consulte la sección de información en el Manual del propietario) o si Usted vende, entrega o transfiere la base a otra persona.
Cualquier reparación o reemplazo de Su base ajustable o de sus componentes de acuerdo con los términos y condiciones de esta garantía limitada, no extiende la garantía aplicable a partir de la fecha de inicio de la garantía. Esta limitación de tiempo podría no aplicarse en algunas jurisdicciones, como la Provincia de Quebec.
La decisión de reparar o de reemplazar partes definitivas de acuerdo con esta garantía la tomará L&P o se le pedirá a L&P que la tome, bajo su propio criterio y su absoluta discreción.
Continúa en la página siguiente...

Manual del propietario base ajustable 500 99301625-d 42
garantÍa liMitada Por 1 aÑo, 3 aÑos y 10 aÑos
La reparación o reemplazo será el único recurso para el Comprador. No habrá responsabilidad por parte de L&P por cualquier daño especial, indirecto, incidental, o consiguiente, ni por cualquier otro daño, reclamación o pérdida que no esté cubierto en forma expresa por los términos y condiciones de esta garantía.
Esta garantía limitada no incluye el reembolso de costos o gastos por motivos de inconveniencia, retiro, instalación, tiempo de configuración, pérdida de uso, envío o cualquier otro costo o gasto. L&P y sus técnicos de servicio no serán responsables de mover muebles o cualquier otro objeto que no esté sujeto a la base ajustable para poder llevar a cabo el servicio en la misma.
Es absoluta responsabilidad de Usted proporcionar el espacio adecuado y la accesibilidad conveniente para la base ajustable. En caso de que el técnico no pueda llevar a cabo el servicio debido a una falta de accesibilidad, la llamada a servicio le será facturada a Usted y el servicio deberá ser reprogramado.
L&P no hace ninguna otra garantía, sea expresa o implícita, y todas las garantías implícitas de comerciabilidad e idoneidad para un propósito en particular son rechazadas por L&P y excluidas de este acuerdo.
Algunos estados de los Estados Unidos no permiten la exclusión o limitación de daños incidentales o consecuenciales, de modo que la limitación o exclusión anterior podría no aplicar en el caso de Usted.
Esta garantía le otorga a Usted derechos legales específicos, y Usted podría gozar también de otros derechos, los cuales pueden variar de jurisdicción a jurisdicción. Esta garantía es válida en todos los 50 estados de los Estados Unidos de América, en el Distrito de Columbia, Puerto Rico, así como en las 10 provincias y los 3 territorios de Canadá.
Para obtener servicio al cliente conforme a esta garantía limitada, notifique a L&P por correo postal, teléfono, correo electrónico o en línea, a las direcciones que se muestran a continuación:
Servicio al cliente Mattress Firm
teléfono sin cargo: 844-MATT-FRMen línea: mattressfirm.com
POR FAvOR, NO CONTACTE A SU COMERCIANTE MINORISTA O A CUALqUIER OTRO PERSONAL DE SERvICIO


99301625-d EDR13912 1/17
nationwide custoMer service toll free: (844) Matt-frM© 2017 Mattress Firm, Inc.