owners manual - jugs sports you for choosing the jugs gun handheld sports radar—a highly advanced...
TRANSCRIPT

™
OWNERS MANUAL
SAVE THIS MANUAL
Instructions for
The JUGS Gun™
Sports RadarPart No. R2050
Table of ContentsWelcome to JUGS Sports . . . . . . . . . . . . . . . . . . . . . . . . . . . . . . . . . . . . . . .3
About This Manual . . . . . . . . . . . . . . . . . . . . . . . . . . . . . . . . . . . . . . . . . . . .3
1SafetyInformation . . . . . . . . . . . . . . . . . . . . . . . . . . . . . . . . . . . . . . .4
2ReceivingInspection. . . . . . . . . . . . . . . . . . . . . . . . . . . . . . . . . . . . . .5
3GettingStarted . . . . . . . . . . . . . . . . . . . . . . . . . . . . . . . . . . . . . . . . . .6 3.1 Introduction . . . . . . . . . . . . . . . . . . . . . . . . . . . . . . . . . . . . . . . .6 3.2 Battery Charging . . . . . . . . . . . . . . . . . . . . . . . . . . . . . . . . . . .6 3.3 Removing The Battery Holder . . . . . . . . . . . . . . . . . . . . . . . . . .6 3.4 Battery Installation. . . . . . . . . . . . . . . . . . . . . . . . . . . . . . . . . . .7 3.5 Inserting The Holder Into The JUGS Gun™ . . . . . . . . . . . . . . . .7 3.6 Charging The Batteries . . . . . . . . . . . . . . . . . . . . . . . . . . . . . . .8 3.7 Charging Status Indicator (LED) . . . . . . . . . . . . . . . . . . . . . . . .9 3.8 Battery Run Time . . . . . . . . . . . . . . . . . . . . . . . . . . . . . . . . . . .10 3.9 Replacing Batteries . . . . . . . . . . . . . . . . . . . . . . . . . . . . . . . . .10 3.10 Connecting The Power Cord . . . . . . . . . . . . . . . . . . . . . . . . . .10 3.11 Plug In The Power Cord . . . . . . . . . . . . . . . . . . . . . . . . . . . . .10 3.12 Control Panel Functions . . . . . . . . . . . . . . . . . . . . . . . . . . . . . 11
4Components . . . . . . . . . . . . . . . . . . . . . . . . . . . . . . . . . . . . . . . . . . . 11 4.1 Control Buttons Overview . . . . . . . . . . . . . . . . . . . . . . . . . . . . 11 4.2 Display . . . . . . . . . . . . . . . . . . . . . . . . . . . . . . . . . . . . . . . . . .12 4.2.1 Number Segments . . . . . . . . . . . . . . . . . . . . . . . . . . . . . . . . .12 4.2.2 Status Indicator Icons . . . . . . . . . . . . . . . . . . . . . . . . . . . . . . .12 4.3 Trigger . . . . . . . . . . . . . . . . . . . . . . . . . . . . . . . . . . . . . . . . . . .14 4.4 Auto Mode . . . . . . . . . . . . . . . . . . . . . . . . . . . . . . . . . . . . . . .14 4.5 Mounting Configuration . . . . . . . . . . . . . . . . . . . . . . . . . . . . .14
5 OperatingModes . . . . . . . . . . . . . . . . . . . . . . . . . . . . . . . . . . . . . .15 5.1 Menu . . . . . . . . . . . . . . . . . . . . . . . . . . . . . . . . . . . . . . . . . . .15 5.2 Recall . . . . . . . . . . . . . . . . . . . . . . . . . . . . . . . . . . . . . . . . . . . 16
6ClockingaSpeedReading. . . . . . . . . . . . . . . . . . . . . . . . . . . . . . .17 6.1 Fast Mode . . . . . . . . . . . . . . . . . . . . . . . . . . . . . . . . . . . . . . . .17
1
6.2 Last Mode . . . . . . . . . . . . . . . . . . . . . . . . . . . . . . . . . . . . . . . .17 6.3 Fast/Last Mode . . . . . . . . . . . . . . . . . . . . . . . . . . . . . . . . . . . .18 6.4 Continuous Speed Mode . . . . . . . . . . . . . . . . . . . . . . . . . . . .18 6.5 Auto Speed Mode. . . . . . . . . . . . . . . . . . . . . . . . . . . . . . . . . .19
7 SerialOutputMode . . . . . . . . . . . . . . . . . . . . . . . . . . . . . . . . . . . . .19
8PerformanceTips. . . . . . . . . . . . . . . . . . . . . . . . . . . . . . . . . . . . . . 19 8.1 How Radar Works. . . . . . . . . . . . . . . . . . . . . . . . . . . . . . . . . .19 8.2 Interference Sources and Remedies . . . . . . . . . . . . . . . . . . . 20 8.2.1 Angular Interference (Cosine Error Effect) . . . . . . . . . . . . . . 20 8.2.2 Electromagnetic Interference (EMI). . . . . . . . . . . . . . . . . . . . 21 8.2.3 Feedback Interference. . . . . . . . . . . . . . . . . . . . . . . . . . . . . . .21 8.2.4 Radio Frequency Interference (RFI). . . . . . . . . . . . . . . . . . . . 21 8.2.5 Scanning . . . . . . . . . . . . . . . . . . . . . . . . . . . . . . . . . . . . . . . . .21 8.2.6 Environmental Conditions . . . . . . . . . . . . . . . . . . . . . . . . . . . .21
9 Care,Cleaning,andStorage . . . . . . . . . . . . . . . . . . . . . . . . . . . . 21
10FrequentlyAskedQuestions(FAQ) . . . . . . . . . . . . . . . . . . . . . . .22
11Specifications . . . . . . . . . . . . . . . . . . . . . . . . . . . . . . . . . . . . . . . . . 23 11.1 Antenna Parameters K-Band . . . . . . . . . . . . . . . . . . . . . . . . . .23 11.2 Environment . . . . . . . . . . . . . . . . . . . . . . . . . . . . . . . . . . . . . . .23 11.3 Speed Range Parameters . . . . . . . . . . . . . . . . . . . . . . . . . . . .23 11.4 Power Consumption Parameters . . . . . . . . . . . . . . . . . . . . . . .23
12 CommunicationsPort . . . . . . . . . . . . . . . . . . . . . . . . . . . . . . . . . . . .24
13Warranty . . . . . . . . . . . . . . . . . . . . . . . . . . . . . . . . . . . . . . . . . . . . . .24
14ServiceReturnProcedure . . . . . . . . . . . . . . . . . . . . . . . . . . . . . . . .25
15 HowtoOrderAdditionalProductsandAccessories . . . . . . . . .26
2

WelcometoJUGSSports
Thank you for choosing The JUGS Gun™ Handheld Sports Radar—a highly advanced sports radar device that will reward you with years of dependable service. The JUGS Gun™ incorporates high performance and long range, with many leading features. We urge you to study this manual before using The JUGS Gun™ so you can maximize the benefits of this sophisticated radar device. We believe you will be pleasantly surprised by its features and advantages.
——JUGS Sports
AboutThisManual
This manual contains valuable information to help you set up, use and maintain your radar, so you can extend its life and keep it at peak performance. Please take a moment to read through it, and keep it handy for future reference.
Notethefollowingsymbolsinthismanual:
!WARNING Indicates a warning message about safety precautions. Please read it carefully.
!CAUTION Indicates a helpful tip or precaution to note.
OPTIONAL Indicates section refers to optional equipment.
™
3
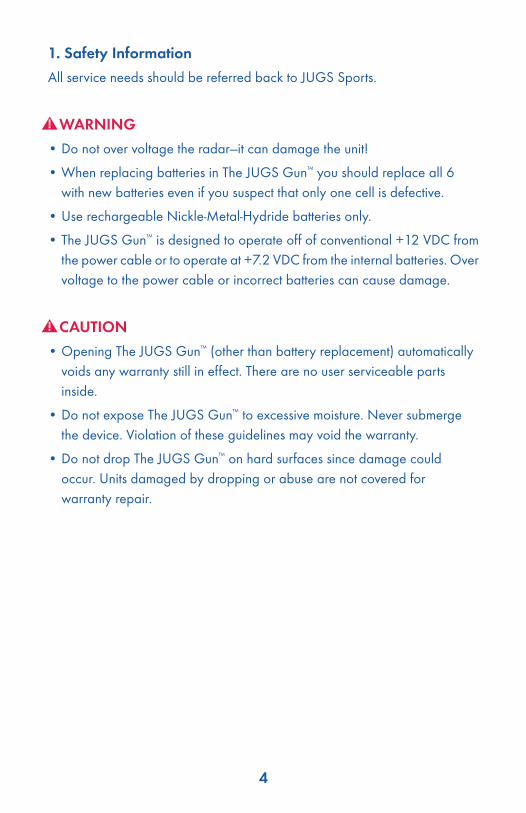
1.SafetyInformation
All service needs should be referred back to JUGS Sports.
!WARNING
• Do not over voltage the radar—it can damage the unit!
• When replacing batteries in The JUGS Gun™ you should replace all 6 with new batteries even if you suspect that only one cell is defective.
• Use rechargeable Nickle-Metal-Hydride batteries only.
• The JUGS Gun™ is designed to operate off of conventional +12 VDC from the power cable or to operate at +7.2 VDC from the internal batteries. Over voltage to the power cable or incorrect batteries can cause damage.
!CAUTION
• Opening The JUGS Gun™ (other than battery replacement) automatically voids any warranty still in effect. There are no user serviceable parts inside.
• Do not expose The JUGS Gun™ to excessive moisture. Never submerge the device. Violation of these guidelines may void the warranty.
• Do not drop The JUGS Gun™ on hard surfaces since damage could occur. Units damaged by dropping or abuse are not covered for warranty repair.
4
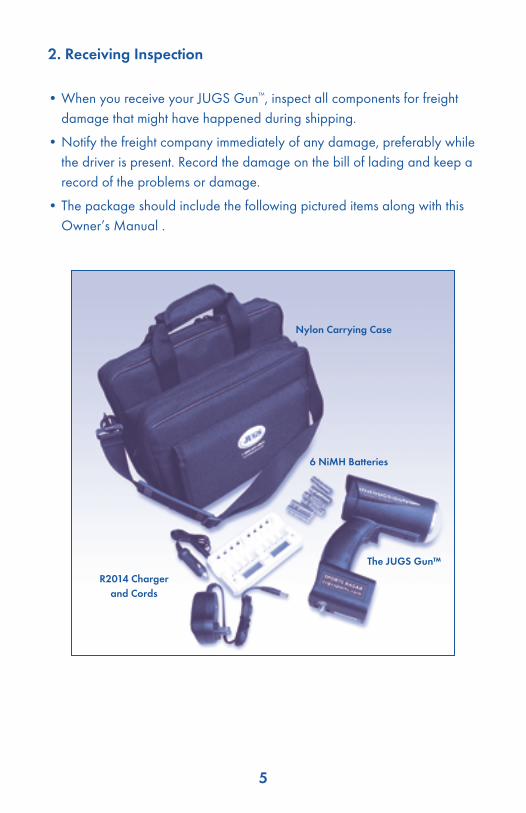
2.ReceivingInspection
• When you receive your JUGS Gun™, inspect all components for freight damage that might have happened during shipping.
• Notify the freight company immediately of any damage, preferably while the driver is present. Record the damage on the bill of lading and keep a record of the problems or damage.
• The package should include the following pictured items along with this Owner’s Manual .
TheJUGSGun™
6NiMHBatteries
NylonCarryingCase
R2014ChargerandCords
5
3.GettingStarted
3.1 Introduction
The JUGS Gun™ stationary radar gives you the option to track objects approaching or receding. Features such as Recall allow you to select and review up to 5 previous events. Fast/Last adds additional flexibility by allowing you to set The JUGS Gun™ to display either the fastest speed measured and/or the last speed measured. Other features are selectable through the menu option.
3.2 Battery Charging
The JUGS Gun™ is designed to operate off of six (6) rechargeable Nickel-Metal-Hydride batteries (or off the optional DC power cord). When you first receive your radar, the batteries will need to be charged for the first time before using. Once batteries have been charged if you do not use the JUGS Gun™ for 3-4 weeks, you will want to recharge the batteries before use in order to get the full run time. To charge batteries for the first time or to replace the batteries follow steps 3.6 to 3.7.
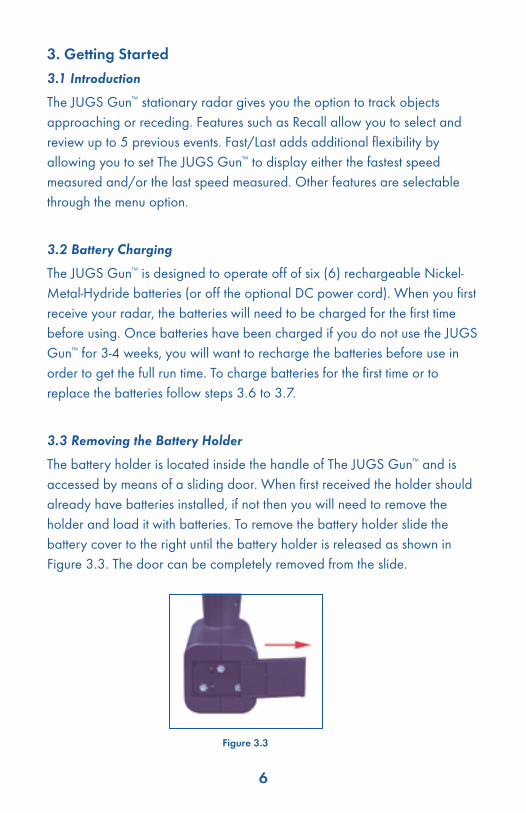
3.3 Removing the Battery Holder
The battery holder is located inside the handle of The JUGS Gun™ and is accessed by means of a sliding door. When first received the holder should already have batteries installed, if not then you will need to remove the holder and load it with batteries. To remove the battery holder slide the battery cover to the right until the battery holder is released as shown in Figure 3.3. The door can be completely removed from the slide.
Figure3.3
6
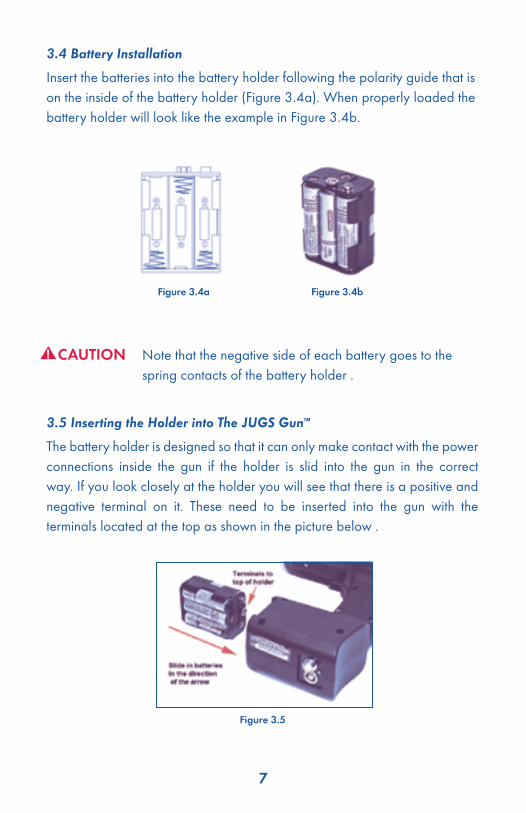
3.4 Battery Installation
Insert the batteries into the battery holder following the polarity guide that is on the inside of the battery holder (Figure 3.4a). When properly loaded the battery holder will look like the example in Figure 3.4b.
!CAUTION Note that the negative side of each battery goes to the spring contacts of the battery holder .
3.5 Inserting the Holder into The JUGS Gun™
The battery holder is designed so that it can only make contact with the power connections inside the gun if the holder is slid into the gun in the correct way. If you look closely at the holder you will see that there is a positive and negative terminal on it. These need to be inserted into the gun with the terminals located at the top as shown in the picture below .
Figure3.4a Figure3.4b
Figure3.5
7

Once the batteries have been properly loaded into the holder and the holder has been inserted into the handle of the gun then the door can be put back in place and slid closed.
!CAUTION If the holder has been placed incorrectly into the handle the door can not be put back in place and closed .
3.6 Charging the Batteries
The JUGS Gun™ comes with a LCD AA Battery Quick Charger (R2014 Charger and Cords.) When you receive your JUGS Gun™, charge the batteries until fully charged.
!CAUTION You must only use rechargeable batteries in this recharger.
Charging:The LCD Display on the charger shows the charge status for each of the AA Battery channels (up to 8) using a series of 4 bars (25, 50, 75 and 100%) to indicate charge percentage. All 6 batteries must be at 100% charge to run The JUGS Gun™. Note: If even one of the batteries is not fully charged, your gun will not operate.
ChargingStatus: The LCD charge-status bars will blink while the batteries are charging. These bars will stop blinking and remain on when the batteries are fully charged at 100%. After the required charging time, if the charge status shows 100% and the bar continues to blink, the battery needs to be replaced.
ChargingTime: This charger will charge 4 batteries in approximately 2 hours and 8 batteries in approximately 4 hours.
LCDAABatteryQuickChargerFeatures: • 8 bays for charging up to 8 NiMH AA or AAA batteries at a time • Dual LCD Status Displays and Refresh function • 12-Volt DC Car cord
8

This LCD Battery Quick Charger comes standard with The JUGS Gun™ and Packages that include The JUGS Gun™. If you would like to use your JUGS Gun™ using standard 110-volt AC, an AC Adapter for your JUGS Gun™ can be purchased separately.
OPTIONAL 3.7 Charge Status Indicator (LED)
If using one of the optional AC Adapters to charge your JUGS Gun™ , the status of the charge can be determined by the Charge Status Indicator LED located on the bottom of the handle (See figure 3 .7). The table below defines the status.
• Fast blinking green light = checking battery condition
• Medium blinking green light = charging battery
• Solid green light = charged
• Solid red light = charging error
The normal charging sequence is fast blink for 60 seconds, medium blink until batteries are fully charged (approximately 2 hours for fully discharged batteries) and solid green once batteries are charged. The gun can be left to charge indefinitely. The charging circuit will automatically shut off once charging is complete.
!CAUTION The JUGS Gun™ must be OFF or the batteries will not charge. You can not operate The JUGS Gun™ and charge the batteries at the same time.
Best performance from your batteries is obtained when recharged at temperature between 50oF (10oC) and 113oF (45oC). Recharging outside of that temperature range may result in reduced battery life or incomplete charging.
Figure3.7
9

3.8 Battery Run Time
How long The JUGS Gun™ can operate between recharges depends upon several factors including the milliamp hour (mAh) capacity of the batteries, age of the batteries, and how The JUGS Gun™ is used. Generally a set of 6 new 2500 mAh batteries fully charged should run for approximately 1 week between recharges given normal use.
3.9 Replacing Batteries
When replacing the batteries with new ones remember to use only rechargeable Nickel-Metal-Hydride (NiMH) batteries and to replace ALL the batteries at the same time even if you suspect that only one battery is bad. Follow the instructions listed in steps 3.2 through 3.7 for proper installation and charging when replacing batteries.
OPTIONAL3.10 Connecting the Optional Power Cords
If you choose to run off the power cord instead of the internal batteries, connect the power cord to the receptacle on the bottom of The JUGS Gun™ being sure to properly align the plug on the power cord to the connector on the bottom of The JUGS Gun™ (See figure 3 .8). The JUGS Gun™ automatically will switch from the internal batteries to the power cord for power when the unit is turned on.
OPTIONAL3.11 Plug In the Optional Power Cords
Two optional power cords are available from JUGS for your convenience. The R2016 is for use with 12VDC power outlets such as a vehicle receptacle. The R2017 transformer may be used with any two-prong, 100-240VAC wall or strip receptacle.
Figure3.8
10
R2016
R2017
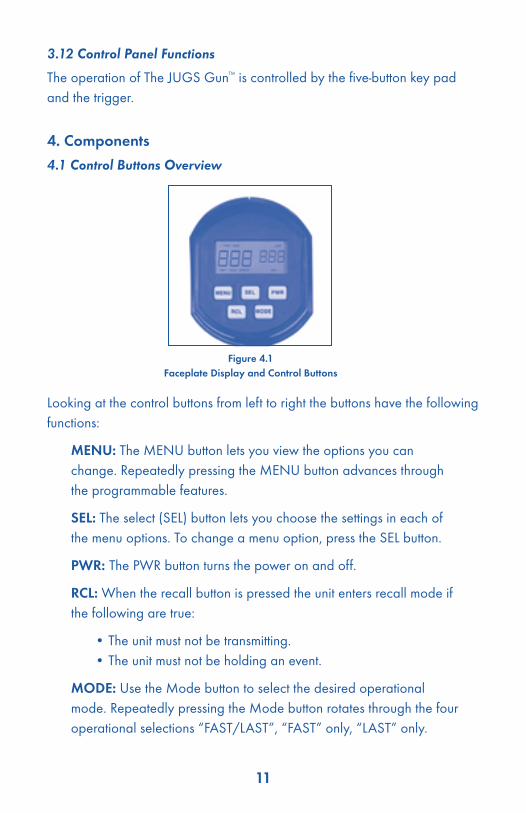
3.12 Control Panel Functions
The operation of The JUGS Gun™ is controlled by the five-button key pad and the trigger.
4.Components
4.1 Control Buttons Overview
Looking at the control buttons from left to right the buttons have the following functions:
MENU:The MENU button lets you view the options you can change. Repeatedly pressing the MENU button advances through the programmable features.
SEL:The select (SEL) button lets you choose the settings in each of the menu options. To change a menu option, press the SEL button.
PWR:The PWR button turns the power on and off.
RCL: When the recall button is pressed the unit enters recall mode if the following are true:
• The unit must not be transmitting. • The unit must not be holding an event.
MODE:Use the Mode button to select the desired operational mode. Repeatedly pressing the Mode button rotates through the four operational selections “FAST/LAST”, “FAST” only, “LAST” only.
Figure4.1FaceplateDisplayandControlButtons
11
4.2 Display
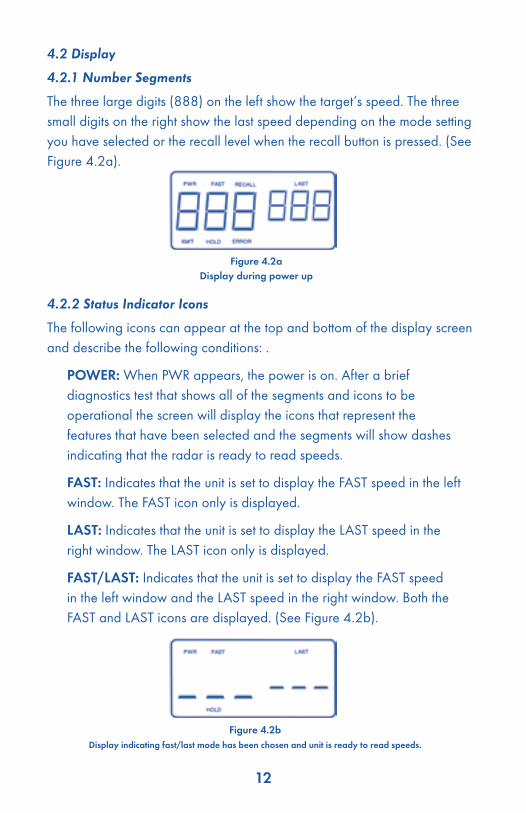
4.2.1 Number Segments
The three large digits (888) on the left show the target’s speed. The three small digits on the right show the last speed depending on the mode setting you have selected or the recall level when the recall button is pressed. (See Figure 4.2a).
4.2.2 Status Indicator Icons
The following icons can appear at the top and bottom of the display screen and describe the following conditions: .
POWER: When PWR appears, the power is on. After a brief diagnostics test that shows all of the segments and icons to be operational the screen will display the icons that represent the features that have been selected and the segments will show dashes indicating that the radar is ready to read speeds.
FAST: Indicates that the unit is set to display the FAST speed in the left window. The FAST icon only is displayed.
LAST: Indicates that the unit is set to display the LAST speed in the right window. The LAST icon only is displayed.
FAST/LAST: Indicates that the unit is set to display the FAST speed in the left window and the LAST speed in the right window. Both the FAST and LAST icons are displayed. (See Figure 4.2b).
Figure4.2aDisplayduringpowerup
Figure4.2bDisplayindicatingfast/lastmodehasbeenchosenandunitisreadytoreadspeeds.
12
XMIT: Indicates that the radar is transmitting.
HOLD: Indicates the system is not transmitting.
ERROR: Indicates that the radar has detected an internal hardware error which can affect the operation of the radar device. You should turn the gun off and back on. If the problem persists, contact JUGS Sports at 800-547-6843.
MPH: The radar displays speeds in miles-per-hour (mph), MPH does not appear in the display—it is the default setting.
KPH: The radar displays speeds in kilometers-per-hour (km/h), KPH appears in the display.
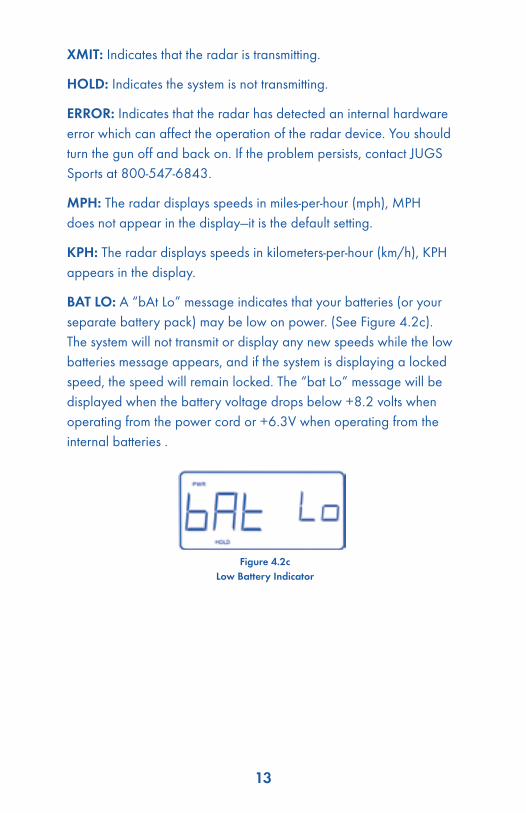
BATLO:A “bAt Lo” message indicates that your batteries (or your separate battery pack) may be low on power. (See Figure 4.2c). The system will not transmit or display any new speeds while the low batteries message appears, and if the system is displaying a locked speed, the speed will remain locked. The “bat Lo” message will be displayed when the battery voltage drops below +8.2 volts when operating from the power cord or +6.3V when operating from the internal batteries .
Figure4.2cLowBatteryIndicator
13
4.3 Trigger
The radar transmits and receives microwave energy when you pull the trigger. To measure the speeds, pull and hold the trigger. When you want to lock a speed, release the trigger.
4.4 Auto Mode
To measure speeds automatically without using the trigger mode, simply click the trigger once and release. The JUGS Gun™ will automatically record a speed then clear after the designated hold time indicated in the menu. Default time is five seconds.
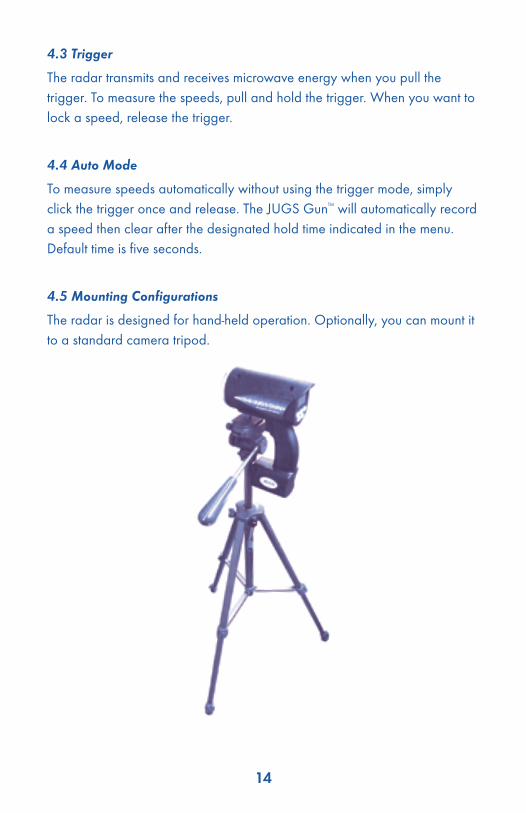
4.5 Mounting Configurations
The radar is designed for hand-held operation. Optionally, you can mount it to a standard camera tripod.
14
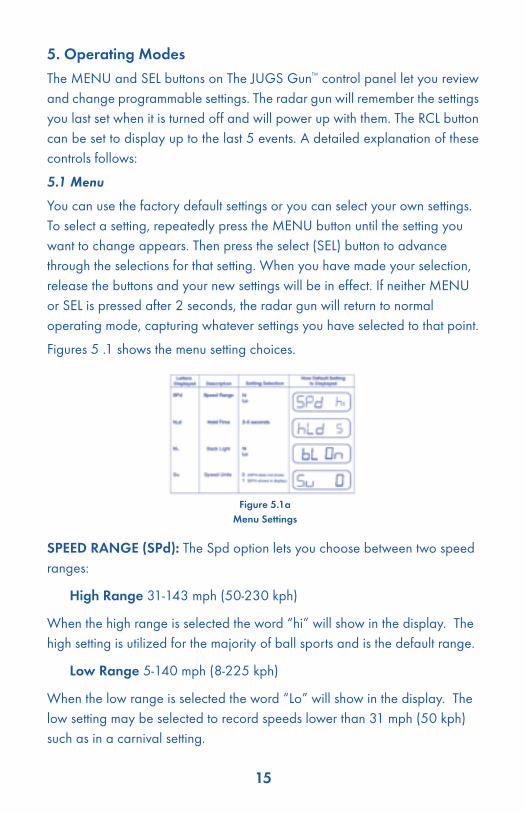
5.OperatingModes
The MENU and SEL buttons on The JUGS Gun™ control panel let you review and change programmable settings. The radar gun will remember the settings you last set when it is turned off and will power up with them. The RCL button can be set to display up to the last 5 events. A detailed explanation of these controls follows:
5.1 Menu
You can use the factory default settings or you can select your own settings. To select a setting, repeatedly press the MENU button until the setting you want to change appears. Then press the select (SEL) button to advance through the selections for that setting. When you have made your selection, release the buttons and your new settings will be in effect. If neither MENU or SEL is pressed after 2 seconds, the radar gun will return to normal operating mode, capturing whatever settings you have selected to that point.
Figures 5 .1 shows the menu setting choices.
SPEEDRANGE(SPd): The Spd option lets you choose between two speed ranges:
HighRange 31-143 mph (50-230 kph)
When the high range is selected the word “hi” will show in the display. The high setting is utilized for the majority of ball sports and is the default range.
LowRange 5-140 mph (8-225 kph)
When the low range is selected the word “Lo” will show in the display. The low setting may be selected to record speeds lower than 31 mph (50 kph) such as in a carnival setting.
Figure5.1aMenuSettings
15
!CAUTION If The JUGS Gun™ is in low speed mode and you are trying to measure high speed targets, there is a greater chance that the radar will lock onto the speed of the pitcher’s arm or the speed of the bat swing.
HOLD(HLd): The HLd option lets you set the length of time that the locked reading will show in the display window. The default setting is “5”.
BACKLIGHT(BL): This turns on and off the LCD backlight. The backlight is used to illuminate the display in low light conditions. The default setting is “ON”.
SPEEDUNITS(Su):Speed units allow the user to switch from MPH (miles per hour) to KPH (kilometers per hour).
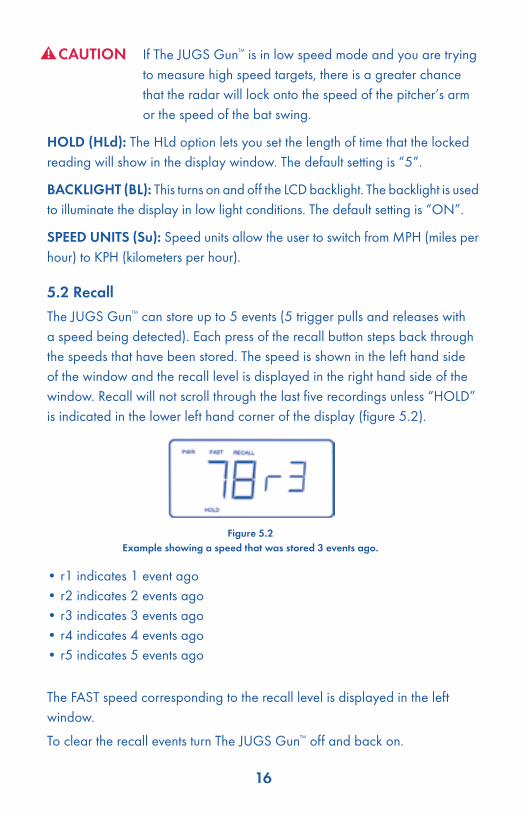
5.2Recall
The JUGS Gun™ can store up to 5 events (5 trigger pulls and releases with a speed being detected). Each press of the recall button steps back through the speeds that have been stored. The speed is shown in the left hand side of the window and the recall level is displayed in the right hand side of the window. Recall will not scroll through the last five recordings unless “HOLD” is indicated in the lower left hand corner of the display (figure 5.2).
• r1 indicates 1 event ago• r2 indicates 2 events ago• r3 indicates 3 events ago• r4 indicates 4 events ago• r5 indicates 5 events ago
The FAST speed corresponding to the recall level is displayed in the left window.
To clear the recall events turn The JUGS Gun™ off and back on.
Figure5.2Exampleshowingaspeedthatwasstored3eventsago.
16
!CAUTION The unit will exit recall mode after the recall button is NOT pressed for 2 seconds.
The unit will exit recall mode if the unit begins transmitting. 6.ClockingASpeedReading
The JUGS Gun™ detects targets moving either toward or away from it. The radar measures the true release speed with an accuracy of +1 display unit, approximately 12 inches (30 centimeters), from the pitcher’s hand before the pitch loses speed. For the most accurate reading, stand to one side of the catcher and point the gun toward the pitch so the radar beam is parallel to the direction of the ball. Also, you can stand behind the pitcher to position the radar. The radar will detect speeds within a 300 feet (91 meters) range. However, when the gun is closer to the release pitch, the speed reading is more accurate.
Theradargunoperatesinfivemodes:Fast,Last,Fast/Last,ContinuousandAuto.
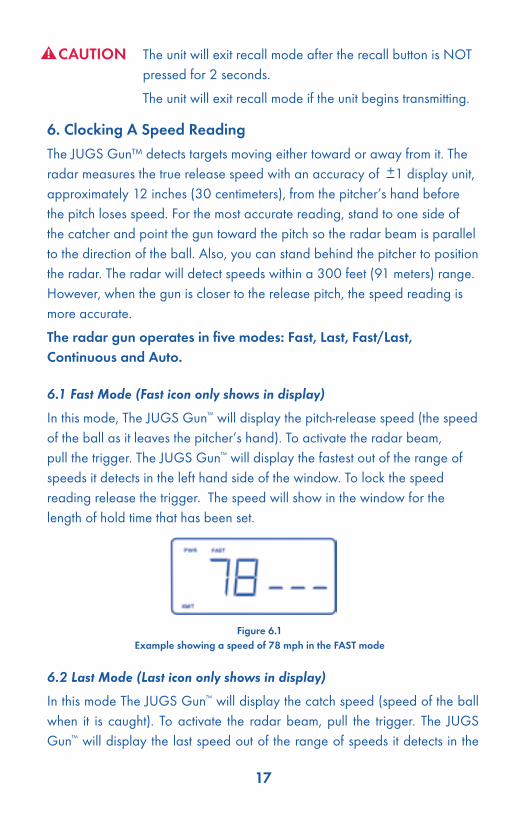
6.1 Fast Mode (Fast icon only shows in display)
In this mode, The JUGS Gun™ will display the pitch-release speed (the speed of the ball as it leaves the pitcher’s hand). To activate the radar beam, pull the trigger. The JUGS Gun™ will display the fastest out of the range of speeds it detects in the left hand side of the window. To lock the speed reading release the trigger. The speed will show in the window for the length of hold time that has been set.
6.2 Last Mode (Last icon only shows in display)
In this mode The JUGS Gun™ will display the catch speed (speed of the ball when it is caught). To activate the radar beam, pull the trigger. The JUGS Gun™ will display the last speed out of the range of speeds it detects in the
Figure6.1Exampleshowingaspeedof78mphintheFASTmode
17
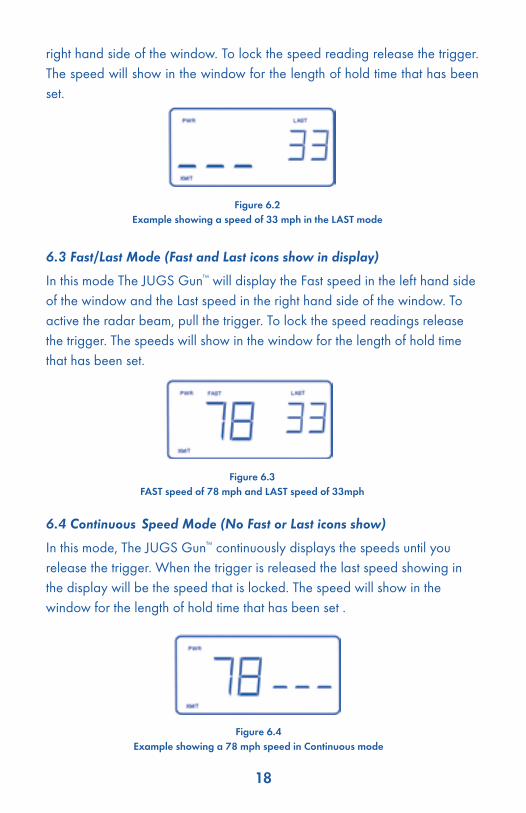
right hand side of the window. To lock the speed reading release the trigger. The speed will show in the window for the length of hold time that has been set.
6.3 Fast/Last Mode (Fast and Last icons show in display)
In this mode The JUGS Gun™ will display the Fast speed in the left hand side of the window and the Last speed in the right hand side of the window. To active the radar beam, pull the trigger. To lock the speed readings release the trigger. The speeds will show in the window for the length of hold time that has been set.
6.4 Continuous Speed Mode (No Fast or Last icons show)
In this mode, The JUGS Gun™ continuously displays the speeds until you release the trigger. When the trigger is released the last speed showing in the display will be the speed that is locked. The speed will show in the window for the length of hold time that has been set .
Figure6.2Exampleshowingaspeedof33mphintheLASTmode
Figure6.3FASTspeedof78mphandLASTspeedof33mph
Figure6.4Exampleshowinga78mphspeedinContinuousmode
18
6.5 Auto Speed Mode
In Auto mode, The JUGS Gun™ automatically records and displays the speeds without using the trigger. Simply pull the trigger twice to activate Auto Mode. The lower left screen will change from “HOLD” to “XMIT.” The recorded speed will show in the window for the length of hold time that has been set. To return to trigger mode, simply pull the trigger once.
7.SerialOutput
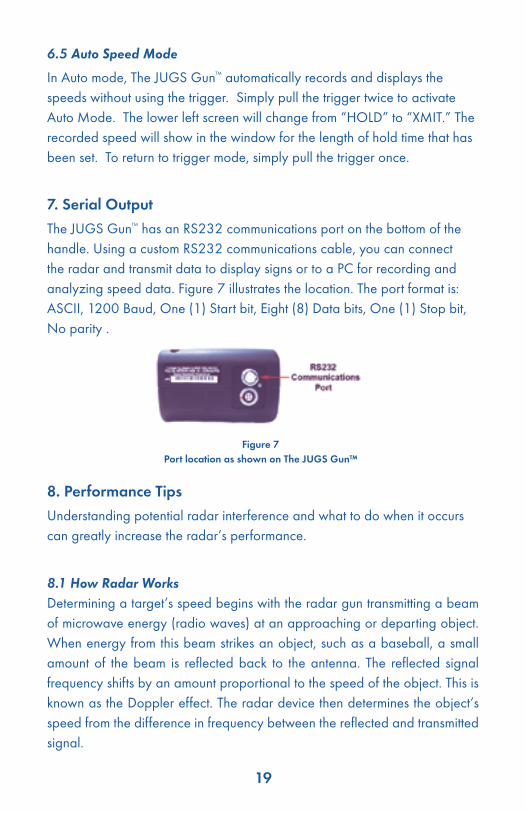
The JUGS Gun™ has an RS232 communications port on the bottom of the handle. Using a custom RS232 communications cable, you can connect the radar and transmit data to display signs or to a PC for recording and analyzing speed data. Figure 7 illustrates the location. The port format is: ASCII, 1200 Baud, One (1) Start bit, Eight (8) Data bits, One (1) Stop bit, No parity .
8.PerformanceTips
Understanding potential radar interference and what to do when it occurs can greatly increase the radar’s performance.
8.1 How Radar Works Determining a target’s speed begins with the radar gun transmitting a beam of microwave energy (radio waves) at an approaching or departing object. When energy from this beam strikes an object, such as a baseball, a small amount of the beam is reflected back to the antenna. The reflected signal frequency shifts by an amount proportional to the speed of the object. This is known as the Doppler effect. The radar device then determines the object’s speed from the difference in frequency between the reflected and transmitted signal.
Figure7PortlocationasshownonTheJUGSGun™
19

8.2 Interference Sources
When properly installed and operated, Doppler radar technology is extremely accurate and reliable. However, variations in the environment can cause situations and circumstances which can cause spurious (erratic and unusually low or high) speeds to display. Signs that a speed is spurious can include the following characteristics:
• A reading appears when no target is in the operational range of the antenna.
• A target entering the operational range overrides the interference signal, causing the displayed speed to change suddenly.
• Speeds are irregular and do not provide a valid reading.
8.2.1 Angular Interference (Cosine Error Effect)
The cosine error effect causes the radar device to display a speed, which is lower than the actual pitch-release speed. This condition exists whenever the target’s path is not parallel to the gun’s antenna. As the angle between the beam of the antenna and the target increases, the displayed speed decreases. An angle of zero (0) is best.
The following table shows the effect that an increasing angle has on a displayed speed.
HorizontalAngleDegrees
0 1 3 5 10 15 20 30 45 60 90˚ Actual Speed Displayed Speed
31 mph 31 30 30 30 30 30 29 27 22 16 0 41 mph 41 40 40 40 40 39 38 35 28 20 0 50 mph 50 49 49 49 49 48 46 43 35 25 0 56 mph 56 55 55 55 55 54 52 48 40 28 0 63 mph 63 61 61 61 61 60 58 54 44 31 0 69 mph 69 68 68 68 67 66 64 59 48 34 0
Table8.2.1b:Actualanddisplayedspeedsatdifferentantenna-to-targetangles.
Figure8.2.1aAnangularerroroccurswhenthetarget’spathisnotparalleltotheradarantenna
20
8.2.1 Angular Interference (Cosine Error Effect) (Continued)
Small angles (less than 10°) have little effect on accuracy. As the angle increases, the displayed speed decreases. At 90°, the target speed is 0—grossly incorrect .
8.2.2 Electromagnetic Interference (EMI)
Operating electric motors can produce EMI. To correct the interference, simply turn off its source.
8.2.3 Feedback Interference
When the radar beam is directed at laptop computer screens, streetlights, and other electronic devices, it can display spurious speeds. To correct the interference, relocate the radar gun’s antenna.
8.2.4 Radio Frequency Interference
The system can inadvertently process radio energy as Doppler speeds, including that from police radios, airport radar, microwave transmission towers, CB radio transmitters, and AM/FM transmission towers. For this type of interference to occur, the radar gun must be operating very close to the radio transmitter.
8.2.5 Scanning
The JUGS Gun™ is designed to be used while attached to a solid mount or hand-held in a steady position. Moving or “scanning” the antenna past stationary objects can cause the system to detect motion. Obtaining a speed reading from scanning will not happen when you properly use the radar and is considered deliberate misuse of the system.
8.2.6 Environmental Conditions
Fog, rain, snow, and blowing dust can reduce the detection range.
9.Care,Cleaning,andStorage
• Avoid spilling food, beverages and other liquids on the radar device.
• When you are not using or transporting the device, store it in its original packaging.
• To clean the radar device, dust it with a soft clean cloth, which is free of cleaning solutions .
21
10.FrequentlyAskedQuestions(FAQ)
Q. My radar gun will not power up. What should I do?
A . If operating off the batteries check to make sure they are charged. If operating off the power cord check to make sure that the power cord is properly plugged into the power source. If the LED on the lighter plug is off, you may have blown the fuse. If the LED (light) on the connector is on, you have power. If your radar still does not power up, call JUGS Sports at 800-547-6843.
Q. What if I drop my gun?
A . The unit is extremely durable. Simply power up—If the gun doesn’t appear to work properly, contact JUGS Sports.
Q. Can I use any type of batteries in The JUGS Gun™
A . No, The JUGS Gun™ is specifically designed to use rechargeable Nickel-Metal-Hydride batteries. Once battery performance has diminished and you determine that new batteries should be installed make sure you replace ALL the batteries otherwise recharge performance may be diminished.
Q. My gun seems to be picking up ghost (spurious) readings. How do I fix this?
A . Look for possible sources of interference, such as fans, florescent lights, TV and radio towers, nearby road traffic, and laptop computer screens. Then reposition The JUGS Gun™ gun so it is not pointing towards the source of interference.
Q. The speed on my gun seems too slow. What is causing it?
A . You might be experiencing a cosine angle error. See the section 8.2.1 titled: Angular Interference (Cosine Error Effect) for more information. Reposition The JUGS Gun™ to point directly in line with the target’s travel path. The most accurate speed is given when the target is coming straight at or straight away from The JUGS Gun™.
22
11.Specifications
11.1 Antenna Parameters
K-Band IACP . . . . . . . . . . . . . . . . . . . . . . . . . . . . . . . . . . . . . . . . . . . . . . .Type III Nominal transmission frequency . . . . . . . . . . . . . . . . . . . . 24.150 GHz Nominal horizontal beamwidth . . . . . . . . . . . . . . . . . . . . . . . . . . . . .12° Polarization. . . . . . . . . . . . . . . . . . . . . . . . . . . . . . . . . . . Linear (Vertical) Nominal microwave power output. . . . . . . . . . . . . . . . . . . . . . . . 7 mW Maximum aperture power density . . . . . . . . . . . . . . . . . . . <1 mW/cm2
11.2 Environment
Ambient operating temperatures . . . . -22°F, (-30°C) to 158°F, (70°C) Maximum humidity . . 90% relative humidity (non-condensing) at 37°C
11.3 Speed Range Parameters
Speed Display Ranges Minimum Maximum
Lo . . . . . . . . . . . . . . . . . . . . . . . . . 5 mph (8 kph) . . . . 140 mph (225 kph)
hi . . . . . . . . . . . . . . . . . . . . . . . . . 31 mph (50 kph) . . 143 mph (230 kph)
11.4 Power Consumption Parameters JUGS Gun™
Supply voltage range (with power cord). . . . .+8.3v DC to +16.5v DC Low voltage trip with antenna on (with cord) . . . . . . . . . . . . +8.2v DC Battery supply voltage . . . . . . . . . . . . . . . . . . . . . . . . . . . . . . .+7.2v DC Battery low voltage trip with antenna on. . . . . . . . . . . . . . . . +6.3v DC
The JUGS Gun™ when using power cord. All currents measured at 13.8v DC with backlight on.
Standby (antenna off). . . . . . . . . . . . . . . . . . . . . . . . . . . . . . . . 0.105 amperes
Antenna ON (no targets displayed). . . . . . . . . . . . . . . . . . . . . . . 0.170 amperes
Antenna ON (“55” target displayed). . . . . . . . . . . . . . . . . . . . . . 0.172 amperes
Antenna OFF (segment check “888 888”) . . . . . . . . . . . . . . . . . . .0.116 amperes
Antenna ON (segment check “888 888”) . . . . . . . . . . . . . . . . . . 0.180 amperes
23

12.CommunicationsPort
The RS232 communications port (COM) is located on the bottom of the handle right next to where the power cable plugs in. The serial communication has the following characteristics (8:n:1) and is transmit only:
One (1) start bit Eight (8) data bits No parity One (1) stop bit Transmission at 1200 baud
The unit transmits data as ASCII symbols in the following digit sequence
ASCII [hundreds][tens][ones] Carriage return<CR> (<CR> = ASCII decimal value 13)
The radar unit sends the data in this sequence when the speed display changes.
13.Warranty
TWO-YEARWARRANTY
JUGS Sports guarantees the radar to be free from defects in workmanship and material and to operate within specifications for a period of two years. During this period, JUGS Sports will repair or replace, at its option, any component (excluding batteries) found to be defective, without cost to the owner, providing you return the unit to the factory.
The full warranty on parts and workmanship does not include normal wear and tear, crushing, dropping, fire, impact, immersion, over-tightening of screws or damage from attempted repair or modifications by unauthorized service agents.
For repairs, simply return the unit (transportation prepaid) directly to JUGS Sports. Refer to section 14 Service Return Procedure.
24
14.ServiceReturnProcedure
If you have questions, want a quick problem diagnosis, or need to return your radar unit to the factory:
• Call JUGS Sports and ask to speak with a Customer Service Representative. Havetheserialnumberoftheradarunit. Phone:800-547-6843 Fax:503-691-1100
If you need to return your radar unit to JUGS Sports:
• Ask to arrange for a Return Authorization Number. You will need to give the serial number of the radar that is to be serviced. Theserialnumberislocatedonthebottomofthehandle.
• Return ALL of the radar’s parts in the original packaging (transportation prepaid) .
• If so directed, include a note describing the problem and/or the incident that resulted in the problem . Failure to do so can delay the return of your radar device .
• Based on the information that you have given, the Customer Service Representative will issue you a return authorization (RA) number. Write the RA number on your note and shipping label.
• Return the system to:
JUGSSports11885SWHermanRoadTualatin,Oregon97062
The customer is responsible for the shipping charges to send the system to JUGS Sports.
The customer is responsible for all shipping charges to the JUGS Sports. JUGS does not accept incoming COD shipments. JUGS Sports will pay the freight (normal ground service) for shipping the system from the repair facility to the customer, providing the system is still under warranty. If you want to ship your package express or next day air, we will invoice you for these freight charges.
25

If your radar is out of warranty and you would like to know the cost of repair prior to the actual repair work being performed, JUGS Sports would be happy to give you a repair estimate. To obtain an estimate, request it either on the paperwork you submit with the radar when you send it in for service or when you obtain a Return Authorization (RA) number. JUGS Sports provides estimates only upon request.
The initial charge for an estimate is currently $50.00 per unit if your radar gun is not under warranty plus the return shipping and handling fees. If, after reviewing the estimate cost, you decide not to have your radar repaired, you will be invoiced $50.00 as a minimum charge. If you decide to have your radar gun repaired, you do not owe the estimated charge (the charge is waived) and only pay the amount stated in the estimate.
15.HowtoOrderAdditionalProductsandAccessories
You can order upgrades to The JUGS Gun™ (when available) as well as cables, cases, power supplies, tripods, and tuning forks. To see product descriptions or order products, see the JUGS Sports web site at jugssports.com or call the sales office at 800-547-6843.
™
26

If you need more information about this
product or any other JUGS product or
service, please contact the manufacturer:
In the USA and Canada,
call toll-free: 1-800-547-6843.
For International Orders,
call collect: 0-503-692-1635.
Our fax number is:
1-503-691-1100.
Visit our website at
jugssports.com
Se habla espan ol.
© 2011 JUGS Sports TJG-0911
™