owner’s manual - club car · club car, inc. (“club car”) hereby warrants to the original...
TRANSCRIPT
1997DS Golf Cars
Electric and Gasoline
Owne
r’s M
anua
l

WARNING• THE ENGINE EXHAUST FROM THIS PRODUCT CONTAINS
CHEMICALS KNOWN TO THE STATE OF CALIFORNIA TO CAUSECANCER, BIRTH DEFECTS, OR OTHER REPRODUCTIVE HARM.
NOTICE
The Club Car Limited Warranty appears on the pages following this notice, and the Limited Lifetime FleetWarranty appears on the last pages of this manual. No other warranties, express or implied, are containedherein. Your authorized representative checked this vehicle before it was delivered to you and will provide youwith a completed warranty registration card.
Club Car is not liable for errors in this manual or for incidental or consequential damages that result from theuse of the material in this manual.
This vehicle conforms to the current American National Standards Institute’s Z130 Safety and PerformanceRequirements for Golf Cars. This standard, which promotes safety in the design, application, and operationof golf cars, defines a golf car as “a vehicle used to convey a person or persons and equipment to play thegame of golf in an area designated as a golf course”. Throughout this manual, the words “golf car” and “vehi-cle” are used interchangeably.
This manual contains proprietary information that is protected by copyright. All rights are reserved. No part ofthis manual may be photocopied, reproduced, or translated to another language without the written consentof Club Car, Inc.
The information contained in this document is subject to change without notice.
Club Car reserves the right to make design changes to either gasoline or electric vehicles without obligationto make these changes on units previously sold.
These vehicles are designed and manufactured for off-road use only. They do not conform to Federal MotorVehicle Safety Standards or EPA regulations and are not equipped for operation on public streets, roads, orhighways.
©1996 Club Car, Inc.
Club Car, Armorflex, PowerDrive,PowerDrive Plus, and Tranquility areregistered trademarks of Club Car, Inc.
This manual effective August 1, 1996
i

CLUB CAR LIMITED THREE (3) YEAR WARRANTY FOR 1997 INDIVID-UAL GOLF CARS IN THE UNITED STATES AND CANADA
1. WARRANTY:
CLUB CAR, INC. (“CLUB CAR”) hereby warrants to the original retail purchaser that its new 1997 Model DSgolf car purchased from CLUB CAR or an authorized distributor or dealer for use in the United States or Can-ada shall be free from defects in materials and workmanship under normal use and service as a golf car forthe periods stated below, subject to the provisions, limitations, and exclusions contained in this limited war-ranty.
LIMITED THREE YEAR WARRANTY:
The golf car frame (excluding the front and rear bumper mounts), rack and pinion steering gearbox unit, sus-pension system (defined as the shock absorbers, shock mounts, A-plate, leaf springs, shackles, and associ-ated hardware), gasoline engine, unitized transaxle, torque converters (drive and driven), starter generator,transaxle (electric vehicle), and electric motor are warranted with respect to parts and labor against defectsin materials and workmanship for a period of three years from the date of purchase.
LIMITED TWO YEAR WARRANTY:
All remaining components of the golf car not specified otherwise are warranted with respect to parts andlabor against defects in materials and workmanship for a period of two years from the date of purchase.
This limited warranty covers materials, workmanship, and repair labor cost as to those items specificallylisted above for the periods specified. Such repair labor shall be performed only by CLUB CAR, its authorizeddistributors or dealers, or a service agency approved by CLUB CAR.
IF THE WARRANTY REGISTRATION FORM IS NOT COMPLETED AND RETURNED TO CLUB CAR ATTHE TIME OF THE ORIGINAL RETAIL SALE, PURCHASER MUST PROVIDE PROOF OF DATE OF PUR-CHASE WITH ANY WARRANTY CLAIM.
2. EXCLUSIONS:
Excluded from any CLUB CAR warranty are all optional equipment and accessories, fuses, filters, decals(except safety decals), spark plugs, lubricants, trim pieces, seats, routine wear items such as the chargerplug and receptacle, brake shoes, belts, brushes, bushings, engine mounts, mats and pads, maintenanceadjustments, cosmetic deterioration, and items which deteriorate or fail due to exposure or ordinary wear andtear. Batteries, battery charger, on-board computer, and solid state controller are covered by separate CLUBCAR warranties. Tires are warranted by their manufacturer. Also excluded from any CLUB CAR warranty isdamage to a golf car or component resulting from a cause other than a defect including unreasonable orunintended strain or use, improper installation of accessories, installation of parts or accessories that are notoriginal equipment, overloading, accident, alteration, abuse, or neglect.
Transportation expenses for warranty service are also excluded from this warranty.
3. VOIDING OF WARRANTY:
THIS AND ANY OTHER WARRANTY SHALL BE VOID IF THE GOLF CAR IS ABUSED OR USED IN ANUNINTENDED MANNER OR SHOWS INDICATIONS THAT IT HAS BEEN ALTERED IN ANY WAY, INCLUD-ING, BUT NOT LIMITED TO, MODIFICATION OF THE SPEED GOVERNOR, BRAKING SYSTEM, STEER-ING, TRANSAXLE, OR OTHER OPERATING SYSTEMS OF THE CAR TO CAUSE IT TO PERFORMOUTSIDE CLUB CAR SPECIFICATIONS. THE WARRANTY IS LIKEWISE VOID IF THE CAR SHOWS INDI-CATIONS THAT REASONABLE OR NECESSARY MAINTENANCE AS OUTLINED IN THE OWNER’SMANUAL AND MAINTENANCE AND SERVICE MANUAL WAS NOT PERFORMED AT THE TIME AND INTHE MANNER SPECIFIED IN SUCH MANUALS.
4. SOLE REMEDY:
CLUB CAR’S ONLY LIABILITY UNDER THIS LIMITED WARRANTY, OR IN ANY ACTION, WHETHERBASED UPON WARRANTY, CONTRACT, NEGLIGENCE, STRICT PRODUCT LIABILITY, OR OTHER-WISE, IS LIMITED TO THE REPAIR OR REPLACEMENT, AT CLUB CAR’S OPTION, OF A GOLF CAR OR
ii

COMPONENT THEREOF THAT CLUB CAR DEEMS TO BE DEFECTIVE. REPLACEMENT SHALL MEANFURNISHING, DURING THE APPLICABLE LIMITED WARRANTY PERIOD, A NEW GOLF CAR OR FAC-TORY RECONDITIONED VEHICLE OR COMPONENT THEREOF WHICH IS IDENTICAL OR REASON-ABLY EQUIVALENT TO THE WARRANTED PRODUCT OR COMPONENT AT NO COST TO THEPURCHASER. REPAIR SHALL MEAN REMEDYING A DEFECT IN THE GOLF CAR OR COMPONENTTHEREOF AT NO COST TO THE PURCHASER DURING THE APPLICABLE LIMITED WARRANTYPERIOD. IF CLUB CAR ELECTS TO REPAIR THE GOLF CAR, IT MAY PROVIDE FACTORY RECONDI-TIONED PARTS OR COMPONENTS. ALL PARTS AND COMPONENTS REPLACED UNDER WARRANTYSHALL BECOME THE PROPERTY OF CLUB CAR.
5. HOW TO MAKE A WARRANTY CLAIM:
To make a warranty claim under this limited warranty, you must present the golf car or defective componentto an authorized CLUB CAR distributor or dealer or send the defective component, freight prepaid, to WAR-RANTY ADMINISTRATION, CLUB CAR, INC., 4152 Washington Road, P.O. Box 204658, Augusta, Georgia30917-4658.
6. DISCLAIMER:
THIS LIMITED WARRANTY IS EXCLUSIVE. CLUB CAR MAKES NO OTHER WARRANTY OF ANY KIND,EXPRESS OR IMPLIED. ANY IMPLIED WARRANTIES OF MERCHANTABILITY OR FITNESS FOR APARTICULAR PURPOSE WHICH EXCEED THE OBLIGATIONS OR TIME LIMITS STATED IN THIS WAR-RANTY ARE HEREBY DISCLAIMED BY CLUB CAR AND EXCLUDED FROM THIS WARRANTY. THEPURCHASER AND CLUB CAR EXPRESSLY AGREE THAT THE REMEDY OF REPLACEMENT ORREPAIR OF THE DEFECTIVE GOLF CAR OR COMPONENT THEREOF IS THE EXCLUSIVE AND SOLEREMEDY OF THE PURCHASER. CLUB CAR MAKES NO OTHER REPRESENTATION OR WARRANTYOF ANY KIND, AND NO REPRESENTATIVE, EMPLOYEE, DISTRIBUTOR OR DEALER OF CLUB CARHAS THE AUTHORITY TO MAKE OR IMPLY ANY REPRESENTATION, PROMISE OR AGREEMENTWHICH IN ANY WAY VARIES THE TERMS OF THIS WARRANTY.
7. NO CONSEQUENTIAL DAMAGES:
IN NO EVENT SHALL CLUB CAR BE LIABLE FOR ANY INCIDENTAL OR CONSEQUENTIAL DAM-AGES INCLUDING, BUT NOT LIMITED TO, LOSS RELATED TO PROPERTY OTHER THAN THE GOLFCAR, LOSS OF USE, LOSS OF TIME, INCONVENIENCE, OR ANY OTHER ECONOMIC LOSS.
Some states allow neither limitation on the duration of an implied warranty nor exclusions or limitation of inci-dental or consequential damages. Therefore, the above limitations or exclusions may not apply to you.
This warranty gives you specific legal rights, and you may also have other rights which vary from state tostate.
8. INFORMATION:
For further information contact WARRANTY ADMINISTRATION, CLUB CAR, INC., P.O. Box 204658,Augusta, Georgia 30917-4658, U.S.A., 706-863-3000.
9. WARNING:
Any modification or alteration of any golf car beyond factory specifications, including those that affect theweight distribution, stability, or speed of the golf car, can cause serious personal injury or death.
iii

FOREWORD
Thank you for choosing Club Car, the golf car most widely recognized as the industry leader in vehicle effi-ciency and long-lasting value. Whether you have chosen the DS Gasoline or DS Electric, you have chosenthe finest golf car on the market. Please protect your investment and ensure that your Club Car providesyears of reliable, superior performance by returning your Warranty Registration (provided by your distributor/dealer), and by reading and following the maintenance instructions in this manual.
Your comfort and safety are important to us as well, so we urge you to read and follow the step-by-step oper-ating instructions and safety procedures in this manual. These instructions must be followed in order to avoidthe risk of severe personal injury. If you rent or loan your vehicle to others, we recommend that you ask themto read this manual before they operate the vehicle.
Club Car products are backed by a customer support system designed to offer you fast, courteous service. Inthe event that your golf car needs repairs or services, we recommend that your local authorized Club Carrepresentative perform them. For the name and address of the Club Car representative nearest you, call706-863-3000, Ext. 822. If you would prefer to write to us, direct your letter to: Club Car, Attention: ProductDevelopment Department, P.O. Box 204658, Augusta, Ga. 30917-4658 USA. Your local authorized Club Carrepresentative can also provide technical advice, parts, and service manuals.
We hope you will consider this owner’s manual a permanent part of your golf car. If you sell the vehicle,please include the manual so that the next owner will have the important operating, safety, and maintenanceinformation it contains.
iv

TABLE OF CONTENTS
Safety Details . . . . . . . . . . . . . . . . . . . . . . . . . . . . . . . . . . . . . . . . . . . . . . . . . . . . . . . . . . . . . . . . . . . . . 1
General Warnings . . . . . . . . . . . . . . . . . . . . . . . . . . . . . . . . . . . . . . . . . . . . . . . . . . . . . . . . . . . . . . . . . . . 1
Feature Identification - Gasoline Vehicle . . . . . . . . . . . . . . . . . . . . . . . . . . . . . . . . . . . . . . . . . . . . . . . . . 3
Feature Identification - Electric Vehicle . . . . . . . . . . . . . . . . . . . . . . . . . . . . . . . . . . . . . . . . . . . . . . . . . . . 4
General Information . . . . . . . . . . . . . . . . . . . . . . . . . . . . . . . . . . . . . . . . . . . . . . . . . . . . . . . . . . . . . . . . . 5
Model Identification . . . . . . . . . . . . . . . . . . . . . . . . . . . . . . . . . . . . . . . . . . . . . . . . . . . . . . . . . . . . . . . . . . 5
Safety Committee . . . . . . . . . . . . . . . . . . . . . . . . . . . . . . . . . . . . . . . . . . . . . . . . . . . . . . . . . . . . . . . . . . . 5
Pre-Operation Checklist . . . . . . . . . . . . . . . . . . . . . . . . . . . . . . . . . . . . . . . . . . . . . . . . . . . . . . . . . . . . . . 6
Controls . . . . . . . . . . . . . . . . . . . . . . . . . . . . . . . . . . . . . . . . . . . . . . . . . . . . . . . . . . . . . . . . . . . . . . . . . . 7
Driving Instructions . . . . . . . . . . . . . . . . . . . . . . . . . . . . . . . . . . . . . . . . . . . . . . . . . . . . . . . . . . . . . . . . . . 12
Towing . . . . . . . . . . . . . . . . . . . . . . . . . . . . . . . . . . . . . . . . . . . . . . . . . . . . . . . . . . . . . . . . . . . . . . . . . . . 14
Transporting on a Trailer . . . . . . . . . . . . . . . . . . . . . . . . . . . . . . . . . . . . . . . . . . . . . . . . . . . . . . . . . . . . . . 14
Storage - Gasoline Vehicle . . . . . . . . . . . . . . . . . . . . . . . . . . . . . . . . . . . . . . . . . . . . . . . . . . . . . . . . . . . . 15
Storage - Electric Vehicle . . . . . . . . . . . . . . . . . . . . . . . . . . . . . . . . . . . . . . . . . . . . . . . . . . . . . . . . . . . . . 16
Maintenance . . . . . . . . . . . . . . . . . . . . . . . . . . . . . . . . . . . . . . . . . . . . . . . . . . . . . . . . . . . . . . . . . . . . . . . 17
Periodic Service Schedule - Gasoline Vehicle . . . . . . . . . . . . . . . . . . . . . . . . . . . . . . . . . . . . . . . . . . . . . 19
Periodic Service Schedule - Electric Vehicle . . . . . . . . . . . . . . . . . . . . . . . . . . . . . . . . . . . . . . . . . . . . . . 21
Periodic Lubrication Schedule - Gasoline Vehicle . . . . . . . . . . . . . . . . . . . . . . . . . . . . . . . . . . . . . . . . . . 24
Periodic Lubrication Schedule - Electric Vehicle . . . . . . . . . . . . . . . . . . . . . . . . . . . . . . . . . . . . . . . . . . . . 25
Vehicle Capacities . . . . . . . . . . . . . . . . . . . . . . . . . . . . . . . . . . . . . . . . . . . . . . . . . . . . . . . . . . . . . . . . . . 26
Engine Oil - Gasoline Vehicle . . . . . . . . . . . . . . . . . . . . . . . . . . . . . . . . . . . . . . . . . . . . . . . . . . . . . . . . . . 27
Fueling Instructions - Gasoline Vehicle . . . . . . . . . . . . . . . . . . . . . . . . . . . . . . . . . . . . . . . . . . . . . . . . . . . 27
Battery - Gasoline Vehicle . . . . . . . . . . . . . . . . . . . . . . . . . . . . . . . . . . . . . . . . . . . . . . . . . . . . . . . . . . . . 28
Battery - Electric Vehicle . . . . . . . . . . . . . . . . . . . . . . . . . . . . . . . . . . . . . . . . . . . . . . . . . . . . . . . . . . . . . . 29
Battery Charger - Electric Vehicle . . . . . . . . . . . . . . . . . . . . . . . . . . . . . . . . . . . . . . . . . . . . . . . . . . . . . . . 30
Cleaning The Vehicle . . . . . . . . . . . . . . . . . . . . . . . . . . . . . . . . . . . . . . . . . . . . . . . . . . . . . . . . . . . . . . . . 34
Vehicle Controller - Electric Vehicle . . . . . . . . . . . . . . . . . . . . . . . . . . . . . . . . . . . . . . . . . . . . . . . . . . . . . . 35
Accessories and Options . . . . . . . . . . . . . . . . . . . . . . . . . . . . . . . . . . . . . . . . . . . . . . . . . . . . . . . . . . . . . 35
Subsequent Owner Registration . . . . . . . . . . . . . . . . . . . . . . . . . . . . . . . . . . . . . . . . . . . . . . . . . . . . . . . . 36
Fairway Villager . . . . . . . . . . . . . . . . . . . . . . . . . . . . . . . . . . . . . . . . . . . . . . . . . . . . . . . . . . . . . . . . . . . . . 36
Vehicle Specifications . . . . . . . . . . . . . . . . . . . . . . . . . . . . . . . . . . . . . . . . . . . . . . . . . . . . . . . . . . . . . . . . 38
v

Safety signs like you see above may at first seem shocking, but their impact is mildcompared with the reality of severe personal injury.
Your safey and satisfaction are of the utmost importance to Club Car. That is why weurge you to study this owner’s manual, and to read, understand, and heed the warn-ings in this manual, as well as the safety decals on your vehicle, before operatingthe vehicle.
Take time to understand the language of safety. It is a language that can save yourlife.
! WARNING
Moving Parts
Practice Safety
vi

SAFETY DETAILS
It is important to note that some vital statements throughout this manual and on the decals affixed to thevehicle are preceded by the words DANGER, WARNING, CAUTION, or NOTE. For your protection, we rec-ommend that you take special notice of these safety procedures. Safety procedures are essential and mustbe followed.
Throughout this manual and on the operation and warning decals affixed to the vehicle, the words “golf car”and “vehicle” are used interchangeably. “Golf car” is defined in the Notice of this manual and no other repre-sentation is stated or implied.
If any of the operation or warning decals on the vehicle become damaged, have been removed or cannot beeasily read they should be replaced immediately to avoid possible personal injury, property damage, ordeath. Contact your CLUB CAR distributor/dealer.
GENERAL WARNINGS
The safety procedures listed must be followed whenever the vehicle is being operated, repaired, orserviced. Other specific warnings appear throughout this manual and on the vehicle.
• THIS OWNER’S MANUAL SHOULD BE READ COMPLETELY BEFORE ATTEMPTING TO DRIVEOR SERVICE THE VEHICLE. FAILURE TO FOLLOW THE INSTRUCTIONS IN THIS MANUALCOULD RESULT IN PROPERTY DAMAGE, SEVERE PERSONAL INJURY, OR DEATH.
• A DANGER INDICATES AN IMMEDIATE HAZARD WHICH WILL RESULT IN SEVERE PER-SONAL INJURY OR DEATH.
• A WARNING INDICATES AN IMMEDIATE HAZARD WHICH COULD RESULT IN SEVERE PER-SONAL INJURY OR DEATH.
• A CAUTION INDICATES HAZARDS OR UNSAFE PRACTICES WHICH COULD RESULT IN PROD-UCT OR PROPERTY DAMAGE OR MINOR PERSONAL INJURY.
• A NOTE PROVIDES KEY INFORMATION TO MAKE PROCEDURES MORE EASILY UNDER-STOOD.
• GASOLINE VAPORS - FLAMMMABLE! EXPLOSIVE! DO NOT SMOKE. KEEP SPARKS ANDFLAMES AWAY FROM THE AREA OF THE VEHICLE. SERVICE ONLY IN WELL-VENTILATEDAREAS.
WARNING
DANGER
WARNING
CAUTION
NOTE
DANGER
1
General Warnings, Continued:
• BATTERY VAPORS - FLAMMMABLE! EXPLOSIVE! DO NOT SMOKE. KEEP SPARKS ANDFLAMES AWAY FROM THE AREA OF THE VEHICLE. SERVICE ONLY IN WELL-VENTILATEDAREAS.
• DO NOT OPERATE GASOLINE VEHICLE IN ENCLOSED AREA WITHOUT PROPER VENTILA-TION. ENGINE PRODUCES CARBON MONOXIDE WHICH IS AN ODORLESS, DEADLY POISON.
• A GOLF CAR WILL NOT PROVIDE PROTECTION FROM LIGHTNING, FLYING OBJECTS, OROTHER STORM RELATED HAZARDS. IF CAUGHT IN A STORM WHILE DRIVING A GOLF CAR,EXIT THE VEHICLE AND SEEK SHELTER IN ACCORDANCE WITH APPLICABLE SAFETYGUIDELINES FOR YOUR LOCATION.
• THE ENGINE EXHAUST FROM THIS PRODUCT CONTAINS CHEMICALS KNOWN TO THESTATE OF CALIFORNIA TO CAUSE CANCER, BIRTH DEFECTS, OR OTHER REPRODUCTIVEHARM.
• ONLY TRAINED MECHANICS SHOULD REPAIR OR SERVICE THE VEHICLE. ANYONE DOINGEVEN SIMPLE REPAIRS OR SERVICE SHOULD FOLLOW THE PROCEDURES EXACTLY ASSTATED IN THIS MANUAL, AND OBEY ALL DANGERS, WARNINGS, AND CAUTIONS LISTED INTHIS MANUAL AS WELL AS THOSE AFFIXED TO THE VEHICLE.
• ALWAYS WEAR SAFETY GLASSES OR APPROVED EYE PROTECTION WHEN SERVICING THEVEHICLE. WEAR A FULL FACE SHIELD WHEN WORKING WITH BATTERIES.
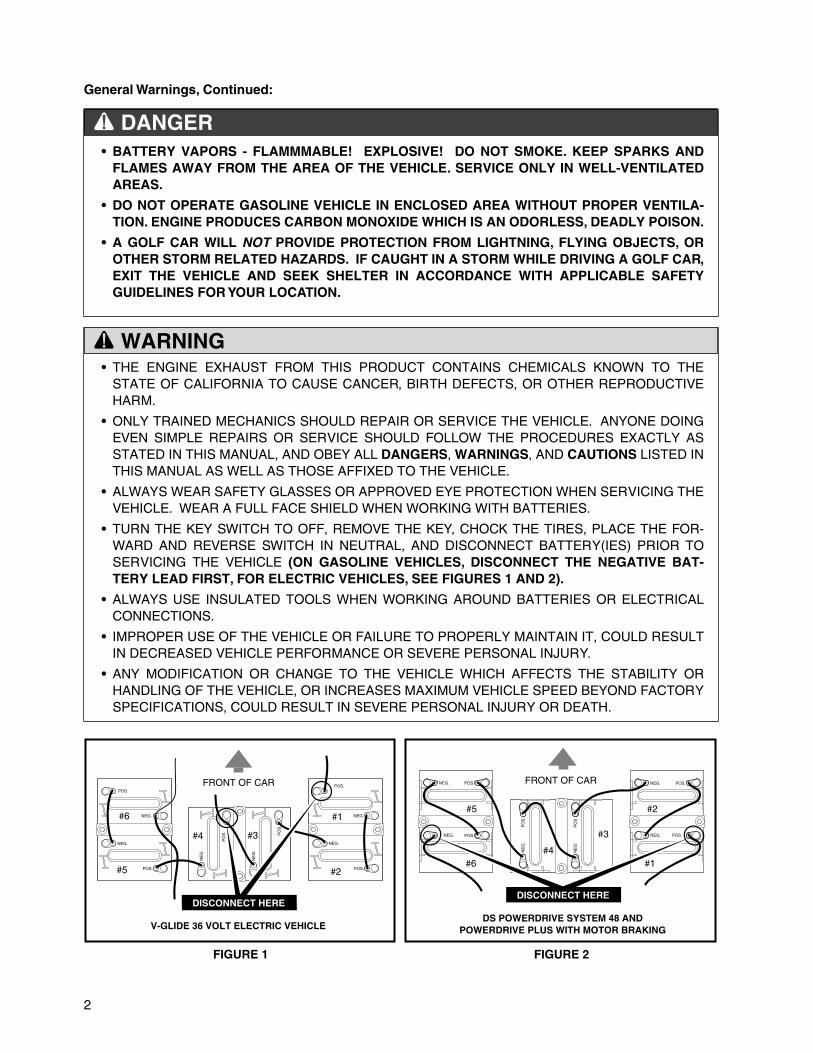
• TURN THE KEY SWITCH TO OFF, REMOVE THE KEY, CHOCK THE TIRES, PLACE THE FOR-WARD AND REVERSE SWITCH IN NEUTRAL, AND DISCONNECT BATTERY(IES) PRIOR TOSERVICING THE VEHICLE (ON GASOLINE VEHICLES, DISCONNECT THE NEGATIVE BAT-TERY LEAD FIRST, FOR ELECTRIC VEHICLES, SEE FIGURES 1 AND 2).
• ALWAYS USE INSULATED TOOLS WHEN WORKING AROUND BATTERIES OR ELECTRICALCONNECTIONS.
• IMPROPER USE OF THE VEHICLE OR FAILURE TO PROPERLY MAINTAIN IT, COULD RESULTIN DECREASED VEHICLE PERFORMANCE OR SEVERE PERSONAL INJURY.
• ANY MODIFICATION OR CHANGE TO THE VEHICLE WHICH AFFECTS THE STABILITY ORHANDLING OF THE VEHICLE, OR INCREASES MAXIMUM VEHICLE SPEED BEYOND FACTORYSPECIFICATIONS, COULD RESULT IN SEVERE PERSONAL INJURY OR DEATH.
FIGURE 1 FIGURE 2
DANGER
WARNING
POS.
NEG.
POS.
NEG.
POS.
NEG.
POS.
NEG.
NE
G.
PO
S.
PO
S.
NE
G.
#1
#2#5
#6
#4 #3
FRONT OF CAR
V-GLIDE 36 VOLT ELECTRIC VEHICLE
DISCONNECT HERE
POS.NEG.
POS.NEG.POS.NEG.
POS.NEG.
PO
S.
NE
G.
PO
S.
NE
G.
#1
#2#5
#6#4
#3
FRONT OF CAR
DS POWERDRIVE SYSTEM 48 ANDPOWERDRIVE PLUS WITH MOTOR BRAKING
DISCONNECT HERE
2
PRACTICE GOLF ETIQUETTE• Observe club rules.• Drive on golf car paths when possible.• Keep proper distance from greens.• Replace divots.• Repair ball marks on greens.• Rake sand traps.• Allow faster players to play through.• Help speed up play.• Dispose of litter properly.
Club Car
• Read operating instructions before
using vehicle.
• Never stand in front or behind vehicle.
• Vehicle should be driven only in specified
areas by trained persons.
• Do not use on public roads.
• Only two persons per seat.
• Operate vehicle from driver’s side only.
• Do not start vehicle until all people
are seated.
• Remain seated and hold on in moving vehicle.• Keep arms, legs, feet and body inside vehicle.• Stop vehicle before changing direction. Buzzer will sound in reverse.• Drive slowly in turns.
• Drive slowly straight up and down slopes.
• Set park brake before leaving vehicle.
• Remove key when vehicle is not in use.
• Place shift lever in neutral when vehicle
is not in use.
WARNING!Failure to follow theseinstructions can causesevere injury or death.
OFF ON
OPERATING INSTRUCTIONS
• Read owner’s manual prior to operation.• Study and understand controls. Be sure everyone is seated.• Before driving, read safety warnings located above pedals.
• Make sure wheels are turned in desired direction.• Turn key to “ON” position and be sure nothing is in your path.
• Select direction by placing shift lever in desired position:F - Forward N - Neutral R - Reverse
•Vehicle will start moving when accelerator pedal is depressed. • Slowly depress accelerator pedal to increase speed. Park brake will
release when accelerator pedal is depressed.• To stop, release accelerator pedal and depress brake pedal.
• After stopping, firmly depress park brake until it locks.• Place forward and reverse switch in neutral position.
Turn key “OFF” and remove key when not in use.
OPERATING INSTRUCTIONS
DECAL
GOLF ETIQUETTE
OILWARNING
LIGHT
SAFETY WARNING DECAL
KEY SWITCH
SERIAL NUMBER
BRAKE PEDAL
PARK BRAKE PEDAL
ACCELERATORPEDAL
ClubCar®
Checking Engine Oil Level
Periodic Service ScheduleService Regular Interval
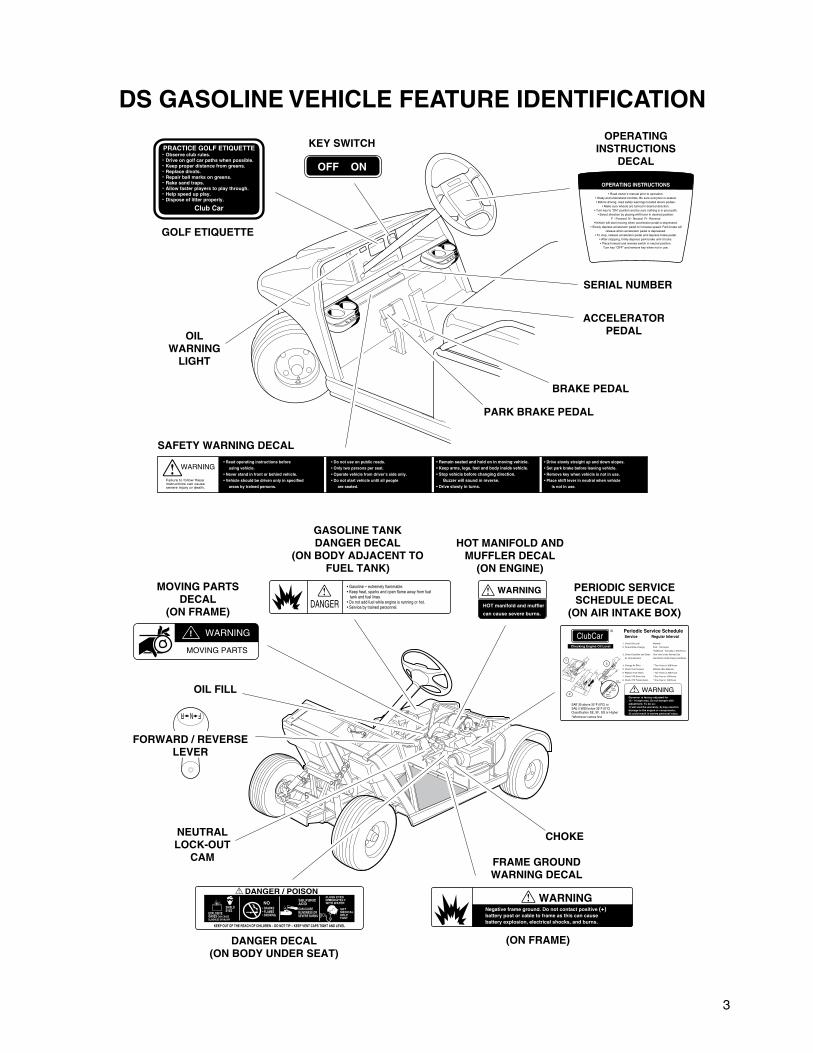
Governor is factory adjusted for12 - 14 mph max. Do not tamper withadjustment. To do so:1) will void the warranty; 2) may result in damage to the engine or components;3) could result in severe personal injury.
WARNING!
SAE 30 above 32°F (0ºC) orSAE 5 W20 below 32°F (0°C)Classification SE, SF, SG or Higher*Whichever comes first
1. Check Oil Level
2. Oil and Filter Change
3. Check Condition and Clean
Air Filter Element
4. Change Air Filter
5. Check Tire Pressure
6. Replace Fuel Filters
7. Check / Fill Drive Unit
8. Check / Fill Transmission
Monthly
First - 100 Hours
*Additional - Annually or 200 Hours
One Year Under Normal Use
Six Months Under Dusty Conditions
* Two Years or 300 Hours
Monthly (See Manual)
* Two Years or 300 Hours
* One Year or 150 Hours
* One Year or 150 Hours
! WARNING
MOVING PARTS
DANGER!
• Gasoline – extremely flammable.• Keep heat, sparks and open flame away from fuel tank and fuel lines.• Do not add fuel while engine is running or hot.• Service by trained personnel.
WARNING!HOT manifold and muffler
can cause severe burns.
WARNING!Negative frame ground. Do not contact positive (+)battery post or cable to frame as this can causebattery explosion, electrical shocks, and burns.
DANGER / POISON!FLUSH EYESIMMEDIATELYWITH WATER
GETMEDICALHELPFAST
SULFURICACIDCAN CAUSEBLINDNESS ORSEVERE BURNS
NO• SPARKS• FLAMES• SMOKING
KEEP OUT OF THE REACH OF CHILDREN – DO NOT TIP – KEEP VENT CAPS TIGHT AND LEVEL
SHIELDEYES
EXPLOSIVEGASES CAN CAUSEBLINDNESS OR INJURY
GASOLINE TANKDANGER DECAL
(ON BODY ADJACENT TOFUEL TANK)
MOVING PARTSDECAL
(ON FRAME)
DANGER DECAL(ON BODY UNDER SEAT)
(ON FRAME)
FRAME GROUNDWARNING DECAL
HOT MANIFOLD ANDMUFFLER DECAL
(ON ENGINE)
PERIODIC SERVICESCHEDULE DECAL
(ON AIR INTAKE BOX)
LowLevel
SafeLevel
FullLevel
2
13
CHOKE
FNR
FORWARD / REVERSELEVER
OIL FILL
NEUTRALLOCK-OUT
CAM
DS GASOLINE VEHICLE FEATURE IDENTIFICATION
3

PRACTICE GOLF ETIQUETTE• Observe club rules.• Drive on golf car paths when possible.• Keep proper distance from greens.• Replace divots.• Repair ball marks on greens.• Rake sand traps.• Allow faster players to play through.• Help speed up play.• Dispose of litter properly.
Club Car
• Read operating instructions before
using vehicle.
• Never stand in front or behind vehicle.
• Vehicle should be driven only in specified
areas by trained persons.
• Do not use on public roads.
• Only two persons per seat.
• Operate vehicle from driver’s side only.
• Do not start vehicle until all people
are seated.
• Remain seated and hold on in moving vehicle.• Keep arms, legs, feet and body inside vehicle.• Stop vehicle before changing direction. Buzzer will sound in reverse.• Drive slowly in turns.
• Drive slowly straight up and down slopes.
• Set park brake before leaving vehicle.
• Remove key when vehicle is not in use.
• Place shift lever in neutral when vehicle
is not in use.
WARNING!Failure to follow theseinstructions can causesevere injury or death.
Club Car
DANGER / POISON!FLUSH EYESIMMEDIATELYWITH WATER
GETMEDICALHELPFAST
SULFURICACIDCAN CAUSEBLINDNESS ORSEVERE BURNS
NO• SPARKS• FLAMES• SMOKING
KEEP OUT OF THE REACH OF CHILDREN – DO NOT TIP – KEEP VENT CAPS TIGHT AND LEVEL
SHIELDEYES
EXPLOSIVEGASES CAN CAUSEBLINDNESS OR INJURY
WARNING! HOT RESISTORS CAN CAUSE SEVERE BURNS.
CAUTION!
• DO NOT OPERATE VEHICLE WITHOUTCOVER IN PLACE • DO NOT DIRECTWATER STREAM AT THIS SWITCH
RESISTOR WARNING DECALV-GLIDE 36 VOLT AND POWERDRIVE PLUS VEHICLES
(ON BODY UNDER SEAT)
SPEED SWITCH CAUTION DECALV-GLIDE 36 VOLT VEHICLE ONLY
(ON WIPER SWITCH COVER)
OFF ON
OPERATING INSTRUCTIONS
• Read owner’s manual prior to operation.• Study and understand controls. Be sure everyone is seated.• Before driving, read safety warnings located above pedals.
• Make sure wheels are turned in desired direction.• Turn key to “ON” position and be sure nothing is in your path.
• Select direction by placing shift lever in desired position:F - Forward N - Neutral R - Reverse
•Vehicle will start moving when accelerator pedal is depressed. • Slowly depress accelerator pedal to increase speed. Park brake will
release when accelerator pedal is depressed.• To stop, release accelerator pedal and depress brake pedal.
• After stopping, firmly depress park brake until it locks.• Place forward and reverse switch in neutral position.
Turn key “OFF” and remove key when not in use.
KEY SWITCHDECAL
SERIAL NUMBER
BRAKE PEDAL
OR
BATTERYWARNING LIGHT
PARK BRAKE PEDAL
ACCELERATORPEDAL
GOLF ETIQUETTEDECAL
V-GLIDE 36 VOLT AND POWERDRIVE SYSTEM 48 VEHICLES
OR
SAFETY WARNING DECAL
DANGER DECAL(ON BODY UNDER SEAT)
OPERATING INSTRUCTIONSDECAL
CHARGERRECEPTACLE
IMPORTANT NOTICEVEHICLE EQUIPPED TO CONTROL DOWNHILL SPEED
• Maximum vehicle speed is controlled during downhill operation with accelerator pedal depressed.• Vehicle will brake gently when accelerator pedal is released.• System is activated only when key is in the "ON" position.• When towing vehicle, key must be in the "OFF" position.
Club Car
MOTOR BRAKING DECALPOWERDRIVE PLUS VEHICLE
ONLY
FNR
FR
FORWARD - REVERSESWITCH
(POWERDRIVE PLUSVEHICLES ONLY)
FORWARD - REVERSELEVER
(POWERDRIVE SYSTEM 48AND V-GLIDE 36 VOLT
VEHICLES)
DS ELECTRIC VEHICLE FEATURE IDENTIFICATION
4
GENERAL INFORMATION
There are four DS Golf Car models: the DS gasoline powered vehicle, the DS V-Glide 36 volt electric pow-ered vehicle, the DS PowerDrive System 48 (48 volt) electric vehicle, and the DS PowerDrive Plus (48 volt)electric vehicle with motor braking. Throughout this manual, important features unique to each model arehighlighted. We urge the owner/operator to read and understand this manual, and to pay special attention tothe features specific to his/her vehicle.
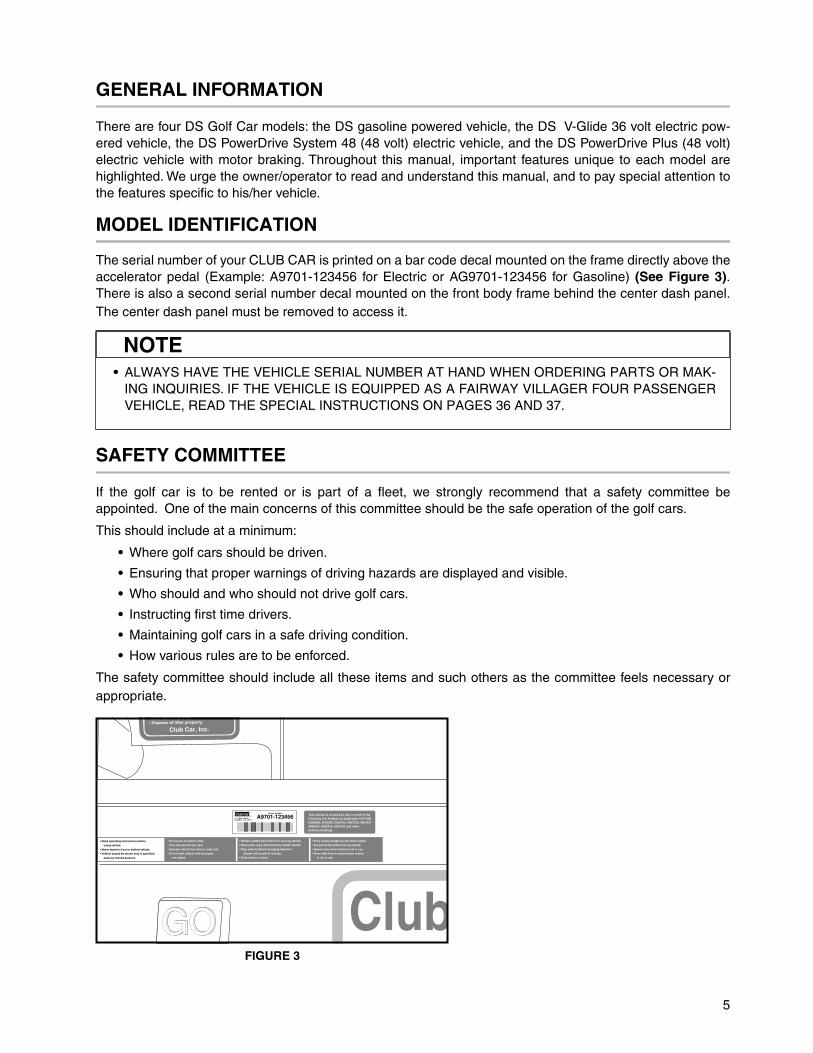
MODEL IDENTIFICATION
The serial number of your CLUB CAR is printed on a bar code decal mounted on the frame directly above theaccelerator pedal (Example: A9701-123456 for Electric or AG9701-123456 for Gasoline) (See Figure 3).There is also a second serial number decal mounted on the front body frame behind the center dash panel.The center dash panel must be removed to access it.
SAFETY COMMITTEE
If the golf car is to be rented or is part of a fleet, we strongly recommend that a safety committee beappointed. One of the main concerns of this committee should be the safe operation of the golf cars.
This should include at a minimum:
• Where golf cars should be driven.
• Ensuring that proper warnings of driving hazards are displayed and visible.
• Who should and who should not drive golf cars.
• Instructing first time drivers.
• Maintaining golf cars in a safe driving condition.
• How various rules are to be enforced.
The safety committee should include all these items and such others as the committee feels necessary orappropriate.
• ALWAYS HAVE THE VEHICLE SERIAL NUMBER AT HAND WHEN ORDERING PARTS OR MAK-ING INQUIRIES. IF THE VEHICLE IS EQUIPPED AS A FAIRWAY VILLAGER FOUR PASSENGERVEHICLE, READ THE SPECIAL INSTRUCTIONS ON PAGES 36 AND 37.
FIGURE 3
NOTE
l Help speed up play.l Dispose of litter properly.
Club Car, Inc.
• Read operating instructions before
using vehicle.
• Never stand in front or behind vehicle.
• Vehicle should be driven only in specified
areas by trained persons.
• Do not use on public roads.
• Only two persons per seat.
• Operate vehicle from driver’s side only.
• Do not start vehicle until all people
are seated.
• Remain seated and hold on in moving vehicle.• Keep arms, legs, feet and body inside vehicle.• Stop vehicle before changing direction. Buzzer will sound in reverse.• Drive slowly in turns.
• Drive slowly straight up and down slopes.
• Set park brake before leaving vehicle.
• Remove key when vehicle is not in use.
• Place shift lever in neutral when vehicle
is not in use.
This vehicle is covered by one or more of thefollowing U.S. Patents as applicable: D271008D292899, 4343503, 4539162, 4637270, 48218274826467, 5042519, 5083736 and otherpatents pendings.
ClubGOGO
SERIAL NUMBER
A9701-123456P O BOX 204658AUGUSTA GA 30917
Club CarR
5
PRE-OPERATION CHECKLIST
Your CLUB CAR has been thoroughly inspected and adjusted at the factory, and also by your CLUB CARdistributor/dealer. However, upon arrival of your new CLUB CAR(s), you should become familiar with its con-trols and operation, and carefully inspect each vehicle to be satisfied that it is in proper working conditionbefore accepting delivery.
Use the following checklist as a guide to inspect your new vehicle, and in conjunction with the Periodic Ser-vice Schedules (pages 19 through 23). Any problems should be corrected only by your CLUB CAR distribu-tor/dealer or a trained mechanic.
• General: All the parts should be in place and properly installed. Be sure that all nuts, bolts, and screwsare tight. On the DS Gasoline vehicle, check all hose clamps for tight fit as well as the starter belt fortightness.
• Warning Decals: Check to ensure that all warning and operation decals are in place (See Pages 3and 4).
• Tires: Check for proper tire pressure (See Vehicle Capacities, Page 26).
• Batteries (electric vehicles): Check electrolyte to ensure that it is at its proper level (See Figure 22,Page 29). Check battery posts. Wires should be tight and free of corrosion. Charge batteries fullybefore first use of vehicle.
• V-Glide Speed Switch (V-Glide 36 volt electric vehicles): Be sure speed switch cover is properlysecured prior to operating the vehicle.
• Engine (gasoline vehicles): Check for proper engine oil level (See Engine Oil, Page 27).
• Fuel (gasoline vehicles): Check fuel level (See Fueling Instructions, Page 27).
PERFORMANCE INSPECTIONAfter you have familiarized yourself with the vehicle’s controls and have read and understood the drivinginstructions, take the vehicle for a test drive. Use the following checklist as a guide to inspect your new vehi-cle. Any problems should be corrected only by your CLUB CAR distributor/dealer or a trained technician.
All vehicles:• Brakes: Be sure the brakes function properly. When brake pedal is fully depressed under moderate
pressure, it should not go more than halfway to the floor, and vehicle should come to a smooth, straightstop within 14 feet. If the pedal goes more than halfway to the floor, or if the vehicle swerves or fails tostop within 14 feet, have the brake system checked and adjusted as required. Brake adjustment mustbe maintained so that the brake pedal cannot be depressed to the floor under any circumstances.
• Park Brake: When latched, the park brake should lock the wheels and hold the vehicle stationary (onincline of 20% or less). It should release when either the accelerator or brake pedal is depressed.
• Steering: The vehicle should be easy to steer and should not have any play in the steering wheel.
• Accelerator: As the accelerator pedal is depressed, the engine or motor should start and the vehicleshould come up smoothly to full speed. When the pedal is released it should return to the original posi-tion and the engine or motor should stop. The DS Electric vehicle runs at reduced speed in reverse.
• Governor (gasoline vehicles): Check maximum speed of the vehicle. The vehicle should run at 12-15MPH (19-24 KPH) on a level surface.
• General: Listen for any unusual noises such as squeaks or rattles. Check the vehicle’s ride and perfor-mance. Have a CLUB CAR distributor/dealer or a trained mechanic investigate anything unusual.
• BE SURE THE PLASTIC HAS BEEN REMOVED FROM THE SEAT BOTTOM BEFORE OPERAT-ING THE VEHICLE. FAILURE TO DO SO MAY RESULT IN A FIRE, PROPERTY DAMAGE, PER-SONAL INJURY, OR DEATH.
WARNING
6

DS PowerDrive Plus Vehicles with Motor Braking:• Zero Speed Detect: With the vehicle parked on level ground and the park brake disengaged, turn the
ignition key to the ON position and attempt to push the vehicle. It should resist rolling (moving at nomore than 1 or 2 mph) with the forward and reverse switch in any position.
• “Pedal Up” Motor Braking: Accelerate the vehicle to full speed and then release the acceleratorpedal. The vehicle should quickly and smoothly slow to approximately 9 mph.
• “Pedal Down” Motor Braking: Accelerate down an incline with the accelerator pedal depressed.When the vehicle reaches approximately 15 mph, regenerative motor braking should engage and mod-erate vehicle speed between 15 and 16 mph, depending upon the grade of the hill.
CONTROLS
KEY SWITCH The key switch is mounted on the dash to the right of the steering column (See Figure 4, Page 8). It has twopositions, OFF and ON, which are clearly labeled.
• DO NOT OPERATE GASOLINE VEHICLE IN AN ENCLOSED AREA WITHOUT PROPER VENTI-LATION. GASOLINE ENGINES PRODUCE CARBON MONOXIDE GAS, WHICH IS AN ODOR-LESS, DEADLY POISION.
• ANY MODIFICATION OR CHANGE TO THE VEHICLE WHICH AFFECTS THE STABILITY ORHANDLING OF THE VEHICLE, OR INCREASES MAXIMUM VEHICLE SPEED BEYOND FACTORYSPECIFICATIONS, COULD RESULT IN SEVERE PERSONAL INJURY OR DEATH.
• IF RENTING OR LOANING THE VEHICLE, MAKE SURE THE DRIVER IS FAMILIAR WITH ALLCONTROLS AND OPERATING PROCEDURES BEFORE ALLOWING THE VEHICLE TO BEDRIVEN.
• DO NOT TAMPER WITH THE GASOLINE VEHICLE’S GOVERNOR. DOING SO WILL VOID THEWARRANTY, AS WELL AS DAMAGE THE ENGINE AND OTHER COMPONENTS, AND COULDRESULT IN PROPERTY DAMAGE, PERSONAL INJURY, OR DEATH DUE TO UNSAFE SPEEDS.
• DO NOT MODIFY OR CHANGE THE VEHICLE IN ANY WAY WHICH MIGHT AFFECT ITS STABIL-ITY OR HANDLING, OR INCREASE MAXIMUM SPEED BEYOND FACTORY SPECIFICATIONS.PROPERTY DAMAGE, PERSONAL INJURY, OR DEATH COULD RESULT.
• DO NOT SHIFT THE FORWARD/REVERSE SWITCH WHILE THE VEHICLE IS IN MOTION. TOAVOID INJURY TO AN UNSUSPECTING PASSENGER OR DAMAGE TO THE VEHICLE, ALWAYSBRING THE VEHICLE TO A FULL STOP BEFORE SHIFTING THE SWITCH. A BUZZER WILLSOUND AS A WARNING WHEN THE VEHICLE IS IN REVERSE.
• RELEASE THE ACCELERATOR PEDAL AND THEN DEPRESS THE BRAKE PEDAL FIRMLYUNTIL THE VEHICLE STOPS. TO AVOID UNINTENTIONAL STARTING OR ROLLING OF THEVEHICLE, SET THE PARK BRAKE, TURN THE KEY SWITCH TO OFF, AND REMOVE THE KEYWHEN LEAVING THE VEHICLE.
• THE KEY CAN BE REMOVED WHEN THE KEY SWITCH IS IN THE OFF POSITION ONLY.
DANGER
WARNING
NOTE
7

FORWARD/REVERSE CONTROL
DS Gasoline, DS V-Glide Electric, and DS PowerDrive System 48:The forward/reverse shift lever is located on the seat support panel, below and to the right of the driver’s rightknee (See Figure 5). The lever has three distinct positions: F (forward), N (neutral), and R (reverse). Rotatethe lever towards the driver, F (forward), to run the vehicle in the forward direction, or towards the passenger,R (reverse), to run the vehicle in reverse. When the lever is in the straight up, or N (neutral) position, the vehi-cle will not run. The engine on the DS Gasoline will stop if it is shifted to this position while running. The DSElectric vehicle operates at reduced speed in reverse. When the vehicle is in reverse, the reverse warningbuzzer will sound.
DS PowerDrive Plus With Motor Braking:The forward/reverse shift switch is located in the same place as the forward/reverse shift lever on all other DSmodels; on the seat support panel below and to the right of the driver’s right knee. The Forward (F) andReverse (R) positions are clearly marked on the switch. Push down the F (forward) side of the switch to runthe vehicle in the forward direction, or push down the R (reverse) side of the switch to run the vehicle inreverse. When the switch is positioned with neither side down, the vehicle is in the NEUTRAL position andthe vehicle will not run if the accelerator is depressed (See Figure 6).
ACCELERATOR PEDAL
The accelerator pedal is the pedal on the right, with the word GO molded into it (See Figure 7).
FIGURE 4 FIGURE 5
• THE REVERSE BUZZER WILL SOUND AS A WARNING WHEN THE VEHICLE IS IN REVERSE.
• THE OPERATION OF THE ACCELERATOR PEDAL DIFFERS FROM THAT OF AN AUTOMO-BILE. WHEN THE KEY SWITCH IS ON, AND THE SHIFT LEVER IS IN EITHER FORWARD ORREVERSE, DEPRESSING THE ACCELERATOR PEDAL WILL AUTOMATICALLY RELEASE THEPARK BRAKE AND START THE VEHICLE MOVING IN THE DIRECTION SELECTED (FORWARDOR REVERSE). AS THE ACCELERATOR PEDAL IS DEPRESSED, SPEED WILL INCREASEUNTIL FULL SPEED IS REACHED. WHEN THE ACCELERATOR IS RELEASED, POWER WILL BECUT OFF AND THE ENGINE OR MOTOR WILL STOP RUNNING.
• POWERDRIVE PLUS VEHICLES ONLY: SEE “PEDAL-UP” AND “PEDAL-DOWN” MOTOR BRAK-ING ON PAGE 7.
PRACTICE GOLF ETIQUETTE
� Observe club rules.
� Drive on golf car paths when possible.
� Keep proper distance from greens.
� Replace divots.
� Repair ball marks on greens.
� Rake sand traps.
� Allow faster players to play through.
� Help speed up play.
� Dispose of litter properly.Club Car
OFF ON
NOTE
NOTE
8
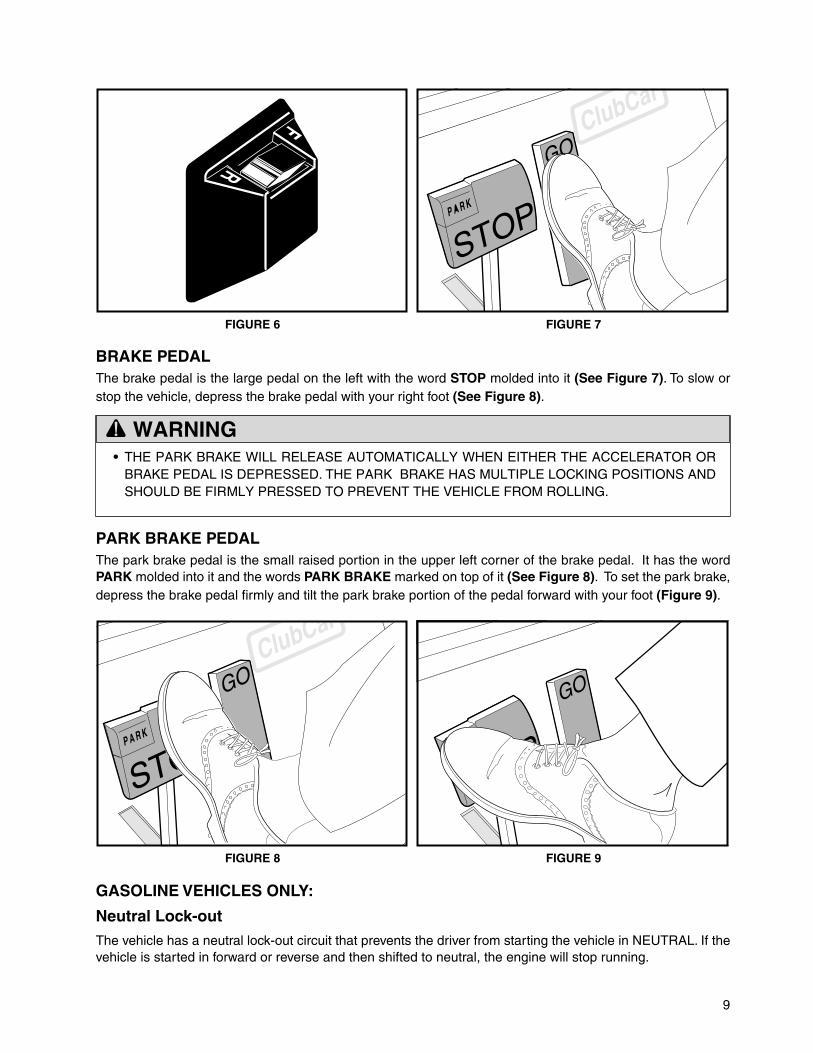
BRAKE PEDALThe brake pedal is the large pedal on the left with the word STOP molded into it (See Figure 7). To slow orstop the vehicle, depress the brake pedal with your right foot (See Figure 8).
PARK BRAKE PEDALThe park brake pedal is the small raised portion in the upper left corner of the brake pedal. It has the wordPARK molded into it and the words PARK BRAKE marked on top of it (See Figure 8). To set the park brake,depress the brake pedal firmly and tilt the park brake portion of the pedal forward with your foot (Figure 9).
GASOLINE VEHICLES ONLY:
Neutral Lock-outThe vehicle has a neutral lock-out circuit that prevents the driver from starting the vehicle in NEUTRAL. If thevehicle is started in forward or reverse and then shifted to neutral, the engine will stop running.
FIGURE 6 FIGURE 7
• THE PARK BRAKE WILL RELEASE AUTOMATICALLY WHEN EITHER THE ACCELERATOR ORBRAKE PEDAL IS DEPRESSED. THE PARK BRAKE HAS MULTIPLE LOCKING POSITIONS ANDSHOULD BE FIRMLY PRESSED TO PREVENT THE VEHICLE FROM ROLLING.
FIGURE 8 FIGURE 9
R
F
WARNING
9
Neutral Lock-out, Continued:
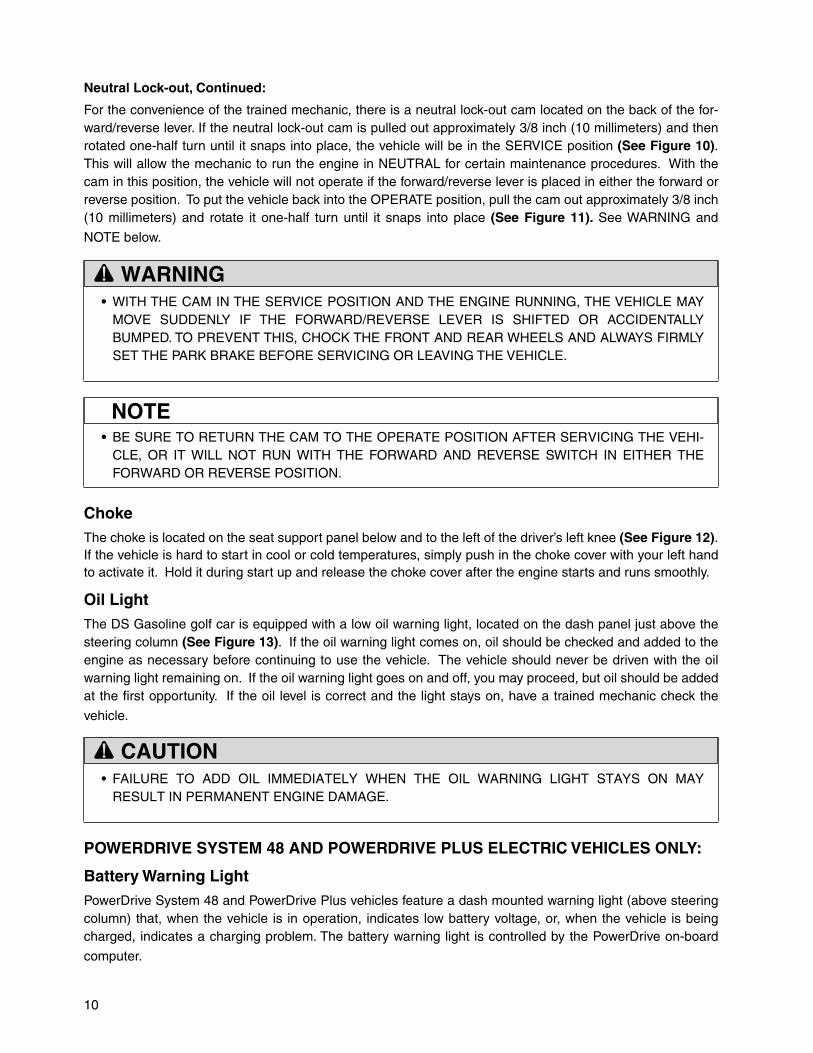
For the convenience of the trained mechanic, there is a neutral lock-out cam located on the back of the for-ward/reverse lever. If the neutral lock-out cam is pulled out approximately 3/8 inch (10 millimeters) and thenrotated one-half turn until it snaps into place, the vehicle will be in the SERVICE position (See Figure 10).This will allow the mechanic to run the engine in NEUTRAL for certain maintenance procedures. With thecam in this position, the vehicle will not operate if the forward/reverse lever is placed in either the forward orreverse position. To put the vehicle back into the OPERATE position, pull the cam out approximately 3/8 inch(10 millimeters) and rotate it one-half turn until it snaps into place (See Figure 11). See WARNING and
NOTE below.
ChokeThe choke is located on the seat support panel below and to the left of the driver’s left knee (See Figure 12).If the vehicle is hard to start in cool or cold temperatures, simply push in the choke cover with your left handto activate it. Hold it during start up and release the choke cover after the engine starts and runs smoothly.
Oil LightThe DS Gasoline golf car is equipped with a low oil warning light, located on the dash panel just above thesteering column (See Figure 13). If the oil warning light comes on, oil should be checked and added to theengine as necessary before continuing to use the vehicle. The vehicle should never be driven with the oilwarning light remaining on. If the oil warning light goes on and off, you may proceed, but oil should be addedat the first opportunity. If the oil level is correct and the light stays on, have a trained mechanic check the
vehicle.
POWERDRIVE SYSTEM 48 AND POWERDRIVE PLUS ELECTRIC VEHICLES ONLY:
Battery Warning LightPowerDrive System 48 and PowerDrive Plus vehicles feature a dash mounted warning light (above steeringcolumn) that, when the vehicle is in operation, indicates low battery voltage, or, when the vehicle is beingcharged, indicates a charging problem. The battery warning light is controlled by the PowerDrive on-board
computer.
• WITH THE CAM IN THE SERVICE POSITION AND THE ENGINE RUNNING, THE VEHICLE MAYMOVE SUDDENLY IF THE FORWARD/REVERSE LEVER IS SHIFTED OR ACCIDENTALLYBUMPED. TO PREVENT THIS, CHOCK THE FRONT AND REAR WHEELS AND ALWAYS FIRMLYSET THE PARK BRAKE BEFORE SERVICING OR LEAVING THE VEHICLE.
• BE SURE TO RETURN THE CAM TO THE OPERATE POSITION AFTER SERVICING THE VEHI-CLE, OR IT WILL NOT RUN WITH THE FORWARD AND REVERSE SWITCH IN EITHER THEFORWARD OR REVERSE POSITION.
• FAILURE TO ADD OIL IMMEDIATELY WHEN THE OIL WARNING LIGHT STAYS ON MAYRESULT IN PERMANENT ENGINE DAMAGE.
WARNING
NOTE
CAUTION
10

When the vehicle is in operation, the warning light will come on and remain illuminated if:
• Batteries voltage drops below 48 when there is no load on the batteries (the vehicle is stopped andthere are no accessories on).
• Batteries have discharged to less than 25% of rated capacity.
If the warning light comes on during a round of golf, there is enough power remaining to finish the round, butthe car should be charged before being used again. If the warning light comes on and the vehicle is unable tofinish the round, have your Club Car distributor/dealer check the vehicle for a possible battery or electricalsystem problem.
When the batteries receive an incomplete charge because 1) the DC power cord is disconnected, 2) ACpower to the charger is interrupted, 3) automatic charger shut-off occurs after 16 hours of operation, or 4)the charger malfunctions, the warning light will indicate as follows:
• The warning light will not come on if the charge is 90% or more complete. The on-board computer willretain in memory the amount of charge needed to fully replenish the batteries and will complete thecharge during the next charge cycle.
• When the charger is unplugged, the warning light will come on and remain illuminated for 10 seconds ifthe charge is less than 90% complete but the car has enough power to complete 36 holes of golf. Thiswill alert the fleet operator that the car may be used, but that it must be charged to completion as soonas possible.
• The warning light will come on and remain illuminated if the charger times out at 16 hours (see chargermanual) and the batteries are not sufficiently charged. This indicates an abnormal charge cycle. Thecharger and batteries should be checked by your Club Car distributor/dealer.
FIGURE 10 FIGURE 11
FIGURE 12 FIGURE 13
NEUTRAL FORWARD
SERVICE POSITION
NEUTRAL FORWARD
OPERATE POSITION
PRACTICE GOLF ETIQUETTE
� Observe club rules.
� Drive on golf car paths when possible.
� Keep proper distance from greens.
� Replace divots.� Repair ball marks on greens.
� Rake sand traps.
� Allow faster players to play through.
� Help speed up play.
� Dispose of litter properly.Club Car
11

Battery Warning Light, Continued:
• The warning light will come on during a charge cycle (DC plug is still connected) if AC power to thecharger is interrupted. The light will go out when AC power is restored.
DRIVING INSTRUCTIONS
No one should drive the vehicle without first being instructed in the proper operation and use of the vehicle’scontrols. An experienced operator should accompany each first-time driver on a test drive before allowinghim(her) to operate the vehicle alone. Only licensed drivers should be allowed to drive this vehicle.
To ensure safe operation of the vehicle, follow exactly and in order, all of the following procedures. Read andunderstand all instructions prior to driving the vehicle.
• IF RENTING OR LOANING THE VEHICLE, MAKE SURE THE DRIVER IS FAMILIAR WITH ALLCONTROLS AND OPERATING PROCEDURES BEFORE ALLOWING THE VEHICLE TO BEDRIVEN.
• NO MORE THAN TWO PEOPLE SHOULD BE ON THE VEHICLE AT ONE TIME.
• THE VEHICLE IS NOT SPECIALLY EQUIPPED FOR HANDICAPPED PERSONS. BE SURE ALLPERSONS CAN PROPERLY OPERATE THE VEHICLE PRIOR TO ALLOWING THEM TO DRIVETHE VEHICLE.
• FOR NIGHT USE, THE VEHICLE MUST BE EQUIPPED WITH HEADLIGHTS, TAILLIGHTS, ANDREFLECTORS.
• STOP THE VEHICLE BEFORE SHIFTING THE FORWARD AND REVERSE SWITCH. FAILURE TODO SO MAY RESULT IN INJURY TO AN UNSUSPECTING PASSENGER AND (OR) DAMAGE TOTHE VEHICLE. A BUZZER WILL SOUND AS A WARNING WHEN THE VEHICLE IS IN REVERSE.
WHEN DRIVING THE VEHICLE:
• OPERATE THE VEHICLE FROM THE DRIVER’S SEAT ONLY.
• TO PREVENT FALLS FROM THE VEHICLE, REMAIN SEATED IN A MOVING VEHICLE AND HOLDON TO SEAT HANDLES OR HANDRAILS AT ALL TIMES. DRIVER SHOULD KEEP BOTH HANDSON THE STEERING WHEEL WHEN THE VEHICLE IS IN MOTION.
• KEEP ALL BODY PARTS INSIDE THE VEHICLE TO PREVENT THEM FROM GETTING CAUGHTBETWEEN THE VEHICLE AND THE GROUND OR OTHER OBJECTS.
• TO PREVENT OVERTURNING OF THE VEHICLE, DRIVE SLOWLY IN TURNS.
• TO PREVENT OVERTURNING OF THE VEHICLE, DRIVE SLOWLY STRAIGHT UP AND DOWNSLOPES. DO NOT DRIVE THE VEHICLE ON SLOPES EXCEEDING 20% INCLINE.
• TO AVOID POSSIBLE INJURY TO AN UNSUSPECTING PASSENGER AND (OR) DAMAGE TO THEVEHICLE, AVOID SUDDEN STARTS, SUDDEN STOPS, AND ABRUPT TURNS
• TO AVOID THE POSSIBILITY OF LOSING CONTROL OF OR OVERTURNING THE VEHICLE,REDUCE SPEED FOR ADVERSE DRIVING CONDITIONS SUCH AS WET GRASS OR ROUGHTERRAIN.
• DO NOT USE THE VEHICLE ON PUBLIC ROADS. IT IS NOT DESIGNED OR INTENDED FORSTREET USE AND SHOULD NOT BE LICENSED FOR USE ON PUBLIC ROADS
• OBEY ALL LOCAL RULES CONCERNING GOLF CARS.
• THE VEHICLE SHOULD BE DRIVEN IN ONLY SPECIFIED AREAS BY TRAINED PEOPLE.
• TO AVOID BEING STRUCK, DO NOT STAND IN FRONT OF OR BEHIND THE VEHICLE.
• DO NOT DRIVE WHILE UNDER THE INFLUENCE OF ALCOHOL, DRUGS, OR MEDICATIONS.
WARNING
12
STARTING THE VEHICLE1. Enter the vehicle.
2. Study and understand controls.
3. Be sure everyone is seated and holding onto seat handles or handrails.
4. Read safety warnings located above pedals.
5. Make sure wheels are turned in desired direction.
6. Turn key to the ON position and be sure nothing is in your path.
7. Select direction by placing shift lever in desired position (F = forward or R = reverse).
8. Slowly depress accelerator pedal. The park brake will release automatically and the vehicle will start tomove. As the accelerator pedal is depressed, speed will increase until full speed is reached.
STOPPING THE VEHICLE
To stop the vehicle, release the accelerator pedal and depress the brake pedal with your right foot until thevehicle comes to a complete stop.
PARKING AND LEAVING THE VEHICLE1. After stopping the vehicle, firmly depress the park brake pedal until it locks. This will prevent the vehicle
from rolling.
2. Turn the key switch to OFF and place the shift lever in the NEUTRAL position. Remove the key whenthe vehicle is not in use.
• PowerDrive Plus Vehicles (Motor Braking) Only: When the vehicle’s key switch is ON (with the for-ward and reverse switch in any position), the “zero speed detect” function will prevent the vehicle fromrolling at more than 1 or 2 mph unless the accelerator is depressed. This prevents the possibility of aparked vehicle (with the park brake disengaged) rolling away too fast to be overtaken on foot (See“Zero Speed Detect”, Page 7).
• VEHICLE OPERATOR MUST CONTROL SPEED WHEN GOING DOWNHILL.
• NEVER SHIFT THE VEHICLE OUT OF FORWARD WHILE GOING DOWNHILL. IF YOU DO, YOUWILL NOT BE ABLE TO SHIFT INTO REVERSE OR BACK INTO FORWARD UNTIL STOPPED.
• GASOLINE VEHICLE ONLY: DEPRESS THE BRAKE PEDAL AS NECESSARY AND PARTIALLYDEPRESS THE ACCELERATOR WHEN DESCENDING A HILL. WITH THE ACCELERATORPEDAL PARTIALLY DEPRESSED, THE GOVERNOR WILL CAUSE THE ENGINE TO ASSIST THEBRAKES IN CONTROLLING DOWNHILL SPEED.
• POWERDRIVE PLUS VEHICLE (WITH MOTOR BRAKING) ONLY: “PEDAL DOWN” OR “PEDALUP” MOTOR BRAKING MAY BE USED TO CONTROL SPEED WHEN GOING DOWNHILL (SEEPERFORMANCE INSPECTION ON PAGE 7). HOWEVER, TERRAIN OR OTHER CONDITIONSMAY REQUIRE THAT PEDAL BRAKING BE USED IN CONJUNCTION WITH MOTOR BRAKING.
• DRIVING THROUGH WATER MAY AFFECT THE BRAKES. AFTER DRIVING THROUGH WATER,CHECK EFFECTIVENESS OF THE BRAKES BY GENTLY DEPRESSING THE BRAKE PEDAL. IFTHE VEHICLE DOES NOT SLOW DOWN AT THE NORMAL RATE, CONTINUE TO DEPRESS THEBRAKES UNTIL THEY DRY OUT AND NORMAL PERFORMANCE RETURNS.
• WHEN STOPPED ON A HILL, USE THE BRAKE PEDAL TO HOLD YOUR POSITION. DO NOTUSE THE ACCELERATOR PEDAL.
WARNING
WARNING
CAUTION
13
TOWING
All vehicles are equipped with both front and rear tow bar attaching points. A light duty tow bar is availablefor break-down towing and single vehicle towing. A heavy duty tow bar and an on-board tow bar are avail-able for multi-vehicle towing. Observe all of the above warnings when towing.
TRANSPORTING ON A TRAILER
If your vehicle must be transported over long distances or on public highways, it should be done on anapproved trailer observing all the following warnings:
• NEVER TOW THE VEHICLE ON PUBLIC STREETS OR HIGHWAYS.
• USE ONLY APPROVED CLUB CAR TOW BARS.
• TURN THE KEY SWITCH TO OFF AND PLACE THE FORWARD AND REVERSE SWITCH IN NEU-TRAL BEFORE TOWING THE VEHICLE.
• EXTREME CAUTION SHOULD BE USED WHEN TOWING ANY VEHICLE.
• DO NOT EXCEED 5 MPH (8 KPH) TOWING SPEED.
• DO NOT ALLOW PEOPLE IN THE VEHICLES BEING TOWED.
• AVOID SUDDEN STARTS, SUDDEN STOPS, AND TIGHT TURNS WHEN TOWING.
• DO NOT TOW MORE THAN ONE CLUB CAR VEHICLE WITH ANOTHER CLUB CAR VEHICLE. IFMORE THAN ONE VEHICLE MUST BE TOWED, AN ADEQUATELY POWERED VEHICLE (TRAC-TOR OR FULL SIZED TRUCK) PROPERLY FITTED, WITH A TOW HITCH HEIGHT OF 11 INCHESSHOULD BE USED. ONLY HEAVY-DUTY TOW BARS SHOULD BE USED FOR MULTI-VEHICLETOWING. NEVER TOW MORE THAN FIVE VEHICLES AT ONE TIME.
• POWERDRIVE PLUS VEHICLE (WITH MOTOR BRAKING) ONLY: THE KEY SWITCH MUST BEOFF BEFORE THE VEHICLE CAN BE TOWED. THE VEHICLE WILL NOT ROLL OTHERWISE.
• FOR USE ON PUBLIC ROADS, THE TRAILER MUST MEET ALL FEDERAL, STATE, AND LOCALREQUIREMENTS SUCH AS TAILLIGHTS, BRAKE LIGHTS, ETC.
• ALWAYS USE AN APPROVED TRAILER THAT HAS A LOAD RATING OF 1200 LBS. (544 KG)PER VEHICLE TO BE TOWED (EXAMPLE: A TWO-CAR TRAILER SHOULD BE RATED AT 2 X1200 = 2400 LBS (2 X 544 = 1088 KG)).
• NEVER TOW A CLUB CAR VEHICLE BEHIND A PASSENGER VEHICLE OR TRUCK ON A PUB-LIC ROAD UNLESS IT IS ON AN APPROVED TRAILER.
• THE VEHICLE TO BE TOWED SHOULD BE TIED SECURELY TO THE TRAILER, WITH THE FOR-WARD AND REVERSE SWITCH IN NEUTRAL, THE KEY SWITCH OFF, AND THE PARK BRAKEFIRMLY DEPRESSED AND LOCKED.
• WHEN TOWING ON A TRAILER, NORMAL ROAD SPEED OF THE TOW VEHICLE SHOULD BEREDUCED.
• BECAUSE OF THE ADDED LENGTH OF THE TRAILER, CAUTION SHOULD BE USED WHENTURNING A CORNER.
• REMOVE THE VEHICLE WINDSHIELD BEFORE TRANSPORTING ON A TRAILER.
WARNING
WARNING
14

STORAGE - GASOLINE VEHICLE
To prepare your vehicle for extended off season storage:
1. Store vehicle in a cool place. This will prevent self-discharge of the battery. If the battery appears to beweak, have it charged using an automotive-type 12-volt battery charger rated 10 amps or less.
2. Drain carburetor and seal the fuel tank.
2.1. Place the Foward and Reverse Lever in the NEUTRAL position and the neutral lock-out cam inthe SERVICE position. Disconnect the fuel line from the inlet side of the fuel pump and run theengine until fuel remaining in the carburetor and fuel lines is used up and the engine stalls. Returnthe neutral lock-out cam to OPERATE position.
2.2. Loosen (do not remove) the carburetor drain screw and drain fuel remaining in bowl into a smallcontainer, then pour the fuel from the container into vehicle fuel tank.
2.3. Reconnect fuel line to fuel pump.
2.4. Disconnect fuel vent line from fuel tank vent nipple.
2.5. Plug the fuel tank vent nipple so that it is air tight. We recommend using a slip-on vinyl cap.
3. To protect the engine, remove the spark plug and pour 1/2 ounce of SAE 10 weight oil into the enginethrough the spark plug hole. Rotate the engine’s crank shaft several times and then re-install the sparkplug.
• GASOLINE - FLAMMABLE! EXPLOSIVE! DO NOT SMOKE. KEEP SPARKS AND FLAMESAWAY FROM THE AREA OF THE VEHICLE.
• NEVER ATTEMPT TO DRAIN GASOLINE WHEN THE ENGINE IS HOT OR WHILE IT IS RUN-NING. BE SURE TO CLEAN UP ANY SPILLED GASOLINE BEFORE OPERATING THE VEHICLE.
• STORE GASOLINE IN AN APPROVED GASOLINE CONTAINER ONLY. STORE IN A WELL-VEN-TILATED AREA AWAY FROM SPARKS, OPEN FLAMES, HEATERS, OR HEAT SOURCES.
• DO NOT SERVICE, REPAIR, OR OPERATE IN AN ENCLOSED AREA WITHOUT PROPER VEN-TILATION. THE ENGINE PRODUCES CARBON MONOXIDE WHICH IS AN ODORLESS, DEADLYPOISON.
• KEEP GASOLINE OUT OF THE REACH OF CHILDREN.
• DO NOT SIPHON GASOLINE FROM THE VEHICLE.
• DO NOT ATTEMPT TO CHARGE A BATTERY IF IT IS FROZEN OR IF THE CASE IS BULGED.DISCARD THE BATTERY. FROZEN BATTERIES CAN EXPLODE.
• BATTERIES IN A LOW STATE OF CHARGE WILL FREEZE AT LOW TEMPERATURES.
• TURN THE KEY SWITCH OFF, REMOVE THE KEY, AND LEAVE THE FORWARD AND REVERSESWITCH IN THE NEUTRAL POSITION DURING STORAGE. THIS IS TO PREVENT UNINTEN-TIONAL STARTING OF THE VEHICLE.
DANGER
WARNING
CAUTION
WARNING
15

Storage of Gasoline Vehicle, Continued:
4. Increase tire pressure to 20 psi (.96 kPa).
5. Grease front suspension and do all quarterly periodic lubrication (See Periodic Lubrication Sched-ule, Page 24).
6. Thoroughly clean front body, rear body, seats, engine compartment, and underside of vehicle.
7. Do not latch the park brake. Block tires to prevent the vehicle from rolling.
TO RETURN THE STORED VEHICLE TO SERVICE:1. Restore fuel system to operation.
1.1. Remove plug from the fuel tank vent nipple and reconnect fuel vent line to tank.
1.2. Place the Forward and Reverse Lever in the NEUTRAL position and the neutral lock-out cam inthe SERVICE position. Crank the engine until fuel is pumped into the carburetor and fuel linesand the engine starts. Turn engine off and return neutral lock-out cam to the OPERATE position.
2. Readjust tire pressure to 12-14 psi (.57/.67 kPa).
3. Perform the Pre-Operation Checklist (See pages 6 and 7).
STORAGE - ELECTRIC VEHICLE
1. Fully charge batteries (See Batteries - Electric Vehicle, Page 29).
2. Wash off any corrosion around the terminals with a solution of baking soda and water (one cup per gal-lon of water), then rinse solution from the batteries (NOTE: Do not allow this solution to enter the bat-teries). Let the terminals dry and coat them with CLUB CAR battery terminal spray, Part No. 1014305.
• WHEN RUNNING THE ENGINE FOR THE FIRST TIME AFTER STORAGE, IT MAY SMOKEEXCESSIVELY FOR A SHORT WHILE DUE TO THE OIL ADDED TO THE ENGINE IN PREPARA-TION FOR STORAGE.
• TURN THE KEY SWITCH OFF, REMOVE THE KEY, AND LEAVE THE FORWARD AND REVERSESWITCH IN THE NEUTRAL POSITION DURING STORAGE. THIS IS TO PREVENT UNINTEN-TIONAL STARTING OF THE VEHICLE.
• DO NOT ATTEMPT TO CHARGE FROZEN BATTERIES OR BATTERIES WITH BULGED CASES.DISCARD THE BATTERY. FROZEN BATTERIES CAN EXPLODE.
• BATTERIES IN LOW STATE OF CHARGE WILL FREEZE AT LOW TEMPERATURES.
• WHEN WASHING THE VEHICLE, DO NOT DIRECT WATER STREAM AT THE SPEED SWITCH,FORWARD AND REVERSE SWITCH, OR OTHER ELECTRICAL COMPONENT.
• IF BATTERY WIRE TERMINALS ARE DAMAGED OR CORRODED, THEY SHOULD BEREPLACED OR CLEANED AS NECESSARY. FAILURE TO DO SO MAY CAUSE THEM TO OVER-HEAT DURING OPERATION.
NOTE
WARNING
CAUTION
16
3. Store in a cool, dry place. This will prevent self-discharge of the batteries.
4. Adjust tire pressure to 20 psi (.96 kPa).
5. Grease front suspension and do all quarterly periodic lubrication (See Periodic Lubrication Sched-ule, Page 25).
6. Thoroughly clean front body, rear body, seats, battery compartment, and underside of vehicle.
7. Do not latch the park brake. Block tires to prevent the vehicle from rolling.
8. Keep batteries fully charged during storage (See Batteries - Electric Vehicle, Page 29).
• Recharge 36 volt vehicles with Accu-Power battery chargers every 6-8 weeks as necessary.
• Leave PowerDrive System 48 and PowerDrive Plus vehicles with PowerDrive chargers plugged in dur-ing storage. The PowerDrive storage charge feature will automatically charge the batteries as neededthroughout storage period (See Batteries - Electric Vehicle, Page 29).
TO RETURN THE STORED VEHICLE TO SERVICE:
1. Fully charge batteries (See Batteries - Electric Vehicle, Page 29).
2. Readjust tire pressure to 18-20 psi (.86/.96 kPa).
3. Perform the Pre-Operation Checklist (See pages 6 and 7).
MAINTENANCE
GENERAL INFORMATION: To ensure trouble-free vehicle performance, it is very important to follow an established preventive mainte-nance program (regularly scheduled service, even though the vehicle is functional). Regular and consistentvehicle maintenance can prevent vehicle down-time and expensive repairs that result from neglect. Anyvehicle not functioning correctly should be removed from use until it is properly repaired. This will prevent fur-ther damage to the vehicle and avoid the possibility of injury due to unsafe conditions.
Contact your local Club Car distributor/dealer to perform all repairs and semi-annual and annual periodic ser-vice.
• See Page 19 for Gasoline Vehicle Periodic Service Schedule.
• See Page 21 for Electric Vehicle Periodic Service Schedule.
• See Page 24 for Gasoline Vehicle Periodic Lubrication Schedule.
• See Page 25 for Electric Vehicle Periodic Lubrication Schedule.
• See Page 26 for Vehicle Capacities (all DS vehicles).
• A POWERDRIVE SYSTEM 48 OR POWERDRIVE PLUS VEHICLE WILL NOT OPERATE WHILEPLUGGED TO A CHARGER.
• ONLY TRAINED MECHANICS SHOULD REPAIR OR SERVICE THE VEHICLE. ANYONE DOINGEVEN SIMPLE REPAIRS OR SERVICE SHOULD FOLLOW THE PROCEDURES EXACTLY ASSTATED IN THIS MANUAL, AND OBEY THE DANGERS, WARNINGS, AND CAUTIONS LISTED INTHIS MANUAL, AS WELL AS THOSE AFFIXED TO THE VEHICLE.
NOTE
WARNING
17

Maintenance, Continued:
• IF ANY PROBLEMS ARE FOUND DURING SCHEDULED INSPECTION OR SERVICE, DO NOTOPERATE THE VEHICLE UNTIL REPAIRS ARE MADE. FAILURE TO MAKE NECESSARYREPAIRS COULD RESULT IN FIRE, PROPERTY DAMAGE, SEVERE PERSONAL INJURY, ORDEATH.
• ALWAYS WEAR SAFETY GLASSES OR APPROVED EYE PROTECTION WHEN SERVICING THEVEHICLE. WEAR A FULL-FACE SHIELD WHEN WORKING WITH BATTERIES.
• ALWAYS USE INSULATED TOOLS WHEN WORKING AROUND BATTERIES OR ELECTRICALCONNECTIONS.
• TURN KEY SWITCH TO OFF, REMOVE THE KEY, PLACE THE FORWARD AND REVERSESWITCH IN THE NEUTRAL POSITION, AND CHOCK TIRES PRIOR TO SERVICING.
• MOVING PARTS - DO NOT ATTEMPT TO SERVICE GASOLINE VEHICLE WHILE THE ENGINE ISRUNNING.
• HOT! DO NOT ATTEMPT TO SERVICE HOT ENGINE, MOTOR, RESISTORS, OR EXHAUST SYS-TEM. ATTEMPTING TO DO SO COULD CAUSE SEVERE BURNS.
GASOLINE VEHICLES ONLY:
• TO AVOID UNINTENTIONAL STARTING OF THE VEHICLE, BEFORE SERVICING ALWAYS:
- DISCONNECT THE BATTERY CABLES, NEGATIVE (-) FIRST.
- DISCONNECT THE SPARK PLUG WIRE FROM THE SPARK PLUG.
• FRAME GROUND - DO NOT ALLOW WRENCH OR OTHER METAL OBJECTS TO CONTACTFRAME WHEN DISCONNECTING BATTERIES OR OTHER ELECTRICAL WIRING. NEVERALLOW A POSITIVE WIRE TO TOUCH THE VEHICLE FRAME, ENGINE, INNER FRAME, OROTHER METAL COMPONENT.
ELECTRIC VEHICLES ONLY:
• TO AVOID UNINTENTIONAL STARTING OF THE VEHICLE, DISCONNECT THE BATTERIES ASSHOWN (SEE FIGURES 14 AND 15). ON POWERDRIVE SYSTEM 48 AND POWERDRIVE PLUSVEHICLES, ALSO DISCHARGE THE CONTROLLER AS FOLLOWS:
- TURN THE KEY SWITCH TO ON AND PLACE THE FORWARD AND REVERSE SWITCH IN THEREVERSE POSITION.
- SLOWLY DEPRESS THE ACCELERATOR PEDAL AND KEEP IT DEPRESSED UNTIL THEREVERSE WARNING BUZZER CAN NO LONGER BE HEARD. WHEN THE BUZZER STOPSSOUNDING, THE CONTROLLER IS DISCHARGED.
FIGURE 14 FIGURE 15
WARNING
POS.
NEG.
POS.
NEG.
POS.
NEG.
POS.
NEG.
NE
G.
PO
S.
PO
S.
NE
G.
#1
#2#5
#6
#4 #3
FRONT OF CAR
V-GLIDE 36 VOLT ELECTRIC VEHICLE
DISCONNECT HERE
POS.NEG.
POS.NEG.POS.NEG.
POS.NEG.
PO
S.
NE
G.
PO
S.
NE
G.
#1
#2#5
#6#4
#3
FRONT OF CAR
DS POWERDRIVE SYSTEM 48 ANDPOWERDRIVE PLUS WITH MOTOR BRAKING
DISCONNECT HERE
18

PERIODIC SERVICE SCHEDULES
• IF ANY PROBLEMS ARE FOUND, DO NOT OPERATE THE VEHICLE UNTIL REPAIRS AREMADE. FAILURE TO MAKE NECESSARY REPAIRS COULD RESULT IN FIRE, PROPERTY DAM-AGE, SEVERE PERSONAL INJURY, OR DEATH.
• ALL SERVICE, REPAIRS, AND ADJUSTMENTS MUST BE MADE PER INSTRUCTIONS IN THEDS GOLF CAR MAINTENANCE AND SERVICE MANUAL, PUBLICATION PART NUMBER1019051-01.
PERIODIC SERVICE SCHEDULE - GASOLINE VEHICLE
REGULAR INTERVAL SERVICE
Daily Service by Owner
Accelerator pedal/rod Check for proper operation (See Performance Inspection, Page 6). Adjust as necessary.
Accelerator/governor linkage and cables Check for proper operation (See Performance Inspec-tion, Page 6). Adjust as necessary.
Brake System Check for proper operation (See Performance Inspec-tion, Page 6). Adjust as necessary.
Choke Check for proper operation (See Page 10).
Engine Check for proper operation.
Engine air intake system Check air filter element, clean as necessary.
Engine cooling air intake Check for clogging, clean as necessary.
Fuel System Check fuel tank, lines, cap, pump, and carburetor for fuel leakage.
Park Brake Check for proper operation. (See Performance Inspection, Page 6).
Reverse Warning Buzzer Check for proper operation (See NOTE, Page 8).
Steering and linkages Check for proper operation (See Performance Inspec-tion, Page 6).
Tires Check for wear and damage.
Unitized Transaxle Check shift linkage for proper operation.
Vehicle warning decals Make sure all are in place (See Gasoline Vehicle Feature Identification, Page 3).
Weekly Service by Owner
Battery Clean terminals and wash dirt from casing, check electrolyte level (See Page 29).
Electrical wiring and connections Check for tightness and damage.
Torque Converter Rinse with water.
General Vehicle
Check for loose hardware and tightenas required.
Check maximum speed of vehicle. Maximum vehicle speed should be 12-15 mph (19-24 kph).
Wash engine compartment and undersideof vehicle.
Check all daily items listed above.
Periodic Service Schedule Continued on Next Page.
WARNING
19

Monthly Service by Owneror Trained Mechanic
Battery Wash battery top with baking soda/water solution (See Page 28).
Brake System
Check brake cables for damage; replace as required.
Check for proper operation (See Performance Inspec-tion, Page 6). Check brake pedal free play. Adjust as necessary (See DS Maintenance & Service Manual).
Engine
Make sure that both ground wires are tight and properly connected.
Check engine oil level - change as required(See Gas Vehicle Lubrication Chart, Page 24).
Exhaust System Check for leaks.
Tires
Check for wear and damage.
Check air pressure and adjust as necessary(See Vehicle Capacities Chart on Page 26).
Check all daily and weekly items listed above
Quarterly Serviceby Owneror Trained Mechanic
Engine Check engine oil level - change as required(See Gas Vehicle Lubrication Chart, Page 24).
Engine air intake hose Check clamps for tightness; check hose for cracks.
Accelerator pedal/rod Check for proper operation, adjust as necessary (See NOTE, Page 8).
Accelerator/governor linkageand cables Check for proper operation, adjust as necessary.
Steering Lubricate per Gas Vehicle Lubrication Charton Page 24.
General Vehicle Lubricate per Gas Vehicle Lubrication Charton Page 24.
Check all daily, weekly, and monthly items listed above.
Semi-annual Service by Trained Mechanic Only(Every 100 rounds or50 hours of operation)
Brake System
Check for proper operation (See Performance Inspec-tion, Page 6). Check brake pedal free play. Clean, and adjust as necessary (See DS Maintenance & Service Manual).
Check brake shoes, replace if necessary.
Lubricate slide plates with graphite (See DS Mainte-nance & Service Manual).
Drive Belt Check for cracks, wear, or glazing, replace if neces-sary.
Electrical Wiring Check for cracked or worn insulation.
Engine Check spark plug wire and boot for damage and proper routing.
Exhaust System
Check head and exhaust/header pipe flange connec-tion gasket for leaks.
Check muffler condition.
Front Wheel Alignment and Camber Check and adjust as required (See DS Maintenance & Service Manual).
Periodic Service Schedule Continued on Next Page.
PERIODIC SERVICE SCHEDULE - GASOLINE VEHICLE
REGULAR INTERVAL SERVICE
20

PERIODIC SERVICE SCHEDULES
Semi-annual Service by Trained Mechanic Only(Every 100 rounds or50 hours of operation),Continued:
Torque Converter/Drive Belt Check for proper operation. Inspect belt and replace as required.
Starter/Generator Belt
Check for cracks, wear, and glazing, replace if neces-sary.
Check belt tension, adjust as required.
General Vehicle Lubricate per Gas Vehicle Lubrication Chart on Page 24.
Check all daily, weekly, monthly, and quarterly items listed above.
Annual Service byTrained Mechanic Only(Every 200 rounds or100 hours of operation)
Engine
Check engine oil level - change as required(See Gas Vehicle Lubrication Chart, Page 24).
Check for leaks around gaskets, fill plugs, etc.
Inspect, clean, and regap spark plug; replace ifnecessary.
Engine Air Intake Check air filter element, clean or replace.
Fuel Filters Replace.
Front Wheel Bearings Inspect and check for free play; repack with chassis lube and adjust as necessary.
Starter/Generator Check brush length (remove excess carbon dust); replace as necessary.
Unitized Transaxle Check/fill transaxle to plug level (See Gas Vehicle Lubrication Chart on Page 24).
General Vehicle Lubricate per Gas Vehicle Lubrication Charton Page 24.
Check all daily, weekly, monthly, quarterly, and semi-annual items listed above.
• IF ANY PROBLEMS ARE FOUND, DO NOT OPERATE THE VEHICLE UNTIL REPAIRS AREMADE. FAILURE TO MAKE NECESSARY REPAIRS COULD RESULT IN FIRE, PROPERTY DAM-AGE, SEVERE PERSONAL INJURY, OR DEATH.
• ALL SERVICE, REPAIRS, AND ADJUSTMENTS MUST BE MADE PER INSTRUCTIONS IN THEDS GOLF CAR MAINTENANCE AND SERVICE MANUAL, PUBLICATION PART NUMBER1019051-01.
PERIODIC SERVICE SCHEDULE - ELECTRIC VEHICLE
REGULAR INTERVAL SERVICE
Daily Service by Owner
Accelerator pedal/rod Check for proper operation (See Performance Inspec-tion, Page 6). Adjust as necessary.
Accelerator Switch(Wiper Switch or Continuously Variable Potentiometer)
Check for proper operation (See DS Maintenance and Service Manual).
Periodic Service Schedule Continued on Next Page.
PERIODIC SERVICE SCHEDULE - GASOLINE VEHICLE
REGULAR INTERVAL SERVICE
WARNING
21

Daily Service by Owner, Continued:
Batteries Charge batteries.
Brake System Check for proper operation (See Performance Inspec-tion, Page 6). Adjust as necessary.
Charger and Receptacle Check for damage and snug fit.
Park Brake Check for proper operation (See Performance Inspec-tion, Page 6). Adjust as necessary.
Reverse Warning Buzzer Check for proper operation (See NOTE, middle of Page 8).
Steering and linkages Check for proper operation.
Tires Check for wear and damage.
Vehicle warning decals Make sure all are in place (See Electric Vehicle Fea-ture Identification, Page 4).
Weekly Service by Owner
Batteries Clean terminals and wash dirt from casing, check electrolyte level (See Page 29).
Electrical wiring and connections Check for tightness and damage.
General Vehicle
Check for loose hardware and tightenas required.
Check maximum speed of vehicle. Maximum vehicle speed should be 12-15 mph (19-24 kph).
Check all daily items listed above.
Monthly Service by Owneror Trained Mechanic
Batteries Wash battery tops with baking soda/water solution.
Brake System
Check for proper operation (See Performance Inspec-tion, Page 6). Check brake pedal free play. Adjust as necessary (See DS Maintenance & Service Manual).
Check brake cables for damage and replace as required.
Tires Check for wear and damage.
Tires Check air pressure and adjust as necessary(See Vehicle Capacities Chart on Page 26).
Accelerator Switch(Wiper Switch or Continuously Variable Potentiometer)
Check for cracks or other damage; make sure switch is securely fastened to frame.
Check all daily and weekly items listed above
Quarterly Serviceby Owneror Trained Mechanic
Accelerator pedal/rod Check for proper operation, adjust as necessary (See NOTE, bottom of Page 8).
Steering Lubricate per Electric Vehicle Lubrication Chart on Page 25.
General Vehicle Lubricate per Electric Vehicle Lubrication Chart on Page 25.
Check all daily, weekly, and monthly items listed above.
Periodic Service Schedule Continued on Next Page.
PERIODIC SERVICE SCHEDULE - ELECTRIC VEHICLE
REGULAR INTERVAL SERVICE
22

Semi-annual Service byTrained Mechanic Only(Every 100 rounds or50 hours of operation)
Batteries Check specific gravity, electrolyte level, and on-charge voltage.
Brake System
Check for proper operation (See Performance Inspec-tion, Page 6). Check brake pedal free play. Clean, and adjust as necessary (See DS Maintenance & Service Manual).
Check brake shoes, replace if necessary.
Lubricate slide plates with graphite (See DS Mainte-nance & Service Manual).
Electrical Wiring Check for cracked or worn insulation.
Forward and Reverse Switch Check condition of contacts and wire connections; Make sure connections are tight.
Front Wheel Alignment and Camber Check and adjust as required (See DS Maintenance & Service Manual).
General Vehicle Lubricate per Electric Vehicle Lubrication Chart on Page 25.
Check all daily, weekly, monthly, and quarterly items listed above.
Annual Service byTrained Mechanic Only(Every 200 rounds or100 hours of operation)
Accelerator Switch(Wiper Switch or Continuously Variable Potentiometer)
Check for proper operation, remove cover and check for wear and damage (See Maintenance & Service Manual).Wiper switch type only: check contacts for burns, excessive heat, or arcing; check brush for wear.
Batteries Perform discharge test.
Motor Check motor brushes; replace as necessary.
Front Wheel Bearings Inspect and check for free play; repack with chassis lube and adjust as necessary.
Transaxle Check/fill transaxle to plug level (see Electric Vehicle Lubrication Chart on Page 25.
General Vehicle Lubricate per Electric Vehicle Lubrication Charton Page 25.
Check all daily, weekly, monthly, quarterly, and semi-annual items listed above.
• IF ANY PROBLEMS ARE FOUND, DO NOT OPERATE THE VEHICLE UNTIL REPAIRS AREMADE. FAILURE TO MAKE NECESSARY REPAIRS COULD RESULT IN FIRE, PROPERTY DAM-AGE, SEVERE PERSONAL INJURY, OR DEATH.
• ALL SERVICE, REPAIRS, AND ADJUSTMENTS MUST BE MADE PER INSTRUCTIONS IN THEDS GOLF CAR MAINTENANCE AND SERVICE MANUAL, PUBLICATION PART NUMBER1019051-01.
PERIODIC SERVICE SCHEDULE - ELECTRIC VEHICLE
REGULAR INTERVAL SERVICE
WARNING
23

PERIODIC LUBRICATION SCHEDULES
*See Figure 16 below.
PERIODIC LUBRICATION SCHEDULE - GASOLINE VEHICLE
REGULAR INTERVAL SERVICE PLACE* RECOMMENDED LUBRICANT
Quarterly by Owneror Trained Technician
Brake shaft bearings 1. Dry Moly Lube - Club Car Part No. 1012151
Brake Linkage and Pivots 2. Dry Moly Lube - Club Car Part No. 1012151
Accelerator push rod pivots and shifter cable pivots
3. Dry Moly Lube - Club Car Part No. 1012151
Front Suspension (5 fittings) 4. Chassis Lube
Annually by TrainedTechnician Only(Every 200 rounds or100 hours of operation)
Check/fill unitized transaxle to plug level
5. 27 oz. (.8 liter) 80-90 WT. API Class GL-3 or 80-90 WT. AGMA Class EP Gear Lube
Inspect front wheel bearings(Repack as necessary)
6. Chassis Lube
First Change 100 Hours -Additional Change Every400 Rounds or Every 200Hours of Operation,or Annually -Whichever Comes First
Change engine oil and oil filter 7. 32 oz. (.97 liter) without filter; 38 oz. (1.16 liters) with filter. 10W30 above 32°F (0°C)or SAE 5W20 below 32°F (0°C) API ClassSE, SF, or SG Oil (or higher)
FIGURE 16
DS GASOLINE VEHICLELUBRICATION POINTS
7
33
4
42
2
1
1
6
6
4
44
3
5
24

PERIODIC LUBRICATION SCHEDULES
*See Figure 17 below, and Figure 18 on Page 26.
PERIODIC LUBRICATION SCHEDULE - ELECTRIC VEHICLE
REGULAR INTERVAL SERVICE PLACE* RECOMMENDED LUBRICANT
Quarterly by Owneror Trained Technician
Brake shaft bearings 1. Dry Moly Lube - Club Car Part No. 1012151
Brake Linkage and Pivots 2. Dry Moly Lube - Club Car Part No. 1012151
Accelerator pivots 3. Dry Moly Lube - Club Car Part No. 1012151
Forward and reverse switch contactsand charger receptacle 4. WD-40®
Front Suspension (5 fittings) 5. Chassis Lube
Annually by TrainedTechnician Only(Every 200 rounds or100 hours of operation)
Check/fill transaxle to plug level 6. 22 oz. (.67 liter) SAE 30 WT. APIClass SE, SF, or SG Oil (or higher)
Inspect front wheel bearings(Repack as necessary)
7. Chassis Lube
FIGURE 17
33
4
2
2
1
1
7
4 55
5 55
7
6
POWERDRIVE SYSTEM 48 VEHICLE ANDPOWERDRIVE PLUS VEHICLE LUBRICATION POINTS
25

VEHICLE CAPACITIES
FIGURE 18
CAPACITIES
GASOLINE VEHICLES ELECTRIC VEHICLES
Engine Crankcase without filter 32 oz. (.98 liters)
Engine Crankcase with filter 38 oz. (1.16 liters)
Unitized Transaxle (gas vehicle) 27 oz. (.8 liters)
Transaxle (electric vehicle) 22 oz. (.67 liters)
Gasoline Tank 7 gallons (26.5 liters)
Tire Pressure 12-14 psi (83-96 kPa) 18-20 psi (124-138 kPa)
3
2
2
1
1
7
55
5
4
55
7
3
6
V-GLIDE 36 VOLT VEHICLELUBRICATION POINTS
26

ENGINE OIL - GASOLINE VEHICLE
Even though the oil warning light on the dash should warn you if your oil is getting low, engine oil level shouldbe checked monthly (See Figure 19).
FUELING INSTRUCTIONS - GASOLINE VEHICLE
• TO CHECK ENGINE OIL, THE ENGINE MUST BE IN LEVEL POSITION. REMOVE THE OIL LEVELDIPSTICK FROM THE OIL FILLER TUBE AND WIPE OIL FROM IT WITH A CLEAN DRY CLOTHOR PAPER TOWEL. CHECK OIL BY INSERTING THE DIPSTICK FULLY INTO THE OIL FILLERTUBE AND IMMEDIATELY REMOVING IT AGAIN. IF THE OIL LEVEL IS AT OR BELOW THE ADDMARK ON THE DIPSTICK GAUGE, ADD OIL UNTIL THE LEVEL IS BETWEEN ADD AND FULL(SAFE LEVEL). DO NOT OVERFILL! REINSERT DIPSTICK INTO THE OIL FILLER TUBE.
FIGURE 19 FIGURE 20
• GASOLINE - FLAMMABLE! EXPLOSIVE! DO NOT SMOKE. KEEP SPARKS AND FLAMESAWAY FROM THE AREA OF THE VEHICLE.
• SERVICE OR REPAIR IN WELL VENTILATED AREA ONLY.• NEVER ATTEMPT TO POUR GASOLINE INTO THE FUEL TANK WHEN THE ENGINE IS HOT OR
WHILE IT IS RUNNING.• TO AVOID ELECTRIC ARC CAUSED BY STATIC ELECTRICITY, THE FUEL STORAGE/PUMP-
ING DEVICE MUST BE GROUNDED. IF THE PUMP IS NOT GROUNDED, THE VEHICLE MUSTBE GROUNDED TO THE PUMP BEFORE AND DURING THE FUELING OPERATION.
• IF THE VEHICLE HAS AN ALL-WEATHER ENCLOSURE INSTALLED, THE GAS TANK MUST BEPROPERLY VENTED AS SHOWN (FIGURE 20).
• TO AVOID THE POSSIBILITY OF FIRE, BE SURE TO CLEAN UP ANY SPILLED GASOLINEBEFORE OPERATING THE VEHICLE.
• WHENEVER POSSIBLE, AVOID USING OXYGENATED FUELS AND FUELS THAT AREBLENDED WITH ALCOHOL. VEHICLES TO BE STORED FOR EXTENDED PERIODS SHOULD BEPREPARED FOR STORAGE AS INSTRUCTED ON PAGE 15 OF THIS MANUAL.
NOTE
LowLevel
SafeLevel
FullLevel
2
13
VENT TUBE VENT
GAS TANKGAS TANK
DANGER
NOTE
27
Fueling Instructions, Continued:
1. Lift and remove seat bottom.
2. The fuel tank is located on passenger side of vehicle. Remove fuel cap and fill the fuel tank with freshunleaded gasoline only.
3. Replace fuel cap on tank, being sure cap is tightened securely.
4. Replace seat bottom.
BATTERY - GASOLINE VEHICLE
The battery in the DS Gasoline Vehicle is a 12 volt, low maintenance battery that requires infrequent water-ing (Figure 21).
Any corrosion around the positive (+) or negative (-) terminals should be washed off with a solution of bakingsoda and water (1 cup per gallon of water). Rinse solution off the battery. Be sure terminals are tight. Let theterminals dry and then spray them with CLUB CAR battery terminal spray (Club Car Part No.1014305).
• DO NOT OVERFILL THE FUEL TANK. AVOID SPILLING FUEL.
• BATTERY - EXPLOSIVE GASSES! DO NOT SMOKE! KEEP SPARKS AND FLAMES AWAYFROM THE AREA OF THE VEHICLE. TOOLS, WIRES, AND METAL OBJECTS CAN CAUSESPARKS WHEN SHORTED ACROSS A BATTERY. FOLLOW ALL INSTRUCTIONS CAREFULLYWHEN WORKING WITH BATTERIES.
• CHARGE BATTERY IN A WELL-VENTILATED AREA ONLY.
• POISON! CONTAINS ACID! CAUSES SEVERE BURNS - AVOID CONTACT WITH SKIN, EYES,OR CLOTHING. ANTIDOTES:
- EXTERNAL: FLUSH WITH WATER FOR 15 MINUTES. CALL A PHYSICIAN IMMEDIATELY.
- INTERNAL: DRINK LARGE QUANTITIES OF MILK OR WATER FOLLOWED WITH MILK OFMAGNESIA OR VEGETABLE OIL. CALL A PHYSICIAN IMMEDIATELY.
- EYES: FLUSH WITH WATER FOR 15 MINUTES. CALL A PHYSICIAN IMMEDIATELY.
• DO NOT JUMP START THE VEHICLE. TO CHARGE THE BATTERY, USE AN AUTOMOTIVE-TYPE 12-VOLT CHARGER RATED AT 10 AMPS OR LESS.
• ALWAYS WEAR SAFETY GLASSES OR APPROVED EYE PROTECTION WHEN SERVICING THEVEHICLE.
• ALWAYS USE INSULATED TOOLS WHEN WORKING AROUND BATTERIES OR ELECTRICALCONNECTIONS.
• IF BATTERY WIRE TERMINALS ARE DAMAGED OR CORRODED, THEY SHOULD BEREPLACED OR CLEANED AS NECESSARY. FAILURE TO DO SO MAY CAUSE THEM TO OVER-HEAT DURING OPERATION.
CAUTION
DANGER
WARNING
CAUTION
28
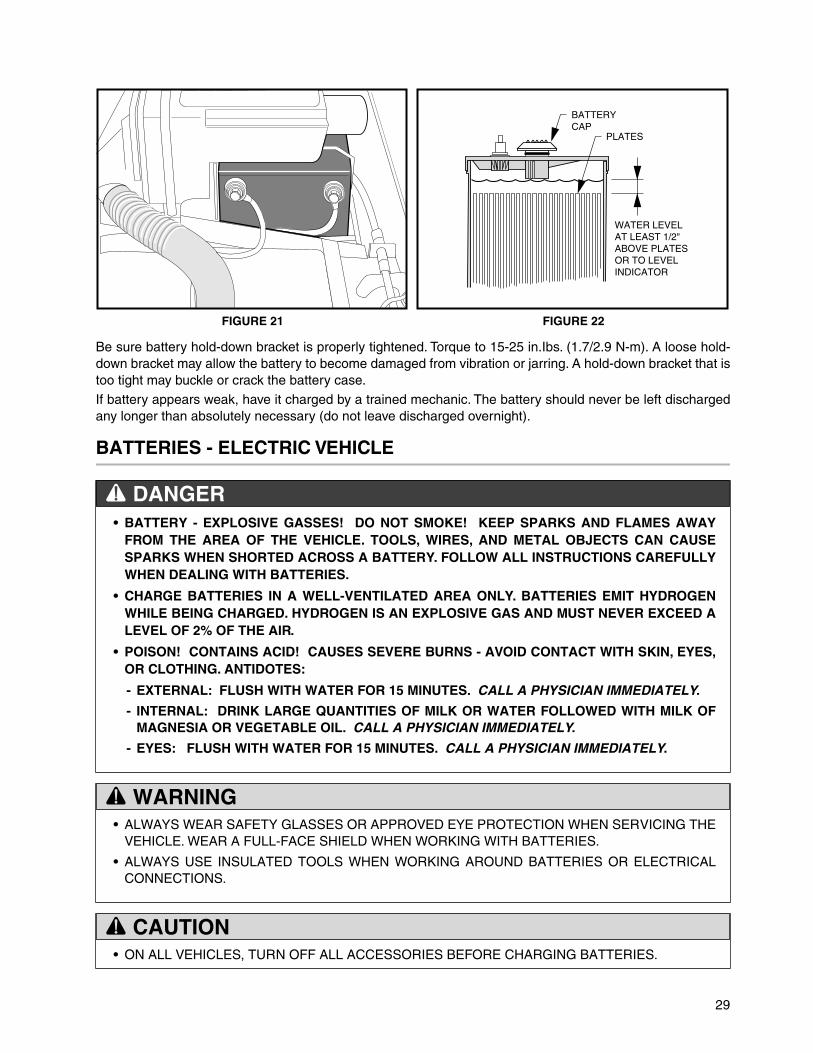
Be sure battery hold-down bracket is properly tightened. Torque to 15-25 in.Ibs. (1.7/2.9 N-m). A loose hold-down bracket may allow the battery to become damaged from vibration or jarring. A hold-down bracket that istoo tight may buckle or crack the battery case.
If battery appears weak, have it charged by a trained mechanic. The battery should never be left dischargedany longer than absolutely necessary (do not leave discharged overnight).
BATTERIES - ELECTRIC VEHICLE
FIGURE 21 FIGURE 22
• BATTERY - EXPLOSIVE GASSES! DO NOT SMOKE! KEEP SPARKS AND FLAMES AWAYFROM THE AREA OF THE VEHICLE. TOOLS, WIRES, AND METAL OBJECTS CAN CAUSESPARKS WHEN SHORTED ACROSS A BATTERY. FOLLOW ALL INSTRUCTIONS CAREFULLYWHEN DEALING WITH BATTERIES.
• CHARGE BATTERIES IN A WELL-VENTILATED AREA ONLY. BATTERIES EMIT HYDROGENWHILE BEING CHARGED. HYDROGEN IS AN EXPLOSIVE GAS AND MUST NEVER EXCEED ALEVEL OF 2% OF THE AIR.
• POISON! CONTAINS ACID! CAUSES SEVERE BURNS - AVOID CONTACT WITH SKIN, EYES,OR CLOTHING. ANTIDOTES:
- EXTERNAL: FLUSH WITH WATER FOR 15 MINUTES. CALL A PHYSICIAN IMMEDIATELY.
- INTERNAL: DRINK LARGE QUANTITIES OF MILK OR WATER FOLLOWED WITH MILK OFMAGNESIA OR VEGETABLE OIL. CALL A PHYSICIAN IMMEDIATELY.
- EYES: FLUSH WITH WATER FOR 15 MINUTES. CALL A PHYSICIAN IMMEDIATELY.
• ALWAYS WEAR SAFETY GLASSES OR APPROVED EYE PROTECTION WHEN SERVICING THEVEHICLE. WEAR A FULL-FACE SHIELD WHEN WORKING WITH BATTERIES.
• ALWAYS USE INSULATED TOOLS WHEN WORKING AROUND BATTERIES OR ELECTRICALCONNECTIONS.
• ON ALL VEHICLES, TURN OFF ALL ACCESSORIES BEFORE CHARGING BATTERIES.
WATER LEVELAT LEAST 1/2"ABOVE PLATESOR TO LEVELINDICATOR
PLATES
BATTERYCAP
DANGER
WARNING
CAUTION
29

Batteries - Electric Vehicles, Continued:
• The batteries in DS V-Glide 36 Volt Electric Vehicles are 6 volts each. • The batteries in PowerDrive System 48 and PowerDrive Plus Electric Vehicles are 8 volts each.
Both the 6 and 8 volt batteries are deep cycle batteries, specially built for electric vehicle application. Auto-motive batteries should never be used.
New batteries will not deliver their full capabilities until they have been discharged and recharged 20 to 50times. To obtain the maximum service life from new batteries, restrict vehicle with new batteries to 36 holes ofuse between charges in the first two months of operation. Batteries should be fully charged before first use ofnew vehicle, before first use of a vehicle after storage, and before releasing vehicle for use each day.
BATTERY CARETo keep batteries in good working condition, follow this maintenance program on a regular basis:
1. The batteries should be kept clean and free of corrosion. Wash tops and terminals of batteries with asolution of baking soda and water (1 cup baking soda per gallon of water). Rinse solution off batteries(NOTE: Do not allow this solution to enter the battery). Be sure terminals are tight. Let the terminals dryand then spray them with CLUB CAR battery protector spray (Part No. 1014305).
2. The water level in the batteries should be checked weekly (See Figure 22, Page 29, for proper level).Add water only after charging unless the water level is below the top of the plates. In this case, add justenough water to cover the plates, charge and then check the level again. Never charge batteries ifplates are exposed above water level. For best battery life, add only distilled water.
3. The hold-down straps should be tight enough so that the batteries do not move while the vehicle is inmotion, but not so tight as to crack or buckle the battery case. Torque hold-down retaining nuts to 15-25 in.lbs. (1.7/2.8 N-m). The terminal connections should be clean and tight, and any worn insulationor frayed wires should be replaced. Torque battery terminals to 90-100 in.lbs. (10/11.3 N-m).
4. After use, the batteries should be placed on charge. The batteries should never be left discharged anylonger than absolutely necessary (do not leave discharged overnight).
BATTERY CHARGER - ELECTRIC VEHICLE
• A BATTERY WATERING GUN IS AVAILABLE AT MANY AUTO PARTS DEALERS.
• IF BATTERY WIRE TERMINALS ARE DAMAGED OR CORRODED, THEY SHOULD BEREPLACED OR CLEANED AS NECESSARY. FAILURE TO DO SO MAY CAUSE THEM TO OVER-HEAT DURING OPERATION.
• BATTERIES EMIT HYDROGEN WHILE BEING CHARGED. HYDROGEN IS AN EXPLOSIVEGAS. IF THE VEHICLE IS EQUIPPED WITH A WEATHERPROOF ENCLOSURE, IT SHOULD BEUNZIPPED AND PULLED BACK WHILE BATTERIES ARE BEING CHARGED. THIS IS TO AVOIDTHE ACCUMULATION OF HYDROGEN GAS INSIDE THE ENCLOSURE.
• THE CHARGING AREA MUST BE VENTILATED. HYDROGEN LEVEL IN THE AIR MUST NEVEREXCEED 2%. THE TOTAL VOLUME OF AIR IN THE BUILDING MUST BE CHANGED FIVETIMES PER HOUR. EXHAUST FANS SHOULD BE LOCATED AT THE HIGHEST POINT OF THEROOF. CONTACT A LOCAL HVAC ENGINEER.
NOTE
CAUTION
DANGER
30

• EACH CHARGER SHOULD HAVE ITS OWN DEDICATED 15 OR 20 AMPERE SEPARATELY PRO-TECTED (CIRCUIT BREAKER OR FUSE) SINGLE PHASE BRANCH CIRCUIT, IN ACCORDANCEWITH ALL APPLICABLE ELECTRICAL CODES FOR THE LOCATION.
• CONNECT THE CHARGER AC SUPPLY CORD TO A PROPERLY GROUNDED, THREE-WIREOUTLET OF THE PROPER VOLTAGE AND FREQUENCY AS SHOWN ON THE CHARGER.
• DO NOT USE AN ADAPTER TO PLUG THE CHARGER WITH A THREE-PRONG PLUG INTO ATWO-PRONG OUTLET. IMPROPER CONNECTION OF THE EQUIPMENT-GROUNDING CON-DUCTOR CAN RESULT IN A FIRE OR AN ELECTRICAL SHOCK.
• AN EXTENSION CORD OR ELECTRICAL OUTLET MUST ACCEPT A THREE-PRONG PLUG. THEUSE OF IMPROPER EXTENSION CORD COULD RESULT IN FIRE OR AN ELECTRICAL SHOCK.
• ONLY TRAINED TECHNICIANS SHOULD REPAIR OR SERVICE THE CHARGER. CONTACTYOUR NEAREST CLUB CAR DISTRIBUTOR/DEALER.
• DO NOT OPERATE THE CHARGER IF IT HAS RECEIVED A SHARP BLOW, WAS DROPPED, OROTHERWISE DAMAGED IN ANY WAY.
• HAVE WORN, CUT, OR DAMAGED POWER CORDS OR WIRES REPLACED IMMEDIATELY.
• DO NOT USE NEAR FUELS, GRAIN DUST, SOLVENTS, THINNERS, OR OTHER FLAMMABLES.CHARGERS CAN IGNITE FLAMMABLE MATERIALS AND VAPORS.
• DO NOT EXPOSE TO RAIN OR ANY LIQUID. KEEP THE CHARGER DRY.
• NEVER PUSH OBJECTS OF ANY KIND INTO THE CHARGER THROUGH CABINET SLOTS.THEY MAY TOUCH DANGEROUS VOLTAGE POINTS OR CAUSE AN ELECTRICAL SHORT CIR-CUIT THAT COULD RESULT IN FIRE OR ELECTRICAL SHOCK.
• 36 VOLT ACCU-POWER CHARGER: DO NOT DISCONNECT THE DC OUTPUT PLUG FROMTHE VEHICLE RECEPTACLE WHEN THE CHARGER IS ON. THE RESULTING ARCING ANDBURNING COULD DAMAGE THE PLUG AND RECEPTACLE AND COULD CAUSE BATTERIESTO EXPLODE. IF THE CHARGER MUST BE STOPPED, DISCONNECT THE AC SUPPLY PLUGFROM THE WALL OUTLET BEFORE DISCONNECTING THE CHARGER DC CORD FROM THEVEHICLE RECEPTACLE
• 48 VOLT POWERDRIVE CHARGER: WHEN THE CHARGER IS ON, THE CHARGER DC CORDMAY BE DISCONNECTED FROM THE VEHICLE RECEPTACLE SLOWLY. JERKING OR PULL-ING THE DC CORD OUT QUICKLY COULD CAUSE ARCING AND BURNING THAT COULD DAM-AGE THE PLUG AND RECEPTACLE AND COULD CAUSE BATTERIES TO EXPLODE.
• DO NOT BLOCK OR COVER SLOTS AND OPENINGS IN THE BACK AND BOTTOM OFCHARGER CABINET. THEY PROVIDE VENTILATION AND PROTECT THE CHARGER FROMOVERHEATING.
• DO NOT ALLOW CLOTHING, BLANKETS, OR OTHER MATERIAL TO COVER THE CHARGER.
• PROVIDE ADEQUATE VENTILATION FOR THE CHARGER.
• 36 VOLT ACCU-POWER CHARGER: DO NOT LEAVE THE DC CORD PLUGGED INTO A VEHI-CLE RECEPTACLE WHILE UNATTENDED FOR MORE THAN TWO DAYS IN A ROW. SEVEREOVERHEATING AND DAMAGE TO THE BATTERIES MAY RESULT IF THE CHARGER DOESNOT TURN OFF.
• INSTALL SURGE ARRESTORS ON INCOMING AC POWER LINES. SURGE ARRESTORS WILLHELP PROTECT ELECTRICAL/ELECTRONIC COMPONENTS IN THE CHARGER AND ON THEVEHICLE FROM ALL BUT DIRECT OR VERY CLOSE LIGHTNING STRIKES.
WARNING
CAUTION
31

Battery Charger - Electric Vehicle, Continued:
Each electric vehicle is supplied with a fully automatic battery charger as standard equipment. The AC cordto each charger is to be connected to a source capable of supplying 10 amperes minimum per charger.
The battery charger must be grounded to reduce the risk of electrical shock. The charger is equipped withan AC electric cord having an equipment-grounding conductor and a grounding type plug and is for use on anominal 115 Volt 60 Hertz circuit, unless otherwise noted on the charger. The plug must be grounded to anappropriate dedicated receptacle that is properly installed and grounded in accordance with the NationalElectrical Code, ANSI/NFPA 70, and all local codes and ordinances.
The use of an extension cord with the charger should be avoided. If an extension cord must be used, a threeconductor No. 12 AWG heavy duty cord with a ground conductor in good electrical condition must be used.Keep it as short as possible (no more than twelve feet). Locate all cords so that they will not be stepped on,tripped over, or otherwise subject to damage or stress.
Ventilation fans should be located at the highest point in the room and must be capable of changing the totalvolume of air in the room five times per hour. Consult a local HVAC engineer.
TO CHARGE BATTERIES
• BECAUSE THE POWERDRIVE CHARGER HAS A STORAGE CHARGE FEATURE THAT AUTO-MATICALLY CHECKS AND RECHARGES THE BATTERIES AS NECESSARY EVERY 15 DAYS, ITCAN REMAIN PLUGGED TO A POWERDRIVE VEHICLE THROUGHOUT THE STORAGEPERIOD.
• SHORTLY AFTER CHARGING HAS BEGUN, THE POWERDRIVE CHARGER WILL SHUT OFF INORDER TO RUN A SELF-DIAGNOSTIC PROGRAM (AMMETER WILL DROP TO 0). CHARGINGWILL RESUME IN A FEW MOMENTS (AMMETER WILL RETURN TO CURRENT STATE OFCHARGE).
• BE SURE ALL WIRE CONNECTIONS AT THE RECEPTACLE AND THE FUSE LINK ARE CLEANAND TIGHT.
• DO NOT ROCK OR BEND THE PLUG. TO CONNECT THE CHARGER PLUG TO THE VEHICLERECEPTACLE, GRASP THE PLUG HANDLE AND PUSH THE PLUG STRAIGHT INTO THERECEPTACLE (SEE FIGURE 23).
• DO NOT PULL ON THE DC CORD (SEE FIGURE 24). DO NOT TWIST, ROCK OR BEND THEPLUG. TO DISCONNECT THE CHARGER PLUG FROM THE VEHICLE RECEPTACLE, GRASPTHE PLUG BY THE HANDLE AND PULL THE PLUG STRAIGHT OUT OF THE RECEPTACLE.
• DO NOT CONNECT A PORTABLE CHARGER TO THE RECEPTACLE IF THE CHARGER CORD,PLUG, OR THE VEHICLE RECEPTACLE IS BROKEN, DAMAGED IN ANY MANNER, OR DOESNOT MAKE A GOOD ELECTRICAL CONNECTION. FIRE OR PERSONAL INJURY CAN RESULT.HAVE IT REPLACED BY A QUALIFIED SERVICE PERSON IMMEDIATELY.
• FAILURE TO FOLLOW THESE INSTRUCTIONS COULD RESULT IN DAMAGE TO THECHARGER CORD, THE PLUG, AND (OR) THE VEHICLE’S RECEPTACLE.
DO NOT USE A CHARGER IF:
• THE PLUG IS TOO LOOSE OR DOES NOT MAKE A GOOD CONNECTION.
• THE PLUG AND RECEPTACLE FEEL HOTTER THAN NORMAL DURING CHARGE.
• THE PLUG PINS (POWERDRIVE CHARGERS) OR BLADES (ACCU-POWER CHARGERS), ORRECEPTACLE CONTACTS ARE BENT OR CORRODED.
NOTE
WARNING
32

Insert the charger’s DC plug into the vehicle’s receptacle. The charger will turn on two to ten seconds later(Figure 23).
• When inserting the PowerDrive System 48 DC plug, align the raised guide on the plug with the guideslot in the receptacle and push straight in slowly.
• The PowerDrive Charger interacts with an on-board computer on the PowerDrive System 48 Golf Car.The computer records the amount of energy consumed during vehicle use. While the charger isplugged in, the golf car’s control circuit is locked out, preventing operation of the vehicle, as well as thepossibility of consequent damage to the charger and the vehicle.
Once the lock-out is actuated, the charger turns on. The on-board computer then records the amount of energy being returned to the batteries. When the optimum amount of energy needed to replenish the batteries is returned, the charger will shut off. The control circuit lock-out remains activated until the charger plug is disconnected from the vehicle.
Because of these unique features, only PowerDrive System 48 vehicles are compatible with the PowerDrive Charger (Neither vehicles made by other manufacturers, nor other Club Car models are compatible).
DO NOT USE A CHARGER IF:
• THE PLUG, RECEPTACLE, OR CORDS ARE CUT, WORN, HAVE ANY EXPOSED WIRES ORARE DAMAGED IN ANY WAY.
• USING THE CHARGER WITH ANY OF THE ABOVE SYMPTOMS COULD RESULT IN A FIRE,PROPERTY DAMAGE, PERSONAL INJURY, OR DEATH.
• THE DC CHARGER CORD AND PLUG ARE WEAR ITEMS AND MUST BE REPLACED WHENWORN OR DAMAGED.
• WHEN TEMPERATURES FALL BELOW 65° F (18.3 C), BATTERIES CHARGED IN UNHEATEDAREAS SHOULD BE PLACED ON CHARGE AS SOON AS POSSIBLE AFTER USE. BATTERIESARE WARMEST IMMEDIATELY AFTER USE, AND COLD BATTERIES REQUIRE MORE TIME TOFULLY CHARGE.
FIGURE 23 FIGURE 24
WARNING
NOTE
33

To Charge Batteries, Continued:
As long as the charger is allowed to shut off by itself, the batteries will be fully charged. Overcharging andundercharging will normally be prevented.
Batteries should be put on charge even if they have been used for only a short period (9 holes of golf or 10minutes). The charger is automatic and will turn off when batteries are fully charged. If the charger does notseem to be operating properly, or if the batteries seem weak, contact your local Club Car distributor/dealer.
PLUG AND RECEPTACLEIf the charger plug becomes difficult to insert or disconnect, the receptacle contacts should be lightly sprayedwith WD-40 brand spray lubricant. The plug should then be inserted and removed several times to ensureease of insertion, ease of removal, and good electrical contact.
Receptacle Fuse LinkAs an additional feature to protect the batteries and charging circuit from an overload, the electric vehicle isequipped with a receptacle fuse link (Figure 25, V-Glide 36 volt vehicle, or Figure 26, PowerDrive System48 vehicle). If the portable charger does not come on when the vehicle is placed on charge, visually inspectthe fuse link.
CLEANING THE VEHICLE
The vehicle is equipped with an Armorflex® front body and rear body. Use only mild dishwashing liquid soapwith a sponge or soft cloth for normal cleaning. See CAUTION at the top of next page.
• IF THE WARNING TAG HAS BEEN DAMAGED OR REMOVED FROM THE DC CORD, HAVE ITREPLACED IMMEDIATELY.
• IF THE RECEPTACLE FUSE LINK IS BLOWN, DETERMINE THE SOURCE OF THE ELECTRICALPROBLEM AND CORRECT IT BEFORE REPLACING THE FUSE. CONTACT YOUR NEARESTCLUB CAR DISTRIBUTOR/DEALER.
FIGURE 25 FIGURE 26
NOTE
WARNING
DANGER / POISON
!
36 VOLT FUSE LINK
DANGER / POISON
!
48 VOLT FUSE LINK
SENSE LEAD FUSE
34

Minor scratches or blemishes in the front body or the rear body can be buffed out using most commerciallyavailable polishing compounds and polishes.
The seats of the vehicle will last longer with proper cleaning. Mild soap or detergent with a sponge or softcloth for normal cleaning is recommended. For stubborn or imbedded dirt, a soft bristle brush may be used.
Do not use harsh detergents or cleaning solvents on the front body, the rear body, or the seat.
Battery acid, fertilizers, tars, asphalt, creosote, paint, or chewing gum should be removed immediately to pre-vent possible stains. Use commercial automotive products because the finish on the vehicle is the same asthe finish on today’s automobiles.
VEHICLE CONTROLLER - ELECTRIC VEHICLE
The DS Electric vehicle is equipped with either a Solid State Speed Controller (PowerDrive System 48 andPowerDrive System 48 with Motor Braking), or a V-Glide Speed Controller (36 Volt Vehicle).
In order to properly service and maintain the Solid State Controller Vehicle or the V-Glide Speed ControllerVehicle, it is necessary to understand the electrical circuitry and the functions of all components in both sys-tems. Therefore, if any repair or servicing needs to be performed, we recommend that it be performed by anauthorized CLUB CAR distributor/dealer using CLUB CAR OEM parts.
ACCESSORIES AND OPTIONS
The vehicle is available with a complete line of optional equipment items and accessories that are availablefrom Club Car and our dealers/distributors. Care should be taken that these accessories and options areproperly installed by trained technicians, and that they are used in the manner for which they were designed.
• IF A PRESSURE WASHER IS USED, DO NOT EXCEED 500 PSI (3448 KPA). NOZZLE SHOULDBE SET TO WIDE ANGLE SPRAY.
OPTIONAL EQUIPMENT ALL DS GOLF CARS:
• Accent Striping • Ashtray • On-board Tow Bar
• Woodgrain Decal • Rear View Mirror • Trailer Hitch
• Custom Club Decals • Glove Box • Hour Meter
• I.D. Numbers • Power Rib Tires • Sweater Basket
• Adjustable Seat Back • Extra Traction Tires • Information Holder
• Scuff Guards • White Wall Tires • Beverage Cooler
• Canopy Top • Chrome Hub Wheel Covers • Extra Two-bag Attachment
• Weather-proof Enclosure • Chrome Sport Wheel Covers • Bagwell Liner
• Tinted Split Windshield • Sand Bunker Rake Kit • Snap-on Tee Holder
• Clear or Tinted Snap-onWindshield
• Sand Bottle DivotRepair Kit
• AM/FM Stereo Cassette Radio withClock
• Sand Basket and DivotBucket Repair Kit
• Lighting Package (high/low beam head-lights, taillights, brake lights, and horn)
• Temporary Tow Bar for Single Vehi-cle Towing
• Deluxe Lighting Package with TurnSignals
• Permanent Tow Bar for MultipleVehicle Towing (factory installed)
Optional Equipment Continued on Next Page.
CAUTION
35

SUBSEQUENT OWNER REGISTRATION
In the event a vehicle is bought as a used vehicle from another individual or from a distributor/dealer, westrongly urge the new owner to re-register the vehicle with Club Car. This will enable us to contact you if theneed arises. Please send your name, address, and serial number(s) of the vehicle(s) to CLUB CAR, INC.,P.O. Box 204658, Augusta. GA 30917-4658, ATTN: Vehicle Registration.
FAIRWAY VILLAGER
The Fairway Villager is designed to provide a smooth and comfortable ride for four passengers, and is offeredin both gasoline and PowerDrive System 48 electric power configurations. An optional rack for two golf bagsis also available. Contact your nearest Club Car distributor/dealer. This Owner’s Manual should be read thor-oughly prior to operating the vehicle.
The Fairway Villager should be driven and maintained as stated in this Owner’s Manual with the followingexceptions:
MAINTENANCERefer to Pages 19 through 26 for periodic service schedules and periodic lubrication schedules. See NOTEat the top of next page.
OPTIONAL EQUIPMENT ELECTRIC VEHICLES ONLY:
• 3.75 hp Electric Motor (PowerDrive Sys-tem 48 vehicle only)
• Battery Indicator
• 3.5 hp Electric Motor (V-Glide 36 voltvehicle only)
• On-board Charger with RewindCord
OPTIONAL EQUIPMENT GASOLINE VEHICLES ONLY:
• Fuel Gauge • Spark Arrestor Kit
• TINTED WINDSHIELDS AND WEATHER-PROOF ENCLOSURES WILL NOT PROTECT OCCU-PANTS FROM FLYING OBJECTS (GOLF BALLS, ETC.).
• TO PREVENT POSSIBLE INJURY TO AN UNSUSPECTING PASSENGER, OR DAMAGE TO THEVEHICLE, AVOID SUDDEN STARTS, SUDDEN STOPS, AND ABRUPT TURNS.
• VEHICLE SHOULD BE DRIVEN AT SLOWER SPEEDS WHEN FOUR PASSENGERS ARE IN THEVEHICLE.
• PASSENGERS SHOULD HOLD ON TO SEAT HANDLES OR HAND RAILS AT ALL TIMES (SEEFIGURE 27). DRIVER SHOULD KEEP BOTH HANDS ON THE STEERING WHEEL WHILE VEHI-CLE IS MOVING.
• DO NOT LEAVE CHILDREN UNATTENDED ON THE REAR SEAT WHILE VEHICLE IS MOVING.
• NO MORE THAN FOUR PASSENGERS SHOULD BE ON THE VEHICLE AT ONE TIME.
• KEEP ALL BODY PARTS INSIDE THE VEHICLE TO PREVENT THEM FROM GETTING CAUGHTBETWEEN THE VEHICLE AND THE GROUND OR OTHER OBJECTS.
WARNING
WARNING
36

STORAGE COMPARTMENTThere is an enclosed storage compartment underneath the rear seat with 2 cu.ft. (.06 cu.m.) of storage area.Access the storage compartment by lifting the rear seat.
ELECTRIC FAIRWAY VILLAGERAn optional on-board charger is available for the Fairway Villager electric. The charger should be plugged intoa properly grounded nominal 115 Volts AC, 60 Hertz outlet. The AC line to which the charger is to be con-nected must be capable of supplying 15 amperes minimum to the charger. The rear seat should be proppedopen while charging the batteries.
• IF THE VEHICLE IS CONSTANTLY HAULING HEAVY LOADS, THE PREVENTIVE MAINTENANCEPROCEDURES SHOULD BE PERFORMED MORE OFTEN THAN RECOMMENDED IN THE SER-VICE AND LUBRICATION SCHEDULES.
• EACH CHARGER SHOULD HAVE ITS OWN DEDICATED 15 OR 20 AMPERE SEPARATELY PRO-TECTED (CIRCUIT BREAKER OR FUSE) SINGLE PHASE BRANCH CIRCUIT, IN ACCORDANCEWITH ALL APPLICABLE ELECTRICAL CODES FOR THE LOCATION.
• BEFORE CHARGING BATTERIES, TURN OFF ALL ACCESSORIES ON ALL VEHICLES.
• IF USING AN ON-BOARD CHARGER, BE SURE THE AC PLUG IS UNPLUGGED FROM THE OUT-LET BEFORE ATTEMPTING TO DRIVE THE VEHICLE. CHARGER AND AC OUTLET WILL BEDAMAGED IF THE CHARGER IS NOT UNPLUGGED BEFORE DRIVING. BE SURE THE ACCORD IS PROPERLY WOUND UP ON THE REEL BEFORE DRIVING THE VEHICLE. STUDY ALLGENERAL INFORMATION , NOTES, CAUTIONS, AND WARNINGS AS WELL AS ALL INFORMA-TION, NOTES, CAUTIONS, AND WARNINGS SPECIFIC TO THE POWERDRIVE CHARGER ANDPOWERDRIVE SYSTEM 48 IN THE BATTERY CHARGER SECTION OF THIS OWNER’S MANUAL(PAGE 30).
FIGURE 27
NOTE
WARNING
CAUTION
SEAT HANDLE
HAND RAIL
FOOT REST
37

VEHICLE SPECIFICATIONS
SPECIFICATIONS DS GASOLINE
POWERDRIVE SYSTEM 48 ELECTRIC
POWERDRIVE PLUS
ELECTRIC
DS36 VOLT
ELECTRIC
POWER SOURCE
Engine: 4 cycle, OHV, 286 cc, 9.0 hp rated., single cylinder, air cooled, with pressure lubrication system. •
Drive Motor: Direct drive, 48 volts DC, series wound, 3.1 hp. •
Drive Motor: Direct drive, 48 volts DC, shunt wound, 3.2 hp. •
Drive Motor: Direct drive, 36 volts DC, series wound, 2.97 hp. •
Fuel System: Side draft carburetor with float bowl, fixed jets, fuel filter, and impulse fuel pump. •
Governor: Automatic ground speed sensing, internally geared in unitized transaxle. •
Ignition: Transistor electronic ingnition with electronic RPM limiter. •
Unitized Transaxle: Fully synchronized forward and reverse with neutral (11.8:1 forward, 17.1:1 reverse). •
Transaxle: Double reduction helical gear with 12.28:1 direct drive axle. • • •
Electrical System: 12 volt, 460 cold cranking amp battery and 35 amp charging capacity. •
Electrical System: 48 volts DC, reduced speed reverse. • •
Electrical System: 36 volts DC, reduced speed reverse. •
Batteries: High capacity, deep cycle, Trojan PowerDrive 8 volt, 117 min. capacity. • •
Batteries: High capacity, deep cycle, Trojan PowerDrive 6 volt, 115 min. capacity. •
Charger: Automatic, 17 amp PowerDrive; UL and CSA listed. • •
Charger: Automatic, 21 amp Accu-Power; UL and CSA listed. •
Torque Converter: Automatic, variable speed, dry type. •
STEERING/SUSPENSION/BRAKES
Steering: Self-adjusting rack and pinion. • • • •
Suspension: Front and rear tapered mono-leaf springs with dual hydrau-lic shocks. • • • •
Brakes: Dual rear wheel self-adjusting brakes with cast iron drums and single brake pedal with automatic-release park brake. • • • •
BODY/CHASSIS
Frame/Chassis: Twin I-Beam welded aluminum. • • • •
Front and Rear Body: Armorflex® • • • •
Body Finish: Protective coat over molded-in color. • • • •
Tires: 18.00 x 8.50 - 8.00 tubeless, 4 ply rated. • • • •
SEATING CAPACITY/FUEL CAPACITY
Standard Seating Capacity: 2 persons • • • •
Fairway Villager Seating Capacity: 4 persons • • N/A •
Fuel Tank: 7 gallons (26.5 liters), unleaded gasoline only. •
DIMENSIONS/WEIGHT
Overall Length 91-1/2”(232 cm)
91-1/2”(232 cm)
91-1/2”(232 cm)
91-1/2”(232 cm)
Overall Width 47-1/4”(120 cm)
47-1/4”(120 cm)
47-1/4”(120 cm)
47-1/4”(120 cm)
Specifications Continued on Next Page.
38
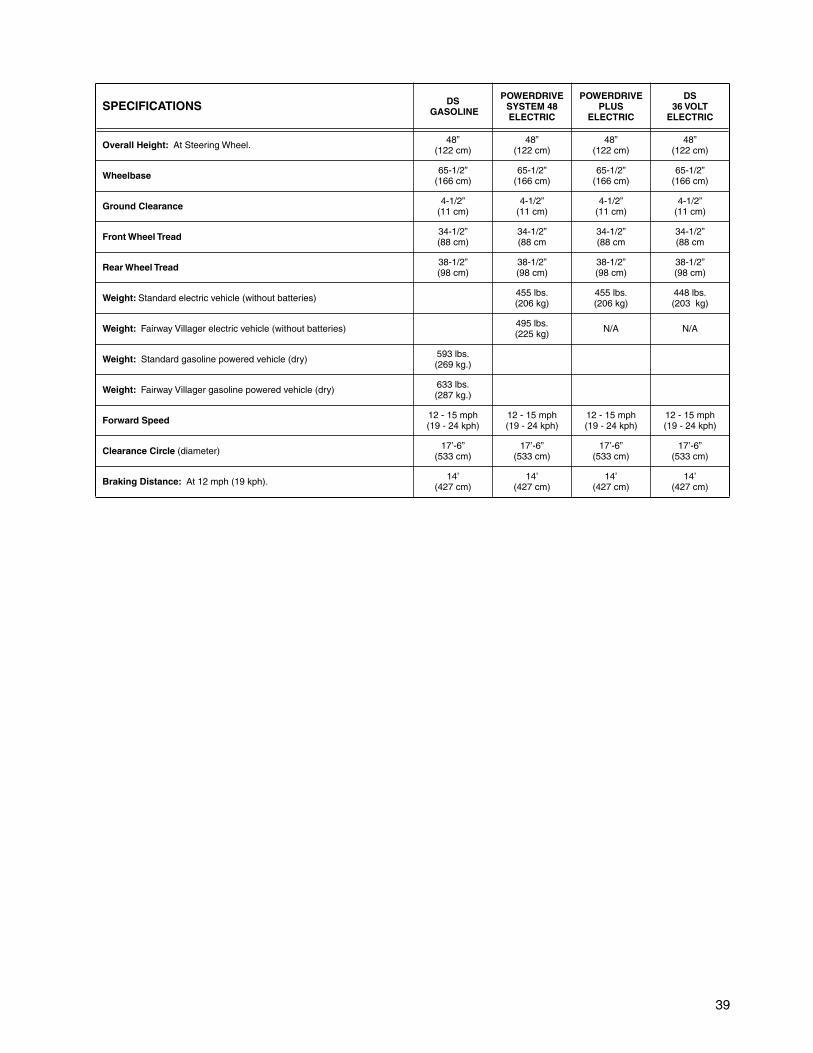
Overall Height: At Steering Wheel. 48”(122 cm)
48”(122 cm)
48”(122 cm)
48”(122 cm)
Wheelbase 65-1/2”(166 cm)
65-1/2”(166 cm)
65-1/2”(166 cm)
65-1/2”(166 cm)
Ground Clearance 4-1/2”(11 cm)
4-1/2”(11 cm)
4-1/2”(11 cm)
4-1/2”(11 cm)
Front Wheel Tread 34-1/2”(88 cm)
34-1/2”(88 cm
34-1/2”(88 cm
34-1/2”(88 cm
Rear Wheel Tread 38-1/2”(98 cm)
38-1/2”(98 cm)
38-1/2”(98 cm)
38-1/2”(98 cm)
Weight: Standard electric vehicle (without batteries) 455 lbs.(206 kg)
455 lbs.(206 kg)
448 lbs.(203 kg)
Weight: Fairway Villager electric vehicle (without batteries) 495 lbs.(225 kg) N/A N/A
Weight: Standard gasoline powered vehicle (dry) 593 lbs.(269 kg.)
Weight: Fairway Villager gasoline powered vehicle (dry) 633 lbs.(287 kg.)
Forward Speed 12 - 15 mph(19 - 24 kph)
12 - 15 mph(19 - 24 kph)
12 - 15 mph(19 - 24 kph)
12 - 15 mph(19 - 24 kph)
Clearance Circle (diameter) 17’-6”(533 cm)
17’-6”(533 cm)
17’-6”(533 cm)
17’-6”(533 cm)
Braking Distance: At 12 mph (19 kph). 14’(427 cm)
14’(427 cm)
14’(427 cm)
14’(427 cm)
SPECIFICATIONS DS GASOLINE
POWERDRIVE SYSTEM 48 ELECTRIC
POWERDRIVE PLUS
ELECTRIC
DS36 VOLT
ELECTRIC
39

CLUB CAR LIMITED LIFETIME WARRANTY FOR 1997 FLEET GOLF CARS IN THE UNITED STATES AND CANADA
1. WARRANTY:
CLUB CAR, INC. (“CLUB CAR”) hereby warrants to the Original Retail Fleet Purchaser or Original RetailFleet Lessee, as those terms are defined herein, and subject to the provisions, limitations and exclusionscontained in this limited warranty, that its new 1997 Model DS golf car purchased from CLUB CAR or anauthorized distributor or dealer for use in the United States or Canada shall be free from defects in materialsand workmanship under normal use and service as a golf car for the periods stated below.
LIMITED LIFETIME WARRANTY:
The golf car frame (excluding the front and rear bumper mounts), the rack and pinion steering gearbox unit,and the suspension system (defined as the shock absorbers, shock mounts, A-plates, leaf springs, shacklesand associated hardware) are warranted with respect to parts and labor against defects in materials andworkmanship for the lifetime of the vehicle while owned by the Original Retail Fleet Purchaser or in the pos-session of the Original Retail Fleet Lessee.
LIMITED THREE YEAR WARRANTY:
The gasoline engine, transmission, torque converter (drive and driven), unitized transaxle, starter generator,transaxle (electric vehicle), and electric motor are warranted with respect to parts and labor against defectsin materials and workmanship for a period of three years from the date of purchase while owned by the Orig-inal Retail Fleet Purchaser or in the possession of the Original Retail Fleet Lessee.
LIMITED TWO YEAR WARRANTY:
All remaining components of the golf car not specified otherwise are warranted with respect to parts andlabor against defects in materials and workmanship for a period of two years from the date of purchase whileowned by the Original Retail Fleet Purchaser or in the possession of the Original Retail Fleet Lessee.
This limited warranty covers materials, workmanship and repair labor cost as to those items specifically listedabove for the periods specified. Such repair labor shall be performed only by CLUB CAR, its authorized dis-tributors or dealers, or a service agency approved by CLUB CAR.
IF THE WARRANTY REGISTRATION FORM IS NOT COMPLETED AND RETURNED TO CLUB CAR ATTHE TIME OF THE ORIGINAL RETAIL SALE, PURCHASER MUST PROVIDE PROOF OF DATE OF PUR-CHASE WITH ANY WARRANTY CLAIM.
2. EXCLUSIONS:
Excluded from any CLUB CAR warranty are all optional equipment and accessories, fuses, filters, decals(except safety decals), spark plugs, lubricants, and trim pieces, seats, routine wear items such as thecharger plug and receptacle, brake shoes, belts, brushes, bushings, engine mounts, mats and pads, mainte-nance adjustments, cosmetic deterioration, and items which deteriorate or fail due to exposure or ordinarywear and tear. Batteries, the battery charger, on-board computer, and solid-state speed controller are cov-ered under separate CLUB CAR warranties. Tires are warranted by their manufacturer. Also excluded fromany CLUB CAR warranty is damage to a golf car or component resulting from a cause other than a defectincluding unreasonable or unintended strain or use, improper installation of accessories, installation of partsor accessories that are not original equipment, overloading, accident, alteration, abuse or neglect.
Transportation expenses for warranty service are also excluded from this warranty.
3. VOIDING OF WARRANTY:
THIS AND ANY OTHER WARRANTY SHALL BE VOID IF THE GOLF CAR IS ABUSED OR USED IN ANUNINTENDED MANNER OR SHOWS INDICATIONS THAT IT HAS BEEN ALTERED IN ANY WAY, INCLUD-ING, BUT NOT LIMITED TO, MODIFICATION OF THE SPEED GOVERNOR, BRAKING SYSTEM, STEER-ING, TRANSAXLE, OR OTHER OPERATING SYSTEMS OF THE CAR TO CAUSE IT TO PERFORM
40

OUTSIDE CLUB CAR SPECIFICATIONS. THE WARRANTY IS LIKEWISE VOID IF THE CAR SHOWS INDI-CATIONS THAT REASONABLE OR NECESSARY MAINTENANCE AS OUTLINED IN THE OWNER’SMANUAL AND MAINTENANCE AND SERVICE MANUAL WAS NOT PERFORMED AT THE TIME AND INTHE MANNER SPECIFIED IN SUCH MANUALS.
4. SOLE REMEDY:
CLUB CAR’S ONLY LIABILITY UNDER THIS LIMITED WARRANTY, OR IN ANY ACTION WHETHERBASED UPON WARRANTY, CONTRACT, NEGLIGENCE, STRICT PRODUCT LIABILITY OR OTHER-WISE, IS LIMITED TO THE REPAIR OR REPLACEMENT, AT CLUB CAR’S OPTION, OF A GOLF CAR ORCOMPONENT THEREOF THAT CLUB CAR DEEMS TO BE DEFECTIVE. REPLACEMENT SHALL MEANFURNISHING, DURING THE APPLICABLE LIMITED WARRANTY PERIOD, A NEW GOLF CAR OR FAC-TORY RECONDITIONED VEHICLE OR COMPONENT THEREOF WHICH IS IDENTICAL OR REASON-ABLY EQUIVALENT TO THE WARRANTED PRODUCT OR COMPONENT AT NO COST TO THEPURCHASER. REPAIR SHALL MEAN REMEDYING A DEFECT IN THE GOLF CAR OR COMPONENTTHEREOF AT NO COST TO THE PURCHASER DURING THE APPLICABLE LIMITED WARRANTYPERIOD. IF CLUB CAR ELECTS TO REPAIR THE GOLF CAR, IT MAY PROVIDE FACTORY RECONDI-TIONED PARTS OR COMPONENTS. ALL PARTS AND COMPONENTS REPLACED UNDER WARRANTYSHALL BECOME THE PROPERTY OF CLUB CAR.
5. HOW TO MAKE A WARRANTY CLAIM:
To make a warranty claim under this limited warranty, you must present the golf car or defective componentto an authorized CLUB CAR distributor or dealer or send the defective component, freight prepaid, to WAR-RANTY ADMINISTRATION, CLUB CAR, INC., 4152 Washington Road, P.O. Box 204658, Augusta, Georgia30917-4658.
6. DEFINITIONS:
For the purpose of this warranty, an Original Retail Fleet Purchaser is the original purchaser of the golf carwho is in the business of owning or operating golf courses and who purchases such golf car for the purposeof renting it to golf players for use on such courses. An Original Retail Fleet Lessee is the first end-user of thegolf car who is in the business of owning and operating golf courses and who leases such golf car for the pur-pose of renting it to golf players for use on such golf courses. In the event the golf car is purchased or leasedby any entity for the purpose of leasing it to an Original Retail Fleet Lessee, then this limited warranty shallextend only to the first Original Retail Fleet Lessee, and not to such entity or to any subsequent lessee of thegolf car.
7. DISCLAIMER:
THIS LIMITED WARRANTY IS EXCLUSIVE. CLUB CAR MAKES NO OTHER WARRANTY OF ANY KIND,EXPRESS OR IMPLIED. ANY IMPLIED WARRANTIES OF MERCHANTABILITY OR FITNESS FOR APARTICULAR PURPOSE WHICH EXCEED THE OBLIGATIONS OR TIME LIMITS STATED IN THIS WAR-RANTY ARE HEREBY DISCLAIMED BY CLUB CAR AND EXCLUDED FROM THIS WARRANTY. THEPURCHASER AND CLUB CAR EXPRESSLY AGREE THAT THE REMEDY OF REPAIR OR REPLACE-MENT OF THE DEFECTIVE GOLF CAR OR COMPONENT THEREOF IS THE EXCLUSIVE AND SOLEREMEDY OF THE PURCHASER. CLUB CAR MAKES NO OTHER REPRESENTATION OR WARRANTYOF ANY KIND, AND NO REPRESENTATIVE, EMPLOYEE, DISTRIBUTOR, OR DEALER OF CLUB CARHAS THE AUTHORITY TO MAKE OR IMPLY ANY REPRESENTATION, PROMISE, OR AGREEMENTWHICH IN ANY WAY VARIES THE TERMS OF THIS WARRANTY.
8. NO CONSEQUENTIAL DAMAGES:
IN NO EVENT SHALL CLUB CAR BE LIABLE FOR ANY INCIDENTAL OR CONSEQUENTIAL DAM-AGES INCLUDING, BUT NOT LIMITED TO, LOSS RELATED TO PROPERTY OTHER THAN THE GOLFCAR, LOSS OF USE, LOSS OF TIME, INCONVENIENCE, OR ANY OTHER ECONOMIC LOSS.
41

Limited Warranty, Continued:
Some states allow neither limitation on the duration of an implied warranty nor exclusions or limitation of inci-dental or consequential damages. Therefore, the above limitations or exclusions may not apply to you.
This warranty gives you specific legal rights, and you may also have other rights which vary from state tostate.
9. INFORMATION:
For further information, contact WARRANTY ADMINISTRATION, CLUB CAR, INC., P.O. Box 204658,Augusta, Georgia 30917-4658, U.S.A., 706-863-3000.
10. WARNING:
Any modification or alteration of any golf car beyond factory specifications, including those that affect theweight distribution, stability, or speed of the golf car, can cause serious personal injury or death.
42


Publication Part Number 101906301Edition Code 0796D1005A
Club Car, Inc.
P.O. Box 204658
Augusta, GA 30917-4658
USA
Web www.clubcar.com
Phone 1.706.863.3000
1.800.ClubCar
Int’l +1 706.863.3000
Fax 1.706.863.5808