owner's manual cargo hook sling suspension system eurocopter
TRANSCRIPT

Owner's Manual
For the
Cargo Hook Sling Suspension System
For the
Eurocopter AS350 Series
System Part Number 200-282-00
Owner's Manual Number 120-105-00 Revision 15
August 1, 2013
13915 NW 3rd Court Vancouver Washington 98685 USA Phone: 360-546-3072 Fax: 360-546-3073 Toll Free: 800-275-0883
www.OnboardSystems.com

This page intentionally left blank.
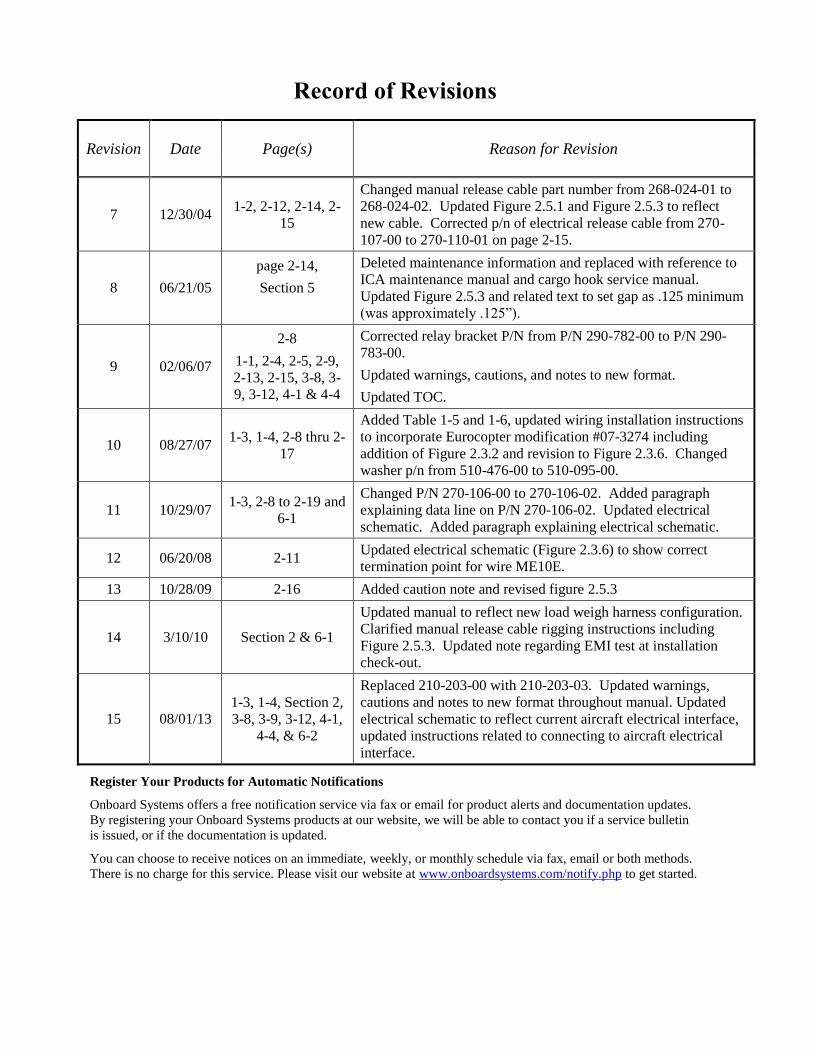
Record of Revisions
Revision
Date
Page(s)
Reason for Revision
7 12/30/04 1-2, 2-12, 2-14, 2-
15
Changed manual release cable part number from 268-024-01 to
268-024-02. Updated Figure 2.5.1 and Figure 2.5.3 to reflect
new cable. Corrected p/n of electrical release cable from 270-
107-00 to 270-110-01 on page 2-15.
8 06/21/05
page 2-14,
Section 5
Deleted maintenance information and replaced with reference to
ICA maintenance manual and cargo hook service manual.
Updated Figure 2.5.3 and related text to set gap as .125 minimum
(was approximately .125”).
9 02/06/07
2-8
1-1, 2-4, 2-5, 2-9,
2-13, 2-15, 3-8, 3-
9, 3-12, 4-1 & 4-4
Corrected relay bracket P/N from P/N 290-782-00 to P/N 290-
783-00.
Updated warnings, cautions, and notes to new format.
Updated TOC.
10 08/27/07 1-3, 1-4, 2-8 thru 2-
17
Added Table 1-5 and 1-6, updated wiring installation instructions
to incorporate Eurocopter modification #07-3274 including
addition of Figure 2.3.2 and revision to Figure 2.3.6. Changed
washer p/n from 510-476-00 to 510-095-00.
11 10/29/07 1-3, 2-8 to 2-19 and
6-1
Changed P/N 270-106-00 to 270-106-02. Added paragraph
explaining data line on P/N 270-106-02. Updated electrical
schematic. Added paragraph explaining electrical schematic.
12 06/20/08 2-11 Updated electrical schematic (Figure 2.3.6) to show correct
termination point for wire ME10E.
13 10/28/09 2-16 Added caution note and revised figure 2.5.3
14 3/10/10 Section 2 & 6-1
Updated manual to reflect new load weigh harness configuration.
Clarified manual release cable rigging instructions including
Figure 2.5.3. Updated note regarding EMI test at installation
check-out.
15 08/01/13 1-3, 1-4, Section 2,
3-8, 3-9, 3-12, 4-1,
4-4, & 6-2
Replaced 210-203-00 with 210-203-03. Updated warnings,
cautions and notes to new format throughout manual. Updated
electrical schematic to reflect current aircraft electrical interface,
updated instructions related to connecting to aircraft electrical
interface.
Register Your Products for Automatic Notifications
Onboard Systems offers a free notification service via fax or email for product alerts and documentation updates.
By registering your Onboard Systems products at our website, we will be able to contact you if a service bulletin
is issued, or if the documentation is updated.
You can choose to receive notices on an immediate, weekly, or monthly schedule via fax, email or both methods.
There is no charge for this service. Please visit our website at www.onboardsystems.com/notify.php to get started.

This page intentionally left blank.

CONTENTS Section 1 General Information
Introduction, 1-1
Safety Labels, 1-1
Specifications, 1-2
Inspection, 1-2
Bill of Materials, 1-3
Theory of Operation, 1-5
Section 2 Installation Instructions Installation Instructions, 2-1
Cargo Hook Sling Suspension System Installation, 2-1
Fixed Manual Release Cable Assembly Installation, 2-1
Cockpit Indicator Installation, 2-6
Electrical Wiring Installation, 2-8
Sling Suspension Installation, 2-13
Removable Manual Release Cable Assembly Installation, 2-14
External Electrical Release and Load Cell Cable Installation, 2-16
Placard Installation, 2-17
Installation Check-Out, 2-17
Component Weights, 2-18
Paper Work, 2-18
Section 3 Load Weigh Systems Operation Instructions Indicator Front Panel, 3-1
The Run Mode, 3-2
To Zero or Tare the Display, 3-3
To Un-Zero the Display, 3-3
Error Codes, 3-4
The Setup Mode, 3-5
Indicator Dampening, 3-7
To look at, or change the dampening level, 3-7
Indicator Calibration, 3-8
To look at or change the calibration code, 3-8
Installation Zero, 3-9
To run the installation zero routine, 3-9
Calibration by Lifting a Known Weight, 3-9
To run calibration by known weight routine, 3-10
Setting the Scale on a Remote Analog Meter, 3-11
To look at or change the scale, 3-11
Select KG or LB Units, 3-12
To look at or change the units, 3-12
Indicator Version, 3-13

CONTENTS, continued
Section 4 Operation Instructions Operating Procedures, 4-1
Disconnecting Removable Provisions, 4-2
Cargo Hook Loading, 4-3
Cargo Hook Rigging, 4-4
Section 5 Maintenance Instructions for Returning a System to the Factory, 5-1
Section 6 System Part Numbers 210-204-00 AS 350 Sling Fixed Provisions, 6-1
210-206-00 AS 350 Sling Removable Provisions, 6-2
232-150-00 Release Handle Assembly, 6-3
232-151-00 Quick Disconnect Support Assembly, 6-4
232-144-00 Sling Gimbal Sub-Assembly, 6-5
232-148-00 Sling Gimbal Assembly, 6-6
Section 7 Certification FAA STC, 7-1
Canadian Approval, 7-2
EASA Approval, 7-3

CONTENTS, continued
Figures 2.1.1 Fixed Manual Release Cable Installation Overview, 2-1
2.1.2 Manual Release Lever Installation, 2-2
2.1.3 Cabin Floor Hole Detail, 2-2
2.1.4 Cable Routing Through Frame, 2-3
2.1.5 Grommet Installation, 2-3
2.1.6 Cable Support Bracket Installation, 2-4
2.1.7 QD Bracket Installation, 2-4
2.1.8 Cable Support Clamp Installation, 2-5
2.2.1 Indicator Bracket Installation, 2-6
2.2.2 Indicator Bracket Hardware, 2-6
2.2.3 C-39 Indicator Installation, 2-7
2.3.1 Electrical Wiring Routing Overview, 2-9
2.3.2 P/N 270-108-00 Harness Modification, 2-9
2.3.3 Relay Bracket Installation, 2-9
2.3.4 Relay Installation, 2-10
2.3.5 Connector Bracket Installation, 2-10
2.3.6 Electrical Schematic, 2-11
2.4.1 Sling Suspension Installation, 2-13
2.5.1 Manual Release Cable Rig, 2-14
2.5.2 Manual Release Cable Connection, 2-14
2.5.3 Manual Release Cable Rig Check, 2-15
2.6.1 Un-commanded Release From Incorrectly Secured Cable, 2-17
3-1 Front Panel, 3-1
3-2 After Diagnostic Routine, 3-2
3-3 LB Legend Displayed, 3-2
3-4 Zeroing the Display, 3-3
3-5 Changing Dampening Level, 3-7
3-6 Changing the CAL Code, 3-8
3-7 Running CAL Routine, 3-10
3-8 Entering Load in CAL Routine, 3-10
3-9 Changing the Scale, 3-11
3-10 Changing the Units, 3-12
3-11 Looking at Indicator Version, 3-13
4.1 Manual Release Cable Disconnect, 4-2
4.2 Cargo Hook Loading, 4-3
4.3 Example of Recommended Cargo Hook Rigging, 4-5

CONTENTS, continued
Tables 1-1 Suspension System Specifications, 1-2
1-2 P/N 528-023-01 Cargo Hook Specifications, 1-2
1-3 Onboard Bill of Materials, 1-3
1-4 Eurocopter Parts, 1-4
1-5 Eurocopter Electrical Parts – Pre Mod #07-3274, 1-4
1-6 Eurocopter Electrical Parts – with Mod. #07-3274, 1-4
2-1 Optional Equipment Connectors, 2-8
2-2 Cargo Hook Connector, 2-16
2-3 Component Weights, 2-18
3-1 Indicator Error Codes, 3-4
3-2 Indicator Setup Routines, 3-6

General Information 1-1
Section 1
General Information Introduction
The 200-282-00 Cargo Hook Sling Suspension System kit consists of fixed
provisions (P/N 210-204-00) and removable provisions (P/N 210-206-00).
The fixed provisions are permanently installed on the aircraft while the
removable provisions are easily removed when not required on the
helicopter’s mission.
These kits are approved for installation on Eurocopter AS350B, AS350BA,
AS350D, AS350B1, AS350B2, and AS350B3 helicopters:
Safety Labels
The following definitions apply to safety labels used in this manual.
Indicates a hazardous situation which, if not
avoided, will result in death or serious injury.
Indicates a hazardous situation which, if not
avoided, could result in death or serious injury.
Indicates a hazardous situation which, if not
avoided, could result in minor or moderate injury.
Draws the reader’s attention to important or
unusual information not directly related to safety.
Used to address practices not related to personal
injury.

1-2 General Information
Specifications
Table 1-1 Suspension System Specifications
Design load 1,660 lb. (750 kg.)
Design ultimate strength 6,225 lb. (2823 kg.)
Unit weight, Fixed Provisions 5 lbs (2.3 kg.)
Unit weight, Removable Provisions 5.5 lbs (2.5 kg.)
Table 1-2 P/N 528-023-01 Cargo Hook Specifications
Design load 3,500 lb. (1,580 kg.)
Design ultimate strength 15,750 lb. (7,140 kg.)
Electrical release capacity 8,750 lb. (3,970 kg.)
Mechanical release capacity 8,750 lb. (3,970 kg.)
Force required for mechanical
release at 3,500 lb.
8 lb. Max.(.600” travel)
Electrical requirements 22-32 VDC 6.9 – 10 amps
Minimum release load 0 pounds
Unit weight 3.0 pounds (1.35 kg.)
Mating electrical connector PC06A8-2S SR
Load capacities given are for the equipment described only. Loading limits
for your particular helicopter model still apply. Consult your flight
manual.
Inspection Inspect the kit items for evidence of damage, corrosion and security of lock
wire and fasteners. If damage is evident, do not use the items until they are
repaired.

General Information 1-3
Bill of Materials The following items are included with the 200-282-00 Sling Suspension
System, the 210-204-00 fixed provisions, or the 210-206-00 removable
provisions. If shortages are found contact the company from whom the
system was purchased.
Table 1-3 Onboard Systems Bill of Materials Part
Number
Description Total Kit
Number
200-282-00
Fixed Kit
Number
210-204-00
Removable
Kit Number
210-206-00
120-105-00 Owner's Manual 1 1 1
121-013-00 RFMS 1 1 1
122-005-00 Cargo Hook Service Manual 1 - 1
123-012-00 ICA Manual for AS 350 Sling Kit 1 1 1
210-095-XX C-39 indicator Assembly 1 1 -
210-203-03 AS 350 Sling Load Cell Assembly 1 - 1
215-165-00 Multiple Decal Sheet 1 1 -
215-167-00 Max Hook Load 1660 Decal 1 - 1
232-148-00 AS 350 Sling Gimbal Assembly 1 - 1
232-150-00 Release Handle Assembly 1 1 -
232-151-00 Quick Disconnect Support Assy 1 1 -
268-024-02 Manual Release Cable Assy 1 - 1
270-106-02 Load Weigh Internal Harness 1 1 -
270-108-00 Electrical Release Internal Harness 1 1 -
270-110-01 Electrical Release Cable Assembly 1 - 1
290-772-00 Indicator Mount Bracket 1 1 -
290-781-00 Cable Support Bracket 1 1 -
290-782-00 Connector Bracket 1 1 -
290-783-00 Relay Bracket 1 1 -
445-005-00 Relay 1 1 -
500-065-00 Grommet Edging 1 1 -
510-029-00 Nut 8 8 -
510-042-00 Washer 3 3 -
510-062-00 Washer 8 8 -
510-085-00 Washer 3 3 -
510-095-00 Washer 3 3 -
510-102-00 Nut 5 5 -
510-277-00 Screw 2 2 -
510-278-00 Washer 2 2 -
510-279-00 Nut 2 2 -
510-453-00 Bolt 3 3 -
510-455-00 Bolt 2 2 -
510-457-00 Screw 4 4 -
510-475-00 Screw 3 3 -
510-481-00 Screw 8 8 -
512-024-00 Adel Clamp 2 2 -
528-023-01 Cargo Hook 1 - 1

1-4 General Information
Bill of Materials continued
To complete the cargo hook installation the following Eurocopter parts
may be necessary to obtain (these parts are frequently found to be on the
aircraft or are standard Eurocopter parts).
These items may or may not be installed with a
standard aircraft, therefore verification is
recommended before purchasing them.
Table 1-4 Eurocopter Parts
Eurocopter P/N Onboard P/N Description Qty
DHS751-160.62 610-007-00 Grommet 1
SL211M5-1 610-009-00 Nut 3
A3125-2 H179 610-011-00 Quick Disconnect Clamp 2
350A86-0020-33 610-016-00 Bracket 1
ASNA0078A403 610-019-00 Rivet 3
The cargo hook electrical system interfaces with the aircraft’s electrical
panel. Earlier versions (pre-mod. #07-3274) of the AS350 utilize a fuse
type switch panel. The following electrical panel components for these
versions are typically found to be on the aircraft, but may be necessary to
obtain.
Table 1.5 Eurocopter Electrical Parts – Pre-mod. #07-3274
Eurocopter P/N Onboard P/N Description Qty
DHS775-160-42 610-012-00 Indicator Light Body 1
DHS775-240-22 610-013-00 Indicator Light 1
EN2240-6839 610-014-00 Lamp 4
DI-2-5* 610-017-00 Fuse 2.5A 1
DA8-16A* 610-018-00 Fuse 16A 1
AS350B2 and B3 aircraft with modification #07-3274 incorporated utilize
a circuit breaker type switch panel. The following electrical panel
components for these versions are typically found to be on the aircraft, but
may be necessary to obtain.
Table 1.6 Eurocopter Electrical Parts – with Mod. #07-3274 Eurocopter P/N Onboard P/N Description Qty
045004A127A 610-027-00 Cargo Hook Sling Switch 1
ECS0744A02A5 610-028-00 Circuit Breaker 2.5A 1
ECS0744B15A0 610-029-00 Circuit Breaker 15A 1

General Information 1-5
Theory of Operation The 200-282-00 Cargo Hook Sling Suspension System is comprised of:
A gimbaled suspension with load cell that supports the cargo hook.
An electrical release system that provides means for release by pilot
actuation of the push-button switch in the cockpit. When the push-
button switch is pressed, it energizes the DC solenoid in the cargo
hook, and the solenoid opens the latch in the internal mechanism.
A manual release system, which provides a means of releasing a cargo
hook load in the event of an electrical release system failure. A lever
mounted to the collective stick actuates it.
Ground personnel may also release a load by the actuation of a lever
located on the side of the cargo hook.
A load weigh system, which is comprised of an Indicator mounted to
the RH door pillar within the cockpit connected to a load cell between
the cargo hook and frame.
A load is attached to the cargo hook by passing a cargo sling ring into the
throat of the load beam and pushing the ring against the upper portion of
the load beam throat, which will cause the hook to close. In the closed
position, a latch engages the load beam and latches it in this position.
To release the load, the latch is disengaged from the load beam. With the
latch disengaged, the weight of the load causes the load beam to swing to
its open position, and the cargo sling ring slides off the load beam. The
load beam then remains in the open position awaiting the next load.

This page intentionally left blank.

Installation Instructions 2-1
Section 2 Installation Instructions
These procedures are provided for the benefit of experienced aircraft maintenance
facilities capable of carrying out the procedures. They must not be attempted by
those lacking the necessary expertise.
Cargo Hook Sling Suspension System Installation
2.1 Fixed Manual Release Cable Assembly Installation
Remove lower fairings to access areas underneath cabin floor where cable is
routed.
The manual release cable installation consists of a fixed section (P/N 268-025-00)
and a removable section. The fixed section is routed from the release lever at the
collective, aft to a bracket at the centerline of the forward fuel tank support (as
shown in Figure 2.1.1). Figure 2.1.1 is an overview of the cable routing and the
figures and instructions following detail the cable support installations at various
points.
Figure 2.1.1 Fixed Manual Release Cable Installation Overview.
Route cable outboard
through this hole.
See Figure 2.1.5
See Figure 2.1.4
See Figure 2.1.3
See Figure 2.1.6
FWD
A/C Centerline
X 1790.15 X 2700
Y 400
Manual Release Cable
View Looking Outboard
From A/C Centerline
View Looking Down
Centerline of fwd
fuel tank support
See Figures 2.1.7
and 2.1.8
See Figure 2.1.2

2-2 Installation Instructions
2.1 Fixed Manual Release Cable Assembly Installation continued
Mount the manual release lever (assembly P/N 232-138-00) to the collective shaft
with the Clamp Half (P/N 290-753-00) and two screws (P/N 510-390-00) provided
pre-assembled on the release lever assembly, as illustrated below.
Figure 2.1.2 Manual Release Lever Installation
Route the cable to underneath the cabin floor through the existing slot by removing
the grommet to allow the cable end fitting to be fed through. Re-install grommet.
If the slot in the floor does not exist, create one with dimensions as shown below in
the cabin floor 43 mm from the collective pitch lever unit and 150 mm forward of
X1790.15 (see below) and install the grommet (Eurocopter P/N DG-38).
Figure 2.1.3 Cabin Floor Hole Detail
Screws
P/N 510-390-00
Clamp Half
P/N 290-753-00
150mm FROM X 1790.15
VIEW LOOKING DOWN
Fwd
Collective Pitch
Lever Unit
43mm
35mm
Ø25mm
A/C Centerline

Installation Instructions 2-3
2.1 Fixed Manual Release Cable Assembly Installation, continued
Underneath the floor route the manual release cable through an existing hole in the
frame immediately aft of the collective by securing an Adel clamp (P/N 512-024-
00) to the existing bracket (Eurocopter P/N 350A86-1051-00) with hardware as
illustrated below and routing the cable through it.
Figure 2.1.4 Cable Routing Through Frame
Aft of the frame, route the cable outboard through the hole in the structural
member as shown in Figure 2.1.1 and Figure 2.1.5 and install Plastic Edging
Grommet (P/N 500-065-00).
Figure 2.1.5 Grommet Installation
Plastic Edging Grommet
P/N 500-065-00
View Looking Aft
Cabin Floor
A/C
Cen
terline
A
A A-A
Bolt P/N 510-453-00
Washer P/N 510-042-00
Nut P/N 510-102-00
Adel Clamp
P/N 512-024-00

2-4 Installation Instructions
2.1 Fixed Manual Release Cable Assembly Installation continued
At the inboard side of the RH forward landing gear fitting (X2700) secure Cable
Support Bracket (P/N 290-781-00) with hardware as illustrated below. Route
release cable through and secure Adel Clamp (P/N 512-024-00) to Cable Support
Bracket with hardware as illustrated below.
Figure 2.1.6 Cable Support Bracket Installation
Install the Quick Disconnect Bracket Assembly (P/N 232-151-00) on the RH rear
lower fairing (with fairing removed) at a location 400mm (15.7 in.) to the right of
the A/C centerline and in line with the forward fuel tank support (reference Figure
2.1.1) utilizing the existing insert holes in the honeycomb panel structure. Secure
with fasteners (provided pre-assembled on bracket) as illustrated below.
If your helicopter does not have holes in the
honeycomb panel, modify panel per Eurocopter
Service Bulletin No. 25.00.62.
Figure 2.1.7 QD Bracket Installation
Y400
Bolt (2)
P/N 510-455-00
QD Bracket Assembly
P/N 232-151-00
Nut (2)
P/N 510-102-00
Washer (2)
P/N 510-454-00
Bolt P/N 510-453-00
Clamp P/N 512-024-00
Bracket P/N 290-781-00
Bolt P/N 510-453-00
Washer P/N 510-042-00 Nut P/N 510-102-00
Washer P/N 510-454-00
Washer P/N 510-042-00
Nut P/N 510-102-00X2700
Landing Gear Fitting
Inboard

Installation Instructions 2-5
2.1 Fixed Manual Release Cable Assembly Installation continued
Install the 2 clamps (Eurocopter P/N A3125-2 H179) that will support the
removable section of the manual release cable. The clamps are installed at points 1
and 2 (see below) using existing inserts in the belly of the helicopter.
If your helicopter does not have holes in the
honeycomb panel, modify panel per Eurocopter
Service Bulletin No. 25.00.62.
Figure 2.1.8 Cable Support Clamp Installation
A/C Centerline
Y400
View Looking Up
At Lower Aft Cowling
Fwd
1
2
A
A
Fuel Tank Support
Centerline
A-A
Rotated 90°
Bolt
P/N 510-455-00
NutP/N 510-102-00
Washer
P/N 510-454-00
Clamp
Eurocopter P/N A3125-2 H179

2-6 Installation Instructions
2.2 Cockpit Indicator Installation
The Indicator is mounted on the RH door pillar. If nut clips are not pre-installed in
the door pillar, install them per the following.
Hold the Indicator Bracket (P/N 290-772-00) at location as shown below and
transfer its hole pattern to the door pillar.
Figure 2.2.1 Indicator Bracket Installation
Drill three mounting holes in the RH door pillar to install the nut clips. Reuse the
electrical bonding screw at the fourth location (see below).
After completing electrical bonding, install the three nut clips (Eurocopter P/N
SL211M5-1) and fasten Indicator Bracket with three screws (P/N 510-475-00) and
three washers (P/N 510-095-00).
Figure 2.2.2 Indicator Bracket Hardware
View Looking Outbd
RH Door Pillar
Fwd
C-39 Indicator Bracket
P/N 290-772-00
Screw
P/N 510-475-00
Washer
P/N 510-095-00
Electrical Bonding Screw

Installation Instructions 2-7
2.2 Cockpit Indicator Installation continued
Install C-39 Indicator (P/N 210-095-00) onto the bracket with hardware as
illustrated below.
Figure 2.2.3 C-39 Indicator Installation
Hook Load
0 LB KG
CAL
UN-ZERO SETUP
DAMP
X 10
ZERO
A
A
A-A
Screw P/N 510-457-00 (4)C-39 Indicator

2-8 Installation Instructions
2.3 Electrical Wiring Installation Install electrical harnesses (P/N 270-106-02 and P/N 270-108-00). Route them
along the existing harnesses (reference Figure 2.3.1) while observing the following
precautions:
- Pick up existing wire runs by opening existing cable clamps.
Nylon ties alone may not be used for primary support.
- The distance between supports should not exceed 21”.
- Bend radius of wire or harness must not be less than 10 times the
wire or harness diameter.
- Inspect and verify that the wire harness may not be manually
deflected into a structure with a bend radius of less than .13”.
Make the appropriate connections with electrical contacts supplied with kit.
Secure the C-39 indicator harness (P/N 270-106-02) along the canopy with clamps
and connect the C-39 indicator connector. Refer to Figure 2.3.6 for electrical
schematic.
The P/N 270-106-02 electrical harness includes a data line for use with an Onboard
Systems Data Recorder or Analog Meter. These items are not included under this
STC. Attach connectors to data line per pin out in Table 2-1 to connect the Analog
Slave Meter or Data Recorder to the electrical harness “DATA” line. If a data
connector is present on the data line use harness P/N 270-059-00 to connect to
Analog Slave Meter. If the accessory connector is not used, stow this line of the
harness.
The data line may or may not be terminated with a
data connector depending on manufacture date.
Table 2-1 Optional Equipment Connectors
Analog Meter Connector
P/N 410-130-00
Mfg P/N: MS3126F10-6P
Data Recorder Connector
P/N 410-011-00, 410-057-00 & 410-020-00
Pin Color Function Pin Color Function
A WH Power 1 WH/BL Ground
B WH/GN Clock 3 WH Power
C WH/OR Data 5 Shield Shield
D WH/BL Ground 7 WH/GN Clock Signal
E Shield Shield 9 WH/OR Data Signal
4 Red* Flight Switch
2 Purple* Cap. Switch
*Optional

Installation Instructions 2-9
2.3 Electrical Wiring Installation continued
Figure 2.3.1 Electrical Wiring Routing Overview
If installing the wire harnesses on a newer AS350B2 or B3 model equipped with a
switch panel of circuit breaker design (Eurocopter mod. #07-3274 incorporated)
the electrical harness P/N 270-108-00 requires minor modification as follows. Cut
the ME1E wire off just prior to the butt splice and discard the splice and the 20 ga.
wires.
Figure 2.3.2 P/N 270-108-00 Harness Modification
Install Relay Bracket (P/N 290-783-00) by creating two holes in the LH beam at
Y400 as illustrated in Figure 2.3.3.
Figure 2.3.3 Relay Bracket Installation
7.1 in.
(180 mm)
LH Beam Y 400
Existing hole
Z 2450
1.30 in.
(33 mm)
Ø0.169 in (2)
SpliceCut wire here.
20 ga.
20 ga.
16 ga.
ME1E
Hook L
oad
0 L
B K
GC
AL
UN
-ZER
O
SETU
P
DA
MP
X 1
0
ZERO
C-39 Indicator
X2700
Y400
Y400
Connector Bracket
Install per Figure 2.3.5
Relay Bracket - 23M
Install per Figure 2.3.3

2-10 Installation Instructions
2.3 Electrical Wiring Installation continued Secure Relay Bracket with two screws (P/N 510-277-00), washers (P/N 510-278-
00), and nuts (P/N 510-279-00).
Place relay socket (part of 270-108-00 electrical harness) into relay bracket
mounting holes from below and secure to relay and Relay Bracket with hardware
provided with relay (as illustrated below).
Figure 2.3.4 Relay Installation
Relay Bracket
P/N 290-783-00
Relay
P/N 445-005-00
Relay Socket
P/N 445-004-00
(part of 270-108-00 electrical harness)
Up
Fwd
Install Connector Bracket (P/N 290-782-00) at fuel tank support frame. Locate
Connector Bracket as shown below and drill support frame for rivets (Eurocopter
P/N ASNA0078A403) to match its hole pattern. Drill out pilot holes in Connector
Bracket for rivets.
Fasten hook release connector (32M) and load cell connector (55M) to the
Connector Bracket with screws (P/N 510-481-00), washers (P/N 510-062-00), and
nuts (P/N 510-029-00).
Install screws with their heads on the bottom side
of bracket flange (if nuts are installed on bottom
side they will interfere with mating connector).
Figure 2.3.5 Connector Bracket Installation
Install electrical markers (P/N 215-165-00).
Y=0
A-A
Looking Down
AA
View Looking Forward
Connector Bracket
P/N 290-782-00
Rivets (3)
1.18 in (30 mm)
7.28 in (185 mm)
Load Cell Connector55M
Hook Release Connector32M

Installation Instructions 2-11
2.3 Electrical Wiring Installation continued
The electrical schematic for the electrical release system and the load weigh
system is shown below along with the aircraft’s interface points. Eurocopter
modification #’s 07-4280 and 07-3450 are reflected below. Earlier Eurocopter
configurations which affected how and where wire numbers ME1E, ME2E and
ME10E of the electrical release harness and load weigh harness interface with the
helicopter are shown on the following page. Refer to the applicable Eurocopter
Wiring Diagrams Manual for additional information and for other cargo hook
aircraft side wiring configurations that may not be shown.
For the C-39 Indicator backlighting, install wire 2LK71E to an available pin in
the instrument panel or console lighting circuit (31L for pre-mod 07-4280), at 28
volts the indicator’s internal bulb draws 25 mA.
If existing Eurocopter cargo hook or load weigh wiring is installed and
terminated at the locations below, remove the wires completely or remove from
connectors and cap and stow them.
Figure 2.3.6 Electrical Schematic
ME87E
B B B B
55M
ME87E
F F
D
E
C
D
E
55M
A
B B
C C
ME5E
24M
AA
32M
A A
ME5E
1N
2LK71E
2LK72NE
ME6NE
L
M
P
R
N
K
N
P
R
L
M
K
A
C
B
F
E
H
J
G
D
H
J
G
E
F
D
B
C
A
30M
C-39 IN
DIC
ATO
R
X2A1 X1 A2
ME4NE
23M
3N
ME10E
BELLY DISCONNECT
INSTRUMENT
LIGHTING
A
C
ME1E
X4
ME2E 10
PP
6
2.5A
31ALP32 BREAKER PANEL
Existing Eurocopter Wiring, post-Mod #07-4280
Note: Data line included with
Load Weigh Harness P/N 270-106-02 only.
Data line may or may not be terminated with
a connector, depending on manufacture date.
13
18
2
7
16
11
20ALP-J1A P1A
U/CA FLOOR U/CA FLOOR
A1
10A
44ALP BREAKER PANEL
SWING
A1
BUS
OPT1
To "CARGO REL"
cyclic button.
Existing Eurocopter Wiring,
post-Mod #07-3450 shown.

2-12 Installation Instructions
2.3 Electrical Wiring Installation continued
Figure 2.3.6 Electrical Schematic continued
272
1
PP
9
16A
4
6
12
2.5A
PP
6
15
5
9
8
Existing Eurocopter Wiring, pre-mod #07-1737
ME1E
ME2E
ME10E
25
14
13
11
10
12
4
7
9
25
17
10
11
8
19
2.5A
PP
5
21
CONTROL
PANEL
21
27
P.C.B
ME3E
ME1E
A
ME2E 3
4
3
E
16A
PP
9P
P6
2.5A
32
31
Existing Eurocopter Wiring, post-mod #07-1737
9
X3
15A
PP
9
31 32
ME1E
Existing Eurocopter Wiring, pre-mod #07-3475
ME10E
20 Cyclic Lever PCB
20
21
3
2
1
24
A
C
91022
9
8
SLING
Existing Eurocopter Wiring, Post-Mod #07-3273

Installation Instructions 2-13
2.4 Sling Suspension Installation
Attach the Sling Suspension with Cargo Hook onto the hard point at the helicopter
centerline using the hardware supplied, as illustrated below. Orient the cargo hook
such that its load beam points forward (as shown below).
Figure 2.4.1 Sling Suspension Installation
Cotter Pin
P/N 510-081-00
Nut
P/N 510-259-00
Fwd
Washer
P/N 510-336-00
Centerline of fuel tank supportHelicopter hard point
Bolt
P/N 510-451-00
Washer
P/N 510-336-00
Gimbal Pin
P/N 290-766-00
2.5 Removable Manual Release Cable Assembly Installation
Connect the removable manual release cable (P/N 268-024-02) to the cargo hook
first, per the following instructions:
Remove the manual release cover from the cargo hook. Thread the fitting at the
end of the manual release cable into the manual release boss on the hook side plate
until the threads protrude approximately .125” inch beyond the boss and secure
with jam nut (as shown in Figure 2.5.1).
Leave the cover off of the cargo hook until the other end of the release cable is
connected, in order to verify proper setting.

2-14 Installation Instructions
2.5 Removable Manual Release Cable Assembly Installation continued
Figure 2.5.1 Manual Release Cable Rigging
Connect the other end of the removable cable assembly to the end of the fixed
cable by sliding the Adapter Fitting back to expose the swaged cable end fitting
and connecting this fitting to the swaged cable end fitting on the fixed cable as
shown below.
The pre-set compressed spring length is set at
the factory to be 1.94/2.00 inches (see below). If
necessary, minor adjustments may be made at
the release handle assembly on the collective.
Thread the Adapter Fitting on the removable cable onto the fixed cable adapter
fitting and lock in position by engaging a castellation with the Locking Pin (P/N
514-052-00).
Snap the removable cable Adapter Fitting into the inboard spring clip on the Quick
Disconnect Support Assembly.
Figure 2.5.2 Manual Release Cable Connection
Fixed Manual Release Cable
Adapter Fitting
Removable Manual Release Cable
Adapter Fitting
1.94/2.00
Locking Pin
P/N 514-052-00

Installation Instructions 2-15
2.5 Removable Manual Release Cable Assembly Installation continued
Verify proper setting at the hook:
Place the cable ball end fitting into the hook manual release fork fitting as
illustrated in Figure 2.5.3. Move the manual release lever in the clockwise
direction until it is against the cam stop. Measure the cable ball end free play with
the manual release handle in the cockpit in the non-release position. The gap must
be a minimum of .125” (3.2 mm) (see below).
Manual release cable rigging must be done with
the cargo hook in the closed and locked position.
Figure 2.5.3 Manual Release Cable Rigging Check
cable ball end
manual release lever
fork
.125" min.
(3.2 mm) release cable
Load beam must be closed
and locked when rigging.
If the gap is less than .125”, make adjustments at the hook only. This is done by
disconnecting the cable at the interface with the fixed manual release cable (Figure
2.5.2), loosening the jam nut, and rotating the cable in the required direction.

2-16 Installation Instructions
2.6 External Electrical Release and Load Cell Cable Installation
Connect the appropriate end of the cargo hook electrical release cable (P/N 270-
110-01) to the Cargo Hook (24M, ref. Figure 2.3.4) and secure with safety wire.
Connect the other end of the cable to the appropriate connector (32M) mounted per
section 2.3.
See Table 2-2 for connector pin out information.
Table 2-2 Cargo Hook Connector
Pin Function
A Ground
B Power
The cargo hook is equipped with a suppression
diode that will be damaged if the cargo hook
electrical connection is reversed.
Connect the electrical cable from the load cell (55M) cable to the appropriate
connector (55M) mounted per section 2.3.
Un-commanded cargo hook release will happen if
the manual and electrical release cables are
improperly restrained. The cables must not be the
stops that prevent the Cargo Hook from swinging
freely in all directions. If the Cargo Hook loads
cause the hook to strain against the manual
release cable the swaged end of the cable may
separate allowing the inner cable to activate the
cargo hook manual release mechanism. The result
is an un-commanded release. Ensure that no
combination of cyclic stick or Cargo Hook
position is restrained by the manual or electrical
release cables

Installation Instructions 2-17
2.6 External Electrical Release and Load Cell Cable Installation continued
Figure 2.6.1 Un-commanded Release From Incorrectly Secured Cable
2.7 Placard Installation Install appropriate load limitation placard, P/N 215-167-00 (1660 lb max. hook
load). Locate the placard on the belly of the helicopter, visible to the ground
operator and near the hook.
2.8 Installation Check-Out After installation of the Cargo Hook Sling Suspension System, perform the
following functional checks.
1. Swing the installed Cargo Hook Sling Suspension to its full extremes to ensure
that the manual release cable assembly and the electrical release cable have
enough slack to allow full swing of the cargo hook assembly without straining
or damaging the cables. The cables must not be the stops that prevent the
Cargo Hook from swinging freely in all directions.
2. With no load on the cargo hook load beam, pull the handle operated cargo
hook mechanical release, the Cargo Hook should release. Reset the cargo hook
load beam.
3. With no load on the cargo hook load beam, depress the cargo hook electrical
release button, the Cargo Hook should release. Reset the cargo hook load
beam.

2-18 Installation Instructions
2.8 Installation Check-Out continued 4. Perform an EMI ground test per AC 43.13-1b section 11-107. For equipment
that can only be checked in flight an EMI flight test may be required.
The cargo hook is of a class of equipment not
known to have a high potential for interference.
This class of equipment does not require special
EMI installation testing (i.e. FADEC) as required
in paragraphs 7 and 8 of FAA policy
memorandum ASW-2001-01.
5. Power on the Indicator and allow it to warm up for 5 minutes (with no load on
the hook). Press both Indicator buttons at the same time to go to the Setup
Mode. Scroll through the menu until the symbol “0 in” is displayed, then press
the right button. Remove any weight that is not to be zeroed out and press
either button to complete the procedure.
Component Weights The weights of the Cargo Hook Sling Suspension System components are listed
below.
Table 2-3 Component Weights and Cgs
Item Weight Station
Fixed Provisions 5 lbs (2.3 kg.) 92 in. (2337 mm)
Removable Provisions 5.5 lbs (2.5 kg.) 134.4 in. (3415 mm)
Complete Install 10.5 lbs (4.8 kg.) 114.2 in. (2901 mm)
Paper Work In the US, fill in FAA form 337 for the initial installation. This procedure may
vary in different countries. Make the appropriate aircraft log book entry. Place the
Rotorcraft Flight Manual Supplement P/N 121-013-00 in the Rotorcraft Flight
Manual.

Load Weigh System Operation Instructions 3-1
Section 3
Load Weigh System Operation Instructions
Indicator Front Panel The C-39 Indicator front panel includes the following features.
The four 7 segment LCD digits show the weight on the Cargo Hook and
display various setup information.
The Legends clarify the digital display, i.e. - when the LB Legend is
turned on, the display will be pounds, etc.
The right button is used to Zero the display in the Run Mode and select
the digit to be changed in the Setup Mode.
The left button is used to Un-Zero the display in the Run Mode and
scroll the selected digit in the Setup Mode.
Figure 3-1 Front Panel
Calibration &
Dampening
Legend
Zero & Un-Zero Legend
Unit Legend
Digits
Left Button Right Button

3-2 Load Weigh System Operation Instructions
The Run Mode The C-39 Indicator has two operating modes, Run and Setup. The Run
Mode is used to display the cargo hook weight and the Setup Mode is used
to setup or configure the Indicator to the helicopter and to the Load Cell.
When powered up, the Indicator always comes on in the Run Mode.
After the Indicator has been correctly installed, power it up by activating the
aircraft electrical system. The Indicator will go through a self-diagnostic
routine. During this routine the display will display all of the digits and
legends. If a problem is found during the routine an Error Code will be
displayed. For an explanation of Error Codes see the section Error Codes.
After the diagnostic routine the display should look like this:
Figure 3-2 After Diagnostic Routine
The illustration is of the Indicator in the Run Mode with no load on the
hook. Note the LB legend displayed.
Figure 3-3 LB Legend Displayed
The illustration is a typical hook load reading. The display is 3,500 pounds,
note the last digit is not displayed.

Load Weigh System Operation Instructions 3-3
The Run Mode continued To Zero or Tare the Display
The zero feature is used to zero or tare the weight on the Cargo Hook that is
not wanted, such as the weight of a cargo net or long line. The Right button
is used to zero the Indicator reading. When the Right button is pressed the
display is zeroed. The zero legend is turned on and the zeroed number is
stored in memory. If the Right button is pressed again, before the Un-zero
button is pressed, the display blinks in response to the button closure. Zero
is only available in the Run Mode.
Figure 3-4 Zeroing the Display
To Un-Zero the Display
The Left button is used to add the zeroed value back into the current
Indicator reading or Un-zero the display. When the Left button is pressed,
the number previously zeroed is added to the current display and the Un-
zero legend is turned on. If the Left button is again pressed before the zero
button is pressed, the display blinks in response to the button closure. Un-
Zero is only available in the Run Mode.
Zero Legend
Un-Zero Legend

3-4 Load Weigh System Operation Instructions
The Run Mode continued
Error Codes
Error Codes are the result of difficulties discovered during the Indicator
diagnostic tests. Diagnostic tests occur at power up and during the execution
of certain routines. Listed below is a matrix of the Error Code displays, their
meaning and possible corrective action. Pressing either button will usually
bypass the error code, however, the displayed information may be suspect.
Table 3-1 Indicator Error Codes
DISPLAY
CAUSE
POSSIBLE
CORRECTIVE ACTION
Err 1 A/D or D/A circuit failure Potential short in the optional
analog meter cable. Clear short
and power cycle the Indicator
by turning the power to the
Indicator off for a few
moments. If Error Code
continues, return the Indicator
to the factory.
Err 2 NV Ram failure Power cycle the Indicator; if
Error Code continues, return
the Indicator to the factory.
Err 3 NV Ram write failure Re-enter data, if Error Code
continues, return the Indicator
to the factory.
Err 4 NV Ram busy failure Power cycle the Indicator, if
Error Code continues return
the Indicator to the factory.

Load Weigh System Operation Instructions 3-5
The Setup Mode The C-39 Indicator can be used with a wide range of helicopters and load
cells. The Setup Mode on the Indicator matches the Indicator to the Load
Cell and to the helicopter. This is accomplished by entering data into the
Indicator. Entered data includes the load cell Calibration Code, the units that
the Indicator should read-out (pounds or kilograms), and several other items.
The Indicator has a group of Setup routines, arranged in menu form, that are
used to configure the Indicator. Shown on the next page is a matrix of the
Setup routines and a brief discussion of their function and how they are
programmed. A complete discussion of each setup item is presented later in
this section.
To enter the Setup Mode press both the Right and Left buttons at the same
time while the Indicator is powered up and in the Run Mode. To exit the
Setup Mode and return to the Run Mode, press both the buttons at the same
time. If you are in a Setup routine and have started to change an entry, but
you change your mind before completing the procedure, power cycle the
Indicator to exit the Setup Mode and then go to the Run Mode without
changing the item. The Indicator is power cycled by turning the Indicator
power off for a few moments.

3-6 Load Weigh System Operation Instructions
The Setup Mode continued
Table 3-2 Indicator Setup Routines
MENU
FUNCTION
DISPLAY Press the Left button to
scroll through the menu Press the Right button to view or change the
menu item.
To return to the Run Mode press both the
Right and Left buttons at the same time.
DAMP
Dampening Level, sets the pilots preference
for display dampening.
Blinking display is previously entered
Dampening Level. Select the desired
dampening level by pressing the Left
button.
CODE
Calibration Code, matches the Indicator to the
Load Cell.
Display is previously entered CAL Code.
The Code is changed by selecting the digit
to be changed with the Right button. The
selected digit will blink. Change the
blinking digit by pressing the Left button.
0 in
Installation ZERO, matches the Indicator to
the installed Load Cell and to the helicopter.
After this procedure the display will be zero
when no load is on the Cargo Hook.
Display is a combination of load on the
Load Cell, and normal load cell zero
offset. Remove all weight from the
installed Load Cell except the Cargo
Hook, and press any button to complete
the procedure and return to the Run Mode.
LOAD
Load, is used to calibrate the system by lifting
a known load.
No previous display is shown. Enter the
known load using the Right button to
select the digit to be changed and Left
button to enter the number. Known load is
entered "X 10" i.e.; 5000 kilograms is
entered as 500. After the known load is
entered, press both buttons at the same
time and lift the known load. When the
load is stabilized press either button. A
new Calibration Code will be calculated
and the known load will be displayed. This
completes the procedure.
Scale
Scale, matches the analog output of the
Indicator to an optional remote analog meter.
Display is previously entered number. To
change the number use the Right button to
select a digit, use the Left button to scroll
the digit to the desired number. Entry is
times 10.
LB KG Units, selects the Indicator units (pounds or
kilograms).
Display is previously selected unit. To
change the unit, use the Left button.
XX - V Version, is the revision level of the Indicator
hardware and software.
Version is for information only, it cannot
be changed.

Load Weigh System Operation Instructions 3-7
The Setup Mode continued
Indicator Dampening
The Damp or dampening routine allows the pilot to adjust the Indicator
dampening level to his preference. The dampening routine is a program that
stabilizes the Indicator reading. It offers a trade-off between Indicator
responsiveness and stability. Ten dampening levels are available, from 0
through 9. At level 0 the display responds to the slightest change in weight.
However, if the load bounced even slightly, the display digits would respond
instantly, making the display look unstable. With a dampening level of 9,
the display would be stable under the most turbulent conditions, however, it
would take several seconds for the display to respond to a change in weight.
The ideal dampening level will depend on the flying conditions. A mid
range setting of 5 or 6 is usually adequate.
To Look at or Change the Dampening Level
With the Indicator powered up and in the Run Mode, press both buttons at
the same time to go to Setup. Scroll through the menu, using the Left button,
until the word DAMP is displayed. To look at or change the Dampening
Level press the Right button. The display should look like this:
Figure 3-5 Changing Dampening Level
The CAL and the DAMP legend is turned on and the previously set
dampening level is displayed. To return to Run without changing the current
dampening level press both the Right and Left buttons at the same time. To
change the dampening number, use the Left button to scroll the blinking
digit to the desired number. After the selection has been made press both the
Right and Left buttons at the same time to return to Run.

3-8 Load Weigh System Operation Instructions
The Setup Mode continued
Indicator Calibration
The Calibration Code, or CAL code, is a mandatory input. The Indicator
will not accurately display the load without the correct Calibration Code.
The Calibration Code scales the signal from the Load Cell.
If the C-39 Indicator was supplied as part of a Load Weigh System, the
Calibration Code will have been entered into the Indicator by the factory,
however, it should be confirmed. If the Indicator is to be mated to a different
Load Cell, it must be calibrated before use. Calibration can be done by
entering a known Calibration Code or by lifting a known load and having
the Indicator calibrate itself. Both options are discussed below.
To Look at or Change the Calibration Code
With the Indicator powered up and in the Run Mode, press both buttons at
the same time to go to Setup. Scroll through the menu until the word CODE
is displayed, then press the Right button. The display should look like this:
Figure 3-6 Changing the CAL Code
The CAL legend is turned on and the previously entered or computed
Calibration Code is displayed. To return to Run without changing the CAL
Code, press both the Right and Left buttons at the same time. To change the
Calibration Code, use the Right button to select the digit to be changed, then
use the Left button to scroll the blinking digit to the desired number. When
the Calibration Code has been entered, press both the Right and Left button
at the same time to return to Run.
Depending on the type of Load Cell, the
Calibration code could be a 3 or 4 digit number. If
the Calibration Code is a 3 digit number a leading
zero (0) must be used. For example if a Load Cell
had a CAL Code of 395 it would be entered as
0395.

Load Weigh System Operation Instructions 3-9
The Setup Mode continued
To Look at or Change the Calibration Code, continued
If the load cell Calibration Code is not known or as a cross check, the
Indicator can generate the Calibration Code. This is done by entering the
weight of a known load into the Indicator LOAD routine and then lifting the
load. See the section Calibration by Lifting a Known Load.
Installation Zero
Installation zero is a routine that matches the Indicator to the INSTALLED
Load Cell. It adjusts the Indicator reading to compensate for the weight of
the Cargo Hook on the Load Cell and whatever zero offset is built into the
Load Cell. The Installation Zero procedure is not mandatory. If done the
Indicator will read zero when the Un-Zero button is pressed and there is no
weight on the Cargo Hook. If the Installation Zero is not done, the Indicator
will show the weight of the Cargo Hook plus the value of the Load Cell zero
offset.
To Run the Installation Zero Routine
With the Indicator powered up and in the Run Mode, press both buttons at
the same time to go to Setup. Scroll through the menu until the symbol "0
in" is displayed, then press the Right button. The CAL legend will be turned
on and the current weight on the Cargo Hook will be displayed and blinking.
Remove any weight that is not to be zeroed out and press either button to
complete the procedure and return to the Run Mode.
Calibration by Lifting a Known Weight
Calibration by lifting a known weight is a Setup routine that calculates the
Calibration Code for the Load Cell attached to the Indicator. It is useful if
the load cell Calibration Code is not known or as a cross check to the
accuracy of a known Calibration Code. The procedure is done by entering
the known weight into the Indicator and then lifting the weight. This
procedure can be done in the shop or on the helicopter. The accuracy of the
procedure is directly related to the weight of the known load. If for example
the procedure was done with a 1,000 pound load that was assumed to weigh
only 900 pounds, all subsequent lifts would be displayed 10% light.
Be sure to include the weight of everything
between the Cargo Hook and the load, i.e. the
cable, net, dirt, etc.
The closer the known load approaches the lifting capacity of the helicopter,
the more accurate the calculated Calibration Code will be.

3-10 Load Weigh System Operation Instructions
The Setup Mode continued
To Run the Calibration by Lifting a Known Weight Routine
With the Indicator powered up and in the Run Mode, press both buttons at
the same time to go to Setup. Scroll through the menu until the word LOAD
is displayed, then press the Right button. The display should look like this:
Figure 3-7 Running CAL Routine
The CAL legend is turned on and the first digit is blinking. The previous
load is not displayed. At this point if you wish to return to the Run Mode
without changing the Calibration Code, power cycle the Indicator. At this
point it is not possible to return to the Run Mode without changing the
Calibration Code by using the buttons on the Indicator front panel.
To proceed with the procedure, use the Right button to select the digit to be
changed, then use the Left button to scroll the blinking digit to the desired
number. Note that the known weight is entered "X 10"; a 1000 pound load is
entered as 100. When the known load has been entered, press both the Right
and Left button at the same time. The display will look like this:
Figure 3-8 Entering Load in CAL Routine
Load Weigh System Operation Instructions 3-11
The Setup Mode continued
Calibration by Lifting a Known Weight, continued
The CAL legend and the digits will be blinking. Again, at this point if you
wish to return to the Run Mode without changing the Calibration Code,
power cycle the Indicator. It is not possible to return to the Run Mode by
using the buttons on the Indicator front panel without changing the
Calibration Code. If you wish to proceed, lift the known load and when it is
stabilized, press either button to complete the procedure. The Indicator will
display the load. This ends the procedure. The Indicator is now calibrated to
the Load Cell. It is a good practice to go to the Code routine and record the
new Calibration code for later reference.
Setting the Scale for a remote analog meter
The Scale routine is used when a user supplied analog meter is connected to
the Indicator. It is used to match or calibrate the analog meter to the
Indicator. The Indicator outputs a 0 to 5 VDC analog signal which is
proportional to the Load Cell load. The Scale number tells the Indicator at
what point in pounds or kilograms it should reach the 5 VDC output. If for
example a 5 volt analog meter is used and its full scale reading is 10,000
pounds, the number entered into the Indicator Scale routine would be 1000
(the number is entered X 10). This number tells the Indicator that it should
output the proportional 0 to 5 VDC signal between zero pounds and 10,000
pounds.
The Scale number does not affect Onboard Slave Meters, P/N 210-106-00 or
210-180-00. This number only affects user supplied instruments connected
to the analog out signal.
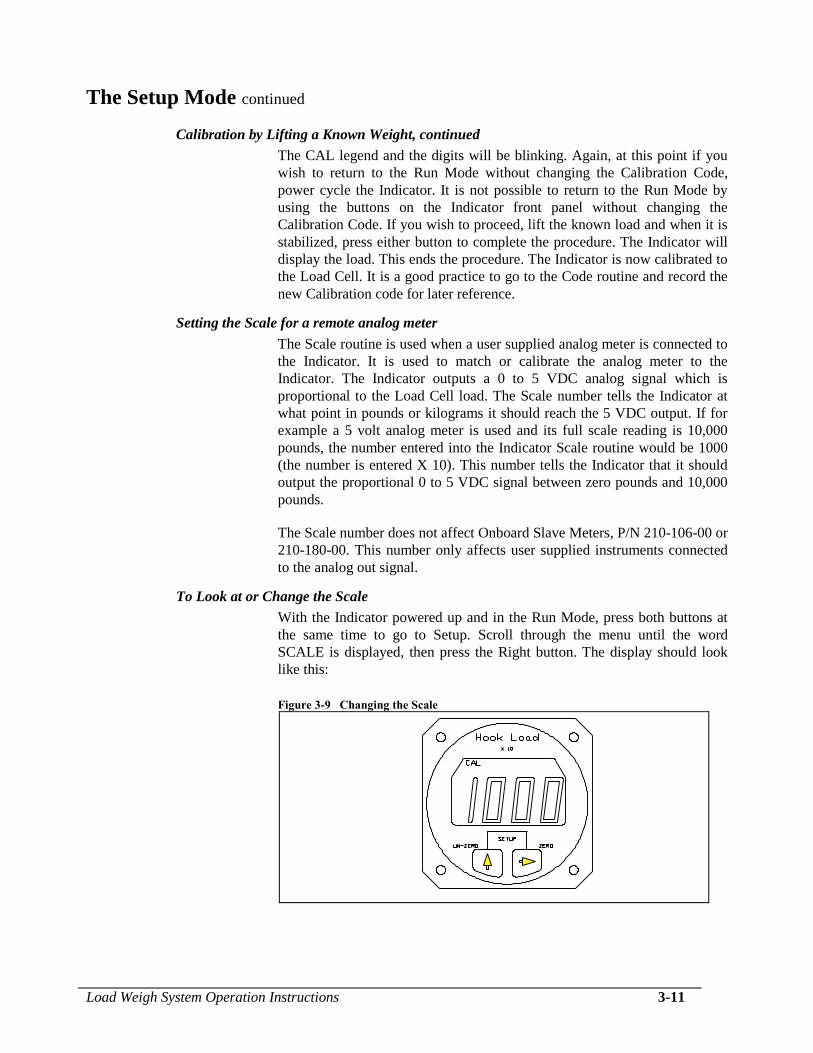
To Look at or Change the Scale
With the Indicator powered up and in the Run Mode, press both buttons at
the same time to go to Setup. Scroll through the menu until the word
SCALE is displayed, then press the Right button. The display should look
like this:
Figure 3-9 Changing the Scale

3-12 Load Weigh System Operation Instructions
The Setup Mode continued
To Look at or Change the Scale, continued
The CAL legend is turned on and the previously set Scale number is
displayed. To return to Run without changing the Scale, press both the Right
and Left button at the same time. To change the Scale number, use the Right
button to select a digit to be changed, then use the Left button to scroll the
blinking digit to the desired number. When the complete Scale number has
been entered, press both the Right and Left button at the same time to return
to Run.
Select KG or LB Units
The units routine sets the display to read in pounds (LB) or kilograms (KG).
To look at or change the Units
With the Indicator powered up and in the Run Mode, press both buttons at
the same time to go to Setup. Scroll through the menu until the word LB or
KG is displayed, then press the Right button. The display should look like
this:
Figure 3-10 Changing the Units
The CAL legend is turned on and the previously set unit is displayed. To
return to Run without changing the units, press both the Right and Left
button at the same time. To change the units press the Left button. When the
selection has been made, press both the Right and Left button at the same
time to return to Run.
The selected units are displayed when in the Run
Mode.

Load Weigh System Operation Instructions 3-13
The Setup Mode continued
Indicator Version
The Version routine displays the Indicator's hardware and software revision
levels. Version is set at the factory and cannot be changed.
Figure 3-11 Looking at Indicator Version

This page intentionally left blank.

Operation Instructions 4-1
Section 4
Operation Instructions
Operating Procedures Daily prior to each cargo hook use perform the following:
1. Ensure that the Cargo Hook Sling Suspension has been properly
installed and that the manual and electrical release cables do not limit
the movement of the hook.
2. Be completely familiar with this Owner’s Manual, Cargo Hook
Component Maintenance Manual 122-005-00 and the ICA Maintenance
Manual 123-012-00.
3. Activate the electrical system and press the Cargo Hook release button
to ensure the cargo hook electrical release is operating correctly. The
mechanism should operate smoothly and the Cargo Hook must release.
Reset the hook by hand after the release. If the hook does not release or
relatch, do not use the unit until the difficulty is resolved.
The cargo hook release solenoid is intended to be
energized only intermittently. Depressing the
electrical release button continuously in excess of
20 seconds will cause the release solenoid to
overheat, possibly causing permanent damage.
4. Activate the manual release lever to test the cargo hook manual release
mechanism. The mechanism should operate smoothly and the Cargo
Hook must release. Reset the hook by hand after release. If the hook
does not release or re-latch do not use the unit until the difficulty is
resolved.
5. Swing the installed Cargo Hook and the suspension to ensure that the
manual release cable assembly and the electrical release cable have
enough slack to allow full swing of each component without straining or
damaging the cables. The cables must not be the stops that prevent the
Cargo Hook or the suspension from swinging freely in all directions.
6. Visually check for presence and security of fasteners, and condition of
cables. Swing the Cargo Hook and the suspension in fore and aft and
side to side directions to check for freedom of rotation at all joints.
See the troubleshooting table in the ICA for additional instructions.

4-2 Operation Instructions
Disconnecting Removable Provisions
For helicopter missions in which the cargo hook sling suspension system is
not needed, its removable provisions may be removed per the following
instructions.
1. Remove the removable section of the manual release cable by un-
clipping it from the bracket on the belly of the helicopter, disengaging
the locking pin (see Figure 2.5.2) and unthreading the Adapter Fitting.
Unclip the Release Cable Cap (see below) from the bracket and thread it
over the open end of the fixed manual release cable assembly and clip it
into the inboard spring clip on the bracket.
Figure 4-1 Manual Release Cable Disconnect
2. Remove the electrical release cable and the load cell cable at the
bulkhead connectors at the fuel tank support frame.
3. Remove the Sling Suspension at the helicopter hard point (reference
Figure 2.4.1).
Release Cable Cap
Fwd
Inbd

Operation Instructions 4-3
Cargo Hook Loading The cargo hook can easily be loaded with one hand. A load is attached to
the hook by pushing the ring upward against the upper portion of the load
beam throat, as illustrated in Figure 4.2, until an internal latch engages the
load beam and latches it in the closed position.
Figure 4.2 Cargo Hook Loading

4-4 Operation Instructions
Cargo Hook Rigging Extreme care must be exercised when rigging a load to the Cargo Hook.
Steel load rings are recommended to provide consistent release performance
and resistance to fouling. The following illustration shows the recommended
rigging, but is not intended to represent all rigging possibilities.
Some combinations of small primary rings and
large secondary rings could cause fouling during
release.
It is the responsibility of the operator to assure the cargo hook will function
properly with each rigging.
Nylon Type Straps and Rope
Nylon type straps (or similar material) or rope
must not be used directly on the cargo hook load
beam. If nylon straps or rope must be used they
should be first attached to a steel primary ring.
Verify that the ring will freely slide off the load
beam when it is opened. Only the primary ring
should be in contact with the cargo hook load
beam.

Operation Instructions 4-5
Cargo Hook Rigging, continued Figure 4.3 Example of Recommended Cargo Hook Rigging
PRIMARY RING
SECONDARY RING
LOAD

This page intentionally left blank.

Maintenance 5-1
Section 5
Maintenance Refer to the Instructions for Continued Airworthiness (ICA) manual 123-
012-00 for maintenance of the cargo hook suspension system. For
maintenance of the cargo hook refer to Cargo Hook Component
Maintenance Manual 122-005-00.
Instructions for Returning Equipment to the Factory
If an Onboard Systems product must be returned to the factory for any
reason (including returns, service, repairs, overhaul, etc) obtain an RMA
number before shipping your return.
An RMA number is required for all equipment
returns.
To obtain an RMA, please use one of the listed methods.
Contact Technical Support by phone or e-mail
Generate an RMA number at our website:
http://www.onboardsystems.com/rma.php
After you have obtained the RMA number, please be sure to:
Package the component carefully to ensure safe transit.
Write the RMA number on the outside of the box or on the
mailing label.
Include the RMA number and reason for the return on your
purchase or work order.
Include your name, address, phone and fax number and email (as
applicable).
Return the components freight, cartage, insurance and customs
prepaid to:
Onboard Systems
13915 NW 3rd Court
Vancouver, Washington 98685
USA
Phone: 360-546-3072

This page intentionally left blank.

System Part Numbers 6-1
Section 6 System Part Numbers
210-204-00 AS 350 Sling Fixed Provisions
Item Part Number Description Qty
1 232-151-00 Quick Disconnect Support Assembly 1
2 232-150-00 Release Handle Assembly 1
4 210-095-00 C-39 Indicator 1
5 290-772-00 Indicator Mount Bracket 1
6 290-781-00 Cable Support Bracket 1
7 290-783-00 Relay Bracket 1
8 445-005-00 Relay 1
9 290-782-00 Connector Bracket 1
10 500-065-00 Grommet Edging 1
11 270-106-02 Load Weigh Internal Harness 1
12 270-108-00 Release Internal Harness 1
13 215-165-00 Multiple Sticker Sheet 1

6-2 System Part Numbers
System Part Numbers continued
210-206-00 AS 350 Sling Removable Provisions
Item Part Number Description Qty
1 232-148-00 AS 350 Sling Gimbal Assembly 1
2 210-203-03* AS 350 Sling Load Cell Assembly 1
3 528-023-01 3,500 lb. Keeperless Cargo Hook 1
4 270-110-01 Electrical Release Cable Assembly 1
5 268-024-02 Manual Release Cable Assembly 1
6 215-167-00 Max Hook Load 1660 Decal 1 *Supersedes 210-203-00, these P/N’s are interchangeable.

System Part Numbers 6-3
System Part Numbers continued
232-150-00 Release Handle Assembly
Item Part Number Description Qty
1 268-025-00 Fixed Manual Release Cable 1
2 510-317-00 Screw 2
3 290-757-00 Cover 1
4 510-210-00 8-32 Locking Heli-Coil 2
5 290-754-00 Lever Body 1
6 517-049-00 Pulley 1
7 290-759-00 Shaft 1
8 510-450-00 Bolt, handle pivot 1
9 510-449-00 Bolt, pulley pivot 1
10 290-755-00 Handle 1
11 510-042-00 Washer 1
12 510-082-00 Nut 2
13 510-125-00 Cotter Pin 2
14 510-248-00 10-32 Heli-Coil 2
15 290-753-00 Clamp Half 1
16 510-390-00 Screw, Mounting Clamp 2
17 510-095-00 Washer 3

6-4 System Part Numbers
System Part Numbers continued
232-151-00 Quick Disconnect Support Assembly
Item Part Number Description Qty
1 290-797-00 Attach Bracket 1
2 290-791-00 Release Cable Cap 1
3 514-053-00 Spring Clip 1
4 510-102-00 Nut 2
5 510-085-00 AN 970-3 2
6 510-455-00 NAS 6603-13 2
7 514-050-00 Spring Clip 1
8 510-211-00 Button Head Screw 3
9 531-016-00 Crimp Sleeve 2
10 531-015-00 Lanyard 6”

System Part Numbers 6-5
System Part Numbers continued
232-144-00 Sling Gimbal Sub-Assembly
Item Part Number Description Qty
1 517-051-00 Bushing 1
2 290-294-00 Attach Bushing 2
3 290-767-00 Gimbal 1
1
2
3

6-6 System Part Numbers
System Part Numbers continued
232-148-00 Sling Gimbal Assembly
Item Part Number Description Qty
1 510-081-00 Cotter pin 1
2 510-259-00 Nut 1
3 510-336-00 Washer 2
4 290-766-00 Gimbal Pin 1
5 510-183-00 Washer 2
6 290-332-00 Attach Bolt 1
7 232-144-00 Swing Gimbal Sub Assembly 1
8 510-451-00 Bolt 1
9 510-174-00 Washer 1
10 510-170-00 Nut 1
11 510-178-00 Cotter pin 1

Certification 7-1
Section 7 Certification FAA STC

7-2 Certification
Canadian Approval

Certification 7-3
EASA Approval

7-4 Certification
EASA Approval continued