owner’s manual and suspension setup...
TRANSCRIPT

Owner’s Manual and Suspension Setup Guide
Copyright © Kreft LLC 2016


Congratulations! Thanks for choosing Kreft Moto’s suspension tuning services.
To get the most out of your new suspension setup, we recommend following a
few basic guidelines for initial setup, fine tuning, and servicing of your suspension
components. This manual goes into greater detail for those who wish to learn
more about fine-tuning their Kreft suspension.
Contents Initial Setup ............................................................................................................ 5
Front fork installation ........................................................................................ 5
Rear shock installation ....................................................................................... 6
Setting rider sag ................................................................................................. 7
Tuning guide ......................................................................................................... 10
Compression vs. rebound damping ................................................................. 10
Damping adjustments ...................................................................................... 10
Location of adjusters (specific to bike model) ................................................. 11
How “clickers” work ......................................................................................... 12
Low speed vs. high speed damping ................................................................. 13

High speed compression adjuster (HSC) .......................................................... 13
Tuning your suspension ................................................................................... 14
Tuning for speed and soil type ......................................................................... 15
Tuning chassis balance ..................................................................................... 16
Radical changes in terrain ................................................................................ 19
Troubleshooting ............................................................................................... 21
Servicing your suspension .................................................................................... 22
Recommended service interval ....................................................................... 22
Valving updates ................................................................................................ 22
Initial Setup
Front fork installation
1. Insert the fork legs into the triple clamps and install each leg at the same height above the triple clamp. Use the fork height recommended by Kreft Moto for your bike (see Specifications).
2. Snug the triple clamp bolts just firmly enough to hold the fork legs in place. 3. Clean the fork lugs on the inside where they hold the axle. They should be
smooth and polished with no corrosion. The same goes for the axle itself. 4. Install the front axle only
with no wheel. Verify that it installs easily and will rotate freely. If it does not, try raising or lowering one fork leg by small amounts to help bring the axle into alignment.
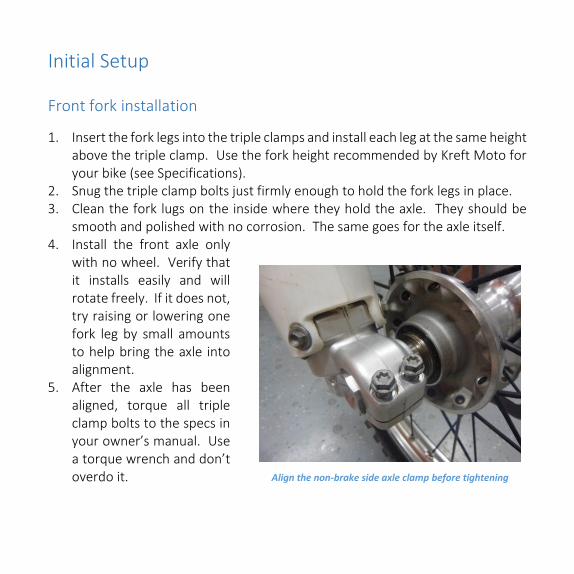
5. After the axle has been aligned, torque all triple clamp bolts to the specs in your owner’s manual. Use a torque wrench and don’t overdo it. Align the non-brake side axle clamp before tightening

6. Install the front wheel. Temporarily snug the non-brake side axle clamp and tighten the axle nut to the torque recommended in your owner’s manual.
7. Loosen the non-brake side axle clamp bolts. Torque the brake sideaxle clamp bolts ONLY.
8. Verify that the non-brake side clamp “floats” freely back and forth on the axle. You should be able to move in 1-2mm in each direction.
9. Allow the axle clamp to find its natural centered location, then torque the non-brake size axle clamp bolts. Now you are aligned!
Rear shock installation
1. Check the condition of linkage bearings or PDS heim joint. 2. Install the shock in the reverse order of removal (presumably, you removed
the shock before sending it to Kreft Moto for service). 3. Tighten linkage bolts and shock mount bolts to the torque specified in your
owner’s manual.
Setting rider sag
“Sag” is how much the rear shock compresses with a rider on board the motorcycle.
Use the following procedure to measure and adjust rider sag:
1. Get a buddy to help. You can’t take an accurate sag measurement by yourself.
2. Support the bike on a stand with its wheels off the ground. The rear
suspension should be fully extended.
NOTE: Make sure your suspension linkage pivots and shock mounts are in good
condition. If a bearing is rusty or sticky, you won’t be able to set sag accurately.
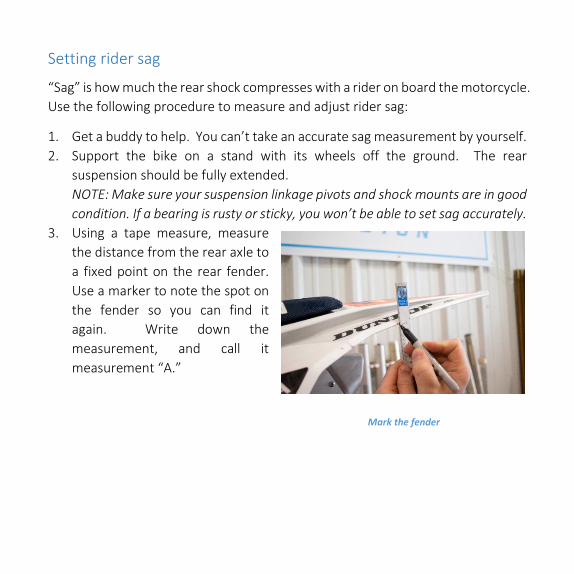
3. Using a tape measure, measure
the distance from the rear axle to
a fixed point on the rear fender.
Use a marker to note the spot on
the fender so you can find it
again. Write down the
measurement, and call it
measurement “A.”
Mark the fender
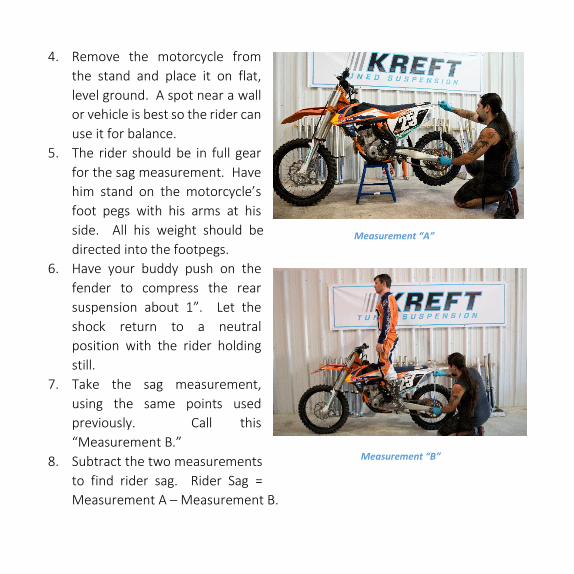
4. Remove the motorcycle from
the stand and place it on flat,
level ground. A spot near a wall
or vehicle is best so the rider can
use it for balance.
5. The rider should be in full gear
for the sag measurement. Have
him stand on the motorcycle’s
foot pegs with his arms at his
side. All his weight should be
directed into the footpegs.
6. Have your buddy push on the
fender to compress the rear
suspension about 1”. Let the
shock return to a neutral
position with the rider holding
still.
7. Take the sag measurement,
using the same points used
previously. Call this
“Measurement B.”
8. Subtract the two measurements
to find rider sag. Rider Sag =
Measurement A – Measurement B.
Measurement “A”
Measurement “B”

Compare the measured rider sag with the recommended sag value for your bike
provided by Kreft Moto.
If measured rider sag is less than the recommended sag, reduce shock
spring preload.
If measured rider sag is more than the recommended sag, increase shock
spring preload.
NOTE: It is easiest to change shock spring preload with the bike on a stand and the
rear wheel off the ground.
Continue measuring rider sag and changing preload until the rider sag is +/- 2mm
from the recommended value.
Compression vs. rebound damping
Damping is resistance to movement. In motorcycle suspension, oil passing
through valves inside the suspension converts kinetic energy (movement) into
heat. This helps dissipate the force of bumps.
Compression damping slows compressing motions of the fork or shock absorber.
Rebound damping slows the extension of the fork or shock back to full travel.
Damping adjustments
Damping adjusters are also called “clickers” because of the detent mechanism that
makes them turn in fixed increments. Turn the adjuster knob or screw to make an
adjustment.
Clockwise → increase damping force
Counter-clockwise → reduce damping force
Full clockwise → fully closed (stiff) a/k/a “position zero”
Full counter-clockwise → fully open (soft)
To count clicks, turn the adjuster knob or screw clockwise until it lightly bottoms.
The adjuster is now fully closed. This is position zero. Count the clicks as you turn
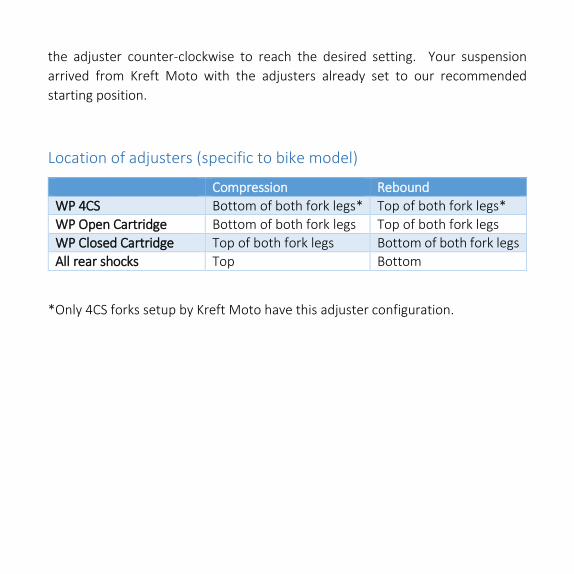
the adjuster counter-clockwise to reach the desired setting. Your suspension
arrived from Kreft Moto with the adjusters already set to our recommended
starting position.
Location of adjusters (specific to bike model)
Compression Rebound
WP 4CS Bottom of both fork legs* Top of both fork legs*
WP Open Cartridge Bottom of both fork legs Top of both fork legs
WP Closed Cartridge Top of both fork legs Bottom of both fork legs
All rear shocks Top Bottom
*Only 4CS forks setup by Kreft Moto have this adjuster configuration.

How “clickers” work
The external damping adjusters provided on modern
motorcycles help fine tune the suspension for your
preferences or terrain. The low-speed adjusters are
often called “clickers” because of the detent
mechanism that makes them move in defined
increments with a detectible click. The adjuster is a
needle valve – essentially a conical screw (needle) that
partially blocks a small hole (orifice). When the adjuster
is fully closed, the needle shuts off oil flow through the
orifice. Are you turn the clicker out, more oil is allowed
to flow through the orifice.
Clickers make the entire damping curve softer or stiffer
by the same amount. Proportionally speaking, they
have a much greater impact on low speed suspension movements because the
total damping force is small at low speeds. For example, a two-pound change in
damping force created by the adjuster is more significant when total damping
force is five pounds rather than fifty pounds. That’s why clickers are also known
as low-speed adjusters.
No matter where your adjusters are set, eventually the fluid pressure overcomes
the flow capacity of the orifice. The building fluid pressure forces the valving shims
away from the piston face and allows oil to flow through. The adjusters have no
effect on the shim stack itself.
A simple needle valve.

Low speed vs. high speed damping
With a few exceptions, suspension damping is speed dependent. That means the
amount of damping force varies in proportion to how fast the suspension is moving.
Incidentally, the speed of the bike doesn’t matter – it’s the speed the wheels are
moving up and down that counts.
Tuners often refer to “low speed” damping or “high speed” damping to
differentiate among broad categories of suspension movements. Brake dive is an
example of a low speed event. Weight is transferred forward under braking and
forces the front suspension down. Skimming whoops is a high speed event. The
suspension compresses very rapidly each time the wheels slam into the ground.
High speed compression adjuster (HSC)
The rear shock absorber has an additional adjuster designed to control high speed
compression (HSC) damping. This adjuster is a 17mm nut located around the
outside of low speed compression adjuster screw. The HSC adjuster does not have
detents (“clicks”), so we count revolutions from the fully counter-clockwise
position rather than clicks. A typical high speed compression setting is 2.0 turns
out.
Fine tuning your suspension
First thing’s first – go ride your bike. Give yourself time to get used to the new
suspension.
After the initial adjustment period, you may wish to spend some time fine tuning
the suspension to your specific preferences. This is entirely optional. Kreft Moto
delivers the suspension to you with our best estimate of the perfect setup for you,
and many riders never deviate from those settings.
If you do choose to fine tune on your own, it’s best to conduct testing on a quiet
section of trail or track you know well. Pick a place that is representative of where
you ride most often, and someplace you can ride the same short section over and
over again in rapid succession. Try two laps on a track, or about a quarter mile of
trail.
Start at the baseline recommended settings and ride your test loop twice, paying
careful attention to how the bike is responding to the terrain. Try to ignore your
expectations – just ride and observe.
Always make one adjustment at a time. Run the loop, adjust, then run the loop
again and observe the effects. It is often helpful to verify your observations by
returning to the previous setting. This can be a tedious process, but you will arrive
at a clear conclusion. There is no need to follow a specific order of adjustments
like “fork first” or “rebound first.” Go after where you think the issue resides, but
be prepared to acknowledge when you’re wrong and try something else.

Bike Speed
Although we make one adjustment at a time, don’t be afraid to make aggressive
changes. Especially when you are new to tuning. Rather than adjusting one or
two clicks and questioning your observations, make a big change –five or ten clicks.
This will leave no doubt that your observations are real.
The goal is to “bracket” the ideal setting. Identify where in the range the adjusters
are definitely too restrictive and where they are definitely too loose, then work in
gradually until you are able to zero in the best setting. With practice, you will be
able to detect even very small changes in the damping settings.
Tuning for speed and soil type
ROCKS HARDPACK LOAM MUD SAND
SLOWER TERRAIN FASTER TERRAIN
Soil Conditions

Chassis balance
Chassis balance describes how weight is distributed on the front and rear wheels
of a motorcycle in motion. An unbalanced suspension setup will cause all kinds of
handling and suspension problems related to uneven or unstable weight
distribution. Spring rates, preload, fork height in the triple clamp, and valving
configuration all affect chassis balance. While the damper internals are usually left
to a specialist, springs, preload, and fork height are all accessible to the average
rider.
So how do you know if your bike’s balance is holding you back? Make an
investment in teaching yourself what a balanced bike feels like.
Balance tuning procedure:
1. There are many ways to influence the chassis balance, so I recommend simplifying the process by altering just one variable: shock spring preload (sag). Leave the fork height and fork spring preload at Kreft’s recommended settings.

2. Start with the recommended race sag to establish a baseline. Ride your favorite section of track or trail several times and take note of the bike’s handling characteristics.
3. Next, increase preload on the shock spring by one full turn and test.
4. Then go the other direction. Reduce preload by two turns (one turn looser than baseline) and test.
5. Establish the range of preload that feels best. From there, move on to smaller adjustments of one-half turn, one-quarter turn and so on. As with damping adjustments, the goal is to bracket the acceptable range and gradually zero in on the ideal setting.
6. The fork rebound setting can be used in conjunction with shock preload to fine-tune turning feel. The rebound clicker is very sensitive, so adjust in increments of one click at a time and use caution in straying too far from the baseline setting.
Why can’t my tuner deliver the bike perfectly balanced for me?
Every combination of bike and rider is unique. Some people ride far back on the bike, some are always over the gas tank. Some people brake hard into corners,
The X-Trig adjuster makes it easier to adjust sag

while others prefer to maintain momentum. Even tire choice and air pressure have a significant affect balance. Kreft Moto will provide an excellent foundation for a balanced setup, but some fine-tuning by the rider will give the best possible result.
Handling characteristics of a front-end high motorcycle
“Floppy” steering. Feels like the handlebars are perched on a teeter-totter. In a slow, tight turn, counter-steering is required to keep the handlebars from flopping all the way over to the steering stop.
Light and dancy steering. The steering jumps too easily within 10° of center, requiring excess input at the handlebar to keep the steering on line.
Rider continually feels the need to scoot toward the front of the bike.
Handling characteristics of a rear-end high motorcycle
Heavy steering feel. Excess input at the handlebar required to initiate and complete a turn.
Steering will “knife” (turn in violently) in sand or soft soil, especially during corner initiation.
Rider continually feels the need to scoot toward the back of the bike.
Handling characteristics of a well-balanced motorcycle
Very little input at the handlebar required to initiate or finish a turn. Calm and comfortable on straightaways. The bike feels almost effortless to ride.

The rider’s body is naturally returned to the sweet spot in the center of the bike, not feeling the need to adjust his riding position.
Radical changes in terrain
Your suspension is designed to perform optimally under the riding conditions you
described to Kreft Moto when ordering the suspension service. If you plan to use
the motorcycle for a radically different type of terrain, aggressive adjustments will
be necessary.
Here’s an example. A woods rider who normally rides technical, rocky terrain
decides to ride a motocross track for a day. His suspension is tuned to absorb
sharp rocks, not for landing large jumps. This rider should make aggressive
changes from his baseline settings:
Fork compression: +75%
Fork rebound: +40%
If the fork bottoms, add oil in 10cc increments until bottoming stops
Shock low speed compression: +50%
Shock high speed compression: +1.25 turns
Shock rebound: +40%
This means that if the rider’s original fork compression setting was 20 clicks out,
he should increase that setting by 75% to 5 clicks out. If he finds the ride is harsh

and bottoming is not an issue, he should back out the adjusters until an
appropriate balance between comfort and bottoming resistance is achieved.
The same principle applies to riders transitioning in the other direction, from
motocross to technical singletrack. Aggressive clicker adjustments are not a
substitute for a revalve, but in a pinch it is a lot better than nothing at all!
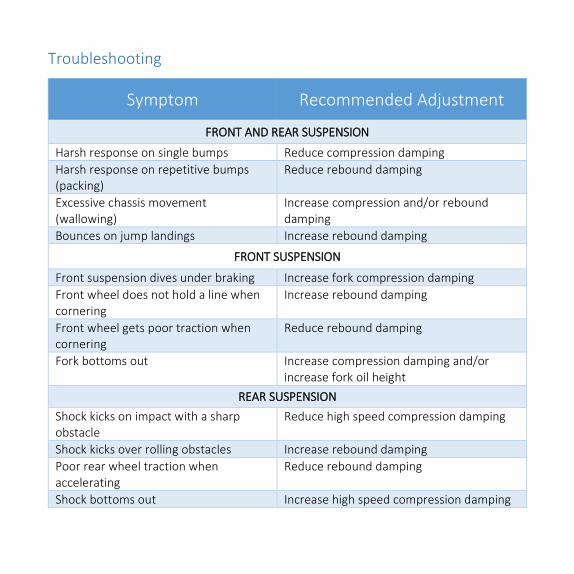
Troubleshooting
Symptom Recommended Adjustment
FRONT AND REAR SUSPENSION
Harsh response on single bumps Reduce compression damping
Harsh response on repetitive bumps (packing)
Reduce rebound damping
Excessive chassis movement (wallowing)
Increase compression and/or rebound damping
Bounces on jump landings Increase rebound damping
FRONT SUSPENSION
Front suspension dives under braking Increase fork compression damping
Front wheel does not hold a line when cornering
Increase rebound damping
Front wheel gets poor traction when cornering
Reduce rebound damping
Fork bottoms out Increase compression damping and/or increase fork oil height
REAR SUSPENSION
Shock kicks on impact with a sharp obstacle
Reduce high speed compression damping
Shock kicks over rolling obstacles Increase rebound damping
Poor rear wheel traction when accelerating
Reduce rebound damping
Shock bottoms out Increase high speed compression damping

Recommended service interval
Kreft Moto recommends servicing both fork and shock at 40-hour intervals. Very
fast or heavyweight riders may require more frequent service; novices and
lightweight riders may be able to get by with less.
Valving updates
Kreft Moto offers valving updates at no additional charge during a standard service. We offer this service for two reasons: (1) to provide our customers with continual updates using the latest improvements, and (2) to facilitate minor valving adjustments in accordance with the rider’s preferences.

Suspension Service Log
Date Hours/
Mileage Description
Performed by

Kreft Moto 20780 High Desert Lane, Ste 1 Bend, OR 97701 Telephone: 541-797-0700 Email: [email protected] Web: www.kreftmoto.com Facebook: www.facebook.com/pages/Kreft-Moto/