owner's manual 2002 - spaparts123.net · 4 emerald spa owner's manual save these...
TRANSCRIPT

copyright 2003 Emerald Spa Corporation
(rev. 6/03) All Rights Reserved
Introduction Congratulations on your purchase of the finest whirlpool spa on the market today. Emerald SpaCorporation welcomes you to the Emerald Spa Life-style! We are confident that this purchase will fulfillall your comfort, therapy and relaxation needs.
With proper care, your spa will provide many years of comfort and pleasure. Please take the time toread all of the instructions before you install your Emerald or Cygnus Series Spa. This Owner's Manualwill help you understand all the features of your spa and ensure that you get the most from your invest-ment.
Remember, your beautiful new spa is a powerful appliance! You owe it to yourself, your family andfriends, to make sure that the spa is installed correctly and safely.
This manual explains safety precautions, installation instructions, operating directions, and maintenanceprocedures. If you have questions after reading this manual, please call your Emerald Spa ServiceRepresentative at 1-800-766-7727.
Read and understand all safety, installation, operating instructions and all warningsand cautions before adding water or attaching electrical power.
InfInfInfInfInfororororormamamamamation on tion on tion on tion on tion on YYYYYour Spaour Spaour Spaour Spaour Spa
Spa Model:Spa Model:Spa Model:Spa Model:Spa Model:
PPPPPooooowwwwwer Per Per Per Per Pacacacacack Model:k Model:k Model:k Model:k Model:
Serial #:Serial #:Serial #:Serial #:Serial #:

Warnings, Cautions,
and Notes
Throughout this manual, various Warnings, Cautions, and Notes will appear in the left margin or at thebeginning of the text associated with the Warning, Caution, or Note. These comments range in importancefrom helpful hints to situations where the possibility of personal injury exists. Please take the time to readand understand them. The pictures and drawings may not reflect product changes that occurred after theprinting of this manual.
Warnings, Cautions, and Notes appear as follows:
WARNING:Indicates a situation in which
personal injury may occur.
CAUTION:Indicates a situation in which
damage to equipment ormaterial may occur.
NOTE:Provides helpful information for
proper operation of your Emerald whirl-pool spa.
Model and Serial Number Locations
Refer to the illustration below to locate and record the model number and serial number of both your Spa andSpa Power Pack.
SAVE THESE INSTRUCTIONS

Table of Contents INTRODUCTION ....................................................................................2IMPORTANT SAFETY INSTRUCTIONS ...................................................4-5IMPORTANT USER SAFETY INSTRUCTIONS .......................................6-7SPA LOCATION .........................................................................................8INSTALLATION INSTRUCTIONS ...............................................................9
General Procedures ......................................................................9240V Systems.................................................................................10-12
FEATURES AND CONTROLS......................................................................13Spa At-A-Glance................................................................................... 13Equipment Compartment...................................................................14Power Pack...................................................................................15-17Spa Side Control Panels.................................................................18-30
Lite Leader......................................................................18-19SS-1D.................................................................................20-21SS-3D.............................................................................................22-23DS-2.........................................................................................24-26DS-4.....................................................................................27-32
In-spa Features ............................................................................................33-36STARTING AND USING YOUR SPA...................................................................37
Installation of Filter Element....................................................................37Proper Water Level...............................................................................38Bleeding Air for one and two pump systems..................................38Testing the Ground Fault Circuit Interrupter (GFCI)......................39Pump Priming........................................................................................39-40Setting the Thermostat............................................................................41
SPA WATER CHEMISTRY.......................................................................................42Chemical Safety Tips.............................................................................42Spa Capacity.............................................................................................42pH Control.............................................................................................43Disinfecting Your Spa............................................................................44Ozone Generator....................................................................................45Other Water Chemistry Considerations.......................................................45
MAINTAINING YOUR SPA......................................................................................46Draining the Water....................................................................................46Cleaning the Spa Shell..............................................................................47Cleaning the Filter....................................................................................47Space Saver II Filtration System.............................................................48Relamping the Underwater Light............................................................48Standby Mode...........................................................................................48Winterizing Your Spa..............................................................................49The Spa Cabinet.................................................................................49
TROUBLESHOOTING.......................................................................................50-54Lite Leader, SS-1D & SS-3D................................................................50-51DS-2 & DS-4....................................................................................52-54
ELECTRICAL SCHEMATICS .......................................................................55-59Lite Leader.........................................................................................................55SS-1D...............................................................................................................56SS-3D.............................................................................................................57DS-2..................................................................................................................58DS-4..................................................................................................................59

IMPORTANT SAFETYINSTRUCTIONS
When installing and using this electrical equipment, basic safety precautions should always be adhered to,including the following:
1. READ AND FOLLOW ALL INSTRUCTIONS.
2. WARNING: To Reduce the risk of injury, do not permit children to use this product unless they areclosely supervised at all times.
3. A wire connector is provided on this unit to connect a minimum No. 8 AWG (8.4mm2) solid copperconductor between this unit and any metal equipment, metal enclosures of electrical equipment,metal siding, metal sliding doors, metal rails, metal water pipe, or conduit within 5 feet (1.5m) ofthe unit.
4. DANGER: Risk of accidental drowning. Extreme caution must be exercised to preventunauthorized access by children. To avoid accidents, ensure that children cannot use this spaunless they are supervised at all times.
5. DANGER: Risk of injury. The suction fittings in this spa are sized to match the specific water flowcreated by the pump. Should the need arise to replace the suction fittings or the pump, be sure thatthe flow rates are compatible. Never operate your spa if the suction fittings are broken or missing.Never replace a suction fitting with one rated less than the flow rate marked on the original suctionfitting.
6. DANGER: Risk of electric shock. Install at least 5 feet (1.5m) from all metal surfaces. As analternative, a spa may be installed within 5 feet of metal surfaces if each metal surface ispermanently connected by a minimum No. 8 AWG (8.4mm2) solid copper conductor to the wireconnector on the terminal box that is provided for this purpose.
7. DANGER: Risk of electric shock. Do not permit any electric appliance, such as a light, telephone,or television within 5 feet (1.5m) of a spa.
General
4 Emerald Spa Owner's Manual
SAVE THESE INSTRUCTIONS

IMPORTANT SAFETYINSTRUCTIONS
When installing and using this electrical equipment, basic safety precautions should always be adhered to,including the following:
1. READ AND FOLLOW ALL INSTRUCTIONS.
2. Read and follow all General Safety Instructions provided on pg. 4.
3. A terminal marked "GROUND" is provided within the motor control enclosure. To reduce the riskof electrical shock, connect this terminal to the grounding terminal of the electric supply panel witha continuous green insulated copper wire equivalent in size to the circuit conductors supplying thisequipment.
4. This equipment must be provided with a ground fault circuit interrupter located in the powersupply panel as installed by an electrician. Before each use of your spa, with the power turned on,push the test button. A red indicator should appear. Push the reset button, and the red indicatorshould disappear. IF THE INTERRUPTER FAILS TO OPERATE IN THIS MANNER, THERE IS AGROUND CURRENT FLOWING, INDICATING THE POSSIBILITY OF AN ELECTRIC SHOCK.Shut off the power to the spa until the source of the breakdown has been identified andcorrected.
5. The electrical service panel should be equipped with a 50-amp GFCI overcurrent protective device.
6. The minimum supply conductor capacity is 50 Amp and should be sized as follows:No. 6 AWG, or No. 8 AWG 75o C.
7. The electrical supply for the spa must include a suitably rated switch or circuit breaker to open allungrounded supply conductors, to comply with section 422-20 of the National Electrical Code,ANSI/NFPA 70-1999. The disconnecting means must be readily accessible to the spa occupant butmust not be within 5 feet of the spa.
240V Hard WiredConnected
Systems
SAVE THESE INSTRUCTIONS
5Important Safety Instructions

IMPORTANT USER SAFETYINSTRUCTIONS
When using this spa, basic safety precautions should always be followed.
WARNING:As a spa owner, you should always review these instructions with first time or occasional users of the spa.Remember, they may not be aware of the possible risks associated with spa water temperature.
1. READ AND FOLLOW ALL INSTRUCTIONS.
2. WARNING: TO REDUCE THE RISK OF INJURY, do not permit children to use this product unlessthey are closely supervised at all times.
3. DANGER: RISK OF ACCIDENTAL DROWNING. Extreme caution must be exercised to preventunauthorized access by children. To avoid accidents, ensure that children cannot use the spa unlessthey are supervised at all times.
4. WARNING: TO REDUCE THE RISK OF INJURY, the water in a spa should never exceed 104o F[40o C]. Water temperatures between 100o F [38o C] and 104o F [40o C] are considered safe for ahealthy adult for a 10 to 15 minute time period. Lower water temperatures are recommended forextended use [exceeding 10-15 minutes] and for young children.
5. Since excessive water temperatures have a high potential for causing fetal damage during the earlymonths of pregnancy, pregnant or possibly pregnant women should limit spa water temperaturesto 100o F [38o C].
6. Before entering a spa, the user should measure the water temperature with an accurate thermom-eter such as a medical thermometer, since the tolerance of temperature regulating devices vary.
7. The use of alcohol, drugs, or medication before or during spa use may lead to unconsciousness with the possibility of drowning.
To Reduce the Risk of Injury
6 Emerald Spa Owner's Manual
SAVE THESE INSTRUCTIONS

IMPORTANT USER SAFETYINSTRUCTIONS (Continued)
8. Persons suffering from obesity or with a medical history of heart disease, low or high bloodpressure, circulatory system problems, or diabetes should consult a physician before using a spa.
9. Persons using medication should consult a physician before using a spa, since some medicationsmay induce drowsiness while other medications may affect heart rate, blood pressure andcirculation.
10. Extended use of your spa in water temperatures between 100o F and 104o F may causeHYPERTHERMIA (elevated body temperature). Hyperthermia occurs when the internaltemperature of the body reaches a level several degrees above the normal body temperature of98.6o F. The symptoms include dizziness, fainting, drowsiness, lethargy, and an increase in theinternal temperature of the body. The effects of hyperthermia include (1) unawareness of impendinghazard, (2) failure to perceive heat, (3) failure to recognize the need to exit the spa, (4) physicalinability to exit the spa, (5) fetal damage in pregnant women, and (6) unconsciousness, resulting ina danger of drowning.
11. WARNING: The use of alcohol, drugs, or medication can greatly increase the risk of fatalhyperthermia in spas.
12. During Winter months where the temperature is consistently below freezing, check your spaperiodically to assure that it is operating correctly and that the power to the spa has not beeninterrupted as to assure that the water lines are not in danger of feezing.
13. Do not use your spa alone.
14. Make sure that the following emergency telephone numbers are listed at the nearest telephone:physician, hospital, ambulance, and police.
15. Have at least one person in the family learn CPR (cardio-pulminary resuscitation). It could save alife!
SAVE THESE INSTRUCTIONS
7Important User Safety Instructions

SPA LOCATIONOutdoor ConsiderationsIndoor Considerations
There are many things to consider prior to locating your spa. The following lists cover some of the morecommon factors involved in choosing the ideal location.
Local fencing and enclosure codes.
Local electrical and plumbing codes.
The view from your house.
Your ability to supervise the spa.
Wind direction and exposure to sunlight.
Location relative to trees (falling leaves and shade).
Dressing and bathroom location.
Storage area for maintenance equipment and chemicals (storing chemicals inside your spa cabinetwill void the warranty).
Landscaping and evening lighting.
Spa must be placed on a flat, level surface.
Water is heavy (approx. 8lbs per gallon). If a spa is placed on flooring or decking, be sure the structureis strong enough to support the added weight.
Walls, ceiling, flooring, and woodwork must be able to withstand high humidity.
You may need cross-ventilation fans or oversized dehumidifiers (or both) to remove excess humidity.
Spa chemicals in the air may corrode certain metals in your home.
Floor drains are needed to carry off water splashed from the spa.
Recessed spas must be positioned to permit servicing from above or below floor.
Water is heavy. Be sure the flooring or decking is strong enough to support the added weight.
Due to the many precautions that must be taken to avoid damage to the surrounding environment fromhumidity and water inherent with spa use, it is usually prudent to avoid a second story location thatmay be above finished living space.
Outdoor Considerations
Indoor Considerations
!!!!!
!!!!!
!!!!!
!!!!!
!!!!!
!!!!!
!!!!!
!!!!!
!!!!!
!!!!!
!!!!!
!!!!!
!!!!!
!!!!!
!!!!!
!!!!!
!!!!!
!!!!!
8 Emerald Spa Owner's Manual
INSTALLATION INSTRUCTIONSGeneral Procedures240V Systems
This section covers the installation of your spa. All electrical steps must be performed by a licensed electrician.The spa must be connected to a proper power supply and meet all National Electrical Code (N.E.C.) and localcode requirements. The connection must include the conductors necessary for operation and bonding, asrequired by N.E.C.
1. Remove the spa from its shipping container and retain all safety, operation, and warranty information.
2. Position the spa on a flat, level surface such as concrete, or a wood deck which provides adequatedrainage.
3. Position the spa at least 5 feet from all metal surfaces unless each metal surface is permanentlyconnected to a bonding wire, as indicated in step 4.
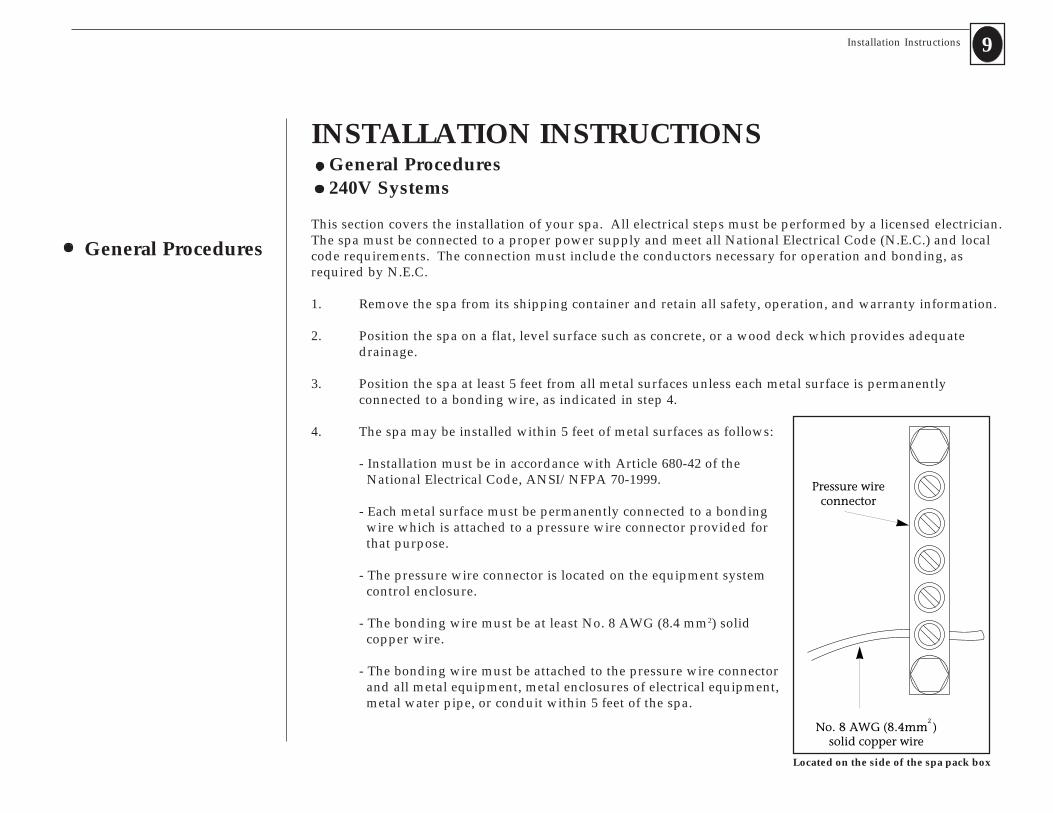
4. The spa may be installed within 5 feet of metal surfaces as follows:
- Installation must be in accordance with Article 680-42 of the National Electrical Code, ANSI/NFPA 70-1999.
- Each metal surface must be permanently connected to a bonding wire which is attached to a pressure wire connector provided for that purpose.
- The pressure wire connector is located on the equipment system control enclosure.
- The bonding wire must be at least No. 8 AWG (8.4 mm2) solid copper wire.
- The bonding wire must be attached to the pressure wire connector and all metal equipment, metal enclosures of electrical equipment, metal water pipe, or conduit within 5 feet of the spa.
Located on the side of the spa pack box
9Installation Instructions
General Procedures

1. Install a 50-amp, GFCI overcurrent protective device in the electrical service panel.
2. The electrical supply for the spa must include a suitable rated switch or circuit breaker to shut offthe power supply (to comply with section 422-20 of the National Electrical Code, ANSI/NFPA 70-1999). This disconnecting means must be readily accessible to the spa occupant, but must not bewithin 5 feet of the spa. (see diagram below)
3. With the spa placed in its final location, power can be routed in two ways:
Under the spa cabinet- See figure 1 on pg. 11
- Determine placement of hole in floor so that conduit may enter between the spa shell and the wooden cabinet.
- Move the spa to allow working room. Cut off the conduit above the floor surface.
- Use an LB on the conduit to permit wire pulling if required.
Through a power entrance opening drilled by anelectrician - See figure 2 on pg. 11
- Move the spa to allow working room. Use nonmetallic conduit and fittings. Cut off the conduit above the floor surface to permit the installation of an LB at the power entrance opening height.
240V Systems(Lite Leader 240V,
SS-1D, SS-3D,DS-2, DS-4)
10 Emerald Spa Owner's Manual

4. Pull 4 copper current carrying conductors (one each: black, red, white, green). Use either No. 6 AWG60o C, No. 8 AWG 75o C, or No. 8 AWG 90o C wire, if spa is 100 feet or less away from its power supply.Note: the ground must be equal to or larger than the largest power conductor.
5. Reposition the spa at its final location and route the flexible conduit.
6. Using a 1" conduit connector at the end of the flexible conduit, route wires through an entrance hole cutby your electrician in the control enclosure, and attach the conduit connector to the control enclosure.
240V Systems [Continued]
Figure 1 Figure 2
Installation Instructions 11

7. Attach power wires to the terminal block. See 240V wiring diagram inside the control enclosurecover. Attach the wires as follows:
- White wire to terminal #2
- Black wire to terminal #3
- Red wire to terminal #4
- Green wire to terminal #5
8. Complete the conductor connections at the power supply panel.
9. Do not turn power on until instructed to do so in the "Starting and Using Your Spa" section.
240-Volt Power Input
Note:Consult the Wiring Diagram on Page 53 for 240 Volt to 120 Volt conversion onthe Lite Leader System Only.
Emerald Spa Owner's Manual12

Spa At-A-GlanceSpa At-A-GlanceEquipment CompartmentPower PackSpa Side ControlIn-Spa Features
1 - Pump System 2 - Pump System
FEATURES AND CONTROLS
Your Emerald pa may be equipped with a variety of user controls and optional features. This sectionlocates and describes each. Please take the time to recognize and understand the functions of these compo-nents and controls.
Spa At-A-Glance provides a pictorial overview of key user components.
Features and Controls 13
75 Sq. Ftor Space Saver
Filter
(These diagrams represent generic one pump and two pump systems. They are not intended to represent any specific model.)

The equipment compartment houses the "nerve center" of the spa and includes the following system components.
Pump(s)
Emerald Spas have different pump systems, depending on the spa model. Emerald Base, Classic and SpecialEdition spas have a two-speed (circulation/jets) pump and provide:
- Filtration, circulation and heat on low speed.- Hydrotherapy jet action on high speed for 120V. For 240V, the spa will also heat in high speed.
The Emerald Elite, Cygnus and Special Edition DLX spa have a two pump system which uses an additionalbooster pump to enhance jet action.
Blower
Emerald Classic, Elite, Special Edition and Cygnus spas include a blower to provide bubble therapy and anenhanced force of air to the water jets called High Performance-Jet Select.
Caution:T-valves must be open when spa is in use. See Fig. 1.T-valves must be in closed position before any plumbing is disassembled for service. See Fig. 2.
T-valves
All one-pump systems have two T-valves, located in the water circulation lines on either side of the power pack.Some models have two pumps, which include two additional T-valves located on either side of the booster pump.
To operate T-Valve:
- To close, temporarily remove security clip and push T-handle down.- To open, pull T-handle up and secure with security clip.
Equipment Compartment
14 Emerald Spa Owner's Manual
Fig. 2 Fig. 1
Lock Unlock
Open, Detent
Closed
Open, DetentPosition
Closed, LockedPosition

One-Pump System
Below is a general description for the one pump system of the Lite Leader,SS-1D, and SS-3D used in your Emerald spa.
1. control panel - (SS-3D shown) 10. connector plumbing elbow2. temperature sensor 11. heater3. ozone generator (optional) 12. control outputs4. light 13. power pack5. 2-speed circulation/jets pump 14. water outlet T-valve6. water inlet T-valve 15. water outlet line to spa7. water inlet line from spa 16. ozone tee8. air line from blower to spa 17. grounding wire (not on Base Models)9. air blower (not on Base Models)
Power Pack
This diagram represents a generic one pumpsystem. It is not intended to represent anyspecific model.
Features and Controls 15

Power Pack (continued)
This diagram represents a generic two pumpsystem. It is not intended to represent anyspecific model.
16 Emerald Spa Owner's Manual
Two-Pump System
All Emerald Elite, Cygnus and Special Edition DLX models use a two pump system. The followingis a general description of this system.
1. control panel - (DS-4 shown) 11. water inlet T-valve - pump 22. temperature sensor 12. air line from blower to spa3. water inlet T-valve - pump 1 13. air blower4. 2-speed circulation/jets pump 14. ozone tee5. ozone generator (optional) 15. control outputs6. light 16. heater7. booster pump - pump 2 17. power pack8. water outlet T-valve - pump 2 18. connector plumbing elbow9. water outlet line to manifold 19. water outlet T-valve - pump 110. water inlet line from spa-pump 2 20. water inlet line from spa - pump 1
21. Auxillory control panel - (DS-4 only)22. grounding bar23. water outlet line to spa24. fiber optic source (optional)

Lite Leader SS-1D SS-3D DS-2 DS-4
17Features and Controls
The Features of each Power Pack are Summarized in the Following Chart:
Pump
Heater
Blower
Light
Control Panel
Ozonator (optional) 120V
Voltage Requirement
Temperature Adjustment
Automatic Time Outs
Preset Filter Cycles
Programmable Filter Cycles
Sensor Failure Detection
Flow Switch Error Detection
Freeze Protection
High Limit Protection with Reset
Heater/Status Indicator
Night Vision Backlight
Continuous Digital H2O Temperature Display
Digital Time Display
Icon Representation of Functions
Digital Operational Status Display (stnd. & econ.)
Digital Diagnostic Display
Automatic Filtration
Automatic Air Injector Purge
Automatic Clean-Up Cycle
Temperature Lock
Panel Lock
Battery Back-Up Program Saver
Remote Control Panel (Option)
High Performance Jet Select
Standby Mode (Pump disable) - I-Lock
Optional Freeze Sensor Input
Fiber Optic Lighting Capable
4.8 hp, 2speed
5.5KW
No
Yes
Digital
Ready
240V
Keypad
Yes
Yes
Yes:Topside
Yes
Yes
Yes
Yes
Yes
No
Yes
No
No
No
Yes
Yes
No
No
No
No
No
No
No
No
Yes
No
4.8 hp, 2speed
5.5KW
Yes
Yes
Digital
Ready
240V
Keypad
Yes
Yes
Yes:Topside
Yes
Yes
Yes
Yes
Yes
No
Yes
No
No
No
Yes
Yes
Yes
No
No
No
No
No
Yes
No
Yes
No
(1) 3.65hp & (1) 3.5hp
5.5KW
Yes
Yes
Digital
Ready
240V
Keypad
Yes
Yes
Yes:Topside
Yes
Yes
Yes
Yes
Yes
Yes
Yes
Yes
Yes
Yes
Yes
Yes
Yes
Yes
Yes
Yes
Yes
Yes
Yes
Yes
Yes
Yes
1.5 hp, 2speed
1.0/4.0KW
No
Yes
Digital
Ready
240V(120v opt.)
Keypad
Yes
Yes
Yes
Yes
Yes
Yes
Yes
Yes
No
Yes
No
No
No
Yes
Yes
No
No
No
No
No
No
No
No
No
No
(1) 3.65hp & (1) 2hp
5.5KW
Yes
Yes
Digital
Ready
240V
Keypad
Yes
Yes
Yes:Topside
Yes
Yes
Yes
Yes
Yes
No
Yes
No
No
Yes
Yes
Yes
Yes
Yes
No
No
Yes
No
Yes
Yes
Yes
Yes

Spa Side Control Lite Leader
Start-up
Your Lite Leader control has been specifically designed so that by simply connecting the spa to its properlygrounded source, the control will automatically heat the water to the set temperature. Your spa equippedwith the Lite Leader is shipped in the 240V configuration. See the Lite Leader schematics on page 53 if youplan to convert the Lite Leader power system to a 120V configuration.
Temperature Adjustment (80o F - 104o F)
Temperature adjustment is controlled by pushing the pad. The display shows the actual water tem-perature unless the pad is pressed. When the pad is pressed, the display will show the set temperature.Pressing the pad a second time will cause the set temperature to increase or decrease depending on whatdirection was last chosen. Each successive press will change the set temperature in the same direction.
If the opposite direction is desired, release the pad and let the display revert to the actual water tempera-ture again. Press the pad to display the set temperature, and again to make the temperature change in thedesired direction.
Light and Jets Keypad
Press the pad once to turn on the light. Press the pad again and the low-speed pump, light and ozonegenerator (if installed) will operate. Press the pad a third time and the high-speed pump and light will run.Press the pad again and only the high-speed pump will be on. Press the pad a final time to turn off allfunctions. The light will automatically turn off after 4 hours of operation. The low-speed pump and ozonegenerator (if installed) turn off after 2 hours, and the high-speed pump turns off after 15 minutes of opera-tion. The low-speed pump starts automatically when the heater is turned on. If automatically activated,the low-speed pump cannot be turned off with the function pad; however, the high-speed pump may bestarted.
18 Emerald Spa Owner's Manual

Preset Filter Cycles
Your Lite Leader will automatically filter itself twice each day. The first filter cycle will begin 1 minute afterthe Lite Leader is energized. The second filter cycle will begin 12 hours after the start of the first filter cycle.The filter cycle is preset at the factory for 2 hour filter cycles every 12 hours. 5 hour or 12 hour cycle times(every twelve hours) can be set by your dealer. Note: the low-speed pump and ozone generator (if installed)will run during filter cycles.
Center Display MessagesThese are some of the messages you may see on the center display.
Overheat (Spa is deactivated)The spa has shut down. DO NOT ENTER THE WATER! Turn off all power to the spa and callyour dealer or service organization. To reset the spa, press any panel button.
FlowA pressure switch is not working. Call your dealer or service organization.
SensorThe high-limit sensor or water temperature sensor is not working. Call your dealer or serviceorganization.
Spa Side ControlLite Leader
[continued]
19Features and Controls

Spa Side Control Panel SS-1D
Start-up
When your spa is first powered up, it will automatically heat and maintain 100o F until you change the settemperature. Immediately after start-up, the spa will begin a 3 hour filter cycle to clean the water. To selecta different duration, see "Preset Filter Cycles" below.
Temperature Adjustment (60o F - 104o F)
Press the pad to display the temperature previously set. Pressing the pad a second time will cause theset temperature to increase or decrease depending on what direction was last chosen. Each successive presswill change the set temperature in the same direction.
If the opposite direction is desired, release the pad and let the display revert to the actual water tempera-ture again. Press the pad to display the set temperature, and again to make the temperature change in thedesired direction.
Light and Jets Keypad
Touch the pad once to turn on the spa light. Touch the pad again, and the light, low-speed pump, andozone generator (if installed) will operate. Press the pad a third time, and the light and the high-speedpump will run. Press the pad again, and only the high-speed pump will run. Press the pad again to turnthe high-speed pump off. The light will automatically turn off after 1 hour of use. The low-speed pumpand ozone generator (if installed) turn off after 2 hours, and the high-speed pump after 15 minutes. Thelow-speed pump starts automatically when the heater is turned on. If automatically activated, the low-speed pump cannot be turned off with the function pad; however, the high-speed pump may be started.
Preset Filter Cycles
Your spa will automatically filter itself for 3 hours, twice each day. The first filter cycle will start oneminute after the spa is powered up. The second filter cycle will begin twelve hours later. The low-speedpump and ozone generator (if installed) will run during filter cycles.
20 Emerald Spa Owner's Manual

Setting the Filter Cycles - SS-1D ONLY
The filter cycle duration is programmable via the topside panel. Press the pad, then the pad, and"F3" will be displayed on the panel. "F3" is the default filter time and indicates a 3 hour cycle. Press thepad again to cycle through the rest of the filter time options; "F6" = 6 hours, "F9 = 9 hours, and "FC" = 12hours. After you have selected your duration, press the pad again to exit the programming.
Center Display MessagesThese are some of the messages you may see on the center display.
Overheat (Spa is deactivated)The spa has shut down. DO NOT ENTER THE WATER! Turn off all power to the spa and callyour dealer or service organization. To reset the spa, press any panel button.
FlowA pressure switch is not working. Call your dealer or service organization.
SensorThe high-limit sensor or water temperature sensor is not working. Call your dealer or serviceorganization.
Spa Side Control Panel SS-1D
[continued]
21Features and Controls

22 Emerald Spa Owner's Manual
Spa Side ControlPanel SS-3D
Start-Up
Your spa control has been specifically designed so that by simply connecting the spa to its properlygrounded source, the spa will automatically heat to the set temperature.
Temperature Adjustment (60o F - 104o F)
Spa temperature is controlled by pressing the "Set" pad. The display shows the actual water temperatureunless the pad is pressed. When the pad is pressed, the display will show the set temperature. Pressing thepad a second time will cause the set temperature to increase or decrease depending on what direction waslast chosen. Each successive press will change the set temperature in the same direction.
If the opposite direction is desired, release the pad and let the display revert to the actual water tempera-ture again. Press the pad to display the set temperature, and again to make the temperature change in thedesired direction.
Jets Keypad
Touch the "Jets" pad once to activate the low speed pump. Touch the pad again to activate the high-speedpump. Press the pad a third time to deactivate the pump. The low-speed pump starts automatically whenthe heater is turned on, when a filter cycle is activated, or when a freezing condition is detected. If auto-matically activated, the low-speed pump cannot be disabled from the front panel; however, the high-speedpump may be started. Whenever the low-speed pump is energized with this pad, it will automatically turnoff after 2 hours. The high-speed pump turns off after 15 minutes.
Air Keypad
Press the "Blower" pad to turn the air jets on and off. The air jets will automatically turn off after 15 min-utes of use.
Light Keypad
Press the "Light" pad to turn the spa light on and off. The spa light will automatically turn off after 1 hour.

Spa Side ControlPanel SS-3D(Continued)
Preset Filter Cycles
Your spa will automatically filter itself twice each day. The first filter cycle will begin one minute after thespa is energized. The second filter cycle will begin twelve hours later. To clean out the blower lines, the airjets will run for 30 seconds at the start of the first filter cycle. During filtration, the low-speed pump willactivate. The ozone generator (if installed) will run on low pump demand. Filter duration is program-mable via the topside panel.
Setting the Filter Cycles
Press the "Set" pad, then the "Jets" pad, and "F3" will be displayed on the panel. "F3" is the default filtertime and indicates a 3 hour cycle. Press the "Set" pad again to cycle through the rest of the filter timeoptions; "F6" = 6 hours, "F9" = 9 hours, and "FC" = 12 hours. After you have selected your duration, pressthe "Jets" pad again to exit the programming mode.
Safety Features
Overheat Protection (Spa is deactivated)
If your spa should overheat, the display will flash {OH}. In such a condition, DO NOT ENTER THEWATER. Turn off all power to the spa and contact your dealer or service organization. Overheating mayalso occur if the filter duration is set too long at the time of installation. To reset the spa, press any panelbutton.
Flow Switch Detection
If a pressure switch malfunctions, the display will show {FL}. Contact your dealer or service organization.
Open Sensor (Spa is deactivated)
If the high-limit sensor or water temperature sensor malfunctions, the display will show {Sn}. Contact yourdealer or service organization.
23Features and Controls

24 Emerald Spa Owner's Manual
Spa Side ControlPanel DS-2
Start-upYour spa control has been specifically designed so that by simply connecting the spa to its properlygrounded source, the spa will function properly and safely at 100o F. When your spa is first activated, theLCD will display the current spa temperature and COOL in the display window if the water is 20o F coolerthan the set temperature. During each filter cycle, the spa will heat to the set temperature.
User's Keypads
Temperature Controls (60o F - 104o F)The current temperature is constantly displayed on the LCD. Press either the up(warm) or down (cool) arrows once to display the set temperature. (The settemperature is designated by a triangle in the upper left corner.) Each time eitherpad is pressed again, the set temperature will increase or decrease depending upon
which pad is pressed. After three seconds, the LCD will automatically display the current spa temperature.Jets Keypad
Touch this pad once to activate the low-speed pump. Touch again to activate thehigh-speed. Press the pad a third time and the second pump will also activate. Press thepad again to deactivate the pump(s). The low-speed pump starts automatically when the
heater is turned on, when a filter cycle is activated, or when a freezing condition is detected. If automati-cally activated, the low-speed pump cannot be turned off with the "jets" pad; however, the high-speedpump may be started. When the low-speed pump is started with this pad, it will automatically stop after 2hours and 20 minutes of operation. The high-speed pump will stop after 15 minutes.Blower Keypad
Touch the blower keypad to activate the first speed of the blower (high). Press the padagain to activate the second speed of the blower (low) and once again to turn the blower off.The blower will automatically turn off after 15 minutes.
Light KeypadPress this pad to operate the light cycle. The light will automatically turn off after 1 hour ofoperation. If your spa is equipped with optional fiber optic lighting, then 8 colors will cycleonce you press the light keypad. To stop on a desireable color press the light keypad a
second time. To turn the fiber optic lighting off press a third time.

Spa Side Control Panel DS-2 (continued)
Standard or Economy ModePress this pad to switch between modes. Economy mode only heats the water during filtercycles. Standard mode maintains the desired set temperature at all times.
Filter Cycles
Your spa will automatically filter itself twice a day. The first filter cycle will start one minute after the spais powered up. The second filter cycle will begin twelve hours later. The blower will run for 30 seconds atthe start of the first cycle to clean out the air lines. The low-speed pump will run during filter cycles (unlessthe high-speed pump is activated) and the heater will be on. The ozone generator (if installed) will run onlow pump demand. Filter cycle duration is programmed via the topside panel for 3, 6, 9 or 12 hours. Toprogram, press the "Warm" or "Cool" pad, then press the "Mode" pad. Press the "Warm" or "Cool" padagain to select the duration of the twice-daily cycle. Press the "Mode" pad to program the heater to enableor disable during filter cycles.
Cleanup Cycle
The low-speed pump turns on 20 minutes after the jets pad is pressed. The cleanup cycle runs for 2 hours.
Disabling Pumps
In times when you are entertaining or relaxing in the area of your spa, you can turn off the pump to avoidhearing any spa operational noise due to filtering or ozonating. To do this press the "Warm" or "Cool" pad,then the "Light" pad, and all spa functions will be disabled except for freeze control. To resume spa opera-tion, press any panel button.
Center Display MessagesThese are some of the messages you may see on the center display.
StandardThe spa is in standard mode. StAN is flashed alternately with the current spa temperatureand COOL until the spa water is 20o F cooler than the set temperature.
EconomyThe spa is in economy mode. ECON is flashed alternately with the current spa temperatureand COOL until the spa water is 20o F cooler than the set temperature.
25Features and Controls

26 Emerald Spa Owner's Manual
Overheat protectionIf a malfunction occurs and spa water reaches 112o F, or the high-limit sensor has detected118o F at the heater the spa is deactivated. In such a condition, DO NOT ENTER WATER!Remove the spa cover and allow the water to cool. At 110o F the spa should automaticallyreset. If the spa does not reset, shut off power to the spa and call your dealer or serviceorganization.
Freeze protectionIf a freeze condition is detected, the pumps are automatically activated. This is a normalspa function; no action is necessary. Freeze protection is enabled regardless of the spa'sstatus.
Flow switchIf constantly displayed, a pressure switch has malfunctioned. Contact your dealer or serviceorganization. If the flow message is flashing : the filter may need cleaning, the water levelmay be low, or the T-valves may need to be opened.
Temperature set backIf spa water is more than 20o F cooler than the temperature last set, no action is required.Spa is functioning properly.
Open SensorSpa is deactivated. The high-limit temperature sensor is not working. This must berepaired only by a dealer or a qualified service organization.
Open SensorSpa is deactivated. The water temperature sensor is not working. This also must berepaired by a dealer or qualified service organization.
StandbySpa is deactivated. Designates a self-protective mode when low voltage or supply noise ispresent or when the spa's pumps have been disabled for filter cleaning. Press any panelbutton to resume spa operation.
Spa Side Control Panel DS-2 (continued)

Features and Controls
General Description
Your Control panel consists of three main parts:
1. User's Keypads
Temperature Controls (60o F - 104o F)When either of these pads is touched once, the LCD will display the temperaturewhich has been set, as well as the words "SET HEAT". Each time either of thesepads is pressed again, the set temperature will increase or decrease, depending on
which pad is pressed. After 3 seconds, the LCD will automatically display the spa temperature.
Jets KeypadTouch this pad once to activate the low-speed pump. Touch again to activate the high-speed. Press the pad a third time and the second pump will also activate. Press the padagain to deactivate the pump(s). The low-speed pump starts automatically when the heater
is turned on, when a filter cycle is activated, or when a freezing condition is detected. If automaticallyactivated, the low-speed pump cannot be turned off with the "jets" pad; however, the high-speed pump maybe started. When the low-speed pump is started with this pad, it will automatically stop after 2 hours and20 minutes of operation. The high-speed pump will stop after 15 minutes.
Blower KeypadTouch the blower keypad to activate the first speed of the blower (high). Press the padagain to activate the second speed of the blower (low) and once again to turn the blower off.The blower will automatically turn off after 15 minutes.
Spa Side ControlPanel DS-4
Start-upWhen your spa is powered up, it begins running in standard mode, which automatically heats and main-tains the water at 100o F. Pressing the # pad switches the spa from standard mode to economy mode. Thissetting is designed for periods of little or no use, but continues to filter twice a day and maintains waterquality
27
28 Emerald Spa Owner's Manual
Spa Side Control Panel DS-4 (continued)
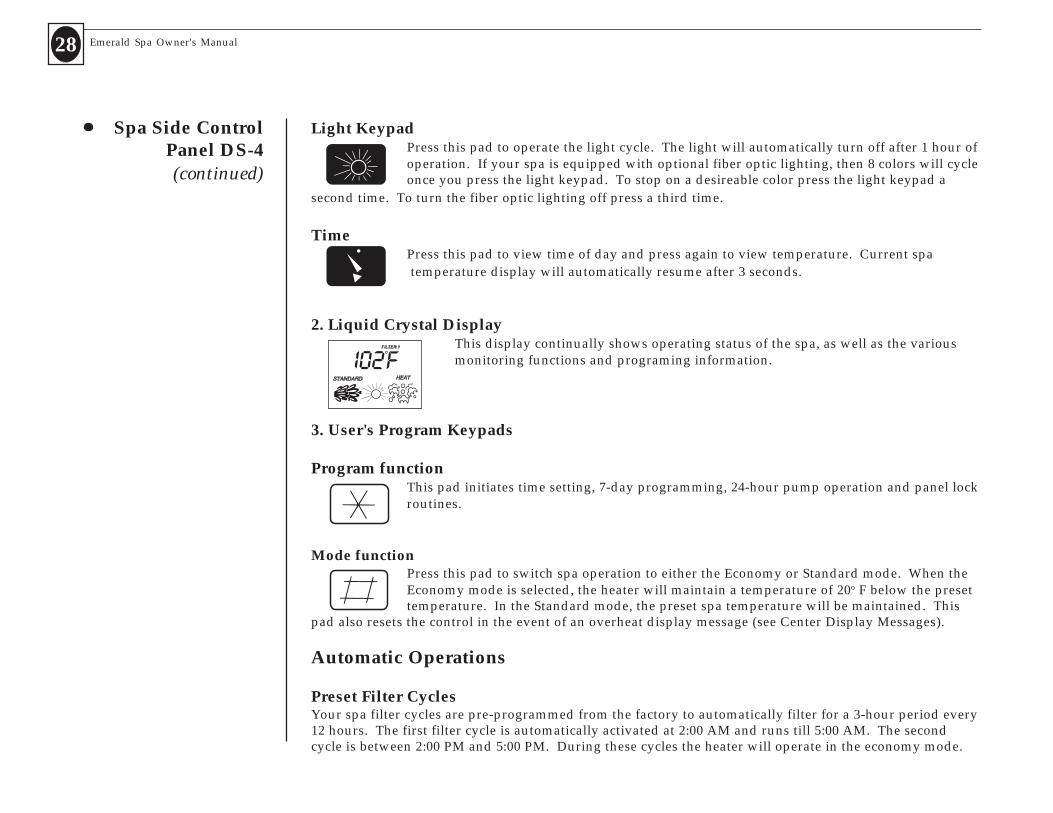
Light KeypadPress this pad to operate the light cycle. The light will automatically turn off after 1 hour ofoperation. If your spa is equipped with optional fiber optic lighting, then 8 colors will cycleonce you press the light keypad. To stop on a desireable color press the light keypad a
second time. To turn the fiber optic lighting off press a third time.
TimePress this pad to view time of day and press again to view temperature. Current spa temperature display will automatically resume after 3 seconds.
2. Liquid Crystal DisplayThis display continually shows operating status of the spa, as well as the variousmonitoring functions and programing information.
3. User's Program Keypads
Program functionThis pad initiates time setting, 7-day programming, 24-hour pump operation and panel lockroutines.
Mode functionPress this pad to switch spa operation to either the Economy or Standard mode. When theEconomy mode is selected, the heater will maintain a temperature of 20o F below the presettemperature. In the Standard mode, the preset spa temperature will be maintained. This
pad also resets the control in the event of an overheat display message (see Center Display Messages).
Automatic Operations
Preset Filter CyclesYour spa filter cycles are pre-programmed from the factory to automatically filter for a 3-hour period every12 hours. The first filter cycle is automatically activated at 2:00 AM and runs till 5:00 AM. The secondcycle is between 2:00 PM and 5:00 PM. During these cycles the heater will operate in the economy mode.

Spa Side Control Panel DS-4 (continued)
Optional Filter CyclesWhile you are not required to set filter cycles, if you want to change them, press the time pad, and the star(*) pad twice all within 3 seconds. "SET START FILTER 1" (AM cycle) will appear on the display.
Press the "Warm" or "Cool" keypad to reset the filter start time.
When "SET HEAT" is on the display, press the "Warm" pad to enable or press the "Cool" to disable theheater during filtering.
Press the star (*) pad to see "STOP FILTER 1" and adjust the time with the "Warm" or "Cool" pad as doneabove.
Press the star (*) pad to see "START FILTER 2" (PM cycle) and proceed as above.
Pressing the mode (#) pad will enter the new filter cycle times into the system and display the current watertemperature.
Cleanup Cycle
Your spa has an automatic cleanup cycle which circulates and maintains the cleanliness of the water.
Twenty minutes after the "Jets" pad has last been pressed the cleanup cycle will begin. (Due to preset time-outs, the spa assumes that you are finished using the spa 20 minutes after the "Jets" pad is pressed.) Duringthe clean up cycle, the circulating pump will turn on for a 2 hour period and the panel will display "FIL-TER".
If the "JETS" pad is pressed during the cleanup cycle, the cleanup cycle will shut off. Twenty minutes afterthe "JETS" pad is pressed, the cleanup cycle will begin again.
Disabling Pumps
In times when you are entertaining or relaxing in the area of your spa or when cleaning or replacing yourfilter, you can turn off the pump to avoid hearing any spa operational noise due to filtering or ozonating. Todo this press the "Time" then "Down" button and ILOC will appear on the display, and all spa functions willbe disabled except for freeze control. To resume spa operation, press any panel button.
Invert Temperature Display
To view the temperature display from the inside of the spa or from the outside, press the "TIME" pad thenthe " or # for either direction.
29Features and Controls
Programming
Initial Start-up
Your Spa Control has been specifically designed so that by simply connecting the spa to its properlygrounded source and touching the Mode [#] pad, the spa will function properly and safely at 100o F. In thismode, all user pads will be completely functional. The spa will just about take care of itself. However, tofully utilize the unique capabilities of the control, it is important to set the time of day and the day of theweek properly.
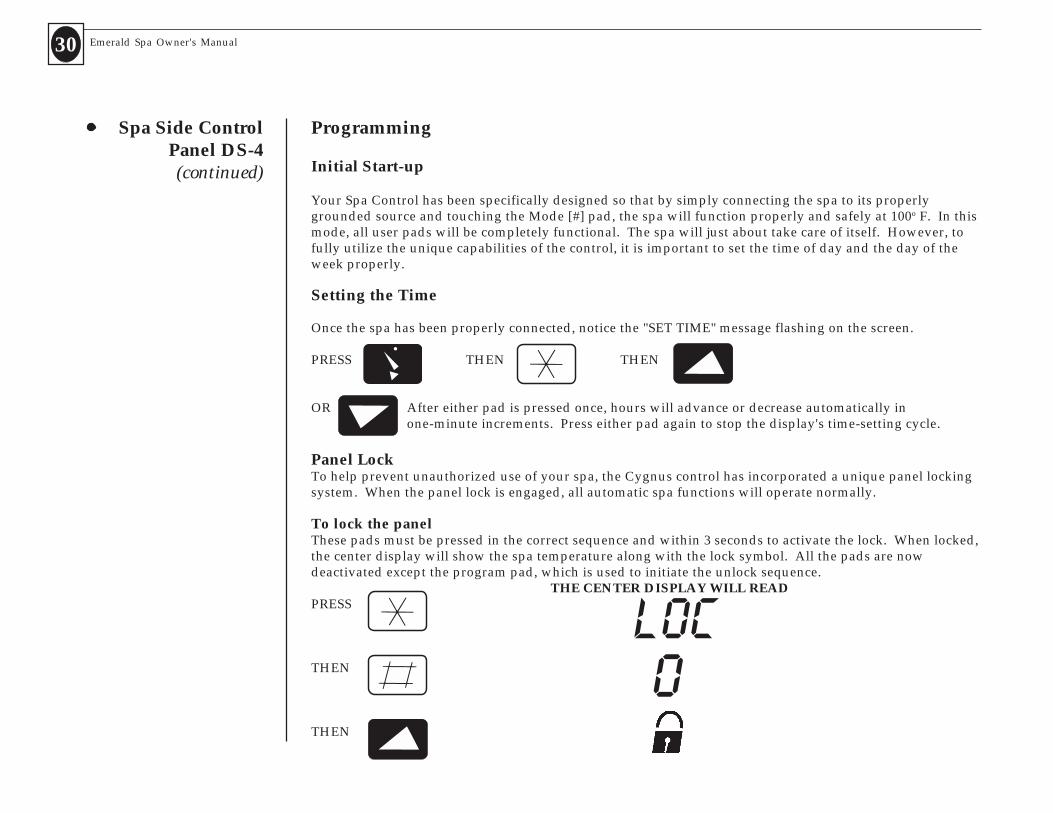
Setting the Time
Once the spa has been properly connected, notice the "SET TIME" message flashing on the screen.
PRESS THEN THEN
OR After either pad is pressed once, hours will advance or decrease automatically inone-minute increments. Press either pad again to stop the display's time-setting cycle.
Spa Side Control Panel DS-4 (continued)
Panel LockTo help prevent unauthorized use of your spa, the Cygnus control has incorporated a unique panel lockingsystem. When the panel lock is engaged, all automatic spa functions will operate normally.
To lock the panelThese pads must be pressed in the correct sequence and within 3 seconds to activate the lock. When locked,the center display will show the spa temperature along with the lock symbol. All the pads are nowdeactivated except the program pad, which is used to initiate the unlock sequence.
THE CENTER DISPLAY WILL READPRESS
THEN
THEN
30 Emerald Spa Owner's Manual

Spa Side Control Panel DS-4 (continued)
To unlock the panel
These pads must be pressed in the correct sequence and within 2 seconds to unlock the panel. When thelast pad is pressed, the lock symbol will disappear. All pads are now active.
PRESS THEN THEN
Temperature LockThe temperature lock is provided to prevent unauthorized temperature adjustment of your spa water.While setting your spa water temperature, immediately after you pressed ", follow the instructions below tolock the set temperature. When the temperature lock is engaged, all automatic spa functions will operatenormally.
To lock the temperatureThese pads must be pressed in the correct sequence and within 3 seconds to activate the temperature lock.When locked, the center display will show the spa temperature, the lock symbol, and the words "SETHEAT". The temperature pads will be deactivated; when pressed, the set temperature will appear with adouble arrow next to it. THE CENTER DISPLAY WILL READ
PRESS
THEN
THEN
To unlock the temperatureThese pads must be pressed in the correct sequence and within 2 secondsto unlock the temperature. When the last pad is pressed, the lock symbol will disappear. All pads are nowactive.
PRESS THEN THEN
31Features and Controls

32 Emerald Spa Owner's Manual
Spa Side Control Panel DS-4 (continued)
Center Display MessagesThese are some of the messages you may see on the center display.
Interlock (Some models only)Spa is deactivated. Designates a self-protective mode when low voltage or supply noise is present orwhen the spa's pumps have been disabled for filter cleaning. Press the Mode [#] pad to reset.
Battery backupPower has been cut off to the spa, and it is using its battery backup to preserve its settings[15 to 20 minutes]. The control panel will be disabled until power returns to the unit.
Overheat protectionSpa is deactivated. If a malfunction occurs and spa water reaches 112o F, the system willcompletely shut down. In such a condition, DO NOT ENTER WATER! Turn off all power to the spa
and contact your dealer or service organization. Overheating may also occur if you set the low-speed pump tooperate for extended periods of time in Economy mode. In this instance, remove the spa cover and allow thewater to cool to below 110o F. Touch the mode [#] pad to reset the system. If the water is still hotter than the settemperature, touch the blower pad to cool the spa.
Freeze protectionIf a freeze condition is detected, both pumps are automatically activated. This is a normal spa func-tion; no corrective action is necessary. Freeze protection is enabled regardless of the spa's status.
Flow switchIf constantly displayed, a pressure switch has malfunctioned. Contact your dealer or service organiza-tion. If the flow message is flashing: 1- The filter may be plugged. Remove the filter and clean. 2- The
amount of water may be inadequate. Be sure the spa is properly filled. 3- A pressure switch has malfunc-tioned. The spa will operate, but the heater will not activate. Contact your dealer or qualified service organi-zation.
Temperature set backIf spa water is more than 20o F cooler than the temperature set point, the heater will automaticallyactivate to provide freeze protection. This is a normal function; no corrective action is needed.
Open SensorSpa is deactivated. The high-limit temperature sensor is not working. This must be repaired onlyby a dealer or a qualified service organization.
Open SensorSpa is deactivated. The water temperature sensor is not working. This also must be repaired by adealer or qualified service organization.

In-Spa Features 33
Therapy Jets and Controls
Euro Jet
Cyclone Mini Jet
Cyclone Swirl Jet
Cyclone Directional Jet
3-way TurboTurbo Air Control(Cygnus feature only)
Note:Other jets may not operatewhen the turbo-jet is on.
The Mini allows the barrel to be positioned to deliverpinpoint therapy to a location. Turn the outer ring toalso moderate the water flowing through the jet.
The Cyclone swirl jet rotates 360 degrees at a rapid ratethus massaging a larger area. Turn the outer ring toalso moderate the water flowing through the jet.The Cyclone directional allows the barrel to be posi-tioned to deliver a broad therapy to a specific location.Turn the outer ring to also moderate the water flowingthrough the jet.
The function of this diverting jet is as follows: 1. When both pumps are engaged and the jet is turned all theway to the right (the 3 o'clock position) the Turbo and allother jets except the Tsunami (see next page) are functioning. 2. Whenever pumps are activated and the jet is in the middle(12 o'clock position), water pressure is realized in all the jetsexcept the Turbo and Tsunami. 3. When both pumps are engaged and the jet is all the way tothe left (the 9 o'clock position) all the jets in the spa areworking.
Euro jets are fully adjustable and are used in theEmerald Captain's chair, and various other locations insome Emerald models.
In-Spa FeaturesYour spa may be equipped with a variety of therapy jets, controls, and fixtures. Refer to the following charts and identify thosefeatures installed on your spa. NOTE: take care not to turn the jet face beyond the natural stopping point. If this does occur it mayprevent the jet from functioning properly.
Jet Face Appearance may be subject to change at any time.
ON OFF
ON OFF
ON OFFSuper CycloneAdjustable Swirl
The Super Cyclone features a controllable velocity ofwater in either a straight position or in a rotation.Simply take your finger and click the barrel of the jetdown to cause the nozzle to move in a rotationalpattern.

Therapy Jets, Control and Drain
Waterfall JetCygnus Only
Tsunami JetCygnus Only
IndividualNeck Jet ControlCygnus Only
Drain
A standard feature on all Cygnus spas, the Tsunami jet is locatedjust above the footwell. This jet works in coordination with the 3-way Turbo jet (see previous page). By turning the turbo jet to the9 o'clock position with both pumps running a large degree of wateris forced into the Tsunami allowing a high volume of water toappear. Jet action is further enhanced by the Tsunami's own aircontrol located on the top coping of the spa.
The new spigot found on all models near the base of the cabinetis for the use of draining your spa. To operate:1. Unscrew the cap and attach a garden hose.2. Turn the black nozzle (the part just behind where the capscrews on) counter-clockwise and pull out to drain the waterfrom your spa.3. When finished draining detach the garden hose, screw the capback on and then push in and turn clockwise (the part justbehind where the cap screws on).
Installed on all Cygnus models is a separate valve controlling theintensity of the water pressure for the neck jets. Pressure is con-trolled by turning the face of the jet and/or by the use of thiscontrol valve (location on the side of the arm rest).
34 Emerald Spa Owner's Manual
A standard feature on all Cygnus spas, the waterfall jet is locatedabove the waterline. Utilizing the valve installed on the interiorside wall of the spa, you can control the intensity of the waterstream. Use for ambiance, relaxation or therapy for the neck andshoulders.

Cup Holders and Options
Cup Holders
Towel WarmerOption
Hydro VibeStereo SystemOptionNote: Includes a TowelWarmer Area
Located along the top edge of every Emerald and Cygnus spa aretwo areas to set a cup or soda can. These cup holders are strictly foryour convenience when you seek refreshments during use of yourspa.DANGER: Alcoholic beverages are strictly prohibited in a spa
Optional on Cygnus spas is a special compartment built into acorner of the Cygnus Cabinet identifiable with a handle for open-ing. Simply place your towel or robe in the compartment and thevented heat from the interior of the spa will keep it warm.DANGER: Do NOT use for chemical storage!
Optional on Emerald Elite, Cygnus and Special Editian DLX models is afiber optic light package. This option allows for an eight-color lightselection to emit from the spa light, light nodes installed around the topperimeter of the spa coping and the Emerald logo installed on one side ofthe cabinet. To operate the Fiber Optic lights (if installed) see page 24light keypad if you own an Emerald Special Edition DLX or Elite or page28 light keypad if you own a Cygnus spa.
In-Spa Features 35
Fiber OpticsOption
The manufacturer’s instruction manual for Emerald’s Hydro Vibe Sound Systemis in the warranty bag located next to the power pack inside the spa cabinet.Consult this manual for important user instructions and proper operation ofthe system.
The major components of Emerald’s Elite stereo system are the stereo,interior mounted stereo speakers, and the top side sound emitter.Please consult the enclosed stereo owners manual for instructions onhow to use your Emerald Elite Stereo.
The Emerald Hydro Vibe Stereo System includes a mounted stereo in thetowel warmer area (below right picture), two flush mounted speakers,and a special floating remote that controls both the operations of the spa,as well as the operations of your HydroVibe Stereo. The HydroVibeuses transducer technology that allows for listening pleasure from insidethe spa. The four transducers mounted to the underside of the spa shellcreate a unique speaker effect. Controlling the sound balance between thesetransducers and the external cabinet mounted speakers is achieved usingthe stereo’s fade control. Please consult the enclosed stereo owners manualfor proper operation.

Other Controls and Fixtures
Air Control Valves
Light
Air Injectors(Not available on Lite Leader & SS-1D controls)
Strip Skimmer(Emerald Base &Emerald Classic)
Weir Skimmer(Emerald Special Edition,Elite & Cygnus Series)
Suction Grate
Warning:Never Block or removethe suction grate. Do notuse spa if suction grate isremoved!
The air intake valves are located near the spa side control panel.Turn to increase or decrease the amount of air mixed with the waterflow. More air adds to the massage effect.
When the blower is on, air bubbles are released from the injectorsprimarily located on the lounger seat and the footwell. Theseinjectors create a mild vibrating effect that massages the body.
This skimmer is found on Emerald Base and Classic modelsfeaturing Lite Leader, SS-1D and SS-3D controllers. Its purpose isto skim the water surface. Always keep the water level at least2/3 high on the skimmer or damage to the system may result.
This skimmer is found on Emerald Elite (DS-2 controller), SpecialEdition (SS-3D controller) and Cygnus Series (DS-4 controllers).Its purpose is to skim the water surface. Always keep the waterlevel at least half way up the opening of the skimmer or damageto the system may result.
The suction grate is the intake opening for the water circulatingsystem. This grate protects you from the powerful suctioncreated by the pump(s) that power your spa.
OFFON
Aromatherapy Option(NOT an optionon the Emerald Base)
To use the aromatherapy feature, unscrew the cap and, as thepicture to the right demonstrates, place special aromatherapy pelletbags inside. The scent will be disbursed primarily while the bloweris operating.
36 Emerald Spa Owner's Manual
This fixture is controlled by the "Light" button on the SS-3D, DS-2and DS-4 panels. With the Lite Leader and SS-1D, see the Lightsand Jets section on page 18 for the Lite Leader control and page 20for the SS-1D. (Optional Fiber Optics pictured to the right).

Starting And Using Your Spa
Install Filter ElementsProper Water LevelBleeding AirTesting the GFCIOne-Pump PrimingTwo-Pump PrimingSetting the Thermostat
Install FilterElements
Placing elements in the Filter
1. Unpackage the filter element(s) located inside thecabinet to be inserted into the filter.
2. Unscrew the top of the filter canister located onthe top of the coping and insert the element with thelargest hole into the appropriate filter housing.
3. Insert the element with the smaller hole into the filterhousing that accepts it.
4. Insert the Filtering Assist Plug into the middleof the filter element with the smallest hole.(This procedure allows for water to penetrateinto the interior pleats of the element allowingfor optimal filtration.)
Note: The Filter Key allows
the loosening/tighteningof the filter caps for filter/
spa maintenance. Thefilter key's two parallel
pegs are inserted into thefilter cap and turned to
the desired open/closedoperation. The removal
hook aids in lifting theelements from the interior
of the filter.
Starting and Using Your Spa 37
Space Saver II found on 199, 499,509, 595 & Special Edition units
75 Sq. Ft Filterfound on Cygnus,Emerald 899, 799,699 & 599 models

Emerald Spa Owner's Manual38
Caution:Low water level can damage the water circulating system andvoid your warranty. Read and understand all safety,location, and installation instructions before proceeding.
Add water until level is at appropriate level for your model'sskimmer (see page 34) or damage to system may result.
Proper Water Level
Bleeding AirCaution: Air must be bled from the system. Air in the system can damage the spa and void the warranty.
Dual Filter1. While the spa is off use the filter key to unscrew and remove the filter caps. This allows for thelarge pocket of air naturally formed when the spa was filled with water to escape from the filter cavity.2. Once the water level inside the filter housing has reached the same level as the water inside the spayou can then replace the filter caps.3. Tighten the filter cap snuggly using the filter key. Be sure not to overtighten. When the spa is running,you should not see or hear any water leaking from the spot where the filter top meets the housing. If you seeor hear water escaping turn the spa off and retighten the filter lid.
Single Filter1. While the spa is operating in low speed, turn the bleeder screw located on the top of the filter lidcounter-clockwise a half turn. This will allow air to escape.2. When water appears turn the screw clockwise to shut the valve until the water no longer is seencoming out. Be sure not to over-tighten as to not crack the valve.
Dual Filter Single Filter
Bleeder Valve

39Starting and Using Your Spa
One pump Priming [for spas equipped with Lite Leader, SS-1D, and SS-3D]
Note: If water does not flow within
a minute or two, turn offpower to the spa and repeat
steps for bleeding the air.
Testing the GFCI [for spas equipped
with Lite Leader (240V) SS-1D, SS-3D, DS-2,
and DS-4]
Caution:Never run the system without circulating water. Doing so can damage the pump and void the warranty.
1. Press the "Jets" key pad. The pump will begin to operate in the high-speed mode; this willfacilitate pump priming.
2. When your jets begin to operate vigorously, the pump is primed.
Your spa must be provided with a GFCI-circuit breaker located in the power supply panel as installed byyour electrician. Turn on the circuit breaker and test the GFCI by pushing the test button. A red indicatorshould appear and your spa should stop operating. Push the reset button and the red indicator shoulddisappear. The spa should begin to operate normally.
WARNING:If the GFCI fails to operate in this manner, there is a risk of electric shock! Shut off the main power source.Identify and correct problem before using the spa.

40 Emerald Spa Owner's Manual
Two-Pump Priming [for spas equipped
with DS-2 and DS-4]
Note:If water does not flow within a
minute or two, turn off all powerto the spa and repeat steps for
bleeding air.
Caution:Never run the system without circulating water! Doing so can damage pumps and void the warranty.
Each pump must be primed separately. To accomplish this, follow these steps.
1. Press the "Jets" key pad twice. The circulating/jets pump will operate in the low speed mode on thefirst press and in the high speed mode on the second press. The high speed mode will facilitatepump priming.
2. When the jets begin to operate moderately, the circulating/jets pump is completely primed.
3. Now press the "Jets" key pad a third time. The jets booster pump will now operate.
4. When the jets begin to operate more vigorously, the jets booster pump is completely primed. If youdo not see any distinguishing difference in jet flow when pressing the "Jets" button a third time thenthe booster pump may require direct priming.
A. Remove the equipment panel and locate the booster pump (see 2-pump system diagram onpage 16).
B. With the booster pump running turn the pump drain plug counterclockwise until a steadystream of water appears. Once water appears quickly tighten the plug and you shouldnotice a more intense flow of water through the jets.
C. If no noticeable difference has occured repeat step B.
Water Line Connection goes to the jet

Setting the Thermostat WARNING:Never use the spa at temperatures above 104o F.Temperatures above 104o F or prolonged immersion may cause hyperthermia. [See "Important SafetyInstructions" in the first section of this manual for a description of the symptoms and effects of hyperther-mia.]
For Spas with a Lite Leader, SS-1D or SS-3D Power System: Press the thermostat button ("set" button forSS-3D) to display the temperature previously set. Pressing the pad a second time will cause the settemperature to increase or decrease depending on what direction was last chosen. Each successive presswill change the set temperature in the same direction. If the opposite direction is desired, release the padand let the display revert to the actual water temperature again. Press the pad to display the set tempera-ture, and again to make the temperature change in the desired direction.
For Spas with a DS-2 or DS-4 Power System: Press the "Warm or Cool" temperature key pad until thedigital readout indicates a thermostat set point of 95o F.
Note:The hot setting on the thermostat will produce a temperature of approximately 104o F. Initially, operateyour spa at 95o F and cautiously increase the temperature over a few day period as you become accustomedto its effect.
Starting and Using Your Spa 41

42 Emerald Spa Owner's Manual
SPA WATER CHEMISTRY
Never mix different types of chemicals or contaminate them in any way.Do not exceed recommended dosages.After supercholorinating/brominating, wait until the disinfectant level is down to 3-5 parts per
million [ppm] before using the spa.Keep chemicals out of reach of children and pets.Keep containers closed when not in use.Do not use contents of unlabeled containers.Never add water to chemicals. If called for by the instructions, add chemicals to water.Dispose of empty containers as instructed on the label.Never handle chemicals with your bare hands.Store chemicals in a cool, dry, clean place [not under spa].
The following table lists the total water system capacity for all Emerald Spas and will help you to deter-mine the dosage of chemicals.
Spa Series Max. Capacity [gal.] Useable [gal.]
199 210 170 499 290 200 509 390 340 595 400 300599/C2009 465 370699/C3009 440 330799/C5009 450 340899/C7009 640 500 1009SE 235 180 1409SE 350 280
!!!!!
!!!!!
!!!!!
!!!!!
!!!!!
!!!!!
!!!!!
!!!!!
!!!!!
!!!!!
Chemical Safety Tips
Note:Check and maintain your water
chemistry at least twice a week forproper levels (see page 41).
Spa Capacity
Note:Useable: at the level
noted on skimmerfull level (see page 34)
Chemical Safety TipsSpa CapacitypH ControlDisinfecting Your SpaOzone GeneratorOther Water Chemistry Considerations

Caution:Do not use your spa until the pH level of the water is between 7.2 and 7.6. A pH level below 7.2 or above 7.6may damage the spa shell and power pack, and void your warranty.
All water is either acidic, alkaline, or neutral. pH is defined as a method of measuring this characteristic. ApH level of 7.0 would be neutral. A pH level above 7.0 would be alkaline while a pH level below 7.0 wouldbe acidic. The pH level of your spa water must be kept between 7.2 and 7.6. Above 7.6 the water willbecome discolored and cloudy. pH levels below 7.2 will cause corrosion to metals in the circulation system.Both high and low pH levels will cause eye irritation. Improper pH levels also reduce the effectiveness ofdisinfectants.
Maintain an ideal pH level as follows:
1. Test the pH level of the water regularly with a reliable test kit.2. Adjust the pH level as required.
- Increase pH by adding soda ash.- Decrease pH by adding sodium bisulfate.
3. Refer to the table below and determine the dosage level per 100 gallons.4. Add chemicals to at least one gallon of water.5. Pour the mixture into the spa with circulation system on.6. Wait at least 3 hours. Recheck the pH level.
High pH - Add Sodium Bisulfate (pH down)Test Reading Dosage [per 100 gal.]
Above 8.4 .24 oz. [1 teaspoon]
8.0 to 8.4 .16 oz. [.7 teaspoon] 7.8 to 8.0 .08 oz. [.4 teaspoon]
7.2 to 7.6 Ideal
Low pH- Add Soda Ash (pH up)
Test Reading Dosage [per 100 gal.]
Less than 6.5 .6 oz. [3.6 teaspoons]
6.5 to 6.8 .45 oz. [3 teaspoons] 6.8 to 7.2 .12 oz. [.7 teaspoons] 7.2 to 7.6 Ideal
pH Control
}
8.2
7.8
7.67.2
6.8
Note:If the instructions that
accompany the pHadjusting chemicals differ
from those given here,follow the instructions
that come with thechemicals.
pHLevel
above 7.6AddAcid
Ideal
Below 6.8Add
Soda Ash
Spa Water Chemistry 43
44 Emerald Spa Owner's Manual
Disinfecting Your Spa
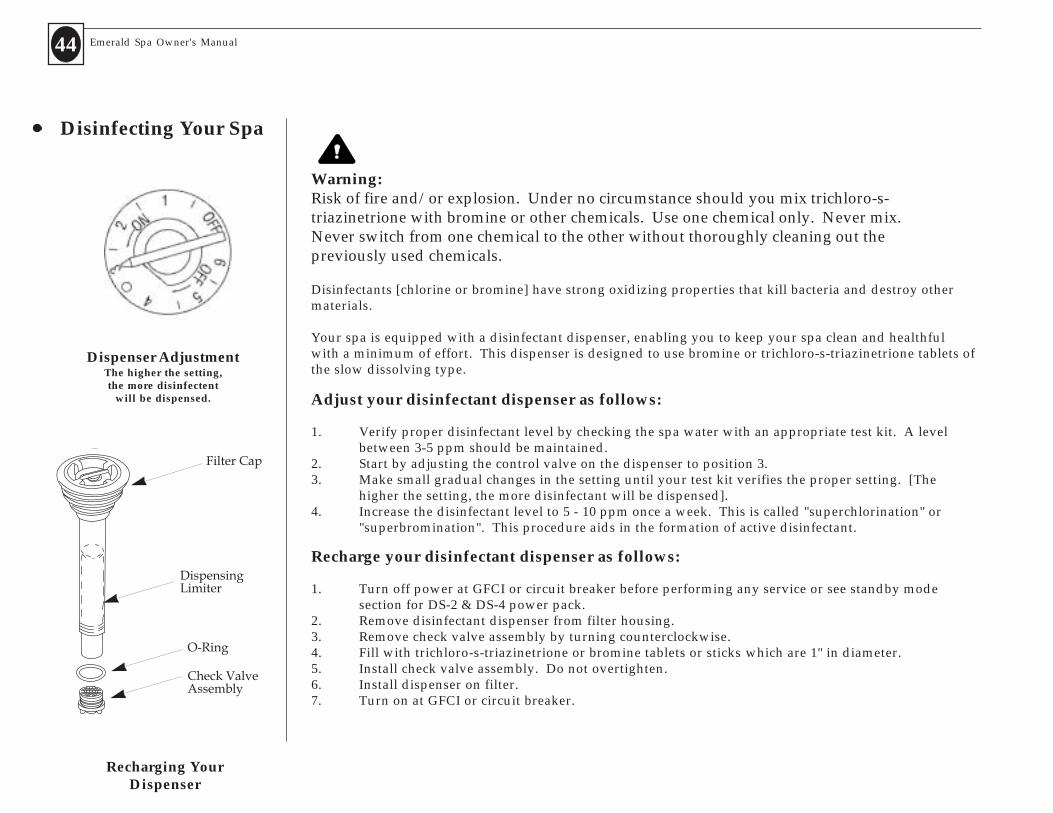
Warning:Risk of fire and/or explosion. Under no circumstance should you mix trichloro-s-triazinetrione with bromine or other chemicals. Use one chemical only. Never mix.Never switch from one chemical to the other without thoroughly cleaning out thepreviously used chemicals.
Disinfectants [chlorine or bromine] have strong oxidizing properties that kill bacteria and destroy othermaterials.
Your spa is equipped with a disinfectant dispenser, enabling you to keep your spa clean and healthfulwith a minimum of effort. This dispenser is designed to use bromine or trichloro-s-triazinetrione tablets ofthe slow dissolving type.
Adjust your disinfectant dispenser as follows:
1. Verify proper disinfectant level by checking the spa water with an appropriate test kit. A levelbetween 3-5 ppm should be maintained.
2. Start by adjusting the control valve on the dispenser to position 3.3. Make small gradual changes in the setting until your test kit verifies the proper setting. [The
higher the setting, the more disinfectant will be dispensed].4. Increase the disinfectant level to 5 - 10 ppm once a week. This is called "superchlorination" or
"superbromination". This procedure aids in the formation of active disinfectant.
Recharge your disinfectant dispenser as follows:
1. Turn off power at GFCI or circuit breaker before performing any service or see standby modesection for DS-2 & DS-4 power pack.
2. Remove disinfectant dispenser from filter housing.3. Remove check valve assembly by turning counterclockwise.4. Fill with trichloro-s-triazinetrione or bromine tablets or sticks which are 1" in diameter.5. Install check valve assembly. Do not overtighten.6. Install dispenser on filter.7. Turn on at GFCI or circuit breaker.
Dispenser AdjustmentThe higher the setting,the more disinfectent
will be dispensed.
Recharging YourDispenser

Ozone Generator [optional]
Other WaterChemistry
Considerations
Note:When water evaporates,minerals from the water
and the chemicals are leftbehind. As the level of
these minerals increases,water treatment becomesmore and more difficult.Therefore, at some point
(between 4-12 weeks,depending on use), it iseasier and less costly todrain and refill the spa
instead of continuingto treat the same water.
An Ozone generator will supplement disinfectants and provide the following benefits:
- kills bacteria and viruses- destroys matter which might discolor water- does not affect the pH level of the water- safe for bathers and equipment- has no "chemical" smell- automatic and requires little or no maintenance- reduces the need for disinfectants
Refer to your ozone generator owner's manual for information on service and maintenance.
Total Alkalinity-
Total Alkalinity is important because it helps to keep the pH in the proper range. Test with an appropriatetest kit, and adjust as needed following the instructions supplied with the test kit. If you are usingtrichloro-s-triazinetrione as a disinfectant, adjust to 60-100 ppm. If you are using bromine as a disinfectant,adjust to 100-150 ppm. Higher levels may cause cloudy water and scale formations, while lower levels maylead to corrosion and uncontrollable pH variations.
Calcium Hardness-
Proper calcium hardness levels will help you to maintain other water quality values such as pH and totalalkalinity, and help to avoid cloudy water and/or scaling on the tub surfaces, equipment, and piping.Maintain the calcium hardness of your spa at 200 ppm when using trichloro-s-triazinetrione as a disinfec-tant. For bromine, maintain the calcium hardness between 150-300 ppm. Test with an appropriate test kitand adjust as needed, following the instructions supplied with the test kit.
Total Dissolved Solids-
Tap water contains 50-300 ppm total dissolved solids [TDS]. When the level goes above 1500 ppm in a spa,the efficiency of sanitizers is reduced and corrosion is accelerated. To reduce TDS levels, replace some orall of the spa water.
45Spa Water Chemistry

46 Emerald Spa Owner's Manual
Draining the Water
Note:Chemically treated water
may damage plants.Place the garden hose
in a safe discharge area.
Note:Some water will be left in thebottom of the spa and in your
plumbing lines. This smallamount of water can be mixed
with fresh water without conse-quence. If 100% draining is
required, a small submersiblepump or a wet/dry shop vac
should be used. If winterizingyour spa please turn to
page 47 for completeinstructions.
MAINTAINING YOUR SPADraining the WaterCleaning the Spa ShellCleaning the FilterRelamping the Underwater LightStandby ModeWinterizing Your SpaThe Spa Cabinet
Caution:Do not allow the pump to run without water. Running the pump without water will cause pumpdamage and void the warranty.
To drain your spa without taking access panel off:1. Unscrew the cap and attach a garden hose.2. Turn the black nozzle (the part just behind where the cap screws on) counter-clockwise and pull out to
drain the water from your spa.3. When finished draining detach the garden hose, screw the cap back on and then push in and turn
clockwise (the part just behind where the cap screws on).

Cleaning theSpa Shell
Note:Do not use scouring
cleansers or solvents;damage to the acrylic
finish will result.
Note:Do not use strong
solvents such asgasoline, acetone, or
denatured alcohol;damage to the acrylic
finish will result.
Cleaning the Filter
Use a nonabrasive household cleaner to clean all spa shell surfaces and fixtures. Do not use scouringcleansers or solvents; damage to the acrylic finish will result.
Your Emerald Whirlpool Spa is manufactured using LUCITE XL 1000 continuous-cast cross-linked acrylicsheet. This material provides a strong chemical-resistant high gloss surface that is hard, nonporous, andimpermeable to water.
Given proper care, the polished, lustrous surface of LUCITE XL 1000 sheet will retain its appearance formany years. To clean your spa be sure to use a soft absorbent cloth with any of the commercially availablenonabrasive foam or liquid agents in general cleaning concentrations. Always rinse thoroughly with cleanwater and a soft chamois or moist cellulose sponge.
Cleaning agents containing strong abrasives such as scouring powders or strong solvents such as gasoline,acetone, or denatured alcohol should not be used to clean the acrylic surface of your spa.
Fine scratches may be minimized by the use of a mild automobile cleaner-polish. The cleaner-polish has afine abrasive action, and its wax content tends to fill small scratches to make them less visible.
1. Turn off power at GFCI, circuit breaker before performing any service. For DS-2 and DS-4 modelsyou may want to use the stand-by mode by pressing the " or # pad, then the "light" pad for theDS-2 and if you have a DS-4 you simply press "time" then the # pad.
2. Using a filter key, open filters and remove elements.
3. Clean the filter elements as required:
- Spray with a garden hose to remove trapped dirt.- Soak in a solution of water and filter cleaner solution to remove body oils and other contaminants or see your dealer for recommended cleaning supplies.- Inspect the elements for damage and replace as required.- Rinse thoroughly.
4. Place clean filter elements in housing and install filter tops.
5. Turn the power on at GFCI, circuit breaker. For Stand-by mode, touch any keypad to resume spaoperation for DS-2 and DS-4.
47Maintaining Your Spa

Temperature(Standby) Setback
Note:Turning air intake controls offprevents air from entering the
water and helps reduce heat loss.
During those times when the spa will not be used for extended periods. (ex. vacations)
1. Adjust the temperature setting to 60o F.2. Turn air intake controls off.3. Cover the spa to reduce heat loss and evaporation, and to prevent unauthorized use.
ON OFF(MAX) (MIN)
Relamping the Underwater Light
Caution:Do not attempt to remove or reinstall the light lens without usingthe proper tool provided.
The underwater light should be relamped from the under side of the spa as follows:
1. Disconnect the power from the spa.2. Locate the light fixture on the back of the spa inside the cabinet.3. Remove the old bulb and install a new bulb.
48 Emerald Spa Owner's Manual

Winterizing Your Spa
Caution:Do not use automobile
type radiator antifreeze.
Note:It is possible to use the air
blower (if equipped) to purgethe air lines. Ask your dealer
for assistance if you wantto use this procedure.
Note:If you cannot drain all the
water, especially from the blowerair injector lines, add an inhibited
propylene glycol type antifreezeto any remaining water. Propylene
Glycol can be purchased mostcommonly in a store with a
Recreational Vehicle section.Always call your dealer for assis-
tance
The Spa Cabinet
Note:Do not apply varnish,
shellac, or surface sealantsto the wood. Theytend to react with
chemicals in the woodand the UV rays of
the sun to cause yellowing,peeling, and flaking.
The following procedure should be followed if you choose to deactivate your spa for the winter months.
1. Drain all water from spa using drain hose.
2. Unplug the pump power cords from the control outputs.
3. Press the blower keypad and run blower until all air lines are dry.
4. Vacuum out each jet and air injector with a shop vac.
5. Remove any remaining water in the spa with a sponge or cloth.
6. Turn power off at main power supply panel.
7. Disconnect all plumbing from power pack at unions. Open T-valves to allow water to drain, andvacuum out each open union
8. Open drain valve and filter tops and vacuum out thoroughly.
9. Connected to the manifold is a hose that allows drainage of the manifold. Connect a hose to the spigot and drain the manifold.
10. Clean spa as instructed in maintenance section.
11. Use a locking spa cover to keep water out and prevent unauthorized use.
12. Please see side notes for adding the proper antifreeze.
The red cedar cabinet of your spa is protected with a wood sealer. It is normal for the cabinet to take on aweathered appearance with time and exposure to the elements.
Protect and revive the wood surface with a light sanding and the application of a wood preservative ortongue oil. Since Emerald uses only decay-resistant woods in its spa construction, you may choose to allowyour cabinet to age with time and weather.
Durabilt Cabinet
If you have purchased an optional Durabilt cabinet, know that the outer surface of the Durabilt Cabinet ismade completely of a synthetic material. To clean, take a dampened rag with mild dish soap and wash theoutside panels.
49Maintaining Your Spa

TROUBLESHOOTINGProblems Things to Check
Power system inoperative 1. Not plugged in (120v).(No LED display on the panel). 2. Circuit breaker tripped or not turned on.
3. Ground fault circuit interrupter tripped.4. Fuse in control box blown.
Fault indicated by spa 1. OH: Overheat Protection (spa is de activated).control display message. If a malfunction occurs and spa water reaches 112o F.,
the system will completely shut down. In such acondition, DO NOT ENTER THE WATER. Turn offall power to the spa and contact your dealer orservice organization. Overheating may also occurif you set the low speed pump to operate forextended periods of time. In this instance, removethe spa cover and allow the water to cool to below110o F. Touch the MODE (#) pad to reset the system.If the water is still hotter than the set temperature,touch the blower pad to cool the spa.
FLO: (Constant display) A pressure switch hasmalfunctioned. Contact your dealer or serviceorganization.FLO: (Flashing display):- A suction valve may be closed. Check position of valve.- The amount of water may be inadequate. Be sure the spa is properly filled.- A pressure switch has malfunctioned. The spa will operate, but the heater will not activate.Contact your dealer or service organization.
SN: Open sensor (spa is deacti vated). The high-limitsensor or water temperature sensor is not working.Call your dealer or service organization.
Spas equipped with Lite Leader,
SS-1D & SS-3DPower Systems
WARNING:Risk of electrical shock. Electrical
troubleshooting should be doneby qualified technicians.
WARNING:Risk of electrical shock. Disconnect
power cord from receptacle orturn power off at main service
panel before removing fuse.
50 Emerald Spa Owner's Manual

Pump does not prime. 1. Circulation T-valve closed.2. Not enough water in the spa.3. Air locked. Bleed air as described previously in this manual. (pg. 36)
Hydrotherapy jets do 1. Filter clogged.not operate. 2. Pump not primed.
3. Air intake valve(s) closed.4. Jet venturi nozzles plugged or missing.
Spa does not heat. 1. Thermostat set too low.2. Low flow, pump not primed, or water level too low.3. Pressure switch not sensing enough pressure.4. Heater element defective.
Spa heats, but not to set 1. Spa not covered or not covered properly sealingtemperature. the spa cover to the top edge of the spa. Heat loss
is greater for an uncovered spa. High wind, low humidity also increase heat loss.
Problems Things to CheckSpas equipped with Lite Leader,SS-1D, SS-3D
Power Systems[continued]
51Troubleshooting

52 Emerald Spa Owner's Manual
Spas equipped with DS-2 & DS-4
Power Systems
WARNING:Risk of electrical shock. Electrical
troubleshooting should be doneby qualified technicians.
WARNING:Risk of electrical shock. Disconnect
power cord from receptacle orturn power off at main service
panel before removing fuse.
TROUBLESHOOTING (cont.)Problems Things to Check
Power system inoperative 1. Circuit breaker tripped or not turned on.(No LCD display on the panel). 2. Fuse in control box blown.
Fault indicated by spa 1. OH: Overheat Protection (spa is de activated).control display message. If a malfunction occurs and spa water reaches 112o F.,
the system will completely shut down. In such acondition, DO NOT ENTER THE WATER. Turn offall power to the spa and contact your dealer orservice organization. Overheating may also occurif you set the low speed pump to operate forextended periods of time. In this instance, removethe spa cover and allow the water to cool to below110o F. Touch the MODE (#) pad to reset the system.If the water is still hotter than the set temperature,touch the blower pad to cool the spa.
FLO: (Constant display) A pressure switch hasmalfunctioned. Contact your dealer or serviceorganization.FLO: (Flashing display):- A suction valve may be closed. Check position of valve.- The amount of water may be inadequate. Be sure the spa is properly filled.- A pressure switch has malfunctioned. The spa will operate, but the heater will not activate. Contact your dealer or service organization.
ICE: Freeze protection. If a freeze condition isdetected, all pumps will automatically activate. Thisis a normal spa function; corrective action may notbe necessary. Freeze protection is enabled regardlessof the spa's status.

Problems Things to Check
Fault Indicators(continued).
ILOC: The spa is disabled in a standby mode. Thismode is typically used to clean the spa filter. To resetpress any button.
COOL: Temperature set back. If spa water is more than20o F cooler than the temperature set point, the heaterwill automatically activate to provide freeze protection.This is a normal function; no corrective action is neces-sary.
SN1: Open sensor (spa is deactivated). The high-limittemperature sensor is not working. This must berepaired by a dealer or service organization.
SN3: Open sensor (spa is deactivated). The watersensor is not working. This also must be repaired by adealer or service organization.
Pd: (Only an indicator to DS-4 systems). Batterybackup. Power has been cut off to the spa, and it isusing its battery backup to preserve its settings (forshort interruptions). The control panel will be disableduntil power returns to the unit.
Econ: (Only an indicator to DS-2 systems). Designatesthat the spa is in economy mode. The message isflashed alternately with the current spa temperatureand COOL until the spa water is 15o F cooler than theset temperature.
Spas equipped with DS-2 & DS-4
Power Systems[continued]
53Troubleshooting

Spas equipped with DS-2 & DS-4
Power Systems[continued]
Emerald Spa Owner's Manual54
Pump does not prime. 1. Circulation T-valve closed.2. Not enough water in the spa.3. Air locked. Bleed air as described previously in this manual. (pg. 36)
Hydrotherapy jets do 1. Filter clogged.not operate. 2. Pump not primed.
3. Air intake valve(s) closed.4. Jet venturi nozzles plugged or missing.
Spa does not heat. 1. Thermostat set too low.2. Low flow, pump not primed, or water level too low.3. Pressure switch not sensing enough pressure.4. Heater element defective.
Spa heats, but not to set 1. Spa not covered or not covered properly sealingtemperature. the spa cover to the top edge of the spa. Heat loss
is greater for an uncovered spa. High wind, low humidity also increase heat loss.
Problems Things to Check

55Electrical Schematics
Electrical Schematics
Lite Leader
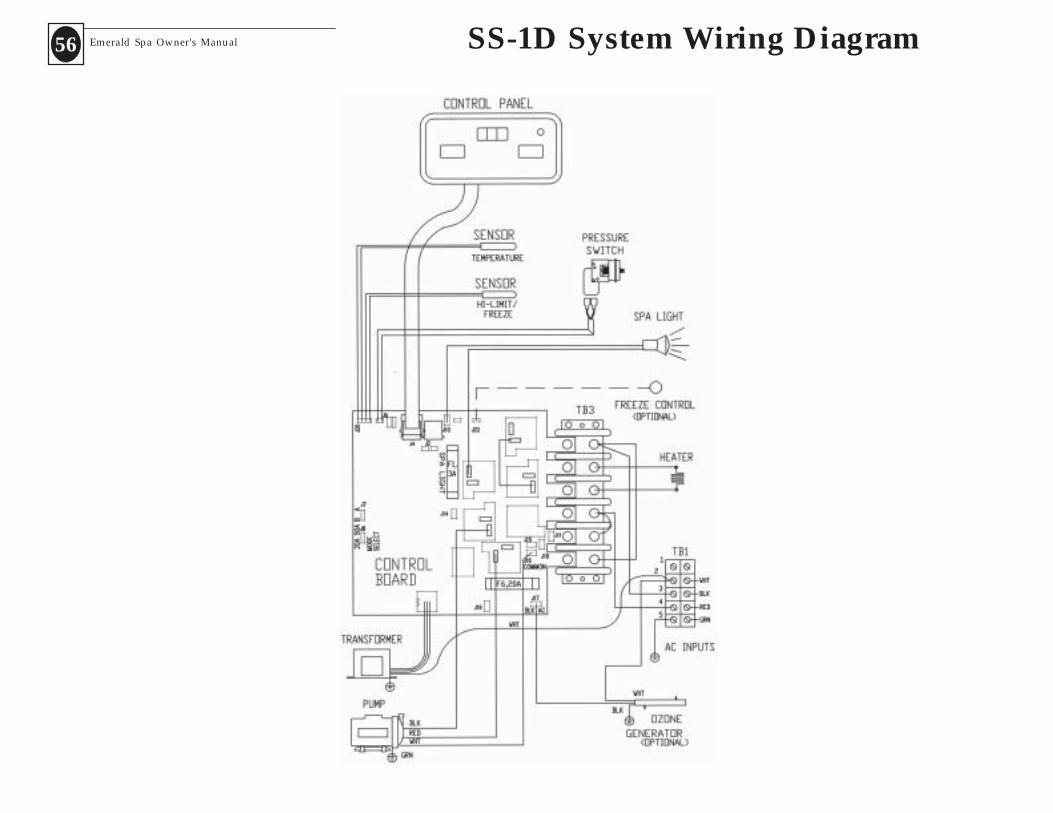
56 Emerald Spa Owner's Manual SS-1D System Wiring Diagram

57Electrical SchematicsSS-3D System Wiring Diagram

DS-2 System Wiring Diagram58 Emerald Spa Owner's Manual

59Electrical SchematicsDS-4 System Wiring Diagram

Notes: