owner’s manual model: walk-through ......walk-through assembly gate owner’s manual model: 0930...
TRANSCRIPT

WALK-THROUGH ASSEMBLY GATE
OWNER’S MANUAL MODEL: 0930 PW DS, 0941 PW DS
www.carlsonpetproducts.comCarlson Pet Products, Inc.3200 Corporate Center Drive, Suite 105 | Burnsville, MN 55306, USA952.435.1084Made in China
• READ ALL INSTRUCTIONS BEFORE ASSEMBLY AND USE OF GATE.• KEEP INSTRUCTIONS FOR FUTURE USE.!
WITH SMALL PET DOOR

ENGLISH2
!
Before Using Product
Read and follow all instructions carefully to ensure that your gate and extensions are properly installed. Improper installation could result in the gate becoming unstable or dislodged from the doorway. Please keep these instructions for your reference.
WARNING• To prevent serious injury or death, securely install gate or enclosure and
use according to manufacturer's instructions.• This product is safe for use with children from 6 to 24 months of age.• Children have died or been seriously injured when gates are not securely
installed. ALWAYS install and use gate as directed using all required parts.• STOP using when a child can climb over or dislodge the gate.• STOP using when a pet can climb over or dislodge the gate.• Use only with the locking/latching mechanism securely engaged.• To prevent falls, never use at top of stairs.• NEVER use to keep child away from pool.• Always ensure the gate is resting against the floor before beginning
installation.• Children should not be allowed near the small pet door unsupervised.
When children are present, the small pet door should remain closed and securely latched.
• Strangulation hazard: pets can force themselves into very small openings; use this gate with pets whose heads will not fit into openings in the gate, between the gate and floor, or between the gate and wall.
• Never leave pet or child unattended. This product may not prevent all accidents.
• Check the gate regularly to see if all the hardware and mountings are tightened.
• Do not use if any components are missing or damaged.

ENGLISH 3
Before Assembly
PLEASE CHECK TO MAKE SURE YOU HAVE THE FOLLOWING PARTS:
A Left Side Frame Half (1)
B Gate Door Panel (1)
C Right Side Frame Half (1)
D 6" Extension (1)
E Threaded spindle rods (4) F
F Wall Cups (4) G 1" Wall Mount Screws (4) H Spring Loaded Upper Door Mounting Pin (1) I Frame Assembly Screws (2) J Hex Key (1)
G J
I
H
F
E
DCBA

ENGLISH4
MODEL 4" 6" 8" 12" MAX SIZE
0941 PW DS 29 – 38 inches
Extensions List
NOTE: When installing any gate at its maximum width, use wall cups to ensure stability and safety.
NOTE
MODEL 4" 6" 8" 12" MAX SIZE
0930 PW DS 29 – 38 inches
WARNING: The gap between the gate and wall should not exceed more than 2.5 inches.!

ENGLISH 5
Assembling Your Gate
STEP 1 Take the left and right gate frame halves and align the holes in the lower horizontal tube. Place
the frame halves together and then using the frame assembly screws and hex key, tighten the two halves together.
STEP 2 Lower the gate door into the assembled gate frame and insert the lower gate door pin into the
mounting hole on the frame.

ENGLISH6
NOTE: You will notice a slight gap between the gate door latch and the frame tube. This is not a defect. Your gate is a pressure mounted gate and this gap will disappear once you tighten your gate in the doorway opening.
NOTE: Once the spring loaded mounting pin is inserted into the gate door hole, it cannot be taken out again by hand.
STEP 3 Align the hole in the upper corner of the gate door with the hole in the door mounting bracket.
Insert the spring loaded mounting pin into the hole in the mounting bracket and the door.

ENGLISH 7
STEP 1 Locate the (4) threaded spindle
rods. Rotate the adjustment wheels along the threading, eliminating the gap between the adjustment wheel and the rubber foot.
STEP 2 Insert the (4) threaded spindle rods
into the holes at each of the four corners of the gate.
RUBBER FOOT
ADJUSTMENT WHEEL
Installing Your Gate
NOTE: The ends of the gate frame are not threaded. The threaded spindle rods should slide into the end of the frame tubes without any resistance.

ENGLISH8
NOTE: It may be necessary to hold the threaded spindle rods or rubber feet while rotating the adjustment wheels to ensure the entire unit does not rotate.
STEP 3 Position the gate so that it is level and centered within your doorway or opening. Rotate the
adjustment wheels on the threaded spindle rods in the opposite direction as in STEP 1, expanding the gap between the rubber foot and the adjustment wheel. Expand each of the (4) threaded spindle rods until they make contact with the doorway or opening. Do not fully tighten the threaded spindle rods yet.

ENGLISH 9
STEP 4 When you are satisfied with the general placement of your gate, fully tighten the threaded
spindle rods attached to the lower corners of the gate by further rotating the adjustment wheels. Continue by tightening the upper threaded spindle rods. As you tighten the threaded spindle
rods, you will notice the gap between the door frame and the easy slide latch begin to narrow. In order for the gate to function properly, stop tightening the upper threaded spindle rods just
before the outer housing of the easy slide latch and the receiving component touch.
RECEIVING COMPONENT
OUTER HOUSING
NOTE: There should be equal spacing among each of the (4) threaded spindle rods. Make the appropriate adjustment to ensure you have installed your gate safely.

ENGLISH10
Positioning and Attaching the Wall Cups
Using the wall cups will affix your gate more firmly in the doorway or opening. This is the recommended way to use the gate.
STEP 1 After you have mounted your gate, and you are satisfied with its positioning, draw a circle on the
surface of your doorway or opening around the perimeter of the (4) rubber feet.
STEP 2 Next, completely remove the gate from the opening by loosening each of the (4) threaded
spindle rods to depressurize the gate.

ENGLISH 11
STEP 3 With the gate fully removed, you can now use the circles you marked during STEP 1 as guides
for screwing in your (4) wall cups. Center each of the wall cups within the guide circles and use the provided self-tapping screws to
fasten them in place via the hole through the center of each wall cup.
STEP 4 Reinstall your gate in the doorway or opening according to the instructions, using the newly
installed wall cups as anchoring points for the (4) threaded spindle rods.
ENGLISH12
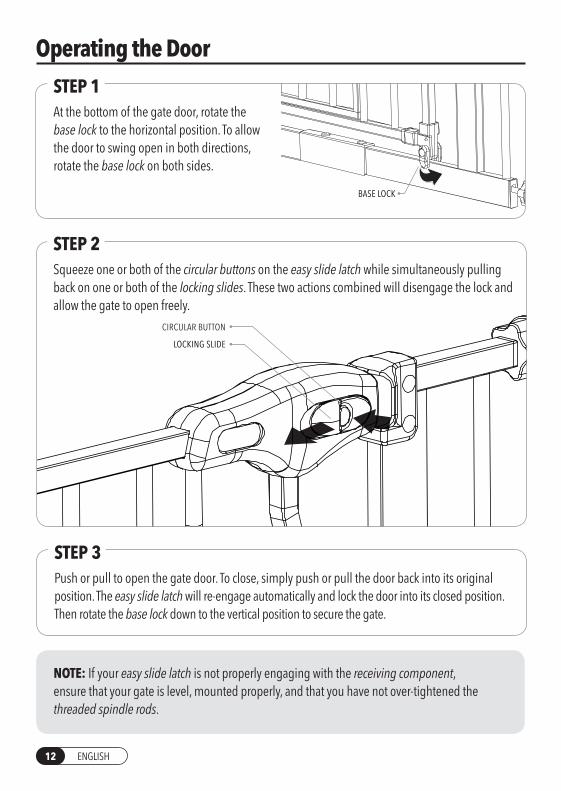
Operating the Door
STEP 3 Push or pull to open the gate door. To close, simply push or pull the door back into its original
position. The easy slide latch will re-engage automatically and lock the door into its closed position. Then rotate the base lock down to the vertical position to secure the gate.
NOTE: If your easy slide latch is not properly engaging with the receiving component, ensure that your gate is level, mounted properly, and that you have not over-tightened the threaded spindle rods.
STEP 2 Squeeze one or both of the circular buttons on the easy slide latch while simultaneously pulling
back on one or both of the locking slides. These two actions combined will disengage the lock and allow the gate to open freely.
CIRCULAR BUTTON
LOCKING SLIDE
STEP 1 At the bottom of the gate door, rotate the
base lock to the horizontal position. To allow the door to swing open in both directions, rotate the base lock on both sides.
BASE LOCK

ENGLISH 13
Adding a Gate Extension
STEP 1 Choose the side of the gate to be extended and remove the top and bottom threaded spindle rods.
STEP 2 Assemble the gate and extension as illustrated. Reposition the gate and fit in accordance with the
gate fitting instructions.
NOTE: It is preferable to install any extensions on the hinge side of the gate. If you have an application that requires additional extensions, please contact the manufacturer.
ENGLISH14
REMOVING YOUR GATE FROM THE WALL
To remove your gate from the wall, rotate the adjustment wheels on each of the (4) threaded spindle rods to depressurize the gate from its doorway or opening. Then, gently pull or push the gate free from its doorway or opening.
CARE AND MAINTENANCE
Periodically check the gate for signs of damage, wear, or missing components. Do not use if any part is missing, worn or damaged. Check the gate regularly to ensure all the hardware and mountings are tightened. Do not use abrasive cleaners or bleach. Clean by sponging with warm water and a mild detergent.
90 DAYS LIMITED WARRANTY
If, during the first 90 days after consumer purchase of the item, under reasonable and non-commercial use and conditions of maintenance, it fails while owned by the original purchaser because of the quality of materials or workmanship of finish and assembly, Carlson Pet Products, Inc. will replace or repair it at Carlson’s option. PROOF OF PURCHASE REQUIRED.

ENGLISH 15
Replacement Parts
B C EA
F
I
G
A Threaded Spindle Rods w/Adjustment Wheel Gray = #14016
B Top Plug Insert Gray = #14020
C Spring Loaded Upper Door Mounting Pin #10051
D Easy Slide Latch w/All Internal Components White = #13017
E 1" Wall Mount Screws #10001
F Wall Cups Gray = #14015
G Pet Door Pull Lock White = #13038
H Bottom Plug Insert Gray = #14019
I Frame Assembly Screws #10050
D
H

www.carlsonpetproducts.com
Carlson Pet Products, Inc. 3200 Corporate Center Drive, Suite 105 Burnsville, MN 55306, USA
952.435.1084
20170615EF