outlook 2003 user guide - emory universityit.emory.edu/media/outlook2003userguide.pdf · outlook...
TRANSCRIPT

Outlook 2003 User Guide
Contents:
Main Screen 1
Getting Help 2
Outlook Buttons 2
Organizing Messages 3
Sending Messages 4
Saving Messages 4
Message Options 4
Message Tracking 5
Recalling/Resending 5
Replying/Forwarding 6
Searching 6
Creating Rules 7
Out of Office Assistant 7
Junk E-Mail Filter 7
Deleting Messages 8
Undeleting Messages 8
Attachments 8
Calendar 9
Contacts 11
Distribution Lists 12
Desktop Alerts 13
Creating a Signature 13
Outlook Today 14
Outlook Options 14
Outlook Web Access 15
Keyboard Shortcuts 18
Main Screen
The main screen is divided into 3 windows: the navigation pane, the view pane and the reading pane. The reading pane is similar to what used to be called the preview pane. Each can be controlled by the View menu.
The Navigation Pane:
The navigation pane has section buttons on it: Mail, Calendar, Contacts, Tasks, Notes, Folder List and Shortcuts. If you do not see all of these buttons, you can resize the pane so that you can see them all by dragging the dark thin blue bar (with dots on it) that divides the screen and drag it up. You can also customize the navigation pane by using the Configure Buttons option on the lower right section of the pane.
The Mail section also has a Favorites area. You can drag & drop any folder from the All Mail Folders area in it will be copied into your favorites. They will then be easier to find and use.
The View Pane:
The view pane displays the actual items (messages, appointments, contacts, etc.) On the top of the view pane is the Arranged by: feature that is explained below. If you would like to see the column headers (Subject, From, Received, etc.) then you just need to resize the view pane so that it is larger and the reading pane is smaller. Keep resizing it until you see the column headers appear.
1

Outlook 2003 User Guide
2
Tips & Tricks: Drag & Drop messages to the calendar, contacts, tasks, notes, etc.
Use the Find a Contact! box on the Standard Toolbar to quickly find a contact while you are in e-mail, calendar, etc.
To quickly send an e-mail to a contact(s), find the contact using the find contact white box, then drag the contact’s info to the Inbox.
The Reading Pane:
The reading pane allows you to view the messages without having to double-click and open the messages. The reading pane displays to the right of the screen by default but can be displayed on the bottom of the screen or turned off completely by going to View – Reading Pane…
You can also work with attachments, accept or decline meeting requests, and use voting buttons in the reading pane.
Getting Help There are many ways to get help in using Outlook 2003 at Emory:
1. Use the Type a Question for Help (white box in top right corner) 2. Use the Help Task Pane (Help – Microsoft Office Outlook Help…) 3. Use Microsoft Online Help (Help – Microsoft Office Online) 4. Use all of the help options on your IT Emory web site (www.it.emory.edu –
Healthcare Exchange – Training, Help, FAQ…) 5. Call 8-INFO (to be used only for Emory Healthcare employees during initial
migration to Outlook) (once the migration has finished please call your regular help desk numbers: Emory Healthcare: 8-Help; Emory University 7-7777 or your local support provider)
6. Send your questions to: [email protected] (for Emory Healthcare employees during initial migration only).
Outlook Buttons
New Msg Search
Work Week View
Address Book
Weekly View
Move to Folder
New Appt
Monthly View
Delete
Calendar Coloring
New Contact
Reply to Sender
Group Schedules
New Task
Reply to All
Go to Today
New Note
Forward
Daily View
To recall or resend a message, open the message in your sent items folder and click on Actions-recall or resend this message.
Right-click on any message to get a shortcut list of options.
In the Preview Pane of the message, click on the attachment and drag and drop it into a folder on your computer such as My Documents.

Outlook 2003 User Guide
Organizing Messages
Sorting, Viewing & Grouping Messages:
The view pane allows you to change the sorting order of the window and how it is viewed. You can easily sort your messages by clicking on the Arranged by… button and choosing your sorting order (or use the view menu) and you can change how you view your messages by using View-Arrange by-Current View… You can also ungroup your messages by clicking on the Arrange by…button and clicking on Show In Groups which will turn the grouping option off.
Creating Folders:
Keeping too many messages in your Inbox can lead to many frustrating moments. It is difficult to sort through and find the messages that you need in a hurry. The more organized approach is to create personal folders and move messages into the folders on a continual basis. To create a folder, right-click on the Inbox and choose New Folder… You can also create a folder within folders. You can also right-click on the Mailbox and choose New Folder…and this will place the folder under the Mailbox instead of under the Inbox. Moving Messages: You can move messages by dragging & dropping them in to the appropriate folder. Use the shortcut keys (Ctrl & Shift – see the side panel under Tips & Tricks) to select multiple messages and move them all at once. You can also move messages automatically by creating rules. You can create rules to automatically move, delete, and flag messages (etc.). To create a rule, select Tools-Rules and Alerts… New Rule…
Categorizing Messages:
Categories are a great way to organize your messages by subject matter. To categorize a message, right-click on the message and select Categories…. Each message can be in as many categories as you would like. You can also create your own categories by clicking on Master Category List. Once your messages are categorized, you can then sort the messages by category by using the Arrange by…option.
Quick Flags:
You can quickly flag messages for follow-up by clicking the flag icon next to the message. When you flag an item for follow-up, it’s automatically placed in the For Follow Up folder. If you click again on the flag icon, the follow-up is marked as complete. Several flag colors are available to help you categorize and find messages more easily. Right-click on the flag icon to see all color choices and options.
Tips & Tricks: Use Control+Click to select non-adjacent items.
Use Shift+Click to select adjacent items.
Double-Click to select a word. Triple-Click to select a paragraph.
Control+Drag to make a copy. Drag to move.
Use Control+Home to jump to the top of any file.
Use Control+End to jump to the bottom of any file.
3
Outlook 2003 User Guide
You can also add reminders to flags. This allows you to change the type of flag and thedue date. If a due date is filled in a reminder window will then pop up to remind you about the due date on this message.
Using Color:
You can organize your messages by color coding them. You can apply different colors to different users. To color code your messages, click on Tools-Organize… and click on Using Color.
Sending Messages There are many ways to create a message but the following list describes the easiestway:
1. Click on the Mail section button on the Navigation Pane (if you are not already there)
2. Click on the New button 3. Either type in the e-mail addresses, using a semi-colon to separate addresses
OR click on the To…button to select names from the address book 4. Click in the Subject area to type in a subject 5. Click in the message area to type in a message 6. Click on buttons displayed on the E-mail toolbar to add priorities, flags or options. 7. Click on the paperclip button to add an attachment if necessary. 8. Click on the Send button to send the message.
Saving Messages If you do not have time to finish your message or you are not ready to complete themessage, you can always save it and finish it later. When you save a message it isautomatically saved in the Drafts folder. You would have to open it up from there to finishthe message and then send it. To save a message, click on the Save button and then close the message.
Setting Message Options You can use the Message Options dialog box in the Message window to change message settings, delivery options, and add other features to an e-mail message before sending it.
Message Settings – You can set the importance and sensitivity of the message. Messages with high importance appear with a red exclamationpoint and messages with a low importance appear with a blue down-arrow.
4
Outlook 2003 User Guide
MessaWhen the tautomatically message is notification smessage ma mark icon an
When the tmessage windelivery andfor read norequesting acancel the re
You can cus Preferences
RecallOutlook allo moved the m click on Actio
Outlook sen fails. The noSuccess or added to the
When you re the recipientmessage wil
Voting and Tracking Options – You can use voting buttons to insertbuttons that the recipient can use to respond to a question or issue. Adelivery receipt is for when the message gets delivered and a read receipt isfor when the message gets opened.
Delivery Options – You can have replies sent to someone else, save thesent message in another folder instead of the Sent folder, delay the sending of the message until a specific date and time, and have the message expire or delete itself out of the recipient’s inbox. (Delivery options are only available to Exchange users.)
You can also “link” this message to a particular contact OR place it in a particular category.
ge Tracking Options racking options are enabled (as discussed in the previous topic) you receive a notification in your inbox from the System Administrator when adelivered/read. When a message marked for delivery is delivered, the ent back displays a green arrow icon and the subject Delivered:. When a rked for read notification, the message sent back displays a green checkd the subject Read:.
racking options have been enabled, the Tracking page appears in the dow for messages in the Sent Items folder. The Tracking page displays the
receipt status of the message. When a recipient opens a message marked tification, a warning box opens telling the recipient that the sender is read receipt. The recipient can select Yes to send the receipt or No to ceipt.
tomize the way the Tracking Options is setup by going to Tools – Options –– E-mail Options…Tracking Options…
ing/Resending a Message ws you to recall messages sent to Exchange users who have not read oressage yet. To recall/resend a message, open the sent message first, thenns – Recall or Resend…
ds you a notification informing you whether the message recall succeeds ortification appears in your inbox as a message with a subject Message Recall Message Recall Failure. When you recall a message, a Tracking page is original message in the Sent Items folder.
call a message, the recipient receives a message with the subject Recall. If reads the recall notice before the reading the original message, the recalled l be removed from the recipient’s inbox.
5
Outlook 2003 User Guide
6
Calendar Tips & Tricks:
Use Control+Click to select non-adjacent items.
Use Shift+Click to select adjacent items.
Replying or Forwarding Messages There are various ways that you can use to reply to a message or forward a message to someone else.
You can single click on the message and use the Reply, Reply to All, or Forward buttons on the top of the screen
You can right-click on the message and use the Reply, Reply to All, or Forward options
You can open the message and use the Reply, Reply to All, or Forward buttons on the top of the screen
Searching for Messages There are various features that you can use to help you locate messages in a timely manner. Some have been mentioned above (sorting, viewing, grouping, and categorizing) and some mentioned below (finding and using the search folders option).
Finding Messages: Use the Find button to search for messages. You can select what words to search for and what folder to search in. Once you fill in the search criteria and press the Enter key or click on Find Now, all of the messages that match the criteria will display in the view pane. Click on the Clear button to clear your search and show all messages again. You can also use the Advanced Find feature from the Options drop-down and find messages based on dates, flags, text within message, etc.
Using Search Folders: You can use search folders to view messages by category. Search folders are virtual folders in that they do not contain actual messages but provide a view to only those messages that meet the specified criteria. To create a search folder:
1. In the Navigation pane, right-click Search Folders. 2. Choose New Search Folder to open the New Search Folder dialog box. 3. From the Select a Search Folder list, select a condition. 4. Click OK.
Use the Date Navigator in the Calendar to view multiple days of appointments. Use the Ctrl+Click option to select several days that are not next to each other.
Use the Today button to jump to the current day’s appointments.
Right-click on time intervals to display short-cuts.
Right-click in appointment screen to display short-cuts.
Dragging appointments to another day/time moves them.
Control+dragging appointments to another day/time copies them.
To turn the taskpad on (like it used to be in previous versions) click on View-Taskpad.
Right-click on the Calendar and click Open in New Window. This will open the calendar in a separate window.

Outlook 2003 User Guide
Creating Rules You can create rules that help you to automate your e-mail system and to stay better organized.
To create a Rule:
1. Click on Tools – Rules and Alerts... (Emory is not using Alerts) 2. Create a rule by using a template or by starting from blank 3. If you are using a template, click on the links in the bottom half of the
screen to setup the rule and then click Next until you see the finish button. 4. If you are starting from blank then just click Next and setup the rule using
the next 3 screens. 5. Click Finish. 6. Choose to enable or disable the rule. Enabling it will turn it on immediately
while disabling it will keep it for future use but not be activated.
Out of Office Assistant The Out of Office Assistant can be turned on so that all incoming messages can beautomatically replied to when you are out of the office. This can be enabled/disabled using the Outlook or Outlook Web Access.
To setup the Out of Office Assistant…
1. Click on Tools – Out of Office Assistant… 2. Select the I am currently Out of Office option 3. Click inside the text box and write the message that you want to send while
you are away. 4. When you return to the office and start Outlook, a box will pop up asking if
you want to turn off the Out of Office Assistant.
Junk E-mail Filter The Junk E-mail Filter looks at your incoming messages and reviews the subject and body for indications that the message is junk mail. Any messages that it views as junk mail is automatically placed in the Junk E-mail folder. This filter is turned on by default and set to a protection level of low. You can change the protection level through Tools-Options-JunkE-mail.
You can also add E-mail addresses to the filter if the automatic filter did not catch it. To dothis, right-click on the mail message and choose Junk E-mail. Three filter lists are available:
7

Outlook 2003 User Guide
Safe Senders List – E-mail addresses that you include in this list will not be identified as junk mail.
8
Contacts Tips & Tricks:
Use Control+Click to select non-adjacent items.
Use Shift+Click to select adjacent items.
Drag & Drop contacts to the Inbox to quickly create an e-mail.
Safe Recipients List – E-mail addresses that you send messages to will not be treated as junk mail. (i.e. distribution lists)
Block Senders List – E-mail addresses that you include in this list will automatically be treated as junk mail regardless of content.
Deleting Messages You can delete messages, appointments, contacts, tasks or notes by selecting the item(s) (use the control+click or shift+click to select multiple messages) and then press the Delete key on your keyboard, the Delete button, OR select Delete from the right-click menu. You may also want to just drag & drop them to your Deleted Items folder in the Navigation Pane.
Items are automatically emptied from your Deleted Items folder every 14 days. If necessary, you can get an item back that has been deleted but is still in the Deleted Items folder. The easiest way to “undelete” from the Deleted Items folder is to select the item(s) and just drag them back to the Inbox, Calendar, etc.
You can also “empty” your deleted items folder any time you wish by right-clicking on the Deleted Items folder and selecting “Empty Deleted Items folder”.
Undeleting Messages Have you ever deleted mail from your Deleted Items folder and then wanted to retrieve it? In most cases, you can with Outlook 2003. You have up to 2 weeks to recover deleted items. To recover deleted items:
1. In the Folder list, click Deleted Items. 2. On the Tools menu, click Recover Deleted Items. 3. Click the item you want to recover. To select multiple items, click the first item, and
then hold down CTRL and click additional items. 4. Click the Recover Selected Items button.
The items will be returned to your Deleted Items folder and marked as recovered and then you can move them to other folders.
Working with Attachments You can use Outlook to send or distribute files of any type. These attached files are indicated by the paperclip icon. The recipient can then use the attached file as desired.
Outlook 2003 User Guide
Attaching a File:
You can attach a file to your e-mail by clicking on the paperclip icon in the message dialog box. Once you attach a file, the Attachment Options…button will appear on the screen. Click on this button to see available options for this attachment. (Emory users will only be attaching regular attachments.) You will see more attachment options if you attach a picture file. Outlook gives you the ability to send the pictures as a smaller size.
Working with an attached file:
If you receive an e-mail with an attachment there are several ways to work with the attachment. One way is to select the message and use the Reading Pane to see the attached file. You can then right-click on the attached file and see the attachment options to open, print, save as, etc.
If you open an attachment in Word 2003, you will notice that the default view is the Reading Layout View. This is for easier reading onscreen. The document text does not appear as printed, rather it is adjusted to fit the screen. However, you can select the Actual Page button to view the document as it would print. You can turn this default view off for Outlook attachments in Word by going to Tools – Options – General – disable Allow Starting in Reading Layout option.
Calendar The calendar provides scheduling features in Outlook. You can create personal appointments and events, meetings, check other people’s schedules, and have access to other people’s calendars.
The taskpad is NOT on by default but can easily be turned on by clicking on View – Taskpad…
Calendar Views
You can decide how many days that you want to see on the calendar by choosing the buttons across the top of the screen: Day, Work Week, Week, or Month
Date Navigator
The date navigator (the window pane in the top left (or right) corner that shows the months) can be used to customize the days that are displayed in the appointment screen.
♦ Click and hold on the month to see a list of other months ♦ Use the Control key to select days that are not in consecutive order ♦ Use the Shift key to select days that are in consecutive order
9

Outlook 2003 User Guide
♦ ♦
Creating
There are m
♦ ♦ ♦ ♦ ♦
You can qAttendees on the scrSchedulingIf there arebutton on thattendees a
Editing A
How you eappointmenmake the cjust click amove or codrag & drop
Color Co
You can orThis is by you are firsselecting Etoolbar.
Categori
You can orcategories.can customcategorizinArrange by
Click to the left of any week to select the entire week Resize the window to show more than 2 months
Appointments
any ways to create an appointment or a meeting:
Click and type at appropriate time interval (appointment only) Double-click at appropriate time interval Right-click at appropriate time interval and choose New… Click on New button or drop-down arrow Click at the starting time, shift+click on the ending time and click on New button (or right-click, New…)
uickly change an appointment into a meeting by clicking on the Invite button from the new appointment dialog box. An appointment will have a To: een awaiting the attendee’s names to be entered. You can also use the tab to look at invitees schedules before you send out the meeting invitation. conflicts appearing in the schedule then you can click on the AutoPick Next e bottom of the screen to have Outlook select the next available time that all re available.
ppointments
dit the appointment is dependent on what you would like to do with the t. To change information about an appointment or meeting, double-click and
hanges. To simply change the time, you do not need to double-click, instead nd drag the border around the appt. to shorten/lengthen the duration. To py an appointment, you can copy and paste it into the new date or simply it to the correct date.
ding Appointments
ganize your calendar items by assigning different colors to different events. right-clicking on an item and choosing label… or by assigning a label when t entering the appointment/meeting. You can customize your own labels by dit-Label… or by clicking on the Calendar Coloring button on the Standard
zing Appointments
ganize your calendar items by placing each appointment/meeting into certain This is done by right-clicking on an item and choosing categories…. You ize your own categories by selecting Master Category List. Once you have
g your items, you can then view your items by category by clicking on View--Current View-By Category. (If you want the screen to look like the calendar
10

Outlook 2003 User Guide
Sharing Calendars
For you to see someone else’s calendar, they have to give you “permission” to do so. They would need to open their Outlook Calendar and click on Share My Calendar. This will display the permissions screen for their calendar. They would then click the new button and select the person that they want to give rights to. Then they would select which rights to give that person by putting a check mark in the desired options.
To see someone else’s calendar; once you have been given rights; you would open up your Outlook Calendar and click on Open a Shared Calendar…select the person’s name whose calendar you are trying to see and click OK. Both calendar wills display on the screen at once. Once you open up someone else’s calendar for the first time, you would not need to go thru the same steps to open it in the future since all previously viewed calendars will be listed in the navigation pane on the left of the screen. You can then control whose calendar and how many calendars to see by placing check marks on the desired calendars or taking the check mark off to stop displaying that calendar.
Using the Taskpad
You can add tasks to the taskpad by just clicking where it says “Click here to add a new task”. Just type the task and press Enter. If you want to enter more information about that task then the can double-click the task to open the task dialog box. The task dialog box allows you to enter due dates, status, priority, and % complete for the task. You can also categorize the task or “link” it to a contact.
A task will keep appearing on the calendar every new day until it is either completed or removed. To complete a task, click in the check box.
Contacts The Global Address List (GAL) will contain all company wide employees and is available from the Address Book. The Contacts book will contain all of your personal addresses. You can get to your contacts book from your address book by just changing what book it is looking at (the drop down arrow).
Adding Contacts You can add contacts by switching to your Contacts book and clicking on the New button. Fill out all of the information that you know and click on Save and Close. You can also add contacts by just dragging a mail message to the Contacts button. This will automatically create a contact.
view again then switch it back to View by Day/Week/Month.)
11

Outlook 2003 User Guide
Categorizing Contacts
You can organize your contacts by placing each contact into certain categories. This is done by right-clicking on a contact and choosing categories…. You can customize your own categories by selecting Master Category List. Once you have categorizing your contacts, you can then view your contacts by category by clicking on View-Arrange by-Current View-By Category. (If you want the screen to look like the contact view again then switch it back to View by Address Cards.)
Flagging Contacts For Follow-up
You can flag each contact for follow-up so that you can keep better track on what type of work still needs to be done on that account. This can be done by right-clicking on a contact and choosing Follow-up…
Sending Contacts E-mail
If you are in your Inbox already, then the easiest way to send e-mail to your contact(s) is to choose their names from your address book (remember to switch what book you are looking at to the contacts book). If you are in your contacts book, then the easiest way to send e-mail to your contact(s) is to drag and drop their address card into the Inbox.
Distribution Lists
Whenever you need to continuously send E-mail to the same group of people, then you should create a distribution list for this group of people and just send it to the list. To create a distribution list:
1. Click on File-New-Distribution List… (or click on the drop-down arrow next to the New button and select Distribution List…)
2. Type the name of your Distribution List. 3. To add members from your address book (or contacts), click on Select Members… 4. To add members that are not in any book, click on Add Members… 5. Click Save and Close
There is a limitation of 100 members in any 1 address book. Once a distribution list is created, it will appear in your contacts book.
Printing Contacts
Outlook offers different options to print your contact list. Select File-Print…and choose a print style. You can also change the view and print that. (i.e. View-Arrange By-Current View-Phone List.)
12
13
Outlook 2003 User Guide Forwarding Contacts
Send contacts to other people by right-clicking on the contact you want to send and then click Forward. A new e-mail message will be created with that contact included as an attachment. When the recipients receive the contact, all they have to do is to drag the attachment onto the Contacts folder and it will be added automatically to their contacts list.
Creating additional Personal Books
You can create additional personal books by just right-clicking on the contacts folder in the navigation pane and selecting New Folder…
Desktop Alerts A Desktop Alert is a semi-transparent message box that appears in front of the current window when a new e-mail message, meeting request, or task request arrives. The desktop alert displays who the item is from and the subject. By default, desktop alerts are turned on and only display for 7 seconds. When a desktop alert appears, pointing to it makes it more visible and leaves it on the screen for easier reading. Desktop alerts settings can be changed by clicking on Tools – Options – Preferences – E-Mail Options – Advanced E-Mail Options…Desktop Alert Settings…
Creating a Signature You can create a signature so that it automatically appears on the bottom of all out-going messages. To create a signature, click on Tools – Options – Mail Format – Signatures…New...type in a name for this signature, choose how to create your signature, click Next, and type in your desired signature. Click Finish and OK when done. The last signature that you create will be set as the default signature as shown under Signature for new messages:
If you don’t want to default to any signature (you would rather insert the signature manually when needed) then change the Signature for new messages: to None. To manually insert the signature then Word 2003 must not be set up as your default e-mail editor. Then you can use the Insert menu while creating a message and select the signature to insert. If Word is set as your default E-mail editor then you would need to create a signature in Word Autotext to be able to insert them manually.
Using Outlook Today You can set up the Outlook Today page to be the first page that you see when you open

Outlook 2003 User Guide
To customize the Outlook Today page, click on the Customize Outlook Today button in the upper right of the screen. You will see options to go directly to Outlook Today when starting, Message options, Calendar options, Task options, and styles.
To get out of the Outlook Today page, just click on another option (i.e. Inbox).
Outlook Options You can easily set up Outlook to work better for you by going in to Tools – Options… and investigate all of the options available. Below is a list of some of the options that may help you:
Preferences tab – Junk E-mail… – setup how Outlook handles junk e-mail.
Preferences tab – E-mail Options… – setup e-mail, advanced e-mail options (including Desktop Alerts), and Tracking Options.
Preferences tab – Calendar Options… – setup calendar and how it works for you including what days and hours you work.
Preferences tab – Task Options… – setup tasks and how it works for you.
Preferences tab – Contact Options… – setup contacts and how it works for you.
Preferences tab – Note Options… – setup notes and how it works for you.
Mail Format tab – setup Word 2003 as your e-mail editor, create signatures, etc.
Spelling tab – setup spell checker to automatically check before sending a message, etc.
Other tab – setup Navigation Pane Options, Reading Pane Options, etc.
Delegates tab – setup someone else to send items on your behalf.
up Outlook. The Outlook Today page displays your appointment, tasks, and e-mail today. To view the Outlook Today page, click on the Mailbox in the Navigation Pane.
14
Outlook 2003 User Guide
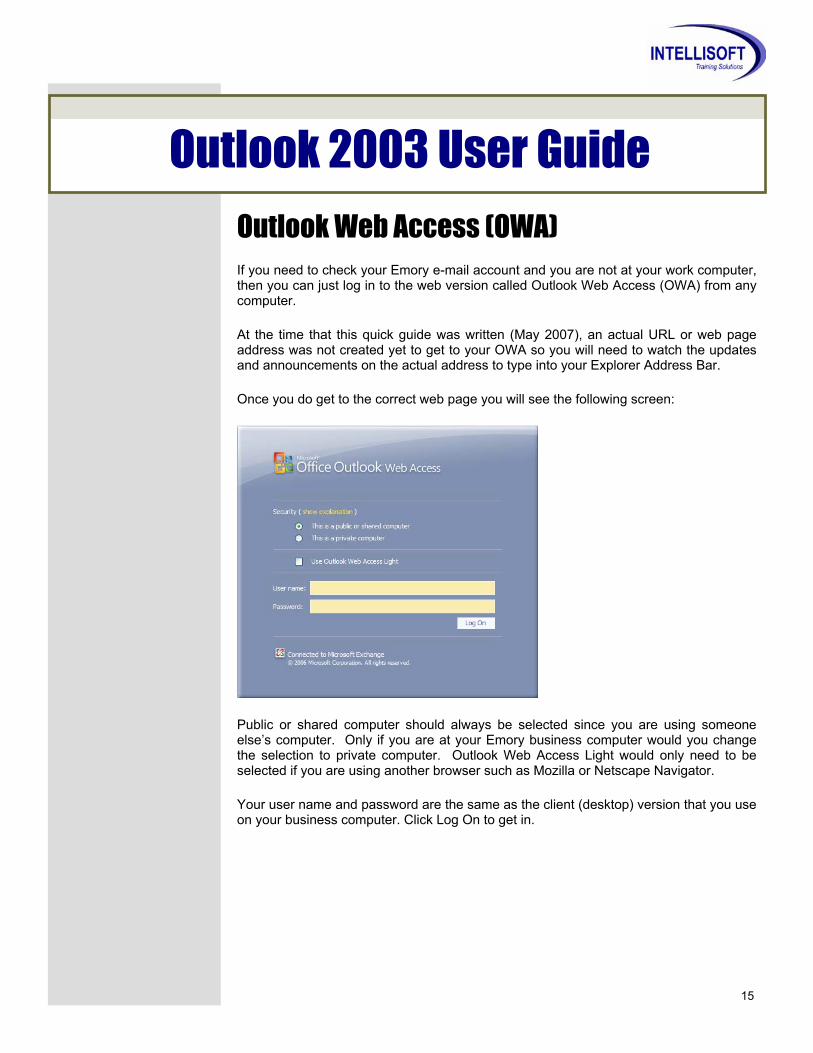
Outlook Web Access (OWA) If you need to check your Emory e-mail account and you are not at your work computer, then you can just log in to the web version called Outlook Web Access (OWA) from any computer.
At the time that this quick guide was written (May 2007), an actual URL or web page address was not created yet to get to your OWA so you will need to watch the updates and announcements on the actual address to type into your Explorer Address Bar.
Once you do get to the correct web page you will see the following screen:
Public or shared computer should always be selected since you are using someone else’s computer. Only if you are at your Emory business computer would you change the selection to private computer. Outlook Web Access Light would only need to be selected if you are using another browser such as Mozilla or Netscape Navigator.
Your user name and password are the same as the client (desktop) version that you use on your business computer. Click Log On to get in.
15

Outlook 2003 User Guide
OWA Main Screen
OWA Buttons
New Message
Search
Show/Hide Reading Pane
Help
Single/Multiple Line
New Appt
Delete
New Contact
Check Messages
Go to Today
Reply to Sender
1 Day View
Reply to All
5 Day View
Forward 7 Day View
16

17
Outlook 2003 User Guide As you can see, many features are similar between Outlook 2003 (the client or desktop version) and Outlook Web Access (OWA).
The following is a list of differences in the web version compared to the client version:
There are no outlook menu’s available (the menu’s you see are Explorer menu’s) so you will have to use the Options button in the upper right corner to get to a lot of different options:
- Signatures - Spelling - Calendar Options - Out of Office Assistant - Rules - Junk E-mail - General Settings - Deleted Items - Mobile Devices
The Navigation Pane looks & acts slightly different
You cannot create/edit distribution lists in the web version but you can view/use already created distribution lists
The following is a list of things you CAN do in OWA: You can drag & drop messages
You can right-click on messages
You can flag messages for follow-up
You can set up Out of Office Assistant
You can create folders
You can create appointments & meetings
Logging Off OWA When you are ready to close OWA you MUST Log Off before closing the Explorer window in order to keep your e-mail’s safe and secure. The Log Off button is in the upper right corner of the screen.
Outlook 2003 User Guide
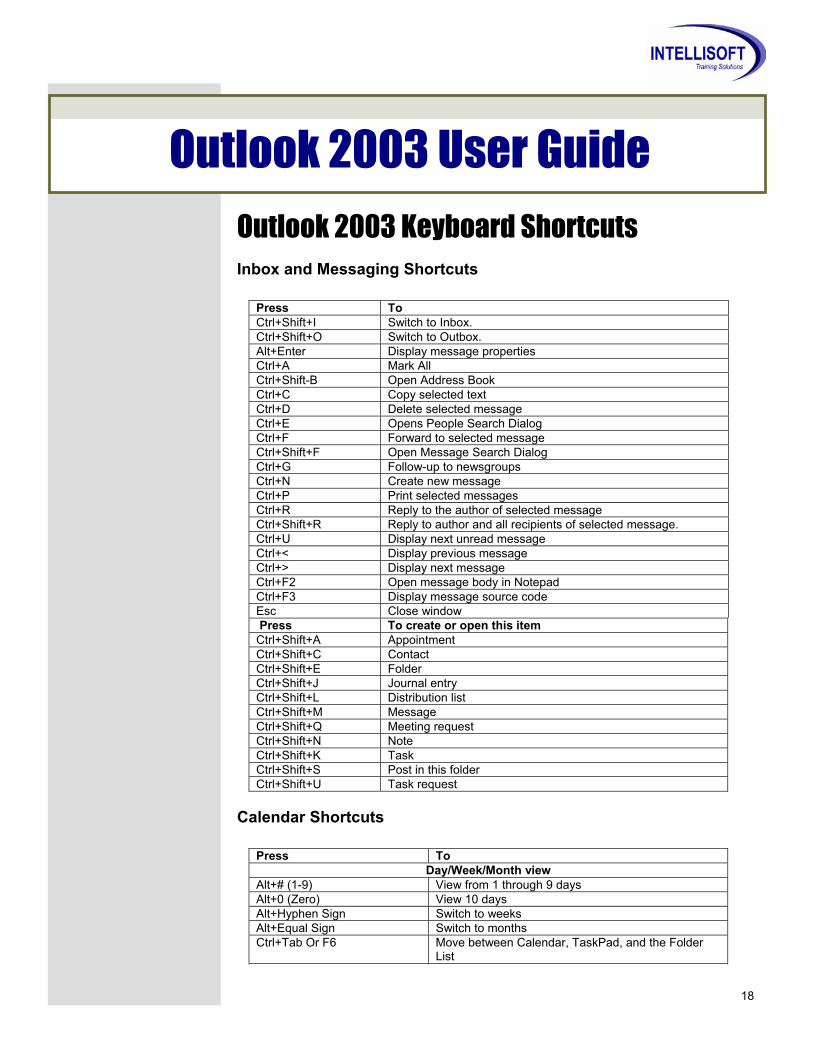
Outlook 2003 Keyboard Shortcuts Inbox and Messaging Shortcuts
Press To Ctrl+Shift+I Switch to Inbox. Ctrl+Shift+O Switch to Outbox. Alt+Enter Display message properties Ctrl+A Mark All Ctrl+Shift-B Open Address Book Ctrl+C Copy selected text Ctrl+D Delete selected message Ctrl+E Opens People Search Dialog Ctrl+F Forward to selected message Ctrl+Shift+F Open Message Search Dialog Ctrl+G Follow-up to newsgroups Ctrl+N Create new message Ctrl+P Print selected messages Ctrl+R Reply to the author of selected message Ctrl+Shift+R Reply to author and all recipients of selected message. Ctrl+U Display next unread message Ctrl+< Display previous message Ctrl+> Display next message Ctrl+F2 Open message body in Notepad Ctrl+F3 Display message source code Esc Close window Press To create or open this item Ctrl+Shift+A Appointment Ctrl+Shift+C Contact Ctrl+Shift+E Folder Ctrl+Shift+J Journal entry Ctrl+Shift+L Distribution list Ctrl+Shift+M Message Ctrl+Shift+Q Meeting request Ctrl+Shift+N Note Ctrl+Shift+K Task Ctrl+Shift+S Post in this folder Ctrl+Shift+U Task request
Calendar Shortcuts
Press To Day/Week/Month view
Alt+# (1-9) View from 1 through 9 days Alt+0 (Zero) View 10 days Alt+Hyphen Sign Switch to weeks Alt+Equal Sign Switch to months Ctrl+Tab Or F6 Move between Calendar, TaskPad, and the Folder
List
18

Outlook 2003 User Guide
Left Arrow Go to the previous day Go to the next day
Alt+Left Arrow Move selected item to the previous day when multiple days appear
Alt+Right Arrow Move selected item to the next day when multiple days appear
Alt+Down Arrow Go to the same day in the next week Alt+Up Arrow Go to the same day in the previous week
For Day view Home Select the time that begins your work day End Select the time that ends your work day Up Arrow Select the previous block of time Down Arrow Select the next block of time Page Up Select the block of time at the top of the screen Page Down Select the block of time at the bottom of the screen Shift+Up Arrow Or Down Arrow
Extend or reduce the selected time
With The Cursor In The Appointment, Alt+Up Arrow Or Down Arrow
Move an appointment
With The Cursor In The Appointment, Alt+Shift+Up Arrow Or Down Arrow
Change an appointment start or end time
Alt+Down Arrow Move selected item to the same day in the next week Alt+Up Arrow Move selected item to the same day in the previous
week For Week or Month views
Home Go to the first day of the week End Go to the last day of the week Page Up Go to the same day of the week in the previous week
(or 5 weeks previous if viewing by month) Page Down Go to the same day of the week in the next week (or
5 weeks ahead if viewing by month) Alt+Up, Down, Left, Or Right Arrow
Move the appointment up, down, left, or right
Shift+Left, Right, Up, Or Down Arrow; Or Shift+Home Or End
Change the duration of the selected block of time
For Date Navigator Alt+Home Go to the first day of the current week Alt+End Go to the last day of the current week Alt+Up Arrow Go to the same day in the previous week Alt+Down Arrow Go to the same day in the next week Alt+Page Up Go to the first day of the month Alt+Page Down Go to the last day of the month
Right Arrow
19