oticon safari fitting guide/media/oticon us/main/download center... · oticon safari fitting guide...
TRANSCRIPT

Pediatric Fitting Mode
OticOn saFari Fitting guide
The Complete Guide to Fitting Oticon Safari using Genie 2010.2

The Pediatric Fitting Mode was developed based on input from audio-logists from all over the world with the aim to help simplify the fitting process of children with hearing loss.
The goal is to offer:
• Intuitive pediatric features
• Pediatric default settings – and the option to personalize them
• More time for counseling – with less time spent on programming
• Greater certainty – hence more confidence in the fitting
Genie 2010.2
Pages marked with indicate steps that should always be carried out.The other pages deal with optional steps.
Genie
2

3
Fitting• Pediatric Default Settings – pediatric appropriate
with the option to define own settings and age brackets
• Settings Overview – quickly verify that the instrument settings are set as you wish
• Compression Ratio – ascertain the CR of the fitting with one click
• Visual Indicator (LED) – visual confirmation can be enabled or disabled as desired
• Improved FM flexibility – change or maintain program button settings
• Volume Control Reserve Gain – information is readily available
How does the Pediatric Fitting Mode help?
Counseling• Parent counselling support incorporated
into Genie
• Child-oriented sounds and pictures
• Dedicated instructional videos

Table of Contents 4Connecting Safari to Genie 5Personalize Genie 9 Fitting Step 10 Graph Format 11 Pediatric Default Settings 12 Default Rationale 13 Measurement Modules 14Navigation 15Pediatric Settings Dialog 17Counseling 22Select Family 24Selection Select Instrument 26 RECD, REUR and Audiogram 27 Program Manager 30 Telephone Options 31 Acoustics 32COW, CHILD, ELF 33Links 34 Pediatric Instruction Videos 35
Fitting Controls 38 Automatics 40 More Tools Feedback Manager 41 REM 42 Live Demonstration 43 Activity Analyzer 44 Fitting Assistant 45 In-situ Audiometry 46End Fitting Buttons and Indicators 48 Operate Pushbutton and VC 49 Beeps 50 Visual Indicator (LED) 51 ConnectLine 52 TV 53 Phones 54 Music/ Audio 55More Tools Phone and DAI/FM 56 Phone Programs 57 DAI/FM 58 Save, Program and Exit 59 User Instructions 60
Table of Contents

5
It is just as easy and quick to fit Safari instruments as other Oticon hearing instruments.
Safari is programmed using programming shoes and Oticon programming cable #3 (right and left).
You can also use nEARcom to fit Safari instruments without cables.
Connecting Safari to Genie

6
1. Open the battery door on the instrument and slide the programming shoe into the guide as shown. (Make sure the battery is fresh).
2. Close the battery door and attach the HI-PRO or NOAHlink cable.
Connecting the Programming Shoe
1
2

7
For greater flexibility and comfort use nEARcom to fit Safari instruments without cables.
Detect the instruments1. Switch on the instruments using fresh batteries.
2. Lay nEARcom on the table and place the instru-ments in the middle of the neck loop.
3. Click Detect for cordless programming.
Note: make sure the instrument volume control is set to position 3 during detection.
nEARcom
Cordless programming
Wired programming

8
Instruments which have never been programmed must be assigned to the correct side – left and right – in Genie.
Use a BEEP test as follows:
To identify the instrument place it in the middle of the neck loop and click BEEP. The instrument will beep for 6 seconds.
While the instrument is beeping, remove it from nEARcom and listen to it. If the instrument does not beep, return it to the middle of the neck loop, click Change side 1 and click the same BEEP. Listen to the instrument again.
Click Continue and proceed with the programming.
nEARcom
1

9
In Genie Preferences you can Personalize the user interface and settings for pediatric fittings.
Go to Preferences g Specific Preferences:
• Fitting Step
• Graph Format
• Pediatric Default Settings
• Default Rationale
• Measurement Modules
Personalize Genie
Changes in Preferences apply to all products.The new settings will be applied when you restart Genie.
Personalize genie

10
Select All channels plus MPO to access more controls in the fitting step.
Preferences – Fitting Step
When fitting Safari SP, the MPO is available in the control panel by default.

11
To view the SPLogram as the default graph in the Fitting step, select SPLogram.
Preferences – Graph Format
To simplify verification, the SPLogram allows you to compare the fit to target with results from external real-ear measurement equip-ment.

12
Three panels are available:
• Age brackets Click + or – to customize the age bracket
• Automatics Change the Noise Management and Directionality for each age bracket above
• Buttons Provide access to the Volume Control for each age bracket
Preferences – Pediatric Default Settings
A default setup is available from Oticon. Personalize Genie by choosing your preferred default setting. My Voice is not a Safari feature. Setting will apply to pediatric fittings of Agil Pro, Chili SP9, Epoq XW, Dual XW, Epoq XW and Dual XW.

13
The default rationale for children is DSL v5.0a.
• Select product Family
• Choose your preferred rationale for each hearing instrument
Preferences – Default Rationale

14
• When fitting Safari through Noah, you can select a preferred REM or HIT module
• If selected, the REM module will open automatically when going to the REM tool in the Fitting step
Preferences – Measurement Modules

15
Horizontal navigation – organizer steps:• Client: Appears only when running Genie outside Noah
• Counseling: Appears only if Gateway is installed
• Family: Selection of all hearing instrument families
• Selection: Selection of instrument style, features, and entry of pre-fitting measures (e.g. RECD)
• Fitting: Feedback measurement, verification and fine tuning of settings
• End Fitting: Setting of user buttons and indicators, ConnectLine, FM, save, program and exit
Navigation

16
Vertical navigation – task pane: • For each organizer step there is a Task Pane providing
access to tools and links related to where you are in the fitting process
Navigation

17
In a new Safari fitting, an overview dialog lists the default settings based on the child’s age.
• Age bracket and age of the child
• Setting of Directionality and Noise Management
• Volume Control status
• Available program and rationale
Pediatric Settings Dialog
Select Show Pediatric Settings to view the dialog during the fitting.

18
• The dialog box will always reflect the current settings of the hearing instrument
Pediatric Settings Dialog
• When children enter a new age group, Genie will alert you via this dialog box. Use the ‘Apply’ button to accept the new age group settings


Fitting Steps Overview
FamilySelect Family
Counseling SelectionSelect Instrument
RECD, REUR and Audiogram
Program Manager
– Telephone Options
Acoustics
COW – CHILD – ELF
Links
Pediatric InstructionVideos
FittingControls
Automatic Features
Feedback Manager
REM
Live Demonstration
Activity Analyzer
Fitting Assistant
In-situ Audiometry
End FittingButton and Indicators
– Operate pushbutton and VC
– Beeps – Visual Indicator
ConnectLine
Phone and DAI/FM
User Instructions
gg g g
Evaluation
Your Child’s Hearing
Learning Language
Recommendations
The Ear

Counseling
Evaluation
Your Child’s Hearing
Learning Language
Recommendations
The Ear
counseling

22
Counseling
The Pediatric Counseling tool has been developed to sup-port the counseling process. It offers a suite of dynamic visual and audio modules within the following areas:
• Evaluation
• Your Child’s Hearing
• Recommendations
• Learning Language
• The EarAudiogram will be automatically imported into the Pediatric Counseling tool from Genie.Installation of Oticon Gateway CD version 2.0 or later isrequired to run the counseling tool properly from Genie.

23
FamilySelect Family
Family
24
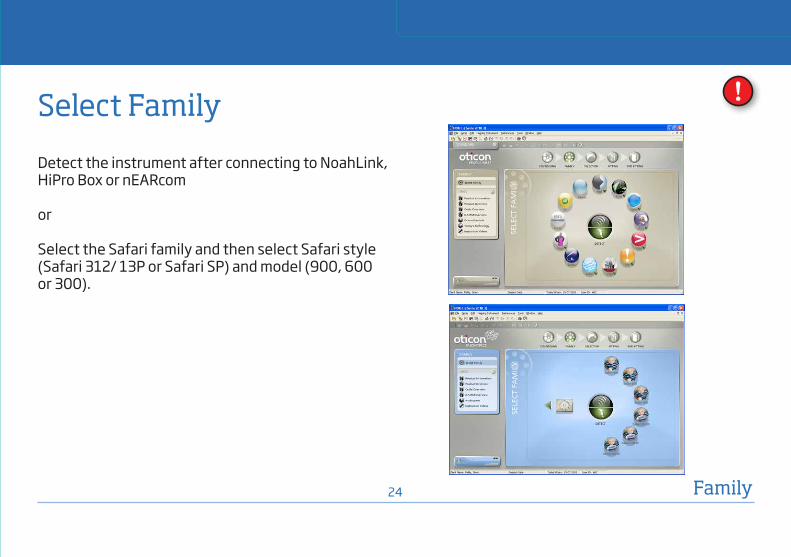
Detect the instrument after connecting to NoahLink,HiPro Box or nEARcom
or
Select the Safari family and then select Safari style (Safari 312/ 13P or Safari SP) and model (900, 600 or 300).
Select Family
Family

SelectionSelect Instrument
RECD, REUR and Audiogram
Program Manager
– Telephone Options
Acoustics
COW – CHILD – ELF
Links
Pediatric InstructionVideos
selection

26
If the instrument is not connected, choose the appropriate style:
• An overview of the different hearing instrument styles is presented
• The fitting range is reflected for each style selected
Oticon Streamer can be selected if part of the fitting.
Select Instrument
The correct style and model is automatically detected in a live fitting. Select whether Streamer will be part of the fitting. To simulate a fitting select the style and model you want to simulate.
Selection
To select Safari SP, go to Family step

27
RECD, REUR and Audiogram
Selection
In order to most accurately prescribe hearing instrument settings, Genie needs information on the measurement methods used to obtain the audio-metric thresholds. By entering this data, Genie will determine whether to apply corrections or not. See examples on the following pages.
Choose the tab you need and enter the appropriate values:
• RECD
• REUR
• AudiogramIf you do not want Genie to apply any corrections to the audiometric information entered, you do not need to visit this area. By default, no corrections are applied.

28
Enter the measured RECD values in the appropriate boxes.
RECD
If no values are inserted, Genie will automatically use the predicted values for the appropriate age.
RECD values differ greatly between infants and adults. They change during early childhood, and can be expected to reach adult values by the time the child is about seven years old.
Selection

29
Audiogram
Selection
Select the appropriate:
• Measurement method
• Test signal transducer
• dB measurement unit
Genie will make the necessary audiogram corrections based on the information entered.
Thresholds are dependent on the transducers used:– Headphones– Insert earphones– Insert earphones (with own earmold)– Free Field
Genie does not apply any corrections unless you alter settings in the screen and represcribe settings. The grey curve shows the corrected audiogram.

30
By default, one program is available: P1: General (M).
To add extra programs:Click ‘Add‘ and select additional program from the options menu.
Program Manager
The default rationale is DSL v5.0a, pediatric.
When an FM receiver or DAI shoe is connected, the DAI/FM+M program is automatically on, and the program switch is deactivated (see page 58 for more information). To change this default setting, go to Phone and DAI/FM in End Fitting.
Selection
Important:If you want to provide access to more than one program when using FM and/or DAI, remember to uncheck ‘‘Automatically deactivate program switch when attaching DAI/FM shoe’’ in Phone and DAI/FM.

31
Telephone Options
Selection
Phone programs available:Phone (T): The telecoil input in Phone (T) has increased gain within the telephone bandwidth compared to the Telecoil (ALD) program.Phone (M/ MT): Omni mic. with increased gain within the telephone bandwidth. Safari SP also has telecoil input.
Programs can be set:• Manually activated in P2/3/4 – Phone (T) and Phone (M/ MT) • Automatically activated Auto Phone – Auto (T) or
Auto (M/ MT) (No separate program is required)
Adjustments made in P1 are transferred to all the Phone programs. The non-phone ear listens in P1 or “reduced P1” with Binaural Broadband. You can disable the reduc-tion in the End Fitting step, Phone and DAI/FM.
The Auto Phone program is automatically acti-vated when the instrument is held close to a telephone receiver with a magnet. This gives the child an optimized telephone program with-out having to use the program switch.

32
Verify the settings of Vent, Hook and Tubing.
Acoustics
Genie automatically selects a vent size according to the child’s age and audiogram.
Note: Very small ears preclude the use of an open vent. The following defaults will apply:– 0-3 years: 0 mm vent– 4-7 years: ≤ 2 mm vent– >7 years: audiogram-based vent suggestions
Selection
33
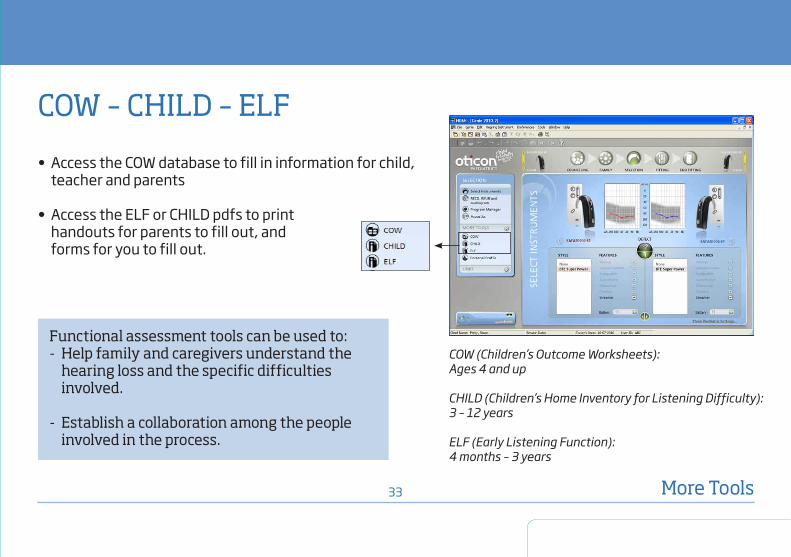
• Access the COW database to fill in information for child, teacher and parents
• Access the ELF or CHILD pdfs to print handouts for parents to fill out, and forms for you to fill out.
COW – CHILD – ELF
COW (Children’s Outcome Worksheets):Ages 4 and up
CHILD (Children’s Home Inventory for Listening Difficulty):3 – 12 years
ELF (Early Listening Function):4 months – 3 years
Functional assessment tools can be used to:- Help family and caregivers understand the
hearing loss and the specific difficulties involved.
- Establish a collaboration among the people involved in the process.
More Tools
34
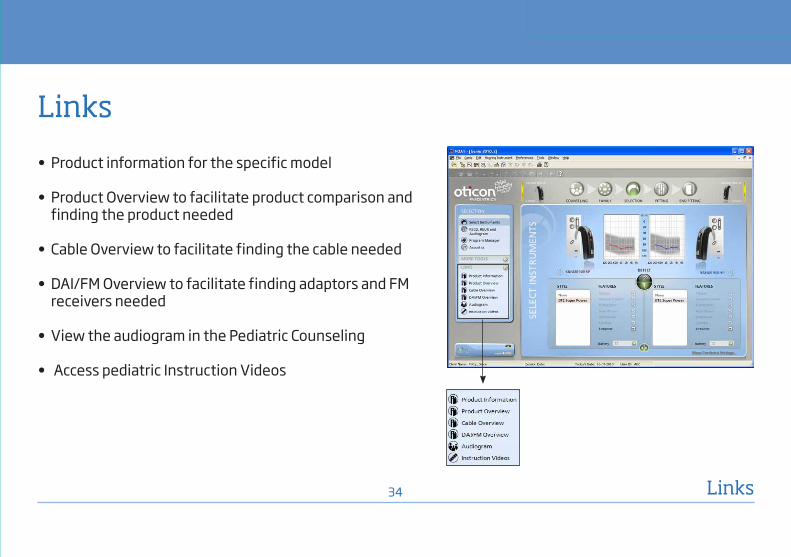
• Product information for the specific model
• Product Overview to facilitate product comparison and finding the product needed
• Cable Overview to facilitate finding the cable needed
• DAI/FM Overview to facilitate finding adaptors and FM receivers needed
• View the audiogram in the Pediatric Counseling
• Access pediatric Instruction Videos
Links
Links

35
Pediatric Instruction Videos
Links
Can be used:
• During counseling of parents and clients
• As a visual support tool for the professional
Scroll down to ‘P’ for pediatrics to locate pediatric In-struction Videos.


FittingControls
Automatic Features
Feedback Manager
REM
Live Demonstration
Activity Analyzer
Fitting Assistant
In-situ Audiometry
Fitting

38
• Review and verify the prescribed settings
• Make changes using +/- for the appropriate frequency region and input level
• View Volume Control Reserve Gain for each ear
• To view Compression Ratio for independent fitting bands press
• To make the correction binaurally press
Controls
The VC Reserve Gain displays the volume range between the preferred level and the instrument’s possible maximum gain in the range of 0-10 dB, at 2.5 dB steps. Adjust the instrument’s gain or change the feedback limit to modify the reserve gain. The volume control range is 30 dB: -20 dB to maximum + 10 dBvel. Position “3” is the preferred level on the Safari SP VC wheel.
Fitting

39
Controls
The Overall Loudness Trimmer (OLT) is available for Super Power fittings only.
The OLT changes both gain and MPO to protect speech intelligibility. The steps are reversible, which means that if returning to a previously tested step, the values in this step will still remain the same.
Fitting
The analog VC in Safari SP is temporarily disabled when connected to Genie.
The Adaptation Manager is available for Safari 312 and 13P and will default to level 3.

40
Click on this tab to change the settings of the following automatic features:
• Directionality
• Noise Management
• Binaural Broadband
Automatics
By default, automatic features are turned OFF for the age 0-3. You can define default automatic settings by age bracket through the Genie Preferences feature (see page 12 in this guide).If you disable Binaural Broadband all binaural func-tionalities; Binaural Processing (compression, Binaural Noise Management, DFC2), Synchronization and Coor-dination (pushbutton and VC), are disabled.
Fitting
Safari SP offers the choice between Moderate (default) and Maximum Noise Management. Maximum allows up to 3 dB more attenuation.

41
It is recommended to run the Feedback Manager for all Safari SP fittings.
It is important to be in a quiet environment while mea-suring feedback limits.
It is only necessary to run the Feedback Manager for 13P and 312 models if feedback is present.
Feedback Manager
More Tools
Genie prescribes a suitable feedback limit to prevent feedback for Safari SP. It is recommended to measure the feedback limit of the individual fitting to ensure that maximum gain can be provided. The feedback limit can be displayed in the Insertion Gain and Gain 2cc graph views in the Controls screen: Press the Feedback Limit button.
Raise or lower the feedback limit if required.

42
The Genie REM tool lets you verify the prescription with-out you having to disable Automatic features beforehand.
The preferred REM module will also open automatically through Noah if selected in Preferences. If not, a Tool Selection dialog will appear that lets you select the desired REM module.
REM
More Tools
43
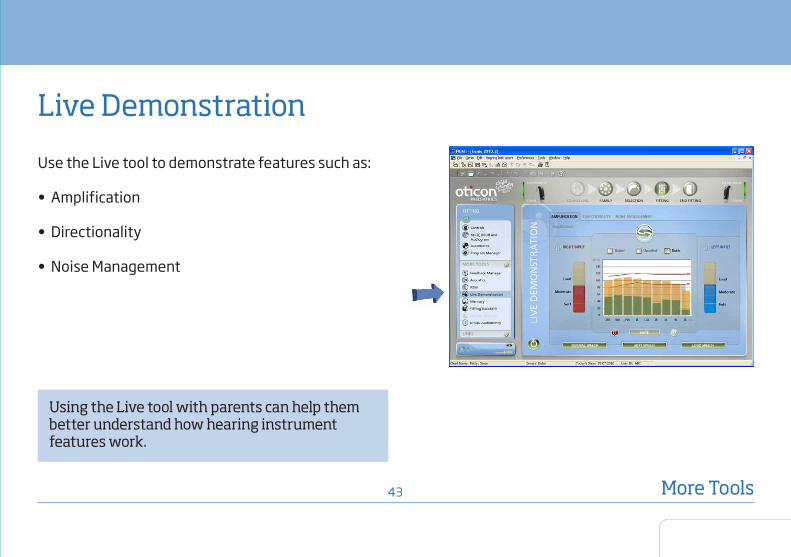
Use the Live tool to demonstrate features such as:
• Amplification
• Directionality
• Noise Management
Live Demonstration
More Tools
Using the Live tool with parents can help them better understand how hearing instrument features work.
44
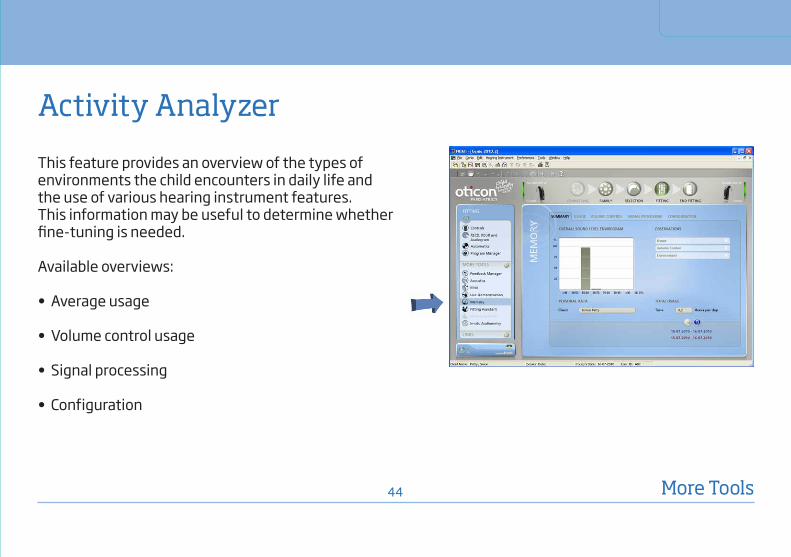
This feature provides an overview of the types of environments the child encounters in daily life and the use of various hearing instrument features. This information may be useful to determine whether fine-tuning is needed.
Available overviews:
• Average usage
• Volume control usage
• Signal processing
• Configuration
Activity Analyzer
More Tools

45
If fine-tuning should be needed, the Fitting Assistant can be helpful.
Select a tab:
• General perception
• Speech perception
• Own voice
Select the control that matches the child’s complaint or the parents’ observation.
Click left or right to adjust (the initial setting is indicated by an arrow in the middle).
Fitting Assistant
Click to access different sound samples including Sounds for Children, to assist in the fine-tuning process.
More Tools

In-situ audiometry is available and can be used to mea-sure the audiogram between 125 Hz - 6 kHz using the client’s own earmolds and hearing instruments.
• Hearing thresholds are measured directly in the child’s ear with the instrument
• Measurements can be conveniently made in various quiet environments such as child’s home or a room in the clinic
• In-situ audiometry can be used to make a better instant fitting for demonstration purposes
In-situ Audiometry (Safari SP only)
More Tools46
Note: In-situ audiogram is based on the actual instrument and acoustics. In-situ audiometry is not recommended if the child has a mixed or conductive hearing loss.

End FittingButton and Indicators
– Operate pushbutton and VC
– Beeps – Visual Indicator
ConnectLine
Phone and DAI/FM
User Instructions
end Fitting

48
The “Buttons and Indicators” task is used to con-figure the function(s) of the hearing instrument control button. Beeps and Visual indicators can also be enabled or disabled.
Buttons and Indicators
End Fitting

49
On the “Operate Pushbutton and VC” tab the following pushbutton functions can be activated or deactivated:
• Program switch
• Volume control
• Mute function
By default, the Program Switch, Volume Control and Mute function are turned OFF.
Operate Pushbutton and VC
A binaural pushbutton function is available for both Volume Control and Program Switch (Safari 900 & 600).Safari SP has a binaural Program Button (900, 600 & 300). The analog VC wheel is not binaurally coordi-nated.
End Fitting
When fitting small children and infants, it is recommended to disable the VC, program switch and muting to avoid accidental changes.

50
On the Beeps tab the following beeps can be configured:
• The beep signal’s frequency and level (can be tested during programming)
• Startup jingle
• Volume Control indicators
• Battery Low indicator (can be tested during programming)
Beeps
The startup jingle and the Change Battery Warning are active by default.Beeps may be deactivated, as these can be confusing to younger children.
End Fitting

51
Visual Indicator (LED)
End Fitting
On the Visual Indicator tab the following visual indications can be configured:
Program Indicator• Blink to indicate program number: 1 blink - P1,
2 blinks - P2 etc.
• Volume Control indicator
• Blink at preferred volume level: 5 rapid blinks
Battery Low indicator• Battery low warning: Continuous rapid blinking
For small children and infants the Visual Indicator (LED) should be activated to give parents and caregivers assur-ance that the instrument is ON.

52
ConnectLine
End Fitting
Adjust the three ConnectLine applications; TV, Phones, and Music /Audio, in the following dimensions:
• General perception
• Power Bass
• Music Widening (not Phones)
To make the correction binaurally press
Safari 900 SP offers Power Bass and Music Widening. The prescribed/selected vent size determines whether Power Bass is default set to On or Off. Music Widening is default set to Off.
It is always possible to activate either Power Bass or Music Widening when available. It is not possible to activate both features in a single application.

53
TV
End Fitting
General Perception• The level of TV alone and relative to the hearing
instrument microphone (M) level is set
• Use the ‘sound quality’ trimmer to correct the emphasis of the audio response by adjusting the tonal balance according to the child’s preferences
Power Bass• For improved TV experience it might be beneficial to
set Power Bass to High
or
Music Widening• For TV listening it might be beneficial to set Music
Widening to Off to optimize speech understanding
Safari 900 SP offers Power Bass and Music Widening.

54
Phones
End Fitting
General Perception• The level of Phone alone and relative to the hearing
instrument microphone (M) level is set
• Use the ‘sound quality’ trimmer to correct the emphasis of the audio response by adjusting the tonal balance according to the child’s preferences
Power Bass• It might be beneficial to set Power Bass to Medium
Safari 900 SP offers Power Bass.Microphone (M) relative to Phone:Normally, the level for the hearing instrument microphone should be lower (softer) than the phone to enhance the phone conversation.

55
Music / Audio
End Fitting
General Perception• Music Level, microphone (M) relative to music can be
adjusted
• Use the ‘sound quality’ trimmer to adjust the tonal balance of the audio signal
Power Bass• For improved music experience it might be beneficial
to set Power Bass to High
or
Music Widening• It might be beneficial to set the Music Widening
feature to Medium
Safari 900 SP offers Power Bass and Music Widening.

56
In this section, an overview of current phone and FM settings is provided. By selecting the “Phone Programs” or “DAI/FM” tabs, the default settings can be modified.
Phone and DAI/FM
More Tools

57
The Auto Phone program is automatically activated when a telephone receiver with a magnet is held close to the hearing instrument.
Auto Phone can be selected for one or two ears and set to either Auto (T) or Auto (M/ MT).
• Specify whether the Auto Phone program should use telecoil or microphone input or, in Safari SP a combination (MT)
• The gain reduction on the non-phone side can be disabled. This option applies both for Auto Phone and Manual Phone programs
Phone Programs
Instruments with binaural synchronization have reduced gain in P1 on the side not using a Phone program.
More Tools

58
When an FM receiver or an DAI/FM adapter shoe is connected, the program automatically changes to FM/DAI+M.
DAI/FM
When an FM audio shoe is connected and the program switch is deactivated, only FM+M (default) or FM only program is available.
More Tools
Important:If you want to provide access to more than one program when using FM and/or DAI, remember to uncheck ‘‘Automatically deactivate program switch when attaching DAI/FM shoe’’.

59
Remember to press ‘Save, Program and Exit‘ when the fitting is completed before the hearing instrument is disconnected.
Save, Program and Exit
End Fitting

60
The User Instructions provide information about push-button, volume control and visual indicator settings.
This information can be printed for the client to take home.
User Instructions
Printing out the instructions can help parents remember how the hearing instrument is programmed.
End FittingExample of the Visual Indicator printout
A detailed “Addendum for Instructions for Use” can be printed.

www.oticonusa.com
1063
27US
/ 09
.10
It takes a truly dedicated approach to help children with hearing problems achieve their full potential. That’s why we deliver the solutions and services that professionals and caregivers need to provide children the opportunities they deserve. This is what child-friendly hearing care is all about.