osprey kids' ace series - osprey packs - bags and ... owner's manual ace series ace 75...
TRANSCRIPT
ospreypacks.com
OWNER'S MANUAL
ACE SERIES
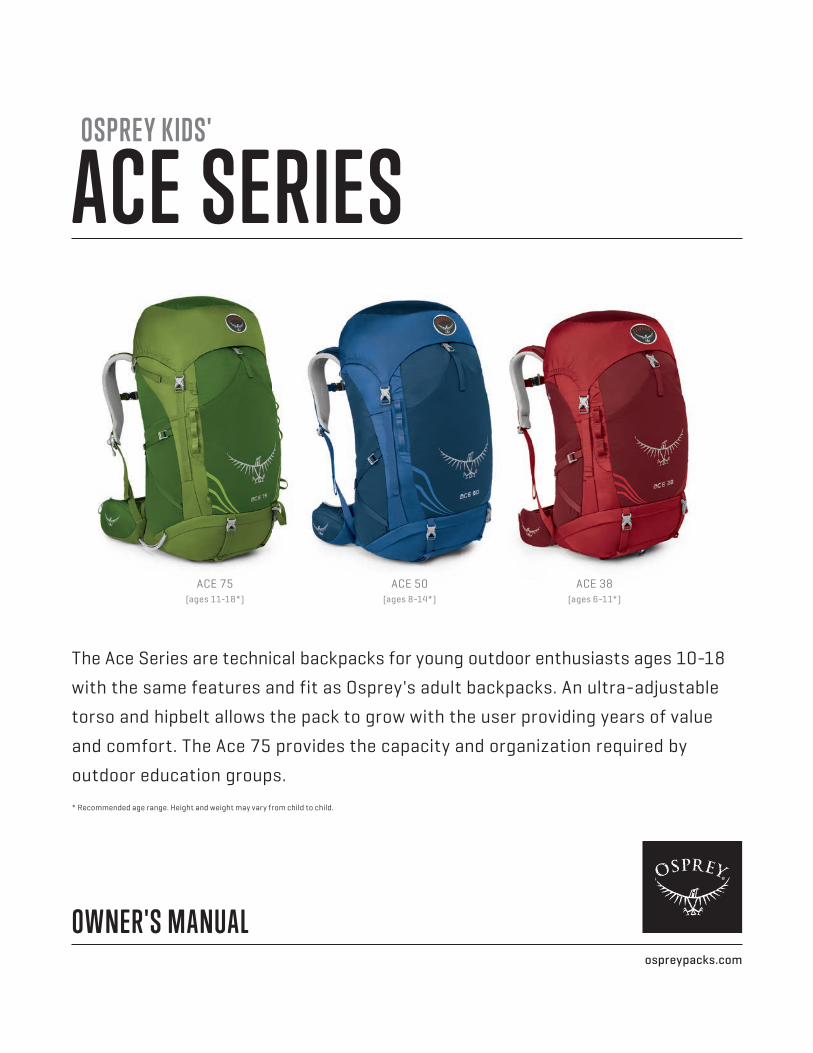
ACE 75(ages 11-18*)
ACE 50(ages 8-14*)
ACE 38(ages 6-11*)
The Ace Series are technical backpacks for young outdoor enthusiasts ages 10-18
with the same features and fit as Osprey's adult backpacks. An ultra-adjustable
torso and hipbelt allows the pack to grow with the user providing years of value
and comfort. The Ace 75 provides the capacity and organization required by
outdoor education groups.
* Recommended age range. Height and weight may vary from child to child.
OSPREY KIDS'
ACE SERIES 2
OVERVIEW
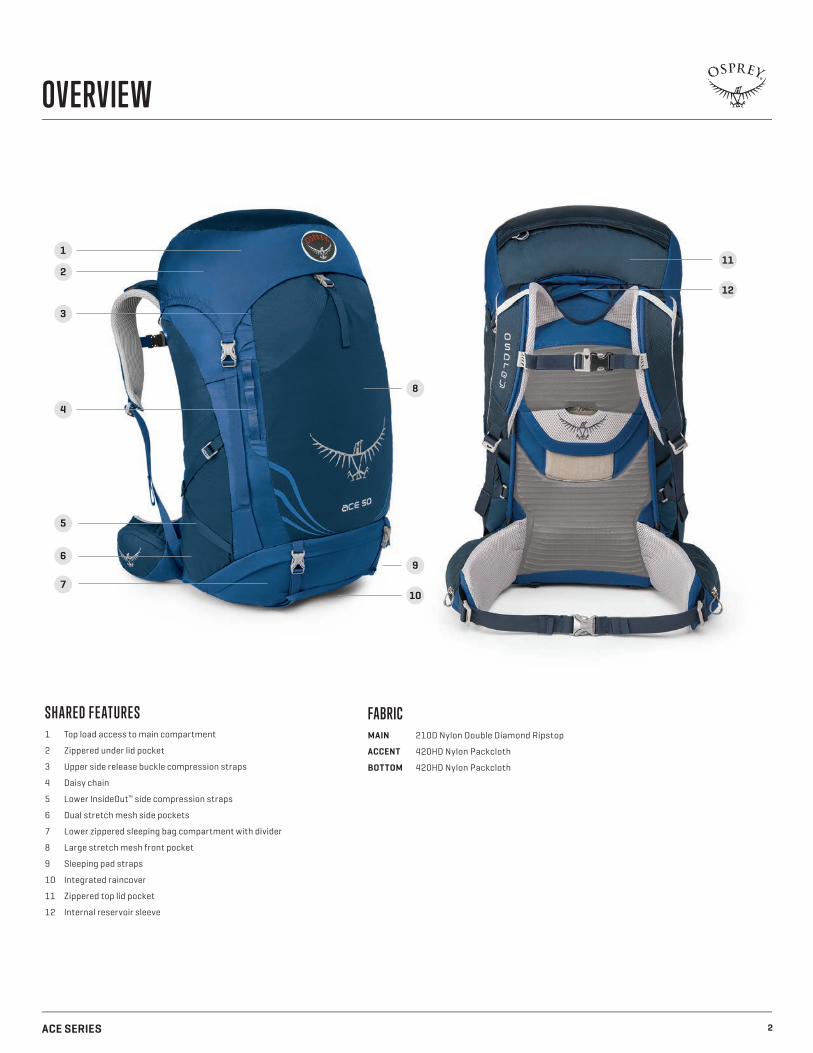
SHARED FE ATURES1 Top load access to main compartment
2 Zippered under lid pocket
3 Upper side release buckle compression straps
4 Daisy chain
5 Lower InsideOut™ side compression straps
6 Dual stretch mesh side pockets
7 Lower zippered sleeping bag compartment with divider
8 Large stretch mesh front pocket
9 Sleeping pad straps
10 Integrated raincover
11 Zippered top lid pocket
12 Internal reservoir sleeve
FABRIC MAIN 210D Nylon Double Diamond Ripstop
ACCENT 420HD Nylon Packcloth
BOTTOM 420HD Nylon Packcloth
2
1
3
5
4
6
7
8
9
10
11
12
ACE SERIES
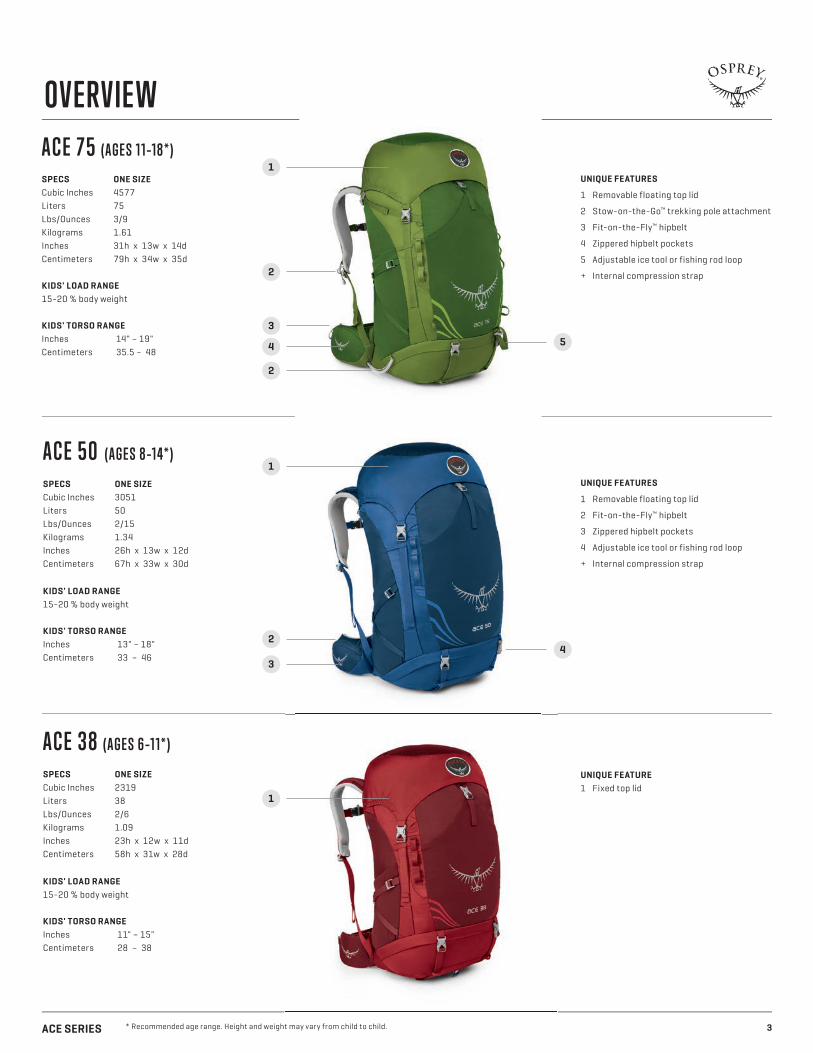
A CE 5 0 ( A GE S 8 –1 4* )
SPECS ONE SIZE Cubic Inches 3051Liters 50Lbs/Ounces 2/15Kilograms 1.34Inches 26h x 13w x 12dCentimeters 67h x 33w x 30d
KIDS' LOAD RANGE15-20 % body weight
KIDS' TORSO RANGEInches 13" – 18"Centimeters 33 – 46
A CE 7 5 ( A GE S 1 1–18 * )
SPECS ONE SIZE Cubic Inches 4577Liters 75Lbs/Ounces 3/9Kilograms 1.61Inches 31h x 13w x 14dCentimeters 79h x 34w x 35d
KIDS' LOAD RANGE15-20 % body weight
KIDS' TORSO RANGEInches 14" – 19"Centimeters 35.5 – 48
A CE 38 ( A GE S 6 –1 1* )
SPECS ONE SIZE Cubic Inches 2319Liters 38Lbs/Ounces 2/6Kilograms 1.09Inches 23h x 12w x 11dCentimeters 58h x 31w x 28d
KIDS' LOAD RANGE15-20 % body weight
KIDS' TORSO RANGEInches 11" – 15"Centimeters 28 – 38
3
54
2
2
3
1
43
2
1
1
UNIQUE FEATURES
1 Removable floating top lid
2 Stow-on-the-Go™ trekking pole attachment
3 Fit-on-the-Fly™ hipbelt
4 Zippered hipbelt pockets
5 Adjustable ice tool or fishing rod loop
+ Internal compression strap
UNIQUE FEATURES
1 Removable floating top lid
2 Fit-on-the-Fly™ hipbelt
3 Zippered hipbelt pockets
4 Adjustable ice tool or fishing rod loop
+ Internal compression strap
OVERVIEW
UNIQUE FEATURE1 Fixed top lid
* Recommended age range. Height and weight may vary from child to child.
ACE SERIES 4
O V ER V IE W
SIZING / FI T
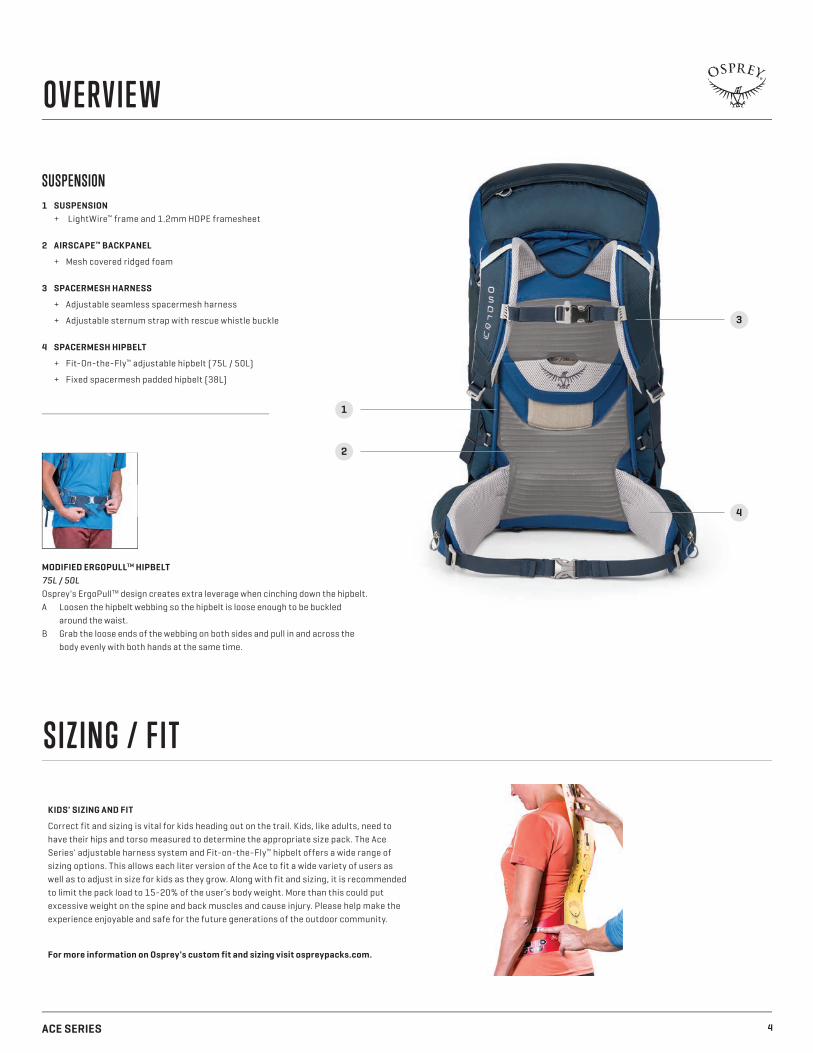
SUSPENSION 1 SUSPENSION + LightWire™ frame and 1.2mm HDPE framesheet
2 AIRSCAPE™ BACKPANEL
+ Mesh covered ridged foam
3 SPACERMESH HARNESS
+ Adjustable seamless spacermesh harness
+ Adjustable sternum strap with rescue whistle buckle
4 SPACERMESH HIPBELT
+ Fit-On-the-Fly™ adjustable hipbelt (75L / 50L)
+ Fixed spacermesh padded hipbelt (38L)
4
3
1
2
MODIFIED ERGOPULLTM HIPBELT 75L / 50LOsprey's ErgoPullTM design creates extra leverage when cinching down the hipbelt. A Loosen the hipbelt webbing so the hipbelt is loose enough to be buckled
around the waist.B Grab the loose ends of the webbing on both sides and pull in and across the
body evenly with both hands at the same time.
KIDS' SIZING AND FIT
Correct fit and sizing is vital for kids heading out on the trail. Kids, like adults, need to have their hips and torso measured to determine the appropriate size pack. The Ace Series' adjustable harness system and Fit-on-the-Fly™ hipbelt offers a wide range of sizing options. This allows each liter version of the Ace to fit a wide variety of users as well as to adjust in size for kids as they grow. Along with fit and sizing, it is recommended to limit the pack load to 15-20% of the user’s body weight. More than this could put excessive weight on the spine and back muscles and cause injury. Please help make the experience enjoyable and safe for the future generations of the outdoor community.
For more information on Osprey's custom fit and sizing visit ospreypacks.com.
ACE SERIES 5
SIZING / FIT
B E
A
C
D
A
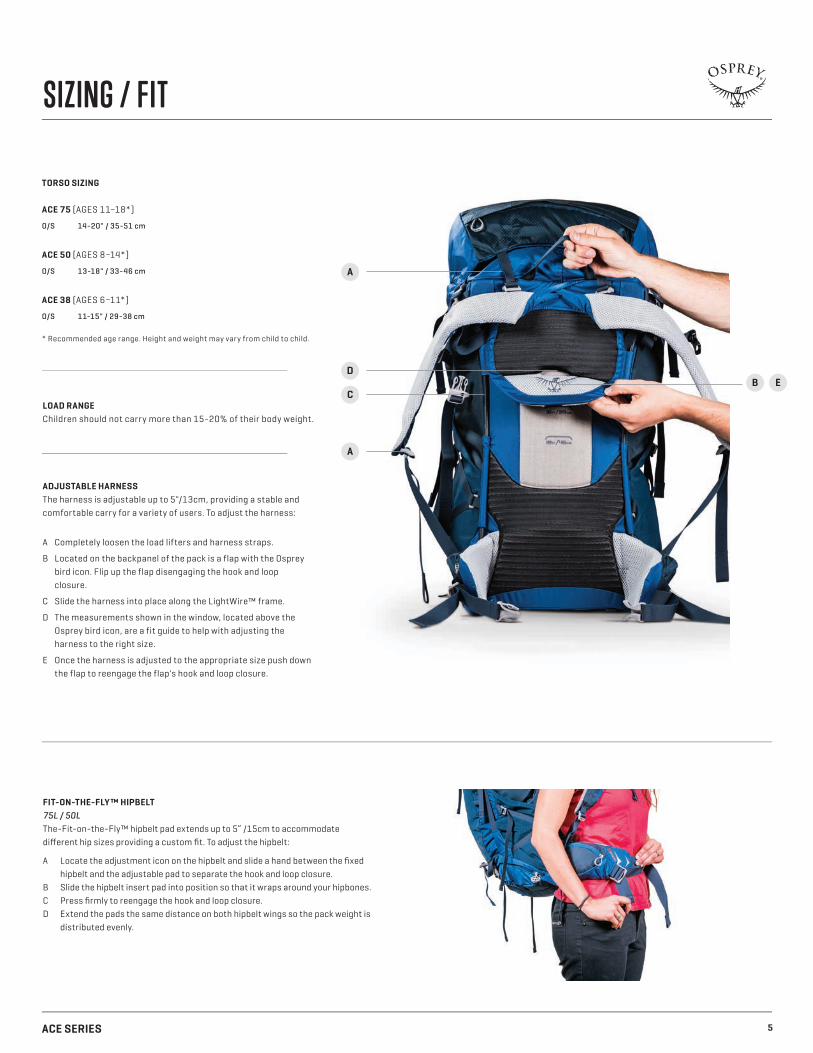
ADJUSTABLE HARNESSThe harness is adjustable up to 5"/13cm, providing a stable and comfortable carry for a variety of users. To adjust the harness:
A Completely loosen the load lifters and harness straps.
B Located on the backpanel of the pack is a flap with the Osprey bird icon. Flip up the flap disengaging the hook and loop closure.
C Slide the harness into place along the LightWire™ frame.
D The measurements shown in the window, located above the Osprey bird icon, are a fit guide to help with adjusting the harness to the right size.
E Once the harness is adjusted to the appropriate size push down the flap to reengage the flap's hook and loop closure.
TORSO SIZING
ACE 75 (AGES 11–18*)
O/S 14-20" / 35-51 cm
ACE 50 (AGES 8–14*)
O/S 13-18" / 33-46 cm
ACE 38 (AGES 6–11*)
O/S 11-15" / 29-38 cm
* Recommended age range. Height and weight may vary from child to child.
LOAD RANGEChildren should not carry more than 15-20% of their body weight.
FIT-ON-THE-FLY™ HIPBELT 75L / 50LThe-Fit-on-the-Fly™ hipbelt pad extends up to 5” /15cm to accommodate diff erent hip sizes providing a custom fi t. To adjust the hipbelt:
A Locate the adjustment icon on the hipbelt and slide a hand between the fi xed hipbelt and the adjustable pad to separate the hook and loop closure.
B Slide the hipbelt insert pad into position so that it wraps around your hipbones. C Press fi rmly to reengage the hook and loop closure. D Extend the pads the same distance on both hipbelt wings so the pack weight is
distributed evenly.
ACE SERIES 6
FEATURE DETAILS
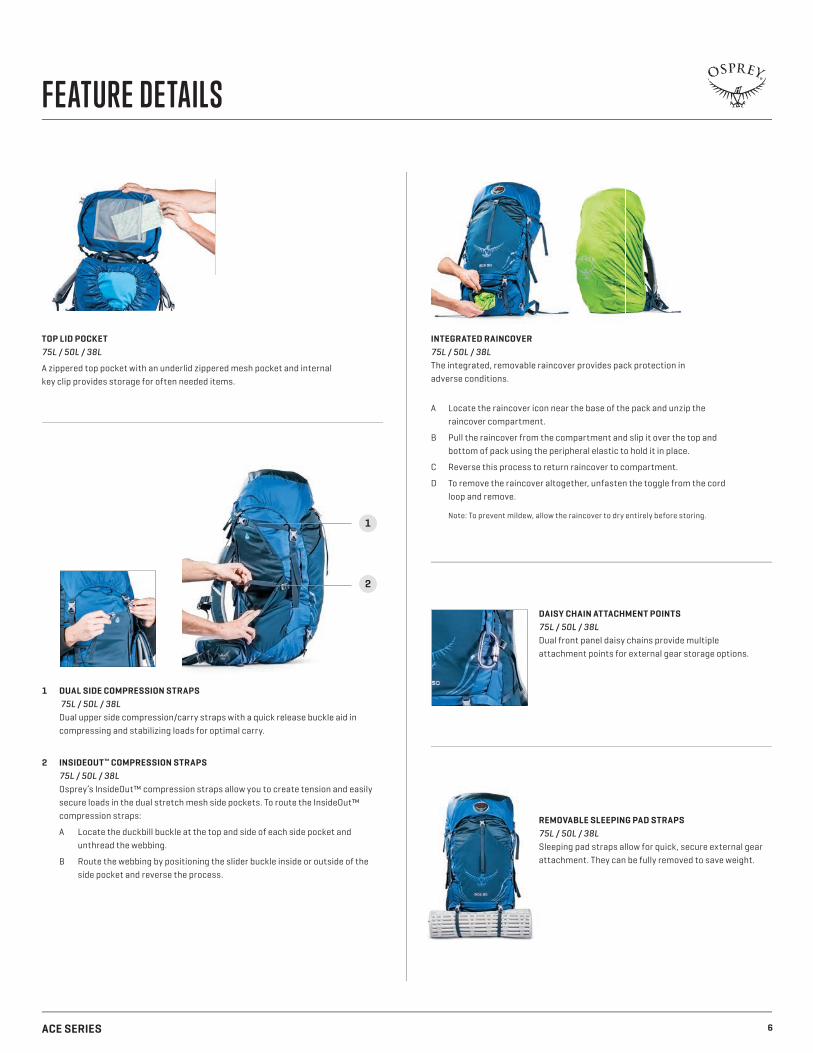
REMOVABLE SLEEPING PAD STRAPS 75L / 50L / 38L Sleeping pad straps allow for quick, secure external gear attachment. They can be fully removed to save weight.
DAISY CHAIN ATTACHMENT POINTS75L / 50L / 38LDual front panel daisy chains provide multiple attachment points for external gear storage options.
INTEGRATED RAINCOVER75L / 50L / 38L The integrated, removable raincover provides pack protection in adverse conditions.
A Locate the raincover icon near the base of the pack and unzip the raincover compartment.
B Pull the raincover from the compartment and slip it over the top and bottom of pack using the peripheral elastic to hold it in place.
C Reverse this process to return raincover to compartment.
D To remove the raincover altogether, unfasten the toggle from the cord loop and remove.
Note: To prevent mildew, allow the raincover to dry entirely before storing.
TOP LID POCKET 75L / 50L / 38L
A zippered top pocket with an underlid zippered mesh pocket and internal key clip provides storage for often needed items.
1 DUAL SIDE COMPRESSION STRAPS 75L / 50L / 38L Dual upper side compression/carry straps with a quick release buckle aid in
compressing and stabilizing loads for optimal carry.
2 INSIDEOUT™ COMPRESSION STRAPS 75L / 50L / 38L Osprey’s InsideOut™ compression straps allow you to create tension and easily
secure loads in the dual stretch mesh side pockets. To route the InsideOut™ compression straps:
A Locate the duckbill buckle at the top and side of each side pocket and unthread the webbing.
B Route the webbing by positioning the slider buckle inside or outside of the side pocket and reverse the process.
1
2

ACE SERIES 7
FE AT UR E DE TA IL S
REMOVABLE FLOATING TOP LID75L / 50LThe fl oating top lid can extend to accept oversized loads or can be removed from the pack body. The top lid is attached to the pack body using a three-point vector strap system for easy adjustment with variable loads. Unthread the side ladder buckle and slide the strap through the sewn-in slider buckles on the backpanel. To reattach, reverse this process.
INTERNAL COMPRESSION STRAP75L / 50LOnce your pack is loaded, clip and tighten the red internal compression strap to stabilize the load.
ICE TOOL/FISHING ROD LOOP75L / 50LThe single gear loop located at the base of the front panel of the pack is provided for fi shing rod or ice tool carry and works in conjunction with your own rigging to provide stable, secure carry.
STOW-ON-THE-GO™ TREKKING POLE ATTACHMENT75L / 50LOsprey's Stow-on the-Go™ trekking pole attachment is designed to quickly attach and carry trekking poles while wearing a pack.
A Adjust the trekking poles to their minimum length.B Locate the elasticized loop on the lower left side of pack. While
pulling the loop out from the pack, insert the basket end of the trekking poles into the loop.
C On the left harness strap locate the trekking pole icon. Pull up on the cord to open, place pole handles in the loop and tighten with the cord lock to secure.
D Reverse these steps to remove the trekking poles.
DAYLITE PACK / ALPINE POCKET ATTACHMENT75L There are four cord loops on the front of the pack for attaching an Osprey Daylite pack or Alpine Pocket.
A Locate the four sliders on the upper and lower straps of the Daylite. B Align the sliders with the four cord loops on the larger pack.C Push each slider through the cord loop.D Tighten the straps to secure.
8ACE SERIES
PACK / RESERVOIR MAINTENANCE
Your Osprey pack is an extremely durable product and is built for years of use.
However, some basic pack maintenance will help ensure your pack lasts a lifetime.
For complete instructions on cleaning your Osprey pack, visit: ospreypacks.com/PackTech/PackCare.
OSPRE Y PACKSSTANDARD MAINTENANCE
+ After each trip be sure to clean out your pack thoroughly.
+ Clean the zippers regularly using mild soap, warm water and soft brush. This will help keep them in proper working condition.
+ If your pack is wet, hang it to dry out of direct sunlight.
+ Loosen all the straps.
+ Wash your pack if dirt, sweat, salt and stains have worked their way into fabrics, webbing or mesh. (Do not immerse travel packs in water with our HighRoad™ Wheeled Chassis.)
WASHING YOUR PACK
A Empty the pack including any food, dirt or spilled contents.
B If your pack has a removable harness and hipbelt, remove them from the pack body.
C Do NOT wash your pack in a washing machine. Clean your pack and components in a bathtub or large sink using a mild detergent and warm water.
D Agitate the pack gently. Scrub the inside and outside of all compartments including the pockets with a soft brush.
E Clean the zippers using a mild soap, warm water and a soft brush. Flush water and soap through the buckles. Keeping dirt and debris out of the zippers and buckles will help keep them in proper working condition.
F Drain the dirty water from the bathtub or sink and refi ll with cool clean non-soapy water. Rinse the pack thoroughly. Repeat this step as neccessary.
G Hang your pack to dry outside or in a well ventilated area, out of direct sunlight.
WHEELED TRAVEL LUGGAGE
(Do not immerse travel packs in water with our HighRoad™ Wheeled Chassis.)
A After each trip, empty the pack including any food, dirt or spilled contents.
B Clean the zippers regularly using mild soap, warm water and soft brush. This will help keep them in proper working condition.
C Wipe the exterior of the chassis with a damp cloth or sponge.
D Clean the pack fabric by scrubbing stains and dirt with warm water, mild detergent and a soft brush or sponge.
E Use a wet towel with clean non-soapy water to wipe away any soap residue on the pack.
F Hang your pack to dry outside or in a well ventilated area, out of direct sunlight.
RECOMMENDED CLEANING PRODUCTS Osprey recommends Nikwax® products for pack care. Be sure to read label directions carefully before applying any product to your pack.
Tech Wash® - Use this with warm water for washing and cleaning your packs or luggage.
Tent & Gear Solar Proof® - Use this spray-on product to protect your packs from UV exposure and to improve water repellency.
OSPRE Y RESERVOIRSRESERVOIR STANDARD MAINTENANCE
+ Our reservoir’s anti-microbial formula prevents most mold and bacteria growth.
+ Rinsing out your reservoir after each use should keep your reservoir fresh, especially when using sugary drink mixes.
+ Periodically use Osprey's Hydraulics™ Cleaning Tablets to clean your reservoir.
+ Iodine or other purifying tablets used in your reservoir will not aff ect the quality of your reservoir. However these tablets may stain the reservoir over time.
+ Freezing your reservoir will not eff ect the quality of the reservoir. However if the reservoir is fi lled with water, be aware that water expands when it freezes and can damage your reservoir if it is overfi lled.
+ Do NOT pour boiling water into the reservoir. This can damage the reservoir and will void your warranty.
+ Watch “Cleaning an Osprey Hydraulics™ Reservoir” video on Osprey Packs YouTube® page.
CLEANING YOUR RESERVOIR (WITH OSPREY HYDRAULICS™ CLEANING TABLETS)
A Fill reservoir with warm water. Do not use bleach or boiling water.
B Add one cleaning tablet to reservoir and close the cap.
C Let tablet dissolve for 5 minutes with the reservoir laying on its back.
D Shake the reservoir for 30 seconds to mix and spread the solution.
E Pinch the bite valve and squeeze the reservoir to remove air and fi ll the reservoir hose and bite valve with solution.
F Let the reservoir sit for 15 minutes and then pour out solution.
G Rinse the reservoir and tube with clean cool water.
H Hang your reservoir to dry in a well ventilated area.
DEEP CLEANING YOUR RESERVOIR (WITH OSPREY HYDRAULICS™ CLEANING KIT)
1 Rinse out the reservoir and fi ll it with warm water and a mild dish detergent. Do not use bleach or boiling water.
2 With the large cleaning brush from Osprey's Hydraulics™ Cleaning Kit scrub the interior of the reservoir.
3 Remove the hose from the reservoir and the bite valve from the hose and use the small brush from Osprey's Hydraulics™ Cleaning Kit to scrub the interior of the hose.
4 Remove the silicone bite valve cover and clean it and the bite valve with warm soapy water.
5 Rinse the interior and exterior of the reservoir, hose and bite valve parts with cool clean water.
6 Let the hose and bite valve dry in a well-ventilated area.
7 Insert Osprey's Hydraulics™ Cleaning Kit drying rack into the reservoir and hang to dry in a well ventilated area.
For complete instructions on cleaning your Osprey reservoir watch, “Cleaning an Osprey Hydraulics™ Reservoir” at youtube.com/ospreypacks.
ospreypacks.com
OWNER'S MANUAL
OSPRE Y ACCESSORIES Customize and protect your pack with Osprey’s full line of accessories. For the full lineup, please visit your local Osprey retailer or visit: ospreypacks.com.
PACK YOUR PACKLoading your pack correctly optimizes comfort while you are carrying it. For complete information visit: ospreypacks.com/PackTech/HowToPackYourPack
GUAR ANTEE At Osprey, sustainability is designed into our packs, which are built to last a lifetime and backed by a superb guarantee, no matter how hard you are on your gear. Visit ospreypacks.com for details.
QUES TIONS?Contact Osprey Customer Service. Real help from real people. Scroll over the customer service tab at ospreypacks.com.
OSPREY PACKS, INC. 115 PROGRESS CIRCLE CORTEZ, CO 81321 USA 866-284-7830
S15 - UPDATED 11/14
www.ospreypacks.com/PackTech/OwnersManuals에서 사용자 설명 서를다운로드하세요
KR
ospreypacks.com/PackTech/OwnersManuals