orion
DESCRIPTION
Orion instruction guideTRANSCRIPT

Assembly guide forhydroponic mini kit
Figure 1.1 / Orion Solo
Figure 1.2 / Orion Duo
Figure 1.3 / Orion Trio(Lamp and lightning support are optional)

Table of contentsPreparations before assembly 3
Foreword . . . . . . . . . . . . . . . . . . . . . . . . . . . . . . . . . . . . . . . . . . . . . . . . . 3
Conventions . . . . . . . . . . . . . . . . . . . . . . . . . . . . . . . . . . . . . . . . . . . . . . . 3
Toolbox . . . . . . . . . . . . . . . . . . . . . . . . . . . . . . . . . . . . . . . . . . . . . . . . . 3
Unpacking . . . . . . . . . . . . . . . . . . . . . . . . . . . . . . . . . . . . . . . . . . . . . . . . 3
Setting up Orion unit
Step 1. Step-up of feeding system. . . . . . . . . . . . . . . . . . . . . . . . . . . . . 4
Step 2. Getting ready and setting in place the two (2) slabsand eight (8) blocks of rock wool . . . . . . . . . . . . . . . . . . . . . . . 5
Step 3. Submersible pump . . . . . . . . . . . . . . . . . . . . . . . . . . . . . . . . . . 6
Start-up 6
How to short-circuit a pair of feeding tubes 6
Annex A 6
2 / Assembly guide for Orion hydroponic mini kits
Les plastiques Qualiplast inc.
480 Dufferin StreetSalaberry-de-ValleyfieldQuebec, J6S 2B4Tel. (450) 371-7000Fax: (450) 371-7002E-mail: [email protected] site: www.qualiplast com
THERMO… PERFORMINGFOR OUR CLIENTS !
November 2001

Preparing for assemblyForeword
Thank you for buying our Orion hydroponic mini kit.
The various steps, as described in this assembly guide, will give you all the infor-mation needed to put your new system in operation.
IMPORTANT – We recommend that you follow all the steps in the assemblyprocedure, in the order as explained in the guide.
Conventions
All throughout this document you will find references put in parenthesis. Follo-wing examples will explain how to read them.
(figure 5.1) refers to figure 5.1
(figure 2.2A) refers to figure 2.2 at item pointed by letter A
(figures 3.1, 3.2) refers to figure 3.1 and to figure 3.2
(figures 3.1B, 4.1) refers to figure 3.1 at item pointed by letter Band refers also to figure 4.1
Toolbox
We suggest following tools for assembly: sharp blade knife and soft tip marker.
Unpacking
Check for good condition of box or boxes received. Contact immediately your dis-tributor if any damage due to transport.
Unwrap all parts found inside package. Carefully check that all parts match withannex A list, page 6.
3 / Assembly guide for Orion hydroponic mini kits

Set up of an Orion unitStep 1.Set up of feeding system
NOTE: Refer to figure 1.1 for guide in this step.
Insert then screw in a connector in each of eight (8) holes of distributor tube,1/2 in. (12 mm)
Set in place eight (8) feeding tubes 1/8 in. (8 mm) to the (8) connectors.Place the feeding tubes through the openings of culture tub.
Make appear inside of culture tub all feeding tubes having a length of approx.12 in. (30 cm). Deposit culture tub on the nutrient reservoir.
Slide the culture tub to its maximum position and connect the distributor tube tothe pump (for more details about pump, refer to step 3 of guide). Make sure towell set in the distributor tube into the male section of the pump connector. Passthrough the electric cable of pump into the reservoir slot as shown in figure 1.2.
Ensure that the pump rests well at bottom of reservoir when you close the lid ofculture tub.
4 / Assembly guide for Orion hydroponic mini kits
Figure 1.1
Figure 1.2
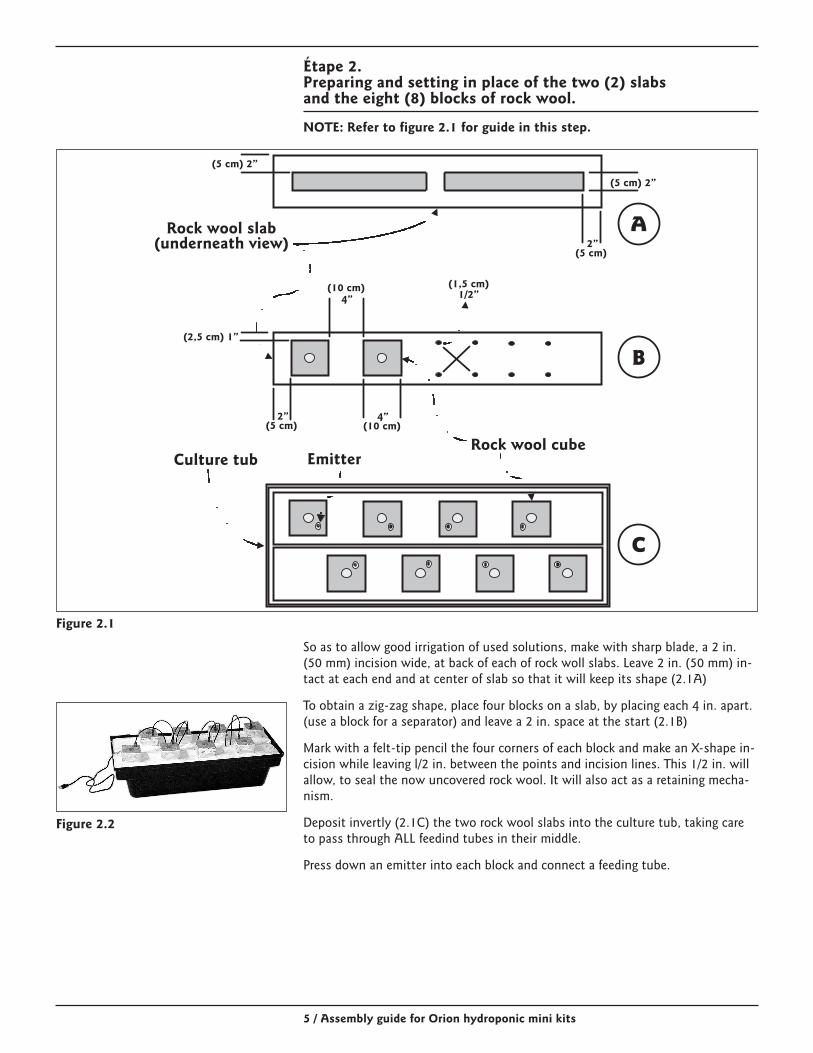
Étape 2.Preparing and setting in place of the two (2) slabsand the eight (8) blocks of rock wool.
NOTE: Refer to figure 2.1 for guide in this step.
So as to allow good irrigation of used solutions, make with sharp blade, a 2 in.(50 mm) incision wide, at back of each of rock woll slabs. Leave 2 in. (50 mm) in-tact at each end and at center of slab so that it will keep its shape (2.1A)
To obtain a zig-zag shape, place four blocks on a slab, by placing each 4 in. apart.(use a block for a separator) and leave a 2 in. space at the start (2.1B)
Mark with a felt-tip pencil the four corners of each block and make an X-shape in-cision while leaving l/2 in. between the points and incision lines. This 1/2 in. willallow, to seal the now uncovered rock wool. It will also act as a retaining mecha-nism.
Deposit invertly (2.1C) the two rock wool slabs into the culture tub, taking careto pass through ALL feedind tubes in their middle.
Press down an emitter into each block and connect a feeding tube.
5 / Assembly guide for Orion hydroponic mini kits
Figure 2.1
Figure 2.2

Étape 3.Submersible pump
NOTE: Refer to figure 3.1 and 3.2 for more details.
The submersible pump is equipped with a filter and a flowcontrol handle.
The solution flow can be adjusted by turning the handle, ei-ther left or right, as the direction is not important.
Check regularly the state of the filter situated inside thepump cover. Filter is reached by removing the pump cover.
Start-up
• Fill the nutrient reservoir with water or nutritive solution.
• Activate the pump.
• Make visual inspection of system so as to detect any wa-ter leaks and to make sure ALL emitters work.
How to short-circuit a pair of feeding tubes
It is possible to short-circuit two feeding outlets by joiningtwo connectors using a feeding tube.
Annex A: items for one (1) Orion unitDescription Qty Description Qty
Nutrient reservoir 1 Sliding culture tub 1
Submersible pump 1 Emitter 8
Flexible tube – distributor,1/2 po. (12 mm),lenght 6 po. (125 mm)
1Flexible tube – feeding,1/8 po. (3 mm),lenght 48 po. (1,2 m)
8
Connector tube – flexible,1/8 po. (3 mm) 8 Anti-root membrane
3 x 3 po. (7,5 x 7,5 cm) 1
Rock wool slab, 36 x 6 x 3po. (90 x 15 x 7,5 cm) 2 Rock wool block, 4 x 4 x
2,5 po. (10 x 10 x 6,25 cm) 8
Assembly guide 1
6 / Assembly guide for Orion hydroponic mini kits
Figure 3.1
Figure 3.2