original quality – the best replacement - carid.com · pdf fileoriginal quality –...
TRANSCRIPT
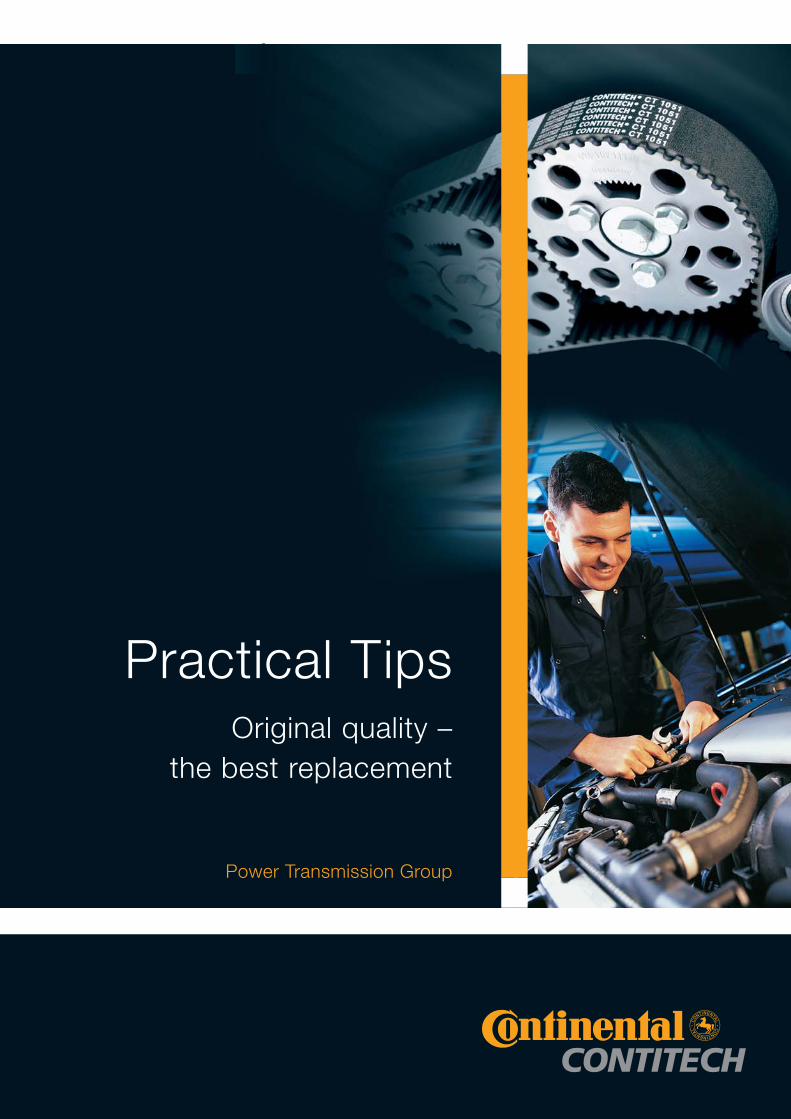
Power Transmission Group
Practical TipsOriginal quality –
the best replacement
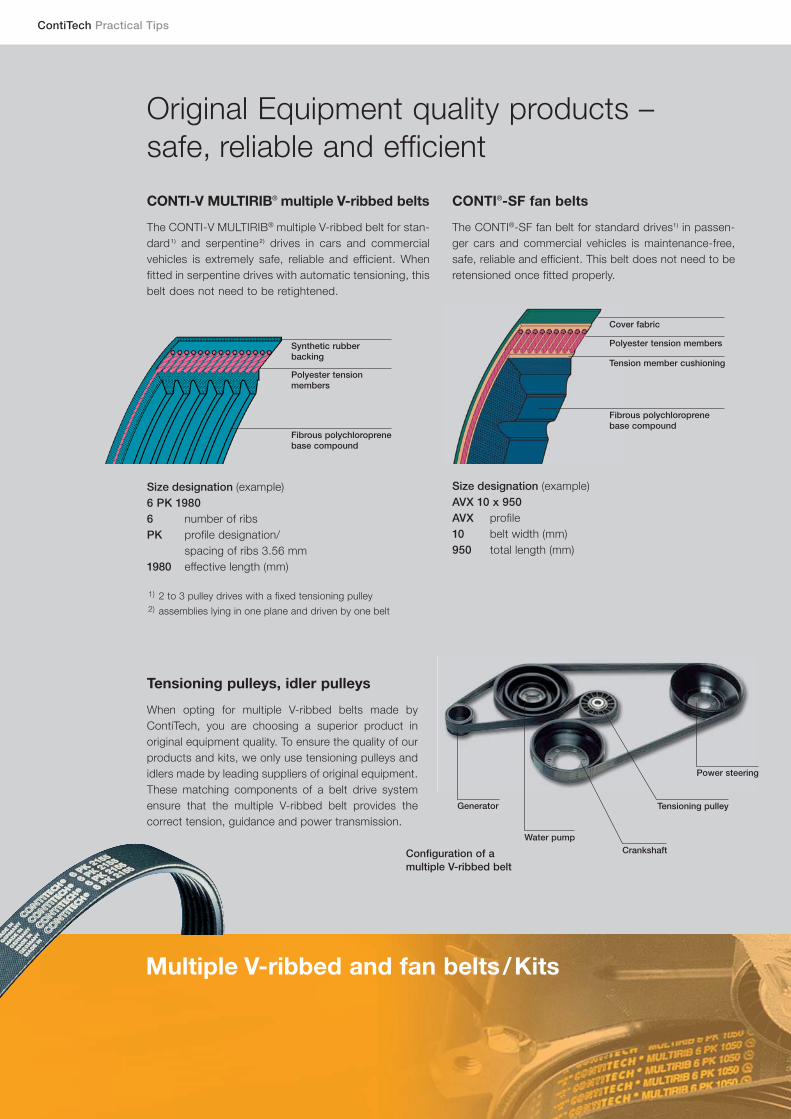
CONTI-V MULTIRIB® multiple V-ribbed belts
The CONTI-V MULTIRIB® multiple V-ribbed belt for stan-dard1) and serpentine2) drives in cars and commercialvehicles is extremely safe, reliable and efficient. Whenfitted in serpentine drives with automatic tensioning, thisbelt does not need to be retightened.
CONTI®-SF fan belts
The CONTI®-SF fan belt for standard drives1) in passen-ger cars and commercial vehicles is maintenance-free,safe, reliable and efficient. This belt does not need to beretensioned once fitted properly.
ContiTech Practical Tips
Original Equipment quality products –safe, reliable and efficient
Tensioning pulleys, idler pulleys
When opting for multiple V-ribbed belts made by ContiTech, you are choosing a superior product in original equipment quality. To ensure the quality of ourproducts and kits, we only use tensioning pulleys andidlers made by leading suppliers of original equipment.These matching components of a belt drive systemensure that the multiple V-ribbed belt provides thecorrect tension, guidance and power transmission.
Generator
Configuration of a multiple V-ribbed belt
Tensioning pulley
Water pumpCrankshaft
Power steering
Size designation (example)6 PK 19806 number of ribsPK profile designation/
spacing of ribs 3.56 mm1980 effective length (mm)
1) 2 to 3 pulley drives with a fixed tensioning pulley2) assemblies lying in one plane and driven by one belt
Size designation (example)AVX 10 x 950AVX profile10 belt width (mm) 950 total length (mm)
Multiple V-ribbed and fan belts/Kits
Polyester tension members
Synthetic rubberbacking
Fibrous polychloroprenebase compound
Polyester tension members
Tension member cushioning
Fibrous polychloroprenebase compound
Cover fabric

Changing a multiple V-ribbed belt
If the belt drive has an automatic tensioning system:
• Use appropriate tools to move the tensioner to “beltremoval”.
• Secure the tensioner in this position. (1)
• Make sure you are familiar with the belt configuration(drawing a sketch helps).
• Remove the belt.
• Check tensioner, back idler pulleys and belt pulleys forany wear or damage. (2)
• Ensure you have the correct belt size. First place itover the plain and flanged pulleys (3), and then push itover the smooth back idler pulleys. (4)
• Check that the belt is properly seated in the grooves.
• Release the tensioner securing mechanism with a suitable tool and move the tensioner against the belt.Remove all tools.
• Check that the belt is properly seated on all pulleys.
• Start the engine and watch that the belt is runningalong its intended path.
ContiTech Practical Tips
Changing the belt correctly – for 100% drive function
• Turn off the engine. Use the Krikit 2 or Krikit 3 tensiongauge to check the belt tension on the taut section ofthe belt (5). If the tension is incorrect, check the tensioning system against the manufacturer’s data.
• Dispose of the replaced belt in an environmentally friendly way.
If the belt drive includes a fixed tensioning pulley:
• Release the tensioning system and move it into thedrive unit.
• Make sure you are familiar with the belt configuration(drawing a sketch helps).
• Remove the belt.
• Check tensioner, back idler pulleys and belt pulleys for any wear or damage.
• Ensure you have the correct belt size. First place itover the plain and flanged pulleys, and then push itover the smooth back idler pulleys.
• Check that the belt is properly seated in the grooves.
3 421
Multiple V-ribbed belts and fan belts

• Use the Krikit 2 or Krikit 3 tension gauge to check the belt tension on the taut section of the belt. (5)
New multiple V-ribbed belts Profile PK: 12 -14 kg/rib
Used multiple V-ribbed belts Profile PK: 9 -10 kg/rib
• Let the engine run for a few minutes, then switch it off. Check the tension and make any necessaryadjustments.
• Dispose of the replaced belt in an environmentallyfriendly way.
Changing a fan belt
Changing fan belts is similar to changing multiple V-ribbed belts with a fixed tensioning pulley. Use the Krikit 1 tension gauge to adjust the belt tension (6).
New fan belts Profile AVX 10: 40 kgProfile AVX 13: 55 kg
Used fan belts Profile AVX 10: 25-30 kgProfile AVX 13: 40-45 kg
Safety tips
• When installing belts, only use the correct tool (not a screwdriver). The belt must be installed without theuse of force.
• Belt dressing or similar materials should be used onlyin emergencies to eliminate noises.
• Never allow caustic or corrosive liquids to come intocontact with the belt drive, as they could damage the plastic parts.
• Check that the belt pulleys are in flawless condition(no dirt, rust or burrs) and are the correct size for thebelt profile.
• Ensure that the pulleys are properly aligned parallel to the axis.
• V-belt drives in sets contain belts in matched lengths.If any one belt fails, all belts must be replaced.
5 6
CONTI® BTT Hz (Belt Tension Tester):Electronic alternative for measuring the tension of multiple V-ribbed belts
ContiTech Practical Tips
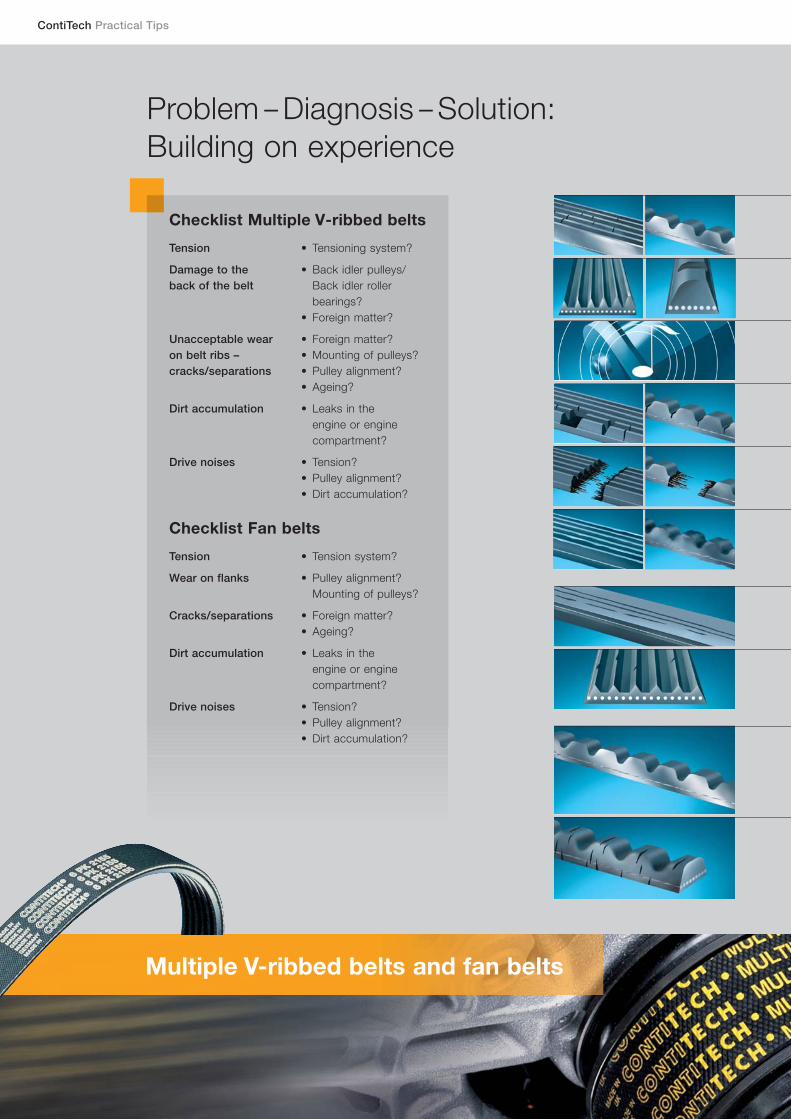
Problem – Diagnosis – Solution:Building on experience
Checklist Multiple V-ribbed belts
Tension • Tensioning system?
Damage to the • Back idler pulleys/back of the belt Back idler roller
bearings?• Foreign matter?
Unacceptable wear • Foreign matter?on belt ribs – • Mounting of pulleys?cracks/separations • Pulley alignment?
• Ageing?
Dirt accumulation • Leaks in theengine or enginecompartment?
Drive noises • Tension?• Pulley alignment?• Dirt accumulation?
Checklist Fan belts
Tension • Tension system?
Wear on flanks • Pulley alignment?Mounting of pulleys?
Cracks/separations • Foreign matter?• Ageing?
Dirt accumulation • Leaks in theengine or enginecompartment?
Drive noises • Tension?• Pulley alignment?• Dirt accumulation?
Multiple V-ribbed belts and fan belts

Hardened, polished flanks� Incorrect tensioning� Tension member of belt damaged
by incorrect fitting
� Change the belt, adjust tension correctly� Change the belt, fit properly
� Examine the drive. Line up or, if necessary,replace any non-aligned pulleys, change the belt
� Check the tension. If necessary, tighten or change the belt
Hardened, polished flanks (different tension values for belts of sets)
� Pulleys not aligned� Tension member of belt damaged
by incorrect fitting � Mismatching of belts
Uneven wear on ribs� Pulleys are not aligned� Substantial belt vibrations
Running noises from belt� Insufficient tension� Belt past its useful life
� Tighten or change the belt� Change the belt
Cracks/separations in belt body/ribs� Belt tension is too high/low� Belt past its useful life� Foreign matter
� Change the belt, adjust tension correctly� � Change the belt
Crack in the belt after a short running time� Tension members damaged as
a result of incorrect fitting� Belt excessively tensioned
� Change the belt, fitting it correctly� Change the belt, adjust tension correctly
Dirt accumulation on the belt� Leaks in the engine or engine compartment
(e.g. escape of oil, antifreeze etc.)� Repair leak(s), change the belt
Damage to the back of the belt� Back idler pulley defective (sluggish, surface damaged,
e.g. by foreign matter)� Change the belt, replace the back idler pulleys
Unacceptable wear of belt ribs� Pulleys/idlers/assemblies defective (sluggish) � Pulleys not aligned
� Replace pulleys/idlers/assemblies, change the belt� Align or replace pulleys, change the belt
� Examine the drive, line up non-aligned pulleysand fit a new set of belts
� Change the belt, fitting it correctly� Always replace a complete set of belts
Excessive wear on flanks/flanks brittle� Excessive slip� Pulleys not aligned� Pulley grooves with uneven wear
� Change the belt, adjust the tension correctly� Examine the drive, line up or, if necessary, replace
any non-aligned pulleys� Line up or, if necessary, replace any non-aligned pulleys
Problem and cause Multiple V-ribbed belts/fan belts Solution
Problem and cause Multiple V-ribbed belts Solution
Problem and cause Fan belts Solution
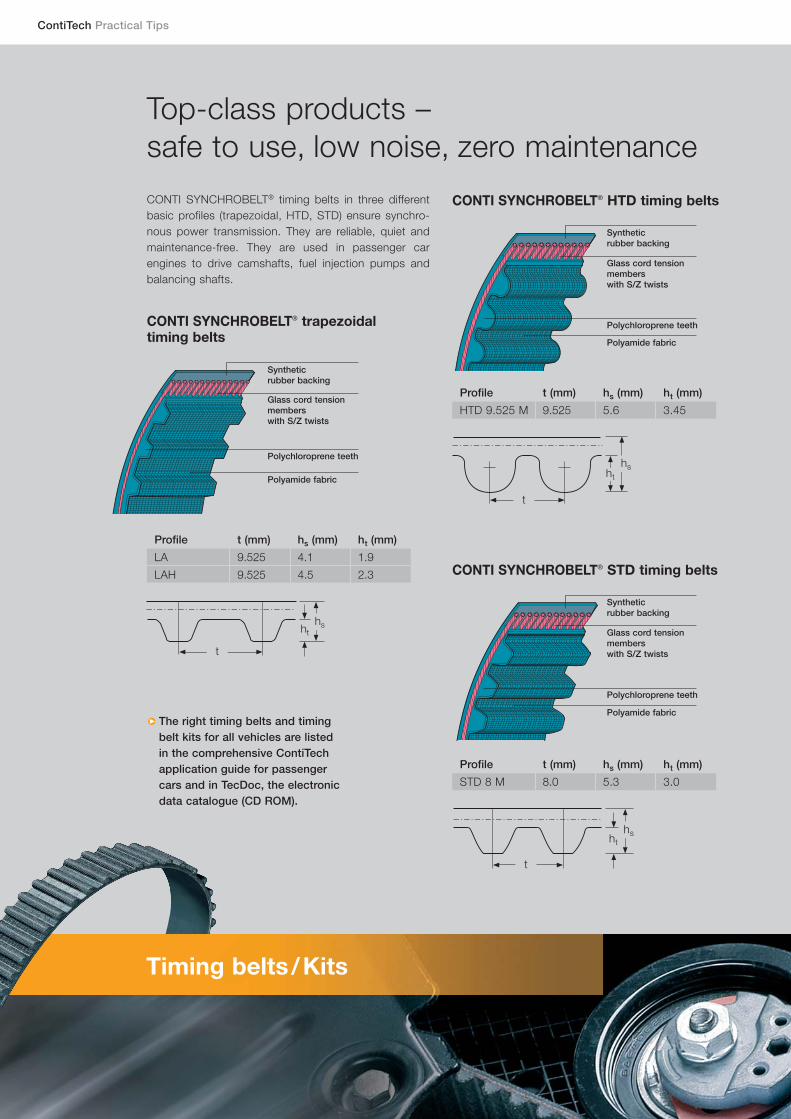
CONTI SYNCHROBELT® timing belts in three differentbasic profiles (trapezoidal, HTD, STD) ensure synchro-nous power transmission. They are reliable, quiet andmaintenance-free. They are used in passenger car engines to drive camshafts, fuel injection pumps andbalancing shafts.
ContiTech Practical Tips
Top-class products – safe to use, low noise, zero maintenance
Profile t (mm) hs (mm) ht (mm)
LA 9.525 4.1 1.9
LAH 9.525 4.5 2.3
Glass cord tension memberswith S/Z twists
Polychloroprene teeth
Polyamide fabric
Syntheticrubber backing
CONTI SYNCHROBELT® trapezoidal timing belts
CONTI SYNCHROBELT® HTD timing belts
Glass cord tension memberswith S/Z twists
Polychloroprene teeth
Polyamide fabric
Syntheticrubber backing
Glass cord tension memberswith S/Z twists
Polychloroprene teeth
Polyamide fabric
Syntheticrubber backing
CONTI SYNCHROBELT® STD timing belts
The right timing belts and timing belt kits for all vehicles are listed in the comprehensive ContiTechapplication guide for passenger cars and in TecDoc, the electronicdata catalogue (CD ROM).
Profile t (mm) hs (mm) ht (mm)
HTD 9.525 M 9.525 5.6 3.45
Profile t (mm) hs (mm) ht (mm)
STD 8 M 8.0 5.3 3.0
t
hths
t
hs
t
hths
q
ht
Timing belts/Kits

Tensioning pulleys, idler/guide pulleys
With timing belts from ContiTech, you are opting for atop product in original equipment quality. To ensure thequality of our products and kits we only use tensioning,idler and guide pulleys made by leading suppliers of original equipment. These matching components of acontrol drive ensure the correct tensioning, guiding andpower transmitting of timing belts.
Configuration of a timing belt
In modern engines timing belts and matching com-ponents are subjected to a great deal of stress.High rotational speeds, vibrations and extreme tem-peratures can easily have a negative effect on thefunctioning of parts, e.g. ball bearings. Cracks belowthe metal surface, overheating and worn-out sealingrings of ball bearings lead to increased metal wear and even the jamming of pulleys. So they can easilycause belt damage. If a timing belt snaps when theengine is running, the engine can sustain irreparabledamage. So it is strongly recommended that timingbelts and matching components are replaced at the same time, just to be on the safe side.
Tensioning pulley
Guide pulley
Idler pulley
Bearing ring
Ball bearing
Tensioning roller bearing
Be on the safe side!
CONTI SYNCHROBELT® KIT
Depending on the application, this product combinestiming belts, tensioning pulleys, idler and/or guide pulleysin a single pack. Replacing the timing belt and its matching parts at the same time gives extra engine reliability and means greater safety for the motorist. Thereare also benefits for the garage: no need to order individualparts, all items are perfectly matched, and there’s sturdypackaging to protect the products before they are used.
Kit withwater pump

ContiTech Practical Tips
Changing a timing belt
• Disconnect the earth cable from the battery.
• Remove all drive belts, pulleys or hoses that could get in the way when the timing belt is removed.
• Remove the timing belt cover.
• Turn the crankshaft in the running direction of theengine as far as top dead centre, and bring markingon the engine case into line with the marking on thecrankshaft vibration damper and the camshaft. (1)
• Loosen the adjusting screw of the tensioning pulley.
• Pull the tensioning pulley away from the timing beltand screw the tensioning pulley tight again. (2)
• Remove the timing belt.
• Check tensioner, smooth back idler pulleys, belt pulleys for wear or damage. If necessary replacethem. (3)
• Adjust all markings until they are properly aligned.
• Place the new timing belt on the pulleys.
Changing the belt correctly – for 100 % drive function
• Loosen the adjusting screw of the tensioning pulley,allowing the pulley to move freely.
• Turn the adjusting screw carefully into its final position(make proper allowance for the spring pressure). If thetensioning pulley is not automatic, tension the timingbelt as specified by the vehicle manufacturer, usingthe tensioning device provided for this. (4)
• Check the alignment of the markings.
• Rotate the crankshaft by at least two complete revol-utions in the running direction of the engine to ensurethe timing belt is properly tensioned by the tensioningpulley.
• Check the alignment of the markings once again.
• Put the tensioning pulley in its intended position and tighten the screws with the specified torque setting. (5)
• Refit the timing belt cover as well as all drive belts, pulleys and hoses that were removed.
• Reconnect the earth cable to the battery.
• Start the engine.
• Make any adjustments that are necessary.
• Dispose of the replaced belt in an environmentally friendly way.
321
Timing belts
4

5LA
LAR
LAN
LAH
LAHR
LAHN
HTD9.525 M
HTDN9.525 M
HTDH9.525 M
HTDA9.525 M
HTDA8 M
HTDK8 M
STD8 M
STDN8 M
CHDN9.525 M
CHD9.525 M
CPPN9.525 M
Audi, Citroën, Fiat, Ford,Mazda, Opel/Vauxhall,Peugeot, Renault, Volvo, VW
Audi, Fiat, Ford, Lada, Lancia,Mitsubishi, Opel/Vauxhall,Rover, Vauxhall, VW
Fiat, VW
Audi, Fiat, Ford, Opel/Vauxhall, Peugeot, Porsche,Renault, Volvo, VW
Audi, Bedford,Mitsubishi, VW
Audi, VW
BMW, Citroën, Honda, Mazda,Opel/Vauxhall, Porsche, Renault, Rover, Volvo, VW
Ford, Lada, Volvo
Opel/Vauxhall
Daihatsu, Honda, Mazda,Mitsubishi, Renault, Rover, Suzuki, Volvo
Daihatsu, Mazda, Nissan,Rover, Subaru, Suzuki
Mazda, Toyota
Audi, Ferrari, Fiat,Lancia, Land-Rover, VW
Fiat, Lancia
Ford, Fiat, Citroën,Peugeot, Rover
Fiat, Renault
Citroën, Honda, Land-rover, Peugeot, Rover
Belt profile
Pulley profile
Examples of application
Code
Profiles of timing belts and timing belt pulleys
Safety tips
• When fitting belts, only use the correct tool. The beltmust be placed in position manually. In no circum-stances may timing belts be forced, e.g. with rimlevers, on to toothed pulleys or rolled over flanged pul-leys. Such action would damage the tension member.
• Never allow caustic or corrosive liquids to come intocontact with the belt drive, as they could damage theplastic parts.
• Keep the belt well away from oil mist, dripping oil andother chemicals!
• Always comply with the installation instructions of thevehicle manufacturer! These are printed in the owner’smanual in the section explaining how to change atiming belt.
• Fill in the sticker accompanying every new ContiTechtiming belt and stick it in the engine compartmentwhere it can easily be seen.
• Regardless of which components are defective –whether tensioning pulley, idler pulley or guide pulley – all these components must be replaced!

ContiTech Practical Tips
Problem – Diagnosis – Solution:Ensuring a smooth operation
Checklist Timing belts
Changing interval
Tension • Tensioning system?
Damage to the • Idler pulleys?back of the belt • Tensioning pulleys?
• Foreign matter?
Unacceptable wear • Toothed pulleys?of tooth profile • Assemblies?
• Pulley alignment?• Foreign matter?
Cracks/separations • Toothed pulleys?• Assemblies?• Foreign matter?• Pulley alignment?
Edge wear • Pulley alignment?• Flanged pulley?
Dirt accumulation • Leaks in thesystem components of the engine?
Drive noises • Tension?• Pulley alignment?• Assemblies?• Idler/tensioning
pulleys?
Timing belts

Running noises from belt� Tension too high: Belt whines, whistles� Tension too low: Belt knocks against covering
Edge wear� Belt not parallel to axis: Belt runs against flanged pulley� Wheels axially off-centre: Timing belt cannot be properly aligned� Flanged pulley has flaws� Bearing play in components
� � Adjust tension properly
� � Check drive, line up or, if necessary, replace any non-aligned pulleys, change the belt
� � Replace idler/tensioning pulleys, change the belt
Defective system components� Bearing play� Damaged running surface
� � Replace the idler, tensioning and/or guide pulley
Fabric wear in the tooth root� Belt excessively tensioned� Belt is overheating� Timing belt pulley is worn out
� Change the belt, adjust tension correctly� Find out cause (e.g. check cold performance),
take corrective action, change the belt� Replace timing belt pulley, change the belt
Unacceptable wear of tooth flanks/ base separating and tooth shearing
� Tension too high/too low� Trapped foreign matter� Jammed timing belt pulley or tensioning pulley
� Change the belt, adjust tension properly� Remove foreign matter, check covering
is seated properly, change the belt� Find out cause (e.g. defective bearing),
take corrective action, change the belt
Running marks on teeth side� Foreign matter in timing belt drive� Flaws in teeth of timing belt pulley caused
by foreign matter or tools during fitting� Timing belt damaged before/during fitting
� Remove foreign matter, change the belt, check the cover is seated properly
� Replace timing belt pulley, change the belt,ensuring it is properly fitted
� Change the belt, ensuring it is properly fitted
Cracks on back of timing belt� Ambient temperature too high/low� Contact with foreign media� Back idler pulley sluggish� Ageing
� Find out cause (e.g. check cold performance), takecorrective action, change the belt
� Change the belt, check the covering is seated properly� Replace pulley, change the belt� Change the belt
Timing belt snaps� Foreign matter in the drive� Contact with foreign media� Excessive tensioning� Belt was crimped before/during fitting
� Remove foreign matter/media, change the belt� Change the belt, check the covering is seated properly� Change the belt, adjust tension properly� Change the belt and fit it correctly
Teeth and fabric separating from belt body� Leaks in the engine or engine compartment
(e.g. escape of oil, antifreeze etc.)� Repair leak(s), change the belt
Problem and cause Timing belts Solution
REPLACEMENT BELTSCONTITECH BELTS