organizing the workplace to maximize productivity
TRANSCRIPT

1
Organizing the Workplace to Maximize Productivity
A 5S/Workplace Organization Resource Guide

2
About UT CIS
The University of Tennessee Center for Industrial Services (UT CIS) delivers technical assistance and training to businesses and communities throughout Tennessee. UT CIS has the real-world experience and expertise to give businesses and communities the tools they need to grow, succeed, and create good jobs.
Table of Contents
Since 2018, UT CIS has completed over 380 projects with Tennessee manufacturers exceeding one billion in customer reported economic impact.
3 What Is 5S?
3 Why is 5S Important?
4 Typical 5S Benefits
5 Starting with 5S
9 Step 1: Start
11 Step 2: Set In Order
12 Set in Order Guidelines
13 Step 3: Shine
14 Step 4: Standardize
15 Common Visual Control
Techniques
16 OSHA/ANSI Floor Marking Color
Code Chart
17 Step 5: Sustain
18 5S Planning Tool
21 5S Implementation Supply
22 5S Audit
27 Workstation Requirements Form
28 Red Tag Item Log
29 Item Disposition List
30 Detailed “What to Look For” List
31 Shine Cleaning Plan

3
What is 5S?
5S is a simple system that allows you to standardize an operation, manage the exceptions and measure and improve overtime.The 5S methodology includes five phases that turn organization into a step-by-step system allowing your workplace to become more productive.
An organized work area reduces excessive motion and wasted time looking for the right tool. When everything has a place, it is easier to spot something missing or misplaced. A clean work area draws attention to problems or safety hazards. A clean floor helps spot any leaks or spills. Encouraging people to watch for and address problems can result in a positive change to an organizations culture.
SORT
SET IN ORDER
SHINE
STANDARDIZE
SUSTAIN5S
Met
hodo
logy
Why is 5S important ?
5S achieves real results that are immediately measurable. By eliminating time that is wasted on searching for or waiting for tools, supplies, or information you gain value added production time that increases overall productivity. 5S is a means to an end.
A typical 5S implementation will achieve 50 to 75 percent increase in production time and considerably less machine downtime as equipment issues are identified and repaired faster. What could you do with 50% more production time?
Scenerio: First impressions are everything. Imagine you are a new employee at
Company ABC. You are excited to begin your manufacturing career and show up on the first day excited to become part of a team building a world class product. You show up a few minutes early and met your new supervisor. The supervisor gives you a quick tour stopping at your new workstation...and it’s a disaster. The equipment is dirty, the tools have been thrown onto the table and you can’t even see the tabletop surface underneath all of this mess.
How would this affect your morale and productivity? As a new employee, what would you need to do in order to start your day? How do you know what product is good or bad? How do you even know what to work on? What would a potential customer think?
The 5S methodology implemented as part of a larger business model will reduce waste, improve quality, promote safety, and drive enterprise wide continuous improvement.

4
The 5S system is designed to improve productivity through organization, identification, maintenance, and sustainability. Its end goal is to increase productivity and profits while improving employee morale. The 5S system is a not a series of steps that are carried out one time but rather the pillar of a
strong continuous improvement culture. 5S focuses on keeping everything in its place to maintain consistency in the work environment. Eliminating inconsistencies reduces disruptions to production processes, resulting in a more predictable quality of output.
Workplace Utilization
Employee Safety
Employee Morale
Product Quality
Equipment Reliability
Typical 5S Benefits
Productivity
Machine SetupTime
Process Control
Non Value-Added Activities
Mistakes and Errors
Employee Orientation and Training Time
Time Searching, Waiting for Tools, Information Parts, Supplies, Inventory
Wasteful InventoryTransportation
Excess Inventory Costs
Clutter and Disorganization
Ergonomics Issues
Workers CompsCosts
More: Less:

5
Starting with 5S
Before beginning your 5S journey, it is important to understand the current company culture and any past experiences. There are three common attitudes toward implementing 5S:
We have done this in the past, but it did not “stick”. In this situation the best way to kick start a new effort is to start with top level commitment and training. Evaluate the reasons 5S did not “stick” the first time.• Was 5S treated as a
“flavor of the month” program?• Was it “pushed” by a plant manager or CEO
that is no longer with the company?• Was 5S considered “housekeeping” that was
done the last five minutes of each shift?• Did the previous program have associated
metrics that were regularly updated and discussed?
Review the above questions as a leadership team before restarting to provide a solid basis for sustainment and continuous improvement.
We have already implemented 5S. If you have already started implementing 5S but are still experiencing the pain points, then it is time to evaluate your efforts. • Has everyone been trained on 5S and
its benefits?• Is 5S ingrained into your work processes and
a part of new workflow design?• Are you regularly observing workspaces and
identifying improvement opportunities? • Are you tracking (and acting on)
relevant metrics?
Take a walk through your operation, do you see faded banners on the walls, obsolete floor markings, unorganized workstations, old data on production boards? If so, refer back to the first scenario.
We have never heard of 5S. Keep reading!
Pain Points
Organizations that could greatly benefit from 5S may be experiencing the following pain points:
• Lost Production because operators are waiting on supplies, parts or information.
• Operators away from workstation looking for tools, PPE, parts, inventory
• High rate of defects and rework.• Equipment is dirty; maintenance cannot
identify new leaks.
• Setup times are longer than ten minutes.• Workforce spends significant time “cleaning
up” before a customer visit.• No space for new equipment or workspaces.• Material handlers moving inventory around.• Excessive time and manpower needed to
conduct yearly inventory.• Employees have “hidden stashes” of
supplies or tools (increases costs).

6
Choosing An Area
Select small target areas or zones to begin your 5S implementation. When choosing a starting place consider:• Overall likelihood for success in terms of
current team culture• Level of production – does a particular area
need to achieve more?• Are safety incidences higher at a certain
workstation or machine?• Where do you have the longest setup/
changeover time?• Do you need to improve equipment uptime
on a particular machine?• Is the office environment the better place
to start?
Showing the success in a pilot area will give others a reason to buy-in to the system, creating a sustainable foundation for a successful 5S system.
Choosing A Team
The most important aspect of choosing a 5S area team is making sure you DO NOT leave the operators out. The operators that work in the process each day are your most valuable players. They know what does and does not work, how to finesse equipment that is not properly maintained, and how to produce quality parts from a subpar process.
Aside from primary operators, the area supervisor and a maintenance technician are invaluable. The supervisor will provide support and remove roadblocks while the maintenance technician can expedite any work order requests.
In today’s manufacturing environment, a team of four to six participants is sufficient to implement 5S in a reasonably sized area. Including team members from other departments; especially the office, is a great way to spread enthusiasm for and understanding of the 5S system. It also gives other departments the opportunity to understand other aspects of the process.
Traditionally, 5S is implemented during a three to five-day kaizen event in which all hands are on deck and production is halted. For most companies, that is not a viable option. Set an implementation schedule that works for your production needs and stick to it.

7
Be a mentorSet the visionInitiate the 5S systemProvide resourcesLead by example
Top Management Role
Facilitate the 5S processLead by exampleProvide 5S trainingRemove roadblocksEmpower workforce
Middle/Line Management Role
Participate activelyGive suggestionsRespect other’s opinionBe a good team playerMaintain discipline
Frontline Employee Role
All levels of management must understand and practice the 5S methodology to provide an example to other employees. Top management will set the vision and support that vision throughout the organization. Middle and line managers will have a direct role in leading and coordinating the 5S process. The front-line employees are the most important group for any type of improvement activity. They will be directly impacted by the changes but also have firsthand knowledge of how to improve the process.
Understand the Current State
Once a team is determined, the next step is to establish a baseline for the target area. This process will help determine improvement ideas and make it possible to measure success.To establish a baseline process: 1. Take before photos of the area. Photos are
a great way to show the before and after states. Take the after photos from the same perspective as the before photos.
Levels of Support
2. Build a spaghetti diagram (see next page for directions) documenting the operator, material, and information flow.
3. Document baseline metrics like number of steps, material flow distance, amount of downtime or delay due to searching or waiting, current throughput, and lead time.
4. Conduct an initial 5S audit.5. Complete a workstation requirements form.
It is important to understand the purpose of the workstation:• What activities happen in the area
(materials dropped off and picked up, component part and tool storage, paperwork, testing, PPE storage? Others.) – include a template.
• What tools and information are required?

8
Drawing a Spaghetti Diagram
1. Start with a blank layout of the work area.
2. Track the movement of the operator, materials, and information.
3. Document the number of steps and flow distance.
4. Rearrange the work area to reduce movement.
Using Red Tags
This first “S” is where workers will make decisions that lead to a clutter-free workspace; the visual cues of the 5S red tags are a vital part of the process. Before starting the Sort phase, you will need to work with red tags.
Red Tags - as shown on the right - are used to identify items in the work area whose immediate use or need is unclear. 5S Red Tagged items should be placed in a separate location called a Red Tag Holding Area. To begin using Red Tags, follow these steps:
1. Determine the location of a Red Tag Holding Area.
2. Set up and identify the Red Tag Holding Area.
3. Identify a Red Tag Holding Area manager4. Develop and post rules and standards for the
Red Tag Holding Area.
Date:Department:Tagged By:Item Description:
Item CategoryRaw MaterialFinished GoodWIPMachine PartRework/ScrapTools EquipmentTooling/Fixture
Other/Unknown
Reason TaggedNot UsedDoes not Function
Owner Unknown
Other

9
5. Identify unused, unnecessary, or misplaced items
6. Complete a red tag for each item7. Attach red tag to the item8. Move the item to the red tag holding are9. Items will be held for no longer than 30 days
Red Tag Holding Area Guidelines
• The Red Tag Holding Area Manager will
log all items in the Red Tag Item Log
• Items should not remain in the holding
area longer than 30 days.
• Locate the red tag holding area so that it
is visible (not hidden in the back).
• Employees may add to or remove items
from the red tag area as needed.
Step 1 : SORT
Sort simply means to go through everything in your work area and only keep items that are used on a frequent basis. All other items are red tagged, stored outside the area, or discarded. The Item Disposition List will help determine what to do with items used infrequently.
Question everything in the work area. Your goal is to understand:• When was an item last used? (never ask,
“Do you need this?”)• What is an item used for? • Who uses the item?• What quantity of the item is required for
current hourly/daily production rates?• Would removing the item negatively
impact production?
As a rule of thumb anything that has not been used in the past two weeks should be red tagged. A red tag does not mean an item needs to be thrown away; it simply means an item is not used where it is. Once items have been tagged, they may be moved to the red tag area.
What to Look For
• Rusty parts or tools
• Excessive inventory and supplies
• Things covered in dust from lack of use
• Redundant parts or tools in cabinets
and drawers
• Obsolete fixtures, jigs, parts, equipment
• Outdated information
• Defective parts, tools, and equipment
When In Doubt, Move It Out

10
Item Disposition List
1. For each red tagged item, determine the
category within which it belongs.
2. Determine the action required and write it
on the red tag and/or the Red Tag Item Log.
3. The red tag area manager is responsible for
properly storing and disposing of items in
the red tag area.
4. The operators and 5S team are responsible
for properly storing items that will remain in
the work area.
• Sell • Hold for depreciation• Give away• Throw away
Obsolete
• Place in red tag area for dispositionScrap
• Store at point of useUsed Daily
• Store in an accessible area outside the immediate workstation
Used Less than Once per Month
• Place in red tag area for disposition
Seldom Used
• Return to supplier• Recycle• Schedule repair/rework
Defective
Category Action
• Place in red tag area for dispositionUnknown
• Store at workstationUsed Once per Week

11
Step 2: SET IN ORDER
The Set in Order goal is to arrange tools, equipment, and parts so that they encourage work flow. This process lets everyone know what goes where, and gives them confidence that everything is where it needs to be.
Set in Order Process
1. Identify and gather needed supplies (bins, labels, tags, colored tape, etc).
2. Use the spaghetti diagram to set the new layout flow (if applicable).
3. Use the workstation requirements form to determine required tools, materials, information, etc.
4. Analyze the work area for additional improvement opportunities and look for ways to reduce sources of waste and error as well as to make the workplace more visually instructiive.
Set in Order Guidelines
• Tools belong to the workstation or machine – not the operator
• Eliminate Searching Waste. • Walking in a straight line is better than
walking around things.• The more often an item is used, the closer it
should be to where it is used.• Make it easy to locate and get an item.• Make it easy to return an item after use.• Eliminate empty space if possible.• Have only one row of items on shelves.• Avoid storing items in piles.• Apply the First in First Out rule.• Avoid storing materials or supplies on
the floor.
A Place for Everything and Everything in Its Place
• Eliminate doors and drawers when possible.• Avoid private collections of supplies
and equipment.
Questions to Consider
• Where should items be located to make them most accessible for the normal pattern of the work?
• How can you tell, at a glance, if an item is there, or if the normal pattern of work has been broken?
• What should happen, immediately, if that normal pattern of work is broken?

12
Equipment & Tools
Set In Order Guidelines
• Utility pipes, conduits, compressed air hoses, gas cylinders and electrical systems are clearly labeled.
• Tools are kept near the point of use, organized, and labeled.• Gauges and indicators are marked so abnormalities
can be quickly detected.
• Quality standards are visually designed and properly displayed.• Examples of acceptable and unacceptable outputs are posted.• Quality performance trends are displayed.
• The latest version of work instructions and job aids are posted.
• Visual or auditory signals are employed to alert operators to abnormal conditions.
• Mistake-proofing devices are used to prevent human and machine errors.
• Line side inventories (inventory type, max/min quantity, location, etc.) are clearly marked.
• Storerooms (shelf, rack and bin labels, restocking indicators, barcoding, etc.) are organized and marked.
• Inventory delivery routes are marked, and replenishment procedures are posted.
• Provide hazard warnings and safe work instructions at the point of need.
• Locations for lockout/tag out devices, eye wash stations, first aid stations, safety showers, etc., are clearly marked.
• Proper personal protection equipment is easy to access and ready for use.
Quality
Procedures
Inventory/Material Handling
Safety

13
Step 3: SHINE
Shine is not about “housekeeping”. The goal of the Shine phase is to return the work area and equipment to a “like new” condition and then maintain that condition. The end goal is having the ability to quickly identify abnormal conditions. For example, it is easier to see an oil leak if it drips on a clean floor.
Shine Procedures
1. Check to see if everything is in its place.2. Check to see if you need to replace anything.3. Check specific equipment for
necessary repairs.4. Check everything; see if deep cleaning,
repair, or replacement is needed.5. Shine and inspect through cleaning
every shift.
Make It Look and Run Like Brand New
Use the Shine Cleaning Plan to:• Determine shine activities, frequencies,
and assignments.• Identify appropriate cleaning methods,
tools, and supplies.

14
Step 4: STANDARDIZE
Standardize is fundamentally about establishing clear, unambiguous norms and is initiated after the workspace has been sorted, organized, and cleaned. Standardizing work areas and procedures ensure the first three phases are maintained. In order to accomplish this step: assign and integrate 5S responsibilties, schedule 5S tasks and audit the results.
Standarizing the workspace has many benefits:• Ability to maintain a great first impression
with customers and new employees. • Easier to train new employees and cross
train current employees.• A safer workplace with fewer errors and
quality defects.• Consistency in products and services
provided to customers.• Operators are able to identify
abnormal conditions.• Each employee knows what needs to be
done, when it needs to be done, and exactly how to do it.
Key Questions to Address and Mitigate:• Have procedures/work instructions been
created or updated based on changes introduced in the previous steps?
• Do operators share a common approach to accomplishing tasks in the work area?
• Is there a system by which procedures/labels/schedules, etc. are regularly
Maintain the first three S’s
maintained, reviewed and improved in the future?
• How can we prevent accumulating unnecessary items?
• How can we prevent tools and items from not being returned to the right place?
• What daily inspection is needed to quickly address equipment issues?
• How can we create a visual workplace?
Visual management is designed to create a work place that is self-explaining, self ordering, and self improving. Visual management provides the operational status in a easy to understand format, conveys information, instructions and feedback, and makes problems, abnormalities or deviations from standards visible to everyone.
Implementing a visual workplace can serve as the key sustaining force of a 5S implementation.

15
Common Visual Control TechniquesSI
GN
SD
RA
WE
R
FO
AM
STA
TU
S B
OA
RD
SA
ND
ON
LI
GH
TSLA
BE
LSSH
AD
OW
BO
AR
DS
FLO
OR
M
AR
KIN
GS
The main purpose of visual controls, commonly implemented during standardize, is to organize the
workplace so that anyone can quickly see the current status of your operation.
5S RED TAG AREA
LINE STATUS
TARGET
ACTUAL
DIFFERENCE
EFFICIENCY (%)
R U N N I N G
9 5 32 3 9
7 1 4
24
Markers
Marke
rs
Markers
16
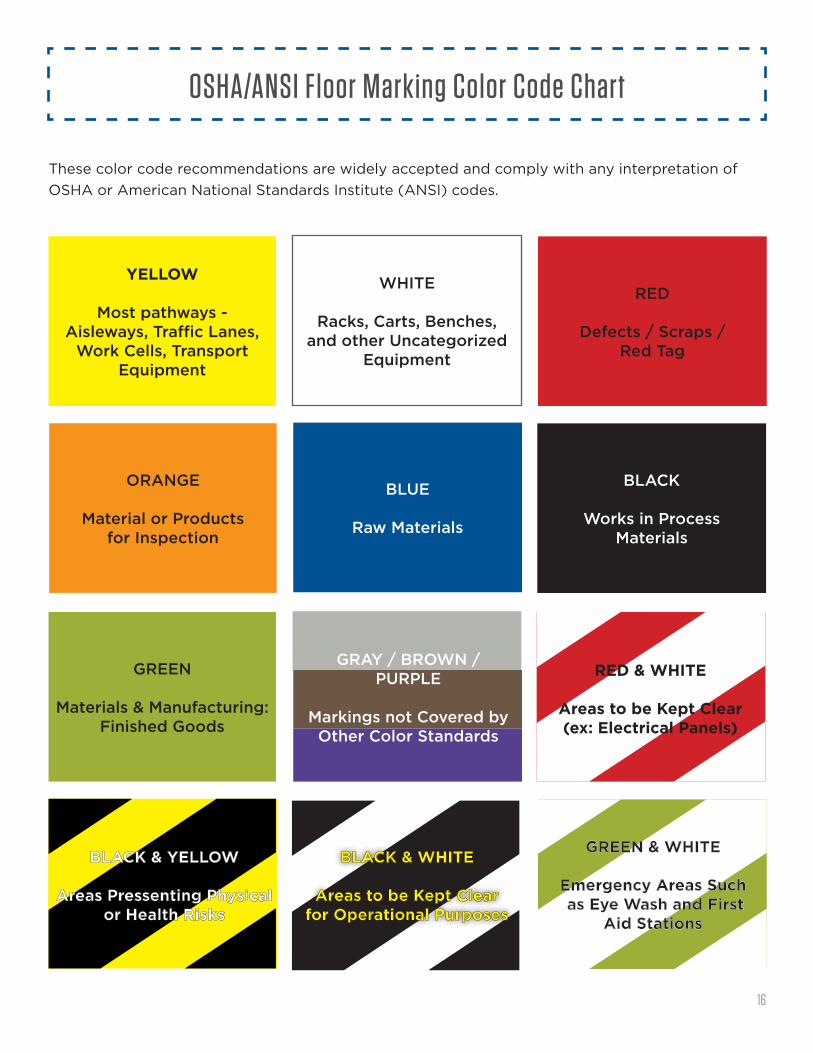
OSHA/ANSI Floor Marking Color Code Chart
YELLOW
Most pathways - Aisleways, Traffic Lanes,
Work Cells, Transport Equipment
WHITE
Racks, Carts, Benches, and other Uncategorized
Equipment
RED
Defects / Scraps / Red Tag
ORANGE
Material or Products for Inspection
BLUE
Raw Materials
BLACK
Works in Process Materials
GREEN
Materials & Manufacturing: Finished Goods
These color code recommendations are widely accepted and comply with any interpretation of OSHA or American National Standards Institute (ANSI) codes.
GRAY / BROWN / PURPLE
Markings not Covered by Other Color Standards
17
The most common complaint about 5S is “we couldn’t sustain it.” The two major causes of this failure are:• Employees are not involved in every step of
the process• Management naively assumes that
employees will instantly understand the value of 5S and will practice it.
5S is a never-ending daily process in which Sustain means not only sustaining the gains, but also to keep improving workplace organization.
Sustain Procedure• Stick to the rules to keep the workplace well-
ordered and run by agreed-upon standards.• Ensure that all workers have been trained in
the procedures.• Use the results of regular 5S audits to
implement further improvements.• Inform and encourage participation
through 5S concepts and skills training, 5S communications boards, photo displays, one-point lessons, study groups, and daily and weekly 5S activities.
Step 5: SUSTAIN
Supporting Continuing Committment
Sustain Questions to Consider• Have the 5S benefits been adequately
communicated to all stakeholders?• Is the workforce trained to carry-out the
5S activities?• Is there a system in place to monitor and
follow-up 5S tasks?• Are 5S audit results communicated and
corrective actions implemented?• Are measures in place to ensure work
areas and processes are regularly evaluated and improved?

18
5S PLANNING TOOL
1. Establish 5S Target Areas
Strategy: Find areas that will show remarkable success and give teams experience with 5S.
STEPS QUESTIONS
• Where do bottlenecks exist?• What area creates frustration and wasted time?• Which areas have clear boundaries and ownership?• How much resistance might be involved?• Who will need to be on board?• How much time do you and potential team members have?• What are the measurable sources of waste
for improvement?• Do these improvement measures support organizational/
area goals?
2. Determine timecommitment andestablishimplementation dates.
Strategy: Determine the extent of 5S activity for this to be successful.
• How large is the area?• How many people can do 5S work in this area without
getting in each other’s way?• How long would it take to conduct: Sort? Set in Order?
Shine?• How many people would need to give input to agree to
standardization?• Is the potential outcome worth the resources required?• What lead times are needed for team scheduling, ordering
special supplies, etc?• Are there any slow times or peak activity times to consider
- daily, weekly, seasonal?
3. Determine resourcerequirement estimates.
Strategy: Consider detailed requirements to adequately complete the 5S activity.
• What additional equipment might be needed?• What are potential issues for handling items in• the area, e.g. sharing or ownership with other
departments or shifts?• What maintenance/facilities help can you anticipate?

19
5S PLANNING TOOL
4. Select the team.
Strategy: Your team is your best resource; assign members that best know the area and can most benefit from the experience.
STEPS QUESTIONS
• Who works in the area? Who complains the most?• Who could be a champion for the results?• Is it possible to include members from associated groups?
5. Determine who you willneed help from and keystake holders.
Strategy: Early identification of the support you will need for the event itself, as well as for successful implementation.benefit from the experience.
• Who interfaces with these areas? Consider users andsuppliers that have a stake in the changes.
• What specific resource support will you need for each ofthe 5S Steps?
• Who can give you a valuable, informed opinion regardingthe changes?
6. Identify potential issuesand a plan for resolution.
Strategy: Anticipate potential situations that are likely to surface; identify long-standing situations that will require resolution.
• Are there issues that need to be resolved at theLeadership level? How will Leadership be informed?
• Who else will need to be on board?

20
5S PLANNING TOOL
7. Identify Expectations
and Measures.
Strategy: Align with organizational measures.
STEPS QUESTIONS
• What needs to change in the area?• What is the vision for the work area after the 5S? How can
we measure the change to show success?• What baseline data do we have?• What baseline data do we need to collect?

21
PPE
5S IMPLEMENTATION SUPPLY
Baseline
Sort
Set in Order
Shine
Standardize
Sustain
• Gloves• Tyvek suits• Safety glasses
• Rolling tape measure• Butcher paper/white board• Markers (different colors)• Blank 5S audit form
• Clipboards• Camera• Blank Workplace Scan Form• Blank Initial Cleaning
Plan Form
• Face shields• Ear plugs
• Assorted tools (to take itemsapart if needed)
• Red tag area “rules”• Item Disposition form• Blank Red Tag Item form
• Dedicated fork truck orpallet jack
• Bins or boxes for small items• Red tags
• Area map and spaghetti map• Label maker and label material• Floor marking tape• Colored bins, organizers
• Required workstation tools& supplies
• Drawer foam• Shadow board materials
• EPA Approved Cleaner/Degreaser• Cleaning rags• Spray bottles• Scrapers
• Brooms/mops, mop buckets• Plastic pails w/handles• Pressure washer• Paint supplies (brushes,
rollers, paint)
• No specific supplies needed• Develop standard procedures,
checklist, etc.
• Address the “keyquestions” list
• Tags to flagmaintenance issues
• Total employee involvement• Management support
• 5S communication and trainingfor new employees

22
5S AUDIT
DATE
LAST AUDIT DATE
AREA
LAST AUDIT SCORE
AUDITOR
NEXT AUDIT DATE
0NO EFFORT
1SLIGHT EFFORT
2MODERATE
EFFORT
3AVERAGE RESULTS*MINIMUM
ACCEPTABLE*
4ABOVE
AVERAGE RESULTS
5OUTSTANDING
RESULTS
QUESTION # SORT SCORE
1Only the required EQUIPMENT is present in the area. All obsolete, broken, or unnecessary equipment not required for current projects are removed from the area or red tagged for removal.
2 Only the required TOOLS are present in the area. Tools not required for current projects are re- moved from the area or red tagged for removal.
3Only the required FURNITURE is present in the area. All obsolete, broken, or unnecessary work- benches, shelves, chairs, lockers, etc. not required for current projects are removed from the area or red tagged for removal.
4Only the required SPARE PARTS and MATERIALS are present in the area. Items not required for current projects are removed from the area or red tagged for removal.
5Only the required PAPERWORK is present in the area. Outdated or irrelevant memos, instructions, reports, posters, etc. are removed from the area.
6 All TRIPPING HAZARDS such as electrical wires and equipment cables are removed from all working, standing, and walking areas.
“SORT” TOTAL SCORE:

23
5S AUDIT
QUESTION # SET IN ORDER SCORE
1EQUIPMENT/MACHINERY is clearly identified (numbered, named, color coded, etc.) and placed in a properly identified location. Critical maintenance points are clearly marked.
2TOOLS have a designated storage area that is within reach of the user/operator. The location is properly labeled, and a system is in place to identify tools that are absent.
3 When applicable, FURNITURE is clearly identified (numbered, named, color coded, etc.) and placed in a properly identified location.
4 Locations for CONTAINERS, WIP’s, BOXES, BINS, etc. are clearly defined via signs or marked/taped lines and properly labeled.
5 PAPERWORK is properly labeled and has a clearly identified location that is away from work sur- faces.
6 Work areas requiring PERSONAL PROTECTIVE EQUIPMENT (PPE) are clearly marked (floor tape, safety signs/labels, etc.).
7 STOP SWITCHES AND BREAKERS are properly maintained, highly visible and located for easy access in case of emergency.
8 FIRE HOSES, FIRE EXTINGUISHERS and other emergency equipment are prominently displayed and are unobstructed.
9FLOORS/AISLES are clearly marked; forklift lanes, exits, dangerous areas, paths of egress, walk- ways, aisles, etc. are all marked with visible lines (floor tape/floor paint).
10Working conditions are ERGONOMICALLY FRIENDLY- Tools and other items needed for daily work are stored at appropriate heights, anti-fatigue mats are in place where applicable, related safety signage is displayed clearly, etc.
11The work area layout accommodates EASY UNOBSTRUCTED EXIT in case of emergency. The emergency exit route is posted in a conspicuous location for all to see.
“SET IN ORDER” TOTAL SCORE:
0NO EFFORT
1SLIGHT EFFORT
2MODERATE
EFFORT
3AVERAGE RESULTS*MINIMUM
ACCEPTABLE*
4ABOVE
AVERAGE RESULTS
5OUTSTANDING
RESULTS

24
5S AUDIT
QUESTION # SHINE SCORE
1 All TOOLS are kept clean and in good working order and stored in a manner to keep them clean and free from risk of damage.
2 WORK SURFACES (Machines, workbenches, dies, and other equipment including electrical boxes) are kept clean and painted.
3 WALLS, PARTITIONS, RAILS, ETC. are kept clean and painted.
4 FLOORS are free from dirt, debris, oil, parts, hardware, empty boxes, etc. and all drains (if applicable) are clear of debris and clogs.
5 PAPERWORK is kept clean and protected from dirt and other contaminants.
6CONTAINERS, BOXES, BINS, ETC. are clean and not cracked, torn, or otherwise damaged. When stored, they are neatly stacked in their correct location.
7All PERSONAL PROTECTIVE EQUIPMENT (PPE) is maintained in sanitary and reliable condition and is properly store in an easily accessible and labeled location when not in use.
8 All CLEANING EQUIPMENT is neatly stored and is readily available when needed.
9All EQUIPMENT SAFETY-related warnings, signs, labels, floor lines, etc. are all clean, easy to read, not torn or damaged, and provide adequate protection.
10There is a posted SCHEDULE showing times, frequency, and responsibilities to clean areas of the workplace such as windows, corners, walls, doors, tops of cabinets, etc.
“SHINE” TOTAL SCORE:
0NO EFFORT
1SLIGHT EFFORT
2MODERATE
EFFORT
3AVERAGE RESULTS*MINIMUM
ACCEPTABLE*
4ABOVE
AVERAGE RESULTS
5OUTSTANDING
RESULTS

25
5S AUDIT
QUESTION # STANDARDIZE SCORE
1 TOOLS, EQUIPMENT, PAPERWORK, FURNITURE, ETC is stored neatly in designated areas and are returned to their proper locations after use.
2 Equipment MAINTENANCE RECORDS are visible and clearly state when maintenance last occurred.
3 PRODUCT WASTE (shavings, containers, liquids, wrappers, etc.) is consistently and regularly cleaned up and removed from the work area.
4PREVENTATIVE MEASURES have been implemented to ensure the work area meets 5S guidelines (e.g. systems that do not allow waste to accumulate such as containers to collect product debris from machines)
5The WORK ENVIRONMENT satisfies the requirements of the work being performed- Lighting brightness and color, temperature, air flow and quality, etc.
6 The RESULTS OF THE PREVIOUS AUDIT are posted and clearly visible for the entire team.
7 AREAS FOR IMPROVEMENT identified during the previous audit have been addressed and completed.
“STANDARDIZE” TOTAL SCORE:
QUESTION # SUSTAIN SCORE
1 A member of MANAGEMENT has participated in a 5S activity such as an audit or other activity within the past 3 audit periods.
2 RECOGNITION is given to teams who get involved in 5S activities.
3 TIME AND RESOURCES are allocated to complete 5S activities and improvement suggestions
4 All operators, team leaders, supervisors, etc. are assigned 5S ACTIVITIES to be completed at least once a week.
5 The team took the INITIATIVE to make improvements to the workplace that were NOT identified during the last audit.
“STANDARDIZE” TOTAL SCORE:

26
5S AUDIT
Audit Score:
Areas for Improvement:
Sort Set in Order Shine Standardize Sustain Total
Individual Score
Maximum Score 30 55 50 35 25 195
195

27
WORKSTATION REQUIREMENTS FORM
Workstation Activities Equipment Tools Materials Information
For each Workstation, identify the activities that are required to be performed there. List all resources used to perform the activities (equipment, tools, materials, information). Consider how and where these resources will be stored at the Workstation.

28
RED TAG ITEM LOG
Tag Number Item Tagged Reason for Tagging Notes/Disposition

29
ITEM DISPOSITION LIST
CATEGORY ACTION
Obsolete
• Sell• Hold for depreciation• Give away• Throw away
Defective• Return to supplier• Recycle• Schedule repair/rework
Scrap • Place in red tag area for disposition
Trash • Throw away• Recycle
Not Used in This Area • Place in red tag area for disposition
Used Daily • Store at point of use
Used Once Per Week • Store at workstation
Used Less Than Once Per Month
• Store in an accessible area outside theimmediate workstation
Seldom Used • Place in red tag area for disposition
Unknown • Place in red tag area for disposition

30
DETAILED “WHAT TO LOOK FOR” LIST
Search These Spaces:Floors
Aisles
Work surfaces
Corners near entrances, exits and stairs
Behind/under workbenches & equipment
Along interior and exterior walls
Toolboxes
Look for Unused Furniture:Chairs
Desks
Carts
Filing cabinets
Benches
Look for Unused Equipment:Jigs
Tools
Cutting bits
Dies
Inspection gear
Gauges
Carts
Conveyance tools
Check Walls and Boards for:Out-of-date items
Useless signboards and messages
Look for Unused Supplies:Spare parts
Small parts
Spare inventory
Raw materials
In-process inventory
Sort Storage Spaces:Lockers
Carts
Storage shelves
Floors
Workbenches
Look for Other Unused items:Dishes
Trash cans
Personal items
Clothes
Tools

31
SHINE CLEANING PLAN
Target Area:
Directions:1. Identify the target area and enter it above.2. Decide what the task is and where it should happen, and list it in the appropriate column below.3. Decide who will perform the task and when, and list it below.4. Determine which materials and tools you need and list them below.
Task Location Who When Materials & Tools Needed

32
Ready to Start Implementing 5S in Your Facil i ty?
Now that you understand what 5S is and how it works, it’s time to start implementing. UT CIS can help you at any stage of this process and provide your team with 5S training. To learn more, please visit https://bit.ly/CIS_5S or contact your local Solutions Consultant.
Kenny Smith, [email protected]
Michael Codega, [email protected]
Kevin Cooper, [email protected]
Andre Temple, [email protected]
George Aslinger, [email protected]
Bill Hicks, 865-974-2249 [email protected]
Norma Wilcox, 615-532-4914 [email protected]
Gordon Reed, [email protected]
Find Your Local Solutions Consultant
1
2
3
4
5
6
7
8