order management™ – what’s new guide...
TRANSCRIPT
Paragon®
Order Management™ – What’s New Guide (Release 13.0)
Enterprise Information Solutions (EIS) Education
POM700H Release 13.0 March 27, 2015
2 Paragon Order Management– What’s New Guide (Release 13.0)
March 2015 Release 13.0 ©McKesson Corporation Proprietary to McKesson – Subject to Confidentiality Agreement
Publication Information
Copyright © 2014 McKesson Corporation and/or one of its subsidiaries. All Rights Reserved.
Use of this documentation and related software is governed by a license agreement. This documentation and related software contain confidential, proprietary and trade secret information of McKesson Corporation and/or one of its subsidiaries and are protected under United States and international copyright and other intellectual property laws. Use, disclosure, reproduction, modification, distribution, or storage in a retrieval system in any form or by any means is prohibited without the prior express written permission of McKesson Corporation and/or one of its subsidiaries. This documentation and related software are subject to change without notice.
Purpose This guide provides information about the enhancements and changes that impact Paragon Order Management in Release 13.0. It is intended for customers and users already familiar with the application and build of the Paragon Order Management product.
Publication date March 2015
Release Paragon Order Management, Release 13.0
Trademarks All other product and company names may be trademarks or registered trademarks of their respective companies.
Disclaimer The names used in this publication are not the names of real individuals. Any similarity or likeness of the names used in this publication with the names of actual persons is purely coincidental and not intentional.

Paragon Order Management – What’s New Guide (Release 13.0) 3
©McKesson Corporation Release 13.0 March 2015 Proprietary to McKesson – Subject to Confidentiality Agreement
Contents
Publication Information ............................................................................................................. 2
About this guide ........................................................................................................................ 4 Resources .............................................................................................................................. 4
Order Managements enhancements ......................................................................................... 5 Enhancement – Reset of OMWQ and ACKN (140736) ....................................................... 5 Enhancement – Caregiver Search Window (141202)........................................................... 8 Enhancement – Ordering Caregiver (141232) .................................................................... 11 Enhancement – Display Prompt Before Next Patient (158599) .............................................. 12 Enhancement – CPOE Orders Report (168566).................................................................... 17 Enhancement – CPOE Orders Report (179696).................................................................... 17
4 Paragon Order Management– What’s New Guide (Release 13.0)
March 2015 Release 13.0 ©McKesson Corporation Proprietary to McKesson – Subject to Confidentiality Agreement
About this guide
This What’s New guide provides information about the enhancements and changes included in Paragon Order Management.
Resources Build times
Where indicated, there may be build required for the implementation of the enhancement. Extra time needs to be allotted to incorporate any Reference Master updates/changes or other build requirements prior to testing these enhancements.
Audience The primary individuals impacted by these enhancements are clinicians who use Order Management to view patient information and create documentation/notes.
Paragon Order Management – What’s New Guide (Release 13.0) 5
©McKesson Corporation Release 13.0 March 2015 Proprietary to McKesson – Subject to Confidentiality Agreement
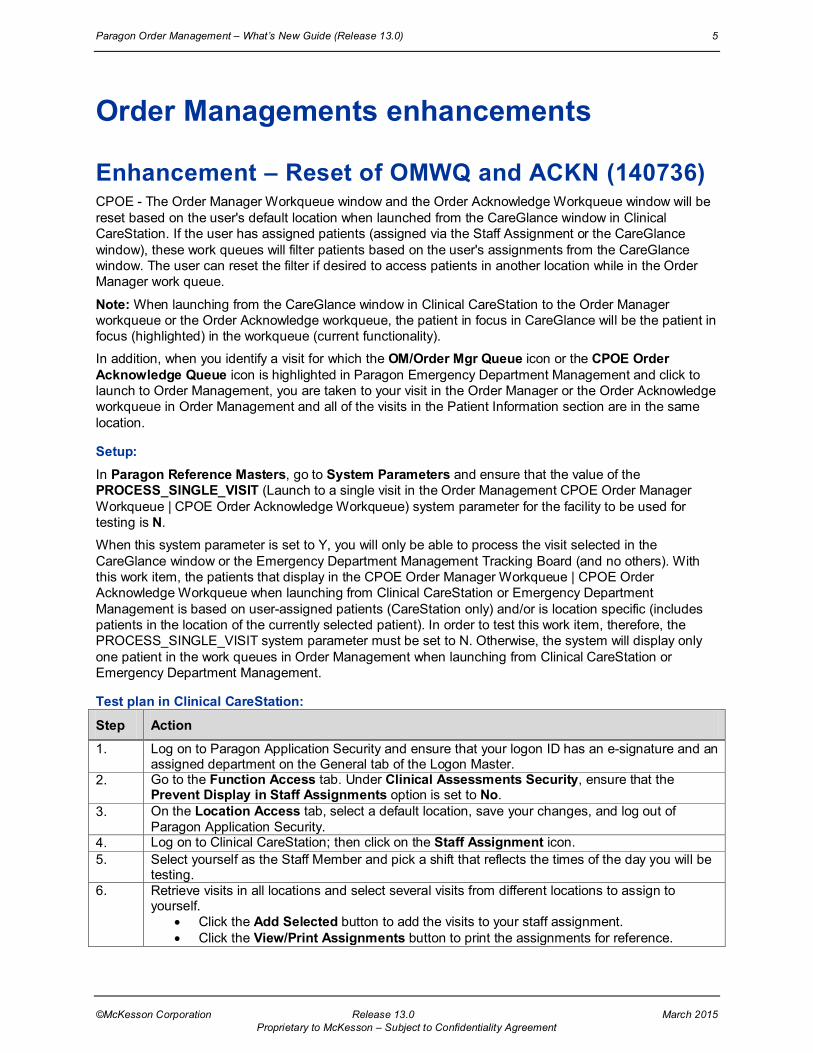
Order Managements enhancements
Enhancement – Reset of OMWQ and ACKN (140736) CPOE - The Order Manager Workqueue window and the Order Acknowledge Workqueue window will be reset based on the user's default location when launched from the CareGlance window in Clinical CareStation. If the user has assigned patients (assigned via the Staff Assignment or the CareGlance window), these work queues will filter patients based on the user's assignments from the CareGlance window. The user can reset the filter if desired to access patients in another location while in the Order Manager work queue.
Note: When launching from the CareGlance window in Clinical CareStation to the Order Manager workqueue or the Order Acknowledge workqueue, the patient in focus in CareGlance will be the patient in focus (highlighted) in the workqueue (current functionality).
In addition, when you identify a visit for which the OM/Order Mgr Queue icon or the CPOE Order Acknowledge Queue icon is highlighted in Paragon Emergency Department Management and click to launch to Order Management, you are taken to your visit in the Order Manager or the Order Acknowledge workqueue in Order Management and all of the visits in the Patient Information section are in the same location.
Setup: In Paragon Reference Masters, go to System Parameters and ensure that the value of the PROCESS_SINGLE_VISIT (Launch to a single visit in the Order Management CPOE Order Manager Workqueue | CPOE Order Acknowledge Workqueue) system parameter for the facility to be used for testing is N.
When this system parameter is set to Y, you will only be able to process the visit selected in the CareGlance window or the Emergency Department Management Tracking Board (and no others). With this work item, the patients that display in the CPOE Order Manager Workqueue | CPOE Order Acknowledge Workqueue when launching from Clinical CareStation or Emergency Department Management is based on user-assigned patients (CareStation only) and/or is location specific (includes patients in the location of the currently selected patient). In order to test this work item, therefore, the PROCESS_SINGLE_VISIT system parameter must be set to N. Otherwise, the system will display only one patient in the work queues in Order Management when launching from Clinical CareStation or Emergency Department Management.
Test plan in Clinical CareStation:
Step Action
1. Log on to Paragon Application Security and ensure that your logon ID has an e-signature and an assigned department on the General tab of the Logon Master.
2. Go to the Function Access tab. Under Clinical Assessments Security, ensure that the Prevent Display in Staff Assignments option is set to No.
3. On the Location Access tab, select a default location, save your changes, and log out of Paragon Application Security.
4. Log on to Clinical CareStation; then click on the Staff Assignment icon. 5. Select yourself as the Staff Member and pick a shift that reflects the times of the day you will be
testing. 6. Retrieve visits in all locations and select several visits from different locations to assign to
yourself. • Click the Add Selected button to add the visits to your staff assignment. • Click the View/Print Assignments button to print the assignments for reference.
6 Paragon Order Management– What’s New Guide (Release 13.0)
March 2015 Release 13.0 ©McKesson Corporation Proprietary to McKesson – Subject to Confidentiality Agreement
7. Close the Staff Assignments window and open the CareGlance window. 8. Note that the Location drop-down field defaults to the location you selected as your default
location in Paragon Application Security. 9. Select a couple of visits that are not assigned to you and assign them for the current shift by
clicking the Assign check box. 10. Select the shift from the drop-down list. 11. On the CareGlance window:
• Change the Location drop-down list to <All> Locations. • Click the Assigned Patients check box and click the Retrieve button.
Note: With the Assigned Patients check box selected, you only see your assigned patients. 12. Review the list of patient visits that display and locate a red or yellow icon in the OMWQ column
for one of the visits. 13. Double-click the OMWQ icon to open the Order Manager workqueue in Order Management.
• Verify that when the Order Manager work queue opens. • Verify only those patients assigned to you display • Verify the patient you selected on the CareGlance window is the selected patient in the
Order Manager work queue. 14. Complete one or more orders and verify that when the patient information is refreshed, you still
only see patients assigned to you. 15. Click the Filter secondary toolbar buttonassign a filter click the Apply button. 16. Verify that the Order Manager workqueue:
• Reflects what you set in the workqueue filter. • Verify the patient information is not limited to your staff assignments.
17. Close Order Management and return to the CareGlance window in Clinical CareStation. • Test in the same manner with a yellow or red icon in the ACKN column. • Verify that the functionality is the same with regard to filtering data in the Order
Acknowledge workqueue as it was in the Order Manager work queue. 18. Acknowledge the orders for the visit you have selected and verify that when the patient
information is refreshed you still only see patients assigned to you. 19. Log out of (close) Order Management. 20. In Clinical CareStation, close the CareGlance window in Clinical CareStation. Then reopen the
CareGlance window. 21. Verify that the default location you had selected in Paragon Application Security displays and all
of the visits in the list are assigned to that location. Verify the Assigned Patients check box is deselected.
22. Select a visit for which the icon in the OMWQ column is red or yellow. • Double-click the OMWQ icon to launch to the Order Manager work queue in Order
Management. • Verify that when the Assigned Patients check box is not selected, all of the visits in the
Patient Information section of the window are assigned to the same location as the visit you selected.
23. Log out of (close) Order Management. 24. Back in the Clinical CareStation CareGlance window:
• Select a visit for which the icon in the ACKN column is red or yellow. • Launch to the Order Acknowledge workqueue in Order Management. • Verify that all of the visits that display in the Patient Information section of the window
are assigned to the same location as the visit you selected in CareGlance.
Paragon Order Management – What’s New Guide (Release 13.0) 7
©McKesson Corporation Release 13.0 March 2015 Proprietary to McKesson – Subject to Confidentiality Agreement
Test plan in Emergency Department:
Step Action
1. Log on to the Emergency Department Management and go to the Tracking Board.
2. Identify a visit for which the OM/Order Mgr Queue icon is highlighted and click to launch to Order Management.
3. Verify that the visit from Step 2 is highlighted (selected) in the Order Management Order Manager workqueue and that all of the visits in the Patient Information section are located at the same location. Note: The staff assignments from Clinical CareStation do not apply when launching from Emergency Department Management.
4. Click the Filter secondary toolbar buttonassign a filterclick the Apply button. 5. Verify that the Order Manager workqueue now reflects what you set in the workqueue filter and
the Patient Information section is not limited to the location of the visit you selected in Emergency Department Management.
6. Log out of (close) Order Management. 7. Log on to Emergency Department Management and go to the Tracking Board. 8. Find a visit for which the CPOE Order Acknowledge Queue icon (check mark) is yellow or red
and click to launch to Order Management. 9. Verify that you launch to the visit from Step 8 in the CPOE Order Acknowledge Workqueue and
all of the visits in the Patient Information section are located in the same location. (The staff assignments from Clinical CareStation do not apply when launching from Emergency Department Management.)
10. Click the Filter secondary toolbar buttonassign a filterclick the Apply button. 11. Verify that the CPOE Order Acknowledge Workqueue now reflects what you set in the
workqueue filter and the Patient Information section is not limited to the location of the visit you selected in Emergency Department Management.
8 Paragon Order Management– What’s New Guide (Release 13.0)
March 2015 Release 13.0 ©McKesson Corporation Proprietary to McKesson – Subject to Confidentiality Agreement
Enhancement – Caregiver Search Window (141202) The Caregiver Search window displays non-staff caregivers in italics with the last name suffix, first name, middle name (if applicable), and service. The Consulting Caregiver Maintenance and the Call Result windows display non-staff caregivers in italics.
Important: Before you begin Ensure that you have a non-staff provider setup in Paragon Reference Masters in Caregiver Maintenance that can be used for testing.
Test plan 1 – Call Result window and Person Search window:
Step Action
1. Log on to Order Management. 2. On the Visit Selection window, search for a patient and double-click a patient visit. 3. Click the Order Inquiry tab. 4. Open a Laboratory order. 5. Click the Call Result button and click the Caregiver Search icon next to the Call
To field on the Call Result window. 6. On the Caregiver Search window, search for the non-staff provider. 7. Verify that the non-staff provider is italicized.
8. Select the non-staff caregiver and click the Use button. 9. Verify that the non-staff caregiver selected is italicized on the Call Result window.
Paragon Order Management – What’s New Guide (Release 13.0) 9
©McKesson Corporation Release 13.0 March 2015 Proprietary to McKesson – Subject to Confidentiality Agreement
10. Click the Person Search button next to the Person Contacted field on the Call
Result window. 11. On the Person Search window, search for the non-staff provider. Verify that the non-
staff provider is italicized.
10 Paragon Order Management– What’s New Guide (Release 13.0)
March 2015 Release 13.0 ©McKesson Corporation Proprietary to McKesson – Subject to Confidentiality Agreement
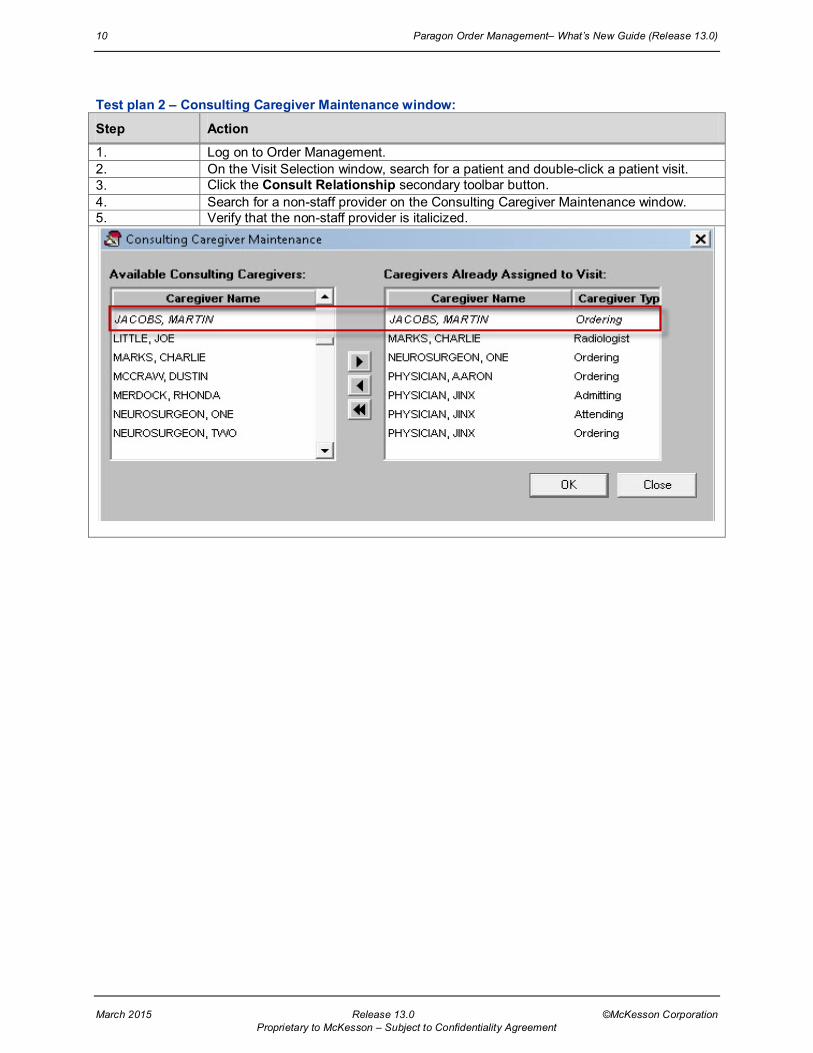
Test plan 2 – Consulting Caregiver Maintenance window:
Step Action
1. Log on to Order Management. 2. On the Visit Selection window, search for a patient and double-click a patient visit. 3. Click the Consult Relationship secondary toolbar button. 4. Search for a non-staff provider on the Consulting Caregiver Maintenance window. 5. Verify that the non-staff provider is italicized.

Paragon Order Management – What’s New Guide (Release 13.0) 11
©McKesson Corporation Release 13.0 March 2015 Proprietary to McKesson – Subject to Confidentiality Agreement
Enhancement – Ordering Caregiver (141232) Ordering Caregiver - The list of ordering caregivers will now display caregiver names in bold when two or more names match. In addition, a hover has been added such that when you hover over a name, the caregiver's provider ID, address, phone number, and service display.
Test plan:
Step Action
1. Log on to Order Management. 2. Select a patient visit to be used for testing. 3. Open the visit. 4. Click the Order Phys: drop-down list:
• Verify that any names that match appear bolded. • Verify that hovering over a caregiver name displays the caregiver's
provider ID, address, phone number, and service.
5. Repeat testing for the Order Entry Detail window using the Create button. 6. Repeat testing for the Order Entry Detail window using the Quick Order button. 7. Repeat testing for the Change Order, Verify Order, and Order Inquiry tabs,
including the following windows: • Change Order tab – Order Detail window. • Verify Order tab – Order Detail window. • Order Inquiry tab - Order Detail window. • Diet Order tab - Order Detail window.
8. Repeat testing for the following additional windows: • CPOE Submitted Orders Report – Search Criteria for Ordering
Physician. • Not Charged Report – Search Criteria for Ordering Physician. • Patient/Caregiver Inquiry - Search Criteria for Caregiver. • Caregiver Information window - Names that match are bolded (address
and phone are already displayed here).
12 Paragon Order Management– What’s New Guide (Release 13.0)
March 2015 Release 13.0 ©McKesson Corporation Proprietary to McKesson – Subject to Confidentiality Agreement
Enhancement – Display Prompt Before Next Patient (158599) The CPOE Order Acknowledge Workqueue and Order Manager Workqueue need to display a prompt before moving to the next patient. When you select a patient, start acknowledging orders, and complete the orders for that patient, the system moves to the next patient in the list, which could be a patient on a different unit that is not your responsibility. Adding a prompt will make it clear that you are not acknowledging orders for the original patient you selected.
Once you complete the actions for the original patient selected, the following prompt is displayed:
There are no further orders to be acknowledged for <PATIENT NAME>. Would you like to proceed to the next patient?
If you click Yes, the next patient in the list is selected and the orders are displayed.
If you click No, you are returned to the application you started in (such as Clinical CareStation CareGlance or the Emergency Department Tracking Board). If you started in Order Management, you remain in the Workqueue to close it and move to the next application manually.
In addition, this enhancement adds the PROCESS_SINGLE_VISIT system parameter to Paragon Reference Masters. When this parameter is set to Yes, when you launch the Order Acknowledge Workqueue or the Order Manager Workqueue from another application, only the visit you had initially selected is displayed in the Workqueue. When you process requests for that visit, the following message is displayed:
All requests for [Patient Name] are complete. Click OK to exit Order Management. Note: The default for PROCESS_SINGLE_VISIT is No (do not process only a single visit). Important: You need to have access to Nurse Entered Orders (NEO) to process Pharmacy orders during testing.
Test plan for Order Management and Clinical CareStation:
Step Action
1. Log on to Order Management. 2. Select Options > CPOE OM Workqueue. 3. Find a visit that has Order Management and Pharmacy orders that need
processing. 4. On the CPOE OM Orders tab, click Select All and click Process OM Order(s). 5. Process each order.
Result: When all OM orders are processed, the CPOE Rx Orders tab is displayed.
6. Click Select All and click Process Rx Order(s). Result: Paragon launches Nurse Entered Orders.
7. Process each order in NEO until completed and exit NEO. Result: You are returned to the Order Manager Workqueue. Note You may need to refresh the Order Manager Workqueue.
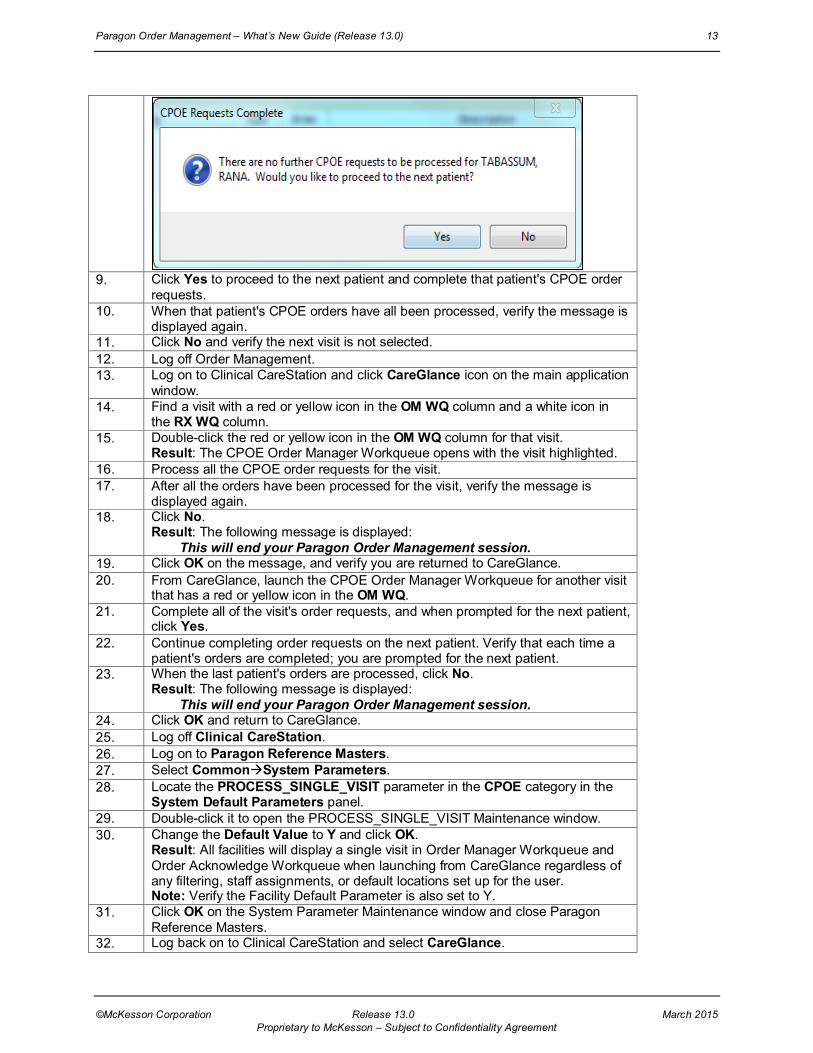
8. After all orders for the visit have been processed, verify the following message is displayed:
Paragon Order Management – What’s New Guide (Release 13.0) 13
©McKesson Corporation Release 13.0 March 2015 Proprietary to McKesson – Subject to Confidentiality Agreement
9. Click Yes to proceed to the next patient and complete that patient's CPOE order
requests. 10. When that patient's CPOE orders have all been processed, verify the message is
displayed again. 11. Click No and verify the next visit is not selected. 12. Log off Order Management. 13. Log on to Clinical CareStation and click CareGlance icon on the main application
window. 14. Find a visit with a red or yellow icon in the OM WQ column and a white icon in
the RX WQ column. 15. Double-click the red or yellow icon in the OM WQ column for that visit.
Result: The CPOE Order Manager Workqueue opens with the visit highlighted. 16. Process all the CPOE order requests for the visit. 17. After all the orders have been processed for the visit, verify the message is
displayed again. 18. Click No.
Result: The following message is displayed: This will end your Paragon Order Management session.
19. Click OK on the message, and verify you are returned to CareGlance. 20. From CareGlance, launch the CPOE Order Manager Workqueue for another visit
that has a red or yellow icon in the OM WQ. 21. Complete all of the visit's order requests, and when prompted for the next patient,
click Yes. 22. Continue completing order requests on the next patient. Verify that each time a
patient's orders are completed; you are prompted for the next patient. 23. When the last patient's orders are processed, click No.
Result: The following message is displayed: This will end your Paragon Order Management session.
24. Click OK and return to CareGlance. 25. Log off Clinical CareStation. 26. Log on to Paragon Reference Masters. 27. Select CommonSystem Parameters. 28. Locate the PROCESS_SINGLE_VISIT parameter in the CPOE category in the
System Default Parameters panel. 29. Double-click it to open the PROCESS_SINGLE_VISIT Maintenance window. 30. Change the Default Value to Y and click OK.
Result: All facilities will display a single visit in Order Manager Workqueue and Order Acknowledge Workqueue when launching from CareGlance regardless of any filtering, staff assignments, or default locations set up for the user. Note: Verify the Facility Default Parameter is also set to Y.
31. Click OK on the System Parameter Maintenance window and close Paragon Reference Masters.
32. Log back on to Clinical CareStation and select CareGlance.

14 Paragon Order Management– What’s New Guide (Release 13.0)
March 2015 Release 13.0 ©McKesson Corporation Proprietary to McKesson – Subject to Confidentiality Agreement
33. Find another visit with orders to process, and double-click the icon in the OM WQ column to launch Order Manager Workqueue.
34. Verify that only the selected visit is displayed when the workqueue opens. 35. Process the pending orders. 36. Verify the following message is displayed:
37. Click OK.
Result: The following message is displayed: This will end your Paragon Order Management session.
38. Click OK to return to CareGlance. 39. Repeat the steps above to test the CPOE Order Acknowledge Workqueue.
Test plan for Emergency Department Management:
Step Action
1. Log on to Paragon Reference Masters. 2. Select Common > System Parameters. 3. Locate the PROCESS_SINGLE_VISIT parameter in the CPOE category in the
System Default Parameters panel. 4. Double-click it to open the PROCESS_SINGLE_VISIT Maintenance window. 5. Change the Default Value to N and click OK.
Result: All facilities will display multiple visits in Order Manager Workqueue and Order Acknowledge Workqueue when launching from Emergency Department Management regardless of any filtering, staff assignments, or default locations set up for the user. Note Verify the Facility Default Parameter is also set to N.
6. Click OK on the System Parameter Maintenance window and close Paragon Reference Masters.
7. Log on to Emergency Department to display the Tracking Board. 8. Find a visit with Pharmacy and non-Pharmacy orders to process and click the
OM/Workqueue icon in the Orders column. Result: The CPOE Order Manager Workqueue opens with the visit highlighted.
9. Verify that all the visits displayed in the Patient Information section are at the same nursing station.
10. Process all the non-Pharmacy requests on the visit, and then process the Pharmacy orders in Nurse Entered Orders.
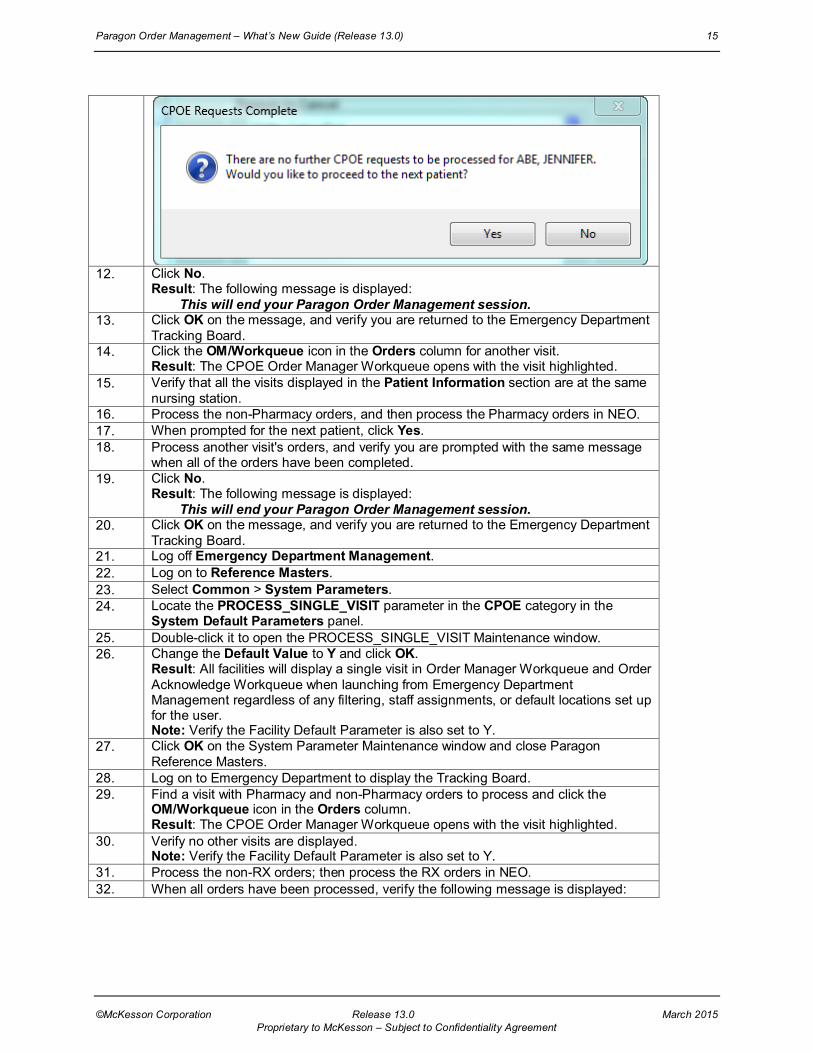
11. After all the orders have been processed for the visit, verify the following message is displayed:
Paragon Order Management – What’s New Guide (Release 13.0) 15
©McKesson Corporation Release 13.0 March 2015 Proprietary to McKesson – Subject to Confidentiality Agreement
12. Click No.
Result: The following message is displayed: This will end your Paragon Order Management session.
13. Click OK on the message, and verify you are returned to the Emergency Department Tracking Board.
14. Click the OM/Workqueue icon in the Orders column for another visit. Result: The CPOE Order Manager Workqueue opens with the visit highlighted.
15. Verify that all the visits displayed in the Patient Information section are at the same nursing station.
16. Process the non-Pharmacy orders, and then process the Pharmacy orders in NEO. 17. When prompted for the next patient, click Yes. 18. Process another visit's orders, and verify you are prompted with the same message
when all of the orders have been completed. 19. Click No.
Result: The following message is displayed: This will end your Paragon Order Management session.
20. Click OK on the message, and verify you are returned to the Emergency Department Tracking Board.
21. Log off Emergency Department Management. 22. Log on to Reference Masters. 23. Select Common > System Parameters. 24. Locate the PROCESS_SINGLE_VISIT parameter in the CPOE category in the
System Default Parameters panel. 25. Double-click it to open the PROCESS_SINGLE_VISIT Maintenance window. 26. Change the Default Value to Y and click OK.
Result: All facilities will display a single visit in Order Manager Workqueue and Order Acknowledge Workqueue when launching from Emergency Department Management regardless of any filtering, staff assignments, or default locations set up for the user. Note: Verify the Facility Default Parameter is also set to Y.
27. Click OK on the System Parameter Maintenance window and close Paragon Reference Masters.
28. Log on to Emergency Department to display the Tracking Board. 29. Find a visit with Pharmacy and non-Pharmacy orders to process and click the
OM/Workqueue icon in the Orders column. Result: The CPOE Order Manager Workqueue opens with the visit highlighted.
30. Verify no other visits are displayed. Note: Verify the Facility Default Parameter is also set to Y.
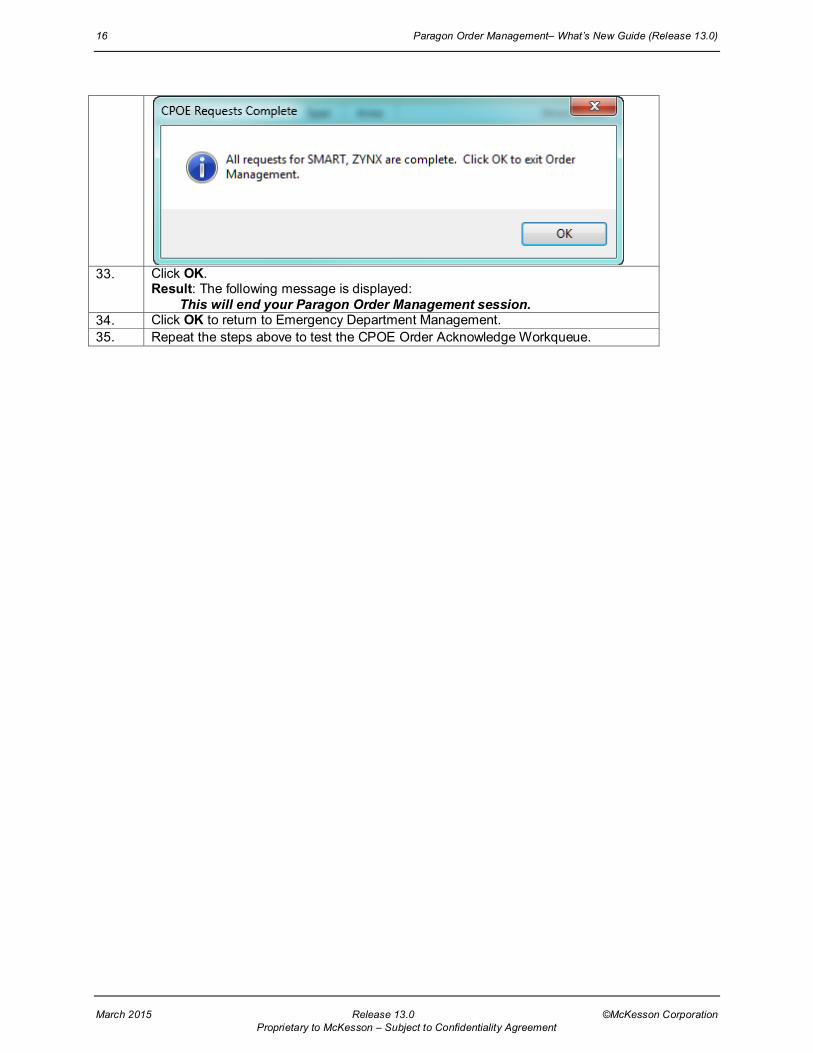
31. Process the non-RX orders; then process the RX orders in NEO. 32. When all orders have been processed, verify the following message is displayed:
16 Paragon Order Management– What’s New Guide (Release 13.0)
March 2015 Release 13.0 ©McKesson Corporation Proprietary to McKesson – Subject to Confidentiality Agreement
33. Click OK.
Result: The following message is displayed: This will end your Paragon Order Management session.
34. Click OK to return to Emergency Department Management. 35. Repeat the steps above to test the CPOE Order Acknowledge Workqueue.
Paragon Order Management – What’s New Guide (Release 13.0) 17
©McKesson Corporation Release 13.0 March 2015 Proprietary to McKesson – Subject to Confidentiality Agreement
Enhancement – CPOE Orders Report (168566) CPOE Orders Report - Change the wording for the ordering provider from "Submitted by XXX" to "Electronically signed by XXX" to adhere to CMS requirements.
Setup: You will need previously placed CPOE orders for various patient visits.
Test Plan:
Step Action
1. Log on to Order Management. 2. Click the Reports primary toolbar button or from the Options menu, select
Reports, and then select the CPOE Orders Report. 3. Enter search criteria and click the Retrieve icon. 4. Verify that the Submitted by < Clinician's Name> field has been changed to
Electronically signed by <Clinician's Name> on the report.
Enhancement – CPOE Orders Report (179696) This work item changes "Read Back" on the Computerized Physician Order Entry (CPOE) Orders Report to "Read Back & Verified."
Prerequisites: • Identify a nurse logon ID that has security access to enter CPOE Verbal, Telephone, and Protocol
orders. • Using the test logon ID, enter CPOE Verbal, Telephone, and Protocol orders from all order areas
on a test patient visit.
Test Plan:
Step Action
1. Log on to Order Management. 2. From the Options menu, select Reports > CPOE Orders Report. 3. Enter search criteria that will return orders that were entered for the test patient
and click the Retrieve icon. 4. Verify that the field previously labeled “Read Back” is now labeled “Read Back
& Verified.” Note: The date/time associated with this field reflects the order date/time stamp in CPOE (not the processed time stamp).