order and management guide - tech data …info.techdata.com/rs/063-hrh-168/images/streamone order...
TRANSCRIPT

STREAMONE CLOUD MARKETPLACE
ORDER AND MANAGEMENT GUIDE

StreamOne Cloud Marketplace
Order and Management Guide
Navigating to the StreamOne Cloud Marketplace
Creating a Quote
Converting a Quote to an Order
Placing Your First Order
CSP - Office 365
CSP - Azure
Autodesk
Purchase Additional Services (Add-On to existing License)
Manage Your Services
Modify or Cancel
SaaS products (Office 365, Dynamics 365 or WES)
IaaS products (Azure)
Autodesk
Delegate Admin on Behalf of (Office 365)
Analysis
StreamOne Insights
Click on the Tech Data logo on any page in
this document to return to this page.

Navigating to the
StreamOne Cloud Marketplace

Finding the StreamOne Cloud Marketplace
Getting to StreamOne from Shop.TechData.com only takes a few very easy steps. First, log in
using your EC ID and password.

Finding the StreamOne Cloud Marketplace
Enter your ID and Password and clock “Log In”

Getting to StreamOne Cloud MarketplaceFrom this page, hover over “BUY” and click on “Cloud Solutions Store”
This will direct you to the StreamOne Cloud Marketplace home page

Creating a Quote

Step 1 – Find the Product ListingIn this example, we are searching for Microsoft CSP listing.

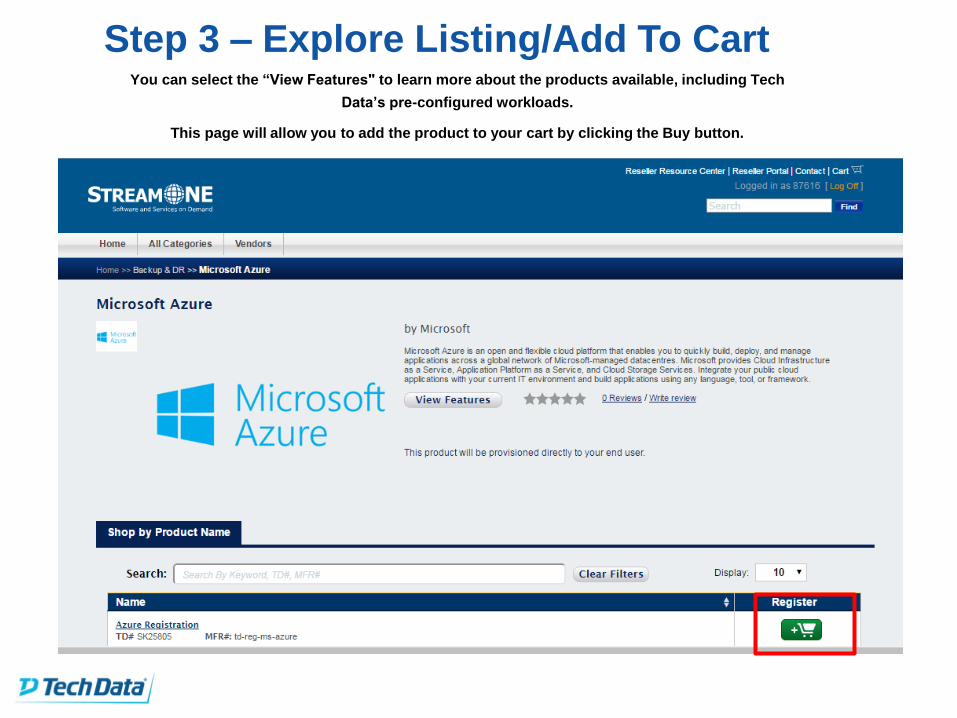
Step 3 – Explore Listing/Add To Cart
You can select the “View Features" to learn more about the products available.
This page will allow you to add the product to your cart by clicking the Buy button.

Once you click the “Buy” button, you will be prompted to either “Continue Shopping” or “View Cart
If you choose to continue shopping, repeat until all products are added, then continue to “View Cart”

Step 4 – View Shopping Cart | Create Quote
Once in the Cart, you'll be able to view your total products added.
Here you can create your quote. Click “Create Quote” button.

Step 5 – Add Quote DetailsEnter the End User Details (these will appear on the quote). Or you can choose an existing End User from your Address
Book.

Step 6 – Customize Your Quote
Enter a name for your quote.
Add your margin so the pricing generated is End User friendly.
Any additional information, Ts and Cs, etc. that you may want to include
Add any custom information on this page and click Save/Review.

Step 7 – Review QuoteReview quote/information for accuracy. At the bottom of the screen, you can take a few actions:
Create PDF – generates a PDF of the
quote so you can email to the End
User. Please note the PDF is only
available 24 hours after creation.
Add to Cart – convert your quote into
an order.
Delete Quote – removes from your
Reseller Portal.
Converting a Quote to an Order

Step 1 – Go to the Reseller PortalClick on the Reseller Portal, located in the top right corner of the StreamOne Cloud Marketplace homepage.

Step 2 – Find Saved Quotes
This is your Reseller Portal dashboard.
You can see the latest 10 quotes
generated in the bottom right of the
Reseller Portal tab.
You can click on “Saved Quotes” to view
all quotes.
#PowerTheCloud
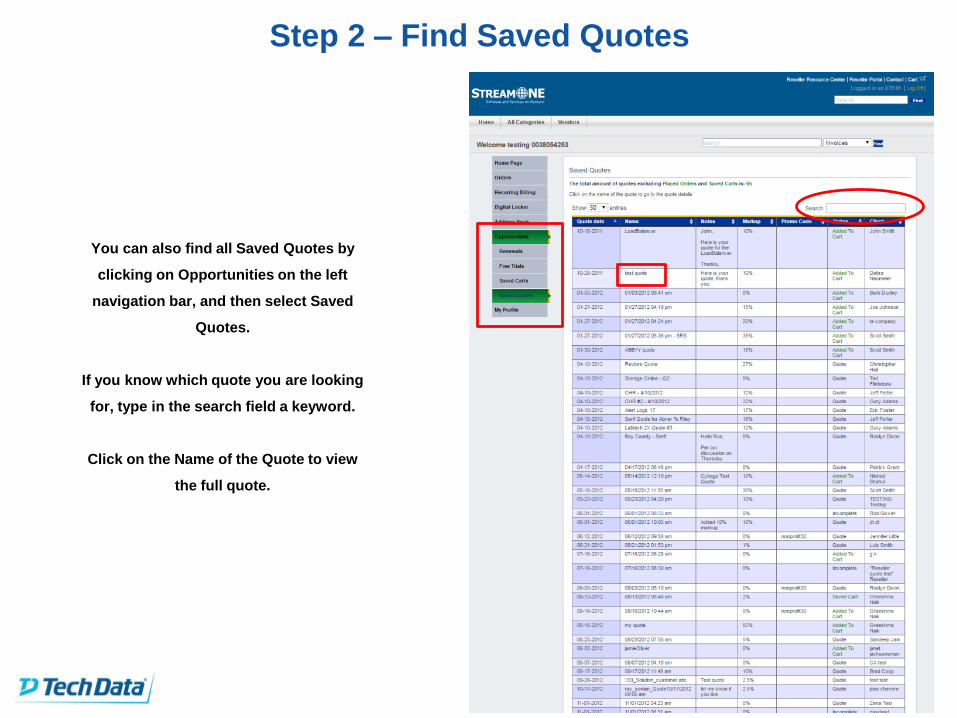
Step 2 – Find Saved Quotes
You can also find all Saved Quotes by
clicking on Opportunities on the left
navigation bar, and then select Saved
Quotes.
If you know which quote you are looking
for, type in the search field a keyword.
Click on the Name of the Quote to view
the full quote.

Step 3 – Add To Cart
To convert to an order, press the
Add To Cart button.

Step 4 – Proceed to Order
View the Shopping Cart and click Proceed To Checkout.
For a complete order walkthrough, please see sections below:
Placing Your First CSP Order
Placing Your First Autodesk Order

Placing Your First CSP Order – Office 365

Step 1 – Find the CSP Listing
StreamOne provides both easy and reliable opportunities to purchase Office CSP products.
From the home page, you can either use the vendor tab and look up all Microsoft products or
you can use the search bar to search specifically for CSP.

Step 2 – Choose the Correct ListingOnce on the listing page, you can select the type of CSP product you wish to purchase.
If you are authorized for Standard and Select Support choose either 1 or 2If you are Authorized for the no Support Elite model, choose either 3 or 4
Suites are packages of plans/services that are bundled together to best meet the needs of the
user.
Stand Alone and Add-On Products are complementary products that could be included
in a suite or sold as individual products. (ex. Skype for Business Online Plan 1)
The BitTitan listing is an example of Incentive Bundles. These non-Microsoft options are only for incentive bundles when they are available.

Step 3 – Explore Listing/Add To Cart
You can select the “View Features" to learn more about the products available.
This page will allow you to add the product to your cart by clicking the Buy button.

You can search for a particular product in the “Product Name” search field

Once you click the “Buy” button, you will be prompted to either “Continue Shopping” or “View Cart
If you choose to continue shopping, repeat until all products are added, then continue to “View Cart”

Step 4 – View Shopping CartOnce in the Cart, you'll be able to view your total products for this order.
Here you can either proceed to checkout or select on of the options below.

Step 5 – Place Order | End User InfoOnce all of the products are added to the Shopping Cart, proceed to checkout and enter the end user information.
IMPORTANT!
The email entered here is for tenant configuration
only. No email will be sent to this address. This must
be an end customer email and NOT an internal
reseller email address.

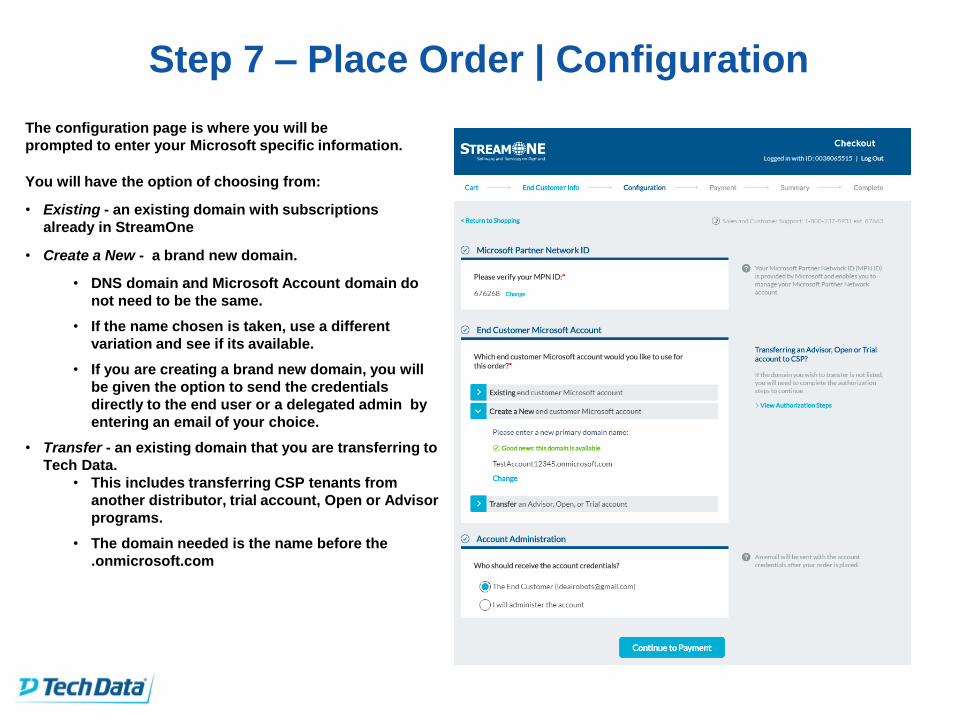
Step 6 – Place Order | Configuration
The configuration page is where you will be
prompted to enter your Microsoft specific information.
You will have the option of choosing from:
• Existing - an existing domain with subscriptions
already in StreamOne
• Create a New - a brand new domain.
• DNS domain and Microsoft Account domain do
not need to be the same.
• If the name chosen is taken, use a different
variation and see if its available.
• If you are creating a brand new domain, you will
be given the option to send the credentials
directly to the end user or a delegated admin by
entering an email of your choice.
• Transfer - an existing domain that you are transferring to
Tech Data.
• This includes transferring CSP tenants from
another distributor, trial account, Open or Advisor
programs.
• The domain needed is the name before the
.onmicrosoft.com

Transfer
Before transferring a domain you must
first go through the authorization steps.
A link to these steps is found on the
Configuration page.
Once that is complete, make sure to
check the box next to “I’ve completed
the authorization steps required to
transfer this subscription.”
IMPORTANT!
For Advisor transfers, be sure to
provide the Default Domain, which can
be found in the Domain section of the
Microsoft Portal.

TransferClicking on the link will bring you to this page which provides the needed steps for the Auhtorization process.

Transfer
Under “Additional Help” there is a link to the Multi-Channel Overview PDF that will give a step by step guide on this process

Step 7 – Place Order | PaymentNext, you must enter a PO number with an option to enter an End User PO number.
You will then select your form of payment from this page.

Step 8 – Place Order | Summary
The final screen of the checkout process
will give you an overall summary of the
order for you to review one last time.
Please Note:
The configuration tab at the top that lists
where the End User login credentials will
be sent to. If you have selected an existing
domain or an advisor transfer, this field will
be blank and no credentials will be sent
out.

CONGRATULATIONS!
You have successfully placed an order for
Office 365 CSP. Once you have your order
confirmation, end user credentials will be
sent out to the appropriate email listed on
the summary page.

Placing Your First CSP Order - Azure

Step 1 – Find the Azure Listing
The StreamOne Cloud Marketplace provides both easy and reliable opportunities to purchase Microsoft Azure.
From the home page, you can either use the vendor tab and look up all Microsoft products or
you can use the search bar to search specifically for Azure.

Step 2 – Choose the Correct ListingOnce on the listing page, select the Microsoft Azure listing by clicking “Click for Details”.
Step 3 – Explore Listing/Add To CartYou can select the “View Features" to learn more about the products available, including Tech
Data’s pre-configured workloads.
This page will allow you to add the product to your cart by clicking the Buy button.

Once you click the “Buy” button, you will be prompted to either “Continue Shopping” or “View Cart
If you choose to continue shopping, repeat until all products are added, then continue to “View Cart”

Step 4 – View Shopping CartOnce in the Cart, you'll be able to view your total products for this order.
Here you can either proceed to checkout or select on of the options below.

Step 5 – Place Order | End User InfoOnce all of the products are added to the Shopping Cart, proceed to checkout and enter the end user information.
IMPORTANT!
The email entered here is for tenant configuration
only. No email will be sent to this address. This must
be an end customer email and NOT an internal
reseller email address.

Step 6 – Azure Settings If you wish to create an empty tenant, select ‘Continue Without Bundles’. If you wish to create a bundle, select from one of our predefined
templates on the dropdown below.

Configuring Your BundleDepending on the chosen bundle, custom questions populate so you can configure the workload accordingly.
Your selection will be
reflected in the Bundle
Summary box on the left.
To change your selection
and choose an empty
tenant, click the red X in
the Bundle Summary.
Questions vary
depending on bundle
selected.

Configuring Your Bundle
Once all of the configurations are set,
you will see a summary of all selections
in the Bundle Summary column.
Here you will see estimated reseller
price per month. Remember, Azure is
billed on actual consumption and this is
only for budgetary purposes.
Click to add an additional Bundle,
Continue to Checkout, Or Save as Quote
to generate a client-friendly quote.
Step 7 – Place Order | Configuration
The configuration page is where you will be
prompted to enter your Microsoft specific information.
You will have the option of choosing from:
• Existing - an existing domain with subscriptions
already in StreamOne
• Create a New - a brand new domain.
• DNS domain and Microsoft Account domain do
not need to be the same.
• If the name chosen is taken, use a different
variation and see if its available.
• If you are creating a brand new domain, you will
be given the option to send the credentials
directly to the end user or a delegated admin by
entering an email of your choice.
• Transfer - an existing domain that you are transferring to
Tech Data.
• This includes transferring CSP tenants from
another distributor, trial account, Open or Advisor
programs.
• The domain needed is the name before the
.onmicrosoft.com

Note for Existing Customers
Customers often make changes to users in existing tenants. So we give you the option to designate two internal user
alias as the owners of a subscription. If you do not enter anything the first user listed alphabetically in the AD for your
Microsoft Service will become the owner. This user must be existing in the directory at the time you enter it.

Credentials Sharing
Before continuing to the payment page we need to select who will receive the account credentials.
If you want to receive these be sure to input an email you have access to.

Step 7 – Place Order | PaymentNext, you must enter a PO number with an option to enter an End User PO number.
You will then select your form of payment from this page.

Step 8 – Place Order | Summary
The final screen of the checkout process
will give you an overall summary of the
order for you to review one last time.
Please Note:
The configuration tab at the top that lists
where the End User login credentials will
be sent to. If you have selected an existing
domain or an advisor transfer, this field will
be blank and no credentials will be sent
out.
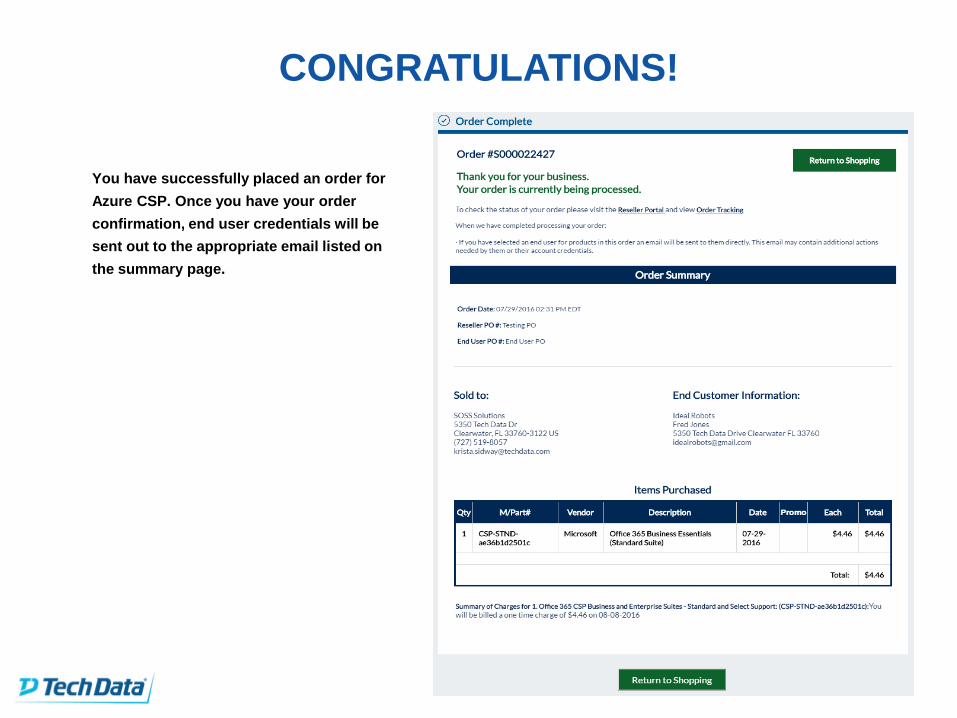
CONGRATULATIONS!
You have successfully placed an order for
Azure CSP. Once you have your order
confirmation, end user credentials will be
sent out to the appropriate email listed on
the summary page.
Placing Your First Autodesk Order

Step 1 – Find the Autodesk Listing
StreamOne provides both easy and reliable opportunities to purchase Autodesk products.
From the home page, you can either use the vendor tab and look up all Autodesk products or
you can use the search bar to search specifically for Autodesk.

Step 2 – Choose the Correct ListingOnce on the listing page, you can select the type of Autodesk product you wish to purchase.
Each result is a separate listing.
Press the “Click for Details” button
to learn more.

Step 3 – Explore Listing/Add To CartThis page will allow you to add the product to your cart by inputting the quantity and clicking the Buy button.

You can search for a particular product in the “Product Name” search field

Once you click the “Buy” button, you will be prompted to either “Continue Shopping” or “View Cart
If you choose to continue shopping, repeat until all products are added, then continue to “View Cart”

Step 4 – View Shopping CartOnce in the Cart, you'll be able to view your total products for this order.
Here you can either proceed to checkout or select on of the options below.

Step 5 – Place Order | End User InfoOnce all of the products are added to the Shopping Cart, proceed to checkout and enter the end user information.
If you are placing an order for an
existing customer in StreamOne,
select their information from the
Address Book.

Step 6 – Place Order | Configuration
The Configuration page is where you will be
prompted to enter your Autodesk specific
information.
You will have the option to create a New
Contract and name it accordingly.
If your purchase is a new license for an existing
contract, there will be a drop down menu
available to select a current Contract.
Also, verify your Customer Specific Number
(CSN) associated with your VAR contract.

Step 7 – Place Order | PaymentNext, you must enter a PO number with an option to enter an End User PO number.
You will then select your form of payment from this page.
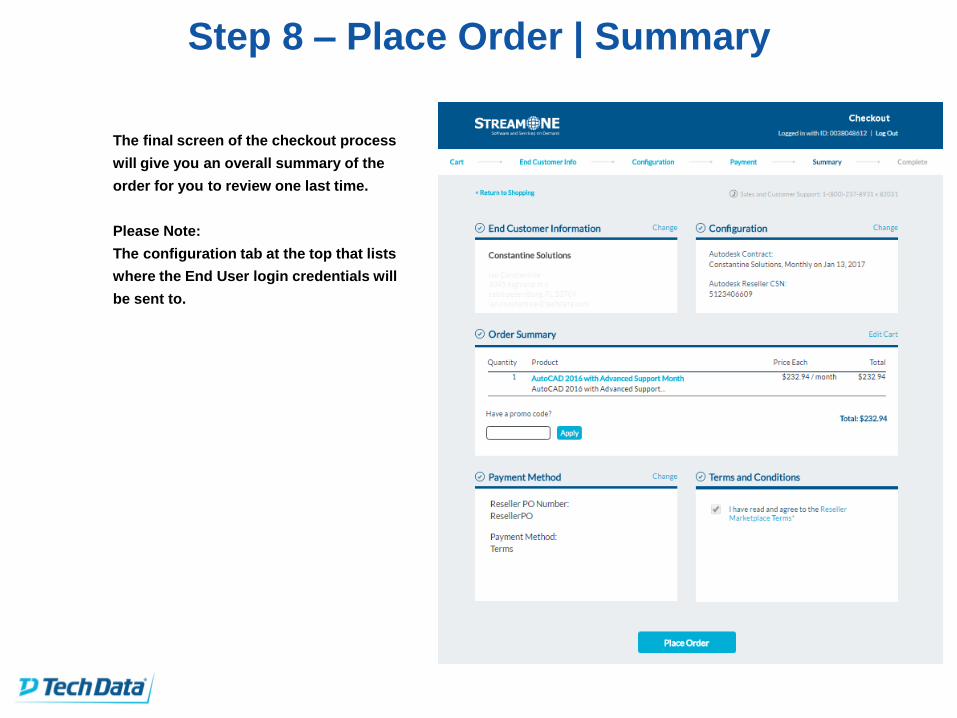
Step 8 – Place Order | Summary
The final screen of the checkout process
will give you an overall summary of the
order for you to review one last time.
Please Note:
The configuration tab at the top that lists
where the End User login credentials will
be sent to.

CONGRATULATIONS!
You have successfully placed an order for
Autodesk. Once you have your order
confirmation, end user credentials will be
sent out to the appropriate email listed on
the summary page.

Purchase Add-On Services

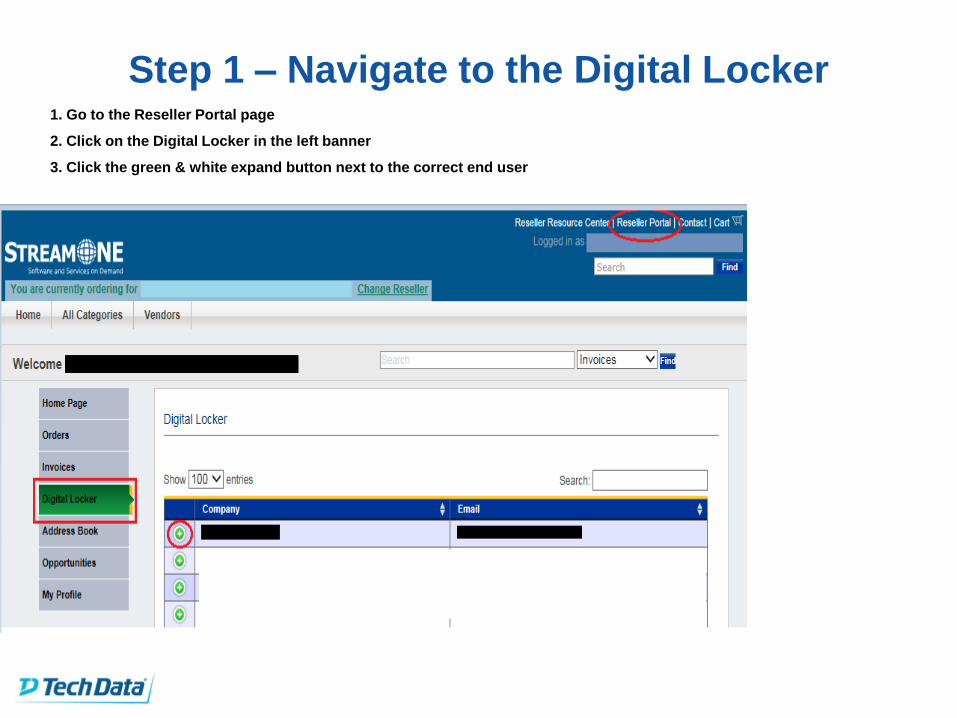
Step 1 – Navigate to the Digital Locker• Go to the Reseller Portal page
• Click on the Digital Locker in the left banner
• Click on the green and white expand button next to the correct end user
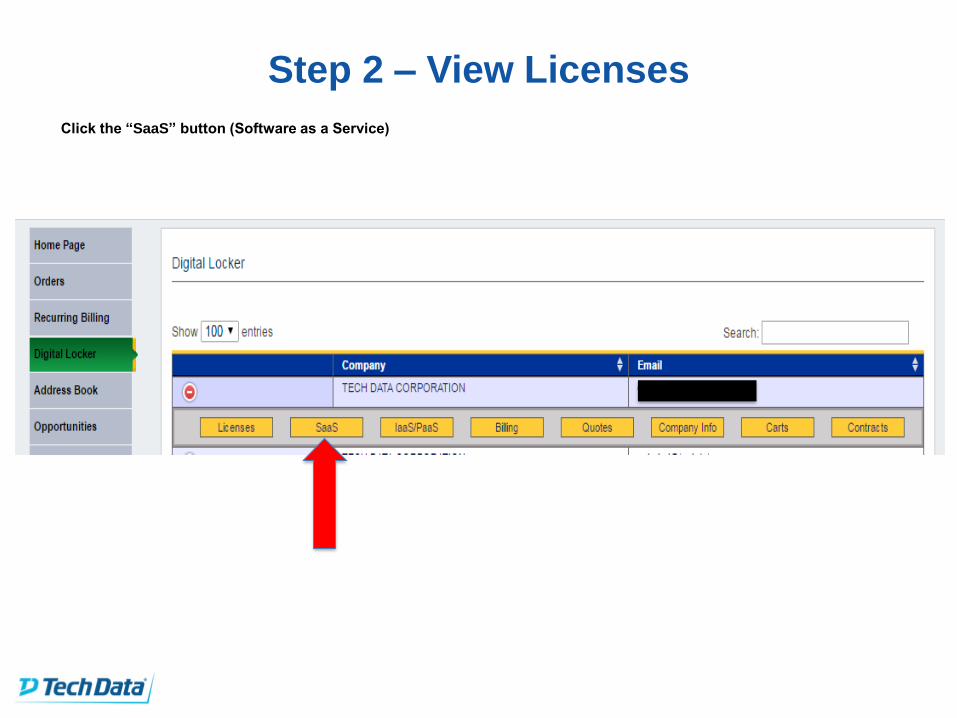
Click the “SaaS” button (Software as a Service)
Step 2 – View Licenses

To Add on Additional Services
Step 3 – Purchase Add-OnsFind the applicable add-on service and type in the quantity needed
Click purchase

Modify or Cancel a SaaS Subscription
1. Go to the Reseller Portal page
2. Click on the Digital Locker in the left banner
3. Click the green & white expand button next to the correct end user
Step 1 – Navigate to the Digital Locker

Step 2 – View Licenses
Click the “SaaS” button

Select the modify button next to the license that needs to be adjusted
Step 3 – Modify the License

Type in the TOTAL number of seats needed and click Modify
OR if canceling, click Suspend.
To Modify or Suspend seats
Step 3 – Modify the License

Cancel an IaaS Subscription

Step 1 – Navigate to the Digital LockerSelect “Digital Locker” from the left hand navigation menu.

Enter your customer’s email address or name in the search box. Next click the Green + sign next to their company
name. From here we will select “Iaas/Paas” to complete our task.
Step 2 - Find Your Customer
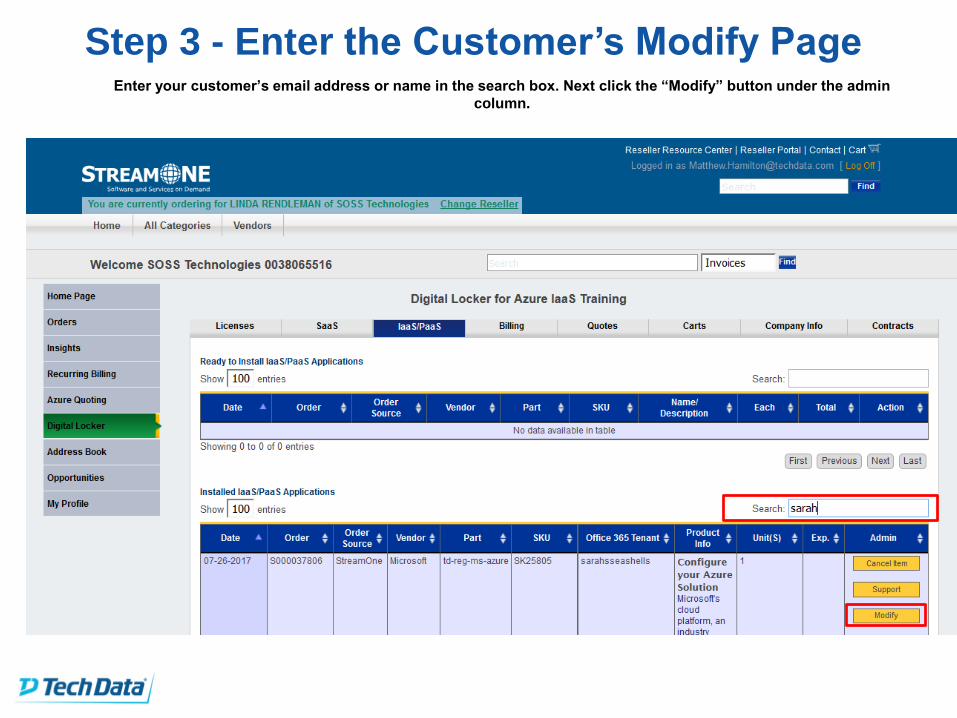
Step 3 - Enter the Customer’s Modify PageEnter your customer’s email address or name in the search box. Next click the “Modify” button under the admin
column.

Step 4 - Suspend the SubscriptionSlide the toggle to the left to suspend this subscription. You will need to enter the tenant name for suspension.

Modify or Cancel Autodesk Auto-Renew

1. Go to the Reseller Portal page
2. Click on the Digital Locker in the left banner
3. Click the green & white expand button next to the correct end user
Step 1 – Navigate to the Digital Locker

Step 2 – View Customer Tenant
Click the “Contracts” button

Step 2 – View Customer Contract
Click the “Manage” button

#PowerTheCloud
Step 3 – Modify
To adjust seat count:
Enter the number of TOTAL seats
desired and click “Modify Seats”
button
To cancel subscription:
Click “Cancel Subscription” button
Reseller Info
Here End User Info Here

Admin on Behalf of (AOBO) Delegation

1. Go to the Reseller Portal page
2. Click on the Digital Locker in the left banner
3. Click the green & white expand button next to the correct end user
Step 1 – Navigate to the Digital Locker

Enter your customer’s email address or name in the search box. Next click the
Green + sign next to their company name.
Step 2 - Find Your Customer

Step 3 - Enter the Customer’s Modify Page
Enter your customer’s email address or name in the search box. Next click the
“Modify” button under the admin column.

Step 4 - Start the Delegation Process
Click the “Delegate” button from the Subscription Settings menu.

Accept the Delegation Process
Log in using YOUR (Reseller) credentials to your company’s Partner Center.
Do not use the end customer’s tenant credentials.
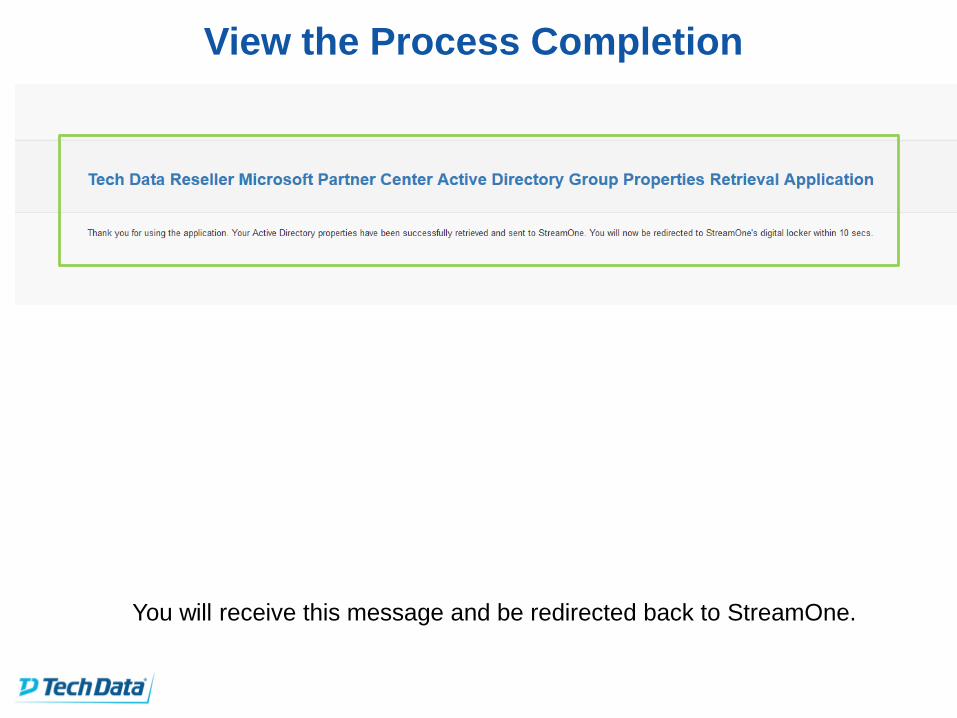
View the Process Completion
You will receive this message and be redirected back to StreamOne.

Check for Error Messages
Look for any error messages that arise. If none appear the process is
completing in the background. Please keep in mind this process typically
takes up to 30 minutes to complete.

Verify Completion
Navigate to www.partnercenter.Microsoft.com and sign in using your
company’s Partner Center credentials.

Verify Completion
Navigate to www.partnercenter.Microsoft.com and sign in using your
company’s Partner Center credentials. Next click “Microsoft Azure
Management Portal” which prompts a new tab to open.
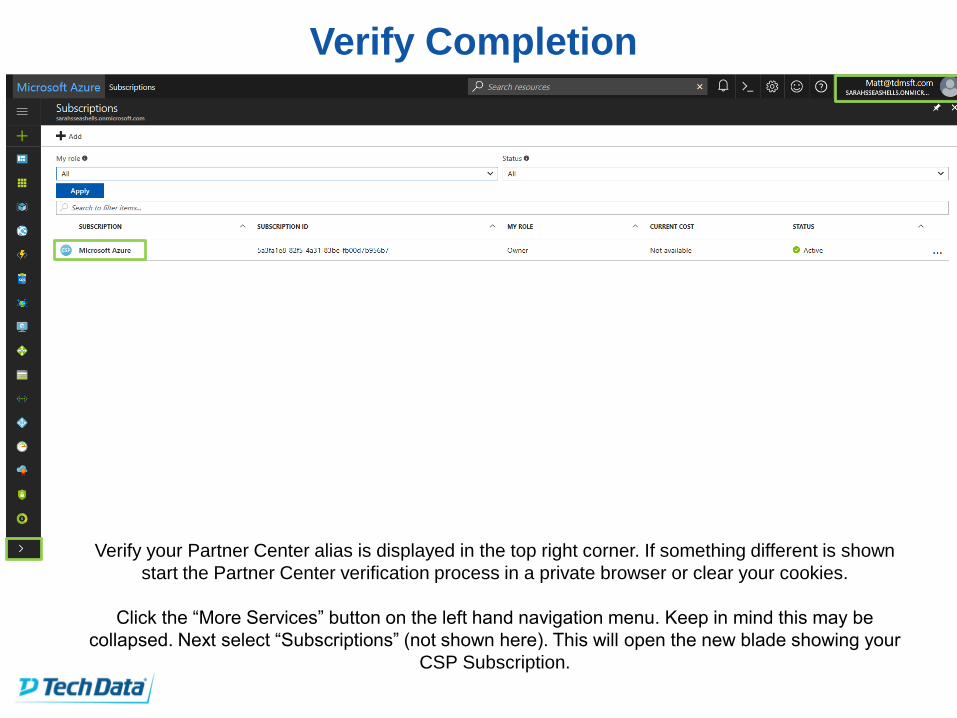
Verify Completion
Verify your Partner Center alias is displayed in the top right corner. If something different is shown
start the Partner Center verification process in a private browser or clear your cookies.
Click the “More Services” button on the left hand navigation menu. Keep in mind this may be
collapsed. Next select “Subscriptions” (not shown here). This will open the new blade showing your
CSP Subscription.

StreamOne Insights

StreamOne Insights OverviewStreamOne Insights provides you with various views to manage your Office 365 and Azure business.
From a single, interactive dashboard, see a high level overview for each line of business with the ability to drill down
into products, clients, and seats.
Now you can
search through
your customer’s
seats and
consumption at
a granular level.

Step 1 – Navigate to StreamOne Insights
From the Reseller Portal,
Click on “Insights” in the
left column.
Once inside you will see
a responsive dashboard.
Try clicking on one of the
colors and the entire
page will filter on that
item.
You can also drill down
on tables to get more
details about your
customer’s licensing.

StreamOne Insights – Office 365
Static details for
current billing cycle
Select criteria to
customize your view
Filter by individual
products and
customers.
Get an overall view
of your customer’s
purchases

StreamOne Insights – Azure
Static details for
current billing cycle
Select criteria to
customize your view
View your
customer’s total
spend for your
chosen filters
Drill down to get
more granular
details on tables

Questions?
1-800-237-8931
www.TechDataCloud.com
Microsoft Cloud/CSP
Ext. 82031
Autodesk
Ext. 82033