orbis2: cataloging - yale university library€¦ · web viewbased on the nelinet training manual...
TRANSCRIPT
Orbis Cataloging Using Voyager
Based on the NELINET training manual Orbis2: Cataloging by Diane Baden & Margaret Lourie [Nelinet Inc. 153 Cordaville Road, Southborough, MA 01772-
1833 (508) 460-7700 or (800) NELINET http://www.nelinet.net
Rev. by the Catalog Policy & Documentation Committee for the Cataloging Coordinating Council
Version 2.1 <June 7 (12:00 PM> 2007/REV
Table of Contents
Goal..................................................................................................................................................1Objectives........................................................................................................................................1Overview..........................................................................................................................................2Logging on to Voyager....................................................................................................................2
Cataloging Screen Display..........................................................................................................3Defaults and Preferences.............................................................................................................4Alternate Key Sequences.............................................................................................................6Help..............................................................................................................................................6Structure of the Database.............................................................................................................7Printing........................................................................................................................................8Closing Windows.........................................................................................................................8Closing Modules..........................................................................................................................8
Searching Orbis...............................................................................................................................9MARC Bibliographic Record........................................................................................................16
Structure of the MARC Record.................................................................................................18Basic Editing..............................................................................................................................21Saving and Validation................................................................................................................24
MARC Holdings Record (MFHD)................................................................................................27Retrieving the MFHD................................................................................................................27MFHD Record...........................................................................................................................27Structure of the MFHD Record.................................................................................................28Basic MFHD Editing.................................................................................................................29Update Record Alert..................................................................................................................29
Item Records..................................................................................................................................31Retrieving Item Records............................................................................................................31Structure of the Item Record......................................................................................................32
Importing Records.........................................................................................................................36Advanced Techniques....................................................................................................................36
Editing Bibliographic Records..................................................................................................36Diacritics/Special Characters.....................................................................................................37Saving and Validation................................................................................................................40
Searching: Using the Keyword, Search Limits, Builder, Keyword in Staff and History Tabs.....40Acquisitions in Cataloging (Acq in the Cat)..............................................................................47Editing MFHDs.........................................................................................................................49Editing Item Records.................................................................................................................50Creating New Bibliographic Records........................................................................................52
Appendix........................................................................................................................................54Function Keys Used in Editing..................................................................................................54Default Macro Express Operations Mapped to Function Keys.................................................54Keyboard Equivalents in Voyager Cataloging Module.............................................................56

Conventions
Characters The character 1 represents the digit one, and the character l represents the lowercase letter el. These characters are distinct on the keyboard and screen. Enter 1 when a digit is required and l when a letter is required; do not use these keys interchangeably.
The digit 0 (zero) and the uppercase letter O are also distinct characters. Enter 0 when a digit is required; enter O when an uppercase letter is required. Do not use these keys interchangeably.
Keys Keys or buttons that you press are enclosed in angle brackets < >.
When you see two keys together, for example, <Alt-R>, press and hold down the first key then tap the second key. Do not type the angle brackets. You do not need to use capital letters; they are used in this document for ease of reading and interpretation.
Data or commands Data or commands that you must type exactly as shown are in boldface type.
Data, the exact form of which you determine, is shown within boldface square brackets [ ]. Do not type the brackets.
Steps Multiple-step procedures are numbered.
Orbis: Cataloging
Goal
To introduce the functions of the Voyager Cataloging module as implemented in Orbis.
Objectives
By the end of this survey you will know how to:
Log in to the Cataloging module Navigate and interpret the windows, menus, and toolbars Search the database using basic search types Understand the relationships among Bibliographic, Authority, Holdings, and Item
records Select and interpret Bibliographic, Holdings, and Item records Edit Bibliographic, Holdings, and Item records Import Bibliographic records from local files and remote databases and overlay
brief records Suppress records from display Perform basic authority validation and save records to Orbis Create new Bibliographic, Holdings, and Item records Learn the basic short cuts for searching and editing using Macro Express
The survey will concentrate on the most frequently used functions. The emphasis will be on learning to use Orbis to perform routine cataloging activities.
Some reference documents (some of these require revision):
Cataloging at Yale (with links to the SML Catalog Dept. page, Tools & Resources page, and other YUL Cataloging websites)http://www.library.yale.edu/cataloging
http://www.library.yale.edu/cataloging/Orbis2Manual/Orbis2TOC.htm#voyager
Using Voyager with Macro Express: http://www.library.yale.edu/cataloging/macroexpress/macxyalehome.html
1

Orbis: Cataloging
Overview Voyager is an integrated system with modules sharing data in real time. Changes made in Cataloging, Acquisitions, or Circulation are reflected automatically in the public access catalog. Staff may be logged on to all three modules simultaneously as well as the Web-based OPAC.
The Cataloging module allows staff to create and maintain Bibliographic, Authority, Holdings, and Item records. In practice Authority Records are not created in Orbis. Voyager uses the MARC21 format for Bibliographic, Authority, and Holdings records. Item records are specific to the Voyager system.
Voyager uses familiar Windows functionality, including icons, menus, and dialog boxes. You can minimize or maximize windows; when multiple windows are open you can tile them to place them side by side, or cascade them to overlap them. Text can be cut or copied and pasted from one window to another. Right clicking the mouse brings up context specific menu choices, and alternate or shortcut key sequences are available for most functions, supplemented by macros created locally.
Logging on to Voyager
Your workstation has the software necessary to access the Voyager modules. You should be training in the Torbis test database rather than the "live" Orbis database. To open a cataloging session in Torbis, click on the VoyagerINIfileChanger icon & then click on Torbis - Train (Tech Services). Click on Start, Yale Library Workstation, Voyager and you will see the modules listed. For training and practice use the same Operator ID and Password you use in the "live" database.
For training purposes, log on to each module in the following order: Cataloging <for production work, cataloging staff will ordinarily start by clicking on the
icon for Cataloging with ExportQ>Circulation (choose SML TECH SVS as your location) Acquisitions (choose any unit from the list)
As you log on, minimize each module before opening the next one.
To return to production, close the Cataloging module (see below), re-open the VoyagerINIfileChanger, and click on Orbis Production (Tech Services) [NOT Orbis Production ]. Then log back on to Orbis.
TIP: to see what database is running, do a title search Where am I. Look for a title (not necessarily the first) beginning Where am I? I am in **PROD ORBIS** <or **TEST ORBIS**>.
In addition, open the Web-based OPAC at http://clark.library.yale.edu/ or http://traindb.library.yale.edu and minimize. To find out which version of the OPAC to use, check the message on the Where am I? search in the Cataloging module. Use the Web-based OPAC to view the results of work done in Torbis.
2
Orbis: Cataloging
Cataloging Screen Display
Title bar Shows the name of the module and, when you have a record open, the title and record ID of the open record. When the Title bar is highlighted it is the “active” screen.
Menu bar Clicking on menu choices displays a drop-down list of selections. Options that are grayed out are not applicable. Available options change depending on activities being performed
in the active window.
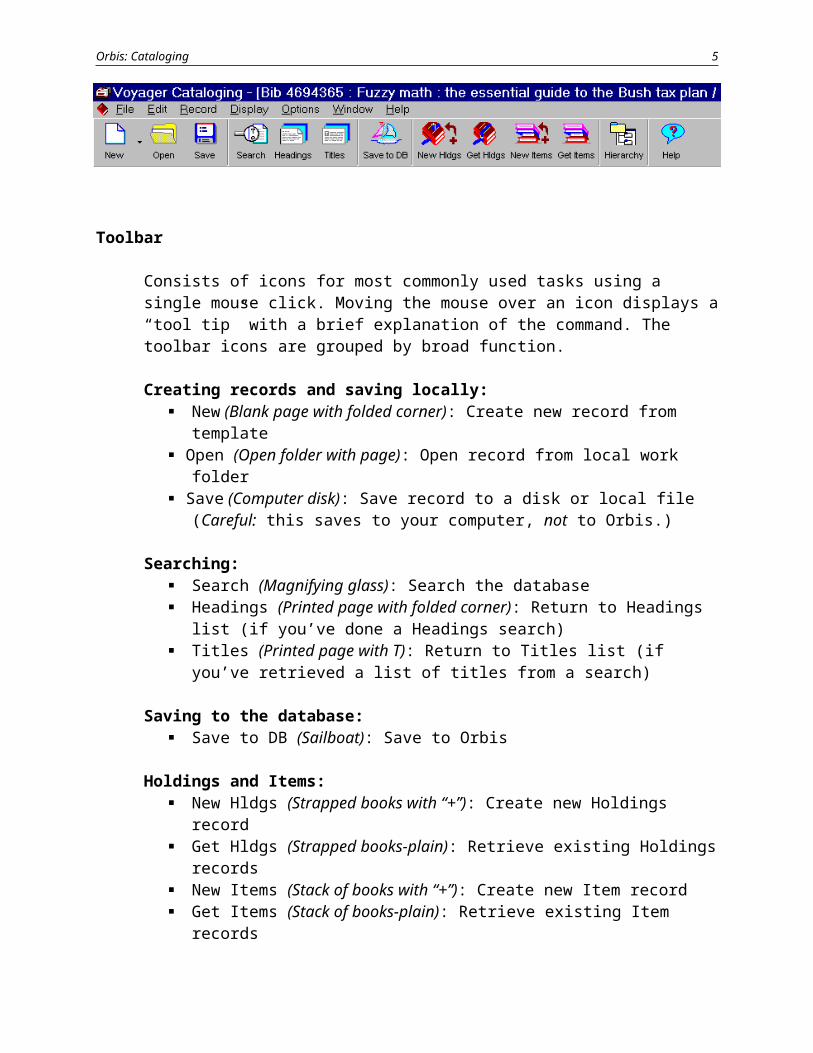
Toolbar
Consists of icons for most commonly used tasks using a single mouse click. Moving the mouse over an icon displays a “tool tip” with a brief explanation of the command. The toolbar icons are grouped by broad function.
Creating records and saving locally: New (Blank page with folded corner): Create new record from template Open (Open folder with page): Open record from local work folder Save (Computer disk): Save record to a disk or local file (Careful: this saves to
your computer, not to Orbis.)
Searching: Search (Magnifying glass): Search the database Headings (Printed page with folded corner): Return to Headings list (if you’ve
done a Headings search) Titles (Printed page with T): Return to Titles list (if you’ve retrieved a list of titles
from a search)
Saving to the database: Save to DB (Sailboat): Save to Orbis
Holdings and Items: New Hldgs (Strapped books with “+”): Create new Holdings record Get Hldgs (Strapped books-plain): Retrieve existing Holdings records New Items (Stack of books with “+”): Create new Item record Get Items (Stack of books-plain): Retrieve existing Item records Hierarchy (Linked catalog cards): Show associated records
3

Orbis: Cataloging
Help: Help (?): Help
Defaults and Preferences
YUL standard defaults and preferences have been set up for all staff. We will look at them briefly to understand what they control but do not change them without consulting your unit's expert user, except where noted in this document.
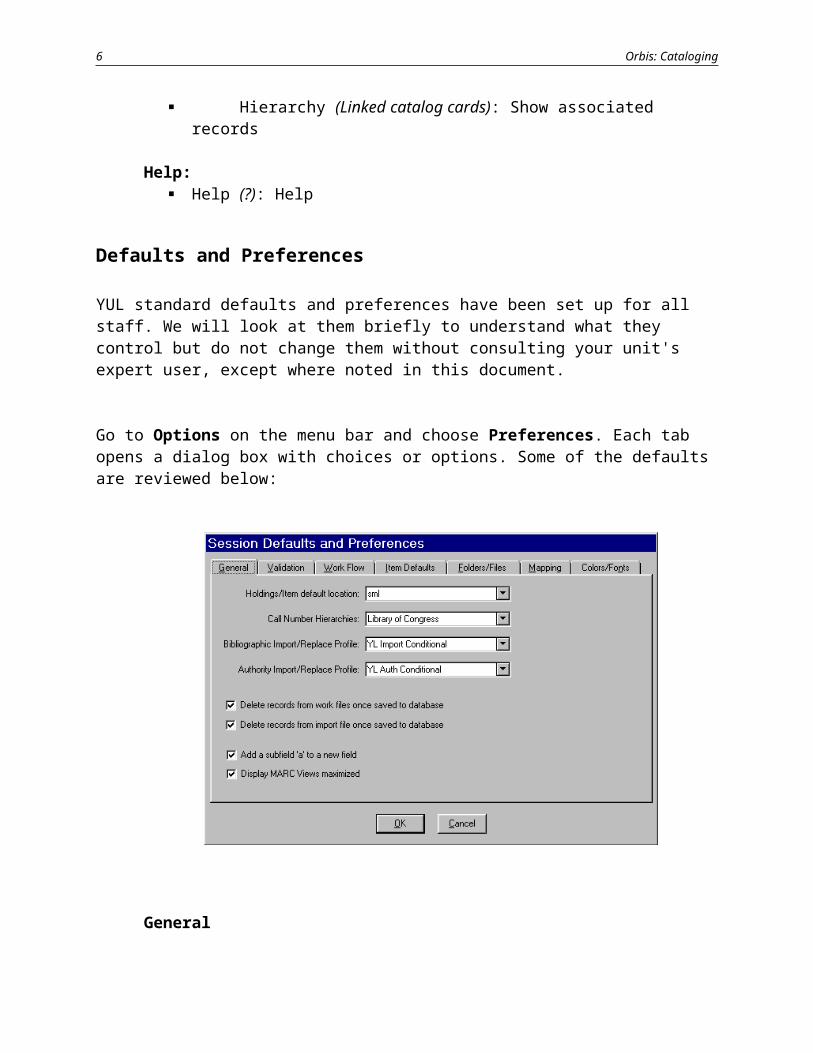
Go to Options on the menu bar and choose Preferences. Each tab opens a dialog box with choices or options. Some of the defaults are reviewed below:
General
Holdings/Item Default Location will insert a default Location code in the Holdings and Item record. For training, sml is the default; for your work, choose your most frequently used Location
Call number hierarchy selects the appropriate call number from the Bibliographic record and inserts it into the Holdings record (LC is the default)
Bibliographic Import/Replace Profile determines how the system handles imported records that are identified as duplicates with existing records (YL Import Conditional is the default)
4
Orbis: Cataloging
Validation Determines the types of automatic MARC and Authority validation performed
when you save records to the database. For training, name validation will usually be the default. Some units may have the Authority validation feature turned off.
Workflow Retain last search keeps the text of your previous search in the search box Automatic truncation for non-keyword searches will truncate your searches
without using a truncation symbol
Item Defaults Identifies a default Item Type for new Item records (default is circ)
Folders/Files Identifies default template used when creating original records Identifies location of default Import files
Mapping MARC21 UTF-8 should be the default setting for the Local Import field. In the
Voyager 5.0 environment, this setting is used whether the record is imported from LCDB, OCLC, or RLIN.
Colors/Fonts Different colors have been selected for the various types of records to make it
easier to distinguish among Bibliographic, Authority, Holdings, and Item records, and Conversion Records (records that failed the Unicode conversion). The color setting for Conversion Records should never match the color setting for any of the other records.
Font sizes are set here. The Font itself MUST be set to Arial Unicode MS. (YUL default font size is 12) TIP: Checking Bold under FONT may make the display easier to read.
5
Orbis: Cataloging
Alternate Key Sequences
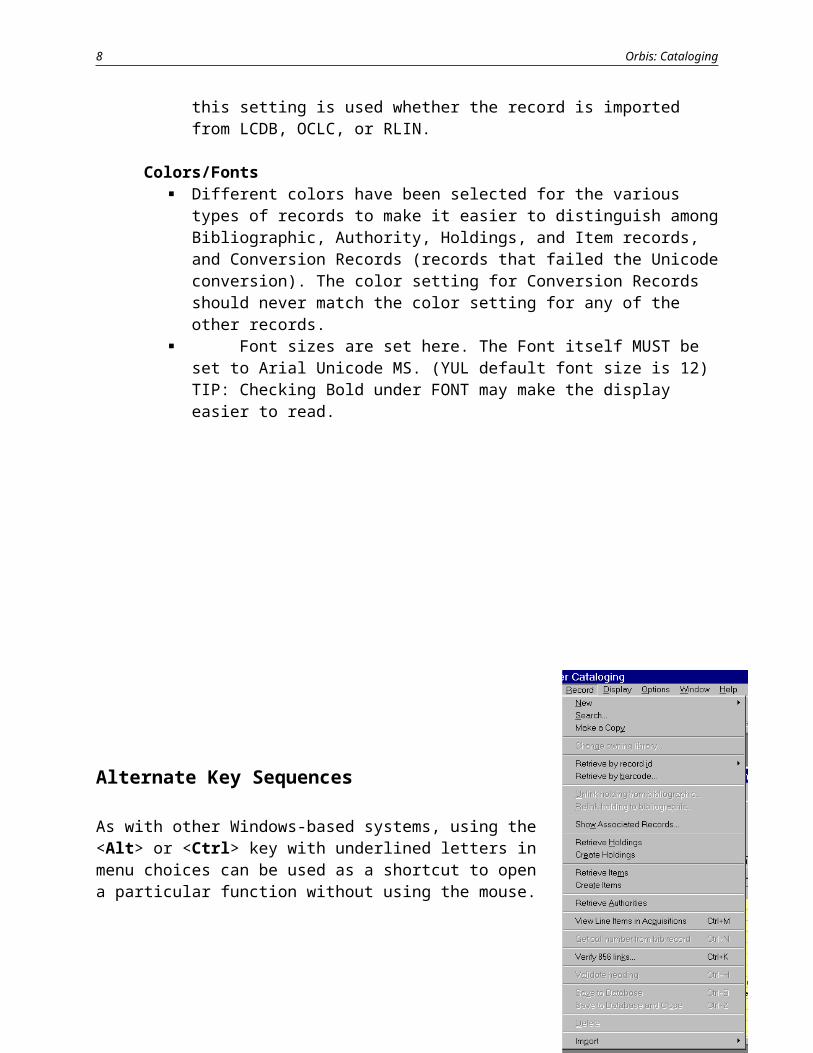
As with other Windows-based systems, using the <Alt> or <Ctrl> key with underlined letters in menu choices can be used as a shortcut to open a particular function without using the mouse.
For example, <Alt-R> opens the Record menu. You can string a sequence of keys, such as <Alt-R+I+B>, which is the equivalent of clicking on Record>Retrieve by record ID>Bibliographic, to do a Bibliographic record ID search.
You only need to hold down <Alt> or <Ctrl> with the first key in the sequence. Do not type the pluses. You do not need to use capital letters; they are used in this document for ease of reading. There is a chart of the alternate key sequences in the Appendix.
Help
Clicking on the Help icon and then on Index takes you to a Help Topics dialog box. Select your topic and a help screen displays. You can also select Contents to view the topics available in Help.
The <F1> function brings up context-specific help from within the cataloging module.
6
Orbis: Cataloging
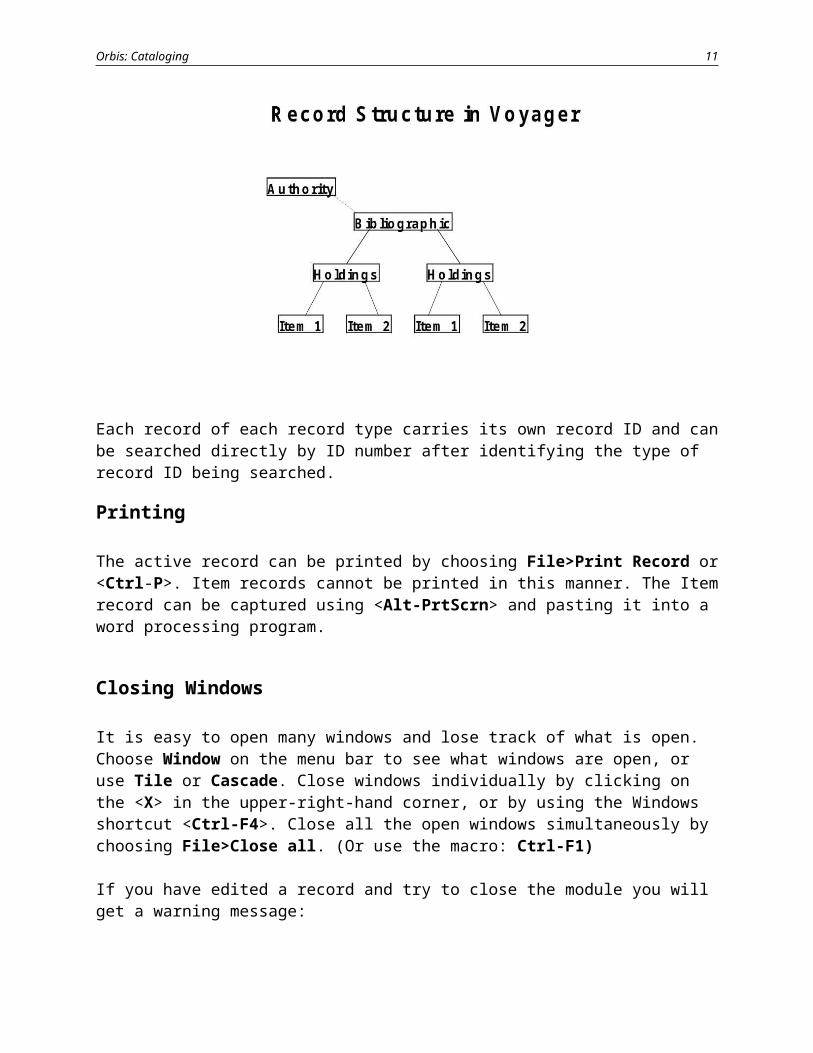
Structure of the Database
There are four types of records in the bibliographic database:
The Bibliographic record provides cataloging description and access
The Holdings record, also called a MFHD (MARC Format for Holdings Data) and pronounced “muff-head” includes location, call number, volume holdings, and copy-specific notes for staff and for the public. Each copy of a work has its own Holdings record, and multiple MFHDs can be attached to a single Bibliographic record
The Item record describes the physical piece, including Location, Barcode number, and Item Type. Item Type is used by the Circulation module. Multiple Item records representing multiple volumes can be attached to a single MFHD. A single Item record can also be attached to multiple Bibliographic records to accommodate “bound with” volumes
The Authority record provides information about name, uniform title, series, and subject
headings
Item records are attached to Holdings records; Holdings records are attached to Bibliographic records. Authority records are not physically connected to Bibliographic records, but are associated with the headings in Bibliographic records.
Each record of each record type carries its own record ID and can be searched directly by ID number after identifying the type of record ID being searched.
7
Orbis: Cataloging
Printing
The active record can be printed by choosing File>Print Record or <Ctrl-P>. Item records cannot be printed in this manner. The Item record can be captured using <Alt-PrtScrn> and pasting it into a word processing program.
Closing Windows
It is easy to open many windows and lose track of what is open. Choose Window on the menu bar to see what windows are open, or use Tile or Cascade. Close windows individually by clicking on the <X> in the upper-right-hand corner, or by using the Windows shortcut <Ctrl-F4>. Close all the open windows simultaneously by choosing File>Close all. (Or use the macro: Ctrl-F1)
If you have edited a record and try to close the module you will get a warning message:
“This record has been modified. Close it anyway?”
Click <Yes> if you want to close without saving your edits. Click <No> if you want to return to the record and Save before closing it.
Closing Modules
Each open module needs to be closed individually. Just click on the <X> in the upper-right-hand corner to close the module, or right-click on any minimized modules and choose Close. Careful: it is easy to accidentally close the module when you only want to close a screen.
If you have edited a record and try to close the module you will get the same warning message as above:
“This record has been modified. Close it anyway?”
Click <Yes> if you want to exit Cataloging without saving your edits. Click <No> if you want to return to the record and Save before exiting.
8
Orbis: Cataloging
Searching Orbis
“Staff-side” searching in Voyager is quite powerful with many options.
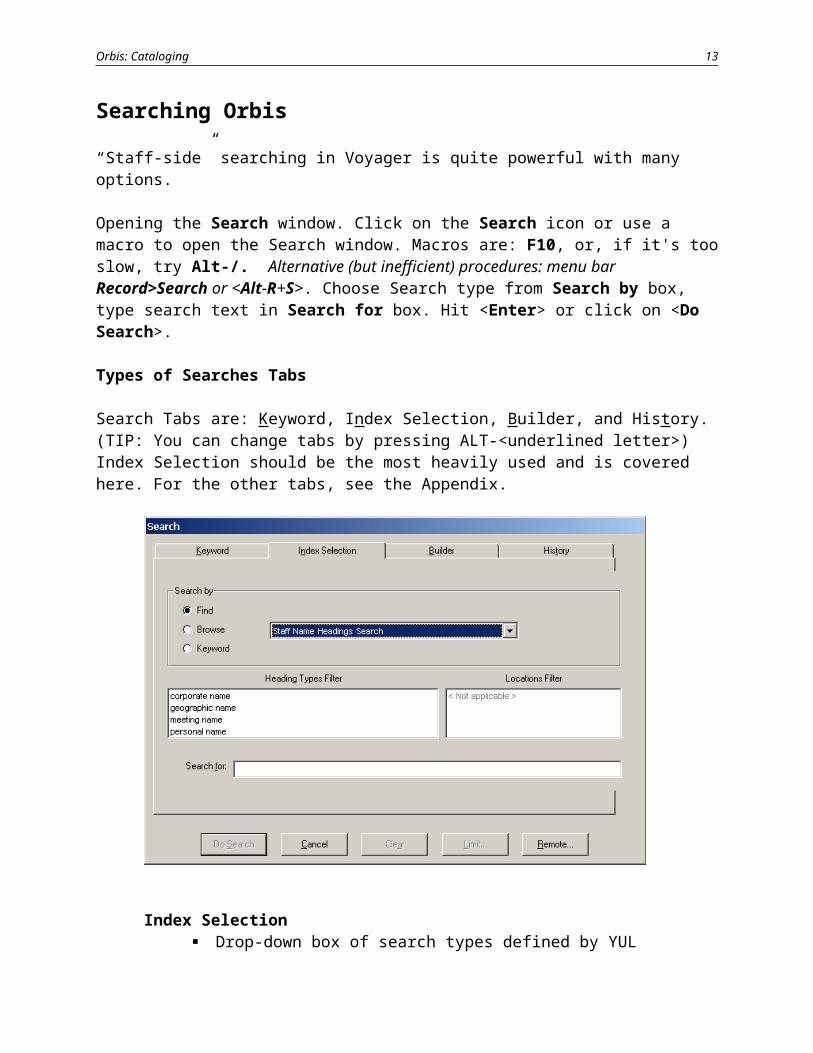
Opening the Search window. Click on the Search icon or use a macro to open the Search window. Macros are: F10, or, if it's too slow, try Alt-/. Alternative (but inefficient) procedures: menu bar Record>Search or <Alt-R+S>. Choose Search type from Search by box, type search text in Search for box. Hit <Enter> or click on <Do Search>.
Types of Searches Tabs
Search Tabs are: Keyword, Index Selection, Builder, and History. (TIP: You can change tabs by pressing ALT-<underlined letter>) Index Selection should be the most heavily used and is covered here. For the other tabs, see the Appendix.
Index Selection Drop-down box of search types defined by YUL Type first letter of desired search type (repeatedly if needed) or scroll through
list using the scroll bar or the up and down arrows. TIP: if you enable index selection macros, you can use a key sequence to retrieve heavily used indexes without scrolling, repeated typing of 1st letter, or up/down arrows. Procedures for enabling an index selection macro are on the Web at:http://www.library.yale.edu/cataloging/macroexpress/macxyaletip1.html
Order of search types adjusts by frequency of use, then alphabetically
9
Orbis: Cataloging
Automatic right truncation (from Preferences) Omit initial articles in title searches Use upper or lower case (not case-sensitive) Omit subfield codes, e.g. ‡b Include or omit punctuation and diacritics; if omitted, don't leave a space Some special characters (e.g. +, &, /, #) must be retained; other characters
(e.g. $, %) may or must be left out (per cent character will cause a title search to fail)
<Find> or <Browse> (<Find> is the default); <Browse> works only on Headings and Call number searches
<Keyword (in Staff)> button allows keyword searching of headings and references in authority records
You can search on original scripts if copied and pasted from the Orbis record or any Unicode bibliographic source such as Connexion, but the sorting arrangement and retrieval for original scripts is imperfect
Searching by Voyager Record IDs and Barcode
Record IDs To open the Retrieve Record ID window, use the appropriate macros: Shift-
Keypad * (Retrieve by bib id); Ctrl-Keypad * (Retrieve MFHD id); Alt-Keypad * (Retrieve Authority ID). Alternative: (using menus) Record>Retrieve by record ID>[choose type of record] or <Alt-R+I+B>, etc.: 3330359; Hit <Enter> or click on <Retrieve>
Copy a bib, authority, or item record ID using the macro Ctrl-F2. (Does not work with LCDB record numbers) Bib ID can also be copied from the ExportQ window or from the 001 field in the MARC Staff view in the OPAC.
Barcode Use the macro assigned to the F7 function key. Alternative:
Record>Retrieve by barcode or <Alt-R+B> Can wand or type in a barcode: 39002042219171
Basic Non-Keyword Searches
Numerico ISBN (020a): 0809015498o LCCN (010a): 73020419
Omit hyphen; must include zeros; if there is a prefix, include the prefix followed by a space: sn 98032913
o ISSN (022a): 0022-3344 Include hyphen or substitute space
o Publisher number (028a): b. & h. 8728; 14069 Include period or substitute space Must include ampersand
10
Orbis: Cataloging
Control numbers (035). See Appendixo System number (035a): CTYV85-A1526 – RLIN number; ocm35306059 (OCLC
number) Can search with or without prefix (CStRLIN or OcoLC) Can search OCLC numbers with or without “ocm” Must include hyphen in RLIN search
o Original system number (0359): FGH3857YL – Orbis1 (NOTIS) key Can omit YL at end (search truncates automatically from Preferences)
o Auth System number (035a) – Orbis1 (NOTIS) authority record key
Titles o Known title (Title). Omit initial articles
Include all other words (right truncated) Include hyphen or substitute space: anglo-american cataloguing rules Include apostrophe or omit with no space: Dad's army Include most other symbols (&, +, /, #) : 3 + 7; S/Z; Me & you & us;
America's #1 business guide (cf. searching without #); [email protected]. BUT: 99% inspiration (cf. searching without %)
Most internal punctuation and diacritics may be included (but no subfield delimiters) when copying and pasting from a record into a search: Tinh so toi ac Nich-xơn
For searching problems when there is an initial article followed by a word with a diacritic on the first letter (e.g. Los últimos …), refer to:http://www.library.yale.edu/cataloging/Orbis2Manual/unicodechecklist.htm#nonfiling
o Journal title: american libraries. Searches 245, 130, 78x; does not search 730 or 630.
Authorities/Headings Searches
Search keys preceded with word “Staff” as in: Staff Name Headings Search, Staff Title Headings Search retrieve Authority records (and cross-references) as well as Bibliographic records
Searches authority-controlled fields (1xx, 440, 6xx, 7xx, 8xx); don't use for searching serial titles in 245 (use Title or Journal Title).
(Non-Staff) Names, Title, Subjects searches only retrieve Bibliographic records; non-Staff searches do not retrieve cross-references
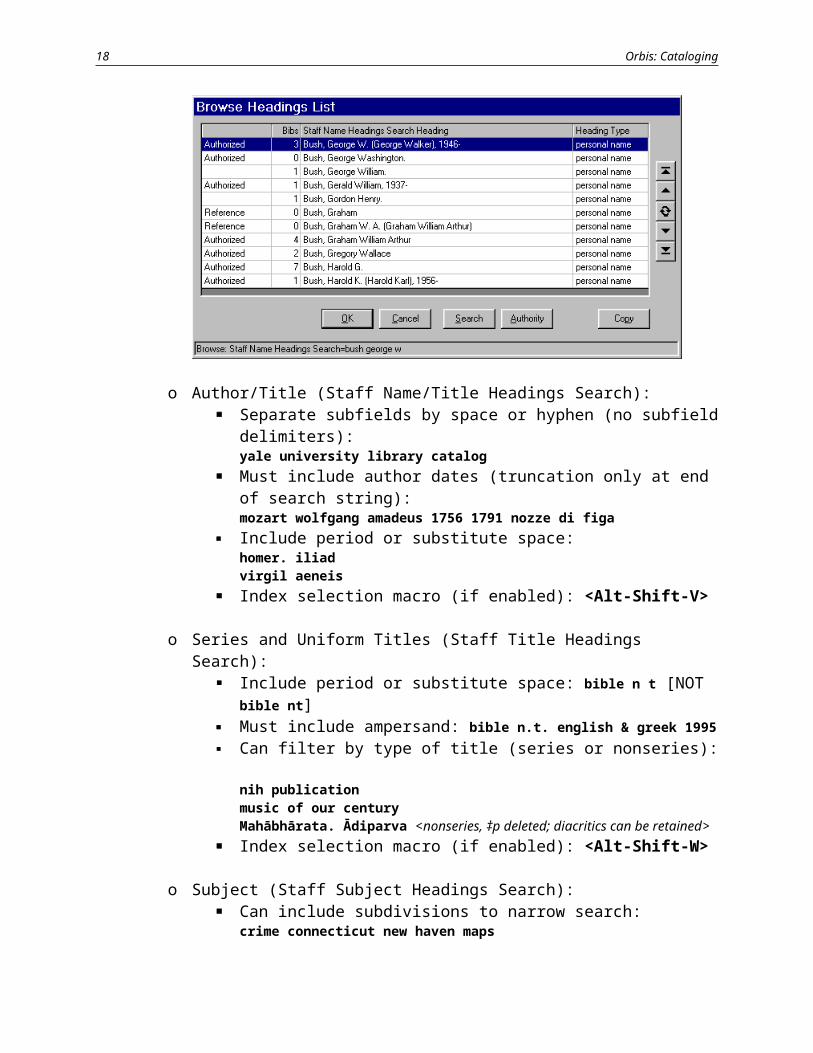
Filters available to narrow search type (type of author, type of subject heading) <Browse> places you in the Browse Headings List; Scroll backward or forward through
index. <Browse> is not available for all Staff searches (Careful: the top and bottom icons take you to the beginning and end of the index)
See list of retrieved Headings with number of associated Bibliographic records Highlight Heading and click <OK> to retrieve Bibliographic records Can <Copy> heading from the Browse Headings List and paste it into a Bibliographic
record. NOTE: Currently disabled in Voyager 5.0.
11

Orbis: Cataloging
o Author (Staff Name Headings Search): For personal names, include date to narrow search or omit (right
truncated); do not include subfield delimiters: stein gertrude 1874 1946; smith robert 18
Omit or include comma Include hyphen or substitute space: clutton brock juliet; louis-
dreyfus, julia Include apostrophe or omit with no space: o'reilly bill; oconnor edwin Include parentheses or omit with no space:
Philadelphia (Pa.); salt lake city utah; lawrence d h david herbert
Can filter by type of name (personal, corporate, geographic): united states dept of commerce
Index selection macro (if enabled): <Alt-Shift-Y>
o Author/Title (Staff Name/Title Headings Search): Separate subfields by space or hyphen (no subfield delimiters):
yale university library catalog Must include author dates (truncation only at end of search string):
mozart wolfgang amadeus 1756 1791 nozze di figa Include period or substitute space:
homer. iliad virgil aeneis
Index selection macro (if enabled): <Alt-Shift-V>
o Series and Uniform Titles (Staff Title Headings Search): Include period or substitute space: bible n t [NOT bible nt] Must include ampersand: bible n.t. english & greek 1995 Can filter by type of title (series or nonseries):
nih publicationmusic of our century
12
Orbis: Cataloging
Mahabharata. Adiparva <nonseries, ‡p deleted; diacritics can be retained>
Index selection macro (if enabled): <Alt-Shift-W>
o Subject (Staff Subject Headings Search): Can include subdivisions to narrow search:
crime connecticut new haven maps Separate subdivisions by space or hyphen (no subfield delimiters):
research and development contracts government united states Can filter by type of subject heading system (LCSH, MeSH, Art &
Architecture Thesaurus): tumors [LCSH]; neoplasms [MeSH]; volvelles [AAT]
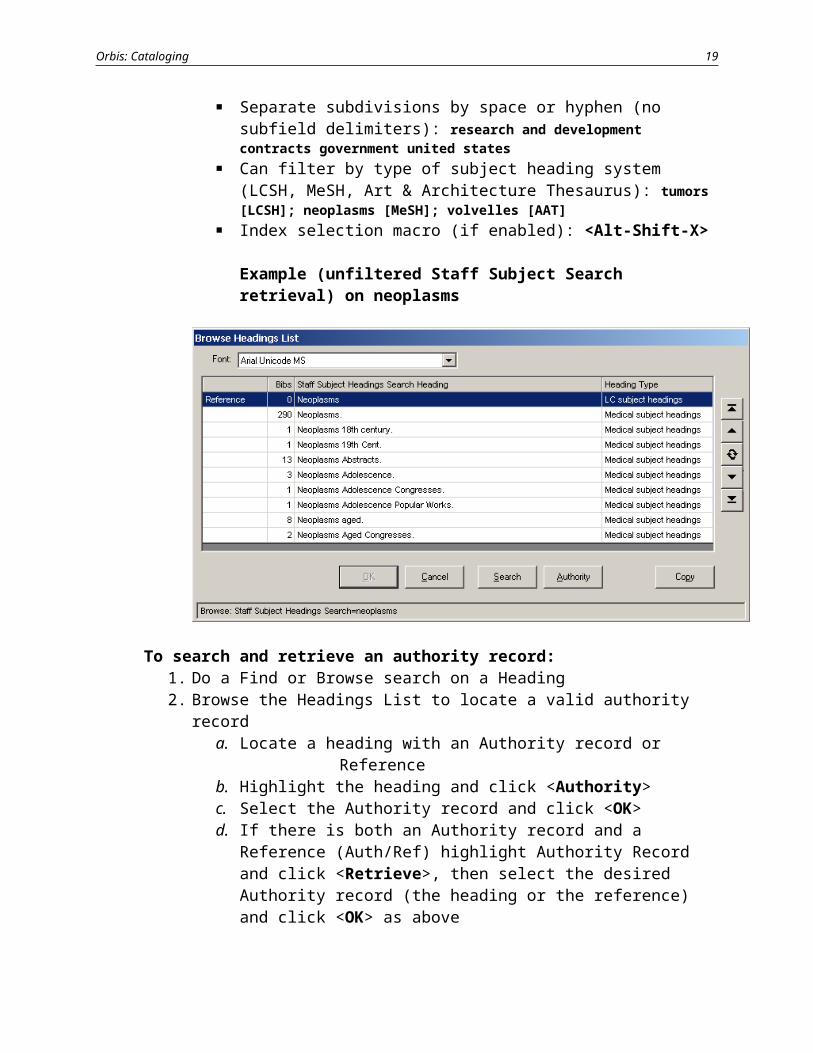
Index selection macro (if enabled): <Alt-Shift-X>
Example (unfiltered Staff Subject Search retrieval) on neoplasms
To search and retrieve an authority record:1. Do a Find or Browse search on a Heading2. Browse the Headings List to locate a valid authority record
a. Locate a heading with an Authority record or Referenceb. Highlight the heading and click <Authority>c. Select the Authority record and click <OK>d. If there is both an Authority record and a Reference (Auth/Ref) highlight
Authority Record and click <Retrieve>, then select the desired Authority record (the heading or the reference) and click <OK> as above
e. Can <Copy> and paste the heading from the Browse Headings List into a Bibliographic record if desired (watch for final punctuation). Disabled on Voyager 5.0 (a bug).
13
Orbis: Cataloging
Keyword in Staff see Advanced Techniques. Searching: Using the Keyword, Builder, and History Tabs (p. 40)
To retrieve all authority records associated with a bibliographic record see Authority Verification section below.
Call Number Searches Most staff will prefer the Web version of Orbis for call number searching: the Web version displays more records & has a "refresh" feature that redisplays the call number sequence after a new number has been saved.
Search key is called Call Number Searches on the call number in the Holdings record (Field 852, subfields h and i) Can do a Find or Browse search Can filter by classification scheme (LC, SuDocs; use Other for Old Yale, not Old Yale) Can filter by Location (only for Browse searches) Call Number: ps3231 w55
o Searches LC Classification numberso Can truncate after first two alphabetic characters and after punctuation, not in the
middle of first numeric segment SUDOC Classification number: td 4.83
o Leave period ino Search with or without spaces after alphabetic characterso Search with or without colon at end
14
Orbis: Cataloging
Limit (see details in Advanced Searching section)
Not available on Headings searches Not retained in search History Can check box to retain Limits between searches
Headings List
Clicking on the Headings icon returns to Headings List screen resulting from most recent Headings search
Titles Index
Clicking on the Titles icon returns to Titles Index screen resulting from most recent search
Remote
Used to search the LC database (LCDB) using the same search techniques as with Orbis PREFER: Macro <Shift-F10> to connect to LCDB. Macro <F10> to reconnect to Orbis
from LCDB.
STOP button
If more than 1000 Headings or Titles are retrieved, can press <STOP> (displays at lower-left corner) to stop the search
15

Orbis: Cataloging
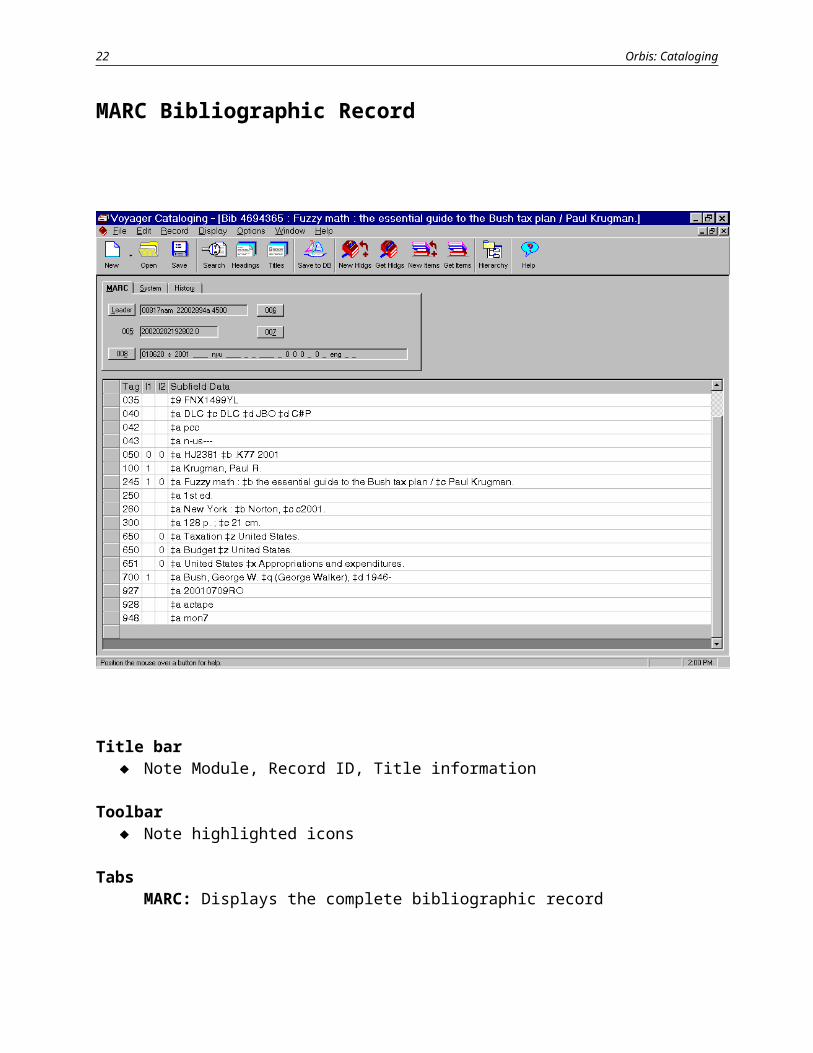
MARC Bibliographic Record
Title bar Note Module, Record ID, Title information
Toolbar Note highlighted icons
TabsMARC: Displays the complete bibliographic recordSystem: Controls suppression of records from OPAC display and flags record for export
(Suppression of Bibliographic record also suppresses MFHD. Do not enable the OK to export function)
History: Shows log of when and by whom the record was created and updated
16

Orbis: Cataloging
Navigation
Use macro on F6 to open the bib record from the MFHD. (Will also work from the Item record with some tweaking) Use macro on <F5> to open the MFHD from the bib record or the item record.
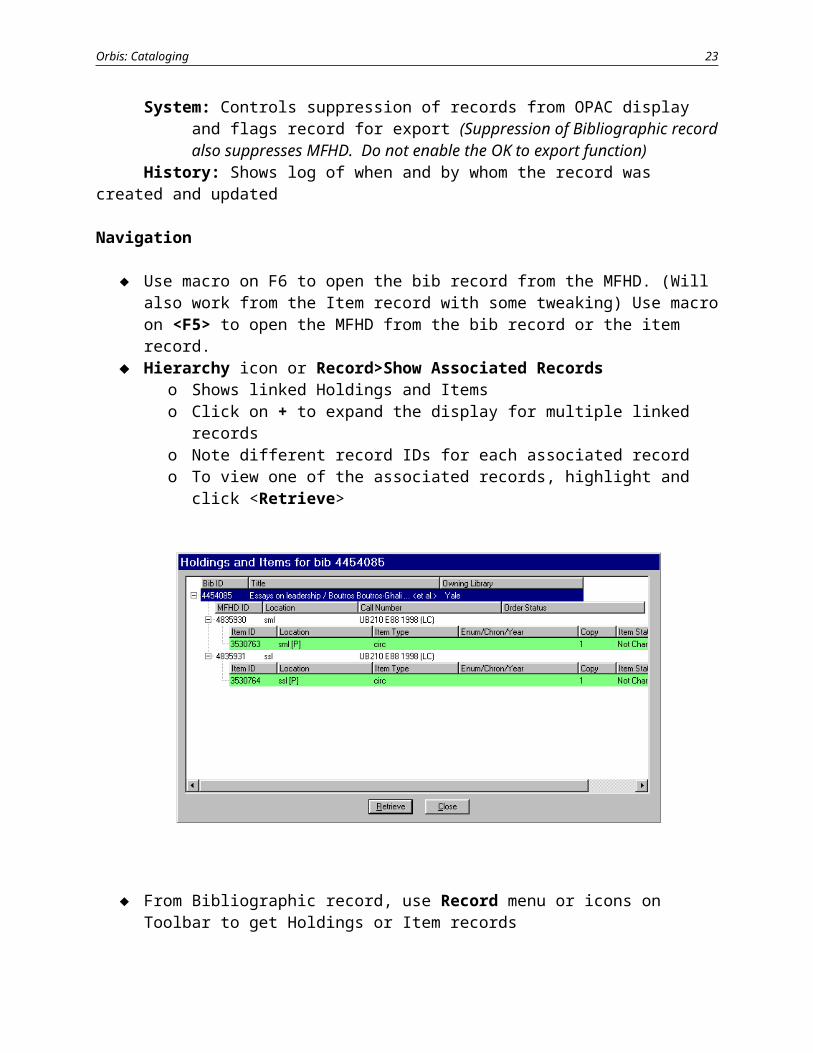
Hierarchy icon or Record>Show Associated Records o Shows linked Holdings and Items o Click on + to expand the display for multiple linked recordso Note different record IDs for each associated recordo To view one of the associated records, highlight and click <Retrieve>
From Bibliographic record, use Record menu or icons on Toolbar to get Holdings or Item records
17

Orbis: Cataloging
Structure of the MARC Record
Leader and Fixed Fields
Leader, 008, 007, and 006 have similar display formats. The template contains a grid of data elements with labeled definitions. Possible values are selected from drop down options or keyed in directly. You must use the mouse or up and down arrow keys to select elements from the grid.TIP: To open a menu, select a line from the grid and press ENTER or the space bar; use the up/down arrow to navigate short menus; for rapid navigation of a long menu, use the scroll bar (not available in Leader window) or hold down the up or down arrow; if the line selected is blue, the mouse scroll wheel is enabled.
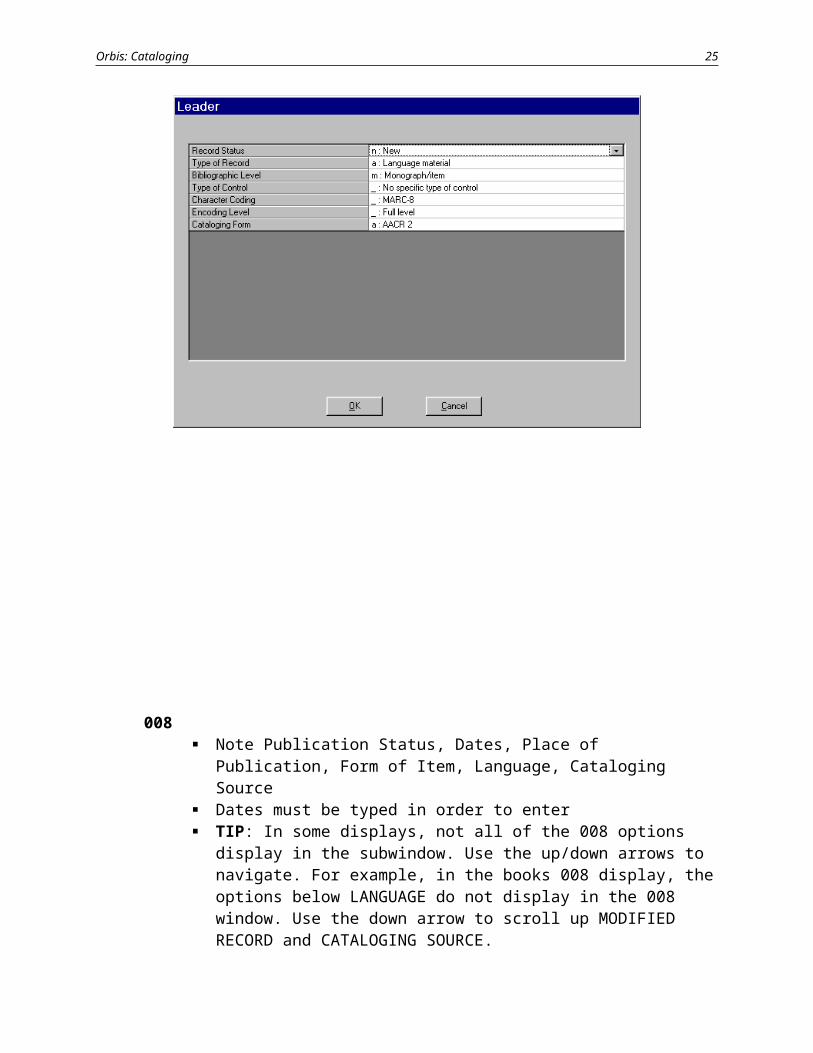
Leader Note Type of Record, Bibliographic Level, Encoding Level, Cataloging Form
18

Orbis: Cataloging
008 Note Publication Status, Dates, Place of Publication, Form of Item, Language,
Cataloging Source Dates must be typed in order to enter TIP: In some displays, not all of the 008 options display in the subwindow.
Use the up/down arrows to navigate. For example, in the books 008 display, the options below LANGUAGE do not display in the 008 window. Use the down arrow to scroll up MODIFIED RECORD and CATALOGING SOURCE.
TIP: To enter Place of Publication or Language, enter the first letter of the place or language. NOTE: If first letter of the code for the place or language is not the same as the initial letter of the name of the place or language, type the first letter of the name until the first letter of the name matches the first letter of the code. EXAMPLE: to find Senegal, type s twice to get past sx Namibia to sm San Marino (the first entry where the code and the initial letter are the same). Then click on the sm San Marino selection to open the s-section of the menu, where you can use the mouse wheel or the scroll bar to scroll through the list of names beginning with s. Note that some s-names precede San Marino because the menu is organized by name rather than code, e.g, ws Samoa. Cf. places beginning with a vs. places beginning with f.
TIP: To open a long 008 menu once you have reached the desired portion of the menu, press ENTER if the code/name is not highlighted. If the code is highlighted, click the highlighted code/name with the mouse.
NOTE: an earlier feature of Voyager where typing the first two letters of the MARC code sent you to the first instance of the code beginning with those letters will not work in Voyager 5.0; typing the second letter will now simply re-execute the search with a different letter.
19
Orbis: Cataloging
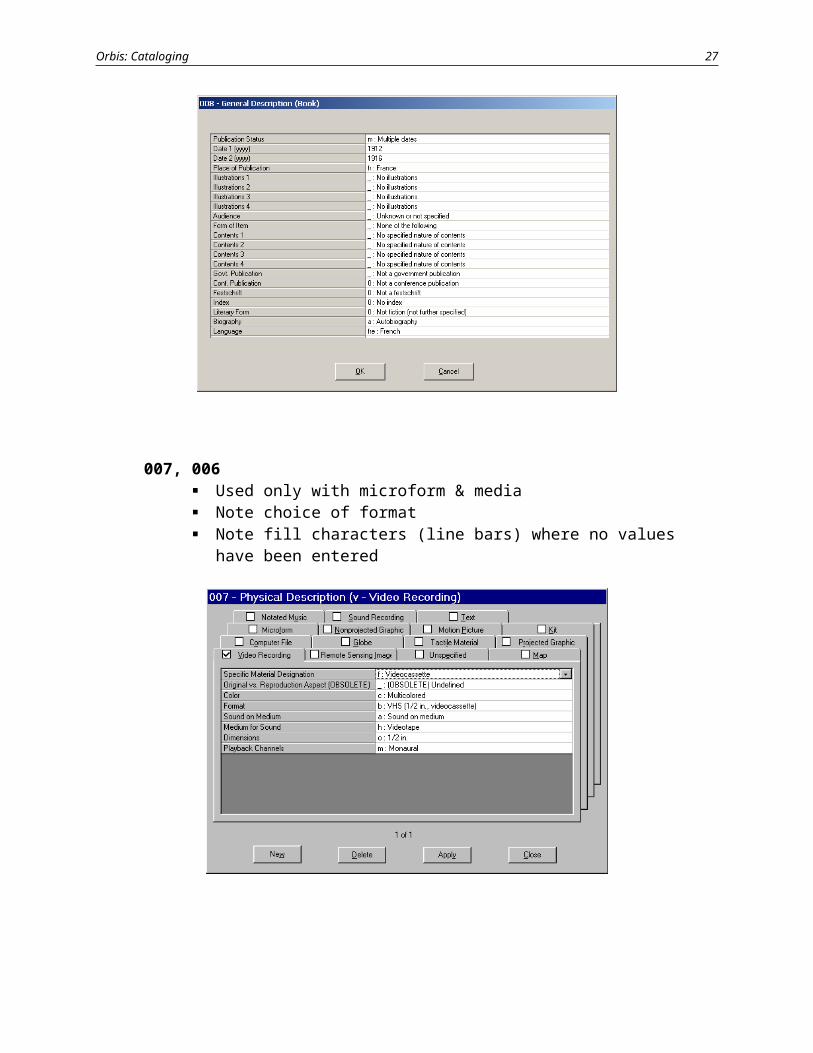
007, 006 Used only with microform & media Note choice of format Note fill characters (line bars) where no values have been entered
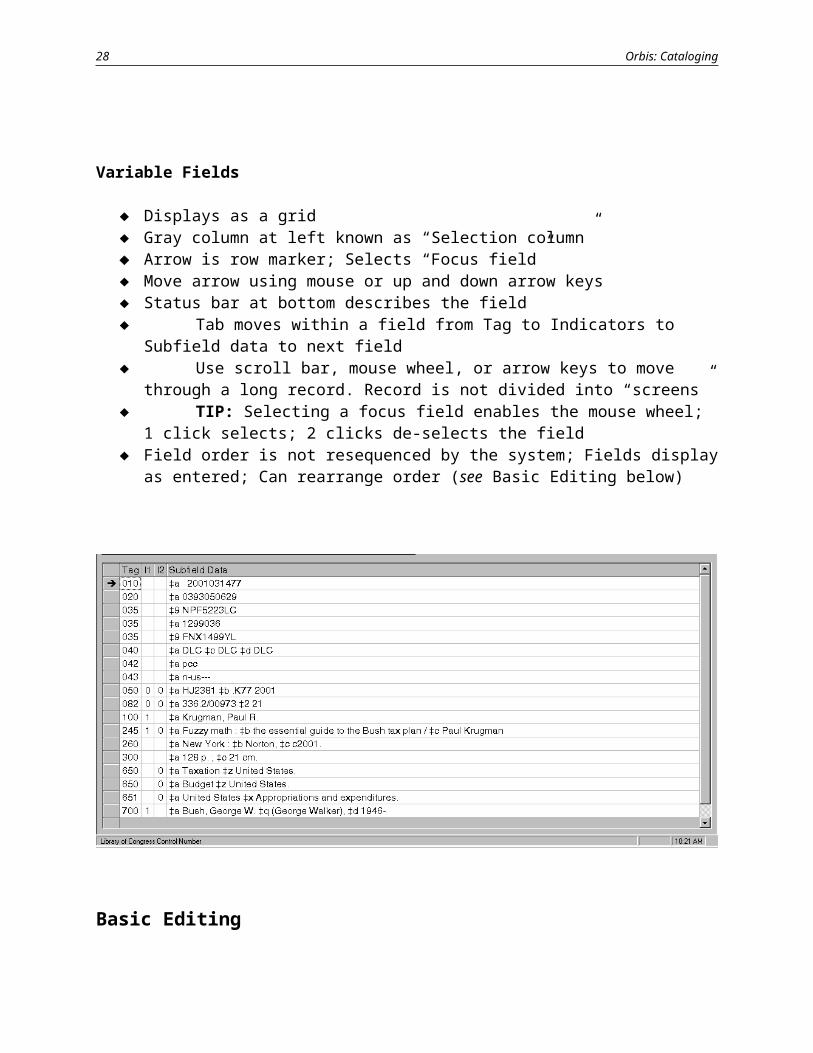
Variable Fields
Displays as a grid Gray column at left known as “Selection column” Arrow is row marker; Selects “Focus field” Move arrow using mouse or up and down arrow keys Status bar at bottom describes the field Tab moves within a field from Tag to Indicators to Subfield data to next field Use scroll bar, mouse wheel, or arrow keys to move through a long record.
Record is not divided into “screens” TIP: Selecting a focus field enables the mouse wheel; 1 click selects; 2 clicks de-
selects the field Field order is not resequenced by the system; Fields display as entered; Can rearrange
order (see Basic Editing below)
20
Orbis: Cataloging
Basic Editing
The same editing techniques apply to Bibliographic, Authority, and Holdings records
Standard Windows commands – highlight, cut, copy, paste Always in Insert, no typeover mode (Hitting <Insert> key adds a new field in a
Bibliographic record) Automatic line wrapping as you type
To select text: Click to place cursor at the beginning of the text to be selected. Hold down
SHIFT key & click at the end of the text to be selected. Or use the arrow keys to move the cursor to the end of the text to be selected.
To replace text: Select by highlighting and type (or paste) new text
To select an entire field: Click in Selection column Right-click to see quick menu
To enter a MARC tag: Click in Tag column. Use <F2> to see valid values; Select tag; Click <OK>
or <Enter> -or- Type valid tag to replace existing one Click in Indicator columns. Use <F2> to see valid values, select and replace
21
Orbis: Cataloging
To enter a subfield code: Use <F2> to see valid values; Select subfield; Click <OK> or <Enter> -or- Use <F9> to create subfield delimiter and type in valid code (adds space
automatically)
To add a field: Select adjacent field by clicking in Selection column <F3>: add new field above Focus field <F4>: add new field below Focus field
To resequence fields: Select (highlight) field; Right click; Choose from quick menu to move field up
or down by one -or- Select, cut and paste an entire field to a new location in the record
To move text: Cut, copy and paste (<Ctrl-X>,<Ctrl-C>, <Ctrl-V>) -or- Select (highlight) and right-click for quick menu
To delete text: Use <Backspace> -or- Select (highlight) text and press <Delete> on keyboard.
To delete a field: Select (highlight) the field; Press the <Delete> key or right click and choose
Delete this field from the quick menuTo undo edits:
Right click within the field you just edited; Choose Undo from quick menu <doesn't always work, e.g. if you replace text Undo is not an option>
Warning: you cannot restore an entire deleted field. To restore, close the record. Prompt will be: This record has been modified. Close it anyway. Choose YES.
Non-roman fields: Staff in roman-script units should edit only roman character text in
UNLINKED fields, i.e., variable fields without an initial ‡6 subfield. For any linked field requiring editing, staff in roman script units should send a
report on the ORBIS Heading Change Form at:http://www.library.yale.edu/cataloging/change_request.htmNOTE: it is OK to use the heading report form even if the typo or other editing problem is not in a heading. For example, the form can be used to report a typo in a roman script parallel title.
Staff in non-roman and roman script units should follow standard workflow procedures when editing non-roman records following the above guidelines. Standard workflow procedure for non-roman units is to update in RLIN and re-export to Orbis (generally); standard workflow procedure for roman script units is to update in Orbis without re-exporting back to the utilities.
22
Orbis: Cataloging
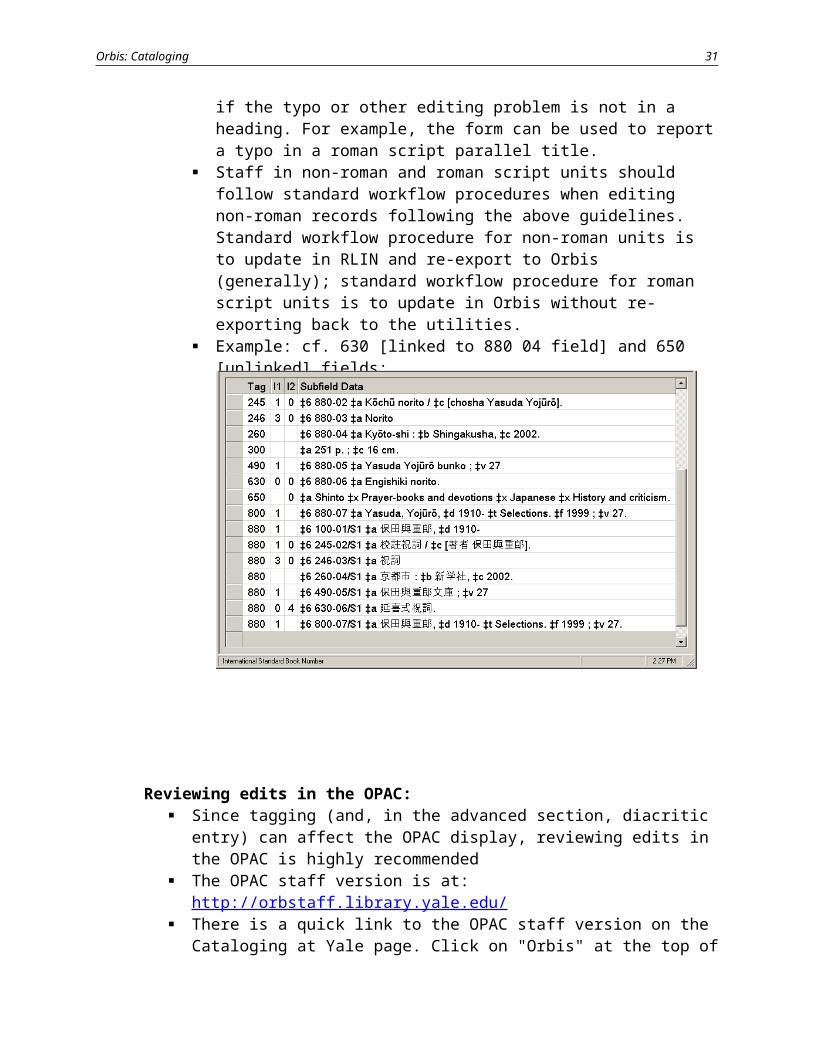
Example: cf. 630 [linked to 880 04 field] and 650 [unlinked] fields:
Reviewing edits in the OPAC: Since tagging (and, in the advanced section, diacritic entry) can affect the OPAC
display, reviewing edits in the OPAC is highly recommended The OPAC staff version is at:
http://orbstaff.library.yale.edu/ There is a quick link to the OPAC staff version on the Cataloging at Yale page.
Click on "Orbis" at the top of the Cataloging at Yale page:http://www.library.yale.edu/cataloging/
If the record you are updating in the Cataloging Module is currently displaying on your browser, you need to click on the browser refresh button to see your changes
When you no longer need to consult the OPAC, be sure to click on the <Log Out> button (next to the HELP button), and then click the <Log Out of CAS> link
A new feature with Voyager 5.0 allows you to access the OPAC version of the record you are updating from the Cataloging Module
o Record>Send Record to>Orbis OPACo There will be a brief period while the software resolves the connection
before the browser displays the recordo Each "Send Record" opens another browser session, which you will need
to log out and close
23
Orbis: Cataloging
Saving and Validation
When records are saved to the database (Save to DB - Sailboat icon or <Ctrl-B>, MARC and Authority validations are automatically performed, based on settings in Preferences.
The first time you Save, a box asks if you wish to change your Import/Replace Profile. This is set in Preferences and should say YL Import Conditional; Click on <No> (meaning, do not change the profile)
To close without saving, click on the X in the upper-right-hand corner (careful not to close the Cataloging Module!) or File>Close
MARC Validation
You cannot save a record to the database with MARC validation errors. Use <F2> to verify and correct tags and subfields. You may have to delete fields from existing or imported records to complete the validation. After correcting MARC validation errors, Save to DB again.
Authority Validation
Every time a record is saved to the database, Voyager attempts to validate name, series, and subject headings, based on settings in Preferences. For now, only Name validation has been selected. Not all staff will have automatic Authority Validation turned on. Some of you may see different results when doing your regular work.
Authority Validation is informational. Records can be saved whether or not Headings validate.
When you save to the database you may see the Authority Validation screen (based on settings in Preferences).
24
Orbis: Cataloging
From the Authority Validation screen you can: Click on <Retrieve auth> to retrieve the Authority record if the headings
have an associated Authority record Click on <Copy> to paste the heading into a Bibliographic record (watch for
final punctuation) Disabled on Voyager 5.0 (a bug). Click on <Search> to perform a Browse Headings search to look for an
Authority record for a heading that doesn’t validate
To save the record to the database after Authority Validation: Click on <Continue>
For an explanation of the Authority Validation categories, see the Authority Control Tip Authority Validation Messages at:
http://www.library.yale.edu/cataloging/authorities/tips/authvalidationmessages.html
25
Orbis: Cataloging
Series validation: There are detailed YUL procedures for Series validation on the website
http://www.library.yale.edu/cataloging/authorities/series_policy.htm Use the procedure below to see which headings have associated Authority
records If a Series heading is represented by an Authority record, retrieve the
Authority record and look for the 090 indicating the YUL classification number for classed together Series
If the 090 is not present, search the Series in the OPAC using a title search and look at the call numbers to determine if it is classed together
If the 090 is present, copy the call number for the Series to paste later into the MFHD
TIP: From 2006- LC will be tagging all series as 490 0. Current local policy is to trace these series.
To view all the Authority records associated with the headings in this record: Macro: Press </ > on number pad. Alternative: Record>Retrieve Authorities
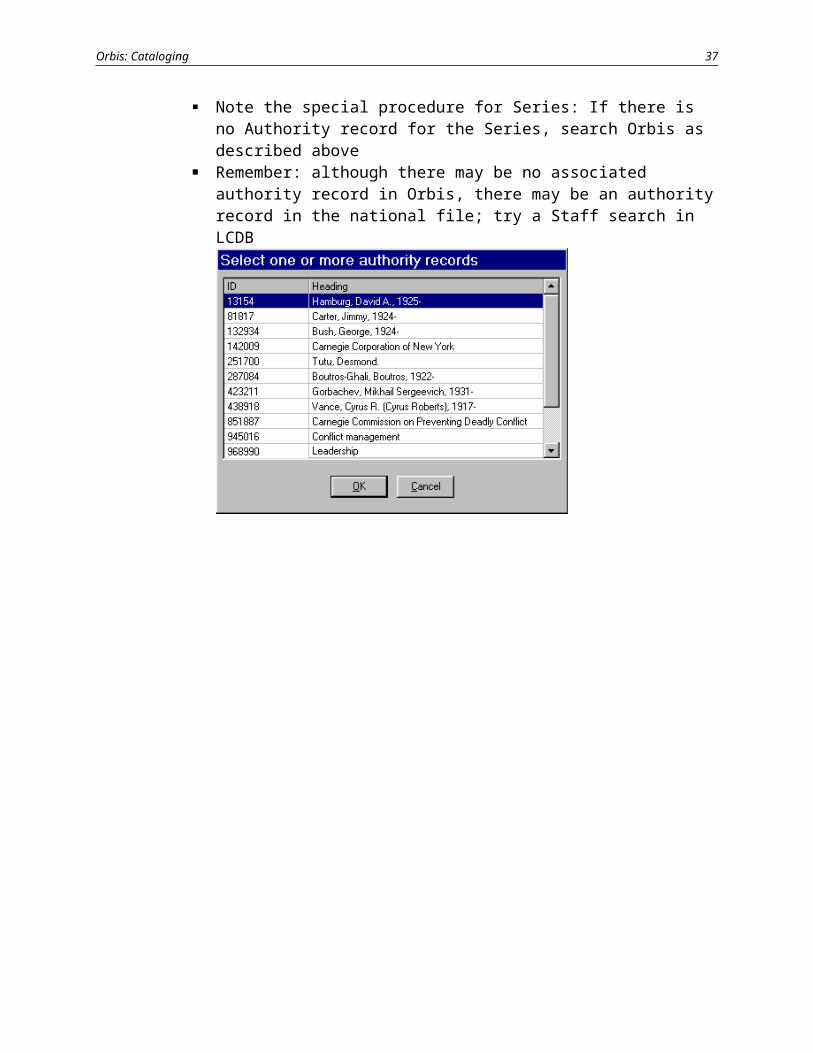
or <Alt-R+A> If there is an authority record associated with a heading in the bibliographic
record, it will be listed in the Select one or more authority records window Only exact matches display <i.e. subject-subdivision combination only if non-
free-floating; if the subordinate body is not established, the corporate name will not be retrieved >
Highlight to select and view the Authority record for that heading. Double click on a list item to open the authority record (or click the OK button if the appropriate list item is already selected); besides series classification decisions, also a quick way to check 053s
Note the special procedure for Series: If there is no Authority record for the Series, search Orbis as described above
Remember: although there may be no associated authority record in Orbis, there may be an authority record in the national file; try a Staff search in LCDB
26
Orbis: Cataloging
MARC Holdings Record (MFHD)
Every copy has a separate MFHD record. Each MFHD record has a separate record ID (different from the Bibliographic record ID).
Retrieving the MFHD
From a Bibliographic or Item record: (Macro) Press <F5> ALTERNATIVE: Get Holdings icon or Record>Retrieve Holdings
From Hierarchy (Associate Records) screen Select MFHD by highlighting Click <Retrieve>
Directly by Holdings Record ID: (Macro) <Ctrl+Keypad *> ALTENATIVE: Record>Retrieve by Record ID>Holdings or <Alt-
R+I+H>
MFHD Record
Tabs
MARC: Displays the MARC Format Holdings record System: Controls suppression of record (if linked Bibliographic record is suppressed so
is MFHD) and flags for export (do not use- see note above under MARC Bibliographic Record)
27

Orbis: Cataloging
Bib Title(s): Shows record ID and title of Bibliographic record the MFHD is attached to. Double-clicking displays the Bibliographic record
History: Record creation and update information
Structure of the MFHD Record
Same layout as the Bibliographic record – grid, selection column, fixed fields.
Leader Identifies MFHD as a single part item (x), multipart item (v) or serial (y). Default Type of record is x: leave as is Default Encoding Level is z: leave as is
007, 008 Leave as is
014 Contains linking/migration information. Do not touch
852 Contains Location (╪b) and Call number (╪h, ╪i)
o Location: Pulled from default in Preferenceso Call numbers: Automatically transferred from the appropriate fields
of the Bibliographic record when the MFHD is created, as set in Preferences
o Indicators: Identify classification scheme and whether single or multi-part
First indicator controls indexing for Call Number searches; Defaults to 0 for LC (from Preferences)
Use 8 for non-LC call numbers Second indicator is 0 for single part item (default) and 1 for
multipart items and serials See policies about first and second Indicators on website
866, 867, 868 Part of same MFHD record as 852 Used to record volumes, supplements, indexes NOTIS OPR receipt lines appear in 866 with blank indicators
28
Orbis: Cataloging
Basic MFHD Editing
Same editing techniques as Bibliographic records. There are many examples on the website.
Orbis Location codes are different from NOTIS/Orbis codes (no commas in codes)o To verify and change Locations, type <Ctrl-L> or Edit>Show Holdings
Locations to display a list of available locations. o Select location and click <OK>
Call numbers can be retrieved automatically from the Bibliographic recordo For order records without a call number or UNCATs, you can retrieve the call
number from the Bibliographic record using <Ctrl-N> or Record>Get call number from Bib Record (cursor can be anywhere in MFHD)
o If there already is a call number (UNCAT) a warning asks if you wish to replace it; Say <Yes>
o Add (LC) to end of call number according to policies o Note new location of + for Oversize at end of LC call number with ╪m Oversize
immediately following
Other possible subfields in the MFHD record:╪k – authorized text notes (see list on website)╪t – copy number where used ╪m Oversize – with LC classification numbers where used╪x – staff notes (do not display in OPAC)╪z – public notes (display in OPAC; Copy and paste complete text from website
To verify correct call number sequence, do a call number browse search in the OPAC (see Shelflisting document on the website for detailed procedures)
To add text volume holdings, position cursor anywhere in the field preceding the field to be inserted and use macro on Shift + F6
After editing, Save to DB icon or <Ctrl-B>
Update Record Alert
Voyager does not lock a record when a cataloger has it open for editing. If two catalogers are working on one record (Bibliographic or Holdings) at the same time, when you try to save the record, The Update Record Alert warns you that the record was modified and saved by someone else while you had it open. The alert asks: View the current version before saving?
29
Orbis: Cataloging
<No> will replace the current saved version with yours without showing you the changes (NEVER choose No! You will wipe out the existing record without seeing how it was changed)
<Cancel> will preserve the existing record and cancel your changes <Yes> will display the current version and allow you to add your edits to the existing
version before saving
30

Orbis: Cataloging
Item Records
Voyager assigns a record ID to Item records that is separate from the Barcode number.
Retrieving Item Records
Macro: Press F7 then – wand or type in barcode. Alternative: Record>Retrieve by barcode or <Alt-R+B>
Record>Retrieve by ID>Item or <Alt-R+I+ I> – type in Item record ID Get Items icon – displays items for the active Holdings record Hierarchy icon – shows all Holdings and Items associated with a Bibliographic record
31
Orbis: Cataloging
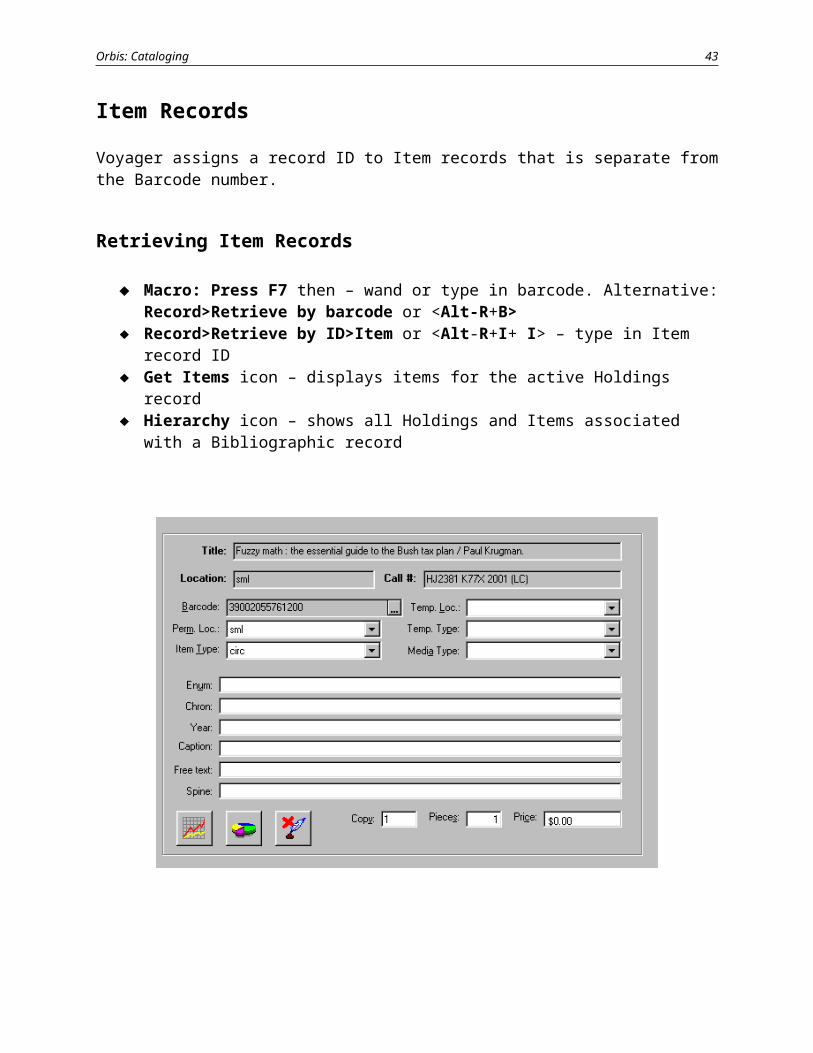
Structure of the Item Record
Header Title from Bibliographic record, Location and Call number from MFHD
Barcode Note ellipses; Click to bring up Barcodes dialog box to add or modify
barcodes System does not require a Barcode in an Item record
Perm. Loc. Permanent Location of Item Should match Holdings Location (system does not require this – see warning
below)Warning: if MFHD Location modified later, Item Perm. Loc. must also be manually changed
Item Type Controls Circulation policies Defaults to “circ”
Warning: check carefully for indication when Item type change needed; Consult drop-down list for correct code
Enumeration Volume numbering
Chronology Separate element from Enumeration in Voyager
Guidelines on recording Enumeration/Chronology at:http://www.library.yale.edu/cataloging/Orbis2Manual/enumchron.htm
Spine Midspine notes converted to Spine field
Buttons at lower left: Graph: Item status as displayed in OPAC Pie chart: Item statistical categories (not used by YUL) Quill pen: Staff note
Pieces Number of physical pieces represented by this single barcode
32
Orbis: Cataloging
Resequencing Item Records
1. Highlight Item to be moved in list of Item records2. Click <Move before> or <Move after>3. Click on Item you are placing it before or after4. Save; then <Cancel> to close the Items display
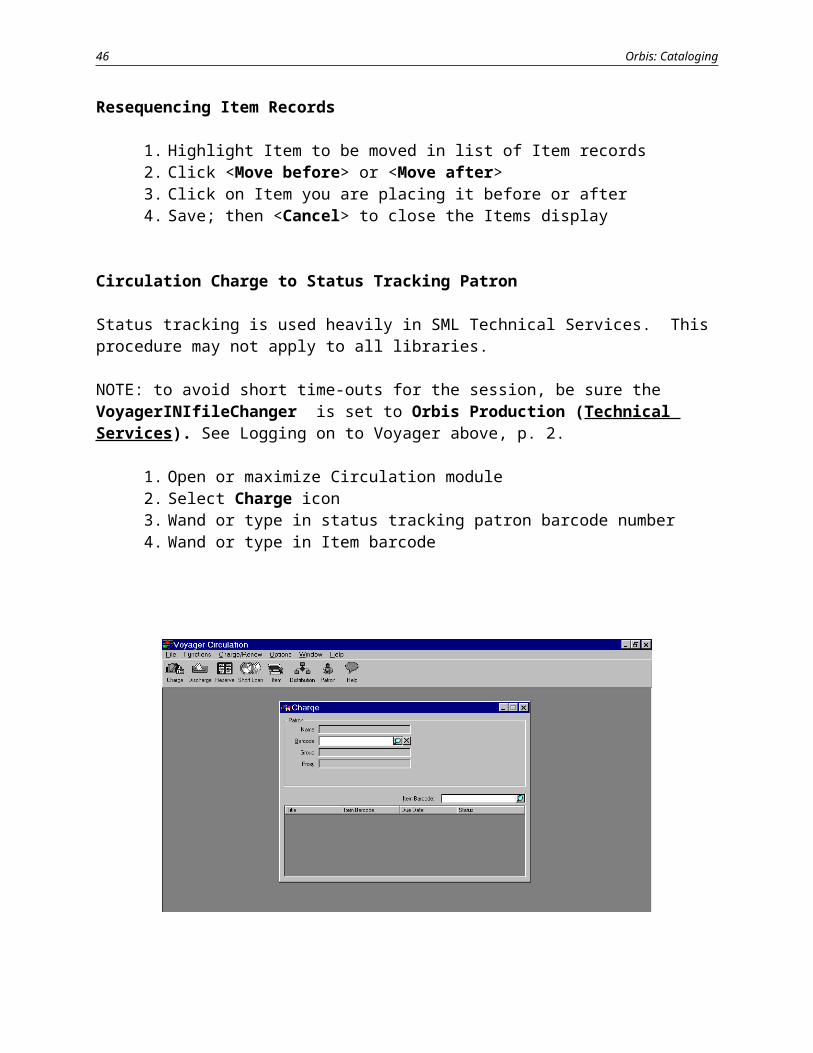
Circulation Charge to Status Tracking Patron
Status tracking is used heavily in SML Technical Services. This procedure may not apply to all libraries.
NOTE: to avoid short time-outs for the session, be sure the VoyagerINIfileChanger is set to Orbis Production (Technical Services). See Logging on to Voyager above, p. 2.
1. Open or maximize Circulation module2. Select Charge icon3. Wand or type in status tracking patron barcode number4. Wand or type in Item barcode
33
Orbis: Cataloging
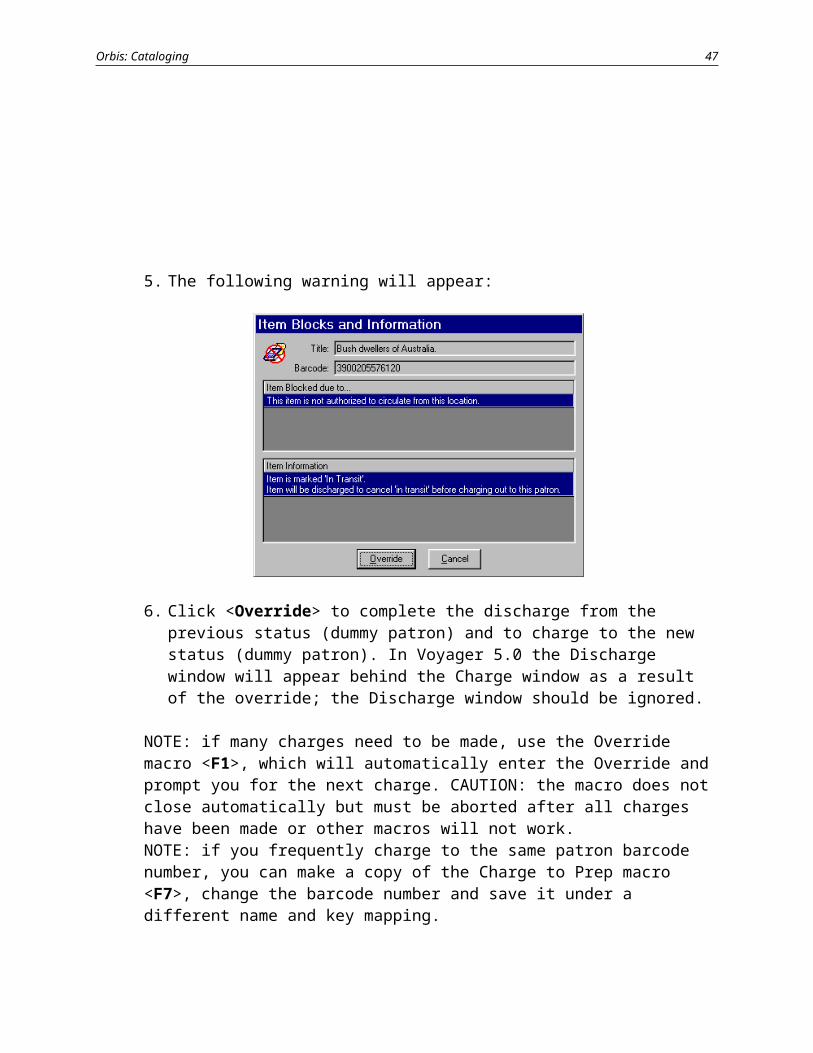
5. The following warning will appear:
6. Click <Override> to complete the discharge from the previous status (dummy patron) and to charge to the new status (dummy patron). In Voyager 5.0 the Discharge window will appear behind the Charge window as a result of the override; the Discharge window should be ignored.
NOTE: if many charges need to be made, use the Override macro <F1>, which will automatically enter the Override and prompt you for the next charge. CAUTION: the macro does not close automatically but must be aborted after all charges have been made or other macros will not work.NOTE: if you frequently charge to the same patron barcode number, you can make a copy of the Charge to Prep macro <F7>, change the barcode number and save it under a different name and key mapping.
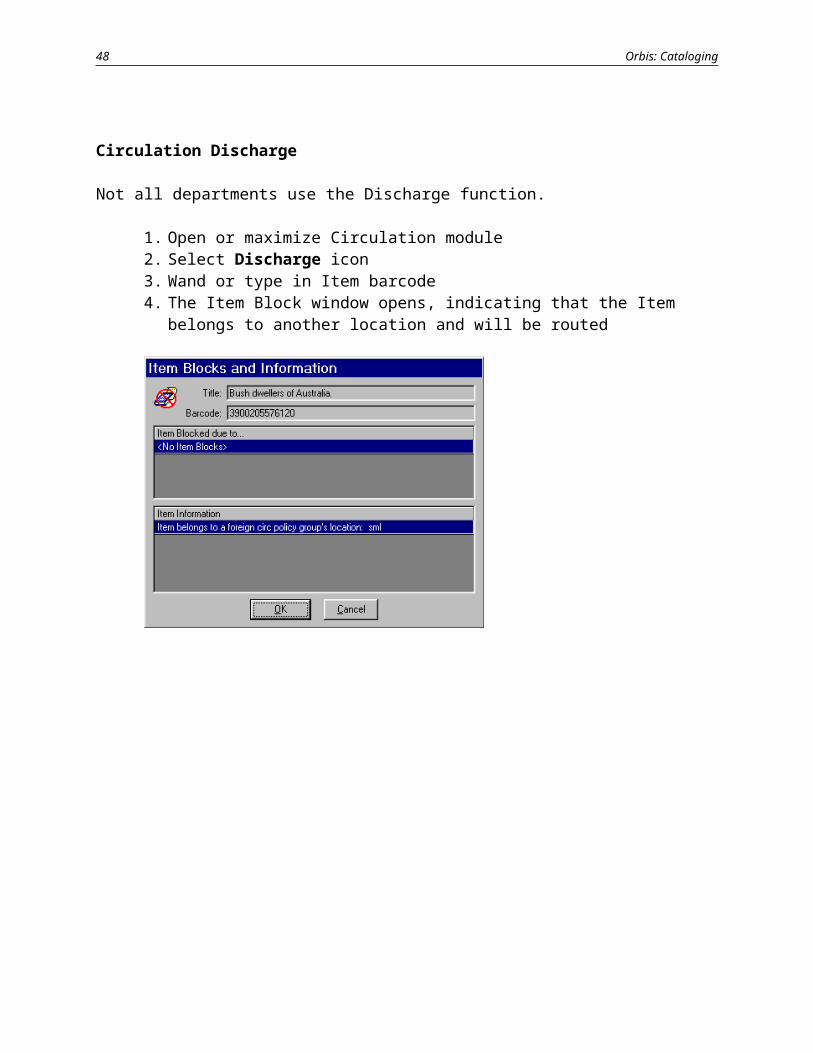
Circulation Discharge
Not all departments use the Discharge function.
1. Open or maximize Circulation module2. Select Discharge icon3. Wand or type in Item barcode4. The Item Block window opens, indicating that the Item belongs to another location
and will be routed
34
Orbis: Cataloging 35

Orbis: Cataloging
Importing Records
This function is used to bring Bibliographic and Authority records into Orbis from a utility (OCLC or RLIN) or from a resource database such as LC.
There are two ways to import: from an external database (LCDB), or from a local file of exported records (OCLC or RLIN). From LCDB: http://www.library.yale.edu/cataloging/Orbis2Manual/LCDBimport.htm
From OCLC/RLIN:http://www.library.yale.edu/cataloging/Orbis2Manual/importrlinoclcmacro.htm
Simultaneous Searching
This has been a known problem in Voyager since 2002 and has still not been addressed with Voyager 5.0. When Orbis has more than one record for the same title, the Simultaneous Search drops one of the titles from the retrieval display when a match is found in LCDB.
For example, a search on the title Surprised by sin retrieves records for 3 different editions in Orbis when only Orbis is searched; a search on the same title in LCDB retrieves records for 3 different editions when only LCDB is searched.
When Simultaneous Searching is performed, the Search Status window shows (correctly) 3 records found in Orbis and 3 records found in LCDB.
But when the Show Results button is clicked, the Titles Index displays 3 records in Orbis (Local database) but only 2 in LCDB.
Advanced Techniques
Editing Bibliographic Records
Leader and Fixed Fields
Key in values or select from drop-down Click <Cancel> or anywhere outside the window to exit from the box Click <OK> to save changes
Leader Change Type code if needed: see warning about invalidating current 008 Say <Yes> and edit 008 for new elements
36

Orbis: Cataloging
006 and 007 <used only for non-book> Select format Select whether creating a new field or editing an existing field (possible to
have multiple 006 and 007 fields) Key in or select values from drop-down list Used to limit searches by format in the OPAC (and in the Cataloging
Module)
Diacritics/Special Characters
Prefer use of Macro Express. Memorizing the macro key mapping for the diacritics you use the most in your work will save you a lot of time if you do a lot of foreign language work. The most heavily used diacritics are mapped to the keypad and function if the NUM LOCK light is on.Keypad map is at:http://www.library.yale.edu/cataloging/macroexpress/keypadmapOrbis.doc
For other diacritics, you can activate the Macro Express Pop-Up menu (mapped to <F12>) or follow the map at:http://www.library.yale.edu/cataloging/macroexpress/diacriticsvoy.htm
The diacritic macros are stored in whatever Macro Express "D" file is current; if you are using an "N" (NO DIACRITICS) file you need to switch to the most current "D" file if you have to enter diacritics in your work; in addition, you need to enable the diacritics pop-up menu. Consult with your expert user if necessary.
NOTE: if you work with languages & certain diacritics and special characters are heavily used but not represented on the keypad macros or on the pop-up menu, keep in mind that the key mapping and pop-up listing can be customized. Consult with your expert user. Expert users should consult with someone from the Macro Express group if necessary.
Voyager 5.0 supports Unicode characters & the ALA character set A diacritic character (e.g. an umlaut) must be entered after the letter that the diacritic
modifies. When a diacritic is entered, it will display above or below the letter, whichever is appropriate: Type Gu<umlaut>nter Orbis displays as Gunter
A non-diacritic character (e.g. an alif) is entered before the letter it modifies and should display before the letter as input: Type H<dot below>ada<macron><alif>iqOrbis displays as Hadaʾiq <cf. entry & position of diacritics for dot below & macron with non-diacritic alif>
37
Orbis: Cataloging
Exception: ligatures are diacritics but do not display above/below the letter they modify due to limitations in the Arial MS Unicode font. The left ligature is entered after the first letter modified; the right ligature is entered after the second letter modified.Type Sot<ligature left>s<ligature right>ializmOrbis displays Sotsializm <the correct display would connect the ligatures over ts>
If you aren't sure whether a character is a diacritic or a non-diacritic, copy the heading from an authority record or a bibliographic record using the same word, or check with someone who knows the language.
Multiple diacritics modifying the same letter: the order in which the diacritics are entered does not seem to affect the display:Type either: nie<circumflex><dot below>mOr type: nie<dot below><circumflex>mOrbis displays niem Applies even if multiple diacritics have the same position:Type either: Nguye<circumflex><tilde>nOr type: Nguye<tilde><circumflex>nOrbis displays Nguyen
Overtyping. In Unicode data entry, the cursor remains in the same position after the character has been entered until a letter (as opposed to a special character) is typed. As a result, it is very easy to incorrectly overtype a special character, sometimes multiple times, if you are not paying attention. (Note that for some languages, as in the Vietnamese example in the previous bullet, overtyping diacritics is the correct procedure.) To undo an overtyped character, use the backspace key until the original character is restored.
If macros are not used, there are 2 methods of adding diacritics, either for an individual character in Special Character Entry, or by entering Special Character Mode which maps keyboard characters to a diacritic chart [not recommended; very awkward to use]
Diacritic mode stays on until you turn it off
Special Character Entry:1. Place cursor in desired location for diacritic2. Edit>Special Character Entry (<Ctrl-E>)3. Select character from box; characters are arranged in alphabetical order by
name 4. Click Insert/Close to add single diacritic; if multiple diacritics modify the
same letter, use a combination of Insert and Insert/Close
38
Orbis: Cataloging
Special Character Mode:1. Uses keyboard mapping2. Edit>Special Character Mode (<Ctrl-D>)3. Note indication in lower right-hand corner “Special Character”4. Key mapping is listed under Key Press column in Special Character Entry
window (see screenshot above)5. Must turn this off to return to normal keyboard mode6. Edit>Special Character Mode (<Ctrl-D>) turns mapping off
To copy a URL
When cataloging a website, Edit>Insert URL from Browser or <Ctrl-U> creates an 856 field in the active Bibliographic record with URL inserted
Replace and Keep This procedure may be used when there is no matching record available to overlay the In-Process record, but there is an existing record in Orbis for an earlier edition. In this case, the goal is to overlay the In-Process record while keeping the existing record as well.
http://www.library.yale.edu/cataloging/Orbis2Manual/replacekeep.htm
Delete a Record
You cannot delete a Bibliographic record that has holdings, items, or orders attached to it. Note that once an item is cataloged, the record is never deleted and is not suppressed).
1. From an active Bibliographic record, Record>Delete or <Alt-R+D>2. The system will prompt you to be sure you want to delete the record
Saving and Validation
In addition to automatic Authority validation as set in Preferences, you can validate the heading in a single field before saving the record. Note that if the heading is valid you do not see the Authority record, just a confirmation that it is a valid heading.
39

Orbis: Cataloging
You can use this technique on any type of heading whether or not you have turned on automatic Authority Validation.
To validate the Heading in a single field:1. Click in selection column to highlight the field3. Right-click for quick menu; Select Validate Heading in this field -or-
Record>Validate Heading 4. If heading not valid, displays Browse Headings List5. From the Browse Headings List you can search for and retrieve the Authority
record for headings that have an associated Authority record 6. Locate and select the valid heading7. Click <Replace> to replace the heading in the Bibliographic record (check for
final punctuation)
Searching: Using the Keyword, Search Limits, Builder, Keyword in Staff and History Tabs
Keyword <Boolean (not using relevance)> search: single words. Operator must be
supplied; no default operator: racial and reform and social and gospel NOTE: don't use the ampersand as a substitute for the Boolean and <Boolean (not using relevance)> search: phrase (phrase is always in quotes):
"racial reform and the social gospel" <cf. "racial reform" and "social gospel">
NESTING: eglise and (gallimard or harmattan); (angels and america) not kushner
<Free Text (using relevance)> search. Works best if operator is left out; default operator is AND: racial reform social gospel
<Free Text (using relevance)> search. Use quotation marks if operator term is one of the search terms; leave out the operator when phrase plus a term are used: "life and fate" grossman <cf. life fate grossman>
All fields of the Bibliographic record are indexed for keyword searching No stopwords <Search Limits> can be combined with Boolean and Free Text searches (see
following section); however, to limit by term use a Boolean/Free Text search with a NOT operator (see NESTING example above)
<Holdings Boolean> button allows searching (any) text in MFHD, including location code; same rules as Boolean searches, but <Search Limits> is not allowed: "section 12" and smly
Keyword searches do not retrieve authority records (but see <Keyword in Staff>)
Keyword searches can be combined with Search Limits, but Search Limits do not allow limiting by MARC field
40
Orbis: Cataloging
Search Limits Language, Location, Date, Medium, Type, Place, Status Does not allow limiting field type; use Builder or in combination with Builder
instead; does not allow limiting by term; use Keyword with NOT EXAMPLE 1: Index Selection/Title: english patient Limit/Medium:
Videorecording <don't confuse with Limit/Medium: Motion Picture!> EXAMPLE 2: Index Selection/Title: don quixote Limit/Language: English
Limit/Date: Less than year: 1800 EXAMPLE 3: Keyword/Boolean: herpetological Limit/Medium Computer File
Limit/Type Serial <NOTE: Limit/Type lists both Serial and Computer File, but selecting both will retrieve all serials associated with herpetological, including print serials, and all computer files, presumably including monographic ones if there were any>
EXAMPLE 4: Keyword/Boolean: monkey Limit/Medium Nonprojected graphic Limit/Location lwl
CAUTION: for long lists, the more heavily used selections are at the beginning, followed by the rest in alphabetical order. EXCEPTION: for the location list, location codes are at the end of the sequence and are more reliable than names of libraries at the beginning of the list, which are used for circulation purposes <cf. results lwl vs. LEWIS WALPOLE LIBRARY>
Cannot be used with searches that include non-bibliographic records, e.g. Staff Searches (which include authority records) and Holdings Boolean search
EASY TO FORGET: Be sure to double-click on the limit term selected or click the ADD button after the term is selected; a Limit type must be listed in the lower window for the limiting to work.
If you check the Retain Search Limits option, remember to uncheck it when you are done; although the Search window will display "Limits are in Effect," if you overlook it, you may not realize that some search results have been excluded.
Builder Keyword searching that can be qualified by field type (derived from the MARC
tags) Can combine with Search Limits Does not search non-bibliographic records (authority records, MFHD, item
records) If searching on a single keyword or phrase,
1. enter term(s) in <Search for:> 2. accept or change the search criteria from the drop-down menu (<any of
these> [default], <all of these>, or <as a phrase> )3. accept or change the <Search in:> option (default: <Keyword Anywhere>)4. click the <Do Search> button
If searching on a combination, use the AND/OR/NOT operator buttons. If the combination is A and B, 1. type A in <Search for:>
41
Orbis: Cataloging
2. accept or change the search criteria from the drop-down menu3. accept or change the <Search in:> option4. click the <AND> (or <OR>, or <NOT>) button (A should display in the
Search Text box)5. type B in <Search for:> 6. repeat 2.-3.7. click <Do Search> button
EASY TO FORGET: Default Search for: syntax is <any of these>; when multiple terms are submitted, the syntax relates them with OR. Remember to re-set to <as a phrase> or <all of these> [terms related by AND] if that is what you really intend or you won't get reliable results.
Builder scenarios
Find current LC usage of the free-floating subdivision --Blogs under personal names in LCDB.
1. Open LCDB (Macro <Shift-F10>2. Open Search window and click on the <Builder> Tab3. Search for: blogs; accept <any of these>4. <Search in:> Subject: Personal Name
TIP: type s repeatedly to retrieve all indexes beginning with s.5. Click <Do Search>
Find serial records on the Cenozoic era in LCDB:1. Open LCDB (Macro <Shift-F10>2. Open Search window, click on <Limit> button.3. Click on <Type> and from the options tree find and double-click on <Serial>,
then click <OK> to return to the Search window4. Click on <Builder> Tab5. <Search for:> cenozoic; accept <any of these>6. <Search in:> Subject:Topical7. Click <Do Search>8. Take a look at the subjects for the records retrieved & note that Cenozoic does
not have to be the initial term in the subject.
Find records with computer file or electronic resource in the additional physical format (776) field in Orbis:
1. Open Search window & click on the <Builder> Tab2. <Search for:> computer file ; change syntax to: <as a phrase>3. <Search in:> Additional Physical Form (776)4. Click <OR> operator button: "computer file" [in Additional Physical Form
(776)] will appear in the Search text box.5. <Search for:> electronic resource; change syntax to: <as a phrase>6. <Search in:> Additional Physical Form (776)
42
Orbis: Cataloging
7. Click OR operator button; "electronic resource" [in Additional Physical Form (776)] will appear in the Search text box. (OR will be added to the previous line in the text box)
8. Click <Do Search>
Find works available in English after 2003 by Jacques Derrida about Paul Celan, and cataloged in LCDB:
1. Open LCDB <Shift-F10>2. Open Search window & click on <Limit> 3. Click on the hierarchy button opposite the <Language> folder to open the
language options tree; double-click on <English> to add the language to the selection window
4. Click on the hierarchy button opposite the <Date> folder to open the date options single-click on <Great Than Year> to open the text box in the date text box, type <2003> click the <ADD> button; Limit Types should now be listed in the Limit
selection window as: <English> and <Greater than Year 2003> click the <OK> button to return to the Search window
5. From the Search window, click on the <Builder> Tab6. <Search for:> derrida jacques; change syntax to <as a phrase>7. <Search in:> Author ; click <AND> operator button8. <Search for:> celan paul; change syntax to <as a phrase>9. <Search in:> Subject: Personal Name10. Click <Do Search>
Find Hungarian language serials about the first World War in LCDB:1. Open LCDB (Macro <Shift-F10>2. Open Search window & click on the <Builder> Tab3. <Search for:> world war 1914; change syntax to <as a phrase>4. <Search in:> Subject: Topical5. Click on <Limit> button6. Click on the hierarchy button opposite the <Language> folder to open the
language options tree; double-click on <Hungarian>. TIP: After opening the <Language> options tree, typing "h" will jump you to languages beginning with h.
7. Click on the hierarchy button opposite the <Type> folder to open the options tree and double-click on <Serial>
8. With the Limits types set displaying in the selections window as: <Type:> Serial and <Language:> Hungarian, click on the OK button to return to the <Builder> window
9. Click on <Do Search>10. PS: Alternatively, you can set the limits before entering the search terms in
Builder
The last 3 scenarios could also work using a combination of Keyword and Limits; however, the Builder search has the advantage of prompting you for the correct syntax.
43
Orbis: Cataloging
Find examples of CD-ROM serial cataloging in LCDB:1. Open LCDB (Macro <Shift-F10>2. Open Search window and click on the <Builder> Tab3. <Search for: > CD-ROMs; change syntax to: <as a phrase>4. <Search in:> Keyword anywhere [i.e., accept default]5. Click on <Limit> button6. Click on the hierarchy button opposite the <Medium> folder to open option tree
and double-click on <Computer File>7. Click on the hierarchy button opposite the <Type> folder to open the option tree
and double-click on <Serial>8. Click OK to return to Builder, then click <Do Search>9. PS: If <Keyword> is used instead of <Builder>, remember to enclose CD-
ROMs in quotes.
Find videos where the director of photography was James Wong Howe in Orbis. Staff Name search retrieves 5 records.
1. Open Search window & click on <Limit> button2. Click on <Medium> to open option tree3. Double-click on <Videorecording>; click <OK> button4. From Search window, click on <Builder> Tab5. <Search for: > james wong howe; change syntax to: <as a phrase>6. <Search in:> Keyword Anywhere [i.e., accept default]7. Click <Do Search>; result 21 hits (photography directors are usually mentioned
in Credits notes; rarely traced as added entries)8. PS: You can enter the Search for:, syntax, and Search in: from Builder first, then
set the limits, before clicking on Do Search.9. PPS: If Keyword is used instead of Builder, remember to enclose james wong
howe in quotes.
Find prints in the Walpole collection with images of both monkeys and dogs.1. Open Search window & click on <Limit> button2. Click on the hierarchy button opposite the <Medium> folder to open the option
tree3. Double-click on <Nonprojected Graphic>4. Click on the hierarchy button opposite the <Location> folder to open the option
tree5. Find <lwl> and <lwlint> (hold down the "l" key to scroll down rapidly). Double-
click on these location codes to add to the selection options6. The limits should now read: Medium: Non-projected Graphic; Location: lwl;
Location: lwlint. Click <OK> to return to the Search window7. Click on the <Builder> tab. 8. <Search for:> monkey>; click <AND> button; Search for: <dog>; leave the
default <Search in: Keyword Anywhere>; click <Do Search>9. Cf. Search for: <monkeys>; click <AND> button; Search for: <dogs>; click
<AND> button; click <Do Search>
44
Orbis: Cataloging
Keyword in Staff (Under the Index Selection Tab/Search by/Keyword) Works in both Orbis & LCDB Use to perform keyword searching on headings, including established headings
and references on authority records: hittite [to retrieve headings beginning with hittite but also headings qualified by hittite, e.g., Hittite literature; Inscriptions, Hittite; Telipinu (Hittite deity) [an established heading]; Telepinus (Hittite deity) [a cross reference]
Use quotation marks to define phrases: "legendary character" [to find examples of subject headings qualified by (Legendary character)]; "group of artists"
Use phrases & less common words; large result sets on common term(s) may take several minutes to process
Selecting a Filter category to limit the search is recommended, e.g. LC Subject Headings
Search Limits not allowed
History Can redo or edit previous searches Limits are not retained here
45
Orbis: Cataloging
Acquisitions in Cataloging (Acq in the Cat)
Allows catalogers to see line items from the Acquisitions module for the active record You must have the Acquisitions module running You must be logged into both Cataloging and Acquisitions with the same Operator ID
and Password You can access Acquisitions line items from an active Bibliographic or MFHD record Record>View Line Item in Acquisitions or <Ctrl-M>
If there are no order records attached to the Bibliographic record, typing <Ctrl-M> will generate the following message:
“This title does not appear on any purchase order.”
If you have not logged on to Acquisitions and you type <Ctrl-M> you see the following message:
“To view a line item in Acquisitions, please make sure it is running and try again.”
To view series standing order receipts for series classed separately, or to view periodical receipts checked in using the predictive pattern software:
Open the Acquisitions Module
46
Orbis: Cataloging
Select <Check-in> Click on the <Serials History> icon Use the radio buttons to select either the check in title or the ISSN and enter the
check-in title or ISSN in the Search for slot and click <Search> For other indexes, click the <Other Search> button to open the familiar
Cataloging Module search window and execute a search. Titles with diacritics should be searched using the Title index in <Other Search:> rather than <Check-in Title>. CAUTION: the available indexes in the Acquisitions Module <Other Search:> are significantly more limited than those available in the Cataloging Module, e.g. <Other Search:> does not include any Staff Search indexes.)
When the search is executed, the Order record title line should appear in the <Select the Correct Order Record> box.
Double click on the listing to open the <Search History Details> window for the complete listing.
47
Orbis: Cataloging
Click on <Clear Workspace> to execute a search for a different title.
Note that clicking on <View Line Item in Acquisitions> from the Record menu in the Cataloging Module will not retrieve the monographic series or periodical <Search History Details> window.
Editing MFHDs
Leader Identifies single part item, multipart item, serial Defaults to x, single part – leave as is
007, 008 Leave as is
866 (Volume holdings), 867 (Supplements), 868 (Indexes)
Some acquisitions units (including SML) are using predictive pattern checkin; issues received do not display in the MFHD. Other acquisitions units continue to add receipts to Fields 866, 867, and 868.
NOTIS OPR receipt lines were converted to Field 866 with blank indicators and display before volume holdings Field 866.
Cataloging staff should not touch 866, 867, 868 fields with blank indicators. Some examples can be found at: http://www.library.yale.edu/cataloging/Orbis2Manual/mfhdexamples.htm#serial
Same editing techniques as above (Macro) Position cursor anywhere in the field above the field to be inserted
and press <Shift-F6>. The macro will insert an 866 field with indicators 41 and linkage subfields ╪8 0.
Use indicators 41 for Volume holdings, Supplements, and Indexes (failure to code indicators properly may affect display in OPAC)
Enter linkage subfield ╪8 0 before subfields a, x, or z (failure to add linkage subfield may affect display in OPAC)
Example: Serial. First 866 is receipt line. Includes volume holdings and index holdings (868)
852 0 1 ╪b sml ╪h DT1 ╪i .J69 ╪z Current issues in SML Periodical Room.; ╪z (Section 18)866 ╪8 0 ╪a v.39:no.1(2001:Mar.)-v.39:no.3(2001:Sept.) ╪d 20020419866 4 1 ╪8 0 ╪a v.1(1963)-v.38(2000)
48
Orbis: Cataloging
868 4 1 ╪8 0 ╪a v.1/35(1963/1997)
Create a New MFHD
In general, there will already be a MFHD, but to create a new one:1. Click on the New Hldgs icon or Record>Create Holdings (see Creating a New
Template later to create your own MFHD template)2. If there is an existing MFHD, you see the Select or Add Holdings screen3. Click <New> to create a new MFHD, or <Retrieve> to see the existing one4. Location and Call Number from the Bibliographic record are filled in automatically
based on Preferences5. Edit using same techniques as above6. Save to Database
Delete a MFHD
You cannot delete a MFHD that has items or orders attached to it.
1. From an active MFHD record, Record>Delete or <Alt-R+D>2. The system will prompt you to be sure you want to delete the record
Editing Item Records
Create a New Item Record
1. Click on New Items icon or Record>Create Items2. Location and Call number pulled from MFHD3. Wand or type barcode and add other required information 4. Check Item type5. Save to Database
Relinking Item records to a Different MFHD
1. Locate the MFHD you want to link the item to; write down the MFHD record ID 2. Retrieve the Item record you wish to move3. Record>Relink to a different holding4. Key in the record ID for the new MFHD5. Click <OK>6. If relinking changes the Location, update the Perm. Loc. in the Item record
Linking One Item record to Multiple Bibliographic Records (Bound Withs).
Currently, macros are used. Refer to:
http://www.library.yale.edu/cataloging/Orbis2Manual/boundwith05.htm
49
Orbis: Cataloging
Changing Barcode NumbersIf the barcode is not affixed to the physical item it is sometimes lost. Use this procedure to replace the number for the lost barcode with the number for a new barcode.
1. Retrieve Item record to be updated2. Click on the ellipsis bar to the right of the Barcode field; Barcodes window will
open3. Cursor should be in the Barcode field of the Barcodes window; enter the new
barcode number or wand the barcode4. The new barcode number will be designated as ACTIVE; the former barcode
number will be designated as INACTIVE5. Note that the item record can be retrieved by either the ACTIVE or INACTIVE
barcode number and can be charged on either the ACTIVE or INACTIVE number
6. The INACTIVE barcode number should be deleted; only an INACTIVE barcode number can be deleted.
7. To delete the INACTIVE barcode number, select the INACTIVE barcode and click the DELETE button; then click YES
Copy an Existing Item Record (for Multi-vols)
1. Retrieve existing Item record for earlier volume2. Record>Make a Copy3. Add barcode4. Edit the Enum and/or Chron field with the new information (Careful:
information is retained from the original Item record and must be changed)5. Save to Database
Delete an Item Record
1. From an active Item record, Record>Delete or <Alt-R+D>2. The system will prompt you to be sure you want to delete the record3. You cannot delete an Item record that is charged to a patron
Placing a Hold in Circulation to Retrieve an Item
1. Retrieve the Item record (Item icon), type in barcode -or-2. Click on magnifying glass icon to display a Search dialog box3. Item>Place Request or Place Request icon4. Scan or type in barcode of departmental patron5. Click on Hold radio button6. Click on Copy radio button to retrieve a specific item7. Select Pickup Location from drop-down list8. Click <OK> to save and exit
50
Orbis: Cataloging
Changing Hold Queue
1. Retrieve the Item record (see above)1. Item>Request Maintenance or Request Maintenance icon2. Highlight Item copy in the Hold queue and click the appropriate arrow to move the
Item up or down in the list3. Can move the Item to the top of the list
Creating New Bibliographic Records
From an Existing Template (Workform)
1. New icon or Record>New>Bibliographic2. If you have a default Template specified in Preferences, it opens automatically3. If there is no default Template specified, Select Bibliographic Template dialog
box opens; Select Template and click <Open>4. Fill in the required fields; Remember the Leader and the 008!5. When you have completed filling in Template, delete all empty fields6. Save to Database7. Follow procedures above for MARC and Authority validation
Creating a New Template
1. File>Template>New2. Choose Bibliographic (or Holdings – you can create a MFHD template here as
well)3. File>Save as (must end in .tem); will save to Folder specified in Preferences4. No MARC validation performed on templates5. Set as default template in Preferences if desired6. CAUTION: the NEW template has a number of default values in the fixed fields
that would be inappropriate in most preliminary record templates, e.g. LEADER: Encoding Level: _ (for full-level); Cataloging Form: i (for ISBD instead of AACR2). 008: Publication Status b (No dates given BC date involved); Place of Publication ilu; Cataloging Source: _ (national level record). In most cases, it is probably safer practice to make a copy of an existing template (for the same format) and modify it to meet the appropriate preliminary record standards.
Editing a Template
1. File>Template>Edit2. <Look in:> should be the Template folder3. Open the Preliminary Record Templates folder
51
Orbis: Cataloging
4. Double-click on the template file icon to be edited; or select the icon and click Open
5. Edit the template. 6. Click on the save (floppy disk) icon on the toolbar (or: File>Save)
Changing a Template (Preliminary Records)
1. Enable the Acquisitions Pop-Up menu2. Double-click on the appropriate Change template macro
Changing a Template (Other)
1. Options>Preferences>Folders/Files2. Verify that under Folders, the Template path is C:\Voyager\Catalog\Template\
preliminary record templateIf the path differs, click on the ellipses, find the preliminary record templates folder in the directories window, and click OK. Be sure to click a follow-up OK under Session Defaults and Preferences
3. Under Templates, click the ellipses on the right side of the Bib: (or Hldg: or Auth:) slot. Window should open with <Look in:> preliminary record templates
4. Verify that <Files of type:> is Template; select from the menu if it is not.5. Double-click on the appropriate template icon (or select and click the <OPEN>
button)6. Be sure to click the follow-up <OK> button at the bottom of the Session Defaults and
Preferences window
Making a New Record by Copying an Existing One
1. Record>Make a Copy2. Edit record as needed (Careful: change all necessary fields)3. Save to Database
Remote
1. Follow Import from Remote database instructions earlier to access and search LC database
2. Select record; Edit as needed; Save to Database
52
Orbis: Cataloging
Appendix
Function Keys Used in Editing
<F1> Help (context-specific)
<F2> Valid Values
<F3> Insert Field Before
<F4> Insert Field After
<F9> Insert Delimiter (includes space after)
Default Macro Express Operations Mapped to Function Keys
Cataloging Module
<Ctrl-F1> Closes all records<Shift-F2> Opens Headings window<Ctrl-F2> Copies Record ID (bibliographic, MFHD, or item record)<Shift-F3> Opens Titles window<Shift-F4> Adds (LC) to end of the call number<F5> Opens MFHD or MFHD dialog box<Shift-F5> Adds (LC)+ $m Oversize to call number<Ctrl-F5> Adds + $m Oversize to call number<F6> Retrieves bibliographic record from the MFHD window<Shift F6> Enters 866 field template from the preceding field<Ctrl-F6> Creates new MFHD<F7> Opens Retrieve Item Record window<Shift-F7> Retrieves Item record or Item Record dialog box from MFHD<Ctrl-F7> Creates new Item record<Ctrl-F9> Deletes all 9xx fields on bib record except 950<F10> Opens Search window; disconnects LCDB<Ctrl-F10> Converts EAN number to ISBN number <Shift-F11> Opens OCLCIMP file and re-sets font to MARC-8<F12> Opens the Pop-up menu selected by the user<Shift-F12> Adds $dCtY<Ctrl-F12> Inserts 040 CtY$cCtY before the field selected
53
Orbis: Cataloging
Note also:Use </> on number pad to retrieve all authority records associated with headings on a bib recordUse <Shift-*> on number pad to open Retrieve by Orbis bib record ID window; use <Ctrl-*> on number pad to open Retrieve by MFHD record ID window; use <Alt-*> on number pad to open Retrieve by Authority record ID window.Use <Shift-Delete key> to erase all text to the right of the cursor ("erase end of field").
Circulation Module
<F1> Activates Override macro<F7> Use to enter most heavily used patron code (usually PRPTM at SML)
For more detailed guidelines, refer to:
http://www.library.yale.edu/cataloging/macroexpress/Standard%20Macro%20Express%20Function%20Keys.doc
For more about using Macro Express in technical services applications:
http://www.library.yale.edu/cataloging/macroexpress/macxyalehome.html
54
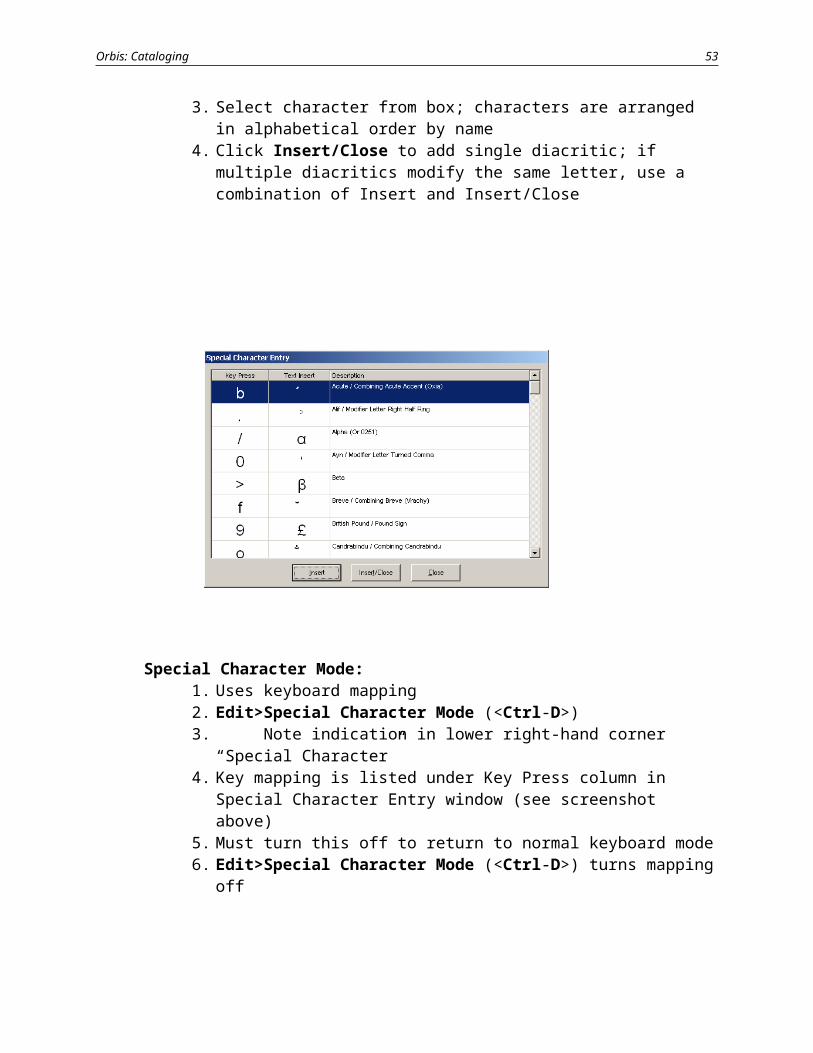
Orbis: Cataloging
Keyboard Equivalents in Voyager Cataloging Module
Cut, Copy and Paste commandsAlthough these commands are not listed on any of the menu items, you can cut, copy and paste in Voyager, to other applications and from other applications to Voyager.
The standard Windows commands for these functions are:
Ctrl-X CutCtrl-C CopyCtrl-V Paste
Alt key
There are keyboard equivalents (commands) in all Voyager modules that combine the Alt key and the underlined letter on the menu item, drop down menu or button. For example, in Voyager Cataloging, the menu item File can be opened by pressing the Alt , then the F key. The keyboard command to open the file menu is Alt-F.
In a drop down menu there are additional menu choices. Each choice has one of the letters underlined. For example, the drop down menu for Record includes a choice for Search. To open the Search menu choice with a keyboard command, press the Alt key, then the R, then S. The keyboard command to open a search dialog box is Alt-R+S.
If a drop down menu choice has an arrow to the right of it, this means that additional menu choices are to be made. For example, the Record menu item has the choice for New with an arrow to the right of it. Highlighting New will show two more choices of Authority and Bibliographic. To choose Bibliographic with a keyboard command, press the Alt key, then N then B. The keyboard command to open a new bib record is Alt-R+N+B.
The Alt key and the letter keys do not need to pressed at the same time. You can press them separately. Make sure the letter sequence is correct.
Ctrl key
In the Acquisitions and Cataloging modules there are also keyboard equivalents that use the Ctrl key and letter. These are found to the right of menu choices. For example, to save a record to Voyager press and hold the Ctrl key and press B. The keyboard equivalent for saving to the database is Ctrl+B. (Use Ctrl+Q to save to the database AND close.)
The Ctrl key must be held down while the additional letter is keyed in.
55
Orbis: Cataloging
Cataloging Module Keyboard Equivalents
Alt. Equiv. FUNCTION STANDARD SEQUENCE
Alt-F FileAlt-F + W Work recordAlt-F + T TemplateAlt-F + I Login InformationAlt-F + S Save Also Ctrl-SAlt-F + A Save as Also Ctrl-AAlt-F + C Close the active open recordAlt-F + O Closes all recordsAlt-F + P+Enter
Print record Also Ctrl-P
Alt-F + L Print labelAlt-F + X Exit
Alt-E EditAlt-E + T Cut Also Ctrl-XAlt-E + C Copy Also Ctrl-CAlt-E + P Paste Also Ctrl-VAlt-E + B Insert field before Also F3Alt-E + A Insert field after Also F4Alt-E + D Delete Field Also the delete keyAlt-E + S Insert subfield Also F9Alt-E + I Edit cell Also F8Alt-E + E Diacritic entry Also Ctrl-EAlt-E + M Diacritic mode Also Ctrl-DAlt-E + W Show MARC values Also F2Alt-E + L Show holdings locations Also Ctrl-L
Alt-R RecordAlt-R + N NewAlt-R + S SearchAlt-R + Y Make a copy (From Bib Record)Alt-R + G Retrieve Holdings from Item RecordAlt-R + I Retrieve by record idAlt-R + B Retrieve by barcodeAlt-R + U Unlink holdings from bibliographic …Alt-R + R Relink holdings to bibliographic…Alt-R + W Show associated recordsAlt-R + H Retrieve holdingsAlt-R + E Create holdingsAlt-R + M Retrieve itemsAlt-R + T Create itemsAlt-R + A Retrieve authoritiesAlt-R + K Verify 856 links Also Ctrl-K
56

Orbis: Cataloging
Alt-R + L Validate heading Also Ctrl-HAlt-R + V Save to database Also Ctrl-BAlt-R + D Delete RecordAlt-R + P ImportAlt-R + Y History (From the Item Record)
Alt-D DisplayAlt-D + H Heading listAlt-D + T Title index
Alt-O OptionsAlt-O + P Preferences
Alt-W WindowAlt-W + T TitleAlt-W + C CascadeAlt-W + A Arrange icons
Alt-H Help
SEARCH WINDOW
Alt-A ClearAlt-B Builder TabAlt-C CancelAlt-E Select Free Text Option (Keyword Tab)Alt-E Edit search (History Tab)Alt-H Select Holdings Boolean Option (Keyword Tab)Alt-K Keyword TabAlt-N Index Selection Tab Alt-O Select Boolean Option (Keyword Tab)Alt-R Open Remote WindowAlt-S Do SearchAlt-T History Tab
PREFERENCES WINDOWAlt-F Folders/Files TabAlt-G General TabAlt-I Item Defaults TabAlt-M Mapping TabAlt-N Colors/Fonts TabAlt-V Validation TabAlt-W Work Flow Tab
57