oral health sterilizer cycle record book: user gudie v2 october 2013 page 1 of 31 sterilizer cycle...
TRANSCRIPT

V2.1 October 2013 Page 1 of 31
STERILIZER CYCLE RECORD BOOK USER GUIDE v2
2011
QUEENSLAND HEALTH ORAL HEALTH
STERILIZER CYCLE RECORD BOOK
V2.1 October 2013 Page 2 of 31
This document has been completed to requirements, policy and procedures of Queensland Oral Health as supplied by Centre for Healthcare Related Infection Surveillance and Prevention. This work is protected by copyright. No part of this design may be reproduced, stored in a retrieval system or transmitted in any form or by any means, electronic, mechanical, photocopying, recording or otherwise without the prior permission of the copyright owner. Manual issue: 2.1 Second printing: June 2011 Trademarks: Suretrax is a trademark. Meditrax is a division of the Altrax Group.

V2.1 October 2013 Page 3 of 31
Contents
1. Aim ........................................................................................................ 5
2. Reason .................................................................................................. 5
3. What is accomplished using the system ................................................ 6
4. How to use the user guide ..................................................................... 7
5. Opening a sterilizer cycle record book ................................................... 8
The front cover ..................................................................................... 8
The inside front cover ......................................................................... 10
The first page – Performance Qualification (PQ) information .............. 10
6. The sterilizer cycle record .................................................................... 12
7. Documenting the preparation of the sterilizer ...................................... 13
Warm up cycle (If applicable) ............................................................. 14
Vacuum/leak rate test cycle ................................................................ 16
Bowie Dick type test ........................................................................... 18
8. Documenting an instrument cycle ........................................................ 20
9. Documenting the results of a sterilization cycle ................................... 23
Documenting the results of a sterilization cycle ................................... 25
10. Documenting failed items. ................................................................... 26
11. Documenting a failed cycle .................................................................. 27
12. Auditing the sterilizer cycle record ....................................................... 27
13. Service or performance qualification ................................................... 28
14. Storage ............................................................................................... 28
15. Patient record ...................................................................................... 28
16. Closing off a sterilizer cycle record book ............................................. 29
17. Recording expired or compromised sterile items. ................................ 30

V2.1 October 2013 Page 4 of 31

V2.1 October 2013 Page 5 of 31
1. Aim To identify and record every cycle of a sterilizer, and any equipment used on a patient which has passed through this process.
2. Reason For consumer protection we must be able to identify any specific item or equipment which has been used on a patient and PROVE that it has successfully been through a decontamination and sterilization process and that it has been checked according to Queensland Health policy and procedures. Remember our defense in litigation, is to provide documentary evidence that equipment has passed through a decontamination and sterilization process, which has been carried out and checked. From that evidence, there is a high probability that the equipment used was sterile. The Queensland Health (QH) Oral Health Sterilizer Cycle Record Book (SCRB) assists in providing traceability and accountability. The need to trace an object applies not only to finding the object, but to determining retrospectively where it has been, and what has happened to it during it’s journey. Accountability is the process of accepting responsibility for the processes that an object is subject to. An account of manufacturing processes is required in order to demonstrate that the necessary care has been taken in the manufacture (or re-manufacture) of items in order to protect life and finance. QH SCRB provides an account (or record) of processes to be maintained, plus a record of the person or persons responsible for those processes (able to identify those person(s) who are able to explain the process). A process is accounted for by the acceptance of responsibility by a person or persons. Documentation is designed around requirements of QH and; AS/NZS 4187:2003 Cleaning, disinfecting and sterilizing reusable medical and surgical instruments and equipment, and maintenance of associated environments in health care facilities AND AS/NZS 4815:2006 Office-based health care facilities — Reprocessing of reusable medical and surgical instruments and equipment, and maintenance of the associated environment. The majority of sterilization carried out in office based practice is carried out in benchtop (small) steam sterilizers.

V2.1 October 2013 Page 6 of 31
3. What is accomplished using the system
• Each sterilizer has an individual record. • Shows total control of the sterilization activities. • Consecutively numbered pages of the book mean that information cannot be added or
deleted providing record integrity. • Meets QH, AS/NZS 4187:2003 and AS/NZS 4815:2006 documentation requirements for
sterilization. • Shows what you are sterilizing. Proof you are not overloading or sterilizing incorrect
items. • Proof of who loaded the sterilizer. • Proof of the success (or failure) of the cycle, and details of individual items which have
failed the process. • Each page in the log is double sided, allowing for cycle information to be recorded on
the front, and item failures on the back. • Proof that all packs / instruments were checked after the sterilization process. • Records all maintenance and testing showing you operate a maintained sterilizer. • Convenient storage of all sterilizer printouts within the sterilizer cycle record book. All
records pertaining to cycles (print outs etc.) shall be stored with the book to give a complete record of the sterilizer history.
• The paper used in the sterilizer cycle record book is manufactured from Sterisyn waterproof synthetic paper for essential record protection in harsh wet environments.
• The batch labels used in the process and placed in patient records allow tracking from the patient record back to the sterilizer cycle record book. You can confirm the sterilizer cycle(s) in which your patients' instruments were sterilized. The advantage of this is that you may now trace to a unique sterilization event that may also be backed up by sterilizer print outs. This provides added security for you and your patients.

V2.1 October 2013 Page 7 of 31
4. How to use the user guide Each instruction is numbered. Each section has an image of the part of the sterilizer cycle record book to which the instruction relates. The number relates directly to the image of the sterilizer cycle record book. For example the following numbered instructions relate to the image where number 1 is in red.
Step 1. Enter your district name and the facility (the actual site where the sterilizer is installed). e.g Cairns - Smithfield CHS

V2.1 October 2013 Page 8 of 31
5. Opening a sterilizer cycle record book The front cover Read the front cover of the log and enter the following information with a black biro/pen. The numbers shown in the step by step instructions, correspond to the following image.
Step 1. Enter your district name. e.g. Cairns. Enter the name of the facility. This is the actual site where the sterilizer is installed.
Step 2. District/ Facility sterilizer no. This is a number that has been allocated by the facility and/or district. Only one number is to be allocated and used for a sterilizer to avoid confusion.
Step 3. If this sterilizer cycle record book is to be used for a loan sterilizer, place a tick in the box. Enter from where the loan sterilizer came from.
Step 4. Enter the sterilizer make. Fill in the sterilizer model number. As sterilizer manufacturer’s improve their sterilizers, the model number changes for their reference, parts may be quite different from one model to another. Fill in the sterilizer serial number. This number is a unique number only for that particular machine.
Step 5. Enter the QH Asset number allocated to this sterilizer.
Step 6. Fill in the first cycle number that is to be entered in the sterilizer cycle record book. (Remember, if you take this number from the sterilizer cycle counter, this should be a sequential number following on from the previous cycle).
Step 7. Enter the date the sterilizer cycle record (log) book commenced.
Step 8. Print your name. Sign that you have opened this book and completed the information required for successful use of the sterilizer cycle record book. (OPTIONAL to include the performance qualification information - see next step).

V2.1 October 2013 Page 9 of 31

V2.1 October 2013 Page 10 of 31
The inside front cover The fastener on the inside front cover may be used to store sterilizer cycle information, test results or any other useful information. The first page – Performance Qualification (PQ) information
Note that this is optional to complete. You may choose to put a line through it and note to refer to technicians report, which should be kept near the sterilizer.

V2.1 October 2013 Page 11 of 31
On the first page of the book: enter the performance qualification information. Enter details of current PQ (validated) load and type of cycle for the sterilizer that this book relates.
A written description of the challenge load and a photograph or diagram is very useful. This assists all staff including casual staff to:
• Identify the date of the last validation of the sterilizer (or when it is due) • Identify the sterilizer cycle was validated (e.g. wrapped cycle that sterilizes at
134°C) • Identify the “Challenge Load” that was validated and should not be exceeded
(overloading)
Step 1. Enter the date of performance qualification by the technician. At a minimum
performance qualification must be undertaken annually. Step 2. Enter the type of cycle that was validated on that date. The cycle should be
a sterilization cycle, that will be routinely used by the facility, suitable for sterilization of instruments that incorporates a drying stage. To avoid confusion use the terminology used by the sterilizer manufacturer and found on the record/printout. e.g. Wrapped, B Standard. If more than two different types of cycles have been validated, ensure both cycles are documented and clearly differentiated.
Step 3. Enter the minimum temperature that must be reached during the sterilization
time, (holding time/sterilization phase.) e.g. 134°C. Enter the minimum length of time that the sterilization temperature (as shown in 15) must be held. Enter the sterilization pressure to be reached and provided on the sterilization record/printout. Pressures can be measured in different ways. e.g bar, millibar (mb), Kilopascal (kPa).
Step 4. Enter the details of the contents of the PQ (validated) load, the description,
how many of a specific item and what rack were they placed in the sterilizer. Step 5. If available, attach photographs (or photocopies of photographs) showing the
contents and where and how these items were loaded into the sterilizer. Note: Sufficient numbers of these photographs/photocopies or a system to transfer the photographs to the next sterilizer cycler record book may need to be in place.

V2.1 October 2013 Page 12 of 31
6. The sterilizer cycle record Each page of the sterilizer cycle record book contains two (2) cycle records.
SECOND CYCLE RECORD ON THE PAGE
FIRST CYCLE RECORD ON THE PAGE

V2.1 October 2013 Page 13 of 31
7. Documenting the preparation of the sterilizer One of the main principles of the sterilizing cycle record book is that everything should be complete and accounted for. It is important to account for each and every cycle that is run in a sterilizer and if this is not completed it could be possible for critical activities to be overlooked. There are different types of cycles for different purposes. To account for each cycle means that the
• warm-up tests • vacuum/leak rate tests • Bowie-Dick type tests • service technician/operational and performance qualification cycles
must be recorded using a separate cycle record.

V2.1 October 2013 Page 14 of 31
Warm up cycle (If applicable)
Step 1. When more than one sterilizer is present in the facility, insert the allocated sterilizer number for which this book should be used. This will assist staff to identify and use the correct sterilizing cycle record book.
Step 2. Circle the letter that represents the day. M (Monday), T (Tuesday), W
(Wednesday), T (Thursday) F (Friday) S (Saturday) S (Sunday). Step 3. Enter the date. Entering the wrong date is a common error. Tip. If unsure,
check your mobile phone or computer calendar for the correct date. Step 4. Tick the warm up cycle box. Note: each type of preparation cycle/test
requires a separate sterilizing cycle record to be completed.
Step 5. Determine what the next cycle number should be, based on the type of cycle selected, and enter this number. Generally the number is determined by noting the previous sterilization printout/record number and add one number.
Step 6. Place an unprocessed batch label showing the allocated sterilizer ID,
allocated sterilization batch cycle number and date of sterilization in to the sterilizer cycle record book.
Step 7 Place a line through the item content field – This indicates that the chamber
did not contain any instruments. Step 8. On completion of the warm up cycle, examine the record/printout to ascertain
if the parameters have been met (passed) or not. Tick the appropriate box for PASS or FAIL.
Step 9. In the CYCLE box, tick the appropriate box for PASS or FAIL. The cycle box
allows the operator to PASS or FAIL a cycle based on other visual indicators. This box is very important for Bowie Dick test cycles and instrument cycles.
Step 10. The person who is checking the results of the warm up cycle, prints their
name, signs and dates the cycle record.

V2.1 October 2013 Page 15 of 31
Example of a warm up cycle record

V2.1 October 2013 Page 16 of 31
Vacuum/leak rate test cycle USE THE NEXT CYCLE RECORD If the sterilizer is a pre vacuum sterilizer, a vacuum/leak rate test will be required. Depending on whether or not the sterilizer has an air detector fitted will depend on the frequency of the vacuum/leak rate test.
Step 1. When more than one sterilizer is present in the facility, insert the allocated sterilizer number for which this book should be used. This will assist staff to identify and use the correct sterilizing cycle record book.
Step 2. Circle the letter that represents the day. M (Monday), T (Tuesday), W
(Wednesday), T (Thursday) F (Friday) S (Saturday) S (Sunday). Step 3. Entering the wrong date is a common error. Tip. If unsure, check your mobile
phone or computer calendar for the correct date. Step 4. Place a tick in the box that indicates a Vacuum/Leak Rate test.
Step 5. Determine what the next cycle number should be, based on the type of cycle selected, and enter this number. Generally the number is determined by noting the previous sterilization printout/record number and add one number.
Note: Some sterilizer manufacturer’s test cycles such as the Bowie Dick type test (BD) and vacuum/leak rate tests may not use a new cycle number – only the sterilization cycles have dedicated cycle numbers. So if this is the case, you will continue to use the previous cycle number for these test cycles. For example, if the last recorded cycle number was 761 and the next cycle you will be performing is a vacuum test, the vacuum test will be recorded as 761. Then if the Bowie Dick type test cycle is to be performed, that test cycle will also be recorded as 761. Remember there has only been one sterilizing cycle with a cycle number of 761.
Step 6. Place an unprocessed batch label showing the allocated sterilizer ID,
allocated sterilization batch cycle number and date of sterilization in to the sterilizer cycle record book. (This helps to keep the batch label gun number in sequence)
Step 7. Place a line through the item content field – This indicates that the chamber
did not contain any instruments. Step 8. On completion examine the vacuum/leak rate test cycle record/printout to
ascertain if the parameters have been met (passed) or not. Tick the appropriate box for PASS or FAIL.
Step 9. In the CYCLE box, tick the appropriate box for PASS or FAIL. The cycle box
allows the operator to PASS or FAIL a cycle based on other visual indicators. This box is very important for Bowie Dick test cycles and instrument cycles.

V2.1 October 2013 Page 17 of 31
Step 10. The person who is checking the results of the vacuum/leak rate cycle, prints their name, signs and dates the cycle record.
Example of a vacuum/leak rate test cycle record

V2.1 October 2013 Page 18 of 31
Bowie Dick type test USE THE NEXT CYCLE RECORD If the sterilizer is a pre vacuum sterilizer, a daily Bowie Dick type test is required.
Step 1. When more than one sterilizer is present in the facility, insert the allocated sterilizer number for which this book should be used. This will assist staff to identify and use the correct sterilizing cycle record book.
Step 2. Circle the letter that represents the day. M (Monday), T (Tuesday), W
(Wednesday), T (Thursday) F (Friday) S (Saturday) S (Sunday). Step 3. Entering the wrong date is a common error. Tip. If unsure, check your mobile
phone or computer calendar for the correct date. Step 4. Place a tick in the box that indicates Bowie Dick Type test section.
Step 5. Determine what the next cycle number should be, based on the type of cycle selected, and enter this number. Generally the number is determined by noting the previous sterilization printout/record number and add one number.
Note: Some sterilizer manufacturer’s test cycles such as the Bowie Dick type test (BD) and vacuum/leak rate tests may not use a new cycle number – only the sterilization cycles have dedicated cycle numbers. So if this is the case, you will continue to use the previous cycle number for these test cycles. For example, if the last recorded cycle number was 761 and the next cycle you will be performing is a vacuum test, the vacuum test will be recorded as 761. Then if the Bowie Dick type test cycle is to be performed, that test cycle will also be recorded as 761. Remember there has only been one sterilizing cycle with a cycle number of 761.
Step 6. Place an unprocessed batch label showing the allocated sterilizer ID,
allocated sterilization batch cycle number and date of sterilization in to the sterilizer cycle record book.
Step 7. Place a line through the item content field – This indicates that the chamber
did not contain any instruments. Step 8. On completion of this type of cycle, examine the sterilizer cycle
record/printout to ascertain if the parameters have been met (passed) or not. Tick the appropriate box for PASS or FAIL.
Step 9. Examine the processed Bowie Dick Test Indicator and determine the result.
In the CYCLE box, tick the appropriate box for PASS or FAIL. Please note that even though the sterilizer cycle parameters have been met on the printout, a failure of the Bowie Dick Test indicator is a failed cycle.
Step 10. The person who is checking the results of the Bowie Dick cycle prints their
name, signs and dates the cycle record.

V2.1 October 2013 Page 19 of 31
Example of a Bowie Dick type test cycle record

V2.1 October 2013 Page 20 of 31
8. Documenting an instrument cycle Use the next cycle record
Step 1. When more than one sterilizer is present in the facility, insert the allocated sterilizer number for which this book should be used. This will assist staff to identify and use the correct sterilizing cycle record book.
Step 2. Circle the letter that represents the day. M (Monday), T (Tuesday), W
(Wednesday), T (Thursday) F (Friday) S (Saturday) S (Sunday). Step 3. Enter the date. Entering the wrong date is a common error. Tip. If unsure,
check your mobile phone or computer calendar for the correct date. Step 4. Place a tick in the box that indicates an instrument cycle Step 5. Enter the cycle type or code. e.g B/S (B standard) Step 6. If incorporating a process challenge device in the instrument cycle, tick the
process challenged device box. Step 7. If incorporating a biological indicator in the instrument cycle, tick the
biological indicator box. Step 8. Determine what the next sterilization cycle number should be and enter this
number. Generally the number is determined by noting the previous printout/record number and add one number. This number should be the next sterilization cycle number to be recorded on the printout/record.
Step 9. Place an unprocessed batch label showing the allocated sterilizer ID,
allocated sterilization batch cycle number and date of sterilization in to the sterilizer cycle record book.

V2.1 October 2013 Page 21 of 31
Step 10. Enter the specific details of the contents and the number of items in the
sterilizer cycle record. The most common items included in this sterilizer cycle record were indicated for inclusion by the QH Dental Assistants Network to minimise the writing time required. The columns were grouped by packs/kits/sets of instruments, then hand pieces, motors and triplex, followed by common instruments. For those items not mentioned use the blank row(s) to write the name of the item and number. Every wrapped, packed, pouched item must be checked for non-conformity such as damage or not sealed correctly, and have a batch label applied with the sterilization cycle details. Only the packs to be included in the current cycle should be labeled. Count and document all the items, wrapped, packed, pouched and unwrapped that are to be loaded in to the sterilization chamber for the identified cycle. In the example following: EXAM KITS 4 TRIPLEX BODIES 4 X-RAY HOLDERS 3 HAND SCALER 1 Total number of items = 12 Apply one unprocessed batch label to an “Oral Health Control Pouch” that contains a Class 5 or 6 chemical indicator. The Oral Health control indicator pouch is included in every sterilization instrument cycle that contains wrapped and/or unwrapped items. If using the sterilizer to sterilize cleaning brushes, these items must not be placed in the sterilizer chamber with instruments.
Step 11. Enter the total number of items loaded. In the example following the total
items loaded is 12. Step 12. Enter your signature. Step 13. Print your name.

V2.1 October 2013 Page 22 of 31
Documenting the results of a sterilization cycle

V2.1 October 2013 Page 23 of 31
9. Documenting the results of a sterilization cycle
Step 14. On completion of the cycle, examine the results/printout to ensure the critical parameters - time, temperature and pressure have been met. (See the first page - Performance Qualification information).
Go to the UNLOADING section and the “CYCLE PARAMETERS” section. Enter the length of the sterilization time (holding time).
Step 15. Enter the sterilization temperature. Ensure the minimum sterilization
temperature has been reached and held at that temperature for the required time. Report to your supervisor’s temperatures that are below the minimum sterilization temperature or exceed the 136°C and note in the comments section.
Step 16. AS/NZS 4187:2003 requires the pressure of large steam sterilizers to be
recorded. For large steam sterilizers, record the pressure. Step 17. Read the sterilizer printout result. In the PRINTOUT box, tick the appropriate
box for PASS or FAIL. Step 18. In the CYCLE box, tick the appropriate box for PASS or FAIL. The cycle box
allows the operator to PASS or FAIL a cycle based on other visual indicators. This box is very important for instrument cycles.
Step 19. Remove the items from the chamber. Do not place on a solid surface. Place
in a dedicated cooling area/zone. Visually check and document the results of the “control pouch” class 5/6 chemical indicator by ticking Pass or Fail
Step 20. Visually check the items, to ensure packaging is dry, intact – not split or
punctured. Tick to confirm items have been checked. Step 21. Visually check the class 1 chemical indicators have changed colour. Tick to
confirm the chemical indicators on the packs/pouches have been checked. Step 22. Empty the chamber as soon as possible after the end of the cycle. Document
the time of release of the items from the chamber. This time may differ from the time the cycle ended.
Step 23. Ensure the number and type of items removed from the chamber, correspond
to the number and type documented prior to loading the chamber.
Enter the number of items released and/or number of items failed. If none of the items failed in the cycle, then enter zero (0) in the box relating to the number of failed items. Enter a reason for the failed items. If required the “Comments” section may also be used. (Do not leave failed items to cool with items able to be released – remove and clearly label failed item(s) as such).

V2.1 October 2013 Page 24 of 31
Step 24. When the control pouch has cooled, check the colour change of the batch
label has changed correctly and remove the batch label and adhere to the sterilizer cycle record.
Step 25. Tick the parameters checked box when all the above steps have occurred.
Step 26. Items must be cooled prior to storage. Tick to confirm items have been
placed into the cooling area. Cooling must occur prior to storage. Step 27. Use the comments section to document notes that would assist another
person to understand what has occurred during the cycle. Step 28. The person authorising the release of the load is accountable and must print
their name, sign and date. Step 29. Attach printout and any other evidence of the cycle. Please ensure that
Process Challenge Device and/or Biological Indicator results are recorded in the area provided. Please note that even though the sterilizer cycle parameters have been met on the printout, a failure of Process Challenge Device and/or Biological Indicators is a failed cycle.
Step 30. Optional - A simple ‘double check’ by another healthcare team member can
be a system factor which helps to prevent errors. It is an ‘action to prevent or minimise harm from health care errors.’ Ideally this is undertaken at the end of each day or the beginning of the next day.
As a quality assurance check, ask a co-worker to check the documented details, such as:- • Correct day is circled. • Correct date is on the batch labels in the cycle record and written in the cycle
record. • The written cycle number is the same cycle number as on both labels and the
printout. • The control batch label class 1 chemical indicator has changed colour from blue to
grey/black. • The minimum sterilization time, temperature (and pressure) has been reached
(refer to the Performance Qualification information in the front cover or technicians report), this may be confirmed on the printout.
• If cleaning brushes are noted as being in a cycle, these items must be sterilized separately from instruments and not be placed in the sterilizer chamber with instruments.
• Total number of items loaded and unloaded (including failed items) is the same. • Signature and name of person loading and unloading/releasing is present. • Print name (or if the person doesn’t wish to be named, place a tick or initials to
show a double check has been done).

V2.1 October 2013 Page 25 of 31
Documenting the results of a sterilization cycle
V2.1 October 2013 Page 26 of 31
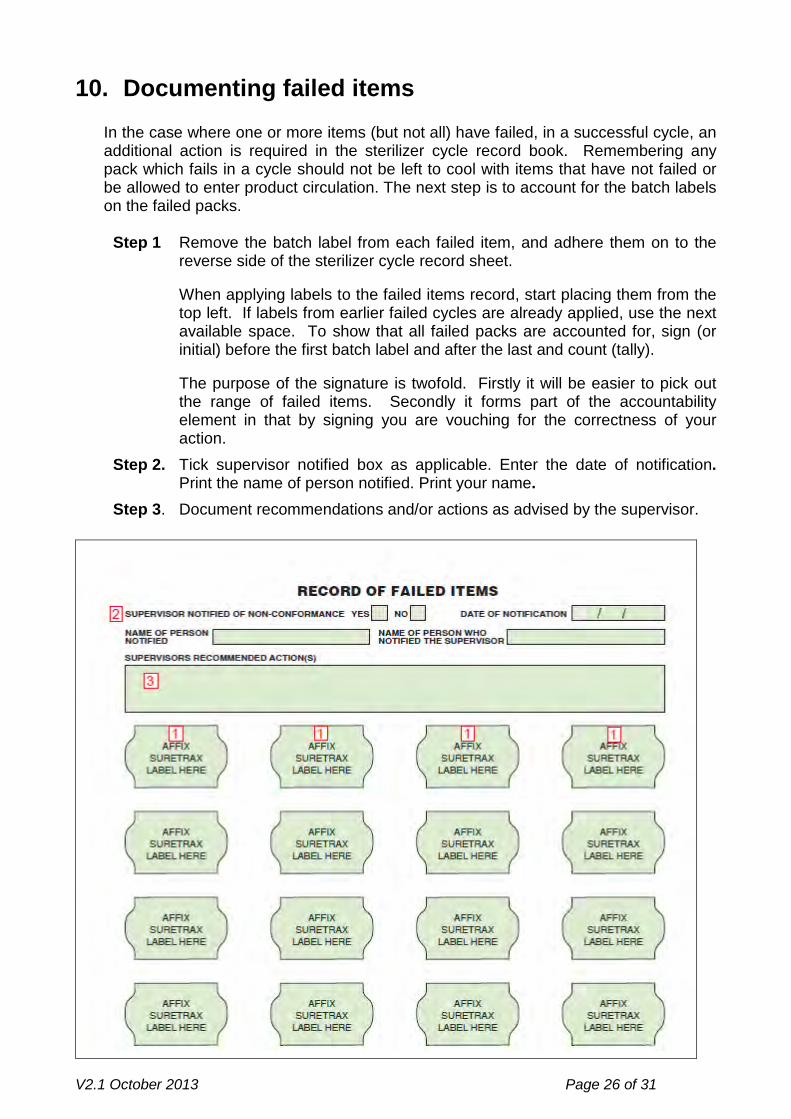
10. Documenting failed items
In the case where one or more items (but not all) have failed, in a successful cycle, an additional action is required in the sterilizer cycle record book. Remembering any pack which fails in a cycle should not be left to cool with items that have not failed or be allowed to enter product circulation. The next step is to account for the batch labels on the failed packs.
Step 1 Remove the batch label from each failed item, and adhere them on to the
reverse side of the sterilizer cycle record sheet.
When applying labels to the failed items record, start placing them from the top left. If labels from earlier failed cycles are already applied, use the next available space. To show that all failed packs are accounted for, sign (or initial) before the first batch label and after the last and count (tally). The purpose of the signature is twofold. Firstly it will be easier to pick out the range of failed items. Secondly it forms part of the accountability element in that by signing you are vouching for the correctness of your action.
Step 2. Tick supervisor notified box as applicable. Enter the date of notification. Print the name of person notified. Print your name.
Step 3. Document recommendations and/or actions as advised by the supervisor.
V2.1 October 2013 Page 27 of 31
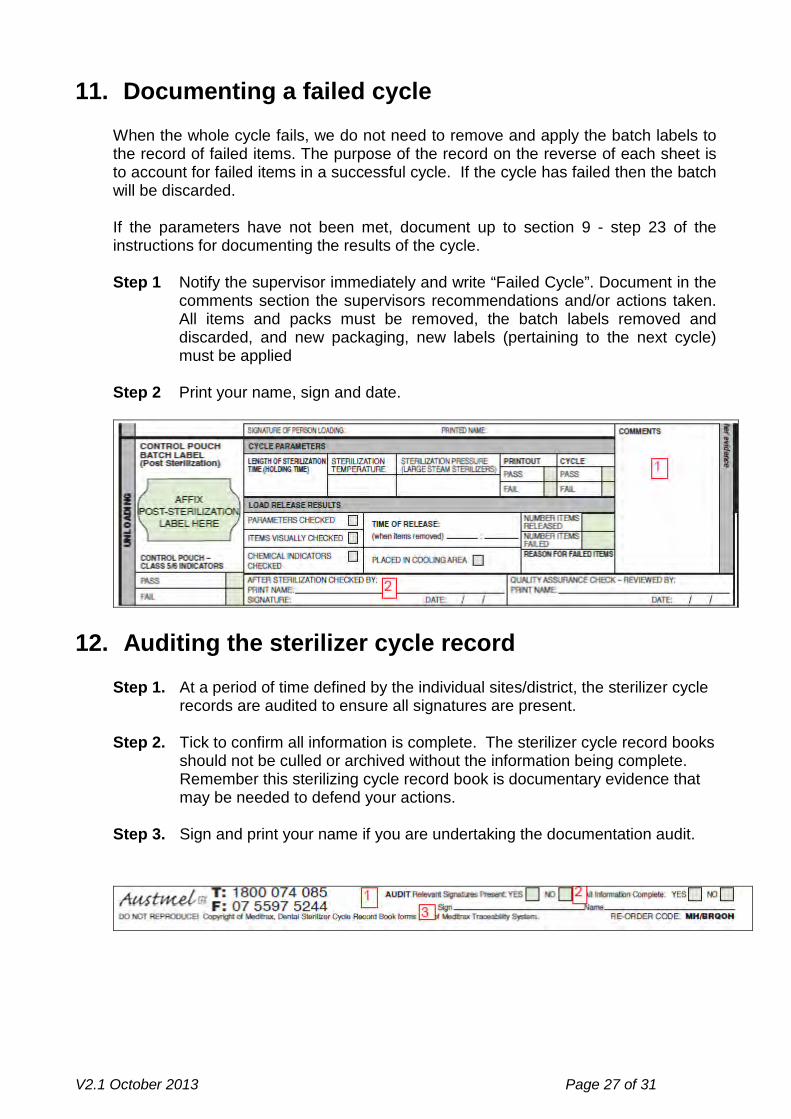
11. Documenting a failed cycle
When the whole cycle fails, we do not need to remove and apply the batch labels to the record of failed items. The purpose of the record on the reverse of each sheet is to account for failed items in a successful cycle. If the cycle has failed then the batch will be discarded. If the parameters have not been met, document up to section 9 - step 23 of the instructions for documenting the results of the cycle. Step 1 Notify the supervisor immediately and write “Failed Cycle”. Document in the
comments section the supervisors recommendations and/or actions taken. All items and packs must be removed, the batch labels removed and discarded, and new packaging, new labels (pertaining to the next cycle) must be applied
Step 2 Print your name, sign and date.
12. Auditing the sterilizer cycle record
Step 1. At a period of time defined by the individual sites/district, the sterilizer cycle records are audited to ensure all signatures are present.
Step 2. Tick to confirm all information is complete. The sterilizer cycle record books
should not be culled or archived without the information being complete. Remember this sterilizing cycle record book is documentary evidence that may be needed to defend your actions.
Step 3. Sign and print your name if you are undertaking the documentation audit.

V2.1 October 2013 Page 28 of 31
13. Service or performance qualification
Step 1. Tick the service or performance qualification in conjunction with the steps found in Section 8 - Documenting an instrument cycle - Steps 1 to Steps 7. Use the comments box as needed.
14. Storage
When packs have been sterilized and cooled, they may enter sterile circulation. Usually this will mean being stored for a period of time, as opposed to being used immediately. This section is concerned with good housekeeping. Ensure a process is in place to help with good stock rotation, for example, pick items from the front in the storage area for use and restock to the back. For every out-of-date item that needs to be re-processed, there is a cost. With good stock rotation that cost can be reduced. To minimise the type and number of items being reprocessed, document the items requiring reprocessing, and in order to reduce the costs associated with reprocessing unused items, a blank table is contained in section 17 to assist with monitoring and determining what stock may be superfluous.
15. Patient record
One of the benefits of the Suretrax batch label is that it can be re-applied. The significance of this is in the recording of items used in an operation. In general this means the application of the Suretrax label, from each item used, onto the patient’s record. A Suretrax batch label is an accountable document. It provides a direct link to the sterilizer cycle which sterilized an item. Without the label, there is no way to prove that: • The sterilizer cycle responsible for the sterilization of the pack was successful (and
hence that the pack is sterile). • The pack was actually in that cycle ŧ.
________________________________________ ŧ Application of Batch code label proves packs into the autoclave.

V2.1 October 2013 Page 29 of 31
16. Closing off a sterilizer cycle record book When a sterilizer cycle record book is filled, and before starting a new sterilizer cycle record book, complete the details on the front cover of the old sterilizer cycle record book.
Step 1. Fill in the 'cycle to' box as appropriate. Step 2. Date the close of the sterilizer cycle record book (log) Step 3. Print your name Step 4. Sign for the closure.
The fastener on the bottom edge of the book should be used to fasten the log book – the front cover and the back cover together. The book has been designed to expand to take the additional paper thickness when the book is complete. The information that you have gathered gives a detailed history of your sterilizers. That information is like an insurance policy providing evidence that the batches you have processed have been accounted for, whether sterilization has been successful or not. Under Australia product liability laws you are required to keep records of processes for a minimum period of time. Check with you your medical records department before destroying any records. If you are required to produce evidence regarding the success of a batch during that period, then it makes sense to introduce an archival system to enable easy finding. For your guidance in setting up an archiving system, please note the following: An archival system should be designed to allow you, and those that follow you, to find records quickly and efficiently
Set up an archival register to include some or all of the following information:
• Sterilizer number • Cycle range • Date of opening/closure • Location
Where you store your records today may not be where they end up tomorrow, record all movements. If you remove files make sure they go back in the right place Finally remember, these records prove that your policy and procedures are correct. Treat them with the respect and care they deserve.

V2.1 October 2013 Page 30 of 31
17. Recording expired or compromised sterile items. This is an optional activity. Some facilities have found it a useful quality improvement activity to monitor the number of items being returned for reprocessing within a three month period and to account for all batch labels including those that have been compromised prior to use. The following tables have been developed and provided by the Bundaberg Oral Health Dental Service.
RECORD OF EXPIRED ITEMS DATE STICKER STICKER STICKER STICKER
DESCRIPTION OF INSTRUMENTS
DATE STICKER STICKER STICKER STICKER
DESCRIPTION OF INSTRUMENTS
DATE STICKER STICKER STICKER STICKER
DESCRIPTION OF INSTRUMENTS
DATE STICKER STICKER STICKER STICKER
DESCRIPTION OF INSTRUMENTS
DATE STICKER STICKER STICKER STICKER
DESCRIPTION OF INSTRUMENTS
DATE STICKER STICKER STICKER STICKER
DESCRIPTION OF INSTRUMENTS
DATE STICKER STICKER STICKER STICKER
DESCRIPTION OF INSTRUMENTS

V2.1 October 2013 Page 31 of 31
RECORD OF COMPROMISED ITEMS
DATE BATCH LABEL STICKER INSTRUMENT REASON