oracle soa suite 11g administrator's handbooks handbook . oracle soa suite 11g is the backbone...
TRANSCRIPT

Oracle SOA Suite 11g Administrator's Handbook
Ahmed Aboulnaga Arun Pareek
Chapter No. 2 "Management of SOA
Composite Applications"

In this package, you will find: A Biography of the authors of the book
A preview chapter from the book, Chapter NO.2 "Management of SOA Composite Applications"
A synopsis of the book’s content
Information on where to buy this book
About the Authors Ahmed Aboulnaga is a Technical Director at IPN Web Inc., a full life cycle systems integrator headquartered in Maryland, USA. Ahmed's professional focus is on technical management, architecture, and consulting within the Oracle Fusion Middleware stack, having implemented enterprise solutions for commercial, government, and global customers over the years.
Ahmed is an Oracle SOA Architect Certified Expert and Oracle Application Server Certified Associate and has presented at OpenWorld, Collaborate, OAUG, IOUG, and various Oracle users groups in the past. He actively contributes to the online community in areas of WebLogic Server, SOA Suite, Application Integration Architecture, Oracle Service Bus, Grid Control, and other Oracle middleware technologies. Ahmed is currently the President of the Western Michigan Oracle Users Group.
I would like to thank my father for instilling in me a strong work ethic, encouraging my passion in technology, and supporting my efforts on this book. You are greatly missed.
For More Information: www.packtpub.com/oracle-soa-suite-11g-administrators-handbook/book

Arun Pareek is an IASA certified Software Architect and has been actively working as an SOA and BPM practitioner. Over the past six years, he has worked in the capacity of Consultant and Architect in the implementation of a variety of SOA-based projects for customers across the globe. He has a knack for designing systems that are scalable, manageable, performant, and fault-tolerant, and is a keen enthusiast of automation techniques.
He is currently employed with Rubicon Red, Australia; an innovative IT professional services firm focused on enabling enterprise agility and operational excellence through the adoption of emerging technologies such as SOA, BPM, and Cloud Computing. Rubicon Red was founded in 2009 to focus on the emergent needs of Oracle Fusion Middleware customers, and offers a robust SOA adoption methodology incorporating agile development, reference architecture(s), automation, and governance.
Prior to working with Rubicon Red, Arun has worked for companies such as Dell and Accenture where he has successfully executed many SOA-based projects in the communications and utilities domain.
Arun Pareek has also been engaged with Packt Publishing as a Technical Reviewer for quite some time now; reviewing books such as Oracle BAM 11gR1 Handbook and Oracle BPM Suite 11g Developer's cookbook. He is also an active blogger on these technologies, and runs a widely popular blog at http://beatechnologies.wordpress.com. He can also be contacted at his personal e-mail address at [email protected].
For More Information: www.packtpub.com/oracle-soa-suite-11g-administrators-handbook/book

Oracle SOA Suite 11g Administrator's Handbook Oracle SOA Suite 11g is the backbone of messaging and application integration in a service oriented architecture. An Application Administrator is responsible for end-to-end administration and management of this infrastructure. The role extends to other areas such as architecting an SOA infrastructure, troubleshooting, monitoring, performance tuning, and securing transactions that flow over loosely coupled components. Understanding the underlying components, services, and configuration and their relation to each other is necessary to effectively administer the Oracle SOA Suite 11g environment. Due to its sheer size, administering Oracle SOA Suite 11g is a daunting task, but this book provides detailed explanations and walkthroughs of all of the core administrative areas.
We begin with an introduction to SOA and quickly move on to management of SOA composite applications. You will learn how to manage composite applications, their deployments, and lifecycles, followed by detailed explanations surrounding monitoring and performance tuning the Oracle SOA Suite 11g infrastructure. In-depth explanations of numerous configuration and administration areas are also covered. You will be taken through troubleshooting approaches on how to identify faults and exceptions through extended logging and thread dumps, finding solutions to common startup problems, and deployment issues. We also explain how to secure the deployed services by leveraging Oracle Web Services Manager. Later chapters deal with managing the metadata services repository, backup, and recovery, and will conclude with advanced topics such as silent installs, cloning, and high availability installations..
What This Book Covers Chapter 1, SOA Infrastructure Management: What You Need to Know, introduces Oracle SOA Suite 11g, a complete, best-of-breed, and hot-pluggable product set that helps to deliver robust, agile, and reliable SOA solutions. This chapter introduces the capabilities of Oracle SOA Suite 11g and provides a snapshot of several important aspects surrounding its administration and how it can be leveraged to effectively manage and monitor the SOA infrastructure.
Chapter 2, Management of SOA Composite Applications, focuses on the management of composites, describing composite lifecycles, revisions and states, leveraging ant for automated build and deployments, using configuration plans for code promotion, and defining partitions to logically separate composites. It also describes ways to optimally save instance data, explaining the relation between database usages with respect to various audit levels that can be set.
For More Information: www.packtpub.com/oracle-soa-suite-11g-administrators-handbook/book
Chapter 3, Monitoring Oracle SOA Suite 11g, emphasizes monitoring of the service engines and instances, understanding their states as well as obtaining performance metrics of composite instances running on the Oracle SOA Suite 11g infrastructure. This chapter also describes other areas that include a detailed explanation of sensors, ECID, Oracle WebLogic Server infrastructure monitoring, and the break down of the log files in an easy to understand format.
Chapter 4, Tuning Oracle SOA Suite 11g for Optimum Performance, is one of the more important chapters, as it provides guidelines and recommendations on how to drastically improve the performance of your Oracle SOA Suite 11g infrastructure, covering areas of Oracle WebLogic Server, service engines, code considerations, Oracle Database, and operating system tuning recommendations.
Chapter 5, Configuring and Administering Oracle SOA Suite 11g, is quite a long chapter, as it details the numerous administrative areas around BPEL, Mediator, UMS, BAM, and Human Workflow components in varying detail. Other topics such as startup and shutdown of the infrastructure, administration of DVMs and XREFs, configuration of log rotation, setting up UMS, and the creation of read-only MDS accounts for developers are also described.
Chapter 6, Troubleshooting the Oracle SOA Suite 11g Infrastructure, unlike other troubleshooting guides which simply list out solutions to common errors, presents a comprehensive troubleshooting methodology, which, when coupled with the foundational knowledge of the previous chapters, provides you with a better ability to solve most issues related to the infrastructure.
Chapter 7, Configuring Security Policies, introduces Oracle Web Services Manager, a central policy framework for service oriented applications used by Oracle SOA Suite 11g to implement service-level security. This chapter explains the OWSM security semantics such as policy assertions, templates, keystores, and credential stores. It also covers how they can be used to apply security to components within a composite along with the configurations required at the infrastructure. The chapter also covers administration topics that range from logging, exporting, importing, and versioning the various policies by using a combination of WLST and console approaches.
Chapter 8, Managing the Metadata Services Repository and Dehydration Store, discusses operational aspects of the metadata services layer including deploying applications to use an MDS repository, exporting and importing metadata across environments, and database growth management activities, such as tuning and purging. It also discusses partitioning surrounding the Dehydration Store.
For More Information: www.packtpub.com/oracle-soa-suite-11g-administrators-handbook/book
Chapter 9, Backup and Recovery, identifies exactly what components need to be backed up (such as the Middleware Home, JDK, Windows registry keys, and runtime artifacts), what would need to be restored in the event of a failure, and to what point in time a recovery would be needed. The chapter provides the necessary approach to recover your environment from the backup point and also explains ways to leverage cloning to backup and restore a middleware installation and domain from one environment to another.
Chapter 10, Advanced Administration Topics, covers several advanced, disjoined topics that most Oracle SOA Suite 11g administrators will be engaged in, namely, patching Oracle SOA Suite components, upgrading from Oracle SOA Suite 10g, installing a highly available clustered setup of the infrastructure, and performing silent installations. You can download this chapter from http://www.packtpub.com/sites/default/files/downloads/6082EN_Chapter10_ Advanced Administration Topics.pdf.
For More Information: www.packtpub.com/oracle-soa-suite-11g-administrators-handbook/book

Management of SOA Composite Applications
Developers typically create composite applications or simply composites that are packaged into single, deployable JAR fi les. These applications can contain any number of service components that include BPEL or BPMN processes, Mediator services, human tasks and workfl ows, and business rules. Composites include logic and code that form the foundation of SOA-based integrations. Though the design and development of composites are not the ultimate responsibility of the Oracle SOA Suite 11g administrator, the deployment, monitoring, and management of them are.
In this chapter, we will discuss the concepts that enable you to manage these composites, and cover the following areas in more detail:
Managing composite lifecycles Structuring composite deployments with partitions Setting up ant for automated composite build management Promoting code, using confi guration plans Understanding and confi guring composite audit levels
Managing composite lifecycles Every composite has a state, mode, and associated metadata. The state can be up (started) or down (shut down). The mode can either be active or retired. Metadata is stored in the Metadata Store (MDS) , which is a database-based repository used by Oracle SOA Suite 11g, and consists of information that includes default revision number, last modifi cation date, deployment and redeployment times, and instance statistics. Before walking through how to manage the state and mode of composites, we will begin by describing composite revisions.
For More Information: www.packtpub.com/oracle-soa-suite-11g-administrators-handbook/book

Management of SOA Composite Applications
[ 34 ]
Understanding revisions When a HelloWorld composite is deployed to the server, a revision is required during the deployment. Thus, the service's Web Services Description Language (WSDL) can be accessed via a URL similar to the following, clearly indicating a revision of "1.0" after the composite name:
http://soahost1:8001/soa-infra/services/default/HelloWorld!1.0/HelloWorld.wsdl
However, there may be a case where a new version of the service needs to be deployed and that this version has a different implementation from the existing one. Overwriting the existing version may not be the right option as it would break all client applications that are already utilizing the service. Thus, it makes sense to deploy the new service using a different revision, such as revision "2.0", and thus make both the versions available simultaneously. It would, therefore, be accessible at a different URL:
http://soahost1:8001/soa-infra/services/default/HelloWorld!2.0/HelloWorld.wsdl
Now, the old and new services are both available and accessible. Clients accessing revision 1.0 of the composite may transition to revision 2.0 at their own pace. If multiple revisions of the same service are deployed, one of them must be specifi ed as the default revision. This can be specifi ed during deployment time or changed at runtime. The default revision would thus be accessed at a revision-independent URL:
http://soahost1:8001/soa-infra/services/default/HelloWorld/HelloWorld.wsdl
Typically, client applications will access the default revision. Revisions are advantageous in environments where maintaining old and new versions of the same composite is required, particularly if it involves breaking changes.
As shown in the following screenshot, default revisions are indicated by a green dot in the list of composites for a given partition. Partitions will be explained in detail later in this chapter.
For More Information: www.packtpub.com/oracle-soa-suite-11g-administrators-handbook/book

Chapter 2
[ 35 ]
Changing the composite default revision at runtime If a composite is not the default revision, the Set As Default... button will appear in the composite page, as shown in the following screenshot. By clicking on this button, it is possible at this point to set the revision of this composite as the default revision if you choose to.
If a default composite application is undeployed, the default revision is automatically changed to the last deployed revision.
For More Information: www.packtpub.com/oracle-soa-suite-11g-administrators-handbook/book
Management of SOA Composite Applications
[ 36 ]
Deploying, redeploying, and undeploying composites Composites are deployed and redeployed as SOA Archives or SARs, which are similar to traditional JAR fi les. Oracle Enterprise Manager Fusion Middleware Control provides the ability to deploy, redeploy, and undeploy a SAR from the convenience and simplicity of a web browser. Though deploying via the console is extremely easy, the following two important points should be considered:
A SAR fi le is a special JAR fi le that requires a prefi x of sca_ and may include environment-specifi c information bundled within the JAR fi le. For example, the composite may reference a web service on some external development server. The URL of this web service is hardcoded in the JAR fi le. Deploying the same JAR to a production server would not be valid.
Deployment of multiple composites via the console is cumbersome and time consuming. Using ant is the preferred method for deploying multiple SARs and this will be covered in a subsequent section in this chapter.
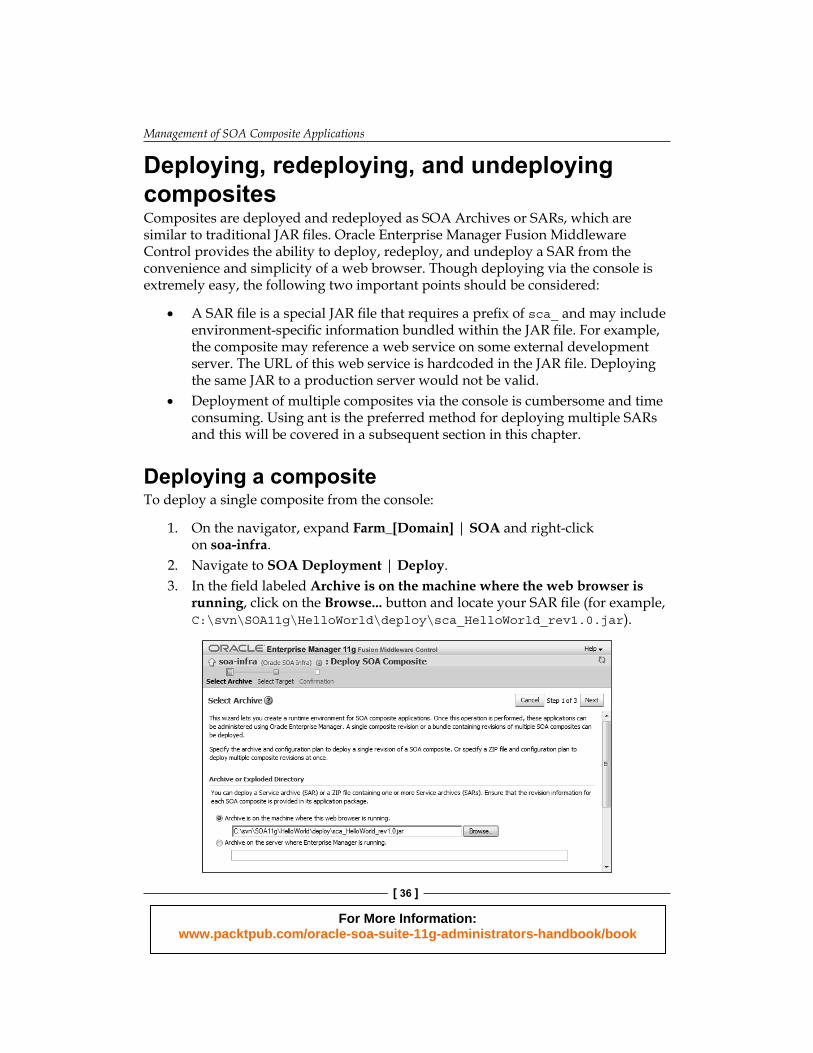
Deploying a composite To deploy a single composite from the console:
1. On the navigator, expand Farm_[Domain] | SOA and right-click on soa-infra.
2. Navigate to SOA Deployment | Deploy.3. In the fi eld labeled Archive is on the machine where the web browser is
running, click on the Browse... button and locate your SAR fi le (for example, C:\svn\SOA11g\HelloWorld\deploy\sca_HelloWorld_rev1.0.jar).
For More Information: www.packtpub.com/oracle-soa-suite-11g-administrators-handbook/book
Chapter 2
[ 37 ]
4. Click on Next.5. From the drop-down list, select the partition to which you wish to deploy
this composite.6. Click on Next.7. Choose the radio button Deploy as default revision or Do not change the
default revision.8. Click on the Deploy button.
When the HelloWorld composite is deployed as revision 1.0 and as the default version, an entry is logged in the soa_server1.out fi le (located under $MW_HOME/user_projects/domains/soa_domain/servers/soa_server1/logs/soa_server1.out) as follows:
INFO: DeploymentEventPublisher.invoke Publishing deploy event for default/HelloWorld!1.0*soa_fe9ee226-4f29-4db7-b4be-d7410bbc13ffdefault/HelloWorld!1.0*soa_fe9ee226-4f29-4db7-b4be-d7410bbc13ff
Once it is deployed, the service becomes available immediately. If the composite uses inbound resources (such as the JMS Adapter, which consumes from a JMS queue), the consumption begins immediately once the composite is deployed.
The rest of the instructions in this chapter assume that the HelloWorld composite is deployed to the default partition.
Redeploying a composite To redeploy a single composite from the console:
1. On the navigator, expand Farm_[Domain] | SOA | soa-infra.2. Expand the partition (for example, default) and right-click on the composite
name that you wish to redeploy (for example, HelloWorld).3. Navigate to SOA Deployment | Redeploy.4. In the fi eld labeled Archive is on the machine where the web browser is
running, click on the Browse button and locate your SAR fi le (for example, C:\svn\SOA11g\HelloWorld\deploy\sca_HelloWorld_rev1.0.jar).
5. Click on Next.6. Choose the radio button Deploy as default revision or Do not change the
default revision.7. Click on the Redeploy button.
For More Information: www.packtpub.com/oracle-soa-suite-11g-administrators-handbook/book

Management of SOA Composite Applications
[ 38 ]
Redeploying a composite overwrites the existing revision. The state of the instances of the older revision are all changed to stale (instance states are described in detail in Chapter 3, Monitoring Oracle SOA Suite 11g).
Undeploying a composite To undeploy a single composite from the console:
1. On the navigator, expand Farm_[Domain] | SOA | soa-infra.2. Expand the partition (for example, default) and right-click on the
composite name that you wish to undeploy (for example, HelloWorld).3. Navigate to SOA Deployment | Undeploy.4. Click on the Undeploy button.
In addition to the service no longer being available, undeploying a composite (or a composite revision) changes the state of all historical instances to stale, denoted by the icon . If the default revision of the composite is undeployed, the last deployed revision of the composite becomes the default.
Starting up and shutting down composites Composites are automatically started up when they are deployed. If a composite is shut down, all requests to the composite are rejected, including callbacks. New requests are not served and new instances are not created. However, all running instances are allowed to complete.
Though starting up and shutting down composites via the console is extremely easy, if you require to start up or shut down multiple composites, two approaches are available (discussed in detail later in this chapter):
Composites deployed to the same partition can all be started up or all be shut down with a single operation.
Ant can be used to automate the startup and shutdown of composites.
Starting a composite To start up a single composite from the console:
1. On the navigator, expand Farm_[Domain] | SOA | soa-infra.2. Expand the default partition , and click on the HelloWorld composite
and the revision.
For More Information: www.packtpub.com/oracle-soa-suite-11g-administrators-handbook/book

Chapter 2
[ 39 ]
3. Click on the Start Up button , which will only appear if the composite is already shut down.
Shutting down a composite To shut down a single composite from the console:
1. On the navigator, expand Farm_[Domain] | SOA | soa-infra.2. Expand the partition (for example, default), choose from among the
deployed composites, and click on the composite name and the revision (for example, HelloWorld[1.0]).
3. Click on the Shut Down button , which will only appear if the composite is already started up.
For More Information: www.packtpub.com/oracle-soa-suite-11g-administrators-handbook/book

Management of SOA Composite Applications
[ 40 ]
Retiring and activating composites Composites have two modes—active and retired. These are often confused with composite states, which can be up (started) and down (shut down).
Composites are automatically activated when they are deployed (in fact, they are also started up as well, so active and started composites are really identical in nature). However, when a composite is retired, new instances cannot be created. Existing instances, however, continue to completion. This includes instances that receive callbacks. The ability to receive callbacks and time based waits is the primary difference between a retired composite and a composite that has been shut down.
The only difference between activating a composite and starting up a composite is that activating the composite affects the retired mode, while starting up a composite affects the shutdown state.
Retiring a composite To retire a single composite from the console:
1. On the navigator, expand Farm_[Domain] | SOA | soa-infra.2. Expand the partition (for example, default) and click on the composite
name (for example, HelloWorld).3. Click on the Retire button , which will only appear if the composite is
already active.
Activating a composite To activate a single composite from the console:
1. On the navigator, expand Farm_[Domain] | SOA | soa-infra.2. Expand the partition (for exampple, default) and click on the composite
name (for example, HelloWorld).3. Click on the Activate button, which will only appear if the composite is
already retired.
For More Information: www.packtpub.com/oracle-soa-suite-11g-administrators-handbook/book

Chapter 2
[ 41 ]
Deleting instances When an SOA composite application is invoked, a new composite instance is created. Every instance has a unique ID and its details can be retrieved from Oracle Enterprise Manager Fusion Middleware Control. Administrators are expected to delete completed instances and free up their data periodically to control growth. Too much instance-related data requires additional storage and it also impacts the performance of the console. We will discuss management of the instance data in Chapter 8, Managing the Metadata Services Repository and Dehydration Store, but it may be worthwhile briefl y describing how to delete instances, thereby purging all data related to it, manually from Oracle Enterprise Manager Fusion Middleware Control as part of composite management activities. Deleting instances is quite easy as demonstrated in the following steps:
1. On the navigator, expand Farm_[Domain] | SOA | soa-infra.2. Expand the partition (for example, default) and click on the composite name
(for example, HelloWorld).3. Click on the Instances tab.4. At this point, you can delete instances in one of the following two ways:
Highlight the list of instances (press the Ctrl key and click on each composite one by one) and click on the Delete Selected button.
Click on the Delete With Options button. From here you can delete instances older than a specifi c time or delete all instances within a time frame that have a certain state.
We can also bulk delete/purge composite instances from the underlying database dehydration store through the use of SQL scripts. Again, this will be covered in more detail in Chapter 8, Managing the Metadata Services Repository and Dehydration Store.
Structuring composite deployments with partitions Prior to Oracle SOA Suite 11g PS2 (11.1.1.3), as hundreds of composites were deployed to the SOA server, they were all listed in alphabetical order on the console, which made it a burden to manage and was not very structured. Oracle recognized the lack of structure and, therefore, introduced the concept of partitions to help better organize where to deploy your composites. However, partitions are just logical separations to group your composites together. Domain libraries, extension modules, server Java Naming and Directory Interface (JNDI), and infrastructure properties are shared across all partitions.
For More Information: www.packtpub.com/oracle-soa-suite-11g-administrators-handbook/book

Management of SOA Composite Applications
[ 42 ]
Partitions do not have their own confi guration or logging. They serve no purpose other than grouping composites into separate categories. Thus, for example, code for your Human Resources integrations can reside in a partition separate from your EBS integrations, offering better structuring and organization. There are a few bulk lifecycle management tasks that can be performed on all SOA composite applications in a partition, as we will describe in this section. For example, all composites within a partition can be shut down with a single operation.
The preceding screenshot shows a list of partitions in the navigator under soa-infra. Each partition may have one or more composite applications deployed to it. Partitions cannot be cascaded (that is, a partition cannot have a child partition).
The default partition Oracle SOA Suite 11g should have, as a minimum, one partition. The default partition is created automatically when the product is installed, but it can be deleted afterwards if you choose to. You must always have at least one partition to allow you to deploy composites.
Managing partitions You can perform several management tasks pertaining to partitions. These tasks include:
Creating a partition Deleting a partition, including all composites within the partition Starting up and shutting down all composites in a partition Retiring and activating all composites in a partition Undeploying all composites in a partition
For More Information: www.packtpub.com/oracle-soa-suite-11g-administrators-handbook/book

Chapter 2
[ 43 ]
The simplest method to manage partitions is via the Manage Partitions page. Simply navigate to this page to create, delete, or perform bulk lifecycle management operations on the partitions:
1. Right-click on soa-infra, then click on Manage Partitions to access the Manage Partitions page.
2. At this point, you can do one of the following four things:a. Click on the Create button to create a partition.b. Highlight an existing partition and click on the Delete button to
delete the partition.c. Highlight an existing partition and click on the Composites Control
button to start up, shut down, activate, or retire all composites within that partition.
d. Highlight an existing partition and click on the Deployment button to undeploy all composites within this partition, or to deploy a single composite to this partition.
The Manage Partitions page with each of its action buttons is shown in the following screenshot. The Composites Control and Deployment buttons are only activated when a partition is highlighted.
Partitions do not have a state or a mode. Thus, for example, you are not shutting down the partition, you are actually shutting down all composites within the partition.
Creating a partition When creating a partition, be mindful of the following naming conventions:
Letters, numbers, underscores, and dashes are allowed (dashes are not allowed as the fi rst character)
Spaces are not allowed
For More Information: www.packtpub.com/oracle-soa-suite-11g-administrators-handbook/book

Management of SOA Composite Applications
[ 44 ]
Also, be aware that partitions cannot be renamed once they are created.
Deleting a partition When considering deleting partitions, remember that there always needs to be one partition in existence. If you delete all partitions, it will not be possible to deploy any code to the server. If you delete a partition, all composites within that partition are automatically undeployed.
Grouping SOA composite applications into partitions Typically developers choose a partition to which a particular composite should be deployed, but as an administrator, you must understand its implications.
When composites are deployed—whether through JDeveloper, the console, or ant—a partition name must be specifi ed. Code deployed to the default partition will result in a different WSDL URL than that deployed to, for example, the HumanResources partition as shown here:
http://soahost1:8001/soa-infra/services/default/HelloWorld/HelloWorld.wsdl
http://soahost1:8001/soa-infra/services/HumanResources/HelloWorld/HelloWorld.wsdl
Considerations for partition management There are some considerations regarding partitions that you should be aware of:
Avoid creating partitions called Dev, Test, and Prod. Though possible, partitions are not designed to separate by environment.
Domain libraries and SOA extensions (such as MQs and AQs) are shared by all partitions, so it is not possible to have different versions of these libraries or extensions for each partition.
It is not possible to have the same JNDI address for outbound connection pools in Resource Adapters pointing to different queue manager or data sources for composites deployed in different partitions.
Oracle SOA Suite 11g parameters such as timeouts, threads, and recovery confi gurations are defi ned by WebLogic Server domain, not by partition.
For More Information: www.packtpub.com/oracle-soa-suite-11g-administrators-handbook/book

Chapter 2
[ 45 ]
If composites that use inbound adapters (such as the inbound AQ Adapter, in which messages are automatically dequeued from an Oracle AQ) are deployed to multiple partitions, it is not guaranteed which composite will dequeue the inbound message (that is, they will compete with each other).
Setting up ant for automated composite management All component management tasks that can be performed manually through the web-based Oracle Enterprise Manager Fusion Middleware Control console can also be executed with a script through the command-line utility ant. In this section, we describe how to use ant to start up, shut down, activate, and retire composites, as well as package and deploy them. Oracle SOA Suite 11g ships all necessary ant scripts to perform these tasks, and they are quite easy to use.
Setting the environment Here, we will describe how to set both Linux and Microsoft Windows based environments to allow you to run your ant commands through the command line. Your ant scripts do not have to be installed on the same machine running Oracle SOA Suite 11g. In fact, it is not unusual to dedicate a single machine or server, which would host your ant scripts, allowing you to centralize the startup, shutdown, and deployment of your SOA composites to multiple target environments. You will also see how ant enables automated build management for your environment in later sections of this chapter.
Setting the environment path for ant In your environment, we assume that Oracle SOA Suite 11g is installed, which is recommended, as it will include all the required binaries to run ant. The Middleware Home, the Oracle SOA Suite 11g Home, the Java Home, WebLogic Server username and password, and SOA server host and port will need to be updated appropriately to refl ect your environment. Directory locations and JDK versions may differ depending on the patchset of Oracle SOA Suite 11g installed. These commands must be executed to set your environment paths before running any ant command.
On Linux/Unix In this chapter, we will assume that your code will reside under $CODE under the same Unix account where the Middleware Home and other binaries are installed. This is because the ant scripts require access to specifi c product libraries. The scripts assume a bash-based shell, so some changes may be required if other shells are used.
For More Information: www.packtpub.com/oracle-soa-suite-11g-administrators-handbook/book

Management of SOA Composite Applications
[ 46 ]
To set your environment, we recommend fi rst creating a shell script setAntEnv.sh with the following content while keeping in mind to replace the highlighted values to suit your environment and installation:
export USERNAME=weblogicexport PASSWORD=welcome1export SOAHOST=soahost1export SOAPORT=8001export SOAURL=http://${SOAHOST}:${SOAPORT}export CODE=/u01/svn/SOA11gexport MW_HOME=/u01/app/oracle/Middlewareexport ORACLE_HOME=$MW_HOME/Oracle_SOA1export JAVA_HOME=$MW_HOME/jdk160_24export ANT_HOME=$MW_HOME/modules/org.apache.ant_1.7.1export PATH=$JAVA_HOME/bin:$ANT_HOME/bin:$ANT_HOME/lib:$PATH:.
Don't forget to change the permissions of the script to executable:
chmod 750 setAntEnv.sh
Prior to running any ant command in the remainder of the chapter, simply source this shell script once to set your environment for your session as follows:
source setAntEnv.sh
Finally, make sure to change to the $ORACLE_HOME/bin directory before running any of the ant commands:
cd $ORACLE_HOME/bin
On Windows We will assume that your code will reside under %CODE%. To set your environment, we recommend fi rst creating a shell script setAntEnv.bat with the following content:
set USERNAME=weblogicset PASSWORD=welcome1set SOAHOST=soahost1set SOAPORT=8001set SOAURL=http://soaHost:soaPortset CODE=c:\svn\SOA11gset MW_HOME=C:\Oracle\Middlewareset ORACLE_HOME=%MW_HOME%\Oracle_SOA1set JAVA_HOME=%ORACLE_HOME%\jdk160_24set ANT_HOME=%ORACLE_HOME%\modules\org.apache.ant_1.7.1set PATH=%JAVA_HOME%\bin;%ANT_HOME%\bin;%ANT_HOME%\lib;%PATH%
For More Information: www.packtpub.com/oracle-soa-suite-11g-administrators-handbook/book
Chapter 2
[ 47 ]
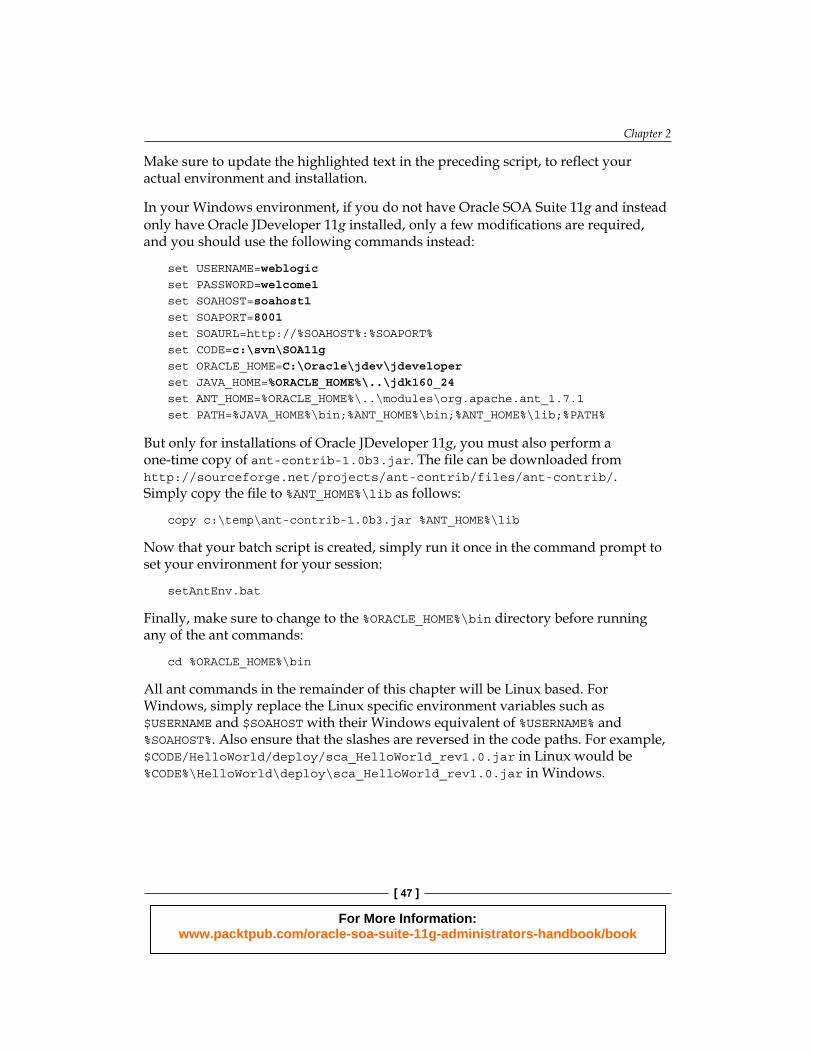
Make sure to update the highlighted text in the preceding script, to refl ect your actual environment and installation.
In your Windows environment, if you do not have Oracle SOA Suite 11g and instead only have Oracle JDeveloper 11g installed, only a few modifi cations are required, and you should use the following commands instead:
set USERNAME=weblogicset PASSWORD=welcome1set SOAHOST=soahost1set SOAPORT=8001set SOAURL=http://%SOAHOST%:%SOAPORT%set CODE=c:\svn\SOA11gset ORACLE_HOME=C:\Oracle\jdev\jdeveloperset JAVA_HOME=%ORACLE_HOME%\..\jdk160_24set ANT_HOME=%ORACLE_HOME%\..\modules\org.apache.ant_1.7.1set PATH=%JAVA_HOME%\bin;%ANT_HOME%\bin;%ANT_HOME%\lib;%PATH%
But only for installations of Oracle JDeveloper 11g, you must also perform a one-time copy of ant-contrib-1.0b3.jar. The fi le can be downloaded from http://sourceforge.net/projects/ant-contrib/files/ant-contrib/. Simply copy the fi le to %ANT_HOME%\lib as follows:
copy c:\temp\ant-contrib-1.0b3.jar %ANT_HOME%\lib
Now that your batch script is created, simply run it once in the command prompt to set your environment for your session:
setAntEnv.bat
Finally, make sure to change to the %ORACLE_HOME%\bin directory before running any of the ant commands:
cd %ORACLE_HOME%\bin
All ant commands in the remainder of this chapter will be Linux based. For Windows, simply replace the Linux specifi c environment variables such as $USERNAME and $SOAHOST with their Windows equivalent of %USERNAME% and %SOAHOST%. Also ensure that the slashes are reversed in the code paths. For example, $CODE/HelloWorld/deploy/sca_HelloWorld_rev1.0.jar in Linux would be %CODE%\HelloWorld\deploy\sca_HelloWorld_rev1.0.jar in Windows.
For More Information: www.packtpub.com/oracle-soa-suite-11g-administrators-handbook/book

Management of SOA Composite Applications
[ 48 ]
Starting and stopping composites with ant Once you set the environment, you can start up a composite on Linux by running the following command:
ant -f ant-sca-mgmt.xml startComposite -Duser=$USERNAME -Dpassword=$PASSWORD -Dhost=$SOAHOST -Dport=$SOAPORT -DcompositeName=HelloWorld -Dpartition=default -Drevision=1.0
Likewise, you can stop a composite on Linux using the following:
ant -f ant-sca-mgmt.xml stopComposite -Duser=$USERNAME -Dpassword=$PASSWORD -Dhost=$SOAHOST -Dport=$SOAPORT -DcompositeName=HelloWorld -Dpartition=default -Drevision=1.0
You must also specify the composite name, the partition name it is deployed to, and the revision of the composite you wish to start up and shut down.
Packaging, deploying, and undeploying composites with ant The commands in the following sections demonstrate how to package the HelloWorld composite project. This creates a deployable JAR fi le under the project's ~/deploy subdirectory. This JAR fi le can then either be manually deployed via Oracle Enterprise Manager Fusion Middleware Control as we have demonstrated earlier in this chapter, or through ant as shown in this section.
Packaging a composite via ant The process of packaging a composite is equivalent to using the Make command in JDeveloper. The composite project is validated, compiled, and eventually built into a single deployable JAR fi le.
To package the HelloWorld composite application in Linux, simply run:
ant -f ant-sca-package.xml package -DcompositeDir=$CODE/HelloWorld -DcompositeName=HelloWorld -Drevision=1.0
If no errors are encountered, you should expect to fi nd the sca_HelloWorld_rev1.0.jar under the $CODE/HelloWorld/deploy directory.
For More Information: www.packtpub.com/oracle-soa-suite-11g-administrators-handbook/book

Chapter 2
[ 49 ]
Deploying a composite via ant Now that the composite application is packaged, the SAR (or JAR fi le) can be deployed. The ant command references the path to the SAR directly (in Linux) as shown:
ant -f ant-sca-deploy.xml deploy -DserverURL=$SOAURL/soa-infra/deployer -Duser=$USERNAME -Dpassword=$PASSWORD -DsarLocation=$CODE/HelloWorld/deploy/sca_HelloWorld_rev1.0.jar -Dpartition=default -Doverwrite=true -DforceDefault=true
As shown in these examples, the server URL, username, and password to the Oracle SOA Suite 11g runtime environment must be supplied. The fully qualifi ed path to the SAR fi le must be provided in the sarLocation argument. Similar to deploying to the console, you must specify the partition to which you want to deploy. If a partition is not specifi ed then the composite is deployed to the default partition. In this example, you can see that we do not provide a revision for the composite. This is because the revision was already specifi ed during compilation (that is, packaging) time.
The overwrite argument specifi es if you want to overwrite the composite already deployed to the server and the forceDefault argument specifi es if you want this revision to be set as the default revision once it is deployed. The overwrite fl ag has to be specifi ed if the composite is already deployed with the same revision number in the same partition. For fi rst time deployments, specifying the overwrite fl ag is optional.
Undeploying a composite via ant A composite can be undeployed via ant as well. On Linux, this is done by simply running the following command:
ant -f ant-sca-deploy.xml undeploy -DserverURL=$SOAURL/soa-infra/deployer -Duser=$USERNAME -Dpassword=$PASSWORD -DcompositeName=HelloWorld -Dpartition=default -revision=1.0
Exporting MDS artifacts with ant The MDS, or Metadata Store, is a database-based repository, which stores various artifacts that can be referenced from within your SOA code. This can include shared schemas (that is, XSD fi les), WSDLs, fault policies and bindings, domain value maps (DVMs), confi guration fi les, and more.
Often, it is necessary to export the contents of the MDS either for backup, export, or management purposes. Fortunately, Oracle has provided an ant target that allows the easy export of MDS contents into a single JAR fi le. Once the JAR fi le is exported, it can be unzipped to your local fi lesystem and browsed through any fi le browser.
For More Information: www.packtpub.com/oracle-soa-suite-11g-administrators-handbook/book

Management of SOA Composite Applications
[ 50 ]
This command demonstrates how to execute ant to export the contents of your entire MDS to a single JAR fi le:
ant -f ant-sca-deploy.xml exportSharedData -DserverURL=$SOAURL/soa-infra/deployer -Duser=$USERNAME -Dpassword=$PASSWORD -DjarFile=SOAMetaData.jar -Dpattern=**
The JAR fi le SOAMetaData.jar can now be unzipped and browsed through the fi lesystem. When extracted to a temporary folder such as /tmp/svn, it may extract the following fi les:
/tmp/svn/SOAMetaData/faultPolicies/fault-bindings.xml/tmp/svn/SOAMetaData/faultPolicies/fault-policies.xml
These fi les can now be navigated through the fi lesystem.
The pattern argument can be used to fi lter the contents you wish to export, allowing you to pick and choose what you want to export if you choose not to export the entire MDS content. For example, specifying a pattern of /apps/SOAMetaData/dvm/**;/apps/SOAMetaData/faultPolicies/** will only export the artifacts under those two subfolders within the MDS.
Importing artifacts to the MDS with ant Since MDS artifacts and contents are exported as a JAR fi le, it makes sense for it to be imported in the same manner.
For example, you may have the following fi les that you just updated on your local fi le system and wish to import them to the MDS. This may include fault policies, DVMs, and schemas located in the following local directory structure:
/tmp/svn/tmp/svn/SOAMetaData/faultPolicies/fault-bindings.xml/tmp/svn/SOAMetaData/faultPolicies/fault-policies.xml/tmp/svn/SOAMetaData/dvm/CurrencyCode.dvm/tmp/svn/SOAMetaData/xsd/ErrorHandling/errorEvent.xsd
Firstly, you should zip up the contents of the ~/SOAMetaData subfolder generating a single SOAMetaData.jar fi le:
cd /tmp/svnzip -r SOAMetaData.jar SOAMetaData
For More Information: www.packtpub.com/oracle-soa-suite-11g-administrators-handbook/book

Chapter 2
[ 51 ]
The JAR fi le is now ready to be imported to the MDS to maintain the same directory structure inside the MDS:
ant -f ant-sca-deploy.xml deploy -Dwl_home=/u01/app/middleware/wlserver_10.3 -Doracle.home=$ORACLE_HOME -DserverURL=$SOAURL/soa-infra/deployer -Duser=$USERNAME -Dpassword=$PASSWORD -Doverwrite=true -DforceDefault=true -DsarLocation=SOAMetaData.jar
Promoting code using confi guration plans Promoting code refers to the activity of taking code from one environment, such as the development environment, and deploying it to the next one, such as the test environment. A typical software development promotion lifecycle sees code moving from development to test to QA (quality assurance) to production. As code is successfully tested in one environment, it is deployed to the next.
Why we need confi guration plans Unlike Java applications, SOA composite applications do not rely on property fi les to maintain environment specifi c confi guration. Many SOA projects may include references to other external services, for example, http://payment-processing-server-dev:7777/proc/servlet/createCustomer. As you can see from this URL, the developer is referencing some external development server as identifi ed by the hostname payment-processing-server-dev. This URL is hardcoded within the code and ultimately included within the deployable SAR. Prior to deploying this code to the test environment, the administrator must fi nd a way to ensure that the test URL is referenced instead (which may have a different host, port, and protocol) as shown by https://payment-processing-server-test:7778/proc/servlet/createCustomer.
The SAR may potentially have other environment-specifi c settings such as URLs, JNDIs, and hostnames hardcoded in the SAR. One option is to manually extract the contents of the JAR fi le, manually edit all entries, and re-JAR it. This is a manual, cumbersome, and error prone process. Another approach is to attach a confi guration plan to your composite at deployment.
The confi guration plan is a single XML fi le that is attached to the SAR at deployment time. It is similar to a search-and-replace functionality, ensuring that references of one environment (such as development) are replaced with the next one (such as the test environment).
For More Information: www.packtpub.com/oracle-soa-suite-11g-administrators-handbook/book

Management of SOA Composite Applications
[ 52 ]
Understanding confi guration plan contents The following cfgplan_test.xml fi le is a confi guration plan designed to be attached to the SAR at deployment time. It is used when deploying code written against a development environment to a test environment.
<?xml version="1.0" encoding="UTF-8"?><SOAConfigPlan xmlns:jca="http://platform.integration.oracle/blocks/adapter/fw/metadata" xmlns:wsp="http://schemas.xmlsoap.org/ws/2004/09/policy" xmlns:orawsp="http://schemas.oracle.com/ws/2006/01/policy" xmlns:edl="http://schemas.oracle.com/events/edl" xmlns="http://schemas.oracle.com/soa/configplan"> <composite name="*"> <import> <searchReplace> <search>http://soa11gdev:8001</search> <replace>http://soa11gtest:8001</replace> </searchReplace> </import> <service name="readFile"> <binding type="*"> <property name="inFileFolder"> <replace>/u01/input/test</replace> </property> </binding> </service> <reference name="*"> <binding type="ws"> <attribute name="location"> <searchReplace> <search> http://payment-processing-server- dev:7777/proc/servlet</search> <replace> https://payment-processing-server- test:7778/proc/servlet</replace> </searchReplace> </attribute> </binding> </reference> </composite> <wsdlAndSchema name="HelloWorld.wsdl|xsd/HelloWorld.xsd"> <searchReplace> <search>sharedSchemaServerDev</search> <replace>sharedSchemaServerTest</replace> </searchReplace>
For More Information: www.packtpub.com/oracle-soa-suite-11g-administrators-handbook/book

Chapter 2
[ 53 ]
<searchReplace> <search>7777</search> <replace>80</replace> </searchReplace> </wsdlAndSchema></SOAConfigPlan>
The fi le contains two main sections—composite and wsdlAndSchema. All entries within the <composite> tags apply to the composite.xml fi le in the SOA composite application. In this example, the <wsdlAndSchema> tag is specifi cally applied to the HelloWorld.wsdl and xsd/HelloWorld.xsd fi les within the project.
Let's walk through the preceding confi guration plan in more detail.
<composite name="*"> This indicates that no matter what composite this confi guration plan is attached to, the search-replace rules will apply to all, designated by *. Alternatively, it is possible to create different rules, which apply to different composites, such as:
<composite "HelloWorld1"> <import> <searchReplace> <search>http://soa11gdev:8001</search> <replace>http://soa11gtest:8001</replace> </searchReplace> </import></composite "HelloWorld1"><composite "HelloWorld2"> <import> <searchReplace> <search>http://soa11gdev:8001</search> <replace>http://soa11gtest:8001</replace> </searchReplace> </import></composite "HelloWorld2">
The only reason to separate composite confi guration as shown in the preceding confi guration snippet is because the search-replace rules are different for each composite. If you do not envision any difference in the search-replace rules, we recommend sticking to <composite "*"> instead in order to maintain simplicity.
For More Information: www.packtpub.com/oracle-soa-suite-11g-administrators-handbook/book

Management of SOA Composite Applications
[ 54 ]
<import> The import tag is a subelement of the <composite> tag. Essentially, any search-replace within the <import> tag will apply to the <import> sections in composite.xml. You can have any number of search-replace elements here.
<service> All composites will likely have a service. A service defi nition is synonymous to the input of the composite. A composite may have multiple services (for multiple interfaces), each of which can be invoked separately.
In the confi guration plan, the <service> and <reference> tags use similar approaches. In the preceding example, there appears to be an inbound File Adapter that has an inFileFolder property. The code may be hardcoded with folder property /u01/input/dev. But here, the confi guration plan will overwrite that property with the setting of /u01/input/test as the input folder.
<reference> Composites may or may not have references, which refer to other resources such as another web service or an adapter.
Often, the reference could be the fully qualifi ed URL to some other service either on the same server or a different one. Here, the confi guration plan will replace all references to http://payment-processing-server-dev:7777/proc/servlet (development server) with https://payment-processing-server-test:7778/proc/servlet (test server).
Attaching a confi guration plan Attaching a confi guration plan is quite simple. The ant command to deploy a composite application does not change and only an additional argument, which is the references to the fully qualifi ed path to the confi guration plan, is required:
ant -f ant-sca-deploy.xml deploy -DserverURL=$SOAURL/soa-infra/deployer -Duser=$USERNAME -Dpassword=$PASSWORD -DsarLocation=$CODE/HelloWorld/deploy/sca_HelloWorld_rev1.0.jar -Dpartition=default -Doverwrite=true -DforceDefault=true -Dconfigplan=/tmp/cfgplan_test.xml
For More Information: www.packtpub.com/oracle-soa-suite-11g-administrators-handbook/book

Chapter 2
[ 55 ]
Best practices with confi guration plans The approach to managing code promotion effectively involves following a simple process to maintain consistency, and ensure proper substitution of environment-specifi c settings and deployment to other environments.
The summarized approach we recommend is as follows:
1. Developers should ensure that all URLs, JNDIs, hostnames, ports, and so on, reference development environments and they should try to remain as consistent as possible.For example, if multiple developers are working on multiple pieces of code that reference the same external service, they should try to be as consistent as possible. If this is the reference:http://payment-processing-server-dev:7777/proc/servlet
They should avoid being inconsistent across their code:http://payment-processing-server-dev.somedomain.org:7777/proc/servlethttp://PAYMENT-PROCESSING-SERVER-DEV:7777/proc/servlethttps://payment-processing-server-dev:7778/proc/servlet
The lack of consistency only means that additional search-replace statements will need to be added in the confi guration plans.
2. The Oracle SOA Suite 11g administrator should create a confi guration plan for every environment:
Test: cfgplan_test.xml QA: cfgplan_qa.xml Prod: cfgplan_prod.xml
The cfgplan_test.xml confi guration plan should replace all development environment settings with the test equivalent. The cfgplan_qa.xml should, similarly, replace all development environment settings with the QA equivalent. The cfgplan_prod.xml should do the same.Thus, the code will always maintain development environment specifi c settings, and it is the confi guration plan that will ensure that these settings are replaced appropriately when the code is deployed to the target environment.
3. Every time a new environment-specifi c setting is used, the administrator should ensure that it is added to each of the confi guration plans.
4. The administrator should always attach a confi guration plan to every deployment.
For More Information: www.packtpub.com/oracle-soa-suite-11g-administrators-handbook/book

Management of SOA Composite Applications
[ 56 ]
Using confi guration plans In this example, we will exemplify the usage of confi guration plans in a real world use case.
We have a simple HelloWorld BPEL project already deployed to both our development and test servers. On our development server, this is accessible at the URL http://soa11gdev:8001/soa-infra/services/default/HelloWorldBPEL/helloworld_client_ep?WSDL.
On our test server, it is accessible here, with only the hostname having changed. The URL is http://soa11gtest:8001/soa-infra/services/default/HelloWorldBPEL/helloworld_client_ep?WSDL.
When developing a Mediator composite that calls this BPEL service in our development environment, it will naturally invoke the development URL (accessible at http://soa11gdev:8001). When deploying this to the test server, this Mediator composite will continue to invoke the BPEL service on the development server! Our goal then, as the administrator, is to deploy this same Mediator project to the test server and change its references to the test environment accordingly.
Once the Mediator project is saved, the project will include two fi les with hardcoded URLs. The composite.xml fi le has the following code snippet:
<reference name="HelloWorldBPEL_BPEL" ui:wsdlLocation="http://soa11gdev:8001/soa- infra/services/default/HelloWorldBPEL/HelloWorldBPEL.wsdl"> <interface.wsdl interface="http://xmlns.oracle.com /SOA11g/HelloWorldBPEL/HelloWorld#wsdl.interface(HelloWorld)"/> <binding.ws port="http://xmlns.oracle.com/ SOA11g/HelloWorldBPEL/HelloWorld#wsdl. endpoint(helloworld_client_ep/HelloWorld_pt)" location="http://soa11gdev:8001/soa- infra/services/default/HelloWorldBPEL/helloworld_client_ep?WSDL" soapVersion="1.1"> <property name="weblogic.wsee.wsat.transaction.flowOption" type="xs:string" many="false">WSDLDriven</property> </binding.ws></reference>
And the Mediator1.componentType fi le in the same project includes the following code snippet:
<reference name="HelloWorld_BPEL" ui:wsdlLocation="http://soa11gdev:8001/soa- infra/services/default/HelloWorldBPEL/HelloWorld.wsdl"> <interface.wsdl interface="http://xmlns.oracle.com /SOA11g/HelloWorldBPEL/HelloWorld#wsdl.interface(HelloWorld)"/></reference>
For More Information: www.packtpub.com/oracle-soa-suite-11g-administrators-handbook/book

Chapter 2
[ 57 ]
Prior to deploying this to the test server, we fi rst create a confi guration plan cfgplan_test.xml with the following content:
<?xml version="1.0" encoding="UTF-8"?><SOAConfigPlan xmlns:jca="http://platform.integration.oracle/blocks/adapter/fw/metadata" xmlns:wsp="http://schemas.xmlsoap.org/ws/2004/09/policy" xmlns:orawsp="http://schemas.oracle.com/ws/2006/01/policy" xmlns:edl="http://schemas.oracle.com/events/edl" xmlns="http://schemas.oracle.com/soa/configplan"> <composite name="*"> <import> <searchReplace> <search>http://soa11gdev:8001</search> <replace>http://soa11gtest:8001</replace> </searchReplace> </import> <reference name="*"> <binding type="ws"> <attribute name="location"> <searchReplace> <search>http://soa11gdev:8001</search> <replace>http://soa11gtest:8001</replace> </searchReplace> </attribute> </binding> </reference> </composite></SOAConfigPlan>
The confi guration plan replaces all references of http://soa11gdev:8001 to the test server's equivalent http://soa11gtest:8001.
We fi nally deploy the Mediator project to the test environment attaching the confi guration plan that we just created:
cd %ORACLE_HOME/binant -f ant-sca-deploy.xml deploy -Duser=$USERNAME -Dpassword=$PASSWORD -DserverURL=$SOAURL/soa-infra/deployer -DsarLocation=$CODE/HelloWorld_Mediator/deploy/sca_HelloWorld_Mediator_rev1.0.jar -Dpartition=default -Doverwrite=true -DforceDefault=true -Dconfigplan=/tmp/cfgplan_test.xml
By attaching the confi guration plan, the code, which was originally developed to reference development server specifi c URLs, is now deployed to the test server referencing test specifi c URLs.
For More Information: www.packtpub.com/oracle-soa-suite-11g-administrators-handbook/book
Management of SOA Composite Applications
[ 58 ]
Understanding and confi guring composite audit levels Setting the level of auditing tells the SOA Infrastructure how much information you want logged in order to assist in the monitoring and troubleshooting of instances. For example, if the audit level is completely off, the administrator will have no visibility into any composite instance. No instance data is logged and it is impossible to tell anything at that point (although instances are actually created and requests are serviced just fi ne). On the other hand, if the audit level is set to development, not only is the instance data logged, but the payload is also logged at every operation, giving the administrator complete visibility into the step-by-step execution of every instance!
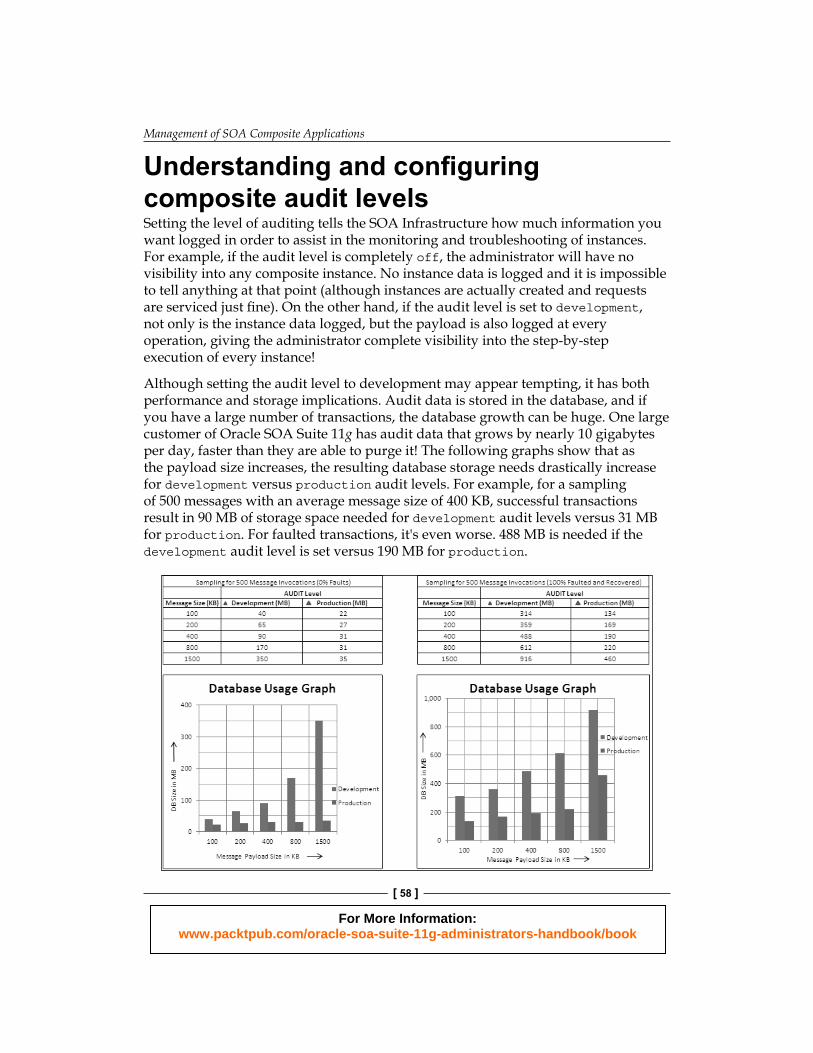
Although setting the audit level to development may appear tempting, it has both performance and storage implications. Audit data is stored in the database, and if you have a large number of transactions, the database growth can be huge. One large customer of Oracle SOA Suite 11g has audit data that grows by nearly 10 gigabytes per day, faster than they are able to purge it! The following graphs show that as the payload size increases, the resulting database storage needs drastically increase for development versus production audit levels. For example, for a sampling of 500 messages with an average message size of 400 KB, successful transactions result in 90 MB of storage space needed for development audit levels versus 31 MB for production. For faulted transactions, it's even worse. 488 MB is needed if the development audit level is set versus 190 MB for production.
For More Information: www.packtpub.com/oracle-soa-suite-11g-administrators-handbook/book

Chapter 2
[ 59 ]
Not only are there storage concerns, as we have seen, but performance implications are severe. Enabling the development audit level at the SOA Infrastructure can result in approximately a 40 percent hit in composite instance performance!
Audit levelsAlthough audit levels can be confi gured in various areas, as we shall describe shortly, they mostly (but not in every case) fall under one of these four levels:
Off: Absolutely no composite instance or payload information is collected. Although this is the best in terms of performance, it severely limits the visibility as no information is logged, rendering it an option that is not recommended in most cases. Instances are created, but nothing is logged to the database or displayed on the console, which may lead to diffi culties in fault diagnosis and incident analysis.
Development: Both composite instance and payload information are collected. Though this option provides the most detail, it is the worst performing of all the audit levels. It is recommended to set this in development environments for debugging purposes, but not in production environments, except for transactions that specifi cally require that degree of auditing.
Production: Although composite instance information is collected, most payload details are not. This is the typical setting for production environments and provides the best balance between performance and visibility. If payload details need to be captured, it is best to consider setting the audit level to development only for specifi c composites, components, or services, as we shall describe later.
Inherit: Audit levels are inherited from the parent level (we will describe this shortly).
For More Information: www.packtpub.com/oracle-soa-suite-11g-administrators-handbook/book

Management of SOA Composite Applications
[ 60 ]
To view the instance details, you should click on the composite on the navigator on the left, click on the Instances tab, then click on the instance ID. A pop-up window will reveal the details of this instance, including the audit trails. The following screenshots show the difference between the development and production audit levels:
Audit levels set to development capture payloads throughout most activities, such as Assign and Transform. By expanding the sign in the Assign activity, the payload is displayed. As you can see, the development audit level is advantageous and it allows you to see the changes made to the message across every activity or routing rule, but as discussed earlier, there are both storage and performance implications as a result.
Order of precedence for audit level settings Before describing the order of precedence for audit level settings and what exactly it is, let's recap on specifi c terminology fi rst:
Component: Examples of components include a BPEL process, a Mediator service, or a BPMN process. Within JDeveloper, these components are the building blocks for composite applications.
For More Information: www.packtpub.com/oracle-soa-suite-11g-administrators-handbook/book

Chapter 2
[ 61 ]
Composite: A composite consists of zero or more components. For example, a single composite can include a BPEL component and two Mediator components. Composite applications are packaged into a single JAR fi le that is deployed to the SOA Infrastructure.
Service engine: Though we have not described service engines in detail yet, they are the actual engines that run the code. There are three main service engines—BPEL Service Engine, Mediator Service Engine, and BPMN Service Engine. As their names imply, the BPEL Service Engine executes the BPEL code, the Mediator Service Engine executes the Mediator code, and the BPMN Service Engine executes the BPMN code.
SOA Infrastructure: The SOA Infrastructure is the underlying infrastructure, which is comprised of the service engines mentioned in the preceding section and to which the composite applications are deployed.
Why have we described these terms? Because audit levels can be manipulated across each of these. It is possible to set the audit level at the component level, the composite level, or even the service engine level. But if the audit level is set at the composite level as development and at the SOA Infrastructure level as production, which one takes precedence?
At a high level, the order of precedence is as follows:
Component > Composite > Service Engine > SOA Infrastructure
What this means is that, for example, if the audit level is set to development at the composite level and production at the SOA Infrastructure level, that the setting at the composite level overrides that of the SOA Infrastructure. If the composite audit level is set to inherit, it will inherit the settings from the applicable service engine. If the service engine is also set to inherit, it will inherit the settings from the SOA Infrastructure. As a general rule, we recommend setting all audit level settings to inherit and controlling it at the SOA Infrastructure level. Then, as the need for different levels of auditing are required, start manipulating the service engine, composite, and component audit levels as needed.
Unfortunately, the rules on what takes precedence are rather complicated as you start changing each of them. If auditing at the service engine is enabled and the composite audit level is set to off, there is no audit trail generated for this composite and its underlying components. Neither the service engine nor SOA Infrastructure audit levels take effect in this case. When the audit level of a composite is set to inherit, depending on what the audit levels of the service engine and the SOA Infrastructure are, either of them may take effect, which is confusing. Detailed examples of order of precedence can be found in the fi rst chapter of the Oracle Fusion Middleware Administrator's Guide for Oracle SOA Suite 11g Release 1 (11.1.1).
For More Information: www.packtpub.com/oracle-soa-suite-11g-administrators-handbook/book

Management of SOA Composite Applications
[ 62 ]
Modifying audit levels We had previously discussed that audit levels can be set at the component, composite, service engine, and SOA Infrastructure levels. Here, we will describe how to set each of these.
Modifying component audit levels Component level auditing can only be manipulated for BPEL and BPMN components, but not Mediator components.
For example, developers can modify BPEL component level auditing by inserting the bpel.config.auditLevel property within their component reference in the composite.xml fi le of their project as shown in the following code snippet:
<component name="HelloWorld"> <implementation.bpel src="HelloWorld.bpel" /> <property name="bpel.config.auditLevel">Off</property></component>
Modifying composite audit levels Audit levels can be changed during runtime at the composite level. To do so, perform the following steps:
1. On the navigator, expand Farm_[Domain] | SOA | soa-infra.2. Expand the partition (for example, default) and click on the composite name
(for example, HelloWorld).3. Click on the Settings button.4. Click on the Composite Audit Level menu item.5. Choose between one of the four audit levels:
Inherit Off Production Development
For More Information: www.packtpub.com/oracle-soa-suite-11g-administrators-handbook/book
Chapter 2
[ 63 ]
Modifying service engine audit levels Both the BPEL Service Engine and BPMN Service Engine have a fi fth audit level—minimal. The minimal audit level collects instance information, but not payload details in the fl ow audit trails.
To set the audit level for the BPEL Service Engine:
1. Right-click on soa-infra and then navigate to SOA Administration | BPEL Properties.
2. Set the Audit Level fi eld.3. Click on Apply.
To set the audit level for the BPMN Service Engine:
1. Right-click on soa-infra and then navigate to SOA Administration | BPMN Properties.
2. Set the Audit Level fi eld.3. Click on Apply.
To set the audit level for the Mediator Service Engine:
1. Right-click on soa-infra and then navigate to SOA Administration | Mediator Properties.
2. Set the Audit Level fi eld.3. Click on Apply.
Modifying SOA Infrastructure Audit Levels The SOA Infrastructure audit level can be confi gured by performing the following:
1. Right-click on soa-infra and then navigate to SOA Administration | Common Properties.
2. Set the Audit Level fi eld.3. Click on Apply.
For More Information: www.packtpub.com/oracle-soa-suite-11g-administrators-handbook/book

Management of SOA Composite Applications
[ 64 ]
SummaryThe focus of this chapter was to walk through key activities that enable the Oracle SOA Suite 11g administrator to perform various composite application functions, including basic management to deployment to auditing. Specifi cally, we focused on the following:
Managing composite lifecycles, discussing the differences between startup/shutdown states and the active/retired modes.
Understanding revisions and how to set the default revision of composites. Deploying, undeploying, and redeploying composites from Oracle Enterprise
Manager Fusion Middleware Control. Understanding and managing partitions, including partition creation
and deletion, as well as bulk management operations such as starting up, shutting down, and undeploying all composites in a partition.
Setting up ant scripts for deploying, undeploying, and redeploying composite applications.
Using ant to import and export artifacts to and from the MDS. Understanding the purpose of confi guration plans and how to use them. Discuss the various audit levels, how to set them, and performance and
storage implications of each.
The ant-build scripts are an important aspect that every Oracle SOA Suite 11g administrator should have a good handle on. Though we touched upon the more important elements of ant as it pertains to Oracle SOA Suite 11g, for more information, refer to chapter 43.6.2 titled How to Manage SOA Composite Applications with ant Scripts in the Oracle Fusion Middleware Developer's Guide for Oracle SOA Suite 11g at http://download.oracle.com/docs/cd/E12839_01/integration.1111/e10224/sca_lifecycle.htm#sthref2497.
The next chapter will cover the essentials of monitoring the Oracle SOA Suite 11g infrastructure, the service engines, and instances. We will also describe the infamous ECID, how to search BPEL and composite sensors, detail out the component and composite states, and break down the log fi les in an easy to understand format.
For More Information: www.packtpub.com/oracle-soa-suite-11g-administrators-handbook/book

Where to buy this book You can buy Oracle SOA Suite 11g Administrator's Handbook from the Packt Publishing website: http://www.packtpub.com/oracle-soa-suite-11g-administrators-handbook/book.
Free shipping to the US, UK, Europe and selected Asian countries. For more information, please read our shipping policy.
Alternatively, you can buy the book from Amazon, BN.com, Computer Manuals and most internet book retailers.
www.PacktPub.com
For More Information: www.packtpub.com/oracle-soa-suite-11g-administrators-handbook/book