oracle planning and budgeting cloud service august …€¦ · planning and budgeting cloud service...
TRANSCRIPT
What's New in Oracle Planning and Budgeting Cloud Service
August 2015 Release (15.08)
2
TABLE OF CONTENTS PLANNING AND BUDGETING...................................................................................................................................... 4 ANNOUNCEMENTS .................................................................................................................................................. 4
New Financial Reporting Studio Release ............................................................................................................................ 4 New Version of EPM Automate Utility ............................................................................................................................... 4 Smart View ......................................................................................................................................................................... 4 Support for Internet Explorer 11 Standards Mode ............................................................................................................ 4 Recommended Browsers ................................................................................................................................................... 5 Removal of Internet Explorer 9 Support ............................................................................................................................ 5 Removal of Remote XUL Manager Requirement ............................................................................................................... 5 Removal of Standard Interface .......................................................................................................................................... 5 Defects Fixed ...................................................................................................................................................................... 6
PLANNING SIMPLIFIED INTERFACE .............................................................................................................................. 8 Saving Data Automatically ................................................................................................................................................. 8 Undoing Actions ................................................................................................................................................................. 8 Defining Valid Intersections ............................................................................................................................................... 8 Using Excel Formulas in Planning ....................................................................................................................................... 9 Using Planning Sandboxes ................................................................................................................................................. 9 Printing Supporting Detail ................................................................................................................................................ 10 Synchronizing Data instantly ............................................................................................................................................ 11 Instant Save ..................................................................................................................................................................... 11 New Keyboard Shortcuts ................................................................................................................................................. 11 Logging on to Planning Application via EPM Mobile App ................................................................................................ 12
SMART VIEW FOR OFFICE ....................................................................................................................................... 13 Smart Forms ..................................................................................................................................................................... 13 Predictive Planning .......................................................................................................................................................... 14
DATA MANAGEMENT ............................................................................................................................................ 18 Data Loading .................................................................................................................................................................... 18 Import Format Builder ..................................................................................................................................................... 22 POV Locking ..................................................................................................................................................................... 22
CALCULATION MANAGER ....................................................................................................................................... 24 New Design-Time Prompt Functions for Templates ........................................................................................................ 24 Finding and Replacing Text in the Variable Designer ....................................................................................................... 24 Aggregation System Template Enhancements ................................................................................................................ 25 Script Editor Enhancements ............................................................................................................................................. 25 Filtering Objects in the System View ............................................................................................................................... 26 Analyzing Scripts .............................................................................................................................................................. 26 Customizing Views ........................................................................................................................................................... 27 Comparing the Scripts of a Saved Rule to a Changed Rule .............................................................................................. 27 Launching Planning Business Rules and Viewing Logs ..................................................................................................... 28 Enabling Email Notification When Planning Business Rules are Launched ...................................................................... 28 Support for Parallel Processing ........................................................................................................................................ 29
FINANCIAL REPORTING ........................................................................................................................................... 30 Query-Ready Export ......................................................................................................................................................... 30
FINANCIAL REPORTING STUDIO ................................................................................................................................ 31

3
APPLICATION MANAGEMENT .................................................................................................................................. 32 Security Audit Report ....................................................................................................................................................... 32 User Role Changes ........................................................................................................................................................... 32
4
PLANNING AND BUDGETING
This guide outlines what you need to know about new or improved functionality in Oracle Planning and Budgeting Cloud. Each section includes a brief description of the feature, the steps to take to either enable or begin using the feature, tips or considerations to keep in mind, and the resources available to help you.
ANNOUNCEMENTS
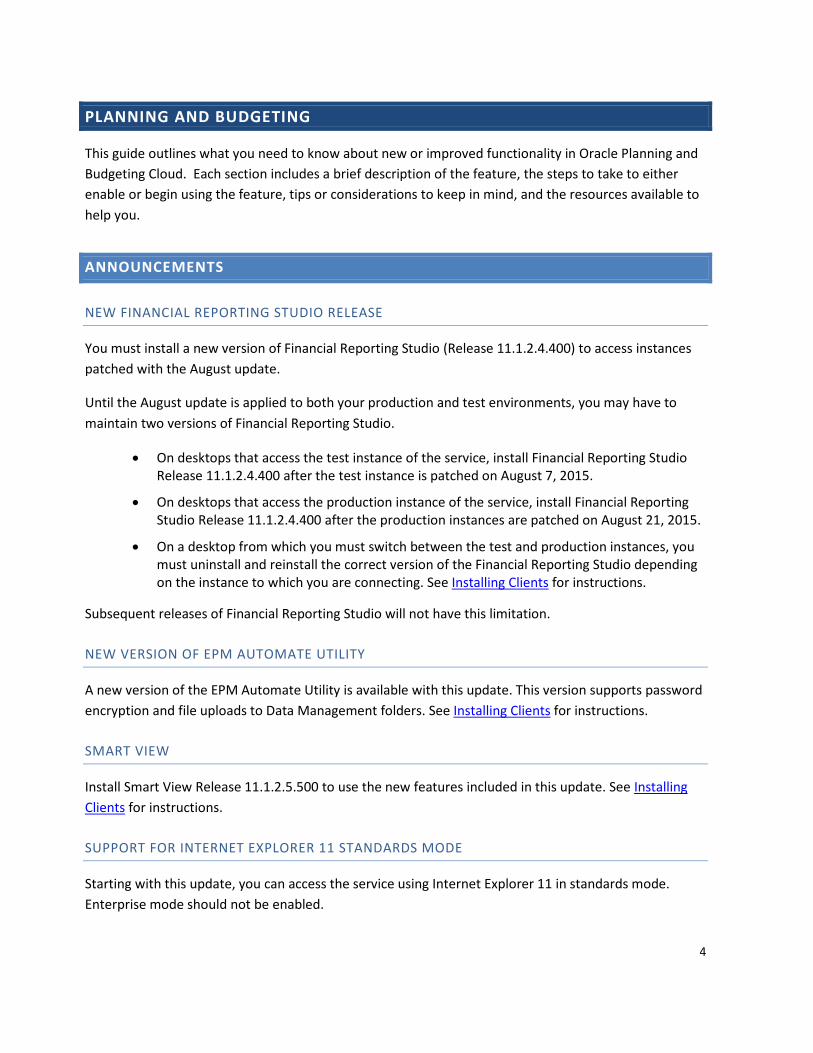
NEW FINANCIAL REPORTING STUDIO RELEASE
You must install a new version of Financial Reporting Studio (Release 11.1.2.4.400) to access instances patched with the August update.
Until the August update is applied to both your production and test environments, you may have to maintain two versions of Financial Reporting Studio.
• On desktops that access the test instance of the service, install Financial Reporting Studio Release 11.1.2.4.400 after the test instance is patched on August 7, 2015.
• On desktops that access the production instance of the service, install Financial Reporting Studio Release 11.1.2.4.400 after the production instances are patched on August 21, 2015.
• On a desktop from which you must switch between the test and production instances, you must uninstall and reinstall the correct version of the Financial Reporting Studio depending on the instance to which you are connecting. See Installing Clients for instructions.
Subsequent releases of Financial Reporting Studio will not have this limitation.
NEW VERSION OF EPM AUTOMATE UTILITY
A new version of the EPM Automate Utility is available with this update. This version supports password encryption and file uploads to Data Management folders. See Installing Clients for instructions.
SMART VIEW
Install Smart View Release 11.1.2.5.500 to use the new features included in this update. See Installing Clients for instructions.
SUPPORT FOR INTERNET EXPLORER 11 STANDARDS MODE
Starting with this update, you can access the service using Internet Explorer 11 in standards mode. Enterprise mode should not be enabled.
5
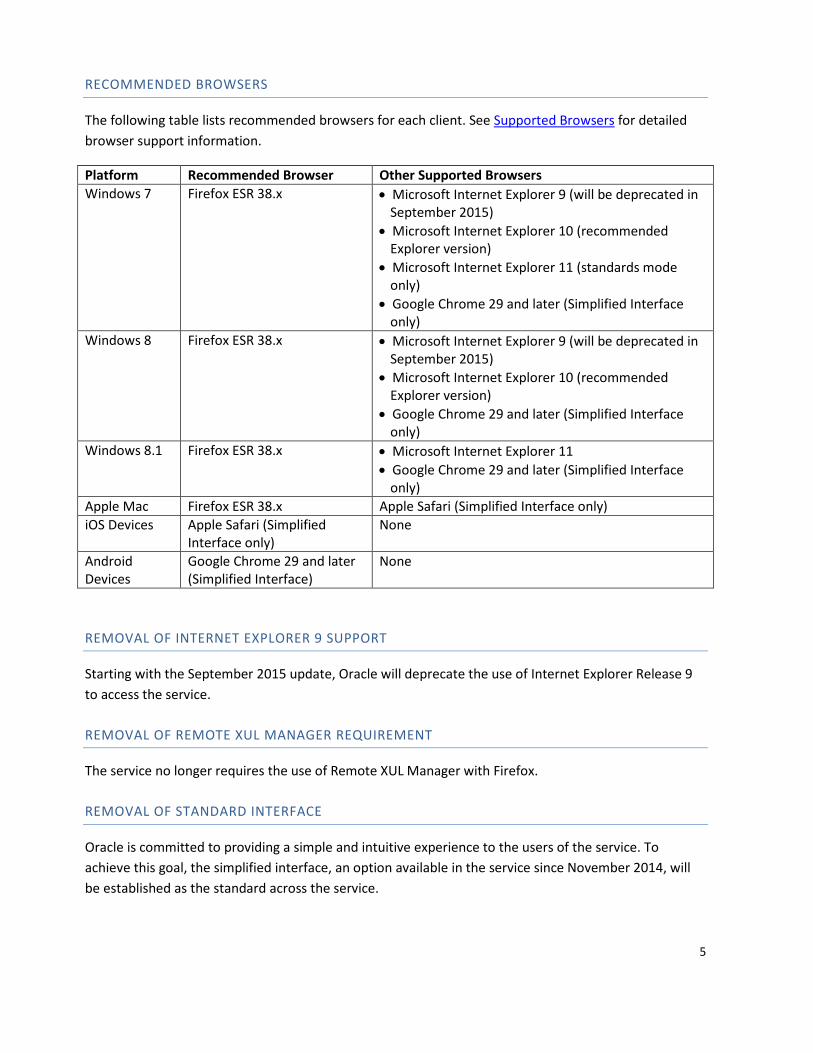
RECOMMENDED BROWSERS
The following table lists recommended browsers for each client. See Supported Browsers for detailed browser support information.
Platform Recommended Browser Other Supported Browsers Windows 7 Firefox ESR 38.x • Microsoft Internet Explorer 9 (will be deprecated in
September 2015) • Microsoft Internet Explorer 10 (recommended
Explorer version) • Microsoft Internet Explorer 11 (standards mode
only) • Google Chrome 29 and later (Simplified Interface
only) Windows 8 Firefox ESR 38.x • Microsoft Internet Explorer 9 (will be deprecated in
September 2015) • Microsoft Internet Explorer 10 (recommended
Explorer version) • Google Chrome 29 and later (Simplified Interface
only) Windows 8.1 Firefox ESR 38.x • Microsoft Internet Explorer 11
• Google Chrome 29 and later (Simplified Interface only)
Apple Mac Firefox ESR 38.x Apple Safari (Simplified Interface only) iOS Devices Apple Safari (Simplified
Interface only) None
Android Devices
Google Chrome 29 and later (Simplified Interface)
None
REMOVAL OF INTERNET EXPLORER 9 SUPPORT
Starting with the September 2015 update, Oracle will deprecate the use of Internet Explorer Release 9 to access the service.
REMOVAL OF REMOTE XUL MANAGER REQUIREMENT
The service no longer requires the use of Remote XUL Manager with Firefox.
REMOVAL OF STANDARD INTERFACE
Oracle is committed to providing a simple and intuitive experience to the users of the service. To achieve this goal, the simplified interface, an option available in the service since November 2014, will be established as the standard across the service.
6
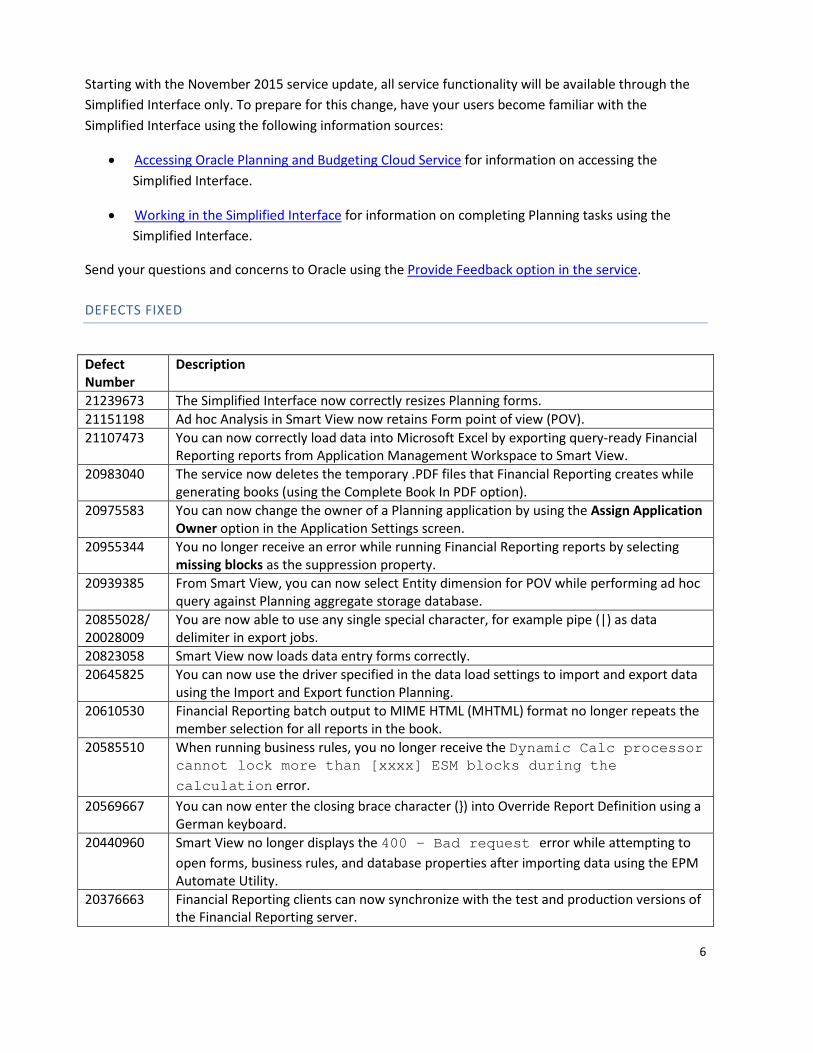
Starting with the November 2015 service update, all service functionality will be available through the Simplified Interface only. To prepare for this change, have your users become familiar with the Simplified Interface using the following information sources:
• Accessing Oracle Planning and Budgeting Cloud Service for information on accessing the Simplified Interface.
• Working in the Simplified Interface for information on completing Planning tasks using the Simplified Interface.
Send your questions and concerns to Oracle using the Provide Feedback option in the service.
DEFECTS FIXED
Defect Number
Description
21239673 The Simplified Interface now correctly resizes Planning forms. 21151198 Ad hoc Analysis in Smart View now retains Form point of view (POV). 21107473 You can now correctly load data into Microsoft Excel by exporting query-ready Financial
Reporting reports from Application Management Workspace to Smart View. 20983040 The service now deletes the temporary .PDF files that Financial Reporting creates while
generating books (using the Complete Book In PDF option). 20975583 You can now change the owner of a Planning application by using the Assign Application
Owner option in the Application Settings screen. 20955344 You no longer receive an error while running Financial Reporting reports by selecting
missing blocks as the suppression property. 20939385 From Smart View, you can now select Entity dimension for POV while performing ad hoc
query against Planning aggregate storage database. 20855028/ 20028009
You are now able to use any single special character, for example pipe (|) as data delimiter in export jobs.
20823058 Smart View now loads data entry forms correctly. 20645825 You can now use the driver specified in the data load settings to import and export data
using the Import and Export function Planning. 20610530 Financial Reporting batch output to MIME HTML (MHTML) format no longer repeats the
member selection for all reports in the book. 20585510 When running business rules, you no longer receive the Dynamic Calc processor
cannot lock more than [xxxx] ESM blocks during the calculation error.
20569667 You can now enter the closing brace character (}) into Override Report Definition using a German keyboard.
20440960 Smart View no longer displays the 400 - Bad request error while attempting to open forms, business rules, and database properties after importing data using the EPM Automate Utility.
20376663 Financial Reporting clients can now synchronize with the test and production versions of the Financial Reporting server.
7
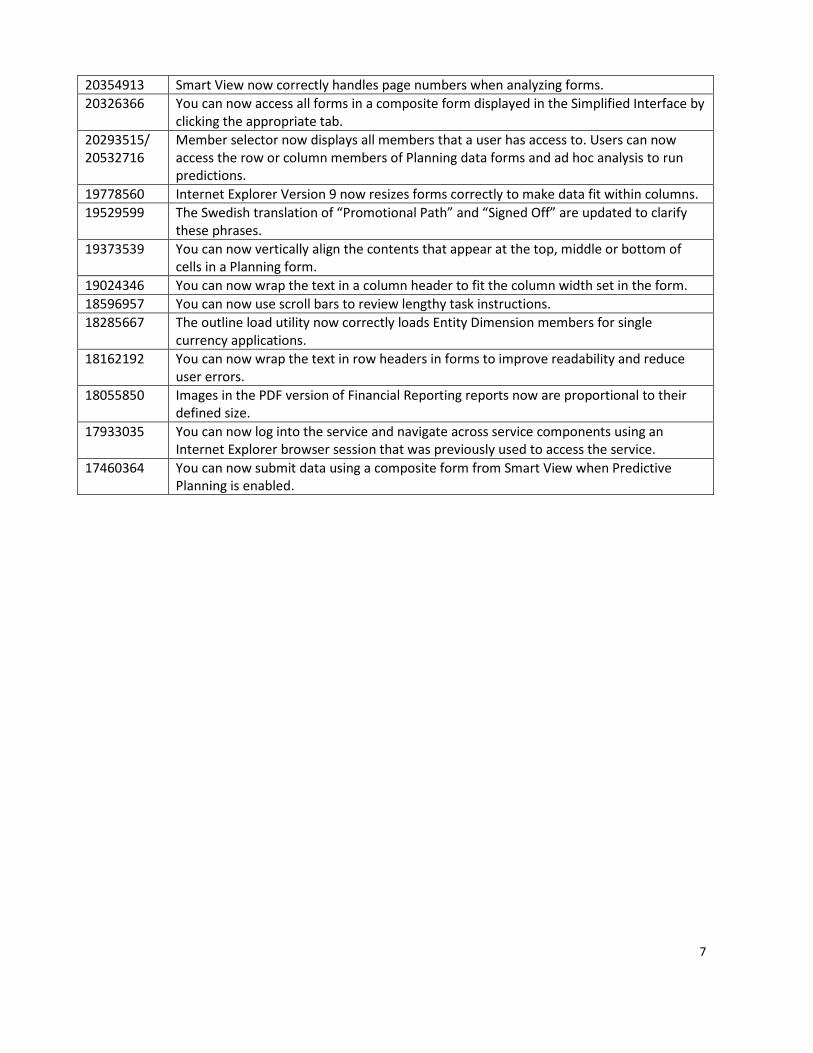
20354913 Smart View now correctly handles page numbers when analyzing forms. 20326366 You can now access all forms in a composite form displayed in the Simplified Interface by
clicking the appropriate tab. 20293515/ 20532716
Member selector now displays all members that a user has access to. Users can now access the row or column members of Planning data forms and ad hoc analysis to run predictions.
19778560 Internet Explorer Version 9 now resizes forms correctly to make data fit within columns. 19529599 The Swedish translation of “Promotional Path” and “Signed Off” are updated to clarify
these phrases. 19373539 You can now vertically align the contents that appear at the top, middle or bottom of
cells in a Planning form. 19024346 You can now wrap the text in a column header to fit the column width set in the form. 18596957 You can now use scroll bars to review lengthy task instructions. 18285667 The outline load utility now correctly loads Entity Dimension members for single
currency applications. 18162192 You can now wrap the text in row headers in forms to improve readability and reduce
user errors. 18055850 Images in the PDF version of Financial Reporting reports now are proportional to their
defined size. 17933035 You can now log into the service and navigate across service components using an
Internet Explorer browser session that was previously used to access the service. 17460364 You can now submit data using a composite form from Smart View when Predictive
Planning is enabled.
8
PLANNING SIMPLIFIED INTERFACE
SAVING DATA AUTOMATICALLY
Administrators can set up a simple form that automatically saves planners' data (autosave) when they move out of a cell in the simplified interface, and values are aggregated to their parents immediately. No prompt or message is displayed, and the affected cells are displayed in green. Also, with this option selected, planners can use Undo (Ctrl+Z).
To enable automatic save, in form design, administrators select the new Grid Properties option Enable Autosave for a simple form.
See “Setting Form Grid Properties” in Administering Planning for Oracle Planning and Budgeting Cloud Service and “Basics of Working with Data” in Working with Oracle Planning and Budgeting Cloud Service Using the Simplified Interface. To learn about setting form grid properties, watch this video.
UNDOING ACTIONS
When working with a simple form in the simplified interface, if an administrator set up the form to support Undo, you can successively undo your actions by pressing Ctrl+Z (or by clicking or tapping Undo on the Data tab). To enable Undo, in form design, an administrator selects the new Grid Properties option Enable Autosave for a simple form.
See “Basics of Working with Data” in Working with Oracle Planning and Budgeting Cloud Service Using the Simplified Interface, and “Setting Form Grid Properties” in Administering Planning for Oracle Planning and Budgeting Cloud Service.
DEFINING VALID INTERSECTIONS
Valid Intersections enable administrators to define rules, called valid intersection rules, which filter certain cell intersections to users when users enter data or select runtime prompts. For example, administrators can specify that certain products are valid only for some departments, which restricts users from entering data directly in other cells.
To define valid intersections, you must be an administrator with access to the simplified interface. You define valid intersections in the Console.
After valid intersections are defined, cells containing invalid data are read-only. This restriction speeds the planning process and optimizes the information available to users.
9
Administrators must be familiar with these valid intersection concepts:
• Valid intersection groups
• Valid intersection rules
• Anchor and nonanchor dimensions
See “Defining Valid Intersections” in Administering Oracle Planning and Budgeting Cloud Service Using the Simplified Interface. To learn about setting up valid intersections, watch this video.
USING EXCEL FORMULAS IN PLANNING
In Smart View ad hoc analysis, you can create Excel formulas and members that calculate instantly without affecting the rest of the Planning application. You can then execute, in Planning, the calculations that you created in Smart View. To make this customized ad hoc grid available in Planning, when you save it in Smart View, select the option Save as a Smart Form. Then you can open and use this customized Smart Form in Planning, including the rows, columns, and calculations that you added.
See Working with Smart View for Oracle Enterprise Performance Management Cloud Services and watch this video.
USING PLANNING SANDBOXES
Users can use the new sandbox capabilities to keep their work private as they work on their plans. They can experiment with various outcomes in a sandbox without others seeing their work in progress. For example, perhaps a planner hasn’t finished revenue planning. By building this plan in a sandbox, the revenue data isn’t included in the application’s calculations. When the planner is ready to share their results with others, publishes the sandbox is published.
Here, the user is looking into a “what if” scenario of adding computers, so he has increased the value for Equipment Expense in Q2 in a sandbox named New Computers. (The original data is in the Working
version.) To create another sandbox, click or tap at the top right of the grid.

10
To enable sandboxes:
1. When you create the application on the Create Application page, select Enable Sandboxes.
2. Create and enable Version dimension members for sandboxes.
3. Design or modify forms that you want to support sandboxes so that either:
o The Version dimension is on the Page axis.
o The Version dimension is a POV that has a user variable.
Administrators, see “Managing Sandboxes” in Administering Oracle Planning and Budgeting Cloud Service Using the Simplified Interface. Planners, see “Building a Plan Privately” in Working with Oracle Planning and Budgeting Cloud Service Using the Simplified Interface. To learn about analyzing data using sandboxes, watch this video.
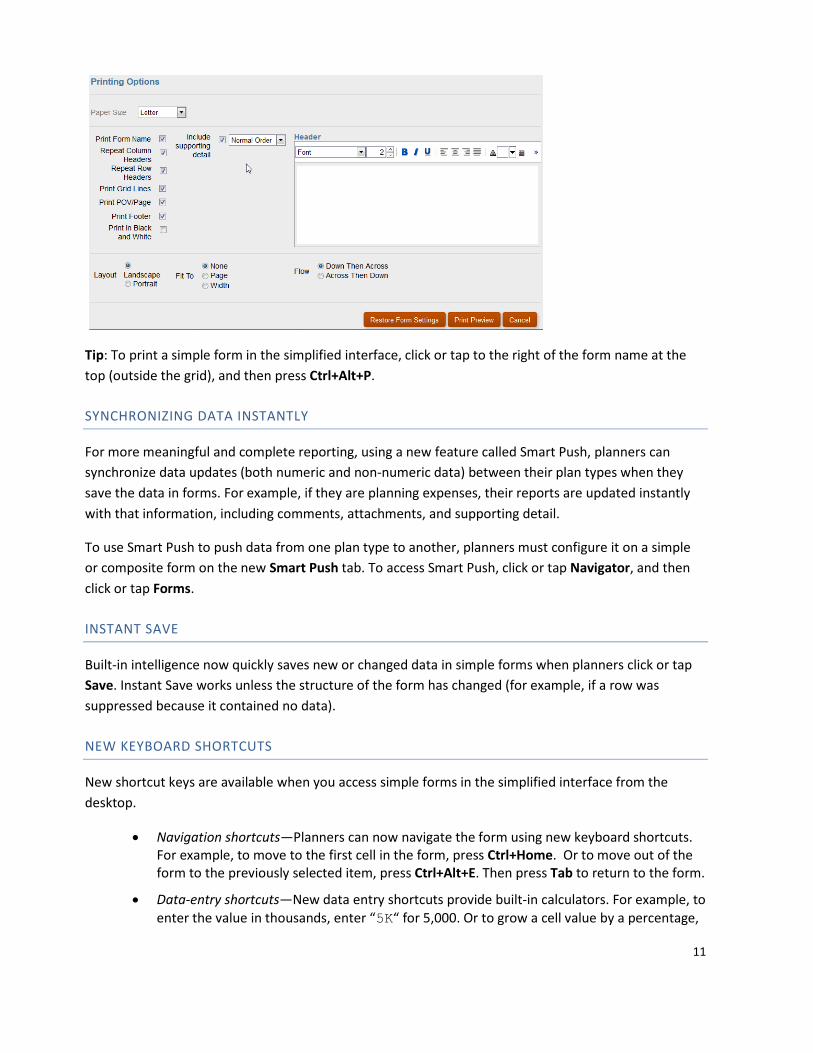
PRINTING SUPPORTING DETAIL
You can print forms to PDF with supporting detail included in the output. In a form or ad hoc grid, click or tap Print.
11
Tip: To print a simple form in the simplified interface, click or tap to the right of the form name at the top (outside the grid), and then press Ctrl+Alt+P.
SYNCHRONIZING DATA INSTANTLY
For more meaningful and complete reporting, using a new feature called Smart Push, planners can synchronize data updates (both numeric and non-numeric data) between their plan types when they save the data in forms. For example, if they are planning expenses, their reports are updated instantly with that information, including comments, attachments, and supporting detail.
To use Smart Push to push data from one plan type to another, planners must configure it on a simple or composite form on the new Smart Push tab. To access Smart Push, click or tap Navigator, and then click or tap Forms.
INSTANT SAVE
Built-in intelligence now quickly saves new or changed data in simple forms when planners click or tap Save. Instant Save works unless the structure of the form has changed (for example, if a row was suppressed because it contained no data).
NEW KEYBOARD SHORTCUTS
New shortcut keys are available when you access simple forms in the simplified interface from the desktop.
• Navigation shortcuts—Planners can now navigate the form using new keyboard shortcuts. For example, to move to the first cell in the form, press Ctrl+Home. Or to move out of the form to the previously selected item, press Ctrl+Alt+E. Then press Tab to return to the form.
• Data-entry shortcuts—New data entry shortcuts provide built-in calculators. For example, to enter the value in thousands, enter “5K“ for 5,000. Or to grow a cell value by a percentage,

12
enter “gr”. For example, if the cell value is 200, entering “gr50“ after 200 increases the cell value by 50 percent, to 300.
• Formatting shortcuts—Keyboard shortcuts enable planners to quickly format values. For example, to bold a value, press Ctrl+Alt+B. Or to underline a value, press Ctrl+Alt+U.
For a full list of keyboard shortcuts, see “Working with Data” in Working with Oracle Planning and Budgeting Cloud Service Using the Simplified Interface.
LOGGING ON TO PLANNING APPLICATION VIA EPM MOBILE APP
Planning customers can now use the EPM Mobile app to log on to their Oracle Planning and Budgeting Cloud Service application and perform selected tasks within the mobile app. The EPM Mobile app enables you to perform the tasks described in the EPM Mobile User’s Guide in the EPM Mobile library.
To enable this feature:
1. Download the app from the app store on a supported mobile device:
o iPhone: Apple App store
o Android: Google Play Store
2. Log on to the app and perform the tasks available in the mobile app.
For instructions on working with EPM Mobile, see the EPM Mobile User’s Guide and other resources on the EPM Mobile library.
13
SMART VIEW FOR OFFICE
SMART FORMS
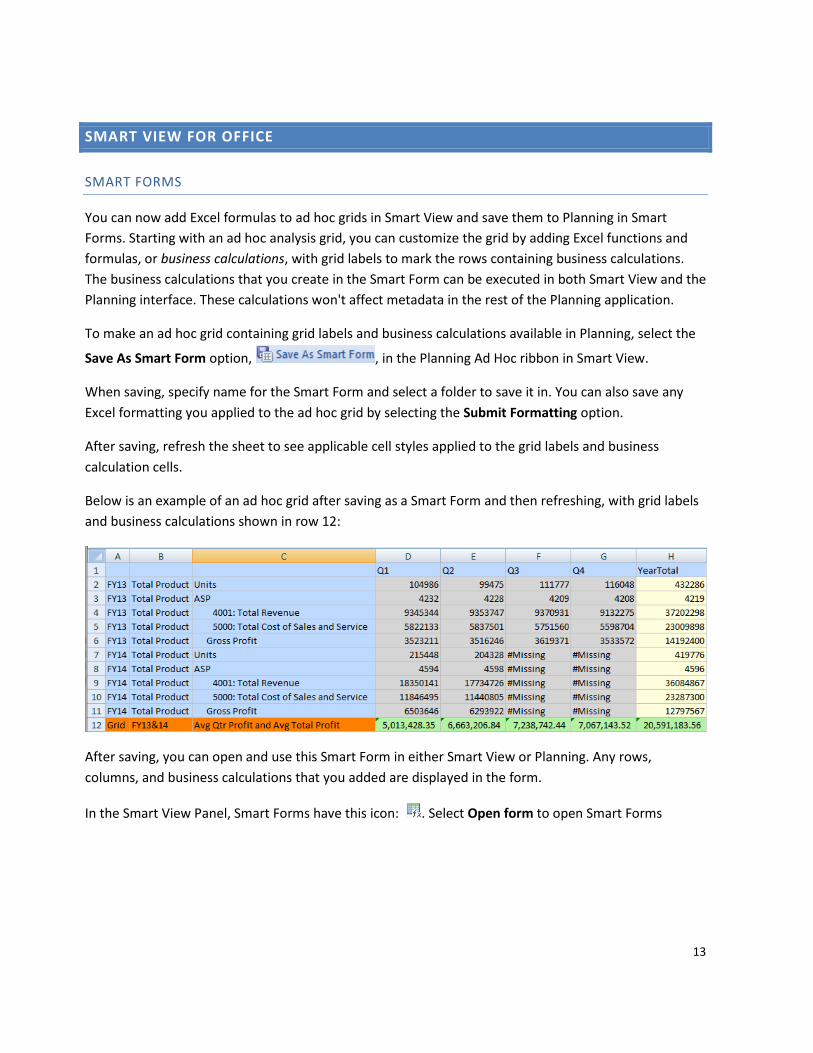
You can now add Excel formulas to ad hoc grids in Smart View and save them to Planning in Smart Forms. Starting with an ad hoc analysis grid, you can customize the grid by adding Excel functions and formulas, or business calculations, with grid labels to mark the rows containing business calculations. The business calculations that you create in the Smart Form can be executed in both Smart View and the Planning interface. These calculations won't affect metadata in the rest of the Planning application.
To make an ad hoc grid containing grid labels and business calculations available in Planning, select the
Save As Smart Form option, , in the Planning Ad Hoc ribbon in Smart View.
When saving, specify name for the Smart Form and select a folder to save it in. You can also save any Excel formatting you applied to the ad hoc grid by selecting the Submit Formatting option.
After saving, refresh the sheet to see applicable cell styles applied to the grid labels and business calculation cells.
Below is an example of an ad hoc grid after saving as a Smart Form and then refreshing, with grid labels and business calculations shown in row 12:
After saving, you can open and use this Smart Form in either Smart View or Planning. Any rows, columns, and business calculations that you added are displayed in the form.
In the Smart View Panel, Smart Forms have this icon: . Select Open form to open Smart Forms
14
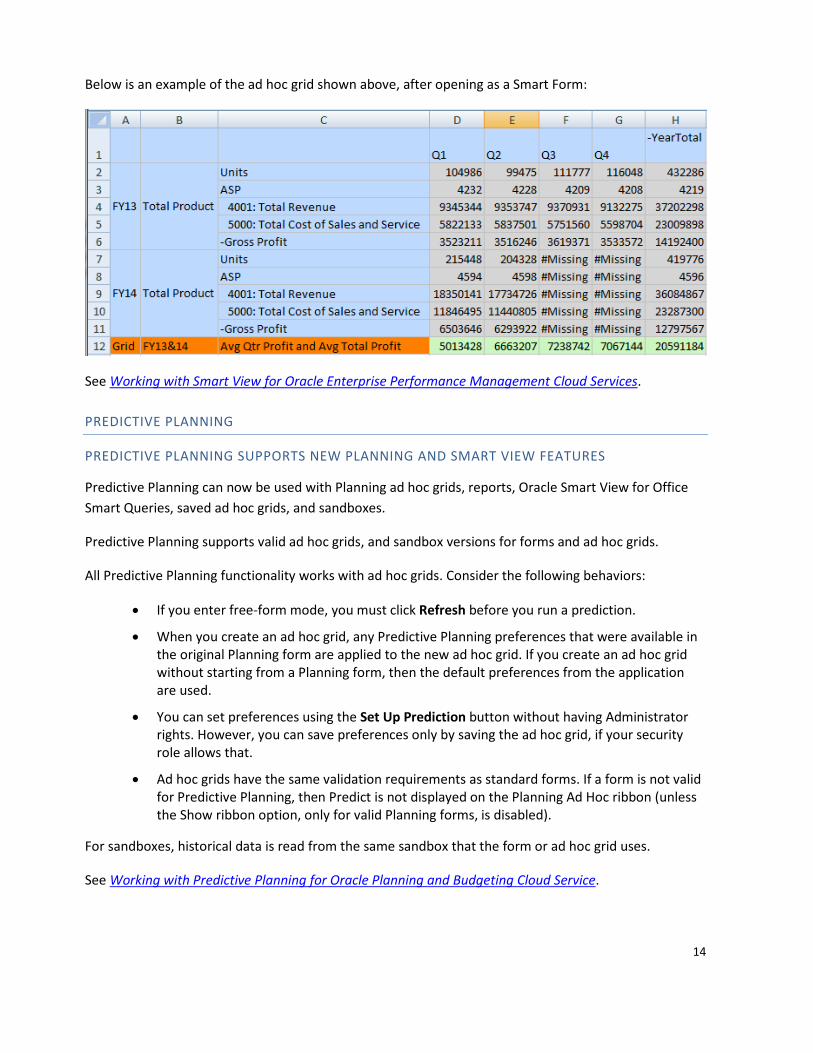
Below is an example of the ad hoc grid shown above, after opening as a Smart Form:
See Working with Smart View for Oracle Enterprise Performance Management Cloud Services.
PREDICTIVE PLANNING
PREDICTIVE PLANNING SUPPORTS NEW PLANNING AND SMART VIEW FEATURES
Predictive Planning can now be used with Planning ad hoc grids, reports, Oracle Smart View for Office Smart Queries, saved ad hoc grids, and sandboxes.
Predictive Planning supports valid ad hoc grids, and sandbox versions for forms and ad hoc grids.
All Predictive Planning functionality works with ad hoc grids. Consider the following behaviors:
• If you enter free-form mode, you must click Refresh before you run a prediction.
• When you create an ad hoc grid, any Predictive Planning preferences that were available in the original Planning form are applied to the new ad hoc grid. If you create an ad hoc grid without starting from a Planning form, then the default preferences from the application are used.
• You can set preferences using the Set Up Prediction button without having Administrator rights. However, you can save preferences only by saving the ad hoc grid, if your security role allows that.
• Ad hoc grids have the same validation requirements as standard forms. If a form is not valid for Predictive Planning, then Predict is not displayed on the Planning Ad Hoc ribbon (unless the Show ribbon option, only for valid Planning forms, is disabled).
For sandboxes, historical data is read from the same sandbox that the form or ad hoc grid uses.
See Working with Predictive Planning for Oracle Planning and Budgeting Cloud Service.
15
QUICK PREDICT
Quick Predict enables you to run and paste predictions with a few mouse clicks or keystrokes.
With Quick Predict, all form defaults, except those for member selection, are used automatically. The predicted results are immediately pasted into the Planning form. You can enter predicted data into all cells for a member or into selected cells.
To run a prediction with Quick Predict:
1. In a Planning form in Smart View, select member names or cells to predict.
2. Right-click and then select Predictive Planning. Or, select the Predictive Planning ribbon, and then click the lower half of the Predict button, with the label and arrow.
3. Indicate whether to predict an entire member or selected cells:
o Select Quick Predict Selected Members to predict future values for selected members and paste results into all the members' future data cells.
o Select Quick Predict To Selected Cells to predict future values for members containing the selected data cells and paste results into only the selected cells.
Note: To avoid having data overwritten, the Planning administrator should add a prediction scenario to the form before you predict data.
See Working with Predictive Planning for Oracle Planning and Budgeting Cloud Service.
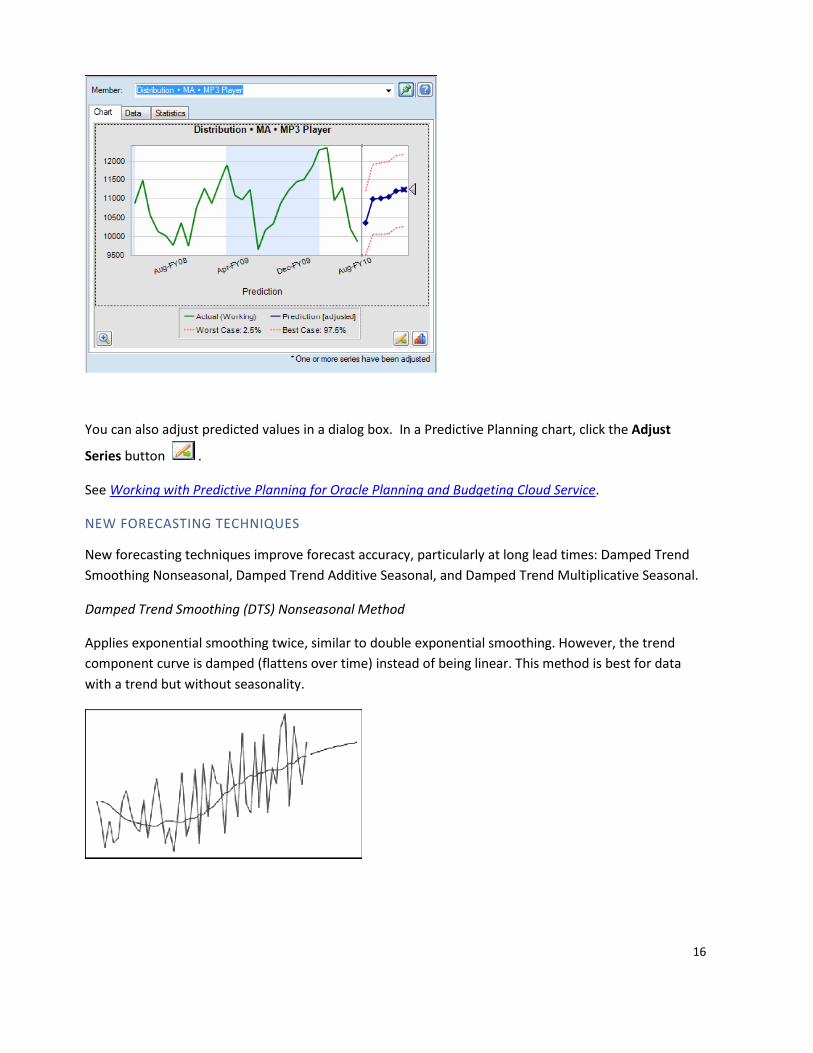
PREDICTION CHART ENHANCEMENTS
Prediction chart enhancements enable you to directly manipulate predicted data series. You can adjust predictions without retyping predicted values.
Prediction charts typically show actual data followed by future series such as predicted values and “worst case/best case” values. You can adjust future series by activating a “chart grabber” and manipulating charted data with the mouse or by using the Adjust Series dialog box. When you release the mouse button or click OK in the dialog box, changes are immediately pasted to the matching series on the form.
To adjust the data series using the chart grabber, click the future data series to activate the chart grabber. Then you can move the chart grabber up or down to increase or decrease all values evenly with the first period value unlocked, click a predicted data point and move it to adjust only that value, or right-click and select Lock First Period to keep the first predicted value constant. Move the chart grabber up or down to increase or decrease all values relative to the first value.
16
You can also adjust predicted values in a dialog box. In a Predictive Planning chart, click the Adjust
Series button .
See Working with Predictive Planning for Oracle Planning and Budgeting Cloud Service.
NEW FORECASTING TECHNIQUES
New forecasting techniques improve forecast accuracy, particularly at long lead times: Damped Trend Smoothing Nonseasonal, Damped Trend Additive Seasonal, and Damped Trend Multiplicative Seasonal.
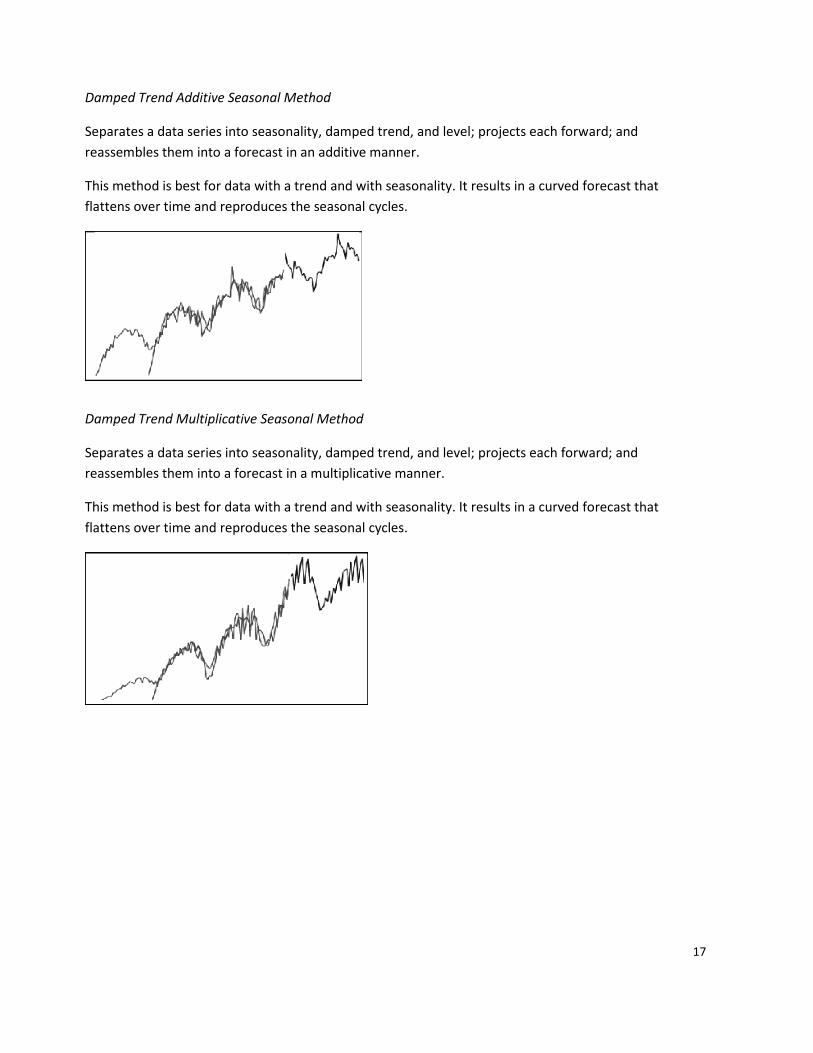
Damped Trend Smoothing (DTS) Nonseasonal Method
Applies exponential smoothing twice, similar to double exponential smoothing. However, the trend component curve is damped (flattens over time) instead of being linear. This method is best for data with a trend but without seasonality.
17
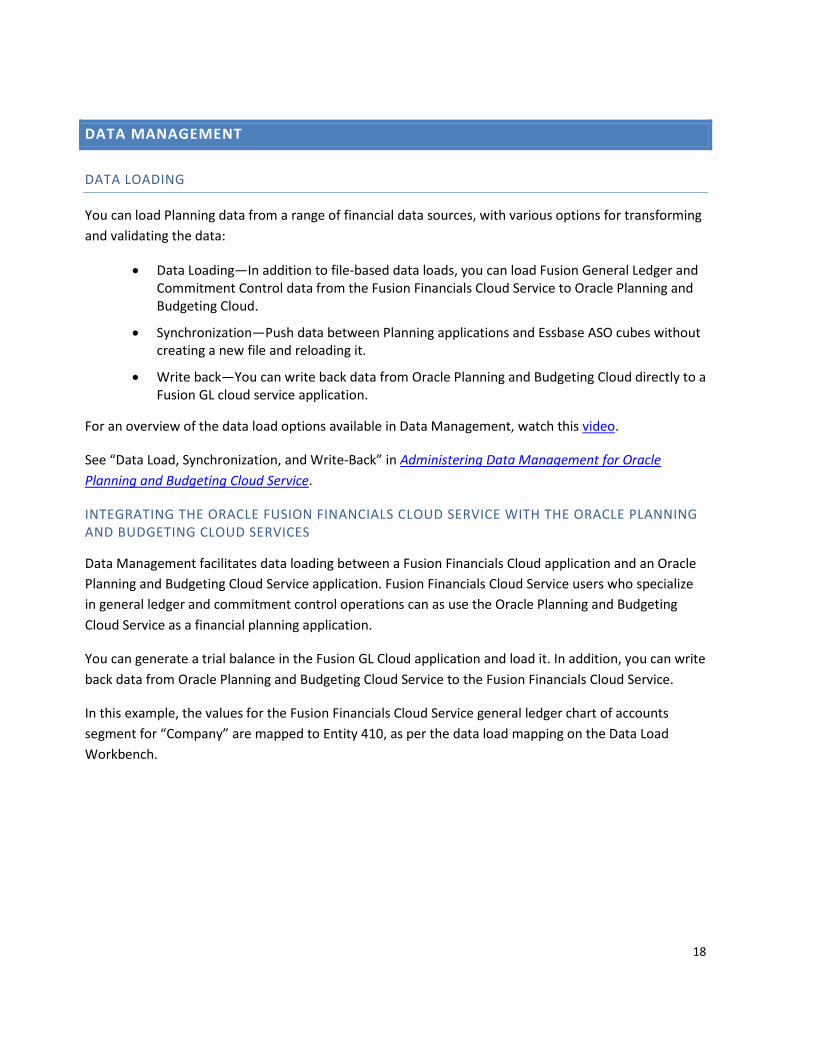
Damped Trend Additive Seasonal Method
Separates a data series into seasonality, damped trend, and level; projects each forward; and reassembles them into a forecast in an additive manner.
This method is best for data with a trend and with seasonality. It results in a curved forecast that flattens over time and reproduces the seasonal cycles.
Damped Trend Multiplicative Seasonal Method
Separates a data series into seasonality, damped trend, and level; projects each forward; and reassembles them into a forecast in a multiplicative manner.
This method is best for data with a trend and with seasonality. It results in a curved forecast that flattens over time and reproduces the seasonal cycles.
18
DATA MANAGEMENT
DATA LOADING
You can load Planning data from a range of financial data sources, with various options for transforming and validating the data:
• Data Loading—In addition to file-based data loads, you can load Fusion General Ledger and Commitment Control data from the Fusion Financials Cloud Service to Oracle Planning and Budgeting Cloud.
• Synchronization—Push data between Planning applications and Essbase ASO cubes without creating a new file and reloading it.
• Write back—You can write back data from Oracle Planning and Budgeting Cloud directly to a Fusion GL cloud service application.
For an overview of the data load options available in Data Management, watch this video.
See “Data Load, Synchronization, and Write-Back” in Administering Data Management for Oracle Planning and Budgeting Cloud Service.
INTEGRATING THE ORACLE FUSION FINANCIALS CLOUD SERVICE WITH THE ORACLE PLANNING AND BUDGETING CLOUD SERVICES
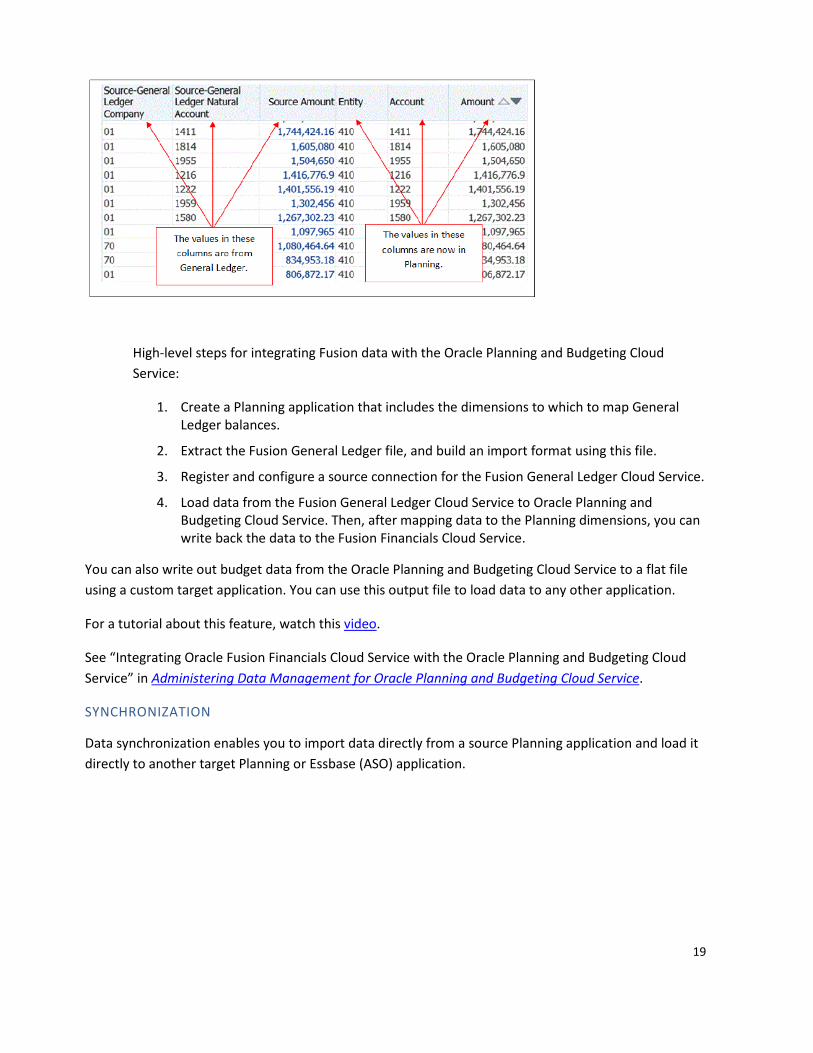
Data Management facilitates data loading between a Fusion Financials Cloud application and an Oracle Planning and Budgeting Cloud Service application. Fusion Financials Cloud Service users who specialize in general ledger and commitment control operations can as use the Oracle Planning and Budgeting Cloud Service as a financial planning application.
You can generate a trial balance in the Fusion GL Cloud application and load it. In addition, you can write back data from Oracle Planning and Budgeting Cloud Service to the Fusion Financials Cloud Service.
In this example, the values for the Fusion Financials Cloud Service general ledger chart of accounts segment for “Company” are mapped to Entity 410, as per the data load mapping on the Data Load Workbench.
19
High-level steps for integrating Fusion data with the Oracle Planning and Budgeting Cloud Service:
1. Create a Planning application that includes the dimensions to which to map General Ledger balances.
2. Extract the Fusion General Ledger file, and build an import format using this file.
3. Register and configure a source connection for the Fusion General Ledger Cloud Service.
4. Load data from the Fusion General Ledger Cloud Service to Oracle Planning and Budgeting Cloud Service. Then, after mapping data to the Planning dimensions, you can write back the data to the Fusion Financials Cloud Service.
You can also write out budget data from the Oracle Planning and Budgeting Cloud Service to a flat file using a custom target application. You can use this output file to load data to any other application.
For a tutorial about this feature, watch this video.
See “Integrating Oracle Fusion Financials Cloud Service with the Oracle Planning and Budgeting Cloud Service” in Administering Data Management for Oracle Planning and Budgeting Cloud Service.
SYNCHRONIZATION
Data synchronization enables you to import data directly from a source Planning application and load it directly to another target Planning or Essbase (ASO) application.
20
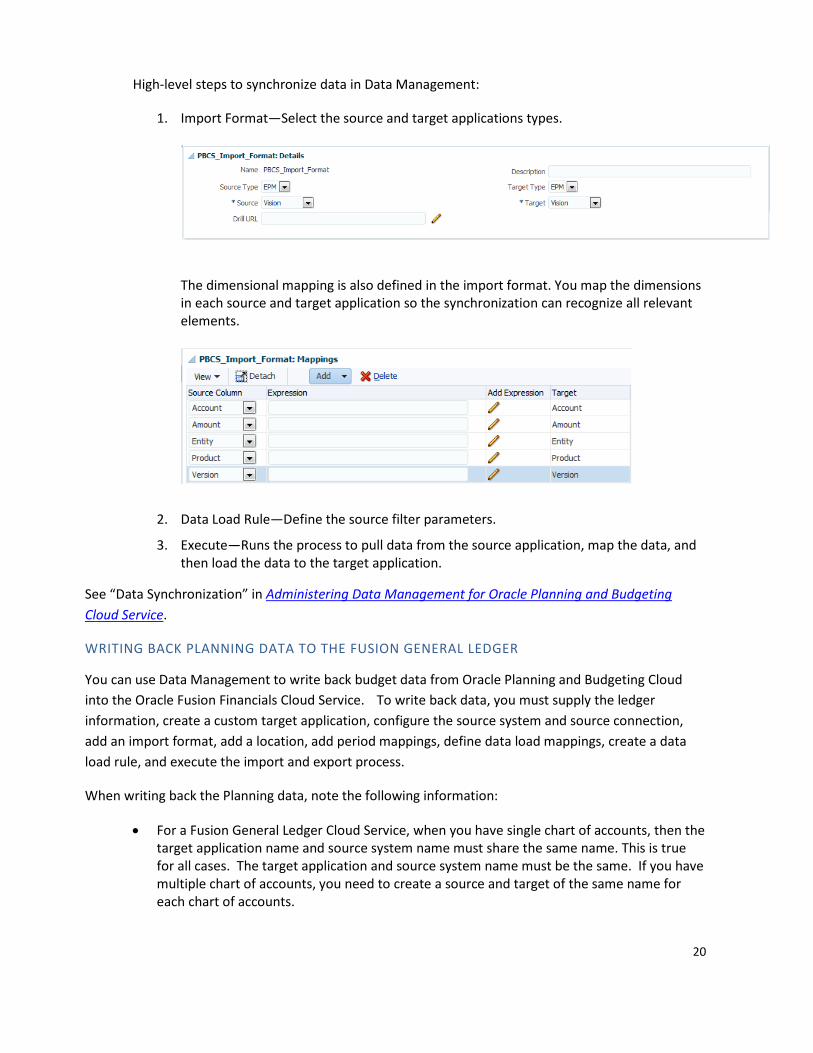
High-level steps to synchronize data in Data Management:
1. Import Format—Select the source and target applications types.
The dimensional mapping is also defined in the import format. You map the dimensions in each source and target application so the synchronization can recognize all relevant elements.
2. Data Load Rule—Define the source filter parameters.
3. Execute—Runs the process to pull data from the source application, map the data, and then load the data to the target application.
See “Data Synchronization” in Administering Data Management for Oracle Planning and Budgeting Cloud Service.
WRITING BACK PLANNING DATA TO THE FUSION GENERAL LEDGER
You can use Data Management to write back budget data from Oracle Planning and Budgeting Cloud into the Oracle Fusion Financials Cloud Service. To write back data, you must supply the ledger information, create a custom target application, configure the source system and source connection, add an import format, add a location, add period mappings, define data load mappings, create a data load rule, and execute the import and export process.
When writing back the Planning data, note the following information:
• For a Fusion General Ledger Cloud Service, when you have single chart of accounts, then the target application name and source system name must share the same name. This is true for all cases. The target application and source system name must be the same. If you have multiple chart of accounts, you need to create a source and target of the same name for each chart of accounts.
21
• For a Fusion Commitment Control source, when you have a XCC source, the last three characters of the source and target application must be “XCC.”
For a tutorial about writing back to the Fusion General Ledger, watch this video.
See “Writing Back the Planning Data to the Fusion General Ledger” in Administering Data Management for Oracle Planning and Budgeting Cloud Service.
WRITING BACKING INTEGRATED PLANNING AND FUSION DATA TO A FLAT FILE
After completing a planning or budgeting cycle in Oracle Planning and Budgeting Cloud Service (either from a file-based source system, or a Planning application created using Fusion General Ledger data), data can be written out to a text file for use in an external application.
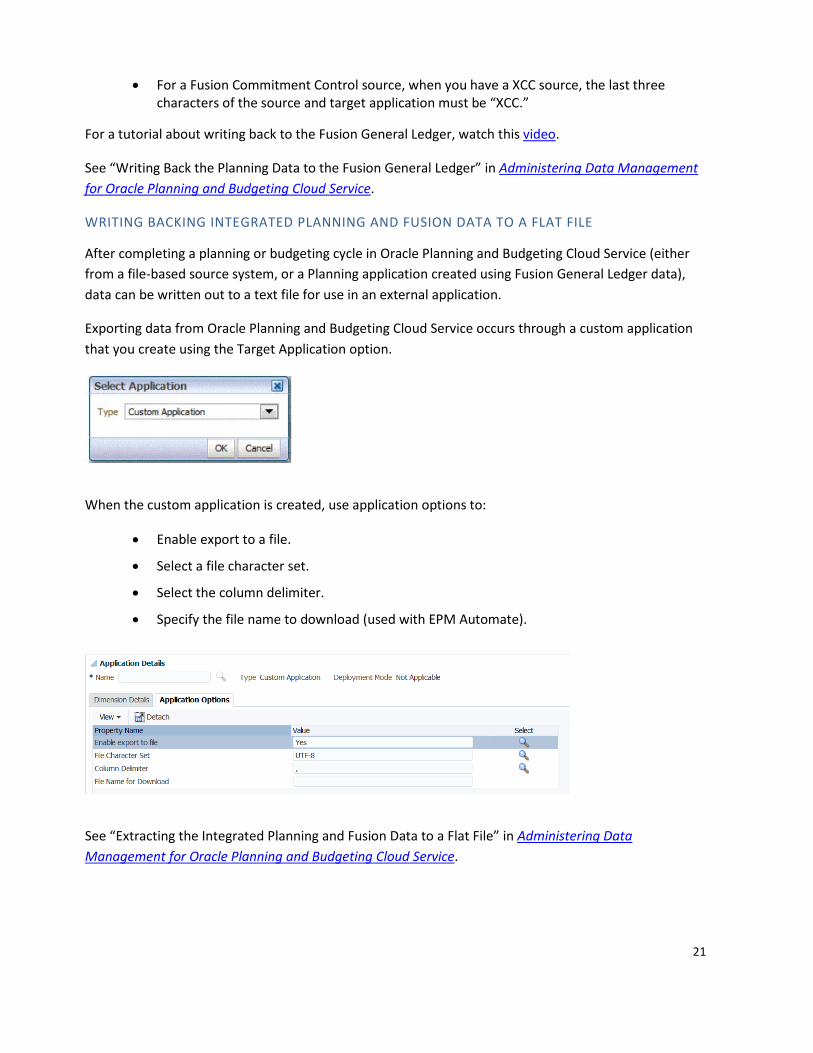
Exporting data from Oracle Planning and Budgeting Cloud Service occurs through a custom application that you create using the Target Application option.
When the custom application is created, use application options to:
• Enable export to a file.
• Select a file character set.
• Select the column delimiter.
• Specify the file name to download (used with EPM Automate).
See “Extracting the Integrated Planning and Fusion Data to a Flat File” in Administering Data Management for Oracle Planning and Budgeting Cloud Service.
22
IMPORT FORMAT BUILDER
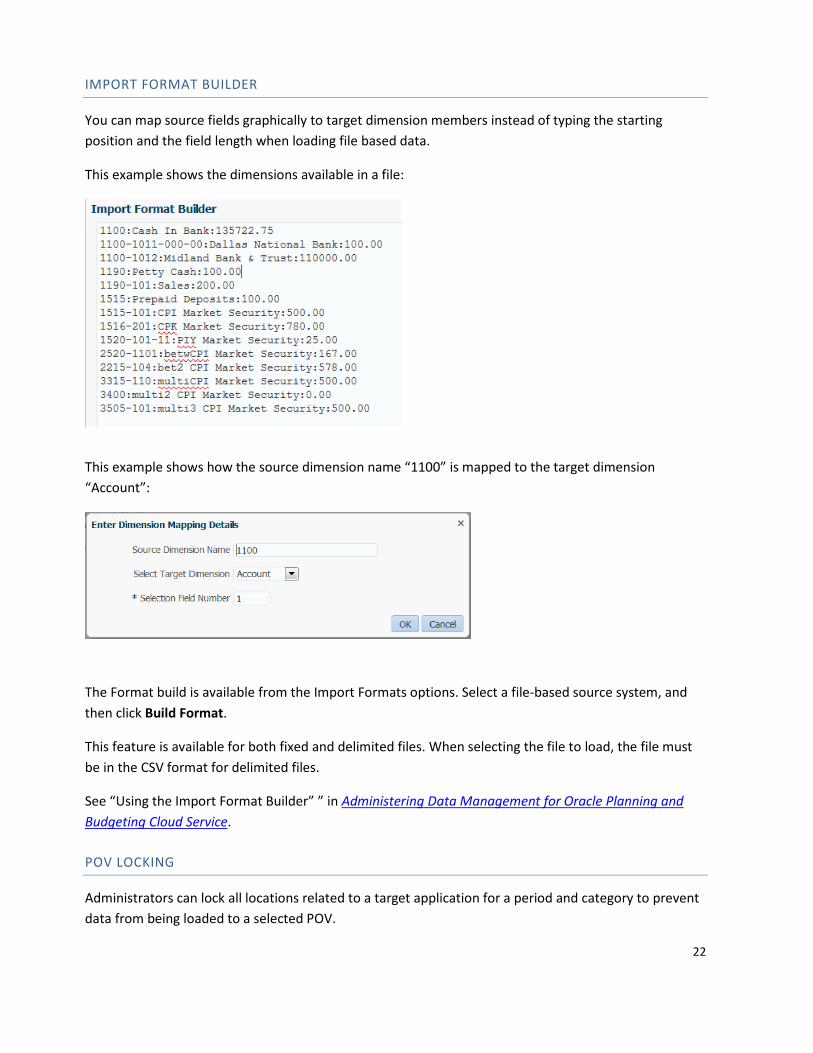
You can map source fields graphically to target dimension members instead of typing the starting position and the field length when loading file based data.
This example shows the dimensions available in a file:
This example shows how the source dimension name “1100” is mapped to the target dimension “Account”:
The Format build is available from the Import Formats options. Select a file-based source system, and then click Build Format.
This feature is available for both fixed and delimited files. When selecting the file to load, the file must be in the CSV format for delimited files.
See “Using the Import Format Builder” ” in Administering Data Management for Oracle Planning and Budgeting Cloud Service.
POV LOCKING
Administrators can lock all locations related to a target application for a period and category to prevent data from being loaded to a selected POV.
23
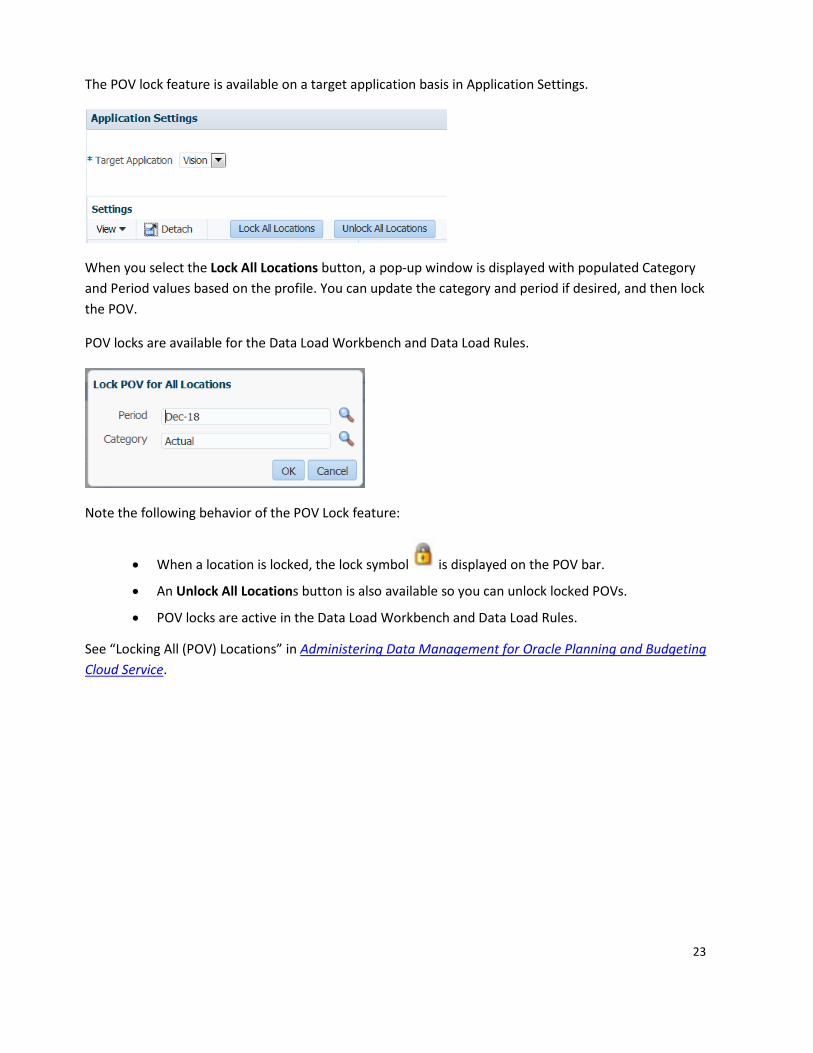
The POV lock feature is available on a target application basis in Application Settings.
When you select the Lock All Locations button, a pop-up window is displayed with populated Category and Period values based on the profile. You can update the category and period if desired, and then lock the POV.
POV locks are available for the Data Load Workbench and Data Load Rules.
Note the following behavior of the POV Lock feature:
• When a location is locked, the lock symbol is displayed on the POV bar.
• An Unlock All Locations button is also available so you can unlock locked POVs.
• POV locks are active in the Data Load Workbench and Data Load Rules.
See “Locking All (POV) Locations” in Administering Data Management for Oracle Planning and Budgeting Cloud Service.
24
CALCULATION MANAGER
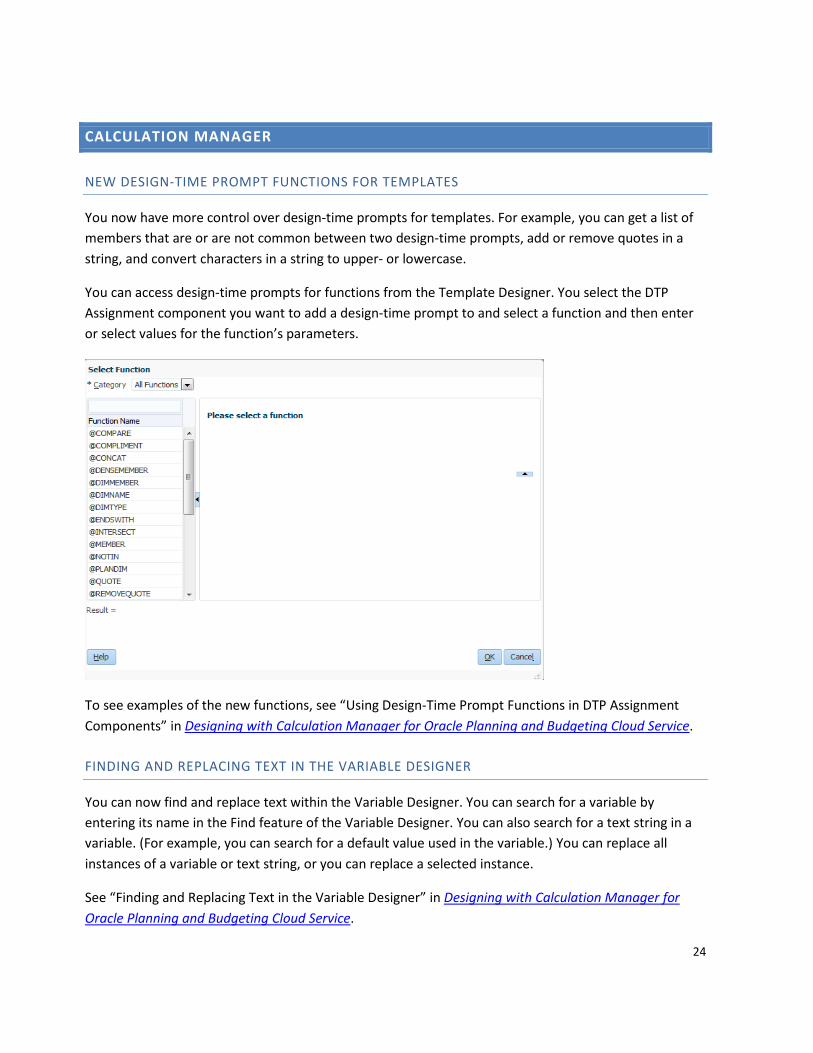
NEW DESIGN-TIME PROMPT FUNCTIONS FOR TEMPLATES
You now have more control over design-time prompts for templates. For example, you can get a list of members that are or are not common between two design-time prompts, add or remove quotes in a string, and convert characters in a string to upper- or lowercase.
You can access design-time prompts for functions from the Template Designer. You select the DTP Assignment component you want to add a design-time prompt to and select a function and then enter or select values for the function’s parameters.
To see examples of the new functions, see “Using Design-Time Prompt Functions in DTP Assignment Components” in Designing with Calculation Manager for Oracle Planning and Budgeting Cloud Service.
FINDING AND REPLACING TEXT IN THE VARIABLE DESIGNER
You can now find and replace text within the Variable Designer. You can search for a variable by entering its name in the Find feature of the Variable Designer. You can also search for a text string in a variable. (For example, you can search for a default value used in the variable.) You can replace all instances of a variable or text string, or you can replace a selected instance.
See “Finding and Replacing Text in the Variable Designer” in Designing with Calculation Manager for Oracle Planning and Budgeting Cloud Service.
25
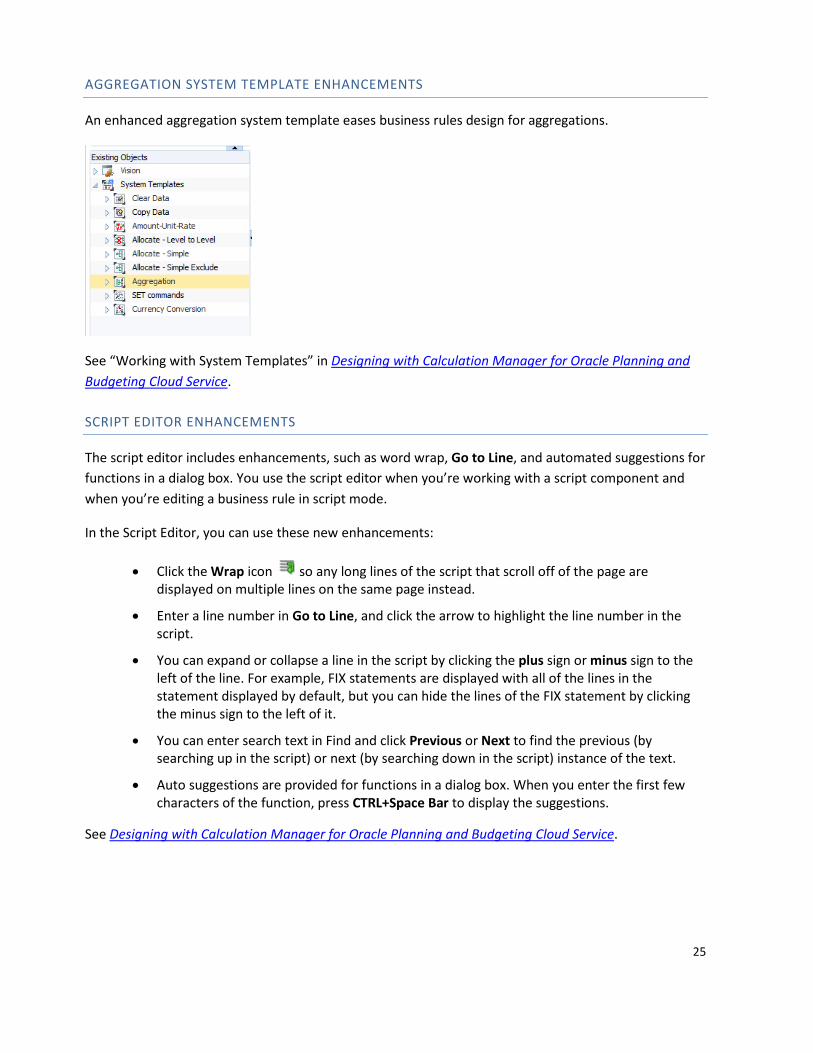
AGGREGATION SYSTEM TEMPLATE ENHANCEMENTS
An enhanced aggregation system template eases business rules design for aggregations.
See “Working with System Templates” in Designing with Calculation Manager for Oracle Planning and Budgeting Cloud Service.
SCRIPT EDITOR ENHANCEMENTS
The script editor includes enhancements, such as word wrap, Go to Line, and automated suggestions for functions in a dialog box. You use the script editor when you’re working with a script component and when you’re editing a business rule in script mode.
In the Script Editor, you can use these new enhancements:
• Click the Wrap icon so any long lines of the script that scroll off of the page are displayed on multiple lines on the same page instead.
• Enter a line number in Go to Line, and click the arrow to highlight the line number in the script.
• You can expand or collapse a line in the script by clicking the plus sign or minus sign to the left of the line. For example, FIX statements are displayed with all of the lines in the statement displayed by default, but you can hide the lines of the FIX statement by clicking the minus sign to the left of it.
• You can enter search text in Find and click Previous or Next to find the previous (by searching up in the script) or next (by searching down in the script) instance of the text.
• Auto suggestions are provided for functions in a dialog box. When you enter the first few characters of the function, press CTRL+Space Bar to display the suggestions.
See Designing with Calculation Manager for Oracle Planning and Budgeting Cloud Service.
26
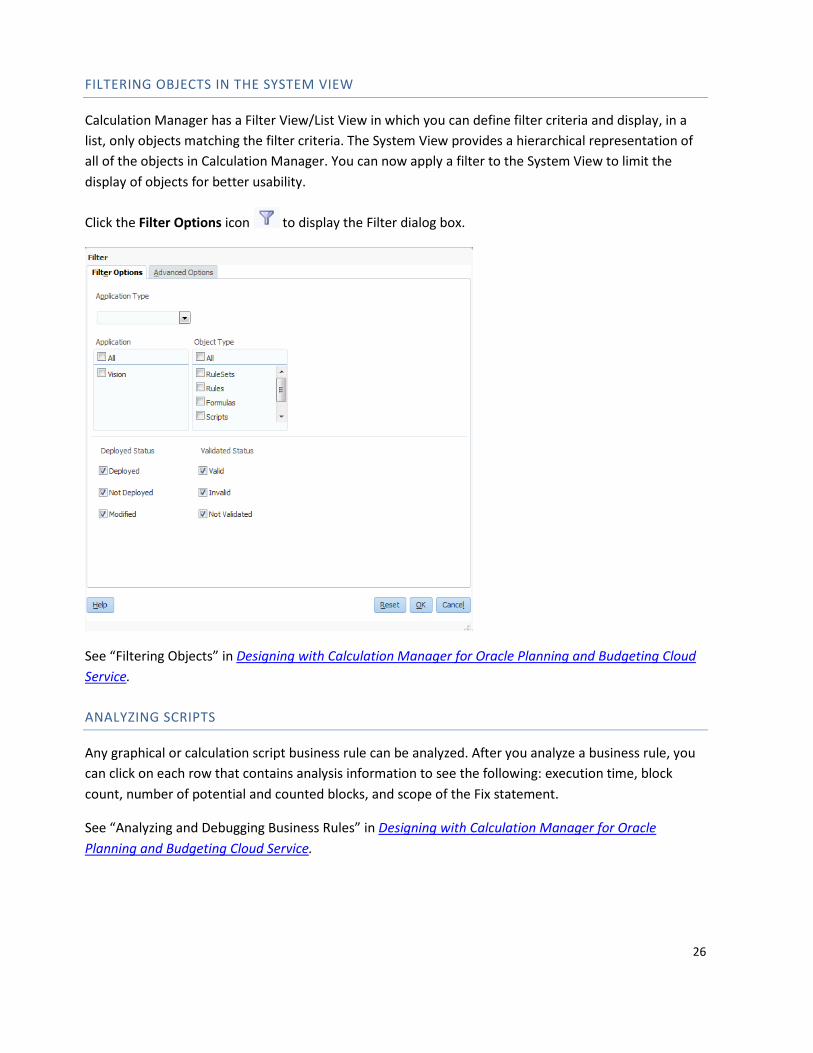
FILTERING OBJECTS IN THE SYSTEM VIEW
Calculation Manager has a Filter View/List View in which you can define filter criteria and display, in a list, only objects matching the filter criteria. The System View provides a hierarchical representation of all of the objects in Calculation Manager. You can now apply a filter to the System View to limit the display of objects for better usability.
Click the Filter Options icon to display the Filter dialog box.
See “Filtering Objects” in Designing with Calculation Manager for Oracle Planning and Budgeting Cloud Service.
ANALYZING SCRIPTS
Any graphical or calculation script business rule can be analyzed. After you analyze a business rule, you can click on each row that contains analysis information to see the following: execution time, block count, number of potential and counted blocks, and scope of the Fix statement.
See “Analyzing and Debugging Business Rules” in Designing with Calculation Manager for Oracle Planning and Budgeting Cloud Service.
27
CUSTOMIZING VIEWS
You can customize the columns that are displayed and the order in which they display in Calculation Manager’s views. In the System View, Custom View, and Deployment View, you can also expand and collapse the contents of the Planning application type, its applications, plan types, and the objects within them.
See “Customizing Views” in Designing with Calculation Manager for Oracle Planning and Budgeting Cloud Service.
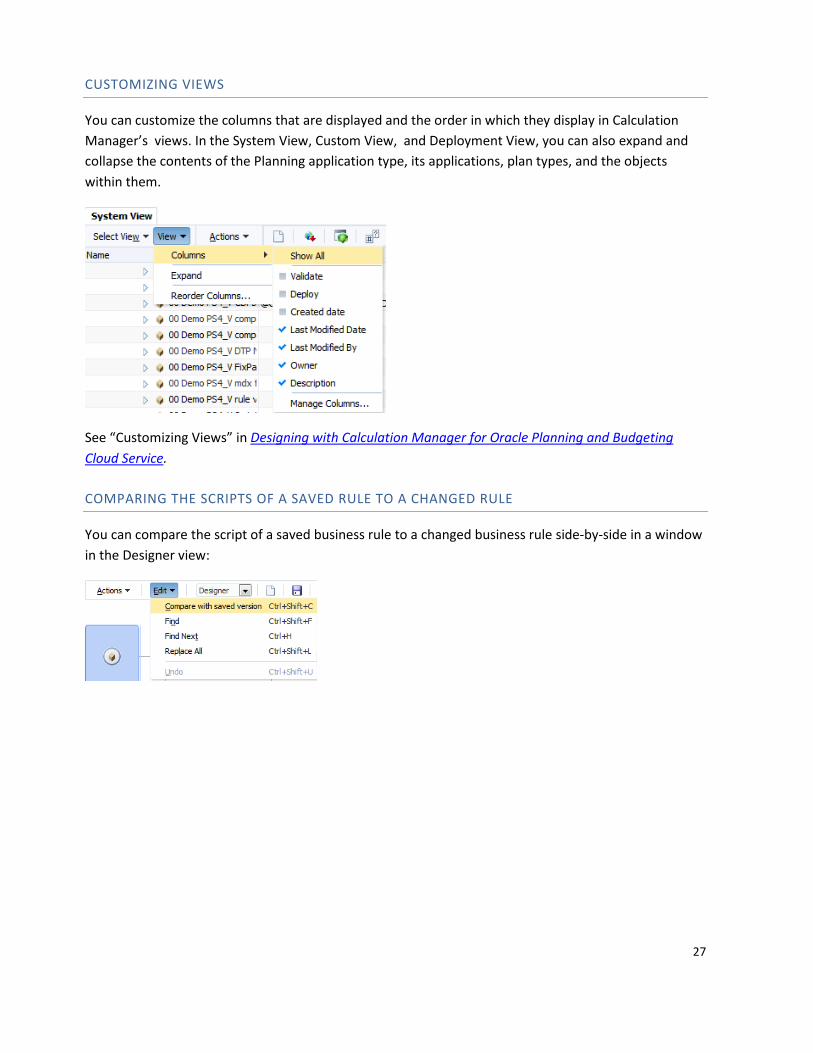
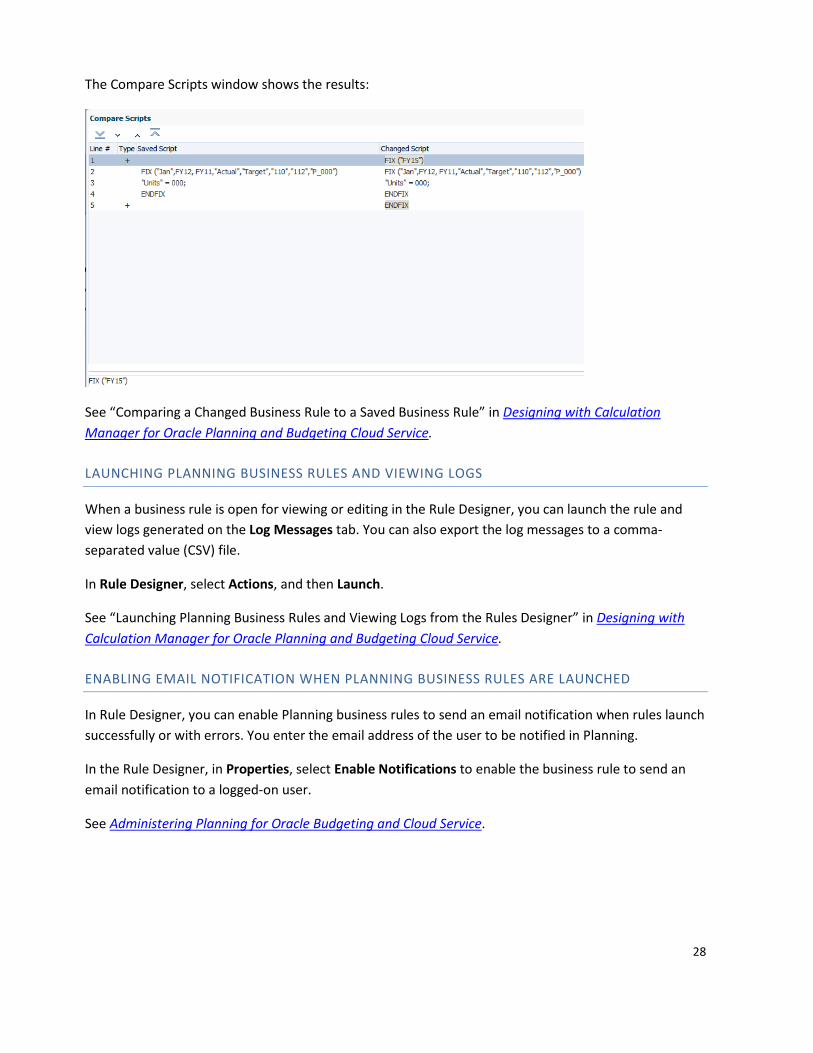
COMPARING THE SCRIPTS OF A SAVED RULE TO A CHANGED RULE
You can compare the script of a saved business rule to a changed business rule side-by-side in a window in the Designer view:
28
The Compare Scripts window shows the results:
See “Comparing a Changed Business Rule to a Saved Business Rule” in Designing with Calculation Manager for Oracle Planning and Budgeting Cloud Service.
LAUNCHING PLANNING BUSINESS RULES AND VIEWING LOGS
When a business rule is open for viewing or editing in the Rule Designer, you can launch the rule and view logs generated on the Log Messages tab. You can also export the log messages to a comma-separated value (CSV) file.
In Rule Designer, select Actions, and then Launch.
See “Launching Planning Business Rules and Viewing Logs from the Rules Designer” in Designing with Calculation Manager for Oracle Planning and Budgeting Cloud Service.
ENABLING EMAIL NOTIFICATION WHEN PLANNING BUSINESS RULES ARE LAUNCHED
In Rule Designer, you can enable Planning business rules to send an email notification when rules launch successfully or with errors. You enter the email address of the user to be notified in Planning.
In the Rule Designer, in Properties, select Enable Notifications to enable the business rule to send an email notification to a logged-on user.
See Administering Planning for Oracle Budgeting and Cloud Service.
29
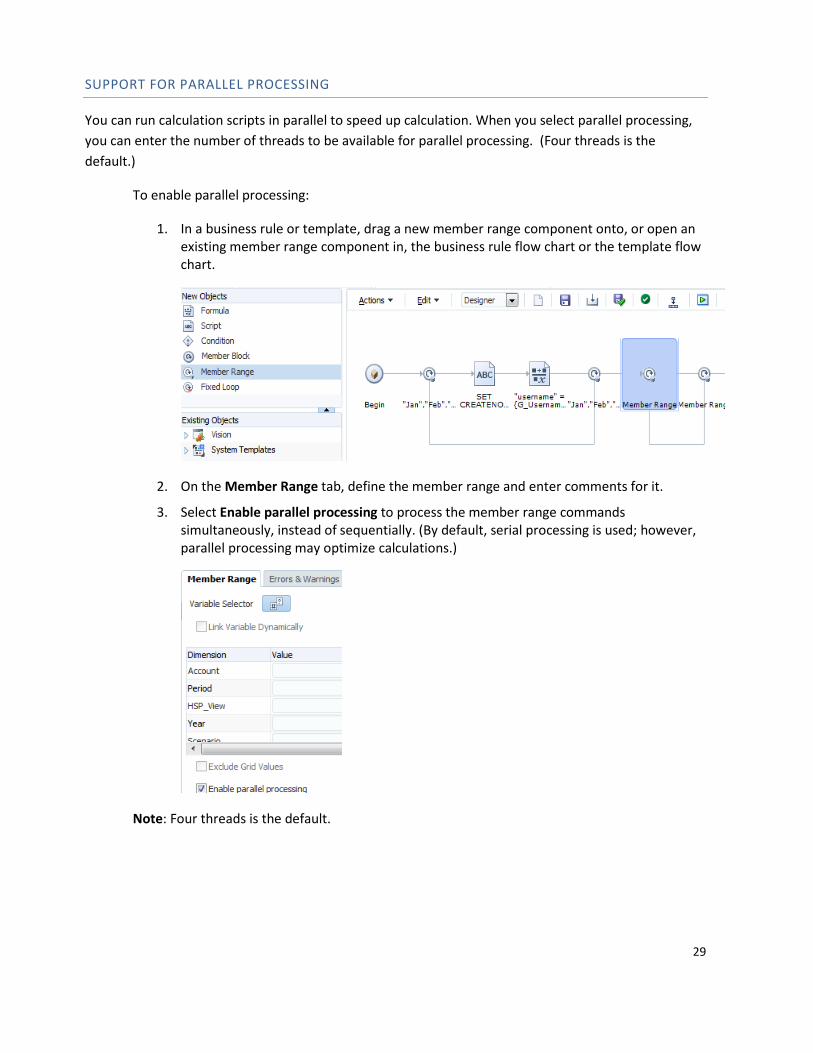
SUPPORT FOR PARALLEL PROCESSING
You can run calculation scripts in parallel to speed up calculation. When you select parallel processing, you can enter the number of threads to be available for parallel processing. (Four threads is the default.)
To enable parallel processing:
1. In a business rule or template, drag a new member range component onto, or open an existing member range component in, the business rule flow chart or the template flow chart.
2. On the Member Range tab, define the member range and enter comments for it.
3. Select Enable parallel processing to process the member range commands simultaneously, instead of sequentially. (By default, serial processing is used; however, parallel processing may optimize calculations.)
Note: Four threads is the default.
30
FINANCIAL REPORTING
QUERY-READY EXPORT
New user preferences for Financial Reporting enable additional control over exporting a Financial Reporting report grid to a Query Ready output in Excel.
You can now export to a New Worksheet (opens the exported report as a new sheet in an existing Excel workbook), to a New Workbook (opens the exported report as “sheet 1” in a new Excel workbook), or both. This feature is available only when the Export Mode in Workspace Preferences is set to “Smart View.”
To launch a query-ready export of a Financial Reporting report:
1. In Planning and Budgeting Cloud Service Workspace, select File, then Preferences, and then Financial Reporting.
2. In the “Query-Ready Export” section, under “Export To”, select New Worksheet, New Workbook, or both.
See “General Financial Reporting Preferences” in Designing Documents with Financial Reporting for Oracle Planning and Budgeting Cloud Service.
31
FINANCIAL REPORTING STUDIO
In previous releases, the installed Financial Reporting Studio version needed to match the Financial Reporting server version. This release enables automatic synchronization of the Financial Reporting Studio version with the server version by a Windows user who does not have administrator privileges, without requiring a new client installation.
An initial 11.1.2.4.400 installation of the new version of Financial Reporting Studio is still required by a Windows administrator; however, when a differing server version is detected (later or earlier releases, with 11.1.2.4.400 as a minimum), Financial Reporting Studio requests approval from the user to synchronize with the server version. After the user accepts the request to synchronize with a server version, a synchronization package is downloaded and cached. The package caching only requires it to be downloaded once per server version.
See “Starting Reporting Studio” in Designing with Financial Reporting Studio for Oracle Planning and Budgeting Cloud Service.
32
APPLICATION MANAGEMENT
SECURITY AUDIT REPORT
The User Audit Report, available from Application Management, contains information on the users who have signed into a service instance over a period of time. The report shows the IP address of the computer from which the user logged in and the date and time at which the user accessed the service instance.
The service provides a default User Audit Report that lists all users who signed in over the last day. Service Administrators can regenerate this report for a custom date range or for the last day, last 30 days, last 90 days, or last 120 days.
USER ROLE CHANGES
User roles in Planning and Budgeting Cloud have been modified:
• The Service Administrator role now includes drill-through, GL write-back and run integration.
• The Power User role now includes create integration and drill-through.
• The Planner role now includes explorer and content manager role to enable importing and exporting documents.

33
Copyright © 2015, Oracle and/or its affiliates. All rights reserved.
This document is provided for information purposes only, and the contents hereof are subject to change without notice. This document is not warranted to be error-free, nor subject to any other warranties or conditions, whether expressed orally or implied in law, including implied warranties and conditions of merchantability or fitness for a particular purpose. We specifically disclaim any liability with respect to this document, and no contractual obligations are formed either directly or indirectly by this document. This document may not be reproduced or transmitted in any form or by any means, electronic or mechanical, for any purpose, without our prior written permission.
Oracle and Java are registered trademarks of Oracle and/or its affiliates. Other names may be trademarks of their respective owners.
Intel and Intel Xeon are trademarks or registered trademarks of Intel Corporation. All SPARC trademarks are used under license and are trademarks or registered trademarks of SPARC International, Inc. AMD, Opteron, the AMD logo, and the AMD Opteron logo are trademarks or registered trademarks of Advanced Micro Devices. UNIX is a registered trademark of The Open Group.