oracle enterprise manager advanced configuration
TRANSCRIPT
Oracle® Enterprise ManagerAdvanced Configuration
10g Release 5 (10.2.0.5)
E10954-03
June 2009

Oracle Enterprise Manager Advanced Configuration, 10g Release 5 (10.2.0.5)
E10954-03
Copyright © 2003, 2009, Oracle and/or its affiliates. All rights reserved.
Contributor: Raj Aggarwal, Muralidharan Bhoopathy, Diarmuid Cawley, Leo Cloutier, Sudip Datta, Erik DeMember, Kondayya Duvvuri, James Emmond, Irina Goldshteyn, Jacqueline Gosselin, Scott Grover, Rahul Gupta, Luming Han, Ana Hernandez, Narain Jagathesan, Eunhei Jang, Aparna Kamath, Ramanujam Krishnan, Dennis A. Lee, Conrad Lo, Jaydeep Marfatia, Karen McKeen, Rahul Pandey, Raghu Patti, Ravi Pinnamaneni, Pushpa Raghavachar, Sridhar T. Reddy, Prashanth Shishir, Anu Vale, Steven Viavant, James Viscusi, Jin G. Wang, Julie Wong, Michael Zampiceni
This software and related documentation are provided under a license agreement containing restrictions on use and disclosure and are protected by intellectual property laws. Except as expressly permitted in your license agreement or allowed by law, you may not use, copy, reproduce, translate, broadcast, modify, license, transmit, distribute, exhibit, perform, publish, or display any part, in any form, or by any means. Reverse engineering, disassembly, or decompilation of this software, unless required by law for interoperability, is prohibited.
The information contained herein is subject to change without notice and is not warranted to be error-free. If you find any errors, please report them to us in writing.
If this software or related documentation is delivered to the U.S. Government or anyone licensing it on behalf of the U.S. Government, the following notice is applicable:
U.S. GOVERNMENT RIGHTS Programs, software, databases, and related documentation and technical data delivered to U.S. Government customers are "commercial computer software" or "commercial technical data" pursuant to the applicable Federal Acquisition Regulation and agency-specific supplemental regulations. As such, the use, duplication, disclosure, modification, and adaptation shall be subject to the restrictions and license terms set forth in the applicable Government contract, and, to the extent applicable by the terms of the Government contract, the additional rights set forth in FAR 52.227-19, Commercial Computer Software License (December 2007). Oracle USA, Inc., 500 Oracle Parkway, Redwood City, CA 94065.
This software is developed for general use in a variety of information management applications. It is not developed or intended for use in any inherently dangerous applications, including applications which may create a risk of personal injury. If you use this software in dangerous applications, then you shall be responsible to take all appropriate fail-safe, backup, redundancy, and other measures to ensure the safe use of this software. Oracle Corporation and its affiliates disclaim any liability for any damages caused by use of this software in dangerous applications.
Oracle is a registered trademark of Oracle Corporation and/or its affiliates. Other names may be trademarks of their respective owners.
This software and documentation may provide access to or information on content, products, and services from third parties. Oracle Corporation and its affiliates are not responsible for and expressly disclaim all warranties of any kind with respect to third-party content, products, and services. Oracle Corporation and its affiliates will not be responsible for any loss, costs, or damages incurred due to your access to or use of third-party content, products, or services.
iii
Contents
Preface ............................................................................................................................................................... xix
Intended Audience.................................................................................................................................... xixDocumentation Accessibility ................................................................................................................... xixRelated Documents ................................................................................................................................... xxConventions ............................................................................................................................................... xx
1 Introduction to Enterprise Manager Advanced Configuration
1.1 Types of Advanced Configuration Tasks................................................................................ 1-11.2 Understanding the Enterprise Manager Directory Structure............................................... 1-11.2.1 Understanding the Enterprise Manager Directories Installed with Oracle Enterprise
Manager 10g Grid Control 1-21.2.1.1 About the Oracle Management Service Home Directory....................................... 1-21.2.1.2 About the Oracle Management Agent Home (AGENT_HOME) Directory ........ 1-31.2.1.3 Summary of the Important Directories in the Management Service Home ........ 1-31.2.2 Understanding the Enterprise Manager Directories Installed with the Management
Agent 1-41.2.2.1 Summary of the Important Directories in the Management Agent Home .......... 1-41.2.2.2 Understanding the Management Agent Directory Structure on Windows......... 1-51.2.3 Understanding the Enterprise Manager Directories Installed with Oracle Application
Server 1-51.2.4 Understanding the Enterprise Manager Directories Installed with Oracle Database 10g
1-61.2.5 Tip for Identifying the Oracle Home When Using the emctl Command .................... 1-71.2.6 Configuring Database Console During and After the Oracle Database 10g Installation..
1-81.2.6.1 Configuring Database Console During Installation ................................................ 1-81.2.6.2 Configuring Database Console with DBCA ............................................................. 1-91.2.6.3 Configuring Database Console with EMCA ......................................................... 1-111.2.6.4 Using an Input File for EMCA Parameters............................................................ 1-151.2.6.5 Using EMCA with Oracle Real Application Clusters .......................................... 1-161.2.6.6 Specifying the Ports Used By the Database Console............................................ 1-181.2.6.7 EMCA Troubleshooting Tips................................................................................... 1-191.2.6.7.1 Using EMCA After Changing the Database Listener Port........................... 1-191.2.6.7.2 Upgrading Database or ASM Instances with 10g Release 2 Grid Control
Agents 1-191.2.6.7.3 Using EMCA When Database Host Name or IP Address Changes .......... 1-19
iv
1.2.6.7.4 Using EMCA When the TNS Configuration Is Changed ............................. 1-201.2.7 Deconfiguring Database Control.................................................................................... 1-201.3 Enabling Enterprise Manager Accessibility Features ......................................................... 1-201.3.1 Enabling Enterprise Manager Accessibility Mode....................................................... 1-211.3.2 Providing Textual Descriptions of Enterprise Manager Charts ................................ 1-21
2 Starting and Stopping Enterprise Manager Components
2.1 Controlling the Oracle Management Agent............................................................................ 2-12.1.1 Starting, Stopping, and Checking the Status of the Management Agent on UNIX... 2-12.1.2 Starting and Stopping the Management Agent on Windows....................................... 2-22.1.3 Checking the Status of the Management Agent on Windows ...................................... 2-32.2 Controlling the Oracle Management Service.......................................................................... 2-42.2.1 Controlling the Management Service on UNIX .............................................................. 2-42.2.1.1 Using OPMN to Start and Stop the Management Service...................................... 2-42.2.1.2 Using emctl to Start, Stop, and Check the Status of the Oracle Management Service
2-52.2.1.3 Starting and Stopping Oracle Application Server Web Cache ............................. 2-52.2.2 Controlling the Management Service on Windows........................................................ 2-62.3 Controlling the Application Server Control............................................................................ 2-72.3.1 Starting and Stopping the Application Server Control on UNIX................................. 2-72.3.2 Starting and Stopping the Application Server Control on Windows .......................... 2-82.4 Controlling the Database Control on UNIX............................................................................ 2-82.4.1 Starting the Database Control on UNIX........................................................................... 2-82.4.2 Stopping the Database Control on UNIX......................................................................... 2-82.4.3 Starting and Stopping the Database Control on Windows ........................................... 2-92.5 Guidelines for Starting Multiple Enterprise Manager Components on a Single Host ..... 2-92.6 Starting and Stopping Oracle Enterprise Manager 10g Grid Control .............................. 2-102.6.1 Starting Grid Control and All Its Components ............................................................ 2-102.6.2 Stopping Grid Control and All Its Components .......................................................... 2-112.7 Additional Management Agent Commands ....................................................................... 2-132.7.1 Uploading and Reloading Data to the Management Repository .............................. 2-132.7.2 Specifying New Target Monitoring Credentials .......................................................... 2-132.7.2.1 Using the Grid Control Console to Modify the Monitoring Credentials .......... 2-142.7.2.2 Using the Enterprise Manager Command Line to Modify the Monitoring
Credentials 2-142.7.3 Listing the Targets on a Managed Host......................................................................... 2-152.7.4 Controlling Blackouts....................................................................................................... 2-162.7.5 Changing the Management Agent Time Zone............................................................. 2-182.7.6 Reevaluating Metric Collections..................................................................................... 2-18
3 Grid Control Common Configurations
3.1 About Common Configurations............................................................................................... 3-13.2 Deploying Grid Control Components on a Single Host ....................................................... 3-23.3 Managing Multiple Hosts and Deploying a Remote Management Repository ................ 3-43.4 Using Multiple Management Service Installations................................................................ 3-63.4.1 Understanding the Flow of Management Data When Using Multiple Management
Services 3-6
v
3.4.2 Determining When to Use Multiple Management Service Installations..................... 3-83.4.2.1 Monitoring the Load on Your Management Service Installations ........................ 3-93.4.2.2 Monitoring the Response Time of the Enterprise Manager Web Application Target
3-93.5 High Availability Configurations - Maximum Availability Architecture....................... 3-103.5.1 Configuring the Management Repository .................................................................... 3-113.5.1.1 Post Management Service - Install Management Repository Configuration ... 3-123.5.2 Configuring the Management Services ......................................................................... 3-123.5.2.1 Management Service Install Location..................................................................... 3-123.5.2.2 Configure Management Service to Management Repository Communication 3-133.5.2.3 Configure Management Service to Direct Traffic Through SLB......................... 3-143.5.3 Installing Additional Management Services ................................................................ 3-143.5.3.1 Configuring Shared File Areas for Management Services .................................. 3-153.5.4 Configuring a Load Balancer .......................................................................................... 3-163.5.4.1 Configuring Oracle HTTP Server When Using a Load Balancer for the Grid
Control Console 3-193.5.4.2 Configuring Console URL........................................................................................ 3-203.5.4.3 Understanding the Flow of Data When Load Balancing the Grid Control Console ..
3-203.5.5 Configuring the Management Agent............................................................................. 3-213.5.5.1 Load Balancing Connections Between the Management Agent and the
Management Service 3-223.5.6 Disaster Recovery ............................................................................................................. 3-243.5.6.1 Prerequisites ............................................................................................................... 3-253.5.6.2 Setup Standby Database ........................................................................................... 3-253.5.6.3 Setup Standby Management Service ...................................................................... 3-263.5.6.4 Switchover .................................................................................................................. 3-273.5.6.5 Failover........................................................................................................................ 3-283.5.6.6 Automatic Failover.................................................................................................... 3-303.6 Installation Best Practices for Enterprise Manager High Availability ............................. 3-323.6.1 Configuring the Management Agent to Automatically Start on Boot and Restart on
Failure 3-323.6.2 Configuring Restart for the Management Agent ......................................................... 3-323.6.3 Installing the Management Agent Software on Redundant Storage ........................ 3-333.6.4 Install the Management Service Shared File Areas on Redundant Storage............. 3-333.7 Configuration With Grid Control.......................................................................................... 3-333.7.1 Console Warnings, Alerts, and Notifications ............................................................... 3-343.7.2 Configure Additional Error Reporting Mechanisms................................................... 3-343.7.3 Component Backup.......................................................................................................... 3-343.7.4 Troubleshooting................................................................................................................ 3-343.7.4.1 Upload Delay for Monitoring Data......................................................................... 3-343.7.4.2 Notification Delay of Target State Change ............................................................ 3-35
4 Configuring Oracle Enterprise Manager for Active and Passive Environments
4.1 Using Virtual Host Names for Active and Passive High Availability Environments in Enterprise Manager Database Control 4-1
4.1.1 Set Up the Alias for the Virtual Host Name and Virtual IP Address .......................... 4-2
vi
4.1.2 Set Up Shared Storage......................................................................................................... 4-24.1.3 Set Up the Environment...................................................................................................... 4-24.1.4 Ensure That the Oracle USERNAME, ID, and GROUP NAME Are Synchronized on
All Cluster Members 4-24.1.5 Ensure That Inventory Files Are on the Shared Storage................................................ 4-34.1.6 Start the Installer .................................................................................................................. 4-34.1.6.1 Windows NT Specific Configuration Steps .............................................................. 4-34.1.7 Start Services......................................................................................................................... 4-34.2 Configuring Grid Control Repository in Active/Passive High Availability Environments ...
4-44.2.1 Installation and Configuration .......................................................................................... 4-44.2.2 Set Up the Virtual Host Name/Virtual IP Address........................................................ 4-54.2.3 Set Up the Environment...................................................................................................... 4-54.2.4 Synchronize Operating System User IDs ......................................................................... 4-64.2.5 Set Up Inventory .................................................................................................................. 4-64.2.6 Install the Software .............................................................................................................. 4-64.2.6.1 Windows NT Specific Configuration Steps .............................................................. 4-74.2.7 Startup of Services ............................................................................................................... 4-74.2.8 Summary............................................................................................................................... 4-74.3 How to Configure Grid Control OMS in Active/Passive Environment for High
Availability Failover Using Virtual Host Names 4-74.3.1 Overview and Requirements ............................................................................................. 4-74.3.2 Installation and Configuration .......................................................................................... 4-84.3.3 Setting Up the Virtual Host Name/Virtual IP Address ................................................ 4-84.3.4 Setting Up Shared Storage.................................................................................................. 4-84.3.5 Setting Up the Environment .............................................................................................. 4-94.3.6 Synchronizing Operating System IDs............................................................................... 4-94.3.7 Setting Up Shared Inventory.............................................................................................. 4-94.3.8 Installing the Software ........................................................................................................ 4-94.3.8.1 Windows Specific Configuration Steps.................................................................. 4-104.3.9 Starting Up Services ......................................................................................................... 4-114.3.10 Summary............................................................................................................................ 4-114.4 Configuring Targets for Failover in Active/Passive Environments ................................ 4-114.4.1 Target Relocation in Active/Passive Environments ................................................... 4-124.4.2 Installation and Configuration ....................................................................................... 4-124.4.2.1 Prerequisites ............................................................................................................... 4-124.4.2.2 Configuration Steps................................................................................................... 4-124.4.3 Failover Procedure............................................................................................................ 4-134.4.4 Fallback Procedure ........................................................................................................... 4-134.4.5 EM CLI Parameter Reference.......................................................................................... 4-144.4.6 Script Examples................................................................................................................. 4-144.4.6.1 Relocation Script ........................................................................................................ 4-144.4.6.2 Start Listener Script ................................................................................................... 4-154.4.6.3 Stop Listener Script ................................................................................................... 4-164.5 Configuring Additional Oracle Enterprise Management Agents for Use in Active and
Passive Environments 4-164.5.1 Installation and Configuration ....................................................................................... 4-164.5.2 Switchover Steps............................................................................................................... 4-18
vii
4.5.3 Performance Implications................................................................................................ 4-184.5.4 Summary............................................................................................................................ 4-19
5 Backup, Recovery, and Disaster Recovery
5.1 Backup and Recovery of Enterprise Manager ........................................................................ 5-15.2 Repository Backup and Recovery............................................................................................. 5-15.2.1 Repository Backup .............................................................................................................. 5-25.2.2 Repository Recovery ........................................................................................................... 5-45.2.3 Recovery Scenarios .............................................................................................................. 5-65.2.3.1 Full Recovery on the Same Host ................................................................................ 5-65.2.3.2 Incomplete Recovery on the Same Host.................................................................... 5-65.2.3.3 Full Recovery on a Different Host.............................................................................. 5-75.2.3.4 Incomplete Recovery on a Different Host................................................................. 5-75.3 OMS Backup and Recovery....................................................................................................... 5-85.3.1 Backing Up the OMS ........................................................................................................... 5-85.3.2 Recovering the OMS............................................................................................................ 5-95.3.3 OMS Recovery Scenarios .................................................................................................... 5-95.3.3.1 Single OMS with No Server Load Balancer (SLB). OMS Restored on the same Host
5-95.3.3.2 Single OMS, No SLB, OMS Restored on a Different Host ................................... 5-105.3.3.3 Multiple OMS, Server Load Balancer configured, OMS restored on the same host ..
5-115.3.3.4 Multiple OMS, Server Load Balancer configured, OMS restored on a different host
5-125.4 Agent Backup and Recovery .................................................................................................. 5-125.4.1 Backing Up Agents ........................................................................................................... 5-125.4.2 Recovering Agents............................................................................................................ 5-125.4.3 Agent Recovery Scenarios ............................................................................................... 5-135.4.3.1 Agent reinstall, same port. ...................................................................................... 5-135.4.3.2 Agent restore from filesystem backup ................................................................... 5-135.5 Recovering from a Compound OMS-Repository Failure .................................................. 5-145.5.1 Collapsed configuration, recovery on the same host, incomplete recovery of repository
5-145.5.2 Distributed configuration, Multi-OMS with SLB, recovery on different hosts,
incomplete recovery of repository 5-155.6 EMCTL High Availability Commands ................................................................................. 5-16
6 Enterprise Manager Security
6.1 About Oracle Enterprise Manager Security ............................................................................ 6-16.1.1 Oracle Enterprise Manager Security Model..................................................................... 6-16.1.2 Classes of Users and Their Privileges ............................................................................... 6-26.1.3 Resources Protected............................................................................................................. 6-26.1.4 Authorization and Access Enforcement........................................................................... 6-26.1.5 Leveraging Oracle Application Server Security Services .............................................. 6-36.1.6 Leveraging Oracle Identity Management Infrastructure............................................... 6-36.2 Configuring Security for Grid Control .................................................................................... 6-36.2.1 About Enterprise Manager Framework Security............................................................ 6-4
viii
6.2.2 Overview of the Steps Required to Enable Enterprise Manager Framework Security ..... 6-5
6.2.3 Enabling Security for the Oracle Management Service.................................................. 6-66.2.3.1 Checking the Security Status ...................................................................................... 6-96.2.4 Enabling Security for the Oracle Management Agent ................................................... 6-96.2.5 Enabling Security with Multiple Management Service Installations........................ 6-116.2.6 Restricting HTTP Access to the Management Service ................................................ 6-116.2.7 Managing Agent Registration Passwords..................................................................... 6-136.2.7.1 Using the Grid Control Console to Manage Agent Registration Passwords.... 6-146.2.7.2 Using emctl to Add a New Agent Registration Password .................................. 6-146.2.8 Enabling Security with a Server Load Balancer ........................................................... 6-156.2.9 Enabling Security for the Management Repository Database ................................... 6-156.2.9.1 About Oracle Advanced Security and the sqlnet.ora Configuration File ......... 6-166.2.9.2 Configuring the Management Service to Connect to a Secure Management
Repository Database 6-166.2.9.3 Enabling Oracle Advanced Security for the Management Repository.............. 6-186.2.9.4 Enabling Security for a Management Agent Monitoring a Secure Management
Repository or Database 6-196.2.10 Configuring Third Party Certificates ............................................................................. 6-196.2.10.1 Configuring Third Party Certificate for HTTPS Upload Virtual Host .............. 6-196.2.10.2 Configuring Third Party Certificate for HTTPS Apache Virtual Host .............. 6-206.3 Enterprise Manager User Administration............................................................................ 6-206.3.1 Creating / Modifying Administrators........................................................................... 6-216.3.2 Configuring Enterprise Manager for Use with Oracle Application Server Single
Sign-On 6-226.3.2.1 Configuring Enterprise Manager to Use the Single Sign-On Logon Page........ 6-226.3.2.2 Registering HTTP Port With Single Sign On Server ........................................... 6-256.3.2.3 Configuring Enterprise Manager to Use Single Sign-On with the osso.conf File .......
6-256.3.2.4 Registering Single Sign-On Users as Enterprise Manager Administrators ...... 6-266.3.2.5 Creating Single Sign-On Users Using EMCLI....................................................... 6-276.3.2.6 Grid Control as a Single Sign-On Partner Application........................................ 6-296.3.2.7 Bypassing the Single Sign-On Logon Page............................................................ 6-296.3.3 Configuring Enterprise Manager for Use with Enterprise User Security ................ 6-296.3.3.1 Registering Enterprise Users as Enterprise Manager Users................................ 6-306.3.3.2 Using EMCLI to Create Enterprise Manager Users of Type Enterprise Users. 6-316.3.4 Changing SYSMAN and MGMT_VIEW User Passwords.......................................... 6-316.3.4.1 Changing the SYSMAN User Password ................................................................ 6-316.3.4.2 Changing the MGMT_VIEW User Password........................................................ 6-316.4 Setting Up the Auditing System for Enterprise Manager.................................................. 6-326.4.1 Configuring the Enterprise Manager Audit System.................................................... 6-326.4.1.1 Enabling and Disabling Auditing Using emcli Commands................................ 6-326.4.1.2 Enabling and Disabling Auditing Using PL/SQL................................................ 6-326.4.2 Configuring the Audit Data Export Service ................................................................. 6-336.4.3 Searching the Audit Data ................................................................................................ 6-336.5 Configuring the emkey ........................................................................................................... 6-366.5.1 Generating the emkey ...................................................................................................... 6-366.5.2 emctl Commands .............................................................................................................. 6-36
ix
6.5.2.1 emctl status emkey .................................................................................................... 6-376.5.2.2 emctl config emkey -repos ...................................................................................... 6-386.5.2.3 emctl config emkey -emkeyfile ............................................................................... 6-386.5.2.4 emctl config emkey -emkey .................................................................................... 6-386.5.2.5 emctl config emkey -remove_from_repos ............................................................. 6-396.5.2.6 emctl config emkey -copy_to_repos ...................................................................... 6-396.5.3 Install and Upgrade Scenarios ........................................................................................ 6-396.5.3.1 Installing the Management Repository ................................................................. 6-396.5.3.2 Installing the First Oracle Management Service ................................................... 6-406.5.3.3 Installing Additional Oracle Management Service .............................................. 6-406.5.3.4 Upgrading from 10.1 to 10.2 .................................................................................... 6-406.5.3.5 Recreating the Management Repository ............................................................... 6-406.6 Additional Security Considerations...................................................................................... 6-406.6.1 Responding to Browser-Specific Security Certificate Alerts ...................................... 6-416.6.1.1 Responding to the Internet Explorer Security Alert Dialog Box ........................ 6-416.6.1.2 Responding to the Netscape Navigator New Site Certificate Dialog Box ........ 6-426.6.1.3 Preventing the Display of the Internet Explorer Security Information Dialog Box....
6-436.6.2 Configuring Beacons to Monitor Web Applications Over HTTPS............................ 6-436.7 Other Security Features........................................................................................................... 6-456.7.1 Using ORACLE _HOME Credentials ............................................................................ 6-456.7.2 Patching Oracle Homes When the User is Locked ...................................................... 6-476.7.3 Cloning Oracle Homes..................................................................................................... 6-476.7.4 Using the sudo Command............................................................................................... 6-48
7 Configuring Enterprise Manager for Firewalls
7.1 Considerations Before Configuring Your Firewall ................................................................ 7-17.2 Firewall Configurations for Enterprise Management Components.................................... 7-27.2.1 Firewalls Between Your Browser and the Grid Control Console................................. 7-37.2.2 Configuring the Management Agent on a Host Protected by a Firewall .................... 7-47.2.2.1 Configuring the Management Agent to Use a Proxy Server ................................. 7-57.2.2.2 Configuring the Firewall to Allow Incoming Communication From the
Management Service 7-67.2.3 Configuring the Management Service on a Host Protected by a Firewall .................. 7-77.2.3.1 Configuring the Management Service to Use a Proxy Server................................ 7-77.2.3.2 About the dontProxyfor Property.............................................................................. 7-87.2.3.3 Configuring the Firewall to Allow Incoming Management Data From the
Management Agents 7-97.2.4 Firewalls Between the Management Service and the Management Repository ..... 7-107.2.5 Firewalls Between the Grid Control and a Managed Database Target .................... 7-107.2.6 Firewalls Used with Multiple Management Services.................................................. 7-117.2.7 Configuring Firewalls to Allow ICMP and UDP Traffic for Beacons ....................... 7-117.2.8 Configuring Firewalls When Managing Oracle Application Server......................... 7-127.3 Viewing a Summary of the Ports Assigned During the Application Server Installation.........
7-127.4 Additional Considerations for Windows XP ....................................................................... 7-13
x
8 Configuring Services
8.1 Summary of Service Management Tasks ................................................................................ 8-18.2 Setting up the System ................................................................................................................. 8-38.3 Creating a Service ....................................................................................................................... 8-48.4 Configuring a Service ................................................................................................................. 8-58.4.1 Availability Definition ........................................................................................................ 8-68.4.2 Performance Metrics ........................................................................................................... 8-78.4.3 Usage Metrics ....................................................................................................................... 8-88.4.4 Business Metrics................................................................................................................... 8-98.4.5 Service Tests and Beacons .................................................................................................. 8-98.4.5.1 Configuring the Beacons .......................................................................................... 8-108.4.5.2 Configuring Windows Beacons for Web Transaction (Browser) Playback ...... 8-118.4.6 Root Cause Analysis Configuration............................................................................... 8-138.4.6.1 Getting the Most From Root Cause Analysis ........................................................ 8-148.5 Recording Web Transactions.................................................................................................. 8-148.6 Monitoring Settings ................................................................................................................ 8-158.7 Configuring Aggregate Services............................................................................................ 8-168.8 Configuring End-User Performance Monitoring ................................................................ 8-178.8.1 Configuring End-User Performance Monitoring Using Oracle HTTP Server Based on
Apache 2.0 or Apache HTTP Server 2.0 8-178.8.1.1 Setting up the Third Party Apache Server ............................................................. 8-198.8.2 Configuring End-User Performance Monitoring Using Oracle Application Server Web
Cache 8-198.8.2.1 Configuring Oracle Application Server Web Cache 10.1.2 ................................. 8-208.8.2.2 Configuring Oracle Application Server Web Cache 9.0.4 .................................. 8-218.8.2.3 Configuring End-User Performance Monitoring Using Earlier Versions of Oracle
Application Server Web Cache 8-228.8.2.3.1 Using the chronos_setup.pl Configuration Script ......................................... 8-228.8.2.3.2 Configuring the Document Root For Each Web Server................................ 8-238.8.2.3.3 Configuring Oracle Application Server Web Cache for End-User Performance
Monitoring 8-248.8.2.3.4 Starting End-User Performance Monitoring .................................................. 8-248.8.2.4 Configuring End-User Performance Monitoring Using Standalone Oracle
Application Server Web Cache 8-258.8.2.4.1 Installing Standalone Oracle Application Server Web Cache ..................... 8-258.8.2.4.2 Configuring Standalone Oracle Application Server Web Cache ................ 8-268.8.2.4.3 Enabling End-User Performance Monitoring for Standalone Oracle
Application Server Web Cache 8-268.8.3 Configuring End-User Performance Monitoring for Web Page Extensions ............ 8-278.8.4 Configuring End-User Performance Monitoring for Web Pages Having the Same URI..
8-278.8.5 Starting and Stopping End-User Performance Monitoring........................................ 8-288.8.6 Verifying and Troubleshooting End-User Performance Monitoring........................ 8-298.8.7 Enabling End-User Performance Monitoring for Third-Party Application Servers 8-318.9 Managing Forms Applications............................................................................................... 8-318.9.1 Recording and Monitoring Forms Transactions .......................................................... 8-328.9.1.1 Setting the Permissions of the .java.policy File .................................................... 8-328.9.1.2 Using a Trusted Enterprise Manager Certificate .................................................. 8-33
xi
8.9.1.3 Adding a Forms Certificate to the Enterprise Manager Agent........................... 8-348.9.1.4 Configuring the Forms Server ................................................................................. 8-358.9.1.5 Installing the Transaction Recorder to Record and Play Back Forms Transactions ...
8-358.9.2 Monitoring the End-User Performance of Forms Applications................................. 8-368.9.2.1 Configuring the Forms Server for End-User Performance Monitoring ........... 8-378.9.2.2 Configuring the OracleAS Web Cache ................................................................... 8-378.9.2.3 Configuring the Oracle HTTP Server / Apache HTTP Server ........................... 8-398.9.2.4 Starting and Stopping End-User Performance Monitoring................................. 8-408.10 Configuring OC4J for Request Performance Diagnostics .................................................. 8-418.10.1 Selecting OC4J Targets for Request Performance Diagnostics .................................. 8-418.10.2 Configuring Interactive Transaction Tracing ............................................................... 8-418.10.3 Configuring OC4J Tracing for Request Performance Data ........................................ 8-428.10.4 Additional Configuration for Monitoring UIX Applications..................................... 8-438.11 Setting Up Monitoring Templates ......................................................................................... 8-448.11.1 Configuring Service Tests and Beacons......................................................................... 8-448.12 Configuring Service Levels..................................................................................................... 8-458.12.1 Defining Service Level Rules .......................................................................................... 8-468.12.2 Viewing Service Level Details ........................................................................................ 8-468.13 Configuring a Service Using the Command Line Interface............................................... 8-478.14 Troubleshooting Service Tests ............................................................................................... 8-478.14.1 Verifying and Troubleshooting Forms Transactions................................................... 8-478.14.1.1 Troubleshooting Forms Transaction Playback...................................................... 8-478.14.1.2 Troubleshooting Forms Transaction Recording ................................................... 8-498.14.1.3 Troubleshooting End-User Performance of Forms Transactions ....................... 8-508.14.2 Verifying and Troubleshooting Web Transactions...................................................... 8-50
9 Locating and Configuring Enterprise Manager Log Files
9.1 Locating and Configuring Management Agent Log and Trace Files.................................. 9-19.1.1 About the Management Agent Log and Trace Files....................................................... 9-19.1.2 Locating the Management Agent Log and Trace Files................................................... 9-39.1.3 About Management Agent Rollover Files........................................................................ 9-39.1.4 Controlling the Size and Number of Management Agent Log and Trace Files ......... 9-39.1.5 Controlling the Contents of the Management Agent Trace File ................................... 9-49.1.6 Controlling the Size and Number of Fetchlet Log and Trace Files .............................. 9-59.1.7 Controlling the Contents of the Fetchlet Trace File ....................................................... 9-69.2 Locating and Configuring Management Service Log and Trace Files ................................ 9-79.2.1 About the Management Service Log and Trace Files ..................................................... 9-79.2.2 Locating the Management Service Log and Trace Files................................................. 9-79.2.3 Controlling the Size and Number of Management Service Log and Trace Files ....... 9-79.2.4 Controlling the Contents of the Management Service Trace File ................................. 9-89.2.5 Controlling the Oracle Application Server Log Files ..................................................... 9-9
10 Maintaining and Troubleshooting the Management Repository
10.1 Management Repository Deployment Guidelines ............................................................. 10-110.2 Management Repository Data Retention Policies............................................................... 10-2
xii
10.2.1 Management Repository Default Aggregation and Purging Policies....................... 10-210.2.2 Management Repository Default Aggregation and Purging Policies for Other
Management Data 10-310.2.3 Modifying the Default Aggregation and Purging Policies......................................... 10-310.2.4 Modifying Data Retention Policies When Targets Are Deleted ................................ 10-410.2.5 How to Modify the Retention Period of Job History................................................... 10-510.3 Changing the SYSMAN Password ........................................................................................ 10-610.3.1 Overview of the MGMT_VIEW User............................................................................. 10-810.4 Dropping and Recreating the Management Repository .................................................... 10-810.4.1 Dropping the Management Repository......................................................................... 10-810.4.2 Recreating the Management Repository ....................................................................... 10-910.4.2.1 Using the RepManager Script to Create the Management Repository.............. 10-910.4.2.2 Using a Connect Descriptor to Identify the Management Repository Database ........
10-1010.5 Troubleshooting Management Repository Creation Errors ............................................ 10-1010.5.1 Package Body Does Not Exist Error While Creating the Management Repository...........
10-1110.5.2 Server Connection Hung Error While Creating the Management Repository...... 10-1110.5.3 General Troubleshooting Techniques for Creating the Management Repository 10-1110.6 Cross Platform Enterprise Manager Repository Migration............................................. 10-1210.6.1 Common Prerequisites................................................................................................... 10-1210.6.2 Methodologies................................................................................................................. 10-1310.6.2.1 Cross Platform Transportable Tablespaces.......................................................... 10-1310.6.2.1.1 Preparation for Transportable Tablespaces.................................................. 10-1310.6.2.1.2 Extract metadata............................................................................................... 10-1310.6.2.1.3 Endian check and conversion ......................................................................... 10-1410.6.2.1.4 Import metadata and plugin tablespaces ..................................................... 10-1410.6.2.1.5 Post Plug In Steps ............................................................................................. 10-1510.6.2.2 Data Pump................................................................................................................ 10-1610.6.2.2.1 Prepare for Data Pump.................................................................................... 10-1610.6.2.2.2 Data Pump Export............................................................................................ 10-1610.6.2.2.3 Data Pump Import ........................................................................................... 10-1710.6.2.2.4 Post Import EM Steps ...................................................................................... 10-1710.6.2.3 Export/Import ......................................................................................................... 10-1810.6.2.3.1 Prepare for Export/Import ............................................................................. 10-1810.6.2.3.2 Export ................................................................................................................. 10-1810.6.2.3.3 Import................................................................................................................. 10-1910.6.2.3.4 Post Import EM Steps ...................................................................................... 10-1910.6.3 Post Migration Verification ........................................................................................... 10-2010.7 Improving the Login Performance of the Console Home Page ...................................... 10-20
11 Using Enterprise Manager For Grid Automation With Deployment Procedures
11.1 Key Advantages of Deployment Procedures....................................................................... 11-111.1.1 Deployment Procedures Shipped In Oracle Enterprise Manager ............................. 11-211.2 Deployment Procedure Requirements.................................................................................. 11-311.2.1 Supported Versions of Products..................................................................................... 11-3
xiii
11.2.2 Supported Versions of SUDO/PBRUN......................................................................... 11-311.2.3 Management Agent Requirements ................................................................................ 11-311.2.4 Oracle Software Library Requirements ......................................................................... 11-311.2.5 Patch Requirements.......................................................................................................... 11-311.3 Use-Cases for Deployment Procedures ................................................................................ 11-411.3.1 Using Deployment Procedures to Apply Security-Related Critical Patch Updates to
Oracle Databases 11-411.3.2 Using Deployment Procedures for Single-Click Extend of Real Application Clusters.....
11-511.3.3 Using Deployment Procedures for Delete/Scale Down of Real Application Clusters .....
11-511.3.4 Enhanced Linux Patching for ULN................................................................................ 11-511.3.4.1 Setting Up Staging Server......................................................................................... 11-611.3.4.1.1 Manually Registering Staging Server .............................................................. 11-611.3.4.1.2 Manually Subscribing to Additional ULN Channels.................................... 11-711.3.4.1.3 Configuring the Staging Server in EM ............................................................ 11-711.3.5 Using Deployment Procedures or Cloning Wizard to Provision Oracle Home...... 11-711.4 Customizable Deployment Procedures ................................................................................ 11-711.4.1 Phases and Steps ............................................................................................................... 11-811.4.2 Customization Examples ................................................................................................. 11-911.4.2.1 Insert Custom Step to Backup the Database Before Patching............................. 11-911.4.2.2 Manual Step................................................................................................................ 11-911.4.2.3 Application Service Shutdown and Startup Handling ........................................ 11-911.4.2.4 Set Notification for the Deployment Procedure Run ........................................... 11-911.4.3 Importing or Exporting Deployment Procedures...................................................... 11-1011.4.3.1 Checking Software Library .................................................................................... 11-1111.4.3.2 Deploying Specific PAR File .................................................................................. 11-1111.4.3.3 Deploying All PAR Files......................................................................................... 11-1111.4.3.4 Exporting Deployment Procedures (or PAR Files)............................................. 11-1111.4.3.5 Importing PAR Files................................................................................................ 11-1211.4.3.6 Importing or Exporting Components or Directives with Secret Values ......... 11-1311.5 Running Deployment Procedures Using SUDO, PowerBroker, and Privilege Delegation.....
11-1311.5.1 SUDO and PowerBroker Versus Privilege Delegation ............................................. 11-1311.5.2 Creating Privilege Delegation Template ..................................................................... 11-1411.5.3 Using SUDO, PowerBroker, Privilege Delegation in Deployment Procedures .... 11-1411.6 Deployment Procedure Variables........................................................................................ 11-1611.7 EMCLI Concepts and Requirements to Execute Deployment Procedures ................... 11-1711.7.1 EMCLI Concepts ............................................................................................................. 11-1711.7.2 EMCLI Requirements..................................................................................................... 11-1811.8 Using EMCLI to Execute Deployment Procedures........................................................... 11-1911.8.1 Step 1: Finding Procedure GUID.................................................................................. 11-2011.8.2 Step 2: Obtaining RuntimeData Template And RuntimeData XML....................... 11-2111.8.3 Step 3: Creating Properties File..................................................................................... 11-2211.8.3.1 Properties File for Out-Of-Box Procedures.......................................................... 11-2211.8.3.2 Properties File for Customized Procedures ......................................................... 11-2211.8.3.3 Properties File For Extending Procedure Execution .......................................... 11-2411.8.3.4 Properties File For Applying Multiple Patches At Once ................................... 11-24
xiv
11.8.4 Step 4: Procedure Execution.......................................................................................... 11-2511.8.4.1 Patching Single Instance Database for UNIX Using Out-of-Box Procedure... 11-2611.8.5 Use Cases for EMCLI-based Provisioning and Patching.......................................... 11-2611.8.5.1 Use Cases for CRS/ASM/RAC Provisioning Procedure .................................. 11-2611.8.5.2 Use Cases for Extend Cluster Procedure ............................................................. 11-2811.8.5.3 Use Cases For RAC Delete/Descale Procedure .................................................. 11-2811.8.5.4 Use Cases for Patching............................................................................................ 11-2911.8.5.5 Limitations................................................................................................................ 11-3111.8.6 Setting Up Preferred Credentials for Targets ............................................................. 11-3111.8.6.1 Setting Credentials From the Oracle Enterprise Manager User Interface....... 11-3111.8.6.2 Setting Credentials Through EMCLI .................................................................... 11-3111.8.6.3 Clearing Credentials Through EMCLI ................................................................. 11-3211.8.7 Converting Standalone Agents to Cluster Agents..................................................... 11-3311.8.8 Queries to Acquire Data for Patching Runtime ......................................................... 11-3411.9 Known Issues and Troubleshooting.................................................................................... 11-3511.9.1 Known Issues .................................................................................................................. 11-3511.9.2 Troubleshooting.............................................................................................................. 11-3511.9.2.1 Log Files to Review When Deployment Procedure Fails .................................. 11-35
12 Sizing and Maximizing the Performance of Oracle Enterprise Manager
12.1 Oracle Enterprise Manager Grid Control Architecture Overview ................................... 12-112.2 Enterprise Manager Grid Control Sizing and Performance Methodology ..................... 12-212.2.1 Step 1: Choosing a Starting Platform Grid Control Deployment .............................. 12-312.2.1.1 Network Topology Considerations ........................................................................ 12-412.2.2 Step 2: Periodically Evaluate the Vital Signs of Your Site .......................................... 12-512.2.3 Step 3: Use DBA and Enterprise Manager Tasks To Eliminate Bottlenecks Through
Housekeeping 12-712.2.3.1 Online Weekly Tasks................................................................................................. 12-712.2.3.2 Offline Monthly Tasks .............................................................................................. 12-812.2.4 Step 4: Eliminate Bottlenecks Through Tuning........................................................... 12-912.2.4.1 High CPU Utilization................................................................................................ 12-912.2.4.2 Loader Vital Signs ................................................................................................... 12-1012.2.4.3 Rollup Vital Signs .................................................................................................... 12-1112.2.4.4 Managing Repository Collection Threads ........................................................... 12-1212.2.4.5 Job, Notification, and Alert Vital Signs ................................................................ 12-1212.2.4.6 I/O Vital Signs ......................................................................................................... 12-1212.2.4.7 The Oracle Enterprise Manager Performance Page............................................ 12-1312.2.5 Step 5: Extrapolating Linearly Into the Future for Sizing Requirements ............... 12-1412.3 Oracle Enterprise Manager Backup, Recovery, and Disaster Recovery Considerations .........
12-1512.3.1 Best Practices for Backup............................................................................................... 12-1512.3.2 Best Practices for Recovery............................................................................................ 12-1612.3.2.1 Recovering the Management Repository............................................................. 12-1612.3.2.2 Recovering the Oracle Management Service....................................................... 12-1712.3.2.3 Recovering the Oracle Management Agent......................................................... 12-1712.3.3 Best Practice for Disaster Recovery (DR) .................................................................... 12-1712.3.3.1 Management Repository ........................................................................................ 12-18
xv
12.3.3.2 Oracle Management Service .................................................................................. 12-1812.3.3.3 Management Agent................................................................................................. 12-18
13 Reconfiguring the Management Agent and Management Service
13.1 Reconfiguring the Oracle Management Agent.................................................................... 13-113.1.1 Configuring the Management Agent to Use a New Management Service.............. 13-113.1.2 Securing the Management Agent ................................................................................... 13-213.1.3 Changing the Management Agent Port......................................................................... 13-213.1.4 Controlling the Amount of Disk Space Used by the Management Agent ............... 13-313.1.5 About the Management Agent Watchdog Process...................................................... 13-413.1.6 Setting the Management Agent Time Zone .................................................................. 13-413.1.6.1 Understanding How the Management Agent Obtains Time Zone Information ........
13-513.1.6.2 Resetting the Time Zone of the Management Agent Due to ...Inconsistency of Time
Zones 13-513.1.6.3 Troubleshooting Management Agent Time Zone Problems............................... 13-613.1.6.4 Troubleshooting Management Service Time Zone Problems............................. 13-713.1.7 Adding Trust Points to the Management Agent Configuration................................ 13-713.2 Reconfiguring the Oracle Management Service .................................................................. 13-813.2.1 Configuring the Management Service to Use a New Management Repository ..... 13-813.2.1.1 Changing the Repository Properties in the emoms.properties File ................... 13-813.2.1.2 About Changing the Repository Password ........................................................... 13-913.2.2 Configuring the Management Service to Use a New Port........................................ 13-1013.2.3 Configuring the Management Service to Prompt You When Using Execute Commands
13-11
14 Configuring Notifications
14.1 Setting Up Notifications.......................................................................................................... 14-114.1.1 Setting Up a Mail Server for Notifications.................................................................... 14-114.1.1.1 Setting Up Repeat Notifications .............................................................................. 14-414.1.2 Setting Up E-mail for Yourself........................................................................................ 14-514.1.2.1 Defining E-mail Addresses ...................................................................................... 14-514.1.2.2 Setting Up a Notification Schedule ......................................................................... 14-714.1.2.3 Subscribe to Receive E-mail for Notification Rules .............................................. 14-714.1.3 Setting Up E-mail for Other Administrators .............................................................. 14-1214.1.4 E-mail Customization..................................................................................................... 14-1314.1.4.1 E-mail Customization Reference ........................................................................... 14-1414.2 Extending Notification Beyond E-mail............................................................................... 14-1814.2.1 Custom Notification Methods Using Scripts and SNMP Traps ............................. 14-1814.2.1.1 Adding a Notification Method based on an OS Command or Script.............. 14-1914.2.1.2 Adding a Notification Method Based on a PL/SQL Procedure ....................... 14-2214.2.1.3 Adding a Notification Method Based on an SNMP Trap.................................. 14-2614.3 Passing Corrective Action Status Change Information................................................... 14-2814.3.1 Passing Corrective Action Execution Status to an OS Command or Script .......... 14-2814.3.2 Passing Corrective Action Execution Status to a PLSQL Procedure...................... 14-3014.4 Passing Job Execution Status Information........................................................................ 14-3214.4.1 Passing Job Execution Status to a PLSQL Procedure ............................................... 14-32
xvi
14.4.2 Passing Job Execution Status to an OS Command or Script.................................... 14-3414.5 Passing User-Defined Target Properties to Notification Methods ................................. 14-3414.6 Assigning Methods to Rules................................................................................................. 14-3514.7 Assigning Rules to Methods................................................................................................. 14-3614.8 Notification Coverage ........................................................................................................... 14-3714.9 Management Information Base (MIB)................................................................................. 14-3714.9.1 About MIBs...................................................................................................................... 14-3714.9.2 Reading the MIB Variable Descriptions ...................................................................... 14-3814.9.2.1 Variable Name ......................................................................................................... 14-3814.9.2.2 MIB Definition.......................................................................................................... 14-3914.10 Troubleshooting Notifications ............................................................................................. 14-4514.10.1 General Setup .................................................................................................................. 14-4514.10.2 Notification System Errors ............................................................................................ 14-4514.10.3 Notification System Trace Messages............................................................................ 14-4614.10.4 E-mail Errors.................................................................................................................... 14-4714.10.5 OS Command Errors ...................................................................................................... 14-4714.10.6 SNMP Trap Errors .......................................................................................................... 14-4814.10.7 PL/SQL Errors ................................................................................................................ 14-48
15 User-Defined Metrics
15.1 Extending Monitoring Capability.......................................................................................... 15-115.2 Creating OS-Based User-Defined Metrics ............................................................................ 15-215.2.1 Create Your OS Monitoring Script ................................................................................. 15-215.2.1.1 Code to check the status of monitored objects ...................................................... 15-215.2.1.2 Code to return script results to Enterprise Manager............................................ 15-215.2.1.3 Script Runtime Environment ................................................................................... 15-415.2.2 Register the Script as a User-Defined Metric ................................................................ 15-515.2.3 OS-Based User-Defined Metric Example ...................................................................... 15-815.3 Creating a SQL-Based User-Defined Metric ...................................................................... 15-1015.3.1 SQL-Based User-Defined Metric Examples ................................................................ 15-1415.3.1.1 Example 1: Query Returning Tablespace Name and Percent Used ................ 15-1415.3.1.2 Example 2: Query Returning Segment Name/Type and Extent Count.......... 15-1515.3.1.3 Example 3: Embed a Long SQL statement in a PL/SQL Routine .................... 15-1515.4 Notifications, Corrective Actions, and Monitoring Templates ....................................... 15-1715.4.1 Getting Notifications for User-Defined Metrics ......................................................... 15-1715.4.2 Setting Corrective Actions for User-Defined Metrics................................................ 15-1815.4.3 Deploying User-Defined Metrics Across Many Targets Using Monitoring Templates....
15-1815.4.4 Deleting User-Defined Metrics Across Many Targets Using Monitoring Templates .......
15-2015.5 Changing User-Defined Metric Credentials ...................................................................... 15-21
16 Using a Software Library
16.1 Overview of Software Library ............................................................................................... 16-116.2 Setting up the Software Library............................................................................................. 16-216.3 Using the Software Library .................................................................................................... 16-2
xvii
16.3.1 Exporting and Importing Entities Across Oracle Enterprise Manager Deployments....... 16-4
16.3.2 Deleting and Purging Software Library Entities.......................................................... 16-616.4 De-Configuring a Software Library ...................................................................................... 16-616.5 Software Library Maintenance Tasks.................................................................................... 16-616.6 Software Library Issues........................................................................................................... 16-7
17 Additional Configuration Tasks
17.1 Understanding Default and Custom Data Collections....................................................... 17-117.1.1 How Enterprise Manager Stores Default Collection Information............................. 17-117.1.2 Restoring Default Collection Settings............................................................................ 17-217.2 Enabling Multi-Inventory Support for Configuration Management ............................... 17-217.2.1 AGENT_HOME Versus AGENT_STATE Directories................................................. 17-317.3 Manually Configuring a Database Target for Complete Monitoring .............................. 17-417.4 Modifying the Default Login Timeout Value ...................................................................... 17-617.5 Configuring Clusters and Cluster Databases in Grid Control .......................................... 17-717.5.1 Configuring Clusters........................................................................................................ 17-717.5.2 Configuring Cluster Databases....................................................................................... 17-817.5.3 Discovering Instances Added to the Cluster Database ............................................... 17-817.5.3.1 Troubleshooting......................................................................................................... 17-917.6 Collecting Client Configurations ........................................................................................... 17-917.6.1 Configuring the Client System Analyzer .................................................................... 17-1017.6.1.1 Client System Analyzer in Oracle Grid Control ................................................. 17-1017.6.1.2 Deploying Client System Analyzer Independently ........................................... 17-1017.6.2 Configuration Parameters ............................................................................................. 17-1217.6.2.1 Associating the Parameters with an Application ............................................... 17-1517.6.3 Rules ................................................................................................................................. 17-1517.6.4 Customization ................................................................................................................. 17-1717.6.5 CSA Deployment Examples .......................................................................................... 17-1717.6.5.1 Using Multiple Collection Tags............................................................................. 17-1717.6.5.2 Privilege Model for Viewing Client Configurations .......................................... 17-1817.6.5.3 Using the Customization API Example ............................................................... 17-1917.6.5.4 Using the CSA Servlet Filter Example.................................................................. 17-2017.6.5.5 Sample Deployments .............................................................................................. 17-2117.6.5.5.1 Example 1: Helpdesk ....................................................................................... 17-2117.6.5.5.2 Example 2: Inventory....................................................................................... 17-2217.6.5.5.3 Example 3: Problem Detection ....................................................................... 17-2317.7 Setting Up and Configuring a Software Library With Oracle Enterprise Manager..... 17-2417.7.1 Setting Up a Software Library ...................................................................................... 17-2417.7.2 Configuring a Software Library.................................................................................... 17-2417.7.3 Deleting or Cleaning Up a Software Library .............................................................. 17-2417.8 Configuring Privilege Delegation Providers ..................................................................... 17-2517.8.1 Creating a Privilege Delegation Setting ...................................................................... 17-2617.8.1.1 Creating a Sudo Setting Using EM CLI................................................................ 17-2617.8.1.2 Creating a PowerBroker Setting Using EM CLI.................................................. 17-2617.8.2 Applying Privilege Delegation Setting........................................................................ 17-2717.8.2.1 Applying Settings to Host Targets........................................................................ 17-27

xviii
17.8.2.2 Applying Settings to a Composite Target............................................................ 17-2817.8.3 Disabling Host Privilege Delegation Provider Settings ............................................ 17-2817.8.4 Sudo Configuration: Sudoers File ................................................................................ 17-28A Out-Of-Box RuntimeData Templates for RAC Procedures ................................................. A-1Table A–1Out-Of-Box RuntimeData Templates for Patching Procedures ...................................... A-1C Displaying BPEL Processes on the Oracle Enterprise Manager Processes Tab ................ C-1n Scenario 1: Providing Credentials Using Oracle Enterprise Manager Grid Control C-13. Scenario 2: Add Required BPEL Jar Files To Agent CLASSPATH.............................. C-26. Retrieving the OPMN Port ................................................................................................ C-3
Index
xix
Preface
This Advanced Configuration guide describes the advanced configuration tasks you can perform after you have installed Oracle Enterprise Manager and have started using the software. These tasks are optional and provide additional functionality for specific types of Oracle Enterprise Manager customers.
Note that later versions of this and other Enterprise Manager books may be available on the Oracle Technology Network:
http://www.oracle.com/technology/documentation/oem.html
Intended AudienceThis guide is written for system administrators who want to configure the advanced features of Oracle Enterprise Manager 11g. You should already be familiar with Oracle and the administrative tasks you want to perform.
You should also be familiar with the operation of your specific UNIX or Windows system. Refer to the documentation for your platform-specific documentation, if necessary.
Documentation AccessibilityOur goal is to make Oracle products, services, and supporting documentation accessible, with good usability, to the disabled community. To that end, our documentation includes features that make information available to users of assistive technology. This documentation is available in HTML format, and contains markup to facilitate access by the disabled community. Accessibility standards will continue to evolve over time, and Oracle is actively engaged with other market-leading technology vendors to address technical obstacles so that our documentation can be accessible to all of our customers. For more information, visit the Oracle Accessibility Program Web site at
http://www.oracle.com/accessibility/
Accessibility of Code Examples in DocumentationScreen readers may not always correctly read the code examples in this document. The conventions for writing code require that closing braces should appear on an otherwise empty line; however, some screen readers may not always read a line of text that consists solely of a bracket or brace.
xx
Accessibility of Links to External Web Sites in DocumentationThis documentation may contain links to Web sites of other companies or organizations that Oracle does not own or control. Oracle neither evaluates nor makes any representations regarding the accessibility of these Web sites.
TTY Access to Oracle Support ServicesOracle provides dedicated Text Telephone (TTY) access to Oracle Support Services within the United States of America 24 hours a day, seven days a week. For TTY support, call 800.446.2398.
Related DocumentsFor more information, see the following manuals in the Oracle Enterprise Manager 10g Release 2 documentation set:
■ Oracle Enterprise Manager Concepts
■ Oracle Enterprise Manager Grid Control Quick Installation Guide
■ Oracle Enterprise Manager Grid Control Installation and Basic Configuration
■ Oracle Enterprise Manager Configuration for Oracle Collaboration Suite
■ Oracle Enterprise Manager Policy Reference Manual
■ Oracle Enterprise Manager Framework, Host, and Third-Party Metric Reference Manual
■ Oracle Enterprise Manager Oracle Database and Database-Related Metric Reference Manual
■ Oracle Enterprise Manager Oracle Application Server Metric Reference Manual
Oracle Enterprise Manager Oracle Collaboration Suite Metric Reference Manual
■ Oracle Enterprise Manager Extensibility
■ Oracle Enterprise Manager Command Line Interface
■ Oracle Enterprise Manager SNMP Support Reference Guide
■ Oracle Enterprise Manager Licensing Information
The latest versions of this and other Enterprise Manager books can be found at:
http://www.oracle.com/technology/documentation/oem.html
Oracle Enterprise Manager also provides extensive online help. Click Help on any Oracle Enterprise Manager page to display the online help system.
ConventionsThe following text conventions are used in this document:
Convention Meaning
boldface Boldface type indicates graphical user interface elements associated with an action, or terms defined in text or the glossary.
italic Italic type indicates book titles, emphasis, or placeholder variables for which you supply particular values.
monospace Monospace type indicates commands within a paragraph, URLs, code in examples, text that appears on the screen, or text that you enter.
Introduction to Enterprise Manager Advanced Configuration 1-1
1Introduction to Enterprise Manager
Advanced Configuration
This chapter introduces you to Enterprise Manager advanced configuration and provides basic information about your Enterprise Manager installation. It describes the directory structure and how to make Enterprise Manager accessible to all your users.
After you review this chapter, you can move on to the other advanced configuration tasks described in this manual.
Specifically, this chapter includes the following topics:
■ Types of Advanced Configuration Tasks
■ Understanding the Enterprise Manager Directory Structure
■ Enabling Enterprise Manager Accessibility Features
1.1 Types of Advanced Configuration TasksEnterprise Manager is designed to install easily with a set of standard configuration settings so you can get up and running with the software quickly.
However, Oracle realizes that hardware and software management requirements vary dramatically among business enterprises. As a result, Enterprise Manager can be reconfigured after installation so you can:
■ Implement Enterprise Manager security and firewall features.
■ Enable End-User Performance Monitoring for your Web applications.
■ Reconfigure Enterprise Manager components when you need to modify the topology of your network environment.
■ Maintain and troubleshoot the Enterprise Manager components as your business grows.
1.2 Understanding the Enterprise Manager Directory StructureBefore you perform maintenance and advanced configuration tasks, you must be familiar with the directories and files that are copied to disk when you install Enterprise Manager. Understanding where specific files are located can help you if you need to troubleshoot installation or configuration problems.
The directories and files installed by Enterprise Manager vary, depending upon the installation options you select during the Enterprise Manager installation. The location of Enterprise Manager files and directories also varies slightly when Enterprise
Understanding the Enterprise Manager Directory Structure
1-2 Oracle Enterprise Manager Advanced Configuration
Manager is installed as part of an Oracle Application Server or Oracle Database 10g installation.
Use the following sections to become familiar with the directories that are created on your disk when you install Enterprise Manager:
■ Understanding the Enterprise Manager Directories Installed with Oracle Enterprise Manager 10g Grid Control
■ Understanding the Enterprise Manager Directories Installed with the Management Agent
■ Understanding the Enterprise Manager Directories Installed with Oracle Application Server
■ Understanding the Enterprise Manager Directories Installed with Oracle Database 10g
■ Tip for Identifying the Oracle Home When Using the emctl Command
■ Configuring Database Console During and After the Oracle Database 10g Installation
■ Deconfiguring Database Control
1.2.1 Understanding the Enterprise Manager Directories Installed with Oracle Enterprise Manager 10g Grid Control
When you install Oracle Enterprise Manager 10g Grid Control, you can select from four installation types. All of these installation types, except the Oracle Management Agent installation type, install the Oracle Management Service.
When you install the Oracle Management Service, you actually install three Oracle home directories:
■ The Management Service home directory
■ The Management Agent home directory
■ The Database home directory
1.2.1.1 About the Oracle Management Service Home DirectoryThe Oracle Management Service is a J2EE application in the form of an OC4J instance (OC4J_EM) that is installed and deployed using the Oracle Application Server J2EE and Web Cache installation type.
The installation procedure installs the Enterprise Manager components within the Oracle Application Server Home, including the Oracle Management Service.
Information about the directories that are specific to the Oracle Application Server installation can be found in the Oracle Application Server documentation. For example, the location of the most of the Oracle Application Server configuration and log files are described in the Oracle Application Server documentation.
Note: When you install Oracle Enterprise Manager 10g Grid Control, Oracle Database is also installed, but will not contain Enterprise Manager Configuration Assistant (EMCA) in the Oracle Database Home.
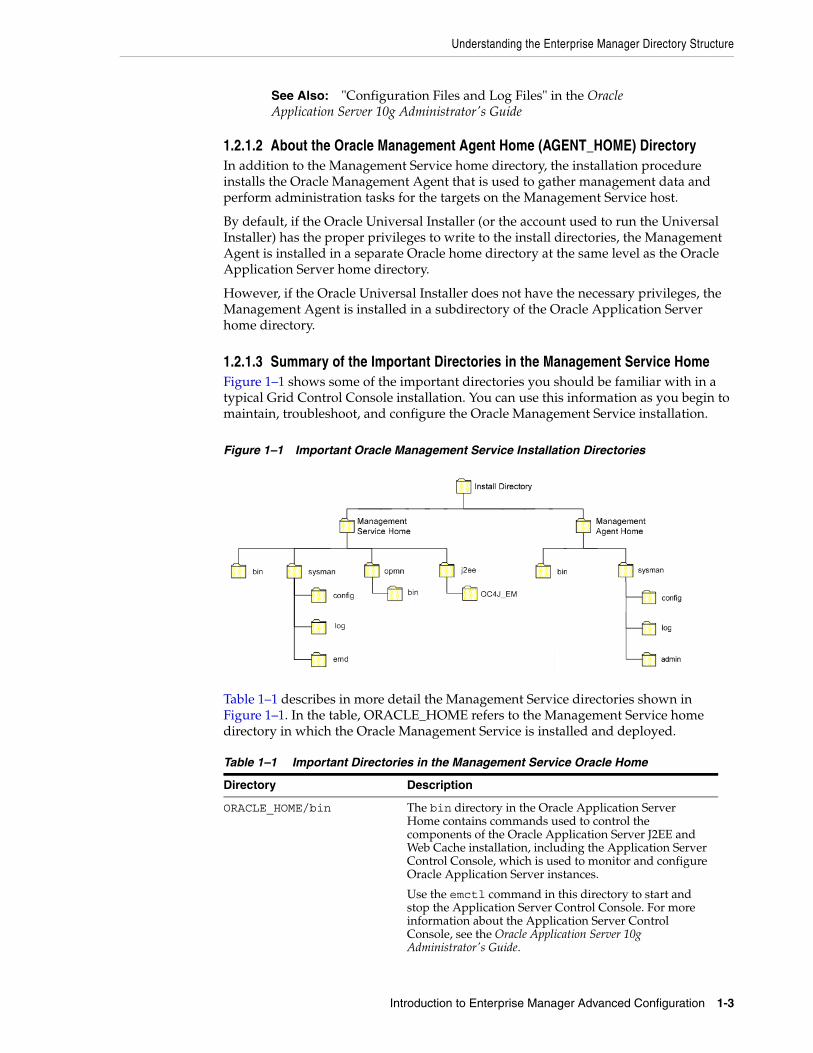
Understanding the Enterprise Manager Directory Structure
Introduction to Enterprise Manager Advanced Configuration 1-3
1.2.1.2 About the Oracle Management Agent Home (AGENT_HOME) DirectoryIn addition to the Management Service home directory, the installation procedure installs the Oracle Management Agent that is used to gather management data and perform administration tasks for the targets on the Management Service host.
By default, if the Oracle Universal Installer (or the account used to run the Universal Installer) has the proper privileges to write to the install directories, the Management Agent is installed in a separate Oracle home directory at the same level as the Oracle Application Server home directory.
However, if the Oracle Universal Installer does not have the necessary privileges, the Management Agent is installed in a subdirectory of the Oracle Application Server home directory.
1.2.1.3 Summary of the Important Directories in the Management Service HomeFigure 1–1 shows some of the important directories you should be familiar with in a typical Grid Control Console installation. You can use this information as you begin to maintain, troubleshoot, and configure the Oracle Management Service installation.
Figure 1–1 Important Oracle Management Service Installation Directories
Table 1–1 describes in more detail the Management Service directories shown in Figure 1–1. In the table, ORACLE_HOME refers to the Management Service home directory in which the Oracle Management Service is installed and deployed.
See Also: "Configuration Files and Log Files" in the Oracle Application Server 10g Administrator's Guide
Table 1–1 Important Directories in the Management Service Oracle Home
Directory Description
ORACLE_HOME/bin The bin directory in the Oracle Application Server Home contains commands used to control the components of the Oracle Application Server J2EE and Web Cache installation, including the Application Server Control Console, which is used to monitor and configure Oracle Application Server instances.
Use the emctl command in this directory to start and stop the Application Server Control Console. For more information about the Application Server Control Console, see the Oracle Application Server 10g Administrator's Guide.
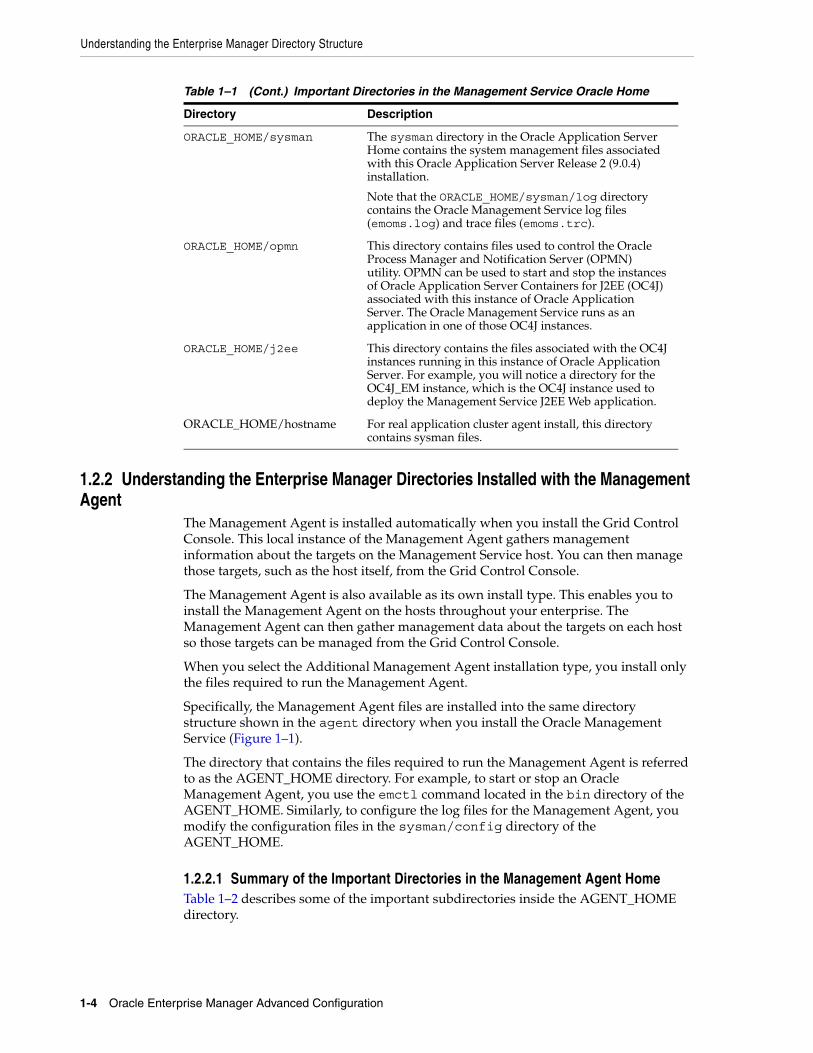
Understanding the Enterprise Manager Directory Structure
1-4 Oracle Enterprise Manager Advanced Configuration
1.2.2 Understanding the Enterprise Manager Directories Installed with the Management Agent
The Management Agent is installed automatically when you install the Grid Control Console. This local instance of the Management Agent gathers management information about the targets on the Management Service host. You can then manage those targets, such as the host itself, from the Grid Control Console.
The Management Agent is also available as its own install type. This enables you to install the Management Agent on the hosts throughout your enterprise. The Management Agent can then gather management data about the targets on each host so those targets can be managed from the Grid Control Console.
When you select the Additional Management Agent installation type, you install only the files required to run the Management Agent.
Specifically, the Management Agent files are installed into the same directory structure shown in the agent directory when you install the Oracle Management Service (Figure 1–1).
The directory that contains the files required to run the Management Agent is referred to as the AGENT_HOME directory. For example, to start or stop an Oracle Management Agent, you use the emctl command located in the bin directory of the AGENT_HOME. Similarly, to configure the log files for the Management Agent, you modify the configuration files in the sysman/config directory of the AGENT_HOME.
1.2.2.1 Summary of the Important Directories in the Management Agent HomeTable 1–2 describes some of the important subdirectories inside the AGENT_HOME directory.
ORACLE_HOME/sysman The sysman directory in the Oracle Application Server Home contains the system management files associated with this Oracle Application Server Release 2 (9.0.4) installation.
Note that the ORACLE_HOME/sysman/log directory contains the Oracle Management Service log files (emoms.log) and trace files (emoms.trc).
ORACLE_HOME/opmn This directory contains files used to control the Oracle Process Manager and Notification Server (OPMN) utility. OPMN can be used to start and stop the instances of Oracle Application Server Containers for J2EE (OC4J) associated with this instance of Oracle Application Server. The Oracle Management Service runs as an application in one of those OC4J instances.
ORACLE_HOME/j2ee This directory contains the files associated with the OC4J instances running in this instance of Oracle Application Server. For example, you will notice a directory for the OC4J_EM instance, which is the OC4J instance used to deploy the Management Service J2EE Web application.
ORACLE_HOME/hostname For real application cluster agent install, this directory contains sysman files.
Table 1–1 (Cont.) Important Directories in the Management Service Oracle Home
Directory Description
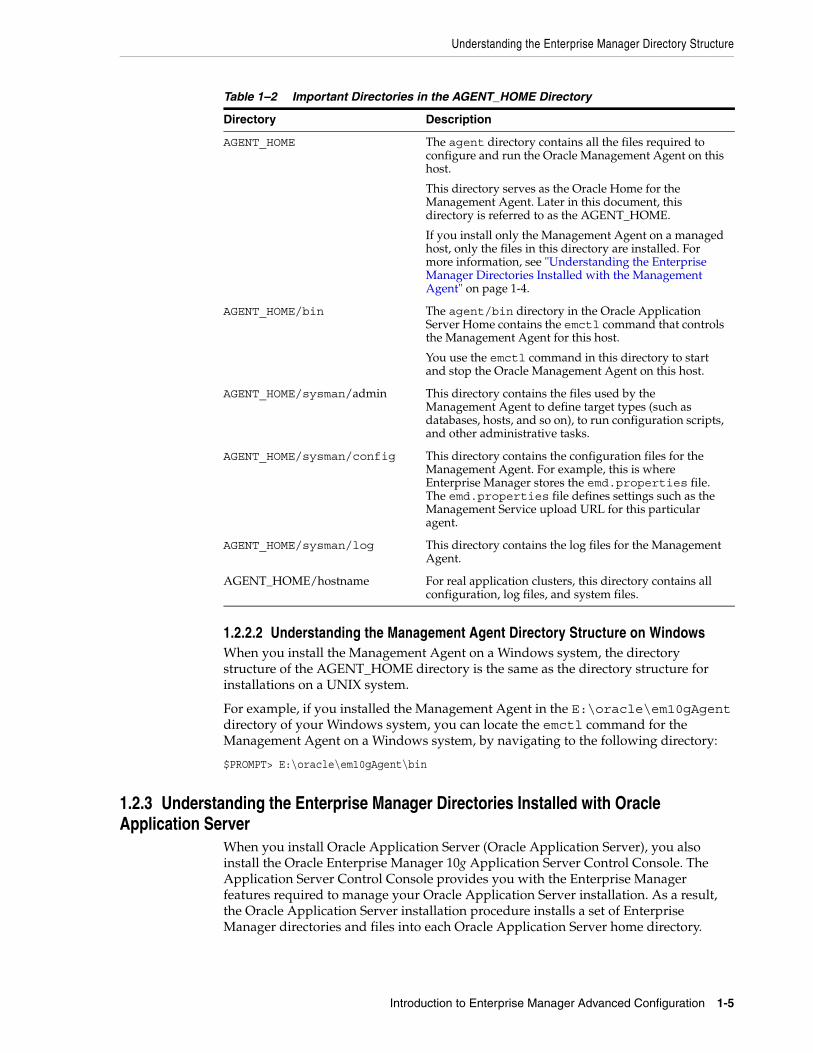
Understanding the Enterprise Manager Directory Structure
Introduction to Enterprise Manager Advanced Configuration 1-5
1.2.2.2 Understanding the Management Agent Directory Structure on WindowsWhen you install the Management Agent on a Windows system, the directory structure of the AGENT_HOME directory is the same as the directory structure for installations on a UNIX system.
For example, if you installed the Management Agent in the E:\oracle\em10gAgent directory of your Windows system, you can locate the emctl command for the Management Agent on a Windows system, by navigating to the following directory:
$PROMPT> E:\oracle\em10gAgent\bin
1.2.3 Understanding the Enterprise Manager Directories Installed with Oracle Application Server
When you install Oracle Application Server (Oracle Application Server), you also install the Oracle Enterprise Manager 10g Application Server Control Console. The Application Server Control Console provides you with the Enterprise Manager features required to manage your Oracle Application Server installation. As a result, the Oracle Application Server installation procedure installs a set of Enterprise Manager directories and files into each Oracle Application Server home directory.
Table 1–2 Important Directories in the AGENT_HOME Directory
Directory Description
AGENT_HOME The agent directory contains all the files required to configure and run the Oracle Management Agent on this host.
This directory serves as the Oracle Home for the Management Agent. Later in this document, this directory is referred to as the AGENT_HOME.
If you install only the Management Agent on a managed host, only the files in this directory are installed. For more information, see "Understanding the Enterprise Manager Directories Installed with the Management Agent" on page 1-4.
AGENT_HOME/bin The agent/bin directory in the Oracle Application Server Home contains the emctl command that controls the Management Agent for this host.
You use the emctl command in this directory to start and stop the Oracle Management Agent on this host.
AGENT_HOME/sysman/admin This directory contains the files used by the Management Agent to define target types (such as databases, hosts, and so on), to run configuration scripts, and other administrative tasks.
AGENT_HOME/sysman/config This directory contains the configuration files for the Management Agent. For example, this is where Enterprise Manager stores the emd.properties file. The emd.properties file defines settings such as the Management Service upload URL for this particular agent.
AGENT_HOME/sysman/log This directory contains the log files for the Management Agent.
AGENT_HOME/hostname For real application clusters, this directory contains all configuration, log files, and system files.
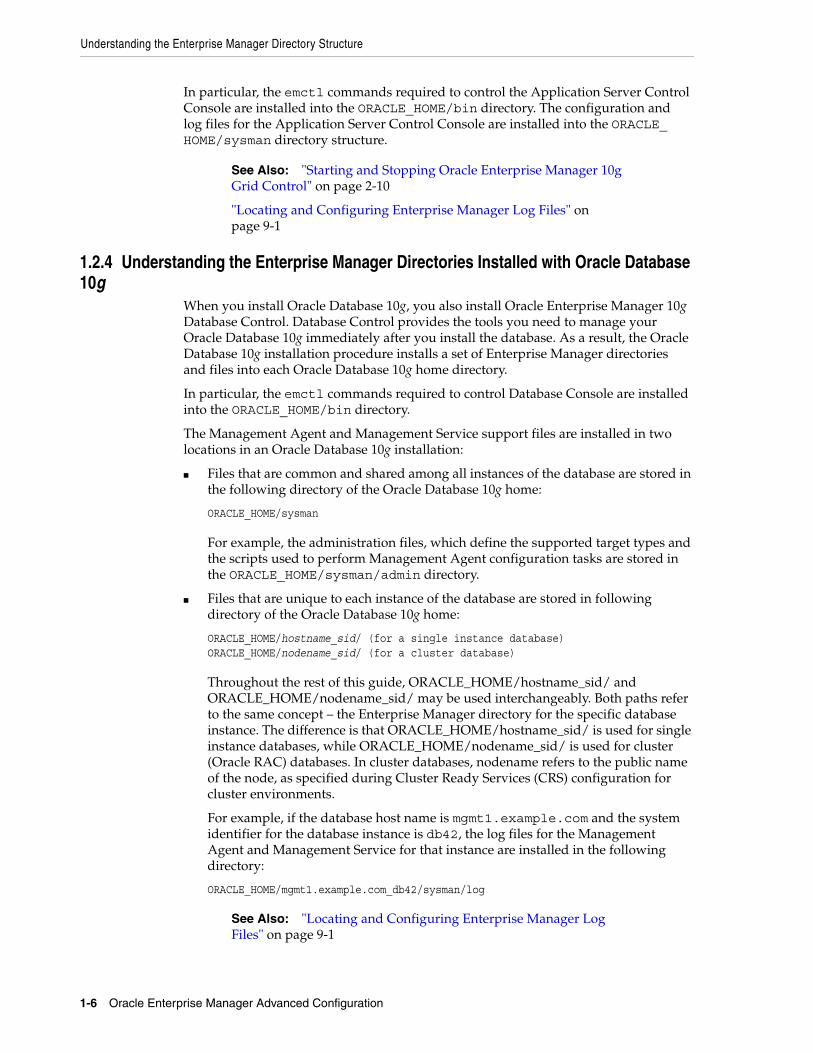
Understanding the Enterprise Manager Directory Structure
1-6 Oracle Enterprise Manager Advanced Configuration
In particular, the emctl commands required to control the Application Server Control Console are installed into the ORACLE_HOME/bin directory. The configuration and log files for the Application Server Control Console are installed into the ORACLE_HOME/sysman directory structure.
1.2.4 Understanding the Enterprise Manager Directories Installed with Oracle Database 10g
When you install Oracle Database 10g, you also install Oracle Enterprise Manager 10g Database Control. Database Control provides the tools you need to manage your Oracle Database 10g immediately after you install the database. As a result, the Oracle Database 10g installation procedure installs a set of Enterprise Manager directories and files into each Oracle Database 10g home directory.
In particular, the emctl commands required to control Database Console are installed into the ORACLE_HOME/bin directory.
The Management Agent and Management Service support files are installed in two locations in an Oracle Database 10g installation:
■ Files that are common and shared among all instances of the database are stored in the following directory of the Oracle Database 10g home:
ORACLE_HOME/sysman
For example, the administration files, which define the supported target types and the scripts used to perform Management Agent configuration tasks are stored in the ORACLE_HOME/sysman/admin directory.
■ Files that are unique to each instance of the database are stored in following directory of the Oracle Database 10g home:
ORACLE_HOME/hostname_sid/ (for a single instance database)ORACLE_HOME/nodename_sid/ (for a cluster database)
Throughout the rest of this guide, ORACLE_HOME/hostname_sid/ and ORACLE_HOME/nodename_sid/ may be used interchangeably. Both paths refer to the same concept – the Enterprise Manager directory for the specific database instance. The difference is that ORACLE_HOME/hostname_sid/ is used for single instance databases, while ORACLE_HOME/nodename_sid/ is used for cluster (Oracle RAC) databases. In cluster databases, nodename refers to the public name of the node, as specified during Cluster Ready Services (CRS) configuration for cluster environments.
For example, if the database host name is mgmt1.example.com and the system identifier for the database instance is db42, the log files for the Management Agent and Management Service for that instance are installed in the following directory:
ORACLE_HOME/mgmt1.example.com_db42/sysman/log
See Also: "Starting and Stopping Oracle Enterprise Manager 10g Grid Control" on page 2-10
"Locating and Configuring Enterprise Manager Log Files" on page 9-1
See Also: "Locating and Configuring Enterprise Manager Log Files" on page 9-1
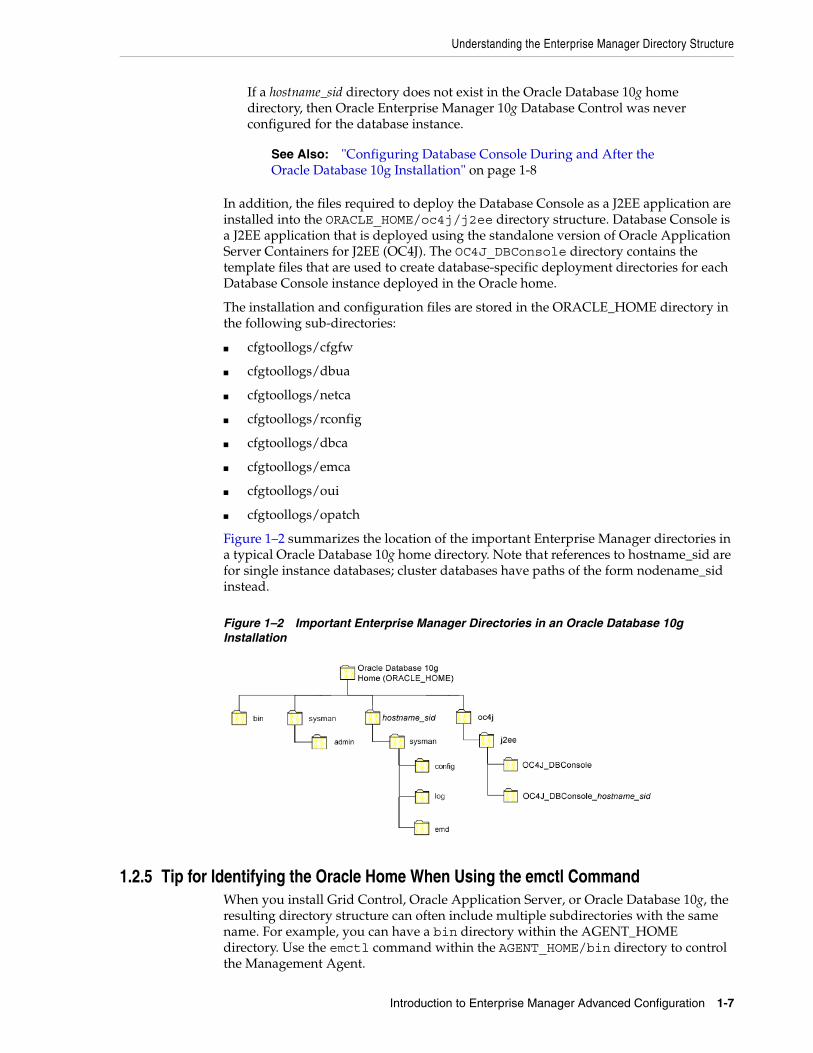
Understanding the Enterprise Manager Directory Structure
Introduction to Enterprise Manager Advanced Configuration 1-7
If a hostname_sid directory does not exist in the Oracle Database 10g home directory, then Oracle Enterprise Manager 10g Database Control was never configured for the database instance.
In addition, the files required to deploy the Database Console as a J2EE application are installed into the ORACLE_HOME/oc4j/j2ee directory structure. Database Console is a J2EE application that is deployed using the standalone version of Oracle Application Server Containers for J2EE (OC4J). The OC4J_DBConsole directory contains the template files that are used to create database-specific deployment directories for each Database Console instance deployed in the Oracle home.
The installation and configuration files are stored in the ORACLE_HOME directory in the following sub-directories:
■ cfgtoollogs/cfgfw
■ cfgtoollogs/dbua
■ cfgtoollogs/netca
■ cfgtoollogs/rconfig
■ cfgtoollogs/dbca
■ cfgtoollogs/emca
■ cfgtoollogs/oui
■ cfgtoollogs/opatch
Figure 1–2 summarizes the location of the important Enterprise Manager directories in a typical Oracle Database 10g home directory. Note that references to hostname_sid are for single instance databases; cluster databases have paths of the form nodename_sid instead.
Figure 1–2 Important Enterprise Manager Directories in an Oracle Database 10g Installation
1.2.5 Tip for Identifying the Oracle Home When Using the emctl CommandWhen you install Grid Control, Oracle Application Server, or Oracle Database 10g, the resulting directory structure can often include multiple subdirectories with the same name. For example, you can have a bin directory within the AGENT_HOME directory. Use the emctl command within the AGENT_HOME/bin directory to control the Management Agent.
See Also: "Configuring Database Console During and After the Oracle Database 10g Installation" on page 1-8
Understanding the Enterprise Manager Directory Structure
1-8 Oracle Enterprise Manager Advanced Configuration
In addition, you can have a bin directory within the Management Service Oracle home. Use the emctl command in this directory to control the Management Service.
To quickly identify the Oracle home that is controlled by the files in a particular bin directory, use the following command:
$PROMPT> emctl getemhome
This command displays the path to the current Oracle home that will be affected by commands executed by this instance of the emctl command. For example, the following example shows how the current emctl command can be used to control the Management Service installed in the /dev1/private/em_ms_home1/ Oracle home:
$PROMPT> emctl getemhomeCopyright (c) 1996, 2004 Oracle Corporation. All rights reserved.EMHOME=/dev1/private/em_ms_home1
1.2.6 Configuring Database Console During and After the Oracle Database 10g Installation
The following sections describe how Oracle Enterprise Manager 10g Database Control is configured during the Oracle Database 10g installation. These sections also describe how you can configure Database Console after the installation:
■ Configuring Database Console During Installation
■ Configuring Database Console with DBCA
■ Configuring Database Console with EMCA
■ Using EMCA with Oracle Real Application Clusters
■ EMCA Troubleshooting Tips
1.2.6.1 Configuring Database Console During InstallationIf you create a database while installing Oracle Database 10g, you have the option of configuring your database so it can be managed by Oracle Enterprise Manager 10g Grid Control Console or by Oracle Enterprise Manager Database Console.
Figure 1–3 shows the Management Options page, which allows you to select your database management options while installing Oracle Database 10g.
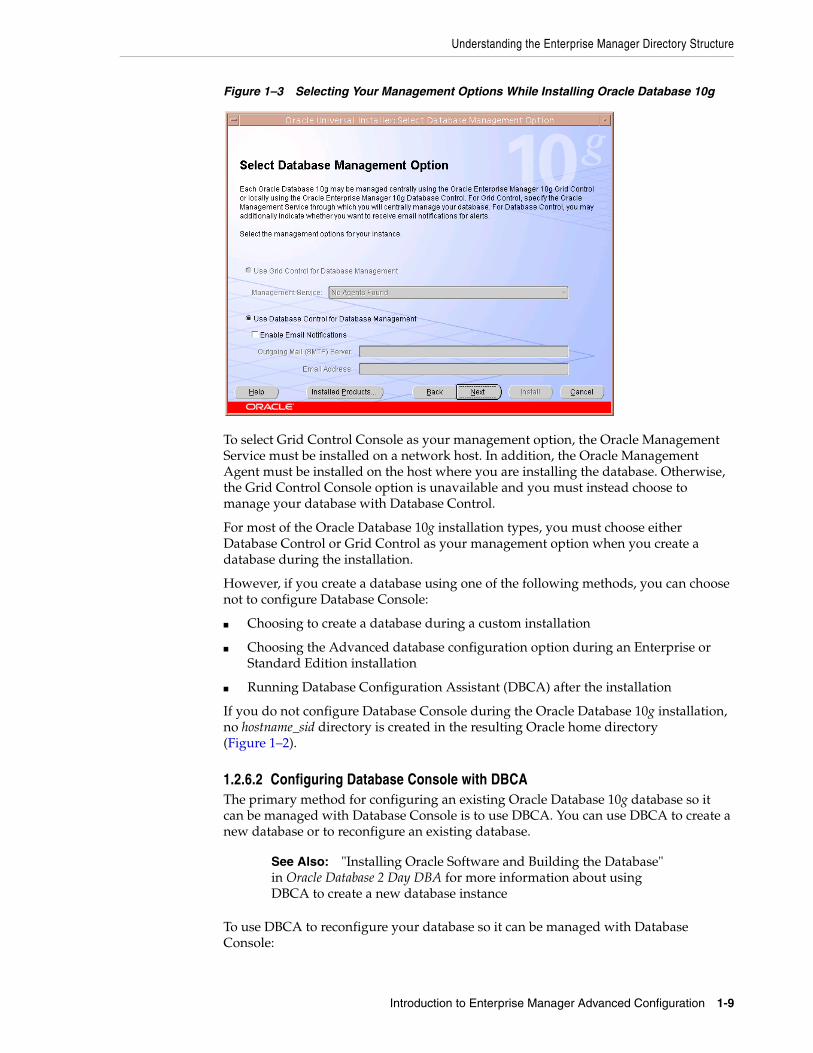
Understanding the Enterprise Manager Directory Structure
Introduction to Enterprise Manager Advanced Configuration 1-9
Figure 1–3 Selecting Your Management Options While Installing Oracle Database 10g
To select Grid Control Console as your management option, the Oracle Management Service must be installed on a network host. In addition, the Oracle Management Agent must be installed on the host where you are installing the database. Otherwise, the Grid Control Console option is unavailable and you must instead choose to manage your database with Database Control.
For most of the Oracle Database 10g installation types, you must choose either Database Control or Grid Control as your management option when you create a database during the installation.
However, if you create a database using one of the following methods, you can choose not to configure Database Console:
■ Choosing to create a database during a custom installation
■ Choosing the Advanced database configuration option during an Enterprise or Standard Edition installation
■ Running Database Configuration Assistant (DBCA) after the installation
If you do not configure Database Console during the Oracle Database 10g installation, no hostname_sid directory is created in the resulting Oracle home directory (Figure 1–2).
1.2.6.2 Configuring Database Console with DBCAThe primary method for configuring an existing Oracle Database 10g database so it can be managed with Database Console is to use DBCA. You can use DBCA to create a new database or to reconfigure an existing database.
To use DBCA to reconfigure your database so it can be managed with Database Console:
See Also: "Installing Oracle Software and Building the Database" in Oracle Database 2 Day DBA for more information about using DBCA to create a new database instance
Understanding the Enterprise Manager Directory Structure
1-10 Oracle Enterprise Manager Advanced Configuration
1. Log into the database host as a member of the administrative group that is authorized to install Oracle software and create and run the database.
2. Start DBCA, as follows:
■ On Windows, select Start, point to Programs, Oracle - home_name, Configuration and Migration Tools, and then select Database Configuration Assistant.
■ On UNIX, change directory to the ORACLE_HOME/bin directory and enter the following command:
$PROMPT> ./dbca
The DBCA Welcome page appears.
3. Advance to the Operations page and select Configure Database Options.
4. Advance to the Database page and select the database you want to configure.
5. Advance to the Management Options page (Figure 1–4) and select the following options:
■ Configure the Database with Enterprise Manager
■ Use Database Control for Database Management
6. Optionally, select the options for enabling e-mail notifications and enabling daily backups.
For more information about Enterprise Manager notifications and daily backups, click Help on the Management Options page.
7. Advance until the Finish button is available.
8. Click Finish to reconfigure the database so it uses Database Console.
After DBCA reconfigures the database, a new subdirectory appears in the Oracle home. This directory is named using the following format and contains Database Console configuration and state files specific to the database you just configured:
hostname_sid
For example:
mgmthost1.example.com_myNewDB
Note that for cluster databases, the directories are named nodename_sid.
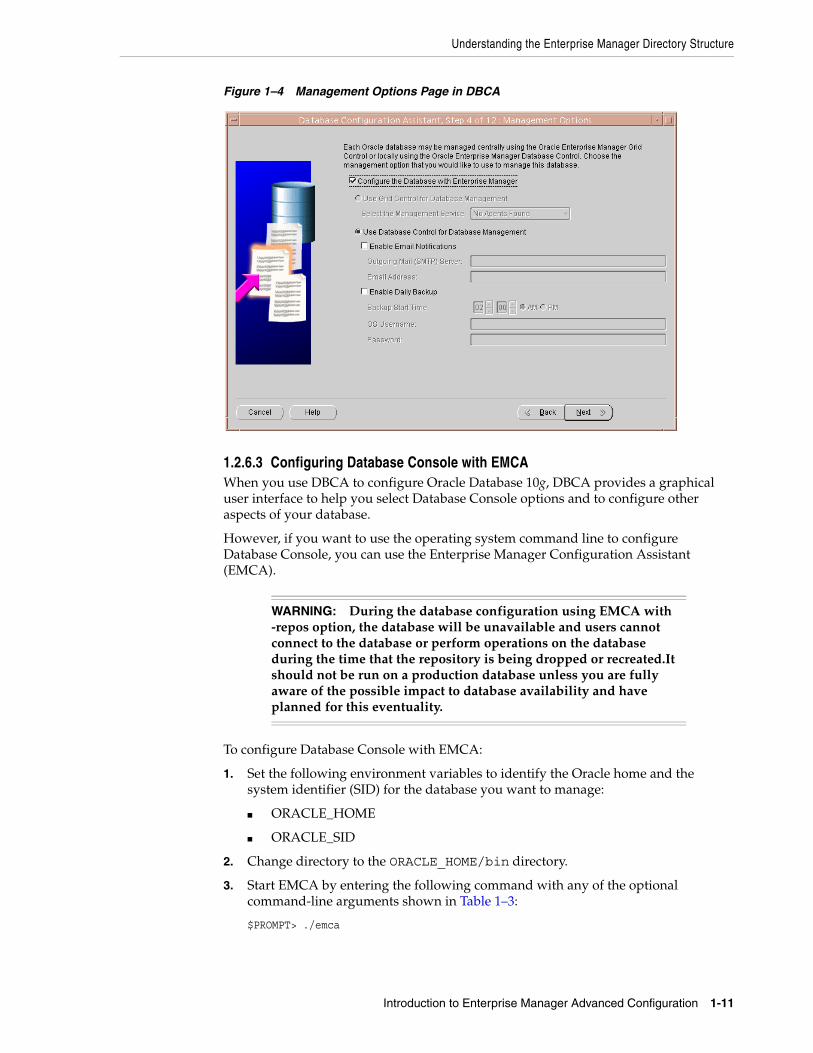
Understanding the Enterprise Manager Directory Structure
Introduction to Enterprise Manager Advanced Configuration 1-11
Figure 1–4 Management Options Page in DBCA
1.2.6.3 Configuring Database Console with EMCAWhen you use DBCA to configure Oracle Database 10g, DBCA provides a graphical user interface to help you select Database Console options and to configure other aspects of your database.
However, if you want to use the operating system command line to configure Database Console, you can use the Enterprise Manager Configuration Assistant (EMCA).
To configure Database Console with EMCA:
1. Set the following environment variables to identify the Oracle home and the system identifier (SID) for the database you want to manage:
■ ORACLE_HOME
■ ORACLE_SID
2. Change directory to the ORACLE_HOME/bin directory.
3. Start EMCA by entering the following command with any of the optional command-line arguments shown in Table 1–3:
$PROMPT> ./emca
WARNING: During the database configuration using EMCA with -repos option, the database will be unavailable and users cannot connect to the database or perform operations on the database during the time that the repository is being dropped or recreated.It should not be run on a production database unless you are fully aware of the possible impact to database availability and have planned for this eventuality.
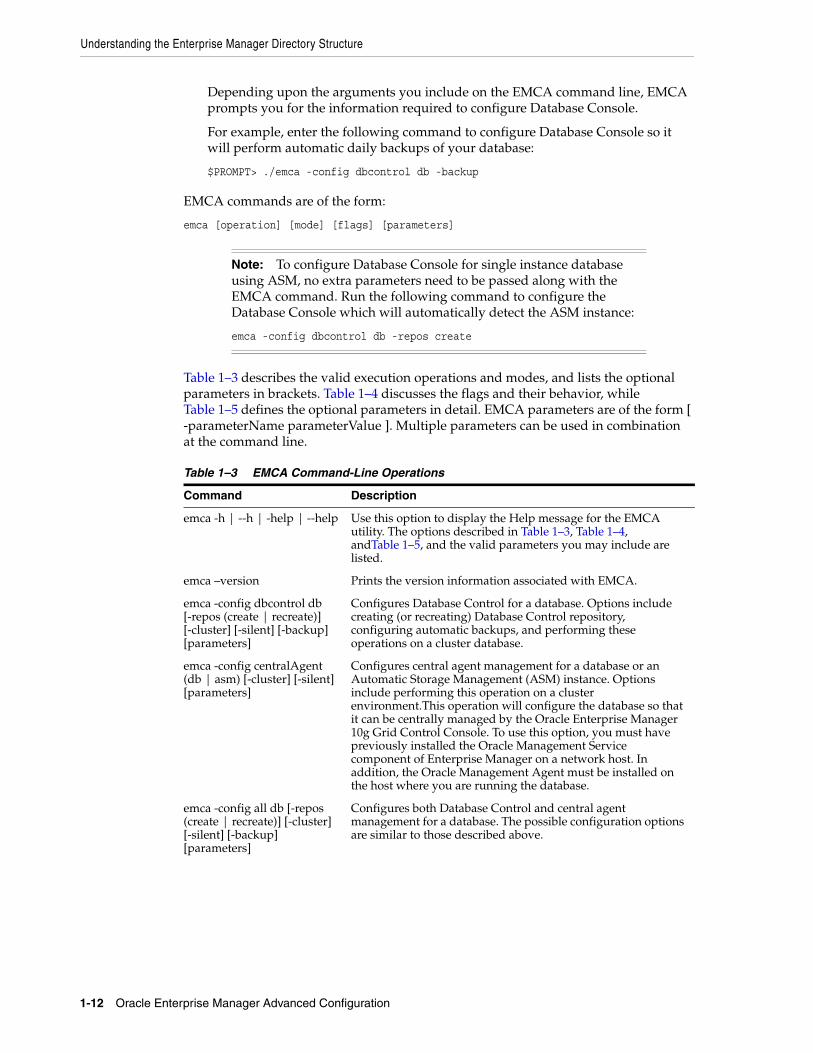
Understanding the Enterprise Manager Directory Structure
1-12 Oracle Enterprise Manager Advanced Configuration
Depending upon the arguments you include on the EMCA command line, EMCA prompts you for the information required to configure Database Console.
For example, enter the following command to configure Database Console so it will perform automatic daily backups of your database:
$PROMPT> ./emca -config dbcontrol db -backup
EMCA commands are of the form:
emca [operation] [mode] [flags] [parameters]
Table 1–3 describes the valid execution operations and modes, and lists the optional parameters in brackets. Table 1–4 discusses the flags and their behavior, while Table 1–5 defines the optional parameters in detail. EMCA parameters are of the form [ -parameterName parameterValue ]. Multiple parameters can be used in combination at the command line.
Note: To configure Database Console for single instance database using ASM, no extra parameters need to be passed along with the EMCA command. Run the following command to configure the Database Console which will automatically detect the ASM instance:
emca -config dbcontrol db -repos create
Table 1–3 EMCA Command-Line Operations
Command Description
emca -h | --h | -help | --help Use this option to display the Help message for the EMCA utility. The options described in Table 1–3, Table 1–4, andTable 1–5, and the valid parameters you may include are listed.
emca –version Prints the version information associated with EMCA.
emca -config dbcontrol db [-repos (create | recreate)] [-cluster] [-silent] [-backup] [parameters]
Configures Database Control for a database. Options include creating (or recreating) Database Control repository, configuring automatic backups, and performing these operations on a cluster database.
emca -config centralAgent (db | asm) [-cluster] [-silent] [parameters]
Configures central agent management for a database or an Automatic Storage Management (ASM) instance. Options include performing this operation on a cluster environment.This operation will configure the database so that it can be centrally managed by the Oracle Enterprise Manager 10g Grid Control Console. To use this option, you must have previously installed the Oracle Management Service component of Enterprise Manager on a network host. In addition, the Oracle Management Agent must be installed on the host where you are running the database.
emca -config all db [-repos (create | recreate)] [-cluster] [-silent] [-backup] [parameters]
Configures both Database Control and central agent management for a database. The possible configuration options are similar to those described above.
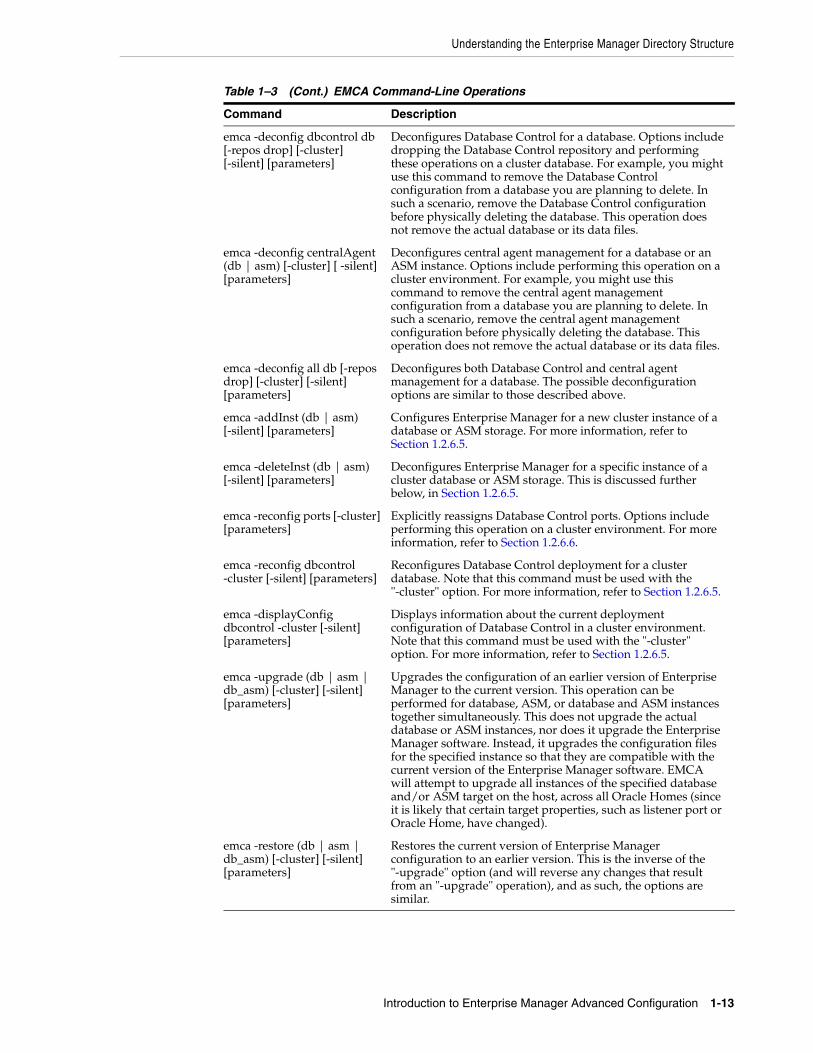
Understanding the Enterprise Manager Directory Structure
Introduction to Enterprise Manager Advanced Configuration 1-13
emca -deconfig dbcontrol db [-repos drop] [-cluster] [-silent] [parameters]
Deconfigures Database Control for a database. Options include dropping the Database Control repository and performing these operations on a cluster database. For example, you might use this command to remove the Database Control configuration from a database you are planning to delete. In such a scenario, remove the Database Control configuration before physically deleting the database. This operation does not remove the actual database or its data files.
emca -deconfig centralAgent (db | asm) [-cluster] [ -silent] [parameters]
Deconfigures central agent management for a database or an ASM instance. Options include performing this operation on a cluster environment. For example, you might use this command to remove the central agent management configuration from a database you are planning to delete. In such a scenario, remove the central agent management configuration before physically deleting the database. This operation does not remove the actual database or its data files.
emca -deconfig all db [-repos drop] [-cluster] [-silent] [parameters]
Deconfigures both Database Control and central agent management for a database. The possible deconfiguration options are similar to those described above.
emca -addInst (db | asm) [-silent] [parameters]
Configures Enterprise Manager for a new cluster instance of a database or ASM storage. For more information, refer to Section 1.2.6.5.
emca -deleteInst (db | asm) [-silent] [parameters]
Deconfigures Enterprise Manager for a specific instance of a cluster database or ASM storage. This is discussed further below, in Section 1.2.6.5.
emca -reconfig ports [-cluster] [parameters]
Explicitly reassigns Database Control ports. Options include performing this operation on a cluster environment. For more information, refer to Section 1.2.6.6.
emca -reconfig dbcontrol -cluster [-silent] [parameters]
Reconfigures Database Control deployment for a cluster database. Note that this command must be used with the "-cluster" option. For more information, refer to Section 1.2.6.5.
emca -displayConfig dbcontrol -cluster [-silent] [parameters]
Displays information about the current deployment configuration of Database Control in a cluster environment. Note that this command must be used with the "-cluster" option. For more information, refer to Section 1.2.6.5.
emca -upgrade (db | asm | db_asm) [-cluster] [-silent] [parameters]
Upgrades the configuration of an earlier version of Enterprise Manager to the current version. This operation can be performed for database, ASM, or database and ASM instances together simultaneously. This does not upgrade the actual database or ASM instances, nor does it upgrade the Enterprise Manager software. Instead, it upgrades the configuration files for the specified instance so that they are compatible with the current version of the Enterprise Manager software. EMCA will attempt to upgrade all instances of the specified database and/or ASM target on the host, across all Oracle Homes (since it is likely that certain target properties, such as listener port or Oracle Home, have changed).
emca -restore (db | asm | db_asm) [-cluster] [-silent] [parameters]
Restores the current version of Enterprise Manager configuration to an earlier version. This is the inverse of the "-upgrade" option (and will reverse any changes that result from an "-upgrade" operation), and as such, the options are similar.
Table 1–3 (Cont.) EMCA Command-Line Operations
Command Description
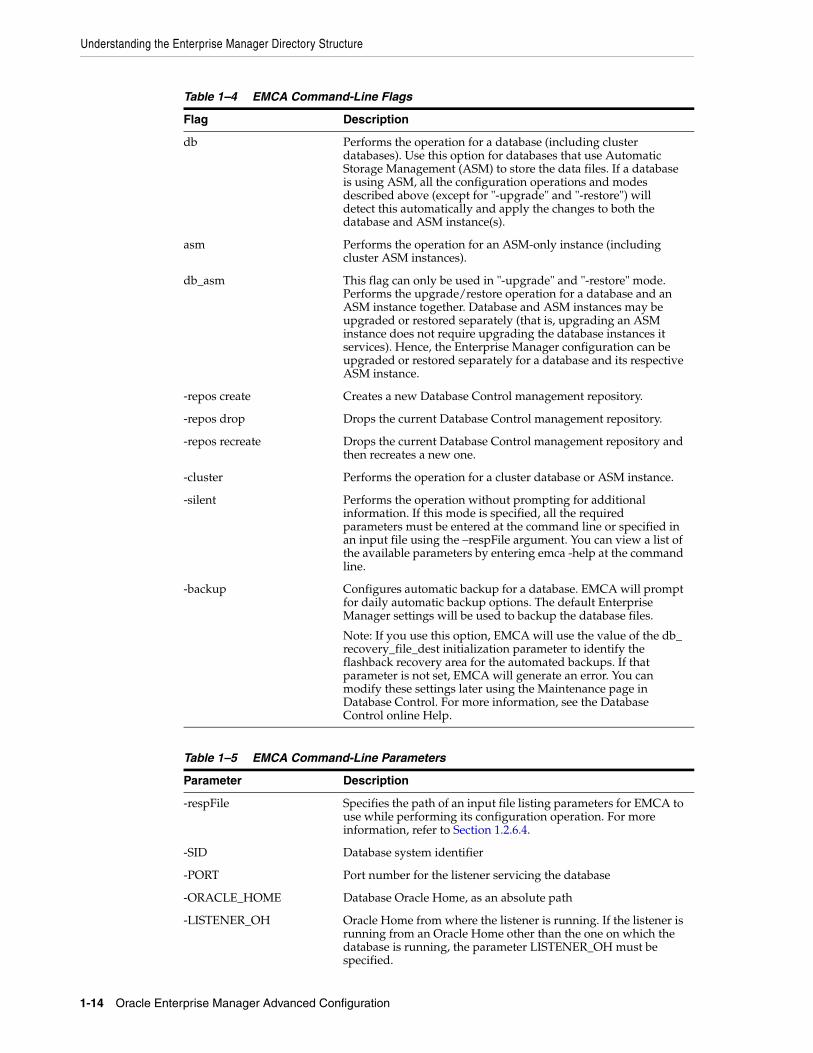
Understanding the Enterprise Manager Directory Structure
1-14 Oracle Enterprise Manager Advanced Configuration
Table 1–4 EMCA Command-Line Flags
Flag Description
db Performs the operation for a database (including cluster databases). Use this option for databases that use Automatic Storage Management (ASM) to store the data files. If a database is using ASM, all the configuration operations and modes described above (except for "-upgrade" and "-restore") will detect this automatically and apply the changes to both the database and ASM instance(s).
asm Performs the operation for an ASM-only instance (including cluster ASM instances).
db_asm This flag can only be used in "-upgrade" and "-restore" mode. Performs the upgrade/restore operation for a database and an ASM instance together. Database and ASM instances may be upgraded or restored separately (that is, upgrading an ASM instance does not require upgrading the database instances it services). Hence, the Enterprise Manager configuration can be upgraded or restored separately for a database and its respective ASM instance.
-repos create Creates a new Database Control management repository.
-repos drop Drops the current Database Control management repository.
-repos recreate Drops the current Database Control management repository and then recreates a new one.
-cluster Performs the operation for a cluster database or ASM instance.
-silent Performs the operation without prompting for additional information. If this mode is specified, all the required parameters must be entered at the command line or specified in an input file using the –respFile argument. You can view a list of the available parameters by entering emca -help at the command line.
-backup Configures automatic backup for a database. EMCA will prompt for daily automatic backup options. The default Enterprise Manager settings will be used to backup the database files.
Note: If you use this option, EMCA will use the value of the db_recovery_file_dest initialization parameter to identify the flashback recovery area for the automated backups. If that parameter is not set, EMCA will generate an error. You can modify these settings later using the Maintenance page in Database Control. For more information, see the Database Control online Help.
Table 1–5 EMCA Command-Line Parameters
Parameter Description
-respFile Specifies the path of an input file listing parameters for EMCA to use while performing its configuration operation. For more information, refer to Section 1.2.6.4.
-SID Database system identifier
-PORT Port number for the listener servicing the database
-ORACLE_HOME Database Oracle Home, as an absolute path
-LISTENER_OH Oracle Home from where the listener is running. If the listener is running from an Oracle Home other than the one on which the database is running, the parameter LISTENER_OH must be specified.
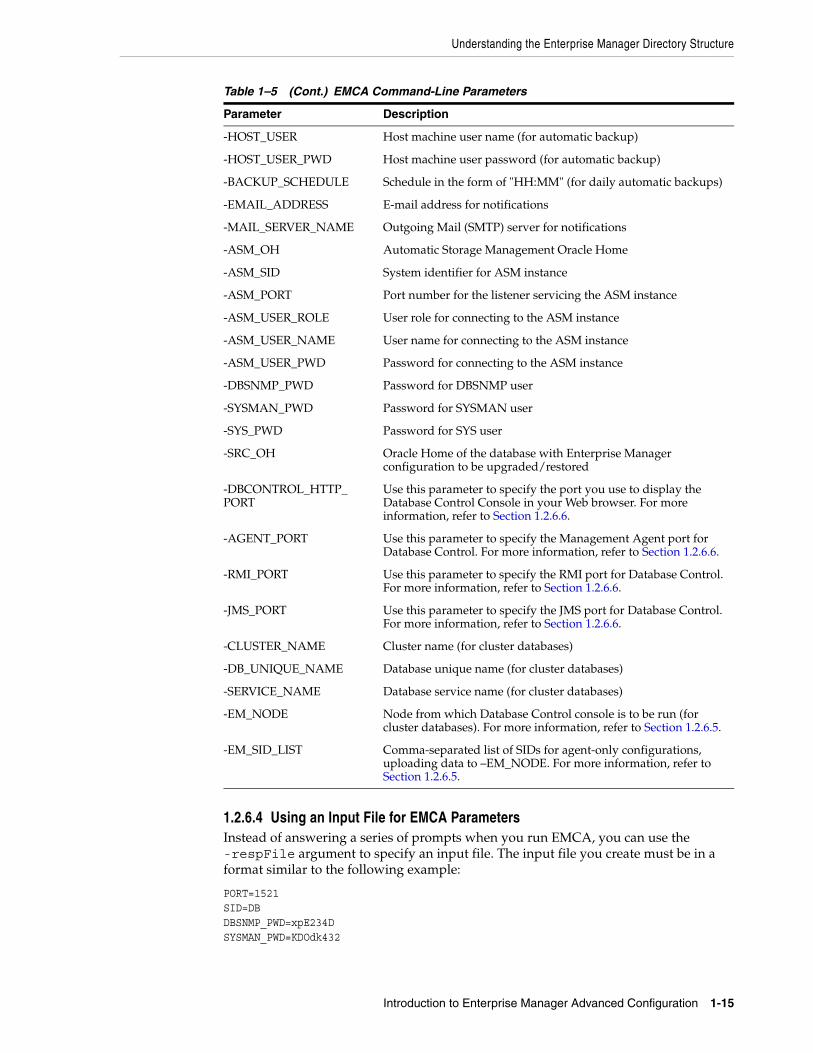
Understanding the Enterprise Manager Directory Structure
Introduction to Enterprise Manager Advanced Configuration 1-15
1.2.6.4 Using an Input File for EMCA ParametersInstead of answering a series of prompts when you run EMCA, you can use the -respFile argument to specify an input file. The input file you create must be in a format similar to the following example:
PORT=1521SID=DBDBSNMP_PWD=xpE234DSYSMAN_PWD=KDOdk432
-HOST_USER Host machine user name (for automatic backup)
-HOST_USER_PWD Host machine user password (for automatic backup)
-BACKUP_SCHEDULE Schedule in the form of "HH:MM" (for daily automatic backups)
-EMAIL_ADDRESS E-mail address for notifications
-MAIL_SERVER_NAME Outgoing Mail (SMTP) server for notifications
-ASM_OH Automatic Storage Management Oracle Home
-ASM_SID System identifier for ASM instance
-ASM_PORT Port number for the listener servicing the ASM instance
-ASM_USER_ROLE User role for connecting to the ASM instance
-ASM_USER_NAME User name for connecting to the ASM instance
-ASM_USER_PWD Password for connecting to the ASM instance
-DBSNMP_PWD Password for DBSNMP user
-SYSMAN_PWD Password for SYSMAN user
-SYS_PWD Password for SYS user
-SRC_OH Oracle Home of the database with Enterprise Manager configuration to be upgraded/restored
-DBCONTROL_HTTP_PORT
Use this parameter to specify the port you use to display the Database Control Console in your Web browser. For more information, refer to Section 1.2.6.6.
-AGENT_PORT Use this parameter to specify the Management Agent port for Database Control. For more information, refer to Section 1.2.6.6.
-RMI_PORT Use this parameter to specify the RMI port for Database Control. For more information, refer to Section 1.2.6.6.
-JMS_PORT Use this parameter to specify the JMS port for Database Control. For more information, refer to Section 1.2.6.6.
-CLUSTER_NAME Cluster name (for cluster databases)
-DB_UNIQUE_NAME Database unique name (for cluster databases)
-SERVICE_NAME Database service name (for cluster databases)
-EM_NODE Node from which Database Control console is to be run (for cluster databases). For more information, refer to Section 1.2.6.5.
-EM_SID_LIST Comma-separated list of SIDs for agent-only configurations, uploading data to –EM_NODE. For more information, refer to Section 1.2.6.5.
Table 1–5 (Cont.) EMCA Command-Line Parameters
Parameter Description
Understanding the Enterprise Manager Directory Structure
1-16 Oracle Enterprise Manager Advanced Configuration
After you create an EMCA input file, you can use it on the command line as follows:
$PROMPT> ./emca -config dbcontrol db -respFile input_file_path
For example, to configure the Database Console to perform daily backups and create the Database Control Management Repository, create an input file similar to the one shown in Example 1–1 and enter the following command at the operating system prompt:
$PROMPT> ./emca -config dbcontrol db -repos create -backup -respFile input_file_path
Example 1–1 EMCA Input File that Configures Database Control for Automatic Backup and Creates the Database Control Management Repository
PORT=1521SID=DBDBSNMP_PWD=dow3l224SYSMAN_PWD=squN3243HOST_USER=johnsonHOST_USER_PWD=diTf32ofSYS_PWD=qlKj4352BACKUP_SCHEDULE=06:30
1.2.6.5 Using EMCA with Oracle Real Application ClustersOracle Real Application Clusters (Oracle RAC) provides a high availability database environment spanning multiple hosts. Each cluster may be made up of multiple cluster databases, each of which consists of multiple cluster database instances. A cluster database is available as long as one of its instances is available.
Each EMCA command can be used in Real Application Clusters environments; certain commands are only applicable in cluster setups. To indicate that you have a cluster database, use the –cluster flag which is available in almost every EMCA operational mode.
When you use EMCA to configure Database Console for Real Application Clusters, you configure the Database Console for each instance in the cluster. However, by default, the Database Control Console will only start on the local node. On every other node of the cluster, only the Enterprise Manager agent will start. This is because the Database Control Console opens a number of connections to the database. If an instance of the console is running on every host in the cluster, then you may easily exceed the maximum number of permitted open connections on a 32-node or 64-node environment.
To remedy this, the Database Control Console is only started on the local node. On every other node, the commands emctl start dbconsole and emctl stop dbconsole only start and stop the agent. Each of the remote agents will upload their respective data to the console running on the local node, from where you can monitor and manage all the targets in the cluster. On each instance of the Oracle RAC database, the following subdirectories will be created:
$ORACLE_HOME/nodename1_SID1$ORACLE_HOME/nodename2_SID2..$ORACLE_HOME/nodenamen_SIDn
where SID1...SIDn are database system identifiers.
Understanding the Enterprise Manager Directory Structure
Introduction to Enterprise Manager Advanced Configuration 1-17
However, note that if you upgrade a 10g Release 1 cluster database (configured with Database Control) to 10g Release 2, the 10g Release 1 Database Control configuration will be retained. The 10g Release 1 Database Control has a Database Console running on each node for the real-application cluster. The console will still be started on each individual node. If you wish to modify the configuration, use the following command:
emca -reconfig dbcontrol –cluster –EM_NODE nodename -EM_SID_LIST SID list
where nodename is the public name of the node and SID list is a comma-separated list of database system identifiers. This command reconfigures the current Database Control setup and:
1. Starts a Database Control Console on nodename, if one has not been started yet.
2. Redirects the agents monitoring the database instances in SID list so that they upload their data to the console running on nodename. Also, agents monitoring database instances on nodename will also upload their data to the local console. Note that if you do not pass -EM_NODE or -EM_SID_LIST at the command line, you will be prompted for them.
-EM_NODE defaults to the local node if not specified when prompted. -EM_SID_LIST defaults to all database instances if not specified.
You may use this command to start the console on more than one node. For instance, on an 8-node cluster with node1, node2, node3, node4, node5, node6, node7, node8 and database instances oradb1, oradb2, oradb3, oradb4, oradb5, oradb6, oradb7, oradb8, you can run the following commands in succession:
$PROMPT> emca -reconfig dbcontrol –cluster –EM_NODE node1 -EM_SID_LIST oradb2,oradb3,oradb4$PROMPT> emca -reconfig dbcontrol –cluster –EM_NODE node5 -EM_SID_LIST oradb6,oradb7,oradb8
In this scenario, there will be two Database Control consoles running, one on node1 and the other on node5. From either of these consoles, you can manage and monitor all targets in the cluster.
For information on the current cluster configuration, you can run:
emca -displayConfig dbcontrol –cluster
The above command prompts for the database unique name for the cluster database. This will print the current configuration onto the screen, indicating the nodes that have consoles running on them and the consoles where each agent is uploading.
For configuring Enterprise Manager for a new cluster instance of a database or ASM storage, use the following command:
emca -addInst db
On cluster databases, another common operation is the creation and deletion of database instances. After you create a new instance, you can run EMCA to configure Database Control or central agent management for that instance using the command emca -addInst db. Running EMCA does not create the actual database instance; it only configures Enterprise Manager so that you can manage the instance in a way consistent with the rest of the cluster database instances. When configuring Enterprise Manager for a new instance, run the EMCA command only after you have created the instance. Also, run the command from a node in the cluster that already has Enterprise Manager configured for its associated database instance, as these configuration settings will be propagated to the new instance. Do not run this command from the node on which the new instance was created. Note that this option can be used only in
Understanding the Enterprise Manager Directory Structure
1-18 Oracle Enterprise Manager Advanced Configuration
a Real Application Clusters environment, so you do not need to use the -cluster option on the command line. After running the command emca -addInst db, enter the following information for the node and database:
Node name: node2Database Unique Name: EM102Database SID: EM1022
To deconfigure Enterprise Manager for a specific database instance (typically before the database instance is deleted), use the inverse command, emca -deleteInst db. Running EMCA does not delete the database instance; it only removes the Enterprise Manager configuration so that you will no longer be able to manage the instance with Enterprise Manager. Ensure that you run the EMCA command before you delete the actual cluster database instance. Also, ensure that you run the command from a different node and not from the node on which the database instance will be deleted. Note that this option can be used only in a Real Application Clusters environment, so you do not need to use the -cluster option on the command line.
For more information, see Table 1–3 which describes EMCA command-line operations.
1.2.6.6 Specifying the Ports Used By the Database ConsoleWhen you initially install Oracle Database 10g or configure the Database Console with EMCA, the Database Console uses a set of default system ports. For example, by default, you access Database Console using port 1158 in 10g Release 2, as in:
http://host.domain:1158/em
This is the default port assigned to Database Control by the Internet Assigned Numbers Authority (IANA). Likewise, the default Database Control Agent port, as assigned by the IANA, is 3938.
To use ports other than the default ports, use the following EMCA command-line arguments when you initially configure the Database Console with EMCA. Alternatively, you can explicitly assign ports after configuring Database Control using the following command:
emca -reconfig ports [-cluster]
The following list summarizes the EMCA command-line arguments that control the standard Database Control port assignments:
■ -DBCONTROL_HTTP_PORT port_number
This port number is used in the Database Control Console URL. For example, if you set this port to 5570, you can then display the Database Control Console using the following URL:
Note: If you use emca -c to configure the Database Control for Real Application Clusters, check TNS_ADMIN on all cluster nodes. If different TNS_ADMIN are set for each node, the listener for the target cannot be configured correctly. If so, set the same TNS_ADMIN on all cluster nodes before executing the emca -c command.
Note: You can also use the following EMCA command-line arguments to configure Database Control after you have installed and configured Oracle Database 10g.
Understanding the Enterprise Manager Directory Structure
Introduction to Enterprise Manager Advanced Configuration 1-19
http://host.domain:5570/em
■ -RMI_PORT port_number
This port number is used by the Remote Method Invocation (RMI) system, which is part of the J2EE software required by Database Control. The default port can be changed if the user wants to configure a specific port for Database Console. When a port other than the default port (1521) is used, use the -RMI_PORT or -JMS_PORT options along with the emca reconfig command.
■ -JMS_PORT port_number
This port is used by the OC4J Java Message Service (JMS), which is part of the J2EE software required by Database Control. The default port can be changed if the user wants to configure a specific port for Database Console. When a port other than the default port (1521) is used, use the -RMI_PORT or -JMS_PORT options along with the emca reconfig command.
■ -AGENT_PORT port_number
This port is used by the Database Control Management Agent, which is monitoring and administering the database for the Database Control.
1.2.6.7 EMCA Troubleshooting TipsThe following section describes some troubleshooting tips to consider when using EMCA to configure the Database Control:
■ Using EMCA After Changing the Database Listener Port
■ Upgrading Database or ASM Instances with 10g Release 2 Grid Control Agents
1.2.6.7.1 Using EMCA After Changing the Database Listener Port If you change the listener port of the database after you have configured Database Control, the database status will appear as down. To reconfigure Database Control so it uses the new listener port, run the EMCA command using the -config dbcontrol db [-cluster] command-line arguments.
1.2.6.7.2 Upgrading Database or ASM Instances with 10g Release 2 Grid Control Agents When upgrading a 10g Release 1 database and/or ASM instance that was configured for Oracle Enterprise Manager (either Database Control or a Grid Control central agent) to 10g Release 2, all Enterprise Manager targets on the relevant host(s) referring to the upgraded instance(s) will be updated automatically. This is because the upgrade involves altering the instance's Oracle Home, port, or other target-associated properties. However, some of these targets on the host(s) will not be updated successfully during the upgrade if they are managed by a 10g Release 2 Grid Control Agent. To update these targets, in the Home page for the upgraded database (or ASM) target, click the "Monitoring Configuration" link. On this page, you can update the required properties such as Oracle Home, listener port and so on to the correct values.
1.2.6.7.3 Using EMCA When Database Host Name or IP Address Changes When the database host name (including the domain name) or the IP address changes, deconfigure and then reconfigure the Database Console with the repository create command. Run the following command:
emca -deconfig dbcontrol db -repos dropemca -config dbcontrol db -repos create
or
emca -deconfig dbcontrol db
Enabling Enterprise Manager Accessibility Features
1-20 Oracle Enterprise Manager Advanced Configuration
emca -config dbcontrol db -repos recreate
1.2.6.7.4 Using EMCA When the TNS Configuration Is Changed When the TNS configuration is changed, set the environment variable and then run the following command:
emca -config dbcontrol db
1.2.7 Deconfiguring Database ControlYou can deconfigure Database Control through EMCA, the operating system command line. To deconfigure Database Console, use the following command:
emca -deconfig dbcontrol db [-repos drop] [-cluster] [-silent] [parameters]
The above command deconfigures Database Control for a database. Options include dropping the Database Control repository and performing these operations on a cluster database. For example, you might use this command to remove the Database Control configuration. In such a scenario, remove the Database Control configuration before physically deleting the database. This operation does not remove the actual database or its data files.
To deconfigure Database Control for a single instance database, run the following command:
emca -deconfig dbcontrol db -repos drop -SID database sid -PORT listener port -SYS_PWD password for sys user -SYSMAN_PWD password for SYSMAN user To deconfigure Database Control for an Oracle Real Application Clusters (Oracle RAC) database, run the following command:
emca -deconfig dbcontrol db -repos drop -cluster -DB_UNIQUE_NAME database unique name -PORT listener port -SYS_PWD password for sys user -SYSMAN_PWD password for SYSMAN user -CLUSTER_NAME cluster name
You will need to deconfigure Database Control if you want to configure Grid Control to use a database already configured with Database Control. Grid Control will detect the Database Control SYSMAN schema and prompt the user to discard the Database Control SYSMAN schema and re-create one for Grid Control. Shutdown and deconfigure Database Control before proceeding to overwrite the SYSMAN schema.
If you are planning to configure a new database to be used as a Grid Control repository, do not configure Database Control during this database installation.
1.3 Enabling Enterprise Manager Accessibility FeaturesAs part of the effort to make Oracle products, services, and supporting documentation accessible and usable to the disabled community, Enterprise Manager offers several features that make management data available to users of assistive technology.
To enable these features and provide for full accessibility, you must modify two configuration settings, which are described in the following sections:
■ Enabling Enterprise Manager Accessibility Mode
■ Providing Textual Descriptions of Enterprise Manager Charts

Enabling Enterprise Manager Accessibility Features
Introduction to Enterprise Manager Advanced Configuration 1-21
1.3.1 Enabling Enterprise Manager Accessibility ModeEnterprise Manager takes advantage of user interface development technologies that improve the responsiveness of some user operations. For example, when you navigate to a new record set in a table, Enterprise Manager does not redisplay the entire HTML page.
However, this performance-improving technology is generally not supported by screen readers. To disable this feature, and as a result, make the Enterprise Manager HTML pages more accessible for disabled users, use the following procedure.
1. Locate the uix-config.xml configuration file.
To locate the uix-config.xml file in a Grid Control Console installation, change directory to the following location in the Management Service home:
ORACLE_HOME/j2ee/OC4J_EM/applications/em/em/WEB-INF (Grid Control)
To locate the uix-config.xml file in a Oracle Database 10g installation, change directory to the following location in the database home:
ORACLE_HOME/oc4j/j2ee/oc4j_applications/applications/em/em/WEB-INF (Database Control)
2. Open the uix-config.xml file using a text editor and locate the following entry:
<!-- An alternate configuration that disables accessibility features --><default-configuration> <accessibility-mode>inaccessible</accessibility-mode></default-configuration>
3. Change the value of the accessibility-mode property from inaccessible to accessible.
4. Save and close the file.
5. Restart the Oracle Management Service (if you are modifying a Grid Control Console installation) or restart the Database Console (if you are modifying an Oracle Database 10g installation).
1.3.2 Providing Textual Descriptions of Enterprise Manager ChartsThroughout Enterprise Manager, charts are used to display performance data. For most users, these charts provide a valuable graphical view of the data that can reveal trends and help identify minimum and maximum values for performance metrics.
However, charts do not convey information in a manner that can be read by a screen reader. To remedy this problem, you can configure Enterprise Manager to provide a complete textual representation of each performance chart. By default, support for the textual representation of charts is disabled. When textual description for charts is
Note: The following procedure is valid for both Grid Control Console and Database Console installations. Differences in the location of configuration files is noted where applicable.
For information on enabling accessibility for the Application Server Control Console, see "Managing and Configuring the Application Server Control" in the Oracle Application Server 10g Administrator's Guide.

Enabling Enterprise Manager Accessibility Features
1-22 Oracle Enterprise Manager Advanced Configuration
enabled, Enterprise Manager displays a small icon for each chart that can be used as a drill-down link to the textual representation.
Figure 1–5 shows an example of the icon that displays beneath Enterprise Manager charts when you have enabled the textual representation of charts.
Figure 1–5 Icon Representing the Textual Representation of a Chart
To enable the drill-down icon for the textual representation of charts:
1. Locate the web.xml configuration file.
To locate the web.xml file in a Grid Control Console installation, change directory to the following location in the Management Service home:
ORACLE_HOME/j2ee/OC4J_EM/applications/em/em/WEB-INF
To locate the web.xml file in a Oracle Database 10g installation, change directory to the following location in the database home:
ORACLE_HOME/oc4j/j2ee/oc4j_applications/applications/em/em/WEB-INF
2. Open the web.xml file with your favorite text editor and locate the following six lines of the file:
<!-- Uncomment this to enable textual chart descriptions<context-param><param-name>enableChartDescription</param-name><param-value>true</param-value></context-param>-->
3. Remove comments from this section by deleting the first line and the last line of this section so that the section consists of only these 4 lines:
<context-param><param-name>enableChartDescription</param-name><param-value>true</param-value></context-param>
4. Save and exit the file.
5. Restart the Management Service (if you are modifying a Grid Control Console installation) or restart the Database Console (if you are modifying an Oracle Database 10g installation).
Starting and Stopping Enterprise Manager Components 2-1
2Starting and Stopping Enterprise Manager
Components
To start and stop the Management Service, the Management Agent, the Grid Control Console, the Application Server Control Console, and Database Control, use the Enterprise Manager command line utility (emctl).
The capabilities of the command-line utility can be broken down into the following categories:
■ Controlling the Oracle Management Agent
■ Controlling the Oracle Management Service
■ Controlling the Application Server Control
■ Controlling the Database Control on UNIX
■ Guidelines for Starting Multiple Enterprise Manager Components on a Single Host
■ Starting and Stopping Oracle Enterprise Manager 10g Grid Control
■ Additional Management Agent Commands
2.1 Controlling the Oracle Management AgentThe following sections describe how to use the Enterprise Manager command line utility (emctl) to control the Oracle Management Agent:
■ Starting, Stopping, and Checking the Status of the Management Agent on UNIX
■ Starting and Stopping the Management Agent on Windows
■ Checking the Status of the Management Agent on Windows
2.1.1 Starting, Stopping, and Checking the Status of the Management Agent on UNIXTo start, stop, or check the status of the Management Agent on UNIX systems:
1. Change directory to the AGENT_HOME/bin directory.
2. Use the appropriate command described in Table 2–1.
For example, to stop the Management Agent, enter the following commands:
$PROMPT> cd AGENT_HOME/bin$PROMPT> ./emctl stop agent
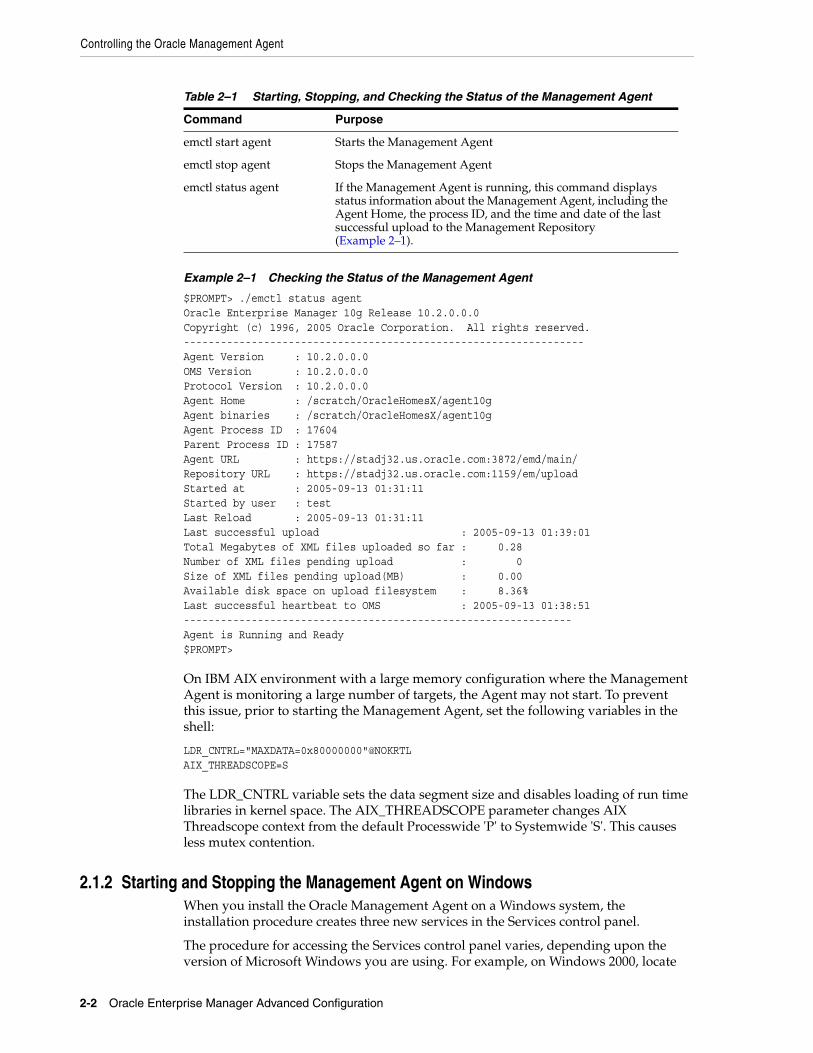
Controlling the Oracle Management Agent
2-2 Oracle Enterprise Manager Advanced Configuration
Example 2–1 Checking the Status of the Management Agent
$PROMPT> ./emctl status agentOracle Enterprise Manager 10g Release 10.2.0.0.0Copyright (c) 1996, 2005 Oracle Corporation. All rights reserved.-----------------------------------------------------------------Agent Version : 10.2.0.0.0OMS Version : 10.2.0.0.0Protocol Version : 10.2.0.0.0Agent Home : /scratch/OracleHomesX/agent10gAgent binaries : /scratch/OracleHomesX/agent10gAgent Process ID : 17604Parent Process ID : 17587Agent URL : https://stadj32.us.oracle.com:3872/emd/main/Repository URL : https://stadj32.us.oracle.com:1159/em/uploadStarted at : 2005-09-13 01:31:11Started by user : testLast Reload : 2005-09-13 01:31:11Last successful upload : 2005-09-13 01:39:01Total Megabytes of XML files uploaded so far : 0.28Number of XML files pending upload : 0Size of XML files pending upload(MB) : 0.00Available disk space on upload filesystem : 8.36%Last successful heartbeat to OMS : 2005-09-13 01:38:51---------------------------------------------------------------Agent is Running and Ready$PROMPT>
On IBM AIX environment with a large memory configuration where the Management Agent is monitoring a large number of targets, the Agent may not start. To prevent this issue, prior to starting the Management Agent, set the following variables in the shell:
LDR_CNTRL="MAXDATA=0x80000000"@NOKRTLAIX_THREADSCOPE=S
The LDR_CNTRL variable sets the data segment size and disables loading of run time libraries in kernel space. The AIX_THREADSCOPE parameter changes AIX Threadscope context from the default Processwide 'P' to Systemwide 'S'. This causes less mutex contention.
2.1.2 Starting and Stopping the Management Agent on WindowsWhen you install the Oracle Management Agent on a Windows system, the installation procedure creates three new services in the Services control panel.
The procedure for accessing the Services control panel varies, depending upon the version of Microsoft Windows you are using. For example, on Windows 2000, locate
Table 2–1 Starting, Stopping, and Checking the Status of the Management Agent
Command Purpose
emctl start agent Starts the Management Agent
emctl stop agent Stops the Management Agent
emctl status agent If the Management Agent is running, this command displays status information about the Management Agent, including the Agent Home, the process ID, and the time and date of the last successful upload to the Management Repository (Example 2–1).
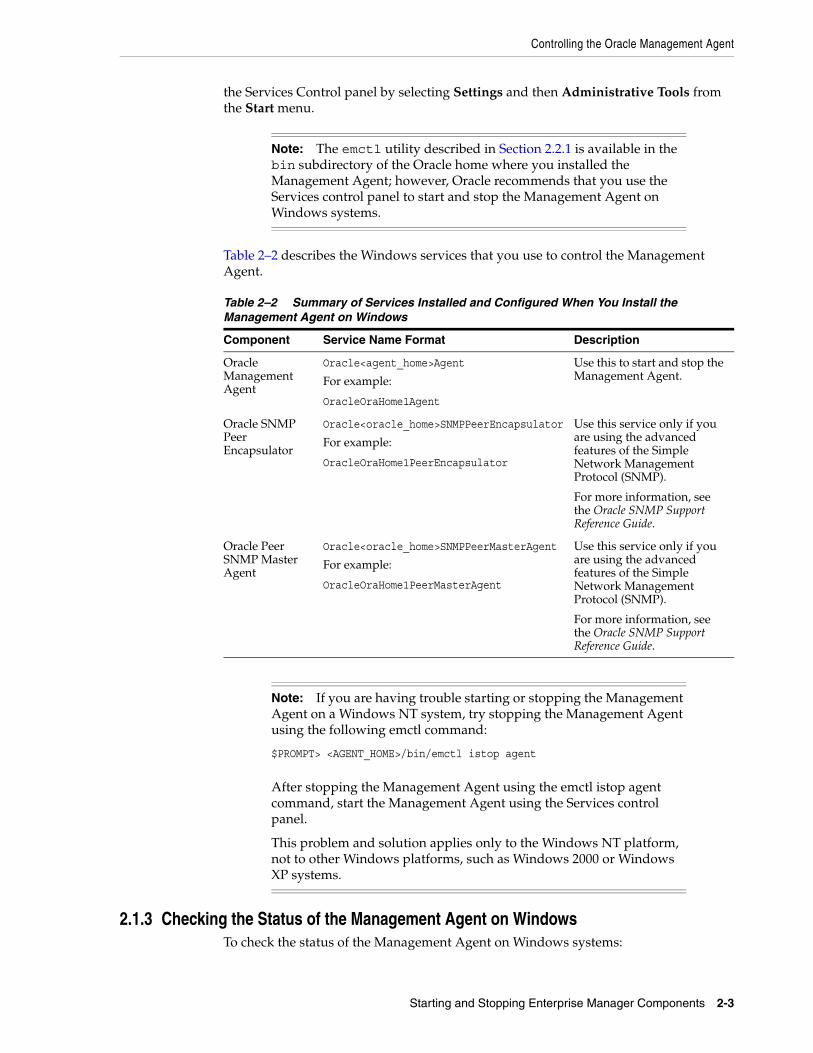
Controlling the Oracle Management Agent
Starting and Stopping Enterprise Manager Components 2-3
the Services Control panel by selecting Settings and then Administrative Tools from the Start menu.
Table 2–2 describes the Windows services that you use to control the Management Agent.
2.1.3 Checking the Status of the Management Agent on WindowsTo check the status of the Management Agent on Windows systems:
Note: The emctl utility described in Section 2.2.1 is available in the bin subdirectory of the Oracle home where you installed the Management Agent; however, Oracle recommends that you use the Services control panel to start and stop the Management Agent on Windows systems.
Table 2–2 Summary of Services Installed and Configured When You Install the Management Agent on Windows
Component Service Name Format Description
Oracle Management Agent
Oracle<agent_home>Agent
For example:
OracleOraHome1Agent
Use this to start and stop the Management Agent.
Oracle SNMP Peer Encapsulator
Oracle<oracle_home>SNMPPeerEncapsulator
For example:
OracleOraHome1PeerEncapsulator
Use this service only if you are using the advanced features of the Simple Network Management Protocol (SNMP).
For more information, see the Oracle SNMP Support Reference Guide.
Oracle Peer SNMP Master Agent
Oracle<oracle_home>SNMPPeerMasterAgent
For example:
OracleOraHome1PeerMasterAgent
Use this service only if you are using the advanced features of the Simple Network Management Protocol (SNMP).
For more information, see the Oracle SNMP Support Reference Guide.
Note: If you are having trouble starting or stopping the Management Agent on a Windows NT system, try stopping the Management Agent using the following emctl command:
$PROMPT> <AGENT_HOME>/bin/emctl istop agent
After stopping the Management Agent using the emctl istop agent command, start the Management Agent using the Services control panel.
This problem and solution applies only to the Windows NT platform, not to other Windows platforms, such as Windows 2000 or Windows XP systems.
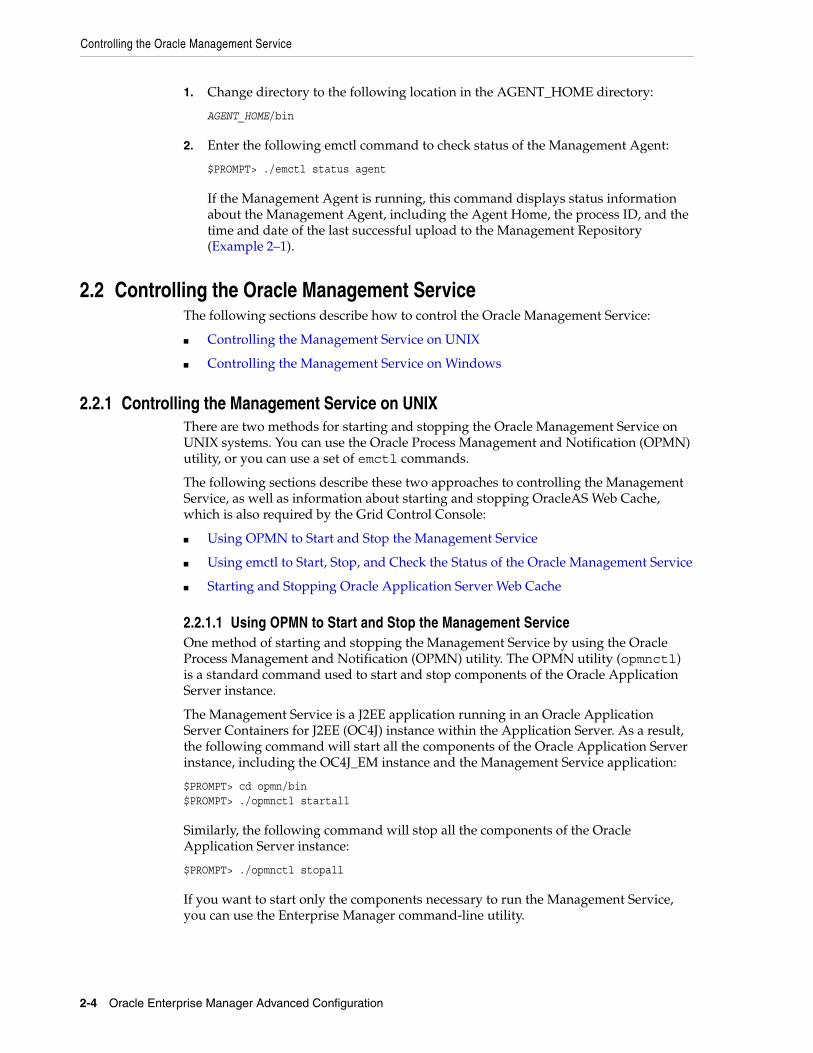
Controlling the Oracle Management Service
2-4 Oracle Enterprise Manager Advanced Configuration
1. Change directory to the following location in the AGENT_HOME directory:
AGENT_HOME/bin
2. Enter the following emctl command to check status of the Management Agent:
$PROMPT> ./emctl status agent
If the Management Agent is running, this command displays status information about the Management Agent, including the Agent Home, the process ID, and the time and date of the last successful upload to the Management Repository (Example 2–1).
2.2 Controlling the Oracle Management ServiceThe following sections describe how to control the Oracle Management Service:
■ Controlling the Management Service on UNIX
■ Controlling the Management Service on Windows
2.2.1 Controlling the Management Service on UNIXThere are two methods for starting and stopping the Oracle Management Service on UNIX systems. You can use the Oracle Process Management and Notification (OPMN) utility, or you can use a set of emctl commands.
The following sections describe these two approaches to controlling the Management Service, as well as information about starting and stopping OracleAS Web Cache, which is also required by the Grid Control Console:
■ Using OPMN to Start and Stop the Management Service
■ Using emctl to Start, Stop, and Check the Status of the Oracle Management Service
■ Starting and Stopping Oracle Application Server Web Cache
2.2.1.1 Using OPMN to Start and Stop the Management ServiceOne method of starting and stopping the Management Service by using the Oracle Process Management and Notification (OPMN) utility. The OPMN utility (opmnctl) is a standard command used to start and stop components of the Oracle Application Server instance.
The Management Service is a J2EE application running in an Oracle Application Server Containers for J2EE (OC4J) instance within the Application Server. As a result, the following command will start all the components of the Oracle Application Server instance, including the OC4J_EM instance and the Management Service application:
$PROMPT> cd opmn/bin$PROMPT> ./opmnctl startall
Similarly, the following command will stop all the components of the Oracle Application Server instance:
$PROMPT> ./opmnctl stopall
If you want to start only the components necessary to run the Management Service, you can use the Enterprise Manager command-line utility.
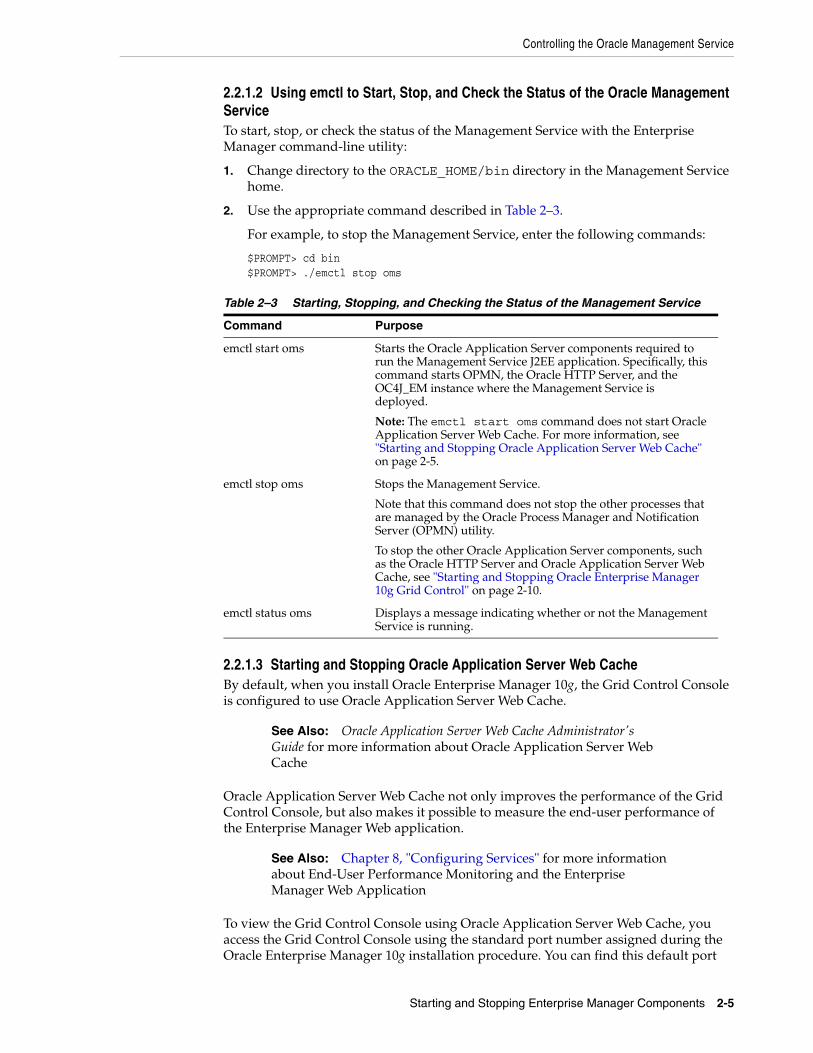
Controlling the Oracle Management Service
Starting and Stopping Enterprise Manager Components 2-5
2.2.1.2 Using emctl to Start, Stop, and Check the Status of the Oracle Management ServiceTo start, stop, or check the status of the Management Service with the Enterprise Manager command-line utility:
1. Change directory to the ORACLE_HOME/bin directory in the Management Service home.
2. Use the appropriate command described in Table 2–3.
For example, to stop the Management Service, enter the following commands:
$PROMPT> cd bin$PROMPT> ./emctl stop oms
2.2.1.3 Starting and Stopping Oracle Application Server Web Cache By default, when you install Oracle Enterprise Manager 10g, the Grid Control Console is configured to use Oracle Application Server Web Cache.
Oracle Application Server Web Cache not only improves the performance of the Grid Control Console, but also makes it possible to measure the end-user performance of the Enterprise Manager Web application.
To view the Grid Control Console using Oracle Application Server Web Cache, you access the Grid Control Console using the standard port number assigned during the Oracle Enterprise Manager 10g installation procedure. You can find this default port
Table 2–3 Starting, Stopping, and Checking the Status of the Management Service
Command Purpose
emctl start oms Starts the Oracle Application Server components required to run the Management Service J2EE application. Specifically, this command starts OPMN, the Oracle HTTP Server, and the OC4J_EM instance where the Management Service is deployed.
Note: The emctl start oms command does not start Oracle Application Server Web Cache. For more information, see "Starting and Stopping Oracle Application Server Web Cache" on page 2-5.
emctl stop oms Stops the Management Service.
Note that this command does not stop the other processes that are managed by the Oracle Process Manager and Notification Server (OPMN) utility.
To stop the other Oracle Application Server components, such as the Oracle HTTP Server and Oracle Application Server Web Cache, see "Starting and Stopping Oracle Enterprise Manager 10g Grid Control" on page 2-10.
emctl status oms Displays a message indicating whether or not the Management Service is running.
See Also: Oracle Application Server Web Cache Administrator's Guide for more information about Oracle Application Server Web Cache
See Also: Chapter 8, "Configuring Services" for more information about End-User Performance Monitoring and the Enterprise Manager Web Application
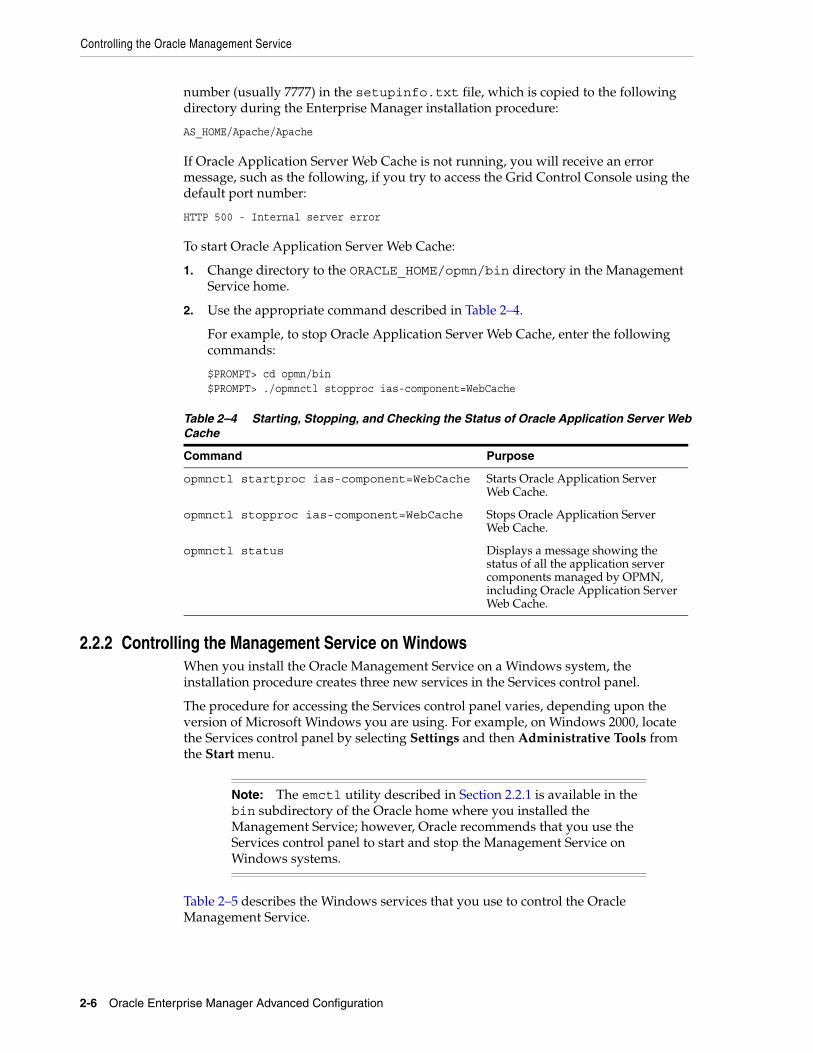
Controlling the Oracle Management Service
2-6 Oracle Enterprise Manager Advanced Configuration
number (usually 7777) in the setupinfo.txt file, which is copied to the following directory during the Enterprise Manager installation procedure:
AS_HOME/Apache/Apache
If Oracle Application Server Web Cache is not running, you will receive an error message, such as the following, if you try to access the Grid Control Console using the default port number:
HTTP 500 - Internal server error
To start Oracle Application Server Web Cache:
1. Change directory to the ORACLE_HOME/opmn/bin directory in the Management Service home.
2. Use the appropriate command described in Table 2–4.
For example, to stop Oracle Application Server Web Cache, enter the following commands:
$PROMPT> cd opmn/bin$PROMPT> ./opmnctl stopproc ias-component=WebCache
2.2.2 Controlling the Management Service on WindowsWhen you install the Oracle Management Service on a Windows system, the installation procedure creates three new services in the Services control panel.
The procedure for accessing the Services control panel varies, depending upon the version of Microsoft Windows you are using. For example, on Windows 2000, locate the Services control panel by selecting Settings and then Administrative Tools from the Start menu.
Table 2–5 describes the Windows services that you use to control the Oracle Management Service.
Table 2–4 Starting, Stopping, and Checking the Status of Oracle Application Server Web Cache
Command Purpose
opmnctl startproc ias-component=WebCache Starts Oracle Application Server Web Cache.
opmnctl stopproc ias-component=WebCache Stops Oracle Application Server Web Cache.
opmnctl status Displays a message showing the status of all the application server components managed by OPMN, including Oracle Application Server Web Cache.
Note: The emctl utility described in Section 2.2.1 is available in the bin subdirectory of the Oracle home where you installed the Management Service; however, Oracle recommends that you use the Services control panel to start and stop the Management Service on Windows systems.
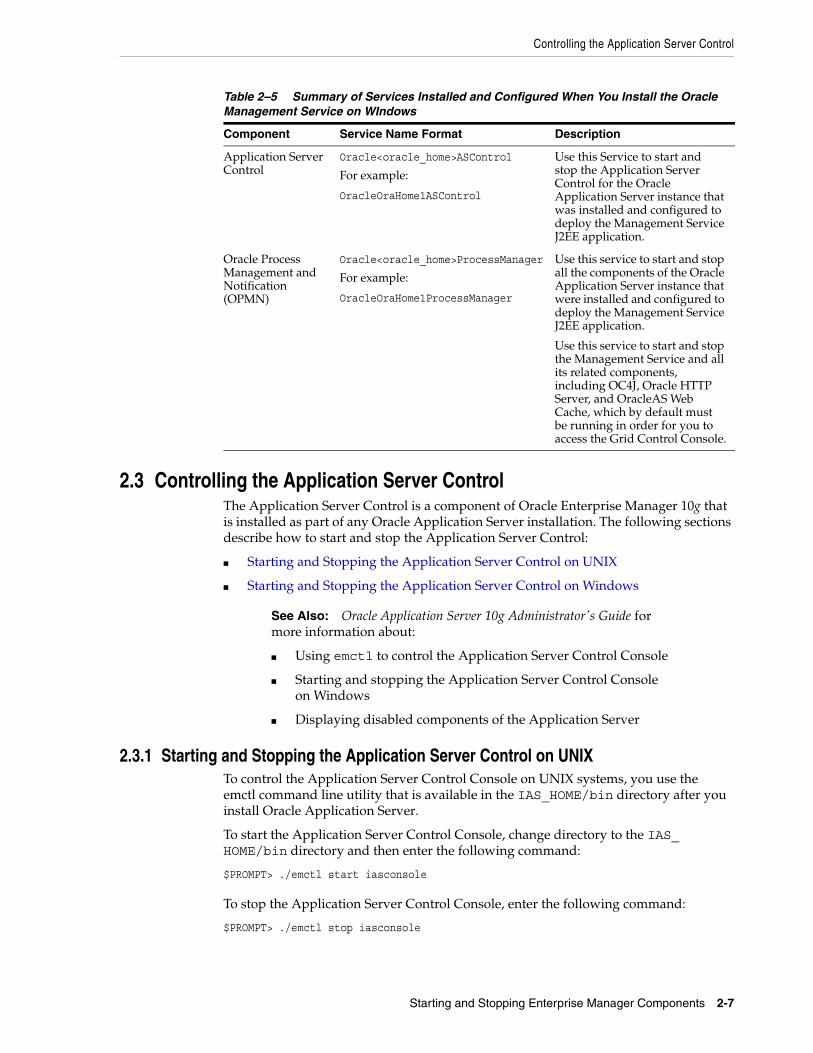
Controlling the Application Server Control
Starting and Stopping Enterprise Manager Components 2-7
2.3 Controlling the Application Server ControlThe Application Server Control is a component of Oracle Enterprise Manager 10g that is installed as part of any Oracle Application Server installation. The following sections describe how to start and stop the Application Server Control:
■ Starting and Stopping the Application Server Control on UNIX
■ Starting and Stopping the Application Server Control on Windows
2.3.1 Starting and Stopping the Application Server Control on UNIXTo control the Application Server Control Console on UNIX systems, you use the emctl command line utility that is available in the IAS_HOME/bin directory after you install Oracle Application Server.
To start the Application Server Control Console, change directory to the IAS_HOME/bin directory and then enter the following command:
$PROMPT> ./emctl start iasconsole
To stop the Application Server Control Console, enter the following command:
$PROMPT> ./emctl stop iasconsole
Table 2–5 Summary of Services Installed and Configured When You Install the Oracle Management Service on WIndows
Component Service Name Format Description
Application Server Control
Oracle<oracle_home>ASControl
For example:
OracleOraHome1ASControl
Use this Service to start and stop the Application Server Control for the Oracle Application Server instance that was installed and configured to deploy the Management Service J2EE application.
Oracle Process Management and Notification (OPMN)
Oracle<oracle_home>ProcessManager
For example:
OracleOraHome1ProcessManager
Use this service to start and stop all the components of the Oracle Application Server instance that were installed and configured to deploy the Management Service J2EE application.
Use this service to start and stop the Management Service and all its related components, including OC4J, Oracle HTTP Server, and OracleAS Web Cache, which by default must be running in order for you to access the Grid Control Console.
See Also: Oracle Application Server 10g Administrator's Guide for more information about:
■ Using emctl to control the Application Server Control Console
■ Starting and stopping the Application Server Control Console on Windows
■ Displaying disabled components of the Application Server
Controlling the Database Control on UNIX
2-8 Oracle Enterprise Manager Advanced Configuration
2.3.2 Starting and Stopping the Application Server Control on WindowsTo start or stop the Application Server Control on Windows systems:
1. Open the Services control panel.
For example, on Windows NT, select Start, point to Settings, select Control Panel, and then double-click the Services icon.
On Windows 2000, select Start, point to Administrative Tools, and select Services.
2. Locate the Application Server Control in the list of services.
The name of the service is usually consists of "Oracle", followed by the name of the home directory you specified during the installation, followed by the word "ASControl." For example, if you specified AS10g as the Oracle Home, the Service name would be:
OracleAS10gASControl
3. After you locate the service, you can use the Services control panel to start or stop the Application Server Control service.
By default, the Application Server Control service is configured to start automatically when the system starts.
You can also start the Oracle Application Server Control console (iasconsole) on Windows using NET START Oracleoms10gASControl.
To stop the Oracle Application Server Control console (iasconsole) on Windows. use NET STOP Oracleoms10gASControl.
2.4 Controlling the Database Control on UNIXThe Oracle Enterprise Manager 10g Database Control Console is a component of Oracle Enterprise Manager 10g that is installed as part of any Oracle Database 10g installation.
To control the Database Control, you use the emctl command-line utility that is available in the ORACLE_HOME/bin directory after you install Oracle Database 10g.
2.4.1 Starting the Database Control on UNIXTo start the Database Control, as well the Management Agent and the Management Service associated with the Database Control:
1. Set the following environment variables to identify the Oracle home and the system identifier (SID) for the database instance you want to manage:
■ ORACLE_HOME
■ ORACLE_SID
2. Change directory to the ORACLE_HOME/bin directory.
3. Enter the following command:
$PROMPT> ./emctl start dbconsole
2.4.2 Stopping the Database Control on UNIXTo stop the Database Control, as well the Management Agent and the Management Service associated with the Database Control:
Guidelines for Starting Multiple Enterprise Manager Components on a Single Host
Starting and Stopping Enterprise Manager Components 2-9
1. Set the following environment variables to identify the Oracle home and the system identifier (SID) for the database instance you want to manage:
■ ORACLE_HOME
■ ORACLE_SID
2. Change directory to the ORACLE_HOME/bin directory.
3. Enter the following command:
$PROMPT> ./emctl stop dbconsole
2.4.3 Starting and Stopping the Database Control on WindowsTo start or stop the Database Control on Windows systems:
1. Open the Services control panel.
For example, on Windows NT, select Start, point to Settings, select Control Panel, and then double-click the Services icon.
On Windows 2000, select Start, point to Administrative Tools, and select Services.
2. Locate the Database Control in the list of services.
The name of the service is usually consists of "Oracle", followed by the name of the home directory you specified during the installation and the database system identifier (SID), followed by the word "DBControl." For example, if you specified DBd10g as the Oracle Home, the Service name would be:
OracleDB10gDBControl
3. After you locate the service, you can use the Services control panel to start or stop the Database Control service.
By default, the Database Control service is configured to start automatically when the system starts.
You can also start the Database Control on Windows using emctl start iasconsole as described in Section 2.4.2.
2.5 Guidelines for Starting Multiple Enterprise Manager Components on a Single Host
Oracle Enterprise Manager 10g components are used to manage a variety of Oracle software products. For example, each time you install Oracle Application Server 10g (9.0.4) instance, you also install an Application Server Control. Similarly, each time you install Oracle Database 10g, you install a Database Control. In addition, if you want to centrally manage your system with Database Control, the Management Agent is also installed on each host you monitor.
In most cases, in a production environment, you will want to distribute your database and application server instances among multiple hosts to improve performance and availability of your software resources. However, in rare cases where you must install multiple application servers or databases on the same host, consider the following guidelines.
When you start Application Server Control, the Management Agent, or the Database Control, Enterprise Manager immediately begins gathering important monitoring data
Starting and Stopping Oracle Enterprise Manager 10g Grid Control
2-10 Oracle Enterprise Manager Advanced Configuration
about the host and its managed targets. Keep this in mind when you develop a process for starting the components on the host.
Specifically, consider staggering the startup process so that each Enterprise Manager process has a chance to start before the next process begins its startup procedure.
For example, suppose you have installed OracleAS Infrastructure 10g, the J2EE and Web Cache application server installation type, and the Management Agent on the same host. When you start up all the components (for example, after a restart of the system), use a process such as the following:
1. Use the opmnctl startall command to start all the OPMN-managed processes in the OracleAS Infrastructure 10g home directory.
2. Wait 15 seconds.
3. Use the emctl start iasconsole command to start the Application Server Control in the OracleAS Infrastructure 10g home directory.
4. Wait 15 seconds.
5. Use the opmnctl startall command to start all the OPMN-managed processes in the J2EE and Web Cache home directory.
6. Wait 15 seconds.
7. Use the emctl start iasconsole command to start the Application Server Control in the J2EE and Web Cache home directory.
8. Wait 15 seconds.
9. Use the emctl start agent command to start the Management Agent for the host.
Using a staggered startup procedure such as the preceding example will ensure that the processes are not in contention for resources during the CPU-intensive startup phase for each component.
2.6 Starting and Stopping Oracle Enterprise Manager 10g Grid ControlAs described in the previous sections, you use separate commands to control the Oracle Management Service, Oracle Management Agent, and the Oracle Application Server components on which the Grid Control depends.
The following sections describe how to stop and start all the Grid Control components that are installed by the Oracle Enterprise Manager 10g Grid Control Console installation procedure.
You can use this procedure to start all the framework components after a system reboot or to shutdown all the components before bringing the system down for system maintenance.
2.6.1 Starting Grid Control and All Its ComponentsThe following procedure summarizes the steps required to start all the components of the Grid Control. For example, use this procedure if you have restarted the host computer and all the components of the Grid Control have been installed on that host.
To start all the Grid Control components on a host, use the following procedure:
1. If your Oracle Management Repository resides on the host, change directory to the Oracle Home for the database where you installed the Management Repository and start the database and the Net Listener for the database:
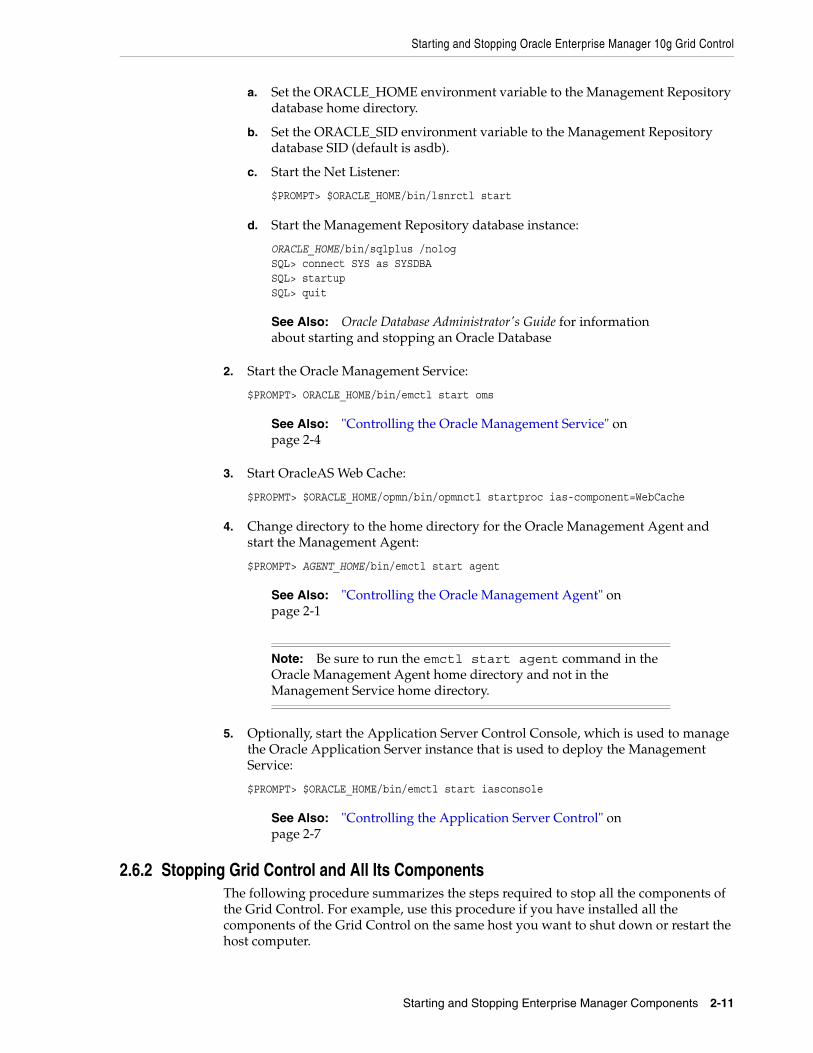
Starting and Stopping Oracle Enterprise Manager 10g Grid Control
Starting and Stopping Enterprise Manager Components 2-11
a. Set the ORACLE_HOME environment variable to the Management Repository database home directory.
b. Set the ORACLE_SID environment variable to the Management Repository database SID (default is asdb).
c. Start the Net Listener:
$PROMPT> $ORACLE_HOME/bin/lsnrctl start
d. Start the Management Repository database instance:
ORACLE_HOME/bin/sqlplus /nologSQL> connect SYS as SYSDBASQL> startupSQL> quit
2. Start the Oracle Management Service:
$PROMPT> ORACLE_HOME/bin/emctl start oms
3. Start OracleAS Web Cache:
$PROPMT> $ORACLE_HOME/opmn/bin/opmnctl startproc ias-component=WebCache
4. Change directory to the home directory for the Oracle Management Agent and start the Management Agent:
$PROMPT> AGENT_HOME/bin/emctl start agent
5. Optionally, start the Application Server Control Console, which is used to manage the Oracle Application Server instance that is used to deploy the Management Service:
$PROMPT> $ORACLE_HOME/bin/emctl start iasconsole
2.6.2 Stopping Grid Control and All Its ComponentsThe following procedure summarizes the steps required to stop all the components of the Grid Control. For example, use this procedure if you have installed all the components of the Grid Control on the same host you want to shut down or restart the host computer.
See Also: Oracle Database Administrator's Guide for information about starting and stopping an Oracle Database
See Also: "Controlling the Oracle Management Service" on page 2-4
See Also: "Controlling the Oracle Management Agent" on page 2-1
Note: Be sure to run the emctl start agent command in the Oracle Management Agent home directory and not in the Management Service home directory.
See Also: "Controlling the Application Server Control" on page 2-7
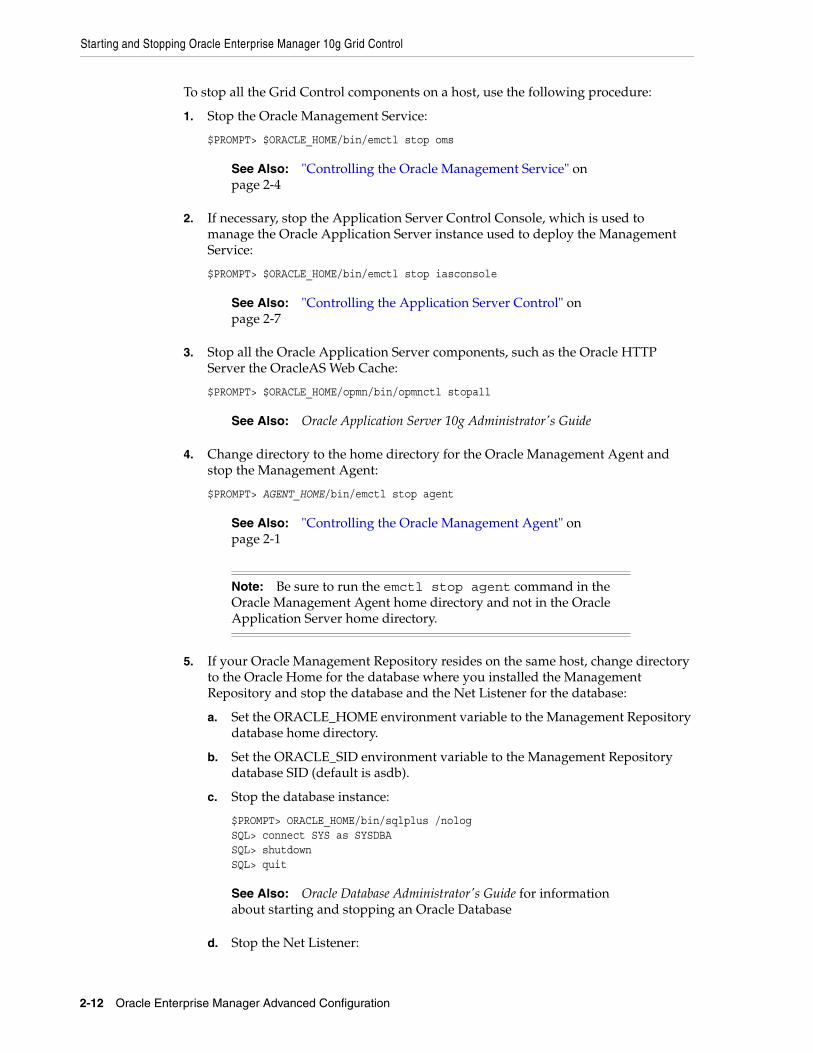
Starting and Stopping Oracle Enterprise Manager 10g Grid Control
2-12 Oracle Enterprise Manager Advanced Configuration
To stop all the Grid Control components on a host, use the following procedure:
1. Stop the Oracle Management Service:
$PROMPT> $ORACLE_HOME/bin/emctl stop oms
2. If necessary, stop the Application Server Control Console, which is used to manage the Oracle Application Server instance used to deploy the Management Service:
$PROMPT> $ORACLE_HOME/bin/emctl stop iasconsole
3. Stop all the Oracle Application Server components, such as the Oracle HTTP Server the OracleAS Web Cache:
$PROMPT> $ORACLE_HOME/opmn/bin/opmnctl stopall
4. Change directory to the home directory for the Oracle Management Agent and stop the Management Agent:
$PROMPT> AGENT_HOME/bin/emctl stop agent
5. If your Oracle Management Repository resides on the same host, change directory to the Oracle Home for the database where you installed the Management Repository and stop the database and the Net Listener for the database:
a. Set the ORACLE_HOME environment variable to the Management Repository database home directory.
b. Set the ORACLE_SID environment variable to the Management Repository database SID (default is asdb).
c. Stop the database instance:
$PROMPT> ORACLE_HOME/bin/sqlplus /nologSQL> connect SYS as SYSDBASQL> shutdownSQL> quit
d. Stop the Net Listener:
See Also: "Controlling the Oracle Management Service" on page 2-4
See Also: "Controlling the Application Server Control" on page 2-7
See Also: Oracle Application Server 10g Administrator's Guide
See Also: "Controlling the Oracle Management Agent" on page 2-1
Note: Be sure to run the emctl stop agent command in the Oracle Management Agent home directory and not in the Oracle Application Server home directory.
See Also: Oracle Database Administrator's Guide for information about starting and stopping an Oracle Database
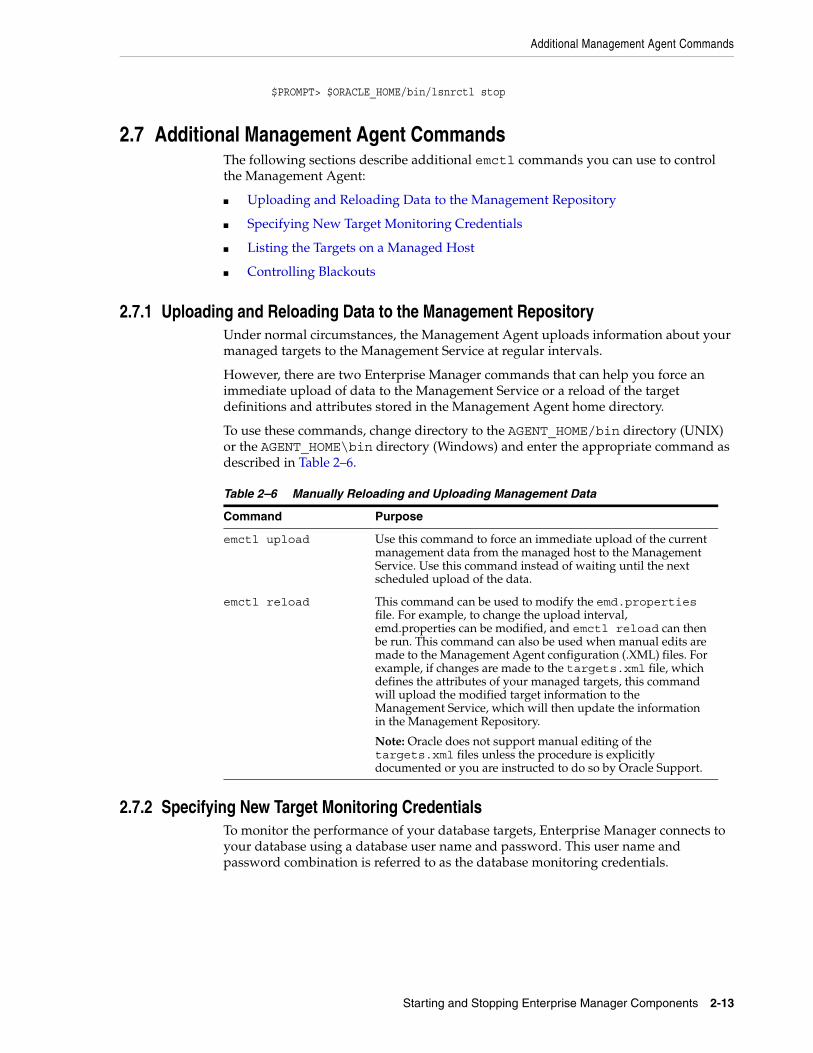
Additional Management Agent Commands
Starting and Stopping Enterprise Manager Components 2-13
$PROMPT> $ORACLE_HOME/bin/lsnrctl stop
2.7 Additional Management Agent CommandsThe following sections describe additional emctl commands you can use to control the Management Agent:
■ Uploading and Reloading Data to the Management Repository
■ Specifying New Target Monitoring Credentials
■ Listing the Targets on a Managed Host
■ Controlling Blackouts
2.7.1 Uploading and Reloading Data to the Management RepositoryUnder normal circumstances, the Management Agent uploads information about your managed targets to the Management Service at regular intervals.
However, there are two Enterprise Manager commands that can help you force an immediate upload of data to the Management Service or a reload of the target definitions and attributes stored in the Management Agent home directory.
To use these commands, change directory to the AGENT_HOME/bin directory (UNIX) or the AGENT_HOME\bin directory (Windows) and enter the appropriate command as described in Table 2–6.
2.7.2 Specifying New Target Monitoring CredentialsTo monitor the performance of your database targets, Enterprise Manager connects to your database using a database user name and password. This user name and password combination is referred to as the database monitoring credentials.
Table 2–6 Manually Reloading and Uploading Management Data
Command Purpose
emctl upload Use this command to force an immediate upload of the current management data from the managed host to the Management Service. Use this command instead of waiting until the next scheduled upload of the data.
emctl reload This command can be used to modify the emd.properties file. For example, to change the upload interval, emd.properties can be modified, and emctl reload can then be run. This command can also be used when manual edits are made to the Management Agent configuration (.XML) files. For example, if changes are made to the targets.xml file, which defines the attributes of your managed targets, this command will upload the modified target information to the Management Service, which will then update the information in the Management Repository.
Note: Oracle does not support manual editing of the targets.xml files unless the procedure is explicitly documented or you are instructed to do so by Oracle Support.
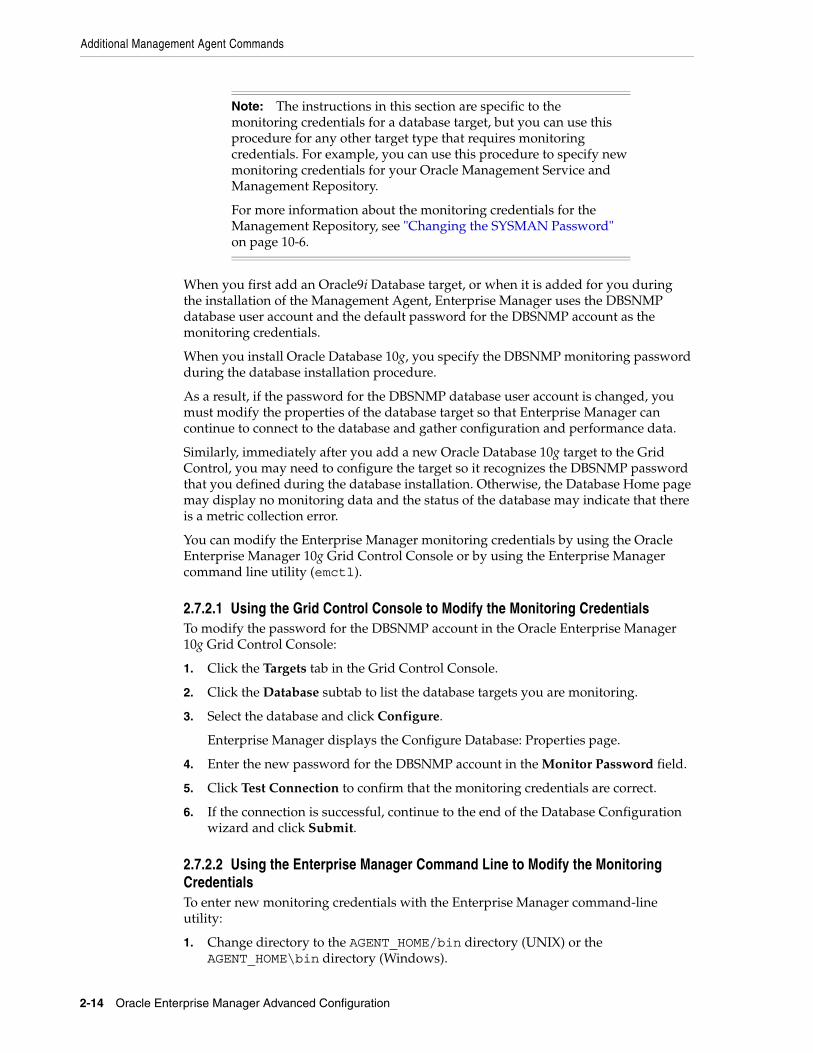
Additional Management Agent Commands
2-14 Oracle Enterprise Manager Advanced Configuration
When you first add an Oracle9i Database target, or when it is added for you during the installation of the Management Agent, Enterprise Manager uses the DBSNMP database user account and the default password for the DBSNMP account as the monitoring credentials.
When you install Oracle Database 10g, you specify the DBSNMP monitoring password during the database installation procedure.
As a result, if the password for the DBSNMP database user account is changed, you must modify the properties of the database target so that Enterprise Manager can continue to connect to the database and gather configuration and performance data.
Similarly, immediately after you add a new Oracle Database 10g target to the Grid Control, you may need to configure the target so it recognizes the DBSNMP password that you defined during the database installation. Otherwise, the Database Home page may display no monitoring data and the status of the database may indicate that there is a metric collection error.
You can modify the Enterprise Manager monitoring credentials by using the Oracle Enterprise Manager 10g Grid Control Console or by using the Enterprise Manager command line utility (emctl).
2.7.2.1 Using the Grid Control Console to Modify the Monitoring CredentialsTo modify the password for the DBSNMP account in the Oracle Enterprise Manager 10g Grid Control Console:
1. Click the Targets tab in the Grid Control Console.
2. Click the Database subtab to list the database targets you are monitoring.
3. Select the database and click Configure.
Enterprise Manager displays the Configure Database: Properties page.
4. Enter the new password for the DBSNMP account in the Monitor Password field.
5. Click Test Connection to confirm that the monitoring credentials are correct.
6. If the connection is successful, continue to the end of the Database Configuration wizard and click Submit.
2.7.2.2 Using the Enterprise Manager Command Line to Modify the Monitoring CredentialsTo enter new monitoring credentials with the Enterprise Manager command-line utility:
1. Change directory to the AGENT_HOME/bin directory (UNIX) or the AGENT_HOME\bin directory (Windows).
Note: The instructions in this section are specific to the monitoring credentials for a database target, but you can use this procedure for any other target type that requires monitoring credentials. For example, you can use this procedure to specify new monitoring credentials for your Oracle Management Service and Management Repository.
For more information about the monitoring credentials for the Management Repository, see "Changing the SYSMAN Password" on page 10-6.
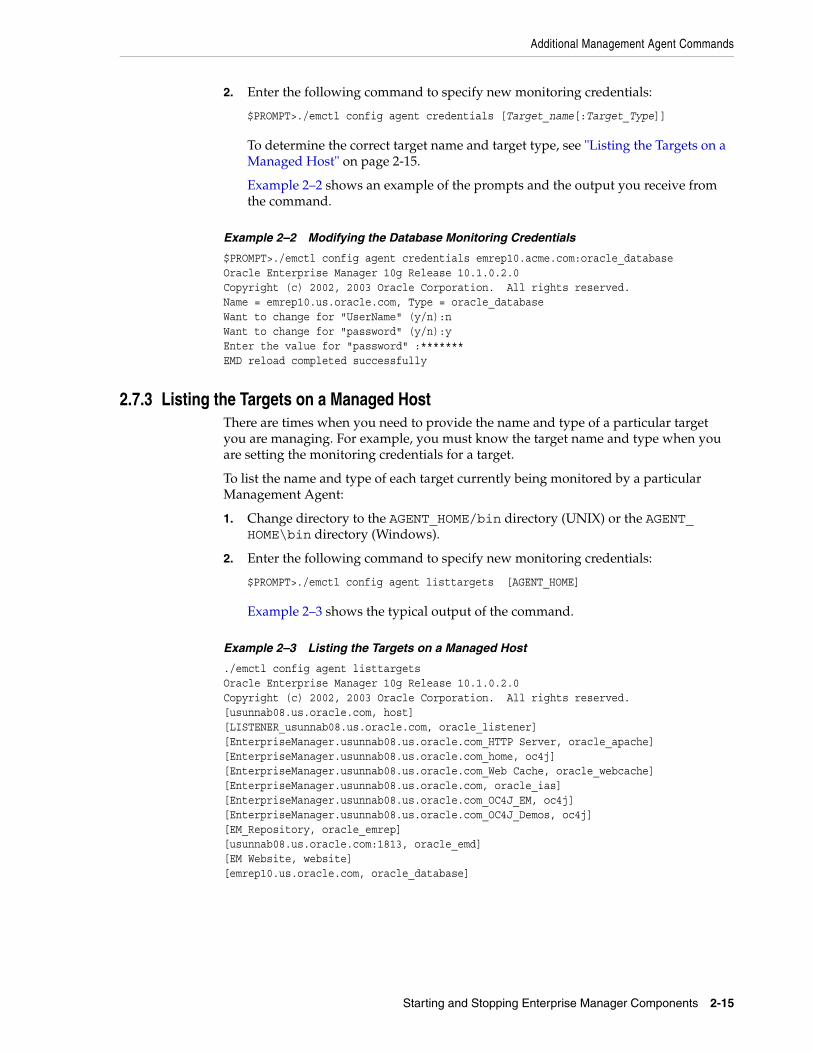
Additional Management Agent Commands
Starting and Stopping Enterprise Manager Components 2-15
2. Enter the following command to specify new monitoring credentials:
$PROMPT>./emctl config agent credentials [Target_name[:Target_Type]]
To determine the correct target name and target type, see "Listing the Targets on a Managed Host" on page 2-15.
Example 2–2 shows an example of the prompts and the output you receive from the command.
Example 2–2 Modifying the Database Monitoring Credentials
$PROMPT>./emctl config agent credentials emrep10.acme.com:oracle_databaseOracle Enterprise Manager 10g Release 10.1.0.2.0Copyright (c) 2002, 2003 Oracle Corporation. All rights reserved.Name = emrep10.us.oracle.com, Type = oracle_databaseWant to change for "UserName" (y/n):nWant to change for "password" (y/n):yEnter the value for "password" :*******EMD reload completed successfully
2.7.3 Listing the Targets on a Managed HostThere are times when you need to provide the name and type of a particular target you are managing. For example, you must know the target name and type when you are setting the monitoring credentials for a target.
To list the name and type of each target currently being monitored by a particular Management Agent:
1. Change directory to the AGENT_HOME/bin directory (UNIX) or the AGENT_HOME\bin directory (Windows).
2. Enter the following command to specify new monitoring credentials:
$PROMPT>./emctl config agent listtargets [AGENT_HOME]
Example 2–3 shows the typical output of the command.
Example 2–3 Listing the Targets on a Managed Host
./emctl config agent listtargetsOracle Enterprise Manager 10g Release 10.1.0.2.0Copyright (c) 2002, 2003 Oracle Corporation. All rights reserved.[usunnab08.us.oracle.com, host][LISTENER_usunnab08.us.oracle.com, oracle_listener][EnterpriseManager.usunnab08.us.oracle.com_HTTP Server, oracle_apache][EnterpriseManager.usunnab08.us.oracle.com_home, oc4j][EnterpriseManager.usunnab08.us.oracle.com_Web Cache, oracle_webcache][EnterpriseManager.usunnab08.us.oracle.com, oracle_ias][EnterpriseManager.usunnab08.us.oracle.com_OC4J_EM, oc4j][EnterpriseManager.usunnab08.us.oracle.com_OC4J_Demos, oc4j][EM_Repository, oracle_emrep][usunnab08.us.oracle.com:1813, oracle_emd][EM Website, website][emrep10.us.oracle.com, oracle_database]
Additional Management Agent Commands
2-16 Oracle Enterprise Manager Advanced Configuration
2.7.4 Controlling BlackoutsBlackouts allow Enterprise Manager users to suspend management data collection activity on one or more managed targets. For example, administrators use blackouts to prevent data collection during scheduled maintenance or emergency operations.
You can control blackouts from the Oracle Enterprise Manager 10g Grid Control Console or from the Enterprise Manager command line utility (emctl). However, if you are controlling target blackouts from the command line, you should not attempt to control the same blackouts from the Grid Control Console. Similarly, if you are controlling target blackouts from the Grid Control Console, do not attempt to control those blackouts from the command line.
From the command line, you can perform the following blackout functions:
■ Starting Immediate Blackouts
■ Stopping Immediate Blackouts
■ Checking the Status of Immediate Blackouts
To use the Enterprise Manager command-line utility to control blackouts:
1. Change directory to the AGENT_HOME/bin directory (UNIX) or the AGENT_HOME\bin directory (Windows).
2. Enter the appropriate command as described in Table 2–7.
See Also: The "Systems Monitoring" chapter in Oracle Enterprise Manager Concepts for more information about Enterprise Manager blackouts
See Also: "Creating, Editing, and Viewing Blackouts" in the Enterprise Manager online help for information about controlling blackouts from the Grid Control Console
Note: When you start a blackout from the command line, any Enterprise Manager jobs scheduled to run against the blacked out targets will still run. If you use the Grid Control Console to control blackouts, you can optionally prevent jobs from running against blacked out targets.
Note: When you start a blackout, you must identify the target or targets affected by the blackout. To obtain the correct target name and target type for a target, see "Listing the Targets on a Managed Host" on page 2-15.
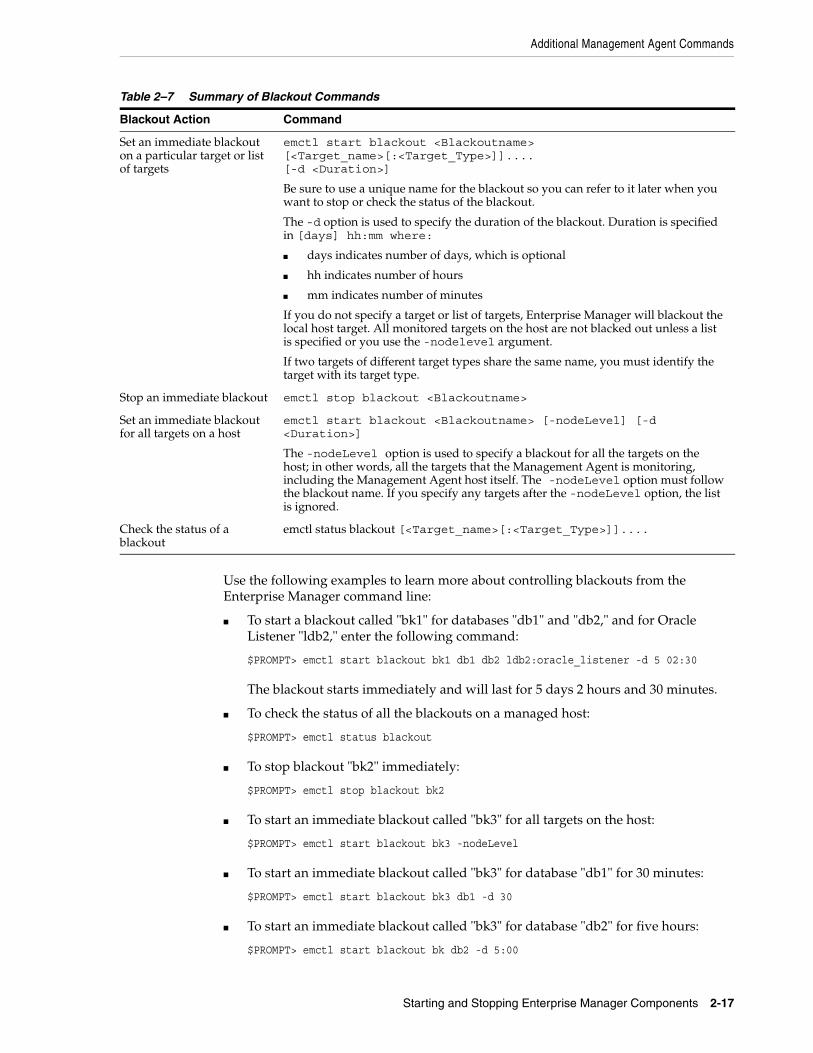
Additional Management Agent Commands
Starting and Stopping Enterprise Manager Components 2-17
Use the following examples to learn more about controlling blackouts from the Enterprise Manager command line:
■ To start a blackout called "bk1" for databases "db1" and "db2," and for Oracle Listener "ldb2," enter the following command:
$PROMPT> emctl start blackout bk1 db1 db2 ldb2:oracle_listener -d 5 02:30
The blackout starts immediately and will last for 5 days 2 hours and 30 minutes.
■ To check the status of all the blackouts on a managed host:
$PROMPT> emctl status blackout
■ To stop blackout "bk2" immediately:
$PROMPT> emctl stop blackout bk2
■ To start an immediate blackout called "bk3" for all targets on the host:
$PROMPT> emctl start blackout bk3 -nodeLevel
■ To start an immediate blackout called "bk3" for database "db1" for 30 minutes:
$PROMPT> emctl start blackout bk3 db1 -d 30
■ To start an immediate blackout called "bk3" for database "db2" for five hours:
$PROMPT> emctl start blackout bk db2 -d 5:00
Table 2–7 Summary of Blackout Commands
Blackout Action Command
Set an immediate blackout on a particular target or list of targets
emctl start blackout <Blackoutname> [<Target_name>[:<Target_Type>]].... [-d <Duration>]
Be sure to use a unique name for the blackout so you can refer to it later when you want to stop or check the status of the blackout.
The -d option is used to specify the duration of the blackout. Duration is specified in [days] hh:mm where:
■ days indicates number of days, which is optional
■ hh indicates number of hours
■ mm indicates number of minutes
If you do not specify a target or list of targets, Enterprise Manager will blackout the local host target. All monitored targets on the host are not blacked out unless a list is specified or you use the -nodelevel argument.
If two targets of different target types share the same name, you must identify the target with its target type.
Stop an immediate blackout emctl stop blackout <Blackoutname>
Set an immediate blackout for all targets on a host
emctl start blackout <Blackoutname> [-nodeLevel] [-d <Duration>]
The -nodeLevel option is used to specify a blackout for all the targets on the host; in other words, all the targets that the Management Agent is monitoring, including the Management Agent host itself. The -nodeLevel option must follow the blackout name. If you specify any targets after the -nodeLevel option, the list is ignored.
Check the status of a blackout
emctl status blackout [<Target_name>[:<Target_Type>]]....
Additional Management Agent Commands
2-18 Oracle Enterprise Manager Advanced Configuration
2.7.5 Changing the Management Agent Time ZoneThe Management Agent may fail to start after the upgrade if it realizes that it is no longer in the same time zone that it was originally configured with.
There were bugs in Enterprise Manager Releases 10.1.0.2 and 10.1.0.3 RAC Management Agent installs that caused the Management Agent to be configured with a UTC timezone.
You can correct the time zone used by the Management Agent using the following command:
emctl resetTZ agent
This command will correct the Management Agent side time zone and specify an additional command to be run against the Management Repository to correct the value there.
To check for blackouts:
1. In the Grid Control Console, go to the All Targets page under the Targets tab, and locate the Management Agent in the list of targets. Click on the Management Agent's name. This brings you to the Management Agent's home page.
2. The list of targets monitored by the Management Agent are listed in the "Monitored Targets" section.
3. For each of target in the list:
a. Click the target name. This brings you to the target's home page.
b. In the Related Links section of the home page, click the Blackouts link. This allows you to check any currently running blackouts or blackouts that are scheduled in the future for this target.
If such blackouts exist, then:
1. From the Grid Control Console, stop all currently running blackouts on all targets monitored by that Management Agent.
2. From the Grid Control Console, stop all scheduled blackouts on all targets monitored by that Management Agent.
Once you have stopped all currently running and scheduled blackouts, you can run the emctl resetTZ agent command to change the Management Agent's time zone.
Once you have changed the Management Agent’s time zone, create new blackouts on the targets as needed.
2.7.6 Reevaluating Metric CollectionsIf you are running a Management Agent Release 10.2, then you can use the following command to perform an immediate reevaluation of a metric collection:
IMPORTANT: Before you change the Management Agent time zone, first check to see if there are any blackouts that are currently running or scheduled to run on any target managed by that Management Agent.
See Also: Section 13.1.6, "Setting the Management Agent Time Zone" on page 13-4

Additional Management Agent Commands
Starting and Stopping Enterprise Manager Components 2-19
emctl control agent runCollection <targetName>:<targetType> <colletionItemName>
where <collectionItemName> is the name of the Collection Item that collects the metric.
Performing this command causes the reevaluated value of the metric to be uploaded into the Management Repository, and possibly trigger alerts if the metric crosses its threshold.
Related metrics are typically collected together; collectively a set of metrics collected together is called a Metric Collection. Each Metric Collection has its own name. If you want to reevaluate a metric, you first need to determine the name of the Metric Collection to which it belongs, then the CollectionItem for that Metric Collection.
When you run the previous command to reevaluate the metric, all other metrics that are part of the same Metric Collection and Collection Item will also be reevaluated.
Perform the following steps to determine the Metric Collection name and Collection Item name for a metric:
1. Go to $ORACLE_HOME/sysman/admin/metadata directory, where $ORACLE_HOME is the Oracle Home of the Management Agent.
2. Locate the XML file for the target type. For example, if you are interested in the host metric 'Filesystem Space Available(%)' metric, look for the host.xml file.
3. In the xml file, look for the metric in which you are interested. The metric that you are familiar with is actually the display name of the metric. The metric name would be preceded by a tag that started with:
<Label NLSID=
For example, in the host.xml file, the metric 'Filesystem Space Available(%)" would have an entry that looks like this:
<Label NLSID="host_filesys_pctAvailable">Filesystem Space Available (%) </Label>
4. Once you have located the metric in the xml file, you will notice that its entry is part of a bigger entry that starts with:
<Metric NAME=
Take note of the value defined for "Metric NAME". This is the Metric Collection name. For example, for the 'Filesystem Space Available(%)' metric, the entry would look like this:
<Metric NAME="Filesystems"
So for the 'Filesystem Space Available(%)' metric, the Metric Collection name is 'Filesystems'.
5. The Collection Item name for this Metric Collection needs to be determined next. Go to the $ORACLE_HOME/sysman/admin/default_collection directory, where $ORACLE_HOME is the Oracle Home of the Management Agent.
6. In this directory, look for the collection file for the target type. In our example, this would be host.xml.
7. In cases where a Metric Collection is collected by itself, there would be a single Collection Item of the same name in the collection file. To determine if this is the case for your Metric Collection, look for an entry in the collection file that starts with:
<CollectionItem NAME=

Additional Management Agent Commands
2-20 Oracle Enterprise Manager Advanced Configuration
where the value assigned to the CollectionItem NAME matches the Metric NAME in step (4).
For the 'Filesystem Space Available(%)' metric, the entry in the collection file would look like:
<CollectionItem NAME = "Filesystems"
8. If you find such an entry, then the value assigned to "CollectionItem NAME" is the collection item name that you can use in the emctl command.
9. Otherwise, this means the Metric Collection is collected with other Metric Collections under a single Collection Item. To find the Collection Item for your Metric Collection, first search for your Metric Collection. It should be preceded by the tag:
<MetricColl NAME=
Once you have located it, look in the file above it for: <CollectionItem NAME=
The value associated with the CollectionItem NAME is the name of the collection item that you should use in the emctl command.
For example if the you want to reevaluate the host metric "Open Ports", using the previous steps, you would do the following:
a. Go to the $ORACLE_HOME/sysman/admin/metadata directory where $ORACLE_HOME is the Oracle Home of the Management Agent. Look for the host.xml file and in that file locate: <Metric NAME="openPorts".
b. Then go to the $ORACLE_HOME/sysman/admin/default_collection directory. Look for the host.xml file and in that file look for <CollectionItem NAME="openPorts".
Failing this, look for <MetricColl NAME="openPorts".
c. Look above this entry in the file to find the <CollectionItem NAME= string and find <CollectionItem NAME="oracle_security".
The CollectinItem name oracle_security is what you would use in the emctl command to reevaluate the Open Ports metric.
3
Grid Control Common Configurations 3-1
3 Grid Control Common Configurations
Oracle Enterprise Manager 10g Grid Control is based on a flexible architecture, which allows you to deploy the Grid Control components in the most efficient and practical manner for your organization. This chapter describes some common configurations that demonstrate how you can deploy the Grid Control architecture in various computing environments.
The common configurations are presented in a logical progression, starting with the simplest configuration and ending with a complex configuration that involves the deployment of high availability components, such as load balancers, Oracle Real Application Clusters, and Oracle Data Guard.
This chapter contains the following sections:
■ About Common Configurations
■ Deploying Grid Control Components on a Single Host
■ Managing Multiple Hosts and Deploying a Remote Management Repository
■ Using Multiple Management Service Installations
■ High Availability Configurations - Maximum Availability Architecture
■ Installation Best Practices for Enterprise Manager High Availability
■ Configuration With Grid Control
3.1 About Common ConfigurationsThe common configurations described in this chapter are provided as examples only. The actual Grid Control configurations that you deploy in your own environment will vary depending upon the needs of your organization.
For instance, the examples in this chapter assume you are using the OracleAS Web Cache port to access the Grid Control console. By default, when you first install Grid Control, you display the Grid Control console by navigating to the default OracleAS Web Cache port. In fact, you can modify your own configuration so administrators bypass OracleAS Web Cache and use a port that connects them directly to the Oracle HTTP Server.
For another example, in a production environment you will likely want to implement firewalls and other security considerations. The common configurations described in this chapter are not meant to show how firewalls and security policies should be implemented in your environment.

Deploying Grid Control Components on a Single Host
3-2 Oracle Enterprise Manager Advanced Configuration
Besides providing a description of common configuration this chapter can also help you understand the architecture and flow of data among the Grid Control components. Based on this knowledge, you can make better decisions about how to configure Grid Control for your specific management requirements.
The Grid Control architecture consists of the following software components:
■ Oracle Management Agent
■ Oracle Management Service
■ Oracle Management Repository
■ Oracle Enterprise Manager 10g Grid Control Console
The remaining sections of this chapter describe how you can deploy these components in a variety of combinations and across a single host or multiple hosts.
3.2 Deploying Grid Control Components on a Single HostFigure 3–1 shows how each of the Grid Control components are configured to interact when you install Grid Control on a single host. This is the default configuration that results when you use the Grid Control installation procedure to install the Enterprise Manager 10g Grid Control Using a New Database installation type.
See Also: Chapter 6, "Enterprise Manager Security" for information about securing the connections between Grid Control components
Chapter 7, "Configuring Enterprise Manager for Firewalls" for information about configuring firewalls between Grid Control components
See Also: Oracle Enterprise Manager Concepts for more information about each of the Grid Control components
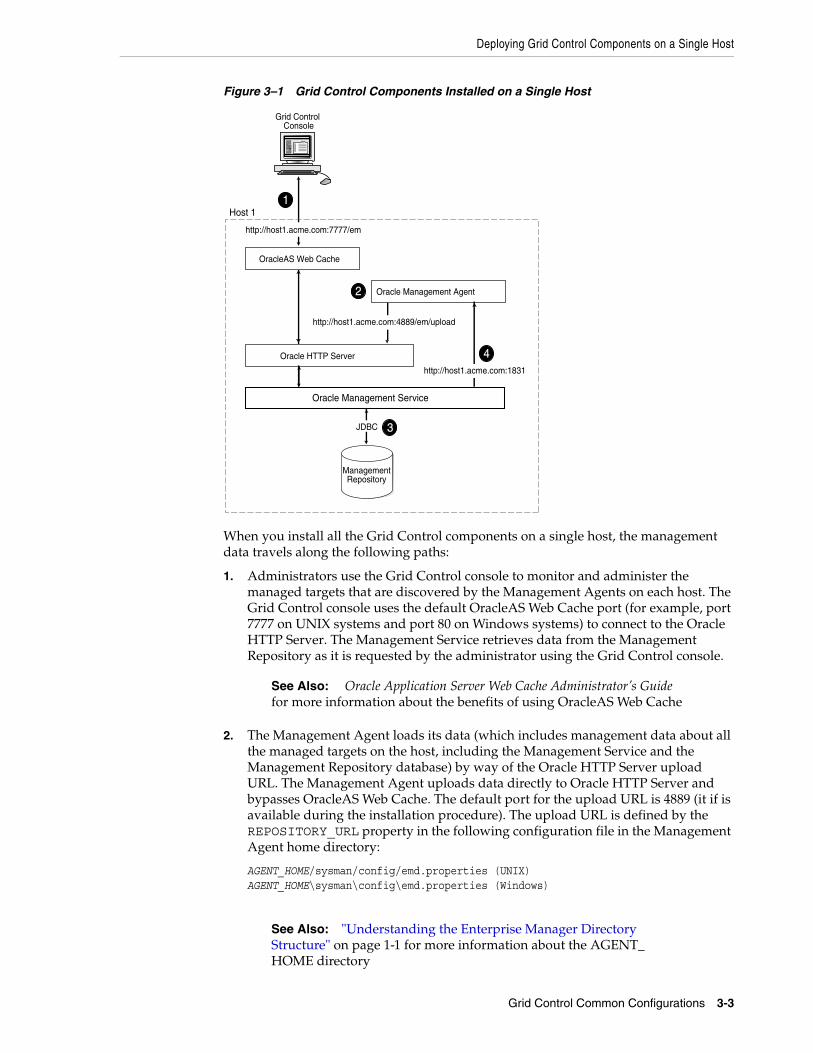
Deploying Grid Control Components on a Single Host
Grid Control Common Configurations 3-3
Figure 3–1 Grid Control Components Installed on a Single Host
When you install all the Grid Control components on a single host, the management data travels along the following paths:
1. Administrators use the Grid Control console to monitor and administer the managed targets that are discovered by the Management Agents on each host. The Grid Control console uses the default OracleAS Web Cache port (for example, port 7777 on UNIX systems and port 80 on Windows systems) to connect to the Oracle HTTP Server. The Management Service retrieves data from the Management Repository as it is requested by the administrator using the Grid Control console.
2. The Management Agent loads its data (which includes management data about all the managed targets on the host, including the Management Service and the Management Repository database) by way of the Oracle HTTP Server upload URL. The Management Agent uploads data directly to Oracle HTTP Server and bypasses OracleAS Web Cache. The default port for the upload URL is 4889 (it if is available during the installation procedure). The upload URL is defined by the REPOSITORY_URL property in the following configuration file in the Management Agent home directory:
AGENT_HOME/sysman/config/emd.properties (UNIX)AGENT_HOME\sysman\config\emd.properties (Windows)
See Also: Oracle Application Server Web Cache Administrator’s Guide for more information about the benefits of using OracleAS Web Cache
See Also: "Understanding the Enterprise Manager Directory Structure" on page 1-1 for more information about the AGENT_HOME directory
ManagementRepository
Oracle Management Service
Host 1
Grid Control Console
http://host1.acme.com:7777/em
OracleAS Web Cache
Oracle HTTP Server
Oracle Management Agent
http://host1.acme.com:4889/em/upload
JDBC
1
2
3
http://host1.acme.com:1831
4
Managing Multiple Hosts and Deploying a Remote Management Repository
3-4 Oracle Enterprise Manager Advanced Configuration
3. The Management Service uses JDBC connections to load data into the Management Repository database and to retrieve information from the Management Repository so it can be displayed in the Grid Control console. The Management Repository connection information is defined in the following configuration file in the Management Service home directory:
ORACLE_HOME/sysman/config/emoms.properties (UNIX)ORACLE_HOME\sysman\config\emoms.properties (Windows)
4. The Management Service sends data to the Management Agent by way of HTTP. The Management Agent software includes a built-in HTTP listener that listens on the Management Agent URL for messages from the Management Service. As a result, the Management Service can bypass the Oracle HTTP Server and communicate directly with the Management Agent. If the Management Agent is on a remote system, no Oracle HTTP Server is required on the Management Agent host.
The Management Service uses the Management Agent URL to monitor the availability of the Management Agent, submit Enterprise Manager jobs, and other management functions.
The Management Agent URL can be identified by the EMD_URL property in the following configuration file in the Management Agent home directory:
AGENT_HOME/sysman/config/emd.properties (UNIX)AGENT_HOME\sysman\config\emd.properties (Windows)
For example:
EMD_URL=http://host1.acme.com:1831/emd/main/
In addition, the name of the Management Agent as it appears in the Grid Control console consists of the Management Agent host name and the port used by the Management Agent URL.
3.3 Managing Multiple Hosts and Deploying a Remote Management Repository
Installing all the Grid Control components on a single host is an effective way to initially explore the capabilities and features available to you when you centrally manage your Oracle environment.
A logical progression from the single-host environment is to a more distributed approach, where the Management Repository database is on a separate host and does not compete for resources with the Management Service. The benefit in such a configuration is scalability; the workload for the Management Repository and Management Service can now be split. This configuration also provides the flexibility to adjust the resources allocated to each tier, depending on the system load. (Such a configuration is shown in Figure 3–2.) See Section 3.4.2.1, "Monitoring the Load on Your Management Service Installations" for additional information.
See Also: "Reconfiguring the Oracle Management Service" on page 13-8 for more information on modifying the Management Repository connection information in the emoms.properties file

Managing Multiple Hosts and Deploying a Remote Management Repository
Grid Control Common Configurations 3-5
Figure 3–2 Grid Control Components Distributed on Multiple Hosts with One Management Service
In this more distributed configuration, data about your managed targets travels along the following paths so it can be gathered, stored, and made available to administrators by way of the Grid Control console:
1. Administrators use the Grid Control console to monitor and administer the targets just as they do in the single-host scenario described in Section 3.2.
2. Management Agents are installed on each host on the network, including the Management Repository host and the Management Service host. The Management Agents upload their data to the Management Service by way of the Management Service upload URL, which is defined in the emd.properties file in each Management Agent home directory. The upload URL bypasses OracleAS Web Cache and uploads the data directly through the Oracle HTTP Server.
3. The Management Repository is installed on a separate machine that is dedicated to hosting the Management Repository database. The Management Service uses JDBC connections to load data into the Management Repository database and to retrieve information from the Management Repository so it can be displayed in the Grid Control console. This remote connection is defined in the emoms.properties configuration file in the Management Service home directory.
4. The Management Service communicates directly with each remote Management Agent over HTTP by way of the Management Agent URL. The Management Agent URL is defined by the EMD_URL property in the emd.properties file of each Management Agent home directory. As described in Section 3.2, the
Grid Control Console
Oracle Management Agent Oracle Management AgentOracle Management Agent
Oracle Management Agent
http://host1.acme.com:4889/em/upload
Oracle Management Agent
http://host1.acme.com:7777/em
ManagementRepository
Oracle Management Agent
OracleAS Web Cache
Oracle HTTP Server
Oracle Management ServiceJDBC
1
2
3
http://<agent_host>:1831
4
Using Multiple Management Service Installations
3-6 Oracle Enterprise Manager Advanced Configuration
Management Agent includes a built-in HTTP listener so no Oracle HTTP Server is required on the Management Agent host.
3.4 Using Multiple Management Service InstallationsIn larger production environments, you may find it necessary to add additional Management Service installations to help reduce the load on the Management Service and improve the efficiency of the data flow.
The following sections provide more information about this configuration:
■ Understanding the Flow of Management Data When Using Multiple Management Services
■ Determining When to Use Multiple Management Service Installations
3.4.1 Understanding the Flow of Management Data When Using Multiple Management Services
Figure 3–3 shows a typical environment where an additional Management Service has been added to improve the scalability of the Grid Control environment.
Note: When you add additional Management Service installations to your Grid Control configuration, be sure to adjust the parameters of your Management Repository database. For example, you will likely need to increase the number of processes allowed to connect to the database at one time. Although the number of required processes will vary depending on the overall environment and the specific load on the database, as a general guideline, you should increase the number of processes by 40 for each additional Management Service.
For more information, see the description of the PROCESSES initialization parameter in the Oracle Database Reference.
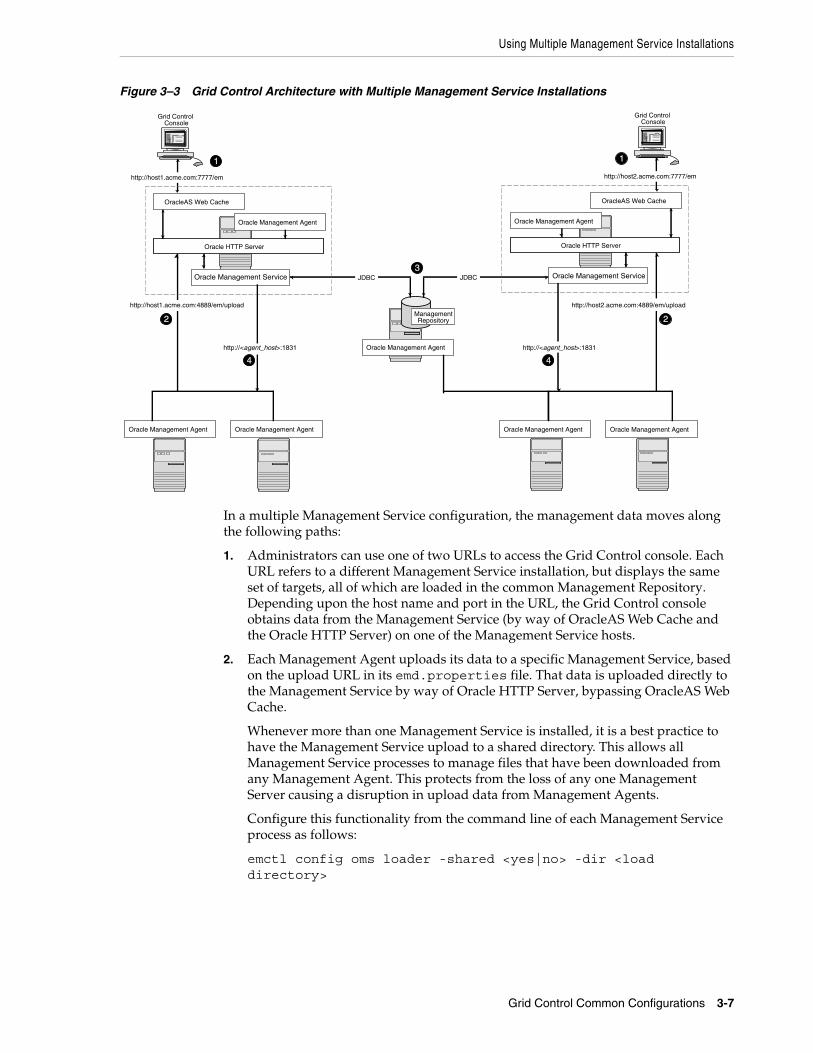
Using Multiple Management Service Installations
Grid Control Common Configurations 3-7
Figure 3–3 Grid Control Architecture with Multiple Management Service Installations
In a multiple Management Service configuration, the management data moves along the following paths:
1. Administrators can use one of two URLs to access the Grid Control console. Each URL refers to a different Management Service installation, but displays the same set of targets, all of which are loaded in the common Management Repository. Depending upon the host name and port in the URL, the Grid Control console obtains data from the Management Service (by way of OracleAS Web Cache and the Oracle HTTP Server) on one of the Management Service hosts.
2. Each Management Agent uploads its data to a specific Management Service, based on the upload URL in its emd.properties file. That data is uploaded directly to the Management Service by way of Oracle HTTP Server, bypassing OracleAS Web Cache.
Whenever more than one Management Service is installed, it is a best practice to have the Management Service upload to a shared directory. This allows all Management Service processes to manage files that have been downloaded from any Management Agent. This protects from the loss of any one Management Server causing a disruption in upload data from Management Agents.
Configure this functionality from the command line of each Management Service process as follows:
emctl config oms loader -shared <yes|no> -dir <load directory>
Oracle Management Agent Oracle Management AgentOracle Management Agent
Oracle Management Agent
Oracle Management Agent
JDBC
ManagementRepository
JDBC
Grid Control Console
http://host1.acme.com:4889/em/upload
http://host1.acme.com:7777/em
Oracle Management Agent
OracleAS Web Cache
Oracle HTTP Server
Oracle Management Service
Grid Control Console
http://host2.acme.com:4889/em/upload
http://host2.acme.com:7777/em
Oracle Management Agent
OracleAS Web Cache
Oracle HTTP Server
Oracle Management Service
1
2
3
1
2
http://<agent_host>:1831
4
http://<agent_host>:1831
4
Using Multiple Management Service Installations
3-8 Oracle Enterprise Manager Advanced Configuration
3. Each Management Service communicates by way of JDBC with a common Management Repository, which is installed in a database on a dedicated Management Repository host. Each Management Service uses the same database connection information, defined in the emoms.properties file, to load data from its Management Agents into the Management Repository. The Management Service uses the same connection information to pull data from the Management Repository as it is requested by the Grid Control console.
4. Any Management Service in the system can communicate directly with any of the remote Management Agents defined in the common Management Repository. The Management Services communicate with the Management Agents over HTTP by way of the unique Management Agent URL assigned to each Management Agent.
As described in Section 3.2, the Management Agent URL is defined by the EMD_URL property in the emd.properties file of each Management Agent home directory. Each Management Agent includes a built-in HTTP listener so no Oracle HTTP Server is required on the Management Agent host.
3.4.2 Determining When to Use Multiple Management Service InstallationsManagement Services not only exist as the receivers of upload information from Management Agents. They also retrieve data from the Management Repository. The Management Service renders this data in the form of HTML pages, which are requested by and displayed in the client Web browser. In addition, the Management Services perform background processing tasks, such as notification delivery and the dispatch of Enterprise Manager jobs.
As a result, the assignment of Management Agents to Management Services must be carefully managed. Improper distribution of load from Management Agents to Management Services may result in perceived:
Important: By adding a load balancer, you can avoid the following problems:
■ Should the Management Service fail, any Management Agent connected to it cannot upload data.
■ Because user accounts only know about one Management Service, users lose connectivity should the Management Service go down even if the other Management Service is up.
See Section 3.5, "High Availability Configurations - Maximum Availability Architecture" for information regarding load balancers.
Note: If deployment procedures are being used in this environment, they should be configured to use shared storage in the same way as the shared Management Service loader. To modify the location for the deployment procedure library:
1. Click the Deployments tab on the Enterprise Manager Home page.
2. Click the Provisioning subtab.
3. On the Provisioning page, click the Administration subtab.
4. In the Software Library Configuration section, click Add to set the Software Library Directory Location to a shared storage that can be accessed by any host running the Management Service.
Using Multiple Management Service Installations
Grid Control Common Configurations 3-9
■ Sluggish user interface response
■ Delays in delivering notification messages
■ Backlog in monitoring information being uploaded to the Management Repository
■ Delays in dispatching jobs
The following sections provide some tips for monitoring the load and response time of your Management Service installations:
■ Monitoring the Load on Your Management Service Installations
■ Monitoring the Response Time of the Enterprise Manager Web Application Target
3.4.2.1 Monitoring the Load on Your Management Service InstallationsIf your environment is not configured with an SLB, to keep the workload evenly distributed you should always be aware of how many Management Agents are configured per Management Service and monitor the load on each Management Service.
At any time, you can view a list of Management Agents and Management Services using Setup on the Grid Control console.
Use the charts on the Overview page of Management Services and Repository to monitor:
■ Loader backlog (files)
The Loader is part of the Management Service that pushes metric data into the Management Repository at periodic intervals. If the Loader Backlog chart indicates that the backlog is high and Loader output is low, there is data pending load, which may indicate a system bottleneck or the need for another Management Service. The chart shows the total backlog of files totaled over all Oracle Management Services for the past 24 hours. Click the image to display loader backlog charts for each individual Management Service over the past 24 hours.
■ Notification delivery backlog
The Notification Delivery Backlog chart displays the number of notifications to be delivered that could not be processed in the time allocated. Notifications are delivered by the Management Services. This number is summed across all Management Services and is sampled every 10 minutes. The graph displays the data for the last 24 hours. It is useful for determining a growing backlog of notifications. When this graph shows constant growth over the past 24 hours, then consider adding another Management Service, reducing the number of notification rules, and verifying that all rules and notification methods are useful and valid.
3.4.2.2 Monitoring the Response Time of the Enterprise Manager Web Application TargetThe information on the Management Services and Repository page can help you determine the load being placed on your Management Service installations. More importantly, consider how the performance of your Management Service installations is affecting the performance of the Grid Control console.
Use the EM Website Web Application target to review the response time of the Grid Control console pages:
1. From the Grid Control console, click the Targets tab and then click the Web Applications subtab.
High Availability Configurations - Maximum Availability Architecture
3-10 Oracle Enterprise Manager Advanced Configuration
2. Click EM Website in the list of Web Application targets.
3. In the Key Test Summary table, click homepage. The resulting page provides the response time of the Grid Control console homepage URL.
4. Click Page Performance to view the response time of some selected Grid Control console pages.
5. Select 7 Days or 31 Days from the View Data menu to determine whether or not there are any trends in the performance of your Grid Control installation.
Consider adding additional Management Service installations if the response time of all pages is increasing over time or if the response time is unusually high for specific popular pages within the Grid Control console.
3.5 High Availability Configurations - Maximum Availability ArchitectureHighly Available systems are critical to the success of virtually every business today. It is equally important that the management infrastructure monitoring these mission-critical systems are highly available. The Enterprise Manager Grid Control architecture is engineered to be scalable and available from the ground up. It is designed to ensure that you concentrate on managing the assets that support your business, while it takes care of meeting your business Service Level Agreements.
When you configure Grid Control for high availability, your aim is to protect each component of the system, as well as the flow of management data in case of performance or availability problems, such as a failure of a host or a Management Service.
Maximum Availability Architecture (MAA) provides a highly available Enterprise Manager implementation by guarding against failure at each component of Enterprise Manager.
The impacts of failure of the different Enterprise Manager components are:
■ Management Agent failure or failure in the communication between Management Agents and Management Services
Results in targets no longer monitored by Enterprise Manager, though the Enterprise Manager console is still available and one can view historical data from the Management Repository.
■ Management Service failure
See Also: The Enterprise Manager online help for more information about using the homepage URL and Application Performance Management (also known as Application Performance Monitoring) to determine the performance of your Web Applications
Note: The Page Performance page provides data generated only by users who access the Grid Control console by way of the OracleAS Web Cache port (usually, 7777).
Note: You can use Application Performance Management and Web Application targets to monitor your own Web applications. For more information, see Chapter 8, "Configuring Services".
High Availability Configurations - Maximum Availability Architecture
Grid Control Common Configurations 3-11
Results in the unavailability of Enterprise Manager console, as well as unavailability of almost all Enterprise Manager services.
■ Management Repository failure
Results in failure on the part of Enterprise Manager to save the uploaded data by the Management Agents as well as unavailability of almost all Enterprise Manager services.
Overall, failure in any component of Enterprise Manager can result in substantial service disruption. Therefore it is essential that each component be hardened using a highly available architecture.
You can configure Enterprise Manager to run in either active-active or active-passive mode using a single instance database as the Management Repository. The following text summarizes the active-active mode.
Refer to the following sections for more information about common Grid Control configurations that take advantage of high availability hardware and software solutions. These configurations are part of the Maximum Availability Architecture (MAA).
■ Configuring the Management Repository
■ Configuring the Management Services
■ Installing Additional Management Services
■ Configuring a Load Balancer
■ Configuring the Management Agent
■ Disaster Recovery
3.5.1 Configuring the Management RepositoryBefore installing Enterprise Manager, you should prepare the database, which will be used for setting up Management Repository. Install the database using Database Configuration Assistant (DBCA) to make sure that you inherit all Oracle install best practices.
■ Configure Database
– For both high availability and scalability, you should configure the Management Repository in the latest certified database version, with the RAC option enabled. Check for the latest version of database certified for Enterprise Manager from the Certify tab on the My Oracle Support website.
– Choose Automatic Storage Management (ASM) as the underlying storage technology.
– When the database installation is complete:
Go to $ORACLE_HOME/rbdms/admin directory of the database home and execute the 'dbmspool.sql'
This installs the DBMS_SHARED_POOL package, which will help in improving throughput of the Management Repository.
■ Install Enterprise Manager
While installing Enterprise Manager using Oracle Universal Installer (OUI), you will be presented with two options for configuring the Management Repository:
– Option 1: Install using a new database (default install)
High Availability Configurations - Maximum Availability Architecture
3-12 Oracle Enterprise Manager Advanced Configuration
– Option 2: Install using an existing database.
For MAA, you should chose 'Option 2: Install using an existing database'. When prompted for the 'existing database', you can point to the database configured in the previous step to setup the Management Repository.
3.5.1.1 Post Management Service - Install Management Repository ConfigurationThere are some parameters that should be configured during the Management Repository database install (as previously mentioned) and some parameters that should be set after the Management Service has been installed. Once the Enterprise Manager console is available, it can be used to configure these best practices in the Management Repository. These best practices fall in the area of:
■ Configuring Storage
■ Configuring Oracle Database 10g with RAC for High Availability and Fast Recover Ability
– Enable ARCHIVELOG Mode
– Enable Block Checksums
– Configure the Size of Redo Log Files and Groups Appropriately
– Use a Flash Recovery Area
– Enable Flashback Database
– Use Fast-Start Fault Recovery to Control Instance Recovery Time
– Enable Database Block Checking
– Set DISK_ASYNCH_IO
The details of these settings are available in the Oracle Database High Availability Best Practices.
Use the MAA Advisor for additional high availability recommendations that should be applied to the Management Repository. To access the MAA Advisor:
1. On the Database Target Home page, locate the High Availability section.
2. Click Details next to the Console item.
3. In the Availability Summary section of the High Availability Console page, click Details next to the MAA Advisor item.
3.5.2 Configuring the Management ServicesOnce you configure the Management Repository, the next step is to install and configure the Enterprise Manager Grid Control mid-tier, the Management Services, for greater availability. Before discussing steps that add mid-tier redundancy and scalability, note that the Management Service itself has a built in restart mechanism based on the Oracle Process Management and Notification Service (OPMN). This service will attempt to restart a Management Service that is down.
3.5.2.1 Management Service Install LocationIf you are managing a large environment with multiple Management Services and Management Repository nodes, then consider installing the Management Services on hardware nodes that are different from Management Repository nodes (Figure 3–4). This allows you to scale out the Management Services in the future.
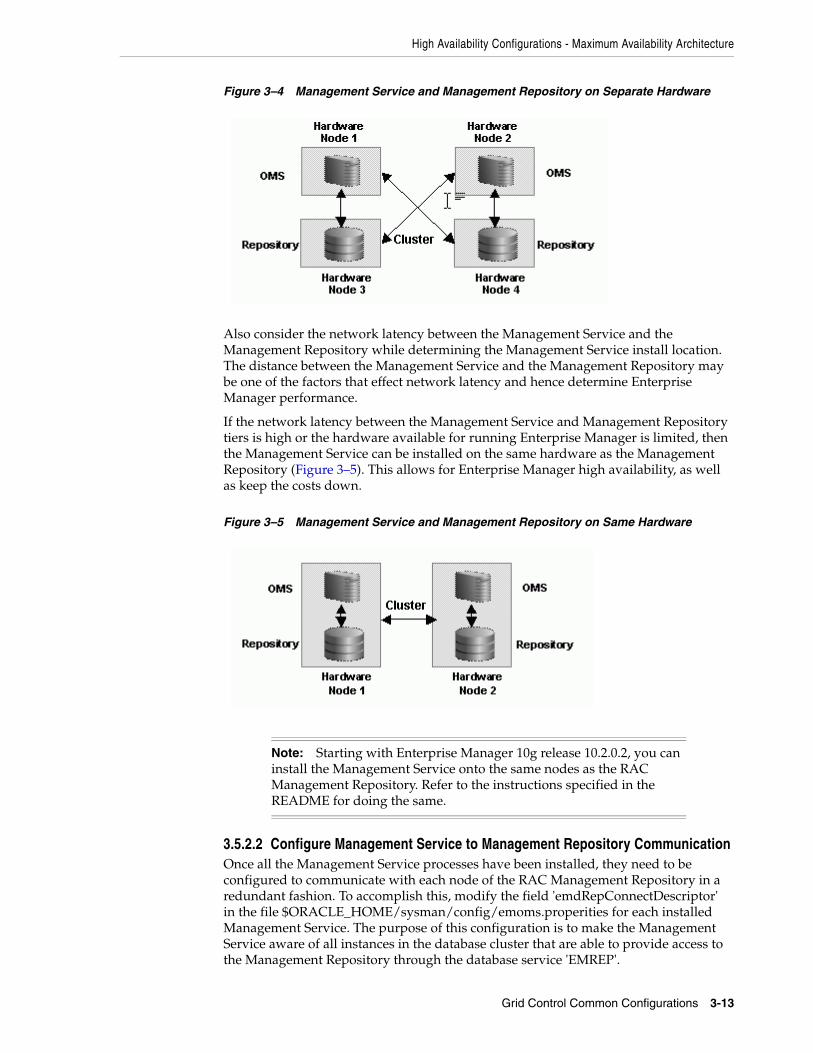
High Availability Configurations - Maximum Availability Architecture
Grid Control Common Configurations 3-13
Figure 3–4 Management Service and Management Repository on Separate Hardware
Also consider the network latency between the Management Service and the Management Repository while determining the Management Service install location. The distance between the Management Service and the Management Repository may be one of the factors that effect network latency and hence determine Enterprise Manager performance.
If the network latency between the Management Service and Management Repository tiers is high or the hardware available for running Enterprise Manager is limited, then the Management Service can be installed on the same hardware as the Management Repository (Figure 3–5). This allows for Enterprise Manager high availability, as well as keep the costs down.
Figure 3–5 Management Service and Management Repository on Same Hardware
3.5.2.2 Configure Management Service to Management Repository CommunicationOnce all the Management Service processes have been installed, they need to be configured to communicate with each node of the RAC Management Repository in a redundant fashion. To accomplish this, modify the field 'emdRepConnectDescriptor' in the file $ORACLE_HOME/sysman/config/emoms.properities for each installed Management Service. The purpose of this configuration is to make the Management Service aware of all instances in the database cluster that are able to provide access to the Management Repository through the database service 'EMREP'.
Note: Starting with Enterprise Manager 10g release 10.2.0.2, you can install the Management Service onto the same nodes as the RAC Management Repository. Refer to the instructions specified in the README for doing the same.
High Availability Configurations - Maximum Availability Architecture
3-14 Oracle Enterprise Manager Advanced Configuration
Note that Real Application Cluster (RAC) nodes are referred to by their virtual IP (vip) names. The service_name parameter is used instead of the system identifier (SID) in connect_data mode and failover is turned on. Refer to Oracle Database Net Services Administrator’s Guide for details.
oracle.sysman.eml.mntr.emdRepConnectDescriptor=(DESCRIPTION\=(ADDRESS_LIST\=(FAILOVER\=ON) (ADDRESS\=(PROTOCOL\=TCP)(HOST\=node1-vip.example.com)(PORT\=1521))(ADDRESS\=(PROTOCOL\=TCP)(HOST\=node2-vip.example.com)(PORT\=1521)) (CONNECT_DATA\=(SERVICE_NAME\=EMREP)))
After making the previous change, run the following command to make the same change to the monitoring configuration used for the Management Services and Repository target: emctl config emrep -conn_desc "<tns alias>"
3.5.2.3 Configure Management Service to Direct Traffic Through SLBFinally, modify the Management Service to take advantage of the capabilities of the Server Load Balancer. These modifications will cause all the Management Service nodes to redirect Enterprise Manager console traffic through the server load balancer, thereby presenting a single URL to the Enterprise Manager user.
To prevent the browser from bypassing the load balancer when a URL is redirected, Grid Control will now reconfigure the ssl.conf file as a part of resecuring the Management Service. After the Load Balancer is configured, issue the following command from the Management Server home: emctl secure oms
Modify the 'Port' in the Oracle HTTP Server configuration file at $ORACLE_HOME/Apache/Apache/conf/ssl.conf to be '443'. This assumes you are running in the default secured configuration between the Management Service and Management Agent.
3.5.3 Installing Additional Management ServicesInstall at least one additional Management Service using the Oracle Universal Installer (OUI) option 'Add Additional Management Service'. While you need two Management Services at the minimum for High Availability, additional Management Service processes can be installed depending on anticipated workload or based on system usage data. See Chapter 12, "Sizing and Maximizing the Performance of Oracle Enterprise Manager" for sizing recommendations.
Now that the first Management Service has been setup for high availability, the configuration can be copied over to additional Management Services easily using new emctl commands. Note the following considerations before installing additional Management Services.
■ The additional Management Service should be hosted in close network proximity to the Management Repository database for network latency reasons.
■ Configure the directory used for the shared filesystem loader to be available on the additional Management Service host using the same path as the first Management Service. Refer to Section 3.5.3.1, "Configuring Shared File Areas for Management Services" for additional information.
■ Additional Management Services should be installed using the same OS user and group as the first Management Service. Proper user equivalence should be setup so that files created by the first Management Service on the shared loader directory can be accessed and modified by the additional Management Service process.
High Availability Configurations - Maximum Availability Architecture
Grid Control Common Configurations 3-15
■ Adjust the parameters of your Management Repository database. For example, you will likely need to increase the number of processes allowed to connect to the database at one time. Although the number of required processes will vary depending on the overall environment and the specific load on the database, as a general guideline, you should increase the number of processes by 40 for each additional Management Service.
■ For the install to succeed, the emkey might need to be copied temporarily to the Management Repository on the first Management Service using emctl config emkey -copy_to_repos if it had been removed earlier from Management Repository as per security best practices.
Install the Management Service software using steps documented in the Oracle Enterprise Manager Grid Control Installation and Basic Configuration Guide. Refer to the Installing Software-Only and Configuring Later - Additional Management Service option. Update the software to the latest patchset to match the first Management Service. Note that the emctl commands to copy over the configuration from the first Management Service do not copy over any software binaries. Once you have the additional Management Service installed, use the following steps to copy over the configuration from the first Management Service.
1. Export the configuration from the first Management Service using emctl exportconfig oms -dir <location for the export file>
2. Copy over the exported file to the additional Management Service
3. Shutdown the additional Management Service
4. Import the exported configuration on the additional Management Service using emctl importconfig oms -file <full path of the export file>
5. Restart the additional Management Service
6. Setup EMCLI using emcli setup -url=https://slb.example.com/em -username sysman -password <sysman password> -nocertvalidate
7. Resecure the Management Agent that is installed with the additional Management Service to upload to SLB using emctl secure agent -emdWalletSrcUrl https://slb.example.com:<upload port>/em
8. Update the SLB configuration by adding the additional Management Service to the different pools on the SLB. Setup monitors for the new Management Service. Modify the ssl.conf file to set the Port directive to the SLB virtual port used for UI access.
3.5.3.1 Configuring Shared File Areas for Management ServicesThe Management Service for Grid Control 10g Release 2 has a high availability feature called the Shared Filesystem Loader. In the Shared Filesystem Loader, management data files received from Management Agents are stored temporarily on a common shared location called the shared receive directory. All Management Services are configured to use the same storage location for the shared receive directory. The Management Services coordinate internally and distribute amongst themselves the workload of uploading files into the Management Repository. Should a Management Service go down, its workload is taken up by surviving Management Services.
1. Allow all Management Services to process the Management Agent data and take better advantage of available resources.
2. The ability of another Management Service to process Management Agent data in the event of a failure of a Management Service.
High Availability Configurations - Maximum Availability Architecture
3-16 Oracle Enterprise Manager Advanced Configuration
To configure the Management Service to use Shared File system Loader, you must run the following steps:
a. Stop all Oracle Management Services.
b. Configure a shared receive directory that is accessible by all Management Services using redundant file system storage.
c. Execute:
emctl config oms loader -shared yes -dir <loaderdirectory> individually on all Management Service hosts, where <loaderdirectory> is the full path to the shared receive directory created.
3. Configure Software Library
Since software library location has to be accessed by all Management Services, considerations similar to shared filesystem loader directory apply here too. Refer to Chapter 16, "Using a Software Library,", for details.
3.5.4 Configuring a Load BalancerThis section describes guidelines you can use for configuring a load balancer to balance the upload of data from Management Agents to multiple Management Service installations.
In the following examples, assume that you have installed two Management Service processes on Host A and Host B. For ease of installation, start with two hosts that have no application server processes installed. This ensures that the default ports are used as seen in the following table. The examples use these default values for illustration purposes.
Note: Enterprise Manager will fail to start if all the Management Services are not configured to point to the same shared directory. This shared directory should be on redundant storage.
Note: To modify the location for the deployment procedure library using the Enterprise Manager UI:
1. Click the Deployments tab on the Enterprise Manager Home page.
2. Click the Provisioning subtab.
3. On the Provisioning page, click the Administration subtab.
4. In the Software Library Configuration section, click Add to set the Software Library Directory Location to a shared storage that can be accessed by any host running the Management Service.
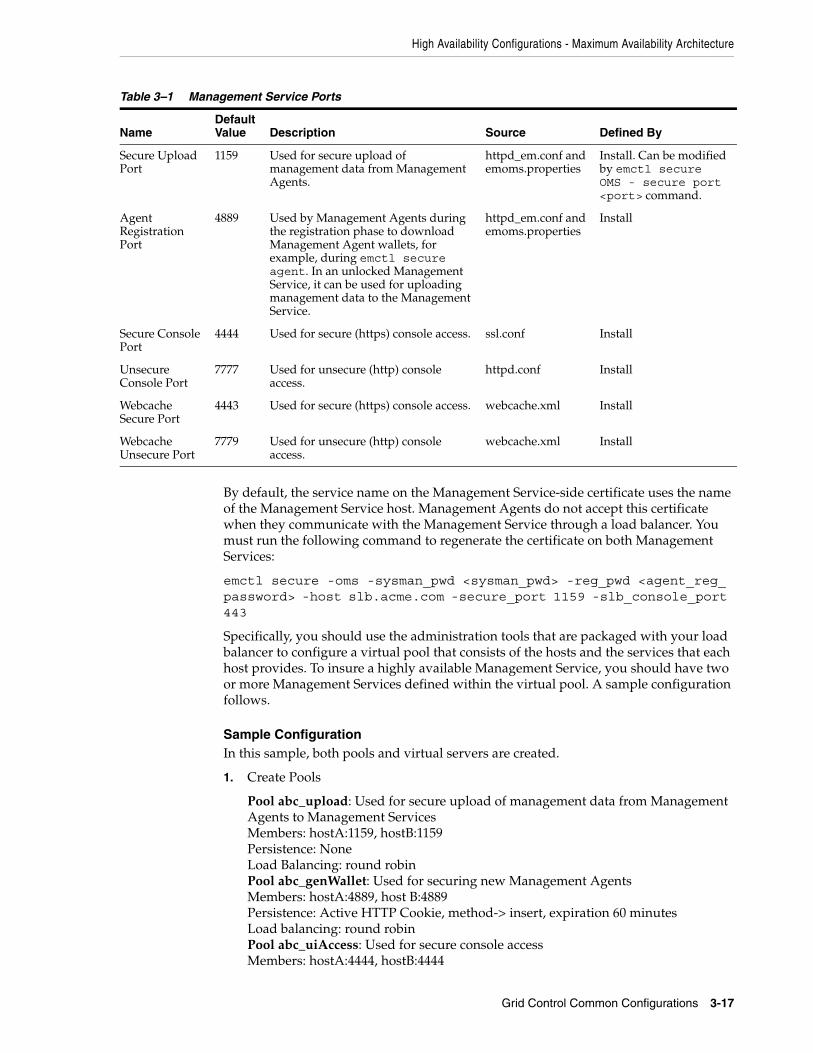
High Availability Configurations - Maximum Availability Architecture
Grid Control Common Configurations 3-17
By default, the service name on the Management Service-side certificate uses the name of the Management Service host. Management Agents do not accept this certificate when they communicate with the Management Service through a load balancer. You must run the following command to regenerate the certificate on both Management Services:
emctl secure -oms -sysman_pwd <sysman_pwd> -reg_pwd <agent_reg_password> -host slb.acme.com -secure_port 1159 -slb_console_port 443
Specifically, you should use the administration tools that are packaged with your load balancer to configure a virtual pool that consists of the hosts and the services that each host provides. To insure a highly available Management Service, you should have two or more Management Services defined within the virtual pool. A sample configuration follows.
Sample ConfigurationIn this sample, both pools and virtual servers are created.
1. Create Pools
Pool abc_upload: Used for secure upload of management data from Management Agents to Management ServicesMembers: hostA:1159, hostB:1159Persistence: NoneLoad Balancing: round robinPool abc_genWallet: Used for securing new Management AgentsMembers: hostA:4889, host B:4889Persistence: Active HTTP Cookie, method-> insert, expiration 60 minutesLoad balancing: round robinPool abc_uiAccess: Used for secure console accessMembers: hostA:4444, hostB:4444
Table 3–1 Management Service Ports
NameDefault Value Description Source Defined By
Secure Upload Port
1159 Used for secure upload of management data from Management Agents.
httpd_em.conf and emoms.properties
Install. Can be modified by emctl secure OMS - secure port <port> command.
Agent Registration Port
4889 Used by Management Agents during the registration phase to download Management Agent wallets, for example, during emctl secure agent. In an unlocked Management Service, it can be used for uploading management data to the Management Service.
httpd_em.conf and emoms.properties
Install
Secure Console Port
4444 Used for secure (https) console access. ssl.conf Install
Unsecure Console Port
7777 Used for unsecure (http) console access.
httpd.conf Install
Webcache Secure Port
4443 Used for secure (https) console access. webcache.xml Install
Webcache Unsecure Port
7779 Used for unsecure (http) console access.
webcache.xml Install
High Availability Configurations - Maximum Availability Architecture
3-18 Oracle Enterprise Manager Advanced Configuration
Persistence: Simple (also known as Client IP based persistence), timeout-> 3000 seconds (should be greater than the OC4J session timeout of 45 minutes)Load balancing: round robin
2. Create Virtual Servers
Virtual Server for secure uploadAddress: slb.acme.comService: 1159Pool: abc_uploadVirtual Server for Management Agent registrationAddress: slb.acme.comService: 4889Pool: abc_genWalletVirtual Server for UI accessAddress: sslb.acme.comService: https i.e. 443Pool: abc_uiAccess
Modify the REPOSITORY_URL property in the emd.properties file located in the sysman/config directory of the Management Agent home directory. The host name and port specified must be that of the load balancer virtual service.
This configuration allows the distribution of connections from Management Agents equally between Management Services. In the event a Management Service becomes unavailable, the load balancer should be configured to direct connections to the surviving Management Services.
Detecting Unavailable Management ServicesTo successfully implement this configuration, the load balancer can be configured to monitor the underlying Management Service. On some models, for example, you can configure a monitor on the load balancer. The monitor defines the:
■ HTTP request that is to be sent to a Management Service
■ Expected result in the event of success
■ Frequency of evaluation
For example, the load balancer can be configured to check the state of the Management Service every 5 seconds. On three successive failures, the load balancer can then mark the component as unavailable and no longer route requests to it. The monitor should be configured to send the string GET /em/upload over HTTP and expect to get the response Http XML File receiver. See the following sample monitor configuration.
Sample Monitor ConfigurationIn this sample, three monitors are configured: mon_upload, mon_genWallet, and mon_uiAccess.
Monitor mon_uploadType: httpsInterval: 60Timeout: 181Send String: GET /em/upload HTTP/1.0\n
See Also: "Configuring the Management Agent to Use a New Management Service" on page 13-1 for more information about modifying the REPOSITORY_URL property for a Management Agent
High Availability Configurations - Maximum Availability Architecture
Grid Control Common Configurations 3-19
Receive Rule: Http Receiver Servlet active!Associate with: hostA:1159, hostB:1159
Monitor mon_genWalletType: httpInterval: 60Timeout: 181Send String: GET /em/genwallet HTTP/1.0\nReceive Rule: GenWallet Servlet activatedAssociate with: hostA:4889, hostB:4889
Monitor mon_uiAccessType: httpsInterval: 5Timeout: 16Send String: GET /em/console/home HTTP/1.0\nUser-Agent: Mozilla/4.0 (compatible; MSIE 6.0; Windows NT 5.0)\nReceive Rule: /em/console/logon/logon;jsessionid=Associate with: hostA:4444, hostB:4444
3.5.4.1 Configuring Oracle HTTP Server When Using a Load Balancer for the Grid Control ConsoleThe Management Service is implemented as a J2EE Web application, which is deployed on an instance of Oracle Application Server. Like many Web-based applications, the Management Service often redirects the client browser to a specific set of HTML pages, such as a logon screen and a specific application component or feature.
When the Oracle HTTP Server redirects a URL, it sends the URL, including the Oracle HTTP Server host name, back to the client browser. The browser then uses that URL, which includes the Oracle HTTP Server host name, to reconnect to the Oracle HTTP Server. As a result, the client browser attempts to connect directly to the Management Service host and bypasses the load balancer.
To prevent the browser from bypassing the load balancer when a URL is redirected, Grid Control will now reconfigure the ssl.conf file as a part of resecuring the Management Service. After the Load Balancer is configured, issue the following command from the Management Server home: emctl secure oms
Note: The network bandwidth requirements on the Load Balancer need to be reviewed carefully. Monitor the traffic being handled by the load balancer using the administrative tools packaged with your load balancer. Ensure that the load balancer is capable of handling the traffic passing through it. For example, deployments with a large number of targets can easily exhaust a 100 Mbps Ethernet card. A Gigabit Ethernet card would be required in such cases.
See Also: Your Load Balancer documentation for more information on configuring virtual pools, load balancing policies, and monitoring network traffic
See Also: Oracle HTTP Server Administrator's Guide
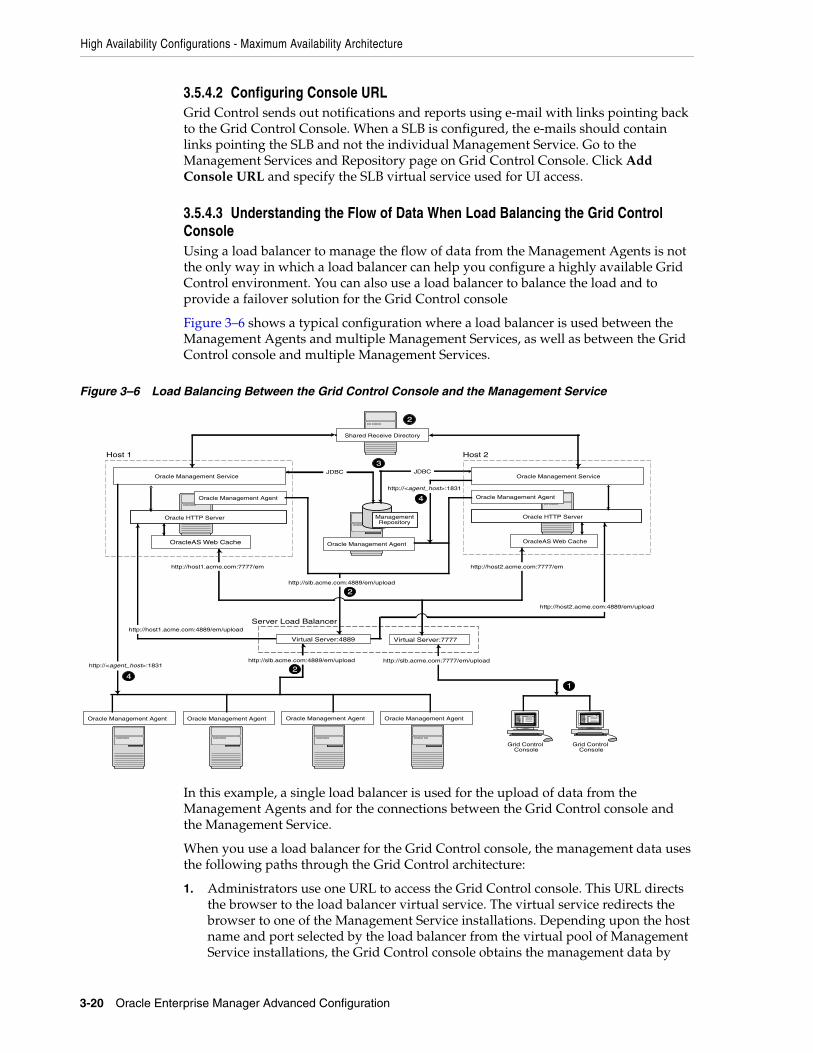
High Availability Configurations - Maximum Availability Architecture
3-20 Oracle Enterprise Manager Advanced Configuration
3.5.4.2 Configuring Console URLGrid Control sends out notifications and reports using e-mail with links pointing back to the Grid Control Console. When a SLB is configured, the e-mails should contain links pointing the SLB and not the individual Management Service. Go to the Management Services and Repository page on Grid Control Console. Click Add Console URL and specify the SLB virtual service used for UI access.
3.5.4.3 Understanding the Flow of Data When Load Balancing the Grid Control ConsoleUsing a load balancer to manage the flow of data from the Management Agents is not the only way in which a load balancer can help you configure a highly available Grid Control environment. You can also use a load balancer to balance the load and to provide a failover solution for the Grid Control console
Figure 3–6 shows a typical configuration where a load balancer is used between the Management Agents and multiple Management Services, as well as between the Grid Control console and multiple Management Services.
Figure 3–6 Load Balancing Between the Grid Control Console and the Management Service
In this example, a single load balancer is used for the upload of data from the Management Agents and for the connections between the Grid Control console and the Management Service.
When you use a load balancer for the Grid Control console, the management data uses the following paths through the Grid Control architecture:
1. Administrators use one URL to access the Grid Control console. This URL directs the browser to the load balancer virtual service. The virtual service redirects the browser to one of the Management Service installations. Depending upon the host name and port selected by the load balancer from the virtual pool of Management Service installations, the Grid Control console obtains the management data by
Oracle Management Agent Oracle Management AgentOracle Management Agent
Oracle Management Agent
Oracle Management Agent
JDBC
ManagementRepository
JDBC
Grid Control Console
http://slb.acme.com:4889/em/upload
Oracle Management Agent
Oracle Management Service
Oracle HTTP Server
OracleAS Web Cache
Grid Control Console
Oracle Management Agent
Oracle Management Service
Oracle HTTP Server
OracleAS Web Cache
Server Load Balancer
http://slb.acme.com:7777/em/upload
Virtual Server:7777Virtual Server:4889
1
2
3
2http://slb.acme.com:4889/em/upload
http://<agent_host>:1831
4
http://<agent_host>:1831
4
http://host2.acme.com:4889/em/upload
http://host1.acme.com:4889/em/upload
http://host2.acme.com:7777/emhttp://host1.acme.com:7777/em
Host 2Host 1
Shared Receive Directory
2
High Availability Configurations - Maximum Availability Architecture
Grid Control Common Configurations 3-21
way of OracleAS Web Cache and the Oracle HTTP Server on one of the Management Service hosts.
2. Each Management Agent uploads its data to a common load balancer URL (as described in Section 3.5.5.1) and data is written to the shared receive directory.
3. Each Management Service communicates by way of JDBC with a common Management Repository, just as they do in the multiple Management Service configuration defined in Section 3.4.
4. Each Management Service communicates directly with each Management Agent by way of HTTP, just as they do in the multiple Management Service configuration defined in Section 3.
3.5.5 Configuring the Management AgentThe final piece of Enterprise Manager High Availability is the Management Agent configuration. Before we jump into the Management Agent configuration, it is worthwhile to note that the Management Agent has high availability built into it out of the box. A 'watchdog' process, created automatically on Management Agent startup, monitors each Management Agent process. In the event of a failure of the Management Agent process, the 'watchdog' will try to automatically re-start the Management Agent process.
Communication between the Management Agent and the Management Service tiers in a default Enterprise Manager Grid Control install is a point-to-point set up. Therefore, the default configuration does not protect from the scenario where the Management Service becomes unavailable. In that scenario, a Management Agent will not be able to upload monitoring information to the Management Service (and to the Management Repository), resulting in the targets becoming unmonitored until that Management Agent is manually configured to point to a second Management Service.
To avoid this situation, use hardware Server Load Balancer (SLB) between the Management Agents and the Management Services. The Load Balancer monitors the health and status of each Management Service and makes sure that the connections made through it are directed to surviving Management Service nodes in the event of any type of failure. As an additional benefit of using SLB, the load balancer can also be configured to manage user communications to Enterprise Manager. The Load Balancer handles this through the creation of 'pools' of available resources.
■ Configure the Management Agent to Communicate Through SLB
The load balancer provides a virtual IP address that all Management Agents can use. Once the load balancer is setup, the Management Agents need to be configured to route their traffic to the Management Service through the SLB. This can be achieved through a couple of property file changes on the Management Agents.
Resecure all Management Agents - Management Agents that were installed prior to SLB setup would be uploading directly to the Management Service. These Management Agents will not be able to upload after SLB is setup. Resecure these Management Agents to upload to the SLB by running the following command on each Management Agent. This command is available for Management Agents available for Enterprise Manager release 10.2.0.5. Prior to this release, you must manually edit the emd.properties file and use the secure agent command to secure the Management Agent.
emctl secure agent -emdWalletSrcUrl https://slb.example.com:<upload port>/em

High Availability Configurations - Maximum Availability Architecture
3-22 Oracle Enterprise Manager Advanced Configuration
■ Configure the Management Agent to Allow Retrofitting a SLB
Some installations may not have access to a SLB during their initial install, but may foresee the need to add one later. If that is the case, consider configuring the Virtual IP address that will be used for the SLB as apart of the initial installation and having that IP address point to an existing Management Service. Secure communications between Management Agents and Management Services are based on the host name. If a new host name is introduced later, each Management Agent will not have to be re-secured as it is configured to point to the new Virtual IP maintained by the SLB.
3.5.5.1 Load Balancing Connections Between the Management Agent and the Management ServiceBefore you implement a plan to protect the flow of management data from the Management Agents to the Management Service, you should be aware of some key concepts.
Specifically, Management Agents do not maintain a persistent connection to the Management Service. When a Management Agent needs to upload collected monitoring data or an urgent target state change, the Management Agent establishes a connection to the Management Service. If the connection is not possible, such as in the case of a network failure or a host failure, the Management Agent retains the data and reattempts to send the information later.
To protect against the situation where a Management Service is unavailable, you can use a load balancer between the Management Agents and the Management Services.
However, if you decide to implement such a configuration, be sure to understand the flow of data when load balancing the upload of management data.
Figure 3–7 shows a typical scenario where a set of Management Agents upload their data to a load balancer, which redirects the data to one of two Management Service installations.
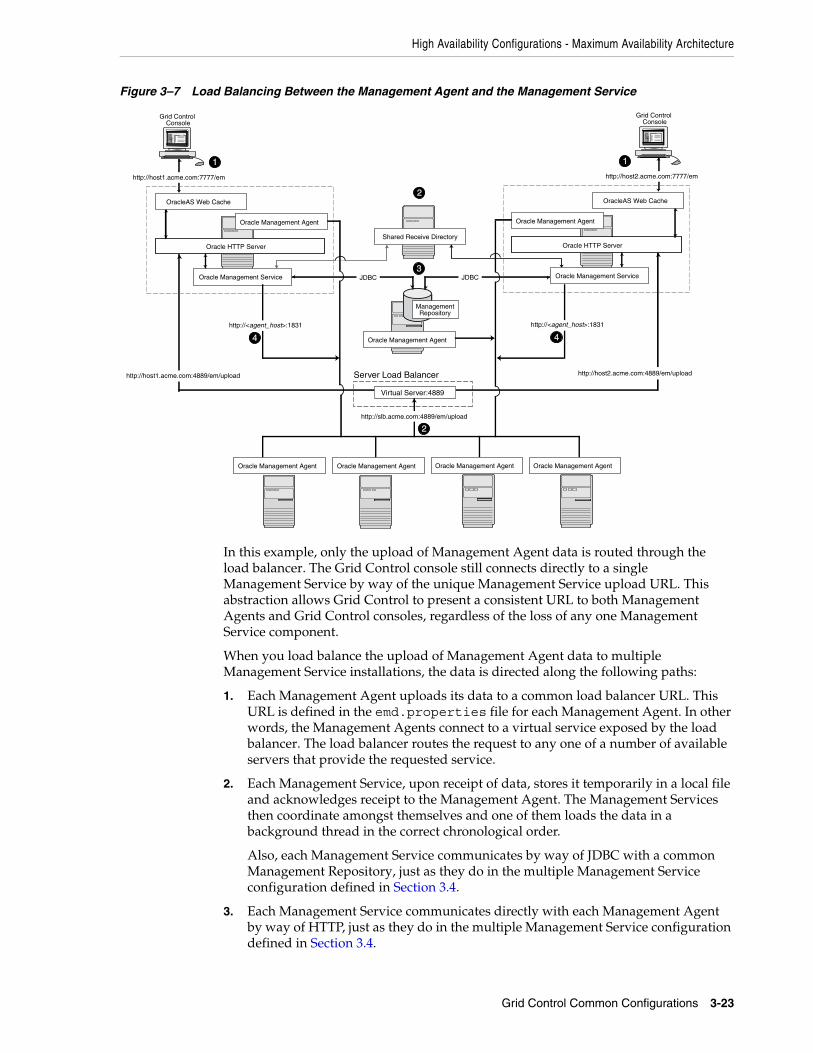
High Availability Configurations - Maximum Availability Architecture
Grid Control Common Configurations 3-23
Figure 3–7 Load Balancing Between the Management Agent and the Management Service
In this example, only the upload of Management Agent data is routed through the load balancer. The Grid Control console still connects directly to a single Management Service by way of the unique Management Service upload URL. This abstraction allows Grid Control to present a consistent URL to both Management Agents and Grid Control consoles, regardless of the loss of any one Management Service component.
When you load balance the upload of Management Agent data to multiple Management Service installations, the data is directed along the following paths:
1. Each Management Agent uploads its data to a common load balancer URL. This URL is defined in the emd.properties file for each Management Agent. In other words, the Management Agents connect to a virtual service exposed by the load balancer. The load balancer routes the request to any one of a number of available servers that provide the requested service.
2. Each Management Service, upon receipt of data, stores it temporarily in a local file and acknowledges receipt to the Management Agent. The Management Services then coordinate amongst themselves and one of them loads the data in a background thread in the correct chronological order.
Also, each Management Service communicates by way of JDBC with a common Management Repository, just as they do in the multiple Management Service configuration defined in Section 3.4.
3. Each Management Service communicates directly with each Management Agent by way of HTTP, just as they do in the multiple Management Service configuration defined in Section 3.4.
Oracle Management Agent Oracle Management AgentOracle Management Agent
Oracle Management Agent
Oracle Management Agent
JDBC
ManagementRepository
JDBC
Grid Control Console
http://host1.acme.com:4889/em/upload
http://slb.acme.com:4889/em/upload
http://host1.acme.com:7777/em
Oracle Management Agent
OracleAS Web Cache
Oracle HTTP Server
Oracle Management Service
Grid Control Console
http://host2.acme.com:4889/em/upload
http://host2.acme.com:7777/em
Oracle Management Agent
OracleAS Web Cache
Oracle HTTP Server
Oracle Management Service
Server Load Balancer
Virtual Server:4889
1
2
3
1
http://<agent_host>:1831
4
http://<agent_host>:1831
4
2
Shared Receive Directory
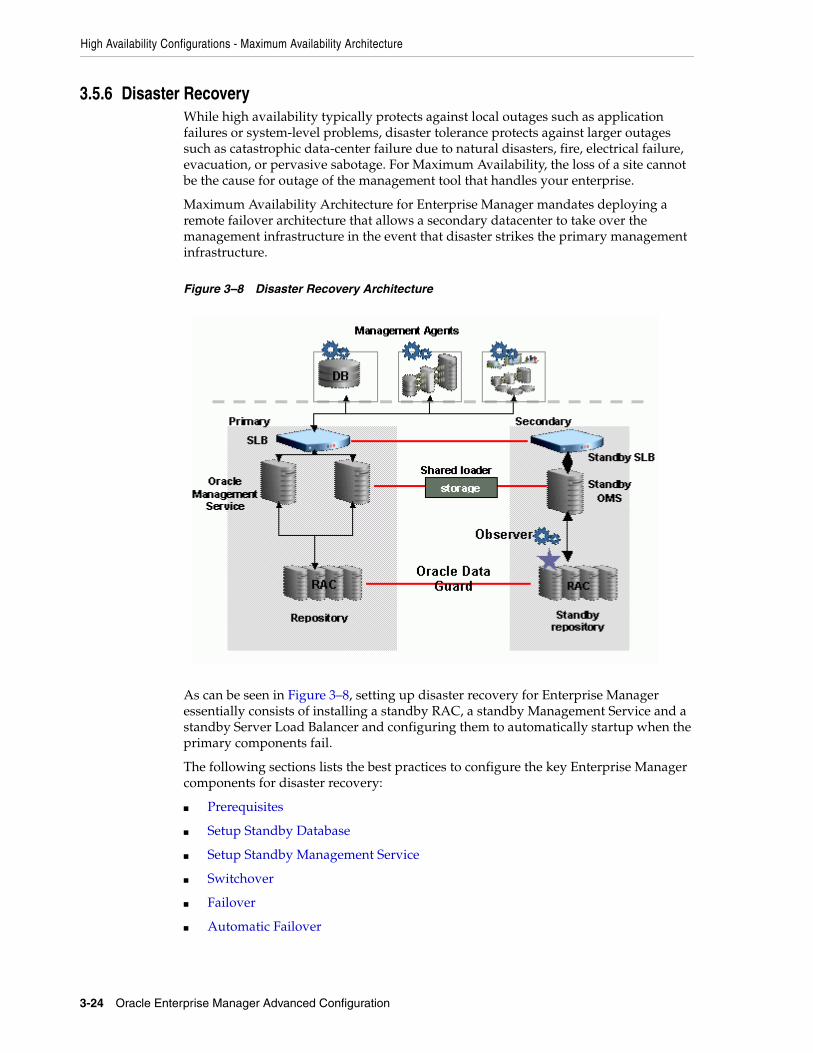
High Availability Configurations - Maximum Availability Architecture
3-24 Oracle Enterprise Manager Advanced Configuration
3.5.6 Disaster RecoveryWhile high availability typically protects against local outages such as application failures or system-level problems, disaster tolerance protects against larger outages such as catastrophic data-center failure due to natural disasters, fire, electrical failure, evacuation, or pervasive sabotage. For Maximum Availability, the loss of a site cannot be the cause for outage of the management tool that handles your enterprise.
Maximum Availability Architecture for Enterprise Manager mandates deploying a remote failover architecture that allows a secondary datacenter to take over the management infrastructure in the event that disaster strikes the primary management infrastructure.
Figure 3–8 Disaster Recovery Architecture
As can be seen in Figure 3–8, setting up disaster recovery for Enterprise Manager essentially consists of installing a standby RAC, a standby Management Service and a standby Server Load Balancer and configuring them to automatically startup when the primary components fail.
The following sections lists the best practices to configure the key Enterprise Manager components for disaster recovery:
■ Prerequisites
■ Setup Standby Database
■ Setup Standby Management Service
■ Switchover
■ Failover
■ Automatic Failover
High Availability Configurations - Maximum Availability Architecture
Grid Control Common Configurations 3-25
3.5.6.1 PrerequisitesThe following prerequisites must be satisfied.
■ The primary site must be configured as per Grid Control MAA guidelines described in previous sections. This includes Management Services fronted by an SLB and all Management Agents configured to upload to Management Services by the SLB.
■ The standby site must be similar to the primary site in terms of hardware and network resources to ensure there is no loss of performance when failover happens.
■ There must be sufficient network bandwidth between the primary and standby sites to handle peak redo data generation.
■ Configure shared storage used for shared filesystem loader and software library to be replicated at the primary and standby site. In the event of a site outage, the contents of this shared storage must be made available on the standby site using hardware vendor disk level replication technologies.
■ For complete redundancy in a disaster recovery environment, a second load balancer must be installed at the standby site. The secondary SLB must be configured in the same fashion as the primary. Some SLB vendors (such as F5 Networks) offer additional services that can be used to pass control of the Virtual IP presented by the SLB on the primary site to the SLB on the standby site in the event of a site outage. This can be used to facilitate automatic switching of Management Agent traffic from the primary site to the standby site.
3.5.6.2 Setup Standby DatabaseAs described earlier, the starting point of this step is to have the primary site configured as per Grid Control MAA guidelines. The following steps will lay down the procedure for setting up the standby Management Repository database.
1. Prepare Standby Management Repository hosts for Data Guard
Install a Management Agent on each of the standby Management Repository hosts. Configure the Management Agents to upload by the SLB on the primary site.
Install CRS and Database software on the standby Management Repository hosts. The version used must be the same as that on the primary site.
2. Prepare Primary Management Repository database for Data Guard
In case the primary Management Repository database is not already configured, enable archive log mode, setup flash recovery area and enable flashback database on the primary Management Repository database.
3. Create Physical Standby Database
In Enterprise Manager, the standby Management Repository database must be physical standbys. Use the Enterprise Manager Console to setup a physical standby database in the standby environment prepared in previous steps. Note that Enterprise Manager Console does not support creating a standby RAC database. If the standby database has to be RAC, configure the standby database using a single instance and then use the Convert to RAC option from Enterprise Manager Console to convert the single instance standby database to RAC. Also, note that during single instance standby creation, the database files should be created on shared storage to facilitate conversion to RAC later.
4. Add Static Service to Listener
High Availability Configurations - Maximum Availability Architecture
3-26 Oracle Enterprise Manager Advanced Configuration
To enable Data Guard to restart instances during the course of broker operations, a service with a specific name must be statically registered with the local listener of each instance. The value for the GLOBAL_DBNAME attribute must be set to a concatenation of <db_unique_name>_DGMGRL.<db_domain>. For example, in the LISTENER.ORA file:
SID_LIST_LISTENER=(SID_LIST=(SID_DESC=(SID_NAME=sid_name) (GLOBAL_DBNAME=db_unique_name_DGMGRL.db_domain) (ORACLE_HOME=oracle_home)))
5. Enable Flashback Database on the Standby Database
6. Verify Physical Standby
Verify the Physical Standby database through the Enterprise Manager Console. Click the Log Switch button on the Data Guard page to switch log and verify that it is received and applied to the standby database.
3.5.6.3 Setup Standby Management ServiceThe following considerations should be noted before installing the standby Management Services.
■ It is recommended that this activity be done during a lean period or during a planned maintenance window. When new Management Services are installed on the standby site, they are initially configured to connect to the Management Repository database on the primary site. Some workload will be taken up by the new Management Service. This could result in temporary loss in performance if the standby site Management Services are located far away from the primary site Management Repository database. However there would be no data loss and the performance would recover once the standby Management Services are shutdown post configuration.
■ The shared storage used for the shared filesystem loader and software library must be made available on the standby site using the same paths as the primary site.
Install the Management Service software using steps documented in the Oracle Enterprise Manager Grid Control Installation and Basic Configuration Guide. Refer to the Installing Software-Only and Configuring Later - Additional Management Service option. Specify the primary database connection settings in the response file. Once you have the Management Service installed, use the following steps to copy over the configuration from any the primary Management Service.
1. Export the configuration from the primary Management Service using:
emctl exportconfig oms -dir <location for the export file>
2. Copy over the exported file to the standby Management Service
3. Shutdown the standby Management Service
4. Import the exported configuration on the standby Management Service using: emctl importconfig oms -file <full path of the export file>
5. Make the standby Management Service point to the standby Management Repository database by updating the emoms.properties file: oracle.sysman.eml.mntr.emdRepConnectDescriptor=<connect descriptor of standby database>
High Availability Configurations - Maximum Availability Architecture
Grid Control Common Configurations 3-27
6. Setup EMCLI on the standby Management Service using the URL of the primary SLB using emcli setup -url=https://slb.example.com/em -username sysman -password <sysman password> -nocertvalidate
7. Resecure the Management Agent that is installed with the standby Management Service to upload to primary SLB using emctl secure agent -emdWalletSrcUrl https://slb.example.com:<upload port>/em
8. Update the standby SLB configuration by adding the standby Management Service to the different pools on the SLB. Setup monitors for the new Management Service. Modify the ssl.conf file to set the Port directive to the SLB virtual port used for UI access.
Repeat the previous steps for setting up an additional standby Management Service.
3.5.6.4 SwitchoverSwitchover is a planned activity where operations are transferred from the Primary site to a Standby site. This is usually done for testing and validation of Disaster Recovery (DR) scenarios and for planned maintenance activities on the primary infrastructure. This section describes the steps to switchover to the standby site. The same procedure is applied to switchover in either direction.
Enterprise Manager Console cannot be used to perform switchover of the Management Repository database. The Data Guard Broker command line tool DGMGRL should be used instead.
1. Prepare Standby Database
Verify that recovery is up-to-date. Using the Enterprise Manager Console, you can view the value of the ApplyLag column for the standby database in the Standby Databases section of the Data Guard Overview Page.
2. Shutdown the Primary Enterprise Manager Application Tier
Shutdown all the Management Services in the primary site by running the following command on each Management Service: opmnctl stopall
Shutdown the Enterprise Manager jobs running in Management Repository database: - alter system set job_queue_processes=0;
3. Verify Shared Loader Directory / Software Library Availability
Ensure all files from the primary site are available on the standby site.
4. Switchover to the Standby Database
Use DGMGRL to perform a switchover to the standby database. The command can be run on the primary site or the standby site. The switchover command verifies the states of the primary database and the standby database, affects switchover of roles, restarts the old primary database, and sets it up as the new standby database.
SWITCHOVER TO <standby database name>;
Verify the post switchover states:
Note: To monitor a standby database completely, the user monitoring the database must have SYSDBA privileges. This privilege is required because the standby database is in a mounted-only state. A best practice is to ensure that the users monitoring the primary and standby databases both have SYSDBA privileges.
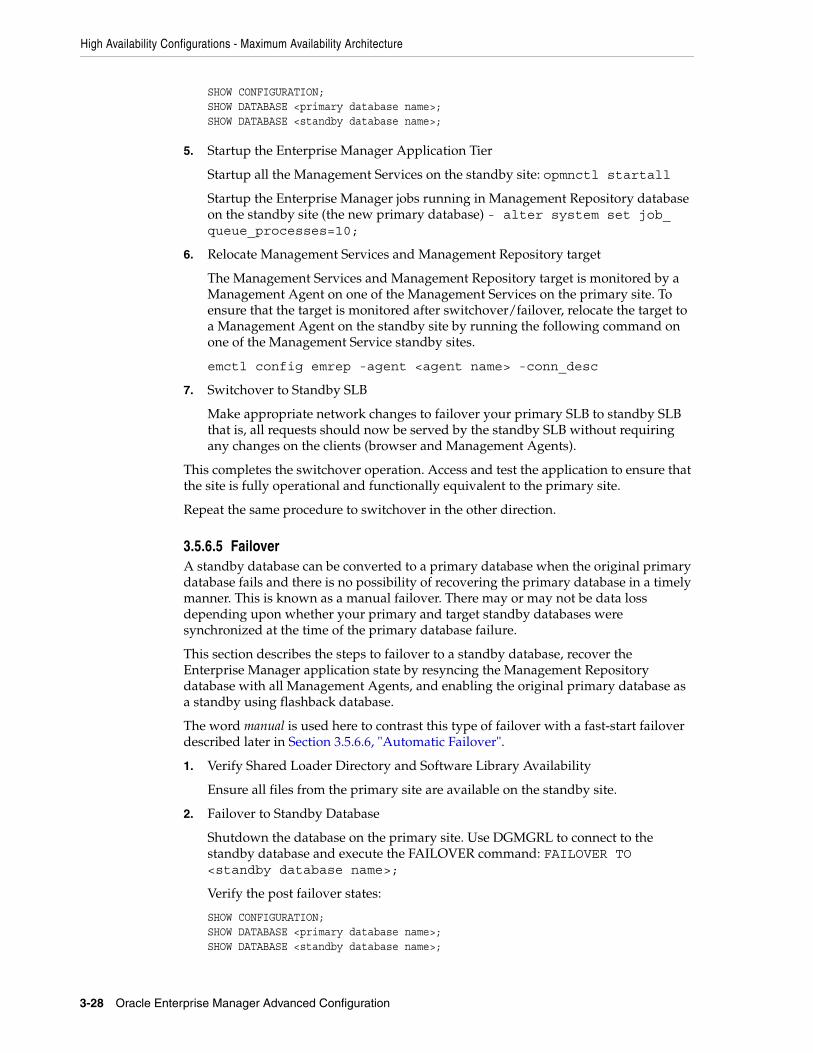
High Availability Configurations - Maximum Availability Architecture
3-28 Oracle Enterprise Manager Advanced Configuration
SHOW CONFIGURATION;SHOW DATABASE <primary database name>;SHOW DATABASE <standby database name>;
5. Startup the Enterprise Manager Application Tier
Startup all the Management Services on the standby site: opmnctl startall
Startup the Enterprise Manager jobs running in Management Repository database on the standby site (the new primary database) - alter system set job_queue_processes=10;
6. Relocate Management Services and Management Repository target
The Management Services and Management Repository target is monitored by a Management Agent on one of the Management Services on the primary site. To ensure that the target is monitored after switchover/failover, relocate the target to a Management Agent on the standby site by running the following command on one of the Management Service standby sites.
emctl config emrep -agent <agent name> -conn_desc
7. Switchover to Standby SLB
Make appropriate network changes to failover your primary SLB to standby SLB that is, all requests should now be served by the standby SLB without requiring any changes on the clients (browser and Management Agents).
This completes the switchover operation. Access and test the application to ensure that the site is fully operational and functionally equivalent to the primary site.
Repeat the same procedure to switchover in the other direction.
3.5.6.5 FailoverA standby database can be converted to a primary database when the original primary database fails and there is no possibility of recovering the primary database in a timely manner. This is known as a manual failover. There may or may not be data loss depending upon whether your primary and target standby databases were synchronized at the time of the primary database failure.
This section describes the steps to failover to a standby database, recover the Enterprise Manager application state by resyncing the Management Repository database with all Management Agents, and enabling the original primary database as a standby using flashback database.
The word manual is used here to contrast this type of failover with a fast-start failover described later in Section 3.5.6.6, "Automatic Failover".
1. Verify Shared Loader Directory and Software Library Availability
Ensure all files from the primary site are available on the standby site.
2. Failover to Standby Database
Shutdown the database on the primary site. Use DGMGRL to connect to the standby database and execute the FAILOVER command: FAILOVER TO <standby database name>;
Verify the post failover states:
SHOW CONFIGURATION;SHOW DATABASE <primary database name>;SHOW DATABASE <standby database name>;
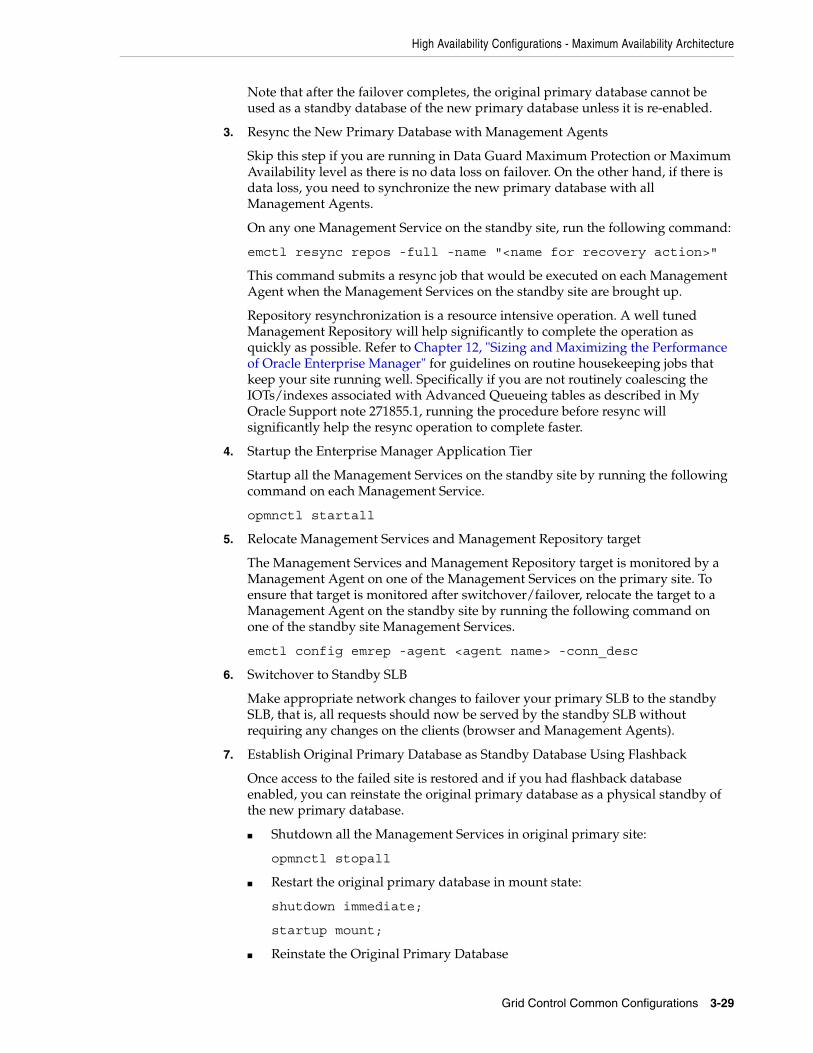
High Availability Configurations - Maximum Availability Architecture
Grid Control Common Configurations 3-29
Note that after the failover completes, the original primary database cannot be used as a standby database of the new primary database unless it is re-enabled.
3. Resync the New Primary Database with Management Agents
Skip this step if you are running in Data Guard Maximum Protection or Maximum Availability level as there is no data loss on failover. On the other hand, if there is data loss, you need to synchronize the new primary database with all Management Agents.
On any one Management Service on the standby site, run the following command:
emctl resync repos -full -name "<name for recovery action>"
This command submits a resync job that would be executed on each Management Agent when the Management Services on the standby site are brought up.
Repository resynchronization is a resource intensive operation. A well tuned Management Repository will help significantly to complete the operation as quickly as possible. Refer to Chapter 12, "Sizing and Maximizing the Performance of Oracle Enterprise Manager" for guidelines on routine housekeeping jobs that keep your site running well. Specifically if you are not routinely coalescing the IOTs/indexes associated with Advanced Queueing tables as described in My Oracle Support note 271855.1, running the procedure before resync will significantly help the resync operation to complete faster.
4. Startup the Enterprise Manager Application Tier
Startup all the Management Services on the standby site by running the following command on each Management Service.
opmnctl startall
5. Relocate Management Services and Management Repository target
The Management Services and Management Repository target is monitored by a Management Agent on one of the Management Services on the primary site. To ensure that target is monitored after switchover/failover, relocate the target to a Management Agent on the standby site by running the following command on one of the standby site Management Services.
emctl config emrep -agent <agent name> -conn_desc
6. Switchover to Standby SLB
Make appropriate network changes to failover your primary SLB to the standby SLB, that is, all requests should now be served by the standby SLB without requiring any changes on the clients (browser and Management Agents).
7. Establish Original Primary Database as Standby Database Using Flashback
Once access to the failed site is restored and if you had flashback database enabled, you can reinstate the original primary database as a physical standby of the new primary database.
■ Shutdown all the Management Services in original primary site:
opmnctl stopall
■ Restart the original primary database in mount state:
shutdown immediate;
startup mount;
■ Reinstate the Original Primary Database
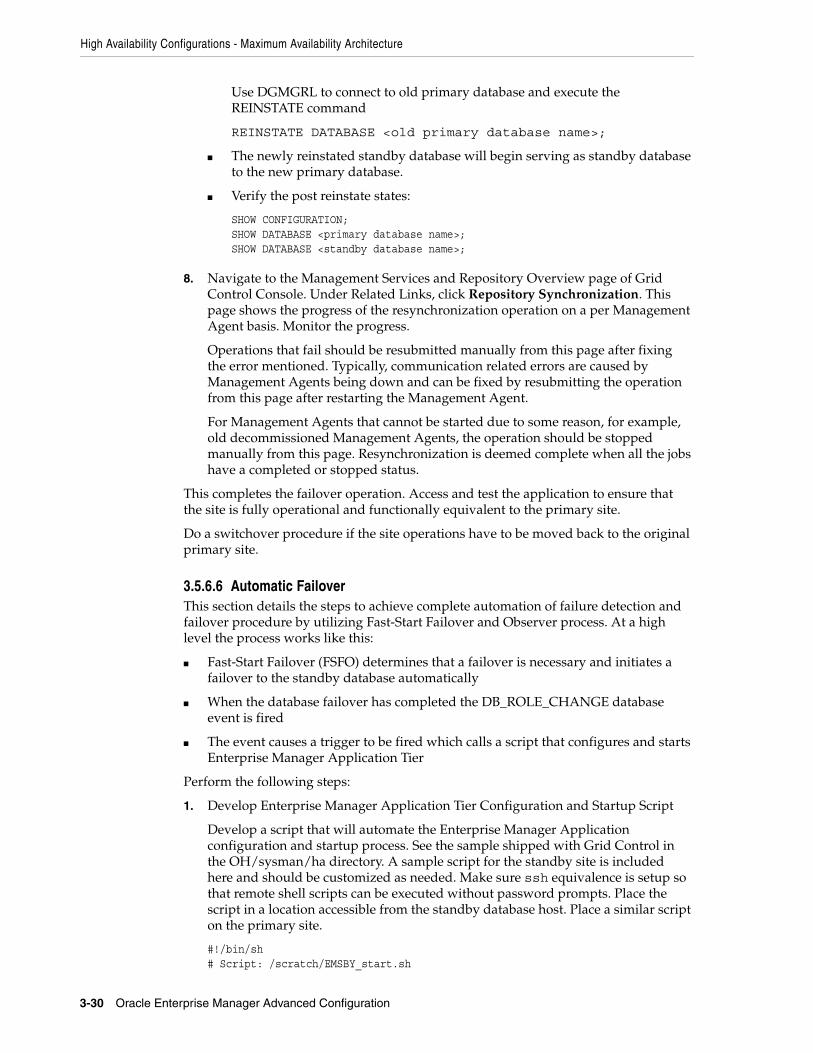
High Availability Configurations - Maximum Availability Architecture
3-30 Oracle Enterprise Manager Advanced Configuration
Use DGMGRL to connect to old primary database and execute the REINSTATE command
REINSTATE DATABASE <old primary database name>;
■ The newly reinstated standby database will begin serving as standby database to the new primary database.
■ Verify the post reinstate states:
SHOW CONFIGURATION;SHOW DATABASE <primary database name>;SHOW DATABASE <standby database name>;
8. Navigate to the Management Services and Repository Overview page of Grid Control Console. Under Related Links, click Repository Synchronization. This page shows the progress of the resynchronization operation on a per Management Agent basis. Monitor the progress.
Operations that fail should be resubmitted manually from this page after fixing the error mentioned. Typically, communication related errors are caused by Management Agents being down and can be fixed by resubmitting the operation from this page after restarting the Management Agent.
For Management Agents that cannot be started due to some reason, for example, old decommissioned Management Agents, the operation should be stopped manually from this page. Resynchronization is deemed complete when all the jobs have a completed or stopped status.
This completes the failover operation. Access and test the application to ensure that the site is fully operational and functionally equivalent to the primary site.
Do a switchover procedure if the site operations have to be moved back to the original primary site.
3.5.6.6 Automatic FailoverThis section details the steps to achieve complete automation of failure detection and failover procedure by utilizing Fast-Start Failover and Observer process. At a high level the process works like this:
■ Fast-Start Failover (FSFO) determines that a failover is necessary and initiates a failover to the standby database automatically
■ When the database failover has completed the DB_ROLE_CHANGE database event is fired
■ The event causes a trigger to be fired which calls a script that configures and starts Enterprise Manager Application Tier
Perform the following steps:
1. Develop Enterprise Manager Application Tier Configuration and Startup Script
Develop a script that will automate the Enterprise Manager Application configuration and startup process. See the sample shipped with Grid Control in the OH/sysman/ha directory. A sample script for the standby site is included here and should be customized as needed. Make sure ssh equivalence is setup so that remote shell scripts can be executed without password prompts. Place the script in a location accessible from the standby database host. Place a similar script on the primary site.
#!/bin/sh# Script: /scratch/EMSBY_start.sh
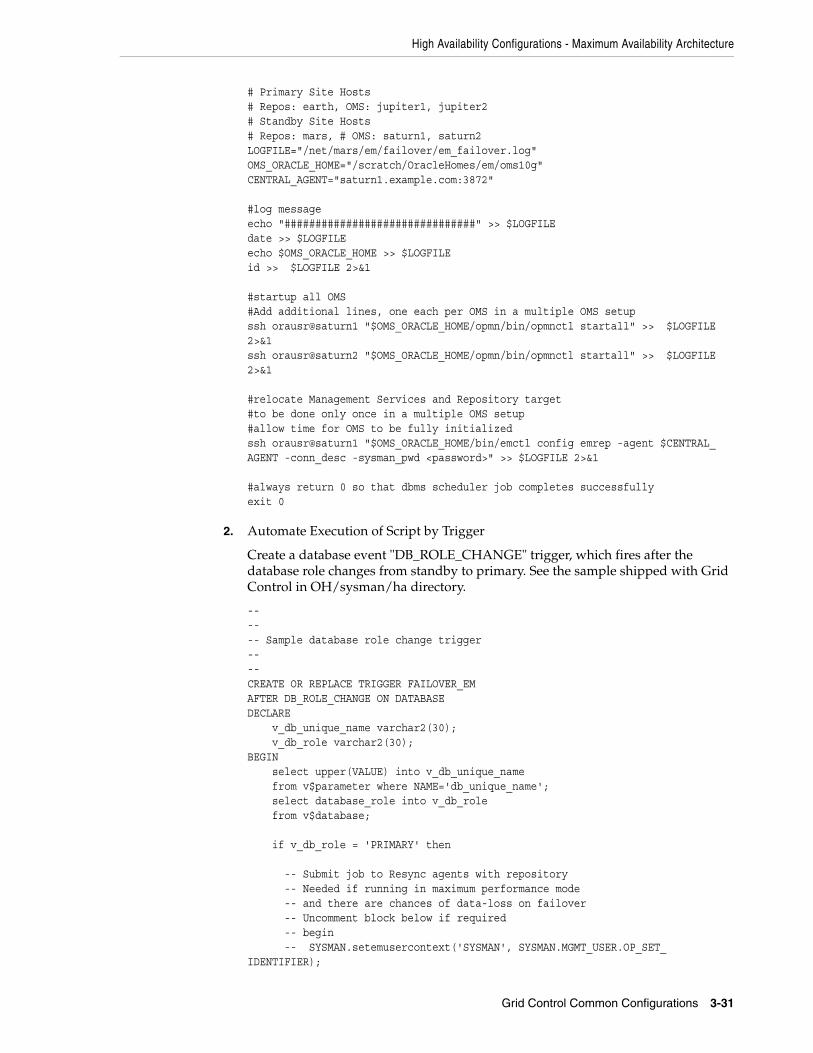
High Availability Configurations - Maximum Availability Architecture
Grid Control Common Configurations 3-31
# Primary Site Hosts# Repos: earth, OMS: jupiter1, jupiter2# Standby Site Hosts# Repos: mars, # OMS: saturn1, saturn2LOGFILE="/net/mars/em/failover/em_failover.log"OMS_ORACLE_HOME="/scratch/OracleHomes/em/oms10g"CENTRAL_AGENT="saturn1.example.com:3872" #log messageecho "###############################" >> $LOGFILEdate >> $LOGFILEecho $OMS_ORACLE_HOME >> $LOGFILEid >> $LOGFILE 2>&1 #startup all OMS#Add additional lines, one each per OMS in a multiple OMS setupssh orausr@saturn1 "$OMS_ORACLE_HOME/opmn/bin/opmnctl startall" >> $LOGFILE 2>&1ssh orausr@saturn2 "$OMS_ORACLE_HOME/opmn/bin/opmnctl startall" >> $LOGFILE 2>&1 #relocate Management Services and Repository target#to be done only once in a multiple OMS setup#allow time for OMS to be fully initializedssh orausr@saturn1 "$OMS_ORACLE_HOME/bin/emctl config emrep -agent $CENTRAL_AGENT -conn_desc -sysman_pwd <password>" >> $LOGFILE 2>&1 #always return 0 so that dbms scheduler job completes successfullyexit 0
2. Automate Execution of Script by Trigger
Create a database event "DB_ROLE_CHANGE" trigger, which fires after the database role changes from standby to primary. See the sample shipped with Grid Control in OH/sysman/ha directory.
------ Sample database role change trigger----CREATE OR REPLACE TRIGGER FAILOVER_EMAFTER DB_ROLE_CHANGE ON DATABASEDECLARE v_db_unique_name varchar2(30); v_db_role varchar2(30);BEGIN select upper(VALUE) into v_db_unique_name from v$parameter where NAME='db_unique_name'; select database_role into v_db_role from v$database; if v_db_role = 'PRIMARY' then -- Submit job to Resync agents with repository -- Needed if running in maximum performance mode -- and there are chances of data-loss on failover -- Uncomment block below if required -- begin -- SYSMAN.setemusercontext('SYSMAN', SYSMAN.MGMT_USER.OP_SET_IDENTIFIER);
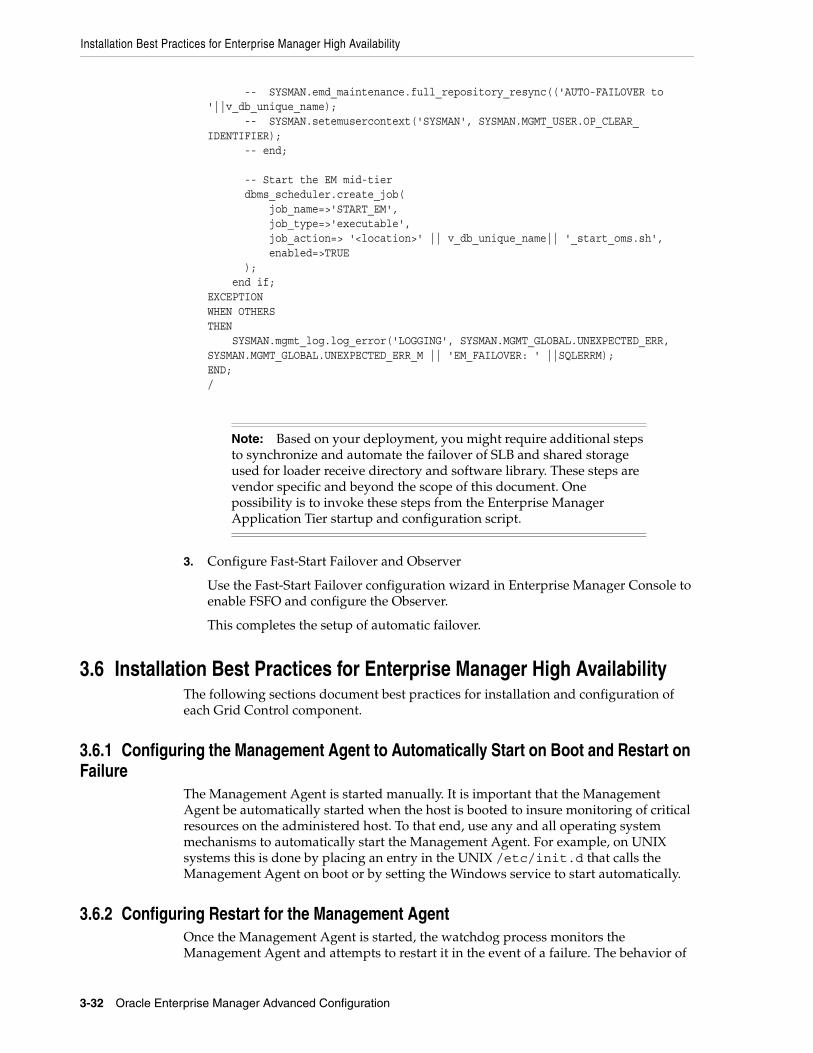
Installation Best Practices for Enterprise Manager High Availability
3-32 Oracle Enterprise Manager Advanced Configuration
-- SYSMAN.emd_maintenance.full_repository_resync(('AUTO-FAILOVER to '||v_db_unique_name); -- SYSMAN.setemusercontext('SYSMAN', SYSMAN.MGMT_USER.OP_CLEAR_IDENTIFIER); -- end; -- Start the EM mid-tier dbms_scheduler.create_job( job_name=>'START_EM', job_type=>'executable', job_action=> '<location>' || v_db_unique_name|| '_start_oms.sh', enabled=>TRUE ); end if;EXCEPTIONWHEN OTHERSTHEN SYSMAN.mgmt_log.log_error('LOGGING', SYSMAN.MGMT_GLOBAL.UNEXPECTED_ERR,SYSMAN.MGMT_GLOBAL.UNEXPECTED_ERR_M || 'EM_FAILOVER: ' ||SQLERRM);END;/
3. Configure Fast-Start Failover and Observer
Use the Fast-Start Failover configuration wizard in Enterprise Manager Console to enable FSFO and configure the Observer.
This completes the setup of automatic failover.
3.6 Installation Best Practices for Enterprise Manager High AvailabilityThe following sections document best practices for installation and configuration of each Grid Control component.
3.6.1 Configuring the Management Agent to Automatically Start on Boot and Restart on Failure
The Management Agent is started manually. It is important that the Management Agent be automatically started when the host is booted to insure monitoring of critical resources on the administered host. To that end, use any and all operating system mechanisms to automatically start the Management Agent. For example, on UNIX systems this is done by placing an entry in the UNIX /etc/init.d that calls the Management Agent on boot or by setting the Windows service to start automatically.
3.6.2 Configuring Restart for the Management AgentOnce the Management Agent is started, the watchdog process monitors the Management Agent and attempts to restart it in the event of a failure. The behavior of
Note: Based on your deployment, you might require additional steps to synchronize and automate the failover of SLB and shared storage used for loader receive directory and software library. These steps are vendor specific and beyond the scope of this document. One possibility is to invoke these steps from the Enterprise Manager Application Tier startup and configuration script.
Configuration With Grid Control
Grid Control Common Configurations 3-33
the watchdog is controlled by environment variables set before the Management Agent process starts. The environment variables that control this behavior follow. All testing discussed here was done with the default settings.
■ EM_MAX_RETRIES – This is the maximum number of times the watchdog will attempt to restart the Management Agent within the EM_RETRY_WINDOW. The default is to attempt restart of the Management Agent 3 times.
■ EM_RETRY_WINDOW - This is the time interval in seconds that is used together with the EM_MAX_RETRIES environmental variable to determine whether the Management Agent is to be restarted. The default is 600 seconds.
The watchdog will not restart the Management Agent if the watchdog detects that the Management Agent has required restart more than EM_MAX_RETRIES within the EM_RETRY_WINDOW time period.
3.6.3 Installing the Management Agent Software on Redundant StorageThe Management Agent persists its intermediate state and collected information using local files in the $AGENT_HOME/$HOSTNAME/sysman/emd sub tree under the Management Agent home directory.
In the event that these files are lost or corrupted before being uploaded to the Management Repository, a loss of monitoring data and any pending alerts not yet uploaded to the Management Repository occurs.
At a minimum, configure these sub-directories on striped redundant or mirrored storage. Availability would be further enhanced by placing the entire $AGENT_HOME on redundant storage. The Management Agent home directory is shown by entering the command 'emctl getemhome' on the command line, or from the Management Services and Repository tab and Agents tab in the Grid Control console.
3.6.4 Install the Management Service Shared File Areas on Redundant StorageThe Management Service contains results of the intermediate collected data before it is loaded into the Management Repository. The loader receive directory contains these files and is typically empty when the Management Service is able to load data as quickly as it is received. Once the files are received by the Management Service, the Management Agent considers them committed and therefore removes its local copy. In the event that these files are lost before being uploaded to the Management Repository, data loss will occur. At a minimum, configure these sub-directories on striped redundant or mirrored storage. When Management Services are configured for the Shared Filesystem Loader, all services share the same loader receive directory. It is recommended that the shared loader receive directory be on a clustered file system like NetApps Filer.
3.7 Configuration With Grid ControlGrid Control comes preconfigured with a series of default rules to monitor many common targets. These rules can be extended to monitor the Grid Control infrastructure as well as the other targets on your network to meet specific monitoring needs.
Configuration With Grid Control
3-34 Oracle Enterprise Manager Advanced Configuration
3.7.1 Console Warnings, Alerts, and NotificationsThe following list is a set of recommendations that extend the default monitoring performed by Enterprise Manager. Use the Notification Rules link on the Preferences page to adjust the default rules provided on the Configuration/Rules page:
■ Ensure the Agent Unreachable rule is set to alert on all Management Agents unreachable and Management Agents clear errors.
■ Ensure the Repository Operations Availability rule is set to notify on any unreachable problems with the Management Service or Management Repository nodes. Also modify this rule to alert on the Targets Not Providing Data condition and any database alerts that are detected against the database serving as the Management Repository.
Modify the Agent Upload Problems Rule to alert when the Management Service status has hit a warning or clear threshold.
3.7.2 Configure Additional Error Reporting MechanismsEnterprise Manager provides error reporting mechanisms through e-mail notifications, PL/SQL packages, and SNMP alerts. Configure these mechanisms based on the infrastructure of the production site. If using e-mail for notifications, configure the notification rule through the Grid Control console to notify administrators using multiple SMTP servers if they are available. This can be done by modifying the default e-mail server setting on the Notification Methods option under Setup.
3.7.3 Component BackupBackup procedures for the database are well established standards. Configure backup for the Management Repository using the RMAN interface provided in the Grid Control console. Refer to the RMAN documentation or the Maximum Availability architecture document for detailed implementation instructions.
In addition to the Management Repository, the Management Service and Management Agent should also have regular backups. Backups should be performed after any configuration change. Best practices for backing up these tiers are documented in the section, Section 12.3, "Oracle Enterprise Manager Backup, Recovery, and Disaster Recovery Considerations" on page 12-15.
3.7.4 TroubleshootingIn the event of a problem with Grid Control, the starting point for any diagnostic effort is the console itself. The Management System tab provides access to an overview of all Management Service operations and current alerts. Other pages summarize the health of Management Service processes and logged errors These pages are useful for determining the causes of any performance problems as the summary page shows at a historical view of the amount of files waiting to be loaded to the Management Repository and the amount of work waiting to be completed by Management Agents.
3.7.4.1 Upload Delay for Monitoring DataWhen assessing the health and availability of targets through the Grid Control console, information is slow to appear in the UI, especially after a Management Service outage. The state of a target in the Grid Control console may be delayed after a state change on the monitored host. Use the Management System page to gauge backlog for pending files to be processed.

Configuration With Grid Control
Grid Control Common Configurations 3-35
3.7.4.2 Notification Delay of Target State ChangeThe model used by the Management Agent to assess the state of health for any particular monitored target is poll based. Management Agents immediately post a notification to the Management Service as soon as a change in state is detected. This infers that there is some potential delay for the Management Agent to actually detect a change in state.

Configuration With Grid Control
3-36 Oracle Enterprise Manager Advanced Configuration
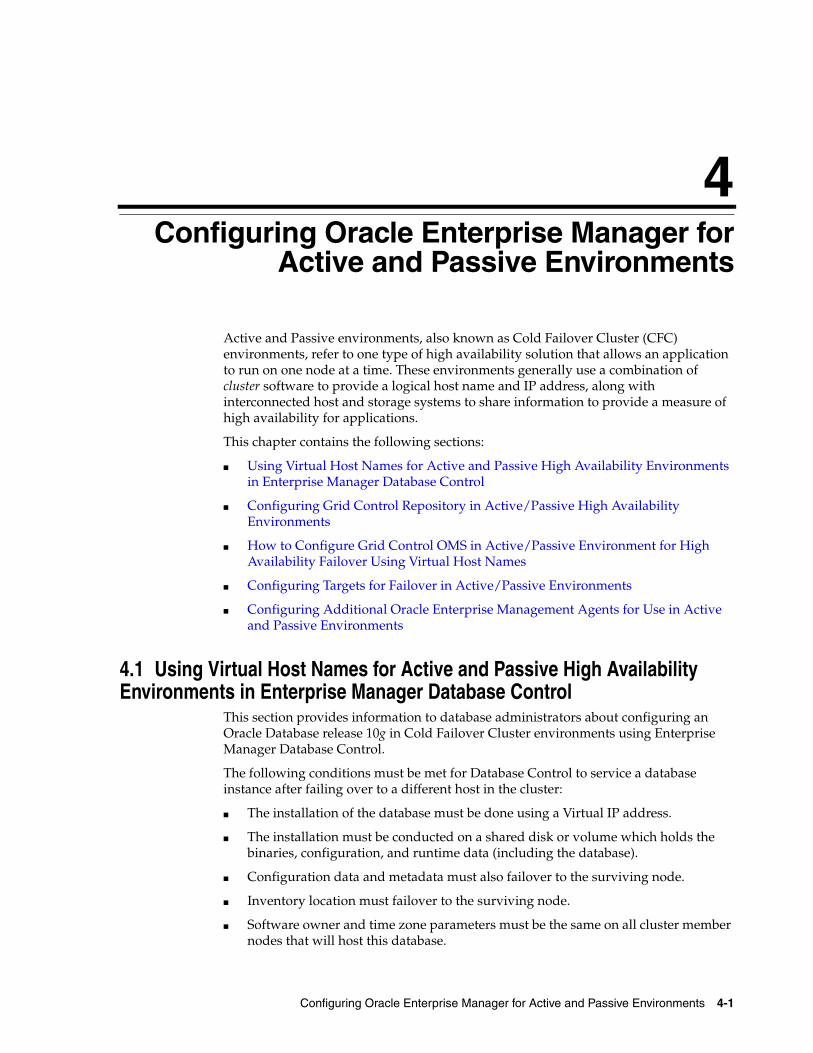
4
Configuring Oracle Enterprise Manager for Active and Passive Environments 4-1
4 Configuring Oracle Enterprise Manager forActive and Passive Environments
Active and Passive environments, also known as Cold Failover Cluster (CFC) environments, refer to one type of high availability solution that allows an application to run on one node at a time. These environments generally use a combination of cluster software to provide a logical host name and IP address, along with interconnected host and storage systems to share information to provide a measure of high availability for applications.
This chapter contains the following sections:
■ Using Virtual Host Names for Active and Passive High Availability Environments in Enterprise Manager Database Control
■ Configuring Grid Control Repository in Active/Passive High Availability Environments
■ How to Configure Grid Control OMS in Active/Passive Environment for High Availability Failover Using Virtual Host Names
■ Configuring Targets for Failover in Active/Passive Environments
■ Configuring Additional Oracle Enterprise Management Agents for Use in Active and Passive Environments
4.1 Using Virtual Host Names for Active and Passive High Availability Environments in Enterprise Manager Database Control
This section provides information to database administrators about configuring an Oracle Database release 10g in Cold Failover Cluster environments using Enterprise Manager Database Control.
The following conditions must be met for Database Control to service a database instance after failing over to a different host in the cluster:
■ The installation of the database must be done using a Virtual IP address.
■ The installation must be conducted on a shared disk or volume which holds the binaries, configuration, and runtime data (including the database).
■ Configuration data and metadata must also failover to the surviving node.
■ Inventory location must failover to the surviving node.
■ Software owner and time zone parameters must be the same on all cluster member nodes that will host this database.
Using Virtual Host Names for Active and Passive High Availability Environments in Enterprise Manager Database Control
4-2 Oracle Enterprise Manager Advanced Configuration
The following items are configuration and installation points you should consider before getting started.
■ To override the physical host name of the cluster member with a virtual host name, software must be installed using the parameter ORACLE_HOSTNAME.
■ For inventory pointer, software must be installed using the command parameter invPtrLoc to point to the shared inventory location file, which includes the path to the shared inventory location.
■ The database software, the configuration of the database, and Database Control are done on a shared volume.
4.1.1 Set Up the Alias for the Virtual Host Name and Virtual IP AddressYou can set up the alias for the virtual host name and virtual IP address by either allowing the clusterware to set it up automatically or by setting it up manually before installation and startup of Oracle services. The virtual host name must be static and resolvable consistently on the network. All nodes participating in the setup must resolve the virtual IP address to the same host name. Standard TCP tools similar to nslookup and traceroute commands can be used to verify the set up.
4.1.2 Set Up Shared StorageShared storage can be managed by the clusterware that is in use or you can use any shared file system volume as long as it is supported. The most common shared file system is NFS. You can also use the Oracle Cluster File System software.
4.1.3 Set Up the EnvironmentSome operating system versions require specific operating system patches to be applied prior to installing release 10gR2 of the Oracle database. You must also have sufficient kernel resources available when you conduct the installation.
Before you launch the installer, specific environment variables must be verified. Each of the following variables must be identically set for the account you are using to install the software on all machines participating in the cluster.
■ Operating system variable TZ, time zone setting. You should unset this prior to the installation.
■ PERL variables. Variables like PERL5LIB should be unset to prevent the installation and Database Control from picking up the incorrect set of PERL libraries.
■ Paths used for dynamic libraries. Based on the operating system, the variables can be LD_LIBRARY_PATH, LIBPATH, SHLIB_PATH, or DYLD_LIBRARY_PATH. These variables should only point to directories that are visible and usable on each node of the cluster.
4.1.4 Ensure That the Oracle USERNAME, ID, and GROUP NAME Are Synchronized on All Cluster Members
The user and group of the software owner should be defined identically on all nodes of the cluster. You can verify this using the following command:
$ id -auid=1234(oracle) gid=5678(dba) groups=5678(dba)
Using Virtual Host Names for Active and Passive High Availability Environments in Enterprise Manager Database Control
Configuring Oracle Enterprise Manager for Active and Passive Environments 4-3
4.1.5 Ensure That Inventory Files Are on the Shared StorageTo ensure that inventory files are on the shared storage, follow these steps:
■ Create you new ORACLE_HOME directory.
■ Create the Oracle Inventory directory under the new Oracle home
cd <shared oracle home>mkdir oraInventory
■ Create the oraInst.loc file. This file contains the Inventory directory path information required by the Universal Installer:
1. vi oraInst.loc
2. Enter the path information to the Oracle Inventory directory and specify the group of the software owner as the dba user. For example:
inventory_loc=/app/oracle/product/10.2/oraInventoryinst_group=dba
Depending on the type of operating system, the default directory for the oraInst.loc file is either /etc (for example, on Linux) or /var/opt/oracle (for example, on Solaris and HP-UX).
4.1.6 Start the InstallerTo start the installer, point to the inventory location file oraInst.loc, and specify the host name of the virtual group. The debug parameter in the example below is optional:
$ export ORACLE_HOSTNAME=lxdb.acme.com$ runInstaller -invPtrloc /app/oracle/share1/oraInst.loc ORACLE_HOSTNAME=lxdb.acme.com -debug
4.1.6.1 Windows NT Specific Configuration StepsOn Windows environments, an additional step is required to copy over service and keys required by the Oracle software.
1. Using regedit on the first host, export each Oracle service from under HKEY_LOCAL_MACHINE\SYSTEM\CurrentControlSet\Services.
2. Using regedit on the first host, export HKEY_LOCAL_MACHINE\SOFTWARE\ORACLE.
3. Use regedit to import the files created in step 1 and 2 to the failover host.
For Windows, NT services need to be created on the failover host. For an Enterprise Manager release 10.2.0.5 Management Agent, the following command can be used:
emctl create service [-user <username>] [-pwd <password>] -name <servicename>
This has to be done once on the failover host after doing a failover.
4.1.7 Start ServicesYou must start the services in the following order:
1. Establish IP address on the active node
2. Start the TNS listener
3. Start the database

Configuring Grid Control Repository in Active/Passive High Availability Environments
4-4 Oracle Enterprise Manager Advanced Configuration
4. Start dbconsole
5. Test functionality
In the event that services do not start, do the following:
1. Establish IP on failover box
2. Start TNS listener
lsnrctl start
3. Start the database
dbstart
4. Start Database Control
emctl start dbconsole
5. Test functionality
To manually stop or shutdown a service, follow these steps:
1. Stop the application.
2. Stop Database Control
emctl stop dbconsole
3. Stop TNS listener
lsnrctl stop
4. Stop the database
dbshut
5. Stop IP
4.2 Configuring Grid Control Repository in Active/Passive High Availability Environments
In order for Grid Control repository to fail over to a different host, the following conditions must be met:
■ The installation must be conducted using a Virtual Hostname and an associated unique IP address
■ Installation must occur on a shared disk/volume which holds the binaries, the configuration, and the runtime data (including the repository database)
■ Configuration data and metadata must also failover to the surviving node
■ Inventory location must failover to the surviving node
■ Software owner and time zone parameters must be the same on all cluster member nodes that will host this OMS
4.2.1 Installation and ConfigurationThe following installation and configuration requirements should be noted:
■ To override the physical host name of the cluster member with a virtual host name, software must be installed using the parameter ORACLE_HOSTNAME.
Configuring Grid Control Repository in Active/Passive High Availability Environments
Configuring Oracle Enterprise Manager for Active and Passive Environments 4-5
■ For inventory pointer, software must be installed using the command line parameter -invPtrLoc to point to the shared inventory location file, which includes the path to the shared inventory location.
■ The database software, the configuration of the database, and data files are on a shared volume.
If you are using an NFS mounted volume for the installation, ensure that you specify rsize and wsize in your mount command to prevent I/O issues. See My Oracle Support note 279393.1 Linux.NetApp: RHEL/SUSE Setup Recommendations for NetApp Filer Storage.
Example:
grid-repo.acme.com:/u01/app/share1 /u01/app/share1 nfsrw,bg,rsize=32768,wsize=32768,hard,nointr,tcp,noac,vers=3,timeo=600 0 0
4.2.2 Set Up the Virtual Host Name/Virtual IP AddressYou can set up the virtual host name and virtual IP address by either allowing the clusterware to set it up or manually setting it up before installation and startup of Oracle services. The virtual host name must be static and resolvable consistently on the network. All nodes participating in the setup must resolve the virtual IP address to the same host name. Standard TCP tools such as nslookup and traceroute can be used to verify the host name. Validate using the commands listed below:
nslookup <virtual hostname>
This command returns the virtual IP address and fully qualified host name.
nslookup <virtual IP>
This command returns the virtual IP address and fully qualified host name.
Be sure to try these commands on every node of the cluster to verify that the correct information is returned.
4.2.3 Set Up the EnvironmentSome operating system versions require specific patches to be applied prior to installing 10gR2. The user installing and using the 10gR2 software must also have sufficient kernel resources available. Refer to the operating system’s installation guide for more details.
Before you launch the installer, certain environment variables must be verified. Each of these variables must be set up identically for the account installing the software on ALL machines participating in the cluster:
■ OS variable TZ (time zone setting)
You should unset this variable prior to installation.
■ PERL variables
Variables such as PERL5LIB should also be unset to prevent inadvertently picking up the wrong set of PERL libraries.
Note: Any reference to shared could also be true for non-shared failover volumes, which can be mounted on active hosts after failover.
Configuring Grid Control Repository in Active/Passive High Availability Environments
4-6 Oracle Enterprise Manager Advanced Configuration
■ Same operating system, operating system patches, and version of the kernel. Therefore, RHEL 3 and RHEL 4 are not allowed for a CFC system.
■ System libraries
For example, LIBPATH, LD_LIBRARY_PATH, SHLIB_PATH, and so on. The same system libraries must be present.
4.2.4 Synchronize Operating System User IDsThe user and group of the software owner should be defined identically on all nodes of the cluster. This can be verified using the id command:
$ id -a
uid=550(oracle) gid=50(oinstall) groups=501(dba)
4.2.5 Set Up InventoryYou can set up the inventory by using the following steps:
1. Create your new ORACLE_HOME directory.
2. Create the Oracle Inventory directory under the new oracle home
cd <shared oracle home>
mkdir oraInventory
3. Create the oraInst.loc file. This file contains the Inventory directory path information needed by the Universal Installer.
vi oraInst.loc
Enter the path information to the Oracle Inventory directory, and specify the group of the software owner as the oinstall user:
Example:
inventory_loc=/app/oracle/product/10.2/oraInventoryinst_group=oinstall
4.2.6 Install the SoftwareFollow these steps to install the software:
1. Create the shared disk location on both the nodes for the software binaries.
2. Point to the inventory location file oraInst.loc (under the ORACLE_BASE in this case), as well as specifying the host name of the virtual group. For example:
$ export ORACLE_HOSTNAME=grid-repo.acme.com$ runInstaller -invPtrLoc /app/oracle/share1/oraInst.loc ORACLE_HOSTNAME=grid-repo.acme.com
3. Install the repository DB software only on the shared location. For example:
/oradbnas/app/oracle/product/oradb10203 using Host1
4. Start DBCA and create all the data files be on the shared location. For example:
/oradbnas/oradata
5. Continue the rest of the installation normally.
How to Configure Grid Control OMS in Active/Passive Environment for High Availability Failover Using Virtual Host Names
Configuring Oracle Enterprise Manager for Active and Passive Environments 4-7
6. Once completed, copy the files oraInst.loc and oratab to /etc. Also copy /opt/oracle to all cluster member hosts (Host2, Host3, and so on).
4.2.6.1 Windows NT Specific Configuration StepsOn Windows environments, an additional step is required to copy over service and keys required by the Oracle software.
1. Using regedit on the first host, export each Oracle service from under HKEY_LOCAL_MACHINE\SYSTEM\CurrentControlSet\Services.
2. Using regedit on the first host, export HKEY_LOCAL_MACHINE\SOFTWARE\ORACLE.
3. Use regedit to import the files created in step 1 and 2 to the failover host.
For Windows, NT services need to be created on the failover host. For an Enterprise Manager release 10.2.0.5 Management Agent, the following command can be used:
emctl create service [-user <username>] [-pwd <password>] -name <servicename>
This has to be done once on the failover host after doing a failover.
4.2.7 Startup of ServicesBe sure you start your services in the proper order:
1. Establish IP address on the active node
2. Start the TNS listener if it is part of the same failover group
3. Start the database if it is part of the same failover group
In case of failover, follow these steps:
1. Establish IP address on the failover box
2. Start TNS listener (lsnrctl start) if it is part of the same failover group
3. Start the database (dbstart) if it is part of the same failover group
4.2.8 SummaryThe Grid Control Management Repository can now be deployed in a CFC environment that utilizes a floating host name.
To deploy the OMS midtier in a CFC environment, please see Section 4.3, "How to Configure Grid Control OMS in Active/Passive Environment for High Availability Failover Using Virtual Host Names".
4.3 How to Configure Grid Control OMS in Active/Passive Environment for High Availability Failover Using Virtual Host Names
This section provides a general reference for Grid Control administrators who want to configure Enterprise Manager 10g Grid Control in Cold Failover Cluster (CFC) environments.
4.3.1 Overview and RequirementsThe following conditions must be met for Grid Control to fail over to a different host:
How to Configure Grid Control OMS in Active/Passive Environment for High Availability Failover Using Virtual Host Names
4-8 Oracle Enterprise Manager Advanced Configuration
■ The installation must be done using a Virtual Host Name and an associated unique IP address.
■ Install on a shared disk/volume which holds the binaries, the configuration and the runtime data (including the recv directory).
■ Configuration data and metadata must also failover to the surviving node.
■ Inventory location must failover to the surviving node.
■ Software owner and time zone parameters must be the same on all cluster member nodes that will host this Oracle Management Service (OMS).
4.3.2 Installation and ConfigurationTo override the physical host name of the cluster member with a virtual host name, software must be installed using the parameter ORACLE_HOSTNAME. For inventory pointer, the software must be installed using the command line parameter -invPtrLoc to point to the shared inventory location file, which includes the path to the shared inventory location.
If you are using an NFS mounted volume for the installation, please ensure that you specify rsize and wsize in your mount command to prevent running into I/O issues.
For example:
oms.acme.com:/u01/app/share1 /u01/app/share1 nfs rw,bg,rsize=32768,wsize=32768,hard,nointr,tcp,noac,vers=3,timeo=600 0 0
4.3.3 Setting Up the Virtual Host Name/Virtual IP AddressYou can set up the virtual host name and virtual IP address by either allowing the clusterware to set it up, or manually setting it up yourself before installation and startup of Oracle services. The virtual host name must be static and resolvable consistently on the network. All nodes participating in the setup must resolve the virtual IP address to the same host name. Standard TCP tools such as nslookup and traceroute can be used to verify the host name. Validate using the following commands:
nslookup <virtual hostname>
This command returns the virtual IP address and full qualified host name.
nslookup <virtual IP>
This command returns the virtual IP address and fully qualified host name.
Be sure to try these commands on every node of the cluster and verify that the correct information is returned.
4.3.4 Setting Up Shared StorageStorage can be managed by the clusterware that is in use or you can use any shared file system (FS) volume as long as it is not an unsupported type, such as OCFS V1. The most common shared file system is NFS.
Note: Any reference to shared failover volumes could also be true for non-shared failover volumes which can be mounted on active hosts after failover.

How to Configure Grid Control OMS in Active/Passive Environment for High Availability Failover Using Virtual Host Names
Configuring Oracle Enterprise Manager for Active and Passive Environments 4-9
4.3.5 Setting Up the EnvironmentSome operating system versions require specific operating system patches be applied prior to installing 10gR2. The user installing and using the 10gR2 software must also have sufficient kernel resources available. Refer to the operating system’s installation guide for more details.
Before you launch the installer, certain environment variables need to be verified. Each of these variables must be identically set for the account installing the software on ALL machines participating in the cluster:
■ OS variable TZ
Time zone setting. You should unset this variable prior to installation
■ PERL variables
Variables such as PERL5LIB should also be unset to avoid association to the incorrect set of PERL libraries
4.3.6 Synchronizing Operating System IDsThe user and group of the software owner should be defined identically on all nodes of the cluster. This can be verified using the ‘id’ command:
$ id -a
uid=550(oracle) gid=50(oinstall) groups=501(dba)
4.3.7 Setting Up Shared InventoryUse the following steps to set up shared inventory:
1. Create your new ORACLE_HOME directory.
2. Create the Oracle Inventory directory under the new oracle home:
$ cd <shared oracle home>
$ mkdir oraInventory
3. Create the oraInst.loc file. This file contains the Inventory directory path information needed by the Universal Installer.
a. vi oraInst.loc
b. Enter the path information to the Oracle Inventory directory and specify the group of the software owner as the oinstall user. For example:
inventory_loc=/app/oracle/product/10.2/oraInventory
inst_group=oinstall
4.3.8 Installing the SoftwareRefer to the following steps when installing the software:
1. Create the shared disk location on both the nodes for the software binaries
Note: Do not create the ssl.conf file on shared storage, otherwise there is a potential for locking issues. Create the ssl.conf file on local storage.
How to Configure Grid Control OMS in Active/Passive Environment for High Availability Failover Using Virtual Host Names
4-10 Oracle Enterprise Manager Advanced Configuration
2. Point to the inventory location file oraInst.loc (under the ORACLE_BASE in this case), as well as specifying the host name of the virtual group. For example:
$ export ORACLE_HOSTNAME=lxdb.acme.com$ runInstaller -invPtrloc /app/oracle/share1/oraInst.loc ORACLE_HOSTNAME=lxdb.acme.com -debug
3. Modify the results of the uname -n (node name) command by executing the UNIX command hostname <unqualified name of virtual host>. V$session reads that command immediately.
If you are unable to modify the host name, abort the installer when the OMS configuration assistant fails at emctl config emkey and execute the following commands to complete the installation:
a. Replace all host name entries with the virtual host name in $OMS_HOME/sysman/config/emoms.properties.
b. <OMS_HOME>/bin/emctl config emkey -repos -force
c. <OMS_HOME>/bin/emctl secure oms
d. <OMS_HOME>/bin/emctl secure lock
e. <OMS_HOME>/perl/bin/perl $OMSHOME/sysman/install/precompilejsp.pl <OMS_HOME>/j2ee/OC4J_EM/config/global-web-application.xml
Perform this step if you are using Grid Control 10.2.0.1. Grid Control must be installed before applying the 10.2.0.4 or 10.2.0.5 patchsets.
f. <OMS_HOME>/bin/emctl config agent updateTZ
g. <OMS_HOME>/opmn/bin/opmnctl stopall
h. <OMS_HOME>/opmn/bin/opmnctl startall
i. <AGENT_HOME>/bin/agentca -f
4. Install Oracle Management Services on cluster member Host1 using the option, "EM install using the existing DB"
5. Continue the remainder of the installation normally.
6. Once completed, copy the files oraInst.loc and oratab to /etc. Also copy /opt/oracle to all cluster member hosts (Host2, Host3, and so on).
4.3.8.1 Windows Specific Configuration StepsOn Windows environments, an additional step is required to copy over service and keys required by the Oracle software.
1. Using regedit on the first host, export each Oracle service from under HKEY_LOCAL_MACHINE\SYSTEM\CurrentControlSet\Services.
2. Using regedit on the first host, export HKEY_LOCAL_MACHINE\SOFTWARE\ORACLE.
3. Use regedit to import the files created in step 1 and 2 to the failover host.
For Windows, NT services need to be created on the failover host. For an Enterprise Manager release 10.2.0.5 Management Agent, the following command can be used:
emctl create service [-user <username>] [-pwd <password>] -name <servicename>
Configuring Targets for Failover in Active/Passive Environments
Configuring Oracle Enterprise Manager for Active and Passive Environments 4-11
This has to be done once on the failover host after doing a failover.
4.3.9 Starting Up ServicesEnsure that you start your services in the proper order. Use the order listed below:
1. Establish IP address on the active node
2. Start the TNS listener (if it is part of the same failover group)
3. Start the database (if it is part of the same failover group)
4. Start Grid Control using opmnctl startall
5. Test functionality
In case of failover, refer to the following steps:
1. Establish IP on failover box
2. Start TNS listener using the command lsnrctl start if it is part of the same failover group
3. Start the database using the command dbstart if it is part of the same failover group
4. Start Grid Control using the command opmnctl startall
5. Test the functionality
4.3.10 SummaryThe OMS mid-tier component of Grid Control can now be deployed in a CFC environments that utilize a floating host name.
To deploy the repository database in a CFC environment, see Section 4.2, "Configuring Grid Control Repository in Active/Passive High Availability Environments".
4.4 Configuring Targets for Failover in Active/Passive EnvironmentsThis section provides a general reference for Grid Control administrators who want to relocate Cold Failover Cluster (CFC) targets from one existing Management Agent to another. Although the targets are capable of running on multiple nodes, these targets run only on the active node in a CFC environment.
CFC environments generally use a combination of cluster software to provide a virtual host name and IP address along with interconnected host and storage systems to share information and provide high availability for applications. Automating failover of the virtual host name and IP, in combination with relocating the Enterprise Manager targets and restarting the applications on the passive node, requires the use of Oracle Enterprise Manager command-line interface (EM CLI) and Oracle Clusterware (running Oracle Database release 10g or 11g) or third-party cluster software. Several Oracle partner vendors provide clusterware solutions in this area.
The Enterprise Manager Command Line Interface (EM CLI) allows you to access Enterprise Manager Grid Control functionality from text-based consoles (terminal sessions) for a variety of operating systems. Using EM CLI, you can perform Enterprise Manager Grid Control console-based operations, like monitoring and managing targets, jobs, groups, blackouts, notifications, and alerts. See the Oracle Enterprise Manager Command Line Interface manual for more information.
Configuring Targets for Failover in Active/Passive Environments
4-12 Oracle Enterprise Manager Advanced Configuration
4.4.1 Target Relocation in Active/Passive EnvironmentsBeginning with Oracle Enterprise Manager 10g release 10.2.0.5, a single Oracle Management Agent running on each node in the cluster can monitor targets configured for active / passive high availability. Only one Management Agent is required on each of the physical nodes of the CFC cluster because, in case of a failover to the passive node, Enterprise Manager can move the HA monitored targets from the Management Agent on the failed node to another Management Agent on the newly activated node using a series of EMCLI commands.
If your application is running in an active/passive environment, the clusterware brings up the applications on the passive node in the event that the active node fails. For Enterprise Manager to continue monitoring the targets in this type of configuration, the existing Management Agent needs additional configuration.
The following sections describe how to prepare the environment to automate and restart targets on the new active node. Failover and fallback procedures are also provided.
4.4.2 Installation and ConfigurationThe following sections describe how to configure Enterprise Manager to support a CFC configuration using the existing Management Agents communicating with the Oracle Management Service processes:
■ Prerequisites
■ Configuration Steps
4.4.2.1 PrerequisitesPrepare the Active/Passive environments as follows:
■ Ensure the operating system clock is synchronized across all nodes of the cluster. (Consider using Network Time Protocol (NTP) or another network synchronization method.)
■ Use the EM CLI RELOCATE_TARGETS command only with Enterprise Manager Release 10.2.0.5 (and higher) Management Agents.
4.4.2.2 Configuration StepsThe following steps show how to configure Enterprise Manager to support a CFC configuration using the existing Management Agents that are communicating with the OMS processes. The example that follows is based on a configuration with a two-node cluster that has one failover group. For additional information about targets running in CFC active/passive environments, see My Oracle Support note 406014.1.
1. Configure EM CLI
To set up and configure target relocation, use the Oracle Enterprise Manager command-line interface (EM CLI). See the Oracle Enterprise Manager Command Line Interface manual and the Oracle Enterprise Manager Extensibility manual for information about EM CLI and Management Plug-Ins.
2. Install Management Agents
Install the Management Agent on a local disk volume on each node in the cluster. Once installed, the Management Agents are visible in the Grid Control console.
3. Discover Targets
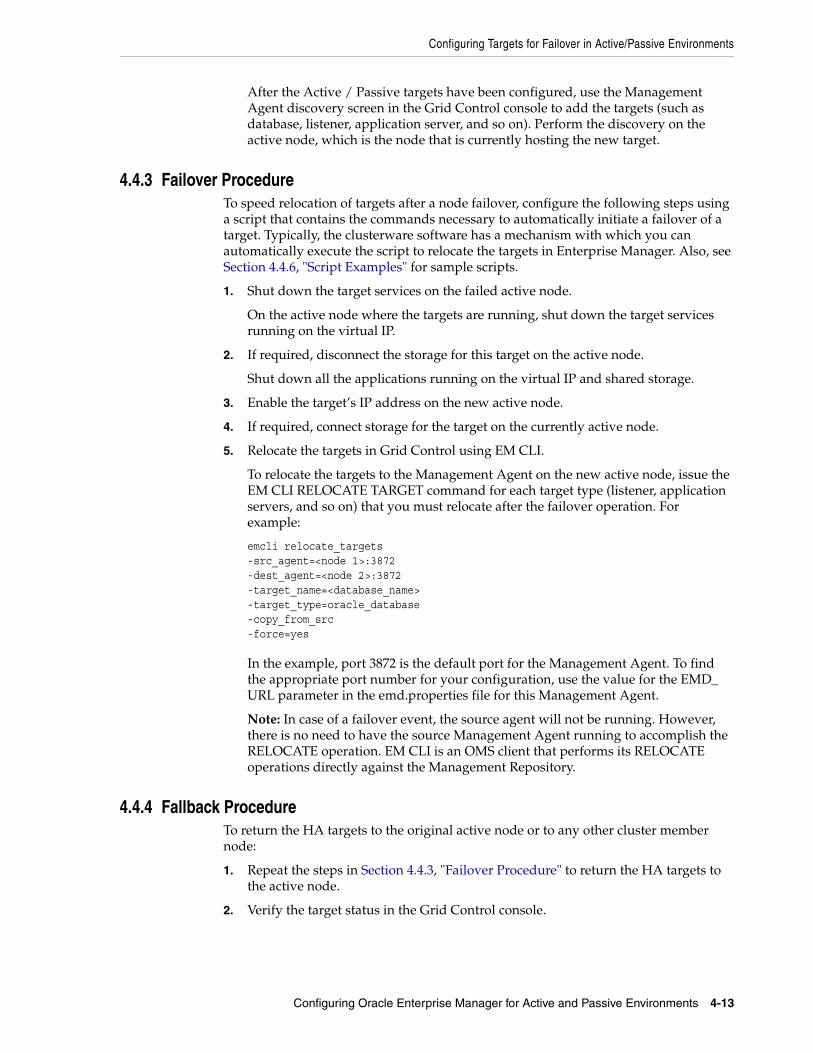
Configuring Targets for Failover in Active/Passive Environments
Configuring Oracle Enterprise Manager for Active and Passive Environments 4-13
After the Active / Passive targets have been configured, use the Management Agent discovery screen in the Grid Control console to add the targets (such as database, listener, application server, and so on). Perform the discovery on the active node, which is the node that is currently hosting the new target.
4.4.3 Failover ProcedureTo speed relocation of targets after a node failover, configure the following steps using a script that contains the commands necessary to automatically initiate a failover of a target. Typically, the clusterware software has a mechanism with which you can automatically execute the script to relocate the targets in Enterprise Manager. Also, see Section 4.4.6, "Script Examples" for sample scripts.
1. Shut down the target services on the failed active node.
On the active node where the targets are running, shut down the target services running on the virtual IP.
2. If required, disconnect the storage for this target on the active node.
Shut down all the applications running on the virtual IP and shared storage.
3. Enable the target’s IP address on the new active node.
4. If required, connect storage for the target on the currently active node.
5. Relocate the targets in Grid Control using EM CLI.
To relocate the targets to the Management Agent on the new active node, issue the EM CLI RELOCATE TARGET command for each target type (listener, application servers, and so on) that you must relocate after the failover operation. For example:
emcli relocate_targets-src_agent=<node 1>:3872 -dest_agent=<node 2>:3872-target_name=<database_name>-target_type=oracle_database-copy_from_src -force=yes
In the example, port 3872 is the default port for the Management Agent. To find the appropriate port number for your configuration, use the value for the EMD_URL parameter in the emd.properties file for this Management Agent.
Note: In case of a failover event, the source agent will not be running. However, there is no need to have the source Management Agent running to accomplish the RELOCATE operation. EM CLI is an OMS client that performs its RELOCATE operations directly against the Management Repository.
4.4.4 Fallback ProcedureTo return the HA targets to the original active node or to any other cluster member node:
1. Repeat the steps in Section 4.4.3, "Failover Procedure" to return the HA targets to the active node.
2. Verify the target status in the Grid Control console.
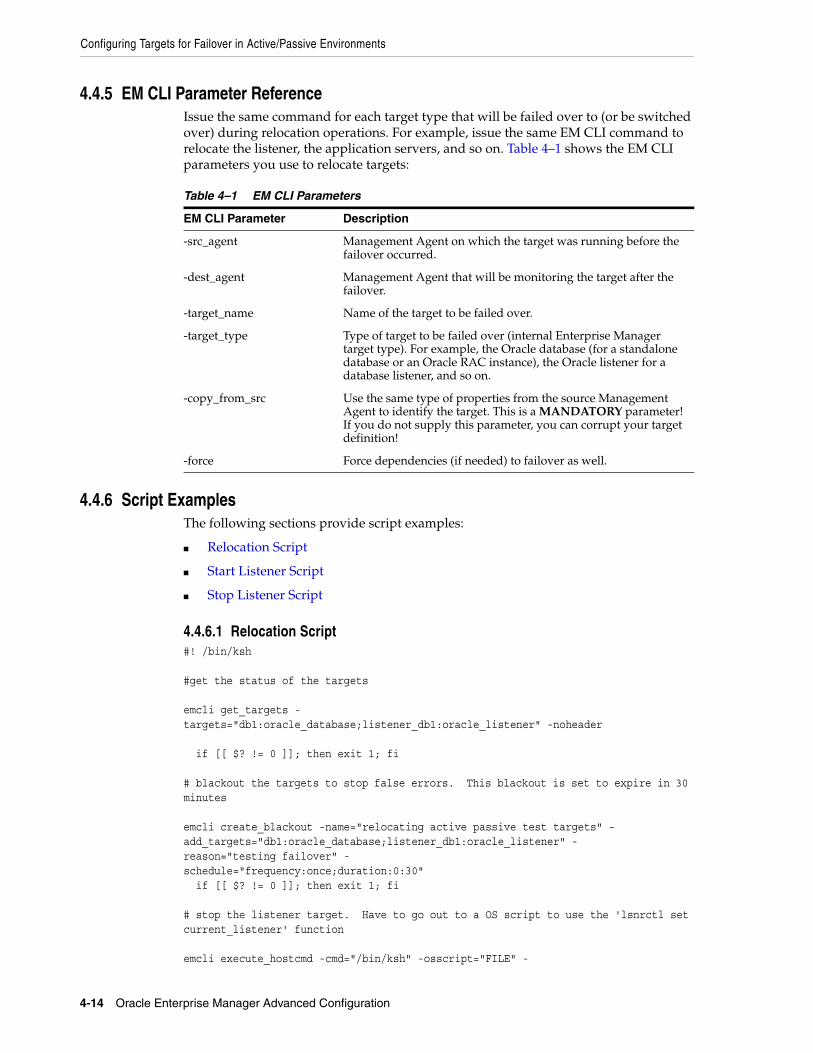
Configuring Targets for Failover in Active/Passive Environments
4-14 Oracle Enterprise Manager Advanced Configuration
4.4.5 EM CLI Parameter ReferenceIssue the same command for each target type that will be failed over to (or be switched over) during relocation operations. For example, issue the same EM CLI command to relocate the listener, the application servers, and so on. Table 4–1 shows the EM CLI parameters you use to relocate targets:
4.4.6 Script ExamplesThe following sections provide script examples:
■ Relocation Script
■ Start Listener Script
■ Stop Listener Script
4.4.6.1 Relocation Script#! /bin/ksh
#get the status of the targets
emcli get_targets -targets="db1:oracle_database;listener_db1:oracle_listener" -noheader
if [[ $? != 0 ]]; then exit 1; fi
# blackout the targets to stop false errors. This blackout is set to expire in 30 minutes
emcli create_blackout -name="relocating active passive test targets" -add_targets="db1:oracle_database;listener_db1:oracle_listener" -reason="testing failover" -schedule="frequency:once;duration:0:30" if [[ $? != 0 ]]; then exit 1; fi
# stop the listener target. Have to go out to a OS script to use the 'lsnrctl setcurrent_listener' function
emcli execute_hostcmd -cmd="/bin/ksh" -osscript="FILE" -
Table 4–1 EM CLI Parameters
EM CLI Parameter Description
-src_agent Management Agent on which the target was running before the failover occurred.
-dest_agent Management Agent that will be monitoring the target after the failover.
-target_name Name of the target to be failed over.
-target_type Type of target to be failed over (internal Enterprise Manager target type). For example, the Oracle database (for a standalone database or an Oracle RAC instance), the Oracle listener for a database listener, and so on.
-copy_from_src Use the same type of properties from the source Management Agent to identify the target. This is a MANDATORY parameter! If you do not supply this parameter, you can corrupt your target definition!
-force Force dependencies (if needed) to failover as well.

Configuring Targets for Failover in Active/Passive Environments
Configuring Oracle Enterprise Manager for Active and Passive Environments 4-15
input_file="FILE:/scratch/oraha/cfc_test/listener_stop.ksh" -credential_set_name="HostCredsNormal" -targets="host1.us.oracle.com:host" if [[ $? != 0 ]]; then exit 1; fi
# now, stop the database
emcli execute_sql -sql="shutdown abort" -targets="db1:oracle_database" -credential_set_name="DBCredsSYSDBA" if [[ $? != 0 ]]; then exit 1; fi
# relocate the targets to the new host
emcli relocate_targets -src_agent=host1.us.oracle.com:3872 -dest_agent=host2.us.oracle.com:3872 -target_name=db1 -target_type=oracle_database -copy_from_src -force=yes -changed_param=MachineName:host1vip.us.oracle.com if [[ $? != 0 ]]; then exit 1; fi
emcli relocate_targets -src_agent=host1.us.oracle.com:3872 -dest_agent=host2.us.oracle.com:3872 -target_name=listener_db1 -target_type=oracle_listener -copy_from_src -force=yes -changed_param=MachineName:host1vip.us.oracle.com if [[ $? != 0 ]]; then exit 1; fi
# Now, restart database and listener on the new host
emcli execute_hostcmd -cmd="/bin/ksh" -osscript="FILE" -input_file="FILE:/scratch/oraha/cfc_test/listener_start.ksh" -credential_set_name="HostCredsNormal" -targets="host2.us.oracle.com:host" if [[ $? != 0 ]]; then exit 1; fi
emcli execute_sql -sql="startup" -targets="db1:oracle_database" -credential_set_name="DBCredsSYSDBA" if [[ $? != 0 ]]; then exit 1; fi
# Time to end the blackout and let the targets become visible
emcli stop_blackout -name="relocating active passive test targets" if [[ $? != 0 ]]; then exit 1; fi
# and finally, recheck the status of the targets
emcli get_targets -targets="db1:oracle_database;listener_db1:oracle_listener" -noheader if [[ $? != 0 ]]; then exit 1; fi
4.4.6.2 Start Listener Script#!/bin/ksh
export
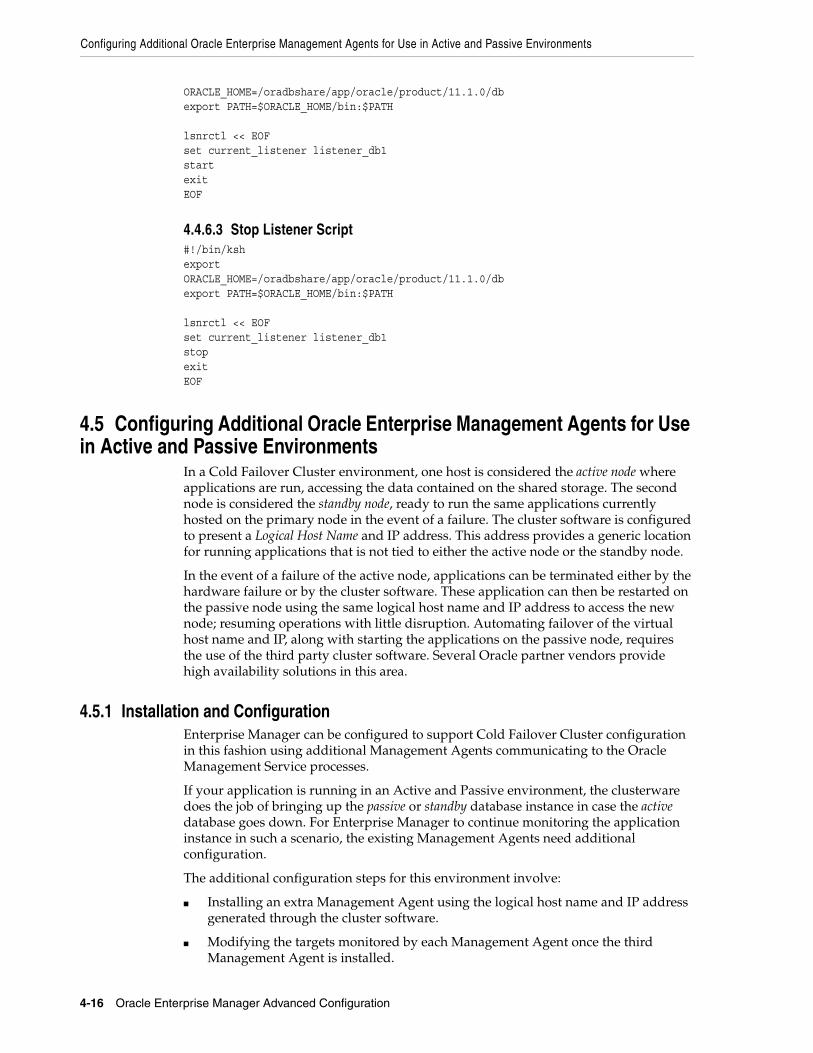
Configuring Additional Oracle Enterprise Management Agents for Use in Active and Passive Environments
4-16 Oracle Enterprise Manager Advanced Configuration
ORACLE_HOME=/oradbshare/app/oracle/product/11.1.0/dbexport PATH=$ORACLE_HOME/bin:$PATH
lsnrctl << EOFset current_listener listener_db1startexitEOF
4.4.6.3 Stop Listener Script#!/bin/kshexport ORACLE_HOME=/oradbshare/app/oracle/product/11.1.0/dbexport PATH=$ORACLE_HOME/bin:$PATH
lsnrctl << EOFset current_listener listener_db1stopexitEOF
4.5 Configuring Additional Oracle Enterprise Management Agents for Use in Active and Passive Environments
In a Cold Failover Cluster environment, one host is considered the active node where applications are run, accessing the data contained on the shared storage. The second node is considered the standby node, ready to run the same applications currently hosted on the primary node in the event of a failure. The cluster software is configured to present a Logical Host Name and IP address. This address provides a generic location for running applications that is not tied to either the active node or the standby node.
In the event of a failure of the active node, applications can be terminated either by the hardware failure or by the cluster software. These application can then be restarted on the passive node using the same logical host name and IP address to access the new node; resuming operations with little disruption. Automating failover of the virtual host name and IP, along with starting the applications on the passive node, requires the use of the third party cluster software. Several Oracle partner vendors provide high availability solutions in this area.
4.5.1 Installation and ConfigurationEnterprise Manager can be configured to support Cold Failover Cluster configuration in this fashion using additional Management Agents communicating to the Oracle Management Service processes.
If your application is running in an Active and Passive environment, the clusterware does the job of bringing up the passive or standby database instance in case the active database goes down. For Enterprise Manager to continue monitoring the application instance in such a scenario, the existing Management Agents need additional configuration.
The additional configuration steps for this environment involve:
■ Installing an extra Management Agent using the logical host name and IP address generated through the cluster software.
■ Modifying the targets monitored by each Management Agent once the third Management Agent is installed.
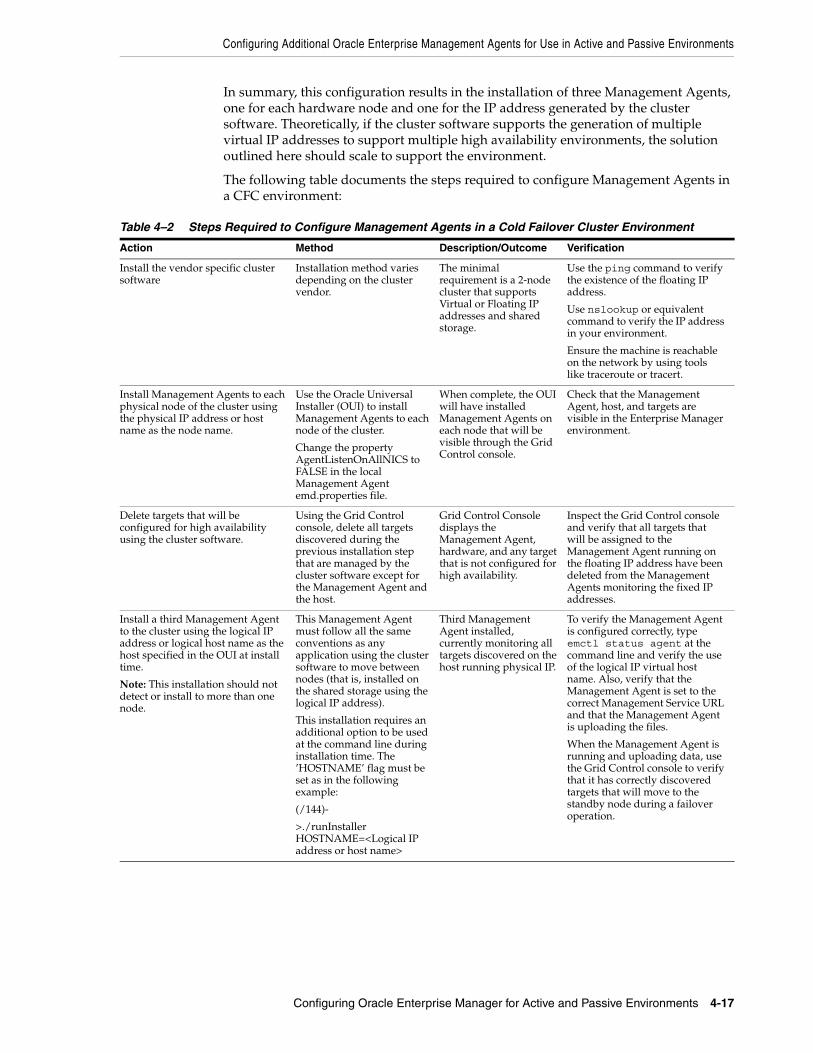
Configuring Additional Oracle Enterprise Management Agents for Use in Active and Passive Environments
Configuring Oracle Enterprise Manager for Active and Passive Environments 4-17
In summary, this configuration results in the installation of three Management Agents, one for each hardware node and one for the IP address generated by the cluster software. Theoretically, if the cluster software supports the generation of multiple virtual IP addresses to support multiple high availability environments, the solution outlined here should scale to support the environment.
The following table documents the steps required to configure Management Agents in a CFC environment:
Table 4–2 Steps Required to Configure Management Agents in a Cold Failover Cluster Environment
Action Method Description/Outcome Verification
Install the vendor specific cluster software
Installation method varies depending on the cluster vendor.
The minimal requirement is a 2-node cluster that supports Virtual or Floating IP addresses and shared storage.
Use the ping command to verify the existence of the floating IP address.
Use nslookup or equivalent command to verify the IP address in your environment.
Ensure the machine is reachable on the network by using tools like traceroute or tracert.
Install Management Agents to each physical node of the cluster using the physical IP address or host name as the node name.
Use the Oracle Universal Installer (OUI) to install Management Agents to each node of the cluster.
Change the property AgentListenOnAllNICS to FALSE in the local Management Agent emd.properties file.
When complete, the OUI will have installed Management Agents on each node that will be visible through the Grid Control console.
Check that the Management Agent, host, and targets are visible in the Enterprise Manager environment.
Delete targets that will be configured for high availability using the cluster software.
Using the Grid Control console, delete all targets discovered during the previous installation step that are managed by the cluster software except for the Management Agent and the host.
Grid Control Console displays the Management Agent, hardware, and any target that is not configured for high availability.
Inspect the Grid Control console and verify that all targets that will be assigned to the Management Agent running on the floating IP address have been deleted from the Management Agents monitoring the fixed IP addresses.
Install a third Management Agent to the cluster using the logical IP address or logical host name as the host specified in the OUI at install time.
Note: This installation should not detect or install to more than one node.
This Management Agent must follow all the same conventions as any application using the cluster software to move between nodes (that is, installed on the shared storage using the logical IP address).
This installation requires an additional option to be used at the command line during installation time. The ’HOSTNAME’ flag must be set as in the following example:
(/144)-
>./runInstaller HOSTNAME=<Logical IP address or host name>
Third Management Agent installed, currently monitoring all targets discovered on the host running physical IP.
To verify the Management Agent is configured correctly, type emctl status agent at the command line and verify the use of the logical IP virtual host name. Also, verify that the Management Agent is set to the correct Management Service URL and that the Management Agent is uploading the files.
When the Management Agent is running and uploading data, use the Grid Control console to verify that it has correctly discovered targets that will move to the standby node during a failover operation.
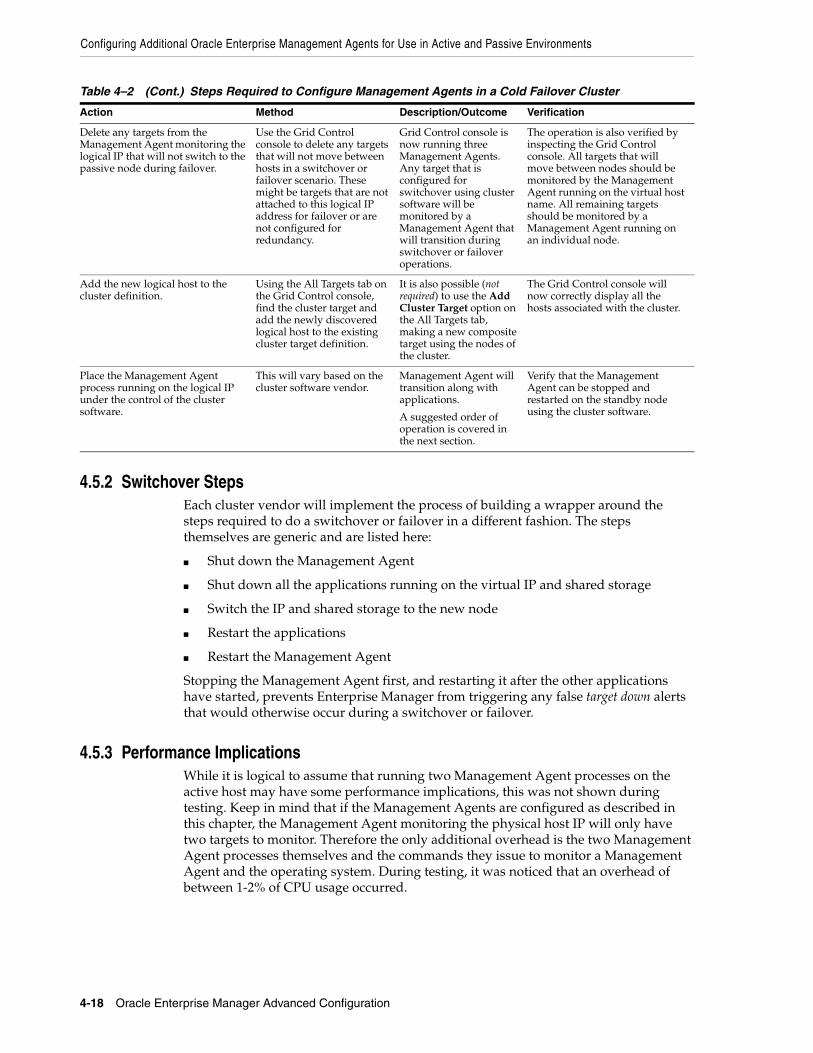
Configuring Additional Oracle Enterprise Management Agents for Use in Active and Passive Environments
4-18 Oracle Enterprise Manager Advanced Configuration
4.5.2 Switchover StepsEach cluster vendor will implement the process of building a wrapper around the steps required to do a switchover or failover in a different fashion. The steps themselves are generic and are listed here:
■ Shut down the Management Agent
■ Shut down all the applications running on the virtual IP and shared storage
■ Switch the IP and shared storage to the new node
■ Restart the applications
■ Restart the Management Agent
Stopping the Management Agent first, and restarting it after the other applications have started, prevents Enterprise Manager from triggering any false target down alerts that would otherwise occur during a switchover or failover.
4.5.3 Performance ImplicationsWhile it is logical to assume that running two Management Agent processes on the active host may have some performance implications, this was not shown during testing. Keep in mind that if the Management Agents are configured as described in this chapter, the Management Agent monitoring the physical host IP will only have two targets to monitor. Therefore the only additional overhead is the two Management Agent processes themselves and the commands they issue to monitor a Management Agent and the operating system. During testing, it was noticed that an overhead of between 1-2% of CPU usage occurred.
Delete any targets from the Management Agent monitoring the logical IP that will not switch to the passive node during failover.
Use the Grid Control console to delete any targets that will not move between hosts in a switchover or failover scenario. These might be targets that are not attached to this logical IP address for failover or are not configured for redundancy.
Grid Control console is now running three Management Agents. Any target that is configured for switchover using cluster software will be monitored by a Management Agent that will transition during switchover or failover operations.
The operation is also verified by inspecting the Grid Control console. All targets that will move between nodes should be monitored by the Management Agent running on the virtual host name. All remaining targets should be monitored by a Management Agent running on an individual node.
Add the new logical host to the cluster definition.
Using the All Targets tab on the Grid Control console, find the cluster target and add the newly discovered logical host to the existing cluster target definition.
It is also possible (not required) to use the Add Cluster Target option on the All Targets tab, making a new composite target using the nodes of the cluster.
The Grid Control console will now correctly display all the hosts associated with the cluster.
Place the Management Agent process running on the logical IP under the control of the cluster software.
This will vary based on the cluster software vendor.
Management Agent will transition along with applications.
A suggested order of operation is covered in the next section.
Verify that the Management Agent can be stopped and restarted on the standby node using the cluster software.
Table 4–2 (Cont.) Steps Required to Configure Management Agents in a Cold Failover Cluster
Action Method Description/Outcome Verification

Configuring Additional Oracle Enterprise Management Agents for Use in Active and Passive Environments
Configuring Oracle Enterprise Manager for Active and Passive Environments 4-19
4.5.4 SummaryGenerically, configuring Enterprise Manager to support Cold Cluster Failover environments encompasses the following steps.
■ Install a Management Agent for each virtual host name that is presented by the cluster and insure that the Management Agent is correctly communicating to the Management Service.
■ Configure the Management Agent that will move between nodes to monitor the appropriate highly available targets.
■ Verify that the Management Agent can be stopped on the primary node and restarted on the secondary node automatically by the cluster software in the event of a switchover or failover.

Configuring Additional Oracle Enterprise Management Agents for Use in Active and Passive Environments
4-20 Oracle Enterprise Manager Advanced Configuration
5
Backup, Recovery, and Disaster Recovery 5-1
5Backup, Recovery, and Disaster Recovery
Enterprise Manager’s distributed architecture necessitates a multi-pronged approach to backup, recovery and disaster recovery planning. This chapter covers practical approaches to implementing an efficient and robust backup and recovery environment and discusses the best practices for backup and recovery of different tiers of Enterprise Manager.
This chapter contains the following sections:
■ Backup and Recovery of Enterprise Manager
■ Repository Backup and Recovery
■ OMS Backup and Recovery
■ Agent Backup and Recovery
■ Recovering from a Compound OMS-Repository Failure
■ EMCTL High Availability Commands
5.1 Backup and Recovery of Enterprise ManagerAlthough Enterprise Manager functions as a single entity, technically, it is built on a distributed, multi-tier software architecture composed of the following software components:
■ Oracle Management Services (OMS)
■ Oracle Management Agent (Agent)
■ Oracle Management Repository (Repository)
Each component, being uniquely different in composition and function, requires different approaches to backup and recovery. For this reason, the backup and recovery strategies are discussed on a per-tier basis in this chapter. For an overview of the Enterprise Manager Architecture, refer to Enterprise Manager Grid Control Installation and Basic Configuration 10g Release 5 (10.2)
5.2 Repository Backup and RecoveryThe Repository is the storage location where all the information collected by the Agent gets stored. It consists of objects such as database jobs, packages, procedures, views, and tablespaces. Because it is configured in an Oracle Database, the backup and recovery strategies for the repository are essentially the same as those for the Oracle Database. Backup procedures for the database are well established standards and can
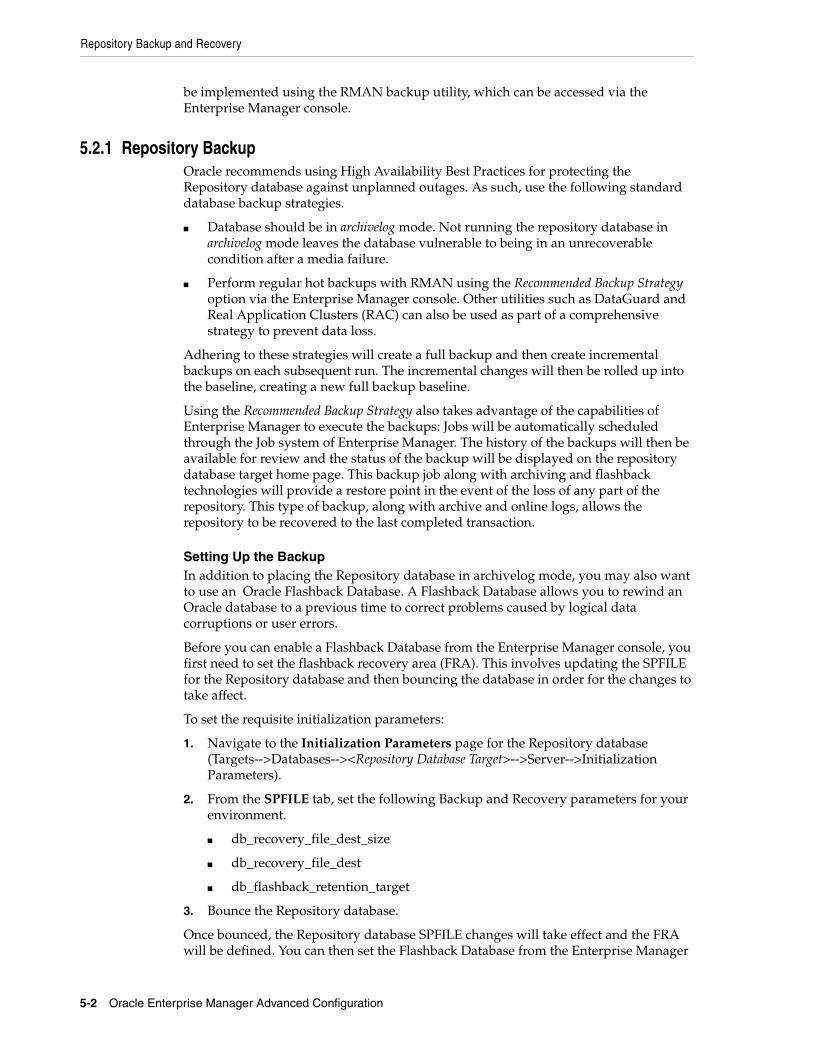
Repository Backup and Recovery
5-2 Oracle Enterprise Manager Advanced Configuration
be implemented using the RMAN backup utility, which can be accessed via the Enterprise Manager console.
5.2.1 Repository Backup Oracle recommends using High Availability Best Practices for protecting the Repository database against unplanned outages. As such, use the following standard database backup strategies.
■ Database should be in archivelog mode. Not running the repository database in archivelog mode leaves the database vulnerable to being in an unrecoverable condition after a media failure.
■ Perform regular hot backups with RMAN using the Recommended Backup Strategy option via the Enterprise Manager console. Other utilities such as DataGuard and Real Application Clusters (RAC) can also be used as part of a comprehensive strategy to prevent data loss.
Adhering to these strategies will create a full backup and then create incremental backups on each subsequent run. The incremental changes will then be rolled up into the baseline, creating a new full backup baseline.
Using the Recommended Backup Strategy also takes advantage of the capabilities of Enterprise Manager to execute the backups: Jobs will be automatically scheduled through the Job system of Enterprise Manager. The history of the backups will then be available for review and the status of the backup will be displayed on the repository database target home page. This backup job along with archiving and flashback technologies will provide a restore point in the event of the loss of any part of the repository. This type of backup, along with archive and online logs, allows the repository to be recovered to the last completed transaction.
Setting Up the BackupIn addition to placing the Repository database in archivelog mode, you may also want to use an Oracle Flashback Database. A Flashback Database allows you to rewind an Oracle database to a previous time to correct problems caused by logical data corruptions or user errors.
Before you can enable a Flashback Database from the Enterprise Manager console, you first need to set the flashback recovery area (FRA). This involves updating the SPFILE for the Repository database and then bouncing the database in order for the changes to take affect.
To set the requisite initialization parameters:
1. Navigate to the Initialization Parameters page for the Repository database (Targets-->Databases--><Repository Database Target>-->Server-->Initialization Parameters).
2. From the SPFILE tab, set the following Backup and Recovery parameters for your environment.
■ db_recovery_file_dest_size
■ db_recovery_file_dest
■ db_flashback_retention_target
3. Bounce the Repository database.
Once bounced, the Repository database SPFILE changes will take effect and the FRA will be defined. You can then set the Flashback Database from the Enterprise Manager
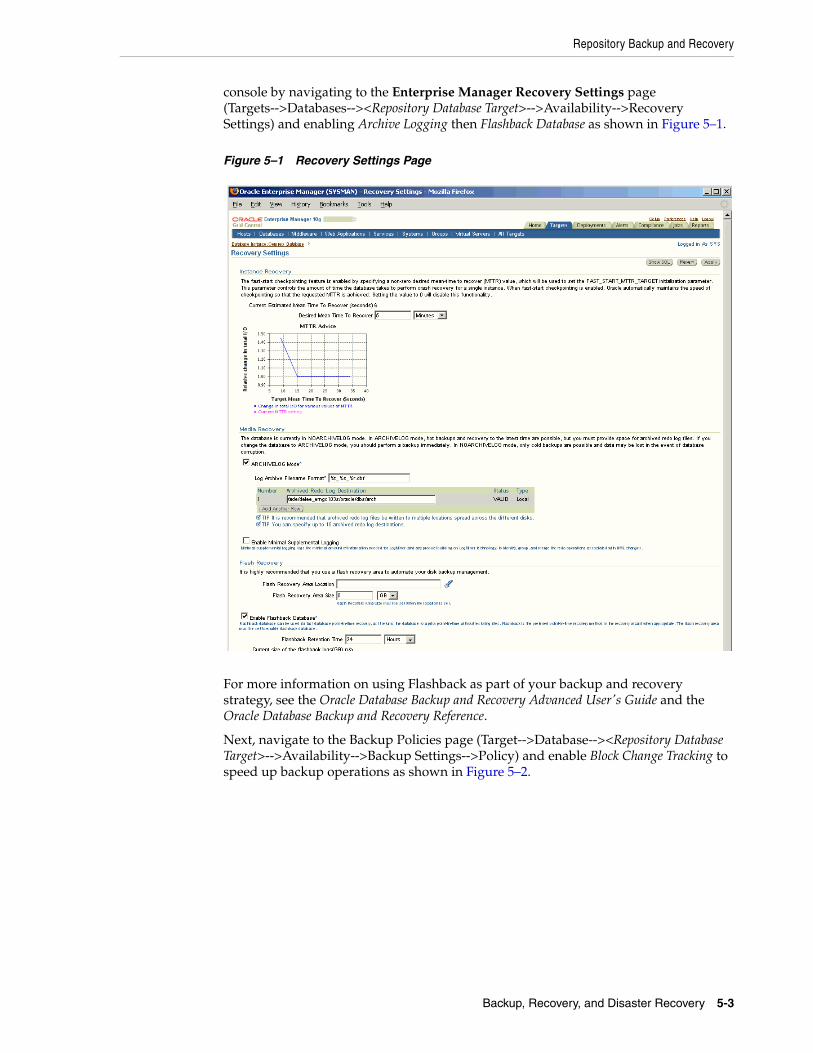
Repository Backup and Recovery
Backup, Recovery, and Disaster Recovery 5-3
console by navigating to the Enterprise Manager Recovery Settings page (Targets-->Databases--><Repository Database Target>-->Availability-->Recovery Settings) and enabling Archive Logging then Flashback Database as shown in Figure 5–1.
Figure 5–1 Recovery Settings Page
For more information on using Flashback as part of your backup and recovery strategy, see the Oracle Database Backup and Recovery Advanced User's Guide and the Oracle Database Backup and Recovery Reference.
Next, navigate to the Backup Policies page (Target-->Database--><Repository Database Target>-->Availability-->Backup Settings-->Policy) and enable Block Change Tracking to speed up backup operations as shown in Figure 5–2.
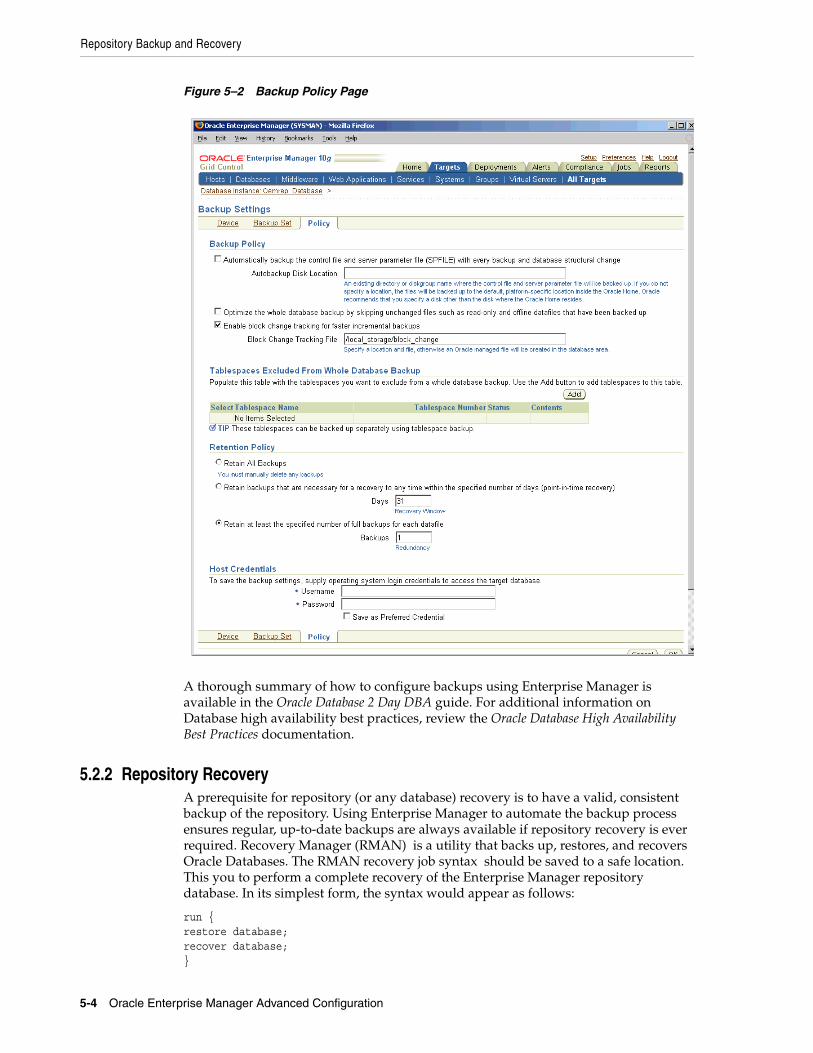
Repository Backup and Recovery
5-4 Oracle Enterprise Manager Advanced Configuration
Figure 5–2 Backup Policy Page
A thorough summary of how to configure backups using Enterprise Manager is available in the Oracle Database 2 Day DBA guide. For additional information on Database high availability best practices, review the Oracle Database High Availability Best Practices documentation.
5.2.2 Repository RecoveryA prerequisite for repository (or any database) recovery is to have a valid, consistent backup of the repository. Using Enterprise Manager to automate the backup process ensures regular, up-to-date backups are always available if repository recovery is ever required. Recovery Manager (RMAN) is a utility that backs up, restores, and recovers Oracle Databases. The RMAN recovery job syntax should be saved to a safe location. This you to perform a complete recovery of the Enterprise Manager repository database. In its simplest form, the syntax would appear as follows:
run {restore database;recover database;}
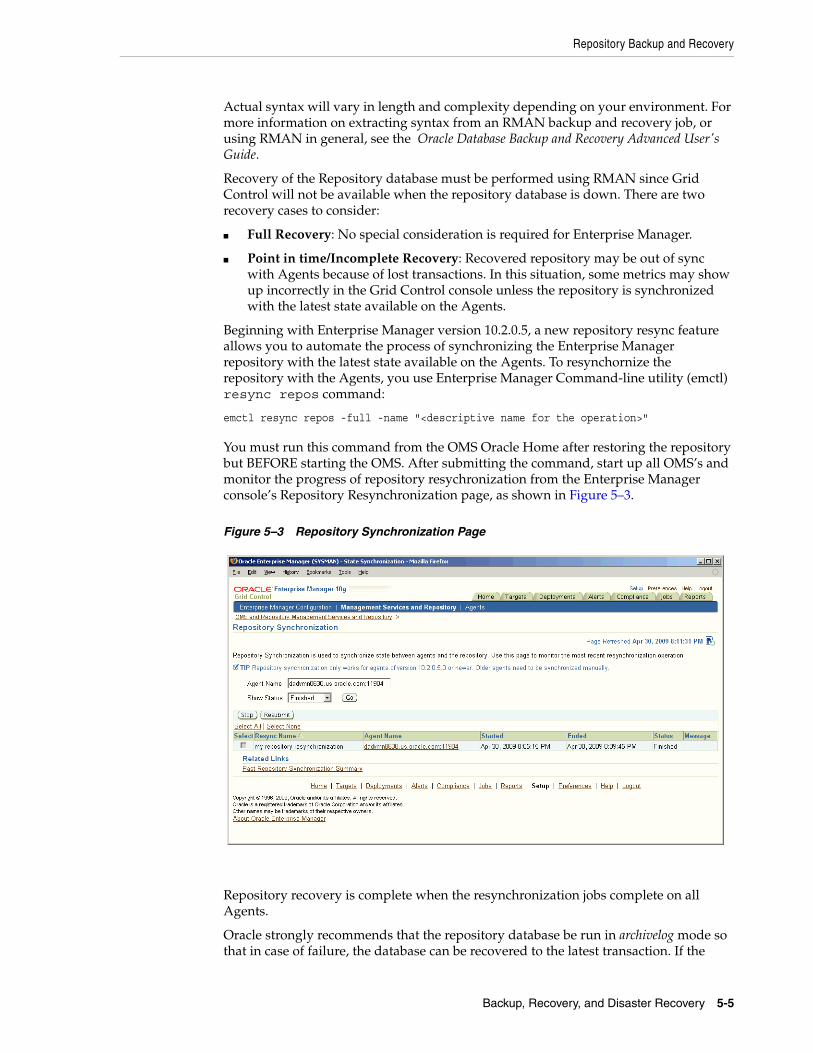
Repository Backup and Recovery
Backup, Recovery, and Disaster Recovery 5-5
Actual syntax will vary in length and complexity depending on your environment. For more information on extracting syntax from an RMAN backup and recovery job, or using RMAN in general, see the Oracle Database Backup and Recovery Advanced User's Guide.
Recovery of the Repository database must be performed using RMAN since Grid Control will not be available when the repository database is down. There are two recovery cases to consider:
■ Full Recovery: No special consideration is required for Enterprise Manager.
■ Point in time/Incomplete Recovery: Recovered repository may be out of sync with Agents because of lost transactions. In this situation, some metrics may show up incorrectly in the Grid Control console unless the repository is synchronized with the latest state available on the Agents.
Beginning with Enterprise Manager version 10.2.0.5, a new repository resync feature allows you to automate the process of synchronizing the Enterprise Manager repository with the latest state available on the Agents. To resynchornize the repository with the Agents, you use Enterprise Manager Command-line utility (emctl) resync repos command:
emctl resync repos -full -name "<descriptive name for the operation>"
You must run this command from the OMS Oracle Home after restoring the repository but BEFORE starting the OMS. After submitting the command, start up all OMS’s and monitor the progress of repository resychronization from the Enterprise Manager console’s Repository Resynchronization page, as shown in Figure 5–3.
Figure 5–3 Repository Synchronization Page
Repository recovery is complete when the resynchronization jobs complete on all Agents.
Oracle strongly recommends that the repository database be run in archivelog mode so that in case of failure, the database can be recovered to the latest transaction. If the
Repository Backup and Recovery
5-6 Oracle Enterprise Manager Advanced Configuration
database cannot be recovered to the last transaction, Repository Synchronization can be used to restore monitoring capabilities for targets that existed when the last backup was taken. Actions taken after the backup will not be recovered automatically. Some examples of actions that will not be recovered automatically by Repository Synchronization are:
■ Notification Rules
■ Preferred Credentials
■ Groups, Services, Systems
■ Jobs/Deployment Procedures
■ Custom Reports
■ New Agents
Manually Resynchronizing AgentsThe Enterprise Manager Repository Synchronization feature can only be used for Agents 10.2.0.5 or later. Older Agents must be resynchronized manually using the following procedure:
1. Shut down the Agent.
2. Delete the agentstmp.txt, lastupld.xml, state/* and upload/* files from the $AGENT_HOME/sysman/emd directory.
3. Restart the Agent.
5.2.3 Recovery ScenariosThe following scenarios illustrate various repository recovery situations along with the recovery steps.
5.2.3.1 Full Recovery on the Same HostRepository database is running in archivelog mode. Recent backup, archive log files and redo logs are available. The repository database crashes.
Resolution:
1. Stop the OMS(s) using opmnctl stopall.
2. Recover the database using RMAN
3. Bring the site up using opmnctl startall on all OMS(s)
4. No further action is required.
5. Verify that the site is fully operational.
5.2.3.2 Incomplete Recovery on the Same HostRepository database is running in noarchivelog mode. Full offline backup is available. The repository database crashes.
Resolution:
1. Stop the OMS(s) using opmnctl stopall.
2. Recover the database using RMAN
3. Initiate Repository Resync using emctl resync repos -full -name "<resync name>" from one of the OMS Oracle home.

Repository Backup and Recovery
Backup, Recovery, and Disaster Recovery 5-7
4. Start OMS(s) using opmnctl startall.
5. Manually fix all pre-10.2.0.5 Agents by shutting down the Agent, deleting the agentstmp.txt, lastupld.xml, state/* and upload/* files under the $AGENT_HOME/sysman/emd directory. Restart the Agent.
6. Log into Grid Control. Navigate to Management Services and Repository Overview page. Click on Repository Synchronization under Related Links. Monitor the status of resync jobs. Resubmit failed jobs, if any, after fixing the error.
7. Verify that the site is fully operational.
5.2.3.3 Full Recovery on a Different HostThe repository database is running on host "A" in archivelog mode. Recent backup, archive log files and redo logs are available. Host "A" is lost due to hardware failure.
Resolution:
1. Stop the OMS(s) using opmnctl stopall.
2. Recover the database using RMAN on a different host (host "B").
3. Change the connect descriptor in each OMS emoms.properties file to point to database on host "B".
4. Start the OMS(s) using opmnctl startall.
5. Relocate the repository database target to the Agent running on host "B" by running the following command from the OMS:
$emctl config repos -host <hostB> -oh <OH of repository on hostB> -conn_desc "<TNS connect descriptor>"
6. Change the monitoring configuration for the OMS and Repository target: by running the following command from the OMS:
$emctl config emrep -conn_desc "<TNS connect descriptor>"
7. Verify that the site is fully operational.
5.2.3.4 Incomplete Recovery on a Different HostThe repository database is running on host "A" in noarchivelog mode. Full offline backup is available. Host "A" is lost due to hardware failure.
Resolution:
1. Stop the OMS(s) using opmnctl stopall.
2. Recover the database using RMAN on a different host (host "B").
Note: This command can only be used to relocate the repository database under the following conditions:
■ An Agent is already running on this machine.
■ No database on host "B" has been discovered.
If a new Agent had been installed on host "B", you must ensure there are NO previously discovered database targets.
OMS Backup and Recovery
5-8 Oracle Enterprise Manager Advanced Configuration
3. Change the connect descriptor in each OMS emoms.properties file to point to the database on host "B".
4. Initiate Repository Resync:
emctl resync repos -full -name "<resync name>"
from one of the OMS Oracle homes.
5. Start the OMS(s) using opmnctl startall
6. Run the command to relocate the repository database target to the Agent running on host "B":
emctl config repos -agent <agent on host B> -host <hostB> -oh <OH of repository on hostB> -conn_desc "<TNS connect descriptor>"
7. Run the command to change monitoring configuration for the OMS and Repository target:
emctl config emrep -conn_desc "<TNS connect descriptor>"
8. Manually fix all pre-10.2.0.5 Agents by shutting down the Agent, deleting the agentstmp.txt, lastupld.xml, state/* and upload/* files under the $AGENT_HOME/sysman/emd directory. Restart the Agent.
9. Log into Grid Control. Navigate to Management Services and Repository Overview page. Click on Repository Synchronization under Related Links. Monitor the status of resync jobs. Resubmit failed jobs, if any, after fixing the error mentioned.
10. Verify that the site is fully operational.
5.3 OMS Backup and RecoveryThe OMS is a J2EE Web application that orchestrates with Management Agents to discover targets, monitor and manage them, and store the collected information in a repository for future reference and analysis. The OMS also renders the Web interface for the Enterprise Manager console.
5.3.1 Backing Up the OMSThe OMS is generally stateless. Some transient and configuration data is stored on the OMS file system. The shared loader “recv”directory stores metric data uploaded from Agents temporarily before the data is loaded into the repository. If an OMS goes down, other surviving OMS(s) upload the data stored in the shared loader location. In a High Availability (HA) configuration, the shared loader receive directory should be protected using some HA storage technology.
Beginning with Enterprise Manager version 10.2.0.5, a snapshot of OMS configuration can be taken using the emctl exportconfig oms command.
emctl exportconfig oms [-sysman_pwd <sysman password>] [-dir <backup dir>] Specify directory to store backup file [-keep_host] Specify this parameter if the OMS was installed using a virtual hostname. For example: ORACLE_HOSTNAME
Running exportconfig captures a snapshot of the OMS at a given point in time, thus allowing you to back up the most recent OMS configuration on a regular basis. If
OMS Backup and Recovery
Backup, Recovery, and Disaster Recovery 5-9
required, the most recent snapshot can then be restored on a fresh OMS installation on the same or different host.
5.3.2 Recovering the OMSIf an OMS is lost, it should be reinstalled using “Installing Software-Only and Configuring Later". This is an additional Management Service option documented in the Oracle Enterprise Manager Grid Control Installation and Basic Configuration guide. The OMS configuration can then be restored with the following command:
emctl importconfig oms
Use export file backed up earlier. This command is available beginning with Enterprise Manager version 10.2.0.5.
5.3.3 OMS Recovery ScenariosThe following scenarios illustrate various OMS recovery situations along with the recovery steps.
5.3.3.1 Single OMS with No Server Load Balancer (SLB). OMS Restored on the same HostSingle OMS site. No SLB is present. The OMS configuration was backed up using the emctl exportconfig oms command. OMS is lost.
Resolution:
1. If possible, deinstall the OMS and Agent OracleHomes using the Oracle Universal Installer (OUI).
2. Reinstall the OMS using “Install Software only, configure later” – Additional management service option. Location of the install need not be same as the previous install.
3. Import the OMS configuration:
emctl importconfig oms -file <exportfile>
Important: A prerequisite for recovery is to have recent, valid OMS configuration backups available. Oracle recommends that you back up the OMS using the emctl exportconfig oms command whenever an OMS configuration change is made. Alternatively, you can run this command on a regular basis using the Enterprise Manager job system.
Note: This step only applies if there is some remnant of the OMS still exists on the file system. Deinstallation of the OMS using OUI would not be possible if the OMS was lost as a result of disk/media failure.
OMS Backup and Recovery
5-10 Oracle Enterprise Manager Advanced Configuration
At this point two options exist depending upon the port used by the reinstalled Agent that comes along with the OMS:
Option A: Agent uses the same port as the previous installation.
■ OMS automatically blocks the Agent. Resync the Agent from Agent homepage
Option B: Agent uses a different port.
■ Run the command to relocate the OMS and Repository target to reinstalled Agent:
emctl config emrep -agent <reinstalled agent>
■ Locate duplicate targets from the Management Services and Repository Overview page. Relocate duplicate targets from the old agent to the reinstalled Agent. Delete the old Agent.
4. Verify that the site is fully operational.
5.3.3.2 Single OMS, No SLB, OMS Restored on a Different HostSingle OMS site. The OMS is running on host "A." No SLB is present. The OMS configuration was backed up using the emctl exportconfig oms command. Host "A" is lost.
Resolution:
1. Reinstall the OMS using “Install Software only, configure later” – Additional management service option. Location of install need not be same as earlier install.
2. Import the OMS configuration:
emctl importconfig oms -file <exportfile>
At this point, two possibilities exist depending upon your network setup
3. Option A: Make host "B" reachable with hostname host "A"
■ Update the network information on host "B" so that it is reachable using the old host name from host "A." This can be done by multi-homing and adding an additional IP of host "A" to host "B".
■ Resecure the OMS
emctl secure oms -host <host A>
■ Resecure the Agent on host "B".
emctl secure agent -emdWalletUrlSrc "http://hostA:<httpport>/em"
Important: When using the importconfig command, the following restrictions apply:
■ The OMS configuration import can only be performed between the same operating system types.
■ The OMS configuration must be imported into the same version OMS.
■ Importing the OMS configuration only copies information which is unique to the installation (for example, emkey). For this reason, you should not use the importconfig command to copy OMS configurations across different Repositories.
OMS Backup and Recovery
Backup, Recovery, and Disaster Recovery 5-11
Option B: Change the OMS to which all Agents point and then resecure all Agents
■ Make all Agents in the deployment point to new OMS running on host "B". On each Agent, run the following command
emctl secure agent -emdWalletUrlSrc "http://hostB:<httpport>/em"
Run the command to relocate OMS and Repository target to Agent "B":
emctl config emrep -agent <agent on host "B">.
4. Locate duplicate targets from the Management Services and Repository Overview page of the Enterprise Manager console. Clicking the Duplicate Targets link, will bring you to the Duplicate Targets page. To resolve duplicate target errors, the duplicate target must be renamed on the conflicting Agent.
5. Verify that the site is fully operational.
5.3.3.3 Multiple OMS, Server Load Balancer configured, OMS restored on the same hostMultiple OMS site. All OMSs fronted by an SLB. OMS configuration backed up using the emctl exportconfig oms command. One OMS is lost.
Resolution:
1. Deinstall the OMS and Agent OracleHomes using the Oracle Universal Installer.
2. Reinstall the OMS on same host using “Install Software only, configure later” – Additional management service option. Location of the install need not be the same as the earlier install.
3. Import the OMS configuration:
emctl importconfig oms -file <exportfile>
4. Resecure the Agent that gets installed along with OMS.
emctl secure agent -emdWalletSrcUrl"http://slb:<httpport>/em"
Because the Agent that is installed with the OMS uses the same port as before, the OMS automatically blocks the Agent. You need to "resync" the Agent from the Agent homepage.
5. Verify that the site is fully operational.
Note: Because the new machine uses the same hostname as the old machine, all the Agents in your monitored environment already know where to locate the new OMS.
Note: Because the new machine is using a different hostname from the one originally hosting the OMS, all Agents in your monitored environment must be told where to find the new OMS.
Agent Backup and Recovery
5-12 Oracle Enterprise Manager Advanced Configuration
5.3.3.4 Multiple OMS, Server Load Balancer configured, OMS restored on a different hostMultiple OMS site. OMSs fronted by Server Load Balancers. OMS configuration backed up using the emctl exportconfig oms command. OMS on host "A" is lost.
1. Ensure that shared loader receive directory and shared software library locations are accessible from the new OMS host (host "B")
2. Reinstall OMS on host "B" using the “Install Software only, configure later” – management service option. Location of the install need not be same as previous install.
3. Import the OMS configuration:
emctl importconfig oms -file <exportfile>
4. Resecure the Agent that gets installed along with OMS
emctl secure agent -emdWalletSrcUrl"http://slb:<httpport>/em"
5. Relocate the OMS and Repository target to reinstalled Agent:
emctl config emrep -agent <agent on hostB>
6. Locate duplicate targets from the Management Services and Repository Overview page. Relocate duplicate targets from the Agent on host "A" to the Agent on host "B". Delete the Agent on host "A".
7. Configure the SLB to include this new host in its configuration.
Comment: Is there an SLB note that covers this?
8. Verify that the site is fully operational.
5.4 Agent Backup and RecoveryThe Agent is an integral software component that is deployed on each monitored host. It is responsible for monitoring all the targets running on those hosts, communicating that information to the middle-tier OMS and managing and maintaining the hosts and its targets.
5.4.1 Backing Up AgentsThere are no special considerations for backing up Agents. As a best practice, reference Agent installs should be maintained for different platforms and kept up-to-date in terms of customizations in the emd.properties file and patches applied. Use Deployment options from the Grid Control console to install and maintain Reference Agent installs.
5.4.2 Recovering AgentsIf an Agent is lost, it should be reinstalled by cloning from a reference install. Cloning from a reference install is often the fastest way to recover an Agent install as one does not have to track and reapply customizations and patches. Care should be taken to reinstall the Agent using the same port. Using the Enterprise Manager’s Agent Resynchronization feature, a reinstalled Agent can be reconfigured using target information present in the repository. When the Agent is reinstalled using the same port, the OMS detects that it has been re-installed and blocks it temporarily to prevent the auto-discovered targets in the re-installed Agent from overwriting any customizations done previously.
Agent Backup and Recovery
Backup, Recovery, and Disaster Recovery 5-13
The Agent can be resynchronized and unblocked from the Agent homepage by clicking on the Resynchronize Agent button. Resynchronization pushes all targets from the repository to the Agent and then unblocks the Agent.
5.4.3 Agent Recovery ScenariosThe following scenarios illustrate various Agent recovery situations along with the recovery steps. The Agent resynchronization feature requires that a reinstalled Agent use the same port as the previous Agent that crashed.
5.4.3.1 Agent reinstall, same port. An Agent is monitoring multiple targets. The Agent install is lost.
1. Deinstall Agent OracleHome using the Oracle Universal Installer.
2. Install a new Agent or use the Agent clone option to reinstall the Agent though Enterprise Manager. Specify the same port as used by the crashed Agent. The location of install need not be same as previous install.
The OMS detects that Agent has been re-installed and blocks the Agent.
3. Initiate Agent Resynchronization from the Agent homepage.
All targets in the repository are pushed to the new Agent and Agent is unblocked.
4. Reconfigure User-defined Metrics if the location of User-defined Metric scripts have changed.
5. Verify that the Agent is operational and all target configurations have been restored.
5.4.3.2 Agent restore from filesystem backupAn Agent is monitoring multiple targets. File system backup for the Agent OracleHome exists. The Agent install is lost.
1. Deinstall Agent OracleHome using OUI.
2. Restore the Agent from file system backup. Start the Agent.
OMS detects that Agent has been restored from backup and blocks the Agent
3. Initiate Agent Resynchronization from the Agent homepage.
All targets in the repository are pushed to the new Agent and Agent is unblocked.
4. Verify that the Agent is functional and all target configurations have been restored using the following emctl commands:
emctl status agentemctl upload agent
There should be no errors and no XML files in the backlog.
Blocked Agents: A blocked Agent is a condition where the OMS rejects all heartbeat or upload requests from the blocked Agent. Hence, a blocked Agent will not be able to upload any alerts or metric data to the OMS. However, blocked Agents continue to collect monitoring data.
Recovering from a Compound OMS-Repository Failure
5-14 Oracle Enterprise Manager Advanced Configuration
5.5 Recovering from a Compound OMS-Repository FailureWhen both OMS and repository fail simultaneously, the recovery situation becomes more complex depending upon factors such as whether the OMS and repository are collocated, whether recovery has to be made on the same or different host, or whether there are multiple OMSs fronted by an SLB. In general, the order of recovery for this type of compound failure should be repository first followed by OMS(s) following the steps outlined in the appropriate recovery scenarios discussed earlier. The following scenarios illustrate two OMS-Repository failures and the requisite recovery steps.
5.5.1 Collapsed configuration, recovery on the same host, incomplete recovery of repository
Repository and the OMS are installed on same host (host "A"). No Server Load Balancer is configured. The repository database is running in noarchivelog mode. Full cold backup is available. Export of OMS configuration via emctl exportconfig oms is available. The repository, OMS and the Agent crash.
1. Recover the repository database using RMAN.
2. Since the OMS OracleHome is not available and repository resynchronization has to be initiated before starting an OMS against the restored repository, submit "resync" via the following PL/SQL block. Log into the repository as SYSMAN using SQLplus and run:
begin emd_maintenance.full_repository_resync('<resync name>'); end;
3. Deinstall the crashed OMS and Agent OracleHomes using OUI.
4. Reinstall the OMS using “Install Software only, configure later”. This is an additional management service option. Location of the install need not be same as previous install.
5. Import the OMS configuration:
emctl importconfig oms -file <exportfile>
Because the Agent that is installed with the OMS uses the same port as before, the OMS automatically blocks the Agent. At this point, you must "resync" the Agent from the Agent homepage.
6. Manually fix all pre-10.2.0.5 Agents by shutting down the Agent, deleting the agentstmp.txt, lastupld.xml, state/* and upload/* files under $AGENT_HOME/sysman/emd directory. Restart the Agent.
7. Log into Enterprise Manager and navigate to the Management Services and Repository Overview page. Click on Repository Synchronization under Related Links. Monitor the status of resync jobs. Resubmit failed jobs, if any, after fixing the errors.
8. Verify that the site is fully operational.
Note: he Repository Synchronization function will automatically fix all 10.2.0.5 and later Agents.
Recovering from a Compound OMS-Repository Failure
Backup, Recovery, and Disaster Recovery 5-15
5.5.2 Distributed configuration, Multi-OMS with SLB, recovery on different hosts, incomplete recovery of repository
Repository installed on host "X". Two OMSs are installed-- one on host "A" and one on host "B". OMSs are fronted by an SLB. Repository database running in noarchivelog mode. Full offline backup available. Host "X" and host "B" are lost.
1. Stop the OMS on host "A" using opmnctl stopall
2. Recover the database using RMAN on new host "Y"
3. Update the connect descriptor in the emoms.properties file on host "A" to point to host "Y".
4. Initiate Repository resynchronization:
emctl resync repos -full -name "<resync name>"
from the OMS Oracle home of host "A"
5. Run the command to relocate and reconfigure the repository database target:
emctl config repos -agent <agent on hostY> -oh <OH on hostY> -host <hostY> -conn_desc "<TNS connect descriptor>"
6. Export latest OMS configuration from host "A":
emctl exportconfig oms -dir <export location>
7. Ensure that shared loader receive directory and shared software library locations are accessible from the host "C".
8. Start the OMS on hostA using opmnctl startall
9. Reinstall the OMS on host "C" using the “Install Software only, configure later” – Additional management service option. Location of install need not be same as previous install.
10. Import the OMS configuration:
emctl importconfig oms -file <exportfile>
11. Update the SLB pools by replacing host "B" entries with host "C".
12. Resecure the Agent that gets installed along with OMS on host "C"
emctl secure agent -emdWalletSrcUrl "http://slb/:<httpport>/em"
13. Relocate and reconfigure the OMS and Repository target:
emctl config emrep -agent <agent on hostC> -conn_desc "<TNS connect descriptor>"
14. Locate duplicate targets from the Management Services and Repository Overview page. Relocate duplicate targets from Agent "B" to Agent "C". Delete the old Agent on host "B".
15. Manually fix all pre-10.2.0.5 Agents by shutting down the Agent, deleting the agentstmp.txt, lastupld.xml, state/* and upload/* files under $AGENT_HOME/sysman/emd directory. Restart the Agent.
16. Login to Grid Control and navigate to the Management Services and Repository Overview page. Click on Repository Synchronization under Related Links. Monitor the status of resync jobs. Resubmit failed jobs, if any , after fixing any errors mentioned.
17. Verify that the site is fully operational.
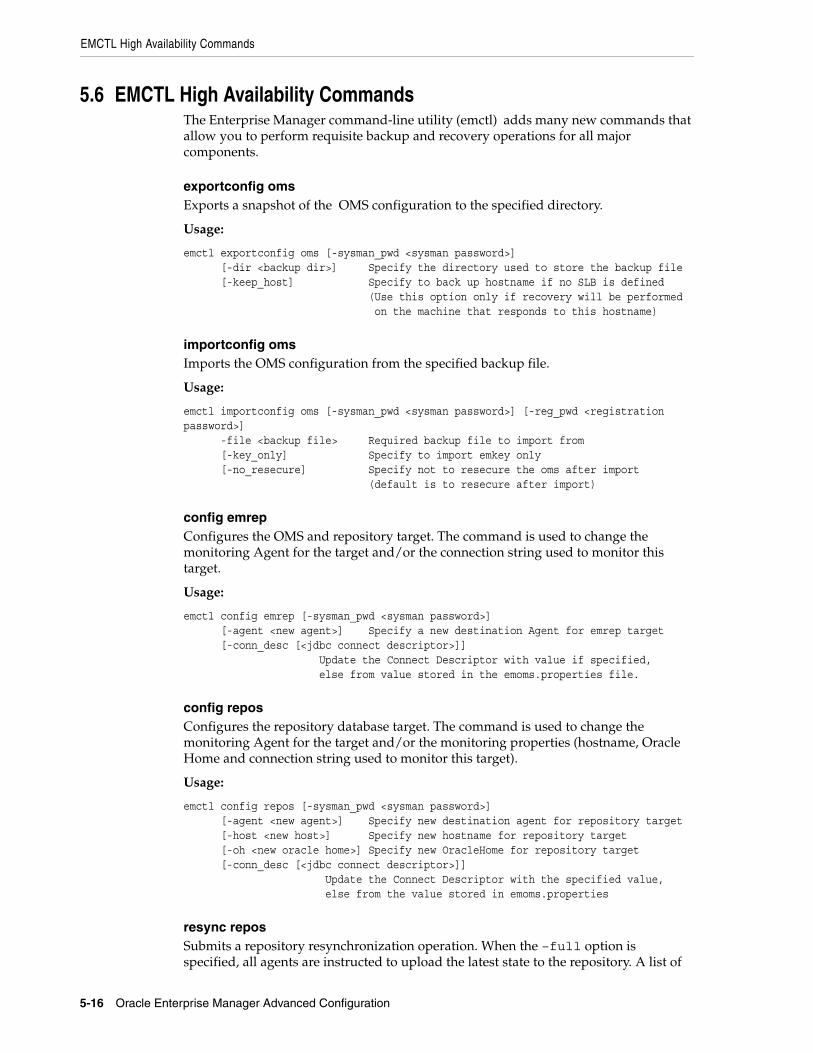
EMCTL High Availability Commands
5-16 Oracle Enterprise Manager Advanced Configuration
5.6 EMCTL High Availability CommandsThe Enterprise Manager command-line utility (emctl) adds many new commands that allow you to perform requisite backup and recovery operations for all major components.
exportconfig omsExports a snapshot of the OMS configuration to the specified directory.
Usage:
emctl exportconfig oms [-sysman_pwd <sysman password>] [-dir <backup dir>] Specify the directory used to store the backup file [-keep_host] Specify to back up hostname if no SLB is defined (Use this option only if recovery will be performed on the machine that responds to this hostname)
importconfig omsImports the OMS configuration from the specified backup file.
Usage:
emctl importconfig oms [-sysman_pwd <sysman password>] [-reg_pwd <registration password>] -file <backup file> Required backup file to import from [-key_only] Specify to import emkey only [-no_resecure] Specify not to resecure the oms after import (default is to resecure after import)
config emrepConfigures the OMS and repository target. The command is used to change the monitoring Agent for the target and/or the connection string used to monitor this target.
Usage:
emctl config emrep [-sysman_pwd <sysman password>] [-agent <new agent>] Specify a new destination Agent for emrep target [-conn_desc [<jdbc connect descriptor>]] Update the Connect Descriptor with value if specified, else from value stored in the emoms.properties file.
config reposConfigures the repository database target. The command is used to change the monitoring Agent for the target and/or the monitoring properties (hostname, Oracle Home and connection string used to monitor this target).
Usage:
emctl config repos [-sysman_pwd <sysman password>] [-agent <new agent>] Specify new destination agent for repository target [-host <new host>] Specify new hostname for repository target [-oh <new oracle home>] Specify new OracleHome for repository target [-conn_desc [<jdbc connect descriptor>]] Update the Connect Descriptor with the specified value, else from the value stored in emoms.properties
resync reposSubmits a repository resynchronization operation. When the –full option is specified, all agents are instructed to upload the latest state to the repository. A list of

EMCTL High Availability Commands
Backup, Recovery, and Disaster Recovery 5-17
agents can be specified using the –agentlist option to resync with a given list of agents.
Usage:
emctl resync repos (-full|-agentlist "agent names") [-name "resync name"] [-sysman_pwd "sysman password"]
abortresync reposAborts the currently running repository resynchronization operation. Use the –full option to stop a full repository resynchronization. Use the –agentlist option to stop resync on a list of agents.
Usage:
emctl abortresync repos (-full|-agentlist "agent names") -name "resync name" [-sysman_pwd "sysman password"]
statusresync reposLists the status of given repository resynchronization operation.
Usage:
emctl statusresync repos -name "resync name"
create serviceValid on Windows only. The command creates a service for the Oracle Management Services on Windows. You use this command to manage the Windows service for the OMS on a failover host in a Cold Failover Cluster setup.
Usage:
emctl create service [-user <username>] [-pwd <password>] -name <servicename> Name of service to be created
delete serviceValid on Windows only. Deletes the service for the Oracle Management Services on Windows.
Usage:
emctl delete service -name <servicename> Name of service to be deleted
resyncAgentResynchronizes a restored or reinstalled Agent by pushing all target configuration from the repository.
Usage:
emcli resyncAgent -agent="Agent Name" [-keep_blocked]

EMCTL High Availability Commands
5-18 Oracle Enterprise Manager Advanced Configuration

Enterprise Manager Security 6-1
6Enterprise Manager Security
This chapter describes how to configure Oracle Enterprise Manager Security. Specifically, this chapter contains the following sections:
■ About Oracle Enterprise Manager Security
■ Configuring Security for Grid Control
■ Enterprise Manager User Administration
■ Setting Up the Auditing System for Enterprise Manager
■ Configuring the emkey
■ Additional Security Considerations
■ Other Security Features
6.1 About Oracle Enterprise Manager SecurityOracle Enterprise Manager provides tools and procedures to help you ensure that you are managing your Oracle environment in a secure manner. The following sections describe the security features provided by Enterprise Manager.
6.1.1 Oracle Enterprise Manager Security ModelThe goals of Oracle Enterprise Manager security are:
■ To be sure that only users with the proper privileges have access to critical monitoring and administrative data.
This goal is met by requiring username and password credentials before users can access the Enterprise Manager consoles and appropriate privileges for accessing the critical data. This includes access to the Oracle Enterprise Manager 10g Grid Control Console and the Oracle Enterprise Manager 10g Application Server Control Console.
■ To be sure that all data transferred between Enterprise Manager components is transferred in a secure manner and that all data gathered by each Oracle Management Agent can be transferred only to the Oracle Management Service for which the Management Agent is configured.
This goal is met by enabling Enterprise Manager Framework Security. Enterprise Manager Framework Security automates the process of securing the Enterprise Manager components installed and configured on your network.
See Also: "About Enterprise Manager Framework Security" on page 6-4
About Oracle Enterprise Manager Security
6-2 Oracle Enterprise Manager Advanced Configuration
6.1.2 Classes of Users and Their PrivilegesOracle Enterprise Manager supports different classes of Oracle users, depending upon the environment you are managing and the context in which you are using Oracle Enterprise Manager 10g. For example:
■ The Grid Control Console provides support for creating and managing Enterprise Manager administrator accounts.
The Enterprise Manager administrators you create and manage in the Grid Control Console are granted privileges and roles to log in to the Grid Control Console and to manage specific target types and to perform specific management tasks.
The default super administrator for the Grid Control Console is the SYSMAN user, which is a database user associated with the Oracle Management Repository. You define the password for the SYSMAN account during the Enterprise Manager installation procedure.
■ Oracle Application Server administrators use the Oracle Application Server administrator account (ias_admin) to log in to the Application Server Control Console.
■ You use the ias_admin account to manage the components of a specific Oracle Application Server instance. You define the password for the ias_admin account during the Oracle Application Server installation procedure.
6.1.3 Resources ProtectedBy restricting access to privileged users and providing tools to secure communications between Oracle Enterprise Manager 10g components, Enterprise Manager protects critical information in the Oracle Management Repository.
The Management Repository contains management data that Enterprise Manager uses to help you monitor the performance and availability of your entire enterprise. This data provides you with information about the types of hardware and software you have deployed, as well as the historical performance and specific characteristics of the applications, databases, applications servers, and other targets that you manage.
The Management Repository also contains information about the Enterprise Manager administrators who have the privileges to access the management data.
6.1.4 Authorization and Access EnforcementAuthorization and access enforcement for Enterprise Manager is controlled as follows:
■ When you use the Grid Control Console, you create and manage Enterprise Manager administrator accounts. The SYSMAN super administrator can assign specific privileges and roles to each of the additional administrators. These privileges and roles control the targets an administrator can manage and the specific types of tasks the administrator can perform.
■ When you use the Application Server Control Console, access to the Console is restricted to administrators who use the ias_admin administrator’s account. The ias_admin account is set up automatically and you assign a password for the account during the Oracle Application Server installation procedure.
See Also: "About Administrators and Roles" in the Enterprise Manager online Help

Configuring Security for Grid Control
Enterprise Manager Security 6-3
6.1.5 Leveraging Oracle Application Server Security ServicesAs a Web-based application, Enterprise Manager relies on industry-standard technologies to provide secure access to the Oracle Enterprise Manager 10g Grid Control Console and Application Server Control Console.
When you configure security for the Oracle Enterprise Manager 10g Grid Control Console, Enterprise Manager Framework Security provides secure communications between the components of your Enterprise Manager installation.
Enterprise Manager Grid Console application is deployed in a OPMN managed OC4J instance. When you configure security for the Grid Console, Enterprise Manager uses the standard security services of OC4J znd OHS to protect your management data.
6.1.6 Leveraging Oracle Identity Management InfrastructureOracle Enterprise Manager 10g takes advantage of Oracle Identity Management in two ways:
■ First, you can configure the Grid Control Console so it uses Oracle Application Server Single Sign-On. Administrators can then use their Single Sign-On credentials to log in to the Grid Control Console.
■ Second, you can take advantage of the Enterprise User Security features of the Oracle database. Enterprise User Security provides single sign-on (SSO) or single password authentication for your database users.
6.2 Configuring Security for Grid ControlThis section contains the following topics:
See Also: Oracle Application Server 10g Administrator’s Guide for more information about the ias_admin account
See Also: "About Administrators and Roles" in the Enterprise Manager online Help
See Also: "Configuring Security for Grid Control" on page 6-3 for more information about the Enterprise Manager Framework Security
Oracle HTTP Server Administrator's Guide for information about configuring security for your Oracle HTTP Server
See Also: Oracle Application Server Single Sign-On Administrator’s Guide for general information about Oracle Application Server Single Sign-On
See Also: "Managing Enterprise User Security" in the Oracle Advanced Security Administrator's Guide
Note: You can configure Enterprise Manager to either use Oracle Application Server Single Sign-On or the Enterprise User Security features. You cannot use both options at the same time.
Configuring Security for Grid Control
6-4 Oracle Enterprise Manager Advanced Configuration
■ About Enterprise Manager Framework Security
■ Overview of the Steps Required to Enable Enterprise Manager Framework Security
■ Enabling Security for the Oracle Management Service
■ Enabling Security for the Oracle Management Agent
■ Enabling Security with Multiple Management Service Installations
■ Restricting HTTP Access to the Management Service
■ Managing Agent Registration Passwords
■ Enabling Security with a Server Load Balancer
■ Enabling Security for the Management Repository Database
6.2.1 About Enterprise Manager Framework SecurityEnterprise Manager Framework Security provides safe and secure communication channels between the components of Enterprise Manager. For example, Framework Security provides secure connections between your Oracle Management Service and its Management Agents.
Enterprise Manager Framework Security works in concert with—but does not replace—the security features you should enable for your Oracle HTTP Server. Oracle HTTP Server is part of the Oracle Application Server instance that is used to deploy the Management Service J2EE Web application.
Figure 6–1 shows how Enterprise Manager Framework Security provides security for the connections between the Enterprise Manager components.
See Also: Oracle Enterprise Manager Concepts for an overview of Enterprise Manager components
See Also: Oracle Application Server 10g Security Guide
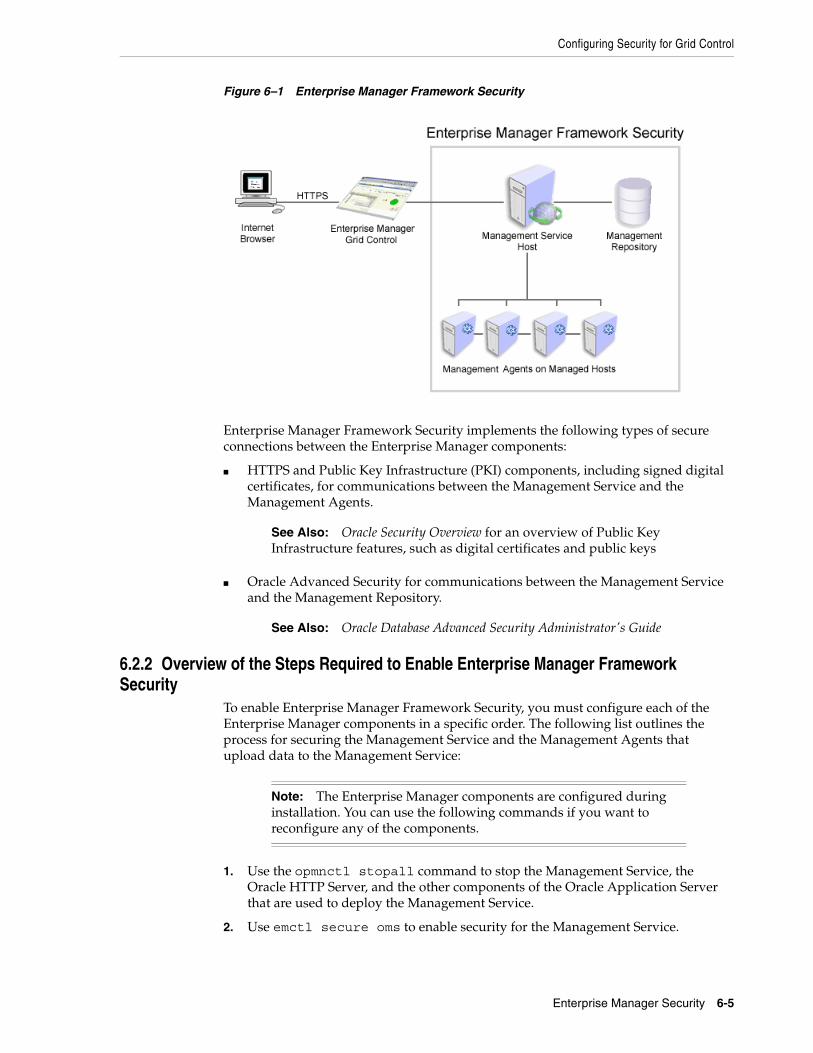
Configuring Security for Grid Control
Enterprise Manager Security 6-5
Figure 6–1 Enterprise Manager Framework Security
Enterprise Manager Framework Security implements the following types of secure connections between the Enterprise Manager components:
■ HTTPS and Public Key Infrastructure (PKI) components, including signed digital certificates, for communications between the Management Service and the Management Agents.
■ Oracle Advanced Security for communications between the Management Service and the Management Repository.
6.2.2 Overview of the Steps Required to Enable Enterprise Manager Framework Security
To enable Enterprise Manager Framework Security, you must configure each of the Enterprise Manager components in a specific order. The following list outlines the process for securing the Management Service and the Management Agents that upload data to the Management Service:
1. Use the opmnctl stopall command to stop the Management Service, the Oracle HTTP Server, and the other components of the Oracle Application Server that are used to deploy the Management Service.
2. Use emctl secure oms to enable security for the Management Service.
See Also: Oracle Security Overview for an overview of Public Key Infrastructure features, such as digital certificates and public keys
See Also: Oracle Database Advanced Security Administrator's Guide
Note: The Enterprise Manager components are configured during installation. You can use the following commands if you want to reconfigure any of the components.
Configuring Security for Grid Control
6-6 Oracle Enterprise Manager Advanced Configuration
3. Restart the Management Service, the Oracle HTTP Server, OracleAS Web Cache, and the other application server components using the opmnctl startall command.
4. For each Management Agent, stop the Management Agent, use the emctl secure agent command to enable security for the Management Agent, and restart the Management Agent.
5. After security is enabled for all the Management Agents, use the emctl secure lock command to restrict HTTP Access to the Management Service. This will ensure that Management Agents for which security has not been enabled will not be able upload data to the Management Service.
The following sections describe how to perform each of these steps in more detail.
6.2.3 Enabling Security for the Oracle Management ServiceTo enable Enterprise Manager Framework Security for the Management Service, you use the emctl secure oms utility, which is located in the following subdirectory of the Management Service home directory:
$ORACLE_HOME/bin
The emctl secure oms utility performs the following actions:
■ Generates a Root Key within your Management Repository. The Root Key is used during distribution of Oracle Wallets containing unique digital certificates for your Management Agents.
■ Modifies your Oracle HTTP Server to enable an HTTPS channel between your Management Service and Management Agents, independent from any existing HTTPS configuration that may be present in your Oracle HTTP Server.
■ Enables your Management Service to accept requests from Management Agents using Enterprise Manager Framework Security.
To run the emctl secure oms utility you must first choose an Agent Registration Password. The Agent Registration password is used to validate that future installation sessions of Oracle Management Agents and Oracle Management Services are authorized to load their data into this Enterprise Manager installation.
To enable Enterprise Manager Framework Security for the Oracle Management Service:
1. Change directory to the following directory in the Management Service home:
ORACLE_HOME/opmn/bin
2. Stop the Management Service, the Oracle HTTP Server, and the other application server components using the following command:
$PROMPT> ./opmnctl stopall
3. Change directory to the following directory in the Management Service home:
ORACLE_HOME/bin
4. Enter the following command:
Note: To resolve errors from emctl secure operations, refer to $ORACLE_HOME/sysman/log/secure.log for more details.

Configuring Security for Grid Control
Enterprise Manager Security 6-7
$PROMPT> ./emctl secure oms
5. You will be prompted for the Enterprise Manager Root Password. Enter the SYSMAN password.
6. You will be prompted for the Agent Registration Password, which is the password required for any Management Agent attempting to secure with the Management Service. Specify an Agent Registration Password for the Management Service.
7. When the operation is complete, restart the Management Service, the Oracle HTTP Server, and OracleAS Web Cache:
$PROMPT> cd $ORACLE_HOME/opmn/bin$PROMPT> ./opmnctl startall
8. After the Management Service restarts, test the secure connection to the Management Service by browsing to the following secure URL using the HTTPS protocol:
https://hostname.domain:https_upload_port/em
For example:
https://mgmthost1.acme.com:1159/em
If the Management Service security has been enabled, your browser displays the Enterprise Manager Login page.
Example 6–1 Sample Output of the emctl secure oms Command
$PROMPT> ./emctl secure omsOracle Enterprise Manager 10g Release 5 Grid ControlCopyright (c) 1996, 2009 Oracle Corporation. All rights reserved.Securing OMS... Started.Securing OMS... SuccessfulAlternatively, you can enter the emctl secure oms command all on one line, but if you enter the command on one line, the passwords you enter will be displayed on the screen as you type the command.
Note: The 1159 port number is the default secure port used by the Management Agents to upload data to the Management Service. This port number may vary if the default port is unavailable.
See Also: "Viewing a Summary of the Ports Assigned During the Application Server Installation" on page 7-12
Caution: While the emctl secure oms command provides immediate HTTPS browser access to the Grid Control Console by using the secure Management Agent upload port, it does not enable security for the default OracleAS Web Cache port that your administrators use to display the Grid Control Console.
To enable security for users who access the Grid Control through OracleAS Web Cache, refer to Oracle Application Server 10g Security Guide.
Configuring Security for Grid Control
6-8 Oracle Enterprise Manager Advanced Configuration
Example 6–2 Usage of the emctl secure oms Command (II)
$PROMPT> emctl secure oms [-sysman_pwd <sysman password>][-reg_pwd <registration password>][-host <hostname>][-reset][-secure_port <secure_port>][-upload_http_port <upload_http_port>][-slb_port <slb port>][-slb_console_port <slb console port>][-root_dc <root_dc>][-root_country <root_country>][-root_state <root_state>][-root_loc <root_loc>][-root_org <root_org>][-root_unit <root_unit>] [-root_email <root_email>][-wallet <wallet_loc> -trust_certs_loc <certs_loc>] [-wallet_pwd <pwd>][-key_strength <strength>][-cert_validity <validity>]
The parameters are explained below:
■ sysman_pwd - Oracle Management Repository user password.
■ reg_pwd - The Management Agent registration password.
■ host - The host name to be used in the certificate used by the Oracle Management Service. You may need to use the SLB host name if there is an SLB before the Management Service.
■ reset - If the Oracle Management Service is secured with this option, a new root certificate is generated. All the agents and the Oracle Management Services need to be resecured for use with the new root certificate.
■ secure_port - The port to be used for secure communication. The default value is 4888.
■ upload_http_port - The port used for upload communications.
■ slb_port - This parameter is required when Server Load Balancer is used. It specifies the secure upload port configured in the Server Load Balancer.
■ slb_console_port - This parameter is required when Server Load Balancer is used. It specifies the secure upload port configured in the Server Load Balancer.
■ trust_certs_loc - The location of the trusted_certs.txt (required when third party certificates are used).
■ root_dc - The domain component used in the root certificate. The default value is com.
■ root_country - The country to be used in the root certificate. The default value is US.
■ root_state - The state to be used in the root certificate. The default value is CA.
■ root_loc - The location to be used in the root certificate. The default value is EnterpriseManager on <hostname>.
■ root_org - The organization name to be used in the root certificate. The default value is EnterpriseManager on <hostname>.
■ root_unit - The organizational unit to be used in the root certificate. The default value is EnterpriseManager on <hostname>.
■ root_email - The email address to be used in the root certificate. The default value is EnterpriseManager@<hostname>.
■ wallet: This is the directory where the wallet to be used in the https upload port is located.
■ wallet_pwd: This is the wallet password and is required only if the wallet is not an SSO wallet.
■ key_strength: The strength of the key to be used. Valid values are 512, 1024, 2048, and 4096.
Configuring Security for Grid Control
Enterprise Manager Security 6-9
■ cert_validity: The number of days for which the self-signed certificate is valid. The valid range is between 1 to 3650.
6.2.3.1 Checking the Security StatusYou can check whether security has been enabled for the Management Service by entering the emctl status oms -secure command.
Example 6–3 Sample Output of the emctl secure status oms Command
$prompt> emctl status oms -secureOracle Enterprise Manager 10g Release 5 Grid Control Copyright (c) 1996, 2009 Oracle Corporation. All rights reserved.Checking the security status of the OMS at location set in /OH/oms10g/sysman/config/emoms.properties... Done.OMS is secure on HTTPS Port 1159
6.2.4 Enabling Security for the Oracle Management AgentWhen you install the Management Agent on a host, you must identify the Management Service that will be used by the Management Agent. If the Management Service you specify has been configured to take advantage of Enterprise Manager Framework Security, you will be prompted for the Agent Registration Password and Enterprise Manager Framework Security will be enabled for the Management Agent during the installation.
Otherwise, if the Management Service has not been configured for Enterprise Manager Framework Security or if the Registration Password was not specified during installation, then security will not be enabled for the Management Agent. In those cases, you can later enable Enterprise Manager Framework Security for the Management Agent.
To enable Enterprise Manager Framework Security for the Management Agent, use the emctl secure agent utility, which is located in the following directory of the Management Agent home directory:
AGENT_HOME/bin (UNIX)AGENT_HOME\bin (Windows)
The emctl secure agent utility performs the following actions:
■ Obtains an Oracle Wallet from the Management Service that contains a unique digital certificate for the Management Agent. This certificate is required in order for the Management Agent to conduct SSL communication with the secure Management Service.
■ Obtains an Agent Key for the Management Agent that is registered with the Management Service.
■ Configures the Management Agent so it is available on your network over HTTPS and so it uses the Management Service HTTPS upload URL for all its communication with the Management Service.
To enable Enterprise Manager Framework Security for the Management Agent:
1. Ensure that your Management Service and the Management Repository are up and running.
Note: The key_strength and cert_validity parameters are applicable only when the -wallet option is not used.
Configuring Security for Grid Control
6-10 Oracle Enterprise Manager Advanced Configuration
2. Change directory to the following directory:
AGENT_HOME/bin (UNIX)AGENT_HOME\bin (Windows)
3. Stop the Management Agent:
$PROMPT> ./emctl stop agent
4. Enter the following command:
$PROMPT> ./emctl secure agent (UNIX)$PROMPT> emctl secure agent (Windows)
The emctl secure agent utility prompts you for the Agent Registration Password, authenticates the password against the Management Service, and reconfigures the Management Agent to use Enterprise Manager Framework Security.
Example 6–4 shows sample output of the emctl secure agent utility.
5. Restart the Management Agent:
$PROMPT> ./emctl start agent
6. Confirm that the Management Agent is secure by checking the Management Agent home page.
In the General section of the Management Agent home page (Figure 6–2), the Secure Upload field indicates whether or not Enterprise Manager Framework Security has been enabled for the Management Agent.
Example 6–4 Sample Output of the emctl secure agent Utility
$PROMPT> ./emctl secure agentOracle Enterprise Manager 10g Release 5 Grid Control 10.2.0.5.0.Copyright (c) 1996, 2009 Oracle Corporation. All rights reserved.Securing agent... StartedSecuring agent... Successful.
Example 6–5 Sample Output of the emctl secure status agent Command
[oracle@stang14 bin]$ ./emctl status agent -secure
Note: Alternatively, you can enter the command all on one line, but if you enter the command on one line, the password you enter will be displayed on the screen as you type:
$PROMPT> ./emctl secure agent agent_registration_pwd (UNIX)$PROMPT> emctl secure agent agent_registration_pwd (Windows)
Note: You can also check if the Agent Management is secure by running the emctl status agent -secure command, or by checking the Agent and Repository URLs in the output of the emctl status agent command.
See Also: "Checking the Status of an Oracle Management Agent" in the Enterprise Manager online Help
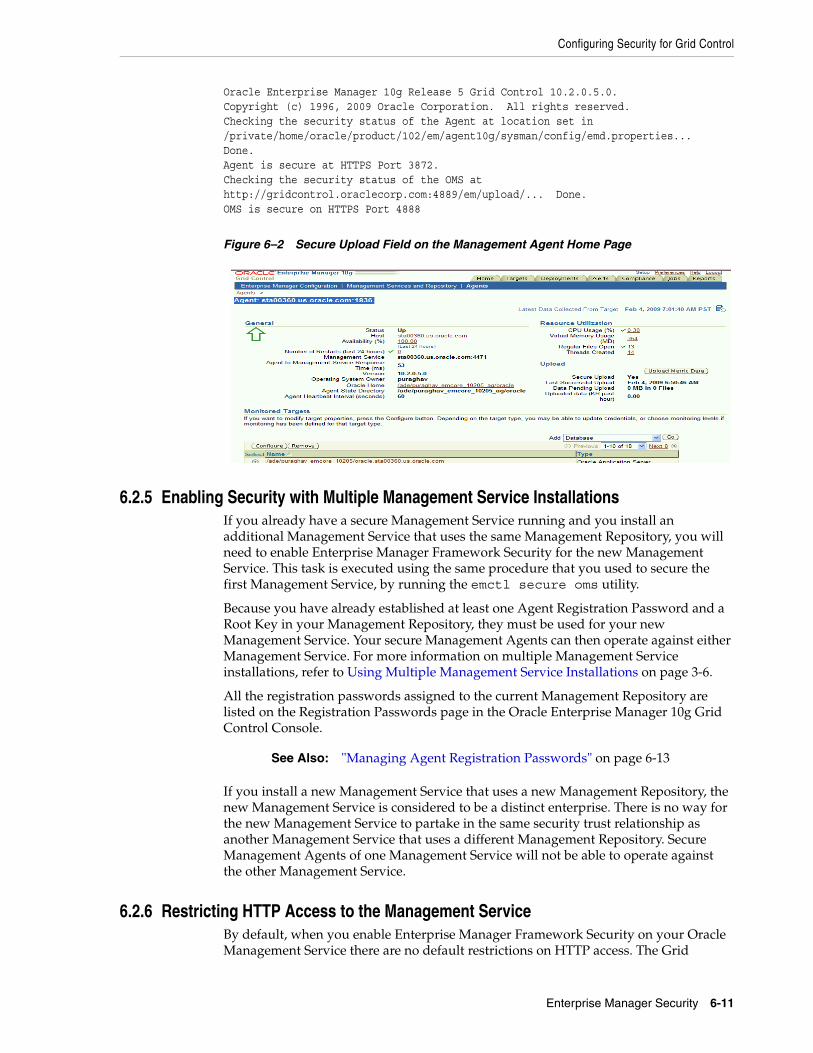
Configuring Security for Grid Control
Enterprise Manager Security 6-11
Oracle Enterprise Manager 10g Release 5 Grid Control 10.2.0.5.0. Copyright (c) 1996, 2009 Oracle Corporation. All rights reserved.Checking the security status of the Agent at location set in /private/home/oracle/product/102/em/agent10g/sysman/config/emd.properties... Done.Agent is secure at HTTPS Port 3872.Checking the security status of the OMS at http://gridcontrol.oraclecorp.com:4889/em/upload/... Done.OMS is secure on HTTPS Port 4888
Figure 6–2 Secure Upload Field on the Management Agent Home Page
6.2.5 Enabling Security with Multiple Management Service InstallationsIf you already have a secure Management Service running and you install an additional Management Service that uses the same Management Repository, you will need to enable Enterprise Manager Framework Security for the new Management Service. This task is executed using the same procedure that you used to secure the first Management Service, by running the emctl secure oms utility.
Because you have already established at least one Agent Registration Password and a Root Key in your Management Repository, they must be used for your new Management Service. Your secure Management Agents can then operate against either Management Service. For more information on multiple Management Service installations, refer to Using Multiple Management Service Installations on page 3-6.
All the registration passwords assigned to the current Management Repository are listed on the Registration Passwords page in the Oracle Enterprise Manager 10g Grid Control Console.
If you install a new Management Service that uses a new Management Repository, the new Management Service is considered to be a distinct enterprise. There is no way for the new Management Service to partake in the same security trust relationship as another Management Service that uses a different Management Repository. Secure Management Agents of one Management Service will not be able to operate against the other Management Service.
6.2.6 Restricting HTTP Access to the Management ServiceBy default, when you enable Enterprise Manager Framework Security on your Oracle Management Service there are no default restrictions on HTTP access. The Grid
See Also: "Managing Agent Registration Passwords" on page 6-13
Configuring Security for Grid Control
6-12 Oracle Enterprise Manager Advanced Configuration
Control Console can also be accessed over HTTP and the Oracle Management Agents will be able to upload over HTTP as well as HTTPS.
However, it is important that only secure Management Agent installations that use the Management Service HTTPS channel are able to upload data to your Management Repository and Grid Control console is accessible via HTTPS only.
To restrict access so Management Agents can upload data to the Management Service only over HTTPS:
1. Stop the Management Service, the Oracle HTTP Server, and the other application server components:
$PROMPT> cd $ORACLE_HOME/opmn/bin$PROMPT> ./opmnctl stopall
2. Change directory to the following location in the Management Service home:
$ORACLE_HOME/bin
3. Enter the following command to prevent Management Agents from uploading data to the Management Service over HTTP:
$PROMPT> emctl secure lock -upload
4. Restart the Management Service, the Oracle HTTP Server, and the other application server components:
$PROMPT> cd $ORACLE_HOME/opmn/bin$PROMPT> ./opmnctl startall
5. Verify that you cannot access the Management Agent upload URL using the HTTP protocol:
For example, navigate to the following URL:
http://hostname.domain:4889/em/upload
You should receive an error message similar to the following:
ForbiddenYou don't have permission to access /em/upload on this server
6. Verify that you can access the Management Agent Upload URL using the HTTPS protocol:
Note:
■ To lock the console and prevent HTTP access to the console, enter the following command:
emctl secure lock -console
■ To lock both, enter either of the following commands:
emctl secure lock or emctl secure lock -upload -console
■ To lock both the console access and uploads from Agents while enabling security on the Management Service, enter the following command:
emctl secure oms -lock [other options]
Configuring Security for Grid Control
Enterprise Manager Security 6-13
For example, navigate to the following URL:
https://hostname.domain:4888/em/upload
You should receive the following message, which confirms the secure upload port is available to secure Management Agents:
Http XML File receiverHttp Recceiver Servlet active!
To allow the Management Service to accept uploads from unsecure Management Agents, use the following command:
$PROMPT> emctl secure unlock -upload
Example 6–6 Sample Output of the emctl secure lock Command
$prompt> emctl secure lockOracle Enterprise Manager 10g Release 5 Grid ControlCopyright (c) 1996, 2009 Oracle Corporation. All rights reserved.OMS Console is locked. Access the console over HTTPS ports.Agent Upload is locked. Agents must be secure and upload over HTTPS port.
Example 6–7 Sample Output of the emctl secure unlock Command
$prompt> emctl secure unlockOracle Enterprise Manager 10g Release 5 Grid ControlCopyright (c) 1996, 2009 Oracle Corporation. All rights reserved.OMS Console is unlocked. HTTP ports too can be used to access console.Agent Upload is unlocked. Unsecure Agents may upload over HTTP.
To restrict HTTP access to the Oracle Enterprise Manager 10g Grid Control Console, use the emctl secure lock -console command.
6.2.7 Managing Agent Registration PasswordsEnterprise Manager uses the Agent Registration password to validate that installations of Oracle Management Agents are authorized to load their data into the Oracle Management Service.
The Agent Registration password is created during installation when security is enabled for the Oracle Management Service.
Note:
■ To unlock the console and allow HTTP access to the console, enter the following command:
emctl secure unlock -console
■ To unlock both, enter either of the following command:
emctl secure unlockemctl secur unlock -console -upload
Note: To avoid new Agents from being installed, you can delete all the registration passwords.
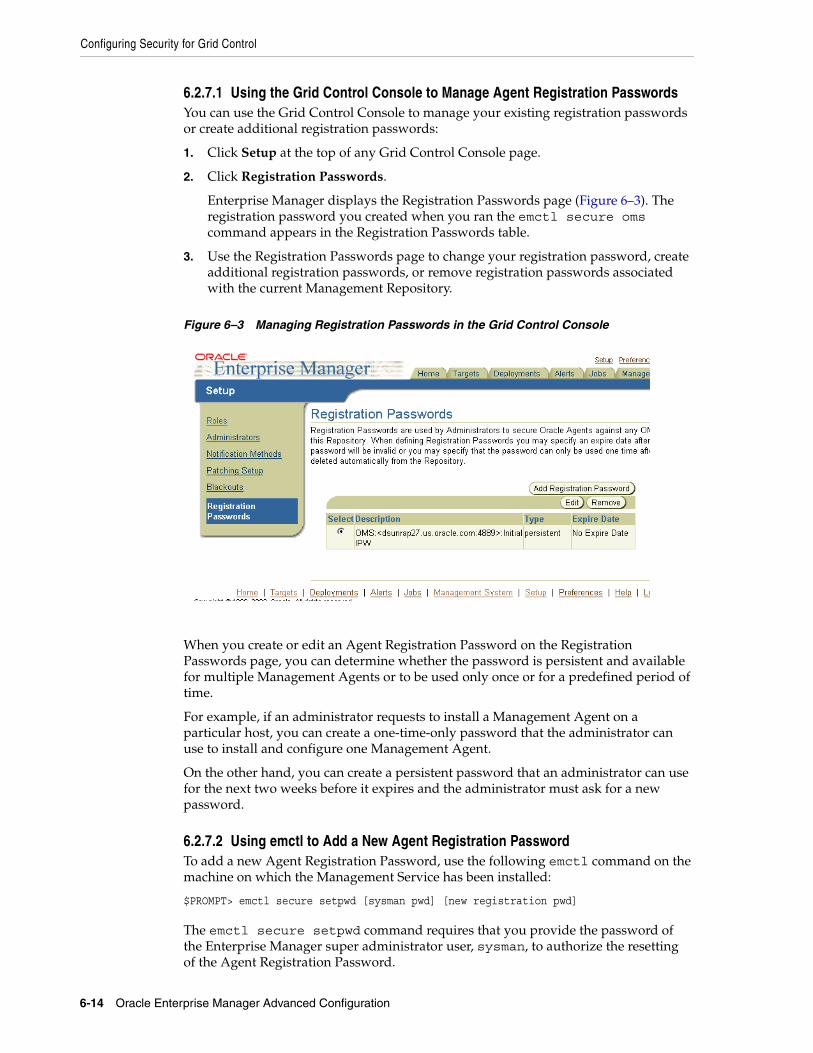
Configuring Security for Grid Control
6-14 Oracle Enterprise Manager Advanced Configuration
6.2.7.1 Using the Grid Control Console to Manage Agent Registration PasswordsYou can use the Grid Control Console to manage your existing registration passwords or create additional registration passwords:
1. Click Setup at the top of any Grid Control Console page.
2. Click Registration Passwords.
Enterprise Manager displays the Registration Passwords page (Figure 6–3). The registration password you created when you ran the emctl secure oms command appears in the Registration Passwords table.
3. Use the Registration Passwords page to change your registration password, create additional registration passwords, or remove registration passwords associated with the current Management Repository.
Figure 6–3 Managing Registration Passwords in the Grid Control Console
When you create or edit an Agent Registration Password on the Registration Passwords page, you can determine whether the password is persistent and available for multiple Management Agents or to be used only once or for a predefined period of time.
For example, if an administrator requests to install a Management Agent on a particular host, you can create a one-time-only password that the administrator can use to install and configure one Management Agent.
On the other hand, you can create a persistent password that an administrator can use for the next two weeks before it expires and the administrator must ask for a new password.
6.2.7.2 Using emctl to Add a New Agent Registration PasswordTo add a new Agent Registration Password, use the following emctl command on the machine on which the Management Service has been installed:
$PROMPT> emctl secure setpwd [sysman pwd] [new registration pwd]
The emctl secure setpwd command requires that you provide the password of the Enterprise Manager super administrator user, sysman, to authorize the resetting of the Agent Registration Password.

Configuring Security for Grid Control
Enterprise Manager Security 6-15
If you change the Agent Registration Password, you must communicate the new password to other Enterprise Manager administrators who need to install new Management Agents, enable Enterprise Manager Framework Security for existing Management Agents, or install additional Management Services.
As with other security passwords, you should change the Agent Registration Password on a regular and frequent basis to prevent it from becoming too widespread.
6.2.8 Enabling Security with a Server Load BalancerWhen you deploy a Management Service that is available behind a Server Load Balancer (SLB), special attention must be given to the DNS host name over which the Management Service will be available. Although the Management Service may run on a particular local host, for example myhost.mycompany.com, your Management Agents will access the Management Service using the host name that has been assigned to the Server Load Balancer. For example, oracleoms.mycompany.com.
As a result, when you enable Enterprise Manager Framework Security for the Management Service, it is important to ensure that the Server Load Balancer host name is embedded into the Certificate that the Management Service uses for SSL communications. To do so, enter the following commands:
This may be done by using emctl secure oms and specifying the host name in the with an extra -host parameter as follows:
■ Specify the -host parameter with the emctl secure oms command as follows:
$PROMPT>emctl secure oms -host <hostname>
■ Set UseCanonicalName directive to On in the OMS_Home/Apache/Apache/conf/httpd.conf file.
■ Enable security on the Management Service by entering the following command:
$PROMPT>emctl secure oms -host <slb_hostname> [-slb_console_port <slb UI port>] [-slb_port <slb upload port>] [other params]
■ Create virtual servers and pools on the Server Load Balancer.
■ Verify that the console can be accessed using the following URL:
https://slbhost:slb_console_port/em
■ Re-secure the Agents with Server Load Balancer by using the following command:
$PROMPT>emctl secure agent -emdWalletSrcUrl <SLB Upload url>
6.2.9 Enabling Security for the Management Repository DatabaseThis section describes how to enable Security for the Oracle Management Repository. This section includes the following topics:
■ About Oracle Advanced Security and the sqlnet.ora Configuration File
■ Configuring the Management Service to Connect to a Secure Management Repository Database
■ Enabling Oracle Advanced Security for the Management Repository
■ Enabling Security for a Management Agent Monitoring a Secure Management Repository or Database
Configuring Security for Grid Control
6-16 Oracle Enterprise Manager Advanced Configuration
6.2.9.1 About Oracle Advanced Security and the sqlnet.ora Configuration FileYou enable security for the Management Repository by using Oracle Advanced Security. Oracle Advanced Security ensures the security of data transferred to and from an Oracle database.
To enable Oracle Advanced Security for the Management Repository database, you must make modifications to the sqlnet.ora configuration file. The sqlnet.ora configuration file is used to define various database connection properties, including Oracle Advanced Security parameters.
The sqlnet.ora file is located in the following subdirectory of the Database home:
ORACLE_HOME/network/admin
After you have enabled Security for the Management Repository and the Management Services that communicate with the Management Repository, you must also configure Oracle Advanced Security for the Management Agent by modifying the sqlnet.ora configuration file in the Management Agent home directory.
It is important that both the Management Service and the Management Repository are configured to use Oracle Advanced Security. Otherwise, errors will occur when the Management Service attempts to connect to the Management Repository. For example, the Management Service might receive the following error:
ORA-12645: Parameter does not exist
To correct this problem, be sure both the Management Service and the Management Repository are configured as described in the following sections.
6.2.9.2 Configuring the Management Service to Connect to a Secure Management Repository DatabaseIf you have enabled Oracle Advanced Security for the Management Service database—or if you plan to enable Oracle Advanced Security for the Management Repository database—use the following procedure to enable Oracle Advanced Security for the Management Service:
1. Stop the Management Service:
$PROMPT> ORACLE_HOME/bin/emctl stop oms
2. Locate the following configuration file in the Management Service home directory:
ORACLE_HOME/sysman/config/emoms.properties
See Also: Oracle Database Advanced Security Administrator's Guide
See Also: "Enabling Security for a Management Agent Monitoring a Secure Management Repository or Database" on page 6-19
Note: The procedures in this section describe how to manually modify the sqlnet.ora configuration file to enable Oracle Advanced Security. Alternatively, you can make these modifications using the administration tools described in the Oracle Database Advanced Security Administrator's Guide.
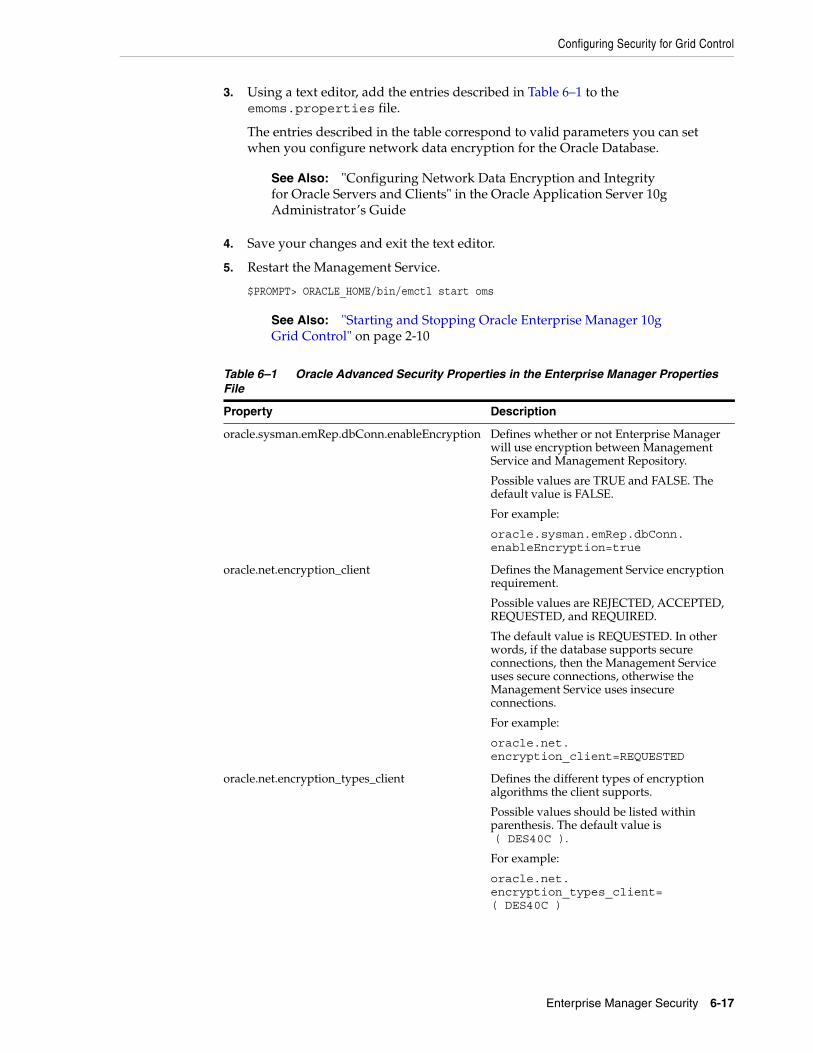
Configuring Security for Grid Control
Enterprise Manager Security 6-17
3. Using a text editor, add the entries described in Table 6–1 to the emoms.properties file.
The entries described in the table correspond to valid parameters you can set when you configure network data encryption for the Oracle Database.
4. Save your changes and exit the text editor.
5. Restart the Management Service.
$PROMPT> ORACLE_HOME/bin/emctl start oms
See Also: "Configuring Network Data Encryption and Integrity for Oracle Servers and Clients" in the Oracle Application Server 10g Administrator’s Guide
See Also: "Starting and Stopping Oracle Enterprise Manager 10g Grid Control" on page 2-10
Table 6–1 Oracle Advanced Security Properties in the Enterprise Manager Properties File
Property Description
oracle.sysman.emRep.dbConn.enableEncryption Defines whether or not Enterprise Manager will use encryption between Management Service and Management Repository.
Possible values are TRUE and FALSE. The default value is FALSE.
For example:
oracle.sysman.emRep.dbConn.enableEncryption=true
oracle.net.encryption_client Defines the Management Service encryption requirement.
Possible values are REJECTED, ACCEPTED, REQUESTED, and REQUIRED.
The default value is REQUESTED. In other words, if the database supports secure connections, then the Management Service uses secure connections, otherwise the Management Service uses insecure connections.
For example:
oracle.net.encryption_client=REQUESTED
oracle.net.encryption_types_client Defines the different types of encryption algorithms the client supports.
Possible values should be listed within parenthesis. The default value is ( DES40C ).
For example:
oracle.net.encryption_types_client=( DES40C )
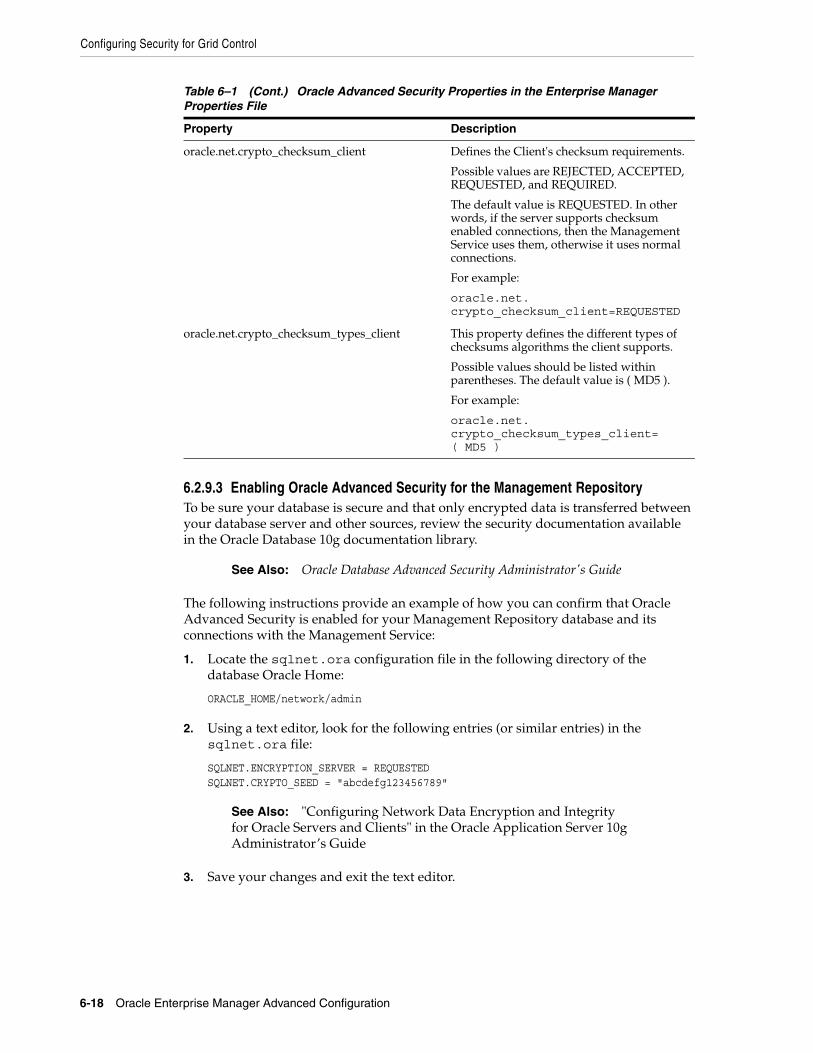
Configuring Security for Grid Control
6-18 Oracle Enterprise Manager Advanced Configuration
6.2.9.3 Enabling Oracle Advanced Security for the Management RepositoryTo be sure your database is secure and that only encrypted data is transferred between your database server and other sources, review the security documentation available in the Oracle Database 10g documentation library.
The following instructions provide an example of how you can confirm that Oracle Advanced Security is enabled for your Management Repository database and its connections with the Management Service:
1. Locate the sqlnet.ora configuration file in the following directory of the database Oracle Home:
ORACLE_HOME/network/admin
2. Using a text editor, look for the following entries (or similar entries) in the sqlnet.ora file:
SQLNET.ENCRYPTION_SERVER = REQUESTEDSQLNET.CRYPTO_SEED = "abcdefg123456789"
3. Save your changes and exit the text editor.
oracle.net.crypto_checksum_client Defines the Client's checksum requirements.
Possible values are REJECTED, ACCEPTED, REQUESTED, and REQUIRED.
The default value is REQUESTED. In other words, if the server supports checksum enabled connections, then the Management Service uses them, otherwise it uses normal connections.
For example:
oracle.net.crypto_checksum_client=REQUESTED
oracle.net.crypto_checksum_types_client This property defines the different types of checksums algorithms the client supports.
Possible values should be listed within parentheses. The default value is ( MD5 ).
For example:
oracle.net.crypto_checksum_types_client=( MD5 )
See Also: Oracle Database Advanced Security Administrator's Guide
See Also: "Configuring Network Data Encryption and Integrity for Oracle Servers and Clients" in the Oracle Application Server 10g Administrator’s Guide
Table 6–1 (Cont.) Oracle Advanced Security Properties in the Enterprise Manager Properties File
Property Description
Configuring Security for Grid Control
Enterprise Manager Security 6-19
6.2.9.4 Enabling Security for a Management Agent Monitoring a Secure Management Repository or DatabaseAfter you have enabled Oracle Advanced Security for the Management Repository, you must also enable Advanced Security for the Management Agent that is monitoring the Management Repository:
1. Locate the sqlnet.ora configuration file in the following directory inside the home directory for the Management Agent that is monitoring the Management Repository:
AGENT_HOME/network/admin (UNIX)AGENT_HOME\network\admin (Windows)
2. Using a text editor, add the following entry to the sqlnet.ora configuration file:
SQLNET.CRYPTO_SEED = "abcdefg123456789"
3. Save your changes and exit the text editor.
4. Restart the Management Agent.
6.2.10 Configuring Third Party CertificatesYou can configure third party certificates for:
■ Configuring Third Party Certificate for HTTPS Upload Virtual Host
■ Configuring Third Party Certificate for HTTPS Apache Virtual Host
6.2.10.1 Configuring Third Party Certificate for HTTPS Upload Virtual HostYou can configure the third party certificate for the HTTPS Upload Virtual Host in two ways:
Method I
1. Create a wallet for each OMS in the grid.
2. While creating the wallet, specify the host name of the machine where the OMS is installed or the Load Balancer Name if the OMS is behind the Load Balancer for Common Name.
3. Write the certificates of all the Certificate Authorities in the certificate chain (like the Root Certificate Authority, Intermediate Certificate Authority) into a file named trusted_certs.txt.
4. Download or copy the trusted_certs.txt file to the host machines on which each Agent that is communicating with the OMS is running.
5. Run the following command on each Agent and restart the Agent:
emctl secure add_trust_cert -trust_certs_loc <location of the trusted_certs.txt file>
6. Run the following command on each OMS:
See Also: "Configuring Network Data Encryption and Integrity for Oracle Servers and Clients" in the Oracle Application Server 10g Administrator’s Guide
See Also: "Controlling the Oracle Management Agent" on page 2-1
Enterprise Manager User Administration
6-20 Oracle Enterprise Manager Advanced Configuration
emctl secure oms -wallet <location of wallet> -trust_certs_loc <loc of trusted_certs.txt> [any other options]
Method 2
1. Create a wallet for each OMS in the grid.
2. Specify the host name of the machine where the OMS is installed or the Load Balancer Name if the OMS is behind the Server Load Balancer for Common Name (CN).
3. Write the certificates of all the Certificate Authorities in the certificate chain (like the Root Certificate Authority, Intermediate Certificate Authority) into a file named trusted_certs.txt.
4. Download or copy the trusted_certs.txt file to the host machines on which each Agent that is communicating with the OMS is running.
5. Run the following command on each OMS:
emctl secure oms -wallet <location of wallet> -trust_certs_loc <loc of trusted_certs.txt> [any other options]
6. Either re-secure the Agent by running the emctl secure agent command or import the trust points by running the emctl secure add_trust_cert -trust_certs_loc <location of the trusted_certs.txt file> command.
6.2.10.2 Configuring Third Party Certificate for HTTPS Apache Virtual HostTo configure the third party certificate for HTTPS Apache Virtual Host:
1. Create a wallet for each OMS in the grid. Specify the host name of the machine where the OMS is installed or the Load Balancer Name if the OMS is behind the Server Load Balancer for Common Name.
2. Run the following command on each OMS:
emctl secure console -wallet <location of wallet>
6.3 Enterprise Manager User AdministrationThis section describes the various user administration tasks that can be performed. It contains the following sections:
■ Creating / Modifying Administrators
■ Configuring Enterprise Manager for Use with Oracle Application Server Single Sign-On
Note: If the wallet is not a single sign-on wallet, you will be prompted for the password.
Note: If the wallet is not a single sign-on wallet, you will be prompted for the password.
Note: If the wallet is not a single sign-on wallet, your are prompted for the wallet’s password.
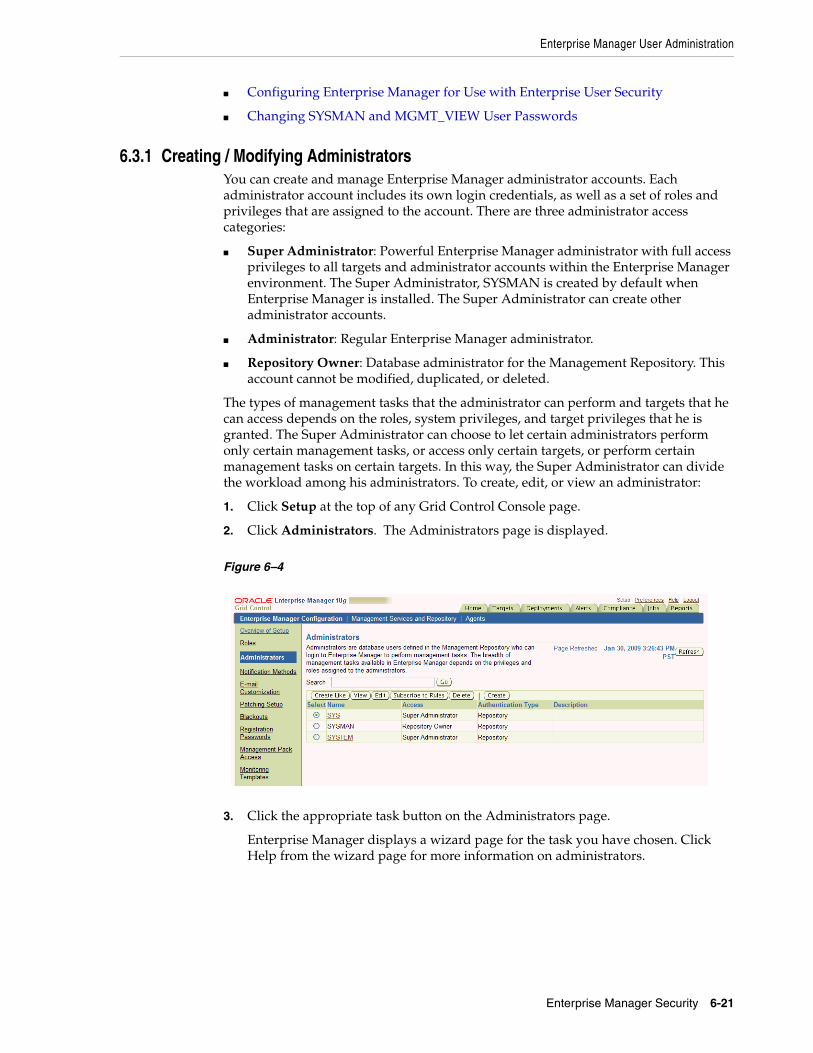
Enterprise Manager User Administration
Enterprise Manager Security 6-21
■ Configuring Enterprise Manager for Use with Enterprise User Security
■ Changing SYSMAN and MGMT_VIEW User Passwords
6.3.1 Creating / Modifying AdministratorsYou can create and manage Enterprise Manager administrator accounts. Each administrator account includes its own login credentials, as well as a set of roles and privileges that are assigned to the account. There are three administrator access categories:
■ Super Administrator: Powerful Enterprise Manager administrator with full access privileges to all targets and administrator accounts within the Enterprise Manager environment. The Super Administrator, SYSMAN is created by default when Enterprise Manager is installed. The Super Administrator can create other administrator accounts.
■ Administrator: Regular Enterprise Manager administrator.
■ Repository Owner: Database administrator for the Management Repository. This account cannot be modified, duplicated, or deleted.
The types of management tasks that the administrator can perform and targets that he can access depends on the roles, system privileges, and target privileges that he is granted. The Super Administrator can choose to let certain administrators perform only certain management tasks, or access only certain targets, or perform certain management tasks on certain targets. In this way, the Super Administrator can divide the workload among his administrators. To create, edit, or view an administrator:
1. Click Setup at the top of any Grid Control Console page.
2. Click Administrators. The Administrators page is displayed.
Figure 6–4
3. Click the appropriate task button on the Administrators page.
Enterprise Manager displays a wizard page for the task you have chosen. Click Help from the wizard page for more information on administrators.
Enterprise Manager User Administration
6-22 Oracle Enterprise Manager Advanced Configuration
6.3.2 Configuring Enterprise Manager for Use with Oracle Application Server Single Sign-On
If you are currently using Oracle Application Server Single Sign-On to control access and authorization for your enterprise, you can extend those capabilities to the Grid Control Console.
By default, when you navigate to the Grid Control Console, Enterprise Manager displays the Enterprise Manager login page. However, you can configure Enterprise Manager so it uses Oracle Application Server Single Sign-On to authorize your Grid Control Console users. Instead of seeing the Enterprise Manager login page, Grid Control Console users will see the standard Oracle Application Server Single Sign-On login page. From the login page, administrators can use their Oracle Application Server Single Sign-On credentials to access the Oracle Enterprise Manager 10g Grid Control Console.
The following sections describe how to configure Enterprise Manager as an OracleAS Single Sign-On Partner Application:
■ Configuring Enterprise Manager to Use the Single Sign-On Logon Page
■ Registering HTTP Port With Single Sign On Server
■ Configuring Enterprise Manager to Use Single Sign-On with the osso.conf File
■ Registering Single Sign-On Users as Enterprise Manager Administrators
■ Creating Single Sign-On Users Using EMCLI
■ Grid Control as a Single Sign-On Partner Application
■ Bypassing the Single Sign-On Logon Page
6.3.2.1 Configuring Enterprise Manager to Use the Single Sign-On Logon PageTo configure the Grid Control Console for use with Oracle Application Server Single Sign-On:
1. Set the ORACLE_HOME environment variables to the Management Service home directory.
For example:
$PROMPT> setenv ORACLE_HOME /dev01/oracle/em10g_GridControl
2. Change directory to the bin directory of the Management Service Oracle home:
$PROMPT> cd $ORACLE_HOME/opmn/bin
3. Stop the Management Service, the Oracle HTTP Server, and the other components of the application server:
Note:
■ You can configure Enterprise Manager to either use Oracle Application Server Single Sign-On or the Enterprise User Security features. You cannot use both options at the same time.
■ When Enterprise Manager is configured to use Single Sign-On with Server Load Balancer, make sure that the correct monitoring settings have been defined. For details, refer to the chapter on Grid Control Common Configurations.
Enterprise Manager User Administration
Enterprise Manager Security 6-23
$PROMPT> ./opmnctl stopall
4. Change directory to the bin directory of the Management Service Oracle home:
$PROMPT> cd $ORACLE_HOME/bin
5. Enter the following command at the operating system prompt:
$PROMPT> ./emctl config oms sso -host ssoHost -port ssoPort -sid ssoSid -pass ssoPassword -das http://ssohost:port/
For example:
$PROMPT> ./emctl config oms sso -host sshost1.acme.com -port 1521 -sid asdb -pass Ch22x5xt -das http://ssohost1.acme.com:7777
Table 6–2 describes the arguments on the emctl config oms sso command line.
Example 6–8 shows the typical output generated by the emctl config oms sso command.
6. Restart the Management Service, Oracle HTTP Server, and the other application server components:
$PROMPT> cd $ORACLE_HOME/opmn/bin$PROMPT> ./opmnctl startall
7. Go the Grid Control Console URL.
For example:
https://mgmthost1.acme.com:7777/em
The browser is redirected to the standard Single Sign-On Logon page.
Note:
■ You can use the osso.conf file to configure the Grid Control for use with Oracle Application Server Single Sign-On. For more details, refer to Registering HTTP Port With Single Sign On Server.
■ By default the emctl config oms sso command registers https URL with the SSO server. You can use the -unsecure option to register the http URL.
Note: You can remove the single sign-on configuration and restore Grid control authentication by using the following command:
emctl config oms sso -remove
Table 6–2 Arguments for the emctl sso Command
Argument Description
-host The name of the host computer where the Oracle Application Server Single Sign-On server resides. Be sure to use the fully-qualified host name.
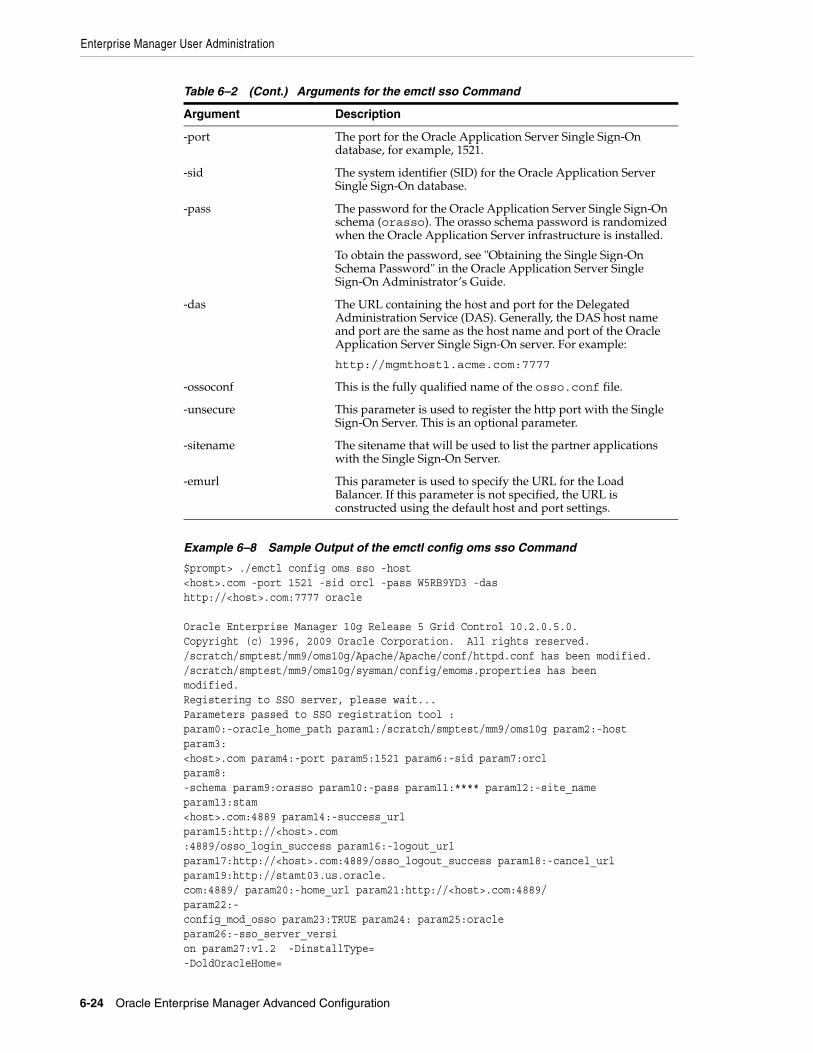
Enterprise Manager User Administration
6-24 Oracle Enterprise Manager Advanced Configuration
Example 6–8 Sample Output of the emctl config oms sso Command
$prompt> ./emctl config oms sso -host <host>.com -port 1521 -sid orcl -pass W5RB9YD3 -das http://<host>.com:7777 oracle Oracle Enterprise Manager 10g Release 5 Grid Control 10.2.0.5.0. Copyright (c) 1996, 2009 Oracle Corporation. All rights reserved./scratch/smptest/mm9/oms10g/Apache/Apache/conf/httpd.conf has been modified./scratch/smptest/mm9/oms10g/sysman/config/emoms.properties has been modified.Registering to SSO server, please wait...Parameters passed to SSO registration tool :param0:-oracle_home_path param1:/scratch/smptest/mm9/oms10g param2:-host param3:<host>.com param4:-port param5:1521 param6:-sid param7:orcl param8:-schema param9:orasso param10:-pass param11:**** param12:-site_name param13:stam<host>.com:4889 param14:-success_url param15:http://<host>.com:4889/osso_login_success param16:-logout_url param17:http://<host>.com:4889/osso_logout_success param18:-cancel_url param19:http://stamt03.us.oracle.com:4889/ param20:-home_url param21:http://<host>.com:4889/ param22:-config_mod_osso param23:TRUE param24: param25:oracle param26:-sso_server_version param27:v1.2 -DinstallType=-DoldOracleHome=
-port The port for the Oracle Application Server Single Sign-On database, for example, 1521.
-sid The system identifier (SID) for the Oracle Application Server Single Sign-On database.
-pass The password for the Oracle Application Server Single Sign-On schema (orasso). The orasso schema password is randomized when the Oracle Application Server infrastructure is installed.
To obtain the password, see "Obtaining the Single Sign-On Schema Password" in the Oracle Application Server Single Sign-On Administrator’s Guide.
-das The URL containing the host and port for the Delegated Administration Service (DAS). Generally, the DAS host name and port are the same as the host name and port of the Oracle Application Server Single Sign-On server. For example:
http://mgmthost1.acme.com:7777
-ossoconf This is the fully qualified name of the osso.conf file.
-unsecure This parameter is used to register the http port with the Single Sign-On Server. This is an optional parameter.
-sitename The sitename that will be used to list the partner applications with the Single Sign-On Server.
-emurl This parameter is used to specify the URL for the Load Balancer. If this parameter is not specified, the URL is constructed using the default host and port settings.
Table 6–2 (Cont.) Arguments for the emctl sso Command
Argument Description
Enterprise Manager User Administration
Enterprise Manager Security 6-25
-DoldOHSUser=rootCheck /scratch/smptest/mm9/oms10g/sso/log/ssoreg.log for details of this registrationSSO registration tool finished successfully.Done!
6.3.2.2 Registering HTTP Port With Single Sign On ServerBy default, the https port is registered with the Single Sign-on server. If you want to register the http port with the Single Sign-on server, you can specify the -unsecure parameter as follows
$prompt>emctl config oms sso -host ssoHost -port ssoPort -sid ssoSid -pass ssoPassword -das dasURL -unsecure
where:
■ host ssoHost: is the fully qualified host name.
■ port ssoPort: is the listener port for the SSO database.
■ sid ssoSid: is the SSO database SID
■ pass ssoPassword: is the orasso user password. This parameter is optional.
■ das dasURL: stands for the http://host:port where host is the ssoHost, port is the http port for the OIDDAS URL.
■ unsecure: is used to register the http port with the Single Sign-On Server.
6.3.2.3 Configuring Enterprise Manager to Use Single Sign-On with the osso.conf FileIn some environments, the Single Sign-On Server may be managed by different administrators who may not share the credentials. The osso.conf file can be used or the necessary parameter values required to create the osso.conf file can be specified.
To register Enterprise Manager as a partner application manually, follow these steps:
1. Enter the following URL to navigate to the SSO Administration page.
http://sso_host:sso_port/pls/orasso
2. Login as orcladmin user and click SSO Administration.
3. Click Administer Partner Applications and then click Add Partner Application.
4. Enter the following information on the Add Partner Application page.
Name: <EMPartnerName>Home URL: protocol://em_host:em_portSuccess URL: protocol://em_host:em_port/osso_login_success Logout URL: protocol://em_host:em_port/osso_logout_successAdministrator Email: [email protected]
where host, port, and protocol refer to the EM Host, port and the protocol (http or https) used.
5. After entering these details, click Edit <EMPartnerName> and enter the following parameters to generate the osso.txt. Sample values for these parameters are shown below:
sso_server_version: v1.2cipher_key: <EncryptionKeyValue>
Enterprise Manager User Administration
6-26 Oracle Enterprise Manager Advanced Configuration
site_id: <IDValue>site_token: <TokenValue>login_url: protocol://sso_host:sso_port/pls/orasso/orasso.wwsso_app_admin.lsloginlogout_url=protocol://sso_host:sso_port/pls/orasso/orasso.wwsso_app_admin.ls_logoutcancel_url=protocol://em_host:em_portsso_timeout_cookie_name=SSO_ID_TIMEOUTsso_timeout_cookie_key=9E231B3C1A3A808A
6. Enter the following command to generate the osso.conf file:
$ORACLE_HOME/Apache/Apache/bin/iasobf osso.txt osso.conf root
7. Use the osso.conf file for registration as follows:
$emctl config oms sso -ossoconf osso.conf -das http://sso_host:sso_port/
8. Restart Apache and OMS as follows:
Opmnctl stopallOpmnctl startall
6.3.2.4 Registering Single Sign-On Users as Enterprise Manager AdministratorsAfter you have configured Enterprise Manager to use the Single Sign-On logon page, you can register any Single Sign-On user as an Enterprise Manager administrator:
1. Go the Grid Control Console URL.
For example:
http://mgmthost1.acme.com:7777/em
The browser is redirected to the standard Single Sign-On Logon page.
2. Enter the credentials for a valid Single Sign-On user.
If the Single Sign-On user is not an Enterprise Manager administrator, the browser is redirected to a modified version of the Enterprise Manager logon page (Figure 6–5).
3. Log in to Enterprise Manager as a Super Administrator.
4. Click Setup and then click Administrators to display the Administrators page.
Because Enterprise Manager has been configured to use Single Sign-On, the first page in the Create Administrator wizard now offers you the option of creating an administrator based on a registered Oracle Internet Directory user (Figure 6–6).
5. Select Oracle Internet Directory and advance to the next page in the wizard.
6. Enter the name and e-mail address of the Oracle Internet Directory user, or click the flashlight icon to search for a user name in the Oracle Internet Directory.
7. Use the rest of the wizard pages to define the roles, system privileges, and other characteristics of the Enterprise Manager administrator and then click Finish.
Enterprise Manager displays a summary page that lists the characteristics of the administrator account.
8. Click Finish to create the new Enterprise Manager administrator.
See Also: "Creating, Editing, and Viewing Administrators" in the Enterprise Manager online Help
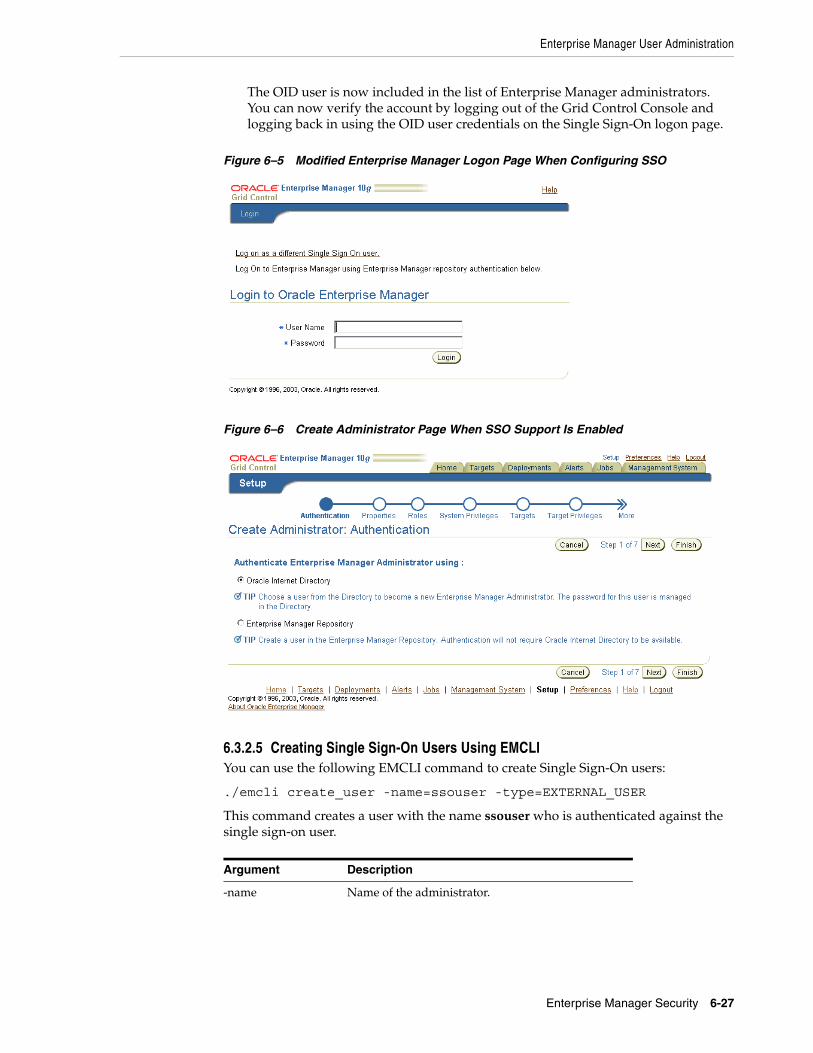
Enterprise Manager User Administration
Enterprise Manager Security 6-27
The OID user is now included in the list of Enterprise Manager administrators. You can now verify the account by logging out of the Grid Control Console and logging back in using the OID user credentials on the Single Sign-On logon page.
Figure 6–5 Modified Enterprise Manager Logon Page When Configuring SSO
Figure 6–6 Create Administrator Page When SSO Support Is Enabled
6.3.2.5 Creating Single Sign-On Users Using EMCLIYou can use the following EMCLI command to create Single Sign-On users:
./emcli create_user -name=ssouser -type=EXTERNAL_USER
This command creates a user with the name ssouser who is authenticated against the single sign-on user.
Argument Description
-name Name of the administrator.
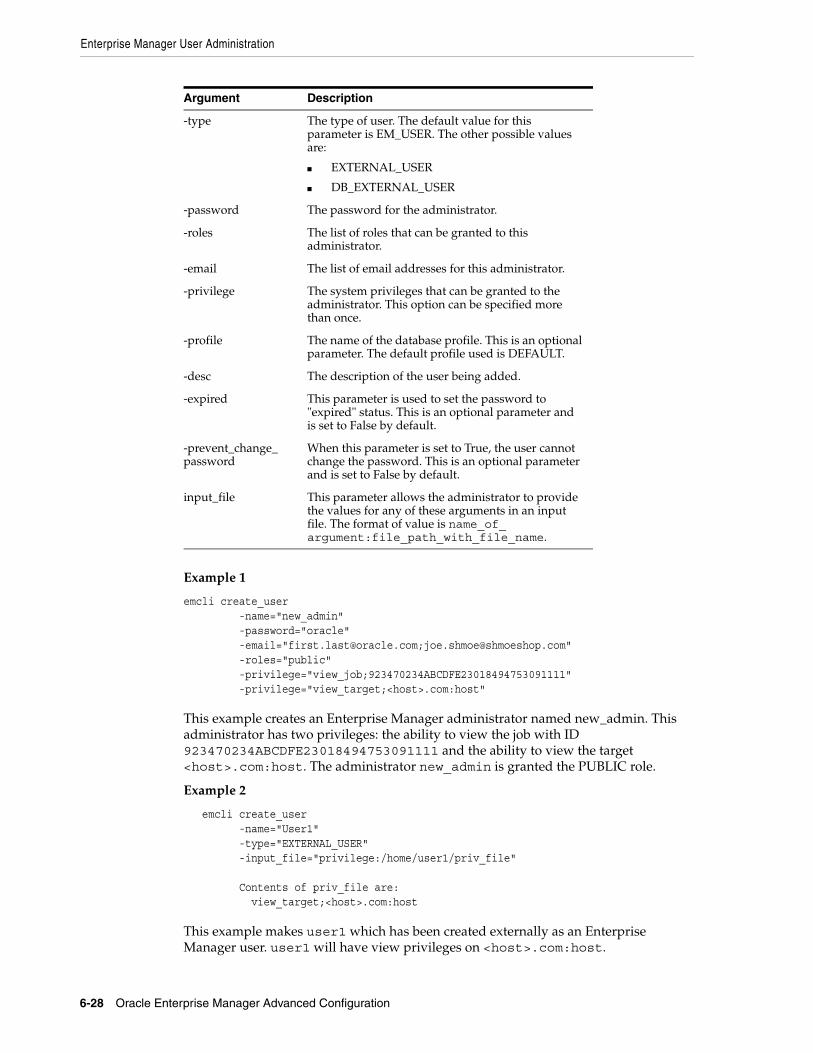
Enterprise Manager User Administration
6-28 Oracle Enterprise Manager Advanced Configuration
Example 1
emcli create_user -name="new_admin" -password="oracle" -email="[email protected];[email protected]" -roles="public" -privilege="view_job;923470234ABCDFE23018494753091111" -privilege="view_target;<host>.com:host"
This example creates an Enterprise Manager administrator named new_admin. This administrator has two privileges: the ability to view the job with ID 923470234ABCDFE23018494753091111 and the ability to view the target <host>.com:host. The administrator new_admin is granted the PUBLIC role.
Example 2
emcli create_user -name="User1" -type="EXTERNAL_USER" -input_file="privilege:/home/user1/priv_file"
Contents of priv_file are: view_target;<host>.com:host
This example makes user1 which has been created externally as an Enterprise Manager user. user1 will have view privileges on <host>.com:host.
-type The type of user. The default value for this parameter is EM_USER. The other possible values are:
■ EXTERNAL_USER
■ DB_EXTERNAL_USER
-password The password for the administrator.
-roles The list of roles that can be granted to this administrator.
-email The list of email addresses for this administrator.
-privilege The system privileges that can be granted to the administrator. This option can be specified more than once.
-profile The name of the database profile. This is an optional parameter. The default profile used is DEFAULT.
-desc The description of the user being added.
-expired This parameter is used to set the password to "expired" status. This is an optional parameter and is set to False by default.
-prevent_change_password
When this parameter is set to True, the user cannot change the password. This is an optional parameter and is set to False by default.
input_file This parameter allows the administrator to provide the values for any of these arguments in an input file. The format of value is name_of_argument:file_path_with_file_name.
Argument Description
Enterprise Manager User Administration
Enterprise Manager Security 6-29
Example 3
emcli create_user -name="User1" -desc="This is temp hire." -prevent_change_password="true" -profile="MGMT_ADMIN_USER_PROFILE
This example sets user1 as an Enterprise Manager user with some description. The prevent_change_password is set to true to indicate that the password cannot be changed by user1 and the profile is set to MGMT_ADMIN_USER_PROFILE.
Example 4
emcli create_user -name="User1" -desc="This is temp hire." -expire="true"
This example sets user1 as an Enterprise Manager with some description. Since the password is set to expire immediately, when the user logs in for the first time, he is prompted to change the password.
6.3.2.6 Grid Control as a Single Sign-On Partner ApplicationThe emctl config oms sso command adds the Oracle Enterprise Manager 10g Grid Control Console as an Oracle Application Server Single Sign-On partner application. Partner applications are those applications that have delegated authentication to the Oracle Application Server Single Sign-On Server.
To see the list of partner applications, navigate to the following URL:
http://hostname:port/pls/orasso/orasso.home
For example:
http://ssohost1.acme.com:7777/pls/orasso/orasso.home
6.3.2.7 Bypassing the Single Sign-On Logon PageAfter you configure Enterprise Manager to use the Single Sign-On logon page, you can bypass the Single Sign-On page at any time and go directly to the Enterprise Manager logon page by entering the following URL:
http://hostname.domain:port/em/console/logon/logon
For example:
http://mgmthost1.acme.com:7777/em/console/logon/logon
6.3.3 Configuring Enterprise Manager for Use with Enterprise User SecurityEnterprise User Security enables you to create and store Oracle9i database information as directory objects in an LDAP-compliant directory server. For example, an administrator can create and store enterprise users and roles for the Oracle9i database in the directory, which helps centralize the administration of users and roles across multiple databases.
See Also: "Enterprise User Security Configuration Tasks and Troubleshooting" in the Oracle Database Advanced Security Administrator's Guide
Enterprise Manager User Administration
6-30 Oracle Enterprise Manager Advanced Configuration
If you currently use Enterprise User Security for all your Oracle9i databases, you can extend this feature to Enterprise Manager. Configuring Enterprise Manager for use with Enterprise User Security simplifies the process of logging in to database targets you are managing with the Oracle Enterprise Manager 10g Grid Control Console.
To configure Enterprise Manager for use with Enterprise User Security:
1. Ensure that you have enabled Enterprise User Security for your Oracle Management Repository database, as well as the database targets you will be managing with the Grid Control Console. Refer to Oracle Database Advanced Security Administrator’s Guide for details.
2. Change directory to the ORACLE_HOME/sysman/config directory and open the emoms.properties file with your favorite text editor.
3. Add the following entries in the emoms.properties file:
oracle.sysman.emSDK.sec.DirectoryAuthenticationType=EnterpriseUseroracle.sysman.emSDK.sec.eus.Domain=<ClientDomainName> (For example: mydomain.com)oracle.sysman.emSDK.sec.eus.DASHostUrl=<das_url> (For example: oracle.sysman.emSDK.sec.eus.DASHostUrl=http://my.dashost.com:7777 )
4. Save and close the emoms.properties file.
5. Stop the Oracle Management Service.
6. Start the Management Service.
The next time you use the Oracle Enterprise Manager 10g Grid Control Console to drill down to a managed database, Enterprise Manager will attempt to connect to the database using Enterprise User Security. If successful, Enterprise Manager will connect you to the database without displaying a login page. If the attempt to use Enterprise User Security fails, Enterprise Manager will prompt you for the database credentials.
6.3.3.1 Registering Enterprise Users as Enterprise Manager UsersAfter you have configured Enterprise Manager to use Enterprise Users, you can register existing enterprise uses as Enterprise Manager Users and grant them the necessary privileges so that they can manage Enterprise Manager effectively by following these steps:
1. Log into Enterprise Manager as a Super Administrator.
2. Click Setup and then click Administrators to display the Administrators page. Since Enterprise Manager has been configured to use Enterprise Users, the first page of the Create Administrator wizard will provide the option to create an administrator based on a registered Oracle Internet Directory user (see Figure 6–6) or a normal database user.
3. Select Oracle Internet Directory and click Continue to go to the next page in the wizard.
4. Enter the name and e-mail address of the Oracle Internet Directory user or click the flashlight icon to search for a user name in the Oracle Internet Directory.
5. Use the rest of the wizard pages to define the roles, system privileges, and other characteristics of the Enterprise Manager administrator and then click Finish.
See Also: "Controlling the Oracle Management Service" on page 2-4
Enterprise Manager User Administration
Enterprise Manager Security 6-31
Enterprise Manager displays a summary page that lists the characteristics of the administrator account.
6. Click Finish to create the new Enterprise Manager administrator.
The OID user is now included in the list of Enterprise Manager administrators. You can now verify the account by logging out of the Grid Control Console and logging back in using the OID user credentials on the Single Sign-On logon page.
6.3.3.2 Using EMCLI to Create Enterprise Manager Users of Type Enterprise UsersTo register Enterprise Users as Enterprise Manager users, enter the following command:
./emcli create_user -name=eususer -type=DB_EXTERNAL_USER
This command registers the eususer as an Enterprise Manager user where eususer is an existing Enterprise User. For more details, refer to Creating Single Sign-On Users Using EMCLI.
6.3.4 Changing SYSMAN and MGMT_VIEW User PasswordsThis section describes the following:
■ Changing the SYSMAN User Password
■ Changing the MGMT_VIEW User Password
6.3.4.1 Changing the SYSMAN User PasswordTo change the password of the SYSMAN user, enter the following command:
emctl config oms -change_repos_pwd [-change_in_db] [-old_pwd <old_pwd>] [-new_pwd <new_pwd>] [-use_sys_pwd [-sys_pwd <sys_pwd>]]
You must run this command on each Management Service in your environment.
6.3.4.2 Changing the MGMT_VIEW User PasswordTo change the password of the MGMT_VIEW user, enter the following command:
emctl config oms -change_view_user_pwd [-sysman_pwd <sysman_pwd>] [-user_pwd <user_pwd>] [-auto_generate]
Parameter Description
-change_in_db This parameter is optional and is used to change the SYSMAN password in the repository. If there are multiple Management Services running, this parameter must be set to true for at least one Management service.
If this parameter is not specified, the emoms.properties file will be updated with the new SYSMAN password.
-old_pwd This is the current SYSMAN password.
-new_pwd This is the new password.
-use_sys_pwd This parameter is optional and is used to connect to the database as a SYS user.
-sys_pwd This is the password for the SYS user.
Setting Up the Auditing System for Enterprise Manager
6-32 Oracle Enterprise Manager Advanced Configuration
6.4 Setting Up the Auditing System for Enterprise ManagerAll operations performed by Enterprise Manager users such as creating users, granting privileges, starting a remote job like patching or cloning, need to be audited to ensure compliance with the Sarbanes-Oxley Act of 2002 (SAS 70). This act defines standards an auditor must use to assess the contracted internal controls of a service organization. Auditing an operation enables an administrator to monitor, detect, and investigate problems and enforce enterprise wide security policies.
Irrespective of how the user has logged into Enterprise Manager, if auditing is enabled, each user action is audited and the audit details are stored in a record.
6.4.1 Configuring the Enterprise Manager Audit SystemYou can configure the Enterprise Manager Audit System by using the following options:
■ Enabling and Disabling Auditing Using emcli Commands
■ Enabling and Disabling Auditing Using PL/SQL
6.4.1.1 Enabling and Disabling Auditing Using emcli CommandsYou can use the following emcli commands:
■ enable_audit: Enables auditing for all user operations.
■ disable_audit: Disables auditing for all user operations.
■ show_audit_actions_list: Shows a list of the user operations being audited.
■ show_audit_settings: Shows the audit status, operation list, externalization service details, and purge period details.
6.4.1.2 Enabling and Disabling Auditing Using PL/SQLTo set up the audit system in Enterprise Manager:
1. The audit function is turned off by default. Log in to the Enterprise Manager Management Repository as the sysman user. To turn on the audit function, enter the following commands:
SQL> exec mgmt_audit_admin.enable_audit;SQL> commit;
2. After enabling auditing, you must restart the Oracle Management Service to ensure that this change has taken effect.
3. You can then login to Enterprise Manager and perform other user operations.
Parameter Description
-sysman_pwd The password for the SYSMAN user.
-user_pwd The new password for theMGMT_VIEW user.This is an optional parameter and if it is not specified, the password is auto generated.
-auto_generate If this option is specified, the password is auto generated.
Setting Up the Auditing System for Enterprise Manager
Enterprise Manager Security 6-33
6.4.2 Configuring the Audit Data Export ServiceAudit data needs to be protected and maintained for several years. The volume of audit data may become very large and impact the performance of the system. To limit the amount of data stored in the repository, the audit data must be externalized or archived at regular intervals. The archived audit data is stored in an XML file complying with the ODL format. To externalize the audit data, the EM_AUDIT_EXTERNALIZATION API is used. Records of the format <file-prefix>.NNNNN.xml, where NNNN is a number are generated. The numbers start with 00001 and continue to 99999.
You can set up the audit externalization service for exporting audit data into the file system by using the following emcli command:
■ update_audit_setting -file_prefix=<file_prefix> -directory_name=<directory_name> -file_size = <file size> -data_retention_period=<period in days>: Sets up the externalization service for exporting audit data to the file system.
– file_prefix: The prefix of the file which contains the audit data.
– directory_name: The name of the database directory that is mapped to the OS directory.
– file_size: The file size is the size of the file the data is written to.
– data_retention_period: The period for which the audit data is to be retained inside the repository.
For more details on the EMCLI verbs, refer to Enterprise Manager Command Line Reference.
6.4.3 Searching the Audit DataYou can search for audit data that has been generated over a specified period. You can also search for the following:
■ Audit details of a specific user operation or all user operations.
■ Audit details of operations with a Success or Failure status or All operations.
To view the audit data, click the Setup option. On the Setup page, click the Management Services and Repository tab. The Overview page is displayed. Click the Audit Data link under the Audit section. The Audit Data page is displayed.
Notes:
■ You can disable the auditing function by entering the following command:
SQL> exec mgmt_audit_admin.disable_audit;SQL> commit;
After disabling auditing, you must restart the Oracle Management Service to ensure that this change has taken effect.
■ All the Super Administrators can view the audit data.
■ To view the audit data, login into Enterprise Manager and click the Setup option. On the Setup page, click the Management Services and Repository tab. In the Overview page, click the Audit Data link under the Audit section to view the audit data.
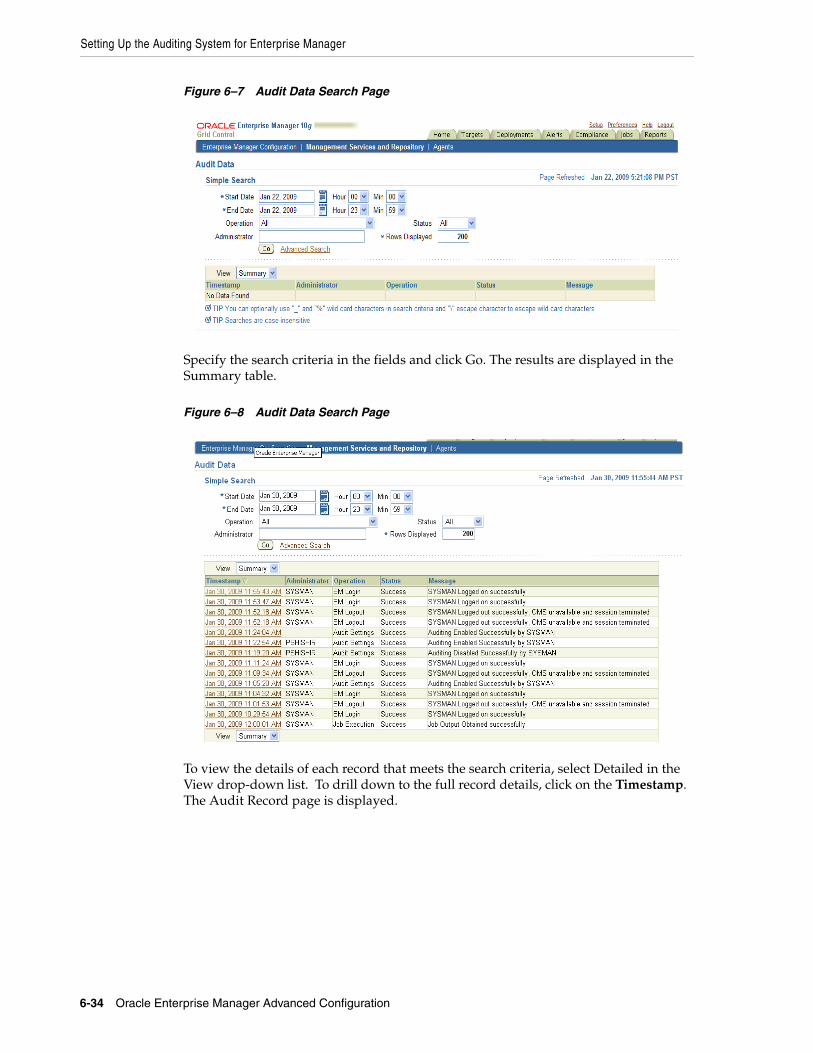
Setting Up the Auditing System for Enterprise Manager
6-34 Oracle Enterprise Manager Advanced Configuration
Figure 6–7 Audit Data Search Page
Specify the search criteria in the fields and click Go. The results are displayed in the Summary table.
Figure 6–8 Audit Data Search Page
To view the details of each record that meets the search criteria, select Detailed in the View drop-down list. To drill down to the full record details, click on the Timestamp. The Audit Record page is displayed.
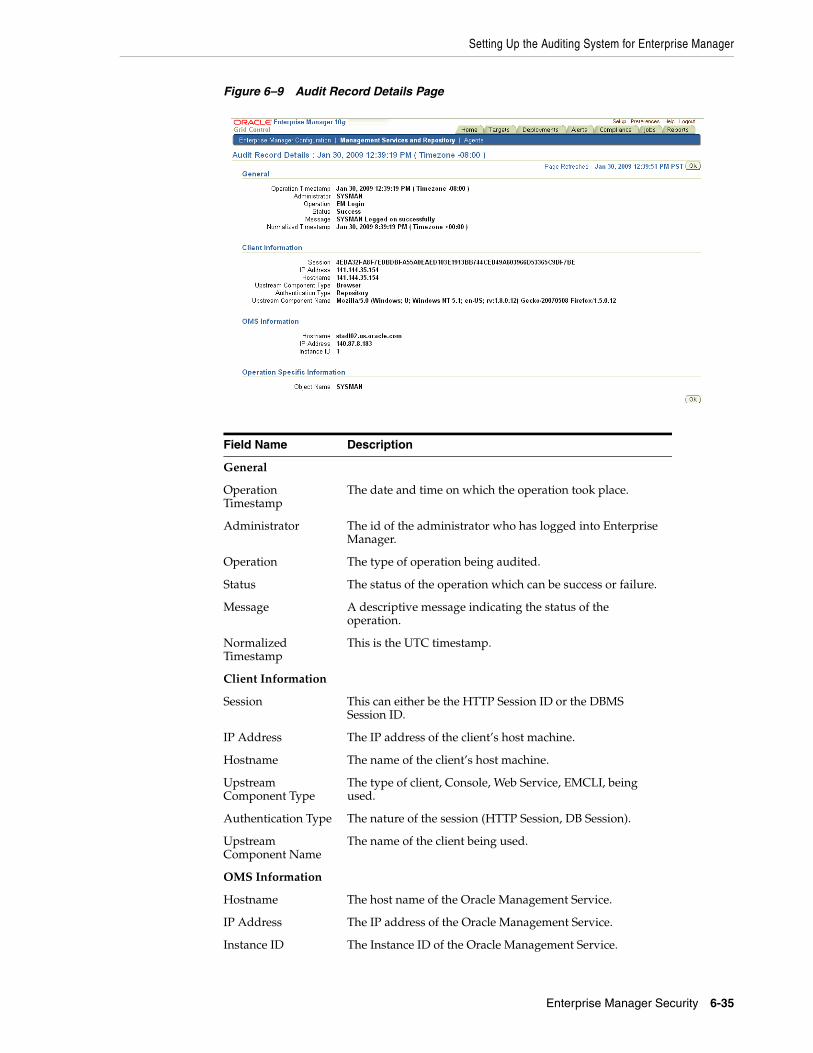
Setting Up the Auditing System for Enterprise Manager
Enterprise Manager Security 6-35
Figure 6–9 Audit Record Details Page
Field Name Description
General
Operation Timestamp
The date and time on which the operation took place.
Administrator The id of the administrator who has logged into Enterprise Manager.
Operation The type of operation being audited.
Status The status of the operation which can be success or failure.
Message A descriptive message indicating the status of the operation.
Normalized Timestamp
This is the UTC timestamp.
Client Information
Session This can either be the HTTP Session ID or the DBMS Session ID.
IP Address The IP address of the client’s host machine.
Hostname The name of the client’s host machine.
Upstream Component Type
The type of client, Console, Web Service, EMCLI, being used.
Authentication Type The nature of the session (HTTP Session, DB Session).
Upstream Component Name
The name of the client being used.
OMS Information
Hostname The host name of the Oracle Management Service.
IP Address The IP address of the Oracle Management Service.
Instance ID The Instance ID of the Oracle Management Service.
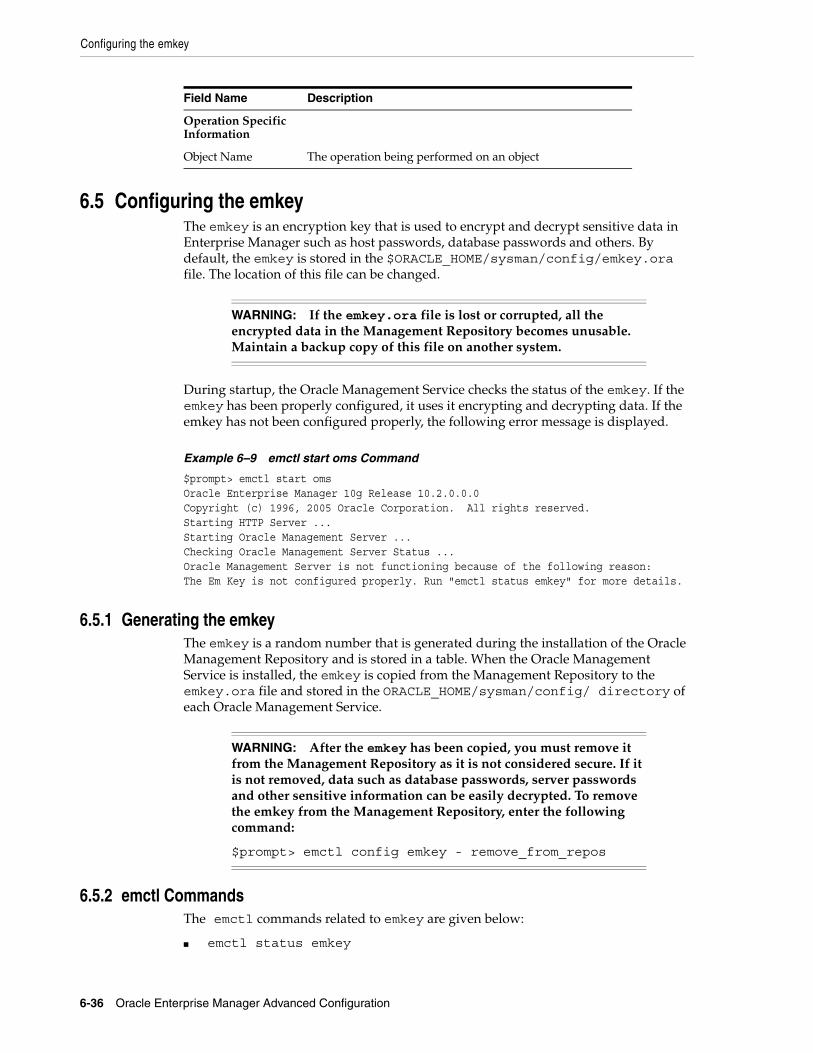
Configuring the emkey
6-36 Oracle Enterprise Manager Advanced Configuration
6.5 Configuring the emkeyThe emkey is an encryption key that is used to encrypt and decrypt sensitive data in Enterprise Manager such as host passwords, database passwords and others. By default, the emkey is stored in the $ORACLE_HOME/sysman/config/emkey.ora file. The location of this file can be changed.
During startup, the Oracle Management Service checks the status of the emkey. If the emkey has been properly configured, it uses it encrypting and decrypting data. If the emkey has not been configured properly, the following error message is displayed.
Example 6–9 emctl start oms Command
$prompt> emctl start omsOracle Enterprise Manager 10g Release 10.2.0.0.0 Copyright (c) 1996, 2005 Oracle Corporation. All rights reserved.Starting HTTP Server ...Starting Oracle Management Server ...Checking Oracle Management Server Status ...Oracle Management Server is not functioning because of the following reason:The Em Key is not configured properly. Run "emctl status emkey" for more details.
6.5.1 Generating the emkeyThe emkey is a random number that is generated during the installation of the Oracle Management Repository and is stored in a table. When the Oracle Management Service is installed, the emkey is copied from the Management Repository to the emkey.ora file and stored in the ORACLE_HOME/sysman/config/ directory of each Oracle Management Service.
6.5.2 emctl CommandsThe emctl commands related to emkey are given below:
■ emctl status emkey
Operation Specific Information
Object Name The operation being performed on an object
WARNING: If the emkey.ora file is lost or corrupted, all the encrypted data in the Management Repository becomes unusable. Maintain a backup copy of this file on another system.
WARNING: After the emkey has been copied, you must remove it from the Management Repository as it is not considered secure. If it is not removed, data such as database passwords, server passwords and other sensitive information can be easily decrypted. To remove the emkey from the Management Repository, enter the following command:
$prompt> emctl config emkey - remove_from_repos
Field Name Description
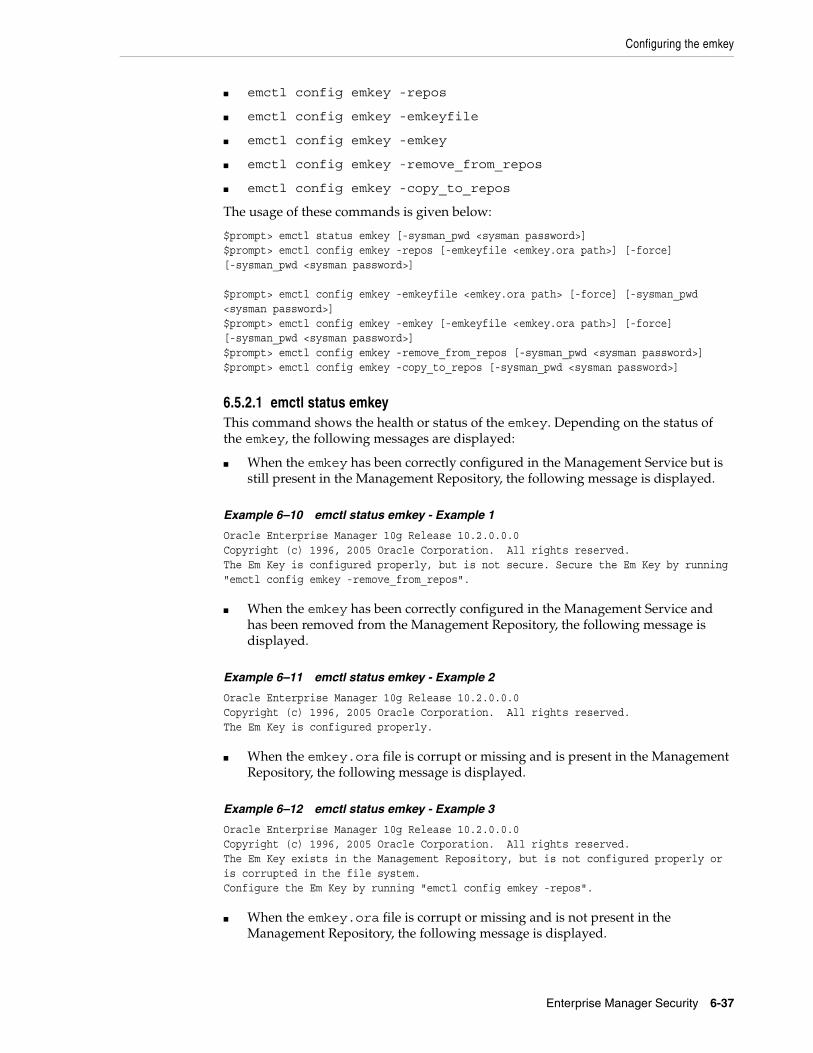
Configuring the emkey
Enterprise Manager Security 6-37
■ emctl config emkey -repos
■ emctl config emkey -emkeyfile
■ emctl config emkey -emkey
■ emctl config emkey -remove_from_repos
■ emctl config emkey -copy_to_repos
The usage of these commands is given below:
$prompt> emctl status emkey [-sysman_pwd <sysman password>]$prompt> emctl config emkey -repos [-emkeyfile <emkey.ora path>] [-force] [-sysman_pwd <sysman password>]
$prompt> emctl config emkey -emkeyfile <emkey.ora path> [-force] [-sysman_pwd <sysman password>]$prompt> emctl config emkey -emkey [-emkeyfile <emkey.ora path>] [-force] [-sysman_pwd <sysman password>]$prompt> emctl config emkey -remove_from_repos [-sysman_pwd <sysman password>]$prompt> emctl config emkey -copy_to_repos [-sysman_pwd <sysman password>]
6.5.2.1 emctl status emkeyThis command shows the health or status of the emkey. Depending on the status of the emkey, the following messages are displayed:
■ When the emkey has been correctly configured in the Management Service but is still present in the Management Repository, the following message is displayed.
Example 6–10 emctl status emkey - Example 1
Oracle Enterprise Manager 10g Release 10.2.0.0.0 Copyright (c) 1996, 2005 Oracle Corporation. All rights reserved.The Em Key is configured properly, but is not secure. Secure the Em Key by running "emctl config emkey -remove_from_repos".
■ When the emkey has been correctly configured in the Management Service and has been removed from the Management Repository, the following message is displayed.
Example 6–11 emctl status emkey - Example 2
Oracle Enterprise Manager 10g Release 10.2.0.0.0 Copyright (c) 1996, 2005 Oracle Corporation. All rights reserved.The Em Key is configured properly.
■ When the emkey.ora file is corrupt or missing and is present in the Management Repository, the following message is displayed.
Example 6–12 emctl status emkey - Example 3
Oracle Enterprise Manager 10g Release 10.2.0.0.0 Copyright (c) 1996, 2005 Oracle Corporation. All rights reserved.The Em Key exists in the Management Repository, but is not configured properly or is corrupted in the file system.Configure the Em Key by running "emctl config emkey -repos".
■ When the emkey.ora file is corrupt or missing and is not present in the Management Repository, the following message is displayed.
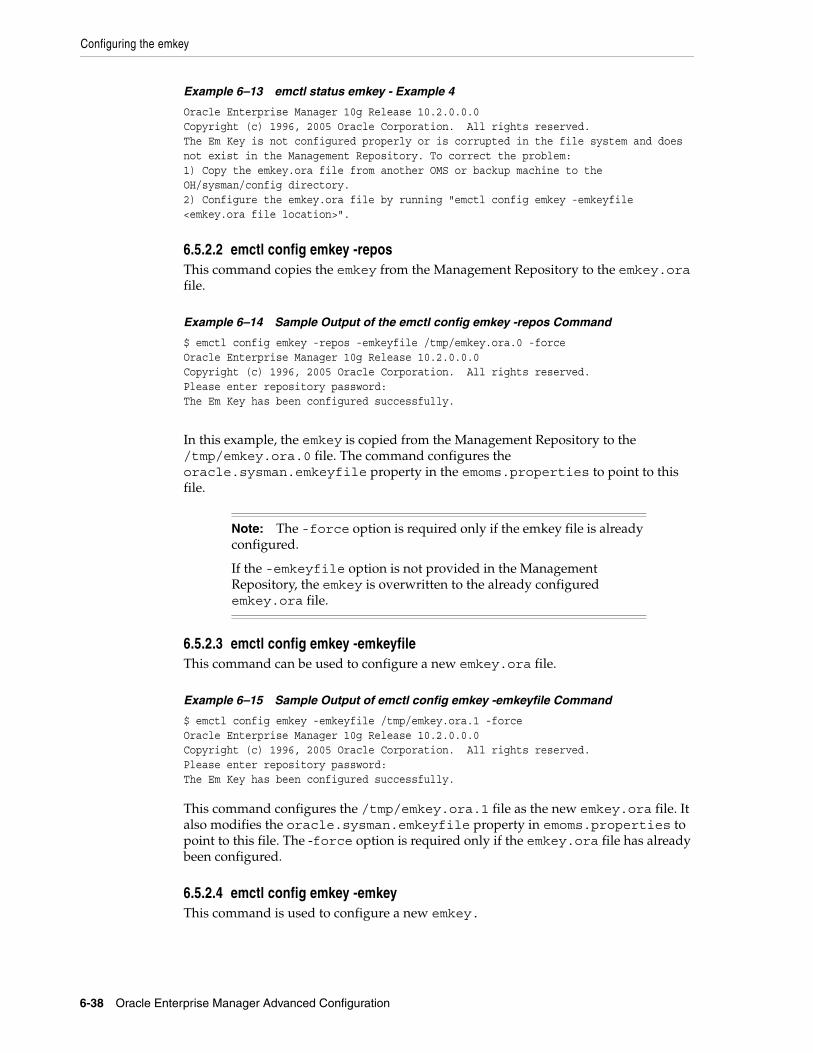
Configuring the emkey
6-38 Oracle Enterprise Manager Advanced Configuration
Example 6–13 emctl status emkey - Example 4
Oracle Enterprise Manager 10g Release 10.2.0.0.0 Copyright (c) 1996, 2005 Oracle Corporation. All rights reserved.The Em Key is not configured properly or is corrupted in the file system and does not exist in the Management Repository. To correct the problem:1) Copy the emkey.ora file from another OMS or backup machine to the OH/sysman/config directory.2) Configure the emkey.ora file by running "emctl config emkey -emkeyfile <emkey.ora file location>".
6.5.2.2 emctl config emkey -repos This command copies the emkey from the Management Repository to the emkey.ora file.
Example 6–14 Sample Output of the emctl config emkey -repos Command
$ emctl config emkey -repos -emkeyfile /tmp/emkey.ora.0 -forceOracle Enterprise Manager 10g Release 10.2.0.0.0 Copyright (c) 1996, 2005 Oracle Corporation. All rights reserved.Please enter repository password: The Em Key has been configured successfully.
In this example, the emkey is copied from the Management Repository to the /tmp/emkey.ora.0 file. The command configures the oracle.sysman.emkeyfile property in the emoms.properties to point to this file.
6.5.2.3 emctl config emkey -emkeyfile This command can be used to configure a new emkey.ora file.
Example 6–15 Sample Output of emctl config emkey -emkeyfile Command
$ emctl config emkey -emkeyfile /tmp/emkey.ora.1 -forceOracle Enterprise Manager 10g Release 10.2.0.0.0 Copyright (c) 1996, 2005 Oracle Corporation. All rights reserved.Please enter repository password: The Em Key has been configured successfully.
This command configures the /tmp/emkey.ora.1 file as the new emkey.ora file. It also modifies the oracle.sysman.emkeyfile property in emoms.properties to point to this file. The -force option is required only if the emkey.ora file has already been configured.
6.5.2.4 emctl config emkey -emkey This command is used to configure a new emkey.
Note: The -force option is required only if the emkey file is already configured.
If the -emkeyfile option is not provided in the Management Repository, the emkey is overwritten to the already configured emkey.ora file.
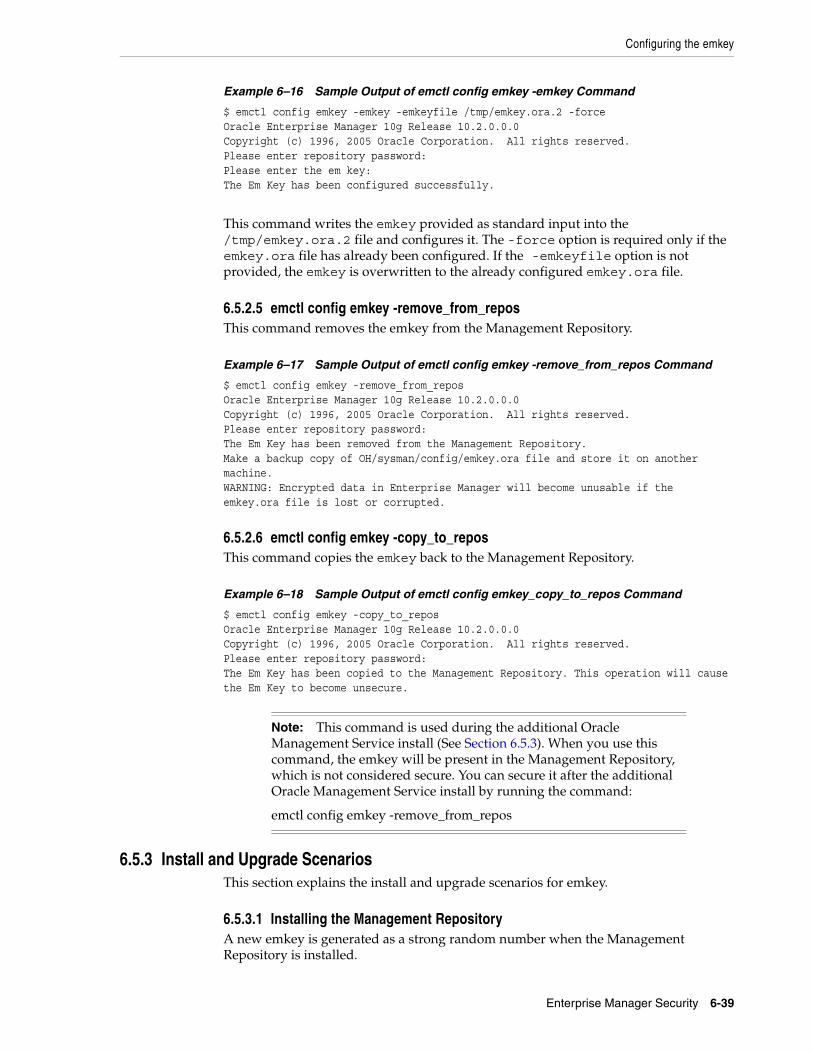
Configuring the emkey
Enterprise Manager Security 6-39
Example 6–16 Sample Output of emctl config emkey -emkey Command
$ emctl config emkey -emkey -emkeyfile /tmp/emkey.ora.2 -forceOracle Enterprise Manager 10g Release 10.2.0.0.0 Copyright (c) 1996, 2005 Oracle Corporation. All rights reserved.Please enter repository password: Please enter the em key: The Em Key has been configured successfully.
This command writes the emkey provided as standard input into the /tmp/emkey.ora.2 file and configures it. The -force option is required only if the emkey.ora file has already been configured. If the -emkeyfile option is not provided, the emkey is overwritten to the already configured emkey.ora file.
6.5.2.5 emctl config emkey -remove_from_reposThis command removes the emkey from the Management Repository.
Example 6–17 Sample Output of emctl config emkey -remove_from_repos Command
$ emctl config emkey -remove_from_reposOracle Enterprise Manager 10g Release 10.2.0.0.0 Copyright (c) 1996, 2005 Oracle Corporation. All rights reserved.Please enter repository password: The Em Key has been removed from the Management Repository.Make a backup copy of OH/sysman/config/emkey.ora file and store it on another machine.WARNING: Encrypted data in Enterprise Manager will become unusable if the emkey.ora file is lost or corrupted.
6.5.2.6 emctl config emkey -copy_to_repos This command copies the emkey back to the Management Repository.
Example 6–18 Sample Output of emctl config emkey_copy_to_repos Command
$ emctl config emkey -copy_to_reposOracle Enterprise Manager 10g Release 10.2.0.0.0 Copyright (c) 1996, 2005 Oracle Corporation. All rights reserved.Please enter repository password: The Em Key has been copied to the Management Repository. This operation will cause the Em Key to become unsecure.
6.5.3 Install and Upgrade ScenariosThis section explains the install and upgrade scenarios for emkey.
6.5.3.1 Installing the Management Repository A new emkey is generated as a strong random number when the Management Repository is installed.
Note: This command is used during the additional Oracle Management Service install (See Section 6.5.3). When you use this command, the emkey will be present in the Management Repository, which is not considered secure. You can secure it after the additional Oracle Management Service install by running the command:
emctl config emkey -remove_from_repos
Additional Security Considerations
6-40 Oracle Enterprise Manager Advanced Configuration
6.5.3.2 Installing the First Oracle Management ServiceWhen the Oracle Management Service is installed, the installer copies the emkey from the Management Repository and stores it in the emkey.ora file.
6.5.3.3 Installing Additional Oracle Management ServiceSimilar to the first Oracle Management Service install, the installer will copy the emkey from the Management Repository to the emkey.ora file of the additional Oracle Management Service.
6.5.3.4 Upgrading from 10.1 to 10.2The Management Repository is upgraded as usual. When the Oracle Management Service is upgraded, the upgrade script copies the emkey from the Management Repository to the emkey.ora file of each Oracle Management Service.
6.5.3.5 Recreating the Management Repository When the Management Repository is recreated, a new emkey is generated. This new key will not be in synchronization with the existing emkey.ora in the Oracle Management Service home directory. Enter the emctl config emkey -repos -force command to overwrite the new emkey to the emkey.ora file.
6.6 Additional Security ConsiderationsAfter you enable security for the Enterprise Manager components and framework, there are additional security considerations. This section provides the following topics:
■ Responding to Browser-Specific Security Certificate Alerts
■ Configuring Beacons to Monitor Web Applications Over HTTPS
Note: After installation, the emkey will be present in the Management Repository. This is not considered secure. The user can secure the emkey by running the emctl command emctl config emkey -remove_from_repos
Note: After the first Oracle Management Service install, you may have removed the emkey from the Management Repository using the emctl command.
Before the additional Oracle Management Service is installed, run the following command from the first Oracle Management Service home to copy the emkey to the Management Repository.
emctl config emkey -copy_to_repos
If the additional Oracle Management Service install is done without the emkey in the Management Repository, the installer will prompt the user to run the command mentioned above.
Note: After all the Oracle Management Service have been upgraded, you can secure the emkey, that is, remove it from the Management Repository by running the following command:
emctl config emkey -remove_from_repos
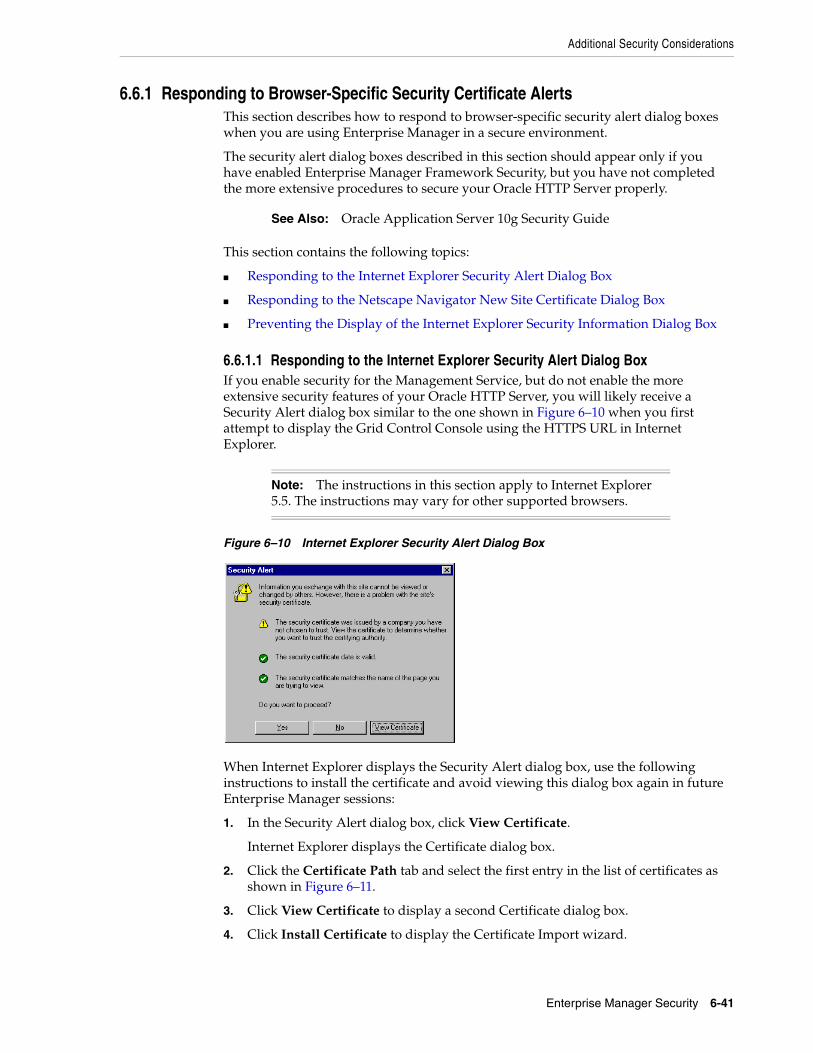
Additional Security Considerations
Enterprise Manager Security 6-41
6.6.1 Responding to Browser-Specific Security Certificate AlertsThis section describes how to respond to browser-specific security alert dialog boxes when you are using Enterprise Manager in a secure environment.
The security alert dialog boxes described in this section should appear only if you have enabled Enterprise Manager Framework Security, but you have not completed the more extensive procedures to secure your Oracle HTTP Server properly.
This section contains the following topics:
■ Responding to the Internet Explorer Security Alert Dialog Box
■ Responding to the Netscape Navigator New Site Certificate Dialog Box
■ Preventing the Display of the Internet Explorer Security Information Dialog Box
6.6.1.1 Responding to the Internet Explorer Security Alert Dialog BoxIf you enable security for the Management Service, but do not enable the more extensive security features of your Oracle HTTP Server, you will likely receive a Security Alert dialog box similar to the one shown in Figure 6–10 when you first attempt to display the Grid Control Console using the HTTPS URL in Internet Explorer.
Figure 6–10 Internet Explorer Security Alert Dialog Box
When Internet Explorer displays the Security Alert dialog box, use the following instructions to install the certificate and avoid viewing this dialog box again in future Enterprise Manager sessions:
1. In the Security Alert dialog box, click View Certificate.
Internet Explorer displays the Certificate dialog box.
2. Click the Certificate Path tab and select the first entry in the list of certificates as shown in Figure 6–11.
3. Click View Certificate to display a second Certificate dialog box.
4. Click Install Certificate to display the Certificate Import wizard.
See Also: Oracle Application Server 10g Security Guide
Note: The instructions in this section apply to Internet Explorer 5.5. The instructions may vary for other supported browsers.
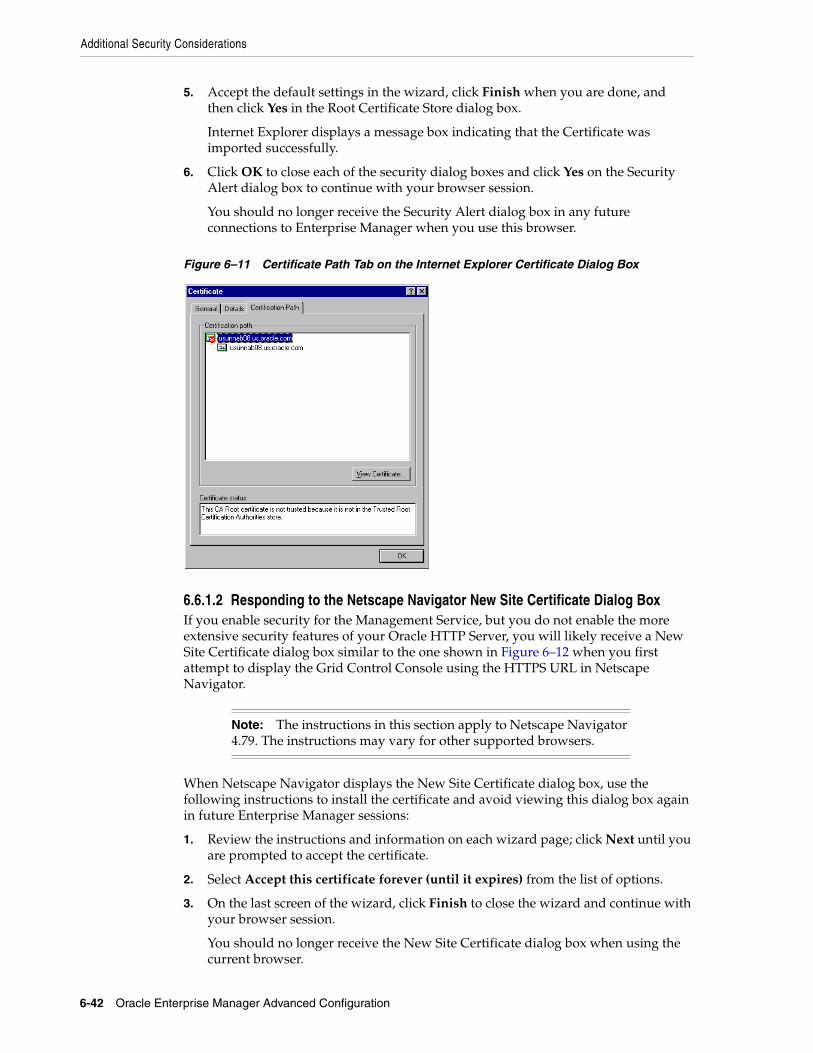
Additional Security Considerations
6-42 Oracle Enterprise Manager Advanced Configuration
5. Accept the default settings in the wizard, click Finish when you are done, and then click Yes in the Root Certificate Store dialog box.
Internet Explorer displays a message box indicating that the Certificate was imported successfully.
6. Click OK to close each of the security dialog boxes and click Yes on the Security Alert dialog box to continue with your browser session.
You should no longer receive the Security Alert dialog box in any future connections to Enterprise Manager when you use this browser.
Figure 6–11 Certificate Path Tab on the Internet Explorer Certificate Dialog Box
6.6.1.2 Responding to the Netscape Navigator New Site Certificate Dialog BoxIf you enable security for the Management Service, but you do not enable the more extensive security features of your Oracle HTTP Server, you will likely receive a New Site Certificate dialog box similar to the one shown in Figure 6–12 when you first attempt to display the Grid Control Console using the HTTPS URL in Netscape Navigator.
When Netscape Navigator displays the New Site Certificate dialog box, use the following instructions to install the certificate and avoid viewing this dialog box again in future Enterprise Manager sessions:
1. Review the instructions and information on each wizard page; click Next until you are prompted to accept the certificate.
2. Select Accept this certificate forever (until it expires) from the list of options.
3. On the last screen of the wizard, click Finish to close the wizard and continue with your browser session.
You should no longer receive the New Site Certificate dialog box when using the current browser.
Note: The instructions in this section apply to Netscape Navigator 4.79. The instructions may vary for other supported browsers.
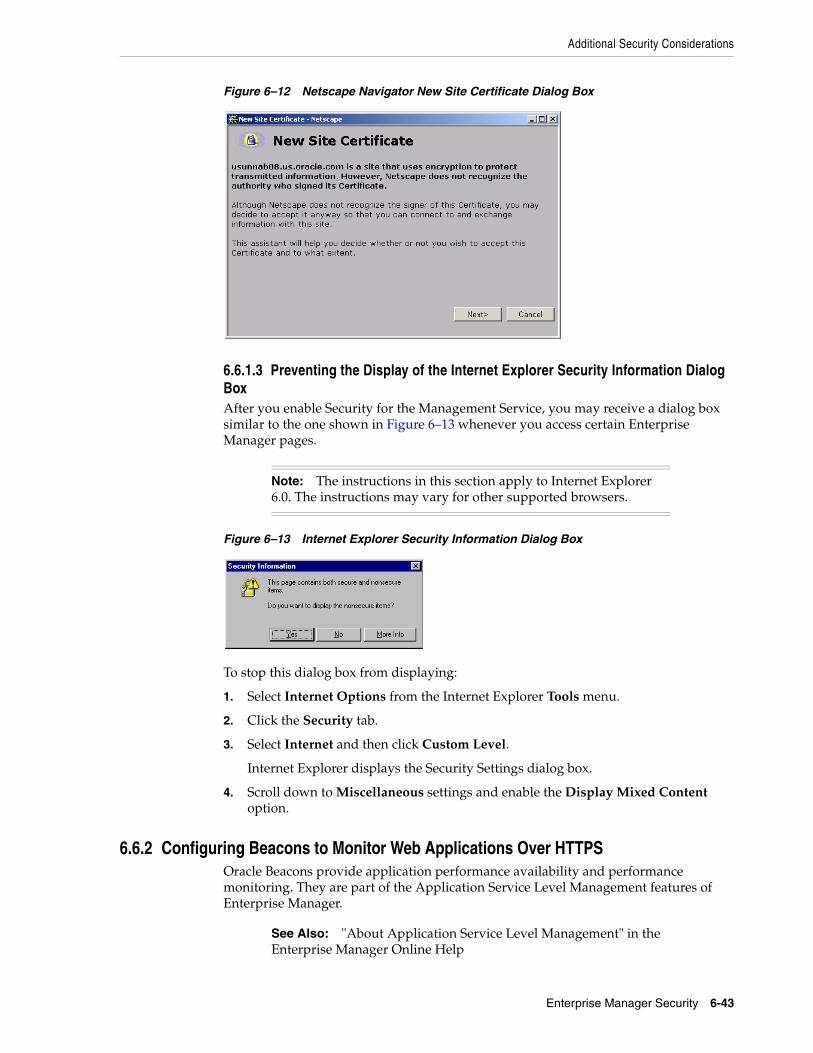
Additional Security Considerations
Enterprise Manager Security 6-43
Figure 6–12 Netscape Navigator New Site Certificate Dialog Box
6.6.1.3 Preventing the Display of the Internet Explorer Security Information Dialog BoxAfter you enable Security for the Management Service, you may receive a dialog box similar to the one shown in Figure 6–13 whenever you access certain Enterprise Manager pages.
Figure 6–13 Internet Explorer Security Information Dialog Box
To stop this dialog box from displaying:
1. Select Internet Options from the Internet Explorer Tools menu.
2. Click the Security tab.
3. Select Internet and then click Custom Level.
Internet Explorer displays the Security Settings dialog box.
4. Scroll down to Miscellaneous settings and enable the Display Mixed Content option.
6.6.2 Configuring Beacons to Monitor Web Applications Over HTTPSOracle Beacons provide application performance availability and performance monitoring. They are part of the Application Service Level Management features of Enterprise Manager.
Note: The instructions in this section apply to Internet Explorer 6.0. The instructions may vary for other supported browsers.
See Also: "About Application Service Level Management" in the Enterprise Manager Online Help
Additional Security Considerations
6-44 Oracle Enterprise Manager Advanced Configuration
When a Beacon is used to monitor a URL over Secure Sockets Layer (SSL) using an HTTPS URL, the Beacon must be configured to recognize the Certificate Authority that has been used by the Web site where that URL resides.
The Beacon software is preconfigured to recognize most commercial Certificate Authorities that are likely to be used by a secure Internet Web Site. However, you may encounter Web Sites that, although available over HTTPS, do not have a Certificate that has been signed by a commercial Certificate Authority recognized by the Beacon. The following are out-of-box certificates recognized by Beacons:
■ Class 1 Public Primary Certification Authority by VeriSign, Inc.
■ Class 2 Public Primary Certification Authority by VeriSign, Inc.
■ Class 3 Public Primary Certification Authority by VeriSign, Inc.
■ Secure Server Certification Authority by RSA Data Security, Inc.
■ GTE CyberTrust Root by GTE Corporation
■ GTE CyberTrust Global Root by GTE CyberTrust Solutions, Inc.
■ Entrust.net Secure Server Certification Authority by Entrust.net ((c) 1999
■ Entrust.net Limited, www.entrust.net/CPS incorp. by ref. (limits liab.))
■ Entrust.net Certification Authority (2048) by Entrust.net ((c) 1999
■ Entrust.net Limited, www.entrust.net/CPS_2048 incorp. by ref. (limits liab.))
■ Entrust.net Secure Server Certification Authority by Entrust.net ((c) 2000
■ Entrust.net Limited, www.entrust.net/SSL_CPS incorp. by ref. (limits liab.))
In those cases, for example, if you attempt to use the Test section of the Beacon Performance page to test the HTTP Response of the secure URL, the following error appears in the Status Description column of the Response Metrics table on the URL Test Page:
javax.net.ssl.SSLException: SSL handshake failed: X509CertChainIncompleteErr--https://mgmtsys.acme.com/OracleMyPage.Home
To correct this problem, you must allow the Beacon to recognize the Certificate Authority that was used by the Web Site to support HTTPS. You must add the Certificate of that Certificate Authority to the list of Certificate Authorities recognized by Beacon.
To configure the Beacon to recognize the Certificate Authority:
1. Obtain the Certificate of the Web Site's Certificate Authority, as follows:
a. In Microsoft Internet Explorer, connect to the HTTPS URL of the Web Site you are attempting to monitor.
b. Double-click the lock icon at the bottom of the browser screen, which indicates that you have connected to a secure Web site.
See Also: "The Public Key Infrastructure Approach to Security" in Oracle Security Overview for an overview of Public Key Infrastructure features, such as Certificate Authorities
See Also: "Using Beacons to Monitor Remote URL Availability" in the Enterprise Manager online help

Other Security Features
Enterprise Manager Security 6-45
The browser displays the Certificate dialog box, which describes the Certificate used for this Web site. Other browsers offer a similar mechanism to view the Certificate detail of a Web Site.
c. Click the Certificate Path tab and select the first entry in the list of certificates as shown in Figure 6–11.
d. Click View Certificate to display a second Certificate dialog box.
e. Click the Details tab on the Certificate window.
f. Click Copy to File to display the Certificate Manager Export wizard.
g. In the Certificate Manager Export wizard, select Base64 encoded X.509 (.CER) as the format you want to export and save the certificate to a text file with an easily-identifiable name, such as beacon_certificate.cer.
h. Open the certificate file using a text editor.
The content of the certificate file will look similar to the content shown in Example 6–19.
2. Update the list of Beacon Certificate Authorities as follows:
a. Locate the b64InternetCertificate.txt file in the following directory of Agent Home of the Beacon host:
agent_home/sysman/config/
This file contains a list of Base64 Certificates.
b. Edit the b64InternetCertificate.txt file and add the contents of the Certificate file you just exported to the end of the file, taking care to include all the Base64 text of the Certificate including the BEGIN and END lines.
3. Restart the Management Agent.
After you restart the Management Agent, the Beacon detects your addition to the list of Certificate Authorities recognized by Beacon and you can successfully monitor the availability and performance of the secure Web site URL.
Example 6–19 Sample Content of an Exported Certificate
-----BEGIN CERTIFICATE----- MIIDBzCCAnCgAwIBAgIQTs4NcImNY3JAs5edi/5RkTANBgkqhkiG9w0BAQQFADCB... base64 certificate content...-----END CERTIFICATE-----
6.7 Other Security FeaturesThis section describes Enterprise Manager security features.
6.7.1 Using ORACLE _HOME CredentialsOracle Enterprise Manager 10g Release 2 introduces the concept of ORACLE_HOME credentials to designate the owner of the ORACLE_HOME with special credentials for the ORACLE_HOME. The operating system user who installs the software will also need to perform the patching. In Oracle Enterprise Manager 10g Release 2, one can explicitly set the ORACLE_HOME credential and store it in the Management Repository. While patching, the user can use existing operating system credentials or override it under special circumstances. The user can specify ORACLE_HOME
Other Security Features
6-46 Oracle Enterprise Manager Advanced Configuration
credentials and in the same interface choose to store it in the Management Repository for future use.
The Enterprise Manager Command line interface (EM CLI) also provides a facility to set ORACLE_HOME credentials. This is useful in cases where the Super Administrator sets the credentials and the user who initiates the patching job is unaware of the actual credentials. For auditing in security-hardened data centers, the owner of the software is usually different from the user who initiates the patching job. The patching application internally switches the user context to the owner of the software and patches the software. To emulate such a case, the patch administrator will set the ORACLE_HOME credentials to the owner of the ORACLE_HOME. The Grid Control user who executes the patching job will be unaware of the credentials. The patching job will internally execute as the owner of the ORACLE_HOME. Grid Control will audit the patching job and capture the name of the Grid Control user who initiated the job. For example, if the owner of the ORACLE_HOME is "X", the patch super administrator in Grid Control is "Y" and the target administrator in Grid Control is "Y". "Y" will set the ORACLE_HOME credential to "X" with the password, using EMCLI. "Z" will submit the patching job using the already stored preferred credentials. Grid Control will audit the job as submitted by "Z".
The following is an example for setting the Oracle Home credentials using command line:
./emcli set_credential -target_type=host -target_name=val1 -credential_set=OHCreds -column="OHUsername:val2;OHPassword:val3"-oracle_homes="val4"
where:
val1 = Hostname
val2 = Oracle Home user name
val3 = Oracle Home password
val4 = Oracle Home location
You can also set credentials for multiple Oracle Homes on the same host using the following command:
./emcli set_credential -target_type=host -target_name=val1 -credential_set=OHCreds -column="OHUsername:val2;OHPassword:val3" -oracle_homes="val4;val5
where
val1 = Hostname
val2 = Oracle Home user name
val3 = Oracle Home password
val4 = Oracle Home location 1
val5 = Oracle Home location 2
Note: Only one host can be passed to the verb.* If one wants multiple Oracle Home credentials on multiple hosts, then you will need Shell or Perl script to read lines, one at a time, from a file containing the host, credential values, and home location, and call the emcli set_credential verb for each row in the file.
Other Security Features
Enterprise Manager Security 6-47
The emcli set_credential command sets preferred credentials for given users. Table 6–3 describes the input values to the emcli set_credential command.
6.7.2 Patching Oracle Homes When the User is LockedTo patch an Oracle Home used by a user "Oracle" and the user is locked:
1. Edit the default patching script and prepend sudo or sudo -u or pbrun -u to the default patching step. You need to set a policy (by editing the sudoers file) to allow the user submitting the job (who must be a valid operating system user) to be able to run sudo or pbrun without being prompted for password.
6.7.3 Cloning Oracle HomesThe cloning application is wizard-driven. The source of the Oracle Home being cloned may be either an installed Oracle Home or a Software Library. Following are the steps in the cloning process:
Table 6–3 emcli set_credential Parameters
Parameter Input Value Description
-target_type -target_type ="ttype" Type of target. Must be "host" in case the "-oracle_homes" parameter is specified.
-target_name [-target_name="tname"] Name of target. Omit this argument to set enterprise preferred credentials. Must be hostname in case "-oracle_homes" parameter is specified
-credential_set -credential_set="cred_set" Credential set affected.
-user [-user="user"] Enterprise Manager user whose credentials are affected. If omitted, the current user's credentials are affected.
-columns -columns="col1:newval1;col2:newval2;..."
The name and new value of the column(s) to set. Every column of the credential set must be specified. Alternatively, a tag from the -input_file argument may be used so that the credential values are not seen on the command line. This argument may be specified more than once.
-input_file [-input_file="tag1:file_path1;tag2:file_path2;..."]
Path of file that has -columns argument(s). This option is used to hide passwords. Each path must be accompanied by a tag which is referenced in the -columns argument. This argument may be specified more than once.
-oracle_homes [-oracle_homes="home1;home2"]
Name of Oracle Homes on the target host. Credentials will be added/updated for all specified home
Note: You cannot patch Oracle Homes without targets. This must be done by using the Patching wizard.
Other Security Features
6-48 Oracle Enterprise Manager Advanced Configuration
1. If the source is an installed Oracle Home, then, after selecting the Oracle Home, a user will need to specify the Oracle Home credentials. These credentials once specified for an Oracle Home are stored in the repository. The next time a user clones the same Oracle Home, these credentials are automatically populated. Other parameters queried from the user at this point is a temporary location (on the source computer) and the list of files to be excluded from the Oracle Home. If the cloning source is a Software Library, the source Oracle Home credentials will not be queried for.
2. The user needs to specify the target location and provide the required credentials for each target location. These credentials will be the Oracle Home credentials for each of these target locations. Subsequently, if a user selects any of these cloned Oracle Homes as a source, the Oracle Home credentials are automatically populated.
3. Depending on the product being cloned, the user can view the Enterprise Manager page where query parameters required for the particular product being cloned are displayed.
4. The user can, then, view the execution of user-supplied pre-cloning and post-cloning scripts and the root.sh script. The root.sh script will always be run with sudo privileges, but the user has the option to decide if the pre-cloning and post-cloning scripts run with sudo privileges.
5. Finally, the user can schedule the cloning job at a convenient time.
For more information about cloning, refer to the Enterprise Manager Online Help.
6.7.4 Using the sudo Commandsudo allows a permitted user to execute a command as the superuser or another user, as specified in the sudoers file. You need to set a policy (by editing the sudoers file) to allow the user submitting the job (who must be a valid operating system user) to be able to use sudo. For more information, see the manual page on sudo (man sudo) on Unix. Enterprise Manager authenticates the user using sudo, and executes the script as sudo.
For example, if the command to be executed is foo -arg1 -arg2, it will be executed as sudo -S foo -arg1 -arg2.
Configuring Enterprise Manager for Firewalls 7-1
7Configuring Enterprise Manager for Firewalls
Firewalls protect a company's Information Technology (IT) infrastructure by providing the ability to restrict network traffic by examining each network packet and determining the appropriate course of action.
Firewall configuration typically involves restricting the ports that are available to one side of the firewall, for example the Internet. It can also be set up to restrict the type of traffic that can pass through a particular port such as HTTP. If a client attempts to connect to a restricted port (a port not covered by a security "rule") or uses a protocol that is incorrect, then the client will be disconnected immediately by the firewall. Firewalls can also be used within a company Intranet to restrict user access to specific servers.
You can deploy the components of Oracle Enterprise Manager on different hosts throughout your enterprise. These hosts can be separated by firewalls. This chapter describes how firewalls can be configured to allow communication between the Enterprise Manager components.
This chapter contains the following topics:
■ Considerations Before Configuring Your Firewall
■ Firewall Configurations for Enterprise Management Components
■ Viewing a Summary of the Ports Assigned During the Application Server Installation
7.1 Considerations Before Configuring Your FirewallFirewall configuration should be the last phase of Enterprise Manager deployment. Before you configure your firewalls, make sure you are able to log in to the Grid Control Console and that your Management Agents are up and monitoring targets.
If you are deploying Enterprise Manager in an environment where firewalls are already installed, open the default Enterprise Manager communication ports for all traffic until you have completed the installation and configuration processes and are certain that you are able to log in to the Oracle Enterprise Manager 10g Grid Control Console and that your Oracle Management Agents are up and monitoring targets.
The default communication ports for Enterprise Manager are assigned during the installation. If you modify the default ports, be sure to use the new port assignments when you configure the firewalls.
See Also: Chapter 3 for more information about some of the ways you can configure the Grid Control components on your network
Firewall Configurations for Enterprise Management Components
7-2 Oracle Enterprise Manager Advanced Configuration
If you are enabling Enterprise Manager Framework Security for the Management Service, the final step in that configuration process is to restrict uploads from the Management Agents to secure channels only. Before completing that step, configure your firewalls to allow both HTTP and HTTPS traffic between the Management Agent and Management Repository and test to be sure that you can log in to Enterprise Manager and that data is being uploaded to the Management Repository.
After you have confirmed that the Management Service and Management Agents can communicate with both protocols enabled, complete the transition to secure mode and change your firewall configuration as necessary. If you incrementally configure your firewalls, it will be easier to troubleshoot any configuration problems.
7.2 Firewall Configurations for Enterprise Management ComponentsYour main task in enabling Enterprise Manager to work in a firewall-protected environment is to take advantage of proxy servers whenever possible, to make sure only the necessary ports are open for secure communications, and to make sure that only data necessary for running your business is allowed to pass through the firewall.
The following sections describe the ports and types of data required by Enterprise Manager in a secure, firewall-protected environment:
■ Firewalls Between Your Browser and the Grid Control Console
■ Configuring the Management Agent on a Host Protected by a Firewall
■ Configuring the Management Service on a Host Protected by a Firewall
■ Firewalls Between the Management Service and the Management Repository
■ Firewalls Between the Grid Control and a Managed Database Target
■ Firewalls Used with Multiple Management Services
■ Configuring Firewalls to Allow ICMP and UDP Traffic for Beacons
■ Configuring Firewalls When Managing Oracle Application Server
Figure 7–1 provides a topology of an Enterprise Manager grid environment that is using a firewall, and also illustrates the default ports that can be used.
See Also: Chapter 13, "Reconfiguring the Management Agent and Management Service" for information about locating and changing the default ports for the Oracle Management Service and the Oracle Management Agent
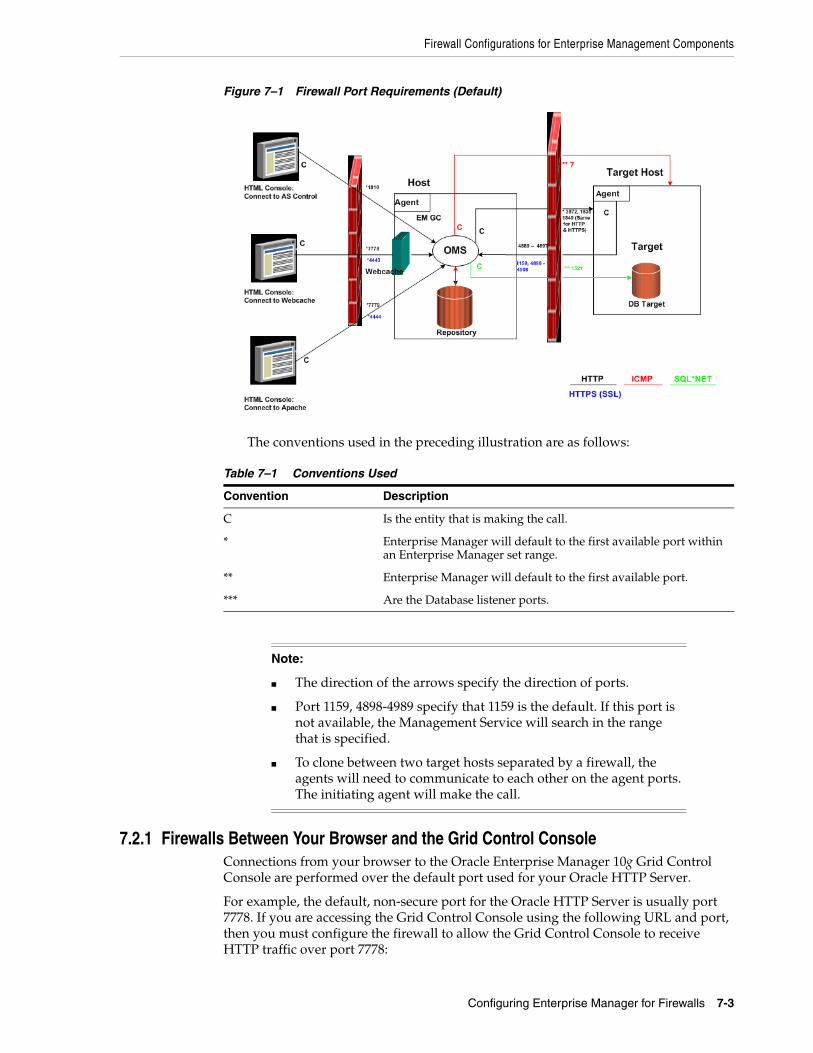
Firewall Configurations for Enterprise Management Components
Configuring Enterprise Manager for Firewalls 7-3
Figure 7–1 Firewall Port Requirements (Default)
The conventions used in the preceding illustration are as follows:
7.2.1 Firewalls Between Your Browser and the Grid Control ConsoleConnections from your browser to the Oracle Enterprise Manager 10g Grid Control Console are performed over the default port used for your Oracle HTTP Server.
For example, the default, non-secure port for the Oracle HTTP Server is usually port 7778. If you are accessing the Grid Control Console using the following URL and port, then you must configure the firewall to allow the Grid Control Console to receive HTTP traffic over port 7778:
Table 7–1 Conventions Used
Convention Description
C Is the entity that is making the call.
* Enterprise Manager will default to the first available port within an Enterprise Manager set range.
** Enterprise Manager will default to the first available port.
*** Are the Database listener ports.
Note:
■ The direction of the arrows specify the direction of ports.
■ Port 1159, 4898-4989 specify that 1159 is the default. If this port is not available, the Management Service will search in the range that is specified.
■ To clone between two target hosts separated by a firewall, the agents will need to communicate to each other on the agent ports. The initiating agent will make the call.

Firewall Configurations for Enterprise Management Components
7-4 Oracle Enterprise Manager Advanced Configuration
http://mgmthost.acme.com:7778/em
On the other hand, if you have enabled security for your Oracle HTTP Server, you are likely using the default secure port for the server, which is usually port 4443. If you are accessing the Grid Control Console using the following URL and port, then you must configure the firewall to allow the Grid Control Console to receive HTTP traffic over port 4443:
https://mgmthost.acme.com:4443/em
Figure 7–2 shows the typical configuration of a firewall between your browser and the Grid Control Console Web-based console that is rendered by the Management Service.
Figure 7–2 Firewall Between Your Browser and the Grid Control Console
7.2.2 Configuring the Management Agent on a Host Protected by a FirewallIf your Management Agent is installed on a host that is protected by a firewall and the Management Service is on the other side of the firewall, you must perform the following tasks:
■ Configure the Management Agent to use a proxy server for its uploads to the Management Service.
■ Configure the firewall to allow incoming HTTP traffic from the Management Service on the Management Agent port. Regardless of whether or not Enterprise Manager Framework Security has been enabled, the default port is 3872. If this default port is not available, the default port range between 1830 - 1849 is used. Incoming traffic can be received only if the port corresponding to the Management Agent is open in the firewall.
Figure 7–3 illustrates the connections the Management Agent must make when it is protected by a firewall.
See also: Oracle Application Server 10g Security Guide
Firewall
Web-BasedGrid Control
BrowserManagementService(J2EE WebApplication)
77784443
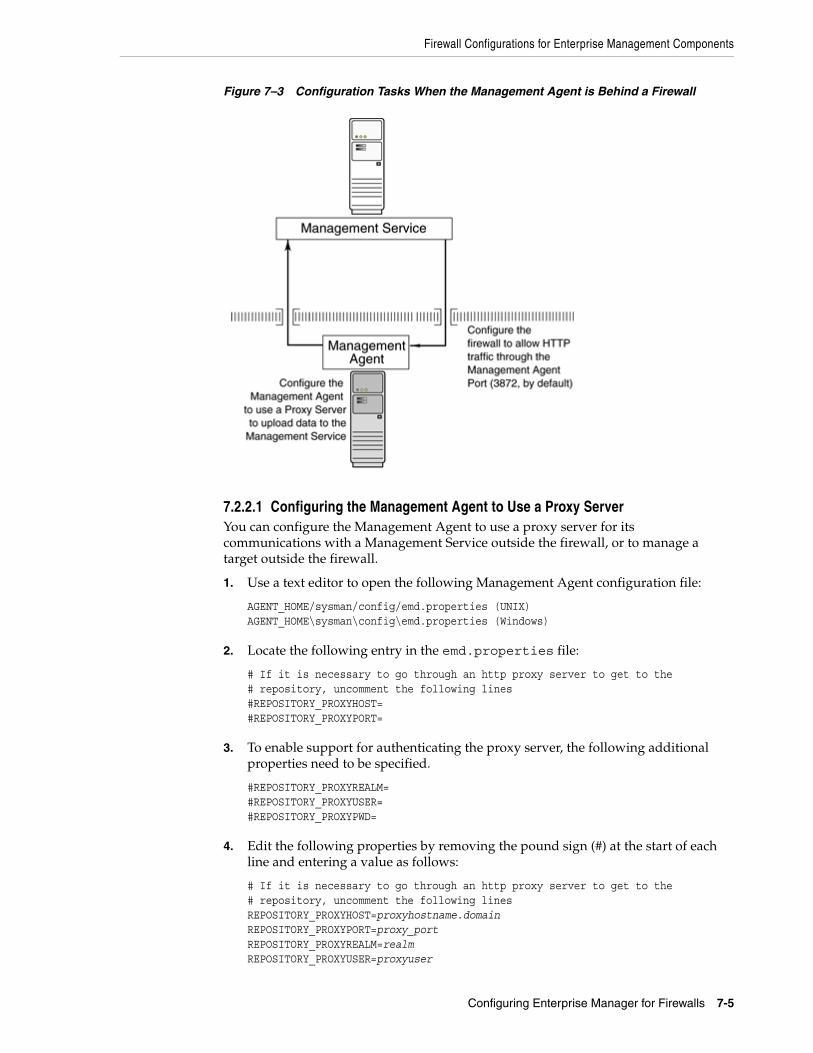
Firewall Configurations for Enterprise Management Components
Configuring Enterprise Manager for Firewalls 7-5
Figure 7–3 Configuration Tasks When the Management Agent is Behind a Firewall
7.2.2.1 Configuring the Management Agent to Use a Proxy ServerYou can configure the Management Agent to use a proxy server for its communications with a Management Service outside the firewall, or to manage a target outside the firewall.
1. Use a text editor to open the following Management Agent configuration file:
AGENT_HOME/sysman/config/emd.properties (UNIX)AGENT_HOME\sysman\config\emd.properties (Windows)
2. Locate the following entry in the emd.properties file:
# If it is necessary to go through an http proxy server to get to the# repository, uncomment the following lines#REPOSITORY_PROXYHOST=#REPOSITORY_PROXYPORT=
3. To enable support for authenticating the proxy server, the following additional properties need to be specified.
#REPOSITORY_PROXYREALM=#REPOSITORY_PROXYUSER=#REPOSITORY_PROXYPWD=
4. Edit the following properties by removing the pound sign (#) at the start of each line and entering a value as follows:
# If it is necessary to go through an http proxy server to get to the# repository, uncomment the following linesREPOSITORY_PROXYHOST=proxyhostname.domainREPOSITORY_PROXYPORT=proxy_portREPOSITORY_PROXYREALM=realmREPOSITORY_PROXYUSER=proxyuser
Firewall Configurations for Enterprise Management Components
7-6 Oracle Enterprise Manager Advanced Configuration
REPOSITORY_PROXYPWD=proxypassword
For example:
REPOSITORY_PROXYHOST=proxy42.acme.comREPOSITORY_PROXYPORT=80REPOSITORY_PROXYREALM=REPOSITORY_PROXYUSER=REPOSITORY_PROXYPWD=
5. Save your changes and close the emd.properties file.
6. Stop and start the Management Agent.
7.2.2.2 Configuring the Firewall to Allow Incoming Communication From the Management ServiceWhile the Management Agents in your environment must upload data from your managed hosts to the Management Service, the Management Service must also communicate with the Management Agents. As a result, if the Management Agent is protected by a firewall, the Management Service must be able to contact the Management Agent through the firewall on the Management Agent port.
By default, the Enterprise Manager installation procedure assigns port 1830 to the Management Agent. However, if that port is occupied, the installation may assign an alternate port number.
In addition, administrators can change the Management Agent port after the installation.
After you determine the port number assigned to the Management Agent, you must then configure the firewall to allow incoming HTTP or HTTPS traffic (depending upon whether or not you have enabled Enterprise Manager Framework Security) on that port.
See Also: "Controlling the Oracle Management Agent" on page 2-1
Note: The proxy password will be rewritten when you restart the Management Agent.
Note: The port number for the Management Agent does not change when you enable Enterprise Manager Framework Security. For more information, see "Configuring Security for Grid Control" on page 6-3
See Also: "Chapter 13, "Reconfiguring the Management Agent and Management Service" for information about locating and changing the default ports for the Oracle Management Service and the Oracle Management Agent.
See Also: Your firewall documentation for more information about opening specific ports for HTTP or HTTPS traffic.
"Configuring Security for Grid Control" on page 6-3 for information about Enterprise Manager Framework Security
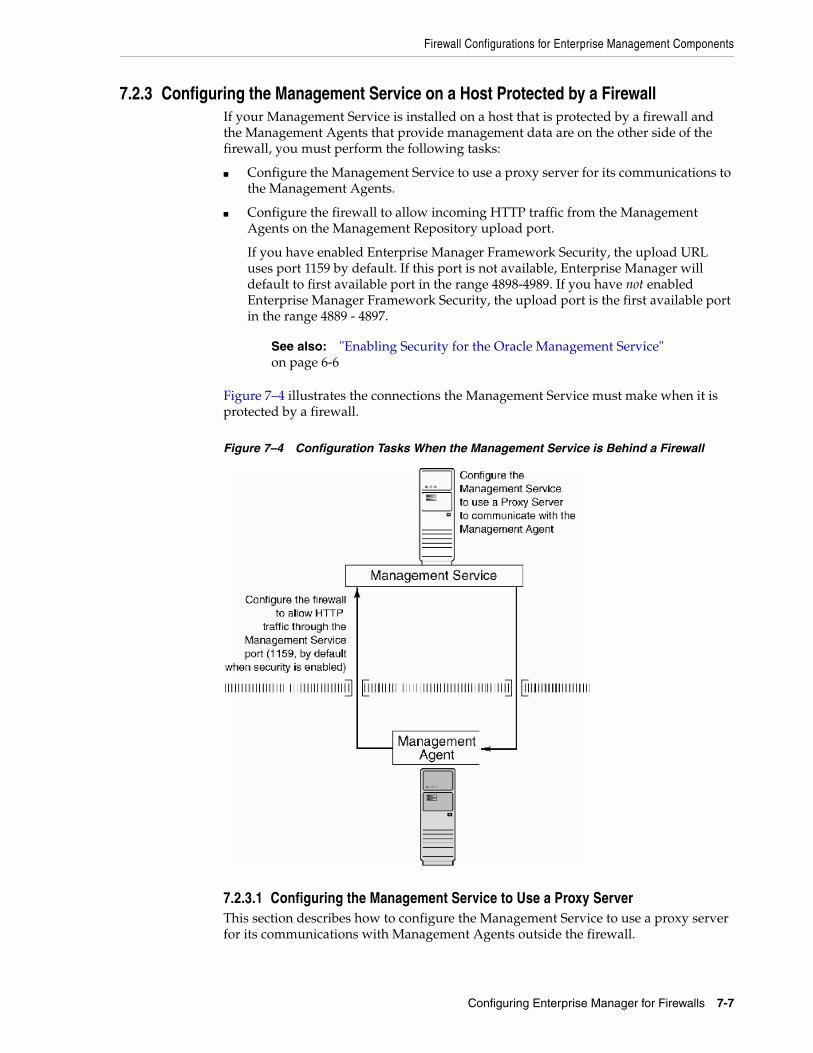
Firewall Configurations for Enterprise Management Components
Configuring Enterprise Manager for Firewalls 7-7
7.2.3 Configuring the Management Service on a Host Protected by a FirewallIf your Management Service is installed on a host that is protected by a firewall and the Management Agents that provide management data are on the other side of the firewall, you must perform the following tasks:
■ Configure the Management Service to use a proxy server for its communications to the Management Agents.
■ Configure the firewall to allow incoming HTTP traffic from the Management Agents on the Management Repository upload port.
If you have enabled Enterprise Manager Framework Security, the upload URL uses port 1159 by default. If this port is not available, Enterprise Manager will default to first available port in the range 4898-4989. If you have not enabled Enterprise Manager Framework Security, the upload port is the first available port in the range 4889 - 4897.
Figure 7–4 illustrates the connections the Management Service must make when it is protected by a firewall.
Figure 7–4 Configuration Tasks When the Management Service is Behind a Firewall
7.2.3.1 Configuring the Management Service to Use a Proxy ServerThis section describes how to configure the Management Service to use a proxy server for its communications with Management Agents outside the firewall.
See also: "Enabling Security for the Oracle Management Service" on page 6-6
Firewall Configurations for Enterprise Management Components
7-8 Oracle Enterprise Manager Advanced Configuration
To configure the Management Service to use a proxy server:
1. Use a text editor to open the following configuration file in the Management Service home directory:
ORACLE_HOME/sysman/config/emoms.properties
2. Add the following entries to emoms.properties file:
proxyHost=proxyhost.domainproxyPort=proxy_portdontProxyFor=.domain1, .domain2, .domain3, ...proxyRealm=realmproxyUser=proxyuserproxyPwd=proxypassword
For example:
proxyHost=proxy42.acme.comproxyHost=80dontProxyFor=.acme.com, .acme.us.comproxyRealmproxyUserproxyPwdThe dontProxyFor property identifies specific URL domains for which the proxy will not be used. The proxyRealm property indicates the protected space that requires authentication.
3. Save your changes and close the emoms.properties file.
4. Stop and start the Management Service:
$PROMPT> ORACLE_HOME/bin/emctl stop oms$PROMPT> ORACLE_HOME/bin/emctl start oms
7.2.3.2 About the dontProxyfor PropertyWhen you configure the Management Service to use a proxy server, it is important to understand the purpose of the dontProxyFor property, which identifies specific URL domains for which the proxy will not be used.
For example, suppose the following were true:
Note: The proxy configuration properties described in this section are the same Management Service properties you must modify if your network is protected by a firewall and you want Enterprise Manager to search automatically for critical patches and patch sets. For more information, see "Specifying Patching Credentials" in the Enterprise Manager online Help.
See Also: "About the dontProxyfor Property" on page 7-8 for guidelines on when to use the dontProxyFor property
Note: The proxy password will be rewritten when you restart the Management Service.
Firewall Configurations for Enterprise Management Components
Configuring Enterprise Manager for Firewalls 7-9
■ You have installed the Management Service and several Management Agents on hosts that are inside the company firewall. These hosts are in the internal .acme.com and .acme.us.com domains.
■ You have installed several additional Management Agents on hosts that are outside the firewall. These hosts are installed in the .acme.uk domain.
■ You have configured Enterprise Manager to automatically check for critical software patches on the OracleMetaLink Internet site.
In this scenario, you want the Management Service to connect directly to the Management Agents inside the firewall without using the proxy server. On the other hand, you want the Management Service to use the proxy server to contact the Management Agents outside the firewall, as well as the OracleMetaLink Internet site, which resides at the following URL:
http://metalink.oracle.com
The following entry in the emoms.properties file will prevent the Management Service from using the proxy server for connections to the Management Agents inside the firewall. Connections to OracleMetaLink and to Management Agents outside the firewall will be routed through the proxy server:
proxyHost=proxy42.acme.comproxyHost=80dontProxyFor=.acme.com, .acme.us.com
7.2.3.3 Configuring the Firewall to Allow Incoming Management Data From the Management AgentsWhile the Management Agents in your environment must contact the Management Agents on your managed hosts, the Management Service must also be able to receive upload data from the Management Agents. If the Management Service is behind a firewall, you must configure the firewall to allow the Management Agents to upload data on the upload port.
By default, the Enterprise Manager installation procedure assigns port 4889 as the Repository upload port. However, if that port is occupied, the installation will assign an alternate port number.
In addition, when you enable Enterprise Manager Framework Security, the upload port is automatically changed to the secure 1159 HTTPS port.
Administrators can also change the upload port after the installation.
After you determine the port number assigned to the Management Service upload port, you must then configure the firewall to allow incoming HTTP or HTTPS traffic (depending upon whether or not you have enabled Enterprise Manager Framework Security) on that port.
See Also: "Configuring Security for Grid Control" on page 6-3 for information about Enterprise Manager Framework Security
See Also: Chapter 13, "Reconfiguring the Management Agent and Management Service" for information about locating and changing the default ports for the Oracle Management Service and the Oracle Management Agent.
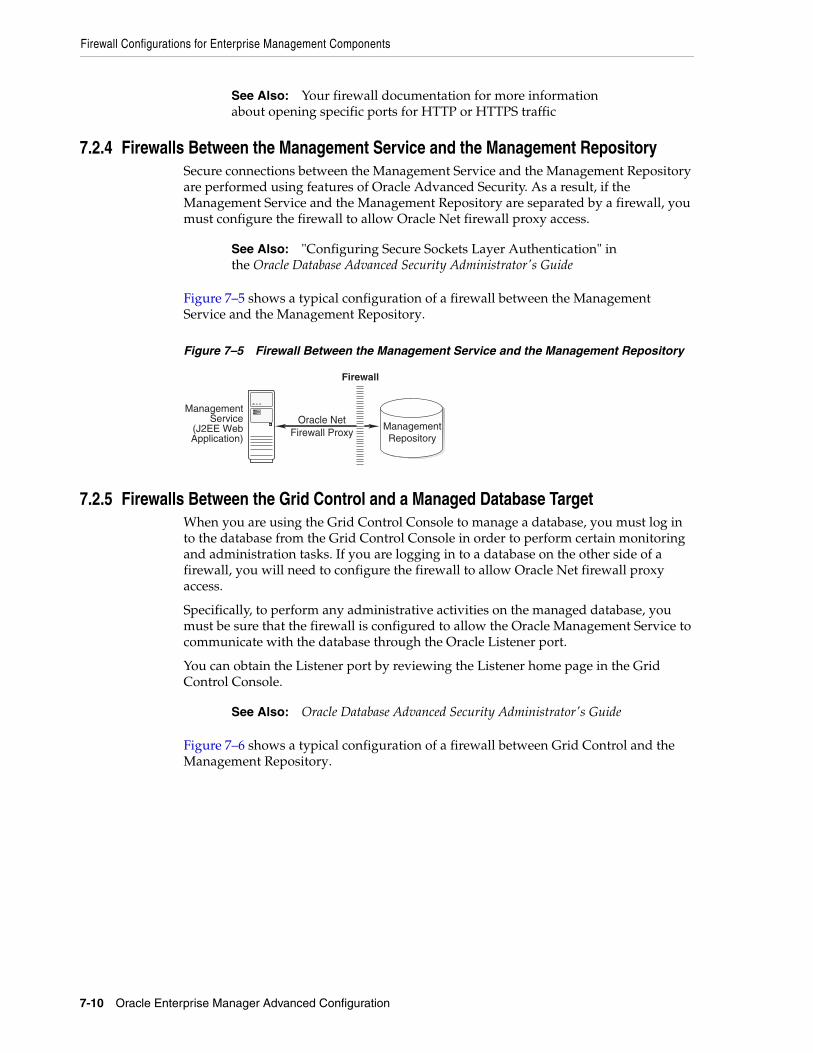
Firewall Configurations for Enterprise Management Components
7-10 Oracle Enterprise Manager Advanced Configuration
7.2.4 Firewalls Between the Management Service and the Management RepositorySecure connections between the Management Service and the Management Repository are performed using features of Oracle Advanced Security. As a result, if the Management Service and the Management Repository are separated by a firewall, you must configure the firewall to allow Oracle Net firewall proxy access.
Figure 7–5 shows a typical configuration of a firewall between the Management Service and the Management Repository.
Figure 7–5 Firewall Between the Management Service and the Management Repository
7.2.5 Firewalls Between the Grid Control and a Managed Database TargetWhen you are using the Grid Control Console to manage a database, you must log in to the database from the Grid Control Console in order to perform certain monitoring and administration tasks. If you are logging in to a database on the other side of a firewall, you will need to configure the firewall to allow Oracle Net firewall proxy access.
Specifically, to perform any administrative activities on the managed database, you must be sure that the firewall is configured to allow the Oracle Management Service to communicate with the database through the Oracle Listener port.
You can obtain the Listener port by reviewing the Listener home page in the Grid Control Console.
Figure 7–6 shows a typical configuration of a firewall between Grid Control and the Management Repository.
See Also: Your firewall documentation for more information about opening specific ports for HTTP or HTTPS traffic
See Also: "Configuring Secure Sockets Layer Authentication" in the Oracle Database Advanced Security Administrator's Guide
See Also: Oracle Database Advanced Security Administrator's Guide
ManagementRepository
ManagementService
(J2EE WebApplication)
Firewall
Oracle NetFirewall Proxy
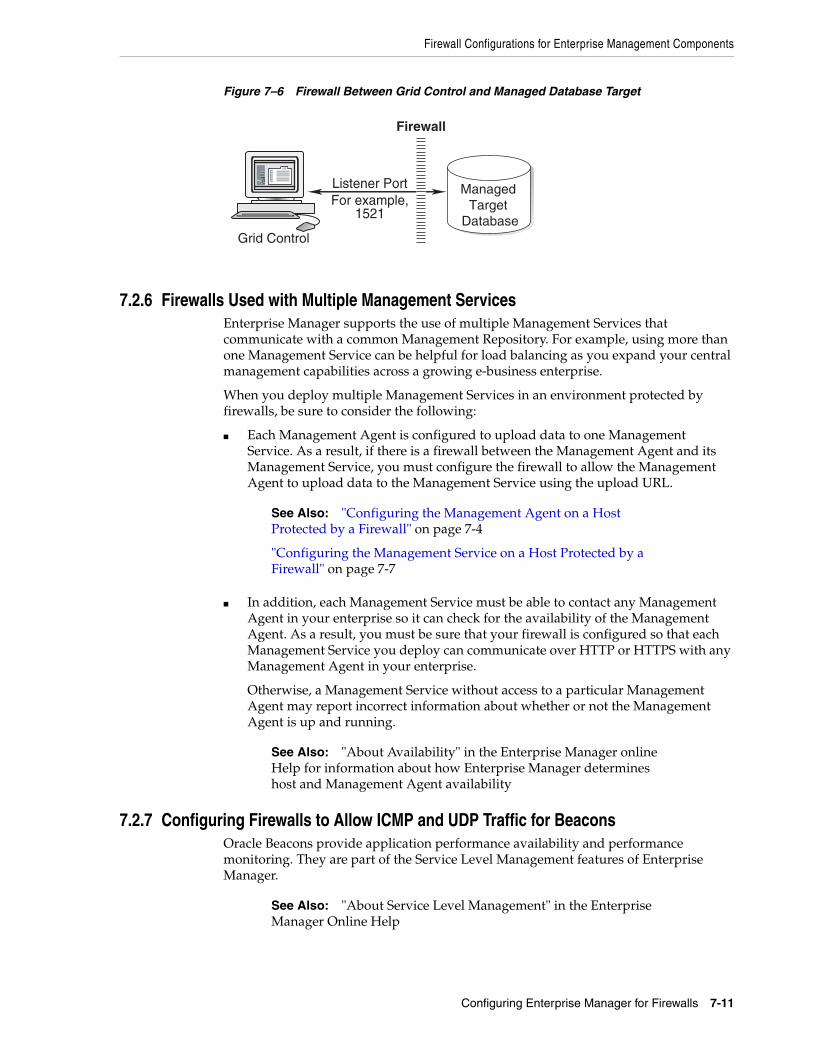
Firewall Configurations for Enterprise Management Components
Configuring Enterprise Manager for Firewalls 7-11
Figure 7–6 Firewall Between Grid Control and Managed Database Target
7.2.6 Firewalls Used with Multiple Management ServicesEnterprise Manager supports the use of multiple Management Services that communicate with a common Management Repository. For example, using more than one Management Service can be helpful for load balancing as you expand your central management capabilities across a growing e-business enterprise.
When you deploy multiple Management Services in an environment protected by firewalls, be sure to consider the following:
■ Each Management Agent is configured to upload data to one Management Service. As a result, if there is a firewall between the Management Agent and its Management Service, you must configure the firewall to allow the Management Agent to upload data to the Management Service using the upload URL.
■ In addition, each Management Service must be able to contact any Management Agent in your enterprise so it can check for the availability of the Management Agent. As a result, you must be sure that your firewall is configured so that each Management Service you deploy can communicate over HTTP or HTTPS with any Management Agent in your enterprise.
Otherwise, a Management Service without access to a particular Management Agent may report incorrect information about whether or not the Management Agent is up and running.
7.2.7 Configuring Firewalls to Allow ICMP and UDP Traffic for BeaconsOracle Beacons provide application performance availability and performance monitoring. They are part of the Service Level Management features of Enterprise Manager.
See Also: "Configuring the Management Agent on a Host Protected by a Firewall" on page 7-4
"Configuring the Management Service on a Host Protected by a Firewall" on page 7-7
See Also: "About Availability" in the Enterprise Manager online Help for information about how Enterprise Manager determines host and Management Agent availability
See Also: "About Service Level Management" in the Enterprise Manager Online Help
Managed Target
Database
Firewall
Listener PortFor example,
1521
Grid Control
Viewing a Summary of the Ports Assigned During the Application Server Installation
7-12 Oracle Enterprise Manager Advanced Configuration
Enterprise Manager uses the industry-standard Internet Control Message Protocol (ICMP) and User Datagram Protocol (UDP) to transfer data between Beacon and the network components you are monitoring. There may be situations where your Web application components and the Beacons you use to monitor those components are separated by a firewall. In those cases, you must configure your firewall to allow ICMP, UDP, and HTTP traffic.
7.2.8 Configuring Firewalls When Managing Oracle Application ServerIf you are using Grid Control to manage instances of Oracle Application Server, there may be other ports that you need to access through a firewall, depending upon your configurations.
For example, when you are monitoring the performance of your Oracle Application Server instance from the Grid Control Console, you can click Administer on the Application Server Home page to display the Application Server Control Console. If the Oracle Application Server target you are monitoring is separated from the Grid Control Console by a firewall, you will need to configure the firewall to allow an HTTP or HTTPS connection through Application Server Control Console port (usually, 1810).
7.3 Viewing a Summary of the Ports Assigned During the Application Server Installation
As described in the previous sections of this chapter, it is important to understand and identify the ports used by each of the Oracle Enterprise Manager 10g components before you configure your firewalls.
When you install the Oracle Application Server 10g or the Oracle Enterprise Manager 10g Grid Control, you can view a list of the ports assigned during the application server installation by viewing the contents of the following file
ORACLE_HOME/install/portlist.ini
In addition, you can use the Application Server Control Console to view a list of all the ports in use by the application server:
1. Navigate to the Application Server home page in the Application Server Control Console.
2. Click Ports.
See Also: "Configuring Beacons to Monitor Web Applications Over HTTPS" on page 6-43
See Also: Oracle Application Server Administrator's Guide for more information about configuring ports for Oracle Application Server
Note: The portlist.ini file lists the port numbers assigned during the installation. This file is not updated if port numbers are changed after the installation.
See Also: "Viewing and Modifying Application Server Port Assignments" in the Enterprise Manager online Help
Additional Considerations for Windows XP
Configuring Enterprise Manager for Firewalls 7-13
7.4 Additional Considerations for Windows XPFor secure agent install, ensure that the firewall settings are disabled for HTTP/HTTPS communication for Windows XP:
1. Go to Start, and then select Control Panel.
2. In Control Panel, click Windows Firewall.
3. In the Exceptions tab in the Windows Firewall dialog box, click Add Port.
4. In the Add a Port dialog box, specify the name and number of the port.
5. Click Change scope to specify the computers for which the port is unblocked.

Additional Considerations for Windows XP
7-14 Oracle Enterprise Manager Advanced Configuration
Configuring Services 8-1
8Configuring Services
This chapter describes how to configure services in Oracle Enterprise Manager 10g Grid Control Console. It contains the following sections:
■ Summary of Service Management Tasks
■ Setting up the System
■ Creating a Service
■ Configuring a Service
■ Recording Web Transactions
■ Monitoring Settings
■ Configuring Aggregate Services
■ Configuring End-User Performance Monitoring
■ Managing Forms Applications
■ Configuring OC4J for Request Performance Diagnostics
■ Setting Up Monitoring Templates
■ Configuring Service Levels
■ Configuring a Service Using the Command Line Interface
■ Troubleshooting Service Tests
8.1 Summary of Service Management TasksThis table provides a summary list of all the service management features and their requirements.
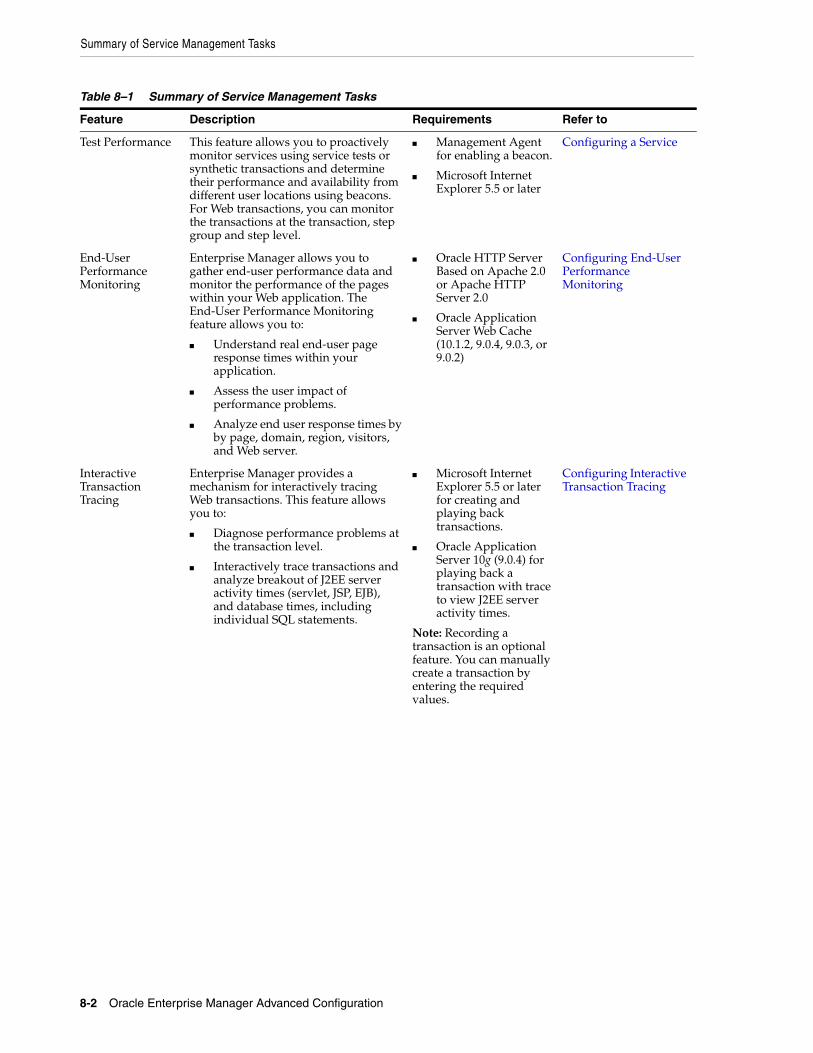
Summary of Service Management Tasks
8-2 Oracle Enterprise Manager Advanced Configuration
Table 8–1 Summary of Service Management Tasks
Feature Description Requirements Refer to
Test Performance This feature allows you to proactively monitor services using service tests or synthetic transactions and determine their performance and availability from different user locations using beacons. For Web transactions, you can monitor the transactions at the transaction, step group and step level.
■ Management Agent for enabling a beacon.
■ Microsoft Internet Explorer 5.5 or later
Configuring a Service
End-User Performance Monitoring
Enterprise Manager allows you to gather end-user performance data and monitor the performance of the pages within your Web application. The End-User Performance Monitoring feature allows you to:
■ Understand real end-user page response times within your application.
■ Assess the user impact of performance problems.
■ Analyze end user response times by by page, domain, region, visitors, and Web server.
■ Oracle HTTP Server Based on Apache 2.0 or Apache HTTP Server 2.0
■ Oracle Application Server Web Cache (10.1.2, 9.0.4, 9.0.3, or 9.0.2)
Configuring End-User Performance Monitoring
Interactive Transaction Tracing
Enterprise Manager provides a mechanism for interactively tracing Web transactions. This feature allows you to:
■ Diagnose performance problems at the transaction level.
■ Interactively trace transactions and analyze breakout of J2EE server activity times (servlet, JSP, EJB), and database times, including individual SQL statements.
■ Microsoft Internet Explorer 5.5 or later for creating and playing back transactions.
■ Oracle Application Server 10g (9.0.4) for playing back a transaction with trace to view J2EE server activity times.
Note: Recording a transaction is an optional feature. You can manually create a transaction by entering the required values.
Configuring Interactive Transaction Tracing
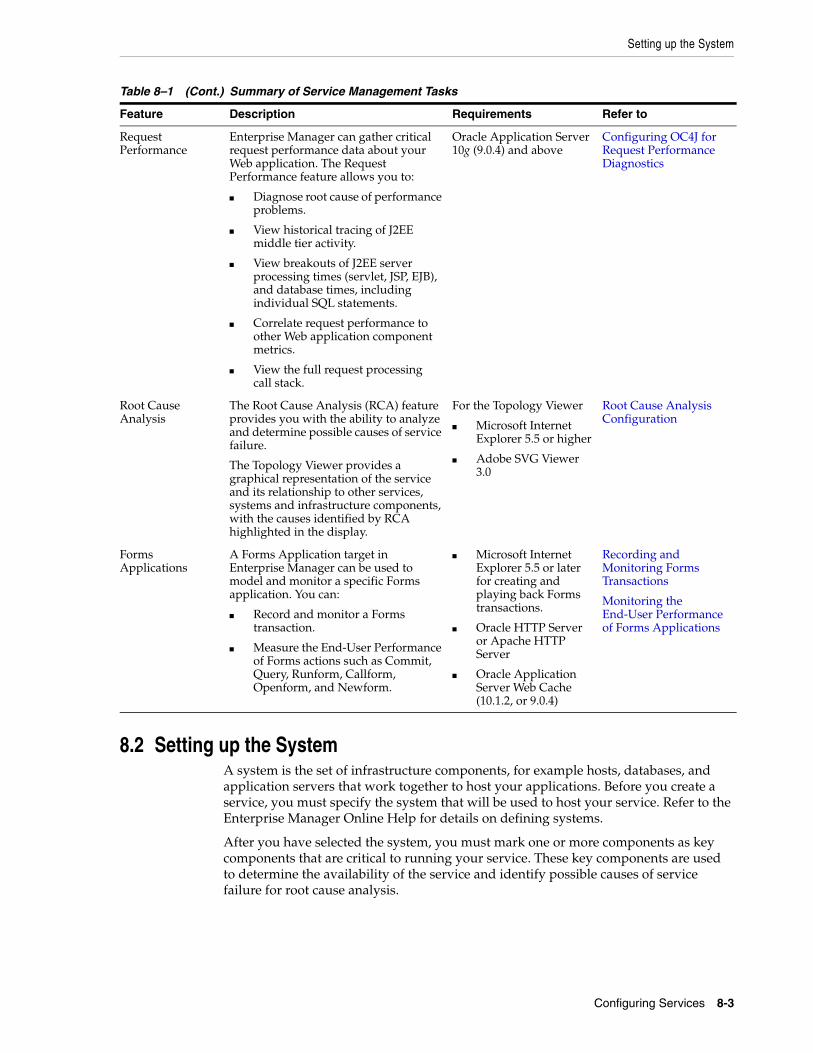
Setting up the System
Configuring Services 8-3
8.2 Setting up the SystemA system is the set of infrastructure components, for example hosts, databases, and application servers that work together to host your applications. Before you create a service, you must specify the system that will be used to host your service. Refer to the Enterprise Manager Online Help for details on defining systems.
After you have selected the system, you must mark one or more components as key components that are critical to running your service. These key components are used to determine the availability of the service and identify possible causes of service failure for root cause analysis.
Request Performance
Enterprise Manager can gather critical request performance data about your Web application. The Request Performance feature allows you to:
■ Diagnose root cause of performance problems.
■ View historical tracing of J2EE middle tier activity.
■ View breakouts of J2EE server processing times (servlet, JSP, EJB), and database times, including individual SQL statements.
■ Correlate request performance to other Web application component metrics.
■ View the full request processing call stack.
Oracle Application Server 10g (9.0.4) and above
Configuring OC4J for Request Performance Diagnostics
Root Cause Analysis
The Root Cause Analysis (RCA) feature provides you with the ability to analyze and determine possible causes of service failure.
The Topology Viewer provides a graphical representation of the service and its relationship to other services, systems and infrastructure components, with the causes identified by RCA highlighted in the display.
For the Topology Viewer
■ Microsoft Internet Explorer 5.5 or higher
■ Adobe SVG Viewer 3.0
Root Cause Analysis Configuration
Forms Applications
A Forms Application target in Enterprise Manager can be used to model and monitor a specific Forms application. You can:
■ Record and monitor a Forms transaction.
■ Measure the End-User Performance of Forms actions such as Commit, Query, Runform, Callform, Openform, and Newform.
■ Microsoft Internet Explorer 5.5 or later for creating and playing back Forms transactions.
■ Oracle HTTP Server or Apache HTTP Server
■ Oracle Application Server Web Cache (10.1.2, or 9.0.4)
Recording and Monitoring Forms Transactions
Monitoring the End-User Performance of Forms Applications
Table 8–1 (Cont.) Summary of Service Management Tasks
Feature Description Requirements Refer to
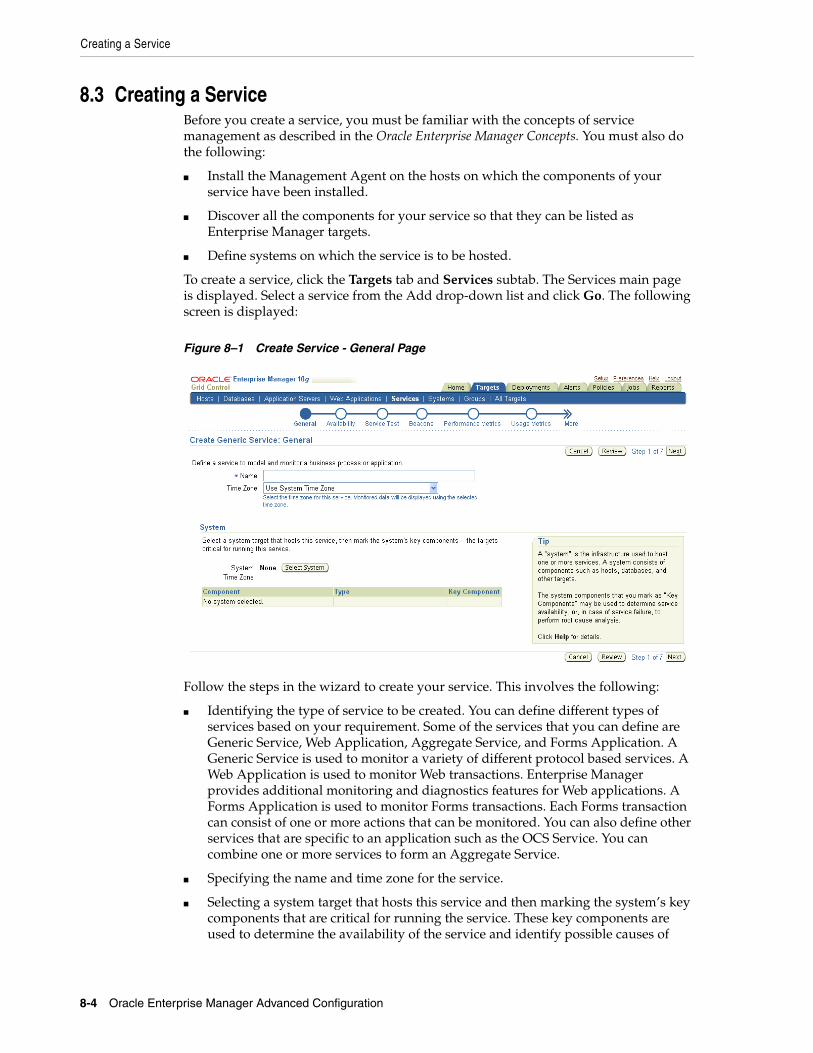
Creating a Service
8-4 Oracle Enterprise Manager Advanced Configuration
8.3 Creating a ServiceBefore you create a service, you must be familiar with the concepts of service management as described in the Oracle Enterprise Manager Concepts. You must also do the following:
■ Install the Management Agent on the hosts on which the components of your service have been installed.
■ Discover all the components for your service so that they can be listed as Enterprise Manager targets.
■ Define systems on which the service is to be hosted.
To create a service, click the Targets tab and Services subtab. The Services main page is displayed. Select a service from the Add drop-down list and click Go. The following screen is displayed:
Figure 8–1 Create Service - General Page
Follow the steps in the wizard to create your service. This involves the following:
■ Identifying the type of service to be created. You can define different types of services based on your requirement. Some of the services that you can define are Generic Service, Web Application, Aggregate Service, and Forms Application. A Generic Service is used to monitor a variety of different protocol based services. A Web Application is used to monitor Web transactions. Enterprise Manager provides additional monitoring and diagnostics features for Web applications. A Forms Application is used to monitor Forms transactions. Each Forms transaction can consist of one or more actions that can be monitored. You can also define other services that are specific to an application such as the OCS Service. You can combine one or more services to form an Aggregate Service.
■ Specifying the name and time zone for the service.
■ Selecting a system target that hosts this service and then marking the system’s key components that are critical for running the service. These key components are used to determine the availability of the service and identify possible causes of
Configuring a Service
Configuring Services 8-5
service failure. For more information on defining systems and monitoring them, refer to the Service Management chapter in Oracle Enterprise Manager Concepts.
■ Setting up the availability definition for the service. This can be service test-based or system-based. If you select service test, the service’s availability is based on the execution of the service test by the one or more key beacons. If availability is based on system, availability is based on the status of one or more key components of the system.
■ Adding one or more beacons to monitor service tests. Click Add to add one or more beacons for monitoring the service. It is recommended that you use beacons that are strategically located in your key user communities in order for them to proactively test the availability of the service from those locations. If no beacons exist, click Create to create a new beacon.
■ Defining the metrics that will be used to measure the performance of the service. Performance metrics can be based on service tests or system components. After defining the metrics, you can specify the critical and warning thresholds. You can also specify the metric that is to be displayed in a graphical format on the Service Home page.
■ Defining the metrics that will be used to measure the user demand for the service. Usage metrics can be based on one or more system components. After defining the metrics, you can specify the critical and warning thresholds. You can also specify the metric that is to be displayed in a graphical format on the Service Home page.
■ After you have completed all the steps in the wizard, click Finish to create your service. Refer to the Enterprise Manager Online Help for more details on these pages.
8.4 Configuring a ServiceAfter you have created the service, you can configure it further by selecting an option from the Monitoring Configuration page. To configure a service, select a service from the Services main page and click Configure to go to the Monitoring Configuration page. The following screen is displayed.
Note: Beacons marked as key beacons will be used to determine the availability of the service. The service is available if one or more service tests can be successfully executed from at least one key beacon.
For Web applications, you can compare the performance of the service test execution from each remote beacon against the local beacon.
Note: You can define usage metrics for system-based services only.
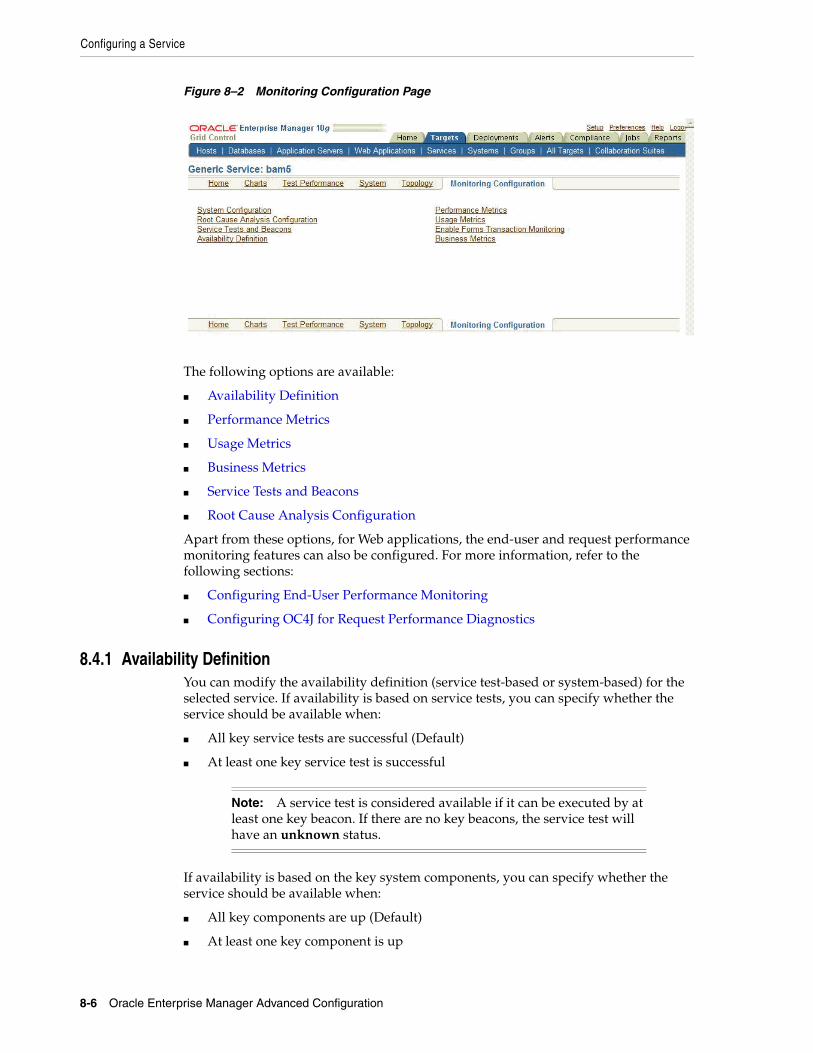
Configuring a Service
8-6 Oracle Enterprise Manager Advanced Configuration
Figure 8–2 Monitoring Configuration Page
The following options are available:
■ Availability Definition
■ Performance Metrics
■ Usage Metrics
■ Business Metrics
■ Service Tests and Beacons
■ Root Cause Analysis Configuration
Apart from these options, for Web applications, the end-user and request performance monitoring features can also be configured. For more information, refer to the following sections:
■ Configuring End-User Performance Monitoring
■ Configuring OC4J for Request Performance Diagnostics
8.4.1 Availability DefinitionYou can modify the availability definition (service test-based or system-based) for the selected service. If availability is based on service tests, you can specify whether the service should be available when:
■ All key service tests are successful (Default)
■ At least one key service test is successful
If availability is based on the key system components, you can specify whether the service should be available when:
■ All key components are up (Default)
■ At least one key component is up
Note: A service test is considered available if it can be executed by at least one key beacon. If there are no key beacons, the service test will have an unknown status.
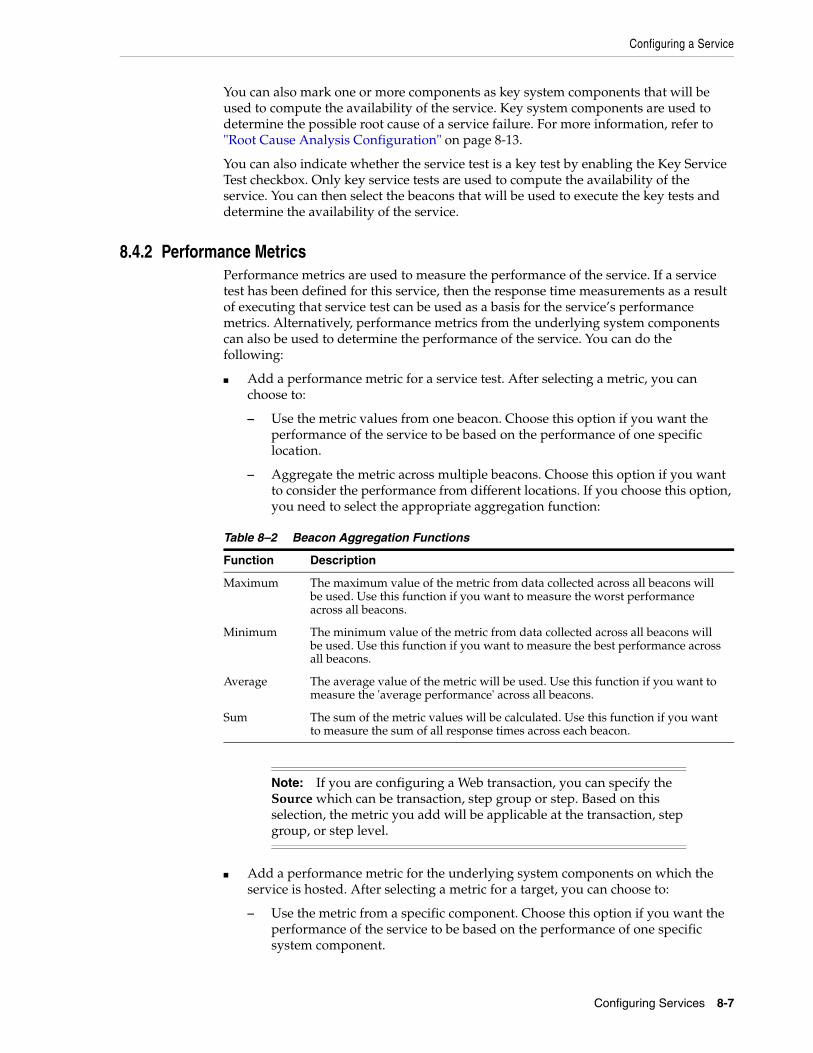
Configuring a Service
Configuring Services 8-7
You can also mark one or more components as key system components that will be used to compute the availability of the service. Key system components are used to determine the possible root cause of a service failure. For more information, refer to "Root Cause Analysis Configuration" on page 8-13.
You can also indicate whether the service test is a key test by enabling the Key Service Test checkbox. Only key service tests are used to compute the availability of the service. You can then select the beacons that will be used to execute the key tests and determine the availability of the service.
8.4.2 Performance MetricsPerformance metrics are used to measure the performance of the service. If a service test has been defined for this service, then the response time measurements as a result of executing that service test can be used as a basis for the service’s performance metrics. Alternatively, performance metrics from the underlying system components can also be used to determine the performance of the service. You can do the following:
■ Add a performance metric for a service test. After selecting a metric, you can choose to:
– Use the metric values from one beacon. Choose this option if you want the performance of the service to be based on the performance of one specific location.
– Aggregate the metric across multiple beacons. Choose this option if you want to consider the performance from different locations. If you choose this option, you need to select the appropriate aggregation function:
■ Add a performance metric for the underlying system components on which the service is hosted. After selecting a metric for a target, you can choose to:
– Use the metric from a specific component. Choose this option if you want the performance of the service to be based on the performance of one specific system component.
Table 8–2 Beacon Aggregation Functions
Function Description
Maximum The maximum value of the metric from data collected across all beacons will be used. Use this function if you want to measure the worst performance across all beacons.
Minimum The minimum value of the metric from data collected across all beacons will be used. Use this function if you want to measure the best performance across all beacons.
Average The average value of the metric will be used. Use this function if you want to measure the 'average performance' across all beacons.
Sum The sum of the metric values will be calculated. Use this function if you want to measure the sum of all response times across each beacon.
Note: If you are configuring a Web transaction, you can specify the Source which can be transaction, step group or step. Based on this selection, the metric you add will be applicable at the transaction, step group, or step level.
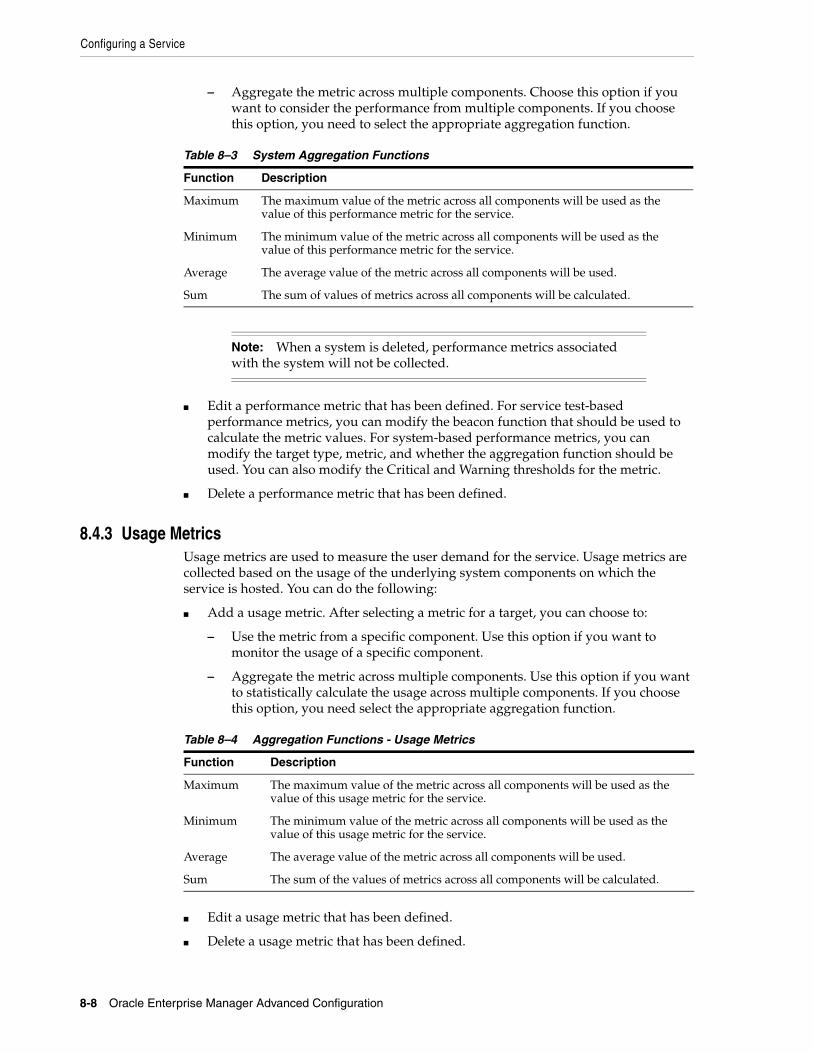
Configuring a Service
8-8 Oracle Enterprise Manager Advanced Configuration
– Aggregate the metric across multiple components. Choose this option if you want to consider the performance from multiple components. If you choose this option, you need to select the appropriate aggregation function.
■ Edit a performance metric that has been defined. For service test-based performance metrics, you can modify the beacon function that should be used to calculate the metric values. For system-based performance metrics, you can modify the target type, metric, and whether the aggregation function should be used. You can also modify the Critical and Warning thresholds for the metric.
■ Delete a performance metric that has been defined.
8.4.3 Usage MetricsUsage metrics are used to measure the user demand for the service. Usage metrics are collected based on the usage of the underlying system components on which the service is hosted. You can do the following:
■ Add a usage metric. After selecting a metric for a target, you can choose to:
– Use the metric from a specific component. Use this option if you want to monitor the usage of a specific component.
– Aggregate the metric across multiple components. Use this option if you want to statistically calculate the usage across multiple components. If you choose this option, you need select the appropriate aggregation function.
■ Edit a usage metric that has been defined.
■ Delete a usage metric that has been defined.
Table 8–3 System Aggregation Functions
Function Description
Maximum The maximum value of the metric across all components will be used as the value of this performance metric for the service.
Minimum The minimum value of the metric across all components will be used as the value of this performance metric for the service.
Average The average value of the metric across all components will be used.
Sum The sum of values of metrics across all components will be calculated.
Note: When a system is deleted, performance metrics associated with the system will not be collected.
Table 8–4 Aggregation Functions - Usage Metrics
Function Description
Maximum The maximum value of the metric across all components will be used as the value of this usage metric for the service.
Minimum The minimum value of the metric across all components will be used as the value of this usage metric for the service.
Average The average value of the metric across all components will be used.
Sum The sum of the values of metrics across all components will be calculated.
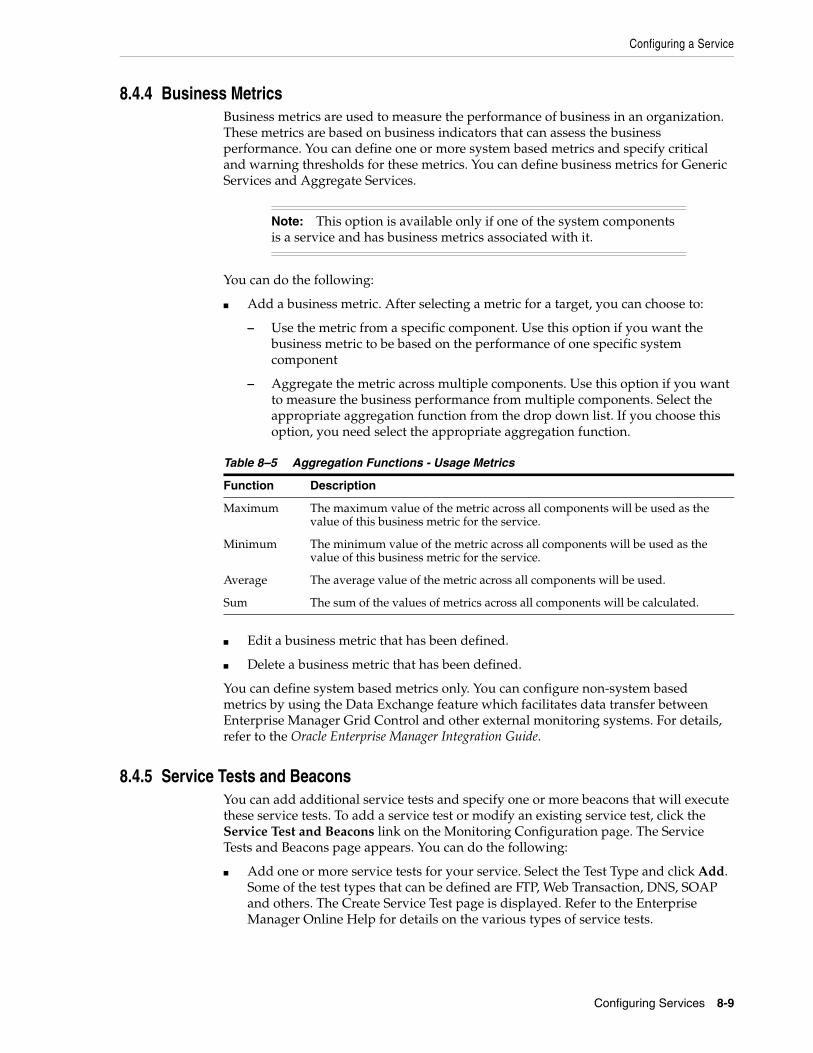
Configuring a Service
Configuring Services 8-9
8.4.4 Business MetricsBusiness metrics are used to measure the performance of business in an organization. These metrics are based on business indicators that can assess the business performance. You can define one or more system based metrics and specify critical and warning thresholds for these metrics. You can define business metrics for Generic Services and Aggregate Services.
You can do the following:
■ Add a business metric. After selecting a metric for a target, you can choose to:
– Use the metric from a specific component. Use this option if you want the business metric to be based on the performance of one specific system component
– Aggregate the metric across multiple components. Use this option if you want to measure the business performance from multiple components. Select the appropriate aggregation function from the drop down list. If you choose this option, you need select the appropriate aggregation function.
■ Edit a business metric that has been defined.
■ Delete a business metric that has been defined.
You can define system based metrics only. You can configure non-system based metrics by using the Data Exchange feature which facilitates data transfer between Enterprise Manager Grid Control and other external monitoring systems. For details, refer to the Oracle Enterprise Manager Integration Guide.
8.4.5 Service Tests and BeaconsYou can add additional service tests and specify one or more beacons that will execute these service tests. To add a service test or modify an existing service test, click the Service Test and Beacons link on the Monitoring Configuration page. The Service Tests and Beacons page appears. You can do the following:
■ Add one or more service tests for your service. Select the Test Type and click Add. Some of the test types that can be defined are FTP, Web Transaction, DNS, SOAP and others. The Create Service Test page is displayed. Refer to the Enterprise Manager Online Help for details on the various types of service tests.
Note: This option is available only if one of the system components is a service and has business metrics associated with it.
Table 8–5 Aggregation Functions - Usage Metrics
Function Description
Maximum The maximum value of the metric across all components will be used as the value of this business metric for the service.
Minimum The minimum value of the metric across all components will be used as the value of this business metric for the service.
Average The average value of the metric across all components will be used.
Sum The sum of the values of metrics across all components will be calculated.
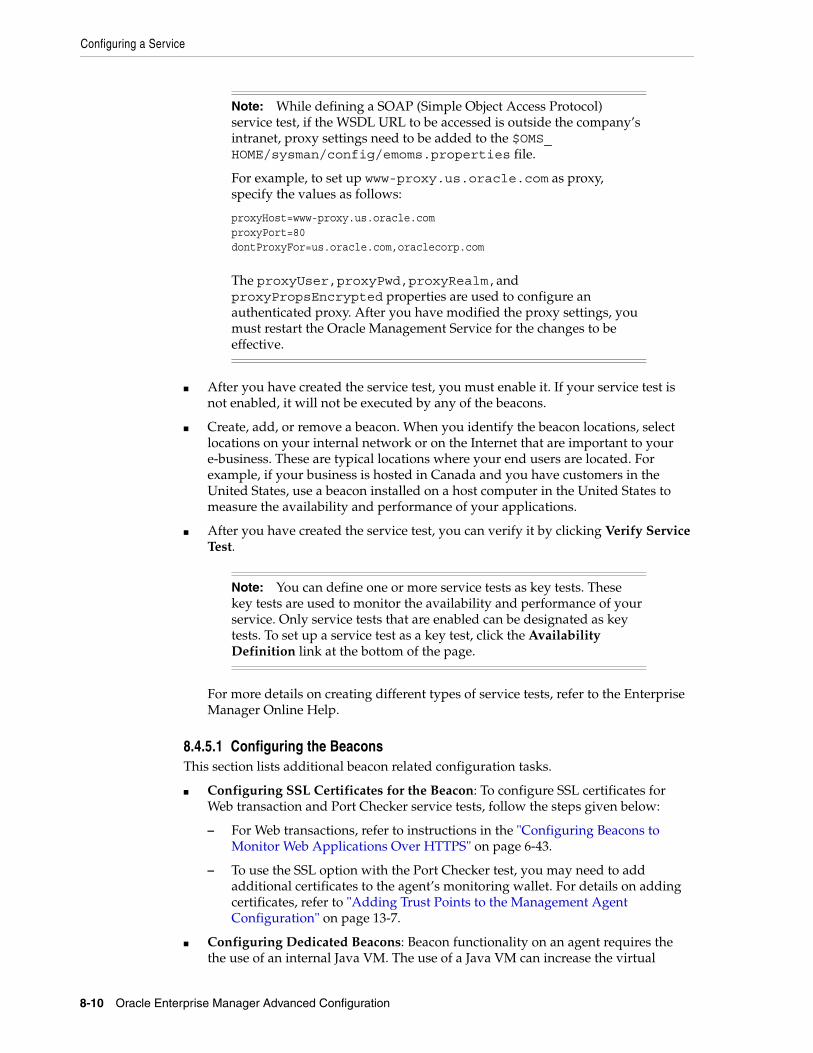
Configuring a Service
8-10 Oracle Enterprise Manager Advanced Configuration
■ After you have created the service test, you must enable it. If your service test is not enabled, it will not be executed by any of the beacons.
■ Create, add, or remove a beacon. When you identify the beacon locations, select locations on your internal network or on the Internet that are important to your e-business. These are typical locations where your end users are located. For example, if your business is hosted in Canada and you have customers in the United States, use a beacon installed on a host computer in the United States to measure the availability and performance of your applications.
■ After you have created the service test, you can verify it by clicking Verify Service Test.
For more details on creating different types of service tests, refer to the Enterprise Manager Online Help.
8.4.5.1 Configuring the BeaconsThis section lists additional beacon related configuration tasks.
■ Configuring SSL Certificates for the Beacon: To configure SSL certificates for Web transaction and Port Checker service tests, follow the steps given below:
– For Web transactions, refer to instructions in the "Configuring Beacons to Monitor Web Applications Over HTTPS" on page 6-43.
– To use the SSL option with the Port Checker test, you may need to add additional certificates to the agent’s monitoring wallet. For details on adding certificates, refer to "Adding Trust Points to the Management Agent Configuration" on page 13-7.
■ Configuring Dedicated Beacons: Beacon functionality on an agent requires the the use of an internal Java VM. The use of a Java VM can increase the virtual
Note: While defining a SOAP (Simple Object Access Protocol) service test, if the WSDL URL to be accessed is outside the company’s intranet, proxy settings need to be added to the $OMS_HOME/sysman/config/emoms.properties file.
For example, to set up www-proxy.us.oracle.com as proxy, specify the values as follows:
proxyHost=www-proxy.us.oracle.comproxyPort=80dontProxyFor=us.oracle.com,oraclecorp.com
The proxyUser,proxyPwd,proxyRealm,and proxyPropsEncrypted properties are used to configure an authenticated proxy. After you have modified the proxy settings, you must restart the Oracle Management Service for the changes to be effective.
Note: You can define one or more service tests as key tests. These key tests are used to monitor the availability and performance of your service. Only service tests that are enabled can be designated as key tests. To set up a service test as a key test, click the Availability Definition link at the bottom of the page.
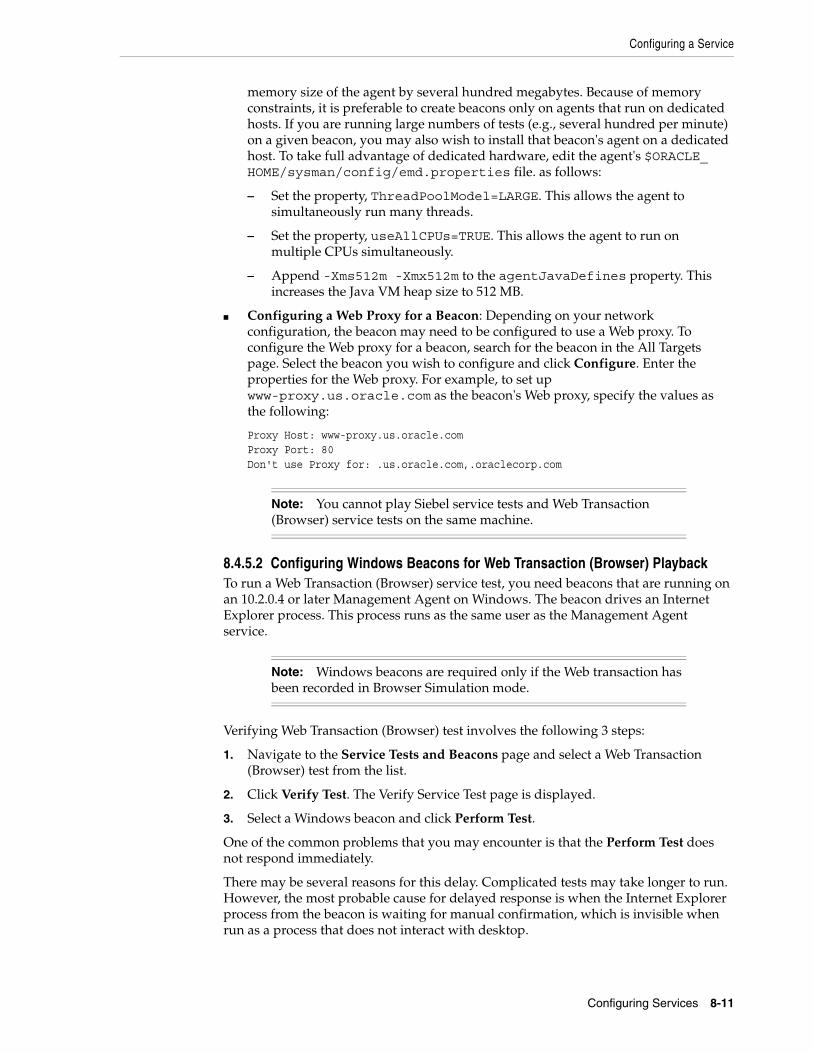
Configuring a Service
Configuring Services 8-11
memory size of the agent by several hundred megabytes. Because of memory constraints, it is preferable to create beacons only on agents that run on dedicated hosts. If you are running large numbers of tests (e.g., several hundred per minute) on a given beacon, you may also wish to install that beacon's agent on a dedicated host. To take full advantage of dedicated hardware, edit the agent's $ORACLE_HOME/sysman/config/emd.properties file. as follows:
– Set the property, ThreadPoolModel=LARGE. This allows the agent to simultaneously run many threads.
– Set the property, useAllCPUs=TRUE. This allows the agent to run on multiple CPUs simultaneously.
– Append -Xms512m -Xmx512m to the agentJavaDefines property. This increases the Java VM heap size to 512 MB.
■ Configuring a Web Proxy for a Beacon: Depending on your network configuration, the beacon may need to be configured to use a Web proxy. To configure the Web proxy for a beacon, search for the beacon in the All Targets page. Select the beacon you wish to configure and click Configure. Enter the properties for the Web proxy. For example, to set up www-proxy.us.oracle.com as the beacon's Web proxy, specify the values as the following:
Proxy Host: www-proxy.us.oracle.comProxy Port: 80Don't use Proxy for: .us.oracle.com,.oraclecorp.com
8.4.5.2 Configuring Windows Beacons for Web Transaction (Browser) PlaybackTo run a Web Transaction (Browser) service test, you need beacons that are running on an 10.2.0.4 or later Management Agent on Windows. The beacon drives an Internet Explorer process. This process runs as the same user as the Management Agent service.
Verifying Web Transaction (Browser) test involves the following 3 steps:
1. Navigate to the Service Tests and Beacons page and select a Web Transaction (Browser) test from the list.
2. Click Verify Test. The Verify Service Test page is displayed.
3. Select a Windows beacon and click Perform Test.
One of the common problems that you may encounter is that the Perform Test does not respond immediately.
There may be several reasons for this delay. Complicated tests may take longer to run. However, the most probable cause for delayed response is when the Internet Explorer process from the beacon is waiting for manual confirmation, which is invisible when run as a process that does not interact with desktop.
Note: You cannot play Siebel service tests and Web Transaction (Browser) service tests on the same machine.
Note: Windows beacons are required only if the Web transaction has been recorded in Browser Simulation mode.
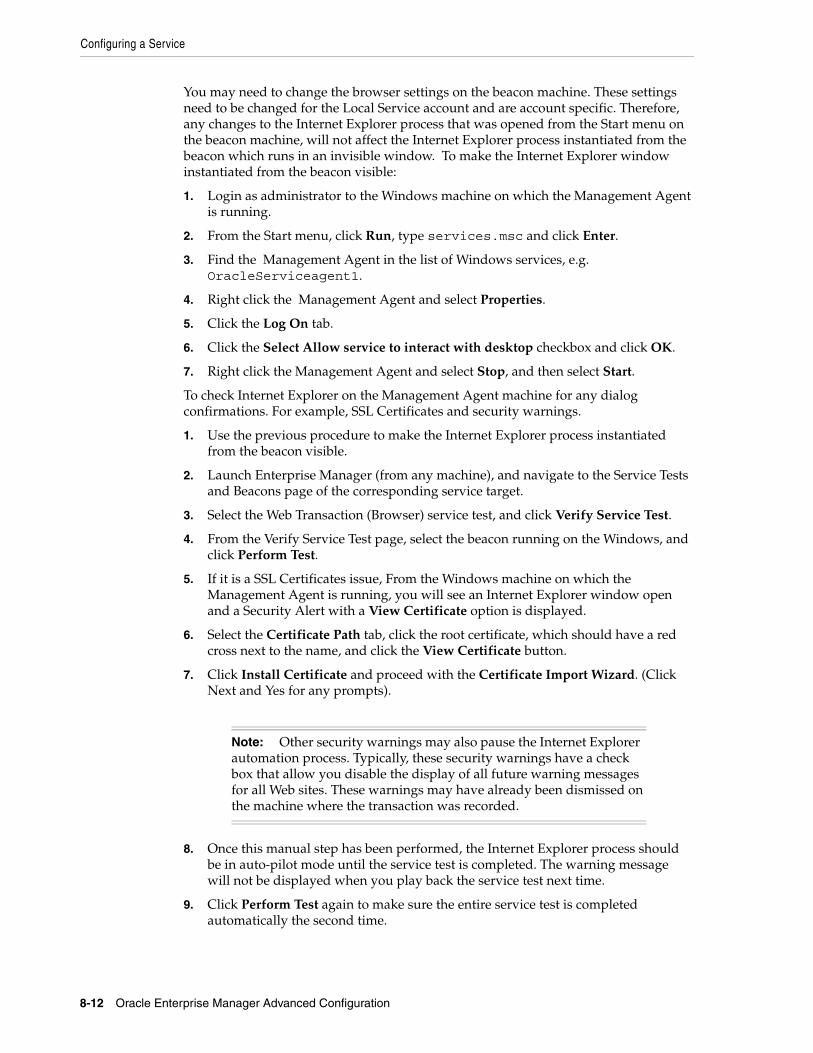
Configuring a Service
8-12 Oracle Enterprise Manager Advanced Configuration
You may need to change the browser settings on the beacon machine. These settings need to be changed for the Local Service account and are account specific. Therefore, any changes to the Internet Explorer process that was opened from the Start menu on the beacon machine, will not affect the Internet Explorer process instantiated from the beacon which runs in an invisible window. To make the Internet Explorer window instantiated from the beacon visible:
1. Login as administrator to the Windows machine on which the Management Agent is running.
2. From the Start menu, click Run, type services.msc and click Enter.
3. Find the Management Agent in the list of Windows services, e.g. OracleServiceagent1.
4. Right click the Management Agent and select Properties.
5. Click the Log On tab.
6. Click the Select Allow service to interact with desktop checkbox and click OK.
7. Right click the Management Agent and select Stop, and then select Start.
To check Internet Explorer on the Management Agent machine for any dialog confirmations. For example, SSL Certificates and security warnings.
1. Use the previous procedure to make the Internet Explorer process instantiated from the beacon visible.
2. Launch Enterprise Manager (from any machine), and navigate to the Service Tests and Beacons page of the corresponding service target.
3. Select the Web Transaction (Browser) service test, and click Verify Service Test.
4. From the Verify Service Test page, select the beacon running on the Windows, and click Perform Test.
5. If it is a SSL Certificates issue, From the Windows machine on which the Management Agent is running, you will see an Internet Explorer window open and a Security Alert with a View Certificate option is displayed.
6. Select the Certificate Path tab, click the root certificate, which should have a red cross next to the name, and click the View Certificate button.
7. Click Install Certificate and proceed with the Certificate Import Wizard. (Click Next and Yes for any prompts).
8. Once this manual step has been performed, the Internet Explorer process should be in auto-pilot mode until the service test is completed. The warning message will not be displayed when you play back the service test next time.
9. Click Perform Test again to make sure the entire service test is completed automatically the second time.
Note: Other security warnings may also pause the Internet Explorer automation process. Typically, these security warnings have a check box that allow you disable the display of all future warning messages for all Web sites. These warnings may have already been dismissed on the machine where the transaction was recorded.
Configuring a Service
Configuring Services 8-13
To make the Internet Explorer window instantiated from the beacon invisible, you can repeat the steps 1 to 5, uncheck the Select Allow service to interact with desktop checkbox and continue with step 7.
To configure the proxy setting for Web Transaction (Browser) service tests:
1. Make the Internet Explorer process instantiated from the beacon visible.
2. Launch Enterprise Manager (from any machine), and navigate to the Service Tests and Beacons page of the corresponding service target.
3. Select the Web Transaction (Browser) service test, and click Verify Service Test.
4. From the Verify Service Test page, select the beacon running on the Windows, and click Perform Test.
5. From the Windows machine where the Management Agent is running, you should see two Internet Explorer windows open. From either of the windows, select the Tools > Internet Options.
6. Click the Connections tab and then click LAN Settings, and make all relevant changes there. These changes apply to all service tests running on this beacon.
7. Close both the Internet Explorer windows.
8. Click Perform Test again to make sure the entire service test is completed automatically the second time.
9. Make the Internet Explorer process instantiated from the beacon invisible.
8.4.6 Root Cause Analysis ConfigurationYou can use Root Cause Analysis (RCA) to filter a set of events to determine the cause of a higher level system, service, or application problem. RCA can help you to eliminate apparent performance problems that may otherwise appear to be root causes but which are only side effects or symptoms of the actual root cause of the problem, allowing you to more quickly identify problem areas. You can view the RCA results on the Home page or Topology page of any service that is currently down. The Topology page allows you to see a graphical representation of the service, system and component dependencies with the targets highlighted that RCA has implicated as causing the service failure.
Before running RCA, you can choose to:
■ Configure the tool to run automatically whenever a service fails.
■ Disable RCA by changing the default Analysis Mode to Manual.
■ Define component tests for the service and thresholds for individual tests.
To configure Root Cause Analysis, follow these steps:
1. From the Service Home page, click Monitoring Configuration.
2. From the Monitoring Configuration page, click Root Cause Analysis Configuration.
3. If the current mode is set to Automatic, click Set Mode Manual to disable RCA. If you choose to perform the analysis manually, you can perform the analysis from
Note: At any one time, each test run launches two Internet Explorer windows. One of the windows schedules the steps during playback. The other window actually shows the site being played back.
Recording Web Transactions
8-14 Oracle Enterprise Manager Advanced Configuration
the Service home page at anytime by choosing Perform Analysis if the service is down. If the current mode is set for Manual, click Set Mode Automatic to enable RCA when the state of the service and its components change
4. Click the link in the Component Tests column of the table for the key component you want to manage. You can then manage component tests for the service on the Component Tests page by adding, removing, or editing tests. Refer to the Enterprise Manager Online Help for details on defining component tests.
8.4.6.1 Getting the Most From Root Cause AnalysisRoot Cause Analysis (RCA) can provide you with great value by filtering through large amounts of data related to your services and identifying the most significant events that have occurred that are affecting your service's availability. If you are constructing your own services to manage in Enterprise Manager it is important that the services are defined with some thought and planning in order to get the most out of RCA.
The first item to consider in getting the most from RCA is the set of dependencies that your service has on other services or system components. Be sure to identify all of the system components that your service utilizes in order to accomplish its task. If you omit a key component and the service fails, RCA will not be able to identify that component as a possible cause. Conversely, if you include components in the service definition that the service does not actually depend on, RCA may erroneously identify the component as a cause of service failures.
When building service dependencies, keep in mind that you can take advantage of the aggregate service concept that is supported by Enterprise Manager. This allows you to break your service into smaller sub-services, each with its own set of dependencies.
Your services may be easier to manage in the modular fashion, and RCA will consider not only the status of a sub-service (a service that you depend on) but also on any of the system components or service that the sub-service depends on in turn and provides you with the power to encapsulate the services a key component exposes to you in the form of a managed service that your service may then depend on.
The second item to consider in getting the most from RCA is the use of component tests. As you define the system components that your service depends on, consider that there may be aspects of these components that may result in your service failure without the component itself failing. Component tests allow RCA to test the status not only of the target itself but also the status of its key aspects.
The RCA system allows you to create component tests based on any metric that is available for the key component. Remember, this includes any user-defined metrics that you have created for the component, allowing you great flexibility in how RCA tests the aspects of that component should your service fail.
8.5 Recording Web TransactionsYou can record a transaction using an intuitive playback recorder that automatically records a series of user actions and navigation paths. You can play back transactions interactively, know whether it is internal or external to the data center, and
Note: When you disable RCA and set it back to automatic mode, RCA does not store the previous history results for you, thus providing no history for later reference.
Monitoring Settings
Configuring Services 8-15
understand the in-depth break-out of response times across all tiers of the Web application for quick diagnosis.
You must install the transaction recorder in your computer to record transactions. The transaction recorder is also used for playing back and tracing transactions. The transaction recorder is downloaded from the Enterprise Manager Grid Control server the first time any of these actions is performed. The transaction recorder requires some Microsoft libraries to be installed in your computer. If these libraries are not present during installation, they are automatically downloaded and installed from the Microsoft site. Make sure that your computer has access to the Internet to download these files. After the installation has been completed, you may need to restart your computer to make the changes effective.
8.6 Monitoring Settings For each service, you can define the frequency (which determines how often the service will be triggered against your application) and the performance thresholds. When a service exceeds its performance thresholds, an alert is generated.
To define metrics and thresholds, click Monitoring Settings for Tests link on the Service Tests and Beacons page. The Metric and Policy Settings page is displayed. Click the Monitoring Settings link. The Monitoring Settings - Thresholds page appears.
■ View By Metric, Beacon - In this view, you can click Add Beacon Overrides to override the default threshold values for one or more beacons. In this case, the default thresholds will only be used for beacons without any overrides. Any new beacons added to the service will use the default thresholds. Click Add Metric to add one or more metrics.
■ View By Beacon, Metric - In this view, you can click on the Default icon to toggle between Edit and View modes for a specific metric. In the Edit mode, you can modify the parameters of the metric. You can also modify the parameters of the metric for a specific beacon. In the View mode, the default parameters of the metric will be used.
Apart from these procedures, you can also define metrics at the step, and step group level for Web transactions. You can choose either of the following views:
– View By Step, Metric, Beacon: In this view, you can click Add Beacon Overrides to override the default threshold values for one or more beacons. In this case, the default thresholds will only be used for beacons without any overrides. Any new beacons added to the Web transaction will use the default thresholds. Click Add Metric to define thresholds for one or more metrics. Alerts are generated only if the value of the Data Granularity property is set to 'Transaction' for the service tests. For more information on the Web transaction properties, refer to the Create / Edit Service Test - Web Transaction help page in the Enterprise Manager Online Help.
– View By Step, Beacon, Metric: In this view, you can click on the Default icon to toggle between Edit and View modes for a specific metric. In the Edit mode, you can modify the parameters of the metric for a specific beacon. In the View mode, the default parameters of the metric will be used. Alerts are generated only if the value of the Data Granularity property is set to ' Step'.
To define the default collection frequency and collection properties, click the Collection Settings tab on the Monitoring Settings page. You can do the following:
Configuring Aggregate Services
8-16 Oracle Enterprise Manager Advanced Configuration
■ Specify the default collection frequency for all the beacons. To override the collection frequency for a specific beacon, click Add Beacon Overrides.
■ Specify the collection properties and their corresponding values for one or more beacons.
Refer to the Enterprise Manager Online Help for more details on the defining the collection intervals and performance thresholds.
8.7 Configuring Aggregate ServicesAggregate services consist of one or more services, called subservices. A subservice is any service created in Enterprise Manager. The availability, performance, business criteria, and usage for the aggregate service depend on the availability, performance, business criteria, and usage for the individual subservices comprising the service. To create an aggregate service, navigate to the Services main page, select Aggregate Service from the Add drop-down list and click Go. The Add Aggregate Service page appears. Creating an Aggregate Service involves the following:
■ Specifying the name and time zone for the service.
■ Adding the services that make up this aggregate service.
■ Establishing the availability definition for the aggregate service. Availability of an aggregate service depends on the availability of its constituent subservices. The availability for a subservice may depend on the successful execution of a service test or on the availability of the system components on which the subservice runs, depending how the subservice was defined.
■ Defining the metrics used to measure the performance of your aggregate service. You can add performance metrics from single subservices, or based on statistical aggregations of more than one metric. Once you have selected the performance metrics, you can set the thresholds used to trigger critical and warning alerts, or remove metrics you no longer want.
■ Defining the metrics used to measure the usage of your aggregate service. Usage metrics can be based on the metrics of one or more system components. You can add usage metrics from single subservices, or based on statistical aggregations of more than one metric. Once you have selected the usage metrics, you can set the thresholds used to trigger critical and warning alerts, or remove metrics you no longer want.
■ Defining the metrics that are used to measure of the performance of business in the organization. These metrics are based on business indicators that can assess the business performance.You can add business metrics from single subservices, or based on statistical aggregations of more than one metric. Once you have selected the business metrics, you can set the thresholds to trigger critical and warning alerts, or remove metrics you no longer want.
After you have created an aggregate service, you can add or remove its constituent subservices, modify the availability definition and add or delete performance or usage metrics. Refer to the Enterprise Manager Online Help for details on these operations.
WARNING: If you delete or remove a subservice from an aggregate service, the aggregate service performance, usage, and business metrics may be affected if they are based on a deleted subservice’s metrics.
Configuring End-User Performance Monitoring
Configuring Services 8-17
8.8 Configuring End-User Performance MonitoringEnterprise Manager allows you to monitor the response time data generated by actual end-users as they access and navigate your Web site. You can gather end-user performance data and monitor the performance of the pages within your Web application. The Web servers such as OracleAS Web Cache, Oracle HTTP Server, and Apache HTTP Server collect the end-user performance data and store it in the log file. Enterprise Manager processes this data and uploads it to the Management Repository. You can then view and analyze this data on the Page Performance page.
To gather the end-user performance data, you must configure one of the following Web servers so that Website activities are logged and stored in the correct format.
■ Oracle HTTP Server Based on Apache 2.0
■ OracleAS Web Cache
■ Apache HTTP Server 2.0 or higher
After you have configured one of these Web servers, you can enable the collection of end-user performance data. You can then view the end-user performance data on the Page Performance page in Enterprise Manager.
Before you configure the Web server, you must do the following:
■ Create a Web application target that contains one of these Web servers.
■ Make this Web server as a key system component for your Web application. If this Web server is a part of the Redundancy Group, make sure that the Redundancy Group is a key system component of your Web application. To enable end-user performance monitoring, you must configure the specific Web server within the Redundancy Group.
The following sections provide instructions on configuring the Web server for End-User Performance Monitoring:
■ Configuring End-User Performance Monitoring Using Oracle HTTP Server Based on Apache 2.0 or Apache HTTP Server 2.0
■ Configuring End-User Performance Monitoring Using Oracle Application Server Web Cache
8.8.1 Configuring End-User Performance Monitoring Using Oracle HTTP Server Based on Apache 2.0 or Apache HTTP Server 2.0
To enable End-User Performance Monitoring, you can use either of the following Apache server versions:
■ Oracle HTTP Server Based on Apache 2.0
■ Apache HTTP Server 2.0 or higher (This can be downloaded from http://www.apache.org)
Before configuring either of these Apache server versions, you must perform the following steps:
1. In the Agent Home page, select either Oracle HTTP Server or Apache HTTP Server as a target type.
Note: If you are using the Oracle HTTP Server Based on Apache 2.0, the Redundancy Group is referred to as the HTTP Server HA Group.
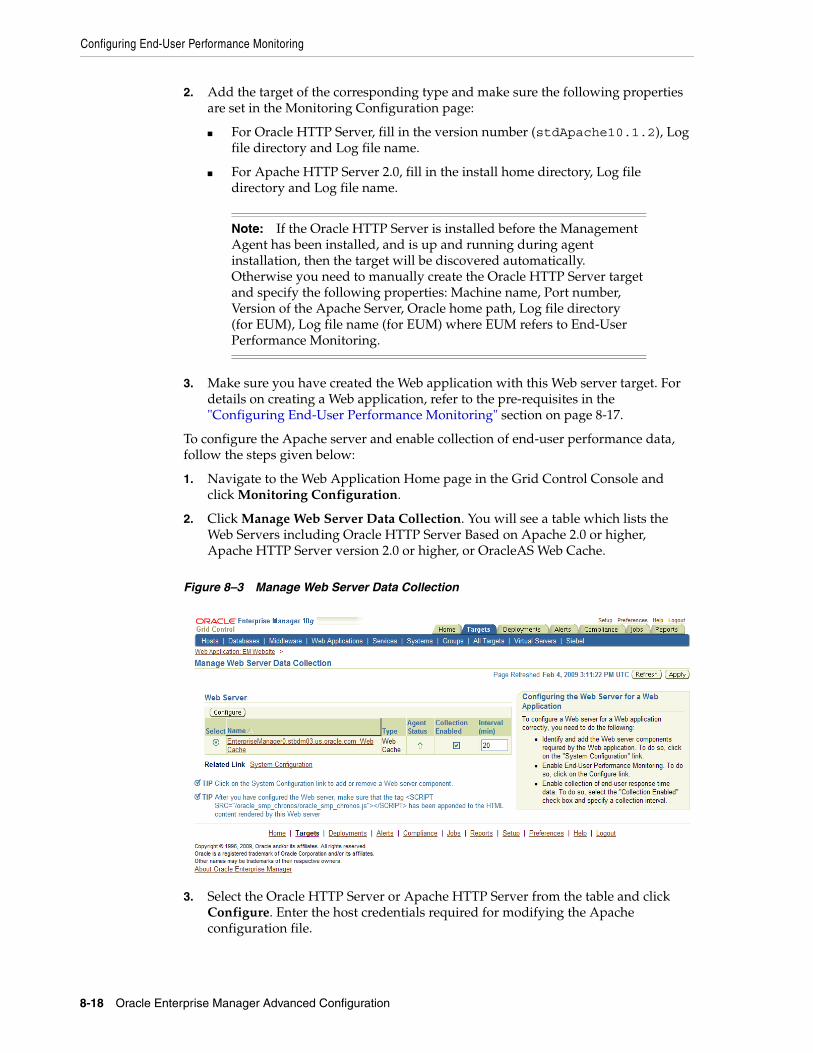
Configuring End-User Performance Monitoring
8-18 Oracle Enterprise Manager Advanced Configuration
2. Add the target of the corresponding type and make sure the following properties are set in the Monitoring Configuration page:
■ For Oracle HTTP Server, fill in the version number (stdApache10.1.2), Log file directory and Log file name.
■ For Apache HTTP Server 2.0, fill in the install home directory, Log file directory and Log file name.
3. Make sure you have created the Web application with this Web server target. For details on creating a Web application, refer to the pre-requisites in the "Configuring End-User Performance Monitoring" section on page 8-17.
To configure the Apache server and enable collection of end-user performance data, follow the steps given below:
1. Navigate to the Web Application Home page in the Grid Control Console and click Monitoring Configuration.
2. Click Manage Web Server Data Collection. You will see a table which lists the Web Servers including Oracle HTTP Server Based on Apache 2.0 or higher, Apache HTTP Server version 2.0 or higher, or OracleAS Web Cache.
Figure 8–3 Manage Web Server Data Collection
3. Select the Oracle HTTP Server or Apache HTTP Server from the table and click Configure. Enter the host credentials required for modifying the Apache configuration file.
Note: If the Oracle HTTP Server is installed before the Management Agent has been installed, and is up and running during agent installation, then the target will be discovered automatically. Otherwise you need to manually create the Oracle HTTP Server target and specify the following properties: Machine name, Port number, Version of the Apache Server, Oracle home path, Log file directory (for EUM), Log file name (for EUM) where EUM refers to End-User Performance Monitoring.
Configuring End-User Performance Monitoring
Configuring Services 8-19
4. After logging in, you will see a table containing the list of sites that are being hosted by the Apache server. These include a list of virtual hosts defined by the user in the Apache Configuration file. The up and the down arrows under the Monitoring Status column shows the corresponding site is currently being monitored. For each site, check or uncheck the Enable Monitoring checkbox to indicate whether this site is to be monitored. For the site that is to be monitored, enter the log file name in the text box to indicate the location in which the end-user performance data is to be stored. By default, the log file will be created under the logs/directory under Apache root directory. To save the log file in a different directory, enter a file name with the absolute path.
5. Make sure that the log file name and the location you specify here match the Log file name and Log file directory in the Monitoring Configuration page of the Oracle HTTP Server or Apache HTTP Server target.
6. You can also use the one button accelerator to enable all sites or disable all sites all at once.
7. To selectively disable or enable certain URLs on a specific site, select the site, click Set URLs. Click Insert Before or Insert After to create a URL rule and place it in the desired place among all URL rules. A URL rule contains a URL Pattern, URL Pattern Type, and a check box indicating if this URL is to be monitored or not. For example, a URL rule with URL Pattern "abc" and URL Pattern Type "Ends With" and Monitor unchecked means that any URL ending with "abc" will not be monitored by End-User Performance Monitoring. The user can also delete a URL rule, move a URL rule up or down to increase or decrease its priority.
8. After you have made the configuration changes, click OK to go to the Apache Restart page. Restarting the Apache server will finalize all configuration changes, and end-user performance data will be logged by the Apache server.
9. After you have configured the Apache server, you will return to the Manage Web Server Data Collection page. You can now enable the collection of end-user performance data. For more details, refer to "Starting and Stopping End-User Performance Monitoring" on page 8-28. If you do not see data after End-User Performance Monitoring has been enabled, refer to the "Verifying and Troubleshooting End-User Performance Monitoring" on page 8-29.
8.8.1.1 Setting up the Third Party Apache ServerTo set up the Third Party Apache HTTP Server 2.0, follow these steps:
1. Install the third party Application Server.
2. Install Apache HTTP Server 2.0.
3. Install the plug-in for the Apache HTTP Server 2.0 that was provided by the Application Server.
4. Ensure that the Web application works with the Apache HTTP Server2.0 server. You can then follow the steps to configure the Apache server and enable collection of end-user performance data.
8.8.2 Configuring End-User Performance Monitoring Using Oracle Application Server Web Cache
Enterprise Manager uses data from Oracle Application Server Web Cache to gather statistics about the performance of pages within your Web applications. As a result, you must configure Oracle Application Server Web Cache to ensure that it logs your Web site activity and that the data is in the correct format.
Configuring End-User Performance Monitoring
8-20 Oracle Enterprise Manager Advanced Configuration
When Oracle Application Server Web Cache is properly configured, Enterprise Manager can begin collecting the end-user performance data and load it into the Oracle Management Repository.
The following sections describe how to configure and collect end-user performance data if you are using the OracleAS Web Cache:
■ Configuring Oracle Application Server Web Cache 10.1.2
■ Configuring Oracle Application Server Web Cache 9.0.4
■ Configuring End-User Performance Monitoring Using Earlier Versions of Oracle Application Server Web Cache
■ Configuring End-User Performance Monitoring Using Standalone Oracle Application Server Web Cache
8.8.2.1 Configuring Oracle Application Server Web Cache 10.1.2To configure the OracleAS Web Cache for End-User Performance Monitoring, follow the instructions in the following sections:
1. Navigate to the Web Application Home page in the Grid Control Console and click Monitoring Configuration.
2. Click Manage Web Server Data Collection. Enterprise Manager displays the Manage Web Server Data Collection page.
3. Select the Web Cache target and click Configure. Enterprise Manager displays the login dialog box for the Oracle Application Server Control.
4. Enter the username and password for the Application Server Control user or the ias_admin account. The password for the ias_admin account is defined during the installation of Oracle Application Server.
5. After you have logged into Oracle Application Server Control, you can then configure the Oracle Application Server Web Cache using the Set Up End-User Performance Monitoring page. Check the Enable End-User Performance Monitoring checkbox and click OK to enable End-User Performance Monitoring at the Web Cache level.
6. At the site-level configuration section, select a site and check Enable Monitoring for that site.
7. From the drop-down list, select the Access Log Format as access log:WCLF for each site you want to monitor. If this format is not in the list, click Use Required
See Also: "Configuring End-User Performance Monitoring" in the Oracle Application Server Web Cache Administrator’s Guide.
Tip: If the login dialog box does not appear or if you see an error message in your browser window, navigate to the Web Cache Home page. Click Administer in the Related Links section. You will be prompted for the user name and password for the Application Server Control. Click Administration and scroll down and click End-User Performance Monitoring.
Tip: Disabling End-User Performance Monitoring at the Web Cache level will override site-level settings.
Configuring End-User Performance Monitoring
Configuring Services 8-21
Log Format. This automatically picks up the End-User Performance Monitoring log format.
8. Click the link under the URLs to Monitor column. The URLs To Monitor page is displayed. Click Add Another Row to create a URL rule and place it in the desired place among all URL rules. A URL rule contains a URL Pattern, URL Pattern Type, and a check box indicating if this URL is to be monitored or not. For example, a URL rule with URL Pattern "abc" and URL Pattern Type "Ends With" and Monitor unchecked means that any URL ending with "abc" will not be monitored by End-User Performance Monitoring. The user can also change the priority of the URL rule by clicking Reorder. Click OK to save the changes and return to the Set Up End-User Performance Monitoring page.
9. After you have configured the Web Cache in the Set Up End-User Performance Monitoring page, click OK to save the changes. You will then return to the Web Cache Administration page in Oracle Application Server Control. Click Restart to restart the Web Cache. For more detailed information about configuring these options, click Help on the Set Up End-User Performance Monitoring page.
10. Close the Application Server Control browser window and return to the Manage Web Server Data Collection page in the Grid Control console. You can now enable the collection of end-user performance data. For more details, refer to "Starting and Stopping End-User Performance Monitoring" on page 8-28. If you do not see data after end-user performance has been enabled, refer to "Verifying and Troubleshooting End-User Performance Monitoring" on page 8-29.
8.8.2.2 Configuring Oracle Application Server Web Cache 9.0.4 To configure the Oracle Application Server Web Cache Manager 9.0.4, follow the instructions given in these sections:
1. Navigate to the Web Application home page in the Grid Control console and click Monitoring Configuration.
2. Click Manage Web Server Data Collection. Enterprise Manager displays the Manage Web Server Data Collection page.
3. Select the Web Cache target and click Configure. Enterprise Manager displays the login dialog box for the Web Cache Manager.
4. Enter the username and password for the Web Cache administrator account. The first time you log in to the Oracle Application Server Web Cache administrator account, the password is administrator. The password for the ias_admin account is defined during the installation of Oracle Application Server.
5. Enable OracleAS Web Cache logging for End-User Performance Monitoring:
a. Select Logging and Diagnostics and then select End-User Performance Monitoring in the OracleAS Web Cache Manager navigator frame.
You can enable monitoring for a particular Web cache or for an entire site.
b. To enable monitoring for a particular Web cache, select the Web cache from the Cache-Specific End-User Performance Monitoring section and click Enable.
Tip: If the login dialog box does not appear or if you receive an error message in your browser window, you may have to start the Oracle Application Server Web Cache Manager. For more information about starting and using Oracle Application Server Web Cache Manager, refer to the Oracle Application Server Web Cache Administrator’s Guide.
Configuring End-User Performance Monitoring
8-22 Oracle Enterprise Manager Advanced Configuration
Be sure to enable the Web cache that you are using as a front-end to your Web application.
c. To enable monitoring for the entire site, select the site from the Site-Specific End-User Performance Monitoring section and click Enable.
6. Configure Oracle Application Server Web Cache to use the Web Cache Log Format (WCLF):
a. Select Logging and Diagnostics and then select Access Logs in the OracleAS Web Cache Manager navigator frame.
b. In the Cache-Specific Access Log Configuration table, click Edit Selected and enable the access log for your selected cache.
c. In the Site-Specific Access Log Configuration table, make sure that the Format style of the selected Site Name is WCLF and that it is enabled.
7. Click Apply Changes at the top of the Web Cache Manager window and restart OracleAS Web Cache by clicking Restart on the Web Cache Manager Cache Operations page.
8. Close the Web Cache Manager browser window and return to the Manage Web Server Data Collection page in the Grid Control console. You can now enable the collection of end-user performance data. For more details, refer to "Starting and Stopping End-User Performance Monitoring" on page 8-28. If you do not see data after end-user performance has been enabled, refer to "Verifying and Troubleshooting End-User Performance Monitoring" on page 8-29.
8.8.2.3 Configuring End-User Performance Monitoring Using Earlier Versions of Oracle Application Server Web CacheIf you are managing an earlier version of the Oracle Application Server using the Oracle Enterprise Manager 10g Grid Control Console, you can monitor your Web applications with End-User Performance Monitoring, but you cannot configure your Oracle Application Server Web Cache instance from within the Grid Control console.
Instead, you configure End-User Performance Monitoring for Oracle Application Server Web Cache 9.0.2 and 9.0.3 by running the chronos_setup.pl script on the computer that hosts your Oracle HTTP Server.
8.8.2.3.1 Using the chronos_setup.pl Configuration Script
Before you begin, consider the following:
■ The chronos_setup.pl script is installed in the bin directory of your Management Agent home when you install the Management Agent using the instructions in Oracle Enterprise Manager Grid Control Installation and Basic Configuration.
■ You must run the chronos_setup.pl script as an operating system user with the privilege to write to the document root of your Oracle HTTP Server.
■ If you have trouble running the script, run it with no arguments to display the help text.
To enable End-User Performance Monitoring for Oracle Application Server Web Cache 9.0.2 or Oracle Application Server Web Cache 9.0.3, you must run the chronos_setup.pl script three times, each time with a different argument:
■ Once to configure the document root for each Web server in your Web site
■ Once to configure Oracle Application Server Web Cache
Configuring End-User Performance Monitoring
Configuring Services 8-23
■ Once to start collecting response time data
The following sections describe each step of enabling End-User Performance Monitoring for Oracle Application Server Web Cache 9.0.2 or Oracle Application Server Web Cache 9.0.3.
8.8.2.3.2 Configuring the Document Root For Each Web Server When you run the chronos_setup.pl script with the webserver argument, the script:
■ Creates a new directory inside the document root. The directory is called:
oracle_smp_chronos
■ Installs two files into the oracle_smp_chronos directory:
oracle_smp_chronos.jsoracle_smp_chronos.giforacle_smp_eum_init.jsoracle_smp_eum_main.js
The oracle_smp_chronos.js must be installed in the document root of each Web server that serves content for your Website.
For example, if Oracle Application Server Web Cache and your Web server are on different machines and an Oracle Management Agent is present on the Web server machine, you must run the chronos_setup.pl script with the webserver option on the Web Server host to configure the document root for the remote Web server.
If Oracle Application Server Web Cache and your Web server are installed on different machines and you have no plans to install a Management Agent or to monitor the Web server, you will need to create a directory called oracle_smp_chronos under the Web server document root directory, and using FTP, place the oracle_smp_chronos.js file in the oracle_smp_chronos directory.
To configure the document root for each Web server:
1. Change directory to the /bin directory in the Management Agent home directory.
For example:
$PROMPT> cd AGENT_HOME/bin
2. Make sure you have write access to the Web server document root directory and then run the script as follows:
$PROMPT> perl chronos_setup.pl webserver location_of_the_webserver_DocumentRoot
An example of a Document Root is as follows:
$ORACLE_HOME/Apache/Apache/htdocs
To find the location of the document root, you can perform either of these steps:
■ Log in to the Oracle Application Server Release 2 (9.0.2) Enterprise Manager Web site and navigate to the Oracle HTTP Server Home Page. The document root is displayed in the General section of the HTTP Server Home Page.
■ Use a text editor or a command-line search utility to search for the term DocumentRoot in the following Oracle HTTP Server configuration file:
Note: If you have more than one document root, you must run the chronos_setup.pl script on each document root.
Configuring End-User Performance Monitoring
8-24 Oracle Enterprise Manager Advanced Configuration
$ORACLE_HOME/Apache/Apache/conf/httpd.conf
8.8.2.3.3 Configuring Oracle Application Server Web Cache for End-User Performance Monitoring
To configure Oracle Application Server Web Cache for End-User Performance Monitoring, you run the chronos_setup.pl script with the webcache argument. The script sets up Oracle Application Server Web Cache for End-User Performance Monitoring, and stops and restarts Oracle Application Server Web Cache automatically.
To configure Oracle Application Server Web Cache for End-User Performance Monitoring:
1. Make sure you have write access to the Oracle Application Server Web Cache directory.
For example, if Web Cache is installed in an Oracle Application Server home directory, you will need access to the IAS_HOME/webcache directory.
2. Change directory to the /bin directory in the Management Agent home directory.
For example:
$PROMPT> cd /private/agent_home/bin
3. Run the script as follows:
$PROMPT> perl chronos_setup.pl webcache webcache_installation_directory
8.8.2.3.4 Starting End-User Performance Monitoring To start End-User Performance Monitoring, you run the chronos_setup.pl script with the collection argument. The script creates a collection file for the specified target and restarts the agent.
To start End-User Performance Monitoring:
1. Log in as the user who installed the Management Agent so you have write access to the following directory:
AGENT_HOME/sysman/emd/collection
2. Change directory to the /bin directory in the Management Agent home directory.
For example:
$PROMPT> cd AGENT_HOME/bin
3. Locate the name of the Oracle Application Server Web Cache target.
You can locate the name of the target in one of three ways:
■ From the Oracle Enterprise Manager 10g Grid Control Console, locate the Oracle Application Server Web Cache target on the Targets tab. The name listed in the first column of the Target table is the name you must enter as an
Note: After running chronos_setup.pl, if you cannot restart Oracle Application Server Web Cache, back out of the configuration process by copying the following files back to their original name and location:
■ internal.xml<timestamp>
■ webcache.xml<timestamp>
Configuring End-User Performance Monitoring
Configuring Services 8-25
argument to the chronos_setup.pl script. Note the use of spaces and underscores.
■ Search the contents of the targets.xml configuration file, which lists all the targets managed by the Management Agent. Locate the Oracle Application Server Web Cache entry in the file and use the NAME attribute for the Web Cache target. The targets.xml file is located in the following directory of the Management Agent home:
AGENT_HOME/sysman/emd/targets.xml
■ Use the emctl config agent listtargets command to list the target names and target types currently being monitored by the Management Agent.
4. Start the collection for the Oracle Application Server Web Cache target by running the script as follows:
$PROMPT> perl chronos_setup.pl collection webcache_targetname
8.8.2.4 Configuring End-User Performance Monitoring Using Standalone Oracle Application Server Web CacheOracle Application Server Web Cache is available as a standalone download from the Oracle Technology Network (OTN). The standalone version of Oracle Application Server Web Cache allows you to improve the performance and reliability of your Web server even if you are not using Oracle Application Server.
If you are using standalone Oracle Application Server Web Cache with a third-party Web server, you can still manage Oracle Application Server Web Cache using the Oracle Enterprise Manager 10g Grid Control Console. As a result, you can also use End-User Performance Monitoring to monitor the Web applications that your users access through Oracle Application Server Web Cache.
Configuring End-User Performance Monitoring for standalone Oracle Application Server Web Cache involves the following steps, which are described in the following sections:
■ Installing Standalone Oracle Application Server Web Cache
■ Configuring Standalone Oracle Application Server Web Cache
■ Enabling End-User Performance Monitoring for Standalone Oracle Application Server Web Cache
8.8.2.4.1 Installing Standalone Oracle Application Server Web Cache
To install the standalone version of Oracle Application Server Web Cache:
1. Navigate to the Oracle Technology Network (OTN):
http://otn.oracle.com/software/content.html
2. Locate and select the Oracle Application Server Web Cache download option and follow the links for your operating system.
See Also: "Listing the Targets on a Managed Host" on page 2-15.
Note: If the name of the Oracle Application Server Web Cache target includes spaces, you must use quotation marks around the name
Configuring End-User Performance Monitoring
8-26 Oracle Enterprise Manager Advanced Configuration
3. Use the instructions on the OTN Web site to download Oracle Application Server Web Cache.
4. Use the instructions in the Web Cache readme file to install Oracle Application Server Web Cache in its own Oracle Home.
8.8.2.4.2 Configuring Standalone Oracle Application Server Web Cache
End-User Performance Monitoring uses data from Oracle Application Server Web Cache to gather statistics about the performance of pages within your Web applications. As a result, Enterprise Manager obtains End-User Performance Monitoring data only when Oracle Application Server Web Cache is configured to improve the performance and reliability of your Web server.
Specifically, you must perform the following Oracle Application Server Web Cache configuration tasks:
1. Change the default listening port of your HTTP Server (for example, 7777) to a new port number (for example, 7778) and restart the HTTP Server.
2. Start Oracle Application Server Web Cache and its administration tools.
3. Configure Oracle Application Server Web Cache so it receives requests on the default port previously assigned to your Web server (for example, 7777).
4. Configure Oracle Application Server Web Cache so it so it sends cache misses to your newly defined Web server default port number (for example, 7778), which is also referred to as the origin server.
5. Create an Oracle Application Server Web Cache site and map the site to your origin server.
6. Apply the changes and restart Oracle Application Server Web Cache.
7. Test the installation to be sure Oracle Application Server Web Cache and your Web server are working properly.
8.8.2.4.3 Enabling End-User Performance Monitoring for Standalone Oracle Application Server Web Cache
After you have installed and configured Oracle Application Server Web Cache and tested the configuration to be sure your Web site data is being cached, you can then enable End-User Performance Monitoring.
The procedure for enabling End-User Performance Monitoring is similar to the procedures documented earlier in this chapter. Use the Oracle Application Server Control for Web Cache 10.1.2 or Oracle Application Server Web Cache Manager for Web Cache 9.0.4 to configure End-User Performance Monitoring, and use Grid Control
See Also: Oracle Application Server Web Cache Administrator’s Guide for complete instructions for configuring Oracle Application Server Web Cache
See Also: "Specifying Listening Addresses and Ports" in the Enterprise Manager Online Help if you are using Oracle HTTP Server and managing the server with Enterprise Manager.
Oracle HTTP Server Administrator's Guide for information about modifying the httpd.conf file if you are not managing the server with Enterprise Manager.
Configuring End-User Performance Monitoring
Configuring Services 8-27
to start End-User Performance Monitoring, as described in "Starting and Stopping End-User Performance Monitoring" on page 8-28.
8.8.3 Configuring End-User Performance Monitoring for Web Page ExtensionsEnd User Performance Monitoring feature automatically recognizes all pages with extensions htm, txt, jhtml, shtml, jsp, and asp. However, additional configuration is required if a Web Application has pages with extensions that are not recognized automatically. For example, for Web Applications that have pages with .do extension, you will have to make additional configuration so that they get recognized.
To configure end-user performance monitoring for Web page extensions that are not recognized automatically, do these:
1. Access the Web Cache or HTTP Server Home Page.
2. From the Related Links section, click Monitoring Configuration.
3. To specify single page extensions, provide the following value in the property Additional Optional Properties (for EUM)
pageext <appropriate page extension
For example, if the Web page has the extension .do, then provide the following:
pageext do
To specify multiple page extensions, provide the following value:
pageext <appropriate page extension>/<appropriate page extension>
For example, if the Web pages have the extensions .do and .html, then provide the following:
pageext do/html
8.8.4 Configuring End-User Performance Monitoring for Web Pages Having the Same URI
By default, Page Performance reports the performance data for the pages identified by URLs without any query parameters. For example, if the complete URL for petstore search page is /petstore/search?cat=cats, then Page Performance reports data only for /petstore/search.
This works fine if the Web Application pages can be identified by URI uniquely without any query parameters. However, it is not possible to identify the pages if a Web Application has the same URI that is used for all pages. For example, the petstore search page URL /petsore?pageid=search and the petstore cart page URL /petsore?pageid=cart.
To configure end-user performance monitoring for Web pages that have the same URI, do these:
1. Access the Web Cache or HTTP Server Home Page.
2. From the Related Links section, click Monitoring Configuration.
3. Provide the following value in the property Page Identifying Parameters (for EUM)
<query parameter name>
Configuring End-User Performance Monitoring
8-28 Oracle Enterprise Manager Advanced Configuration
For example, if the URI for the petstore search page is /petsore?pageid=search, the specify the following:
pageid
The query parameters specified can be applicable to all URI paths, or specific to particular URI paths.
For example, if you want all URLs that have a query parameter called 'target' or 'event' to be reported with those query parameters, then specify the following:
target,event
For example, if you want the URLs that have '/em' as the path and have 'target' or 'event' to be reported with those query parameters, then specify the following:
/em:target,event
For example, if you want the URLs that have '/em' as the path to be reported, then specify the following:
/em/console:event
To show how the reported data will look like, here is an example. Consider that the following are the URLs for the application:
/portal/page?tab=home&event=login&id=12312312
/portal/page?tab=home&event=submit&id=553634
/portal/page?tab=admin&event=update&id=23423234
/portal/page?tab=admin&event=cancel&id=6784532
If you do not specify anything, then you will see one URL, that is, "/portal/page".
If you specify 'tab', then you will see two URLs, that is, "/portal/page?tab=home" and "/portal/page?tab=admin".
If you specify 'tab,event', then you will see four URLs (and EUM data for each), that is, the following:
"/portal/page?tab=home&event=login"
"/portal/page?tab=home&event=submit"
"/portal/page?tab=admin&event=update"
"/portal/page?tab=admin&event=cancel"
8.8.5 Starting and Stopping End-User Performance MonitoringAfter you have configured the Web server to enable collection, you can then start collecting end-user performance data.
1. Navigate to the Web Application home page in the Grid Control console and click Monitoring Configuration.
2. Click Manage Web Server Data Collection. Enterprise Manager displays the Manage Web Server Data Collection page.
3. In the Interval (minutes) column, enter the interval at which Enterprise Manager will collect performance data.
Configuring End-User Performance Monitoring
Configuring Services 8-29
4. Check the Collection Enabled checkbox.
5. Click Apply, review the changes and confirm by clicking Apply again. End-User Performance Monitoring collection is enabled and data will soon be uploaded to the database and shown under the Page Performance page.
To stop collecting end-user performance data:
1. Navigate to the Manage Web Server Data Collection page.
2. Clear the check box in the Collection Enabled column of the table and click Apply.
3. Click Apply again to confirm the changes.
8.8.6 Verifying and Troubleshooting End-User Performance MonitoringTo verify that End-User Performance Monitoring is working properly:
1. Wait a period of time to allow Enterprise Manager to begin collecting end-user performance data and to start loading the data into the Management Repository. Specifically, you should wait until the next upload of data from the Management Agent to the Management Service. The Management Service then loads the data into the Management Repository. For more information about how Enterprise Manager gathers and uploads to the repository, see Oracle Enterprise Manager Concepts.
2. Navigate to the Web Application home page, select a Web application and navigate to the Page Performance tab. Verify that there is data in the Slowest Response Times table.
3. Another way to verify the existence of end-user performance data, is to note the value of the Number of Unprocessed Samples. Samples for an hour that has not ended are referred to as Unprocessed Samples. For example, data is processed for the time period between 10 am to 11 am, 11 am to 12 pm and so on. Therefore, data from 10 am to 11 am will be considered as Unprocessed Samples if the 11 am boundary has not been crossed or if there is no incoming end-user traffic after 11 am. If this is a non-zero value, click Process Samples. End-user performance data is displayed in the Slowest Response Times table.
4. If you still do not see any data on the Page Performance page, consider the following troubleshooting tips:
a. Be sure you have completed all the steps required to configure End-User Performance Monitoring. Make sure that the Web server you are using to collect end-user performance data, is either OracleAS Web Cache or Oracle HTTP Server Based on Apache 2.0 (stdApache10.1.2), or Apache HTTP Server (2.0 or higher). You can see the Web server version in the Monitoring Configuration page.
b. To monitor Web pages from a third party Application Server, follow the instructions for installing an Apache 2.0 server with the Application Server.
c. Install End-User Performance Monitoring after installing the plug-in for the Application Server.
– When using the Apache Configuration page, log in using the same account used to install Apache.
– If the Apache server is running on a port less than 1024, the server must be started as root. Apache can be started as root with a lower privileged account by changing ownership of bin/httpd to root and setting its

Configuring End-User Performance Monitoring
8-30 Oracle Enterprise Manager Advanced Configuration
setuid flag. When Apache is started as root, the 'User' and 'Group' directives in httpd.conf need to be set to the user who installed the Apache server.
– If your Web site uses IFrames and End-User Monitoring is not working on those pages, you will need to switch to the newer JavaScript version with IFrame support. In the <apache root>/conf/eum.conf file, follow the directions for enabling IFrame support.
d. Be sure there is enough activity on your site. If no user is visiting and using your Web application, there may be no end-user performance data to collect or to upload to the Management Repository.
e. Be sure you have waited long enough for the Management Agent on the Web server host to upload data to the repository. Check the Management Agent home page to determine the last time the Management Agent successfully uploaded data to the Management Repository.
f. Check the html source of the URLs that you wanted to monitor: make sure the tag <SCRIPT SRC="/oracle_smp_chronos/oracle_smp_chronos.js"></SCRIPT> has been appended to the HTML source of these URLs.
– If it is present, proceed to the next step.
– If it is not present, check the configuration of your OracleAS Web Cache, Oracle HTTP Server, or Apache HTTP Server. Make sure that all configurations are correct, the site has been enabled, and the Web server has been successfully restarted after saving any configuration changes.
g. Go to the OracleAS Web Cache or Apache server target home page, click Monitoring Configuration, and check if the log file in the defined Log file directory contains any recent data.
– If it does not have data, go to the next step.
– If the log file does contain data and the Web server is OracleAS Web Cache, login to Oracle Application Server Control or Web Cache Manager and make sure that the access log is in WCLF or End-User Performance Monitoring format.
h. Verify that the OracleAS Web Cache / Apache server Monitoring Configuration properties that specify the location and name of the log file are accurate.
i. Check the Web Server target Home page for any collection errors. Often, the collection error will provide information describing why performance data cannot be collected.
j. Navigate to the All Metrics page for the Web server target and check to be sure the APM Mining Performance Details metrics are being collected successfully.
Note: Only pages with a Content-Type header of text or HTML will be monitored. Pages that pass through the Apache Server with a Content-Encoding header (like gzip) will not be monitored because the JavaScript tag cannot be added to these pages.
Managing Forms Applications
Configuring Services 8-31
8.8.7 Enabling End-User Performance Monitoring for Third-Party Application ServersFor enabling End-User Performance Monitoring for third-party application servers like IBM WebSphere Application Server, BEA WebLogic Managed Server, and JBoss Application Server, after you configure one of the Web servers as explained in this chapter, you have to enable the Application Server Diagnostics Pack for the Web applications hosted on these servers.
To do so, perform the following steps:
1. Click Setup on the top-right corner of the Grid Control console and navigate to the Overview of Setup page.
2. Click Management Pack Access from the panel to the left.
3. On the Management Pack Access page, select the All Targets option in the View Options section of this page.
4. Select Web Application from the Search menu, and click Go. The table lists all the Web applications monitored.
5. For the Web application for which you want to enable End-User Performance Monitoring, check Application Server Diagnostics Pack and Pack Access Agreed, and then click Apply.
6. Now return to the Web Application Home Page and click Page Performance to see the end-user performance monitoring data that has been collected.
8.9 Managing Forms ApplicationsA Forms Application target in Enterprise Manager can be used to model and monitor a specific Forms application. To use a Forms Application target, you must ensure that the following prerequisites are met:
■ Install the Management Agent on the hosts on which the components of your Forms Application have been installed.
Note: End-User Performance Monitoring for a Web application is not supported if the J2EE container hosting that application is SSL enabled. This applies to Oracle J2EE containers, that is OC4J, and any non-Oracle J2EE containers for third-party application servers like BEA WebLogic Managed Server, IBM WebSphere Application Server, or JBoss Application Server. To activate End-User Performance Monitoring for such a Web application, disable SSL for that J2EE container.
For information about configuring SSL for Oracle Application Servers, refer to the Security Guide for your Oracle Application Server release. Documentation for all the Oracle Application releases is available from the Oracle Technology Network: http://www.oracle.com/technology/documentation/index.html.
For information about configuring SSL for third-party servers, refer to your third-party documentation.
Note: The following 3 steps are required for pre 10.2.0.5 versions only.
Managing Forms Applications
8-32 Oracle Enterprise Manager Advanced Configuration
■ Verify that all the components for your Forms Application has been discovered so that they can be listed as Enterprise Manager targets.
■ Create a system that contains all the components that are required for the Forms Application that is to be monitored. The system can contain an Oracle HTTP Server, Apache HTTP Server or an OracleAS Web Cache. For more details on creating a system, refer to Setting up the System.
■ You can create a Forms Application target using the Create Service Wizard. See Creating a Service for details. Before you create a service, you must be familiar with the concepts of service management as described in the Oracle Enterprise Manager Concepts.
After you have set up the Forms Application target, you can use it to do the following:
■ Record and monitor a Forms transaction. See Recording and Monitoring Forms Transactions for details.
■ Measure the End-User Performance of Forms actions such as Commit, Query, Runform, Callform, Openform, and Newform. See Monitoring the End-User Performance of Forms Applications for details.
8.9.1 Recording and Monitoring Forms TransactionsA Forms transaction consists of a set of user actions within a single application when using Forms. For example, an Update Employee Salary transaction may consist of several user actions like open salary form, update salary form, and save salary form. You can record multiple Forms transactions by using the intuitive playback recorder that automatically records a series of Forms actions.
Before recording a Forms transaction, you must do the following:
■ Set the permissions of the .java.policy file on each Windows client. See Setting the Permissions of the .java.policy File on page 8-32. (pre-10.2.0.5)
■ Ensure that a trusted Enterprise Manager certificate is used. See Using a Trusted Enterprise Manager Certificate on page 8-33.
■ Add a certificate to the Enterprise Manager Agent to play back secure Forms transactions. See Adding a Forms Certificate to the Enterprise Manager Agent on page 8-34.
■ Configure the Forms server so that Forms transactions can be recorded. See Configuring the Forms Server on page 8-35. (This step is required for pre 10.2.0.5.0 versions only)
After you have performed these steps, you can install the transaction recorder to record and play back the Forms transaction. See Installing the Transaction Recorder to Record and Play Back Forms Transactions on page 8-35.
8.9.1.1 Setting the Permissions of the .java.policy File You must set the permissions of the .java.policy file on each Windows client on which the Forms transaction is being recorded. To set the permissions, follow these steps:
1. Ensure that the .java.policy file is present under the user home directory. If the .java.policy file does not exist, you must create one as follows:
Note: The following step is required for the 10.2.0.5 version only.
Managing Forms Applications
Configuring Services 8-33
■ Create a java.policy (without the ".") file.
■ Click Start and Run from your Windows desktop.
■ Type cmd and click OK.
■ At the DOS prompt, rename the file as follows:
move java.policy .java.policy
2. Create the .java.policy file. If you are using the 10.2.0.5 version, follow the instructions listed in step 2 below. For all other versions, follow the instructions listed in step 1.
1. Set the permissions for each Forms server or Oracle Applications server as follows:
grant codeBase "URL" { permission java.security.SecurityPermission "putProviderProperty.SunJSSE";};
where URL needs to be replaced with the code source location of the Forms applet. By specifying the codeBase, you grant permissions to the code present in that location. For example, for an out-of-box Forms installation, you must specify the codeBase as follows:
http://formsServerHost:port/forms/java/*
where formsServerHost and port must be replaced with the host name and port number of the Forms server.
For Oracle Applications, you must specify the codeBase as follows:
http://appsHost:appsPort/OA_JAVA/oracle/apps/fnd/jar/*
where appsHost and appsPort must be replaced with the host name and port number of the Oracle Applications.
2. Set the permissions for the Recorder as follows:
grant codeBase "<full_em_url>/console/formsapp/lib/formsRecorder.jar" { permission java.security.AllPermission; };
where the full_em_URL is the Enterprise Manager base URL. For example - https://host1.mycompany.com:7768/em
8.9.1.2 Using a Trusted Enterprise Manager CertificateIf you are using secure Enterprise Manager to record a Forms transaction running on Oracle Jinitiator or a Java plug-in, you must ensure that the Enterprise Manager certificate is trusted by Oracle Jinitiator and JPI. For Oracle Jinitiator, you must append the Enterprise Manager certificate to Jinitiator’s certdb.txt file. For the Java Plug-in, you must set the certificate as trusted by JPI.
To ensure that the Enterprise Manager certificate is trusted by Jinitiator and JPI, follow these steps:
1. Export the Enterprise Manager certificate to a file.
– When you launch secure Enterprise Manager, if Enterprise Manager is using a self generated certificate, you may see a "Certificate Error". Double click on the error and click View Certificates. The Certificate window is displayed.
Managing Forms Applications
8-34 Oracle Enterprise Manager Advanced Configuration
– Click the Details tab and then click Copy to file... to export the certificate to a file. The Certificate Export Wizard is displayed.
– Click Next in the Welcome page.
– In the Export File Format page, select Base-64 encoded X.509(.CER) and click Next.
– Click Browse to select the name and the location of the file to which the certificate is to be saved.
– Click Finish. The certificate has now been exported to a file.
2. After the certificate has been exported, you must set the certificate as trusted by Jinitiator or JPI.
For Forms applications running on Oracle Jinitiator:
– Open certdb.txt under [Jinitiator InstallRoot]\lib\security\ directory. Usually Jinitiator is installed under C:\ProgramFiles\Oracle\Jinitiator [version]).
– Use a text editor to open the file to which the certificate has been exported. Copy the contents and append it to certdb.txt.
For Forms applications running on Java plug-in:
– In the Control Panel, double click the Java program that is used to run the Forms application.
– Click the Security tab and then click Certificates.
– From the Certificate Type drop down list, select Secure Site.
– Click Import to import the file to the location in which the Enterprise Manager certificate has been saved.
– Close the certificate windows and the Java Control Panel.
3. Close the browser window. When the Forms application is accessed again, Jinitiator or JPI is restarted. This ensures that the changes to the security settings have been saved.
8.9.1.3 Adding a Forms Certificate to the Enterprise Manager AgentTo play back a secure Forms transaction, you must add a Forms certificate to the Enterprise Manager Agent by following these steps:
1. Stop the Management Agent by entering the emctl stop agent command.
2. Create an importable certificate file from the forms server certificate (Base64 encoded X.509 format) and name this file as forms.cer.
3. Copy the forms.cer to %AGENT_HOME%/jdk/jre/lib/security/ directory.
4. Run keytool with the following parameters (the keytool executable can be found under the jdk/jre/bin directory)
keytool -import -alias forms -file %AGENT_HOME%/jdk/jre/lib/security/forms.cer -keystore AGENT_HOME%/jdk/jre/lib/security/cacerts
5. You will be prompted for the cacerts password. Enter changeit as the password.
6. Start the Management Agent by entering the emctl start agent command.
For Forms6i, you need to follow these steps:
Managing Forms Applications
Configuring Services 8-35
1. Stop the Management Agent by entering the emctl stop agent command.
2. Obtain forms server certificate in Base64 encoded X.509 format and append to $AGENT_HOME/sysman/config/b64InternetCertificate.txt file.
3. Start the agent by entering the emctl start agent command.
8.9.1.4 Configuring the Forms ServerBefore recording a Forms transaction, you must configure the Forms server by following these steps:
1. Create a system based Forms Application target that contains Forms, OracleAS Web Cache or Oracle HTTP Server / Apache HTTP Server targets. These targets must be a part of the system of the Forms Application. They must also be key components of your Forms Application or part of a key Redundancy Group. If you are using the Oracle HTTP Server, the Redundancy Group is referred to as the HTTP Server HA Group.
2. Set up the Forms server for recording transactions:
1. Navigate to the Forms Application Home page in the Grid Control console and click Monitoring Configuration.
2. Click Enable Forms Transaction Monitoring.
The Enable Forms Transaction Monitoring page is displayed.
3. Select a Forms server from the list and click Configure.
The Configure Forms Server: Login page is displayed.
4. Enter the login credentials of the host on which Forms server is installed and click Continue.
The jar files required for Forms Transaction Monitoring (formsRecorder.jar, jsse.jar, jnet.jar, and jcert.jar) are copied into the Forms applet’s archive directory (ORACLE_HOME/forms/java) and a confirmation message is displayed.
For Oracle Applications, the archive directory is located at $JAVA_TOP/oracle/apps/fnd/jar.
5. Click Yes to configure the Forms server and return to the Enable Forms Transaction Monitoring page.
After you have configured the system-based Forms Application target, you can record and play back Forms transactions to monitor the availability of the Forms application. To do so, navigate to the Monitoring Configuration page and click Availability Definition. In this page, change the Availability Definition to Service Test.
8.9.1.5 Installing the Transaction Recorder to Record and Play Back Forms TransactionsAfter you have configured the Forms server, you can install the transaction recorder on your computer. The transaction recorder is downloaded from the Enterprise Manager Grid Control server the first time you access the Record Forms Transaction
Note: The following steps are applicable for pre 10.2.0.5 versions only.

Managing Forms Applications
8-36 Oracle Enterprise Manager Advanced Configuration
page. The transaction recorder requires some Microsoft libraries to be installed in your computer. Make sure that your computer has access to the Internet to download these files. If these libraries are not present during installation, they are automatically downloaded and installed from the Microsoft site. After you have recorded a Forms transaction, if you need to record another one in the same browser, you must use the same JVM version for the new transaction.
You can record multiple Forms transactions on the Forms Application target and monitor these transactions periodically. Before recording a Forms transaction, ensure that all other Forms applications are closed. When you a record a Forms transaction, make sure that the following parameters are specified correctly:
■ Login URL: If you selected the Login Type as Single Sign-On (SSO) or Oracle Applications Login, the Login URL must be explicitly specified.
■ Connection Type: This can be:
– Socket: Ensure that the Forms server host name and port number are specified correctly.
– HTTP / HTTPS: If the Connection Type is HTTPS and a non-standard certificate is being used, you must import the certificate into the Agent Home directory.
■ Forms Path: This is an optional parameter and points to the absolute path of the forms files (.fmx) on the Forms server. To find the absolute path, launch the Forms Application and view the source HTML file of the Forms launcher window. The path is stored in a variable called xmodule. Example: The path may be stored as /myvol/oracle01/apps/apps_st/appl/fnd/12.0.0/forms/US/.
For more details on recording a Forms transaction and metrics collected, refer to the Enterprise Manager Online Help.
8.9.2 Monitoring the End-User Performance of Forms ApplicationsThe End-User Performance Monitoring utility allows you to measure the response time of your applications by viewing information about how quickly the responses are delivered to the end users. When you access a Forms application, the End-User Performance Monitoring utility measures the response time of Forms actions such as Commit, Query, Runform, Callform, Newform, and Openform.
You can monitor the Forms actions and view reports based on the response times experienced by the user. You can also define a Watch List of the most important Forms actions to monitor and view the response metrics of these critical operations at a glance.
Before you can begin monitoring the End-User Performance of a Forms Application, you must configure the Forms and Web server to enable data collection for End-User
Note: This parameter is required only if the Forms transaction has been recorded on one Forms server and played back against a different Forms server with a different installation path.
Note: End-User Performance Monitoring is supported with Forms server version 6i Patch 16, 10g R2. For version 6i Patch 16, only the Commit operation can be monitored.
Managing Forms Applications
Configuring Services 8-37
Performance Monitoring. To configure the Forms Application for End-User Performance Monitoring, follow these steps:
■ Configure the Forms server to enable End-User Performance Monitoring.
■ Configure the Web server (OracleAS Web Cache or Oracle HTTP Server / Apache HTTP Server) so that it can be used for End-User Performance Monitoring.
■ Enable the collection of end-user performance data.
8.9.2.1 Configuring the Forms Server for End-User Performance Monitoring Before you can enable the collection of end-user performance data, you must first configure the Forms server. To configure the Forms server, follow these steps:
1. Navigate to the Forms Application Home page in Enterprise Manager Grid Control.
2. Click Monitoring Configuration.
3. Click Manage Web Server Data Collection.
4. On the Manage Web Server Data Collection page, select the Forms server and click Configure. The Configure Forms Server for End-User Performance Monitoring: Login page is displayed.
5. Enter the host login credentials and click Continue. The Configure Forms for End-User Performance Monitoring: Configuration Sections page is displayed.
6. Select a section and check the Enable Monitoring checkbox to enable End-User Performance Monitoring on that section. Click Enable All or Disable All to enable or disable all the sections. You can also click Add New Section to add a section without affecting existing sections. After adding the section, you can enable End-User Performance Monitoring by selecting the checkbox. You can also delete a section that you have added.
7. Set the value of the End-User Performance Monitoring URL column to http://<hostname:portnumber>/oracle_smp_chronos/oracle_smp_chronos_sdk.gif. The hostname and port number are for the Web Server that is serving the Forms application.
8. After you have configured the Forms server, click OK to save the changes and return to the Manage Web Server Data Collection page.
8.9.2.2 Configuring the OracleAS Web CacheYou can use the 10.1.2 or 9.0.4 versions of OracleAS Web Cache to collect end-user performance data.
■ OracleAS Web Cache 10.1.2: To configure OracleAS Web Cache 10.1.2, follow these instructions:
1. You can configure OracleAS Web Cache by using the Oracle Application Server Control. Navigate to the Forms Application home page in the Enterprise Manager Grid Control.
Tip: A section is a parameter defined in the formsweb.cfg. It specifies which section of Forms configuration the user wants to run. The section usually includes the application name and other relevant parameters which are required for successful execution of the application.
Managing Forms Applications
8-38 Oracle Enterprise Manager Advanced Configuration
2. Click Monitoring Configuration.
3. Click Manage Web Server Data Collection.
4. On the Manage Web Server Data Collection page, select the Web Cache target and click Configure. The Application Server Control login dialog box is displayed.
If Application Server Control is not available, you can also use the Oracle Application Server Web Cache Manager to configure the OracleAS Web Cache for End-User Performance Monitoring. For more information about starting and using Oracle Application Server Web Cache Manager, refer to the Oracle Application Server Web Cache Administrator's Guide.
5. Enter the username and password for the Web Cache administrator account or the ias_admin account. The password for the ias_admin account is defined during the installation of Oracle Application Server.
After you have logged into Oracle Application Server Control, you can configure OracleAS Web Cache from the Set Up End-User Performance Monitoring page.
6. Select the Access Log Format as access log:WCLF for each site from the drop down list. If this format is not in the list, click Use Required Log Format.
7. You will return to the Web Cache Administration page in Oracle Application Server Control. Click Restart to restart the Web Cache. For more detailed information about configuring these options, refer to the Enterprise Manager Online Help.
8. Close the Oracle Application Server Control browser window and return to the Manage Web Server Data Collection page in the Enterprise Manager Grid Control.
■ OracleAS Web Cache 9.0.4: To configure OracleAS Web Cache 9.0.4, follow these instructions:
1. You can configure OracleAS Web Cache by using the Oracle Application Server Web Cache Manager. Navigate to the Forms Application home page in the Enterprise Manager Grid Control.
2. Click Monitoring Configuration.
3. Click Manage Web Server Data Collection.
4. On the Manage Web Server Data Collection page, select the Web Cache target and click Configure. A login dialog box is displayed.
Tip: If the login dialog box does not appear or if you receive an error message in your browser window, navigate to the Web Cache Home page and click Administer under the Related Links. You will be prompted for the user name and password for Application Server Control. Click Administration, scroll down and click End-User Performance Monitoring.
Tip: If the login dialog box does not appear or if you receive an error message in your browser window, navigate to the Web Cache Home page and click Administer under the Related Links. You will be prompted for the user name and password for Application Server Control. Click Administration, scroll down and click End-User Performance Monitoring.
Managing Forms Applications
Configuring Services 8-39
5. Enter the username and password for the Web Cache administrator account. The first time you log in to the Oracle Application Server Web Cache administrator account, the password is administrator.
6. Configure Oracle Application Server Web Cache to use the Web Cache Log Format (WCLF):
– Select Logging and Diagnostics and then select Access Logs in the OracleASWeb Cache Manager navigator frame.
– In the Cache-Specific Access Log Configuration table, click Edit Selected and enable the access log for your selected cache.
– In the Site-Specific Access Log Configuration table, make sure that the Format style of the selected Site Name is WCLF and that it is enabled.
For more details on changing the access_log format, refer to the Enterprise Manager Online Help.
7. Click Apply Changes at the top of the Oracle Application Server Web Cache Manager window and restart Oracle Application Server Web Cache by clicking Restart on the Oracle Application Server Web Cache Manager Cache Operations page.
8. Close the Oracle Application Server Web Cache Manager window and return to the Manage Web Server Data Collection page in the Grid Control console. You can now enable the collection of end-user performance data.
8.9.2.3 Configuring the Oracle HTTP Server / Apache HTTP ServerYou can collect end-user performance data by using Oracle HTTP Server or Apache HTTP Server. Before you use these server, follow these steps:
1. On the Agent Home page, select the Oracle HTTP Server or Apache HTTP Server target type. If you are using a generic third party Apache server, select a Apache HTTP Server target.
2. Add the target of the corresponding type and make sure that the Log file directory and Log file name properties are set in the Monitoring Configuration page.
The Log file directory and Log file name you specify here will be used by the End-User Performance Mining Engine to upload end-user performance data.
3. Create a system target and a Forms Application target. Add the Oracle HTTP Server or Apache HTTP Server target to the system target, and make it a key component of the Forms Application target or a part of a key Redundancy Group target. If you are using Oracle HTTP Server, the Redundancy Group is referred to as HTTP Server HA Group.
Note: If the Oracle HTTP Server is installed before the Management Agent has been installed, and is up and running during agent installation, then the target will be discovered automatically. Otherwise you need to manually create the Oracle HTTP Server target and specify the following properties: Machine name, Port number, Version of the Apache Server, Oracle home path, Log file directory (for EUM), Log file name (for EUM) where EUM refers to End-UserPerformance Monitoring.
Managing Forms Applications
8-40 Oracle Enterprise Manager Advanced Configuration
4. Navigate to the Monitoring Configuration page for the Forms Application target that contains the Oracle HTTP Server or Apache HTTP Server target. Click Manage Web Server Data Collection. You will see a table which lists the Web Servers including Oracle HTTP Server, Apache HTTP Server, or OracleAS Web Cache.
5. Select the Oracle HTTP Server or Apache HTTP Server from the table and click Configure. Enter the username and password for the host on which the Oracle HTTP Server or Apache HTTP server is installed.
6. After logging in, you will see a table containing the list of sites that are being hosted by the Apache server. These include a list of virtual hosts defined by the user in the Apache Configuration file. The up and the down arrows under the Monitoring Status column shows the corresponding site is currently being monitored. For each site, check or uncheck the Enable Monitoring checkbox to indicate whether this site is to be monitored. For the site that is to be monitored, enter the log file name in the text box to indicate the location in which the end-user performance data is to be stored. By default, the log file will be created under the logs/directory under Apache root directory. To save the log file in a different directory, enter a file name with the absolute path.
7. Make sure that the log file name you specify here matches the Log file directory and Log file name in Monitoring Configuration page of the Oracle HTTP Server or Apache HTTP Server target.
8. You can also use the one button accelerator to enable all sites or disable all sites all at once.
9. After you have made the configuration changes, click OK to go to the Apache Restart page. Restarting the Apache server will finalize all configuration changes, and end-user performance data will be logged by the Apache server.
10. After you have configured the Web server, you must configure the Forms server and enable collection of the End-User Performance data from the Manage Web Server Data Collection Page. For details on configuring the Forms server, refer to the Enterprise Manager Online Help.
8.9.2.4 Starting and Stopping End-User Performance MonitoringAfter you have configured the Forms and Web server to enable collection, you can then start collecting end-user performance data.
1. Navigate to the Web Application home page in the Grid Control console and click Monitoring Configuration.
2. Click Manage Web Server Data Collection. Enterprise Manager displays the Manage Web Server Data Collection page.
3. In the Interval (minutes) column, enter the interval at which Enterprise Manager will collect performance data.
4. Check the Collection Enabled checkbox.
5. Click Apply, review the changes and confirm by clicking Apply again. End-User Performance Monitoring collection is enabled and data will soon be uploaded to the database and shown under the Page Performance page.
To stop collecting end-user performance data:
1. Navigate to the Manage Web Server Data Collection page.
2. Clear the check box in the Collection Enabled column of the table and click Apply.
Configuring OC4J for Request Performance Diagnostics
Configuring Services 8-41
3. Click Apply again to confirm the changes.
8.10 Configuring OC4J for Request Performance DiagnosticsEnterprise Manager can gather critical request performance data about your Web application and display this performance data. This feature can be instrumental when you are diagnosing application server and back-end performance issues.
Before you can begin collecting request performance data, you must do the following:
■ Create a Web application target and associate it with a system that contains the OC4J instances to be monitored.
■ Make these OC4J instances as key system components for your Web application and enable the logging and tracing capabilities. If these OC4J instances are a part of an OC4J Cluster, make sure that this OC4J Cluster is a key system component of your Web application. To enable request performance monitoring, you must configure the specific OC4J instance within the OC4J cluster.
For more information, see the following:
■ Selecting OC4J Targets for Request Performance Diagnostics
■ Configuring Interactive Transaction Tracing
■ Configuring OC4J Tracing for Request Performance Data
■ Additional Configuration for Monitoring UIX Applications
8.10.1 Selecting OC4J Targets for Request Performance DiagnosticsBefore you configure the OC4J target to collect request performance data, follow the steps given below to add the target to the Web application.
1. Configure the system where the OC4J targets are defined for the Web application target.
2. Navigate to the Web application Home page and click Monitoring Configuration.
3. Click System Configuration. From the list of system components displayed on this page, select one or more OC4J targets and select the checkbox in the Key Components column. The OC4J targets can now be configured and used to collect request performance data.
8.10.2 Configuring Interactive Transaction TracingWhen you use transactions to monitor your Web application, some of the transactions you create often involve application components such as servlets, Java Server Pages (JSPs), Enterprise Java Beans (EJBs), and database connections. Often, the best way to solve a performance problem is to trace these more complex transactions and analyze the time spent processing each application component.
Enterprise Manager provides a mechanism for tracing these transactions. Use the Service Tests and Beacons link on the Monitoring Configuration page of the Web application target to create your transactions and to trace the transactions as they are processed by the servlets, JSPs, EJBs, or database connections of your application.
However, before you can take advantage of transaction tracing, you must first enable tracing for the OC4J instance used to deploy the application. Each OC4J instance of an OC4J cluster must be configured independently. The OC4J instances of the OC4J
Configuring OC4J for Request Performance Diagnostics
8-42 Oracle Enterprise Manager Advanced Configuration
clusters selected as key components of the Web application target are displayed on the Manage Web Server Data Collection page.
To enable tracing for an OC4J instance:
1. Navigate to the Web Application Home page and click Monitoring Configuration.
2. Click Manage OC4J Data Collection.
Enterprise Manager displays the Manage OC4J Data Collection page.
3. Select the OC4J to configure and click Enable Logging.
Enterprise Manager opens another browser window and displays the Tracing Properties page for the OC4J instance in the Application Server Control.
If you are prompted to log in to the Application Server Control Console, enter the credentials for the ias_admin administrator’s account.
4. Select the following options on the Tracing Properties page:
■ Enable JDBC/SQL Performance Details
■ Enable Interactive Trace
You can use the default values for most of the tracing properties.
5. Click Apply.
If this is the first time you are enabling OC4J tracing for this application server, Enterprise Manager displays a message stating that the transtrace application is being deployed. The Application Server Control then prompts you to restart the OC4J instance.
6. Click Yes to restart the instance and enable the tracing properties.
7. Return to the Grid Control console.
Tracing is now enabled for the selected OC4J instance.
8.10.3 Configuring OC4J Tracing for Request Performance DataYou must configure OC4J instances to enable tracing so that request performance data can be collected. Each OC4J instance of an OC4J cluster must be configured independently. The OC4J instances of the OC4J clusters selected as key components of the Web application target are displayed on the Manage Web Server Data Collection page. To configure the OC4 instances, follow these steps:
1. Navigate to the Web Application home page and click Monitoring Configuration.
2. Click Manage OC4J Data Collection.
Enterprise Manager displays the Manage OC4J Data Collection page.
3. For the OC4J instance that you used to deploy your application, select the check box in the Collection Enabled column.
4. In the Interval (minutes) column, enter the interval at which to collect OC4J tracing data.
Note: Turning on the Enable JDBC/SQL Performance Details option allows to you drilldown to actual SQL statements but this may require more resources.
Configuring OC4J for Request Performance Diagnostics
Configuring Services 8-43
The recommended interval setting is 60 minutes.
5. Select the OC4Js to configure and click Enable Logging.
Enterprise Manager opens another browser window and displays the Tracing Properties page for the OC4J instances in the Application Server Control.
If you are prompted to log in to the Application Server Control Console, enter the credentials for the ias_admin administrator’s account.
6. Select the following options on the Tracing Properties page:
■ Enable JDBC/SQL Performance Details
■ Enable Historical Trace
You can use the default values for most of the tracing properties. However, Oracle recommends that you set the Frequency to Generate Trace File (seconds) field to 3600 seconds (equivalent to 60 minutes).
7. Click Apply.
If this is the first time you are enabling OC4J tracing for this application server, Enterprise Manager displays a message stating that the transtrace application is being deployed. The Application Server Control then prompts you to restart the OC4J instance.
8. Click Yes to restart the instance and enable the tracing properties.
9. Return to the Grid Control console.
Request Performance data should begin to appear on the Request Performance page as soon as data for the OC4J instance is collected and uploaded into the Management Repository.
8.10.4 Additional Configuration for Monitoring UIX ApplicationsIf you used Oracle User Interface XML (UIX) to build your application, there is an additional configuration step you must perform before you can monitor the requests of your application.
Before you can monitor the requests of your UIX application, you must do the following:
1. Enable tracing for the OC4J instance you used to deploy your application, as described in "Configuring OC4J Tracing for Request Performance Data" on page 8-42.
2. Locate the following configuration file in the Application Server home directory where you deployed your UIX application:
$ORACLE_HOME/j2ee/OC4J_instance_name/config/oc4j.properties
For example, if you deployed your application in the OC4J instance called "home," locate the following configuration file:
Note: Modifying the value in the Trace File Directory field is not supported.
See Also: Your JDeveloper documentation for information on using UIX to develop Web applications
Setting Up Monitoring Templates
8-44 Oracle Enterprise Manager Advanced Configuration
$ORACLE_HOME/j2ee/home/config/oc4j.properties
3. Open the oc4j.properties file using your favorite text editor and add the following line to the end of the file:
oracle.dms.transtrace.dollarstrippingenabled=true
4. Save your changes and close the oc4j.properties file.
5. Restart the OC4J instance.
8.11 Setting Up Monitoring TemplatesA monitoring template for a service contains definitions of one or more service tests, as well as a list of monitoring beacons. A monitoring template can be used to create service tests on any number of service targets, and specify a list of monitoring beacons.
A monitoring template must be created from a service target. Once the template is created, the user can edit the template, create copies, or delete it. Finally, the user can apply the template to other targets, which creates the service tests on the other targets and adds the monitoring beacons.
To create a Monitoring Template, follow the steps given below:
1. Click Setup to navigate to the main Setup page in Enterprise Manager.
2. Click the Monitoring Templates link in the left panel.
3. Click Create to create a monitoring template.
4. In the target selection box, enter or select a service target and click Continue.
5. In the Monitoring Template General Page, enter the name of the template that you wish to create.
6. Click Tests to add / remove or configure service tests associated with the selected service target. Make the required changes to this page and click OK to save the template to the repository.
After you have created the Monitoring Template, use the Apply option to apply this template to a service test. You can click Edit to modify the template. For more details on these operations, refer to the Online Help.
8.11.1 Configuring Service Tests and BeaconsYou can configure the service tests and beacons associated with the template by using the options in the Tests page. A service test-based template contains the following elements:
■ Variables: A variable may occur at multiple locations in the service tests. The Variables table allows you to specify default values for all the variables. These default values will be stored in the template along with the variables. You can specify values other than the default while applying the template to a target. You can perform the following operations:
– Add a variable. The variable can consist of letters, numbers and underscores only.
– Rename a variable. When you rename a variable, all variable references in the service tests will be replaced with the new name.
Configuring Service Levels
Configuring Services 8-45
– Remove variables for properties within service tests. If you remove a non-password variable, all references to the variable in test properties will be replaced with the variable's default value
– Replace Text in test properties with a variable definition.
■ Service Tests: You can edit the test definition and define variables for various properties. You can select the tests from the original target that are to be part of the template by clicking the Add / Remove button. You can specify whether the service test is a key test and if it should be enabled. You can also click Monitoring Settings to drill down to this page and define metrics and thresholds for the service tests.
■ Beacons: Use the Add / Remove button to specify which beacons are to be included in the template. You can also specify whether each beacon is a key beacon.
Refer to the Enterprise Manager Online Help for detailed instructions on these operations.
8.12 Configuring Service LevelsA service level rule is defined as an assessment criteria used to determine service quality. It allows you to specify availability and performance criteria that your service must meet during business hours as defined in your Service Level Agreement. For example, e-mail service must be 99.99% available between 8am and 8pm, Monday through Friday.
A service level rule specifies the percentage of time a service meets the performance and availability criteria as defined in the Service Level Rule. By default, a service is expected to meet the specified criteria 85% of the time during defined business hours. You may raise or lower this percentage level according to service expectations. A service level rule is based on the following:
■ Business Hours: Time range during which the service level should be calculated as specified in your Service Level Agreement.
■ Availability: Allows you to specify when the service should be considered available. This will only affect the service level calculations and not the actual availability state displayed in the console. You can choose a service to be considered up when it is one or more of the following states:
– Up: By default the service is considered to be Up or available.
– Under Blackout: This option allows you to specify service blackout time (planned activity that renders the service as technically unavailable) as available service time.
– Unknown: This option allows you to specify time that a service is unmonitored because the Management Agent is unavailable be counted as available service time.
■ Performance Criteria: You can optionally designate poor performance of a service as a Service Level violation. For example, if your Website is up, but it takes 10 seconds to load a single page, your service may be considered unavailable.
■ Business Criteria: Business criteria are useful in determining in the health of the business processes for a particular service. You can optionally define business metrics that can affect the Service Level. A Service Level violation occurs when a critical alert is generated for a specified business metric.
Configuring Service Levels
8-46 Oracle Enterprise Manager Advanced Configuration
■ Actual Service Level: This is calculated as percentage of time during business hours that your service meets the specified availability, performance, and business criteria.
■ Expected Service Level: Denotes a minimum acceptable service level that your service must meet over any relevant evaluation period.
You can define only one service level rule for each service. The service level rule will be used to evaluate the Actual Service Level over a time period and compare it against the Expected Service Level.
8.12.1 Defining Service Level RulesWhen you create a service, the default service rule is applied to the service. However, you must edit the service level rule for each service to accurately define the assessment criteria that is appropriate for your service. To define a service level rule:
1. Click the Targets tab and Services subtab. The Services main page is displayed.
2. Click the service name link to go to the Service Home page.
3. In the Related Links section, click Edit Service Level Rule.
4. On the Edit Service Level Rule page, specify the expected service level and the actual service level and click OK. The expected service level specifies the percentage of time a service meets the performance, and availability criteria defined in the Service Level Rule. The actual service level defines the baseline criteria used to define service quality and includes business hours, availability, and performance criteria.
8.12.2 Viewing Service Level DetailsYou can view service level information directly from the either of the following:
■ Enterprise Manager Grid Control Console -From any Service Home page, you can click on the Actual Service Level to drill down to the Service Level Details page. This page displays what Actual Service Level is achieved by the service over the last 24 hours/ 7 days / 31 days, compared to the Expected Service Level. In addition, details on service violation and time of each violation are presented in both graphical and textual formats.
■ Information Publisher - Information Publisher provides an out-of-box report definition called the Services Dashboard that provides a comprehensive view of any service. From the Report Definition page, click on the Services Monitoring Dashboard report definition to generate a comprehensive view of an existing service. By default, the availability and performance status and Service Level of the service are displayed. The Information Publisher also provides service-specific report elements that allow you to create your own custom report definitions. The following report elements are available:
Note: The Business Criteria column is displayed only if one or more key business indicators are associated with the service. Refer to Oracle Enterprise Manager Integration Guide.
Note: Any Super Administrator, owner of the service, or Enterprise Manager administrator with OPERATOR_TARGET target privileges can define or update the Service Level Rule.
Troubleshooting Service Tests
Configuring Services 8-47
– Service Level Details: Displays Actual Service Level achieved over a time-period and violations that affected it.
– Service Level Summary: Displays service level violations that occurred over selected time-period for a set of services.
– Services Monitoring Dashboard: Displays status, performance, and service level information for a set of services.
– Services Status Summary: Information on one or more services’ current status, performance, and component statuses.
Refer to the Online Help for more details on the report elements.
8.13 Configuring a Service Using the Command Line InterfaceUsing the Command Line Interface, you can define service targets, templates and set up alerts. EM CLI is intended for use by enterprise or system administrators writing scripts (shell/batch file, perl, tcl, php, etc.) that provide workflow in the customer's business process. EM CLI can also be used by administrators interactively, and directly from an operating system console. Refer to Enterprise Manager Command Line Interface Guide for details.
8.14 Troubleshooting Service TestsThis section lists some of the common errors you may encounter while using the Forms and the Web Transaction test type. The following topics are covered here:
■ Verifying and Troubleshooting Forms Transactions
■ Verifying and Troubleshooting Web Transactions
8.14.1 Verifying and Troubleshooting Forms TransactionsThe section covers the following:
■ Troubleshooting Forms Transaction Playback
■ Troubleshooting Forms Transaction Recording
■ Troubleshooting End-User Performance of Forms Transactions
8.14.1.1 Troubleshooting Forms Transaction PlaybackThis section lists some of the common errors you may encounter while playing back a Forms transaction and provides suggestions to resolve these errors.
1. Problem: Connection to Forms Server is lost. Possible version mismatch between agentjars and formsjars. (This error occurs in pre 10.2.0.5 versions only.)
Possible Cause: The transaction was recorded using an out-of-the-box Forms version.
Solution: Verify the version of the Forms Application that you are running by checking the version number in the About Oracle Forms Online Help. If this version is not supported, follow the steps listed under Error Message 2.
2. Problem: Version Not Supported <forms_version> (This error occurs in pre 10.2.0.5 versions only.)
Possible Cause: The machine on which the beacon has been installed does not contain the necessary forms jar files.
Troubleshooting Service Tests
8-48 Oracle Enterprise Manager Advanced Configuration
Solution: To resolve this error, follow these steps:
1. Login to the system on which the Forms server has been installed. Locate the frmall.jar (if you are using Forms 10.1 or later) or f90all.jar (if are using Forms 9.0.4 or later) under the $FORMS_HOME/forms/java directory.
2. Login to the system on which the beacon has been deployed and copy the jar file to the $ORACLE_HOME/jlib/forms/<version>/ directory. The version you specify here should be the same as the version string in the error message. Make sure that the directory is empty before you copy over the jar file.
If you are using Oracle Applications R12 and you encounter this error, follow these steps to resolve the error:
1. Login to the system in which the Oracle Application server has been deployed. Locate the following files:
$JAVA_TOP/oracle/apps/fnd/jar/fndforms.jar$JAVA_TOP/oracle/apps/fnd/jar/fndewt.jar
2. Login to the system on which the beacon has been deployed and copy these files to the $ORACLE_HOME/jlib/forms/apps/ directory. Make sure that the directory is empty before you copy over the jar files.
3. Problem: Forms URL is not pointing to the forms servlet.
Possible Cause: When the Forms transaction was recorded, the location of the forms servlet could not be determined.
Solution: Make sure that the Forms URL Parameter is pointing to the forms servlet. It should be http://<hostname>:<port>/forms/frmservlet for Forms10g or http://<hostname>:<port>/forms/f90servlet for Forms 9i. This parameter is automatically set by the Forms Transaction Recorder. But if it has not been set, you can locate the URL by following these steps:
■ Launch the Forms application.
■ View the source HTML file in the Forms launcher window.
■ Locate the xsurl variable. The URL is stored in this variable.
4. Problem: Could not connect to <machine name>.
Possible Cause: The machine on which the beacon has been installed cannot access the Forms Application.
Solution: Make sure the machine on which the beacon has been installed can access the Forms Application and firewalls have been properly configured. Support for playing back Forms transactions through proxy server is not available in this release.
5. Problem: Invalid module path in the initial message.
Possible Cause: The transaction may have been incorrectly recorded or may be corrupt.
Solution: Try to record the transaction again.
6. Problem: Cannot connect to login server.
Note: You cannot monitor two deployments of Oracle Applications from the same beacon if different versions of Oracle Applications have been used.
Troubleshooting Service Tests
Configuring Services 8-49
Possible Cause: This error may occur due the following reasons:
■ The Login URL that you have specified may be incorrect.
■ An invalid HTTPS certificate may have been provided for the login server.
Solution:
■ Verify that the Login URL is correct.
■ If you are using HTTPS to connect to login server, make sure the certificate on the server is written for the login server machine itself. Make sure the SSL Certificate is imported into Agent and the CN of the certificate matches the host name of the login Server URL.
7. Problem: The Forms transaction fails with a time-out.
Possible Cause: The default time-out period (1 minute) may be too short.
Solution: Change the time-out period by editing the Forms transaction and modify the value of the FormsTimeout parameter in the Advanced Properties section. For example, if you set the value of the parameter as FormsTimeout=600000, the connection will be timed out after 600000 milliseconds.
8.14.1.2 Troubleshooting Forms Transaction RecordingThis section lists some troubleshooting steps that you can use when the Forms transaction cannot be recorded successfully.
1. Make sure that all your Internet Explorer instances are closed and no java runtime programs are open.
2. Start recording again with tracing enabled and open the java console. You can view any exceptions or error messages displayed on the console.
3. You should now see the text "Forms Transaction Recorder Version: <version number>" on the console. If this text is displayed, proceed to step 5. If you do not see the text, check if the formsRecorder.jar has been copied to the Forms archive directory. You can perform this check using either of the following methods: (This step is required for pre 10.2.0.5 versions only)
1. Navigate to the Forms archive directory and check if the formsRecorder.jar file is present in the directory.
2. Navigate to the Enable Forms Transaction Monitoring page, select the corresponding Forms server target and click Configure. Enter the host credentials to see if the Forms Transaction Recorder has already been configured on this Forms server. If the formsRecorder.jar is not present in the Forms archive directory, follow the steps in the Configuring the Forms Server section to configure your Forms server for transaction monitoring. After ensuring that the formsRecorder.jar is present in the archive directory of the Forms server, go back to Step 1 and try recording again.
4. If you see an exception related to the java .policy file displayed on the java console, check the file to ensure that it has the required content and is in the right location. If any errors are found, you must fix these errors and try recording again. See Setting the Permissions of the .java.policy File on page 8-32.
5. If the recording still fails, check if the Enterprise Manager Certificate has been imported to the secure site as described in Using a Trusted Enterprise Manager Certificate. If the certificate has not been imported, you must import it and try recording again. See Using a Trusted Enterprise Manager Certificate on page 8-33.
Troubleshooting Service Tests
8-50 Oracle Enterprise Manager Advanced Configuration
8.14.1.3 Troubleshooting End-User Performance of Forms TransactionsThis section lists troubleshooting steps that you can use when the Forms transaction End-user Performance Monitoring (EUM) data is not being displayed.
1. Ensure that the Forms server is configured with EUM.
From the Manage Web Server Data Collection page, select the Forms server and click Configure. Log in using the credentials of the host where the Forms server is installed. Ensure that the correct Forms configuration section has been configured with EUM enabled and that the correct EUM URL is specified. Go to the Forms application URL (with the correct configuration section) and perform "Save" or "Query" actions to generate EUM traffic.
2. Ensure that the Web server is configured to log End-User Performance Monitoring data.
From the Manage Web Server Data Collection page, select the Web server and click Configure.
If you are using a Web Cache to log EUM data, login to the Web Cache Administration page or Web Cache Manager and check if the access_log file is set to either End-User Performance Monitoring or WCLF format. End-User Performance Monitoring data is logged into Web Cache's access_log.
If you are using HTTP Server or Apache HTTP Server, log in using the credentials of the host where the HTTP Server is installed. Then check if EUM has been enabled and note the path of the log file in the configuration page.
3. Ensure that the EUM log file is being generated.
Go to the location of the End-User Performance Monitoring log file, open the log file and search for word "sdk".
"sdk" entries indicate that there is EUM traffic and that the monitoring configuration is correct. In this situation, more time is required to collect end-user performance data. If the log file exists and "sdk" entries are found, go to step 4.
4. Check the Monitoring Configuration page of the Web Cache or HTTP Server target to ensure the parameters "Log File Directory (for EUM)" and "Log File Name (for EUM)" match that of the log file path shown on the configuration page.
5. Another way to verify the existence of end-user performance data, is to note the value of the Number of Unprocessed Samples on the Page Performance page of the Forms application. Samples for an hour that has not ended are referred to as Unprocessed Samples. For example, data is processed for the time period between 10 am to 11 am, 11 am to 12 pm and so on. Therefore, data from 10 am to 11 am will be considered Unprocessed Samples if the 11 am boundary has not been crossed or if there is no incoming end-user traffic after 11 am. If this is a non-zero value, click Process Samples. End-user performance data is displayed in the Slowest Response Times table.
8.14.2 Verifying and Troubleshooting Web TransactionsThis section lists some of the common errors you may encounter while recording and playing back Web Transactions.
1. Scenario: Verify Service Test displays: Connection establishment timed out -- http://..../
Possible Cause: The beacon can only access that URL via a proxy server and it has not been configured.
Troubleshooting Service Tests
Configuring Services 8-51
Solution: From the All Targets page, select the beacon, click Configure and set the beacon proxy setting.
2. Scenario: Verify Service Test displays: Authorization Required -- https://...../
Possible Cause: The Basic Authentication information is not recorded automatically.
Solution: To resolve this error, follow these steps:
1. From the Service Tests and Beacons page, select the service test, click Edit.
2. Make sure you enter all the Basic Authentication information: Username, Password, and Realm.
3. Scenario: Verify Service Test displays sun.security.validator.ValidatorException: No trusted certificate found -- https://....../.
Possible Cause: The beacon does not know about this SSL Certificate.
Possible Solution: From the Service Tests and Beacons page, select the service test, and click Edit. Under Advanced Properties, and set Authenticate SSL Certificates to No.
4. Scenario: Verify Service Test displays: Timeout of 300000 exceeded for https://....../ Response time = 3000000
Possible Cause: The test may be too complex to complete within the allotted time. Or, this may be an actual performance issue with the server.
Possible Solution: From the Service Tests and Beacons page, select the service test, and click Edit. If this is not a server performance issue, under Advanced Properties, increase the Timeout Value.
5. Scenario: The Verify Service Test option reports that the service as down, but the Web application is up and you can successfully play back the Web transaction.
Possible Cause: The Web application is only compatible with Internet Explorer or Mozilla-based browsers.
Possible Solution: From the Service Tests and Beacons page, select the service test, and click Edit. Under Advanced Properties, set the User Agent Header as Mozilla/4.0 (compatible; MSIE 6.0; Windows NT 5.1) OracleEMAgentURLTiming/3.0.
6. Scenario: Test Performance Page does not show any step metrics.
Possible Cause: By default, only transaction-level metrics are collected.
Possible Solution: From the Service Tests and Beacons page, select the service test, click Edit, and set Data Granularity to Step.
Note: Realm usually appears above the Username label in the Browser’s authorization dialog box.
Note: For Grid Control 10.2.0.4 and beyond, this User Agent Header is set automatically during Web transaction recording.

Troubleshooting Service Tests
8-52 Oracle Enterprise Manager Advanced Configuration
Locating and Configuring Enterprise Manager Log Files 9-1
9Locating and Configuring Enterprise
Manager Log Files
When you install the Oracle Management Agent or the Oracle Management Service, Enterprise Manager automatically configures the system to save certain informational, warning, and error information to a set of log files.
Log files can help you troubleshoot potential problems with an Enterprise Manager installation. They provide detailed information about the actions performed by Enterprise Manager and whether or not any warnings or errors occurred.
This chapter not only helps you locate and review the contents of Enterprise Manager log files, but also includes instructions for configuring the log files to provide more detailed information to help in troubleshooting or to provide less detailed information to save disk space.
This chapter contains the following sections:
■ Locating and Configuring Management Agent Log and Trace Files
■ Locating and Configuring Management Service Log and Trace Files
9.1 Locating and Configuring Management Agent Log and Trace FilesThe following sections provide information on the log and trace files for the Oracle Management Agent:
■ About the Management Agent Log and Trace Files
■ Locating the Management Agent Log and Trace Files
■ About Management Agent Rollover Files
■ Controlling the Size and Number of Management Agent Log and Trace Files
■ Controlling the Size and Number of Fetchlet Log and Trace Files
■ Controlling the Contents of the Fetchlet Trace File
9.1.1 About the Management Agent Log and Trace FilesOracle Management Agent log and trace files store important information that support personnel can later use to troubleshoot problems. The Management Agent uses three types of log files:
■ The Management Agent log file (emagent.log)
The Agent saves information to the log file when the Agent performs an action (such as starting, stopping, or connecting to a Management Service) or when the
Locating and Configuring Management Agent Log and Trace Files
9-2 Oracle Enterprise Manager Advanced Configuration
Agent generates an error (for example, when the Agent cannot connect to the Management Service).
■ The Management Agent trace file (emagent.trc)
The Management Agent trace file provides an advanced method of troubleshooting that can provide support personnel with even more information about what actions the Agent was performing when a particular problem occurred.
■ The Management Agent startup log file (emagent.nohup)
The Management Agent saves information to the startup log file when there is a problem starting the agent. This file is updated by the Management Agent Watchdog Process. When the Watchdog Process finds any problems, it logs to this file.
Following are other management agent log files:
See Also: "About the Management Agent Watchdog Process" on page 13-4
Table 9–1 Log Files
Log File Description
agabend.log This log provided in 10.2.0.3 or higher contains all the Agent startup errors. Errors will be added for each failed startup to this file. The Agent watchdog mines this file, to report on an abnormal end of the Agent.
apmeum.log Log and trace information from the End-User monitoring (Chronos) scripts
e2eme.log Log file for the End-To-End tracing of OC4J
e2eme.trc Trace file for the End-To-End tracing of OC4J
emagent.log Log file used by the Agent process. Contains all informational messages in local language.
emagent.nohup Log file for the Agent watchdog. This will contain all actions the watchdog has performed.
emagent.trc Trace file used by the Agent process. Contains all the trace messages in English only.
emagent_memdump_<time>.trc
Optional trace file, generated by an ‘emctl status agent memory’ command. Contains the overview of the memory usage of the Agent at that point in time.
emagent_perl.trc Trace file for the PERL scripts. This includes the PERL metrics and the discovery
emdctl.log Agent control utility log file
emdctl.trc Agent control utility trace file
emsubagent.log SNMP sub-Agent log file
emsubagent.nohup SNMP sub-Agent log file with the STDOUT and STDERR messages.
emsubagent.trc SNMP sub-Agent trace file
nfsPatchPlug.log Log file for nfs agent during Oracle home patching.
nmei.log Log file for the ilint XML file validation.
Locating and Configuring Management Agent Log and Trace Files
Locating and Configuring Enterprise Manager Log Files 9-3
In addition, Enterprise Manager also provides a log file and a trace file for the fetchlets, which are software programs used by the Management Agent for certain data-gathering tasks:
■ emagentfetchlet.log
■ emagentfetchlet.trc
9.1.2 Locating the Management Agent Log and Trace FilesThe log/trc files for the Agent are written in the Agent runtime directory. You can find the runtime directory by using this command:
$ emctl getemhome
The log and trace files will be located at <EMHOME>/sysman/log.
9.1.3 About Management Agent Rollover FilesBoth the Management Agent log file and the Management Agent trace file are designed to increase in size over time as information is written to the files. However, they are also designed to reach a maximum size. When the files reach the predefined maximum size, the Management Agent renames (or rolls) the logging or trace information to a new file name and starts a new log or trace file. This process keeps the log files from growing too large.
To be sure you have access to important log or trace file information, the Management Agent will rollover the log and trace files four times by default. When it rolls the log or trace file over the fourth time, the Agent deletes the oldest rollover file.
As a result, you will often see a total of four log files and four trace files in the log directory. The following example shows three archived trace files and the current trace file in the AGENT_HOME/sysman/log directory:
emagent.trcemagent.trc.1emagent.trc.2emagent.trc.3
9.1.4 Controlling the Size and Number of Management Agent Log and Trace FilesYou can control how large the log file and the trace file can get before the Management Agent creates a rollover file. You can also control how many rollover files are created before the Management Agent deletes any logging or tracing data.
To control the size and number of Management Agent Log and Trace Files:
nmei.trc Log file for the ilint XML file validation.
nmo.trc Windows NT only. Trace with file additional authentication tracing is nmotracing is enabled in the emd.properties file.
secure.log Log file with all secure operations done from the Agent.
See Also: Chapter 1, "Introduction to Enterprise Manager Advanced Configuration" for information about locating the Agent home directory.
Table 9–1 (Cont.) Log Files
Log File Description
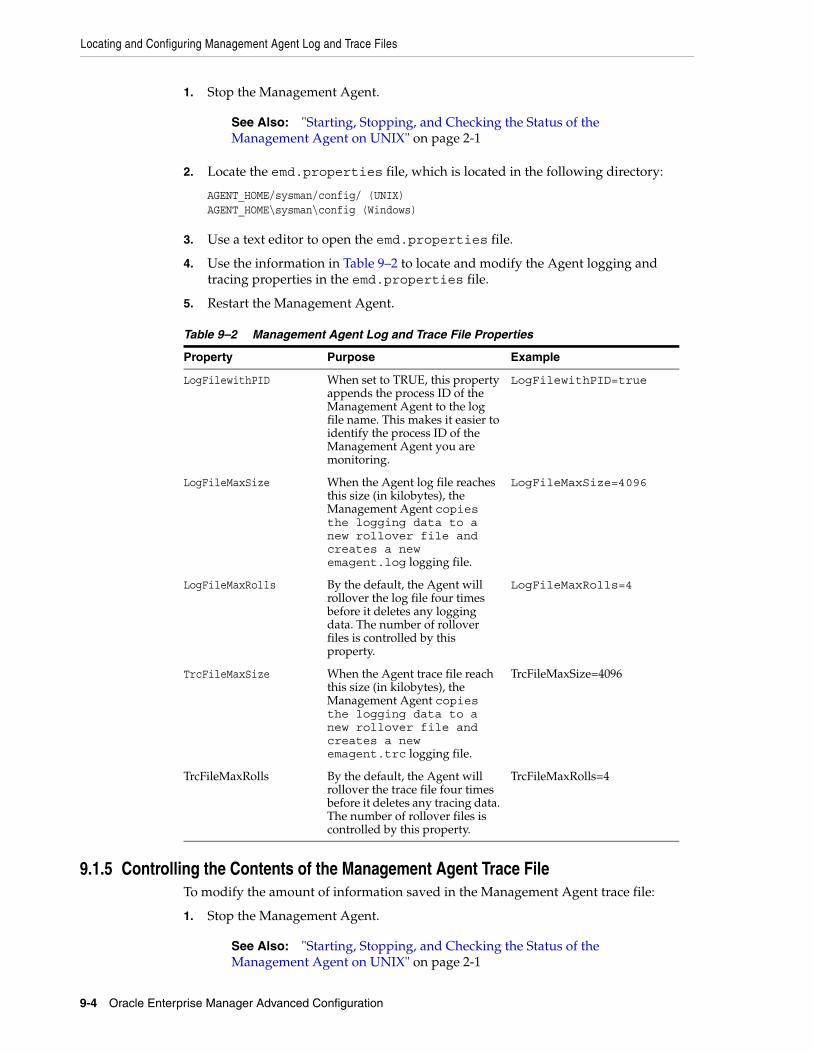
Locating and Configuring Management Agent Log and Trace Files
9-4 Oracle Enterprise Manager Advanced Configuration
1. Stop the Management Agent.
2. Locate the emd.properties file, which is located in the following directory:
AGENT_HOME/sysman/config/ (UNIX)AGENT_HOME\sysman\config (Windows)
3. Use a text editor to open the emd.properties file.
4. Use the information in Table 9–2 to locate and modify the Agent logging and tracing properties in the emd.properties file.
5. Restart the Management Agent.
9.1.5 Controlling the Contents of the Management Agent Trace FileTo modify the amount of information saved in the Management Agent trace file:
1. Stop the Management Agent.
See Also: "Starting, Stopping, and Checking the Status of the Management Agent on UNIX" on page 2-1
Table 9–2 Management Agent Log and Trace File Properties
Property Purpose Example
LogFilewithPID When set to TRUE, this property appends the process ID of the Management Agent to the log file name. This makes it easier to identify the process ID of the Management Agent you are monitoring.
LogFilewithPID=true
LogFileMaxSize When the Agent log file reaches this size (in kilobytes), the Management Agent copies the logging data to a new rollover file and creates a new emagent.log logging file.
LogFileMaxSize=4096
LogFileMaxRolls By the default, the Agent will rollover the log file four times before it deletes any logging data. The number of rollover files is controlled by this property.
LogFileMaxRolls=4
TrcFileMaxSize When the Agent trace file reach this size (in kilobytes), the Management Agent copies the logging data to a new rollover file and creates a new emagent.trc logging file.
TrcFileMaxSize=4096
TrcFileMaxRolls By the default, the Agent will rollover the trace file four times before it deletes any tracing data. The number of rollover files is controlled by this property.
TrcFileMaxRolls=4
See Also: "Starting, Stopping, and Checking the Status of the Management Agent on UNIX" on page 2-1
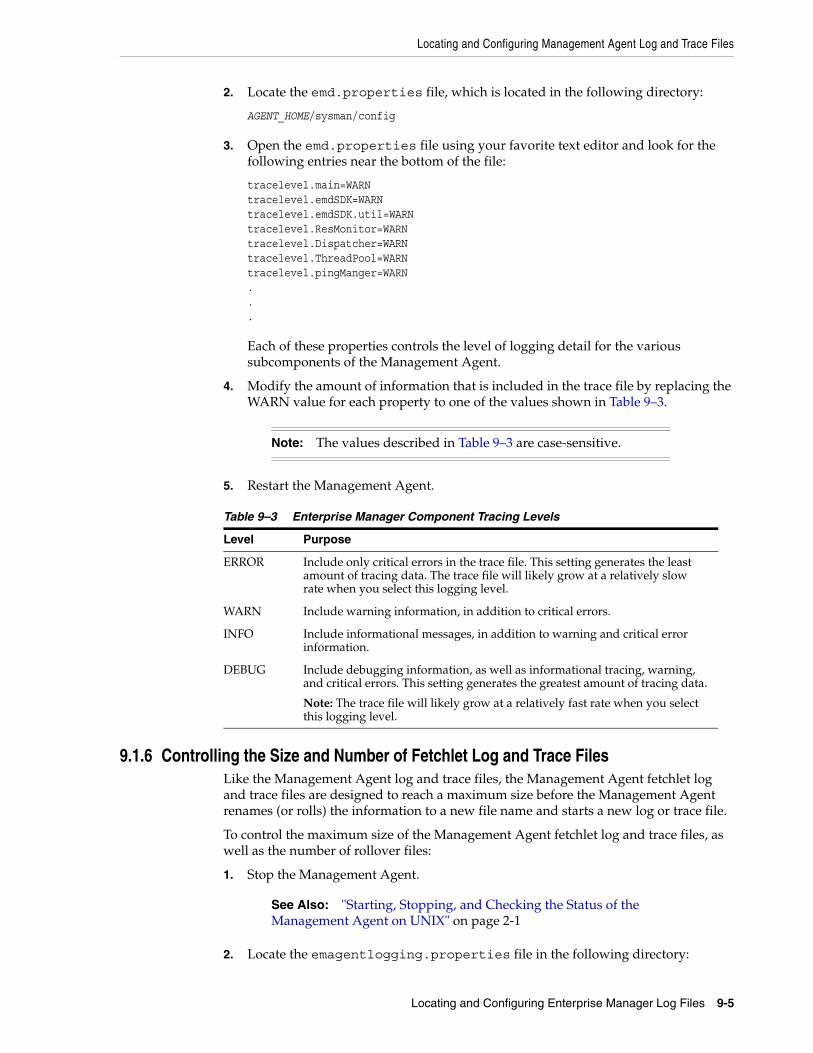
Locating and Configuring Management Agent Log and Trace Files
Locating and Configuring Enterprise Manager Log Files 9-5
2. Locate the emd.properties file, which is located in the following directory:
AGENT_HOME/sysman/config
3. Open the emd.properties file using your favorite text editor and look for the following entries near the bottom of the file:
tracelevel.main=WARNtracelevel.emdSDK=WARNtracelevel.emdSDK.util=WARNtracelevel.ResMonitor=WARNtracelevel.Dispatcher=WARNtracelevel.ThreadPool=WARNtracelevel.pingManger=WARN...
Each of these properties controls the level of logging detail for the various subcomponents of the Management Agent.
4. Modify the amount of information that is included in the trace file by replacing the WARN value for each property to one of the values shown in Table 9–3.
5. Restart the Management Agent.
9.1.6 Controlling the Size and Number of Fetchlet Log and Trace FilesLike the Management Agent log and trace files, the Management Agent fetchlet log and trace files are designed to reach a maximum size before the Management Agent renames (or rolls) the information to a new file name and starts a new log or trace file.
To control the maximum size of the Management Agent fetchlet log and trace files, as well as the number of rollover files:
1. Stop the Management Agent.
2. Locate the emagentlogging.properties file in the following directory:
Note: The values described in Table 9–3 are case-sensitive.
Table 9–3 Enterprise Manager Component Tracing Levels
Level Purpose
ERROR Include only critical errors in the trace file. This setting generates the least amount of tracing data. The trace file will likely grow at a relatively slow rate when you select this logging level.
WARN Include warning information, in addition to critical errors.
INFO Include informational messages, in addition to warning and critical error information.
DEBUG Include debugging information, as well as informational tracing, warning, and critical errors. This setting generates the greatest amount of tracing data.
Note: The trace file will likely grow at a relatively fast rate when you select this logging level.
See Also: "Starting, Stopping, and Checking the Status of the Management Agent on UNIX" on page 2-1
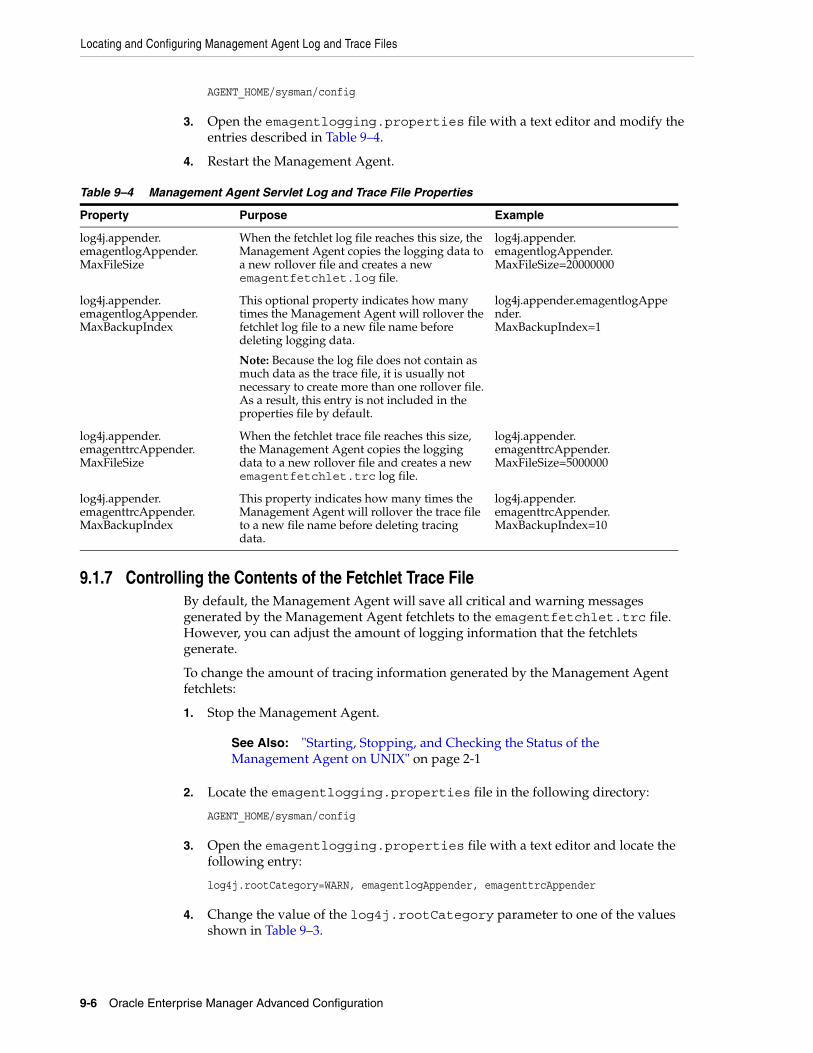
Locating and Configuring Management Agent Log and Trace Files
9-6 Oracle Enterprise Manager Advanced Configuration
AGENT_HOME/sysman/config
3. Open the emagentlogging.properties file with a text editor and modify the entries described in Table 9–4.
4. Restart the Management Agent.
9.1.7 Controlling the Contents of the Fetchlet Trace FileBy default, the Management Agent will save all critical and warning messages generated by the Management Agent fetchlets to the emagentfetchlet.trc file. However, you can adjust the amount of logging information that the fetchlets generate.
To change the amount of tracing information generated by the Management Agent fetchlets:
1. Stop the Management Agent.
2. Locate the emagentlogging.properties file in the following directory:
AGENT_HOME/sysman/config
3. Open the emagentlogging.properties file with a text editor and locate the following entry:
log4j.rootCategory=WARN, emagentlogAppender, emagenttrcAppender
4. Change the value of the log4j.rootCategory parameter to one of the values shown in Table 9–3.
Table 9–4 Management Agent Servlet Log and Trace File Properties
Property Purpose Example
log4j.appender.emagentlogAppender.MaxFileSize
When the fetchlet log file reaches this size, the Management Agent copies the logging data to a new rollover file and creates a new emagentfetchlet.log file.
log4j.appender.emagentlogAppender.MaxFileSize=20000000
log4j.appender.emagentlogAppender.MaxBackupIndex
This optional property indicates how many times the Management Agent will rollover the fetchlet log file to a new file name before deleting logging data.
Note: Because the log file does not contain as much data as the trace file, it is usually not necessary to create more than one rollover file. As a result, this entry is not included in the properties file by default.
log4j.appender.emagentlogAppender.MaxBackupIndex=1
log4j.appender.emagenttrcAppender.MaxFileSize
When the fetchlet trace file reaches this size, the Management Agent copies the logging data to a new rollover file and creates a new emagentfetchlet.trc log file.
log4j.appender.emagenttrcAppender.MaxFileSize=5000000
log4j.appender.emagenttrcAppender.MaxBackupIndex
This property indicates how many times the Management Agent will rollover the trace file to a new file name before deleting tracing data.
log4j.appender.emagenttrcAppender.MaxBackupIndex=10
See Also: "Starting, Stopping, and Checking the Status of the Management Agent on UNIX" on page 2-1

Locating and Configuring Management Service Log and Trace Files
Locating and Configuring Enterprise Manager Log Files 9-7
5. Restart the Management Agent.
9.2 Locating and Configuring Management Service Log and Trace FilesThe following sections describe how to locate and configure the Management Service log files:
■ Locating the Management Service Log and Trace Files
■ Controlling the Size and Number of Management Service Log and Trace Files
■ Controlling the Contents of the Management Service Trace File
■ Controlling the Oracle Application Server Log Files
9.2.1 About the Management Service Log and Trace FilesOracle Management Service log and trace files store important information that support personnel can later use to troubleshoot problems. The Management Service uses two types of log files:
■ The Management Service log file (emoms.log)
The Oracle Management Service saves information to the log file when the Management Service performs an action (such as starting or stopping) or when the Management Service generates an error.
■ The Management Service trace file (emoms.trc)
The Management Service trace file provides an advanced method of troubleshooting that can provide support personnel with even more information about what actions the Management Service was performing when a particular problem occurred.
9.2.2 Locating the Management Service Log and Trace FilesThe Management Service log and trace files are stored in the following directory inside the Oracle Application Server Home where the Oracle Management Service is installed and deployed:
AS_HOME/sysman/log/
9.2.3 Controlling the Size and Number of Management Service Log and Trace FilesThe Management Service log and trace files increases in size over time as information is written to the files. However, the files are designed to reach a maximum size. When the files reach the predefined maximum size, the Management Service renames (or rolls) the logging information to a new file name and starts a new log or trace file. This process keeps the log and trace files from growing too large.
As a result, you will often see multiple log and trace files in the Management Service log directory. The following example shows one archived log file and the current log file in the AS_HOME/sysman/log directory:
emoms.logemoms.log.1
Note: The the values described in Table 9–3 are case-sensitive.
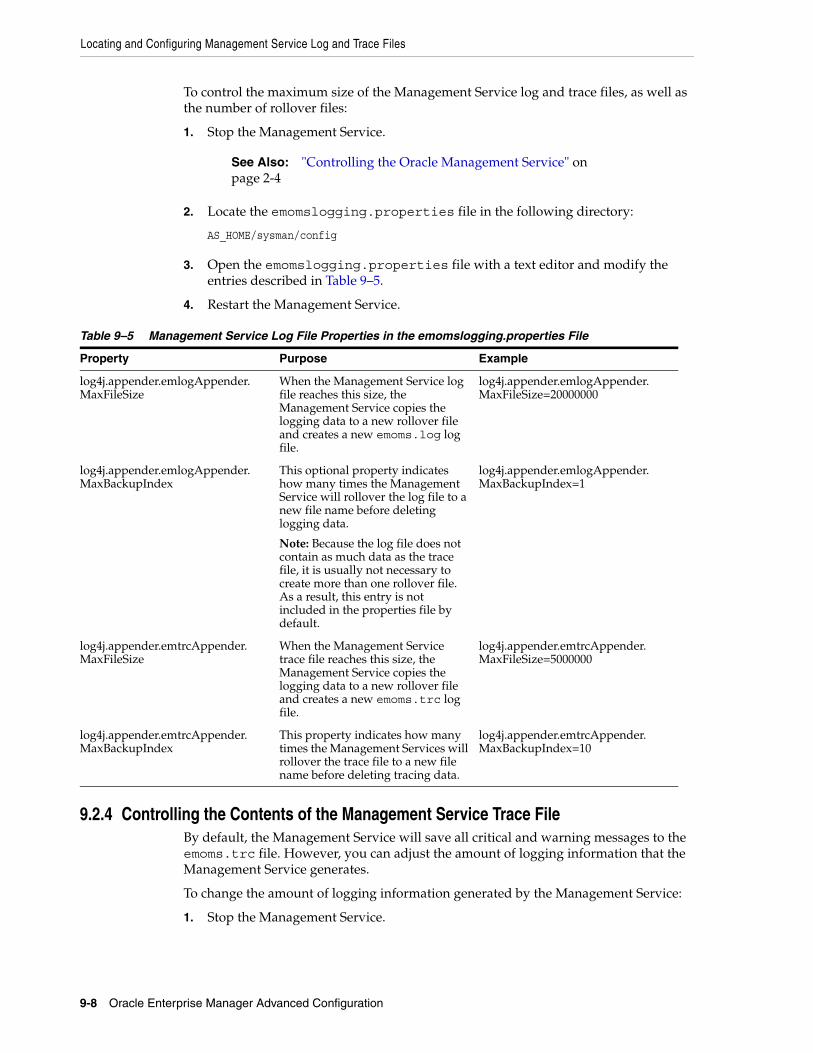
Locating and Configuring Management Service Log and Trace Files
9-8 Oracle Enterprise Manager Advanced Configuration
To control the maximum size of the Management Service log and trace files, as well as the number of rollover files:
1. Stop the Management Service.
2. Locate the emomslogging.properties file in the following directory:
AS_HOME/sysman/config
3. Open the emomslogging.properties file with a text editor and modify the entries described in Table 9–5.
4. Restart the Management Service.
9.2.4 Controlling the Contents of the Management Service Trace FileBy default, the Management Service will save all critical and warning messages to the emoms.trc file. However, you can adjust the amount of logging information that the Management Service generates.
To change the amount of logging information generated by the Management Service:
1. Stop the Management Service.
See Also: "Controlling the Oracle Management Service" on page 2-4
Table 9–5 Management Service Log File Properties in the emomslogging.properties File
Property Purpose Example
log4j.appender.emlogAppender.MaxFileSize
When the Management Service log file reaches this size, the Management Service copies the logging data to a new rollover file and creates a new emoms.log log file.
log4j.appender.emlogAppender.MaxFileSize=20000000
log4j.appender.emlogAppender.MaxBackupIndex
This optional property indicates how many times the Management Service will rollover the log file to a new file name before deleting logging data.
Note: Because the log file does not contain as much data as the trace file, it is usually not necessary to create more than one rollover file. As a result, this entry is not included in the properties file by default.
log4j.appender.emlogAppender.MaxBackupIndex=1
log4j.appender.emtrcAppender.MaxFileSize
When the Management Service trace file reaches this size, the Management Service copies the logging data to a new rollover file and creates a new emoms.trc log file.
log4j.appender.emtrcAppender.MaxFileSize=5000000
log4j.appender.emtrcAppender.MaxBackupIndex
This property indicates how many times the Management Services will rollover the trace file to a new file name before deleting tracing data.
log4j.appender.emtrcAppender.MaxBackupIndex=10
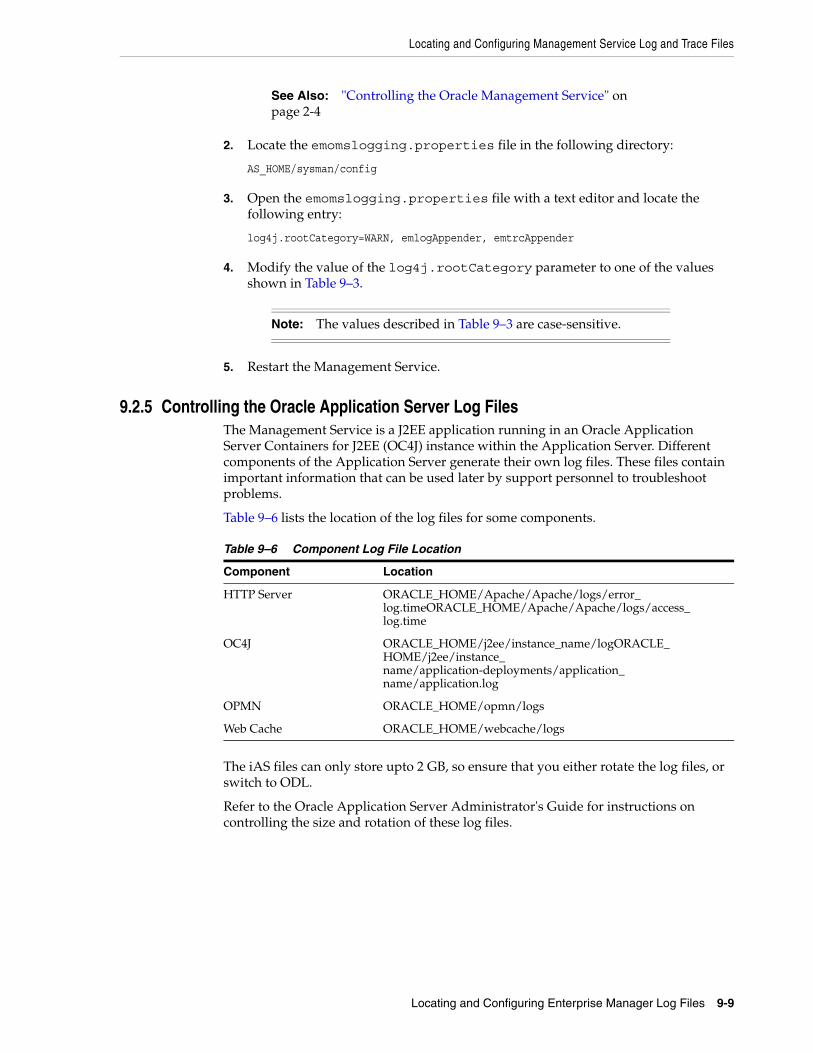
Locating and Configuring Management Service Log and Trace Files
Locating and Configuring Enterprise Manager Log Files 9-9
2. Locate the emomslogging.properties file in the following directory:
AS_HOME/sysman/config
3. Open the emomslogging.properties file with a text editor and locate the following entry:
log4j.rootCategory=WARN, emlogAppender, emtrcAppender
4. Modify the value of the log4j.rootCategory parameter to one of the values shown in Table 9–3.
5. Restart the Management Service.
9.2.5 Controlling the Oracle Application Server Log FilesThe Management Service is a J2EE application running in an Oracle Application Server Containers for J2EE (OC4J) instance within the Application Server. Different components of the Application Server generate their own log files. These files contain important information that can be used later by support personnel to troubleshoot problems.
Table 9–6 lists the location of the log files for some components.
The iAS files can only store upto 2 GB, so ensure that you either rotate the log files, or switch to ODL.
Refer to the Oracle Application Server Administrator's Guide for instructions on controlling the size and rotation of these log files.
See Also: "Controlling the Oracle Management Service" on page 2-4
Note: The values described in Table 9–3 are case-sensitive.
Table 9–6 Component Log File Location
Component Location
HTTP Server ORACLE_HOME/Apache/Apache/logs/error_log.timeORACLE_HOME/Apache/Apache/logs/access_log.time
OC4J ORACLE_HOME/j2ee/instance_name/logORACLE_HOME/j2ee/instance_name/application-deployments/application_name/application.log
OPMN ORACLE_HOME/opmn/logs
Web Cache ORACLE_HOME/webcache/logs

Locating and Configuring Management Service Log and Trace Files
9-10 Oracle Enterprise Manager Advanced Configuration
Maintaining and Troubleshooting the Management Repository 10-1
10 Maintaining and Troubleshooting the
Management Repository
This chapter describes maintenance and troubleshooting techniques for maintaining a well-performing Management Repository.
Specifically, this chapter contains the following sections:
■ Management Repository Deployment Guidelines
■ Management Repository Data Retention Policies
■ Changing the SYSMAN Password
■ Dropping and Recreating the Management Repository
■ Troubleshooting Management Repository Creation Errors
■ Cross Platform Enterprise Manager Repository Migration
■ Improving the Login Performance of the Console Home Page
10.1 Management Repository Deployment GuidelinesTo be sure that your management data is secure, reliable, and always available, consider the following settings and configuration guidelines when you are deploying the Management Repository:
■ Install a RAID-capable Logical Volume Manager (LVM) or hardware RAID on the system where the Management Repository resides. At a minimum the operating system must support disk mirroring and stripping. Configure all the Management Repository data files with some redundant configuration.
■ Use Real Application Clusters to provide the highest levels of availability for the Management Repository.
■ If you use Enterprise Manager to alert administrators of errors or availability issues in a production environment, be sure that the Grid Control components are configured with the same level of availability. At a minimum, consider using Oracle Data Guard to mirror the Management Repository database. Configure the Data Guard environment for no data loss.
See Also: Oracle Database High Availability Architecture and Best Practices
Oracle Data Guard Concepts and Administration
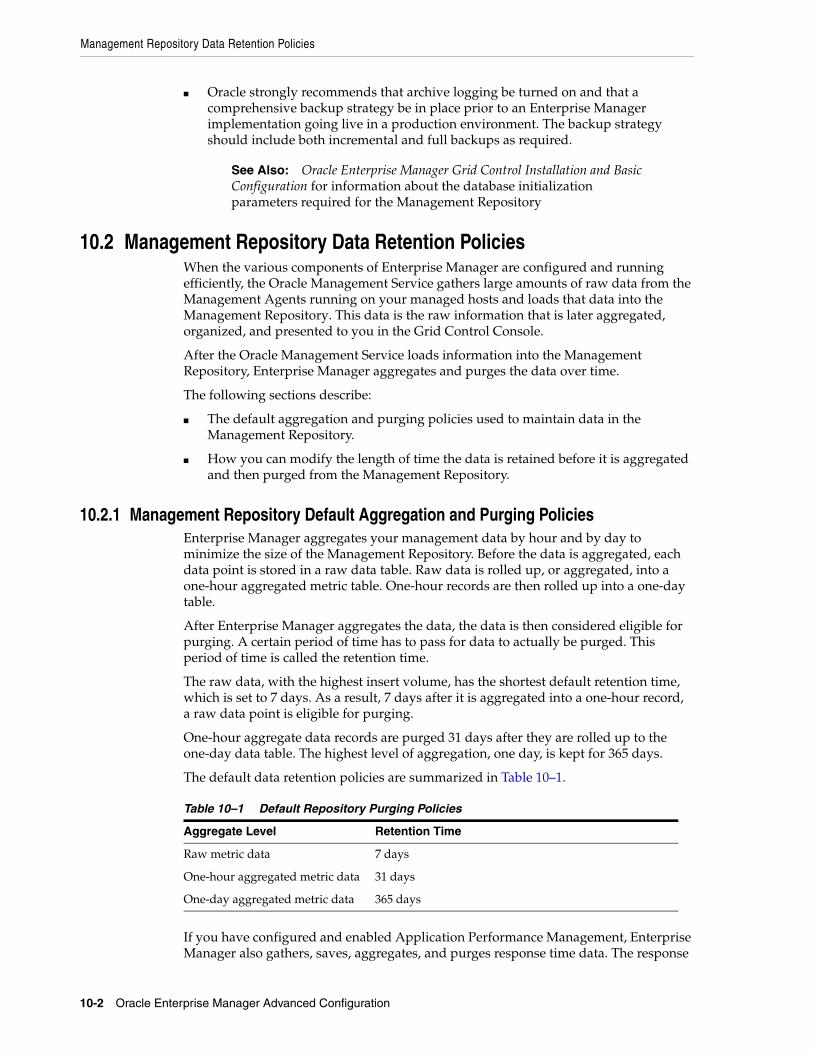
Management Repository Data Retention Policies
10-2 Oracle Enterprise Manager Advanced Configuration
■ Oracle strongly recommends that archive logging be turned on and that a comprehensive backup strategy be in place prior to an Enterprise Manager implementation going live in a production environment. The backup strategy should include both incremental and full backups as required.
10.2 Management Repository Data Retention PoliciesWhen the various components of Enterprise Manager are configured and running efficiently, the Oracle Management Service gathers large amounts of raw data from the Management Agents running on your managed hosts and loads that data into the Management Repository. This data is the raw information that is later aggregated, organized, and presented to you in the Grid Control Console.
After the Oracle Management Service loads information into the Management Repository, Enterprise Manager aggregates and purges the data over time.
The following sections describe:
■ The default aggregation and purging policies used to maintain data in the Management Repository.
■ How you can modify the length of time the data is retained before it is aggregated and then purged from the Management Repository.
10.2.1 Management Repository Default Aggregation and Purging PoliciesEnterprise Manager aggregates your management data by hour and by day to minimize the size of the Management Repository. Before the data is aggregated, each data point is stored in a raw data table. Raw data is rolled up, or aggregated, into a one-hour aggregated metric table. One-hour records are then rolled up into a one-day table.
After Enterprise Manager aggregates the data, the data is then considered eligible for purging. A certain period of time has to pass for data to actually be purged. This period of time is called the retention time.
The raw data, with the highest insert volume, has the shortest default retention time, which is set to 7 days. As a result, 7 days after it is aggregated into a one-hour record, a raw data point is eligible for purging.
One-hour aggregate data records are purged 31 days after they are rolled up to the one-day data table. The highest level of aggregation, one day, is kept for 365 days.
The default data retention policies are summarized in Table 10–1.
If you have configured and enabled Application Performance Management, Enterprise Manager also gathers, saves, aggregates, and purges response time data. The response
See Also: Oracle Enterprise Manager Grid Control Installation and Basic Configuration for information about the database initialization parameters required for the Management Repository
Table 10–1 Default Repository Purging Policies
Aggregate Level Retention Time
Raw metric data 7 days
One-hour aggregated metric data 31 days
One-day aggregated metric data 365 days

Management Repository Data Retention Policies
Maintaining and Troubleshooting the Management Repository 10-3
time data is purged using policies similar to those used for metric data. The Application Performance Management purging policies are shown in Table 10–2.
10.2.2 Management Repository Default Aggregation and Purging Policies for Other Management Data
Besides the metric data and Application Performance Monitoring data, other types of Enterprise Manager data accumulates over time in the Management Repository.
For example, the last availability record for a target will also remain in the Management Repository indefinitely, so the last known state of a target is preserved.
10.2.3 Modifying the Default Aggregation and Purging PoliciesThe Enterprise Manager default aggregation and purging policies were designed to provide the most available data for analysis while still providing the best performance and disk-space requirements for the Management Repository. As a result, you should not modify these policies to improve performance or increase your available disk space. Modifying these default policies can affect the performance of the Management Repository and have adverse reactions on the scalability of your Enterprise Manager installation.
However, if you plan to extract or review the raw or aggregated data using data analysis tools other than Enterprise Manager, you may want to increase the amount of raw or aggregated data available in the Management Repository. You can accomplish this by increasing the retention times for the raw or aggregated data.
To modify the default retention time for each level of management data in the Management Repository, you must insert additional rows into the MGMT_PARAMETERS table in the Management Repository database. Table 10–3 shows the parameters you must insert into the MGMT_PARAMETERS table to modify the retention time for each of the raw data and aggregate data tables.
Table names that contain "_RT_" indicate tables used for Application Performance Monitoring response time data. In the Table Name column, replace datatype with one of the three response time data types: DOMAIN, IP, or URL.
Table 10–2 Default Repository Purging Policies for Application Performance Management Data
Aggregate Level Retention Time
Raw response time data 24 hours
One-hour aggregated response time data
7 days
One-hour distribution response time data
24 hours
One-day aggregated response time data
31 days
One-day distribution aggregated response time data
31 days
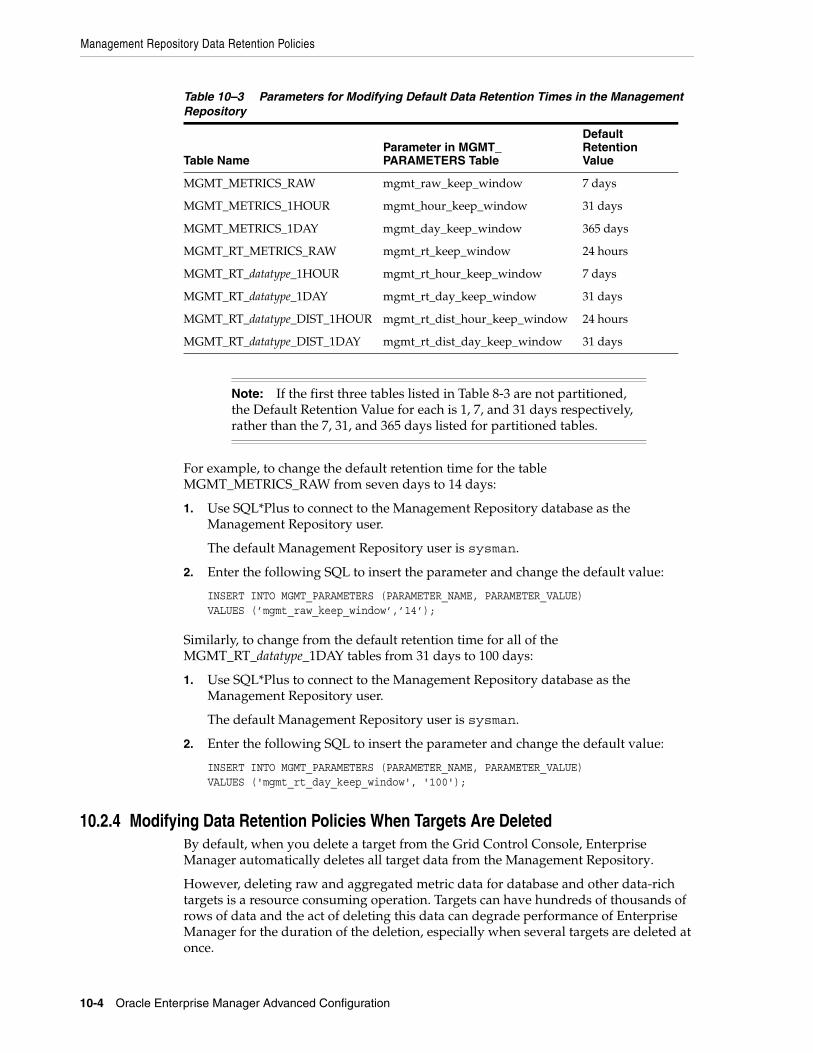
Management Repository Data Retention Policies
10-4 Oracle Enterprise Manager Advanced Configuration
For example, to change the default retention time for the table MGMT_METRICS_RAW from seven days to 14 days:
1. Use SQL*Plus to connect to the Management Repository database as the Management Repository user.
The default Management Repository user is sysman.
2. Enter the following SQL to insert the parameter and change the default value:
INSERT INTO MGMT_PARAMETERS (PARAMETER_NAME, PARAMETER_VALUE) VALUES (’mgmt_raw_keep_window’,’14’);
Similarly, to change from the default retention time for all of the MGMT_RT_datatype_1DAY tables from 31 days to 100 days:
1. Use SQL*Plus to connect to the Management Repository database as the Management Repository user.
The default Management Repository user is sysman.
2. Enter the following SQL to insert the parameter and change the default value:
INSERT INTO MGMT_PARAMETERS (PARAMETER_NAME, PARAMETER_VALUE) VALUES ('mgmt_rt_day_keep_window', '100');
10.2.4 Modifying Data Retention Policies When Targets Are DeletedBy default, when you delete a target from the Grid Control Console, Enterprise Manager automatically deletes all target data from the Management Repository.
However, deleting raw and aggregated metric data for database and other data-rich targets is a resource consuming operation. Targets can have hundreds of thousands of rows of data and the act of deleting this data can degrade performance of Enterprise Manager for the duration of the deletion, especially when several targets are deleted at once.
Table 10–3 Parameters for Modifying Default Data Retention Times in the Management Repository
Table NameParameter in MGMT_PARAMETERS Table
Default Retention Value
MGMT_METRICS_RAW mgmt_raw_keep_window 7 days
MGMT_METRICS_1HOUR mgmt_hour_keep_window 31 days
MGMT_METRICS_1DAY mgmt_day_keep_window 365 days
MGMT_RT_METRICS_RAW mgmt_rt_keep_window 24 hours
MGMT_RT_datatype_1HOUR mgmt_rt_hour_keep_window 7 days
MGMT_RT_datatype_1DAY mgmt_rt_day_keep_window 31 days
MGMT_RT_datatype_DIST_1HOUR mgmt_rt_dist_hour_keep_window 24 hours
MGMT_RT_datatype_DIST_1DAY mgmt_rt_dist_day_keep_window 31 days
Note: If the first three tables listed in Table 8-3 are not partitioned, the Default Retention Value for each is 1, 7, and 31 days respectively, rather than the 7, 31, and 365 days listed for partitioned tables.
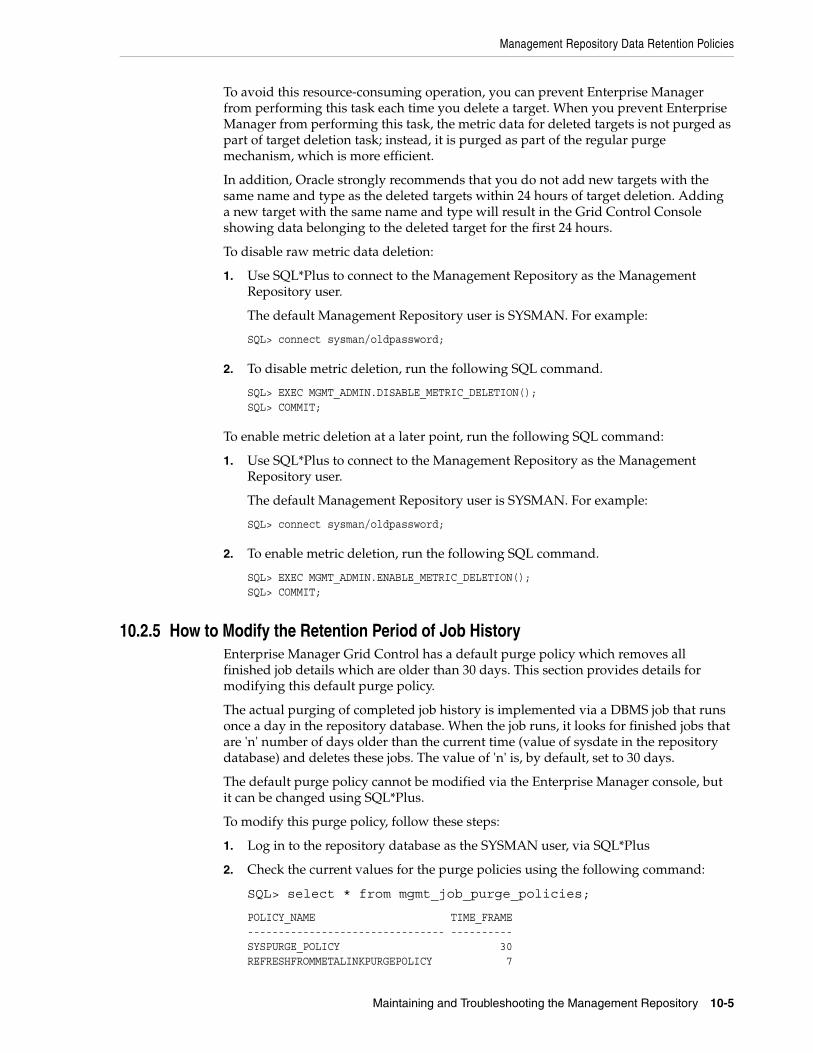
Management Repository Data Retention Policies
Maintaining and Troubleshooting the Management Repository 10-5
To avoid this resource-consuming operation, you can prevent Enterprise Manager from performing this task each time you delete a target. When you prevent Enterprise Manager from performing this task, the metric data for deleted targets is not purged as part of target deletion task; instead, it is purged as part of the regular purge mechanism, which is more efficient.
In addition, Oracle strongly recommends that you do not add new targets with the same name and type as the deleted targets within 24 hours of target deletion. Adding a new target with the same name and type will result in the Grid Control Console showing data belonging to the deleted target for the first 24 hours.
To disable raw metric data deletion:
1. Use SQL*Plus to connect to the Management Repository as the Management Repository user.
The default Management Repository user is SYSMAN. For example:
SQL> connect sysman/oldpassword;
2. To disable metric deletion, run the following SQL command.
SQL> EXEC MGMT_ADMIN.DISABLE_METRIC_DELETION();SQL> COMMIT;
To enable metric deletion at a later point, run the following SQL command:
1. Use SQL*Plus to connect to the Management Repository as the Management Repository user.
The default Management Repository user is SYSMAN. For example:
SQL> connect sysman/oldpassword;
2. To enable metric deletion, run the following SQL command.
SQL> EXEC MGMT_ADMIN.ENABLE_METRIC_DELETION();SQL> COMMIT;
10.2.5 How to Modify the Retention Period of Job HistoryEnterprise Manager Grid Control has a default purge policy which removes all finished job details which are older than 30 days. This section provides details for modifying this default purge policy.
The actual purging of completed job history is implemented via a DBMS job that runs once a day in the repository database. When the job runs, it looks for finished jobs that are 'n' number of days older than the current time (value of sysdate in the repository database) and deletes these jobs. The value of 'n' is, by default, set to 30 days.
The default purge policy cannot be modified via the Enterprise Manager console, but it can be changed using SQL*Plus.
To modify this purge policy, follow these steps:
1. Log in to the repository database as the SYSMAN user, via SQL*Plus
2. Check the current values for the purge policies using the following command:
SQL> select * from mgmt_job_purge_policies;
POLICY_NAME TIME_FRAME-------------------------------- ----------SYSPURGE_POLICY 30REFRESHFROMMETALINKPURGEPOLICY 7
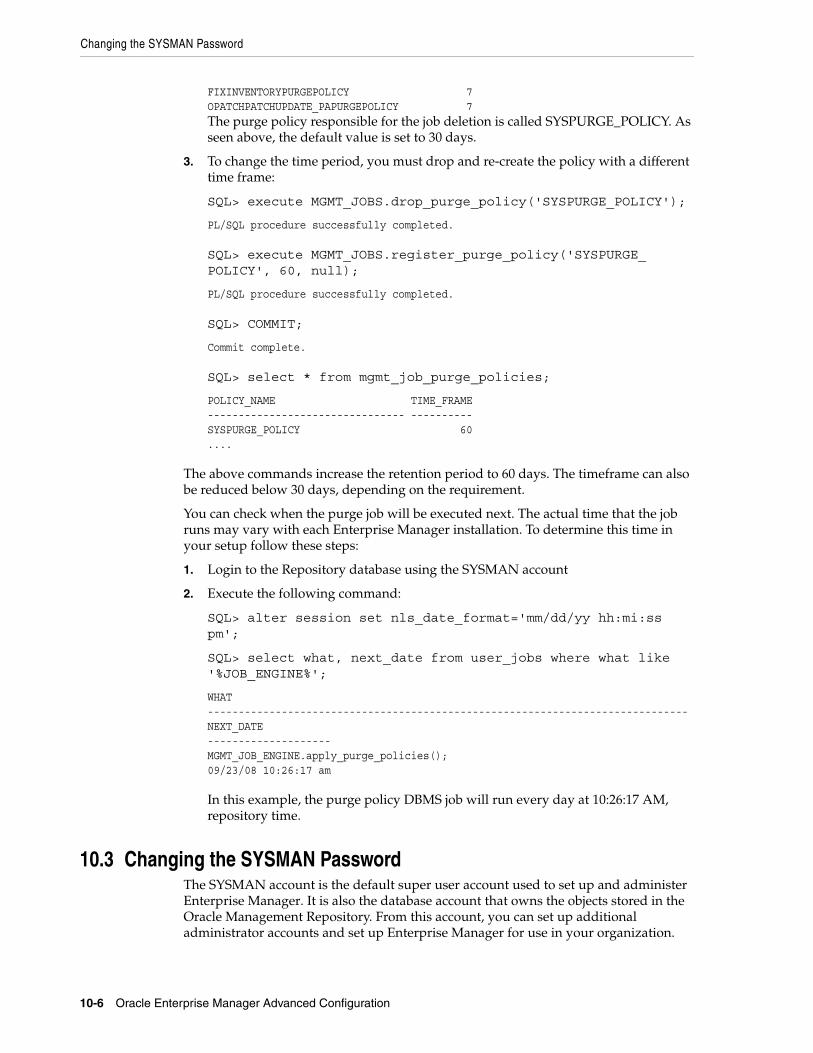
Changing the SYSMAN Password
10-6 Oracle Enterprise Manager Advanced Configuration
FIXINVENTORYPURGEPOLICY 7OPATCHPATCHUPDATE_PAPURGEPOLICY 7The purge policy responsible for the job deletion is called SYSPURGE_POLICY. As seen above, the default value is set to 30 days.
3. To change the time period, you must drop and re-create the policy with a different time frame:
SQL> execute MGMT_JOBS.drop_purge_policy('SYSPURGE_POLICY');
PL/SQL procedure successfully completed.
SQL> execute MGMT_JOBS.register_purge_policy('SYSPURGE_POLICY', 60, null);
PL/SQL procedure successfully completed.
SQL> COMMIT;
Commit complete.
SQL> select * from mgmt_job_purge_policies;
POLICY_NAME TIME_FRAME-------------------------------- ---------- SYSPURGE_POLICY 60....
The above commands increase the retention period to 60 days. The timeframe can also be reduced below 30 days, depending on the requirement.
You can check when the purge job will be executed next. The actual time that the job runs may vary with each Enterprise Manager installation. To determine this time in your setup follow these steps:
1. Login to the Repository database using the SYSMAN account
2. Execute the following command:
SQL> alter session set nls_date_format='mm/dd/yy hh:mi:ss pm';
SQL> select what, next_date from user_jobs where what like '%JOB_ENGINE%';
WHAT------------------------------------------------------------------------------NEXT_DATE--------------------MGMT_JOB_ENGINE.apply_purge_policies();09/23/08 10:26:17 am
In this example, the purge policy DBMS job will run every day at 10:26:17 AM, repository time.
10.3 Changing the SYSMAN PasswordThe SYSMAN account is the default super user account used to set up and administer Enterprise Manager. It is also the database account that owns the objects stored in the Oracle Management Repository. From this account, you can set up additional administrator accounts and set up Enterprise Manager for use in your organization.
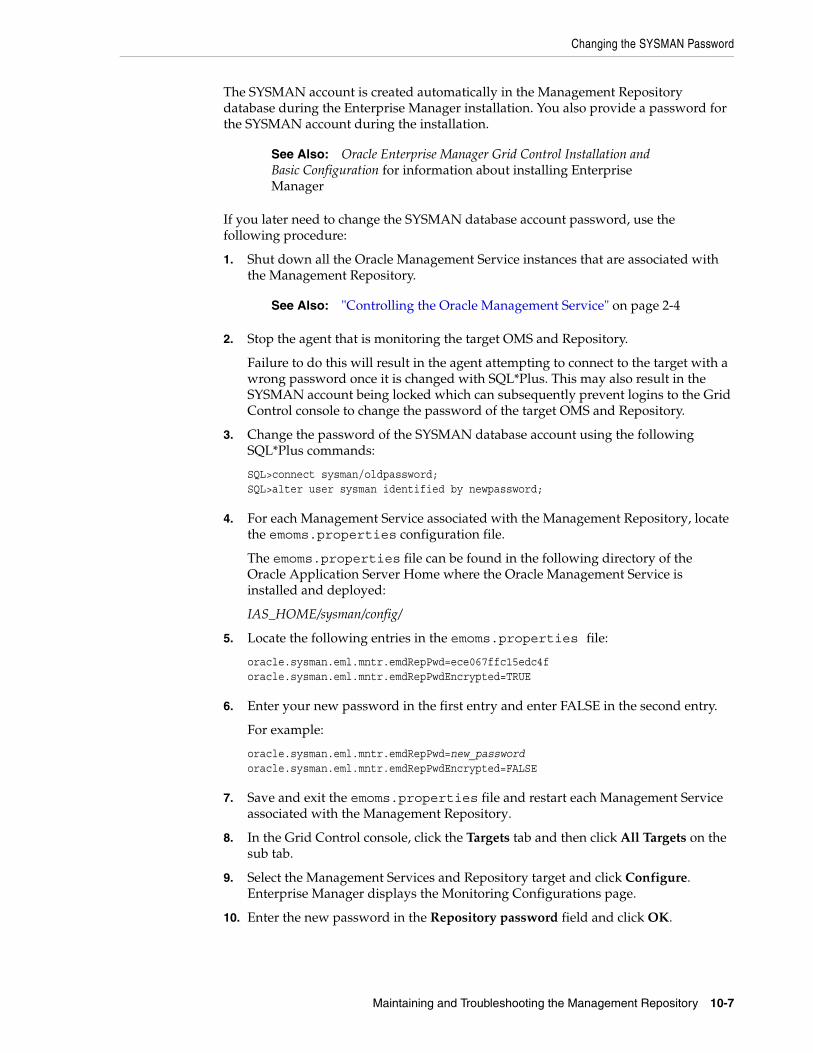
Changing the SYSMAN Password
Maintaining and Troubleshooting the Management Repository 10-7
The SYSMAN account is created automatically in the Management Repository database during the Enterprise Manager installation. You also provide a password for the SYSMAN account during the installation.
If you later need to change the SYSMAN database account password, use the following procedure:
1. Shut down all the Oracle Management Service instances that are associated with the Management Repository.
2. Stop the agent that is monitoring the target OMS and Repository.
Failure to do this will result in the agent attempting to connect to the target with a wrong password once it is changed with SQL*Plus. This may also result in the SYSMAN account being locked which can subsequently prevent logins to the Grid Control console to change the password of the target OMS and Repository.
3. Change the password of the SYSMAN database account using the following SQL*Plus commands:
SQL>connect sysman/oldpassword;SQL>alter user sysman identified by newpassword;
4. For each Management Service associated with the Management Repository, locate the emoms.properties configuration file.
The emoms.properties file can be found in the following directory of the Oracle Application Server Home where the Oracle Management Service is installed and deployed:
IAS_HOME/sysman/config/
5. Locate the following entries in the emoms.properties file:
oracle.sysman.eml.mntr.emdRepPwd=ece067ffc15edc4foracle.sysman.eml.mntr.emdRepPwdEncrypted=TRUE
6. Enter your new password in the first entry and enter FALSE in the second entry.
For example:
oracle.sysman.eml.mntr.emdRepPwd=new_passwordoracle.sysman.eml.mntr.emdRepPwdEncrypted=FALSE
7. Save and exit the emoms.properties file and restart each Management Service associated with the Management Repository.
8. In the Grid Control console, click the Targets tab and then click All Targets on the sub tab.
9. Select the Management Services and Repository target and click Configure. Enterprise Manager displays the Monitoring Configurations page.
10. Enter the new password in the Repository password field and click OK.
See Also: Oracle Enterprise Manager Grid Control Installation and Basic Configuration for information about installing Enterprise Manager
See Also: "Controlling the Oracle Management Service" on page 2-4
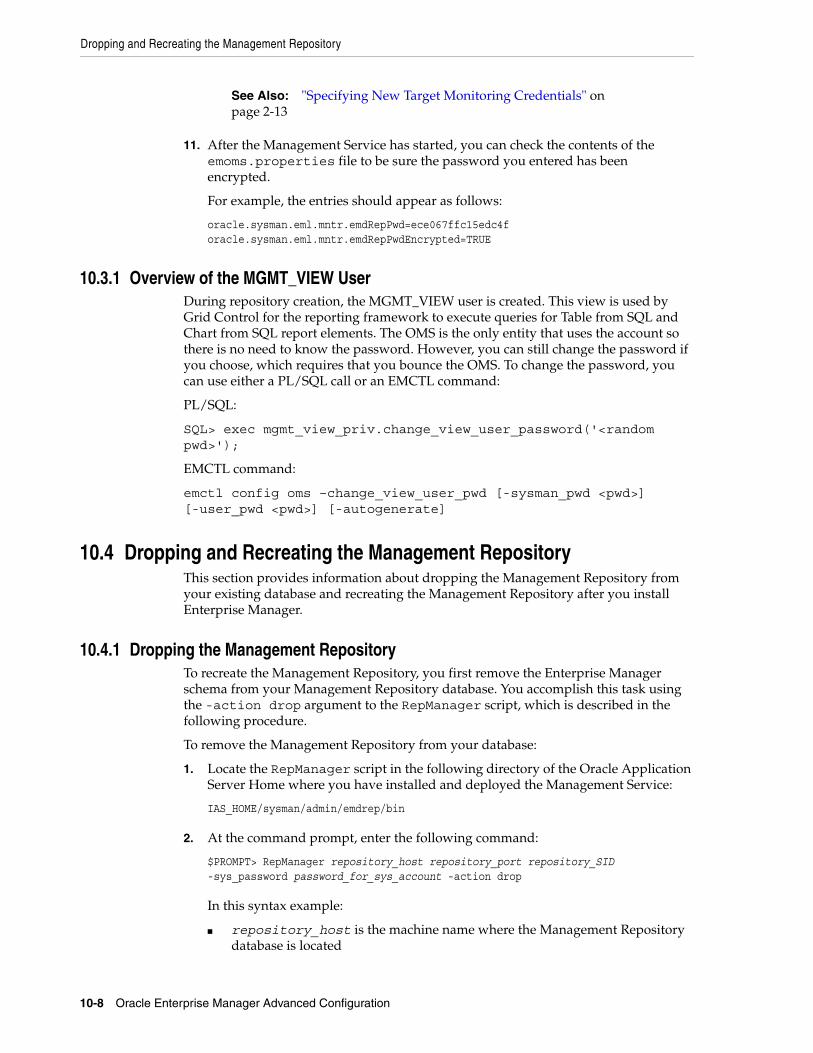
Dropping and Recreating the Management Repository
10-8 Oracle Enterprise Manager Advanced Configuration
11. After the Management Service has started, you can check the contents of the emoms.properties file to be sure the password you entered has been encrypted.
For example, the entries should appear as follows:
oracle.sysman.eml.mntr.emdRepPwd=ece067ffc15edc4foracle.sysman.eml.mntr.emdRepPwdEncrypted=TRUE
10.3.1 Overview of the MGMT_VIEW UserDuring repository creation, the MGMT_VIEW user is created. This view is used by Grid Control for the reporting framework to execute queries for Table from SQL and Chart from SQL report elements. The OMS is the only entity that uses the account so there is no need to know the password. However, you can still change the password if you choose, which requires that you bounce the OMS. To change the password, you can use either a PL/SQL call or an EMCTL command:
PL/SQL:
SQL> exec mgmt_view_priv.change_view_user_password('<random pwd>');
EMCTL command:
emctl config oms –change_view_user_pwd [-sysman_pwd <pwd>] [-user_pwd <pwd>] [-autogenerate]
10.4 Dropping and Recreating the Management RepositoryThis section provides information about dropping the Management Repository from your existing database and recreating the Management Repository after you install Enterprise Manager.
10.4.1 Dropping the Management RepositoryTo recreate the Management Repository, you first remove the Enterprise Manager schema from your Management Repository database. You accomplish this task using the -action drop argument to the RepManager script, which is described in the following procedure.
To remove the Management Repository from your database:
1. Locate the RepManager script in the following directory of the Oracle Application Server Home where you have installed and deployed the Management Service:
IAS_HOME/sysman/admin/emdrep/bin
2. At the command prompt, enter the following command:
$PROMPT> RepManager repository_host repository_port repository_SID -sys_password password_for_sys_account -action drop
In this syntax example:
■ repository_host is the machine name where the Management Repository database is located
See Also: "Specifying New Target Monitoring Credentials" on page 2-13
Dropping and Recreating the Management Repository
Maintaining and Troubleshooting the Management Repository 10-9
■ repository_port is the Management Repository database listener port address, usually 1521 or 1526
■ repository_SID is the Management Repository database system identifier
■ password_for_sys_account is the password of the SYS user for the database. For example, change_on_install.
■ -action drop indicates that you want to drop the Management Repository.
Alternatively, you can use a connect descriptor to identify the database on the RepManager command line. The connect descriptor identifies the host, port, and name of the database using a standard Oracle database syntax.
For example, you can use the connect descriptor as follows to create the Management Repository:
$PROMPT> ./RepManager -connect "(DESCRIPTION=(ADDRESS=(PROTOCOL=TCP)(HOST=host1)(PORT=1521)) (CONNECT_DATE=(SERVICE_NAME=servicename)))"-sys_password efkl34lmn -action drop
10.4.2 Recreating the Management RepositoryThe preferred method for creating the Management Repository is to create the Management Repository during the Enterprise Manager installation procedure, which is performed using Oracle Universal Installer.
However, if you need to recreate the Management Repository in an existing database, you can use the RepManager script, which is installed when you install the Management Service. Refer to the following sections for more information:
■ Using the RepManager Script to Create the Management Repository
■ Using a Connect Descriptor to Identify the Management Repository Database
10.4.2.1 Using the RepManager Script to Create the Management RepositoryTo create a Management Repository in an existing database:
1. Review the hardware and software requirements for the Management Repository as described in Oracle Enterprise Manager Grid Control Installation and Basic Configuration. and review the section "Management Repository Deployment Guidelines" on page 10-1.
2. Locate the RepManager script in the following directory of the Oracle Management Service home directory:
ORACLE_HOME/sysman/admin/emdrep/bin
3. At the command prompt, enter the following command:
$PROMPT> ./RepManager repository_host repository_port repository_SID -sys_password password_for_sys_account -action create
See Also: "Establishing a Connection and Testing the Network" in the Oracle Database Net Services Administrator's Guide for more information about connecting to a database using connect descriptors
See Also: Oracle Enterprise Manager Grid Control Installation and Basic Configuration for information about installing Enterprise Manager
Troubleshooting Management Repository Creation Errors
10-10 Oracle Enterprise Manager Advanced Configuration
In this syntax example:
■ repository_host is the machine name where the Management Repository database is located
■ repository_port is the Management Repository database listener port address, usually 1521 or 1526
■ repository_SID is the Management Repository database system identifier
■ password_for_sys_account is the password of the SYS user for the database. For example, change_on_install.
Enterprise Manager creates the Management Repository in the database you specified in the command line.
10.4.2.2 Using a Connect Descriptor to Identify the Management Repository DatabaseAlternatively, you can use a connect descriptor to identify the database on the RepManager command line. The connect descriptor identifies the host, port, and name of the database using a standard Oracle database syntax.
For example, you can use the connect descriptor as follows to create the Management Repository:
$PROMPT> ./RepManager -connect "(DESCRIPTION=(ADDRESS=(PROTOCOL=TCP)(HOST=host1)(PORT=1521)) (CONNECT_DATA=(SERVICE_NAME=servicename)))"-sys_password efkl34lmn -action create
The ability to use a connect string allows you to provide an address list as part of the connection string. The following example shows how you can provide an address list consisting of two listeners as part of the RepManager command line. If a listener on one host becomes unavailable, the second listener can still accept incoming requests:
$PROMPT> ./RepManager -connect "(DESCRIPTION=(ADDRESS_LIST=(ADDRESS=(PROTOCOL=TCP)(HOST=host1)(PORT=1521)(ADDRESS=(PROTOCOL=TCP)(HOST=host2)(PORT=1521)(CONNECT_DATE=(SERVICE_NAME=servicename)))"-sys_password efkl34lmn -action create
10.5 Troubleshooting Management Repository Creation ErrorsOracle Universal Installer creates the Management Repository using a configuration step at the end of the installation process. If the repository configuration tool fails, note the exact error messages displayed in the configuration tools window, wait until the other configuration tools have finished, exit from Universal Installer, and then use the following sections to troubleshoot the problem.
See Also: "Establishing a Connection and Testing the Network" in the Oracle Database Net Services Administrator's Guide for more information about connecting to a database using a connect descriptor
See Also: Oracle Database High Availability Architecture and Best Practices
"Configuring the Management Services" on page 3-12
Troubleshooting Management Repository Creation Errors
Maintaining and Troubleshooting the Management Repository 10-11
10.5.1 Package Body Does Not Exist Error While Creating the Management RepositoryIf the creation of your Management Repository is interrupted, you may receive the following when you attempt to create or drop the Management Repository at a later time:
SQL> ERROR:ORA-00604: error occurred at recursive SQL level 1ORA-04068: existing state of packages has been discardedORA-04067: not executed, package body "SYSMAN.MGMT_USER" does not existORA-06508: PL/SQL: could not find program unit being calledORA-06512: at "SYSMAN.SETEMUSERCONTEXT", line 5ORA-06512: at "SYSMAN.CLEAR_EMCONTEXT_ON_LOGOFF", line 4ORA-06512: at line 4
To fix this problem, see "General Troubleshooting Techniques for Creating the Management Repository" on page 10-11.
10.5.2 Server Connection Hung Error While Creating the Management RepositoryIf you receive an error such as the following when you try to connect to the Management Repository database, you are likely using an unsupported version of the Oracle Database:
Server Connection Hung
To remedy the problem, upgrade your database to the supported version as described in Oracle Enterprise Manager Grid Control Installation and Basic Configuration.
10.5.3 General Troubleshooting Techniques for Creating the Management RepositoryIf you encounter an error while creating the Management Repository, drop the repository by running the -drop argument to the RepManager script.
If the RepManager script drops the repository successfully, try creating the Management Repository again.
If you encounter errors while dropping the Management Repository, do the following:
1. Connect to the database as SYSDBA using SQL*Plus.
2. Check to see if the SYSMAN database user exists in the Management Repository database.
For example, use the following command to see if the SYSMAN user exists:
prompt> SELECT username FROM DBA_USERS WHERE username='SYSMAN';
3. If the SYSMAN user exists, drop the user by entering the following SQL*Plus command:
prompt> DROP USER SYSMAN CASCADE;
4. Check to see if the following triggers exist:
SYSMAN.EMD_USER_LOGOFFSYSMAN.EMD_USER_LOGON
For example, use the following command to see if the EMD_USER_LOGOFF trigger exists in the database:
See Also: "Dropping the Management Repository" on page 10-8

Cross Platform Enterprise Manager Repository Migration
10-12 Oracle Enterprise Manager Advanced Configuration
prompt> SELECT trigger_name FROM ALL_TRIGGERS WHERE trigger_name='EMD_USER_LOGOFF';
5. If the triggers exist, drop them from the database using the following commands:
prompt> DROP TRIGGER SYSMAN.EMD_USER_LOGOFF;prompt> DROP TRIGGER SYSMAN.EMD_USER_LOGON;
10.6 Cross Platform Enterprise Manager Repository MigrationThere are user requirements for migrating an Enterprise Manager repository across servers - same and cross platforms.
The Enterprise Manager repository migration process is not exactly the same as database migration. In case of Enterprise Manager Repository migration you must take care of Enterprise Manager specific data, options, and pre-requisites for the repository move. You should make sure data integrity is maintained from both the Enterprise Manager and Oracle database perspective.
This brings up need for defining the process that can be followed by end users for successful and reliable migration of repository in minimum time and with maximum efficiency.
The overall strategy for migration depends on:
■ The source and target database version
■ The amount of data/size of repository
■ Actual data to migrate [selective/full migration]
Cross platform transportable tablespace along with data pump (for metadata) is the fastest and best approach for moving large Enterprise Manager Grid Control repository from one platform to another. Other option that can be considered for migration is to use Data Pump for both data and metadata moves but this would require more time than the cross platform transportable tablespace approach for the same amount of data. The advantage to using the data pump approach is that it provides granular control over options and the overall process, as in the case of selective data being migrated and not the whole of source data. If the source and target is not on version 10g then export/import is the only way to get the data migrated cross platform.
More details on cross platform transportable tablespace, data pump, and export/import options can be found at the Oracle Technology Network (OTN) or in the Oracle Database Administrator's Guide.
10.6.1 Common PrerequisitesThe following lists the common prerequisites for a repository migration:
■ Source and target database must use the same character set and should be at same version.
■ Source and target database should meet all the pre-requisites mentioned for Enterprise Manager Repository software requirements mentioned in Enterprise Manager install guide.
■ If source and target database are NOT on 10g - only Export/Import can be used for cross platform migration

Cross Platform Enterprise Manager Repository Migration
Maintaining and Troubleshooting the Management Repository 10-13
■ If Source and target database are on 10g - either of three options Cross platform transportable tablespaces migration, Data Pump or Export/Import can be used for cross platform repository migration
■ You cannot transport a tablespace to a target database in which a tablespace with the same name already exists. However, you can rename either the tablespace to be transported or the destination tablespace before the transport operation.
■ To plug a transportable tablespace set into an Oracle Database on a different platform, both databases must have compatibility set to at least 10.0.
■ Most of the platforms(but not all) are supported for cross-platform tablespace transport. You can query the V$TRANSPORTABLE_PLATFORM view to see the platforms that are supported, and to determine their platform IDs and their endian format (byte ordering).
■ Source and Destination host should have EM agent running and configured to the instance which is to be migrated
■ If target database has EM repository installed, it should be first dropped using RepManager before target database related steps are carried out.
10.6.2 MethodologiesThe following sections discuss the methodologies of a repository migration.
10.6.2.1 Cross Platform Transportable TablespacesOracle's transportable tablespace feature allows users to quickly move a user tablespace across Oracle databases. It is the most efficient way to move bulk data between databases. Prior to Oracle Database 10g, if you want to transport a tablespace, both source and target databases need to be on the same platform. Oracle Database 10g adds the cross platform support for transportable tablespaces. With the cross platform transportable tablespace, you can transport tablespaces across platforms.
Cross platform transportable tablespaces allows a database to be migrated from one platform to another (use with Data Pump or Import/Export).
10.6.2.1.1 Preparation for Transportable Tablespaces
Use these steps to prepare for transportable tablespaces:
1. Prepare set of user tablespaces and Check for containment violation
execute DBMS_TTS.TRANSPORT_SET_CHECK('MGMT_TABLESPACE,MGMT_ECM_DEPOT_TS', TRUE);
select * FROM transport_set_violations;
2. Shutdown OMS instances and prepare for migration
Shutdown OMS, set job queue_processes to 0 and run
@IAS_HOME/sysman/admin/emdrep/sql/core/latest/admin/admin_remove_dbms_jobs.sql
3. Make the tablespaces to be transported read only
alter tablespace MGMT_TABLESPACE read only;
alter tablespace MGMT_ECM_DEPOT_TS read only;
10.6.2.1.2 Extract metadata

Cross Platform Enterprise Manager Repository Migration
10-14 Oracle Enterprise Manager Advanced Configuration
Extract Metadata for transportable tablespaces using Data Pump Utility:
1. Create data pump directory
create directory data_pump_dir as '/scratch/gachawla/EM102/ttsdata';
2. Extract the metadata using data pump (or export )
expdp DUMPFILE=ttsem102.dmp TRANSPORT_TABLESPACES=MGMT_TABLESPACE,MGMT_ECM_DEPOT_TS TRANSPORT_FULL_CHECK=Y
3. Extract other objects ( packages, procedures, functions, temporary tables etc - Not contained in user tablespaces)
expdp SCHEMAS=SYSMAN CONTENT=METADATA_ONLY EXCLUDE=INDEX,CONSTRAINT DUMPFILE=data_pump_dir:postexp.dmp LOGFILE=data_pump_dir:postexp.log JOB_NAME=expmet
10.6.2.1.3 Endian check and conversion
Run Endian check and convert the datafiles if endian is different between source and destination:
1. For Endian check, run this on both source and destination database
SELECT endian_format
FROM v$transportable_platform tp, v$database d
WHERE tp.platform_name = d.platform_name;
If the source platform and the target platform are of different endianness, then an additional step must be done on either the source or target platform to convert the tablespace being transported to the target format. If they are of the same endianness, then no conversion is necessary and tablespaces can be transported as if they were on the same platform.
Example:
Source Endian Linux IA (32-bit) - Little Destination Endian Solaris[tm] OE (32-bit) - Big
2. Ship datafiles, metadata dump to target and Convert datafiles using RMAN
Ship the datafiles and the metadata dump to target and On target convert all datafiles to destination endian:
CONVERT DATAFILE'/d14/em10g/oradata/em102/mgmt.dbf','/d14/em10g/oradata/em102/mgmt_ecm_depot1.dbf'FROM PLATFORM 'Linux IA (32-bit)';
Conversion via RMAN can be done either on source or target (For more details refer RMAN doc). Parallelism can be used to speed up the process if the user tablespaces contains multiple datafiles.
10.6.2.1.4 Import metadata and plugin tablespaces
Use the following steps to import metadata and plugin tablespaces:
1. Run RepManager to drop target repository (if target database has EM repository installed)

Cross Platform Enterprise Manager Repository Migration
Maintaining and Troubleshooting the Management Repository 10-15
RepManager repository_host repository_port repository_SID -sys_password password_for_sys_account -action drop
2. Run pre import steps to create sysman user and grant privs on target database
@IAS_HOME/sysman/admin/emdrep/sql/core/latest/admin/admin_create_repos_user.sql
@IAS_HOME/sysman/admin/emdrep/sql/core/latest/admin/admin_pre_import.sql
3. Invoke Data Pump utility to plug the set of tablespaces into the target database.
impdp DUMPFILE=ttsem102.dmp DIRECTORY=data_pump_dir
TRANSPORT_DATAFILES=/d14/em10g/oradata/em102/mgmt.dbf,/d14/em10g/oradata/em102/mgmt_ecm_depot1.dbf
4. Import other objects (packages, procedures, functions etc)
impdp CONTENT=METADATA_ONLY EXCLUDE=INDEX,CONSTRAINT DUMPFILE=data_pump_dir:postexp.dmp LOGFILE=data_pump_dir:postexp.log
10.6.2.1.5 Post Plug In Steps
Follow these post plug in steps:
1. Run post plugin steps to recompile any invalids, create public synonyms, create other users, enable VPD policy, repin packages
@IAS_HOME/sysman/admin/emdrep/sql/core/latest/admin/admin_create_synonyms.sql
@IAS_HOME/sysman/admin/emdrep/sql/core/latest/admin/admin_post_import.sql
Check for invalid objects - compare source and destination schemas for any discrepancy in counts and invalids.
2. Bring user tablespaces back to read write mode
alter tablespace MGMT_TABLESPACE read write;
alter tablespace MGMT_ECM_DEPOT_TS read write;
3. Submit EM dbms jobs
Reset back job_queue_processes to original value and run
@IAS_HOME/sysman/admin/emdrep/sql/core/latest/admin/admin_submit_dbms_jobs.sql
4. Update OMS properties and startup OMS
Update emoms.properties to reflect the migrated repository. Update host name - oracle.sysman.eml.mntr.emdRepServer and port with the correct value and start the OMS.
5. Relocate Management Services and Repository target
If Management Services and repository target needs to be migrated to the destination host, run em_assoc. handle_relocated_target to relocate the target or recreate the target on the target host.
6. Discover/relocate Database and database Listener targets
Cross Platform Enterprise Manager Repository Migration
10-16 Oracle Enterprise Manager Advanced Configuration
Discover the target database and listener in EM or relocate the targets from source agent to destination agent.
10.6.2.2 Data PumpOracle Data Pump technology enables high-speed, parallel movement of bulk data and metadata from one database to another. Data Pump uses APIs to load and unload data instead of usual SQL commands. Data pump operations can be run via EM interface and is very useful for cross platform database migration.
The migration of the database using the Data Pump export and Data Pump import tools comprises these steps: export the data into a dump file on the source server with the expdp command; copy or move the dump file to the target server; and import the dump file into Oracle on the target server by using the impdp command; and run post import EM specific steps.
Tuning parameters that were used in original Export and Import, such as BUFFER and RECORDLENGTH, are neither required nor supported by Data Pump Export and Import
10.6.2.2.1 Prepare for Data Pump
Use the following steps to prepare for data pump:
1. Pre-requisite for using Data pump for EM repository
Impdp fails for EM repository because of data pump bug - Bug 4386766 - IMPDP WITH COMPRESSED INDEXES FAILS WITH ORA-14071 AND ORA-39083. This bug is fixed in 10.2. Backport is available for 10.1.0.4. This RDBMS patch has to be applied to use expdp/impdp for EM repository migration or workaround is to use exp/imp for extract and import.
2. Create data pump directory
Create directory data_pump_dir as '/scratch/gachawla/EM102/ttsdata';
3. Shutdown OMS instances and prepare for migration
Shutdown OMS, set job queue_processes to 0 and run @IAS_HOME/sysman/admin/emdrep/sql/core/latest/admin/admin_remove_dbms_jobs.sql
To improve throughput of a job, PARALLEL parameter should be used to set a degree of parallelism that takes maximum advantage of current conditions. In general, the degree of parallelism should be set to more than twice the number of CPUs on an instance.
All data pump actions are performed by multiple jobs (server processes not DBMS_JOB jobs). These jobs are controlled by a master control process which uses Advanced Queuing. At runtime an advanced queue table, named after the job name, is created and used by the master control process. The table is dropped on completion of the data pump job. The job and the advanced queue can be named using the JOB_NAME parameter.
DBMS_DATAPUMP APIs can also be used to do data pump export/import. Please refer to Data pump section in 10g administration manual for all the options.
10.6.2.2.2 Data Pump Export
Use these steps to run data pump export:
1. Run data pump export:
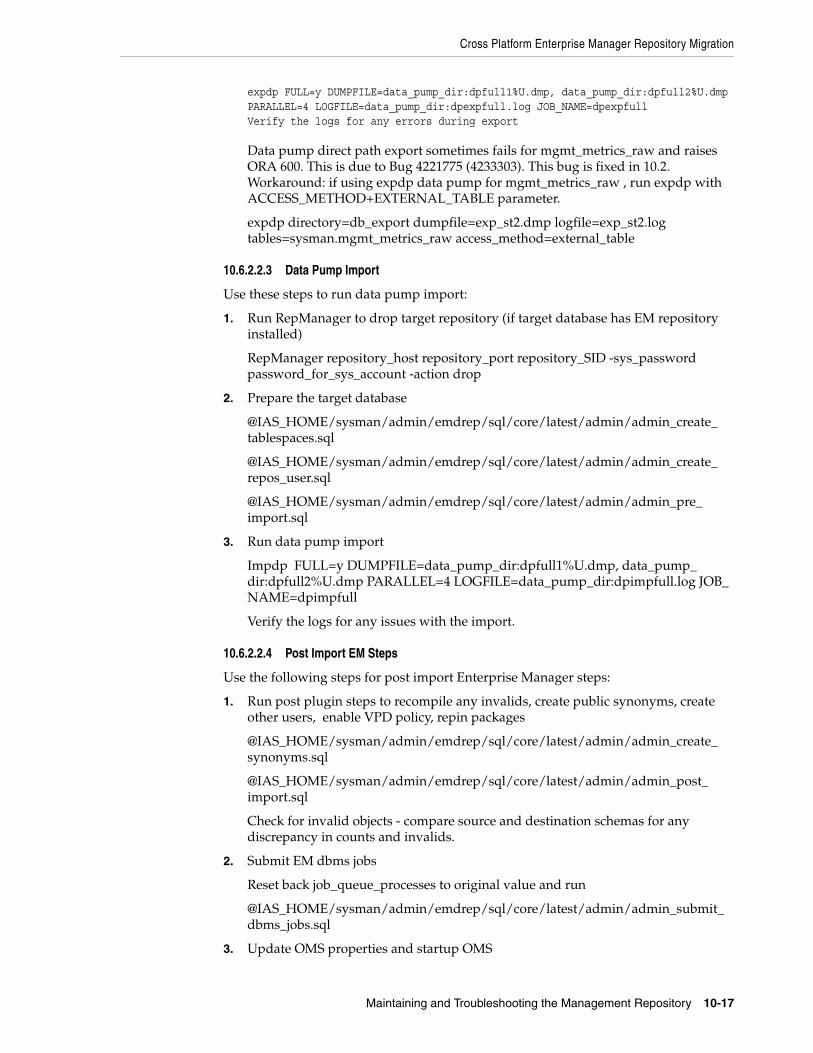
Cross Platform Enterprise Manager Repository Migration
Maintaining and Troubleshooting the Management Repository 10-17
expdp FULL=y DUMPFILE=data_pump_dir:dpfull1%U.dmp, data_pump_dir:dpfull2%U.dmp PARALLEL=4 LOGFILE=data_pump_dir:dpexpfull.log JOB_NAME=dpexpfullVerify the logs for any errors during export
Data pump direct path export sometimes fails for mgmt_metrics_raw and raises ORA 600. This is due to Bug 4221775 (4233303). This bug is fixed in 10.2. Workaround: if using expdp data pump for mgmt_metrics_raw , run expdp with ACCESS_METHOD+EXTERNAL_TABLE parameter.
expdp directory=db_export dumpfile=exp_st2.dmp logfile=exp_st2.log tables=sysman.mgmt_metrics_raw access_method=external_table
10.6.2.2.3 Data Pump Import
Use these steps to run data pump import:
1. Run RepManager to drop target repository (if target database has EM repository installed)
RepManager repository_host repository_port repository_SID -sys_password password_for_sys_account -action drop
2. Prepare the target database
@IAS_HOME/sysman/admin/emdrep/sql/core/latest/admin/admin_create_tablespaces.sql
@IAS_HOME/sysman/admin/emdrep/sql/core/latest/admin/admin_create_repos_user.sql
@IAS_HOME/sysman/admin/emdrep/sql/core/latest/admin/admin_pre_import.sql
3. Run data pump import
Impdp FULL=y DUMPFILE=data_pump_dir:dpfull1%U.dmp, data_pump_dir:dpfull2%U.dmp PARALLEL=4 LOGFILE=data_pump_dir:dpimpfull.log JOB_NAME=dpimpfull
Verify the logs for any issues with the import.
10.6.2.2.4 Post Import EM Steps
Use the following steps for post import Enterprise Manager steps:
1. Run post plugin steps to recompile any invalids, create public synonyms, create other users, enable VPD policy, repin packages
@IAS_HOME/sysman/admin/emdrep/sql/core/latest/admin/admin_create_synonyms.sql
@IAS_HOME/sysman/admin/emdrep/sql/core/latest/admin/admin_post_import.sql
Check for invalid objects - compare source and destination schemas for any discrepancy in counts and invalids.
2. Submit EM dbms jobs
Reset back job_queue_processes to original value and run
@IAS_HOME/sysman/admin/emdrep/sql/core/latest/admin/admin_submit_dbms_jobs.sql
3. Update OMS properties and startup OMS
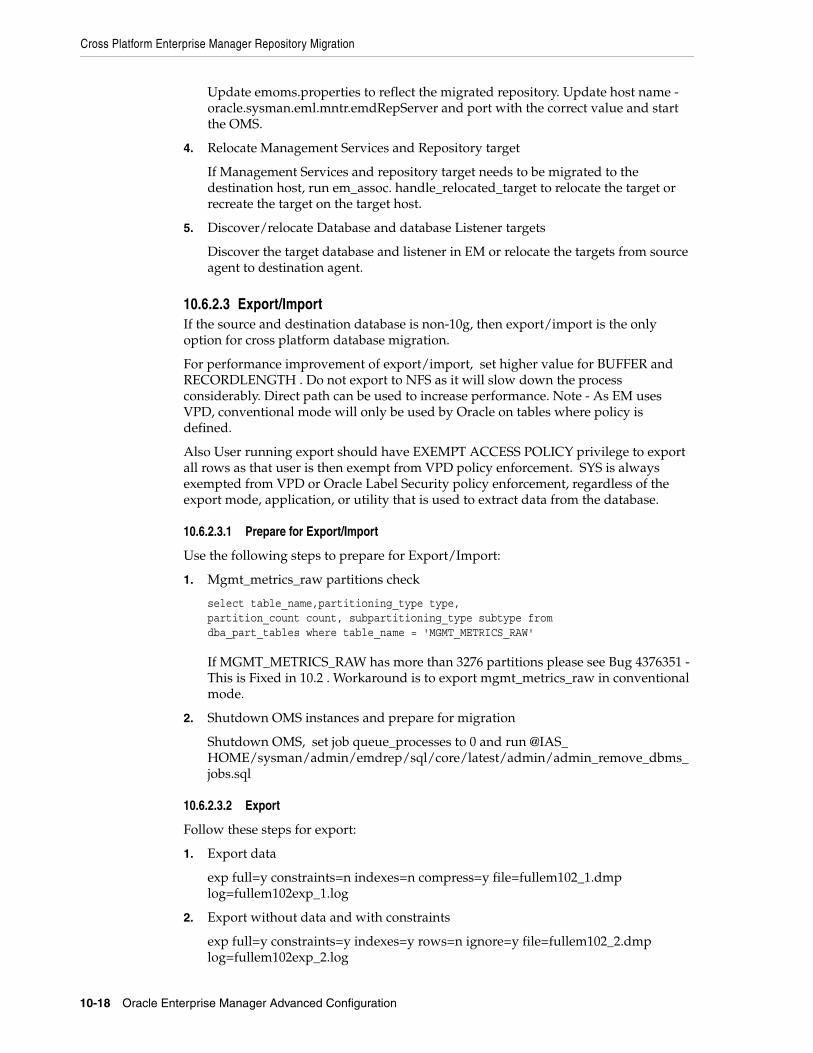
Cross Platform Enterprise Manager Repository Migration
10-18 Oracle Enterprise Manager Advanced Configuration
Update emoms.properties to reflect the migrated repository. Update host name - oracle.sysman.eml.mntr.emdRepServer and port with the correct value and start the OMS.
4. Relocate Management Services and Repository target
If Management Services and repository target needs to be migrated to the destination host, run em_assoc. handle_relocated_target to relocate the target or recreate the target on the target host.
5. Discover/relocate Database and database Listener targets
Discover the target database and listener in EM or relocate the targets from source agent to destination agent.
10.6.2.3 Export/ImportIf the source and destination database is non-10g, then export/import is the only option for cross platform database migration.
For performance improvement of export/import, set higher value for BUFFER and RECORDLENGTH . Do not export to NFS as it will slow down the process considerably. Direct path can be used to increase performance. Note - As EM uses VPD, conventional mode will only be used by Oracle on tables where policy is defined.
Also User running export should have EXEMPT ACCESS POLICY privilege to export all rows as that user is then exempt from VPD policy enforcement. SYS is always exempted from VPD or Oracle Label Security policy enforcement, regardless of the export mode, application, or utility that is used to extract data from the database.
10.6.2.3.1 Prepare for Export/Import
Use the following steps to prepare for Export/Import:
1. Mgmt_metrics_raw partitions check
select table_name,partitioning_type type,partition_count count, subpartitioning_type subtype fromdba_part_tables where table_name = 'MGMT_METRICS_RAW'
If MGMT_METRICS_RAW has more than 3276 partitions please see Bug 4376351 - This is Fixed in 10.2 . Workaround is to export mgmt_metrics_raw in conventional mode.
2. Shutdown OMS instances and prepare for migration
Shutdown OMS, set job queue_processes to 0 and run @IAS_HOME/sysman/admin/emdrep/sql/core/latest/admin/admin_remove_dbms_jobs.sql
10.6.2.3.2 Export
Follow these steps for export:
1. Export data
exp full=y constraints=n indexes=n compress=y file=fullem102_1.dmp log=fullem102exp_1.log
2. Export without data and with constraints
exp full=y constraints=y indexes=y rows=n ignore=y file=fullem102_2.dmp log=fullem102exp_2.log
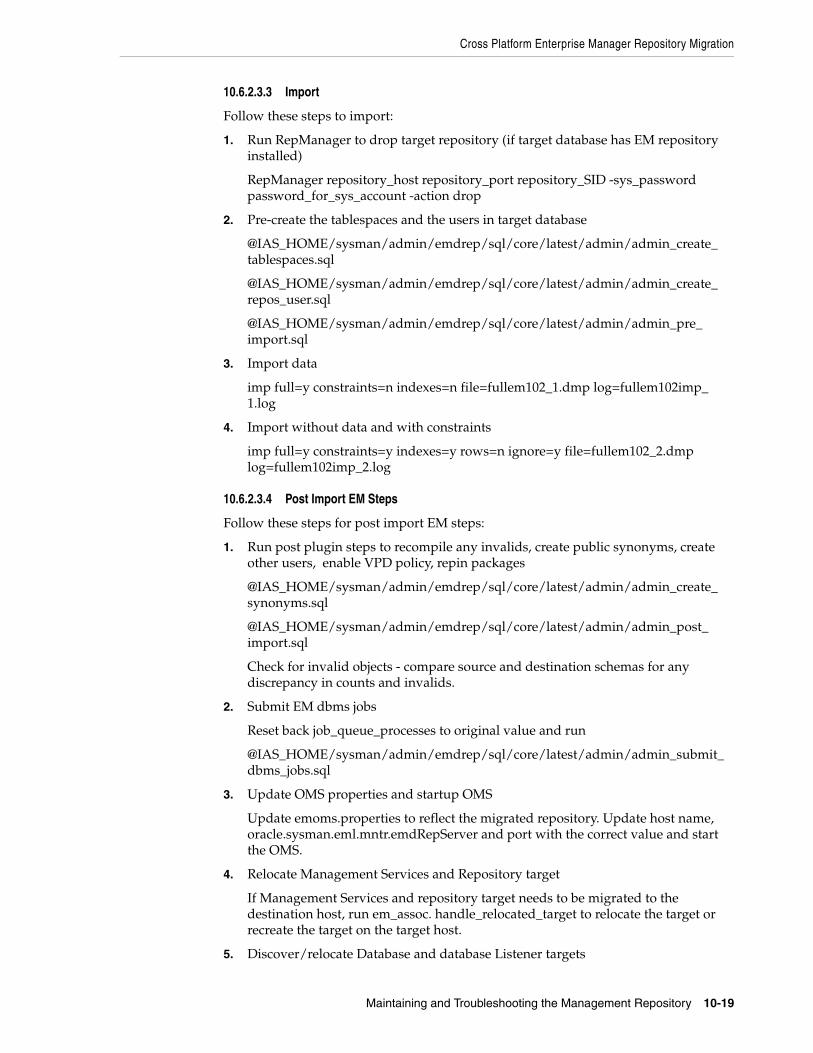
Cross Platform Enterprise Manager Repository Migration
Maintaining and Troubleshooting the Management Repository 10-19
10.6.2.3.3 Import
Follow these steps to import:
1. Run RepManager to drop target repository (if target database has EM repository installed)
RepManager repository_host repository_port repository_SID -sys_password password_for_sys_account -action drop
2. Pre-create the tablespaces and the users in target database
@IAS_HOME/sysman/admin/emdrep/sql/core/latest/admin/admin_create_tablespaces.sql
@IAS_HOME/sysman/admin/emdrep/sql/core/latest/admin/admin_create_repos_user.sql
@IAS_HOME/sysman/admin/emdrep/sql/core/latest/admin/admin_pre_import.sql
3. Import data
imp full=y constraints=n indexes=n file=fullem102_1.dmp log=fullem102imp_1.log
4. Import without data and with constraints
imp full=y constraints=y indexes=y rows=n ignore=y file=fullem102_2.dmp log=fullem102imp_2.log
10.6.2.3.4 Post Import EM Steps
Follow these steps for post import EM steps:
1. Run post plugin steps to recompile any invalids, create public synonyms, create other users, enable VPD policy, repin packages
@IAS_HOME/sysman/admin/emdrep/sql/core/latest/admin/admin_create_synonyms.sql
@IAS_HOME/sysman/admin/emdrep/sql/core/latest/admin/admin_post_import.sql
Check for invalid objects - compare source and destination schemas for any discrepancy in counts and invalids.
2. Submit EM dbms jobs
Reset back job_queue_processes to original value and run
@IAS_HOME/sysman/admin/emdrep/sql/core/latest/admin/admin_submit_dbms_jobs.sql
3. Update OMS properties and startup OMS
Update emoms.properties to reflect the migrated repository. Update host name, oracle.sysman.eml.mntr.emdRepServer and port with the correct value and start the OMS.
4. Relocate Management Services and Repository target
If Management Services and repository target needs to be migrated to the destination host, run em_assoc. handle_relocated_target to relocate the target or recreate the target on the target host.
5. Discover/relocate Database and database Listener targets

Improving the Login Performance of the Console Home Page
10-20 Oracle Enterprise Manager Advanced Configuration
Discover the target database and listener in EM or relocate the targets from source agent to destination agent.
10.6.3 Post Migration VerificationThese verification steps should be carried out post migration to ensure that the migration was completely successful:
■ Verify any discrepancy in objects by comparing source and target databases through EM
■ Verify migrated database through EM whether database is running without any issues
■ Verify repository operations, dbms jobs and whether any management system errors reported
■ Verify all EM functionalities are working fine after migration
■ Make sure Management Services and Repository target is properly relocated by verifying through EM
10.7 Improving the Login Performance of the Console Home PageOracle Enterprise Manager now provides an option that will more quickly display the Console Home page even in a scenario where the Management Repository is very large. Normally, factors such as the number of alerts, errors, policies, and critical patches can contribute to delayed displayed times. Since there is no single factor nor any simple way to scale the SQL or user interface, a simple option flag has been added that removes the following page elements for all users.
When the emoms.properties flag, LargeRepository=, is set to true (when normally the default is false), the SQL for the following items is not executed and thus the items will not be displayed on the Console page.
1. Three sections from the Overview Page segment:
■ All Target Alerts
– Critical
– Warning
– Errors
■ All Target Policy Violations
– Critical
– Warning
– Informational
■ All Target Jobs
– Problem Executions (last 7 days)
– Suspended Executions (last 7 days)
2. The page segment which includes Security Patch Violations and Critical Patch Advisories.
The Deployment Summary section would move up to fill in the vacated space.
Using Enterprise Manager For Grid Automation With Deployment Procedures 11-1
11Using Enterprise Manager For Grid
Automation With Deployment Procedures
Deployment procedures are Oracle’s latest contribution in automating operations around the grid. This chapter introduces the concept of deployment procedures to system administrators and integrators. The chapter spells out the advantages and features of deployment procedures and discusses a sampling of use cases that these deployment procedures are designed to solve.
Deployment procedures are out-of-box best practices that comprise enumeration of a set of steps that are orchestrated by Oracle Enterprise Manager. Oracle ships a set of “best practice” deployment procedures to accomplish provisioning and patching related tasks. Deployment procedures can be extended and customized for customer needs. The deployment procedure to patch a single instance database differs from the one to patch a Data Guard or a RAC environment. Deployment procedures can vary from one customer to another, or from a test installation to a production installation.
Deployment procedures take into account and resolve the reality that environments are often different, with each having complexities across different tiers with multiple dependencies. The situation is further compounded by existing operational practices. For example, in a typical data center, deployment procedures can involve a design time activity (typically performed by a lead administrator) and a runtime activity (typically performed by the operator).
Deployment procedures are licensed under the Provisioning and Patch Automation Pack.
11.1 Key Advantages of Deployment ProceduresThe main advantage of deployment procedures lies in the fact that they can provide an extremely flexible framework for data center automation. While a vendor like Oracle often has specific best practice recommendations for patching and provisioning, the reality is that each data center has unique ways of achieving them. Deployment procedures are nothing more than a framework to achieve synergy between Oracle’s out of box best practices and customers’ own methods. Custom scripts can easily be plugged into deployment procedures for handling special tasks. The following properties of deployment procedures increase their value:
1. Extensible
The objective of deployment procedures is to have as many best practice methods out of box as possible. In an ideal case the customer should be able to run the deployment procedures as-is against a set of targets. Oracle-shipped best practices deployment procedures cannot be modified. The customer can create a copy of the
Key Advantages of Deployment Procedures
11-2 Oracle Enterprise Manager Advanced Configuration
Oracle shipped deployment procedure and modify the same to insert or delete steps and error handling modes.
2. Reusable
Deployment procedures are reusable. The steps of the deployment procedure can be based against directives that are stored in the Software Library. The deployment procedures can also be exported and imported across environments. This implies that the deployment procedures once developed for a test environment need not be recreated for production environment.
3. Hot-pluggable
The out-of-box deployment procedures are metadata driven so new sets of procedures can be added to the Oracle Enterprise Manager environment without any additional outage.
4. Automatable
The runtime for all the deployment procedures can be automated using EMCLI and associated verbs, such as Oracle patching, OS patching and so forth. For more information on these verbs, see the Enterprise Manager Command Line Interface Guide available at:
http://www.oracle.com/technology/documentation/oem.html
11.1.1 Deployment Procedures Shipped In Oracle Enterprise ManagerThe following are the out-of-box deployment procedures:
■ Application Server Deployment
■ Oracle Clusterware/Oracle Real Applications Clusters (RAC) Provisioning
■ Delete/Scale Down Oracle Real Applications Clusters
■ One Click Extend Cluster Database
■ Patch Oracle RAC Database -- All Nodes
■ Patch Oracle RAC Database -- Rolling
■ Patch Oracle Clusterware (Rolling Upgrade)
■ Patch Oracle Database
■ Patch Application Server
■ Patch Solaris Hosts
■ Patch Linux Hosts
■ Patch Windows Hosts
■ Patch Standalone Oracle Automatic Storage Management
■ Database Provisioning
■ Oracle Replay Client Provisioning
■ Linux RPM Repository Server Setup
■ Patch Oracle Clusterware - All Nodes
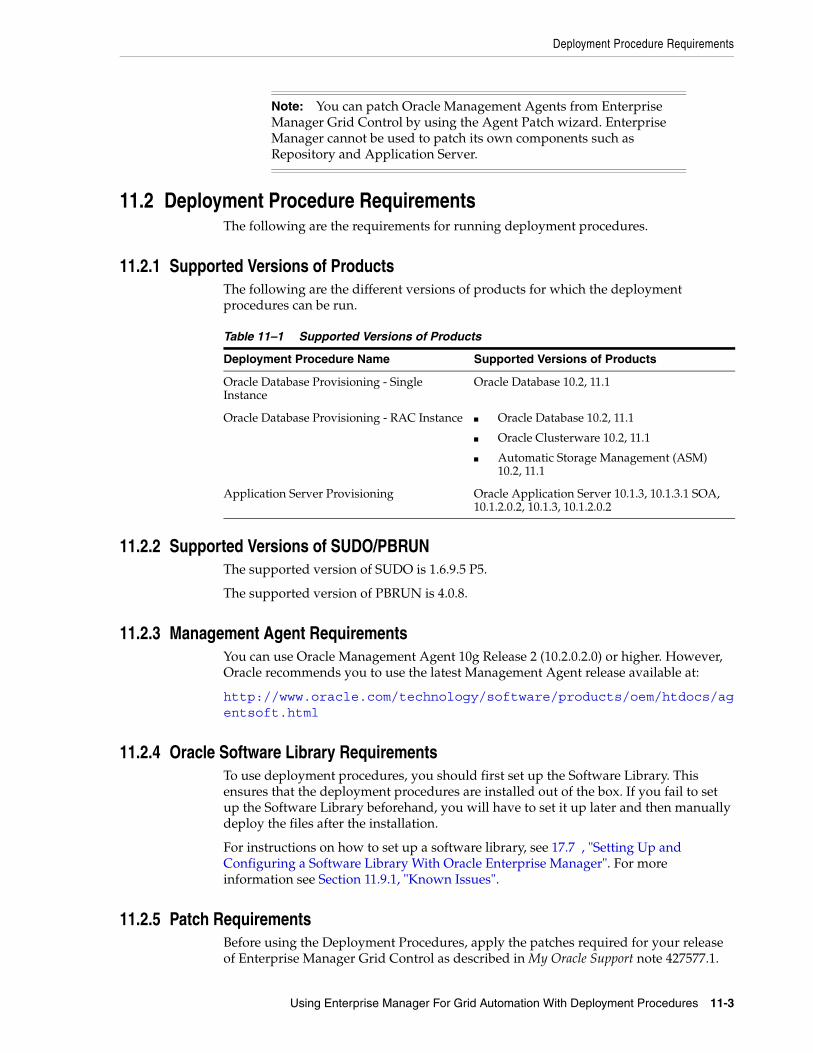
Deployment Procedure Requirements
Using Enterprise Manager For Grid Automation With Deployment Procedures 11-3
11.2 Deployment Procedure RequirementsThe following are the requirements for running deployment procedures.
11.2.1 Supported Versions of ProductsThe following are the different versions of products for which the deployment procedures can be run.
11.2.2 Supported Versions of SUDO/PBRUNThe supported version of SUDO is 1.6.9.5 P5.
The supported version of PBRUN is 4.0.8.
11.2.3 Management Agent RequirementsYou can use Oracle Management Agent 10g Release 2 (10.2.0.2.0) or higher. However, Oracle recommends you to use the latest Management Agent release available at:
http://www.oracle.com/technology/software/products/oem/htdocs/agentsoft.html
11.2.4 Oracle Software Library RequirementsTo use deployment procedures, you should first set up the Software Library. This ensures that the deployment procedures are installed out of the box. If you fail to set up the Software Library beforehand, you will have to set it up later and then manually deploy the files after the installation.
For instructions on how to set up a software library, see 17.7 , "Setting Up and Configuring a Software Library With Oracle Enterprise Manager". For more information see Section 11.9.1, "Known Issues".
11.2.5 Patch RequirementsBefore using the Deployment Procedures, apply the patches required for your release of Enterprise Manager Grid Control as described in My Oracle Support note 427577.1.
Note: You can patch Oracle Management Agents from Enterprise Manager Grid Control by using the Agent Patch wizard. Enterprise Manager cannot be used to patch its own components such as Repository and Application Server.
Table 11–1 Supported Versions of Products
Deployment Procedure Name Supported Versions of Products
Oracle Database Provisioning - Single Instance
Oracle Database 10.2, 11.1
Oracle Database Provisioning - RAC Instance ■ Oracle Database 10.2, 11.1
■ Oracle Clusterware 10.2, 11.1
■ Automatic Storage Management (ASM) 10.2, 11.1
Application Server Provisioning Oracle Application Server 10.1.3, 10.1.3.1 SOA, 10.1.2.0.2, 10.1.3, 10.1.2.0.2
Use-Cases for Deployment Procedures
11-4 Oracle Enterprise Manager Advanced Configuration
If you are using Enterprise Manager 10g Grid Control Release 5 (10.2.0.5) and if it is configured for offline mode of patching, then from My Oracle Support, manually download patch 6880880 for the required platform and version of the target you are patching, and upload it to the Software Library. This is a platform-specific patch, so you will have to carefully select the platform while downloading this patch.
For example, if you are patching Oracle Database 11g Release 1 (11.1) that is running on Linux x86, then download patch 6880880 for the Linux x86 platform and for the 11.1.0.0.0 release. To upload patches to the Software Library, in Grid Control, click the Deployments tab, and from the Patching section, click View/Upload Patch. Ensure that you upload it under the product family "System Management Products and Product - Universal Installer" with the appropriate release and platform details.
11.3 Use-Cases for Deployment ProceduresThe following sections provide examples of some use cases for deployment procedures.
11.3.1 Using Deployment Procedures to Apply Security-Related Critical Patch Updates to Oracle Databases
The out-of-box deployment procedure Patch Oracle Database can be used to apply critical patch updates (CPU) to several single instance databases simultaneously. In the following example, patch 5049080, a critical patch, is applied to 10.2.0.1 databases.
This involves the following steps:
1. Patch Download and Upload step (optional)
You can choose to upload it to Oracle Software Library or Patch Cache.
2. Runtime (Deployment time) steps:
There are 3 inputs that must be provided at runtime - the patch number(s), the targets and the credentials. Finally the procedure must be scheduled for immediate or deferred execution.
1. Select the out-of-box deployment procedure “Patch Oracle Database” and run it.
You can choose to select the patch from My Oracle Support or from the Software Library.
2. Deployment Procedure by default will run the default SQL (catcpu.sql for CPUs) if present or you can provide custom SQL script to run.
3. The targets are then chosen from a list of targets that are automatically populated on the screen based on the version of the product the patch applies to.
4. Credentials follow. You can choose to use the ORACLE_HOME credentials from the repository.
5. Finally the procedure is scheduled and submitted. The procedure can then be monitored by using “Procedure Completion Status” link. It can be retried from a failed step, if required.
Note: Before running any patching-related deployment procedures, meet the prerequisites listed in Section 11.2.5, "Patch Requirements".
Use-Cases for Deployment Procedures
Using Enterprise Manager For Grid Automation With Deployment Procedures 11-5
11.3.2 Using Deployment Procedures for Single-Click Extend of Real Application Clusters
The out-of-box "Extend Real Application Clusters" deployment procedure can be used for extending an existing Real Application Cluster to one or many nodes. In the following example, an existing cluster is extended to one additional node.
Use the following steps:
1. Runtime (Deployment time) steps:
a. Run the out-of-box Extend Real Application Clusters procedure.
b. Choose the existing cluster to be extended and mention the details of the new node where the cluster will be extended.
c. Mention the credential information for the new nodes and a schedule for extension operation. After you finish, click the Submit button to execute the deployment procedure.
Once you submit the procedure, you can monitor it using the Procedure Completion Status link.
11.3.3 Using Deployment Procedures for Delete/Scale Down of Real Application Clusters
You can use the out-of-box Delete/Scale Down Real Application Clusters deployment procedure to delete or scale down an existing Real Application Cluster.
Use the following steps:
1. Runtime (Deployment) steps:
a. Run the out-of-box Delete/Scale Down Real Application Clusters procedure.
b. From the list of available nodes, select one, multiple, or all nodes for deletion from the cluster.
c. Mention the credential information for the new nodes and a schedule for extension operation. When you finish, click Submit to execute the deployment procedure.
Once you submit the procedure, you can monitor it using the Procedure Completion Status feature.
11.3.4 Enhanced Linux Patching for ULNEnhanced Linux Patching feature of Enterprise Manager supports the Unbreakable Linux Network (ULN) subscribers through EM. ULN provides access to Linux software patches, updates and fixes for its customers. Oracle provides three levels of Unbreakable Linux support:
■ Network Support - access to patches and updates via ULN
■ Basic Support - access to patches and updates via ULN, 24x7 support, complete Linux server life cycle management
■ Premier Support - access to patches and updates via ULN, 24x7 support, Linux server life cycle management, backporting, lifetime support
The Linux Staging Server Setup page in EM allows you to set up a staging server for Linux patching. You can select the Host to setup the Staging server and register the host to the Unbreakable Linux Network (ULN).
Use-Cases for Deployment Procedures
11-6 Oracle Enterprise Manager Advanced Configuration
11.3.4.1 Setting Up Staging ServerBefore using the Enhanced Linux patching feature, you must set up the Stating Server and this is a one-time task. The processes involved in setting up a Staging server are:
■ Manually registering the Staging server machine to ULN
■ Manually subscribing to additional ULN channels
■ Configuring the Staging Server in EM
These processes can be executed by using a deployment procedure that has four steps:
1. Installs the up2date tool in the Staging Server.
2. Register the Staging Server to ULN. This is a manual step.
3. Subscribes the Staging Server to additional ULN channels.
This is also a manual step and the deployment procedure will prompt you to perform these two steps manually and outside EM.
4. The deployment procedure downloads the latest packages from the subscribed channels into the Staging Server.
This is a recurring step, run once in 24 hours. It checks for any new packages that are available in the ULN channels and downloads it into the Staging Server. First three steps are run only once. The last step is performed only after the two manual steps are completed.
11.3.4.1.1 Manually Registering Staging Server
Staging server can be registered to ULN by using the up2date tool. Up2date is a program that allows a machine to be synchronized with the latest packages. To use ULN and up2date, you must register the Staging server with ULN and subscribe to a ULN channel (it is also possible to subscribe to multiple channels). There are several ULN channels available and one containing the latest version is automatically chosen upon registration depending on the architecture and OS version of the Staging server.
Follow these tasks as a root user to register Staging server to ULN:
1. Download the Enterprise Linux up2date RPM from http://linux.oracle.com. To install the up2date RPM, type the following command in the command line:
#rpm -Uvh up2date-4.4.6936.i386.rpm
up2date version and architecture varies according to Staging Server configuration. This command will be run as a root user.
2. Import GPG Key of Oracle by running the command:
#rpm --import /usr/share/rhn/RPM-GPG-KEY
Customizable Deployment Procedures
Using Enterprise Manager For Grid Automation With Deployment Procedures 11-7
3. Run the following command to register the server:
#up2date --nox --register
Executing this command takes you through a series of interview screens and finally the ULN is registered to the default channel el4_<arch>_latest.
11.3.4.1.2 Manually Subscribing to Additional ULN Channels
You can use the Web interface provided by ULN to subscribe to additional ULN channels. The web-interface is accessed through http://linux.oracle.com, and you can log on using the user name and password supplied at the time of registration. This process needs to be done whenever you want to subscribe the Staging Server to a new ULN channel.
As of now, the ULN interface allows only to subscribe to channels that match the architecture of the machine.
11.3.4.1.3 Configuring the Staging Server in EM
To start the Stating server set up process in EM, perform these steps:
1. Click the Staging Server Setup link from the Patching Setup page.
Enterprise Manager displays the Linux Staging Server Setup page.
2. Select the Host where you want to setup the Staging server and needs to be registered to the Unbreakable Linux Network (ULN)
3. Specify the credentials for the staging server host to be used for patching
EM then schedules a recurring job that drives the download of latest packages from the subscribed ULN channels into the Staging Server. This job also extracts header information of the packages by running the "yum-arch" and "up2date" commands.
11.3.5 Using Deployment Procedures or Cloning Wizard to Provision Oracle HomeYou can provision Oracle homes using the deployment procedures or the cloning wizard. Depending on the Oracle home type, one method might be more suitable than the other. To understand when to use which method, see My Oracle Support note 737939.1.
11.4 Customizable Deployment ProceduresThe out-of-box deployment procedures can be used as starting templates to create similar procedures (using the “Create Like” functionality), which can then be customized. You can edit the deployment procedure to insert or delete a step or a
Note: The Software Library by default contains the latest version of up2date for Red Hat Enterprise Linux 4, i386 hardware platform. If the Staging Server is of a different release version or architecture (use uname -p on your system to identify the architecture), download the appropriate version of "up2date" and "up2date-gnome" packages from the link http://linux.oracle.com/switch.html. Compress these two packages by using Zip utility into a file named "up2date_comp.zip" and replace it in the Software Library location, "Components > Oracle Components > Stage Server Up2date Component > 10.2.0.4.0 > Linux > UP2DATE_RPM".
Customizable Deployment Procedures
11-8 Oracle Enterprise Manager Advanced Configuration
phase, or to enable or disable a step or a phase. Deployment procedures also allow different error handling methods depending upon the case. For example, in a patching operation where hosts are patched in parallel, it may be wise to simply skip the host on which a failure occurs. However, failure on a device creation could render the remaining provisioning operation ineffective. Therefore it may be necessary to abort the entire procedure for failure of such a step.
11.4.1 Phases and StepsThere are various phases and steps in a deployment procedure. A phase contains steps or more phases and is associated with a target list. It defines the execution of the steps within. The types of phases are:
■ Rolling phase - in this type of phase, steps are executed serially across targets.
■ Parallel phase - in this type of phase, steps are executed in parallel across targets.
A step is an abstraction of a unit of work. For example, starting the database. It is part of a phase or is independent. The types of steps are:
■ Directive
Directive Step is a special type of Action Step to deploy a directive alone. This is useful when users want to store their custom scripts in the Software Library and reuse them in a Deployment Procedure.
■ Component (Generic or Registered)
A Generic Component Step is a special type of Action Step to deploy a Software Library Component and the associated Directive. Deployment Procedure Manager executes the directive with respect to the component. Components used for Generic Component Step generally has one directive associated with it. This association is done by selecting both the component and directive while creating the step. All directives that you associate with the component while uploading to the software library will be ignored while executing the step.
■ Job
Job Step is a special type of Action Step that executes a predefined job type on a target. This is used if you want to execute a job type as a part of a Deployment Procedure. You need to pass job parameters for a step.
■ Manual
Manual Step is that task that requires user interaction and cannot be automated. Typically, Deployment Manager would display the instructions that need to be performed by the user. After the operation is performed, the user proceeds to the next step.
■ Host Command
Host Command Step is a special type of Action Step that encapsulates simple host commands. This step allows the user to enter a command line or a script (multiple commands) to be executed on the target host.
You can provide values to various properties associated with a directive or component through Map Properties. You have three execution privileges: Normal, Sudo and PAM (Pluggable Authentication Modules) for Windows platform. You can choose the appropriate privilege you want by selecting the privilege from Execution privilege list box, under Execution Mode section.
Customizable Deployment Procedures
Using Enterprise Manager For Grid Automation With Deployment Procedures 11-9
11.4.2 Customization ExamplesThe following sections describe three examples that illustrate how deployment procedures can be customized.
11.4.2.1 Insert Custom Step to Backup the Database Before PatchingA data center is notified by Grid Control that its Oracle Database installations are affected by Oracle’s latest Critical Patch Update (CPU). The Security administrator studies the impact and hands it over to the lead DBA who first applies it to his test systems. In the process he wants to backup the database before applying the patch. He uses the Create Like feature of the out-of-box Oracle Database Patching Deployment procedure and inserts a custom step before the Apply Patch step, associating his script to take a backup, which he has uploaded to the Software Library. As a result, on the execution of the Deployment Procedure the backup of the database is performed each time before applying the patch.
11.4.2.2 Manual StepXYZ Corporation has a process of ensuring that users are logged off from their application before the database is shutdown. The DBA checks with key users that they have indeed logged off before proceeding with the database shutdown. This can be achieved by introducing a manual step before the “Stop Database” step. The procedure would pause on the completion of the manual step. Only when the DBA chooses to continue would the procedure advance.
11.4.2.3 Application Service Shutdown and Startup HandlingDeployment procedures can be used to perform operations that are outside the scope of out-of-box procedures. Examples include stopping and starting an ERP application or registering a newly provisioned service with the load balancer. Each of these steps can run in the context of any valid operating system user and can make use of a Pluggable Authentication Module like “pbrun” (Powerbroker). They can also run in superuser mode using “sudo”.
11.4.2.4 Set Notification for the Deployment Procedure RunEnterprise Manager Grid Control has capabilities that allow it to send notifications for the deployment procedure run status.
To receive notifications from deployment procedures, follow the steps below during design time:
1. Do a 'Create Like' of the out-of-box procedures
2. Select the check box 'Enable Notification', and optionally provide the 'Notification Tag Name'.
3. Select the statuses for which you would want the notifications to be sent from the list. For example: Success, Failure, or Action Required.
4. Save the procedure.
5. Enable the Send Email option for the standard PAF Status Notification rule from the Notification Rules page under Preferences.
Upon running the procedure based on the status selected for notification, the users for whom the email address is setup would receive notifications.

Customizable Deployment Procedures
11-10 Oracle Enterprise Manager Advanced Configuration
The above case assumes that the Mail Server is configured and the email address is preset in the Oracle Enterprise Manager Grid Control. For instructions on how to configure notifications, see Section 14.1, "Setting Up Notifications".
Advanced users can customize the standard PAF Status Notification rule to receive notifications in required ways for specific deployment procedures. For example, you might want to be notified by email for a test system procedure, but for a production run you might want to be informed of the status through SMS Alerts. To incorporate specific requirements and enable different methods of notification, you would need to use the 'Create Like' function to modify the standard out-of-box notification rule and edit the job with the specific notification tag name used in the deployment procedure and associating specific Method of notification from the pre-defined notification methods.
11.4.3 Importing or Exporting Deployment ProceduresThe deployment procedures and/or the components and directives from the Software Library are essentially stored in Procedure Archive (PAR) files. When you import or export deployment procedures, you technically import or export PAR files. These PAR files can be imported or exported using an out-of-box PARDeploy utility.
The PARDeploy utility is located at $ORACLE_HOME/bin directory, and the PAR files are located at $ORACLE_HOME/sysman/prov/paf.
The following is the usage information displayed when you run $ORACLE_HOME/bin/PARDeploy:
PARDeploy -action <deploy|view> -parFile <file> -force(optional)PARDeploy -action <deploy|view> -parFile <file> -force(optional) -ssPasswd <password>PARDeploy -action <deploy|view> -parDir <dir> -force(optional)PARDeploy -action export -guid <procedure guid> -file <file> -displayName <name> -description <desc> -metadataOnly(optional)PARDeploy -checkPARDeploy -help
Additionally, the following options are provided:
Table 11–2 PARDeploy Options
Option Description
-force Force the swlib entities to be created/reuploaded, if already present creates a new revision.
-check Check if Software Library is configured.
-file <file> PAR file.
-action <deploy|view|export> Deploy, view or export par file.
-verbose Verbose mode.
-help Display this help message.
-displayName <displayName> PAR file name.
-parDir <dir> Directory where par files are located.
-metadataOnly Flag for metadata-only exports.
-guid <guid> Procedure GUID to export. To export mulitiple procedures provide the GUIDs separated by ","
-parFile <file> Path of par file.
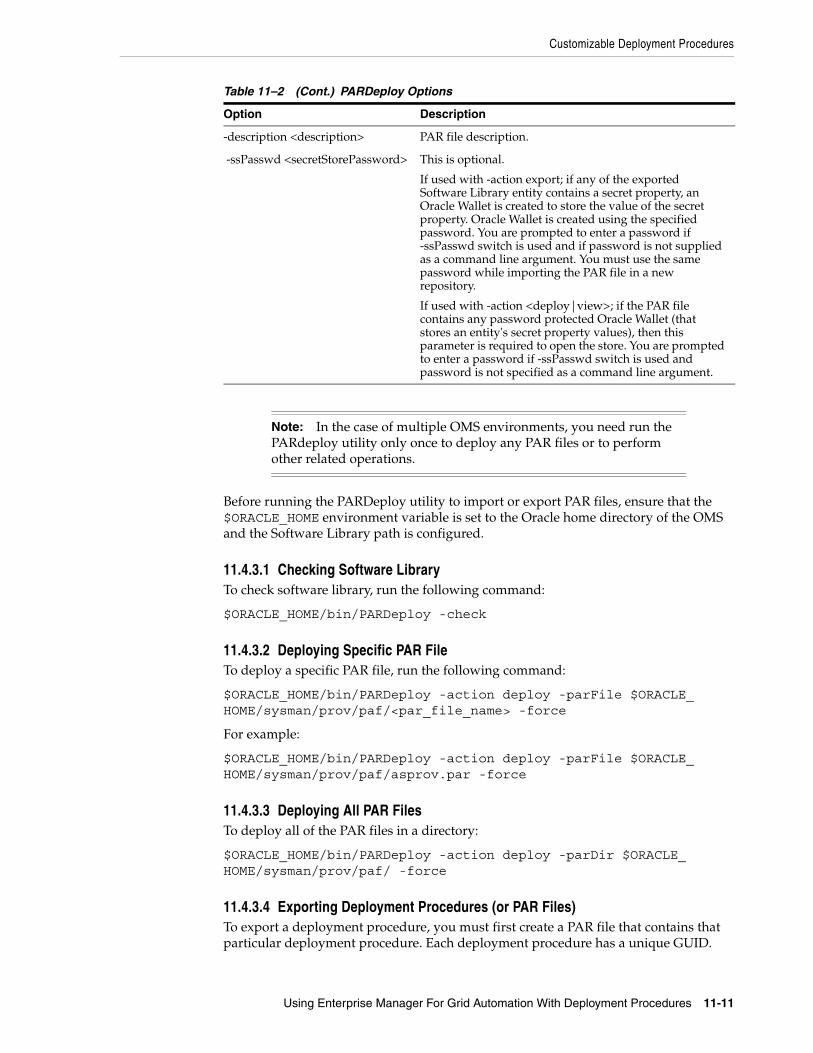
Customizable Deployment Procedures
Using Enterprise Manager For Grid Automation With Deployment Procedures 11-11
Before running the PARDeploy utility to import or export PAR files, ensure that the $ORACLE_HOME environment variable is set to the Oracle home directory of the OMS and the Software Library path is configured.
11.4.3.1 Checking Software LibraryTo check software library, run the following command:
$ORACLE_HOME/bin/PARDeploy -check
11.4.3.2 Deploying Specific PAR FileTo deploy a specific PAR file, run the following command:
$ORACLE_HOME/bin/PARDeploy -action deploy -parFile $ORACLE_HOME/sysman/prov/paf/<par_file_name> -force
For example:
$ORACLE_HOME/bin/PARDeploy -action deploy -parFile $ORACLE_HOME/sysman/prov/paf/asprov.par -force
11.4.3.3 Deploying All PAR FilesTo deploy all of the PAR files in a directory:
$ORACLE_HOME/bin/PARDeploy -action deploy -parDir $ORACLE_HOME/sysman/prov/paf/ -force
11.4.3.4 Exporting Deployment Procedures (or PAR Files)To export a deployment procedure, you must first create a PAR file that contains that particular deployment procedure. Each deployment procedure has a unique GUID.
-description <description> PAR file description.
-ssPasswd <secretStorePassword> This is optional.
If used with -action export; if any of the exported Software Library entity contains a secret property, an Oracle Wallet is created to store the value of the secret property. Oracle Wallet is created using the specified password. You are prompted to enter a password if -ssPasswd switch is used and if password is not supplied as a command line argument. You must use the same password while importing the PAR file in a new repository.
If used with -action <deploy|view>; if the PAR file contains any password protected Oracle Wallet (that stores an entity's secret property values), then this parameter is required to open the store. You are prompted to enter a password if -ssPasswd switch is used and password is not specified as a command line argument.
Note: In the case of multiple OMS environments, you need run the PARdeploy utility only once to deploy any PAR files or to perform other related operations.
Table 11–2 (Cont.) PARDeploy Options
Option Description
Customizable Deployment Procedures
11-12 Oracle Enterprise Manager Advanced Configuration
Before running the PARDeploy tool to export it, obtain the GUID of the deployment procedure.
To obtain the GUID of the deployment procedure:
1. In Grid Control, click the Deployments tab.
2. On the Deployments page, from the Deployment Procedure Manager section, click Deployment Procedures.
3. Deployment Procedure Manager page, in the Procedures table, click the deployment procedure you want to export.
4. On the View Procedure page, note the URL of the page from the address bar of the browser.
The format of the URL should be similar to this:
http://<OMS host>:<port>/em/console/paf/procedureView?guid=<value of GUID>
To create a PAR file that contains this deployment procedure, run the PARDeploy utility with the export option as the action, and quote the GUID of the deployment procedure you want to export.
$ORACLE_HOME/bin/PARDeploy -action export -guid <GUID> -file exportedDP.par -displayName "User exported DP" -description "<description>"
For example, if the GUID of the deployment procedure that you want to export is FAC05DD31E3791C3E030579D23106C67, then run the following command:
$ORACLE_HOME/bin/PARDeploy -action export -guid FAC05DD31E3791C3E030579D23106C67 -file exportedDP.par -displayName "User exported DP" -description "Deployment Procedure to be copied to other OMS"
After you run this command, a new PAR file named exportedDP.par is created in the directory where you ran the command. You can then import this PAR file to another OMS.
To export multiple deployment procedures or PAR files, specify the GUIDs separated by a comma.
11.4.3.5 Importing PAR FilesTo import PAR files or deploy them to an OMS, you can use the PARDeploy utility. Alternatively, you can also log in to the second Enterprise Manager Grid Control, navigate to the Deployment Procedure Manager page, and click Upload to upload the PAR file.
Note: When a procedure is exported using PARDeploy, any directives or components referred by the procedure are also exported. However, only the latest revision of these directives or components will be exported. If you do not want to export components or directives, you can specify the -metadataOnly flag when running PARDeploy.

Running Deployment Procedures Using SUDO, PowerBroker, and Privilege Delegation
Using Enterprise Manager For Grid Automation With Deployment Procedures 11-13
11.4.3.6 Importing or Exporting Components or Directives with Secret ValuesWhen importing or exporting components and/or directives that contain properties with secret values, you must use the -ssPasswd command and provide the secrete store password to create Oracle Wallet. This helps in securely storing and retrieving these properties. For more informationabout the -ssPasswd command, see Table 11–2, " PARDeploy Options".
11.5 Running Deployment Procedures Using SUDO, PowerBroker, and Privilege Delegation
Enterprise Manager Grid Control allows you to run deployment procedures using authentication utilities such as SUDO, PowerBroker, and Privilege Delegation.
While SUDO and PowerBroker are third-party utilities supported in Enterprise Manager Grid Control, Privilege Delegation is proprietary to Oracle. Privilege Delegation is a framework that allows you to use either SUDO or PowerBroker to perform an activity with the privileges of another user. Privilege Delegation can use either SUDO or PowerBroker, but not both, and the settings are only for a single host. Therefore, if a host is set up with pbrun, then it will use only pbrun.
The support for SUDO and PowerBroker is offered in Enterprise Manager 10g Grid Control Release 4 (10.2.0.4) or lower, but the support for Privilege Delegation is offered only in Enterprise Manager 10g Grid Control Release 5 (10.2.0.5) or higher.
For more information about Privilege Delegation, see the section on Configuring Privilege Delegation Providers in the chapter Additional Configuration Tasks. You can also find information about Privilege Delegation in the online help system provided in Enterprise Manager Grid Control.
11.5.1 SUDO and PowerBroker Versus Privilege DelegationYou can use any of these utilities to run deployment procedures in Enterprise Manager Grid Control. However, some limitations involved in using SUDO and PowerBroker are:
■ While SUDO is supported in a password-protected mode, PowerBroker is not. Therefore, every time you use PowerBroker, you will have to run them without a password.
■ You have to configure SUDO and PowerBroker settings every time you edit a deployment procedure. You cannot create a standard template with these settings that can be reused wherever required.
■ You can use SUDO and PowerBroker settings only for deployment procedures, and not for jobs that can be run for performing critical tasks on hosts.
Privilege Delegation, a framework that combines SUDO and PowerBroker, offers the same functionality with the following advantages:
■ You have the flexibility to use either SUDO or PowerBroker within the same framework.
■ Using the framework, you can now run PowerBroker in a password-protected mode. This offers more security.
■ You can create a template with these Privilege Delegation settings and reuse it for multiple hosts. This not only allows you to standardize Privilege Delegation setting across your enterprise, but also facilitates the process of configuring
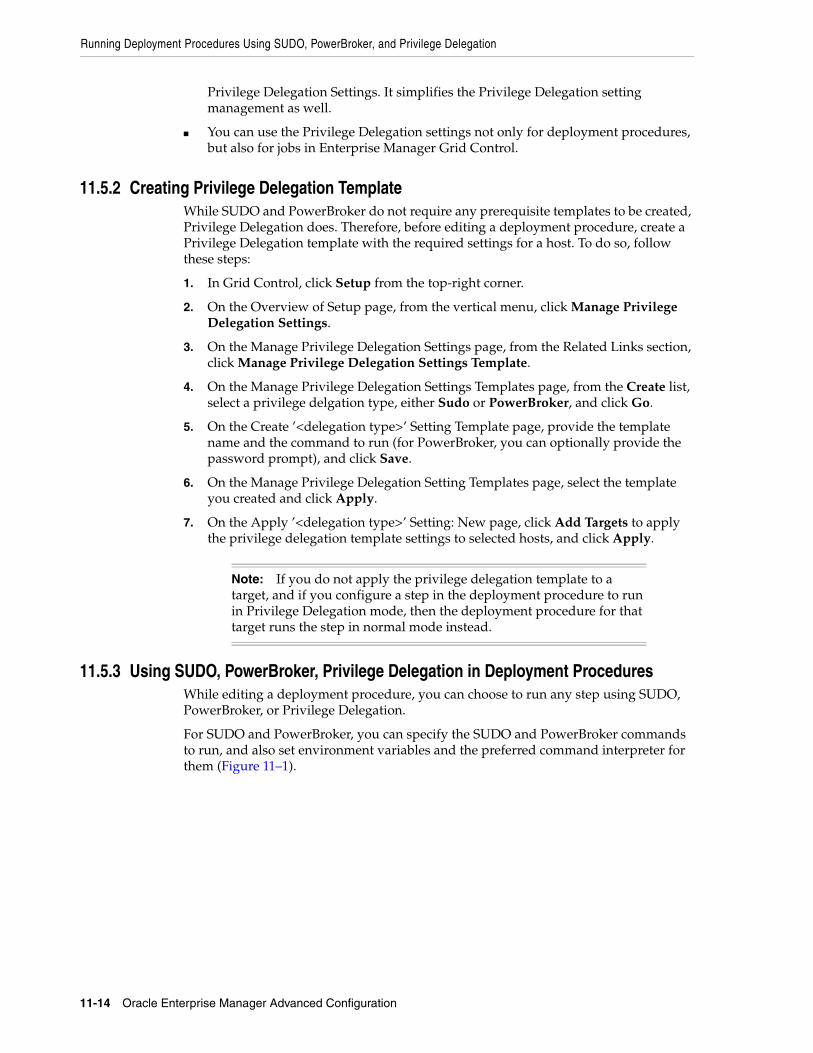
Running Deployment Procedures Using SUDO, PowerBroker, and Privilege Delegation
11-14 Oracle Enterprise Manager Advanced Configuration
Privilege Delegation Settings. It simplifies the Privilege Delegation setting management as well.
■ You can use the Privilege Delegation settings not only for deployment procedures, but also for jobs in Enterprise Manager Grid Control.
11.5.2 Creating Privilege Delegation TemplateWhile SUDO and PowerBroker do not require any prerequisite templates to be created, Privilege Delegation does. Therefore, before editing a deployment procedure, create a Privilege Delegation template with the required settings for a host. To do so, follow these steps:
1. In Grid Control, click Setup from the top-right corner.
2. On the Overview of Setup page, from the vertical menu, click Manage Privilege Delegation Settings.
3. On the Manage Privilege Delegation Settings page, from the Related Links section, click Manage Privilege Delegation Settings Template.
4. On the Manage Privilege Delegation Settings Templates page, from the Create list, select a privilege delgation type, either Sudo or PowerBroker, and click Go.
5. On the Create ’<delegation type>’ Setting Template page, provide the template name and the command to run (for PowerBroker, you can optionally provide the password prompt), and click Save.
6. On the Manage Privilege Delegation Setting Templates page, select the template you created and click Apply.
7. On the Apply ’<delegation type>’ Setting: New page, click Add Targets to apply the privilege delegation template settings to selected hosts, and click Apply.
11.5.3 Using SUDO, PowerBroker, Privilege Delegation in Deployment ProceduresWhile editing a deployment procedure, you can choose to run any step using SUDO, PowerBroker, or Privilege Delegation.
For SUDO and PowerBroker, you can specify the SUDO and PowerBroker commands to run, and also set environment variables and the preferred command interpreter for them (Figure 11–1).
Note: If you do not apply the privilege delegation template to a target, and if you configure a step in the deployment procedure to run in Privilege Delegation mode, then the deployment procedure for that target runs the step in normal mode instead.
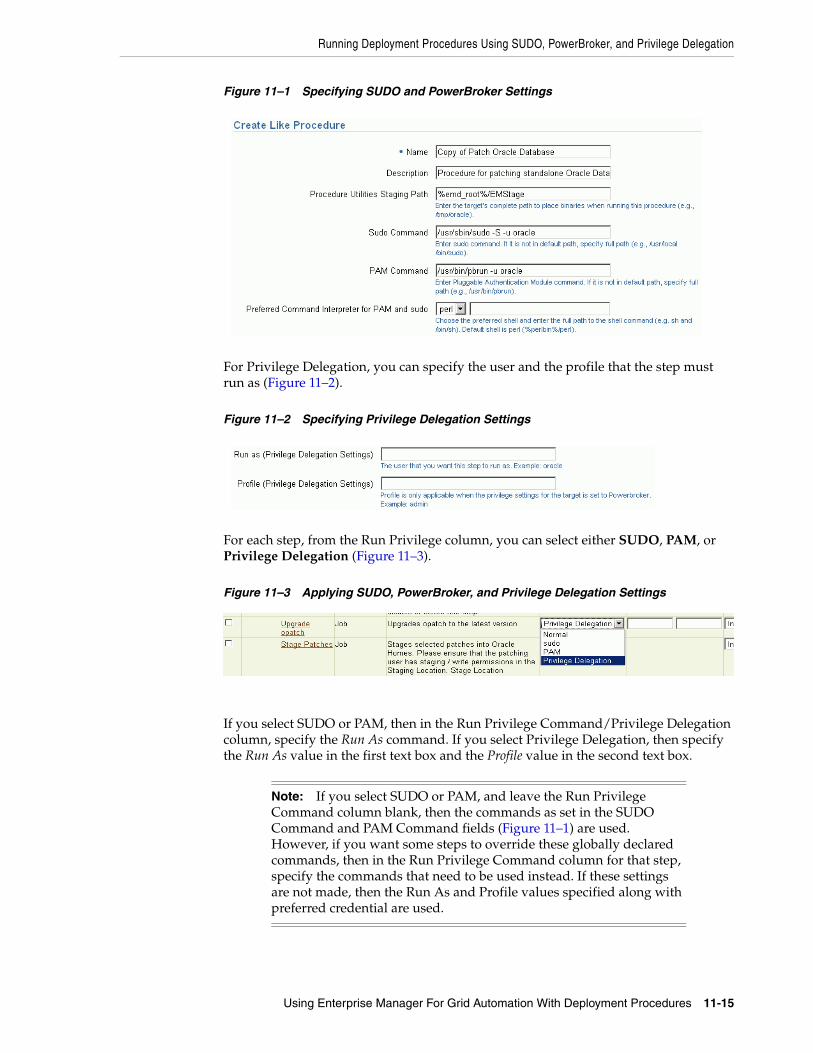
Running Deployment Procedures Using SUDO, PowerBroker, and Privilege Delegation
Using Enterprise Manager For Grid Automation With Deployment Procedures 11-15
Figure 11–1 Specifying SUDO and PowerBroker Settings
For Privilege Delegation, you can specify the user and the profile that the step must run as (Figure 11–2).
Figure 11–2 Specifying Privilege Delegation Settings
For each step, from the Run Privilege column, you can select either SUDO, PAM, or Privilege Delegation (Figure 11–3).
Figure 11–3 Applying SUDO, PowerBroker, and Privilege Delegation Settings
If you select SUDO or PAM, then in the Run Privilege Command/Privilege Delegation column, specify the Run As command. If you select Privilege Delegation, then specify the Run As value in the first text box and the Profile value in the second text box.
Note: If you select SUDO or PAM, and leave the Run Privilege Command column blank, then the commands as set in the SUDO Command and PAM Command fields (Figure 11–1) are used. However, if you want some steps to override these globally declared commands, then in the Run Privilege Command column for that step, specify the commands that need to be used instead. If these settings are not made, then the Run As and Profile values specified along with preferred credential are used.
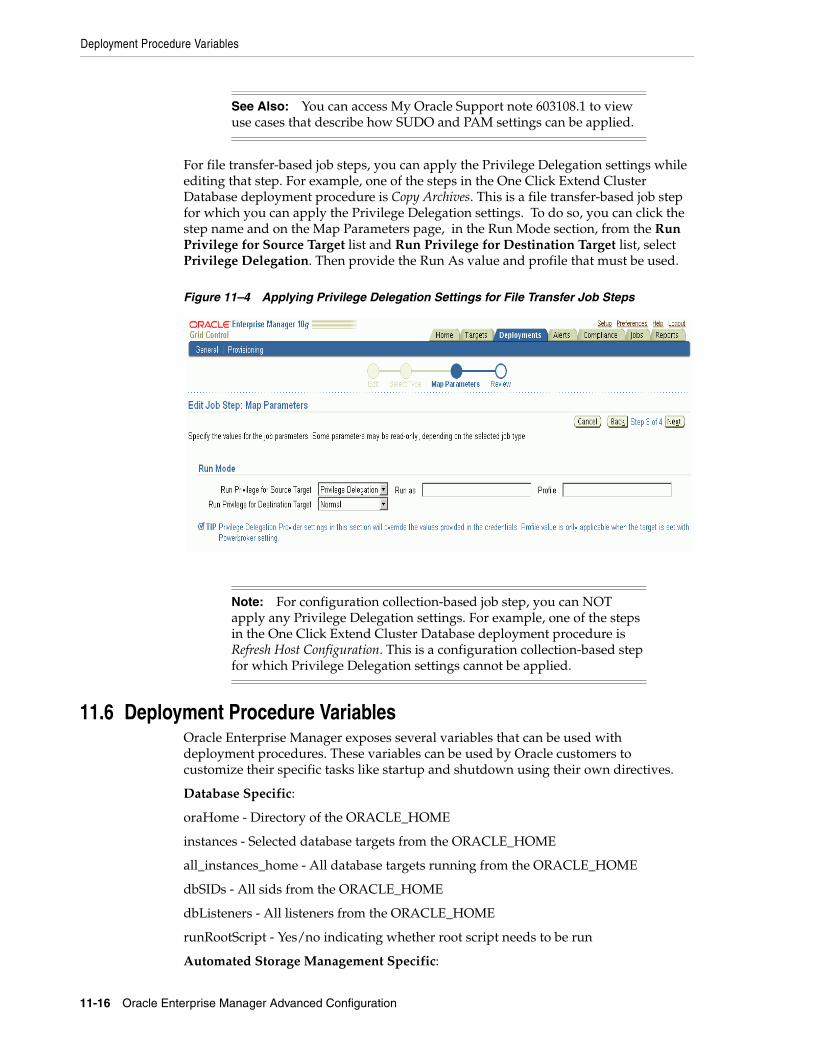
Deployment Procedure Variables
11-16 Oracle Enterprise Manager Advanced Configuration
For file transfer-based job steps, you can apply the Privilege Delegation settings while editing that step. For example, one of the steps in the One Click Extend Cluster Database deployment procedure is Copy Archives. This is a file transfer-based job step for which you can apply the Privilege Delegation settings. To do so, you can click the step name and on the Map Parameters page, in the Run Mode section, from the Run Privilege for Source Target list and Run Privilege for Destination Target list, select Privilege Delegation. Then provide the Run As value and profile that must be used.
Figure 11–4 Applying Privilege Delegation Settings for File Transfer Job Steps
11.6 Deployment Procedure VariablesOracle Enterprise Manager exposes several variables that can be used with deployment procedures. These variables can be used by Oracle customers to customize their specific tasks like startup and shutdown using their own directives.
Database Specific:
oraHome - Directory of the ORACLE_HOME
instances - Selected database targets from the ORACLE_HOME
all_instances_home - All database targets running from the ORACLE_HOME
dbSIDs - All sids from the ORACLE_HOME
dbListeners - All listeners from the ORACLE_HOME
runRootScript - Yes/no indicating whether root script needs to be run
Automated Storage Management Specific:
See Also: You can access My Oracle Support note 603108.1 to view use cases that describe how SUDO and PAM settings can be applied.
Note: For configuration collection-based job step, you can NOT apply any Privilege Delegation settings. For example, one of the steps in the One Click Extend Cluster Database deployment procedure is Refresh Host Configuration. This is a configuration collection-based step for which Privilege Delegation settings cannot be applied.
EMCLI Concepts and Requirements to Execute Deployment Procedures
Using Enterprise Manager For Grid Automation With Deployment Procedures 11-17
asmTargetHome - Selected ASM target ORACLE_HOME
asmIntanceName - ASM instance running from the ORACLE_HOME
asminstances - ASM instances running from the ORACLE_HOME
Real Application Cluster Specific:
racLocalInstanceNames - All local RAC Database instances running out of the ORACLE_HOME
racLocalInstanceTgtNames - All local RAC Database target names running out of the ORACLE_HOME
racLocalInstanceHomes - All ORACLE_HOMEs running the RAC database instances locally
racLocalInstanceSids - sids of the local RAC instances running in the ORACLE_HOME
Clusterware Specific:
nodeName - Name of CRS node on which the RAC instance being patched is running
crsName - Cluster name
Application Server Specific:
oracleSid - Value of SID that may be present in an AS ORACLE_HOME
Global:
isPatchset - Yes/No specifying whether patchset is being applied to the ORACLE_HOME
stageDir - The staging directory to use provided like %oracle_home%....
replacedStageDir - The absolute staging location of patches
patchIDs - List of patch ids selected
patchSrcs - Indicating whether the patches came from My Oracle Support or software library
patchData – Uniform resource Names (URNs) of the patches
patchReleases - Corresponding release of the patches
targetVersion - Version of the target being patched
11.7 EMCLI Concepts and Requirements to Execute Deployment Procedures
The following section describes basic EMCLI concepts and requirements for using EMCLI to run deployment procedures.
11.7.1 EMCLI ConceptsBefore using EMCLI to run deployment procedures, familiarize yourself with the following EMCLI concepts:
■ RuntimeData xml
Runtime data response file (known as RuntimeData xml) is required to execute any out-of-the-box or customized procedures. This file provides input for the configuration parameters consumed by a given procedure during execution.
EMCLI Concepts and Requirements to Execute Deployment Procedures
11-18 Oracle Enterprise Manager Advanced Configuration
Each time you use the Enterprise Manager User Interface to execute an out-of-box or customized deployment procedure, a RuntimeData xml file is automatically created based on the user input for the various parameters required by the procedure.
■ RuntimeData Template
Oracle provides out of the box templates for creating runtime data response files for the deployment procedures used in the most common use cases. These are known as "RuntimeData templates". These templates are available under the emcli/samples directory in OMS oracle home. The user needs to modify the configuration properties in these templates in order to generate RuntimeData xml file for a executing a procedure.
For example, in order to provision RAC/AS you need to provide inputs such as install base location, shared device paths for the OCR, Voting disk and data files (in case of RAC). Similarly for patching procedures inputs such as targets to be patched and patch number would be needed.
■ Procedure GUID
Both out-of-box and customized procedures are associated with a global unique identifier (GUID). This GUID is required while executing the procedures using EMCLI. Refer to Appendix A, "Out-Of-Box Runtime Data Templates" for GUID of out-of-box procedures.
■ Procedure Instance GUID
Each execution of a given out-of-box or customized procedures is associated with an instance global unique identifier (GUID). This instance GUID is generated at runtime and can be used to monitor the execution of the procedure.
■ Properties File
For every execution of deployment procedure you must modify the values of the required configuration parameters for a RuntimeData xml or RuntimeData template. Instead of manually editing the xml files you can populate a simple properties with name-value pairs for listing values of configuration parameters such as hosts; platform for deployment, and so on.
■ Procedure Execution Scripts
Oracle provides out of box scripts for the execution of procedures for Provisioning and Patching. These Perl scripts are available under the emcli/scripts directory in OMS oracle home. The user needs to copy the scripts to the working directory location where the EMCLI client is setup for execution.
The properties file, the associated RuntimeData xml or RuntimeData template and GUID of the relevant procedure are then submitted as input to an out-of-box script which creates a new runtime data response file and executes the procedure.
11.7.2 EMCLI RequirementsYou must ensure that the following requirements are met prior to using EMCLI to execute deployment procedures:
■ EMCLI client must be set up. Please refer to the Installation and Configuration section of the Enterprise Manager Command Line Interface Guide for configuring the EMCLI client. The document is available at:
http://www.oracle.com/technology/documentation/oem.html
Using EMCLI to Execute Deployment Procedures
Using Enterprise Manager For Grid Automation With Deployment Procedures 11-19
■ Targets that will be supplied to the deployment procedures are managed by Management Agents of version 10.2.0.2 or higher.
■ If you are using Enterprise Manager 10g Grid Control Release 3 (10.2.0.3), then download and apply the My Oracle Support patch - 5890474 on 10.2.0.3 OMS, which will update the EMCLI procedure execution scripts, Out-of-box templates, and properties files. This updates the emcli/samples and emcli/scripts directory in OMS oracle home.
■ If you are using Enterprise Manager 10g Grid Control Release 3 (10.2.0.3), then after applying the patch on OMS, download the procedure execution scripts, out-of-box templates and properties files on the machine where the EMCLI client is setup. The out-of-box templates and properties files for patching and provisioning are available in the respective directories under OMS HOME/emcli/samples/.
■ Before using any Real Application Cluster (RAC) related procedure, please be sure that the management agents on the nodes are cluster agents. Refer to Section 11.8.7, "Converting Standalone Agents to Cluster Agents" for information about converting standalone agents to cluster agents.
■ EMCLI-based patching and provisioning uses the Oracle Home credentials set in Oracle Enterprise Manager. The preferred credentials can be set for the targets during the execution of the deployment procedures in Oracle Enterprise Manager. It can also be set explicitly from the Oracle Enterprise Manager user interface or by using EMCLI. Please refer to Section 11.8.6, "Setting Up Preferred Credentials for Targets" to set credentials for the Oracle Homes.
11.8 Using EMCLI to Execute Deployment ProceduresOracle provides out-of-the-box templates for creating run time data for deployment procedures used in the most common use cases. These are known as runtimedata templates. You can access them under the emcli/samples directory in the OMS oracle home and you can then modify the configuration properties in these templates.
The process to use EMCLI to execute deployment procedures is depicted in Figure 11–5.
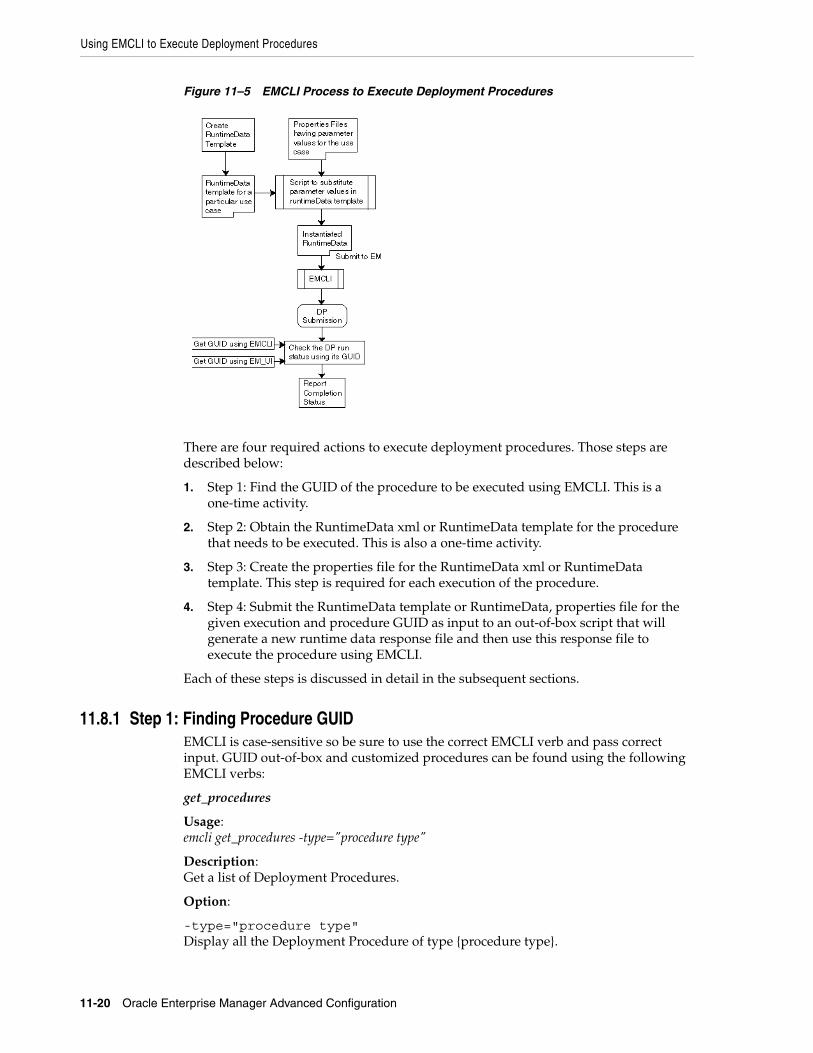
Using EMCLI to Execute Deployment Procedures
11-20 Oracle Enterprise Manager Advanced Configuration
Figure 11–5 EMCLI Process to Execute Deployment Procedures
There are four required actions to execute deployment procedures. Those steps are described below:
1. Step 1: Find the GUID of the procedure to be executed using EMCLI. This is a one-time activity.
2. Step 2: Obtain the RuntimeData xml or RuntimeData template for the procedure that needs to be executed. This is also a one-time activity.
3. Step 3: Create the properties file for the RuntimeData xml or RuntimeData template. This step is required for each execution of the procedure.
4. Step 4: Submit the RuntimeData template or RuntimeData, properties file for the given execution and procedure GUID as input to an out-of-box script that will generate a new runtime data response file and then use this response file to execute the procedure using EMCLI.
Each of these steps is discussed in detail in the subsequent sections.
11.8.1 Step 1: Finding Procedure GUIDEMCLI is case-sensitive so be sure to use the correct EMCLI verb and pass correct input. GUID out-of-box and customized procedures can be found using the following EMCLI verbs:
get_procedures
Usage: emcli get_procedures -type="procedure type"
Description: Get a list of Deployment Procedures.
Option:
-type="procedure type"Display all the Deployment Procedure of type {procedure type}.
Using EMCLI to Execute Deployment Procedures
Using Enterprise Manager For Grid Automation With Deployment Procedures 11-21
Output Columns: GUID, Procedure Type, Name, Version, Created By
RAC procedures are of type: RACPROVAS procedures are of type: AS ProvisioningThe Standalone Database, RAC rolling, and CRS patching procedures are of type: PatchOracleSoftware
Alternatively the type associated with procedures can be found using the get_procedure_type EMCLI command.
get_procedure_types
Usage:emcli get_procedure_types
Description:Get the list of all deployment procedure types
Output Columns:Procedure Type
11.8.2 Step 2: Obtaining RuntimeData Template And RuntimeData XMLFor out-of-box procedures, RuntimeData Templates are located in the emcli/samples directory in the Oracle Management Service (OMS) oracle home. Information about out-of-box procedures and their associated out-of-box templates can be found in Appendix A, "Out-Of-Box Runtime Data Templates".
For customized procedures you have to download the RuntimeData xml generated from an earlier execution of this procedure. To obtain the RuntimeData xml you first need to find the Instance GUID associated with the earlier execution of the procedure and then use it to download the RuntimeData xml generated for it. The following EMCLI verbs can be used to download a RuntimeData xml:
emcli get_instances -type="procedure type"
Usage:emcli get_instances -type="procedure type"
Description:Display list of procedure instances. EMCLI verb to obtain Instance GUID associated with an earlier execution of the customized procedure.
Option:-type="procedure type"Display all the Procedure Instances of a given type.
Output Columns:Instance GUID, Procedure Type, Instance Name, Status
To find the type associated with procedures, use the get_procedures_type verb.
emcli get_instance_data_xml -instance="instance_guid"
Usage:emcli get_instance_data_xml -instance="instance_guid"
Note: GUIDs and procedure types for the out-of-box procedures can be found in Appendix A, "Out-Of-Box Runtime Data Templates".
Using EMCLI to Execute Deployment Procedures
11-22 Oracle Enterprise Manager Advanced Configuration
Description:Download Instance Data XML. EMCLI verb to download a RuntimeData xml using Instance GUID.
Option:-instance is used to specify the instance GUID.
Example:emcli get_instance_data_xml -instance="16B15CB29C3F9E6CE040578C96093F61"
Output:The Instance Data XML.
11.8.3 Step 3: Creating Properties FileThe following sections describe the properties files for out-of-box procedures, customized procedures, and extending procedure execution.
11.8.3.1 Properties File for Out-Of-Box ProceduresIf you are using an out-of-box RuntimeData template, a user identifies the variables in the RuntimeData template file that need to be replaced with values for the configuration properties for a given execution of the procedure. Of all the variables present in the Runtime Data templates, only some might be mandatory for running a given procedure. Once this is done you can create the properties file, which would contain name value pairs mentioning the variables and the values with which they would be replaced for generating the RuntimeData xml file.
For out-of-box procedures, a sample properties file can be found in Appendix B, "Sample Property Files for the Out-of-Box RuntimeData Templates". The corresponding RuntimeData Templates can be obtained from the zip file where this document is present.
Note that each sample properties files in Appendix B contains a section for mandatory variables which should be present in the properties file with relevant values to be substituted at run time. You can optionally provide values for other variables present in the templates.
11.8.3.2 Properties File for Customized ProceduresIn case of customized procedures the RuntimeData xml actually have values instead of placeholder variables for the configuration properties. You need to replace the old runtime values in the RuntimeData xml of the previous run with the new runtime values, which are relevant to the new run.
For this you can have a properties file of the form:
<old_value>=<new_value>
For example, consider this snippet from the RuntimeData xml used to patch an Oracle Database:
…
<scalar value="dbtarget1" classname="java.lang.String" name="targetsToPatch"/>
<scalar value=" HostPrefNormal" classname="java.lang.String" name="hostCredentialSet"/>
<list classname="java.util.Vector" name="patchIDs">
Using EMCLI to Execute Deployment Procedures
Using Enterprise Manager For Grid Automation With Deployment Procedures 11-23
<scalar value="=%oracle_home%/EMStagedPatches" classname="java.lang.String" name="stageDir"/>
<scalar value="false" classname="java.lang.String" name="isPatchset"/>
<scalar value="true" classname="java.lang.String" name="isNotPatchset"/>
<scalar value="defaultSqlScript" classname="java.lang.String" name="sqlScript"/>...
The portions in double quotes are actually the configuration property values that were used during the last execution of the patching procedure.
To patch another database you need to create a properties file with oldvalue=newvalue type of entries for at least the mandatory parameters (in case of patching on the mandatory property is targetsToPatch). Hence the new properties file would look something as below:
dbtarget1=dbtarget2
Since this approach would simply replace an old-string with a new-string, you might run into issues if the old-string is substring in multiple strings in the DP runtime xml. In that case the resulting runtime xml might be erroneous. To circumvent this issue, it is strongly advised to format the properties file a proper fashion. The thumb-rule here is: put the specifics before the generics. A fragment of a properties file in the form of old-value=new-value pairs shown below, illustrates this point.
node1.test.com=node2example.com
node1=node2
node1,node2=node3,node4
Also for specifying the passwords in the properties file please make sure you include the following line in the properties file before mentioning any passwords.
oracle.sysman.pp.paf.impl.EncryptedString =oracle.sysman.pp.paf.impl.UnencryptedString
After this you can mention the password as shown in the examples below:
1. For a password value to replace the placeholder variable in the template file
oracle.sysman.pp.paf.impl.EncryptedString=oracle.sysman.pp.paf.impl.
UnencryptedStringcrsasmrac_provisioning_USER_PASSWORD=mypassword
2. For a new password value to replace an older one in a RuntimeData xml
oracle.sysman.pp.paf.impl.EncryptedString=oracle.sysman.pp.paf.impl.
UnencryptedStringmyOLDpass=myNEWpassword
Note that mypassword and myNewpassword used in the above examples are clear text passwords.
Note: The elements var_runOpatchUpgrade and var_isUpgradeStepEnabled have been added to support Opatch upgrade. The first element should be set to "true" to run the opatch upgrade step. var_isUpgradeStepEnabled should be set to "true" if opatch is to be upgraded, otherwise, it should be "false".

Using EMCLI to Execute Deployment Procedures
11-24 Oracle Enterprise Manager Advanced Configuration
11.8.3.3 Properties File For Extending Procedure ExecutionProperties file allows you to use the same RuntimeData xml for extending the use case. For example, you might have performed a successful procedure execution (partial cluster scale- up or scale down or patching) for a target and you want to extend it to a set of new targets.
You can do this by using a Properties file and replacing the parameter values in it (Refer to the Mandatory parameter section at Appendix B, "Sample Property Files for the Out-of-Box RuntimeData Templates" for the various procedures). For example:
node1 = node2,node 3
Wherein node1 is the Target for which you had executed the procedure previously and node2 and node3 are the targets to which you want to extend the procedure execution.
An exception to this rule is extending the patching procedures to a different set of targets, which would require you to have a properties file with the following mandatory parameter (Instead of the approach of <old-value>=<new-value>):
PA_VAR_targetsToPatch=Tgt2, Tgt3, Tgt4
Wherein Tgt2, Tgt3 and Tgt4 are the new targets to which you want to extend the procedure execution.
Refer to Section 11.8.8, "Queries to Acquire Data for Patching Runtime" for the list of queries which can be used to acquire data for creating properties file.
11.8.3.4 Properties File For Applying Multiple Patches At OnceIn 10.2.0.4, new elements have been added in RuntimeData xml to support multiple patches. The new elements are:
■ patchesToBeApplied - Enter a comma-separated list of patch IDs for this element.
Example: <scalar value="patchesToBeApplied" classname="java.lang.String" name="patchListToApply"/>
■ patchSourceForPatches - Enter patch source, which is either SWLIB or METALINK. Default source is SWLIB
Example: <scalar value="patchSourceForPatches" classname="java.lang.String" name="patchListSource"/>
■ patchPlatformForPatches - This is optional. Enter supported platforms for patchOptional. You must provide a valid platform ID. To get platform IDs, run the displayPlatformInfo.pl script in <EMCLI working directory>/scripts.
Example: <scalar value="patchPlatformForPatches" classname="java.lang.String" name="patchPlatform"/>
■ patchReleaseForPatches - Enter the release of the patchset. This is optional, but required for patchsets.
Example: <scalar value="patchReleaseForPatches" classname="java.lang.String" name="patchRelease"/>
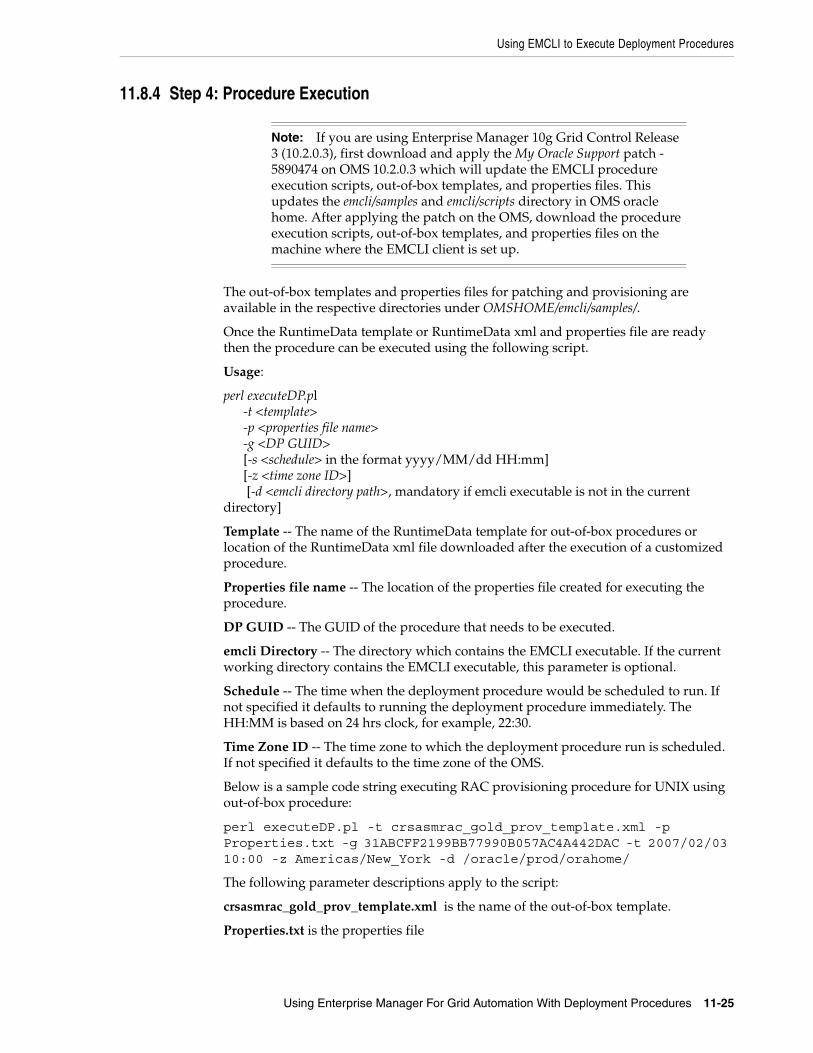
Using EMCLI to Execute Deployment Procedures
Using Enterprise Manager For Grid Automation With Deployment Procedures 11-25
11.8.4 Step 4: Procedure Execution
The out-of-box templates and properties files for patching and provisioning are available in the respective directories under OMSHOME/emcli/samples/.
Once the RuntimeData template or RuntimeData xml and properties file are ready then the procedure can be executed using the following script.
Usage:
perl executeDP.pl -t <template> -p <properties file name> -g <DP GUID> [-s <schedule> in the format yyyy/MM/dd HH:mm] [-z <time zone ID>] [-d <emcli directory path>, mandatory if emcli executable is not in the current directory]
Template -- The name of the RuntimeData template for out-of-box procedures or location of the RuntimeData xml file downloaded after the execution of a customized procedure.
Properties file name -- The location of the properties file created for executing the procedure.
DP GUID -- The GUID of the procedure that needs to be executed.
emcli Directory -- The directory which contains the EMCLI executable. If the current working directory contains the EMCLI executable, this parameter is optional.
Schedule -- The time when the deployment procedure would be scheduled to run. If not specified it defaults to running the deployment procedure immediately. The HH:MM is based on 24 hrs clock, for example, 22:30.
Time Zone ID -- The time zone to which the deployment procedure run is scheduled. If not specified it defaults to the time zone of the OMS.
Below is a sample code string executing RAC provisioning procedure for UNIX using out-of-box procedure:
perl executeDP.pl -t crsasmrac_gold_prov_template.xml -p Properties.txt -g 31ABCFF2199BB77990B057AC4A442DAC -t 2007/02/03 10:00 -z Americas/New_York -d /oracle/prod/orahome/
The following parameter descriptions apply to the script:
crsasmrac_gold_prov_template.xml is the name of the out-of-box template.
Properties.txt is the properties file
Note: If you are using Enterprise Manager 10g Grid Control Release 3 (10.2.0.3), first download and apply the My Oracle Support patch - 5890474 on OMS 10.2.0.3 which will update the EMCLI procedure execution scripts, out-of-box templates, and properties files. This updates the emcli/samples and emcli/scripts directory in OMS oracle home. After applying the patch on the OMS, download the procedure execution scripts, out-of-box templates, and properties files on the machine where the EMCLI client is set up.
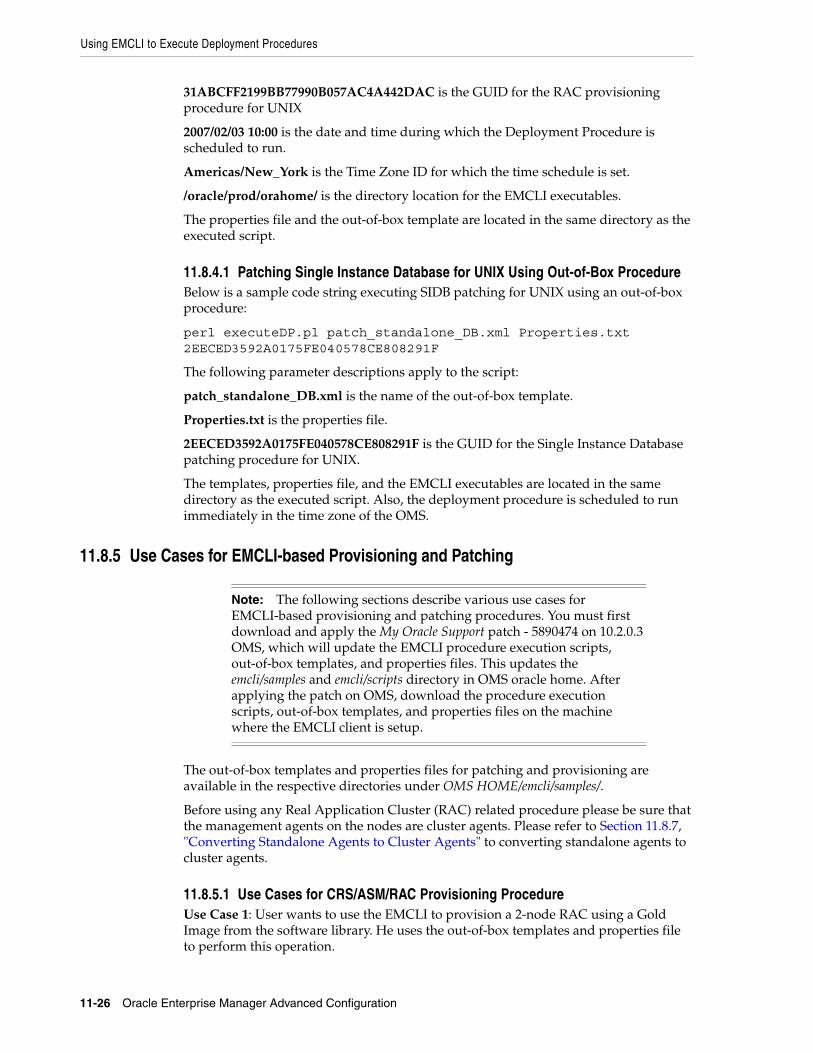
Using EMCLI to Execute Deployment Procedures
11-26 Oracle Enterprise Manager Advanced Configuration
31ABCFF2199BB77990B057AC4A442DAC is the GUID for the RAC provisioning procedure for UNIX
2007/02/03 10:00 is the date and time during which the Deployment Procedure is scheduled to run.
Americas/New_York is the Time Zone ID for which the time schedule is set.
/oracle/prod/orahome/ is the directory location for the EMCLI executables.
The properties file and the out-of-box template are located in the same directory as the executed script.
11.8.4.1 Patching Single Instance Database for UNIX Using Out-of-Box ProcedureBelow is a sample code string executing SIDB patching for UNIX using an out-of-box procedure:
perl executeDP.pl patch_standalone_DB.xml Properties.txt 2EECED3592A0175FE040578CE808291F
The following parameter descriptions apply to the script:
patch_standalone_DB.xml is the name of the out-of-box template.
Properties.txt is the properties file.
2EECED3592A0175FE040578CE808291F is the GUID for the Single Instance Database patching procedure for UNIX.
The templates, properties file, and the EMCLI executables are located in the same directory as the executed script. Also, the deployment procedure is scheduled to run immediately in the time zone of the OMS.
11.8.5 Use Cases for EMCLI-based Provisioning and Patching
The out-of-box templates and properties files for patching and provisioning are available in the respective directories under OMS HOME/emcli/samples/.
Before using any Real Application Cluster (RAC) related procedure please be sure that the management agents on the nodes are cluster agents. Please refer to Section 11.8.7, "Converting Standalone Agents to Cluster Agents" to converting standalone agents to cluster agents.
11.8.5.1 Use Cases for CRS/ASM/RAC Provisioning ProcedureUse Case 1: User wants to use the EMCLI to provision a 2-node RAC using a Gold Image from the software library. He uses the out-of-box templates and properties file to perform this operation.
Note: The following sections describe various use cases for EMCLI-based provisioning and patching procedures. You must first download and apply the My Oracle Support patch - 5890474 on 10.2.0.3 OMS, which will update the EMCLI procedure execution scripts, out-of-box templates, and properties files. This updates the emcli/samples and emcli/scripts directory in OMS oracle home. After applying the patch on OMS, download the procedure execution scripts, out-of-box templates, and properties files on the machine where the EMCLI client is setup.
Using EMCLI to Execute Deployment Procedures
Using Enterprise Manager For Grid Automation With Deployment Procedures 11-27
■ User creates a Properties file with the mandatory configuration parameters required for RAC provisioning procedure and assigns appropriate values for the variables. Refer Sample Properties file with Mandatory parameters for out-of-box RAC provisioning procedure using Gold Image
■ User finds the appropriate GUID for the RAC provisioning procedure. Refer to section "Out-of-box RuntimeData Templates For RAC Procedures" of Appendix A, "Out-Of-Box Runtime Data Templates" for GUID, procedure type, and template name information for the out-of-box RAC provisioning procedure using Gold Image from Software Library.
■ User submits the procedure for execution by invoking the executeDP.pl script and providing the location details of the properties file, location of the out-of-box template and procedure GUID.
Use Case 2: User wants to use the EMCLI provision another 4 node RAC using the same out-of-box templates and properties file as used in Use case 1 to perform this operation.
■ User takes the properties file from the previous use case and makes the necessary changes for the mandatory parameters to provision a 4-node RAC.
■ User submits the procedure for execution by invoking the executeDP.pl script and providing the location details of the properties file, location of the out-of-box template and procedure GUID. Sample usage of the script is shown below.
Use Case 3: User wants to use the EMCLI to provision a 2-node RAC using a Reference Installation. He uses the out-of-box templates and properties file to perform this operation.
■ User creates a Properties file with the mandatory configuration parameters required for RAC provisioning procedure and assigns appropriate values for the variables. Refer Sample Properties file with Mandatory parameters for out-of-box RAC provisioning procedure using Reference Installation.
■ User finds the appropriate GUID for the RAC provisioning procedure. Refer to section "Out-of-box RuntimeData Templates For RAC Procedures" of Appendix A, "Out-Of-Box Runtime Data Templates" for GUID, procedure type, and template name information for the out-of-box RAC provisioning procedure using Reference Installation.
■ User submits the procedure for execution by invoking the executeDP.pl script and providing the location details of the properties file, location of the out-of-box template and procedure GUID.
Use Case 4: User customizes and tests the out-of-box RAC provisioning procedure using reference host. He wants to use the EMCLI to provision a 2-node RAC. He uses the runtime data xml of the trial runs of his customized procedure and properties file to perform this operation on a similar 2-node RAC.
■ Locates the instance GUID of the previous trial run as described in section.
■ User downloads the Runtime data xml for the previous execution of the procedure.
■ User identifies the parameters in the Runtime data xml that need to be substituted with new values. He then creates a properties file with name-value pairs like <old-value>=<new-value> for carrying out the necessary runtime substitutions. This properties file should at least contain the substitution rule for the values corresponding to the mandatory parameters mentioned in Sample Properties file with Mandatory parameters for out-of-box RAC provisioning procedure using
Using EMCLI to Execute Deployment Procedures
11-28 Oracle Enterprise Manager Advanced Configuration
Reference Installation in addition to the other values that he might want to substitute.
■ User finds the GUID for the customized RAC provisioning procedure. Refer to section Finding Procedure GUID.
■ User submits the procedure for execution by invoking the executeDP.pl script and providing the location details of the properties file, location of the downloaded Runtime data xml and procedure GUID.
Use Case 5: User customizes and tests the out-of-box RAC provisioning procedure. He wants to use the EMCLI to provision a N-node RAC. He uses the runtime data xml of a trial run of his customized procedure and properties file to perform this operation on a M-node cluster (where M>N).
■ Locates the instance GUID of the previous trial run of the customized procedure.
■ User downloads the Runtime data xml for the previous execution of the procedure.
■ User identifies the parameters in the Runtime data xml that need to be substituted with new values. He then creates a properties file with name-value pairs like <old-value>=<new-value> for carrying out the necessary runtime substitutions. This properties file should at least contain the substitution rule for the values corresponding to the mandatory parameters mentioned in Sample Properties file with Mandatory parameters for out-of-box RAC provisioning procedure using Gold Image, in addition to the other values that he might want to substitute.
■ User finds the GUID for the customized RAC provisioning procedure. Refer to section Finding Procedure GUID.
■ User submits the procedure for execution by invoking the executeDP.pl script and providing the location details of the properties file, location of the downloaded Runtime data xml and procedure GUID.
11.8.5.2 Use Cases for Extend Cluster ProcedureUse Case 1: User wants to use the EMCLI to extend a 2-node RAC to 4-node cluster. He uses the out-of-box templates and properties file to perform this operation.
■ User creates a Properties file with at least the mandatory parameters required for cluster Extension procedure and assigns appropriate values for the variables. Refer Sample Properties file with Mandatory parameters for out-of-box Cluster Extend procedure.
■ User finds the appropriate GUID for the RAC provisioning procedure. Refer to section "Out-of-box RuntimeData Templates For RAC Procedures" of Appendix A, "Out-Of-Box Runtime Data Templates" for GUID, procedure type, and template name information for the out-of-box Cluster Extend procedure.
■ User submits the procedure for execution by invoking the executeDP.pl script and providing the location details of the properties file, name of the out-of-box template and procedure GUID.
11.8.5.3 Use Cases For RAC Delete/Descale ProcedureUse Case 1: User wants to use the EMCLI to delete the 2-node RAC cluster. He uses the out-of-box templates and properties file to perform this operation.
■ User creates a Properties file with at least the mandatory parameters required for RAC Delete procedure and assigns appropriate values for the variables. Refer
Using EMCLI to Execute Deployment Procedures
Using Enterprise Manager For Grid Automation With Deployment Procedures 11-29
Sample Properties file with Mandatory parameters for out-of-box Cluster Delete procedure.
■ User finds the appropriate GUID for the RAC Delete procedure. Refer to section "Out-of-box RuntimeData Templates For RAC Procedures" of Appendix A, "Out-Of-Box Runtime Data Templates" for GUID, procedure type, and template name information for the out-of-box Scale Down/Delete RAC procedure. Note that template used for Cluster Scale down and Cluster Delete use cases differ.
■ User submits the procedure for execution by invoking the executeDP.pl script and providing the location details of the properties file, name of the out-of-box template and procedure GUID.
Use Case 2: User wants to use the EMCLI to descale a 2-node RAC cluster. He uses the out-of-box templates and properties file to perform this operation.
■ User creates a Properties file with at least the mandatory parameters required for RAC Scale Down procedure and assigns appropriate values for the variables. Refer Sample Properties file with Mandatory parameters for out-of-box Cluster Descale procedure.
■ User finds the appropriate GUID for the RAC Descale procedure. Refer to section "Out-of-box RuntimeData Templates For RAC Procedures" of Appendix A, "Out-Of-Box Runtime Data Templates" for GUID, procedure type, and template name information for the out-of-box Scale Down/Delete RAC procedure. Note that template used for Cluster Scale down and Cluster Delete use cases are different.
■ User submits the procedure for execution by invoking the executeDP.pl script and providing the location details of the properties file, name of the out-of-box template and procedure GUID.
11.8.5.4 Use Cases for PatchingUse Case 1: User wants to use the out-of-box Database Patching procedure to apply a one-off patch to a database. He uses the out-of-box templates and properties file to perform this operation.
■ User creates a Properties file with the mandatory configuration parameters required for patching the database with a particular one-off and assigns appropriate values for these variables. List of the mandatory values can be found from the Sample Properties file with Mandatory parameters for all the patching procedures.
■ User finds the appropriate GUID for the Patch provisioning procedure. Refer to section "Out-of-box RuntimeData Templates For Patching Procedures" of Appendix A, "Out-Of-Box Runtime Data Templates" for GUID, procedure type, and template name information for the out-of-box Patch Oracle Database procedure.
■ User submits the procedure for execution by invoking the executeDP.pl script and providing the location details of the properties file, location of the out-of-box template and procedure GUID.
Use Case 2: User wants to use the Database Patching procedure to apply multiple one-off patches to multiple databases. He uses the out-of-box templates and properties file created in use User Case 1 above to perform this operation.
■ User creates a Properties file with the mandatory configuration parameters required for patching the database with a particular one-off and assigns appropriate values for these variables. List of the mandatory values can be found
Using EMCLI to Execute Deployment Procedures
11-30 Oracle Enterprise Manager Advanced Configuration
from the Sample Properties file with Mandatory parameters for all the patching procedures.
■ User submits the procedure for execution by invoking the executeDP.pl script and providing the location details of the properties file, location of the out-of-box template and procedure GUID.
Use Case 3: User wants to use the Database Patching procedure to apply a patchset to a set of databases. He uses the out-of-box templates and properties file created in use Use Case 1 above to perform this operation.
■ User creates a Properties file with the mandatory configuration parameters required for patching the database with a particular one-off and assigns appropriate values for these variables. List of the mandatory values can be found from the Sample Properties file with Mandatory parameters for all the patching procedures.
■ User find the appropriate GUID for the Patch provisioning procedure.
■ User submits the procedure for execution by invoking the executeDP.pl script and providing the location details of the properties file, location of the out-of-box template and procedure GUID.
Use Case 4: User customizes and tests the out-of-box Oracle Clusterware Patching procedure. He wants to use the EMCLI to patch a 2-node cluster. He uses the runtime data xml of the trial runs of his customized procedure and properties file to perform this operation on a similar 2-node cluster.
■ User creates a Properties file with the mandatory configuration parameters required for patching the database with a particular one-off and assigns appropriate values for these variables. List of the mandatory values can be found from the Sample Properties file with Mandatory parameters for all the patching procedures.
■ User finds the GUID for the customized patching procedure.
■ User submits the procedure for execution by invoking the executeDP.pl script and providing the location details of the properties file, location of the run time data xml and procedure GUID.
Use Case 5: User customizes and tests the out-of-box Oracle Clusterware Patching procedure. He wants to use the EMCLI to patch a 2-node cluster. He uses the runtime data xml of the trial runs of his customized procedure and properties file to perform this operation on a similar N-node cluster.
■ User creates a Properties file with the mandatory configuration parameters required for patching the database with a particular one-off and assigns appropriate values for these variables. List of the mandatory values can be found from the Sample Properties file with Mandatory parameters for all the patching procedures.
For example, use the mandatory variable of the Properties file for scaling up to multiple Targets as seen here:
PA_VAR_targetsToPatch=NewTarget1, NewTarget2, NewTarget3…
■ User finds the GUID for the customized patching procedure.
■ User submits the procedure for execution by invoking the executeDP.pl script and providing the location details of the properties file, location of the runtime data xml and procedure GUID.
Using EMCLI to Execute Deployment Procedures
Using Enterprise Manager For Grid Automation With Deployment Procedures 11-31
11.8.5.5 LimitationsThere is a limitation to consider when using patching deployment procedures through EMCLI.
Out-of -box templates are not available for patching deployment procedures like Application Server patching, Real Application Cluster -All nodes and pre-requisite checkers for Database, Real Application Cluster (RAC), Automatic Storage Management (ASM) and Clusterware. To use EMCLI for these procedures:
■ Run the procedure once through the UI.
■ Export the run time data xml
emcli get_instance_data_xml -instance="instance_guid"
Where, instance_guid is of the deployment procedure. (Refer to step 2-Obtaining Runtime Data Template and Data xml.)
■ Create a properties file with the mandatory configuration parameter required for patching or running pre-requisite checker and assign appropriate values for the other changes. List of the mandatory values can be found from the Sample Properties file with Mandatory parameters for all the patching procedures.
For example, use the mandatory variable of the Properties file for scaling up to multiple Targets
PA_VAR_targetsT=NewTarget1, NewTarget2, NewTarget3…
■ Submit the procedure for execution by invoking the executeDP.pl script and providing the location details of the properties file, location of the runtime data xml and procedure GUID.
11.8.6 Setting Up Preferred Credentials for TargetsThe EMCLI execution looks for the credentials for the Targets under the Enterprise Manager with the OMS user executing the procedures. The preset credentials is looked up for the Targets under patching or for the ones used as a reference during provisioning procedures.
The credentials can be stored while doing any patching or provisioning operations through the Enterprise Manager user interface in the 'Credentials' section of the procedure run. If not, you can set up the credentials either through the Enterprise Manager OMS explicitly or through the use of EMCLI commands.
11.8.6.1 Setting Credentials From the Oracle Enterprise Manager User InterfaceYou can set the credentials for targets through the Oracle Enterprise Manager user interface by following these steps:
1. Log in to Oracle Enterprise Manger.
2. Access the link "Preferences" on the top right corner of the page.
3. Click on "Preferred Credentials" link in the options section of the page.
4. Setup 'Normal' or 'Preferred Credentials' from this page for the Target type. (Example: Database Instance, Cluster Database or Cluster).
11.8.6.2 Setting Credentials Through EMCLIYou can set the credentials for targets through the EMCLI command line interface using the following code sequence:
Using EMCLI to Execute Deployment Procedures
11-32 Oracle Enterprise Manager Advanced Configuration
set_credential -target_type="ttype" [-target_name="tname"] -credential_set="cred_set" [-user="user"] -columns="col1:newval1;col2:newval2;..." [-input_file="tag1:file_path1;tag2:file_path2;..."] [-oracle_homes="home1;home2"]
The following list describes the options used in the EMCLI code:
■ target_type - Type of target. Must be "host" in case "-oracle_homes" parameter is specified.
■ target_name - Name of target. Omit this argument to set enterprise preferred credentials. Must be hostname in case "-oracle_homes" parameter is specified.
■ user - Enterprise Manager user whose credentials are affected. If omitted, the current user's credentials are affected.
■ columns - The name and new value of the column(s) to set. Every column of the credential set must be specified. Alternatively, a tag from the -input_file argument may be used so that the credential values are not seen on the command line. This argument may be specified more than once.
■ input_file - Path of file that has -columns argument(s). This option is used to hide passwords. Each path must be accompanied by a tag, which is referenced in the -columns argument. This argument may be specified more than once.
■ oracle_homes - Name of oracle homes on the target host. Credentials will be added/updated for all specified homes.
The list of columns and the credential sets they belong to is included in the metadata file for each target type. This and other credential information is in the <CredentialInfo> section of the metadata.
The following is an example of the sequence:
emcli set_credential -target_type=host -target_name=host.us.oracle.com -credential_set=OHCreds -user=admin1 -column="OHUsername:joe;OHPassword:newPass" -oracle_homes="database1;mydb"
For more details on EMCLI, refer to the verb reference section of Enterprise Manager Command Line Interface Guide available at:
http://www.oracle.com/technology/documentation/oem.html
11.8.6.3 Clearing Credentials Through EMCLIYou can clear preferred or monitoring credentials for given users through the EMCLI command line interface using the following code sequence:
emcli clear_credential -target_type="ttype" [-target_name="tname"] -credential_set="cred_set" [-user="user"] [-oracle_homes="home1;home2"]
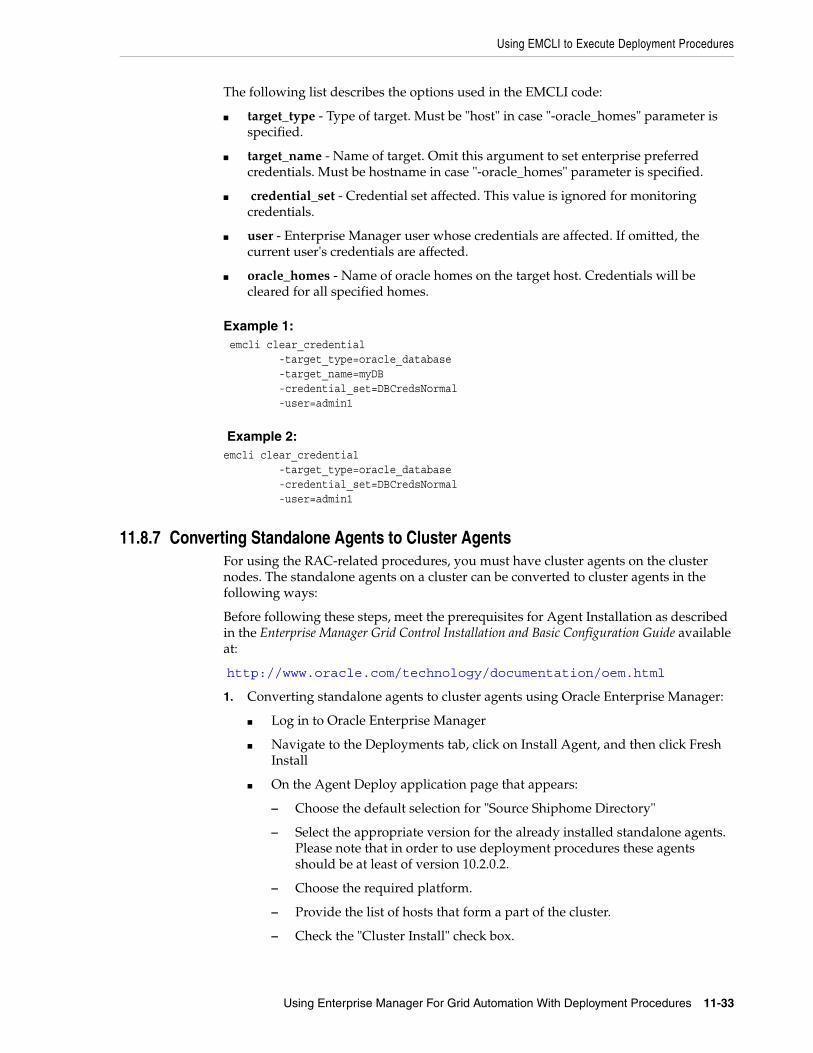
Using EMCLI to Execute Deployment Procedures
Using Enterprise Manager For Grid Automation With Deployment Procedures 11-33
The following list describes the options used in the EMCLI code:
■ target_type - Type of target. Must be "host" in case "-oracle_homes" parameter is specified.
■ target_name - Name of target. Omit this argument to set enterprise preferred credentials. Must be hostname in case "-oracle_homes" parameter is specified.
■ credential_set - Credential set affected. This value is ignored for monitoring credentials.
■ user - Enterprise Manager user whose credentials are affected. If omitted, the current user's credentials are affected.
■ oracle_homes - Name of oracle homes on the target host. Credentials will be cleared for all specified homes.
Example 1: emcli clear_credential -target_type=oracle_database -target_name=myDB -credential_set=DBCredsNormal -user=admin1
Example 2:emcli clear_credential -target_type=oracle_database -credential_set=DBCredsNormal -user=admin1
11.8.7 Converting Standalone Agents to Cluster AgentsFor using the RAC-related procedures, you must have cluster agents on the cluster nodes. The standalone agents on a cluster can be converted to cluster agents in the following ways:
Before following these steps, meet the prerequisites for Agent Installation as described in the Enterprise Manager Grid Control Installation and Basic Configuration Guide available at:
http://www.oracle.com/technology/documentation/oem.html
1. Converting standalone agents to cluster agents using Oracle Enterprise Manager:
■ Log in to Oracle Enterprise Manager
■ Navigate to the Deployments tab, click on Install Agent, and then click Fresh Install
■ On the Agent Deploy application page that appears:
– Choose the default selection for "Source Shiphome Directory"
– Select the appropriate version for the already installed standalone agents. Please note that in order to use deployment procedures these agents should be at least of version 10.2.0.2.
– Choose the required platform.
– Provide the list of hosts that form a part of the cluster.
– Check the "Cluster Install" check box.

Using EMCLI to Execute Deployment Procedures
11-34 Oracle Enterprise Manager Advanced Configuration
– Use the "Populate Defaults" button to fill values for "Cluster Node List" parameter.
– Provide the cluster name of the existing cluster.
– Provide the host credentials and the agent installation base directory for the nodes that form the cluster.
– Supply any other optional parameters and click on the continue button.
2. Converting the standalone agents using the agentca utility:
■ Invoke the agentca using the -f and -c option from the <Agent Oracle home>/bin directory of the standalone agent on each cluster node. Also use the -n option to specify the name of the cluster. For example:
<Agent Oracle Home>/bin/agentca -f -n <cluster name> -c "{<comma separated cluster node list like node1, node 2…>}"
■ In case ssh connection is setup between the cluster nodes, then run the following command from <Agent Oracle Home>/oui/bin directory on one of the nodes:
./runInstaller -updateNodelist ORACLE_HOME=<Agent Oracle Home> "CLUSTER_NODES={<comma separated list of nodes in the cluster>}"
■ In case ssh connection is not setup between the nodes then run the following command from <Agent Oracle Home>/oui/bin directory on each node:
./runInstaller -updateNodelist ORACLE_HOME=< Agent Oracle Home > "CLUSTER_NODES={< comma separated list of nodes in the cluster >}" -local
11.8.8 Queries to Acquire Data for Patching RuntimeUse the following queries to acquire data for patching runtime:
■ Use the following query to acquire an Instance name from a host:
select target_name, target_type, oracle_home from em$ECM_TARGETS_VIEW where host = '<host name>';
■ Get the instance name for a given host:
select target_name, target_type, oracle_home from em$ECM_TARGETS_VIEW where host = '<host name>';
■ Get the instances of a CRS given the name of the CRS:
select assoc_target_name, crs_instance from sysman.mgmt$target_associations where assoc_def_name='contains' and source_target_name='<crs_name>' and source_target_type='cluster'
■ Get all CRS and its instances:
select source_target_name crs_name, assoc_target_name, crs_instance from sysman.mgmt$target_associations where assoc_def_name='contains' and source_target_type='cluster' order by source_target_name
■ Get instances of a RAC cluster given the name of the RAC cluster:
select assoc_target_name rac_instance from sysman.mgmt$target_associations where assoc_def_name='contains' and source_target_name='<rac_name>' and source_target_type='rac_database'
■ Get all RAC clusters and their instances:
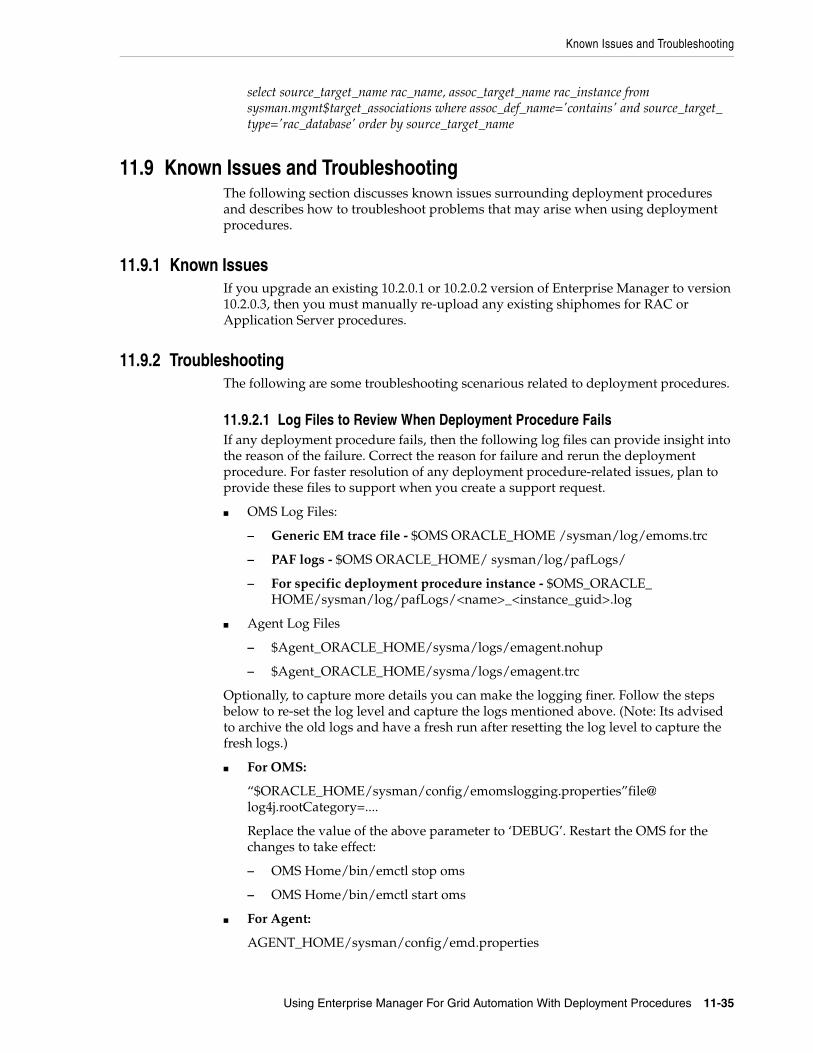
Known Issues and Troubleshooting
Using Enterprise Manager For Grid Automation With Deployment Procedures 11-35
select source_target_name rac_name, assoc_target_name rac_instance from sysman.mgmt$target_associations where assoc_def_name='contains' and source_target_type='rac_database' order by source_target_name
11.9 Known Issues and TroubleshootingThe following section discusses known issues surrounding deployment procedures and describes how to troubleshoot problems that may arise when using deployment procedures.
11.9.1 Known IssuesIf you upgrade an existing 10.2.0.1 or 10.2.0.2 version of Enterprise Manager to version 10.2.0.3, then you must manually re-upload any existing shiphomes for RAC or Application Server procedures.
11.9.2 TroubleshootingThe following are some troubleshooting scenarious related to deployment procedures.
11.9.2.1 Log Files to Review When Deployment Procedure FailsIf any deployment procedure fails, then the following log files can provide insight into the reason of the failure. Correct the reason for failure and rerun the deployment procedure. For faster resolution of any deployment procedure-related issues, plan to provide these files to support when you create a support request.
■ OMS Log Files:
– Generic EM trace file - $OMS ORACLE_HOME /sysman/log/emoms.trc
– PAF logs - $OMS ORACLE_HOME/ sysman/log/pafLogs/
– For specific deployment procedure instance - $OMS_ORACLE_HOME/sysman/log/pafLogs/<name>_<instance_guid>.log
■ Agent Log Files
– $Agent_ORACLE_HOME/sysma/logs/emagent.nohup
– $Agent_ORACLE_HOME/sysma/logs/emagent.trc
Optionally, to capture more details you can make the logging finer. Follow the steps below to re-set the log level and capture the logs mentioned above. (Note: Its advised to archive the old logs and have a fresh run after resetting the log level to capture the fresh logs.)
■ For OMS:
“$ORACLE_HOME/sysman/config/emomslogging.properties”file@ log4j.rootCategory=....
Replace the value of the above parameter to ‘DEBUG’. Restart the OMS for the changes to take effect:
– OMS Home/bin/emctl stop oms
– OMS Home/bin/emctl start oms
■ For Agent:
AGENT_HOME/sysman/config/emd.properties

Known Issues and Troubleshooting
11-36 Oracle Enterprise Manager Advanced Configuration
tracelevel.Dispatcherr=DEBUG (Writes to emagent.nohup)
tracelevel.command=DEBUG (Writes to emagent.trc)
Re-load the agent: $Agent_ORACLE_HOME/bin/emctl reload agent
The settings above are to be set only when you want additional details and when the logs do not have sufficient information to debug the issue. Make sure to set the debug level back to the original levels after reproducing the issue. While reporting issues with deployment procedures, associate the tar/zip of the logs from both the above locations with the SR.
Sizing and Maximizing the Performance of Oracle Enterprise Manager 12-1
12Sizing and Maximizing the Performance of
Oracle Enterprise Manager
Oracle Enterprise Manager 10g Grid Control has the ability to scale for hundreds of users and thousands of systems and services on a single Enterprise Manager implementation.
This chapter describes techniques for achieving optimal performance using the Oracle Enterprise Manager application. It can also help you with capacity planning, sizing and maximizing Enterprise Manager performance in a large scale environment. By maintaining routine housekeeping and monitoring performance regularly, you insure that you will have the required data to make accurate forecasts of future sizing requirements. Receiving good baseline values for the Enterprise Manager Grid Control vital signs and setting reasonable warning and critical thresholds on baselines allows Enterprise Manager to monitor itself for you.
This chapter also provides practical approaches to backup, recovery, and disaster recovery topics while addressing different strategies when practical for each tier of Enterprise Manager.
This chapter contains the following sections:
■ Oracle Enterprise Manager Grid Control Architecture Overview
■ Enterprise Manager Grid Control Sizing and Performance Methodology
■ Oracle Enterprise Manager Backup, Recovery, and Disaster Recovery Considerations
12.1 Oracle Enterprise Manager Grid Control Architecture OverviewThe architecture for Oracle Enterprise Manager 10g Grid Control exemplifies two key concepts in application performance tuning: distribution and parallelization of processing. Each component of Grid Control can be configured to apply both these concepts.
The components of Enterprise Manager Grid Control include:
■ The Management Agent - A process that is deployed on each monitored host and that is responsible for monitoring all services and components on the host. The Management Agent is also responsible for communicating that information to the middle-tier Management Service and for managing and maintaining the system and its services.
■ The Management Service - A J2EE Web application that renders the user interface for the Grid Control Console, works with all Management Agents to process

Enterprise Manager Grid Control Sizing and Performance Methodology
12-2 Oracle Enterprise Manager Advanced Configuration
monitoring and jobs information, and uses the Management Repository as its data store.
■ The Management Repository - The schema is an Oracle Database that contains all available information about administrators, services, and applications managed within Enterprise Manager.
Figure 12–1 Overview of Enterprise Manager Architecture Components
For more information about the Grid Control architecture, see the Oracle Enterprise Manager 10g documentation:
■ Oracle Enterprise Manager Grid Control Installation and Basic Configuration
■ Oracle Enterprise Manager Concepts
The Oracle Enterprise Manager 10g documentation is available at the following location on the Oracle Technology Network (OTN):
http://otn.oracle.com/documentation/oem.html
12.2 Enterprise Manager Grid Control Sizing and Performance Methodology
An accurate predictor of capacity at scale is the actual metric trend information from each individual Enterprise Manager Grid Control deployment. This information, combined with an established, rough, starting host system size and iterative tuning and maintenance, produces the most effective means of predicting capacity for your Enterprise Manager Grid Control deployment. It also assists in keeping your deployment performing at an optimal level.
Here are the steps to follow to enact the Enterprise Manager Grid Control sizing methodology:
Web-BasedGrid Control
ThinJDBC
HTTP(S)
HTTP(S) HTTP(S)HTTP(S)
ManagementService
(J2EE WebApplication)
ApplicationServer
OS/Third-PartyApplication
ManagedTargets
ManagementRepository
Database
ManagementAgent
ManagementAgent
ManagementAgent
ApplicationServerControl
DatabaseControl
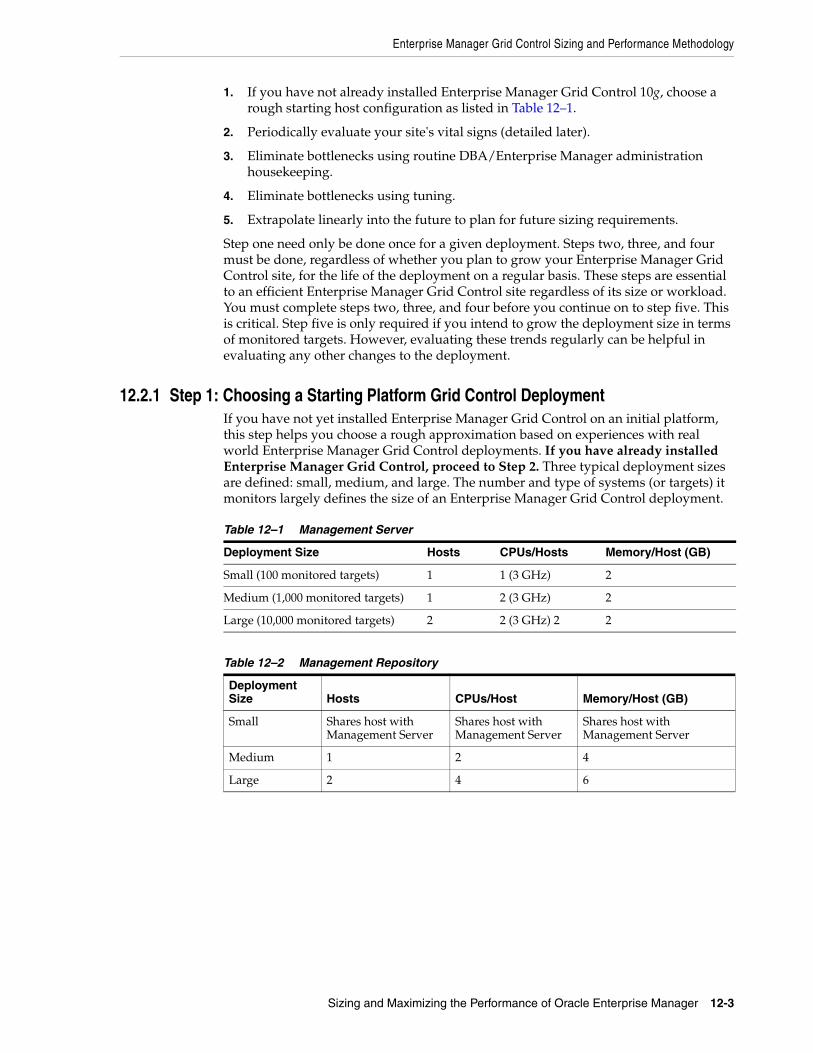
Enterprise Manager Grid Control Sizing and Performance Methodology
Sizing and Maximizing the Performance of Oracle Enterprise Manager 12-3
1. If you have not already installed Enterprise Manager Grid Control 10g, choose a rough starting host configuration as listed in Table 12–1.
2. Periodically evaluate your site's vital signs (detailed later).
3. Eliminate bottlenecks using routine DBA/Enterprise Manager administration housekeeping.
4. Eliminate bottlenecks using tuning.
5. Extrapolate linearly into the future to plan for future sizing requirements.
Step one need only be done once for a given deployment. Steps two, three, and four must be done, regardless of whether you plan to grow your Enterprise Manager Grid Control site, for the life of the deployment on a regular basis. These steps are essential to an efficient Enterprise Manager Grid Control site regardless of its size or workload. You must complete steps two, three, and four before you continue on to step five. This is critical. Step five is only required if you intend to grow the deployment size in terms of monitored targets. However, evaluating these trends regularly can be helpful in evaluating any other changes to the deployment.
12.2.1 Step 1: Choosing a Starting Platform Grid Control DeploymentIf you have not yet installed Enterprise Manager Grid Control on an initial platform, this step helps you choose a rough approximation based on experiences with real world Enterprise Manager Grid Control deployments. If you have already installed Enterprise Manager Grid Control, proceed to Step 2. Three typical deployment sizes are defined: small, medium, and large. The number and type of systems (or targets) it monitors largely defines the size of an Enterprise Manager Grid Control deployment.
Table 12–1 Management Server
Deployment Size Hosts CPUs/Hosts Memory/Host (GB)
Small (100 monitored targets) 1 1 (3 GHz) 2
Medium (1,000 monitored targets) 1 2 (3 GHz) 2
Large (10,000 monitored targets) 2 2 (3 GHz) 2 2
Table 12–2 Management Repository
Deployment Size Hosts CPUs/Host Memory/Host (GB)
Small Shares host with Management Server
Shares host with Management Server
Shares host with Management Server
Medium 1 2 4
Large 2 4 6
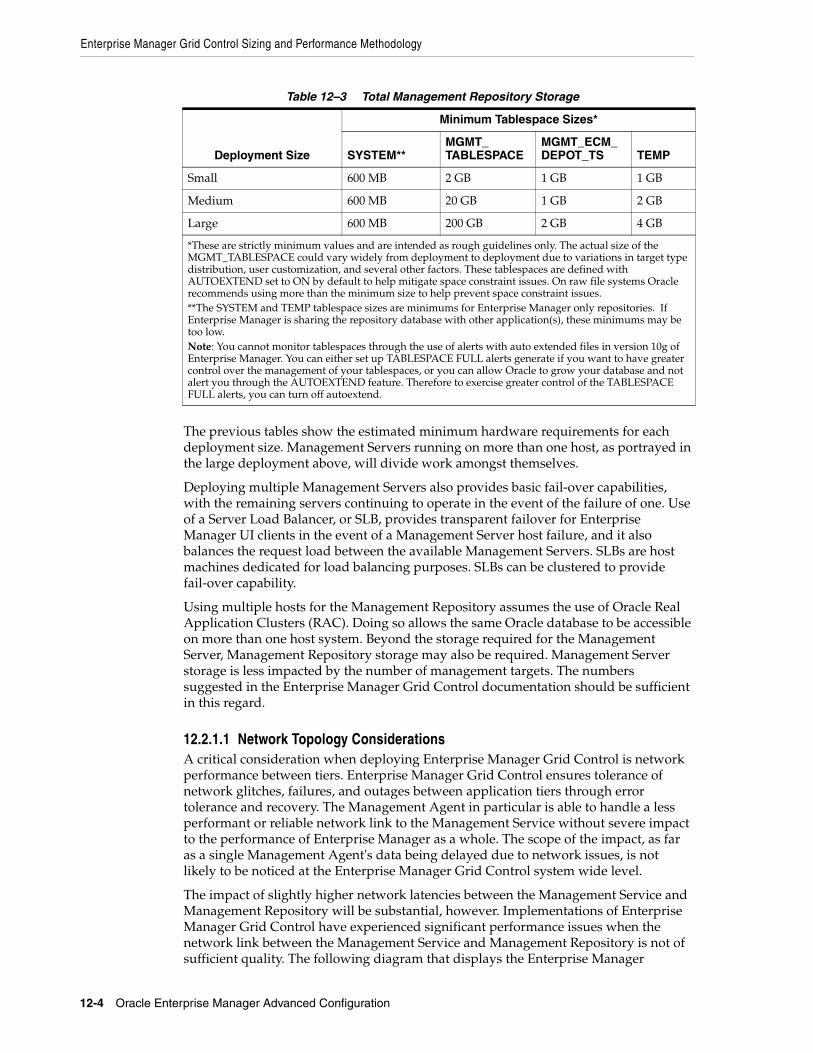
Enterprise Manager Grid Control Sizing and Performance Methodology
12-4 Oracle Enterprise Manager Advanced Configuration
The previous tables show the estimated minimum hardware requirements for each deployment size. Management Servers running on more than one host, as portrayed in the large deployment above, will divide work amongst themselves.
Deploying multiple Management Servers also provides basic fail-over capabilities, with the remaining servers continuing to operate in the event of the failure of one. Use of a Server Load Balancer, or SLB, provides transparent failover for Enterprise Manager UI clients in the event of a Management Server host failure, and it also balances the request load between the available Management Servers. SLBs are host machines dedicated for load balancing purposes. SLBs can be clustered to provide fail-over capability.
Using multiple hosts for the Management Repository assumes the use of Oracle Real Application Clusters (RAC). Doing so allows the same Oracle database to be accessible on more than one host system. Beyond the storage required for the Management Server, Management Repository storage may also be required. Management Server storage is less impacted by the number of management targets. The numbers suggested in the Enterprise Manager Grid Control documentation should be sufficient in this regard.
12.2.1.1 Network Topology ConsiderationsA critical consideration when deploying Enterprise Manager Grid Control is network performance between tiers. Enterprise Manager Grid Control ensures tolerance of network glitches, failures, and outages between application tiers through error tolerance and recovery. The Management Agent in particular is able to handle a less performant or reliable network link to the Management Service without severe impact to the performance of Enterprise Manager as a whole. The scope of the impact, as far as a single Management Agent's data being delayed due to network issues, is not likely to be noticed at the Enterprise Manager Grid Control system wide level.
The impact of slightly higher network latencies between the Management Service and Management Repository will be substantial, however. Implementations of Enterprise Manager Grid Control have experienced significant performance issues when the network link between the Management Service and Management Repository is not of sufficient quality. The following diagram that displays the Enterprise Manager
Table 12–3 Total Management Repository Storage
Deployment Size
Minimum Tablespace Sizes*
SYSTEM**MGMT_TABLESPACE
MGMT_ECM_DEPOT_TS TEMP
Small 600 MB 2 GB 1 GB 1 GB
Medium 600 MB 20 GB 1 GB 2 GB
Large 600 MB 200 GB 2 GB 4 GB
*These are strictly minimum values and are intended as rough guidelines only. The actual size of the MGMT_TABLESPACE could vary widely from deployment to deployment due to variations in target type distribution, user customization, and several other factors. These tablespaces are defined with AUTOEXTEND set to ON by default to help mitigate space constraint issues. On raw file systems Oracle recommends using more than the minimum size to help prevent space constraint issues. **The SYSTEM and TEMP tablespace sizes are minimums for Enterprise Manager only repositories. If Enterprise Manager is sharing the repository database with other application(s), these minimums may be too low.Note: You cannot monitor tablespaces through the use of alerts with auto extended files in version 10g of Enterprise Manager. You can either set up TABLESPACE FULL alerts generate if you want to have greater control over the management of your tablespaces, or you can allow Oracle to grow your database and not alert you through the AUTOEXTEND feature. Therefore to exercise greater control of the TABLESPACE FULL alerts, you can turn off autoextend.
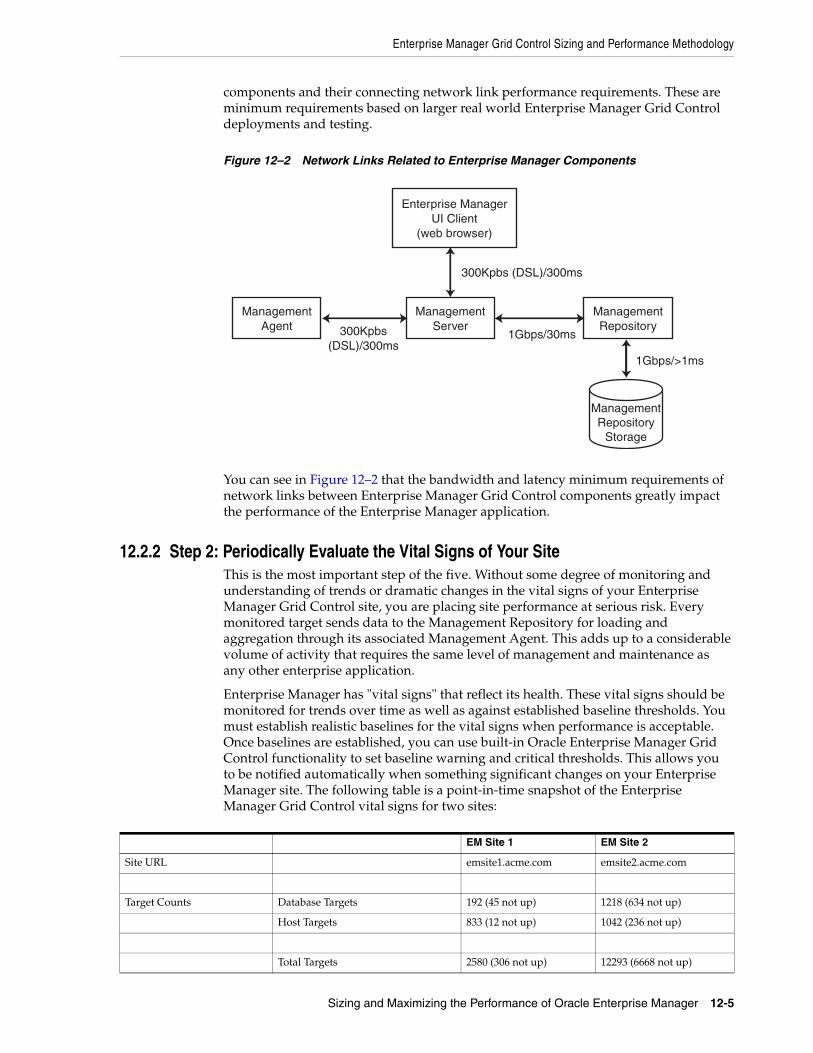
Enterprise Manager Grid Control Sizing and Performance Methodology
Sizing and Maximizing the Performance of Oracle Enterprise Manager 12-5
components and their connecting network link performance requirements. These are minimum requirements based on larger real world Enterprise Manager Grid Control deployments and testing.
Figure 12–2 Network Links Related to Enterprise Manager Components
You can see in Figure 12–2 that the bandwidth and latency minimum requirements of network links between Enterprise Manager Grid Control components greatly impact the performance of the Enterprise Manager application.
12.2.2 Step 2: Periodically Evaluate the Vital Signs of Your SiteThis is the most important step of the five. Without some degree of monitoring and understanding of trends or dramatic changes in the vital signs of your Enterprise Manager Grid Control site, you are placing site performance at serious risk. Every monitored target sends data to the Management Repository for loading and aggregation through its associated Management Agent. This adds up to a considerable volume of activity that requires the same level of management and maintenance as any other enterprise application.
Enterprise Manager has "vital signs" that reflect its health. These vital signs should be monitored for trends over time as well as against established baseline thresholds. You must establish realistic baselines for the vital signs when performance is acceptable. Once baselines are established, you can use built-in Oracle Enterprise Manager Grid Control functionality to set baseline warning and critical thresholds. This allows you to be notified automatically when something significant changes on your Enterprise Manager site. The following table is a point-in-time snapshot of the Enterprise Manager Grid Control vital signs for two sites:
EM Site 1 EM Site 2
Site URL emsite1.acme.com emsite2.acme.com
Target Counts Database Targets 192 (45 not up) 1218 (634 not up)
Host Targets 833 (12 not up) 1042 (236 not up)
Total Targets 2580 (306 not up) 12293 (6668 not up)
Enterprise ManagerUI Client
(web browser)
ManagementRepository
ManagementAgent
ManagementServer300Kpbs
(DSL)/300ms1Gbps/30ms
1Gbps/>1ms
ManagementRepository
Storage
300Kpbs (DSL)/300ms
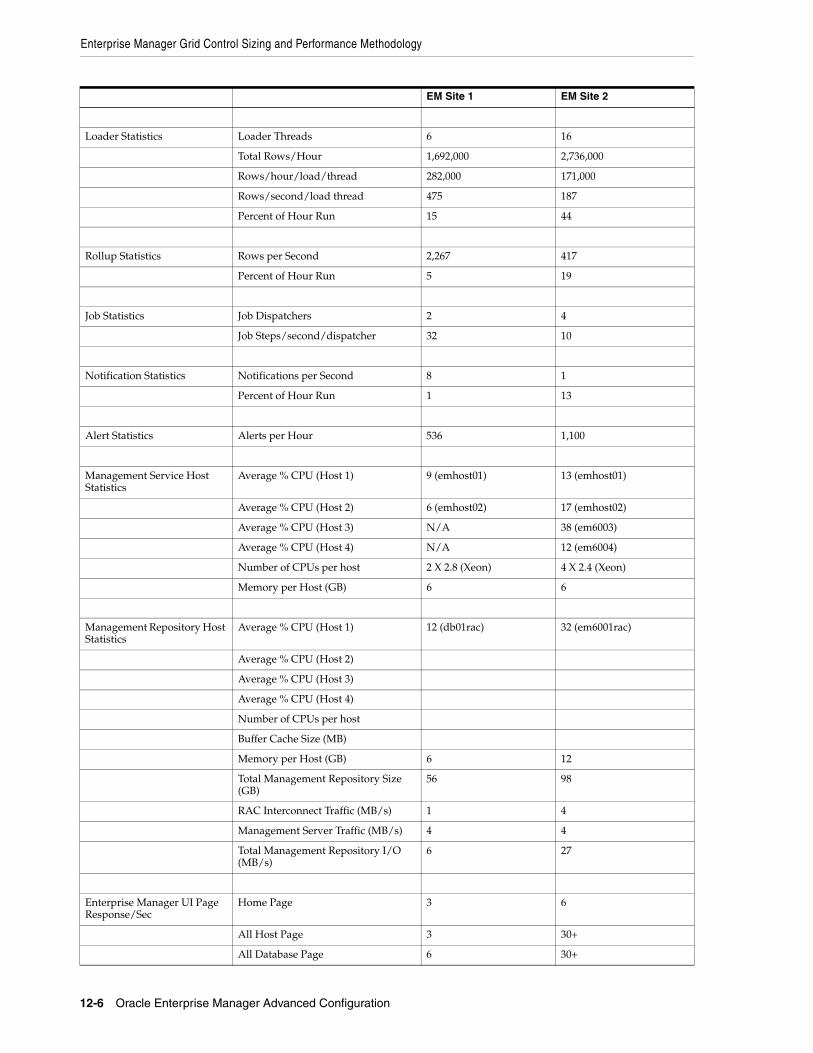
Enterprise Manager Grid Control Sizing and Performance Methodology
12-6 Oracle Enterprise Manager Advanced Configuration
Loader Statistics Loader Threads 6 16
Total Rows/Hour 1,692,000 2,736,000
Rows/hour/load/thread 282,000 171,000
Rows/second/load thread 475 187
Percent of Hour Run 15 44
Rollup Statistics Rows per Second 2,267 417
Percent of Hour Run 5 19
Job Statistics Job Dispatchers 2 4
Job Steps/second/dispatcher 32 10
Notification Statistics Notifications per Second 8 1
Percent of Hour Run 1 13
Alert Statistics Alerts per Hour 536 1,100
Management Service Host Statistics
Average % CPU (Host 1) 9 (emhost01) 13 (emhost01)
Average % CPU (Host 2) 6 (emhost02) 17 (emhost02)
Average % CPU (Host 3) N/A 38 (em6003)
Average % CPU (Host 4) N/A 12 (em6004)
Number of CPUs per host 2 X 2.8 (Xeon) 4 X 2.4 (Xeon)
Memory per Host (GB) 6 6
Management Repository Host Statistics
Average % CPU (Host 1) 12 (db01rac) 32 (em6001rac)
Average % CPU (Host 2)
Average % CPU (Host 3)
Average % CPU (Host 4)
Number of CPUs per host
Buffer Cache Size (MB)
Memory per Host (GB) 6 12
Total Management Repository Size (GB)
56 98
RAC Interconnect Traffic (MB/s) 1 4
Management Server Traffic (MB/s) 4 4
Total Management Repository I/O (MB/s)
6 27
Enterprise Manager UI Page Response/Sec
Home Page 3 6
All Host Page 3 30+
All Database Page 6 30+
EM Site 1 EM Site 2
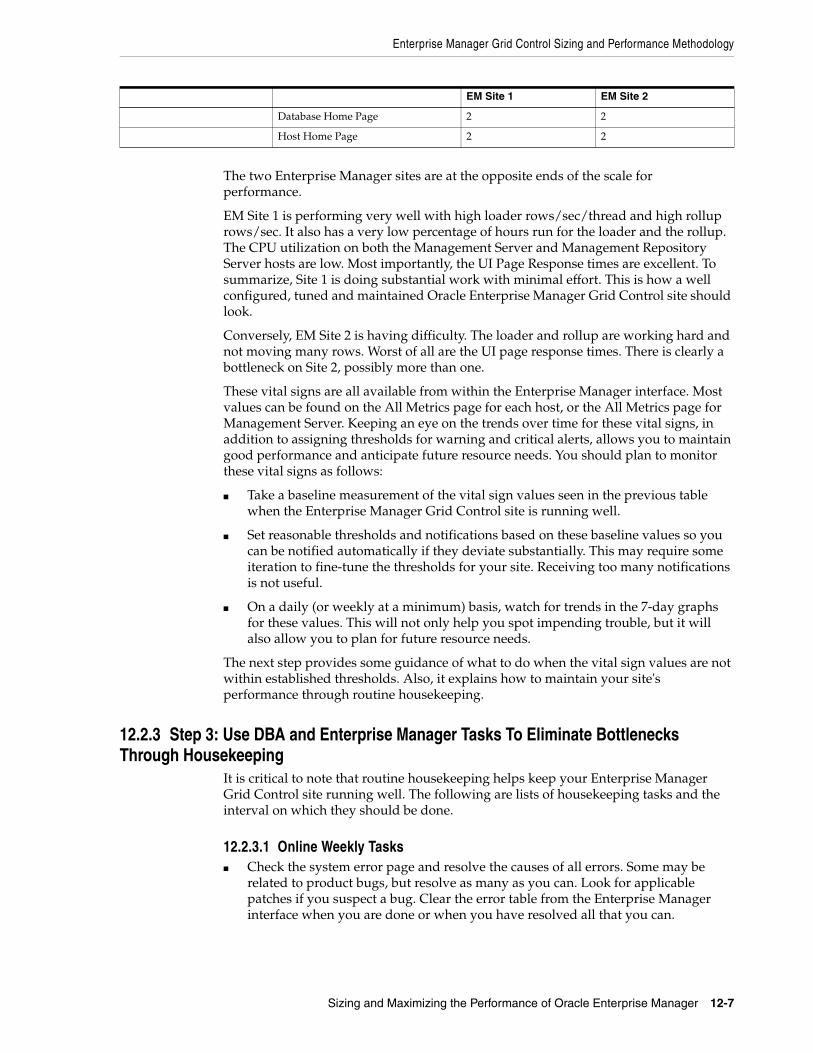
Enterprise Manager Grid Control Sizing and Performance Methodology
Sizing and Maximizing the Performance of Oracle Enterprise Manager 12-7
The two Enterprise Manager sites are at the opposite ends of the scale for performance.
EM Site 1 is performing very well with high loader rows/sec/thread and high rollup rows/sec. It also has a very low percentage of hours run for the loader and the rollup. The CPU utilization on both the Management Server and Management Repository Server hosts are low. Most importantly, the UI Page Response times are excellent. To summarize, Site 1 is doing substantial work with minimal effort. This is how a well configured, tuned and maintained Oracle Enterprise Manager Grid Control site should look.
Conversely, EM Site 2 is having difficulty. The loader and rollup are working hard and not moving many rows. Worst of all are the UI page response times. There is clearly a bottleneck on Site 2, possibly more than one.
These vital signs are all available from within the Enterprise Manager interface. Most values can be found on the All Metrics page for each host, or the All Metrics page for Management Server. Keeping an eye on the trends over time for these vital signs, in addition to assigning thresholds for warning and critical alerts, allows you to maintain good performance and anticipate future resource needs. You should plan to monitor these vital signs as follows:
■ Take a baseline measurement of the vital sign values seen in the previous table when the Enterprise Manager Grid Control site is running well.
■ Set reasonable thresholds and notifications based on these baseline values so you can be notified automatically if they deviate substantially. This may require some iteration to fine-tune the thresholds for your site. Receiving too many notifications is not useful.
■ On a daily (or weekly at a minimum) basis, watch for trends in the 7-day graphs for these values. This will not only help you spot impending trouble, but it will also allow you to plan for future resource needs.
The next step provides some guidance of what to do when the vital sign values are not within established thresholds. Also, it explains how to maintain your site's performance through routine housekeeping.
12.2.3 Step 3: Use DBA and Enterprise Manager Tasks To Eliminate Bottlenecks Through Housekeeping
It is critical to note that routine housekeeping helps keep your Enterprise Manager Grid Control site running well. The following are lists of housekeeping tasks and the interval on which they should be done.
12.2.3.1 Online Weekly Tasks■ Check the system error page and resolve the causes of all errors. Some may be
related to product bugs, but resolve as many as you can. Look for applicable patches if you suspect a bug. Clear the error table from the Enterprise Manager interface when you are done or when you have resolved all that you can.
Database Home Page 2 2
Host Home Page 2 2
EM Site 1 EM Site 2
Enterprise Manager Grid Control Sizing and Performance Methodology
12-8 Oracle Enterprise Manager Advanced Configuration
■ Check the alerts and errors for any metric collection errors. Most of these will be due to configuration issues at the target being monitored. Resolve these errors by fixing the reported problem. The error should then clear automatically.
■ Try to resolve any open alerts in the system. Also, if there are severities that are frequently oscillating between clear and warning or critical, try adjusting the threshold to stop frequent warning and critical alert conditions. Frequent alert oscillation can add significant load at the Management Server. Adjusting the threshold to a more reasonable level will help Enterprise Manager to work more efficiently for you. Adjusting the threshold for an alert may be the only way to close the alert. This is perfectly acceptable in cases where the tolerances are too tight for a metric.
■ Watch for monitored targets that are always listed with a down status. Try to get them up and working again, or remove them from Oracle Enterprise Manager.
■ Watch the Alert Log error metric for the Management Repository database for critical (ORA-0600, for example) errors. Resolve these as soon as possible. A search on My Oracle Support (formerly Oracle MetaLink) using the error details almost always will reveal some clues to its cause and provide available patches.
■ Analyze the three major tables in the Management Repository: MGMT_METRICS_RAW, MGMT_METRICS_1HOUR, and MGMT_METRICS_1DAY. If your Management Repository is in an Oracle 10g database, then these tables are automatically analyzed weekly and you can skip this task. If your Management Repository is in an Oracle version 9 database, then you will need to ensure that the following commands are run weekly:
– exec dbms_stats.gather_table_stats('SYSMAN', 'MGMT_METRICS_RAW', null, .000001, false, 'for all indexed columns', null, 'global', true, null, null, null);
– exec dbms_stats.gather_table_stats('SYSMAN', 'MGMT_METRICS_1HOUR', null, .000001, false, 'for all indexed columns', null, 'global', true, null, null, null);
– exec dbms_stats.gather_table_stats('SYSMAN', 'MGMT_METRICS_1DAY', null, .000001, false, 'for all indexed columns', null, 'global', true, null, null, null);
12.2.3.2 Offline Monthly Tasks■ Drop old partitions.
Oracle Enterprise Manager automatically truncates the data and reclaims the space used by partitions older than the default retention times for each table. Enterprise Manager cannot drop partitions while the Management Service is running. Doing so may generate Enterprise Manager error messages due to SQL cursors being invalidated incorrectly. The following command must be run with all Management Servers down:
– exec EMD_MAINT_UTIL.PARTITION_MAINTENANCE;
■ For Oracle 10.2 (or higher) database version Enterprise Manager repositories, review and consider implementing any AWR Segment Advisor recommendations.
Note: This step is only required if the Enterprise Manager repository database version is less than version 10.2. In versions 10.2 and above, the maintenance job drops the partitions automatically.
Enterprise Manager Grid Control Sizing and Performance Methodology
Sizing and Maximizing the Performance of Oracle Enterprise Manager 12-9
The Segment Advisor will help identify any necessary EM repository segment rebuild task(s).
12.2.4 Step 4: Eliminate Bottlenecks Through TuningThe most common causes of performance bottlenecks in the Enterprise Manager Grid Control application are listed below (in order of most to least common):
1. Housekeeping that is not being done (far and away the biggest source of performance problems)
2. Hardware or software that is incorrectly configured
3. Hardware resource exhaustion
When the vital signs are routinely outside of an established threshold, or are trending that way over time, you must address two areas. First, you must ensure that all previously listed housekeeping is up to date. Secondly, you must address resource utilization of the Enterprise Manager Grid Control application. The vital signs listed in the previous table reflect key points of resource utilization and throughput in Enterprise Manager Grid Control. The following sections cover some of the key vital signs along with possible options for dealing with vital signs that have crossed thresholds established from baseline values.
12.2.4.1 High CPU UtilizationWhen you are asked to evaluate a site for performance and notice high CPU utilization, there are a few common steps you should follow to determine what resources are being used and where.
1. The Management Server is typically a very minimal consumer of CPU. High CPU utilization in the Enterprise Manager Grid Control almost always manifests as a symptom at the Management Repository.
2. Use the Processes display on the Enterprise Manager Host home page to determine which processes are consuming the most CPU on any Management Service or Management Repository host that has crossed a CPU threshold.
3. Once you have established that Enterprise Manager is consuming the most CPU, use Enterprise Manager to identify what activity is the highest CPU consumer. Typically this manifests itself on a Management Repository host where most of the Management Service's work is performed. It is very rare that the Management Service itself is the source of the bottleneck. Here are a few typical spots to investigate when the Management Repository appears to be using too many resources.
a. Click on the CPU Used database resource listed on the Management Repository's Database Performance page to examine the SQL that is using the most CPU at the Management Repository.
b. Check the Database Locks on the Management Repository's Database Performance page looking for any contention issues.
High CPU utilization is probably the most common symptom of any performance bottleneck. Typically, the Management Repository is the biggest consumer of CPU, which is where you should focus. A properly configured and maintained Management Repository host system that is not otherwise hardware resource constrained should average roughly 40 percent or less total CPU utilization. A Management Server host system should average roughly 20 percent or less total CPU utilization. These relatively low average values should allow sufficient headroom for spikes in activity. Allowing for activity spikes helps keep your page performance more consistent over
Enterprise Manager Grid Control Sizing and Performance Methodology
12-10 Oracle Enterprise Manager Advanced Configuration
time. If your Enterprise Manager Grid Control site interface pages happen to be responding well (approximately 3 seconds) while there is no significant (constant) loader backlog, and it is using more CPU than recommended, you may not have to address it unless you are concerned it is part of a larger upward trend.
The recommended path for tracking down the root cause of high Management Repository CPU utilization is captured under step 3.b above. This allows you to start at the Management Repository Performance page and work your way down to the SQL that is consuming the most CPU in its processing. This approach has been used very successfully on several real world sites.
If you are running Enterprise Manager on Intel based hosts, the Enterprise Manager Grid Control Management Service and Management Repository will both benefit from Hyper-Threading (HT) being enabled on the host or hosts on which they are deployed. HT is a function of certain late models of Intel processors, which allows the execution of some amount of CPU instructions in parallel. This gives the appearance of double the number of CPUs physically available on the system. Testing has proven that HT provides approximately 1.5 times the CPU processing power as the same system without HT enabled. This can significantly improve system performance. The Management Service and Management Repository both frequently have more than one process executing simultaneously, so they can benefit greatly from HT.
12.2.4.2 Loader Vital SignsThe vital signs for the loader indicate exactly how much data is continuously coming into the system from all the Enterprise Manager Agents. The most important items here are the percent of hour runs and rows/second/thread. The (Loader) % of hour run indicates whether the loader threads configured are able to keep pace with the incoming data volume. As this value approaches 100%, it becomes apparent that the loading process is failing to keep pace with the incoming data volume. The lower this value, the more efficiently your loader is running and the less resources it requires from the Management Service host. Adding more loader threads to your Management Server can help reduce the percent of hour run for the loader.
Rows/Second/Thread is a precise measure of each loader thread's throughput per second. The higher this number, the better. Rows/Second/Thread as high as 1200 have been observed on some smaller, well configured and maintained Enterprise Manager Grid Control sites. If you have not increased the number of loader threads and this number is trending down, it may indicate a problem later. One way to overcome a decreasing rows/second/thread is to add more loader threads.
The number of Loader Threads is always set to one by default in the Management Server configuration file. Each Management Server can have a maximum of 10 loader threads. Adding loader threads to a Management Server typically increases the overall host CPU utilization by 2% to 5% on a Enterprise Manager Grid Control site with many Management Agents configured. Customers can change this value as their site requires. Most medium size and smaller configurations will never need more than one loader thread. Here is a simple guideline for adding loader threads:
Max total (across all Management Servers) loader threads = 2 X number of Management Repository host CPUs
There is a diminishing return when adding loader threads. You will not yield 100% capacity from the second, or higher, thread. There should be a positive benefit, however. As you add loader threads, you should see rows/second/thread decrease, but total rows/hour throughput should increase. If you are not seeing significant improvement in total rows/hour, and there is a constantly growing loader file backlog, it may not be worth the cost of the increase in loader threads. You should explore other tuning or housekeeping opportunities in this case.
Enterprise Manager Grid Control Sizing and Performance Methodology
Sizing and Maximizing the Performance of Oracle Enterprise Manager 12-11
To add more loader threads you can change the following configuration parameter:
em.loader.threadPoolSize=n
Where 'n' is a positive integer [1-10]. The default is one and any value other than [1-10] will result in the thread pool size defaulting to one. This property file is located in the {ORACLE_HOME}/sysman/config directory. Changing this parameter will require a restart of the Management Service to be reloaded with the new value.
12.2.4.3 Rollup Vital SignsThe rollup process is the aggregation mechanism for Enterprise Manager Grid Control. Once an hour, it processes all the new raw data loaded into the Management Repository table MGMT_METRICS_RAW, calculates averages and stores them in the tables MGMT_METRICS_1HOUR and MGMT_METRICS_1DAY. The two vital signs for the rollup are the rows/second and % of hour run. Due to the large volume of data rows processed by the rollup, it tends to be the largest consumer of Management Repository buffer cache space. Because of this, the rollup vital signs can be great indicators of the benefit of increasing buffer cache size.
Rollup rows/second shows exactly how many rows are being processed, or aggregated and stored, every second. This value is usually around 2,000 (+/- 500) rows per second on a site with a decent size buffer cache and reasonable speedy I/O. A downward trend over time for this value may indicate a future problem, but as long as % of hour run is under 100 your site is probably fine.
If rollup % of hour run is trending up (or is higher than your baseline), and you have not yet set the Management Repository buffer cache to its maximum, it may be advantageous to increase the buffer cache setting. Usually, if there is going to be a benefit from increasing buffer cache, you will see an overall improvement in resource utilization and throughput on the Management Repository host. The loader statistics will appear a little better. CPU utilization on the host will be reduced and I/O will decrease. The most telling improvement will be in the rollup statistics. There should be a noticeable improvement in both rollup rows/second and % of hour run. If you do not see any improvement in any of these vital signs, you can revert the buffer cache to its previous size. The old Buffer Cache Hit Ratio metric can be misleading. It has been observed in testing that Buffer Cache Hit Ratio will appear high when the buffer cache is significantly undersized and Enterprise Manager Grid Control performance is struggling because of it. There will be times when increasing buffer cache will not help improve performance for Grid Control. This is typically due to resource constraints or contention elsewhere in the application. Consider using the steps listed in the High CPU Utilization section to identify the point of contention. Grid Control also provides advice on buffer cache sizing from the database itself. This is available on the database Memory Parameters page.
One important thing to note when considering increasing buffer cache is that there may be operating system mechanisms that can help improve Enterprise Manager Grid Control performance. One example of this is the "large memory" option available on Red Hat Linux. The Linux OS Red Hat Advanced Server™ 2.1 (RHAS) has a feature called big pages. In RHAS 2.1, bigpages is a boot up parameter that can be used to pre-allocate large shared memory segments. Use of this feature, in conjunction with a large Management Repository SGA, can significantly improve overall Grid Control application performance. Starting in Red Hat Enterprise Linux™ 3, big pages functionality is replaced with a new feature called huge pages, which no longer requires a boot-up parameter.
Enterprise Manager Grid Control Sizing and Performance Methodology
12-12 Oracle Enterprise Manager Advanced Configuration
12.2.4.4 Managing Repository Collection ThreadsThere are two classes of collections; short running tasks (task class 0) and long running tasks (task class 1). Workers are assigned the task class based on when they have to process the collections. By default, one worker is created for short running tasks and one for long running tasks. The default count of workers for each class is maintained in the table mgmt_task_Worker_counts.
The count can be increased or decreased using the mgmt_collection.set_worker_count() procedure.
Example 1: mgmt_collection.set_worker_count(0,2)
This will set the default number of collections to 2 for short running tasks.
Example 2: mgmt_collection.set_worker_count(1,2)
This will set the default number of collections to 2 for long running tasks.
The collections must be started after setting the count by running mgmt_collection.start_workers(). This call will stop existing workers (dbms jobs) and start new workers based on the default counts specified in the mgmt_task_Worker_counts table. The collection workers are started normally when emd_maintenance.submit_em_dbms_jobs() is called.
You can check the backlog of collections per task class under Management Services And Repository --> All Metrics --> Repository Collections Performance and then set the workers based on the backlog.
You can also run a collection worker syncronously in the current session by running mgmt_collection.run_worker.
Example: mgmt_collection.run_worker(0) ;
This will process short running pending tasks in the current session and exit when there are no more pending collections.
12.2.4.5 Job, Notification, and Alert Vital SignsJobs, notifications, and alerts are indicators of the processing efficiency of the Management Service(s) on your Enterprise Manager Grid Control site. Any negative trends in these values are usually a symptom of contention elsewhere in the application. The best use of these values is to measure the benefit of running with more than one Management Server. There is one job dispatcher in each Management Server. Adding Management Servers will not always improve these values. In general, adding Management Servers will improve overall throughput for Grid Control when the application is not otherwise experiencing resource contention issues. Job, Notification, and Alert vital signs can help measure that improvement.
12.2.4.6 I/O Vital SignsMonitoring the I/O throughput of the different channels in your Enterprise Manager Grid Control deployment is essential to ensuring good performance. At minimum, there are three different I/O channels on which you should have a baseline and alert thresholds defined:
■ Disk I/O from the Management Repository instance to its data files
■ Network I/O between the Management Server and Management Repository
■ RAC interconnect (network) I/O (on RAC systems only)
You should understand the potential peak and sustained throughput I/O capabilities for each of these channels. Based on these and the baseline values you establish, you can derive reasonable thresholds for warning and critical alerts on them in Grid
Enterprise Manager Grid Control Sizing and Performance Methodology
Sizing and Maximizing the Performance of Oracle Enterprise Manager 12-13
Control. You will then be notified automatically if you approach these thresholds on your site. Some Grid Control site administrators can be unaware or mistaken about what these I/O channels can handle on their sites. This can lead to Enterprise Manager Grid Control saturating these channels, which in turn cripples performance on the site. In such an unfortunate situation, you would see that many vital signs would be impacted negatively.
To discover whether the Management Repository is involved, you can use Grid Control to check the Database Performance page. On the Performance page for the Management Repository, click on the wait graph showing the largest amount of time spent. From this you can continue to drill down into the actual SQL code or sessions that are waiting. This should help you to understand where the bottleneck is originating.
Another area to check is unexpected I/O load from non-Enterprise Manager Grid Control sources like backups, another application, or a possible data-mining co-worker who engages in complex SQL queries, multiple Cartesian products, and so on.
Total Repository I/O trouble can be caused by two factors. The first is a lack of regular housekeeping. Some of the Grid Control segments can be very badly fragmented causing a severe I/O drain. Second, there can be some poorly tuned SQL statements consuming much of the site I/O bandwidth. These two main contributors can cause most of the Grid Control vital signs to plummet. In addition, the lax housekeeping can cause the Management Repository's allocated size to increase dramatically.
One important feature of which to take advantage is asynchronous I/O. Enabling asynchronous I/O can dramatically improve overall performance of the Grid Control application. The Sun Solaris™ and Linux operating systems have this capability, but may be disabled by default. The Microsoft Windows™ operating system uses asynchronous I/O by default. Oracle strongly recommends enabling of this operating system feature on the Management Repository hosts and on Management Service hosts as well.
12.2.4.7 The Oracle Enterprise Manager Performance PageThere may be occasions when Enterprise Manager user interface pages are slow in the absence of any other performance degradation. The typical cause for these slow downs will be an area of Enterprise Manager housekeeping that has been overlooked. The first line of monitoring for Enterprise Manger page performance is the use of Enterprise Manager Beacons. These functionalities are also useful for web applications other than Enterprise Manager.
Beacons are designed to be lightweight page performance monitoring targets. After defining a Beacon target on an Management Agent, you can then define UI performance transactions using the Beacon. These transactions are a series of UI page hits that you will manually walk through once. Thereafter, the Beacon will automatically repeat your UI transaction on a specified interval. Each time the Beacon transaction is run, Enterprise Manager will calculate its performance and store it for historical purposes. In addition, alerts can be generated when page performance degrades below thresholds you specify.
When you configure the Enterprise Manager Beacon, you begin with a single predefined transaction that monitors the home page you specify during this process. You can then add as many transactions as are appropriate. You can also set up additional Beacons from different points on your network against the same web application to measure the impact of WAN latency on application performance. This same functionality is available for all Web applications monitored by Enterprise Manager Grid Control.
Enterprise Manager Grid Control Sizing and Performance Methodology
12-14 Oracle Enterprise Manager Advanced Configuration
After you are alerted to a UI page that is performing poorly, you can then use the second line of page performance monitoring in Enterprise Manager Grid Control. This new end-to-end (or E2E) monitoring functionality in Grid Control is designed to allow you to break down processing time of a page into its basic parts. This will allow you to pinpoint when maintenance may be required to enhance page performance. E2E monitoring in Grid Control lets you break down both the client side processing and the server side processing of a single page hit.
The next page down in the Middle Tier Performance section will break out the processing time by tier for the page. By clicking on the largest slice of the Processing Time Breakdown pie chart, which is JDBC time above, you can get the SQL details. By clicking on the SQL statement, you break out the performance of its execution over time.
The JDBC page displays the SQL calls the system is spending most of its page time executing. This SQL call could be an individual DML statement or a PL/SQL procedure call. In the case of an individual SQL statement, you should examine the segments (tables and their indexes) accessed by the statement to determine their housekeeping (rebuild and reorg) needs. The PL/SQL procedure case is slightly more involved because you must look at the procedure's source code in the Management Repository to identify the tables and associated indexes accessed by the call.
Once you have identified the segments, you can then run the necessary rebuild and reorganization statements for them with the Management Server down. This should dramatically improve page performance. There are cases where page performance will not be helped by rebuild and reorganization alone, such as when excessive numbers of open alerts, system errors, and metric errors exist. The only way to improve these calls is to address (for example, clean up or remove) the numbers of these issues. After these numbers are reduced, then the segment rebuild and reorganization should be completed to optimize performance. These scenarios are covered in Section 12.2.3. If you stay current, you should not need to analyze UI page performance as often, if at all.
12.2.5 Step 5: Extrapolating Linearly Into the Future for Sizing RequirementsDetermining future storage requirements is an excellent example of effectively using vital sign trends. You can use two built-in Grid Control charts to forecast this: the total number of targets over time and the Management Repository size over time.
Both of the graphs are available on the All Metrics page for the Management Service. It should be obvious that there is a correlation between the two graphs. A straight line applied to both curves would reveal a fairly similar growth rate. After a target is added to Enterprise Manager Grid Control for monitoring, there is a 31-day period where Management Repository growth will be seen because most of the data that will consume Management Repository space for a target requires approximately 31 days to be fully represented in the Management Repository. A small amount of growth will continue for that target for the next year because that is the longest default data retention time at the highest level of data aggregation. This should be negligible compared with the growth over the first 31 days.
When you stop adding targets, the graphs will level off in about 31 days. When the graphs level off, you should see a correlation between the number of targets added and the amount of additional space used in the Management Repository. Tracking these values from early on in your Enterprise Manager Grid Control deployment process helps you to manage your site's storage capacity proactively. This history is an invaluable tool.
Oracle Enterprise Manager Backup, Recovery, and Disaster Recovery Considerations
Sizing and Maximizing the Performance of Oracle Enterprise Manager 12-15
The same type of correlation can be made between CPU utilization and total targets to determine those requirements. There is a more immediate leveling off of CPU utilization as targets are added. There should be no significant increase in CPU cost over time after adding the targets beyond the relatively immediate increase. Introducing new monitoring to existing targets, whether new metrics or increased collections, would most likely lead to increased CPU utilization.
12.3 Oracle Enterprise Manager Backup, Recovery, and Disaster Recovery Considerations
Enterprise Manager incorporates a portable browser-based interface to the Grid Control console, as well as the Oracle application server technology, to serve as the middle-tier Management Service tool. The foundation of the tool remains rooted in database server technology to manage both the Management Repository and historical data. This section provides practical approaches to these high availability topics and discusses different strategies when practical for each tier of Enterprise Manager.
12.3.1 Best Practices for BackupFor the Oracle database, the best backup practice is to use the standard database tools and do the following:
1. Have the database in archivelog mode
2. Perform regular online backups using the Oracle Suggested Backup strategy option available through Grid Control. This strategy uses Recovery Manager (RMAN).
This strategy creates a full backup and then creates incremental backups on each subsequent run. The incremental changes are then rolled up into the baseline, creating a new full backup baseline.
Using the Oracle Suggested Backup strategy also takes advantage of the capabilities of Grid Control to execute the backups. Backup jobs are automatically scheduled through the Grid Control Job subsystem. The history of the backups is available for review and the status of the backup displays in the Job Activity section of the database target’s home page.
Use of this job along with archiving and flashback technologies provides a restore point in the event of the loss of any part of the Management Repository. This backup, along with archive and online logs, allows the Management Repository to be recovered to the last completed transaction.
To enable archiving and flashback technologies, use the Recovery Settings page and enable:
1. Archive Logging
Bounce the database and restart all Management Service processes
2. Flashback Database
Bounce the database and restart all Management Service processes
3. Block Change Tracking feature to speed up backup operations.
A summary of how to configure backups using Enterprise Manager is available in the Oracle Database 2 Day DBA manual.
For additional information on database high availability best practices, review the Oracle Database High Availability Architecture and Best Practices manual.
Oracle Enterprise Manager Backup, Recovery, and Disaster Recovery Considerations
12-16 Oracle Enterprise Manager Advanced Configuration
You can set the frequency of the backup job depending on how much data is generated in the Grid Control environment and how much outage time you can tolerate if a restore is required. If the outage window is small and the Service Level Agreement can not be satisfied by restoring the database, consider additional strategies for Management Repository availability such a Real Application Cluster (RAC) or Data Guard database. Additional High Availability options for the Management Repository are documented in the Configuring Enterprise Manager for High Availability paper available from the Maximum Availability Architecture (MAA) page on the Oracle Technology Network (OTN) at http://www.oracle.com/technology/deploy/availability/htdocs/maa.htm
12.3.2 Best Practices for RecoveryFor the Oracle Database, the best practice for recovery is to be prepared. Because in some situations the Management Repository, Management Service, and Management Agents will not have access to Grid Control, you will need to use the command-line interface to enter the RMAN commands.
12.3.2.1 Recovering the Management RepositoryIf something happens to affect the Management Repository, Grid Control will not be available to provide the management interface to RMAN.
A sample syntax for database recovery using RMAN follows. For detailed information, review the information on database recovery in the Oracle Database Backup and Recovery User's Guide.
RMAN> STARTUP MOUNT;RMAN> RESTORE DATABASE;RMAN> RECOVER DATABASE;RMAN> ALTER DATABASE OPEN;
When considering recovery of the Management Repository, there are two cases to consider:
■ Full recovery of the Management Repository is possible
There are no special considerations for Enterprise Manager. When the database is recovered, restart the database and Management Service processes. Management Agents will then upload pending files to the Management Repository.
■ Only point in time and incomplete recovery is possible
Management Agents will be unable to communicate to the Management Repository correctly until they are reset. You must perform the following steps manually:
a. Shut down the Management Agent
b. Delete the agntstmp.txt and lastupld.xml files in the $AGENT_HOME/sysman/emd directories
c. Go the /state and /upload subdirectories and clear their contents
d. Restart the Management Agent.
You must repeat these steps for each Management Agent.
In the case of incomplete recovery, Management Agents may not be able to upload data until the previous steps are completed. Additionally, there is no immediate indication in the interface that the Management Agents cannot communicate with the
Oracle Enterprise Manager Backup, Recovery, and Disaster Recovery Considerations
Sizing and Maximizing the Performance of Oracle Enterprise Manager 12-17
Management Service after this type of recovery. This information would be available from the Management Agent logs or command line Management Agent status. If incomplete recovery is required, you must perform this procedure for each Management Agent.
12.3.2.2 Recovering the Oracle Management ServiceBecause the Management Service is stateless, the task is to restore the binaries and configuration files in the shortest time possible. There are two alternatives in this case.
■ Backup the entire software directory structure. You can restore the directory structure to the same directory path should a Management Service failure occur. At the same time, backup the Management Agent associated with this Management Service install. You will need to restore this Management Agent should a restore of the Management Service be required.
■ Reinstall from the original media.
For any highly available Management Service install, it is a recommended practice that you ensure that the /recv directory is protected with a mirroring technology. The /recv directory is the directory the Management Service uses to stage files it receives from Management Agents before writing their contents to the database Management Repository.
After the Management Agent finishes transmitting its XML files to the Management Service, the Management Agent deletes its copy of the XML files. Metric data sent from the Management Agents would then be lost.
12.3.2.3 Recovering the Oracle Management AgentThe recovery of the Management Agent is similar to the Management Service recovery except that the Management Agent is not stateless. There are two strategies that can be used:
■ If the host name has changed, and you are using an SLB to manage connections, you have to modify the connection pools in the SLB to drop the old host name and add the new name. If you are not using an SLB, each agent that previously pointed to the old OMS host must have its emd. properties file modified to point to the new OMS host name. You can use this procedure to handle a case where you need to bring up a new OMS on a new host because the former machine has crashed.
Assuming the host name has not changed, a disk backup and restore is sufficient.
a. Delete the agntstmp.txt and the lastupld.xml files from the /sysman/emd directory.
b. Clear the /state and /upload subdirectories of all entries before restarting the Management Agent.
c. Start the Management Agent. This step forces a rediscovery of the targets on the host.
■ Reinstall the Management Agent from the original media.
As with the Management Service, it is recommended you protect the /state and /upload directories with a mirroring technology.
12.3.3 Best Practice for Disaster Recovery (DR)In the event of a node failure, you can restore the database using RMAN or OS commands. To speed this process, implement Data Guard to replicate the Management Repository to a different hardware node.
Oracle Enterprise Manager Backup, Recovery, and Disaster Recovery Considerations
12-18 Oracle Enterprise Manager Advanced Configuration
12.3.3.1 Management RepositoryIf you are restoring the Management Repository to a new host, restore a backup of the database and modify the emoms.properties file for each Management Service manually to point to the new Management Repository location. In addition, you must update the targets.xml file for each Management Service to reflect the new Management Repository location. If there is a data loss during recovery, see Recovering the Management Repository for information.
To speed Management Repository reconnection from the Management Service in the event of a single Management Service failure, configure the Management Service with a Transparent Application Failover (TAF) aware connect string. You can configure the Management Service with a TAF connect string in the emoms.properities file that will automatically redirect communications to another node using the FAILOVER syntax. An example follows:
EM=(description=(failover=on)(address_list=(failover=on)(address=(protocol=tcp)(port=1522)(host=EMPRIM1.us.oracle.com))(address=(protocol=tcp)(port=1522)(host=EMPRIM2.us.oracle.com)))(address_list=(failover=on)(address=(protocol=tcp)(port=1522)(host=EMSEC1.us.oracle.com))(address=(protocol=tcp)(port=1522)(host=EMSEC2.us.oracle.com)))(connect_data=(service_name=EMrep.us.oracle.com)))
12.3.3.2 Oracle Management ServicePreinstall the Management Service and Management Agent on the hardware that will be used for Disaster Recovery. This eliminates the step of restoring a copy of the Enterprise Manager binary files from backup and modifying the Management Service and Management Agent configuration files.
12.3.3.3 Management AgentIn the event of a true disaster recovery, it is easier to reinstall the Management Agent and allow it to do a clean discovery of all targets running on the new host.
Note: In the event of a disaster, do not restore the Management Service and Management Agent binaries from an existing backup to a new host because there are host name dependencies. Always do a fresh install.
13
Reconfiguring the Management Agent and Management Service 13-1
13 Reconfiguring the Management Agent andManagement Service
This chapter describes how to reconfigure Enterprise Manager if you later revisit your configuration decisions after you have installed the software.
This chapter contains the following sections:
■ Reconfiguring the Oracle Management Agent
■ Reconfiguring the Oracle Management Service
13.1 Reconfiguring the Oracle Management AgentThe following sections describe reconfiguration and tuning changes you can make to the Management Agent after you have installed Enterprise Manager. Refer to the following sections for more information:
■ Configuring the Management Agent to Use a New Management Service
■ Changing the Management Agent Port
■ Controlling the Amount of Disk Space Used by the Management Agent
■ About the Management Agent Watchdog Process
■ Setting the Management Agent Time Zone
■ Adding Trust Points to the Management Agent Configuration
13.1.1 Configuring the Management Agent to Use a New Management ServiceWhen you install the Management Agent on a managed host, you associate the Management Agent with a particular Management Service. The Management Agent uses the Management Service URL address and port to identify and communicate with the Management Service.
After you install the Management Agent, you can later reconfigure the Management Agent so it is associated with a different Management Service. Reconfiguring the Management Agent requires no changes to the Management Service. The reconfigured Management Agent will begin communicating with the new Management Service after the Management Agent is restarted.
To associate the Management Agent with a new Management Service after you have installed the Management Agent:
1. Stop the Management Agent.
Reconfiguring the Oracle Management Agent
13-2 Oracle Enterprise Manager Advanced Configuration
2. Locate the emd.properties file in the Management Agent home directory:
AGENT_HOME/sysman/config/emd.properties
3. Use a text editor to open the file and locate the REPOSITORY_URL property.
4. Modify the value for the REPOSITORY_URL property so it references the new Management Service.
For example:
REPOSITORY_URL=http://mgmthost2.acme.com:4889/em/upload
5. Modify the value for the emdWalletSrcUrl and emdWalletDest properties so they reference the new Management Service and the new Oracle home path, respectively:
For example, if the new Management Service is on a host called mgmthost2.acme.com and the new Oracle home is /private/oracle/em10g, modify the properties as follows:
emdWalletSrcUrl=http://mgmthost2.acme.com:4889/em/wallets/emdemdWalletDest=/private/oracle/em10g/sysman/config/server
6. Save your changes and close the emd.properties file.
7. Delete all the files in the following directories:
AGENT_HOME/sysman/emd/upload/AGENT_HOME/sysman/emd/state/
8. Restart the Management Agent.
13.1.2 Securing the Management AgentTo secure the Management Agent of the new Management Service, use the following command:
emctl secure agent <password_to_secure_agent_against_new_mgmt_service>
13.1.3 Changing the Management Agent PortThe Management Agent uses a predefined port number to receive requests from the Management Service. This port number is defined by default when you install the Management Agent on a managed host. If you later need to modify this port, you can use the following procedure. You might need to modify this port number if you have existing software that uses the default Management Agent port.
To change the Management Agent port:
1. Stop the Management Agent.
See Also: "Controlling the Oracle Management Agent" on page 2-1
Note: You can use the emctl clearstate agent command to delete the files in the state directory.
See Also: "Controlling the Oracle Management Agent" on page 2-1
Reconfiguring the Oracle Management Agent
Reconfiguring the Management Agent and Management Service 13-3
2. Locate the emd.properties file in the Management Agent home directory:
AGENT_HOME/sysman/config/emd.properties
3. Use a text editor to open the file and locate the EMD_URL property.
For example:
EMD_URL=http://managed_host1.acme.com:1813/emd/main
4. Modify the port number in the EMD_URL property so the Management Agent uses a new unused port on the managed host.
For example:
EMD_URL=http://managed_host1.acme.com:1913/emd/main
5. Start the Management Agent.
13.1.4 Controlling the Amount of Disk Space Used by the Management AgentOracle designed the Management Agent to work within a set of disk space limits. These limits prevent the Management Agent from using too much disk space and causing performance or resource issues on your enterprise systems. However, if disk space becomes an issue, you can adjust the default settings that are used to control the amount of disk space used by the Management Agent.
As the Management Agent on a particular host gathers management data about the targets on the host, it saves the collected data on the local disk until the data is uploaded to the Management Repository. The Management Agent saves this collected data and metadata in the following directory:
AGENT_HOME/sysman/emd/upload
By default, the Management Agent will save up to 50MB of collected data in the upload directory. If the amount of collected data exceeds 50MB, data collection is stopped temporarily until the data is uploaded to the repository and more disk space becomes available.
In addition, the Management Agent checks to be sure that the percentage of disk space currently in use on the local disk does not exceed 98 percent. If this value is exceeded, the Management Agent stops collecting data and stops saving information to the Management Agent log and trace files.
You can modify these default settings as follows:
1. Stop the Management Agent.
2. Locate the emd.properties file in the Management Agent home directory:
AGENT_HOME/sysman/config/emd.properties
3. Use a text editor to open the file and modify the entries shown in Table 13–1.
4. Save your changes and exit the file.
Note: After the changed URL is processed, the old Management Agent should not have any targets. If you want, you can then remove the old Management Agent from the Management Service.
See Also: "Controlling the Oracle Management Agent" on page 2-1
Reconfiguring the Oracle Management Agent
13-4 Oracle Enterprise Manager Advanced Configuration
5. Restart the Management Agent.
13.1.5 About the Management Agent Watchdog ProcessThe Management Agent is the Enterprise Manager component that gathers the data you need to manage your enterprise efficiently. As a result, Enterprise Manager includes software that keeps track of the Management Agent processes and makes sure the Management Agent stays running.
For example, if the Management Agent quits unexpectedly, this self-monitoring process—referred to as the watchdog process—will restart the Management Agent automatically.
In most situations, the watchdog process works in the background and requires no configuration or maintenance. The watchdog process is controlled by the emwd.pl script located in the following directory of the Management Agent home directory:
AGENT_HOME/bin
You can identify the watchdog process by using the following commands:
$PROMPT> ps -ef | grep emwd
13.1.6 Setting the Management Agent Time ZoneIn today’s global economy, it is not uncommon for the systems you manage to reside in multiple locations throughout the world. For example, if your company headquarters are in New Hampshire, USA, you may need to manage systems that reside in California, Canada, and in Europe.
As Enterprise Manager collects monitoring data from Management Agents running on these remote systems, it is important that the data is correlated accurately. A software failure on a machine in Ontario, Canada might be the cause of a performance problem on a machine in Hoboken, New Jersey.
To correlate this data, it is important that Enterprise Manager obtains the correct time zone for each Management Agent that you install. The following sections describe how the Management Agent obtains the time zone and how to correct the problem if the time zone for a Management Agent is incorrect:
■ Understanding How the Management Agent Obtains Time Zone Information
■ Resetting the Time Zone of the Management Agent Due to Inconsistency of Time Zones
Table 13–1 Properties for Controlling the Disk Space Used by the Management Agent
Property Explanation
UploadMaxBytesXML Use this property in the emd.properties file to specify the maximum number of megabytes (MB) used by the collected data in the Management Agent upload directory. When this limit is exceeded, the Management Agent will stop collecting additional management data until the next upload to the Management Repository reduces the amount of collected data in the upload directory.
UploadMaxDiskUsedPct Use this property in the emd.properties file to specify the maximum percentage of disk space that can be in use on the local disk before the Management Agent temporarily stops collecting additional data and stops saving information to the Management Agent log and trace files.
The Management Agent will begin collecting data again when the percentage of disk space in use falls to less than the percentage specified in the UploadMaxDiskUsedPctFloor property in the emd.properties file.
Reconfiguring the Oracle Management Agent
Reconfiguring the Management Agent and Management Service 13-5
■ Troubleshooting Management Agent Time Zone Problems
■ Troubleshooting Management Service Time Zone Problems
13.1.6.1 Understanding How the Management Agent Obtains Time Zone InformationWhen you install the Management Agent, the software attempts to obtain the current time zone of the host computer. If successful, the installation procedure updates the agentTZRegion property setting in the following configuration file:
AGENT_HOME/sysman/config/emd.properties
The agentTZRegion property can be set to any of the values listed in the following file, which is installed in the Management Agent home directory:
AGENT_HOME/sysman/admin/suportedtzs.lst
13.1.6.2 Resetting the Time Zone of the Management Agent Due to Inconsistency of Time ZonesYou need to reset the time zone of the Management Agent when both of the following situations are true:
■ The Management Agent has been running with a particular time zone
■ Subsequently a change occurs to the time zone of the host where the Management Agent is running
To propagate the time zone change to the emd.properties file, perform the following:
1. Execute the following script:
ORACLE_HOME/bin/emctl resetTZ agent
This script updates ORACLE_HOME/<hostname>_<sid>/sysman/config/emd.properties so that the value of agentTZRegion matches that of the current time zone setting of the machine.
2. In addition, this command prompts you to run a script against the Enterprise Manager Repository. You must log in to the database as the Enterprise Manager repository user and run the script mgmt_target.set_agent_tzrgn. An example follows:
SQL> exec mgmt_target.set_agent_tzrgn(’em.oracle.com:1830’,’PST8PDT’);SQL> commit;
Note: The location of the emd.properties file depends on the Control Console being used:
■ For the Database Control Console, the location is usually: ORACLE_HOME/<host>_<sid>/sysman/config
■ For the Application Server Control Console, the location is: ORACLE_HOME/sysman/config
■ For the Grid Control Management Agent, the location is ORACLE_HOME/sysman/config
■ For the Real Application Cluster central Management Agent, the location is usually: ORACLE_HOME/<host>/sysman/config
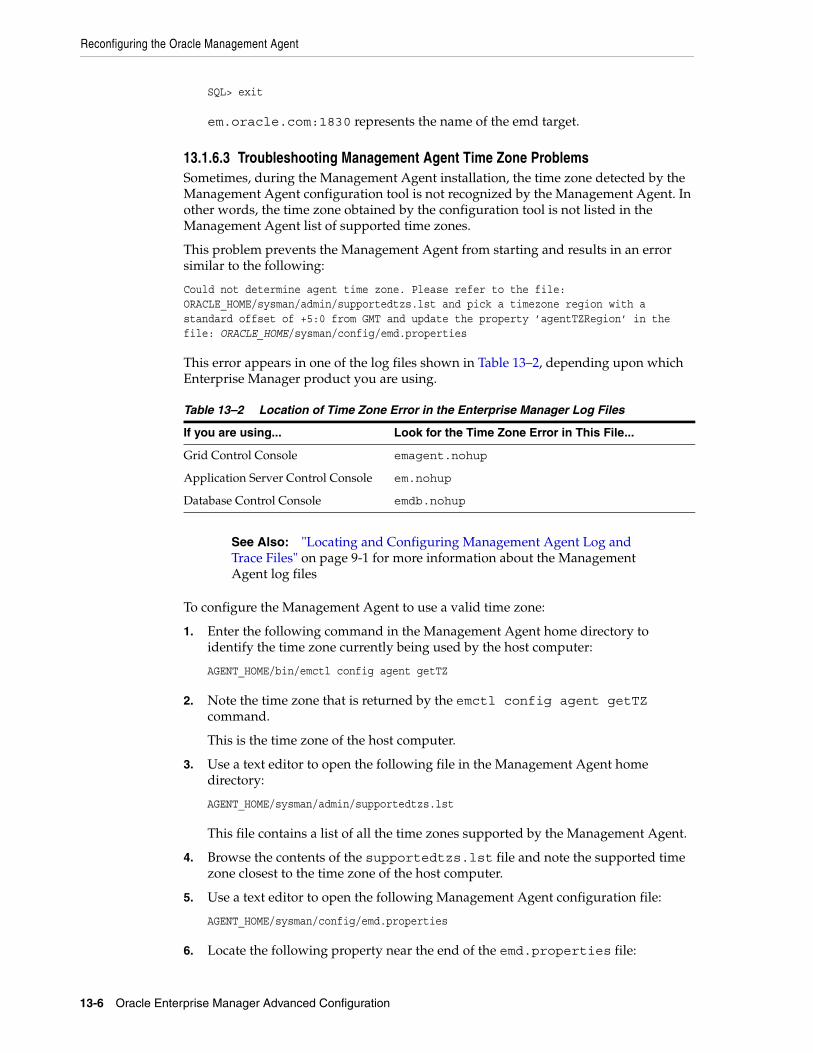
Reconfiguring the Oracle Management Agent
13-6 Oracle Enterprise Manager Advanced Configuration
SQL> exit
em.oracle.com:1830 represents the name of the emd target.
13.1.6.3 Troubleshooting Management Agent Time Zone ProblemsSometimes, during the Management Agent installation, the time zone detected by the Management Agent configuration tool is not recognized by the Management Agent. In other words, the time zone obtained by the configuration tool is not listed in the Management Agent list of supported time zones.
This problem prevents the Management Agent from starting and results in an error similar to the following:
Could not determine agent time zone. Please refer to the file:ORACLE_HOME/sysman/admin/supportedtzs.lst and pick a timezone region with astandard offset of +5:0 from GMT and update the property ’agentTZRegion’ in thefile: ORACLE_HOME/sysman/config/emd.properties
This error appears in one of the log files shown in Table 13–2, depending upon which Enterprise Manager product you are using.
To configure the Management Agent to use a valid time zone:
1. Enter the following command in the Management Agent home directory to identify the time zone currently being used by the host computer:
AGENT_HOME/bin/emctl config agent getTZ
2. Note the time zone that is returned by the emctl config agent getTZ command.
This is the time zone of the host computer.
3. Use a text editor to open the following file in the Management Agent home directory:
AGENT_HOME/sysman/admin/supportedtzs.lst
This file contains a list of all the time zones supported by the Management Agent.
4. Browse the contents of the supportedtzs.lst file and note the supported time zone closest to the time zone of the host computer.
5. Use a text editor to open the following Management Agent configuration file:
AGENT_HOME/sysman/config/emd.properties
6. Locate the following property near the end of the emd.properties file:
Table 13–2 Location of Time Zone Error in the Enterprise Manager Log Files
If you are using... Look for the Time Zone Error in This File...
Grid Control Console emagent.nohup
Application Server Control Console em.nohup
Database Control Console emdb.nohup
See Also: "Locating and Configuring Management Agent Log and Trace Files" on page 9-1 for more information about the Management Agent log files
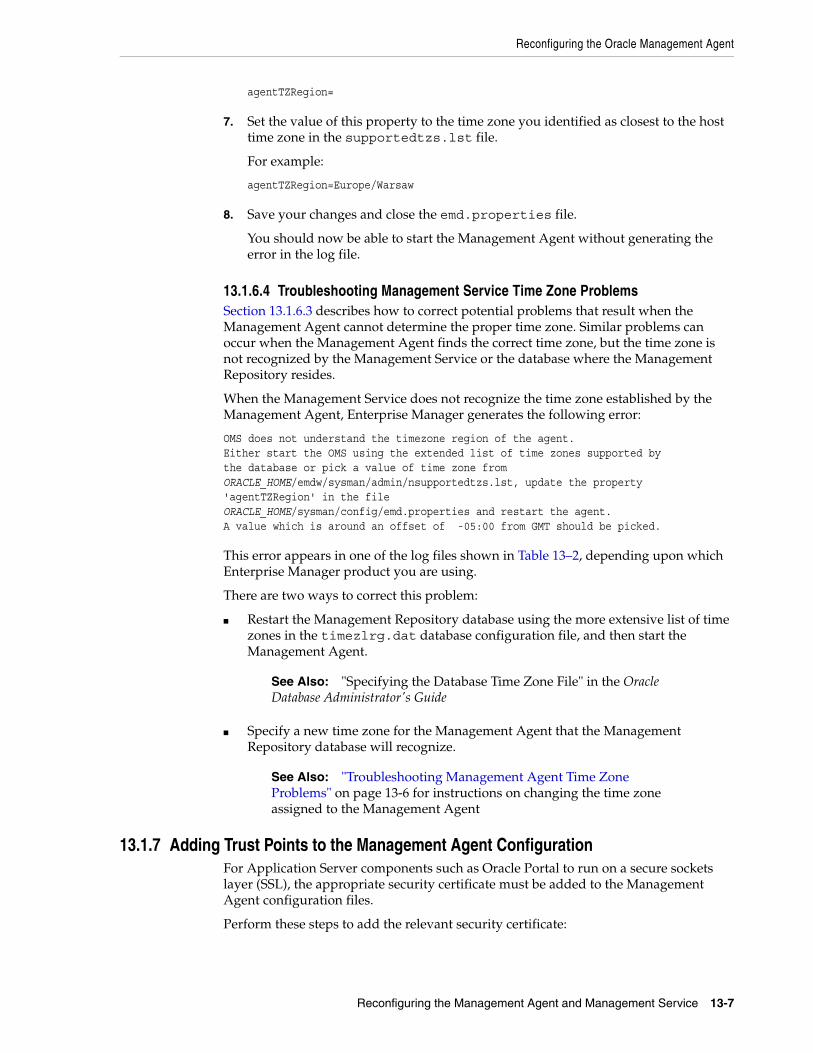
Reconfiguring the Oracle Management Agent
Reconfiguring the Management Agent and Management Service 13-7
agentTZRegion=
7. Set the value of this property to the time zone you identified as closest to the host time zone in the supportedtzs.lst file.
For example:
agentTZRegion=Europe/Warsaw
8. Save your changes and close the emd.properties file.
You should now be able to start the Management Agent without generating the error in the log file.
13.1.6.4 Troubleshooting Management Service Time Zone ProblemsSection 13.1.6.3 describes how to correct potential problems that result when the Management Agent cannot determine the proper time zone. Similar problems can occur when the Management Agent finds the correct time zone, but the time zone is not recognized by the Management Service or the database where the Management Repository resides.
When the Management Service does not recognize the time zone established by the Management Agent, Enterprise Manager generates the following error:
OMS does not understand the timezone region of the agent.Either start the OMS using the extended list of time zones supported by the database or pick a value of time zone fromORACLE_HOME/emdw/sysman/admin/nsupportedtzs.lst, update the property 'agentTZRegion' in the fileORACLE_HOME/sysman/config/emd.properties and restart the agent.A value which is around an offset of -05:00 from GMT should be picked.
This error appears in one of the log files shown in Table 13–2, depending upon which Enterprise Manager product you are using.
There are two ways to correct this problem:
■ Restart the Management Repository database using the more extensive list of time zones in the timezlrg.dat database configuration file, and then start the Management Agent.
■ Specify a new time zone for the Management Agent that the Management Repository database will recognize.
13.1.7 Adding Trust Points to the Management Agent ConfigurationFor Application Server components such as Oracle Portal to run on a secure sockets layer (SSL), the appropriate security certificate must be added to the Management Agent configuration files.
Perform these steps to add the relevant security certificate:
See Also: "Specifying the Database Time Zone File" in the Oracle Database Administrator's Guide
See Also: "Troubleshooting Management Agent Time Zone Problems" on page 13-6 for instructions on changing the time zone assigned to the Management Agent
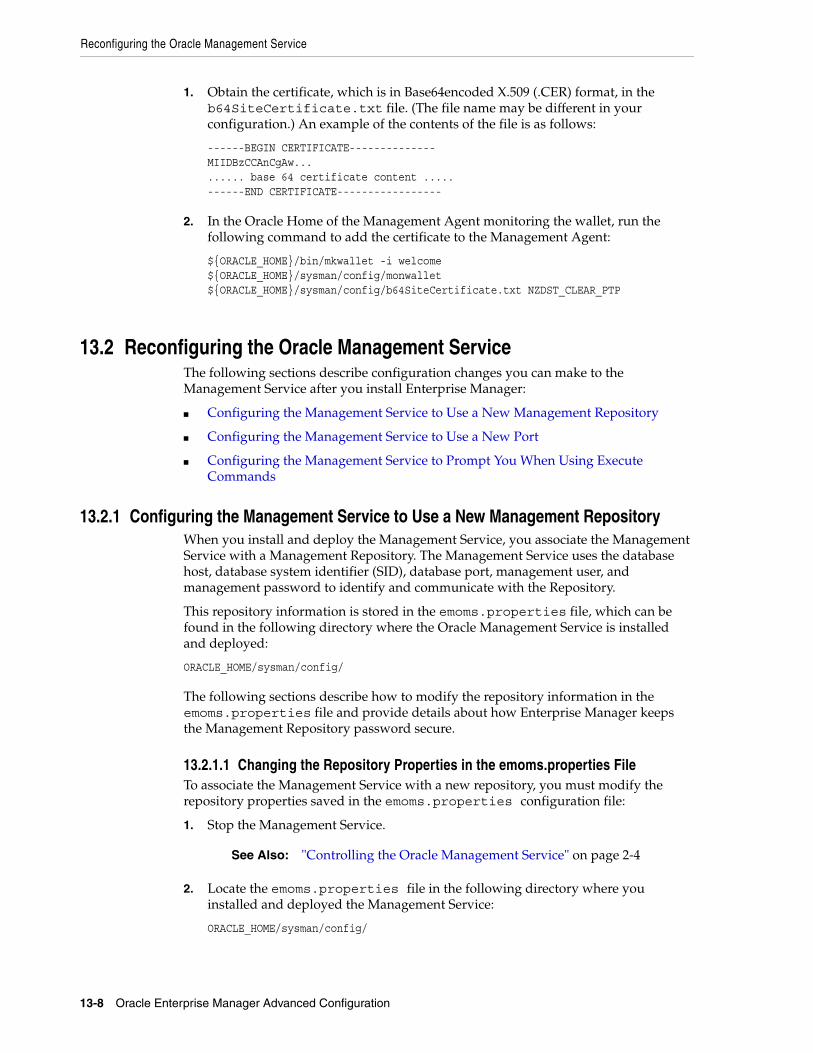
Reconfiguring the Oracle Management Service
13-8 Oracle Enterprise Manager Advanced Configuration
1. Obtain the certificate, which is in Base64encoded X.509 (.CER) format, in the b64SiteCertificate.txt file. (The file name may be different in your configuration.) An example of the contents of the file is as follows:
------BEGIN CERTIFICATE--------------MIIDBzCCAnCgAw......... base 64 certificate content .....------END CERTIFICATE-----------------
2. In the Oracle Home of the Management Agent monitoring the wallet, run the following command to add the certificate to the Management Agent:
${ORACLE_HOME}/bin/mkwallet -i welcome${ORACLE_HOME}/sysman/config/monwallet${ORACLE_HOME}/sysman/config/b64SiteCertificate.txt NZDST_CLEAR_PTP
13.2 Reconfiguring the Oracle Management ServiceThe following sections describe configuration changes you can make to the Management Service after you install Enterprise Manager:
■ Configuring the Management Service to Use a New Management Repository
■ Configuring the Management Service to Use a New Port
■ Configuring the Management Service to Prompt You When Using Execute Commands
13.2.1 Configuring the Management Service to Use a New Management RepositoryWhen you install and deploy the Management Service, you associate the Management Service with a Management Repository. The Management Service uses the database host, database system identifier (SID), database port, management user, and management password to identify and communicate with the Repository.
This repository information is stored in the emoms.properties file, which can be found in the following directory where the Oracle Management Service is installed and deployed:
ORACLE_HOME/sysman/config/
The following sections describe how to modify the repository information in the emoms.properties file and provide details about how Enterprise Manager keeps the Management Repository password secure.
13.2.1.1 Changing the Repository Properties in the emoms.properties FileTo associate the Management Service with a new repository, you must modify the repository properties saved in the emoms.properties configuration file:
1. Stop the Management Service.
2. Locate the emoms.properties file in the following directory where you installed and deployed the Management Service:
ORACLE_HOME/sysman/config/
See Also: "Controlling the Oracle Management Service" on page 2-4
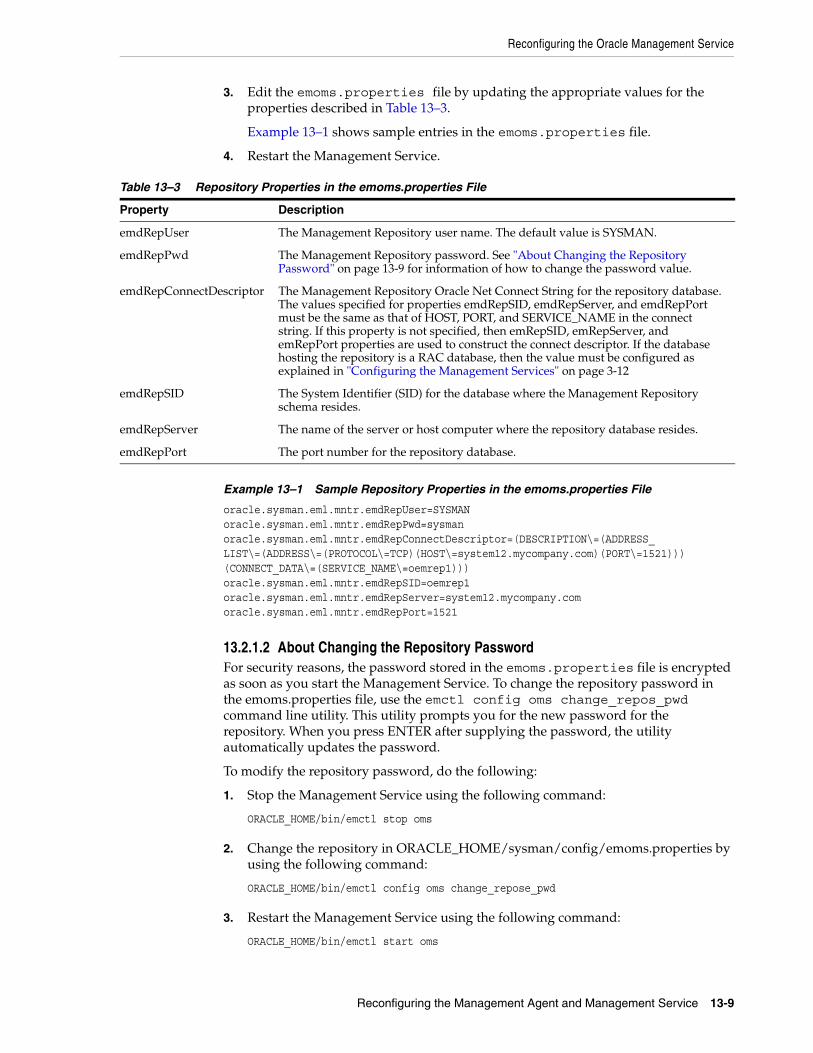
Reconfiguring the Oracle Management Service
Reconfiguring the Management Agent and Management Service 13-9
3. Edit the emoms.properties file by updating the appropriate values for the properties described in Table 13–3.
Example 13–1 shows sample entries in the emoms.properties file.
4. Restart the Management Service.
Example 13–1 Sample Repository Properties in the emoms.properties File
oracle.sysman.eml.mntr.emdRepUser=SYSMANoracle.sysman.eml.mntr.emdRepPwd=sysmanoracle.sysman.eml.mntr.emdRepConnectDescriptor=(DESCRIPTION\=(ADDRESS_LIST\=(ADDRESS\=(PROTOCOL\=TCP)(HOST\=system12.mycompany.com)(PORT\=1521)))(CONNECT_DATA\=(SERVICE_NAME\=oemrep1)))oracle.sysman.eml.mntr.emdRepSID=oemrep1oracle.sysman.eml.mntr.emdRepServer=system12.mycompany.comoracle.sysman.eml.mntr.emdRepPort=1521
13.2.1.2 About Changing the Repository PasswordFor security reasons, the password stored in the emoms.properties file is encrypted as soon as you start the Management Service. To change the repository password in the emoms.properties file, use the emctl config oms change_repos_pwd command line utility. This utility prompts you for the new password for the repository. When you press ENTER after supplying the password, the utility automatically updates the password.
To modify the repository password, do the following:
1. Stop the Management Service using the following command:
ORACLE_HOME/bin/emctl stop oms
2. Change the repository in ORACLE_HOME/sysman/config/emoms.properties by using the following command:
ORACLE_HOME/bin/emctl config oms change_repose_pwd
3. Restart the Management Service using the following command:
ORACLE_HOME/bin/emctl start oms
Table 13–3 Repository Properties in the emoms.properties File
Property Description
emdRepUser The Management Repository user name. The default value is SYSMAN.
emdRepPwd The Management Repository password. See "About Changing the Repository Password" on page 13-9 for information of how to change the password value.
emdRepConnectDescriptor The Management Repository Oracle Net Connect String for the repository database. The values specified for properties emdRepSID, emdRepServer, and emdRepPort must be the same as that of HOST, PORT, and SERVICE_NAME in the connect string. If this property is not specified, then emRepSID, emRepServer, and emRepPort properties are used to construct the connect descriptor. If the database hosting the repository is a RAC database, then the value must be configured as explained in "Configuring the Management Services" on page 3-12
emdRepSID The System Identifier (SID) for the database where the Management Repository schema resides.
emdRepServer The name of the server or host computer where the repository database resides.
emdRepPort The port number for the repository database.
Reconfiguring the Oracle Management Service
13-10 Oracle Enterprise Manager Advanced Configuration
13.2.2 Configuring the Management Service to Use a New PortWhen you install the Management Service, the port number for the Management Service is automatically set to 4889. The following procedure describes how to manually change the port number after the Enterprise Manager installation. For example, you will have to modify the port number if you attempt to install two Oracle Management Services on the same host computer.
To change the default Management Service port:
1. Stop the Management Service.
2. Locate the following httpd_em.conf file located in the following directory in the home directory where you installed and deployed the Management Service:
ORACLE_HOME/sysman/config/
3. Open the http_em.conf file with a text editor and change all occurrences of 4889 to the new port number you want to use.
4. Save and close the http_em.conf file.
5. Inform the DCM layer about the port change:
ORACLE_HOME/dcm/bin/dcmctl updateconfig -ct ohs
6. Locate the emoms.properties file in the same sysman/config directory.
7. Open the emoms.properties file with a text editor and change the following entry so it references the new port number of the Management Service:
oracle.sysman.emSDK.svlt.ConsoleServerPort=4889
8. Restart the Management Service.
9. Reconfigure each Management Agent on your managed hosts to use the new management port.
To change the default Management Service port to a secure port:
1. Stop the Management Service using:
ORACLE_HOME/bin/emctl stop oms
2. Change the secure port using the following command:
ORACLE_HOME/bin/emctl secure oms -secure_port <newPortNo>
3. Inform the DCM layer about the port change:
ORACLE_HOME/dcm/bin/dcmctl updateconfig -ct ohs
4. Start the Management Service using:
ORACLE_HOME/bin/emctl start oms
See Also: "Controlling the Oracle Management Service" on page 2-4
See Also: "Configuring the Management Agent to Use a New Management Service" on page 13-1
Reconfiguring the Oracle Management Service
Reconfiguring the Management Agent and Management Service 13-11
13.2.3 Configuring the Management Service to Prompt You When Using Execute Commands
The Execute Host Command and Execute SQL applications enable you to execute commands against multiple hosts and multiple databases respectively.
The default, when you click the Execute button of these applications, is for the command execution to begin immediately on the specified targets. If desired, you can set up the Management Service so that a confirmation page displays when you click the Execute button.
To enable the confirmation page for each application, perform the following:
1. Stop the Management Service.
2. Locate the emoms.properties file where you installed the Management Service:
ORACLE_HOME/sysman/config/emoms.properties
3. Edit the emoms.properties file and add the appropriate lines:
■ For the Execute Host Command, add the following line:
oracle.sysman.cmd.tgt.multiTarget.confirmExecuteHostCommand=true
■ For Execute SQL, add the following line:
oracle.sysman.cmd.tgt.multiTarget.confirmExecuteSQL=true
4. Save the changes and close the emos.properties file.
5. Restart the Management Service.
Note: The text in the commands is case-sensitive.

Reconfiguring the Oracle Management Service
13-12 Oracle Enterprise Manager Advanced Configuration
Configuring Notifications 14-1
14Configuring Notifications
The notification system allows you to notify Enterprise Manager administrators of alerts, policy violations, and the status changes of job executions. In addition to notifying administrators, the notification system can perform actions such as executing operating system commands (including scripts) and PL/SQL procedures when an alert is triggered. This capability allows you to implement automatically specific IT practices under particular alert conditions. For example, if an alert is generated when monitoring the operational (up/down) status of a database, you may want the notification system to automatically open an in-house trouble-ticket using an OS script so that the appropriate IT staff can respond in a timely manner.
By using Simple Network Management Protocol (SNMP) traps, the Enterprise Manager notification system also allows you to send traps to SNMP-enabled third-party applications such as HP OpenView. Some administrators may want to send third-party applications a notification when a certain metric has exceeded a threshold.
This chapter covers the following:
■ Setting Up Notifications
■ Extending Notification Beyond E-mail
■ Passing Corrective Action Status Change Information
■ Passing Job Execution Status Information
■ Passing User-Defined Target Properties to Notification Methods
■ Assigning Methods to Rules
■ Assigning Rules to Methods
■ Notification Coverage
■ Management Information Base (MIB)
■ Troubleshooting Notifications
14.1 Setting Up NotificationsAll Enterprise Manager administrators can set up e-mail notifications for themselves. Super Administrators also have the ability to set up notifications for other Enterprise Manager administrators.
14.1.1 Setting Up a Mail Server for NotificationsBefore Enterprise Manager can send e-mail notifications, you must first specify the Outgoing Mail (SMTP) servers to be used by the notification system. Once set, you can
Setting Up Notifications
14-2 Oracle Enterprise Manager Advanced Configuration
then define e-mail notifications for yourself or, if you have Super Administrator privileges, other Enterprise Manager administrators.
You specify the Outgoing Mail (SMTP) server on the Notification Methods page (Figure 14–1). Display the Notification Methods page by clicking Setup on any page in the Grid Control console and clicking Notification Methods in the vertical navigation bar.
Specify one or more outgoing mail server names, the mail server authentication credentials (User Name, Password, and Confirm Password), if required, the name you want to appear as the sender of the notification messages, and the e-mail address you want to use to send your e-mail notifications. This address, called the Sender’s Mail Address, must be a valid address on each mail server that you specify. A message will be sent to this e-mail address if any problem is encountered during the sending of an e-mail notification. Example 14–1 shows sample notification method entries.
Example 14–1 Mail Server Settings
■ Outgoing Mail (SMTP) Server - smtp01.mycorp.com:587, smtp02.mycorp.com
■ User Name - myadmin
■ Password - ******
■ Confirm Password - ******
■ Identify Sender As - Enterprise Manager
■ Sender’s E-mail Address - [email protected]
■ Use Secure Connection - No: E-mail is not encrypted. SSL: E-mail is encrypted using the Secure Sockets Layer protocol. TLS, if available: E-mail is encrypted using the Transport Layer Security protocol if the mail server supports TLS. If the server does not support TLS, the e-mail is automatically sent as plain text.
Note: You must have Super Administrator privileges in order to set up SMTP servers.
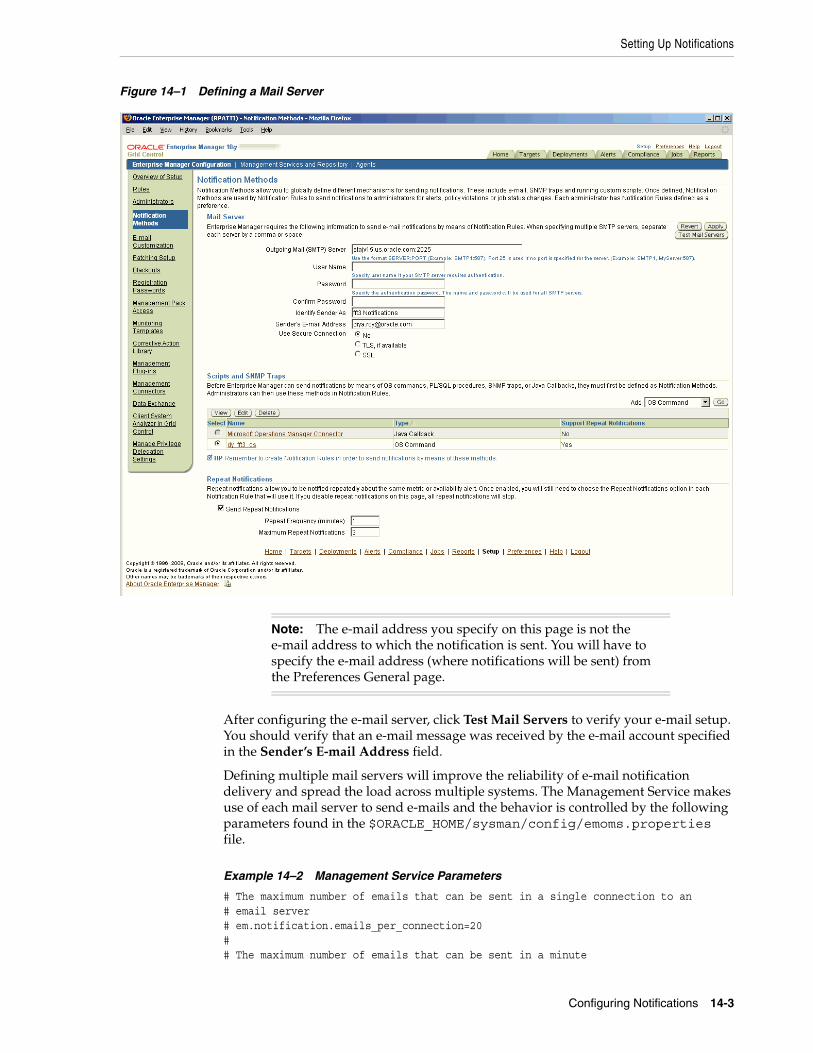
Setting Up Notifications
Configuring Notifications 14-3
Figure 14–1 Defining a Mail Server
After configuring the e-mail server, click Test Mail Servers to verify your e-mail setup. You should verify that an e-mail message was received by the e-mail account specified in the Sender’s E-mail Address field.
Defining multiple mail servers will improve the reliability of e-mail notification delivery and spread the load across multiple systems. The Management Service makes use of each mail server to send e-mails and the behavior is controlled by the following parameters found in the $ORACLE_HOME/sysman/config/emoms.properties file.
Example 14–2 Management Service Parameters
# The maximum number of emails that can be sent in a single connection to an# email server# em.notification.emails_per_connection=20## The maximum number of emails that can be sent in a minute
Note: The e-mail address you specify on this page is not the e-mail address to which the notification is sent. You will have to specify the e-mail address (where notifications will be sent) from the Preferences General page.
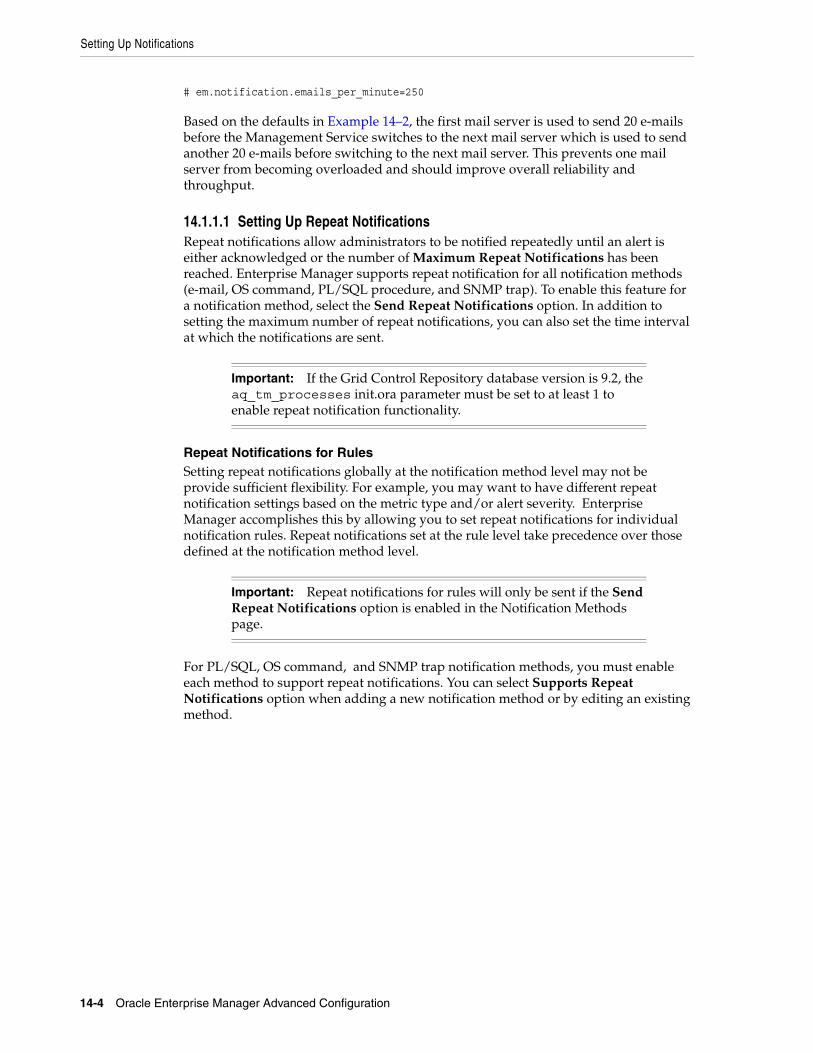
Setting Up Notifications
14-4 Oracle Enterprise Manager Advanced Configuration
# em.notification.emails_per_minute=250
Based on the defaults in Example 14–2, the first mail server is used to send 20 e-mails before the Management Service switches to the next mail server which is used to send another 20 e-mails before switching to the next mail server. This prevents one mail server from becoming overloaded and should improve overall reliability and throughput.
14.1.1.1 Setting Up Repeat NotificationsRepeat notifications allow administrators to be notified repeatedly until an alert is either acknowledged or the number of Maximum Repeat Notifications has been reached. Enterprise Manager supports repeat notification for all notification methods (e-mail, OS command, PL/SQL procedure, and SNMP trap). To enable this feature for a notification method, select the Send Repeat Notifications option. In addition to setting the maximum number of repeat notifications, you can also set the time interval at which the notifications are sent.
Repeat Notifications for RulesSetting repeat notifications globally at the notification method level may not be provide sufficient flexibility. For example, you may want to have different repeat notification settings based on the metric type and/or alert severity. Enterprise Manager accomplishes this by allowing you to set repeat notifications for individual notification rules. Repeat notifications set at the rule level take precedence over those defined at the notification method level.
For PL/SQL, OS command, and SNMP trap notification methods, you must enable each method to support repeat notifications. You can select Supports Repeat Notifications option when adding a new notification method or by editing an existing method.
Important: If the Grid Control Repository database version is 9.2, the aq_tm_processes init.ora parameter must be set to at least 1 to enable repeat notification functionality.
Important: Repeat notifications for rules will only be sent if the Send Repeat Notifications option is enabled in the Notification Methods page.
Setting Up Notifications
Configuring Notifications 14-5
Figure 14–2 Enabling Repeat Notification for an OS Command Notification Method
14.1.2 Setting Up E-mail for YourselfIf you want to receive notifications by e-mail, you will need to specify your e-mail address(s) in the General page under the Preferences link in the Grid Control console. In addition to defining notification e-mail addresses, you associate the notification message format (long or short) to be used for your e-mail address.
Setting up e-mail involves three steps:
Step 1: Define e-mail addresses.
Step 2: Set up a Notification Schedule.
Step 3: Subscribe to receive e-mail for notification rules.
14.1.2.1 Defining E-mail AddressesAn e-mail address can have up to 128 characters. There is no upper limit with the number of e-mail addresses.
To add an e-mail address:
1. From the Grid Control console, click Preferences. By default the General page is selected.
2. Click Add Another Row to create a new e-mail entry field in the E-mail Addresses table.
3. Specify the e-mail associated with your Enterprise Manager account. All e-mail notifications you receive from Enterprise Manager will be sent to the e-mail addresses you specify.
For example, [email protected]
Select the message format for your e-mail address. The Long Format sends a HTML formatted e-mail that contains detailed information. Example 14–3 shows a typical notification that uses the long format.
The Short Format (Example 14–4) sends a concise, text e-mail that is limited to a configurable number of characters, thereby allowing the e-mail be received as an SMS message or page. The content of the message can be sent entirely in the

Setting Up Notifications
14-6 Oracle Enterprise Manager Advanced Configuration
subject, entirely in the body or split across the subject and body. For example, in the last case, the subject could contain the severity type (for example, Critical) and the target name. The body could contain the time the severity occurred and the severity message. Since the message length is limited, some of this information may be truncated. If truncation has occurred there will be an ellipsis end of the message.
4. Click Apply to save your e-mail address.
Example 14–3 Long E-mail Notification for Alerts
Name=myhost.comType=HostHost=myhost.comMetric=Filesystem Space Available (%)Mount Point =/usrTimestamp=06-OCT-2006 16:27:05 US/PacificSeverity=WarningMessage=Filesystem / has only 76.07% available spaceRule Name=Host Availability and Critical StatesRule Owner=SYSMAN
Example 14–4 Short E-mail Notification for Alerts
Subject is :EM:Unreachable Start:myhostBody is :Nov 16, 2006 2:02:19 PM EST:Agent is Unreachable (REASON = Connection refused) but the host is UP
More about Short E-mail FormatEnterprise Manager does not directly support message services such as paging or SMS, but instead relies on external gateways to, for example, perform the conversion from e-mail to page.
Entries in the emoms.properties file define the size and format of the short e-mail.
You must establish the maximum size your device can support and whether the message is sent in subject, body or both.
emoms.properties Entries for a Short E-mail Format# The maximum size of a short format email# em.notification.short_format_length=155# The format of the short email. It can be set to subject, body or both.## When set to subject the entire message is sent in the subject i.e.# EM:<severity>:<target>:<message>:<timestamp># When set to body the entire message is sent in the body i.e.# EM:<severity>:<target>:<message>:<timestamp># When set to both the message is split i.e. the subject contains# EM:<severity>:<target># and the body contains# <message>:<timestamp># In all cases the message is truncated to the length specified in the# em.notification.short_format_length parameter# em.notification.short_format=both
Setting Up Notifications
Configuring Notifications 14-7
14.1.2.2 Setting Up a Notification ScheduleOnce you have defined your e-mail notification addresses, you will need to define a notification schedule. For example, if your e-mail addresses are [email protected], [email protected], [email protected], you can choose to use one or more of these e-mail addresses for each time period in your notification schedule.
A notification schedule is a repeating schedule used to specify your on-call schedule—the days and time periods and e-mail addresses that should be used by Enterprise Manager to send notifications to you. Each administrator has exactly one notification schedule. When a notification needs to be sent to an administrator, Enterprise Manager consults that administrator's notification schedule to determine the e-mail address to be used. Depending on whether you are Super Administrator or a regular Enterprise Manager administrator, the process of defining a notification schedule differs slightly.
If you are a regular Enterprise Manager administrator and are defining your own notification schedule:1. From the Enterprise Manager Grid Control, click Preferences at the top of the
page. By default the General page is selected.
2. Click Notification Schedule in the vertical navigation bar. Your Notification Schedule page appears.
3. Follow the directions on the Notification Schedule page to specify when you want to receive e-mails.
14.1.2.3 Subscribe to Receive E-mail for Notification Rules A notification rule is a user-defined rule that defines the criteria by which notifications should be sent for alerts, policy violations, corrective action execution status, and job execution status. Specifically, in each rule, you can specify the criteria you are interested in and the notification methods (such as e-mail) that should be used for sending these notifications. For example, you can set up a rule that when any database goes down or any database backup job fails, e-mail should be sent and the "log trouble ticket" notification method should be called. Or you can define another rule such that when the CPU or Memory Utilization of any host reach critical severities, SNMP traps should be sent to another management console. During notification rule creation, you specify criteria such as the targets you are interested in, their monitored metrics, associated alert severity conditions (clear, warning, critical), policy violations, corrective action execution status, or job execution status, and the associated notification method.
To subscribe to a notification rule you create, while creating the rule, go to the Actions page and check the Send Me E-mail option.
Out-of-Box Notification RulesEnterprise Manager Grid control comes with out-of-box notification rules that cover the most common alert conditions. When you install the Oracle Management Service, you are given the option to receive e-mail notifications for critical alerts. If you choose this option, and if an e-mail address for the SYSMAN user was specified, then some default notification rules are created that cover the availability and critical states for
Note: When you enter e-mail addresses for the first time, a 24x7 weekly notification schedule is set automatically. You can then review and modify the schedule to suit your monitoring needs.
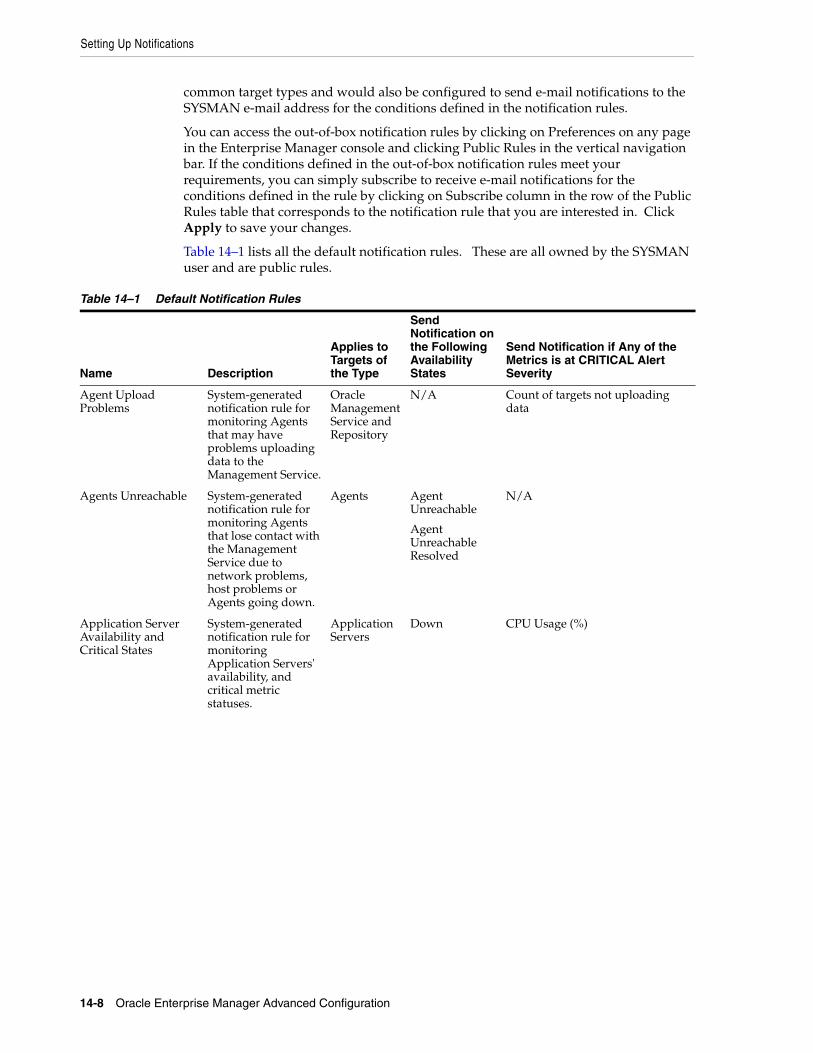
Setting Up Notifications
14-8 Oracle Enterprise Manager Advanced Configuration
common target types and would also be configured to send e-mail notifications to the SYSMAN e-mail address for the conditions defined in the notification rules.
You can access the out-of-box notification rules by clicking on Preferences on any page in the Enterprise Manager console and clicking Public Rules in the vertical navigation bar. If the conditions defined in the out-of-box notification rules meet your requirements, you can simply subscribe to receive e-mail notifications for the conditions defined in the rule by clicking on Subscribe column in the row of the Public Rules table that corresponds to the notification rule that you are interested in. Click Apply to save your changes.
Table 14–1 lists all the default notification rules. These are all owned by the SYSMAN user and are public rules.
Table 14–1 Default Notification Rules
Name Description
Applies to Targets of the Type
Send Notification on the Following Availability States
Send Notification if Any of the Metrics is at CRITICAL Alert Severity
Agent Upload Problems
System-generated notification rule for monitoring Agents that may have problems uploading data to the Management Service.
Oracle Management Service and Repository
N/A Count of targets not uploading data
Agents Unreachable System-generated notification rule for monitoring Agents that lose contact with the Management Service due to network problems, host problems or Agents going down.
Agents Agent Unreachable
Agent Unreachable Resolved
N/A
Application Server Availability and Critical States
System-generated notification rule for monitoring Application Servers' availability, and critical metric statuses.
Application Servers
Down CPU Usage (%)
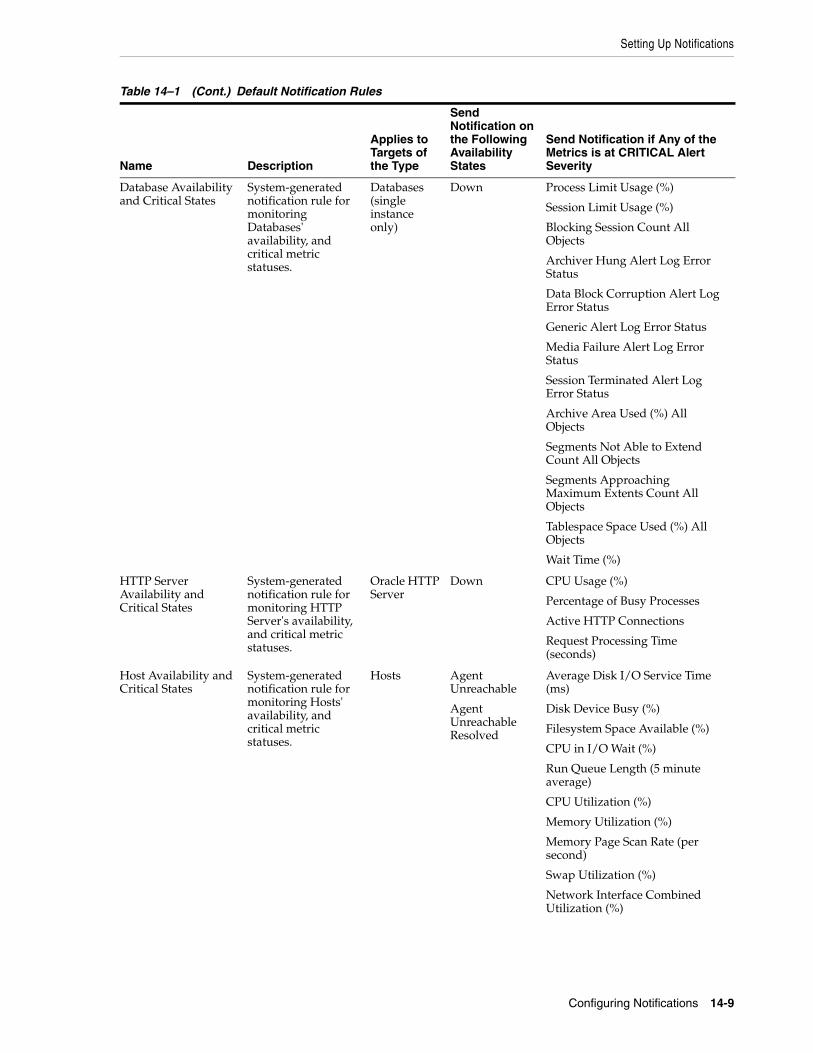
Setting Up Notifications
Configuring Notifications 14-9
Database Availability and Critical States
System-generated notification rule for monitoring Databases' availability, and critical metric statuses.
Databases (single instance only)
Down Process Limit Usage (%)
Session Limit Usage (%)
Blocking Session Count All Objects
Archiver Hung Alert Log Error Status
Data Block Corruption Alert Log Error Status
Generic Alert Log Error Status
Media Failure Alert Log Error Status
Session Terminated Alert Log Error Status
Archive Area Used (%) All Objects
Segments Not Able to Extend Count All Objects
Segments Approaching Maximum Extents Count All Objects
Tablespace Space Used (%) All Objects
Wait Time (%)
HTTP Server Availability and Critical States
System-generated notification rule for monitoring HTTP Server's availability, and critical metric statuses.
Oracle HTTP Server
Down CPU Usage (%)
Percentage of Busy Processes
Active HTTP Connections
Request Processing Time (seconds)
Host Availability and Critical States
System-generated notification rule for monitoring Hosts' availability, and critical metric statuses.
Hosts Agent Unreachable
Agent Unreachable Resolved
Average Disk I/O Service Time (ms)
Disk Device Busy (%)
Filesystem Space Available (%)
CPU in I/O Wait (%)
Run Queue Length (5 minute average)
CPU Utilization (%)
Memory Utilization (%)
Memory Page Scan Rate (per second)
Swap Utilization (%)
Network Interface Combined Utilization (%)
Table 14–1 (Cont.) Default Notification Rules
Name Description
Applies to Targets of the Type
Send Notification on the Following Availability States
Send Notification if Any of the Metrics is at CRITICAL Alert Severity

Setting Up Notifications
14-10 Oracle Enterprise Manager Advanced Configuration
Listener Availability System-generated notification rule for monitoring database Listeners' availability, and critical metric statuses.
Listeners Down N/A
Misconfigured Agents System-generated notification rule for misconfigured agents.
Agent Agent Unreachable
Agent Unreachable Resolved
Consecutive severity upload failure count
Consecutive heartbeat failure count
MS Agent time skew (mins)
Consecutive metadata upload failure count
OC4J Availability and Critical States
System-generated notification rule for monitoring OC4J instance's availability, and critical metric statuses.
OC4J Down CPU Usage (%)
OC4J Instance - Request Processing Time (seconds)
OC4J Instance - Active Sessions
OMS Service Initialization Errors
System-generated notification rule for monitoring OMS service initialization errors.
OMS and Repository
N/A Service Status
PAF Status Notification
System-generated notification rule for Provisioning Advisor Framework: Notifies the instance creator of any status updates.
N/A Up
Down
Corrective Actions on Target Down
Agent Unreachable
Agent Unreachable Resolved
Metric Error Detected
Metric Error Resolved
Blackout Started
Blackout Ended
N/A
Repository Operations Availability
System-generated notification rule for monitoring the availability of the DBMS jobs that are part of the Management Repository.
OMS and Repository
Critical DBMS Job UpDown
Table 14–1 (Cont.) Default Notification Rules
Name Description
Applies to Targets of the Type
Send Notification on the Following Availability States
Send Notification if Any of the Metrics is at CRITICAL Alert Severity
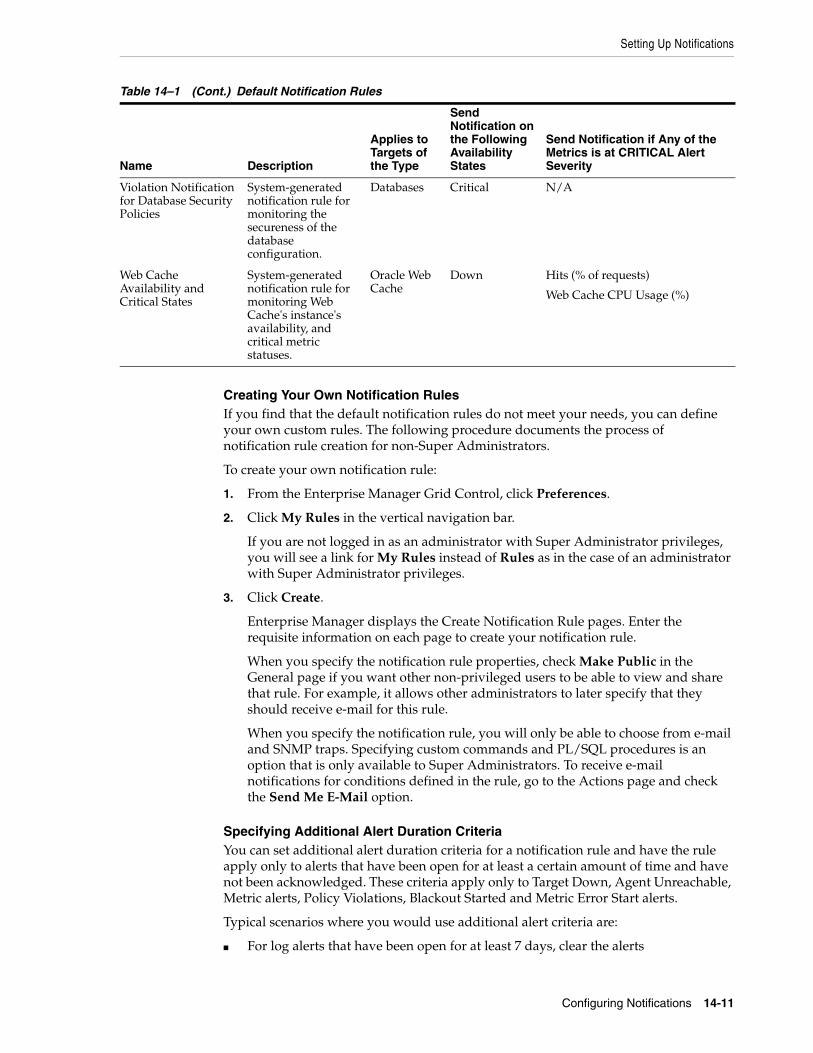
Setting Up Notifications
Configuring Notifications 14-11
Creating Your Own Notification RulesIf you find that the default notification rules do not meet your needs, you can define your own custom rules. The following procedure documents the process of notification rule creation for non-Super Administrators.
To create your own notification rule:
1. From the Enterprise Manager Grid Control, click Preferences.
2. Click My Rules in the vertical navigation bar.
If you are not logged in as an administrator with Super Administrator privileges, you will see a link for My Rules instead of Rules as in the case of an administrator with Super Administrator privileges.
3. Click Create.
Enterprise Manager displays the Create Notification Rule pages. Enter the requisite information on each page to create your notification rule.
When you specify the notification rule properties, check Make Public in the General page if you want other non-privileged users to be able to view and share that rule. For example, it allows other administrators to later specify that they should receive e-mail for this rule.
When you specify the notification rule, you will only be able to choose from e-mail and SNMP traps. Specifying custom commands and PL/SQL procedures is an option that is only available to Super Administrators. To receive e-mail notifications for conditions defined in the rule, go to the Actions page and check the Send Me E-Mail option.
Specifying Additional Alert Duration CriteriaYou can set additional alert duration criteria for a notification rule and have the rule apply only to alerts that have been open for at least a certain amount of time and have not been acknowledged. These criteria apply only to Target Down, Agent Unreachable, Metric alerts, Policy Violations, Blackout Started and Metric Error Start alerts.
Typical scenarios where you would use additional alert criteria are:
■ For log alerts that have been open for at least 7 days, clear the alerts
Violation Notification for Database Security Policies
System-generated notification rule for monitoring the secureness of the database configuration.
Databases Critical N/A
Web Cache Availability and Critical States
System-generated notification rule for monitoring Web Cache's instance's availability, and critical metric statuses.
Oracle Web Cache
Down Hits (% of requests)
Web Cache CPU Usage (%)
Table 14–1 (Cont.) Default Notification Rules
Name Description
Applies to Targets of the Type
Send Notification on the Following Availability States
Send Notification if Any of the Metrics is at CRITICAL Alert Severity
Setting Up Notifications
14-12 Oracle Enterprise Manager Advanced Configuration
■ For alerts that have been open for at least 48 hours and have not been acknowledged, send e-mail to the DBA Manager
To specify additional alert duration criteria:
1. Create or edit a notification rule. Additional alert criteria can be added from the Availability, Metrics, or Policy tab.
2. From one of the aforementioned tabs, go to the Additional Alert Criteria section and click Add. The Additional Alert Criteria page appears.
3. Specify the alert duration criteria and click Continue.
14.1.3 Setting Up E-mail for Other AdministratorsIf you have Super Administrator privileges, you can set up e-mail notifications for other Enterprise Manager administrators. To set up e-mail notifications for other Enterprise Manager administrators, you need to:
Step 1: Ensure Each Administrator Account has an Associated E-mail AddressEach administrator to which you want to send e-mail notifications must have a valid e-mail address.
1. Click Setup.
2. Click Administrators from the vertical navigation bar.
3. For each administrator, define an e-mail address. This sets up a 24x7 notification schedule for this user that uses all the e-mail addresses specified.
Enterprise Manager also allows you to specify an administrator address when editing an administrator’s notification schedule.
Step 2: Define Administrators’ Notification SchedulesOnce you have defined e-mail notification addresses for each administrator, you will need to define their respective notification schedules. Although a default 24x7 notification schedule is created when you specify an e-mail address for the first time, you should review and edit the notification schedule as needed.
1. Click Setup.
2. From the vertical navigation bar, click Schedules (under Notification). The Notification Schedule page appears.
3. Specify the administrator who’s notification schedule you wish to edit and click Change.
4. Click Edit Schedule Definition. The Edit Schedule Definition: Time Period page appears. If necessary, modify the rotation schedule.
5. Click Continue. The Edit Schedule Definition: E-mail Addresses page appears.
6. Follow the directions on the Edit Schedule Definition: E-mail Addresses page to modify the notification schedule.
7. Click Finish when you are done.
8. Repeat steps three through seven for each administrator.
Step 3: Assign Notification Rules to AdministratorsWith the notification schedules set, you now need to assign the appropriate notification rules for each designated administrator.
Setting Up Notifications
Configuring Notifications 14-13
1. Click Setup.
2. From the vertical navigation bar, click Administrators.
3. Select the desire administrator.
4. Click Subscribe to Rules. The Subscribe <administrator> to Public Notification Rules page appears.
5. Select the desired notification rules and click Subscribe.
6. Click OK when you are finished.
7. Repeat steps three through six for each administrator.
14.1.4 E-mail CustomizationEnterprise Manager allows Super Administrators to customize global e-mail notifications for the four alert types (Metric Alert, Target Availability, Policy Violation, and Job Status Change). Using predefined building blocks (called attributes and labels) contained within a simple script, Super Administrators can customize alert e-mails by selecting from a wide variety of information content.
To customize an e-mail:
1. Access the E-mail Customization page. Setup-->E-mail Customization
2. Choose the Alert Type and Format.
3. Click Edit. The Edit E-mail Template page is displayed.
From the Edit E-mail Template page, you can modify the content of the e-mail template Enterprise Manager uses to generate e-mail notifications. Extensive information on script formatting, syntax, and options is available from the Edit E-mail Template page via imbedded assistance and online help.
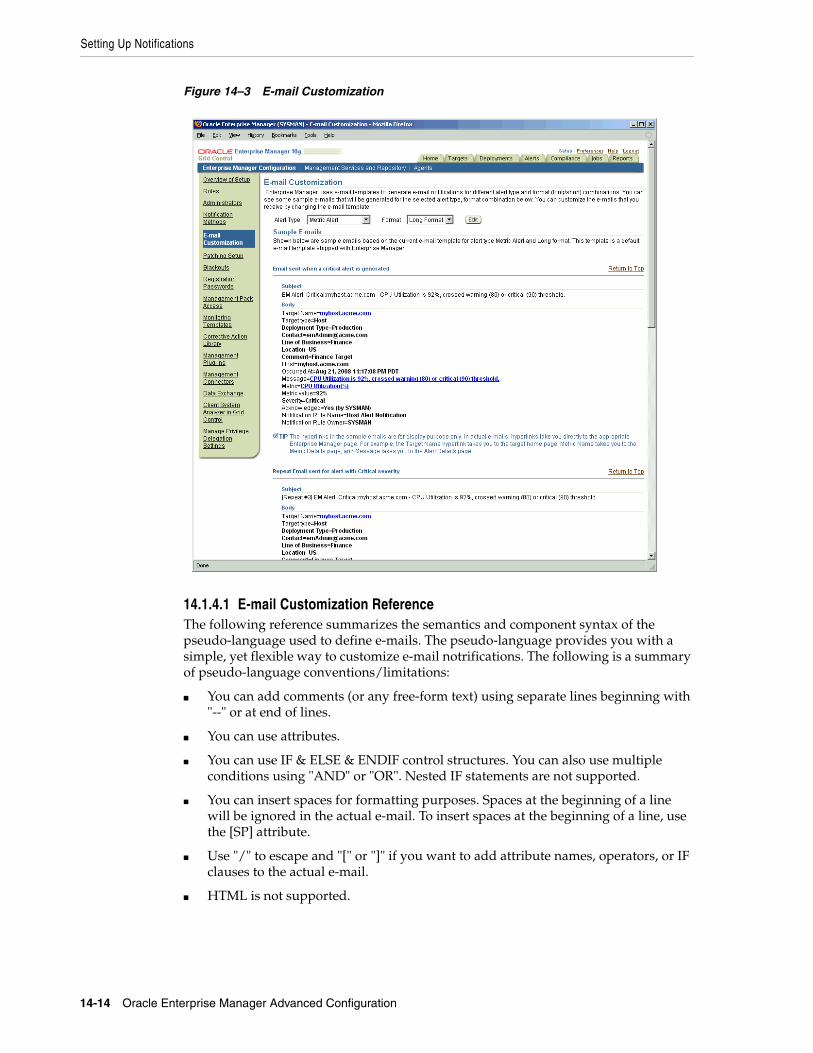
Setting Up Notifications
14-14 Oracle Enterprise Manager Advanced Configuration
Figure 14–3 E-mail Customization
14.1.4.1 E-mail Customization ReferenceThe following reference summarizes the semantics and component syntax of the pseudo-language used to define e-mails. The pseudo-language provides you with a simple, yet flexible way to customize e-mail notrifications. The following is a summary of pseudo-language conventions/limitations:
■ You can add comments (or any free-form text) using separate lines beginning with "--" or at end of lines.
■ You can use attributes.
■ You can use IF & ELSE & ENDIF control structures. You can also use multiple conditions using "AND" or "OR". Nested IF statements are not supported.
■ You can insert spaces for formatting purposes. Spaces at the beginning of a line will be ignored in the actual e-mail. To insert spaces at the beginning of a line, use the [SP] attribute.
■ Use "/" to escape and "[" or "]" if you want to add attribute names, operators, or IF clauses to the actual e-mail.
■ HTML is not supported.

Setting Up Notifications
Configuring Notifications 14-15
Reserved Words and OperatorsThe following table lists all reserved words and operators used when modifying e-mail scripts.
Syntax Elements
Literal TextYou can specify any text as part of the e-mail content. The text will be displayed in the e-mail and will not be translated if the Oracle Management Services (OMS) language setting is changed. For example, ‘my Oracle Home’ appears as ‘my Oracle Home’ in the generated e-mail.
Predefined AttributesPredefined attributes/labels will be substituted with actual values in a specific context. To specify a predefined attribute/label, use the following syntax:
[PREDEFINED_ATTR]
Attribute names can be in either UPPER or LOWER case. The parsing process is case-insensitive.
A pair of square brackets is used to distinguish predefined attributes from literal text. For example, for a job e-mail notification, the actual job name will be substituted for [JOB_NAME]. For a metric e-mail notification, the actual metric column name will be substituted for [METIRC_COLUMN].
You can use the escape character “/” to specify words and not have them interpreted as predefined labels/attributes. For example, "/[NEW/]” will not be considered as the predefined attribute [NEW] when parsed.
OperatorsEQ, NEQ – for text and numeric values
NULL- for text and numeric values
GT, LT, GE, LE – for numeric values
Table 14–2 Reserved Words and Operators
Reserved Word/Operator Description
IF, ELSIF, ENDIF, ELSE Used in IF-ELSE constructs.
AND, OR Boolean operators – used in IF-ELSE constructs only.
NULL To check NULL value for attributes - used in IF-ELSE constructs only.
| Pipe operator – used to show the first non-NULL value in a list of attributes.
For example:
METRIC_NAME|POLICY_NAME
EQ, NEQ Equal and Not-Equal operators – applicable to NULL, STRING and NUMERIC values.
/ Escape character – used to escape reserved words and operators. Escape characters signify that what follows the escape character takes an alternative interpretation.
[ , ] Delimiters used to demarcate attribute names and IF clauses.

Setting Up Notifications
14-16 Oracle Enterprise Manager Advanced Configuration
Control StructuresThe following table lists acceptable script control structures.
Table 14–3 Control Structures
Control Structure Description
Pipe "|" Two or more attributes can be separated by ‘|’ character. For example,
[METRIC_NAME|POLICY_NAME]
In this example, only the applicable attribute within the current alert context will be used (replaced by the actual value) in the e-mail. If more than one attributes are applicable, only the left-most attribute is used.
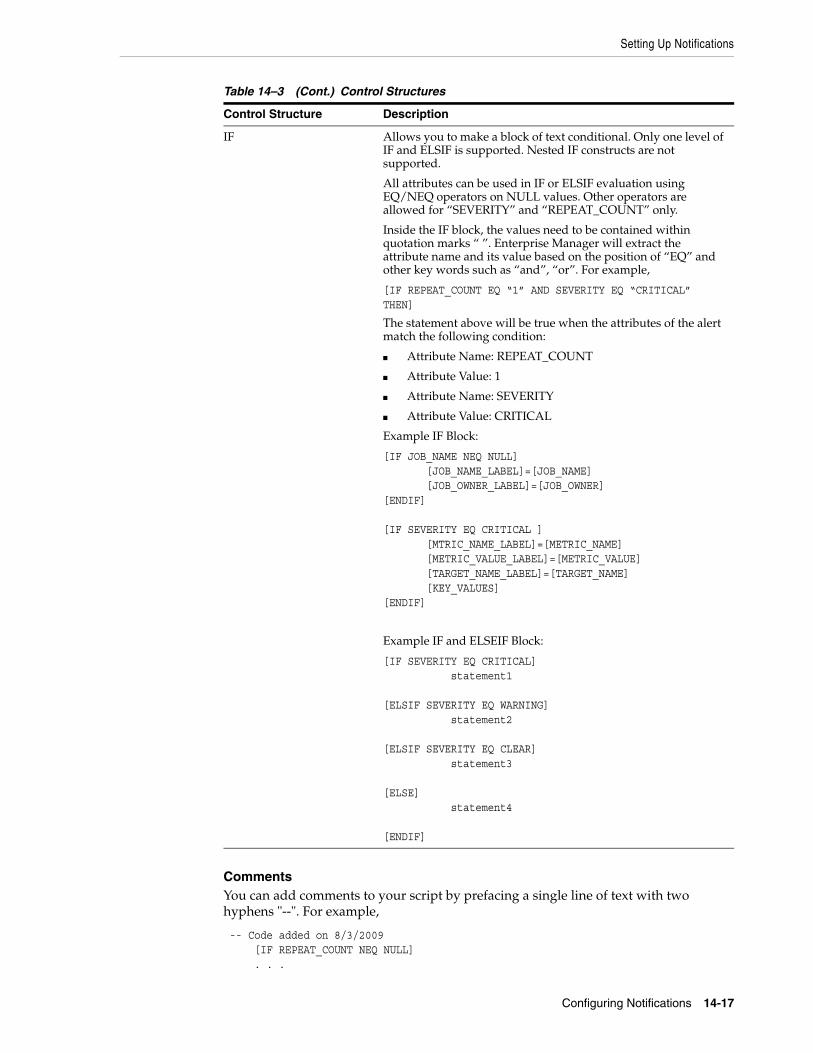
Setting Up Notifications
Configuring Notifications 14-17
CommentsYou can add comments to your script by prefacing a single line of text with two hyphens "--". For example,
-- Code added on 8/3/2009 [IF REPEAT_COUNT NEQ NULL] . . .
IF Allows you to make a block of text conditional. Only one level of IF and ELSIF is supported. Nested IF constructs are not supported.
All attributes can be used in IF or ELSIF evaluation using EQ/NEQ operators on NULL values. Other operators are allowed for “SEVERITY” and “REPEAT_COUNT” only.
Inside the IF block, the values need to be contained within quotation marks “ ”. Enterprise Manager will extract the attribute name and its value based on the position of “EQ” and other key words such as “and”, “or”. For example,
[IF REPEAT_COUNT EQ “1” AND SEVERITY EQ “CRITICAL” THEN]
The statement above will be true when the attributes of the alert match the following condition:
■ Attribute Name: REPEAT_COUNT
■ Attribute Value: 1
■ Attribute Name: SEVERITY
■ Attribute Value: CRITICAL
Example IF Block:
[IF JOB_NAME NEQ NULL] [JOB_NAME_LABEL]=[JOB_NAME] [JOB_OWNER_LABEL]=[JOB_OWNER] [ENDIF] [IF SEVERITY EQ CRITICAL ] [MTRIC_NAME_LABEL]=[METRIC_NAME] [METRIC_VALUE_LABEL]=[METRIC_VALUE] [TARGET_NAME_LABEL]=[TARGET_NAME] [KEY_VALUES] [ENDIF]
Example IF and ELSEIF Block:
[IF SEVERITY EQ CRITICAL] statement1
[ELSIF SEVERITY EQ WARNING] statement2
[ELSIF SEVERITY EQ CLEAR] statement3
[ELSE] statement4
[ENDIF]
Table 14–3 (Cont.) Control Structures
Control Structure Description
Extending Notification Beyond E-mail
14-18 Oracle Enterprise Manager Advanced Configuration
Comments may also be placed at the end of a line of text.
[IF SEVERITY_SHORT EQ W] -- for Warning alert
HTML Tags in Customization Content Use of HTML tags is not supported.
When Enterprise Manager parses the e-mail script, it will convert the “<” and “>” characters of HTML tags into encoded format (< and >). This ensures that the HTML tag is not treated as HTML by the destination system.
ExamplesE-mail customization template scripts support three main operators.
■ Comparison operators: EQ/NEQ/GT/LT/GE/LE
■ Logic operators: AND/OR
■ Pipeline operator: |
14.2 Extending Notification Beyond E-mailNotification Methods are the mechanisms by which alerts are sent. Enterprise Manager Super Administrators can set up e-mail notifications by configuring the 'e-mail' notification method. Most likely this would already have been setup as part of the Oracle Management Service installation.
Enterprise Manager Super Administrators can also define other custom notification methods. For example, alerts may need to be forwarded to a 3rd party trouble-ticketing system. Assuming APIs to the third-party trouble-ticketing system are available, a custom notification method can be created to call a custom OS script that has the appropriate APIs. The custom notification method can be named in a user-friendly fashion, for example, "Log trouble ticket". Once that is defined, any time an administrator needs to send alerts to the trouble-ticketing system, he merely needs to invoke the now globally available notification method called "Log trouble ticket".
Custom notification methods can be defined based on any custom OS script, any custom PL/SQL procedure, or by sending SNMP traps.
Only Super Administrators can define OS Command, PL/SQL, and SNMP Trap notification methods. However, any Enterprise Manager administrator can add these notification methods (once defined by the Super Administrator) to their notification rules.
Through the Notification Methods page, you can:
■ Set up the outgoing mail servers if you plan to send e-mail notifications through notification rules
■ Create other custom notification methods using OS and PL/SQL scripts and SNMP traps.
■ Set global repeat notifications.
14.2.1 Custom Notification Methods Using Scripts and SNMP Traps You can create other custom notification methods based on OS scripts, PL/SQL procedures, or SNMP traps. Any administrator can then use these methods in Notification Rules.
Extending Notification Beyond E-mail
Configuring Notifications 14-19
14.2.1.1 Adding a Notification Method based on an OS Command or ScriptComplete the following four steps to define a notification method based on an OS command or script.
Step 1: Define your OS command or script.You can specify an OS command or script that will be called by the notification system. You can use target and alert or policy violation context information, corrective action execution status and job execution status within the body of the script. Passing metric severity attributes (severity level, type, notification rule, rule owner, or rule owner, and so on) or policy violation information to OS commands/scripts allows you to customize automated responses to alerts or policy violations. For example, if an OS script opens a trouble ticket for an in-house support trouble ticket system, you will want to pass severity levels (critical, warning, and so on) to the script to open a trouble ticket with the appropriate details and escalate the problem. For more information on passing specific types of information to OS Command or Scripts, see
■ "Passing Alert and Policy Violation Information to an OS Command or Script" on page 14-20
■ "Passing Corrective Action Execution Status to an OS Command or Script" on page 14-28
■ "Passing Job Execution Status to an OS Command or Script" on page 14-34
Step 2: Deploy the script on each Management Service host.You must deploy the OS Command or Script on each Management Service host machine that connects to the Management Repository. The OS Command is run as the user who started the Management Service.
The OS Command or Script should be deployed on the same location on each Management Service host machine. The OS Command should be an absolute path, for example, /u1/bin/logSeverity.sh. The command is run by the user who started the Management Service. If an error is encountered during the running of the OS Command, the Notification System can be instructed to retry the sending of the notification to the OS Command by returning an exit code of 100. The procedure is initially retried after one minute, then two minutes, then three minutes and so on, until the notification is a day old, at which point it will be purged.
Example 14–5 shows the parameter in emoms.properties that controls how long the OS Command can execute without being killed by the Management Service. This is to prevent OS Commands from running for an inordinate length of time and blocking the delivery of other notifications. By default the command is allowed to run for 30 seconds before it is killed.
Example 14–5 Parameter in emoms.properties File
# The amount of time in seconds after which an OS Command started by the# Notification System will be killed if it has not exited# em.notification.os_cmd_timeout=30
Note: Notification methods based on OS commands must be configured by an administrator with Super Administrator privileges.
Extending Notification Beyond E-mail
14-20 Oracle Enterprise Manager Advanced Configuration
Step 3: Register your OS Command or Script as a new Notification Method.Add this OS command as a notification method that can be called in Notification Rules. Log in as a Super Administrator, click Setup and then Notification Methods from the vertical navigation bar. From this page, you can define a new notification based on the ’OS Command’ type. See "Adding a Notification Method based on an OS Command or Script" on page 14-19.
The following information is required for each OS command notification method:
■ Name
■ Description
Both Name and Description should be clear and intuitive so that the function of the method is clear to other administrators.
■ OS Command
You must enter the full path of the OS command or script in the OS command field (for example, /u1/bin/myscript.sh). For environments with multiple Management Services, the path must be exactly the same on each machine that has a Management Service. Command line parameters can be included after the full path (for example, /u1/bin/myscript.sh arg1 arg2).
Example 14–6 shows information required for the notification method.
Example 14–6 OS Command Notification Method
Name Trouble TicketingDescription Notification method to log trouble ticket for a severity occurrenceOS Command /private/mozart/bin/logTicket.sh
Step 4: Assign the notification method to a rule.You can edit an existing rule (or create a new notification rule), then go to the Methods page. In the list of Advanced Notification Methods, select your notification method and click ’Assign Method to Rule’. To assign multiple rules to a method or methods to a single rule, see "Assigning Rules to Methods" on page 14-36 or "Assigning Methods to Rules" on page 14-35.
Passing Alert and Policy Violation Information to an OS Command or ScriptThe notification system passes severity information to an OS script or executable using system environment variables.
Conventions used to access environmental variables vary depending on the operating system:
■ UNIX: $ENV_VARIABLE
■ Windows:%ENV_VARIABLE%
The notification system sets the following environment variables before calling the script. The script can then use any or all of these variables within the logic of the script.
Note: There can be more than one OS Command configured per system.
Extending Notification Beyond E-mail
Configuring Notifications 14-21
Your script may reference some or all of these variables.
Table 14–4 Environment Variables
Environment Variable Description
TARGET_NAME Name of the target on which the severity occurred.
TARGET_TYPE Type of target on which the severity occurred. Targets are defined as any monitorable entity, such as Host, Database, Listener, or Oracle HTTP Server. You can view the type of a monitored target on the All Targets page.
HOST Name of the machine on which the target resides.
METRIC Metric generating the severity. This variable is not set for policy violations.
METRIC_VALUE The value of the metric when the threshold was exceeded. Not set for policy violations
POLICY_RULE The name of the policy when the threshold was exceeded. Not set for metric severities
KEY_VALUE For metrics that monitor a set of objects, the KEY_VALUE indicates the specific object that triggered the severity. For example for the Tablespace Space Used (%) metric that monitors tablespace objects, the KEY_VALUE is 'USERS' if the USERS tablespace triggered at warning or critical severity.
KEY_VALUE_NAME For metrics that monitor a set of objects, the KEY_VALUE_NAME indicates the type of object monitored. For example for the Tablespace Space Used (%) metric that monitors tablespace objects, the KEY_VALUE_NAME is 'Tablespace Name'.
VIOLATION_CONTEXT A comma-separated list of name-value pairs that shows the alert context for a policy violation.
TIMESTAMP Time when the severity occurred.
SEVERITY Type of severity. For example, severity for a target’s (availability) status metric are:
■ UP
■ DOWN
■ UNREACHABLE CLEAR
■ UNREACHABLE START
■ BLACKOUT END
■ BLACKOUT START
Other metrics can have any of the following severities:
■ WARNING
■ CRITICAL
■ CLEAR
■ METRIC ERROR CLEAR
■ METRIC ERROR START
MESSAGE Message for the alert that provides details about what triggered the condition.
RULE_NAME Name of the notification rule to which the OS Command notification method was assigned.
RULE_OWNER Name of the Enterprise Manager administrator who owns the notification rule.
Extending Notification Beyond E-mail
14-22 Oracle Enterprise Manager Advanced Configuration
The sample OS script shown in Example 14–7 appends environment variable entries to a log file. In this example, the script logs a severity occurrence to a file server. If the file server is unreachable then an exit code of 100 is returned to force the Oracle Management Service Notification System to retry the notification
Example 14–7 Sample OS Command Script
#!/bin/ksh
LOG_FILE=/net/myhost/logs/severity.logif test -f $LOG_FILEthenecho $TARGET_NAME $MESSAGE $TIMESTAMP >> $LOG_FILEelse exit 100fi
Example 14–8 shows an OS script that logs alert information to the file 'alertmsg.txt'. The file is saved to the /u1/results directory.
Example 14–8 Alert Logging Script
#!/usr/bin/shecho "Alert logged:" > /u1/results/alertmsg.txtecho "\n" >> /u1/results/alertmsg.txtecho "target name is " $TARGET_NAME >> /u1/results/alertmsg.txtecho "target type is " $TARGET_TYPE >> /u1/results/alertmsg.txtecho "target is on host " $HOST >> /u1/results/alertmsg.txtecho "metric in alert is " $METRIC >> /u1/results/alertmsg.txtecho "metric index is " $KEY_VALUE >> /u1/results/alertmsg.txtecho "timestamp is " $TIMESTAMP >> /u1/results/alertmsg.txtecho "severity is " $SEVERITY >> /u1/results/alertmsg.txtecho "message is " $MESSAGE >> /u1/results/alertmsg.txtecho "notification rule is " $RULE_NAME >> /u1/results/alertmsg.txtecho "rule owner is " $RULE_OWNER >> /u1/results/alertmsg.txtexit 0
Example 14–9 shows a script that sends an alert to an HP OpenView console from Enterprise Manager Grid Control. When a metric alert is triggered, the Enterprise Manager Grid Control displays the alert. The HP OpenView script is then called, invoking opcmsg and forwarding the information to the HP OpenView management server.
Example 14–9 HP OpenView Script
/opt/OV/bin/OpC/opcmsg severity="$SEVERITY" app=OEM msg_grp=Oracle msg_text="$MESSAGE" object="$TARGET"
14.2.1.2 Adding a Notification Method Based on a PL/SQL ProcedureComplete the following four steps to define a notification method based on a PL/SQL procedure.
Step 1: Define the PL/SQL procedure.The procedure must have one of the following signatures depending on the type of notification that will be received.
For alerts and policy violations:
PROCEDURE p(severity IN MGMT_NOTIFY_SEVERITY)
Extending Notification Beyond E-mail
Configuring Notifications 14-23
For job execution status changes:
PROCEDURE p(job_status_change IN MGMT_NOTIFY_JOB)
For corrective action status changes:
PROCEDURE p(ca_status_change IN MGMT_NOTIFY_CORRECTIVE_ACTION)
For more information on passing specific types of information to scripts or PL/SQL procedures, see the following sections:
"Passing Alert and Policy Violation Information to a PL/SQL Procedure" on page 14-24
"Passing Corrective Action Status Change Information" on page 14-28
"Passing Job Execution Status Information" on page 14-32
Step 2: Create the PL/SQL procedure on the Management Repository.Create the PL/SQL procedure on the repository database using one of the following procedure specifications:
PROCEDURE p(severity IN MGMT_NOTIFY_SEVERITY)PROCEDURE p(job_status_change IN MGMT_NOTIFY_JOB)PROCEDURE p(ca_status_change IN MGMT_NOTIFY_CORRECTIVE_ACTION)
The PL/SQL procedure must be created on the repository database using the database account of the repository owner (such as SYSMAN)
If an error is encountered during the running of the procedure, the Notification System can be instructed to retry the sending of the notification to the procedure by raising a user defined exception that uses the error code -20000. See Example 14–11, "PL/SQL Procedure Using a Severity Code". The procedure initially retried after one minute, then two minutes, then three minutes and so on, until the notification is a day old, at which point it will be purged.
Step 3: Register your PL/SQL procedure as a new notification method.Log in as a Super Administrator, click Setup and then Notification Methods from the vertical navigation bar. From this page, you can define a new notification based on ’PL/SQL Procedure’. See "Adding a Notification Method Based on a PL/SQL Procedure" on page 14-22.
Make sure to use a fully qualified name that includes the schema owner, package name and procedure name. The procedure will be executed by the repository owner and so the repository owner must have execute permission on the procedure.
Create a notification method based on your PL/SQL procedure. The following information is required when defining the method:
■ Name
■ Description
■ PL/SQL Procedure
Note: The notification method based on a PL/SQL procedure must be configured by an administrator with Super Administrator privileges before a user can select it while creating/editing a notification rule.
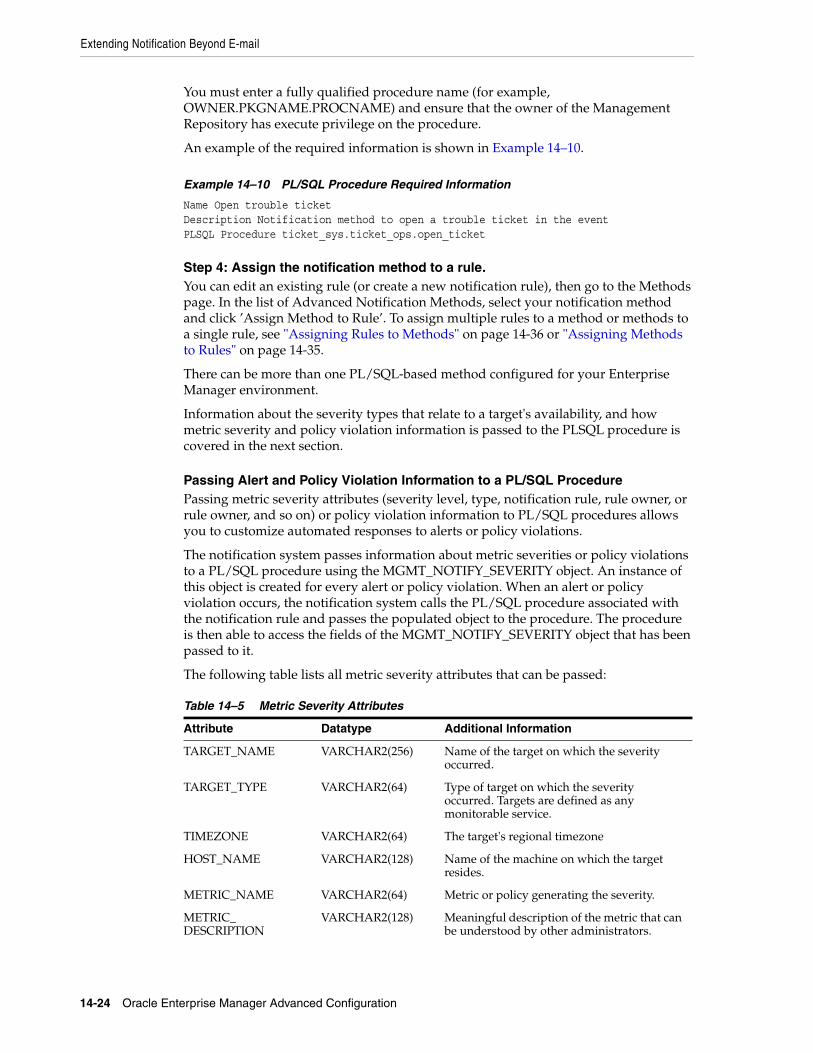
Extending Notification Beyond E-mail
14-24 Oracle Enterprise Manager Advanced Configuration
You must enter a fully qualified procedure name (for example, OWNER.PKGNAME.PROCNAME) and ensure that the owner of the Management Repository has execute privilege on the procedure.
An example of the required information is shown in Example 14–10.
Example 14–10 PL/SQL Procedure Required Information
Name Open trouble ticketDescription Notification method to open a trouble ticket in the eventPLSQL Procedure ticket_sys.ticket_ops.open_ticket
Step 4: Assign the notification method to a rule.You can edit an existing rule (or create a new notification rule), then go to the Methods page. In the list of Advanced Notification Methods, select your notification method and click ’Assign Method to Rule’. To assign multiple rules to a method or methods to a single rule, see "Assigning Rules to Methods" on page 14-36 or "Assigning Methods to Rules" on page 14-35.
There can be more than one PL/SQL-based method configured for your Enterprise Manager environment.
Information about the severity types that relate to a target's availability, and how metric severity and policy violation information is passed to the PLSQL procedure is covered in the next section.
Passing Alert and Policy Violation Information to a PL/SQL ProcedurePassing metric severity attributes (severity level, type, notification rule, rule owner, or rule owner, and so on) or policy violation information to PL/SQL procedures allows you to customize automated responses to alerts or policy violations.
The notification system passes information about metric severities or policy violations to a PL/SQL procedure using the MGMT_NOTIFY_SEVERITY object. An instance of this object is created for every alert or policy violation. When an alert or policy violation occurs, the notification system calls the PL/SQL procedure associated with the notification rule and passes the populated object to the procedure. The procedure is then able to access the fields of the MGMT_NOTIFY_SEVERITY object that has been passed to it.
The following table lists all metric severity attributes that can be passed:
Table 14–5 Metric Severity Attributes
Attribute Datatype Additional Information
TARGET_NAME VARCHAR2(256) Name of the target on which the severity occurred.
TARGET_TYPE VARCHAR2(64) Type of target on which the severity occurred. Targets are defined as any monitorable service.
TIMEZONE VARCHAR2(64) The target's regional timezone
HOST_NAME VARCHAR2(128) Name of the machine on which the target resides.
METRIC_NAME VARCHAR2(64) Metric or policy generating the severity.
METRIC_DESCRIPTION
VARCHAR2(128) Meaningful description of the metric that can be understood by other administrators.
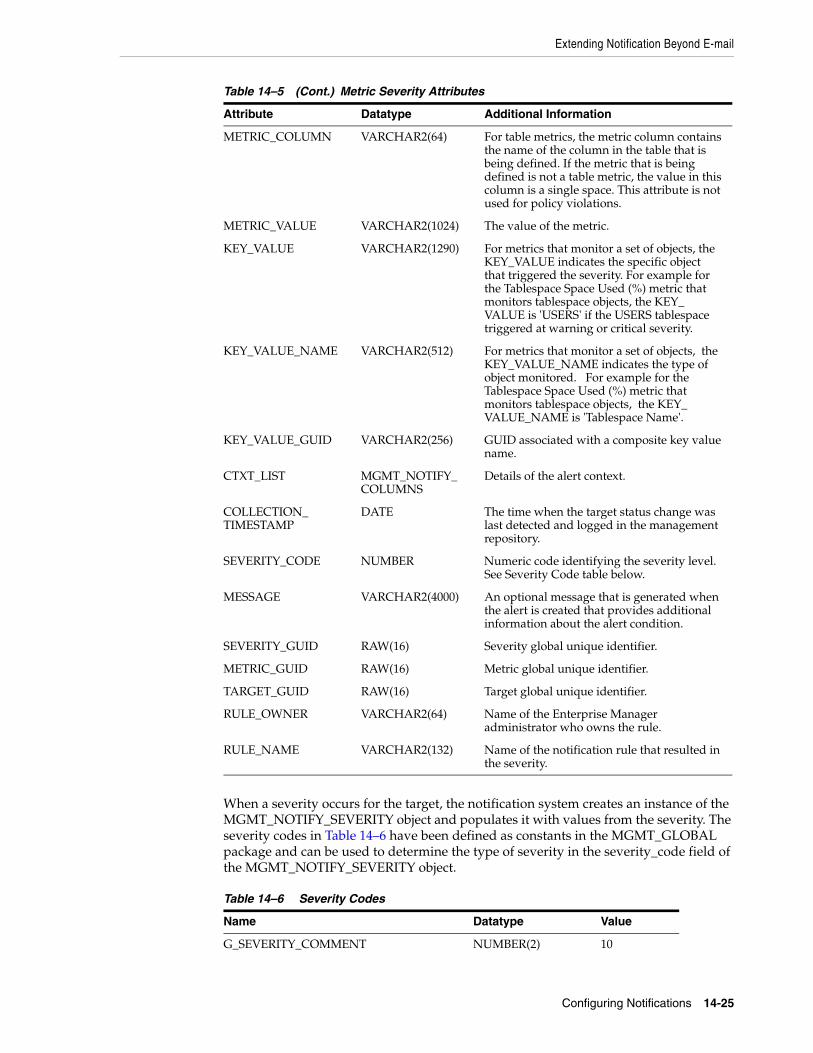
Extending Notification Beyond E-mail
Configuring Notifications 14-25
When a severity occurs for the target, the notification system creates an instance of the MGMT_NOTIFY_SEVERITY object and populates it with values from the severity. The severity codes in Table 14–6 have been defined as constants in the MGMT_GLOBAL package and can be used to determine the type of severity in the severity_code field of the MGMT_NOTIFY_SEVERITY object.
METRIC_COLUMN VARCHAR2(64) For table metrics, the metric column contains the name of the column in the table that is being defined. If the metric that is being defined is not a table metric, the value in this column is a single space. This attribute is not used for policy violations.
METRIC_VALUE VARCHAR2(1024) The value of the metric.
KEY_VALUE VARCHAR2(1290) For metrics that monitor a set of objects, the KEY_VALUE indicates the specific object that triggered the severity. For example for the Tablespace Space Used (%) metric that monitors tablespace objects, the KEY_VALUE is 'USERS' if the USERS tablespace triggered at warning or critical severity.
KEY_VALUE_NAME VARCHAR2(512) For metrics that monitor a set of objects, the KEY_VALUE_NAME indicates the type of object monitored. For example for the Tablespace Space Used (%) metric that monitors tablespace objects, the KEY_VALUE_NAME is 'Tablespace Name'.
KEY_VALUE_GUID VARCHAR2(256) GUID associated with a composite key value name.
CTXT_LIST MGMT_NOTIFY_COLUMNS
Details of the alert context.
COLLECTION_TIMESTAMP
DATE The time when the target status change was last detected and logged in the management repository.
SEVERITY_CODE NUMBER Numeric code identifying the severity level. See Severity Code table below.
MESSAGE VARCHAR2(4000) An optional message that is generated when the alert is created that provides additional information about the alert condition.
SEVERITY_GUID RAW(16) Severity global unique identifier.
METRIC_GUID RAW(16) Metric global unique identifier.
TARGET_GUID RAW(16) Target global unique identifier.
RULE_OWNER VARCHAR2(64) Name of the Enterprise Manager administrator who owns the rule.
RULE_NAME VARCHAR2(132) Name of the notification rule that resulted in the severity.
Table 14–6 Severity Codes
Name Datatype Value
G_SEVERITY_COMMENT NUMBER(2) 10
Table 14–5 (Cont.) Metric Severity Attributes
Attribute Datatype Additional Information
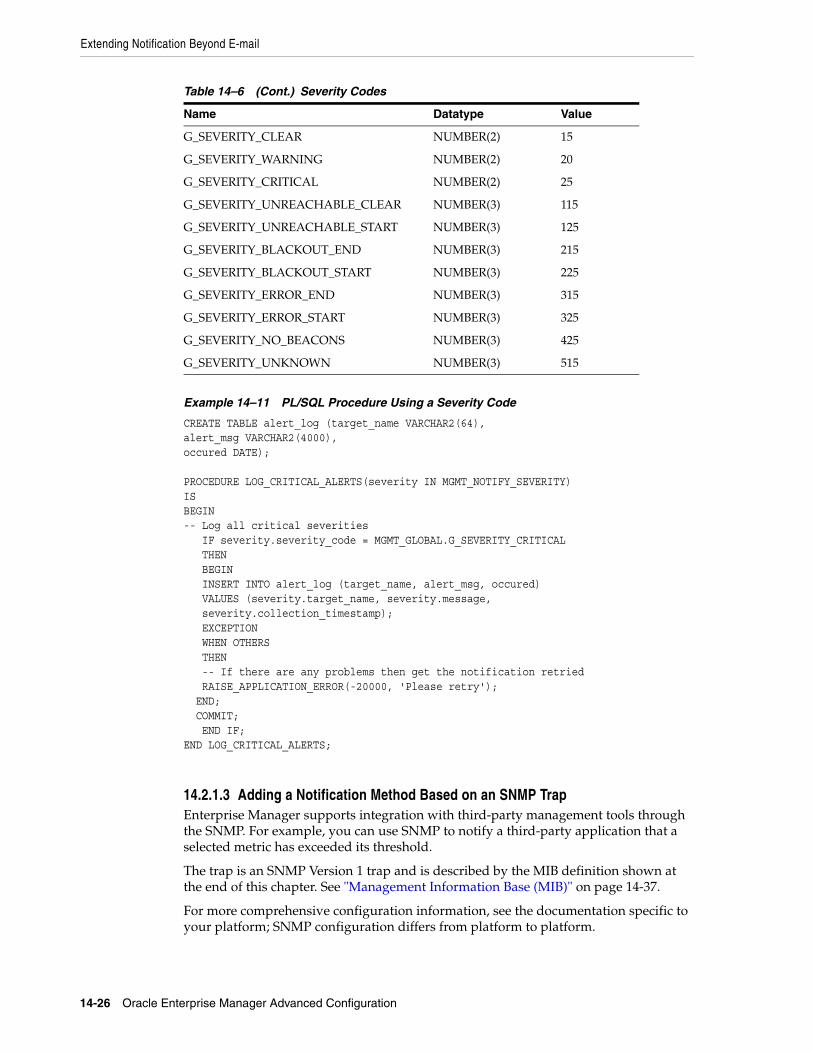
Extending Notification Beyond E-mail
14-26 Oracle Enterprise Manager Advanced Configuration
Example 14–11 PL/SQL Procedure Using a Severity Code
CREATE TABLE alert_log (target_name VARCHAR2(64),alert_msg VARCHAR2(4000),occured DATE);
PROCEDURE LOG_CRITICAL_ALERTS(severity IN MGMT_NOTIFY_SEVERITY)ISBEGIN-- Log all critical severities IF severity.severity_code = MGMT_GLOBAL.G_SEVERITY_CRITICAL THEN BEGIN INSERT INTO alert_log (target_name, alert_msg, occured) VALUES (severity.target_name, severity.message, severity.collection_timestamp); EXCEPTION WHEN OTHERS THEN -- If there are any problems then get the notification retried RAISE_APPLICATION_ERROR(-20000, 'Please retry'); END; COMMIT; END IF;END LOG_CRITICAL_ALERTS;
14.2.1.3 Adding a Notification Method Based on an SNMP TrapEnterprise Manager supports integration with third-party management tools through the SNMP. For example, you can use SNMP to notify a third-party application that a selected metric has exceeded its threshold.
The trap is an SNMP Version 1 trap and is described by the MIB definition shown at the end of this chapter. See "Management Information Base (MIB)" on page 14-37.
For more comprehensive configuration information, see the documentation specific to your platform; SNMP configuration differs from platform to platform.
G_SEVERITY_CLEAR NUMBER(2) 15
G_SEVERITY_WARNING NUMBER(2) 20
G_SEVERITY_CRITICAL NUMBER(2) 25
G_SEVERITY_UNREACHABLE_CLEAR NUMBER(3) 115
G_SEVERITY_UNREACHABLE_START NUMBER(3) 125
G_SEVERITY_BLACKOUT_END NUMBER(3) 215
G_SEVERITY_BLACKOUT_START NUMBER(3) 225
G_SEVERITY_ERROR_END NUMBER(3) 315
G_SEVERITY_ERROR_START NUMBER(3) 325
G_SEVERITY_NO_BEACONS NUMBER(3) 425
G_SEVERITY_UNKNOWN NUMBER(3) 515
Table 14–6 (Cont.) Severity Codes
Name Datatype Value
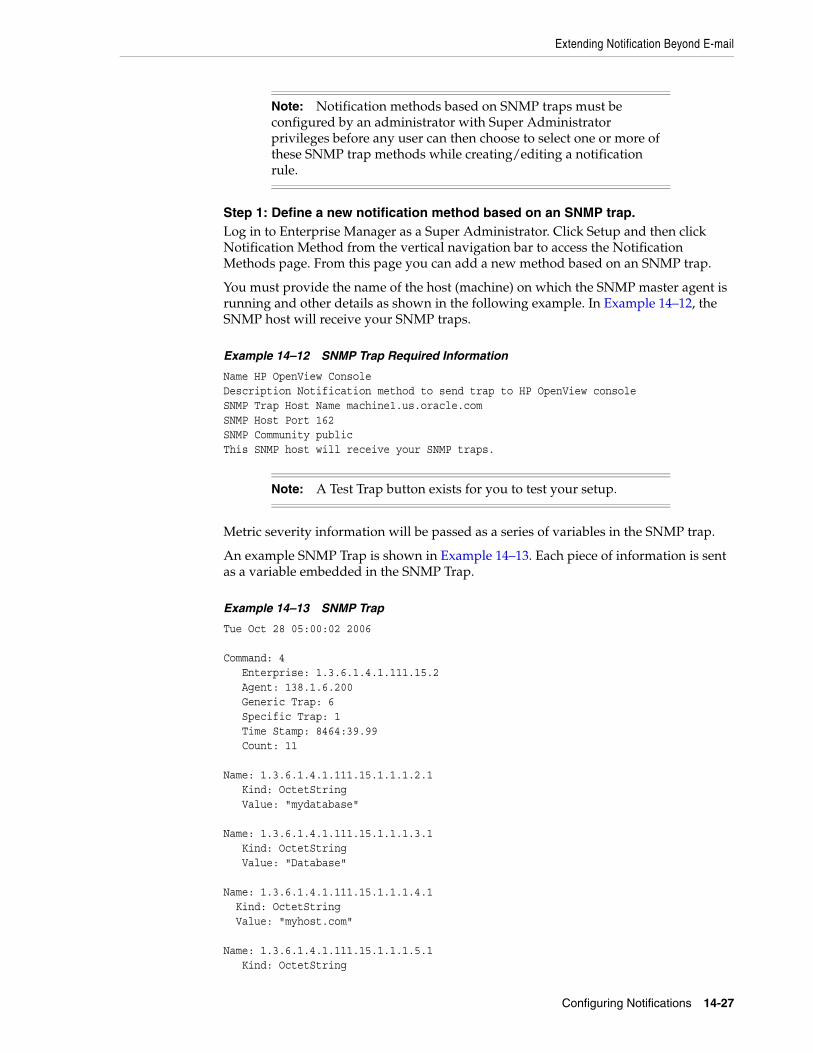
Extending Notification Beyond E-mail
Configuring Notifications 14-27
Step 1: Define a new notification method based on an SNMP trap.Log in to Enterprise Manager as a Super Administrator. Click Setup and then click Notification Method from the vertical navigation bar to access the Notification Methods page. From this page you can add a new method based on an SNMP trap.
You must provide the name of the host (machine) on which the SNMP master agent is running and other details as shown in the following example. In Example 14–12, the SNMP host will receive your SNMP traps.
Example 14–12 SNMP Trap Required Information
Name HP OpenView ConsoleDescription Notification method to send trap to HP OpenView consoleSNMP Trap Host Name machine1.us.oracle.comSNMP Host Port 162SNMP Community publicThis SNMP host will receive your SNMP traps.
Metric severity information will be passed as a series of variables in the SNMP trap.
An example SNMP Trap is shown in Example 14–13. Each piece of information is sent as a variable embedded in the SNMP Trap.
Example 14–13 SNMP Trap
Tue Oct 28 05:00:02 2006
Command: 4 Enterprise: 1.3.6.1.4.1.111.15.2 Agent: 138.1.6.200 Generic Trap: 6 Specific Trap: 1 Time Stamp: 8464:39.99 Count: 11
Name: 1.3.6.1.4.1.111.15.1.1.1.2.1 Kind: OctetString Value: "mydatabase"
Name: 1.3.6.1.4.1.111.15.1.1.1.3.1 Kind: OctetString Value: "Database"
Name: 1.3.6.1.4.1.111.15.1.1.1.4.1 Kind: OctetString Value: "myhost.com"
Name: 1.3.6.1.4.1.111.15.1.1.1.5.1 Kind: OctetString
Note: Notification methods based on SNMP traps must be configured by an administrator with Super Administrator privileges before any user can then choose to select one or more of these SNMP trap methods while creating/editing a notification rule.
Note: A Test Trap button exists for you to test your setup.
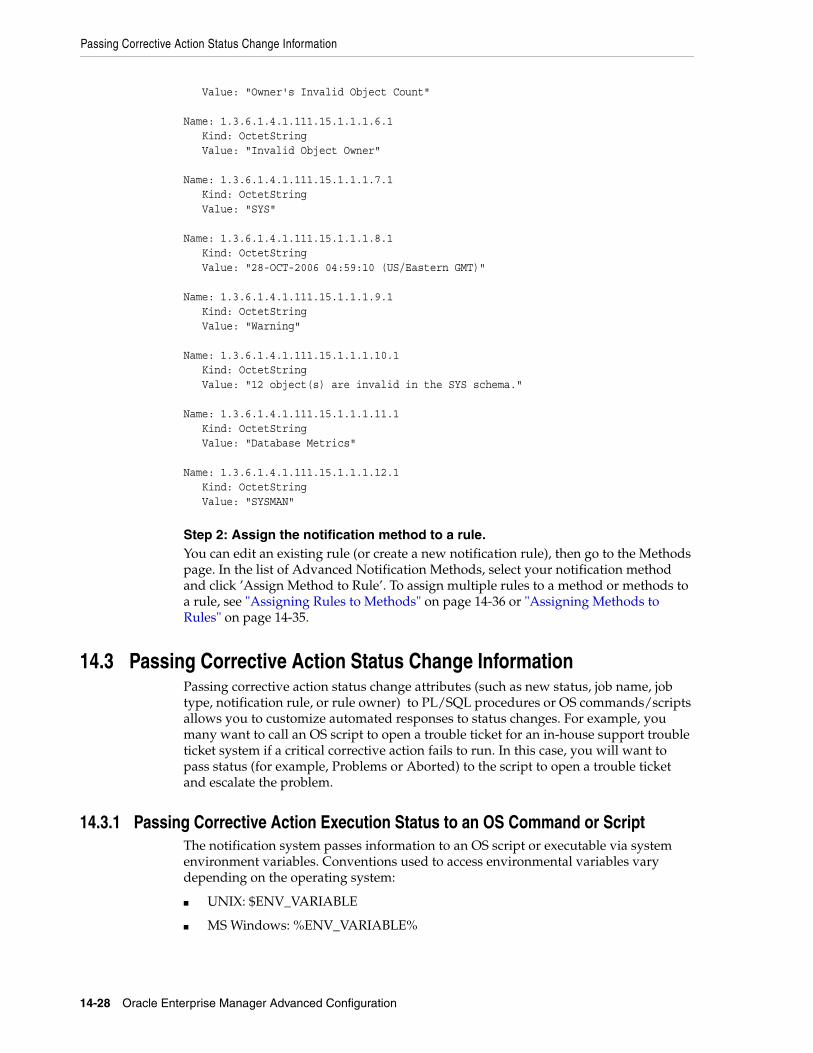
Passing Corrective Action Status Change Information
14-28 Oracle Enterprise Manager Advanced Configuration
Value: "Owner's Invalid Object Count"
Name: 1.3.6.1.4.1.111.15.1.1.1.6.1 Kind: OctetString Value: "Invalid Object Owner"
Name: 1.3.6.1.4.1.111.15.1.1.1.7.1 Kind: OctetString Value: "SYS"
Name: 1.3.6.1.4.1.111.15.1.1.1.8.1 Kind: OctetString Value: "28-OCT-2006 04:59:10 (US/Eastern GMT)"
Name: 1.3.6.1.4.1.111.15.1.1.1.9.1 Kind: OctetString Value: "Warning"
Name: 1.3.6.1.4.1.111.15.1.1.1.10.1 Kind: OctetString Value: "12 object(s) are invalid in the SYS schema."
Name: 1.3.6.1.4.1.111.15.1.1.1.11.1 Kind: OctetString Value: "Database Metrics"
Name: 1.3.6.1.4.1.111.15.1.1.1.12.1 Kind: OctetString Value: "SYSMAN"
Step 2: Assign the notification method to a rule.You can edit an existing rule (or create a new notification rule), then go to the Methods page. In the list of Advanced Notification Methods, select your notification method and click ’Assign Method to Rule’. To assign multiple rules to a method or methods to a rule, see "Assigning Rules to Methods" on page 14-36 or "Assigning Methods to Rules" on page 14-35.
14.3 Passing Corrective Action Status Change InformationPassing corrective action status change attributes (such as new status, job name, job type, notification rule, or rule owner) to PL/SQL procedures or OS commands/scripts allows you to customize automated responses to status changes. For example, you many want to call an OS script to open a trouble ticket for an in-house support trouble ticket system if a critical corrective action fails to run. In this case, you will want to pass status (for example, Problems or Aborted) to the script to open a trouble ticket and escalate the problem.
14.3.1 Passing Corrective Action Execution Status to an OS Command or ScriptThe notification system passes information to an OS script or executable via system environment variables. Conventions used to access environmental variables vary depending on the operating system:
■ UNIX: $ENV_VARIABLE
■ MS Windows: %ENV_VARIABLE%
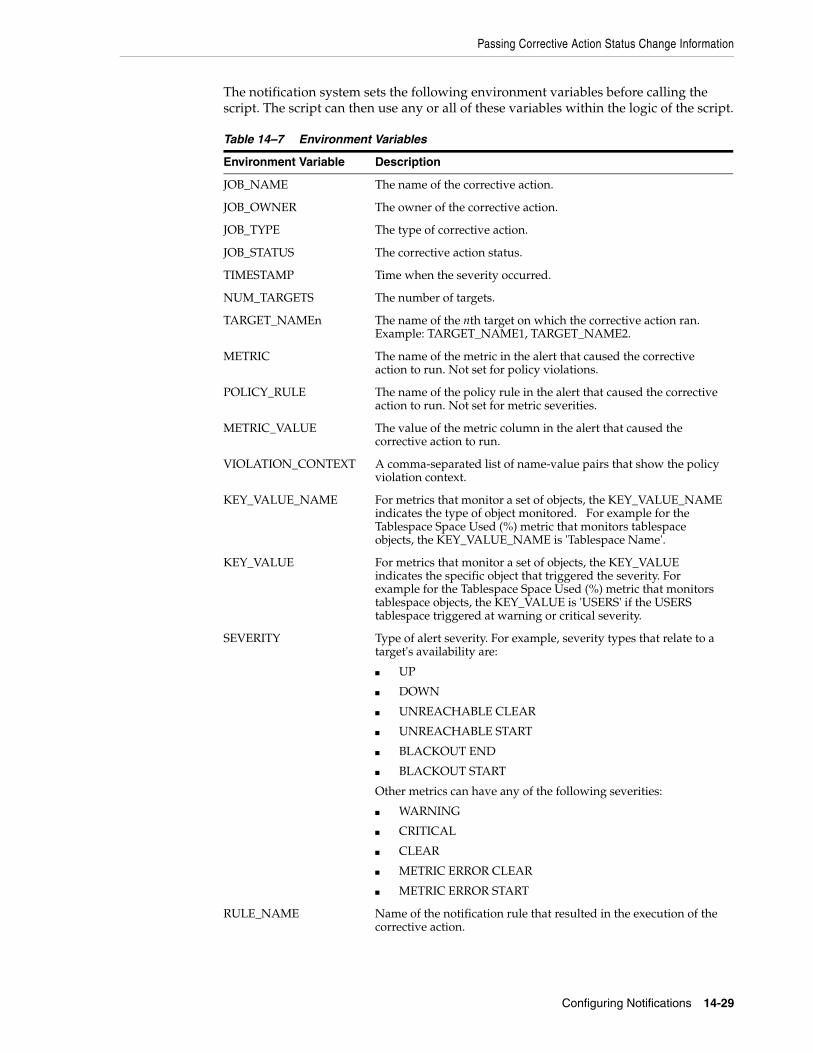
Passing Corrective Action Status Change Information
Configuring Notifications 14-29
The notification system sets the following environment variables before calling the script. The script can then use any or all of these variables within the logic of the script.
Table 14–7 Environment Variables
Environment Variable Description
JOB_NAME The name of the corrective action.
JOB_OWNER The owner of the corrective action.
JOB_TYPE The type of corrective action.
JOB_STATUS The corrective action status.
TIMESTAMP Time when the severity occurred.
NUM_TARGETS The number of targets.
TARGET_NAMEn The name of the nth target on which the corrective action ran. Example: TARGET_NAME1, TARGET_NAME2.
METRIC The name of the metric in the alert that caused the corrective action to run. Not set for policy violations.
POLICY_RULE The name of the policy rule in the alert that caused the corrective action to run. Not set for metric severities.
METRIC_VALUE The value of the metric column in the alert that caused the corrective action to run.
VIOLATION_CONTEXT A comma-separated list of name-value pairs that show the policy violation context.
KEY_VALUE_NAME For metrics that monitor a set of objects, the KEY_VALUE_NAME indicates the type of object monitored. For example for the Tablespace Space Used (%) metric that monitors tablespace objects, the KEY_VALUE_NAME is 'Tablespace Name'.
KEY_VALUE For metrics that monitor a set of objects, the KEY_VALUE indicates the specific object that triggered the severity. For example for the Tablespace Space Used (%) metric that monitors tablespace objects, the KEY_VALUE is 'USERS' if the USERS tablespace triggered at warning or critical severity.
SEVERITY Type of alert severity. For example, severity types that relate to a target's availability are:
■ UP
■ DOWN
■ UNREACHABLE CLEAR
■ UNREACHABLE START
■ BLACKOUT END
■ BLACKOUT START
Other metrics can have any of the following severities:
■ WARNING
■ CRITICAL
■ CLEAR
■ METRIC ERROR CLEAR
■ METRIC ERROR START
RULE_NAME Name of the notification rule that resulted in the execution of the corrective action.
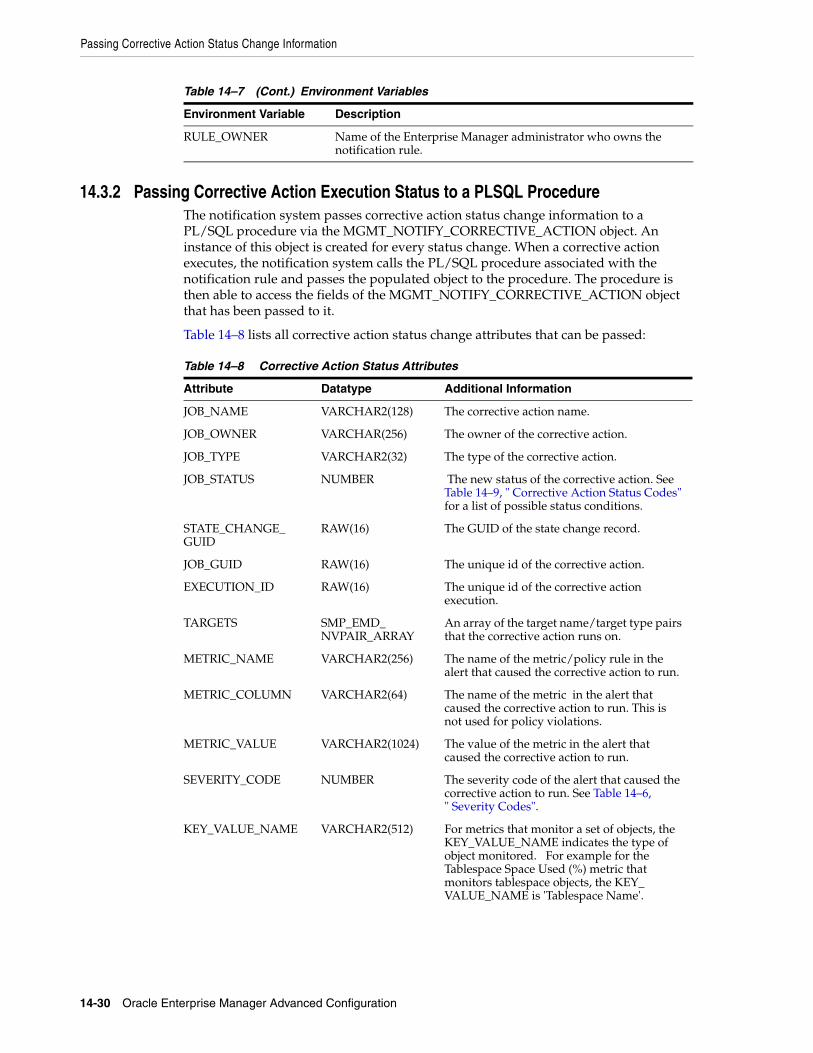
Passing Corrective Action Status Change Information
14-30 Oracle Enterprise Manager Advanced Configuration
14.3.2 Passing Corrective Action Execution Status to a PLSQL ProcedureThe notification system passes corrective action status change information to a PL/SQL procedure via the MGMT_NOTIFY_CORRECTIVE_ACTION object. An instance of this object is created for every status change. When a corrective action executes, the notification system calls the PL/SQL procedure associated with the notification rule and passes the populated object to the procedure. The procedure is then able to access the fields of the MGMT_NOTIFY_CORRECTIVE_ACTION object that has been passed to it.
Table 14–8 lists all corrective action status change attributes that can be passed:
RULE_OWNER Name of the Enterprise Manager administrator who owns the notification rule.
Table 14–8 Corrective Action Status Attributes
Attribute Datatype Additional Information
JOB_NAME VARCHAR2(128) The corrective action name.
JOB_OWNER VARCHAR(256) The owner of the corrective action.
JOB_TYPE VARCHAR2(32) The type of the corrective action.
JOB_STATUS NUMBER The new status of the corrective action. See Table 14–9, " Corrective Action Status Codes" for a list of possible status conditions.
STATE_CHANGE_GUID
RAW(16) The GUID of the state change record.
JOB_GUID RAW(16) The unique id of the corrective action.
EXECUTION_ID RAW(16) The unique id of the corrective action execution.
TARGETS SMP_EMD_NVPAIR_ARRAY
An array of the target name/target type pairs that the corrective action runs on.
METRIC_NAME VARCHAR2(256) The name of the metric/policy rule in the alert that caused the corrective action to run.
METRIC_COLUMN VARCHAR2(64) The name of the metric in the alert that caused the corrective action to run. This is not used for policy violations.
METRIC_VALUE VARCHAR2(1024) The value of the metric in the alert that caused the corrective action to run.
SEVERITY_CODE NUMBER The severity code of the alert that caused the corrective action to run. See Table 14–6, " Severity Codes".
KEY_VALUE_NAME VARCHAR2(512) For metrics that monitor a set of objects, the KEY_VALUE_NAME indicates the type of object monitored. For example for the Tablespace Space Used (%) metric that monitors tablespace objects, the KEY_VALUE_NAME is 'Tablespace Name'.
Table 14–7 (Cont.) Environment Variables
Environment Variable Description

Passing Corrective Action Status Change Information
Configuring Notifications 14-31
The following status codes are possible values for the job_status field of the MGMT_NOTIFY_CORRECTIVE_ACTION object.
KEY_VALUE VARCHAR2(1290) For table metrics, this column contains the value of the key column for the row in the table whose thresholds are being defined. If the thresholds are not for a table metric, or the thresholds apply for all rows in the metric column, then the value in this column will contain a single space.
KEY_VALUE_GUID RAW(16) GUID associated with a composite key value name.
CTXT_LIST MGMT_NOTIFY_COLUMNS
Details of the corrective action status change context.
RULE_OWNER VARCHAR2(64) The owner of the notification rule that caused the PL/SQL notification to be sent.
RULE_NAME VARCHAR2(132) The name of the notification rule that caused the PL/SQL notification method to be invoked.
OCCURRED_DATE DATE The time and date when the status change happened.
Table 14–9 Corrective Action Status Codes
Name Datatype Value
SCHEDULED_STATUS NUMBER(2) 1
EXECUTING_STATUS NUMBER(2) 2
ABORTED_STATUS NUMBER(2) 3
FAILED_STATUS NUMBER(2) 4
COMPLETED_STATUS NUMBER(2) 5
SUSPENDED_STATUS NUMBER(2) 6
AGENTDOWN_STATUS NUMBER(2) 7
STOPPED_STATUS NUMBER(2) 8
SUSPENDED_LOCK_STATUS NUMBER(2) 9
SUSPENDED_EVENT_STATUS NUMBER(2) 10
SUSPENDED_BLACKOUT_STATUS NUMBER(2) 11
STOP_PENDING_STATUS NUMBER(2) 12
SUSPEND_PENDING_STATUS NUMBER(2) 13
INACTIVE_STATUS NUMBER(2) 14
QUEUED_STATUS NUMBER(2) 15
FAILED_RETRIED_STATUS NUMBER(2) 16
WAITING_STATUS NUMBER(2) 17
SKIPPED_STATUS NUMBER(2) 18
REASSIGNED_STATUS NUMBER(2) 20
Table 14–8 (Cont.) Corrective Action Status Attributes
Attribute Datatype Additional Information
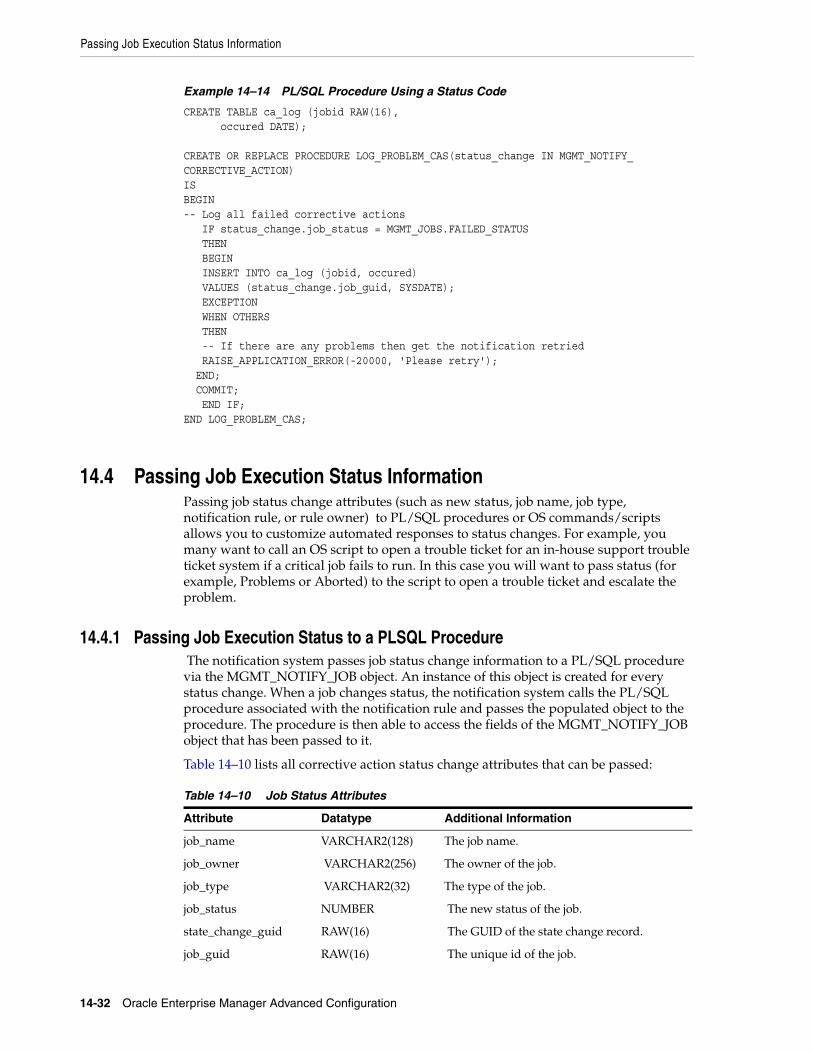
Passing Job Execution Status Information
14-32 Oracle Enterprise Manager Advanced Configuration
Example 14–14 PL/SQL Procedure Using a Status Code
CREATE TABLE ca_log (jobid RAW(16), occured DATE);
CREATE OR REPLACE PROCEDURE LOG_PROBLEM_CAS(status_change IN MGMT_NOTIFY_CORRECTIVE_ACTION)ISBEGIN-- Log all failed corrective actions IF status_change.job_status = MGMT_JOBS.FAILED_STATUS THEN BEGIN INSERT INTO ca_log (jobid, occured) VALUES (status_change.job_guid, SYSDATE); EXCEPTION WHEN OTHERS THEN -- If there are any problems then get the notification retried RAISE_APPLICATION_ERROR(-20000, 'Please retry'); END; COMMIT; END IF;END LOG_PROBLEM_CAS;
14.4 Passing Job Execution Status InformationPassing job status change attributes (such as new status, job name, job type, notification rule, or rule owner) to PL/SQL procedures or OS commands/scripts allows you to customize automated responses to status changes. For example, you many want to call an OS script to open a trouble ticket for an in-house support trouble ticket system if a critical job fails to run. In this case you will want to pass status (for example, Problems or Aborted) to the script to open a trouble ticket and escalate the problem.
14.4.1 Passing Job Execution Status to a PLSQL Procedure The notification system passes job status change information to a PL/SQL procedure via the MGMT_NOTIFY_JOB object. An instance of this object is created for every status change. When a job changes status, the notification system calls the PL/SQL procedure associated with the notification rule and passes the populated object to the procedure. The procedure is then able to access the fields of the MGMT_NOTIFY_JOB object that has been passed to it.
Table 14–10 lists all corrective action status change attributes that can be passed:
Table 14–10 Job Status Attributes
Attribute Datatype Additional Information
job_name VARCHAR2(128) The job name.
job_owner VARCHAR2(256) The owner of the job.
job_type VARCHAR2(32) The type of the job.
job_status NUMBER The new status of the job.
state_change_guid RAW(16) The GUID of the state change record.
job_guid RAW(16) The unique id of the job.

Passing Job Execution Status Information
Configuring Notifications 14-33
When a job status change occurs for the job, the notification system creates an instance of the MGMT_NOTIFY_JOB object and populates it with values from the status change. The following status codes have been defined as constants in the MGMT_JOBS package and can be used to determine the type of status in the job_status field of the MGMT_NOTIFY_JOB object.
Example 14–15 PL/SQL Procedure Using a Status Code (Job)
CREATE TABLE job_log (jobid RAW(16), occured DATE);
execution_id RAW(16) The unique id of the execution.
targets SMP_EMD_NVPAIR_ARRAY
An array of the target name/target type pairs that the job runs on.
rule_owner VARCHAR2(64) The name of the notification rule that cause the notification to be sent.
rule_name VARCHAR2(132) The owner of the notification rule that cause the notification to be sent.
occurred_date DATE The time and date when the status change happened.
Table 14–11 Job Status Codes
Name Datatype Value
SCHEDULED_STATUS NUMBER(2) 1
EXECUTING_STATUS NUMBER(2) 2
ABORTED_STATUS NUMBER(2) 3
FAILED_STATUS NUMBER(2) 4
COMPLETED_STATUS NUMBER(2) 5
SUSPENDED_STATUS NUMBER(2) 6
AGENTDOWN_STATUS NUMBER(2) 7
STOPPED_STATUS NUMBER(2) 8
SUSPENDED_LOCK_STATUS NUMBER(2) 9
SUSPENDED_EVENT_STATUS NUMBER(2) 10
SUSPENDED_BLACKOUT_STATUS NUMBER(2) 11
STOP_PENDING_STATUS NUMBER(2) 12
SUSPEND_PENDING_STATUS NUMBER(2) 13
INACTIVE_STATUS NUMBER(2) 14
QUEUED_STATUS NUMBER(2) 15
FAILED_RETRIED_STATUS NUMBER(2) 16
WAITING_STATUS NUMBER(2) 17
SKIPPED_STATUS NUMBER(2) 18
REASSIGNED_STATUS NUMBER(2) 20
Table 14–10 (Cont.) Job Status Attributes
Attribute Datatype Additional Information
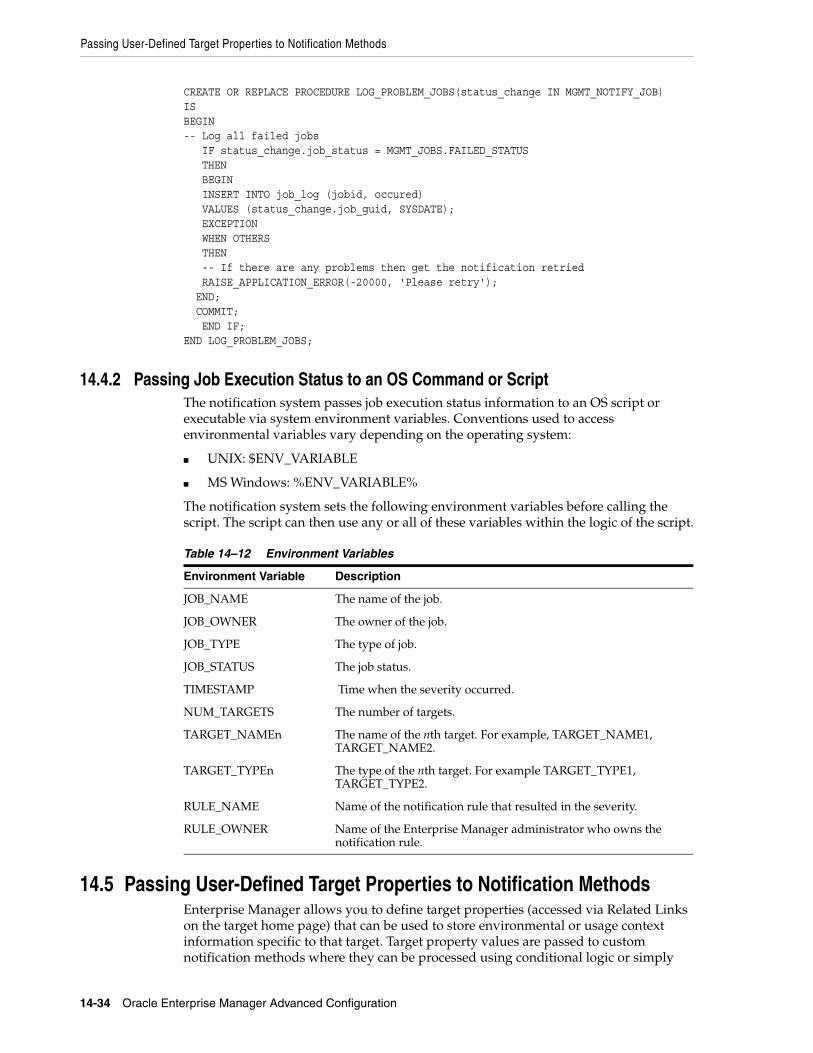
Passing User-Defined Target Properties to Notification Methods
14-34 Oracle Enterprise Manager Advanced Configuration
CREATE OR REPLACE PROCEDURE LOG_PROBLEM_JOBS(status_change IN MGMT_NOTIFY_JOB)ISBEGIN-- Log all failed jobs IF status_change.job_status = MGMT_JOBS.FAILED_STATUS THEN BEGIN INSERT INTO job_log (jobid, occured) VALUES (status_change.job_guid, SYSDATE); EXCEPTION WHEN OTHERS THEN -- If there are any problems then get the notification retried RAISE_APPLICATION_ERROR(-20000, 'Please retry'); END; COMMIT; END IF;END LOG_PROBLEM_JOBS;
14.4.2 Passing Job Execution Status to an OS Command or ScriptThe notification system passes job execution status information to an OS script or executable via system environment variables. Conventions used to access environmental variables vary depending on the operating system:
■ UNIX: $ENV_VARIABLE
■ MS Windows: %ENV_VARIABLE%
The notification system sets the following environment variables before calling the script. The script can then use any or all of these variables within the logic of the script.
14.5 Passing User-Defined Target Properties to Notification MethodsEnterprise Manager allows you to define target properties (accessed via Related Links on the target home page) that can be used to store environmental or usage context information specific to that target. Target property values are passed to custom notification methods where they can be processed using conditional logic or simply
Table 14–12 Environment Variables
Environment Variable Description
JOB_NAME The name of the job.
JOB_OWNER The owner of the job.
JOB_TYPE The type of job.
JOB_STATUS The job status.
TIMESTAMP Time when the severity occurred.
NUM_TARGETS The number of targets.
TARGET_NAMEn The name of the nth target. For example, TARGET_NAME1, TARGET_NAME2.
TARGET_TYPEn The type of the nth target. For example TARGET_TYPE1, TARGET_TYPE2.
RULE_NAME Name of the notification rule that resulted in the severity.
RULE_OWNER Name of the Enterprise Manager administrator who owns the notification rule.
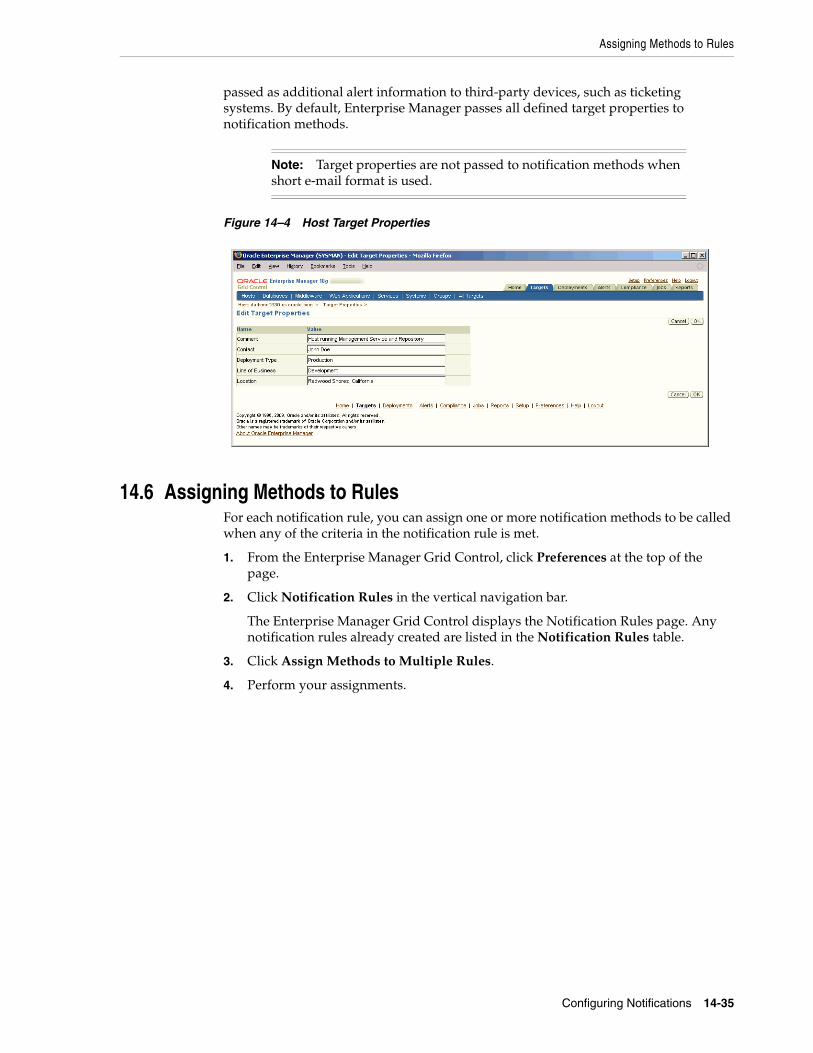
Assigning Methods to Rules
Configuring Notifications 14-35
passed as additional alert information to third-party devices, such as ticketing systems. By default, Enterprise Manager passes all defined target properties to notification methods.
Figure 14–4 Host Target Properties
14.6 Assigning Methods to RulesFor each notification rule, you can assign one or more notification methods to be called when any of the criteria in the notification rule is met.
1. From the Enterprise Manager Grid Control, click Preferences at the top of the page.
2. Click Notification Rules in the vertical navigation bar.
The Enterprise Manager Grid Control displays the Notification Rules page. Any notification rules already created are listed in the Notification Rules table.
3. Click Assign Methods to Multiple Rules.
4. Perform your assignments.
Note: Target properties are not passed to notification methods when short e-mail format is used.
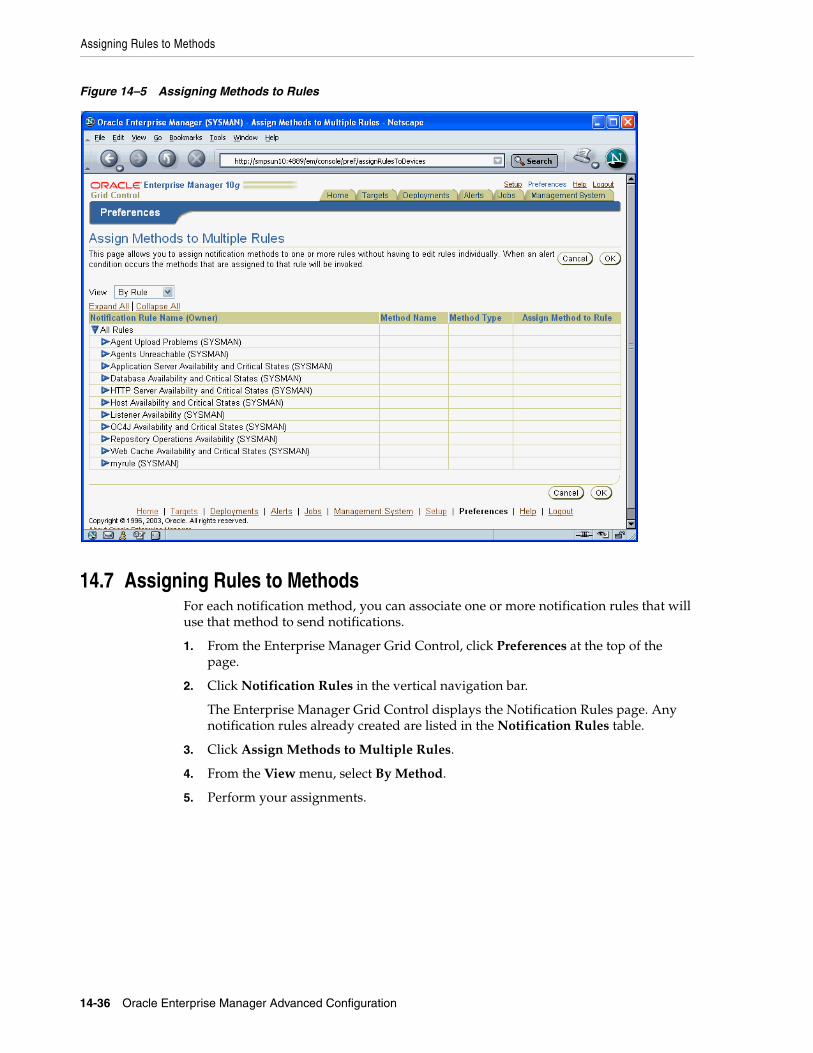
Assigning Rules to Methods
14-36 Oracle Enterprise Manager Advanced Configuration
Figure 14–5 Assigning Methods to Rules
14.7 Assigning Rules to MethodsFor each notification method, you can associate one or more notification rules that will use that method to send notifications.
1. From the Enterprise Manager Grid Control, click Preferences at the top of the page.
2. Click Notification Rules in the vertical navigation bar.
The Enterprise Manager Grid Control displays the Notification Rules page. Any notification rules already created are listed in the Notification Rules table.
3. Click Assign Methods to Multiple Rules.
4. From the View menu, select By Method.
5. Perform your assignments.
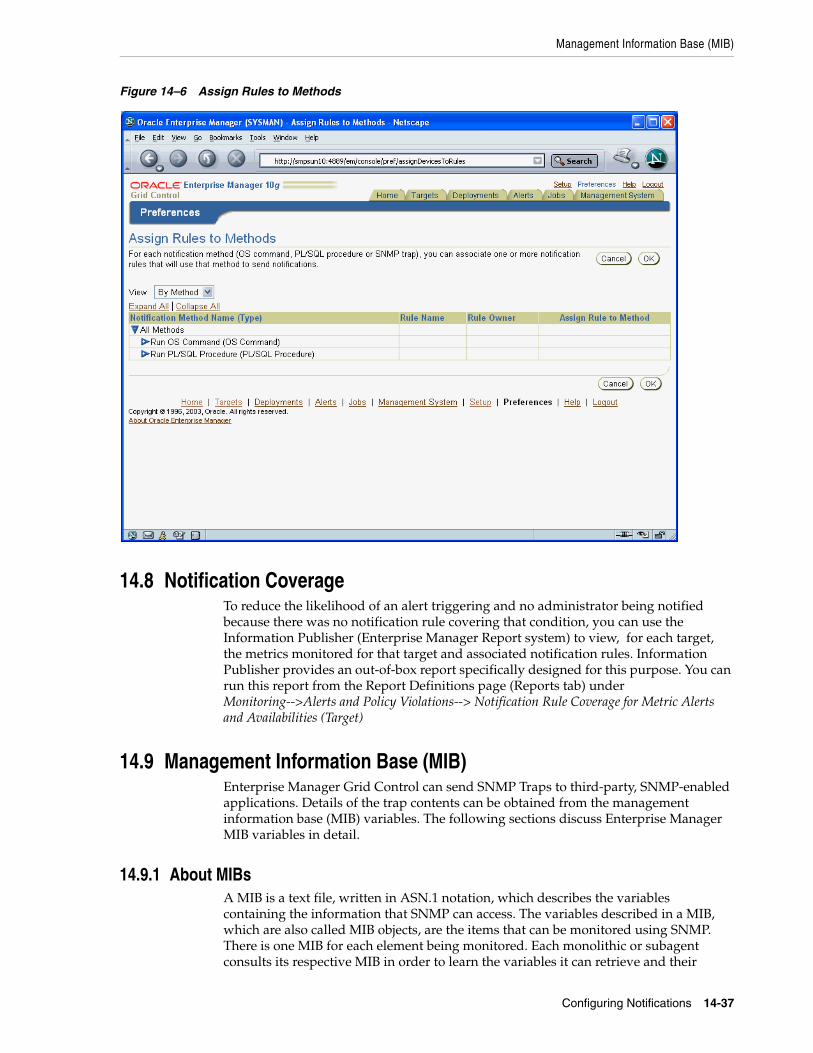
Management Information Base (MIB)
Configuring Notifications 14-37
Figure 14–6 Assign Rules to Methods
14.8 Notification CoverageTo reduce the likelihood of an alert triggering and no administrator being notified because there was no notification rule covering that condition, you can use the Information Publisher (Enterprise Manager Report system) to view, for each target, the metrics monitored for that target and associated notification rules. Information Publisher provides an out-of-box report specifically designed for this purpose. You can run this report from the Report Definitions page (Reports tab) under Monitoring-->Alerts and Policy Violations--> Notification Rule Coverage for Metric Alerts and Availabilities (Target)
14.9 Management Information Base (MIB)Enterprise Manager Grid Control can send SNMP Traps to third-party, SNMP-enabled applications. Details of the trap contents can be obtained from the management information base (MIB) variables. The following sections discuss Enterprise Manager MIB variables in detail.
14.9.1 About MIBsA MIB is a text file, written in ASN.1 notation, which describes the variables containing the information that SNMP can access. The variables described in a MIB, which are also called MIB objects, are the items that can be monitored using SNMP. There is one MIB for each element being monitored. Each monolithic or subagent consults its respective MIB in order to learn the variables it can retrieve and their
Management Information Base (MIB)
14-38 Oracle Enterprise Manager Advanced Configuration
characteristics. The encapsulation of this information in the MIB is what enables master agents to register new subagents dynamically — everything the master agent needs to know about the subagent is contained in its MIB. The management framework and management applications also consult these MIBs for the same purpose. MIBs can be either standard (also called public) or proprietary (also called private or vendor).
The actual values of the variables are not part of the MIB, but are retrieved through a platform-dependent process called "instrumentation". The concept of the MIB is very important because all SNMP communications refer to one or more MIB objects. What is transmitted to the framework is, essentially, MIB variables and their current values.
14.9.2 Reading the MIB Variable DescriptionsThis section covers the format used to describe MIB variables. Note that the STATUS element of SNMP MIB definition, Version 2, is not included in these MIB variable descriptions. Since Oracle has implemented all MIB variables as CURRENT, this value does not vary.
14.9.2.1 Variable Name
SyntaxMaps to the SYNTAX element of SNMP MIB definition, Version 2.
Max-AccessMaps to the MAX-ACCESS element of SNMP MIB definition, Version 2.
StatusMaps to the STATUS element of SNMP MIB definition, Version 2.
ExplanationDescribes the function, use and precise derivation of the variable. (For example, a variable might be derived from a particular configuration file parameter or performance table field.) When appropriate, incorporates the DESCRIPTION part of the MIB definition, Version 2.
Typical RangeDescribes the typical, rather than theoretical, range of the variable. For example, while integer values for many MIB variables can theoretically range up to 4294967295, a typical range in an actual installation will vary to a lesser extent. On the other hand, some variable values for a large database can actually exceed this "theoretical" limit (a "wraparound"). Specifying that a variable value typically ranges from 0 to 1,000 or 1,000 to 3 billion will help the third-party developer to develop the most useful graphical display for the variable.
SignificanceDescribes the significance of the variable when monitoring a typical installation. Alternative ratings are Very Important, Important, Less Important, or Not Normally Used. Clearly, the DBA will want to monitor some variables more closely than others. However, which variables fall into this category can vary from installation to installation, depending on the application, the size of the database, and on the DBA’s objectives. Nevertheless, assessing a variable’s significance relative to the other variables in the MIB can help third-party developers focus their efforts on those variables of most interest to the most DBAs.
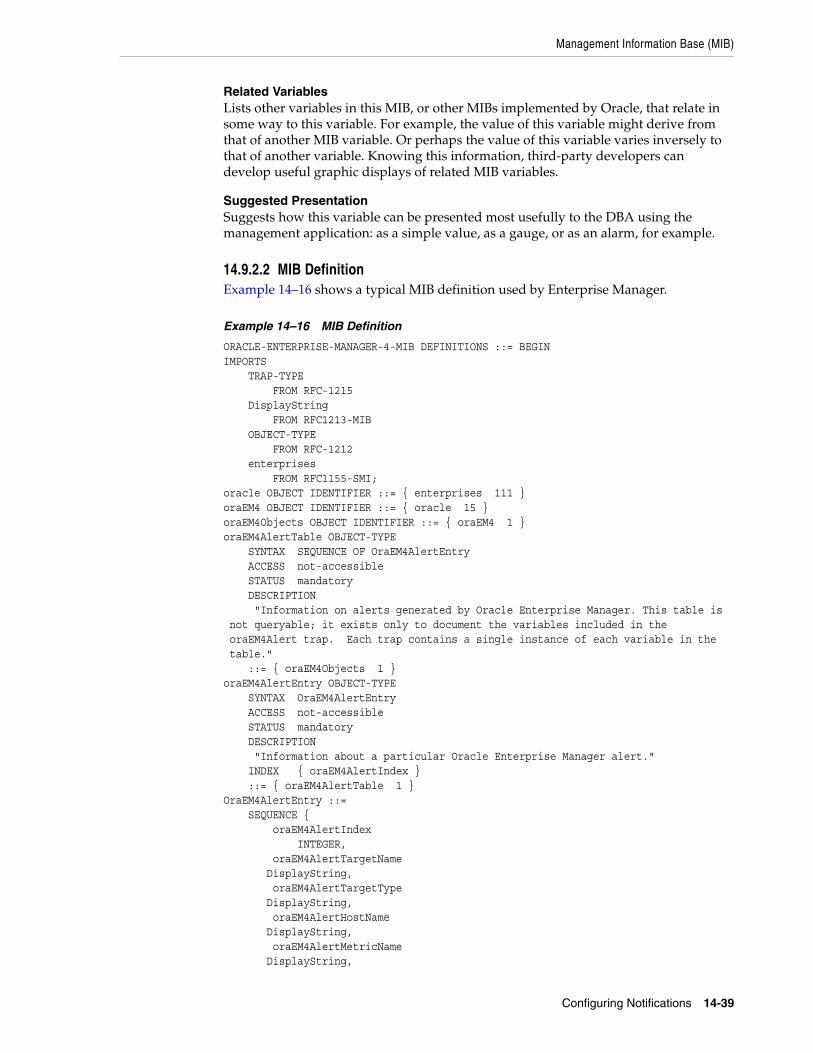
Management Information Base (MIB)
Configuring Notifications 14-39
Related VariablesLists other variables in this MIB, or other MIBs implemented by Oracle, that relate in some way to this variable. For example, the value of this variable might derive from that of another MIB variable. Or perhaps the value of this variable varies inversely to that of another variable. Knowing this information, third-party developers can develop useful graphic displays of related MIB variables.
Suggested PresentationSuggests how this variable can be presented most usefully to the DBA using the management application: as a simple value, as a gauge, or as an alarm, for example.
14.9.2.2 MIB DefinitionExample 14–16 shows a typical MIB definition used by Enterprise Manager.
Example 14–16 MIB Definition
ORACLE-ENTERPRISE-MANAGER-4-MIB DEFINITIONS ::= BEGINIMPORTS TRAP-TYPE FROM RFC-1215 DisplayString FROM RFC1213-MIB OBJECT-TYPE FROM RFC-1212 enterprises FROM RFC1155-SMI;oracle OBJECT IDENTIFIER ::= { enterprises 111 }oraEM4 OBJECT IDENTIFIER ::= { oracle 15 }oraEM4Objects OBJECT IDENTIFIER ::= { oraEM4 1 }oraEM4AlertTable OBJECT-TYPE SYNTAX SEQUENCE OF OraEM4AlertEntry ACCESS not-accessible STATUS mandatory DESCRIPTION "Information on alerts generated by Oracle Enterprise Manager. This table is not queryable; it exists only to document the variables included in the oraEM4Alert trap. Each trap contains a single instance of each variable in the table." ::= { oraEM4Objects 1 }oraEM4AlertEntry OBJECT-TYPE SYNTAX OraEM4AlertEntry ACCESS not-accessible STATUS mandatory DESCRIPTION "Information about a particular Oracle Enterprise Manager alert." INDEX { oraEM4AlertIndex } ::= { oraEM4AlertTable 1 }OraEM4AlertEntry ::= SEQUENCE { oraEM4AlertIndex INTEGER, oraEM4AlertTargetName DisplayString, oraEM4AlertTargetType DisplayString, oraEM4AlertHostName DisplayString, oraEM4AlertMetricName DisplayString,

Management Information Base (MIB)
14-40 Oracle Enterprise Manager Advanced Configuration
oraEM4AlertKeyName DisplayString, oraEM4AlertKeyValue DisplayString, oraEM4AlertTimeStamp DisplayString, oraEM4AlertSeverity DisplayString, oraEM4AlertMessage DisplayString, oraEM4AlertRuleName DisplayString oraEM4AlertRuleOwner DisplayString oraEM4AlertMetricValue DisplayString, oraEM4AlertContext DisplayString }oraEM4AlertIndex OBJECT-TYPE SYNTAX INTEGER ACCESS read-only STATUS mandatory DESCRIPTION "Index of a particular alert, unique only at the moment an alert is generated." ::= { oraEM4AlertEntry 1 }oraEM4AlertTargetName OBJECT-TYPE SYNTAX DisplayString ACCESS read-only STATUS mandatory DESCRIPTION "The name of the target to which this alert applies." ::= { oraEM4AlertEntry 2 }oraEM4AlertTargetType OBJECT-TYPE SYNTAX DisplayString ACCESS read-only STATUS mandatory DESCRIPTION "The type of the target to which this alert applies." ::= { oraEM4AlertEntry 3 }oraEM4AlertHostName OBJECT-TYPE SYNTAX DisplayString ACCESS read-only STATUS mandatory DESCRIPTION "The name of the host on which this alert originated." ::= { oraEM4AlertEntry 4 }oraEM4AlertMetricName OBJECT-TYPE SYNTAX DisplayString ACCESS read-only STATUS mandatory DESCRIPTION "The name of the metric or policy which generated this alert." ::= { oraEM4AlertEntry 5 }oraEM4AlertKeyName OBJECT-TYPE SYNTAX DisplayString ACCESS read-only STATUS mandatory DESCRIPTION

Management Information Base (MIB)
Configuring Notifications 14-41
"The name of the key-column, if present, for the metric which generated this alert." ::= { oraEM4AlertEntry 6 }oraEM4AlertKeyValue OBJECT-TYPE SYNTAX DisplayString ACCESS read-only STATUS mandatory DESCRIPTION "The value of the key-column, if present, for the metric which generated this alert." ::= { oraEM4AlertEntry 7 }oraEM4AlertTimeStamp OBJECT-TYPE SYNTAX DisplayString ACCESS read-only STATUS mandatory DESCRIPTION "The time at which this alert was generated." ::= { oraEM4AlertEntry 8 }oraEM4AlertSeverity OBJECT-TYPE SYNTAX DisplayString ACCESS read-only STATUS mandatory DESCRIPTION "The severity of the alert e.g. Critical." ::= { oraEM4AlertEntry 9 }oraEM4AlertMessage OBJECT-TYPE SYNTAX DisplayString ACCESS read-only STATUS mandatory DESCRIPTION "The message associated with the alert." ::= { oraEM4AlertEntry 10 }oraEM4AlertRuleName OBJECT-TYPE SYNTAX DisplayString ACCESS read-only STATUS mandatory DESCRIPTION "The name of the notification rule that caused this notification." ::= { oraEM4AlertEntry 11 }oraEM4AlertRuleOwner OBJECT-TYPE SYNTAX DisplayString ACCESS read-only STATUS mandatory DESCRIPTION "The owner of the notification rule that caused this notification." ::= { oraEM4AlertEntry 12 }oraEM4AlertMetricValue OBJECT-TYPE SYNTAX DisplayString ACCESS read-only STATUS mandatory DESCRIPTION "The value of the metric which caused this alert to be generated." ::= { oraEM4AlertEntry 13 }oraEM4AlertContext OBJECT-TYPE SYNTAX DisplayString ACCESS read-only STATUS mandatory DESCRIPTION "A comma separated list of metric column names and values associated with the metric that caused this alert to be generated."
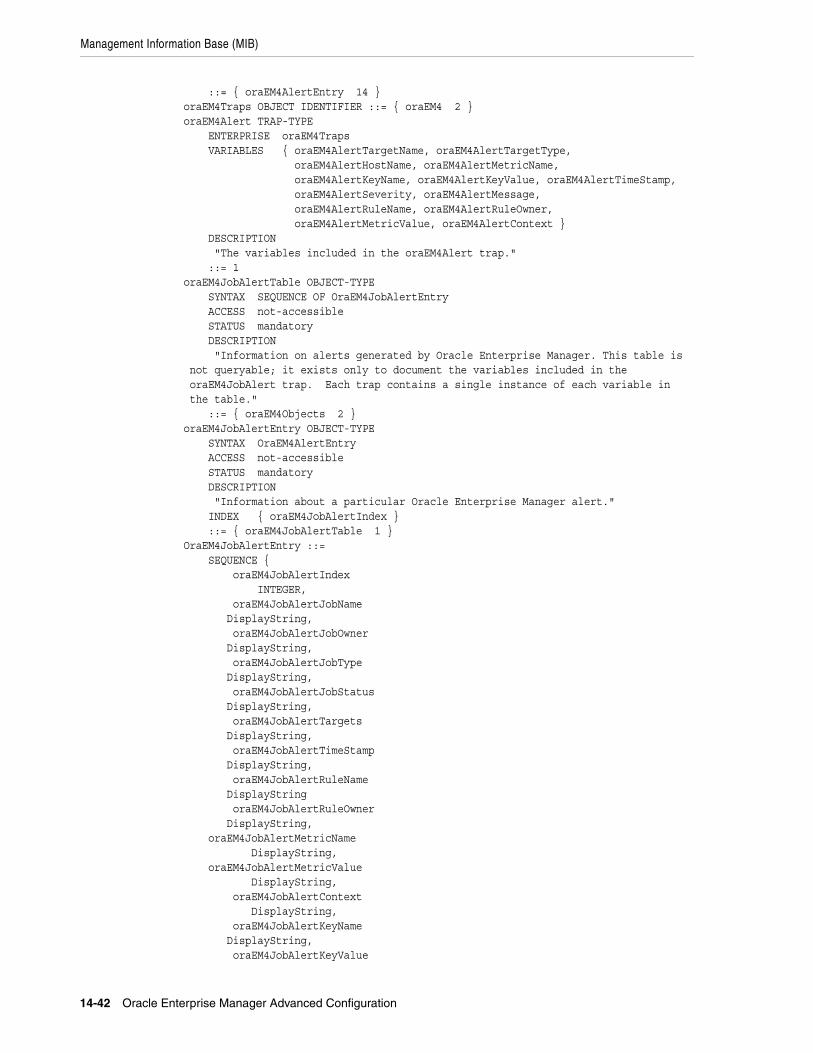
Management Information Base (MIB)
14-42 Oracle Enterprise Manager Advanced Configuration
::= { oraEM4AlertEntry 14 }oraEM4Traps OBJECT IDENTIFIER ::= { oraEM4 2 }oraEM4Alert TRAP-TYPE ENTERPRISE oraEM4Traps VARIABLES { oraEM4AlertTargetName, oraEM4AlertTargetType, oraEM4AlertHostName, oraEM4AlertMetricName, oraEM4AlertKeyName, oraEM4AlertKeyValue, oraEM4AlertTimeStamp, oraEM4AlertSeverity, oraEM4AlertMessage, oraEM4AlertRuleName, oraEM4AlertRuleOwner, oraEM4AlertMetricValue, oraEM4AlertContext } DESCRIPTION "The variables included in the oraEM4Alert trap." ::= 1oraEM4JobAlertTable OBJECT-TYPE SYNTAX SEQUENCE OF OraEM4JobAlertEntry ACCESS not-accessible STATUS mandatory DESCRIPTION "Information on alerts generated by Oracle Enterprise Manager. This table is not queryable; it exists only to document the variables included in the oraEM4JobAlert trap. Each trap contains a single instance of each variable in the table." ::= { oraEM4Objects 2 }oraEM4JobAlertEntry OBJECT-TYPE SYNTAX OraEM4AlertEntry ACCESS not-accessible STATUS mandatory DESCRIPTION "Information about a particular Oracle Enterprise Manager alert." INDEX { oraEM4JobAlertIndex } ::= { oraEM4JobAlertTable 1 }OraEM4JobAlertEntry ::= SEQUENCE { oraEM4JobAlertIndex INTEGER, oraEM4JobAlertJobName DisplayString, oraEM4JobAlertJobOwner DisplayString, oraEM4JobAlertJobType DisplayString, oraEM4JobAlertJobStatus DisplayString, oraEM4JobAlertTargets DisplayString, oraEM4JobAlertTimeStamp DisplayString, oraEM4JobAlertRuleName DisplayString oraEM4JobAlertRuleOwner DisplayString, oraEM4JobAlertMetricName DisplayString, oraEM4JobAlertMetricValue DisplayString, oraEM4JobAlertContext DisplayString, oraEM4JobAlertKeyName DisplayString, oraEM4JobAlertKeyValue

Management Information Base (MIB)
Configuring Notifications 14-43
DisplayString, oraEM4JobAlertSeverity DisplayString }oraEM4JobAlertIndex OBJECT-TYPE SYNTAX INTEGER ACCESS read-only STATUS mandatory DESCRIPTION "Index of a particular alert, unique only at the moment an alert is generated." ::= { oraEM4JobAlertEntry 1 }oraEM4JobAlertJobName OBJECT-TYPE SYNTAX DisplayString ACCESS read-only STATUS mandatory DESCRIPTION "The name of the job to which this alert applies." ::= { oraEM4JobAlertEntry 2 }oraEM4JobAlertJobOwner OBJECT-TYPE SYNTAX DisplayString ACCESS read-only STATUS mandatory DESCRIPTION "The owner of the job to which this alert applies." ::= { oraEM4JobAlertEntry 3 }oraEM4JobAlertJobType OBJECT-TYPE SYNTAX DisplayString ACCESS read-only STATUS mandatory DESCRIPTION "The type of the job to which this alert applies." ::= { oraEM4JobAlertEntry 4 }oraEM4JobAlertJobStatus OBJECT-TYPE SYNTAX DisplayString ACCESS read-only STATUS mandatory DESCRIPTION "The status of the job to which this alert applies." ::= { oraEM4JobAlertEntry 5 }oraEM4JobAlertTargets OBJECT-TYPE SYNTAX DisplayString ACCESS read-only STATUS mandatory DESCRIPTION "A comma separated list of target to which this alert applies." ::= { oraEM4JobAlertEntry 6 }oraEM4JobAlertTimeStamp OBJECT-TYPE SYNTAX DisplayString ACCESS read-only STATUS mandatory DESCRIPTION "The time at which this job status changed causing this alert." ::= { oraEM4JobAlertEntry 7 }oraEM4JobAlertRuleName OBJECT-TYPE SYNTAX DisplayString ACCESS read-only STATUS mandatory DESCRIPTION "The name of the notification rule that caused this notification."

Management Information Base (MIB)
14-44 Oracle Enterprise Manager Advanced Configuration
::= { oraEM4JobAlertEntry 8 }oraEM4JobAlertRuleOwner OBJECT-TYPE SYNTAX DisplayString ACCESS read-only STATUS mandatory DESCRIPTION "The owner of the notification rule that caused this notification." ::= { oraEM4JobAlertEntry 9 }oraEM4JobAlertMetricName OBJECT-TYPE SYNTAX DisplayString ACCESS read-only STATUS mandatory DESCRIPTION "The name of the metric or policy which caused the Corrective Action to run that caused this alert." ::= { oraEM4JobAlertEntry 10 }oraEM4JobAlertMetricValue OBJECT-TYPE SYNTAX DisplayString ACCESS read-only STATUS mandatory DESCRIPTION "The value of the metric which caused the Corrective Action to run that caused this alert." ::= { oraEM4JobAlertEntry 11 }oraEM4JobAlertContext OBJECT-TYPE SYNTAX DisplayString ACCESS read-only STATUS mandatory DESCRIPTION "A comma separated list of metric column names and values associated with the metric which caused the Corrective Action to run that caused this alert." ::= { oraEM4JobAlertEntry 12 }oraEM4JobAlertKeyName OBJECT-TYPE SYNTAX DisplayString ACCESS read-only STATUS mandatory DESCRIPTION "The name of the key-column, if present, for the metric which caused the Corrective Action to run that generated this alert." ::= { oraEM4JobAlertEntry 13 }oraEM4JobAlertKeyValue OBJECT-TYPE SYNTAX DisplayString ACCESS read-only STATUS mandatory DESCRIPTION "The value of the key-column, if present, for the metric which caused the Corrective Action to run that generated this alert." ::= { oraEM4JobAlertEntry 14 }oraEM4JobAlertSeverity OBJECT-TYPE SYNTAX DisplayString ACCESS read-only STATUS mandatory DESCRIPTION "The severity of the metric which caused the Corrective Action to run that generated this alert e.g. Critical." ::= { oraEM4JobAlertEntry 15 }oraEM4JobAlert TRAP-TYPE ENTERPRISE oraEM4Traps VARIABLES { oraEM4JobAlertJobName, oraEM4JobAlertJobOwner, oraEM4JobAlertJobType, oraEM4JobAlertJobStatus,
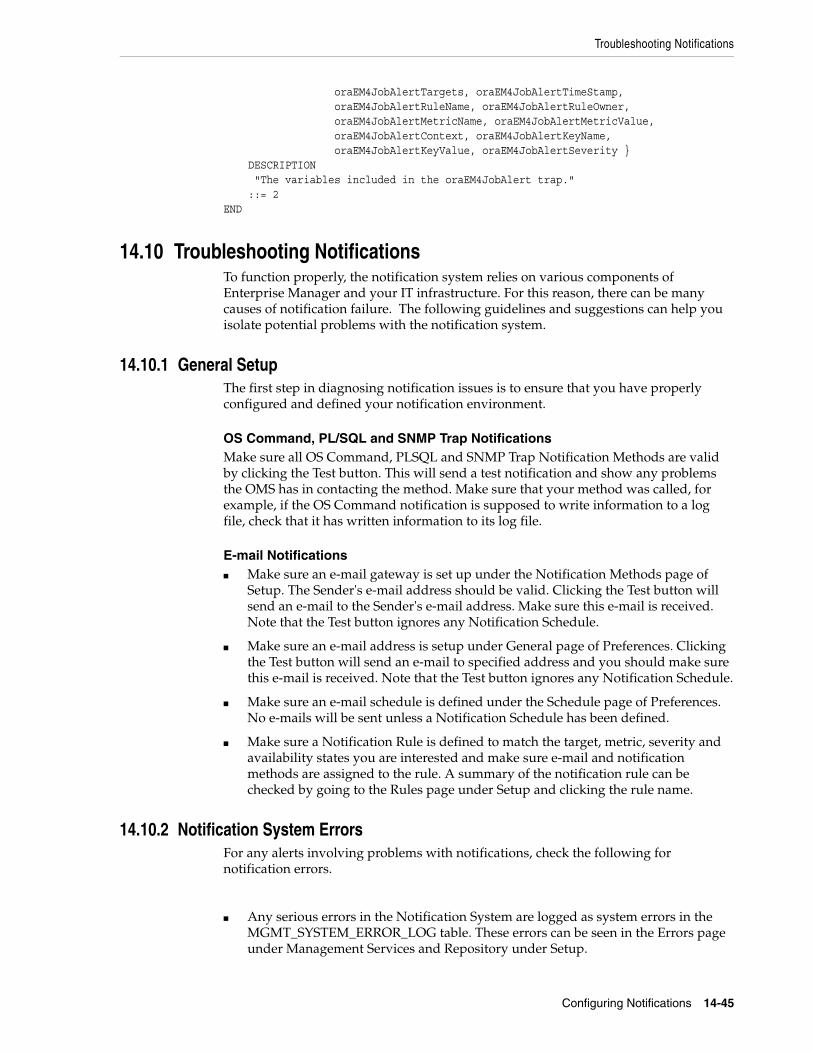
Troubleshooting Notifications
Configuring Notifications 14-45
oraEM4JobAlertTargets, oraEM4JobAlertTimeStamp, oraEM4JobAlertRuleName, oraEM4JobAlertRuleOwner, oraEM4JobAlertMetricName, oraEM4JobAlertMetricValue, oraEM4JobAlertContext, oraEM4JobAlertKeyName, oraEM4JobAlertKeyValue, oraEM4JobAlertSeverity } DESCRIPTION "The variables included in the oraEM4JobAlert trap." ::= 2END
14.10 Troubleshooting NotificationsTo function properly, the notification system relies on various components of Enterprise Manager and your IT infrastructure. For this reason, there can be many causes of notification failure. The following guidelines and suggestions can help you isolate potential problems with the notification system.
14.10.1 General SetupThe first step in diagnosing notification issues is to ensure that you have properly configured and defined your notification environment.
OS Command, PL/SQL and SNMP Trap NotificationsMake sure all OS Command, PLSQL and SNMP Trap Notification Methods are valid by clicking the Test button. This will send a test notification and show any problems the OMS has in contacting the method. Make sure that your method was called, for example, if the OS Command notification is supposed to write information to a log file, check that it has written information to its log file.
E-mail Notifications■ Make sure an e-mail gateway is set up under the Notification Methods page of
Setup. The Sender's e-mail address should be valid. Clicking the Test button will send an e-mail to the Sender's e-mail address. Make sure this e-mail is received. Note that the Test button ignores any Notification Schedule.
■ Make sure an e-mail address is setup under General page of Preferences. Clicking the Test button will send an e-mail to specified address and you should make sure this e-mail is received. Note that the Test button ignores any Notification Schedule.
■ Make sure an e-mail schedule is defined under the Schedule page of Preferences. No e-mails will be sent unless a Notification Schedule has been defined.
■ Make sure a Notification Rule is defined to match the target, metric, severity and availability states you are interested and make sure e-mail and notification methods are assigned to the rule. A summary of the notification rule can be checked by going to the Rules page under Setup and clicking the rule name.
14.10.2 Notification System ErrorsFor any alerts involving problems with notifications, check the following for notification errors.
■ Any serious errors in the Notification System are logged as system errors in the MGMT_SYSTEM_ERROR_LOG table. These errors can be seen in the Errors page under Management Services and Repository under Setup.
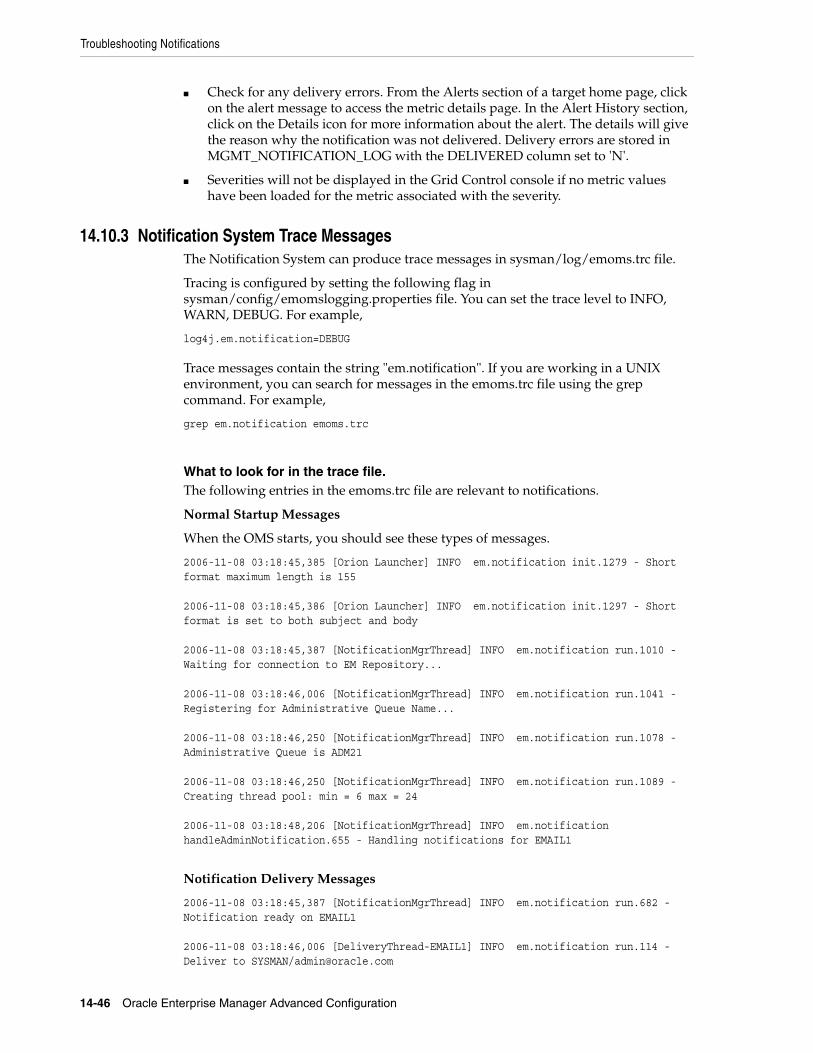
Troubleshooting Notifications
14-46 Oracle Enterprise Manager Advanced Configuration
■ Check for any delivery errors. From the Alerts section of a target home page, click on the alert message to access the metric details page. In the Alert History section, click on the Details icon for more information about the alert. The details will give the reason why the notification was not delivered. Delivery errors are stored in MGMT_NOTIFICATION_LOG with the DELIVERED column set to 'N'.
■ Severities will not be displayed in the Grid Control console if no metric values have been loaded for the metric associated with the severity.
14.10.3 Notification System Trace MessagesThe Notification System can produce trace messages in sysman/log/emoms.trc file.
Tracing is configured by setting the following flag in sysman/config/emomslogging.properties file. You can set the trace level to INFO, WARN, DEBUG. For example,
log4j.em.notification=DEBUG
Trace messages contain the string "em.notification". If you are working in a UNIX environment, you can search for messages in the emoms.trc file using the grep command. For example,
grep em.notification emoms.trc
What to look for in the trace file.The following entries in the emoms.trc file are relevant to notifications.
Normal Startup Messages
When the OMS starts, you should see these types of messages.
2006-11-08 03:18:45,385 [Orion Launcher] INFO em.notification init.1279 - Short format maximum length is 155
2006-11-08 03:18:45,386 [Orion Launcher] INFO em.notification init.1297 - Short format is set to both subject and body
2006-11-08 03:18:45,387 [NotificationMgrThread] INFO em.notification run.1010 - Waiting for connection to EM Repository...
2006-11-08 03:18:46,006 [NotificationMgrThread] INFO em.notification run.1041 - Registering for Administrative Queue Name...
2006-11-08 03:18:46,250 [NotificationMgrThread] INFO em.notification run.1078 - Administrative Queue is ADM21
2006-11-08 03:18:46,250 [NotificationMgrThread] INFO em.notification run.1089 - Creating thread pool: min = 6 max = 24
2006-11-08 03:18:48,206 [NotificationMgrThread] INFO em.notification handleAdminNotification.655 - Handling notifications for EMAIL1
Notification Delivery Messages
2006-11-08 03:18:45,387 [NotificationMgrThread] INFO em.notification run.682 - Notification ready on EMAIL1
2006-11-08 03:18:46,006 [DeliveryThread-EMAIL1] INFO em.notification run.114 - Deliver to SYSMAN/[email protected]
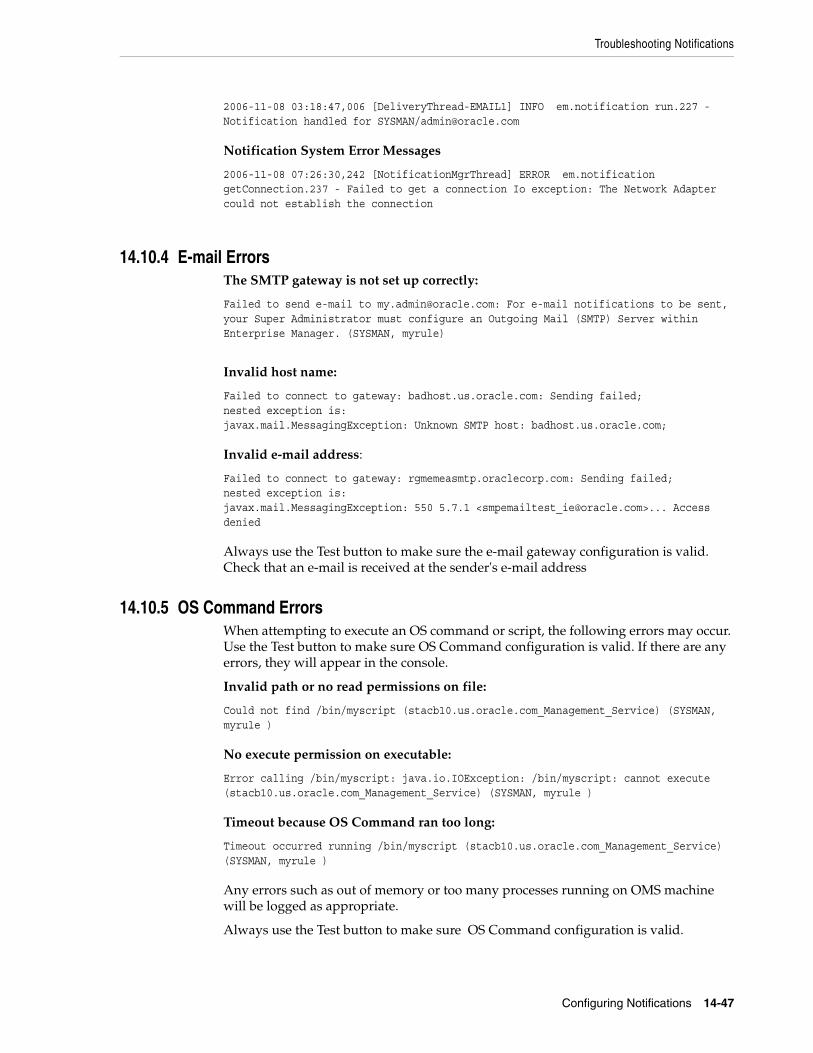
Troubleshooting Notifications
Configuring Notifications 14-47
2006-11-08 03:18:47,006 [DeliveryThread-EMAIL1] INFO em.notification run.227 - Notification handled for SYSMAN/[email protected]
Notification System Error Messages
2006-11-08 07:26:30,242 [NotificationMgrThread] ERROR em.notification getConnection.237 - Failed to get a connection Io exception: The Network Adapter could not establish the connection
14.10.4 E-mail ErrorsThe SMTP gateway is not set up correctly:
Failed to send e-mail to [email protected]: For e-mail notifications to be sent, your Super Administrator must configure an Outgoing Mail (SMTP) Server within Enterprise Manager. (SYSMAN, myrule)
Invalid host name:
Failed to connect to gateway: badhost.us.oracle.com: Sending failed;nested exception is:javax.mail.MessagingException: Unknown SMTP host: badhost.us.oracle.com;
Invalid e-mail address:
Failed to connect to gateway: rgmemeasmtp.oraclecorp.com: Sending failed;nested exception is:javax.mail.MessagingException: 550 5.7.1 <[email protected]>... Access denied
Always use the Test button to make sure the e-mail gateway configuration is valid. Check that an e-mail is received at the sender's e-mail address
14.10.5 OS Command ErrorsWhen attempting to execute an OS command or script, the following errors may occur. Use the Test button to make sure OS Command configuration is valid. If there are any errors, they will appear in the console.
Invalid path or no read permissions on file:
Could not find /bin/myscript (stacb10.us.oracle.com_Management_Service) (SYSMAN, myrule )
No execute permission on executable:
Error calling /bin/myscript: java.io.IOException: /bin/myscript: cannot execute (stacb10.us.oracle.com_Management_Service) (SYSMAN, myrule )
Timeout because OS Command ran too long:
Timeout occurred running /bin/myscript (stacb10.us.oracle.com_Management_Service) (SYSMAN, myrule )
Any errors such as out of memory or too many processes running on OMS machine will be logged as appropriate.
Always use the Test button to make sure OS Command configuration is valid.
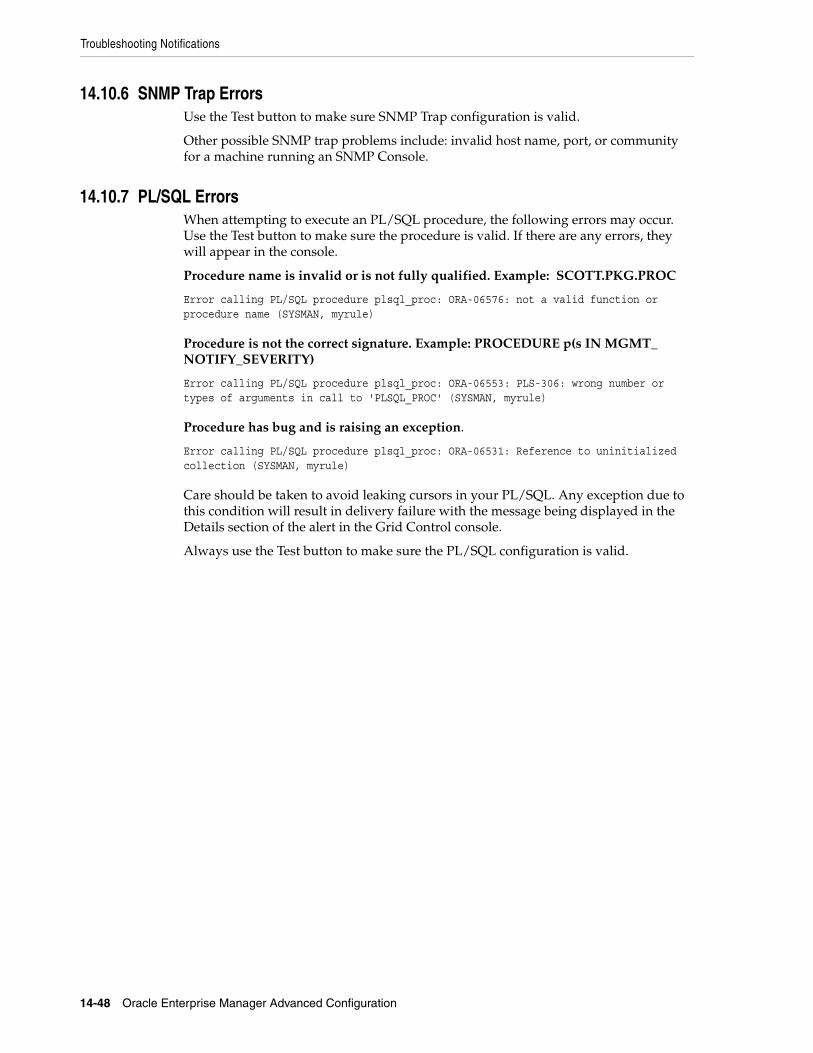
Troubleshooting Notifications
14-48 Oracle Enterprise Manager Advanced Configuration
14.10.6 SNMP Trap ErrorsUse the Test button to make sure SNMP Trap configuration is valid.
Other possible SNMP trap problems include: invalid host name, port, or community for a machine running an SNMP Console.
14.10.7 PL/SQL ErrorsWhen attempting to execute an PL/SQL procedure, the following errors may occur. Use the Test button to make sure the procedure is valid. If there are any errors, they will appear in the console.
Procedure name is invalid or is not fully qualified. Example: SCOTT.PKG.PROC
Error calling PL/SQL procedure plsql_proc: ORA-06576: not a valid function or procedure name (SYSMAN, myrule)
Procedure is not the correct signature. Example: PROCEDURE p(s IN MGMT_NOTIFY_SEVERITY)
Error calling PL/SQL procedure plsql_proc: ORA-06553: PLS-306: wrong number or types of arguments in call to 'PLSQL_PROC' (SYSMAN, myrule)
Procedure has bug and is raising an exception.
Error calling PL/SQL procedure plsql_proc: ORA-06531: Reference to uninitialized collection (SYSMAN, myrule)
Care should be taken to avoid leaking cursors in your PL/SQL. Any exception due to this condition will result in delivery failure with the message being displayed in the Details section of the alert in the Grid Control console.
Always use the Test button to make sure the PL/SQL configuration is valid.
User-Defined Metrics 15-1
15User-Defined Metrics
User-defined metrics allow you to extend the reach of Enterprise Manager’s monitoring to conditions specific to particular environments via custom scripts or SQL queries and function calls. Once defined, user-defined metrics will be monitored, aggregated in the repository and trigger alerts like regular metrics.
This chapter covers the following topics:
■ Extending Monitoring Capability
■ Creating OS-Based User-Defined Metrics
■ Creating a SQL-Based User-Defined Metric
■ Notifications, Corrective Actions, and Monitoring Templates
■ Changing User-Defined Metric Credentials
15.1 Extending Monitoring CapabilityThere are two types of user-defined metrics:
■ OS-Based User-Defined Metrics: Accessed from Host target home pages, these user-defined metrics allow you to define new metrics using custom Operating System (OS) scripts.
To monitor for a particular condition (for example, check successful completion of monthly system maintenance routines), you can write a custom script that will monitor that condition, then create an OS-based user-defined metric that will use your custom script. Each time the metric is evaluated by Enterprise Manager, it will use the specified script, relying on that script to return the value of the condition.
■ SQL-Based User-Defined Metrics: Accessed from Database target home pages, these user-defined metrics allow you to implement custom database monitoring using SQL queries or function calls.
SQL-based user-defined metrics do not use external scripts. You enter SQL directly into the Enterprise Manager user interface at the time of metric creation
Once a user-defined metric is created, all other monitoring features, such as alerts, notifications, historical collections, and corrective actions are automatically available to it.
Administrators who already have their own library of custom monitoring scripts can leverage these monitoring features by integrating their scripts with Enterprise Manager via user-defined metrics. Likewise, existing SQL queries or function calls
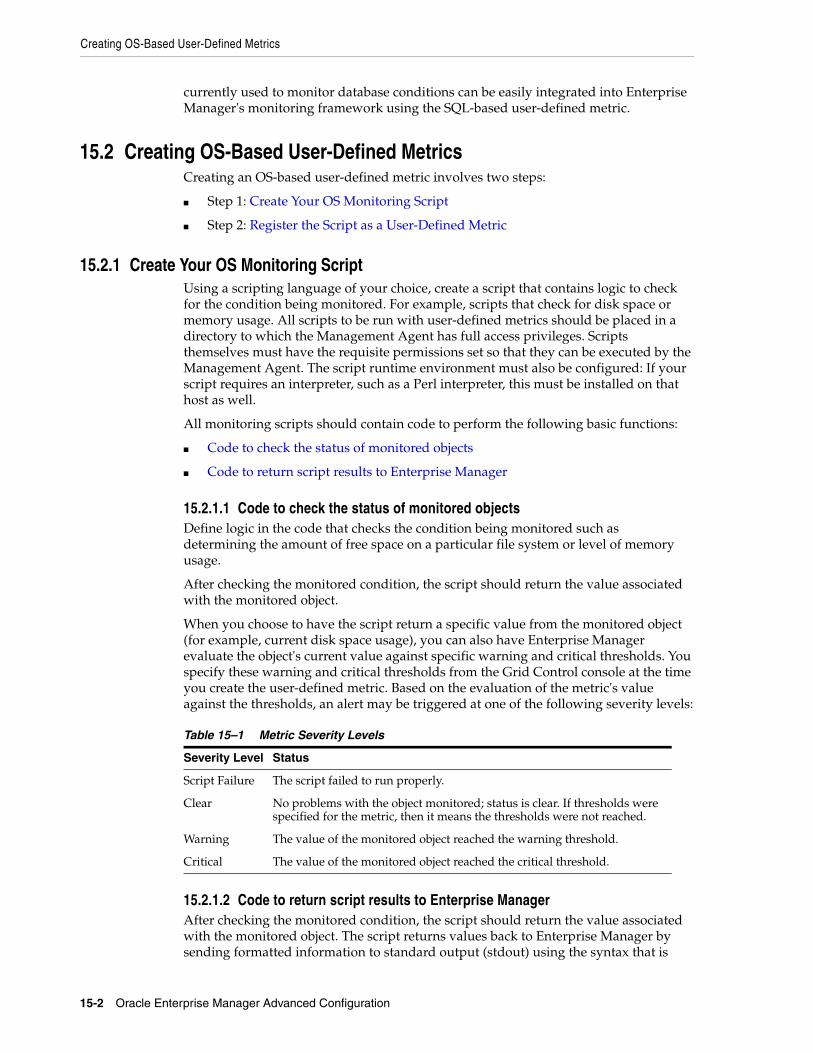
Creating OS-Based User-Defined Metrics
15-2 Oracle Enterprise Manager Advanced Configuration
currently used to monitor database conditions can be easily integrated into Enterprise Manager's monitoring framework using the SQL-based user-defined metric.
15.2 Creating OS-Based User-Defined MetricsCreating an OS-based user-defined metric involves two steps:
■ Step 1: Create Your OS Monitoring Script
■ Step 2: Register the Script as a User-Defined Metric
15.2.1 Create Your OS Monitoring ScriptUsing a scripting language of your choice, create a script that contains logic to check for the condition being monitored. For example, scripts that check for disk space or memory usage. All scripts to be run with user-defined metrics should be placed in a directory to which the Management Agent has full access privileges. Scripts themselves must have the requisite permissions set so that they can be executed by the Management Agent. The script runtime environment must also be configured: If your script requires an interpreter, such as a Perl interpreter, this must be installed on that host as well.
All monitoring scripts should contain code to perform the following basic functions:
■ Code to check the status of monitored objects
■ Code to return script results to Enterprise Manager
15.2.1.1 Code to check the status of monitored objectsDefine logic in the code that checks the condition being monitored such as determining the amount of free space on a particular file system or level of memory usage.
After checking the monitored condition, the script should return the value associated with the monitored object.
When you choose to have the script return a specific value from the monitored object (for example, current disk space usage), you can also have Enterprise Manager evaluate the object's current value against specific warning and critical thresholds. You specify these warning and critical thresholds from the Grid Control console at the time you create the user-defined metric. Based on the evaluation of the metric's value against the thresholds, an alert may be triggered at one of the following severity levels:
15.2.1.2 Code to return script results to Enterprise ManagerAfter checking the monitored condition, the script should return the value associated with the monitored object. The script returns values back to Enterprise Manager by sending formatted information to standard output (stdout) using the syntax that is
Table 15–1 Metric Severity Levels
Severity Level Status
Script Failure The script failed to run properly.
Clear No problems with the object monitored; status is clear. If thresholds were specified for the metric, then it means the thresholds were not reached.
Warning The value of the monitored object reached the warning threshold.
Critical The value of the monitored object reached the critical threshold.
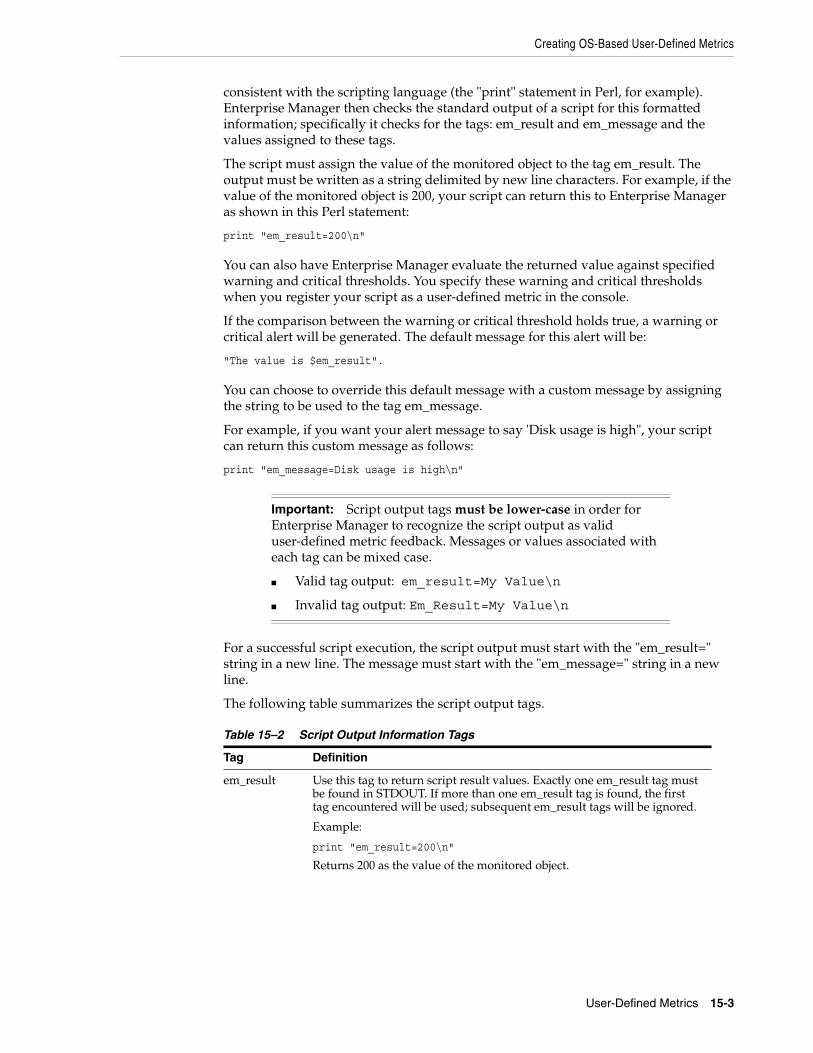
Creating OS-Based User-Defined Metrics
User-Defined Metrics 15-3
consistent with the scripting language (the "print" statement in Perl, for example). Enterprise Manager then checks the standard output of a script for this formatted information; specifically it checks for the tags: em_result and em_message and the values assigned to these tags.
The script must assign the value of the monitored object to the tag em_result. The output must be written as a string delimited by new line characters. For example, if the value of the monitored object is 200, your script can return this to Enterprise Manager as shown in this Perl statement:
print "em_result=200\n"
You can also have Enterprise Manager evaluate the returned value against specified warning and critical thresholds. You specify these warning and critical thresholds when you register your script as a user-defined metric in the console.
If the comparison between the warning or critical threshold holds true, a warning or critical alert will be generated. The default message for this alert will be:
"The value is $em_result".
You can choose to override this default message with a custom message by assigning the string to be used to the tag em_message.
For example, if you want your alert message to say 'Disk usage is high", your script can return this custom message as follows:
print "em_message=Disk usage is high\n"
For a successful script execution, the script output must start with the "em_result=" string in a new line. The message must start with the "em_message=" string in a new line.
The following table summarizes the script output tags.
Important: Script output tags must be lower-case in order for Enterprise Manager to recognize the script output as valid user-defined metric feedback. Messages or values associated with each tag can be mixed case.
■ Valid tag output: em_result=My Value\n
■ Invalid tag output: Em_Result=My Value\n
Table 15–2 Script Output Information Tags
Tag Definition
em_result Use this tag to return script result values. Exactly one em_result tag must be found in STDOUT. If more than one em_result tag is found, the first tag encountered will be used; subsequent em_result tags will be ignored.
Example:
print "em_result=200\n"
Returns 200 as the value of the monitored object.
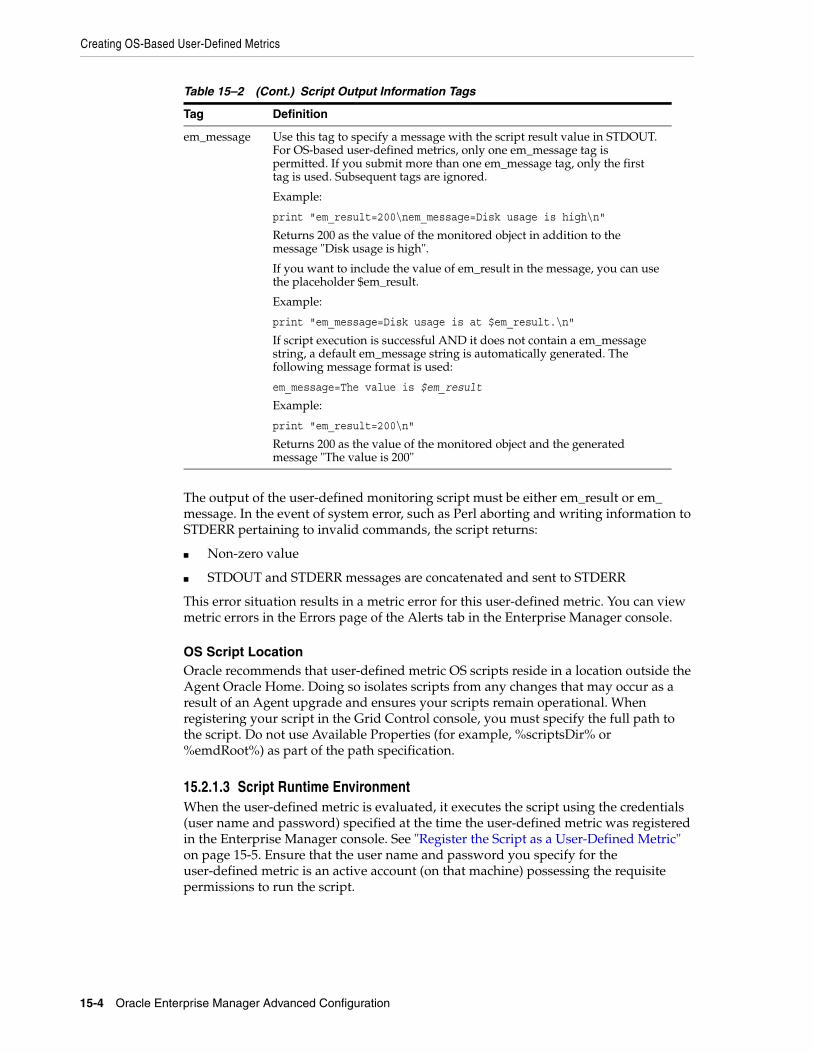
Creating OS-Based User-Defined Metrics
15-4 Oracle Enterprise Manager Advanced Configuration
The output of the user-defined monitoring script must be either em_result or em_message. In the event of system error, such as Perl aborting and writing information to STDERR pertaining to invalid commands, the script returns:
■ Non-zero value
■ STDOUT and STDERR messages are concatenated and sent to STDERR
This error situation results in a metric error for this user-defined metric. You can view metric errors in the Errors page of the Alerts tab in the Enterprise Manager console.
OS Script LocationOracle recommends that user-defined metric OS scripts reside in a location outside the Agent Oracle Home. Doing so isolates scripts from any changes that may occur as a result of an Agent upgrade and ensures your scripts remain operational. When registering your script in the Grid Control console, you must specify the full path to the script. Do not use Available Properties (for example, %scriptsDir% or %emdRoot%) as part of the path specification.
15.2.1.3 Script Runtime EnvironmentWhen the user-defined metric is evaluated, it executes the script using the credentials (user name and password) specified at the time the user-defined metric was registered in the Enterprise Manager console. See "Register the Script as a User-Defined Metric" on page 15-5. Ensure that the user name and password you specify for the user-defined metric is an active account (on that machine) possessing the requisite permissions to run the script.
em_message Use this tag to specify a message with the script result value in STDOUT. For OS-based user-defined metrics, only one em_message tag is permitted. If you submit more than one em_message tag, only the first tag is used. Subsequent tags are ignored.
Example:
print "em_result=200\nem_message=Disk usage is high\n"
Returns 200 as the value of the monitored object in addition to the message "Disk usage is high".
If you want to include the value of em_result in the message, you can use the placeholder $em_result.
Example:
print "em_message=Disk usage is at $em_result.\n"
If script execution is successful AND it does not contain a em_message string, a default em_message string is automatically generated. The following message format is used:
em_message=The value is $em_result
Example:
print "em_result=200\n"
Returns 200 as the value of the monitored object and the generated message "The value is 200"
Table 15–2 (Cont.) Script Output Information Tags
Tag Definition
Creating OS-Based User-Defined Metrics
User-Defined Metrics 15-5
15.2.2 Register the Script as a User-Defined MetricOnce you have created the monitoring script, you are ready to add this monitoring functionality to Enterprise Manager as a user-defined metric.
Creating an OS-Based User-Defined Metric 1. From the home page of the Host that has your OS monitoring script (Related
Links), choose User-Defined Metrics. The User-Defined Metrics summary page appears containing a list of previously defined User-Defined Metrics. From this page, you perform edit, view, delete, or create like functions on existing User-Defined Metrics.
2. Click Create. The Create User-Defined Metric page appears.
3. Enter the requisite metric definition, threshold, and scheduling information. For the Command Line field, enter the full path to your script, including any requisite shell or interpreters. For example, /bin/sh myscript. See the following section for more details.
4. Click OK. The User-Defined Metric summary page appears with the new User-Defined Metric appended to the list.
If the user-defined metric has been created and the severity has not been updated recently, it is possible that there are metric errors associated with the user-defined metric execution. In this situation, access the Errors subtab under Alerts tab to check.
Create User-Defined Metric Page (OS-based User-Defined Metric)The Create User-Defined Metric page allows you to specify the metric information required to successfully register the metric with Enterprise Manager. The page is divided into functional categories:
■ Definition: You define the operational and environmental parameters required to run your script, in addition to the name of the script itself.
■ Operating System Credentials: You enter the credentials used to run the monitoring script. See Enterprise Manager online help for more details on Response Actions. This functional area appears when creating OS-based user-defined metrics.
■ Thresholds: To have the value returned by your script compared with set threshold values, enter the requisite threshold information. The value of the monitored metric returned by your script (as specified by em_result) will be compared against the thresholds you specify. If the comparison holds true, a warning or critical alert may be generated.
■ Schedule: Specify the start time and frequency at which the user-defined script should be run. The time zone used is that of the Agent running on the monitored host.
The following figures show the Create User-Defined Metric pages for an OS-based user-defined metric. When accessing this page from any Host home page, the Create User-Defined Metric page appears as shown in Figure 15–1.
Important: : For OS-based user-defined metrics, make sure the Management Agent is up and running on the machine where the monitoring script resides before creating the user-defined metric. Operator privilege or higher is required on the host target.
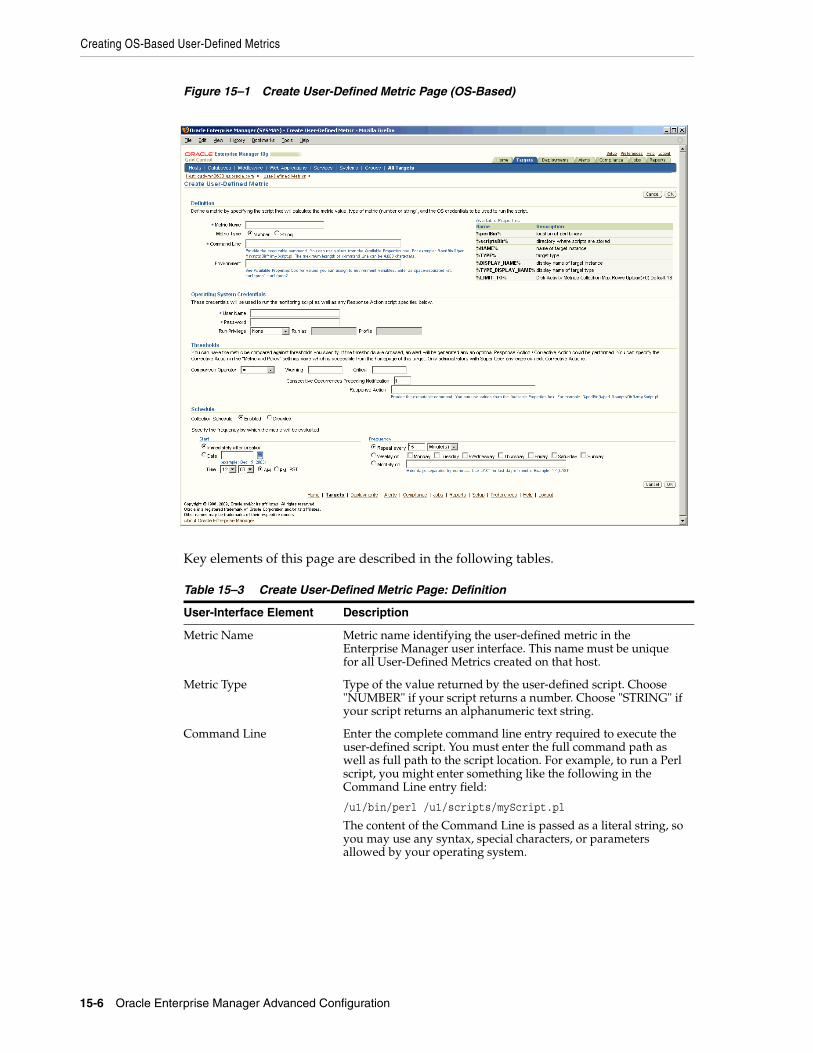
Creating OS-Based User-Defined Metrics
15-6 Oracle Enterprise Manager Advanced Configuration
Figure 15–1 Create User-Defined Metric Page (OS-Based)
Key elements of this page are described in the following tables.
Table 15–3 Create User-Defined Metric Page: Definition
User-Interface Element Description
Metric Name Metric name identifying the user-defined metric in the Enterprise Manager user interface. This name must be unique for all User-Defined Metrics created on that host.
Metric Type Type of the value returned by the user-defined script. Choose "NUMBER" if your script returns a number. Choose "STRING" if your script returns an alphanumeric text string.
Command Line Enter the complete command line entry required to execute the user-defined script. You must enter the full command path as well as full path to the script location. For example, to run a Perl script, you might enter something like the following in the Command Line entry field:
/u1/bin/perl /u1/scripts/myScript.pl
The content of the Command Line is passed as a literal string, so you may use any syntax, special characters, or parameters allowed by your operating system.
Creating OS-Based User-Defined Metrics
User-Defined Metrics 15-7
Environment Optional. Enter any environmental variable(s) required to run the user-defined script. A list of predefined properties that can be passed to your script as variables is listed in the Available Properties box. You may also specify your own environment variables. Multiple variables can be defined as a space-separated list.
Example: If your script uses three variables (var1, var2, var3) where var1 is the location of the Perl directory (predefined), var2 is the directory where your Perl scripts are stored (predefined), and var3 is an Oracle home, your entry in the Environment text entry field would appear as follows:
var1=%perlBin% var2=%scriptsDir% var3=/u1/orahome10
Table 15–4 Create User-Defined Metric Page: Operating System
User-Interface Element Description
User Name Enter the user name for a valid operating system account on the machine where the script is to be run. Make sure the specified account has the requisite privileges to access the script directory and execute the script.
Password Enter the password associated with the User Name.
Table 15–5 Create User-Defined Metric Page: Threshold
User-Interface Element Description
Comparison Operator Select the comparison method Enterprise Manager should use to compare the value returned by the user-defined script to the threshold values.
Available Comparison Operators
Operator Value Metric Type Description
= Number equal to
> Number greater than
< Number less than
>= Number greater than or equal to
<= Number less than or equal to
!= Number not equal to
CONTAINS String contains at least
MATCH String exact match
Warning The value returned by the script is compared to the Warning threshold value using the specified comparison operator. If this comparison holds true, an alert triggers at the warning severity level.
Specifically, an alert triggers at the warning severity level if the following comparison is true:
<script_value> <comparison_operator> <warning_threshold>
and if the consecutive occurrences preceding notification has been reached.
Table 15–3 (Cont.) Create User-Defined Metric Page: Definition
User-Interface Element Description
Creating OS-Based User-Defined Metrics
15-8 Oracle Enterprise Manager Advanced Configuration
The User-Defined Metric Schedule interface lets you specify when the Management Agent should start monitoring and the frequency at which it should monitor the condition using your OS script.
15.2.3 OS-Based User-Defined Metric ExampleThe sample Perl script used in this example monitors the 5-minute load average on the system. The script performs this function by using the 'uptime' command to obtain the average number of jobs in the run queue over the last 5 minutes.
The script is written in Perl and assumes you have Perl interpreter located in /usr/local/bin on the monitored target.
This script, called udmload.pl, is installed in a common administrative script directory defined by the user. For example, /u1/scripts.
Full text of the script:
#!/usr/local/bin/perl
Critical The value returned by the script is compared to the Critical threshold value using the specified comparison operator. If this comparison holds true, an alert triggers at the critical severity level.
Specifically, an alert triggers at the critical severity level if the following comparison is true:
<script_value> <comparison_operator> <critical_threshold>
and if the consecutive occurrences preceding notification has been reached.
Consecutive Occurrences Preceding Notification
Consecutive number of times a returned value reaches either the warning or critical thresholds before an alert triggers at a warning or critical severity. This feature is useful when monitoring for sustained conditions. For example, if your script monitors the CPU load for a particular machine, you do not want to be notified at every CPU load spike. Instead, you are only concerned if the CPU load remains at a particular threshold (warning or critical) level for a consecutive number of monitoring cycles.
Response Action Optional. Specify a script or command that will be executed if the user-defined metric generates a warning or critical alert. The script or command will be executed using the credentials of the Agent owner. Important: Only an Enterprise Manager Super Administrator can create/edit response actions for metrics.
For example, the Management Agent executes the response action if:
The Alert severity is Warning or Critical
AND
There is a change in severity (for example, warning -> critical, critical --> warning, clear --> warning or critical)
For more information, see Enterprise Manager online help.
Important: Do not store user-defined metric monitoring scripts in the same location as Enterprise Manager system scripts.
Table 15–5 (Cont.) Create User-Defined Metric Page: Threshold
User-Interface Element Description
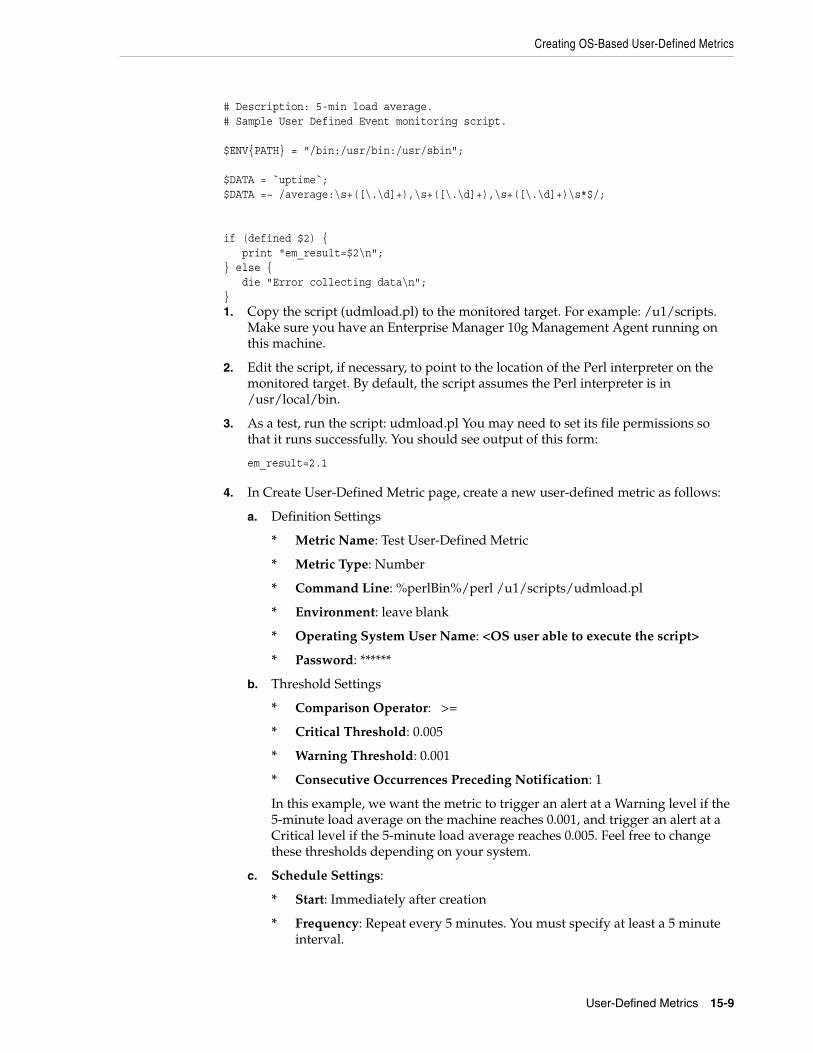
Creating OS-Based User-Defined Metrics
User-Defined Metrics 15-9
# Description: 5-min load average.# Sample User Defined Event monitoring script.
$ENV{PATH} = "/bin:/usr/bin:/usr/sbin";
$DATA = `uptime`; $DATA =~ /average:\s+([\.\d]+),\s+([\.\d]+),\s+([\.\d]+)\s*$/;
if (defined $2) { print "em_result=$2\n"; } else { die "Error collecting data\n"; } 1. Copy the script (udmload.pl) to the monitored target. For example: /u1/scripts.
Make sure you have an Enterprise Manager 10g Management Agent running on this machine.
2. Edit the script, if necessary, to point to the location of the Perl interpreter on the monitored target. By default, the script assumes the Perl interpreter is in /usr/local/bin.
3. As a test, run the script: udmload.pl You may need to set its file permissions so that it runs successfully. You should see output of this form:
em_result=2.1
4. In Create User-Defined Metric page, create a new user-defined metric as follows:
a. Definition Settings
* Metric Name: Test User-Defined Metric
* Metric Type: Number
* Command Line: %perlBin%/perl /u1/scripts/udmload.pl
* Environment: leave blank
* Operating System User Name: <OS user able to execute the script>
* Password: ******
b. Threshold Settings
* Comparison Operator: >=
* Critical Threshold: 0.005
* Warning Threshold: 0.001
* Consecutive Occurrences Preceding Notification: 1
In this example, we want the metric to trigger an alert at a Warning level if the 5-minute load average on the machine reaches 0.001, and trigger an alert at a Critical level if the 5-minute load average reaches 0.005. Feel free to change these thresholds depending on your system.
c. Schedule Settings:
* Start: Immediately after creation
* Frequency: Repeat every 5 minutes. You must specify at least a 5 minute interval.
Creating a SQL-Based User-Defined Metric
15-10 Oracle Enterprise Manager Advanced Configuration
Setting Up the Sample Script as a User-Defined MetricWhen the 5-minute load reaches at least 0.001, you should see the metric trigger an alert.
15.3 Creating a SQL-Based User-Defined MetricYou can also define new metrics using custom SQL queries or function calls supported against single instance databases and instances on Real Application Clusters (RAC). To create this type of user-defined metric, you must have Enterprise Manager Operator privileges on the database:
1. From the Related Links area of any Database home page, choose User-Defined Metrics. The User-Defined Metrics summary page appears containing a list of previously defined user-defined metrics. From this page, you perform edit, view, delete, or create like functions on existing user-defined metrics.
2. Click Create. The Create User-Defined Metric page appears.
3. Enter the requisite metric definition, threshold, and scheduling information. For the SQL Query field, enter the query or function call. See the following section for more information.
Click Test to verify that the SQL query or function call can be executed successfully using the credentials you have specified
4. Click OK. The User-Defined Metric summary page appears with the new user-defined metric appended to the list.
If the user-defined metric has been created and the severity has not been updated recently, it is possible that there are metric errors associated with the user-defined metric execution. In this situation, access the Errors subtab under Alerts tab to check.
Create User-Defined Metric Page (SQL-Based User-Defined Metric)The Create User-Defined Metric page allows you to specify the metric information required to successfully register the metric with Enterprise Manager. The page is divided into functional categories:
■ Definition: You define the operational and environmental parameters required to run your script, in addition to the name of the script itself.
■ Database Credentials: You enter the user name and password for a valid user account on the database where the SQL is to be run. Make sure the specified user account has the requisite administrative and access privileges to execute the SQL query or function call.
■ Thresholds: To have the value returned by your SQL query or function call compared with set threshold values, enter the requisite threshold information. The value of the monitored metric returned by your query or function call will be compared against the thresholds you specify. If the comparison holds true, a warning or critical alert may be generated.
■ Schedule: Specify the start time and frequency at which the user-defined SQL query or function call should be executed. The time zone used is that of the Agent running on the monitored machine.
The following figures show the Create User-Defined Metric pages for a SQL-based user-defined metric. When accessing this page from any Database home page, the Create User-Defined Metric page appears as shown in Figure 15–2.
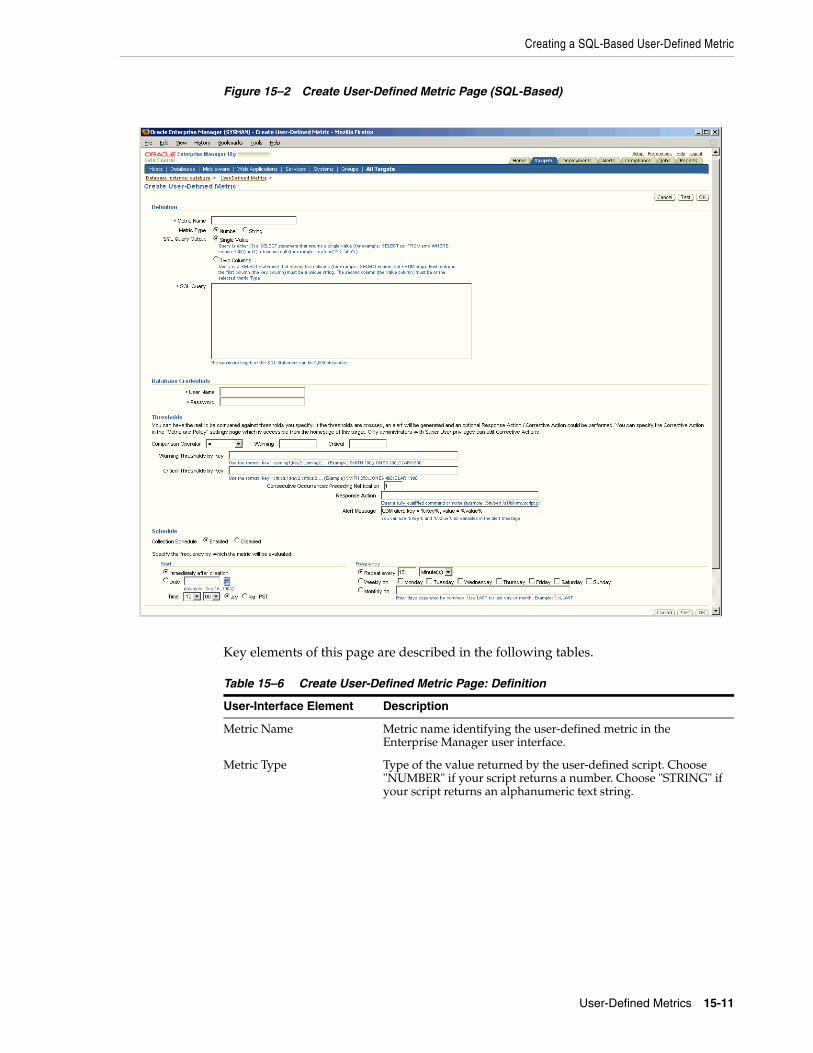
Creating a SQL-Based User-Defined Metric
User-Defined Metrics 15-11
Figure 15–2 Create User-Defined Metric Page (SQL-Based)
Key elements of this page are described in the following tables.
Table 15–6 Create User-Defined Metric Page: Definition
User-Interface Element Description
Metric Name Metric name identifying the user-defined metric in the Enterprise Manager user interface.
Metric Type Type of the value returned by the user-defined script. Choose "NUMBER" if your script returns a number. Choose "STRING" if your script returns an alphanumeric text string.
Creating a SQL-Based User-Defined Metric
15-12 Oracle Enterprise Manager Advanced Configuration
SQL Query Output Specify whether the SQL script is to return a single value (one column) or a multiple rows (two columns).
■ Single Value: Query is one of the following types.
A SELECT statement returning a single value. Example: SELECT sal FROM emp WHERE empno=7369
A function call returning a single value. Example: myfunc(123, 'abc')
■ Two Columns: Query is a SELECT statement that returns two columns and possibly multiple rows. Example: SELECT ename, sal FROM emp. Each entry in the first column (the key column) must be a unique string. The second column (the value column) must be of the selected Metric Type.
SQL Query Enter a SQL query or function call that returns values of the appropriate type (STRING or NUMBER). The SQL statement must return one or two column. If your SQL statement only returns one column, only one row can be returned. If you want multiple rows returned, your SQL statement must return two columns.
Table 15–7 Create User-Defined Metric Page: Database Credentials
User-Interface Element Description
User Name Enter the user name for a valid database account on the database where the SQL query is to be run. Make sure that the specified account has the requisite privileges to run the SQL query.
Password Enter the password associated with the User Name.
Table 15–8 Create User-Defined Metric Page: Threshold
User-Interface Element Description
Comparison Operator Select the comparison method Enterprise Manager should use to compare the value returned by the SQL query or function call to the threshold values. When the query returns two columns, the second column (value column) will be used for comparison against threshold values.
Available Comparison Operators
Operator Value Metric Type Description
= Number equal to
> Number greater than
< Number less than
>= Number greater than or equal to
<= Number less than or equal to
!= Number not equal to
CONTAINS String contains at least
MATCH String exact match
Table 15–6 (Cont.) Create User-Defined Metric Page: Definition
User-Interface Element Description
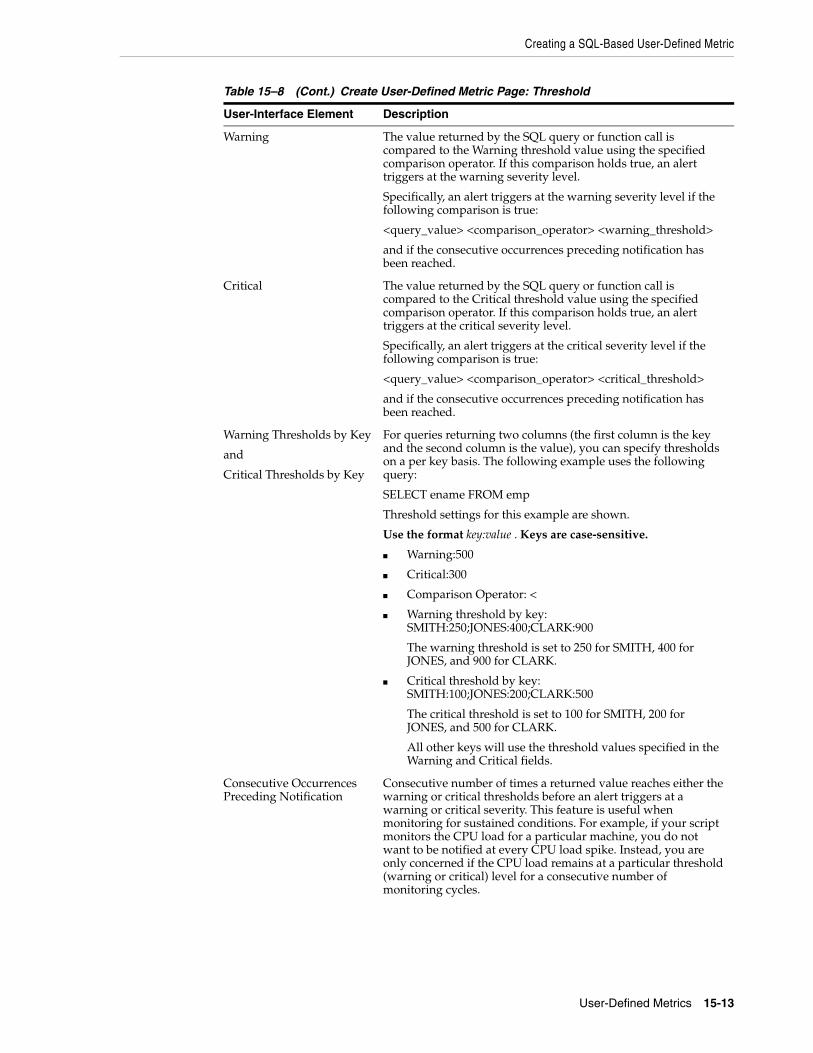
Creating a SQL-Based User-Defined Metric
User-Defined Metrics 15-13
Warning The value returned by the SQL query or function call is compared to the Warning threshold value using the specified comparison operator. If this comparison holds true, an alert triggers at the warning severity level.
Specifically, an alert triggers at the warning severity level if the following comparison is true:
<query_value> <comparison_operator> <warning_threshold>
and if the consecutive occurrences preceding notification has been reached.
Critical The value returned by the SQL query or function call is compared to the Critical threshold value using the specified comparison operator. If this comparison holds true, an alert triggers at the critical severity level.
Specifically, an alert triggers at the critical severity level if the following comparison is true:
<query_value> <comparison_operator> <critical_threshold>
and if the consecutive occurrences preceding notification has been reached.
Warning Thresholds by Key
and
Critical Thresholds by Key
For queries returning two columns (the first column is the key and the second column is the value), you can specify thresholds on a per key basis. The following example uses the following query:
SELECT ename FROM emp
Threshold settings for this example are shown.
Use the format key:value . Keys are case-sensitive.
■ Warning:500
■ Critical:300
■ Comparison Operator: <
■ Warning threshold by key: SMITH:250;JONES:400;CLARK:900
The warning threshold is set to 250 for SMITH, 400 for JONES, and 900 for CLARK.
■ Critical threshold by key: SMITH:100;JONES:200;CLARK:500
The critical threshold is set to 100 for SMITH, 200 for JONES, and 500 for CLARK.
All other keys will use the threshold values specified in the Warning and Critical fields.
Consecutive Occurrences Preceding Notification
Consecutive number of times a returned value reaches either the warning or critical thresholds before an alert triggers at a warning or critical severity. This feature is useful when monitoring for sustained conditions. For example, if your script monitors the CPU load for a particular machine, you do not want to be notified at every CPU load spike. Instead, you are only concerned if the CPU load remains at a particular threshold (warning or critical) level for a consecutive number of monitoring cycles.
Table 15–8 (Cont.) Create User-Defined Metric Page: Threshold
User-Interface Element Description
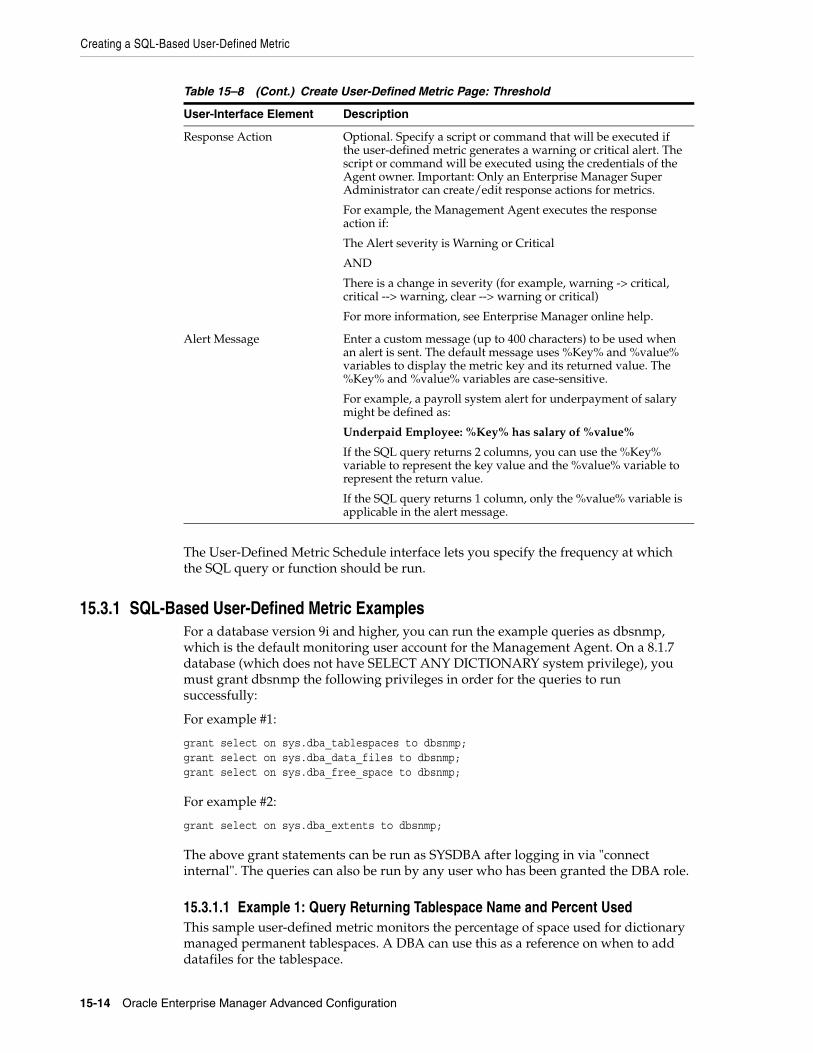
Creating a SQL-Based User-Defined Metric
15-14 Oracle Enterprise Manager Advanced Configuration
The User-Defined Metric Schedule interface lets you specify the frequency at which the SQL query or function should be run.
15.3.1 SQL-Based User-Defined Metric ExamplesFor a database version 9i and higher, you can run the example queries as dbsnmp, which is the default monitoring user account for the Management Agent. On a 8.1.7 database (which does not have SELECT ANY DICTIONARY system privilege), you must grant dbsnmp the following privileges in order for the queries to run successfully:
For example #1:
grant select on sys.dba_tablespaces to dbsnmp;grant select on sys.dba_data_files to dbsnmp;grant select on sys.dba_free_space to dbsnmp;
For example #2:
grant select on sys.dba_extents to dbsnmp;
The above grant statements can be run as SYSDBA after logging in via "connect internal". The queries can also be run by any user who has been granted the DBA role.
15.3.1.1 Example 1: Query Returning Tablespace Name and Percent Used This sample user-defined metric monitors the percentage of space used for dictionary managed permanent tablespaces. A DBA can use this as a reference on when to add datafiles for the tablespace.
Response Action Optional. Specify a script or command that will be executed if the user-defined metric generates a warning or critical alert. The script or command will be executed using the credentials of the Agent owner. Important: Only an Enterprise Manager Super Administrator can create/edit response actions for metrics.
For example, the Management Agent executes the response action if:
The Alert severity is Warning or Critical
AND
There is a change in severity (for example, warning -> critical, critical --> warning, clear --> warning or critical)
For more information, see Enterprise Manager online help.
Alert Message Enter a custom message (up to 400 characters) to be used when an alert is sent. The default message uses %Key% and %value% variables to display the metric key and its returned value. The %Key% and %value% variables are case-sensitive.
For example, a payroll system alert for underpayment of salary might be defined as:
Underpaid Employee: %Key% has salary of %value%
If the SQL query returns 2 columns, you can use the %Key% variable to represent the key value and the %value% variable to represent the return value.
If the SQL query returns 1 column, only the %value% variable is applicable in the alert message.
Table 15–8 (Cont.) Create User-Defined Metric Page: Threshold
User-Interface Element Description

Creating a SQL-Based User-Defined Metric
User-Defined Metrics 15-15
Oracle recommends setting a polling frequency of 30 minutes, warning threshold at 75, and critical threshold at 85.
Example 1 SQLSELECT d.tablespace_name, round(((a.bytes - NVL(f.bytes,0))*100/a.maxbytes),2) used_pctFROM sys.dba_tablespaces d, (select tablespace_name, sum(bytes) bytes, sum(greatest(maxbytes,bytes)) maxbytes from sys.dba_data_files group by tablespace_name) a, (select tablespace_name, sum(bytes) bytes from sys.dba_free_space group by tablespace_name) fWHERE d.tablespace_name = a.tablespace_name(+) AND d.tablespace_name = f.tablespace_name(+) AND NOT (d.extent_management = 'LOCAL' AND d.contents = 'TEMPORARY')
15.3.1.2 Example 2: Query Returning Segment Name/Type and Extent CountThis sample user-defined metric checks for non-system table and index segments that are reaching a high number of extents. A high number of extents could indicate a segment with fragmentation and/or performance problems. A DBA can use this as a reference on when to call Segment Shrink or the Reorganization Wizard in Enterprise Manager.
Oracle recommends setting a polling frequency of 24 hours, warning threshold at 1000, and critical threshold at 2000.
Example 2 SQLSELECT decode(nvl(partition_name, ' '), ' ', owner || '.' || segment_name || ' ' || segment_type, owner || '.' || segment_name || '.' || partition_name || ' ' || segment_type) as segment, count(extent_id) as extent_countFROM dba_extentsWHERE (segment_type like 'TABLE%' OR segment_type like 'INDEX%') AND (owner != 'SYSTEM' AND owner != 'SYS')GROUP BY owner, segment_name, partition_name, segment_typeORDER BY EXTENT_COUNT DESC
15.3.1.3 Example 3: Embed a Long SQL statement in a PL/SQL RoutineIn situations where the SQL statement forming the SQL user-defined metric exceeds 1024 characters, you must embed the SQL statement in a PL/SQL routine. This must be carried out in three step. In this example, a long SQL statement is used to track tablespaces & free space in them and raise alerts if the free space falls below a user specified threshold. A 2-column SQLUDM is crated using this query.
Example 15–1 of a long (more than1024 characters) SQL statement that returns two values: tablespace_name (key) and free_mb(value)
Example 15–1 Long SQL Statement
select Tablespace, case when (MxAvail <= 15) and (MxFreeMB < 20000) then 'CRITICAL, '||MxUsed||'%' when (MxAvail <= 20) and (MxFreeMB < 20000) then 'WARNING, '||MxUsed||'%' else 'OK' end Error_Level, MxAvail,MxUsed,MxFreeMB,MxExdMB from (select nvl(b.tablespace_name, nvl(a.tablespace_name,'UNKNOWN')) as Tablespace, data_files as NumDBFs, mbytes_alloc as AllocMB, Round( mbytes_alloc-nvl(mbytes_free,0),0) as UsedMB,

Creating a SQL-Based User-Defined Metric
15-16 Oracle Enterprise Manager Advanced Configuration
Round(nvl(mbytes_free,0),0) "AllocFreeMB", Round((( mbytes_alloc-nvl(mbytes_free,0))/ mbytes_alloc)*100,0) as AllocUsed, MaxSize_Mbytes as MxExdMB, Round(MaxSize_Mbytes - (mbytes_alloc-nvl(mbytes_free,0)),0) as MxFreeMB, Round((mbytes_alloc/MaxSize_Mbytes*100),0) as MxUsed, Round((MaxSize_Mbytes - (mbytes_alloc-nvl(mbytes_free,0)))/MaxSize_Mbytes *100,0) as MxAvail from ( select sum(bytes)/1024/1024 mbytes_free, max(bytes)/1024/1024 largest,tablespace_name from sys.dba_free_space group by tablespace_name ) a, ( select sum(bytes)/1024/1024 mbytes_alloc, sum(decode(maxbytes,0,bytes,maxbytes))/1024/1024 MaxSize_Mbytes, tablespace_name,count(file_id) data_files from sys.dba_data_files group by tablespace_name )b where a.tablespace_name (+) = b.tablespace_name order by 1)
Because a 2-column SQL UDM is being created (tablespace, free_space_in_MB), an array must created for the data being returned from this query, as shown in
Example 15–2 Creating an Array of Returned Values
CREATE OR REPLACE TYPE tablespace_obj as OBJECT( tablespace_name VARCHAR2(256), free_mb NUMBER);/
CREATE OR REPLACE TYPE tablespace_array AS TABLE OF tablespace_obj;/
The next step is to embed the long SQL statement shown in Example 15–1 in a PL/SQL routine as shown in Example 15–3
Example 15–3 Embedded SQL in a PL/SQL Routine
CREATE OR REPLACE FUNCTION calc_tablespace_free_mbRETURN tablespace_arrayIS tablespace_data TABLESPACE_ARRAY := TABLESPACE_ARRAY();BEGIN SELECT tablespace_obj(tablespace, mxfreemb) BULK COLLECT INTO tablespace_data FROM(select Tablespace, case when (MxAvail <= 15) and (MxFreeMB < 20000) then 'CRITICAL, '||MxUsed||'%' when (MxAvail <= 20) and (MxFreeMB < 20000) then 'WARNING, '||MxUsed||'%' else 'OK' end Error_Level, MxAvail,MxUsed,MxFreeMB,MxExdMB from (select nvl(b.tablespace_name, nvl(a.tablespace_name,'UNKNOWN')) as Tablespace, data_files as NumDBFs, mbytes_alloc as AllocMB, Round( mbytes_alloc-nvl(mbytes_free,0),0) as UsedMB, Round(nvl(mbytes_free,0),0) "AllocFreeMB", Round((( mbytes_alloc-nvl(mbytes_free,0))/ mbytes_alloc)*100,0) as AllocUsed, MaxSize_Mbytes as MxExdMB, Round(MaxSize_Mbytes - (mbytes_alloc-nvl(mbytes_free,0)),0) as MxFreeMB, Round((mbytes_alloc/MaxSize_Mbytes*100),0) as MxUsed, Round((MaxSize_Mbytes - (mbytes_alloc-nvl(mbytes_free,0)))/MaxSize_Mbytes *100,0) as MxAvail from ( select sum(bytes)/1024/1024 mbytes_free, max(bytes)/1024/1024 largest,tablespace_name from sys.dba_free_space group by tablespace_name ) a, ( select sum(bytes)/1024/1024 mbytes_alloc, sum(decode(maxbytes,0,bytes,maxbytes))/1024/1024 MaxSize_Mbytes, tablespace_name,count(file_id) data_files from sys.dba_data_files group by tablespace_name )b where a.tablespace_name (+) = b.tablespace_name order by 1)) CUSTOMER_QUERY;
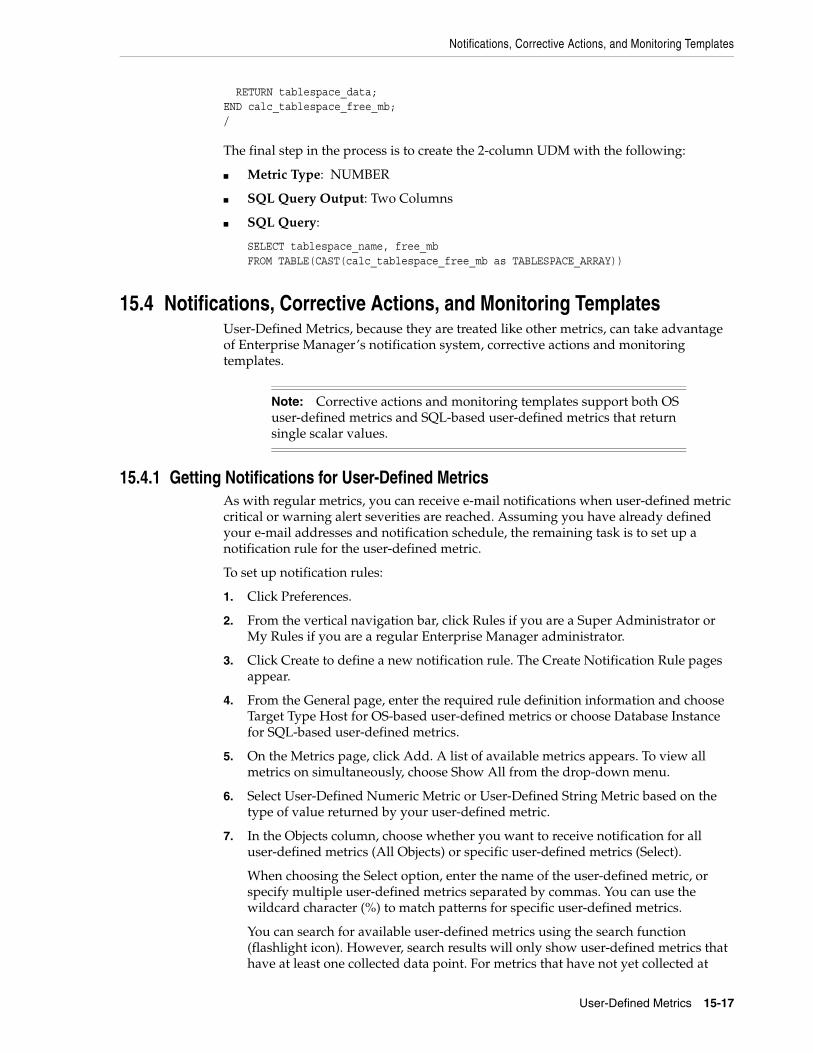
Notifications, Corrective Actions, and Monitoring Templates
User-Defined Metrics 15-17
RETURN tablespace_data;END calc_tablespace_free_mb;/
The final step in the process is to create the 2-column UDM with the following:
■ Metric Type: NUMBER
■ SQL Query Output: Two Columns
■ SQL Query:
SELECT tablespace_name, free_mbFROM TABLE(CAST(calc_tablespace_free_mb as TABLESPACE_ARRAY))
15.4 Notifications, Corrective Actions, and Monitoring TemplatesUser-Defined Metrics, because they are treated like other metrics, can take advantage of Enterprise Manager’s notification system, corrective actions and monitoring templates.
15.4.1 Getting Notifications for User-Defined MetricsAs with regular metrics, you can receive e-mail notifications when user-defined metric critical or warning alert severities are reached. Assuming you have already defined your e-mail addresses and notification schedule, the remaining task is to set up a notification rule for the user-defined metric.
To set up notification rules:
1. Click Preferences.
2. From the vertical navigation bar, click Rules if you are a Super Administrator or My Rules if you are a regular Enterprise Manager administrator.
3. Click Create to define a new notification rule. The Create Notification Rule pages appear.
4. From the General page, enter the required rule definition information and choose Target Type Host for OS-based user-defined metrics or choose Database Instance for SQL-based user-defined metrics.
5. On the Metrics page, click Add. A list of available metrics appears. To view all metrics on simultaneously, choose Show All from the drop-down menu.
6. Select User-Defined Numeric Metric or User-Defined String Metric based on the type of value returned by your user-defined metric.
7. In the Objects column, choose whether you want to receive notification for all user-defined metrics (All Objects) or specific user-defined metrics (Select).
When choosing the Select option, enter the name of the user-defined metric, or specify multiple user-defined metrics separated by commas. You can use the wildcard character (%) to match patterns for specific user-defined metrics.
You can search for available user-defined metrics using the search function (flashlight icon). However, search results will only show user-defined metrics that have at least one collected data point. For metrics that have not yet collected at
Note: Corrective actions and monitoring templates support both OS user-defined metrics and SQL-based user-defined metrics that return single scalar values.
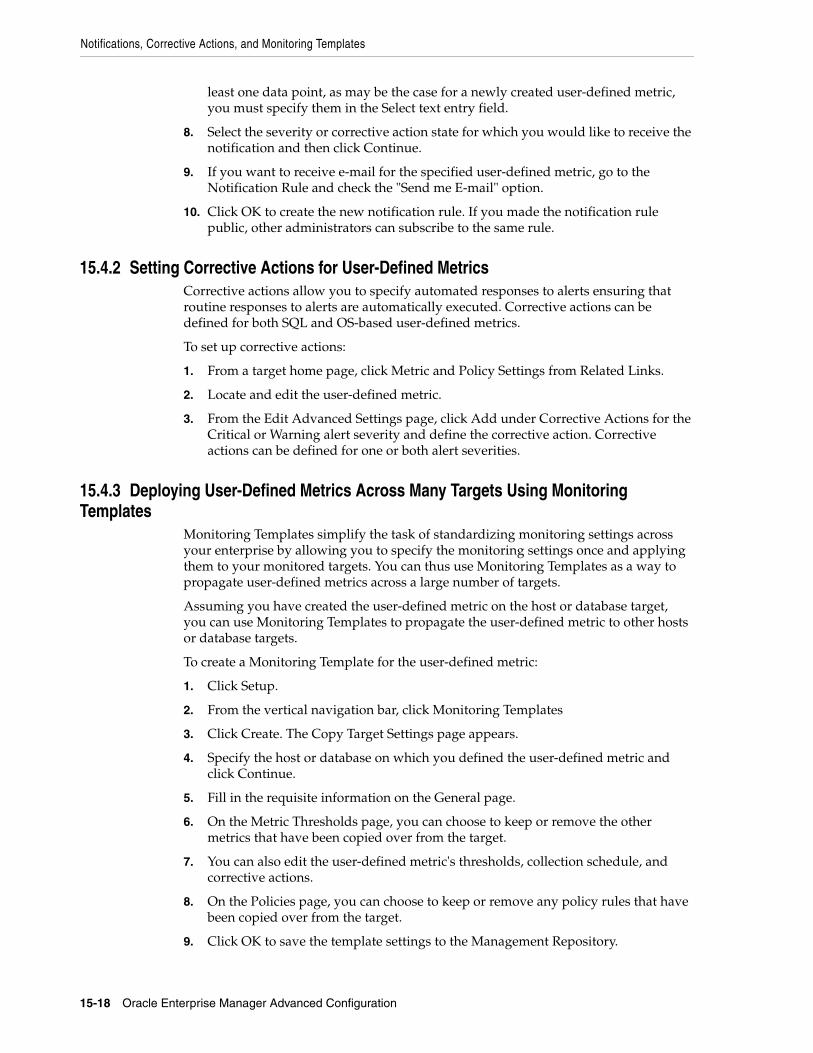
Notifications, Corrective Actions, and Monitoring Templates
15-18 Oracle Enterprise Manager Advanced Configuration
least one data point, as may be the case for a newly created user-defined metric, you must specify them in the Select text entry field.
8. Select the severity or corrective action state for which you would like to receive the notification and then click Continue.
9. If you want to receive e-mail for the specified user-defined metric, go to the Notification Rule and check the "Send me E-mail" option.
10. Click OK to create the new notification rule. If you made the notification rule public, other administrators can subscribe to the same rule.
15.4.2 Setting Corrective Actions for User-Defined MetricsCorrective actions allow you to specify automated responses to alerts ensuring that routine responses to alerts are automatically executed. Corrective actions can be defined for both SQL and OS-based user-defined metrics.
To set up corrective actions:
1. From a target home page, click Metric and Policy Settings from Related Links.
2. Locate and edit the user-defined metric.
3. From the Edit Advanced Settings page, click Add under Corrective Actions for the Critical or Warning alert severity and define the corrective action. Corrective actions can be defined for one or both alert severities.
15.4.3 Deploying User-Defined Metrics Across Many Targets Using Monitoring Templates
Monitoring Templates simplify the task of standardizing monitoring settings across your enterprise by allowing you to specify the monitoring settings once and applying them to your monitored targets. You can thus use Monitoring Templates as a way to propagate user-defined metrics across a large number of targets.
Assuming you have created the user-defined metric on the host or database target, you can use Monitoring Templates to propagate the user-defined metric to other hosts or database targets.
To create a Monitoring Template for the user-defined metric:
1. Click Setup.
2. From the vertical navigation bar, click Monitoring Templates
3. Click Create. The Copy Target Settings page appears.
4. Specify the host or database on which you defined the user-defined metric and click Continue.
5. Fill in the requisite information on the General page.
6. On the Metric Thresholds page, you can choose to keep or remove the other metrics that have been copied over from the target.
7. You can also edit the user-defined metric's thresholds, collection schedule, and corrective actions.
8. On the Policies page, you can choose to keep or remove any policy rules that have been copied over from the target.
9. Click OK to save the template settings to the Management Repository.
Notifications, Corrective Actions, and Monitoring Templates
User-Defined Metrics 15-19
Once the template containing the user-defined metric has been created, you can propagate the user-defined metric by applying the template to other hosts or databases.
To apply the monitoring template:
1. On the Monitoring Templates page, select the monitoring template and click Apply.
2. On the Apply Monitoring Template page, add the targets on which the user-defined metric should be created.
3. If a two-column SQL-based user-defined metric is part of the template, the Metric with Multiple Thresholds option is applied according one of the following situations:
■ Situation One: The target to which the template will be applied does not contain the two-column SQL user-defined metric defined in the template. In this situation, regardless of which Metric with Multiple Thresholds option is chosen, the user-defined metric is copied to the target when you apply the template.
■ Situation Two: The target to which the template will be applied does contain the two-column SQL user-defined metric. The name (case insensitive) and return value (numeric, scalar, or two column) of both the target and template user-defined metrics must match. In this situation, you must select one of the Metric with Multiple Thresholds options:
– Apply threshold settings for monitored objects common to both template and target: For only those keys which the target has in common with the template, the target threshold values will be set to the values defined in the template. This option is chosen by default and is recommended for most situations.
– Duplicate threshold settings on target: For keys which are common between target and template, the thresholds will be set to the values defined in the template. Any extra keys (and their thresholds) that exist in the template but not on the target will be copied to the target in anticipation that these keys will be created in the target at some point in the future. Any extra keys (and their thresholds) that exist on the target but not in the template will be deleted from the target.
Important: If there are other metrics in the monitoring template, refer first to the Enterprise Manager online help for implications of what this option means for these other metrics.
4. Click Continue.
5. On the subsequent page, specify the credentials that should be used when running the user-defined metric on the destination targets.
Important: For OS-based user-defined metrics, you will first need to separately deploy the OS Script used by the user-defined metric to all destination hosts. The OS Script should reside in the same location across all host targets.
For SQL-based user-defined metrics, if the SQL query specified is a function call, then you need to create this function across all databases on which the SQL-based user-defined metric will be created.
Notifications, Corrective Actions, and Monitoring Templates
15-20 Oracle Enterprise Manager Advanced Configuration
6. Click Finish.
7. When you return back to the Monitoring Templates page, check that "Pending Apply Operations" count for your template is zero. This indicates the number of template apply operations that could be pending. Once they are all complete, the count should be zero.
Deploying User-Defined Metrics Using ScriptsAn alternate method of deploying user-defined metrics to large numbers of targets is to use the Enterprise Manager Command Line Interface (EMCLI). Using the EMCLI "apply_template" verb, you can deploy user-defined metrics via custom scripts. For more information about the "apply_template" verb, see the Oracle Enterprise Manager Command Line Interface manual.
15.4.4 Deleting User-Defined Metrics Across Many Targets Using Monitoring TemplatesJust as templates can be used to deploy user-defined metrics across targets, templates can also be used to delete these metrics across targets should these metrics no longer be in use.
To create a Monitoring Template for the user-defined metric:
1. Click Setup.
2. From the vertical navigation bar, click Monitoring Templates
3. Click Create. The Copy Target Settings page appears.
4. Specify the host or database on which there is a user-defined metric that needs to be deleted and click Continue.
5. Fill in the requisite information on the General page.
6. On the Metric Thresholds page, remove all metrics from the template except the user-defined metric to be deleted.
7. Click the pencil icon to access the Edit Advanced Settings page.
8. Check the Mark for Delete option and click Continue. The Mark for Deletion icon now appears next to the user-defined metric on the Metric Thresholds page.
9. On the Policies page, remove all policies.
10. Click OK to save the template settings to the Management Repository.
To apply the monitoring template:
1. On the Monitoring Templates page, select the monitoring template and click Apply.
2. On the Apply Monitoring Template page, add the targets on which the user-defined metric should be deleted.
3. Click Continue.
4. On the subsequent page, specify the credentials that should be used when running the user-defined metric on the destination targets.
5. Click Finish.
6. On the Monitoring Templates page, check that "Pending Apply Operations" count for your template is zero. This indicates the number of template apply operations that could be pending. Once they are all complete, the count should be zero.
Changing User-Defined Metric Credentials
User-Defined Metrics 15-21
Enterprise manager will delete all user-defined metrics found on the selected target that match the following criteria:
■ Name of the user-defined metrics (case insensitive)
■ Return value of the user-defined metric (numeric or scalar)
■ For SQL-based user-defined metrics, the output of the query (single value or two columns). The match does not take into consideration the actual script used by the user-defined metric. For this reason, even though the script on the target user-defined metric may be different from that of the template user-defined metric, the target user-defined metric will still be deleted.
■ Host User-Define Metrics using scripts: You must delete the script from the host on which you want the UDM deleted.
■ SQL-based user-defined metrics using function calls: You must delete the function from the database on which you want the user-defined metric deleted.
15.5 Changing User-Defined Metric CredentialsAs discussed earlier, user-defined metrics require valid credentials (username and password) in order to execute monitoring scripts/SQL queries. For this reason, both the monitored target’s password and the password defined in the user-defined metric must match. This can be problematic if target passwords are changed frequently. For environments with a large number of targets, you can use the Enterprise Manager Command Line Interface (EMCLI) to change the target password and user-defined metric password simultaneously using scripts. Use the ’update_password’ verb to change the target password. This password change is then propagated to all features of Enterprise Manager that use the specified username, which includes preferred credentials, corrective actions, jobs, and both host and SQL-based user-defined metrics.
The following example changes the password associated with the OS user sysUser from sysUserOldPassword to sysUserNewPassword.
Example 15–4 Host Password Change
update_password -target_type=host -target_name=MyHost -credential_type=HostCreds -key_column=HostUserName:sysUser-non_key_column=HostPassword:sysUserOldPassword:sysUserNewPassword
The next example changes the password associated with the database user sys from sysPassword to sysNewPassword.
Example 15–5 Database Password Change
update_password -target_type=oracle_database -target_name=ORCL -credential_type=DBCreds -key_column=DBUserName:sys-non_key_column=DBPassword:sysPassword:sysNewPassword:DBAROLE
For more information about EMCLI, see the Oracle Enterprise Manager Command Line Interface guide.

Changing User-Defined Metric Credentials
15-22 Oracle Enterprise Manager Advanced Configuration
Using a Software Library 16-1
16Using a Software Library
This chapter describes the Software Library feature of Enterprise Manager and contains the following sections:
■ Overview of Software Library
■ Setting up the Software Library
■ Using the Software Library
■ De-Configuring a Software Library
■ Software Library Maintenance Tasks
■ Software Library Issues
16.1 Overview of Software LibraryThe Software Library serves as a repository to store certified software images (for example Oracle Database, operating system, Oracle Real Application Clusters, third party softwares) and other related entities. These can then be automatically mass deployed to provision software, software updates and servers using Oracle Enterprise Manger in a reliable and repeatable manner. These provisioning operations, which are unattended and can be scheduled, lead to substantial cost savings.
Software Library can store the following types of entities:
■ Components: These entities represent the primary building blocks of the provisioning framework. A component can represent Operating system software, Oracle software or any third party software and applications. Software components are individually maintained within the Software Library and versions, states and maturity levels can be associated with each component.
■ Directives: These are constructs used to associate scripts with software components and images. These scripts contain directions on how to interpret and process the contents of a particular component or an image. Directives encapsulate the script, the command line used to invoke the script, and the script configuration properties. Directives are contained within a file that are stored in the Software Library and referenced from the software components that employ them. Versions, states and maturity levels can be associated with each Directive.
■ Images, Network Templates, Hardware Templates, and Storage Templates: These entities are associated with the Bare Metal Provisioning application of the Oracle Enterprise Manager and are used to provision software on bare metal and live servers. Briefly, an Image can be described as a collection of components along with the necessary directives that create a deployable configuration for a single or set of target machines. Network templates, Hardware templates and Storage
Setting up the Software Library
16-2 Oracle Enterprise Manager Advanced Configuration
templates are used to define the network, hardware and disk layout configuration of the target machines respectively. Versions, states and maturity levels can be associated with each of these entities.
16.2 Setting up the Software LibrarySoftware Library can be configured using any mounted file system that is readable and writable from the Oracle Management Service (OMS). If Enterprise Manager is configured as a single server setup, then local directories can be used to configure the Software Library. Ensure that there is enough space available for the storage of software binaries, and associated scripts for the entities that you want to create and store.
In case Enterprise Manager is configured as a multiple servers setup, then the directories comprising the Software Library must be accessible by all OMS. Ensure that there is enough space available on the shared storage to store files that hold binary data for your components and other entities.
To configure the Software Library follow these steps:
1. Access the Oracle Enterprise Manager Provisioning Application by navigating to the Deployments tab.
2. Under the Deployments tab, go to the Provisioning tab. There are a number of tabs here for creating components, directives and other entities. You can access some or all of the tabs depending on the privileges assigned to the user.
3. Access the Administration tab. This requires super administrator privileges similar to SYSMAN user. For information about creating the super administrator, see Section 2.2, Creating Super Administrator for Enterprise Manager in the Best Practices for Bare Metal Provisioning on OTN.
4. In the Software Library Configuration section of the Administration tab, click Add.
5. On the Add Software Library Location page, enter the directory location and then click OK.
When the Software Library is configured, out-of-box Provisioning Archive files (PAR files) will be deployed. These files contain pre-build entities such as components, directives etc., for various applications such as bare metal provisioning and patching. A PAR file is a collection or bundle of Deployment Procedures and Software Library entities that are used for numerous Provisioning and Patching applications.
16.3 Using the Software LibraryThe graphical user interface of the Provisioning application has various tabs for creating Components, Directives, Images, Network and Hardware Templates, which are created and stored in the Software Library. Various subdirectories for storing the entities can be created in the Software Library. These tabs also allow a user to delete and edit an entity stored in the Software Library. They also allow a user to view meta-data information for an entity. Multiple Software Library locations can be
Note: When you add a Software Library location for the first time, the configuration will take some time. Subsequently, adding other Software Library locations will be quicker.

Using the Software Library
Using a Software Library 16-3
configured and when a file/binary is being associated with an entity, the location with the most space is picked.
Refer to the Best Practices for Bare Metal Provisioning on OTN for details on creating entities.
Figure 16–1 shows the Software Library section on the Administration page.
Figure 16–1 Software Library Configuration Section
The Software Library section lists the directory location, free space, used space, and space used by deleted entities. In addition, the following functionalities are also available in the Software Library Configuration section:
PurgeWhen an entity is deleted, the binary file associated with the entity continues to exists on the disk till it is completely removed. The space usage by such binary files can be monitored using "Used Space By Deleted Entities" column against every location. Use the Purge functionality in the Software Library section to permanently remove deleted entities and their respective binary files from the Software Library.
RefreshThe space usage for all Software Library locations can be computed using the Refresh functionality. On clicking Refresh, the Free Space, Used Space, and Used Space by Deleted Entities display the latest space usage details for each location. The Last Computed column gives the date when free space was computed last.
Check AccessibilityUse Check Accessibility to verify that the Software Library location is accessible from all OMS, in case of multiple OMS in your Enterprise Manager deployment. Ensure that normal preferred credentials are set for all hosts running Oracle Management Service to use the Check Accessibility functionality. You can also use the out-of-box Enterprise Manager policy "Non-Shared Software Library Existence" to check if any non-shared Software Library location exists among all OMS.
Export and ImportYou can export Software Library entities and import Provisioning Archive (PAR) files in the Software Library. See Exporting and Importing Entities Across Oracle Enterprise Manager Deployments for more details.
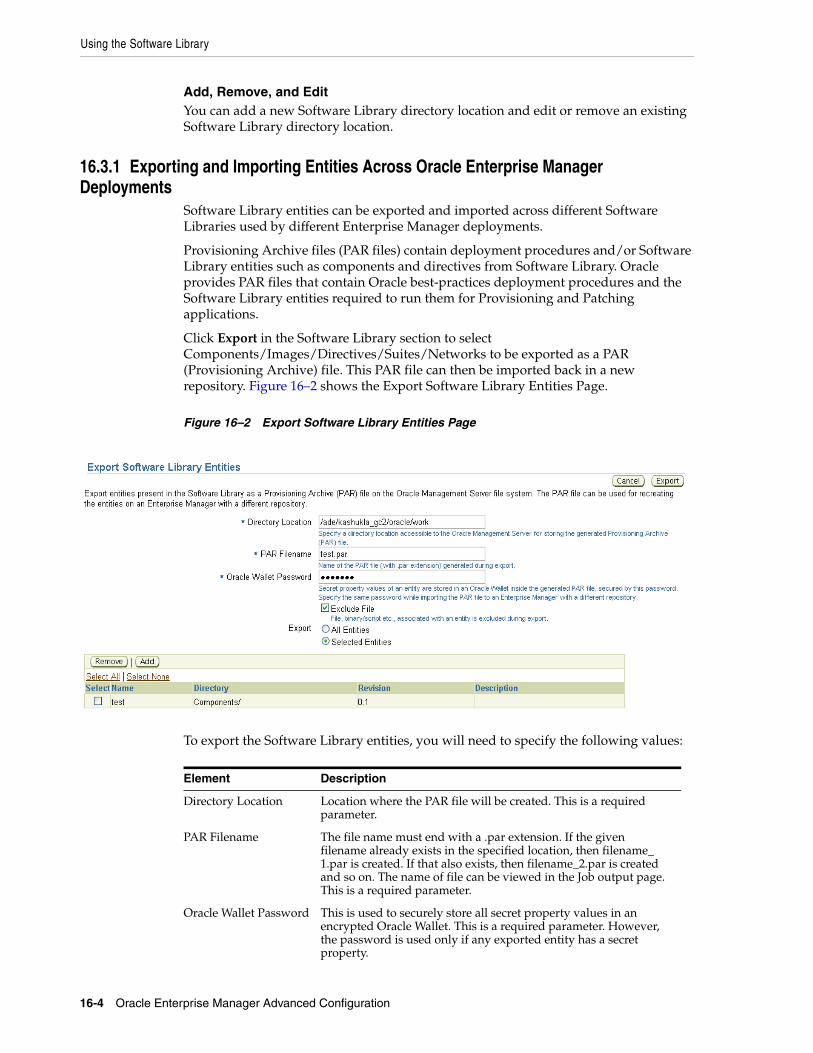
Using the Software Library
16-4 Oracle Enterprise Manager Advanced Configuration
Add, Remove, and EditYou can add a new Software Library directory location and edit or remove an existing Software Library directory location.
16.3.1 Exporting and Importing Entities Across Oracle Enterprise Manager Deployments
Software Library entities can be exported and imported across different Software Libraries used by different Enterprise Manager deployments.
Provisioning Archive files (PAR files) contain deployment procedures and/or Software Library entities such as components and directives from Software Library. Oracle provides PAR files that contain Oracle best-practices deployment procedures and the Software Library entities required to run them for Provisioning and Patching applications.
Click Export in the Software Library section to select Components/Images/Directives/Suites/Networks to be exported as a PAR (Provisioning Archive) file. This PAR file can then be imported back in a new repository. Figure 16–2 shows the Export Software Library Entities Page.
Figure 16–2 Export Software Library Entities Page
To export the Software Library entities, you will need to specify the following values:
Element Description
Directory Location Location where the PAR file will be created. This is a required parameter.
PAR Filename The file name must end with a .par extension. If the given filename already exists in the specified location, then filename_1.par is created. If that also exists, then filename_2.par is created and so on. The name of file can be viewed in the Job output page. This is a required parameter.
Oracle Wallet Password This is used to securely store all secret property values in an encrypted Oracle Wallet. This is a required parameter. However, the password is used only if any exported entity has a secret property.
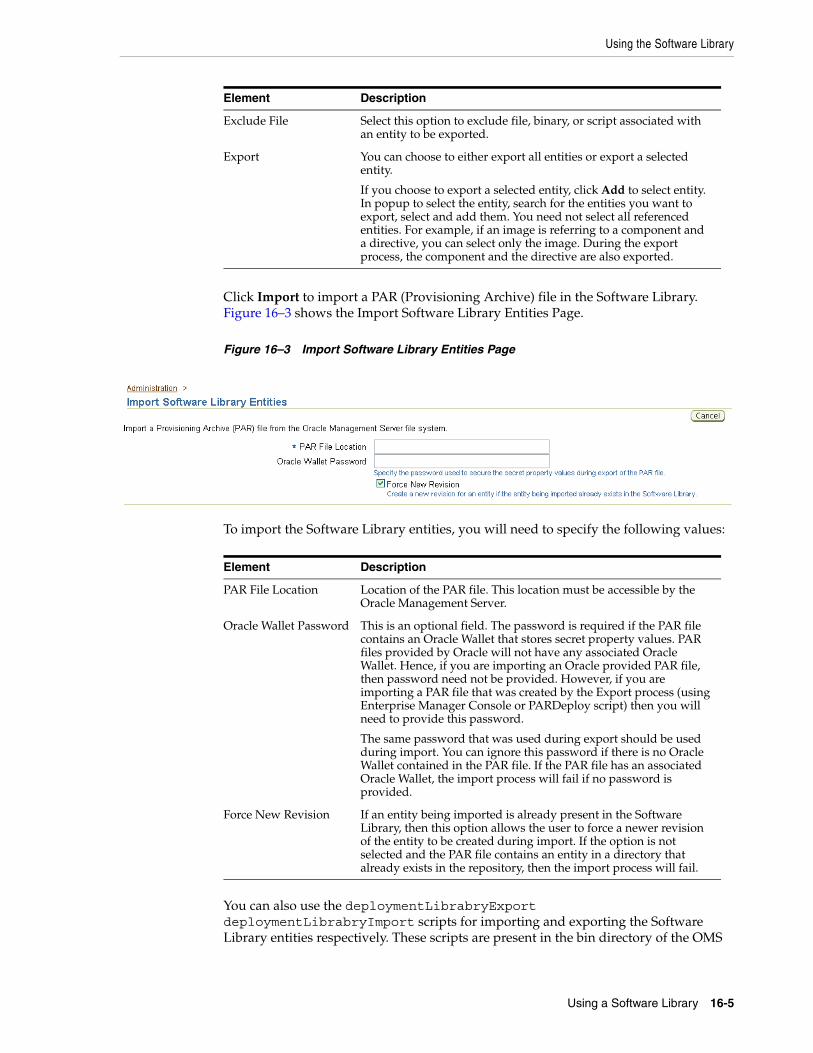
Using the Software Library
Using a Software Library 16-5
Click Import to import a PAR (Provisioning Archive) file in the Software Library. Figure 16–3 shows the Import Software Library Entities Page.
Figure 16–3 Import Software Library Entities Page
To import the Software Library entities, you will need to specify the following values:
You can also use the deploymentLibrabryExport deploymentLibrabryImport scripts for importing and exporting the Software Library entities respectively. These scripts are present in the bin directory of the OMS
Exclude File Select this option to exclude file, binary, or script associated with an entity to be exported.
Export You can choose to either export all entities or export a selected entity.
If you choose to export a selected entity, click Add to select entity. In popup to select the entity, search for the entities you want to export, select and add them. You need not select all referenced entities. For example, if an image is referring to a component and a directive, you can select only the image. During the export process, the component and the directive are also exported.
Element Description
PAR File Location Location of the PAR file. This location must be accessible by the Oracle Management Server.
Oracle Wallet Password This is an optional field. The password is required if the PAR file contains an Oracle Wallet that stores secret property values. PAR files provided by Oracle will not have any associated Oracle Wallet. Hence, if you are importing an Oracle provided PAR file, then password need not be provided. However, if you are importing a PAR file that was created by the Export process (using Enterprise Manager Console or PARDeploy script) then you will need to provide this password.
The same password that was used during export should be used during import. You can ignore this password if there is no Oracle Wallet contained in the PAR file. If the PAR file has an associated Oracle Wallet, the import process will fail if no password is provided.
Force New Revision If an entity being imported is already present in the Software Library, then this option allows the user to force a newer revision of the entity to be created during import. If the option is not selected and the PAR file contains an entity in a directory that already exists in the repository, then the import process will fail.
Element Description
De-Configuring a Software Library
16-6 Oracle Enterprise Manager Advanced Configuration
Oracle Home and provide the flexibility to transfer entities from a test to production or between different production environments.
The scripts support the following import/export use cases:
■ Exporting all directives and importing the same.
■ Exporting all components and importing the same.
■ Exporting all entities in the Software Library (including Network profiles, Images etc.) and importing the same.
The export script is available at the <OMS HOME>/bin/deploymentLibraryExport.pl location on Linux and Windows.
The import script is available at the <OMS HOME>/bin/deploymentLibraryImport.pl location on Linux and Windows.
For information on using the import and export scripts, type --help in the command line.
16.3.2 Deleting and Purging Software Library EntitiesSoftware Library entities can be deleted from the relevant tabs provided by the provisioning application. But it is to be noted that deleting the entity does not purge the file associated with it from the Software Library file system. If you delete an entity, it will not appear in the user interface, but will continue to exist on disk and take up disk space. To clean up and delete entities completely from the file system of the Software Library, you will need to purge the deleted entities.
To purge deleted entities, click Purge in the Software Library section.
You can also purge deleted entities by running the purgeDeploymentLibrary script. The script is located at the following location:
For OMS on Linux: <OMS HOME>/bin/ purgeDeploymentLibrary
16.4 De-Configuring a Software LibraryGo to the Administration tab, Software Library section, choose the Software Library entry and then click Remove to de-configure a Software Library. Once a Software Library entry is deleted, it becomes inaccessible.
Even though the deleted location is not used further for storing binaries/files/scripts of newly-created Software Library entities, it may still store files of already created entities. If the location is not accessible from all Oracle Management Servers, user can experience problems during deployment of such entities later.
If multiple locations for the Software Library are configured, when you deconfigure the Software Library, you can remove all except one Software Library location.
16.5 Software Library Maintenance TasksIt is recommended that the system administrator periodically performs the following administrative tasks to ensure that the Software Library is functioning properly:
■ Refresh the Software Library regularly to compute the free and used disk space.
■ Purge deleted entities to conserve disk space.
■ Check accessibility of the configured Software Library locations to ensure that they are accessible by all Oracle Management Servers.
Software Library Issues
Using a Software Library 16-7
For information about these features, see Using the Software Library.
16.6 Software Library Issues
Component creation sometimes fails with "Cannot create under the software library, please contact your administrator."This may happen if the Software Library is not configured with Enterprise Manager. Configure the Software Library as explained in Section 16.2. Create the components once the Software Library is configured.
"Meta-data for entities is intact in the Management Repository but file system of the Software Library where the associated files are stored has been corrupted." Restoring the file system should be fine but you will lose the entities that were created since the last backup. These entities will still show up in the Provisioning UI but errors will be encountered while accessing them or attempting to deploy them.
For other troubleshooting issues, refer to the Best Practices for Bare Metal Provisioning on OTN.

Software Library Issues
16-8 Oracle Enterprise Manager Advanced Configuration
Additional Configuration Tasks 17-1
17Additional Configuration Tasks
This chapter contains the following sections:
■ Understanding Default and Custom Data Collections
■ Enabling Multi-Inventory Support for Configuration Management
■ Manually Configuring a Database Target for Complete Monitoring
■ Modifying the Default Login Timeout Value
■ Configuring Clusters and Cluster Databases in Grid Control
■ Collecting Client Configurations
■ Setting Up and Configuring a Software Library With Oracle Enterprise Manager
17.1 Understanding Default and Custom Data CollectionsWhen you install the Oracle Management Agent on a host computer, Enterprise Manager automatically begins gathering a default set of metrics that you can use to monitor the performance and availability of each targets on that host. For some of these target metrics, Enterprise Manager provides default threshold settings that determine when you will be notified that there is a problem with the metric.
For selected metrics, you can customize the default thresholds. When you make these types of customizations, Enterprise Manager saves the new settings in a file on the local disk. The following sections provide more information about how these settings are saved:
■ How Enterprise Manager Stores Default Collection Information
■ Restoring Default Collection Settings
17.1.1 How Enterprise Manager Stores Default Collection InformationEnterprise Manager stores the default collection criteria for each target in the following location on each Oracle Management Agent host:
AGENT_HOME/sysman/admin/default_collection/
For some targets, you can use the Oracle Enterprise Manager 10g Grid Control Console to modify the default metric collection settings. For example, you can modify the default thresholds for your host targets. When you make these types of
See Also: "About Alerts" in the Enterprise Manager online help
Enabling Multi-Inventory Support for Configuration Management
17-2 Oracle Enterprise Manager Advanced Configuration
modifications, Enterprise Manager creates a new default collection file in the following directory:
AGENT_HOME/sysman/emd/collection/
This collection file overrides the default collection information stored in the sysman/admin/default_collection directory.
17.1.2 Restoring Default Collection SettingsIf you have made modifications to the metric thresholds for a particular target, you can restore the default metric collection settings by deleting the customized collection information in the sysman/emd/collection directory.
For example, if you want to restore the default collections for a particular database target, remove the customized collection file for that target from the sysman/emd/collection directory. Enterprise Manager will begin using the metric collection information stored in the sysman/admin/default_collection directory.
17.2 Enabling Multi-Inventory Support for Configuration ManagementEvery time you install an Oracle software product on a host computer, Oracle Universal Installer saves information about the software installation on your hard disk. The directories and files that contain this software configuration information are referred to as the Oracle Universal Installer inventory.
When you use Enterprise Manager to monitor your Oracle software installations, Enterprise Manager takes advantage of information saved in the Universal Installer inventory.
As it gathers information about the configuration of your host computer, by default, Enterprise Manager assumes that you have one Oracle Universal Installer inventory on the host. Specifically, Enterprise Manager recognizes the inventory that Oracle Universal Installer uses when you run the Universal Installer on the host.
However, in some cases, you may have more than one inventory. For example, you may have worked with Oracle Support to clone your Oracle software installations. For those cases, you can use the following procedure to be sure that Enterprise Manager can track and manage the software information in multiple inventories on the same host.
To set up Enterprise Manager so it can read multiple inventories on a host:
1. Locate the OUIinventories.add file in the following directory:
$ORACLE_HOME/<nodename>_<sid>/sysman/config
See Also: Oracle Universal Installer and OPatch User's Guide for Windows and UNIX
Caution: Enabling support for multiple inventories is optional and available only for advanced users who are familiar with the Oracle Universal Installer inventory architecture and who have previously worked with multiple inventories on a managed host. This procedure is not required for hosts where normal installations have been performed.
Enabling Multi-Inventory Support for Configuration Management
Additional Configuration Tasks 17-3
The Management Agent state listed in this example represents an installation for Database Control. For more information about the Management Agent state to use for other installations, see Section 17.2.1, "AGENT_HOME Versus AGENT_STATE Directories" on page 17-3.
2. Open OUIinventories.add using a text editor.
Instructions within the file describe the format to use when identifying multiple inventories, as well other techniques for mapping Oracle Homes.
3. Carefully review the instructions within the file.
4. Add entries to the file for each additional inventory on the managed host.
5. Save your changes and close the file.
During its next collection of host configuration information, Enterprise Manager will start gathering software configuration information from the inventories that you identified in the OUIinventories.add file, in addition to the default inventory that Enterprise Manager normally collects.
Alternatively, to see the data gathered from the additional inventories before the next regularly-scheduled collection, navigate to the Host home page in the Grid Control Console, click the Configuration tab, and click the Refresh Data icon next to the page timestamp.
17.2.1 AGENT_HOME Versus AGENT_STATE DirectoriesThe Management Agent recognizes two main directory structures; its installation directory where software binaries and all unchanging metadata are stored, and its configuration/state directory where all customizations and output/log content are stored and/or generated. In a normal Management Agent installation, these two directories are the same. However, they can be different in the following cases:
■ RAC Agent installation ($ORACLE_HOME versus $ORACLE_HOME/<hostname>)
■ Database Control installation ($ORACLE_HOME versus $ORACLE_HOME/<nodename><sid>)
■ State-only Management Agent deployment (using the emctl deploy agent command -- $ORACLE_HOME versus $EMSTATE)
In each of the above cases, there will be multiple instances of the Management Agent running off the same binaries installation. The different instances have different locations to maintain separate configurations but use the same set of binaries. The command emctl agent status provides the values of the Management Agent's binaries and state locations.
Note: If there any irrecoverable problems during the collection of the default inventory (for example, if the inventory file or directory protections prevent Enterprise Manager from reading the inventory), inventories listed in OUIinventories.add file are also not collected.
If the Enterprise Manager is able to read the default inventory, but there is a problem reading an additional inventory listed in the OUIinventories.add file, Enterprise Manager issues a collection warning for those inventories. However, Enterprise Manager does collect the configuration information for the other inventories.

Manually Configuring a Database Target for Complete Monitoring
17-4 Oracle Enterprise Manager Advanced Configuration
17.3 Manually Configuring a Database Target for Complete MonitoringWhen you first discover an Oracle Database 10g target, you should check the monitoring credentials to be sure the password for the DBSNMP database user account is set correctly in the database target properties.
Besides setting the monitoring credentials, no other configuration tasks are required to monitor an Oracle Database 10g target.
However, when you monitor an Oracle9i database or an Oracle8i database, there is some additional configuration required if you want to monitor certain types of database performance metrics using the Grid Control Console.
To monitor these additional performance metrics Enterprise Manager requires that Oracle Statspack and some additional Enterprise Manager packages be installed and configured in the database you are monitoring.
If these additional objects are not available and configured in the database, Enterprise Manager will not be able to gather the data for the complete set of performance metrics. In addition, Enterprise Manager will not be able to gather information that otherwise could be readily available from the Database home page, such as Bad SQL and the Top SQL Report.
You can use the Configure Database wizard in the Grid Control Console to install the required packages into the database, or you can use the following manual procedure.
To manually install Statspack and the other required database objects into an Oracle9i database that you are managing with Enterprise Manager, you can use SQL*Plus and the following procedure:
1. Log in to the database host using an account with privileges that allow you to write to the database home directory and to the Management Agent home directory.
For each of the commands in this procedure, replace AGENT_HOME with the actual path to the Oracle Management Agent home directory and replace ORACLE_HOME with the path to the database home directory.
2. Start SQL*Plus and connect to the database using the SYS account with SYSDBA privileges.
For example:
$PROMPT> ./sqlplus "connect / as sysdba"
3. Enter the following command to run the database dbmon script:
SQL> @AGENT_HOME/sysman/admin/scripts/db/config/dbmon
The script will display the following prompt:
See Also: "Specifying New Target Monitoring Credentials" on page 2-13
See Also: "Using Statspack" in Oracle Database Performance Tuning Guide and Reference in the Oracle9i Documentation Library
See Also: "Modifying Target Properties" in the Enterprise Manager online help for information on configuring managed targets, including database targets
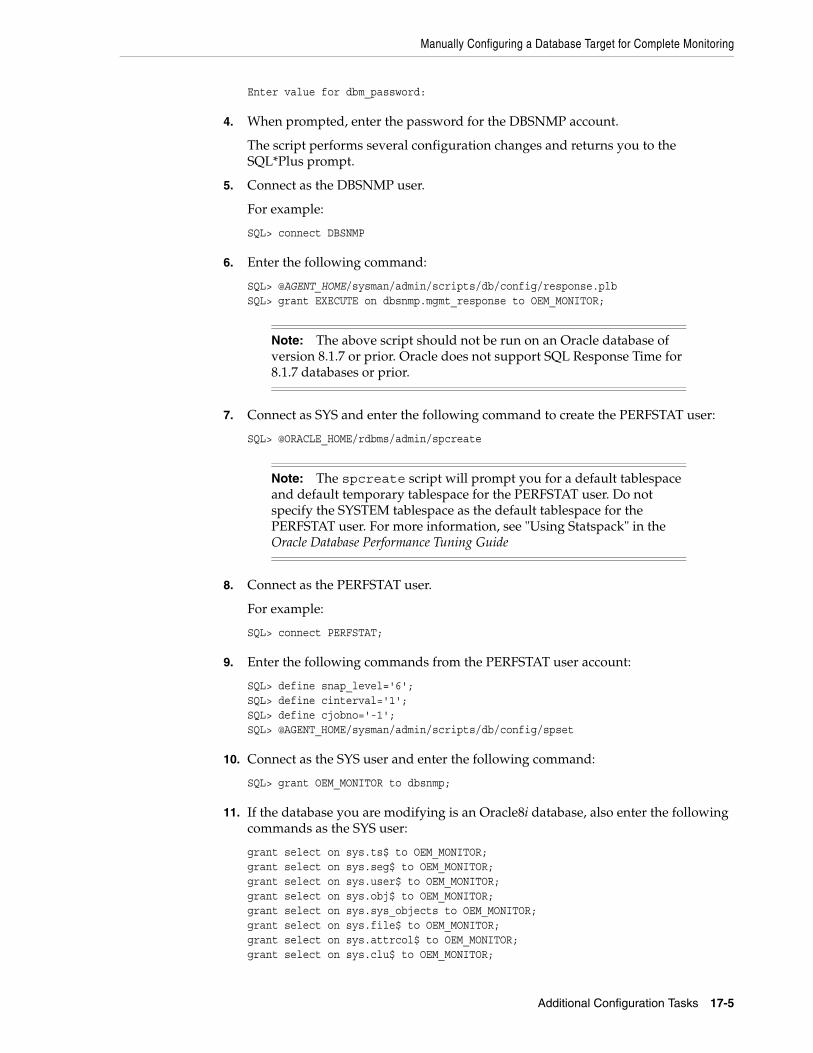
Manually Configuring a Database Target for Complete Monitoring
Additional Configuration Tasks 17-5
Enter value for dbm_password:
4. When prompted, enter the password for the DBSNMP account.
The script performs several configuration changes and returns you to the SQL*Plus prompt.
5. Connect as the DBSNMP user.
For example:
SQL> connect DBSNMP
6. Enter the following command:
SQL> @AGENT_HOME/sysman/admin/scripts/db/config/response.plbSQL> grant EXECUTE on dbsnmp.mgmt_response to OEM_MONITOR;
7. Connect as SYS and enter the following command to create the PERFSTAT user:
SQL> @ORACLE_HOME/rdbms/admin/spcreate
8. Connect as the PERFSTAT user.
For example:
SQL> connect PERFSTAT;
9. Enter the following commands from the PERFSTAT user account:
SQL> define snap_level='6';SQL> define cinterval='1';SQL> define cjobno='-1';SQL> @AGENT_HOME/sysman/admin/scripts/db/config/spset
10. Connect as the SYS user and enter the following command:
SQL> grant OEM_MONITOR to dbsnmp;
11. If the database you are modifying is an Oracle8i database, also enter the following commands as the SYS user:
grant select on sys.ts$ to OEM_MONITOR;grant select on sys.seg$ to OEM_MONITOR;grant select on sys.user$ to OEM_MONITOR;grant select on sys.obj$ to OEM_MONITOR;grant select on sys.sys_objects to OEM_MONITOR;grant select on sys.file$ to OEM_MONITOR;grant select on sys.attrcol$ to OEM_MONITOR;grant select on sys.clu$ to OEM_MONITOR;
Note: The above script should not be run on an Oracle database of version 8.1.7 or prior. Oracle does not support SQL Response Time for 8.1.7 databases or prior.
Note: The spcreate script will prompt you for a default tablespace and default temporary tablespace for the PERFSTAT user. Do not specify the SYSTEM tablespace as the default tablespace for the PERFSTAT user. For more information, see "Using Statspack" in the Oracle Database Performance Tuning Guide
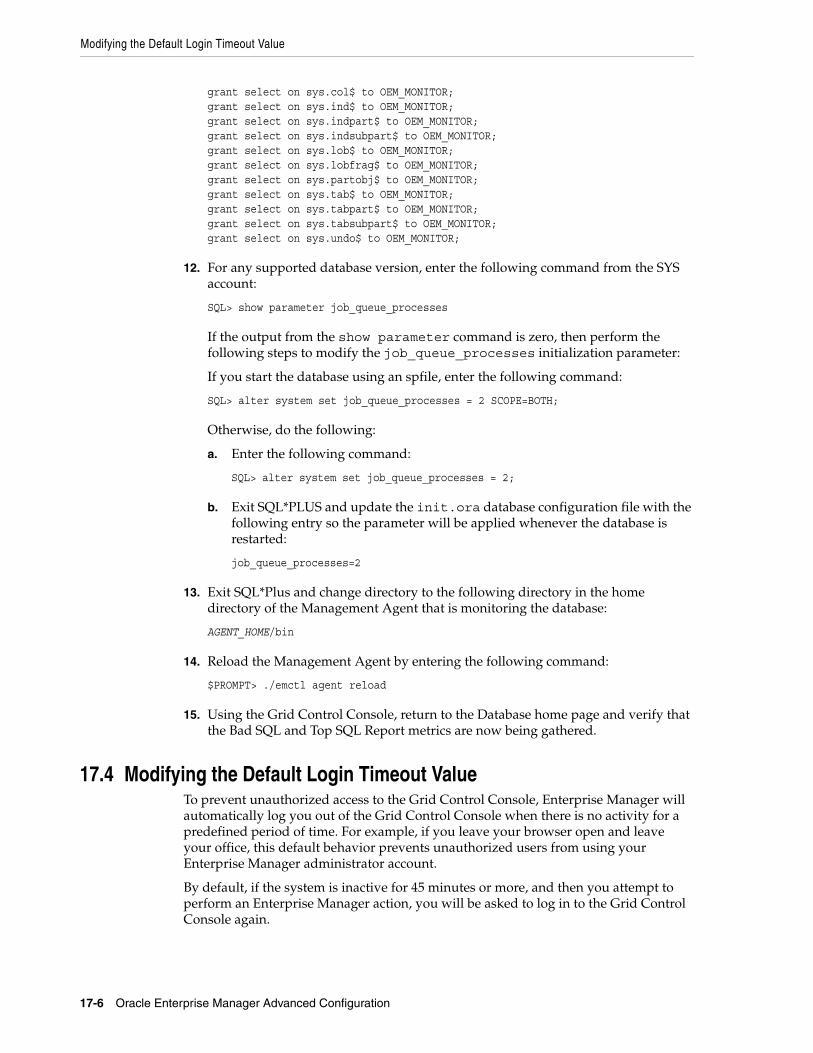
Modifying the Default Login Timeout Value
17-6 Oracle Enterprise Manager Advanced Configuration
grant select on sys.col$ to OEM_MONITOR;grant select on sys.ind$ to OEM_MONITOR;grant select on sys.indpart$ to OEM_MONITOR;grant select on sys.indsubpart$ to OEM_MONITOR;grant select on sys.lob$ to OEM_MONITOR;grant select on sys.lobfrag$ to OEM_MONITOR;grant select on sys.partobj$ to OEM_MONITOR;grant select on sys.tab$ to OEM_MONITOR;grant select on sys.tabpart$ to OEM_MONITOR;grant select on sys.tabsubpart$ to OEM_MONITOR;grant select on sys.undo$ to OEM_MONITOR;
12. For any supported database version, enter the following command from the SYS account:
SQL> show parameter job_queue_processes
If the output from the show parameter command is zero, then perform the following steps to modify the job_queue_processes initialization parameter:
If you start the database using an spfile, enter the following command:
SQL> alter system set job_queue_processes = 2 SCOPE=BOTH;
Otherwise, do the following:
a. Enter the following command:
SQL> alter system set job_queue_processes = 2;
b. Exit SQL*PLUS and update the init.ora database configuration file with the following entry so the parameter will be applied whenever the database is restarted:
job_queue_processes=2
13. Exit SQL*Plus and change directory to the following directory in the home directory of the Management Agent that is monitoring the database:
AGENT_HOME/bin
14. Reload the Management Agent by entering the following command:
$PROMPT> ./emctl agent reload
15. Using the Grid Control Console, return to the Database home page and verify that the Bad SQL and Top SQL Report metrics are now being gathered.
17.4 Modifying the Default Login Timeout ValueTo prevent unauthorized access to the Grid Control Console, Enterprise Manager will automatically log you out of the Grid Control Console when there is no activity for a predefined period of time. For example, if you leave your browser open and leave your office, this default behavior prevents unauthorized users from using your Enterprise Manager administrator account.
By default, if the system is inactive for 45 minutes or more, and then you attempt to perform an Enterprise Manager action, you will be asked to log in to the Grid Control Console again.
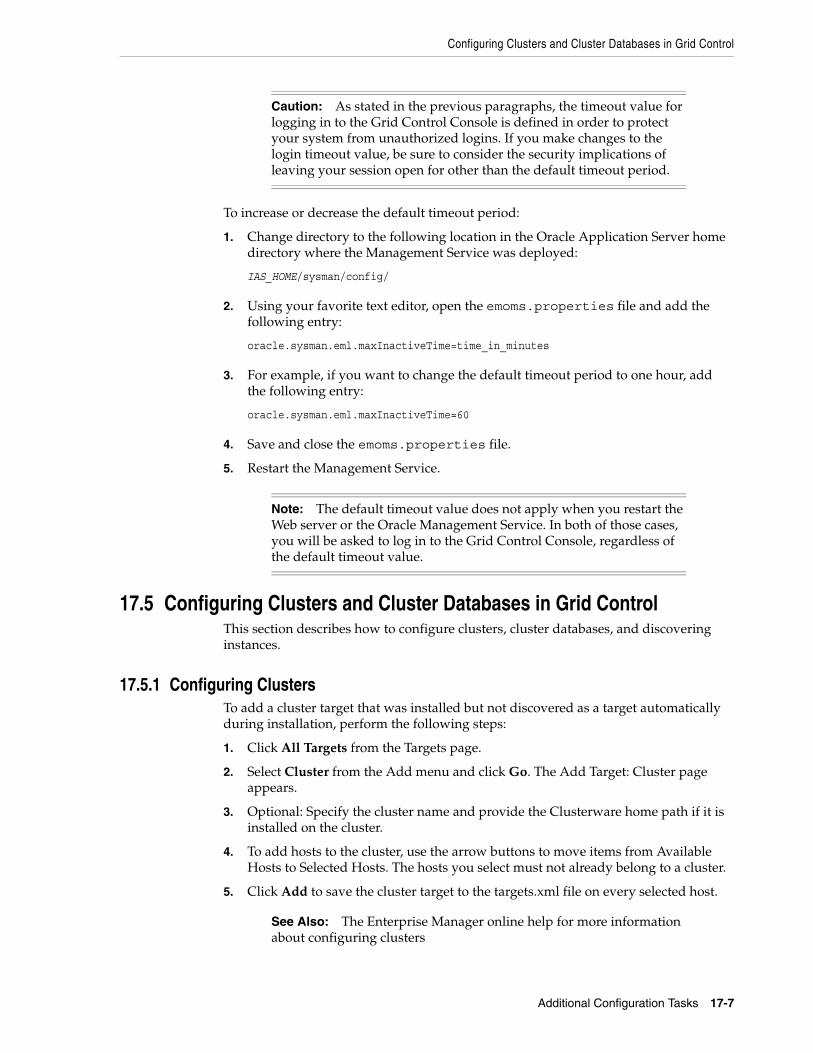
Configuring Clusters and Cluster Databases in Grid Control
Additional Configuration Tasks 17-7
To increase or decrease the default timeout period:
1. Change directory to the following location in the Oracle Application Server home directory where the Management Service was deployed:
IAS_HOME/sysman/config/
2. Using your favorite text editor, open the emoms.properties file and add the following entry:
oracle.sysman.eml.maxInactiveTime=time_in_minutes
3. For example, if you want to change the default timeout period to one hour, add the following entry:
oracle.sysman.eml.maxInactiveTime=60
4. Save and close the emoms.properties file.
5. Restart the Management Service.
17.5 Configuring Clusters and Cluster Databases in Grid ControlThis section describes how to configure clusters, cluster databases, and discovering instances.
17.5.1 Configuring ClustersTo add a cluster target that was installed but not discovered as a target automatically during installation, perform the following steps:
1. Click All Targets from the Targets page.
2. Select Cluster from the Add menu and click Go. The Add Target: Cluster page appears.
3. Optional: Specify the cluster name and provide the Clusterware home path if it is installed on the cluster.
4. To add hosts to the cluster, use the arrow buttons to move items from Available Hosts to Selected Hosts. The hosts you select must not already belong to a cluster.
5. Click Add to save the cluster target to the targets.xml file on every selected host.
Caution: As stated in the previous paragraphs, the timeout value for logging in to the Grid Control Console is defined in order to protect your system from unauthorized logins. If you make changes to the login timeout value, be sure to consider the security implications of leaving your session open for other than the default timeout period.
Note: The default timeout value does not apply when you restart the Web server or the Oracle Management Service. In both of those cases, you will be asked to log in to the Grid Control Console, regardless of the default timeout value.
See Also: The Enterprise Manager online help for more information about configuring clusters
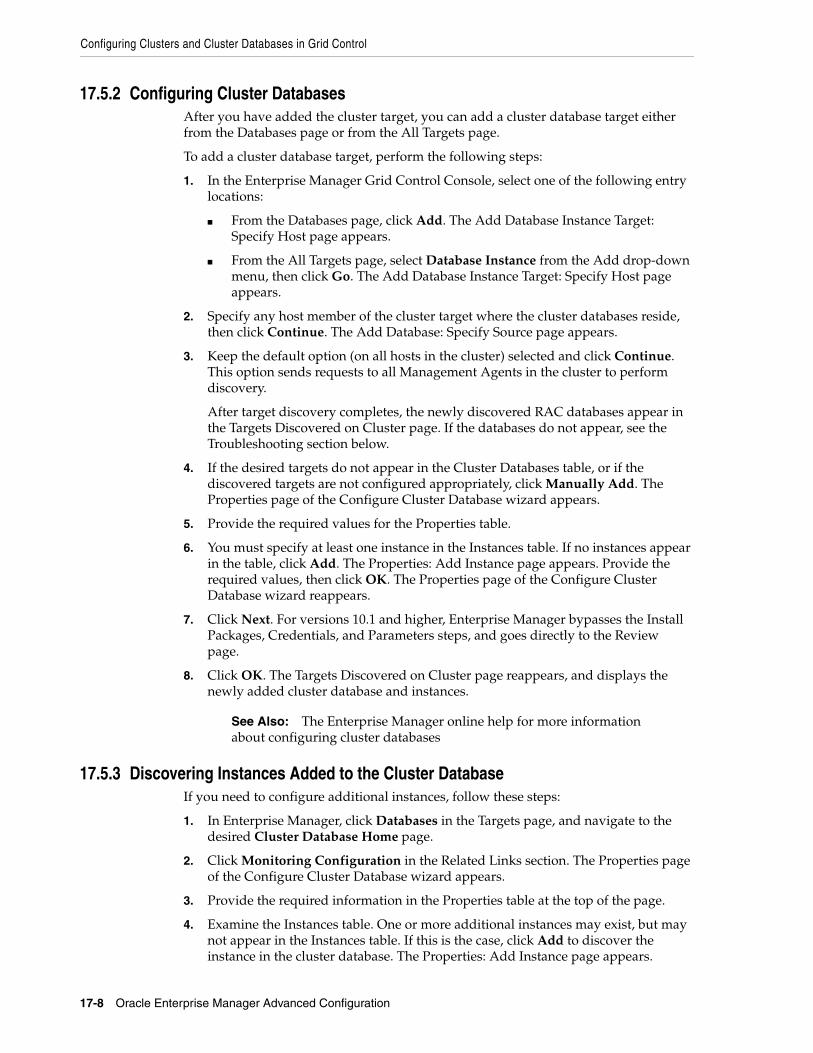
Configuring Clusters and Cluster Databases in Grid Control
17-8 Oracle Enterprise Manager Advanced Configuration
17.5.2 Configuring Cluster DatabasesAfter you have added the cluster target, you can add a cluster database target either from the Databases page or from the All Targets page.
To add a cluster database target, perform the following steps:
1. In the Enterprise Manager Grid Control Console, select one of the following entry locations:
■ From the Databases page, click Add. The Add Database Instance Target: Specify Host page appears.
■ From the All Targets page, select Database Instance from the Add drop-down menu, then click Go. The Add Database Instance Target: Specify Host page appears.
2. Specify any host member of the cluster target where the cluster databases reside, then click Continue. The Add Database: Specify Source page appears.
3. Keep the default option (on all hosts in the cluster) selected and click Continue. This option sends requests to all Management Agents in the cluster to perform discovery.
After target discovery completes, the newly discovered RAC databases appear in the Targets Discovered on Cluster page. If the databases do not appear, see the Troubleshooting section below.
4. If the desired targets do not appear in the Cluster Databases table, or if the discovered targets are not configured appropriately, click Manually Add. The Properties page of the Configure Cluster Database wizard appears.
5. Provide the required values for the Properties table.
6. You must specify at least one instance in the Instances table. If no instances appear in the table, click Add. The Properties: Add Instance page appears. Provide the required values, then click OK. The Properties page of the Configure Cluster Database wizard reappears.
7. Click Next. For versions 10.1 and higher, Enterprise Manager bypasses the Install Packages, Credentials, and Parameters steps, and goes directly to the Review page.
8. Click OK. The Targets Discovered on Cluster page reappears, and displays the newly added cluster database and instances.
17.5.3 Discovering Instances Added to the Cluster DatabaseIf you need to configure additional instances, follow these steps:
1. In Enterprise Manager, click Databases in the Targets page, and navigate to the desired Cluster Database Home page.
2. Click Monitoring Configuration in the Related Links section. The Properties page of the Configure Cluster Database wizard appears.
3. Provide the required information in the Properties table at the top of the page.
4. Examine the Instances table. One or more additional instances may exist, but may not appear in the Instances table. If this is the case, click Add to discover the instance in the cluster database. The Properties: Add Instance page appears.
See Also: The Enterprise Manager online help for more information about configuring cluster databases
Collecting Client Configurations
Additional Configuration Tasks 17-9
5. Provide the required information, then click OK. The wizard Properties page reappears, and displays the added instance view.
6. Click Check Connection to ensure that the connection is working.
17.5.3.1 TroubleshootingIf you encounter configuration issues, check the following required conditions to ensure that automatic discovery is able to function correctly:
■ The host user running the Management Agent is able to run the SRVCTL utility in the Oracle home and retrieve the database configuration.
■ The host user running the Management Agent is able to connect to the database through SQLPLUS using OS authentication.
■ The Oratab (UNIX) or Registry (Windows) contains information about the database.
If automatic discovery still does not resolve your configuration issues after you have ensured the conditions previously listed, you can manually configure cluster databases (see Section 17.5.2, "Configuring Cluster Databases").
For more information about configurations for Oracle Enterprise Manager Grid Control, see Chapter 3, "Grid Control Common Configurations".
17.6 Collecting Client ConfigurationsA client is comprised of a host and operating system user. Client configuration data that is collected includes:
■ Hardware for the client.
■ Operating system (includes information such as operating system properties, file systems, and patches) for the client.
■ Operating system-registered software.
■ Network data, which includes:
– Latency to the Web server
– Bandwidth to the Web server
■ Client-specific data items that describe the configuration of the browser used to access the client configuration collection applet, which includes:
– Browser type (vendor)
– Browser version
– JVM vendor (of the JVM used to run the client configuration collection applet)
– JVM version (of the JVM used to run the client configuration collection applet)
– Proxy server (if specified)
– Proxy server exceptions
– Browser cache size (MB)
– Browser cache update frequency
– Supported HTTP version
See Also: The Enterprise Manager online help for more information about discovering instances added to the cluster database
Collecting Client Configurations
17-10 Oracle Enterprise Manager Advanced Configuration
■ Other client-oriented data items, including:
– Client configuration collection applet identifier (version, defined in the applet code)
– Application URL (from which the client configuration collection applet was accessed)
– Boot drive serial number (not available from diskless systems)
– Collection timestamp (from the client configuration collection applet JSP)
– Collection durations, in milliseconds
– Client IP address
– Effective client IP address - if a network proxy server is being used between the client and the Web server providing the client configuration collection applet, the effective client IP address will be the IP address of the proxy server.
17.6.1 Configuring the Client System AnalyzerThe Client System Analyzer (CSA) allows Web server administrators to collect and analyze end-user client data. The client data is collected by an applet, diagnosed and sent back to the CSA application. The Oracle Management Agent uploads this data to the Enterprise Manager Management Repository. After the client configuration data has been collected by the client configuration collection applet and written to the Web server directory specified by the CSA applet, the client configuration data is uploaded to the Oracle Management Repository.
You can either use the Client System Analyzer in the Grid Control application pre-installed with Enterprise Manager or you can deploy CSA independently to your Web server.
17.6.1.1 Client System Analyzer in Oracle Grid ControlClient System Analyzer in Grid Control - An instance of CSA is pre-installed with Enterprise Manager. If you use this option, you can collect client data without setting up a separate Web server. To activate the pre-installed CSA application in Enterprise Manager, click Deployments. Then click Client System Analyzer in Grid Control and use the button provided to activate the application. Once CSA is activated, end-users can use the URL provided to run the CSA applet. The CSA applet can collect base client configuration information from client systems and Oracle Collaboration Suite client information from Oracle Collaboration Suite client systems.
■ To download the CSA applet and have it collect base client configuration information, a client should use the Client System Analyzer URL in this format: http[s]://management-service-host:port/em/public/ecm/csa/CSA
■ To download the CSA applet and have it collect Oracle Collaboration Suite client configuration information, a client should use the Client System Analyzer URL in this format: http[s]://management-service-host:port/em/public/ecm/csa/CSA?application=OCS
17.6.1.2 Deploying Client System Analyzer IndependentlyThe Client System Analyzer Application can be deployed independently to any J2EE-capable Web server. Click the Deployments tab. Then click Getting Started with
Collecting Client Configurations
Additional Configuration Tasks 17-11
Client System Analyzer and click Deploy Client System Analyzer Application. Follow these steps to deploy the CSA applet and collect the client configuration data.
1. Download the CSA Application:
The CSA application includes the CSA directory along with the necessary JSP applet files. The application is packaged as an EAR file. To download this default EAR file, click Download Client System Analyzer Application. You can customize the default CSA EAR file by modifying the following:
– Rules - This file contains a default set of rules against which the client data is evaluated. You can customize and add rules before deploying CSA.
– Context parameters - You can customize the context parameters in the web.xml file.
– Custom classes - You can provide customized applet classes that can be used to perform tasks like collecting additional data, changing the behavior of the applet, and performing certain operations on the client.
2. Deploy CSA to any J2EE Web server.
The CSA application is deployed on an Application Server as a regular J2EE application. Once the CSA application is deployed, context parameters can be changed similar to other web applications.
3. Direct users to the CSA.
In order for the client data to be collected, the user must access the CSA application. Users can access the CSA JSP page directly or by using a link from another application. Users can be automatically redirected to CSA using the following methods:
– HTTP Server (Apache's mod_rewrite) - This option does not require changes in the Web application.
– Servlet Filter - A servlet filter is a program that filters requests to and from the server. The CSA_filter.jar file contains the servlet filter classes. The servlet filter and the filter mapping need to be added to the Web application.
– CSA Redirection JSP - The CSA Redirection JSP (CSARedirect.jsp) page can be included into the Web application.
4. Configure Enterprise Manager.
Collected client data is recorded in the Receive File Directory on the Web server. To upload the collected client data into Enterprise Manager, you need to do the following:
– Add a CSA Collector Target to the Enterprise Manager Management Agent. To do so, click Add Collector and choose a target from the list.
– Specify the absolute path to the Receive File Directory. The path specified must be the same as the path specified in the outputDir parameter of the CSA application. By default, the client data is stored in the Receive File Directory "csa_results" under the context root of the Client System Analyzer Web application, but this can be configured by changing the applications's "outputDir" context parameter.
5. Test the CSA Deployment.
To verify the CSA deployment, click the URL of the CSA page and check if the client data is collected.
Collecting Client Configurations
17-12 Oracle Enterprise Manager Advanced Configuration
17.6.2 Configuration ParametersThe Client System Analyzer (CSA) can be further configured by modifying the context parameters in the CSA application's WAR file.
Table 17–1 Configuration Parameters
Parameter Description Default Value
alertWhenDone If set to true, a message indicating that the applet has been executed is displayed.
false
appletJAR The name of the JAR file. CSA.jar
application The name of the application associated with this CSA instance. If the application parameter value is not specified, then the Collection Tag has a value of Default.
none
autoRedir If set to "true", this causes the CSA JSP page to automatically use the Sun JVM if JVM was set to JInitiator and the client does not have the appropriate version of JInitiator installed.
false
bwTestFile The name of the file that is downloaded from the server during the bandwidth test.
CSA.mb (included with CSA)
bwTestMsec The amount of time the applet should spend on the bandwidth test. The applet computes bandwidth by counting the number of bytes it can download in this interval.
200 ms
classid The "classid" field for the OBJECT tag. Applicable only if JVM is set to "JInitiator." The classid for Sun is "clsid:8AD9C840-044E-11D1-B3E9-00805F499D93"
codebase - the "codebase" field for the OBJECT tag. Applicable only if JVM is set to "JInitiator."
None – this field MUST be set if JVM is set to "JInitiator," and is ignored otherwise
codebase The codebase field for the OBJECT tag. Applicable only if the JVM is set to "JInitator".
The default for Sun is http://java.sun.com/products/plugin/autodl/jinstall-1_4_2-windows-i586.cab#Version=1,4,0,0
collectCookie The list of the names of cookies to be collected. This parameter is a comma-separated list of cookie names. Only cookies for the current OS user in the current browser will be collected. The Administrator can specify asterisk (*) to collect all of the current user's cookies for the current browser.
If this field is not present, no cookies will be collected.
cookieDomain The domain of the CSA cookie. If either the domain or path of the cookie is not set, cookies are disabled
cookieMaxAge The maximum duration, in seconds, of the cookie on the client machine.
1 year
cookiePath The path of the CSA cookie If either the domain or path is not specified, cookies are disabled.
customClass The name of the class used to collect custom data. none – the default behavior is for no custom code to be executed
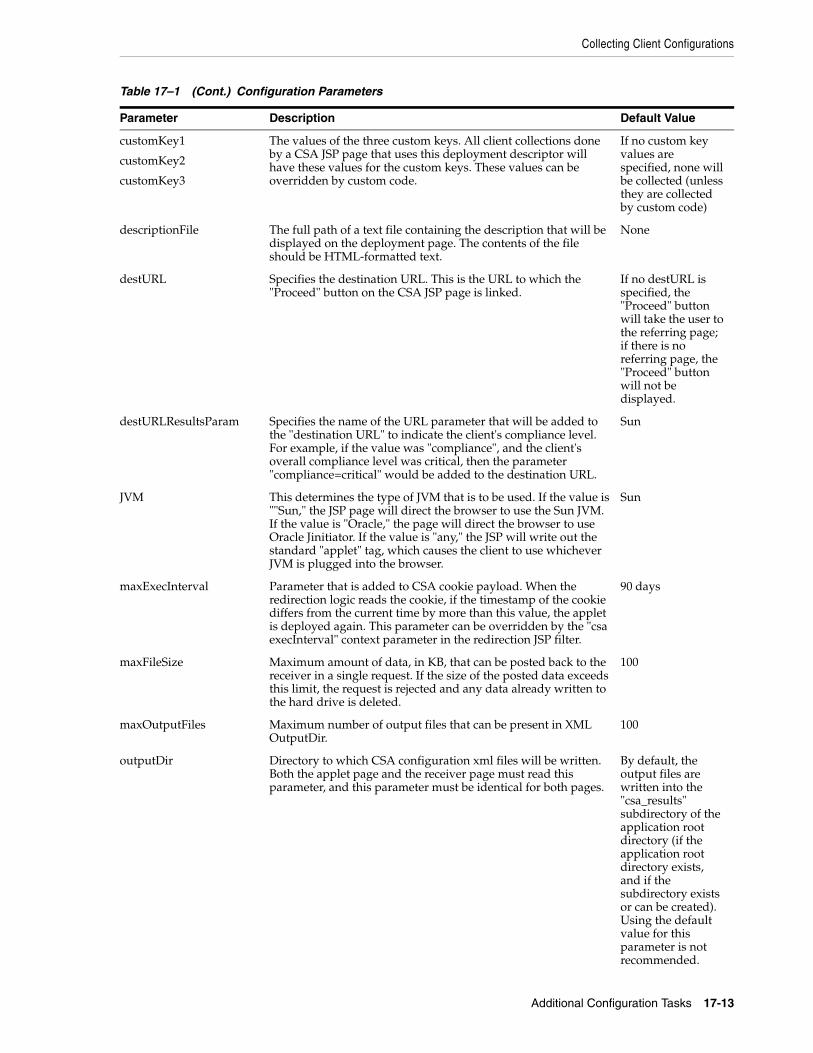
Collecting Client Configurations
Additional Configuration Tasks 17-13
customKey1
customKey2
customKey3
The values of the three custom keys. All client collections done by a CSA JSP page that uses this deployment descriptor will have these values for the custom keys. These values can be overridden by custom code.
If no custom key values are specified, none will be collected (unless they are collected by custom code)
descriptionFile The full path of a text file containing the description that will be displayed on the deployment page. The contents of the file should be HTML-formatted text.
None
destURL Specifies the destination URL. This is the URL to which the "Proceed" button on the CSA JSP page is linked.
If no destURL is specified, the "Proceed" button will take the user to the referring page; if there is no referring page, the "Proceed" button will not be displayed.
destURLResultsParam Specifies the name of the URL parameter that will be added to the "destination URL" to indicate the client's compliance level. For example, if the value was "compliance", and the client's overall compliance level was critical, then the parameter "compliance=critical" would be added to the destination URL.
Sun
JVM This determines the type of JVM that is to be used. If the value is ""Sun," the JSP page will direct the browser to use the Sun JVM. If the value is "Oracle," the page will direct the browser to use Oracle Jinitiator. If the value is "any," the JSP will write out the standard "applet" tag, which causes the client to use whichever JVM is plugged into the browser.
Sun
maxExecInterval Parameter that is added to CSA cookie payload. When the redirection logic reads the cookie, if the timestamp of the cookie differs from the current time by more than this value, the applet is deployed again. This parameter can be overridden by the "csa execInterval" context parameter in the redirection JSP filter.
90 days
maxFileSize Maximum amount of data, in KB, that can be posted back to the receiver in a single request. If the size of the posted data exceeds this limit, the request is rejected and any data already written to the hard drive is deleted.
100
maxOutputFiles Maximum number of output files that can be present in XML OutputDir.
100
outputDir Directory to which CSA configuration xml files will be written. Both the applet page and the receiver page must read this parameter, and this parameter must be identical for both pages.
By default, the output files are written into the "csa_results" subdirectory of the application root directory (if the application root directory exists, and if the subdirectory exists or can be created). Using the default value for this parameter is not recommended.
Table 17–1 (Cont.) Configuration Parameters
Parameter Description Default Value

Collecting Client Configurations
17-14 Oracle Enterprise Manager Advanced Configuration
In addition to these parameters, the CSA redirection parameters can also be configured. Redirection can be enabled either by using a servlet filter or by including a CSA redirection JSP file in some other page. The following context parameters must be available for the redirection to work.
outputEnabled Enables or disables creation of output XML files. Applicable to both applet and receiver pages.
By default, the XML files are created and stored in the XMLOutputDir.
pluginspage Used to direct the user to the JVM installer under Netscape, since Netscape does not support automatic installation. Applicable only if JVM is Jinitiator. Default for Sun is http://java.sun.com/products/plugin/index.html#download
none - This field must be set if JVM is set to "JInitiator" and is ignored otherwise.
receiver The URL to which the applet should post the collected data.
Note: When setting this parameter, the administrator must ensure that the version of the receiver is the same as the version of the applet.
Default is to look for "CSAr.jsp" in the same path as the CSA JSP page
ruleFile Specifies the path on the server, relative to the web application root, of the file that contains the rules to be evaluated.
rules.xml
script Specifies a script, provided by the administrator, which can be run on the CSA XML file before it is marked for upload by the agent.
none - If no script is specified, no script will be run.
type The type field for the OBJECT tag rendered by the CSA JSP page to deploy the applet. This is only applicable if the JVM is set to JInitiator. If the JVM is set to Sun, the type is application/x-java-applet.
none - this field must be set if JVM is set to "JInitiator," and is ignored otherwise
viewData If set to true, this parameters allows the end-user to view the collected data after it is posted to the server.
false
Table 17–2 Configuration Parameters
Parameter Name Description Default Value
csaURL The URL of the CSA JSP page to which the user should be redirected.
No default: This value must be set or redirection cannot work.
execInterval The interval, in seconds, between executions of CSA. If the difference between the cookie's age and the current server time is greater than execInterval, the user is re-directed.
None. If the execInterval is not set, then the user is only redirected if there is a CSA cookie.
redirectURL The URL to which the user should be directed after CSA has executed
None.
If this parameter is not set, the user is directed back to the originally requested page
UIMode 0 - synchronous (in the current browser window)
1 - asynchronous visible
2 - asynchronous invisible
synchronous
Table 17–1 (Cont.) Configuration Parameters
Parameter Description Default Value
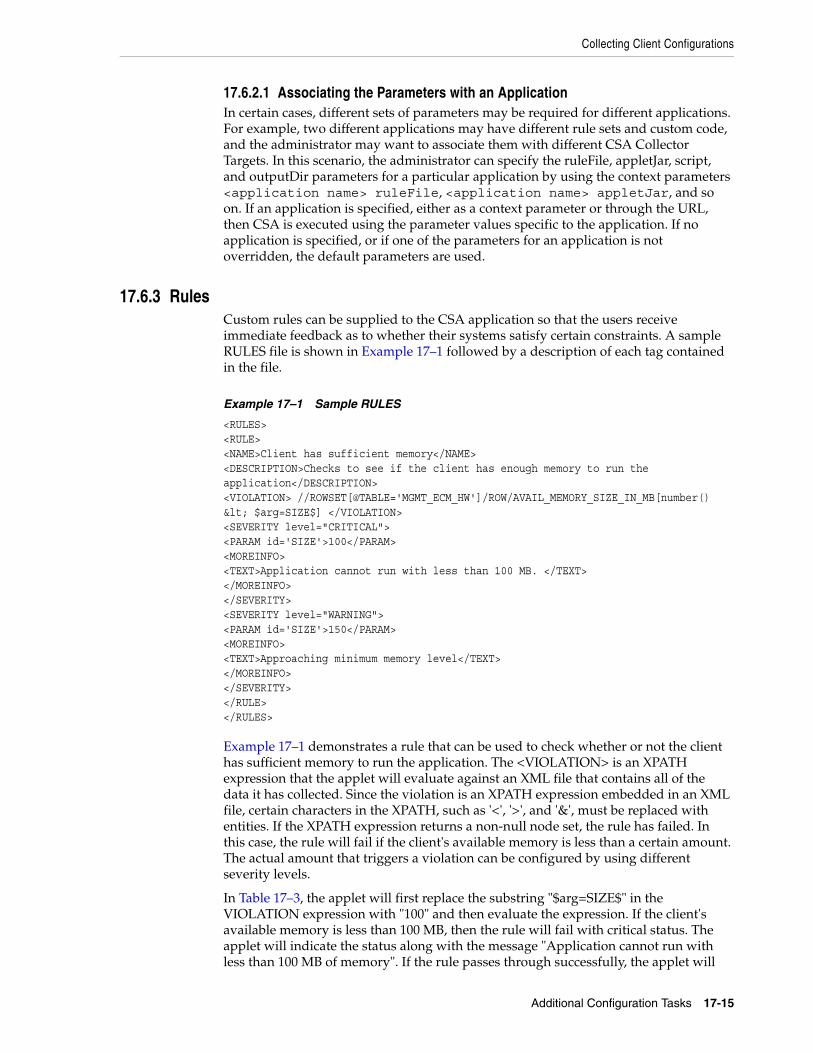
Collecting Client Configurations
Additional Configuration Tasks 17-15
17.6.2.1 Associating the Parameters with an ApplicationIn certain cases, different sets of parameters may be required for different applications. For example, two different applications may have different rule sets and custom code, and the administrator may want to associate them with different CSA Collector Targets. In this scenario, the administrator can specify the ruleFile, appletJar, script, and outputDir parameters for a particular application by using the context parameters <application name> ruleFile, <application name> appletJar, and so on. If an application is specified, either as a context parameter or through the URL, then CSA is executed using the parameter values specific to the application. If no application is specified, or if one of the parameters for an application is not overridden, the default parameters are used.
17.6.3 RulesCustom rules can be supplied to the CSA application so that the users receive immediate feedback as to whether their systems satisfy certain constraints. A sample RULES file is shown in Example 17–1 followed by a description of each tag contained in the file.
Example 17–1 Sample RULES
<RULES><RULE><NAME>Client has sufficient memory</NAME><DESCRIPTION>Checks to see if the client has enough memory to run the application</DESCRIPTION><VIOLATION> //ROWSET[@TABLE='MGMT_ECM_HW']/ROW/AVAIL_MEMORY_SIZE_IN_MB[number() < $arg=SIZE$] </VIOLATION><SEVERITY level="CRITICAL"><PARAM id='SIZE'>100</PARAM><MOREINFO><TEXT>Application cannot run with less than 100 MB. </TEXT></MOREINFO></SEVERITY><SEVERITY level="WARNING"><PARAM id='SIZE'>150</PARAM><MOREINFO><TEXT>Approaching minimum memory level</TEXT></MOREINFO></SEVERITY></RULE></RULES>
Example 17–1 demonstrates a rule that can be used to check whether or not the client has sufficient memory to run the application. The <VIOLATION> is an XPATH expression that the applet will evaluate against an XML file that contains all of the data it has collected. Since the violation is an XPATH expression embedded in an XML file, certain characters in the XPATH, such as '<', '>', and '&', must be replaced with entities. If the XPATH expression returns a non-null node set, the rule has failed. In this case, the rule will fail if the client's available memory is less than a certain amount. The actual amount that triggers a violation can be configured by using different severity levels.
In Table 17–3, the applet will first replace the substring "$arg=SIZE$" in the VIOLATION expression with "100" and then evaluate the expression. If the client's available memory is less than 100 MB, then the rule will fail with critical status. The applet will indicate the status along with the message "Application cannot run with less than 100 MB of memory". If the rule passes through successfully, the applet will
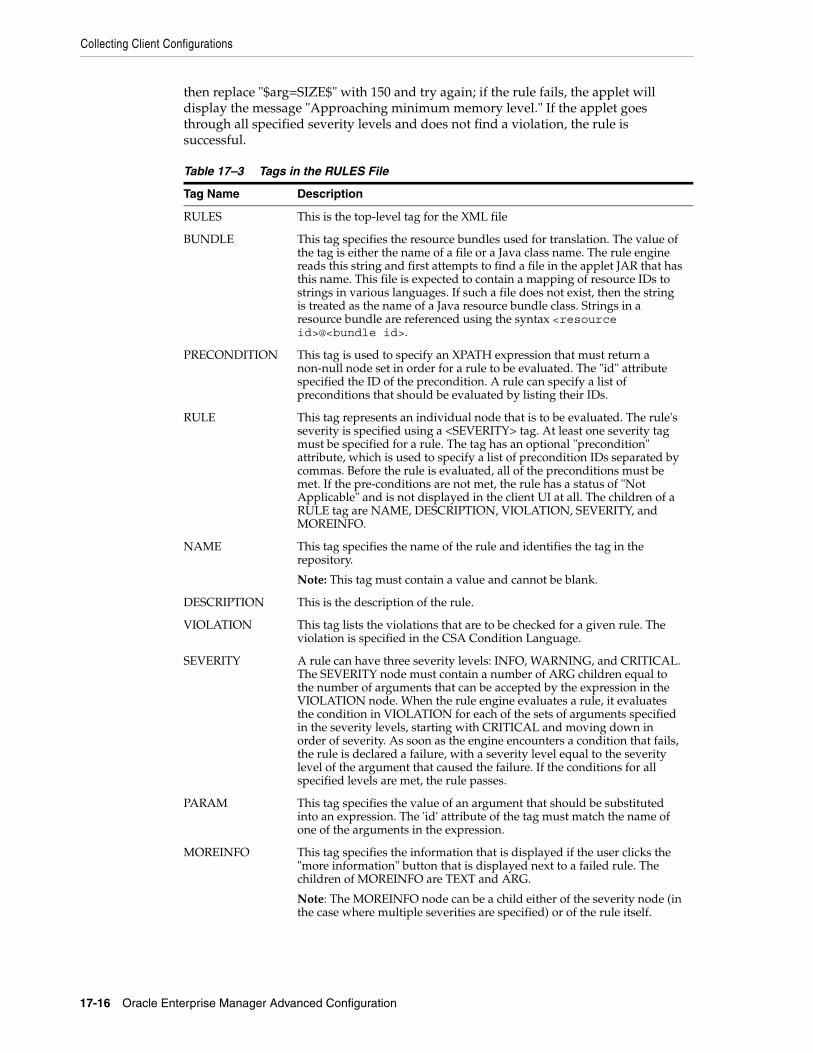
Collecting Client Configurations
17-16 Oracle Enterprise Manager Advanced Configuration
then replace "$arg=SIZE$" with 150 and try again; if the rule fails, the applet will display the message "Approaching minimum memory level." If the applet goes through all specified severity levels and does not find a violation, the rule is successful.
Table 17–3 Tags in the RULES File
Tag Name Description
RULES This is the top-level tag for the XML file
BUNDLE This tag specifies the resource bundles used for translation. The value of the tag is either the name of a file or a Java class name. The rule engine reads this string and first attempts to find a file in the applet JAR that has this name. This file is expected to contain a mapping of resource IDs to strings in various languages. If such a file does not exist, then the string is treated as the name of a Java resource bundle class. Strings in a resource bundle are referenced using the syntax <resource id>@<bundle id>.
PRECONDITION This tag is used to specify an XPATH expression that must return a non-null node set in order for a rule to be evaluated. The "id" attribute specified the ID of the precondition. A rule can specify a list of preconditions that should be evaluated by listing their IDs.
RULE This tag represents an individual node that is to be evaluated. The rule's severity is specified using a <SEVERITY> tag. At least one severity tag must be specified for a rule. The tag has an optional "precondition" attribute, which is used to specify a list of precondition IDs separated by commas. Before the rule is evaluated, all of the preconditions must be met. If the pre-conditions are not met, the rule has a status of "Not Applicable" and is not displayed in the client UI at all. The children of a RULE tag are NAME, DESCRIPTION, VIOLATION, SEVERITY, and MOREINFO.
NAME This tag specifies the name of the rule and identifies the tag in the repository.
Note: This tag must contain a value and cannot be blank.
DESCRIPTION This is the description of the rule.
VIOLATION This tag lists the violations that are to be checked for a given rule. The violation is specified in the CSA Condition Language.
SEVERITY A rule can have three severity levels: INFO, WARNING, and CRITICAL. The SEVERITY node must contain a number of ARG children equal to the number of arguments that can be accepted by the expression in the VIOLATION node. When the rule engine evaluates a rule, it evaluates the condition in VIOLATION for each of the sets of arguments specified in the severity levels, starting with CRITICAL and moving down in order of severity. As soon as the engine encounters a condition that fails, the rule is declared a failure, with a severity level equal to the severity level of the argument that caused the failure. If the conditions for all specified levels are met, the rule passes.
PARAM This tag specifies the value of an argument that should be substituted into an expression. The 'id' attribute of the tag must match the name of one of the arguments in the expression.
MOREINFO This tag specifies the information that is displayed if the user clicks the "more information" button that is displayed next to a failed rule. The children of MOREINFO are TEXT and ARG.
Note: The MOREINFO node can be a child either of the severity node (in the case where multiple severities are specified) or of the rule itself.
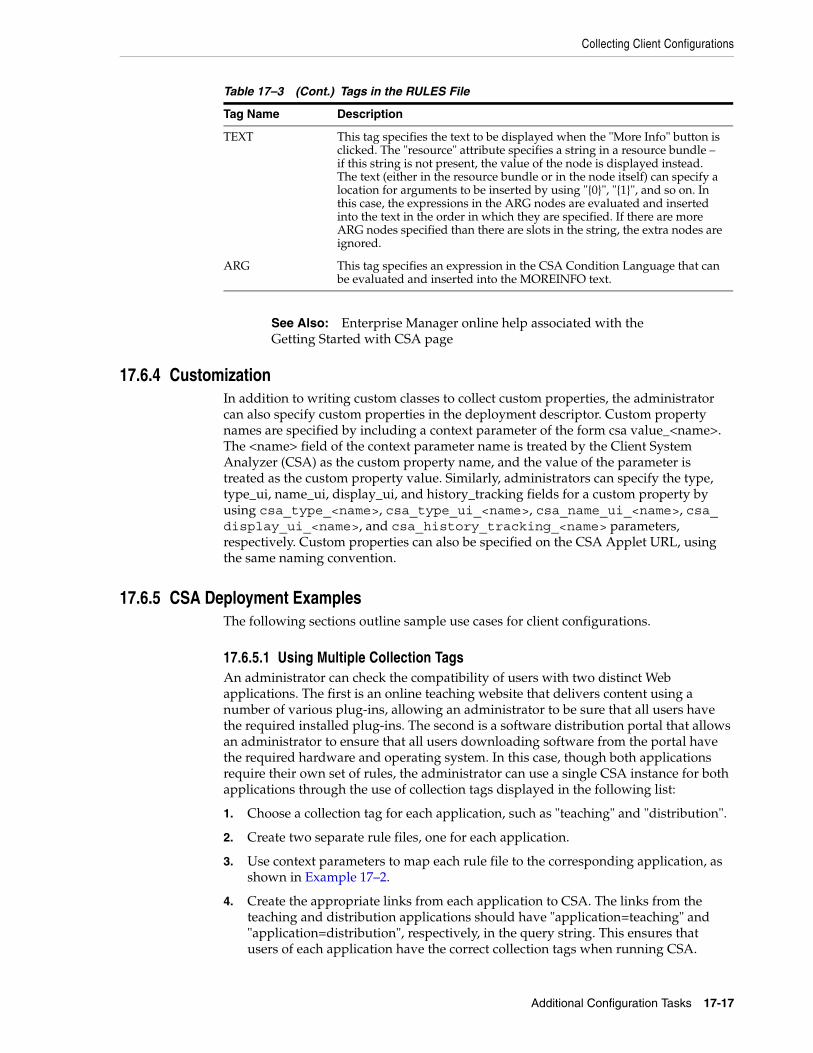
Collecting Client Configurations
Additional Configuration Tasks 17-17
17.6.4 CustomizationIn addition to writing custom classes to collect custom properties, the administrator can also specify custom properties in the deployment descriptor. Custom property names are specified by including a context parameter of the form csa value_<name>. The <name> field of the context parameter name is treated by the Client System Analyzer (CSA) as the custom property name, and the value of the parameter is treated as the custom property value. Similarly, administrators can specify the type, type_ui, name_ui, display_ui, and history_tracking fields for a custom property by using csa_type_<name>, csa_type_ui_<name>, csa_name_ui_<name>, csa_display_ui_<name>, and csa_history_tracking_<name> parameters, respectively. Custom properties can also be specified on the CSA Applet URL, using the same naming convention.
17.6.5 CSA Deployment ExamplesThe following sections outline sample use cases for client configurations.
17.6.5.1 Using Multiple Collection TagsAn administrator can check the compatibility of users with two distinct Web applications. The first is an online teaching website that delivers content using a number of various plug-ins, allowing an administrator to be sure that all users have the required installed plug-ins. The second is a software distribution portal that allows an administrator to ensure that all users downloading software from the portal have the required hardware and operating system. In this case, though both applications require their own set of rules, the administrator can use a single CSA instance for both applications through the use of collection tags displayed in the following list:
1. Choose a collection tag for each application, such as "teaching" and "distribution".
2. Create two separate rule files, one for each application.
3. Use context parameters to map each rule file to the corresponding application, as shown in Example 17–2.
4. Create the appropriate links from each application to CSA. The links from the teaching and distribution applications should have "application=teaching" and "application=distribution", respectively, in the query string. This ensures that users of each application have the correct collection tags when running CSA.
TEXT This tag specifies the text to be displayed when the "More Info" button is clicked. The "resource" attribute specifies a string in a resource bundle – if this string is not present, the value of the node is displayed instead. The text (either in the resource bundle or in the node itself) can specify a location for arguments to be inserted by using "{0}", "{1}", and so on. In this case, the expressions in the ARG nodes are evaluated and inserted into the text in the order in which they are specified. If there are more ARG nodes specified than there are slots in the string, the extra nodes are ignored.
ARG This tag specifies an expression in the CSA Condition Language that can be evaluated and inserted into the MOREINFO text.
See Also: Enterprise Manager online help associated with the Getting Started with CSA page
Table 17–3 (Cont.) Tags in the RULES File
Tag Name Description
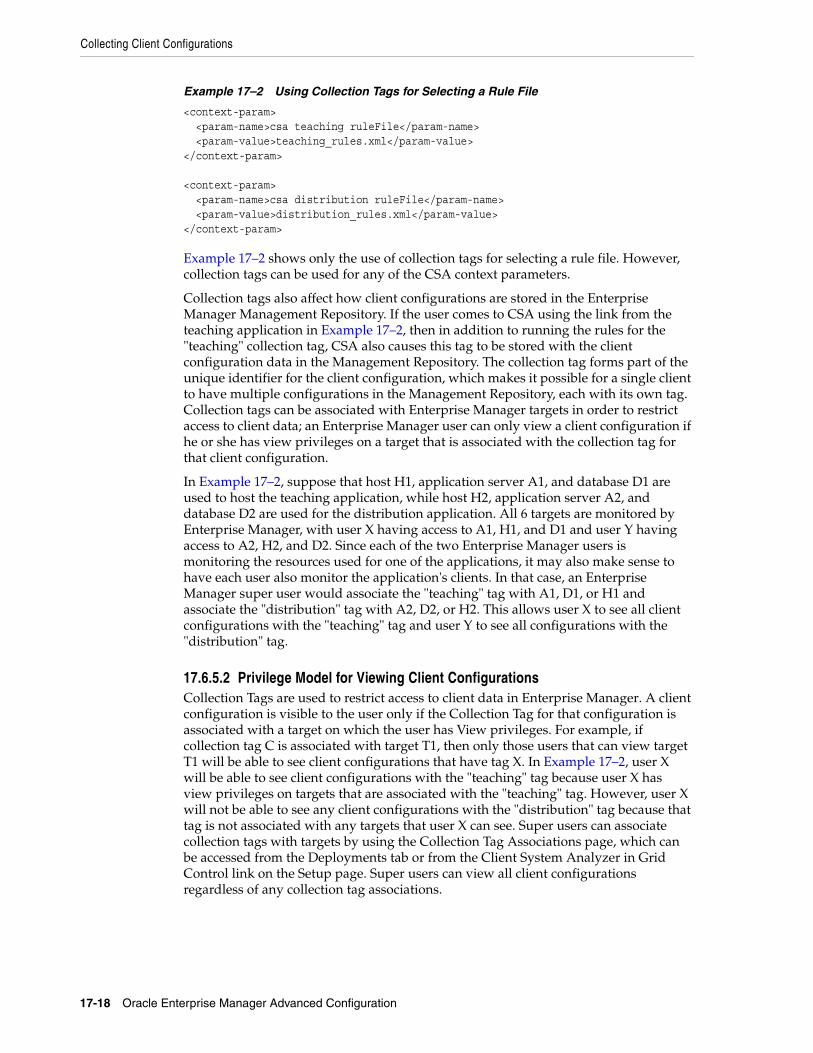
Collecting Client Configurations
17-18 Oracle Enterprise Manager Advanced Configuration
Example 17–2 Using Collection Tags for Selecting a Rule File
<context-param> <param-name>csa teaching ruleFile</param-name> <param-value>teaching_rules.xml</param-value></context-param> <context-param> <param-name>csa distribution ruleFile</param-name> <param-value>distribution_rules.xml</param-value></context-param>
Example 17–2 shows only the use of collection tags for selecting a rule file. However, collection tags can be used for any of the CSA context parameters.
Collection tags also affect how client configurations are stored in the Enterprise Manager Management Repository. If the user comes to CSA using the link from the teaching application in Example 17–2, then in addition to running the rules for the "teaching" collection tag, CSA also causes this tag to be stored with the client configuration data in the Management Repository. The collection tag forms part of the unique identifier for the client configuration, which makes it possible for a single client to have multiple configurations in the Management Repository, each with its own tag. Collection tags can be associated with Enterprise Manager targets in order to restrict access to client data; an Enterprise Manager user can only view a client configuration if he or she has view privileges on a target that is associated with the collection tag for that client configuration.
In Example 17–2, suppose that host H1, application server A1, and database D1 are used to host the teaching application, while host H2, application server A2, and database D2 are used for the distribution application. All 6 targets are monitored by Enterprise Manager, with user X having access to A1, H1, and D1 and user Y having access to A2, H2, and D2. Since each of the two Enterprise Manager users is monitoring the resources used for one of the applications, it may also make sense to have each user also monitor the application's clients. In that case, an Enterprise Manager super user would associate the "teaching" tag with A1, D1, or H1 and associate the "distribution" tag with A2, D2, or H2. This allows user X to see all client configurations with the "teaching" tag and user Y to see all configurations with the "distribution" tag.
17.6.5.2 Privilege Model for Viewing Client ConfigurationsCollection Tags are used to restrict access to client data in Enterprise Manager. A client configuration is visible to the user only if the Collection Tag for that configuration is associated with a target on which the user has View privileges. For example, if collection tag C is associated with target T1, then only those users that can view target T1 will be able to see client configurations that have tag X. In Example 17–2, user X will be able to see client configurations with the "teaching" tag because user X has view privileges on targets that are associated with the "teaching" tag. However, user X will not be able to see any client configurations with the "distribution" tag because that tag is not associated with any targets that user X can see. Super users can associate collection tags with targets by using the Collection Tag Associations page, which can be accessed from the Deployments tab or from the Client System Analyzer in Grid Control link on the Setup page. Super users can view all client configurations regardless of any collection tag associations.
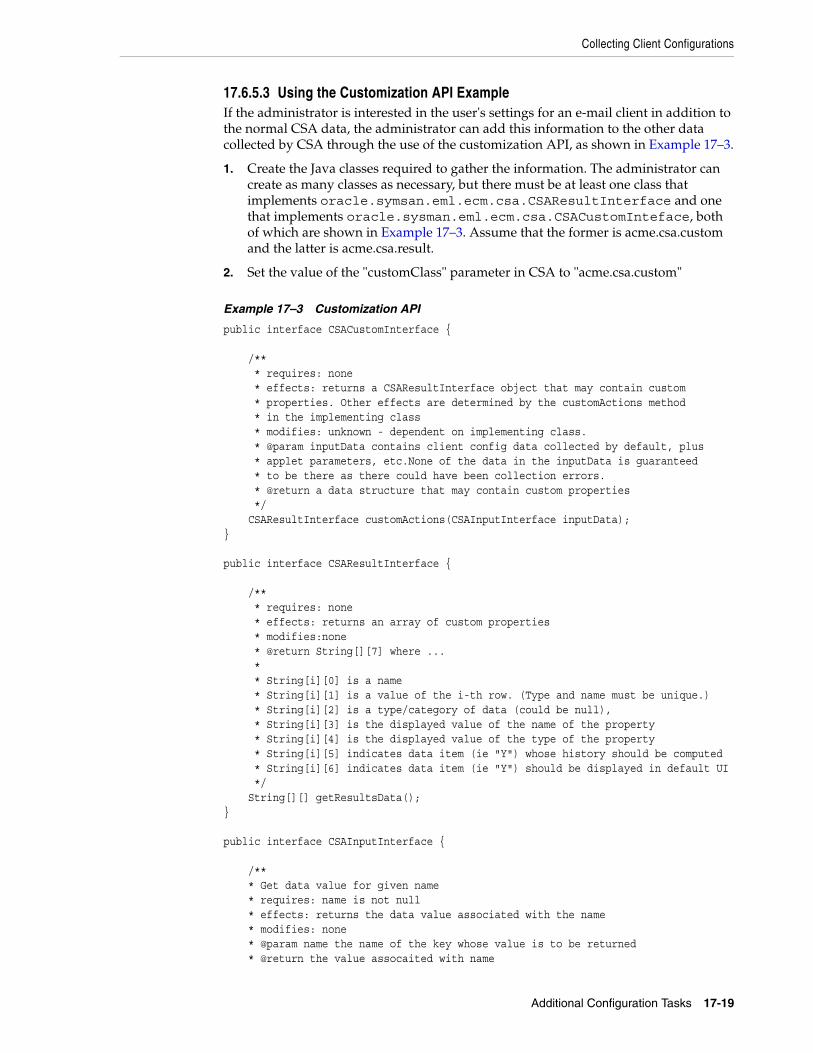
Collecting Client Configurations
Additional Configuration Tasks 17-19
17.6.5.3 Using the Customization API ExampleIf the administrator is interested in the user's settings for an e-mail client in addition to the normal CSA data, the administrator can add this information to the other data collected by CSA through the use of the customization API, as shown in Example 17–3.
1. Create the Java classes required to gather the information. The administrator can create as many classes as necessary, but there must be at least one class that implements oracle.symsan.eml.ecm.csa.CSAResultInterface and one that implements oracle.sysman.eml.ecm.csa.CSACustomInteface, both of which are shown in Example 17–3. Assume that the former is acme.csa.custom and the latter is acme.csa.result.
2. Set the value of the "customClass" parameter in CSA to "acme.csa.custom"
Example 17–3 Customization API
public interface CSACustomInterface { /** * requires: none * effects: returns a CSAResultInterface object that may contain custom * properties. Other effects are determined by the customActions method * in the implementing class * modifies: unknown - dependent on implementing class. * @param inputData contains client config data collected by default, plus * applet parameters, etc.None of the data in the inputData is guaranteed * to be there as there could have been collection errors. * @return a data structure that may contain custom properties */ CSAResultInterface customActions(CSAInputInterface inputData);} public interface CSAResultInterface { /** * requires: none * effects: returns an array of custom properties * modifies:none * @return String[][7] where ... * * String[i][0] is a name * String[i][1] is a value of the i-th row. (Type and name must be unique.) * String[i][2] is a type/category of data (could be null), * String[i][3] is the displayed value of the name of the property * String[i][4] is the displayed value of the type of the property * String[i][5] indicates data item (ie "Y") whose history should be computed * String[i][6] indicates data item (ie "Y") should be displayed in default UI */ String[][] getResultsData();} public interface CSAInputInterface { /** * Get data value for given name * requires: name is not null * effects: returns the data value associated with the name * modifies: none * @param name the name of the key whose value is to be returned * @return the value assocaited with name
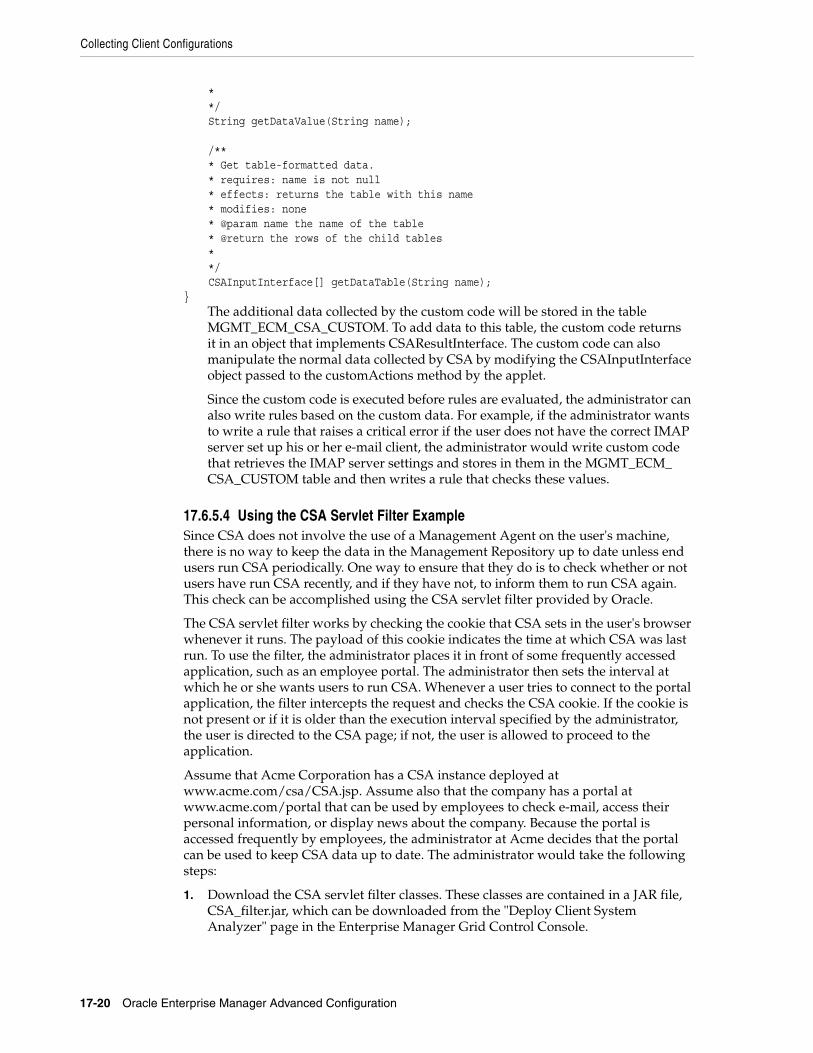
Collecting Client Configurations
17-20 Oracle Enterprise Manager Advanced Configuration
* */ String getDataValue(String name); /** * Get table-formatted data. * requires: name is not null * effects: returns the table with this name * modifies: none * @param name the name of the table * @return the rows of the child tables * */ CSAInputInterface[] getDataTable(String name);}
The additional data collected by the custom code will be stored in the table MGMT_ECM_CSA_CUSTOM. To add data to this table, the custom code returns it in an object that implements CSAResultInterface. The custom code can also manipulate the normal data collected by CSA by modifying the CSAInputInterface object passed to the customActions method by the applet.
Since the custom code is executed before rules are evaluated, the administrator can also write rules based on the custom data. For example, if the administrator wants to write a rule that raises a critical error if the user does not have the correct IMAP server set up his or her e-mail client, the administrator would write custom code that retrieves the IMAP server settings and stores in them in the MGMT_ECM_CSA_CUSTOM table and then writes a rule that checks these values.
17.6.5.4 Using the CSA Servlet Filter ExampleSince CSA does not involve the use of a Management Agent on the user's machine, there is no way to keep the data in the Management Repository up to date unless end users run CSA periodically. One way to ensure that they do is to check whether or not users have run CSA recently, and if they have not, to inform them to run CSA again. This check can be accomplished using the CSA servlet filter provided by Oracle.
The CSA servlet filter works by checking the cookie that CSA sets in the user's browser whenever it runs. The payload of this cookie indicates the time at which CSA was last run. To use the filter, the administrator places it in front of some frequently accessed application, such as an employee portal. The administrator then sets the interval at which he or she wants users to run CSA. Whenever a user tries to connect to the portal application, the filter intercepts the request and checks the CSA cookie. If the cookie is not present or if it is older than the execution interval specified by the administrator, the user is directed to the CSA page; if not, the user is allowed to proceed to the application.
Assume that Acme Corporation has a CSA instance deployed at www.acme.com/csa/CSA.jsp. Assume also that the company has a portal at www.acme.com/portal that can be used by employees to check e-mail, access their personal information, or display news about the company. Because the portal is accessed frequently by employees, the administrator at Acme decides that the portal can be used to keep CSA data up to date. The administrator would take the following steps:
1. Download the CSA servlet filter classes. These classes are contained in a JAR file, CSA_filter.jar, which can be downloaded from the "Deploy Client System Analyzer" page in the Enterprise Manager Grid Control Console.
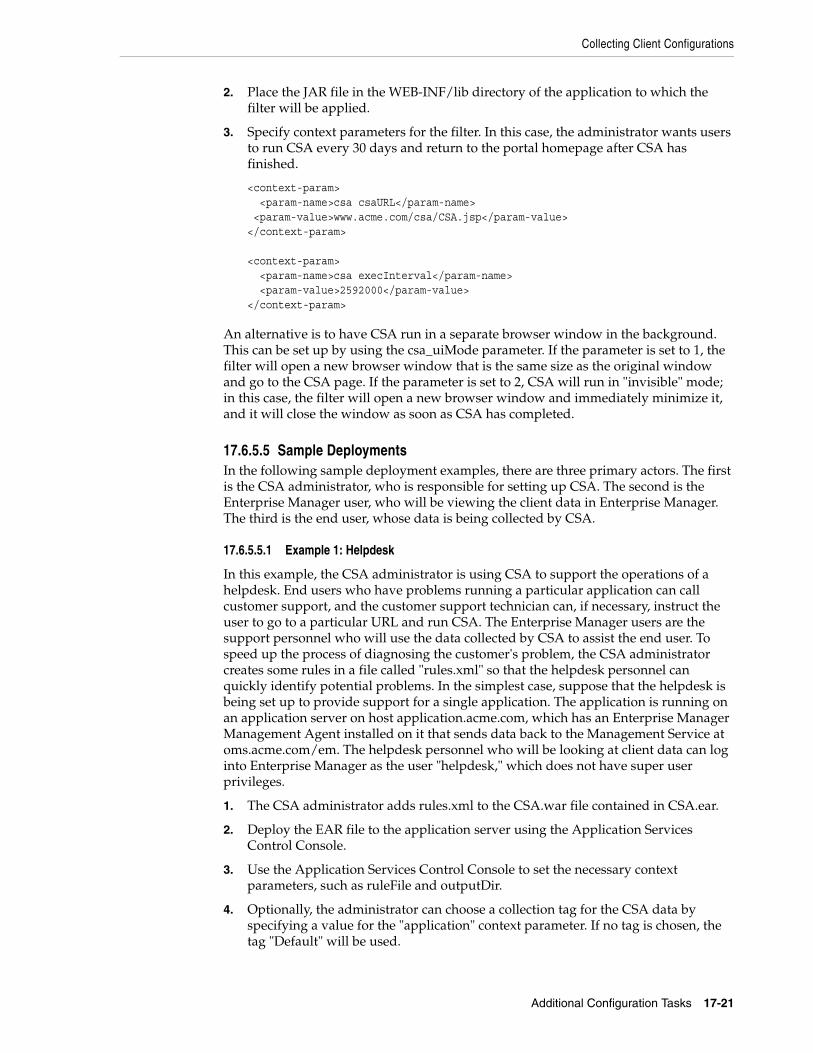
Collecting Client Configurations
Additional Configuration Tasks 17-21
2. Place the JAR file in the WEB-INF/lib directory of the application to which the filter will be applied.
3. Specify context parameters for the filter. In this case, the administrator wants users to run CSA every 30 days and return to the portal homepage after CSA has finished.
<context-param> <param-name>csa csaURL</param-name> <param-value>www.acme.com/csa/CSA.jsp</param-value></context-param> <context-param> <param-name>csa execInterval</param-name> <param-value>2592000</param-value></context-param>
An alternative is to have CSA run in a separate browser window in the background. This can be set up by using the csa_uiMode parameter. If the parameter is set to 1, the filter will open a new browser window that is the same size as the original window and go to the CSA page. If the parameter is set to 2, CSA will run in "invisible" mode; in this case, the filter will open a new browser window and immediately minimize it, and it will close the window as soon as CSA has completed.
17.6.5.5 Sample DeploymentsIn the following sample deployment examples, there are three primary actors. The first is the CSA administrator, who is responsible for setting up CSA. The second is the Enterprise Manager user, who will be viewing the client data in Enterprise Manager. The third is the end user, whose data is being collected by CSA.
17.6.5.5.1 Example 1: Helpdesk
In this example, the CSA administrator is using CSA to support the operations of a helpdesk. End users who have problems running a particular application can call customer support, and the customer support technician can, if necessary, instruct the user to go to a particular URL and run CSA. The Enterprise Manager users are the support personnel who will use the data collected by CSA to assist the end user. To speed up the process of diagnosing the customer's problem, the CSA administrator creates some rules in a file called "rules.xml" so that the helpdesk personnel can quickly identify potential problems. In the simplest case, suppose that the helpdesk is being set up to provide support for a single application. The application is running on an application server on host application.acme.com, which has an Enterprise Manager Management Agent installed on it that sends data back to the Management Service at oms.acme.com/em. The helpdesk personnel who will be looking at client data can log into Enterprise Manager as the user "helpdesk," which does not have super user privileges.
1. The CSA administrator adds rules.xml to the CSA.war file contained in CSA.ear.
2. Deploy the EAR file to the application server using the Application Services Control Console.
3. Use the Application Services Control Console to set the necessary context parameters, such as ruleFile and outputDir.
4. Optionally, the administrator can choose a collection tag for the CSA data by specifying a value for the "application" context parameter. If no tag is chosen, the tag "Default" will be used.
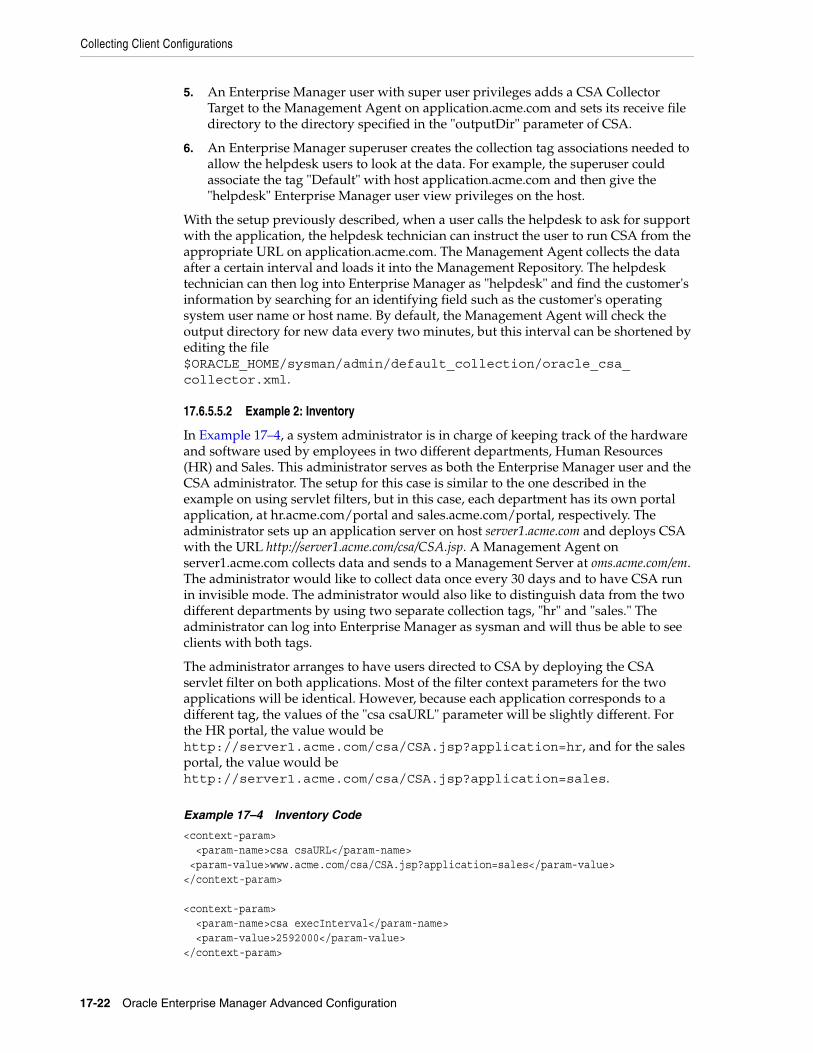
Collecting Client Configurations
17-22 Oracle Enterprise Manager Advanced Configuration
5. An Enterprise Manager user with super user privileges adds a CSA Collector Target to the Management Agent on application.acme.com and sets its receive file directory to the directory specified in the "outputDir" parameter of CSA.
6. An Enterprise Manager superuser creates the collection tag associations needed to allow the helpdesk users to look at the data. For example, the superuser could associate the tag "Default" with host application.acme.com and then give the "helpdesk" Enterprise Manager user view privileges on the host.
With the setup previously described, when a user calls the helpdesk to ask for support with the application, the helpdesk technician can instruct the user to run CSA from the appropriate URL on application.acme.com. The Management Agent collects the data after a certain interval and loads it into the Management Repository. The helpdesk technician can then log into Enterprise Manager as "helpdesk" and find the customer's information by searching for an identifying field such as the customer's operating system user name or host name. By default, the Management Agent will check the output directory for new data every two minutes, but this interval can be shortened by editing the file $ORACLE_HOME/sysman/admin/default_collection/oracle_csa_collector.xml.
17.6.5.5.2 Example 2: Inventory
In Example 17–4, a system administrator is in charge of keeping track of the hardware and software used by employees in two different departments, Human Resources (HR) and Sales. This administrator serves as both the Enterprise Manager user and the CSA administrator. The setup for this case is similar to the one described in the example on using servlet filters, but in this case, each department has its own portal application, at hr.acme.com/portal and sales.acme.com/portal, respectively. The administrator sets up an application server on host server1.acme.com and deploys CSA with the URL http://server1.acme.com/csa/CSA.jsp. A Management Agent on server1.acme.com collects data and sends to a Management Server at oms.acme.com/em. The administrator would like to collect data once every 30 days and to have CSA run in invisible mode. The administrator would also like to distinguish data from the two different departments by using two separate collection tags, "hr" and "sales." The administrator can log into Enterprise Manager as sysman and will thus be able to see clients with both tags.
The administrator arranges to have users directed to CSA by deploying the CSA servlet filter on both applications. Most of the filter context parameters for the two applications will be identical. However, because each application corresponds to a different tag, the values of the "csa csaURL" parameter will be slightly different. For the HR portal, the value would be http://server1.acme.com/csa/CSA.jsp?application=hr, and for the sales portal, the value would be http://server1.acme.com/csa/CSA.jsp?application=sales.
Example 17–4 Inventory Code
<context-param> <param-name>csa csaURL</param-name> <param-value>www.acme.com/csa/CSA.jsp?application=sales</param-value></context-param> <context-param> <param-name>csa execInterval</param-name> <param-value>2592000</param-value></context-param>
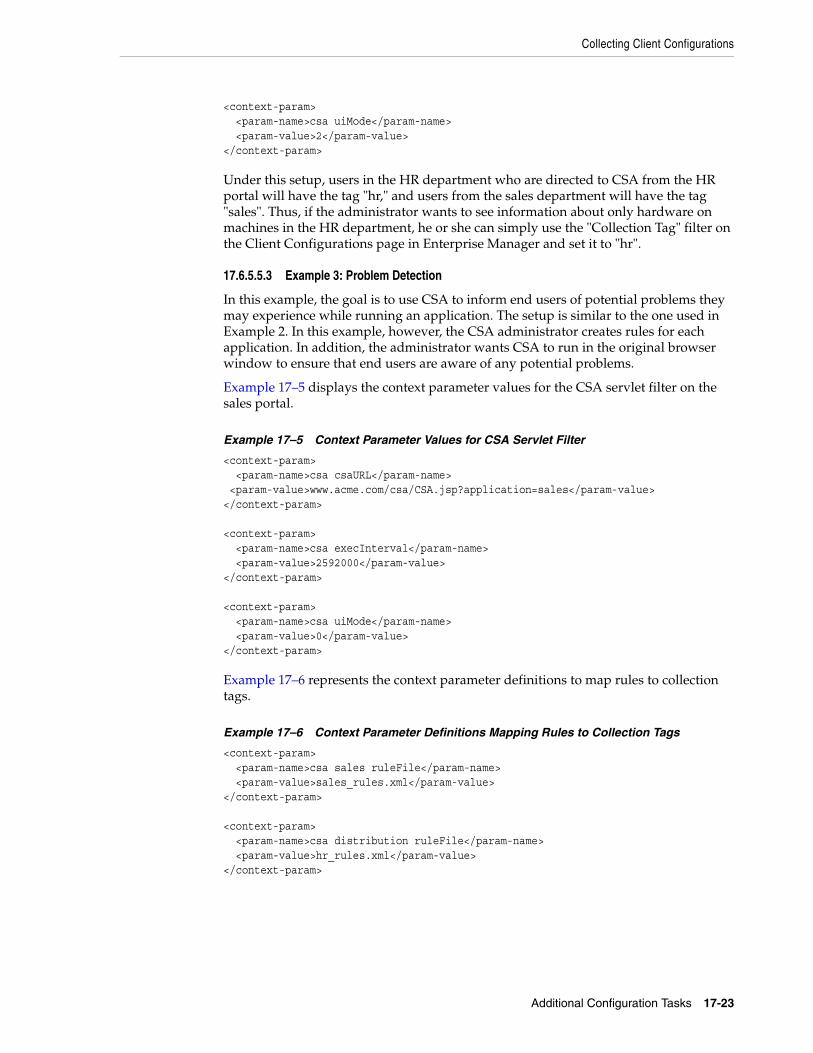
Collecting Client Configurations
Additional Configuration Tasks 17-23
<context-param> <param-name>csa uiMode</param-name> <param-value>2</param-value></context-param>
Under this setup, users in the HR department who are directed to CSA from the HR portal will have the tag "hr," and users from the sales department will have the tag "sales". Thus, if the administrator wants to see information about only hardware on machines in the HR department, he or she can simply use the "Collection Tag" filter on the Client Configurations page in Enterprise Manager and set it to "hr".
17.6.5.5.3 Example 3: Problem Detection
In this example, the goal is to use CSA to inform end users of potential problems they may experience while running an application. The setup is similar to the one used in Example 2. In this example, however, the CSA administrator creates rules for each application. In addition, the administrator wants CSA to run in the original browser window to ensure that end users are aware of any potential problems.
Example 17–5 displays the context parameter values for the CSA servlet filter on the sales portal.
Example 17–5 Context Parameter Values for CSA Servlet Filter
<context-param> <param-name>csa csaURL</param-name> <param-value>www.acme.com/csa/CSA.jsp?application=sales</param-value></context-param> <context-param> <param-name>csa execInterval</param-name> <param-value>2592000</param-value></context-param> <context-param> <param-name>csa uiMode</param-name> <param-value>0</param-value></context-param>
Example 17–6 represents the context parameter definitions to map rules to collection tags.
Example 17–6 Context Parameter Definitions Mapping Rules to Collection Tags
<context-param> <param-name>csa sales ruleFile</param-name> <param-value>sales_rules.xml</param-value></context-param> <context-param> <param-name>csa distribution ruleFile</param-name> <param-value>hr_rules.xml</param-value></context-param>
Setting Up and Configuring a Software Library With Oracle Enterprise Manager
17-24 Oracle Enterprise Manager Advanced Configuration
17.7 Setting Up and Configuring a Software Library With Oracle Enterprise Manager
The following sections describe how to set up and configure a software library using Oracle Enterprise Manager.
17.7.1 Setting Up a Software LibraryThe software library should be located in a directory accessible by all Oracle Management Servers (OMS). If there is only one OMS, the directory can be local. For multiple OMS environments, the directory can ge on a Network File Server accessible from all Oracle Management Servers. You should ensure that there is sufficient space available on the shared storage to store file that hold the binary data for all of the components.
If you create operating system components, TAR files containing all the RPMs for a Linux installation will be stored in the software library. If you create Oracle database components, TAR files containing all the files from a reference Oracle home directory or contents from the installable media will be stored in the software library.
You should ensure that the shared storage is accessible through NFS mount points to all Oracle Management Servers in the environment.
17.7.2 Configuring a Software LibraryThe graphical user interface of the Provisioning application shows various tabs for Components, Directives, and Images. You can access all of the tabs depending on the privileges assigned to you. For example, if you have superuser privileges, you can access the Administration tab. The Administration tab contains different sections that you can use to configure various elements in the environment.
To configure a software library, follow these steps:
1. In the Software Library Configuration section of the Administration tab of the Provisioning application, press the Add button.
2. On the Add Software Library Location page, enter the directory location of the software library you are creating and then click OK.
17.7.3 Deleting or Cleaning Up a Software LibraryTo delete the software library , select the software library from the Administration tab and click Remove to delete it.
To delete the components of a software library, select the components from the software library and choose Delete. This will remove the components. To clean up the delete components completely from the File System , you must run the following command:
<OMS HOME>/bin/purgeDeploymentLibrary <conn string> <username> <password> [-job <oms_host>
The options for this command are listed below:
<conn string> is of form: "jdbc:oracle:thin:@dbhost:dbport:sid" where dbhost, dbport and sid should be replaced appropriately
<username> is repository username
<password> is repository passwd
Configuring Privilege Delegation Providers
Additional Configuration Tasks 17-25
[-job <oms_host>] is optional; if provided a job would be submitted (schedule is immediate). The user can view the status of the job by navigating to the Jobs page on the Enterprise Manager console.
<oms_host> is OMS hostname
17.8 Configuring Privilege Delegation ProvidersA privilege delegation provider is defined as a program that allows a logged in user to perform an activity with the privileges of another user. Typically, the privileges that are granted to a specific user are administered centrally.
Enterprise Manager preferred credentials allow you to use two types of privilege delegation providers:
■ Sudo
Sudo allows a permitted user to execute a command as the super user or another user, as specified in the sudo user administration file (sudoers). If the invoking user is root or if the target user is the same as the invoking user, no password is required. Otherwise, sudo requires that users authenticate themselves with a password by default.
Sudo determines who is an authorized user by consulting the file /etc/sudoers file. Once a user has been authenticated, a timestamp is updated and the user may then use sudo without a password for a short period of time (5 minutes unless overridden in the sudoers file).
■ PowerBroker
Symark PowerBroker enables UNIX system administrators to specify the circumstances under which other users may run certain programs such as root (or other important accounts). The result is that responsibility for such actions as adding user accounts, fixing line printer queues, and so on, can be safely assigned to the appropriate people, without disclosing the root password. The full power of root is thus protected from potential misuse or abuse. For example, modifying databases or file permissions, or erasing disks.
Symark PowerBroker can access existing programs as well as its own set of utilities that execute common system administration tasks. Utilities being developed to run on top of Symark PowerBroker can manage passwords, accounts, backups, line printers, file ownership or removal, rebooting, logging people out, killing their programs, deciding who can log in to where from where, and so on. They can also provide TCP/IP, Load Balancer, cron, NIS, NFS, FTP, rlogin, and accounting subsystem management. Users can work from within a restricted shell or editor to access certain programs or files as root.
For additional information about Sudo or PowerBroker, see their respective product documentation.
Using Enterprise Manager’s command line interface (EM CLI), you can set/edit privilege delegation provider properties for a host. See the Oracle Enterprise Manager Command Line Interface guide for more information. See your privilege delegation provider documentation for detailed setup and configuration information.
Note: (In the default configuration, this is the user's password, not the root password.
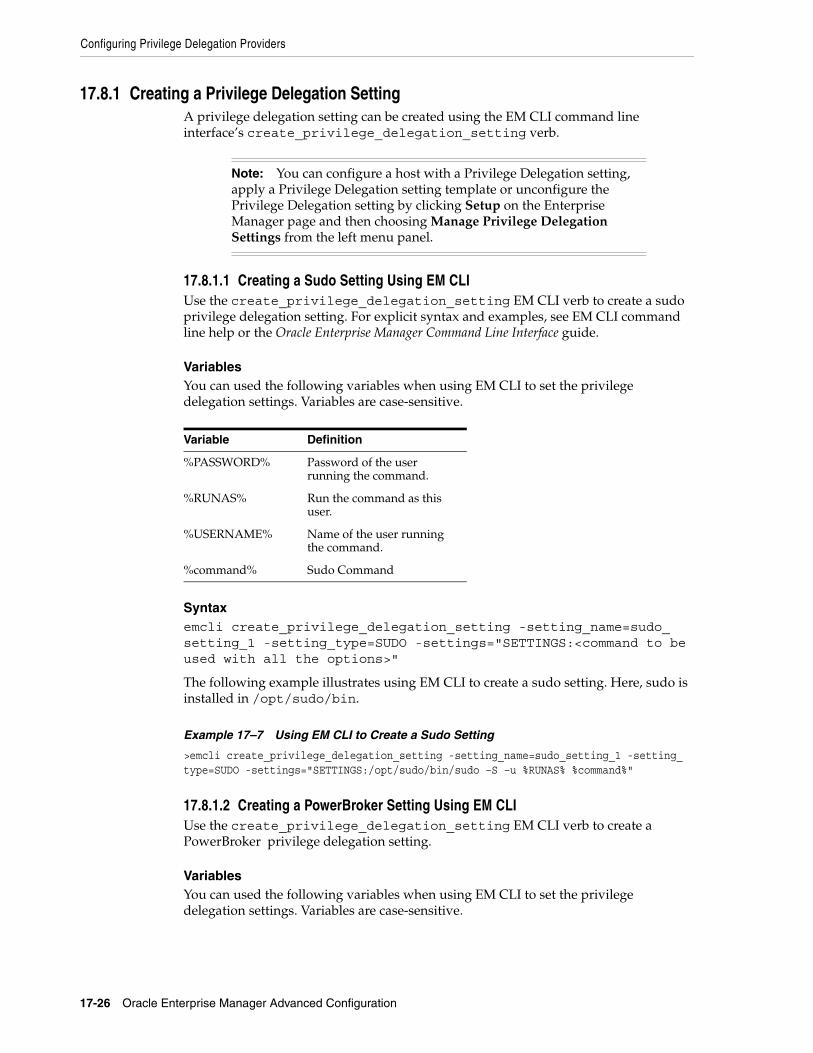
Configuring Privilege Delegation Providers
17-26 Oracle Enterprise Manager Advanced Configuration
17.8.1 Creating a Privilege Delegation SettingA privilege delegation setting can be created using the EM CLI command line interface’s create_privilege_delegation_setting verb.
17.8.1.1 Creating a Sudo Setting Using EM CLIUse the create_privilege_delegation_setting EM CLI verb to create a sudo privilege delegation setting. For explicit syntax and examples, see EM CLI command line help or the Oracle Enterprise Manager Command Line Interface guide.
VariablesYou can used the following variables when using EM CLI to set the privilege delegation settings. Variables are case-sensitive.
Syntaxemcli create_privilege_delegation_setting -setting_name=sudo_setting_1 -setting_type=SUDO -settings="SETTINGS:<command to be used with all the options>"
The following example illustrates using EM CLI to create a sudo setting. Here, sudo is installed in /opt/sudo/bin.
Example 17–7 Using EM CLI to Create a Sudo Setting
>emcli create_privilege_delegation_setting -setting_name=sudo_setting_1 -setting_type=SUDO -settings="SETTINGS:/opt/sudo/bin/sudo –S –u %RUNAS% %command%"
17.8.1.2 Creating a PowerBroker Setting Using EM CLIUse the create_privilege_delegation_setting EM CLI verb to create a PowerBroker privilege delegation setting.
VariablesYou can used the following variables when using EM CLI to set the privilege delegation settings. Variables are case-sensitive.
Note: You can configure a host with a Privilege Delegation setting, apply a Privilege Delegation setting template or unconfigure the Privilege Delegation setting by clicking Setup on the Enterprise Manager page and then choosing Manage Privilege Delegation Settings from the left menu panel.
Variable Definition
%PASSWORD% Password of the user running the command.
%RUNAS% Run the command as this user.
%USERNAME% Name of the user running the command.
%command% Sudo Command
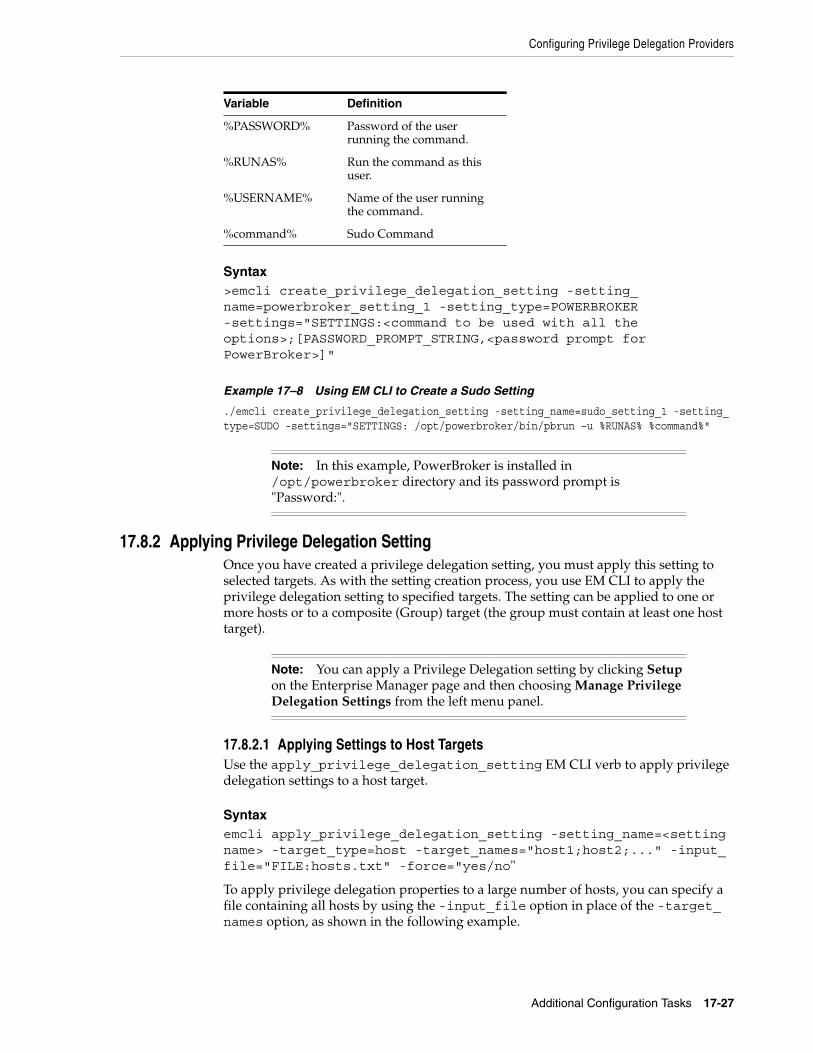
Configuring Privilege Delegation Providers
Additional Configuration Tasks 17-27
Syntax>emcli create_privilege_delegation_setting -setting_name=powerbroker_setting_1 -setting_type=POWERBROKER -settings="SETTINGS:<command to be used with all the options>;[PASSWORD_PROMPT_STRING,<password prompt for PowerBroker>]"
Example 17–8 Using EM CLI to Create a Sudo Setting
./emcli create_privilege_delegation_setting -setting_name=sudo_setting_1 -setting_type=SUDO -settings="SETTINGS: /opt/powerbroker/bin/pbrun –u %RUNAS% %command%"
17.8.2 Applying Privilege Delegation SettingOnce you have created a privilege delegation setting, you must apply this setting to selected targets. As with the setting creation process, you use EM CLI to apply the privilege delegation setting to specified targets. The setting can be applied to one or more hosts or to a composite (Group) target (the group must contain at least one host target).
17.8.2.1 Applying Settings to Host TargetsUse the apply_privilege_delegation_setting EM CLI verb to apply privilege delegation settings to a host target.
Syntaxemcli apply_privilege_delegation_setting -setting_name=<setting name> -target_type=host -target_names="host1;host2;..." -input_file="FILE:hosts.txt" -force="yes/no"
To apply privilege delegation properties to a large number of hosts, you can specify a file containing all hosts by using the -input_file option in place of the -target_names option, as shown in the following example.
Variable Definition
%PASSWORD% Password of the user running the command.
%RUNAS% Run the command as this user.
%USERNAME% Name of the user running the command.
%command% Sudo Command
Note: In this example, PowerBroker is installed in /opt/powerbroker directory and its password prompt is "Password:".
Note: You can apply a Privilege Delegation setting by clicking Setup on the Enterprise Manager page and then choosing Manage Privilege Delegation Settings from the left menu panel.
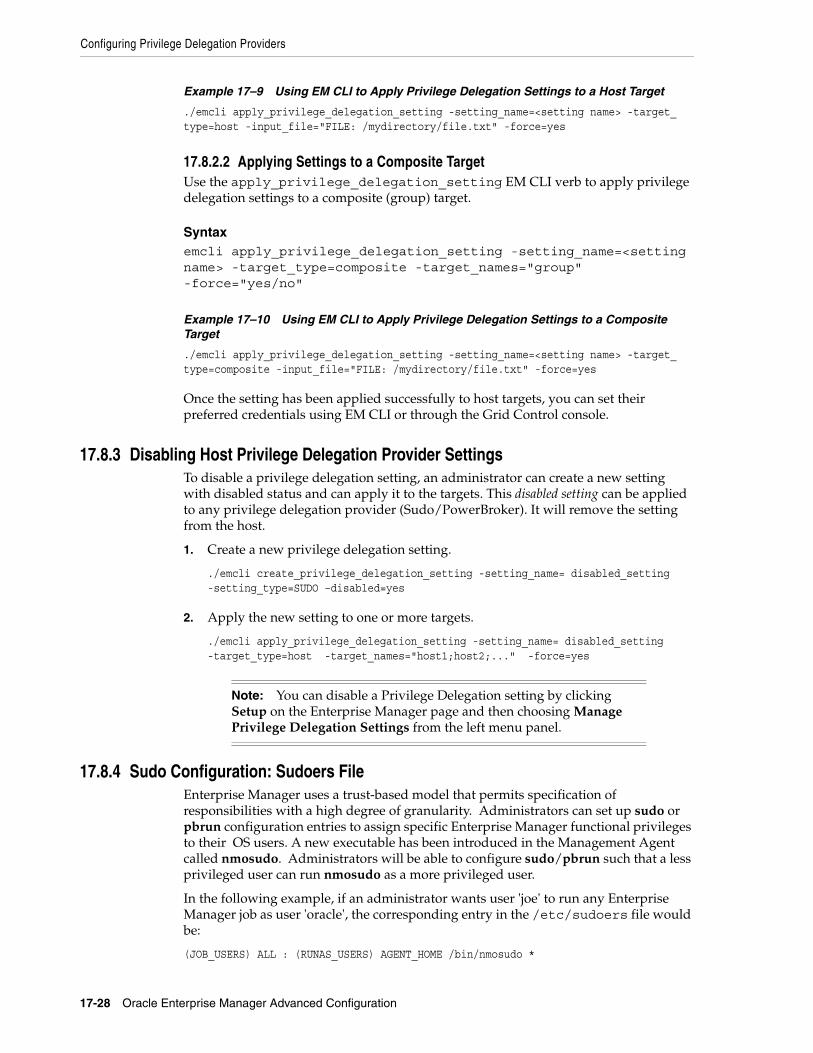
Configuring Privilege Delegation Providers
17-28 Oracle Enterprise Manager Advanced Configuration
Example 17–9 Using EM CLI to Apply Privilege Delegation Settings to a Host Target
./emcli apply_privilege_delegation_setting -setting_name=<setting name> -target_type=host -input_file="FILE: /mydirectory/file.txt" -force=yes
17.8.2.2 Applying Settings to a Composite TargetUse the apply_privilege_delegation_setting EM CLI verb to apply privilege delegation settings to a composite (group) target.
Syntaxemcli apply_privilege_delegation_setting -setting_name=<setting name> -target_type=composite -target_names="group" -force="yes/no"
Example 17–10 Using EM CLI to Apply Privilege Delegation Settings to a Composite Target
./emcli apply_privilege_delegation_setting -setting_name=<setting name> -target_type=composite -input_file="FILE: /mydirectory/file.txt" -force=yes
Once the setting has been applied successfully to host targets, you can set their preferred credentials using EM CLI or through the Grid Control console.
17.8.3 Disabling Host Privilege Delegation Provider SettingsTo disable a privilege delegation setting, an administrator can create a new setting with disabled status and can apply it to the targets. This disabled setting can be applied to any privilege delegation provider (Sudo/PowerBroker). It will remove the setting from the host.
1. Create a new privilege delegation setting.
./emcli create_privilege_delegation_setting -setting_name= disabled_setting -setting_type=SUDO –disabled=yes
2. Apply the new setting to one or more targets.
./emcli apply_privilege_delegation_setting -setting_name= disabled_setting -target_type=host -target_names="host1;host2;..." -force=yes
17.8.4 Sudo Configuration: Sudoers FileEnterprise Manager uses a trust-based model that permits specification of responsibilities with a high degree of granularity. Administrators can set up sudo or pbrun configuration entries to assign specific Enterprise Manager functional privileges to their OS users. A new executable has been introduced in the Management Agent called nmosudo. Administrators will be able to configure sudo/pbrun such that a less privileged user can run nmosudo as a more privileged user.
In the following example, if an administrator wants user 'joe' to run any Enterprise Manager job as user 'oracle', the corresponding entry in the /etc/sudoers file would be:
(JOB_USERS) ALL : (RUNAS_USERS) AGENT_HOME /bin/nmosudo *
Note: You can disable a Privilege Delegation setting by clicking Setup on the Enterprise Manager page and then choosing Manage Privilege Delegation Settings from the left menu panel.

Configuring Privilege Delegation Providers
Additional Configuration Tasks 17-29
Where 'joe' would be in the JOB_BACKUP_USERS list and 'oracle' would be in the RUNAS_USERS list.
Enterprise Manager will guarantee that the nmosudo executable will only honor requests to run remote operation requests from the OMS via the Agent. nmosudo will not run the remote operation if it cannot validate that the request came from the Agent. Thus, as shown in the example above, it will not be possible for user ’joe’ to invoke nmosudo directly from the command line and run a Perl script as user ’oracle’.
Note: To ensure system security, the administrator must provide the full path to the nmosudo executable.

Configuring Privilege Delegation Providers
17-30 Oracle Enterprise Manager Advanced Configuration
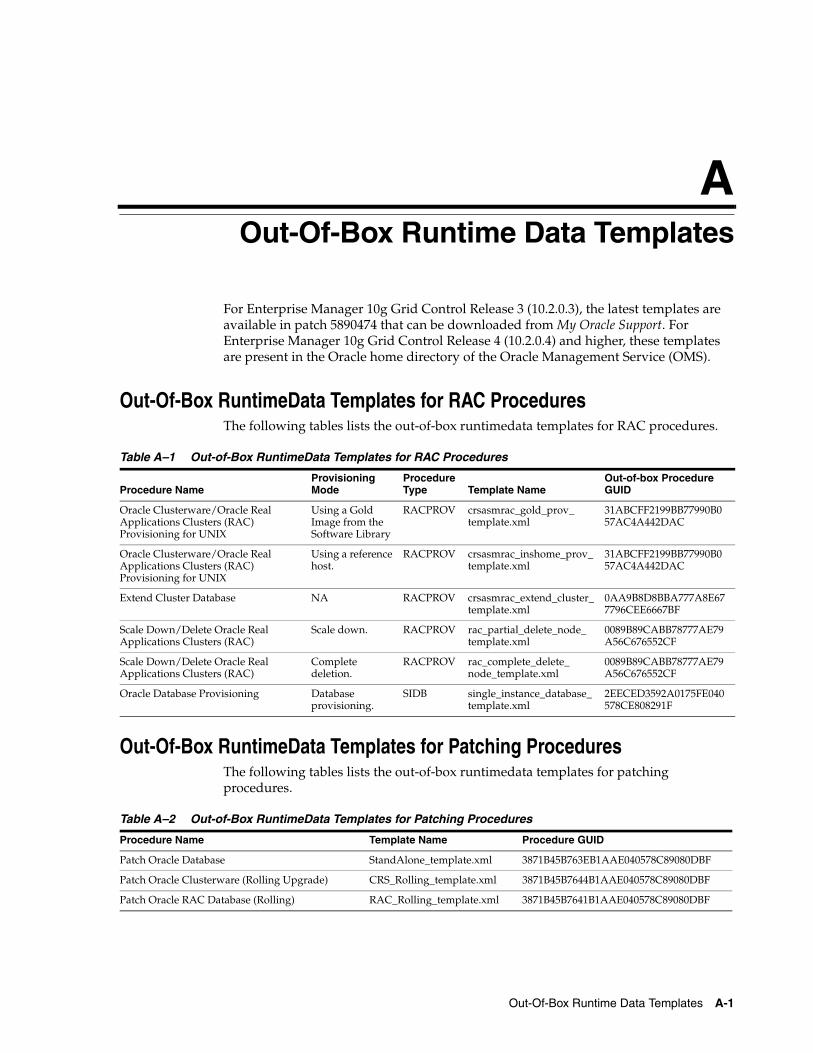
Out-Of-Box Runtime Data Templates A-1
AOut-Of-Box Runtime Data Templates
For Enterprise Manager 10g Grid Control Release 3 (10.2.0.3), the latest templates are available in patch 5890474 that can be downloaded from My Oracle Support. For Enterprise Manager 10g Grid Control Release 4 (10.2.0.4) and higher, these templates are present in the Oracle home directory of the Oracle Management Service (OMS).
Out-Of-Box RuntimeData Templates for RAC ProceduresThe following tables lists the out-of-box runtimedata templates for RAC procedures.
Out-Of-Box RuntimeData Templates for Patching ProceduresThe following tables lists the out-of-box runtimedata templates for patching procedures.
Table A–1 Out-of-Box RuntimeData Templates for RAC Procedures
Procedure NameProvisioning Mode
Procedure Type Template Name
Out-of-box Procedure GUID
Oracle Clusterware/Oracle Real Applications Clusters (RAC) Provisioning for UNIX
Using a Gold Image from the Software Library
RACPROV crsasmrac_gold_prov_template.xml
31ABCFF2199BB77990B057AC4A442DAC
Oracle Clusterware/Oracle Real Applications Clusters (RAC) Provisioning for UNIX
Using a reference host.
RACPROV crsasmrac_inshome_prov_template.xml
31ABCFF2199BB77990B057AC4A442DAC
Extend Cluster Database NA RACPROV crsasmrac_extend_cluster_template.xml
0AA9B8D8BBA777A8E677796CEE6667BF
Scale Down/Delete Oracle Real Applications Clusters (RAC)
Scale down. RACPROV rac_partial_delete_node_template.xml
0089B89CABB78777AE79A56C676552CF
Scale Down/Delete Oracle Real Applications Clusters (RAC)
Complete deletion.
RACPROV rac_complete_delete_node_template.xml
0089B89CABB78777AE79A56C676552CF
Oracle Database Provisioning Database provisioning.
SIDB single_instance_database_template.xml
2EECED3592A0175FE040578CE808291F
Table A–2 Out-of-Box RuntimeData Templates for Patching Procedures
Procedure Name Template Name Procedure GUID
Patch Oracle Database StandAlone_template.xml 3871B45B763EB1AAE040578C89080DBF
Patch Oracle Clusterware (Rolling Upgrade) CRS_Rolling_template.xml 3871B45B7644B1AAE040578C89080DBF
Patch Oracle RAC Database (Rolling) RAC_Rolling_template.xml 3871B45B7641B1AAE040578C89080DBF

Out-Of-Box RuntimeData Templates for Patching Procedures
A-2 Oracle Enterprise Manager Advanced Configuration
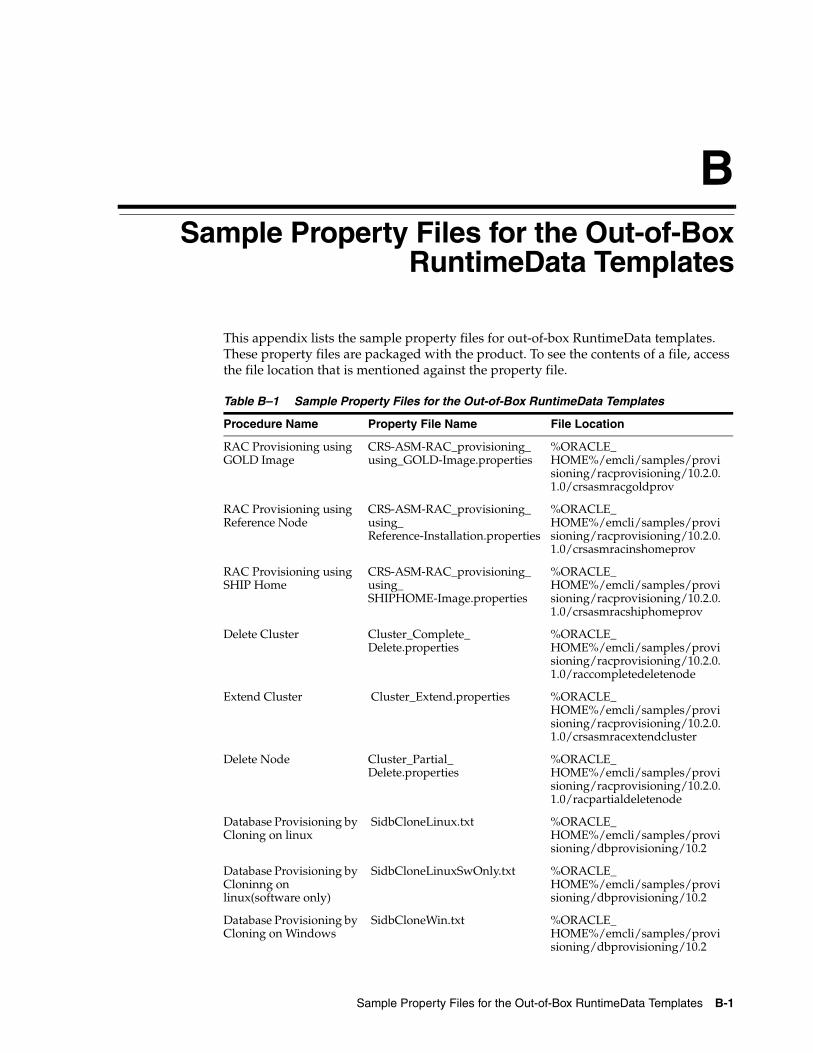
Sample Property Files for the Out-of-Box RuntimeData Templates B-1
BSample Property Files for the Out-of-Box
RuntimeData Templates
This appendix lists the sample property files for out-of-box RuntimeData templates. These property files are packaged with the product. To see the contents of a file, access the file location that is mentioned against the property file.
Table B–1 Sample Property Files for the Out-of-Box RuntimeData Templates
Procedure Name Property File Name File Location
RAC Provisioning using GOLD Image
CRS-ASM-RAC_provisioning_using_GOLD-Image.properties
%ORACLE_HOME%/emcli/samples/provisioning/racprovisioning/10.2.0.1.0/crsasmracgoldprov
RAC Provisioning using Reference Node
CRS-ASM-RAC_provisioning_using_Reference-Installation.properties
%ORACLE_HOME%/emcli/samples/provisioning/racprovisioning/10.2.0.1.0/crsasmracinshomeprov
RAC Provisioning using SHIP Home
CRS-ASM-RAC_provisioning_using_SHIPHOME-Image.properties
%ORACLE_HOME%/emcli/samples/provisioning/racprovisioning/10.2.0.1.0/crsasmracshiphomeprov
Delete Cluster Cluster_Complete_Delete.properties
%ORACLE_HOME%/emcli/samples/provisioning/racprovisioning/10.2.0.1.0/raccompletedeletenode
Extend Cluster Cluster_Extend.properties %ORACLE_HOME%/emcli/samples/provisioning/racprovisioning/10.2.0.1.0/crsasmracextendcluster
Delete Node Cluster_Partial_Delete.properties
%ORACLE_HOME%/emcli/samples/provisioning/racprovisioning/10.2.0.1.0/racpartialdeletenode
Database Provisioning by Cloning on linux
SidbCloneLinux.txt %ORACLE_HOME%/emcli/samples/provisioning/dbprovisioning/10.2
Database Provisioning by Cloninng on linux(software only)
SidbCloneLinuxSwOnly.txt %ORACLE_HOME%/emcli/samples/provisioning/dbprovisioning/10.2
Database Provisioning by Cloning on Windows
SidbCloneWin.txt %ORACLE_HOME%/emcli/samples/provisioning/dbprovisioning/10.2
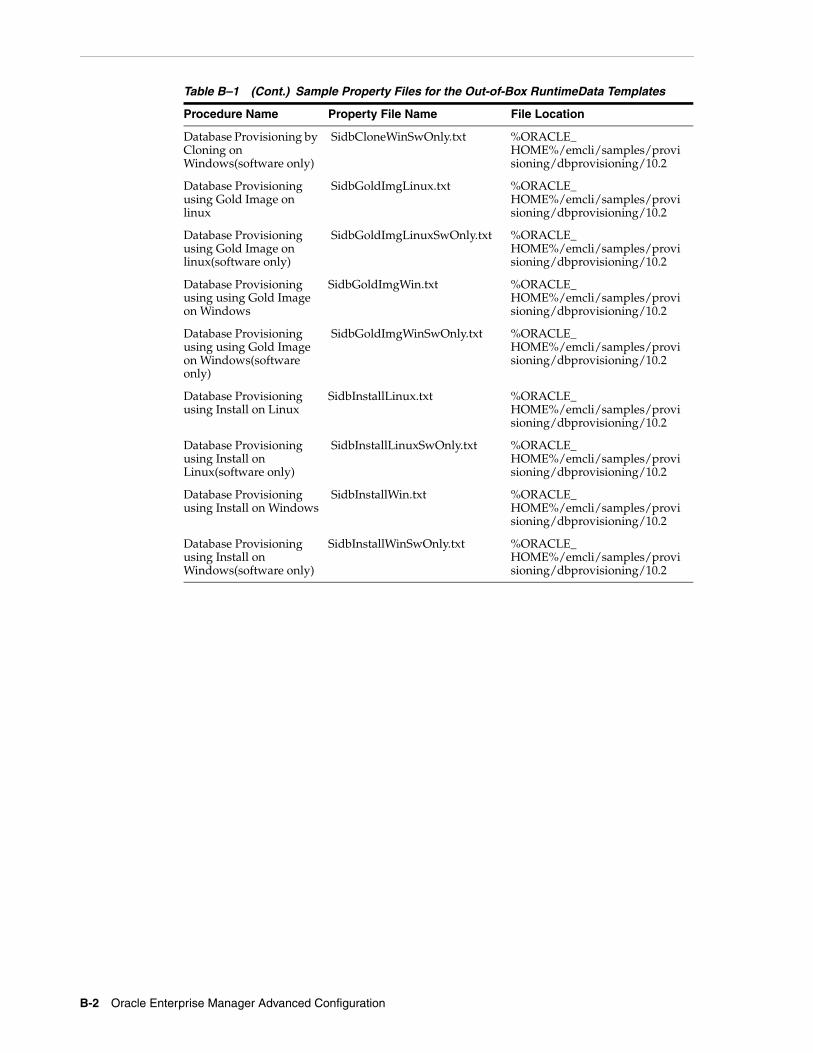
B-2 Oracle Enterprise Manager Advanced Configuration
Database Provisioning by Cloning on Windows(software only)
SidbCloneWinSwOnly.txt %ORACLE_HOME%/emcli/samples/provisioning/dbprovisioning/10.2
Database Provisioning using Gold Image on linux
SidbGoldImgLinux.txt %ORACLE_HOME%/emcli/samples/provisioning/dbprovisioning/10.2
Database Provisioning using Gold Image on linux(software only)
SidbGoldImgLinuxSwOnly.txt %ORACLE_HOME%/emcli/samples/provisioning/dbprovisioning/10.2
Database Provisioning using using Gold Image on Windows
SidbGoldImgWin.txt %ORACLE_HOME%/emcli/samples/provisioning/dbprovisioning/10.2
Database Provisioning using using Gold Image on Windows(software only)
SidbGoldImgWinSwOnly.txt %ORACLE_HOME%/emcli/samples/provisioning/dbprovisioning/10.2
Database Provisioning using Install on Linux
SidbInstallLinux.txt %ORACLE_HOME%/emcli/samples/provisioning/dbprovisioning/10.2
Database Provisioning using Install on Linux(software only)
SidbInstallLinuxSwOnly.txt %ORACLE_HOME%/emcli/samples/provisioning/dbprovisioning/10.2
Database Provisioning using Install on Windows
SidbInstallWin.txt %ORACLE_HOME%/emcli/samples/provisioning/dbprovisioning/10.2
Database Provisioning using Install on Windows(software only)
SidbInstallWinSwOnly.txt %ORACLE_HOME%/emcli/samples/provisioning/dbprovisioning/10.2
Table B–1 (Cont.) Sample Property Files for the Out-of-Box RuntimeData Templates
Procedure Name Property File Name File Location
Troubleshooting C-1
CTroubleshooting
This appendix suggests solutions to issues that have been identified for components of Oracle Enterprise Manager.
Displaying BPEL Processes on the Oracle Enterprise Manager Processes Tab
BPEL (Business Process Execution Language) is an XML-based language for enabling task sharing across multiple enterprises using a combination of Web services. BPEL is based on the XML schema, simple object access protocol (SOAP), and Web services description language (WSDL). BPEL provides enterprises with an industry standard for business process orchestration and execution. Using BPEL, you can design a business process that integrates a series of discrete services into an end-to-end process flow. This integration reduces process cost and complexity. The BPEL language enables you to define how to:
■ Send XML messages to, and asynchronously receive XML messages from, remote services
■ Manipulate XML data structures
■ Manage events and exceptions
■ Design parallel flows of process execution
■ Undo portions of processes when exceptions occur
Oracle BPEL Process Manager enables enterprises to model, deploy, and manage BPEL processes. It includes a BPEL business process modeler, a scalable BPEL runtime engine, an extensible WSDL binding framework, and a monitoring console.
BPEL targets can be discovered in Oracle Enterprise Manager. After the discovery of the BPEL target, the BPEL process may occasionally not be listed in the Enterprise Manager BPEL Process Manager Processes tab. There are two causes for this and two ways to ensure they display on the Processes tab. The sections below discuss these scenarios in detail.
Scenario 1: Providing Credentials Using Oracle Enterprise Manager Grid ControlThe credentials required for monitoring the BPEL target are not provided in Enterprise Manager Grid Control. To address this, you can provide the credentials using Enterprise Manager Grid Control using the following steps.
1. On the BPEL Process Manager home page, click on the Monitoring Configuration link
Displaying BPEL Processes on the Oracle Enterprise Manager Processes Tab
C-2 Oracle Enterprise Manager Advanced Configuration
2. On the 'Monitoring Configuration' page, check the following four fields:
■ BPEL Admin Username -- Provide the BPEL administrator user ID
■ BPEL Password - Provide the BPEL admin password
When adding the credentials validate the following two criteria:
– BPEL Admin User ID and password should have BPEL Admin role
– The same credentials should succeed for the BPEL console login operation
■ Initial Context Factory - In case this field is empty, please copy the string value 'com.evermind.server.rmi.RMIInitialContextFactory'
■ Context Provider URL - In case this field is empty, please copy the following highlighted string given below.
opmn:ormi://<host>:<opmn_port>:home/orabpel
3. Click the OK button to save the settings.
Scenario 2: Add Required BPEL Jar Files To Agent CLASSPATHThe required BPEL jar files (storage containers) are not added to agent CLASSPATH. To add the jars, follow these steps.
1. Log in to the host machine where SOA is installed.
2. Go to the ORACLE_HOME of the EM Agent installed on the same host.
3. Open file '$AGENT_ORACLE_HOME/sysman/config/emd.properties' as shown in figure.
4. Check whether the following jar files have been added to the CLASSPATH property in the file. The property must manually update with the BPEL-specific jar file names to get the process listing.
■ $BPEL_SERVER_ORACLE_HOME/opmn/lib/optic.jar
■ $BPEL_SERVER_ORACLE_HOME/bpel/lib/orabpel.jar
■ $BPEL_SERVER_ORACLE_HOME/bpel/lib/orabpel-common.jar
■ $BPEL_SERVER_ORACLE_HOME/bpel/lib/orabpel-thirdparty.jar
■ $BPEL_SERVER_ORACLE_HOME/j2ee/home/oc4jclient.jar
■ $BPEL_SERVER_ORACLE_HOME/j2ee/home/j2ee_1.3.01.jar
Note: Replace the <host>,<opmn port> with the correct host address and opmn port number details for the Oracle Application Server where the BPEL Process Manager is deployed. (Steps to retrieve <opmn port> are described in Retrieving the OPMN Port.)
Note: The $BPEL_SERVER_ORACLE_HOME should be replaced with the absolute path of the ORACLE_HOME path of the application server where the SOA is installed.
Displaying BPEL Processes on the Oracle Enterprise Manager Processes Tab
Troubleshooting C-3
5. Add the JAR filenames to CLASSPATH property. When adding the jar files to CLASSPATH, ensure that the BPEL home optic.jar property is the first value in the classpath.
6. Restart the EM Agent.
Retrieving the OPMN PortTo retrieve SOA Applications Server OPMN PORT details, follow these steps.
1. Open the configuration file $SOA_ORACLE_HOME/opmn/conf/opmn.xml. $SOA_ORACLE_HOME corresponds to SOA Application server home location.
2. Identify the value of the request port attribute in the configuration file.

Displaying BPEL Processes on the Oracle Enterprise Manager Processes Tab
C-4 Oracle Enterprise Manager Advanced Configuration

Index-1
Index
Aabortresync repos, 5-17accessibility
enabling accessibility mode, 1-21enabling accessiblity features, 1-20providing textual descriptions of charts, 1-21
Additional Management Agent installation type, 1-4advanced configuration
introduction, 1-1types of tasks, 1-1
Agent Registration Password, 6-6changing, 6-13
agent resynchronization, manual, 5-6Agent Upload Problems
default notification rule, 14-8agent, backup and recovery, 5-12AGENT_HOME
definition, 1-4, 1-5AGENT_HOME/bin, 1-5AGENT_HOME/network/admin, 6-19AGENT_HOME/sysman, 1-5AGENT_
HOME/sysman/admin/scripts/db/config/response.pl, 17-5
AGENT_HOME/sysman/config, 1-5AGENT_HOME/sysman/log, 1-5Agents Unreachable
default notification rule, 14-8aggregration and purging policies
See data retention policiesalerts, 12-8Application Performance Management, 6-43, 7-11Application Server Availability and Critical/Warning
Statesdefault notification rule, 14-8
Application Server Controldirectory structure, 1-5introduction, 1-5Ports page, 7-12starting and stopping, 2-7starting and stopping on Windows systems, 2-7
Application Service Level Managementusing to monitor the Management Service, 3-10
archive loggingfor Management Repository database, 10-2
assistive technology, 1-20asynchronous I/O, 12-13
BBackup, 12-15backup and recovery, 5-1Bad SQL
configuring the database to show Bad SQL, 17-4baselines, 12-5Beacons, 12-13
configuring firewalls to allow ICMP traffic, 7-11monitoring Web Applications over HTTPS, 6-43
blackoutscontrolling with emctl, 2-16examples, 2-17
buffer cache, 12-11
Ccapacity
predicting, 12-2Certificate dialog box
Internet Explorer, 6-41, 6-45charts
providing textual descriptions for accessibility, 1-21
collection directory, 17-2Common Configurations
overview, 3-1common configurations
deploying a remote management repository, 3-4deploying Grid Control on a single host, 3-2firewalls and other security considerations, 3-1high availability configurations, 3-10managing multiple hosts, 3-4using multiple Management Services, 3-6
config emrep, 5-16config repos, 5-16Configuring Services, 8-1
Availability, 8-4, 8-6Beacons, 8-5Key Beacons, 8-5Local Beacon, 8-5Service Test-Based, 8-5, 8-6System-Based, 8-5, 8-6

Index-2
Command Line Interface, 8-47Create, 8-4, 8-32End-User Performance Monitoring, 8-2, 8-17
Access Log Format, 8-20chronos_setup.sh, 8-22, 8-24EUM, 8-18Manage Web Server Data Collection, 8-19,
8-21Set URLs, 8-19Standalone Web Cache, 8-25Unprocessed Samples, 8-29URL Pattern, 8-21Web Cache Log Format, 8-22Web Cache Manager, 8-21
Interactive Transaction Tracing, 8-2J2EE Server Activity, 8-2
MetricsPerformance, 8-5Usage, 8-8Usage Metrics, 8-5
Monitoring Settings, 8-15Beacon Overrides, 8-15Collection Settings, 8-15Data Granularity, 8-15Frequency, 8-15
Monitoring Templates, 8-44Beacons, 8-45Service Tests, 8-45Service Tests and Beacons, 8-44Variables, 8-44
Oracle Application Server 10g (9.0.4), 8-3Performance, 8-5Performance Metrics, 8-7
Aggregation Function, 8-7Recording Transactions, 8-2, 8-14, 8-32Request Performance, 8-3, 8-41
Correlate Requests, 8-3Database Connections, 8-41Enterprise Java Beans (EJBs), 8-41JDeveloper, 8-43Manage OC4J Data Collection, 8-42OC4J Cluster, 8-41OC4J Instances, 8-41OC4J Tracing, 8-42Oracle Application Server 10g (9.0.4), 8-3Oracle User Interface XML (UIX), 8-43Service Tests and Beacons, 8-41Tracing Properties, 8-42
Root Cause Analysis, 8-3, 8-7, 8-13Component Tests, 8-14Topology, 8-13Topology Viewer, 8-3
Service Level Rules, 8-45Actual Service Level, 8-46Availability, 8-45Business Hours, 8-45Expected Service Level, 8-46Information Publisher, 8-46Performance Criteria, 8-45Services Dashboard, 8-46
Service Tests and Beacons, 8-9Configuring Dedicated Beacons, 8-10SSL Certificate, 8-10Tests, 8-9Web Proxy, 8-11
Service-Test Based AvailabilityKey Service Tests, 8-6
System, 8-3Key Components, 8-4
System-Based AvailabilityKey Components, 8-6
Test Performance, 8-2Thresholds
Critical, 8-5Warning, 8-5
Time Zone, 8-4Types
Aggregate Service, 8-16Types of Service
Generic Service, 8-4Types of Services
Aggregate Service, 8-4OCS Service, 8-4Web Application, 8-4
connect descriptorusing to identify the Management Repository
database, 10-9, 10-10create service, 5-17creating a monitoring script, 15-2
Ddata collections
how Enterprise Manager stores, 17-1restoring default, 17-2understanding default and custom, 17-1
Data Guardconfiguring Enterprise Manager availability, 10-1
data retention policiesfor Application Performance Management
data, 10-3for other Management data, 10-3modifying default, 10-3of the Management Repository, 10-2when targets are deleted, 10-4
Database Availability and Critical/Warning Statesdefault notification rule, 14-9
Database Configuration AssistantSee DBCA
Database Controlconfiguring after installation, 1-8, 1-11configuring during installation, 1-8configuring with DBCA, 1-9configuring with EMCA, 1-11directory structure, 1-6introduction, 1-6location of Management Agent and Management
Service support files, 1-6starting on UNIX, 2-8stopping on UNIX, 2-8

Index-3
DBCAconfiguring Database Control with, 1-9Management Options page, 1-9starting on UNIX, 1-10starting on Windows, 1-10
DBSNMP database user, 2-14setting the password for, 2-14
DBSNMP user, 17-5default_collection directory, 17-1delete service, 5-17deleting targets
data retention policies when, 10-4deployment procedure
variables, 11-16deployment procedures
advantages, 11-1customizable, 11-7definition, 11-1troubleshooting, 11-35use cases, 11-4using EMCLI to execute, 11-19using for grid automation, 11-1
directory structureintroduction to, 1-1
Disaster Recovery, 12-17disaster recovery, 5-1disk mirroring and stripping
Management Repository guideline, 10-1disk space management
controlling Management Agent disk space, 13-3controlling the contents of trace files, 9-4controlling the size and number of log and trace
files, 9-3, 9-6, 9-7controlling the size of log and trace files, 9-8
dontProxyFordescription of property, 7-8property in emoms.properties, 7-8
dropping the Management Repository, 10-8
EE2E monitoring, 12-14EM Website
using to monitor the Management Service, 3-10Web Application target, 3-10
em_message, 15-4em_result, 15-3emagent.log, 9-1emagentlogging.properties, 9-6
log4j.rootCategory property, 9-6MaxBackupIndex property, 9-6MaxFileSize property, 9-6
emagent.nohup, 9-2emagent.trc, 9-2E-mail Customization, 14-14e-mail notifications
upper limits, 14-5EMCA
command-line arguments, 1-12configuring Database Control for Real Application
Clusters, 1-16configuring Database Control with, 1-11reconfiguring Database Control after changing the
listener port, 1-19sample EMCA input file, 1-16specifying port assignments, 1-18troubleshooting problems with the Database
Control, 1-19troubleshooting tips, 1-19using an input file for EMCA parameters, 1-15
emctl, 2-1controlling blackouts, 2-16listing targets on a managed host, 2-15location in AGENT_HOME, 1-5security commands, 6-6setting monitoring credentials, 2-14starting, stopping, and checking the Management
Service, 2-4emctl config agent credentials, 2-15emctl config agent listtargets, 2-15emctl config oms
sample output, 6-24, 6-36emctl config oms sso, 6-23emctl getemhome, 1-8EMCTL High Availablity, 5-16emctl istop, 2-3emctl reload, 2-13emctl secure agent, 6-9
sample output, 6-10emctl secure lock, 6-12emctl secure oms, 6-6, 6-7
sample output, 6-7emctl secure setpwd, 6-14emctl secure unlock, 6-13emctl start agent, 2-2emctl start blackout, 2-17emctl start dbconsole, 2-8emctl start iasconsole, 2-7emctl start oms, 2-5emctl status agent, 2-2emctl status blackout, 2-17emctl status oms, 2-5emctl stop agent, 2-2emctl stop blackout, 2-17emctl stop dbconsole, 2-9emctl stop iasconsole, 2-7emctl stop oms, 2-5emctl upload, 2-13EMD_URL
property in the emd.properties file, 13-3emd.properties, 9-4, 13-2, 13-3
EMD_URL, 13-3emdWalletDest, 13-2emdWalletSrcUrl, 13-2location, 1-5LogFileMaxRolls, 9-4REPOSITORY_PROXYHOST, 7-5REPOSITORY_PROXYPORT, 7-5REPOSITORY_URL, 3-3, 3-5, 13-2TrcFileMaxrolls, 9-4

Index-4
TrcFileMaxSize, 9-4UploadMaxBytesXML, 13-4UploadMaxDiskUsedPct, 13-4
emdRepPortproperty in the emoms.properties file, 13-9
emdRepPwdproperty in the emoms.properties file, 13-9
emdRepServerproperty in the emoms.properties file, 13-9
emdRepSIDproperty in the emoms.properties file, 13-9
emdRepUserproperty in the emoms.properties file, 13-9
emdWalletDestproperty in emd.properties, 13-2
emdWalletSrcUrlproperty in emd.properties, 13-2
em.notification.emails_per_minuteproperty in emoms.properties, 14-4
em.notification.os_cmd_timeoutproperty in emoms.properties, 14-19
emoms.log, 9-7emomslogging.properties, 9-8, 9-9
MaxBackupIndex, 9-8MaxFileSize, 9-8
emoms.properties, 10-7, 13-8configuring the JDBC connection to the
Management Repository, 3-4, 3-5dontProxyFor property, 7-8emdRepPort, 13-9emdRepPwd, 13-9emdRepServer, 13-9emdRepSID, 13-9emdRepUser, 13-9em.notification.emails_per_connection, 14-3
property in emoms.properties, 14-3em.notification.emails_per_minute, 14-4em.notification.os_cmd_timeout, 14-19maxInactiveTime, 17-7oracle.net.crypto_checksum_client, 6-18oracle.net.crypto_checksum_types_client, 6-18oracle.net.encryption_client, 6-17oracle.net.encryption_types_client, 6-17oracle.sysman.eml.mntr.emdRepPwd, 10-7oracle.sysman.eml.mntr.emdRepPwdEncrypted,
10-7oracle.sysman.emRep.dbConn.enableEncryption,
6-17oracle.sysman.emSDK.sec.DirectoryAuthentication
Type, 6-30oracle.sysman.emSDK.svlt.ConsoleServerPort, 13
-10proxyHost property, 7-8proxyPort property, 7-8sample Management Repository properties, 13-9
emoms.trc, 9-7emwd watchdog script
in the AGENT_HOME/bin directory, 13-4End-User Performance Monitoring
Web Server
Apache HTTP Server 2.0, 8-2, 8-3, 8-17, 8-18Oracle Application Server Web Cache, 8-2,
8-3, 8-20Oracle HTTP Server, 8-17, 8-18Oracle HTTP Server Based on Apache 2.0, 8-2,
8-3, 8-17OracleAS Web Cache, 8-17
Enterprise ManagerSee Oracle Enterprise Manager
Enterprise Manager 10g Grid Control Using a New Database
installation type, 3-2Enterprise Manager Configuration Assistant
See EMCAEnterprise Manager Framework Security
about, 6-4compared with Oracle HTTP Server security
features, 6-4configuring, 6-3enabling for Management Repository, 6-15enabling for multiple Management Services, 6-11enabling for the Management Agent, 6-9in a firewall environment, 7-2overview of steps required, 6-5restricting HTTP access, 6-11types of secure connections, 6-5
exportconfig oms, 5-16
Ffetchlet
log and trace files, 9-5firewalls
between browser and the Grid Control, 7-3between Grid Control and a managed database
target, 7-10between Management Service and Management
Agents, 7-11between Management Service and Management
Repository, 7-10configuring for ICMP traffic, 7-11configuring for UDP traffic, 7-11configuring the Management Agent for, 7-4configuring the Management Service for, 7-7configuring to allow incoming data from
Management Service, 7-9configuring to allow incoming traffic to
Management Agent, 7-6considerations before configuring, 7-1considerations when using with multiple
Management Services, 7-11Flashback Database, 5-2Flashback Recovery Area, 5-2
Ggetemhome
emctl command, 1-8Grid Control
architecture overview, 12-1
Index-5
components, 12-1configuring notifications, 14-1deploying on a single host, 3-2sizing, 12-2starting, 2-10starting all components of, 2-10stopping, 2-11stopping all components of, 2-11
guidelinesfor deploying the Management Repository, 10-1
HHigh Availablity commands, 5-16Host Availability and Critical/Warning States
default notification rule, 14-9HTTP 500 - Internal server error, 2-6HTTP access
restricting, 6-11HTTP Server Availability and Critical/Warning States
default notification rule, 14-9http_em.conf, 13-10HTTPS, 6-5Hyper-Threading, 12-10
IICMP, 7-11importconfig oms, 5-16initialization parameter
adjusting when using multiple Management Services, 3-6
Internet Control Message Protocol, 7-11Internet Explorer
Certificate dialog box, 6-41, 6-45security alert dialog box, 6-41Security Information dialog box, 6-43
introduction to advanced configuration, 1-1I/O Channels
monitoring, 12-12istop
emctl command, 2-3
JJ2EE, 6-4
directory in Oracle Management Service home, 1-4
Java Message Service (JMS), 1-19javax.net.ssl.SSLException
SSL handshake failed, 6-44job_queue_processes, 17-6
LListener Availability
default notification rule, 14-10Listener port
obtaining, 7-10load balancing
connections between the Management Agent and
Management Service, 3-22Loader, 12-10Loader backlog (files)
on the Grid Control Management System tab, 3-9loader threads, 12-10log files
controlling the content of, 9-4controlling the size and number of, 9-7controlling the size of, 9-3fetchlet log files, 9-5locating and configuring, 9-1locating Management Agent, 9-3locating Management Service, 9-7Management Agent, 9-1Oracle Management Service, 9-7rollover files, 9-3
log4j.appender.emagentlogAppender.MaxBackupIndex, 9-6
log4j.appender.emagentlogAppender.MaxFileSize, 9-6
log4j.appender.emagenttrcAppender.MaxBackupIndex, 9-6
log4j.appender.emagenttrcAppender.MaxFileSize, 9-6
log4j.appender.emlogAppender. MaxBackupIndex, 9-8
log4j.appender.emlogAppender. MaxFileSize, 9-8log4j.appender.emtrcAppender.
MaxBackupIndex, 9-8log4j.appender.emtrcAppender. MaxFileSize, 9-8log4j.rootCategory property in
emagentlogging.properties, 9-6log4j.rootCategory=WARN, emlogAppender,
emtrcAppender, 9-9LogFileMaxRolls property in emd.properties, 9-4Login Timeout Value
modifying the default, 17-6LVM (Logical Volume Manager), 10-1
MManagement Agent, 12-1, 12-4, 12-5
additional Management Agent commands, 2-13checking the status on UNIX, 2-2checking the status on Windows, 2-3configuring to allow incoming communication
from the Management Service, 7-6configuring to use a proxy server, 7-5configuring trust points, 13-7reinstalling, 12-18starting and stopping on UNIX, 2-1starting and stopping on Windows, 2-2
Management Information Base (MIB), 14-37definition, 14-37MIB variable descriptions, 14-38
Management Options pagein DBCA, 1-9in Oracle Universal Installer, 1-8
Management RepositorySee Oracle Management Repository
Index-6
Management Server, 12-9Management Servers
adding, 12-12Management Service, 12-1, 12-4
See Oracle Management Servicestarting and stopping on Windows systems, 2-6using a server load balancer, 3-22
master agentOracle Peer SNMP Master Agent service, 2-3
MaxBackupIndexproperty in emomslogging.properties, 9-8
MaxBackupIndex property in emagentlogging.properties, 9-6
MaxFileSizeproperty in emomslogging.properties, 9-8
MaxFileSize property in emagentlogging.properties, 9-6
maxInactiveTimeproperty in emoms.properties, 17-7
MGMT_ADMIN.DISABLE_METRIC_DELETION, 10-5
MGMT_ADMIN.ENABLE_METRIC_DELETION, 10-5
MGMT_METRICS_1DAY table, 10-4MGMT_METRICS_1HOUR table, 10-4MGMT_METRICS_RAW table, 10-4MGMT_PARAMETERS table, 10-3MGMT_RT_datatype_1DAY table, 10-4MGMT_RT_datatype_1HOUR table, 10-4MGMT_RT_datatype_DIST_1DAY table, 10-4MGMT_RT_datatype_DIST_1HOUR table, 10-4MGMT_RT_METRICS_RAW table, 10-4MIB
See Management Information Base (MIB)monitoring credentials
defined, 2-13example of setting, 2-15setting, 2-13setting in Grid Control, 2-14setting with emctl, 2-14
monitoring script creation, 15-2monitoring templates, 15-18
NNetscape Navigator
New Site Certificate dialog box, 6-42network/admin, 6-16, 6-18, 6-19New Site Certificate dialog box
Netscape Navigator, 6-42nmosudo, 17-28Notification backlog
on the Grid Control Management System tab, 3-9Notification Methods, 14-18notification methods
based on a PL/SQL Procedure, 14-22based on an SNMP trap, 14-26based on operating system commands, 14-19
notification rulesdefinition, 14-7
out-of-box, 14-7out-of-the-box notification rules, 14-6subscribing to, 14-7
notification schedules, 14-6notification system
e-mail errors, 14-47notification system errors, 14-45notification system, trace messages, 14-46notifications
assigning methods to rules, 14-35assigning rules to methods, 14-36configuring, 14-1defining multiple mail servers, 14-3long e-mail notifications, 14-6mail server settings, 14-2mail server settings in emoms.properties, 14-3management information base (MIB), 14-37notification schedules, 14-6sample Operating System command script, 14-22setting up, 14-1short email notifications, 14-6using custom notfication methods, 14-18
Notifiction RulesCustom, 14-11
OOC4J Availability and Critical/Warning States
default notification rule, 14-10OEM_MONITOR, 17-5OMS backup, 5-8OMS recovery, 5-9OMS recovery scenarios, 5-9OMS, backup and recovery, 5-8OMS-Repository Failure, 5-14Operating System command
sample notification method for, 14-20sample script, 14-22
Operating System scripts, 14-18while creating notification methods, 14-18
OPMNSee Oracle Process Management and Notification
opmnctlusing to start Web Cache, 2-6using to stop Web Cache, 2-6
opmnctl startall, 2-4, 6-7, 6-23opmnctl status, 2-6opmnctl stopall, 2-4, 6-6, 6-23opmnctl stopproc ias-component=WebCache, 2-6ORA-12645
Parameter does not exist, 6-16Oracle Advanced Security, 6-5, 6-16, 7-10
enabling for Management Repository, 6-18enabling for the Management Agent, 6-19
Oracle Application ServerEnterprise Manager directories installed with, 1-5
Oracle Application Server Web Cacheas part of a common configuration, 3-1, 3-3bypassing, 3-1default port number, 2-5

Index-7
errors when not running, 2-6starting and stopping, 2-5starting and stopping with opmnctl, 2-6using with Grid Control, 2-5Web Cache Manager, 8-21
Oracle Database 10gEnterprise Manager directories installed with, 1-6
Oracle Enterprise Managercomponents, 12-4directory structure, 1-1log files, 9-1rollup process, 12-11security model, 6-1starting and stopping Enterprise Manager
components, 2-1Oracle Enterprise Manager 10g Grid Control
See Grid ControlOracle Enterprise Manger
tuning, 12-9Oracle HTTP Server
configuring for use with a server load balancer, 3-19
Oracle Identity Management, 6-3Oracle Internet Directory, 6-26Oracle Management Agent
about the log and trace files, 9-1changing the port, 13-2configuring when protected by a firewall, 7-4controlling disk space used by, 13-3controlling the content of trace files, 9-4controlling the size of log and trace files, 9-3directory structure, 1-4directory structure on Windows, 1-5enabling security for, 6-9, 6-19fetchlet log and trace files, 9-5installing with Grid Control, 1-4location of log and trace files, 9-3log and trace files, 9-1log and trace rollover files, 9-3reconfiguring to use a new Management
Service, 13-1starting and stopping, 2-1Watchdog process, 13-4
Oracle Management Repository, 12-2changing the Management Repository
password, 13-9configuration parameters in the emoms.properties
file, 13-9configuring for high availability, 3-11data retention policies, 10-2deploying on a remote host, 3-4deployment guidelines, 10-1dropping, 10-8enabling Oracle Advanced Security, 6-18enabling security for, 6-15identifying with a connect descriptor, 10-9, 10-10recreating, 10-8, 10-9reloading data, 2-13restoring, 12-18starting the Management Repository
database, 2-11troubleshooting, 10-11uploading data, 2-13
Oracle Management Service, 12-18about the log and trace files, 9-7adjusting the PROCESSES initialization
parameter, 3-6bin directory, 1-3components installed with, 1-2configuring for use with a proxy server, 7-7configuring to allow incoming data from
Management Agent, 7-9configuring to use a new Repository, 13-8configuring when protected by a firewall, 7-7determining when to use multiple Management
Services, 3-8enabling security for, 6-6enabling security for multiple Management
Services, 6-11home directory, 1-2j2ee directory, 1-4location the log and trace files, 9-7log and trace files, 9-7modifying monitoring credentials, 2-14monitoring the load, 3-9monitoring the response time, 3-9monitoring with Application Service Level
Management, 3-10opmn directory, 1-4reconfiguring, 13-8reconfiguring to use a new port, 13-10restoring, 12-18starting, stopping, and checking, 2-4sysman directory, 1-4tips for monitoring the load and response
time, 3-9using multiple management services, 3-6
Oracle Net firewall proxy access, 7-10Oracle Process Management and Notification
(OPMN)using to start and stop the Management
Service, 2-4, 2-7Oracle Process Manager and Notification
(OPMN), 1-4Oracle Technology Network (OTN), 8-25Oracle Universal Installer
Management Options page, 1-8ORACLE_HOME/bin, 1-3ORACLE_HOME/hostname_sid/, 1-6ORACLE_HOME/install, 7-12ORACLE_HOME/j2ee, 1-4ORACLE_HOME/network/admin, 6-16, 6-18ORACLE_HOME/oc4j/j2ee, 1-7ORACLE_HOME/oc4j/j2ee/OC4J_DBConsole, 1-7ORACLE_HOME/opmn, 1-4ORACLE_HOME/opmn/bin, 2-6ORACLE_HOME/sysman, 1-4, 1-6Oracle8i database
configuring for monitoring, 17-4Oracle9i

Index-8
configuring for monitoring, 17-4oracle.net.crypto_checksum_client
property in emoms.properties, 6-18oracle.net.crypto_checksum_types_client
property in emoms.properties, 6-18oracle.net.encryption_client
property in emoms.properties, 6-17oracle.net.encryption_types_client
property in emoms.properties, 6-17oracle.sysman.eml.mntr.emdRepPwd
property in emoms.properties, 10-7oracle.sysman.eml.mntr.emdRepPwdEncrypted
property in emoms.properties, 10-7oracle.sysman.emRep.dbConn.enableEncryption
entry in emoms.properties, 6-17oracle.sysman.emSDK.sec.DirectoryAuthenticationTy
peproperty in emoms.properties, 6-30
oracle.sysman.emSDK.svlt.ConsoleServerPortproperty in emoms.properties file, 13-10
OS scriptsSee Operating System scripts
OTN (Oracle Technology Network), 8-25OUIinventories.add, 17-3
Ppassword
changing the Management Repository password, 13-9
changing the SYSMAN password, 10-6peer encapsulator service
SNMP, 2-3Performance Metrics
Beacon Aggregation FunctionAverage, 8-7, 8-8Maximum, 8-7Minimum, 8-7, 8-8Sum, 8-7, 8-8
System Aggregation FunctionMaximum, 8-8
PERFSTAT, 17-5PL/SQL procedures, 14-18
sample, 14-26while creating a notification method, 14-22while creating notfication methods, 14-18
Pluggable Authentication Modules, 11-13portlist.ini, 7-12ports
4888, 7-7, 7-94889, 7-9, 13-10changing the Management Agent port, 13-2default port for the Management Agent upload
URL, 3-3default Web Cache port on Windows
systems, 3-3displaying in the Application Server
Control, 7-12portlist.ini, 7-12reconfiguring Database Control after changing the
listener port, 1-19reconfiguring the port used by the Management
Service, 13-10specifying Database Control ports, 1-18viewing a summary of ports assigned during
installation, 7-12PowerBroker, 17-25Privilege Delegation Providers, 17-25privilege delegation setting
applying, 17-27creating, 17-26disabling, 17-28
PROCESSES, 3-6ProcessManager
service used to control the Management Service on Windows systems, 2-7
proxy serverconfiguring Management Agent for, 7-5configuring the Management Service for, 7-7
proxyHostproperty in emoms.properties, 7-8
proxyPortproperty in emoms.properties, 7-8
Public Key Infrastructure (PKI), 6-5, 6-44purging policies
See data retention policies
RRAID-capable disk
Management Repository guideline, 10-1Recovery, 12-15recovery scenarios, 5-6Remote Method Invocation (RMI), 1-19Repeat Notifications, 14-4Repeat Notifications for Rules, 14-4RepManager script, 10-8, 10-9Repository Operations Availability
default notification rule, 14-10repository recovery, 5-4repository, backing up, 5-1repository, recoverying, 5-1REPOSITORY_PROXYHOST
property in emd.properties, 7-5REPOSITORY_PROXYPORT
property in emd.properties, 7-5REPOSITORY_URL
property in emd.properties, 3-3, 3-5property in the emd.properties file, 13-2
resync repos, 5-16resyncAgent, 5-17rollover files, 9-3rollup process, 12-11Root Cause Analysis
ModeAutomatic, 8-14Manual, 8-13
root password See also SYSMANwhen enabling security for the Management

Index-9
Service, 6-7
Sscalability
determining when to use multiple Management Services, 3-8
screen readers, 1-21script registration, UDM, 15-5script results, returning, 15-2security
about Enterprise Manager security, 6-1authorization and access enforcement, 6-2classes of users and their privileges, 6-2Enterprise Manager security model, 6-1leveraging Oracle Application Server security
services, 6-3leveraging Oracle Identity Management
Infrastructure, 6-3overview of steps required to enable Enterprise
Manager Framework Security, 6-5See also Enterprise Manager Framework Security
security alert dialog boxInternet Explorer, 6-41
security certificate alertsresponding to, 6-41
security featuresSee Enterprise Manager Framework Security
Security Information dialog boxInternet Explorer, 6-43
self-monitoringfeature of the Management Agent, 13-4
Server Connection Hungerror while creating the repository, 10-11
Server Load Balancer, 6-15server load balancer, 3-23
configuring a virtual pool, 3-20configuring a virtual service, 3-20using with Management Services, 3-22
Service Tests and BeaconsTests
DNS, 8-9FTP, 8-9SOAP, 8-9Web Transaction, 8-9
Services control panelusing to start and stop the Management
Agent, 2-8, 2-9using to start the Management Service, 2-6
session timeoutmodifying, 17-6
setupinfo.txt, 2-6SNMP
Oracle Peer SNMP Master Agent service, 2-3Oracle SNMP Peer Encapsulator service, 2-3
SNMP traps, 14-18, 14-26sample, 14-27
Software Library, 16-1creating and deleting entities, 16-2de-configuring, 16-6
setting up, 16-2SQL UDM, character limit, 15-15SQL UDM, long statements, 15-15SQLNET.CRYPTO_SEED
entry in sqlnet.ora, 6-18, 6-19SQLNET.ENCRYPTION_SERVER
entry in sqlnet.ora, 6-18sqlnet.ora, 6-16
SQLNET.CRYPTO_SEED, 6-18, 6-19SQLNET.ENCRYPTION_SERVER, 6-18
starting and stoppingEnterprise Manager components, 2-1
state directoryin the Management Agent home, 13-2
Statspack, 17-4Status Codes, Corrective Actions, 14-32, 14-33statusresync repos, 5-17Sudo, 17-25SYSMAN
changing the SYSMAN password, 10-6checking for existence of, 10-11entering SYSMAN password when enabling
security, 6-7sysman/admin/default_collection, 17-2sysman/emd/collection, 17-2system errors, notification, 14-45
Ttarget monitoring credentials
defined, 2-13example of setting, 2-15setting, 2-13setting in Grid Control, 2-14
targetslisting targets on a managed host, 2-15
tasksadvanced configuration tasks, 1-1
thresholds, 12-5, 12-7Top SQL Report
configuring the database to show the Top SQL Report, 17-4
trace filescomponent tracing levels, 9-5controlling the content of, 9-4controlling the contents of Management
Service, 9-8controlling the size and number of, 9-7controlling the size of, 9-3fetchlet trace files, 9-5locating Management Agent, 9-3locating Management Service, 9-7Management Agent, 9-1Oracle Management Service, 9-7rollover files, 9-3
TrcFileMaxRolls property in emd.properties, 9-4TrcFileMaxSize property in emd.properties, 9-4Troubleshooting
when using EMCA, 1-19troubleshooting
Index-10
general techniques while creating the Management Repository, 10-11
problems starting or configuring the Database Control, 1-19
while creating the Management Repository, 10-10with EMCA, 1-19
Troubleshooting Service Tests, 8-47Forms Transactions, 8-47
troubleshooting, notifications, 14-45trust points
Management Agent Configuration, 13-7
UUDP, 7-11uix-config.xml, 1-21upload directory
in the Management Agent home, 13-2, 13-3UploadMaxBytesXML
property in the emd.properties file, 13-4UploadMaxDiskUsedPct
property in the emd.properties file, 13-4Usage Metrics
Aggregation FunctionAverage, 8-8, 8-9Maximum, 8-8, 8-9Minimum, 8-8, 8-9Sum, 8-8, 8-9
User Datagram Protocol, 7-11User-defined metric page
Command Line, 15-6Comparison Operator, 15-7, 15-12Consecutive Occurrences Preceding
Notification, 15-8, 15-13Critical, 15-8, 15-13Environment, 15-7Metric Name, 15-6, 15-11Metric Type, 15-6, 15-11Operating System User Name and
Password, 15-7Response Action, 15-8, 15-14Warning, 15-7, 15-13
User-defined metric page, Central Console, 15-5, 15-10
user-defined metric, example, 15-8User-defined metrics, 15-1user-defined metrics, 15-18
Vvirtual pool
when configuring a server load balancer, 3-20virtual service
when configuring a server load balancer, 3-20
Wwatchdog process
for the Management Agent, 13-4Web Application
Source
Step, 8-7Step Group, 8-7Transaction, 8-7
Web Application targetusing to monitor the Management Service
response time, 3-9Web Applications
monitoring over HTTPS, 6-43Web Cache
See Oracle Application Server Web CacheWeb Cache Availability and Critical/Warning States
default notification rule, 14-11web.xml, 1-22