oracle endeca platform services · pipeline overview ... oracle endeca platform services forge...
TRANSCRIPT

Oracle Endeca Platform ServicesForge Guide
Version 6.1.2 • March 2012


Contents
Preface.............................................................................................................................9About this guide............................................................................................................................................9Who should use this guide............................................................................................................................9Conventions used in this guide.....................................................................................................................9Contacting Oracle Endeca Customer Support............................................................................................10
Part I: Basic Pipeline Development.........................................................11
Chapter 1: The Endeca ITL.......................................................................13Introduction to the Endeca ITL............................................................................................................13Endeca ITL components......................................................................................................................14
Chapter 2: Endeca ITL Development......................................................17Endeca ITL development process.......................................................................................................17Endeca tools suite...............................................................................................................................17A closer look at data processing and indexing....................................................................................21
Chapter 3: Overview of Source Property Mapping................................27About source property mapping..........................................................................................................27About using a single property mapper.................................................................................................27About using explicit mapping...............................................................................................................27Minimum configuration.........................................................................................................................28About mapping unwanted properties...................................................................................................28About removing source properties after mapping................................................................................28Types of source property mapping......................................................................................................29About adding a property mapper.........................................................................................................30The Mappings editor............................................................................................................................32
Chapter 4: Match Modes..........................................................................35About choosing a match mode for dimensions....................................................................................35Rules of thumb for dimension mapping...............................................................................................37Dimension mapping example..............................................................................................................37
Chapter 5: Advanced Mapping Techniques............................................39The Property Mapper editor Advanced tab..........................................................................................39About enabling implicit mapping..........................................................................................................39Enabling default mapping....................................................................................................................40About the default maximum length for source property values............................................................41
Chapter 6: Before Building Your Instance Configuration......................43Endeca Application Controller directory structure...............................................................................43Pipeline overview.................................................................................................................................43
Chapter 7: About Creating a Basic Pipeline...........................................47The Basic Pipeline template................................................................................................................47Record adapters..................................................................................................................................48Dimension adapter..............................................................................................................................49Dimension server.................................................................................................................................50Property mapper..................................................................................................................................51Indexer adapter....................................................................................................................................51
Chapter 8: About Running Your Basic Pipeline.....................................53Running a pipeline...............................................................................................................................53
iii

Viewing pipeline results in a UI reference implementation..................................................................53
Chapter 9: After Your Basic Pipeline Is Running...................................55Additional tasks...................................................................................................................................55About source property mapping..........................................................................................................55Setting the record specifier property....................................................................................................58About specifying dimensions and dimension value order....................................................................59Additional pipeline components...........................................................................................................59Additional index configuration options.................................................................................................60
Part II: Joins..............................................................................................63
Chapter 10: Overview of Joins................................................................65Record assemblers and joins..............................................................................................................65About performing joins in a database..................................................................................................66Join keys and record indexes..............................................................................................................66Join types............................................................................................................................................68
Chapter 11: About Configuring Join Keys and Record Indexes..........75Creating a record index.......................................................................................................................75Creating a join key for a record cache.................................................................................................76Join keys with multiple properties or dimensions.................................................................................77
Chapter 12: About Implementing Joins..................................................79Implementing a join.............................................................................................................................79
Chapter 13: Advanced Join Behavior.....................................................83Records that have multiple values for a join key..................................................................................83Sources that have multiple records with the same join key value........................................................84About tweaking left joins......................................................................................................................85
Chapter 14: Tips and Troubleshooting for Joins....................................87Joins that do not require record caches..............................................................................................87Working with sources that have multiple records with the same join key value...................................87Best practice for choosing left and right side of joins...........................................................................87Combining equivalent records in record caches..................................................................................88Forge warnings when combining large numbers of records................................................................89
Part III: Advanced Dimension Features..................................................91
Chapter 15: Externally-Created Dimensions..........................................93Overview of externally-created dimensions.........................................................................................93XML requirements...............................................................................................................................95Importing an externally-created dimension..........................................................................................97
Chapter 16: Externally-Managed Taxonomies........................................99Overview of externally-managed taxonomies......................................................................................99Including externally-managed taxonomies in your project...................................................................99XSLT and XML requirements.............................................................................................................100Pipeline configuration........................................................................................................................102About updating an externally-managed taxonomy in your pipeline...................................................105Unexpected default-mapping behavior..............................................................................................105
Part IV: Other Advanced Features.........................................................107
Chapter 17: The Forge Logging System...............................................109
Oracle Endeca Platform Servicesiv

Overview of the Forge logging system..............................................................................................109Log levels reference...........................................................................................................................109About logging topics..........................................................................................................................109The command line interface..............................................................................................................110
Chapter 18: The Forge Metrics Web Service........................................113About the Forge Metrics Web service................................................................................................113About enabling Forge metrics............................................................................................................114About using Forge metrics.................................................................................................................115The MetricsService API.....................................................................................................................115
Appendix A: Forge Flag Reference.......................................................117Forge flag options reference.....................................................................................................................117
Appendix B:File Formats Supported by the Document Conversion Module.125Word processing formats..........................................................................................................................125Text and markup formats..........................................................................................................................127Spreadsheet formats................................................................................................................................128Vector image formats................................................................................................................................129Raster image formats...............................................................................................................................130Presentation formats.................................................................................................................................132Archive formats.........................................................................................................................................132Database formats.....................................................................................................................................133E-mail formats...........................................................................................................................................134Other formats............................................................................................................................................134
v
Contents


Copyright and disclaimer
Copyright © 2003, 2012, Oracle and/or its affiliates. All rights reserved.
Oracle and Java are registered trademarks of Oracle and/or its affiliates. Other names may betrademarks of their respective owners. UNIX is a registered trademark of The Open Group.
This software and related documentation are provided under a license agreement containing restrictionson use and disclosure and are protected by intellectual property laws. Except as expressly permittedin your license agreement or allowed by law, you may not use, copy, reproduce, translate, broadcast,modify, license, transmit, distribute, exhibit, perform, publish or display any part, in any form, or byany means. Reverse engineering, disassembly, or decompilation of this software, unless required bylaw for interoperability, is prohibited.
The information contained herein is subject to change without notice and is not warranted to beerror-free. If you find any errors, please report them to us in writing.
If this is software or related documentation that is delivered to the U.S. Government or anyone licensingit on behalf of the U.S. Government, the following notice is applicable:
U.S. GOVERNMENT END USERS: Oracle programs, including any operating system, integratedsoftware, any programs installed on the hardware, and/or documentation, delivered to U.S. Governmentend users are "commercial computer software" pursuant to the applicable Federal Acquisition Regulationand agency-specific supplemental regulations. As such, use, duplication, disclosure, modification, andadaptation of the programs, including any operating system, integrated software, any programs installedon the hardware, and/or documentation, shall be subject to license terms and license restrictionsapplicable to the programs. No other rights are granted to the U.S. Government.
This software or hardware is developed for general use in a variety of information managementapplications. It is not developed or intended for use in any inherently dangerous applications, includingapplications that may create a risk of personal injury. If you use this software or hardware in dangerousapplications, then you shall be responsible to take all appropriate fail-safe, backup, redundancy, andother measures to ensure its safe use. Oracle Corporation and its affiliates disclaim any liability forany damages caused by use of this software or hardware in dangerous applications.
This software or hardware and documentation may provide access to or information on content,products and services from third parties. Oracle Corporation and its affiliates are not responsible forand expressly disclaim all warranties of any kind with respect to third-party content, products, andservices. Oracle Corporation and its affiliates will not be responsible for any loss, costs, or damagesincurred due to your access to or use of third-party content, products, or services.
Rosette® Linguistics Platform Copyright © 2000-2011 Basis Technology Corp. All rights reserved.
Teragram Language Identification Software Copyright © 1997-2005 Teragram Corporation. All rightsreserved.
vii


Preface
Oracle Endeca's Web commerce solution enables your company to deliver a personalized, consistentcustomer buying experience across all channels — online, in-store, mobile, or social. Whenever andwherever customers engage with your business, the Oracle Endeca Web commerce solution delivers,analyzes, and targets just the right content to just the right customer to encourage clicks and drivebusiness results.
Oracle Endeca Guided Search is the most effective way for your customers to dynamically exploreyour storefront and find relevant and desired items quickly. An industry-leading faceted search andGuided Navigation solution, Oracle Endeca Guided Search enables businesses to help guide andinfluence customers in each step of their search experience. At the core of Oracle Endeca GuidedSearch is the MDEX Engine,™ a hybrid search-analytical database specifically designed forhigh-performance exploration and discovery. The Endeca Content Acquisition System provides a setof extensible mechanisms to bring both structured data and unstructured content into the MDEX Enginefrom a variety of source systems. Endeca Assembler dynamically assembles content from any resourceand seamlessly combines it with results from the MDEX Engine.
Oracle Endeca Experience Manager is a single, flexible solution that enables you to create, deliver,and manage content-rich, cross-channel customer experiences. It also enables non-technical businessusers to deliver targeted, user-centric online experiences in a scalable way — creating always-relevantcustomer interactions that increase conversion rates and accelerate cross-channel sales. Non-technicalusers can control how, where, when, and what type of content is presented in response to any search,category selection, or facet refinement.
These components — along with additional modules for SEO, Social, and Mobile channel support —make up the core of Oracle Endeca Experience Manager, a customer experience management platformfocused on delivering the most relevant, targeted, and optimized experience for every customer, atevery step, across all customer touch points.
About this guideThis guide describes the major tasks involved in developing the instance configuration, including thepipeline, of an Endeca application.
It assumes that you have read the Oracle Endeca Guided Search Getting Started Guide and arefamiliar with the Endeca terminology and basic concepts.
Who should use this guideThis guide is intended for developers who are building applications using Oracle Endeca GuidedSearch.
Conventions used in this guideThis guide uses the following typographical conventions:

Code examples, inline references to code elements, file names, and user input are set in monospacefont. In the case of long lines of code, or when inline monospace text occurs at the end of a line, thefollowing symbol is used to show that the content continues on to the next line: ¬
When copying and pasting such examples, ensure that any occurrences of the symbol and thecorresponding line break are deleted and any remaining space is closed up.
Contacting Oracle Endeca Customer SupportOracle Endeca Customer Support provides registered users with important information regardingOracle Endeca software, implementation questions, product and solution help, as well as overall newsand updates.
You can contact Oracle Endeca Customer Support through Oracle's Support portal, My Oracle Supportat https://support.oracle.com.
Endeca ConfidentialOracle Endeca Platform Services Forge Guide
| Preface10

Part 1
Basic Pipeline Development
• The Endeca ITL• Endeca ITL Development• Overview of Source Property Mapping• Match Modes• Advanced Mapping Techniques• Before Building Your Instance Configuration• About Creating a Basic Pipeline• About Running Your Basic Pipeline• After Your Basic Pipeline Is Running


Chapter 1
The Endeca ITL
The Endeca Information Transformation Layer (ITL) is a major component of Oracle Endeca GuidedSearch. This section provides an introduction to the Endeca ITL and its componenets.
Introduction to the Endeca ITLThe Endeca Information Transformation Layer (ITL) reads in your source data and manipulates it intoa set of indices for the Endeca MDEX Engine. The Endeca ITL consists of the Content AcquisitionSystem and the Data Foundry.
Although the original source data is not changed, this transformation process may change itsrepresentation within your Endeca implementation.The Endeca ITL is an off-line process that you runon your data at intervals that are appropriate for your business requirements.
Endeca Content Acquisition SystemThe Content Acquisition System includes the Endeca Web Crawler and the Endeca CAS Server, aswell as a rich set of packaged adapters.
These components crawl unstructured content sources and ingest structured data. This includesrelational databases, file servers, content management systems, and enterprise systems such asenterprise resource planning (ERP) and master data management (MDM).
Packaged adapters reach the most common systems, including JDBC and ODBC.The Content AdapterDevelopment Kit (CADK) allows developers to write custom adapters and Java manipulators.
Endeca Data FoundryThe Endeca Data Foundry aggregates information and transforms it into Endeca records and MDEXEngine indices.
During the data processing phase, the Data Foundry:
• Imports your source data• Tags it with the dimension values used for navigating and Endeca properties used for display.• Stores the tagged data—along with your dimension specifications and any configuration rules—as
Endeca records that are ready for indexing.

• Indexes the Endeca records it produced during its data processing phase, and produces a set ofindices in Endeca MDEX Engine format.
Endeca ITL componentsAt a base level, the Endeca ITL is a combination of programs and configuration files. The Endeca ITLhas additional components that support a variety of features.
This illustration shows a high-level view of the Endeca ITL architecture.
The components described in this section are the core components that all Endeca implementationsuse, regardless of the additional features they implement.
Pipeline components will be discussed in this guide as is appropriate. For more detailed informationabout pipeline components, see the Developer Studio online help.
Data Foundry programsData Foundry component is composed of two core programs, Forge and Dgidx.
• Forge is the data processing program that transforms your source data into standardized, taggedEndeca records.
• Dgidx is the indexing program that reads the tagged Endeca records that were prepared by Forgeand creates the proprietary indices for the Endeca MDEX Engine.
Configuration filesForge and Dgidx use an instance configuration to accomplish their tasks. An instance configurationincludes a pipeline, a dimension hierarchy, and an index configuration.
Pipeline
The pipeline functions as a script for the entire process of transforming source data to Endeca records.
The pipeline describes a data processing workflow as a graph of data transformation stages, knownas components, connected by links across which data flows.
Endeca ConfidentialOracle Endeca Platform Services Forge Guide
The Endeca ITL | Endeca ITL components14

The components specify the format and the location of the source data, any changes to be made tothe source data (manipulation), and how to map each record’s source properties to Endeca propertiesand dimensions.
If you intend to run partial updates, your instance configuration will contain two pipelines: one forrunning baseline updates and one for partial updates. See the Endeca Partial Updates Guide for detailson setting up the partial updates pipeline.
Dimension hierarchy
The dimension hierarchy contains a unique name and ID for each dimension, as well as names andIDs for any dimension values created in Developer Studio.The Data Foundry uses these unique namesand IDs when it maps your data’s source properties to dimensions.
These names and IDs can be created in three different ways:
• Automatically, by the Data Foundry.• In Developer Studio.• In an external system, and then imported either into the Data Foundry or Developer Studio.
The dimension hierarchy is used during indexing to support the incremental filtering that is the essenceof Guided Navigation.
Index configuration
The index configuration defines how your Endeca records, Endeca properties, dimensions, anddimension values are indexed by the Data Foundry. The index configuration is the mechanism forimplementing a number of Endeca features such as search and ranking.
Oracle Endeca Platform Services Forge GuideEndeca Confidential
15The Endeca ITL | Endeca ITL components


Chapter 2
Endeca ITL Development
The Endeca Information Transformation Layer components provide a means for you to develop yourdata processing back end.This section provides an overview of the development process and Endecatools suite, and a closer look at data processing and indexing.
Endeca ITL development processThe Endeca ITL uses an instance configuration to process, tag, and locate data.
Creating an instance configuration is an iterative process. Oracle recommends that you first create avery simple instance configuration to test your data. After the simple configuration is working as youexpect, you can make additional modifications, view your results, and make changes as necessary.Also, it is often useful to work on a subset of your data, for quicker turnaround of data processing,while you are developing your instance configuration.
At a high level, Endeca ITL development looks like this:
1. Use Developer Studio to create an instance configuration.
This defines how your data should be indexed and displayed. It includes Content Acquisition Systemcomponents, such as a JDBC Adapter.
2. Use an Endeca Deployment Template application to do the following:
a) Run Forge, referencing the instance configuration, to process your source data into taggedEndeca records.
b) Run Dgidx on the Forge output to create MDEX Engine indices from the tagged Endeca records.c) Run Dgraph to start a MDEX Engine and point it at the indices created by Dgidx.
3. View the results and repeat these steps to make changes as necessary.
Endeca tools suiteThe Endeca distribution includes two tools that help you create and edit your instance configuration,and maintain your Endeca implementation: Endeca Developer Studio and Oracle Endeca Workbench.This section provides a brief introduction to these tools.

Endeca Developer StudioEndeca Developer Studio is a Windows application that you use to define all aspects of your instanceconfiguration.
With Developer Studio, you can define:
• Pipeline components for tasks such as loading, standardizing, joining, mapping, and exportingdata.
• Endeca properties and property attributes such as sort and rollup.• Dimensions and dimension values, including dimension hierarchy.• Precedence rules among dimensions that provide better control over your implementation’s
navigation flow.• Search configurations, including which properties and dimensions are available for search.• Dynamic business rules that allow you to promote certain records on your Web site using data-driven
business logic. Dynamic business rules are used to implement merchandising and contentspotlighting.
• User profiles that tailor the content returned to an end-user based upon preconfigured rules.
Developer Studio uses a project file, with an .esp extension, that contains pointers to the XML filesthat support an instance configuration. Editing a project in Developer Studio edits these underlyingfiles.
Oracle Endeca WorkbenchOracle Endeca Workbench is a Web-based application that provides access to reports that describehow end-users are using an Endeca implementation.
The two primary audiences for Endeca Workbench are:
• Business users who define business logic such as merchandising/content-spotlighting rules andthesaurus entries.
Endeca Workbench lets business users make changes to parts of an Endeca implementation afterthe implementation’s core functionality has been developed. For example, a developer usesDeveloper Studio to specify which Endeca properties and dimensions are available for search,then a business user uses Endeca Workbench to specify thesaurus entries that support searchfunctionality.
• System administrators who maintain and manage an Endeca implementation.
Endeca Workbench lets system administrators provision applications, components and scripts tothe Endeca Application Controller, monitor the status of an Endeca implementation, and start andstop system processes.
Endeca Workbench can report the most popular search terms, the most popular navigation locations,search terms that are most often misspelled, and so forth.
About system provisioning tasks in Endeca Workbench
System provisioning lets you assign resources to a new Endeca application in Endeca Workbench,and modify the resources in an existing application.You can provision more than one application tothe EAC, using the EAC Admin Console page of Endeca Workbench.
Typically, you provision resources to the Endeca configuration in the following order:
1. Add, edit or remove an Endeca application.
Endeca ConfidentialOracle Endeca Platform Services Forge Guide
Endeca ITL Development | Endeca tools suite18

2. Add, edit or remove hosts from the application.3. Add, configure or remove Endeca components on one or more hosts.
Endeca components include Forge, the Indexer (Dgidx), Aggregated Indexer, MDEX Engine(Dgraph), Aggregated MDEX Engine, Log Server, and Report Generator.
4. Add, edit, or remove an EAC script.
About system operations tasks in Endeca Workbench
System operations let you run Endeca components by using Endeca Workbench to call underlyingEAC processes.
On the EAC Admin Console page of Endeca Workbench, you can do the following:
• Start and stop the Endeca applications and components you provision.
Typically, each provisioned application can have its own set of components, such as Forge, theIndexer, the MDEX Engine, the Log Server and the Report Generator.You can then start and stopthese components.
• Start and stop the EAC scripts you provision.These could include the scripts that perform a baselineupdate and report generation for the application.
• Monitor the status of Endeca components.
Finding more information on tools setup and usageYou can find tool setup and usage information in the following locations:
• The Oracle Endeca Workbench Administrator’s Guide provides in-depth information about toolsetup and configuration.
• The Oracle Endeca Developer Studio Help and the Oracle Endeca Workbench Help provide detailson using each individual tool’s features.
About controlling your environmentWhile not part of the Endeca ITL development per se, before you can begin building and runningpipelines, you must put into place a mechanism for controlling the resources in your Endecaimplementation. This mechanism provides process execution and job management facilities.
About using the Endeca Application ControllerThe Endeca Application Controller is the interface you use to control, manage, and monitor yourEndeca implementations.
The use of open standards, such as the Web Services Descriptive Language (WSDL), makes theApplication Controller platform and language agnostic. As a result, the Application Controller supportsa wide variety of applications in production. In addition, the Application Controller allows you to handlecomplex operating environments that support features such as partial updates, delta updates, phasedDgraph updates and more.
Application Controller architecture
Most implementations that use the Application Controller will follow the general setup outlined below.
Oracle Endeca Platform Services Forge GuideEndeca Confidential
19Endeca ITL Development | Endeca tools suite

The following illustration shows the architecture of a typical implementation that uses the ApplicationController.
In this architecture diagram, the following happens:
1. The developer creates an instance configuration, using Developer Studio, that determines whatdata and features will be incorporated into the index.
2. The developer creates a provisioning document in XML format that defines all the hosts andcomponents in the implementation.
3. The developer sends the provisioning files to the EAC Central Server machine. The developer canuse three methods for the provisioning tasks:
• Endeca Workbench• The eaccmd utility• A custom Web services interface.
4. Once the Agent machines in the implementation are provisioned, the developer sends commands(again using either eaccmd, Endeca Workbench, or a custom interface) to the EAC Central Server.The EAC Central Server communicates these tasks to its Agents, which reside on each machinethat is running Endeca components.
5. The Application Controller manages the entire data update process, according to the instructionsit receives.This includes running Forge and the Indexer (Dgidx) to create indexed data, and startingthe MDEX Engine (Dgraph) based on that indexed data.
For detailed information on configuring and using the Endeca Application Controller, see the OracleEndeca Application Controller Guide.
Ways of communicating with the Endeca Application Controller
You have three ways in which you can communicate with the EAC Central Server:
• Endeca Workbench• The eaccmd utility• A custom Web services interface (using the Endeca WSDL).
About using Endeca Workbench to communicate with the EAC Central Server
Endeca Workbench lets you provision the resources in your environment, such as applications,components and logging, and start and stop these resources as needed. Endeca Workbenchcommunicates this information to the EAC Central Server to coordinate and execute the processesthat result in a running Endeca implementation.
Endeca ConfidentialOracle Endeca Platform Services Forge Guide
Endeca ITL Development | Endeca tools suite20

Endeca Workbench is one of the ways of communicating with the EAC Central Server (the other twoare the eaccmd utility and a custom Web services interface).
The primary benefit of using Endeca Workbench as a means of communication with the EAC CentralServer is that it relieves you of the burden of using the command line utility eaccmd, or of creating acustom Web services interface.
Endeca Workbench allows multiple users to edit the same implementation while avoiding conflictingchanges. Only one Endeca Workbench user can edit a particular implementation module at any giventime, locking out all other users from that module.
Important: Concurrent project editing can only happen in Endeca Workbench. There is nobuilt-in allowance for concurrent users of Endeca Workbench and Developer Studio. Therefore,to prevent changes from being overwritten or otherwise lost, a project should be active in onlyone of these tools at a time.
A closer look at data processing and indexingIt is important to have a clear understanding of how the Data Foundry works with source records beforeyou begin building your instance configuration. Read the following sections for a behind-the-sceneslook at the data processing and indexing functions in the Data Foundry.
Data processingThe data processing workflow in the Data Foundry is defined in your pipeline and typically follows aspecific path.
The Forge and Dgidx programs do the actual data processing, but the components you have definedin the pipeline dictate which tasks are performed and when. The Data Foundry attempts to utilize allof the hardware resources available to it, both by processing records in multiple componentssimultaneously, and by processing multiple records simultaneously within the same component.
The data processing workflow typically follows this path:
1. Load the raw data for each source record.
2. Standardize each source record’s properties and property values to create consistency acrossrecords.
3. Map the source record’s properties into Endeca properties and/or dimensions.
4. Write the tagged Endeca records, along with any dimension hierarchy and index configuration, asfinished data that is ready for indexing.
5. Index the finished data and create the proprietary indices used by the MDEX Engine.
Data processing workflow
The following illustration shows a simple conversion of source data into tagged Endeca records:
Oracle Endeca Platform Services Forge GuideEndeca Confidential
21Endeca ITL Development | A closer look at data processing and indexing
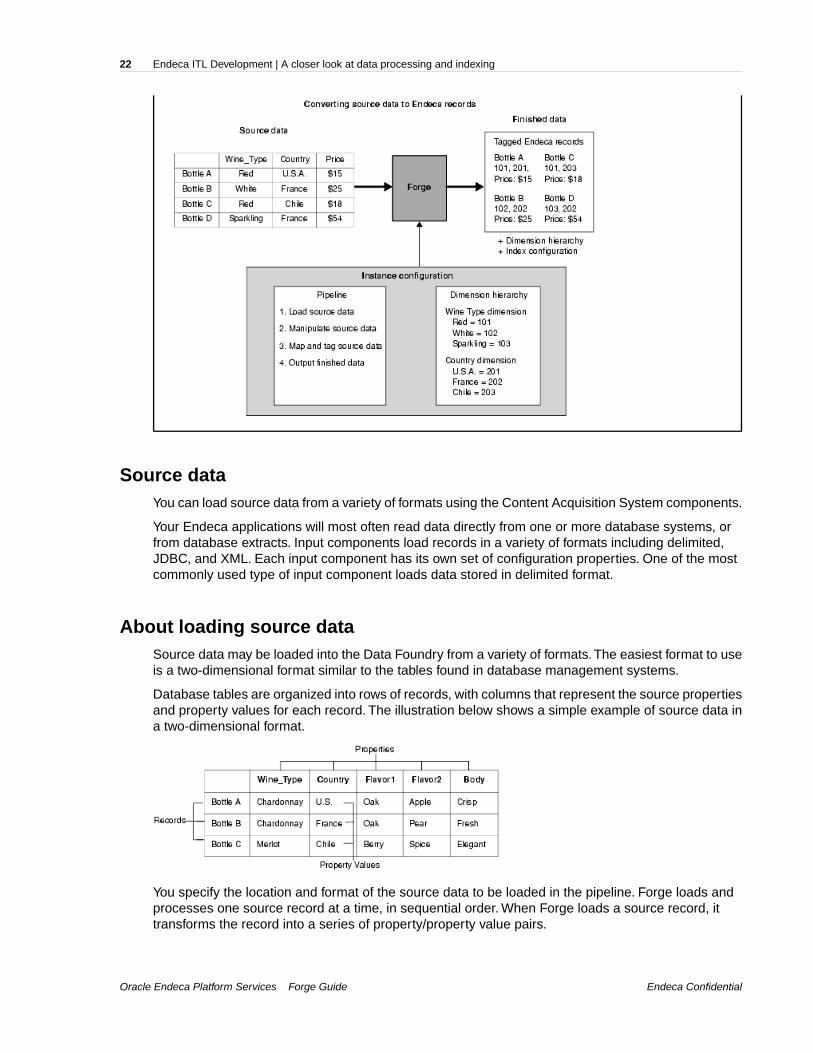
Source dataYou can load source data from a variety of formats using the Content Acquisition System components.
Your Endeca applications will most often read data directly from one or more database systems, orfrom database extracts. Input components load records in a variety of formats including delimited,JDBC, and XML. Each input component has its own set of configuration properties. One of the mostcommonly used type of input component loads data stored in delimited format.
About loading source dataSource data may be loaded into the Data Foundry from a variety of formats.The easiest format to useis a two-dimensional format similar to the tables found in database management systems.
Database tables are organized into rows of records, with columns that represent the source propertiesand property values for each record. The illustration below shows a simple example of source data ina two-dimensional format.
You specify the location and format of the source data to be loaded in the pipeline. Forge loads andprocesses one source record at a time, in sequential order. When Forge loads a source record, ittransforms the record into a series of property/property value pairs.
Endeca ConfidentialOracle Endeca Platform Services Forge Guide
Endeca ITL Development | A closer look at data processing and indexing22

Standardizing source recordsYou specify any standardization of source properties and property values in the pipeline. Standardizationcleanses the data so that it is as consistent as possible before mapping begins.
You can take the following steps to standardize your data:
Note: The functionality described below supports limited data cleansing. If you have an existingdata cleansing infrastructure, it may be more advantageous to use that facility instead.
1. Fix misspellings in your source properties and property values.
2. Explicitly specify the encoding type (e.g., UTF-8, CP-1252, or Latin-1) of the source data whenForge reads it into a Pipeline. If you are loading text-based source data in a Record Adapter, youspecify the encoding type in the Encoding field of the General tab. If an incorrect encoding isspecified, then Forge generates warnings about any characters that do not make sense in thespecified encoding. For example, in the ASCII encoding, any character with a number above 127is considered invalid. Invalid characters are replaced with strings prefixed by %X, so the invalidcharacters are not loaded into Forge.
3. Remove unsupported characters.
The only legal Unicode characters are U+09, U+0D, U+0A, U+20-U+7E, U+85, U+A0-U+D7FF,and U+E000-U+FFFD. In particular, source data should not contain Unicode characters from therange 0x00 through 0x1F with the exceptions of 0x09 (tab), 0x0A (newline), and 0x0D (carriagereturn). For example, records based on databases may use 0x00 (null) as a default empty value.Other characters that are often in existing database sources are 0x1C (field separator), 0x1E (recordseparator), and 0x1F (unit separator).
If a data source contains additional control characters as defined by the chosen encoding, removeor replace the control characters. For example, Windows-1252 specifies 0x7F-0x81, 0x8D-0x90,0x9D-0x9E as control characters, and Latin-1 specifies x7F and x9F as control characters.
The following are some notes and suggestions for dealing with control characters:
• The default input adapter encoding (LATIN-1) for delimited and vertical record input adaptersin Forge makes the assumption, for throughput efficiency, that input data does not containcontrol characters (i.e. x00-x1F [except x09, x0A, x0D] and x7F-x9F).
• For data sources that contain control characters because of character data in a non-Latinencoding (e.g., UTF-8 or Windows-1252), the recommended and best practice solution is toexplicitly specify the encoding type (e.g., "UTF-8" or "Windows-1252").
• For data sources that contain character data in more than one non-Latin encoding (e.g., amixture of UTF-8 and Windows-1252), the recommended and best practice solution is to explicitlyspecify the more conservative encoding type (e.g., UTF-8).
Oracle Endeca Platform Services Forge GuideEndeca Confidential
23Endeca ITL Development | A closer look at data processing and indexing

• For data sources where the data-cleanliness assumption is not satisfied because of real controlcharacters (i.e., x00-x1F [except x09, x0A, x0D] and x7F), the recommended and best practicesolution is to clean the data ahead of time to remove or replace those control characters. If datasources contain additional control characters as defined by the chosen encoding, these shouldalso be removed or replaced.For data sources where the data-cleanliness assumption is notsatisfied because of real control characters (i.e., x00-x1F [except x09, x0A, x0D] and x7F), therecommended and best practice solution is to clean the data ahead of time to remove or replacethose control characters. If data sources contain additional control characters as defined bythe chosen encoding, these should also be removed or replaced.
4. Edit source property values to use a consistent format (for example, USA instead of United Statesor U.S.).
5. Re-assign similar source properties to one common property. (for example, you could assign aFlavor1 property and a Flavor2 property to a generic Flavors property).
Example of standardized source records
The following image shows a simple standardization example:
About mapping source properties and property valuesAfter a source record has been standardized, Forge maps the record’s source properties to dimensionsand Endeca properties.
• Mapping a source property to a dimension indicates that the record should be tagged with adimension value ID from within that dimension. This enables navigation on the property.
• Mapping a source property to an Endeca property indicates that the property should be retainedfor display and search.
Related LinksOverview of Source Property Mapping on page 27
The property mapper is a pipeline component used to map properties on the records in yoursource data to Endeca properties and/or dimensions to make them navigable, displayable,both, or neither. The property mapper is a key component in developing a pipeline, so it isimportant to understand its functions well.
About writing out tagged dataAfter all the source records have been mapped, the Forge program writes its finished data.
The finished data consists of:
• The Endeca records along with their tagged dimension value IDs and Endeca properties.• The names and IDs for each dimension and dimension value, along with any dimension hierarchy.
Endeca ConfidentialOracle Endeca Platform Services Forge Guide
Endeca ITL Development | A closer look at data processing and indexing24

• Any index configuration specified.
About indexingAfter Forge creates the tagged data, Dgidx indexes the output and creates the proprietary indices forthe Endeca MDEX Engine.
Oracle Endeca Platform Services Forge GuideEndeca Confidential
25Endeca ITL Development | A closer look at data processing and indexing


Chapter 3
Overview of Source Property Mapping
The property mapper is a pipeline component used to map properties on the records in your sourcedata to Endeca properties and/or dimensions to make them navigable, displayable, both, or neither.The property mapper is a key component in developing a pipeline, so it is important to understand itsfunctions well.
About source property mappingSource property mappings dictate which dimension values are tagged to each record and whichproperty information is available for record search, sort, and display.
Note that before you can map a source property to an Endeca property or dimension, you must havecreated that Endeca property or dimension.
Source properties can be mapped in three different ways. They can be:
• Mapped to an Endeca property (for search, sort, and display only).• Mapped to a dimension (for search, sort, display, and navigation).• Ignored by specifying a null mapping.
You use a property mapper component to establish source property mappings. Typically, the propertymapper is placed in the pipeline after the Perl manipulator (if one exists) that is used to clean andprepare source properties.You should use a single property mapper to map all of your source propertiesto both Endeca properties or dimensions.
About using a single property mapperYou should use a single property mapper to map all of your source properties to both Endeca propertiesor dimensions. Although there are rare cases where multiple property mappers may be used, Oraclestrongly recommends that you use only one property mapper in any given pipeline.
About using explicit mappingWhen you specify a source property and a target Endeca property or dimension to map to, you arecreating an explicit mapping. In general, explicit mapping is the type of mapping Oracle recommendsyou use.

However, Developer Studio also offers some advanced techniques that allow you to automate themapping process. These techniques are intended to facilitate the process of building prototypes andshould not be used for building production-ready implementations.
Related LinksAdvanced Mapping Techniques on page 39
You can specify mapping techniques and default behavior using the Property Mapper editorAdvanced tab.
Types of source property mapping on page 29There are four types of source property mappings:
Minimum configurationAt a minimum, a property mapper requires both a record source and a dimension source to define thecomponents that will supply it with record and dimension data.
The dimension source must be a dimension server.You can leave the other settings at their defaultswhile developing your initial working pipeline, then add mappings as needed.
About mapping unwanted propertiesMapping properties that do not add value to the application is wasteful in terms of processing time andresources. Oracle recommends, therefore, that you only create mappings for those source propertiesyou intend to use in your final application.
Source properties that do not have mappings specified for them are ignored during the mappingprocess, unless you use the advanced mapping techniques on the Property Mapper editor Advancedtab.
Related LinksAdvanced Mapping Techniques on page 39
You can specify mapping techniques and default behavior using the Property Mapper editorAdvanced tab.
About removing source properties after mappingAfter mapping, source properties still exist as part of the Endeca record.You can remove them andcreate a record that consists exclusively of Endeca properties and dimension values by enabling theFilter Unknown Properties setting in your pipeline's indexer adapter.
The following example shows this option:
Endeca ConfidentialOracle Endeca Platform Services Forge Guide
Overview of Source Property Mapping | Minimum configuration28

Types of source property mappingThere are four types of source property mappings:
• Explicit mapping — Explicit mappings are created when you use the property mapper's Mappingseditor to specify a source property and a target Endeca property or dimension to map to. In otherwords, the mapping does not exist until you explicitly create it. In general, this is the type of mappingOracle recommends that you use.
• Null mapping — Null mappings are a type of explicit mapping, because you have to use theMappings editor to explicitly create one. The difference is that while explicit mappings map asource property to an Endeca property or dimension, a null mapping tells the Data Foundry thatit should not try to map a specific source property.
Explicit null mappings provide a means to prevent an implicit or default mapping from being formedfor a particular source property. In other words, you can enable either implicit or default mapping,and then turn off mapping altogether for selected source properties using explicit null mappings.
• Implicit mapping — When implicit mapping is enabled, any source property that has a name thatis identical to an existing dimension is automatically mapped to that dimension. The like-nameddimension, and any of its constituent dimension values, must already exist in your dimensionhierarchy.
Note: Implicit mapping works only if no explicit mapping exists.
Implicit mapping is limited to mappings between source properties and dimensions. Implicit mappingcannot take place between source properties and Endeca properties.
You enable implicit mapping from the property mapper Advanced tab.
• Default mapping — This option defines the default that Forge uses to handle source propertiesthat have neither explicit nor implicit mappings.You can specify that Forge ignore source propertieswithout explicit or implicit mappings, create a new Endeca property to map to the source property,or create a new dimension to map to the source property.
Oracle Endeca Platform Services Forge GuideEndeca Confidential
29Overview of Source Property Mapping | Types of source property mapping

You enable default mapping from the property mapper Advanced tab.
Important: Techniques to automate the mapping process are intended to facilitate the processof building prototypes and should not be used for building production-ready implementations.Implicit and default mapping techniques can have unexpected results if you’re not careful whenusing them.
Related LinksAbout enabling implicit mapping on page 39
The first advanced option, Map source properties to Endeca dimensions with the samename, enables implicit mapping.
Enabling default mapping on page 40The default mapping option defines the default that Forge uses to handle source propertiesthat have neither explicit nor implicit mappings. There are three possible settings.
Priority order of source property mappingForge uses a specific prioritization when mapping source properties.
1. Forge looks for an explicit mapping for the source property.2. If no explicit mapping exists and “Map source properties to Endeca dimensions with the same
name” is enabled, Forge tries to create an implicit mapping between the source property and alike-named dimension.
3. If no explicit or implicit mapping exists, Forge uses the “If no mapping is found, map sourceproperties to Endeca: Properties/Dimensions” option to determine how to handle the mapping.
About adding a property mapperThis section provides a quick overview to adding a property mapper to the pipeline, including:
• Determining where to place the property mapper in the pipeline.• Creating the property mapper in Developer Studio.• Using the Mappings editor, which you use to create explicit and null mappings.
Determining where to add the property mapperThe fundamental requirements for the placement of a property mapper in the pipeline are:
• The property mapper must come after a record input component (such as a record adapter) anda dimension input component (such as a dimension server).
• The property mapper must come before the indexer adapter.
In a basic pipeline, the property mapper uses the record adapter as its record source and the dimensionserver as its dimension source, and then the indexer adapter takes the property mapper’s output asits record source.
Partial Update Pipeline
Pipelines used for partial updates also use a property mapper, as explained in the Endeca PartialUpdates Guide. The Pipeline Diagram example below shows a partial update pipeline:
Endeca ConfidentialOracle Endeca Platform Services Forge Guide
Overview of Source Property Mapping | About adding a property mapper30

In this partial update pipeline, the property mapper (PropDimMapper) uses the record adapter(LoadUpdateData) as its record source and the dimension server as its dimension source.The recordmanipulator (UpdateManipulator) uses the property mapper as its record source.
Creating the property mapperThe Developer Studio help provides a step-by-step procedure of how to add a property mapper toyour pipeline. This section gives an overview of the general steps.
To create a property mapper:
1. In Developer Studio, open the Pipeline Diagram dialog.
2. Select New > Property Mapper.A New Property Mapper editor is displayed.
Oracle Endeca Platform Services Forge GuideEndeca Confidential
31Overview of Source Property Mapping | About adding a property mapper

3. Enter a name for the property mapper, a record source, and a dimension source.You can leavethe other settings at their defaults while developing your initial working pipeline.
4. To add the property mapper, click OK.
The next sections will give overviews of the functions available in the Mappings editor.
The Mappings editorThe Mappings editor is where you create your source property mappings.You access this editorfrom the Property Mapper editor by clicking the Mappings button.
When you open the Mappings editor, it displays a table of the existing source property mappings:
The meanings of the table columns are:
• Source – The name of the source property to be mapped.• Target – The name of an Endeca property or dimension to which the source property will be
mapped. This cell will be empty if the source property has a null mapping.• Match mode – Indicates the type of match mode used for a dimension mapping (the cell will be
empty for properties).
Related LinksAbout choosing a match mode for dimensions on page 35
In Developer Studio, you set the type of dimension value handling, on a per mapping basis,by selecting a mode from the Match mode list in the Dimension Mapping editor, as illustratedbelow:
Creating new source mappingsThe New button lets you create a new source property mapping.
To create a new mapping:
1. Left-click the New button.Three choices are displayed.
Endeca ConfidentialOracle Endeca Platform Services Forge Guide
Overview of Source Property Mapping | The Mappings editor32
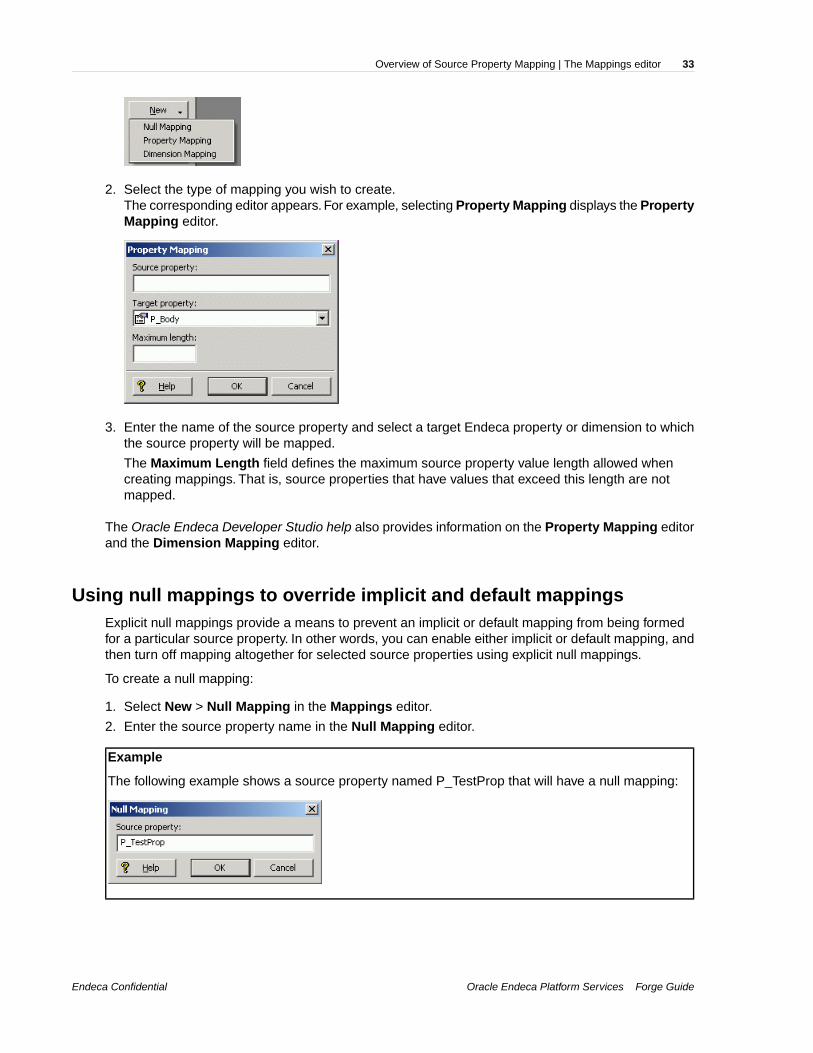
2. Select the type of mapping you wish to create.The corresponding editor appears. For example, selecting Property Mapping displays the PropertyMapping editor.
3. Enter the name of the source property and select a target Endeca property or dimension to whichthe source property will be mapped.
The Maximum Length field defines the maximum source property value length allowed whencreating mappings. That is, source properties that have values that exceed this length are notmapped.
The Oracle Endeca Developer Studio help also provides information on the Property Mapping editorand the Dimension Mapping editor.
Using null mappings to override implicit and default mappingsExplicit null mappings provide a means to prevent an implicit or default mapping from being formedfor a particular source property. In other words, you can enable either implicit or default mapping, andthen turn off mapping altogether for selected source properties using explicit null mappings.
To create a null mapping:
1. Select New > Null Mapping in the Mappings editor.
2. Enter the source property name in the Null Mapping editor.
Example
The following example shows a source property named P_TestProp that will have a null mapping:
Oracle Endeca Platform Services Forge GuideEndeca Confidential
33Overview of Source Property Mapping | The Mappings editor

About assigning multiple mappingsYou can assign more than one mapping to a source property—for example, you can map a sourceproperty to both a dimension and an Endeca property. A typical source property that you may want tomap to both a dimension and an Endeca property is Price.
You can map the Price source property in the following ways:
• To a Price Range dimension that allows the end-user to search for records within a given pricerange (for example, wines that cost between $10 and $25).
• To an Endeca property that allows you to display the discrete price of each individual record.
Conversely, you can assign more than one source property to a single dimension or Endeca property.For example, if you have multiple source properties that are equivalent, most likely they should all bemapped to the same dimension or Endeca property. Flavor and Color are example properties thatmight require this behavior.
Endeca ConfidentialOracle Endeca Platform Services Forge Guide
Overview of Source Property Mapping | The Mappings editor34

Chapter 4
Match Modes
When Forge maps a source property value to a dimension value, the dimension value it uses caneither be explicitly defined in the dimension hierarchy or automatically generated by Forge.You controlthis behavior by using match modes.
About choosing a match mode for dimensionsIn Developer Studio, you set the type of dimension value handling, on a per mapping basis, by selectinga mode from the Match mode list in the Dimension Mapping editor, as illustrated below:
There are three match modes you can choose from:
• Normal• Must Match• Auto Generate
Note: Match modes only apply to dimensions.They are not used when mapping source propertiesto Endeca properties.
Normal modeNormal match mode maps only those source property values that have a matching dimension valueexplicitly defined in the dimension hierarchy.
Forge assigns the IDs for any matching dimension values to the Endeca records. Any source propertyvalues that do not have matching dimension values in the dimension hierarchy are ignored.

In order for a source property value to match a dimension value, the dimension value’s definition mustcontain a synonym that:
• Is an exact text match to the source property value.• Has its Classify option enabled.
Example
This example shows the Synonyms dialog in the Dimension Value editor with a dimension valuesynonym that has its Classify option enabled:
Must Match modeMust Match behaves identically to Normal, with the exception that Must Match issues a warning forany source property values that do not have matching dimension values.
Related LinksThe Forge Logging System on page 109
This section provides a brief introduction to the Forge logging system. Its command-lineinterface allows you to focus on the messages that interest you globally and by topic.
Auto Generate modeAuto Generate specifies that Forge automatically generates a dimension value name and ID for anysource property value that does not have a matching dimension value in the dimension hierarchy.Forge uses these automatically-generated names and IDs to tag the Endeca records the same as itwould explicitly-defined dimension values.
Auto Generate mode dramatically reduces the amount of editing you have to do to the dimensionhierarchy. However, auto-generated dimensions are always flat. Auto-generated names and IDs arepersisted in a file that you specify as part of a dimension server component.
Related LinksDimension server on page 50
Dimension servers work in conjunction with dimension adapters, and serve as a centralizedsource of dimension information for all other pipeline components.
Endeca ConfidentialOracle Endeca Platform Services Forge Guide
Match Modes | About choosing a match mode for dimensions36

Rules of thumb for dimension mappingWhen you choose the match mode to use for generating your dimension values, keep in mind thefollowing two rules of thumb:
• If you manually define dimension values in the dimension hierarchy, the Normal, Must Match, andAuto Generate features behave identically with respect to those dimension values.
• Any source property value that does not have a matching dimension value specified in the dimensionhierarchy will not be mapped unless you have set the dimension to Auto Generate in the pipeline.
Dimension mapping exampleThe following illustration shows a simple dimension mapping example that uses a combination ofgeneration methods. The sections after the illustration describe the mapping behavior in the example.
Dimension mapping
Wine_Type dimension
The Red and White property values have matching Red and White dimension values specified in thedimension hierarchy. These property values are mapped to the Red and White dimension value IDs,
Oracle Endeca Platform Services Forge GuideEndeca Confidential
37Match Modes | Rules of thumb for dimension mapping

respectively. Bottles B and C are tagged with the Red dimension value ID, and Bottle A is tagged withthe White dimension value ID.
The Sparkling property value does not have a matching dimension value in the dimension hierarchy.The Wine Type dimension is set to Must Match, so this property is ignored and a warning is issued.As a result, Bottle D does not get tagged with a dimension value ID from the Wine Type dimension.
Country dimension
There are no dimension values explicitly defined in the dimension hierarchy for the Country dimension.However, this dimension is set to Auto Generate, so all three of the Country property values (USA,France, and Chile) are mapped to automatically-generated dimension value IDs.
Bottle A is tagged with the auto-generated ID for the USA dimension value. Bottles B and D are taggedwith the auto-generated ID for the France dimension value. Bottle C is tagged with the auto-generatedID for the Chile dimension value.
Body dimension
The Crisp property value has a matching dimension value specified in the dimension hierarchy, so theCrisp property value is mapped to the Crisp dimension value. Bottle A is tagged with the Crisp dimensionvalue ID.
The other three property values (Elegant, Full, and Fresh) do not have matching dimension values inthe dimension hierarchy but, because the Body dimension is set to Auto Generate, these three propertyvalues are mapped to automatically-generated dimension value IDs.
Bottle B is tagged with the auto-generated ID for the Elegant dimension value. Bottle C is tagged withthe auto-generated ID for the Full dimension value. Bottle D is tagged with the auto-generated ID forthe Fresh dimension value.
Regardless of how they were generated, all of the dimension value IDs are included in the finisheddata that Forge produces for indexing.
Endeca ConfidentialOracle Endeca Platform Services Forge Guide
Match Modes | Dimension mapping example38

Chapter 5
Advanced Mapping Techniques
You can specify mapping techniques and default behavior using the Property Mapper editor Advancedtab.
The Property Mapper editor Advanced tabThe Property Mapper editor Advanced tab (shown below) lets you configure advanced mappingtechniques when you are building prototypes.
The following sections describes these techniques.
Important: Oracle strongly recommends that you use the explicit mapping techniques, becausethe advanced mapping techniques can have unexpected results if you are not careful whenusing them.
About enabling implicit mappingThe first advanced option, Map source properties to Endeca dimensions with the same name,enables implicit mapping.

When implicit mapping is enabled, any source property that has a name that is identical to an existingdimension is automatically mapped to that dimension. The like-named dimension, and any of itsconstituent dimension values, must already exist in your dimension hierarchy (in other words, you’vealready defined them using the Dimensions and Dimension Values editors).
Implicit mapping uses the Normal mapping mode where only those source property values that havea matching dimension value explicitly defined in the dimension hierarchy are mapped. Forge assignsthe IDs for any matching dimension values to the Endeca records. Any source property values thatdo not have matching dimension values in the dimension hierarchy are ignored.
Note: Implicit mapping is limited to mappings between source properties and dimensions. Thismeans that implicit mapping cannot take place between source properties and Endeca properties.In addition, implicit mapping only works if no explicit mapping exists.
Enabling default mappingThe default mapping option defines the default that Forge uses to handle source properties that haveneither explicit nor implicit mappings. There are three possible settings.
Use the default mapping option with caution because:
• With this option enabled, all source properties will ultimately be mapped and mapped propertiesuse system resources. Ideally, you should only map source properties that you intend to use inyour implementation so that you minimize the use of system resources.
• Many production-level implementations automatically pull and process new data when it is available.If this data has new source properties, these properties will be mapped and included in your MDEXEngine indices. Again, this uses system resources unnecessarily but, perhaps more importantly,this situation may also result in the display of dimensions or Endeca properties that you do notwant your users to see.
To set the default mapping options:
1. Select the Advanced tab in the Property Mapper editor.The tab includes the following option:
If no mapping is found, map source properties to Endeca:
• Properties• Dimensions
2. Select one or neither of the two settings:
DescriptionOption
Uncheck the option altogether to ignore source properties that do not have anexplicit or implicit mapping defined.
Neither
Check Property to create a mapping between the source property and anEndeca property. Forge does this by creating a new Endeca property that usesthe same name and value as the source property and assigning it to the record.
Properties
Check Dimension to create a mapping between the source property and adimension. Forge does this by creating a new dimension, using the source
Dimensions
property’s name. Forge uses the Auto Generate mode to populate thedimension with dimension values that match the source property’s values.
Endeca ConfidentialOracle Endeca Platform Services Forge Guide
Advanced Mapping Techniques | Enabling default mapping40

About the default maximum length for source propertyvalues
The Default Maximum Length option defines the maximum source property value length allowedwhen creating mappings. Source properties that have values that exceed this length are not mapped,and a warning is issued by the Forge Logging system, if so configured.
If you do not explicitly specify a Default Maximum Length, Forge checks against the following limitswhen determining whether to map a value:
• Source properties that are mapped to Endeca properties can have values of any length.• Source properties that are mapped to dimensions must have values that are 255 characters or
less.
If you do explicitly specify a Default Maximum Length, that length is applied to both Endeca propertyand dimension mappings.
Related LinksThe Forge Logging System on page 109
This section provides a brief introduction to the Forge logging system. Its command-lineinterface allows you to focus on the messages that interest you globally and by topic.
About overriding the default maximum length settingYou can override the Default Maximum Length setting on a per-mapping basis by using the MaximumLength field in both the Property Mapping and Dimension Mapping editors.
Example
Suppose you use the Default Maximum Length to limit the length of all your source property mappingsto be 100 characters. However, you want to allow the P_Description property to have a greater limit(say, 255 characters).You would then use the Property Mapping editor to set an override for theP_Description source property that allows the description to be up to 255 characters:
Oracle Endeca Platform Services Forge GuideEndeca Confidential
41Advanced Mapping Techniques | About the default maximum length for source property values


Chapter 6
Before Building Your InstanceConfiguration
Before you start building your instance configuration, you must create a directory structure to supportyour data processing back end.
Endeca Application Controller directory structureWhile the Endeca Application Controller builds the directory structure it requires, you first have to buildtwo directories:
• Endeca instance configuration directory — You create this directory and its contents withDeveloper Studio (using the File > New Project menu). The directory contains the DeveloperStudio project file, the baseline pipeline file, the partial updates pipeline file (if you are runningpartial updates), and the index configuration files (XML).You then use Developer Studio to sendthe instance configuration to Endeca Workbench.
• Incoming directory — This directory contains the source data to be processed by Forge.Youthen provision this directory in Endeca Workbench by using the EAC Administration > AdminConsole menu, and selecting the Forge component tab.
You must create these directories before you use Endeca Workbench to provision your applicationand its components to the EAC. Be sure to copy your source data to the incoming directory on themachine that will be running Forge. This is the location where Forge looks for source data.
Pipeline overviewYour pipeline functions as the script for the entire data transformation process that occurs when yourun the Forge program. The pipeline specifies things like the format and location of the source data,any changes to be made to the source data (standardization), and the mapping method to use foreach of the source data’s properties.
A pipeline is composed of a collection of components. Each component performs a specific functionduring the transformation of your source data into Endeca records. Components are linked togetherby means of cross-references, giving the pipeline a sequential flow.

About adding and editing pipeline componentsYou add and edit pipeline components using the Pipeline Diagram editor in Developer Studio.
The pipeline diagram depicts the components in your pipeline and the relationship between them. Itdescribes the flow of events that occur in the process of converting raw data to a format that the EndecaMDEX Engine can use, making it easy for you to trace the logic of your data model. The pipelinediagram is the best way to maneuver and maintain a high-level view of your pipeline as it grows insize and complexity.
For details on adding and editing pipeline components, see the Oracle Endeca Developer Studio Help.
About creating a data flow using component namesYou must give every component in your pipeline a unique name that identifies it to the other components.You use these names to specify cross-references between components, effectively creating a flow ofdata through the pipeline.
Pipeline Example
For example, by tracing the data flow backwards in the following illustration and starting from thebottom, you can see that:
1. IndexerAdapter gets its data from PropMapper and DimensionServer.2. PropMapper gets its data from LoadData and DimensionServer.3. DimensionServer gets its data from Dimensions.4. LoadData and Dimensions both get their data from source files (this is indicated by the lack of
arrows feeding them).
When you specify a data source within a component’s editor, you are indicating which of the othercomponents will provide data to that component. Components can have multiple data sources, suchas the PropMapper component above, which has both a record source, LoadData, and a dimensionsource, DimensionServer.
Endeca ConfidentialOracle Endeca Platform Services Forge Guide
Before Building Your Instance Configuration | Pipeline overview44

Pipeline Example: Adding a Pipeline Component
Alternatively, you can connect pipeline components graphically in the Pipeline Diagram editor.
When you add and remove components, you must be careful to make any data source changesrequired to maintain the correct data flow. To illustrate this point, the example above is modified toinclude another component, RecordManipulator, that comes between LoadData and PropMapper inthe data flow of the pipeline. Adding RecordManipulator in this location requires that:
• RecordManipulator’s data source is set to LoadData.• PropMapper’s data source is changed to RecordManipulator.
Similar care must be taken when removing a component from a pipeline.
URLs in the pipelineSome of the components in the pipeline require URLs that point to external files, such as source datafiles. All of these URLs are relative to the location of the Pipeline.epx file.
This file contains the pipeline specifications that you have created in Developer Studio. DeveloperStudio automatically generates a Pipeline.epx file when you create a new project and saves it inthe same directory as your .esp project file.
Note: As a rule, you should not move the Pipeline.epx file, or any other automaticallygenerated files, from their location in the same directory as the .esp project file.
Oracle Endeca Platform Services Forge GuideEndeca Confidential
45Before Building Your Instance Configuration | Pipeline overview


Chapter 7
About Creating a Basic Pipeline
Endeca Developer Studio provides a Basic Pipeline template that helps you get started when buildingyour pipeline from scratch. The goal of the Basic Pipeline template is to get you up and running witha working pipeline as quickly as possible. A working pipeline is defined as a pipeline that can read insource records and output finished records, ready for indexing.
The Basic Pipeline templateThe Basic Pipeline template streamlines the setup for a pipeline that contains the following fivecomponents:
• Record adapter (LoadData) for loading source data.• Property mapper (PropMapper) for mapping source properties to Endeca properties and dimensions.• Indexer adapter (IndexerAdapter) for writing out data that is ready to be indexed by the Dgidx
program.• Dimension adapter (Dimensions) for loading dimension data.• Dimension server (DimensionServer) that functions as a single repository for dimension data that
has been input via one or more dimension adapters.
The following illustration shows the pipeline diagram for a basic pipeline:

Oracle recommends that you leave most of the Basic Pipeline component options at their defaultsettings and customize them later, after you have a basic pipeline functioning. Endeca also recommendsthat you do not include other components to perform additional tasks until after you have a functioningpipeline. The remainder of this section describes how to get a Basic Pipeline working.
Note: This section does not describe all of the features of a basic pipeline’s components inexhaustive detail. It describes the minimum you need to know to create a functioning pipeline.Detailed information on individual components is included in subsequent chapters of this bookand in the Oracle Endeca Developer Studio Help.
Record adaptersRecord adapters load and save records in a variety of formats, including delimited, binary, ODBC(Windows only), JDBC, and Microsoft Exchange. Each record adapter format has its own set ofattributes.
This section describes the most common type of record adapter: an input record adapter that loadsdata stored in delimited format. See the Oracle Endeca Developer Studio help for detailed informationon the other record adapter types.
Note: Output record adapters are primarily used as a diagnostic tool and for translating formats.
Source data in delimited format
A delimited file is a rectangular file with columns and rows separated by specified characters. Eachrow corresponds to a record and each column corresponds to a property.
Endeca ConfidentialOracle Endeca Platform Services Forge Guide
About Creating a Basic Pipeline | Record adapters48

The records in a delimited file must have identical properties, in terms of number and type, althoughit is possible for a record to have a null value for a property.
About the Record Index tabThe Record Index tab allows you to add dimensions or properties that are used in the record adapter'srecord index to control the order in which records are read in for downstream components.
A record index is used to support join functionality, and is needed only if a downstream componentwill need to request records by ID. For example, a cache needs to be able to respond to a recordassembler's (left join) request for a particular record.
If the order of the records being used by the downstream component do not matter, then you shouldnot add a record index to the record adapter. For example, a switch join does not require a recordindex on components above it because it does not matter what order the records are pulled in.
If the record adapter has a record index that is not required, you may see a Forge log WARN messageabout an ID conflict, as illustrated by the following example:
FORGE {baseline}: The RecordAdapter 'LoadMainData' has recordsthat do not follow the index specified.Record number '14' violates the index sort order with record key[R_VHNR] => {'PVal [value= 361945]'} (the previous record keywas [R_VHNR] => {'PVal [value= 957483]'})!
If you see this warning, remove the record index from the record adapter and Forge will stop removingrecords that do not conform to the record index.
Note: There are two cases where join keys are not required for data sources and, hence, neitherare record indexes.
Related LinksJoins that do not require record caches on page 87
There are two join cases that do not require record caches:
Dimension adapterYou use dimension adapters to load dimension data.
When you create a new project in Developer Studio, a default dimensions file, called Dimensions.xml,is created for you and stored in the same directory as your .esp project file. As you make changesto your dimension hierarchy in Developer Studio, this file is updated to reflect the changes.
Oracle Endeca Platform Services Forge GuideEndeca Confidential
49About Creating a Basic Pipeline | Dimension adapter

Note: Dimension adapters can also save dimension information for diagnostic purposes. Savingdimensions is an advanced topic and it is not covered in this section.
Dimension serverDimension servers work in conjunction with dimension adapters, and serve as a centralized sourceof dimension information for all other pipeline components.
Dimension information typically follows the path outlined below:
1. Dimension adapters load dimension information from your dimension source files.2. The dimension server gets its dimension information from the dimension adapters.3. Other pipeline components get their dimension information from the dimension server.
Setting up your pipeline with a dimension server allows you to change your dimension adapters asneeded without having to change the dimension source for all other pipeline components that requiredimension information.
In addition to functioning as a centralized source for dimension information, dimension servers alsocoordinate the loading and saving of dimension information that is generated when using the AutoGenerate option during source property-to-dimension mapping. Auto-generated dimensions arepersisted in the file location that is specified as part of the dimension server component.
Typically, there is only one dimension server per pipeline.
Related LinksOverview of Source Property Mapping on page 27
The property mapper is a pipeline component used to map properties on the records in yoursource data to Endeca properties and/or dimensions to make them navigable, displayable,
Endeca ConfidentialOracle Endeca Platform Services Forge Guide
About Creating a Basic Pipeline | Dimension server50

both, or neither. The property mapper is a key component in developing a pipeline, so it isimportant to understand its functions well.
Property mapperYou use a property mapper component to establish mappings between source properties, and Endecaproperties and dimensions.These mappings dictate which dimension values are tagged to the currentrecord and which property information is available for record search and display.
Oracle strongly recommends that you have only one property mapper per pipeline.
At a minimum, a property mapper requires both a record source and a dimension source to define thecomponents that will supply it with record and dimension data.You can leave the other settings attheir defaults while developing your initial working pipeline.
Important: The property mapper is a crucial component and you should be very familiar withits settings.
Related LinksOverview of Source Property Mapping on page 27
The property mapper is a pipeline component used to map properties on the records in yoursource data to Endeca properties and/or dimensions to make them navigable, displayable,both, or neither. The property mapper is a key component in developing a pipeline, so it isimportant to understand its functions well.
Indexer adapterAn indexer adapter writes out data that is ready to be indexed by the Dgidx program. An indexeradapter requires two data sources: one for record data and one for dimension data. Typically, thereis only one indexer adapter per pipeline.
Oracle Endeca Platform Services Forge GuideEndeca Confidential
51About Creating a Basic Pipeline | Property mapper

Chapter 8
About Running Your Basic Pipeline
After you have created your basic pipeline, you should run it and view the results.Your initial goal isto make sure that your source data is running through the entire pipeline and being incorporated intothe MDEX Engine indices.
Running a pipelineThis task describes the steps you use to run your basic pipeline.
The Basic Pipeline template does not contain a source data file. Therefore, before you run the BasicPipeline, make sure you have created an incoming directory that contains source data. Alternatively,you can use the incoming directory in the sample_wine_data reference implementation.
See the Oracle Endeca Workbench Administrator’s Guide for more details on running a pipeline underthe Endeca Application Controller.
To run a pipeline:
1. In Endeca Workbench, provision your application and its components to the EAC Central Server,as documented in the Oracle Endeca Workbench Administrator’s Guide.
2. In Developer Studio, use the Tools > Endeca Workbench menu option to send your instanceconfiguration to Endeca Workbench by using the Set Instance Configuration option.
3. In Endeca Workbench, run a baseline update script to process your data and start the MDEX Engine(optionally, you can run a baseline update script using the eaccmd utility, or the custom Webservices interface).
Viewing pipeline results in a UI reference implementationOnce you have an MDEX Engine running, you can use a generic front-end, called a UI referenceimplementation, to view the data. UI reference implementations are sample Web applications includedwith the Endeca distribution.
This procedure assumes that the JSP UI reference implementation that is shipped with the EndecaWorkbench is running.
To test your basic pipeline using a UI reference implementation:
1. Open Internet Explorer 6.0 or later.

2. Navigate to the JSP reference implementation; for example:
http://localhost:8888/endeca_jspref
3. Enter the host and port for your MDEX Engine and click Go.
At this point in the process, you should see a list of records but no Endeca properties or dimensions.
You must define and map Endeca properties and dimensions before they can appear in your Webapplication.
Related LinksAfter Your Basic Pipeline Is Running on page 55
After you get your basic pipeline running, you can begin crafting your Endeca implementationin earnest. Again, Oracle recommends a stepped approach where you implement a smallset of features, test them to make sure your implementation is behaving as expected, andthen implement additional features.
Endeca ConfidentialOracle Endeca Platform Services Forge Guide
About Running Your Basic Pipeline | Viewing pipeline results in a UI reference implementation54

Chapter 9
After Your Basic Pipeline Is Running
After you get your basic pipeline running, you can begin crafting your Endeca implementation in earnest.Again, Oracle recommends a stepped approach where you implement a small set of features, testthem to make sure your implementation is behaving as expected, and then implement additionalfeatures.
Additional tasksAdditional tasks you will most likely want to do include:
• Create Endeca properties and dimensions, and then map them to your source properties.• Designate an Endeca property to be the record specifier.• Add pipeline components for various tasks such as joining source data and manipulating source
data properties.• Specify additional index configuration settings such as search configuration, dimension groups,
and so forth.
Important: The information in this section gives a high level overview of these additional tasksand is not intended to be complete. Refer to other sections in this documentation and the OracleEndeca Developer Studio Help for detailed information on implementing the features listed here,as well as many others.
About source property mappingSource property mappings dictate which dimension values are tagged to each record and whichproperty information is available for record search, sort, and display.
Before you can map a source property to an Endeca property or dimension, you must create theEndeca property or dimension. This section covers how to create Endeca properties and dimensionsas well as how to map source properties to them. It also tells you how to create null mappings.
Source properties can be mapped in three different ways. They can be:
• Mapped to an Endeca property (for search, sort, and display only).• Mapped to a dimension (for search, sort, display, and navigation).• Ignored by specifying a null mapping.
Note: The mapping described in this section is known as explicit mapping. In general, this isthe type of mapping Oracle recommends that you use.
Related LinksOverview of Source Property Mapping on page 27
The property mapper is a pipeline component used to map properties on the records in yoursource data to Endeca properties and/or dimensions to make them navigable, displayable,both, or neither. The property mapper is a key component in developing a pipeline, so it isimportant to understand its functions well.
Adding and mapping Endeca propertiesPreparing an Endeca property for display within an Endeca implementation is a two-step process.
Note: The UI reference implementation has been written to iterate over all the Endeca propertiesthat are returned with a query and display them, so you don’t have to do any additional codingto get the Endeca property to display in the UI.
You must:
1. Add the Endeca property to your project.You do this in the Property editor in Developer Studio.
2. Create a mapping between a source property and the Endeca property.You do this in the PropertyMapper editor in Developer Studio.
This step instructs the Data Foundry to populate the Endeca property with the value from the sourceproperty. Without this mapping, the Endeca property will not be available for display.
Continue adding Endeca properties and mapping them to source properties.You can map multiplesource properties to a single Endeca property.
Adding and mapping dimensionsSimilar to creating an Endeca property, the process for adding a dimension to your implementationhas several steps.
To create a dimension, you must:
1. Add the dimension to your project.You do this in the Dimension editor in Developer Studio.
2. Add any dimension values that you want to create manually.
3. Create a mapping between a source property and the dimension in the Developer Studio PropertyMapper editor. Without this mapping, the dimension will be removed from the MDEX Engine.
Related LinksOverview of Source Property Mapping on page 27
The property mapper is a pipeline component used to map properties on the records in yoursource data to Endeca properties and/or dimensions to make them navigable, displayable,both, or neither. The property mapper is a key component in developing a pipeline, so it isimportant to understand its functions well.
Endeca ConfidentialOracle Endeca Platform Services Forge Guide
After Your Basic Pipeline Is Running | About source property mapping56

About synonyms
Synonyms provide a textual way to refer to a dimension value, rather than by ID alone.You specifythe way each synonym is used by the MDEX Engine in the Dimension Value Synonyms editor inDeveloper Studio.
A dimension value can have multiple synonyms.You can choose from Search, Classify, and (Display)options as follows:
• Enabling the Search option indicates that this synonym should be considered during record anddimension searches.You can enable search for multiple synonyms, allowing you to create a morerobust dimension value for searching.
• Enabling the Classify option indicates that this synonym should be considered when attemptingto map a source property value to this dimension value. In order for a source property value tomatch a dimension value, the dimension value’s definition must contain a synonym that:
• Is an exact text match to the source property value.• Has its Classify option enabled.
If a synonym does not have its Classify option enabled, it is ignored during mapping, regardlessof whether or not it is a text match to a source property value.
Again, by enabling classification for multiple synonyms, you increase the mapping potential for adimension value because a source property can map to any of the synonyms that have beenmarked with Classify.
• While you can have multiple synonyms for a dimension value, only one synonym can be markedfor display. This is the synonym whose text is displayed in your implementation whenever thisdimension value is shown. By default, the first synonym you create is set to be displayed, as isindicated by the parentheses around the synonym’s name, but you can set any synonym for displayin the Synonyms dialog box
To better understand these three options, consider the following example.
Example
This dimension value has an ID of 100 (automatically assigned by Developer Studio) and threesynonyms:
Dimension Value ID = 100Synonyms = 2002 SEARCH=enabled CLASSIFY=enabled DISPLAY=yes ‘02 SEARCH=enabled CLASSIFY=enabled DISPLAY=no 02 SEARCH=enabled CLASSIFY=enabled DISPLAY=no
In this example, records with source property values matching any of the following terms would betagged with the dimension value ID 100, and dimension searches on those terms would return thatdimension value ID:
2002
‘02
02
Additionally, anytime the dimension value with an ID of 100 is displayed in the implementation, thetext used to represent the dimension value is “2002”.
After you have created the dimension and defined any manual dimension values, you create themapping between a source property and the dimension.
Oracle Endeca Platform Services Forge GuideEndeca Confidential
57After Your Basic Pipeline Is Running | About source property mapping

Note: The UI reference implementation has been written to iterate over all the dimensions thatare returned with a query and display them, so you don’t have to do any additional coding toget the dimension to display in the UI.
Continue adding dimensions and mapping them to source properties.You can map multiple sourceproperties to a single dimension.
About null mappingsA null mapping, set in the Developer Studio Property Mapper editor, indicates that a source propertyshould be ignored.
Explicit null mappings provide a means to prevent an automated mapping from being formed for aparticular source property. In other words, you can enable automated mapping, and then turn offmapping for selected source properties using explicit null mappings.
Related LinksTypes of source property mapping on page 29
There are four types of source property mappings:
Setting the record specifier propertyDeveloper Studio lets you configure how records should be identified by your application. TheRECORD_SPEC attribute allows you to specify the property that you wish to use to identify specificrecords.
Records can have only one record spec during updates and at startup.You may set the RECORD_SPECattribute’s value to TRUE in any property where the values for the property meet the followingrequirements:
• The value for this property on each record must be unique.• Each record should be assigned exactly one value for this property.
Only one property in the project may have the RECORD_SPEC attribute set to TRUE.
For example, Forge uses the RECORD_SPEC property value to identify the records that it is transforming.If the project does not have a designated the RECORD_SPEC property, Forge assigns a unique recordspecifier value to each record. As another example, implementing partial updates requires that theproject have an assigned RECORD_SPEC property.
Although it is valid for a project to not have a specific RECORD_SPEC property, it is recommended thatyou assign one. For example, you may wish to use a field such as UPC, SKU, or part_number toidentify a record.
To configure a RECORD_SPEC attribute for an existing property:
1. In the Project tab of Developer Studio, double-click Properties.
2. From the Properties view, select a property and click Edit.The Property editor is displayed.
3. In the General tab, check Use for Record Spec.
4. Click OK.The Properties view is redisplayed.
Endeca ConfidentialOracle Endeca Platform Services Forge Guide
After Your Basic Pipeline Is Running | Setting the record specifier property58

5. Select File > Save.
About specifying dimensions and dimension value orderThe MDEX Engine returns dimensions and dimension values in the order in which they are specifiedin the Developer Studio Dimensions and Dimension Values editors, respectively. As a result, youmay want to reorder your dimensions and dimension values to better control their display.
Additional pipeline componentsAfter you have added your dimensions and Endeca properties to your project, you may want to includeother pipeline components to perform additional tasks. The following table describes the componentsyou can add:
For More InfoDescriptionComponent
"Adding a record assembler" inthis guide and in the OracleEndeca Developer Studio Help.
Join data from one or more secondary datasources to the current record.
Recordassemblers
"Adding a record cache" in thisguide and in the Oracle EndecaDeveloper Studio Help.
Store a temporary copy of record data that hasbeen read in by a record adapter. Recordcaches are generally used in conjunction withrecord assemblers and are set up to containdata from secondary data sources.
Record caches
For information on how to writeyour own Java manipulator and
A Java manipulator is your own code in Javathat you can use to perform data manipulation
Java manipulators
for a sample code, see theon properties and records. Java manipulatorsEndeca Content AdapterDevelopment Kit (CADK) Guide.
provide you with the most generic way ofchanging records in the Forge pipeline.
A Java manipulator contains a class that isbased on the Java API Adapter interface in theContent Adapter Development Kit (CADK).
See "Using Perl Manipulators toChange Source Properties" in the
Allow you to write custom Perl code thatchanges the data associated with an Endeca
Perl manipulators
Oracle Endeca Developer StudioHelp.
record. Perl manipulators are useful for suchtasks as manually adding or removing sourceproperties, changing the value of a source
For details on Perl code syntax,see the Endeca Forge API Guidefor Perl.
property, retrieving records based on aparticular key, and so on.
"Creating a spider" in this guide.Crawl document hierarchies on a file systemor over HTTP. From a root URL, a spider spoolsURLs of documents to crawl.
Spiders
Oracle Endeca Platform Services Forge GuideEndeca Confidential
59After Your Basic Pipeline Is Running | About specifying dimensions and dimension value order

For More InfoDescriptionComponent
See "Record Manipulators andExpressions" in the OracleEndeca Developer Studio Help.
Provide support, such as URL extraction, for acontent acquisition system, such as a crawlerimplementation.
Recordmanipulators
See the Endeca Partial UpdatesGuide.
Provide support for partial (rapid) updates.Update adapters
Related LinksAdding a record cache on page 79
Use the options in the Record Cache editor to add and configure a record cache for eachof your record sources.
Additional index configuration optionsThe Endeca MDEX Platform offers a rich set of index configuration options that allow you to customizeyour Endeca implementation.You use the index configuration to specify things like searchconfigurations, precedence rules, dynamic business rules, and so on.
The major index configuration features are described in the table below. Refer to other sections of thisguide as well as to the Endeca Basic Development Guide and the Endeca Advanced DevelopmentGuide for information on all of the features you can choose to implement.
For More InfoDescriptionComponent
See the "Working withDimensions" chapter in EndecaBasic Development Guide.
Allow you to organize dimensions into explicitgroupings for presentation purposes.
Dimension groups
See "Configuring DimensionGroups" in the Oracle EndecaDeveloper Studio Help.
See the "Working with SearchInterfaces" chapter in EndecaBasic Development Guide.
Allow you to control record search behavior forgroups of one or more properties ordimensions. Some of the features that can be
Search interfaces
specified for a search interface includeSee "Configuring SearchInterfaces" in the Oracle EndecaDeveloper Studio Help.
relevance ranking, matching across multipleproperties and dimensions, and partialmatching.
See the "Using Stemming andThesaurus" chapter in the EndecaAdvanced Development Guide.
The thesaurus allows the MDEX Engine toreturn matches for related concepts to wordsor phrases contained in user queries. For
Thesaurus entries
example, an thesaurus entry might specify thatSee "Configuring Search" in theOracle Endeca Developer StudioHelp.
the phrase "Mark Twain" is interchangeablewith the phrase "Samuel Clemens".
Endeca ConfidentialOracle Endeca Platform Services Forge Guide
After Your Basic Pipeline Is Running | Additional index configuration options60

For More InfoDescriptionComponent
See the Oracle EndecaWorkbench Help.
See the "Advanced SearchFeatures" section in the EndecaAdvanced Development Guide.
Stop words are words that are set to be ignoredby the Endeca MDEX Engine. Typically,common words like "the" are included in thestop word list.
Stop words
See "Configuring Search" inOracle Endeca Developer StudioHelp.
See the "Search Characters"chapter in the Endeca BasicDevelopment Guide.
Allow you to configure the handling ofpunctuation and other non-alphanumericcharacters in search queries.
Search characters
See "Configuring Search" inOracle Endeca Developer StudioHelp.
See the "Using Stemming andThesaurus" chapter in the EndecaAdvanced Development Guide.
Stemming allows the word root and wordderivations of search terms to be included insearch results. For example, a search for the
Stemming
term “children” would also consider “child”See “Configuring Search” in theOracle Endeca Developer StudioHelp.
(which is the word root). This means thatsingular and plural forms of nouns areconsidered equivalent and interchangeable forall search operations. Preconfigured stemmingfiles are shipped for supported languages.Youcannot modify these files, but you can enableor disable stemming with Developer Studio.
See "Configuring PrecedenceRules" in the Oracle EndecaDeveloper Studio Help.
Allow your Endeca implementation to delay thedisplay of a dimension until the user triggers it,making navigation through the data easier andavoiding information overload.
Precedence rules
See "Promoting Records withDynamic Business Rules" in the
Dynamic business rules allow you to promotecontextually relevant result records, based on
Dynamic businessrules
Endeca Advanced DevelopmentGuide.
data-driven rules, to users as they navigate orsearch within a dataset. For example, you canshow a list of best-selling merlots when a user
See "Configuring DynamicBusiness Rules" in OracleEndeca Developer Studio Help.
has navigated to a record set made up ofmerlots. Dynamic business rules make itpossible to implement features such asmerchandising and content spotlighting. See "Working with dynamic
business rules" in the OracleEndeca Workbench Help.
Oracle Endeca Platform Services Forge GuideEndeca Confidential
61After Your Basic Pipeline Is Running | Additional index configuration options


Part 2
Joins
• Overview of Joins• About Configuring Join Keys and Record Indexes• About Implementing Joins• Advanced Join Behavior• Tips and Troubleshooting for Joins

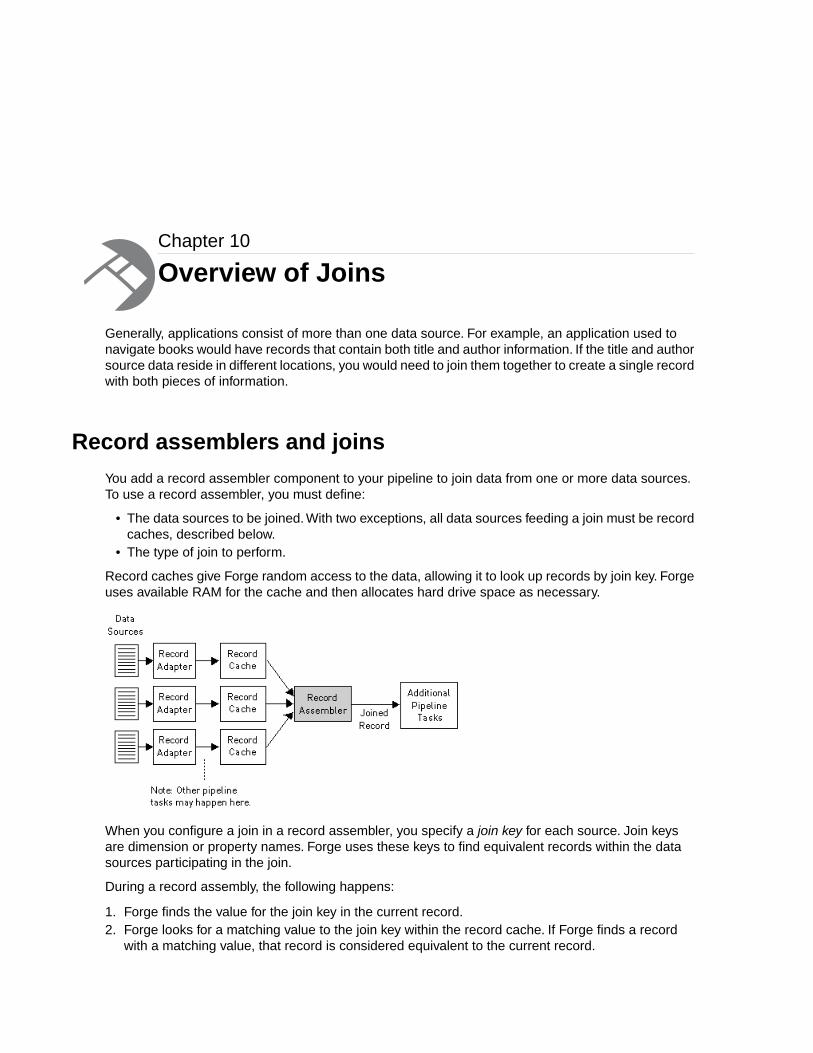
Chapter 10
Overview of Joins
Generally, applications consist of more than one data source. For example, an application used tonavigate books would have records that contain both title and author information. If the title and authorsource data reside in different locations, you would need to join them together to create a single recordwith both pieces of information.
Record assemblers and joinsYou add a record assembler component to your pipeline to join data from one or more data sources.To use a record assembler, you must define:
• The data sources to be joined. With two exceptions, all data sources feeding a join must be recordcaches, described below.
• The type of join to perform.
Record caches give Forge random access to the data, allowing it to look up records by join key. Forgeuses available RAM for the cache and then allocates hard drive space as necessary.
When you configure a join in a record assembler, you specify a join key for each source. Join keysare dimension or property names. Forge uses these keys to find equivalent records within the datasources participating in the join.
During a record assembly, the following happens:
1. Forge finds the value for the join key in the current record.2. Forge looks for a matching value to the join key within the record cache. If Forge finds a record
with a matching value, that record is considered equivalent to the current record.

3. Forge performs the join according to the configuration that you have specified.
Related LinksJoins that do not require record caches on page 87
There are two join cases that do not require record caches:
Overview of Joins on page 65Generally, applications consist of more than one data source. For example, an applicationused to navigate books would have records that contain both title and author information. Ifthe title and author source data reside in different locations, you would need to join themtogether to create a single record with both pieces of information.
About performing joins in a databaseWhile the Data Foundry offers a large variety of join types and functionality, you are encouraged toperform joins within a database prior to exporting the information to the Data Foundry, if possible. Theadvantages of using a database to perform the join include:
• Many users are more familiar with this technology.• Databases typically provide support for more data types.• If the data is already in a database, existing indexes may be used, eliminating the need to recreate
the index.• Eliminating joins from your pipeline makes for simpler pipelines.• Using the database, in some cases, may reduce I/O by collapsing data in the join.
However, it is not always possible to join information in a database. Data may exist outside of adatabase or in incompatible databases, may require a transformation prior to aggregation, and so on.It is for these cases that the Data Foundry provides its extensive join facility.
Join keys and record indexesJoin keys determine how records are compared by the record assembler. For each data source feedinga join, you designate one or more properties or dimensions to function as the source's join key.
During the course of the join, the record assembler compares the values within each source's join key.Records that have the same values for their respective keys are considered equivalent for the purposesof the join. With two exceptions, all joins require a join key for each data source.
Comparisons are based solely on property and dimension values, not names. It is not a requirement,therefore, that the properties and dimensions you specify for your record keys have identical names.
Example
As an example, consider the following left join with four record sources. Source 1 and Source 2 useId as their join key. Source 3 and Source 4 use Pid as their join key. The other properties are notpart of the join key for any of the sources.
Endeca ConfidentialOracle Endeca Platform Services Forge Guide
Overview of Joins | About performing joins in a database66
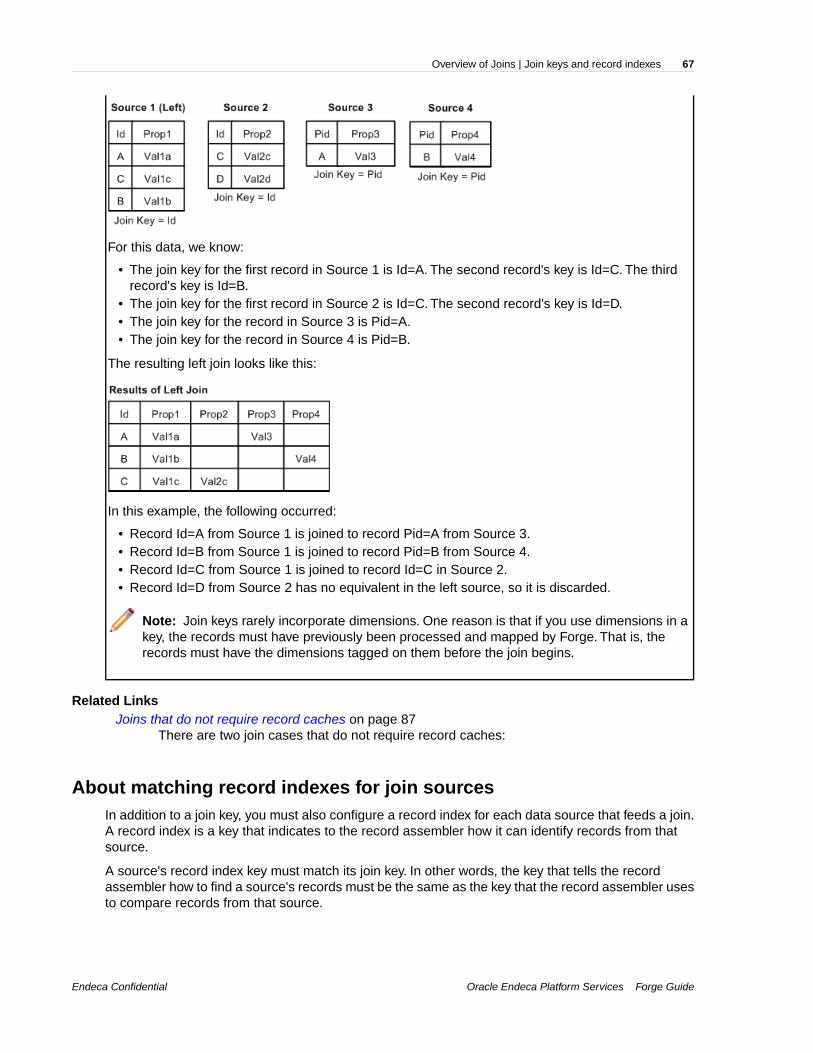
For this data, we know:
• The join key for the first record in Source 1 is Id=A. The second record's key is Id=C. The thirdrecord's key is Id=B.
• The join key for the first record in Source 2 is Id=C. The second record's key is Id=D.• The join key for the record in Source 3 is Pid=A.• The join key for the record in Source 4 is Pid=B.
The resulting left join looks like this:
In this example, the following occurred:
• Record Id=A from Source 1 is joined to record Pid=A from Source 3.• Record Id=B from Source 1 is joined to record Pid=B from Source 4.• Record Id=C from Source 1 is joined to record Id=C in Source 2.• Record Id=D from Source 2 has no equivalent in the left source, so it is discarded.
Note: Join keys rarely incorporate dimensions. One reason is that if you use dimensions in akey, the records must have previously been processed and mapped by Forge. That is, therecords must have the dimensions tagged on them before the join begins.
Related LinksJoins that do not require record caches on page 87
There are two join cases that do not require record caches:
About matching record indexes for join sourcesIn addition to a join key, you must also configure a record index for each data source that feeds a join.A record index is a key that indicates to the record assembler how it can identify records from thatsource.
A source's record index key must match its join key. In other words, the key that tells the recordassembler how to find a source's records must be the same as the key that the record assembler usesto compare records from that source.
Oracle Endeca Platform Services Forge GuideEndeca Confidential
67Overview of Joins | Join keys and record indexes

Note: There are two cases where join keys are not required for data sources and, hence, neitherare record indexes.
Related LinksJoins that do not require record caches on page 87
There are two join cases that do not require record caches:
About Configuring Join Keys and Record Indexes on page 75In addition to a join key, you must also configure a record index for each data source thatfeeds a join. A record index is a key that indicates to the record assembler how it can identifyrecords from that source.
Join typesThe following sections describe the join types supported by the Data Foundry. Each section providesa simple example for the join type being discussed. Note that while most of the examples use tworecord sources, many of the join types accept more than two sources, while other join types acceptonly one. Also note that in the examples, Id is the name of the join key for all sources.
Left joinWith a left join, if a record from the left source compares equally to any records from the other sources,those records are combined. Records from the non-left sources that do not compare equally to a recordin the left source are discarded.
In a left join, records from the left source are always processed, regardless of whether or not they arecombined with records from non-left sources.
In the example below, the left source is Source 1. Records A, C, and D from Source 1 are combinedwith their equivalents from Source 2. Record E is discarded because it comes from a non-left sourceand has no equivalent in the left source. Record B is not combined with any other records, becauseit has no equivalent in Source 2, but it is still processed because it comes from the left source.
Endeca ConfidentialOracle Endeca Platform Services Forge Guide
Overview of Joins | Join types68

Inner joinIn an inner join, only records common to all sources are processed. Records that appear in all sourcesare combined and the combined record is processed. Records that do not exist in all sources arediscarded.
In the example below, Records A, C, and D are combined and processed. Records B and E are notcommon to all sources and are discarded.
Outer joinIn an outer join, all records from all sources are processed. Records that compare equally are combinedinto a single record.
With an outer join, records that do not have equivalents in other data sources are not combined, butare still processed and included in the join output. An outer join requires two or more record sources.
In the example below, Records A, C, and D have equivalents in both Source 1 and Source 2. Theserecords are combined. Records B and E do not have equivalents but they are still processed. As aresult, Record B does not have values for Retail and Wholesale because there is no Record Bin Source 2. Correspondingly, Record E has no values for Name and Brand because there is noRecord E in Source 1.
Oracle Endeca Platform Services Forge GuideEndeca Confidential
69Overview of Joins | Join types

Disjunct joinIn a disjunct join, only records that are unique across all sources are processed. All other records arediscarded.
In this example, records B and E are unique across all sources, so they are processed. Records A,C, and D are not unique and therefore are discarded. Note that, in this example, the results for thejoin appear odd, because a record will never have both Name/Brand properties and Retail/Whole¬sale properties. Typically, this join is most useful when working with sources that share a commonset of properties.
Switch joinIn a switch join, given N sources, all records from Source 1 are processed, then all records from Source2, and so on until all records from all N sources have been processed.
Note that records are never compared or combined, and all records from all sources are processed.Generally, a switch join is applied to sources that have similar properties but unique records, withrespect to record keys, across the sources.
In this example, all the records from Source 1 are processed, then all the records from Source 2 areprocessed.
Endeca ConfidentialOracle Endeca Platform Services Forge Guide
Overview of Joins | Join types70

Sort switch joinIn a sort switch, all records from all sources are processed in such a way as to maintain the recordindex. The record index specifies that records should be processed in a sorted order, determined byrecord key comparison.
With a sort switch join, records are never combined. If a record from Source 1 compares equally to arecord from Source 2, the record from Source 1 is processed first, consistent with the order of thesources as specified in the join settings.
In the example below, records A, C, and D are common to both Source 1 and Source 2. For each ofthese records, the Source 1 instance is processed before the Source 2 instance. Records B and Edo not have equivalents, but they are processed in the order dictated by the record index which is,in this case, the Id key.
Oracle Endeca Platform Services Forge GuideEndeca Confidential
71Overview of Joins | Join types

First record joinIn a first record join, the sources are prioritized such that, if a record from a higher priority sourcecompares equally to records from lower priority sources, the record from the highest priority source isprocessed and the records from the lower priority sources are discarded.
Sources are listed in order of decreasing priority in the join configuration.
Records are never combined. The most common use of this join is for handling incremental feeds.For incremental feeds, history data (previously processed records) is given a lower priority and thelatest data feed takes precedence. Records from the latest feed replace records in the history data,and records from the history data are processed only if a corresponding record does not exist in thelatest feed.
In this example, records A, C, and D from Source 1 are processed, while their equivalents in Source2 are discarded. Records B and E are both processed because they have no equivalents.
Endeca ConfidentialOracle Endeca Platform Services Forge Guide
Overview of Joins | Join types72

Combine joinA combine join combines like records from a single data source. Combine is a pseudo-join that operateson a single source.
In the example below, there are multiple records with Id=A, Id=C, and Id=D. These records arecombined. Only one records exists for Id=B and Id=E, so neither of these records is combined, butboth are processed and included in the joined data.
Note: Combining large numbers of records will cause Forge to print warning messages aboutslow performance.
Related LinksForge warnings when combining large numbers of records on page 89
When combining a large number of records (via either a Combine join or a record cache withthe Combine Records setting enabled), Forge will issue a warning that performance maybe slow. The default number of records at which this warning is issued is 100.
Oracle Endeca Platform Services Forge GuideEndeca Confidential
73Overview of Joins | Join types


Chapter 11
About Configuring Join Keys and RecordIndexes
In addition to a join key, you must also configure a record index for each data source that feeds a join.A record index is a key that indicates to the record assembler how it can identify records from thatsource.
Creating a record indexYou specify a record index for a data source in the source's editor. The following example describeshow to create a record index for a record cache.
We use a record cache in this example because, with two exceptions, all data sources that feed a joinmust be record caches.
To create a record index for a record cache:
1. In the pipeline diagram, double-click the record cache you want to edit to open it in the RecordCache editor.
2. Click the Record Index tab.
3. Click Add.
4. In the Type frame, do one of the following:
• Choose Custom Property. Type a name for the property in the Custom Property text box.• Choose Dimension. Select a dimension name from the Dimension list.
5. (Optional) Repeat steps 2 and 3 to add additional dimensions or properties to the index.
6. (Optional) To reorder the components in the index, select a property or dimension and click Up orDown.
7. Click OK.
Example
The following illustration shows a record cache called LeftDataCache with a record index of P_Name,P_Price.

You specify a record cache's join key in the Record Assembler editor that uses the cache.
A source's record index key must match its join key. In other words, the key that tells the recordassembler how to find a source's records must be the same as the key that the record assembler usesto compare records from that source.
Related LinksJoins that do not require record caches on page 87
There are two join cases that do not require record caches:
Join keys with multiple properties or dimensions on page 77You can specify multiple properties or dimensions, called key components, for a single joinkey in order to join records based on more than one characteristic.
Creating a join key for a record cache on page 76The following example describes how to create a join key for a record cache.
Creating a join key for a record cacheThe following example describes how to create a join key for a record cache.
In addition to a join key, you must also configure a record index for each data source that feeds a join.A record index is a key that indicates to the record assembler how it can identify records from thatsource.
To create a join key for a record cache:
1. In the pipeline diagram, double-click the record assembler that uses the cache to open it in theRecord Assembler editor.
2. Click the Record Join tab.
The list of join entries corresponds with the data sources you specified in the Sources tab.
3. Select the record cache and click Edit.The Join Entry editor appears.
4. Click Add.The Key Component editor appears.
5. Using the steps below, create a join key that is identical to the record index key you created for therecord cache.
Endeca ConfidentialOracle Endeca Platform Services Forge Guide
About Configuring Join Keys and Record Indexes | Creating a join key for a record cache76
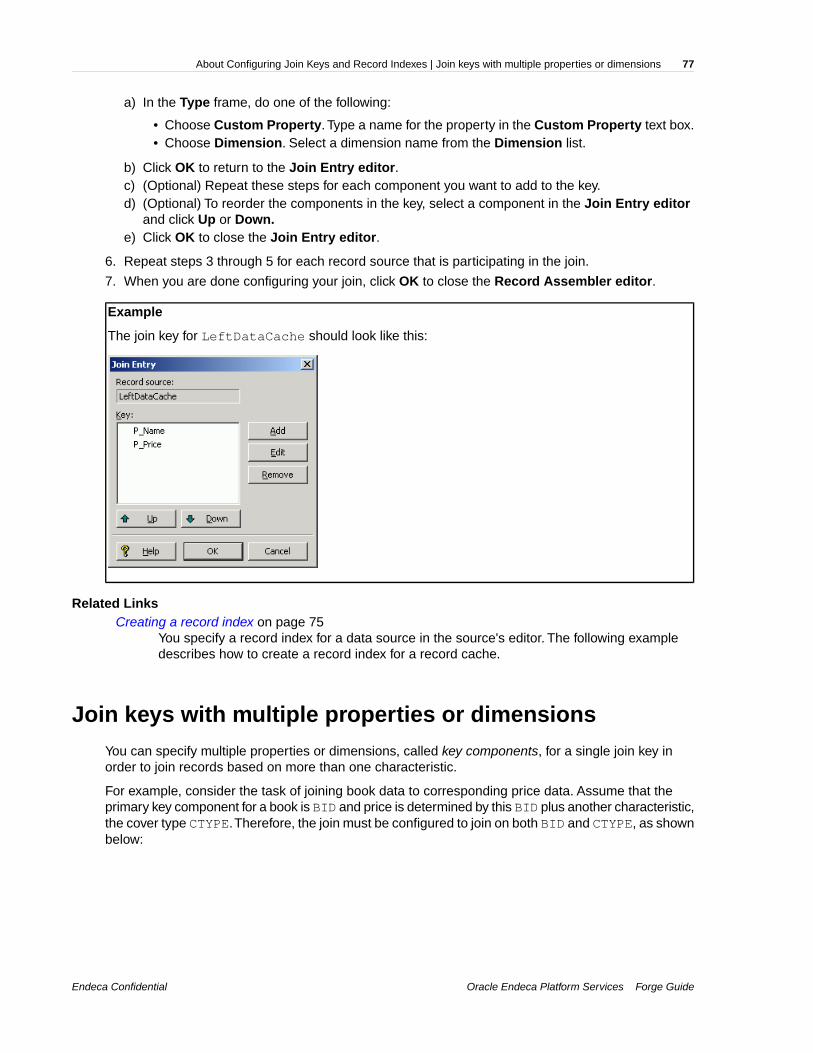
In the Type frame, do one of the following:a)
• Choose Custom Property. Type a name for the property in the Custom Property text box.• Choose Dimension. Select a dimension name from the Dimension list.
b) Click OK to return to the Join Entry editor.c) (Optional) Repeat these steps for each component you want to add to the key.d) (Optional) To reorder the components in the key, select a component in the Join Entry editor
and click Up or Down.e) Click OK to close the Join Entry editor.
6. Repeat steps 3 through 5 for each record source that is participating in the join.
7. When you are done configuring your join, click OK to close the Record Assembler editor.
Example
The join key for LeftDataCache should look like this:
Related LinksCreating a record index on page 75
You specify a record index for a data source in the source's editor. The following exampledescribes how to create a record index for a record cache.
Join keys with multiple properties or dimensionsYou can specify multiple properties or dimensions, called key components, for a single join key inorder to join records based on more than one characteristic.
For example, consider the task of joining book data to corresponding price data. Assume that theprimary key component for a book is BID and price is determined by this BID plus another characteristic,the cover type CTYPE.Therefore, the join must be configured to join on both BID and CTYPE, as shownbelow:
Oracle Endeca Platform Services Forge GuideEndeca Confidential
77About Configuring Join Keys and Record Indexes | Join keys with multiple properties or dimensions

For consistency in the comparison, the join key for each source participating in a join must be parallel.In other words, they must have the same number of key components, in the same order. Also, thetype of each join key component must be parallel for all join entries in a given record assembler. Thismeans that a dimension value key component cannot be compared to a property name key component.
Endeca ConfidentialOracle Endeca Platform Services Forge Guide
About Configuring Join Keys and Record Indexes | Join keys with multiple properties or dimensions78

Chapter 12
About Implementing Joins
With two exceptions, all data sources feeding a join must be record caches, so the procedures in thissection are written from that perspective.
Implementing a joinIn order to implement a join, you must add the join and the records it will process into your pipeline,and configure the join accordingly.
Implementing a join is a three-step process:
1. Add a record cache to your pipeline for each record source that will feed the join.
2. Add a record assembler to your pipeline.
3. Configure the join in the record assembler.
Each step is described in the following sections.
Adding a record cacheUse the options in the Record Cache editor to add and configure a record cache for each of yourrecord sources.
To add a record cache for each record source that will feed the join:
1. In the Pipeline Diagram editor, click New, and then choose Record > Cache.The Record Cache editor appears.
2. In the Name text box, type a unique name for this record cache.
3. (Optional) In the General tab, you may do the following:
a) If the cache should load fewer than the total number of records from the record source, typethe number of records to load in the Maximum Records text box. This features is provided fortesting purposes.
b) If you want to merge records with equivalent record index key values into a single record, checkthe Combine Records option. For one-to-many or many-to-many joins, leave Combine Recordsunchecked.
Important: The Combine Records option can have unexpected results if you do notunderstand how it functions.

4. In the Sources tab, select a record source and, optionally, a dimension source.
If a component's record index contains dimension values, you must provide a dimension source.Generally, this is only the case if you are caching data that has been previously processed byForge.
5. In the Record Index tab, do the following:
a) Specify which properties or dimensions you want to use as the record index for this component.Note that the record index you specify for a cache must match the join key that you will specifyfor that cache in the record assembler.
b) Indicate whether you want to discard records with duplicate keys.
6. (Optional) In the Comment tab, add a comment for the component.
7. Click OK.
8. Repeat these steps for all record sources that will be part of the join.
Related LinksJoins that do not require record caches on page 87
There are two join cases that do not require record caches:
Combining equivalent records in record caches on page 88The General tab on the Record Cache editor has a Combine Records setting. With thesetting enabled for record caches, equivalent records in data sources are combined.
Adding a record assemblerUse the Record Assembler editor to add and configure a new record assembler for your pipeline.
To add a record assembler to your pipeline:
1. In the Pipeline Diagram editor, click New, and then choose Record > Assembler.The Record Assembler editor appears.
2. In the Name text box, type a unique name for the new record assembler.
3. In the Sources tab, do the following:
a) In the Record Sources list, select a record source and click Add. Repeat as necessary to addadditional record sources.
With two exceptions, record assemblers must use record caches as their source of record data.
b) In the Dimension Source list, select a dimension source.
If the key on which a join is performed contains dimension values, you must provide a dimensionsource. Generally, this is only the case if you are joining data that has already been processedonce by Forge.
4. (Optional) In the Record Index tab, do the following:
a) Specify which properties or dimensions you want to use as the record index for this component.
An assembler's record index does not affect the join, it only affects the order in which downstreamcomponents will retrieve records from the assembler.
b) Indicate whether you want to discard records with duplicate keys.
5. In the Record Join tab, configure your joins.
6. (Optional) In the Comment tab, add a comment for the component.
7. Click OK.
Related Links
Endeca ConfidentialOracle Endeca Platform Services Forge Guide
About Implementing Joins | Implementing a join80

Joins that do not require record caches on page 87There are two join cases that do not require record caches:
Configuring the join on page 81You can use the Record Assembler and Join Type editors to choose from and configurethe different types of joins.
Configuring the joinYou can use the Record Assembler and Join Type editors to choose from and configure the differenttypes of joins.
To configure the join in the record assembler:
1. In the Record Assembler editor, click the Record Join tab.
2. Use the Join Type list to select the kind of join you want to perform.
3. If you are performing a left join, check the Multi Sub-records option if the left record can be joinedto more than one right record.
4. The join entries list represents the record sources that will participate in the join, as specified onthe Sources tab. In the Join Entries list, define the order of your join entries by selecting an entryand clicking Up or Down.
For all joins, properties get processed from join sources in the order in they are in the list. The firstentry is the Left entry for a left join.
5. To define the join key for a join entry, select the entry from the Join Entries list and click Edit.The Join Entry editor appears.
6. Click Add.The Key Component editor appears.
7. Using the steps below, create a join key that is identical to the record index key for the join entryyou selected.
a) In the Type frame, do one of the following:
• Choose Custom Property. Type a name for the property in the Custom Property text box.• Choose Dimension. Select a dimension name from the Dimension list.
b) Click OK to return to the Join Entry editor.c) (Optional) Repeat these steps for each component you want to add to the key.d) (Optional) To reorder the components in the key, select a component in the Join Entry editor
and click Up or Down.e) Click OK to close the Join Entry editor.
8. Repeat steps 5 through 7 for each record source that is participating in the join.
9. When you are done configuring your join, click OK to close the Record Assembler editor.
Related LinksAbout tweaking left joins on page 85
The Multi Sub-records setting (on the Record Assembler editor Record Join tab) changesthe behavior of a left join if a record from the left source has multiple values for the join key.It is used only used with left joins. Enabling this option forces Forge to create multiple keysfor such records.
Join keys with multiple properties or dimensions on page 77You can specify multiple properties or dimensions, called key components, for a single joinkey in order to join records based on more than one characteristic.
Oracle Endeca Platform Services Forge GuideEndeca Confidential
81About Implementing Joins | Implementing a join

Join types on page 68The following sections describe the join types supported by the Data Foundry. Each sectionprovides a simple example for the join type being discussed. Note that while most of theexamples use two record sources, many of the join types accept more than two sources,while other join types accept only one. Also note that in the examples, Id is the name of thejoin key for all sources.
Endeca ConfidentialOracle Endeca Platform Services Forge Guide
About Implementing Joins | Implementing a join82

Chapter 13
Advanced Join Behavior
In some cases, multiple sets of records may use identical join keys, or a single record may includemultiple keys (such as a database table with two Id columns). These sections cover how joins arehandled for such situations.
Records that have multiple values for a join keyA record can have multiple property values for a given property name. For example, a record couldhave two values for the property Id.
If a record is configured to join to another record based on a key that has multiple values in one orboth of the records, the join implementation must consider the multiple values in the comparison.
The question is, if the record has the values {A, B} for the property Id, should it match to records withvalue A, value B, or both? The answer is that the record matches to records that have exactly bothvalues. This behavior is different than the semantics of a database join, because tuples in a databasehave only one value per column. Therefore, you should carefully consider how to handle records thathave multiple values per key component.
Note: This section describes how to deal with records that have multiple values per join key.Do not confuse this scenario with one where your join keys incorporate multipleproperties/dimensions.
The following example illustrates the effects of joining records that have multiple values for a join key.
A left join, using Id as the join key, on these two data sources results in the following:

The record from Source 1 with join key (Id=A, Id=BB) is combined with a record with the same keyfrom Source 2. Similarly, since both sources have a record with keys (Id=A, Id=CC) and (Id=B, Id=CC),these records are combined appropriately. Finally, the record (Id=DD, Id=A) from Source 1 is combinedwith the record (Id=A, Id=DD) from Source 2. The order of the property values is not significant.
You can tweak left joins in which the left source has multiple values for a key by telling Forge to createa separate join key based on each value.
Related LinksJoin keys with multiple properties or dimensions on page 77
You can specify multiple properties or dimensions, called key components, for a single joinkey in order to join records based on more than one characteristic.
About tweaking left joins on page 85The Multi Sub-records setting (on the Record Assembler editor Record Join tab) changesthe behavior of a left join if a record from the left source has multiple values for the join key.It is used only used with left joins. Enabling this option forces Forge to create multiple keysfor such records.
Sources that have multiple records with the same join keyvalue
This section explains Forge's behavior when joining sources where each source may have more thanone record with the same join key value (higher cardinality joins).
For example, a record source might process 5 records each with Id=A. This behavior has a databasecounterpart. It is considered here because the results of the join can be complicated. The result of thejoin is a Cartesian product of the sets of records, from each source, with the same join key.
Consider performing a left join on the following two data sources, assuming the join key is the propertyId. Both sources have records with redundant keys. For example, Source 1 has three records withId=A and two records with Id=B. Source 2 has three records with Id=A and two records with Id=B.
Endeca ConfidentialOracle Endeca Platform Services Forge Guide
Advanced Join Behavior | Sources that have multiple records with the same join key value84

The results of a left join on these two data sources look like this:
As discussed above, the join produces a Cartesian product. The first record from Source 1 (Id=A,Name=Shirt, Color=Blue) is combined with each of the three records from Source 2 that have thejoin key Id=A, producing the first three records shown in the results table. Similarly, the second recordfrom Source 1 (Id=A, Name=shirt, Color=blue) is combined with each of the three records from Source2 with the join key Id=A to produce the next three records.
For a given join key Id=x, the number of records created by a Cartesian product is the product of thenumber of records in each source with Id=x. In the example above, Source 1 had two records withId=A and Source 2 had three. Therefore, the Cartesian product produces six records (2 x 3 = 6).Adding a third source with three records of Id=A would produce 18 records (2 x 3 x 3 = 18). Becausethe number of records produced can grow quickly, you should take care should to evaluate correctnesswhen dealing with data of this nature. Often, the desired behavior is to combine records with duplicatekeys, using a Combine join or the Combine Records option on a record cache, from all or severalsources.
About tweaking left joinsThe Multi Sub-records setting (on the Record Assembler editor Record Join tab) changes thebehavior of a left join if a record from the left source has multiple values for the join key. It is used onlyused with left joins. Enabling this option forces Forge to create multiple keys for such records.
Oracle Endeca Platform Services Forge GuideEndeca Confidential
85Advanced Join Behavior | About tweaking left joins

Note: In the case where a left source's join key consists of a single property/dimension, eachvalue becomes an independent key.
For example, if the join key is Id, a record with the values Id=1, Id=2, Id=3 produces three independentkeys, one for each value. The right sources are searched for each of these keys. That is, each rightsource is queried for a match to the join key Id=1, a match to Id=2, and finally a match to Id=3. Allrecords that match any of the keys are combined with the record from the left source, producing thejoined record.
Multi sub-records can be extrapolated to join keys with multiple key components by considering thevalues corresponding to each key component as a set. Performing a Cartesian product of these setsprovides the key combinations. For example, given the key components idA and idB and a record fromthe left source with the values idA=1, idA=2, idB=11, idB=12, the keys produced by the Cartesianproduct are [{idA=1, idB=11}, {idA=1, idB=12}, {idA=2, idB=11}, {idA=2, idB=12}]. Again, the rightsources are searched for each of these keys.
Multi sub-records
A good example that illustrates the use of multi sub-records is one where you have a left table thatconsists of a CD and the songs on it, and a right table with song details.
In this example, you would perform the join on the SongId, so that each song in the left table is joinedappropriately with its counterpart in the right table. Note that in this example, SongId is the join keyfor all sources.
Related LinksJoin keys with multiple properties or dimensions on page 77
You can specify multiple properties or dimensions, called key components, for a single joinkey in order to join records based on more than one characteristic.
Endeca ConfidentialOracle Endeca Platform Services Forge Guide
Advanced Join Behavior | About tweaking left joins86

Chapter 14
Tips and Troubleshooting for Joins
The sections below provide tips and troubleshooting information for joins.
Joins that do not require record cachesThere are two join cases that do not require record caches:
• Switch joins do not do record comparisons and, hence, do not require record caches for their datasources.You can use any type of record server component (record adapter, record cache, recordassembler, Perl manipulator, and so on) as a source for a switch join.
• For a left join, for which all of the right sources are record caches, the left source does not requirea record cache. This special case is useful for optimizing a left join with a large, unsorted datasource.
Working with sources that have multiple records with thesame join key value
In order to configure a join with the desired behavior, it is important to have a strong understanding ofwhat happens when record assemblers process records that do not have unique values for their joinkeys (higher cardinality joins).
Related LinksSources that have multiple records with the same join key value on page 84
This section explains Forge's behavior when joining sources where each source may havemore than one record with the same join key value (higher cardinality joins).
Best practice for choosing left and right side of joinsA best practice is to keep record sources with the most values per join key on the left side of joins.
When performing joins (such as an outer join), Forge can output records from both sides of the join,except where two records, one from each side, match on the join key, in which case it combines thetwo records into one.The interesting case is when multiple records on each side have the same valuefor the join key. For example, if 10 records from the left side and 10 records from the right side each
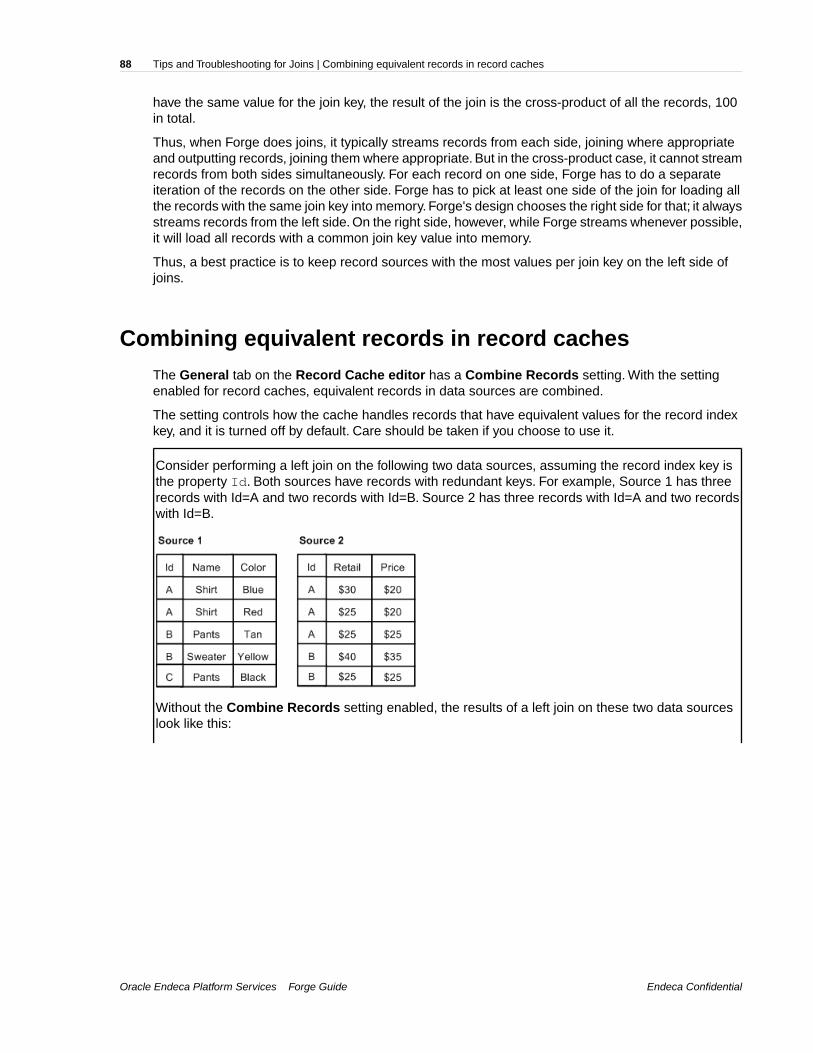
have the same value for the join key, the result of the join is the cross-product of all the records, 100in total.
Thus, when Forge does joins, it typically streams records from each side, joining where appropriateand outputting records, joining them where appropriate. But in the cross-product case, it cannot streamrecords from both sides simultaneously. For each record on one side, Forge has to do a separateiteration of the records on the other side. Forge has to pick at least one side of the join for loading allthe records with the same join key into memory. Forge's design chooses the right side for that; it alwaysstreams records from the left side. On the right side, however, while Forge streams whenever possible,it will load all records with a common join key value into memory.
Thus, a best practice is to keep record sources with the most values per join key on the left side ofjoins.
Combining equivalent records in record cachesThe General tab on the Record Cache editor has a Combine Records setting. With the settingenabled for record caches, equivalent records in data sources are combined.
The setting controls how the cache handles records that have equivalent values for the record indexkey, and it is turned off by default. Care should be taken if you choose to use it.
Consider performing a left join on the following two data sources, assuming the record index key isthe property Id. Both sources have records with redundant keys. For example, Source 1 has threerecords with Id=A and two records with Id=B. Source 2 has three records with Id=A and two recordswith Id=B.
Without the Combine Records setting enabled, the results of a left join on these two data sourceslook like this:
Endeca ConfidentialOracle Endeca Platform Services Forge Guide
Tips and Troubleshooting for Joins | Combining equivalent records in record caches88

With the Combine Records setting enabled for the record caches, equivalent records in the datasources would be combined, so the new data sources would look like this:
The results of a left join on these two combined data sources would look like this:
Forge warnings when combining large numbers of recordsWhen combining a large number of records (via either a Combine join or a record cache with theCombine Records setting enabled), Forge will issue a warning that performance may be slow. Thedefault number of records at which this warning is issued is 100.
This threshold can be adjusted with the Forge --combineWarnCount command-line flag.
Two messages will be printed:
• The first is an informational message that is printed when the number of records combined reachesthe --combineWarnCount threshold. The message includes the key of the records being
Oracle Endeca Platform Services Forge GuideEndeca Confidential
89Tips and Troubleshooting for Joins | Forge warnings when combining large numbers of records

combined. The intent of this message is to give users an early warning that Forge has just starteda potentially long operation and therefore may seem to be stalled, but is actually working.
• The second message is a warning, indicating the total number of records combined, and the valueof the key.
Note: Setting the --combineWarnCount value to 0 (zero) will disable these messages.
Endeca ConfidentialOracle Endeca Platform Services Forge Guide
Tips and Troubleshooting for Joins | Forge warnings when combining large numbers of records90

Part 3
Advanced Dimension Features
• Externally-Created Dimensions• Externally-Managed Taxonomies


Chapter 15
Externally-Created Dimensions
This section describes how to include and work with an externally-created dimension in a DeveloperStudio project. This capability allows you to build all or part of a logical hierarchy for your data setoutside of Developer Studio and then import that logical hierarchy as an Endeca dimension availablefor use in search and Guided Navigation.
Overview of externally-created dimensionsAn externally-created dimension describes a logical hierarchy of a data set; however, the dimensionhierarchy is transformed from its source format to Endeca compatible XML outside of Developer Studio.
The logical hierarchy of an externally-created dimension must conform to Endeca’s external interfacefor describing a data hierarchy (found in external_dimensions.dtd) before you import thedimension into your project. Once you import an externally-created dimension, its ownership is whollytransferred to Developer Studio, so that afterwards you can modify the dimension with DeveloperStudio.
Related LinksExternal dimensions and external taxonomies on page 93
Externally-managed taxonomies and externally-created dimensions differ in how you includethem in a Developer Studio project and how Developer Studio treats them once they are partof a project.
External dimensions and external taxonomiesExternally-managed taxonomies and externally-created dimensions differ in how you include them ina Developer Studio project and how Developer Studio treats them once they are part of a project.
It is important to clarify the difference between an externally-managed taxonomy and anexternally-created dimension to determine which feature document is appropriate for your purposes.Use the table below to determine which one you are working with.
The following table compares an externally-managed taxonomy and an externally-created dimension:

Externally-created dimensionExternally-managedtaxonomy
Operation
You generally do not update the source file for thehierarchy after you import it into your project. If you
Any changes to the dimensionmust be made in third-party
How do youmodify or update
do update the file and re-import, then any changestool.You then export thethe hierarchyyou made to the dimension using Developer Studiotaxonomy from the tool, andafter it is in the
project? are discarded. After importing the hierarchy, youcan modify a dimension just as if you created itmanually using Developer Studio.
Forge transforms thetaxonomy and re-integratesthe changes into your project.
After you import the file, Developer Studio takesfull ownership of the dimension and its dimension
The third-party tool thatcreated the file retains
How doesDeveloper Studio
values.You can modify any characteristics of thedimension and its dimension values.
ownership. The dimension isalmost entirely read-only in theproject.You cannot add or
manage thehierarchy?
remove dimension values fromthe dimension. However, youcan modify whether dimensionvalues are inert andcollapsible.
Created either directly in an XML file or createdusing a third-party tool.
Created using a third-partytool.
How do youcreate the XMLfile?
By choosing Import External Dimension on theFile menu. During import, Developer Studio creates
Read in to a pipeline using adimension adapter with
How do youinclude the file in
internal dimensions and dimension values for eachFormat set to XML -a DeveloperStudio project? node in the file's hierarchy. If you create the file
using a third-party tool and any XML transformationExternally Managed. Forgetransforms the taxonomy file
is necessary, you must transform the file outsidein to a dimension according tothe project before you choose Import Externalthe .xslt file that you specifyDimension on the File menu.The file must conformto external_dimensions.dtd.
on the Transformer tab of thedimension adapter.
Related LinksOverview of externally-managed taxonomies on page 99
An externally-managed taxonomy is a logical hierarchy for a data set that is built and managedusing a third-party tool. Once you include an externally-managed taxonomy in your project,it becomes a dimension whose hierarchy is managed by the third-party tool that created it.
Including externally-created dimensions in your projectYou can use Developer Studio to include an externally-created dimension file in your project, as longas the dimension file conforms to the external_dimensions.dtd file.
Ensure you are working with an externally-created dimension, and not an externally-managed taxonomy.Any created dimension files must conform to the Endeca external_dimensions.dtd file.
Endeca ConfidentialOracle Endeca Platform Services Forge Guide
Externally-Created Dimensions | Overview of externally-created dimensions94

An overview of the process to include an externally-created dimension in a Developer Studio projectis as follows:
1. Create a dimension hierarchy.You can do this one of two ways:
• Create it manually in an XML file.• Create a dimension using a third-party tool.
2. Import the XML file for the dimension into Developer Studio, and modify the dimension and dimensionvalues as necessary.
Related LinksExternal dimensions and external taxonomies on page 93
Externally-managed taxonomies and externally-created dimensions differ in how you includethem in a Developer Studio project and how Developer Studio treats them once they are partof a project.
XML requirements on page 95When you create an external dimension—whether by creating it directly in an XML file or bytransforming it from a source file—the dimension must conform to Endeca’sexternal_dimensions.dtd file before you import it into your project.
Importing an externally-created dimension on page 97You add an externally-created dimension to your pipeline by importing it with DeveloperStudio.
XML requirementsWhen you create an external dimension—whether by creating it directly in an XML file or by transformingit from a source file—the dimension must conform to Endeca’s external_dimensions.dtd filebefore you import it into your project.
The external_dimensions.dtd file defines Endeca-compatible XML used to describe dimensionhierarchies in an Endeca system. This file is located in %ENDECA_ROOT%\conf\dtd on Windowsand $ENDECA_ROOT/conf/dtd on UNIX.
Also, an XML declaration that specifies the external_dimensions.dtd file is required in an externaldimensions file. If you omit specifying the DTD in the XML declaration, none of the DTD’s impliedvalues or other default values, such as classification values, are applied to the external dimensionsduring Endeca ITL processing. Here is an example XML declaration that should appear at the beginningof an external dimension file:
<?xml version="1.0" encoding="UTF-8" standalone="no"?><!DOCTYPE external_dimensions SYSTEM "external_dimensions.dtd">
Here is a very simple example of an external dimension file with the required XML declaration and twodimensions:
<?xml version="1.0" encoding="UTF-8" standalone="no"?><!DOCTYPE external_dimensions SYSTEM "external_dimensions.dtd">
<external_dimensions> <node id="1" name="color" classify="true"> <node id="2" name="red" classify="true"/> <node id="3" name="blue" classify="true"/> </node>
Oracle Endeca Platform Services Forge GuideEndeca Confidential
95Externally-Created Dimensions | XML requirements

<node id="10" name="size" classify="true"> <node id="20" name="small" classify="true"/> <node id="30" name="med" classify="true"/> </node>
</external_dimensions>
Related LinksXML syntax to specify dimension hierarchy on page 96
The XML elements available to external_dimensions.dtd allow a flexible XML syntaxto describe a dimension hierarchy. There are three different syntax approaches you canchoose from when building the hierarchy structure of your externally-created dimension.
XML syntax to specify dimension hierarchyThe XML elements available to external_dimensions.dtd allow a flexible XML syntax to describea dimension hierarchy.There are three different syntax approaches you can choose from when buildingthe hierarchy structure of your externally-created dimension.
All three approaches are supported by external_dimensions.dtd. Each provides a slightly differentsyntax structure to define a dimension and express the parent/child relationship among dimensionsand dimension values. The three syntax choices are as follows:
• Use nested node elements within node elements.• Use the parent attribute of a node to reference a parent’s node ID.• Use the child element to reference the child’s node ID.
You can use only one of the three approaches to describe a hierarchy within a single XML file. In otherwords, do not mix different syntax structures within one file. Any node element without a parent nodedescribes a new dimension.You can describe as many dimensions as necessary in a single XML file.
The following examples show each approach to building a dimension hierarchy. The these examplesare semantically equivalent: each describes the same dimension and child dimension values.
Example of using nested node elements
This example shows nested dimension values red and blue within the dimension color:
<node name="color" id="1"> <node name="red" id="2"/> <node name="blue" id="3"/></node>
Example of using parent attributes
This example shows the red and blue dimension values using the parent attribute. The value of theparent attribute references the ID for the dimension color:
<node name="color" id="1"/><node id="2" name="red" parent="1"/><node id="3" name="blue" parent="1"/>
Endeca ConfidentialOracle Endeca Platform Services Forge Guide
Externally-Created Dimensions | XML requirements96

Example of using child elements
This example uses child elements to indicate that red and blue are dimension values of the colordimension. The ID of each child element references the ID of the red and blue nodes:
<node name="color" id="1"> <child id="2"/> <child id="3"/></node><node name="red" id="2"/><node name="blue" id="3"/>
Node ID requirements
Each node element in your dimension hierarchy must have an id attribute. Depending on yourrequirements, you may choose to provide any of the following values for the id attribute:
• Name — If the name of a dimension value is what determines its identity, then provide the idattribute with the name.
• Path — If the path from the root node to the dimension value determines its identity, then providea value representing the path in the id attribute.
• Existing identifier — If a node already has an identifier, then that identifier can be used in the idattribute.
The id value must be unique. If you are including multiple XML files, the identifier must be uniqueacross the files.
There is one scenario where an id attribute is optional. It is optional only if you are using anexternally-created dimension and also defining your dimension hierarchy using nested nodesub-elements (rather than using parent or child ID referencing).
Importing an externally-created dimensionYou add an externally-created dimension to your pipeline by importing it with Developer Studio.
Once you import the XML file, the dimension appears in the Dimensions view, and Developer Studiohas full read-write ownership of the dimension.You can modify any aspects of a dimension and itsdimension values as if you created it in Developer Studio.
To import an externally-created dimension:
Note: Unlike the procedure to import an externally-managed taxonomy, you do not need to runa baseline update to import an externally-created dimension.
1. Select File > Import External Dimensions.The Import External Dimensions dialog box displays.
2. Specify the XML file that defines the dimensions.
3. Chose a dimension adapter from the Dimension adapter to receive imported dimensionsdrop-down list.
4. Click OK.The dimensions appear in the Dimensions editor for you to configure as necessary.
5. Save the project.
Oracle Endeca Platform Services Forge GuideEndeca Confidential
97Externally-Created Dimensions | Importing an externally-created dimension

Related LinksIncluding externally-managed taxonomies in your project on page 99
You can use Developer Studio to include an externally-managed taxonomy into your project,but you cannot alter the taxonomy within Developer Studio, even after importing it.
Endeca ConfidentialOracle Endeca Platform Services Forge Guide
Externally-Created Dimensions | Importing an externally-created dimension98
Chapter 16
Externally-Managed Taxonomies
This section describes how to work with an externally-managed taxonomy in a Developer Studioproject. This capability allows you to build all or part of a logical hierarchy for your data set outside ofDeveloper Studio and use Developer Studio to transform that logical hierarchy into Endeca dimensionsand dimension values for use in search and Guided Navigation.
Overview of externally-managed taxonomiesAn externally-managed taxonomy is a logical hierarchy for a data set that is built and managed usinga third-party tool. Once you include an externally-managed taxonomy in your project, it becomes adimension whose hierarchy is managed by the third-party tool that created it.
In Developer Studio, you cannot add or remove dimension values from an externally-managedtaxonomy. If you want to modify a dimension or its dimension values, you have to edit the taxonomyusing the third-party tool and then update the taxonomy in your project.
It is important to clarify the difference between an externally-managed taxonomy and anexternally-created dimension to determine which feature document is appropriate for your purposes.The two concepts are similar yet have two important key differences: externally-managed taxonomiesand externally-created dimensions differ in how you include them in a Developer Studio project andhow Developer Studio treats them once they are part of a project.
Related LinksExternal dimensions and external taxonomies on page 93
Externally-managed taxonomies and externally-created dimensions differ in how you includethem in a Developer Studio project and how Developer Studio treats them once they are partof a project.
Including externally-managed taxonomies in your projectYou can use Developer Studio to include an externally-managed taxonomy into your project, but youcannot alter the taxonomy within Developer Studio, even after importing it.
Ensure you are working with an externally-managed taxonomy, and not an externally-created dimension.
An overview of the process to include an externally-managed taxonomy in a Developer Studio projectis as follows:

1. You build an externally-managed taxonomy using a third-party tool. This guide does not describeany third-party tools or procedures that you might use to perform this task.
2. You create an XSLT style sheet that instructs Forge how to transform the taxonomy into EndecaXML that conforms to external_dimensions.dtd.
3. You configure your Developer Studio pipeline to perform the following tasks:
a) Describe the location of an externally-managed taxonomy and an XSLT style sheet with adimension adapter.
b) Transform an externally-managed taxonomy into an externally-managed dimension by runninga baseline update.
c) Add an externally-managed dimension to the Dimensions view and the Dimension Valuesview.
After you finish the tasks listed above, you can perform additional pipeline configuration that uses theexternally-managed dimension, and then run a second baseline update to process and tag your Endecarecords.
Related LinksExternal dimensions and external taxonomies on page 93
Externally-managed taxonomies and externally-created dimensions differ in how you includethem in a Developer Studio project and how Developer Studio treats them once they are partof a project.
XSLT and XML requirements on page 100To transform an externally-managed taxonomy into an externally-managed dimension, youhave to create an XSLT style sheet that instructs Forge how to map the taxonomy XML toEndeca XML. The mapping in your XSLT style sheet and your resulting hierarchy mustconform to the Endeca external_dimensions.dtd file.
XSLT and XML requirementsTo transform an externally-managed taxonomy into an externally-managed dimension, you have tocreate an XSLT style sheet that instructs Forge how to map the taxonomy XML to Endeca XML. Themapping in your XSLT style sheet and your resulting hierarchy must conform to the Endecaexternal_dimensions.dtd file.
About XSLT mappingIn order for Developer Studio to process the XML from your externally-managed taxonomy, you haveto create an XSLT style sheet that instructs Forge how to map the XML elements in anexternally-managed taxonomy to Endeca-compatible XML.
This requires configuring the Transformer tab of a dimension adapter with the path to the XSLT stylesheet and the path to the taxonomy XML file, and then running a baseline update to transform theexternal taxonomy into an Endeca dimension.
The external_dimensions.dtd defines Endeca-compatible XML to describe dimension hierarchies.This file is located in %ENDECA_ROOT%\conf\dtd on Windows and $ENDECA_ROOT/conf/dtd onUNIX.
Endeca ConfidentialOracle Endeca Platform Services Forge Guide
Externally-Managed Taxonomies | XSLT and XML requirements100

XML syntax to specify dimension hierarchyThe XML elements available to external_dimensions.dtd allow a flexible XML syntax to describedimension hierarchy. There are three different syntax approaches you can choose from when buildingthe hierarchy structure of your externally-managed dimension.
All three options are supported by external_dimensions.dtd. Each approach provides a slightlydifferent syntax structure to define a dimension and express the parent/child relationship amongdimensions and dimension values. The three syntax choices are as follows:
• Use nested node elements within node elements.• Use the parent attribute of a node to reference a parent’s node ID.• Use the child element to reference the child’s node ID.
You can use only one of the three approaches to describe a hierarchy within a single XML file. In otherwords, do not mix different syntax structures within one file. Any node element without a parent nodedescribes a new dimension.You can describe as many dimensions as necessary in a single XML file.
The following examples show each approach to building a dimension hierarchy. These examples aresemantically equivalent: each describes the same dimension and child dimension values.
Example of using nested node elements
This example shows nested dimension values red and blue within the dimension color:
<node name="color" id="1"> <node name="red" id="2"/> <node name="blue" id="3"/></node>
Example of using parent attributes
This example shows the red and blue dimension values using the parent attribute. The value of theparent attribute references the ID for the dimension color.
<node name="color" id="1"/><node name="red" id="2" parent="1"/><node name="blue" id="3" parent="1"/>
Example of using child elements
This example uses child elements to indicate that red and blue are dimension values of the colordimension. The ID of each child element references the ID of the red and blue nodes.
<node name="color" id="1"> <child id="2"/> <child id="3"/></node><node name="red" id="2"/><node name="blue" id="3"/>
Node ID requirements and identifier management in ForgeWhen you transform the hierarchy structure from an external taxonomy, each node element in yourdimension hierarchy must have an id attribute. Forge ensures that each identifier is unique across anEndeca implementation by creating a mapping between a node’s ID and an internal identifier thatForge creates.
Oracle Endeca Platform Services Forge GuideEndeca Confidential
101Externally-Managed Taxonomies | XSLT and XML requirements

This internal mapping ensures that Forge assigns the same identifier to a node from an externaltaxonomy each time the taxonomy is processed. For example, if you provide updated versions of ataxonomy file, Forge determines which dimension values map to dimension values from a previousversion of the file according to the internal identifier. However, there is a scenario where Forge doesnot preserve the mapping between the id attribute and the internal identifier that Forge creates for thedimension value. This occurs if you reorganize a dimension value to become a child of a differentparent dimension. Reorganizing a dimension value within the same parent dimension does not affectthe id mapping when Forge reprocesses updated files.
Depending on your requirements, you may choose to provide any of the following values for the idattribute:
• Name — If the name of a dimension value is what determines its identity, then the XSLT stylesheet should fill the id attribute with the name.
• Path — If the path from the root node to the dimension value determines its identity, then the XSLTstyle sheet should put a value representing the path in the id attribute.
• Existing identifier — If a node already has an identifier, then that identifier can be used in the idattribute.
You can provide an arbitrary ID as long as the value is unique. If you are including multiple XML files,the identifier must be unique across all files. As described above, Forge ensures that identifiers areunique across the system.
Pipeline configurationThese sections describe the pipeline configuration requirements to incorporate an externally-managedtaxonomy into your Developer Studio project.
Integrating an externally-managed taxonomyYou use a dimension adapter to read in XML from an externally-managed taxonomy and transform itto an externally-managed Endeca dimension. If necessary, you can import and transform multipletaxonomies by using a different dimension adapter for each taxonomy file.
To perform the taxonomy transformation, you configure a dimension adapter with the XML file of thetaxonomy and the XSLT style sheet that Forge uses to transform the taxonomy file’s XML elements.You then build the rest of your pipeline, set the instance configuration, and run a baseline update.When the update runs, Forge transforms the taxonomy into a dimension that you can load and examinein the Dimensions view.
To integrate an externally-managed taxonomy:
1. In the Project tab of Developer Studio, double-click Pipeline Diagram.
2. In the Pipeline Diagram editor, choose New > Dimension > Adapter.The Dimension Adapter editor displays.
3. In the Dimension Adapter Name text box, enter a unique name for the dimension adapter.
4. In the General tab, do the following:
a) In the Direction frame, select Input.b) In the Format field, select XML - Externally Managed.c) In the URL field, enter the path to the source taxonomy file.This path can be absolute or relative
to the location of your project’s Pipeline.epx file.d) Check Require Data if you want Forge to generate an error if the file does not exist or is empty.
Endeca ConfidentialOracle Endeca Platform Services Forge Guide
Externally-Managed Taxonomies | Pipeline configuration102

5. In the Transformer tab, do the following:
a) In the Type field, enter XSLT.b) In the URL field, specify the path to the XSLT file you created.
6. Click OK.
7. Select File > Save
8. If necessary, repeat steps 2 through 6 to include additional taxonomies.
9. Create a dimension server to provide a single point of reference for other pipeline components toaccess dimension information. For more information about dimension servers, see the OracleEndeca Developer Studio Help.
Transforming an externally managed taxonomyIn order to transform your externally-managed taxonomy into an Endeca dimension, you have to setthe instance configuration and run a baseline update.
Running the update allows Forge to transform the taxonomy and store a temporary copy of the resultingdimension in the EAC Central Server. After you run the update, you can then create a dimension inthe Dimensions view.
To transform an externally-managed taxonomy:
Note: To reduce processing time for large source data sets, you may want to run the baselineupdate using the -n flag for Forge. (The -n flag controls the number of records processed in apipeline, for example, -n 10 processes ten records.) You can specify the flag in the Forgesection of the EAC Admin Console page of Endeca Workbench.
1. Add any pipeline components to your pipeline which are required for the update to run.
You cannot, for example, run the update without a property mapper. However, you can temporarilyadd a default property mapper and later configure it with property and dimension mapping.
2. Ensure you have sent the latest instance configuration to Endeca Workbench.
Oracle recommends using the update_web_studio_config script to perform this task, as it willnot overwrite any configuration files which are maintained by Endeca Workbench. Theupdate_web_studio_config script is included in the Endeca Deployment Template.
The Oracle Endeca Deployment Template is available on the Oracle Software Delivery Cloud. Formore information about the Endeca Deployment Template, see the Oracle Endeca DeploymentTemplate Usage Guide, included in the downloadable ZIP file.
3. On the EAC Admin Console page of Endeca Workbench, run your baseline update script.
Related LinksLoading an externally-managed dimension on page 104
After you transform an external taxonomy into an Endeca dimension, you can then load thedimension in the Dimensions view and add its dimension values to the Dimension Valuesview.
Oracle Endeca Platform Services Forge GuideEndeca Confidential
103Externally-Managed Taxonomies | Pipeline configuration
Uploading post-Forge dimensions to Endeca WorkbenchIf you are using the baseline update script provided with the Deployment Template, it will automaticallyupload the post-Forge dimensions to Endeca Workbench. If, however, you are not using these scripts,you must use the emgr_update utility.
After the baseline update finishes, the latest dimension values generated by the Forge process mustbe uploaded to Endeca Workbench. This will ensure that any new dimension values (including valuesfor autogen dimensions and external dimensions) are available to Endeca Workbench for use (forexample, for merchandizing rule triggers).
If you are not using the baseline update script provided with the Deployment Template, you must usethe emgr_update utility as follows:
1. Open a command prompt or UNIX shell to run the utility.
2. Enter the following into the command line:emgr_update --action set_post_forge_dimsThis will update the Endeca Workbench configuration with the post-Forge dimensions.
For more information on this utility, see the Oracle Endeca Guided Search Administrator’s Guide.
Loading an externally-managed dimensionAfter you transform an external taxonomy into an Endeca dimension, you can then load the dimensionin the Dimensions view and add its dimension values to the Dimension Values view.
Rather than click New, as you would to manually create a dimension in Developer Studio, you insteadclick Discover in Dimensions view to add an externally-managed dimension. Developer Studiodiscovers the dimension by reading in the dimension’s file that Forge created when you ran the firstbaseline update. Next, you load the dimension values in the Dimension Values editor.
To load a dimension and its dimension values:
Note: Because the dimension values are externally managed, you cannot add or removedimension values.You can however modify whether dimension values are inert or collapsible.
1. In the Project tab of Developer Studio, double-click Dimensions.The Dimensions view displays.
2. Click the Discover button to add the externally-managed dimension to the Dimensions view.
Most characteristics of an externally-managed dimension and its dimension values are not modifiable.These characteristics either appear as unavailable or Developer Studio displays a message indicatingwhat actions are possible.
The dimension appears in the Dimensions view with its Type column set to Externally Managed.
3. In Dimensions view, select the externally-managed dimension and click Values.The Dimension Values view appears with the root dimension value of the externally-manageddimension displayed.
4. Select the root dimension value and click Load.The remaining dimension values display.
5. Repeat steps 3 and 4 for any additional externally-managed taxonomies you integrated in yourproject.
Related LinksAbout updating an externally-managed taxonomy in your pipeline on page 105
Endeca ConfidentialOracle Endeca Platform Services Forge Guide
Externally-Managed Taxonomies | Pipeline configuration104

If you want to modify an externally-managed taxonomy and replace it with a newer version,you have to revise the taxonomy using the third-party tool that created it, and then repeat theprocess of incorporating the externally-managed taxonomy into your pipeline.
Running a second baseline updateAfter loading dimension values and building the rest of your pipeline, you must run a second baselineupdate to process and tag your Endeca records. The second baseline update performs property anddimension mapping that could not be performed in the first baseline update because theexternally-managed dimensions had not yet been transformed and available for mapping.
Before running this update, make sure you have transformed and mapped your externally-manageddimensions.
To run a second baseline update:
1. Ensure you have sent the latest instance configuration to Endeca Workbench.
Oracle recommends using the update_web_studio_config script to perform this task, as it willnot overwrite any configuration files which are maintained by Endeca Workbench. Theupdate_web_studio_config script is included in the Endeca Deployment Template.
The Oracle Endeca Deployment Template is available on the Oracle Software Delivery Cloud. Formore information about the Endeca Deployment Template, see the Oracle Endeca DeploymentTemplate Usage Guide, included in the downloadable ZIP file.
2. On the EAC Admin Console page of Endeca Workbench, run your baseline update script.
About updating an externally-managed taxonomy in yourpipeline
If you want to modify an externally-managed taxonomy and replace it with a newer version, you haveto revise the taxonomy using the third-party tool that created it, and then repeat the process ofincorporating the externally-managed taxonomy into your pipeline.
Related LinksPipeline configuration on page 102
These sections describe the pipeline configuration requirements to incorporate anexternally-managed taxonomy into your Developer Studio project.
Unexpected default-mapping behaviorUnder certain circumstances, Forge will default-map dimensions from externally-managed taxonomieseven when default dimension mapping is disabled in the Property Mapper.The following two conditionsare required for this behavior to occur:
• A dimension mapping exists in the Property Mapper which points to a dimension sourced from anexternally-managed taxonomy file.
• The source node for the mapped dimension is not present in the externally-managed taxonomyfile (for example, because of a taxonomy change or user error).
Oracle Endeca Platform Services Forge GuideEndeca Confidential
105Externally-Managed Taxonomies | About updating an externally-managed taxonomy in your pipeline

When these two conditions are met, Forge dynamically creates an entry for the missing node'sdimension in its output dimensions files; this entry has the attribute value SRC_TYPE="PROPMAPPER",as seen on default-mapped dimension entries.
This behavior occurs even when the default dimension mapping functionality is disabled (that is, theIf no mapping is found, map source properties to Endeca dimensions option on the Advancedtab of the Property Mapper component editor in Developer Studio is not checked).
The reason for the behavior is that in this case, Forge is handling the pipeline differently than DeveloperStudio. In Developer Studio, you cannot map a source property to a non-existent dimension. Forge,however, allows for properties to be mapped to undeclared dimensions, and when it encounters sucha mapping, it creates a new dimension for it using the property mapper.
Endeca ConfidentialOracle Endeca Platform Services Forge Guide
Externally-Managed Taxonomies | Unexpected default-mapping behavior106

Part 4
Other Advanced Features
• The Forge Logging System• The Forge Metrics Web Service


Chapter 17
The Forge Logging System
This section provides a brief introduction to the Forge logging system. Its command-line interfaceallows you to focus on the messages that interest you globally and by topic.
Overview of the Forge logging systemThe Forge logging system provides a logging interface to Forge components. With this system, youcan specify the logging level for a component globally or by topic.
The logging level allows you to filter logging messages so you can monitor elements of interest at theappropriate granularity without being overwhelmed by messages that are not relevant.
A simple command-line interface makes it easy to adjust your logging strategy to respond to yourneeds. During development, you might be interested in feedback on only the feature you are workingon, while in production, you would typically focus on warnings and errors.
Log levels referenceThe log levels used by Forge logging are as follows:
DescriptionLog level
Indicates a problem so severe that you have to shut down.FATAL
Non-fatal error messages.ERROR
Alerts you to any peculiarities the system notes.You may want to address these.WARN
Provides status messages, even if everything is working correctly.INFO
Provides all information of interest to a user.DEBUG
About logging topicsAll log messages are flagged with one or more topics.There are different types for different components,all logically related to some aspect of the component.
In Forge, you can specify individual logging levels for each of the following topics:
• baseline• update• config• webservice• metrics
The command line interfaceYou access logging on Forge with the --logLevel option. Its usage is as follows: --logLevel(<topicName>=)<logLevel>
By selecting a level you are requesting all feedback at of that level of severity and greater. For example,by specifying the WARN level, you receive WARN, ERROR, and FATAL messages.
The --logLevel option sets either the default log level, the topic log level, or both:
• The default log level provides global logging for the component:
forge --logLevel WARN
This example logs all WARN level or higher messages.
Note: Forge defaults to log all INFO or higher level messages if a default level is not specified.
• The topic log level provides logging at the specified level for just the specified topic:
forge --logLevel baseline=DEBUG
This example overrides the default log level and logs all DEBUG messages and higher in the baselinetopic.
• If two different log levels are specified, either globally or to the same topic, the finer-grained levelis used:
forge –logLevel INFO –logLevel WARN
In the case of this example, all INFO level messages and higher are printed out.
It is possible to specify both default and topic level logging in the same command to filter the feedbackthat you receive. For example:
forge --logLevel WARN --logLevel config=INFO --logLevel update=DEBUG
This command works as follows:
• It logs all WARN or higher messages, regardless of topic.• It logs any message flagged with the config topic if it is INFO level or higher.• It logs any message flagged with the update topic if it is DEBUG level or higher.
Aliasing existing -v levelsThe Forge -v logging option is still supported, but has been changed to alias the --logLevel optionas follows: -v[f|e|w|i|d]. The following table maps the relationships and indicates the status ofthe arguments in this release (supported or deprecated).
Endeca ConfidentialOracle Endeca Platform Services Forge Guide
The Forge Logging System | The command line interface110

6.1 log levelPre-6.x meaningStatus in 6.1Argument
DEBUGDefaults to v (verbose) or the EDF_LOG_LEVELenvironment variable.
Supported-v
DEBUGVerbose (all messages).Deprecated-vv
INFOInfo (info, stat, warnings, and errors).Supported-vi
INFOStat (stat, warnings, and errors).Deprecated-va
WARNWarnings and errors.Supported-vw
ERRORErrors.Supported-ve
ERRORQuiet mode (errors).Deprecated-vq
FATALSilent mode (fatal errors).Deprecated-vs
DEBUGn/aSupported-vd
FATALn/aSupported-vf
Has no effect. Thetimestamp is alwaysprinted now.
Printed out the timestamp when using--legacyLogFormat.
Deprecated-vt
About logging output to a fileIn Forge, the -o flag defines a location for the logging output file. If you do not specify a location, itlogs to standard error.
The following snippet shows the start of an output file:
INFO 01/25/07 15:15:50.791 UTC FORGE {config}: forge 6.1.0.52 ("i86pc-win32")
INFO 01/25/07 15:15:50.791 UTC FORGE {config}: Copyright 2001-2007 Endeca Technologies, Inc.
INFO 01/25/07 15:15:50.791 UTC FORGE {config}: Command Line: i86pc-win32\bin\forge.exe
INFO 01/25/07 15:15:50.791 UTC FORGE {config}: Initialized cURL, version: libcurl/7.15.5 OpenSSL/0.9.8
ERROR 01/25/07 15:15:50.791 UTC FORGE {config}: A file name is required!
Changes to the EDF_LOG_LEVEL environment variableThe EDF_LOG_LEVEL environment variable continues to be supported. If used, it should be set to oneof the new log level names.
The EDF_LOG_LEVEL environment variable sets the default Forge log level.
If you choose to use EDF_LOG_LEVEL, the variable should be set to one of the new log level names,such as WARN or ERROR. Just as in previous versions of logging, the value set in EDF_LOG_LEVELmay be overridden by any command line argument that changes the global log level.
Oracle Endeca Platform Services Forge GuideEndeca Confidential
111The Forge Logging System | The command line interface


Chapter 18
The Forge Metrics Web Service
You can query a running Forge component for performance metrics using the Forge Metrics Webservice. This makes Forge easier to integrate into your management and monitoring framework.
About the Forge Metrics Web serviceThe Forge Metrics Web service provides progress and performance metrics for Forge.You can usethe output of this Web service in the monitoring tool or interface of your choice.
A running instance of Forge hosts a WSDL interface, metrics.wsdl. Using this WSDL interface,you can query Forge for specific information about its performance.
Metrics are hierarchical, with parent-child relationships indicated by their location in the tree.You caneither give the service a full path to precisely the information you are seeking, or get the full tree andtraverse it to find what you want.
The following is an example of the kind of information tree returned by the Forge Metrics Web service:
(Root) Start time: Wed Jan 24 14:34:14 2007 Percent complete: 41.4% Throughput: 871 records/second Records processed: 24000 Components IndexerAdapter Records processed: 24902 Total processing time: 2.331 seconds PropDimMapper Records processed: 24902 Total processing time: 6.983 seconds LoadMainData Records processed: 24903 Total processing time: 8.19 seconds
Each metric can be one of three types:
• Metric — serves as a parent category for child metrics, without containing any data of its own.• Attribute metric — stores attributes, such as the start time of the Forge being queried.
For each attribute metric you request, you receive ID, Name, and Attribute Value (a string).
• Measurement metric — contains quantatative data, such as:

• Estimated percent complete.• Overall throughput.• Number of records processed.• Per-component throughput.
For each measurement metric you request, you receive ID, Name, Measurement Units (a string),and Measurement Value (a number).
Note:
The Forge Metrics Web service does not tell you what step Forge is on or its estimated time tocompletion.
The service is not long-lived; it exits when Forge does. For this reason, you cannot use thisservice to find out how long the Forge run took.
The Forge Metrics Web service does not work in conjunction with parallel Forge.
About enabling Forge metricsBefore you can generate Forge metrics, you have tell Forge the port on which to set up the ForgeMetrics Web service. By doing so, you also turn Forge metrics on.
In the Endeca Application Controller, you set the web-service-port when you provision the Forgecomponent.You can do this three ways:
• In Endeca Workbench, on the EAC Administration page.• In a provisioning file used with the eaccmd tool (for details on provisioning a Forge component,
see the Oracle Endeca Application Controller Guide.• Programmatically, via the webServicePort on the ForgeComponentType object. For details,
see the Oracle Endeca Application Controller Guide.
Outside of the Application Controller environment, you can also set or change the Web service port(and thus turn on Forge metrics) at the Forge commandline. The commandline argument for settingthe metrics port is --wsport <port-number> .
About enabling SSL securityYou can enable SSL on the Forge component to make the Forge Metrics Web service secure.
For information on enabling SSL on the Forge component programmatically or while provisioning witheaccmd, see the Oracle Endeca Application Controller Guide.
Note: The Web services port disregards the cipher sub-element of the ssl-configurationelement.
Endeca ConfidentialOracle Endeca Platform Services Forge Guide
The Forge Metrics Web Service | About enabling Forge metrics114

About using Forge metricsAssuming Forge’s web-service-port is set, when you start Forge, it serves up the Metrics Webservice.You can then use any Web services interface to talk to it and request metrics.
You can request global information on the parent node, or request on a component-by-componentbasis. (Each pipeline component has corresponding metrics.) If you request "/" , the Metrics Webservice returns the root and all of its children. To refine your request, you give the Web service thepath to the node you are interested in.
The MetricsService APIThe MetricsService interface includes the methods and classes described below.
The metrics schema is defined in metrics.wsdl, which is located in the$ENDECA_ROOT/lib/services directory on UNIX and %ENDECA_ROOT%\lib\services onWindows.
Methods
ReturnsExceptionParametersPurpose
Name
getMetricOutput,a string
MetricFaultis the error
getMetricInput is aMetricInputType object
Lists thecollection of
getMetric(MetricInputTypegetMetricInput)
collection ofmetrics.
messagereturnedwhen themethod fails.
consisting of a path to the node youwant to query and a Boolean settingthat allows you to exclude thatnode’s children from the query.
metrics in anapplication.
Classes
PropertiesPurposeName
id is a unique string identifier for the metric.A class that describes a metric.MetricType
displayName is the name for the metric,as it appears in the output file.
children is a collection of metric objects.
metric is a collection of metrics comprisingthis MetricListType object.
A class that describes a list ofmetrics.
MetricListType
path is the path to the node you want toquery. Null indicates top level, returning thewhole tree.
A class that describes the input tothe getMetric method.
MetricInputType
excludeChildren lets you indicate if youwant just the metrics of the node specifiedin path or those of its children too.
Oracle Endeca Platform Services Forge GuideEndeca Confidential
115The Forge Metrics Web Service | About using Forge metrics

PropertiesPurposeName
metric is an object of type MetricType.A class that describes the outputreturned by the getMetric method.
MetricResultType
value is a string describing the attribute.An extension of MetricType, theAttributeType class describesan attribute metric.
AttributeType
value is a double representing the value ofthe measurement metric.
An extension of MetricType, theMeasurementType class describesa measurement metric.
MeasurementType
units is a string describing the unit ofmeasure used by the metric.
Endeca ConfidentialOracle Endeca Platform Services Forge Guide
The Forge Metrics Web Service | The MetricsService API116

Appendix A
Forge Flag Reference
This reference provides a description of the options (flags) used by the Forge program.
Forge flag options referenceThe included table lists the different flag options that Forge takes.
The usage of Forge is as follows:
forge [-bcdinov] [--options] <Pipeline-XML-File>
<Pipeline-XML-File> can be a relative path or use the file://[hostname]/ protocol.
Forge takes the following options:
Important: All flags are case-sensitive.
DescriptionOption
Specify the maximum number of records that the record caches shouldbuffer. This may be set individually in the Maximum Records field ofthe Record Cache editor in Developer Studio.
-b <cache-num>
Forge has a set of XML entity definitions whose values can beoverridden at the command line, such as current_date, cur¬
-c <name=value>
rent_time, and end_of_line.You can specify a replacementstring for the default entity values using the -c option, or in an .inifile specified with -i (described below).
The format is:
<configValName=configVal>
For example:
end_of_line=”\n”
which would be specified on the command line with:
-c end_of_line=”\n”
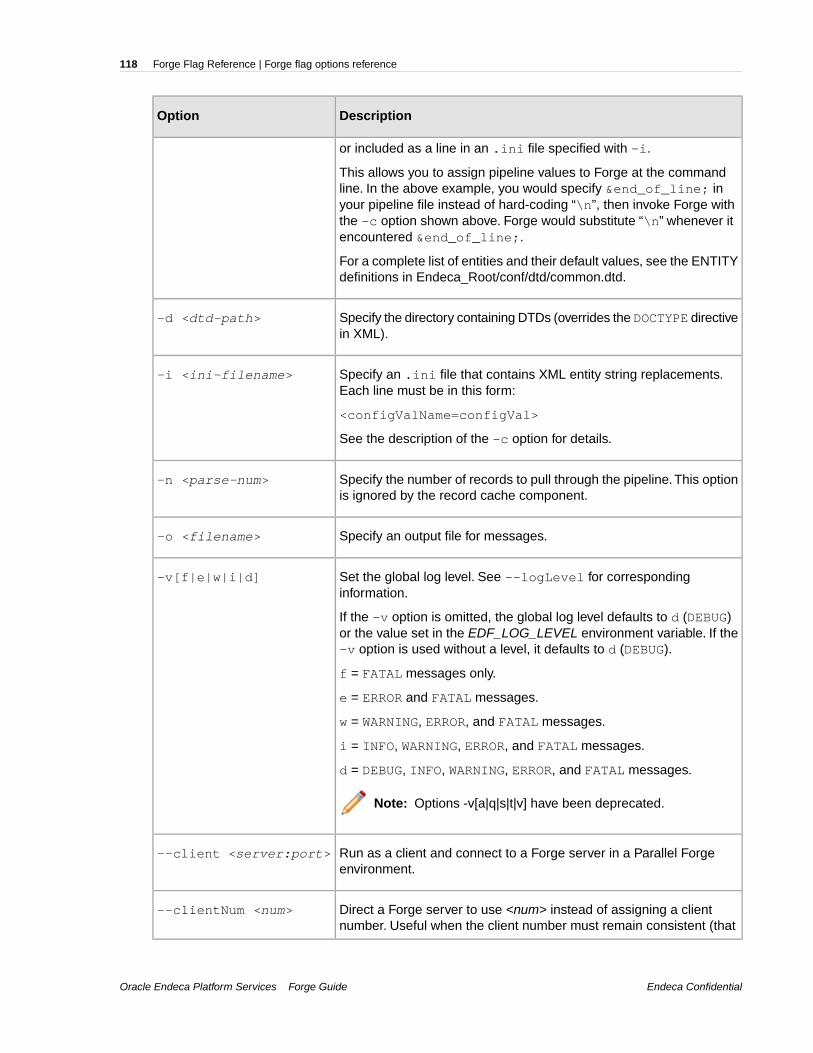
DescriptionOption
or included as a line in an .ini file specified with -i.
This allows you to assign pipeline values to Forge at the commandline. In the above example, you would specify &end_of_line; inyour pipeline file instead of hard-coding “\n”, then invoke Forge withthe -c option shown above. Forge would substitute “\n” whenever itencountered &end_of_line;.
For a complete list of entities and their default values, see the ENTITYdefinitions in Endeca_Root/conf/dtd/common.dtd.
Specify the directory containing DTDs (overrides the DOCTYPE directivein XML).
-d <dtd-path>
Specify an .ini file that contains XML entity string replacements.Each line must be in this form:
-i <ini-filename>
<configValName=configVal>
See the description of the -c option for details.
Specify the number of records to pull through the pipeline.This optionis ignored by the record cache component.
-n <parse-num>
Specify an output file for messages.-o <filename>
Set the global log level. See --logLevel for correspondinginformation.
-v[f|e|w|i|d]
If the -v option is omitted, the global log level defaults to d (DEBUG)or the value set in the EDF_LOG_LEVEL environment variable. If the-v option is used without a level, it defaults to d (DEBUG).
f = FATAL messages only.
e = ERROR and FATAL messages.
w = WARNING, ERROR, and FATAL messages.
i = INFO, WARNING, ERROR, and FATAL messages.
d = DEBUG, INFO, WARNING, ERROR, and FATAL messages.
Note: Options -v[a|q|s|t|v] have been deprecated.
Run as a client and connect to a Forge server in a Parallel Forgeenvironment.
--client <server:port>
Direct a Forge server to use <num> instead of assigning a clientnumber. Useful when the client number must remain consistent (that
--clientNum <num>
Endeca ConfidentialOracle Endeca Platform Services Forge Guide
Forge Flag Reference | Forge flag options reference118

DescriptionOption
is, it must start from zero and be sequential for all clients). Requiresthe --client option.
Specify the number of records that can be combined (via a Combinejoin or a record cache with the Combine Records setting enabled)
--combineWarnCount<num>
before issuing a warning that performance may be slow. The defaultis 100, while 0 will disable the warnings.
Instruct Forge to compress the output to a level of <num>, which is 0to 9 (where 0 = minimum, 9 = maximum). Specify off to turn offcompression.
--compression <num> |off
Specify the number of retries (-1 to 100) when connecting to theserver. The default is 12 while -1 = retry forever. Requires the--client option.
--connectRetries <num>
Deprecated. Encrypt a key pair so that only Forge can read it.--encryptKey[user:]<password>
Print full help if used with no options. Prints specific help with theseoptions (option names and arguments are case sensitive):
--help [option]
• expression = Prints help on expression syntax.• expression:TYPE = Prints help on the syntax for a specific
expression type, which can be DVAL, FLOAT, INTEGER,PROPERTY, STREAM, STRING, or VOID.
• config = Prints help on configuration options.
Set the compression of the IndexerAdapter output Forge to a level of<num>, which is 0 to 9 (where 0 = minimum, 9 = maximum). Specifyoff to turn off compression.
--idxCompression[<num> | off]
Instruct Forge to ignore any state files on startup. The state files areignored only during the startup process. After start up, Forge createsstate files during an update and overwrites the existing state files.
--ignoreState
Instruct Forge to copy index configuration files from the specifieddirectory to its output directory.
--indexConfigDir<path>
Instruct Forge to load input data from this directory.<path> must bean absolute path and will be used as a base path for the pipeline. Anyrelative paths in the pipeline will be relative to this base path.
--inputDir <path>
Note: If the pipeline uses absolute paths, Forge ignores thisflag.
Oracle Endeca Platform Services Forge GuideEndeca Confidential
119Forge Flag Reference | Forge flag options reference

DescriptionOption
Deprecated. Specify the encoding of non-XML input files.--input-encoding<encoding>
Prepend the given Java option to the Java command line used to starta Java virtual machine (JVM).
--javaArgument<java_arg>
Override the value of the Class path field on the General tab of theRecord adapter, if one is specified.
--javaClasspath<classpath>
If the Record adapter has a Format setting with JDBC selected, thenClass path indicates the JDBC driver.
If the Record adapter has a Format setting with Java Adapterselected, then Class path indicates the absolute path to the customrecord adapter’s .jar file.
Specifies the location of the Java runtime engine (JRE). This optionoverrides the value of the Java home field on the General tab of aRecord adapter, if one is specified.
--javaHome <java_home>
The --javaHome setting requires Java 2 Platform Standard Edition5.0 (aka JDK 1.5.0) or later.
Instructs Forge to write logs to this directory, overriding any directoriesspecified in the pipeline.
--logDir <path>
Set the global log level and/or topic-specific log level.--logLevel(<topicName> =)<logLevel>
If this option is omitted, the value defaults to INFO or to that set in theEDF_LOG_LEVEL environment variable.
For corresponding information, see the -v option.
Possible log levels are:
• FATAL = FATAL messages only.• ERROR = ERROR and FATAL messages.• WARN = WARN, ERROR, and FATAL messages.• INFO = INFO, WARN, ERROR, and FATAL messages.• DEBUG = DEBUG, INFO, WARN, ERROR, and FATAL messages.
Possible topics for Forge are:
• baseline• update• config• webservice• metrics
Endeca ConfidentialOracle Endeca Platform Services Forge Guide
Forge Flag Reference | Forge flag options reference120

DescriptionOption
Do not generate new dimension value IDs (for incremental updateswhen batch processing is running).
--noAutoGen
The number of Parallel Forge clients connecting. Required with--server option.
--numClients <num>
Specify the number of Dgidx instances available to Forge.This numbercorresponds to the number of Dgraphs, which in turn corresponds tothe number of file sets Forge creates.
--numPartitions <num>
This option overrides the value of the NUM_IDX attribute in theROLLOVER element of your project’s Pipeline.epx file, if one isspecified.
Instruct Forge to save output data to this directory, overriding anydirectories specified in the pipeline.
--outputDir <path>
Override the value specified in Output prefix field of the IndexerAdapter or Update Adapter editors in your Developer Studio pipeline.
--outputPrefix<prefix>
Add <dir> to perl’s library path. May be repeated.--perllib <dir>
File in which to store process ID (PID).--pidfile<pidfile-path>
Print records as they are produced by each pipeline component. Ifnumber is specified, start printing after that number of records havebeen processed.
--printRecords[number]
Instructs Forge to remove from the AutoGen state any dimensionsthat have been promoted as internal dimensions. When a pipeline
--pruneAutoGen
developer promotes a dimension that was automatically generated,the dimension is copied into the dimensions.xml file and is removedfrom the AutoGen state file.
Specify the number of seconds (0 to 60) to sleep between connectionattempts. The default is 5. Requires the --client option.
--retryInterval <num>
Run as a server and listen on port specified Requires the--numClients option.
--server <portNum>
Deprecated. During a crawl, throttle the rate at which URLs are fetchedby the spider, where:
--spiderThrottle<wait>:<expression_type>:<expression> <wait> is the fetch interval in seconds.
Oracle Endeca Platform Services Forge GuideEndeca Confidential
121Forge Flag Reference | Forge flag options reference
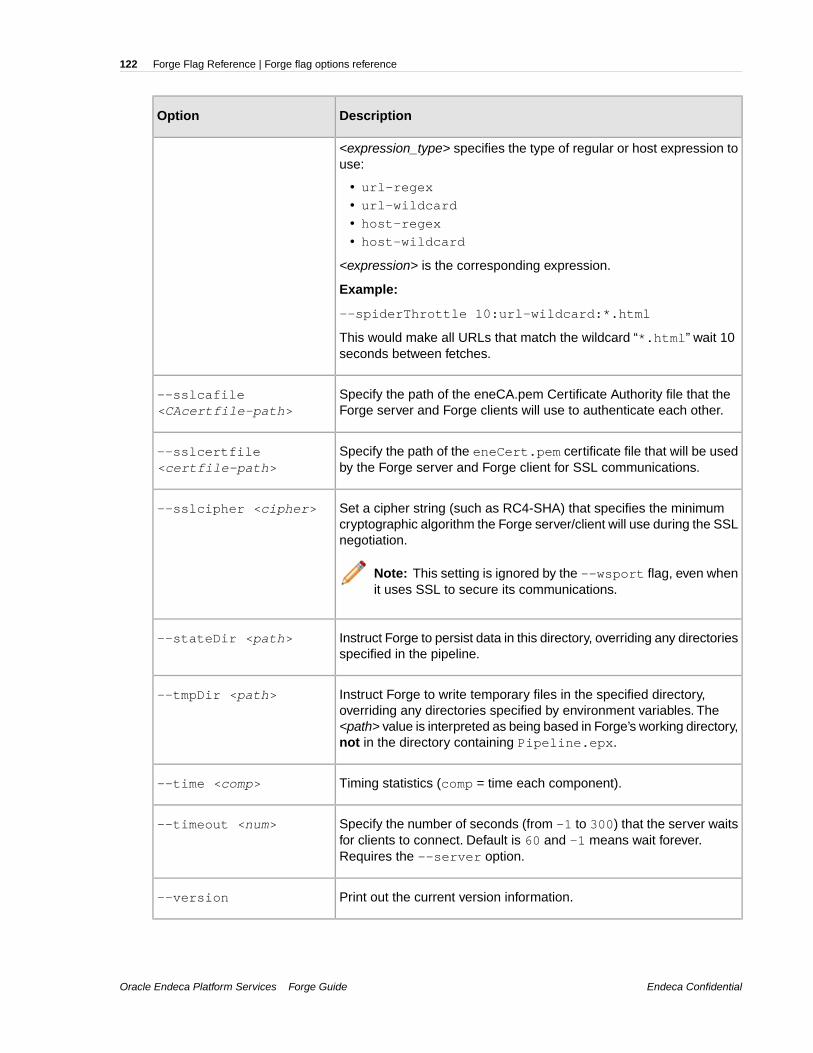
DescriptionOption
<expression_type> specifies the type of regular or host expression touse:
• url-regex
• url-wildcard
• host-regex
• host-wildcard
<expression> is the corresponding expression.
Example:
--spiderThrottle 10:url-wildcard:*.html
This would make all URLs that match the wildcard “*.html” wait 10seconds between fetches.
Specify the path of the eneCA.pem Certificate Authority file that theForge server and Forge clients will use to authenticate each other.
--sslcafile<CAcertfile-path>
Specify the path of the eneCert.pem certificate file that will be usedby the Forge server and Forge client for SSL communications.
--sslcertfile<certfile-path>
Set a cipher string (such as RC4-SHA) that specifies the minimumcryptographic algorithm the Forge server/client will use during the SSLnegotiation.
--sslcipher <cipher>
Note: This setting is ignored by the --wsport flag, even whenit uses SSL to secure its communications.
Instruct Forge to persist data in this directory, overriding any directoriesspecified in the pipeline.
--stateDir <path>
Instruct Forge to write temporary files in the specified directory,overriding any directories specified by environment variables. The
--tmpDir <path>
<path> value is interpreted as being based in Forge’s working directory,not in the directory containing Pipeline.epx.
Timing statistics (comp = time each component).--time <comp>
Specify the number of seconds (from -1 to 300) that the server waitsfor clients to connect. Default is 60 and -1 means wait forever.Requires the --server option.
--timeout <num>
Print out the current version information.--version
Endeca ConfidentialOracle Endeca Platform Services Forge Guide
Forge Flag Reference | Forge flag options reference122

DescriptionOption
Start the Forge Metrics Web service, which is off by default. It listenson the port specified.
--wsport <portNum>
Oracle Endeca Platform Services Forge GuideEndeca Confidential
123Forge Flag Reference | Forge flag options reference


Appendix B
File Formats Supported by the DocumentConversion Module
This section lists the file formats that are supported by the Endeca Document Conversion Module.After installing this module, you can use the CONVERTTOTEXT expression in your pipeline to convertany of the supported source document formats.The Endeca Web Crawler and the Endeca CAS Serverprovide tight integrations with the Document Conversion Module, which means that they can convertbinary files as they are being crawled.
Word processing formatsThe following table lists supported word processing formats:
Version (if applicable)Format
Versions 3.0 - 6.0Adobe FrameMaker (MIF)
Level 2Adobe Illustrator Postscript
Ami
Ami Pro for OS2
2.0, 3.0Ami Pro for Windows
Through 4.0DEC DX
4.0, 4.1DEC DX Plus
3.0 - 4.5Enable Word Processor
1.0, 3.0First Choice WP
3.0Framework WP
97 - 2007Hangul
IBM DCA/FFT
2.0 - 5.0IBM DisplayWrite
1.01IBM Writing Assistant
5.0, 6.0, 8.0 - 13.0, 2004Ichitaro

Version (if applicable)Format
Through 3.0JustWrite
2010Kingsoft WPS Writer
1.1Legacy
Through 2.0Lotus Manuscript
9.7, 96, - Millennium 9.6Lotus WordPro
97 - Millennium 9.6Lotus WordPro (non-Win32)
1.1MacWrite II
All versions through 8.0Mass 11
2003 - 2007Microsoft Publisher (File ID only)
4.0 - 6.0Microsoft Word for DOS
4.0 - 6.0, 98 - 2008Microsoft Word for Macintosh
1.0 - 2007Microsoft Word for Windows
98-JMicrosoft Word for Windows
Microsoft WordPad
2.0Microsoft Works WP for DOS
2.0Microsoft Works WP for Macintosh
3.0, 4.0Microsoft Works WP for Windows
1.0 - 3.0Microsoft Write for Windows
Through 4.0MultiMate
2.0MultiMate Advantage
Navy DIF
3.0Nota Bene
2.0Novell Perfect Works
4.0 - 6.0Office Writer
1.1 - 3.0OpenOffice Writer
3.xOracle Open Office Writer
5.0PC File Doc
Versions A, BPFS:Write
1.0, 2.0Professional Write (DOS)
1.0Professional Write Plus (Windows)
2.0, 3.0Q&A Write (Windows)
1.0 - 3.0Samna Word IV
Smna Work IV+
Endeca ConfidentialOracle Endeca Platform Services Forge Guide
File Formats Supported by the Document Conversion Module | Word processing formats126

Version (if applicable)Format
Samsung JungUm Global (File IDonly)
1.0Signature
1.02SmartWare II WP
1.0Sprint
5.2 - 9.0StarOffice Writer
1.2Total Word
Versions through 2.6Wang PC (IWP)
WordMarc Composer
WordMarc Composer+
WordMarc Word Processor
4.2WordPerfect for DOS
1.02 - 3.1WordPerfect for Macintosh
5.1 - X4WordPerfect for Windows
1.0 - 3.0WordStar 2000 for DOS
2.0, 3.0WordStar 2000 for DOS
3.0 - 7.0WordStar for DOS
1.0WordStar for Windows
Through III+XyWrite
Text and markup formatsThe following table lists supported text and markup formats:
Notes:
• The Document Conversion Module supports converting XML content contained in both PCDATAand CDATA elements.
• In the case of XHTML, "file ID only" means that the conversion process produces an Endecaproperty representing the file format type but nothing else.
Version (if applicable)Format
7 bit and 8 bitANSI Text
7 bit and 8 bitASCII Text
DOS character set
EBCDIC
1.0 - 4.0HTML (CSS rendering not supported)
IBM DCA/RFT
Oracle Endeca Platform Services Forge GuideEndeca Confidential
127File Formats Supported by the Document Conversion Module | Text and markup formats
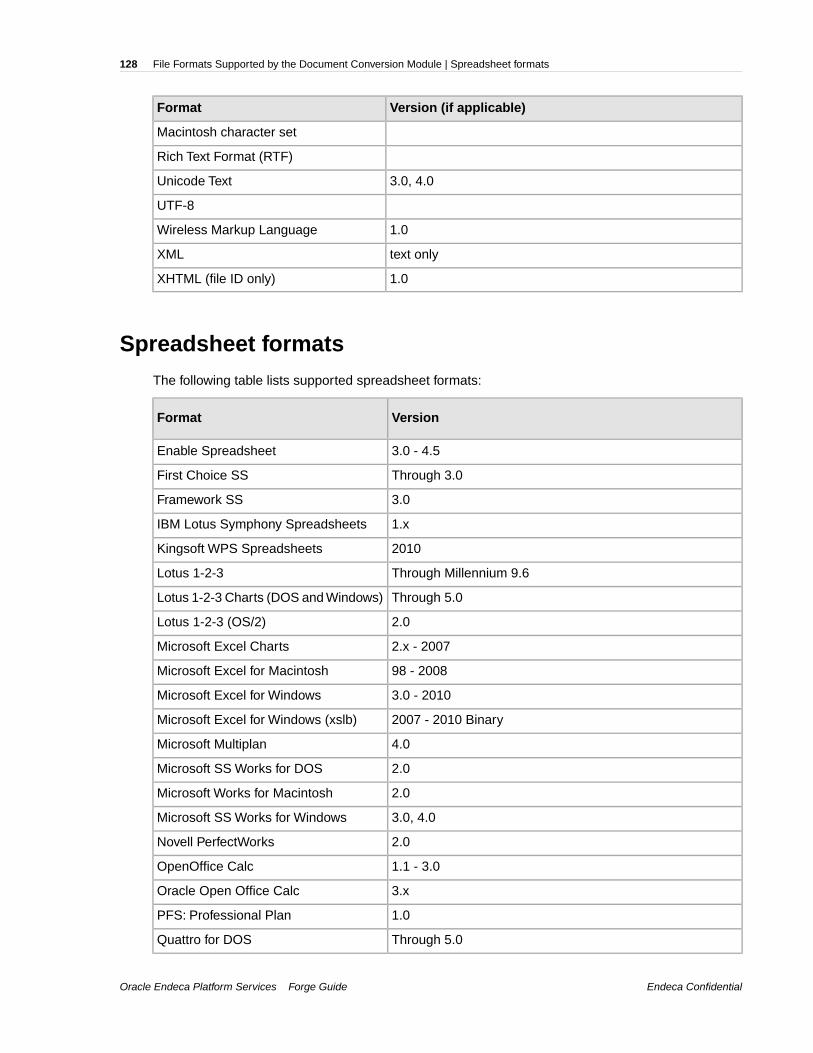
Version (if applicable)Format
Macintosh character set
Rich Text Format (RTF)
3.0, 4.0Unicode Text
UTF-8
1.0Wireless Markup Language
text onlyXML
1.0XHTML (file ID only)
Spreadsheet formatsThe following table lists supported spreadsheet formats:
VersionFormat
3.0 - 4.5Enable Spreadsheet
Through 3.0First Choice SS
3.0Framework SS
1.xIBM Lotus Symphony Spreadsheets
2010Kingsoft WPS Spreadsheets
Through Millennium 9.6Lotus 1-2-3
Through 5.0Lotus 1-2-3 Charts (DOS and Windows)
2.0Lotus 1-2-3 (OS/2)
2.x - 2007Microsoft Excel Charts
98 - 2008Microsoft Excel for Macintosh
3.0 - 2010Microsoft Excel for Windows
2007 - 2010 BinaryMicrosoft Excel for Windows (xslb)
4.0Microsoft Multiplan
2.0Microsoft SS Works for DOS
2.0Microsoft Works for Macintosh
3.0, 4.0Microsoft SS Works for Windows
2.0Novell PerfectWorks
1.1 - 3.0OpenOffice Calc
3.xOracle Open Office Calc
1.0PFS: Professional Plan
Through 5.0Quattro for DOS
Endeca ConfidentialOracle Endeca Platform Services Forge Guide
File Formats Supported by the Document Conversion Module | Spreadsheet formats128
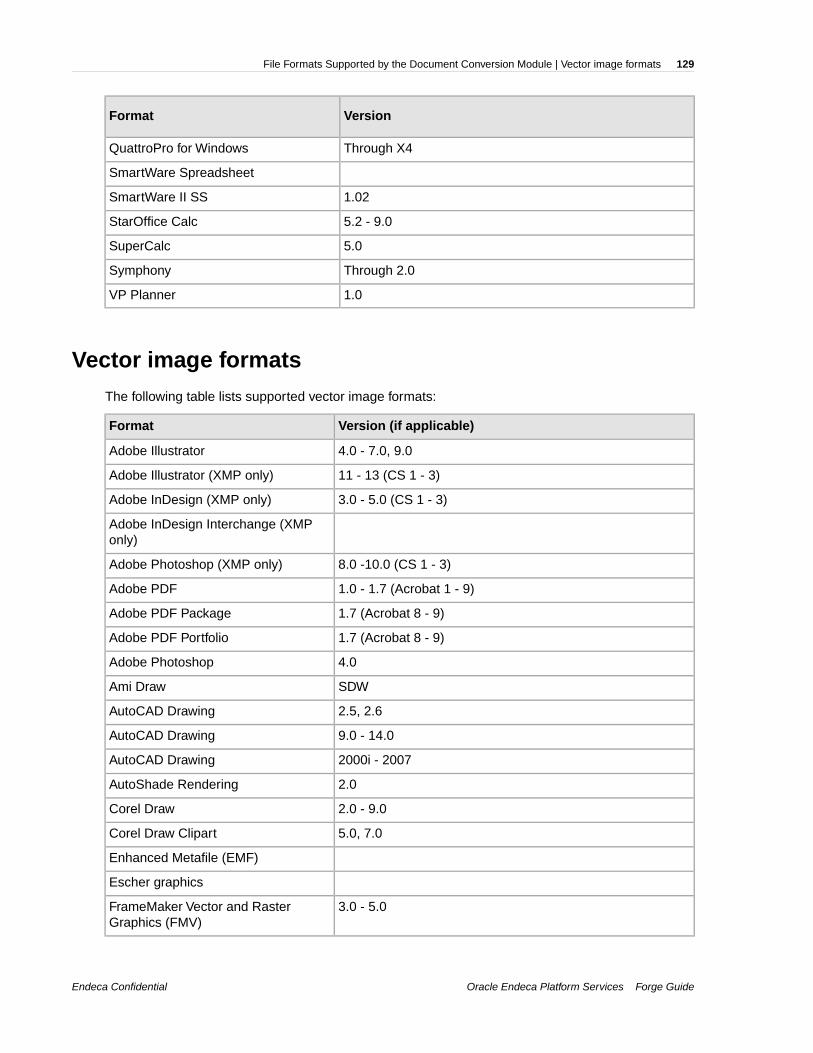
VersionFormat
Through X4QuattroPro for Windows
SmartWare Spreadsheet
1.02SmartWare II SS
5.2 - 9.0StarOffice Calc
5.0SuperCalc
Through 2.0Symphony
1.0VP Planner
Vector image formatsThe following table lists supported vector image formats:
Version (if applicable)Format
4.0 - 7.0, 9.0Adobe Illustrator
11 - 13 (CS 1 - 3)Adobe Illustrator (XMP only)
3.0 - 5.0 (CS 1 - 3)Adobe InDesign (XMP only)
Adobe InDesign Interchange (XMPonly)
8.0 -10.0 (CS 1 - 3)Adobe Photoshop (XMP only)
1.0 - 1.7 (Acrobat 1 - 9)Adobe PDF
1.7 (Acrobat 8 - 9)Adobe PDF Package
1.7 (Acrobat 8 - 9)Adobe PDF Portfolio
4.0Adobe Photoshop
SDWAmi Draw
2.5, 2.6AutoCAD Drawing
9.0 - 14.0AutoCAD Drawing
2000i - 2007AutoCAD Drawing
2.0AutoShade Rendering
2.0 - 9.0Corel Draw
5.0, 7.0Corel Draw Clipart
Enhanced Metafile (EMF)
Escher graphics
3.0 - 5.0FrameMaker Vector and RasterGraphics (FMV)
Oracle Endeca Platform Services Forge GuideEndeca Confidential
129File Formats Supported by the Document Conversion Module | Vector image formats

Version (if applicable)Format
Gem File (Vector)
2.0 - 3.0Harvard Graphics Chart (DOS)
Harvard Graphics for Windows
2.0HP Graphics Language
5.1 - 5.3Initial Graphics Exchange Specification(IGES) Drawing
Through 3.1Micrografx Designer
6.0Micrografx Designer
Through 4.0Micrografx Draw
Microsoft XPS (Text only)
2.0Novell PerfectWorks Draw
1.1 - 3.0OpenOffice Draw
3.xOracle Open Office Draw
4Visio (Page Preview mode onlyWMF/EMF)
5.0 - 2007Visio
2007Visio XML VSX (File ID only)
Windows Metafile
Notes on Adobe PDF text extraction
The CAS Document Conversion Module works as follows when processing Adobe PDF files withsecurity settings:
• The CAS Document Conversion Module will respect the no-copy option of a PDF. That is, if a PDFpublishing application has a no-copy option (which prohibits the copying or extraction of text withinthe PDF), the Document Conversion Module will not extract text from that PDF.
• The CAS Document Conversion Module does not support text extraction from password-protectedfiles.
• The CAS Document Conversion Module does not support text extraction from PDFs with encryptedcontent.
To extract the text from these types of PDFs, you must re-create them without setting the appropriatesecurity option.
In addition, text added with the Sticky Note tool is not extracted.
Raster image formatsThe following table lists supported raster image formats:
Endeca ConfidentialOracle Endeca Platform Services Forge Guide
File Formats Supported by the Document Conversion Module | Raster image formats130

VersionFormat
Type I and Type IICALS Raster (GP4)
ANSI, CALS, NISTComputer Graphics Metafile
TIFF header onlyEncapsulated PostScript (EPS)
GEM Image (Bitmap)
Graphics Interchange Format (GIF)
1.0IBM Graphics Data Format (GDF)
1.0IBM Picture Interchange Format (PIF)
graphic embeddings in PDF filesJBIG2
JFIF (JPEG not in TIFF format)
JPEG
JP2JPEG 2000
Kodak Flash Pix
1.0Kodak Photo CD
Lotus PIC
Lotus Snapshot
BMP onlyMacintosh PICT1 and PICT2
MacPaint
Microsoft Windows Bitmap
Microsoft Windows Cursor
Microsoft Windows Icon
OS/2 Bitmap
OS/2 Warp Bitmap
5.0, 6.0Paint Shop Pro (Win32 only)
PC Paintbrush (PCX)
PC Paintbrush DCX (multi-page PCX)
Portable Bitmap (PBM)
Portable Graymap (PGM)
Portable Network Graphics (PNG)
Portable Pixmap (PPM)
Progressive JPEG
6.x - 9.0StarOffice Draw
Sun Raster
Group 5 and Group 6TIFF
Group 3 and Group 4TIFF CCITT Fax
Oracle Endeca Platform Services Forge GuideEndeca Confidential
131File Formats Supported by the Document Conversion Module | Raster image formats

VersionFormat
2.0Truevision TGA (Targa)
WBMP wireless graphics format
1.0Word Perfect Graphics
x10 compatibleX-Windows Bitmap
x10 compatibleX-Windows Dump
x10 compatibleX-Windows Pixmap
2.0, 7.0, 8.0, 9.0, 10.0WordPerfect Graphics
Presentation formatsThe following table lists supported presentation formats:
Version (if applicable)Format
6.0 - X3Corel Presentations
3.0Harvard Graphics (DOS)
1.xIBM Lotus Symphony Presentations
2010Kingsoft WPS Presentation
1.0 - Millennium 9.6Lotus Freelance
2.0Lotus Freelance (OS/3)
95, 97Lotus Freelance for Windows
4.0 - 2008Microsoft PowerPoint for Macintosh
3.0 - 2010Microsoft PowerPoint for Windows
2007 - 2010Microsoft PowerPoint for WindowsSlideshow
2007 - 2010Microsoft PowerPoint for Windows Template
3.0, 7.0Novell Presentations
1.1, 3.0OpenOffice Impress
3.xOracle Open Office Impress
5.2 - 9.0StarOffice Impress
5.1 - X4WordPerfect Presentations
Archive formatsThe following table lists supported archive formats:
Endeca ConfidentialOracle Endeca Platform Services Forge Guide
File Formats Supported by the Document Conversion Module | Presentation formats132

Version (if applicable)Format
LZA Self Extracting Compress
LZH Compress
95, 97Microsoft Binder
1.5, 2.0, 2.9RAR
Self-extracting .exe
UNIX Compress
UNIX GZip
UNIX TAR
Uuencode
PKZipZIP
WinZipZIP
Database formatsThe following table lists supported database formats:
VersionFormat
4.xDataEase
III, IV, and VDBase
Through 3.0First Choice DB
3.0Framework DB
1.0, 2.0Microsoft Access
2000 - 2003Microsoft Access Report Snapshot (File IDonly)
1.0, 2.0Microsoft Works DB for DOS
2.0Microsoft Works DB for Macintosh
3.0, 4.0Microsoft Works DB for Windows
2.0 - 4.0Paradox (DOS)
1.0Paradox (Windows)
Through 2.0Q & A
R:Base 5000 and R:Base System VR:Base
2.0Reflex
1.02SmartWare II
Oracle Endeca Platform Services Forge GuideEndeca Confidential
133File Formats Supported by the Document Conversion Module | Database formats

E-mail formatsThe following table lists supported e-mail formats:
VersionFormat
MHTEncoded mail messages
Multi Part AlternativeEncoded mail messages
Multi Part DigestEncoded mail messages
Multi Part MixedEncoded mail messages
Multi Part News GroupEncoded mail messages
Multi Part SignedEncoded mail messages
TNEFEncoded mail messages
8.5IBM Lotus Notes Domino XMLLanguage DXL
7.x, 8.xIBM Lotus Notes NSF (File IDonly)
8.xIBM Lotus Notes NSF (Windowsonly with Notes client or DominoServer)
97 - 2007Microsoft Outlook MSG
Microsoft Outlook Express(EML)
97 - 2007Microsoft Outlook FormsTemplate (OFT)
97 - 2007Microsoft Outlook OST
97 - 2007Microsoft Outlook PST
2001Microsoft Outlook PST (Mac)
Other formatsThe following table lists other supported formats:
Version (if applicable)Format
2007Microsoft InfoPath (file IDonly)
2007Microsoft OneNote (file IDonly)
98 - 2003Microsoft Project (text only)
2007Microsoft Project (file ID only)
Endeca ConfidentialOracle Endeca Platform Services Forge Guide
File Formats Supported by the Document Conversion Module | E-mail formats134
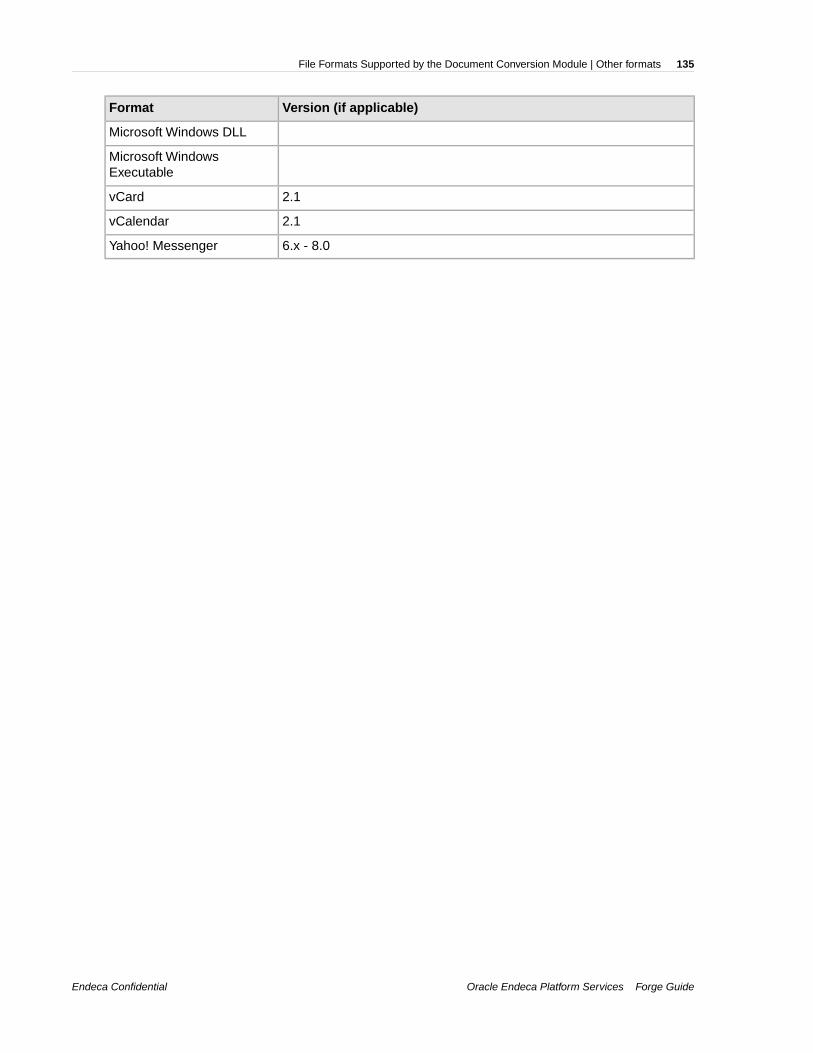
Version (if applicable)Format
Microsoft Windows DLL
Microsoft WindowsExecutable
2.1vCard
2.1vCalendar
6.x - 8.0Yahoo! Messenger
Oracle Endeca Platform Services Forge GuideEndeca Confidential
135File Formats Supported by the Document Conversion Module | Other formats


Index
A
adding components to a pipeline 44Auto Generate mode
described 36saving state information for 50
B
basic pipelinedimension adapter 49dimension server 50indexer adapter 51property mapper 51record adapter 48testing 53
C
combine joins 73Combine Records setting in record caches 88component names as used in a pipeline 44
D
data processinggeneral workflow 21in detail 21loading raw data 22mapping source properties to dimensions 24standardizing properties 23writing out finished data 24
default mappingsenabling 40overriding with null mappings 33
Default Maximum Length 41override 41
Developer Studio 18Dgidx
introduced 14running 17
Dgraph, running the 17dimension adapter 49dimension groups 60dimension hierarchy 15
configuring in Developer Studio 18dimension mapping 24, 35
advanced techniques 39Auto Generate mode 36behavior when no mapping is found 40default mapping 40example 37implicit mapping 40
dimension mapping (continued)Must Match mode 36Normal match mode 35priority order for advanced techniques 30source properties to like-named dimensions 40synonyms 57viewing existing 32
dimension search configured in Developer Studio 18dimension server
for persisting auto-generated dimensions 50overview 50
dimension valuesauto generating 36mapping to source property values 24specifying the order of 59
dimensionsassigning multiple mappings to 34creating 56mapping to source properties 24specifying the order of 59
directory structure for the Endeca Application Controller43disjunct joins 70Document Conversion module
other supported formats 134supported compressed formats 133supported database formats 133supported e-mail formats 134supported presentation formats 132supported raster image formats 131supported text and markup formats 127supported vector image formats 129supported word processing formats 125
dynamic business rules 60configuring in Developer Studio 18configuring in Oracle Endeca Workbench 18
E
emgr_update utility 104Endeca Application Controller
architecture 20communicating with 20communicating with Oracle Endeca Workbench 21directory structure 43introduced 19
Endeca CAS 13Endeca Crawler
Document Conversion modulesupported spreadsheet formats 128
Endeca Developer Studiocreating a basic pipeline project 47creating and mapping dimensions 56

Endeca Developer Studio (continued)creating and mapping Endeca properties 56specifying index configuration options 60using to add and edit pipeline components 44, 59
Endeca ITLarchitecture 14Data Foundry programs 14data processing with 13indexing
about 25indexing with 13, 14, 25introduced 13loading raw data 22mapping source properties to dimensions 24standardizing source properties 23writing out tagged data 24
Endeca propertiesassigning multiple mappings to 34creating 56
Endeca Tools setup information 19Endeca tools suite 18explicit mapping
creating 32described 28
externally created dimensionscompared to externally managed taxonomies 93Developer Studio configuration 94importing 97introduced 93XML requirements 95
externally managed taxonomiesDeveloper Studio configuration 99integrating 102introduced 99loading 104node ID requirements 102pipeline configuration 102transforming 103XML syntax 101XSLT mapping 100
F
filtering unknown properties 28first record joins 72Forge
flags 117introduced 14running 17
Forge logging system 109Forge metrics
enabling 114using 115
Forge Metrics Web service 113API 115enabling SSL 114
H
higher cardinality joins 84
I
implicit mappingdescribed 29enabling 40overriding with null mappings 33
importing externally created dimensions 97index configuration 15, 60indexer adapters 51inner joins 69input components 22instance configuration
creating 17described 14
J
Java manipulators, about 59join keys for data sources 66joins
adding a record assembler 80adding a record cache 79cases where record caches are not required 87choosing left and right 87combine 73combining equivalent records 88configuring in a record assembler 81creating record indexes 75disjunct 70first record 72higher cardinality 84implementing 79inner 69left 68multiple keys in left joins 86multiple values for join key 83outer 69overview 65performing in a database 66record index keys 67sort switch 71switch 70
L
left joinsdescribed 68multiple keys for records 86
loading source data 22logging
aliasing v-levels 111command line interface 110EDF_LOG_LEVEL settings 111levels 109logLevel 110
Oracle Endeca Platform Services138
Index
logging (continued)output file 111topics 110
M
mappingexplicit 29source properties to dimensions 35source properties to like-named dimensions 40
match modesAuto Generate 36Must Match 36Normal 35
Multi Sub-records option for record assembler 86multiple values for a join key 83Must Match mode 36
N
node ID requirements for externally managed taxonomies102Normal match mode 35null mapping
described 29overriding implicit and default mappings 33
O
Oracle Endeca Workbench 18outer joins 69
P
Perl assembler 59pipeline 22
adding components to 44creating a data flow for 44creating using the Basic Pipeline template 47described 14editing components in 44fundamentals 43placement of property mapper 30running 53sequential record processing 22URLs in 45using only one property mapper in 27
precedence rulesintroduced 18specifying in Developer Studio 18, 60
priority order of source property mapping 30property mapper
creating 31described 51minimum configuration 28placement in pipeline 30using only one per pipeline 27, 51using the Mappings editor 32
R
record adapteroverview 48record index 49
record assembleradding for joins 80configuring joins in 81creating join keys 76described 59, 65join keys with multiple properties 77Multi Sub-records option 86
record cacheadding for joins 79Combine Records setting 88creating record indexes 75described 59
record index keys for joins 49, 67record search configured in Developer Studio 18record specifier property, creating 58reference implementation, UI 53
S
search characters 60search configuration 18search interfaces, about 60sort switch join 71source data
in delimited format 48loading 22
source propertiesassigning multiple mappings to 34mapping 55removing unknown 28specifying null mappings for 58standardizing 23
source property mappingdescribed 27priority order 30types 29viewing existing 32
source property valuesdefining maximum length for importing 41mapping to dimension values 35
source records 22spiders 59standardizing source properties 23stemming 60stop words 60switch joins 70system operations 19system provisioning 18
T
tagging Endeca records 17thesaurus entries
configuring in Oracle Endeca Workbench 18
139
Index

thesaurus entries (continued)introduced 60
U
UI reference implementation, using 53unknown source properties, removing 28
W
Web service, Forge Metrics 113
X
XML syntax for dimension hierarchy 96
Oracle Endeca Platform Services140
Index