oracle e-business suite release 12 upgrade and …h50146. to resume normal operation and minimize...
TRANSCRIPT

Code notice ........................................................................................................................................ 2
Executive summary ............................................................................................................................... 4
Introduction ......................................................................................................................................... 5 Recommended test platform and backup strategies............................................................................... 6 Project test environment .................................................................................................................... 6 Migration paths ............................................................................................................................... 6 Recommended migration approach .................................................................................................... 7
Conventions ........................................................................................................................................ 8
Prerequisites ........................................................................................................................................ 9
Migration project test platform ............................................................................................................. 10
Preliminary phase .............................................................................................................................. 11
Migration prerequisites ....................................................................................................................... 12
Phase 1: Upgrading the source RDBMS to 10gR2 ................................................................................. 14 1.1 Prepare the source DB server for 10gR2 upgrade ........................................................................ 14 1.2 Install RDBMS 10gR2 on the source DB server ............................................................................. 16 1.3 Upgrade Applications database to 10gR2 .................................................................................. 18
Phase 2: Migrating Applications 11i database to HP Integrity server ....................................................... 28 2.1 Prepare the target DB server ...................................................................................................... 28 2.2 Prepare the target DB tier .......................................................................................................... 29 2.3 Prepare the source DB node for database migration ..................................................................... 31 2.4 Migrate database to target DB node .......................................................................................... 32 2.5 Prepare database for E-Business Suite 11i ................................................................................... 34
Phase 3: Migrating to E-Business Suite Release 12.0.4 ........................................................................... 38 3.1 Detail planning for the upgrade to R12 ....................................................................................... 38 3.2 Prepare for the upgrade ............................................................................................................ 38 3.3 Final preparations for upgrade .................................................................................................. 39 3.4 Perform upgrade ...................................................................................................................... 41 3.5 Finish the upgrade ................................................................................................................... 41 3.6 Perform post-upgrade tasks ........................................................................................................ 41
Appendix A: Kernel parameters .......................................................................................................... 43
Appendix B: Pre-Upgrade Information Utility output file .......................................................................... 44
Appendix C: Post-Upgrade Information Utility output file ......................................................................... 49
Appendix D: TUMS report for R12 Upgrade ......................................................................................... 51
Appendix E: Recommended OracleMetalink Notes ................................................................................ 52
For more information .......................................................................................................................... 53
Oracle E-Business Suite Release 12 upgrade
and platform migration guide: HP 9000 to
HP Integrity

2
Code notice
This document contains examples of code (“Code”) that you may want to use in building or
developing your own application. You may use this Code only as permitted herein. By your use of
Code, you agree to the terms below. The Licensor, Hewlett-Packard Development Company, L.P.
("HPDC"), grants you the rights listed below.
You may use the Code either by referring to it when developing your own application, copying it in
whole or in part into your application, or building upon a portion or all of it to create your own
application based on it. While using the Code to build your own application, you may alter it,
modify it, and create derivative works of the Code. You may also use the Code to test your
application. You may distribute the Code provided that you comply with the conditions on
distribution described below.
Conditions on distribution
You may:
Reproduce and distribute an unlimited number of copies of the Code within your application, in
source code form, internally within your organization, including subsidiaries and affiliates;
Reproduce and distribute an unlimited number of copies of the Code within your application, in
source code form, externally, provided that:
a. Your application adds significant and primary functionality to the Code;
b. You distribute your application containing the Code under an End-User License Agreement, or
in signed hard-copy form, with terms no less protective than those contained herein, but
permitting your end users only internal distribution as described in item (1) above;
c. You do not use the HPDC name, trademarks, or logo; or the name, trademarks, or logo of
Compaq Computer Corporation ("Compaq"); or the name, trademarks, or logo Hewlett-
Packard Company (“HP”) to market your application;
d. You include a valid copyright notice on your application; and
e. You agree to indemnify, hold harmless, and defend Compaq, HP, and HPDC from and
against any claims or lawsuits, including attorneys' fees, that arise or result from the use or
distribution of your application.
Reproduce and distribute an unlimited number of copies of the Code within your application, in
binary form, internally within your organization, including subsidiaries and affiliates, or externally,
provided that:
a. You do not use the Compaq name, trademarks, or logo; or the name, trademarks or logo of
Hewlett-Packard Company; or the name, trademarks, or logo of HPDC to market your
application;
b. You include a valid copyright notice on your application; and
c. You agree to indemnify, hold harmless, and defend Compaq, HP, and HPDC from and
against any claims or lawsuits, including attorneys’ fees, that arise or result from the use or
distribution of your application.

3
NO WARRANTY
THE CODE IN THIS DOCUMENT IS PROVIDED 'AS-IS', WITHOUT ANY EXPRESSED OR IMPLIED
WARRANTY. IN NO EVENT WILL COMPAQ, HP, OR HPDC AND/OR THEIR SUBSIDIARIES OR
AFFILIATES BE HELD LIABLE FOR ANY DAMAGES ARISING FROM THE USE OF THIS CODE. TO THE
EXTENT PERMITTED BY LAW, COMPAQ AND HP AND HPDC HEREBY DISCLAIM ALL WARRANTIES
AND CONDITIONS WITH REGARD TO THE CODE, INCLUDING ALL IMPLIED WARRANTIES AND
CONDITIONS OF MERCHANTABILITY, FITNESS FOR A PARTICULAR PURPOSE, TITLE, AND NON-
INFRINGEMENT. THE ENTIRE RISK AS TO THE QUALITY AND PERFORMANCE OF THE CODE IS
WITH YOU. SHOULD THE CODE PROVE DEFECTIVE, YOU ASSUME THE COST OF ALL
NECESSARY SERVICING, REPAIR OR CORRECTION. IN NO EVENT SHALL COMPAQ, HP, OR
HPDC OR THEIR SUBSIDIARIES OR AFFILIATES BE LIABLE FOR ANY DIRECT, CONSEQUENTIAL,
INCIDENTAL, SPECIAL, EXEMPLARY, OR PUNITIVE DAMAGES, OR DAMAGES FOR LOSS OF
BUSINESS PROFITS, BUSINESS INTERRUPTION, OR LOSS OF BUSINESS INFORMATION, ARISING
OUT OF THE USE OR INABILITY TO USE THE CODE (INCLUDING BUT NOT LIMITED TO LOSS OF
DATA OR DATA BEING RENDERED INACCURATE OR LOSSES SUSTAINED BY YOU OR THIRD
PARTIES OR A FAILURE OF THE CODE TO OPERATE WITH ANY OTHER PROGRAMS), OR OTHER
DAMAGES WHATSOEVER, EVEN IF COMPAQ, HP, AND/OR HPDC HAVE BEEN ADVISED OF THE
POSSIBILITY OF SUCH DAMAGES.
Reproduction, adaptation or translation without prior written permission is prohibited, except as
allowed under the copyright laws.
4
Executive summary
Oracle E-Business Suite Release 11i is widely deployed across a broad range of HP server platforms:
HP 9000 servers running HP-UX, HP AlphaServers running Tru64 UNIX®, and HP ProLiant servers
running Linux or Microsoft® Windows®. Customers on those and other vendor platforms are faced
with the impending obsolescence of E-Business Suite 11i and/or the operating system/hardware
combinations on which they are deployed. The decisions facing these customers relate to how to
migrate their E-Business Suite 11i environments to a new platform, and whether to upgrade to Release
12 at the same time.
Oracle E-Business Suite Release 12 is certified on several new platforms including HP Integrity servers
running HP-UX for both application and database tiers. HP Integrity servers running Linux and
Windows are also fully certified as the database-only platform for both E-Business Suite Release 11i
and Release 12 split configuration deployments.
This document is a guide for E-Business Suite 11i customers looking to perform a platform migration
from HP 9000 servers to HP Integrity servers running HP-UX and upgrade their Oracle Applications
environment to Release 12. The procedures captured within this document are extracted from various
Oracle notes and guides, and includes additional steps required for HP 9000 server customers to
complete the migration. This document can also be used as an outline to migrate other vendor
platforms to HP Integrity servers running HP-UX.
The procedures within this document are common amongst E-Business Suite Release 11i environments.
However, E-Business Suite is comprised of over 200 business software products, such as Financials,
Manufacturing, Human Resources, and so on. Each product will have its own specific upgrade tasks
that will not be covered within this document. HP recommends that the local experts study the
document Oracle Applications Upgrade Guide: Release 11i to Release 12.0.4 in order to determine
the proper migration plan for each business software product.
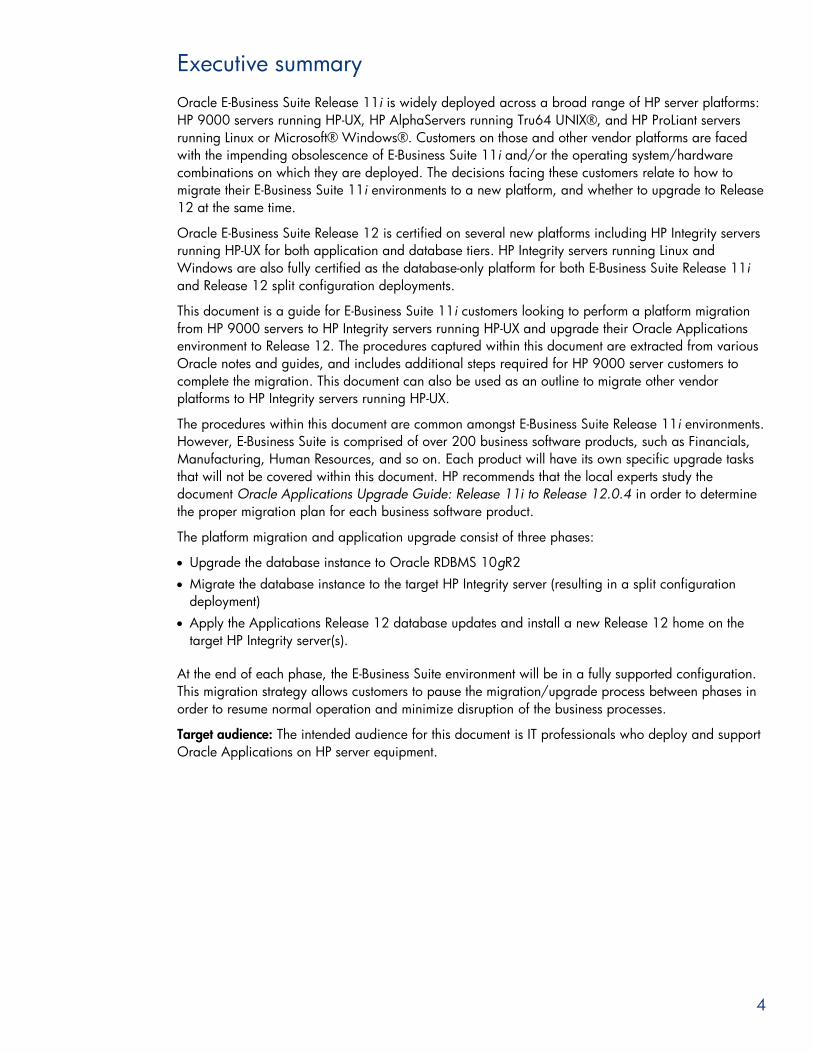
The platform migration and application upgrade consist of three phases:
Upgrade the database instance to Oracle RDBMS 10gR2
Migrate the database instance to the target HP Integrity server (resulting in a split configuration
deployment)
Apply the Applications Release 12 database updates and install a new Release 12 home on the
target HP Integrity server(s).
At the end of each phase, the E-Business Suite environment will be in a fully supported configuration.
This migration strategy allows customers to pause the migration/upgrade process between phases in
order to resume normal operation and minimize disruption of the business processes.
Target audience: The intended audience for this document is IT professionals who deploy and support
Oracle Applications on HP server equipment.

5
Introduction
Oracle E-Business Suite (EBS) is Oracle’s original Enterprise Resource Planning (ERP) application and
incorporates over 200 product-specific business applications. ERP, in this case, is a term referring to a
set of applications connected by a single database that serves some or all of the business processes
within an enterprise-wide company. Oracle E-Business Suite includes an Application Tier that contains
all the business logic for the various business processes and a Database Tier that stores all the
business-critical data.
E-Business Suite deployments generally require a unique plan for each environment in order to
properly migrate the data, application customizations, and product-specific functionality to the target
platform. Each member of the planning team will need to be very familiar with the Oracle
Applications Upgrade Guide: Release 11i to Release 12.0.4, Part Number E12011-02, when
planning the platform migration and application upgrade.
This document provides instructions for migrating an Oracle Applications Release 11.5.10.2
environment running on an HP 9000/HP-UX 11i v2 platform to Release 12.0.4 running on an HP
Integrity/HP-UX 11i v3 platform. This document does not cover the procedures for patching, migrating
customizations, performing product-specific tasks, functional testing, add-on software, or other
languages support. The focus is strictly platform migration and the upgrade of the Oracle E-Business
Suite technology stack.
Depending on the release of E-Business Suite, the platform migration and application upgrade may
require a preliminary phase. The preliminary phase consists of upgrading to the recommended
11.5.10.2 release. This phase is required for all environments 11.5.7 and earlier. Customers running
E-Business Suite Release 11.5.8 and 11.5.9 are not required to upgrade to this newer release if they
are willing to perform all the platform migration and applications upgrade phases in a single
downtime window. Only the 11.5.9 (CU2) and 11.5.10.2 versions support the split-configuration
deployment that allows for pausing between the migration phases described in this document. For this
particular project, the source configuration used E-Business Suite Release 11.5.10.2, which did not
require a preliminary phase.
At the end of each phase of the migration the E-Business Suite environment will be in a fully supported
configuration. This migration strategy allows for the migration to be paused between phases in order
to resume normal operation until continuing onto the next phase.
Phase 1: Upgrade RDBMS to 10gR2
Phase 1 consists of upgrading the source applications database to 10gR2. Customers that have
already upgraded to RDBMS 10.2.0.3 or above may skip this phase and go on to Phase 2.
Note
Oracle RDBMS 10.2.0.4 is now supported by E-Business Suite 11i. Oracle
has discontinued the Critical Patch Update packages for all 10g versions
prior to 10.2.0.4. For that reason, HP recommends upgrading to 10.2.0.4
as part of the EBS migration process.

6
Phase 2: Migrate Applications 11i database
Phase 2 consists of creating a split configuration by performing a platform migration of the source
Applications 11i database instance from the HP 9000 platform to the HP Integrity platform. At the
end of this phase, the E-Business Suite environment will be in a fully supported split configuration
where the E-Business Suite application tier components are running on the HP 9000 server and the
database tier components are running on the HP Integrity server. Oracle Split Configuration also
supports Linux, Windows, Tru64 UNIX, Sun Solaris, or IBM AIX as the application tier platform and
most of the RDBMS supported platforms. For more details on supported E-Business Suite Split
Configurations, review the certify configurations page on the OracleMetalink website.
Phase 3: Upgrade Applications to Release 12
Phase 3 consists of preparing the Applications 11i database instance for E-Business Suite Release
12.0.4, and installing a new Oracle E-Business Suite Release 12.0.4 home on the target HP Integrity
server.
Recommended test platform and backup strategies
Testing all phases on a recent clone of the production environment will yield an accurate estimate of
downtimes required during each phase. The test executions also provide the opportunity to document
any additional steps or patches required for your unique E-Business Suite deployment.
It is strongly recommended to perform a complete backup of the E-Business Suite environment before
and after each phase. These backups will minimize the risk of business disruption by enabling a quick
rollback to a working configuration should an unexpected failure occur.
Project test environment
The test environment used to develop this white paper was comprised of an HP 9000 rp3440 server
with HP-UX 11i v2 as the source platform for the Oracle E-Business Suite 11i environment. Two HP
Integrity BL860c blade servers with HP-UX 11i v3 were the target servers for the application and
database tiers. Only the base components for E-Business Suite and the Vision Demo database were
installed, excluding any Oracle add-on software, third-party products, and foreign languages.
Migration paths
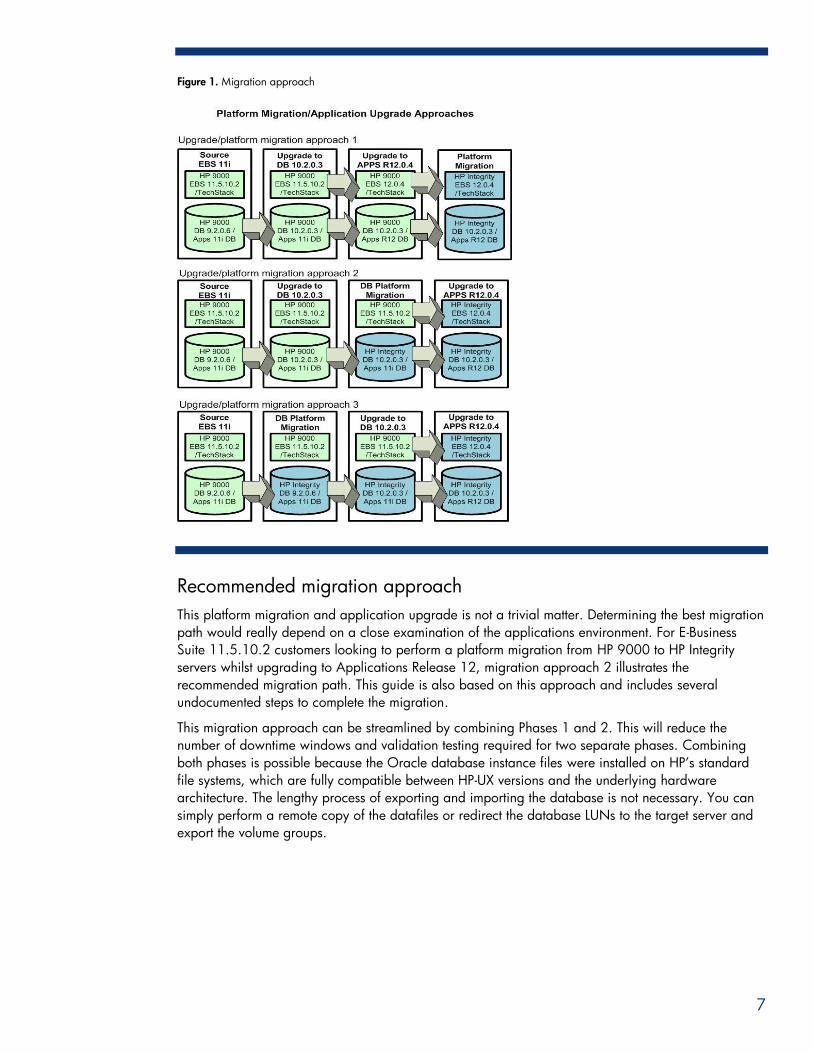
The following figure outlines several different approaches to the migration/upgrade process.
Approach 3 provides a path to migrate the Applications 11i database to the target server and then
upgrade the database to 10gR2. This approach will allow the newer, faster HP servers to be
deployed early in the migration in order to handle most of the heavy lifting during the migration
process. The disadvantage of this approach is that RDBMS 10gR2 is more stable than 9iR2 on the
Integrity platform, and the 10gR2 upgrade on the HP 9000 platform has been more thoroughly tested
by Oracle and HP.
Approach 1 provides a path to upgrade to Oracle Applications Release 12.0.4 on the source
platform and then migrate the whole environment to HP Integrity servers running HP-UX. Only
approach 2 is covered in this document.
7
Figure 1. Migration approach
Recommended migration approach
This platform migration and application upgrade is not a trivial matter. Determining the best migration
path would really depend on a close examination of the applications environment. For E-Business
Suite 11.5.10.2 customers looking to perform a platform migration from HP 9000 to HP Integrity
servers whilst upgrading to Applications Release 12, migration approach 2 illustrates the
recommended migration path. This guide is also based on this approach and includes several
undocumented steps to complete the migration.
This migration approach can be streamlined by combining Phases 1 and 2. This will reduce the
number of downtime windows and validation testing required for two separate phases. Combining
both phases is possible because the Oracle database instance files were installed on HP’s standard
file systems, which are fully compatible between HP-UX versions and the underlying hardware
architecture. The lengthy process of exporting and importing the database is not necessary. You can
simply perform a remote copy of the datafiles or redirect the database LUNs to the target server and
export the volume groups.
8
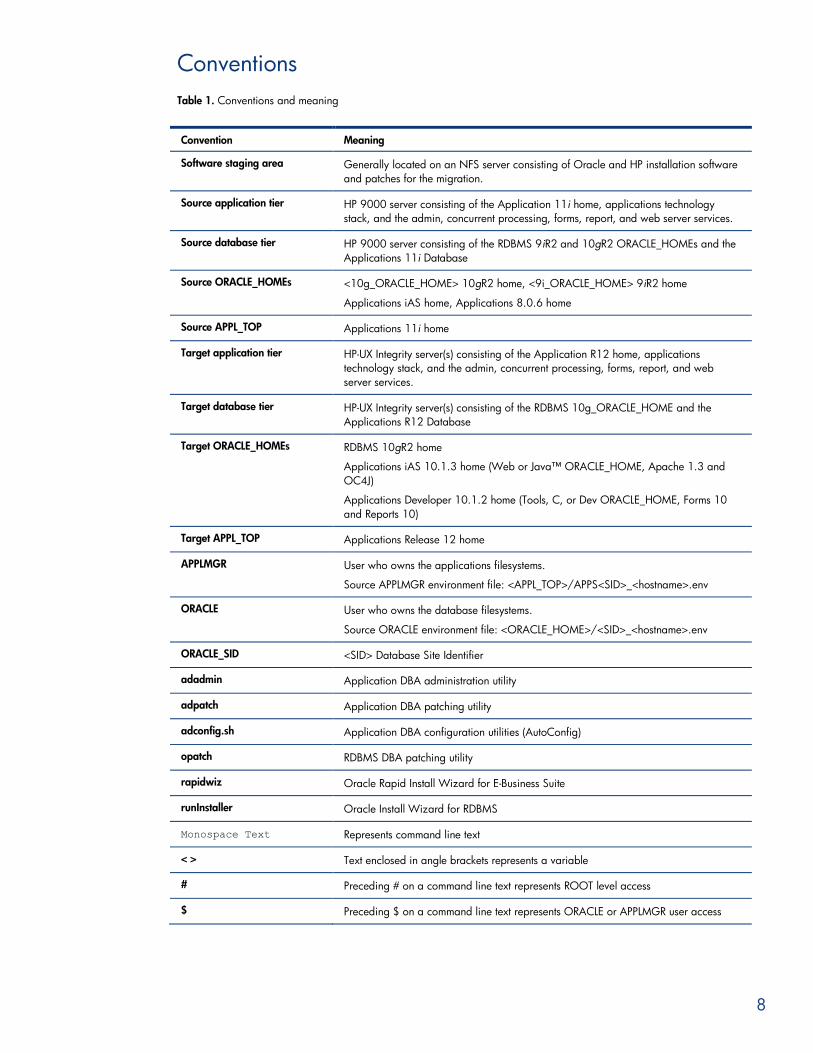
Conventions
Table 1. Conventions and meaning
Convention Meaning
Software staging area Generally located on an NFS server consisting of Oracle and HP installation software
and patches for the migration.
Source application tier HP 9000 server consisting of the Application 11i home, applications technology
stack, and the admin, concurrent processing, forms, report, and web server services.
Source database tier HP 9000 server consisting of the RDBMS 9iR2 and 10gR2 ORACLE_HOMEs and the
Applications 11i Database
Source ORACLE_HOMEs <10g_ORACLE_HOME> 10gR2 home, <9i_ORACLE_HOME> 9iR2 home
Applications iAS home, Applications 8.0.6 home
Source APPL_TOP Applications 11i home
Target application tier HP-UX Integrity server(s) consisting of the Application R12 home, applications
technology stack, and the admin, concurrent processing, forms, report, and web
server services.
Target database tier HP-UX Integrity server(s) consisting of the RDBMS 10g_ORACLE_HOME and the
Applications R12 Database
Target ORACLE_HOMEs RDBMS 10gR2 home
Applications iAS 10.1.3 home (Web or Java™ ORACLE_HOME, Apache 1.3 and
OC4J)
Applications Developer 10.1.2 home (Tools, C, or Dev ORACLE_HOME, Forms 10
and Reports 10)
Target APPL_TOP Applications Release 12 home
APPLMGR User who owns the applications filesystems.
Source APPLMGR environment file: <APPL_TOP>/APPS<SID>_<hostname>.env
ORACLE User who owns the database filesystems.
Source ORACLE environment file: <ORACLE_HOME>/<SID>_<hostname>.env
ORACLE_SID <SID> Database Site Identifier
adadmin Application DBA administration utility
adpatch Application DBA patching utility
adconfig.sh Application DBA configuration utilities (AutoConfig)
opatch RDBMS DBA patching utility
rapidwiz Oracle Rapid Install Wizard for E-Business Suite
runInstaller Oracle Install Wizard for RDBMS
Monospace Text Represents command line text
< > Text enclosed in angle brackets represents a variable
# Preceding # on a command line text represents ROOT level access
$ Preceding $ on a command line text represents ORACLE or APPLMGR user access
9
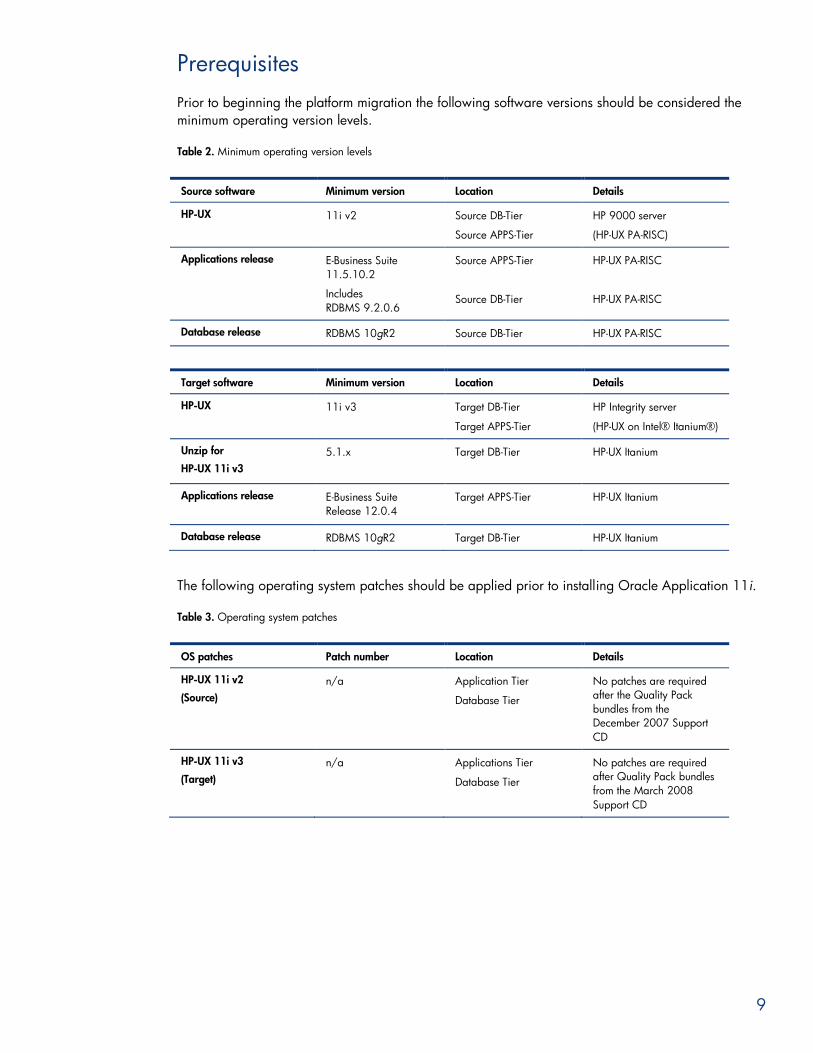
Prerequisites
Prior to beginning the platform migration the following software versions should be considered the
minimum operating version levels.
Table 2. Minimum operating version levels
Source software Minimum version Location Details
HP-UX 11i v2
Source DB-Tier
Source APPS-Tier
HP 9000 server
(HP-UX PA-RISC)
Applications release
E-Business Suite
11.5.10.2
Includes
RDBMS 9.2.0.6
Source APPS-Tier
Source DB-Tier
HP-UX PA-RISC
HP-UX PA-RISC
Database release RDBMS 10gR2 Source DB-Tier HP-UX PA-RISC
Target software Minimum version Location Details
HP-UX
11i v3
Target DB-Tier
Target APPS-Tier
HP Integrity server
(HP-UX on Intel® Itanium®)
Unzip for
HP-UX 11i v3
5.1.x
Target DB-Tier
HP-UX Itanium
Applications release
E-Business Suite
Release 12.0.4
Target APPS-Tier HP-UX Itanium
Database release RDBMS 10gR2 Target DB-Tier HP-UX Itanium
The following operating system patches should be applied prior to installing Oracle Application 11i.
Table 3. Operating system patches
OS patches Patch number Location Details
HP-UX 11i v2
(Source)
n/a Application Tier
Database Tier
No patches are required
after the Quality Pack
bundles from the
December 2007 Support
CD
HP-UX 11i v3
(Target)
n/a Applications Tier
Database Tier
No patches are required
after Quality Pack bundles
from the March 2008
Support CD

10
Migration project test platform
All the steps recorded in this migration document are specific to this test platform. The migration
document was developed using the following configuration.
Source APPS/DB (Applications/Database) server:
HP 9000 rp3440
HP-UX 11i v2 (Sept. 06)
Oracle E-Business Suite 11.5.10.2
Oracle RDBMS 9.2.0.6 & 10gR2
Target DB server:
HP Integrity BL860c blade server
HP-UX 11i v3 (Mar. 08)
Oracle RDBMS 10gR2
Target APPS server:
HP Integrity BL860c blade server
HP-UX 11i v3 (Mar. 08)
Oracle E-Business Suite Release 12.0.4
The source application and database components for Oracle E-Business Suite 11.5.10.2 were
installed in a single-node architecture using the Vision Demo database. A single-node installation
consists of both application tier (application file system, technology stack, admin, concurrent
processing, forms, report, and web services) and database tier (RDBMS file system and Applications
11i database) installed on a single server. The Vision Demo database is a sample database used to
simulate a medium-size company using some of the more popular E-Business Suite software
components.
Oracle RDBMS 10gR2 was also installed on the source DB server in a different ORACLE_HOME for
the Applications 11i Vision Demo database 10gR2 upgrade.
The target DB server was installed with Oracle RDBMS 10gR2 and prepared for Applications 11i
Vision Demo database platform migration.
The target APPS server was prepared for the installation of E-Business Suite Release 12 home.
11
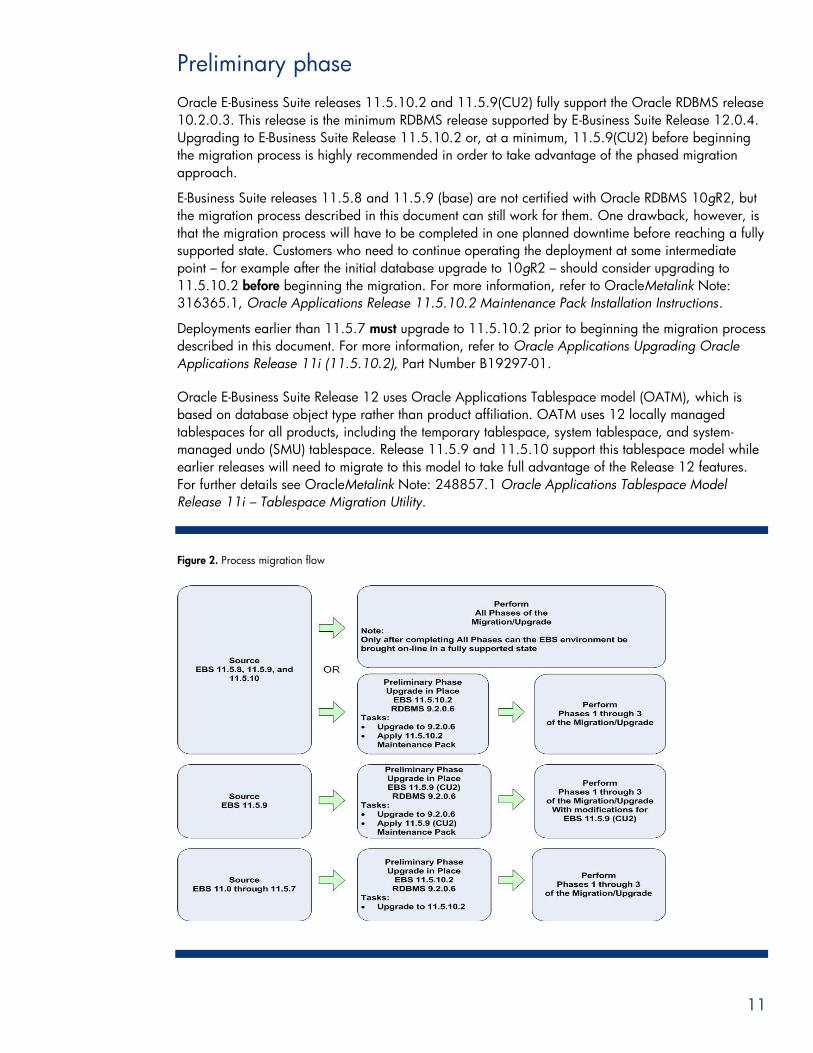
Preliminary phase
Oracle E-Business Suite releases 11.5.10.2 and 11.5.9(CU2) fully support the Oracle RDBMS release
10.2.0.3. This release is the minimum RDBMS release supported by E-Business Suite Release 12.0.4.
Upgrading to E-Business Suite Release 11.5.10.2 or, at a minimum, 11.5.9(CU2) before beginning
the migration process is highly recommended in order to take advantage of the phased migration
approach.
E-Business Suite releases 11.5.8 and 11.5.9 (base) are not certified with Oracle RDBMS 10gR2, but
the migration process described in this document can still work for them. One drawback, however, is
that the migration process will have to be completed in one planned downtime before reaching a fully
supported state. Customers who need to continue operating the deployment at some intermediate
point – for example after the initial database upgrade to 10gR2 – should consider upgrading to
11.5.10.2 before beginning the migration. For more information, refer to OracleMetalink Note:
316365.1, Oracle Applications Release 11.5.10.2 Maintenance Pack Installation Instructions.
Deployments earlier than 11.5.7 must upgrade to 11.5.10.2 prior to beginning the migration process
described in this document. For more information, refer to Oracle Applications Upgrading Oracle
Applications Release 11i (11.5.10.2), Part Number B19297-01.
Oracle E-Business Suite Release 12 uses Oracle Applications Tablespace model (OATM), which is
based on database object type rather than product affiliation. OATM uses 12 locally managed
tablespaces for all products, including the temporary tablespace, system tablespace, and system-
managed undo (SMU) tablespace. Release 11.5.9 and 11.5.10 support this tablespace model while
earlier releases will need to migrate to this model to take full advantage of the Release 12 features.
For further details see OracleMetalink Note: 248857.1 Oracle Applications Tablespace Model
Release 11i – Tablespace Migration Utility.
Figure 2. Process migration flow
12
Migration prerequisites
Oracle E-Business Suite is highly configurable and customizable with many customers deploying their
own unique environments. For this reason, HP strongly recommends that all migration tasks described
in this document be applied first to a test environment in order to determine application downtime and
record any additional steps that may be necessary to properly migrate add-on software, languages,
and customizations. Most customers will run through the migration process a number of times on their
test environments before finally implementing it in the production environment. Also, additional
storage and CPU resources may be required during the migration process, to reduce resource
bottlenecks and expedite the effort. It is also recommended to perform a full backup of the entire
environment before starting and ending each phase of the migration.
The source platform included Oracle E-Business Suite 11.5.10.2, Developer 6i Patch Set 16 and
AutoConfig 11i.AD.I.1. The following application patch list includes the patches required before
starting the migration. For more information, refer to OracleMetalink Note: 726982.1,
Interoperability Notes Oracle E-Business Suite Release 11i with Oracle Database 10g Release 2.
The Applications 11i patches in the following table were applied to the application tier in the order
listed. Additional patches may be required for third-party products and other E-Business Suite software
modules not included with the base installation. National language support (NLS) will also require
additional patches.
Note
This document was written in May of 2009 and all of the following patches
named in this document were available. Always confirm patch list with the
latest OracleMetalink Notes and follow the patch readme instructions unless
otherwise directed.
There may be some advantages to applying a superseded patch or patch
set that better supports your current environment. Oftentimes, a superseded
patch or patch set will contain many other patches, which may produce
unexpected results. Pay close attention to possible dependent patches and
document any additional steps not covered in the guide.
13
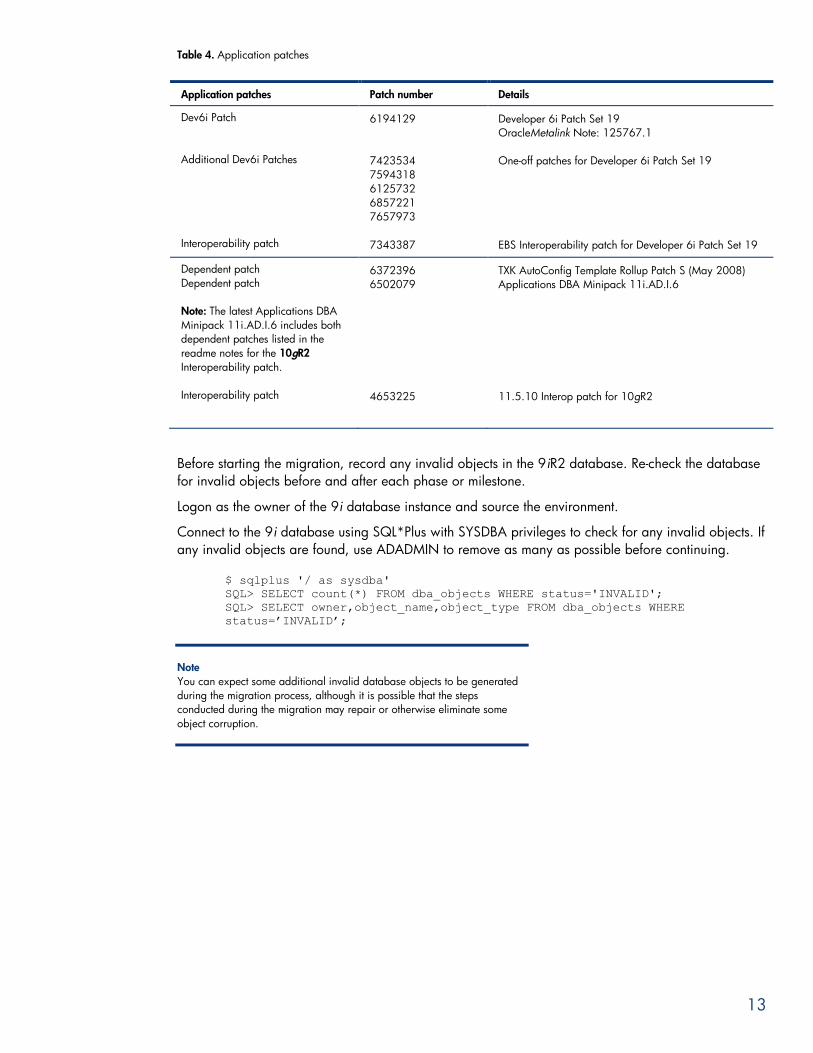
Table 4. Application patches
Application patches Patch number Details
Dev6i Patch
Additional Dev6i Patches
Interoperability patch
6194129
7423534
7594318
6125732
6857221
7657973
7343387
Developer 6i Patch Set 19
OracleMetalink Note: 125767.1
One-off patches for Developer 6i Patch Set 19
EBS Interoperability patch for Developer 6i Patch Set 19
Dependent patch
Dependent patch
Note: The latest Applications DBA
Minipack 11i.AD.I.6 includes both
dependent patches listed in the
readme notes for the 10gR2
Interoperability patch.
Interoperability patch
6372396
6502079
4653225
TXK AutoConfig Template Rollup Patch S (May 2008)
Applications DBA Minipack 11i.AD.I.6
11.5.10 Interop patch for 10gR2
Before starting the migration, record any invalid objects in the 9iR2 database. Re-check the database
for invalid objects before and after each phase or milestone.
Logon as the owner of the 9i database instance and source the environment.
Connect to the 9i database using SQL*Plus with SYSDBA privileges to check for any invalid objects. If
any invalid objects are found, use ADADMIN to remove as many as possible before continuing.
$ sqlplus '/ as sysdba'
SQL> SELECT count(*) FROM dba_objects WHERE status='INVALID';
SQL> SELECT owner,object_name,object_type FROM dba_objects WHERE
status=’INVALID’;
Note
You can expect some additional invalid database objects to be generated
during the migration process, although it is possible that the steps
conducted during the migration may repair or otherwise eliminate some
object corruption.

14
Phase 1: Upgrading the source RDBMS to 10gR2
The source environment consists of an HP 9000 HP-UX 11i v2 platform with Oracle
E-Business Suite 11.5.10.2 and the Vision Demo database instance based on Oracle RDBMS
9.2.0.6. Phase 1 will upgrade the database instance to Oracle RDBMS 10gR2 by first installing a
new 10g_ORACLE_HOME, and then upgrade the Applications 11i database instance using the
Database Upgrade Assistant (DBUA). Before proceeding, determine if your particular environment
requires any additional steps by thoroughly reading both the Oracle Database Upgrade Guide: 10g
Release 2 (10.2), Part# B14238-02 and OracleMetalink Note: 726982.1, Interoperability Notes
Oracle E-Business Suite 11i with Oracle Database 10g Release 2.
Note
Oracle E-Business Suite 11i now supports RDBMS 10.2.0.4, which will be
the base release for future 10gR2 patch sets. Upgrading to 10.2.0.4 will
be the minimum requirement for future patch sets. Upgrading now to
10.2.0.4 will reduce the need to upgrade at a later date.
If your company has already upgraded the Applications 11i database to
10.2.0.3 or higher, then proceed directly to Phase 2: Migrating
Applications 11i database to HP Integrity server.
During this upgrade phase of the migration, you will:
Section 1: Prepare the source database server for 10gR2 upgrade
Section 2: Install RDBMS 10gR2
Section 3: Upgrade Applications 11i database to 10gR2
Section 2 does not depend on section 1 and can be performed first or simultaneously.
Figure 3. Upgrade source RDBMS 9.2.0.6 to 10gR2
Once all the tasks have been completed in this phase, the E-Business Suite 11i environment will be in
a fully supported mode with the upgraded 10gR2 database. At this time, the migration can be
paused to resume normal operations or if time permits, continue on with Phase 2: Migrating
Applications 11i database to target HP Integrity server.
1.1 Prepare the source DB server for 10gR2 upgrade
This section includes the tasks to prepare the source database server for the upgrade to RDBMS
10gR2.
15
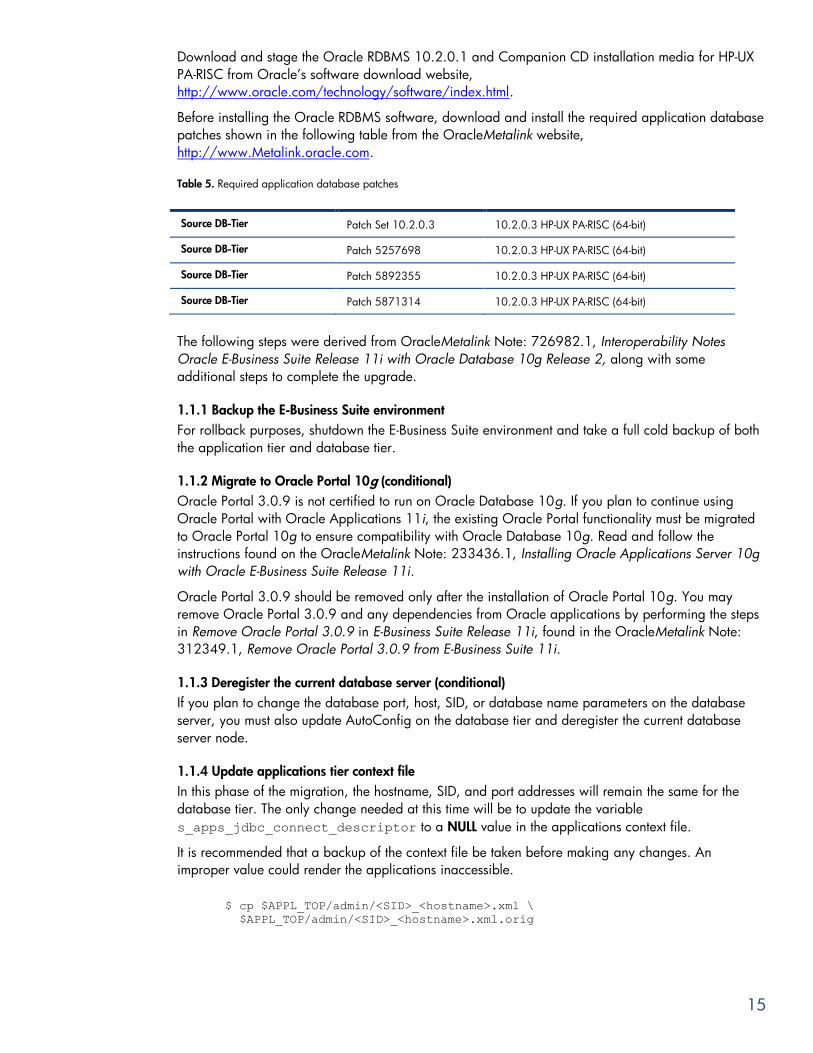
Download and stage the Oracle RDBMS 10.2.0.1 and Companion CD installation media for HP-UX
PA-RISC from Oracle’s software download website,
http://www.oracle.com/technology/software/index.html.
Before installing the Oracle RDBMS software, download and install the required application database
patches shown in the following table from the OracleMetalink website,
http://www.Metalink.oracle.com.
Table 5. Required application database patches
Source DB-Tier Patch Set 10.2.0.3 10.2.0.3 HP-UX PA-RISC (64-bit)
Source DB-Tier Patch 5257698 10.2.0.3 HP-UX PA-RISC (64-bit)
Source DB-Tier Patch 5892355 10.2.0.3 HP-UX PA-RISC (64-bit)
Source DB-Tier Patch 5871314 10.2.0.3 HP-UX PA-RISC (64-bit)
The following steps were derived from OracleMetalink Note: 726982.1, Interoperability Notes
Oracle E-Business Suite Release 11i with Oracle Database 10g Release 2, along with some
additional steps to complete the upgrade.
1.1.1 Backup the E-Business Suite environment
For rollback purposes, shutdown the E-Business Suite environment and take a full cold backup of both
the application tier and database tier.
1.1.2 Migrate to Oracle Portal 10g (conditional)
Oracle Portal 3.0.9 is not certified to run on Oracle Database 10g. If you plan to continue using
Oracle Portal with Oracle Applications 11i, the existing Oracle Portal functionality must be migrated
to Oracle Portal 10g to ensure compatibility with Oracle Database 10g. Read and follow the
instructions found on the OracleMetalink Note: 233436.1, Installing Oracle Applications Server 10g
with Oracle E-Business Suite Release 11i.
Oracle Portal 3.0.9 should be removed only after the installation of Oracle Portal 10g. You may
remove Oracle Portal 3.0.9 and any dependencies from Oracle applications by performing the steps
in Remove Oracle Portal 3.0.9 in E-Business Suite Release 11i, found in the OracleMetalink Note:
312349.1, Remove Oracle Portal 3.0.9 from E-Business Suite 11i.
1.1.3 Deregister the current database server (conditional)
If you plan to change the database port, host, SID, or database name parameters on the database
server, you must also update AutoConfig on the database tier and deregister the current database
server node.
1.1.4 Update applications tier context file
In this phase of the migration, the hostname, SID, and port addresses will remain the same for the
database tier. The only change needed at this time will be to update the variable
s_apps_jdbc_connect_descriptor to a NULL value in the applications context file.
It is recommended that a backup of the context file be taken before making any changes. An
improper value could render the applications inaccessible.
$ cp $APPL_TOP/admin/<SID>_<hostname>.xml \
$APPL_TOP/admin/<SID>_<hostname>.xml.orig

16
1.1.5 Export OLAP analytical workspaces (conditional)
This step was not required since the upgrade was performed on the source database server.
Therefore, no changes were necessary to the platform-specific data held within the analytical
workspace.
1.2 Install RDBMS 10gR2 on the source DB server
This section includes the steps to install the software-only version of the Oracle RDBMS 10.2.0.1 on
the source HP 9000 database server.
1.2.1 Prepare to create the 10.2.0 Oracle home
Read Chapters 1 and 2 of the Oracle Database Installation Guide: 10g Release 2 (10.2) for HP-UX
PA-RISC. Also read the System Considerations and Requirements section of Chapter 3.
1.2.2 Install the base 10.2.0 software
Start up an Xterm session with the source database server as the “oracle” user, change directory to
the 10.2.0.1 installation media staging area, and run the Oracle Universal Installer.
DO NOT source the 9i database environment file.
$ cd <10.2.0.1_staging_directory>
$ ./runInstaller
Select Installation Type
Enterprise Edition
Specify Home Details
Name: OUIHome2
Path: <10g_ORACLE_HOME>
Product-specific prerequisite checks
The warning status for the OS and kernel patches can be ignored if running the
prescribed software releases and kernel settings.
Many of the required patches, as well as some kernel settings, have been superseded
or discontinued.
Upgrade an Existing Database
NO
Select Configuration Option
Install database software only
Execute Configuration scripts Popup
As root user run the following script: # <10g_ORACLE_HOME>/root.sh
End of Installation
1.2.3 Install Oracle Database 10g Products from the 10g Companion CD
Review the tasks in section 3.5, Installing Oracle Database 10g Products in the Oracle Database
Companion CD Installation Guide for your platform. Do not perform the tasks in the Preparing Oracle
Workflow Server for the Oracle Workflow Middle Tier Installation section.
Start up an Xterm session with the source database server as the “oracle” user, change directory to
the 10.2.0.1 Companion CD staging area and run the Oracle Universal Installer.
Make sure that:

17
You DO NOT source the 9i database environment file.
The ORACLE_HOME environment variable points to the new 10.2.0 Oracle home.
The PATH environment variable includes $ORACLE_HOME/bin and the directory where the new
Perl executable is located (usually $ORACLE_HOME/perl/bin).
The LD_LIBRARY_PATH environment variable includes $ORACLE_HOME/lib. The PERL5LIB
environment variable points to the directories where the new Perl libraries are located (usually
$ORACLE_HOME/perl/lib/<perl version> and $ORACLE_HOME/perl/lib/site_perl/<perl
version>).
$ export ORACLE_HOME=/oracle/<sid>db/10.2.0
$ export PATH=$ORACLE_HOME/bin:$ORACLE_HOME/perl/bin:$PATH:.
$ export LD_LIBRARY_PATH=$ORACLE_HOME/lib
$ export PERL5LIB=$ORACLE_HOME/perl/lib/5.8.3 \
:$ORACLE_HOME/perl/lib/site_perl/5.8.3
$ cd <10.2.0 Companion CD staging_directory>
$ ./runInstaller
1.2.4 Perform RDBMS 10gR2 patch set pre-installation tasks
On the database server node, as the owner of the Oracle 10g filesystem and database instance,
download and unzip the 10.2.0.3 patch set for your platform. Read the patch set notes (usually
README.html). Make sure you thoroughly understand the upgrade and patch set installation process
before you begin. Check OracleMetaLink or contact Oracle Support Services to determine any known
issues with the patch set and its interoperability with Oracle E-Business Suite.
1.2.5 Perform RDBMS 10gR2 patch set installation tasks
Review the tasks in the Installing the Oracle Database 10g Patch Set interactively section of the patch
set notes.
Start up an Xterm session with the source database server as the “oracle” user, change directory to
the 10gR2 Patch Set staging area, and run the Oracle Universal Installer directly from that staging
area.
Make sure that:
You DO NOT source the 9i database environment file.
The ORACLE_HOME environment variable points to the new 10.2.0 Oracle home.
The PATH environment variable includes $ORACLE_HOME/bin and the directory where the new
Perl executable is located (usually $ORACLE_HOME/perl/bin).
The LD_LIBRARY_PATH environment variable includes $ORACLE_HOME/lib.
The PERL5LIB environment variable points to the directories where the new Perl libraries are
located (usually $ORACLE_HOME/perl/lib/<perl version> and
$ORACLE_HOME/perl/lib/site_perl/<perl version>)
$ export ORACLE_HOME=<10g_ORACLE_HOME>
$ export PATH=$ORACLE_HOME/bin:$ORACLE_HOME/perl/bin:$PATH:.
$ export LD_LIBRARY_PATH=$ORACLE_HOME/lib
$ export PERL5LIB=$ORACLE_HOME/perl/lib/5.8.3 \
:$ORACLE_HOME/perl/lib/site_perl/5.8.3
$ cd <10.2.0.3 stage directory>/Disk1
$ ./runInstaller
1.2.6 Create nls/data/9idata directory
As the owner of the 10g RDBMS filesystem, set the ORACLE_HOME variable and run the cr9idata.pl
Perl script; then set the ORA_NLS10 environment variable.

18
$ export ORACLE_HOME=<10g_ORACLE_HOME>
$ export PATH=$ORACLE_HOME/bin:$ORACLE_HOME/perl/bin:$PATH:.
$ export LD_LIBRARY_PATH=$ORACLE_HOME/lib
$ export PERL5LIB=$ORACLE_HOME/perl/lib/5.8.3 \
:$ORACLE_HOME/perl/lib/site_perl/5.8.3
$ cd $ORACLE_HOME/nls/data/old
$ perl ./cr9idata.pl
$ export ORA_NLS10=$ORACLE_HOME/nls/data/9idata
1.2.7 Apply additional RDBMS One-off patches
Shutdown the Applications server services, database and listener before applying the following
platform specific RDBMS One-off patches:
5257698 – 10.2.0.3 HP-UX PA-RISC (64-bit)
5892355 – 10.2.0.3 HP-UX PA-RISC (64-bit)
5871314 – 10.2.0.3 HP-UX PA-RISC (64-bit)
Run opatch lsinventory before and after applying patches. Review all the readme files before applying
any patch and review the logs for any discrepancy after applying each patch. If any are found,
resolve them first before continuing to the next step.
1.2.8 Install the latest available patch set release and any required patches (conditional)
Once you have installed the major Oracle Database 10g software, check to see if there is a patch set
release and/or critical patch update to be installed:
Patch sets are a software-release mechanism for delivering tested and integrated product fixes
on a regular basis. Patch sets provide bug fixes only; they do not include new functionality,
and do not require certification on the target system.
Critical Patch Updates (CPU) contains security patch updates and security fixes. As of 2005,
Oracle began providing Critical Patch Updates for all product offerings on a quarterly
schedule. The comprehensive patches address significant security vulnerabilities and include
fixes that are likely to be applied, or that are prerequisites for the security fixes.
The latest patch set release and critical patch update for Oracle Database 10g Release 2 should be
installed prior to upgrading your databases. Refer to the specific patch release and critical patch
update documentation for installation information.
Note: No additional patch sets or CPUs were installed during this upgrade
phase. To reduce patching, see if it is possible to postpone the installation
of the latest patch sets and CPUs until the next phase, platform migration of
the database to HP Integrity servers.
1.3 Upgrade Applications database to 10gR2
This section includes the tasks to upgrade the Oracle E-Business Suite 11i applications database from
9.2.0.6 to 10gR2. During this process, the environment will be unavailable until the upgrade has
completed.
1.3.1 Prepare to upgrade
Review Chapter 2 of Oracle Database Upgrade Guide 10g Release 2 (10.2), Part# B14238-02 and
OracleMetalink Note: 726982.1, Interoperability Notes Oracle E-Business Suite Release 11i with
Oracle Database 10g Release 2, to prepare for the upgrade.

19
Make sure that you unset the TNS_ADMIN environment variable and if event="38004 trace name
context forever, level 1" is defined in either the init<SID>.ora initialization parameter file or the
spfile<SID>.ora server parameter file, remove it.
1.3.2 Shut down the Applications server processes and the database listener
Shut down applications server services on the Applications Administrator Service Node.
# su – applmgr
$ cd $COMMON_TOP/admin/scripts/<SID>_<HOSTNAME>
$ ./adstpall.sh apps/<apps_password>
Shut down database listener on the database node.
# su – oracle
$ lsnrctl stop <SID>
1.3.3 Upgrade the database instance
The following steps were derived from the Oracle Database Upgrade Guide 10g Release 2, Part#
B14238-02, Chapters 3 and 4.
Oracle recommends that you use 500MB as the SYSAUX tablespace size and set autoextend on the
SYSAUX tablespace.
If you plan to change the PL/SQL compilation mode, disable the compilation of objects.
Verify that the /etc/oratab file has correct entries for the 9i Database and 9i Oracle Home.
# cat /etc/oratab
<SID>:<9i_ORACLE_HOME>:N:
Run the pre-upgrade information tool using the following steps:
Logon as the owner of the 9i_RDBMS file system and source the environment.
Copy and run the utlu102i.sql from <upg_10203_log_directory>.
$ cp <10g_ORACLE_HOME>/rdbms/admin/utlu102i.sql \
<upg_10203_log_directory>
Execute the utlu102i.sql by connecting to 9i Database using SQL*Plus with SYSDBA privileges. Spool
the output of this execution into utlu102i.out.
$ cd <upg_10203_log_directory>
$ sqlplus '/ as sysdba'
SQL> spool utlu102i.out
SQL> @utlu102i.sql
SQL> spool off
Review the output for any errors or warnings and make any necessary changes before proceeding on
to the next step. You can safely ignore errors associated with JAccelerator and interMedia Image
Accelerator. For further details, see OracleMetalink Note: 370825.1, UTLU102.SQL Reports that
already-installed components need to be installed.
See Appendix B for the pre-upgrade information tool output file generated by this project and the
steps performed to resolve the warnings identified by the tool.
20
1.3.4 Upgrade database
Make sure that the Applications server processes and the 9i database listener are shut down. Set the
environment variable ORACLE_HOME to point to the 10g_ORACLE_HOME directory created in the
previous step and run the Oracle Database Upgrade Assistant (DBUA) against the Applications 11i
database.
Start an Xterm session on the source database server as the “oracle” user, export the new
ORACLE_HOME, and run the DBUA from $ORACLE_HOME/bin.
$ export ORACLE_HOME=<10g_ORACLE_HOME>
$ cd $ORACLE_HOME/bin
$ ./dbua
Select the 9i database from the list of available databases.
Monitor the progress of the DBUA. At the end of the upgrade process, DBUA will automatically start
the instance.
The upgrade log files are located in $<10g_ORACLE_HOME>/cfgtoollogs/dbua/<SID>/upgrade.
Review “UpgradeResults.html” and make any necessary changes. See Appendix C for the upgrade
results of this project.
1.3.5 Modify initialization parameters
The newly installed Oracle 10gR2 will not be tuned for E-Business Suite. Review the OracleMetalink
Note: 216205.1, Database Initialization Parameters and Configuration for Oracle Applications
Release 11i. Make sure you use the following sections as a guideline for modifying the initialization
parameter file:
Common database initialization parameters
Release-specific database initialization parameters for 10gR2
Database initialization parameter sizing
If System Managed Undo (SMU) is disabled in your database instance, ignore the initialization
parameters that begin with "undo_.” You will be instructed to configure them in the next step.
If native compilation of PL/SQL code is disabled in your database instance, ignore the initialization
parameters that pertain to the native compilation of PL/SQL code.
Note: During the database startup, Oracle DB 10g first looks in
$ORACLE_HOME/dbs for the spfile (spfile<SID>.ora) and if not found the
RDBMS will attempt to load the pfile (init<SID>.ora) file. After the 10.2.0.3
upgrade, both pfile and spfile have the same values. It will be easier to
modify the pfile and then recreate the spfile after all the changes are in and
the database started. Make sure that you rename the spfile<SID>.ora and
backup the init<SID>.ora before modifying.
Make the following modification and restart the database.
Create dump directories for 10g_ORACLE_HOME $ mkdir –p <ORACLE_HOME>/admin/<SID>_<hostname>/bdump
$ mkdir <ORACLE_HOME>/admin/<SID>_<hostname>/cdump
$ mkdir <ORACLE_HOME>/admin/<SID>_<hostname>/udump

21
Modify $ORACLE_HOME/dbs/init<SID>.ora
Modify dump destination directories and any directory path that points to the original
<9i_ORACLE_HOME>.
Common EBS 11i modifications
_fast_full_scan_enabled = FALSE
_like_with_bind_as_equality = TRUE
_sort_elimination_cost_ratio = 5
_sqlexec_progression_cost = 2147483647
_system_trig_enabled = true
processes = 400
10gR2 EBS 11i modifications
_kks_use_mutex_pin=FALSE
_b_tree_bitmap_plans=FALSE
compatible = 10.2.0
optimizer_secure_view_merging=FALSE
session_cached_cursors = 500
sga_target = 2G
shared_pool_reservered_size=40M
shared_pool_size=400M
10gR2 EBS 11i removed parameters
db_cache_size
java_pool_size
large_pool_size
query_rewrite_enabled
undo_retention
1.3.6 Additional database configuration (conditional)
Ensure that System Managed Undo (SMU) is enabled, temporary tablespace is properly defined, and
review the updates for the database initialization parameters for 10gR2. For detailed steps, refer to
OracleMetaLink Note: 216205.1, Database Initialization Parameters and Configuration for Oracle
Applications Release 11i
1.3.7 Perform 10.2.0.3 patch set post-installation tasks
Review the Postinstallation Tasks section of the 10.2.0.3 patch set notes (README.html). Skip sections
7.1 and 7.2 of the patch set notes.
After you install the patch set, you must perform the following post-installation tasks.
Run the post upgrade SQL script. # su – oracle
$ export ORACLE_SID=<SID>
$ export ORACLE_HOME=<10g_ORACLE_HOME>
$ export PATH=$ORACLE_HOME/bin:$PATH:.
$ sqlplus /nolog
SQL> connect sys/<sys_password> as sysdba
SQL> shutdown normal
SQL> STARTUP UPGRADE
SQL> SPOOL /tmp/10203_patch.log
SQL> @?/rdbms/admin/catupgrd.sql
Review the10202_patch.out file.
Verify that all components are valid and the versions are correct.

22
The following information is located at the end of the output file.
Oracle Database 10.2 Upgrade Status Utility 02-16-2009 17:55:50
.
Component Status Version HH:MM:SS
Oracle Database Server VALID 10.2.0.3.0 00:37:25
JServer JAVA Virtual Machine VALID 10.2.0.3.0 00:00:00
Oracle XDK VALID 10.2.0.3.0 00:00:00
Oracle Database Java Packages VALID 10.2.0.3.0 00:00:00
Oracle Text VALID 10.2.0.3.0 00:00:00
Oracle XML Database VALID 10.2.0.3.0 00:00:00
Oracle Real Application Clusters INVALID 10.2.0.3.0 00:00:01
OLAP Analytic Workspace VALID 10.2.0.3.0 00:00:00
OLAP Catalog VALID 10.2.0.3.0 00:00:00
Oracle OLAP API VALID 10.2.0.3.0 00:00:00
Oracle interMedia VALID 10.2.0.3.0 00:00:00
Spatial VALID 10.2.0.3.0 00:00:00
Oracle Enterprise Manager VALID 10.2.0.3.0 00:00:00
.
Total Upgrade Time: 00:44:39
PL/SQL procedure successfully completed.
Bounce the database and run the SQL script to validate invalid objects within the database. SQL> shutdown
SQL> startup
SQL> @?/rdbms/admin/utlrp.sql
Use the following queries to track recompilation progress:
Query returning the number of invalid objects remaining. This number should decrease with time.
SQL> SELECT COUNT(*) FROM obj$ WHERE status IN (4, 5, 6);
Query returning the number of objects compiled so far. This number should increase with time.
SQL> SELECT COUNT(*) FROM UTL_RECOMP_COMPILED;
1.3.8 Install Oracle Data Mining (ODM) and OLAP
Returning to Step 19 of the OracleMetaLink Note: 726982.1, Interoperability Notes Oracle
E-Business Suite Release 11i with Oracle Database 10g Release 2:
Connect to 10g Database using SQL*Plus with sysdba privileges, run the following SQL command.
Perform the task required by the output.
$ sqlplus / as sysdba
SQL> select comp_id from dba_registry where comp_id=’ODM’ or comp_id=’AMD’;
Install ODM if not present in the output of the previous select statement.
SQL> @?/rdbms/admin/dminst.sql SYSAUX TEMP
Install AMD if not present in the output of the previous select statement.
SQL> @?/olap/admin/olap.sql SYSAUX TEMP
1.3.9 Natively compile PL/SQL code (optional)
You can choose to run Oracle Applications 11i PL/SQL database objects in natively compiled mode
with Oracle Database 10g. For detailed steps, refer to the Compiling PL/SQL Code for Native
Execution section of Chapter 11 of Oracle Database PL/SQL User's Guide and Reference 10g
Release 2 (10.2).
When modifying the initialization parameters pertaining to the PL/SQL native compilation, refer to
OracleMetaLink Note: 216205.1 Database Initialization Parameters and Configuration for Oracle
23
Applications Release 11i as a guideline. You can set the
plsql_native_library_subdir_count parameter as described in the PL/SQL user's guide.
Create the associated subdirectories for the given plsql_native_library_dir and
plsql_native_library_subdir_count parameters.
1.3.10 Fix Korean lexers
Run the drkorean.sql script.
$ sqlplus / as sysdba
SQL> startup
SQL> @?/ctx/sample/script/drkorean.sql
1.3.11 Apply RDBMS patches for Daily Business Intelligence (conditional)
If you are using Daily Business Intelligence (DBI), apply the RDBMS patches listed in the Apply
Additional Prerequisite Patches step of the OracleMetaLink Note: 391782.1, About Oracle Daily
Business Intelligence documents.
1.3.12 Import OLAP analytical workspaces (conditional)
This step was not required since the upgrade was performed on the source database server.
Therefore, no changes were necessary to the platform-specific data held within the analytical
workspace.
1.3.13 Start the new database listener (conditional)
Since AutoConfig has not yet been implemented, start the listener with the lsnrctl executable. See the
Oracle Database Net Services Administrator's Guide, 10g Release 2 (10.2) for more information.
Prior to starting the listener, perform these additional steps:
Create the $TNS_ADMIN directory in the 10g_ORACLE_HOME.
$ export ORACLE_HOME=<10g_ORACLE_HOME>
$ export ORACLE_SID=<SID>
$ export PATH=$ORACLE_HOME/bin:$PATH:.
$ export ORA_NLS10=$ORACLE_HOME/nls/data/9idata
$ mkdir –p $ORACLE_HOME/network/admin/<SID>_<hostname>
$ export TNS_ADMIN=$ORACLE_HOME/network/admin/<SID>_<hostname>
Copy the contents of 9i_TNS_ADMIN to $TNS_ADMIN.
$ cp <9i_Oracle_Home>/network/admin/<SID>_<hostname>/* $TNS_ADMIN
Modify the following .ora files changing all directory reference of 9.2.0 to 10.2.0.
$ vi $TNS_ADMIN/listener.ora
$ vi $TNS_ADMIN/sqlnet.ora
$ vi $TNS_ADMIN/tnsnames.ora
Start the new Oracle Net Listener.
$ lsnrctl start <SID>
1.3.14 Run adgrants.sql (conditional)
If you have at least AD.I or E-Business Suite release 11.5.10 installed on your system, copy
$APPL_TOP/admin/adgrants.sql from the administration server node to the database server node.
Use SQL*Plus to connect to the database as SYSDBA and run the script using the following command:
24
$ sqlplus "/ as sysdba" @adgrants.sql <APPLSYS schema name>
where <APPLSYS schema name> is the Applications Object Library user, most commonly named
APPLSYS.
1.3.15 Grant create procedure privilege on CTXSYS
Copy $AD_TOP/patch/115/sql/adctxprv.sql from the administration server node to the
database server node. If you are upgrading to R12, use the R12 version of the file. Use SQL*Plus to
connect to the database as APPS and run the script using the following command:
$ cd $ORACLE_HOME/admin
$ sqlplus apps/<apps_password>
SQL> @adctxprv.sql <SYSTEM password> CTXSYS
1.3.16 Implement and run AutoConfig
Implement and run AutoConfig in the new Oracle home on the database server node. If the database
listener of the new Oracle home is defined differently than the old Oracle home, you must also run
AutoConfig on each application tier server node to update the system with the new listener.
For instructions on how to implement and run AutoConfig, see OracleMetaLink Note: 165159.1,
Using AutoConfig to Manage System Configurations with Oracle Applications 11i.
Shut down all processes, including the database and the listener, and restart them to load the new
environment settings.
This task will migrate AutoConfig to the DB Tier.
Logon to the Application node, source the environment file, then run the admkappsutil.pl script. This
Perl script will create the appsutil.zip file located in the $APPL_TOP/admin/out directory.
If current, you can also use the appsutil.zip located in the 9i_ORACLE_HOME.
$ perl $AD_TOP/bin/admkappsutil.pl
Copy and unzip the appsutil.zip file in the Database node <10g_ORACLE_HOME>.
$ cd <10g_ORACLE_HOME>
$ unzip -o appsutil.zip
Set the following environment variables to be incorporated in the database context file.
# su - oracle
$ export ORACLE_SID=<SID>
$ export ORACLE_HOME=<10g_ORACLE_HOME>
$ export PATH=$ORACLE_HOME/bin:$PATH:.
$ export TNS_ADMIN=$ORACLE_HOME/network/admin/<SID>_<hostname>
$ export ORA_NLS10=$ORACLE_HOME/nls/data/9idata
$ export JRE_TOP=$ORACLE_HOME/jre/1.4.2
$ export LD_LIBRARY_PATH=$ORACLE_HOME/lib32
$ export SHLIB_PATH=$ORACLE_HOME/lib32
$ export LIBPATH=$ORACLE_HOME/lib32
Generate the database context file.
$ cd $ORACLE_HOME/appsutil/bin
$ perl adbldxml.pl tier=db appsuser=apps appspasswd=<apps_password>
The newly-created context file and log file are located in following locations:
Context File = <10g_ORACLE_HOME>/appsutil/<SID>_<hostname>.xml
Log file = <10g_ORACLE_HOME>/appsutil/log/adbldxml_<date>.log

25
Modify the context file, changing all reference of 9.2.0 to 10.2.0.
Note:
An improper entry introduced into the context file can render the
applications environment inoperable. Always make a backup prior to
editing the context file.
Add $ORACLE_HOME/lib32 to the following:
<LD_LIBRARY_PATH oa_var="s_db_ldlib"
osd="HP_UX">/oracle/visdb/10.2.0/lib32:/oracle/visdb/10.2.0/lib:/usr/dt/lib:
/usr/openwin/lib:/oracle/visdb/10.2.0/ctx/lib</LD_LIBRARY_PATH>
<SHLIB_PATH oa_var="s_db_shlib"
osd="HP_UX">/oracle/visdb/10.2.0/lib32:/oracle/visdb/10.2.0/lib:/usr/dt/lib:/usr/
openwin/lib:/oracle/visdb/10.2.0/ctx/lib:/usr/lib:/oracle/visdb/10.2.0/lib32</SHL
IB_PATH>
<LIBPATH oa_var="s_db_libpath"
osd="HP_UX">/oracle/visdb/10.2.0/lib32:/oracle/visdb/10.2.0/lib:/usr/dt/lib:/usr/
openwin/lib:/oracle/visdb/10.2.0/ctx/lib</LIBPATH>
Run AutoConfig to generate a new 10g environment file located in the <10g_ORACLE_HOME>
directory.
$ cd $ORACLE_HOME/appsutil/bin
$ ./adconfig.sh \
contextfile=<10g_ORACLE_HOME>/appsutil/<SID>_<hostname>.xml \
appspass=<apps_password>
Review log file for any failures, errors, or warnings and resolve those issues before continuing.
Shut down the 10g database and listener, source the new database environment file, and then start
up the listener and the 10g database.
$ sqlplus / as sysdba
SQL> shutdown normal
SQL> exit
$ lsnrctl stop <SID>
# su – oracle
$ . <10g_ORACLE_HOME>/<SID>_<hostname>.env
$ lsnrctl start <SID>
$ sqlplus / as sysdba
SQL> startup
1.3.17 Gather statistics for SYS schema
Copy $APPL_TOP/admin/adstats.sql from the administration server node to the database server
node. If you are upgrading to R12, use the R12 version of the file. Note that adstats.sql has to be run
in restricted mode. Use SQL*Plus to connect to the database as SYSDBA and use the following
commands to restart the database in restricted mode, run adstats.sql, and restart the database in
normal mode:
$ sqlplus / as sysdba
SQL> shutdown normal
SQL> startup restrict
SQL> @?/admin/adstats.sql
SQL> shutdown normal
SQL> startup

26
1.3.18 Re-create custom database links (conditional)
During this phase, there were no changes to the Oracle Net listener; consequently, this step can be
disregarded safely.
If the Oracle Net listener in the 10.2.0 Oracle home is defined differently than the one used by the
old Oracle home, you must re-create any custom self-referential database links that exist in the
Applications database instance. To check for the existence of database links, use SQL*Plus on the
database server node to connect to the Applications database instance as APPS and run the following
query:
$ sqlplus apps/<apps password>
SQL> select db_link from dba_db_links;
The EDW_APPS_TO_WH and APPS_TO_APPS database links, if they exist, should have been
updated with the new port number by AutoConfig in the previous step.
If you have custom self-referential database links in the database instance, use the following
commands to drop and re-create them:
$ sqlplus apps/<apps password>
SQL> drop database link <custom database link>;
SQL> create database link <custom database link> connect to
<user> identified by <password> using
'(DESCRIPTION=(ADDRESS=(PROTOCOL=TCP)(HOST=<hostname>)
(PORT=<port number>))(CONNECT_DATA=(SID=<ORACLE_SID>)))';
where <custom database link>, <user>, <password>, <hostname>, <port number>, and
<ORACLE_SID> reflect the new Oracle Net listener for the database instance.
1.3.19 Re-create grants and synonyms
Oracle Database 10g Release 2 (10.2) contains new functionality for grants and synonyms compared
to previous database releases. As a result, you must re-create the grants and synonyms in the APPS
schema. On the administration server node, as the owner of the Applications file system, run AD
Administration and select the Recreate grants and synonyms for APPS schema task from the Maintain
Applications Database Objects menu.
If MRC (Multiple Reporting Currencies) is implemented in your Applications system, then run the
Maintain Multiple Reporting Currencies schema task to re-create MRC triggers in the APPS schema.
Note:
During the first pass of the re-create grants and synonyms task, we received
an ORA-04063 error.
Review OracleMetaLink Note: 387745.1 “Ora-04063: Package Body
"System.Ad_ddl" Has Errors” and run utlrp.sql as described below to
validate all the objects before running the re-create grants and synonyms
task.
Change directory to $ORACLE_HOME/rdbms/admin.
Start SQL*Plus session with sysdba privilege and shutdown the database.
Startup database using the upgrade option.
SQL> startup upgrade
27
Run the utlirp.sql from the directory where you launch the SQL*Plus session.
SQL> @utlirp.sql
Bounce the database and run the utlrp.sql from the directory where you launch the SQL*Plus session.
SQL> @utlrp.sql
Check invalid objects
SQL> select count(*) from dba_objects \
where status = ‘INVALID’;
Note:
Also see OracleMetaLink Note: 380480.1 “Invalid Public Synonym After
Upgrading Database From 9.2.0.4 To 10.2.0.2 in EBS.
According to the Note it is okay to ignore or drop some of the public
synonyms.
Use adadmin on the Administration server node to re-create grants and synonyms.
# su – applmgr
$ . <APPL_TOP>/APPS<SID>_<hostname>.env
$ adadmin
Maintain Applications Database Entities
Re-create grants and synonyms for APPS schema
1.3.20 Apply Oracle Receivables patch 5753621 (conditional)
This step was ignored since it is a One-Off patch for 11.5.9(CU2).
1.3.21 Recreate spfile from pfile
$ cd $ORACLE_HOME/dbs
$ sqlplus / as sysdba
SQL> CREATE SPFILE FROM PFILE = '<ORACLE_HOME>/dbs/init<SID>.ora’;
1.3.22 Validate environment and perform a full backup
After successfully validating the E-Business Suite environment, perform a full backup to complete the
upgrade to 10gR2 phase. The migration process can be paused at this stage and normal business
operations can resume. If time permits, the next phase can be continued immediately or during the
next planned downtime.

28
Phase 2: Migrating Applications 11i database to HP
Integrity server
This phase includes the tasks to migrate the source 10gR2 database instance on an HP 9000 server
running HP-UX 11i v2 to the target HP Integrity server running HP-UX 11i v3. The E-Business Suite
environment will be offline during part of this section. After the completion of this phase, the
E-Business Suite environment can resume normal operations as a fully supported split configuration
where the application tier is running on HP 9000 platform and the database tier is running on HP-UX
Integrity platform. The instructions below are based partly on OracleMetalink Note: 369693.1 Using
Oracle Applications with a Split Configuration Database Tier on Oracle 10g Release 2 and
OracleMetalink Note: 165195.1 Using AutoConfig to Manage System Configurations with Oracle
Applications 11i.
During this phase of the migration, you will:
Prepare the Source and Target DB nodes
Migrate database to target DB node
Perform Post-Migration Tasks
Figure 4. Phase 2 – Migrating Applications 11i database to the target HP Integrity server
2.1 Prepare the target DB server
Configure the HP Integrity servers and install the HP-UX 11i v3 operating system according to HP
product installation notes. Complete the preparation steps by staging the installation media and
patches for 10gR2 database for HP-UX Itanium, apply the required operating system patches, and
incorporate the required kernel parameter settings. For more information, refer to OracleMetalink
Note: 402307.1, Oracle Applications Installation and Upgrade Notes Release 12 (12.0.4) for HP-UX
Itanium.
2.1.1 Install the operating system
Install HP-UX 11i v3 March 2008.
Or install an earlier release of HP-UX 11i v3 and apply the following patch bundles:
QPKBASE (B.11.31.0803.318a) or later
FEATURE11i (B.11.31.0803.318a) or later

29
2.1.2 Modify operating system kernel parameters
Refer to Appendix A for a list of kernel parameters for HP-UX 11i v2 and 11i v3. These are only
suggested kernel settings and should be considered a starting point for additional operation system
tuning.
2.2 Prepare the target DB tier
This section describes how to prepare the target database software for the platform migration of the
Applications 11i database.
2.2.1 Prepare to create the 10.2.0 Oracle home
Read Chapters 1 and 2 of the Oracle Database Installation Guide 10g Release 2 (10.2) and the
System Considerations and Requirements section of Chapter 3 of the Oracle Database Upgrade
Guide 10g Release 2 (10.2). Make sure you thoroughly understand the installation and upgrade
processes.
2.2.2 Install the base 10.2.0 software
Start an Xterm session with the target database server as the “oracle” user, change directory to the
10.2.0.1 staging area, and run the Oracle Universal Installer wizard using the “-ignoreSysPreReqs”
option. DO NOT source the 9i database environment.
$ cd <HP-IA_10.2.0_staging_directory>
$ ./runInstaller -ignoreSysPreReqs Select Installation Type
Enterprise Edition
Product-Specific prerequisite checks
Many warnings associated with the operating system versions, parameters and patches may
be safely ignored. Currently, the installation wizard does not take into account superseded
patches or deprecated kernel parameters.
Select Configuration Option
Install database software only Execute Configuration scripts Popup
As root user run the following script # <10g_ORACLE_HOME>/root.sh
End of Installation
2.2.3 Install the Companion CD for the base 10.2.0 software
Start up an Xterm session as the “oracle” user on the target database server.
Change directory to staging area for the 10.2.0 Companion CD and run the Oracle Universal
Installer wizard using the “-ignoreSysPreReqs” option. DO NOT source the 9i database environment.
Make sure that:
The ORACLE_HOME environment variable points to the new 10.2.0 Oracle home.
The PATH environment variable includes $ORACLE_HOME/bin and the directory where the new
Perl executable is located (usually $ORACLE_HOME/perl/bin).
The LD_LIBRARY_PATH environment variable includes $ORACLE_HOME/lib.

30
The PERL5LIB environment variable points to the directories where the new Perl libraries are located
(usually $ORACLE_HOME/perl/lib/<perl version> and $ORACLE_HOME/perl/lib/site_perl/<perl
version>).
$ export ORACLE_HOME= <10g_ORACLE_HOME>
$ export PATH=$ORACLE_HOME/bin:$ORACLE_HOME/perl/bin:$PATH:.
$ export LD_LIBRARY_PATH=$ORACLE_HOME/lib
$ export SHLIB_PATH=$ORACLE_HOME/lib
$ export PERL5LIB=$ORACLE_HOME/perl/lib/5.8.3 \
:$ORACLE_HOME/perl/lib/site_perl/5.8.3
$ cd <stage_directory>/Disk1
$ ./runInstaller –ignoreSysPrereqs
2.2.4 Perform 10gR2 patch set pre-installation tasks
On the target database server node, as the owner of the Oracle 10g filesystem, download and unzip
the 10.2.0.3 patch set file (p5337014_10203_HPUX-IA64.zip) for the HP-UX Integrity platform. Read
the patch set notes (README.html). Make sure you thoroughly understand the upgrade and patch set
installation process before you begin.
2.2.5 Perform 10gR2 patch set installation tasks
On the target database server node, as the owner of the Oracle RDBMS filesystem and database
instance, read the section on Installing the Oracle Database 10g Patch Set Interactively of the patch
set notes. Make sure that:
The ORACLE_HOME environment variable points to the new 10.2.0 Oracle home.
The PATH environment variable includes $ORACLE_HOME/bin and the directory where the new
Perl executable is located (usually $ORACLE_HOME/perl/bin).
The LD_LIBRARY_PATH environment variable includes $ORACLE_HOME/lib.
The PERL5LIB environment variable points to the directories where the new Perl libraries are located
(usually $ORACLE_HOME/perl/lib/<perl version> and $ORACLE_HOME/perl/lib/site_perl/<perl
version>).
Use the runInstaller program provided in the patch set to run the Oracle Universal Installer (OUI).
Start up an Xterm session as the “oracle” user on the target database server. Export the required
environment variables, change directory to 10.2.0.3 patch set staging area, and run the OUI using
the “-ignoreSysPreReqs” option.
Set the following environment variables and run the install wizard:
$ export ORACLE_HOME=<10g_ORACLE_HOME>
$ export ORACLE_SID=<SID>
$ export PATH=$ORACLE_HOME/bin:$PATH:.
$ export LD_LIBRARY_PATH=$ORACLE_HOME/lib
$ export SHLIB_PATH=$ORACLE_HOME/lib
$ export PERL5LIB=$ORACLE_HOME/perl/lib/5.8.3: \
$ORACLE_HOME/perl/site_perl/5.8.3
$ cd <patchset_directory>/Disk1
$ ./runInstaller -ignoreSysPrereqs
Select the product.xml file from the <patchset_directory>/stage directory.
In the Name field in the Destination section, select the name of the Oracle home that you want to
update from the drop down list.
On the Summary screen, click Install.
When prompted, run the $ORACLE_HOME/root.sh script as the root user.
In the End of Installation screen, click Exit, then click Yes to exit from Oracle Universal Installer.

31
2.2.6 Create nls/data/9idata directory
On the target database server node, as the owner of the Oracle RDBMS filesystem and database
instance, run the $ORACLE_HOME/nls/data/old/cr9idata.pl script to create the
<10g_Oracle_Home>/nls/data/9idata directory.
$ perl $ORACLE_HOME/nls/data/old/cr9idata.pl
After creating the directory, make sure that the ORA_NLS10 environment variable is set to the full
path of the 9idata directory whenever you enable the 10g Oracle home.
$ export ORA_NLS10=$ORACLE_HOME/nls/data/9idata
2.2.7 Apply additional 10.2.0.3 RDBMS patches
Download and apply the following patches to the target DB tier:
5257698 – 10.2.0.3 HP-UX Itanium
5892355 – 10.2.0.3 HP-UX Itanium
5871314 – 10.2.0.3 HP-UX Itanium
2.2.8 Install the latest available patch set release and any required patches (conditional)
Once you have installed the major Oracle Database 10g software, check to see if there is a patch set
release and/or critical patch update to be installed:
Patch sets are a software-release mechanism for delivering tested and integrated product fixes
on a regular basis. Patch sets provide bug fixes only; they do not include new functionality,
and do not require certification on the target system.
Critical Patch Updates (CPUs) contain security patch updates and security fixes. As of 2005,
Oracle began providing Critical Patch Updates for all product offerings on a quarterly
schedule. The comprehensive patches address significant security vulnerabilities and include
fixes that are likely to be applied, or that are prerequisites for the security fixes.
The latest patch set release and critical patch update for Oracle Database 10g Release 2 should be
installed prior to upgrading your databases. Refer to the specific patch release and critical patch
update documentation for installation information.
2.2.9 Verify one-off patch equivalence with source RDBMS ORACLE_HOME
The RDBMS software versions should be exactly equivalent on the HP 9000 and Integrity platforms in
order to avoid any complications when migrating the database instance. The opatch utility should be
used to list the installed patches and confirm that the two ORACLE_HOMEs are indeed equivalent.
2.3 Prepare the source DB node for database migration
This section includes the steps to prepare the source database node for migration. The Oracle
E-Business Suite environment will be off-line until this phase has completed successfully.
2.3.1 Shutdown the E-Business Suite environment and perform a full off-line backup.
Before continuing with this section, perform a full backup for roll-back purposes.
2.3.2 De-register the source database server from the AutoConfig repository in the Applications 11i
database.
Log on to the source DB node as the “oracle” user, source the environment, and run the following
commands:
$ cd $ORACLE_HOME/appsutil/bin
$ perl adgentns.pl appspass=apps \
contextfile=<10g_ORACLE_HOME>/appsutil/<SID>_<hostname>.xml \
-removeserver

32
2.3.3 Create a trace file from the database controlfile (conditional)
This step dumps the contents of the source database controlfile to a trace file, which can be used as a
template to re-create the control files on the target DB node.
Note: This step was omitted in the test environment, the project used
identical directory mapping for data files and was able to reuse the old
controlfiles without modification.
Run the following command on the source database to create a .trc file, which you will use to recreate
the control files on the target machine in a later step.
$ sqlplus/nolog
SQL> connect / as sysdba
SQL> alter database backup controlfile to trace
2.3.4 Perform a SHUTDOWN NORMAL on the source database, and stop the database listener
Oracle recommends using the shutdown normal option during this step in order to cleanly shutdown
the database. This will allow the database files to be moved to another host and cleanly brought back
online.
2.4 Migrate database to target DB node
After a successful installation of RDBMS 10.2.0.3 on the target database node, migrate the source
Applications 11i database to the target database node.
2.4.1 Copy the source RDBMS control and data files
In an Oracle HP-UX environment, copying control and data files is only supported between like
RDBMS versions. Make sure that the proper number, type, and size of filesystems have been created.
If the target directory structure is identical to the source directory structure, no additional modification,
such as creating soft links and or recreate the controlfiles, will need to be performed.
Note: This project used the same directory mapping for both DB nodes. In
this case, simply copy the control and data files from the source DB to the
exact directory location on the target DB making sure that the proper
directory and file permissions are in place. If any of the directories are
missing on the target DB, create them to match the source.
Copy the data files
<Source DB>:<DATA_TOP>/*
Copy the control files for SQLNet
<Source DB>:<10g_ORACLE_HOME>/network/admin/<SID>_<hostname>/*.ora
Copy the database parameter files
<Source DB>:<10g_ORACLE_HOME>/dbs/*.ora
After copying the files, rename the IFILE with the proper hostname.
33
2.4.2 Modify the SQLNet control files, parameter file and then startup the database
Modify the SQLNet files (listener.ora, tnsnames.ora, and sqlnet.ora) by replacing the Source DB
hostname with the Target DB hostname. Always make a backup on any parameter file before
modifying.
$ cd <10g_ORACLE_HOME>/network/admin/<SID>_<hostname>
$ vi <SQLNet file>
Modify the database parameter file:
Rename the spfile (spfile<SID>.ora) so the database will default to the pfile (init<SID>.ora) during
startup. After all the changes are in and the database started, recreate the spfile from the updated
pfile.
Modify the dump file, utl_file_dir, and IFILE settings in the init<SID>.ora file:
$ vi <ORACLE_HOME>/dbs/initVIS.ora
user_dump_dest = <ORACLE_HOME>/admin/<SID>_<hostname>/udump
background_dump_dest = <ORACLE_HOME>/admin/<SID>_<hostname>/bdump
core_dump_dest = <ORACLE_HOME>/admin/<SID>_<hostname>/cdump
utl_file_dir = /usr/tmp,/usr/tmp,<ORACLE_HOME>/appsutil \
/outbound/<SID>_<hostname,/usr/tmp
IFILE = <ORACLE_HOME>/dbs/<SID>_<hostname>_ifile.ora
Create Dump directories:
$ mkdir –p <ORACLE_HOME>/admin/<SID>_<hostname>/udump
$ mkdir <ORACLE_HOME>/admin/<SID>_<hostname>/bdump
$ mkdir <ORACLE_HOME>/admin/<SID>_<hostname>/cdump
Export DB environment settings:
$ export ORACLE_HOME=<10g_ORACLE_HOME>
$ export ORACLE_SID=<SID>
$ export ORA_NLS10=$ORACLE_HOME/nls/data/9idata
$ export PATH=$ORACLE_HOME/bin:$PATH:.
$ export TNS_ADMIN=$ORACLE_HOME/network/admin/<SID>_<hostname>
$ export LD_LIBRARY_PATH=$ORACLE_HOME/lib
$ export SHLIB_PATH=$ORACLE_HOME/lib
$ export PERL5LIB=$ORACLE_HOME/perl/lib/5.8.3: \
$ORACLE_HOME/perl/lib/site_perl/5.8.3
Perform quick test on the database:
$ sqlplus / as sysdba
SQL> startup
$ lsnrctl start <SID>
$ tnsping <SID>
$ sqlplus apps/<apps_password>
Startup database and create spfile:
$ cd $ORACLE_HOME/dbs
$ sqlplus / as sysdba
SQL> CREATE SPFILE FROM PFILE = '<ORACLE_HOME>/dbs/init<SID>.ora’;

34
2.5 Prepare database for E-Business Suite 11i
This final task is outlined in OracleMetalink Note: 369693.1 Using Oracle Applications with a Split
Configuration Database Tier on Oracle 10g Release 2, Section 4: Post-Migration Tasks and
OracleMetalink Note: 165195.1 Using AutoConfig to Manage System Configurations with Oracle
Applications 11i.
2.5.1 Natively compile PL/SQL code (optional)
If you are on a UNIX/Linux platform, you can choose to run Oracle Applications 11i PL/SQL
database objects in natively compiled mode with Oracle Database 10g. See the Compiling PL/SQL
Code for Native Execution section of Chapter 11 of Oracle Database PL/SQL User's Guide and
Reference 10g Release 2 (10.2).
When modifying the initialization parameters pertaining to the PL/SQL native compilation, use
document 216205.1, on OracleMetaLink as a guideline. You can set the
“plsql_native_library_subdir_count” parameter as described in the PL/SQL user's guide. Create the
associated subdirectories for the given “plsql_native_library_dir” and
“plsql_native_library_subdir_count” parameters.
2.5.2 Start the new database listener
Start the Oracle Net listener for the database instance in the new Oracle home if it has not been
started. Start the listener with the lsnrctl executable since AutoConfig has not yet been implemented.
See the Oracle Database Net Services Administrator's Guide 10g Release 2 (10.2) for more
information.
$ lsnrctl start <SID>
2.5.3 Migrate the AD Utilities to the target database server node
This task will migrate the AD Utilities from the administration server node to the target database server
node. For more information, refer to OracleMetalink Note 165195.1 Using AutoConfig to Manage
System Configurations with Oracle Applications 11i, Section 5.
Update the ORACLE_HOME with the AutoConfig files by performing the following steps:
1. On the Application Tier (as the APPLMGR user):
Log in to the APPL_TOP environment (source the environment file)
Create appsutil.zip file $ perl <AD_TOP>/bin/admkappsutil.pl
This action will create appsutil.zip in $APPL_TOP/admin/out directory.
2. On the Database Tier (as the Oracle user):
Copy and unzip the appsutil.zip file to the <RDBMS ORACLE_HOME> $ cd <RDBMS ORACLE_HOME>
$ unzip -o appsutil.zip
3. Generate your database context file.
Verify that the following environment settings are set properly:
$ export ORACLE_SID=<SID>
$ export ORACLE_HOME=<10g_ORACLE_HOME>
$ export PATH=$ORACLE_HOME/bin:$PATH:.
$ export TNS_ADMIN=$ORACLE_HOME/network/admin/<SID>_<hostname>
$ export ORA_NLS10=$ORACLE_HOME /nls/data/9idata
$ export LD_LIBRARY_PATH=$ORACLE_HOME/lib
$ export SHLIB_PATH=$ORACLE_HOME/lib
35
Run the AD build XML Perl script:
$ cd $ORACLE_HOME/appsutil/bin
$ perl adbldxml.pl tier=db appsuser=apps \
appspasswd=<apps_password>
The context file and its creation log were generated in the following locations:
Context File = $ORACLE_HOME/appsutil/<SID>_<hostname>.xml
Log = $ORACLE_HOME/appsutil/log/adbldxml_*.log
4. Run AutoConfig on the Target Database Node.
$ cd $ORACLE_HOME/appsutil/bin
$ ./adconfig.sh \
contextfile=<10g_ORACLE_HOME>/appsutil/<SID>_<hostname>.xml \
appspass=<apps_password>
To complete this task shutdown all database processes including the listener, source the newly
create environment file, and startup the listener and database.
Note
If you receive the following error:
UnsatisfiedLinkError exception loading native library:
njni10,
refer to OracleMetalink Note 353722.1, Autoconfig On Database Tier
Reports Error UnsatisfiedLinkError.
5. Re-create custom database links.
If the Oracle Net listener in the 10.2.0 Oracle home is defined differently than the one used by
the old Oracle home, you must re-create any custom self-referential database links that exist in
the Applications database instance. To check for the existence of database links, use SQL*Plus
on the database server node to connect to the Applications database instance as APPS and run
the following query:
$ sqlplus apps/<apps password>
SQL> select db_link from dba_db_links;
6. Update EDW_APPS_TO_WH and APPS_TO_APPS database links.
If they exist, they should have been updated with the new port number by AutoConfig in a
previous step.
If you have custom self-referential database links in the database instance, use the following
commands to drop and re-create them:
$ sqlplus apps/<apps password>
SQL> drop database link <custom database link>;
SQL> create database link <custom database link> connect to <user>
identified by <password> using
'(DESCRIPTION=(ADDRESS=(PROTOCOL=TCP)(HOST=<hostname>)
(PORT=<portnumber>))(CONNECT_DATA=(SID=<ORACLE_SID)))';
36
where <custom database link>, <user>, <password>,<hostname> , and <ORACLE_SID> are
all as they were in the source database link definition, and <port number> is the port number
of the new Oracle Net listener for the database instance.
7. Reconfigure the application tier to connect to the target database node.
Modify the APPS Tier context file to represent the new DB host name and NULL the value for
the JDBC URL. Edit the tnsnames.ora file and run AutoConfig.
Edit the application tier $CONTEXT_FILE to represent the new target DB host and change the
JDBC URL to a NULL value.
<dbhost oa_var="s_dbhost"><SOURCE_DB_HOSTNAME></dbhost>
To <dbhost oa_var="s_dbhost"><TARGET_DB_HOSTNAME></dbhost>
And
<jdbc_url
oa_var="s_apps_jdbc_connect_descriptor">jdbc:oracle:thin:@(DESCRIPT
ION=(LOAD_BALANCE=YES)(FAILOVER=YES)(ADDRESS_LIST=(ADDRESS=(PROTOCO
L=tcp)(HOST=APPSERVER.mycompany.com)(PORT=1521)))(CONNECT_DATA=(SER
VICE_NAME=<SID>)))</jdbc_url>
To <jdbc_url oa_var="s_apps_jdbc_connect_descriptor">NULL</jdbc_url>
Edit the APPS Tier tnsnames.ora file and remove the dbhost name reference for the original
DB host (the source HP 9000 server). The tnsnames.ora file is located in
<8.0.6_Home>/network/admin/<SID>_<hostname>/tnsnames.ora
8. Run AutoConfig on the APPS Node and start the Applications server processes.
In order for the modifications made to the APPS Node to take effect, you must run AutoConfig
at this time.
Test for remote database connectivity.
$ tnsping <SID>
$ sqplus apps/<apps_password>
Run Autoconfig.
$ $AD_TOP/bin/adconfig.sh \
contextfile=<APPL_TOP>/admin/<SID>_<hostname>.xml \
appspass=<apps_password>
Start all the applications server processes
$ cd $COMMON_TOP/admin/scrtips/<SID>_<hostname>/
$ ./adstrtal.sh apps/<APPSpwd>
2.5.4 Validation tasks
Verify that the migrated database functions properly with the source Application Tier environment. The
Oracle E-Business Suite deployment is now in a fully supported split configuration with the
Applications 11i server services running on HP 9000/HP-UX 11i v2 and the Database 10gR2
running on HP Integrity/HP-UX.
Verify the database server hostname and database release version:
Go to the Oracle Applications Rapid Install Portal, and log on to the E-Business Suite home page as
the sysadmin user. Select a responsibility (such as the System Administrator responsibility). Click on
any form, such as the Concurrent->Requests form. From the Help menu click "About Oracle

37
Applications", and verify that the server hostname and release version correspond to those of the
new HP Integrity database server.
1. Run Diagnostics for HTML-based Applications (Self-service)
Return to the E-Business Suite home page and select the System Administration responsibility.
Click on each link in the Diagnostics section.
2. Run CRM Diagnostics
Return to the E-Business Suite home page and select the CRM HTML Administrator
responsibility. Click on Diagnostics, and select the Basic tab. Click on Run All Groups, and
examine the test results.
The migration process can be paused at this stage and normal business operations can resume. If
time permits, the next phase can be continued immediately or during the next planned downtime. A
full backup of the database instance should be taken before the final phase.
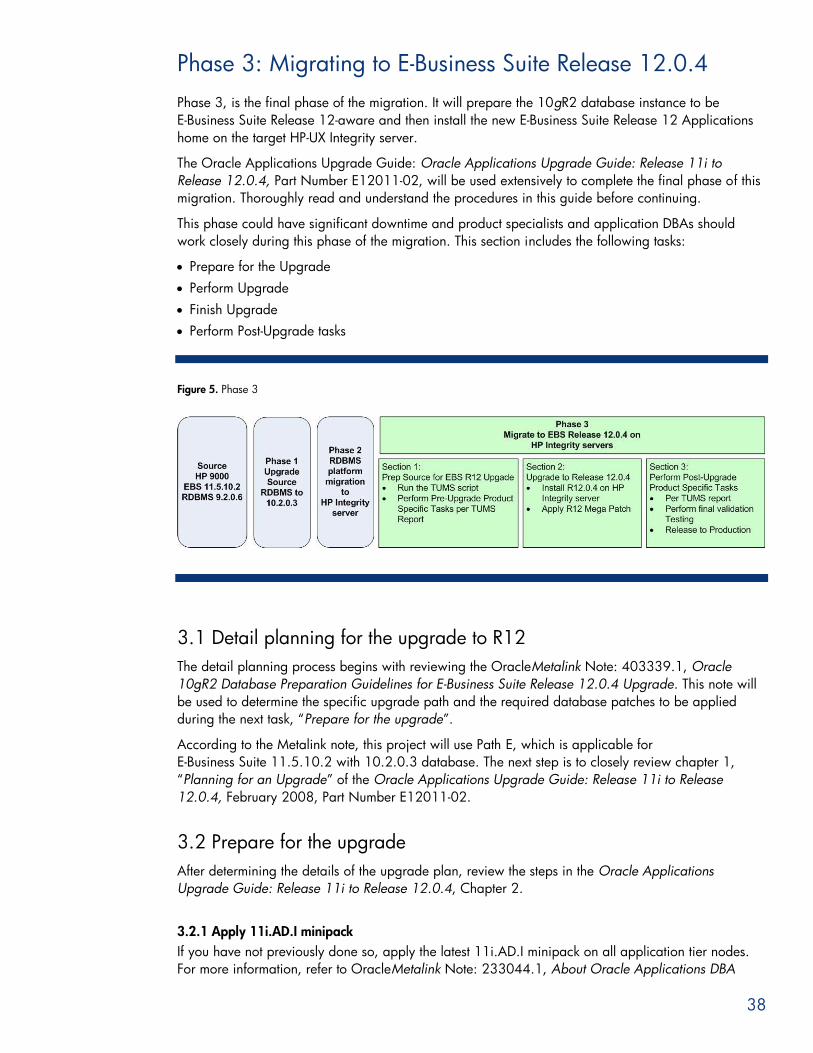
38
Phase 3: Migrating to E-Business Suite Release 12.0.4
Phase 3, is the final phase of the migration. It will prepare the 10gR2 database instance to be
E-Business Suite Release 12-aware and then install the new E-Business Suite Release 12 Applications
home on the target HP-UX Integrity server.
The Oracle Applications Upgrade Guide: Oracle Applications Upgrade Guide: Release 11i to
Release 12.0.4, Part Number E12011-02, will be used extensively to complete the final phase of this
migration. Thoroughly read and understand the procedures in this guide before continuing.
This phase could have significant downtime and product specialists and application DBAs should
work closely during this phase of the migration. This section includes the following tasks:
Prepare for the Upgrade
Perform Upgrade
Finish Upgrade
Perform Post-Upgrade tasks
Figure 5. Phase 3
3.1 Detail planning for the upgrade to R12
The detail planning process begins with reviewing the OracleMetalink Note: 403339.1, Oracle
10gR2 Database Preparation Guidelines for E-Business Suite Release 12.0.4 Upgrade. This note will
be used to determine the specific upgrade path and the required database patches to be applied
during the next task, “Prepare for the upgrade”.
According to the Metalink note, this project will use Path E, which is applicable for
E-Business Suite 11.5.10.2 with 10.2.0.3 database. The next step is to closely review chapter 1,
“Planning for an Upgrade” of the Oracle Applications Upgrade Guide: Release 11i to Release
12.0.4, February 2008, Part Number E12011-02.
3.2 Prepare for the upgrade
After determining the details of the upgrade plan, review the steps in the Oracle Applications
Upgrade Guide: Release 11i to Release 12.0.4, Chapter 2.
3.2.1 Apply 11i.AD.I minipack
If you have not previously done so, apply the latest 11i.AD.I minipack on all application tier nodes.
For more information, refer to OracleMetalink Note: 233044.1, About Oracle Applications DBA

39
Minipack 11i.AD.I. Make sure that the AutoConfig is migrated over to the database node before
continuing.
3.2.2 Run the Upgrade Manual Scripts (TUMS) utility
The TUMS utility reviews the current Oracle Applications 11i environment and creates a report that
lists all the tasks that can be omitted during the upgrade process. TUMS is delivered in a patch, which
supplies the scripts you need to examine your system and create the report.
Download and apply patch 6727612 to the administration server node on your Release 11i
APPL_TOP. The patch supplies the script (adtums.sql) to generate the TUMS report (tumsr12.html).
To generate the TUMS report, login as the applications administrator and source the environment.
Then change to the “$AD_TOP/patch/115/sql” directory and run the adtums.sql script.
$ cd $AD_TOP/patch/115/sql
$ sqlplus apps/<apps_password> @adtums.sql <DIRECTORY>
For the <DIRECTORY> value, enter the full path of the directory to which you want the report to be
written. This directory must be listed in the UTL_FILE_DIR parameter of the init.ora file before TUMS
can write the report.
The report will be generated on the database node: <DIRECTORY>/tumsr12.html.
See Appendix D to view the TUMS report for this project.
3.2.3 Database and system administration tasks
These tasks are executed on the Release 11i APPL_TOP. Complete all tasks in the “Database and
System Administration Tasks” section of chapter 2, Preparing for the Upgrade, in the Upgrade Guide:
Release 11i to Release 12.0.4, excluding the ones listed in the TUMS report, before continuing with
the product-specific tasks.
3.2.4 Product-specific tasks
These tasks are executed on the Release 11i APPL_TOP. Complete all tasks in the “Applications
Technology Tasks” and “Product Specific Tasks” sections of Chapter 2, Preparing for the Upgrade, in
the Upgrade Guide: Release 11i to Release 12.0.4, excluding the ones listed in the TUMS report,
before continuing with the final preparations for upgrade task.
3.3 Final preparations for upgrade
This section completes the final preparation tasks for your existing Release 11i system and installs the
new Oracle Applications Release 12.0.4 environment. These tasks are derived from the Prepare for
the Upgrade sections of Chapter 2, Preparing for the Upgrade, in the Upgrade Guide: Release 11i to
Release 12.0.4.
3.3.1 Gather schema statistics for CBO (required)
Release 12 employs cost-based optimization, which examines FND table statistics to determine the
most efficient access paths and join methods for executing SQL statements. These statistics are
gathered by the FND_STATS process, which you initiate by running the Gather Schema Statistics
concurrent program.
From your Release 11i APPL_TOP, complete the following steps:
1. Log in to Oracle Applications with the System Administrator responsibility.
2. Navigate to the Submit Request window (Request > Run).
3. Submit the Gather Statistics program (Schema).
40
Set the schema name to ALL to gather statistics for all Oracle Applications schema (having an entry in
the FND_PRODUCT_INSTALLATIONS table). In addition to gathering index and table-level statistics,
the program gathers column-level histogram statistics for all columns listed in the
FND_HISTOGRAM_COLS table.
Note
Gather schema statistics on a regular basis to fully utilize the cost-based
optimization feature. In preparation for an upgrade, this needs to be one of
the last tasks you perform before initiating the upgrade downtime so that
the statistics are current.
3.3.2 Backup the database (recommended)
Make a cold backup of the Oracle Applications database. If any problems occur during the upgrade
process the only method to rollback is to restore your system from a recent backup.
Shut down the entire Release 11i environment and make sure that the database is shut down with the
NORMAL option. Using the IMMEDIATE or ABORT option may result in an unusable database
backup.
3.3.3 Prepare the R12 Applications node and run Rapid Install (required)
Prepare the HP-UX Integrity server for E-Business Suite Release 12.0.4 target application node. See
section 2.1 Prepare the target database server, within this document, for preparing the target server
and then use the Rapid Install wizard to lay down the file system and install the new technology stack
for your Release 12.0.4 Oracle Applications system.
Before running Rapid Install, modify the database node sqlnet.ora file to recognize the new HP-UX
Integrity server Release 12.0.4 application node.
Edit the sqlnet.ora to include the <new_host_name> in the “tcp.invited_nodes” section. Once the
sqlnet.ora file has been updated, restart the tnslistener process on the database server so that the
target applications server can properly connect to the remote database.
Run Rapid Install and supply basic information about your system such as port specifications, existing
and new database node descriptions (including mount points), user names and passwords, product
license types, internationalization and language settings, and mount points for other nodes in your
system.
1. Stage the Oracle E-Business Suite Release 12.0.4 installation media.
2. Logon to the HP-UX Integrity server designated as the new applications R12.0.4 node as the
owner of the applications filesystem and change to the <R12.0.4 staging
area>startCD/Disk1/rapidwiz.
3. Start Rapid Install by typing rapidwiz on the command line. The Welcome screen lists the
components that are included in, or supported by, this release of Oracle Applications. Click Next.
4. On the Wizard Operation screen, select Upgrade to Oracle Applications Release 12.0.4. Click
Next.
5. On the Select Upgrade Action screen, select Create Upgrade File System.
6. In the associated screen flow, enter the parameters required to set up your new environment and
run Rapid Install.

41
3.3.4 Migrate or upgrade your database Oracle 10gR2 (conditional)
Review OracleMetalink Note: 403339.1, Oracle 10gR2 Database Preparation Guidelines for an
E-Business Suite Release 12.0.4 Upgrade, Path E, “11.5.10.2 with 10.2.0.3 database”.
For Path E:
Apply the Interim 10.2.0.3 patch bundle 6319846 for HP-UX Itanium. See the readme notes for
instruction on applying this patch.
Apply Oracle Service Patch 5880762 (conditional). See the readme notes for instruction on
applying this patch.
3.4 Perform upgrade
This section describes the tasks required to initiate the upgrade process. All the tasks must be
performed during the upgrade downtime.
Perform all the necessary steps in Chapter 3, Upgrading to Release 12.0.4 in the Upgrade Guide:
Release 11i to Release 12.0.4.
Notes:
In the Oracle Applications Upgrade Guide: Release 11i to Release 12.0.4,
Chapter 3 “Upgrading to Release 12.0.4”
Step 3: Migrate database to Oracle 10g Release 2, there are two options:
Patch the existing 10.2.0.3 home or install a new 10gR2 home using
Release 12.0.4 Rapid Install. This project used the former option.
3.5 Finish the upgrade
Complete all tasks in the “Finish the Upgrade” and “Finish System Administration Tasks” sections of
Chapter 3, Upgrading to Release 12.0.4 in the Upgrade Guide: Release 11i to Release 12.0.4.
All the tasks are performed on the Release 12.0.4 APPL_TOP and should be completed during system
downtime.
3.6 Perform post-upgrade tasks
This section describes tasks that complete the upgrade for specific products.
Complete all tasks in Chapter 4, Post-upgrade Tasks in the Upgrade Guide: Release 11i to Release
12.0.4, excluding the tasks listed in the TUMS report.
This section includes the following tasks:
Applications technology tasks
Customer relationship management tasks
Financials and procurement tasks
Human resources tasks
Intelligence tasks
Projects tasks
Supply chain management tasks

42
System maintenance tasks
Additional tasks
This completes the Oracle E-Business Suite upgrade to Release 12.0.4. Shut down the environment
and perform a full backup. Perform validation testing, and then clone the environment for use with
production support environment.
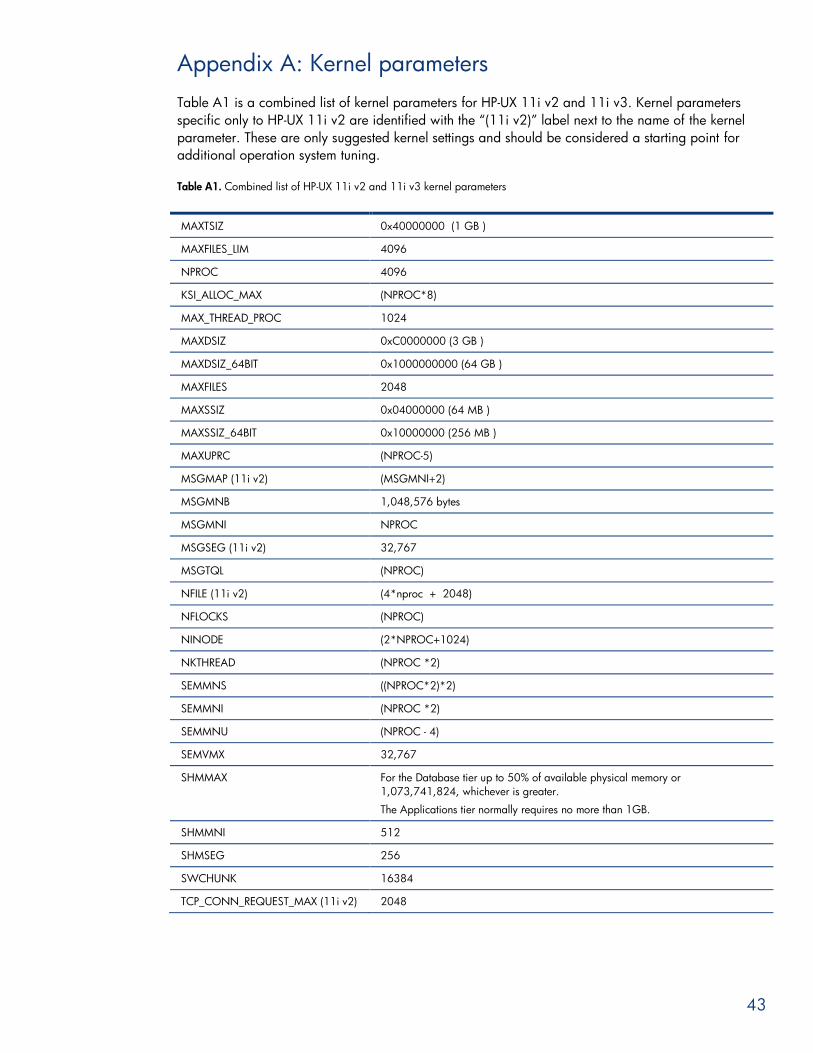
43
Appendix A: Kernel parameters
Table A1 is a combined list of kernel parameters for HP-UX 11i v2 and 11i v3. Kernel parameters
specific only to HP-UX 11i v2 are identified with the “(11i v2)” label next to the name of the kernel
parameter. These are only suggested kernel settings and should be considered a starting point for
additional operation system tuning.
Table A1. Combined list of HP-UX 11i v2 and 11i v3 kernel parameters
MAXTSIZ 0x40000000 (1 GB )
MAXFILES_LIM 4096
NPROC 4096
KSI_ALLOC_MAX (NPROC*8)
MAX_THREAD_PROC 1024
MAXDSIZ 0xC0000000 (3 GB )
MAXDSIZ_64BIT 0x1000000000 (64 GB )
MAXFILES 2048
MAXSSIZ 0x04000000 (64 MB )
MAXSSIZ_64BIT 0x10000000 (256 MB )
MAXUPRC (NPROC-5)
MSGMAP (11i v2) (MSGMNI+2)
MSGMNB 1,048,576 bytes
MSGMNI NPROC
MSGSEG (11i v2) 32,767
MSGTQL (NPROC)
NFILE (11i v2) (4*nproc + 2048)
NFLOCKS (NPROC)
NINODE (2*NPROC+1024)
NKTHREAD (NPROC *2)
SEMMNS ((NPROC*2)*2)
SEMMNI (NPROC *2)
SEMMNU (NPROC - 4)
SEMVMX 32,767
SHMMAX For the Database tier up to 50% of available physical memory or
1,073,741,824, whichever is greater.
The Applications tier normally requires no more than 1GB.
SHMMNI 512
SHMSEG 256
SWCHUNK 16384
TCP_CONN_REQUEST_MAX (11i v2) 2048

44
Appendix B: Pre-Upgrade Information Utility output file
This is the Pre-Upgrade Information Utility output file generated in section 1.3.3, Upgrade the
database instance.
SQL> @utlu102i.sql
Oracle Database 10.2 Upgrade Information Utility 02-16-2009 06:12:05
.
**********************************************************************
Database:
**********************************************************************
--> name: VIS
--> version: 9.2.0.6.0
--> compatible: 9.2.0
--> blocksize: 8192
.
**********************************************************************
Logfiles: [make adjustments in the current environment]
**********************************************************************
--> The existing log files are adequate. No changes are required.
.
**********************************************************************
Tablespaces: [make adjustments in the current environment]
**********************************************************************
--> SYSTEM tablespace is adequate for the upgrade.
.... minimum required size: 7535 MB
--> APPS_UNDOTS1 tablespace is adequate for the upgrade.
.... minimum required size: 28 MB
--> TEMP tablespace is adequate for the upgrade.
.... minimum required size: 58 MB
--> APPS_TS_QUEUES tablespace is adequate for the upgrade.
.... minimum required size: 584 MB
--> APPS_TS_TX_DATA tablespace is adequate for the upgrade.
.... minimum required size: 10579 MB
--> ODM tablespace is adequate for the upgrade.
.... minimum required size: 15 MB
.
**********************************************************************
Update Parameters: [Update Oracle Database 10.2 init.ora or spfile]
**********************************************************************
WARNING: --> "streams_pool_size" is not currently defined and needs a value of at
least 50331648
WARNING: --> "large_pool_size" needs to be increased to at least 8388608
WARNING: --> "session_max_open_files" needs to be increased to at least 20
.
**********************************************************************
Renamed Parameters: [Update Oracle Database 10.2 init.ora or spfile]
**********************************************************************
-- No renamed parameters found. No changes are required.
.
**********************************************************************
Obsolete/Deprecated Parameters: [Update Oracle Database 10.2 init.ora or spfile]
**********************************************************************
--> "optimizer_max_permutations"
--> "row_locking"
--> "undo_suppress_errors"
--> "max_enabled_roles"
--> "enqueue_resources"
--> "sql_trace"
.
**********************************************************************
Components: [The following database components will be upgraded or installed]
**********************************************************************
--> Oracle Catalog Views [upgrade] VALID
--> Oracle Packages and Types [upgrade] VALID
--> JServer JAVA Virtual Machine [upgrade] VALID
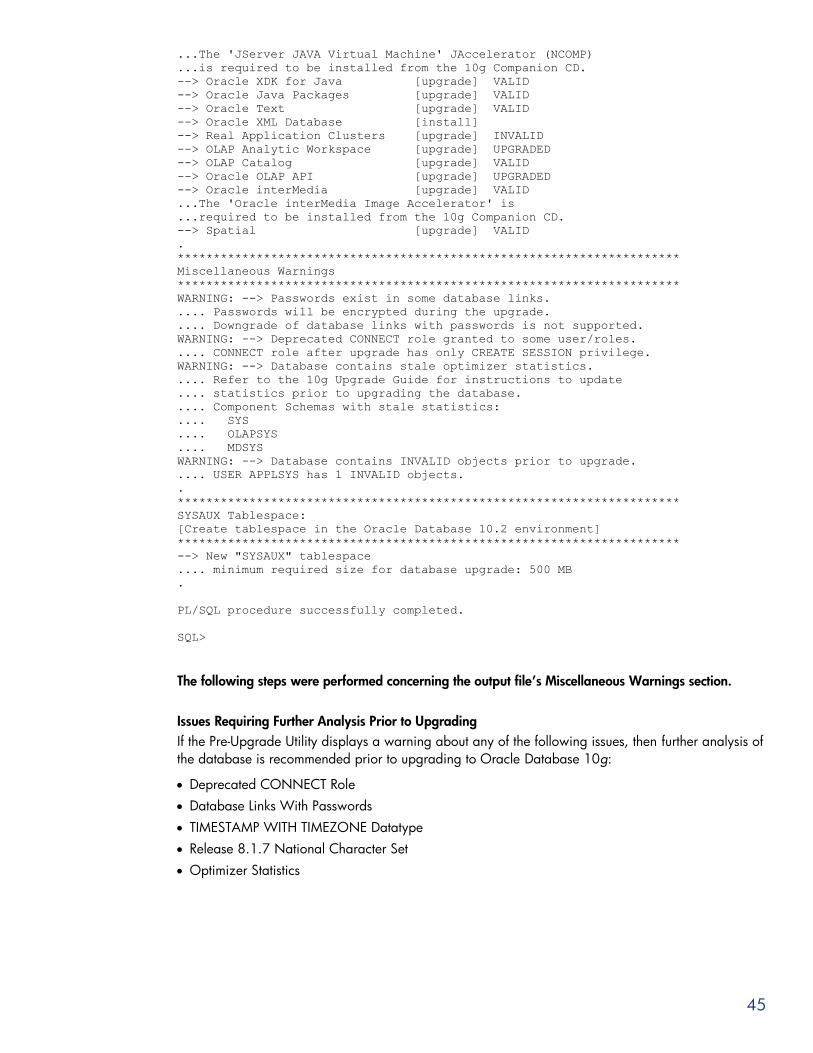
45
...The 'JServer JAVA Virtual Machine' JAccelerator (NCOMP)
...is required to be installed from the 10g Companion CD.
--> Oracle XDK for Java [upgrade] VALID
--> Oracle Java Packages [upgrade] VALID
--> Oracle Text [upgrade] VALID
--> Oracle XML Database [install]
--> Real Application Clusters [upgrade] INVALID
--> OLAP Analytic Workspace [upgrade] UPGRADED
--> OLAP Catalog [upgrade] VALID
--> Oracle OLAP API [upgrade] UPGRADED
--> Oracle interMedia [upgrade] VALID
...The 'Oracle interMedia Image Accelerator' is
...required to be installed from the 10g Companion CD.
--> Spatial [upgrade] VALID
.
**********************************************************************
Miscellaneous Warnings
**********************************************************************
WARNING: --> Passwords exist in some database links.
.... Passwords will be encrypted during the upgrade.
.... Downgrade of database links with passwords is not supported.
WARNING: --> Deprecated CONNECT role granted to some user/roles.
.... CONNECT role after upgrade has only CREATE SESSION privilege.
WARNING: --> Database contains stale optimizer statistics.
.... Refer to the 10g Upgrade Guide for instructions to update
.... statistics prior to upgrading the database.
.... Component Schemas with stale statistics:
.... SYS
.... OLAPSYS
.... MDSYS
WARNING: --> Database contains INVALID objects prior to upgrade.
.... USER APPLSYS has 1 INVALID objects.
.
**********************************************************************
SYSAUX Tablespace:
[Create tablespace in the Oracle Database 10.2 environment]
**********************************************************************
--> New "SYSAUX" tablespace
.... minimum required size for database upgrade: 500 MB
.
PL/SQL procedure successfully completed.
SQL>
The following steps were performed concerning the output file’s Miscellaneous Warnings section.
Issues Requiring Further Analysis Prior to Upgrading
If the Pre-Upgrade Utility displays a warning about any of the following issues, then further analysis of
the database is recommended prior to upgrading to Oracle Database 10g:
Deprecated CONNECT Role
Database Links With Passwords
TIMESTAMP WITH TIMEZONE Datatype
Release 8.1.7 National Character Set
Optimizer Statistics

46
Deprecated CONNECT Role
Each user should ONLY have those privileges appropriate to the tasks he needs to do. Least privilege
mitigates risk by limiting privileges, so that it remains easy to do what is needed while concurrently
reducing the ability to do inappropriate things, either inadvertently or maliciously.
The CONNECT role privilege reduction feature reduces the number of privileges granted to the
connect role to only one:
CREATE SESSION
The seven other privileges have been removed from the CONNECT role:
CREATE TABLE
CREATE VIEW
CREATE SYNONYM
CREATE CLUSTER
CREATE DATABASE LINK
CREATE SEQUENCE
ALTER SESSION
After upgrading to Oracle Database 10g, the CONNECT role will only have the CREATE SESSION
privilege; the other privileges granted to the CONNECT role in earlier releases will be revoked during
the upgrade. To identify which users and roles in your database are granted the CONNECT role, use
the following query:
SELECT grantee FROM dba_role_privs
WHERE granted_role = 'CONNECT' and
grantee NOT IN (
'SYS', 'OUTLN', 'SYSTEM', 'CTXSYS', 'DBSNMP',
'LOGSTDBY_ADMINISTRATOR', 'ORDSYS',
'ORDPLUGINS', 'OEM_MONITOR', 'WKSYS', 'WKPROXY',
'WK_TEST', 'WKUSER', 'MDSYS', 'LBACSYS', 'DMSYS',
'WMSYS', 'OLAPDBA', 'OLAPSVR', 'OLAP_USER',
'OLAPSYS', 'EXFSYS', 'SYSMAN', 'MDDATA',
'SI_INFORMTN_SCHEMA', 'XDB', 'ODM');
GRANTEE
------------------------------------------
EUL_US
SSOSDK
WEBSYS
PROJMFG
SERVICES
WIRELESS
EDWEUL_US
7 rows selected.
If users or roles require privileges other than CREATE SESSION, then grant the specific required
privileges prior to upgrading. The upgrade scripts adjust the privileges for the Oracle-supplied users.
Database Links With Passwords
During the upgrade to Oracle Database 10g, any passwords in database links will be encrypted. To
downgrade back to the original release, all of the database links with encrypted passwords must be
dropped prior to the downgrade. Consequently, the database links will not exist in the downgraded
database. If you anticipate a requirement to be able to downgrade back to your original release,
then save the information about affected database links from the SYS.LINK$ table, so that you can
recreate the database links after the downgrade.

47
TIMESTAMP WITH TIMEZONE Datatype
The time zone files that are supplied with Oracle Database 10g have been updated from version 1 to
version 2 to reflect changes in transition rules for some time zone regions. The changes may affect
existing data of TIMESTAMP WITH TIME ZONE datatype. To preserve this TIMESTAMP data for
updating according to the new time zone transition rules, you must run the utltzuv2.sql script on
the database before upgrading. This script is located in the new 10.2
ORACLE_HOME/rdbms/admin directory. This script analyzes your database for TIMESTAMP WITH
TIME ZONE columns that are affected by the updated time zone transition rules.
See also: Oracle Database Globalization Support Guide for a detailed description of the
utltzuv.sql script
If the utltzuv2.sql script identifies columns with time zone data affected by a database upgrade,
then back up the data in character format before you upgrade the database. After the upgrade, you
must update the tables to ensure that the data is stored based on the new rules. If you export the
tables before upgrading and import them after the upgrade, the conversion will happen automatically
during the import.
Alternatively, create tables with the time zone information in character format (for example,
TO_CHAR(column, 'YYYY-MM-DD HH24.MI.SSXFF TZR'), and recreate the TIMESTAMP data
from these tables after the upgrade.
Release 8.1.7 National Character Set
Starting in Oracle9i, the SQL NCHAR datatypes (NCHAR, NVARCHAR2, and NCLOB) are limited to the
Unicode character set encoding (UTF8 and AL16UTF16) only. Any other version 8 character sets that
were available under the NCHAR datatype, including Asian character sets (such as JA16SJISFIXED),
are no longer supported.
Before migrating your 8.1.7 SQL NCHAR data to the new Unicode NCHAR, Oracle Corporation
recommends that you analyze your SQL NCHAR data, using the Character Set Scanner for the
identification of possible invalid character set conversion or data truncation.
See also: Oracle Database Globalization Support Guide for more information about the Character Set
Scanner
When you upgrade to Oracle Database 10g, the value of the National Character Set of the
upgraded database is set based on the value of the National Character Set of the Oracle8i database
being upgraded. If the old National Character Set is UTF8, then the new National Character Set will
be UTF8. Otherwise, and the National Character Set is changed to AL16UTF16.
During the upgrade, the existing NCHAR columns in the data dictionary are changed to use the new
format and, if the National Character Set has been changed to AL16UTF16, the dictionary NCHAR
columns will be converted to the AL16UTF16 character set.
Optimizer statistics
When upgrading to Oracle Database 10g, optimizer statistics are collected for dictionary tables that
lack statistics. This statistics collection can be time consuming for databases with a large number of
dictionary tables, but statistics gathering only occurs for those tables that lack statistics or are
significantly changed during the upgrade.
To decrease the amount of downtime incurred when collecting statistics, you can collect statistics prior
to performing the actual database upgrade. As of Oracle Database 10g Release 10.1, Oracle
recommends that you use the DBMS_STATS.GATHER_DICTIONARY_STATS procedure to gather
these statistics. For example, you can enter the following:
EXEC DBMS_STATS.GATHER_DICTIONARY_STATS:

48
If you are using Release 9.0.1 or 9.2.0, then you should use the
DBMS_STATS.GATHER_SCHEMA_STATS procedure to gather statistics.
The following warning was also generated by the Pre-Upgrade Information Utility report.
WARNING: --> Database contains stale optimizer statistics.
Refer to the 10g Upgrade Guide for instructions to update statistics prior to upgrading the database.
Component Schemas with stale statistics:
SYS
OLAPSYS
MDSYS
The following steps were used to optimize statistics. $ cd /tmp
$ sqlplus ‘/ as sysdba’
spool gdict.out
grant analyze any to sys;
exec dbms_stats.gather_schema_stats('SYS',options=>'GATHER', estimate_percent =>
DBMS_STATS.AUTO_SAMPLE_SIZE, method_opt => 'FOR ALL COLUMNS SIZE AUTO', cascade
=> TRUE);
exec dbms_stats.gather_schema_stats('OLAPSYS',options=>'GATHER', estimate_percent
=> DBMS_STATS.AUTO_SAMPLE_SIZE, method_opt => 'FOR ALL COLUMNS SIZE AUTO',
cascade => TRUE);
exec dbms_stats.gather_schema_stats('MDSYS',options=>'GATHER', estimate_percent
=> DBMS_STATS.AUTO_SAMPLE_SIZE, method_opt => 'FOR ALL COLUMNS SIZE AUTO',
cascade => TRUE);
spool off
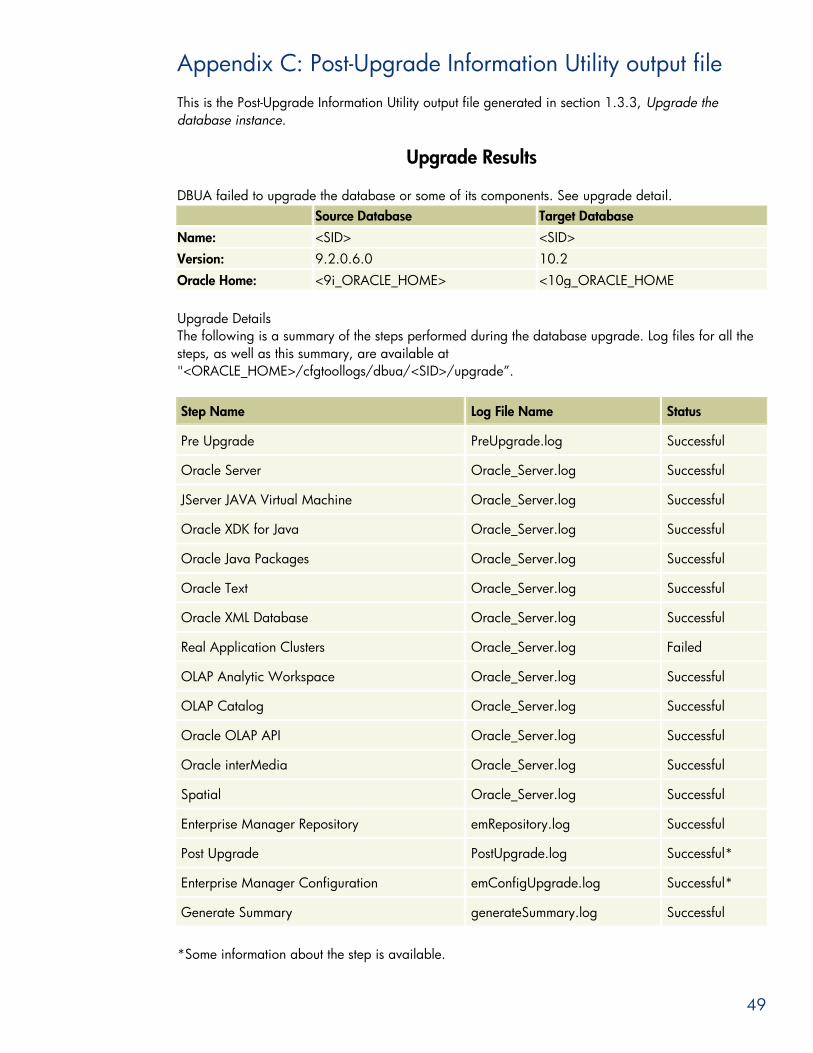
49
Appendix C: Post-Upgrade Information Utility output file
This is the Post-Upgrade Information Utility output file generated in section 1.3.3, Upgrade the
database instance.
Upgrade Results
DBUA failed to upgrade the database or some of its components. See upgrade detail.
Source Database Target Database
Name: <SID> <SID>
Version: 9.2.0.6.0 10.2
Oracle Home: <9i_ORACLE_HOME> <10g_ORACLE_HOME
Upgrade Details
The following is a summary of the steps performed during the database upgrade. Log files for all the
steps, as well as this summary, are available at
"<ORACLE_HOME>/cfgtoollogs/dbua/<SID>/upgrade”.
Step Name Log File Name Status
Pre Upgrade PreUpgrade.log Successful
Oracle Server Oracle_Server.log Successful
JServer JAVA Virtual Machine Oracle_Server.log Successful
Oracle XDK for Java Oracle_Server.log Successful
Oracle Java Packages Oracle_Server.log Successful
Oracle Text Oracle_Server.log Successful
Oracle XML Database Oracle_Server.log Successful
Real Application Clusters Oracle_Server.log Failed
OLAP Analytic Workspace Oracle_Server.log Successful
OLAP Catalog Oracle_Server.log Successful
Oracle OLAP API Oracle_Server.log Successful
Oracle interMedia Oracle_Server.log Successful
Spatial Oracle_Server.log Successful
Enterprise Manager Repository emRepository.log Successful
Post Upgrade PostUpgrade.log Successful*
Enterprise Manager Configuration emConfigUpgrade.log Successful*
Generate Summary generateSummary.log Successful
*Some information about the step is available.

50
Step execution information
Post Upgrade
A persistent initialization parameter file (spfile) has been created at the following location:
<ORACLE_HOME>/dbs/spfile<SID>.ora.
Enterprise Manager Configuration
The Database will be managed locally using the Oracle Enterprise Manager Database Control.
The Database Control URL is http://<DB_Node_FQDN>:1158/em
Initialization Parameter changes
The following changes have been made in the initialization parameters:
Parameters added:
Name Value
streams_pool_size 50331648
Obsolete Parameters Removed:
Name
optimizer_max_permutations
row_locking
undo_suppress_errors
max_enabled_roles
enqueue_resources
sql_trace
Enterprise Manager
The Database will be managed locally using the Oracle Enterprise Manager Database Control.
The Database Control URL is http://<DB_Node_FQDM:1158/em

51
Appendix D: TUMS report for R12 Upgrade
Oracle Applications R12 Upgrade Report (TUMS) – VIS
Based on the analysis of your installation, if it has been determined that you do not need to perform
the following upgrade steps, you may safely omit carrying out these steps from the Upgrading Oracle
Applications Release R12 manual during your upgrade.
Chapter 2: Preparing for the Upgrade
Depot Repair, Step 1 (CSD_DATA_CHECK)
Service Contracts, Step 1 (OKS_VALIDATE_GCD)
Service Contracts, Step 2 (OKS_VALIDATE_RULE)
Oracle Financials (India), Step 1 (JAI_CHECK_CUST)
Internet Expense, Step 1 (OIE_IMPORT_INTERCOMPANY_CHECK)
iPayment, Step 2 (IBY_SEC_UPGRADE)
Marketing, Step 1 (AMS_OSO_PLM_CHK)
Incentive Compensation, Step 1 (CN_PAYRN_REP_CHK)
Application Object Library, Step 1 (FND_ENABLE_MULTI_ORG)
Application Object Library, Step 3 (FND_WORKFLOW_TASKS)
Chapter 4: Post-Upgrade Tasks
iPayment, Step 1 (IBY_WALLET_SETUP)
iPayment, Step 3 (IBY_REMIT_ADV_CONTROL_IT)
Human Resources, Step 5 (PER_RIW_WINRUNNER)
Appendix E: Reducing Downtime
Service Contracts, Step 1 (OKS_R12_MIGRATE)

52
Appendix E: Recommended OracleMetalink Notes
This list enumerates the OracleMetalink Notes that are explicitly referenced in the above
documentation of the platform migration and E-Business Suite upgrade process. Several additional
notes were also included for your convenience.
Preliminary phase:
549389.1 Oracle Applications Release Notes, Release 12.0.4
316365.1 Oracle Applications Release 11.5.10.2 Maintenance Pack Installation Instructions
248857.1 Oracle Applications Tablespace Model Release 11i – Tablespace Migration Utility
Phase 1: Upgrading the Source database to 10gR2
726982.1 Interoperability Notes Oracle E-Business Suite Release 11i with Oracle Database 10g
Release 2
125767.1 Upgrading Developer 6i with Oracle Applications 11i
233044.1 About Oracle Applications DBA Minipack 11i.AD.I
216205.1 Database Initialization Parameters and Configuration for Oracle Applications Release 11i
165195.1 Using AutoConfig to Manage System Configurations with Oracle Applications 11i
Phase 2: Migrating 10gR2 DB to target HP-UX Integrity platform
402307.1 Oracle Applications Installation and Upgrade Notes Release 12 (12.0.4) for HP-UX
Itanium
369693.1 Using Oracle Applications with a Split Configuration Database Tier on Oracle 10g
Release 2
165195.1 Using AutoConfig to Manage System Configurations with Oracle Applications 11i
353722.1 Autoconfig On Database Tier Reports Error UnsatisfiedLinkError
380480.1 Invalid Public Synonym after upgrading database from 9.2.0 to 10.2.0 for EBS
Phase 3: Migrating to E-Business Suite Release 12.0.4
412160.1 Updated Time Zones in Oracle Time Zone File patches
403339.1 Oracle 10gR2 Database Preparation Guidelines for E-Business Suite Release 12.0.4
Upgrade
233044.1 About Oracle Applications DBA Minipack 11i.AD.I

For more information
HP Integrity server product information site: http://www.hp.com/go/integrity
HP BladeSystem product information site: http://www.hp.com/go/bladesystems
HP StorageWorks information site http://www.hp.com/go/storageworks
HP-UX 11i v2 and v3 product information site: http://www.hp.com/go/hpux
HP 9000 server product information site: http://www.hp.com/go/hp9000
Oracle Applications Upgrade Guide: Release 11i to Release 12.0.4, Part# E12011-02
Oracle Applications Installation Guide: Using Rapid Install Release 12, Part# B31295-07
Oracle Applications Patching Procedures, Part# B315657-03
Oracle Applications System Administration Guide – Configuration, Part# B31453-04
Oracle Applications System Administration Guide – Maintenance, Part# B31454-03
Oracle Applications Concepts Release 12, Part# B31450-04
Oracle Database Upgrade Guide: 10g Release 2 (10.2), Part# B14238-02
Oracle Database Administrator’s Guide: 10g Release 2 (10.2), Part# B14231-02
Oracle Database Installation Guide: 10g Release 2 (10.2) for HP-UX PA-RISC (64-bit),
Part# B19068-02
Oracle Database Release Notes: 10g Release 2 (10.2) for HP-UX PA-RISC (64-bit),
Part# B19067-08
Oracle Database Installation Guide: 10g Release 2 (10.2) for HP-UX Itanium, Part# B25293-01
Oracle Database Release Notes: 10g Release 2 (10.2) for HP HP-UX Itanium, Part# B25292-06
To help us improve our documents, please provide feedback at
http://h20219.www2.hp.com/ActiveAnswers/us/en/solutions/technical_tools_feedback.html.
Technology for better business outcomes
© Copyright 2009 Hewlett-Packard Development Company, L.P. The information contained herein is subject to change without notice. The only warranties for HP products and services are set forth in the express warranty statements accompanying such products and services. Nothing herein should be construed as constituting an additional warranty. HP shall not be liable for technical or editorial errors or omissions contained herein.
Oracle is a registered trademark of Oracle Corporation and/or its affiliate. UNIX is a registered trademark of The Open Group. Intel and Itanium are trademarks of Intel Corporation in the U.S. and other countries. Microsoft and Windows are U.S. registered trademarks of Microsoft Corporation. Java is a US trademark of Sun Microsystems, Inc.
4AA2-6528ENW, May 2009