oracle e-business suite in a scalable and ... - dell. · pdf file6 oracle e-business suite on...
TRANSCRIPT

IMPLEMENTING
ORACLE® E-BUSINESS SUITE
IN A SCALABLE AND RELIABLE
VIRTUAL SYSTEM
ARCHITECTURE
A Dell Technical White Paper
Dell™ Database Solutions Engineering, Dell Product Group
Kai Yu
Dell ™ Global Database Management, Dell IT
John Tao
January 2010

2
THIS WHITE PAPER IS FOR INFORMATIONAL PURPOSES ONLY, AND MAY CONTAIN
TYPOGRAPHICAL ERRORS AND TECHNICAL INACCURACIES. THE CONTENT IS PROVIDED AS IS,
WITHOUT EXPRESS OR IMPLIED WARRANTIES OF ANY KIND.
Dell, the Dell logo, OpenManage, and PowerEdge are trademarks of Dell Inc; Linux is the
registered trademark of Linus Torvalds in the United States and other countries; Red Hat
Enterprise Linux is a registered trademark of Red Hat, Inc in the United States and other
countries; Intel and Xeon are registered trademarks of Intel Corporation in the U.S. and other
countries; Oracle is a registered trademark of Oracle Corporation and/or its affiliates. Microsoft
and Internet Explorer are registered trademarks of Microsoft Corporation in the United States
and/or other countries.
© 2010 Dell Inc. All rights reserved.
Reproduction in any manner whatsoever without the express written permission of Dell Inc. is
strictly forbidden. For more information, contact Dell.
THE INFORMATION IN THIS DOCUMENT IS SUBJECT TO CHANGE WITHOUT NOTICE AND IS PROVIDED “AS IS” WITHOUT WARRANTY OF ANY KIND. THE ENTIRE RISK ARISING OUT OF THIS INFORMATION REMAINS WITH THE USER OF THE INFORMATION. IN NO EVENT SHALL DELL BE LIABLE FOR ANY DIRECT, CONSEQUENTIAL, INCIDENTAL, SPECIAL, PUNITIVE OR OTHER DAMAGES, EVEN IF DELL HAS BEEN ADVISED OF THE POSSIBILITY OF SUCH DAMAGES.

3
Contents
Abstract ........................................................................................................................................... 4
Audience and Scope ......................................................................................................................... 4
Section I – Introduction ................................................................................................................... 5
Oracle E-Business Suite on RAC: .................................................................................................. 6
Oracle VM: Oracle Server Virtualization Technology .................................................................. 7
Section II – Dell Oracle Grid Reference POC Project: Combining RAC and VM ............................... 9
Dell Oracle Grid Reference Architecture ..................................................................................... 9
Grid Architecture Design and Implementation ......................................................................... 10
Physical Grid .......................................................................................................................... 10
Virtual Grid ............................................................................................................................ 11
Enterprise Manager as the unified management solution ................................................... 13
Grid hardware platform and storage .................................................................................... 13
Consolidate enterprise applications on the Grid: a general guideline ...................................... 16
Oracle E-Business Suite R12 on the Grid: architecture design .................................................. 17
Section III – Oracle E-Business Suite R12 Implementation on RAC and VM ................................. 18
Prepare the VMs on virtual Grid for EBS application nodes ..................................................... 19
Prepare 11g RAC node 1 on Physical Grid for EBS Fresh Install ................................................ 22
Oracle EBS R12 Fresh Install ...................................................................................................... 24
Oracle EBS 11g Database upgrade ............................................................................................ 29
Converting the Oracle EBS 11g Database to RAC ...................................................................... 32
Expanding the database and application nodes to scale out the Oracle EBS system ............... 36
Section IV – Implement an Oracle EBS R12 Development/Test Instance on the Virtual Grid ...... 39
Deploy Oracle EBS R12 on VMs ................................................................................................. 39
Create Oracle EBS R12 VM templates ....................................................................................... 40
Create new Oracle E-Business Suite instance from the templates ........................................... 41
Conclusion ..................................................................................................................................... 42
References ..................................................................................................................................... 42

4
Abstract
An Oracle E-Business Suite system with an Oracle Real Application Cluster- (Oracle
RAC) enabled database delivers a complete business solution with user access and
flexible capacity features that address the most demanding of requirements. Application
deployment and management for this environment is simplified using the Oracle Virtual
Machine (Oracle VM) server. The benefits derived from the composite environment,
however, are not often realized without gaining a perspective on how to address its
complexity. This paper presents an overview of the architecture and each component of
the technology stack including Dell™ PowerEdge™ Blade servers and Dell EqualLogic
storage. Best practices implementation and configuration details in this document are a
complement to achieving the benefits of Oracle RAC and Oracle VM for Oracle E-
Business Suite Release 12 applications. These technologies are fully aligned with Dell’s
initiatives to simplify data centers and build solutions which are easily scalable. The
technology stacks and configurations discussed in this white paper have been fully
tested by the database solutions team at Dell.
Audience and Scope
This paper provides a top-down view of the system infrastructure beginning with a high-level
discussion of the related technology. The Dell Grid infrastructure proof of concept (POC) project
is introduced along with detailed implementation aspects. Audiences interested in a high-level
overview benefit best by reading the introduction. Those interested in implementation and best
practices specifics should read later sections of this document.
This paper is divided into four major sections:
Introduction to Oracle E-Business Suite, Oracle RAC, and Oracle VM technologies
Dell POC Project Oracle E-Business Suite Release 12 on the Grid: Architecture Design
Oracle E-Business Suite Release 12 implementation on Oracle RAC and Oracle VM
Implementing an Oracle E-Business Suite Release 12 Development/Test instance on the
Virtual Grid

5
Section I – Introduction
Oracle E-Business Suite R12 Architecture
Oracle E-Business Suite R12 is an industry leading Enterprise Resource Planning (ERP) software
platform that integrates a set of enterprise applications that seamlessly automate various line-
of-business processes — including sales, service, marketing, financial, human resources, supply
chain, and manufacturing. Oracle E-Business Suite R12 incorporates the latest technology in a
tiered structure (Figure 1):
1) The Client tier adapted the Native Sun Java plug-in for end-users to connect to
applications via internet browsers (e.g., Microsoft Internet Explorer, Mozilla Firefox,
and Apple Safari).
2) The Application tier uses Oracle Application Server (AS) 10g that includes Oracle AS 10g
10.1.2 for forms and Reports services, Oracle AS 10g 10.1.3 for Oracle containers for
Java (OC4J), as well as Oracle JDeveloper 10.1.3. The application tier is certified with
Oracle Fusion middleware.
3) The Database tier starts with Oracle Database 10gR2 and can be upgraded to Oracle
Database 11g for improved manageability and better performance with advanced
database features such as Automatic Workload Repository, Automatic SGA Tuning, RAC
and Automatic Storage Management (ASM), etc.
The original release of E-Business Suite (EBS) R12 occurred early in 2007. Since that time, most
customers have upgraded or are planning to upgrade their systems to it. Oracle EBS R12 is fully
certified for 64-bit platforms on both the application and database tiers. As a result, both tiers
benefit from Dell PowerEdge servers and 64-bit Linux variants.
Figure 1: Oracle E-Business suite R12 architecture

6
Oracle E-Business Suite on RAC:
Oracle RAC is composed of multiple database instances on servers that are interconnected through a high-speed private network. As a part of Oracle RAC, cache fusion technology for node synchronization makes it possible for multiple database instances to share a single database and execute transactions simultaneously on the single database. ASM is an integrated file system and volume manager that is built into the Oracle database kernel. ASM provides the database administrator with a simple storage management interface that is consistent across all server and storage platforms. ASM provides some key benefits for Oracle 10g and 11g databases such as:
I/O distributed evenly among available disk drives maximizes performance
Automatic disk rebalancing feature allows online addition and removal of storage
Manages database file systems easily
Provides simple management of shared storage for Oracle RAC database
Oracle E-Business Suite applications 11i and R12 can take advantage of Oracle RAC and ASM
technology:
High Availability: Applications connect to multiple Oracle RAC database instances which can be failed over from one another.
Load Balancing: Workload requests from the applications can be evenly distributed to multiple database instances.
Scalability: As application loads increase, Oracle RAC database capacity can be scaled out by adding additional database servers to the cluster.
Oracle RAC is also a key component to implementing Oracle Grid. However, Oracle E-Business applications implementation with Oracle RAC and ASM has requirements you need to be aware of during the application architecture design:
Oracle EBS Rapid Install program is not aware of Oracle RAC/ASM. The default Oracle EBS Rapid Install process only installs the Oracle E-Business database on a single server and stores the database files on an operating system’s file system.
There are additional hardware and license cost considerations for Oracle RAC.
Manual steps are required to convert the Rapid Installed Oracle E-Business applications database to Oracle RAC and ASM using the rconfig and autoconfig utilities. Certain specific tasks need to be performed in the application tier in order for the application technology stack to connect to the Oracle RAC database. Refer to Metalink note # 783044.1[6] for more details of these steps. The complete implementation of these steps will be also examined in the Oracle E-Business Suite R12 implementation on RAC and VM section of this white paper.

7
Figure 2 shows the Oracle E-Business Suite R12 applications stack that is running on Oracle RAC
and ASM.
Figure 2: Oracle E-Business Suite R12 on Oracle RAC and ASM
Oracle VM: Oracle Server Virtualization Technology
Virtualization introduces significant benefits to the design and implementation of database and
application environments. Oracle VM provides a platform that leverages the benefits of
virtualization [8]:
Server consolidation: By allowing multiple guest operating systems to execute on a
single physical server, it increases hardware utilization and significantly reduces the
number of physical servers in the data center.
Isolation: Because the VMs work independently, the operating system and applications
running on the different VMs don’t affect one another.
High performance server virtualization: The difference in performance between a VM
and a physical server is minimal. Performance overhead of an Oracle VM server is even
smaller for a workload that is less I/O intensive such as an application server workload
[10].
Fast deployment through a pre-configured Oracle VM template: An Oracle VM template
can be created to include all components of the VM including the VM operating system,
applications on the operating system, patches, and the configuration. The template
allows for easy, predictable deployment in a few mouse clicks. The implementation of
VMs in this paper will be based on this deployment method. See Section IV for more
details.

8
Centralized management solutions: Oracle Enterprise Manager with the Oracle VM
management pack provides the centralized management solution for both the virtual
and physical environment.
Combined benefits of Grid Computing and server virtualization: Oracle VM is the new
evolvement of the Oracle Grid computing model. In this model, the new Grid is
composed of the physical server as well as the virtual servers.
Oracle VM is the only software virtualization solution certified for any Oracle Software. Oracle
VM release 2.1 and above are certified with Oracle database 10g/11g, Oracle RAC database 10g
and 11g, and Oracle application servers. The following Oracle E-Business Suite versions are
certified with Oracle VM 2.1 as of the writing of this document according to Metalink note
465915.1:
11.5.10 CU2 or later with 11i.ATG_PF.H.RUP5 for Linux x86
12.0.2 RUP2 or later for Linux x86
12.0.4 and above, for 64-bit Oracle Enterprise Linux and 64-bit Red Hat Enterprise
Linux (RHEL) 5 on x86-64 with Oracle VM
12.0.3 (RUP3) or later (including 12.1) with 64-bit Oracle Enterprise Linux (OEL) 4 and
64-bit Red Hat Enterprise Linux 4 on x86-64 with Oracle VM
12.0.4 or higher and 12.1.1 (or higher) is certified on Microsoft Windows Server 2003
(32-bit) running as a guest on Oracle VM using Windows PV driver version 1.0.8 or
higher
12.1.1 or higher on Windows Server 2008 (32-bit) running as a guest on Oracle VM using
Windows PV driver version 1.0.8 or higher
For the latest certifications, please check Metalink note # 465915.1[5].
An Oracle VM environment includes the following components:
Oracle VM Server: A virtualization environment that provides a lightweight, server-
based platform for running VMs. It is based on an updated version of the underlying Xen
Hypervisor technology. The Oracle VM software is installed on a bare metal x86 Dell
Blade server. It includes a Linux kernel running as dom0 with support to manage one or
more domU VMs. Dom0 is the management domain that handles the physical devices’
I/O, networking, etc. Dom0 also runs the VM agents that connect to the Oracle VM
manager.
Virtual Server Pool: An autonomous region of VM servers that collects all the resources
of VM servers. All of the VM servers with one virtual server pool need to access the
shared storage.

9
VM: Guest Operating System with applications running on domU.
Oracle VM manager: The user interface to manage Oracle VM servers, VMs, and system
resources. VM manager can be configured independently or used as a VM management
pack plug-in as a part of Oracle Enterprise Manager Grid control. For the Dell POC
project, the Oracle Enterprise Manager Grid control with the VM management pack
plug-in was used as the unified management solution for the physical grid as well as the
virtual Grid. Figure 3 shows the Oracle VM server and its components. Figure 4 shows
the Oracle guest VMs and the VM server pools.
Figure 3: Oracle VM server and components, Figure 4: Guest VMs /Oracle server pool
Section II – Dell Oracle Grid Reference POC Project: Combining RAC
and VM
Dell Oracle Grid Reference Architecture
The Oracle Grid POC project within the Dell | Oracle Solutions Engineering team served to
establish a Grid that is composed of the physical and virtual servers. The physical servers form
the physical grid which is intended to provide the database grid infrastructure to provide
database services, while the virtual grid is based on Oracle virtualization in which each host of
the grid is essentially a virtual host or a guest VM. The virtual grid is intended to host the
application tier, middleware tier, or test/development databases which are not required to run
on the physical servers. The applications or middleware running on the virtual grid may connect
to their databases running on the physical grid or the virtual grid through the public network
link.
Our goal was to expand the Grid infrastructure so that it included both the physical Grid
provided by Oracle RAC and the virtual grid components provided by Oracle VM. This Grid was
designed to provide a pre-built, scalable infrastructure. It was comprised of a pool of system

10
resources that enabled consolidation of enterprise applications as well as their databases. This
methodology provided a way for applications and database services to share and obtain the
resources within the Grid on demand. Additionally, the project was designed to establish Grid
control as the centralized management aspect of the infrastructure. Figure 5 shows the logical
view of the Grid infrastructure.
Figure 5: Logical View of the Grid Infrastructure
Grid Architecture Design and Implementation
Physical Grid
The physical Grid is composed of an 8-node Oracle Database 11g RAC to provide multiple
database services as illustrated in Figure 6. The physical Grid provides a consolidated 11g RAC
database infrastructure to host multiple databases. Each database on this Grid infrastructure
can be configured to run on any number of database instances depending on the workload. This

11
infrastructure provides each database with the capability to be dynamically migrated to
different Grid nodes depending on the workload of the database instances.
The physical Grid may also be scaled out by adding more nodes to the Grid to meet the demand
of workloads. The empty slots of the blade chassis provide the capability to add additional blade
servers, and Grid control allows them to be joined to the existing physical Grid. The physical Grid
uses ASM to provide storage virtualization for the databases on the cluster.
Figure 6: Physical Grid based on Oracle 11g RAC
Virtual Grid
The virtual Grid is a set of VMs from Oracle VM server pools that consists of several Oracle VM
servers. In the reference design, we started with two servers, which is the minimum required to
provide some level of high availability. The initial pool was comprised of three Dell PowerEdge
M610 blade servers each with 24GB of memory and two Intel Xeon 5500 series quad-core
12
processors. With blades, it is very easy to scale out the VM server pool structure by adding more
M610 blade servers.
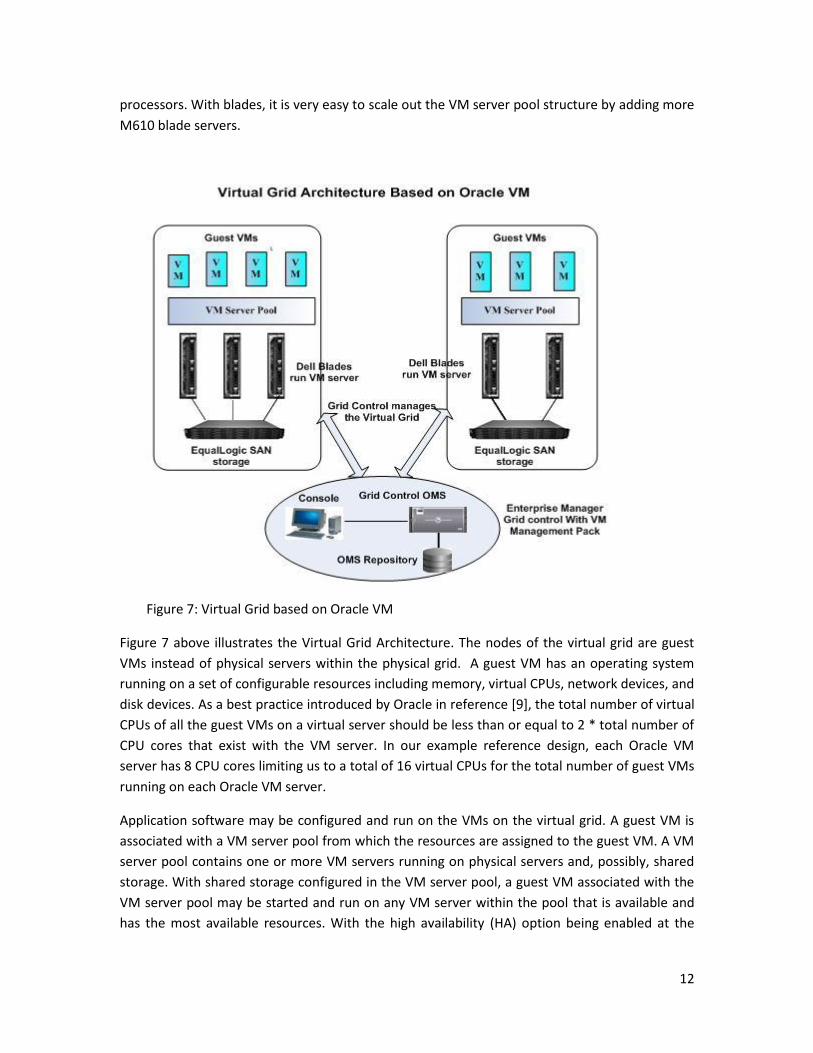
Figure 7: Virtual Grid based on Oracle VM
Figure 7 above illustrates the Virtual Grid Architecture. The nodes of the virtual grid are guest
VMs instead of physical servers within the physical grid. A guest VM has an operating system
running on a set of configurable resources including memory, virtual CPUs, network devices, and
disk devices. As a best practice introduced by Oracle in reference [9], the total number of virtual
CPUs of all the guest VMs on a virtual server should be less than or equal to 2 * total number of
CPU cores that exist with the VM server. In our example reference design, each Oracle VM
server has 8 CPU cores limiting us to a total of 16 virtual CPUs for the total number of guest VMs
running on each Oracle VM server.
Application software may be configured and run on the VMs on the virtual grid. A guest VM is
associated with a VM server pool from which the resources are assigned to the guest VM. A VM
server pool contains one or more VM servers running on physical servers and, possibly, shared
storage. With shared storage configured in the VM server pool, a guest VM associated with the
VM server pool may be started and run on any VM server within the pool that is available and
has the most available resources. With the high availability (HA) option being enabled at the

13
server pool level and the guest VM level, the VM is migrated or restarted on another available
VM server if the VM server that runs the guest VM is shut down or fails.
Enterprise Manager as the unified management solution
To complement the VM manager, the native management solution for the Oracle VM
environment, Oracle has released the Oracle VM management pack for Oracle Enterprise
Manager 10g R5 which provides the complementary solution to manage the virtual server
infrastructure. This Oracle VM management allows Oracle Enterprise Manager to provide the
management and provisioning for the components of the virtual Grid such as virtual server pool,
VM servers, guest VMs, and the resources allocations to the guest VMs such as CPUs, disks,
networks, and memory, as shown in Figure 2.
For this Grid infrastructure, Oracle Enterprise Manager 10g R5 instance with Oracle VM
management Pack is configured as the unified management solution for both physical and
virtual grids. With Application Management Pack (AMP) as a plug-in, Oracle Enterprise Manager
can be used to manage the Oracle E-Business Suite also.
Grid hardware platform and storage
The Grid infrastructure is built on commodity hardware and storage. With the increasing
requirements of IT datacenters, space is always a valuable commodity. Dell PowerEdge blade
servers offer a dense solution to maximize space constraints. Dell’s M1000e blade enclosure
offers the ability to enclose 16 M610 blades in a 10U-sized enclosure, compared to the 2-4U size
of the space for a single non-blade server.
Building an infrastructure that centralizes the database environment reduces complexity across
the IT organization. It also enables more efficient use of resources by sharing them and
eliminating redundancy.
Easily removable expansion is a key factor in building a successful grid. Dell blades offer
straightforward rip-and-replace functionality so that administrators can deploy a replacement
blade easily and with the same configuration as a previous blade.
The server components used in this grid infrastructure have the advantage of continuously
being scaled up as newer and faster components are brought to the market. Continuously
adding higher core densities and speeds will ensure that a grid infrastructure today can be
upgraded well into the future.

14
Figure 8: M1000e Blade Chasis Front and Back
With Dell EqualLogic peer architecture, storage arrays work together to share resources,
distribute load, and optimize performance. In a similar manner, a grid infrastructure seeks to
provide building blocks that can grow incrementally to meet the needs of the datacenter. A Dell
EqualLogic iSCSI SAN can be set up quickly and will grow online storage seamlessly as more
capacity is needed. Many arduous setup tasks common with traditional storage products are
eliminated with a Dell EqualLogic iSCSI. Dell EqualLogic’s linear performance improvements
mean that capacity may be increased whenever the business mandates more storage as a
requirement.
Dell EqualLogic improves Oracle database performance and high availability by automatically
performing load balancing across multiple storage resources. Each array is designed for high
availability including hot-swappable components, multiple RAID types, and hot spare disks. For
more information on Dell EqualLogic’s complementary performance when used in conjunction
with Oracle ASM, review the white papers located at http://www.dell.com/oracle.
Additionally, software built into every member allows administrators to create consistent local
and remote copies of the database for test, development, and recovery. Included in each array
are advanced data protection features such as Auto Replication and Auto-Snapshot Manager.
Dell EqualLogic storage allows administrators to meet growing capacity demands by adding
storage without database downtime.
15
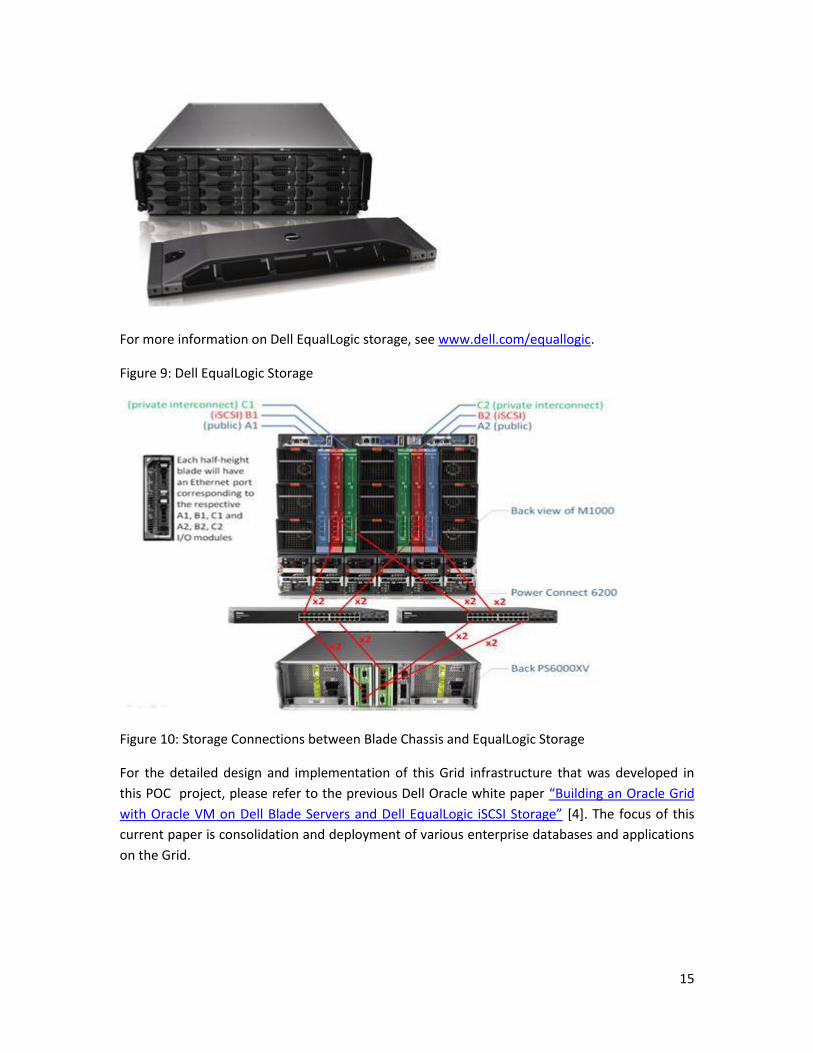
For more information on Dell EqualLogic storage, see www.dell.com/equallogic.
Figure 9: Dell EqualLogic Storage
Figure 10: Storage Connections between Blade Chassis and EqualLogic Storage
For the detailed design and implementation of this Grid infrastructure that was developed in
this POC project, please refer to the previous Dell Oracle white paper “Building an Oracle Grid
with Oracle VM on Dell Blade Servers and Dell EqualLogic iSCSI Storage” [4]. The focus of this
current paper is consolidation and deployment of various enterprise databases and applications
on the Grid.

16
Consolidate enterprise applications on the Grid: a general guideline
The Grid provides a pre-built infrastructure which consolidates several multi-tier applications.
The following options are available for deploying applications on the shared Grid infrastructure:
High transaction volume database tier can be deployed in the physical Grid to take
advantage of the HA and scalability of Oracle 11g RAC database.
Application tier, or middle tier, can be deployed in VMs on the virtual Grid. By having
the VM dedicated to the application tier while multiple VMs run on the same physical
hardware, the virtual Grid provides server consolidation as well as operating system
isolation for the applications. Consequently, these applications are running on their own
operating system and will not affect any other VMs.
The virtual Grid also provides the multiple VMs to run development and test
environments which can be provisioned as needed. For example, by developing Oracle
11g RAC on VMs, the development and test environments can simulate the production
RAC database environment without actually having multiple physical servers for RAC.
The following information outlines the steps to implement these options. In Section IV, we will
use the deployment of Oracle E-Business Suite on the Grid as an example to show the detailed
steps.
Deploy applications and middleware on the virtual Grid
Create a guest VM using the Oracle Enterprise Linux 5.2 template
Deploy application on the guest VM
Build the VM template of the VM
Create new guest VMs based on the VM template
Deploy database service on the physical Grid
Provision adequate size of storage volume from SAN
Make the volume accessible to all the physical Grid nodes
Create the ASM disk group
Create database service on the ASM disk group
Create application database schema on the database
Establish the application database connections
Depending on the availability of an application’s VM templates or VM images, an administrator
has several options to deploy an application on the virtual Grid.
Deploy an application based on pre-built application templates
Register the pre-built application template
Create guest VMs based on the template

17
Customize the guest VM and establish application environment
Build the VM templates of the application
Deploy applications without pre-built application templates
Create the guest VM using an OS VM template
Deploy the applications/middleware/database on VMs
Create VM templates for the applications Deploy applications by importing VM images
Copy the VM image files to /OVS/running pool Import the image files to the VM server pool
Oracle E-Business Suite R12 on the Grid: architecture design
Starting with this section, we will examine how to implement Oracle E-Business suite R12 on this pre-built Grid infrastructure. The scope of the POC involved two different deployments of Oracle E-Business suite on the Grid: production-oriented large deployment on Oracle RAC/VMs and the development/test-oriented small deployment on VMs.
Production-oriented large deployment of Oracle EBS R12 Suite on Oracle RAC/VMs
This option targets a large production Oracle E-Business suite deployment. The database
layer resides in the physical Grid to take advantage of the HA and scalability of the
physical Oracle RAC infrastructure, while the application layer resides on the virtual Grid
to take advantage of the benefits of the VM technology:
Create application tier nodes on the pre-built virtual Grid o Three application tier nodes on three VMs on the virtual Grid o Operating System: Oracle Enterprise Linux 5.2 64-bit o Virtual CPU: 2, Virtual Memory: 2GB, Virtual disk: 13GB for OS disk and
instance_top, 60GB for the shared APPL_TOP for first node o Oracle E-Business suite R12 12.0.0.4 with patches o The shared APPL_TOP and flexible to add more VMs for application
nodes
Database tier on the physical Grid o Use pre-built 8-node 11g RAC infrastructure o Allocate 2-node Oracle RAC EBS database, expansion to more nodes o ASM instances provide the storage virtualization o Oracle EBS application nodes on virtual Grid connect the database
services on physical Grid 150GB data volume allocated on Dell
EqualLogic SAN storage
Scalability of the EBS suite o Add more application nodes by creating VMs using the application
template o Expand the database tier to additional RAC nodes

18
Oracle E Business Suite R12 Development/Test Instance on the Virtual Grid
In this configuration, both application and database tier nodes run on the VMs:
Reduce the physical servers for Development/Test EBS instances
OS: Oracle Enterprise Linux 5.2 64-bit o Virtual CPU: 2, Virtual Memory: 2GB o Virtual disk: Database: 13GB for OS disk, 60GB for database files,
Applications: 13GB for OS disk, 40GB for Application files
Oracle E-Business suite R12 12.0.0.4 with patches
Create application node template and database node template
Deploy additional EBS based on the application/database templates
The following figure shows the architecture of two deployment options of Oracle E-Business
Suite on the Grid:
Figure 11: Deployment of Oracle E-Business Suite on the Grid Infrastructure
Section III – Oracle E-Business Suite R12 Implementation on RAC and
VM
In this section, we will explore the detailed steps to implement Oracle E-Business Suite R12 on
the Grid infrastructure. In the last section, we identified the two deployment options of Oracle
E-Business Suite on the Grid. We will first discuss large production deployment on Oracle RAC

19
and VM, and in the next section, we will discuss the small deployment of a development/test
environment on VM.
Building an Oracle EBS system on an Oracle RAC database and VM infrastructure is a
complicated and comprehensive process. The implementation is based on a pre-configured
Oracle Grid infrastructure that comprises an 8-node Oracle 11g RAC as the physical grid and VM
server pools with three VM servers as the virtual grid. The flow chart in Figure 12 shows a
general process for the major steps in the implementation from a high-level perspective. After
preparing two guest VMs on the physical grid as the application tier nodes and picking the first
Oracle RAC node of the physical grid as the database tier node, the EBS R12 initial installation
can be conducted to lay out the first EBS deployment. Then, we need to upgrade this EBS
database from 10g to 11g. To take advantage of the Oracle 11g RAC infrastructure, this EBS
database needs to be migrated to the RAC/ASM database. As a final step, the applications
running on two guest VMs need to be reconfigured to adapt the Oracle 11g RAC database
configuration. This environment can then be increased in scale by adding more application and
database nodes to the system.
Figure 12: Implementation of Oracle EBS R12 on RAC/VMs
Prepare the VMs on virtual Grid for EBS application nodes
Create VMs for application tier
In the first step, we created two VMs for the Oracle application tier on the virtual Grid using the
Oracle VM OEL 5.2 64-bit VM template. The Oracle template was downloaded from Oracle and
used to create the VMs. The following screen shots represent the process to create the VMs for

20
the application tier using the OEL 5.2 64-bit VM template using the Enterprise Manager VM
management pack.
Begin by completing the information and specifications requested as it pertains to the VM on
the following “Create Guest Virtual Machines” configuration form as shown in Figure 13.
Figure 13: Guest VM Creation page
The VM management pack software creates two VMs (Figure 14) apps1 (host name ebsapps1)
and apps2 (hostname ebsapp2), each of which ran on kblade1 and kblade2 VM server,
respectively, with 2GB memory and 2 CPUs assigned.

21
Figure 14: Adding disk storage to the VMs
We then specified additional virtual disk, apptops, to the first VM ebsapps1 as the shared disk
(Figure 15 below). This 60GB disk will be used as the shared APPL_TOP for all the application tier
nodes by NFS mounted to all other application nodes.

22
Figure 15: Configure file systems on the application tier nodes
The second step is to configure the file systems on the application tier node 1(ebsapp1) on the
virtual disks (Figure 15 above):
The System disk is the virtual device /dev/xvda1 for the guest VM OS.
The apptops disk is the virtual disk /dev/xvdb1 for the shared applications file system.
It is mounted as the local disk for the shared APPL_TOP on the application tier node1,
and NFS is mounted on all other application tier nodes.
Prepare other configurations for the Oracle E-Business Suite Fresh Install
The tasks include configuring OS kernel parameters, loading the required packages and
software, and creating operating system users for Oracle E-business Suite R12 installation. Refer
to [1] for detailed requirements.
Prepare 11g RAC node 1 on Physical Grid for EBS Fresh Install
Oracle 11g RAC node 1 file system structure
As shown in Figure 16 below, each node on the physical Grid has the 11g RAC database
infrastructure that includes:
11g clusterware: /crs; Oracle 11g ASM home: /opt/product/11.1.0/asm; Oracle 11g RAC
home: /opt/oracle/11.1.0/db_1; Enterprise Manager Agent home: /opt/oracle/product/agen10g
23
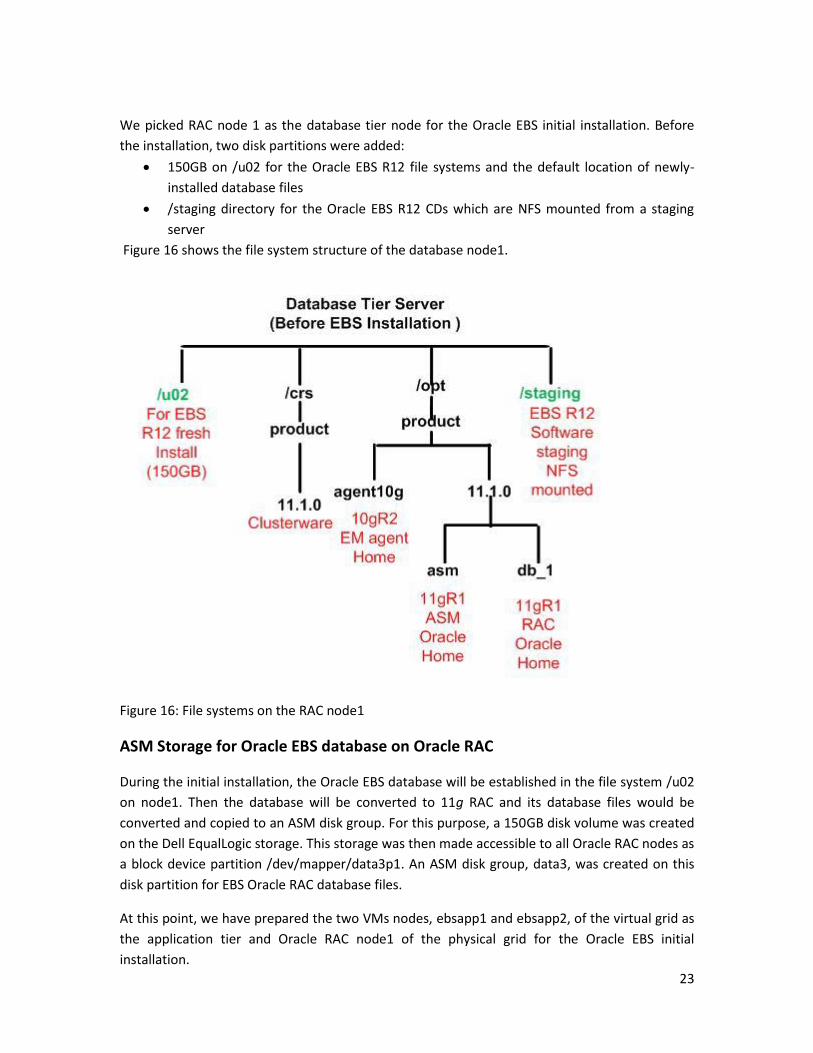
We picked RAC node 1 as the database tier node for the Oracle EBS initial installation. Before
the installation, two disk partitions were added:
150GB on /u02 for the Oracle EBS R12 file systems and the default location of newly-
installed database files
/staging directory for the Oracle EBS R12 CDs which are NFS mounted from a staging
server
Figure 16 shows the file system structure of the database node1.
Figure 16: File systems on the RAC node1
ASM Storage for Oracle EBS database on Oracle RAC
During the initial installation, the Oracle EBS database will be established in the file system /u02
on node1. Then the database will be converted to 11g RAC and its database files would be
converted and copied to an ASM disk group. For this purpose, a 150GB disk volume was created
on the Dell EqualLogic storage. This storage was then made accessible to all Oracle RAC nodes as
a block device partition /dev/mapper/data3p1. An ASM disk group, data3, was created on this
disk partition for EBS Oracle RAC database files.
At this point, we have prepared the two VMs nodes, ebsapp1 and ebsapp2, of the virtual grid as
the application tier and Oracle RAC node1 of the physical grid for the Oracle EBS initial
installation.

24
Oracle EBS R12 Fresh Install
Set up the installation staging area
All of the downloaded software files should be copied to a staging directory and unzipped to the
following structures on the staging file systems. The unzipped files are represented as shown in
Figure 17 below.
oracle@kblade1 R12]$ ls -ltr /staging/staging/R12/ drwxr-xr-x 7 e a 4096 Jul 24 16:58 startCD drwxr-xr-x 11 e a 4096 Jul 24 19:02 oraApps drwxr-xr-x 7 e a 4096 Jul 24 19:13 oraDB drwxr-xr-x 5 e a 4096 Jul 24 19:06 oraAS drwxr-xr-x 50 e a 4096 Jul 24 18:48 oraAppDB drwxr-xr-x 1 e a 4816 Jul 24 19:06 Patches drwxr-xr-x 6 e a 4096 Jul 24 20:50 examples
Figure 17: Files unzipped to staging directory
Fresh Install
After the installation staging area is set up and the xClient display is set, the installation with
Rapid Install can be started from the startCD directory on the database tier as the first step.
oracle@kblade1 R12]$ export DISPLAY=xx.xx.xxx.xxx:0.0
oracle@kblade1 R12]$ cd /staging/staging/R12/startCD/Disk1/rapidwiz
oracle@kblade1 R12]$ ./rapidwiz
Next, follow the steps from the Rapid Install prompts and define all of the configuration details
for both database and application servers. The Rapid Install creates a configuration file which
will be copied and used for the installation on the application tier. In this implementation, we
installed a Vision Demo instance with the database tier on node 1 of the 8-node RAC physical
grid system and 2-node application tier on the Oracle VM with the shared APPL_TOP. The
following screen shots (Figures 18a and 18b) show the detailed configuration information on the
database and application nodes.

25
Figure 18a: Database Node Configuration
Figure 18b: Primary Application Node Configuration
At this point, ensure that the Post-Install Tests (Database Availability and Configuration Upload)
are passed (Figure 19). If there are any errors or warnings, repair the problems and then restart
the Rapid Install.

26
Figure 19: Post-Install Checks
After the installation is complete on the database tier, the configuration file is copied to node 1
of the application tier. In the next step, start the Rapid Install from the staging area where the
configuration file was created on the database node.
Figure 20: Configuration Choice

27
Make sure all of the Pre-Install Checks (Port Availability, Database Install Check, File Systems, Host/Domain, OS User and Group Check, Port Uniqueness, and File Space) and Post-Install Tests (Database Availability, DBC File, Help Page, JSP, Environment File, HTTP, Virtual Directory, and Login Page) are all passed as shown in Figures 21a and 21b.
Figure 21a: Pre-Install Checks: Validate System Configuration
Figure 21b: Post-Install Check: Validate System Configuration
After the Rapid Install is finished, a complete workable Oracle EBS R12 system with a single-node 10gR2 database and a single-node application tier is created and ready to use. The next tasks are to upgrade the database to 11g, convert the database to RAC with ASM, configure the shared APPL_TOP, and add more nodes to the application tier.

28
Figure 22: The Shared APPL_TOP and Adding New Node to the Application Tier
First we need to prepare the existing node by running adprecclone.pl and copying the context file to the new node: [applmgr@ebsapp1 scripts]$ cd $INST_TOP/admin/scripts [applmgr@ebsapp1 scripts]$ perl ./adpreclone.pl appsTier Next, configure the new node to be added by running the following scripts:
Run adclonectx.pl to create a new context file for the new node to be added to the
multi-node system. Run the autoconfig utility to generate the new Instance Home for
this node and update the required tables in the database.
[applmgr@ebsapp2 bin]$ cd /apps/apps/apps_st/comn/clone/bin
[applmgr@ebsapp2 bin]$ perl adclonectx.pl addnode contextfile=/u01/VISD_ebsapp1.xml
[applmgr@ebsapp2 bin]$ cd /apps/apps/apps_st/appl/ad/12.0.0/bin
[applmgr@ebsapp2 bin]$ perl /apps/apps/apps_st/appl/ad/12.0.0/bin/adconfig.pl
contextfile=/u01/inst/apps/VISD_ebsapp2/appl/admin/VISD_ebsapp2.xml
The following screen shot (Figure 23 below) shows that the second node on the application tier
was added with the shared APPL_TOP with node 1.

29
Figure 23: Addition of the second node on the Application Tier
Oracle EBS 11g Database upgrade
The database created as a result of the new install is an Oracle 10gR2 version running on a single
node. To convert the database to the Oracle 11g RAC system, we need to upgrade it to Oracle
11g first. There are pre-upgrade, upgrade, and post-upgrade steps in this process.
Pre-Upgrade
The following are the detailed steps for the pre-upgrade process:
Shutdown the application server processes and database listener.
Install the Example CD in the 11g Oracle Home which is required for Oracle EBS R12.
Apply the following Interoperability database patches for Oracle EBS R12: 6598432,
6815733, 6991626, and 7253531.
Collect Pre-Upgrade Information by running $ORACLE_HOME/rdbms/admin/utlu111i.sql
and then review the report to make sure the database is ready for upgrade.
Run the $ORACLE_HOME/nls/data/old/cr9idata.pl script to create the
$ORACLE_HOME/nls/data/9idata directory.

30
The output of the utlu111s.sql script is shown below:
SQL> spool utlu111s.log
SQL> @?/rdbms/admin/utlu111s.sql
Oracle Database 11.1 Post-Upgrade Status Tool 09-03-2009 18:41:12
Component Status Version HH:MM:SS
Oracle Server
ORA-01408: such column list already indexed VALID 11.1.0.7.0 00:26:14
JServer JAVA Virtual Machine VALID 11.1.0.7.0 00:13:08
Oracle Real Application Clusters INVALID 11.1.0.7.0 00:00:01
OLAP Analytic Workspace VALID 11.1.0.7.0 00:00:16
OLAP Catalog VALID 11.1.0.7.0 00:01:07
Oracle OLAP API VALID 11.1.0.7.0 00:00:31
Oracle XDK VALID 11.1.0.7.0 00:00:30
Oracle Text VALID 11.1.0.7.0 00:01:18
Oracle XML Database VALID 11.1.0.7.0 01:20:42
Oracle Database Java Packages VALID 11.1.0.7.0 00:00:26
Oracle Multimedia VALID 11.1.0.7.0 00:03:32
Spatial VALID 11.1.0.7.0 00:04:57
Gathering Statistics 00:11:06
Total Upgrade Time: 02:23:59
PL/SQL procedure successfully completed.
NOTE: The only status shown as INVALID is for the Oracle Real Application Clusters since the
database is still running on a non-RAC single node.
Check for the integrity of the source database prior to starting the upgrade by
downloading and running the dbupgdiag.sql script, and then validating and resolving
any invalid objects in sys and system.
Check for TIMESTAMP WITH TIMEZONE Data type:
SQL> select * from v$timezone_file;
FILENAME VERSION
------------ ----------
timezlrg.dat 4
Upgrade
The following steps are necessary for database upgrade:
Startup database in upgrade mode.
Run $ORACLE_HOME/rdbms/admin/catupgrd.sql.
Restart the database in normal mode and run the post-upgrade script catuppst.sql.
Recompile all invalid objects with the utlrp.sql.
Run the utlu111s.sql script for upgrade verification.

31
The output of the utlu111s.sql script is shown below:
SQL> spool utlu111s.log
SQL> @?/rdbms/admin/utlu111s.sql
Oracle Database 11.1 Post-Upgrade Status Tool 09-03-2009 18:41:12
Component Status Version HH:MM:SS
Oracle Server
ORA-01408: such column list already indexed
VALID 11.1.0.7.0 00:26:14
JServer JAVA Virtual Machine VALID 11.1.0.7.0 00:13:08
Oracle Real Application Clusters INVALID 11.1.0.7.0 00:00:01
OLAP Analytic Workspace VALID 11.1.0.7.0 00:00:16
OLAP Catalog VALID 11.1.0.7.0 00:01:07
Oracle OLAP API VALID 11.1.0.7.0 00:00:31
Oracle XDK VALID 11.1.0.7.0 00:00:30
Oracle Text VALID 11.1.0.7.0 00:01:18
Oracle XML Database VALID 11.1.0.7.0 01:20:42
Oracle Database Java Packages VALID 11.1.0.7.0 00:00:26
Oracle Multimedia VALID 11.1.0.7.0 00:03:32
Spatial VALID 11.1.0.7.0 00:04:57
Gathering Statistics 00:11:06
Total Upgrade Time: 02:23:59
PL/SQL procedure successfully completed.
SQL> spool off
After the database upgrade has completed successfully, run the following post-upgrade steps:
Start the new listener in the 11g Oracle Home.
Copy the adgrants.sql script from the application tier $APPL_TOP/admin and run it as
sysdba in the Database node.
Grant create procedure privilege on CTXSTS.
Copy the adctxprv.sql script from the application tier $AD_TOP/patch/11g/sql and run it
as APPS with the following command:
$ sqlplus apps/<APPS password> @adctxprv.sql <SYSTEM password> CTXSYS
Validate the Workflow rule set.
On the Apps admin server node, run the wfaqupfix.sql script as APPLSYS with the
following command:
$ sqlplus <APPLSYS user>/<APPLSYS password> @wfaqupfix.sql <APPLSYS user>
<APPS user>
Gather statistics for sys schema.
Copy $APPL_TOP/admin/adstats.sql from the administration server node to the
database server, and run the script as sysdba in restricted mode.
Re-create all custom database links.
After the upgrade is complete, implement autoconfig and run as follows:
Apply patch 6636108 on the application tier.
Run the admkappsutil.pl utility to create the appsutil.zip file in the
<INST_TOP>/admin/out directory.
32
Copy the appsutil.zip file from application tier and unzip it to 11g $ORACLE_HOME.
Build the new context file for the database tier using:
$ORACLE_HOME/appsutil/bin/adbldxml.pl tier=db
Run autoconfig on the application and database tiers.
Re-create grants and synonyms for APPS with adadmin.
Now the application services can be started. Run adpreclone on both the application
and database tiers.
Converting the Oracle EBS 11g Database to RAC
Use the Oracle rconfig utility to convert a non-RAC database to RAC. The following are the
detailed steps:
Prepare ConvertToRAC.xml:
A sample xml file is provided by Oracle with all the entries and formats used with the
rconfig utility. This file is located at $ORACLE_HOME/assistants/rconfig/sampleXMLs.
This file can be edited with all appropriate values. The following is a list of parameters
that should be changed/added:
Convert verify=“ONLY” || “YES” || "NO"
It is recommended that you use verify=ONLY the first time, which will verify if the
database can be converted to RAC successfully or not. If it passes all the verification,
then you may change it to verify=NO to run it the second time, which will actually
process all the conversion steps.
SourceDBHome: /opt/oracle/product/11.1.0/db_1
TargetDBHome: /opt/oracle/product/11.1.0/db_1
o The source and target DB Home can be the same if the standalone database is
running in the same target RAC database Oracle Home.
SourceDBInfo SID: VISD
RAC nodes: kblade1, kblade2 (all RAC database nodes; we use 2-nodes here):
o Instance Prefix: VISD;
o SharedStorage type: ASM
o TargetDatabaseArea: +DATA3
Configure an spfile in ASM and start up the database instance:
Create spfile =’+DATA3/spfilevisd.ora’ from pfile;
Link the init<SID>.ora to the spfile
Start up the database instance with the spfile
Use netca to create local and remote listeners

33
Run rconfig:
o $ORACLE_HOME/bin/rconfig ConvertToRAC.XML
o The rconfig utility will migrate the database to ASM storage, create DB
instances, configure listener and NetServices, configure/register CRS, and start
the instances on all nodes included in the conversion (kblade1 and kblade2).
The following screen shot (Figure 24) shows the Parameter XML file used for rconfig in our environment:
Figure 24: Parameter XML file
After the database is converted to an Oracle RAC, autoconfig needs to be enabled on the database tier with the following steps:
o As the APPS user, de-register the current configuration by running the following command on the primary node: SQL> exec fnd_conc_clone.setup_clean;
o Shutdown the application services and listener.

34
o From the 11gORACLE_HOME/appsutil/bin directory, create an instance-specific XML context file by executing the following command with node 1 information: $ adbldxml.pl tier=db appsuser=apps appspass=<APPSpwd>
o Rename $ORACLE_HOME/dbs/init<instance_name>.ora to allow autoconfig to generate a new init file with RAC-specific parameters.
o Execute the autoconfig script from the $ORACLE_HOME/appsutil/bin directory: $ perl adconfig.pl
o Rename the init file back to init<instance_name>.ora, which points to the spfile in ASM with all the RAC-specific parameters.
o Copy $ORACLE_HOME/appsutil from node 1 to node 2. o Execute the autoconfig script from the $ORACLE_HOME/appsutil/bin directory
with the new context file for node 2: $ adbldxml.pl tier=db appsuser=apps appspass=<APPSpwd>
o From the 11gORACLE_HOME/appsutil/bin directory, create an instance-specific XML context file by executing the command with node 2 information.
o Run autoconfig again on node 1 to update the database and configuration with node 2 information.
Register the TNS_ADMIN with CRS o As autoconfig creates the listener and tnsnames files in a context directory and
not in the $ORACLE_HOME/network/admin directory, the new TNS_ADMIN path must be updated in CRS with the commands for both nodes 1 and 2 after running autoconfig:
$ srvctl setenv nodeapps -n <node > -t "TNS_ADMIN= <Full Path of ORACLE HOME>/network/admin/<context directory>" $ srvctl setenv instance -d <database> -i <instance> -t "TNS_ADMIN= <Full Path of ORACLE HOME>/network/admin/<context directory>"
Run autoconfig on both nodes, then on node 1 again to update the database and configuration with the node 2 information.
Restart the database instances and listeners on both nodes.
Establish the Application Environment for Oracle RAC: o Run adconfig on all application nodes:
Set jdbc_url in the context_file to the instance of RAC Node1 Prepare tnsnames.ora to connect to RAC Node 1 Execute autoconfig:
$AD_TOP/bin/adconfig.sh context_file=<context_name>.xml Check tnsnames.ora in $INST_TOP/ora/10.1.2 and 10.1.3
VISD_BALANCE=(DESCRIPTION= (ADDRESS_LIST=
(LOAD_BALANCE=YES) (FAILOVER=YES) (ADDRESS=(PROTOCOL=tcp)(HOST=kblade1-vip.us.dell.com)(PORT=1521)) (ADDRESS=(PROTOCOL=tcp)(HOST=kblade2-vip.us.dell.com)(PORT=1521)) (CONNECT_DATA=(SERVICE_NAME=VISD)))

35
o Verify VISD.dbc file in $FND_SECURE APPS_JDBC_URL=jdbc\:oracle\:thin\:@(DESCRIPTION\=(ADDRESS_LIST\
= (LOAD_BALANCE\=YES)(FAILOVER\=YES) (ADDRESS\=(PROTOCOL\=tcp) (HOST\=kblade1-
vip.us.dell.com)(PORT\=1521))(ADDRESS\=(PROTOCOL\=tcp) (HOST\=kblade2-vip.us.dell.com)
(PORT\=1521)))(CONNECT_DATA\=(SERVICE_NAME\=VISD)))
Establish the Application Environment for Oracle RAC: o Configure Load Balancing
Edit context_file and set: <TWO_TASK oa_var="s_tools_twotask" osd="unix">VISD_BALANCE</TWO_TASK> /*for Froms apps <TWO_TASK oa_var="s_weboh_twotask" osd="unix">VISD_BALANCE</TWO_TASK> /* for self service apps <jdbc_connect_alias oa_var="s_apps_jdbc_connect_alias">VISD_BALANCE</jdbc_connect_alias> /* for self service apps
Run autoconfig $AD_TOP/adconfig.sh Profile option “Applications Database ID” to set the dbc file at
$FND_SECURE visd.dbc file: apps_jdbc_url session: APPS_JDBC_URL=jdbc\:oracle\:thin\:@(DESCRIPTION\=(ADDRESS_LIST\(LOAD_BALANCE\=YES)(FAILOVER\=YES)(ADDRESS\=(PROTOCOL\=tcp) (HOST\=kblade1vip.us.dell.com)(PORT\=1521))(ADDRESS\=(PROTOCOL\=tcp) (HOST\=kblade2-vip.us.dell.com)(PORT\=1521)))(CONNECT_DATA\= (SERVICE_NAME\=VISD)))
The screen shot below (Figure 25) shows that the application system is running on a 2-node Oracle RAC database (kblade1 and kblade2) and two shared APPL_TOP application nodes (ebsapp1 and ebsapp2).

36
Figure 25: Application systems on a 2-node Oracle RAC database
Expanding the database and application nodes to scale out the Oracle
EBS system
One of the advantages of using Oracle RAC and the shared APPL_TOP is that it’s easy to expand the systems on either the application or database tier. Oracle RAC database systems provide the benefits of high availability, scalability, and load balancing. If more loads are required on the database tier, additional nodes can be added to the existing RAC system. The following are the detailed steps to expand the EBS database to an additional node on the Oracle RAC:
Copy and clone the Oracle Home from the existing node to the new node.
Enable autoconfig on the new node to be added.
Execute the autoconfig script from the $ORACLE_HOME/appsutil/bin directory with the context file for the new node: adbldxml.pl tier=db appsuser=apps appspass=<APPSpwd>
From the 11gORACLE_HOME/appsutil/bin directory, create an instance-specific XML context file by executing the command with the new node information.
Run the autoconfig script again on node 1 to update the database and configuration with node 2 information.
Register the TNS_ADMIN with CRS.

37
As autoconfig creates the listener and tnsnames files in a context directory and not in the $ORACLE_HOME/network/admin directory, the new TNS_ADMIN path must be updated in CRS with the commands for the new node after running autoconfig: srvctl setenv nodeapps -n <node > -t "TNS_ADMIN= <Full Path of ORACLE HOME>/network/admin/<context directory>" srvctl setenv instance -d <database> -i <instance> -t "TNS_ADMIN= <Full Path of ORACLE HOME>/network/admin/<context directory>"
Run autoconfig on all database nodes, then on all the nodes again except for the last node to update the database and configuration with the new node information.
On the application tier, the shared APPL_TOP architecture also provides high availability, scalability, and load balancing. With the shared APPL_TOP, the administrator tasks need to be carried out only once on any node, the disk space requirement is greatly reduced, and by enabling the use of distributed AD, it improves the efficiency of patch application, thereby reducing the downtime. New nodes can be easily added to an existing system. Next, we will describe the steps to add a new VM node on the application tier.
Scale Out Apps Tier: adding an Application tier node To scale out the application tier, we can add a VM as the application node to the application
tier. The steps include:
1. Create VM from an EBS application node template from the VM of application node 1:
Create a VM template from the application node: Go to the Grid control virtual Central, click save Guest VM as template by selecting ebsapp1.
Create a guest VM ebsapp1 as the new application node from the application node template, as shown in the following screen shots (Figures 26 and 27):
Figure 26: Creating Guest Virtual Machines

38
A new guest VM ebsapp1 with hostname ebsapp3 is created as a new application node (Figure 27):
Figure 27: New application node 2. Adding the new application node ebsapp3 is the same as the steps for adding the second node showed above. Here are the steps again:
Run the Apps clone process for instance_top and join the shared APPL_TOP.
Prepare the existing node.
Configure the new node to be added: o Run adclonectx.pl using the existing node context file to create a new context
file for the new node to be added to the multi-node system. o Run the autoconfig utility to generate the new Instance Home for this node and
update the required tables in the database.

39
Section IV – Implement an Oracle EBS R12 Development/Test
Instance on the Virtual Grid
This session will discuss how to deploy the entire Oracle EBS R12 suite with its database node
and application node on the Virtual Grid. By having the initial deployment of EBS suite on the
VMs, an administrator can create VM templates for the entire Oracle EBS R12 deployment that
includes the database node template and application node template. These templates can be
used to deploy new Oracle EBS R12 environments in an automated way. Template-based
deployment has an advantage over traditional cloning methods since templates include the
configurations for the entire application and/or database nodes, network, applications
/database file system, and database files.
Deploy Oracle EBS R12 on VMs
The implementation started with creating guest VMs for the application node and the database
nodes. The step is very similar to creating VMs for application nodes as described in the last
session. We used the Oracle OEL 5.2 64-bit VM template downloaded from Oracle to create two
guest VMs: ebs2app2 (OS hostname ebs2app1) for the application node and ebs2db1 (hostname
ebs2db1) for the database node. The follow screen shot (Figure 28) shows two guest VMs
created on the virtual gird.
Figure 28: Virtual Server guests on the virtual grid The second step is to prepare the storage, network, RPMs, and OS kernel configuration on both nodes according to the requirement of the Oracle EBS R12 fresh install. Refer to [1] for these requirements. After the VMs for the application and database tiers are ready, the installation of the EBS is the
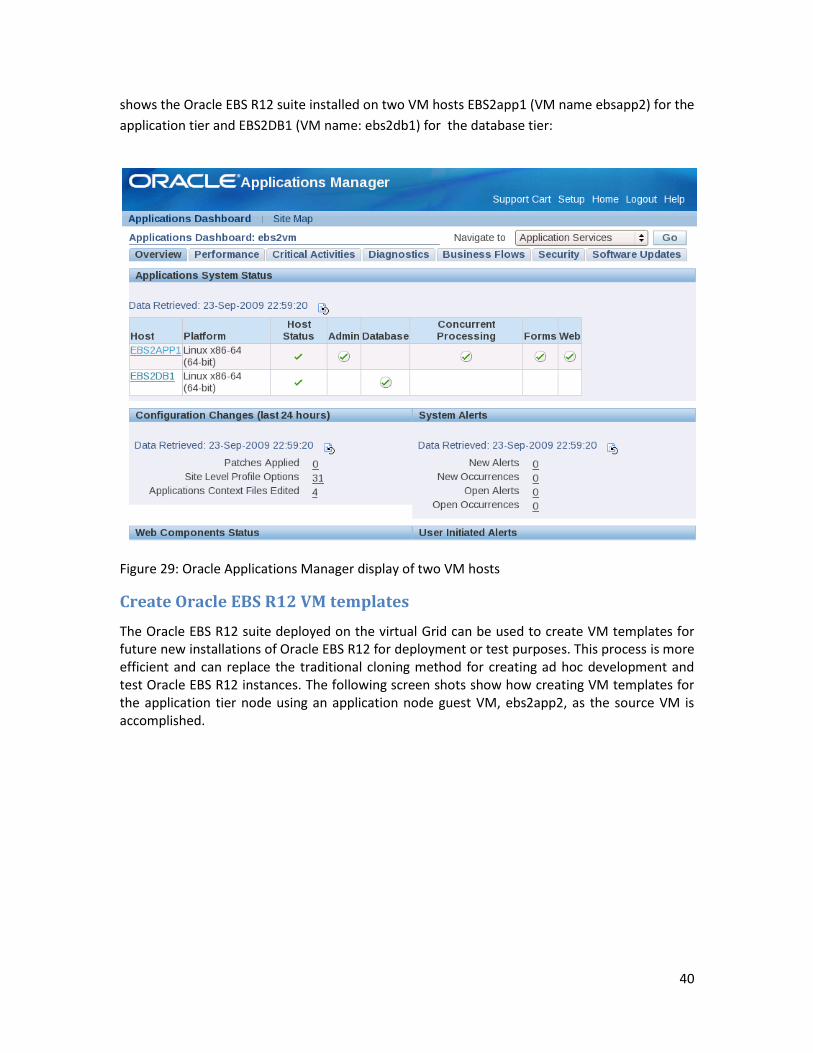
same as was accomplished on the physical grid systems. The following screen shot (Figure 29)
40
shows the Oracle EBS R12 suite installed on two VM hosts EBS2app1 (VM name ebsapp2) for the
application tier and EBS2DB1 (VM name: ebs2db1) for the database tier:
Figure 29: Oracle Applications Manager display of two VM hosts
Create Oracle EBS R12 VM templates
The Oracle EBS R12 suite deployed on the virtual Grid can be used to create VM templates for future new installations of Oracle EBS R12 for deployment or test purposes. This process is more efficient and can replace the traditional cloning method for creating ad hoc development and test Oracle EBS R12 instances. The following screen shots show how creating VM templates for the application tier node using an application node guest VM, ebs2app2, as the source VM is accomplished.

41
Figure 30: Creating a component virtual machine
Figure 31: Review of a created virtual machine component The template of the database tier was also created in the same process by using the VM of a database tier node, VM ebsdb1, as the source.
Create new Oracle E-Business Suite instance from the templates
After the VM templates of an existing Oracle E-Business Suite environment are created, these
templates can be used to create the application tier node VM and the database tier node VM of
a new Oracle EBS environment. In phase two of this on-going project, we plan to develop a
process with the related best practices that automates this VM template-based method for new
Oracle EBS environment deployment.

42
Conclusion
In this paper, we have explored some of the best practices necessary to implement an Oracle E-
Business suite on Oracle RAC in an Oracle VM environment as was accomplished in the Dell
Oracle Grid POC project:
Dell Oracle Grid POC Project: Design of a pre-built Grid system with Oracle RAC and
Oracle VM on Dell commodity hardware and storage to consolidate multiple enterprise
applications and databases
Implementing a large production-oriented Oracle E-Business Suite with Oracle RAC and
Oracle VM on the Grid
Deployment of the entire Oracle E-Business Suite on the Virtual Grid for development
and test, and to create the VM templates for the application tier node and the database
tier node
In phase two of this project, we are planning to work on the following configurations:
The best practices and the automated process of deployment of a new Oracle EBS environment on the virtualized environment based on existing Oracle EBS VM templates
Oracle EBS with both the application tier and the 11g RAC database tier on VMs Some of the contents of this white paper have been previously presented in the following Oracle OpenWorld 2009 presentations:
ID# S310132, “Oracle E-Business Suite on Oracle RAC and Oracle VM: Architecture and Implementation,” Kai Yu and John Tao
ID#: S308185, “Provisioning Oracle RAC in a Virtualized Environment, Using Oracle”
“Enterprise Manager,” Kai Yu and Rajat Nigam
ID#: S308185, “Building an Oracle Grid with Oracle VM on Blade Servers and iSCSI Storage,” Kai Yu and David Mar
References
1 Oracle Applications Installation Guide: Using Rapid Install Release 12, Part Number B31295-
07
2 Oracle Enterprise Manager Concepts 10g Release 5 10.2.0.5, Part Number B31949-10
3 “Deploying Oracle VM Release 2.1 on Dell PowerEdge Servers and Dell/EMC Storage,”
Dell White Paper
4 “Building an Oracle Grid with Oracle VM on Dell Blade Servers and EqualLogic iSCSI Storage,”
Kai Yu, David Mar, Oracle OpenWorld 2009 Presentation Session #S308185 and Dell White
Paper
5 “Using Oracle VM With Oracle E-Business Suite Release 11i and Release 12,” Metalink #
465915.1

43
6 “Using Oracle 11g Release 1 (11.1.0.6) Real Application Clusters and Automatic Storage
Management With Oracle E-Business Suite Release 12,” Metalink # 783044.1
7 “Certified Software on Oracle VM,” Metalink # 464754.1
8 Oracle VM Server User’s Guide, Release 2.1 E-10898-03
9 “Oracle Real Applications Clusters (RAC) on Oracle VM,” Michael Timpanaro-Perrotta, Daniel
Dibbets, Oracle Corp, Technical Best Practices for Virtualization and RAC – Oracle RAC SIG
Web seminar
10 “Oracle Database in a Server Virtualization Environment,” Michael Timpanaro-Perrotta, Nitin
Vengurlekar, Carol Colrain, Daniel Dibbets, Oracle OpenWorld 2008 Presentation, session ID:
S300459