optional lab 5: im ple m e nt the o rd e r ap i · pdf filemulesoft api led connectivity...
TRANSCRIPT

MuleSoft API Led Connectivity Workshop Lab 8: Implement Order API
Optional Lab 5: Implement the Order API
Optional Lab 5: Implement the Order API Overview Step 1: Export the Order API RAML Step 2: Create a new Mule Project from the RAML Step 3: Implement Create Order Flow Step 4: Run the Mule app in Anypoint Studio Step 5: Deploy the Complete Order API to Cloudhub Summary
Overview In this lab, we will create the implementation of our Order API that will process requests to a SOAP Web Service. You will use Anypoint Studio to create a Mule application where there will be one flow for each method of each resource (i.e. GET orders). Additionally you will use APIKit (as part of your Mule application) to process REST requests, transform them to messages to be handled and processed by each flow.
MuleSoft Proprietary & Confidential 1/16

MuleSoft API Led Connectivity Workshop Lab 8: Implement Order API
The implementation will consist of a few steps 1. Export the Order API RAML from API Portal 2. Create a new Mule Project in Anypoint Studio from the Order API RAML 3. Run the Mule app from Anypoint Studio
Then we will test this new API using the API Console and a Mobile application. In this application we will create an Order.
Step 1: Export the Order API RAML In this step, we will use our API definition to create an implementation of our API. In the previous lab we exported the API definition.
1. If Anypoint Studio is not opened, start it from the desktop icon.
2. In the Workspace Launcher, use the workspace you used previously.
3. Click on the (X) to bring up Anypoint Exchange from Studio.
4. Look in the top right corner of the Anypoint Exchange dialog and verify you are logged in as
mythical-exchange-user. a. If you are not, log out b. Log in as mythical-exchange-user
5. Click on RAML under Show: in the filter pane.
6. Enter "Order System API" in the Search box.
7. Click Open Portal to display the API Portal
MuleSoft Proprietary & Confidential 2/16

MuleSoft API Led Connectivity Workshop Lab 8: Implement Order API
8. Click on Download API definition as .zip file and save it.
Step 2: Create a new Mule Project from the RAML In this step we will create a new Mule application in Anypoint Studio from the Order API RAML. This will be the implementation of our REST API.
1. From Anypoint Studio, select File > New > Mule Project to create a New Mule project. A Window will pop-up to define the details of this new application.
2. Give the project the name api-order
3. Select the Mule Server 3.8.1 EE Runtime.
4. Under APIkit Settings, check Add APIkit components. 5. Specify the zip file that you downloaded: <Dir>/Order_APIv2.2.zip 6. Click Open 7. Click Finish. This will create a skeleton project that implements your API.
Let’s explore what was automatically generated.
8. At the top of the diagram you will see a flow called api-order-main with six sub-flows, one for each method defined in the RAML.
MuleSoft Proprietary & Confidential 3/16

MuleSoft API Led Connectivity Workshop Lab 8: Implement Order API
The sub-flows above are defined by your API in the RAML file. Typically, there will be flows that look like this get:/resource, post:/resource, put:/resource, etc. Note that the name of the flow is very important for the APIkit router to be able to route the request to the appropriate flow - you don’t want to change these. When APIkit detects example data in the response of a method in the RAML it inserts a Set Payload Transformer into the flow which returns the static response specified by the example data reference.
NOTE: If you do not see the src/main/api folder with the api-order.raml files and corresponding JSON files (as shown in the screenshot above), the project generation was not successful. Try deleting/re-generating your project or alert your instructor to troubleshoot.
The static response returned by the auto-generated Set Payload Transformer allows you to to test the stub immediately after generation. Obviously these flows can be enhanced to provide more advanced mock services as well as evolve into the full API implementation.
MuleSoft Proprietary & Confidential 4/16

MuleSoft API Led Connectivity Workshop Lab 8: Implement Order API
9. To test the API, let’s run it within Studio first. Right click the application. (If you’ve done this on
the previous labs, feel free to skip this and move to Step 3)
10. Select Run As > Mule Application.
NOTE: Anypoint Studio deployed this application to an embedded Mule run-time. There is no need to deploy to a separate Mule server environment. The developer will be able to develop and test the application locally until it's ready to be deployed to a shared development or QA environment.
11. Test the application using the console. To maximize the console just double-click the APIKit
Console tab.
12. Click the POST tab to test the Create an Order method
13. In the URI Parameters, add a random userId, in this case “1001”
14. Scroll down below, you’ll see the request body. Click the POST button.
15. You should see the response below. Remember this is no longer a mocking service
MuleSoft Proprietary & Confidential 5/16

MuleSoft API Led Connectivity Workshop Lab 8: Implement Order API
responding. It is a live application deployed to the Mule run-time server. You just tested your end-to-end API running in your environment.
16. Go to the console tab and press the red button to stop the Mule run-time server.
MuleSoft Proprietary & Confidential 6/16

MuleSoft API Led Connectivity Workshop Lab 8: Implement Order API
Step 3: Implement Create Order Flow In this step we are going to implement the post:/user/{userId}/order flow. To create an order, we are going to need to
● Call the .NET SOAP Service to create the Order ● Transform the response to json format.
DOUBLE CHECK: Make sure you are modifying the post:/user/{userId}/order:api-config flow!
1. Remove Set Payload icon and the Property icon. To do that you just click on the icons and press
delete.
2. Let's add the Web Service Consumer to the flow. To do that go to the Mule Palette panel and type “web service” in the filter you should see an icon like in the picture above. Drag and drop the icon into the empty flow.
MuleSoft Proprietary & Confidential 7/16

MuleSoft API Led Connectivity Workshop Lab 8: Implement Order API
3. Double-Click on the Web Service Consumer icon to display its configuration panel.
4. Change its name to Create Order.
5. Let’s add a new connector configuration. Click on button on the Connector Configuration.
The configuration window will pop up.
6. In the WSDL Location field, paste the following WSDL definition, that contains the definitions of our .NET SOAP Service which is already deployed: http://services.mythicalcorp.com:86/OrderService.svc?wsdl
Tip: Press the Tab key in the WSDL location field in order for it to auto retrieve the data.
As you can see, the rest of the configuration populates automatically from the WSDL definition that contains the Service Name, Port, and Address, as well as the Operations.
MuleSoft Proprietary & Confidential 8/16

MuleSoft API Led Connectivity Workshop Lab 8: Implement Order API
7. Click OK.
8. Once the configuration was set, select Create Order from the list of operations back in the
basic settings section.
9. Click the Save button on the top right of the Properties Panel . Now our configuration to create the order is complete, but there is one thing missing, we need to format the message coming in and out of the Create Order icon. To do this, we need to add 2 DataWeave Elements, one before and one after the Web Service Consumer.
10. Type “dataweave” in the Mule Palette panel
11. Drag-&-drop a Transform Message before Create Order Web Service
12. Drag-&-drop and one after the Create Order icon.
13. Double click the first Transform Message element to open the properties.
14. Notice that we already have the Metadata defined so we know what coming in and out of these
elements
MuleSoft Proprietary & Confidential 9/16

MuleSoft API Led Connectivity Workshop Lab 8: Implement Order API
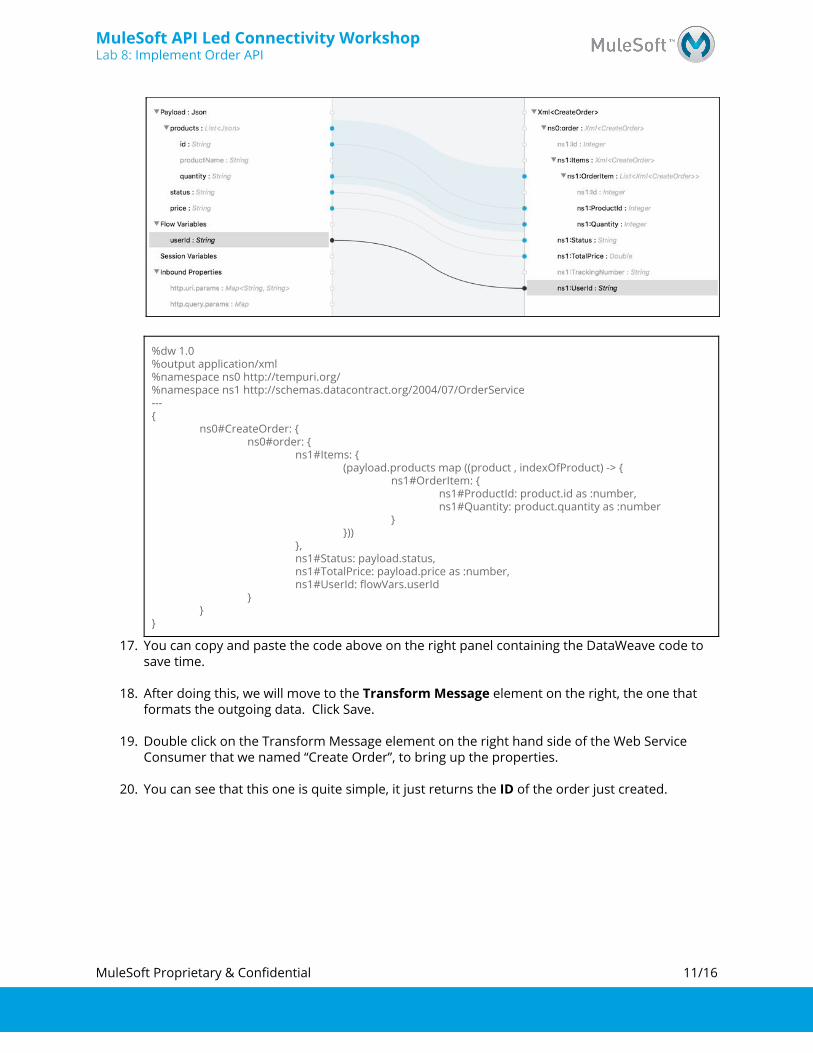
15. The idea is to map each of the incoming items with the ones that our .NET SOAP Service is expecting. For example, match the userId from the left, to the userId on the right:
16. After matching all the corresponding items, the dataweave code on the right should look like
this: Remember not to match the “ ID” fields on the right (the ones that are “id” alone), these are auto-generated for each order created. E.g: ns1:Id : Integer
MuleSoft Proprietary & Confidential 10/16
MuleSoft API Led Connectivity Workshop Lab 8: Implement Order API
%dw 1.0 %output application/xml %namespace ns0 http://tempuri.org/ %namespace ns1 http://schemas.datacontract.org/2004/07/OrderService --- {
ns0#CreateOrder: { ns0#order: {
ns1#Items: { (payload.products map ((product , indexOfProduct) -> {
ns1#OrderItem: { ns1#ProductId: product.id as :number, ns1#Quantity: product.quantity as :number
} }))
}, ns1#Status: payload.status, ns1#TotalPrice: payload.price as :number, ns1#UserId: flowVars.userId
} }
}
17. You can copy and paste the code above on the right panel containing the DataWeave code to save time.
18. After doing this, we will move to the Transform Message element on the right, the one that
formats the outgoing data. Click Save.
19. Double click on the Transform Message element on the right hand side of the Web Service Consumer that we named “Create Order”, to bring up the properties.
20. You can see that this one is quite simple, it just returns the ID of the order just created.
MuleSoft Proprietary & Confidential 11/16

MuleSoft API Led Connectivity Workshop Lab 8: Implement Order API
21. Match the CreateOrderResult on the left, with the Id on the right
22. After this, just click outside in the white canvas to save the changes, or click the save button at
the top right of the element panel.
Step 4: Run the Mule app in Anypoint Studio 1. Now that we have formatted our inbound and outbound messages, we can proceed to run the
application once again, but now actually working with a real already deployed .NET SOAP service, that inserts data into our Order Database.
2. To test the API, right click the application. 3. Select Debug As > Mule Application.
4. Go to the API Console, and click the POST button
MuleSoft Proprietary & Confidential 12/16

MuleSoft API Led Connectivity Workshop Lab 8: Implement Order API
5. Put some numeric User ID in the URI Parameters, generally no longer than 10 digits
6. Check that the body has data, and press POST
7. After you POST the body pre-filled with the example,
a. the Console send a message to the Mule Application, b. the Mule Application sends a request to the .NET SOAP Service (that we transformed
into XML with the Transform Message Element to adjust to the SOAP Service “language”),
c. the .NET SOAP Service creates an order in the DB with the information from the example, and then returns the created ID to the Mule Application (that we transformed into Json) so we can show, in this case: 24 (the number may differ)
MuleSoft Proprietary & Confidential 13/16

MuleSoft API Led Connectivity Workshop Lab 8: Implement Order API
MuleSoft Proprietary & Confidential 14/16

MuleSoft API Led Connectivity Workshop Lab 8: Implement Order API
Step 5: Deploy the Complete Order API to Cloudhub Since during the lab we didn't implement all the API methods, we have published a complete implementation of the Order API on Anypoint Exchange for you download and deploy to Cloudhub. Let's begin:
1. Click on the (X) to bring up Anypoint Exchange from Studio.
2. Look in the top right corner of the Anypoint Exchange dialog and verify you are logged in as
mythical-exchange-user. a. If you are not, log out b. Log in as mythical-exchange-user
3. Click on Templates under Show: in the filter pane.
4. Enter "Complete Order" in the Search box.
5. Click Open to download and Open the Complete Order System API project in Anypoint Studio.
6. This will create a new project called api-order-complete in Anypoint Studio.
Now that we have imported the API implementation, let’s deploy it to Cloudhub.
7. Right click on the project name -> Deploy to Anypoint Platform -> Cloud. 8. When the login popup opens, verify your credentials. If you are not logged in to your Anypoint
account log out and log in.
MuleSoft Proprietary & Confidential 15/16

MuleSoft API Led Connectivity Workshop Lab 8: Implement Order API
Specify the application (worker) configuration for our API. 9. On the application name put <<MyName-order-api>> . You should see a green check if the
name is available. If not, please add additional information to make it unique (ex. Your initials). a. An example would be matt-product-api.
10. Set the Runtime to 3.8.1 11. Set the Worker size to 0.1 vCore 12. Once the configuration is done, click on the Deploy Application button.
The deployment may take 3-4 minutes. In the interim you can browse the API Console at http://<<MyName-order-api>>.cloudhub.io/api/console . Now you have a fully functional Order API of your own and this concludes this step and the this lab.
Summary In this lab you demonstrated how you completed the following steps:
Step 1: Export the Order API RAML Step 2: Create a new Mule Project from the RAML Step 3: Implement Create Order Flow Step 4: Run the Mule app from Anypoint Studio Step 5: Upload the API to Cloudhub
In this lab, we
● used the RAML specification to define our API ● auto-generated a skeleton project to implement the API ● transform response messages using a graphic tool ● we consumed soap services using Web Service consumer component
This lab shows how APIkit quickly allows developers to import the API designed REST API (RAML and supporting artifacts) to enable MuleSoft flow development talk to a deployed .NET SOAP Service. The APIkit also deploys the interactive console with the MuleSoft flows. The lab shows the extent to which a developer can deploy an on-premise and interactive API from the design spec in RAML. Also, in a matter of minutes, we implemented a REST Service that can easily consume SOAP Services, in this case, created using C#.NET. It is important to note that the implementation of an API is a real Mule application and allowed us to test the end-to-end API. Building integration applications and exposing APIs do not require additional knowledge making it easy for Mule developers to work on both integrations and APIs. See the APIkit doc for more information. See the Dataweave doc for more information See the WebService Consumer doc for more information
MuleSoft Proprietary & Confidential 16/16