optimum pick point locations for straight, singly
TRANSCRIPT

Brigham Young University Brigham Young University
BYU ScholarsArchive BYU ScholarsArchive
Theses and Dissertations
2016-06-01
Optimum Pick Point Locations for Straight, Singly Symmetric Optimum Pick Point Locations for Straight, Singly Symmetric
Steel Plate Girders Steel Plate Girders
J. Andrew Pratt Brigham Young University
Follow this and additional works at: https://scholarsarchive.byu.edu/etd
Part of the Civil and Environmental Engineering Commons
BYU ScholarsArchive Citation BYU ScholarsArchive Citation Pratt, J. Andrew, "Optimum Pick Point Locations for Straight, Singly Symmetric Steel Plate Girders" (2016). Theses and Dissertations. 6065. https://scholarsarchive.byu.edu/etd/6065
This Thesis is brought to you for free and open access by BYU ScholarsArchive. It has been accepted for inclusion in Theses and Dissertations by an authorized administrator of BYU ScholarsArchive. For more information, please contact [email protected], [email protected].

Optimum Pick Point Locations for Straight, Singly Symmetric
Steel Plate Girders
J. Andrew Pratt
A thesis submitted to the faculty of Brigham Young University
in partial fulfillment of the requirements for the degree of
Master of Science
Fernando S. Fonseca, Chair Richard J. Balling Paul W. Richards
Department of Civil and Environmental Engineering
Brigham Young University
June 2016
Copyright © 2016 J. Andrew Pratt
All Rights Reserved

ABSTRACT
Optimum Pick Point Locations for Straight, Singly Symmetric Steel Plate Girders
J. Andrew Pratt Department of Civil and Environmental Engineering, BYU
Master of Science
Optimal pick point location is discovered in order to have the full buckling capacity of a suspended, non-prismatic, singly symmetric plate girders. The results show that a significant increase in stability occurs at the pick point location of 0.25L, where L is the span length. This recommendation can be utilized in the field to save construction cost and time because of how simplistic it is to use. A finite element software, ABAQUS 6.14, is used to determine the buckling capacities at different pick point locations and of different cross sections. The dimension of the cross sections and span lengths for the research is based upon a case study.

ACKNOWLEDGEMENTS
I want to thank Dr. Fernando Fonseca for the guidance and scholastic funds that I
received in helping me accomplish this work.

iv
TABLE OF CONTENTS ABSTRACT ............................................................................................................................. ii
ACKNOWLEDGEMENTS .................................................................................................... iii
TABLE OF CONTENTS ........................................................................................................ iv
LIST OF TABLES ................................................................................................................... v
LIST OF FIGURES ................................................................................................................ vi
Chapter 1 Introduction ........................................................................................................ 1
Chapter 2 Literature Review............................................................................................... 4
Chapter 3 Background ........................................................................................................ 7
Girder Specifications ................................................................................................. 7
Site Obstacles ............................................................................................................ 8
Summary ................................................................................................................. 10
Objective ................................................................................................................. 10
Chapter 4 Finite Element Methodology ........................................................................... 11
Model Creation ........................................................................................................ 12
Material Properties .................................................................................................. 13
Mesh Type ............................................................................................................... 13
Boundary Conditions............................................................................................... 17
Load Type ............................................................................................................... 17
Type of Analyses ..................................................................................................... 17
4.6.1 Buckling Analysis ............................................................................................ 17
4.6.2 Non-Linear Analysis ........................................................................................ 24
Chapter 5 Bitchcreek model ............................................................................................. 34
Formulation of the Input File .................................................................................. 34
Results ..................................................................................................................... 37
Load vs. Displacement ............................................................................................ 47
Recommendations ................................................................................................... 49
Chapter 6 Conclusion ....................................................................................................... 50
References .............................................................................................................................. 51

v
LIST OF TABLES
Table 3-1: Girder Specifications for Two Different Cross Sections........................................ 8
Table 5-1: Boundary Condition Set for Contact Location 1 .................................................. 35
Table 5-2: Boundary Condition Set for Contact Location 2 .................................................. 35
Table 5-3: Relationship Between Eigenvalues to the AASHTO Design Parameters ............ 39
Table 5-4: Relationship Between Eigenvalues to Span Lengths ........................................... 42
Table 5-5: Relationship Between Eigenvalues to Flange Area Ratios .................................. 45

vi
LIST OF FIGURES
Figure 1-1: An Example of a Girder Dog Clamp .................................................................... 1
Figure 3-1: Schematic Drawing of a BM Hitch ....................................................................... 9
Figure 4-1: Create Part Dialogue Box in ABAQUS .............................................................. 12
Figure 4-2: A Plate Girder Discretized into Hexahedral Elements ........................................ 14
Figure 4-3: Cube Deformation under a Moment (Drawn by Sun, E.Q.) ............................... 15
Figure 4-4: Cube Deformation of a Fully Integrated First Order under a moment (Drawn by Sun, E.Q.) ....................................................................................................................... 15
Figure 4-5:Cube Deformation of Reduced Integration Element Under a Moment ............... 15
Figure 4-6: Mesh Control Dialog Box in ABAQUS ............................................................. 16
Figure 4-7:Global Seed Dialog Box in ABAQUS ................................................................. 16
Figure 4-8:Typical Buckling Analysis Results in ABAQUS ................................................ 21
Figure 4-9: Create Step Dialog Box in ABAQUS ................................................................. 22
Figure 4-10: Edit Step Dialog Box in ABAQUS ................................................................... 23
Figure 4-11: Edit Keywords, Model Dialog Box in ABAQUS ............................................. 24
Figure 4-12: Arc-length Method for a Particular Convergence Point and Equilibrium Path 26
Figure 4-13:Create Step Dialog Box in ABAQUS ................................................................ 30
Figure 4-14: Edit Sep Dialog Box in ABAQUS .................................................................... 31
Figure 4-15: Edit Step Dialog Box in ABAQUS ................................................................... 32
Figure 4-16: Edit Keywords, Model Dialog Box in ABAQUS ............................................. 32
Figure 4-17: The ABAQUS Code to Introduce Imperfections on the Model........................ 32
Figure 5-1: Orientation of the Cartesian Coordinate System on a Typical Cross Section of a Girder .............................................................................................................................. 36
Figure 5-2: Plan View of Boundary Condition for Sets 1 & 2 .............................................. 37
Figure 5-3: Parameter Definition for the Pick Point Ratios ................................................... 37

vii
Figure 5-4: Cross Sections at Mid and End Spans Used in the First Buckling Analysis ...... 38
Figure 5-5: Relationship Between Eigenvalues to a/L When Flange Width Varies .............. 40
Figure 5-6: Buckling Shapes of the Lowest Eigenvalues for Each a/L ................................. 41
Figure 5-7: Cross Sections at Mid and End Spans Used in the Second Buckling Analysis .. 42
Figure 5-8: Relationship Between the Eigenvalues to a/L When Span Lengths Varies ........ 43
Figure 5-9: Diagram Showing the Different Cross Section Used for the Analysis ............... 43
Figure 5-10: Relationship Between the Eigenvalues to a/L When Area Ratios Vary ........... 45
Figure 5-11: Lateral Displacements of Five Different Span Lengths with the Optimal Pick Point Location of 0.25 .................................................................................................... 46
Figure 5-12: Mid Span Location to Measure Lateral Displacement ...................................... 46
Figure 5-13: End Span Location to Measure Lateral Displacement ...................................... 47
Figure 5-14: Load vs. Lateral Displacement Plot at Mid Span.............................................. 48
Figure 5-15: Load vs. Vertical Displacement Plot at Mid Span ............................................ 49

1
CHAPTER 1 INTRODUCTION
A plate girder is a bridge I-beam composed of individual structural steel plates welded to
form the horizontal flanges and vertical web of the beam. The girder can have a singly
symmetric or doubly symmetric cross section. Herein, singly symmetric cross section is defined
as a cross section symmetric about the centerline of the vertical web. Typically, a plate girder
does not need to be prismatic.
Once the girder is manufactured and shipped to the construction site, it is set in place by a
crane. A selection of clamps can be used to lift up the girder, but the girder dog clamp, shown in
Figure 1-1, is widely used because it is easy to set up. The clamp is essentially a claw
Figure 1-1: An Example of a Girder Dog Clamp

2
wrapping around the top flange and does neither add lateral restraint nor rotational stiffness. The
girder dog clamp comes in pairs, and each clamp is typically situated towards the end of the
girder. The distance between the clamps, also known as pick points, is the unbraced length of the
girder. The combination of the weight of the girder, the unbraced length, and the boundary
conditions can induce lateral-torsional buckling of the girders. Lateral-torsional buckling causes
the girder to “fold” during the erection process. This failure is catastrophic causing significant
damage and is financially costly.
Unfortunately, the American Association of State Highway and Transportation Officials
(AASHTO) only provides provisions to ensure that the girder will not buckle laterally during
placement of the bridge [1]. There are no specified provisions to prevent lateral-torsional
buckling from occurring during lifting operations which is regrettable because mishandling the
girder causes severe damage [2-4]. AASHTO only encourages the department of transportation
of each state to institute provisions to stabilize the girder during lifting operations [1]. With the
exception of the Texas Department of Transportation (TxDOT), no other state department of
transportation (DOT) has guidelines for lifting procedures of bridge plate girders [4].
The purpose of this research is to determine the optimal pick point locations for plate
girders, which can be used as a guideline for engineers and lifting operators. The research
employed ABAQUS 6.14 (a finite element software) to perform the analyses of various cross
sections and span lengths. The research focused solely on singly symmetric, straight (defined as
having no initial lateral bow caused by welding procedures), non-prismatic girders. Singly
symmetric girders were due to a lack of research in this area.
An extensive literature review is given in Chapter 2. In chapter 3, the hazards of an
ineffective lifting operation is explained by using a case study. Then Chapter 4 presents the finite

3
element procedure and methodology used in the research. In Chapter 5, the procedure used to
model the girder of the case study and the results are presented. The conclusion is given in
Chapter 6.

4
CHAPTER 2 LITERATURE REVIEW
Extensive research has been conducted to determine how a plate girder behaves during
lifting operations.
There are many methods to perform lifting operations on a girder. These methods consist
of determining how many cranes are needed, the location of the pick points, and the need for a
shore tower. In addition, these methods can vary at different construction sites and by different
contractors and engineers to determine lifting methods used in the US. Farris [4] conducted a
nationwide survey. The survey focused on five common elements encounter while lifting curved
I-girders: spreader beam lengths, number of cranes, lift points, shore towers, and length of
girders segment lifted. The results of the survey showed that contractors ideally like to have one
crane at the site while using a spreader beam since it is cost effective; however, at times a project
may need to have two cranes. The survey showed that the pick point locations are determined
through structural analysis and having two of them is the most desirable condition.
There has been extensive research in the area of properly lifting operations. Stith, J, et al.
[2, 5-8]; and Plaut, R, et al, [9] analyzed horizontally curved, doubly symmetric plate girders
during lifting operations. From these research projects, a lot of useful guidelines and tools were
developed. One such tool, named UT Lift was developed to help lift operators and engineers to
determine the optimal pick point locations and to determine the length of the spreader beam.
Another tool was a 3-D finite element program named UT Bridge. Plaut and Moen [9-11]

5
developed formulas that can be used to calculate displacements and internal forces in a doubly
symmetric, curved concrete or steel girders during lifting operations. In addition, Plaut and Moen
[9-11] determined that having the pick points as close as possible to 0.21 times the span length
increased girder stability and decreased lateral deformation.
Peart, W.L, et al. [12] investigated the possibility of cambered, horizontally girders being
more susceptible to lateral-torsional buckling during lift operations. The study concluded that the
camber does reduce the critical buckling load. The reasoning lies in the fact that the camber
raises the center of gravity and results in magnified moments.
Numerical methods have been used to determine the stability of doubly symmetric straight
girders during lifting operations. Tarnai [13] used the Ritz and the Galerkin methods to
determine the critical load that would cause the failure of girders due to lateral-torsional
buckling. Dux [14] determined a suspended girder’s buckling capacity by using differential
equations and plate theory. The author concluded that the solution of the differential equations
give an optimum load that is conservatively estimated by Euler Buckling. Tan [15] used plate
theory to conclude that the self-weight of the girder causes the girder to collapse. Yegian [16]
investigated doubly and singly-symmetric girders suspended by cables. The author concluded
that the effective way to increase the girder’s stability is to choose pick points that are 25 percent
of the span length. This conclusion is useful; however, it is limited to prismatic girders.
Farris [4] performed many analyses on curved, non-prismatic, doubly-symmetric girders
using ANSYS. Before performing the analyses, she verified the model by comparing the finite
element results to the gather data taken at a construction site in Texas, which both results
correlated extremely well. Farris [4] concluded that the optimal pick point location is 25 percent
of the span length. This recommendation is very similar to the one mentioned earlier by Yegian.

6
In fact, this paper will show that the same conclusion being reached for straight, non-prismatic,
singly symmetric girders.
Suryoatmono, B, et at. [17]; Helwig, T.A, et at. [18]; Duerr, D [19]; and Mohebkhah, T.A.
[20] conducted research to determine how the modification factor, Cb, of a suspended girder
varies for that of a simply supported girder. The modification factor increases or decreases the
moment capacity of a girder. The results from the study conducted by Helwig et at. [18],
Suryoatmono et at [17], and Duerr [19] showed that Cb is generally different from the equations
given in the American Institute of Steel Construction (AISC) [21] because of the unique
boundary conditions and the slenderness of the girder’s cross section [17-20]. The AISC [21]
recommendations are only valid for a suspended girder if a singly-symmetric girder is simply
supported and the transverse loads apply at mid-height.
In addition, there has been research conducted on the stability of concrete girders during
transportation and lifting operations. Stratford, T, et al. [22, 23] and Laszlo, G.I., et al. [24]
concluded that the concrete girders were susceptible to lateral-torsional buckling while being
lifted.
Finite element analysis has become an important tool in performing complex structural
analysis. In fact, Yuen, R.M. [25] and Moon, J., et al. [26] utilized finite element to conduct a
lateral-torsional buckling analysis on a girder having complex geometries and that is simply
supported but not suspended. The results from these analyses were validated when comparing
experimental data.

7
CHAPTER 3 BACKGROUND
In 2002 the Idaho Department of Transportation undertook a bridge replacement project,
15 miles north of Driggs on the Teton Scenic Byway [27]. The single span bridge was named
The Bitchcreek Bridge. The scope of the project was to build four new plate girders spaced 10
ft.-2in. apart and to add new abutments, decking, cross frames, and concrete parapets. The
center-to-center span of the girder was 195 ft.-2in. with a minimal clearance of 49 ft.-3in.
During lifting procedures, the first girder started to buckle laterally and the project was halted
until a solution was devised.
Girder Specifications
Each girder had two different singly symmetric cross sections along its length to reduce
weight and save manufacturing cost. Cross section 2, the midsection, was from 39.76 ft. to
157.09 ft. along the length of the girder, and cross section 1 was at the ends of the girder. The top
flange was not as thick as the bottom flange in both cross sections. Table 3-1 presents the
dimensions of the cross sections.

8
Table 3-1: Girder Specifications for Two Different Cross Sections
Web Cross Section 1 (Mid Span) Cross Section 2 (End Span)
Bottom Flange Top Flange Bottom Flange Top Flange
Height (ft)
Thickness (in)
Width (in)
Thickness (in)
Width (in)
Thickness (in)
Width (in)
Thickness (in)
Width (in)
Thickness (in)
7.23 0.75 23.62 2.31 17.72 1.37 23.62 1.37 17.72 1
Site Obstacles
At the construction site, the ends and middle pieces were field spliced to form the span of
the girder. Once the girders were assembled, there was a natural lateral bow of approximately 10
in. due to the heat from welding the plates together during fabrication [27]. The pick point
locations were 5 ft. from the ends of the girder. To prevent further lateral bowing, a temporary
133 ft. truss system was designed, and assembled and bolted sideways to the top flange of the
girder. At each pick point location a dog clamp was used to attach the girder to the crane. The
dog clamps provided only vertical and out-of-plane restraining, in other words, a pin connection.
During the lifting of the girder, the girder started to buckle laterally to an extent that the
operation was stopped. Smith [27] conjectured that that the truss system did not provide extra
lateral stiffness to the girder because the bolted connections had too much sloppiness and were
not tighten. The sloppiness in the truss connections allowed the girder to significantly translate
laterally before the truss could be engaged and add lateral stiffness to the girder. The actual
reason why the first lifting attempt did not work was due to the pick points being too far apart.
Essentially, the unbraced length of the girder was too big.

9
The fixing of the problem was costly and significantly delayed the project. New pick
points locations were used, which resulted in the distance between the points to be reduce to 122
ft. In addition, a hitch system, as shown Figure 3-1, replaced the dog clamps. The hitch system
provided not only translational but also rotational restraint to the top flange. The bottom flange,
however, was still free to rotate. The previous 100 ton cranes only had a boom arm length of 70
ft; due to the new pick locations, which exceeded the reach of the arm of the cranes, two new
220 ton cranes with a boom arm length of 105 ft. was used. The changes in lifting operations did
Figure 3-1: Schematic Drawing of a BM Hitch

10
reduce the lateral displacements, but there was still a displacement; however, the displacement
was not significant enough to warrant a different lifting operation.
Summary
Plate girders can experience lateral-torsional buckling during lifting operations. Girder
weight, pick point locations, and boundary conditions at the pick point locations influence the
lateral-torsional capacity of the girder. The fact that the girder is pick up at the top flange and the
bottom flange is completely free to rotate and translate laterally also influences the lateral-
torsional capacity of the girder.
Objective
The objective of this research is to determine the optimal pick point location of straight,
non-prismatic, singly symmetric steel plate girders in order to achieve the lateral-torsional
capacity of a girder. In regards to the first attempt from the case study, if the optimal pick point
location was used, then a second attempt would not have been necessary. Therefore, optimal pick
point location could have saved the project lots of money and time.

11
CHAPTER 4 FINITE ELEMENT METHODOLOGY
The objective of this research will be accomplish by developing numerical models of plate
girders and conducting analyses using these models. The methodology is as follows:
Develop finite element models of several plate girders and the original bitchreek
plate girder.
Conduct buckling analyses of the plate girders.
Conduct non-linear time history analysis of the girders using the results from the
buckling analysis as the load.
Gather and analyze results.
In this chapter, the general procedure used to develop the finite element models of the
plate girders is described in detail. The procedure involves the following steps:
Describe the geometry of the girder.
Describe the material properties of the girder.
Describe the element used and the mesh generation.
Describe the boundary conditions.
Describe the loading type and procedure.
Describe the analyses type.

12
The commercial finite element software ABAQUS was used in this research. The pre-
processor of the software was used to generate the model and the post-processor was used to
gather the results.
Model Creation
The Bitchcreek girder had two different cross sections: one in the middle and one in the
end. In addition, it had bearing stiffeners at the end of the girder. The intermediate stiffeners
were omitted in the analyses. To create the model of the girder, the user needs to specify the
model space, type of part, and the base feature, see Figure 4-1. The following is a chronological
list in creating the Bitchcreek girder:
Determined the model space to be three-dimensional.
Determined the part type to be deformable because it allowed for deformation to
occur under a load.
Determined the base feature to be extruded as a solid.
Figure 4-1: Create Part Dialogue Box in ABAQUS

13
Material Properties
The Bitchcreek girder was made out of ASTM A992 structural steel. The modulus of
elasticity was 200000000000 N/m2; the possion’s ratio was 0.26, and the density was 7800
kg/m3. The yielding stress and ultimate stress are not necessary since buckling was the governing
mode of failure.
Mesh Type
The element used is an eight node hexahedral (brick) element because the constitutive
parts of the girder could be easily discretized into small, undistorted cubes as shown in Figure
4-2.
The basic methodologies of finite element analysis are h, p, and h-p methods. The h, or
element size, method is a technique to increase accuracy by keeping the polynomial, p, of the
basis function constant while changing the h parameter to refine the mesh. The p method is a
technique that increases the polynomials of the basis function while keeping the h parameter
constant. Another technique is to use a combination of both methods, the p-h method. In
consequence to these methods, element types have emerged. One of these methods is the eight
node hexahedral element, which has advantages and disadvantages. A disadvantage for the
hexahedral is using one polynomial degree; however, a hexahedral can be more accurate and
computationally fast if an optimal number of elements can be determined to refine the mesh.
Another potential disadvantage to the hexahedral is caused by the complex computer-aided
design (CAD) geometry. If geometry is complex, then the hexahedral technique will produce
distorted elements, which greatly reduce the accuracy of the model. Therein, it is wise to use

14
another element type known as tetrahedral. Finally, another disadvantage to hexahedral element
type is its susceptibility to shear locking. When a fully integrated linear brick is used, it could be
excessively stiff in bending application and modal analysis [28]. Figure 4-3 and Figure 4-4
depicts this phenomenon. As shown in Figure 4-3, the cube on the left deflects upward when an
applied moment exist. When a pure moment is applied, the horizontal dotted lines on the surface
will curve upwards. The vertical dotted lines will always remain perpendicular to the horizontal
dotted lines.
To model the curvature of the deformation, an element needs to mimic the realistic
deformations. The edges of the cube are not able to develop the necessary curvature because of
its increase stiffness. Therefore, the deformation will look like as shown in Figure 4-4. The
horizontal dotted lines on the surface remains straight where the vertical dotted lines are
distorted, which create an angle that is larger than 90 degrees. Therefore, an incorrect artificial
shear stress is introduced, which means that the strain energy is creating shear deformation
instead of bending deformation [28].
Figure 4-2: A Plate Girder Discretized into Hexahedral Elements

15
To overcome the shear locking disadvantage and to increase computational efficiency, a
reduce integration procedure is used. The reduce integration method generates, however, the
“hourglassing problem”. This term refers to excessive flexibility of the element. Figure 4-5
depicts the deformation of a cube under pure bending again. The reduce integration is
represented by the perpendicular dotted lines located at the center of the non-deformed cube. As
moments are applied to the outer edges of the cube, it will deform as shown in the figure;
however, the dotted lines on the surface will remain unchanged indicating that the normal stress
and shear stress are zero and there is no strain at the integration point. This nonphysical response
indicates the structure is excessively flexible and can propagate when a coarse mesh is used [28].
ABAQUS provides default controls to curb the hourglassing phenomenon.
Figure 4-5:Cube Deformation of Reduced Integration Element Under a Moment
Figure 4-3: Cube Deformation under a Moment (Drawn by Sun, E.Q.)
Figure 4-4: Cube Deformation of a Fully Integrated First Order under a moment (Drawn by Sun, E.Q.)

16
The eight-node linear brick with hourglassing control and reduce integration methodology
used is the C3D8R. Overall, the C3D8R is computationally faster and reasonably accurate with a
refined mesh as compared to other element types.
The mesh control dialog box, shown in Figure 4-6, was used to generate the mesh.
Figure 4-6: Mesh Control Dialog Box in ABAQUS
ABAQUS allows to user to specify the width of the element by using the seed command.
The seed dialog box as shown in Figure 4-7. The global size of the element is set to 0.1 meters.
Figure 4-7:Global Seed Dialog Box in ABAQUS

17
Boundary Conditions
The actual girder was lifted by two dog clamps, and modeling the correct boundary
conditions at this support condition is very important for the model to produce realistic results.
The uncertainties due to the boundary conditions led to the decision to construct a scaled model
of the girder, test the girder, and compare the results of the test to that of the scaled model.
Chapter 5 describes in detail the procedure to fabricate the scaled model and the validation of the
finite element model.
Load Type
According to the case study, the only load acting on the girder during lifting was its own
weight, which is essentially a distributed load along the length of the girder. The software
calculates the weight using the cross section properties and the density of the material and
applies the gravity constant to the self-weight of the girder on the model. The gravity constant of
the model was 9.81m/s2.
Type of Analyses
Two types of analyses were conducted: buckling and non-linear displacement analysis. The
purpose of the buckling analysis is to determine the eigenvalues and mode shapes of the girder.
The eigenvalue is then the new load for the non-linear displacement analysis, which allows a
time history response of the pre and post buckling stages of the girder.
4.6.1 Buckling Analysis
The buckling analysis was the first analysis in order to determine the lowest, real, and
positive eigenvalue along with its associated mode shape. This eigenvalue is important because it
18
represented the lowest load to produce a particular mode shape. The mode shape helps define
how the girder displaced and rotated. The calculations from finite element software to determine
the displacement and rotation due to buckling are complex. Therefore, an explanation of
buckling theory is presented to explain how the finite element software solves buckling
problems.
A general eigenvalue buckling problem looks for eigenvalues. In equation form, a buckling
problem can be written as follows in Equation (4-1):
𝐾𝑀𝑁𝑣𝑀 = 0, (4-1)
where KMN is the stiffness matrix of a system when loads such as pressure, concentrated forces,
or thermal loading are applied, and vM are the nontrivial displacement solutions. The M and N
superscripts represents the degrees of freedom of a particular system. The summation of the
product of the eigenvalue and mode shape at each degree of freedom determines displacement,
as shown in Equation (4-2). The equation shows the eigenvalue, 𝜆𝑖𝑀, being multiplied by the
mode shape, 𝑣𝑖𝑀, where i is the summation index. 𝑈𝑖
𝑀 is the total displacement at a particular
degree of freedom M.
𝑈𝑖𝑀 = ∑ 𝜆𝑖
𝑀𝑣𝑖𝑀
𝑖
(4-2)
The value of M is not a large quantity because the governing buckling modes for most structures
are the lowest eigenvalues.
The finite element solver solves buckling problems by a linear perturbation procedure. This
procedure allows the buckling analysis to approximate the bifurcation of stiff structures;
however, it can only work for symmetric matrices. The linear perturbation procedure cannot

19
model substructures within a part and can be very versatile in the analysis process. Herein, the
buckling analysis can use a preloaded configuration from a previous analysis to calculate the
buckling load. This allows the analysis to model a variety of real life problems.
Linear perturbation analysis increments the load pattern, QN, in the eigenvalue buckling
analysis. The magnitude of the load pattern is of no consequence because it will be scaled by the
eigenvalues, 𝜆𝑖, determined from Equation (4-3).
(𝐾𝑂𝑁𝑀 + 𝜆𝑖𝐾∆
𝑁𝑀)𝑣𝑖𝑀 = 0 (4-3)
where 𝐾𝑂𝑁𝑀is the stiffness matrix associated with the reference configuration, which can have
preloads, PN; 𝐾∆𝑁𝑀is the stiffness matrix that is created for each incremental loading pattern, QN;
𝜆𝑖 are the eigenvalues; 𝑣𝑖𝑀are the eigenvectors or mode shapes, i is the mode shape index. The
critical buckling loads, CRi, can then be represented by Equation (4-4):
𝑃𝑁 + 𝜆𝑖𝑄𝑁 = 𝐶𝑅𝑖 (4-4)
Equation (4-4) is in the form of a linear line with a slope value,𝜆𝑖, and a slope intercept, PN.
Therefore, the linear perturbation gets its procedural name. For the nature of the project, the
preloading pattern, PN, is not applicable because preloads are analogous to prestressing. In
consequence, the modeled girder did not have any prestressing elements but only gravity loads
which resulted in a zero preloading pattern. Equation (4-3) can be simplified into Equation (4-5)
(𝜆𝑖𝐾∆𝑁𝑀)𝑣𝑖
𝑀 = 0 (4-5)
The software always normalizes the mode shapes, 𝑣𝑖𝑀; As a result, the eigenvectors do not
represent the actual magnitudes of deformation at the critical load, but always have a maximum
20
displacement of 1.0. Herein, another analysis is needed to determine the non-normalized
displacement.
The software uses the two methods to extract eigenvalues. The first one is known as
Lanczos, and the second one is known as subspace iteration. Both methods are able to
accomplish the same thing, but have different ways in doing it. The Lanczos extraction method is
faster for large number of eigenvectors due to many degrees of freedom. On the other hand, the
subspace iteration is faster when only 20 or less eigenvectors are required. The only
disadvantage to the Lanczos method is its limitation in solving indefinite stiffness matrices. The
only similarity that both methods have is the freedom to request the number of eigenvalues.
Both methods solve the eigenvalue by employing the linear perturbation procedure, which was
described earlier. Once the eigenvalues have been extracted, it is not uncommon to have some
negative values. According to ABAQUS, these values most likely indicate that the structure will
buckle if the loads are applied in the opposite direction. This phenomenon is quite different when
the problem involves frequency, which requires the extracted eigenvalues to be positive and
greater than zero; however, a structural buckling problem can have negative eigenvalues. In fact,
all the eigenvalues can be negative when the structure has most of its members in tension under
normal loading. This loading condition does not induce buckling on the structure, but if the load
is in reverse, then buckling will occur. The Bitchcreek model did have negative eigenvalues from
the buckling analysis. The results show a mixture of negative and positive eigenvalues. Figure
4-8 shows an example of eigenvalue arrangements from one of many analyses performed. To be
consistent

21
for all analyses performed for this paper, the lowest, positive eigenvalue with its associated mode
shape was chosen and used in the Riks method.
The subspace iteration method was chosen to be used in the Bitchcreek model. The
justification in using this particular method is having an analysis that is computationally faster.
The subspace iteration method can solve eigenvalues effectively well and fast with less than 20
needed mode shapes. For the project, at least 19 eigenvectors were chosen to ensure that model
yielded sufficient analytical speed and that all the important mode shapes were being found.
To prompt the software to perform a buckling analysis, the user goes to the model tree and
right click set. Once the pop down menu appears, the user needs to click the create step
command to have a dialog box appear as shown in Figure 4-9. From it, the user specifies the
name of the analysis, the step location, and the procedural type. Once the step has been created,
Figure 4-8:Typical Buckling Analysis Results in ABAQUS

22
Figure 4-9: Create Step Dialog Box in ABAQUS
the user specifies the type of eigenvalue extraction. This is done by going to the model tree to
right click on the new step just created to bring down a pop up menu and clicked edit. From it, a
dialog box, named edit step, appears as shown in Figure 4-10. In the basic tab, the user specifies
the eigenvalue method and the number of requested of eigenvalues. It also allows the user to
specify the maximum number of iteration, located towards the bottom, to ensure that the
requested eigenvalues is reached. In this case, the project called for 600 iterations to ensure that
the analysis has enough iterations to solve for the requested eigenvalues.
Once the buckling analysis has been created, then the last step is to export the model
shapes and eigenvalues in a file format to be used in the Riks method. This is accomplished by
right clicking the Model-1 in the model tree to bring down a pop menu. From it there is a
command called Edit Keywords, Model: Model-1, and it brings up a dialog box allowing the user

23
to add or change the ABAQUS input file to be transmitted to the analytical solvers. Then the user
types the command *MODAL FILE in the line of code towards the bottom right after
**OUTPUT REQUEST, as shown in Figure 4-11. This ensures that the final results will be
exported into a text file with a file extension of .fil. Then the Riks method uses the file to add
imperfection in the model girder before running the non-linear analysis.
The buckling procedure is an important analysis to perform to find the correct eigenvalue
and eigenvector. This section explains the theory behind the eigenvalue problem and the methods
used by the software to solve for eigenvalues. The objective of the section is to give reasonable
justification for choosing the subspace iteration.
Figure 4-10: Edit Step Dialog Box in ABAQUS

24
Figure 4-11: Edit Keywords, Model Dialog Box in ABAQUS
4.6.2 Non-Linear Analysis
The non-linear analysis is a time history response of a structure’s collapse. The software uses
the Riks method to analyze non-linear problems. The Riks method is very useful in solving
complex problems. These problems include predicting unstable, geometrically non-linear collapse
of a structure, analyzing non-linear material properties and boundary conditions, and speeding up
the convergence of ill-conditioned or snap-through problems. For these reasons, the Riks method
is chosen because there could potentially be unstable geometrical collapse, ill conditioned, or snap-
through. This section will explain the mathematical theory behind the Riks method, and the
procedural steps and justifications in setting it up for the project.
The Riks method is one of many mathematical techniques to employ in order to solve the
equilibrium path displayed by load-displacement plots for a particular nonlinear structure. The
equilibrium equation that describes this path is written as:
𝒈(𝒑, 𝜆) = 𝒒𝒊(𝒑) − 𝜆𝒒𝒆𝒇 = 𝟎 (4-6)

25
where 𝒒𝒊 is the internal force vector which is a function of displacement, p, 𝜆 is the load level
parameter, 𝒈(𝒑, 𝜆) is the out of balance force vector and is a function of displacement and load
level parameter, and 𝒒𝒆𝒇 is the vector of the external applied force.
The Riks method solves Equation (4-6) by specifying an arc which has its center on the
equilibrium path. This arc acts as a constraint in determining the length of the tangent lines in order
to iterate until convergence, see Figure 4-12. The mathematical definition of this arc is defined as:
𝑠 = ∫ √𝑑𝒑𝑇𝑑𝒑 + 𝑑𝜆2𝜓2𝒒𝒆𝒇𝑇 𝒒𝒆𝒇 (4-7)
where 𝜓 is the scaling parameter, and it is used because the load contribution depends on a scaling
factor between the load and displacement terms. As a result, there is an intersection between
Equation (4-6) and Equation (4-7), and a new equation can be rewritten as:
Solving Equation (4-8) is done by using ordinary differential equations (ODE), but there is a
problem with this approach. The problem is the difficulty to successfully limit the drift from the
equilibrium path. To resolve the issue, an incremental form of Equation (4-7) is be written as:
𝑎 = Δ𝒑𝑇Δ𝒑 + Δ𝜆2𝜓2𝒒𝒆𝒇𝑇 𝒒𝒆𝒇 − Δ𝑙2 = 0 (4-9)
where Δ𝜆 is the incremental load factor, Δ𝑙 is the fixed radius of the intersection, 𝜓 is the scaling
parameter and is used as a scaling factor between the load and displacement terms, and Δ𝒑 is the
incremental displacement vector. The vector Δ𝒑 and scalar Δ𝜆 possess values from the last
converge equilibrium state, and as a result they are only incremental values and not iterative ones,
𝒈(𝑠) = 𝒒𝒊(𝒑(𝒔)) − 𝜆(𝑠)𝒒𝒆𝒇 = 𝟎 (4-8)

26
which is designated by small delta, 𝛿. Formulating the second-order analysis this way allows the
load parameter,𝜆 , and the displacement vector, p, to be variables because both of them are
dependent to the out-of-balance force vector from Equation (4-6). Therefore, there can be n
equalibrium equations due to the many possibilities of incrementing the displacments to find the
internal forces. Then having Equation (4-9) constrainting long the lines from the tangentalial
stiffness matrices should be, a total of 𝑛 + 1 variables needs to be calculated. To accomplish this,
a Newton-Raphson iteration is employed. Once the Newton Raphson has been instigated into the
equations, they degenerate to
𝒈𝑛 = 𝒈𝑜 + 𝑲𝒕𝛿𝒑 − 𝒒𝒆𝒇𝛿𝜆 = 0 (4-10)
𝑎𝑛 = 𝑎𝑜 + 2Δ𝒑𝑇𝛿𝒑 + 2Δ𝜆𝛿𝜆𝜓2𝒒𝒆𝒇𝑇 𝒒𝒆𝒇 = 0 (4-11)
where n and o are indices that have a meaning of new and old respectively, and Kt is the tangential
stiffness matrix, which is define as Kt = dg/dp. Now the new equations can be combined to create
a set of matrices to solve the iterative changes of 𝛿𝜆 and 𝛿𝒑. The matrices are defined as:
Figure 4-12: Arc-length Method for a Particular Convergence Point and Equilibrium Path

27
[𝛿𝒑𝛿𝜆
] = − [𝑲𝒕 −𝒒𝒆𝒇
2Δ𝒑𝑇 2Δ𝜆𝜓2𝒒𝒆𝒇𝑇 𝒒𝒆𝒇
]
−1
[𝒈𝑜
𝑎𝑜]
(4-12)
Once the vector in the far left of the Equation (4-12) has be calculated, then displacement vector
and load factor are updated.
Batoz and Dhatt proposed another way of solving Equation (4-12) by utilizing Equation
(4-11) as a displacement control at a single point. This results in splitting the iterative
displacement, 𝛿𝒑, into two parts, which creates a new unknown load parameter, 𝜆𝑛 = 𝜆𝑜 + 𝛿𝜆 ,
and is written as:
𝛿𝒑 = −𝑲𝒕−1𝒈𝒐 + 𝛿𝜆𝑲𝒕
−1𝒒𝒆𝒇 = 𝛿𝒑𝒃 + 𝛿𝜆𝛿𝒑𝒕 (4-13)
with 𝛿𝒑𝒕 as the displacement vector relating to the fixed load vector, 𝒒𝒆𝒇, which is defined as
𝛿𝒑𝒕 = 𝑲𝒕−1𝒒𝒆𝒇 , and 𝛿𝒑𝒃 is the iterative change that stems from the load controlled Newton
Raphson method. Now having obtained 𝛿𝒑, it now leads to another equation to solve for unknown
𝛿𝜆, which helps calculate the other incremental displacement and is defined as:
Δ𝒑𝒏 = Δ𝒑𝒐 + 𝛿𝒑 = Δ𝒑𝒐 + 𝛿𝒑𝒃 + 𝛿𝜆𝛿𝒑𝒕 (4-14)
Equation (4-13) and Equation (4-14) can now be substituted into Equation (4-9) to yield the
following scalar quadratic expression:
𝑐1𝛿𝜆2 + 𝑐2𝛿𝜆 + 𝑐3 = 0 (4-15)
where
𝑐1 = 𝛿𝒑𝒕𝑇𝛿𝒑𝒕 + 𝜓2𝒒𝒆𝒇
𝑇 𝒒𝒆𝒇
𝑐2 = 2𝛿𝒑𝒕(Δ𝒑𝒐 + 𝛿𝒑𝒃) + 2Δ𝜆𝑜𝜓2𝒒𝒆𝒇𝑇 𝒒𝒆𝒇
𝑐3 = (Δ𝒑𝒐 + 𝛿𝒑𝒃)𝑇(Δ𝒑𝒐 + 𝛿𝒑𝒃) − Δ𝑙2 + Δ𝜆𝑜𝜓2𝒒𝒆𝒇𝑇 𝒒𝒆𝒇
(4-16)
which can be solved for 𝛿𝜆 so that the complete change is defined from Equation (4-14). This
technique of utilizing Equation (4-11) as a displacement control results in having an invertible

28
banded, symmetric, tangential stiffness matrix, Kt, which is desired in the finite element process;
however, there is a limitation to it. The technique is known to produce a singular stiffness matric,
Kt, at the limit point on the equilibrium path resulting in unsolvable equations. This does not seem
to be a significant problem because of how hard to arrive preciously at the limit point. Nonetheless,
a significant amount of research has been done to correct this issue, but for the purpose of this
paper it will not explain the details in correcting the issue [29].
Now it will be prudent to discuss the overall scheme of the arc-length method as regards to
Figure 4-12. Having converge to the equilibrium point (𝒑𝒐, 𝜆𝑜𝒒𝒆𝒇), where on the graph 𝒒 = 𝒒𝒆𝒇,
an incremental tangential stiffness matrix, Kt, is computed which leads to the point (𝒑𝟏, 𝜆1𝒒𝒆𝒇).
The first iteration process is to utilize Equation (4-15) and Equation (4-16) by having ∆𝒑𝒐 as ∆𝒑𝟏
and ∆𝜆𝑜 as ∆𝜆1 to solve for 𝛿𝒑𝟏 and 𝛿𝜆1. Once these values are determined, then the updating
procedure commence by using:
Δ𝒑𝟐 = Δ𝒑𝟏 + 𝛿𝒑𝟏
Δ𝜆2 = Δ𝜆1 + 𝛿𝜆1 (4-17)
Then adding values from Equation (4-17) to the respective variables of 𝒑𝒐 and 𝜆𝑜 to get the next
point (𝒑𝟐, 𝜆2𝒒𝒆𝒇).
The second iteration procedure involves using Equations (4-15) and (4-16) to find 𝛿𝒑𝟐 and
𝛿𝜆2 by substituting ∆𝒑𝒐 as ∆𝒑𝟐 and ∆𝜆𝑜 as ∆𝜆2. Then Equation (4-17) is utilized to solve for Δ𝒑𝟑
and Δ𝜆3 . Finally add Δ𝒑𝟑 and Δ𝜆3 to 𝒑𝒐 and 𝜆𝑜 to arrive at the next point (𝒑𝟑, 𝜆3𝒒𝒆𝒇) . The
iteration stops when the convergence criterion is satisfied.
The Batoz and Dhatt method, which is a modified version of the Riks method, can be even
more simplified into a cylindrical form, which happens when 𝜓 = 0. This will significantly reduce
all the equations containing the symbol, 𝜓, and ABAQUS uses this method.

29
To initiate the cylindrical method, it needs a predictor value. The predictor value can be
written as:
Δ𝒑𝒑 = Δ𝜆𝑝𝛿𝒑𝒕 (4-18)
and substituting it into Equation (4-11) which will result in the proceeding equation:
Δ𝜆𝑝 = ±Δ𝑙
√𝛿𝒑𝒕𝑇𝛿𝒑𝒕
(4-19)
where Δ𝑙 is specified by the user and is adjusted by the software’s automatic load incrementation
algorithm. Equation (4-19) yields two values: a positive or negative Δ𝜆𝑝 , which denotes the
direction of the response along the tangent line. It is sought after to have only a positive Δ𝜆𝑝 by
choosing a sign that results in a positive dot product of the point from the last converge point and
the previous increment; however, the tangent line can be negative when the equilibrium path has
a high curvature, i.e. the increment size is too large, or the solution bifurcates too sharply, which
is computationally expensive to check. Therefore, the negative tangent is not included in the
analysis because the software assumes that the increment will be small enough to solve most of
those cases, and the simple dot product is sufficient in determining the sign.
Implementing the cylindrical method in ABAQUS is very similar to creating the buckling
analysis. It starts by going to the model tree and right clicking on the word steps in order to have
a pop up menu appear. Once the menu is opened, the user needs to click on create to have the
create step dialog box appear as shown in Figure 4-13. Using the dialog box, the user specifies the
type of analysis to be performed by a particular step to go right after the initial step.

30
Figure 4-13:Create Step Dialog Box in ABAQUS
Having created the step, the user specifies the predictor value for the analysis to start the
procedure and other various parameters pertaining to the structural problem. Then the user clicks
the okay command button on the bottom right of the create step dialog box to bring up another
dialog box named edit step as shown in Figure 4-14. This box had three tabs: Basic, Incrementation,
and Other. In the Basic tab, the user makes sure that the Nlgeom is on. This feature allows for
geometric non-linearity to be performed in the finite element code.
The predictor value is defined by specifying an arc length. This is accomplished by going to
the Incrementation tab as shown in Figure 4-15 . From the tab, the user defines important
parameters that effects the solution converging or not. The defined parameters for the project are:
First, the type command is left to its default value, which is Automatic. This allows ABAQUS to
choose the size of the arc length increments based upon computational efficiency. Second, the
Maximum number of increments is specified to be 42 increments; in other words, 42 points to

31
define the equilibrium path. Third, the Arc length increment values are 0.0001 for initial, 1E-15 for
minimum, and 1E-36 for maximum. These parameters are used by ABAQUS to help the software
converge at a point on the equilibrium path.
Once the Riks method has been established in the model, the buckling modal file needs to
be reference by the non-linear analysis. To accomplish this, the user goes to model tree to right
click on Model-2 to bring down a pop menu. From it, the command called Edit Keywords, Model:
Model-2 could be access to open a dialog box. Then the user scrolls down until the STEP: Riks
section as shown in Figure 4-16. Once there, the user references the file by imputing the following
line of code as shown in Figure 4-17. The *IMPERFECTION command alerts the finite element
software to utilize the created modal file before starting the non-linear analysis. In order to
reference the file, the user specifies the file’s name after writing FILE. Then using the default value
of 1 for the STEP, the user goes to the next line to prescribe the particular eigenvalues of interest
for the model. The finite element software allows for flexibility in
Figure 4-14: Edit Sep Dialog Box in ABAQUS
32
Figure 4-16: Edit Keywords, Model Dialog Box in ABAQUS
** *IMPERFECTION, FILE= Name, STEP=1 3,100 **
Figure 4-17: The ABAQUS Code to Introduce Imperfections on the Model
Figure 4-15: Edit Step Dialog Box in ABAQUS

33
specifying the important eigenvalue that would be used in the Riks step. The value of 100, written
in Figure 4-17, commanded the software to put 100 percent of the eigenvalue into the analysis.
The Riks method is use in order to perform large displacements analyses. These analyses are
accomplished by utilizing a modified arc length method known as the cylindrical method. It
assumes that 𝜓 = 0 in Equation (4-9), which is the contrainting equation. As a result, this
simplifies the equation and eliminates the need to increment the load level parameter, 𝜆. The
method is robust enough to solve geometrically non-linear collapse of a structure and to provide
information about the collapse of a structure after buckling.

34
CHAPTER 5 BITCHCREEK MODEL
The purpose of this chapter is to explain the generation of the input file, the analyses that
were used, and the results from the analyses.
Formulation of the Input File
The generation of the model follows the methodology described in Chapter 3. These
methodologies include the mesh type, the geometry, the material properties, the load type, the
buckling analysis, and the non-linear analysis displacement.
The boundary conditions for the Bitchcreek model needed to mimic the girder clamps
correctly in order to have realistic results. Therefore, at each pick point location there were two
boundary conditions. When the girder was being lifted up by the girder dog clamps, the clamps
had two contact points on both sides of web where it met the top flange, one set for each
location. Table 5-1 and Table 5-2 summarizes the boundaries at each contact location. The check
mark indicates constraint.

35
Table 5-1: Boundary Condition Set for Contact Location 1
Boundary Condition
U1
U2
U3
UR1
UR2
UR3
Table 5-2: Boundary Condition Set for Contact Location 2
Boundary Condition
U1
U2
U3
UR1
UR2
UR3
The same boundary conditions sets were applied at the other pick point locations. The U1,
U2, and U3 corresponds to translation in the x-direction, the y-direction, and the z-direction,
respectively, and the UR1, UR2, and UR3 corresponds to rotation about the x-direction, the y-
direction, and the z-direction, respectively. The orientation of the x, y and z-axes on the cross
section is shown in Figure 5-1.
Figure 5-2 shows how boundary condition set 1 and boundary condition set 2 were applied
on the girder. The reason why the boundary condition set from Table 5-2 is almost fully
constrained is due to the fact that it allows external resistance in order for the girder deflect at the
mid span. The boundary condition set shown in Table 5-1 allows the girder to rotate and translate
on the z-axis. Therefore, both boundary condition sets worked together to have the girder rotate
and buckle laterally.
Another possible boundary condition was explored. The boundary condition set 1 was
discarded and a new boundary condition located at the mid span constrained only the UR2. The
boundary condition set 2 was not changed. The result from the different boundary conditions
yield a slightly different eigenvalue for a 180 ft. span girder. The eigenvalue is 2.3679. The
original eigenvalue is 2.444. Since the difference between these two values is minimal, there is
no concern in changing the original boundary conditions.

36
The first three analyses vary some aspect of the girder’s specifications in order to
determine how the buckling capacity changed as each pick point location. These variances in
Figure 5-1: Orientation of the Cartesian Coordinate System on a Typical Cross Section of a Girder
specifications include changing flange widths, flange thicknesses, and span lengths. These
analyses used only the buckling analysis because the eigenvalue can be equal to or less than the
buckling capacity of the girder at different pick point locations. As the pick point spacing varied
from each analysis, the ratio of the pick point to span length is maintained constant. Figure 5-3
shows the pick point distance, a, defined herein as the distance from the edge of the girder to the
pick point location, and the span length, L, define as the full length of the girder. The ratios that
are used in the analyses ranged from 0.1 to 0.4.
The fourth analysis was conducted to determine how the lateral displacements are related
the optimal pick point locations, and the only changed specification is the span length. For each
span length, the buckling analysis was used in determining the lowest, positive eigenvalues.
Then these eigenvalues were used as the load parameter to perform the non-linear analyses. A

37
total of 24 pick point locations, on both side of the girder, spaced non-uniformly between the
values of 0.3 to 69.2 ft. were used for each span length.
Figure 5-2: Plan View of Boundary Condition for Sets 1 & 2
Figure 5-3: Parameter Definition for the Pick Point Ratios
Results
The first buckling analysis determined the eigenvalues by varying the ratio of the flange
widths to the web’s depth. This ratio is an AASHTO parameter to ensure proper flange
proportions in designing a plate girder. The design specifications manual specifies that the flange
width, bf, needs to be greater or equal to one sixths of the web’s depth, d [1]. As a result, the
ratio, bf/d, was ranged from 1/6 to 1/3. The analysis set the top and bottom flange to equal to

38
each other and vary the flange widths in equal increments. Figure 5-4 shows this as well as the
cross section of the girder. The span length was set to be 197 ft. Table 5-3 shows how the
AASHTO parameter relates to the eigenvalues at each pick point location. A graphical
representation of this table is in Figure 5-5. The figure shows the optimal pick point location to
be 0.25L. These eigenvalues at the location ranges from 6.0 to 13.0. In other words, it takes 6 to
13 times more of the girder’s weight to buckle it at that particular pick point location. Therefore,
the stability had significantly increased. In addition, it is noted that as the flange width
Figure 5-4: Cross Sections at Mid and End Spans Used in the First Buckling Analysis
increased, the overall stability of the girder has increased as well. This phenomenon is due to the
fact as the flange width increased then the girder becomes more rotationally stiff. This stiffness

39
in rotation does not allow the girder to rotate its cross section, which is a characteristic of lateral-
torsional buckling. As a result, the girder has an increase in stability.
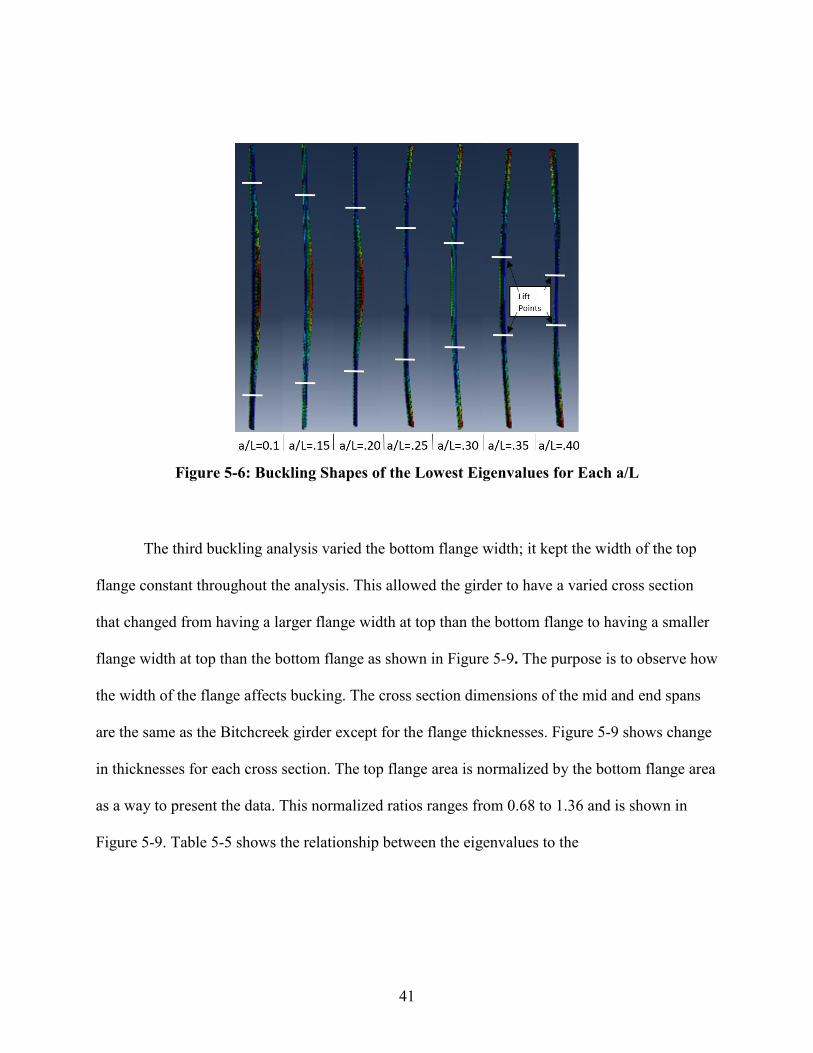
The lowest, positive eigenvalues are selected for all buckling analyses because the girder
will buckle at those values first before reaching other eigenvalues. These eigenvalues have
associated mode shapes as shown in Figure 5-6. The mode shapes in Figure 5-6 were also
present in the other two buckling analyses.
Table 5-3: Relationship Between Eigenvalues to the AASHTO Design Parameters
1/3 3.35
1/4 2.45
1/4.5 2.14
1/5 1.91
1/6 1.65
1/3 5.41
1/4 4.08
1/4.5 3.56
1/5 3.16
1/6 2.66
1/3 9.08
1/4 7.26
1/4.5 6.73
1/5 6.00
1/6 4.68
1/3 12.77
1/4 11.38
1/4.5 10.72
1/5 9.38
1/6 6.38
1/3 10.85
1/4 6.65
1/4.5 5.05
1/5 3.99
1/6 2.62
1/3 6.34
1/4 3.23
1/4.5 2.46
1/5 1.95
1/6 1.30
1/3 4.09
1/4 2.07
1/4.5 1.56
1/5 1.24
1/6 0.83
0.3 59.055
0.35 68.8975
0.4 78.74
0.15 29.5275
0.2 39.37
0.25 49.2125
a/L a(ft) b/d Eigenvalue
0.1 19.685

40
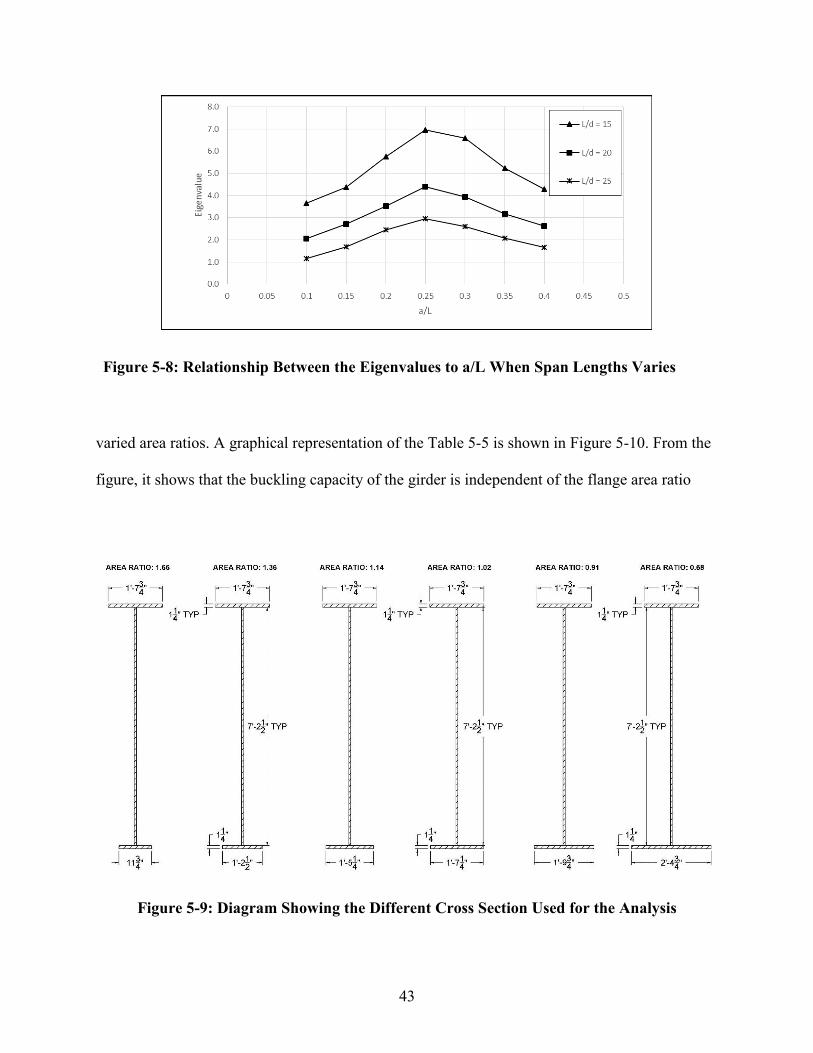
The next buckling analysis involved varying the span lengths. The only specifications
changed from the original Bitchcreek girder was the span length. Figure 5-7 shows the cross
section dimensions of the mid and end spans. The span length, L, is normalized to the web’s
depth, d, and is defined to be the ratio of L/d; the range of this ratio varies from 15 to 25. The
reason for the normalization of the span length is for the ease of presenting the data. Table 5-4
shows the relationship between the eigenvalues to the normalized, L/d, values. A graphical
representation is shown in Figure 5-8. From the figure, it shows that the optimal pick point.
location is 0.25L. This phenomenon is the same as the one mentioned above. The figure also
shows a decrease in span length, L, increases the eigenvalues. This makes sense because lateral-
torsional buckling is a function of length. Therefore, as the length increase then the buckling
capacity decrease whereas if length decrease, then the buckling capacity increase.
Figure 5-5: Relationship Between Eigenvalues to a/L When Flange Width Varies
41
Figure 5-6: Buckling Shapes of the Lowest Eigenvalues for Each a/L
The third buckling analysis varied the bottom flange width; it kept the width of the top
flange constant throughout the analysis. This allowed the girder to have a varied cross section
that changed from having a larger flange width at top than the bottom flange to having a smaller
flange width at top than the bottom flange as shown in Figure 5-9. The purpose is to observe how
the width of the flange affects bucking. The cross section dimensions of the mid and end spans
are the same as the Bitchcreek girder except for the flange thicknesses. Figure 5-9 shows change
in thicknesses for each cross section. The top flange area is normalized by the bottom flange area
as a way to present the data. This normalized ratios ranges from 0.68 to 1.36 and is shown in
Figure 5-9. Table 5-5 shows the relationship between the eigenvalues to the

42
Figure 5-7: Cross Sections at Mid and End Spans Used in the Second Buckling Analysis
Table 5-4: Relationship Between Eigenvalues to Span Lengths
0.10 10.83 3.66
0.15 16.24 4.38
0.20 21.65 5.76
0.25 27.07 6.96
0.30 32.48 6.58
0.35 37.89 5.22
0.40 43.31 4.28
0.10 14.46 2.06
0.15 21.69 2.71
0.20 28.92 3.51
0.25 36.15 4.40
0.30 43.38 3.93
0.35 50.61 3.17
0.40 57.84 2.61
0.10 18.08 1.14
0.15 27.11 1.68
0.20 36.15 2.44
0.25 45.19 2.96
0.30 54.23 2.60
0.35 63.26 2.07
0.40 72.30 1.65
108.27
144.6
180.75
15
20
25
Span Length, L
(ft)L/d a/L a (ft) Eigenvalue
43
Figure 5-8: Relationship Between the Eigenvalues to a/L When Span Lengths Varies
varied area ratios. A graphical representation of the Table 5-5 is shown in Figure 5-10. From the
figure, it shows that the buckling capacity of the girder is independent of the flange area ratio
Figure 5-9: Diagram Showing the Different Cross Section Used for the Analysis

44
for a/L ratios of 0.1 to 0.2. The response of the girder follows a general trend: after reaching its
optimal capacity the capacity decrease with increasing a/L ratio. Also, the results shows that the
buckling capacity of the girder decreases with increasing flange area ratio except for the ratio of
1.36 at a a/L of 0.35. There is no plausible explanation of the occurrence. Further research is
needed to explain this phenomenon.
The last set analysis was the non-linear analysis. This analysis relates maximum lateral
displacements of the top flange to the optimal pick point location of 0.25L. The scope of the
analysis is to analyzed five different girder span each with 24 pick point locations and to keep
the cross sections of the mid and end span the same as the original Bitchcreek girder. The span
lengths vary from the minima of 114.8 ft. to maximum of 197 ft. Figure 5-11 shows results from
the non-linear analysis. The figure shows the lateral displacement decrease when the pick point
locations get closer to the ratio of 0.25. A possible explanation for the somewhat sinusoid
response is that buckling analysis is somewhat similar to a frequency response and the frequency
response of a beam is a sinusoidal.
The maximum lateral displacements are the sum of the mid span displacement and the end
span displacement. Figure 5-12 and Figure 5-13 shows typical locations of where the mid span
and end span measurements were taken, which is represented by the red dot. The reason for
summing these two displacements is to account for the fact that as the middle of the girder
displaced in one direction the end of the girder displaces in the opposite direction. Figure 5-11

45
Table 5-5: Relationship Between Eigenvalues to Flange Area Ratios
Figure 5-10: Relationship Between the Eigenvalues to a/L When Area Ratios Vary
28.87 0.68 2.10
21.65 0.91 2.01
19.25 1.02 1.98
17.32 1.14 1.95
14.50 1.36 1.90
11.81 1.66 1.87
28.87 0.68 3.38
21.65 0.91 3.36
19.25 1.02 3.34
17.32 1.14 3.32
14.50 1.36 3.28
11.81 1.66 3.24
28.87 0.68 6.27
21.65 0.91 6.34
19.25 1.02 6.35
17.32 1.14 6.32
14.50 1.36 6.23
11.81 1.66 5.97
28.87 0.68 10.47
21.65 0.91 9.58
19.25 1.02 8.98
17.32 1.14 8.31
14.50 1.36 7.12
11.81 1.66 5.64
28.87 0.68 9.98
21.65 0.91 6.69
19.25 1.02 5.57
17.32 1.14 4.83
14.50 1.36 5.46
11.81 1.66 3.13
28.87 0.68 5.19
21.65 0.91 3.23
19.25 1.02 2.69
17.32 1.14 2.34
14.50 1.36 3.91
11.81 1.66 1.56
28.87 0.68 3.24
21.65 0.91 2.00
19.25 1.02 1.72
17.32 1.14 1.51
14.50 1.36 1.24
11.81 1.66 1.02
bbf (in)
0.25
0.30
0.35
0.40
Calculated
Area RatioEigenvalue
49.21
59.06
68.90
Span Length, L
(ft)
196.85
a/L a(ft)
0.10
0.15
0.20
19.69
29.53
39.37
78.74

46
Figure 5-11: Lateral Displacements of Five Different Span Lengths with the Optimal Pick Point Location of 0.25
Figure 5-12: Mid Span Location to Measure Lateral Displacement

47
Figure 5-13: End Span Location to Measure Lateral Displacement
shows this phenomenon when the ratio a/L exceeded 0.25 by showing that the lateral
displacements started to increase. This increase is because the mid span displacement is very
small because the pick points are so close but the end span are free to deflect laterally almost like
a cantilever beam. Therefore, there are larger displacements at the end span than the mid span.
Figure 5-11 clearly shows that at the optimal pick point location the lateral displacements is a
minimum. There will always be some lateral displacement no matter where the pick points are
located, but the girder will not buckle.
Load vs. Displacement
A load vs. displacement plot was created from the non-linear analysis and is shown in
Figure 5-14. The pick point location, a, was 0.3 ft. from the edge of the girder. The figure shows
vertical loads plotted against lateral displacements at the mid span. The solid line represents the
equilibrium path, and the dash line represents the eigenvalue calculated from the buckling
analysis. The figure shows a yielding point on the solid line. The dash line is near that point. This

48
is reasonable because buckling occurs before plastic deformation occurs. This deformation
happens after the yielding point. As shown in the figure, once the buckling load reaches 0.82
kip/ft. the girder will displace lateral 1in. and buckle.
Another plot shown in Figure 5-15 shows vertical loads plotted against vertical
displacements at the mid span. The solid and dash lines have the same representations as before.
A positive displacement represents a downward translation. The figure shows when the girder
reaches its buckling capacity there is a vertical displacement. How far of a vertical displacement
depends upon the location of the pick points.
Figure 5-14: Load vs. Lateral Displacement Plot at Mid Span
0.000
1.000
2.000
3.000
4.000
5.000
0 5 10 15 20 25
Ver
tica
l Lo
ad (
kip
/ft)
Lateral Displacements at Mid Span (inches)
Load-Lateral Displacement at Mid Span

49
Figure 5-15: Load vs. Vertical Displacement Plot at Mid Span
Recommendations
After reviewing the data from the four analyses, it was determined that the best possible
pick point location is 0.25L for all non-prismatic, singly symmetric girders. In addition, this
conclusion can be applied to a non-prismatic, doubly symmetric girders due to Farris’ research
[30]. In fact, the results from this research are similar to Farris’ results. Farris concluded that the
optimal pick point location for a non-prismatic, doubly symmetric girder is 0.25L [30].
Therefore, there seems to be irrefutable evidences that the pick point location of 0.25L allows for
a significant percentage of the buckling capacity to be used for all girder types that are non-
prismatic, doubly or singly symmetric

50
CHAPTER 6 CONCLUSION
The purpose of this research is to determine the best optimal pick point location for lifting
non-prismatic, singly symmetric girders. The research used ABAQUS 6.14 to perform the four
analyses. Before performing these analyses, a scaled model of a girder was created and tested in
order to verify that finite element software produces reasonable results. The first three analyses
deal with finding the buckling capacity of a girder at each pick point location. The results from
these analyses concluded that the optimal pick point location is 0.25L, where L is the span length
of a girder. In addition, it concluded that increasing the flange width does increase stability of a
girder because it increases the rotational stiffness. The last analysis is a non-linear analysis. The
analysis determined the lateral displacement of five different span lengths. This analysis used the
buckling analysis to determine the lowest, positive eigenvalue at the largest unbraced length.
Then the eigenvalue was used as a load parameter in the non-linear analysis. The non-linear
analysis used the Riks method as its solver. The result showed that the optimal pick point
location of 0.25L not only used a high percentage of the buckling capacity but as well
significantly decrease lateral displacements. Therefore, the optimal pick point location for lifting
non-prismatic, singly symmetric girders is 0.25L.

51
REFERENCES
1. Officials, A.A.o.S.H.a.T., American Association of State Highway and Transportation Officials Bridge Design Specifications. 15 ed. 2010, Washington, DC: American Association of State Highway and Transportation Officials.
2. Stith, J., et al., Guidelines for design and safe handling of curved I-shaped steel girders. 2010, Center for Transportation Research, University of Texas at Austin.
3. Petruzzi, B.J., Stabilizing techniques for curved steel I-girders during construction. 2010.
4. Farris, J.F.S., Jason; Helwig, Todd; Frank, Karl H.; Engelhardt, Michael D.; Williamson, Eric, Erection lifting practices for horizontally curved I-girders, in 2009 World Steel Bridge Symp. 2009: San Antonio, TX.
5. Stith, J., et al. A method to calculate rotational deformations of curved plate girders during lifting. in Proc., 2009 ASCE Structures Congress. 2009.
6. Stith, J.C., Predicting the behavior of horizontally curved I-girders during construction. 2010.
7. Stith, J., et al., User-Friendly Finite Element Analysis Software for Analysis of Curved-Steel I-Girder Bridges. Transportation Research Record: Journal of the Transportation Research Board, 2010(2200): p. 43-49.
8. Stith, J.C., et al., Behavior of Horizontally Curved I-Girders during Lifting. Journal of Structural Engineering, 2013. 139(4): p. 481-490.
9. Plaut, R., C. Moen, and R. Cojocaru, Beam deflections and stresses during lifting. Engineering Journal, 2012. 49(4): p. 187.

52
10. Plaut, R.H. and C.D. Moen, Analysis of Elastic, Doubly Symmetric, Horizontally Curved Beams during Lifting. Journal of Structural Engineering, 2013. 139(1): p. 39-46.
11. Plaut, R.H. and C.D. Moen, Theory and applications of the lifting of elastic, doubly symmetric, horizontally curved beams. 2013.
12. Peart, W.L., E.J. Rhomberg, and R.W. James, Buckling of suspended cambered girders. Journal of Structural Engineering, 1992. 118(2): p. 505-528.
13. Tarnai, T., Variational methods for analysis of lateral buckling of beams hung at both ends. International Journal of Mechanical Sciences, 1979. 21(6): p. 329-337.
14. Dux, P.F.K.S., Buckling of Suspended I‐Beams. Journal of Structural Engineering, 1990. 116(7): p. 1877-1891.
15. Tan, D., Analysis of self-weight induced collapse of long-deep beams. Computers & Structures, 2000. 78(4): p. 649-659.
16. Yegian, S., Lateral Buckling of I-beams Supported by Cables. 1956: University of Illinois at Urbana-Champaign.
17. Suryoatmono, B. and D. Ho, The moment–gradient factor in lateral–torsional buckling on wide flange steel sections. Journal of Constructional Steel Research, 2002. 58(9): p. 1247-1264.
18. Helwig, T.A. and K.H. Frank, Lateral-torsional buckling of singly symmetric I-beams. Journal of Structural Engineering, 1997. 123(9): p. 1172.
19. Duerr, D., Lateral–Torsional Buckling of Suspended I-Shape Lifting Beams. Practice Periodical on Structural Design and Construction, 2015: p. 06015001.
20. Mohebkhah, A., The moment-gradient factor in lateral–torsional buckling on inelastic castellated beams. Journal of Constructional Steel Research, 2004. 60(10): p. 1481-1494.

53
21. Construction, A.I.o.S., Steel Construction Manual. 14 ed. 2011, United States in America.
22. Stratford, T. and C. Burgoyne, Lateral Stability of long precast concrete beams. Proceedings of the ICE-Structures and Buildings, 1999. 134(2): p. 169-180.
23. Stratford, T. and C. Burgoyne, The toppling of hanging beams. International journal of solids and structures, 2000. 37(26): p. 3569-3589.
24. Laszlo, G.I., R.R., Handling and shipping of long span bridge beams. PCI Journal, 1987. 32(6): p. 86-101.
25. Yuen, R.M., Lateral buckling of steel I-section bridge girders braced by U-frames. 1992, University of Leeds.
26. Moon, J., et al., Lateral–torsional buckling of I-girder with corrugated webs under uniform bending. Thin-Walled Structures, 2009. 47(1): p. 21-30.
27. Smith, B., Lateral Torsional Buckling of Long, Slender, Non-Primatic, Singly-Symmetric Girders, in Civil and Environmental Engineering. 2008, Brigham Young University: Provo UT. p. 25.
28. Sun, E.Q. Shear locking and hourglassing in msc nastran, abaqus, and ansys.
29. Crisfield, M.A., Non-Linear Finite Element Analysis of Solids and Structures Vol. 1. 1991, West Sussex, England: John Wiley & Sons Ltd. 345.
30. Farris, J.F., Behavior of Horizontally Curved Steel I-Girders During Construction, in Civil Engineering Department. 2008, University of Texas: Texas. p. 211.