optimising your profits…
DESCRIPTION
Optimising your profits…. ``. The key to success these days is a bit more than just a will and a way. You need a partner that offers excellent products, reliable service and support, and valuable technical advice . - PowerPoint PPT PresentationTRANSCRIPT

Optimising your
profits…
Optimising your
profits…

````
The key to success these days is a bit more than just a will and a way. You need a partner that offers excellent products, reliable service and support, and valuable technical advice.
has been developed with input from a top South African restaurant, a supermarket chain, a small franchise and a 109-bedroom hotel. This on-site experience has given Platinum the edge over its competitors. Ease-of-operation and features you really need, sets a new standard in Point-of-Sale. Our ‘Reports on Demand’ feature creates reports when and how you need them. Microsoft SQL Server database ensures stability unheard of until now. Designed to work with Microsoft XP ensures that your system is up to date and feature packed.
Platinum Control Software

LOG ON PANELLOG ON PANEL
Click the Platinum Icon on desktop to access the Platinum Log On Panel.
Click the Platinum Icon on desktop to access the Platinum Log On Panel.
Select a user namebefore entering a password. The default password is 1007.
Select a user namebefore entering a password. The default password is 1007.
Once a password is entered, select one of the functions on the panel on the right hand side of the screen.
Once a password is entered, select one of the functions on the panel on the right hand side of the screen.
The Log On Panel is the first panel that appears when Platinum starts.
The keypad in the centre is used to enter the user password.
A user name can be selected by using the User Name drop-down box.
Once a name and password has been entered, various functions can be accessed by selecting an option on the right hand side panel.
Users may choose to clock in or clock out by selecting the ‘Clock In’ or ‘Clock Out’ option.
Cash ups can be accessed by selecting the ‘Cashup’s’ option.
Stock takes are accessed by selecting the ‘Stock Takes’ option.
Restaurant Reservations are accessed by selecting the ‘Reservations’ options.
If ‘Ok’ is selected, the user will be taken to the relevant panel, depending on the user’s access rights.
The Daily Notice Board displays additional information applicable to the user. The Daily Notice Board can be edited on the Company Details panels.
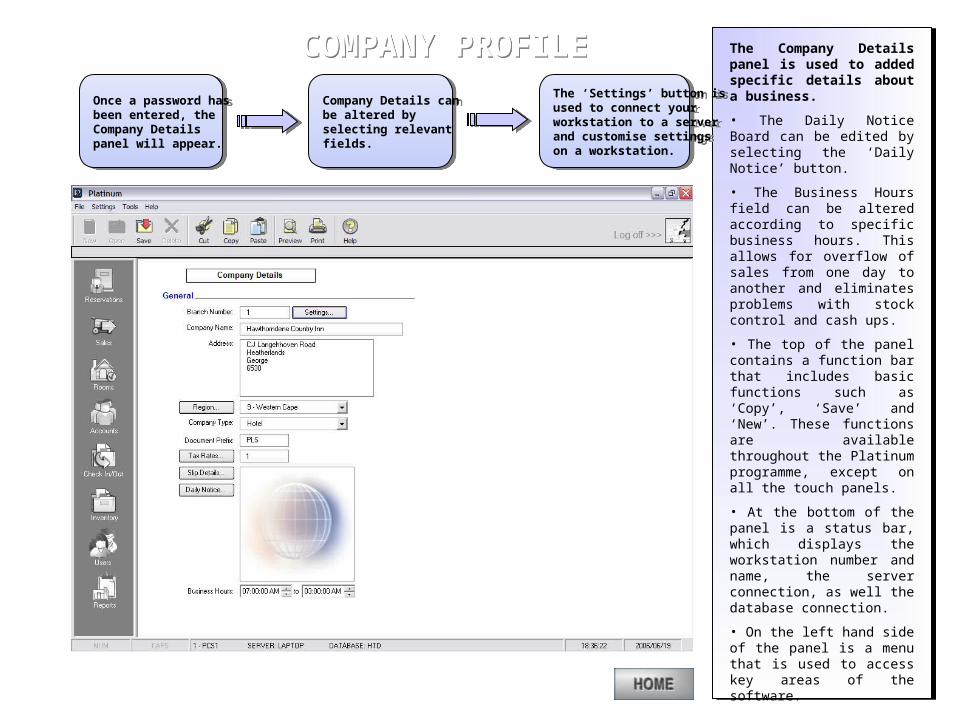
COMPANY PROFILECOMPANY PROFILE
Once a password has been entered, the Company Details panel will appear.
Once a password has been entered, the Company Details panel will appear.
Company Details can be altered by selecting relevant fields.
Company Details can be altered by selecting relevant fields.
The ‘Settings’ button isused to connect your workstation to a server and customise settings on a workstation.
The ‘Settings’ button isused to connect your workstation to a server and customise settings on a workstation.
The Company Details panel is used to added specific details about a business.
• The Daily Notice Board can be edited by selecting the ‘Daily Notice’ button.
• The Business Hours field can be altered according to specific business hours. This allows for overflow of sales from one day to another and eliminates problems with stock control and cash ups.
• The top of the panel contains a function bar that includes basic functions such as ‘Copy’, ‘Save’ and ‘New’. These functions are available throughout the Platinum programme, except on all the touch panels.
• At the bottom of the panel is a status bar, which displays the workstation number and name, the server connection, as well the database connection.
• On the left hand side of the panel is a menu that is used to access key areas of the software.
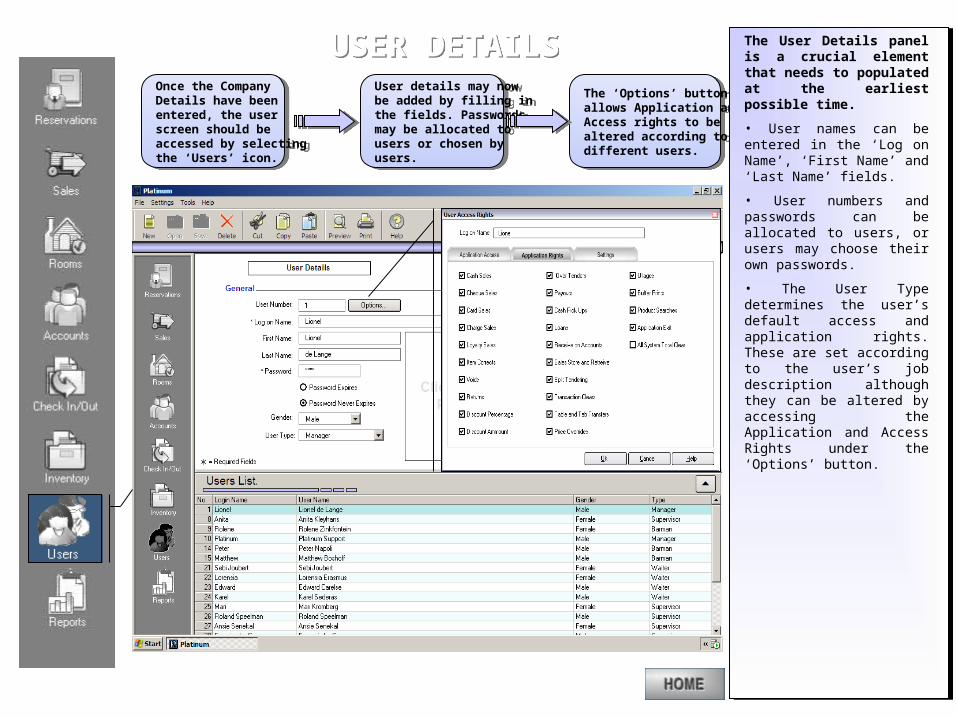
USER DETAILSUSER DETAILSOnce the Company Details have been entered, the user screen should be accessed by selecting the ‘Users’ icon.
Once the Company Details have been entered, the user screen should be accessed by selecting the ‘Users’ icon.
User details may now be added by filling in the fields. Passwords may be allocated to users or chosen by users.
User details may now be added by filling in the fields. Passwords may be allocated to users or chosen by users.
The ‘Options’ button allows Application and Access rights to be altered according to different users.
The ‘Options’ button allows Application and Access rights to be altered according to different users.
The User Details panel is a crucial element that needs to populated at the earliest possible time.
• User names can be entered in the ‘Log on Name’, ‘First Name’ and ‘Last Name’ fields.
• User numbers and passwords can be allocated to users, or users may choose their own passwords.
• The User Type determines the user’s default access and application rights. These are set according to the user’s job description although they can be altered by accessing the Application and Access Rights under the ‘Options’ button.
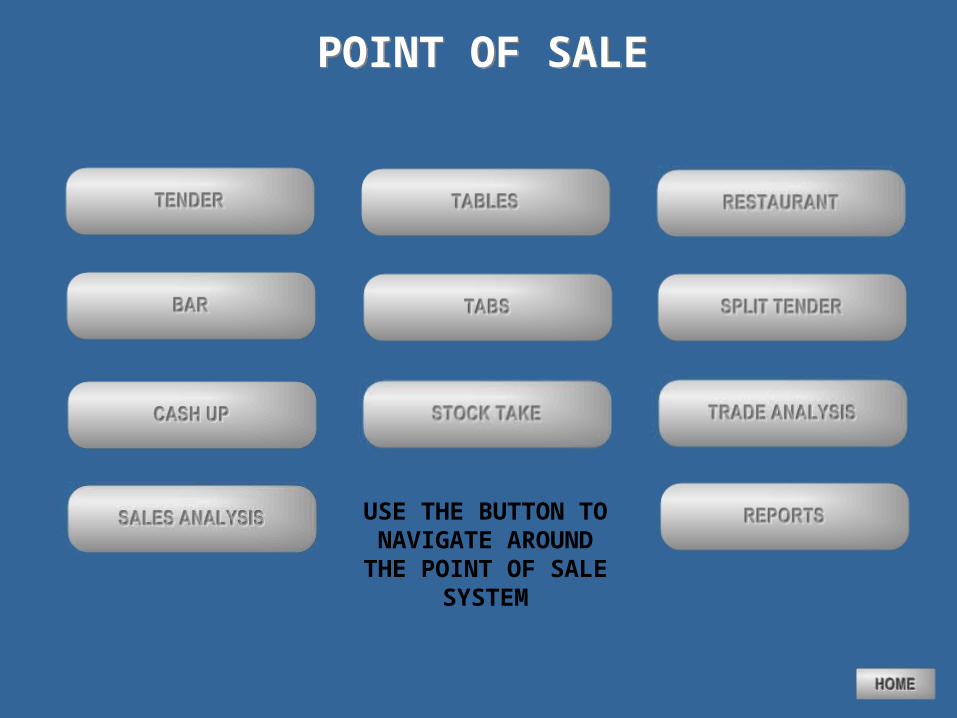
POINT OF SALEPOINT OF SALE
USE THE BUTTON TO NAVIGATE AROUND THE POINT OF SALE
SYSTEM
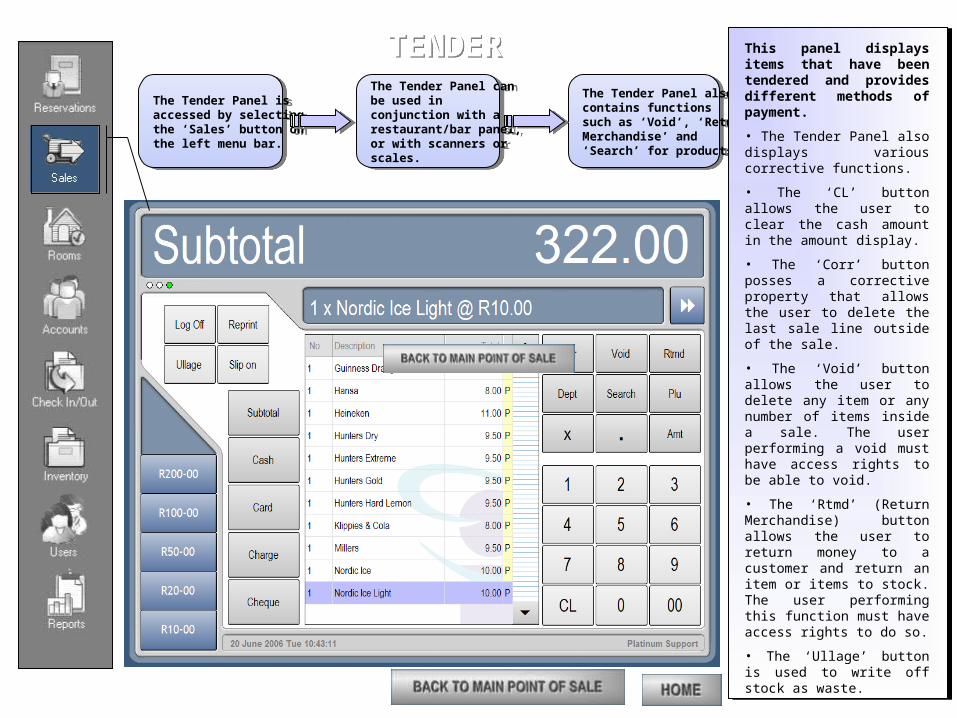
TENDERTENDER
The Tender Panel is accessed by selecting the ‘Sales’ button on the left menu bar.
The Tender Panel is accessed by selecting the ‘Sales’ button on the left menu bar.
The Tender Panel can be used in conjunction with a restaurant/bar panel,or with scanners orscales.
The Tender Panel can be used in conjunction with a restaurant/bar panel,or with scanners orscales.
The Tender Panel also contains functions such as ‘Void’, ‘ReturnMerchandise’ and ‘Search’ for products.
The Tender Panel also contains functions such as ‘Void’, ‘ReturnMerchandise’ and ‘Search’ for products.
This panel displays items that have been tendered and provides different methods of payment.
• The Tender Panel also displays various corrective functions.
• The ‘CL’ button allows the user to clear the cash amount in the amount display.
• The ‘Corr’ button posses a corrective property that allows the user to delete the last sale line outside of the sale.
• The ‘Void’ button allows the user to delete any item or any number of items inside a sale. The user performing a void must have access rights to be able to void.
• The ‘Rtmd’ (Return Merchandise) button allows the user to return money to a customer and return an item or items to stock. The user performing this function must have access rights to do so.
• The ‘Ullage’ button is used to write off stock as waste.
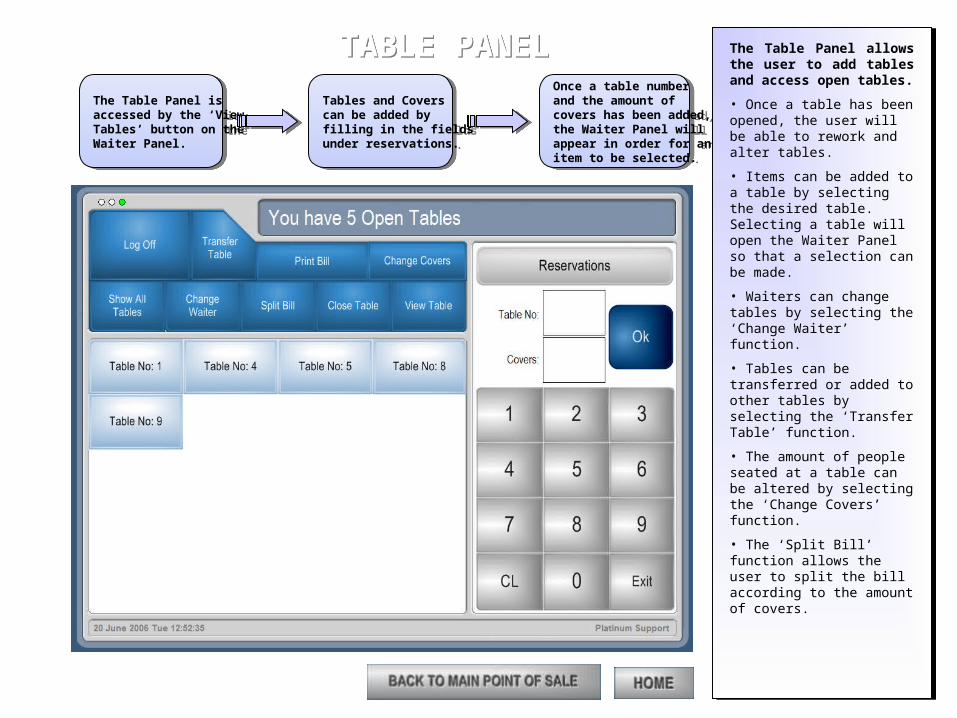
TABLE PANELTABLE PANEL
The Table Panel is accessed by the ‘ViewTables’ button on theWaiter Panel.
The Table Panel is accessed by the ‘ViewTables’ button on theWaiter Panel.
Tables and Covers can be added by filling in the fieldsunder reservations.
Tables and Covers can be added by filling in the fieldsunder reservations.
Once a table number and the amount of covers has been added,the Waiter Panel will appear in order for an item to be selected.
Once a table number and the amount of covers has been added,the Waiter Panel will appear in order for an item to be selected.
The Table Panel allows the user to add tables and access open tables.
• Once a table has been opened, the user will be able to rework and alter tables.
• Items can be added to a table by selecting the desired table. Selecting a table will open the Waiter Panel so that a selection can be made.
• Waiters can change tables by selecting the ‘Change Waiter’ function.
• Tables can be transferred or added to other tables by selecting the ‘Transfer Table’ function.
• The amount of people seated at a table can be altered by selecting the ‘Change Covers’ function.
• The ‘Split Bill’ function allows the user to split the bill according to the amount of covers.
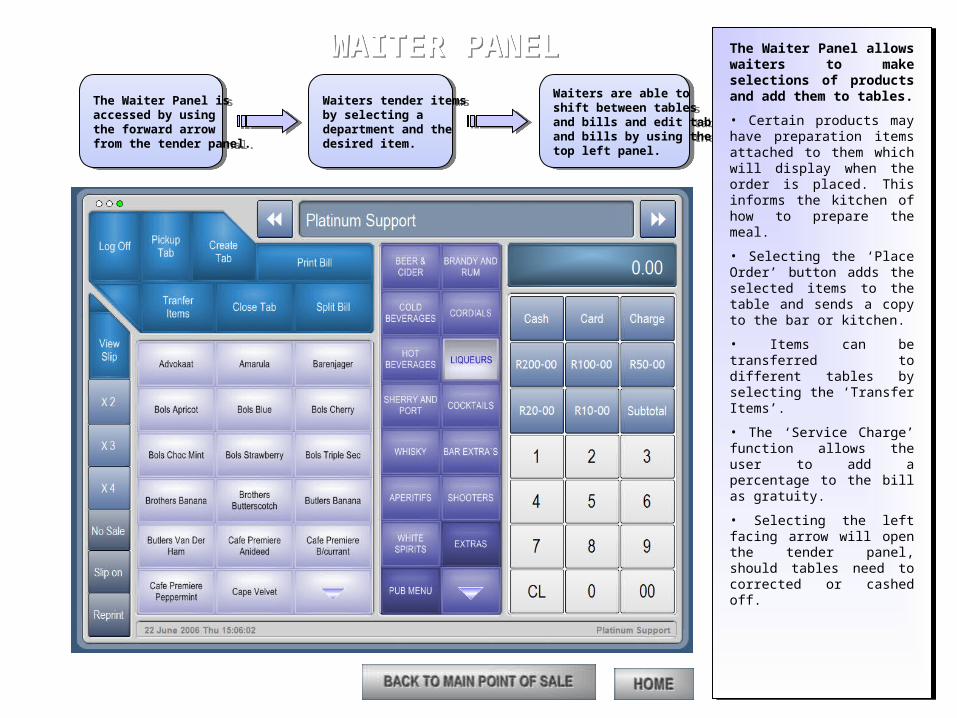
WAITER PANELWAITER PANEL
The Waiter Panel is accessed by using the forward arrow from the tender panel.
The Waiter Panel is accessed by using the forward arrow from the tender panel.
Waiters tender items by selecting a department and thedesired item.
Waiters tender items by selecting a department and thedesired item.
Waiters are able toshift between tables and bills and edit tablesand bills by using the top left panel.
Waiters are able toshift between tables and bills and edit tablesand bills by using the top left panel.
The Waiter Panel allows waiters to make selections of products and add them to tables.
• Certain products may have preparation items attached to them which will display when the order is placed. This informs the kitchen of how to prepare the meal.
• Selecting the ‘Place Order’ button adds the selected items to the table and sends a copy to the bar or kitchen.
• Items can be transferred to different tables by selecting the ‘Transfer Items’.
• The ‘Service Charge’ function allows the user to add a percentage to the bill as gratuity.
• Selecting the left facing arrow will open the tender panel, should tables need to corrected or cashed off.
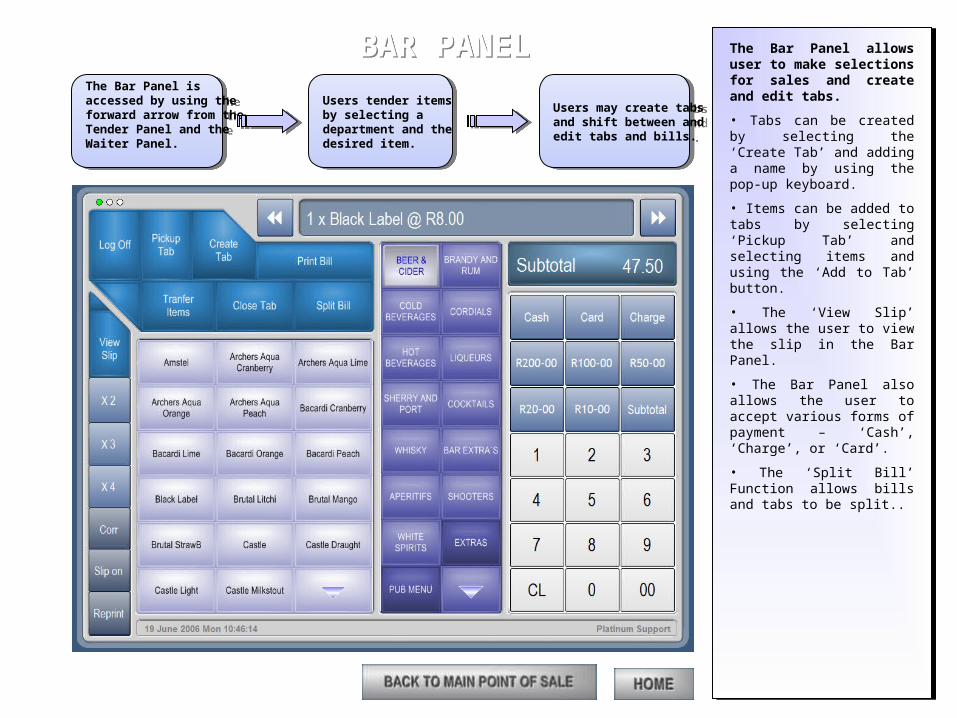
BAR PANELBAR PANELThe Bar Panel is accessed by using theforward arrow from theTender Panel and the Waiter Panel.
The Bar Panel is accessed by using theforward arrow from theTender Panel and the Waiter Panel.
Users tender items by selecting a department and the desired item.
Users tender items by selecting a department and the desired item.
Users may create tabs and shift between and edit tabs and bills.
Users may create tabs and shift between and edit tabs and bills.
The Bar Panel allows user to make selections for sales and create and edit tabs.
• Tabs can be created by selecting the ‘Create Tab’ and adding a name by using the pop-up keyboard.
• Items can be added to tabs by selecting ‘Pickup Tab’ and selecting items and using the ‘Add to Tab’ button.
• The ‘View Slip’ allows the user to view the slip in the Bar Panel.
• The Bar Panel also allows the user to accept various forms of payment – ‘Cash’, ‘Charge’, or ‘Card’.
• The ‘Split Bill’ Function allows bills and tabs to be split..
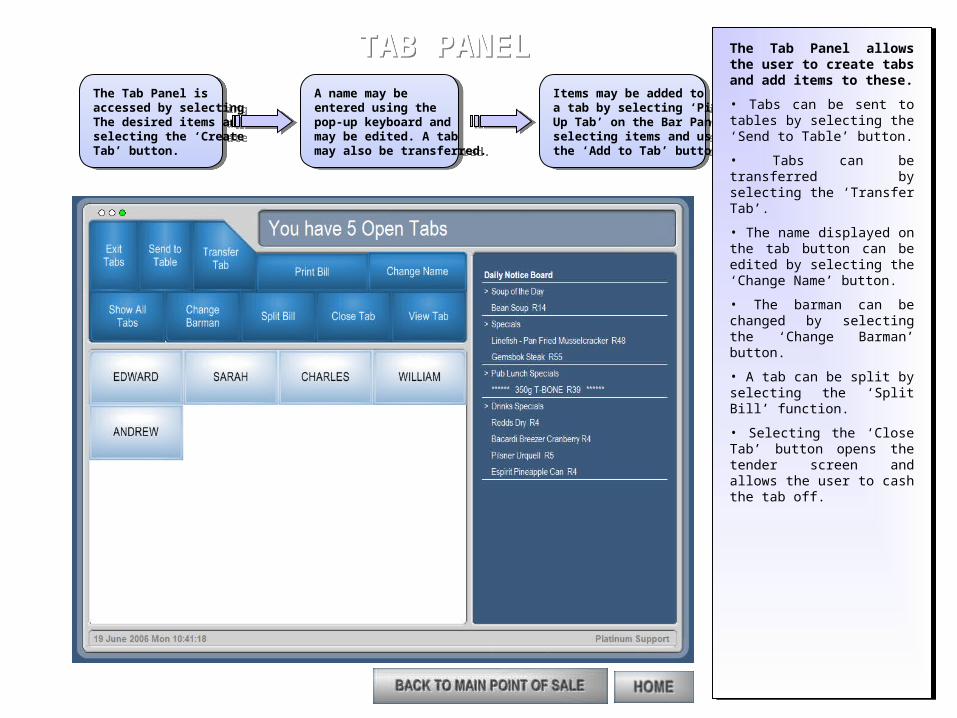
TAB PANELTAB PANELThe Tab Panel is accessed by selectingThe desired items andselecting the ‘CreateTab’ button.
The Tab Panel is accessed by selectingThe desired items andselecting the ‘CreateTab’ button.
A name may be entered using the pop-up keyboard andmay be edited. A tabmay also be transferred.
A name may be entered using the pop-up keyboard andmay be edited. A tabmay also be transferred.
Items may be added to a tab by selecting ‘Pick Up Tab’ on the Bar Panel,selecting items and usingthe ‘Add to Tab’ button.
Items may be added to a tab by selecting ‘Pick Up Tab’ on the Bar Panel,selecting items and usingthe ‘Add to Tab’ button.
The Tab Panel allows the user to create tabs and add items to these.
• Tabs can be sent to tables by selecting the ‘Send to Table’ button.
• Tabs can be transferred by selecting the ‘Transfer Tab’.
• The name displayed on the tab button can be edited by selecting the ‘Change Name’ button.
• The barman can be changed by selecting the ‘Change Barman’ button.
• A tab can be split by selecting the ‘Split Bill’ function.
• Selecting the ‘Close Tab’ button opens the tender screen and allows the user to cash the tab off.
SPLIT TENDERSPLIT TENDERThe Split Tender Panel is accessed by
selecting the ‘Split Bill’ function on the Bar or Waiter Panel.
The Split Tender Panel is accessed by
selecting the ‘Split Bill’ function on the Bar or Waiter Panel.
A table can be split using the ‘Split Once’button.
A table can be split using the ‘Split Once’button.
Once a table has been split, the different splits can be maximised for editing by selecting the ‘ZoomSplit’ button.
Once a table has been split, the different splits can be maximised for editing by selecting the ‘ZoomSplit’ button.
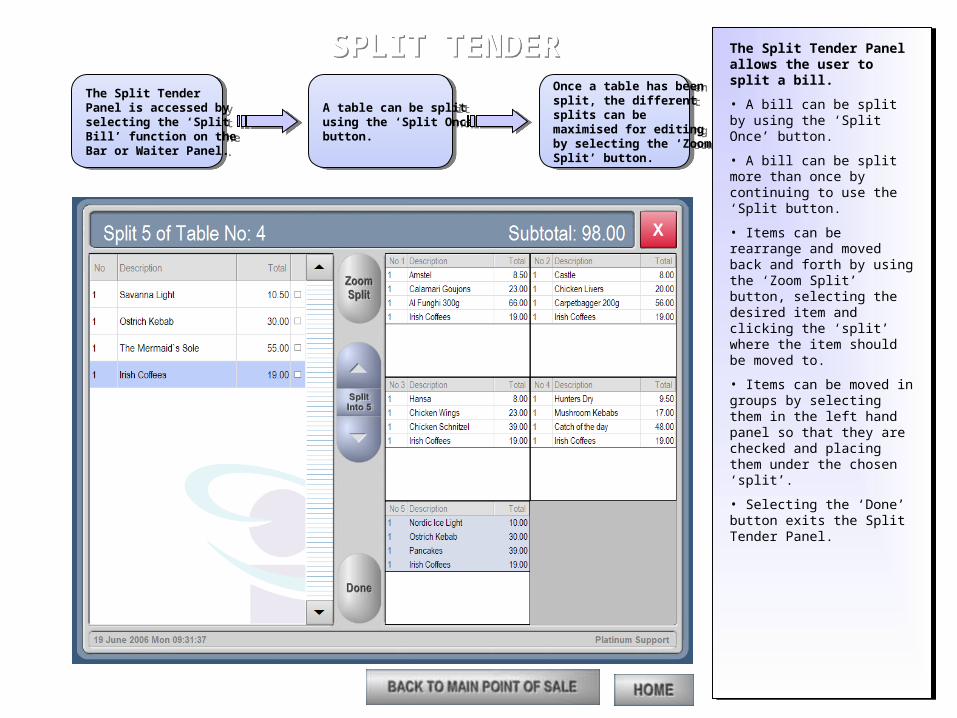
The Split Tender Panel allows the user to split a bill.
• A bill can be split by using the ‘Split Once’ button.
• A bill can be split more than once by continuing to use the ‘Split button.
• Items can be rearrange and moved back and forth by using the ‘Zoom Split’ button, selecting the desired item and clicking the ‘split’ where the item should be moved to.
• Items can be moved in groups by selecting them in the left hand panel so that they are checked and placing them under the chosen ‘split’.
• Selecting the ‘Done’ button exits the Split Tender Panel.
CASH UPCASH UPThe Cash Up Panel isaccessed by entering a password on the LogOn Panel and selecting the ‘Cash Ups’ function.
The Cash Up Panel isaccessed by entering a password on the LogOn Panel and selecting the ‘Cash Ups’ function.
A user is selected from the drop-downbox.
A user is selected from the drop-downbox.
The Cash Up is executed by selecting the ‘Finalize Cash Up’button.
The Cash Up is executed by selecting the ‘Finalize Cash Up’button.
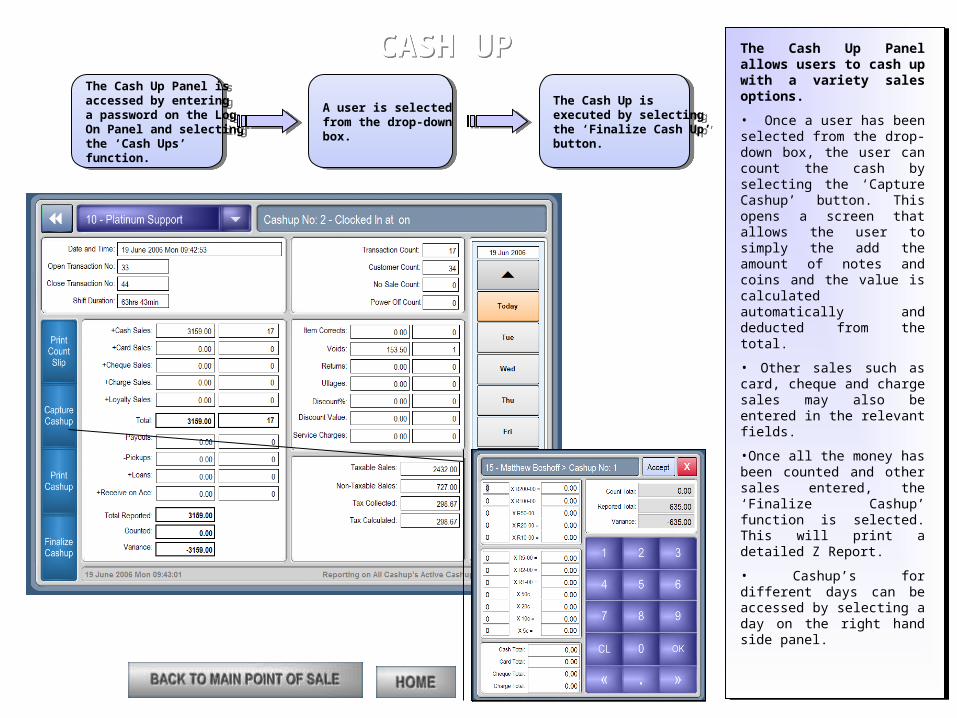
The Cash Up Panel allows users to cash up with a variety sales options.
• Once a user has been selected from the drop-down box, the user can count the cash by selecting the ‘Capture Cashup’ button. This opens a screen that allows the user to simply the add the amount of notes and coins and the value is calculated automatically and deducted from the total.
• Other sales such as card, cheque and charge sales may also be entered in the relevant fields.
•Once all the money has been counted and other sales entered, the ‘Finalize Cashup’ function is selected. This will print a detailed Z Report.
• Cashup’s for different days can be accessed by selecting a day on the right hand side panel.
STOCK TAKESTOCK TAKESTOCK TAKESTOCK TAKEThe Stock Take Panel is accessed by entering a password on the Log On Screen and selecting the ‘Stock Takes’ button.
The Stock Take Panel is accessed by entering a password on the Log On Screen and selecting the ‘Stock Takes’ button.
A manual stock take can be done by printing a count sheet. This is done by selecting the ‘Print Count Sheet’ button.
A manual stock take can be done by printing a count sheet. This is done by selecting the ‘Print Count Sheet’ button.
Data from a manual stock count can be entered by selecting departments and values, using the black department panel and the keypad.
Data from a manual stock count can be entered by selecting departments and values, using the black department panel and the keypad.
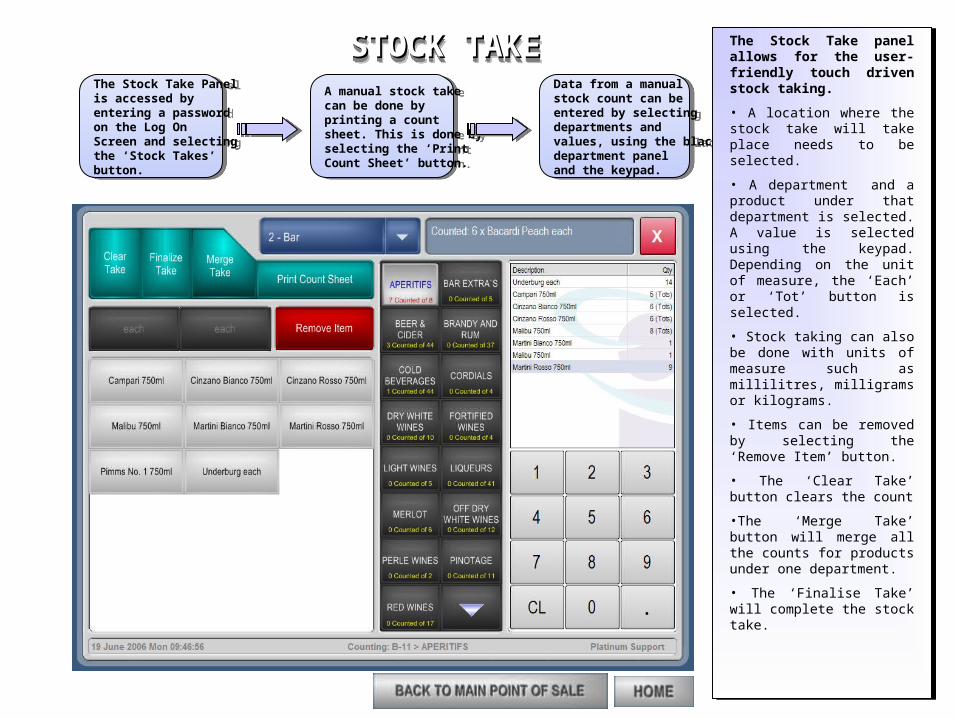
The Stock Take panel allows for the user-friendly touch driven stock taking.
• A location where the stock take will take place needs to be selected.
• A department and a product under that department is selected. A value is selected using the keypad. Depending on the unit of measure, the ‘Each’ or ‘Tot’ button is selected.
• Stock taking can also be done with units of measure such as millilitres, milligrams or kilograms.
• Items can be removed by selecting the ‘Remove Item’ button.
• The ‘Clear Take’ button clears the count
•The ‘Merge Take’ button will merge all the counts for products under one department.
• The ‘Finalise Take’ will complete the stock take.

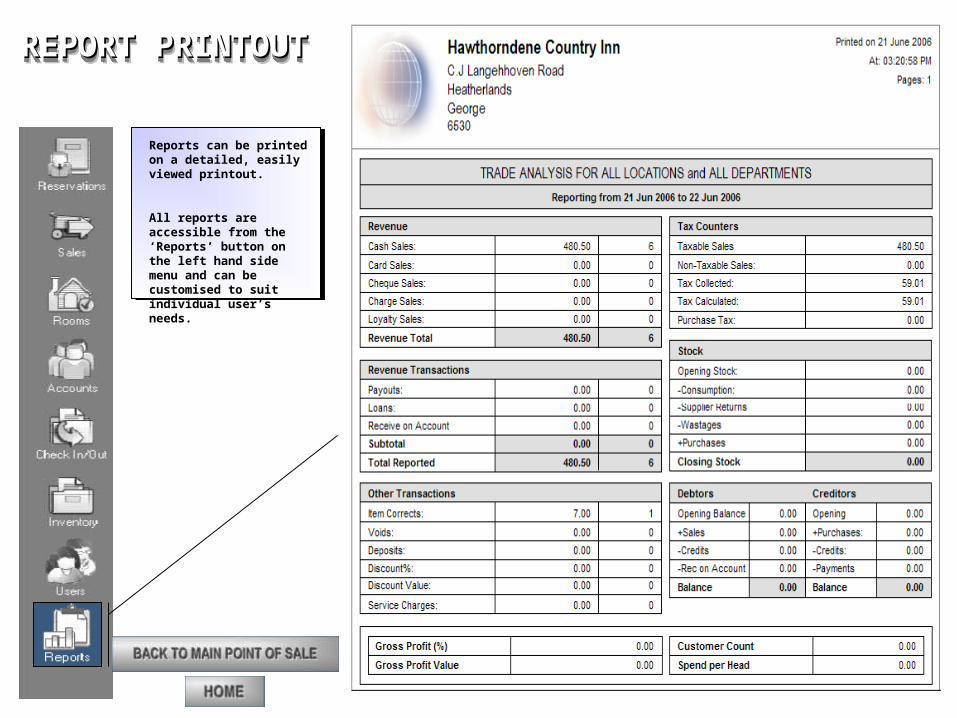
The Trade Analysis Report gives a detailed overview of the day’s sales, payouts and stock takes.
The Trade Analysis Report gives a detailed overview of the day’s sales, payouts and stock takes.
The Trade Analysis Report is accessed by selecting the ‘Reports’ function on the left hand side menu.
The Trade Analysis Report is accessed by selecting the ‘Reports’ function on the left hand side menu.
Reports can selected per day by selecting the date icon needs to the date. Reports can also be displayed by department and by location
Reports can selected per day by selecting the date icon needs to the date. Reports can also be displayed by department and by location
TRADE ANALYSIS REPORTTRADE ANALYSIS REPORTTRADE ANALYSIS REPORTTRADE ANALYSIS REPORT
A Sales Analysis by Product is accessed by selecting the drop-down box next to the date and selecting ‘Sales Analysis by Product’.
A Sales Analysis by Product is accessed by selecting the drop-down box next to the date and selecting ‘Sales Analysis by Product’.
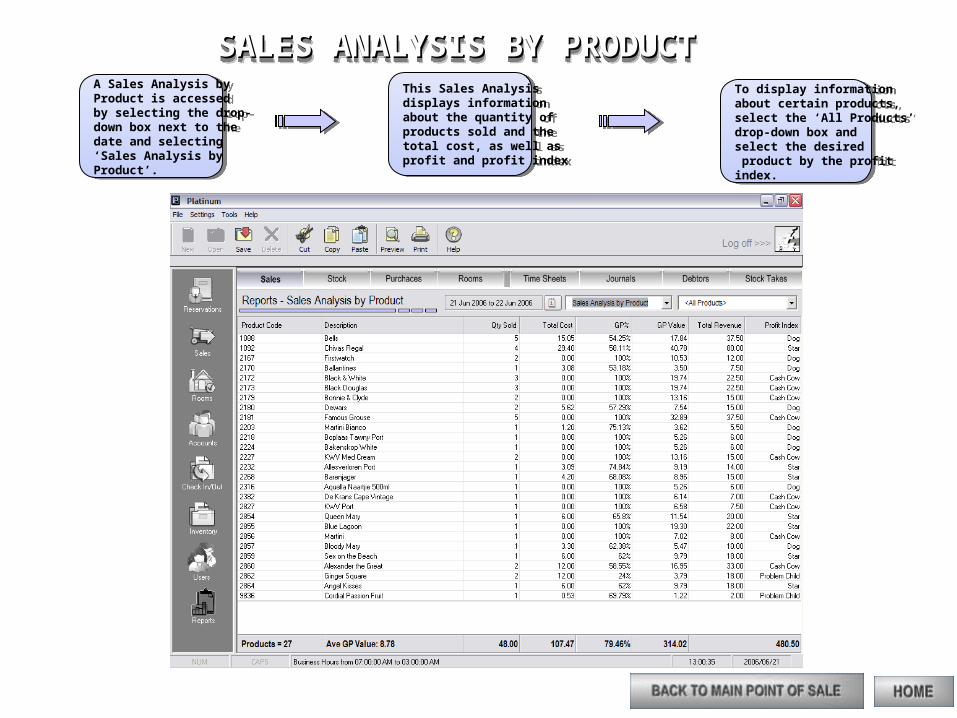
This Sales Analysis displays information about the quantity ofproducts sold and the total cost, as well as profit and profit index
This Sales Analysis displays information about the quantity ofproducts sold and the total cost, as well as profit and profit index
To display information about certain products, select the ‘All Products’ drop-down box and select the desired product by the profit index.
To display information about certain products, select the ‘All Products’ drop-down box and select the desired product by the profit index.
SALES ANALYSIS BY PRODUCTSALES ANALYSIS BY PRODUCTSALES ANALYSIS BY PRODUCTSALES ANALYSIS BY PRODUCT
REPORT PRINTOUTREPORT PRINTOUTREPORT PRINTOUTREPORT PRINTOUT
Reports can be printed on a detailed, easily viewed printout.
All reports are accessible from the ‘Reports’ button on the left hand side menu and can be customised to suit individual user’s needs.
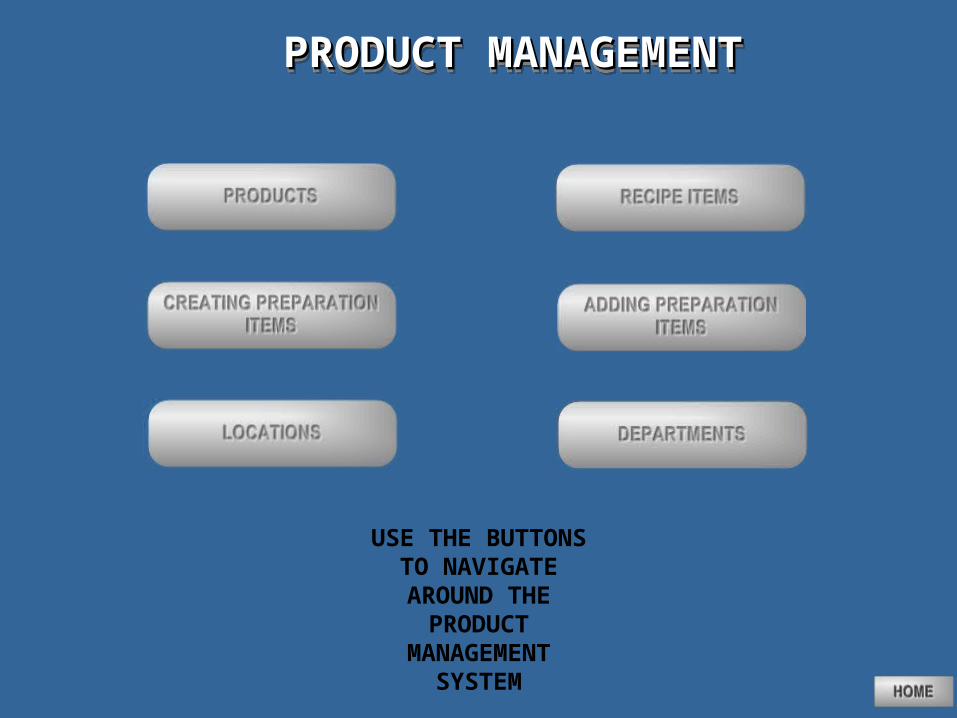
PRODUCT MANAGEMENTPRODUCT MANAGEMENTPRODUCT MANAGEMENTPRODUCT MANAGEMENT
USE THE BUTTONS TO NAVIGATE AROUND THE
PRODUCT MANAGEMENT
SYSTEM
PRODUCTSPRODUCTSPRODUCTSPRODUCTS
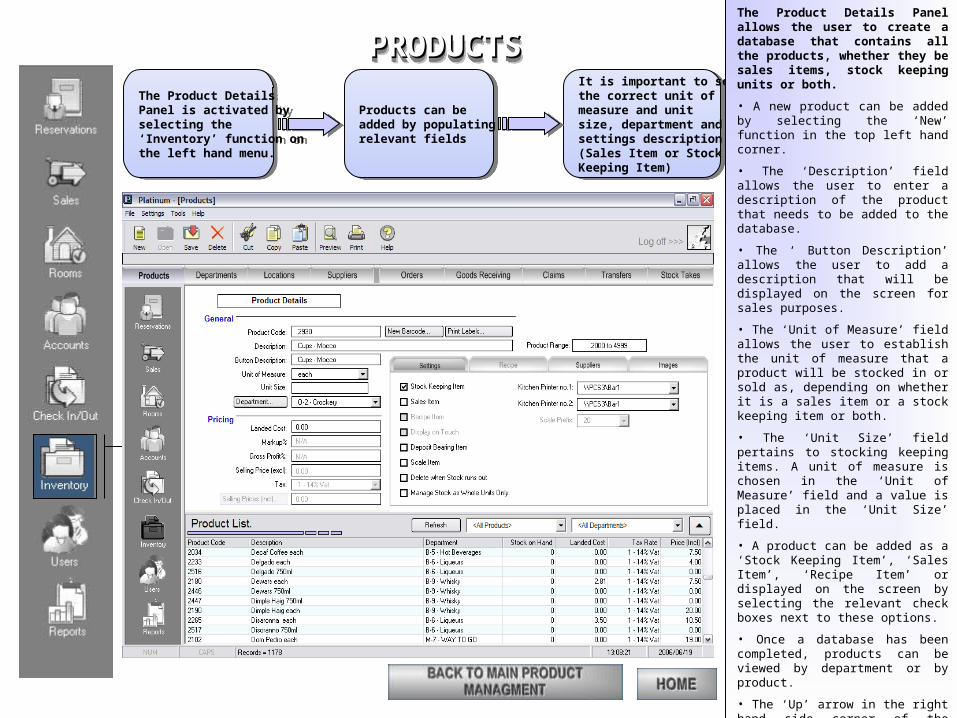
The Product Details Panel is activated by selecting the ‘Inventory’ function on the left hand menu.
The Product Details Panel is activated by selecting the ‘Inventory’ function on the left hand menu.
Products can be added by populating relevant fields
Products can be added by populating relevant fields
It is important to select the correct unit of measure and unit size, department and settings description (Sales Item or Stock Keeping Item)
It is important to select the correct unit of measure and unit size, department and settings description (Sales Item or Stock Keeping Item)
The Product Details Panel allows the user to create a database that contains all the products, whether they be sales items, stock keeping units or both.
• A new product can be added by selecting the ‘New’ function in the top left hand corner.
• The ‘Description’ field allows the user to enter a description of the product that needs to be added to the database.
• The ‘ Button Description’ allows the user to add a description that will be displayed on the screen for sales purposes.
• The ‘Unit of Measure’ field allows the user to establish the unit of measure that a product will be stocked in or sold as, depending on whether it is a sales item or a stock keeping item or both.
• The ‘Unit Size’ field pertains to stocking keeping items. A unit of measure is chosen in the ‘Unit of Measure’ field and a value is placed in the ‘Unit Size’ field.
• A product can be added as a ‘Stock Keeping Item’, ‘Sales Item’, ‘Recipe Item’ or displayed on the screen by selecting the relevant check boxes next to these options.
• Once a database has been completed, products can be viewed by department or by product.
• The ‘Up’ arrow in the right hand side corner of the Product List allows the user to find products, select them and edit them.
• Once a product has been added or edited, select the ‘Save’ button to save the product to the database.
RECIPE ITEMSRECIPE ITEMSRECIPE ITEMSRECIPE ITEMS
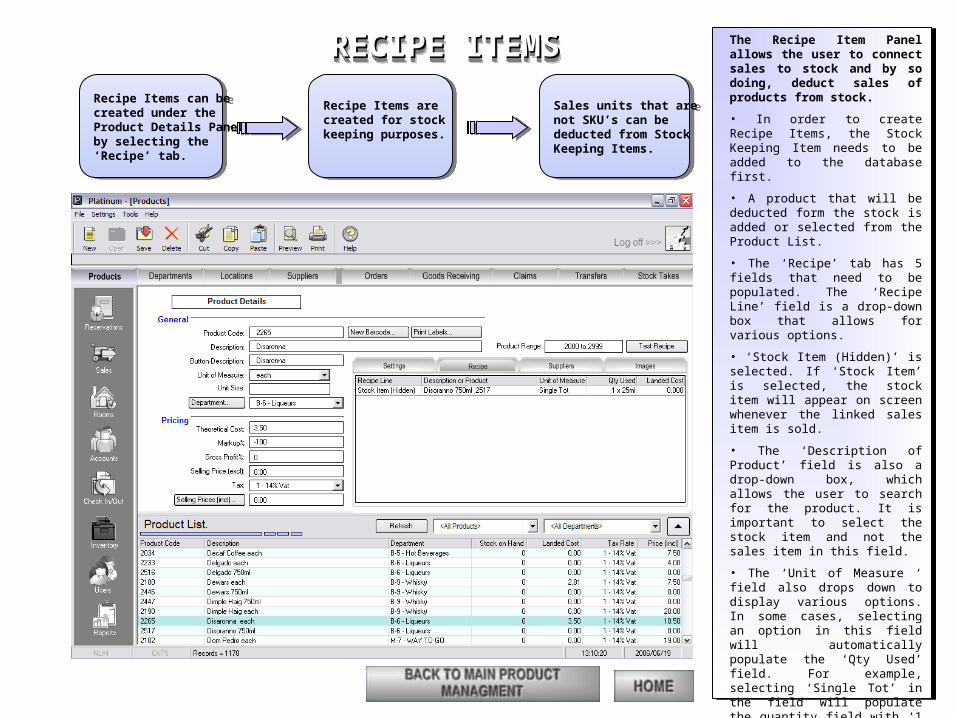
Recipe Items can be created under the Product Details Panel by selecting the ‘Recipe’ tab.
Recipe Items can be created under the Product Details Panel by selecting the ‘Recipe’ tab.
Recipe Items are created for stock keeping purposes.
Recipe Items are created for stock keeping purposes.
Sales units that are not SKU’s can be deducted from StockKeeping Items.
Sales units that are not SKU’s can be deducted from StockKeeping Items.
The Recipe Item Panel allows the user to connect sales to stock and by so doing, deduct sales of products from stock.
• In order to create Recipe Items, the Stock Keeping Item needs to be added to the database first.
• A product that will be deducted form the stock is added or selected from the Product List.
• The ‘Recipe’ tab has 5 fields that need to be populated. The ‘Recipe Line’ field is a drop-down box that allows for various options.
• ‘Stock Item (Hidden)’ is selected. If ‘Stock Item’ is selected, the stock item will appear on screen whenever the linked sales item is sold.
• The ‘Description of Product’ field is also a drop-down box, which allows the user to search for the product. It is important to select the stock item and not the sales item in this field.
• The ‘Unit of Measure ‘ field also drops down to display various options. In some cases, selecting an option in this field will automatically populate the ‘Qty Used’ field. For example, selecting ‘Single Tot’ in the field will populate the quantity field with ‘1 x 25ml’.
• The ‘Landed Cost’ field is populated by the Goods Receiving function.
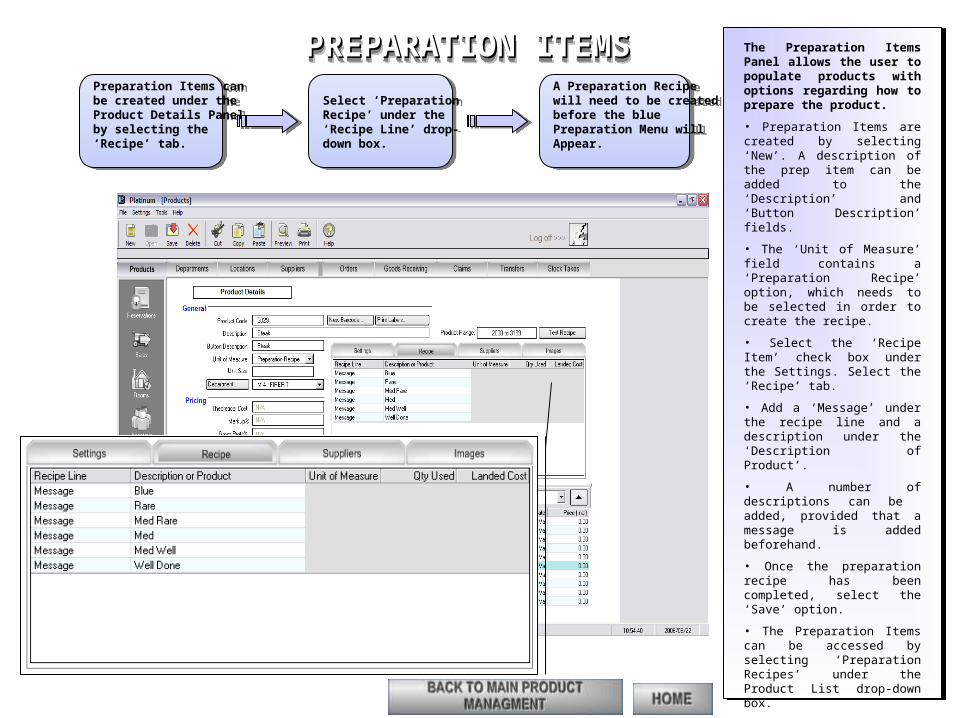
PREPARATION ITEMSPREPARATION ITEMSPREPARATION ITEMSPREPARATION ITEMSPreparation Items can be created under the Product Details Panel by selecting the ‘Recipe’ tab.
Preparation Items can be created under the Product Details Panel by selecting the ‘Recipe’ tab.
Select ‘Preparation Recipe’ under the ‘Recipe Line’ drop-down box.
Select ‘Preparation Recipe’ under the ‘Recipe Line’ drop-down box.
A Preparation Recipe will need to be created before the blue Preparation Menu willAppear.
A Preparation Recipe will need to be created before the blue Preparation Menu willAppear.
The Preparation Items Panel allows the user to populate products with options regarding how to prepare the product.
• Preparation Items are created by selecting ‘New’. A description of the prep item can be added to the ‘Description’ and ‘Button Description’ fields.
• The ‘Unit of Measure’ field contains a ‘Preparation Recipe’ option, which needs to be selected in order to create the recipe.
• Select the ‘Recipe Item’ check box under the Settings. Select the ‘Recipe’ tab.
• Add a ‘Message’ under the recipe line and a description under the ‘Description of Product’.
• A number of descriptions can be added, provided that a message is added beforehand.
• Once the preparation recipe has been completed, select the ‘Save’ option.
• The Preparation Items can be accessed by selecting ‘Preparation Recipes’ under the Product List drop-down box.
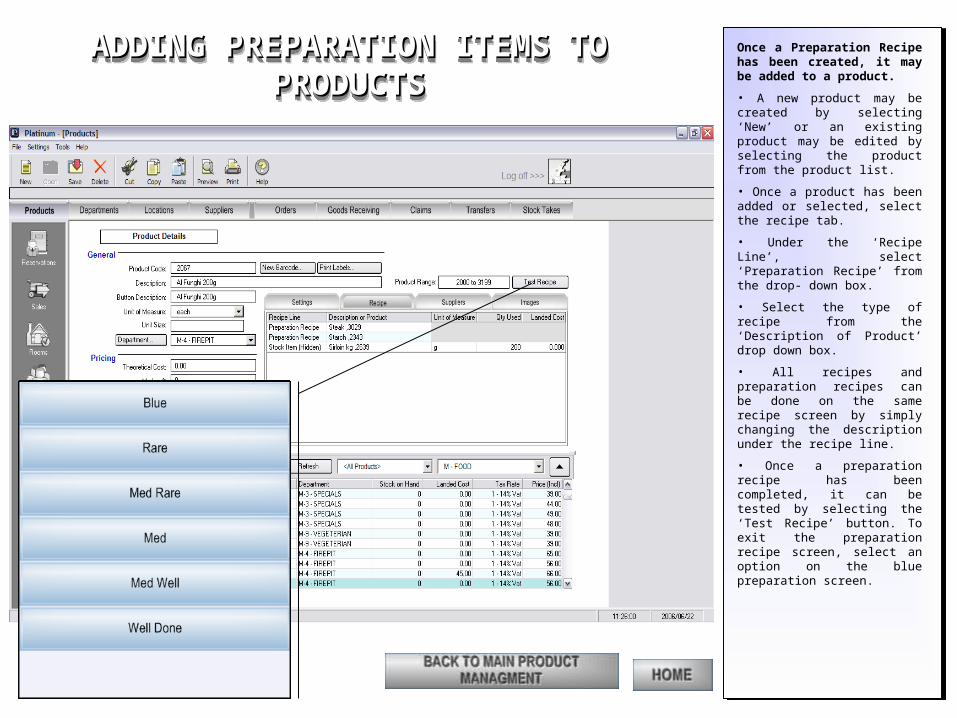
ADDING PREPARATION ITEMS TO ADDING PREPARATION ITEMS TO PRODUCTSPRODUCTS
ADDING PREPARATION ITEMS TO ADDING PREPARATION ITEMS TO PRODUCTSPRODUCTS
Once a Preparation Recipe has been created, it may be added to a product.
• A new product may be created by selecting ‘New’ or an existing product may be edited by selecting the product from the product list.
• Once a product has been added or selected, select the recipe tab.
• Under the ‘Recipe Line’, select ‘Preparation Recipe’ from the drop- down box.
• Select the type of recipe from the ‘Description of Product’ drop down box.
• All recipes and preparation recipes can be done on the same recipe screen by simply changing the description under the recipe line.
• Once a preparation recipe has been completed, it can be tested by selecting the ‘Test Recipe’ button. To exit the preparation recipe screen, select an option on the blue preparation screen.
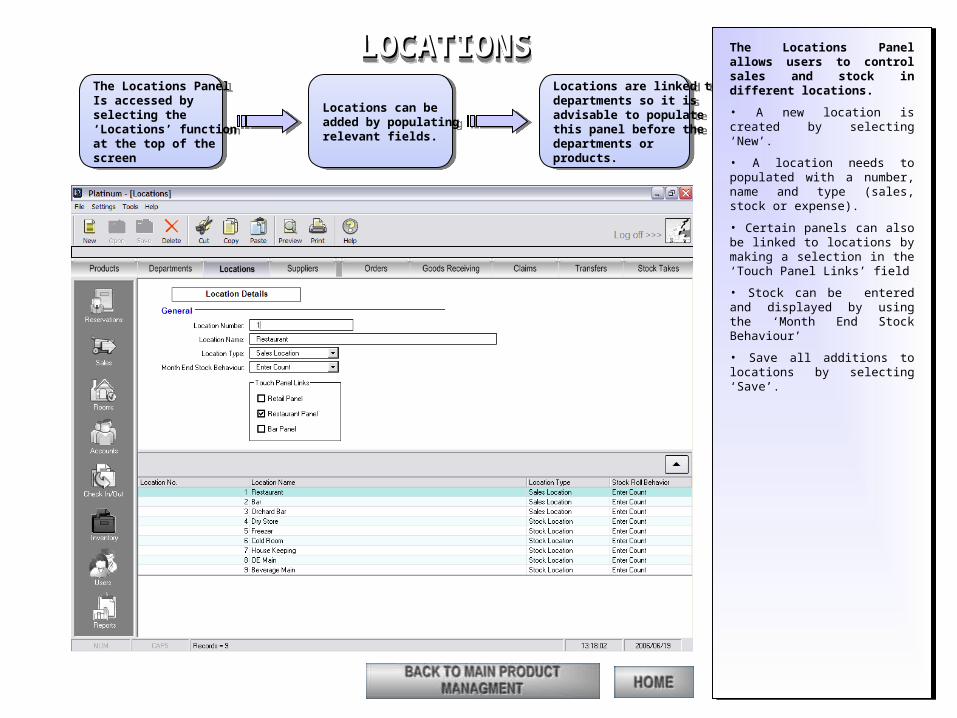
LOCATIONSLOCATIONSLOCATIONSLOCATIONSThe Locations Panel Is accessed by selecting the ‘Locations’ function at the top of the screen
The Locations Panel Is accessed by selecting the ‘Locations’ function at the top of the screen
Locations can be added by populating relevant fields.
Locations can be added by populating relevant fields.
Locations are linked to departments so it is advisable to populate this panel before the departments or products.
Locations are linked to departments so it is advisable to populate this panel before the departments or products.
The Locations Panel allows users to control sales and stock in different locations.
• A new location is created by selecting ‘New’.
• A location needs to populated with a number, name and type (sales, stock or expense).
• Certain panels can also be linked to locations by making a selection in the ‘Touch Panel Links’ field
• Stock can be entered and displayed by using the ‘Month End Stock Behaviour’
• Save all additions to locations by selecting ‘Save’.
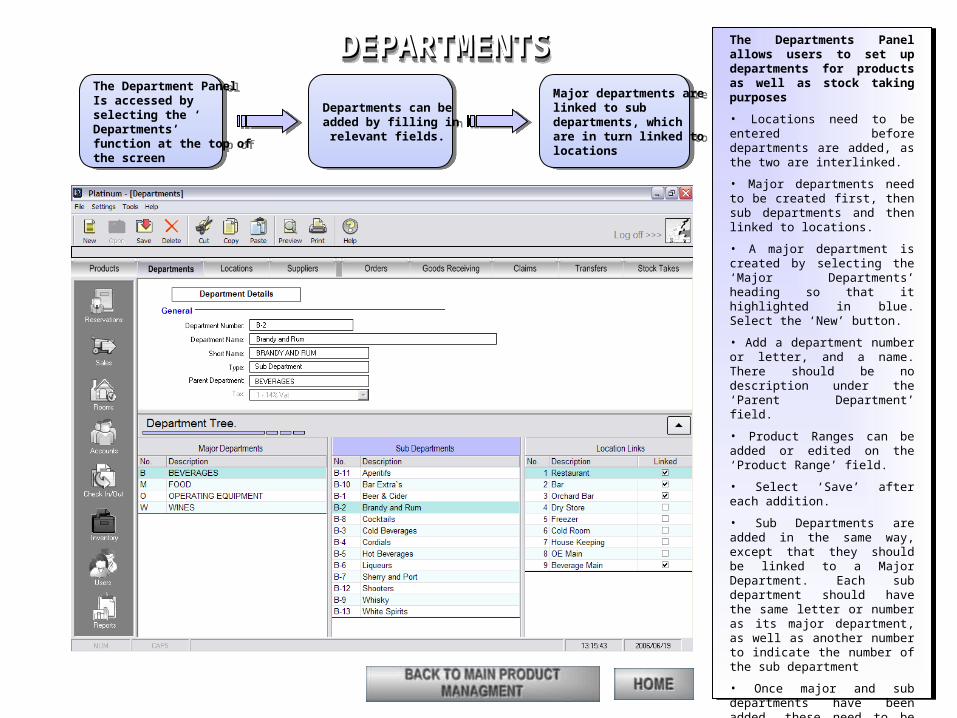
DEPARTMENTSDEPARTMENTSDEPARTMENTSDEPARTMENTSThe Department Panel Is accessed by selecting the ‘Departments’ function at the top of the screen
The Department Panel Is accessed by selecting the ‘Departments’ function at the top of the screen
Departments can be added by filling in the relevant fields.
Departments can be added by filling in the relevant fields.
Major departments are linked to sub departments, which are in turn linked to locations
Major departments are linked to sub departments, which are in turn linked to locations
The Departments Panel allows users to set up departments for products as well as stock taking purposes
• Locations need to be entered before departments are added, as the two are interlinked.
• Major departments need to be created first, then sub departments and then linked to locations.
• A major department is created by selecting the ‘Major Departments’ heading so that it highlighted in blue. Select the ‘New’ button.
• Add a department number or letter, and a name. There should be no description under the ‘Parent Department’ field.
• Product Ranges can be added or edited on the ‘Product Range’ field.
• Select ‘Save’ after each addition.
• Sub Departments are added in the same way, except that they should be linked to a Major Department. Each sub department should have the same letter or number as its major department, as well as another number to indicate the number of the sub department
• Once major and sub departments have been added, these need to be linked to locations. This is done by selecting a major department and the required sub department and selecting the relevant location by using the check boxes.
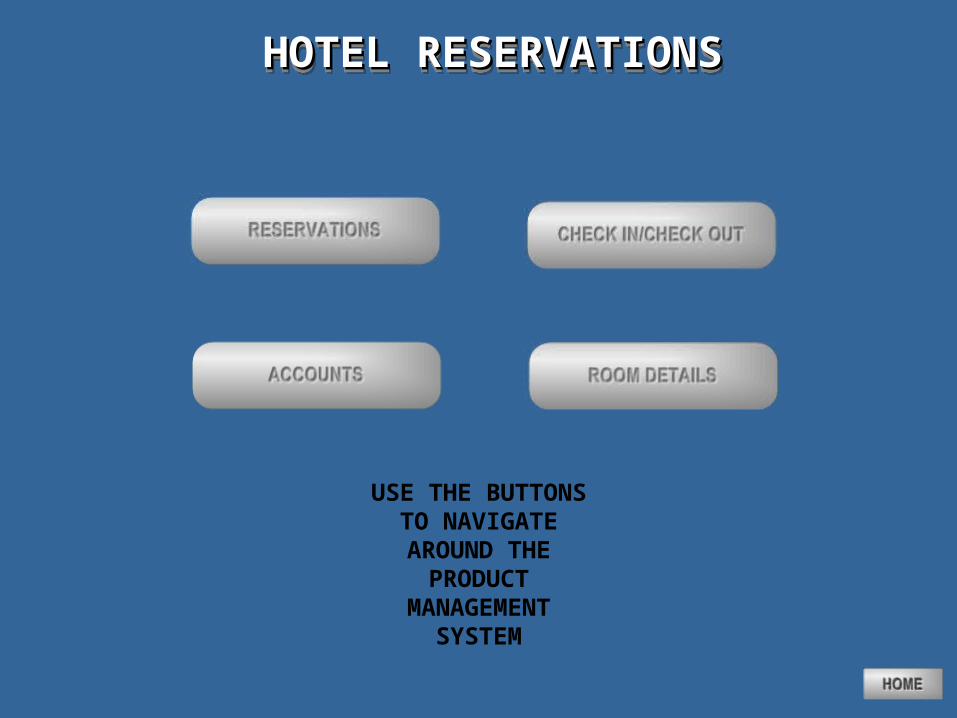
HOTEL RESERVATIONSHOTEL RESERVATIONSHOTEL RESERVATIONSHOTEL RESERVATIONS
USE THE BUTTONS TO NAVIGATE AROUND THE
PRODUCT MANAGEMENT
SYSTEM
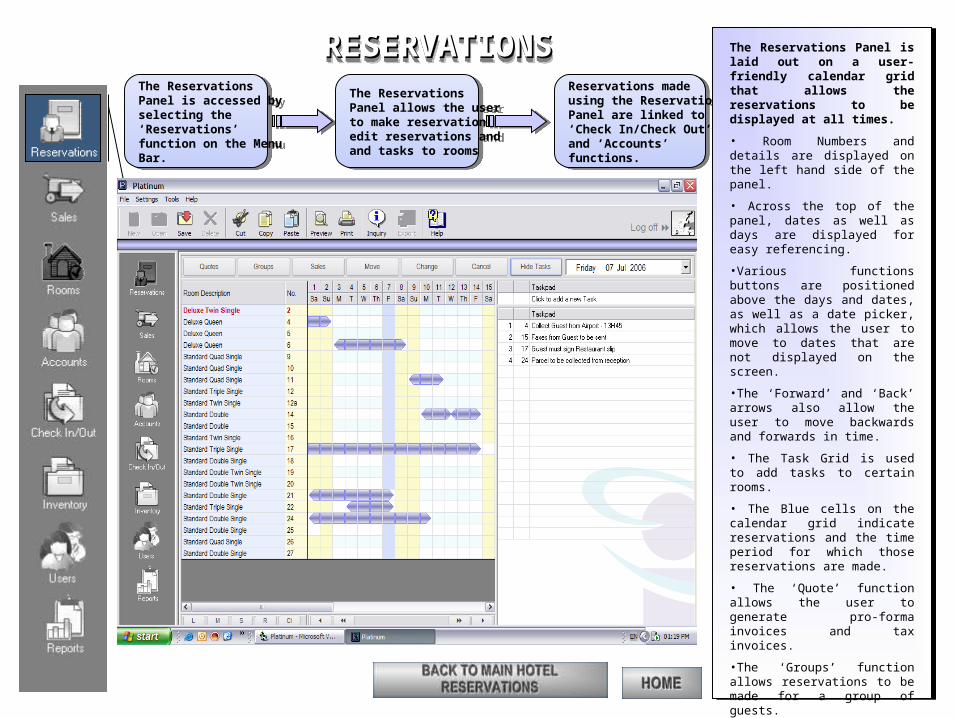
RESERVATIONSRESERVATIONSRESERVATIONSRESERVATIONSThe Reservations Panel is accessed by selecting the ‘Reservations’ function on the Menu Bar.
The Reservations Panel is accessed by selecting the ‘Reservations’ function on the Menu Bar.
The Reservations Panel allows the user to make reservations,edit reservations and and tasks to rooms
The Reservations Panel allows the user to make reservations,edit reservations and and tasks to rooms
Reservations made using the Reservations Panel are linked to the‘Check In/Check Out’ and ‘Accounts’ functions.
Reservations made using the Reservations Panel are linked to the‘Check In/Check Out’ and ‘Accounts’ functions.
The Reservations Panel is laid out on a user-friendly calendar grid that allows the reservations to be displayed at all times.
• Room Numbers and details are displayed on the left hand side of the panel.
• Across the top of the panel, dates as well as days are displayed for easy referencing.
•Various functions buttons are positioned above the days and dates, as well as a date picker, which allows the user to move to dates that are not displayed on the screen.
•The ‘Forward’ and ‘Back’ arrows also allow the user to move backwards and forwards in time.
• The Task Grid is used to add tasks to certain rooms.
• The Blue cells on the calendar grid indicate reservations and the time period for which those reservations are made.
• The ‘Quote’ function allows the user to generate pro-forma invoices and tax invoices.
•The ‘Groups’ function allows reservations to be made for a group of guests.
• The ‘Sales’ function allows the user to add sales that may have occurred in the bar or restaurant to a guest’s bill.
• The ‘Move’, ‘Change’ and ‘Cancel’ buttons are all corrective functions that can be used to move, change or cancel reservations.

MAKING RESERVATIONSMAKING RESERVATIONSMAKING RESERVATIONSMAKING RESERVATIONSIn order to make a reservation, a date or time period needs to be selected on the calendar grid. This is done by selecting the arrival date and room, and double clicking the cell. The Guest Check In panel will appear and can be populated with the guest’s details. Once a departure date has been selected, the relevant cells will be filled in with blue. The guest can be sent a pro-forma invoice by selecting ‘Quotes’.
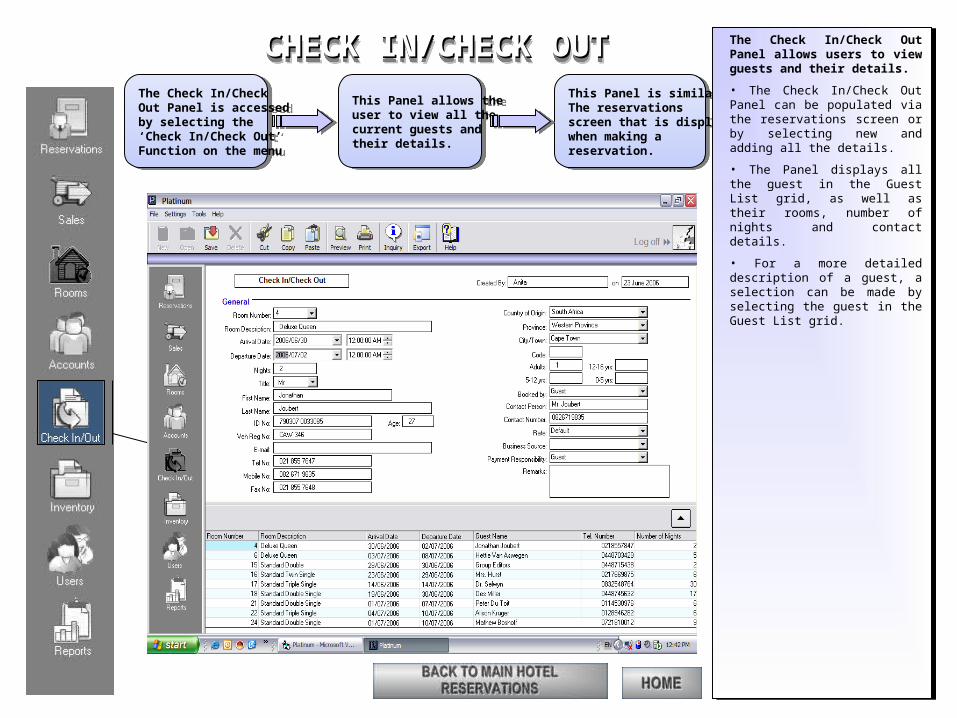
CHECK IN/CHECK OUTCHECK IN/CHECK OUTCHECK IN/CHECK OUTCHECK IN/CHECK OUTThe Check In/Check Out Panel is accessedby selecting the ‘Check In/Check Out’Function on the menu
The Check In/Check Out Panel is accessedby selecting the ‘Check In/Check Out’Function on the menu
This Panel allows the user to view all the current guests and their details.
This Panel allows the user to view all the current guests and their details.
This Panel is similar to The reservations screen that is displayed when making a reservation.
This Panel is similar to The reservations screen that is displayed when making a reservation.
The Check In/Check Out Panel allows users to view guests and their details.
• The Check In/Check Out Panel can be populated via the reservations screen or by selecting new and adding all the details.
• The Panel displays all the guest in the Guest List grid, as well as their rooms, number of nights and contact details.
• For a more detailed description of a guest, a selection can be made by selecting the guest in the Guest List grid.
ROOM DETAILSROOM DETAILSROOM DETAILSROOM DETAILS
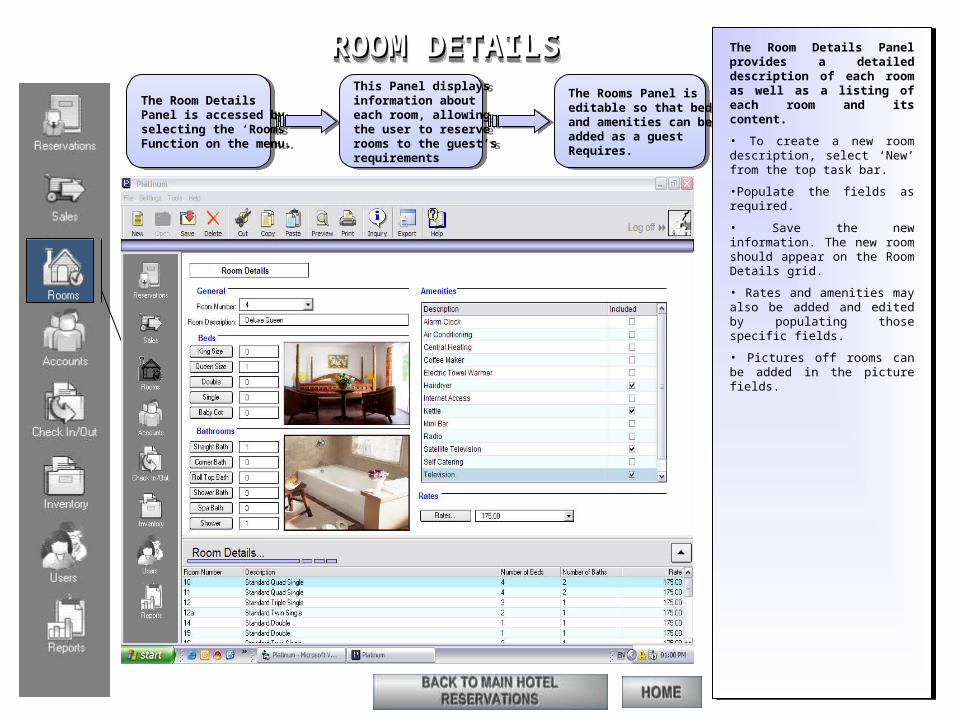
The Room Details Panel is accessed by selecting the ‘Rooms’ Function on the menu.
The Room Details Panel is accessed by selecting the ‘Rooms’ Function on the menu.
This Panel displays information about each room, allowing the user to reserve rooms to the guest’s requirements
This Panel displays information about each room, allowing the user to reserve rooms to the guest’s requirements
The Rooms Panel is editable so that beds and amenities can be added as a guest Requires.
The Rooms Panel is editable so that beds and amenities can be added as a guest Requires.
The Room Details Panel provides a detailed description of each room as well as a listing of each room and its content.
• To create a new room description, select ‘New’ from the top task bar.
•Populate the fields as required.
• Save the new information. The new room should appear on the Room Details grid.
• Rates and amenities may also be added and edited by populating those specific fields.
• Pictures off rooms can be added in the picture fields.
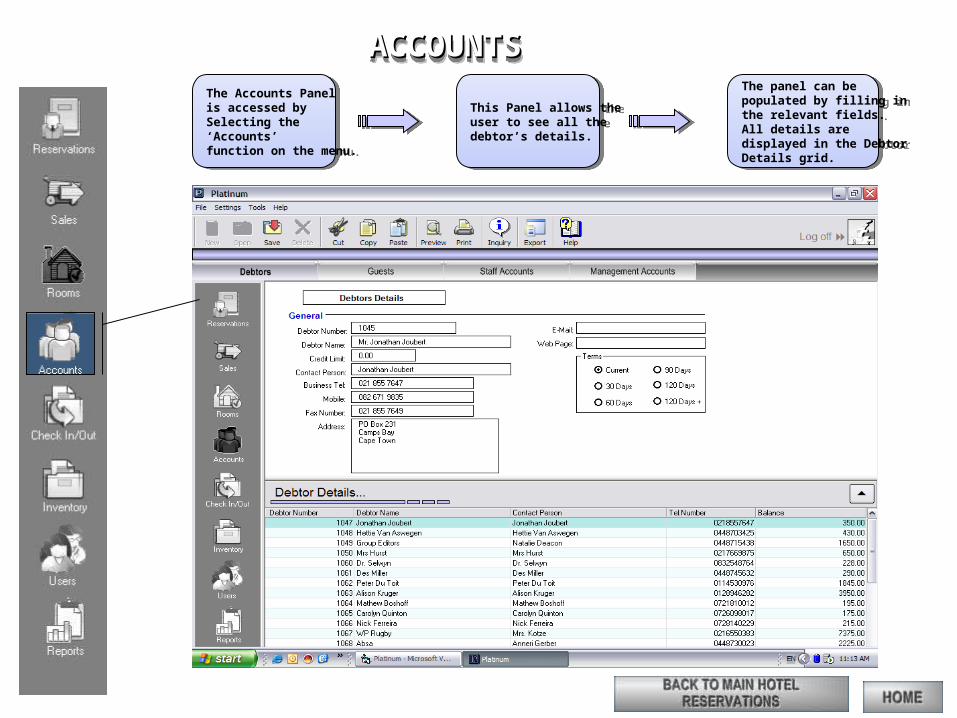
ACCOUNTSACCOUNTSACCOUNTSACCOUNTSThe Accounts Panel is accessed by Selecting the ‘Accounts’ function on the menu.
The Accounts Panel is accessed by Selecting the ‘Accounts’ function on the menu.
This Panel allows the user to see all the debtor’s details.
This Panel allows the user to see all the debtor’s details.
The panel can be populated by filling in the relevant fields. All details are displayed in the DebtorDetails grid.
The panel can be populated by filling in the relevant fields. All details are displayed in the DebtorDetails grid.
For Further For Further Information Call Information Call
Peter Peter
083 652 4943083 652 4943
For Further For Further Information Call Information Call
Peter Peter
083 652 4943083 652 4943