optical tweezers using the texas instruments’ digital ... · pdf fileoptical tweezers...
TRANSCRIPT
Optical Tweezers
Using the Texas Instruments’
Digital Micromirror Device™
by
Jeremy R. Hui
Submitted to the Department of Electrical Engineering and Computer Science
in Partial Fulfillment of the Requirements for the Degrees of
Bachelor of Science in Electrical Science and Engineering
and Master of Engineering in Electrical Engineering and Computer Science
at the Massachusetts Institute of Technology
May 23, 2001
Copyright 2001 Jeremy R. Hui. All rights reserved.
The author hereby grants to M.I.T. permission to reproduce anddistribute publicly paper and electronic copies of this thesis
and to grant others the right to do so.
Author________________________________________________________________Department of Electrical Engineering and Computer Science
May 23, 2001
Certified by____________________________________________________________Richard Gale
VI-A Company Thesis Supervisor
Certified by____________________________________________________________Rajeev Ram
M.I.T. Thesis Supervisor
Accepted by____________________________________________________________Arthur C. Smith
Chairman, Department Committee on Graduate Theses

2

Optical Tweezers Using the Texas Instruments’ Digital Micromirror Device™
byJeremy R. Hui
Submitted to the Department of Electrical Engineering and Computer Science
May 23, 2001
In Partial Fulfillment of the Requirements for the Degrees ofBachelor of Science in Electrical Science and Engineering
and Master of Engineering in Electrical Engineering and Computer Scienceat the Massachusetts Institute of Technology
ABSTRACT
The Digital Micromirror Device (DMD™) provides an effective method of spatially shut-tering monochromatic light as demonstrated with an optical tweezer system. Optical tweezers use laser light to trap and hold microscopic objects such as biological cells. Integrating the DMD into the system allows for control over the intensity and location of light in the optical trap. Code for specialized DMD control board was developed to enable computer control over the DMD. Combined with a video framegrabber and image pro-cessing code, a feedback system was developed with the goal of automated optical trap-ping with idenfication and sorting abilities. The system was able to see, identify, and trap 3µm polystyrene beads using the DMD, but was unable to effectively move the beads to sort them.
VI-A Thesis Supervisor: Dr. Richard Gale, Ph.D.Title: Distinguished Member, Technical Staff, DLP™ Products Technology Development
Thesis Supervisor: Rajeev RamTitle: Associate Professor, Electrical Engineering and Computer Science Department
3

4

CHAPTER 1 Optical Tweezer Theory and Operation
Optical tweezers are based on the theory of radiation pressure.
By using the various effects of light, dielectric particles ranging
in size from submicron to hundreds of microns can be success-
fully held by a beam (or beams) of light. Initially developed by
Ashkin[1] at Bell Labs, optical tweezers are primarily used for
trapping biological cells. A variant of the system has also been
used to slow and trap individual atoms.
Radiation pressure can be broken into several subforces, two
of which are scattering and gradient forces. The scattering
force is in the direction of the light away from the source while
the gradient force is along the intensity gradient towards the
most intense region. The strength of the scattering force is pro-
portional to the light intensity whereas the gradient force is pro-
Optical Tweezers and Texas Instruments Digital Micromirror Device™ 5

Optical Tweezer Theory and Operation
6
portional to the gradient of the light intensity. Balancing these
forces can create three-dimensionally stable traps.
In the Rayleigh regime where the wavelength of light is much
less than the diameter of the object, the trapped objects are
modeled as dipole scatterers, simplifying the forces to the elec-
tromagnetic field representation of light. The scattering force is
proportional to the power scattered and the index of the immer-
sion medium. The gradient force comes from the polarization
force.[2] It is related to the polarizability of the particle and the
gradient of the intensity. The result is a force in the direction of
the gradient of the light.
When applied to particles in the Mie size regime, the forces can
be approximated from a ray-optics approach. (Mie implies the
diameter is large compared to the wavelength of the
light. ) An incident ray is refracted as it passes through
the object; the change of momentum of the light ray equates
Fscat n1S⟨ ⟩ σc
------------= Eq. 1.1
Fgrad
α2
2------ E
2⟨ ⟩∆= Eq. 1.2
λ d»( )
Optical Tweezers and Texas Instruments Digital Micromirror Device™

into a force. Reflection of the ray mostly causes the scattering
force, while refraction causes the gradient force. With a
focused beam of light with a Gaussian intensity profile, the net
force is towards the center of the beam and towards the diffrac-
tion-limited focus point of the light.
More oblique or peripheral rays create greater forces towards
the focus point while direct rays will push the object down-
stream. (Downstream is defined as away from the light source.
Upstream would be towards the light source.) The balance of
these rays creates an axially stiff trap. Transverse stiffness is
affected by the intensity profile. The steeper the gradient along
the beam center line, the stronger the transverse stiffness. This
gradient can be naturally created by the Gaussian intensity
profile of a laser. As a result, the transverse stiffness is approx-
R2
R1
R21
R22
R12
R11
Z
Fig. 1.1: Forces on Sphere Above Light Focal Point
Optical Tweezers and Texas Instruments Digital Micromirror Device™ 7

Optical Tweezer Theory and Operation
8
imately 30 times larger than the axial stiffness.[7] By increasing
the intensity of the oblique rays, the overall trap can be stiff-
ened. (The axial direction is parallel to the light beam, while lat-
eral or transverse directions are perpendicular to the light. As
seen through a microscope, changes in the axial dimension
would result in a change of focus while lateral is the visual
plane.) High NA oil-immersion objective lens are generally
Z
R2R1
R11 R21
R22R12
Fig. 1.2: Forces on Sphere Below Light Focal Point
Beam
Inte
nsi
ty
Net Force
Fig. 1.3
Optical Tweezers and Texas Instruments Digital Micromirror Device™

used to create these oblique rays. The use of oil-immersion
lens, though, causes spherical aberration which causes rays to
not come to a single focus. At points near the cover slide sur-
face, this generates greater forces than a comparable water-
immersion objective, but comes at the cost of trap stiffness as
the trap is moved downwards into the chamber.
The trap strength roughly equal to:
where F is the force acting on the trapped object, Q is a dimen-
sionless efficiency factor, n is the refractive index of the immer-
sion medium, P is the power of the light, and c is the speed of
light.[6] Q generally ranges from 0.1 to 0.4 and compensates
for the effects of wavelength, spot size, polarization, beam pro-
file, and convergence angle of the laser, and the shape, size,
Beam
Inte
nsity
ReflectedRefracted
Fig. 1.4
Ftrap
Qn1P
c--------------= Eq. 1.3
Optical Tweezers and Texas Instruments Digital Micromirror Device™ 9
Optical Tweezer Theory and Operation
10
and refractive index of the trapped object. The resultant forces
are generally in the range of piconewtons given milliwatts of
input power.
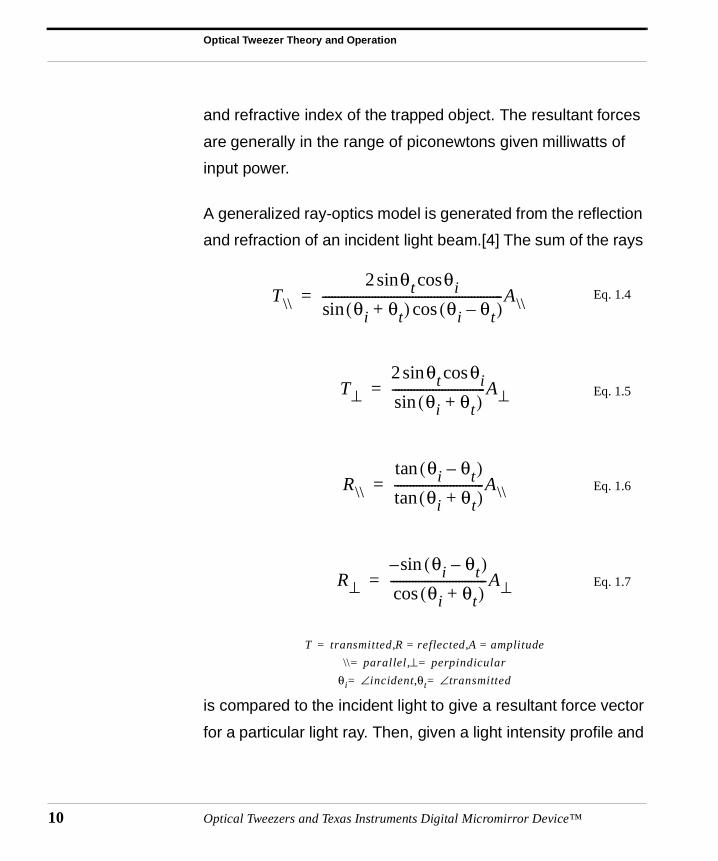
A generalized ray-optics model is generated from the reflection
and refraction of an incident light beam.[4] The sum of the rays
is compared to the incident light to give a resultant force vector
for a particular light ray. Then, given a light intensity profile and
T\\
2 θt θicossin
θi θt+( ) θi θt–( )cossin----------------------------------------------------------A\\= Eq. 1.4
T⊥2 θt θicossin
θi θt+( )sin------------------------------A⊥= Eq. 1.5
R\\
θi θt–( )tan
θi θt+( )tan-----------------------------A\\= Eq. 1.6
R⊥θi θt–( )sin–
θi θt+( )cos-------------------------------A⊥= Eq. 1.7
T transmitted R reflected A amplitude=,=,=
\\ parallel= ⊥ perpindicular=,
θi i∠ ncident θt transmitted∠=,=
Optical Tweezers and Texas Instruments Digital Micromirror Device™

an optic system, we sum the force vectors to determine the
overall force on the bead and location and stability of any pos-
sible optical trap. The rays are assumed to enter the objective
plane in a parallel fashion and are focused to a single point.
The sphere is assumed to have no absorption. The angle of
incidence to a spherical bead is determined from the numerical
aperture and the position of the bead.[3] For a stable trap, the
sum vector must be zero and for any small displacement,
forces must point back to the stable point.
Numerical simulations were performed using this model in a
two-dimensional perspective and assuming a circularly polar-
ized beam. The net result is that two stable trapping locations
appear to be possible. One trapping location encompasses the
focal spot. This would correlate with the highest spot of the
intensity and intensity gradient. The second location is further
downstream (away from the light source and focal spot.) This
location is not as stable, but still appears to have sufficient
force to be stable given the proper incident intensity light pro-
file.
Optical traps, as mentioned earlier, are primarily used for bio-
logical study. Experiments have been done on bacterial, yeast,
and mammalian cells ranging from microsurgery to studying
immune response. Additionally, by using polystyrene or silica
Optical Tweezers and Texas Instruments Digital Micromirror Device™ 11

Optical Tweezer Theory and Operation
12
beads as micro handles, studies have been done on DNA and
protein strengths and structures.[6]
References
1. A. Ashkin, Dziedzic, J., Optics Letters 11, 288 (1986).
2. N. Simpson, Allen, L., Padgett, M., J. Modern Optics 43, 2485 (1996).
3. S. Smith et al., Am. J. Phys. 67, 26 (1999).
4. M. Born, Wolf, E., Priniciples of Optics (Pergamon Press, Oxford, 1970).
5. Z. Hecht, Optics (Addison-Wesley, Reading, MA, 1974) p. 40.
6. K. Svoboda, Block, S., Annu. Rev. Biophys. Biomol. Struct. 23, 247 (1994).
7. G. Wuite, Master’s Thesis, 1996.
Optical Tweezers and Texas Instruments Digital Micromirror Device™

CHAPTER 2 Texas Instruments’ Digital Micromirror Device™
The Texas Instruments Digital Micromirror Device™ is the cul-
mination of over 20 years of continuing research and develop-
ment. Originally designed for printing applications, the DMD™
has since been adapted for other widespread commercial
products, the most prominent being projection displays.[1]
The current incarnation of the device consists of a two-dimen-
sional array of tristable mirrors. Each mirror is square and mea-
sures 16 µm across the side. The mirror is rotated about a
diagonal into one of three states: 0 degrees, +10 degrees, and
-10 degrees. For semantic purposes, the +10 degree state is
referred to the on or 1 state, while the -10 degree state is off or
0. The 0 degree position is the parked position. The mirrors are
individually controllable by a SRAM cell beneath the mirror
Optical Tweezers and Texas Instruments Digital Micromirror Device™ 13

Texas Instruments’ Digital Micromirror Device™
14
structure. Writing a 1 into the cell and forcing a global reset
pulse will cause the mirror to flip from any state into the +10
degree state. The mirror will hold that position until a new reset
pulse is received, regardless of the state of the memory under-
neath.[2]
The general mirror structure begins with a basic SRAM cell. On
top is added the mirror superstructure. The structure has two
parts: a lower platform with the drive electrodes and hinge
structure and a mushroom-shaped part with the actual mirror
surface. Because the hinge lies beneath the actual mirror sur-
face, a 1µm gap is required between each mirror for proper
performance. Additionally, the mirror surface is not completely
flat. Due to the processing, the support post has a hole in the
center, leaving an approximately 1µm square gap in the center
of the mirror. The mirrors have relatively high performance,
with a switching speed around 100µs.[3,4] The mirrors can
Fig. 2.1: DMD Chip
Optical Tweezers and Texas Instruments Digital Micromirror Device™

also hold any given position indefinitely at room temperature
without compromising mirror performance[5].
Fig. 2.2: DMD Structure
Optical Tweezers and Texas Instruments Digital Micromirror Device™ 15
Texas Instruments’ Digital Micromirror Device™
16
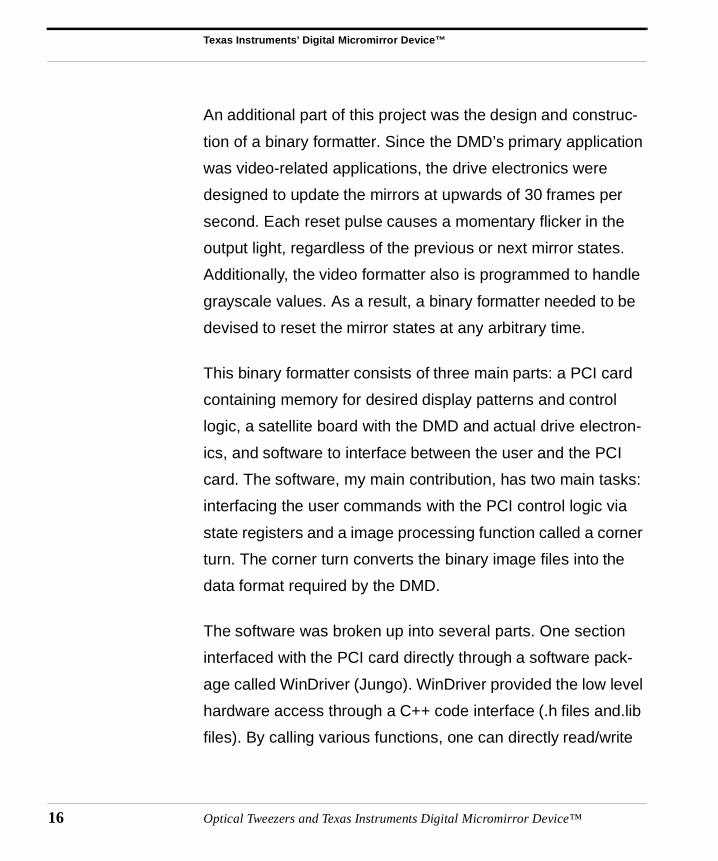
An additional part of this project was the design and construc-
tion of a binary formatter. Since the DMD’s primary application
was video-related applications, the drive electronics were
designed to update the mirrors at upwards of 30 frames per
second. Each reset pulse causes a momentary flicker in the
output light, regardless of the previous or next mirror states.
Additionally, the video formatter also is programmed to handle
grayscale values. As a result, a binary formatter needed to be
devised to reset the mirror states at any arbitrary time.
This binary formatter consists of three main parts: a PCI card
containing memory for desired display patterns and control
logic, a satellite board with the DMD and actual drive electron-
ics, and software to interface between the user and the PCI
card. The software, my main contribution, has two main tasks:
interfacing the user commands with the PCI control logic via
state registers and a image processing function called a corner
turn. The corner turn converts the binary image files into the
data format required by the DMD.
The software was broken up into several parts. One section
interfaced with the PCI card directly through a software pack-
age called WinDriver (Jungo). WinDriver provided the low level
hardware access through a C++ code interface (.h files and.lib
files). By calling various functions, one can directly read/write
Optical Tweezers and Texas Instruments Digital Micromirror Device™

into a section of memory reserved by the PCI card, thus read-
ing/writing into the card resources. It has very little knowledge
of the overall system, resulting in little error checking functions.
This lack of error checking ability lead to building a dynamic
link library (DLL) which encompasses the information about the
PCI card, the abilities of the WinDriver code, and the desired
user interactions.
Effectively, the DLL provides a higher level access to the PCI
card, but it is specific to this particular version of the binary for-
matter. This allows an end user to write code using the basic
DLL functions while we update the binary formatter without
forcing the end user to make consequent and required
changes to his code. This means that the binary formatter
could be upgraded without significant inconvenience, as well
as provide extra utility and flexibility for individual end users.
Above the DLL level would exist an end user’s code definitions.
In this manner, using the functions defined by the binary for-
matter DLL, the user has wide access to the PCI card
resources, but with some error checking built-in. The user can
thus create his own application using the binary formatter. Two
test applications were a batch file-style interface and a
machine vision feedback code for the optical tweezer system.
The batch file interface contains several basic commands from
Optical Tweezers and Texas Instruments Digital Micromirror Device™ 17

Texas Instruments’ Digital Micromirror Device™
18
the reading and writing of registers, to the loading and display-
ing of binary images on the DMD. Its main ability was to read a
file of such commands and to execute them, thus the batch file
definition. The main purpose of this program is for debugging
of the binary formatter card, although it also serves as an initial
testbed of the capabilities of the binary formatter. The machine
vision feedback code is described in greater depth in Chapter
3. Its main task is to capture video data, analyze it, and return a
binary image to the DMD for a feedback system, all working at
video frame rates.
Much of the software development process centered around
debugging the various interaction issues between the software
and hardware. One of the recurring problems was a hanging of
all computer processes due to an improper read or write. Most
of these were linked to the hardware, particularly how the PCI
interface was set up. The hardware side of the binary formatter
used a PLX P9050 chip for interacting with the PCI bus, a XIL-
INX FPGA for logic functions, and 128Mb RAM for image stor-
age. The P9050 chip, being designed for a generic application,
has many variables, but little error checking. As a result, if cer-
tain data registers were set improperly, the PCI bus would not
correctly recognize the card or its resources and resulted in a
crash of the system. Several weeks were spent debugging the
these hardware interactions.
Optical Tweezers and Texas Instruments Digital Micromirror Device™

The software package does have several disadvantages.
Since the software takes a image file as an input, there is a bit
of processing overhead when dealing with file opening. As a
result, the DLL had to be customized to compensate for the
slow processing time.
References
1. L. Hornbeck, Texas Inst. Tech. J. 15, 7-46 (1998).
2. M. Mignardi, Texas Inst. Tech. J. 15, 56-63 (1998).
3. R. Meier, Texas Inst. Tech. J. 15, 64-74 (1998).
4. H. Chu et al., Texas Inst. Tech. J. 15, 75-86 (1998).
5. M. Douglass & Sontheimer, A., Texas Inst. Tech. J. 15, 128-136 (1998).
Optical Tweezers and Texas Instruments Digital Micromirror Device™ 19

Texas Instruments’ Digital Micromirror Device™
20
Optical Tweezers and Texas Instruments Digital Micromirror Device™
CHAPTER 3 Optical Tweezer System Design and Layout
The main goal of using the DMD in an optical tweezer setup is
to use the computer controlled light modulation ability of the
DMD in a fashion that allows for multiple targets to be manipu-
lated and moved in two dimensions.
From the onset, the design of the system assumed that the ray-
optic model description was sufficient to describe the stable
locations of the trap. Initially, I attempted to design a system
that would take the incoming light off each mirror and focus it
into a single point. Thus if all the mirrors were on, a plane of dif-
fraction-limited focus points would be generated beneath the
objective lens. This idea was discarded for two reasons--the
apparent complexity to generate a 1024x768 array of optical
elements to individually focus the light from each mirror and
Optical Tweezers and Texas Instruments Digital Micromirror Device™ 21

Optical Tweezer System Design and Layout
22
questions regarding how the light forces would behave below
the focus plane. With this layout, if multiple mirrors were
employed to hold a single object, there didn’t seem to be a
force-stable point. From the gradient perspective, this layout
made sense--a bead would be attracted to the brightest spot in
three-dimensional space, or the diffraction limited spot. Using
this model, the bead would attempt to encompass as much of
the light as possible, with the most stable position being where
the gradient was the greatest. By shifting the apparent center
of brightness, the bead would attempt to follow the gradient. At
the time, though, my understanding of optical design was insuf-
ficient to implement such a system.
The other and implemented method of operation revolved
around the fact that simulations using the ray-tracing tech-
niques indicated a two stable trapping locations: one at or
slightly below the focus point, and one further down below the
focus spot, away from the light source. From this assumption, I
designed a simple system that spatially shuttered the light
entering into a traditional optical tweezer system. The light
beneath the objective lens comes to a focus, and based on the
mirror states, would form cones extending from the focus. Each
cone of light formed by a singular mirror would be combined
with other cones to create a larger cone of light strong enough
the particle, but only below the focal point. Thus multiple parti-
Optical Tweezers and Texas Instruments Digital Micromirror Device™

cles could be held in separate cones of light and transportable
by changing the center of the cone in a conveyor belt-like fash-
ion. Controlling the DMD would give the control over the posi-
tions of the cones, and therefore, over the trapped particles.
The system construction begins with a basic optical tweezer
system: a laser passes through an objective lens to the tar-
get.[1,2] The target consists of a mixture of water and beads on
a glass slide, covered by a coverslip and index matching oil. In
this experiment, ordinary tap water was used, although distilled
water would have been preferable. The beads used ranged in
Dig
ita
l M
icro
mirro
r D
evic
e
1
1
0
1
Laser (532 nm)
index-matching oil
coverslip
objective
���������
���������
����������������
polystyrene beads in water
���������������������������������������������������������������������������������������������������������������������������������������������������������������������������������������������
���������������������������������������������������������������������������������������������������������������������������������������������������������������������������������������������
Focusing LensDichroic Mirror
100x, 1.25 NAobjective
sample
slide
Fig. 3.1: System Diagram
Optical Tweezers and Texas Instruments Digital Micromirror Device™ 23

Optical Tweezer System Design and Layout
24
size from 0.5µm to 3.0µm, with the final data gathered on
3.0µm beads (Polysciences, Inc). The beads were made of
polystyrene, material chosen for the high numerical aperture
number(1.6) and a specific gravity density similar to water
(1.05). Thus, the beads were expected to float in the liquid for
an extended period of time. The coverslip was a #0 thickness
(0.13 to 0.17mm). The objective lens was a 100x, 1.25 NA, oil
immersion objective with estimated focal length of 0.20mm
(Lomo Optics). The laser source was a 532nm, 50mW
Nd:YAG, beam diameter of 0.7mm (Coherent Inc.). The laser
choice was completely arbitrary as it was the most powerful
laser available in the lab at the time. For these experiments,
this laser was a decent choice since it was both visible to the
naked eye and on the lower end of dangerous in terms of inten-
Fig. 3.2: Actual System Viewed From Above
Optical Tweezers and Texas Instruments Digital Micromirror Device™

sity, but still theoretically strong enough to trap beads with only
a small portion of the laser energy passing to the end of the
system.
To view the beads, a magenta dichroic mirror (Edmund Scien-
tific, Inc.) was employed to redirect the laser beam into the
objective lens. This made it possible for a CCD camera to be
placed over the objective system and image the beads through
the same objective. The CCD was also equipped with a 2x
magnifying lens and a polarizing filter to eliminate most of the
laser light reflecting towards the camera. The purpose of the 2x
TV lens is to increase the imaged size of the beads without
seriously affecting the distance of the camera from the objec-
tive lens. The polarizing filter eliminates almost all of the stray
reflections from the dichroic mirror as well as reflections from
the back of the objective. A short tube is also needed to reduce
the glare from outside light sources.
Underneath the microscope objective, a simple stage was built
using a three-axis lab jack. By having axial control, the stage
could perform all focusing functions without affecting the light
path of the laser trap. A metal platform with a hole in the center
was attached to the jack. The purpose of the hole is to provide
some area for illuminating light to pass from the bottom. Initial
experiments found that laser light was insufficient to illuminate
Optical Tweezers and Texas Instruments Digital Micromirror Device™ 25

Optical Tweezer System Design and Layout
26
the beads for viewing at high objective powers. Thus standard
light sources needed to be boosted. Instead of providing light
from above the stage, the system provided light from below,
giving the camera a bright field in which to work in. Most stan-
Fig. 3.3: Stage Setup
Fig. 3.4: Objective and Lighting Setup
Optical Tweezers and Texas Instruments Digital Micromirror Device™

dard light sources also lacked the sheer intensity, and a large
focusing lens had to be employed to maximize the amount of
light at the stage level. (A slide with a sheet of paper was
employed to roughly determine the focus at the stage.)
The power of the laser requires that the entire system be
shielded in certain areas to prevent possible hazards. Since
the DMD does diffract light, areas around the DMD had to be
shrouded. Behind the dichroic mirror, a laser stop was placed.
(The dichroic mirror did not have perfect reflectivity in the
desired wavelength range, particularly because of the angle of
incidence.)
To gain greater control over the location of bead trapping, a
focusing lens is added to change the laser focus point. This
allows for the camera to properly focus on the beads when
trapped.
A beam expander was also included in the design to illuminate
as many mirrors as possible, but was removed in the final sys-
tem. Initially, a 20x beam expander was used fill the entire
DMD array. This comes at a great cost in beam intensity,
though. At worst, the beam expander throws away half of the
overall intensity. Calculations were made on the amount of
power delivered to the trap. The DMD itself has a 90% fill fac-
tor, 88% aluminum reflectivity, and 85% diffraction efficiency.
Optical Tweezers and Texas Instruments Digital Micromirror Device™ 27
Optical Tweezer System Design and Layout
28
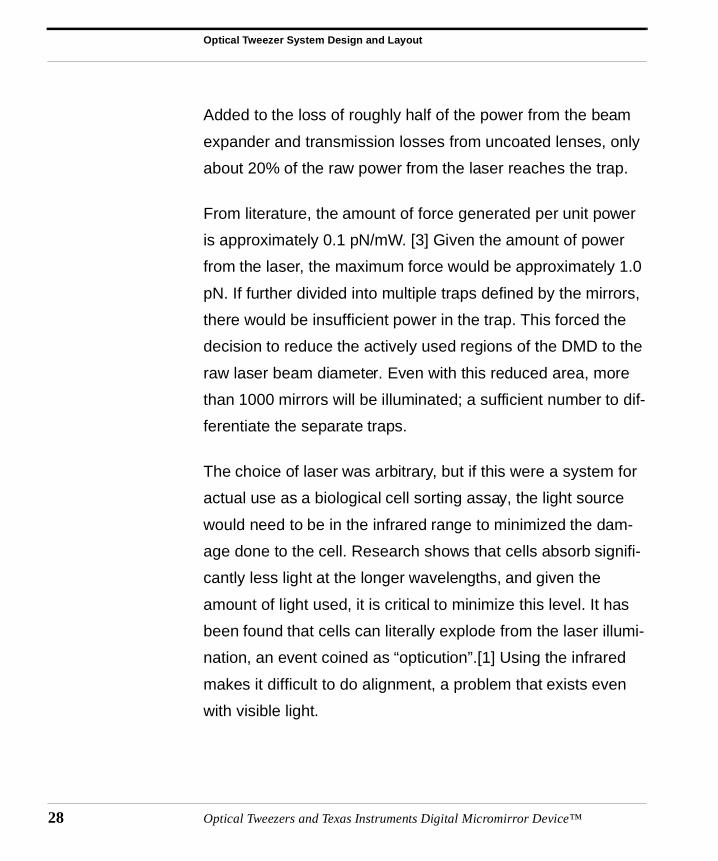
Added to the loss of roughly half of the power from the beam
expander and transmission losses from uncoated lenses, only
about 20% of the raw power from the laser reaches the trap.
From literature, the amount of force generated per unit power
is approximately 0.1 pN/mW. [3] Given the amount of power
from the laser, the maximum force would be approximately 1.0
pN. If further divided into multiple traps defined by the mirrors,
there would be insufficient power in the trap. This forced the
decision to reduce the actively used regions of the DMD to the
raw laser beam diameter. Even with this reduced area, more
than 1000 mirrors will be illuminated; a sufficient number to dif-
ferentiate the separate traps.
The choice of laser was arbitrary, but if this were a system for
actual use as a biological cell sorting assay, the light source
would need to be in the infrared range to minimized the dam-
age done to the cell. Research shows that cells absorb signifi-
cantly less light at the longer wavelengths, and given the
amount of light used, it is critical to minimize this level. It has
been found that cells can literally explode from the laser illumi-
nation, an event coined as “opticution”.[1] Using the infrared
makes it difficult to do alignment, a problem that exists even
with visible light.
Optical Tweezers and Texas Instruments Digital Micromirror Device™

The system requires a fairly strict alignment to obtain the best
performance. The axis of the microscope objective must first
be perpendicular to the coverslip to allow the best focusing and
eliminate sources of stiction. The laser must also be aligned to
fill the center of the objective. The laser below the dichroic mir-
ror should be absolutely parallel to the optical axis of the objec-
tive. If it is not, the trap strength will be slightly reduced due to
the angular displacement of the trap and the spherical aberra-
tion of the objective. Between the DMD and the dichroic mirror,
the laser needs to follow a predetermined track at a set height.
This allows for the trap focusing lens to be easily adjusted with-
out major alignment corrections. As a result, almost every opti-
cal element in the system needed at least 3 axes of movement.
The laser itself needed both angular and linear elements. The
Fig. 3.5: Side View of System
Optical Tweezers and Texas Instruments Digital Micromirror Device™ 29

Optical Tweezer System Design and Layout
30
DMD mount has one vertical, two angular (rotation and tilt),
and one horizontal pieces. The focusing lens has vertical, hori-
zontal, and angular adjustments to keep the laser in the center
of the lens. The dichroic mirror needs two angular adjustments
and a vertical one for centering. The microscope objective has
two axial, two lateral, and one vertical components. One useful
tool for alignment was to build a third structure with a target set
at a specific height. By moving this test structure around the
system, the laser could be aligned to be parallel to the optical
table, reducing the alignment variability.
Fig. 3.6: Side View of System
Optical Tweezers and Texas Instruments Digital Micromirror Device™

To connect the system to the computer and DMD, we added a
color camera attached to a framegrabber and machine vision
code. (Matrox Millenium 2 framegrabber and Matrox Imaging
Library machine vision code) The machine vision algorithm is
simply blob recognition. The code grabs a frame and simulta-
neously processes the previous frame. On the previous frame,
the image is broken down into its component colors of blue,
green, and red. The red image frame is binarized to an arbi-
trary user-defined threshold, and blob-finding algorithms run.
For each blob, the system finds the maximum and minimum x/y
locations and the blob centroid. These values are compared to
previous values stored into a table. This correlates the blobs
from one frame to the next. (The code only tracks blob that
have moved less than its radius, i.e., the centroid of the current
image is within the minimum bounding box.) The table also
records the user-input of which blobs to track and where to
move the desired blobs. From this user information, a new
image to display on the DMD is generated.
The software also processes the green color frame for beam
information. The green laser passes mostly through the system
in a polarized state which the polarized filter removes before it
reaches the camera. As the laser enters the liquid sample, it
reflects and scatters slightly off the coverglass and water inter-
face, giving an accurate estimate of the beam location, assum-
Optical Tweezers and Texas Instruments Digital Micromirror Device™ 31

Optical Tweezer System Design and Layout
32
ing that the beam is travelling parallel to the objective optical
axis. (This is another method to align the system as the sample
is displaced vertically. By turning off most of the mirrors except
those in the center of the DMD, the beam is narrowed. If verti-
cal displacement of the sample causes lateral movement of the
reflection, a misalignment is present and can be immediately
corrected. This, incidentally, is the most accurate measurement
of alignment since seeing the actual light profile of the trap
makes it possible to see the real effects of changes in the opti-
cal system. This sanity check confirms that a pattern on the
DMD can be transposed to a light intensity profile in the trap.)
More importantly, when a bead enters the laser trap, the scat-
tering off the bead causes an intense flash of green light. This
strongly indicates a successful trapping and can be used to
assist the tracking system.
References
1. S. Smith et al., Am. J. Phys. 67, 26 (1999).
2. G. Wuite, Master’s Thesis, 1996.
3. N. Simpson, Allen, L., Padgett, M., J. Modern Optics 43, 2485 (1996).
Optical Tweezers and Texas Instruments Digital Micromirror Device™

CHAPTER 4 Optical Tweezer Performance
With the given system, we are able to successfully trap polysty-
rene spheres ranging in size from 1µm to 3µm. Three micron
spheres are the easiest to track and therefore used for most
measurements. The smaller spheres are stably trapped, but
due to the initial transient motion of trapping, beads are pulled
to far upwards and become stuck to the glass coverslip.
Spheres smaller than 1µm are also tested, but the bead con-
centration is too high to pick out individual spheres and high
fluid flow rates made spheres jump into and immediately out of
the trap. One noticeable phenomenon noticed was these small
beads entering the trap, changing brightness as the beads
rose towards the beam focus, and exiting on the opposite side.
Optical Tweezers and Texas Instruments Digital Micromirror Device™ 33

Optical Tweezer Performance
34
Estimates of the axial trap strength are made inserting the
effects of gravity into the force equation. Assuming that the
effective mass is equal to the real mass times the ratio of the
density of the beads and water, we calculated the amount of
force required to keep the beads suspended. For the 3µm
bead, approximately 0.007pN are required. This measurement
has a high degree of error though. The density of the beads
and water are difficult to estimate. The polystyrene can vary in
density from 1.04 to 1.06, and since tap water was used, its
specific gravity is likely greater than 1. The beads themselves
also vary in size, with a nominal size of 2.837µm and a stan-
dard deviation of 0.133µm. This estimate of trap strength is
also a lower boundary on the actual trap strength, since we did
not push the limits of the trap.
The DMD, though, allows for spatially shuttering the light.
Reducing the beam to a 3 mirror/pixel radius still had success-
ful trapping, but just barely. Any less and the bead escapes.
Assuming the laser has relatively equal power across the
radius, this equates to approximately 0.96mW of power deliv-
ered into the trap and an efficiency factor of 0.0016. This is
much lower than standard optical traps but should be expected
given the narrow cone of light used. Instead of using the entire
optical area of the microscope objective, only a small sliver is
Optical Tweezers and Texas Instruments Digital Micromirror Device™

illuminated. The illumination cone of the trap is very narrow
with few oblique rays. The end result is a very inefficient trap.
Since the DMD can shutter the light in more forms than a sim-
ple pinhole, we modified the pattern to be a donut. An equiva-
lent trap was generated by changing the profile from a solid
circle with 3 pixel diameter to a donut with outer diameter of 3
pixels and an inner diameter of 2 pixels. This increases the
effective Q to 0.0029. This is still a very inefficient trap, but
shows that the DMD could make a trap much more efficient.
This donut profile also seemed to have a greater incidence of
stiction to the cover slip. This suggests that the gradient forces
overbalanced the scattering force and made the stable trap-
ping point a bit further upstream than with the pinhole profile.
43210 5
1
1
1
2
2
2
2
2
2
3
3
3
3
33
3
4
4
4
4
4
2
3
3 3
3
3
33
3
2
2
2
2 2
2
2
2
4
44
4
4
4
4
4
44
4 4 4
4
4
4
4
5
5
5
5
5
5
5
4 5
55
5
5
5 5
5
5
5
5 5
5
5
55
5
5
5 5
5
5
5
55
5
5
5
Fig. 4.1: Radius/Pixel Illumination
Optical Tweezers and Texas Instruments Digital Micromirror Device™ 35

Optical Tweezer Performance
36
Lateral measurements were also made. In this case, no provi-
sions were made to specifically test lateral trap strength, but in
the course of experimenting, a capillary effect occurred within
the sample. As the experiment ran, liquid evaporating from the
edge drew liquid from the center, carrying the beads with it. Ini-
tially this was a problem as the sample dried up within 15 min-
utes. With the video recording capabilities of the system,
though, I was able to examine the tape and find examples of
stable trapping with the lateral flow. Once a bead was success-
fully trapped, a bead floating in the liquid is measured frame by
frame, giving an estimate of the liquid velocity. Assuming lami-
nar flow, we estimate the lateral strength as 0.45pN. To ensure
that the bead was trapped and not stuck to the coverslip, any
subject bead must escape the trap at a later point. This leads
to an accurate measurement of the maximum trap strength
assuming that the velocity can be accurately determined and
conditions are still in a laminar flow phase.
Integrating the vision system also showed promising results.
The camera/framegrabber/software processing/binary format-
ter combination had no significant problems. The vision system
was able to discriminate between the imaged beads and pro-
cess each frame at video frame rates. The binary formatter and
PCI interface were also able to absorb the high data burst rates
required to maintain the high refresh rate. The binary formatter,
Optical Tweezers and Texas Instruments Digital Micromirror Device™

while designed to exclusively control the PCI, was able to suc-
cessful share the bus with a frame grabber, a high data rate
device.
When combined fully with the laser and optics system, though,
the feedback system completely failed. Although the computer
attempted to direct the spheres by changing the DMD pattern, I
was not able to demonstrate a stable trapping scheme that
would directly correlate to distinct trapping locations as viewed
by the CCD camera. On closer inspection, the fault lies with the
interaction of the light with the particle. While simulations
showed that the bead could be stably trapped at a point further
downstream, the actual testing did not show any evidence of
the lower stable trapping point. Attempts were made to move
the bead at the point closer to the beam focus. These were
marginally successful since some bead movement was
detected. The movement, though, had a maximum displace-
ment of 1 um before the bead suffered from stiction to the cov-
erslip. In addition, the bead could only be moved inwards
towards the vertical optical axis. A bead could be trapped with
an angled beam and drawn towards the center, but any attempt
to reverse this movement resulted in instant stiction to the cov-
erslip.
Optical Tweezers and Texas Instruments Digital Micromirror Device™ 37

Optical Tweezer Performance
38
The lack of the lower trap position, though, effectively dooms
the entire sorting assay. Looking closer at the theory, there are
indications that the theory as applied is not correct. While the
ray-optic theory works for focused light with a Gaussian distri-
bution, altering the intensity distribution may mean that the
model will not be entirely correct. When looking at the Rayleigh
regime model of gradient and scattering forces, the trap can
only be stable where there is a significant intensity gradient. If a
trap were to be formed well below the focus, the axial gradient
would be minimal at best. Clearly, a system to use the DMD for
a cell sorting assay could not use this method.
One way of making this assay work properly would require
changing the optical system dramatically. Instead of having all
of the light coming to a single focus, each mirror would have to
direct a ray of light to a separate focus point. These focus
points would lie on a single plane, thus keeping the beads in
focus and under control. By turning on or off each mirror, an
intensity gradient could be created in the lateral direction. An
axial intensity gradient is created by each beam coming to the
separate focus. Ideally, a beam formed by a single mirror
would have to fill the entire objective back while entering the
objective at a distinct angle. Filling the entire back opening of
the objective causes a steep axial gradient as the rays come to
a diffraction-limited point. The distinct entry angle means that
Optical Tweezers and Texas Instruments Digital Micromirror Device™

these diffraction-limited focal points will be at distinct locations.
As long as each beam is identical in terms of parallelism, the
focus points will be along the same plane. Making this optical
system, though, is well beyond my current abilities with optics.
Another failing of the system was the common occurrence of
stiction of beads that were under control by the trap. This was
caused by the low focus point of the microscope objective.
With the given objective, it was impossible to properly image
beads more than a few tens of microns into the sample.
In conclusion, I have shown that the DMD can be used to spa-
tially modulate monochromatic light intensity. When used in
conjunction with the binary formatter, the DMD provides real-
time, adjustable spatial shuttering for a variety of applications.
In this particular application of optical tweezers, the applied
mode of operation was unsuccessful at creating a cell sorting
assay, but provides useful insights about the operation of opti-
cal tweezers.
Optical Tweezers and Texas Instruments Digital Micromirror Device™ 39

Optical Tweezer Performance
40
Optical Tweezers and Texas Instruments Digital Micromirror Device™
CHAPTER A Ray-Optic Simulation
Angle of Incidence
xOr
Oi
r
zy
d
Oo
θi θr θo+=
θrsin xr-- θotan, x
z--= =
θrcos yr-- y⇒ r θrcos= =
z d y–=
Optical Tweezers and Texas Instruments Digital Micromirror Device A-1

Ray-Optic Simulation
Refraction and Reflection Angles
Angles at 1st interface
r θrsin z θo θotan⇒tanr θrsin
d r θrcos–--------------------------= =
θo
r θrsin
d r θrcos–--------------------------atan= 0 θr
rd---acos≤ ≤,
0 θoπ2--- r
d---acos–≤ ≤
Oo
Oio
Vlo
Vto
Vl1
Vt1
Ot1
Oi1Oto
Or
θr Vr0∠=
θi0 θo θr+=
Vl0∠ Vr0 θi0+∠=
A-2 Optical Tweezers and Texas Instruments Digital Micromirror

Snell’s Law of Refraction
Angles at 2nd interface
Angles at 3rd interface
Snell’s Law
Vt0∠ Vr0 π θt0–( )+∠=
θt0 f12 θi0( )=
θi1 θt0=
Vr1∠ Vr0 π 2– θt0( )+∠=
Vl1∠ Vr1 π θ– i1( )+∠ Vr1 π θt0–( )+∠= =
Vt1∠ Vr1 θt1+∠=
θt1 f21 θi1( ) f21 θt0( ) f21 f12 θi0( )( )= = =
θi2 θt1 θi1 θt0= = =
Vr2∠ Vr1 π 2θt0–( )+∠=
Vl1∠ Vr2 π θt0–( )+∠=
Vt1∠ Vr2 θt2+∠ Vr0 θt1+∠= =
2
1
Oi
Ot
2
1
Or
Oi
Optical Tweezers and Texas Instruments Digital Micromirror Device A-3

Ray-Optic Simulation
θisin
θtsin------------
n1
n2-----=
θi π θr–=
A-4 Optical Tweezers and Texas Instruments Digital Micromirror

CHAPTER B Ray-Optic Model Simulation Code
// rayoptic.cpp : Defines the entry point for the console application.//
#include "stdafx.h"#include <math.h>
#define WATER 1.33#define GLASS 1.55#define ERROR 0.001#define PI 3.141592653589793238462 //3.1415926535897932384626433832795D
struct VECTOR{double amplitude;double angle;};
//////double FindThetaR(double ThetaO, double Radius, double X, double Y, double HighThetaR, double LowThetaR, int iterations)
Optical Tweezers and Texas Instruments Digital Micromirror Device B-5

Ray-Optic Model Simulation Code
{double dThetaO;double avgThetaR=(HighThetaR+LowThetaR)/2;dThetaO=atan((Radius*sin(avgThetaR)+Y)/(X+Radius*cos(avgThetaR)));if ((dThetaO<=(ThetaO+ERROR)) && (dThetaO>=(ThetaO-ERROR))) { return avgThetaR;} else if ((iterations<=0) || (HighThetaR==LowThetaR)){ return 999; //error--no solution}else {if (dThetaO<ThetaO)return FindThetaR(ThetaO,Radius,X,Y,HighThetaR,avgThetaR,iterations--);elsereturn FindThetaR(ThetaO,Radius,X,Y,avgThetaR,LowThetaR,iterations--);}};
double diag(double x,double y){return sqrt(x*x+y*y);};
VECTOR AddVectors(VECTOR V1, VECTOR V2){VECTOR result;double vx=V1.amplitude*cos(V1.angle)+V2.amplitude*cos(V2.angle);double vy=V1.amplitude*sin(V1.angle)+V2.amplitude*sin(V2.angle);result.amplitude=diag(vx,vy);result.angle=(vx==0?0:atan2(vy,vx));return result;};
VECTOR DiffVector(VECTOR incident, VECTOR reflected){VECTOR result;double vx=incident.amplitude*cos(incident.angle)-reflected.ampli-tude*cos(reflected.angle);
B-6 Optical Tweezers and Texas Instruments Digital Micromirror

double vy=incident.amplitude*sin(incident.angle)-reflected.ampli-tude*sin(reflected.angle);result.amplitude=diag(vx,vy);result.angle=(vx==0?0:atan2(vy,vx));return result;};
//////ignore polarization for now--assume all rays are // to incident plane//laser is linearly polarized to start.VECTOR ForceFromRayParallel(VECTOR incident,double ThetaR){double ThetaI0=ThetaR+incident.angle;double ThetaT0=asin(WATER/GLASS*sin(ThetaI0));
double Tparall0=2*WATER*cos(ThetaI0)/(GLASS*cos(ThetaI0)+WATER*cos(ThetaT0))*incident.amplitude;double Rparall0=(GLASS*cos(ThetaI0)-WATER*cos(ThetaT0))/(GLASS*cos(ThetaI0)+WATER*cos(ThetaT0))*incident.amplitude;
VECTOR Vlo={Rparall0,ThetaR+ThetaI0};
double ThetaT1=asin(GLASS/WATER*sin(ThetaT0));double cTparall=2*GLASS*cos(ThetaT0)/(WATER*cos(ThetaT0)+GLASS*cos(ThetaT1));double cRparall=(WATER*cos(ThetaT0)-GLASS*cos(ThetaT1))/(WATER*cos(ThetaT0)+GLASS*cos(ThetaT1));
VECTOR Vt1={Tparall0*pow(cRparall,0)*cTparall,ThetaT1+ThetaR+1*(PI-2*ThetaT0)};VECTOR Vt2={Tparall0*pow(cRparall,1)*cTparall,ThetaT1+ThetaR+2*(PI-2*ThetaT0)};VECTOR Vt3={Tparall0*pow(cRparall,2)*cTparall,ThetaT1+ThetaR+3*(PI-2*ThetaT0)};VECTOR Vt4={Tparall0*pow(cRparall,3)*cTparall,ThetaT1+ThetaR+4*(PI-2*ThetaT0)};
VECTOR VTotal=AddVectors(Vlo,Vt1);VTotal=AddVectors(VTotal,Vt2);VTotal=AddVectors(VTotal,Vt3);VTotal=AddVectors(VTotal,Vt4);
Optical Tweezers and Texas Instruments Digital Micromirror Device B-7
Ray-Optic Model Simulation Code
incident.angle=PI-incident.angle;VECTOR VForce=DiffVector(incident,VTotal);return VForce;};
VECTOR ForceFromRayPerpindicular(VECTOR incident,double ThetaR){double ThetaI0=ThetaR+incident.angle;double ThetaT0=asin(WATER/GLASS*sin(ThetaI0));
double Tperpin0=2*WATER*cos(ThetaI0)/(WATER*cos(ThetaI0)+GLASS*cos(ThetaT0))*incident.amplitude;double Rperpin0=(WATER*cos(ThetaI0)-GLASS*cos(ThetaT0))/(WATER*cos(ThetaI0)+GLASS*cos(ThetaT0))*incident.amplitude;VECTOR Vlo={Rperpin0,ThetaR+ThetaI0};
double ThetaT1=asin(GLASS/WATER*sin(ThetaT0));double cTperpin=2*GLASS*cos(ThetaT0)/(GLASS*cos(ThetaT0)+WATER*cos(ThetaT1));double cRperpin=(GLASS*cos(ThetaT0)-WATER*cos(ThetaT1))/(GLASS*cos(ThetaT0)+WATER*cos(ThetaT1));
VECTOR Vt1={Tperpin0*pow(cRperpin,0)*cTperpin,ThetaT1+ThetaR+1*(PI-2*ThetaT0)};VECTOR Vt2={Tperpin0*pow(cRperpin,1)*cTperpin,ThetaT1+ThetaR+2*(PI-2*ThetaT0)};VECTOR Vt3={Tperpin0*pow(cRperpin,2)*cTperpin,ThetaT1+ThetaR+3*(PI-2*ThetaT0)};VECTOR Vt4={Tperpin0*pow(cRperpin,3)*cTperpin,ThetaT1+ThetaR+4*(PI-2*ThetaT0)};/*printf("%f, %f\n%f, %f\n%f, %f\n%f, %f\n%f %f\n",Vlo.amplitude,Vlo.angle,Vt1.amplitude,Vt1.angle,Vt2.amplitude,Vt2.angle,Vt3.amplitude,Vt3.angle,Vt4.amplitude,Vt4.angle);*/
VECTOR VTotal=AddVectors(Vlo,Vt1);VTotal=AddVectors(VTotal,Vt2);VTotal=AddVectors(VTotal,Vt3);VTotal=AddVectors(VTotal,Vt4);VECTOR VForce=DiffVector(incident,VTotal);return VForce;};
B-8 Optical Tweezers and Texas Instruments Digital Micromirror

VECTOR ForceOnSphere(double X, double Y, double Radius){VECTOR V[5];VECTOR Result[5];VECTOR Sum={0,0};double high=acos(Radius/X);double low=-high;V[0].amplitude=1;V[1].amplitude=0;V[2].amplitude=58;V[3].amplitude=0;V[4].amplitude=1;
V[0].angle=PI/50;V[1].angle=PI/75;V[2].angle=0;V[3].angle=-PI/75;V[4].angle=-PI/50;
for (int i=0;i<5;i++){Result[i]=ForceFromRayParallel(V[i],Find-ThetaR(V[i].angle,Radius,X,Y,high,low,10));//printf("%f,%f \n",Result[i].amplitude,Result[i].angle);Sum=AddVectors(Sum,Result[i]);}return Sum;//result indicates light vector--reverse is force vector};
//need to write data to file//define light source(angle/intensity)//define new bead location(given force, move //given light source, initial bead location, track bead movement until movement is neglible.
//
void main(){double r=3;
Optical Tweezers and Texas Instruments Digital Micromirror Device B-9

Ray-Optic Model Simulation Code
double x=10;double y=0;VECTOR a;for (int i=-1;i<2;i++){a=ForceOnSphere(x,y+i*0.1,r);printf("result: %d: %f,%f\n",i, a.amplitude,a.angle);}getchar();
}
B-10 Optical Tweezers and Texas Instruments Digital Micromirror

CHAPTER C Framegrabber to DMD Feedback Code
// OTfeedback.cpp : Defines the entry point for the console application.
//
#include "stdafx.h"
#include <mil.h>
#include <windows.h>
#include <conio.h>
/* Minimum and maximum area of blobs. */
#define MIN_BLOB_AREA50L
#define MAX_BLOB_AREA50000L
/* Radius of the smallest particles to keep. */
#define MIN_BLOB_RADIUS 3L
Optical Tweezers and Texas Instruments Digital Micromirror Device C-11

Framegrabber to DMD Feedback Code
/* Size and color of the cross used to mark centers of gravity. */
#define CROSS_SIZE10L
#define VECTOR_SIZE10L
#define BLACK250L
#define WHITE0L
/* Utility functions prototype */
void DrawCross(MIL_ID ImageId, double CenterX, double CenterY, bool Bold);
void DrawVector(MIL_ID ImageId, double CenterX, double CenterY, int ShiftX, int ShiftY);
void main(void)
{
MIL_ID MilApplication,/* Application identifier.*/
MilSystem,/* System identifier.*/
MilDisplay,/* Display identifier.*/
MilDigitizer,/* Digitizer identifier.*/
MilColorImage[2],/* Color Image identifier.*/
MilGrayImage[2],/* Grayscale Image identifier.*/
MilBinImage[2],/* Binary Image identifier.*/
MilOutImage[2],/* Binary Image identifier.*/
BlobResult, /* Blob result buffer identifier. */
FeatureList; /* Feature list identifier.*/
const int SizeX=512, SizeY=384;
const int cX=0,cY=1,cM=2,tX=3,tY=4;
const int MAX_BLOBS=50;
int cframe=0,nframe=1;
C-12 Optical Tweezers and Texas Instruments Digital Micromirror

long i,j,n;
int Threshold=100;
long TotalBlobs,/* Total number of blobs. */
CogX[MAX_BLOBS],/* X coordinate of center of gravity. */
CogY[MAX_BLOBS],/* Y coordinate of center of gravity. */
CogXmin[MAX_BLOBS],/* Minimum X value*/
CogXmax[MAX_BLOBS],/* Maximum X value*/
CogYmin[MAX_BLOBS],/* Minimum Y value*/
CogYmax[MAX_BLOBS],/* Maximum Y value*/
CogXfer[MAX_BLOBS],/* X Feret*/
CogYfer[MAX_BLOBS]; /* Y Feret*/
int select[MAX_BLOBS][5];
int sel=0;
int shiftX,shiftY;
char Output[384][64];
int ch;
bool go=true;
/* Allocate defaults */
P9050_HANDLE hPlx = NULL;
if (P9050_Open(&hPlx,0x10b5,0x9050,0,0)) //opens BF card
{
//DWORD dwStatus = BF_Status(hPlx);
// TODO: Add a check for 0xfff... as a PCI bus error on init.
//POWERON
P9050_FlagDMD(hPlx, REG_COMMAND14, BIT_POWER_UP, REG_CMD_WRITE, true); //power on
Optical Tweezers and Texas Instruments Digital Micromirror Device C-13

Framegrabber to DMD Feedback Code
P9050_FlagDMD(hPlx, REG_COMMAND10, BIT_BOARD_RESET, REG_CMD_WRITE, true); //board reset
P9050_FlagDMD(hPlx, REG_COMMAND10, BIT_BOARD_RESET, REG_CMD_WRITE, false);
P9050_WriteRegister(hPlx, REG_PATTERN_START_ADDRESS, 0x0); //sets pattern address
//Allocate MIL resources
MappAllocDefault(M_SETUP, &MilApplication, &MilSystem, &MilDisplay, M_NULL, M_NULL);
//Digitizer
MdigAlloc(MilSystem,M_DEFAULT,"NTSC",M_DEFAULT,&MilDigitizer); //initial-izes digitizer
MdigControl(MilDigitizer,M_GRAB_SCALE, 0.8); //grab of 0.8 of 640x480
MdigControl(MilDigitizer,M_GRAB_MODE,M_ASYNCHRONOUS); //asynchro-nous mode--grab and continue
//Image buffers
for (i=0;i<2;i++) { //allocate processing buffers
MbufAllocColor(MilSys-tem,3,SizeX,SizeY,8+M_UNSIGNED,M_GRAB+M_IMAGE,&MilColorImage[i]);
MbufAlloc2d(MilSys-tem,SizeX,SizeY,8+M_UNSIGNED,M_PROC+M_IMAGE,&MilGrayImage[i]);
MbufAlloc2d(MilSys-tem,SizeX,SizeY,1+M_UNSIGNED,M_PROC+M_DISP+M_IMAGE,&MilBinIm-age[i]);
MbufAlloc2d(MilSys-tem,SizeX,SizeY,1+M_UNSIGNED,M_PROC+M_IMAGE,&MilOutImage[i]);
}
//Blob analysis buffers
MblobAllocResult(MilSystem,&BlobResult);
MblobControl(BlobResult,M_IDENTIFIER_TYPE,M_BINARY);
MblobAllocFeatureList(MilSystem,&FeatureList);
C-14 Optical Tweezers and Texas Instruments Digital Micromirror

MblobSelectFeature(FeatureList,M_CENTER_OF_GRAVITY);
MblobSelectFeature(FeatureList,M_BOX);
//clear table of blob position, move, destination
for (i=0;i<MAX_BLOBS;i++) { select[i][cX]=0; }
//grab and process loop
if (getchar()=='a') go=false;
while (go)
{
cframe=nframe;
nframe=1-cframe; //swap display and processing frames
MdispSelect(MilDisplay,MilBinImage[nframe]); //show old binary frame
//MdispSelect(MilOutImage[nframe]);
MdigGrab(MilDigitizer,MilColorImage[nframe]); //grab next frame
MbufCopyColor(MilColorImage[cframe],MilGrayImage[cframe],M_RED); //pull red color (no green!)
MimBinarize(MilGrayImage[cframe],MilBinIm-age[cframe],M_GREATER_OR_EQUAL,Threshold, M_NULL); //binarize
MimOpen(MilBinImage[cframe], MilBinImage[cframe], MIN_BLOB_RADIUS, M_BINARY); //OPEN (make blobs larger)
MblobCalculate(MilBinImage[cframe], M_NULL, FeatureList, BlobResult); //find blobs
MblobSelect(BlobResult, M_EXCLUDE, M_AREA, M_LESS_OR_EQUAL, MIN_BLOB_AREA, M_NULL); //exclude small blobs
MblobGetNumber(BlobResult, &TotalBlobs); //get number of blobs
if(TotalBlobs < MAX_BLOBS) { //get parameters of blobs
MblobGetResult(BlobResult, M_CENTER_OF_GRAVITY_X+M_TYPE_LONG, CogX);
MblobGetResult(BlobResult, M_CENTER_OF_GRAVITY_Y+M_TYPE_LONG, CogY);
MblobGetResult(BlobResult, M_BOX_X_MIN+M_TYPE_LONG, CogXmin);
Optical Tweezers and Texas Instruments Digital Micromirror Device C-15

Framegrabber to DMD Feedback Code
MblobGetResult(BlobResult, M_BOX_X_MAX+M_TYPE_LONG, CogXmax);
MblobGetResult(BlobResult, M_BOX_Y_MIN+M_TYPE_LONG, CogYmin);
MblobGetResult(BlobResult, M_BOX_Y_MAX+M_TYPE_LONG, CogYmax);
MblobGetResult(BlobResult, M_FERET_X+M_TYPE_LONG, CogXfer);
MblobGetResult(BlobResult, M_FERET_Y+M_TYPE_LONG, CogYfer);
}
MbufClear(MilOutImage[cframe],0); //clear output buffer
for (i=0;i<MAX_BLOBS;i++) { //match actual blobs with coordinates in table
if (select[i][cX]!=0) {
for (j=0;j<TotalBlobs;j++)
{
if ((select[i][cX]>CogXmin[j]) && (select[i][cX]<CogXmax[j]) &&
(select[i][cY]>CogYmin[j]) && (select[i][cY]<CogYmax[j])) {
if (i==0) { sel=j; }
select[i][cX]=CogX[j];
select[i][cY]=CogY[j];
//calculate move to
switch (select[i][cM])
{
case 1: shiftX= 1; shiftY=-1; break; //down, left
case 2: shiftX= 1; shiftY= 0; break; //down
case 3: shiftX= 1; shiftY= 1; break; //down, right
case 4: shiftX= 0; shiftY=-1; break; //left
case 5: shiftX= 0; shiftY= 0; break; //hold
case 6: shiftX= 0; shiftY= 1; break; //right
case 7: shiftX=-1; shiftY=-1; break; //up, left;
case 8: shiftX=-1; shiftY= 0; break; //up
case 9: shiftX=-1; shiftY= 1; break; //up, right;
C-16 Optical Tweezers and Texas Instruments Digital Micromirror

}
DrawVector(MilBinImage[cframe],CogX[j],CogY[j], shiftX, shiftY);
MbufCopyColor2d(MilBinImage[cframe],MilOutImage[cframe],
0,CogXmin[j],CogYmin[j],
0,(CogXmin[j]+shiftX),(CogYmin[j]+shiftY),
CogXfer[j],CogYfer[j]); //copy & shift blob
}
}
}
}
for (i=0;i<TotalBlobs; i++){ //box blobs
MgraRect(M_DEFAULT,MilBinImage[cframe], CogXmin[i],CogYmin[i], CogX-max[i],CogYmax[i]);
}
DrawCross(MilBinImage[cframe], CogX[sel],CogY[sel], select[0][cX]?true:false);
MbufGet(MilOutImage[cframe],&Output); //send buffer to array
//board reset??
P9050_FlagDMD(hPlx, REG_COMMAND10, BIT_BOARD_RESET, REG_CMD_WRITE, true);
P9050_FlagDMD(hPlx, REG_COMMAND10, BIT_BOARD_RESET, REG_CMD_WRITE, false);
//for (i=0;i<64;i++) printf("%2x ",Output[0][i]);
char cMask;DWORD add,lData,hData, addr=0x0; int iRow,iBit,iByte;
for (iRow=0;iRow<384;iRow++) { //T-B //for (iRow=383;iRow>=0;iRow--) { //B-T
for (i=0;i<2;i++) {
for (iBit=7;iBit>=0;iBit--) { //for (iBit=0;iBit<8;iBit++) { //R-L
lData=0; hData=0; cMask=0x80>>iBit;
for (iByte=0;iByte<32;iByte++) {
add=0x80000000>>iByte;
Optical Tweezers and Texas Instruments Digital Micromirror Device C-17
Framegrabber to DMD Feedback Code
if (Output[iRow][31-iByte] & cMask) lData+=add;
if (Output[iRow][63-iByte] & cMask) hData+=add;
}
P9050_WriteMemory(hPlx,addr,lData);addr+=0x4;
for (n=0;n<40;n++) {}
P9050_WriteMemory(hPlx,addr,hData);addr+=0x4;
for (n=0;n<40;n++) {}
P9050_WriteMemory(hPlx,addr,lData);addr+=0x4;
for (n=0;n<40;n++) {}
P9050_WriteMemory(hPlx,addr,hData);addr+=0x4;
}
}
if (iRow%8==7) {
P9050_FlagDMD(hPlx, REG_COMMAND10, BIT_WRITE, true, true);
int iCountdown = 1024; bool fFlag;
do { fFlag = P9050_FlagDMD(hPlx, REG_STATUS, BIT_WRITE_FIFO_FULL, false, false);
} while (fFlag && iCountdown--);
if (iCountdown < 0) {
iCountdown = -1;
printf("Countdown invoked");
}
}
}
P9050_FlagDMD(hPlx, REG_COMMAND10, BIT_DMD_LOAD, true, true); //load pattern
P9050_FlagDMD(hPlx, REG_COMMAND10, BIT_DMD_RESET, true, true); //dmd reset pulse
if (_kbhit()) {
C-18 Optical Tweezers and Texas Instruments Digital Micromirror

ch=_getch();
if ((ch==0x0) || (ch==0xe0)) {
switch (_getch()) //ch=_getch();
{
case ';': break;
case '<': break;
case '=': break;
case '>': break;
case '?': sel+=1; if(sel>TotalBlobs) sel=0; break; //F5
case '@':
if (select[0][cX]) {
select[0][cX]=CogX[sel];
select[0][cY]=CogY[sel];
} else { select[0][cX]=0; } break; //F6
case 'A': break;
case 'B': break;
case 'C': break;
case 'D': go=false; break;
case 'H': if (select[0][cM]<7) select[0][cM]+=3; break; //up
case 'K': if ((select[0][cM]%3)!=1) select[0][cM]-=1; break; //left
case 'P': if (select[0][cM]>3) select[0][cM]-=3; break; //down
case 'M': if ((select[0][cM]%3)!=0) select[0][cM]+=1; break; //right
case 'R': break;
case 'G': Threshold+=8; break;
case 'I': break;
case 'S': Threshold+=1; break;
case 'O': Threshold-=8; break;
case 'Q': Threshold-=1; break;
Optical Tweezers and Texas Instruments Digital Micromirror Device C-19

Framegrabber to DMD Feedback Code
}
}
}
//set next destination
} //end loop
printf("%d",Threshold);
//POWEROFF
//release resources
MblobFree(FeatureList);
MblobFree(BlobResult);
for (i=0;i<2;i++) {
MbufFree(MilColorImage[i]);
MbufFree(MilGrayImage[i]);
MbufFree(MilBinImage[i]);
MbufFree(MilOutImage[i]);
}
MdigFree(MilDigitizer);
MappFreeDefault(MilApplication,MilSystem,MilDisplay,M_NULL,M_NULL);
P9050_FlagDMD(hPlx, REG_COMMAND14, BIT_POWER_UP, REG_CMD_WRITE, false); //power down
P9050_Close(hPlx);
} else {
printf("%s",P9050_ErrorString);
getchar();
}
}
C-20 Optical Tweezers and Texas Instruments Digital Micromirror

/* Draw a cross at the specified position. */
void DrawCross(MIL_ID ImageId, double CenterX, double CenterY, bool Bold)
{
int Thick=0;
if (Bold) {Thick=2;}
MgraColor(M_DEFAULT,0);
MgraRectFill(M_DEFAULT, ImageId,
(long)(CenterX+.5)-(CROSS_SIZE/2), (long)(CenterY+.5-Thick),
(long)(CenterX+.5)+(CROSS_SIZE/2), (long)(CenterY+.5+Thick));
MgraLine(M_DEFAULT, ImageId,
(long)(CenterX+.5-Thick), (long)(CenterY+.5)-(CROSS_SIZE/2),
(long)(CenterX+.5+Thick), (long)(CenterY+.5)+(CROSS_SIZE/2));
}
void DrawVector(MIL_ID ImageId, double CenterX, double CenterY, int ShiftX, int ShiftY)
{
MgraLine(M_DEFAULT, ImageId,
(long)(CenterX+.5), (long)(CenterY+.5),
(long)(CenterX+.5)+(ShiftX*VECTOR_SIZE),
(long)(CenterY+.5)+(ShiftY*VECTOR_SIZE));
}
Optical Tweezers and Texas Instruments Digital Micromirror Device C-21

Framegrabber to DMD Feedback Code
C-22 Optical Tweezers and Texas Instruments Digital Micromirror

CHAPTER D Optical Tweezer Video Images
These sets of images were taken from video of 3µm diameter
polystyrene spheres immersed in tap water as they floated by
the optical trap. The images proceed from left to right, top to
bottom, and are spaced 1/30 second apart. The first 16
images show 2 beads, the center and brighter bead being suc-
cessfully trapped. The green fringing around this bead is the
scattering of the trapping laser light. The darker bead is carried
by the flow of fluid from left to right. (The brightness of the
bead indicates the axial position of the bead. A brighter bead
is closer to the microscope objective lens.) Fluid velocity is
estimated at 15µm/s.
Optical Tweezers and Texas Instruments Digital Micromirror Device D-23

Optical Tweezer Video Images
D-24
The second set shows a third bead entering the picture from
the left. The previous trapped bead has become dislodged
from the trap and escapes (frame 8). At frame 13, a bright
flash of green indicates that the third bead has become
trapped. Also note the bead center has lightened considerably
as the trap has drawn the bead upward as well as laterally.
The third set of images show the third bead trapped until a
large clump of spheres collides with and carries the third bead
away. This mass of beads is far too heavy and large for this
particular beam configuration to capture. Other images have
shown that up to 4 beads can be simultaneously trapped in a
similar beam.
The final set demonstrates that manual movement of the beam
via DMD mirror states does translate into changing the position
of the beam and resultingly the bead position. The aiming point
moves from the top left part of the screen to the center in half a
second, dragging the bead along.
Optical Tweezers and Texas Instruments Digital Micromirror