operations manual - case sealing packaging line solutions ... · i. introduction 1 about primeloctm...
TRANSCRIPT

Shurtape is an authorized distributor of PrimelocTM tape applicators.
6000 & 7000
Series
Tape Applicators
Operations Manual
Designed and manufactured by
PrimelocTM Packaging, Inc.

Table of Contents
I. Introduction
About …..……………………………………………….. 1
Operation ………………………………………………. 1
Receiving and Handling .……………….………… 1
Features …………………………………………………. 2
Available Configurations …………………………….. 2
VI. Troubleshooting Guide
Taping Problems …….……………………………….. 11
Carton Problems …..…………………………………. 11
Cutting Problems ………..……………….………… 12
Front/Rear Tab Problems ………………………… 12,13
II. Safety
Owner’s Responsibility …………………………….. 3
Safety Guidelines …..…………………………………. 3
Manual Markers …………..……………….………… 3
V. Assembly Drawings
Assembly Drawings ………………. Attached Package
III. Loading Tape
Tape Roll Hub and Lock Mechanism ….…….. 4
Threading …………………………………………………. 5
IV. Adjustments
Tape Alignment and Tracking …..………………... 6
Tension Management …………………………………. 7
Rear and Front Tab Adjustments ………………. 8
Main Spring ……………………………………………. 9
Determining Spring Settings ……………………….. 9
V. Maintenance
Tools ………………………………….…..……………….. 10
Cleaning and Lubricating ………………………….. 10
Worn parts ………………………………………………. 10

I. Introduction
1
About
PrimeLocTM Packaging strives to develop and deliver the best taping equipment in the industry. Our
ongoing commitment to innovation and to quality design, manufacturing, and testing ensures that
our products will exceed your expectations. Each of our tape applicators has been individually
inspected against our high standard of quality.
This manual explains how to handle, operate, and maintain your tape applicator. Please ensure that
all operators have read and understood the instructions in this manual prior to using or maintaining
the applicator. Note that the illustrations provided may differ from your tape applicator, as there are
multiple base configurations and optional add-ons available.
In the event that you encounter a problem, please refer to the troubleshooting section of this
manual for potential solutions. If your problem persists, you can receive assistance by contacting
your distributor, whose contact information would be listed on the front of the tape applicator.
Replacement parts may be identified by referencing the Assembly Drawings section of this manual.
Operation
PrimeLocTM Tape Applicators are fitted onto case sealers to automatically apply pressure-sensitive
tape to cartons as they are conveyed. The tape applicator can be positioned as a top-, bottom-, or
side-sealing unit.
The tape applicator compression roller makes the initial contact with the carton’s front panel. As the
carton is conveyed past the tape applicator, the tape is fed and applied along the major flaps of the
carton. A spring-loaded safety knife then cuts the tape as the carton exits the machine.
Receiving and Handling
When your tape applicator arrives, be sure to inspect the box for damage and check the
package contents. Beware of any warping of the frame. Ensure that all springs, compression
rollers, and bumpers are in good condition.
When handling the tape applicator, grasp the vinyl grips located on the frame firmly. Do not handle
the tape applicator by the front or rear compression rollers. Doing so may damage the tape
applicator and impact performance.
If the tape applicator is not in use, store it in a dry location.
I. Introduction
2
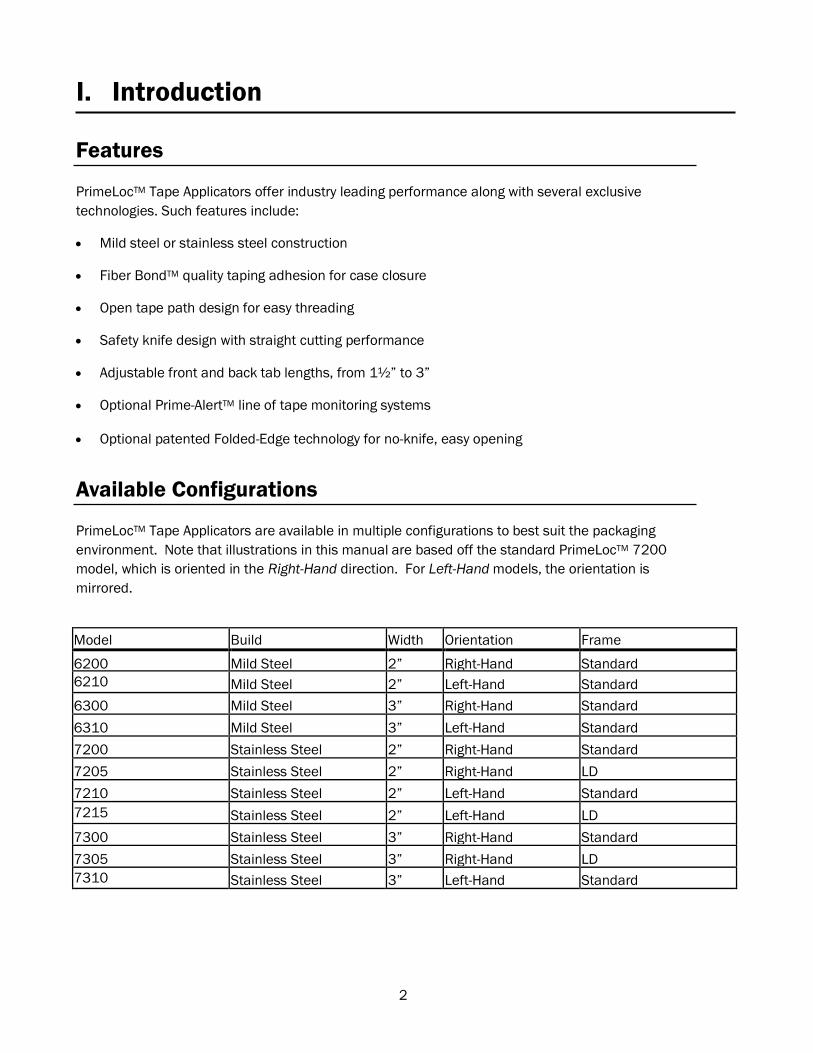
Features
PrimeLocTM Tape Applicators offer industry leading performance along with several exclusive
technologies. Such features include:
Mild steel or stainless steel construction
Fiber BondTM quality taping adhesion for case closure
Open tape path design for easy threading
Safety knife design with straight cutting performance
Adjustable front and back tab lengths, from 1½” to 3”
Optional Prime-AlertTM line of tape monitoring systems
Optional patented Folded-Edge technology for no-knife, easy opening
Available Configurations
PrimeLocTM Tape Applicators are available in multiple configurations to best suit the packaging
environment. Note that illustrations in this manual are based off the standard PrimeLocTM 7200
model, which is oriented in the Right-Hand direction. For Left-Hand models, the orientation is
mirrored.
Model Build Width Orientation Frame
6200 Mild Steel 2” Right-Hand Standard
6210 Mild Steel 2” Left-Hand Standard
6300 Mild Steel 3” Right-Hand Standard
6310 Mild Steel 3” Left-Hand Standard
7200 Stainless Steel 2” Right-Hand Standard
7205 Stainless Steel 2” Right-Hand LD
7210 Stainless Steel 2” Left-Hand Standard
7215 Stainless Steel 2” Left-Hand LD
7300 Stainless Steel 3” Right-Hand Standard
7305 Stainless Steel 3” Right-Hand LD
7310 Stainless Steel 3” Left-Hand Standard
3
II. Safety
Owner’s Responsibility
Owners and operators of PrimeLocTM tape applicators are responsible for preparing and maintaining
an effective safety program. This program should be consistent with good management practices
and meet any applicable laws, regulations, and ordinances. Operators must be aware and trained
to recognize the potential safety hazards of the tape applicator.
Safety Guidelines
Please follow the listed guidelines below for PrimeLocTM tape applicators by OSHA standards
1910.47.
1. Only trained personnel are to operate the tape applicator.
2. Wear safety glasses when near the tape applicator.
3. Determine and shut off all types of power used by the machine prior to handling the tape
applicator (electrical, compressed air, hydraulic, mechanical, etc.).
4. Stay clear of all moving parts which may pinch, shear, or cut.
5. Avoid contact with the spring-loaded knife on the cutting apparatus.
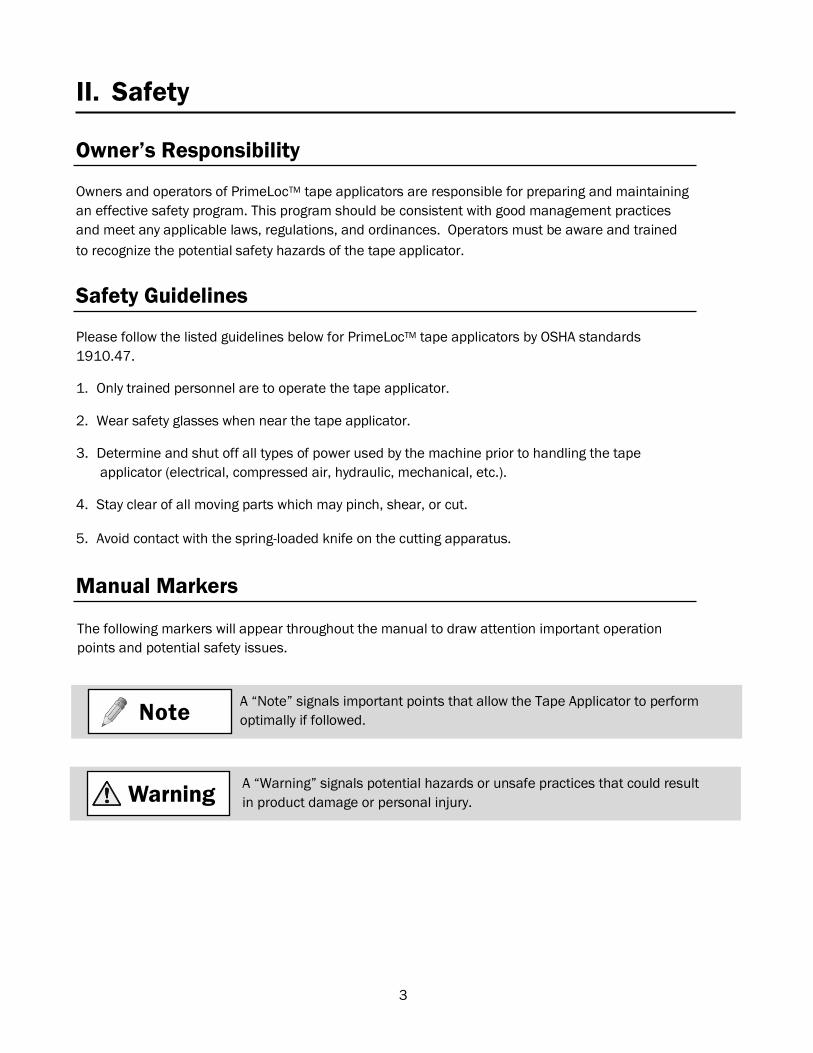
Manual Markers
The following markers will appear throughout the manual to draw attention important operation
points and potential safety issues.
Note
Warning
A “Note” signals important points that allow the Tape Applicator to perform
optimally if followed.
A “Warning” signals potential hazards or unsafe practices that could result
in product damage or personal injury.
4
III. Loading Tape
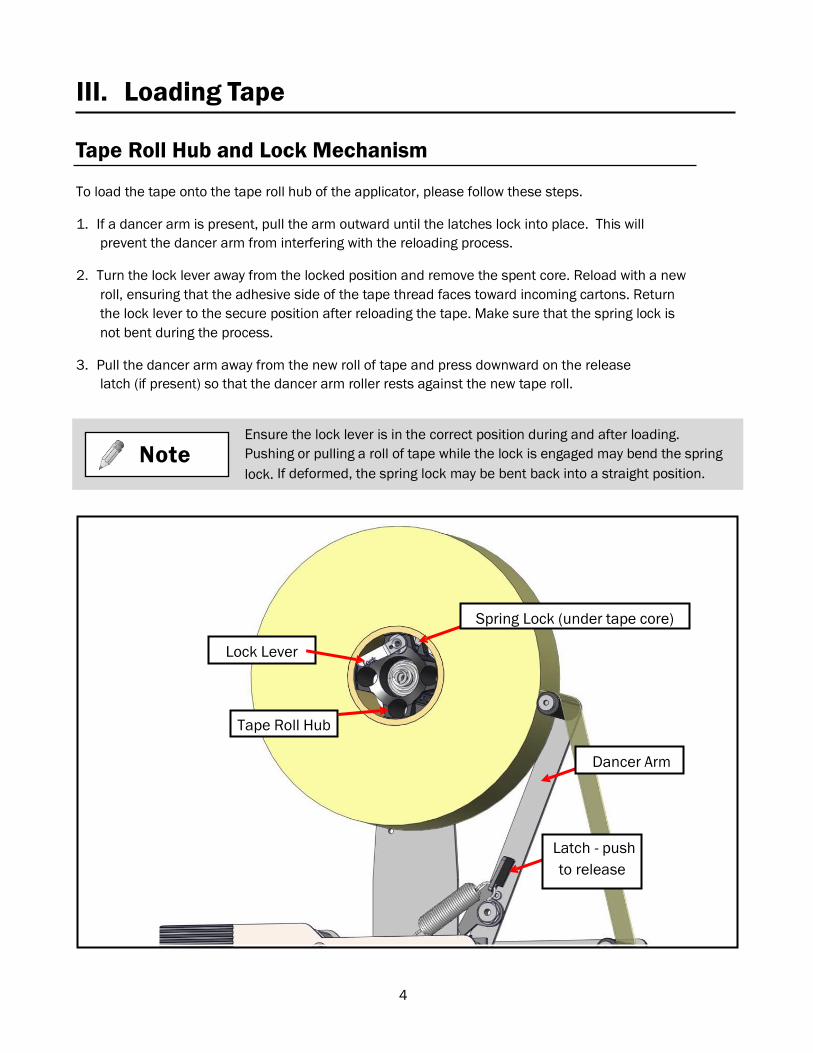
Tape Roll Hub and Lock Mechanism
To load the tape onto the tape roll hub of the applicator, please follow these steps.
1. If a dancer arm is present, pull the arm outward until the latches lock into place. This will
prevent the dancer arm from interfering with the reloading process.
2. Turn the lock lever away from the locked position and remove the spent core. Reload with a new
roll, ensuring that the adhesive side of the tape thread faces toward incoming cartons. Return
the lock lever to the secure position after reloading the tape. Make sure that the spring lock is
not bent during the process.
3. Pull the dancer arm away from the new roll of tape and press downward on the release
latch (if present) so that the dancer arm roller rests against the new tape roll.
Note Ensure the lock lever is in the correct position during and after loading.
Pushing or pulling a roll of tape while the lock is engaged may bend the spring
lock. If deformed, the spring lock may be bent back into a straight position.
Spring Lock (under tape core)
Lock Lever
Tape Roll Hub
Dancer Arm
Latch - push
to release

5
III. Loading Tape
Threading
Due to the open design, threading can usually be accomplished without removing the tape
applicator from the case sealer. Arrow-shaped stickers along the rollers direct the tape threading.
1. Ensure that the new roll is loaded onto the tape roll hub so the adhesive side faces the
incoming cartons at the end of the compression rollers.
2. Thread tape over the dancer arm roller (if present).
3. Pull tape under the first entry roller.
4. Pull tape back around the knurled clutch roller so the adhesive side is in contact with this roller.
5. Pull tape over the tab adjustment roller.
6. Pull tape under the knurled roller and between the crescent tape guide and support pad.
7. Allow tape to extend ½” past the centerline compression roller.
Note The diagram below depicts threading for right-hand tape applicators. The path
is mirrored for left-hand models.
Dancer Arm Roller
Knurled Roller
Entry Roller
Clutch Roller
Crescent Tape Guide
Tape Support
Pad, underneath
Tab Adjustment Roller
6
IV. Adjustments
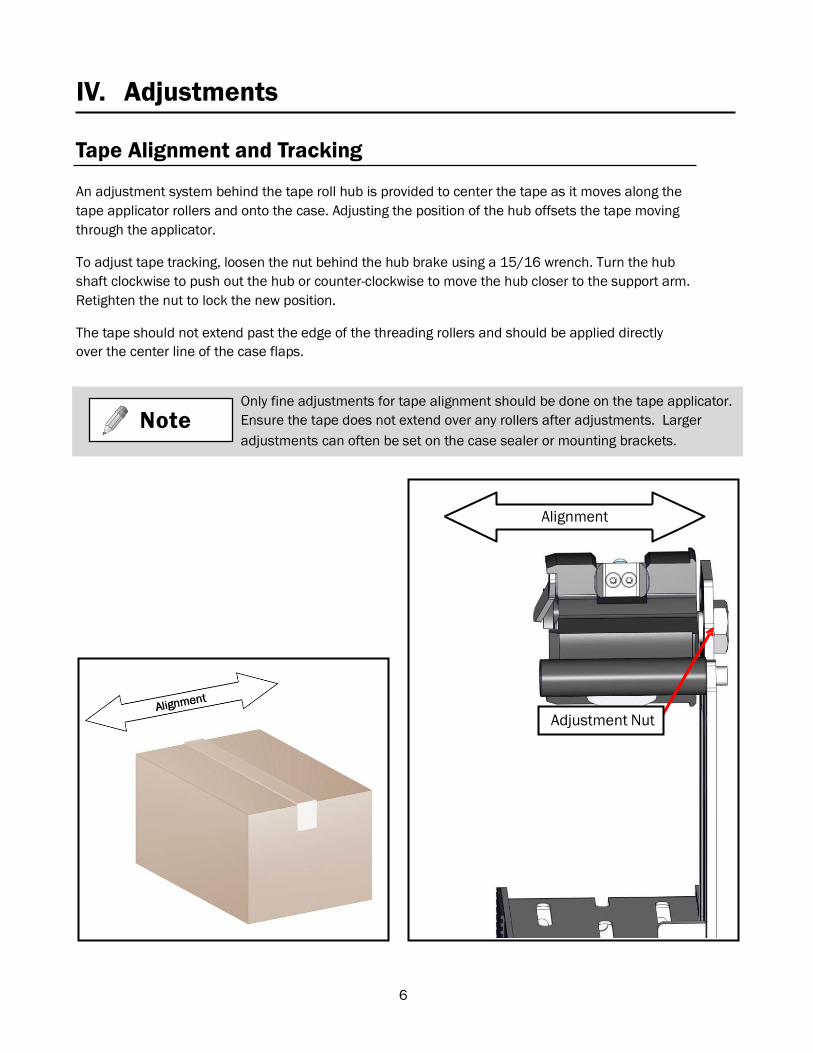
Tape Alignment and Tracking
An adjustment system behind the tape roll hub is provided to center the tape as it moves along the
tape applicator rollers and onto the case. Adjusting the position of the hub offsets the tape moving
through the applicator.
To adjust tape tracking, loosen the nut behind the hub brake using a 15/16 wrench. Turn the hub
shaft clockwise to push out the hub or counter-clockwise to move the hub closer to the support arm.
Retighten the nut to lock the new position.
The tape should not extend past the edge of the threading rollers and should be applied directly
over the center line of the case flaps.
Note Only fine adjustments for tape alignment should be done on the tape applicator.
Ensure the tape does not extend over any rollers after adjustments. Larger
adjustments can often be set on the case sealer or mounting brackets.
Alignment
Adjustment Nut

7
IV. Adjustments
Tension Management
One-Way Clutch Roller (Minor Tension Adjustment)
The more common tape tension adjustment is made at the
one-way clutch roller. The one-way clutch roller affects the
amount of tension or force required to pull the tape. This
adjustment will affect wipe-down and cut-off characteristics.
The troubleshooting section of this manual helps diagnose
improperly adjusted tension.
To increase tension, tighten the center nut clockwise.
To decrease tension, turn the nut counter-clockwise.
To determine tension levels, a yellow sticker with 3 indication
levels may be used with the circular plate below the center nut.
0-1: Light / 1-2: Medium / 2-3: Strong
Tape Roll Hub (Major Tension Adjustment)
The nut and spring on the tape roll hub controls an adjustable
friction brake that should be used to prevent over-spinning of
the tape roll. It may be adjusted to provide a minimum amount
of resistance against tape pull.
To increase tension, tighten the center nut clockwise.
To decrease tension, turn the nut counter- clockwise.
To determine tension levels, a yellow sticker with 3 indication
levels may be used with the circular plate below the center nut.
0-1: Light / 1-2: Medium / 2-3: Strong
Note Tape tension is affected by a variety of factors. Improper tension levels can result
in poorly cut or applied tape. The troubleshooting section of this manual
describes potential tension problems and fixes.
Adjustment Point
Adjustment Point

8
IV. Adjustments
Rear and Front Tab Length Adjustments
Rear Tab
The rear tab length can be adjusted by removing the
adjustment bar and placing it along the two drill holes. The
further the bar extends from the cutting arm, the longer the
tab. After determining a suitable length, ensure that the bar
is secured tightly.
Adjustment can range from 1 ½” to 3” tabs.
Front Tab
The front tab length is adjusted by removing the tab adjustment
roller and securing it along one of the five position holes. After
determining a suitable length, ensure the roller is secured.
Adjustment can range from 1 ½” to 3” tabs.
Note Tab lengths are sensitive to tension
levels. Generally, lower tension settings
are required to create longer tabs.
Front Tab
Rear Tab
9
IV. Adjustments
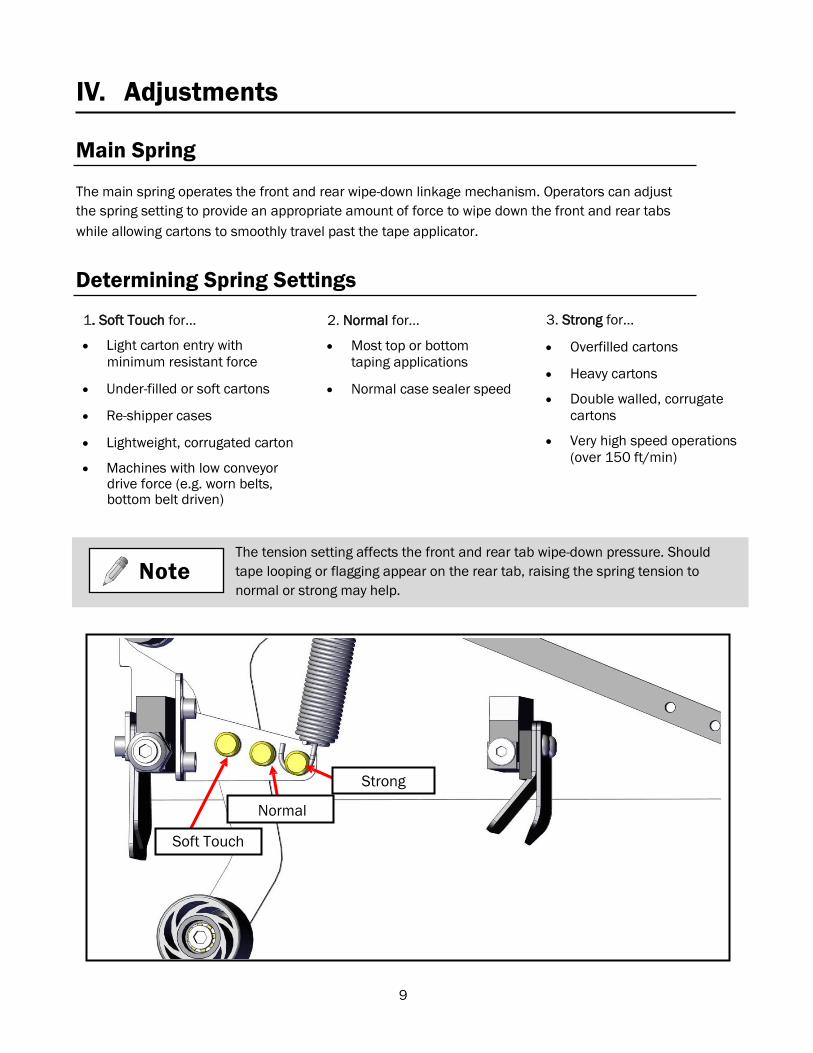
Main Spring
The main spring operates the front and rear wipe-down linkage mechanism. Operators can adjust
the spring setting to provide an appropriate amount of force to wipe down the front and rear tabs
while allowing cartons to smoothly travel past the tape applicator.
Determining Spring Settings
1. Soft Touch for…
Light carton entry with
minimum resistant force
Under-filled or soft cartons
Re-shipper cases
Lightweight, corrugated carton
Machines with low conveyor drive force (e.g. worn belts, bottom belt driven)
2. Normal for…
Most top or bottom
taping applications
Normal case sealer speed
3. Strong for…
Overfilled cartons
Heavy cartons
Double walled, corrugate
cartons
Very high speed operations
(over 150 ft/min)
Note The tension setting affects the front and rear tab wipe-down pressure. Should
tape looping or flagging appear on the rear tab, raising the spring tension to
normal or strong may help.
Normal
Strong
Soft Touch
10
V. Maintenance
Tools
Metric Hex Keys
A ball end set is recommended.
2 mm, 2.5 mm, 3 mm, 4 mm, 5 mm, and 6 mm keys are required.
Wrenches
8 mm, 10 mm, 5/18 inch, and 15/16 inch wrenches are required.
Heat source and Loctite®
Critical fasteners may be secured with removable Loctite® Blue. If a fastener is difficult to remove, apply
heat to loosen.
Cleaning and Lubricating
Rollers
Rollers are subject to adhesive buildup. Clean with a light solvent, i.e. isopropyl alcohol or acetone.
Knife
The knife is subject to adhesive build-up and wear. Clean with a light solvent, i.e. isopropyl alcohol
or acetone. Use light oil to prevent debris from building up. If cutting quality is poor, check the knife
edge and replace if required.
Linkages
Ensure that linkages are properly tightened and lubricated. Use light oil to lubricate.
Warning During maintenance, always beware of the tape applicator’s knife edges.
Worn Parts
1. Determine the worn part(s) by consulting the assembly drawings package at the end of the
manual. Note that 6000 and 7000 series components have the same part numbers if they
share the same orientation and frame width.
2. Contact your local distributor to prepare and deliver replacement parts.

11
VI. Troubleshooting Guide
Taping Problems
Excessive tape stretching
1. Verify that the tape is threaded properly. 2. If a dancer arm is present, make sure that it rests against the tape roll. 3. The tape roll unwind tension may be too high. Decrease drag tension of the tape roll hub and clutch roller
by turning the adjustment nut counter-clockwise. Tape Wrinkling
1. Verify that the tape is threaded properly. 2. The tape applicator may be too far away from the carton. Readjust the tape applicator height so the
bottom of the tape applicator is 1/8” away from the taping surface. Carton is not being taped
1. The leading tab may be too short for the front wipe-down compression roller. a. Readjust or loosen the tension settings until the tape is below the midpoint of the front
application roller. b. Readjust the front tab length with the adjustment roller to increase tab length.
2. The tape applicator may be too far away from the carton. Readjust the machine height so the bottom of the tape applicator is 1/8” away from the taping surface.
Tape is folded along the length of the tape without the use of an edge fold kit
1. The tape may be folded onto one of the rollers during threading.
Carton Problems
Carton is being crushed or collapses under the tape applicator
1. Ensure that the tape applicator is properly distanced away from the carton. The recommended distance is 1/8” from the bottom of the frame to the carton.
2. Lower the main spring force and exchange the cutting spring for a lighter version. This will reduce the resistance against the carton faces.
3. The carton may be under-filled. Increase carton content to provide greater support for the flaps. Otherwise, lower the main spring force and change the cutting spring to reduce applicator force.
Major flap of box is peeled back
1. Ensure that the tape applicator is properly distanced away from the carton. The recommended distance is 1/8” from the bottom of the frame to the carton.
2. Make sure that the front black flap (skid plate) device is installed and functioning properly. 3. Verify that the tension on the clutch roller is not too high.
Tape is not being applied to the center of the carton
1. Ensure that the box is going through the machine while centered and that any guide rails on the machine are equidistant from the cavity. Make sure the machine’s alignment is centered before making adjustments to the tape head.
2. The tape hub may not be aligned with the center of the tape applicator. Loosen the alignment nut on the tape hub and move the tape roll left or right as needed (described on page 6).

12
VI. Troubleshooting Guide
Box is Jamming
1. Ensure that the tape applicator is properly distanced away from the carton. The recommended distance is 1/8” from the bottom of the frame to the carton.
2. If using a bottom belt drive system, make sure that all springs are in light touch settings. 3. A lighter cutting spring may be used on the top tape head cutting arm. 4. Make sure that the belts on the machine are not overly worn and have some traction. 5. If all else fails, notify or call the distributor.
Cutting Problems
Tape is not being cut
1. Ensure that the knife edge is free from debris and adhesive buildup. Clean or replace as required. 2. Make sure that the dull blade extending from the blade is not bent. Replace as needed. 3. The tape head may be too high. It should be approximately 1/8” off the box. 4. Check to see that the tension on the clutch roller is not too loose. If the tension is too loose, the tape will
sag down and become more difficult for the knife to cut. 5. The cutting spring may be damaged. Replace if required.
Tape is being cut off prematurely
1. Make sure the tape is threaded properly. 2. The cutting spring may be too strong relative to the main spring setting. Replace the cutting spring with a
lighter version and/or readjust the main spring to a higher setting. 3. The carton may be excessively under-filled or the flaps may be composed of light grade corrugate.
a. Repackage the contents to increase fill or increase corrugate quality. 4. Lower the head all the way down on the box. 5. The tape unwind tension may be too strong. Reduce tape roll hub tension and the clutch roller tension.
Tape cut is ragged
1. Ensure the knife edge is free from debris and adhesive buildup. Clean or replace as required. 2. The hub and roll of tape may be too far away from the cutting arm. Loosen the nut on the back side of the
hub and move the hub closer to the cutting arm side of the tape head. 3. Check to see that the tension on the clutch roller is not too loose. If the tension is too loose, the tape will
sag down and become more difficult for the knife to cut.
Front/Rear Tab Problems
Rear tab is too long
1. The adjustment bar may be incorrectly set. Adjust as according to page 8. 2. The tape tension may be too loose. Adjust as according to page 7.
Front tab is too long
1. The front tab adjustment roller may be incorrectly set. Adjust as according to page 8. 2. The tape tension may be too loose. Adjust as according to page 7.

13
VI. Troubleshooting Guide
Front and rear tab lengths shorten as tape roll diminishes
1. If the tape head has a dancer arm, make sure that it is locked up against the roll of tape. 2. Tape unwind forces increase as the diameter of the tape roll decreases. Changes in force are more
evident on larger tape rolls, such as 2,000-yard-long rolls. The tape applicator should be equipped with a dancer arm to reduce the variation.
3. The tape roll hub and clutch roller tension settings may be too high. Lower the tape tension to allow for an acceptable tab length.
4. The front tab length may be adjusted to be too short. Reposition the adjusting roller to a suitable front tab length. Compare the tab length with a full roll and a small roll, adjusting the tension as required.