operating & software manual - la...
TRANSCRIPT

MPOperating & Software Manual

Strada
Engl
ish
www.lamarzocco.com V1.0
Table of Contents
Table of Contents ...........................................................................................................................................................................1General Warnings and Safety Specifications........................................................................................................................ 2Definition of Model .......................................................................................................................................................................4Installation........................................................................................................................................................................................ 6Operating the Espresso Machine and Preparing Coffee.................................................................................................. 7Preparing Other Hot Drinks.........................................................................................................................................................9Preventative Maintenance and Weekly Cleaning...............................................................................................................10De-Commissioning and Demolition......................................................................................................................................11
NOTE: The Software Programming Manual follows the Operating Manual
Strada MP - Operating Manual

English
2 La Marzocco, S.r.l. Scarperia, Firenze, ItaliaV1.0
1) This operating manual is an integral and essential part of the product and must be supplied to users. Users are asked to read the enclosed warnings and cautions carefully, as they provide valuable information concerning safety during installation, operation and maintenance. This manual must be kept in a safe place and be available for consultation to new and experienced users alike.
2) Ensure product integrity by inspecting the packaging, making sure it presents no signs of damage which might have affected the enclosed machine.
3) Check the machine’s integrity after having carefully removed the packaging.
Note:In case of doubt, do not go on any further and contact your dealer or retailer immediately. They will send out specialized personnel authorized to perform service on the espresso machine.
4) Packaging (boxes, plastic bags, foam parts and whatever else) must not be left around within easy reach of children, due to the potential danger it represents, nor be discarded in the environment.
5) Check to see that data on the rating plate corresponds to those of the main electrical supply which the machine will be hooked up to.
6) Installation must be performed according to local electrical and plumbing codes and regulations. Installation must also comply to manufacturer instructions, and must be performed by uali ed and authorized personnel.
7) Incorrect installation may cause injury/damage to people, animals or objects, for which the manufacturer shall not be held responsible.
8) Safe electrical operation of this device will be achieved only when the connection to the power outlet has been completed correctly and in observance of all local, national, and international electrical codes and safety regulations, and particularly by grounding the unit. Make sure grounding has been done properly as it represents a fundamental safety re uirement. Ensure uali ed personnel check such connection.
9) Furthermore, you must ensure that the capacity of the available electrical system is suitable for the maximum power consumption indicated on the espresso machine.
10) We do not recommend using adapters, multiple plugs and/or extension cords. If you cannot avoid using them, make sure that they are exclusively of the kind which conforms to local, national, and international electrical codes and safety regulations, being careful not to exceed the power and current ratings indicated on such adapters and extension cords.
11) This device must be used exclusively for the functions it has been designed and built for. Any other application is inappropriate and dangerous.
The manufacturer shall not be held responsible for any damages caused by improper and/or irrational use.
12) Using any electrical device requires that certain fundamental rules be observed. In particular:
- do not touch the device with wet or humid hands and feet;- do not use the device while having no shoes on your feet;- do not use extension cords in bath or shower rooms;- do not unplug the device from the power outlet by pulling on the power
supply cable;- do not expose the device to atmospheric agents (rain, sun, etc.);- do not allow children or untrained personnel to use this device.
13) Before carrying out any maintenance and/or cleaning operation, turn the main switch, which is located on the front left of the machine, to the “0” or OFF position, and disconnect the machine from the electrical network by unplugging the cord or by switching off the relative circuit breaker. For any cleaning operation, follow the instructions contained in this manual only.
14) In case the machine is operating in a faulty manner or breaks down, disconnect it from the electrical network (as described in the preceding point) and close the water supply valve. Do not attempt to repair it. Contact a quali ed and authorized professional to perform any repair. Any repairs must be performed exclusively by the manufacturer or by an authorized centre using only original parts. Non compliance with the above could compromise the safe operation of the machine.
15) ou should plan to make use of a speci c connector during installation, as required by local, national, and international electrical codes and regulations.
16) In order to avoid dangerous overheating problems, it is recommended that the power supply cable be fully unfurled.
17) Do not obstruct air intake and exhaust grilles and, in particular, do not cover the cup warmer tray with cloths or other items.
18) The machine’s power supply cable must not be replaced by users. In case the power supply cable becomes damaged, shut off the machine and disconnect the machine from the electctrical network by switching off the relative circuit breaker and close off the water supply; to replace the power supply cord, contact quali ed professionals only.
THIS EQUIPMENT MUST BE INSTALLED TO COMPLY WITH THE APPLICABLE FEDERAL, STATE, OR LOCAL PLUMBING CODES
WARNING

Strada
Engl
ish
3www.lamarzocco.com V1.0
Legend 1) Main Switch 2) Pressure Gauge (Steam Water) 3) Pressure Gauge (Brew Water) 4) Brew Groups 5) Encoder 6) Hot Water Switch 7) Digital Display 8) Steam Wand 9) Steam Knob
10) Hot Water Wand11) Removable Drain Tray12) Manual Brew Paddle Lever13) Hot Water Mix Valve
For additional information on electronics, and software programming, please see the section entitled Software Programming.
This operating manual refers exclusively to the below model, of our own manufacture:Strada 3 group Mechanical Paddle: 3MP
1) Common Dimensions, Weights, and Features
Weight: Kg. 90
1
29
8
101212
12
5 7 16
9
8
4
11
44
13

English
4 La Marzocco, S.r.l. Scarperia, Firenze, ItaliaV1.0
2) General DescriptionThe machine is built in a 3 group version and is essentially composed of the following parts:
1) Steam Boiler (produces steam and hot water)2) 3 Coffee (“saturation”) boilers3) Brewing groups4) Exterior Cover5) Water pump/s 3) Description of the various parts
Steam BoilerThe Steam Boiler consists of a cylindrical tank made of AISI 300 series stainless steel. Each unit is subject to a hydraulic test, at a pressure of 6 bar, and has an operating pressure of 1.3-1.5 bar. The following is a list of effective volumes and power ratings according to the number of groups installed:
3 groups11 liters 4000 Watts
Covers are installed at either end of the cylindrical tank and on one of them there is housing for the water heating element, which allows the steam boiler to reach operating pressure within approximately 25 minutes. Operating pressure is maintained by temperature probe. The steam boiler has various ttingsused for safety devices, for supplying hot water and steam, and for the heating element.
Coffee BoilerThe Coffee Boiler consists of a cylindrical tank made of AISI 300 series stainless steel. Each unit is subject to a hydraulic test, at a pressure of 18 bar, and has an operating pressure of 9 bar. The following is a list of effective volume and power ratings according to the number of groups installed:
3 groups - 3 x 1,3 liters 3 x 800 Watts
Covers are installed at either end of the cylindrical tank and on one of them there is housing for the water heating elements. The temperature of the coffee boiler is maintained by an electronic temperature controller (PID capable) with anaccuracy of 0.2°C. The brewing groups are installed on the boiler.
Brewing GroupsThey consist of precision casting made of stainless steel. The brewing group accepts the porta lter used to hold the ground coffee; the water ows through the brewing group, through the porta lter basket, through the porta lter spout, and into the cup(s) after brewing has been activated.
Exterior CoverIt consists of a stainless sheet steel body. The structure has been the object of speci c studies to provide good aesthetics,lower ergonometric costs for the operator and reduce thechance of damage to a minimum.
Water PumpThe water pump is a differential pressure, “positive-displacement” type installed on the water supply tubing and is set-up to operate anytime the coffee groups are activated,and through an electric level gauge whenever the steam boiler needs to be replenished.
Sound PressureThe weighted sound pressure level of the machine is lower than 70dBA.
CONSTRUCTION DETAILS
They consist essentially of 2 small boilers, of which:1) Coffee Boiler (hot water generator for brewing coffee)2) Steam Boiler (steam generator for producing steam and hotwater for making tea and other hot drinks)
1) Description of the Coffee Boiler (C.C.)Composed of an AISI 300 series stainless steel tube.Heating is accomplished through an immersion-type plated heating element.-Operating temperature 95°C (adjustable), controlled automaticallyby an electronic temperature controller with an accuracy of 0.2 °C.Operating pressure of 9 bar, developed mechanically by a special positive-displacement pump which is activated automatically every time coffee is brewed.-Pressure is displayed through a pressure gauge with a scale from 0 to 15 bar.-Safety device, based on an expansion type mechanical valve, with counteracting spring adjusted to 12 bar.-Testing:-Hydraulic test at 18 bar performed on ready-to-use small boilers,at our factory;
WARNINGThis equipment must not be used by children, mentallyor physically challenged individuals or anyone lacking
necessary know-how unless supervised by specialized personnel.

Strada
Engl
ish
5www.lamarzocco.com V1.0
3. Installation
WARNING
The Coffee Boiler and Steam Boiler contain water at elevated temperature. Water temperature over 125° F / 52° C can instantly cause severe burns or death from scalding.
(Coffee Boiler 200° F / 93.3° C - Steam Boiler 260° F / 127° C)
2) Description of the Steam Boiler (C.V.)Composed of AISI 300 series stainless steel tube.Heating is accomplished through an immersion-type plated heating element.-Operating pressure of 1.3-1.5 bar, controlled automatically through a pressure switch or a temperature probe, adjusted to open the heating element supply circuit at 1.5 bar and close it at 1.3 bar.-The pressure is displayed by means of a pressure gauge with a scale of 0 to 2 bar.-Safety device, based on an expansion type mechanical valve, with counter-acting spring adjusted to 1.8 bar.-Testing:a) hydraulic test at 4.5 bar performed on ready-to-use small boilers, at our factory;
WASTE/DRAIN
WATER PUMPAND MOTOR
WATER PUMPMOTOR POWERCORD
POWER SUPPLYCORD
MAIN SWITCH AND ELECTRICAL
SUPPLYCONNECTION
WATER FILTRATION/
SOFTNER
MAIN WATER SUPPLY VALVE
OPTIONALWATER PUMPAND MOTOR
WATER PUMPAND MOTOR
BRAIDED HOSE
BRAIDED HOSE
ADDITIONALWATER PUMPMOTOR POWERCORD

English
6 La Marzocco, S.r.l. Scarperia, Firenze, ItaliaV1.0
WARNING
The manufacturer declines any responsibility for any event leading to liability suits whenever GROUNDING has NOT
BEEN COMPLETED according to current local, national and international regulations and electrical codes, and/or in lack of
properly connected electrical parts.
WARNING
3. Installation1) Accessories
Check the package to make sure that the following accessories are included: 1 x SINGLE and 3 x DOUBLE porta lters 2 x SINGLE and 4 x DOUBLE lters 1 x tamper 1 x blind lter 1 x cleaning detergent 3 x stainless steel braided hose for water connections 1 x 1,5 mt of reinforced plastic tubing for drainage 1 x hose clamp 1 x TEE Fitting
In order to proceed with installation, it is necessary that the following are available:
a) Pipes carrying drinking water with a 3/8”G (BSP) end connection.b) Electrical Supply according to the speci cation of theespresso machine purchased: 200/220/380/VAC - 50/60Hz electrical connection with ground, protected socket and approved circuit breaker.c) Indirect waste water drain system.
NOTE: The drinking water stopcock and the terminal switches for the electrical system need to be located in the most convenient position for the operator to access them easily and quickly.The machine should be placed on a at counter and must be placed in settings with the following temperatures: Minimum room temperature: 5°CMaximum room temperature: 32°CIf the machine has been temporarily housed in settings with a room temperature of less that 0°C, the machine must be placed in a warmer environment in order to graduallydefrost the hydraulic system prior to use.Water pressure supply must be between 2 and 6 bar.
2) Water Supply ConnectionConnect the inlet of the water lter/softener to the drinking water supply using one of the supplied stainless steel braided hoses. Before connecting the water pump to the espresso machine, g p p p ,ush the water supp ine an the tration s stem in or er to pp
e iminate an resi ua partic es which cou otherwise get stuc p gin taps or a es thus pre enting them from wor ing properp p g g p pConnect the water supply connection of the espresso machine to the water pump outlet using one of the supplied stainless steel braided hoses. Then connect the water pump inlet to the water lter/softener outlet. NOTE: The water pump is a differential pressure, volumetric pump and has been designed to be used exclusively with cold water. Make sure that water is always present while the pump is operating, otherwise air can be introduced into the brew boiler causing an undesirable condition.
3) Electrical Connections
a) Power Supply CordThis is the main power supply cable that provides power to the entire espresso machine. There are different types of cable based upon the electrical requirements of the espresso machine purchased.
WARNINGAt each installation, the machine should be equipped with a new set
of tubes for plumbing and related gaskets.
b) Water Pump Motor Power Cord
This is the power supply for the water pump motor. The internalelectronics will switch the pump motor on when needed.
3-core cable with 1.5 mm2 cross section (CE) or 3-core AWG 16(for UL version) secured to espresso machine via a strain relief connector.
3) Waste Water Drain ConnectionThe espresso machine drain is to be connected by means of the included reinforced plastic tubing. Connect one end of thereinforced plastic tubing to the drain hose connection on the leftside of the espresso machine. Secure with included hose clamp.
Connect the other end to a suitable waste water collection system.In case such a system is not available, drained liquids may becollected in a suitable bucket and any necessary drain pipeextensions should be made using steel-lined PVC tubing andsuitable hose clamps.
WARNINGWARNING
HAZARDOUS VOLTAGE! DISCONNECT FROMPOWER SUPPLY BEFORE SERVICING
WARNING
Before making any electrical connections make sure that
body of the machine in order to prevent inadvertent stress on the power cables.p
CAUTION
U.S.A. and Canada Only-Do Not Connect To A Circuit Operating At More Than
150 V To Ground
THE MOTOR PUMP MUST BE SITUATED CLOSE TO THE MACHINE IN AN ACCESSIBLEPLACE FOR MAINTENANCE BUT NOT FOR ACCIDENTAL INTEFERENCE AND WHERETHERE IS OPTIMAL AIR CIRCULATION
WARNING

Strada
Engl
ish
7www.lamarzocco.com V1.0
2) Waiting for the Espresso Machine to Heat to Operating TemperatureDuring this time, it may happen that the pointer of the coffee boiler pressure gauges reaches as high as 14-15 bar. This may happen anytime that the heating element is in the “on” condition. In this case, it is necessary to adjust the expansion valve in such a way that the pressure never exceeds 11-12 bar. In normal operating conditions, the coffee boiler pressure gauges can read anywhere from 0-12 bar. When brewing, the pressure should be set to 9 bar.When the steam boiler reaches operating temperature, the light on the Tea dispense button will switch on.
Install the porta lter(s) by inserting them into the group and rotate the handle from left to right. When the porta lters are inserted properly, you can press any of the brew buttons to start the ow of water through the porta lter. You should allow hot water to pass through the porta lter(s) for a few seconds each time, in order to pre-heat the porta lter.
Note: It is important to leave the porta lters installed in the espresso machine when not in use. The porta lter must remain heated for the brew process to function correctly.
Encoder
Display
Expansion Valve
FilterBasketBasketSpring
O-ringDoubleSpout
Portafilter
1) Starting the Espresso Machine
Filling the Boilers with WaterOnce the installation procedures have been completed, it is necessary to ll the boiler tanks with water. Complete the following procedure to properly ll the boiler tanks:
Coffee BoilerThe water ows inside the coffee boiler directly, as soon as the water system and water lter/softener valves are opened. Since the in ow of water will compress the air in the boiler, it will be necessary to remove or “bleed” the air from the coffee boiler. All air must be removed in order to completely “saturate” the coffee boiler/group assemblies. To remove the air from the boiler, or “bleed the groups”, it will be necessary to remove the plastic cap from the top of the group.
Loosen the bleed screws one at a time (see picture above) to allow air to escape until water ows from below the screw head. Tighten the screw to stop the water from owing. Over tightening can cause damage to the sealing washer and the group cover. Repeat this procedure on all groups.
Steam BoilerTurn the main switch to position “1” or ON, then push the encoder knob for three seconds and the automatic steam boiler level function will be switched on, activating the auto- ll solenoid valve and the motor pump. This will ll the steam boiler to a predetermined level and will shut off when full.
Note: Air inside the steam boiler may build up pressure (which may be detected through the pressure gauge).Once the pump stops, check the display, the message “Coffee Boiler Filled?” should be displayed. Push the Encoder Knob to con rm that the preceding procedures are complete.The installation is now complete and the espresso machine should be heating to operating temperatures.
English
8 La Marzocco, S.r.l. Scarperia, Firenze, ItaliaV1.0
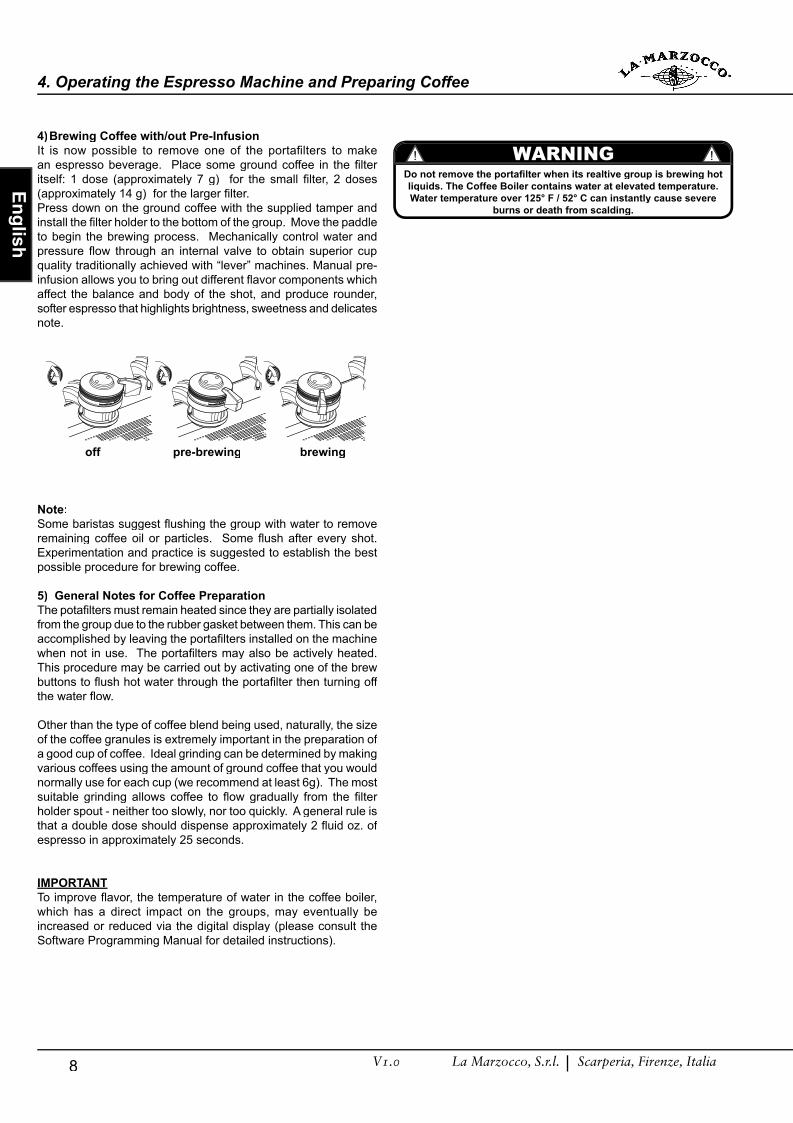
4)Brewing Coffee with/out Pre-InfusionIt is now possible to remove one of the porta lters to make an espresso beverage. Place some ground coffee in the lter itself: 1 dose (approximately 7 g) for the small lter, 2 doses(approximately 14 g) for the larger lter. Press down on the ground coffee with the supplied tamper and install the lter holder to the bottom of the group. Move the paddleto begin the brewing process. Mechanically control water and pressure ow through an internal valve to obtain superior cup quality traditionally achieved with “lever” machines. Manual pre-infusion allows you to bring out different avor components which affect the balance and body of the shot, and produce rounder, softer espresso that highlights brightness, sweetness and delicates note.
off pre-brewing brewing
Note:Some baristas suggest ushing the group with water to remove remaining coffee oil or particles. Some ush after every shot. Experimentation and practice is suggested to establish the best possible procedure for brewing coffee.
5) General Notes for Coffee PreparationThe pota lters must remain heated since they are partially isolatedfrom the group due to the rubber gasket between them. This can beaccomplished by leaving the porta lters installed on the machine when not in use. The porta lters may also be actively heated. This procedure may be carried out by activating one of the brewbuttons to ush hot water through the porta lter then turning off the water ow.
Other than the type of coffee blend being used, naturally, the size of the coffee granules is extremely important in the preparation of a good cup of coffee. Ideal grinding can be determined by making various coffees using the amount of ground coffee that you would normally use for each cup (we recommend at least 6g). The mostsuitable grinding allows coffee to ow gradually from the lter holder spout - neither too slowly, nor too quickly. A general rule isthat a double dose should dispense approximately 2 uid oz. of espresso in approximately 25 seconds.
IMPORTANTTo improve avor, the temperature of water in the coffee boiler, which has a direct impact on the groups, may eventually be increased or reduced via the digital display (please consult the Software Programming Manual for detailed instructions).
liquids. The Coffee Boiler contains water at elevated temperature. Water temperature over 125° F / 52° C can instantly cause severe
burns or death from scalding.
WARNING
Strada
Engl
ish
9www.lamarzocco.com V1.0
5. Preparing Other Hot Drinks
1) Steaming Milk or Other LiquidsDip one of the 2 steam wands (part 8, page 3) which are connected to the steam valve, into the liquid to be heated. Turn the steam lever on gradually until steam is released at the end of the wand.The steam will heat the liquid and raise its temperature.To avoid severe burns, do not allow any liquid to over ow.
In order to successfully foam milk , please follow these steps: Place the pitcher that is partially lled with milk under the steam
wand. Open the steam valve and bring the temperature of the milk to nearly 149/158° F 65/70° C. Lower the pitcher so that the wand tip is just below the surface
of the milk; at this point, move the container up and down just enough to dip the nozzle end in and out of the milk until you get the right amount of foam. Gradually pour the foamed milk over warm espresso for a fresh cup of cappuccino.
In order to prevent heated liquid from being sucked back into the steam boiler, it is recommended that the steam valve and steam wand be purged by opening the valve for a few seconds to allow steam to escape from the end of the steam wand. Failure to do so can cause heated liquid to be transferred from the pitcher to the steam boiler (due to a vacuum created by cooling parts). This condition is undesirable and can contaminate the steam boiler.
2) Preparing Tea and Other hot Drinks.You may dispense hot water by using the xed nozzle (part 10, page 3). To dispense hot water, press the tea water button.
This button commands hot water delivery.The temperature of the water may be adjusted by adjusting the mixing valve.

English
10 La Marzocco, S.r.l. Scarperia, Firenze, ItaliaV1.0
cleaned periodically with a damp cloth.
6) Cleaning the Diffuser ScreenDue to porta lter discharge operations (subsequent to coffee brewing), a certain amount of coffee grounds may slowly build-up
and even partially obstruct the diffuser screen. To clean it, rst unscrew the diffuser screw, then remove the diffuser screen.Put 2 or 3 teaspoons of cleaning detergent for coffee machines in about 1/2 a litre of water inside a heat-resistant container and heat. Place the diffuser screen(s) and diffuser screw(s) in the solution and leave them fully submerged for about 10 minutes. Rinse thoroughly with clean water. Install and run hot water through each group several times with the screen installed.
7) Water PumpWhen brewing coffee, and you can adjust pump pressure by turning the by-pass screw clockwise to increase and counter-clockwise to reduce pressure. Adjust pressure only when one or more groups are brewing coffee.
8) Water Filter/Softener)Please see the documentation accompanying the water lter/softener for proper operating and cleaning instructions.
1) Cleaning groups and drain wells- Put a tablespoon of detergent powder for coffee machines into the blind lter, supplied with the machine, and attach it on the group to be cleaned.
WARNINGcan easily access it for eventual maintenance.
The machine must not be dipped in, nor splashed withwater while cleaning. For cleaning operations, please
follow the instructions listed below very carefully.
CAUTION
liquids. The Coffee Boiler contains water at elevated temperature.Water temperature over 125° F / 52° C can instantly cause severe
burns or death from scalding.
WARNING
- Turn the Paddle Valve on and off approximately 10 times (10 seconds intervals) on each group.
- Rinse the group using a normal lter by running hot water throughit several times.
- Put 2 or 3 teaspoons of detergent powder for coffee machines in about 1/2 a litre of VERY HOT water.- Dip lters and lter holders in the heated solution and leave themfully submerged for about 10 minutes.- Rinse thoroughly with clean water and run hot water through one group several times with the lters in place.- Make one cup of coffee and discard in order to remove any unpleasant avor.
3) Cleaning the drain collectorRemove the drain tray daily and clean. Inspect the drain well also, and wash away any leftover grounds.
4) Cleaning the bodyWipe the stainless steel surfaces with a soft, non abrasive cloth. Do not use any alcohol or solvents whatsoever on painted or decorative parts to avoid damage.
5) Cleaning the hot water and steam nozzlesSteam nozzles must be cleaned immediately after use with a damp cloth and by producing a short burst of steam to prevent the formation of deposits inside the nozzles, which may alter the avor of other drinks to be heated. Hot water nozzles must be
GROUP ASSEMBLY
DIFFUSER SCREEN
DIFFUSERSCREW

Strada
Engl
ish
11www.lamarzocco.com V1.0
7. De-Commissioning and Demolition
1) De-Commissioning and Demolition
Start by setting the main switch to the “0” or OFF position.
Disconnecting from the power outletDisconnect the espresso machine from the electrical network by switching off the associated circuit breaker or circuit protection device. Remove the power supply cord from the power connection. Remove the Pump Motor Power Cord from the water pump motor.
Disconnecting from the water systemShut off the water supply by closing the speci c valve located upstream of the water lter/softener inlet. Disconnect the water pipe at the water lter/softener inlet. Remove the hose connecting the espresso machine to the water pump. Remove the reinforced plastic tubing on the drain connection.
At this point, the machine may be removed from the bar, being very careful not to drop it or crush your ngers.
The machine is made out of various materials and therefore, if not intended for further service, should be delivered to a recycling center which will select materials to be recycled or discarded.
Current regulations make it illegal to discard the machine by leaving it on public grounds or on any private property.
Recycling notice:Warning for the protection of the environment.
Old electrical equipment is made of valuable materials, it is not normal domestic waste! We kindly ask that our clients contribute
to the protection of the environment and natural resources by delivering this equipment to a recycling center, if such centers are present in any one speci c territory.

Strada
Engl
ish
www.lamarzocco.com V1.0
Table of Contents ............................................................................................................................................................................1Strada Programming Introduction .......................................................................................................................................... 2Accessing Programming Mode ................................................................................................................................................ 3Description of the Programming Levels ............................................................................................................................... 4Start Up Procedure ....................................................................................................................................................................... 6
Strada MP - Software Programming Manual

English
2 La Marzocco, S.r.l. Firenze, Scarperia, ItaliaV1.0
Description
Digital Display
Programming Encoder
The encoder knob is always located on the left of group one. By turning it to the right it is possible to increase the value. By turning it left, it is possible to decrease the value and by pushing it down, it is possible to scroll through the software menu, enter functions or con rm rst installation.
It is possible to turn on/off the Strada coffee machine by pushing and holding the Encoder knob for 3 seconds.
The digital display is a backlit screen capable of displaying 2 lines with 16 characters each. The display enables the operator to interact with the espresso machine to change parameter values. The display also provides valuable information to the operator. There are several warnings that can be displayed to alert the operator of an unusual condition or fault. Additionally, simple messages are displayed alerting the operator that an action has been started or that a process needs to begin.
The trada espresso machine has a very functional CPU with many programmable settings.
Additionally, there are many feedback controls to troubleshoot problems that may occur.
The following is a brief introduction to the controls and display and how they interact with the operator.
Strada Programming Introduction

Strada
Engl
ish
3www.lamarzocco.com V1.0
Description
Programming Mode
The three programming levels are as follows:
Barista evel o Password ecessary. imited parameters are available.
Technical evel Barista level parameters plus additional parameters are available.
actory evel actory password needed. Barista evel and Technician level parameters plus additional
parameters are available.
To change any con gurable parameter the operator must rst enter the programming mode.
There are three levels of the programming mode that allow modi cation to speci c parameters, depending on the sequence that is followed
Accessing Programming Mode

English
4 La Marzocco, S.r.l. Firenze, Scarperia, ItaliaV1.0
Programming sequence
Barista Menu
Coffee Boiler 1 witching on offCoffee Boiler 2 witching on offCoffee Boiler 3 witching on offCoffee Boiler 1 TemperatureCoffee Boiler 2 TemperatureCoffee Boiler 3 Temperature
team Boiler TemperatureClock AdjustAuto n ff
Programming equence
anguageTemperature easurement Units CUser nameCoffee Boiler 1 TemperatureCoffee Boiler 2 TemperatureCoffee Boiler 3 Temperature
team Boiler TemperatureClock AdjustAuto n ffCup HeatingPumps etting for Automatic ill
team Boiler Automatic illPump etting for Tea aterCoffee Boiler 1 Temperature OffsetCoffee Boiler 2 Temperature OffsetCoffee Boiler 3 Temperature OffsetTotal Doses
ilter Alarm
Operating Procedure: with the coffee machine on, press and hold the encoder knob for 5 seconds and the Barista evel menu will appear.
Operating Procedure: irst hold the knob for 3 seconds to achieve the O status, then realease it and press and hold it again for an additional 5 seconds. The Technician evel menu will appear.
Description of the Levels
Technical Menu

Strada
Engl
ish
5www.lamarzocco.com V1.0
Programming equence
Factory Menu
achine roup umberCoffee Boilers Proportional, ntegral, derivative P D ettingCoffee Boilers P D tart Coffee Boiler 1 Heating TimeoutCoffee Boiler 2 Heating TimeoutCoffee Boiler 3 Heating Timeout
team Boiler Heating Timeoutteam Boilers Proportional, ntegral, derivative P D ettingteam Boiler P D tartteam Boiler evel Probe ensitivityteam Boiler evel Probe Delayteam Boiler evel Timeoutanguage
Temperature easurement Units CUser ameCoffee Boiler 1 TemperatureCoffee Boiler 2 TemperatureCoffee Boiler 3 Temperature
team Boiler TemperatureClock AdjustAuto On OffCup HeatingPumps etting
team Boiler Automatic illPump setting for Tea aterCoffee Boiler 1 Temperature OffsetCoffee Boiler 2 Temperature OffsetCoffee Boiler 3 Temperature OffsetTotal Doses
ilter Alarm
Operating Procedure: irst hold the knob for 3 seconds to achieve the O status, then realease it and press and hold it again for 15 additional seconds. The
actory evel menu will appear.
Description of the Levels

English
6 La Marzocco, S.r.l. Firenze, Scarperia, ItaliaV1.0
Description
Display Operating Procedure
Turn the ain witch to the On position. O 1, Off1
WARNING! !
Turning the Espresso Machine On!
The following is the procedure for turning on the espresso machine.
Please follow the procedures carefully to avoid any damage.
The espresso machine is now O and information concerning the boiler and heating elements will appear..
The message at left will be displayed brie y. This message indicates the revision level of the software installed in this espresso machine.
Start Up Procedures
HAZARDOUS VOLTAGE! DISCONNECT FROM POWER SUPPLY BEFORE SERVICING
Strada
Engl
ish
7www.lamarzocco.com V1.0
Description
Display Operating Procedure
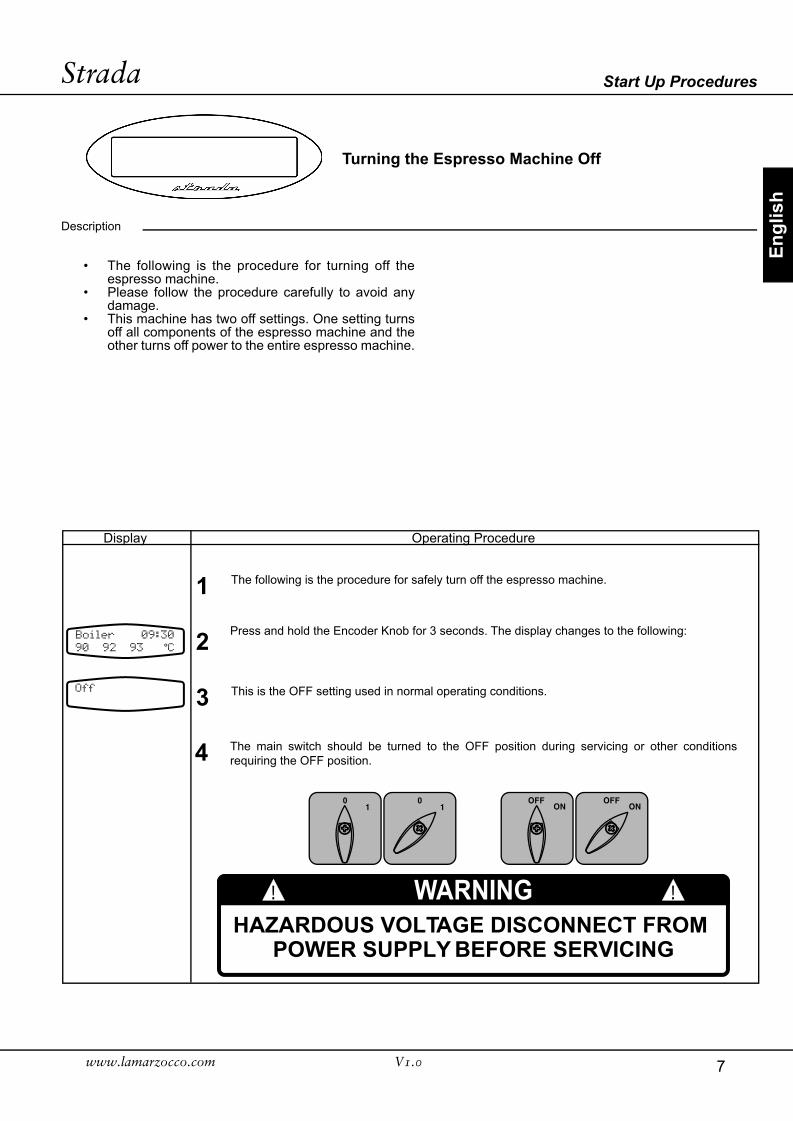
The following is the procedure for safely turn off the espresso machine.1Press and hold the Encoder Knob for 3 seconds. The display changes to the following:
3
WARNING! !
HAZARDOUS VOLTAGE DISCONNECT FROM POWER SUPPLY BEFORE SERVICING
2
Turning the Espresso Machine Off
This is the O setting used in normal operating conditions.
4 The main switch should be turned to the O position during servicing or other conditions requiring the O position.
The following is the procedure for turning off the espresso machine.
Please follow the procedure carefully to avoid any damage.
This machine has two off settings. One setting turns off all components of the espresso machine and the other turns off power to the entire espresso machine.
Start Up Procedures

LA MARZOCCO SRLVia La Torre, 14/HLocalità La Torre50038 Scarperia(Florence) - ITALYT. +39 055 849 191F. +39 055 849 [email protected]