operating instructions introduction 1 2 3 4 5 6 7...
TRANSCRIPT

TotalFlow Print Server
Read this manual carefully and keep it handy for future reference.
Operating Instructions Introduction 1
Trying Out TotalFlow Print Server Using Sample Files 2
Color and Grayscale Printing 3
Working with the Console 4
Configuring TotalFlow Print Server 5
Managing TotalFlow Print Server 6
Working with Jobs 7
Security 8
IPDS 9
Troubleshooting 10
Reference 11
For information not in thismanual, refer to the HelpSystem in your product.


1
PPrreeffaaccee
For safe and correct use, be sure to read the Safety Information in the Setup Guide before using themachine.
Guides for TotalFlow Print Server
The following guides are available for TotalFlow Print Server:
Instruction Manuals
The following instruction manuals are included:
• Setup Guide (printed)This guide provides safety information, regulations, setup procedures, how to connect the printer toTotalFlow Print Server, and settings required before you use TotalFlow Print Server. Before using themachine, be sure to read the section of this manual entitled “ Safety Information”.
• Operating Instructions (this guide, PDF)This guide explains the functions and basic operations of TotalFlow Print Server.
This guide is forTotalFlow Print Server R-62 andTotalFlow Print Server R-62A. Descriptions andillustrations in this manual are the same for these models. However, when necessary somedescriptions and illustrations are different.
Help
There are two ways of displaying help, the Information Center help and the field help. The InformationCenter help explains the functions and basic operations of TotalFlow Print Server. The field help explainseach of the settings, their values, and how to configure them.
Reading the PDF Manuals on the CD-ROM
This section describes how to read Operating Instructions on the supplied manual CD-ROM.
File pathThe manuals are included in the following folder on the CD-ROM:
MANUAL\language
1. Insert the CD-ROM in the CD-ROM drive of your computer.
2. Select a language, and then click [OK].
3. Click [Read manuals].
To view the PDF manuals, you must have Adobe Reader installed on your computer.

How to Use the Information Center Help
Click the icon in the top navigation bar, and then select [Help]. The top page of the InformationCenter help appears.
How to Use the Field Help
Each field where you can specify a value has its own icon. To display a short description of thefield, click the icon. In this guide, this type of help is called “field help”.
To display the related topic in the Information Center, click [More in Help...] within the field help.
2

How to Read the Manuals
Symbols Used in the Manuals
This manual uses the following symbols:
This symbol indicates points that you must pay attention to when using the printserver. Be sure to read these explanations.
This symbol indicates supplementary explanations of the functions of the printserver and instructions on resolving user errors.
[Bold] Bold type inside square brackets indicates the names of keys, menus, menuitems, field labels, settings, and buttons.
[ ] Square brackets indicate the names of keys on the operator control panel orbuttons, fields, and menu items on the remote or local console.
Bold Bold type indicates the names of commands, switches, indicators, and levers.
Italic Italic type indicates variables that you must replace with your owninformation.
Monospace Monospace type indicates computer input and output and file names.
{ } In messages and other elements of the console, curly brackets indicate variablesthat a program replaces with its own information.
... An ellipsis indicates that a series can continue.
Select The words select and selecting refer to using the touch-sensitive screen, themouse, or the keyboard to do an action, choose an option, or enter data.
Disclaimer
To the maximum extent permitted by applicable laws, in no event will the manufacturer be liable for anydamages whatsoever arising out of failures of this machine, losses of the registered data, or the use ornon-use of this product and operation manuals provided with it.
Make sure that you always copy or have backups of the data registered in this machine. Documents ordata might be erased due to your operational errors or malfunctions of the machine.
In no event will the manufacturer be responsible for any documents created by you using this machineor any results from the data executed by you.
Notes
Contents of this manual are subject to change without prior notice.
The manufacturer shall not be responsible for any damage or expense that might result from the use ofparts other than genuine parts from the manufacturer with your office products.
Some illustrations in this manual might be slightly different from the machine.
3

Machine Types
Check the type of your print server before reading the manuals.
• Type 1:TotalFlow Print Server R-62
• Type 2:TotalFlow Print Server R-62A
Trademarks
AIX and IBM are registered trademarks of International Business Machines Corporation in the UnitedStates, other countries, or both.
Adobe, the Adobe logo, Acrobat, Illustrator, InDesign, PostScript, the PostScript logo, PDF, and Readerare either registered trademarks or trademarks of Adobe Systems Incorporated in the United Statesand/or other countries.
Agfa is a trademark of Agfa-Gevaert N.V. or its affiliates.
APOGEE is a trademark of Agfa Gevaert N.V.
AppleTalk, Mac, OS X, and Xcode are trademarks of Apple Inc., registered in the U.S. and othercountries.
DIC and COLOR GUIDE are registered trademarks of DIC Corporation.
GRACoL is a registered trademark of International Digital Enterprise Alliance, Inc. (Idealliance).
Heidelberg and Prinect are registered trademarks of Heidelberger Druckmaschinen AG in Germany,the United States and/or other countries.
HKS is a registered trademark of HKS® Warenzeichenverband e.V. (Hostmann-Steinberg GmbH, K+Eof Flint Group Germany GmbH, Schminke).
i1Pro and i2Pro are either trademarks or registered trademarks of X-Rite, Incorporated.
Kodak and PRINERGY are registered trademarks of Eastman Kodak Company.
Linux is a registered trademark of Linus Torvalds in the United States, other countries, or both.
Microsoft, Windows, Windows Vista, the Windows logo, and Internet Explorer are trademarks ofMicrosoft Corporation in the United States, other countries, or both. The proper names of InternetExplorer 10 and 11 are as follows:
• Internet Explorer® 10
• Internet Explorer® 11
PANTONE and other Pantone trademarks are the property of Pantone LLC.
SCREEN and EQUIOS are trademarks or registered trademarks of SCREEN HOLDINGS CO., LTD.
TOYO INK and COLOR FINDER are registered trademarks of Toyo Ink SC Holdings Co., Ltd.
UNIX is a registered trademark of The Open Group in the United States and other countries.
Other company, product, or service names may be trademarks or service marks of others.
4

Copyrights for Software
This section explains copyrights for software used on the machine.
PANTONE
PANTONE® Colors displayed in the software application or in the user documentation may not matchPANTONE-identified standards. Consult current PANTONE Color Publications for accurate color. ©Pantone LLC, 2016
Pantone is the copyright owner of color data and/or software which are licensed to Ricoh Company,Ltd. to distribute for use only in combination with TotalFlow Print Server. PANTONE Color Data and/orSoftware shall not be copied onto another disk or into memory unless as part of the execution ofTotalFlow Print Server.
DIC
The DIC COLOR GUIDE database has obtained a license from DIC Graphics Corporation.
The color data this product uses conforms to the DIC COLOR GUIDE.
Printed colors using this product may not necessarily match the colors included in the DIC COLORGUIDE.
TOYO
COLOR FINDER is licensed from Toyo Ink Co., Ltd.
HKS
HKS 3000 Plus is licensed from HKS® Warenzeichenverband e. V. (Hostmann-Steinberg GmbH, FlintGroup Germany GmbH, H. Schmincke).
GRACoL 2013 CRP 6
© 2000-2017 Idealliance, Inc. All Rights Reserved.
We have obtained each author's permission for the use of applications including open-source softwareapplications. For details about the copyright information for these software applications, see OSS.pdfon the CD-ROM supplied with the print server.
5

6

7
Preface
Guides for TotalFlow Print Server........................................................................................................ 1
Reading the PDF Manuals on the CD-ROM........................................................................................ 1
How to Use the Information Center Help ............................................................................................ 2
How to Use the Field Help.................................................................................................................. 2
How to Read the Manuals.................................................................................................................. 3
Symbols Used in the Manuals............................................................................................................. 3
Disclaimer........................................................................................................................................... 3
Notes ................................................................................................................................................. 3
Machine Types ................................................................................................................................... 4
Trademarks......................................................................................................................................... 4
Copyrights for Software...................................................................................................................... 5
1 Introduction
Product Overview ................................................................................................................................15
Input Data Streams ...........................................................................................................................15
Network Protocols ............................................................................................................................15
Job Submission Methods ..................................................................................................................16
Job Processing..................................................................................................................................16
Color Support...................................................................................................................................19
System Objects ....................................................................................................................................20
Printer ...............................................................................................................................................20
Printer Presets ...................................................................................................................................20
Virtual Printers...................................................................................................................................21
Jobs and Job Tickets .........................................................................................................................21
Papers and Paper Catalog ...............................................................................................................21
Filters ................................................................................................................................................21
Users and Roles................................................................................................................................22
Logs and Traces ...............................................................................................................................22
Console ...............................................................................................................................................22
Icons Used in the Console ................................................................................................................24
Printer Control Bar ............................................................................................................................26
Interactive Printer ..............................................................................................................................29
Operations Page and Jobs Page ......................................................................................................31
Configuration Page ..........................................................................................................................37
[Job Properties Editor] Dialog.......................................................................................................38
TABLE OF CONTENTS

2 Trying Out TotalFlow Print Server Using Sample Files
Creating and Printing a Ring-Bound Book............................................................................................43
Creating and Printing a Stapled Booklet ..............................................................................................45
Printing Tickets .....................................................................................................................................46
3 Color and Grayscale Printing
Color Printing Concepts .......................................................................................................................49
Color Spaces and ICC profiles .........................................................................................................49
Gamut and Rendering Intent.............................................................................................................50
Color Mixing and Calibration ..........................................................................................................51
Halftones and Tone Transfer Curves .................................................................................................51
File Size............................................................................................................................................52
Grayscale Printing Concepts................................................................................................................52
Color Management .............................................................................................................................53
ICC Profiles ......................................................................................................................................54
Rendering Intents ..............................................................................................................................54
Paper Characteristics ........................................................................................................................55
AFP Color Management ......................................................................................................................56
IPDS Profiles .....................................................................................................................................56
Color Management Resources .........................................................................................................56
Data Objects ....................................................................................................................................63
Resource Library Management .........................................................................................................65
Tips and Best Practices......................................................................................................................66
AFP Resource Installer ......................................................................................................................67
4 Working with the Console
Logging Into and Out of TotalFlow Print Server ....................................................................................69
Setting the Language of the Console....................................................................................................70
Setting the Display Language for the Local Console .........................................................................70
Setting the Keyboard Language for the Console...............................................................................70
Setting the Display Language for the Remote Console ......................................................................71
Setting the Display Language for a User ...........................................................................................71
Setting the Icon and Text Size for the Current User...............................................................................71
Working with Shortcuts ........................................................................................................................71
Customizing the Operations Page and the Jobs Page ..........................................................................72
Changing the Information in a Portlet ...................................................................................................72
Searching for Objects in a Portlet.........................................................................................................73
8

Clearing a Search................................................................................................................................73
Using the Paper Catalog......................................................................................................................74
5 Configuring TotalFlow Print Server
Adding or Copying an Object .............................................................................................................75
Viewing and Updating TotalFlow Print Server Settings ........................................................................75
Setting the Date and Time ....................................................................................................................76
Manually Setting the Date and Time.................................................................................................76
Automatically Setting the Date and Time...........................................................................................76
Configuring Sample Printing.................................................................................................................77
Setting the Default Virtual Printer ..........................................................................................................77
Setting Virtual Printer Defaults and Overrides for Job Properties ...........................................................77
Setting Printer Defaults for Job Properties .............................................................................................78
Defining a JMF Device ID ....................................................................................................................78
Configuring for Job Submission............................................................................................................79
Accessing TotalFlow Print Server Remotely...........................................................................................80
Setting Up SNMP Access .................................................................................................................80
Enabling the Remote Console ...........................................................................................................81
Setting Up for Outgoing E-mail.........................................................................................................81
Setting up Access Using TotalFlow Prep............................................................................................82
Installing Extended Features.................................................................................................................82
Saving Printer Presets ...........................................................................................................................83
Configuring Printer Presets ...................................................................................................................84
6 Managing TotalFlow Print Server
Checking Printer Status.........................................................................................................................85
Checking Toner Levels ......................................................................................................................85
Checking Paper Levels......................................................................................................................86
Checking Other Printer Information...................................................................................................86
Editing an Object .................................................................................................................................87
Disabling an Object.............................................................................................................................87
Enabling an Object..............................................................................................................................88
Loading an Object...............................................................................................................................88
Saving an Object.................................................................................................................................89
Deleting an Object...............................................................................................................................89
Deleting Multiple Objects ....................................................................................................................90
Uploading and Downloading Files ......................................................................................................90
9

Uploading Files ................................................................................................................................90
Downloading Files............................................................................................................................92
Checking the LAN Status of an Ethernet Card ......................................................................................93
Loading Paper in an Input Tray ............................................................................................................93
Editing the Paper in an Input Tray ........................................................................................................93
Viewing Font Properties........................................................................................................................94
Importing a Font...................................................................................................................................94
Using a PostScript Job to Download Fonts ...........................................................................................94
Specifying Color Profiles ......................................................................................................................95
Modifying ICC Profiles.........................................................................................................................96
Modifying NamedColor Profiles ..........................................................................................................97
Managing Black Output ......................................................................................................................98
Managing Brightness and Contrast ......................................................................................................98
Printing a Color Control Bar.................................................................................................................99
Printing Test Masters ..........................................................................................................................100
Calibrating the Printer ........................................................................................................................100
Updating or Creating a Calibration................................................................................................101
Selecting the Calibration for a Paper ..............................................................................................102
Backing Up and Restoring TotalFlow Print Server ...............................................................................102
Backing Up TotalFlow Print Server .................................................................................................103
Restoring TotalFlow Print Server .....................................................................................................104
Erasing the Hard Drive.......................................................................................................................105
Updating Code..................................................................................................................................105
Resetting to Factory Defaults ..............................................................................................................106
Stopping the Printer............................................................................................................................106
Restarting the Printer...........................................................................................................................106
Shutting Down and Restarting TotalFlow Print Server..........................................................................106
Shutting Down and Restarting the Control Unit ...................................................................................107
Shutting Down the Control Unit ..........................................................................................................107
7 Working with Jobs
Submitting a Print Job.........................................................................................................................109
Submitting a Print Job from the Console ..........................................................................................109
Submitting a Job from a Hot Folder on Windows............................................................................110
Submitting a Print Job from a Hot Folder on Mac............................................................................110
Submitting a Print Job Using FTP .....................................................................................................111
Submitting a Print Job Using the Windows Printer Driver .................................................................111
10

Submitting a Print Job Using the Mac Printer Driver.........................................................................112
Submitting a Print Job from Prinect ..................................................................................................113
Submitting a Print Job Using JMF ....................................................................................................113
Submitting a Print Job Using LPR .....................................................................................................114
Submitting a Print Job Using AppleTalk...........................................................................................115
Logging and Storing Job Tickets.........................................................................................................115
Managing Print Jobs ..........................................................................................................................116
Previewing a Print Job.....................................................................................................................116
Viewing a Print Job .........................................................................................................................116
Holding a Print Job .........................................................................................................................117
Printing a Sample Copy of a Single Job..........................................................................................117
Printing a Sample Copy of Every Job..............................................................................................118
Printing Sample Pages of the Current Job........................................................................................118
Causes of Invalid Print Jobs.............................................................................................................118
Editing the Properties of a Print Job with the Job Properties Editor ...................................................119
Editing a Print Job with TotalFlow Prep............................................................................................119
Changing the Tone Curve for a Job ................................................................................................120
Storing a Print Job...........................................................................................................................120
Reprinting a Stored Job ..................................................................................................................121
Suspending a Print Job ...................................................................................................................121
Resetting a Print Job........................................................................................................................122
Releasing a Print Job.......................................................................................................................122
Changing the Order of Processing Jobs..........................................................................................123
Deleting a Print Job.........................................................................................................................123
Specifying Processing Options for Print Jobs ......................................................................................124
Applying a Job Filter ..........................................................................................................................124
Viewing Job Properties ......................................................................................................................125
Defaults and Overrides ......................................................................................................................125
Changing the Job Properties ..............................................................................................................125
Changing Job Options....................................................................................................................126
Editing the Layout Settings ..............................................................................................................130
Changing the Paper Settings ..........................................................................................................134
Changing the Marks and Bleeds Settings .......................................................................................137
Changing Finishing Options............................................................................................................139
Using the Exception Pages..............................................................................................................141
Adding Covers ...............................................................................................................................144
11

Inserting Sheets...............................................................................................................................145
Changing the Color Settings ...........................................................................................................147
Changing the Print Quality Settings.................................................................................................152
Changing the Fifth Station Settings..................................................................................................156
Changing the Watermark Settings ..................................................................................................158
Changing the Header/Footer Settings............................................................................................159
8 Security
Changing Your Password...................................................................................................................161
Resetting a Password .........................................................................................................................161
Setting Up Authentication...................................................................................................................161
Including or Suppressing Customer Data in Traces.............................................................................162
Deleting Customer Data from Archived Traces ...................................................................................162
Encrypting User Data .........................................................................................................................162
Overwriting Deleted Data ..................................................................................................................162
Restricting IP Addresses......................................................................................................................163
Setting up Secure Mode Printing........................................................................................................163
9 IPDS
AFP/IPDS Support .............................................................................................................................165
Mapping IPDS Input Trays .................................................................................................................166
Setting the Default Input and Output Trays for IPDS Jobs....................................................................166
Deleting Captured IPDS Resources ....................................................................................................166
IPDS Print Jobs ...................................................................................................................................167
Canceling an IPDS Print Job ...........................................................................................................167
10 Troubleshooting
Responding to Messages ...................................................................................................................169
Recovering Job Tickets .......................................................................................................................169
Traces ................................................................................................................................................170
Capturing a Print Job ......................................................................................................................170
Saving Traces ................................................................................................................................171
Configuring Traces ........................................................................................................................171
E-mailing Traces .............................................................................................................................171
Managing Archived Traces ............................................................................................................172
Capturing Images of the Console.......................................................................................................172
Troubleshooting Job Properties ..........................................................................................................172
Known Problems ................................................................................................................................173
12

11 Reference
Fonts Shipped with TotalFlow Print Server ..........................................................................................177
ICC Profiles Shipped with TotalFlow Print Server ................................................................................184
Papers Supported ..............................................................................................................................186
Special Toner Patterns........................................................................................................................190
INDEX
13


1
15
11.. Introduction
•Product Overview•System Objects•Console
These Operating Instructions contain user information for TotalFlow Print Server, including informationabout configuring and using the console.
The Setup Guide is also available in printed format.
You can use these interfaces to interact with TotalFlow Print Server:
• The TotalFlow Print Server console runs either locally or in a web browser at a remote computer.While there are minor differences between the local and remote consoles, you can do most tasks ateither and all tasks at one or the other.
• The operator control panel is at the printer. It lets you do common tasks like monitoring the printerstatus and managing print jobs.
PPrroodduucctt OOvveerrvviieewwTotalFlow Print Server is a digital front end for RICOH® Pro C Series printers. It works with printworkflows such as Heidelberg Prinect, Kodak PRINERGY, SCREEN EQUIOS, and Agfa APOGEE.
Input Data Streams
TotalFlow Print Server supports these input data streams:
• PDF Version 1.7
• PDF/VT
• PDF/X
• PostScript Level 3
• PPML Version 2.2
• EPS
• JPEG
• TIFF
• IPDS® (optional)
Network Protocols
TotalFlow Print Server supports these network protocols:
• [IPDS TCP/IP]
• [IPP]
• [JMF]
1
16
• [LPR]
• [Hot Folders]
• [Raw Port]
• [WSD]
• [RHPP]
• [FTP]
• [AppleTalk]
Job Submission Methods
You can use these methods to submit jobs to TotalFlow Print Server:
• The TotalFlow Print Server console.For more information, see Submitting a Print Job from the Console, p. 109.
• A hot folder on the system.For more information, see Submitting a Job from a Hot Folder on Windows, p. 110 or Submitting aPrint Job from a Hot Folder on Mac, p. 110.
• File Transfer Protocol (FTP).For more information, see Submitting a Print Job Using FTP, p. 111.
• The printer driver.For more information, see Submitting a Print Job Using the Windows Printer Driver, p. 111. Forinformation about installing the printer driver, see the Setup Guide.
• Printing workflow systems and tools that create or transmit Job Definition Format (JDF) job tickets. Forexample, PRINERGY, EQUIOS, APOGEE, TotalFlow Print Manager, TotalFlow ProductionManager, and TotalFlow Path.For more information, see Submitting a Print Job Using JMF, p. 113.
• Line Printer Remote (LPR) protocol.For more information, see Submitting a Print Job Using LPR, p. 114.
• AppleTalk protocol.For more information, see Submitting a Print Job Using AppleTalk, p. 115.
Job Processing
This flowchart shows the basic path that jobs take through TotalFlow Print Server. Not all options areshown. For example, the flowchart does not show suspending a job or reprinting a stored job.
1 Introduction

1
17
FTP Console
LPR JMF
START
A
No YesVirtual printer specified?
Printer driver
Submit job
Hot folder
Specified virtual printer receives job
Default virtual printer receives
job
k3fc001
Product Overview

1
18
A
B
Hold
Yes
Yes
No
No
Hold
No
No
Yes
Yes
Yes
Virtual printer assigns defaults
and overridesProcessing option =
Process & Print | Process &Hold?
Processing option = Hold |
Process & Hold?Job is
RIPpedProperty changes
needed?
Operator changes job properties
Is job valid?
Operator releases job
Operator changes job or printer
properties
k3fc002
1 Introduction

1
19
B
Store = ?
END
Store indefinitely Off | Not set
Printer receives job
Printer assigns defaults
Job is processed
Job is printed
Job is stored Job is
stored
Operator deletes job Storage period
expires
Job is deleted
Store for
k3fc003
Color Support
TotalFlow Print Server supports the following color functions:
• ICC profiles
– CMYK profiles: SWOP, GRACoL, FOGRA, Japan Color
– RGB profiles: sRGB, AppleRGB, AdobeRGB, RICOH-RGB
– Gray profiles: AdobeGray
– Device link profiles
– Rendering intent selection
• Profile switching by object type
• PDF/X output intent
• Spot color support: PANTONE, DIC, TOYO, HKS
• Color substitution
• Pure black/Rich black
• Black overprint
• Auto trapping
• Color gradation
• CMOCA CMRs (for the IPDS data stream)
Product Overview

1
20
• Printer calibration
• Halftone screening
• Plate separation
• Toner reduction by object type
• Converting RGB to CMYK
• Output profiles
• Converting color to K-only
• GCR strength control
• 4–object support: text, line art, image, or smooth shade
• Overprint
• Optional functions for RIP Model H:
– Black point compensation
– Printing gray using black
– Preserving primary and secondary colors
– Preserving pure black mode
• Optional functions for RIP Model K and RIP Model S:
– Preserve K black/gray
– Force K black/gray (expand gray recognition)
SSyysstteemm OObbjjeeccttssA TotalFlow Print Server system includes a printer, printer presets, virtual printers, jobs, papers, filters,users, roles, logs, and traces.
Each of these things is a system object. You can define detailed attributes for each system object. Theseattributes are called properties.
Printer
The printer represents the physical device that prints jobs.
Printer Presets
You can save printer configuration settings in collections called printer presets. After you save a printerpreset, you can load it so that you do not have to specify each setting individually.
1 Introduction

1
21
Virtual Printers
Virtual printers are separate input devices that can be created and customized to process print jobsaccording to your requirements and work flows.
TotalFlow Print Server uses virtual printers to receive print jobs. Users can map the virtual printer from aprint submission workstation or server and move job files to the printer.
Every virtual printer has a hot folder associated with it. Hot folders are the most common method ofsubmitting jobs.
You can create up to 250 virtual printers.
Jobs and Job Tickets
A print job is a unit of printing.
The print job consists of a job ticket and the print file associated with that job.
You can define and change various options for print jobs.
Papers and Paper Catalog
Papers represent the physical media that job are printed on. The paper catalog is a list of papers thatare defined for the printer and the input trays or interposer trays where the papers are loaded.
Paper definitions include the size, weight, color, type, and coating of the paper.
In addition to the TotalFlow Print Server paper catalog, some printer controllers have their own papercatalogs. The TotalFlow Print Server paper catalog includes the papers defined in the printer controllerpaper catalog and papers defined using TotalFlow Print Server. When papers are added to or deletedfrom the printer controller paper catalog, the TotalFlow Print Server paper catalog is updatedautomatically.
Filters
Filters are command-line programs that change the data stream in print jobs.
For example, a filter can replace all examples of a text string in jobs submitted to a virtual printer.
RICOH provides customized filters as special orders at customer request. See your sales representativefor details.
System Objects

1
22
Users and Roles
Everyone who works with TotalFlow Print Server has a user ID that is assigned to a role. Roles define thelevel of access that users have and the actions they can do.
TotalFlow Print Server provides these default users:
• [Print submitter]: Assigned to the [Print submitter] role. Only allowed to submit jobs.• [Operator]: Assigned to the [Operator] role. Limited access to configuration settings.• [Administrator]: Assigned to the [Administrator] role. Access to most configuration settings.• [Service]: Assigned to the [Service] role. Full access to printer configuration settings and diagnostic
tools.You cannot delete the predefined users, and you cannot change their associated roles.
[Administrator] users can create, delete, and configure users with lower access levels. Only [Service]users can create, delete, and configure [Administrator] users or other [Service] users.
When you create a user, you specify the associated role for that user. The role defines the basefunctions that a user can perform.
[Administrator] or [Service] users can create, edit, and delete roles, with these restrictions:
• You can restrict the default functions for a role, but not authorize more functions than the default.
• You cannot restrict the authorized functions for the [Print submitter] role.
• Only users with [Service] access can create, edit, or delete roles based on the [Service] role.
Logs and Traces
Logs include messages and other information about TotalFlow Print Server.
Traces are detailed logs that are useful for troubleshooting.
CCoonnssoolleeYou can access TotalFlow Print Server from various locations.
• Through the local console on the computer where TotalFlow Print Server is running. To use the localconsole, you must attach a keyboard, mouse, and monitor to that computer.
• Through a remote computer using a web browser.
• Through the operator control panel on the printer.
Unless otherwise specified, the term “console” means either the local or remote console. You can useeither to do almost all tasks. Exceptions are:
1 Introduction

1
23
Local Only Remote Only
• Setting the language of the local console• Setting the language of the keyboard
attached to TotalFlow Print Server• Setting the text and button size of the local
console
• Setting the language of the web browserused by the remote console
• Setting the text and button size of the remoteconsole
The console contains these pages that let you do different tasks:
• Operations
• Jobs
• Configuration
Operations Page
Use the controls and settings on these pages to set up and run TotalFlow Print Server.
Console

1
24
Icons Used in the Console
This table lists the icons used in the console with a brief description of their function.
For icons used in the interactive printer and the Printer Information portlet, see Printer Graphic Icons, p.35. For job status icons, see Job Status Icons, p. 33. For job view icons, see View modes, p. 39.
Icon Function
Load, select, or mark
Loaded
Create new
Edit
Copy
Search
Save
Delete
Delete multiple objects
Rotate left
Rotate right
Zoom in
Zoom out
Original size
Download, list, or install
Import
Disable or hold
Enable or print
1 Introduction

1
25
Icon Function
Configure
View job
Print test master
More actions
Shut down control unit
Restart DFE
Restart control unit
Clear IPDS buffers
Update code
Log management
Options
Help
i Job or printer information
Informational message
Warning message
Error message
Console

1
26
Printer Control Bar
The printer control bar is at the top of the console and is always present, regardless of which page isdisplayed. You can use it to access some operator actions instead of using the Operations page.
Printer Control Bar (Console)
The printer control bar includes three areas:
1. Printer status areaShows a small image of the printer and message or warning icons. You can open the interactiveprinter from the printer status area to do these tasks:
• See and act on operator messages.
• Check toner levels.
• Edit some properties of the papers in the input trays and interposer trays.
2. Job status areaShows what job is printing and the percent complete.
3. Navigation barThe navigation bar shows the tabs that are available. It also shows which user is currently logged in,a button for submitting jobs, and a button that opens the help system.
The printer status section of the printer control bar displays the current state of the printer. States arelisted in Printer States, p. 27.
1 Introduction

1
27
PPrriinntteerr SSttaatteess
Icon State and Description
(“Ready“)
The printer is ready to print jobs. Before the printer can beginprinting, it must be in the “Ready“ state.
The printer is in the “Ready“ state when all the following conditionsare met:
• The printer and TotalFlow Print Server are powered on andready.
• All supplies are loaded.• No errors are present.
• The ([Start]) button on the printer control bar has beenselected.
(“Printing...“)
The printer is currently operating and printing a job.
Console

1
28
Icon State and Description
(“Not Ready“)
The printer has been stopped.
If the printer changes to “Not Ready“ during printing, the printerstops processing the job and stores the remaining data in the printerbuffers.
Selecting the ([Stop]) button on the printer control barcauses the printer to enter the “Not Ready“ state.
When normal operation is interrupted, the printer goes into a “NotReady“ state.
When the printer detects an intervention condition, it places itself inthe “Not Ready“ state and displays a pop-up warning or errormessage.
These intervention conditions cause a “Not Ready“ status:• The printer needs basic supplies. Some supplies (for example,
staples), let you temporarily bypass this message and continueprocessing. Other supplies (for example, black toner) requireyou to replace them immediately.
• The printer needs basic service that involves paper handling orchecking mechanical conditions. You must handle all messagesof this type immediately.
• The printer has a hardware problem, such as a paper jam or acomponent failure. You can postpone action for some messagesof this type; others you must handle immediately.
In any of these conditions, processing stops so that you can attemptto correct the problem, or, if necessary, call for service. Printererrors can cause some printed pages to be lost or damaged.
(“Error“)
The printer has encountered an error while printing.
(“Warming up“)
The printer has been turned on but it is not ready to print.
The job status window on the printer control bar displays the job name and shows the progress of thejob on the printer.
1 Introduction

1
29
Job Status Window
The printer control bar also includes these buttons:
Button Description
[Sample] Print a copy of the page that is printing and output it to anavailable tray. You can see if the printed results are as expectedeven while printing.
([Stop])
Stop printing.
([Start])
Make the printer ready to print and to start printing if a job isavailable.
Open the interactive printer.
Close the interactive printer.
Interactive Printer
Use the interactive printer to monitor and change basic printer settings.
Interactive Printer
Console

1
30
The interactive printer contains large versions of these portlets:
• Printer Information (see Printer Information, p. 35)
• Operator Messages (see Operator Messages, p. 36)
• Input Trays (see Input Trays, p. 35)
Use these buttons in the printer status area of the printer control bar to open and close the interactiveprinter:
BBuuttttoonnss UUsseedd ttoo OOppeenn aanndd CClloossee tthhee IInntteerraaccttiivvee PPrriinntteerr
Button Description
Open the interactive printer.
Close the interactive printer.
1 Introduction
1
31
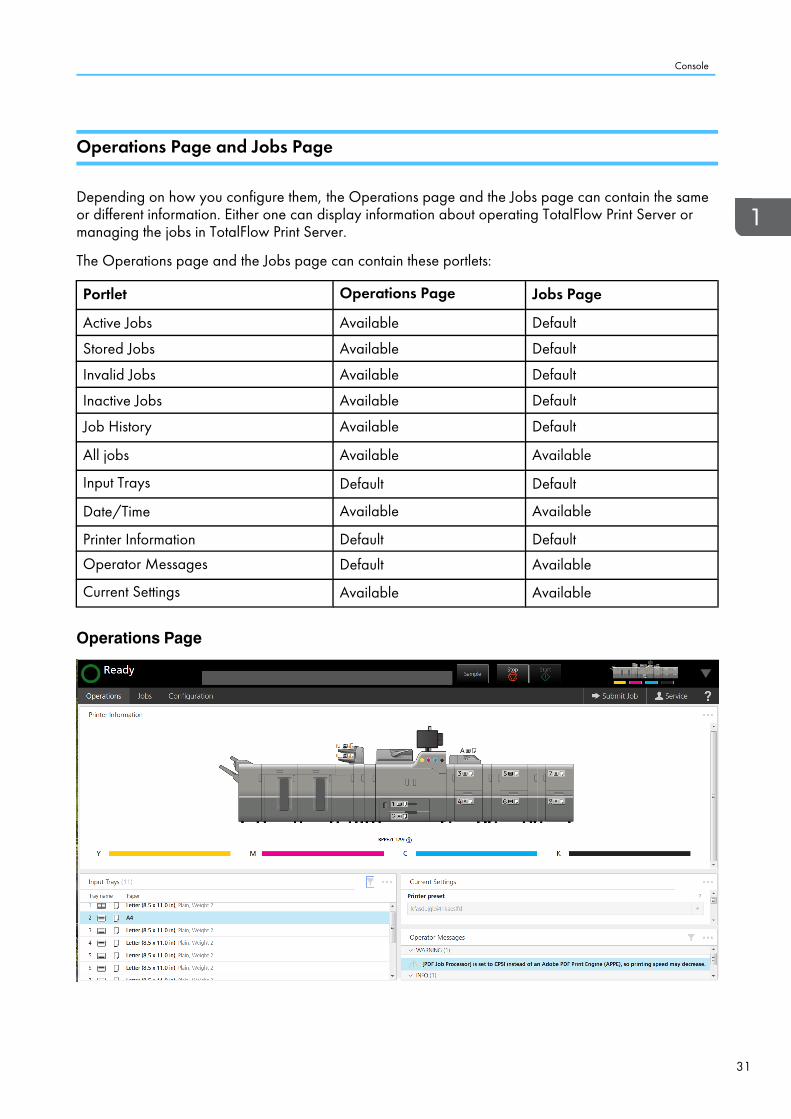
Operations Page and Jobs Page
Depending on how you configure them, the Operations page and the Jobs page can contain the sameor different information. Either one can display information about operating TotalFlow Print Server ormanaging the jobs in TotalFlow Print Server.
The Operations page and the Jobs page can contain these portlets:
Portlet Operations Page Jobs Page
Active Jobs Available Default
Stored Jobs Available Default
Invalid Jobs Available Default
Inactive Jobs Available Default
Job History Available Default
All jobs Available Available
Input Trays Default Default
Date/Time Available Available
Printer Information Default Default
Operator Messages Default Available
Current Settings Available Available
Operations Page
Console
1
32
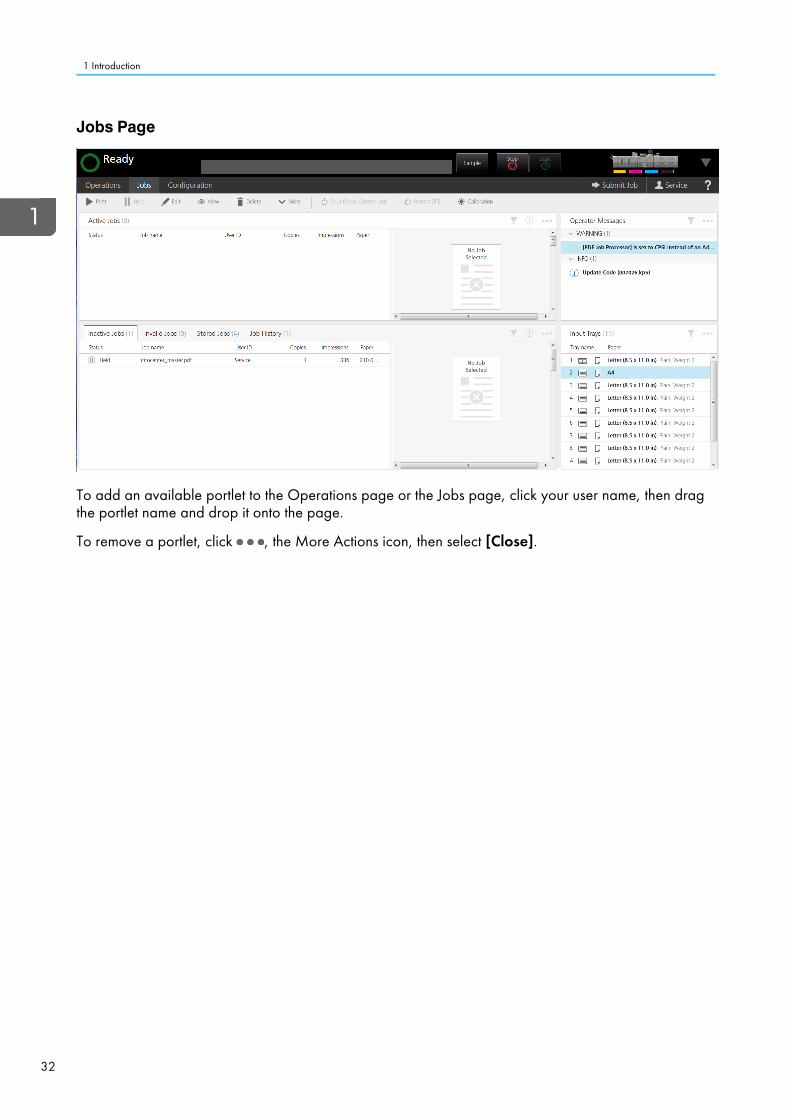
Jobs Page
To add an available portlet to the Operations page or the Jobs page, click your user name, then dragthe portlet name and drop it onto the page.
To remove a portlet, click , the More Actions icon, then select [Close].
1 Introduction

1
33
Jobs Portlets
The Operations page and the Jobs page can contain any of the jobs portlets.
The jobs portlets are:
Active JobsDisplays information about working jobs.
Inactive JobsDisplays information about jobs in the [Held] state.
Stored JobsDisplays information about jobs in the [Stored] state.
Displays information about jobs in the [Invalid] state.
Job HistoryDisplays information about processed and deleted jobs in the [Completed] state and deleted jobsin the [Discontinued] state.
IPDS jobs do not appear in the Job History portlet.
All jobsDisplays information about all current and past jobs that appear in the other jobs portlets.
Use [Manage Columns] to select the properties that appear in each portlet. Selections are:
• [Status] — The status of the job
JJoobb SSttaattuuss IIccoonnss
Icon Icon(Processed)
Description
[Receiving]
[Preprocessing], [Preparing to process], [Processing]
[Working], [Waiting to print]
[Preparing to print]
[Printing]
[Suspending], [Suspended], [Held]
[Invalid], [Invalid/Suspended], [Invalid/Stored],[Quarantined], [Quarantined/Invalid], [Quarantined/Held]
Console

1
34
Icon Icon(Processed)
Description
[Idle]
[Completed]
[Stored], [Stored/Time], [Stored/Space]
[Canceling], [Canceled], [Deleted], [Deleted/Time],[Deleted/Space], [Discontinued]
[Error], [Failing], [Failed]
The icons in the “Icon (Processed)” column show that raster image processing (RIP) is complete.
• [Job name] — The name of the job
• [User ID] — The user who submitted the job
• [Copies] — The number of copies included in the job
• [Impressions] — The total number of printed pages in the job
• [Paper] — The paper that the job requests
• [Size] — The size of the job
• [Job type] — The file type of the job, such as PDF or TIFF
• [Job ID] — The unique identification number for the job
• [Pages per copy] — The number of pages (before impositioning) in one copy of the job
• [Total sheets] — The total number of sheets in the job
• [Number of records] — The total number of records in a variable data job
• [Expiration date] — The date and time when the stored job is automatically deleted
• [Process duration] — How long it took to process the job
• [Received time] — The time when the job was received
• [Print start] — The date and time when the first printed page of the job was stacked in the outputbin
• [Print complete] — The date and time when the last printed page of the job was stacked in theoutput bin, or when the job was terminated
• [Printer preset] — The printer preset that must be loaded to print the job
• [Protocol] — The network protocol by which the job was submitted
• [Customer] — The customer associated with the job
• [Modified by] — The last user who modified the job
• [Store source] —Whether to store only the job source, the source and processed data, or neither
• [Tone curve] — The tone curve applied to the job
1 Introduction

1
35
• [Processing options] — The processing options applied to the job
• [Processed] —Whether the job has been processed
• [Virtual printer] — The virtual printer that received the job
• [Priority] — The priority of the job, with higher numbers meaning higher priority
• [Monochrome pages] — The number of black and white pages in the job
• [Color pages] — The number of color pages in the job
Input Trays
The Input Trays portlet displays information about the paper loaded in the input and interposer trays ofthe printer.
Input trays contain papers for printing the job. Interposer trays contain papers, usually preprinted, forinserting between the sheets of a printed job. For example, an interposer tray can contain anadvertisement to be included with a bill.
This portlet always appears in the interactive printer. It appears on the Operations page by default.
Printer Information
The Printer Information portlet shows a graphic image of the printer, with installed optional equipment.Icons show the status of the printer, the level of paper in each input tray and interposer tray, and thelevel of each toner color.
The printer graphic uses these icons:
PPrriinntteerr GGrraapphhiicc IIccoonnss
Icon Function
Informational messages about the printer are available. See the OperatorMessages portlet for more information.
The printer is not available. See the Operator Messages portlet for moreinformation.
A printer error has occurred. See the Operator Messages portlet for moreinformation.
The cover or door is open.
The input tray or interposer tray is disabled.
The input tray or interposer tray is full of paper.
The input tray or interposer tray is less than full, but more than half full ofpaper.
The input tray or interposer tray is half full of paper or less.
Console

1
36
Icon Function
The input tray or interposer tray has very little paper.
The input tray or interposer tray is empty.
The paper feeds on the long edge. [Auto paper select] is [Yes].
The paper feeds on the long edge. [Auto paper select] is [No].
The paper feeds on the short edge. [Auto paper select] is [Yes].
The paper feeds on the short edge. [Auto paper select] is [No].
Yellow toner.
Magenta toner.
Cyan toner.
Black toner.
Toner is low.
Toner has run out.
The name of the printer appears below the printer image. To see information about the printer or to resetthe print count, click the information icon next to the printer name.
Below the printer name, gauges show the level of each toner color. The color on the left is printed first. Ifthe printer has the fifth-station extension kit, the white or special-effect toner can be printed either first(extreme left) or last (extreme right).
This portlet always appears in the interactive printer. It appears on the Operations page by default.
Operator Messages
The Operator Messages portlet displays information about the current state of the machine, such ashardware failures or paper jams.
The types of messages shown include:
Informational messages, which provide information about the status andconfiguration of the printer.
Warning messages, which sometimes require intervention, such asreloading paper.
Error messages, which require an operator action. When you click amessage in the list, the recovery information for the message displays.
1 Introduction

1
37
This portlet always appears in the interactive printer. To add it to the Operations page or the Jobs page,click your user name, then drag the portlet name and drop it onto the page.
Date/Time
The Date/Time portlet displays the date and time for the control unit only. It does not display the dateand time of any remote computer that is connected.
This portlet does not appear by default. To add it to the Operations page or the Jobs page, click youruser name, then drag the portlet name and drop it onto the page.
The date and time displayed in the portlet is configured under DFE→ Settings on the Configurationpage.
Current Settings
The Current Settings portlet displays various configuration options for TotalFlow Print Server.
This portlet does not appear by default. To add it to the Operations page or the Jobs page, click youruser name, then drag the portlet name and drop it onto the page...
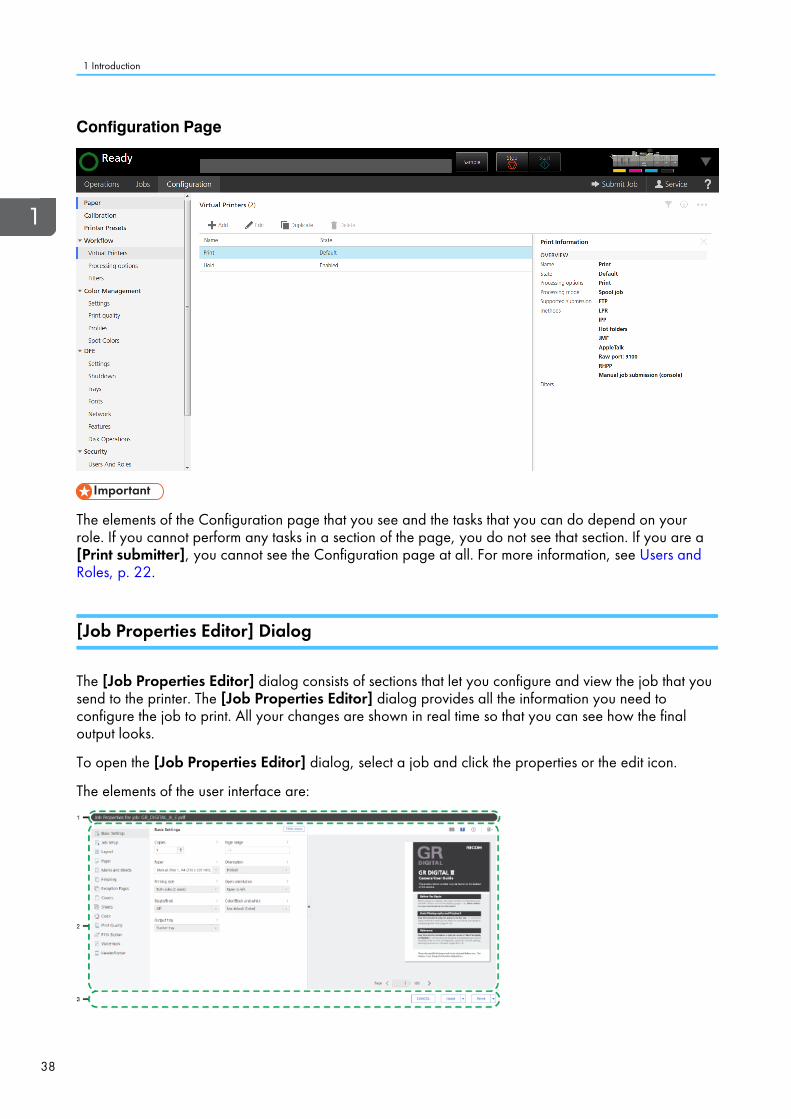
Configuration Page
The Configuration page contains all the parameters that are used to control how TotalFlow Print Serveroperates.
Use the navigation panel at the left to move around the Configuration page.
Console
1
38
Configuration Page
The elements of the Configuration page that you see and the tasks that you can do depend on yourrole. If you cannot perform any tasks in a section of the page, you do not see that section. If you are a[Print submitter], you cannot see the Configuration page at all. For more information, see Users andRoles, p. 22.
[Job Properties Editor] Dialog
The [Job Properties Editor] dialog consists of sections that let you configure and view the job that yousend to the printer. The [Job Properties Editor] dialog provides all the information you need toconfigure the job to print. All your changes are shown in real time so that you can see how the finaloutput looks.
To open the [Job Properties Editor] dialog, select a job and click the properties or the edit icon.
The elements of the user interface are:
1 Introduction

1
39
1. Title bar
2. Content area
3. Action bar
View modes
The views area of the dialog has various options for displaying the job or information about it. Click[Show views] to display the entire views section.
Use the icon at the top right of the section to change the view as described in the table.
Icon View name Description
[Sheet view] Shows the job displayed aspages in the order that you readthem.
[Book view] Shows the job displayed as abook.
[Job Summary] Summarizes all the job settings.These settings can be exportedas HTML files.
[View options] Shows page numbers, slipsheets, and the origin point.
[Book view]
The [Book view] displays the job as a book in the center of the content area. You can flip thepages and see in real time the changes to the job that you print.
Console

1
40
To flip the pages, click the sheet edge or click the next and previous icons.
Icon Name
[Previous page]
[Next page]
For large print jobs, with more than 1000 sheets, only the first 1000 sheets are loaded to be displayed.You can see the number of loaded pages of the total number of pages in the job. The exception pagesare visible only if the range of pages containing the exception pages is already loaded.
This view is not available when some of the options are not set, such as printing side or the paper size.
[Sheet view]
The [Sheet view] shows multiple pages in the order that you read the pages in the job.
1 Introduction

1
41
You can set the zoom levels by using the zoom option from the right bottom corner. The zoom levelsallows you to zoom in and out for a more detailed image or for an overview of all the pages. Use the[Fit width] option to view only the current sheet, zoomed in to fit the width available. The maximumzoom level of 100% displays 96 dots per inch.
This view is not available when some of the options are not set, such as printing side or the paper size.
[Job Summary]
The [Job Summary] view displays a text summary of the current job properties.
Console

1
42
This view includes links that open the correct section, so that you can find the setting that you need to
edit easily. You can also export the summary to an HTML file by clicking , the export button locatedin the upper right side of the [Job Summary] section. You can open and print the HTML file fromoutside the editor.
The settings are listed grouped by the section headings.
If any of the values displays a red triangle, your printer does not support the current selection. You mustchange it to a valid selection.
1 Introduction

2
43
22.. Trying Out TotalFlow Print Server Using Sample Files
•Creating and Printing a Ring-Bound Book•Creating and Printing a Stapled Booklet•Printing Tickets
In this chapter, sample files are used in practice examples so that you can better understand thefunctions and operations of TotalFlow Print Server.
CCrreeaattiinngg aanndd PPrriinnttiinngg aa RRiinngg--BBoouunndd BBooookkThis practice shows you how to create a ring-bound book from a sample file. You will configure a virtualprinter to receive the job, create papers for printing covers and tabs, submit the job by copying the jobfile to a hot folder, specify ring binding, change the paper for the front and back covers, insert tabsbetween chapters, and print the job.
Operations:
• Enabling the [Hot Folders] protocol
• Configuring a virtual printer
• Connecting from a remote system to a hot folder
• Creating papers
• Loading papers in input trays
• Submitting a job through a hot folder
• Changing the view of the [Job Properties Editor]
• Setting the printing sides for a job
• Changing the page size to fit the paper
• Specifying finishing options
• Specifying page substitutions
• Inserting tabs
• Releasing a held job to print
Prerequisites:
• Default size paper, cover paper, and tab stock must be loaded in the input trays of the physicalprinter.
• The printer must have a ring binder attached.
You will use the sample file SAMPLE/SETUPGUIDE.pdf on the TotalFlow Print Server CD-ROM.
1. Make sure that the [Hot Folders] protocol is enabled.See Enabling an Object, p. 88 for instructions.
2. Create a virtual printer, or edit an existing one, to receive the job.
See Adding or Copying an Object, p. 75 or Editing an Object, p. 87 for instructions.
1. Set [Processing option] to [Hold].You must hold the job so that you can edit it.
2. Under [Supported submission methods], select [Hot folders].

2
44
3. If you are working at a remote system, connect to the hot folder.
See Submitting a Job from a Hot Folder on Windows, p. 110 or Submitting a Print Job from a HotFolder on Mac, p. 110 for instructions.
4. Create a paper for covers.
1. Set [Size] to [Letter (8.5 x 11 inch)] or [A4 (210 x 297 mm)], whichever is the defaultpaper size for your printer.
2. Set [Weight] to [Weight 5 (163.1–220.0 gsm].
5. Create a paper for tabs.
1. Set [Size] to [Letter (8.5 x 11 inch)] or [A4 (210 x 297 mm)], whichever is the defaultpaper size for your printer.
2. Set [Weight] to [Weight 4 (105.1–163.0 gsm].
3. Set [Type] to [Tab stock].
4. Set [Number of tabs] to the number of tabs in a bank of tabs.The number of tabs in the job does not have to be an exact multiple of the number of tabs inthe bank. If there are any tabs left over after the job is printed, they are ejected. For example,if there are five tabs in the job and the bank contains six tabs, the sixth tab is ejected. If thebank contains only four tabs, you use one bank and the first tab in the second bank to printfive tabs. The second, third, and fourth tabs of the second bank are ejected.
5. Set [Tab width] to [2 inch] (Letter) or [55 mm] (A4).
6. Set [Tab printing method] to [Text on tab].
6. Load the new papers in input trays.
See Loading Paper in an Input Tray, p. 93 for instructions.
7. Copy SAMPLE/SETUPGUIDE.pdf to the hot folder of the virtual printer that you configuredin Step 2.
The hot folder is in the Printer folder and has the same name as the virtual printer, forexample, Printer/Hold.
8. Select the job in the Inactive Jobs portlet of the Jobs page and click , the edit icon.
The Job Properties editor opens.
9. Click [Show views], then , the pages view icon.
This view lets you verify that you are selecting the right places to insert tabs.
10. In the navigation pane, click [Layout].
1. Set [Printing side] to [Both sides (2 sided)].
2. If your printer default paper is Letter size, set [Reduce/Enlarge] to [Fit to print size].The sample file is formatted for A4 paper.
11. In the navigation pane, click [Finishing], then set [Staple/Bind] to [Ring binding].
12. In the navigation pane, click Exception Pages→ Substitute.
13. Set [Pages] to [First two pages (Front cover)].
2 Trying Out TotalFlow Print Server Using Sample Files

2
45
14. Set [Paper] to the name of the cover paper.
15. Click [Add].
16. Repeat Steps 13 through 15 for [Last two pages (Back cover)].
17. Click [Tab].
18. Find [Tab position]. Look for the page where the appendix begins. Select [Before] and type thenumber of that page in the entry field.
19. In [Line 1], type Appendix.20. Set [Paper] to the name of the tab paper.
21. Click [Add].
22. Repeat Steps 18 through 21 for each chapter.
Work from back to front because each new tab causes the following pages to be renumbered inthe Job Properties editor. (The page numbers in the page images do not change.)
23. Click [OK] to close the editor.
24. Verify that the job is still selected in the Inactive Jobs portlet. Click , the print icon.
CCrreeaattiinngg aanndd PPrriinnttiinngg aa SSttaapplleedd BBooookklleettThis practice shows how to create a stapled booklet from a sample file. You will submit the job bycopying the job file to a hot folder, fit the booklet to the paper size, lay out the booklet, specify stapling,and print the job.
Operations:
• Submitting a job through a hot folder
• Changing the view of the [Job Properties Editor]
• Setting the printing sides for a job
• Changing the page size to fit the paper
• Specifying layout options
• Releasing a held job to print
Prerequisites:
• Default size paper must be loaded in the input trays of the physical printer.
• The printer must have a folding unit and a finisher that supports stapling attached. If you do not havethese options, you can do everything except specifying the finishing properties.
You will use the same hot folder that you set up in Creating and Printing a Ring-Bound Book, p. 43 andthe same sample file, SAMPLE/SETUPGUIDE.pdf.1. Copy SAMPLE/SETUPGUIDE.pdf to the hot folder.
The hot folder is in the Printer folder and has the same name as the virtual printer, forexample, Printer/Hold.
2. Select the job in the Inactive Jobs portlet of the Jobs page and click , the edit icon.
Creating and Printing a Stapled Booklet

2
46
The Job Properties editor opens.
3. Click [Show views], then , the pages view icon.
This view lets you verify the page order of the finished job.
4. In the navigation pane, click [Layout].
1. Set [Printing side] to [Both sides (2 sided)].
2. Set [Reduce/Enlarge] to [Reduce to fit].
3. Set [Pages per sheet] to [2].
4. Set [Imposition] to [Booklet].
The page images in the job preview show a question mark. This is normal becausepreviewing is not supported for booklet jobs.
5. In the navigation pane, click [Finishing] and set [Staple/Bind] to [2-staple at center].As a result, these properties are set automatically:
• [Fold type] is set to [Half fold].
• [Fold sheets together] is selected.
6. Click [OK] to close the editor.
7. Verify that the job is still selected in the Inactive Jobs portlet. Click , the print icon.
PPrriinnttiinngg TTiicckkeettssThis practice shows how to print multiple tickets on one sheet of paper, using the fifth station to cover thetickets with special toner.
Operations:
• Creating a paper
• Loading paper in an input tray
• Submitting a job through a hot folder
• Setting the orientation for a job
• Setting the printing sides for a job
• Specifying fifth station printing options
• Releasing a held job to print
Prerequisite: The printer must have the fifth station extension kit installed, with special toner installed toprint last.
You will use the same hot folder that you set up in Creating and Printing a Ring-Bound Book, p. 43 andthe sample file SAMPLE/TICKETS.pdf. This file already shows multiple images of the ticket on onesheet, with crop marks, so you do not have to define the [Imposition] values.
2 Trying Out TotalFlow Print Server Using Sample Files

2
47
When you preview the sample file in a Jobs portlet, view it using Adobe Reader, or print it on a printerthat does not have the fifth station extension kit, the spot color appears in magenta.
1. Create a paper for tickets.
See Adding or Copying an Object, p. 75 for instructions.
1. Set [Size] to [SRA3 (320 x 450 mm)].
2. Set [Weight] to [Weight 5 (163.1–220.0 gsm].
2. Load the new paper in an input tray.
See Loading Paper in an Input Tray, p. 93 for instructions.
3. Copy SAMPLE/TICKETS.pdf to the hot folder.
The hot folder is in the Printer folder and has the same name as the virtual printer, forexample, Printer/Hold.
4. Select the job in the Inactive Jobs portlet of the Jobs page and click , the edit icon.
The Job Properties editor opens.
5. In the navigation pane, click [Layout].
1. Set [Orientation] to [Landscape].
2. Set [Printing side] to [Front side (1 sided)].
6. In the navigation pane, click [Paper], then set [Paper] to the name of the ticket paper.
7. In the navigation pane, click [Fifth Station] and set [Processing target] to [Named spotcolor].
[Special effect toner] has already been automatically set to [Special].
These things happen automatically:
• [Spot color name] is set to [Clear].
• [Spot color priority] is set to [Named spot color].
• The spot color named [Clear] changes from the alternate color (magenta) to clear in the jobpreview.
8. Click [OK] to close the editor.
9. Verify that the job is still selected in the Inactive Jobs portlet. Click , the print icon.
Printing Tickets

2
48

3
49
33.. Color and Grayscale Printing
•Color Printing Concepts•Grayscale Printing Concepts•Color Management•AFP Color Management
Printing documents in full color or with very high-quality black and white (grayscale) images is morecomplex than printing black and white or spot-color documents. Understanding some of the principlesof color and grayscale printing and how various products can fit into color and grayscale solutions canhelp you integrate color and grayscale printing with your current operations or expand to implementnew color workflows.
CCoolloorr PPrriinnttiinngg CCoonncceeppttssColor printing is significantly more complicated than black and white printing. If you understand some ofthe complexities, you can make the transition from black and white printing to grayscale or colorprinting more smoothly.
Color Spaces and ICC profiles
Presentation devices, such as computer monitors and printers, create colors differently. Because of thesedifferences, colors must be described differently for each device. The different methods of describingcolors are called color spaces. In addition, each device might have one or more International ColorConsortium (ICC) profiles associated with it. ICC profiles are used when an image or another object isconverted to the color space of a different device.
Each device has its own individual color space and range of colors that it can display or print. The colorspace specifies how color information is represented in an image when it is displayed on a particulardevice. As the image is passed from one device to the next, the color information about the image isconverted from the color space of the source device to the color space of the destination device.Because color spaces do not exactly match between devices, some of the color information can be lostor modified in the conversion process.
A color space is a representation of the individual colors that can be combined to create other colors.Some color spaces that are relevant to printing are:
• RGBIn an RGB color space, red, green, and blue light are combined in different amounts and intensitiesto create different colors. RGB colors are often specified as single-byte integers numbered from 0through 255. You can specify 256 levels of intensity for each of the three colors. For example:
– R=0, G=0, B=0 yields black
– R=255, G=255, B=255 yields white
– R=251 , G=254 , B=141 yields a pale yellow
– R=210, G=154, B=241 yields a light purple
Devices such as monitors, digital cameras, and scanners generally use RGB color spaces todescribe colors. Two standard implementations of RGB color spaces are sRGB, which is most oftenused for Web graphics, and Adobe RGB (1998), which we recommend for graphics that areprinted.

3
50
• CMYKIn a CMYK color space, cyan (bright blue), magenta (bright red-pink), yellow, and black pigmentsare combined to create different colors. CMYK values are often represented as a percentage. Thepercentage represents the portion of a particular area of paper that is covered by ink or toner. Forexample:
– C=0%, M=0%, Y=0%, K=100% yields black
– C=0%, M=0%, Y=0%, K=0% yields a blank area on the page
– C=1.6%, M=0%, Y=44.7%, K=.4% yields a pale yellow
– C=17.6%, M=39.6%, Y=5.5%, K=5.5% yields a light purple
Color printers use the CMYK color space; they are loaded with ink or toner in each color. When theprinter places dots of the correct sizes next to and on top of each other on a page, your eyeinterprets them as the intended color.
Implementations of the CMYK color space vary from printer to printer and from paper to paper.Because the original color space of most images is an RGB color space, it is best to leave images inan RGB color space so they retain their original characteristics. That way, your print server or printerhas as much of the original color information as possible when it converts the images to the mostappropriate CMYK color space for the printer and paper combination.
If you save an image by using the CMYK color space, make sure that you either save an ICC profilefor that color space or use a standard non-device specific CMYK color space like SWOP orCoated FOGRA27 and associate the appropriate ICC profile with the image.
• Both RGB and CMYK values can be expressed in different ways. For example, in the PostScript datastream, the values range from 0.0 to 1.0, while in some graphic arts programs they can beexpressed in hexadecimal numbers or as percentages.
An ICC profile contains information for converting an image between a device-specific color spaceand a device-independent color space. A device-independent color space is a color space thatdoes not depend on or relate to the characteristics of any particular device, but rather contains allcolors for all gamuts. The ICC identified a specific profile connection space (PCS) as the target device-independent color space for all ICC profiles.
You can use an input ICC profile to translate color data created on one device (such as a digitalcamera) into the PCS. Then you can use an output ICC profile to convert from the PCS into the nativecolor space of a different device (such as a printer). Converting images from one color space to anotheris process-intensive and can affect performance in your print system, although it is the best way tomaintain consistent color for the devices in your system.
NamedColor profiles are used in addition to ICC profiles. They define a list of colors by name. Thesecolors are called spot colors. They are used instead of the colors in the printer’s ICC profile.
Gamut and Rendering Intent
Every device has a gamut, a range of colors or shades of colors that it can display or print. Somedevices have larger gamuts than others; some devices have gamuts that are similar sizes, but thatcontain slightly different colors. When an image or a print job is created on a device with a gamut that
3 Color and Grayscale Printing

3
51
is different from the printer, you can use a rendering intent to tell the printer how to adjust the colorsthat are outside the gamut of the printer.
The gamut of a printer is almost always significantly smaller than the gamut of a monitor, digital camera,or scanner. Images or graphics nearly always have to be adjusted to print appropriately because someof the colors that they require might be outside the gamut of the printer.
A rendering intent tells the printer how to adjust the image when it encounters colors that it cannotreproduce. Each rendering intent has different benefits and trade-offs, so you can choose one based onhow the print output should look.
Color Mixing and Calibration
Four standard colors (cyan, magenta, yellow, and black) are blended to create all the colors in thegamut of a printer. A printer mixes colors by printing four layers of a page or an image, one in eachcolor. If the printer registration is not set correctly, the images do not line up properly and the colorsappear wrong. In addition, the printer must be calibrated to ensure that all its systems are functioningcorrectly and that it is in a known good state.
By using the color information described in its color space, each device determines the amount of cyan,magenta, yellow, or black to use. Dots of each color are printed in overlapping patterns that, wheninterpreted by your eyes, blend the colors appropriately. To ensure the colors are created accurately,the color planes must be perfectly aligned. If they are not, you might see moire patterns, unintendedpatterns in the printed images, or poorly blended colors, which are especially noticeable on the edgesof your images.
Color printers must be calibrated regularly, in some cases daily, to ensure that the colors they produceare consistent. In addition, follow the recommended printhead maintenance procedures and schedule toensure that the printer operates optimally. Even when a printer is calibrated correctly, its gamut is muchsmaller than that of any monitor, so images do not look the same when they are printed as they dowhen they are displayed on a monitor.
Halftones and Tone Transfer Curves
Halftones are used to convert images (such as photographs, drawings, logos, or charts) from thecontinuous tones that you see on a monitor into a pattern of dots that a printer can put on paper. Tonetransfer curves are used to modify the values of a particular color component and thus adjust the lookand feel of some of the colors. For example, you can apply a tone transfer curve to emphasize thebrightest parts of an image.
Halftones and tone transfer curves are used with both color and grayscale print jobs.
There are several different kinds of halftones, including clustered-dot, stochastic, and error diffusion. Forsimplicity, this discussion only covers clustered-dot halftones.
Clustered-dot halftones are generally characterized by:
• Line screen frequencyLine screen frequency is a measure of the resolution of a halftone, expressed in lines per inch (lpi). Alow line screen frequency, such as 80 lpi, creates coarser images because they use larger halftone
Color Printing Concepts

3
52
dots. A high line screen frequency, such as 150 lpi, can produce higher quality images by usingsmaller halftone dots.
• Halftone patternHalftone dots are printed in various shapes and patterns. For example, dots can generally beround, elliptical, or square, and they can be arranged in slightly different orientations. The halftonepattern also describes how the size of the dot is increased to cover a larger percentage of the totalarea and yield darker colors. Different patterns might produce better results for some print jobs.
• RotationLines of halftone dots do not run parallel with the top or side of the paper because that could causeunintended patterns to emerge, resulting in lower quality output.
In addition, the dots for each of the four colors in a CMYK printer cannot all be printed at the sameangle because they would overlap incorrectly and the colors would not appear as intended.Instead, the lines of dots are printed on the page at specific angles so your eye blends themappropriately.
For example, the black layer of an image might be printed so the lines of dots run across the pageat a 45 degree angle to the top of the paper, while the cyan layer is printed so that its lines of dotsare at a 105 degree angle to the top of the paper.
Tone transfer curves are most often used to offset the effects of dot gain. Dot gain is the tendency forprinted dots to be larger than intended, often because of the way ink reacts with paper. If the ink soaksinto the paper and spreads out, the resulting dot is much larger (and possibly much lighter in color) thanthe printer intended it to be. Tone transfer curves can increase or reduce the amount of ink used inproportion to the dot gain.
File Size
Color print jobs can have a file size that is much larger than black and white print jobs. The larger filesize can lead to longer processing times and increased traffic on your network.
Because color images must contain data about each layer of color, the file might contain three to fourtimes more information than a grayscale file and over 24 times more information than a black and whitefile. In addition, ICC profiles are embedded in some file types (such as TIFF images). While ICC profilesby themselves might not be very large, they do increase the size of an image. If you only have oneimage repeated throughout a print job, and if you construct your job so the image is downloaded onlyonce, the embedded profile is of little concern.
However, if you use a variety of different images, each with an embedded profile, or if you constructyour print job so that each image is downloaded every time it appears, the embedded profiles can addunnecessary volume to the print job. If you plan to use a wide variety of color images, create or savethem with the same color space so they all use the same ICC profile. You can also install color images ina resource library so they can be reused.
GGrraayyssccaallee PPrriinnttiinngg CCoonncceeppttssWith grayscale printing you can reproduce color images as high-quality black and white images byusing many shades of gray to represent subtle variations in color and light. Printing solutions thatproduce high-quality grayscale output use color printing concepts with a black and white printer thatsupports them to achieve that effect.
3 Color and Grayscale Printing
3
53
Moving to grayscale printing might be a first step in a migration to full color printing. You can start tocreate color print jobs and print them on an existing printer until you are ready to invest in color printers.In addition, you can use a grayscale printer as a backup system for a full color printer.
Some color concepts are much less important in grayscale printing than they are in color printing:
• The gamut of a black and white printer is much smaller than that of a color printer; essentially all thecolors in an image must be adjusted.
• The rendering intent you choose has little effect on the appearance of the image because the colorsare already being changed significantly.
• Page registration is less important. Because the printer only uses one color, you do not have to lineup the color planes to create the correct color.
• Paper characteristics have minimal effect on grayscale output; one output profile is usually adequatefor all types of paper.
Other color concepts are more essential to grayscale printing.
Color spaces and ICC profiles
The color space of a black and white printer is much smaller than that of a color printer. Even so,printers that can print grayscale images have output ICC profiles, just like color printers. The ICC profilesfor black and white printers map colors from the profile connection space (PCS) to shades of gray.Otherwise, the color conversion process is the same.
The print job should specify the appropriate input profile; if there is no input ICC profile, the printer usesa reasonable default. The printer has its own default ICC profile installed and available; it should beadequate for nearly all print jobs.
Halftones
Grayscale printers apply halftones to print jobs to print them; halftones let the printer produce manyshades of gray and high-quality images. Generally, the most important characteristic to consider forhalftones in grayscale printing is line screen frequency, expressed in lines per inch (lpi). Each printersupports a set of line screen frequencies natively; when you specify the desired line screen frequency ina print job, the printer chooses the available line screen frequency that best matches it.
Tone transfer curves
Tone transfer curves are used in grayscale printing to adjust the amount of toner that is used at differentlevels of gray, thus adjusting the appearance of images. You can use the appearance value of a tonetransfer curve in grayscale printing to indicate how much the tone transfer curve should adjust the colorvalues. Some sample appearance values could be:
• Dark
• Highlight Midtone
• Standard
CCoolloorr MMaannaaggeemmeennttImages, graphics, and photographs often appear different depending on the monitor or the printer youuse. The colors printed by one printer might not match the colors printed on another printer, even if they
Color Management

3
54
came from the same source. If it is important that colors stay consistent from camera, scanner, or monitorto printer, you must use color management practices.
It is virtually impossible to accurately reproduce the colors that you see on your monitor on a printedpage. Because printers typically have smaller color gamuts than other devices, some of the colors mustalways be adjusted when images are transformed for printing. With color management, you can controlthe adjustments so they are less noticeable than they might be if you use the default settings of yourimage creation software, print server, and printer.
Several factors play significant roles in color management, including ICC profiles, rendering intents, andpaper characteristics.
ICC Profiles
The International Color Consortium (ICC) is an organization that has established open standards forcolor management. These standards help products work together by identifying a device-independentcolor space and defining the elements of an ICC profile.
The device-independent color space that the ICC defined is called the profile connection space (PCS).The PCS is a color space large enough to include all the color gamuts of different input, display, andoutput devices. An ICC profile contains methods that map the colors that a device can create or displayto the values of the corresponding colors in the PCS. The ICC profile can be used to convert an imagefrom a device-specific color space to the PCS, or from the PCS to a device-specific color space.
Product manufacturers create ICC profiles that you can use with their devices. For example, if you takea photograph with a digital camera, you can associate the photograph with the ICC profile for yourcamera. Then, when you want to print that photograph, the color management system converts thecolor data from the camera into the PCS. The printer then uses its ICC profile to convert the photographdata from the PCS into its color space, and prints the photograph as accurately as it can.
For more information about the ICC, ICC profiles, and the PCS, see the ICC Web site:
http://www.color.org
Rendering Intents
Rendering intents indicate what you want a printer to do with colors that are outside its gamut.
ICC profiles support these rendering intents:
• PerceptualIf an image includes any colors that are out-of-gamut for the printer, the printer adjusts all the colorsin the image, even those that are already in the gamut of the printer, so they are all in-gamut andmaintain their color relationships to each other. The result is an image that is visually pleasing, but isnot colorimetrically accurate. The perceptual rendering intent is useful for general reproduction ofimages, particularly photographs.
• SaturationIf a print job includes colors that are out-of-gamut for the printer, the printer replaces the out-of-gamut color with the nearest color in the gamut. It also adjusts the in-gamut colors so that they are
3 Color and Grayscale Printing
3
55
more vivid. Saturation is the least used rendering intent, but it is useful for business graphics, such asimages that contain charts or diagrams.
• Relative colorimetricIf a print job includes colors that are out-of-gamut for the printer, the printer substitutes the nearestin-gamut color; in-gamut colors are not adjusted. Colors printed on papers with different mediawhite points might not match visually. The media white point is the color of the paper that the printjob is printed on. For example, if you print an image on white paper, on off-white paper, and onblue paper by using the relative colorimetric rendering intent, the printer uses the same amount ofink or toner for each one and the resulting color is technically the same. However, the images mightseem different because your eyes adjust to the color of the background and interpret the colordifferently. This rendering intent is typically used for vector graphics.
• Absolute colorimetricAll colors are mapped by using the same method as the relative colorimetric rendering intent,however, all colors are adjusted for the media white point. For example, if you print an image onwhite paper, on off-white paper, and on blue paper by using the absolute colorimetric renderingintent, the printer adjusts the ink or toner used for each one. The resulting color is technically notsame, but the images might look the same because of the way your eyes interpret them inrelationship to the color of the paper. The absolute colorimetric rendering intent is typically used forlogos.
Paper Characteristics
The paper that you use has a significant impact on the colors that you see. Even if you use the same ICCprofile and the same printer, printing on a different paper can result in a very different colorappearance.
Colors can change from paper to paper, particularly if you change from coated to uncoated paper orfrom sheet-fed to continuous forms paper. The changes can be so noticeable that printer manufacturersgenerally test and certify papers with certain characteristics for use with their printers. They also createdifferent ICC profiles for their printers based on paper characteristics. Some ICC profiles can be usedfor groups of papers that have similar characteristics.
When you load paper, you set certain paper characteristics on the printer. When the printer choosesthe correct device-specific output profile to use, it takes the characteristics into consideration. The papercharacteristics are:
• Media brightnessThe percentage of light that the paper reflects
• Media colorThe color of the paper
• Media finishThe characteristics of the surface of the paper, such as: glossy, satin, matte
• Media weightThe basic weight of the paper
Color Management

3
56
AAFFPP CCoolloorr MMaannaaggeemmeennttThere are various ways to print color data with Advanced Function Presentation (AFP). However, toimplement an AFP color printing solution with full color management, you must use color managementresources (CMRs). We also recommend that you install all your color images as data objects andassociate CMRs with them.
• You must have the IPDS extended feature installed and enabled to print AFP print jobs.
IPDS is the host-to-printer data stream for AFP printing systems. The IPDS data stream processing optionsand color management settings are independent of configuration options for TotalFlow Print Server.
IPDS Profiles
When the IPDS extended feature is installed and enabled, IPDS profiles manage the color settings ofIPDS print jobs.
IPDS color management is more automated than International Color Consortium (ICC) colormanagement. This increased automation means that IPDS profiles have fewer settings than ICC profiles.You can select, add, delete, and save profiles for groups, such as RGB or CMYK. However, you cannotapply separate profiles to different objects, such as text or line art.
You need to indicate whether to use color management resources (CMRs) downloaded from the host in[Printer profile source].
Color Management Resources
Color management resources (CMRs) are the foundation of color management in AFP print systems.They are AFP resources that provide all the color management information, such as ICC profiles andhalftones, that an AFP system needs to process a print job and maintain consistent color from one deviceto another.
CMRs share some characteristics with other AFP resources, but are different in some important ways.
CMRs are similar to other AFP resources in these ways:
• CMRs can be associated with elements of a print job at various levels of the hierarchy.Typical hierarchy rules apply, so CMRs specified at lower levels override those at the higher level.For example, a CMR set on a data object overrides a default CMR set on a print file.
• CMRs can be included in a print job in an inline resource group and referenced in a form definition,page environment, object environment, or an include Object (IOB) structured field.
3 Color and Grayscale Printing

3
57
– CMRs can vary in size from several hundred bytes to several megabytes. If your print job usesrelatively few CMRs, including them in the print file might not have an impact on theperformance of your system. However, if your print job uses more than 10 CMRs, the size of theprint job can increase so much that file transfer rates and network traffic are affected.
• CMRs can be stored centrally in a resource library, so you do not need to include them in everyprint job.You can configure all your print servers so they can access the CMRs.
• For the print server to find CMRs, the resource library must be listed in the AFP resource search pathon the print server.
CMRs are different from other AFP resources in these ways:
• You cannot copy CMRs into a resource library as you can other AFP resources.To store CMRs in a central resource library, you must install them by using an application such asAFP Resource Installer.
• CMRs and data objects must be stored in resource libraries that have resource access tables (RATs).AFP Resource Installer creates the RAT when CMRs and data objects are installed. We recommendthat CMRs and data objects be installed in separate resource libraries and that you store resourcesthat do not require RATs (such as form definitions, page definitions, and overlays) in other resourcelibraries.
• CMRs installed in a resource library can have names longer than 8 characters, and you can use thenames in the print data stream.These names are created when you install the CMR by using AFP Resource Installer and are UTF-16BE encoded.
Types of CMRs
Different situations call for different types of CMRs. Some CMRs are created by product manufacturersso you can download and use them, while others are created by your printer or other colormanagement software. If you have the appropriate information, you can also create CMRs yourself.
Some CMRs are used to interpret input files (similar to the function performed by ICC input profiles),while others are used to prepare the final print job output for a specific printer (similar to the functionperformed by ICC output profiles).
Color Conversion CMRs
Color conversion (CC) CMRs are used to convert colors to and from the ICC profile connection space(PCS), a device-independent color space. You can use them to prepare images for color or grayscaleprinting.
Color conversion CMRs are an essential element of any AFP color management system because theyare ICC profiles encapsulated in AFP structures. The AFP structures add information that your colormanagement system can use, but it leaves the ICC profile unaltered.
You can use color conversion CMRs to produce consistent colors on different devices. In a color system,they help ensure that the colors on your monitor are as close as possible to those that are printed. If youmove the print job to a different printer, the colors are adjusted again to match the new printer.
AFP Color Management

3
58
In a grayscale system, color conversion CMRs map colors to appropriate shades of gray to producehigh-quality black and white images.
Passthrough CMRs are color conversion CMRs that indicate that no color processing should be done ifthe color space of the presentation device is the same as the color space of the CMR. PassthroughCMRs contain no data.
Link Color Conversion CMRs
Link color conversion CMRs combine the processing information required to convert an image directlyfrom the color space of an input device to the color space of the output device. Essentially, link colorconversion CMRs replace a pair of color conversion CMRs.
Converting color images to and from the PCS takes a significant amount of processing resources, in partbecause the process includes two conversions. Link color conversion CMRs combine the twoconversions and make them more efficient. The printer can use the link color conversion CMR to convertcolors directly from the color space of the input device to the color space of the output device with thesame color fidelity they would have if the printer did both of the conversions. As a result, link colorconversion CMRs can improve system performance.
The two types of link color conversion CMRs are:
Link CMRsLink (LK) CMRs are unique. You cannot create a link CMR yourself and you do not includereferences to link CMRs in your print jobs. The print system creates and uses link CMRsautomatically.
If you use AFP Resource Installer, link CMRs are generated automatically when you create or installa color conversion CMR. As a result, your resource library always contains link CMRs for everycombination of color conversion CMRs in audit (input) and instruction (output) processing modes.When link CMRs are created, AFP Resource Installer marks them as capturable, so the printer cansave them to be used in other print jobs.
If you do not use AFP Resource Installer, some printers can create link CMRs when they processprint jobs. If you send a print job to one of these printers, the printer controller looks at the auditcolor conversion CMRs that are specified. Then, the print controller looks at the link CMRs that it hasavailable to find one that combines the audit color conversion CMR with the appropriate instructioncolor conversion CMR. If it does not find one, the print controller creates the link CMR and uses it.The print controller can be configured to save the link CMRs that it creates. However, the link CMRsare sometimes removed during normal operation, for example, if the printer runs out of storage or isshut down. If the link is removed, the printer must create a new link CMR the next time it is needed.
When a link CMR is created, the print system evaluates the conversion algorithms to and from thePCS. The system then combines the algorithms, so a data object can be converted directly from onecolor space to the other without actually being converted to the PCS.
Device link CMRsDevice link (DL) CMRs use an ICC device link profile to convert directly from an input color space toan output color space without reference to an audit-mode or instruction-mode CMR. An ICC devicelink profile is a special kind of ICC profile that is used to convert the input device color space to thecolor space of an output or display device. ICC device link profiles are not embedded in images.
You can create, install, and uninstall device link CMRs yourself. Device link CMRs are referenced inthe MO:DCA data stream and take precedence over audit color conversion CMRs. A device link
3 Color and Grayscale Printing

3
59
CMR specifies its own rendering intent, which is indicated in the header of the ICC device linkprofile. This rendering intent overrides any other rendering intent that is active.
The biggest advantage of using device link CMRs is that they preserve the black channel (Kcomponent) of the input color space when converting from CMYK to CMYK.
Halftone CMRs
Halftone (HT) CMRs carry the information that a printer uses to convert print jobs into a pattern of dotsthat it can put on paper. Halftone CMRs can be used with both color and grayscale print jobs.
Halftone CMRs generally specify the line screen frequency, halftone pattern, and rotation of thehalftone that they carry. Some device-specific halftone CMRs also include the printer resolution.
A printer that uses AFP color management to print color or grayscale print jobs must use a halftone CMRto convert the print job into a format that the printer can reproduce in ink or toner. If a halftone CMR isnot specified in the print job, the printer applies a default halftone CMR.
You can associate device-specific halftone CMRs or generic halftone CMRs with print jobs:
• If you know which printer is printing the job, you can associate a device-specific halftone CMR withthe print job (or with AFP resources inside the print job). The printer uses the halftone CMR that youspecify.
• If you do not know which printer is printing the job, but you want to ensure that it uses a halftoneCMR that has certain characteristics, such as a specific line screen frequency, you can associate ageneric halftone CMR with the print job.
Because it is difficult to know which halftone CMRs should be used for the current conditions on thecurrent printer, we recommend that you specify halftone CMRs generically and let the printer choose themost appropriate CMR that it has available.
Generic halftone CMRs
You can use generic halftone CMRs when you want to choose one or more characteristics of thehalftone CMR for a print job, but you do not know exactly which halftone CMRs are available.
When a print job specifies a generic halftone CMR, the print server looks in the resource library forhalftone CMRs that match the printer device type and model. If the print server finds an appropriateCMR, it sends the device-specific halftone CMR to the printer with the print job. If the print server doesnot find an appropriate halftone CMR, it sends the generic halftone CMR to the printer.
If a print job arrives at the printer requesting a generic halftone CMR, the printer compares therequested characteristics with the available device-specific halftone CMRs. If there is a match, theprinter uses the selected device-specific halftone CMR when it processes the print job. If there is nomatch, the printer uses the halftone CMR whose line screen frequency value is closest to the onerequested.
The Color Management Object Content Architecture (CMOCA) has defined a variety of generichalftone CMRs, which cover the most common line screen frequencies and halftone types. A print serverthat supports CMOCA can interpret generic halftone CMRs if it has device-specific halftone CMRsavailable to it in a resource library. If you use AFP Resource Installer, the generic halftone CMRs areinstalled in every resource library that you create and populate by using AFP Resource Installer.
Printers that support CMOCA should be able to interpret those generic CMRs and associate them withdevice-specific halftone CMRs.
AFP Color Management

3
60
Indexed CMRs
Indexed (IX) CMRs map indexed colors in the data to presentation device colors or colorantcombinations.
Indexed CMRs provide rules about how to render indexed colors. Indexed CMRs apply to indexedcolors that are specified by using the highlight color space. They do not apply to indexed colors foundwithin PostScript or other non-IPDS data objects. For Indexed CMRs, both instruction and auditprocessing modes are valid. However, only indexed CMRs with an instruction processing mode areused; those with an audit processing mode are ignored. The tags in the indexed CMR let the CMR usevarious color spaces in the descriptions. These color spaces can be grayscale, named colorants, RGB,CMYK, or CIELAB.
Tone Transfer Curve CMRs
Tone transfer curve (TTC) CMRs are used to carry tone transfer curve information for an AFP print job,so you can modify the values of a particular color component and adjust the appearance of some of thecolors by increasing or decreasing the amount of ink used to emphasize or reduce the effects of dotgain on the final output.
Like halftone CMRs, tone transfer curve CMRs are associated with print jobs specifically or generically.If they are specified generically, the print server looks in the resource library for tone transfer curveCMRs that match the printer device type and model. If the print server finds an appropriate CMR, itsends the device-specific tone transfer curve CMR to the printer with the print job. If the print server doesnot find an appropriate tone transfer curve CMR, it sends the generic tone transfer curve CMR to theprinter.
If a print job arrives at the printer requesting a generic tone transfer curve CMR, the printer comparesthe requested characteristics with the device-specific tone transfer curve CMRs that it has available. Ifthere is a match, the print server or printer uses the selected device-specific tone transfer curve CMRwhen it processes the print job. If the printer cannot find a good match for the generic tone transfercurve CMR, it ignores the request and uses its default tone transfer curve CMR.
The Color Management Object Content Architecture (CMOCA) defines several generic tone transfercurve CMRs with different appearance values. You can use the appearance values to specify how toprint your job with regard to the reported dot gain of the printer.
Generic tone transfer curves can be used to select these appearance values:
DarkThe output is adjusted to show a dot gain of 33% for a 50% dot.
AccutoneThe output is adjusted to show a dot gain of 22% for a 50% dot.
Highlight MidtoneThe output is adjusted to show a dot gain of 14% for a 50% dot. This appearance is often used toemphasize the brightest part of an image.
StandardThe output is adjusted just enough to account for the effects of dot gain, effectively counteracting thedot gain.
3 Color and Grayscale Printing

3
61
If you use AFP Resource Installer, it installs the generic tone transfer curve CMRs on your systemautomatically.
CMR Processing Modes
CMR processing modes tell the print system how to apply a CMR to the print data it is associated with.You specify a CMR processing mode whenever you specify a CMR, although not all modes are validfor all CMR types.
Audit Processing Mode
CMRs with the audit processing mode refer to processing that has already been applied to a resource.In most cases, audit CMRs describe input data and are similar to ICC input profiles.
The audit processing mode is used primarily with color conversion CMRs. In audit processing mode,those CMRs indicate which ICC profile must be applied to convert the data into the profile connectionspace (PCS).
For example, to take a photograph with a digital camera and then include the photograph in an AFPprint job, you can use AFP Resource Installer to:
1. Create a color conversion CMR by using the ICC profile of your camera.
2. Install your photograph in a resource library.
3. Associate the color conversion CMR with the data object, indicating the audit processing mode.
Then, you create a print job that includes the data object. When processing the print job, the systemuses the color conversion CMR to convert the colors in the image into the PCS. The colors can then beconverted into the color space of the printer that is printing it.
Instruction Processing Mode
CMRs with the instruction processing mode refer to processing that is done to prepare the resource for aspecific printer that uses a certain paper or another device. Generally, instruction CMRs refer to outputdata and are similar to ICC output profiles.
The instruction processing mode is used with color conversion, tone transfer curve, and halftone CMRs.In instruction processing mode, these CMRs indicate how the system must convert a resource so it printscorrectly on the target printer. The manufacturer of your printer should provide ICC profiles or a varietyof CMRs that you can use. Those ICC profiles and CMRs might be installed in the printer controller,included with the printer on a CD, or available for download from the manufacturer's Web site.
If you send a color AFP print job to a printer that supports AFP Color Management, color conversionand tone transfer curve CMRs in instruction processing mode can be associated with the job. When theprinter processes the print job, it applies the CMRs in this order:
1. Color conversion CMRs in audit processing mode to convert the resources into the ICC profileconnection space (PCS).
2. Color conversion and tone transfer curve CMRs in instruction processing mode to convert theresources into the color space of the printer.
3. Halftone CMR in instruction processing mode to convert the job pages from their digital format intothe pattern of dots that the printer can produce.
AFP Color Management

3
62
In some cases, CMRs that are usually used as instruction CMRs can be used as audit CMRs. Forexample, if you send a very large print job to a high-speed printer, the images in the print job areconverted into the color space of that printer by using a color conversion CMR with the instructionprocessing mode. However, if you have to reprint part of the job on a different printer, the system mustconvert the print job into the color space of the second printer. In that case, the color conversion CMRof the first printer is used in the audit processing mode to move the images back into the PCS. Then, thesystem uses a color conversion CMR of the second printer in instruction mode to convert the images intoits color space.
Link Processing Mode
CMRs with the link processing mode are used to link an input color space in the presentation data(sometimes defined by an audit CMR) to the output color space of the presentation device (sometimesdefined by an instruction CMR). Only link (LK) and device link (DL) CMRs can be used in link processingmode.
Whenever you install or uninstall audit or instruction color conversion CMRs in your resource library byusing AFP Resource Installer or a similar software product, the AFP Resource Installer automaticallycreates or deletes link (LK) CMRs for every combination of audit and instruction color conversion CMR.
When a print job calls for a given audit-instruction combination, the print server checks the resourcelibrary for a link (LK) CMR for that combination. If the print server finds an appropriate link CMR, itsends the CMR to the printer with the print job. Your printer can use the link (LK) CMRs whenever a printjob indicates that it uses a particular combination of audit and instruction CMRs.
If you do not use AFP Resource Installer or a similar program to install your resources, your color printermust either create link (LK) CMRs while it processes your print jobs or convert the colors in your jobstwice, first from the original color space to the PCS and then from the PCS to the color space of theprinter.
CMR Creation and Installation
Device manufacturers and groups that support AFP color standards create CMRs that you can use inyour color printing systems. You can also create CMRs yourself, based on your needs.
The AFP Consortium, the group that defined the AFP Color Management Object Content Architecture(CMOCA), identified a set of color conversion CMRs that are most often used in audit processingmode. The set includes color conversion CMRs for common color spaces, such as:
• Adobe RGB (1998)
• sRGB
• SMPTE-C RGB
• SWOP CMYK
The standard CMRs are included with AFP Resource Installer, although they are not installed by default.You can install the standard CMRs that you plan to use. In addition, AFP Resource Installerautomatically installs all the generic halftone and tone transfer curve CMRs in any resource library youcreate.
If you need more CMRs, you can create them by using wizards provided in AFP Resource Installer. Seethe online help for details about the wizard.
3 Color and Grayscale Printing

3
63
If you use AFP Resource Installer to create a CMR, the software automatically installs the CMR in aresource library. You can also use AFP Resource Installer to install CMRs that you get from your printermanufacturer.
Data Objects
Presentation data objects contain a single type of data (such as GIF, JPEG, PNG, and TIFF images) andcan be used in your print jobs. These data objects can be placed directly in a page or overlay or canbe defined as resources and included in pages or overlays. Using a data object as a resource is moreefficient when that object appears more than once in a print job; resources are downloaded to theprinter just once and referenced as needed.
Data objects can either be included inline with a print job or installed in a resource library by usingsoftware such as AFP Resource Installer. If you install your data objects in a resource library, you canassociate color conversion CMRs with them.
Types of Data Objects
Image data objects can be stored in a number of different formats, including AFPC JPEG Subset, EPS,GIF, IOCA, PDF, PNG, and TIFF. These image types are device-independent so they can be used bydifferent systems and still be interpreted consistently.
• AFPC JPEG Subset (JPEG)AFPC (AFP Consortium) JPEG Subset files, formerly called JPEG File Interchange Format (JFIF) files,are bitmap image files that are compressed by using Joint Photographic Experts Group (JPEG)compression. As a result, AFPC JPEG Subset files are most commonly referred to as JPEG files. JPEGfiles most commonly use the file extension .jpg, but can also use .jpeg, .jpe, .jfif, and .jif.
JPEG compression deletes information that it considers unnecessary from images when it convertsthem. JPEG files vary from having small amounts of compression to having large amounts ofcompression. The more an image is compressed, the more information is lost. If the image iscompressed only once, there usually is no noticeable effect on the image. However, if the image iscompressed and decompressed repeatedly, the effects of deleting information become morenoticeable.
JPEG compression is commonly used for photographs, especially photographs that are transmittedor displayed on Web pages. The compression makes the files small enough to transmit on a networkefficiently, but leaves enough information that the image is still visually appealing.
• Encapsulated PostScript (EPS)EPS is a PostScript graphics file format that follows conventions that Adobe Systems defined. EPSfiles support embedded ICC profiles.
• Graphics Interchange Format (GIF)GIF files are bitmap image files that are limited to a palette of 256 RGB colors. Because of thelimited color range that it can contain, GIF is not a good format for reproducing photographs, but itis generally adequate for logos or charts. GIF images are widely used on the Internet because theyare usually smaller than other image formats. GIF files use the file extension .gif.
• Image Object Content Architecture (IOCA)
AFP Color Management

3
64
IOCA is an architecture that provides a consistent way to represent images, including conventionsand directions for processing and exchanging image information. The architecture defines imageinformation independently of all data objects and environments in which it might exist and uses self-identifying terms; each field contains a description of itself along with its contents.
• Portable Document Format (PDF)PDF is a standard file format that Adobe Systems developed.
PDF files can be used and stored on various operating systems and contain all the required imageand font data. Design attributes in a PDF are kept in a single compressed package.
– Single-page and multiple-page PDF files can be used as data objects in AFP print jobs.
• Portable Network Graphics (PNG)PNG files are bitmap image files that support indexed colors, palette-based images with 24-bit RGBor 32-bit RGBA colors, grayscale images, an optional alpha channel, and lossless compression.PNG is used for transferring images on the Internet, but not for print graphics. PNG files use the fileextension .png.
• Tagged Image File Format (TIFF)TIFF files are bitmap image files that include headers to provide more information about the image.TIFF files use the file extensions .tif or .tiff.
TIFF files support embedded ICC profiles. If an ICC profile is embedded in a file, the characteristicsof the input color space are known whenever the file is used; however, the profiles increase the filesize. When you save a file in the TIFF format, you can use various compression algorithms.
– Single-image and multiple-image TIFF files can be used as data objects in AFP print jobs.
Not all printers support all types of data objects.
The embedded ICC profiles in EPS, JPEG, and TIFF files contain the information that a printer uses toconvert colors in the image from an input color space into the profile connection space (PCS). The inputcolor space is either an industry-standard space or a custom space that describes the colorreproduction capabilities of a device, such as a scanner, digital camera, monitor, or printer.
Data Object Creation and Installation
You can use a wide variety of software applications to create or manipulate images to include in printjobs. If you want to store them in central resource repositories, you can use AFP Resource Installer toinstall them.
Data object creation
Most types of data objects are images of some kind. Examples include: photographs taken with a digitalcamera; charts or diagrams generated by a software tool; and digital drawings created using graphicssoftware. Regardless of how images are created, you generally need to manipulate them to includethem in print jobs.
The changes include:
3 Color and Grayscale Printing

3
65
• Convert the image into a file type that is appropriate for printing. For example, the file types thatmany graphics applications (such as Adobe Illustrator, CorelDRAW, and Corel Paint Shop Pro) useto store images while you work on them are not appropriate for printing. To use images that youcreate from any of those programs, you can save or export those files as a different file type, suchas EPS, JPEG, or TIFF.
• Make sure that your image files are associated with an appropriate color space or input profile.Follow the instructions provided with your graphics software to set up color management, includinginstalling and using ICC profiles for digital cameras and monitors, and customizing colormanagement settings. The instructions should also explain how to change the color profile that animage uses and how to save an image with an embedded profile.
• Follow the tips and best practices provided in the other sections below for creating images andmanaging them as data object resources.
Data object installation
You can use AFP Resource Installer to install your images in a resource library. AFP Resource Installerincludes wizards that can guide you through the process of installing an image as a data object. Whenyou install an EPS, JPEG, or TIFF image with an embedded ICC profile by using AFP Resource Installer,you can choose how you want to handle the profile:
• Leave the profile in the file without creating a CMR.
• Leave the profile in the file, but also copy the profile and create a CMR from the copy. Associate thenew CMR with the data object.
• To reduce the file size, remove the profile from the file and make the profile into a CMR. Associatethe new CMR with the data object.
Resource Library Management
If you store CMRs and data objects in central resource libraries, you must understand some of thecharacteristics of resource libraries to make sure that your resources are available when and where youneed them.
Resource libraries that AFP Resource Installer creates use a resource access table (RAT) as the indexof the resource library. The index is stored as a file in the library that it refers to. You must store CMRs inresource libraries that use a RAT. We recommend that you store data objects in resource libraries thatuse a RAT as well.
When you use AFP Resource Installer to create a resource library, it creates a RAT and stores it in thelibrary. When you install a CMR or data object, AFP Resource Installer updates the RAT withinformation about the resource. When a print server looks in a resource library for a resource, it firstlooks in the RAT to see if the resource is listed.
The print server relies on the RAT; if it is incorrect, the print server cannot find resources in the resourcelibrary. As a result, you must always use AFP Resource Installer to manage your resource libraries,including to:
• Add CMRs and data objects to a resource library.
AFP Color Management

3
66
Do not copy CMRs or data objects directly into the resource libraries that AFP Resource Installeruses. If you copy CMRs or data objects into these resource libraries, the RAT is not updated so theprint server cannot use it to find the CMRs or data objects.
• Modify properties of data objects and CMRs listed in the RAT.Do not directly edit the RAT or any of the files in a resource library. Do not replace an existingversion of a CMR or data object with a new version by copying the new version directly into theresource library; use AFP Resource Installer to update the resource.
• Install CMRs or data objects in a different resource library or replicate a resource library in adifferent location.Do not copy CMRs or data objects from a resource library and store them in another location.
For more information about completing these tasks, see the AFP Resource Installer online help.
Tips and Best Practices
These general guidelines about creating and managing images and other color resources can improvethe performance of your AFP color printing system.
Tips for images
To optimize the performance of your AFP color printing system, we recommend that you follow someguidelines for creating and including images in print jobs.
When you want to use color images in your print jobs:
• Get the original electronic versions of images instead of scanning existing documents.Almost unnoticeable specks of color in the background of images that have been scanned cangreatly increase the size of the image. If you must scan an image, use an image editing tool to cleanup the background as much as possible.
• Save all images in the same standard color space so you only need one input profile for all of them.Adobe RGB (1998) is the recommended color space for images that are to be printed.
• Flatten multi-layer images (such as the ones you can create in graphics tools like Adobe Illustratorand Corel Paint Shop Pro) before including them in print jobs.Unflattened images are extremely large and more difficult to work with. Save a copy of the originalimage for future editing, but flatten the version that you include in your print job.
Tips for Resources
To optimize the performance of your AFP color printing system, we recommend that you follow someguidelines for managing color resources.
You can use AFP Resource Installer to:
• Install all the CMRs for your printer in a resource library.
• Install the data objects that you use frequently in a resource library.
3 Color and Grayscale Printing

3
67
• Mark the CMRs and data objects that are reused regularly as non-private, capturable resources sothey can be saved on the printer and used for other print jobs without being downloaded everytime.
– This option is not advisable for secure resources, such as signature files.
• Install CMRs and data objects in resource libraries that the print server can access, so they onlyneed to be stored in one place and can be used by all print servers.
• Associate audit color conversion CMRs with data objects that require color management, so theembedded profiles can be removed from the image files.
AFP Resource Installer
AFP Resource Installer is a key element of an AFP color management system when resources are storedin central libraries. You can use it to create, install, and manage color management resources (CMRs)and data objects for use in your system.
AFP Resource Installer is a Java application that you install on a Windows workstation. You can use it toinstall and work with fonts in addition to CMRs and data objects.
You can use AFP Resource Installer to:
• Create CMRs from existing data, including ICC profiles.You can use a wizard to guide you through the process.
• Install CMRs, fonts, and data objects in resource libraries on the local system or on any system thatyou can access with FTP.
• Associate CMRs with data objects, so data objects can be reproduced accurately on differentprinters.In some cases, you can reduce the file size of your images by removing the embedded color profilefrom the file and using an associated CMR.
• Mark resources as capturable.Capturable resources can be captured and saved in the printer for use with other print jobs, whichcan help improve system performance. The print server queries the printer before it sends anyresources; if the printer already has the resource, the print server does not have to send it.
• Mark resources as private.Private resources cannot be captured in the printer and must be downloaded with every print jobthat uses them. For example, you can mark signature files used for company checks as private forsecurity reasons.
When you use AFP Resource Installer to install a color conversion CMR, the software automaticallycreates link (LK) CMRs between the new color conversion CMR and the existing color conversionCMRs. When a print file references the new CMR, the print server automatically downloads the linkCMRs that match the target device type and model and sends them to the printer with the print job. Ifone of those link CMRs is appropriate, the printer can use it instead of having to spend extra timecreating a link CMR.
AFP Color Management

3
68
To let a print server use resources installed by AFP Resource Installer, you must add the path to theresource libraries to the AFP resource path in the server.
3 Color and Grayscale Printing

4
69
44.. Working with the Console
•Logging Into and Out of TotalFlow Print Server•Setting the Language of the Console•Setting the Icon and Text Size for the Current User•Working with Shortcuts•Customizing the Operations Page and the Jobs Page•Changing the Information in a Portlet•Searching for Objects in a Portlet•Clearing a Search•Using the Paper Catalog
The console provides a highly functional user interface that can be accessed either locally or through aremote computer.
You can customize the console to suit your needs.
LLooggggiinngg IInnttoo aanndd OOuutt ooff TToottaallFFllooww PPrriinntt SSeerrvveerrTo use the TotalFlow Print Server console, you must be logged in.
Before using the remote console from Internet Explorer 11, add TotalFlow Print Server to the list oftrusted servers. Click the Settings icon, then [Internet Options], then [Security], then [Trusted Sites],then [Sites]. Type http://hostname, where hostname is the host name or IP address ofTotalFlow Print Server, and click [Add].
If [Authentication required for local console] is set to [No], the user specified in [Default localconsole user] is automatically logged in to the local console when TotalFlow Print Server starts or whenanother user logs out. By default, this user is [Administrator].
To log in:
1. Do one of these actions:
• To use the local console, attach a keyboard, mouse, and monitor to TotalFlow Print Server.
• To use the remote console, open a web browser and go to http://hostname.hostname is the host name or IP address of TotalFlow Print Server.
See the Setup Guide for supported browsers and operating systems.
2. In the [User ID] field, select your user ID.
3. In the [Password] field, type your password.
4. Click [LOGIN].
5. To log out of TotalFlow Print Server:
• On the remote console or on the local console if you are not the default user, click your userID in the printer control bar and select [Log out].
• If you are the default user of the local console, you cannot log out, but you can switch userIDs. Click your user ID in the printer control bar and select [Log in], then log in as a differentuser.

4
70
SSeettttiinngg tthhee LLaanngguuaaggee ooff tthhee CCoonnssoolleeYou can set different languages for the local console, for each remote console, and for different users.
Language settings are used in this order:
Local Console Remote Console
1. The language specified for the individual user
2. The language of the local console
1. The language of the web browser
2. The language of the local console
Setting the Display Language for the Local Console
[Administrator] and [Service] users can change the default display language of the local console.This language is used in the local console when the current user has not set a different preference. It isalso used in the remote console when the web browser is set to a language that TotalFlow Print Serverdoes not support.
This task can be done only at the local console.
To change the display language:
1. On the Configuration page, select DFE→ Settings.
2. In [Language], select the language that you want to use and click [SAVE].
Setting the Keyboard Language for the Console
[Service] users can change the keyboard language of the local console.
This task can be done only at the local console.
To change the language:
1. On the Configuration page, select DFE→ Settings.
2. In [Keyboard Language], select the language that corresponds to the display language andclick [SAVE].
If the display language is [Dutch], select [English] or [French] because the Dutch keyboard isnot supported.
4 Working with the Console

4
71
Setting the Display Language for the Remote Console
Each remote console uses the language of the web browser, if it is available.
TotalFlow Print Server is available in English, Japanese, Brazilian Portuguese, Czech, Dutch, French,German, Italian, Polish, Russian, Simplified Chinese, Spanish, and Turkish. If the browser is set to any ofthese languages, the remote console uses that language. If the browser is set to a regional version ofany of these languages, the remote console uses the basic version of the language. For example, if thebrowser language is French/Canada, the remote console uses French.
If the browser is set to a language that TotalFlow Print Server does not support, the remote console usesthe language of the local console.
Setting the Display Language for a User
You can set a display language for each user. This language is always used for that user in the localconsole. It is not used in the remote console.
You can edit your own user ID and user IDs with a lower access level.
To set the language for a user:
1. On the Configuration page, select Security→ Users And Roles.
2. Select the user ID and click , the edit icon.
3. In the [Display language] field, select a language.Select [Default] to use the display language of the local console.
4. Click [OK].
SSeettttiinngg tthhee IIccoonn aanndd TTeexxtt SSiizzee ffoorr tthhee CCuurrrreenntt UUsseerrEach user can specify the size of text and icons in the console. This setting affects only that user. It mustbe set separately for the local and remote console.
To change the icon and text size in your user preferences:
1. Click your user ID in the printer control bar.
2. Under [Display Size], select [Normal] or [Large].
WWoorrkkiinngg wwiitthh SShhoorrttccuuttssYou can specify what shortcuts to include in the toolbar and how to display them.
To add and remove shortcuts or to change how the shortcuts look, do these steps:
1. Click your user ID in the printer control bar and select [Manage Toolbar].
2. In Manage Action Toolbar, select the pages where you want to display the shortcut toolbar.
3. Select the pages where you want to display shortcuts for the print actions in the toolbar.
Setting the Icon and Text Size for the Current User

4
72
The print actions are [Print], [Hold], [Delete], [Edit], and [View].
4. Select the tasks (other than print actions) for which you want to display shortcuts in the toolbar.
5. Drag and drop the selected tasks to change the order of the shortcuts.
6. Click [OK].
CCuussttoommiizziinngg tthhee OOppeerraattiioonnss PPaaggee aanndd tthhee JJoobbss PPaaggeeYou can change the Operations page and the Jobs page to display the information you need in theway that works best for you.
• To add a portlet to the current page, click your user ID, then drag and drop the name of the portletfrom the menu to the page.
• To close a portlet, click , the More Actions icon, then select [Close].
• To move any portlet, close it, then add it to a different area of the page.
• To move a jobs portlet displayed in a tabbed layout, drag and drop it by the tab ear.
• To resize portlets, drag and drop the boundary between them.
If multiple portlets share a horizontal or vertical boundary, dragging the boundary resizes them all.To resize a single portlet, press [Ctrl] while you drag its boundary.
• To restore the current page to its default layout, click your user ID, then select [Reset Defaults].
CChhaannggiinngg tthhee IInnffoorrmmaattiioonn iinn aa PPoorrttlleettSome portlets and some sections of the Configuration page let you change the information that isdisplayed and the way it is displayed.
Different view options are available for different portlets.
To change what information is displayed and how that information is displayed:
1. Click , the more actions icon.
2. Do any of these actions:
• Select View→ Graphic to display a thumbnail icon and selected properties for each job.
• Select View→ List to display job information in table format.
• In the [List] view, click i , the information icon, to open or close a thumbnail view andsummary of properties for the selected job.
• In Active Jobs only, select View→ Schedule to display jobs in the order that they arescheduled to print. Drag and drop jobs to change the order.
• In Active Jobs only, select View→ Process to display jobs sorted by processing stage.
• Select [Manage Columns] to select the object properties that are displayed. Drag and dropproperties to change their position in the list.
• Select [Group By] to arrange the objects by property values.
• Click a column heading to sort the objects by property values. To sort in ascending ordescending order, click the column heading again.
4 Working with the Console

4
73
SSeeaarrcchhiinngg ffoorr OObbjjeeccttss iinn aa PPoorrttlleett
Some portlets have a search icon ( ) in the title bar. You can search these portlets for objects, such asjobs or papers, with specific properties.
To search for objects in a portlet:
1. Click , the search icon.A text field opens.
2. Specify the search conditions:
• To search for a single text string included in the value of any attribute, type the string in theentry field. The search is not case-sensitive.
• To search for a value of a selected attribute, for more than one value, or for an exact match:
1. Click the arrow in the text field.
2. Select [Match all attributes] or [Match any attributes].
3. Select the property that you want to search for in the list.
4. Select the type of match:
[Contains]The value includes the search string. For example, smith matches smith, Smith,SMITH, and JoeSmith.
[Is]The value exactly matches the search string (except for case). For example, smithmatches smith, Smith, and SMITH, but not JoeSmith.
5. Type the text that you want to search for in the text field.
6. To add another search condition, click , the add icon.
7. To remove a search condition, select it and click , the delete icon.
8. Click [Search].
CClleeaarriinngg aa SSeeaarrcchhIf you do not see an object in a portlet, it is possible that it is filtered out.
To clear a search:
1. If there is no room in the title bar for a text field, click , the search icon.A text field opens below the title bar.
2. Do either of these actions:
• If there is a string in the text field, click ⊗, the cancel icon.• Otherwise, do these steps:
1. Click the arrow in the text field.
Searching for Objects in a Portlet
4
74
2. Click [Reset].
UUssiinngg tthhee PPaappeerr CCaattaallooggIf a paper catalog exists on your device, you can toggle the paper switch to [Paper catalog] andselect the paper from your catalog by name. If there is no [Paper catalog] on your device, the paperswitch is not available and you can only select paper manually. For details about selecting papermanually, see Changing the Paper Settings , p. 134.
Some options are not available for the default properties or if you edit the print job properties from theVirtual Printers section.
4 Working with the Console

5
75
55.. Configuring TotalFlow Print Server
•Adding or Copying an Object•Viewing and Updating TotalFlow Print Server Settings•Setting the Date and Time•Configuring Sample Printing•Setting the Default Virtual Printer•Setting Virtual Printer Defaults and Overrides for Job Properties•Setting Printer Defaults for Job Properties•Defining a JMF Device ID•Configuring for Job Submission•Accessing TotalFlow Print Server Remotely•Installing Extended Features•Saving Printer Presets•Configuring Printer Presets
Use these procedures to configure TotalFlow Print Server.
AAddddiinngg oorr CCooppyyiinngg aann OObbjjeecctt
Whenever you see , the add icon, or , the copy icon, in the section of the Configuration pagefor an object type or in a dialog that lists objects of a particular type, you can create a new object ofthat type.
If you see both icons, you can either create a new object whose only preselected property values aredefaults, or select an existing object and create a new object with the same values. You can thenchange the values for the new object.
To create an object:
1. On the Configuration page, navigate to the appropriate section.
For example, to create a paper, select [Paper].
2. Do either of these actions:
• To create a new object with default values, click , the add icon.
• To use an existing object as a template, select that object and click , the copy icon.
3. Specify a unique name for the new object and specify the correct values for it.
For information, see the context help.
4. Click [OK].
VViieewwiinngg aanndd UUppddaattiinngg TToottaallFFllooww PPrriinntt SSeerrvveerr SSeettttiinnggssThe settings determine the options that TotalFlow Print Server uses.
You cannot change some settings when the printer status is [Ready].
To view or change settings:
1. Go to the appropriate part of the user interface. Each of these places has some printer settings:

5
76
• On the Operations page, the Current Settings portlet.
• On the Jobs page, the Current Settings portlet.
• On the Configuration page, selectWorkflow→ Processing options.
• On the Configuration page, select DFE→ Settings.
• On the Configuration page, select Color Management.
• On the Configuration page, select Security.
2. Type or select new values for the settings that you want to change.
3. Click [SAVE].
SSeettttiinngg tthhee DDaattee aanndd TTiimmeeThe local date and time for TotalFlow Print Server can be set manually or automatically using a timeserver.
You cannot change the date and time when the printer status is [Ready].
Manually Setting the Date and Time
You can set the date and time for TotalFlow Print Server manually.
To set the local date and time manually:
1. On the Configuration page, select DFE→ Settings.
2. Select [Manual] from the [Time source] list.
3. Fill in the appropriate fields.
4. Click [SAVE].
Automatically Setting the Date and Time
The date and time can be set automatically by using any accessible network server or by specifying aserver.
To set the date and time automatically:
1. On the Configuration page, select DFE→ Settings.
2. Select either [Any network server] or [Specific network server] from the [Time source] list.
3. For [Specific network server], enter the [Time server name] and select the [Time servertype].
4. Click [SAVE].
5 Configuring TotalFlow Print Server

5
77
CCoonnffiigguurriinngg SSaammppllee PPrriinnttiinnggYou can configure the printer to allow, limit, or disable printing sample pages of printing jobs.
1. On the Configuration page, selectWorkflow→ Processing options
2. Select one of these values from the [Inspection sample] list:
• To disable sample printing, select [Off].
• To allow operators to print a single sample page or a single collated copy of the current job,select [Manual].
– To print an entire copy of the current job, select [Print collated sample copy]. (If the jobis not collated, only a single sheet is printed. Single-copy jobs are not collated.)
– To print a single sheet of the current job, clear [Print collated sample copy]
• To allow operators to print sample sheets or copies at intervals, select [Periodic].
1. Select or clear the [Print collated sample copy] check box.
2. Select or clear the [Print inspection sample during current job only] check box.
– To stop sample printing at the end of the current job, select this check box.
– To continue sample printing until the operator clicks the [Sample] button, clear thischeck box.
3. Enter the number of sheets to print between samples in [Frequency].
3. Click [OK].
SSeettttiinngg tthhee DDeeffaauulltt VViirrttuuaall PPrriinntteerrThe default virtual printer receives jobs when the job submission method does not specify a virtualprinter.
To set the default virtual printer:
1. On the Configuration page, selectWorkflow→ Virtual Printers.
2. Click the name of the virtual printer and click , the edit icon.
3. If the virtual printer is not enabled, select the [Enable virtual printer] check box.
4. Select the [Use as default virtual printer] check box.
5. Click [OK].
SSeettttiinngg VViirrttuuaall PPrriinntteerr DDeeffaauullttss aanndd OOvveerrrriiddeess ffoorr JJoobb PPrrooppeerrttiieessYou can associate default and override values for job properties with a virtual printer.
When the virtual printer receives a job, the job uses the virtual printer defaults for properties that do nothave a value. It uses the virtual printer overrides for all job properties instead of the values in the jobticket.
To set virtual printer defaults and overrides for job properties:
1. On the Configuration page, selectWorkflow→ Virtual Printers.
Configuring Sample Printing

5
78
2. Click the name of the virtual printer to change and click , the edit icon.
3. Click [Job Properties ...] to open the Job Properties editor.
4. Enter or select values for any properties that you want to set.
For information about job properties, see the field help.
5. Do any of these procedures:
• To mark all job property values in this section of the Job Properties editor as defaults, click[Default].
• To mark all job property values in this section of the Job Properties editor as overrides, click[Override].
• To mark an individual job property value as a default or an override, click the lock icon. Thelock icon toggles between default and override images.
– The icon means that the value is a default.
– The icon means that the value is an override.
6. Click [OK].
SSeettttiinngg PPrriinntteerr DDeeffaauullttss ffoorr JJoobb PPrrooppeerrttiieessYou can associate default values for job properties with the printer. The printer uses these values forproperties that are not set in any other way.
To set printer defaults for job properties:
1. On the Configuration page, selectWorkflow→ Processing options.
2. Click [Job Properties] to open the Job Propertieseditor.
3. Enter or select values for any properties that you want to set.
For information about job properties, see the context help.
4. Click [OK].
DDeeffiinniinngg aa JJMMFF DDeevviiccee IIDDIf you submit jobs using a method that uses a JMF device ID to identify TotalFlow Print Server, you mustdefine the device ID.
To define a JMF device ID:
1. On the Configuration page, select DFE→ Network.
2. Select [JMF] and click , the edit icon, to edit it.
3. In the [State] field, select [Disabled].
4. Click [OK].
5. Click , the edit icon, again.
5 Configuring TotalFlow Print Server

5
79
6. In the [Device ID] field, type a device ID.This device ID must be unique in the network.
7. In the [State] field, select [Enabled].
8. Click [OK].
CCoonnffiigguurriinngg ffoorr JJoobb SSuubbmmiissssiioonnBy default, virtual printers allow users to submit jobs from the console. To allow users to submit jobs inany other way, you must enable the appropriate network protocol and the corresponding jobsubmission method.
A protocol is a set of rules controlling the communication and transfer of data between the host systemand a printer in a network.
The [Manual job submission (console)] job submission method has no corresponding networkprotocol.
Available protocols include:
• [IPDS TCP/IP] allows exclusive, interactive use of a printer by a host system. This protocol isavailable only when the IPDS feature is installed.
• [IPP] supports print job submission, status, and management, and printer status and operations.• [JMF] supports print job submission, status, and management, and printer status and operations.• [LPR] supports print job submission, status, and management, and printer status. It also allows font
downloading.LPR queue names are case-insensitive and restricted to the 7-bit ASCII character set. Because virtualprinter names are limited to the least common denominator that can be used for all job submissionprotocols, virtual printer names are also case-insensitive and restricted to the 7-bit ASCII characterset.
• [Hot Folders] allow files to be copied into directories, from which they are submitted for printing.They also allow font downloading.
• [Raw Port] allows print jobs to be sent directly to a specified port. It also allows font downloading.• [WSD] allows Microsoft Windows systems to discover TotalFlow Print Server in the network. It
supports print job submission, status, and management, and printer status. [WSD] can be enabledfor only one virtual printer at a time.
• [RHPP] supports print job submission to printers that support the Reliable Host Printing Protocol.• [FTP] allows files to be copied from a remote system into directories, from which they are submitted
for printing.• [AppleTalk] supports job submission and font downloading. [AppleTalk] can be enabled for only
one virtual printer at a time.
1. On the Configuration page, select DFE→ Network.
2. Do these steps for each network protocol that you want to use:
1. Select the network protocol and click , the edit icon.
2. Set [State] to [Enabled].
Configuring for Job Submission

5
80
3. Set appropriate values for other properties.
These properties are different for each network protocol. See the context help for moreinformation.
4. Click [OK].
3. On the Configuration page, selectWorkflow→ Virtual Printers.
4. Do these steps for each virtual printer:
1. Select the virtual printer and click , the edit icon.
2. Click [Supported submission methods] to display a list of methods.
3. Select each method that you want to enable.
4. Click [OK].
AAcccceessssiinngg TToottaallFFllooww PPrriinntt SSeerrvveerr RReemmootteellyyUsers can access TotalFlow Print Server from remote computers using various methods. The method youchoose is based on the task you are trying to do.
TotalFlow Print Server allows these types of remote access:
[SNMP]Lets other programs on the network communicate and interact with TotalFlow Print Server using theSimple Network Management Protocol.
[E-mail]Lets users receive notifications about events in TotalFlow Print Server or the printer. Traces and filescan also be sent from TotalFlow Print Server through e-mail.
[Remote console]Lets users access the console over the network using a web browser.
[TotalFlow Prep IP]Lets TotalFlow Prep access the console from the computer whose IP address you specify. This letsusers at the console edit jobs with TotalFlow Prep.
Setting Up SNMP Access
SNMP lets operators on remote computers view printer status, receive notification of printer errorconditions, and control certain printer actions.
To set up SNMP access:
1. On the Configuration page, click DFE→ Network.
2. Select [SNMP] and click , the edit icon.
3. Set [State] to [Enabled].
4. Select the correct SNMP version.
5 Configuring TotalFlow Print Server

5
81
5. Add SNMP trap hosts and users or communities.
6. Click [Show log...] to view status for SNMP.
7. Click [OK].
SNMP Trap Hosts
An SNMP trap host is a system that the SNMP protocol notifies when asynchronous conditions exist onthe control unit.
SNMP Users and Communities
SNMP version 2 supports community-based security, while SNMP version 3 supports user-basedsecurity.
An SNMP user is a remote system that is identified by a unique user name. An SNMP community is agroup of remote systems that are identified by a shared community name. You must define the usernames or community names that are allowed to access TotalFlow Print Server using SNMP.
Enabling the Remote Console
Users can access TotalFlow Print Server remotely by using the remote console.
To enable the remote console:
1. On the Configuration page, click DFE→ Network.
2. Select [Remote console] and click , the edit icon.
3. Set [State] to [Enabled].
4. Click [OK].
Setting Up for Outgoing E-mail
TotalFlow Print Server uses outgoing e-mail to send notification of certain printer conditionsautomatically and to send an internal trace (as an e-mail attachment) to a support person for problemanalysis.
Before you can use e-mail, you must specify your mail server and primary and secondary DNS servers.You can get these addresses from your network administrator.
To set up outgoing e-mail:
1. On the Configuration page, click DFE→ Network.
2. Select [E-mail] and click , the edit icon.
Accessing TotalFlow Print Server Remotely

5
82
3. Set [State] to [Enabled].
4. Specify e-mail options.
For information, see the field help.
Click [Test] to make sure that the e-mail addresses work and that the SMTP server is correct.
5. To send e-mail notifications when specific errors occur, click [Error Codes...].
6. Click an error code and click , the edit icon, to view details and change the status.
7. Click [SMTP Log] to view information in the error log.
8. Click [OK].
Setting up Access Using TotalFlow Prep
TotalFlow Print Server users can access TotalFlow Prep 4.2.3 or later remotely on one computer. Beforeusing TotalFlow Prep, configure the address of the computer where TotalFlow Prep is installed.
TotalFlow Prep is sold separately.
To enable access using TotalFlow Prep:
1. On the Configuration page, click DFE→ Network.
2. Select [TotalFlow Prep IP] and click , the edit icon.
3. Enter the host name or IP address of the computer where TotalFlow Prep is installed.
4. Click [OK].
IInnssttaalllliinngg EExxtteennddeedd FFeeaattuurreessExtended features are available for optional purchase with TotalFlow Print Server. Customer serviceinstalls extended features, using the procedure in this topic.
The access level required to install extended features varies by feature.
Only one RIP option can be installed at a time. Installing a new RIP option automatically uninstalls theold one.
To install an available feature:
1. If the feature requires a dongle to allow installation or function, connect it to the system whereTotalFlow Print Server is installed.
2. On the Configuration page, select DFE→ Features.
3. Click , the install icon.
5 Configuring TotalFlow Print Server

5
83
4. Select the feature you want to install and click [OK].You see a confirmation dialog that tells you what to do next. For some features, you must restartthe computer, enter a password, or get a license from the Entitlement Management System(EMS).
5. If the confirmation dialog shows a system fingerprint:
1. Copy the system fingerprint and paste it into a text editor, or write it down, then click [OK].
2. In a web browser, go to https://www.ricohsoftware-entitlements.com/ems/customerLogin.html and log in using the EID that your customer servicerepresentative provided.The feature that corresponds to the EID is selected.
3. Do either of these actions:
• If the license exists (if you are reinstalling a deleted feature), select it and click [Activate].
• If the license does not exist:
1) Click [Activate].
2) Enter the system fingerprint and click [Generate].
The license is displayed.
4. Click [Save to File] and save the license file with a meaningful name to a folder where youcan find it again.
5. In the next dialog, enter the full file path of the license file.
6. Restart the system where TotalFlow Print Server is installed.
6. Return to DFE→ Features and check to see if the feature is enabled. If not, enable it.
SSaavviinngg PPrriinntteerr PPrreesseettssA printer preset is a set of configuration information. Printer presets let you save the settings for essentialconfiguration items so that you can reuse them later without having to respecify each item individually.Printer presets include the paper catalog, input tray information, and color management settings.
You cannot save printer presets when the printer status is “Ready“.
You can save up to 100 printer presets.
To save a printer preset:
1. On the Configuration page, select [Printer Presets].
2. Click , the save icon.
3. Enter the name of the new printer preset.
4. Click [OK].
The new printer preset is marked as the currently loaded ( ) printer preset.
Saving Printer Presets

5
84
When you load a printer preset, the settings on the console are updated to match the values in theprinter preset.
CCoonnffiigguurriinngg PPrriinntteerr PPrreesseettssYou can change how the options in a printer preset work with system settings.
To configure a printer preset:
1. On the Configuration page, select [Printer Presets].
2. Select a printer preset and click , the configure icon.
3. Select the options for each configurable setting.
Not all parameters can be configured.
1. Select the [Load] check box to indicate that the value is copied to the corresponding systemsetting when the printer preset is loaded. Clear the [Load] check box to ignore the value.By default, [Load] is selected for all parameters.
2. Select or clear [Significant] to indicate how to handle a difference in value between thesystem setting and the currently loaded printer preset. If [Significant] is selected, a differencecauses the currently loaded printer preset to be unloaded. If it is not selected, a differencecauses the printer preset to be marked as modified, but does not cause it to be unloaded.
By default, [Significant] is not selected for most parameters.
4. Click [OK].
5 Configuring TotalFlow Print Server

6
85
66.. Managing TotalFlow Print Server
•Checking Printer Status•Editing an Object•Disabling an Object•Enabling an Object•Loading an Object•Saving an Object•Deleting an Object•Deleting Multiple Objects•Uploading and Downloading Files•Checking the LAN Status of an Ethernet Card•Loading Paper in an Input Tray•Editing the Paper in an Input Tray•Viewing Font Properties•Importing a Font•Using a PostScript Job to Download Fonts•Specifying Color Profiles•Modifying ICC Profiles•Modifying NamedColor Profiles•Managing Black Output•Managing Brightness and Contrast•Printing a Color Control Bar•Printing Test Masters•Calibrating the Printer•Backing Up and Restoring TotalFlow Print Server•Erasing the Hard Drive•Updating Code•Resetting to Factory Defaults•Stopping the Printer•Restarting the Printer•Shutting Down and Restarting TotalFlow Print Server•Shutting Down and Restarting the Control Unit•Shutting Down the Control Unit
Use these procedures to manage TotalFlow Print Server.
CChheecckkiinngg PPrriinntteerr SSttaattuussThere are different ways to check the printer status, depending on the information you want.
Checking Toner Levels
There are several ways to check toner levels.
To see gauges that show the level of each toner color, do any of these actions:
• In the printer control bar, click , the open interactive printer icon, to open the interactiveprinter.The gauges are below the printer name.

6
86
• Find the Printer Information portlet.
This portlet appears by default on the interactive printer and the Operations page. You can add it tothe Jobs page.The gauges are below the printer name.
• In the printer control bar, find the printer image. Small gauges appear under this image.
Checking Paper Levels
There are several ways to check the level of paper in each input tray or interposer tray.
• In the printer control bar, click , the open interactive printer icon, to open the interactiveprinter.For each input or interposer tray, an icon in the appropriate location on the printer graphic showsthe approximate paper level.
• Find thePrinter Information portlet.
This portlet appears by default on the interactive printer and the Operations page. You can add it tothe Jobs page.For each input or interposer tray, an icon in the appropriate location on the printer graphic showsthe approximate paper level.
• Find the Input Trays portlet.
This portlet appears by default on the interactive printer, the Operations page, and the Jobs page.For each input or interposer tray, an icon next to the tray name shows the approximate paper level.
• On the Configuration page, select DFE→ Trays. Select a tray and click , the edit icon.
Checking Other Printer Information
The printer information dialog shows the machine name or IP address of the printer, its status, its serialnumber, the total number of pages printed, and the number of pages printed since the print count waslast reset. It also has a button for resetting the print count.
To open the printer information dialog, do these steps:
1. Find the Printer Information portlet.
This portlet appears by default on the interactive printer and the Operations page. You can add itto the Jobs page.
2. Click i , the information icon, next to the printer name.
6 Managing TotalFlow Print Server

6
87
EEddiittiinngg aann OObbjjeecctt
Whenever you see , the edit icon, in the section of the Configuration page for an object type or in adialog that lists objects of a particular type, you can change the properties of that object.
To edit an object:
1. On the Configuration page, navigate to the appropriate section.
For example, to edit a virtual printer, selectWorkflow→ Virtual Printers.
2. Select the object to edit and click , the edit icon.
3. Update the options as needed.
For information, see the context help.
4. Click [OK].
DDiissaabblliinngg aann OObbjjeeccttSome objects can be disabled when you do not need to use them.
You can disable an object whenever:
• You see , the disable icon. in the section of the Configuration page for an object type or in adialog that lists objects of a particular type.
• The object has a property called [State] whose value is [Enabled].
• The object has a selected check box called [Enabled], [Enable virtual printer], or somethingsimilar.
To disable an object:
1. On the Configuration page, navigate to the appropriate section.
2. If you see , the disable icon, do these steps:
1. If , the disable icon, is grayed out, click , the [Stop]button, to stop the printer.
2. Select the object to disable and click , the disable icon.
3. If you do not see , the disable icon, do these steps:
1. Select the object to disable and click , the edit icon.
2. If the [State] property or [Enabled] check box is grayed out, stop the printer.
3. Do either of these actions:
• In the [State] field, select [Disabled] from the list.
• Clear the [Enabled] check box.
4. Click [OK].
Editing an Object

6
88
If the object is the default virtual printer, the [Default] check box is cleared automatically. Thefirst enabled virtual printer becomes the default virtual printer.
4. If you stopped the printer, click , the [Start] button, to restart it.
EEnnaabblliinngg aann OObbjjeeccttSome objects must be enabled before you can use them.
You can enable an object whenever:
• You see , the enable icon, in the section of the Configuration page for an object type or in adialog that lists objects of a particular type.
• The object has a property called [State] whose value is [Disabled]. or [Enabled].
• The object has a cleared check box called [Enabled], [Enable virtual printer], or somethingsimilar.
To enable an object:
1. On the Configuration page, navigate to the appropriate section.
2. If you see , the enable icon, do these steps:
1. If , the enable icon, is grayed out, click , the [Stop]button, to stop the printer.
2. Select the object to enable and click , the enable icon.
3. If you do not see , the enable icon, do these steps:
1. Select the object to enable and click , the edit icon.
2. If the [State] property or [Enabled] property is grayed out, stop the printer.
3. Do either of these actions:
• In the [State] field, select [Enabled] from the list.
• Select the [Enabled] check box.
4. Click [OK].
4. If you stopped the printer, click , the [Start] button, to restart it..
LLooaaddiinngg aann OObbjjeeccttFor some object types, like printer presets and halftone screening sets, multiple objects can exist, butyou can use only one at a time. Selecting the object that you want to use is called loading it.
6 Managing TotalFlow Print Server

6
89
Whenever you see , the load icon, on Configuration page or in a dialog that lists objects of aparticular type, you can load an object.
To load an object:
1. On the Configuration page, navigate to the appropriate section.
2. Select the object to load.
3. Click , the load icon.
SSaavviinngg aann OObbjjeecctt
Whenever you see , the save icon, or , the export icon, in the section of the Configuration pagefor an object type, you can save an object of that type.
Printer presets are saved at the print server. You can save other objects, such as logs or NamedColorprofiles, to a file on removable storage or a mapped network drive.
To save an object other than a printer preset:
1. On the Configuration page, navigate to the appropriate section.
For example, to save a NamedColor profile, select Color Management→ Spot Colors.
2. Select the object and click , the save icon, or the export icon.
3. Upload the file.
DDeelleettiinngg aann OObbjjeecctt
Whenever you see , the delete icon, in the section of the Configuration page for an object type or ina dialog that lists objects of a particular type, you can delete an object of that type.
Before you delete an extended feature, make sure that you never want to use it again. If there is achance of using it again, disable it instead of deleting it.
• You cannot delete certain objects that are supplied with TotalFlow Print Server, such as theautotray and stringReplace filters.
• You cannot delete some objects, such as fonts, while the printer is running.
To delete an object:
1. On the Configuration page, navigate to the appropriate section.
For example, to delete a virtual printer, selectWorkflow→ Virtual Printers.
2. If , the delete icon, is grayed out, click , the [Stop] button, to stop the printer.
3. Select the object to delete.
Saving an Object

6
90
4. Click , the delete icon.
5. Click [Yes] or [OK] to confirm the action.For extended features, you see a confirmation dialog that tells you what to do next.
6. If you stopped the printer, click , the [Start] button, to restart it.
DDeelleettiinngg MMuullttiippllee OObbjjeeccttss
Whenever you see , the multiple delete icon, on the Configuration page or in a dialog, you candelete all the objects listed there, or a subgroup of them, at once.
To delete multiple objects:
1. Click , the stop button, to stop the printer.
2. On the Configuration page, navigate to the appropriate section.
For example, to delete multiple fonts, select DFE→ Fonts.
3. Click , the multiple delete icon.
4. If you are offered a choice of subgroup, select one.
For example, for fonts, select [Downloaded] or [User installed].
5. Click [OK].
6. Click , the start button, to restart the printer.
UUppllooaaddiinngg aanndd DDoowwnnllooaaddiinngg FFiilleessMany tasks require you to upload files to or download files from TotalFlow Print Server.
You can upload files from and download files to any of these devices:
• A USB storage device attached to TotalFlow Print Server
• A network drive mounted to TotalFlow Print Server
• Any storage device that you can access from the remote console
You can also upload files from a DVD drive attached to TotalFlow Print Server.
If you enable e-mail for remote access, you can also download files to e-mail.
Uploading Files
You must upload files to do tasks like submitting print jobs from the console, importing fonts, or restoringTotalFlow Print Server from a backup file.
6 Managing TotalFlow Print Server

6
91
To upload a file:
• If the file is on a USB storage device attached to TotalFlow Print Server:
1. Select [USB].
2. If you have not already done so, attach the USB drive.
3. To display only files of certain types:
1) Click , the search icon, then click the arrow next to the text field.
2) Select [Display only], then select the file types to display.
3) Click [Search].
4. Select the file.
5. Do either of these actions:
• To submit a job, select a value from [Hold] or [Print].
• To upload a file that is not a job, click [Load].
• If the file is on a DVD attached to TotalFlow Print Server:
1. Select [DVD].
2. If you have not already done so, attach the DVD drive and insert the DVD.
3. To display only files of certain types:
1) Click , the search icon, then click the arrow next to the text field.
2) Select [Display only], then select the file types to display.
3) Click [Search].
4. Select the file.
5. Do either of these actions:
• To submit a job, select a value from [Hold] or [Print].
• To upload a file that is not a job, click [Load].
• If the file is on a network drive mounted to TotalFlow Print Server:
1. Select [Mapped drives].
2. If you have not already done so, mount the network drive.
3. Select the network drive.
4. To display only files of certain types:
1) Click , the search icon, then click the arrow next to the text field.
2) Select [Display only], then select the file types to display.
3) Click [Search].
5. Select the file.
6. Do either of these actions:
Uploading and Downloading Files

6
92
• To submit a job, select an option from the [Hold] list or the [Print] list.
• To upload a file that is not a job, click [Load].
• If the file is on a storage device that you can access from the computer where the remote console isrunning (including the hard drive, USB storage devices, DVDs, and mapped network drives):
1. Select [Computer].
2. Use the standard browser dialog to select and upload the file.
This dialog is different for each browser.
3. Select the file.
4. Do either of these actions:
• To submit a job, select a value from [Hold] or [Print].
• To upload a file that is not a job, click [Load].
Downloading Files
You must download files to do tasks like saving a trace or backing up TotalFlow Print Server.
To download a file:
• To download a file to a USB storage device attached to TotalFlow Print Server:
1. Select [USB].
2. If you have not already done so, attach the USB drive.
3. Go to the folder where you want to store the file.
4. To save the file with a different name, type the new filename.
5. Click [Save].
• To download a file to a network drive mounted to TotalFlow Print Server:
1. Select [Mapped drives].
2. If you have not already done so, mount the network drive.
3. Select the network drive.
4. Go to the folder where you want to store the file.
5. To save the file with a different name, type the new filename.
6. Click [Save].
• To save the file to a storage device that you can access from the computer where the remote consoleis running (including the hard drive, USB storage devices, DVDs, and mapped network drives):
1. Select [Computer].
2. Use the standard browser dialog to save the file.
This dialog is different for each browser.
• To e-mail the file:
6 Managing TotalFlow Print Server

6
93
1. Select [EMAIL].This icon is not available if remote e-mail access is not enabled.
2. Type one or more e-mail addresses.
Separate multiple addresses with any combination of commas and default space characters (U+0020). Do not use the double-byte space character (U+3000).
3. Type a subject for the e-mail.
You cannot send an e-mail with a blank subject.
4. Click [Send].
CChheecckkiinngg tthhee LLAANN SSttaattuuss ooff aann EEtthheerrnneett CCaarrddEthernet adapter cards allow TotalFlow Print Server to receive data from a host or network. One ormore Ethernet adapter cards are installed in TotalFlow Print Server.
To check whether and how fast an Ethernet card is sending and receiving information over the LAN:
1. On the Configuration page, select DFE→ Network.
2. Select an installed Ethernet adapter card and click , the edit icon.
3. Click [LAN Status].
LLooaaddiinngg PPaappeerr iinn aann IInnppuutt TTrraayyWhen you physically load a new paper in an input tray or interposer tray, you must edit the tray inTotalFlow Print Server. If the paper is defined in the paper catalog or for use when the tray is in manualmode, you can select it from a list. This action is called loading the paper.
To load a defined paper:
1. On the Operations page, find the Input Trays portlet.
2. Click the tray where you want to load paper.
3. Select the paper that you want to load.
EEddiittiinngg tthhee PPaappeerr iinn aann IInnppuutt TTrraayyYou can edit the paper loaded in an input tray or interposer tray.
To edit a paper:
1. On the Operations page, find the Input Trays portlet.
2. Click an input tray or interposer tray.
3. To edit a paper defined in the paper catalog, select [Paper Catalog].You can now add a new paper or modify an existing paper.
4. To edit the paper defined for use when the tray is in manual mode, select [Manual paper].You can now edit selected properties of the paper.
Checking the LAN Status of an Ethernet Card

6
94
VViieewwiinngg FFoonntt PPrrooppeerrttiieessYou can view the properties associated with a font.
To view the properties for a font:
1. On the Configuration page, select DFE→ Fonts.
2. Click the font to view and click , the view icon, to see the properties associated with the font.
3. Click [OK].
IImmppoorrttiinngg aa FFoonnttIf your jobs require fonts that are not installed and are not embedded in the job, import those fonts.
To install a font:
1. On the Configuration page, select DFE→ Fonts
2. Click , the import icon.
3. Select and upload the font in the File Browser dialog.
UUssiinngg aa PPoossttSSccrriipptt JJoobb ttoo DDoowwnnllooaadd FFoonnttssYou can download PostScript fonts from a remote system using a PostScript font job. Font jobs aredifferent from print jobs because the printer does not produce printed output for font jobs, even if the jobattempts to generate printed output.
Use one of these communication methods to download fonts using a PostScript job:
• AppleTalk
• FTP
• Hot folders
• LPR
• Raw port
• Font download web page
You must install FTP and LPR and enable the appropriate protocols before you can use them todownload font jobs.
• To download a font job using FTP:
1. Make an FTP connection from the system where the font job is to the system where TotalFlowPrint Server is installed.
For example, ftp myprintserver.2. Do one of these actions:
• If authentication is not required to submit a job, press [Enter] to log in as the default user.
• Otherwise, enter your user name and password.
3. Set the FTP connection to binary mode using the binary or bin command.
6 Managing TotalFlow Print Server

6
95
4. Change the directory on the TotalFlow Print Server system to the /fonts directory by enteringcd /fonts.
5. Send the font job to TotalFlow Print Server.
For example, the command put myfonts.ps sends the file myfonts.ps to the /fontsdirectory on the TotalFlow Print Server system.
6. Enter the bye command to end the FTP connection.
• To download a font job using a hot folder, LPR, AppleTalk, or the raw port protocol:
1. Configure a virtual printer to receive font jobs:
1) Set [Processing option] to [Print].
2) Set [Processing mode] to [Unidirectional Fonts] or [Bidirectional Fonts].
You must use AppleTalk or raw port to download bidirectional fonts. Printing or rippingcannot occur while the AppleTalk protocol is enabled on the virtual printer that is configuredfor bidirectional font download. Also, the AppleTalk protocol is not enabled until theprocessing of print jobs and RIP jobs is complete.
See Adding or Copying an Object, p. 75 or Editing an Object, p. 87 for instructions.
2. Submit the font job like any other job.
See one of these topics for instructions:
• Submitting a Job from a Hot Folder on Windows, p. 110
• Submitting a Print Job from a Hot Folder on Mac, p. 110
• Submitting a Print Job Using LPR, p. 114
3. If you used AppleTalk to download the font job, restart TotalFlow Print Server before you use thefonts to print.
• To download a font job from a web page, use the standard download procedure for your browser.Save the font job to the /fonts directory.
SSppeecciiffyyiinngg CCoolloorr PPrrooffiilleessSpecify the ICC profiles to use in converting input colors to output colors.
You do not have to specify NamedColor profiles. Any NamedColor profile that is installed is usedwhenever a job specifies a color defined in it.
1. Do either of these actions:
• To specify profiles used for non-IPDS jobs, select Color Management→ Profiles on theConfiguration page.
• To specify profiles used for IPDS jobs, select Color Management→ IPDS on theConfiguration page.
2. For each color model, select an input profile that converts the color space used in the job to thePCS or to the printer color space.
Specifying Color Profiles
6
96
Input profiles that convert the job color space to the printer color space are called device linkprofiles. Select a device link profile in the same way as any other input profile.
For non-IPDS jobs, you can select different input profiles for different object types.
You can use the input profile embedded in the job:
• For non-IPDS jobs, select [Pass through] to use the embedded color profile.
• For IPDS jobs, the embedded color profile is always used if it exists. The specified colorprofile is used when there is no embedded color profile.
3. If the input profile is not a device link profile, select a printer profile that converts the PCS to theprinter color space.
If the input profile is a device link profile, the printer profile is ignored.
For non-IPDS jobs, you can select different printer profiles for the front and back of the paper andfor each object type.
Because the texture and coating of different papers affect the appearance of printed colors,printers can use different color spaces, and therefore different profiles, for different paper types.
4. If the input profile is not a device link profile, select a rendering intent to determine how torepresent colors that are defined in the input profile but cannot be reproduced exactly in theoutput color profile.
If the input profile is a device link profile, the rendering intent is ignored.
If you are not sure what rendering intent to use, try [Perceptual], the default.
For non-IPDS jobs, you can select different rendering intents for different object types. For RIPModel K or RIP Model S, you can also select different rendering intents for PDF and PostScript.For PDF, you can select different rendering intents for each input color model.
5. OOppttiioonnaall:: For non-IPDS jobs only, select a reference profile that converts the PCS to a CMYKcolor space associated with a different printer.
Use the reference profile to simulate other printers.
When you specify a reference profile, it is used instead of the printer profile.
MMooddiiffyyiinngg IICCCC PPrrooffiilleessUse color substitutions to modify ICC profiles. A color substitution replaces a specific RGB, CMYK, orgray input color with a defined CMYK output color instead of using the output color in the printerprofile.
To create and use color substitutions:
1. Click , the stop button, to stop the printer.
2. Select Color Management→ Settings on the Configuration page.
3. Click [Substitutions].
4. In the dialog that opens, click , the add icon.
6 Managing TotalFlow Print Server

6
97
5. By default, the new color substitution is enabled. To create a color substitution but not use itimmediately, change [State] to [Disabled].You can create up to 64 color substitutions, but you can enable only 20 at a time.
6. Select the printer profile that you want the color substitution to apply to.
The color substitution is used only when that printer profile is used. Select [All] if the colorsubstitution applies to all ICC profiles.
If you want the color substitution to apply to more than one printer profile, but not to all, you mustcreate a color substitution for each ICC profile.
7. Select values to define the input and output colors.
8. Click [OK], then click [Close], to return to the Configuration page.
9. Set [Color Substitutions] to [On].
10. Click , the start button, to restart the printer.
MMooddiiffyyiinngg NNaammeeddCCoolloorr PPrrooffiilleessUse color exceptions to modify NamedColor profiles. A color exception replaces a specific CMYK orCIELAB named color with an edited CMYK color.
1. On the Configuration page, select Color Management→ Spot Colors.
2. Select a NamedColor profile.
3. Select the color that you want to create an exception for and click , the edit icon.You see a dialog that shows the named color as it is defined in these color spaces:
• CMYK: This definition is used when [Spot color matching] is set to [Off] in ColorManagement→ Settings.
• CIELAB: This definition is used when [Spot color matching] is set to [On]. The L*a*b*values are converted to CMYK values for printing.
4. Click , the add icon.
5. Select a value for [Spot color matching].
The exception is used when the value you select here matches the value of [Spot colormatching] in Color Management→ Settings.
6. If you selected [On], select the ICC profile that the exception applies to.
The exception is used only when that ICC profile is used. Select [Any] if the exception applies toall ICC profiles.
If you want the exception to apply to more than one ICC profile, but not to all, you must createan exception for each ICC profile.
7. Click [OK].
8. Edit the CMYK values for the exception and click [OK].
Modifying NamedColor Profiles

6
98
MMaannaaggiinngg BBllaacckk OOuuttppuuttUse these properties to control the appearance of black output.
See the context help for more information about each property.
[Black/Gray reproduction]Specifies whether to use process black (CMY) and pure black (K), only K black, or whatever isdefined in the CMYK input color space. You can select different input profiles for different objecttypes.
[Black (text/line art)]Specifies whether to use process black (CMY) and pure black (K), only K black, or K black plus aconfigurable amount of cyan for black text and line art.
[Black overprint]For PostScript and PDF data only, specifies whether to preserve the colored background underneathblack text and line art.
[Images][Graphics]For RIP model H only, specify whether to attempt to preserve shadow details in PDF jobs.
[Print RGB gray using black]For RIP model H only, specifies whether to print gray RGB text and line art in PDF jobs using pureblack or process black.
[Threshold]When [Print RGB gray using black] is [On], specifies the maximum percentage of RGB that isconverted to process black.
To edit these properties:
• For CSPI, RIP Model K, or RIP Model S, select Color Management→ Settings on theConfiguration page.
• For RIP Model H, select [Color Management] on the Configuration page, then select [Settings] ,[HDM PDF], or [HDM PS].
MMaannaaggiinngg BBrriigghhttnneessss aanndd CCoonnttrraassttUse tone curves to adjust the colors produced by the printer manually so that they match required colorswhen the job file cannot be corrected. They are especially useful for managing brightness, contrast, andcolor balance.
The [Identity] tone curve, which does not adjust the colors, is supplied with TotalFlow Print Server. Youcannot edit it or delete it.
To edit tone curves:
1. Stop the printer.
2. Do either of these actions:
• On the Jobs page,
6 Managing TotalFlow Print Server

6
99
1. Select a job and click , the view icon. The Image Viewer shows the selected job.
2. Click , the edit tab.
3. Select a tone curve from the list.
• On the Configuration page:
1. Select Color Management→ Print quality.
2. Click the [Tone curve name] list, then click [Manage]
3. Do either of these actions:
– To create a new tone curve, click , the add icon. Enter a name for the new tonecurve. The Add dialog shows the Color test master.
– To edit an existing tone curve, select it and click , the edit icon. The Edit dialogshows the Color test master.
4. Click , the edit tab.
3. Select an edit mode:
• [Graphical Smooth] displays a graphic view of a curve for each color. Drag the adjustmentpoints to change the curve.
• [Graphical Numeric] displays a graphic view and 10 numeric fields for each tone curve.These fields contain values at X-axis values at intervals of 10%, starting at 10% and ending at100%.
4. Select a color to edit.
5. Do any of these actions:
• Drag the adjustment points to change the curve.
• Move the sliders below the graphic left or right.
• In [Graphical Numeric] mode, type values in the numeric fields.
As you make changes, they are applied to the displayed image.
6. To see one color plane at a time:
1. Click , the view tab.
2. Select a single color plane.
7. When you have finished making changes, click [OK].
8. Restart the printer.
PPrriinnttiinngg aa CCoolloorr CCoonnttrrooll BBaarrYou can print a control bar at the bottom of each page to help verify color printing..
To print a color control bar:
Printing a Color Control Bar

6
100
1. On the Configuration page, select Color Management→ Settings.
2. Set [Control bar] to [On] and click [Settings...].
3. By default, the default color control bar is printed. To print a custom color control bar:
1. Set [Color Bar Type] to [Custom].
2. Select a PDF or EPS file in [Paper Wedge File].If the file you want is not listed, clickManage MW Files→ Add new MW file, then uploadthe file.
4. Select print options and click [OK].
PPrriinnttiinngg TTeesstt MMaasstteerrssYou can print a test master to help identify print quality problems.
These types of test masters are available:
[Configuration]These test masters contain information about the printer configuration.
[IPDS] (if the IPDS extended feature is installed)These test masters show the current settings for IPDS jobs.
[PDF]These test masters show the current settings for PDF jobs.
To print a test master:
1. On the Configuration page, select Diagnostics→ List/Test Print.
2. Select the test master to use and click , the test print icon.
3. Select print options and click [OK].
CCaalliibbrraattiinngg tthhee PPrriinntteerrCalibrate the printer to ensure that it prints accurate colors whenever you change toners, use a paperthat has not been calibrated before, or observe printer drift.
Calibration means comparing the colors in the current state of the printer with the reference state, thencalculating a set of tone curves to compensate for the differences. The reference state of a printer isspecified based on paper types and halftones with the current toners.
Each paper is associated with a calibration. Different papers can use the same calibration, for example,different size papers that are otherwise alike. The same paper can use different calibrations underdifferent conditions, for example, on days with high or low humidity, or with different halftonescreenings, or in different input trays.
TotalFlow Print Server includes several predefined calibrations for common paper types. You can alsocreate new calibrations.
6 Managing TotalFlow Print Server

6
101
Updating or Creating a Calibration
Update the existing calibrations when you use new toner or when the color output appears to havechanged. Create a new calibration if the existing calibrations do not suit your needs.
To create a new calibration or to update an existing calibration, you need any one of these measuringdevices:
• An inline color sensor installed on the printer. The inline sensor is the fastest option.
• An i1Pro or i1Pro2 spectrophotometer attached to the print server. An attached spectrometer isfaster than using an offline spectrophotometer.
• An i1Pro or i1Pro2 spectrophotometer attached to an offline computer.
If the spectrophotometer is attached to an offline computer, you must have ColorPort or its replacement,i1Profiler, installed on that computer. If you do not have either of these programs, download i1Profilerfrom http://www.xrite.com. Then use i1Profiler or ColorPort to import these calibration target files fromthe printer driver CD-ROM:
• For i1Profiler and i1Pro2:
Cal_Target_Standard_i1Pro.txfCal_Target_High_i1Pro.txf
• For i1Profiler and i1Pro:
Cal_Target_Standard_i1Pro.txfCal_Target_High_i1Pro.txf
• For ColorPort and i1Pro2 or i1Pro:
Calibration_Target_Standard.xmlCalibration_Target_High.xml
Do not print any jobs while you are calibrating the printer. If calibration is interrupted, restart thecalibration from the beginning.
To create or update a calibration:
1. Do these steps on the operator control panel:
• On a Pro C7100 series printer:
1. Press [User Tools].
2. Press [Adjustment Settings for Operators].
3. Press [0201 Adjust Image Density/ DEMS].
4. Press [Image Density Adjustment: Manual Execute].
• On a Pro C9100 series printer:
1. Press [User Tools].
2. Press [Adjustment Settings for Operators].
Calibrating the Printer

6
102
3. Press [02 Machine Image Quality].
4. Press [0207 Adjust Image Density Before Auto Color Calibration].
5. Press [001 Image Density Adjustment: Manual Execute].
2. On the Configuration page, select [Calibration].
3. Use the Calibration wizard to guide you through these steps:
1. Select calibration options and print the calibration page.
2. Measure the calibration page and, if you used an offline spectrophotometer, upload themeasurements.
3. OOppttiioonnaall:: Print a test page and verify the calibration.
4. Accept the calibration.
Selecting the Calibration for a Paper
You can change the calibration associated with a paper.
To select a calibration:
1. Do either of these actions:
• To select a calibration for a paper in the paper catalog:
1. On the Configuration page, select [Paper].
2. Select the paper and click , the edit icon.
3. Click [General].
• To select a calibration for a paper that is loaded in an input tray:
1. On the Operations page or the interactive printer, find the Input Trays portlet.
2. Click the tray where the paper is loaded.
3. Select [Manual paper].
2. Select a value in the [Calibration] field.
3. Click [OK].
BBaacckkiinngg UUpp aanndd RReessttoorriinngg TToottaallFFllooww PPrriinntt SSeerrvveerrYou can back up TotalFlow Print Server configuration data, user-created ICC profiles, logs, traces and,if space permits, jobs. You can then use the backed-up data to restore TotalFlow Print Server after ahard drive failure or to copy the configuration data to another installation of TotalFlow Print Server.
You can back up data from an installation of TotalFlow Print Server at one printer and restore it toanother printer of the same model. You cannot restore it to another printer of a different model.
6 Managing TotalFlow Print Server

6
103
Backup or RestoreType
Data Type
Configura-tion Data(Note 1)
User-CreatedICC Profiles
Logs Traces Jobs
[Normal] Yes Yes
[Extended backup (noJobs)]
Yes Yes Optional Optional
[Extended backup(include Jobs)]
Yes Yes Optional Optional Yes
[Partial restore] (Note2)
Selected
[Normal restore] (Note3)
Yes Yes
[Extended restore (nojobs)] (Note 3)
Yes Yes Optional Optional
[Extended restore(including jobs)] (Note3)
Yes Yes Optional Optional Yes
1. Configuration data includes printer presets, virtual printers, users, roles, paper catalog, and otherconfiguration parameters. It does not include fonts.
2. [Partial restore] lets you choose whether to preserve or overwrite existing configuration data.
3. [Normal restore], [Extended restore (no jobs)], and [Extended restore (including jobs)]overwrite all existing data. Therefore, only a [Service] user can perform these restore types.
Backing Up TotalFlow Print Server
You can back up configuration data, ICC profiles, logs, and trace files from either the local or remoteconsole. Because jobs can require more space than is available for remote download, you must backup jobs from the local console to a storage device.
To back up TotalFlow Print Server:
1. If you are using the local console, attach a USB storage device to TotalFlow Print Server.
2. Log in as an [Administrator] or [Service] user.
3. On the Configuration page, select DFE→ Disk Operations.
4. Click [Backup].
5. Select the type of backup to perform:
• [Normal] includes configuration data and user-created ICC profiles.
Backing Up and Restoring TotalFlow Print Server

6
104
• [Extended backup (no Jobs)] adds logs, trace files, or both to [Normal] data.
• [Extended backup (include Jobs)] adds jobs to [Extended backup (no Jobs)] data.
6. For [Extended backup (include Jobs)], you see a message if TotalFlow Print Server isprocessing jobs. Click [OK] to restart the system and stop TotalFlow Print Server. When thesystem restarts, restart the backup process.
7. For [Extended backup (no Jobs)] or [Extended backup (include Jobs)], select the types ofdata to back up.
8. Click [OK].
9. Save the backup file.
Restoring TotalFlow Print Server
[Administrator] users can restore configuration data from a backup file. [Service] users can restoreany backup data.
To restore backed-up data:
1. On the Configuration page, select DFE→ Disk Operations.
2. Click [Restore].
3. Select the backup file.
4. Select the type of restore to perform:
• [Partial restore] lets you select the configuration data to restore and whether it replacesexisting data. This is the only option that [Administrator] users can select.
• [Normal restore] includes all configuration data and user-created ICC profiles. Restoredconfiguration data replaces existing data; but restored user-created ICC profiles are addedto existing ICC profiles. Any existing ICC profiles with the same names as restored ICCprofiles are overwritten. Only [Service] users can choose this option.
• [Extended restore (no jobs)] adds logs, trace files, or both to [Normal] data. Restoredlogs and trace files replace existing logs and trace files. Only [Service] users can choosethis option.
• [Extended restore (including jobs)] adds jobs to [Extended restore (no jobs)] data.Only [Service] users can choose this option.
5. For [Extended restore (including jobs)], you see a message if TotalFlow Print Server isprocessing jobs. Click [OK] to restart the system and stop TotalFlow Print Server. When thesystem restarts, restart the restore process.
6. For [Partial restore], [Extended restore (no jobs)] or [Extended restore (including jobs)],select the types of data to restore.
7. For [Partial restore], select one of these options:
• [Add unique only] restores only objects (for example, user IDs) that do not have the samename as existing objects. Existing objects are preserved.
6 Managing TotalFlow Print Server

6
105
• [Add unique and replace non-unique] restores objects that do not have the same name asexisting objects and replaces existing objects that have the same names as restored objects.Existing objects that do not have the same name as restored objects are preserved.
• [Replace all] deletes all existing objects, then restores all objects from the backup file.
8. Click [OK].
For all types of restore except [Partial restore], the system is automatically restarted after the restore iscomplete.
EErraassiinngg tthhee HHaarrdd DDrriivvee[Service] users can erase all data from the hard drive by repeatedly overwriting it.
This operation makes TotalFlow Print Server inoperable. Do not do this operation unless youare completely finished with the print server. For example, do it when you are scrapping theprint server or returning it as part of an upgrade.
This procedure can take up to 17 hours, depending on the amount of data on your hard drive.
1. On the Configuration page, select DFE→ Disk Operations
2. Click [Disk Erase].
3. Select the method for erasing the hard drive:
[DoD]The DoD method complies with the standards set by the Department of Defense for erasingdata from a hard drive.
[NSA]The NSA method complies with the standards set by the National Security Agency for erasingdata from a hard drive.
4. Do either of these actions:
• To continue, select [Confirm] and click [OK].
• To quit, click [Cancel].
UUppddaattiinngg CCooddee[Service] users can use the console to select and install a code update file.
1. On the Configuration page, select DFE→ Disk Operations
2. Click [Update Code].
3. Upload or select the update code file.
4. Do one of these actions:
• Click [OK] to complete the installation. TotalFlow Print Server automatically shuts down andrestarts.
• Click [Cancel] to postpone the installation.
Erasing the Hard Drive

6
106
RReesseettttiinngg ttoo FFaaccttoorryy DDeeffaauullttss[Service] users can reset TotalFlow Print Server to factory defaults.
This operation removes all jobs, all records in the job history, and all logs.
1. On the Configuration page, select DFE→ Disk Operations.
2. Click [Reset to factory defaults].
3. To shut down and restart the control unit after the reset, select [Restart Control Unit oncecomplete].
4. Do either of these actions:
• To continue, click [OK].
• To quit, click [Cancel].
SSttooppppiinngg tthhee PPrriinntteerrStopping the printer leaves the printer powered on, but makes it stop printing. You must stop the printerto change some settings.
To stop the printer, do either of these actions:
• Click , the [Stop] button, in the printer control bar.
This method activates , the [Start] button.
• Press the hardware Stop button at the printer.This method does not activate the [Start] button.
The printer goes into the “Not Ready“ state. If a job is being printed, the printer stops the job and storesthe remaining data in the printer buffers.
RReessttaarrttiinngg tthhee PPrriinntteerrRestart the printer when it is powered on but in the “Not Ready“ state.
If necessary, add supplies or correct an error condition, such as a paper jam, first.
To restart the printer, do either of these actions:
• If , the [Start] button in the printer control bar, is active, click it.
• If the [Start] button is not active, the printer was stopped by the hardware Stop button at the printerengine. Press [Resume] on the operator control panel.
The printer goes into the “Ready“ state. If jobs are available, it starts printing.
SShhuuttttiinngg DDoowwnn aanndd RReessttaarrttiinngg TToottaallFFllooww PPrriinntt SSeerrvveerrYou can shut down and restart the TotalFlow Print Server software without shutting down the hardware.
6 Managing TotalFlow Print Server

6
107
To shut down and restart the TotalFlow Print Server software:
1. On the Configuration page, select DFE→ Shutdown.
2. Click [Restart DFE].
Any job that is being received is terminated. Any job that is printing is available for reprinting after therestart.
SShhuuttttiinngg DDoowwnn aanndd RReessttaarrttiinngg tthhee CCoonnttrrooll UUnniittYou can shut down and restart TotalFlow Print Server, including the hardware. This operation takesseveral minutes.
To shut down and restart the TotalFlow Print Server software and hardware:
1. On the Configuration page, select DFE→ Shutdown.
2. Click [Restart Control Unit].
Any job that is being received is terminated. Any job that is printing is available for reprinting after therestart.
SShhuuttttiinngg DDoowwnn tthhee CCoonnttrrooll UUnniittYou can shut down TotalFlow Print Server, including the hardware, without restarting it.
To shut down the TotalFlow Print Server software and hardware:
1. On the Configuration page, select DFE→ Shutdown.
2. Click [Shut Down Control Unit].
Any job that is being received is terminated. Any job that is printing is saved so that you can reprint itlater.
Shutting Down and Restarting the Control Unit

6
108

7
109
77.. Working with Jobs
•Submitting a Print Job•Logging and Storing Job Tickets•Managing Print Jobs•Specifying Processing Options for Print Jobs•Applying a Job Filter•Viewing Job Properties•Defaults and Overrides•Changing the Job Properties
Use these procedures to work with jobs on TotalFlow Print Server.
SSuubbmmiittttiinngg aa PPrriinntt JJoobbThere are several ways to submit a job to TotalFlow Print Server.
Before you submit jobs from Windows 7, check whether [Authentication required to submit jobs] isset to [Yes]. If so, download and install the Windows hotfix from http://support.microsoft.com/kb/2616471. This hotfix corrects an access problem. Without it, Windows 7 asks you forauthentication, but does not pass your credentials to TotalFlow Print Server.
You cannot submit jobs from applications that do not conform to the data format of TotalFlow PrintServer.
Submitting a Print Job from the Console
You can submit a job from the console.
To submit a print job from the console:
1. Edit the virtual printer where you want to submit the job and make sure that the [Manual jobsubmission (console)] check box is selected under [Supported submission methods].
See Editing an Object, p. 87 for instructions.
2. In the printer control bar, click [Submit Job].
3. Select the jobs that you want to print.
The jobs can be on the local computer, a USB storage device, a CD or DVD, or a mappednetwork drive.
When you submit a job from removable media (DVD or USB), you cannot do other tasks at theconsole until the job finishes spooling or is canceled.
If you submit many jobs at once, some file names can be invisible or can overlap with others. Youcan submit the jobs anyway.
4. Select a virtual printer.
5. To set properties for a single job, do these steps:

7
110
1. Click [Edit].
2. Set properties for the job.
You cannot set properties for multiple jobs at the same time.
6. Select an option for [Hold] or [Print].
Submitting a Job from a Hot Folder on Windows
To submit jobs from a remote Windows system to a virtual printer using a hot folder, you must map anetwork drive to the Printer folder. This folder contains all the virtual printer hot folders.
This procedure explains how to map a network drive on Windows 7. Other versions of Windows vary.
1. In TotalFlow Print Server, make sure that the [Hot folders] network protocol is enabled.
2. Edit the virtual printer and make sure that the values of [Supported submission methods]include [Hot folders].
3. On the Windows [Start] menu, right-click [Computer], then click [Map network drive...].
4. Select a drive letter.
5. In [Folder], type the IP address or host name of the system where TotalFlow Print Server isinstalled with the \\ prefix, then click [Browse...].
6. Select the Printer folder.
7. Select [Reconnect at login].
8. Click [Finish].
9. OOppttiioonnaall:: Create a shortcut to the hot folder.
Each hot folder has the same name as its virtual printer.
1. Right-click the hot folder and select [Create shortcut].You see a message asking if you want to create the shortcut on the desktop.
2. Click [Yes].
10. Copy a file either to the hot folder on the mapped network drive or to the shortcut.
Submitting a Print Job from a Hot Folder on Mac
Print jobs can be submitted from other computers in the network, including Mac systems.
To submit a print job from a hot folder on a Mac system:
1. In TotalFlow Print Server, make sure that the [Hot folders] network protocol is enabled.
2. Edit the virtual printer and make sure that the values of [Supported submission methods]include [Hot folders].
3. In the Mac system Finder, click [Go], then [Connect to Server…].
4. Type the IP address of TotalFlow Print Server with the smb:// prefix, then click [Connect].
7 Working with Jobs

7
111
5. Select [Guest], then click [Connect].
6. Copy a PostScript or PDF file to the hot folder associated with the virtual printer.
The hot folder is in the Printer folder and has the same name as the virtual printer, forexample, Printer/Print.
Submitting a Print Job Using FTP
You can use FTP to submit jobs to a virtual printer.
To submit jobs from a remote computer using FTP:
1. In TotalFlow Print Server, make sure that the [FTP] and [Hot Folders] network protocols areenabled.
2. Edit the virtual printer where you want to submit the job and make sure that the values of[Supported submission methods] include [FTP] and [Hot folders].
3. Make an FTP connection from the remote computer to TotalFlow Print Server.
For example, ftp myprintserver.4. In TotalFlow Print Server, make sure that the [FTP] and [Hot Folders] network protocols are
enabled.
5. Do one of these actions:
• If TotalFlow Print Server does not require authentication to submit a job, press [Enter] to login as the default user.
• Otherwise, enter your user name and password.
You connect to the hot folder for the default virtual printer.
6. OOppttiioonnaall:: To submit the job to a virtual printer other than the default, change to the hot folder forthat virtual printer.
For example, cd ../myvirtualprinter.7. Set the FTP connection to binary mode using the binary or bin command.
8. Send the job to TotalFlow Print Server.
For example, the command put myfile.pdf would send the file myfile.pdf to thedefault virtual printer.
9. Enter the bye command to end the FTP connection.
Submitting a Print Job Using the Windows Printer Driver
You can use the printer driver to submit jobs to TotalFlow Print Server from a remote Windows system.
To install the printer driver, see the Setup Guide.
To submit a job using the printer driver:
1. Open the document file in an application that has a print function (for example, Adobe Reader).
Submitting a Print Job

7
112
2. Select the print function.
In many applications, the print function is [File], then [Print].
3. In the Print window, select the printer and print options.
• When you print a PDF document from Adobe Acrobat or Adobe Reader, do not select[Choose paper source by PDF paper size] if the document includes pages with differentorientations. If you do, the document can be printed incorrectly.
• Do not use the [Separator page] printer option to print separator pages. Use the [Bannerpage] or [Job separator sheet] job property instead.
4. To change the job properties:
1. Click [Properties].
2. If you want to import a job ticket, click [Import] on the [Job Properties] tab and select thejob ticket file.
3. Set job properties in [Frequently Used Settings] or [Job Properties].
• [Frequently Used Settings] include input and output tray settings, paper size and type,print side, finishing options, page orientation, and number of copies. [Frequently UsedSettings] is only available on Windows.
• [Job Properties] is similar to the Job Properties Editor in the console.
4. If you want to export the job properties to a job ticket, click [Export] on [Job Properties]and save the job ticket file.
5. Click [OK].
5. Click [Print].
Submitting a Print Job Using the Mac Printer Driver
You can use the printer driver to submit jobs to TotalFlow Print Server from a remote Mac system.
To install the printer driver, see the Setup Guide.
• You cannot use the printer driver to print from applications where library validation is enabled.
• You cannot use the printer driver to print from applications where garbage collection is enabled.
• Results are unpredictable when you use the printer driver to print from these Mac OS X applications:
– Adobe InDesign CS3 or later
– Adobe Illustrator CS3 or later
To submit a job using the printer driver:
1. Open the document file in an application that has a print function (for example, Adobe Reader).
2. Select the print function.
In many applications, the print function is [File], then [Print].
7 Working with Jobs

7
113
3. In the Print window, select the printer and print options.
When you print a PDF document from Adobe Acrobat or Adobe Reader, do not select [Choosepaper source by PDF paper size] if the document includes pages with different orientations. Ifyou do, the document can be printed incorrectly.
4. To change the job properties:
1. Select [Properties] from the list.
2. If you want to import a job ticket, click [Import] on the [Job Properties] tab and select thejob ticket file.
3. Set job properties in [Job Properties].
[Job Properties] is similar to the Job Properties Editor in the console.
4. If you want to export the job properties to a job ticket, click [Export] on [Job Properties]and save the job ticket file.
5. Click [OK].
5. Click [Print].
Submitting a Print Job from Prinect
Prinect requires you to identify TotalFlow Print Server using a host name or IP address.
Before you use the Prinect Hybrid Workflow system, you must register the paper list in the printer.
1. In TotalFlow Print Server, make sure that the [JMF] network protocol is enabled.
See Enabling an Object, p. 88 for instructions.
2. To submit the job, use the host name or IP address of TotalFlow Print Server.
Submitting a Print Job Using JMF
Many applications that create or transmit Job Definition Format (JDF) job tickets use JMF (JobMessaging Format) to submit jobs. These applications include RICOH TotalFlow Path and workflows likeAPOGEE.
The details for configuring TotalFlow Print Server to receive jobs from these applications vary. This topicprovides a general process. Adjust it if necessary.
1. In TotalFlow Print Server, make sure that the [JMF] network protocol is enabled.
2. If the application requires you to identify TotalFlow Print Server using a URL that includes a JMFdevice ID, make sure that the JMF device ID is defined.
See Defining a JMF Device ID, p. 78 for instructions.
3. Edit the virtual printer where you want to submit the job and make sure that the values of[Supported submission methods] include [JMF].
Submitting a Print Job

7
114
4. To submit the job, use one of these URLs. Experiment to find out which one works for yourapplication.
RICOH TotalFlow Path generates a URL from the host name or IP address of the print server, soyou do not need to specify one.
• To submit the job to the default virtual printer, use this URL:
http://hostname/webJmf/deviceID• To submit the job to a specific virtual printer, use this URL:
http://hostname/webJmf/deviceID/vpname
hhoossttnnaammeeThe host name or IP address of TotalFlow Print Server
ddeevviicceeIIDDThe JMF device ID
vvppnnaammeeThe name of the virtual printer
Submitting a Print Job Using LPR
You can use the lpr command to submit a job from any system where an LPR client is installed toTotalFlow Print Server.
Before you use the lpr command, you must install the LPR client. Windows operating systems earlierthan Windows Vista do not support LPR.
To submit a job using the lpr command:
1. In TotalFlow Print Server, make sure that the [LPR] network protocol is enabled.
2. Edit the virtual printer where you want to submit the job and make sure that the values of[Supported submission methods] include [LPR].
3. Open a command prompt.
4. Enter one of these commands:
• On Windows:
lpr -Shostname -Pvpname filename• On UNIX-based systems, including Mac systems:
lpr -Hhostname -Pvpname filename
hhoossttnnaammeeThe host name or IP address of the system where TotalFlow Print Server is installed
vvppnnaammee
7 Working with Jobs

7
115
The name of the virtual printer
ffiilleennaammeeThe file name of the job
Submitting a Print Job Using AppleTalk
You can submit a print job from an AppleTalk client.
Mac OS X v10.7 and later versions do not support AppleTalk. To submit jobs from these operatingsystems, use a hot folder, LPR, FTP, or the printer driver.
1. In TotalFlow Print Server, make sure that the [AppleTalk] network protocol is enabled.
2. Edit the virtual printer where you want to submit the job and make sure that the values of[Supported submission methods] include [AppleTalk].
[AppleTalk] can be enabled for only one virtual printer at a time.
3. On your Mac system, make sure that AppleTalk is enabled in Network preferences.
4. Do one of these actions:
• For Mac OS X v10.2.8 or earlier, click the [Printer] menu in the print dialog, then [EditPrinter List].
• For Mac OS X v10.3 or later, click the [View] menu, then [Show Printer List].
The Printer List window opens.
5. Click [Add Printer].
6. In the pop-up window, select [AppleTalk].
7. If your network uses AppleTalk zones, choose the appropriate zone in the second pop-up menu.
8. Select the virtual printer and click [Add].
9. Open the document file in an application that has a print function (for example, Adobe Reader).
10. Select the print function.
11. Select the printer, then click [Print].
LLooggggiinngg aanndd SSttoorriinngg JJoobb TTiicckkeettssYou can configure TotalFlow Print Server to log and store the updated job tickets for all jobs submittedto hot folders.
You can store up to 10,000 job tickets. After this limit is reached, the oldest existing job ticket is deletedwhenever a new job ticket is stored.
To enable logging and storing updated job tickets:
1. On the Configuration page, select DFE→ Network.
Logging and Storing Job Tickets

7
116
2. Select [Hot Folders] and click , the edit icon, to edit it.
3. In the [Publish updated job tickets] field, select [Enabled].
4. Click [OK].
MMaannaaggiinngg PPrriinntt JJoobbssThere are several ways to manage print jobs. Print jobs can be paused in various states, stored,restarted, and deleted.
IPDS print jobs are processed differently from other print jobs.
Previewing a Print Job
You can preview a job in a jobs portlet.
To preview a print job:
1. On the Jobs page, find the portlet that contains the print job to preview.
2. Select the print job to preview.
3. If you do not see a preview on the right side of the portlet, click i , the information icon.
Viewing a Print Job
Use the Image Viewer to see a high-resolution image of a print job.
You cannot view jobs in the Job History portlet.
To view a print job:
1. On the Jobs page, find the portlet that contains the print job to view.
2. Select the print job and click , the view icon.The Image Viewer opens and displays an image of the print job.
3. Use these controls to select the area that you want to view:
Icon Description
Zoom in.
Zoom out.
7 Working with Jobs

7
117
Icon Description
Rotate the image 90 degrees to the left.
Rotate the image 90 degrees to the right.
Go to the first page or record of the job.
Go to the previous page or record.
Go to the next page or record.
Go to the last page or record of the job.
The [View] tab shows a thumbnail of the page with the area that you are viewing highlighted.
4. Select the color planes that you want to view.
The selected color planes are superimposed. To see one color plane at a time, select only thatcolor.
5. To close the Image Viewer, click [Cancel].
Holding a Print Job
You can hold active print jobs at any point during the print process until they actually start to print.
To hold a print job:
1. On the Jobs page, find the Active Jobs portlet.
2. Select the active print job to hold.
3. Click , the hold icon.
The print job moves to the Inactive Jobs portlet and the [Held] state.
Printing a Sample Copy of a Single Job
You can print a sample copy of a held job to check it before you print multiple copies.
To print a sample copy:
1. On the Jobs page, find the Inactive Jobs portlet.
2. Select the job that you want to print a copy of.
3. Click , the more actions icon, then select [Sample Print].
The job is released to print a single copy, then returns to the [Held] state.
Managing Print Jobs
7
118
Printing a Sample Copy of Every Job
You can print a sample copy of every job sent to the printer. You can check the sample before you printmultiple copies.
To print a sample copy of every job:
1. On the Configuration page, selectWorkflow→ Processing options.
2. Click [Job Properties].
3. Click [Job Setup] on the left side of the screen.
4. Set [Sample print] to [On].
5. Click [OK].
Each job is released to print a single copy, then placed in the [Held] state.
Printing Sample Pages of the Current Job
You can print sample pages of the job that is currently printing.
To print sample pages:
1. In the printer control bar, click [Sample].Either a copy of the current page of the current job or a collated copy of all the pages of thecurrent job is printed. The output depends on how sample print is configured. Again dependingon the configuration, more samples can be printed at intervals until the end of the job or until youstop sample printing.
2. To stop sample printing, click [Sample] again.
Causes of Invalid Print Jobs
Print jobs that cannot be processed are given a status of [Invalid]. These print jobs are listed in theInvalid Jobs portlet.
An invalid job is not the same thing as a job with errors in the data stream. The job can be free of errors,but the printer is not configured to process it. Changing the job property values or the printerconfiguration settings can make the job valid.
A print job could be invalid because:
• Required fonts are missing and font substitution is turned off.
• The correct printer preset is not loaded or has been modified after loading.
• The correct paper is not loaded.
• The correct page range is not indicated.
7 Working with Jobs

7
119
Editing the Properties of a Print Job with the Job Properties Editor
Use the Job Properties editor to edit the values of print job properties in the job ticket. You do not haveto submit a job ticket with the job to edit these properties. TotalFlow Print Server can create a job ticketinternally.
The values that you set by editing a print job in the Job Properties editor are job ticket values. They takeprecedence over all other values except virtual printer override values.
Only inactive jobs and stored jobs can be edited. Active jobs cannot be edited.
To edit a print job in the Job Properties editor:
1. On the Jobs page, find the portlet that contains the print job to edit.
2. Select the print job to edit.
3. Click , the edit icon.The print job opens in the Job Properties editor.
After you make changes, verify them in the portlet that contains the job.
Editing a Print Job with TotalFlow Prep
Use TotalFlow Prep to edit the content of a print job, or to edit the values of layout and finishingproperties in the job ticket. You do not have to submit a job ticket with the job to edit these properties.TotalFlow Print Server can create a job ticket internally.
Before you can edit jobs using TotalFlow Prep, you must configure TotalFlow Print Server so thatTotalFlow Prep can access it. See Setting up Access Using TotalFlow Prep, p. 82 for instructions.
The values that you set by editing a print job with TotalFlow Prep are job ticket values. They takeprecedence over all other values except virtual printer override values.
Only inactive jobs and stored jobs can be edited. Active jobs cannot be edited.
To edit a print job using TotalFlow Prep:
1. On the Jobs page, find the portlet that contains the print job to edit.
2. Right-click the print job to edit, then click [Open TotalFlow Prep].The print job opens in TotalFlow Prep. For information about using TotalFlow Prep, see TotalFlowPrep User’s Guide.
After you make changes, verify them in the portlet that contains the job.
Managing Print Jobs

7
120
Changing the Tone Curve for a Job
You can select a different tone curve for a job.
To change the tone curve of a print job:
1. On the Jobs page, find the portlet that contains the print job to edit.
2. Select the print job and click , the view icon.The Image Viewer opens and displays an image of the print job.
3. Click the [Edit] tab.
4. Select the tone curve you want to use from the list.
5. Click [OK].
Storing a Print Job
Storing a print job prevents it from being automatically deleted after it is successfully printed. Store printjobs that you plan to run again.
TotalFlow Print Server ignores storage settings from external programs, including the printer driver. Usethe process in this topic to store jobs.
To store a print job:
1. On the Jobs page, find the portlet that contains the print job to store.
2. Select the print job to store.
3. Click , the edit icon.The print job opens in the Job Properties editor.
4. Select Job Setup→ Advanced Settings.
5. In [Store], do any of these actions:
• Select [Store indefinitely] to store the job until the operator deletes it.
• Select [Store until] and specify the date and time when the job will be deleted.
You can set this value only for individual jobs that are already in [Stored] state.
• Select [Store for] and specify the number of days and hours to store the job.
You cannot set this value for individual jobs that are already in [Stored] state.
6. Select [Space available] to delete the job when TotalFlow Print Server runs out of raw spoolspace or approaches the limit of jobs in the system.
7 Working with Jobs

7
121
The jobs with this value that were printed least recently are deleted first.
If TotalFlow Print Server runs out of RIP spool space, jobs with this value are still stored but theirRIP data is deleted. The least recently printed RIP data is deleted first.
7. Click [OK].
• You can use the Job Properties editor to store every non-IPDS print job submitted to TotalFlow PrintServer. On the Configuration page, selectWorkflow→ Processing options. Click [JobProperties] to open the Job Properties editor.
• You can use the Job Properties editor to store every non-IPDS print job submitted to a virtual printer.On the Configuration page, selectWorkflow→ Virtual Printers. Select the virtual printer you
want, then click , the edit icon, then click [Job Properties ...] to open the Job Properties editor.If you set [Store] to [Store for], this value is used to calculate the [Store until] value for jobsreceived by the virtual printer.
Reprinting a Stored Job
You can print a stored job again.
To reprint a stored print job:
1. On the Jobs page, find the Stored Jobs portlet.
2. Select the stored print job you want to reprint.
3. Do one of these actions:
• Click , the print icon.
• Click , the more actions icon, and select [Process and Hold].
• Click , the more actions icon, and select [Process and Print].
• Click , the more actions icon, and select [Print and Store].
• Click , the more actions icon, and select [Process, Print and Store].
The print job moves to the Active Jobs portlet and continues through the process you selected.
Suspending a Print Job
A print job that has a status of [Printing] can be suspended in the middle of its run.
To suspend a print job:
1. On the Jobs page, find the Active Jobs portlet.
Managing Print Jobs

7
122
2. Select the print job to suspend.
3. Click , the more actions icon.
4. Select [Suspend].
The status of the print job changes from [Printing] to [Suspended]. The job moves to the Inactive Jobsportlet.
Resetting a Print Job
A suspended print job can be reset. A reset print job starts printing again from the beginning.
To reset a print job:
1. On the Jobs page, find the Inactive Jobs portlet.
2. Select the print job to reset.
3. Click , the more actions icon, in the toolbar at the top of the page.
4. Select [Reset Suspend Point].The status of the print job changes from [Suspended] to [Held].
5. To finish printing the job, select it and click , the print icon.
Releasing a Print Job
Inactive print jobs can be released to continue processing, printing, or both. A suspended job beginsprinting where it left off.
To release a print job:
1. On the Jobs page, find the Inactive Jobs portlet.
2. Select the inactive print job to release.
3. Do one of these actions:
• Click , the print icon.
• Click , the more actions icon, and select [Process and Hold] or [Process and Print].These options process the print job one time, and then print multiple copies (if selected) of thealready-processed job. Use them to avoid blank pages in between job pages that couldoccur if the processing speed is not as fast as the printing speed. This could happen on acomplex job, especially when it is printing multiple copies.
7 Working with Jobs

7
123
– The recommended time to use [Process and Hold] is during off-shift times or when doingmaintenance operations.
– You can process one job using [Process and Print] or [Process and Hold] and printanother job at the same time; but this can slow down printing.
– You can print test masters during [Process and Hold] because they are alreadyprocessed.
• Click , the more actions icon, and select [Print and Store].
• Click , the more actions icon, the actions icon, and select [Process, Print and Store].
The print job moves to the Active Jobs portlet and continues through the process you selected.
Changing the Order of Processing Jobs
You can change the order in which jobs are processed and printed.
To change the job order:
• To process a job immediately after the current job:
1. In the Active Jobs or All jobs portlet, select the job to process next.
The job must be in the [Waiting to process] or [Waiting to print] state.
2. Click , the more actions icon.
3. Select [Process Next].
• To change the order of all scheduled jobs:
1. In the Active Jobs portlet, click , the options icon.
2. Select View→ Schedule.
3. Drag and drop the jobs into the new order.
Deleting a Print Job
Print jobs can be easily deleted.
To delete a print job:
1. On the Jobs page, find the portlet that contains the print job to delete.
2. Select the print job to delete.
3. Click , the delete icon.
Although the print job is deleted, a record of it can be found in the Job History portlet.
Managing Print Jobs

7
124
SSppeecciiffyyiinngg PPrroocceessssiinngg OOppttiioonnss ffoorr PPrriinntt JJoobbssYou can specify processing options that apply to all non-IPDS jobs. Processing options include theinformation to include on the banner page.
To specify processing options for print jobs:
1. On the Configuration page, selectWorkflow→ Processing options.
2. Select the correct processing options for the print jobs.
Jobs fail if the combination of job processing options and peripherals is incorrect because thedefault value for [Process jobs with unsupported options] is [Fail job]. If you select [Saveand hold], you can change a combination repeatedly because jobs that do not have correctcombinations are saved. However, [Save and hold] uses spool space.
3. To configure the banner page, do these steps:
1. Click [Settings...].
2. Select the properties to include on the banner page.
3. To change the order of the properties, select a property and use the arrows to move it up ordown in the list.
4. Click [OK].
4. Click [SAVE].
AAppppllyyiinngg aa JJoobb FFiilltteerrJob filters are scripts that process all the jobs received by a virtual printer.
TotalFlow Print Server includes basic filters that you can edit to do simple tasks, such as replacing stringsin a job. You can get customized filters from your RICOH sales representative to do more complextasks.
To apply a job filter to the jobs received by a virtual printer:
1. If the filter has not been installed, install it:
1. On the Configuration page, selectWorkflow→ Filters.
2. Click , the install icon.
3. Upload the file.
2. Add the filter to the virtual printer:
Filters are applied in the order that they are added to the virtual printer. If the new filter is to beapplied before an existing filter, delete that filter, add the new filter, then add the existing filteragain.
1. On the Configuration page, selectWorkflow→ Virtual Printers.
2. Edit the virtual printer.
7 Working with Jobs

7
125
3. Set [Processing mode] to [Spool job].
4. Under Filters, click , the add icon.
5. Select the installed filter to add and click [OK].
VViieewwiinngg JJoobb PPrrooppeerrttiieessThe job properties section lets you set up your print job.
It is divided into smaller subsections that let you fine-tune the job.
To view the [Job Properties Editor]:
1. Select a job from the list.
2. To open the editor and to change the job options, click , the edit icon.
Some options are not available for the default properties or if you edit the print job properties from theVirtual Printers section.
DDeeffaauullttss aanndd OOvveerrrriiddeessWhen an override value is set for a virtual printer property, that value replaces any existing value set forthat property in the incoming job. The default values are only used when no value is set in the incomingjob.
If any exception pages are set as defaults, they are used only if the incoming job does not have anyexceptions set. Once a job is in the system, you can edit any property, even the properties set based onan override value.
To switch between the defaults and overrides for a value, do these steps:
1. Open [Job Properties].
2. Select an attribute containing a specific value. On the left side of the label, the icon showsthat the selected value is the default value.
3. To replace an existing value with the one you select, click , the defaults and overrides icon.The override mode is active when the defaults and overrides icon is displayed.
The value selected is used as a default value for the attribute where the change was made. If there is no
value set, the icon shows that the defaults and overrides option is disabled.
CChhaannggiinngg tthhee JJoobb PPrrooppeerrttiieessThe job properties section contains these settings:
• [Basic Settings]
• [Job Setup] settings
• [Layout] settings
Viewing Job Properties

7
126
• [Paper] settings
• [Marks and Bleeds] settings
• [Finishing] settings
• [Exception Pages] settings
• [Covers] settings
• [Sheets] settings
• [Color] settings
• [Print Quality] settings
• [Fifth Station] settings
• [Watermark] settings
• [Header/Footer] settings
The [Fifth Station] settings are only available when a [Fifth Station] extension kit is installed.
The [Fifth Station] extension kit can only be installed on these printers:
• Pro C7200/C7200S/C7200SX/C7200X/C7210/C7210S/C7210SX/C7210X
Changing Job Options
This section lets you see and edit basic information about the print job.
7 Working with Jobs

7
127
To access the job options:
1. Open [Job Properties Editor].
2. Click [Job Setup] on the left side of the screen.
3. Use the options displayed to customize the job.
Some options are not available for the default properties or if you edit the print job properties from theVirtual Printers section.
Configuring the Job Options
You can edit the basic information about the job.
1. Click [Job Setup] on the left side of the screen.
2. Enter the number of copies you want to print in the [Copies] field.
3. To specify which pages to print, enter a single page, multiple pages separated by commas, or arange of pages in the [Page range] field.
4. Specify which records to print, either as a single page, multiple pages separated by commas, ora range of pages in the [Record range] field.
Changing the Job Properties

7
128
To enable the [Record range] field, go to the [Variable Data Settings] section and edit the[Number of pages per record] and [Number of records] fields.
5. To print a single sample copy of the job before manually releasing all the copies for the finalprint, select [On] from the [Sample print] list.
6. To place a banner page before the job, go to [Banner page] and select [Before job]. To placethe banner page before and after the job, click [Before and after job].
7. Expand the [Job Information] group.
8. Enter the job name in the [Job name] field.
9. To specify the user who modified the job, type a name in the [Last modified by] field or select auser already registered from the list.
10. To specify the person who owns the job, enter the name in the [Customer] field.
11. If you have chosen to add a banner page to the job, edit the information to print on the banner inthe [Banner page information] field.
12. Add additional information about the job in the [Notes 1] and [Notes 2] fields.
13. In the [Description] field, enter a text to describe the job.
Some options are not available for the default properties or if you edit the print job properties from theVirtual Printers section.
Editing the Variable Data Settings
Using the Variable Data Printing data formats, you can print personalized documents containingrecords. You can specify the number of records and the number of pages per record.
1. Click [Job Setup] on the left side of the screen.
2. Scroll down and expand the [Variable Data Settings] section.
If the [Number of records] field is disabled, you must set a value for the [Number of pagesper record] field. The [Number of records] field is always displayed as read-only.
3. To specify if you want to cache and reuse the objects in the jobs containing PDF files, select avalue from the [Cache objects in PDF jobs] list.
4. Select the [Number of pages per record] check box.
5. To specify how many pages are per one record, enter a value in the [Number of pages perrecord] field.
The [Number of records] field automatically displays the number of records in the variable datafile. This value is calculated by dividing the total number of pages by the number of pages perrecord.
7 Working with Jobs
7
129
Setting the Job Priority
Specifies the priority of the job.
To set the job priority:
1. Click [Job Setup] on the left side of the screen.
2. Go to [Priority] under [Advanced Settings].
3. If necessary, select the check box to enable the [Priority] input field.
4. Enter 100 if you want the job to be the highest priority or 1 if the job is the lowest priority.
Setting the Job Store Options
Specifies whether the job is stored, and if so for how long.
To set whether or how the job is stored:
1. Click [Job Setup] on the left side of the screen.
2. Scroll down and go to [Store] under [Advanced Settings].
3. To turn off the [Store] option for the current job, select [Off] from the list.
4. To store the job select [Store indefinitely]. If [Space available] is checked, this job is deletedwhen an incoming job requires the space.
5. To store the job for a specific amount of time after it is printed, select [Store for] and set the daysand hours to store the job.
6. To store a job until a specific day and time, select [Store until] and use the calendar icon to setthe date. You can set the time by clicking the up and down arrows or simply entering the digits.
7. Use the [Space available] option to store the job for the selected period if there is enoughstorage space.
8. To store the processed version of the job along with the source, select [Save process].
Setting the Email Address for Notifications
Specifies who to notify when this job completes or printer encounters an error.
To set up an email address to receive notifications when a job is done:
1. Click [Job Setup] on the left side of the screen.
2. Go to [Email notification] and select [Notify on job completion].
3. Enter the email address in the [To] field.
4. In the [Message] field, enter a customized message or a comment for the email body.
Substituting a Font
You can select to substitute a requested font if it is not found.
Changing the Job Properties

7
130
1. Click [Job Setup] on the left side of the screen.
2. Scroll down and go to [Advanced Settings].
3. From the [Font substitution] list, select [On].
Setting a Different Imposition for a Range of Pages
To set a different imposition for only a range of pages:
1. Go to [Job Setup].
2. Set the page range in the [Page range] field.
3. Scroll down and go to [Advanced Settings].
4. Select [Reflow selected pages] from the [Page range imposition] list.
Selecting Printer Presets
Specifies the printer preset used to print the job.
To select a set of printer configuration parameters:
1. Click [Job Setup] on the left side of the screen.
2. Scroll down and go to [Advanced Settings].
3. Go to [Printer preset].
4. Select a printer preset configuration from the list, if available.
5. To print with any printer preset values, select [Any].
Selecting Printer Features
Specifies the printer features used to print the job.
To select a printer feature:
1. Click [Job Setup] on the left side of the screen.
2. Scroll down and go to [Advanced Settings].
3. Go to [Printer feature].
4. Select a printer feature from the list, if available.
Editing the Layout Settings
This section lets you specify how you want the pages to be laid out in your print job.
7 Working with Jobs

7
131
To access the layout options:
1. Open [Job Properties Editor].
2. Click [Layout]on the left side of the screen.
3. Use the options displayed to edit the layout settings.
Setting a Booklet Layout
1. Click [Layout] on the left side of the screen.
2. Go to the [Booklet] section.
3. Set the [Imposition] value to [Booklet].
Setting a Gangup Layout
1. Click [Layout] on the left side of the screen.
2. Go to the [Gangup] section.
3. Set the [Imposition] value to [Repeat] or [Speed].
4. Set the [Pages per sheet] value to [2] or more.
Changing the Job Properties

7
132
Selecting the Printing Side
You can specify which sides of the sheet to print on.
1. Click [Layout] on the left side of the screen.
2. Select the layout type and go to [Printing side].
3. To print only on one side, select [Front side (1 sided)].
4. To print only on the back side of the paper, select [Back side (1 sided)]
5. If you want to print on both sides of the paper, select [Both sides (2 sided)].
Changing the Page Orientation
To change the page orientation from vertical layout to a horizontal layout:
1. Click [Layout] on the left side of the screen.
2. Select the layout type and go to [Orientation].
3. Select [Landscape] from the list.
The selected orientation must match the orientation of the pages in the print file. If there are combinedlayouts in the print file, you must set it to match the orientation of most pages. Jobs submitted to virtualprinters must have the same orientation as the virtual printer. Otherwise, the job might not print asexpected.For example, if the print file has ten pages and seven pages are displayed in portrait mode and three inlandscape mode, you must set the orientation to portrait, to match the orientation of most pages.
Selecting the Open Orientation
You can specify the direction in which sheets are opened.
To select the direction to open or flip the sheets:
1. Click [Layout] on the left side of the screen.
2. Select the layout type and go to [Open orientation].
3. To open the sheet from right to left, select [Open to left]. When you select it, the [Bindingedge] is automatically set to [Left].
4. To open the sheet from bottom to top, select [Open to top]. When you select it, the [Bindingedge] is automatically set to [Top].
Rotating a Page
To specify the amount to rotate the image on each page in the job in a counter clockwise direction:
1. Click [Layout] on the left side of the screen.
2. Select the layout type and go to [Rotation degrees].
7 Working with Jobs

7
133
3. Click one of the buttons to select the number of degrees to rotate the image on the page.
You can use this setting in addition to any automatic rotation. The automatic rotation ensures that thelong edge of the image is aligned with the long edge of the sheet or page.
Scaling an Image
To specify whether to reduce or enlarge the image to fit:
1. Click [Layout] on the left side of the screen.
2. Select the layout type and go to [Reduce/Enlarge] under [Image].
3. To reduce or enlarge the image or up size to match the print size, select [Fit to print size].
4. To reduce an image to match the paper size or the ups size, when there are multiple ups, select[Reduce to fit].
5. To preserve the original size of the image, select [Off].
Aligning an Image
To specify how to align an image:
1. Click [Layout] on the left side of the screen.
2. Select the layout type and go to [Image alignment] under [Image].
3. To have an image centered on the sheet, select [Center].
4. To anchor the corner of an image to the bottom left corner of the sheet select [Bottom left].
Changing the Origin of the Page
1. Click [Layout] on the left side of the screen.
2. Select the layout type and go to [Image offset] under [Image].
3. If necessary, click [Image offset] to switch it on.
4. You can set the same values for front and back by selecting the [Apply the same image offsetfor front and back] check box.
5. Enter a value as a positive or negative number with up to three decimals in the [Front] and[Back] fields.
6. Select the unit of measure from the [Units] list.
• When the sheet is rotated for display purposes, the image offset rotates with the sheet.
• The X and Y arrows on the coordinate system indicate the image offset direction.
Changing the Job Properties

7
134
Adding a New Custom Layout
1. Click [Layout] on the left side of the screen.
2. Go to the [Normal] section and select a value greater than [1] from the [Pages per sheet] list.
3. To create a new custom layout, click [Add custom layout].
4. To preserve the same settings for both sides, check the [Use same layout for both sides] checkbox.
5. To select the location of the layout you want to customize, click the page to select it, use the[Location] list, use the arrows, or simply drag and drop the page on top of another.
6. To specify the degree to rotate the images placed in this location, click one of the [Rotationdegrees] options.
7. To reduce or enlarge the images so that it fits the location, select a value from the [Reduce/Enlarge] list.
8. To specify the amount to offset the images placed in this location, click [Image offset] to switch iton and enter a value in the X and Y fields.
If you do not select the [Maintain custom order] check box, the page order is the same as specifiedunder [Layout]. The [Maintain custom order] check box is automatically selected when you changethe order of pages.
Changing the Paper Settings
This section lets you see information about the paper selected for the job.
7 Working with Jobs

7
135
To access the paper settings options:
1. Open [Job Properties Editor].
2. Click [Paper] on the left side of the screen.
3. Use the options displayed to customize the paper settings.
Adding a Manual Paper
1. Open the [Job Properties Editor].
2. Click [Paper] on the left side of the screen.
3. Expand the [Paper] list and click [Manual paper] to open the [Add manual paper] dialog.
4. Select a tray from the [Input tray] list.
5. Set the size by selecting an option from the [Size] list or select [Custom] to create a custom size .If the size is set as an override, it overrides any size set in the print file. Otherwise, the size set inthe print file is used. See the Defaults and Overrides, p. 125 section for more details.
6. Set the weight by selecting an option from the [Weight] list or enter a weight. To allow the job toprint on any paper weight, select [Any] .
7. Set the type by selecting an option from the [Type] list or enter a type. To allow the job to printon any paper type, select [Any].
Changing the Job Properties

7
136
Some options are not available for the default properties or if you edit the print job properties from theVirtual Printers section.
Updating a Manual Paper
1. Open the [Job Properties Editor].
2. Click [Paper] on the left side of the screen.
3. Go to the [Paper] field and expand the list.
4. In the [Manual paper] section, hover over the paper you want to edit and click the update iconto display the [Update manual paper] dialog.
Setting a Paper Custom Size
1. Open the [Job Properties Editor].
2. Click [Paper] on the left side of the screen.
3. Go to the [Size] list and select [Custom].
4. Enter the custom values in the [Width] and [Height] fields.
Selecting a Paper in the Paper Catalog
The [Paper catalog] mode lets you select the paper that is currently defined in the printer papercatalog. You cannot change the properties of a paper when the [Paper catalog] is selected.
1. Open the [Job Properties Editor].
2. Click [Paper] on the left side of the screen.
3. Expand the [Paper] list and click [Paper catalog].
4. In the [Paper catalog] window, left-click a paper from the [Catalog paper] section.
Sorting the Paper
You can sort the paper in the [Paper catalog].
1. Open [Job Properties Editor].
2. Click [Paper] on the left side of the screen.
3. Expand the [Paper] list.
4. Click [Paper catalog].
5. Click a column heading to sort the paper based on a paper attribute.
To sort the paper in ascending or descending order, click the column heading again.
7 Working with Jobs
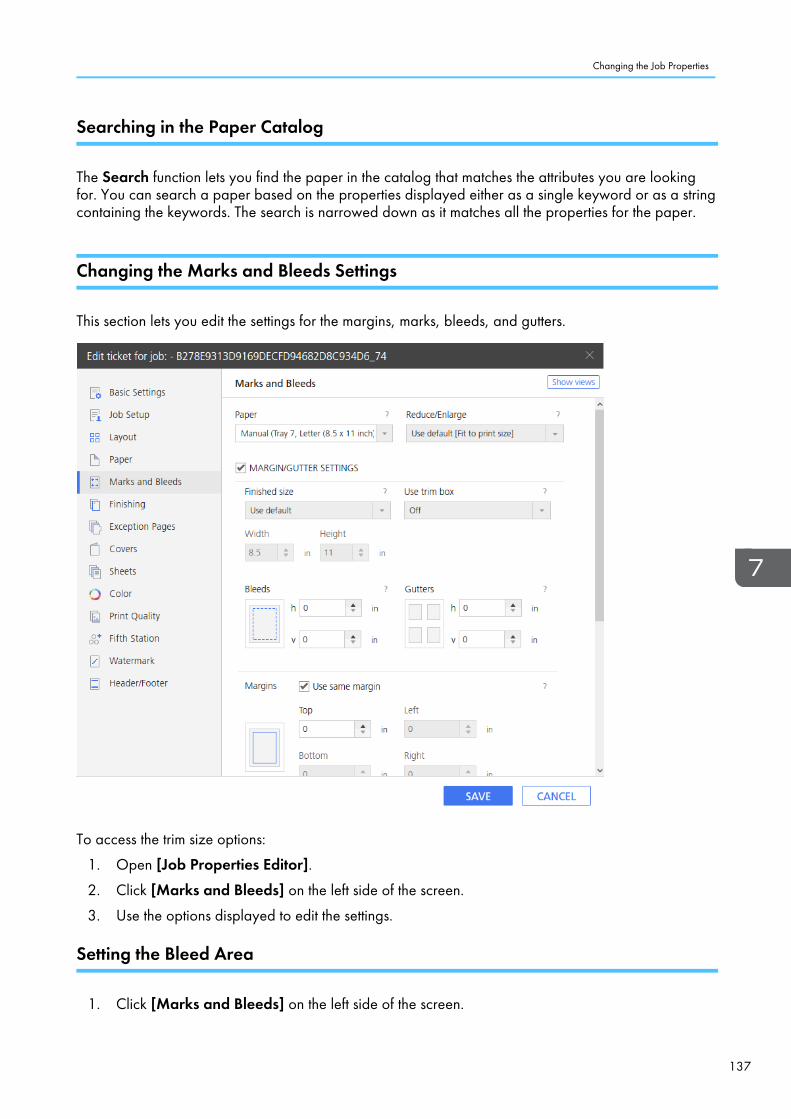
7
137
Searching in the Paper Catalog
The Search function lets you find the paper in the catalog that matches the attributes you are lookingfor. You can search a paper based on the properties displayed either as a single keyword or as a stringcontaining the keywords. The search is narrowed down as it matches all the properties for the paper.
Changing the Marks and Bleeds Settings
This section lets you edit the settings for the margins, marks, bleeds, and gutters.
To access the trim size options:
1. Open [Job Properties Editor].
2. Click [Marks and Bleeds] on the left side of the screen.
3. Use the options displayed to edit the settings.
Setting the Bleed Area
1. Click [Marks and Bleeds] on the left side of the screen.
Changing the Job Properties

7
138
2. Set the paper type and specify whether to reduce or enlarge the image to fit by selecting anoption from the [Reduce/Enlarge] list.
3. Click [Margin/Gutter settings] to switch it on.
4. Go to [Bleeds].
5. Specify the width for the bleed, in the vertical and horizontal fields.
Setting the Distance Between Multiple Pages on a Sheet
1. Click [Marks and Bleeds] on the left side of the screen.
2. Set the paper type and specify whether to reduce or enlarge the image to fit by selecting anoption from the [Reduce/Enlarge] list.
3. Click [Margin/Gutter settings] to switch it on.
4. Go to [Gutters].
5. Specify the width for the gutter in the vertical and horizontal fields.
Setting the Margins
1. Click [Marks and Bleeds] on the left side of the screen.
2. Click [Margin/Gutter settings] to switch it on.
3. Go to [Margins].
4. To set the top, bottom, left, and right margins, which indicate the amount of space to leavebetween the finished size and the outside edges of the sheet, enter the values into thecorresponding fields.
Select the [Use same margin] check box to have the same values for all margins.
Printing Crop Marks
1. Click [Marks and Bleeds] on the left side of the screen.
2. To print the crop marks on the corner:
1. From the [Corner crop marks] list, select the side where to print the crop marks.
2. Select the style for the corner crop marks. The [Single] style marks where to trim the finishedsize and the [Double] style shows both the edge of the bleed and where to trim the finishedsize.
3. To specify the line thickness in points, enter a value in the [Thickness] field.
4. To print the corner crop marks to the edge of the sheet, select [Print to edge].
5. If you want to use a specific length, select [Custom].
6. Enter the values for the horizontal and vertical length and select the units of measure.
7 Working with Jobs

7
139
Set the margins wide enough for the crop marks to print.
3. To print the crop marks on the center:
1. From the [Center crop marks] list, select the side where to print the crop marks.
2. Select the style for the center crop marks.
3. To specify the amount to shift the center of the crop mark from the edge of the finished size,enter a value in the [Offset] field.
4. To specify the units for the offset, use the [Units] list.
Changing Finishing Options
This section lets you see and edit the finishing for the job.
To access the finishing options:
1. Open [Job Properties Editor].
2. Click [Finishing] on the left side of the screen.
3. Use the options displayed to customize the finishing settings.
Changing the Job Properties

7
140
Setting the Stapling and Binding Methods
To insert staples or to select the binding method:
1. Click [Finishing] on the left side of the screen.
2. Go to [Staple/Bind].
3. From the list, select whether to staple or bind the pages in the job.
Selecting the Punching Method
To select how to punch the pages in the job:
1. Click [Finishing] on the left side of the screen.
2. Go to [Punch].
3. Select the punch method from the [Punch] list.
Selecting the Folding Method
To specify how to fold the job or large sheets in the job:
1. Click [Layout] on the left side of the screen.
2. Go to [Fold type].
3. Select one of the folding methods from the list.
Changing the Output Tray
To select what tray to use for the finished output:
1. Click [Finishing] on the left side of the screen.
2. Go to [Output tray].
3. Select one the output trays available for your printer.
Paper that is not folded cannot be send to the output tray of the multi-folding unit. When you print a jobcontaining mixed paper types and some of the paper finishing is a [Z-fold] type, specify a finisher trayas the output tray.
Collating the Job Copies
Specifies how to collate the copies of the job.
To specify how to collate the copies:
1. Click [Finishing] on the left side of the screen.
7 Working with Jobs

7
141
2. To stack all the pages of the first set of copies in the tray, and then jog to offset the stack beforestacking all the pages of the second set of copies in the output tray, select [Shift collate].
3. To set the number of copies you want stacked in each set, enter a value in the [Stack interval]field.
4. To sort all the pages of the first copy in the tray, followed by all the pages of the second copy,select [Collate].
5. To sort all the copies of the first set of pages in the tray, and then jog to offset the stack beforestacking all the copies of the second set of pages in the output tray, select [Stack].
6. To set the number of copies you want stacked in each set, enter a value in the [Stack interval]field.
7. To sort all the copies of the first page in the tray, followed by all the copies of the second page,select [Off].
Ejecting the Job Copies
Specifies whether the output is ejected face-down or face-up in the output tray.
To specify how you want the output ejected:
1. Click [Finishing] on the left side of the screen.
2. Select [Face-down] from the list to print the first page facing down at the bottom of the stack.
3. Select [Face-down, reverse order] from the list to print the first page facing down on top of thestack.
4. Select [Face-up] from the list to print the first page facing up at the bottom of the stack.
5. Select [Face-up, reverse order] from the list to print the first page facing up on top of the stack.
Using the Exception Pages
Use this section to insert blank pages, modify or substitute the settings for the existing pages, createsubsets of pages to be finished, or insert tab pages (including text to print on the tab) for the current job.
The exception pages are:
• [Insert]• [Substitute]• [Subset]• [Tab]
Make sure that you first configure the settings for the [Imposition], [Paper], and [Finishing] optionsbefore any other settings made to the [Exception Pages] section. The exception pages inherit thesesettings when they are first added.
Changing the Job Properties
7
142
Some options are not available for the default properties or if you edit the print job properties from theVirtual Printers section.
Adding Preprinted or Blank Pages
To insert a preprinted or blank page into a job after or before a page:
1. Go to [Exception Pages].
2. Click [Insert].
3. Click [Before] or [After] and then enter the page number in the [Pages] field.
4. Select the paper from the [Paper] list. To preserve the same paper as the job, select the [Usedefault] value.
5. Enter the number of sheets you want to insert in the [Number of sheets] field.
6. Click [Add].
Modifying Pages in a Job
The [Substitute] section allows you to modify the paper, color, printing sides, or image settings for apage or a range of pages. You can also choose to begin a new chapter with the first page of asubstitute.
1. Click [Substitute].
2. In the [Pages] field, enter a number or a range to specify the pages to modify.
Enter a single page, such as 1, or a range of pages separated by a dash, such as 1-10. Whenyou enter a range of pages, a single substitution is created for all the pages in the range.
3. Select the paper, color, printing sides, or image settings.
To use the same paper, color, printing sides, and image settings as the job, select the [Usedefault] value.
4. To begin a new chapter with the substitute, select the [Start new chapter] check box.
5. Click [Add].
Finishing Subsets of Pages
1. Go to [Exception Pages].
2. Click [Subset].
3. In the [Pages] field, enter a number or a range to specify the pages for the subset.
4. To specify how to staple the subset, select one of the values from the [Staple] list.
7 Working with Jobs
7
143
5. To specify how to punch the subset, select one of the values from the [Punch] list.
This field is available only when the printer configuration supports it.
6. To specify how to fold the subset, select one of the values from the [Fold type] list.
This field is available only when the printer configuration supports it.
7. Click [Add].
Inserting Tabs with Text
The [Tab] section allows you to specify where to insert the tab, the paper to use for the tab, and the textto print on the tab. You can also specify the text font and formatting options.
1. Go to [Exception Pages].
2. Click [Tab].
3. Go to [Tab position].
4. To insert before a particular page, click [Before] and enter the page number.
5. To insert after a particular page, click [After] and enter the page number.
6. Select the paper from the [Paper] list.
7. Select the text font name, size, and color.
8. Enter the text to display in the [Line 1] field.
9. If you need additional information or you want the information on multiple lines, use the [Line 2]and [Line 3] fields.
10. Set the [Text direction] to select where to start the text.
11. Go to [Text alignment] to set the horizontal and vertical position of the text.
12. Enter a value in the [Indent] field if you want to indent the text towards the outside edge of thetab.
Tabs are available only when the paper catalog includes paper that supports printing on the tab.Sometimes, tabs are available depending on the settings made in the [Layout] and [Finishing]sections.
Changing the Job Properties

7
144
Adding Covers
The [Covers] section lets you add various types of covers. The type of covers you can add depend onthe settings made on the [Layout] and [Finishing] sections.
Adding Front and Back Covers to a Job
1. Go to [Covers].
2. To add a preprinted or blank front cover, go to [Front cover] and select [Preprinted].
3. To add a printed front cover, go to [Front cover] and select one of the print side options.
4. Select the paper from the [Paper] list.
To use the same settings as the job, select the [Use default] value.
5. Select the [Use same settings for both covers] check box to add the same [Back cover].
6. Clear the [Use same settings for both covers] check box to add a different [Back cover].
7 Working with Jobs

7
145
Adding a Preprinted or Blank Cover to a Booklet
1. Click [Layout] on the left side of the screen.
2. Go to the [Booklet] section.
3. Set the [Imposition] value to [Booklet].
4. Go to the [Booklet cover] section and set the [Cover] to [Preprinted].
5. Select the paper from the [Paper] list.
To use the same settings as the job, select the [Use default] value.
The [Covers] and [Finishing] sections are updated to display the same settings for [Booklet cover].
Adding a Cover to a Perfect Bound Job
1. Click [Finishing] on the left side of the screen.
2. Go to [Staple/Bind] and select [Perfect binding] to enable the [Perfect bound cover]section.
3. Select the paper from the [Cover paper] list.
To use the paper loaded in one of the perfect binder interposer trays, select the [Use default]value.
4. To print on the cover, go to [Cover printing side] to select which sides of the perfect boundcover to print on. If necessary, set [Cover image offset] to shift the images printed on the cover.
To enable the [Cover printing side] field, change the [Cover paper] selection or the [Pagesper sheet] value. The last pages in your print file must be correctly formatted in advance with thecontents of the entire cover, including the spine.
Inserting Sheets
This section lets you enable or disable the insertion of separator sheets and slip sheets in the job.
Changing the Job Properties

7
146
To access the sheet options:
1. Open [Job Properties Editor].
2. Click [Sheets] on the left side of the screen.
3. Use the options displayed to enable or disable the insertion of sheets.
Inserting a Job Separator Sheet
Specifies whether to include a job separator sheet to separate this job from the previous job.
This field is available only when the printer configuration supports it.
To include a job separator sheet:
1. Click [Sheets].
2. In the [Job separator sheet] section, select the [On] button to include a separator sheetbetween the jobs.
3. Select a paper from the [Paper] list.
7 Working with Jobs

7
147
Inserting a Copy Separator Sheet
Specifies whether to include a copy separator sheet between collated copies of the job.
This field is available only when the printer configuration supports it.
To include a copy separator sheet:
1. Click [Sheets].
2. In the [Copy separator sheet] section, select the [On] button.
3. Select a paper from the [Paper] list.
4. Enter the number of copies you want between the separator sheets in the [Interval] field.
Inserting a Slip Sheet
To include a slip sheet:
1. Click [Sheets].
2. In the [Slip sheet] section, check the [On] button.
Changing the Color Settings
This section lets you see and edit the color settings for the job.
Changing the Job Properties

7
148
To access the color settings options:
1. Open [Job Properties Editor].
2. Click [Color] on the left side of the screen.
3. Use the options displayed to customize the color settings.
Some options are not available for the default properties or if you edit the print job properties from theVirtual Printers section.
Printing in Color or Black and White
To specify if the output is printed in color or black and white:
1. Click [Color] or [Basic Settings] on the left side of the screen.
Depending on the printer configuration, the [Color] section might not be displayed.
2. Go to [Color/Black and white].
3. To print in full color, select [Color].
4. To print monochrome, select [Black and white].
7 Working with Jobs

7
149
If [Use default] is selected, the default value set on the printer is applied.
Specifying the Color Planes to Print
Specifies which color planes to print.
You can select to print all the color planes or only some of them.
1. Click [Color] on the left side of the screen.
2. Go to [Print selected planes].
3. To print all the color planes except for the [Special effect] plane, select [CMYK].
4. To print all the color planes, including the [Special effect] plane, select [All].
5. To print only a specific plane or a specific set of planes, select [Custom]. You can add or deletethe planes from the [Print] panel.
• The [Special effect] plane is available only when the printer configuration supports it.
• The [Special effect] plane displays in the [Grid] view and [Book view] using the color andtransparency values set in [Image Viewer].
Printing a [Control bar]
Specifies whether the [Control bar] (including a color bar and/or margin information) is printed oneach sheet.
To print a control bar:
1. Click [Color] on the left side of the screen.
2. Go to [Control bar].
3. To print a control bar on each sheet to check the toner density and track the printer stability,select [On].
For more detailed settings, return to the console and go to Configuration→ ColorManagement→ Settings.
Setting the Color Profiles
1. Click [Color] on the left side of the screen.
2. To set the [Input Profiles]:
1. Go to the [Input Profiles] section and expand it.
2. For the CMYK input profile, go to [CMYK input profile], click [Show details] and select theprofile for each of the [Images], [Text], [Line art], and [Smooth shades] objects.
Changing the Job Properties

7
150
3. For the RGB input profile, go to [RGB input profile], [Show details] and select the profilefor each of the [Images], [Text], [Line art], and [Smooth shades] objects.
4. For the gray input profile, go to [Gray input profile], [Show details] and select the profilefor each of the [Images], [Text], [Line art], and [Smooth shades] objects.
3. To allow one device to simulate another by using RGB separation, select a profile from the[Reference profile] list.
4. To set the [Printer Profiles]:
1. Go to the [Printer Profiles] section and expand it.
2. To set the printer profile on the front, go to [Printer profile, front], [Show details] andselect the profile for each of the [Images], [Text], [Line art], and [Smooth shades]objects.
3. To set the printer profile on the back, go to [Printer profile, back], [Show details] andselect the profile for each of the [Images], [Text], [Line art], and [Smooth shades]objects.
4. To set separate intents for images, text, line art, and smooth shades, select one of the valuesfrom the [Rendering intent] list.
Matching Spot Colors
The spot color is used when only one or two solid colors are needed on a page or when a color has tomatch perfectly and be consistent.
This field is available only when the printer configuration supports it.
To enable matching the spot colors:
1. Click [Color] on the left side of the screen.
2. Go to [Spot color matching].
3. Select [On] from the list.
For more detailed settings, return to the console and go to Configuration→ ColorManagement→ Settings.
Configuring the Advanced Color Settings
This section is available only when the printer configuration supports it.
1. Click [Color] on the left side of the screen.
2. Go to the [Advanced Settings] section and expand it.
3. To substitute a color, set the [Color substitution] to [On].For more detailed settings, return to the console and go to Configuration→ ColorManagement→ Settings.
7 Working with Jobs
7
151
4. To set how to output black for text and line art, select one of the options from the [Black (text/line art)].
5. To limit the toner amount used:
1. Go to [Toner/Ink limit].
2. Select [Low], [Medium], or [High] depending how much you want to limit the amount.
6. To specify how to reproduce black and gray when printing in color, select one of the optionsfrom the [Black/Gray reproduction].
This option might not be available for jobs submitted from Prinect. To configure how to print theblack colors or the gray shades for a PDF file, see Configuring PDF-specific settings, p. 151.
7. Go to [Do not print] to select which spot color name to print with a special toner and not withCMYK.
Configuring PDF-specific settings
These settings apply only to the PDF files sent to the printers. Some of the options might not apply, andthey depend on the available configuration.
To access these settings, you must first expand the [Advanced Settings] area from the [Color] section.
1. If you want the printer to use an embedded PDF/X output intent, select [On] from the [Use PDF/X output intent] list.
2. To specify whether to use color trapping to compensate for poor color registration or not, select avalue from the [Trapping] list.
3. Use the [Blackpoint compensation] option to preserve the shadow details for PDF jobs. Youcan set the compensation separately for images, graphics, and color spaces or just select [On]without showing the details for the [Images] and [Graphics] sections. To expand the sections,click [Show details].
4. Go to [Print gray RGB using black] if you want to use only the black toner for the gray RGBgraphics. Enter 100 in the [Threshold] box to apply it only to black color. Set the value to 0 toapply it to the colors when RGB values are identical.
5. Go to [Preserve pure black] for more control on preserving the colors. You can select topreserve the black, primary, and secondary colors for images, text, line art, and smooth shadesobjects.
To apply the [Preserve pure black] to individual objects:
1. Click [Show details].
2. Select a different value for each object displayed.
Changing the Job Properties

7
152
Changing the Print Quality Settings
To access the print quality settings options:
1. Open [Job Properties Editor].
2. Click [Print Quality] on the left side of the screen.
3. Use the options displayed to customize the print quality settings.
Using Halftone Screening to Convert the Input
To apply a particular halftone screen to the input:
1. Click [Print Quality] on the left side of the screen.
2. Go to [Halftone screening] and use the list to display the values.
3. Select one of the methods to convert the input.
200 dotText: 200 dot
Line art: 200 dot
7 Working with Jobs

7
153
Smooth shade: 200 dot
Image: 200 dot
Performs a halftone screening appropriate for obscuring boundaries between text andphotos.
Text: 200 line + fine textText: 300 line
Line art: 200 line
Smooth shade: 200 line
Image: 200 line
Performs a halftone screening appropriate for graphics and photos.
200 dot + fine textText: 300 line
Line art: 200 dot
Smooth shade: 200 dot
Image: 200 dot
Performs a standard halftone screening appropriate for all kinds of documents.
200 dot + fine text, line art, smooth shadesText: 300 line
Line art: 300 line
Smooth shade: 300 line
Image: 200 dot
Performs a halftone screening appropriate for line art and CAD data.
Interference reductionText: Interference reduction
Line art: Interference reduction
Smooth shade: Interference reduction
Image: Interference reduction
Performs a halftone screening appropriate for hatching patterns and thin lines. This settingreduces moire and breaking of specific-angled thin lines.
175 dotText: 175 dot
Line art: 175 dot
Smooth shade: 175 dot
Image: 175 dot
Performs a smoother halftone screening than 200 dot. This setting sometimes improves halos.
175 line + fine text
Changing the Job Properties

7
154
Text: 300 line
Line art: 175 line
Smooth shade: 175 line
Image: 175 line
Performs a smoother halftone screening than 200 line + fine text. This setting sometimesimproves halos.
300 lineText: 300 line
Line art: 300 line
Smooth shade: 300 line
Image: 300 line
Performs a halftone screening appropriate for thin lines and text in images.
Applying the Maximum Density
During a printer calibration process, the maximum density can be changed to a lower value for one ormore CMYK colors. Applying the maximum density forces the output to be at maximum density level,regardless of calibration.
1. Click [Print Quality] on the left side of the screen.
2. Go to [Use maximum density].
3. Select [For CMYK] to apply the maximum density to all CMYK colors or [For K only] to applythe maximum density to black color only.
Printing Black Characters over Colored Backgrounds
When white lines appear around the characters, use the [Black overprint] option to print the blackcharacters over colored backgrounds:
1. Click [Print Quality] on the left side of the screen.
2. Go to [Black overprint] and select [On] from the list.
Enhancing the Text and Line Art Quality
To enhance the quality for the edge or the thin lines:
1. Click [Print Quality] on the left side of the screen.
2. Expand the [Text/Line Art Quality] section.
3. Go to [Edge enhancement] and select[On] from the list.This enhances edges for text and line art by removing jagged lines.
4. Go to [Thinning/Outline enhancement] and select [On] from the list.This enhances the thin lines for text and line art.
7 Working with Jobs

7
155
Adjusting the Fuser Settings
If there is residual gloss when printing, you can adjust the quality to eliminate it.
1. Click [Print Quality] on the left side of the screen.
2. Go to [Fuser setting].
3. Select [High quality] to eliminate the residual gloss.
Setting the Image Resolution
To specify the output resolution in dots per inch to use when printing TIFF and JPEG jobs:
1. Click [Print Quality] on the left side of the screen.
2. If necessary, select the [Image output resolution] check box.
3. Enter the resolution or use the up and down arrows to specify it. The resolution is expressed indpi.
Replacing Colored Objects with CMYK Objects
The options listed below are displayed only when the printer configuration supports these settings.
To replace the colored objects with CMYK objects:
1. Click [Print Quality] on the left side of the screen.
2. Go to [CMYK knockout white] and select [On] from the list.
Overprinting
The options listed below are displayed only when the printer configuration supports these settings.
When you want to print some colors or objects on top of another, there are two methods. You canchoose to overprint colored objects with CMYK objects or the colored backgrounds with black text andline art:
1. Click [Print Quality] on the left side of the screen.
2. Go to [CMYK overprint] and select [On] from the list to overprint colored objects with CMYKobjects.
3. Go to [Black overprint] and select [On] if you want the black text and line art to overprintcolored backgrounds. You can modify the text size and the black level or you can leave thedefault values.
Changing the Job Properties

7
156
Changing the Fifth Station Settings
[Fifth Station] is a special marking station where you can select different toners to use. This gives youthe option to print with a fifth color.
To access the [Fifth Station] options:
1. Open [Job Properties Editor].
2. Click [Fifth Station] on the left side of the screen.
3. Use the options displayed to customize the [Fifth Station] settings.
7 Working with Jobs

7
157
The [Fifth Station] settings are only available when a [Fifth Station] extension kit is installed.
The [Fifth Station] extension kit can only be installed on these printers:
• Pro C7200
• Pro C7200S
• Pro C7200SX
• Pro C7200X
• Pro C7210
• Pro C7210S
• Pro C7210SX
• Pro C7210X
Setting the Special Effect Toner Properties
1. Click [Fifth Station] on the left side of the screen.
2. Go to [Special effect toner] and select one of the toner types installed on your printer.
3. Go to the [Processing target] control and select one of these options:
• [Named spot color]
The [Named spot color] option is only available when the printer configuration supports it.
• [Whole page]
• [Specified objects]
• [None]
If you select [Named spot color] from the list, choose a specific spot color from the list or enteryour own spot color name. The spot color name entered must match exactly the correspondingspot color name used in the PDF print file. The spot color name used in the PDF print file mustcontain only ASCII printable characters.
To apply the special effect toner only to specific objects, select [Specified objects].
If you select [None], any spot color used is processed using alternate CMYK values.
4. Go to [Spot color priority] to set which spot color has priority over each other. This field is onlydisplayed when you select [Named spot color] from the [Processing target] list.
5. Go to [Adjust tone] and enter a value from 0 to 100%.6. Go to [Print priority] and set it to [Quality] or [Speed]. When the print mode is set to
[Speed], the amount of special effect toner is reduced to enable a faster printing speed.
7. Go to [Page range] and enter the range of pages to print with special effect toner.
8. Go to [Mirror] and select whether to mirror all the sheets in the job. The Mirror function appliesto the entire printing job, even if you set up a page range for the other [Fifth Station] options.
Changing the Job Properties

7
158
The color and transparency values for displaying special effects in the [Sheet view] and [Book view]can be modified in [Image Viewer].
Changing the Watermark Settings
To access the watermark settings options:
1. Open [Job Properties Editor].
2. Click [Watermark] on the left side of the screen.
3. Use the options displayed to customize the watermark settings.
Adding a Watermark to the Job
1. Click [Watermark] on the left side of the screen.
2. To specify the text printed, enter the content in the text area or select a previously specified textfrom the list.
3. To set the font properties, select the name, color, and size for the font displayed.
7 Working with Jobs

7
159
4. To rotate the text 90 degrees, enter the value 90 in the [Angle] field.
5. To make the watermark opaque, leave the transparency percentage to 0 in the [Transparency]field.
6. To customize the position of the text relative to the center of the page, go to [Position] and enterthe amount you want to shift the watermark in the [X] and [Y] fields.
7. To print the watermark only on the first page, select the [First page only] check box. Otherwise,the watermark is printed on all the pages in the job.
Changing the Header/Footer Settings
To access the header/footer settings options:
1. Open [Job Properties Editor].
2. Click [Header/Footer] on the left side of the screen.
3. Use the options displayed to customize the header and footer settings.
Configuring the Header and Footer Text
You can set up and configure the text displayed on the header and footer sections of the job.
Changing the Job Properties

7
160
1. Click [Header/Footer] on the left side of the screen.
2. To specify the text displayed on the left, center, or right at the top or bottom of the page, enter thecontent in the corresponding fields. If you want only the text in the header to be displayed, leavethe footer text fields empty.
You can enter a customized text or insert the page number, date, or time in the header and footerareas.
• To insert the current page number, select [Page &p].
• To insert the current date, select [&d].
• To insert the current time, select [&t].
3. Set the name, color, and size for the font displayed.
4. To set the date format, go to [Date format] and select one of the options from the list.
5. To set the time format, go to [Time format] and select one of the options from the list.
7 Working with Jobs

8
161
88.. Security
•Changing Your Password•Resetting a Password•Setting Up Authentication•Including or Suppressing Customer Data in Traces•Deleting Customer Data from Archived Traces•Encrypting User Data•Overwriting Deleted Data•Restricting IP Addresses•Setting up Secure Mode Printing
Use these procedures to set up and maintain security on TotalFlow Print Server.
CChhaannggiinngg YYoouurr PPaasssswwoorrddYou must change your password when you first log in to the console. You can change it again at anytime. Change it at regular intervals for security.
To change your password:
1. Log in to the console.
2. Click your user ID in the printer control bar and select [Change Password].
3. Enter the requested values.
4. Click [OK].
RReesseettttiinngg aa PPaasssswwoorrddResetting a password deletes the current password without setting a new password.
Only [Service] users can reset passwords for [Service] and [Administrator] users. [Administrator]users can reset passwords for users with lower access levels.
For the user to log in after a password is reset, you must leave the password field blank. The user shouldchange the password after logging in.
To reset a password:
1. On the Configuration page, select Security→ Users And Roles.
2. Select the user ID and click , the edit icon.
3. Click [Reset Password].
4. After you click [OK], the system clears the password.
SSeettttiinngg UUpp AAuutthheennttiiccaattiioonnYou can specify how TotalFlow Print Server uses authentication. The remote authentication settings letusers log in with Lightweight Directory Access Protocol (LDAP) or Active Directory (AD) user IDs.
To set up authentication:
1. On the Configuration page, select Security→ Authentication.
2. Select the correct settings for local and remote authentication.

8
162
See the field help for information.
3. Click [SAVE].
If you set [Authentication required to submit jobs] to [Yes], download and install the Windowshotfix from http://support.microsoft.com/kb/2616471 to Windows 7 client systems.This hotfix corrects an access problem. Without it, Windows 7 asks you for authentication, but does notpass your credentials to TotalFlow Print Server.
IInncclluuddiinngg oorr SSuupppprreessssiinngg CCuussttoommeerr DDaattaa iinn TTrraacceessBy default, the trace information for spooled jobs (not in secure mode) includes customer data. Becausethis data is often sensitive, a [Service] user can specify whether to include it.
To include or suppress customer data in trace information:
1. On the Configuration page, select Security→ Authentication.
2. In the [Job data in traces] list, select one of these values:
• Select [Allowed] to include customer data in job trace information.
• Select [Not allowed] to suppress customer data in job trace information.
3. Click [SAVE].
DDeelleettiinngg CCuussttoommeerr DDaattaa ffrroomm AArrcchhiivveedd TTrraacceessYou can delete sensitive customer data from an archived job trace.
To delete customer data from a trace:
1. On the Configuration page, select Diagnostics→ Traces.
2. Select a trace and click , the delete icon.
EEnnccrryyppttiinngg UUsseerr DDaattaaYou can store user data on the disk in an encrypted format. Encrypted data requires you to enter apassword whenever you start TotalFlow Print Server.
To enable or disable encryption of stored user data:
1. On the Configuration page, select Security→ Encryption.
2. Select a value for [State] to enable or disable encryption.
3. If you selected [Enabled], enter the password for encrypted data.Enter up to 32 bytes.
4. Click [SAVE].
OOvveerrwwrriittiinngg DDeelleetteedd DDaattaaYou can configureTotalFlow Print Server so that when a file is deleted, the area is overwritten.
To enable or disable data overwrite:
8 Security

8
163
1. On the Configuration page, select Security→ Encryption.
2. Select a value for [State] to enable or disable data overwrite.
3. If you selected [Enabled], select the overwrite method.
4. Click [SAVE].
RReessttrriiccttiinngg IIPP AAddddrreesssseessTotalFlow Print Server can be configured to accept network connection requests from certain networkaddresses. You can restrict the network addresses that are used to submit print jobs, access TotalFlowPrint Server using SNMP, and access the remote console.
To restrict IP addresses:
1. On the Configuration page, select Security→ Restricted IP Addresses.
2. For each type of connection you want to restrict, select [Restricted].
3. To allow access from a range of IP addresses:
1. Set [Access] to [Allow].
2. Type values for [IP Address Low] and [IP Address High].
4. To forbid access from a range of IP addresses:
1. Set [Access] to [Allow].You cannot edit [IP Address Low] and [IP Address High] when [Access] is [Deny].
2. Type values for [IP Address Low] and [IP Address High].
3. Set [Access] to [Deny].
5. Click [SAVE].
SSeettttiinngg uupp SSeeccuurree MMooddee PPrriinnttiinnggSecure mode printing sends a job to the printer without placing it on the spool, so that the job is neverwritten to the hard disk.
Secure mode supports these data streams:
• PostScript
• EPS
• JPEG
To use secure mode:
1. Configure a virtual printer. Set [Processing mode] to [Secure mode].See Adding or Copying an Object, p. 75 or Editing an Object, p. 87 for instructions.
2. Submit jobs to that virtual printer in the same way as to other virtual printers.
Restricting IP Addresses

8
164

9
165
99.. IPDS
•AFP/IPDS Support•Mapping IPDS Input Trays•Setting the Default Input and Output Trays for IPDS Jobs•Deleting Captured IPDS Resources•IPDS Print Jobs
This chapter describes the IPDS extended feature.
Intelligent Printer Data Stream® (IPDS) is the host-to-printer data stream for AFP® printing systems. TheIPDS data stream processing options and color management settings are independent of configurationoptions for TotalFlow Print Server.
AAFFPP//IIPPDDSS SSuuppppoorrttTo print AFP or line data jobs using TotalFlow Print Server, you need a print server to convert these datastreams to IPDS. Possibly, you also need a product that manages AFP resources.
InfoPrint® print servers receive print jobs from various sources and prepare them to be sent to aprinter. This preparation includes conversion from AFP or line data format to IPDS. After print jobs havebeen prepared, the print server interacts with the printer to make sure that all the required resources areavailable. Then it sends the print job data to be printed. Several different print servers are available.Although they provide much of the same function, they are appropriate for different environments.
• InfoPrint Manager is a print management solution for AIX , Linux, or Windows. It can process printjobs that contain references to color management resources. It can also search the resource librariesyou create with the AFP Resource installer to find data objects and CMRs when print jobs requestthem. Page Printer Formatting Aid (PPFA) is a feature of InfoPrint Manager that lets you createform definitions and page definitions for use with AFP print jobs. You can use PPFA to associateCMRs with form definitions and page definitions for your color print jobs. The form definitions andpage definitions that you create using PPFA can be used in print jobs that are sent to InfoPrintManager and RICOH ProcessDirector.
• RICOH ProcessDirector is a database-driven print workflow system that lets you manage allaspects of your printing process. The server runs on an AIX , Linux, or Windows system and isaccessed using a Web browser-based interface. Ricoh ProcessDirector can receive and processAFP print jobs that include AFP color management objects. RICOH ProcessDirector can also receiveline data print jobs that refer to CMRs and data objects and convert them into AFP.
TotalFlow Print Server supports the industry-standard AFP color management architecture published bythe AFP Consortium (www.afpcinc.org). This standard can help you provide accurate, consistent, anddevice-independent color output.
InfoPrint AFP Resource Installer lets you create, install, and manage color management resources(CMRs), fonts, and data objects for use in your system. CMRs are AFP resources that provide colormanagement information, such as ICC profiles and halftones. An AFP system uses CMRs to process aprint job and maintain consistent color from one device to another. Data objects contain a single type ofdata (such as TIFF, GIF, and JPEG images). They can be placed directly in a page or overlay or can bedefined as resources and included in pages or overlays. Using a data object as a resource is moreefficient when that object appears more than once in a print job. Resources are downloaded once andreferenced as needed.

9
166
MMaappppiinngg IIPPDDSS IInnppuutt TTrraayyssIPDS jobs request papers by logical input tray instead of paper name. To use the right paper, you mustmap each IPDS logical input tray either to the appropriate paper or to the physical input tray that hasthe appropriate paper loaded.
To map IPDS input trays:
1. On the Configuration page, selectWorkflow→ IPDS.
2. Do either of these actions:
• To map to physical input trays:
1. Select [Tray renumbering].
2. For each physical input tray, enter the number of the corresponding IPDS logical inputtray. Do not map the same logical input tray to more than one physical input tray.
• To map to papers:
1. Select [Media mapping].
2. Do either of these actions:
– To create a new mapping, click , the add icon.
– To change an existing mapping, select it and click , the edit icon.
3. Specify a logical tray, a paper, and whether the tray is enabled or disabled.
4. Click [OK].
3. Click [SAVE].
SSeettttiinngg tthhee DDeeffaauulltt IInnppuutt aanndd OOuuttppuutt TTrraayyss ffoorr IIPPDDSS JJoobbssYou can set the default input and output trays for IPDS jobs.
The input or output tray must be enabled before you can select it.
You cannot select a finishing device as the default IPDS output tray.
1. On the Configuration page, select DFE→ Trays.
2. Select the default input or output tray and click , the edit icon.
3. Select the [IPDS default] check box and click [OK].
DDeelleettiinngg CCaappttuurreedd IIPPDDSS RReessoouurrcceessWhen resources are downloaded with IPDS print jobs,TotalFlow Print Server can save them for futureuse. This is called capturing the resources. You can delete captured resources if you do not need to usethem again.
1. On the Configuration page, clickWorkflow→ IPDS
2. Click [Delete Captured IPDS Resources].
9 IPDS

9
167
IIPPDDSS PPrriinntt JJoobbssIPDS print jobs do not go through the same print process as other print jobs. This difference means thatIPDS print jobs cannot be controlled in the same way as other print jobs. TotalFlow Print Server mustswitch to IPDS mode.
When TotalFlow Print Server switches to IPDS mode:
• No history is retained for IPDS print jobs.
• No preview is available for IPDS print jobs.
• IPDS print jobs cannot be held or suspended, only canceled or stopped.
Canceling an IPDS Print Job
IPDS print jobs cannot be deleted; they must be canceled.
To cancel an IPDS print job:
1. Find the job in one of the jobs portlets.
2. Select the job to be canceled.
3. Click , the delete icon.
4. Click [OK].
IPDS Print Jobs

9
168

10
169
1100.. Troubleshooting
•Responding to Messages•Recovering Job Tickets•Traces•Capturing Images of the Console•Troubleshooting Job Properties•Known Problems
Use these topics to identify and fix problems with TotalFlow Print Server.
RReessppoonnddiinngg ttoo MMeessssaaggeessOperator messages display information about how TotalFlow Print Server or the printer is running.Operator messages display information about how the printer is running.
Operator messages display on the interactive printer and in the Operator Messages portlet of theOperations or Jobs page.
You can tell the type of an operator message by the message icon. The types of operator messagesinclude:
• Informational messagesInformational messages describe the condition of the printer or of TotalFlow Print Server. Sometimesthey appear in response to an operator action. They appear only for your information and do notnecessarily mean that something is wrong. However, if a printer is not performing the way you thinkit should, an informational message can give you information about what to do.
• Warning messagesWarning messages do not stop printing, but if the problem is not solved it could potentially causeproblems. Select the warning message to open a message window that provides more informationabout the warning.
• Error messagesError messages stop printing. Parts of the printer graphics in the Printer Information portlet of theOperations page and in the interactive printer turn red to show the location of the problem. Torestore the printer to the “Ready“ state, follow any recovery directions that appear in the messagewindow.
Some Error messages have additional troubleshooting information that displays in a detailedmessage window. The suggested actions are arranged based on the most likely condition that couldcause the error. You should follow the suggestions in the order listed. Use the mouse to select thecolored text; these are links that display a related online help topic.
RReeccoovveerriinngg JJoobb TTiicckkeettssIf TotalFlow Print Server is configured to log and store job tickets, you can recover them fortroubleshooting.
Job tickets are stored in the \\IP_address\Job History folder on the print server, where:
IIPP__aaddddrreessssThe IP address of the print server.
10
170
TotalFlow Print Server creates an XML file for each job ticket in the Job History folder. If the jobticket contains a job ID, this file is called ticketJobID.xml. Otherwise, the file is calledextJobID.xml or extJobID—intJobID.xml, where:
ttiicckkeettJJoobbIIDDThe job ID from the job ticket. This job ID is assigned by an external program.
eexxttJJoobbIIDDThe external job ID. This job ID is assigned when the job is received.
iinnttJJoobbIIDDThe internal job ID. This job ID is created in some processing steps, for example, when the job isheld or stored.
This file contains the job ticket, including any changes that were made in processing.
In the same folder, TotalFlow Print Server also creates an entry for each terminated job in theJobHistory.csv file. The entry contains the job ID, job name, and whether the job was completed,canceled, or aborted.
JobHistory.csv has a limit of 10,000 entries. After it reaches this limit, the oldest existing entryand the corresponding XML file are deleted whenever a new entry is added.
TTrraacceessTracing lets you save internal event traces or capture a print job as an aid in resolving problems.Internal event tracing is always active.
Select Diagnostics→ Traces on the Configuration page to:
• Request that traces be saved. When you select this, the current state of recent events is saved.
• Start capturing job data.
• Stop capturing job data.
Saving a trace or sending the trace to a specified e-mail destination does not initiate a service call. Youstill need to contact your service representative.
Enabling traces in addition to internal event tracing may affect performance.
Capturing a Print Job
Job captures save print jobs to a memory buffer or to the hard disk. They include print data and hostcommunications. Service representatives use job captures to diagnose problems.
To capture a print job:
1. On the Configuration page, select Diagnostics→ Traces.
2. Under Job Capture, click [Start].
3. Select the values you want.
10 Troubleshooting

10
171
4. Click [OK].
Saving Traces
TotalFlow Print Server automatically captures all the data needed to diagnose software problems whenit encounters a program check or fatal error. You can also save a trace whenever you notice anythingunusual.
To save a trace:
1. On the Configuration page, select Diagnostics→ Traces.
2. Click [Save Traces].
3. Type a description of the trace and then click [OK].
4. Select a destination for downloading and saving the trace file.The trace information is saved after the trace completes.
Configuring Traces
Your service representative might ask you to change the details of a trace to identify a problem.
To configure a trace:
1. On the Configuration page, select Diagnostics→ Traces.
2. Click [Configure Trace].
3. Select a component and click , the edit icon.
4. Select the trace flags that you want to activate and then click [OK].
5. Click [Close].
E-mailing Traces
Before you can e-mail your saved trace data, TotalFlow Print Server must be correctly configured tosend e-mail.
To e-mail traces:
1. On the Configuration page, select Diagnostics→ Traces.
2. Click [Save Traces] and then click [OK].
3. Select [E-mail] and click [OK].
4. Verify the e-mail addresses.
5. Click [OK] to send the e-mail.
Traces

10
172
Managing Archived Traces
The last 660 MB of trace information is saved to an archive file system for use by your servicerepresentative. In some cases, your service representative might need you to access this archive. Toaccess the trace archive:
1. On the Configuration page, select Diagnostics→ Traces.
2. Under Archive Traces, you can select a trace and view details about the trace, save the trace,mark the trace as done, or mark all of the traces in the window as done.
If the trace includes customer data, you can delete that data.
CCaappttuurriinngg IImmaaggeess ooff tthhee CCoonnssoolleeWhen you are troubleshooting problems, it is sometimes useful to capture images of the console.
To capture screen images in PNG format:
1. Click Ctrl+Alt+P.If you are at the local console, the screen image is automatically included in the next trace thatyou save.
2. If you are at a remote console, save the file on your remote computer.
TTrroouubblleesshhoooottiinngg JJoobb PPrrooppeerrttiieessThere are many ways to set the properties of a print job. Depending on the way you use, propertyvalues might not be applied as you expect.
This table shows how property values are applied:
Prece-dence Values Changes Affect More Information1. Override property values set by the
virtual printerJobs receivedafter the change
Setting Virtual Printer Defaults andOverrides for Job Properties, p. 77
2. Property values in the job ticket Edited job only Editing the Properties of a Print Jobwith the Job Properties Editor, p.119
3. Property values set by the pagedescription language
No changespossible
4. Property values set by the jobsubmission protocol
No changespossible
5. Default property values set by thevirtual printer
Jobs receivedafter the change
Setting Virtual Printer Defaults andOverrides for Job Properties, p. 77
6. Paper property values All jobs Editing an Object, p. 87
7. Printer default property values All jobs Setting Printer Defaults for JobProperties, p. 78
10 Troubleshooting

10
173
“Precedence” indicates which setting is applied when the same job property is set in more than oneway. For example, virtual printer override values have a higher precedence than property values set inthe job ticket. If the same job property is set to different values in both ways, the virtual printer overridevalue is applied.
Property values set in different ways are applied at different times:
1. Property values set by the page description language or by the job submission protocol are appliedbefore the job is received. You cannot change these values in TotalFlow Print Server, but you canoverride them for jobs received in the future by setting a virtual printer override value. For individualjobs that are already in the system, you can override them by editing the job ticket.
2. Job ticket values and default and override property values set by the virtual printer are appliedwhen the job is received. Changing property values at the virtual printer does not affect jobs that arealready in the system, but it affects jobs received after the change. You can change these values forindividual jobs that are already in the system by editing the job ticket.
3. Paper property values and printer default property values are applied when the job is printed.Changing these values for the paper or at the printer affects both jobs that are already in the systemand jobs that are received after the change, but only if the value is not set in a way with higherprecedence.
KKnnoowwnn PPrroobblleemmssThis topic includes a table of known problems.
Known Problems

10
174
Problem or Symptom Possible Meanings or Solutions
Job is not stapled.
Job is not punched.
Job is not ring bound.
Job is not perfect bound.
Job is not booklet folded.
Job is not Z-folded.
• The printer might not be able to do theselected finishing operation (staple, punch,bind, fold, and so on) because of otherproperties of the job. Possible causes can be:incompatible finishing settings, too manypages to be stapled together, only certainpaper sizes that can be ring bound, or thejob uses a different paper size. If the printercannot correctly finish a simple job, check theprinter documentation for information aboutother restrictions that apply to that type offinishing.
• The printer might not have the correct finishingequipment installed. For example, if theprinter does not have a perfect binderinstalled, it does not do any jobs requiring theperfect bind option. Resend the job to aprinter that has the required finisher installed.
• The overall job finishing options cannot beprocessed together with subset finishing. Ifyou have selected subset finishing for certainpages in the job, any job finishing selectionsare removed.
• The option of [Z-fold] is not supported when[Binding edge] is set to [Bottom].
• The [Staple/Bind] option is not supportedwhen [Binding edge] is set to[Bottom].
Job is not booklet folded.
Job is not booklet stapled.
Booklet finishing is incompatible with printing ononly one side of the sheet, printing multiple pagesside by side, printing more than two pages on asheet, and inserted tabs.
Set the [Printing side] property to [Both sides(2 sided)] or [Both sides (2 sided), flip onshort edge]. When you change the [Printingside] property, either at the job or page level, toa one-sided option, the booklet formatting isremoved.
On a Windows 7 client, you receive this messagewhen you try to access the printer: You do nothave access to the printer, pleasetry a different username orpassword.
Install Windows hotfix 2616471. For moreinformation, see Setting Up Authentication, p.161.
A PPML job with Japanese characters in the filename fails to print.
Rename the file using only alphanumericcharacters.
Although your display language is not English, anInformation Center topic is displayed in English
Select the Information Center topic from the tableof contents.
10 Troubleshooting

10
175
Problem or Symptom Possible Meanings or Solutions
when you click [More in Help...] in the contexthelp.
Icons in the Information Center are not displayedin Internet Explorer 11 on Windows 10.
Use a different browser.
A special color object in a PostScript job is notprinted. The object under the special color objectmight be knocked out.
Save the original as a PDF file or convert thespecial color object to a CMYK process objectbefore printing.
Halftones are not printed as expected in a jobthat contains multiple layers or transparentobjects.
Either apply the same halftone to all objects oruse an original that does not include multiplelayers or transparent objects.
Special effect toner is not printed as expected ina job that contains multiple layers or transparentobjects.
To use the [Fifth Station] function, use anoriginal that does not include multiple layers ortransparent objects. Otherwise, create a specialcolor plane to apply the special color and specifyit as a named color plane.
The printer prints part of the document, althoughthe number of sheets for one set exceeds thecapacity of the finisher or binder, when thesefinishing functions are used:• Stapling (any value of[Staple/Bind] that
specifies staples)• [Perfect binding]• [Ring binding]• [Fold sheets together]
Do either of these:• Print using [Process and hold] or [Process
and print].• On the Configuration page, set
Workflow→ Processingoptions→ Process jobs before printing to[Yes].
Known Problems

10
176

11
177
1111.. Reference
•Fonts Shipped with TotalFlow Print Server•ICC Profiles Shipped with TotalFlow Print Server•Papers Supported•Special Toner Patterns
Use reference information to help you with configuring and managing TotalFlow Print Server.
FFoonnttss SShhiippppeedd wwiitthh TToottaallFFllooww PPrriinntt SSeerrvveerrThese fonts are shipped with TotalFlow Print Server.
FFoonnttss tthhaatt SSuuppppoorrtt PPDDFF aanndd PPoossttSSccrriipptt
These fonts support the PDF and PostScript data streams. Use the full name of the font when workingwith PDF jobs. Use the PostScript name when working with PostScript jobs.
Full Name PostScript Name
Adobe Heiti Standard OpenType Regular AdobeHeitiStd-Regular
Adobe Ming Standard OpenType Light AdobeMingStd-Light
Adobe Myungjo Standard OpenType Medium AdobeMyungjoStd-Medium
Adobe Sans MM AdobeSansMM
Adobe Serif MM AdobeSerifMM
Adobe Song Standard OpenType Light AdobeSongStd-Light
Albertus MT AlbertusMT
Albertus MT Italic AlbertusMT-Italic
Albertus MT Light AlbertusMT-Light
Antique Olive Bold AntiqueOlive-Bold
Antique Olive Compact AntiqueOlive-Compact
Antique Olive Italic AntiqueOlive-Italic
Antique Olive Roman AntiqueOlive-Roman
Apple Chancery Apple-Chancery
Arial ArialMT
Arial Bold Arial-BoldMT
Arial Bold Italic Arial-BoldItalicMT
Arial Italic Arial-ItalicMT
Bodoni Bold Bodoni-Bold
Bodoni Bold Italic Bodoni-BoldItalic
Bodoni Italic Bodoni-Italic
Bodoni Poster Bodoni-Poster

11
178
Full Name PostScript Name
Bodoni Poster Compressed Bodoni-PosterCompressed
Bodoni Roman Bodoni
Carta Carta
Chicago Chicago
Clarendon Bold Clarendon-Bold
Clarendon Light Clarendon-Light
Clarendon Roman Clarendon
Cooper Black CooperBlack
Cooper Black Italic CooperBlack-Italic
Copperplate Gothic Thirty-Three BC Copperplate-ThirtyThreeBC
Copperplate Gothic Thirty-Two BC Copperplate-ThirtyTwoBC
Coronet Regular Coronet-Regular
Courier Courier
Courier Bold Courier-Bold
Courier Bold Oblique Courier-BoldOblique
Courier Oblique Courier-Oblique
Eurostile Bold Eurostile-Bold
Eurostile Bold Extended #2 Eurostile-BoldExtendedTwo
Eurostile Extended #2 Eurostile-ExtendedTwo
Eurostille Medium Eurostile
Geneva Geneva
Gill Sans GillSans
Gill Sans Bold GillSans-Bold
Gill Sans Bold Condensed GillSans-BoldCondensed
Gill Sans Bold Italic GillSans-BoldItalic
Gill Sans Condensed GillSans-Condensed
Gill Sans Extra Bold GillSans-ExtraBold
Gill Sans Italic GillSans-Italic
Gill Sans Light GillSans-Light
Gill Sans Light Italic GillSans-LightItalic
Goudy Bold Goudy-Bold
Goudy Bold Italic Goudy-BoldItalic
Goudy Extra Bold Goudy-ExtraBold
11 Reference

11
179
Full Name PostScript Name
Goudy Old Style Goudy
Goudy Old Style Italic Goudy-Italic
Helvetica Helvetica
Helvetica Bold Helvetica-Bold
Helvetica Bold Oblique Helvetica-BoldOblique
Helvetica Condensed Bold Helvetica-Condensed-Bold
Helvetica Condensed Bold Oblique Helvetica-Condensed-BoldObl
Helvetica Condensed Medium Helvetica-Condensed
Helvetica Condensed Oblique Helvetica-Condensed-Oblique
Helvetica Narrow Helvetica-Narrow
Helvetica Narrow Bold Helvetica-Narrow-Bold
Helvetica Narrow Bold Oblique Helvetica-Narrow-BoldOblique
Helvetica Narrow Oblique Helvetica-Narrow-Oblique
Helvetica Oblique Helvetica-Oblique
Hoefler Text HoeflerText-Regular
Hoefler Text Black HoeflerText-Black
Hoefler Text Black Italic HoeflerText-BlackItalic
Hoefler Text Italic HoeflerText-Italic
Hoefler Text Ornaments HoeflerText-Ornaments
ITC Avant Garde Gothic Book AvantGarde-Book
ITC Avant Garde Gothic Book Oblique AvantGarde-BookOblique
ITC Avant Garde Gothic Demi AvantGarde-Demi
ITC Avant Garde Gothic Demi Oblique AvantGarde-DemiOblique
ITC Bookman Demi Bookman-Demi
ITC Bookman Demi Italic Bookman-DemiItalic
ITC Bookman Light Bookman-Light
ITC Bookman Light Italic Bookman-LightItalic
ITC Lubalin Graph Book LubalinGraph-Book
ITC Lubalin Graph Demi LubalinGraph-Demi
ITC LubalinGraph Book Oblique LubalinGraph-BookOblique
ITC LubalinGraph Demi Oblique LubalinGraph-DemiOblique
ITC Mona Lisa Recut MonaLisa-Recut
Fonts Shipped with TotalFlow Print Server
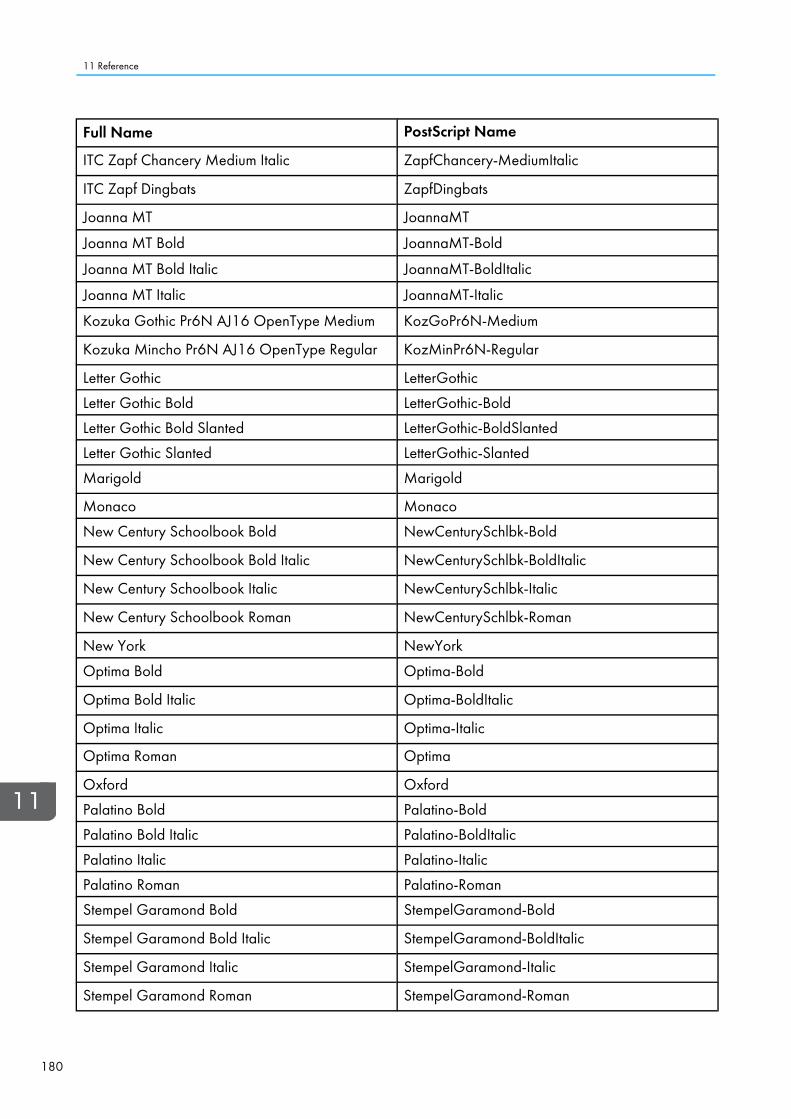
11
180
Full Name PostScript Name
ITC Zapf Chancery Medium Italic ZapfChancery-MediumItalic
ITC Zapf Dingbats ZapfDingbats
Joanna MT JoannaMT
Joanna MT Bold JoannaMT-Bold
Joanna MT Bold Italic JoannaMT-BoldItalic
Joanna MT Italic JoannaMT-Italic
Kozuka Gothic Pr6N AJ16 OpenType Medium KozGoPr6N-Medium
Kozuka Mincho Pr6N AJ16 OpenType Regular KozMinPr6N-Regular
Letter Gothic LetterGothic
Letter Gothic Bold LetterGothic-Bold
Letter Gothic Bold Slanted LetterGothic-BoldSlanted
Letter Gothic Slanted LetterGothic-Slanted
Marigold Marigold
Monaco Monaco
New Century Schoolbook Bold NewCenturySchlbk-Bold
New Century Schoolbook Bold Italic NewCenturySchlbk-BoldItalic
New Century Schoolbook Italic NewCenturySchlbk-Italic
New Century Schoolbook Roman NewCenturySchlbk-Roman
New York NewYork
Optima Bold Optima-Bold
Optima Bold Italic Optima-BoldItalic
Optima Italic Optima-Italic
Optima Roman Optima
Oxford Oxford
Palatino Bold Palatino-Bold
Palatino Bold Italic Palatino-BoldItalic
Palatino Italic Palatino-Italic
Palatino Roman Palatino-Roman
Stempel Garamond Bold StempelGaramond-Bold
Stempel Garamond Bold Italic StempelGaramond-BoldItalic
Stempel Garamond Italic StempelGaramond-Italic
Stempel Garamond Roman StempelGaramond-Roman
11 Reference

11
181
Full Name PostScript Name
Symbol Symbol
Tekton Regular Tekton
Times Bold Times-Bold
Times Bold Italic Times-BoldItalic
Times Italic Times-Italic
Times New Roman TimesNewRomanPSMT
Times New Roman Bold TimesNewRomanPS-BoldMT
Times New Roman Bold Italic TimesNewRomanPS-BoldItalicMT
Times New Roman Italic TimesNewRomanPS-ItalicMT
Times Roman Times-Roman
Univers 45 Light Univers-Light
Univers 45 Light Oblique Univers-LightOblique
Univers 53 Extended Univers-Extended
Univers 53 Extended Oblique Univers-ExtendedObl
Univers 55 Oblique Univers-Oblique
Univers 55 Roman Univers
Univers 57 Condensed Univers-Condensed
Univers 57 Condensed Oblique Univers-CondensedOblique
Univers 63 Bold Extended Univers-BoldExt
Univers 63 Bold Extended Oblique Univers-BoldExtObl
Univers 65 Bold Univers-Bold
Univers 65 Bold Oblique Univers-BoldOblique
Univers 67 Condensed Bold Univers-CondensedBold
Univers 67 Condensed Bold Oblique Univers-CondensedBoldOblique
Wingdings Wingdings
FFoonnttss tthhaatt SSuuppppoorrtt OOnnllyy PPDDFF
These fonts support only the PDF data stream and cannot be used with PostScript jobs.
Fonts Shipped with TotalFlow Print Server

11
182
Adobe Arabic BoldAdobe Arabic Bold ItalicAdobe Arabic ItalicAdobe Arabic RegularAdobe Fan Heiti Std BAdobe Gothic Std BAdobe Hebrew BoldAdobe Hebrew Bold ItalicAdobe Hebrew ItalicAdobe Hebrew RegularAdobe Heiti Std RAdobe Ming Std LAdobe Myungjo Std MAdobe Pi Std
Adobe Song Std LAdobe Thai BoldAdobe Thai Bold ItalicAdobe Thai ItalicAdobe Thai RegularCourier Std BoldCourier Std Bold ObliqueCourier Std MediumCourier Std Medium ObliqueKozuka Gothic Pr6N MKozuka Mincho Pr6N RMinion ProMyriad Pro
MMoorriissaawwaa FFoonnttss ((OOppttiioonnaall))
The Morisawa fonts are an additional set of optional system fonts.
Full Name PostScript Name
CGBM Proportional Roman CGBM-PropRoman
Chu Gothic BBB Medium Proportional Roman ChuGothicBBB-Medium-PropRoman
Gothic Medium BBB GothicBBB-Medium
Heisei Kaku Gothic W5 Proportional Roman HeiseiKakuGothic-W5-PropRoman
Heisei Mincho W3 Proportional Roman HeiseiMincho-W3-PropRoman
Hon Mincho Medium Proportional Roman HonMincho-M-PropRoman
JL Proportional Roman JL-PropRoman
Jun OneZeroOne Light Proportional Roman Jun101-Light-PropRoman
Maru Gothic Medium Proportional Roman MaruGothic-M-PropRoman
Mincho PC Hiragana Mincho-PC-Hiragana
Mincho PC Katakana Mincho-PC-Katakana
MMMA PropRoman MMMA-PropRoman
Osaka Monospaced Roman Osaka-MonoRoman
Osaka Proportional Roman Osaka-PropRoman
PC Century Bold MidashiMin-MA31–PropRoman
PC Helvetica Bold MidashiGo-MB31–PropRoman
PCCentury Old Style Regular FutoMinA101–Bold-PropRoman
11 Reference
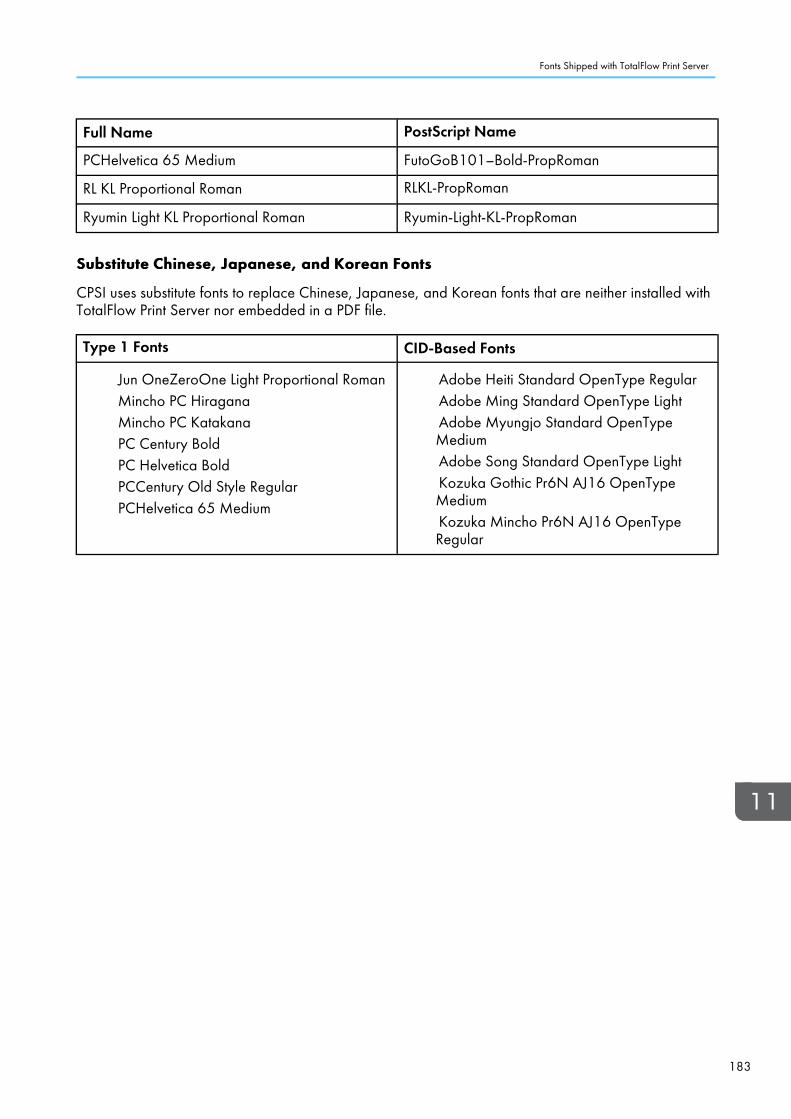
11
183
Full Name PostScript Name
PCHelvetica 65 Medium FutoGoB101–Bold-PropRoman
RL KL Proportional Roman RLKL-PropRoman
Ryumin Light KL Proportional Roman Ryumin-Light-KL-PropRoman
SSuubbssttiittuuttee CChhiinneessee,, JJaappaanneessee,, aanndd KKoorreeaann FFoonnttss
CPSI uses substitute fonts to replace Chinese, Japanese, and Korean fonts that are neither installed withTotalFlow Print Server nor embedded in a PDF file.
Type 1 Fonts CID-Based Fonts
Jun OneZeroOne Light Proportional RomanMincho PC HiraganaMincho PC KatakanaPC Century BoldPC Helvetica BoldPCCentury Old Style RegularPCHelvetica 65 Medium
Adobe Heiti Standard OpenType RegularAdobe Ming Standard OpenType LightAdobe Myungjo Standard OpenTypeMediumAdobe Song Standard OpenType LightKozuka Gothic Pr6N AJ16 OpenTypeMediumKozuka Mincho Pr6N AJ16 OpenTypeRegular
Fonts Shipped with TotalFlow Print Server

11
184
IICCCC PPrrooffiilleess SShhiippppeedd wwiitthh TToottaallFFllooww PPrriinntt SSeerrvveerrThese ICC profiles are shipped with TotalFlow Print Server.
RGB Profiles
• Adobe RGB (1998)• Apple RGB• RICOH RGB photo• RICOH RGB vivid• SMPTE-C• sRGB IEC61966-2-1 black scaled• sRGB IEC61966-2-1 no black scaling• sRGB v4 ICC preference perceptual intent beta
CMYK Profiles
• Coated FOGRA27 (ISO 12647-2:2004)• Coated FOGRA39 (ISO 12647-2:2004)• Coated GRACoL 2006 ISO 12647-2:2004)• GRACoL 2013 CRPC 6• Japan Color 2001 Coated• Japan Color 2001 Uncoated• Japan Color 2002 Newspaper• Japan Color 2003 Web Coated• Japan Color 2011 Coated• Japan Web Coated (Ad)• JMPA ver. 3 (RICOH)• PSO Coated v2 300% Glossy laminate (ECI)• PSO Coated v2 300% Matte laminate (ECI)• PSO Coated V3• PSO LWC Improved (ECI)• PSO Uncoated ISO12647 (ECI)• U.S. Web Coated (SWOP) v2• U.S. Web Uncoated v2• Uncoated FOGRA29 (ISO 12647-2:2004)• Web Coated FOGRA28 (ISO 12647-2:2004)• Web Coated SWOP 2006 Grade 3 Paper• Web Coated SWOP 2006 Grade 5 Paper
Gray Profiles
• Adobe Gray–20% Dot Gain
11 Reference

11
185
Printer Profiles
• For Pro C7200/C7210X series printersThe Pro C7200/C7210X series includes these printer models: Pro C7200, Pro C7200S, ProC7200SX, Pro C7200X, Pro C7210, Pro C7210S, Pro C7210SX, and Pro C7210X.
– Pro C7200Sseries Plain JPN– Pro C7200Sseries Gloss JPN– Pro C7200Sseries Matte JPN– Pro C7200Sseries Plain– Pro C7200Sseries Gloss– Pro C7200Sseries Matte
• For Pro C9200/C9210 printers
– Pro C9200series Plain JPN– Pro C9200series Gloss JPN– Pro C9200series Matte JPN– Pro C9200series Plain– Pro C9200series Gloss– Pro C9200series Matte
NamedColor Profiles
• DIC Color Guide (Part 1 and Part 2)• HKS K (Coated Paper) v2.2• HKS N (Uncoated Paper) v2.2• PANTONE+ Solid Coated-V3• PANTONE+ Solid Uncoated-V3• TOYO COLOR FINDER (Ver. 2.0)
ICC Profiles Shipped with TotalFlow Print Server

11
186
PPaappeerrss SSuuppppoorrtteeddThis topic describes the paper sizes, types, and weights that TotalFlow Print Server supports.
There are some differences between the papers supported for Pro C7200/C7210X series and ProC9200/C9210 printers. The Pro C7200/C7210X series includes these printer models: Pro C7200,Pro C7200S, Pro C7200SX, Pro C7200X, Pro C7210, Pro C7210S, Pro C7210SX, and Pro C7210X.
Paper Sizes
Size Feed Direction Width Length Unit Notes
A3 SEF 297 420 mm
A4 SEF 210 297 mm
A4 LEF 297 210 mm
A5 SEF 148 210 mm
A5 LEF 210 148 mm
A6 SEF 105 148 mm
B4 SEF 257 364 mm
B5 SEF 182 257 mm
B5 LEF 257 182 mm
B6 SEF 128 182 mm
DLT SEF 11 17 inch
Legal SEF 8.5 14 inch
Foolscap SEF 8.5 13 inch
Letter SEF 8.5 11 inch
Letter LEF 11 8.5 inch
Government LG SEF 8.25 14 inch
Folio SEF 8.25 13 inch
F/GL SEF 8 13 inch
Eng Quatro SEF 8 10 inch
Executive SEF 7.25 10.5 inch
Executive LEF 10.5 10.25 inch
Statement SEF 5.5 8.5 inch
Statement LEF 8.5 5.5 inch
8K SEF 267 390 mm
16K SEF 195 267 mm
16K LEF 267 195 mm
12x18 SEF 12 18 inch
11 Reference

11
187
Size Feed Direction Width Length Unit Notes
11x15 SEF 11 15 inch
11x14 SEF 11 14 inch
10x15 SEF 10 15 inch
10x14 SEF 10 14 inch
13x19.2 SEF 13 19.2 inch
13x19 SEF 13 19 inch
12.6x19.2 SEF 12.6 19.2 inch
12.6x18.5 SEF 12.6 18.5 inch
13x18 SEF 13 18 inch
SRA3 SEF 320 450 mm
SRA4 SEF 225 320 mm
SRA4 LEF 320 225 mm
Japanese postcard SEF 4.2 5.5 inch
Custom standard(min.)
100.0 139.7 mm
Custom standard(max.)
330.2 487.7 mm
Custom standard(min.)
3.94 5.50 inch
Custom standard(max.)
13.00 19.20 inch
Custom long(min.)
210.0 139.7 mm
Custom long(max.)
330.2 1260.0 mm Pro C7200/C7210X series,when [Tray A] supportssuper-long paper
Papers Supported

11
188
Size Feed Direction Width Length Unit Notes
Custom long(max.)
330.2 700.0 mm
Custom long(min.)
8.27 5.50 inch
Custom long(max.)
13.00 49.60 inch Pro C7200/C7210X series,when [Tray A] supportssuper-long paper
Custom long(max.)
13.00 27.55 inch
Paper Types and Weights
Supported paper weights are:
1. 52.3—63.0 gsm
2. 63.1—80.0 gsm
3. 80.1—105.0 gsm
4. 105.1—163.0 gsm
5. 163.1—220.0 gsm
6. 220.1—256.0 gsm
7. 256.1—300.0 gsm
8. 300.1—360.0 gsm (Pro C7200/C7210X series), 300.1—350.0 gsm (Pro C9200/C9210)
9. 350.1—400.0 gsm (Pro C9200/C9210 only)
11 Reference

11
189
Type Weights(Pro C7200/C7210X Series)
Weights(Pro C9200/C9210)
[Plain] 1—8 1—9
[Recycled] 1—8 1—9
[Black] 1—8 1—9
[Colored] 1—8 1—9
[Letterhead] 1—8 1—9
[Preprinted] 1—8 1—9
[Prepunched] 1—8 1—9
[Transparency] Not set Not set
[Tab stock] 1—8 1—9
[Translucent] Not set Not set
[Labels] 1—8 1—9
[Coated] 2—8 1—9
[Envelope] 5—7 5—7
[Textured] 1—8 1—9
[Magnetic] Not set Not set
[Metallic/Pearl] 3—8 3—9
[Clear file folder] Not set Not set
[Synthetic] 2—8 1—9
Papers Supported

11
190
SSppeecciiaall TToonneerr PPaatttteerrnnssCertain products that create printable document files, for example, Adobe Illustrator, let you specify ahalftone pattern for special toner. You can apply this pattern either to the whole page or to selectedareas. This pattern is applied to the [Ricoh Effect] for 5th station printing.
• TotalFlow Print Server supports printing these special toner patterns, but you cannot specify them inthe console, the operator control panel, or the printer driver. You must specify these patterns in theprogram that creates the printable document file.
• In Adobe Illustrator, define a special plane called Ricoh Effect. Apply swatches of special toner tothis plane.
TotalFlow Print Server supports these patterns:
Ricoh Effect Value
Area Ratio (Tint) Pixels Effect Pattern
98% 248–255 Reserved
96% 243–247 Reserved
94% 238–242 Reserved
92% 233–237 Reserved
90% 228–232 Full page gloss, Type 1 Inverter mask 1
88% 222–227 Full page gloss, Type 2 Inverter mask 2
86% 217–221 Full page gloss, Type 3 Inverter mask 3
84% 212–216 Reserved
82% 207–211 Reserved
80% 202–206 Matte pattern 25
Texture Pattern 25
78% 197–201 Matte pattern 24
Texture Pattern 24
76% 192–196 Matte pattern 23
Texture Pattern 23
11 Reference
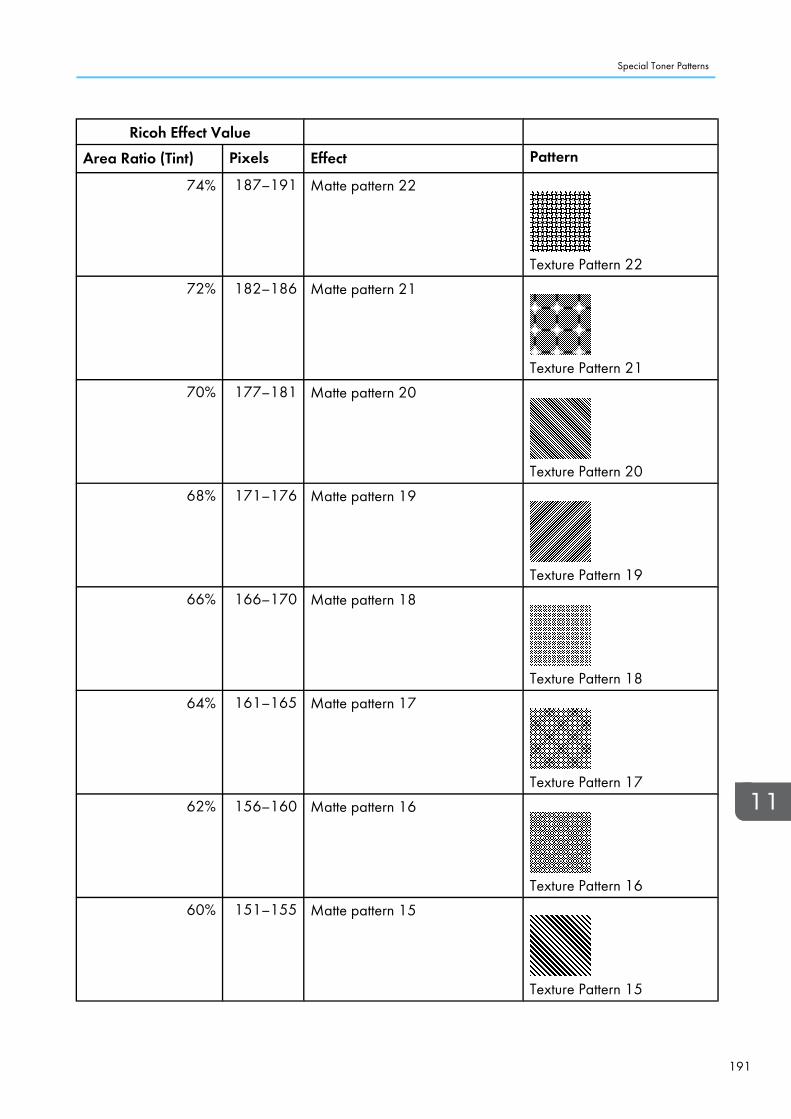
11
191
Ricoh Effect Value
Area Ratio (Tint) Pixels Effect Pattern
74% 187–191 Matte pattern 22
Texture Pattern 22
72% 182–186 Matte pattern 21
Texture Pattern 21
70% 177–181 Matte pattern 20
Texture Pattern 20
68% 171–176 Matte pattern 19
Texture Pattern 19
66% 166–170 Matte pattern 18
Texture Pattern 18
64% 161–165 Matte pattern 17
Texture Pattern 17
62% 156–160 Matte pattern 16
Texture Pattern 16
60% 151–155 Matte pattern 15
Texture Pattern 15
Special Toner Patterns

11
192
Ricoh Effect Value
Area Ratio (Tint) Pixels Effect Pattern
58% 146–150 Matte pattern 14
Texture Pattern 14
56% 141–145 Matte pattern 13
Texture Pattern 13
54% 136–140 Matte pattern 12
Texture Pattern 12
52% 131–135 Matte pattern 11
Texture Pattern 11
50% 126–130 Matte pattern 10
Texture Pattern 10
48% 120–125 Reserved
46% 115–119 Reserved
44% 110–114 Matte pattern 9
Texture Pattern 9
42% 105–109 Matte pattern 8
Texture Pattern 8
40% 100–104 Matte pattern 7
11 Reference

11
193
Ricoh Effect Value
Area Ratio (Tint) Pixels Effect Pattern
Texture Pattern 7
38% 95–99 Reserved
36% 90–94 Reserved
34% 85–89 Matte pattern 6
Texture Pattern 6
32% 80–84 Matte pattern 5
Texture Pattern 5
30% 74–79 Matte pattern 4
Texture Pattern 4
28% 69–73 Reserved
26% 64–68 Reserved
24% 59–63 Matte pattern 3
Texture Pattern 3
22% 54–58 Matte pattern 2
Texture Pattern 2
20% 49–53 Matte pattern 1
Texture Pattern 1
18% 44–48 Reserved
16% 39–43 Reserved
14% 34–38 Reserved
12% 29–33 Reserved
Special Toner Patterns

11
194
Ricoh Effect Value
Area Ratio (Tint) Pixels Effect Pattern
10% 23–28 Reserved
8% 18–22 Reserved
6% 13–17 Reserved
4% 8–12 Reserved
2% 1–7 Reserved
0% 0 None Blank
Inverter mask 1Sets the special toner value to 100%.
Inverter mask 2Sets the special toner value to 150% minus (C+M+Y+K) at each pixel position, but no less than 0%and no greater than 100%.
Inverter mask 3Sets the special toner value to 100% minus (C+M+Y+K) at each pixel position, but no less than 0%.This covers the area evenly with special toner.
11 Reference

195
AA
Absolute colorimetric ........................................54Access ..............................................................82Active Jobs portletColumn titles .................................................33Job properties...............................................33
AD user IDs ....................................................161Adding a booklet cover..................................145Adding a Manual Paper.................................135Adding a New Custom Layout........................134Adding a Perfect Bound Cover .......................145Adding Blank Pages .......................................142Adding Covers ...............................................144Adding Covers to a Job..................................144Adding Watermark.........................................158Advanced Color Settings ................................150AFPColor management.............................. 56, 165Data conversion .........................................165Resource Installer..........................................67Resource management .................................65
AFPC JPEG Subset images................................63All Jobs portletColumn titles .................................................33Job properties...............................................33
APOGEEProduct overview..........................................15Submitting jobs ...........................................113
AppleTalkSubmitting font jobs ......................................94Submitting print jobs ...................................115
Audit processing mode, CMR...........................61Authentication.................................................161Errors..........................................................173
BB
Backing upOverview....................................................102Procedure...................................................103
Banner page ..................................................124Black output, managing....................................98Black overprint ...............................................154Bleed..............................................................137
Book view.........................................................39booklet ...........................................................131booklet cover .................................................145Brightness .........................................................98
CC
Calibrating the printerDefinition ....................................................100New calibration .........................................101Updated calibration ...................................101
Calibration, color .............................................51Center Crop Marks.........................................138Changing Color Settings.................................147Changing Fifth Station Settings .......................156Changing Finishing Options............................139Changing Header/Footer ..............................159Changing Job Options....................................126Changing Paper Settings ................................134Changing the Print Quality Settings.................152Changing the Watermark Settings ..................158CMRS...............................................................56CMYK ............................................................154CMYK color space ...........................................49Collate ...........................................................140Collating Job Copies ......................................140Color Bar .......................................................149Color control bar..............................................99Color conversion CMRs....................................57Color exceptionsAdding .........................................................97Creating .......................................................75Deleting........................................................89Editing ..........................................................87
Color managementAFP architecture..........................................165IPDS .............................................................56Supporting products ...................................165
color management resourcescreating ........................................................62installing .......................................................62
Color management resourcesAudit processing mode .................................61Color conversion ..........................................57
INDEX

Comparison to other AFP resources ..............56Device link (DL) ............................................58Generic halftone...........................................59Generic tone transfer curve ..........................60Halftone .......................................................59Indexed ........................................................60Instruction processing mode..........................61Link (LK)........................................................58Link color conversion ....................................58Link processing mode ...................................62Passthrough ..................................................57Processing modes .........................................61Tone transfer curve .......................................60Types............................................................57
Color planes...................................................116Color printingConcepts ......................................................49File size ........................................................52
Color Settings .................................................147Color spacesColor printing ...............................................49Grayscale printing........................................52
Color substitutionsAdding .........................................................96Creating .......................................................75Deleting................................................. 89–90Editing ..........................................................87Enabling .......................................................96ICC color profilesColor substitutions.....................................96
Color support ...................................................19Color/Black and White..................................148Colored backgrounds.....................................154Colored objects ..............................................155Communities, SNMPCreating .......................................................75Deleting........................................................89Editing ..........................................................87
Configuration page ..........................................37Configuring PDF-specific settings ....................151ConsoleIcon list .........................................................24Overview......................................................22
Contrast............................................................98Conventions........................................................ 3Copy Separator Sheet...........................146–147Corner Crop Marks ........................................138Covers............................................................144Creating users ..................................................75Crop Marks ....................................................138Current Settings portlet .....................................37Custom Layout ................................................134custom size .....................................................136Customer dataDeleting......................................................162In traces......................................................162
DD
DataEncrypting ..................................................162Overwriting deleted....................................162
Data objectsCreating .......................................................64In color printing ............................................63Installing .......................................................64Types of........................................................63
Data streams ....................................................15DateDisplay .........................................................37SettingAutomatically ...........................................76Manually..................................................76
Date/Time portlet .............................................37Default virtual printer ........................................77Defaults and overrides....................................125Defaults for job propertiesPrinter ...........................................................78Virtual printer................................................77
Definition ..........................................................21Deleting users ...................................................89Device link (DL) CMRs ......................................58Device link profilesSpecifying ....................................................95
Dot gain ...........................................................51Download devices............................................90Downloading files.............................................92
196

EE
E-mail ...............................................................81Editing jobs.....................................................119Editing Marks and Bleeds ...............................137Editing users .....................................................87Editors ..............................................................37Eject output.....................................................141Ejecting face-down.........................................141Ejecting face-up..............................................141Email Address.................................................129Enabling Font Substitution ...............................129Encryption ......................................................162EPS data objects...............................................63Erasing hard drive .................................105–106ErrorsAuthentication.............................................173Cannot access printer .................................173Finishing .....................................................173
Ethernet adapter cardsChecking LAN status.....................................93
Exception Pages .............................................141Extended featuresDisabling ......................................................87Enabling .......................................................88Installing .......................................................82IPDS ...........................................................165
FF
Face-down .....................................................141Face-up ..........................................................141Field help............................................................ 2Fifth Station Settings........................................156Fifth-station printing...........................................46File size, color printing......................................52FilesDownloading................................................92Uploading ....................................................90
Filters ................................................................21Uploading ..................................................124
Finishing .........................................................139Errors..........................................................173
Finishing Subsets.............................................142Flowchart..........................................................16
Fold type ........................................................140Folding ...........................................................140Font Substitution..............................................129FontsDeleting................................................. 89–90Deleting captured.......................................166Downloading................................................94Importing ......................................................94PostScript jobs ..............................................94Properties .....................................................94Shipped with TotalFlow Print Server............177
Footer text ......................................................159FTPSubmitting font jobs ......................................94Submitting print jobs ...................................111
Fuser...............................................................155Fuser setting....................................................155
GG
GamutColors in.......................................................51Definition ......................................................51
gangup...........................................................131Generic halftone CMRs ....................................59GIF images.......................................................63Grayscale printingConcepts ......................................................52
Gutters............................................................138
HH
HalftonesCMR.............................................................59Grayscale printing........................................52Overview......................................................51
Header text ....................................................159Header/Footer...............................................159History Jobs portletColumn titles .................................................33Job properties...............................................33
Hot foldersMapping network drives to.........................110Practice ........................................................43Submitting font jobs ......................................94Submitting print jobs
197

Mac .......................................................110Windows hot folder ................................110
II
ICC...................................................................54ICC color profilesSpecifying ....................................................95
ICC profilesGrayscale printing........................................52Overview......................................................54Shipped with TotalFlow Print Server............184
ICC ProfilesColor printing ...............................................49
IconsList ................................................................24Setting size ...................................................71
Image alignment.............................................133Image offset....................................................133Image tips.........................................................66Image viewer..................................................116Inactive Jobs portletColumn titles .................................................33Job properties...............................................33
Indexed CMRs..................................................60InfoPrint AFP Resource Installer .......................165InfoPrint ManagerDescription .................................................165Version required .........................................165
Input traysChecking paper level ...................................86Definition ......................................................35Disabling ......................................................87Editing paper................................................93Enabling .......................................................88IPDS ...........................................................166IPDS default................................................166Loading paper..............................................93
Input Trays portlet .............................................35Inserting a Copy Separator Sheet..........146–147Inserting Tabs .................................................143Instruction processing mode, CMR ...................61Interactive printer..............................................29International Color Consortium.........................54
Interposer traysChecking paper level ...................................86Definition ......................................................35Disabling ......................................................87Editing paper................................................93Enabling .......................................................88Loading paper..............................................93
Invalid Jobs portletColumn titles .................................................33Job properties...............................................33
Inverter masks.................................................190IOCA images ...................................................63IP addressesRestricting access........................................163
IPDSCanceling jobs ...........................................167Color management.............................. 56, 165Data conversion .........................................165Default input tray ........................................166Default output tray ......................................166Definition ....................................................165Deleting resources ......................................166Input trays...................................................166IPDS profilesDefinition ..................................................56
Print jobs.....................................................167IPDS jobsSpecifying color profiles ...............................95
IPDS mode .....................................................167
JJ
JFIF images .......................................................63JMFSubmitting jobs ...........................................113
JMF device ID...................................................78Job Completion Notification ...........................129Job Priority......................................................129Job propertiesChanges applied........................................172Changing ...................................................125Changing with the Job Properties editor......119Changing with TotalFlow Prep ....................119Defaults ................................................. 77–78
198

Overrides .....................................................77Precedence ................................................172Shown in jobs portlets...................................33Viewing ......................................................125
Job Properties .................................................125Job status..........................................................26Job Store ........................................................129Job ticketsRecovering .................................................169Saving ........................................................115Submitting jobs with....................................113
JobsCanceling IPDS ..........................................167Capturing ...................................................170Changing order..........................................123Changing properties of...............................125Changing tone curves.................................120Deleting......................................................123Editing with the Job Properties editor ..........119Editing with TotalFlow Prep.........................119Holding ......................................................117Invalid ........................................................118Previewing..................................................116Priority ........................................................123Processing next...........................................123Processing options ......................................124Processing path ............................................16Releasing....................................................122Reprinting ...................................................121Resetting .....................................................122RICOH TotalFlow Path................................113Sample copy .....................................117–118Sample page..............................................118Searching for................................................73Storing........................................................120Submission methods .....................................16SubmittingAPOGEE ................................................113AppleTalk ...............................................115FTP .........................................................111Hot folder on Mac..................................110Hot folder on Windows ..........................110JMF ........................................................113
LPR .........................................................114Mac printer driver ..................................112Prinect ....................................................113User interface .........................................109Windows printer driver ...........................111
Suspending.................................................121Viewing ......................................................116
Jobs page.........................................................31Customizing..................................................72
JPEG images.....................................................63
KK
K only.............................................................154
LL
Landscape......................................................132LanguageDisplayCurrent user..............................................71Local ........................................................70Remote .....................................................71
Keyboard .....................................................70LDAP user IDs .................................................161Line art quality ................................................154Line screen frequency, halftone ........................51Link (LK) CMRs .................................................58Link color conversion CMRs..............................58Link processing mode, CMR .............................62Logging in ........................................................69LogsDefinition ......................................................22Saving ..........................................................89
LPRSubmitting font jobs ......................................94Submitting print jobs ...................................114
MM
Machine types.................................................... 4Manual Paper .......................................135–136Margins..........................................................138Marks and Bleeds settings ..............................137Maximum density ...........................................154Messages .......................................................169Types............................................................36
199

Mixing, color....................................................51Modifying Pages in a Job ...............................142
NN
NamedColor profilesAlways used .................................................95Color exceptions ..........................................97Saving ..........................................................89
Network protocolsConfiguring ..................................................79Disabling ......................................................87Enabling .......................................................88Supported ....................................................15
New Custom Layout .......................................134
OO
Open Orientation ...........................................132Operation page ...............................................31Customizing..................................................72
Operator Messages portlet ..............................36Order of processing jobs ................................123Orientation .....................................................132Output tray .....................................................140Output traysIPDS default................................................166
Overprint ........................................................155Overrides for job propertiesVirtual printer................................................77
Overwriting deleted data ...............................162
PP
Page orientation .............................................132Page Printer Formatting Aid ............................165PagesViewing job by .............................................40
Paper catalogDefinition ......................................................21
Paper Catalog................................................136Creating paper.............................................75Deleting paper .............................................89Editing paper................................................87Halftone screening setsCreating ...................................................75Deleting....................................................89
Editing ......................................................87Paper characteristics for color...........................55Paper Settings.................................................134PapersChecking level ..............................................86Creating .......................................................75Definition ......................................................21Deleting........................................................89Editing ..........................................................87Editing in tray ...............................................93Loading ........................................................93Searching for................................................73Selecting calibrations..................................102Supported sizes ..........................................186Supported types .........................................186
Passthrough CMRs............................................57PasswordsChanging ...................................................161Resetting.....................................................161
Pattern, halftone ...............................................51PCS ..................................................................54PDF.................................................................151PDF data objects ..............................................63PDF settings ....................................................151Perceptual ........................................................54perfect bound cover .......................................145PNG data objects.............................................63PortletsAdding .................................................. 31, 72Changing view .............................................72Closing .................................................. 31, 72Moving.........................................................72On interactive printer....................................29On Jobs page...............................................31On Operation page .....................................31Resizing........................................................72Searching .....................................................73
Portrait............................................................132PostScript font jobs ...........................................94PPFA...............................................................165PracticesBooklet imposition ........................................45
200

Changing image size....................................45Creating and printing a ring-bound book .....43Creating and printing a stapled booklet .......45Fifth-station printing.......................................46Hot folder .....................................................43Imposition.....................................................45Printing tickets ...............................................46Sample files for.............................................43Tabs .............................................................43
Prinect ..............................................................15Submitting jobs ...........................................113Virtual printer..............................................113
PRINERGYEQUIOS.......................................................15
Print qualityCalibration ........................................100–101Color control bar..........................................99Test masters ................................................100
Print Quality....................................................152Print Quality Settings.......................................152PrinterCalibration .................................................100Information dialog ........................................86IP address.....................................................86Name...........................................................86Page count ...................................................86Restarting....................................................106Serial number ...............................................86Status............................................................85Stopping.....................................................106
Printer calibration for color ...............................51Printer control bar .............................................26Printer driverSubmitting jobsMac .......................................................112Windows................................................111
Printer Information portlet..................................35Printer presetsConfiguring ..................................................84Definition ......................................................20Loading ........................................................88Options ........................................................84
Saving ..........................................................83Printer status......................................................26PrintersDefaults for job properties ............................78Definition ......................................................20
PrintingColor concepts .............................................49Grayscale concepts......................................52
Printing a Color Bar ........................................149Printing Crop Marks .......................................138Printing in Color or Black and White...............148Printing Side ...................................................132Priority ............................................................123Processing modes, CMRAudit.............................................................61Instruction .....................................................61Link...............................................................62
Profile connection space...................................54PropertiesChanging ...................................................125Viewing ......................................................125
Properties for Job dialogGrid view .....................................................40Job view .......................................................39Overview......................................................38View modes..................................................39
Punch .............................................................140
RR
RATs .................................................................65Raw portSubmitting font jobs ......................................94
Reduce/Enlarge.............................................133Relative colorimetric .........................................54Remote accessE-mail ...........................................................81Overview......................................................80Remote console ............................................81SNMP ..........................................................80TotalFlow Prep..............................................82
Rendering intent................................................54Rendering intentsDefinition ......................................................51
201

Resource access tables .....................................65Resource Installer, AFP .....................................67Resource management, color ...........................65ResourcesColor printing tips .........................................66Deleting captured .......................................166Installing .......................................................64Managing ..................................................165
RestartingHardware and software .............................107Software.....................................................106
Restarting the printer .......................................106RestoringOverview....................................................102Procedure...................................................104
RGB color space ..............................................49Ricoh effect.....................................................190RICOH ProcessDirectorDescription .................................................165Version required .........................................165
RICOH TotalFlow Path....................................113Ring-bound book, creating and printing ...........43RolesDefinition ......................................................22Predefined ....................................................22
Rotate.............................................................132Rotation degrees ............................................132Rotation, halftone .............................................51
SS
Sample file .......................................................43SamplesJob copy ...........................................117–118Job page ....................................................118
Saturation.........................................................54Secure mode ..................................................163Security ..........................................................161Selecting a Paper in the Paper Catalog ..........136Selecting the Printing Side...............................132Selecting the Special Effect Toner Properties...157Setting a Booklet Layout .................................131Setting a Gangup Layout................................131Setting a Paper Custom Size...........................136
Setting the Color Profiles.................................149Setting the Job Options...................................127Setting the Job Priority ....................................129Setting the Margins.........................................138SettingsChanging .....................................................75Viewing ........................................................75
Sheet view........................................................40Shortcut buttons ................................................71Shutting downSoftware.....................................................106Software and hardware with restart............107Software and hardware without restart .......107
SNMPCommunities .................................................81Creating communities ...................................75Creating trap hosts .......................................75Deleting communities ....................................89Deleting trap hosts ........................................89Editing communities ......................................87Editing trap hosts ..........................................87Restricting access........................................163Setting up .....................................................80Trap hosts .....................................................81Users ............................................................81
Special Effect Toner Properties........................157Special tonerHalftone patterns ........................................190
Spot color matching .......................................150Staple/Bind....................................................140Stapled booklet, creating and printing..............45Stapling............................................................45StoppingPrinter .........................................................106
Stored Jobs portletColumn titles .................................................33Job properties...............................................33
Storing a Job ..................................................129Submitting print jobsMac printer driver ......................................112Windows printer driver ...............................111
Subsets ...........................................................142Substitutes.......................................................142
202

Supported weights..........................................186Symbols.............................................................. 3
TT
Tabs ...............................................................143Tabs, inserting ..................................................43Test masters ....................................................100Text quality .....................................................154Text/Line Art quality .......................................154TIFF images ......................................................63TimeDisplay .........................................................37SettingAutomatically ...........................................76Manually..................................................76
Tone curvesChanging for jobs.......................................120Creating .......................................................75Deleting........................................................89Editing ................................................... 87, 98Identity .........................................................98
Tone transfer curvesCMR.............................................................60Grayscale printing........................................52Overview......................................................51
Toner levels ......................................................85TotalFlow Prep......................................... 82, 119TotalFlow Print ServerBacking up .................................................102Restoring ....................................................102
TracesArchived.....................................................172Configuring ................................................171Customer data in ........................................162Definition ......................................................22Deleting customer data...............................162Description .................................................170E-mailing ....................................................171Images in....................................................172Saving ................................................. 89, 171Starting.......................................................170
Trademarks......................................................... 4Trap hosts
Creating .......................................................75Deleting........................................................89Editing ..........................................................87
Trim Size.........................................................137Troubleshooting topics....................................169Typefaces ........................................................... 3
UU
Updating a Manual Paper..............................136Updating code ...............................................105Upload devices ................................................90Uploading files .................................................90User interfaceCapturing images .......................................172Display languageCurrent user..............................................71Local ........................................................70Remote .....................................................71
Enabling remote ...........................................81Icon size .......................................................71Keyboard language .....................................70Logging in ....................................................69Properties for Job dialog...............................38Shortcut buttons ............................................71Submitting jobs from ...................................109Text size .......................................................71View modes..................................................39
UsersAccess levels ................................................22Definition ......................................................22Predefined ....................................................22
Users, SNMPCreating .......................................................75Deleting........................................................89Editing ..........................................................87
Using the Exception Pages..............................141
VV
View modes......................................................39Virtual printersCreating .......................................................75Defaults for job properties ............................77Definition ......................................................21Deleting........................................................89
203

Disabling ......................................................87Editing ..........................................................87Enabling .......................................................88Name...........................................................15Overrides for job properties .........................77Prinect ........................................................113Setting default...............................................77
WW
Watermark .....................................................158Watermark Settings ........................................158White lines around characters ........................154
204

Copyright© 2015, 2017 Ricoh Company, Ltd. All rights reserved.

USEN GB AUEN EN 11/2017 M5267502
TotalFlo
wPrin
tServer
Operatin
gInstru
ctions
RICOH COMPANY, LTD.
8-13-1, Ginza, Chuo-ku, Tokyo 104-8222, Japanhttp://www.ricoh.com