operating instruction for p2 card format station - panasonic
TRANSCRIPT

- 1 -
2011.6
Operating Instruction for P2 Card Format Station This operating instruction is for P2card Format station Ver 1.0.14 and later. Content “P2 card format station” formats P2 cards which are inserted in PC card drive or P2 equipment that is connected to PC via USB. Also it checks and upgrades firmware version. At the same time, it checks internal operation of the P2 card simply.
PC operating condition - OS : Windows XP or Vista or 7 - Latest P2 driver for Windows is installed - Log in with Administrator status Card Drive - CardBus slot of PC (Recommended) : All the functions work. - AJ-PCD10,AJ-PCD20,AJ-PCD35,AJ-PCD2,AJ-PCD30 (Recommended)
: All the functions work. - Other P2 equipments than above : Functions other than firmware upgrade work.
Caution: 1. Do not power down or pull out P2 card during this software operation or card
access. Otherwise, the access interruption may cause no restarting of the P2 card. If the card shows any problem, please consult to Panasonic Service Center.
2. To AJ-P2E Series P2 card users
When you press “Start” button in Format window, a bar graph below is displayed. Confirm and click “OK” and proceed to the next step.
Note. When the “RUN DOWN CARD” warning has appeared, ensure that the data is
backed up and the card is replaced within one week of the time. If use of the card is continued beyond this time frame after the warning has appeared, data may not be recorded on the card properly nor may the data on the card be played back

- 2 -
properly. 3. To “Simple Checker” software users
Do not use previously introduced “Simple Checker” software to check the P2 cards which were version up by this “P2 Card Format Station” software. An error message will appear with “Simple Checker” even if there is no error in the P2 card. (This is due to difference of the checking method.) Use the simple check function of the “P2 Format Station” software for this purpose.
Procedure Please see page 2 of 8 when you use Windows XP. Please see page 9 of 15 when you use Windows Vista or Windows7.
Windows XP .
(The explanation is display sample.)
Procedure 1. Unzip the folder “P2CardFormatStationV***.zip” with unzip tool on a PC. 2. Make the “Write Protect SW” to OFF on the back of P2 cards. 3. Insert P2 cards into card slot of PC or P2 equipment connected to PC via USB.
Plural P2 cards can be inserted and operated. 4. Execute the “P2CardFormatStationV***.exe” in the folder of “P2CardFormatStationV***”.

- 3 -
5. First the following message appears. Confirm and click OK.
6. Version and error existence in the P2 cards are checked automatically. When everything is OK, the following message is displayed. Confirm and click Yes.
Note. When other message is displayed before this message appears, please see page 6.
7. When Yes is clicked, the following Format window is displayed. Click Yes for proceeding the format. Input the volume label if needed.
Note. “Full delete” is recommended to be executed in case like the P2 card is abandoned. Please see page 16 for the operation.
All the cards which can be formatted are displayed.

- 4 -
Click Start and proceed to step 8. When you click Close, proceed to step 10. 8. The following warning is displayed. Confirm and click OK.
9. When format of the indicated drive is completed, the following message is displayed. When click OK, the window returns to Format window of the drive. Click Close.
10. When there are other P2 cards to be formatted next, the drive of the card is displayed on the task bar below as shown in figure (flashing a few seconds). Then click it.
The first drive to be formatted is displayed
Click here
The next drive of P2 card to be formatted

- 5 -
11. When it is clicked, the Format window of the next drive is displayed. Click Start.
Repeat step 7 to step 10 for all the drives of formatted P2 cards.
12. When all of the P2 cards are formatted, the following message is displayed. Click OK and the program is closed.
- 6 -
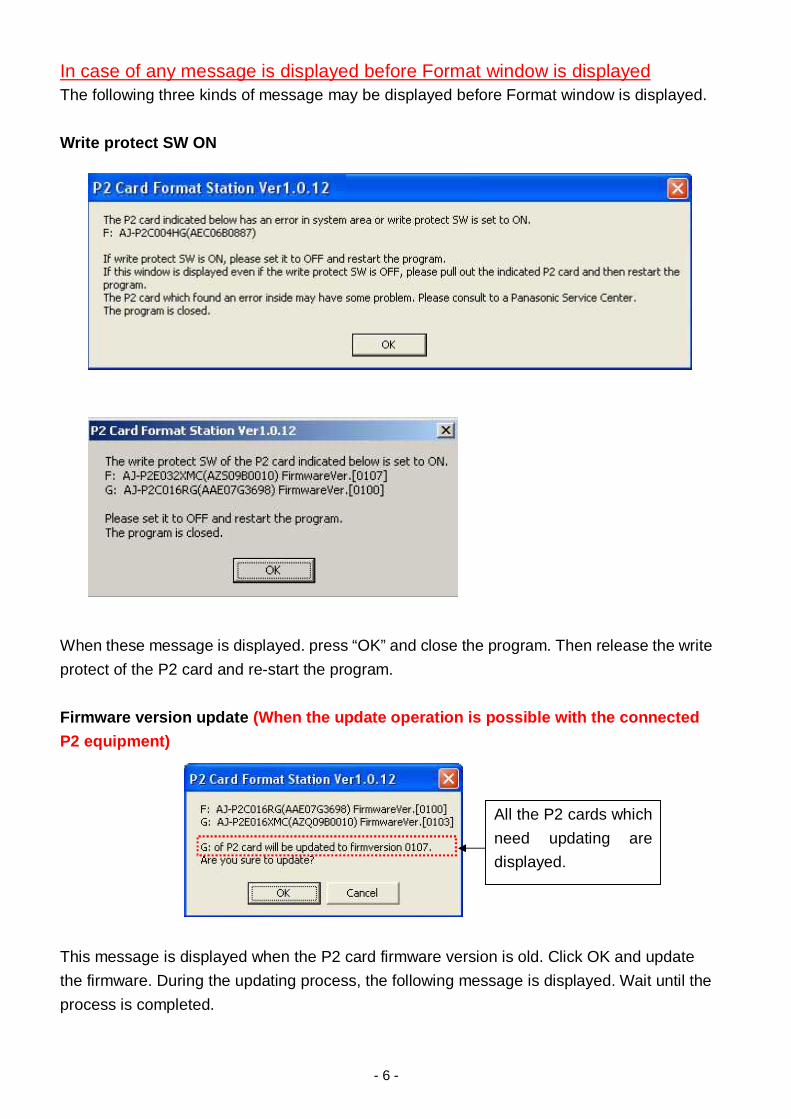
In case of any message is displayed before Format window is displayed The following three kinds of message may be displayed before Format window is displayed. Write protect SW ON
When these message is displayed. press “OK” and close the program. Then release the write protect of the P2 card and re-start the program.
Firmware version update (When the update operation is possible with the connected P2 equipment)
This message is displayed when the P2 card firmware version is old. Click OK and update the firmware. During the updating process, the following message is displayed. Wait until the process is completed.
All the P2 cards which need updating are displayed.

- 7 -
When updating is finished, the following message is displayed.
Click Close and the program is closed. Then eject all the updated P2 cards once and reinsert them. Restart the program and confirm that the version is updated with the display as shown below.
Before update After update Firmware version update (When the update operation is not possible with the connected P2 equipment) When this message is displayed, the update is not possible. However, the format of the P2 Card is possible by pressing OK.
*1: The above is sample display when AJ-PCD20 is connected. The connected P2 equipment and the
drive name is shown in the marking.
*1

- 8 -
Note. When this massage is displayed, the introduction of the latest firmware for the P2
equipment makes it possible to perform the P2 card firmware update. (The latest firmware for P2 Products is downloaded from Support Desk) When “OK” is pressed, the window blow is displayed and format operation is proceeded. When cancel is pressed, the program closes.

- 9 -
Windows Vista or Windows7 .
(The explanation is with Windows Vista display sample.) Procedure 1. Unzip the folder “P2CardFormatStationV***.zip” with unzip tool on a PC. 2. Make the “Write Protect SW” to OFF on the back of P2 cards. 3. Insert P2 cards into card slot of PC or P2 equipment connected to PC via USB.
Plural P2 cards can be inserted and operated. 4. Execute the “P2CardFormatStationV***.exe” in the folder of “P2CardFormatStationV***”. The Security window (User Account Control) is displayed.
Click “Allow” and the program starts.
5. First the following message appears. Confirm and click OK.
- 10 -
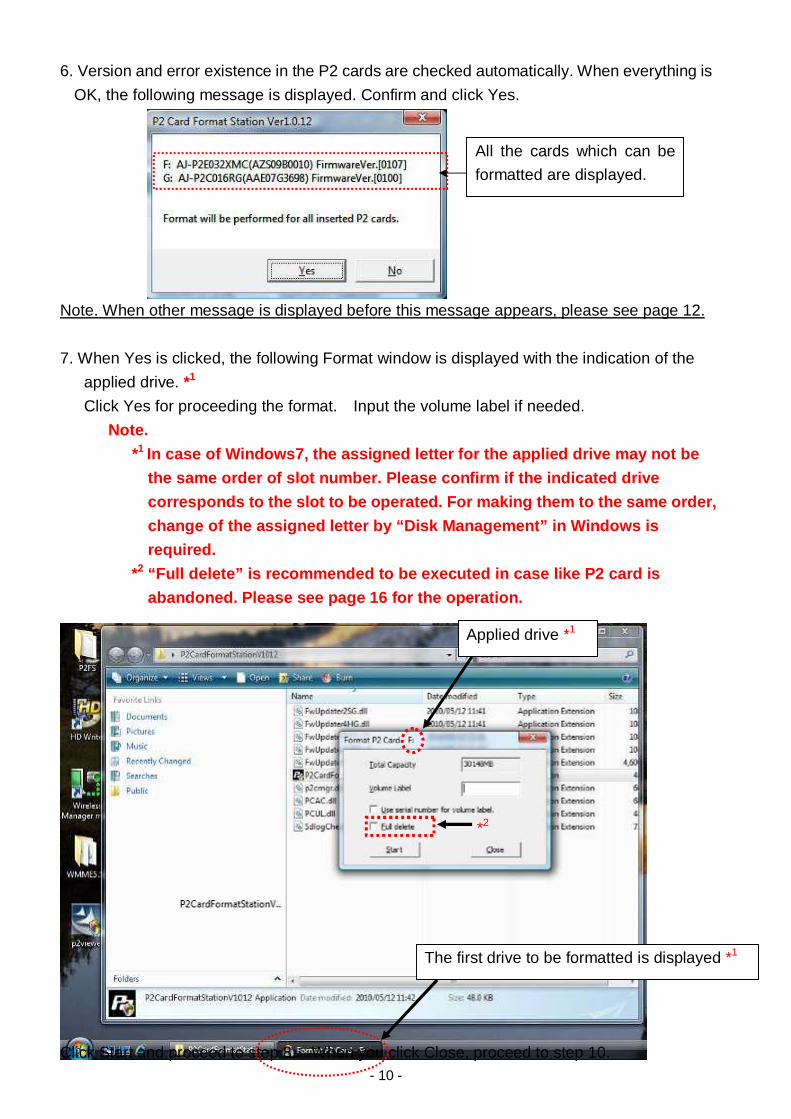
6. Version and error existence in the P2 cards are checked automatically. When everything is OK, the following message is displayed. Confirm and click Yes.
Note. When other message is displayed before this message appears, please see page 12.
7. When Yes is clicked, the following Format window is displayed with the indication of the applied drive. *1
Click Yes for proceeding the format. Input the volume label if needed. Note.
*1 In case of Windows7, the assigned letter for the applied drive may not be the same order of slot number. Please confirm if the indicated drive corresponds to the slot to be operated. For making them to the same order, change of the assigned letter by “Disk Management” in Windows is required.
*2 “Full delete” is recommended to be executed in case like P2 card is abandoned. Please see page 16 for the operation.
Click Start and proceed to step 8. When you click Close, proceed to step 10.
All the cards which can be formatted are displayed.
The first drive to be formatted is displayed *1
Applied drive *1
*2

- 11 -
8. The following warning is displayed. Confirm and click OK.
9. When format of the indicated drive is completed, the following message is displayed. When click OK, the window returns to Format window of the drive. Click Close.
10. When there are other P2 cards to be formatted next, the drive of the card is displayed on the task bar below as shown in figure (flashing a few seconds). Then click it.
Click here The next drive of P2 card to be formatted *1
- 12 -
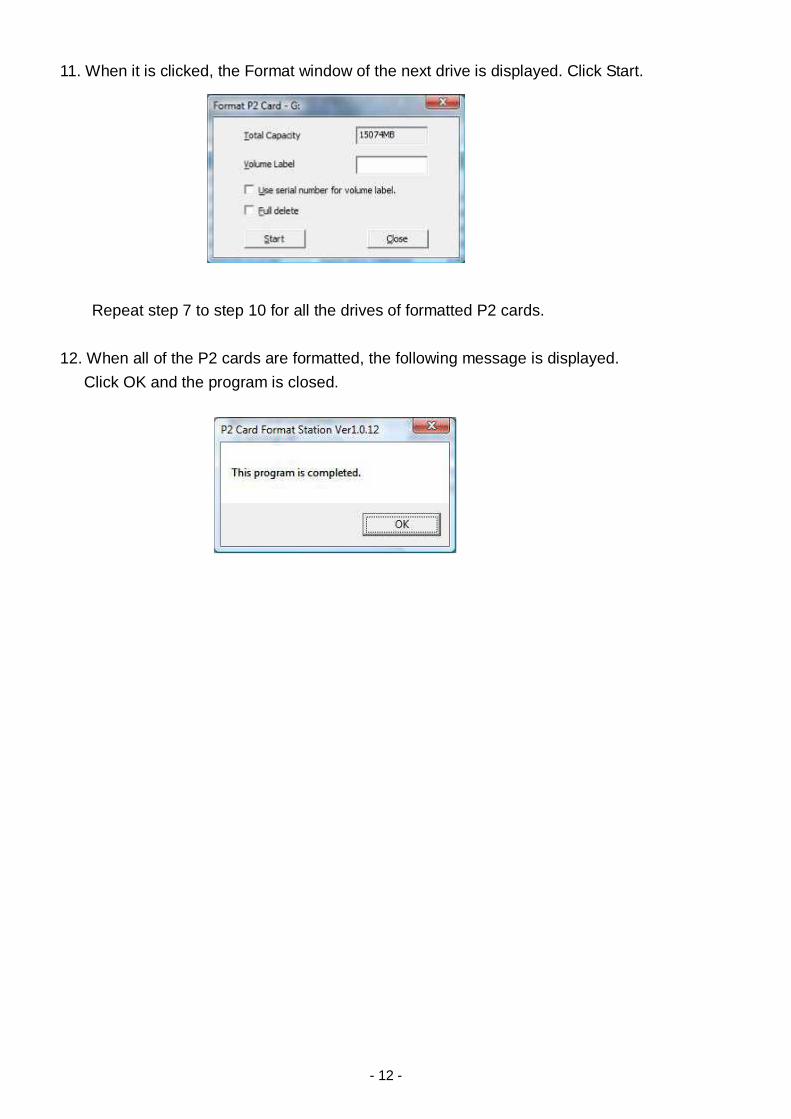
11. When it is clicked, the Format window of the next drive is displayed. Click Start.
Repeat step 7 to step 10 for all the drives of formatted P2 cards.
12. When all of the P2 cards are formatted, the following message is displayed. Click OK and the program is closed.

- 13 -
In case of any message is displayed before Format window is displayed The following three kinds of message may be displayed before Format window is displayed. *1 In case of Windows7, the assigned letter for the applied drive may not be the same
order of slot number. Please confirm if the indicated drive corresponds to the slot to be operated.
Write protect SW ON
When these message is displayed. press “OK” and close the program. Then release the write protect of the P2 card and re-start the program.
Firmware version update (When the update operation is possible with the connected P2 equipment)
All the P2 cards which need updating are displayed.

- 14 -
This message is displayed when the P2 card firmware version is old. Click OK and update the firmware. During the updating process, the following message is displayed. Wait until the process is completed.
When updating is finished, the following message is displayed.
Click Close and the program is closed. Then eject all the updated P2 cards once and reinsert them. Restart the program and confirm that the version is updated with the display as shown below. Before update After update

- 15 -
Firmware version update (When the update operation is not possible with the connected P2 equipment) When this message is displayed, the update is not possible. However, the format of the P2 Card is possible by pressing OK.
*1: The above is sample display when AJ-PCD20 is connected. The connected P2 equipment and the
drive name is shown in the marking.
Note. When this massage is displayed, the introduction of the latest firmware for the P2
equipment makes it possible to perform the P2 card firmware update. (The latest firmware for P2 Products is downloaded from Support Desk) When “OK” is pressed, the window blow is displayed and format operation is proceeded. When cancel is pressed, the program closes.
*1

- 16 -
Operation of "Full delete" (The explanation is with Windows XP display sample.)
Note. “Full delete” is recommended to be executed in case like the P2 card is abandoned.
1. In format P2 card window, click “Full delete” check box. Then click “Start”. 2. The following message appears. Confirm it and click “OK” if you are OK. 3. The following message appears. Confirm again and click “OK” if you are OK. 4. When Full delete of the indicated drive is completed, the following message is displayed. When click OK, the window returns to Format window of the drive. Click Close.