operating / installation manual - fujiohfujioh.com/wp-content/uploads/2017/08/manual_fv-el5… ·...
TRANSCRIPT
Operating / Installation Manual
FV-EL51FV-EL52FV-EL53
Please read this manual carefullybefore using the appliance.
INTRODUCTIONDear Client, Thank you for having purchased our product.
IMPORTANT:
Keep these use instructions with the product. Should the product be sold or transferred to other persons, ensure it is accompanied by itsinstructions.We ask that you carefully read these recommendations before installing and using the product. They have been drafted for your safety and thosenear you.This manual gives indications to maintain the aesthetical and functional qualities of the oven unaltered.
You can also visit our website: www.fujioh.com where you will find our latest news and much more useful and complementary information.With the constant aim to improve our products, we reserve to amend their technical, functional or aesthetical features, parallel to the technicalevolution.
-
Important:
Before starting the oven, carefully read this installation and use manual in order to better know its functioning.
1. OVEN USE AND SAFETY WARNINGS
2. INSTALLATION 2........................................................................................................
SUMMARY
30 ............................................................................................................... FIGURES
3. DESCRIPTION OF THE CONTROLS ..........................................................................
4. USE OF THE OVEN ..................................................................................................
5. AVAILABLE ACCESSORIES ......................................................................................
6. COOKING ADVICE ...................................................................................................
7. CLEANING AND MAINTENANCE ...............................................................................
8. EXTRAORDINARY MAINTENANCE ............................................................................
1 .........................................................................
BUILT-IN ELECTRIC OVEN
3
24
25
25
27
28
1
INSTRUCTIONS FOR THE INSTALLER:
They indicate the operations for the QUALIFIED ENGINEER ,noitallatsni eht tuo yrrac ot evah lliw ohw
commissioning and testing of the appliance.
INSTRUCTIONS FOR THE USER:
indicate the ovens’ use recommendations, the controls description and the correct cleaning and maintenance
operations.
1. Oven use and safety warnings
PRESENTATION
Warning: this appliance and accessibile parts may heat up during use. Be careful not to touch heating elements. The appliance should be kept out of the reach of children younger than 8 years unless supervised at all times.
The appliance can only be used by children older than 8 years and by people with reduced phisical, sensory, mental capabilities or lack of experience or knowledge only if strictly supervised whilst using it or have been shown how to use it in a safe way and understand the hazards involved. Do not let the children play with the appliance. Children mus not be allowed to clean the appliance unsupervised.
Warning: the accessibile parts may get hot when in use: keep the children well away from the applianceNever use steam or high pressure equipment to clean the oven; this may cause problems to the electrical safety devices.
Wire shelves and drip trays must be positioned inside the oven utilizing the the special guides in a proper way (the oven is equipped with 5 guides to position the drip trays and the wire shelves at different levels or 4 levels on lateral side racks as decribed in detail on chapters 5 and 6).
Disconnect the oven from the mains before every intervention which requests access to the live parts. Make sure that the appliance is switched off before replacing the oven light in order to avoid electrical scocks.
Do not utilize abrasive sponges or sharp scrapers to clean the oven glass door as this may scratch the surface causing the glass to shatter.This appliance is exclusively intended for non-professional use. Do not use the appliance for commercial or industrial purposes or for any
other purpose for which it was not conceived.This appliance has been conceived for domestic and private use. It is exclusively intended for cooking food products. Therefore, any
liability for uses different to those indicated is declined. None of the components of this oven are made with asbestos. Do not amend and try to amend the technical features of this appliance, as this might present a danger for yourselves and for those near you.
Before using the oven for the first time, heat it up empty for about 15 min. Ensure the room is ventilated. You may smell a particular odour or notice a small emission of smoke. THIS IS NORMAL.
The appliance becomes hot during use. Do not touch the thermoelements inside the oven. Do not go near the hot upper elements with the hands when inserting or removing the pans or pan supports from the oven, use thermal kitchen gloves. When cooking food, only use plates or pans resistant to high temperatures. Never place aluminium foil directly on to the oven support surface, as the accumulated heat may cause the enamel to deteriorate. Do not lay heavy objects on the oven door and ensure that children do not sit on it. When cleaning the inside, ensure the oven is cold and, moreover, that it is switched off.
•
•
•••
••••
•
•
•
• The alcohol vapours inside the hot cooking compartment may catch fire. Do not cook food containing large quantities of beverages with a high alcohol content. Only use small quantities of beverages with a high alcohol content. Open the door of the appliance carefully.
2
2. INSTALLATION
2.1 Electrical connection
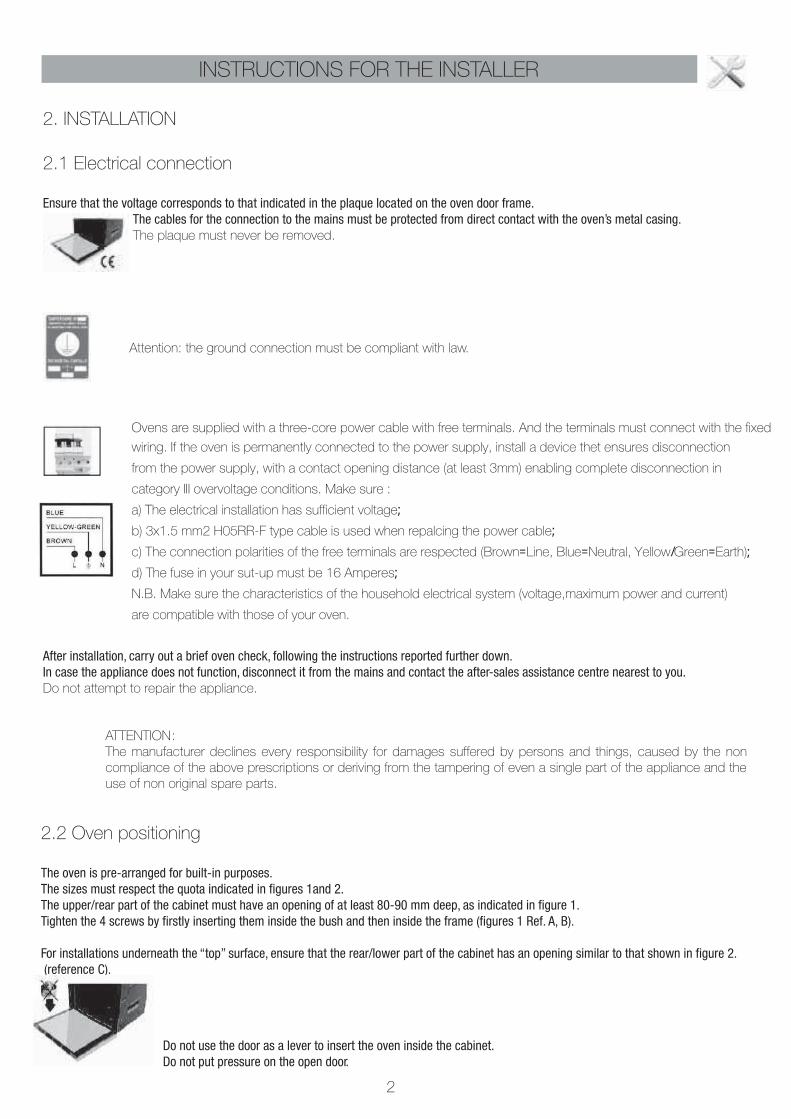
Ensure that the voltage corresponds to that indicated in the plaque located on the oven door frame.The cables for the connection to the mains must be protected from direct contact with the oven’s metal casing.The plaque must never be removed.
Attention: the ground connection must be compliant with law.
After installation, carry out a brief oven check, following the instructions reported further down.In case the appliance does not function, disconnect it from the mains and contact the after-sales assistance centre nearest to you.Do not attempt to repair the appliance.
ATTENTION:
The manufacturer declines every responsibility for damages suffered by persons and things, caused by the non
compliance of the above prescriptions or deriving from the tampering of even a single part of the appliance and the
use of non original spare parts.
INSTRUCTIONS FOR THE INSTALLER
2.2 Oven positioning
The oven is pre-arranged for built-in purposes.The sizes must respect the quota indicated in figures 1and 2.The upper/rear part of the cabinet must have an opening of at least 80-90 mm deep, as indicated in figure 1.Tighten the 4 screws by firstly inserting them inside the bush and then inside the frame (figures 1 Ref. A, B).
For installations underneath the “top” surface, ensure that the rear/lower part of the cabinet has an opening similar to that shown in figure 2. (reference C).
Do not use the door as a lever to insert the oven inside the cabinet.Do not put pressure on the open door.
Ovens are supplied with a three-core power cable with free terminals. And the terminals must connect with the fixed Avoid using reductions or adaptors as they may cause overheating or burning.
wiring. If the oven is permanently connected to the power supply, install a device thet ensures disconnection
from the power supply, with a contact opening distance (at least 3mm) enabling complete disconnection in
category III overvoltage conditions. Make sure :
a) The electrical installation has sufficient voltage
b) 3x1.5 mm2 H05RR-F type cable is used when repalcing the power cable
c) The connection polarities of the free terminals are respected (Brown Line, Blue Neutral, Yellow Green Earth)
d) The fuse in your sut-up must be 16 Amperes
N.B. Make sure the characteristics of the household electrical system (voltage,maximum power and current)
are compatible with those of your oven.
= = =/
;
;
;
;
3
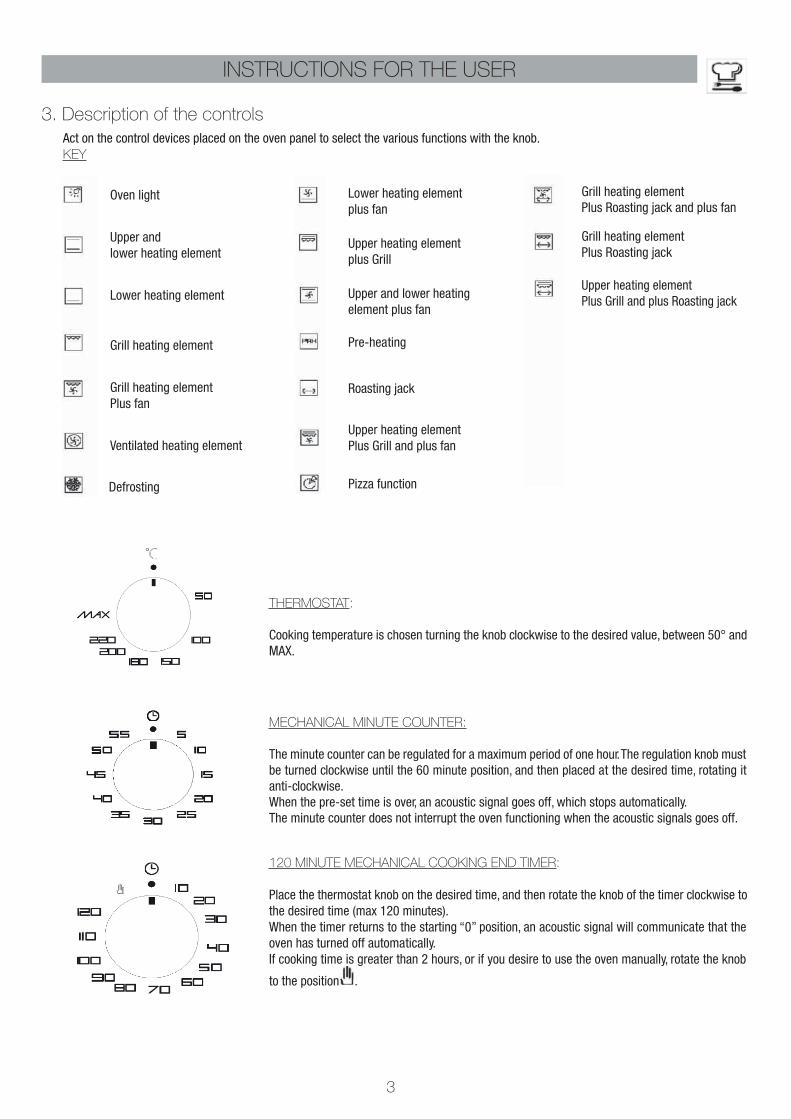
THERMOSTAT:
Cooking temperature is chosen turning the knob clockwise to the desired value, between 50° and MAX.
MECHANICAL MINUTE COUNTER:
The minute counter can be regulated for a maximum period of one hour. The regulation knob must be turned clockwise until the 60 minute position, and then placed at the desired time, rotating it anti-clockwise.When the pre-set time is over, an acoustic signal goes off, which stops automatically.The minute counter does not interrupt the oven functioning when the acoustic signals goes off.
120 MINUTE MECHANICAL COOKING END TIMER:
Place the thermostat knob on the desired time, and then rotate the knob of the timer clockwise to the desired time (max 120 minutes).When the timer returns to the starting “0” position, an acoustic signal will communicate that the oven has turned off automatically.If cooking time is greater than 2 hours, or if you desire to use the oven manually, rotate the knob
to the position .
Oven light
Upper and lower heating element
Lower heating element
Grill heating element
Grill heating elementPlus fan
Ventilated heating element
Defrosting
Lower heating elementplus fan
Upper heating elementplus Grill
Upper and lower heating element plus fan
Pre-heating
Roasting jack
Upper heating elementPlus Grill and plus fan
Pizza function
Grill heating elementPlus Roasting jack and plus fan
Grill heating elementPlus Roasting jack
Upper heating element Plus Grill and plus Roasting jack
INSTRUCTIONS FOR THE USER
3. Description of the controls
Act on the control devices placed on the oven panel to select the various functions with the knob.KEY
4
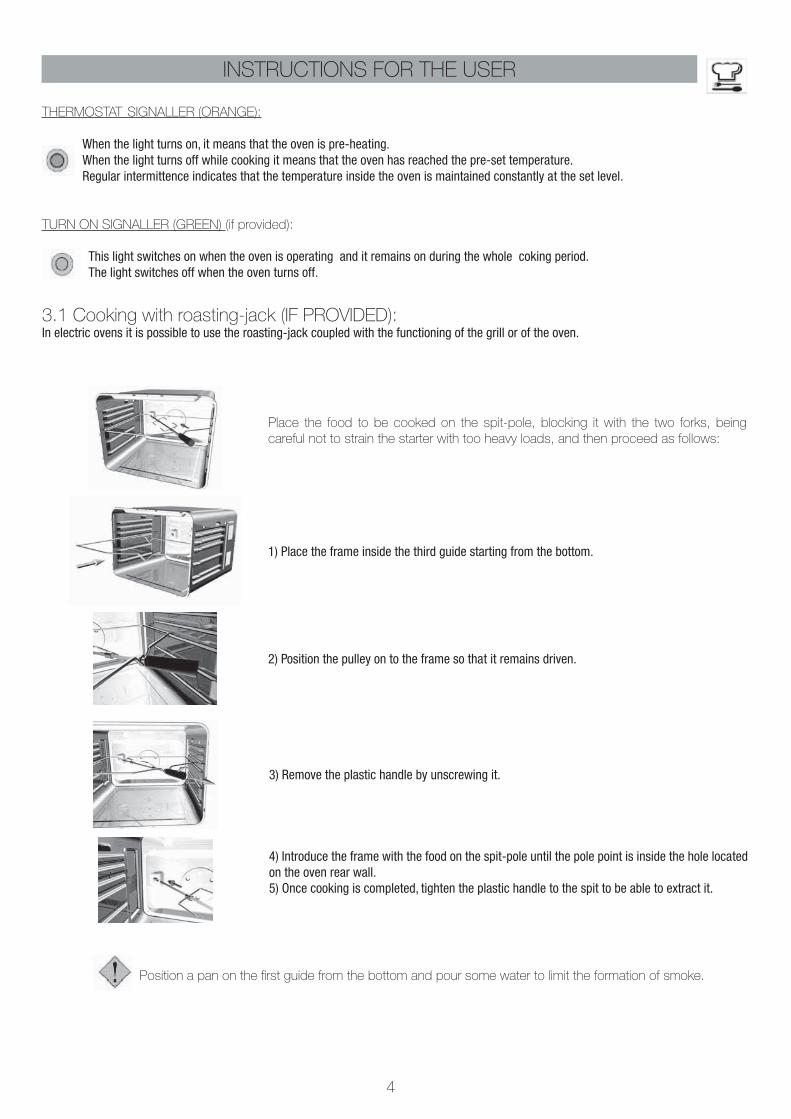
THERMOSTAT SIGNALLER (ORANGE):
When the light turns on, it means that the oven is pre-heating.When the light turns off while cooking it means that the oven has reached the pre-set temperature.Regular intermittence indicates that the temperature inside the oven is maintained constantly at the set level.
TURN ON SIGNALLER (GREEN) (if provided):
This light switches on when the oven is operating and it remains on during the whole coking period.The light switches off when the oven turns off.
3.1 Cooking with roasting-jack (IF PROVIDED):In electric ovens it is possible to use the roasting-jack coupled with the functioning of the grill or of the oven.
INSTRUCTIONS FOR THE USER
Place the food to be cooked on the spit-pole, blocking it with the two forks, being
careful not to strain the starter with too heavy loads, and then proceed as follows:
1) Place the frame inside the third guide starting from the bottom.
2) Position the pulley on to the frame so that it remains driven.
Position a pan on the first guide from the bottom and pour some water to limit the formation of smoke.
3) Remove the plastic handle by unscrewing it.
4) Introduce the frame with the food on the spit-pole until the pole point is inside the hole located on the oven rear wall.5) Once cooking is completed, tighten the plastic handle to the spit to be able to extract it.
5
3.2 ELECTRONIC PROGRAMMER (fig. 3)
FUNCTIONS LIST
Increase of the number on the display
Decrease of the number on the display
Setting of cooking duration and end
3.2.1 Switching on:
Once it is on, the time of the day and the AUTO icon flash on the screen and the oven will be deactivated by the timer. To unblock it, enter the manual setting mode.Then set the correct time of the day.
Manual setting mode:Press MENU (fig. 4).
3.2.2 Time setting:
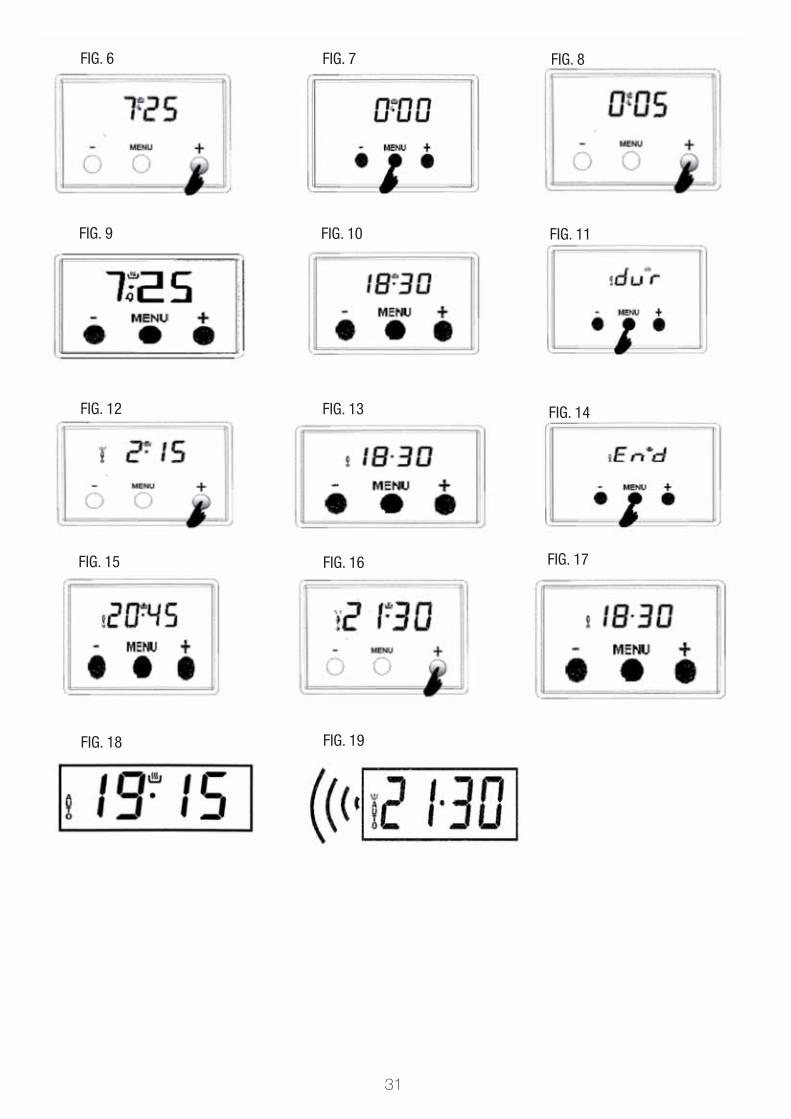
The time can be set only when the cooking programs are not on.While setting, the point between the hours and the minutes flashes.Press + and/or – to set the time (fig. 6).
when the time has been set, wait five seconds or press + and – simultaneously to exit this mode.
INSTRUCTIONS FOR THE USER
3.2.3 Alarm (Buzzer)
2) Press the + or – buttons to set the alarm (fig. 8)
1) Press MENU and the icon of the alarm flashes in minutes format (ex.: 5 min.) (fig. 7)
3) After five seconds the screen will display the time of the day. (fig. 9). When time is up, the buzzer will begin to ring.
Press any button to deactivate it.
3.2.4 Automatic cooking To start cooking immediately, only the duration of cooking needsExample: we want to cook for 2 h and 15’ starting now:
1) The actual time is 18:30. (fig. 10).
2) Press MENU twice to enter the “cooking duration” function. (fig. 11).
3) Press the + or – buttons to set the cooking duration, For example 2h and 15’. (fig. 12).
Within 5 seconds, the screen will display again the current time and the AUTO icon which It remains fixed on the screen fig. 13.
ISet the desired cooking function.
Cooking will start and stop when the set buzzer time has passed (in this case 2h and 15’).If you do not wish to start cooking immediately, you can program the time in which you want cooking to end.After having set the duration of cooking as previously explained, press MENU 3 times entering the cooking end function.
Example: We want the food to be cooked at 20:45:
2) Press + or – to program the time for the end of cooking (fig. 16).
1) Press MENU 3 times until “End” and the time of the end of cooking appear on the screen. In the example, the time for the end of cooking will be:(18:30 + 2:15 = 20:45) (fig. 15)
3) After a few seconds the actual time will appear on the screen. (fig. 17).
Example recapitulation:Having programmed the timer so that the food is ready at 21:30 and since the duration of 2h 15’ was previously set, cooking will begin at 19:15,it will last 2 hours and 15 minutes and it will end at 21:30.
The figure 18 shows how the screen is displayed when cooking starts
The figure 19 shows how the screen is displayed when cooking ends
The timer blocks the oven until entering manual setting mode (see paragraph 3.2.1)
The buzzer will ring for 7 minutes if it is not deactivated by pressing any button.
(fig.14).
3.2.5 End of cooking
3 types of different tones can be selected:
1) Maintain the button pressed to listen to the pre-defined tone;2) Release the key and keep it pressed again to listen to the successive tone;3) The last tone you will listen to will remain set/memorised until it is reprogrammed.
INSTRUCTIONS FOR THE USERINSTRUCTIONS FOR THE USER
6
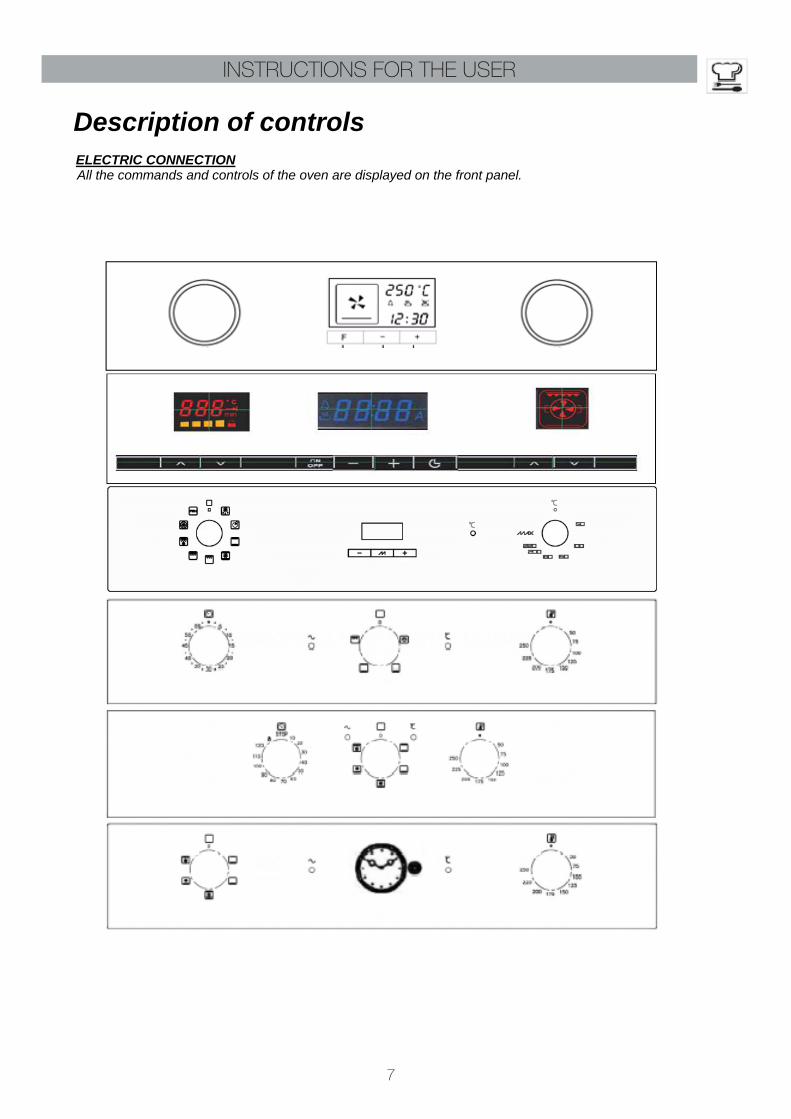
CA Description of controls
ELECTRIC CONNECTION All the commands and controls of the oven are displayed on the front panel.IQUES DU PAN
INSTRUCTIONS FOR THE USER
7
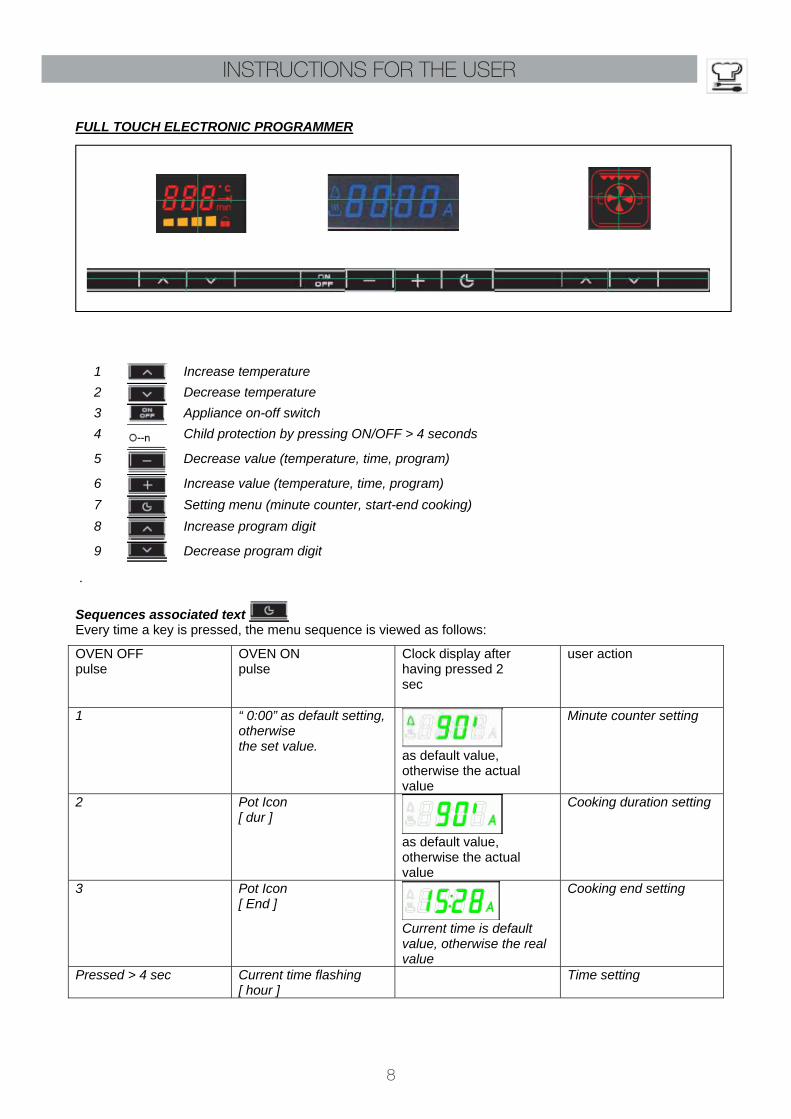
FULL TOUCH ELECTRONIC PROGRAMMER
1 Increase temperature
2 Decrease temperature
3 Appliance on-off switch
4
Child protection by pressing ON/OFF > 4 seconds
5
Decrease value (temperature, time, program)
6 Increase value (temperature, time, program)
7 Setting menu (minute counter, start-end cooking)
8
Increase program digit
9 Decrease program digit
.
Sequences associated text Every time a key is pressed, the menu sequence is viewed as follows:
OVEN OFF pulse
OVEN ON pulse
Clock display after having pressed 2 sec
user action
1 “ 0:00” as default setting, otherwise the set value.
as default value, otherwise the actual value
Minute counter setting
2 Pot Icon [ dur ]
as default value, otherwise the actual value
Cooking duration setting
3 Pot Icon [ End ]
Current time is default value, otherwise the real value
Cooking end setting
Pressed > 4 sec Current time flashing [ hour ]
Time setting
INSTRUCTIONS FOR THE USER
8
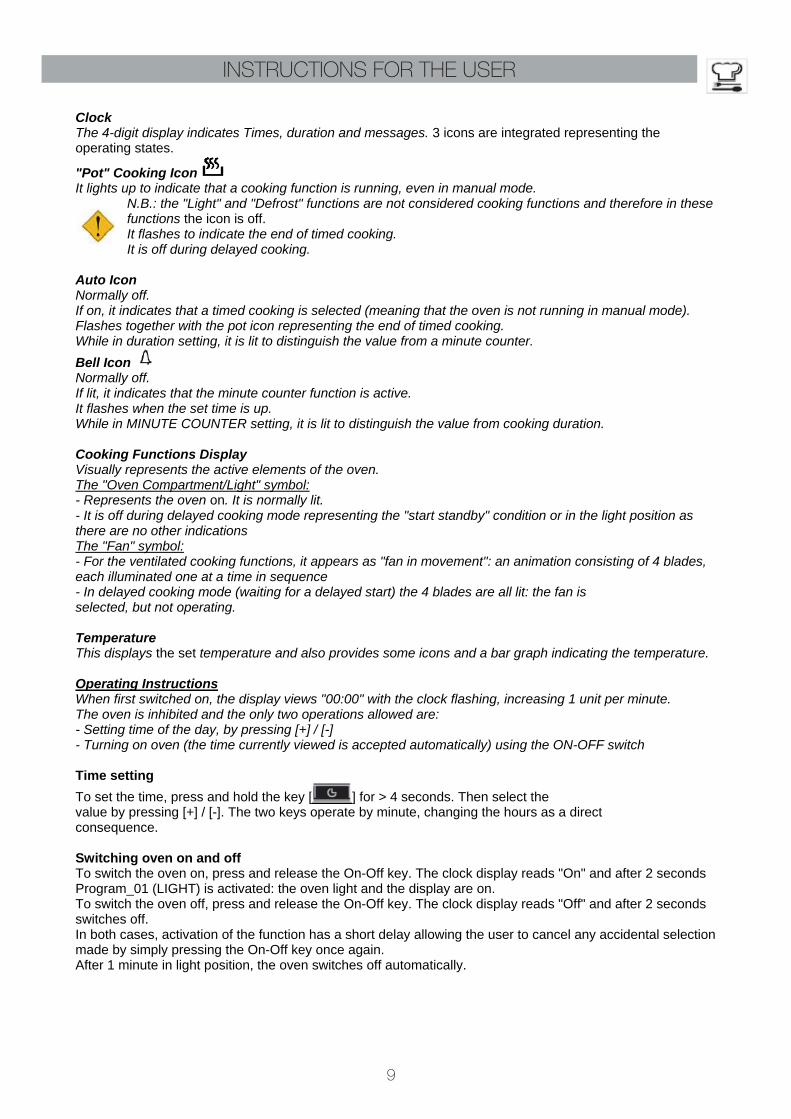
Clock The 4-digit display indicates Times, duration and messages. 3 icons are integrated representing the operating states.
"Pot" Cooking Icon It lights up to indicate that a cooking function is running, even in manual mode.
N.B.: the "Light" and "Defrost" functions are not considered cooking functions and therefore in these functions the icon is off. It flashes to indicate the end of timed cooking. It is off during delayed cooking.
Auto Icon Normally off. If on, it indicates that a timed cooking is selected (meaning that the oven is not running in manual mode). Flashes together with the pot icon representing the end of timed cooking. While in duration setting, it is lit to distinguish the value from a minute counter.
Bell Icon Normally off. If lit, it indicates that the minute counter function is active. It flashes when the set time is up. While in MINUTE COUNTER setting, it is lit to distinguish the value from cooking duration. Cooking Functions Display Visually represents the active elements of the oven. The "Oven Compartment/Light" symbol: - Represents the oven on. It is normally lit. - It is off during delayed cooking mode representing the "start standby" condition or in the light position as there are no other indications The "Fan" symbol: - For the ventilated cooking functions, it appears as "fan in movement": an animation consisting of 4 blades, each illuminated one at a time in sequence - In delayed cooking mode (waiting for a delayed start) the 4 blades are all lit: the fan is selected, but not operating. Temperature This displays the set temperature and also provides some icons and a bar graph indicating the temperature. Operating Instructions When first switched on, the display views "00:00" with the clock flashing, increasing 1 unit per minute. The oven is inhibited and the only two operations allowed are: - Setting time of the day, by pressing [+] / [-] - Turning on oven (the time currently viewed is accepted automatically) using the ON-OFF switch Time setting
To set the time, press and hold the key [ ] for > 4 seconds. Then select the value by pressing [+] / [-]. The two keys operate by minute, changing the hours as a direct consequence. Switching oven on and off To switch the oven on, press and release the On-Off key. The clock display reads "On" and after 2 seconds Program_01 (LIGHT) is activated: the oven light and the display are on. To switch the oven off, press and release the On-Off key. The clock display reads "Off" and after 2 seconds switches off. In both cases, activation of the function has a short delay allowing the user to cancel any accidental selection made by simply pressing the On-Off key once again. After 1 minute in light position, the oven switches off automatically.
INSTRUCTIONS FOR THE USER
9

Minute counter The minute counter does not interrupt functioning of the heating elements and is always available depending on its operating status.
Press and release the key [ ] once, as indicated in point 2.1. Correct the value using [+] and [-], from 0 to a maximum of 180 minutes.. 4 seconds after the last action on the keyboard, the proposed value is accepted and the display goes back to the previous operating mode.
The value is accepted even by pressing the key [ ] after it has been modified.
When the minute counter is up, a buzzer goes off and the icon flashes. Press any key to interrupt the
ringing and to deactivate the icon . Note: The normal function associated to the key pressed is not executed as it is only necessary to stop the ringing.
Manual cooking Switch the oven on and select a cooking mode by means of [Progr]: the oven proposes a default temperature which can be adjusted. After a 4 second wait, the oven starts cooking. Cooking time duration Switch the oven on and press [Time] twice. The clock display will read "dur". Change the value using [+] and [-] from a minimum of 0h: 00m to a maximum of 23h: 59m. After a 4 second wait, the value is accepted. Then select the cooking mode [Progr] and the final temperature [°C]. When the set time has elapsed, the oven returns to the End of Cooking mode. Automatic delay cooking The cooking end time can only be set after having set a cooking time period.
Set the duration and press [ ] once again, the clock display will read "End". Modify the value using [+] and [-]. Cooking duration can be modified starting from the current time viewed up to the current time + 23h 59m. After a 4 second wait, the value is accepted and the oven goes back to Waiting for delayed start. The set value will not be viewed, but will appear at the intended starting time until the cooking end time has been reached. During this phase, the functions display shows the selected cooking function and the temperature display views the set temperature. Both can be modified. The preheating bar is completely off indicating that the oven is not currently heating. The tangential fan works as usual, while the indicator works as described in oven light management. Cooking end mode The oven switches off the heating elements and the buzzer goes off. The functions and temperature display are off. The clock display indicates the time of the day with both the Auto and Pot icons flashing. Press any key except [OnOff] to unlock the oven: it will immediately return to manual cooking mode. The [OnOff] symbol switches the oven off permanently. Cooking mode selection The clock views the selected program number or "Pr01" if no program has been selected. The functions display has the oven compartment symbol flashing or indicates that the program is being edited. Choose the
desired program by pressing [ ] and [ ], between "On" and "Pr 12". After a 4 second wait, the selected program is accepted and becomes operational.
INSTRUCTIONS FOR THE USER
10
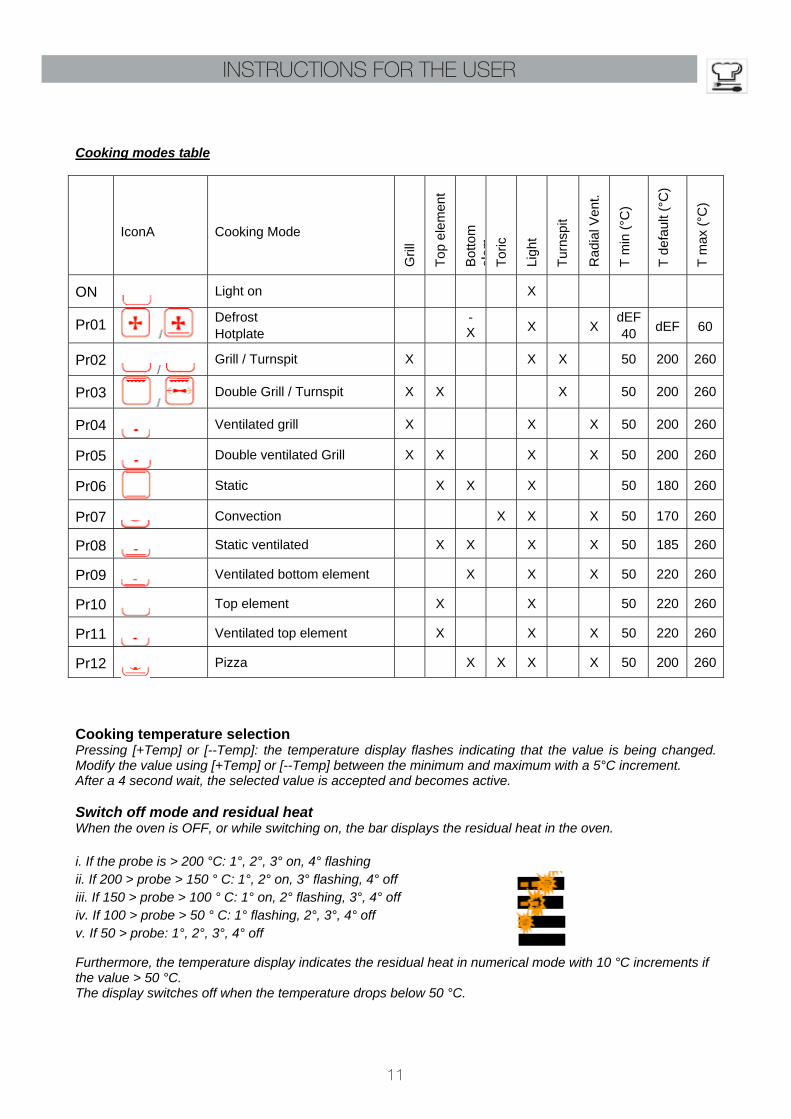
Cooking modes table
IconA Cooking Mode
Gril
l
Top
ele
men
t
Bot
tom
el
emen
tT
oric
Ligh
t
Tur
nspi
t
Rad
ial V
ent.
T m
in (
°C)
T d
efau
lt (°
C)
T m
ax (
°C)
ON
Light on X
Pr01
Defrost Hotplate
- X
X X dEF 40 dEF 60
Pr02
Grill / Turnspit X X X 50 200 260
Pr03
Double Grill / Turnspit X X X 50 200 260
Pr04
Ventilated grill X X X 50 200 260
Pr05
Double ventilated Grill X X X X 50 200 260
Pr06
Static X X X 50 180 260
Pr07 Convection X X X 50 170 260
Pr08 Static ventilated X X X X 50 185 260
Pr09 Ventilated bottom element X X X 50 220 260
Pr10 Top element X X 50 220 260
Pr11 Ventilated top element X X X 50 220 260
Pr12
Pizza X X X X 50 200 260
Cooking temperature selection Pressing [+Temp] or [--Temp]: the temperature display flashes indicating that the value is being changed. Modify the value using [+Temp] or [--Temp] between the minimum and maximum with a 5°C increment. After a 4 second wait, the selected value is accepted and becomes active. Switch off mode and residual heat When the oven is OFF, or while switching on, the bar displays the residual heat in the oven. i. If the probe is > 200 °C: 1°, 2°, 3° on, 4° flashing
ii. If 200 > probe > 150 ° C: 1°, 2° on, 3° flashing, 4° off iii. If 150 > probe > 100 ° C: 1° on, 2° flashing, 3°, 4° off iv. If 100 > probe > 50 ° C: 1° flashing, 2°, 3°, 4° off v. If 50 > probe: 1°, 2°, 3°, 4° off
Furthermore, the temperature display indicates the residual heat in numerical mode with 10 °C increments if the value > 50 °C. The display switches off when the temperature drops below 50 °C.
INSTRUCTIONS FOR THE USER
11
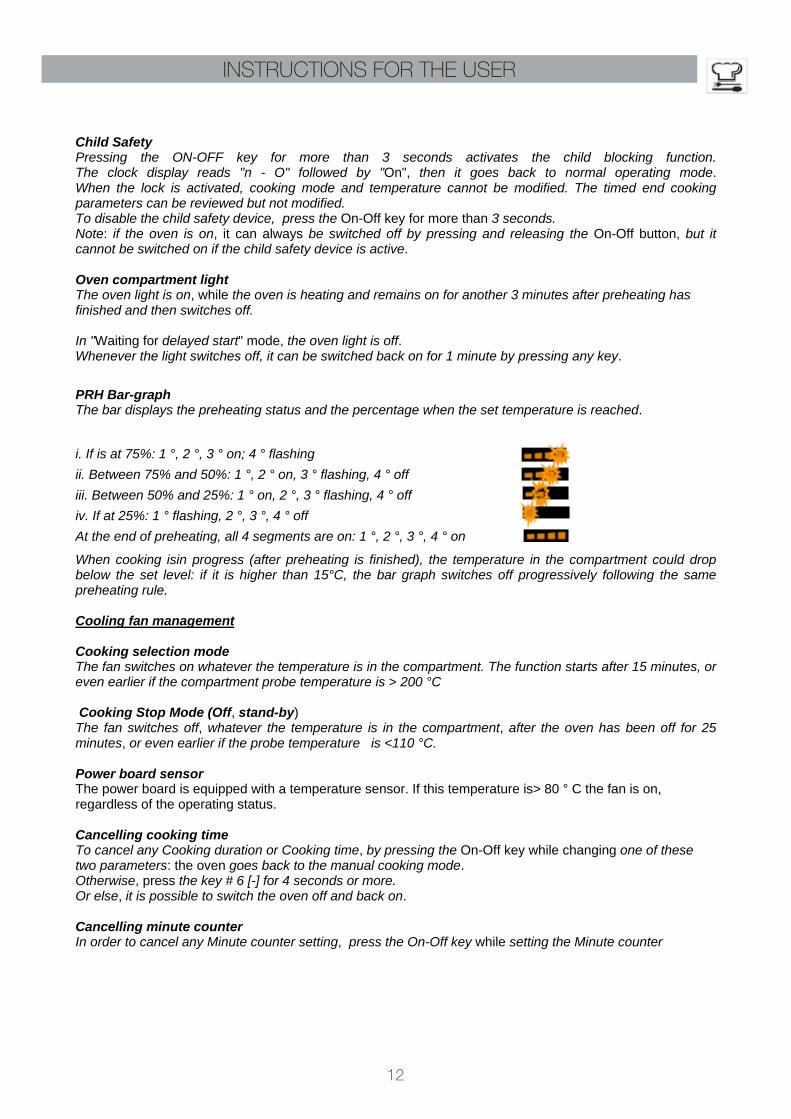
Child Safety Pressing the ON-OFF key for more than 3 seconds activates the child blocking function. The clock display reads "n - O" followed by "On", then it goes back to normal operating mode. When the lock is activated, cooking mode and temperature cannot be modified. The timed end cooking parameters can be reviewed but not modified. To disable the child safety device, press the On-Off key for more than 3 seconds. Note: if the oven is on, it can always be switched off by pressing and releasing the On-Off button, but it cannot be switched on if the child safety device is active. Oven compartment light The oven light is on, while the oven is heating and remains on for another 3 minutes after preheating has finished and then switches off. In "Waiting for delayed start" mode, the oven light is off. Whenever the light switches off, it can be switched back on for 1 minute by pressing any key.
PRH Bar-graph The bar displays the preheating status and the percentage when the set temperature is reached.
i. If is at 75%: 1 °, 2 °, 3 ° on; 4 ° flashing
ii. Between 75% and 50%: 1 °, 2 ° on, 3 ° flashing, 4 ° off
iii. Between 50% and 25%: 1 ° on, 2 °, 3 ° flashing, 4 ° off
iv. If at 25%: 1 ° flashing, 2 °, 3 °, 4 ° off
At the end of preheating, all 4 segments are on: 1 °, 2 °, 3 °, 4 ° on
When cooking isin progress (after preheating is finished), the temperature in the compartment could drop below the set level: if it is higher than 15°C, the bar graph switches off progressively following the same preheating rule. Cooling fan management Cooking selection mode The fan switches on whatever the temperature is in the compartment. The function starts after 15 minutes, or even earlier if the compartment probe temperature is > 200 °C Cooking Stop Mode (Off, stand-by) The fan switches off, whatever the temperature is in the compartment, after the oven has been off for 25 minutes, or even earlier if the probe temperature is <110 °C. Power board sensor The power board is equipped with a temperature sensor. If this temperature is> 80 ° C the fan is on, regardless of the operating status. Cancelling cooking time To cancel any Cooking duration or Cooking time, by pressing the On-Off key while changing one of these two parameters: the oven goes back to the manual cooking mode. Otherwise, press the key # 6 [-] for 4 seconds or more. Or else, it is possible to switch the oven off and back on. Cancelling minute counter In order to cancel any Minute counter setting, press the On-Off key while setting the Minute counter
INSTRUCTIONS FOR THE USER
12
LCD ELECTRONIC PROGRAMMER
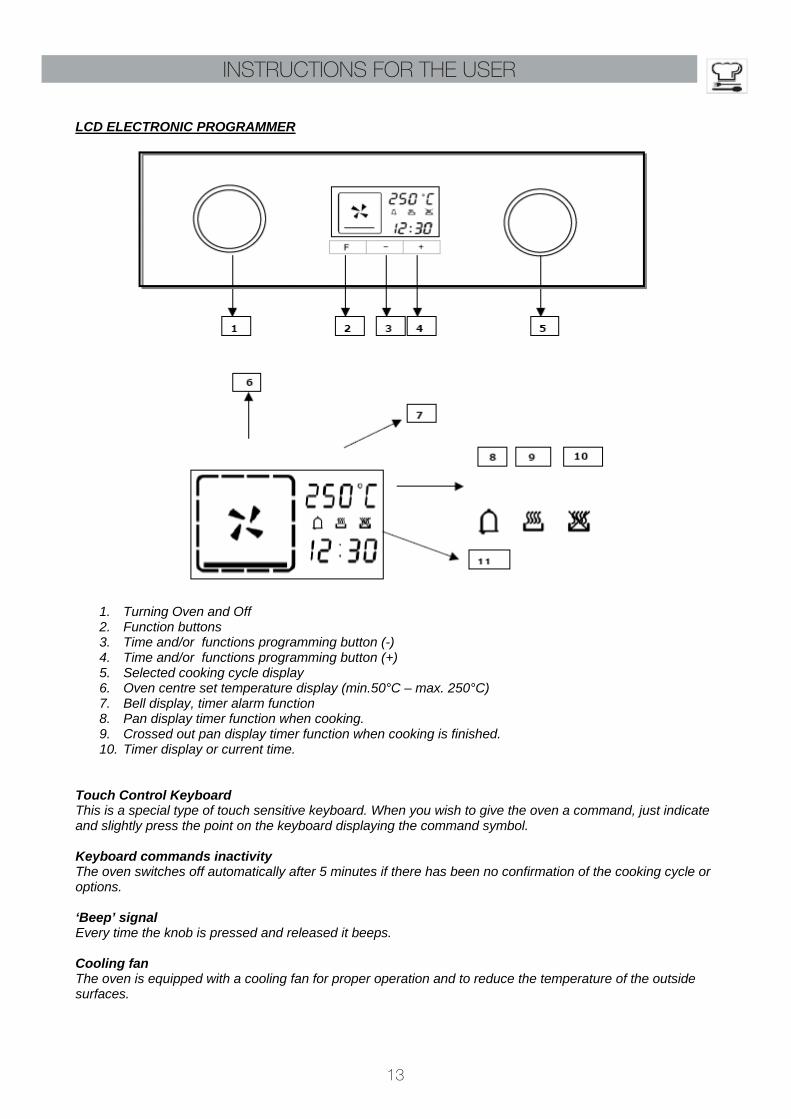
1. Turning Oven and Off 2. Function buttons 3. Time and/or functions programming button (-) 4. Time and/or functions programming button (+) 5. Selected cooking cycle display 6. Oven centre set temperature display (min.50°C – max. 250°C) 7. Bell display, timer alarm function 8. Pan display timer function when cooking. 9. Crossed out pan display timer function when cooking is finished. 10. Timer display or current time.
Touch Control Keyboard This is a special type of touch sensitive keyboard. When you wish to give the oven a command, just indicate and slightly press the point on the keyboard displaying the command symbol. Keyboard commands inactivity The oven switches off automatically after 5 minutes if there has been no confirmation of the cooking cycle or options. ‘Beep’ signal Every time the knob is pressed and released it beeps. Cooling fan The oven is equipped with a cooling fan for proper operation and to reduce the temperature of the outside surfaces.
INSTRUCTIONS FOR THE USER
13
During cooking, the fan starts after a 15 minute delay, or before if the temperature detected by the cooking compartment sensor is higher than 130°C. You can feel an air flow exiting between the front panel and oven door when the fan is running.
Automatic oven light switch off The oven light switches off automatically 2 minutes after a cooking cycle has started. To switch it back on, just touch one of the following sensor keys (+), (-), (F). The light will switch on for another 2 minutes. Night mode During the night, the current time is viewed at half the intensity. When the oven is used, the display returns to maximum intensity.
N.B. Settings are confirmed automatically 5 sec. after the keyboard remains inactive or manually by touching and releasing the sensor key (F )
PROGRAMMER First switch-on: First use or in case of blackout When the oven is connected to the electric mains, all the segments making up displays light up for approximately 3 seconds.
N.B. DO NOT TOUCH THE SENSOR KEYS (F), (-), (+) IN THIS FRAME OF TIME.
Afterwards the digits “00.00” flash on the display. The letters St at the top indicate that your oven is a standard model. Current time setting To operate the oven, the clock must be set at the current time. This operation is necessary every time the oven is connected to the mains after being disconnected or in case of a prolonged blackout.
a) Touch and release the sensor key (+)/(-) to increase/decrease the minutes / hours in automatic mode.
b) To stop the count, touch and release the key (+)/(-). Use the same key to increase/decrease the minutes/hours in manual mode.
When the current time is reached, confirm the operation by pressing the key F or else it is accepted automatically if the setting keys remain idle for 5 sec.
N.B. Upon confirmation, you will hear a double “BEEP”.
How to select a cooking function Turn the knob (1) clockwise or anticlockwise. The available cooking functions will appear on the display. The oven light will switch on. A preset temperature will appear near the selected cooking cycle. How to increase or decrease cooking temperature To increase the temperature shown on the display, turn the knob (3) slightly clockwise to its end of travel, to the + sign. Maximum settable temperature 250°C To decrease the temperature shown on the display, turn the knob (3) slightly anticlockwise to its end of travel, to the - sign. Minimum settable temperature 50°C How to switch the oven off Turn the knob (1) clockwise or anticlockwise until the text OFF appears on the display, followed by a short BEEP. All the heating elements and the oven light will switch off.
INSTRUCTIONS FOR THE USER
14
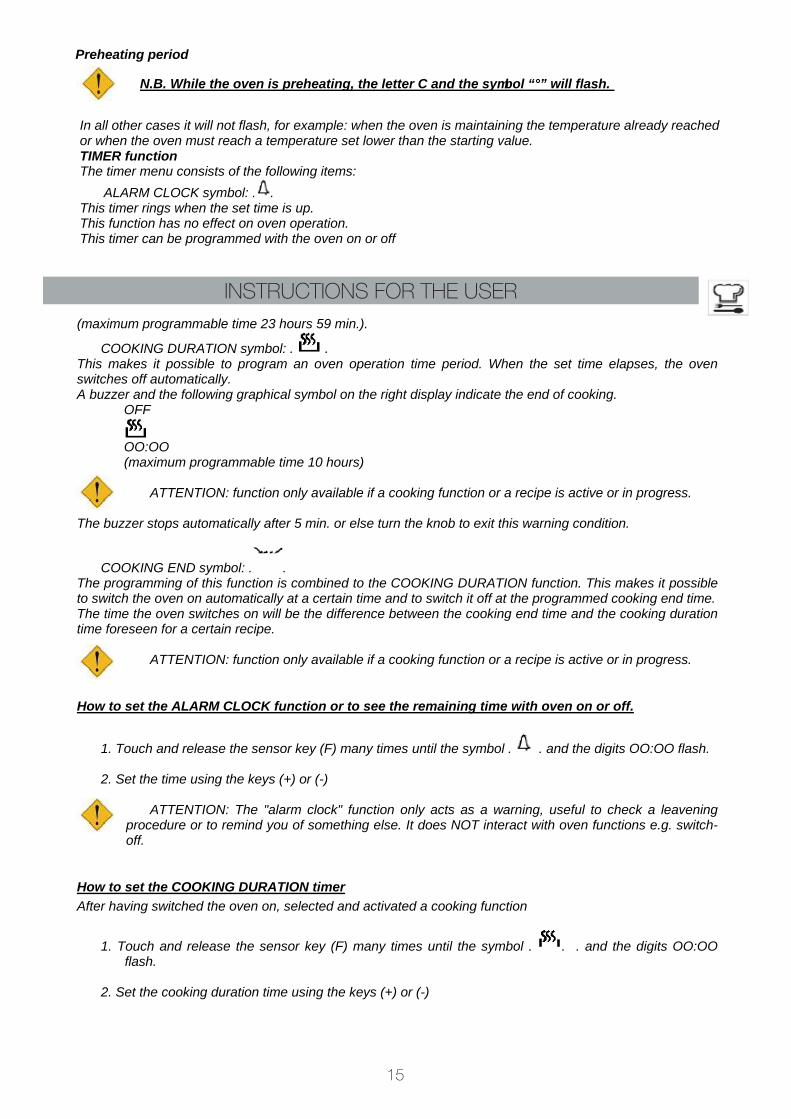
N.B. While the oven is preheating, the letter C and the symbol “°” will flash.
In all other cases it will not flash, for example: when the oven is maintaining the temperature already reached or when the oven must reach a temperature set lower than the starting value. TIMER function The timer menu consists of the following items:
ALARM CLOCK symbol: . . This timer rings when the set time is up. This function has no effect on oven operation. This timer can be programmed with the oven on or off
(maximum programmable time 23 hours 59 min.).
COOKING DURATION symbol: . . This makes it possible to program an oven operation time period. When the set time elapses, the oven switches off automatically. A buzzer and the following graphical symbol on the right display indicate the end of cooking.
OFF
OO:OO (maximum programmable time 10 hours)
ATTENTION: function only available if a cooking function or a recipe is active or in progress.
The buzzer stops automatically after 5 min. or else turn the knob to exit this warning condition.
COOKING END symbol: . . The programming of this function is combined to the COOKING DURATION function. This makes it possible to switch the oven on automatically at a certain time and to switch it off at the programmed cooking end time. The time the oven switches on will be the difference between the cooking end time and the cooking duration time foreseen for a certain recipe.
ATTENTION: function only available if a cooking function or a recipe is active or in progress.
How to set the ALARM CLOCK function or to see the remaining time with oven on or off.
1. Touch and release the sensor key (F) many times until the symbol . . and the digits OO:OO flash. 2. Set the time using the keys (+) or (-)
ATTENTION: The "alarm clock" function only acts as a warning, useful to check a leavening
procedure or to remind you of something else. It does NOT interact with oven functions e.g. switch-off.
How to set the COOKING DURATION timer
After having switched the oven on, selected and activated a cooking function
1. Touch and release the sensor key (F) many times until the symbol . . . and the digits OO:OO flash.
2. Set the cooking duration time using the keys (+) or (-)
INSTRUCTIONS FOR THE USER
Preheating period
15
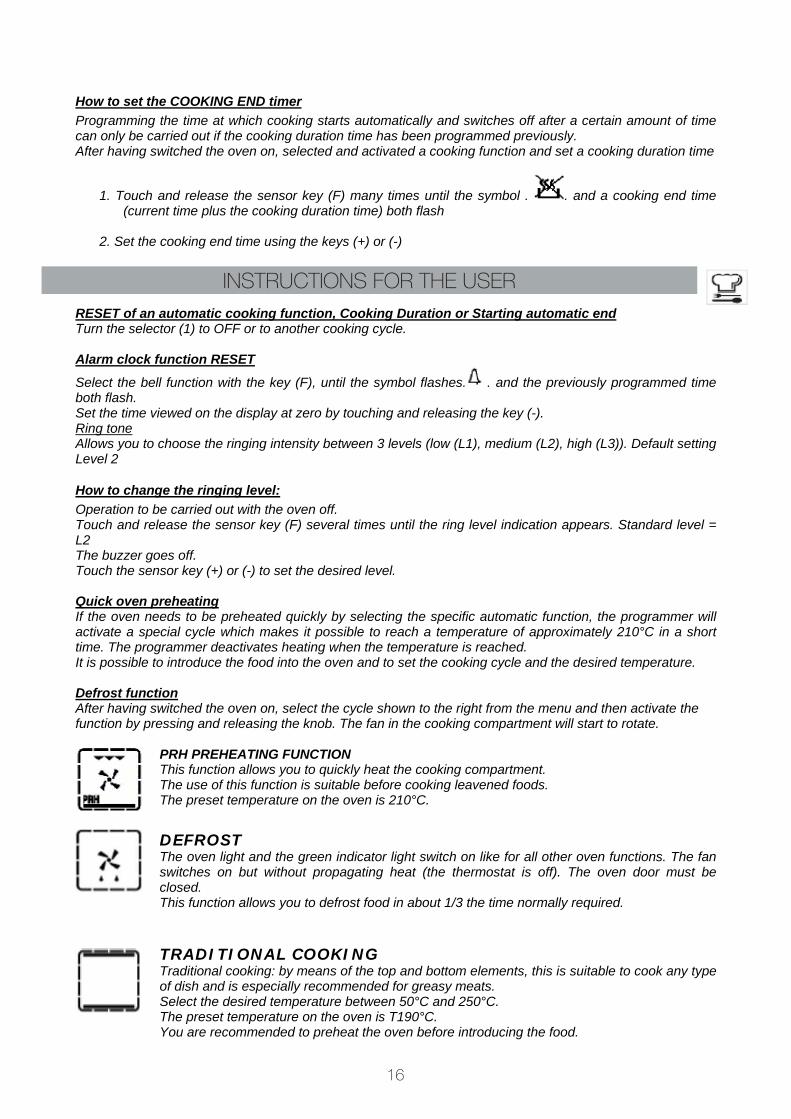
How to set the COOKING END timer
Programming the time at which cooking starts automatically and switches off after a certain amount of time can only be carried out if the cooking duration time has been programmed previously. After having switched the oven on, selected and activated a cooking function and set a cooking duration time
1. Touch and release the sensor key (F) many times until the symbol . . and a cooking end time (current time plus the cooking duration time) both flash
2. Set the cooking end time using the keys (+) or (-)
RESET of an automatic cooking function, Cooking Duration or Starting automatic end Turn the selector (1) to OFF or to another cooking cycle. Alarm clock function RESET
Select the bell function with the key (F), until the symbol flashes. . and the previously programmed time both flash. Set the time viewed on the display at zero by touching and releasing the key (-). Ring tone Allows you to choose the ringing intensity between 3 levels (low (L1), medium (L2), high (L3)). Default setting Level 2
How to change the ringing level:
Operation to be carried out with the oven off. Touch and release the sensor key (F) several times until the ring level indication appears. Standard level = L2 The buzzer goes off. Touch the sensor key (+) or (-) to set the desired level. Quick oven preheating If the oven needs to be preheated quickly by selecting the specific automatic function, the programmer will activate a special cycle which makes it possible to reach a temperature of approximately 210°C in a short time. The programmer deactivates heating when the temperature is reached. It is possible to introduce the food into the oven and to set the cooking cycle and the desired temperature. Defrost function After having switched the oven on, select the cycle shown to the right from the menu and then activate the function by pressing and releasing the knob. The fan in the cooking compartment will start to rotate.
PRH PREHEATING FUNCTION This function allows you to quickly heat the cooking compartment. The use of this function is suitable before cooking leavened foods. The preset temperature on the oven is 210°C.
DEFROST The oven light and the green indicator light switch on like for all other oven functions. The fan switches on but without propagating heat (the thermostat is off). The oven door must be closed. This function allows you to defrost food in about 1/3 the time normally required.
TRADITIONAL COOKING Traditional cooking: by means of the top and bottom elements, this is suitable to cook any type of dish and is especially recommended for greasy meats. Select the desired temperature between 50°C and 250°C. The preset temperature on the oven is T190°C. You are recommended to preheat the oven before introducing the food.
INSTRUCTIONS FOR THE USER
16
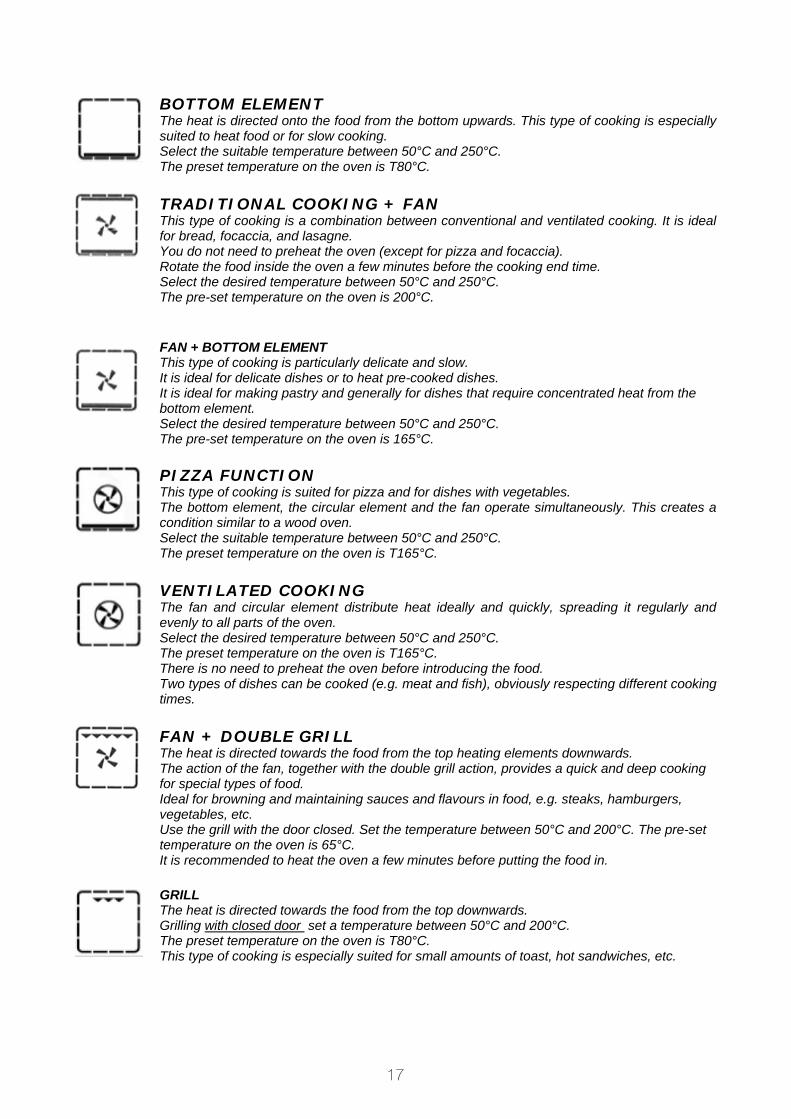
BOTTOM ELEMENT The heat is directed onto the food from the bottom upwards. This type of cooking is especially suited to heat food or for slow cooking. Select the suitable temperature between 50°C and 250°C. The preset temperature on the oven is T80°C.
TRADITIONAL COOKING + FAN
This type of cooking is a combination between conventional and ventilated cooking. It is ideal for bread, focaccia, and lasagne. You do not need to preheat the oven (except for pizza and focaccia). Rotate the food inside the oven a few minutes before the cooking end time. Select the desired temperature between 50°C and 250°C. The pre-set temperature on the oven is 200°C.
FAN + BOTTOM ELEMENT This type of cooking is particularly delicate and slow. It is ideal for delicate dishes or to heat pre-cooked dishes. It is ideal for making pastry and generally for dishes that require concentrated heat from the bottom element. Select the desired temperature between 50°C and 250°C. The pre-set temperature on the oven is 165°C.
PIZZA FUNCTION This type of cooking is suited for pizza and for dishes with vegetables. The bottom element, the circular element and the fan operate simultaneously. This creates a condition similar to a wood oven. Select the suitable temperature between 50°C and 250°C. The preset temperature on the oven is T165°C.
VENTILATED COOKING The fan and circular element distribute heat ideally and quickly, spreading it regularly and evenly to all parts of the oven. Select the desired temperature between 50°C and 250°C. The preset temperature on the oven is T165°C. There is no need to preheat the oven before introducing the food. Two types of dishes can be cooked (e.g. meat and fish), obviously respecting different cooking times.
FAN + DOUBLE GRILL The heat is directed towards the food from the top heating elements downwards. The action of the fan, together with the double grill action, provides a quick and deep cooking for special types of food. Ideal for browning and maintaining sauces and flavours in food, e.g. steaks, hamburgers, vegetables, etc. Use the grill with the door closed. Set the temperature between 50°C and 200°C. The pre-set temperature on the oven is 65°C. It is recommended to heat the oven a few minutes before putting the food in.
GRILL The heat is directed towards the food from the top downwards. Grilling with closed door set a temperature between 50°C and 200°C. The preset temperature on the oven is T80°C. This type of cooking is especially suited for small amounts of toast, hot sandwiches, etc.
17
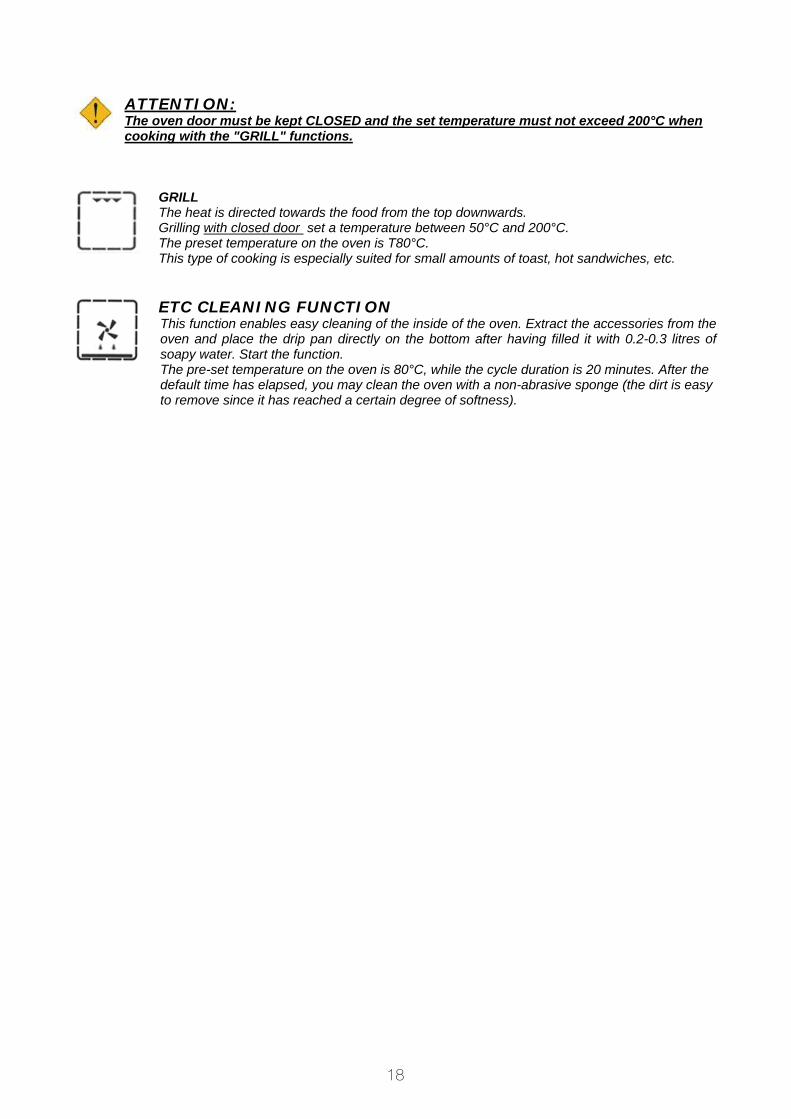
ATTENTION: The oven door must be kept CLOSED and the set temperature must not exceed 200°C when cooking with the "GRILL" functions.
GRILL The heat is directed towards the food from the top downwards. Grilling with closed door set a temperature between 50°C and 200°C. The preset temperature on the oven is T80°C. This type of cooking is especially suited for small amounts of toast, hot sandwiches, etc.
ETC CLEANING FUNCTION This function enables easy cleaning of the inside of the oven. Extract the accessories from the oven and place the drip pan directly on the bottom after having filled it with 0.2-0.3 litres of soapy water. Start the function. The pre-set temperature on the oven is 80°C, while the cycle duration is 20 minutes. After the default time has elapsed, you may clean the oven with a non-abrasive sponge (the dirt is easy to remove since it has reached a certain degree of softness).
18

Advice for cooking: See the specific RECIPES table for the cooking times and temperatures position of different types of food
Group Name of Dish Cooking Function
Cooking Temperature
Cooking Duration
Level NOTES
Flans:
Cannelloni CONVECTION 180° 00h.45’ 2 Lasagne STATIC 160° 00h.50’ 2 Quiche CONVECTION 180° 00h.50’ 2
Potato flans CONVECTION 180 01h.00’ 2 Zucchini flans VENTILATED 180° 00h.50’ 2
Fish:
Dentex GRILL 180° 00h.25’ 3 Salmon (fillet) STATIC 180° 00h.30’ 2 Tunafish (fillet) STATIC 180° 00h.35’ 2
Trout (fillet) STATIC 180° 00h.25’ 2 Mullet GRILL 180° 00h.25’ 3
Bread / Pizza /
Desserts:
Savoury Focaccia PIZZA 220° 00h.20’ 2
Bread CONVECTION 220° 00h.20’ 2
Pizza PIZZA 230° 00h.20’ 2 Savoury tart STATIC 200° 00h.40’ 2 Panzarotti CONVECTION 200° 00h.20’ 2
Jam tart CONVECTION 170° 00h.20’ 2
Apple Pie CONVECTION 170° 00h.35’ 1
Pound Cake CONVECTION 170° 00h.40’ 2 Muffins CONVECTION 190° 00h.15’ 2
Plum Cake CONVECTION 170° 01h.00’ 2
Yogurt biscuits STATIC 170° 00h.15’ 2
Meat:
Pork roast CONVECTION 170° 01h.35’ 2
Veal roast CONVECTION 190° 01h.40’ 2
Roast chicken CONVECTION 190° 01h.00’ 2
Meatloaf CONVECTION 180° 01h.10’ 2
Beef tenderloin STATIC 200° 00h.35’ 2
SPARE RIBS VENTILATED
GRILL 200° 00h.40’ 4
WHAT TO DO IF...
FAULT SOLUTION
The oven does not work Check whether the omnipolar switch or any residual current devices of the electric system are disconnected. In case of faults to the electrical system, contact a qualified electrician. If after turning the omnipolar switch and/or residual current device back on it still does not work, contact the Authorised Assistance Sensor.
The light in the cooking chamber does not switch on Replace the light bulb.
Er associated with a number is viewed on the display See the Error codes table.
The current time digits flash Probable power blackout. Set the current time.
INSTRUCTIONS FOR THE USER
19

In case of a blackout
• Should a blackout occur, when power is restored it could be necessary to reset the current time. • The stored settings are not lost. • Should the blackout occur while cooking, it will not continue.
Error Codes Table The electronic system constantly performs a series of diagnostic tests. If some parameters are not correct, the control unit deactivates the functions and views an error code (Er followed by two digits), all the heating elements are switched off, as well as the fan inside the oven. The cooling fan remains on. Take note of the error code and contact an Authorised Assistance Centre, specifying the error code.
Error Code Cause SOLUTION
ER:01 Cooking compartment sensor PT1000 faulty.
- Replace cooking compartment sensor PT1000. Contact an Authorised Assistance Centre, specifying the error code.
ER:17 Cooking compartment sensor PT1000 faulty.
- Replace cooking compartment sensor PT1000. Contact an Authorised Assistance Centre, specifying the error code.
ER:16 High temperature in cooking compartment
- Check whether the oven is built into the unit according to the instructions provided in this booklet. - Check whether hot air escapes the slots below the control panel. If not, contact an Authorised Assistance Centre, specifying the code.
ER:04 High temperature near circuit boards (power board)
- Check whether the oven is built into the unit according to the instructions provided in this booklet. - Check whether the tangential fan works. Contact an Authorised Assistance Centre, specifying the code - Replace the power board, tangential fan.
ER:02 Power board temperature sensor faulty
Contact an Authorised Assistance Centre, specifying the code - Replace power board.
INSTRUCTIONS FOR THE USER
20

ANALOGUE ELECTRONIC PROGRAMMER
This timer manages the time display (by means of analogue hands) and oven operation (by means of push knob and identification icons). Acting on the push knob allows you to: set the time, program cooking start and end time, set the alarm (minute counter).
Time adjustment To adjust the time indicated by the hands of the clock, briefly press the knob 4 times until the "Clock" icon flashes. Then increase or decrease the displayed time by 1 minute steps, turning the knob clockwise or anticlockwise, and the minute hand moves at 1 minute steps clockwise or anticlockwise. When 10 seconds have elapsed since the last adjustment of the electronic timer, the time adjustment mode is exited automatically.
Manual Cooking With the timer at rest, you can perform manual cooking by acting on the general oven switch (on the outside of the appliance).
Attention: after having powered the timer, you must wait approximately 2 seconds before the relay is energised.
Programming cooking end time The cooking end time programming allows you to start cooking immediately and to end it automatically based on the set time. To program the cooking end time, briefly press the knob twice until the icon "Cooking end" flashes. To increase or decrease cooking time by 1 minute steps, turn the knob clockwise or anticlockwise and the minute hand moves one minute at a time clockwise or anticlockwise. The “END TIME” icon continues to flash for 10 seconds after the last rotation. The program can be confirmed by pressing the knob, as long as at least 2 minutes of cooking has been programmed. When the program is confirmed, cooking starts and the alarm is activated automatically. Cooking will end when "Set Cooking End Time = Current time". To view the set program, briefly press and release the knob while the hands and icons display the set program. When cooking is finished, the “END TIME” icon flashes and the alarm rings. The alarm disables after 1 minute and the “END TIME” icon keeps flashing until the knob is pressed. To cancel the program before the end, press the knob for 3 seconds: the program will be cancelled and the timer will go back to manual cooking mode.
Programming cooking start and end time The cooking start time programming allows you to start and end cooking automatically based on the set times. To program the cooking start time, press the knob once briefly until the icon "START TIME" flashes. To increase or decrease cooking start time by 1 minute steps, turn the knob clockwise or anticlockwise and the minute hand moves one minute at a time clockwise or anticlockwise.
INSTRUCTIONS FOR THE USER
21
The “START TIME” icon continues to flash for 10 seconds after the last rotation. If the knob is not turned or pressed within this time, the hands automatically go back to view the time and the program is cancelled. Pressing the knob memorises the cooking start time (“START TIME” icon remains on), as long as at least a 1 minute delay has been programmed, and you pass to setting the cooking end time (“END TIME" icon starts to flash). Follow the procedure described in the relative paragraph to program the cooking end time. Cooking will start when ''Set Cooking Start Time = Current time''.
Programming Minute counter Programming the minute counter set off a simple alarm at the end of a programmed time without activating cooking (minute counter mode). To program an "alarm" without starting any cooking (minute counter mode), briefly press the knob 3 times until the "ALARM" icon flashes. Then turn the knob and setting of the minute counter is identical that of cooking end time (see the relative paragraph). The minute counter can only be used when no program is in progress.
Blackout Indication The timer indicates a blackout when the "Clock" symbol flashes. In this case, press the knob briefly to deactivate the signal.
Check The test program is activated by keeping the knob pressed when the oven is first powered. The program includes the following functions:
- The hands rotate a full 12 hours; - The 4 indicator LEDs remain on fixed; - The actuator can be turned clockwise/anticlockwise and ringing of the buzzer confirms correct
operation; - The relay is energised (contact closed) approximately 1 second after the autotest.
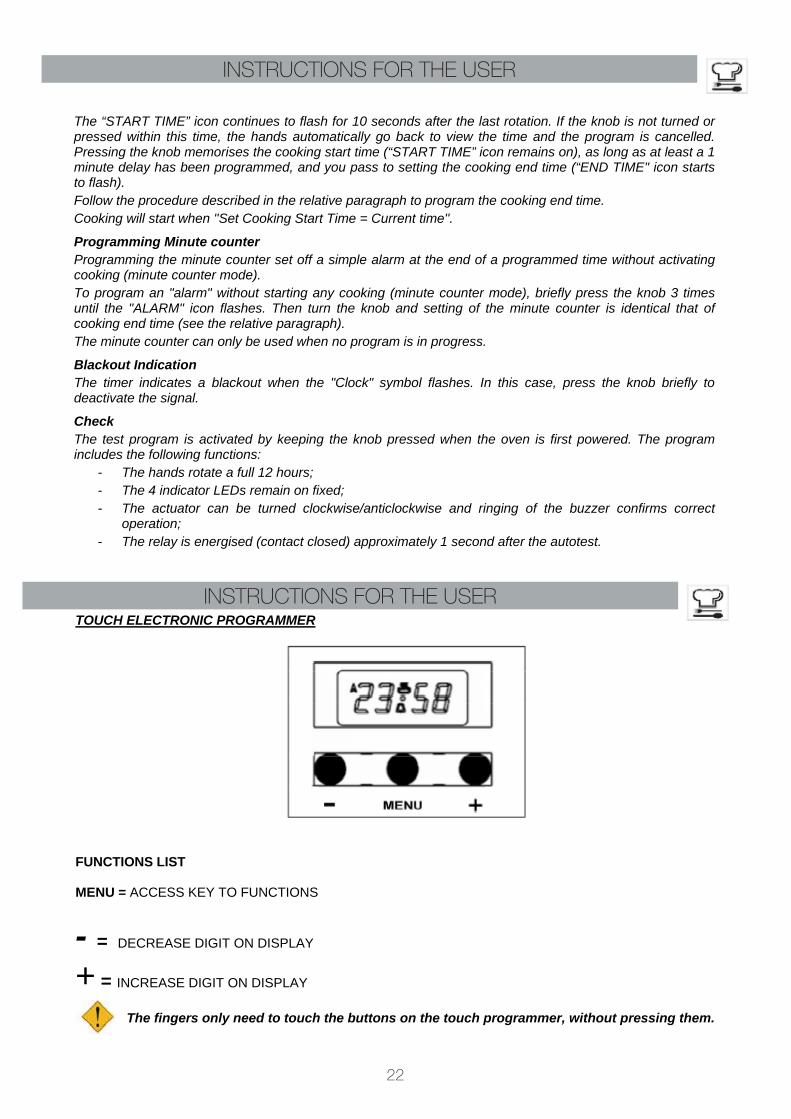
TOUCH ELECTRONIC PROGRAMMER
FUNCTIONS LIST MENU = ACCESS KEY TO FUNCTIONS
- = DECREASE DIGIT ON DISPLAY
+ = INCREASE DIGIT ON DISPLAY The fingers only need to touch the buttons on the touch programmer, without pressing them.
INSTRUCTIONS FOR THE USER
INSTRUCTIONS FOR THE USER
22

Time adjustment If using the oven for the first time or after a power interruption, the display will start to flash indicating the digits 0.00 . Press the programmer to stop flashing. Press the keys to set the exact time. Buzzer The alarm buzzer is triggered when the time set with the minute counter is up and at the end of an automatic program. Just press any key to stop the buzzer; or else wait 7 seconds for the buzzer to stop on its own. To change the ringtone, press for a few seconds while the display displays the time. The ringtone changes every time it is pressed (3 different tones). The new tone will be valid both for the cooking end and alarm buzzer. Choosing the program Press the button repeatedly to select the following programs in this order: Minute counter: The bell symbol flashes and the alarm can be set by pressing the keys
Automatic program duration: The display views the “DUR” screen alternately; pressing the buttons displays the duration setting screen. You can then set the duration using the keys
Automatic program end: The display views the “END” screen alternately; pressing the buttons displays the end setting screen. You can then set the duration using the keys
Current time display Minute counter By selecting the minute counter mode, the bell symbol starts to flash and the display shows the remaining time in hours and minutes. When less than a minute is left, only the remaining seconds are displayed. Activation of the minute counter is indicated when the bell symbol on the display switches on. When the alarm time reaches the end, the buzzer goes off and the bell symbol starts to flash. The minute counter works independently from any other program. Semi-automatic cooking Setting the time: Select the duration or the end and set the desired time by using When the cooking duration or end setting mode is selected, the corresponding “auto” (A) symbol flashes. The relation between the duration and the end of the program is following: END TIME = CURRENT TIME = DURATION. When the duration of the program is set, it is not possible to anticipate the end time. In the same way, the duration of a program cannot be increased when the end time of that program has been selected.
Activate a function and the desired temperature before setting the programmer.
Cooking program end: When the duration reaches the end or the current time corresponds to the end time, the symbol switches off,
INSTRUCTIONS FOR THE USER
23
the “auto” (A) symbols starts to flash and the buzzer goes off indicating the end of the set program. The buzzer stops ringing by pressing any key. Automatic cooking
Times are set as described for the semi-automatic programmer, but in this case both the duration and the end must be set. The end time and the duration determine the starting time according to the following formula: START TIME = END TIME – DURATION. The program starts when the current time corresponds to the starting time and then works as described for the semi-automatic program.
If the calculated starting time is 1 minute more than the current time, it is not possible to increase the duration or to anticipate the end time. This keeps the starting time from being before the current time.
Key lock The key lock function is activated after switch on, restore and when no key has been pressed for at least 8 seconds. Press the key for at least 2 seconds to deactivate the lock.
INSTRUCTIONS FOR THE USER
24
4. OVEN USE This oven combines the qualities of the traditional “static” natural convention ovens with those of the modern “ventilated” forced convention ovens. It is a very versatile appliance which, easily and safely, allows to choose amongst different cooking methods. By acting on the knobs on the panel, the selection of different programs and the desired temperature is obtained.To make the best use of your oven we ask that you carefully read the instruction book.
4.1 General warnings and recommendations
When using the oven for the first time, it is opportune to heat it at its maximum temperature (250°C) for as long as it is necessary to burn any residue manufacture oils, which might confer unpleasant odours to food.
When cooking, do not cover the bottom of the oven with aluminium foil or tinfoil and do not lean pots and pans to avoid damaging the enamel layer.Should you wish to use baking paper, position it so that it does not interfere with the hot air circulation inside the oven.
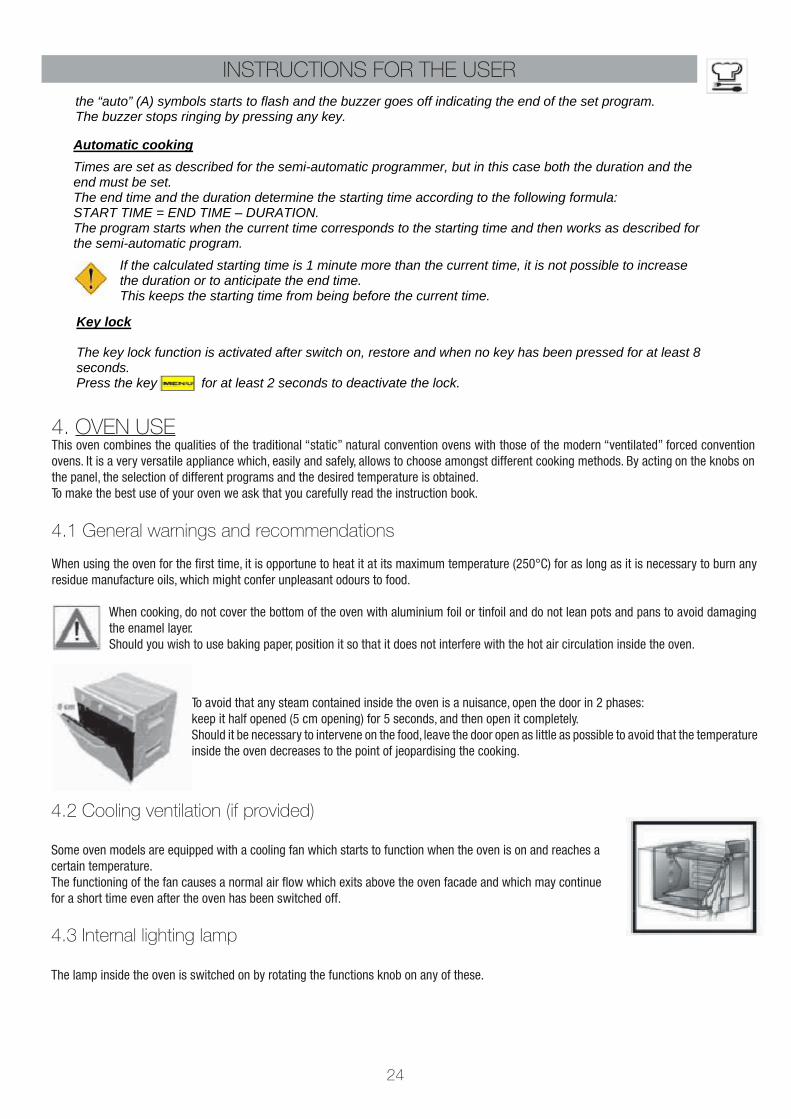
To avoid that any steam contained inside the oven is a nuisance, open the door in 2 phases:keep it half opened (5 cm opening) for 5 seconds, and then open it completely.Should it be necessary to intervene on the food, leave the door open as little as possible to avoid that the temperature inside the oven decreases to the point of jeopardising the cooking.
4.2 Cooling ventilation (if provided)
Some oven models are equipped with a cooling fan which starts to function when the oven is on and reaches a certain temperature.The functioning of the fan causes a normal air flow which exits above the oven facade and which may continue for a short time even after the oven has been switched off.
4.3 Internal lighting lamp
The lamp inside the oven is switched on by rotating the functions knob on any of these.
25
5. AVAILABLE ACCESSORIES
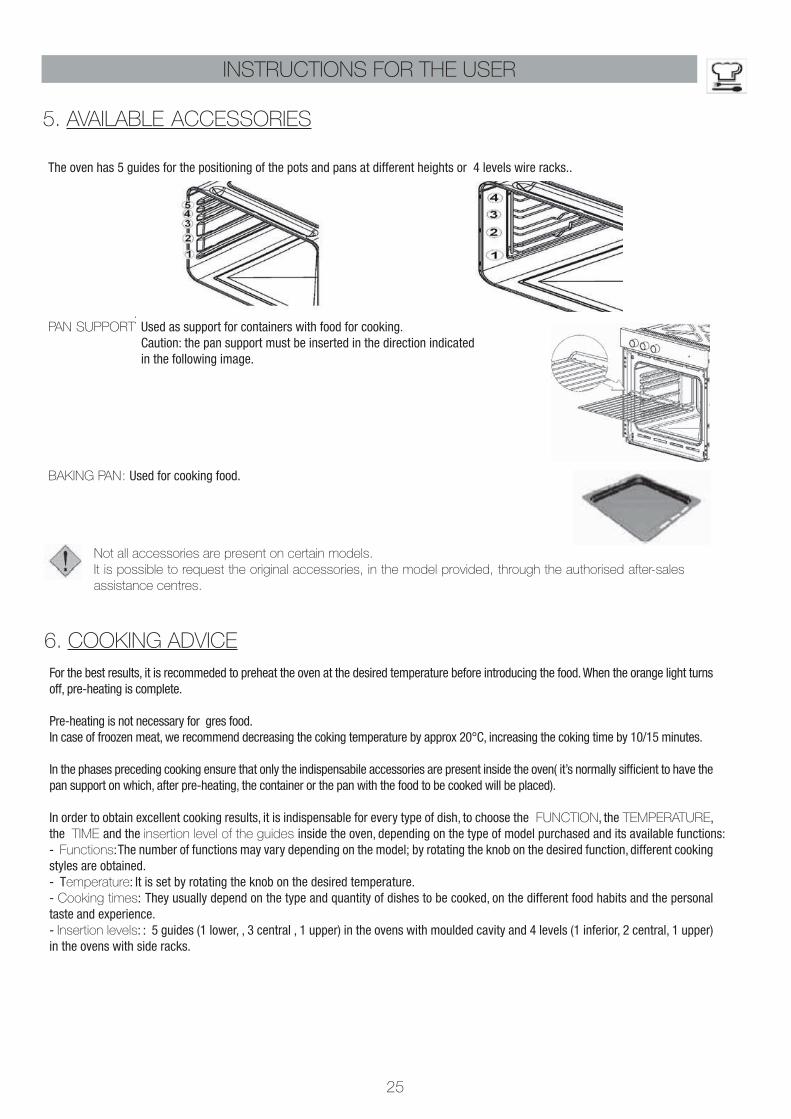
The oven has 5 guides for the positioning of the pots and pans at different heights or 4 levels wire racks..
PAN SUPPORT
: Used as support for containers with food for cooking.Caution: the pan support must be inserted in the direction indicated in the following image.
BAKING PAN: Used for cooking food.
INSTRUCTIONS FOR THE USER
Not all accessories are present on certain models.
It is possible to request the original accessories, in the model provided, through the authorised after-sales
assistance centres.
6. COOKING ADVICE
For the best results, it is recommeded to preheat the oven at the desired temperature before introducing the food. When the orange light turns off, pre-heating is complete.
Pre-heating is not necessary for gres food. In case of froozen meat, we recommend decreasing the coking temperature by approx 20°C, increasing the coking time by 10/15 minutes.
In the phases preceding cooking ensure that only the indispensabile accessories are present inside the oven( it’s normally sifficient to have the pan support on which, after pre-heating, the container or the pan with the food to be cooked will be placed). In order to obtain excellent cooking results, it is indispensable for every type of dish, to choose the FUNCTION, the TEMPERATURE, the TIME and the insertion level of the guides inside the oven, depending on the type of model purchased and its available functions:- Functions: The number of functions may vary depending on the model; by rotating the knob on the desired function, different cooking styles are obtained. - Temperature: It is set by rotating the knob on the desired temperature.- Cooking times: They usually depend on the type and quantity of dishes to be cooked, on the different food habits and the personal taste and experience. - Insertion levels: : 5 guides (1 lower, , 3 central , 1 upper) in the ovens with moulded cavity and 4 levels (1 inferior, 2 central, 1 upper) in the ovens with side racks.
26
The indications supplied on the recipes are generally sufficient to obtain satisfying cooking results.The central levels of insertion are usually suitable for most cooking as it is in this part of the oven that, prior to thermostat control, the perfect stabilisation of the set temperature happens.In electric ovens, the higher the insertion level of the pans or pan supports in the oven the nearer the heat source (higher burnishing of the upper part of the dishes and food grilling).The food portioning and the use of different material and thickness food containers (terracotta, glass, aluminium, steel) can determine cooking times different to those indicated in the recipe books.Forced ventilation cooking produces high humidity removal from food and is usually recommended for cakes with whisked mix, multiple cooking and very thick portions.In delicate cooking with leavening, avoid or reduce to a minimum, the opening of the oven door, in order not to alter the heating thermostat cycles.In cooking using the grill carried out on the pan support or using the roasting-jack, place a pan containing some decilitres of water on the step underneath, to limit grease sprays or excess smoke.
INSTRUCTIONS FOR THE USER
For a significant energy saving during long cooking times, use the residue heat by switching off the oven a few minutes before the average indication of the recipe, keeping the oven door closed.The perfect insulation of the oven compartment will equally allow the dishes to reach the ideal cooking.
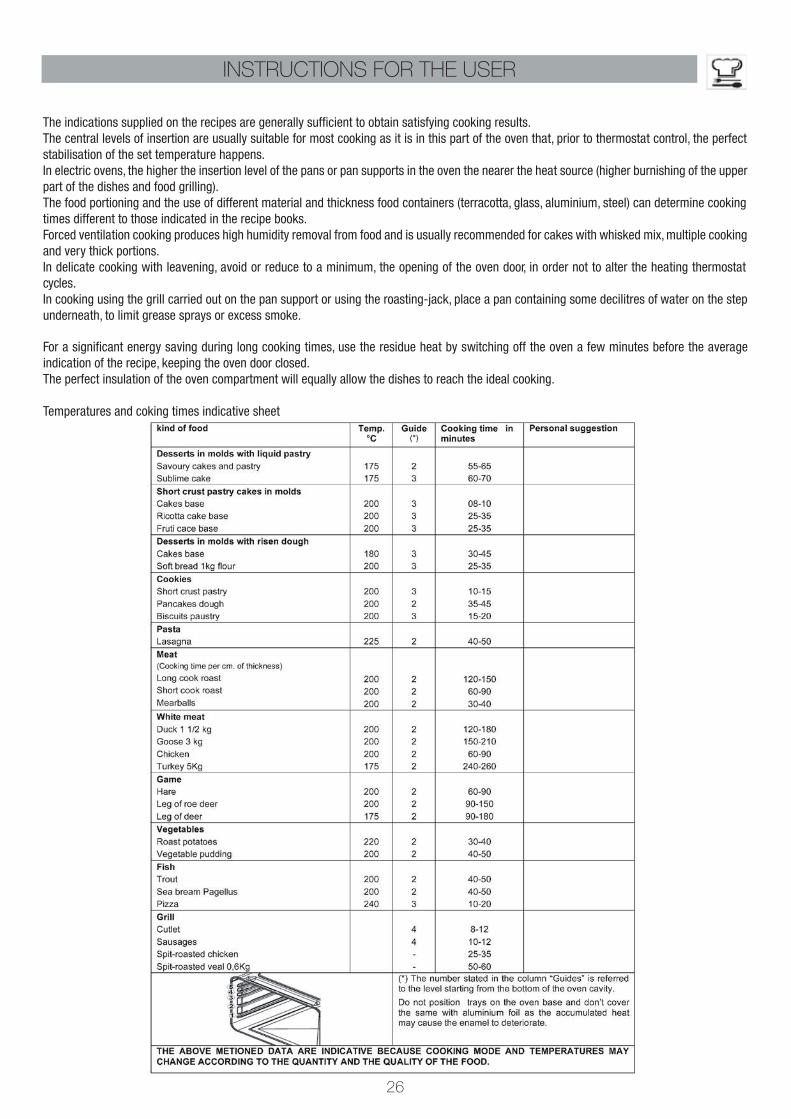
Temperatures and coking times indicative sheet
27
INSTRUCTIONS FOR THE USER
ATTENTION:
During cooking of particularly humid dishes (vegetables flan, meat or fish stews, fruit cakes) water steam generates inside the oven. Pay attention when opening the door!
To limit the steam leaking, use the precaution of opening the door in two phases: move the door by a few cm and, after a few seconds, open it completely.
It is appropriate to know that such water steam, in the minutes after cooking, during cooling of the oven, determines the formation of condense and, therefore, water drops falling on the internal glass of the door and enamelled walls. For good oven maintenance it is necessary to remove this slight presence of water using an absorbing cloth or an abrasive sponge at the end of every cooking process, having as characteristic a high presence of humidity.
The oven door must be kept close during the cooking process.
7. CLEANING AND MAINTENANCE
Disconnect the oven from the mains before every intervention which requests access to the live parts.
7.1 Cleaning the stainless steel
For a good preservation of the stainless steel, it must be cleaned regularly at the end of every use, once it has cooled down.
7.2 Daily routine cleaning
To clean and preserve the stainless steel surfaces, always use only specific products without abrasives.
Use instructions: pour the product on to a damp cloth and wipe the internal surface of the oven, accurately rinse and dry with a soft cloth.
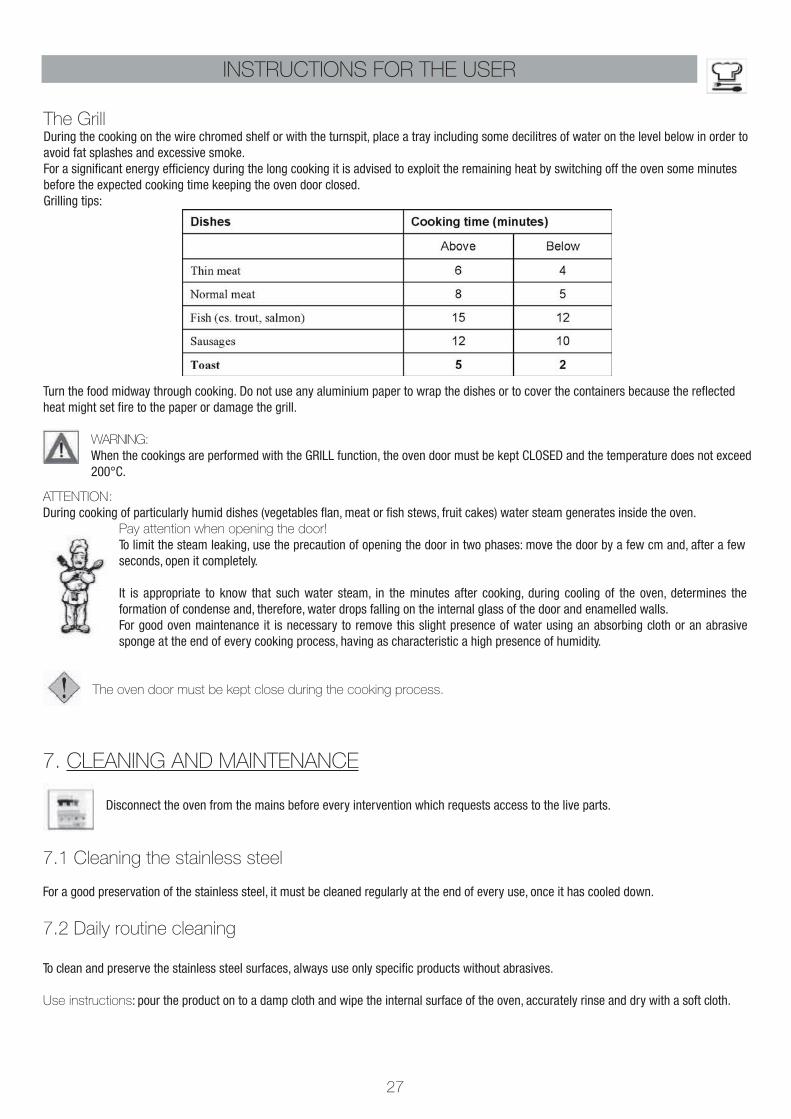
The Grill During the cooking on the wire chromed shelf or with the turnspit, place a tray including some decilitres of water on the level below in order to avoid fat splashes and excessive smoke.For a significant energy efficiency during the long cooking it is advised to exploit the remaining heat by switching off the oven some minutes before the expected cooking time keeping the oven door closed.Grilling tips:
Turn the food midway through cooking. Do not use any aluminium paper to wrap the dishes or to cover the containers because the reflected heat might set fire to the paper or damage the grill.
WARNING:
When the cookings are performed with the GRILL function, the oven door must be kept CLOSED and the temperature does not exceed 200°C.
28
7.3 Food or residue stains
Never use metal sponges or sharp scrapers, the surfaces may be damaged.Use normal products for steel, non abrasive, eventually using tools made of plastic or wood material.Accurately rinse and dry with a soft cloth.Avoid letting sugary food residue dry inside the oven (ex. jam, chocolate, etc.).In time they may ruin the enamel coating the inside of the oven.
For a good preservation of the oven it must be cleaned regularly after it has cooled down.For easier cleaning, extract all removable parts.
INSTRUCTIONS FOR THE USER
7.4 Cleaning the oven (without self-cleaning panels)
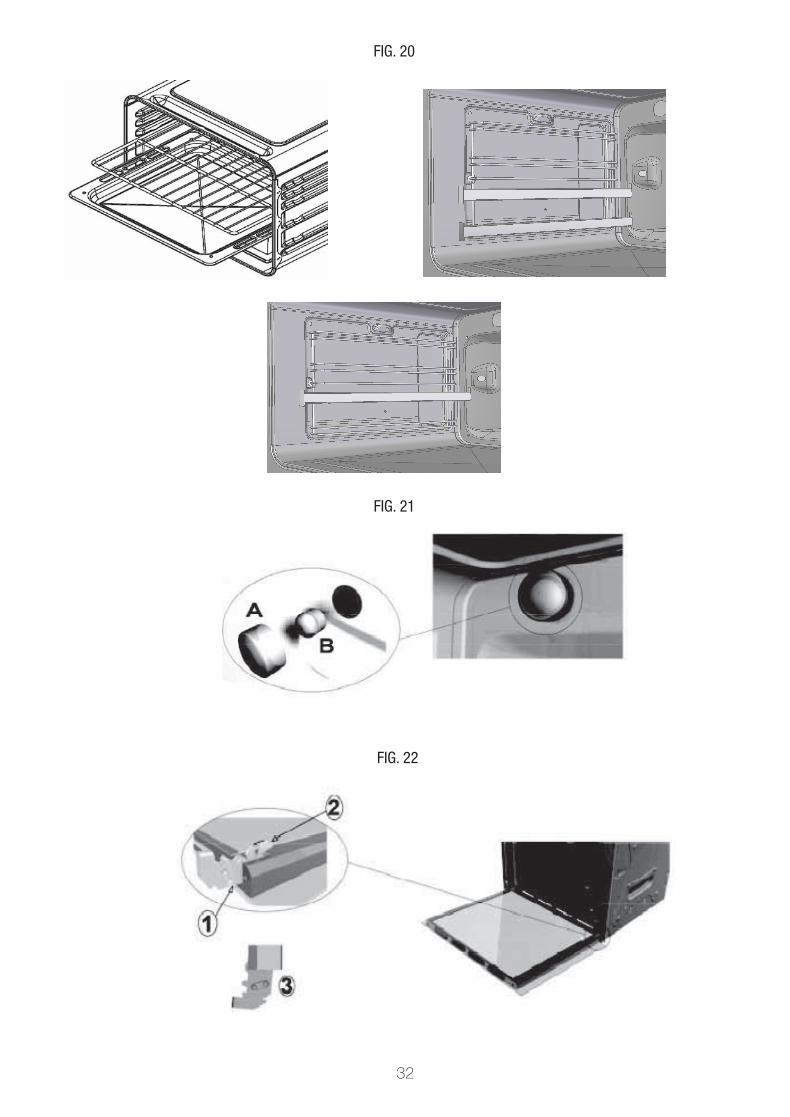
Clean the oven pan support and the side guides with hot water and non abrasive detergents, rinse and dry (fig. 20).The door can be removed for easier cleaning (see point 8.2 dismantling of the door).
7.5 Glass door
To clean use kitchen absorbent paper, in case of persistent dirt, wash with a damp cloth and common detergent.Do not use abrasive detergents or sharp metal scrapers to clean the glass door, since they may scratch the glass surface and cause it to break.We recommend keeping the glass of the door as clean as possible.
8. EXTRAORDINARY MAINTENANCE
The oven requires small maintenance interventions should, in time, those parts subject to wear, such as gaskets, lamp, etc, require replacing.Instructions for these types of interventions are supplied below.
Disconnect the oven from the mains before every intervention which requests access to the live parts.
8.1 Replacement of the internal lighting lamp
Remove protection cover “A” by unscrewing it anti-clockwise, replace lamp “B” with a similar one.Mount the protection once again and screw it clockwise until it is tight (fig. 21).Only use oven lamps (T300°C) 15W or 25W depending on models.
Never touch the lamp with bare fingers, always use protective gloves.Only use lamps obtained from authorised after-sales centres.
8.2 Dismantling of the door
Lift levers “2” up to the ledge with hinges “1” and hold the door at the two sides with both hands near the same hinges.Lift the door upwards forming an angle of approx. 45° and carefully extract it.For the mounting, place hinge “2” in the appropriate grooves, therefore leave the door to lean downwards, ensure it remains blocked in grooves “3”, then release levers “1” (fig. 22).
29
INSTRUCTIONS FOR THE USER
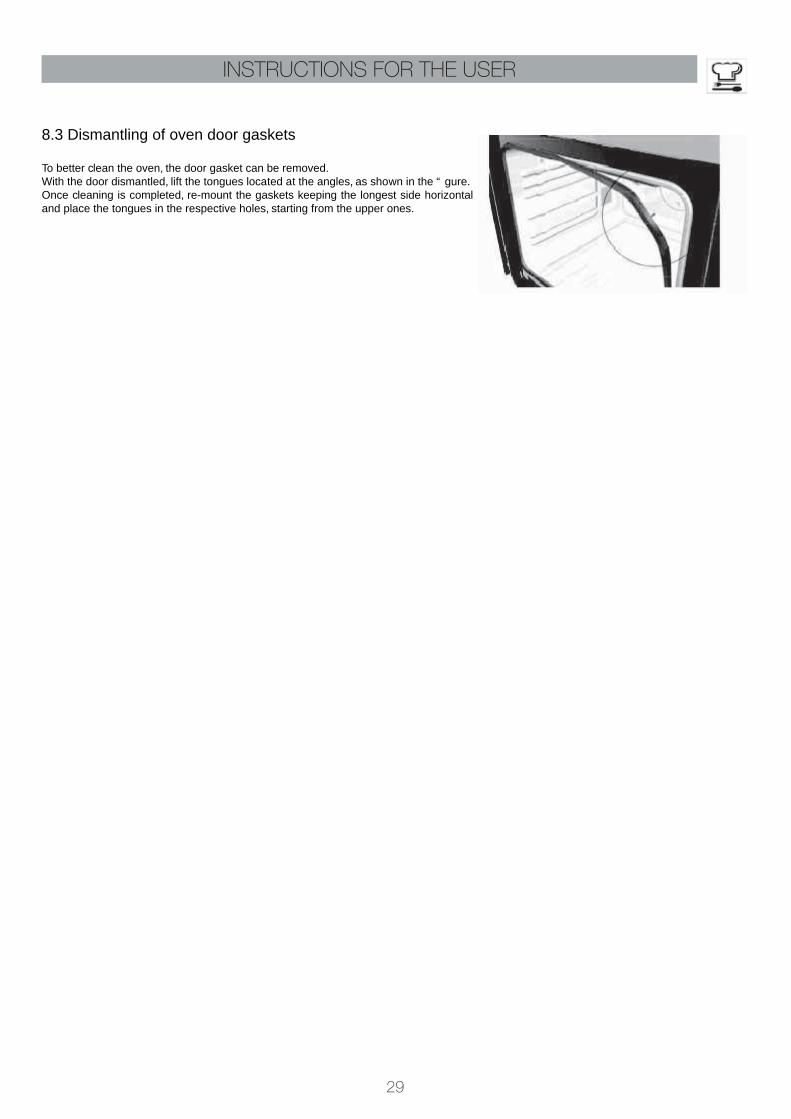
8.3 Dismantling of oven door gaskets
To better clean the oven, the door gasket can be removed.With the door dismantled, lift the tongues located at the angles, as shown in the “gure.Once cleaning is completed, re-mount the gaskets keeping the longest side horizontal and place the tongues in the respective holes, starting from the upper ones.

30
IT
FIG. 2
FIG. 3 FIG. 4 FIG. 5
FIG. 1
31
ITFIG. 6 FIG. 7 FIG. 8
FIG. 9 FIG. 10 FIG. 11
FIG. 12 FIG. 13 FIG. 14
FIG. 15 FIG. 16 FIG. 17
FIG. 18 FIG. 19
32
FIG. 20
FIG. 21
FIG. 22

33

012Y
89
Global Website
www.fujioh.com
Southeast Asia Regional HeadquartersFUJIOH INTERNATIONAL TRADING PTE.LTD.
130 Joo Seng Road #05-05 Singapore 368357
E-mail : [email protected] : (65) 6286 3286 Fax : (65) 6285 3285