operating and installation instructions washer and installation instructions washer to prevent...
TRANSCRIPT

Operating and Installation InstructionsWasher
To prevent accidents and appliance damage, read these instructionsbefore installation or use.
en-US M.-Nr. 10 210 820

Contents
2
IMPORTANT SAFETY INSTRUCTIONS ................................................................ 4
Caring for the environment .................................................................................. 7
Guide to the washer .............................................................................................. 8Control panel ........................................................................................................... 8Display function....................................................................................................... 9
Before using for the first time ............................................................................ 10Setting the display language................................................................................. 10
1. Prepare the laundry......................................................................................... 11
2. Load the laundry.............................................................................................. 12
3. Select a program ............................................................................................. 13
4. Selecting program settings ............................................................................ 14
5. Add detergent .................................................................................................. 16
6. Start the program - Program end .................................................................. 19
Spin cycle ............................................................................................................. 21
Delay Start............................................................................................................ 22
Program guide ..................................................................................................... 23
Changing the programme sequence ................................................................. 27Canceling a program ............................................................................................. 27Interrupting a program........................................................................................... 27Changing a program.............................................................................................. 27Adding/removing laundry during a wash program ................................................ 28Preparing your appliance for an extended vacation.............................................. 28
Detergent ............................................................................................................. 29Miele-recommended detergents ........................................................................... 30General detergent recommendations.................................................................... 31
Cleaning and care ............................................................................................... 32Cleaning the drum................................................................................................. 32Cleaning the exterior and control panel ................................................................ 32Cleaning the detergent dispensing drawer ........................................................... 32Cleaning the liquid detergent inserts..................................................................... 33Cleaning the water inlet filter ................................................................................. 34

Contents
3
Frequently asked questions ............................................................................... 35Problem solving guide........................................................................................... 35A wash program cannot be started....................................................................... 35The following fault message appears in the display and the programhas been canceled ................................................................................................ 36A message appears in the display at the end of the program .............................. 37General problems with the washer........................................................................ 37Poor wash results .................................................................................................. 38The drum door cannot be opened ........................................................................ 39Opening the drum door during a power failure ..................................................... 40
Draining the washing machine ......................................................................... 40Opening the drum door .................................................................................... 41
After sales service ............................................................................................... 42Repairs .................................................................................................................. 42Optional accessories............................................................................................. 42MieleCare .............................................................................................................. 42
Installation............................................................................................................ 44Front view .............................................................................................................. 44Rear view............................................................................................................... 45Installation site....................................................................................................... 46Installation ............................................................................................................. 46Removing the shipping struts ............................................................................... 46Refitting the shipping struts .................................................................................. 48Leveling the machine............................................................................................. 49Screwing out and adjusting the feet...................................................................... 49Water connection .................................................................................................. 50
The water protection system............................................................................ 50Hot and cold water connection ........................................................................ 51Reprogramming to cold water operation.......................................................... 52Drainage ........................................................................................................... 52
Electrical connection ............................................................................................. 53
Setting the language ........................................................................................... 54

IMPORTANT SAFETY INSTRUCTIONS
4
WARNING
To reduce the risk of fire, electric shock or injury to persons whileusing your appliance follow basic safety precautions, including thefollowing:
Read all instructions before using the appliance.
GROUNDING INSTRUCTIONSThis appliance must be grounded. In the event of a malfunction orbreakdown, grounding will reduce the risk of electric shock byproviding a path of least resistance for electric current. Thisappliance is equipped with a cord having an equipmentgroundingconductor and a grounding plug. The plug must be plugged into anappropriate outlet that is properly installed and grounded inaccordance with all local codes and ordinances.
WARNING - Improper connection of the equipment-groundingconductor may result in a risk of electric shock. Check with aqualified electrician if you are in doubt as to whether the appliance isproperly grounded.
Do not modify the plug provided with the appliance - if it will notfit the outlet, have a proper outlet installed by a qualified electrician.
Do not install or use a washer with visible damage.
Do not install or store this appliance where it will be exposed tothe weather.
Do not install your washing machine where temperatures belowfreezing may occur. Frozen hoses may burst under pressure. Thereliability of the electronic control unit may be impaired attemperatures below freezing.
IMPORTANT SAFETY INSTRUCTIONS
5
Before connecting the machine, ensure that the connection dataon the data plate (fusing, voltage and frequency) match the mainselectrical supply. If in doubt contact an electrician.
Do not use an extension cord to connect this appliance to thepower supply. Extension cords do not guarantee the required safetyof the appliance (e.g. danger of overheating).
This appliance is not designed for maritime use or for use inmobile installations such as recreational vehicles or aircraft.However, under certain conditions it may be possible for aninstallation in these applications. Please contact the Miele TechnicalService Dept. with specific requirements.
Do not repair or replace any part of the appliance or attempt anyservicing unless specifically recommended in these operatinginstructions.
If the power cord is damaged it must only be replaced by a MieleService technician with a genuine Miele power cord.
Under certain conditions, hydrogen gas may be produced in a hotwater system that has not been used for 2 weeks or more.HYDROGEN GAS IS EXPLOSIVE. If the hot water system has notbeen used for such a period, turn on all hot water faucets and let thewater flow from each for several minutes before using the washingmachine. This will release any built-up hydrogen gas. Do not smokeor use an open flame during this time, the gas is flammable.
Before the appliance is removed for service or discarded, removethe door.

IMPORTANT SAFETY INSTRUCTIONS
6
Use
Do not allow children to play on or in the appliance. Closesupervision is necessary when the appliance is used near children.
The drum door glass will be hot when washing at very hightemperatures. Do not touch the glass. Danger of burns! Keepchildren away from the washer when in use.
Only use the washing machine to wash items which are specifiedby the manufacturer to be machine washable on the fabric carelabel. Any other applications may be dangerous.
Do not wash articles that have been previously cleaned, washed,soaked or spotted with gasoline, dry-cleaning solvents or otherflammable substances. These articles give off vapors that couldignite or explode. Do not add these items to the wash load.
Do not add gasoline, dry-cleaning solvents, or other flammable orexplosive substances to the wash water. These substances give offvapors which could ignite or explode.
Do not use cleaning solvents on or near the machine or thecontrols. Contact with cleaning solvents will damage the surface..
Do not reach into the appliance if the drum is moving.
Do not tamper with the controls.
SAVE THESE INSTRUCTIONS
Caring for the environment
7
Disposal of the packingmaterialThe cardboard box and packingmaterials protect the appliance duringshipping. They have been designed tobe biodegradable and recyclable.
Ensure that any plastic wrappings,bags, etc. are disposed of safely andkept out of the reach of children.Danger of suffocation!
Disposal of your old applianceElectrical and electronic appliancescontain valuable materials. They alsocontain certain substances, compoundsand components which were essentialfor the proper functioning and safe useof the equipment. Handling thesematerials improperly by disposing ofthem in your household waste can beharmful to your health and theenvironment. Therefore, please do notdispose of your old appliance withregular household waste and followlocal regulations on proper disposal.
Consult with local authorities, dealers orMiele in order to dispose of and recycleelectrical and electronic appliances.Miele assumes no responsibility fordeleting any personal data left on theappliance being disposed. Pleaseensure that your old appliance is keptaway from children until removal.Observe safety requirements forappliances that may tip over or pose anentrapment hazard.
Guide to the washer
8
Control panel
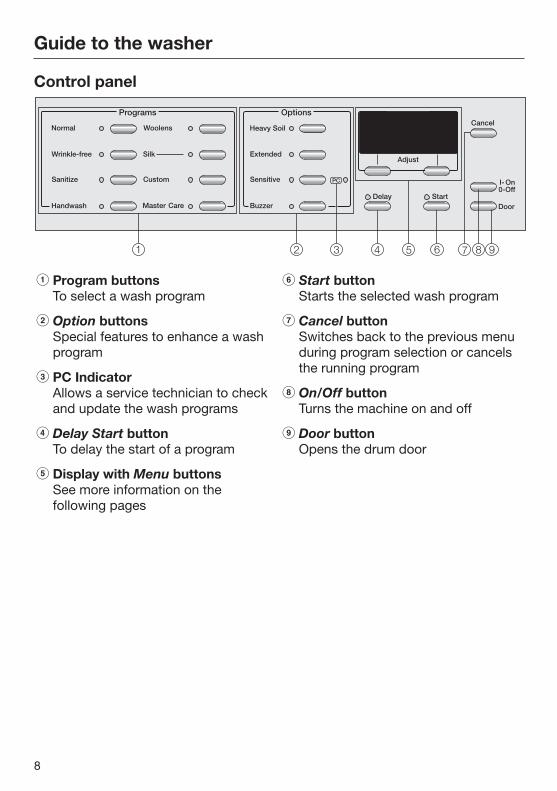
a Program buttonsTo select a wash program
b Option buttonsSpecial features to enhance a washprogram
c PC IndicatorAllows a service technician to checkand update the wash programs
d Delay Start buttonTo delay the start of a program
e Display with Menu buttonsSee more information on thefollowing pages
f Start buttonStarts the selected wash program
g Cancel buttonSwitches back to the previous menuduring program selection or cancelsthe running program
h On/Off buttonTurns the machine on and off
i Door buttonOpens the drum door

Guide to the washer
9
Display functionThe display allows you to operate andselect various functions of the washer.
Selection and display of programsettings
– Temperature selection
– Spin speed selection
– Delay start
– Display of an approximate programrunning time
Program selection using the display
By pressing the MasterCare button, youcan select from the following programs:
– Extra White
– Delicates
– Denim / Jeans
– Dress shirts
– Pillows
– Outerwear
– Table linens
– Beach towels
– Express
– Drain / Spin
– Quick rinse
Menu buttons
Various settings can be made with theMenu buttonsThe values above the vertical line canbe adjusted and/or confirmed.
Example:
Duration: 1:02 h
Warm Max spin
Pressing the left menu button Warmallows to adjust the temperature. TheHigh spin button allows you to adjustthe spin speed.
Example:
MasterCare
OK
Extra White
With the button additional programscan be selected and confirmed with theOK button.

Before using for the first time
10
The appliance must be correctlyinstalled and connected before thefirst use. Please see the "Installationinstructions."This washing machine hasundergone thorough testing in thefactory, there may be some residualwater in the drum from this process.
Running a spin cycle before the first useis, for safety reasons, not possible. Toactivate the spin cycle a wash programmust be run without laundry ordetergent.
Turn on the water supply.
Press the I-On / 0-Offbutton. Thewasher is turned on.
The Welcome screen shows once thewasher is turned on for the first time.
The Welcome screen will not show afterthe washer has run for more than 1hour.
The display now shows the languagesetting.
Setting the display languageThe default setting for the displaylanguage is German. The displaylanguage can be adjusted.
Language
OKdeutsch
Select the desired language bypressing the left menu button Confirm the setting with the right OKbutton.
Shipping strut reminder
The shipping struts must beremoved before the first use to avoidmachine damage.
Confirm that the shipping struts havebeen removed by pressing OK.
The washer is now ready for the firstuse.
Starting the first wash program
Select program
Press the program button Sanitize.
Press the Start button.
Once the program has finished the firstuse is complete. The washer can beused.

1. Prepare the laundry
11
Empty all pockets.
Foreign objects left in pockets(e.g. nails, coins, paper clips, etc.)can cause damage to clothes andthe machine.
Sort the laundry
Only wash items that are labeledmachine washable by the manufacturer.Most garments have a fabric care labelin the collar or side seam.
Sort the laundry by care label andcolor.
Tip: Dark fabrics often bleed the firstfew times they are washed. They shouldbe washed separately several timesbefore being included in a mixed load.
Pre-treating stains
Badly soiled areas, stains etc. shouldbe cleaned as soon as possible,preferably while still fresh. Dab stainswith a damp light colored cloth. Donot rub!
Solvent-based cleaners (e.g.,benzene) can damage plastic parts.When pre-treating a stain, make surethat plastic parts do not come intocontact with cleaning agent.
Chemical (solvent-based)cleaning agents can cause damagein the washing machine.Never use such cleaning agents inthe washing machine!
General tips
– Curtains: Remove any lead weightsor strips before washing.
– Loose bra underwires should beremoved or sewn in place beforewashing.
– Close zippers, hooks and eyeletsbefore washing.
– Comforter covers and pillowcasesshould be fastened to prevent smallitems from rolling inside of them.
Do not wash items with the symbol on the fabric care label.
2. Load the laundry
12
Turn on the washer
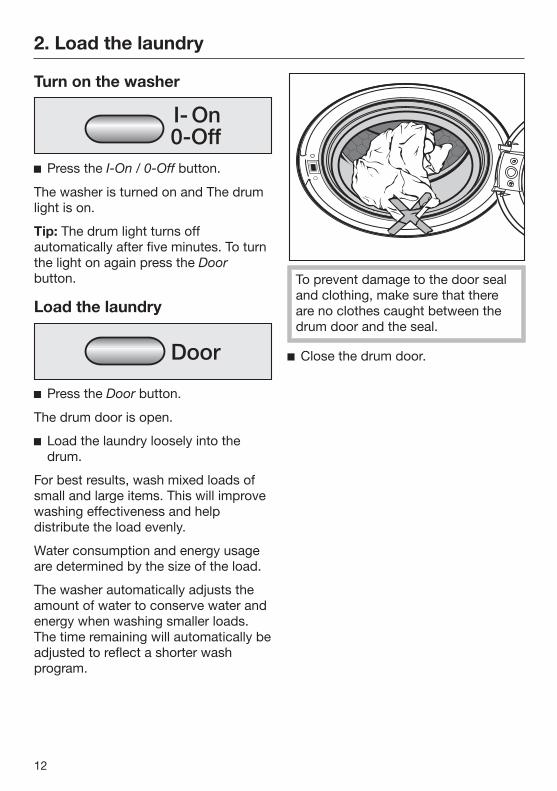
Press the I-On / 0-Off button.
The washer is turned on and The drumlight is on.
Tip: The drum light turns offautomatically after five minutes. To turnthe light on again press the Doorbutton.
Load the laundry
Press the Door button.
The drum door is open.
Load the laundry loosely into thedrum.
For best results, wash mixed loads ofsmall and large items. This will improvewashing effectiveness and helpdistribute the load evenly.
Water consumption and energy usageare determined by the size of the load.
The washer automatically adjusts theamount of water to conserve water andenergy when washing smaller loads.The time remaining will automatically beadjusted to reflect a shorter washprogram.
To prevent damage to the door sealand clothing, make sure that thereare no clothes caught between thedrum door and the seal.
Close the drum door.

3. Select a program
13
A. Program selection usingprogram buttons
Press the button to select the desiredwashing program.
The relevant indicator light will light up.
B. Program selection via theMasterCare button
Press the MasterCare button.
The following appears in the display:
MasterCare
OK
Extra White
With the left button , page down
through the selection list.
The desired program is on the display:
Confirm the program with the rightbutton OK.

4. Selecting program settings
14
Select a temperature and/orspin speedPrograms via program buttons
Duration: 1:02 h
Warm Max spin
Press the left menu button Warm tochange the temperature and pressthe right menu button Max. Spin tochange the spin speed.
Programs via the MasterCare button
Duration: 1:16 h
Hot Max spin
Extra White
Press the left menu button Hot tochange the temperature and pressthe right menu button Max. Spin tochange the spin speed.
Select an option
Select the desired Option with therespective button.
Once an Option is selected, theindicator lights.
Tip: If an Option cannot be selected,the wash program does not permit it.See the "Program Guide" to determinewhich Option is selectable for eachprogram.
Heavy Soil
For heavily soiled laundry or stubborndried on stains.
A pre-wash takes place and the washtime for the main wash is extended.
Extended
For laundry with normal to heavy soilingor stains
The main wash cycle time for the washprogram is extended.

4. Selecting program settings
15
Sensitive
An additional final rinse washes awaydetergent residue and scents.
An additional rinse takes place.
Buzzer
A buzzer signals the end of the washprogram or after Hold. The buzzersounds until the washer is turned off.The buzzer volume can be adjusted.
Adjusting the buzzer volume
No program is selected.
Press the "Buzzer" button until thedisplay shows:
Volume setting
OK
Press the left menu button to
adjust the buzzer volume.
Confirm with OK.
Switching on delay startThe start of a program can be delayedfrom 30 minutes up to 24 hours.
Switch on the delay start (if desired).
Please see "Delay start" for moreinformation.

5. Add detergent
16
Front loading washing machinesrequire special high efficiencydetergents. Closely follow therequirements of the detergentmanufacturer.
Use detergent according to the laundrysoiling.
Use less for smaller loads.
Light soiling
No soiling or stains are visible.
Normal soiling
Some visible soiling or a few lightstains.
Heavy soiling
Very visible soiling or stains.
Use the Heavy soil function and split thedetergent in the Heavy soilcompartment as described.
Too little detergent may cause:
– laundry to not be cleaned effectivelyand become gray and stiff over time.
– grease to not be completely washedfrom the laundry.
– calcium deposits on the heater.
Too much detergent may cause:
– oversudsing with poor wash, rinseand spin results.
– a higher water usage, because of anextra rinse which is automaticallyadded
– a higher environmental burden.
5. Add detergent
17
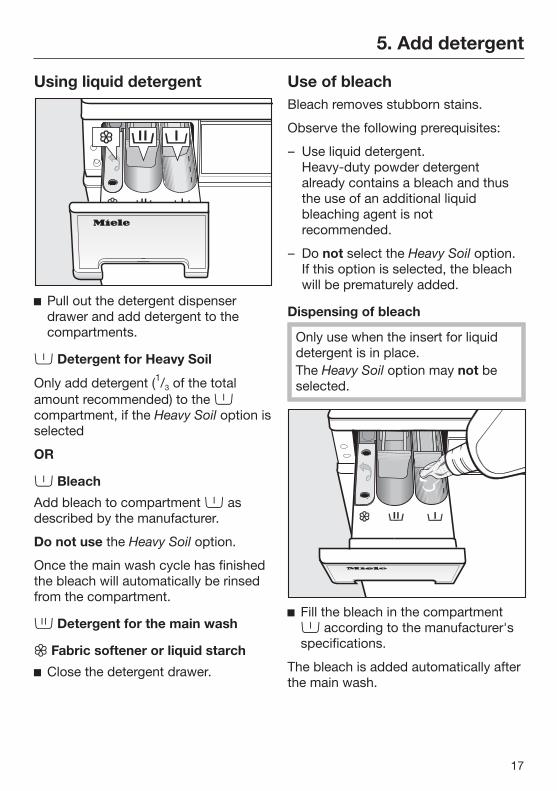
Using liquid detergent
Pull out the detergent dispenserdrawer and add detergent to thecompartments.
Detergent for Heavy Soil
Only add detergent (1/3 of the totalamount recommended) to the compartment, if the Heavy Soil option isselected
OR
Bleach
Add bleach to compartment asdescribed by the manufacturer.
Do not use the Heavy Soil option.
Once the main wash cycle has finishedthe bleach will automatically be rinsedfrom the compartment.
Detergent for the main wash
Fabric softener or liquid starch
Close the detergent drawer.
Use of bleachBleach removes stubborn stains.
Observe the following prerequisites:
– Use liquid detergent.Heavy-duty powder detergentalready contains a bleach and thusthe use of an additional liquidbleaching agent is notrecommended.
– Do not select the Heavy Soil option.If this option is selected, the bleachwill be prematurely added.
Dispensing of bleach
Only use when the insert for liquiddetergent is in place.The Heavy Soil option may not beselected.
Fill the bleach in the compartment according to the manufacturer'sspecifications.
The bleach is added automatically afterthe main wash.

5. Add detergent
18
Using powder detergent
Liquid detergent inserts come alreadyinserted in the detergentcompartments. To use powderdetergent remove the inserts.
Remove the inserts from bothcompartments and .
Tip: Replace the inserts in thecompartments before using liquiddetergent.
Dispensing fabric softener orliquid starchFabric softenerMakes fabrics feel softer and reducesstatic cling in the dryer.
Mild liquid starchA synthetic starch wash that givesfabrics some stiffness.
StarchGives the fabrics stiffness and volume.
Add the fabric softener, mild liquidstarch or starch to compartment .Do not exceed the maximum filllevel marked inside thecompartment.
The fabric softener / liquid starch will bedispensed during the final rinse. A smallamount of water will remain in thecompartment at the end of the program .
If starching frequently, clean thedispenser compartment andespecially the siphon tube.
6. Start the program - Program end
19
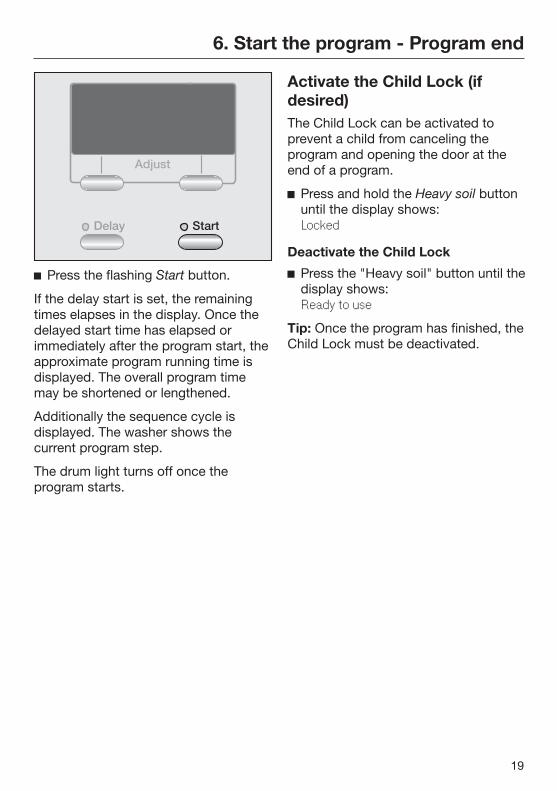
Press the flashing Start button.
If the delay start is set, the remainingtimes elapses in the display. Once thedelayed start time has elapsed orimmediately after the program start, theapproximate program running time isdisplayed. The overall program timemay be shortened or lengthened.
Additionally the sequence cycle isdisplayed. The washer shows thecurrent program step.
The drum light turns off once theprogram starts.
Activate the Child Lock (ifdesired)The Child Lock can be activated toprevent a child from canceling theprogram and opening the door at theend of a program.
Press and hold the Heavy soil buttonuntil the display shows:Locked
Deactivate the Child Lock
Press the "Heavy soil" button until thedisplay shows:Ready to use
Tip: Once the program has finished, theChild Lock must be deactivated.

6. Start the program - Program end
20
Program endDuring the "Anti-crease" program thedisplay shows Anti-crease alternatingwith End.
Open the drum door.
Remove the laundry.
Check the drum for any missedpieces of laundry. Items inadvertentlyleft in the washer may be damaged(e.g. shrink or discolor) during thenext wash cycle.
Check the folds of the door seal forany small articles.
Close the drum door.
Activate the Child Lock.
So children or animals do not find theirway into the drum.

Spin cycle
21
Final spin speed
Program
Normal Max spin
Wrinkle-free High spin
Sanitize Max spin
Handwash Med spin
Woolens High spin
Silk Slow spin
Custom Max spin
Extra White Max spin
Delicates Med spin
Denim/Jeans High spin
Dress shirts Med spin
Pillows High spin
Outerwear Med spin
Table linens High spin
Beach towels Max spin
Express Max spin
Drain / Spin Max spin
Quick rinse High spin
The final spin speed can be reduced, ifthe program allows changes. Theselection of a final spin speed higherthan that shown above is not possible.
Rinse and interim spin
There is a spin cycle after the mainwash and between the rinses. Areduction in the final spin speed willalso reduce the interim spin speed.
Hold
The laundry will not be spun and willremain suspended in the final rinsewater. This reduces creasing if thelaundry is not going to be removed fromthe drum immediately after the end ofthe program.
Under the spin speeds, select Hold.
– Start final spinAt the end of the program, thewashing machine will offer themaximum permitted spin speed. Youcan select a lower spin speed.
Press the Start button.
The final spin is carried out.
– End program without spinning
Press the Cancel button.
The water is drained and the program isended.
No spin (deselect rinse and interimspin and the final spin)
Under the spin speeds, select No spin.
The laundry is not spun between therinse cycles and the end of theprogram. The water is drained and theanti-crease function is activated.

Delay Start
22
Delay start allows you to delay thestart of a program from 30 minutes upto a maximum of 24 hours.
Press the Delay button.
Start in: 0:30h
Warm High spin
With every touch of the Delay button,the start is delayed longer:
– For a delay less than 10 hours, thedelay time extends in 30 minuteincrements.
– For a delay time more than 10 hours,the delay time extends in 1 hourincrements.
Tip: Press and hold the Delay button tospeed up the count.
Cancel
Press the Cancel button.
Adjust
To adjust the Delay Start time canceland reset.
Program guide
23
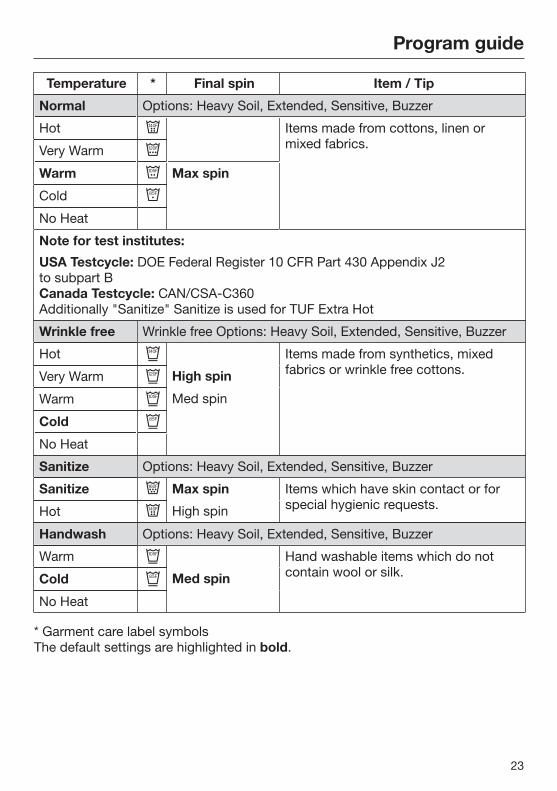
Temperature * Final spin Item / Tip
Normal Options: Heavy Soil, Extended, Sensitive, Buzzer
Hot Items made from cottons, linen ormixed fabrics.Very Warm
Warm Max spin
Cold No Heat
Note for test institutes:
USA Testcycle: DOE Federal Register 10 CFR Part 430 Appendix J2to subpart BCanada Testcycle: CAN/CSA-C360Additionally "Sanitize" Sanitize is used for TUF Extra Hot
Wrinkle free Wrinkle free Options: Heavy Soil, Extended, Sensitive, Buzzer
Hot Items made from synthetics, mixedfabrics or wrinkle free cottons.Very Warm High spin
Warm Med spin
Cold No Heat
Sanitize Options: Heavy Soil, Extended, Sensitive, Buzzer
Sanitize Max spin Items which have skin contact or forspecial hygienic requests.Hot High spin
Handwash Options: Heavy Soil, Extended, Sensitive, Buzzer
Warm Hand washable items which do notcontain wool or silk.Cold Med spin
No Heat
* Garment care label symbolsThe default settings are highlighted in bold.

Program guide
24
Temperature * Final spin Item / Tip
Woolens Options: Sensitive, Buzzer
Warm High spin Items made from washable wool ormixed woolens.Cold Med spin
No Heat Slow spin
Hold
No spin
Silk Options: Buzzer
Cold Slow spin Silk and hand washable items which donot contain wool.No Heat
Custom Options: Heavy Soil, Extended, Sensitive, Buzzer
Sanitize Max spin
Hot High spin
Very Warm Med spin
Warm Slow spin
Cold Rinse hold
No Heat No Spin
Extra White Options: Heavy Soil, Extended, Sensitive, Buzzer
Hot Max spin For white items without special hygienicrequestsVery Warm High spinl
Delicates Options: Extended, Buzzer
Warm Med spin For delicate items made fromsynthetics.Cold Slow spin
No Heat Hold
No Spin
* Garment care label symbolsThe default settings are highlighted in bold.
Program guide
25
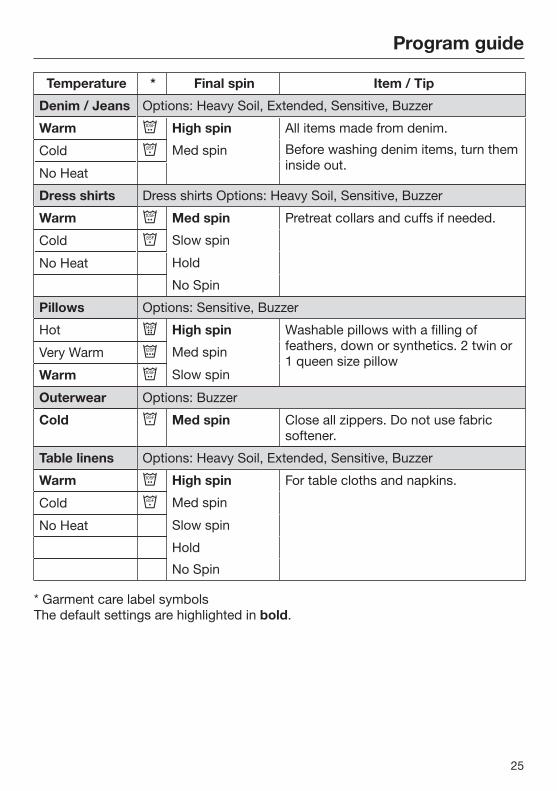
Temperature * Final spin Item / Tip
Denim / Jeans Options: Heavy Soil, Extended, Sensitive, Buzzer
Warm High spin All items made from denim.
Before washing denim items, turn theminside out.
Cold Med spin
No Heat
Dress shirts Dress shirts Options: Heavy Soil, Sensitive, Buzzer
Warm Med spin Pretreat collars and cuffs if needed.
Cold Slow spin
No Heat Hold
No Spin
Pillows Options: Sensitive, Buzzer
Hot High spin Washable pillows with a filling offeathers, down or synthetics. 2 twin or1 queen size pillow
Very Warm Med spin
Warm Slow spin
Outerwear Options: Buzzer
Cold Med spin Close all zippers. Do not use fabricsoftener.
Table linens Options: Heavy Soil, Extended, Sensitive, Buzzer
Warm High spin For table cloths and napkins.
Cold Med spin
No Heat Slow spin
Hold
No Spin
* Garment care label symbolsThe default settings are highlighted in bold.
Program guide
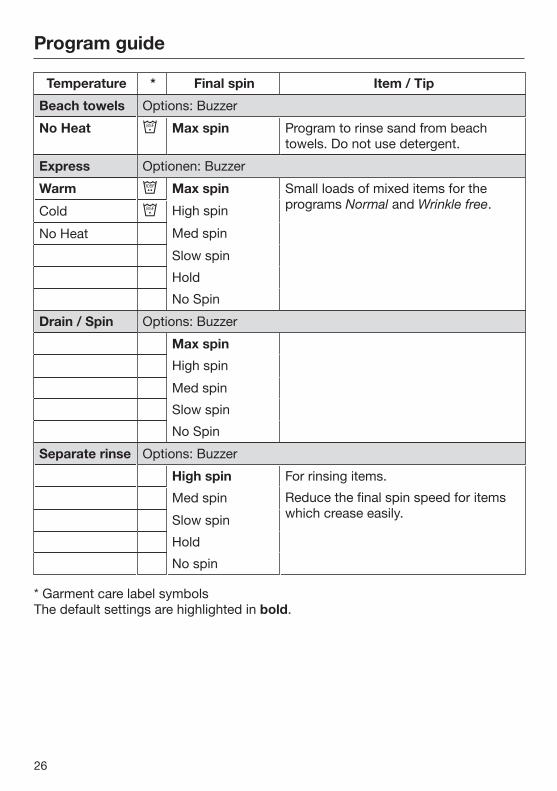
26
Temperature * Final spin Item / Tip
Beach towels Options: Buzzer
No Heat Max spin Program to rinse sand from beachtowels. Do not use detergent.
Express Optionen: Buzzer
Warm Max spin Small loads of mixed items for theprograms Normal and Wrinkle free.Cold High spin
No Heat Med spin
Slow spin
Hold
No Spin
Drain / Spin Options: Buzzer
Max spin
High spin
Med spin
Slow spin
No Spin
Separate rinse Options: Buzzer
High spin For rinsing items.
Reduce the final spin speed for itemswhich crease easily.
Med spin
Slow spin
Hold
No spin
* Garment care label symbolsThe default settings are highlighted in bold.

Changing the programme sequence
27
Canceling a programA program can be canceled any timeafter the program start.
Press and hold the Cancel buttonuntil the display shows:
Cancel
The wash water will be drained away.
To add or remove laundry
Open the drum door.
To select another program
The display requests the programselection.
Press the desired program button.
Interrupting a program Turn the washer off.
To continue:
Turn the washer on again.
Changing a programA program change is not possible oncethe program has started. The programmust be canceled.
Adjusting the temperature
The temperature can be changed up to6 minutes after the program start.
Adjusting the spin speed
The spin speed can be adjustedanytime until the beginning of the finalspin.
Adjusting the options
The options Extended or Sensitive canbe selected or deselected up to 6minutes after the program start.
The Buzzer option can be selected ordeselected at any time.

Changing the programme sequence
28
Adding/removing laundryduring a wash program Press and hold the door button until
the door opens.
Add or remove laundry.
Close the door.
The program continues automatically.
Note:
Once the program has started thewasher can not make adjustments ofthe load size.
The drum door cannot be opened if:
– the water temperature is greater than130 °F (55 °C).
– the water level is too high.
– the program has reached the "FinalSpin".
– The Child Lock function is activated.
If you attempt to open the door whilethe washer is in one of the abovestatuses "Machine locked" will appearin the display.Machine locked
Preparing your appliance foran extended vacationIf you elect to turn off the water to yourhome for an extended period of time,please note that this may not beenough to reduce the risk of a leak.
To be completely safe, you must turnoff the water supply to eachindividual appliance.This means under the sink for adishwasher, at the laundry bib foryour washer, etc.
Detergent
29
Front-loading washing machines requirehigh efficiency detergent. Observe themanufacturer's specification.
Miele offers detergent that has beenperfectly adapted to your washingmachine.
Fabric softener
Makes fabrics feel softer and reducesstatic cling in the dryer.
Mild liquid starch
A synthetic starch wash that givesfabrics some stiffness.
Starch
Gives the fabrics stiffness and volume.
Dyes / dye removers
Do not use dye removers in thiswasher!
The use of dyes in the washer isrecommended only to a degree of usualhousehold use. The salt used for dyingmay corrode the stainless steel withfrequent use.
Use only as directed by themanufacturer.

Detergent
30
Miele-recommended detergentsThe wash programs that are not listed do not have a detergent recommendation.
MieleUltraWhite
MieleUltraColor
MieleSensitive
SkinPowder
MieleSpecialist
Detergents
MieleFabric
Softener
Cottons –
Minimum iron –
Sanitize – –
Synthetics – – –
Woolens – – –
Silks – – –
Custom –
Extra White – –
Delicates – – –
Darks / Denim – – –
Shirts –
Pillows – – –
Outerwear – – – –
Table linen – –
Express – * – –
= Recommended
– = Not recommended
* = Liquid detergent
Miele Wool Care
Miele detergent for down
Miele Outdoor
Detergent
31
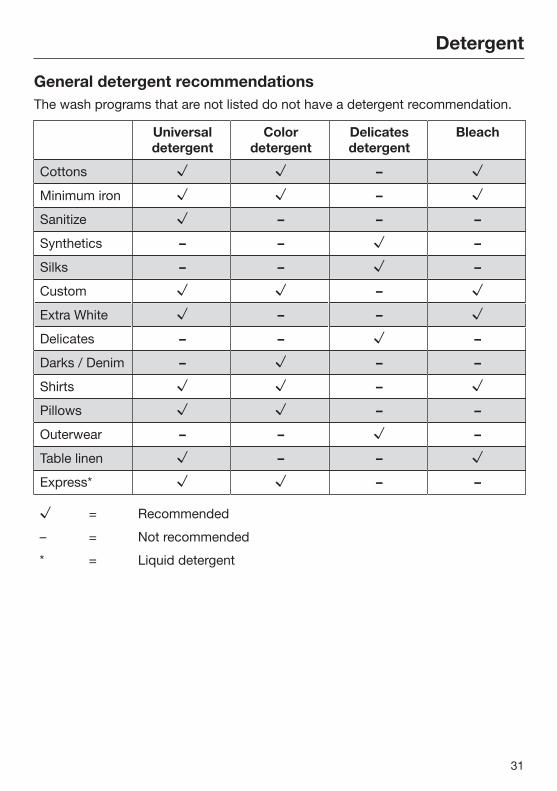
General detergent recommendationsThe wash programs that are not listed do not have a detergent recommendation.
Universaldetergent
Colordetergent
Delicatesdetergent
Bleach
Cottons –
Minimum iron –
Sanitize – – –
Synthetics – – –
Silks – – –
Custom –
Extra White – –
Delicates – – –
Darks / Denim – – –
Shirts –
Pillows – –
Outerwear – – –
Table linen – –
Express* – –
= Recommended
– = Not recommended
* = Liquid detergent

Cleaning and care
32
Cleaning the drumWashing at low temperatures and/orusing liquid detergent can causebacteria and unpleasant odors to buildup in the washing machine. For thisreason, Miele recommends that thewashing machine be cleaned once amonth.
Do not put laundry in the washingmachine.
Select the Sanitize program and theSanitize temperature.
Add ¼ cup of detergent and/orbleach to the detergent dispensingdrawer
Start the program and let it proceedas usual.
At the end of the program, the cleaningof the drum is completed.
Cleaning the exterior andcontrol panel
Before cleaning or maintenance,disconnect the power supply byunplugging the unit or manually"tripping" the circuit breaker.
Do not use a hose to wash downthe washer.
Clean the exterior of the washer witha mild solution of non-abrasivedetergent or soap and water, andwipe dry with a soft cloth.
Clean the drum with a stainless steelcleaner specially formulated for use ina washing machine, available fromMiele.
Do not use chemical solvents,abrasive cleaners, glass or allpurpose cleaners! They will damagethe surface.
Cleaning the detergentdispensing drawer
Washing at low temperatures and theuse of liquid detergent can lead to abuild-up of bacteria in the detergentdispensing drawer.
For hygiene reasons, clean the entiredrawer at regular intervals.
Pull out the detergent drawer as faras it goes. Press down on the redrelease lever and pull the drawer outof the machine.
Remove the liquid detergent inserts
Clean the detergent drawer withwarm water.
Cleaning and care
33
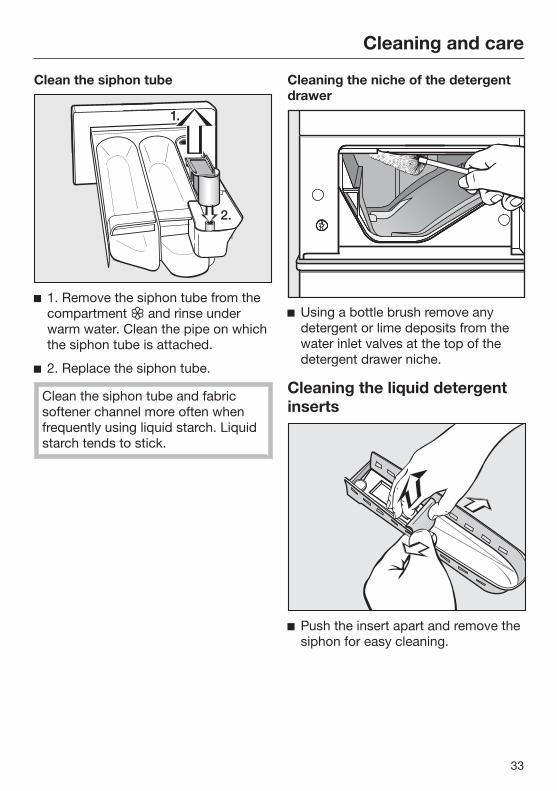
Clean the siphon tube
1. Remove the siphon tube from thecompartment and rinse underwarm water. Clean the pipe on whichthe siphon tube is attached.
2. Replace the siphon tube.
Clean the siphon tube and fabricsoftener channel more often whenfrequently using liquid starch. Liquidstarch tends to stick.
Cleaning the niche of the detergentdrawer
Using a bottle brush remove anydetergent or lime deposits from thewater inlet valves at the top of thedetergent drawer niche.
Cleaning the liquid detergentinserts
Push the insert apart and remove thesiphon for easy cleaning.
Cleaning and care
34
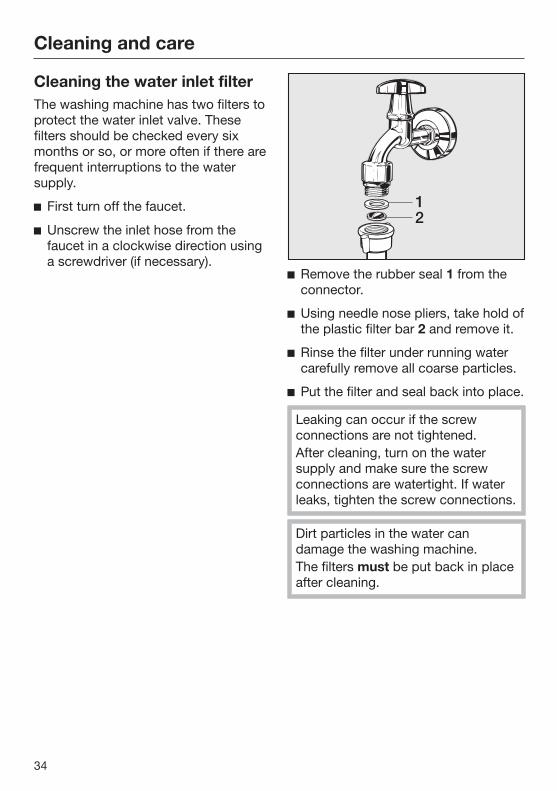
Cleaning the water inlet filterThe washing machine has two filters toprotect the water inlet valve. Thesefilters should be checked every sixmonths or so, or more often if there arefrequent interruptions to the watersupply.
First turn off the faucet.
Unscrew the inlet hose from thefaucet in a clockwise direction usinga screwdriver (if necessary).
Remove the rubber seal 1 from theconnector.
Using needle nose pliers, take hold ofthe plastic filter bar 2 and remove it.
Rinse the filter under running watercarefully remove all coarse particles.
Put the filter and seal back into place.
Leaking can occur if the screwconnections are not tightened.After cleaning, turn on the watersupply and make sure the screwconnections are watertight. If waterleaks, tighten the screw connections.
Dirt particles in the water candamage the washing machine.The filters must be put back in placeafter cleaning.

Frequently asked questions
35
Problem solving guideWith the help of the following guide, minor faults in the performance of theappliance, some of which may result from incorrect operation, can be put rightwithout contacting Miele Service. This will save time and money.
The following guide may help you to find the reason for a fault, and to correct it.You should, however, note the following:
Repairs and other work by unqualified persons could be dangerous. Themanufacturer cannot be held responsible for unauthorized work.Repair work to electrical appliances must only be carried out by a suitablyqualified and competent person in strict accordance with current local andnational safety codes.
A wash program cannot be started
Problem Possible cause and solution
The display stays blankand no indicatorilluminates.
The washer has no power. Check to determine if the washer is plugged in. Check to determine if the circuit breaker has
tripped.
Immediately after theprogram start thewasher cancels theprogram.
The "child entrapment sensor" has reacted. Open the drum door. Check the drum. Restart the program.
Frequently asked questions
36
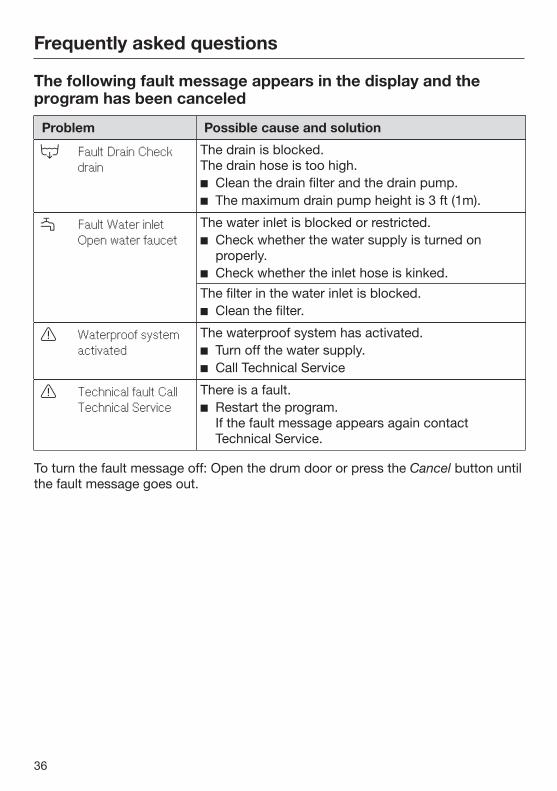
The following fault message appears in the display and theprogram has been canceled
Problem Possible cause and solution
Fault Drain Checkdrain
The drain is blocked.The drain hose is too high. Clean the drain filter and the drain pump. The maximum drain pump height is 3 ft (1m).
Fault Water inletOpen water faucet
The water inlet is blocked or restricted. Check whether the water supply is turned on
properly. Check whether the inlet hose is kinked.
The filter in the water inlet is blocked. Clean the filter.
Waterproof systemactivated
The waterproof system has activated. Turn off the water supply. Call Technical Service
Technical fault CallTechnical Service
There is a fault. Restart the program.
If the fault message appears again contactTechnical Service.
To turn the fault message off: Open the drum door or press the Cancel button untilthe fault message goes out.

Frequently asked questions
37
A message appears in the display at the end of the program
Message Possible cause and solution
In the display flashesAnti-creasealternating withCheck detergent.
The machine has oversudsed. Use less detergent in the next wash program, and
follow the recommended amount on the detergentpackaging.
General problems with the washer
Problem Possible cause and solution
The washer shakesduring the spin cycle.
The four feet are not resting evenly on the floor. Level the machine (see "Leveling the washer").
There are unusualsounds coming fromthe drain pump.
There is no fault!Lapping sounds at the beginning and end of thedrain process are normal.
Large residues ofdetergent remain in thedispenser drawer.
The water pressure is too low. Clean the water intake hose filter under running
water and carefully remove any large particles.Water softeners tend to clump. Clean the detergent drawer. In the future add the
detergent first then the water softener.
The fabric softener isnot completelydispensed or too muchwater remains in the compartment.
The siphon tube is either positioned incorrectly orclogged. Clean the siphon tube, see "Cleaning and care -
Cleaning the detergent drawer".
The display shows aforeign language.
The display language was adjusted. Select the display language. See "Setting the
display language".
Frequently asked questions
38
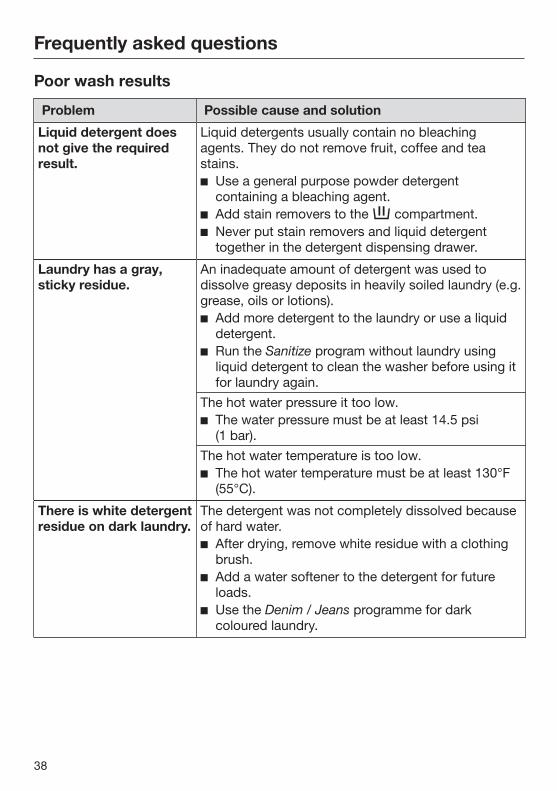
Poor wash results
Problem Possible cause and solution
Liquid detergent doesnot give the requiredresult.
Liquid detergents usually contain no bleachingagents. They do not remove fruit, coffee and teastains. Use a general purpose powder detergent
containing a bleaching agent. Add stain removers to the compartment. Never put stain removers and liquid detergent
together in the detergent dispensing drawer.
Laundry has a gray,sticky residue.
An inadequate amount of detergent was used todissolve greasy deposits in heavily soiled laundry (e.g.grease, oils or lotions). Add more detergent to the laundry or use a liquid
detergent. Run the Sanitize program without laundry using
liquid detergent to clean the washer before using itfor laundry again.
The hot water pressure it too low. The water pressure must be at least 14.5 psi
(1 bar).The hot water temperature is too low. The hot water temperature must be at least 130°F
(55°C).
There is white detergentresidue on dark laundry.
The detergent was not completely dissolved becauseof hard water. After drying, remove white residue with a clothing
brush. Add a water softener to the detergent for future
loads. Use the Denim / Jeans programme for dark
coloured laundry.
Frequently asked questions
39
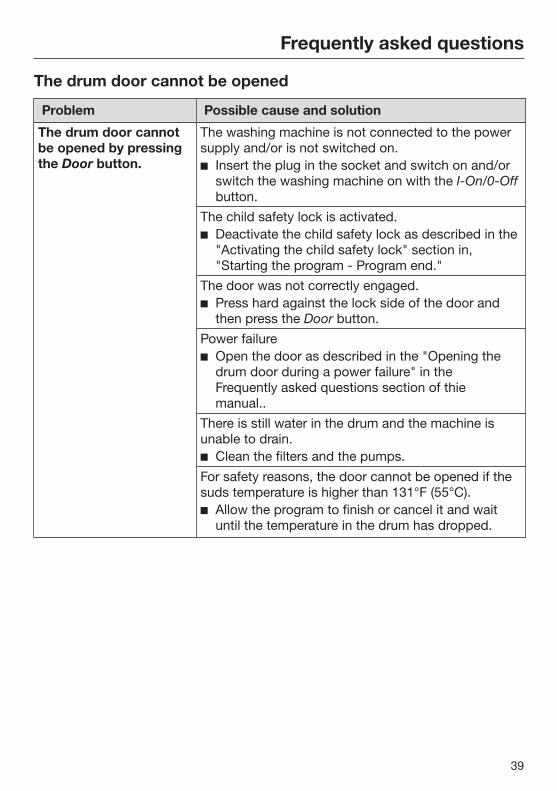
The drum door cannot be opened
Problem Possible cause and solution
The drum door cannotbe opened by pressingthe Door button.
The washing machine is not connected to the powersupply and/or is not switched on. Insert the plug in the socket and switch on and/or
switch the washing machine on with the I-On/0-Offbutton.
The child safety lock is activated. Deactivate the child safety lock as described in the
"Activating the child safety lock" section in,"Starting the program - Program end."
The door was not correctly engaged. Press hard against the lock side of the door and
then press the Door button.Power failure Open the door as described in the "Opening the
drum door during a power failure" in theFrequently asked questions section of thiemanual..
There is still water in the drum and the machine isunable to drain. Clean the filters and the pumps.
For safety reasons, the door cannot be opened if thesuds temperature is higher than 131°F (55°C). Allow the program to finish or cancel it and wait
until the temperature in the drum has dropped.
Frequently asked questions
40
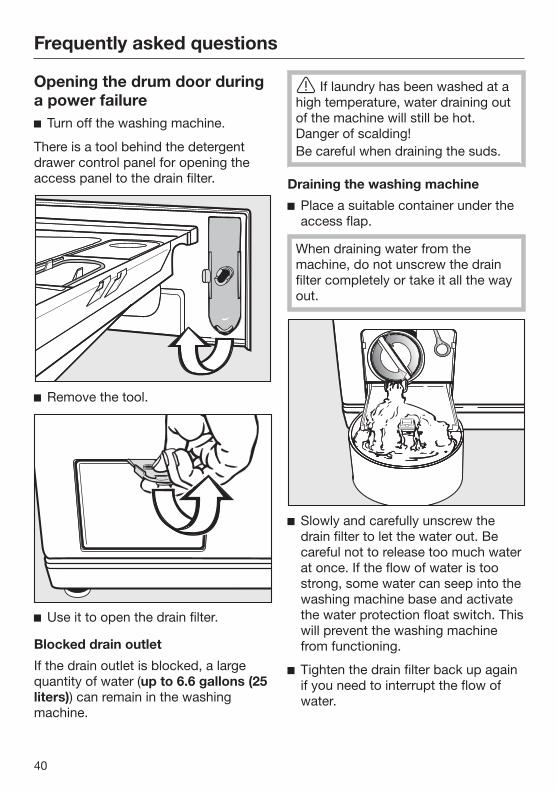
Opening the drum door duringa power failure Turn off the washing machine.
There is a tool behind the detergentdrawer control panel for opening theaccess panel to the drain filter.
Remove the tool.
Use it to open the drain filter.
Blocked drain outlet
If the drain outlet is blocked, a largequantity of water (up to 6.6 gallons (25liters)) can remain in the washingmachine.
If laundry has been washed at ahigh temperature, water draining outof the machine will still be hot.Danger of scalding!Be careful when draining the suds.
Draining the washing machine
Place a suitable container under theaccess flap.
When draining water from themachine, do not unscrew the drainfilter completely or take it all the wayout.
Slowly and carefully unscrew thedrain filter to let the water out. Becareful not to release too much waterat once. If the flow of water is toostrong, some water can seep into thewashing machine base and activatethe water protection float switch. Thiswill prevent the washing machinefrom functioning.
Tighten the drain filter back up againif you need to interrupt the flow ofwater.

Frequently asked questions
41
Once the flow of water stops:
Remove the drain filter completely.
Clean it thoroughly.
Remove any foreign objects (e.g.buttons, coins, etc.) and lint from thefilter housing. Turn the impeller byhand to check that it rotates freely.
Put the drain filter back in place andsecure it.
Make sure the drain filter issecurely tightened. Otherwise thereis a risk of water leakage during use.
To avoid loss of detergent, pour approx.2 quarts (2 liters) of water into thedetergent dispenser drawer aftercleaning the drain filter. Excess waterwill be pumped out automatically beforethe next wash program.
Opening the drum door
Make sure the machine is turnedoff and the drum has stoppedmoving. A moving drum isdangerous.
To open the door, pull down on thering in the upper right corner of theaccess area.

After sales service
42
RepairsFor problems that you cannot resolveon your own, please contact:
– your Miele dealer or
– Miele Technical Service
The telephone number for Miele islisted at the back of theseinstructions.
When contacting Miele, please quotethe model and serial number of yourmachine, both of which are visible onthe data plate above the glass when thedoor is open.
Optional accessoriesOptional accessories are availablethrough your Miele dealer or Miele.
MieleCare(USA only)
MieleCare, our Extended ServiceContract program; gives you theassurance of knowing that yourappliance investment is covered by 5years of worry free ownership.
MieleCare is the only Extended ServiceContract in the industry that guaranteesrepairs by a Miele Authorized ServiceProvider using genuine Miele parts.Only genuine Miele parts installed byfactory trained professionals canguarantee the safety, reliability andlongevity of your Miele appliance.
Please note that unless expresslyapproved in writing by the Miele Servicedepartment, Extended ServiceContracts offered by other providers forMiele products will not be recognizedby Miele. Our goal is to preventunauthorized (and untrained) servicepersonnel from working on your Mieleproducts, possibly doing furtherdamage to them, you and/or yourhome.
To learn more about MieleCareExtended Service Contracts, pleasecontact your appliance dealer or visit usonline at:
www.mieleusa.com

43
Installation Instructions
Information is subject to change.Please refer to our website to obtain the most current product specification,technical & warranty information.
To prevent accidents and appliance damage read these instructions beforeinstallation or use.

Installation
44
Front view
a Hot water intake hose
b Cold water intake hose
c Power cord
d Drain hose (drain options shown i.eadjustable and removable elbows).
e Detergent dispenser drawer
f Control panel
g Drum door
h Access panel to lint trap and drainpump
i Recessed grip
j Four height-adjustable feet
Installation
45
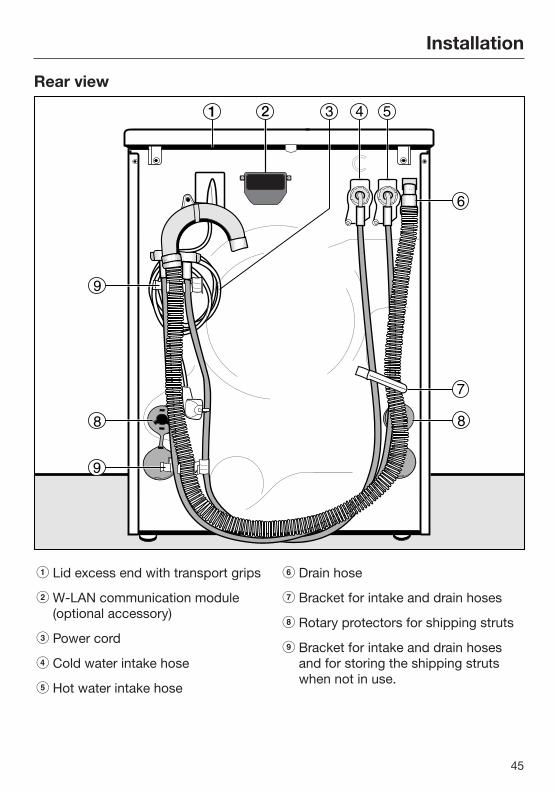
Rear view
a Lid excess end with transport grips
b W-LAN communication module(optional accessory)
c Power cord
d Cold water intake hose
e Hot water intake hose
f Drain hose
g Bracket for intake and drain hoses
h Rotary protectors for shipping struts
i Bracket for intake and drain hosesand for storing the shipping strutswhen not in use.
Installation
46
Installation siteA concrete floor is the most suitablesurface for the washer. Concrete floorsare less prone to vibration during thespin cycle than wooden floors.
Note:
The machine must be leveled andsecurely positioned.
To avoid vibration while spinning, themachine should not be installed onsoft floor coverings.
If the installation must be performed ona wooden floor:
Install the unit on a 2 ft. x 2 ft. x 13/16" (61 x 61 x 3 cm) plywood base.Ideally the base should be largeenough to span several joists andshould be anchored to the joists andnot just the floor boards.
Tip: It is best to install the washer in thecorner of a room, where the stability ofthe floor is at its greatest.
There is a risk of the washingmachine falling off a raised platform.If the machine is installed on a raisedplatform (concrete or masonry), itmust be secured in place using theMTS floor mounting kit (availablefrom Miele).
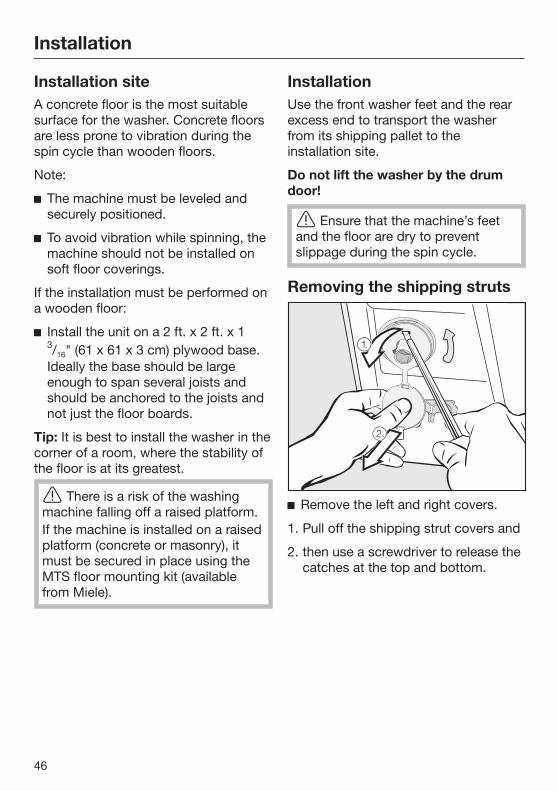
InstallationUse the front washer feet and the rearexcess end to transport the washerfrom its shipping pallet to theinstallation site.
Do not lift the washer by the drumdoor!
Ensure that the machine’s feetand the floor are dry to preventslippage during the spin cycle.
Removing the shipping struts
Remove the left and right covers.
1. Pull off the shipping strut covers and
2. then use a screwdriver to release thecatches at the top and bottom.

Installation
47
Using the wrench supplied, turn theleft-hand shipping strut 90°, then
withdraw the shipping strut.
Turn the right-hand shipping strut90°, then
withdraw the shipping strut.

Installation
48
If the holes are not covered,there is a risk of injury.To avoid the risk of injury the holesfor the shipping struts must becovered after they have beenremoved.
Fit the covers onto the holes.
Secure the shipping struts to theback of the washing machine. Makesure the top catch is located abovethe holder.
The washing machine must notbe moved without the shipping strutsin place.Store the shipping struts. They mustbe refitted if the machine is to bemoved again (e.g. when movinghouse).
Refitting the shipping strutsRefitting is carried out by reversing theprocedure.

Installation
49
Leveling the machineThe washing machine must standperfectly level on all four feet to ensuresafe and proper operation.
Incorrect installation may increaseelectric and water consumption andmay cause the machine to move about.
Screwing out and adjusting thefeetThe four adjustable screw feet are usedto level the machine. All four feet arescrewed in when the machine isdelivered.
Using the wrench supplied, turncounter nut 2 in a clockwise direction.Then turn counter nut 2 together withfoot 1 to unscrew.
Use a level to check that the washingmachine is standing level.
Hold foot 1 securely with a pipewrench. Turn counter nut 2 againusing the wrench supplied until it sitsfirmly up against the housing.
There is a danger of the washingmachine moving about.All four counter nuts must be firmlyup against the housing. Please alsocheck this for the feet which did notneed adjustment.
Installation
50
Water connection
The water protection system
The Miele water protection systemprotects all parts of the washingmachine and its surroundings fromwater damage.
The system consists of the followingmain components:
– the inlet hose
– the electronic module and drainageand overflow protection
– the drain hose
Inlet hoses
– Protection against the hoses bursting
The inlet hose can withstandpressure of more than 7,000 kPa /1,015.26 psi.
Electronic module and washingmachine housing
– Sump: Any leaking water is collectedin a sump in the base of the machine.A float switches off the water inletvalves, preventing any more waterfrom flowing into the machine andwater in the suds container ispumped away.
– Overflow protection: This preventsthe washing machine taking in toomuch water. If the water levelexceeds a certain level, the drainpump switches on and pumps theexcess water away in a controlledway.
Drain hose
The drain hose is protected by aventilation system which prevents thewashing machine from being emptiedcompletely.

Installation
51
The washing machine can beconnected to a portable water supply. Anon-return valve is not needed unlessrequired by building code.
The washing machine has ½" (13 mm)pressure hoses with ¾" (19 mm) femalehose thread connections. If there is nowater hookup, contact a plumber toinstall a connection. Make sure that thesealing ring is seated properly on thehose connector.
Replace the hose only with a genuineMiele hose, or with a hose able towithstand up to 145 psi (10.000 kPa)pressure. The water valve connectormust also be able to withstand 145 psi(10.000 kPa).
The bolted connection is underwater pressure. Open the watersupply slowly to check for leaks.Adjust the rubber seal and the boltedconnection if necessary.
To protect the inlet valve, the twofilters (one at the pressure hose /valve connection and one at the inletconnection to the solenoid valve)must not be removed.
Hot and cold water connection
This washing machine can be operatedwith cold water and/or hot water.
Markings of water intake hoses
Cold water = Blue stripes
Hot water = Red stripes
For technical reasons, thewashing machine must always beconnected to cold water.
Cold water
– The washing machine must bereprogrammed for operation withcold water only.
– Attach the second inlet hose to theback of the washing machine.
– In the Cottons washing program, theonly possible temperature is Not Heat.
Installation
52
Hot water
– The washing machine is programmedfor hot water operation at delivery.
– The temperature of hot water at thefaucet must not exceed 140°F (60°C).The preferred temperature is 131°F(55°C). Consult a plumber if thetemperature at the faucet exceeds140°F (60°C).
– Before connecting to the waterfaucet, check that the outflow of coldwater does not exceed 5 liters / 5quarts. Each additional quart of coldwater reduces the energy efficiency.
– If the hot water supply is turned offfor some time, the washing machinewill automatically switch to the coldwater connection. This safetymeasure is not intended for thepermanent operation of theappliance. The washing machinecontinues to wash using hot wateroperation, but washing results areworsened.
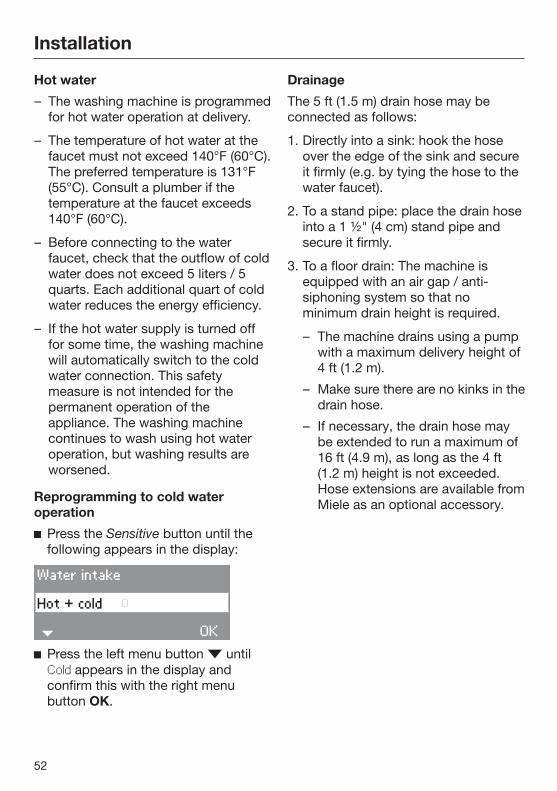
Reprogramming to cold wateroperation
Press the Sensitive button until thefollowing appears in the display:
Water intake
OK
Hot + cold
Press the left menu button untilCold appears in the display andconfirm this with the right menubutton OK.
Drainage
The 5 ft (1.5 m) drain hose may beconnected as follows:
1. Directly into a sink: hook the hoseover the edge of the sink and secureit firmly (e.g. by tying the hose to thewater faucet).
2. To a stand pipe: place the drain hoseinto a 1 ½" (4 cm) stand pipe andsecure it firmly.
3. To a floor drain: The machine isequipped with an air gap / anti-siphoning system so that nominimum drain height is required.
– The machine drains using a pumpwith a maximum delivery height of4 ft (1.2 m).
– Make sure there are no kinks in thedrain hose.
– If necessary, the drain hose maybe extended to run a maximum of16 ft (4.9 m), as long as the 4 ft(1.2 m) height is not exceeded.Hose extensions are available fromMiele as an optional accessory.

Installation
53
Electrical connection
GROUNDING INSTRUCTIONSThis appliance must be grounded. Inthe event of a malfunction orbreakdown, grounding will reducethe risk of electric shock byproviding a path of least resistancefor electric current. This appliance isequipped with a cord having anequipment-grounding conductor anda grounding plug. The plug must beplugged into an appropriate outletthat is properly installed andgrounded in accordance with all localcodes and ordinances.WARNING – Improper connection ofthe equipment-grounding conductorcan result in a risk of electric shock.Check with a qualified electrician orservice representative if you are indoubt as to whether the appliance isproperly grounded.Do not modify the plug provided withthe appliance; if it will not fit theoutlet, have a proper outlet installedby a qualified electrician.
ELECTRICAL INSTRUCTIONSThis installation should be performed byan experienced and qualifiedtechnician, in accordance with localcodes and regulations.
The washing machine is supplied with a5’ 3" (1.6 m) long, 3 wire cord, ending ina NEMA 5-15P plug, ready forconnection to a 120 V, 15 A, 60 Hz, ACpower supply.
The proper outlet can be purchasedfrom an electrical supply dealer.

Setting the language
54
The display can be set to appear inone of several different languages. Thedisplay language can be changed atany time as long as no program is inprogress.
Press the Extended button until thedisplay shows the following:
Language
OKenglish
Scroll through the selection list withthe left button until the desiredlanguage appears in the display.Confirm the language with the OKbutton.
The selected language appears in thedisplay.

9 Independence WayPrinceton, NJ 08540Phone:Fax:www.mieleusa.com
U.S.A.Miele, Inc.
National Headquarters
Please have the model and serial numberof your appliance available before contacting Technical Service.
CanadaImporterMiele Limited
Headquarters and Miele Centre
800-843-7231609-419-4298
Technical Service & SupportNationwidePhone:Fax:[email protected]
161 Four Valley DriveVaughan, ON L4K 4V8www.miele.ca
800-999-1360888-586-8056
Customer Care CentrePhone:
800-565-6435905-532-2272
International HeadquartersMiele & Cie. KGCarl-Miele-Straße 2933332 GüterslohGermany

M.-Nr. 10 210 820 / 01en-US
W 3048