operating and installation instructions fridge freezer - … · operating and installation...
TRANSCRIPT

Operating and installation instructionsFridge freezer
To avoid the risk of accidents or damage to the appliance it is essentialto read these instructions before it is installed and used for the first time.
en-GB M.-Nr. 10 360 590

Contents
2
Warning and Safety instructions .......................................................................... 5
Caring for the environment ................................................................................ 12
How to save energy............................................................................................. 13
Guide to the appliance ........................................................................................ 15
Accessories ......................................................................................................... 17Accessories supplied ............................................................................................ 17Optional accessories............................................................................................. 17
Using for the first time ........................................................................................ 19Before using for the first time................................................................................ 19Connecting the appliance ..................................................................................... 19
Switching on and off ........................................................................................... 20Touch display ........................................................................................................ 20Switching on.......................................................................................................... 20Start screen ........................................................................................................... 21Switching off.......................................................................................................... 22Switching off for longer periods of time ................................................................ 24
The correct temperature..................................................................................... 25. . . in the refrigerator section ................................................................................ 25. . . in the freezer section ....................................................................................... 25Temperature display .............................................................................................. 26Setting the temperature......................................................................................... 26
Temperature range ........................................................................................... 27
Using Super cool, Super freeze and DynaCool ................................................ 28Super freeze function ....................................................................................... 28Super cool function ........................................................................................... 28DynaCool function ............................................................................................ 29Switching a function on or off ............................................................................... 29
Displaying a selected function ......................................................................... 30
Temperature and door alarm.............................................................................. 31Temperature alarm................................................................................................. 31Door alarm............................................................................................................. 32
Selecting further settings ................................................................................... 33Settings overview .................................................................................................. 33
Contents
3
Explanation of the different Settings ..................................................................... 35Switching Party mode on or off .................................................................... 35Switch Holiday mode on/off............................................................................. 36Using the minute minder (QuickCool timer) ................................................ 37Activating or deactivating the safety lock .............................................. 38Switching the appliance off ......................................................................... 38Switching Sabbath mode on/off ................................................................... 39Setting the duration before the door alarm sounds ..................................... 40Switching the sensor tone on / off ......................................................... 40Setting the volume / Switching off alarms and audible tones ..................... 40Setting the display brightness ..................................................................... 41Setting the temperature unit °C/°F ................................................................... 41Switching off Demo mode ............................................................................. 41Resetting to the factory default settings .................................................... 41Accessing Information ................................................................................... 41Replace charcoal filter reminder.................................................................. 42
Storing food in the refrigerator section............................................................. 43Different storage zones ......................................................................................... 43Food which is not suitable for storage in the refrigerator section ......................... 44When shopping for food........................................................................................ 44Storing food correctly............................................................................................ 44
Adjusting the interior fittings (refrigerator section) ......................................... 45Adjusting the door shelf / bottle shelf ................................................................... 45Moving the shelves................................................................................................ 45Adjusting or removing the bottle holder ................................................................ 45Adjusting the bottle rack ....................................................................................... 46Moving the charcoal filters .................................................................................... 46
Freezing and storing food................................................................................... 47Maximum freezing capacity .................................................................................. 47Freezing fresh food................................................................................................ 47Storing frozen food................................................................................................ 47Home freezing ....................................................................................................... 48
Before placing food in the freezer section........................................................ 49Using accessories ................................................................................................. 51Adjusting the interior fittings.................................................................................. 51
Defrosting............................................................................................................. 52
Cleaning and care ............................................................................................... 53Cleaning agents..................................................................................................... 53Preparing the appliance for cleaning..................................................................... 54
Contents
4
Cleaning the interior and accessories ................................................................... 55Cleaning appliance doors and side panels ........................................................... 56Cleaning the ventilation gaps ................................................................................ 56Cleaning the compressor and metal grille at the back of the appliance............... 57Cleaning the door seals......................................................................................... 57After cleaning ........................................................................................................ 58Replacing the charcoal filters ................................................................................ 58
Problem solving guide ........................................................................................ 60
Noises................................................................................................................... 69
After Sales / Guarantee....................................................................................... 70
Information for test institutes............................................................................. 71
Electrical connection .......................................................................................... 72
Installation............................................................................................................ 73Location................................................................................................................. 73Climate range ........................................................................................................ 74Ventilation.............................................................................................................. 74Fitting wall spacers supplied................................................................................. 74Installation ............................................................................................................. 75Building the appliance into a kitchen run .............................................................. 76Appliance dimensions ........................................................................................... 77
Changing the door hinging ................................................................................. 78
Aligning the appliance doors.............................................................................. 84

Warning and Safety instructions
5
This appliance complies with all statutory safety requirements.Please note that inappropriate use can lead to personal injury anddamage to property.
To avoid the risk of accidents and damage to the appliance,please read these instructions carefully before using it for the firsttime. They contain important notes on installation, safety, use andmaintenance.
Miele cannot be held liable for non-compliance with these instruc-tions.
Keep these instructions in a safe place and ensure that new usersare familiar with the contents. Pass them on to any future owner.
Correct application
This appliance is intended for use in domestic households andsimilar working and residential environments. It is not intended for outdoor use.
This appliance is intended for domestic use only for cooling andstoring food and drink as well as for storing deep frozen food, freez-ing fresh food and for making ice.Any other usage is not supported by the manufacturer and could bedangerous.
This appliance is not suitable for storing and keeping cool medi-cines, blood plasma, laboratory preparations or other such materialsor products. Incorrect use of the appliance for such purposes cancause deterioration of the items stored. The appliance is not suitablefor use in areas where there is a risk of explosion.Miele cannot be held liable for damage resulting from improper or in-correct use of the appliance.
Warning and Safety instructions
6
The appliance can only be used by people with reduced physical,sensory or mental capabilities, or lack of experience and knowledge,if they are supervised whilst using it, or have been shown how to useit in a safe way and recognise and understand the consequences ofincorrect operation.
Safety with children
Children under 8 years of age must be kept away from the appli-ance unless they are constantly supervised.
Children 8 years and older may only use the appliance unsuper-vised if they have been shown how to use it in a safe way and recog-nise and understand the consequences of incorrect operation.
Children must not be allowed to clean or maintain the applianceunsupervised.
Please supervise children in the vicinity of the appliance and donot let them play with it.
Danger of suffocation. Packaging, e.g. plastic wrappings, must bekept out of the reach of babies and children. Whilst playing, childrencould become entangled in packaging or pull it over their head andsuffocate.
Technical safety
The coolant system is tested for leaks. This appliance complieswith statutory safety requirements and the appropriate EUguidelines.

Warning and Safety instructions
7
This appliance contains the coolant Isobutane (R600a), a naturalgas which is environmentally friendly. Although it is flammable, itdoes not damage the ozone layer and does not increase the green-house effect.The use of this coolant has, however, led to a slight increase in thenoise level of the appliance. In addition to the noise of the com-pressor, you might be able to hear the coolant flowing around thesystem. This is unavoidable, and does not have any adverse effecton the performance of the appliance.Care must be taken during the transportation and setting up of theappliance that no parts of the cooling system are damaged. Leakingcoolant can damage the eyes.In the event of any damage:
– avoid naked flames or anything which creates a spark,
– disconnect the appliance from the mains electricity supply,
– ventilate the room where the appliance is located for severalminutes, and
– contact the Miele Service Department.
The more coolant there is in an appliance, the larger the room itshould be installed in. In the event of a leakage, if the appliance is ina small room, there is the danger of combustible gases building up.For every 8 g of coolant at least 1 m3 of room space is required. Theamount of coolant in the appliance is stated on the data plate insidethe appliance.
To avoid the risk of damage to the appliance, make sure that theconnection data (fuse rating, frequency and voltage) on the dataplate corresponds to the household supply.Check that this is the case before connecting the appliance. Consulta qualified electrician if in any doubt.
The electrical safety of this appliance can only be guaranteedwhen correctly earthed. It is essential that this standard safety re-quirement is met. If in any doubt please have the electrical installa-tion tested by a qualified electrician.

Warning and Safety instructions
8
Reliable and safe operation of this appliance can only be assuredif it has been connected to the mains electricity supply.
If the electrical connection cable is faulty it must only be replacedby a Miele authorised service technician to protect the user fromdanger.
Do not connect the appliance to the mains electrical supply by amulti-socket adapter or extension lead. These are a fire hazard anddo not guarantee the required safety of the appliance.
Do not use in a damp or wet environment (e.g. garage or utilityroom). Moisture could reach live components or the electrical con-nection and cause a short circuit.
This appliance must not be used in a non-stationary location (e.g.on a ship).
Do not use a damaged appliance. It could be dangerous. Checkthe appliance for visible signs of damage.
The appliance must be isolated from the electricity supply duringinstallation, maintenance and repair work.
Unauthorised installation, maintenance and repairs can causeconsiderable danger for the user.Installation, maintenance and repairs must only be carried out by aMiele authorised technician.
While the appliance is under guarantee, repairs should only be un-dertaken by a Miele authorised service technician. Otherwise theguarantee is invalidated.
Miele can only guarantee the safety of the appliance when genu-ine original Miele replacement parts are used. Faulty componentsmust only be replaced by Miele spare parts.

Warning and Safety instructions
9
Correct use
The appliance is designed for use within a certain climate range(ambient temperatures), and should not be used outside this range.The climate range for your appliance is stated on the data plate in-side the appliance. Installing it in a room with too low an ambienttemperature, e.g. a garage, will lead to the appliance switching offfor longer periods so that it cannot maintain the required temperat-ure.
Do not cover or block the air vents as this could impair the effi-ciency of the appliance, increase the electricity consumption andcould cause damage to the components.
If storing food which contains a lot of fat or oil in the appliance orthe door, make sure that it does not come into contact with plasticcomponents as this could cause stress cracks or break the plastic.
Do not store explosive materials in the appliance or any productscontaining propellants (e.g. spray cans). Electrical components couldcause flammable vapours to ignite. Danger of fire and explosion.
Do not operate any electrical equipment (e.g. an electric ice creammaker) inside the appliance. Danger of sparking and explosion.
Do not store cans or bottles containing carbonated drinks or li-quids which could freeze in the freezer. The cans or bottles could ex-plode. Danger of injury and damage to the appliance.
When cooling drinks quickly in the freezer, make sure bottles arenot left in for more than one hour; otherwise they could burst, caus-ing injury or damage.
Never handle frozen food or the metal parts of the appliance withwet hands. Your hands may freeze to the frozen food or to the metal.Danger of frost burn.
Warning and Safety instructions
10
Do not take ice cubes out with your bare hands and never placeice cubes or ice lollies in your mouth straight from the freezer. Thevery low temperature of the frozen ice or lollies can cause frost burnto the lips and tongue.
Do not refreeze partially or fully defrosted food. Consume defros-ted food as soon as possible, as it will lose its nutritional value andspoil if left for too long. Defrosted food may only be re-frozen after ithas been cooked.
Observe the manufacturer's "use-by" dates and storage instruc-tions given on food to avoid the risk of food poisoning. Storage timeswill depend on several factors, including the freshness and quality ofthe food, as well as the temperature at which it is stored.
Only use genuine original Miele accessories and spare parts withthis appliance. Using accessories or spare parts from other manu-facturers will invalidate the guarantee, and Miele cannot accept liab-ility.
Cleaning and care
Do not use any oils or grease on the door seals, as these willcause the seals to deteriorate and become porous with time.
Do not use a steam cleaning appliance to clean or defrost this ap-pliance. Steam could reach electrical components and cause a short circuit.
Sharp edged or pointed objects will damage the evaporator, caus-ing irreversible damage to the appliance. Do not use sharp edged orpointed objects to
– remove frost and ice,
– separate frozen foods or remove ice trays.
Do not place electric heaters or candles in the appliance to de-frost it. These can damage the plastic parts.

Warning and Safety instructions
11
Do not use defrosting sprays or de-icers, as they could containsubstances which could damage the plastic parts or which mightcause the build-up of gases and pose a danger to health.
Transporting the appliance
Always transport the appliance in an upright position and in its ori-ginal transport packaging to avoid damage in transit.
Danger of injury and damage. The appliance is very heavy andmust be transported by two people.
Disposal of your old appliance
Before disposing of an old appliance, first make the door latch orlock unusable.This way you will prevent children from accidentally locking them-selves in and endangering their lives.
Splashes of coolant can damage the eyes. Be careful not to dam-age any part of the pipework whilst awaiting disposal, e.g. by
– puncturing the coolant channels in the condenser,
– bending any pipework, or
– scratching the surface coating.
Symbol on the compressor (depending on model)
This information is only relevant for recycling. In normal operation there is no risk.
The oil in the compressor can be fatal if swallowed or if it penet-rates the airways.

Caring for the environment
12
Disposal of the packing mater-ialThe packaging is designed to protectthe appliance from damage duringtransportation. The packaging materialsused are selected from materials whichare environmentally friendly for disposaland should be recycled.
Recycling the packaging reduces theuse of raw materials in the manufactur-ing process and also reduces theamount of waste in landfill sites.
Disposal of your old applianceElectrical and electronic equipment of-ten contain valuable materials. Theyalso contain materials which, if handledor disposed of incorrectly, could be po-tentially hazardous to human health andto the environment. They are, however,essential for the correct functioning ofyour appliance. Please do not thereforedispose of it with your householdwaste.
Please dispose of it at your local com-munity waste collection / recyclingcentre.
Take care not to damage the pipeworkat the back of it before or during trans-portation to an authorised collection de-pot.In this way, coolant in the pipework andoil in the compressor will be contained,and will not leak into the environment.
Please ensure that your old appliancepresents no danger to children whilebeing stored awaiting disposal. See"Warning and Safety instructions" formore information.
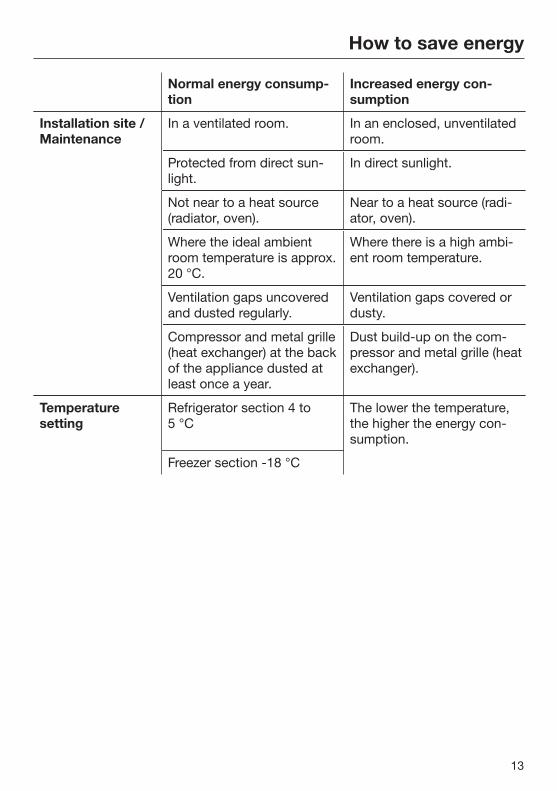
How to save energy
13
Normal energy consump-tion
Increased energy con-sumption
Installation site /Maintenance
In a ventilated room. In an enclosed, unventilatedroom.
Protected from direct sun-light.
In direct sunlight.
Not near to a heat source(radiator, oven).
Near to a heat source (radi-ator, oven).
Where the ideal ambientroom temperature is approx.20 °C.
Where there is a high ambi-ent room temperature.
Ventilation gaps uncoveredand dusted regularly.
Ventilation gaps covered ordusty.
Compressor and metal grille(heat exchanger) at the backof the appliance dusted atleast once a year.
Dust build-up on the com-pressor and metal grille (heatexchanger).
Temperaturesetting
Refrigerator section 4 to5 °C
The lower the temperature,the higher the energy con-sumption.
Freezer section -18 °C

How to save energy
14
Normal energy consump-tion
Increased energy con-sumption
Use Drawers and shelves ar-ranged as they were whenthe appliance was delivered.
Only open the door whennecessary and for as short atime as possible. Store foodin an organised way.
Frequent opening of thedoor for long periods willcause a loss of coldness.The appliance will cool downand the compressor will runfor longer periods.
Take an insulated cool bagwhen shopping and loadfood in the appliance assoon as possible.Replace any food removedas quickly as possible, be-fore it begins to thaw.Allow hot food and drinks tocool down before placingthem in the appliance.
Hot food or food at roomtemperature raises the tem-perature inside the appli-ance. The appliance will cooldown and the compressorwill run for longer periods.
Store food covered or pack-aged.
The evaporation or condens-ation of liquids will cause aloss of coldness.
Place frozen food in the refri-gerator to defrost.
Do not over-fill the applianceto allow air to circulate.
Poor air circulation willcause a loss of coldness.

Guide to the appliance
15
This drawing is for illustration purposes only.
a Control panel with display
b Interior lighting
c Door shelf
d Fan
e Adjustable shelf
f Bottle rack
g Condensate channel and drain hole
h Fruit and vegetable drawers
i Bottle shelf with bottle holder
j Recessed handle
k Frost Free module
l Freezer drawers
For easier installation there are trans-port handles on the back at the top andtransport wheels underneath the appli-ance.
Guide to the appliance
16
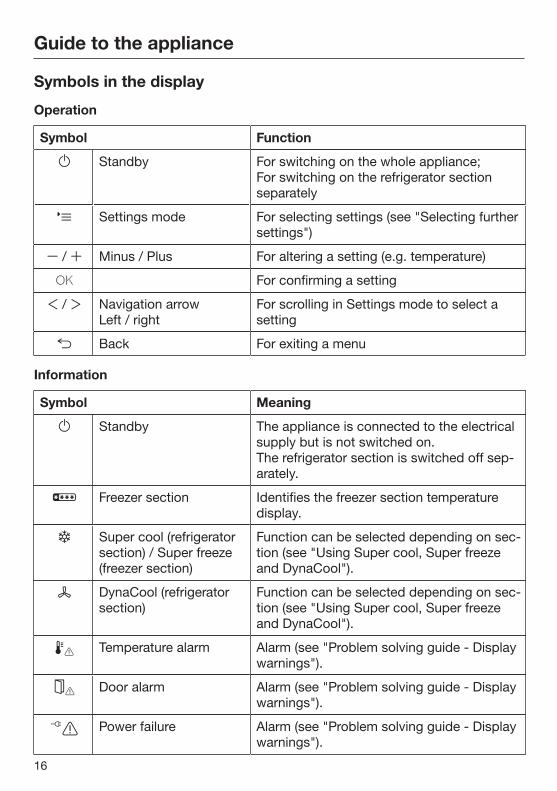
Symbols in the display
Operation
Symbol Function
Standby For switching on the whole appliance;For switching on the refrigerator sectionseparately
Settings mode For selecting settings (see "Selecting furthersettings")
/ Minus / Plus For altering a setting (e.g. temperature)
OK For confirming a setting
/ Navigation arrowLeft / right
For scrolling in Settings mode to select asetting
Back For exiting a menu
Information
Symbol Meaning
Standby The appliance is connected to the electricalsupply but is not switched on.The refrigerator section is switched off sep-arately.
Freezer section Identifies the freezer section temperaturedisplay.
Super cool (refrigeratorsection) / Super freeze(freezer section)
Function can be selected depending on sec-tion (see "Using Super cool, Super freezeand DynaCool").
DynaCool (refrigeratorsection)
Function can be selected depending on sec-tion (see "Using Super cool, Super freezeand DynaCool").
Temperature alarm Alarm (see "Problem solving guide - Displaywarnings").
Door alarm Alarm (see "Problem solving guide - Displaywarnings").
Power failure Alarm (see "Problem solving guide - Displaywarnings").

Accessories
17
Accessories supplied
Bottle holder
The flexible ribs grip the bottles se-curely when the door is opened andclosed.
Ice cube tray
Optional accessoriesA range of useful Miele accessories andcare products are available for your ap-pliance.
These products and other useful ac-cessories can be ordered via the inter-net, from Miele (see back cover forcontact details) or from your Mieledealer.
Miele-Onlineshop: shop.miele.de
Bottle rack
Bottles can be stored horizontally usingthe bottle rack to save space.The bottle rack can be placed at differ-ent positions in the appliance.

Accessories
18
KKF-FF Active AirClean charcoal fil-ters with holder
Charcoal filters neutralise unpleasantodours in the refrigerator section for im-proved air quality.
The charcoal filter holder clips onto theprotective strip at the back of the shelfand can be moved as necessary.
KKF-RFActive AirClean replacement filters
Replacement filters to fit the ActiveAirClean holder are available. We re-commend replacing the charcoal filtersevery 6 months.
Multi-purpose microfibre cloth
The microfibre cloth is suitable for re-moving fingerprints and light soilingfrom surfaces such as stainless steel,glass, plastic and chrome without theuse of chemicals.

Using for the first time
19
Before using for the first time
Packaging material
Remove all packaging material fromthe inside of the appliance.
Protective foil
The side panels, and appliance doorswhere applicable, have a protective foil.
Carefully peel the protective foil off.
Cleaning
Please refer to the relevant instruc-tions in "Cleaning and care".
Clean the inside of the appliance andthe accessories.
Connecting the appliance Connect the appliance to the mains
electricity supply.
Standby
will appear in the display.

Switching on and off
20
Touch display
The display can be scratched bypointed or sharp objects, e.g. pens.Only touch the display with your fin-ger tips.
Touching the display with your fingercreates a tiny charge which releases anelectrical impulse. This impulse is re-cognised by the touch display. The touch display does not react if youtouch it with an object.
It is possible for the touch display tonot react to finger contact if your fin-gers are cold.
Switching on
To enable the temperature to get suffi-ciently cold inside the appliance, allowthe appliance to run for approx.2 hours before placing food in it. Do not place food in the freezer sec-tion until the temperature is at least-18 °C.
Standby
Touch briefly.
The welcome message Miele - Willkommen will appear in the dis-play for approx. 3 seconds.
If this does not happen and ap-pears in the display, the safety lock isstill activated (see "Selecting furthersettings - Activating or deactivatingthe safety lock - Deactivating thesafety lock temporarily").
Switching on and off
21
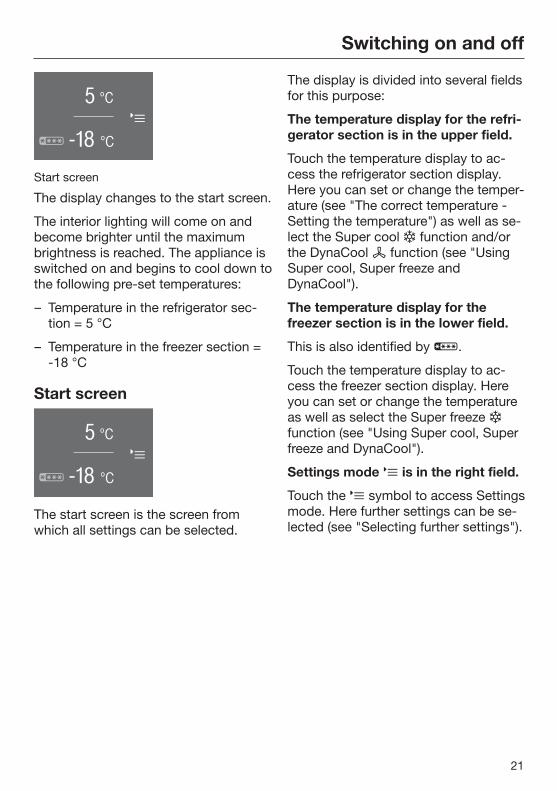
°C
5
-18
°C
Start screen
The display changes to the start screen.
The interior lighting will come on andbecome brighter until the maximumbrightness is reached. The appliance isswitched on and begins to cool down tothe following pre-set temperatures:
– Temperature in the refrigerator sec-tion = 5 °C
– Temperature in the freezer section =-18 °C
Start screen
°C
5
-18
°C
The start screen is the screen fromwhich all settings can be selected.
The display is divided into several fieldsfor this purpose:
The temperature display for the refri-gerator section is in the upper field.
Touch the temperature display to ac-cess the refrigerator section display.Here you can set or change the temper-ature (see "The correct temperature -Setting the temperature") as well as se-lect the Super cool function and/orthe DynaCool function (see "UsingSuper cool, Super freeze andDynaCool").
The temperature display for thefreezer section is in the lower field.
This is also identified by .
Touch the temperature display to ac-cess the freezer section display. Hereyou can set or change the temperatureas well as select the Super freeze function (see "Using Super cool, Superfreeze and DynaCool").
Settings mode is in the right field.
Touch the symbol to access Settingsmode. Here further settings can be se-lected (see "Selecting further settings").

Switching on and off
22
Switching offYou can switch the appliance off in Set-tings mode (see "Selecting further set-tings").
°C
5
-18
°C
Start screen
Touch .
Settings mode
Use the or arrow sensors until is displayed.
Switching off
Touch .
The temperature display goes out and lights up.
The refrigerator section interior lightingwill go out and the cooling process willbe switched off.
will go out after approx. 10 minutes.The display goes dark and switches toenergy-saving mode.
Switching off the refrigerator sectionseparately
The refrigerator section can beswitched off without having to switchoff the freezer section.
Tip: We recommend using the Holidaymode function if you are away on holi-day (see "Selecting further settings -Switching Holiday mode on/off"), sothat the appliance operates at lowerpower rather than being switched offcompletely.
If the Party mode , DynaCool orSuper cool functions have beenpreviously selected, these will beswitched off automatically.
°C
5
-18
°C
Standby
Touch the temperature display in thefield for the refrigerator section.
5 °C
OK
Refrigerator section display
Touch or until is displayed.
Touch .
Touch OK to confirm your entry.
Switching on and off
23
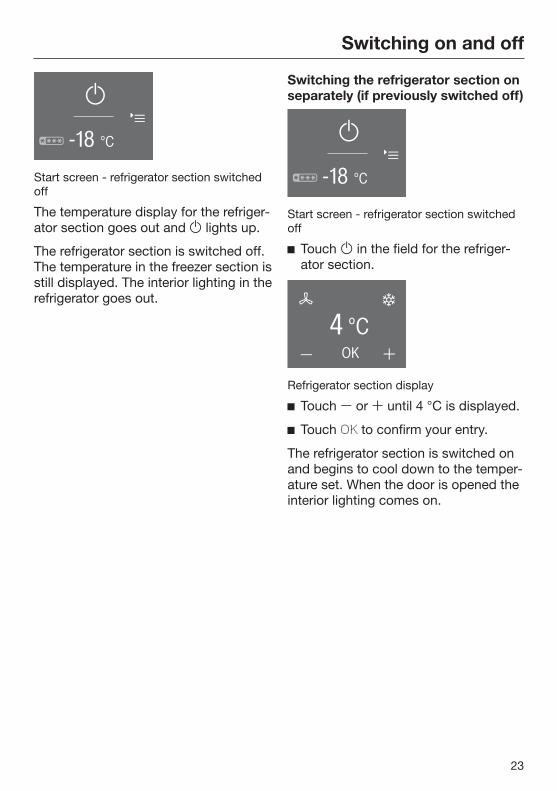
°C
-18
Start screen - refrigerator section switchedoff
The temperature display for the refriger-ator section goes out and lights up.
The refrigerator section is switched off.The temperature in the freezer section isstill displayed. The interior lighting in therefrigerator goes out.
Switching the refrigerator section onseparately (if previously switched off)
°C
-18
Start screen - refrigerator section switchedoff
Touch in the field for the refriger-ator section.
4 °C
OK
Refrigerator section display
Touch or until 4 °C is displayed.
Touch OK to confirm your entry.
The refrigerator section is switched onand begins to cool down to the temper-ature set. When the door is opened theinterior lighting comes on.

Switching on and off
24
Switching off for longer peri-ods of time
If, during a long absence, the ap-pliance is switched off but notcleaned and the door(s) left shut,there is a danger of mould buildingup inside the appliance.It is essential to clean the appliance.
If the appliance is not going to be usedfor a longer period of time, e.g. whilston holiday:
switch the appliance off,
disconnect it from the mains,
clean the appliance and
leave the door(s) ajar to air the appli-ance and avoid odours building up in-side the appliance.
It is also advisable to carry out the lasttwo instructions if you are switchingthe refrigerator section off for a longerperiod of time.

The correct temperature
25
It is very important to set the correcttemperature for storing food in the ap-pliance. Micro-organisms will causefood which is not stored at the correcttemperature to deteriorate rapidly. Tem-perature influences the growth rate ofthese micro-organisms. Reducing thetemperature reduces their growth rate.
The temperature in the appliance willrise:
– the more often the door is openedand the longer it is kept open,
– the more food that is stored in it,
– the warmer the food is which is beingput into it,
– the higher the ambient temperaturesurrounding the appliance. The appli-ance is designed for use within spe-cific ambient temperatures (climaterange). Do not use in ambient tem-peratures for which it is not designed.
. . . in the refrigerator sectionWe recommend a temperature of 4 °Cin the refrigerator section.
. . . in the freezer sectionTo freeze fresh food and to store frozenfood for a long time, a temperature of-18 °C is required. At this temperaturethe growth of micro-organisms is gener-ally halted. As soon as the temperaturerises above -10 °C, the micro-organ-isms become active in the food againso that it cannot be kept as long. Forthis reason, partially defrosted or fullydefrosted food must not be re-frozen.Food may be re-frozen once it has beencooked, as the high temperaturesachieved when cooking destroy mostmicro-organisms.

The correct temperature
26
Temperature display
°C
5
-18
°C
Start screen
In normal operation the upper temper-ature display shows the average, cur-rent temperature in the refrigeratorsection and the lower temperaturedisplay the lowest temperature inthe freezer section.
Depending on the ambient temperatureand the temperature setting, it can takethe appliance a few hours to reach thetemperature required and for this tem-perature to then be shown as a con-stant temperature in the display.
If the temperature in the freezerremains above -18 °C for a longtime, check that the frozen food hasnot started to defrost.If it has, check that the food is safeto use and if it is, then use it as soonas possible or cook it before freezingit again.
Setting the temperatureThe temperatures for the refrigeratorand freezer sections can be set inde-pendently of one another.
Touch the temperature display for thesection you want to change.
The previously set temperature will ap-pear.
4 °C
OK
Refrigerator section display
-18 °C
OK
Freezer section display
Use the and arrow buttons toset the temperature higher or lower.

The correct temperature
27
Touch OK immediately after settingthe temperature to confirm your entry.
Or wait approx. 8 seconds after thesensors were last touched. The tem-perature will then be adopted auto-matically.
Tip: The newly set temperature can alsobe confirmed and adopted by closingthe appliance door.
The temperature display will thenchange to the current temperature inthe appliance.
Temperature range
– The temperature in the refrigeratorsection can be adjusted from 1 °C to9 °C.
– The temperature in the freezer sec-tion can be adjusted from -15 °C to-26 °C.
Tip: If you have adjusted the temperat-ure, wait for approx. 6 hours if the ap-pliance is not very full and for approx.24 hours if the appliance is full beforechecking the temperature display, as itwill take this long for the appliance togive an accurate reading.
If, after this time, the temperature isstill too high or too low, you will needto adjust it again.

Using Super cool, Super freeze and DynaCool
28
The following functions are availabledepending on section:
– Refrigerator sectionSuper cool and DynaCool
– Freezer sectionSuper freeze
See the following pages for more in-formation on these functions and howto switch them on.
Super freeze function For optimum results switch on the Su-per freeze function before putting freshfood into the freezer section. This helpsfood to freeze quickly and retain its nu-trients, vitamins, flavours and appear-ance.
Super freeze is not necessary:
– when placing food in the freezer thatis already frozen.
– when freezing up to 2 kg fresh fooddaily.
When freezing small quantities of foodin the freezer, the Super freeze functionshould be switched on 6 hours before-hand. When freezing the maximum load offood, the Super freeze function shouldbe switched on 24 hours beforehand.
When Super freeze is switched on, theappliance will work at full power tolower the temperature in the appliance.
The Super freeze function will switch it-self off automatically after approx. 65hours. The quantity of fresh food placedin the freezer will determine the durationbefore the Super freeze functionswitches off.
Tip: To save energy, the Super freezefunction can be switched off once aconstant temperature of -18 °C isreached inside the freezer section.Check the temperature inside thefreezer section.
When Super freeze is switched off, theappliance will run at normal poweragain.
Super cool function The Super cool function can be used torapidly reduce the temperature in therefrigerator section to its lowest setting(depending on the room temperature).
Tip: Super cool is particularly recom-mended for the rapid chilling of largeamounts of fresh food or drink.
When Super cool is switched on, theappliance will work at full power tolower the temperature in the appliance.
It switches itself off automatically afterapprox. 12 hours.
Tip: To save energy, Super cool can beswitched off once food and drinks aresufficiently chilled.
When Super cool is switched off the ap-pliance reverts to working at normalpower.

Using Super cool, Super freeze and DynaCool
29
DynaCool function When the DynaCool function is notswitched on, the natural circulation ofair in the appliance will cause differenttemperature zones in the refrigerator asthe cold, heavy air will sink to the low-est section of the appliance. You shouldbear this in mind when placing food inthe appliance (see "Storing food in therefrigerator section").However, if you are placing a largeamount of food in the refrigerator at anyone time, (e.g. after the weekly shop) itis a good idea to switch DynaCool on.This way you can distribute the temper-ature inside the appliance to all areasmore evenly so that all the food will bechilled to about the same degree.The temperature is set as normal.
DynaCool should also be selectedwhen:
– the ambient temperature in the roomis high (above approx. 30 °C), and
– the room humidity level is high.
With DynaCool switched on, the fan isready: when the compressor switcheson, the fan also switches on automat-ically.
Tip: Because DynaCool requires moreenergy, you should switch it off undernormal conditions.
To save energy, the fan switches offautomatically whilst the door is open.
Switching a function on or off Touch the temperature display for the
section you want.
5 °C
OK
Refrigerator section display - DynaCool, Su-per cool
-18 °C
OK
Freezer section display - Super freeze
The current temperature and and or appear in the display.
Touch the symbol for the function youwant.
– If the symbol is lit up orange, thefunction is selected.
– If the symbol is white, the function isdeselected.
Touch OK to confirm your entry.
Or wait approx. 8 seconds after thesensors were last touched. The entrywill then be adopted automatically.
Super cool, Super freeze or DynaCoolare switched on or off.

Using Super cool, Super freeze and DynaCool
30
Functions that are switched on are notdisplayed in the start screen.
Any function which was previouslyswitched on will be switched off fol-lowing an interruption to the powersupply.
Displaying a selected function
Touch the temperature display for therelevant section.
The current temperature lights up in thedisplay. The symbol for the selectedfunction lights up orange.

Temperature and door alarm
31
The appliance has a warning systemwhich ensures that the temperature inthe freezer cannot rise unnoticed and toavoid energy being wasted if a door isleft open.
Temperature alarm
If the temperature in the freezerremains above -18 °C for a longtime, check that the frozen food hasnot started to defrost.If it has, check that the food is safeto use and if it is, then use it as soonas possible or cook it before freezingit again.
If the temperature in the freezer sectionbecomes too warm will light up redin the temperature display for thefreezer section. An alarm will also sound until the causeof the alarm is rectified or the alarm isswitched off.
The temperature the appliance is set atdetermines the temperature the appli-ance recognises as being too warm.
The temperature alarm is only dis-played in the start screen and notwhen selecting a setting.
A temperature alarm is displayed be-fore an existing door alarm.
The temperature alarm occurs, e.g.
– when the appliance is switched onand the temperature in the freezersection differs greatly from the settemperature,
– if a lot of room air enters the freezerwhen food is being loaded, re-ar-ranged or taken out,
– when freezing large amounts of foodat once,
– in the event of a power cut,
– if the appliance has a fault.
The alarm will stop and will go outas soon as the temperature hasdropped down to the correct levelagain.
Switching the temperature alarm offearly and checking the warmest tem-perature
If the alarm disturbs you, you canswitch it off early. You can also find outwhat the warmest temperature was inthe freezer section.
Touch .
The fault message is confirmed and thealarm will stop. The start screen ap-pears in the display: the warmest tem-perature recorded in the freezer sectionso far will flash in the temperature dis-play for approx. 1 minute. The temper-ature display will then change to showthe current temperature in the freezersection.
You can exit from the flashing temperat-ure display early:
Touch the temperature display for thefreezer section.
The flashing warmest temperature dis-play will go out. The display will then re-vert to showing the current temperaturein the freezer section.

Temperature and door alarm
32
Door alarmThe appliance has a warning system toavoid increased energy consumption ifa door is left open, and to protect frozenfood from warm air.
If a door is left open for a longer periodof time will light up yellow in thetemperature display and an alarm willsound four times. If the cause of thealarm is not rectified or if the alarm hasnot been switched off early, the alarmwill sound again approx. every3 minutes.
The period of time before the dooralarm sounds depends on the settingselected (default setting = 2 minutes).The door alarm can also be switchedoff (see "Selecting further settings -Setting the volume / switching offalarms and audible tones").
The alarm will stop and will go outas soon as the door is closed.
The door alarm is only displayed in thestart screen and not during setting.
If an alarm does not sound, eventhough the door alarm has beentriggered, the alarm has beenswitched off in Settings mode (see"Selecting further settings - Settingthe volume / switching off alarms").
Switching the door alarm off early
If the noise disturbs you, you canswitch the alarm off if you wish.
Touch .
The current temperature is shown in thetemperature display. The alarm willstop.

Selecting further settings
33
Settings overviewThe following settings can be activated or changed. Default settings are shown inbold or as marked in the segment bar.
Setting Selection / Factory defaultsetting
Switch Party mode on/off On (symbol orange) / Off
Switch Holiday mode on/off On (symbol orange) / Off
Use minute minder(QuickCool Timer)
0:00 - 9:59 h:min
/ Activate / deactivate the safetylock
On / Off
Switch appliance off OK
Switch Sabbath mode on/off On (symbol orange) / Off
Change the duration before thedoor alarm sounds
Level 1 - 7 (Level 1 = 30 sec.) (Level 4 = 2 min.)
/ Switch sensor tone on/off On / Off
/ Set volume / switch off alarmsand audible tones
Off - Level 7
Set display brightness Level 1 - 7
°C Change the temperature unit °C / °F
Demo mode (only visible whenswitched on)
Off
Reset default settings
Access information about yourappliance
Display (important when re-porting a fault to Miele Service)
Replace charcoal filter re-minder
On (symbol orange) / Off

Selecting further settings
34
Selecting further settingsIn Settings mode certain settingscan be adjusted and functions selected,allowing you to adjust the appliance tosuit your requirements.
See the following pages for more in-formation on these settings.
When you are in Settings mode thedoor alarm or other alarms are auto-matically supressed: the alarm sym-bols will not appear in the display andthe alarm will not sound. Exception: inthe event of an appliance fault (F+number) Settings mode will close im-mediately. The fault code will appearin the display and an alarm will sound(see "Problem solving guide - Displaywarnings").
Selecting the setting you want
°C
5
-18
°C
Start screen
Touch .
Settings mode
Scroll left or right using the or arrow sensors.
The symbol for the selectable settingappears in the middle of the display.
The symbols for the next available set-tings appear in the background to theright and left, but are not selectable.
Touch the symbol for the setting youwant (see "Settings overview").
Depending on the setting selected thereare two options:
1. You go into a sub-menu with furtheroptions or where values can beentered.
2. You select the setting directly. Thesymbol turns orange and this con-firms your selection. If the symbol iswhite, the function has not been ac-tivated.

Selecting further settings
35
Entering values
All values entered must be confirmedwith OK. If the value is not confirmedthe display will revert to the start screenafter approx. 15 seconds and theentered or altered values will not be ad-opted.
Exiting a menu ("Back" )
You can return to the previous screenby touching .
Entries made before this which have notbeen confirmed with OK will not besaved.
Explanation of the differentSettings
Switching Party mode on or off
This function is particularly useful if youneed to cool or freeze large quantitiesof food and drink quickly and make icecubes, for example, if you are expectinga large number of guests.
Super cool, DynaCool and Super freezeare switched on automatically:The refrigerator section as well as thefreezer section cool down very rapidlyto their lowest temperature (dependingon the ambient room temperature).
Tip: Switch the function on approx.4 hours before placing food in the appli-ance.
If Party mode cannot be switched on,the refrigerator section has beenswitched off separately or Holidaymode is switched on.
Party mode will switch off automaticallyafter approx. 20 hours. You can switchit off earlier at any time.
If previously switched on, Party modewill switch off if there is an interruptionto the power supply.

Selecting further settings
36
Switch Holiday mode on/off
This function is useful when going onholiday if you do not wish to switch therefrigerator section off completely anddo not need a high degree of cooling.
The freezer section remains switchedon at -18 °C. The refrigerator section isregulated at a temperature of 15 °C, re-maining in operation whilst also savingenergy.
Do not store any temperature-sensitive food which goes off easilysuch as fruit, vegetables, fish, meatand dairy products during this time.
Food which does not go off quickly canbe stored in the appliance for sometime at this moderate refrigerator sec-tion temperature and the energy con-sumption is lower than in normal opera-tion. This also prevents the build-up ofodours and mould which can occur ifthe refrigerator section is switched offand the door is closed.
When Holiday mode is switched on, it isdisplayed in the start screen:
°C
-18
Holiday mode start screen
If Holiday mode cannot be switchedon, the refrigerator section has beenswitched off separately.
If Party mode, Super cool or DynaCoolare switched on, these will beswitched off when Holiday mode isselected.

Selecting further settings
37
Using the minute minder (Quick-Cool timer)
The minute minder can be used to mon-itor separate processes, e.g. chillingdough. The audible tone will sound atthe set time.
A maximum minute minder duration of9 hours and 59 minutes can be set.
Setting the minute minder
Touch .
Use or to set the hours.
Confirm with OK.
The set hours will be adopted. You cannow set the minutes.
Use or to set the minutes.
Confirm with OK.
The set minutes will be adopted. Theminute minder duration begins to countdown. If the appliance door is openedagain, the minute minder time will ap-pear counting down in the display. Afterapprox. 3 seconds the display changesto the start screen.
If the minute minder duration is dis-played or altered, the minute minderduration counting down is halted.
In the case of an interruption to thepower supply or when power is re-stored, any previously set minuteminder duration is deleted.
– When the minute minder durationhas elapsed
An audible tone can be heard and will flash.
Touch the display.
The start screen appears.
– Altering a minute minder entry
Open the appliance door.
and the minute minder durationcounting down appear for approx.3 seconds in the display.
During this time touch the minuteminder duration counting down in thedisplay.
Touch to alter the minute minderduration set. Proceed exactly as forsetting the minute minder duration(see "Setting the minute minder").
– Cancelling a minute minder dura-tion
Open the appliance door.
and the minute minder durationcounting down appear for approx.3 seconds in the display.
During this time touch the minuteminder duration counting down in thedisplay.
Touch to cancel a minute minderduration
The start screen appears in the display.
You can also alter or cancel a setminute minder duration in Settingsmode.

Selecting further settings
38
Activating or deactivating thesafety lock
The safety lock can be activated to pre-vent:
– the appliance being switched off bymistake,
– the temperature being changed bymistake,
– the DynaCool, Super cool and Superfreeze functions being selected bymistake,
– settings being adjusted by mistake (itis only possible to deactivate thelock).
This prevents the appliance beingswitched off or settings adjustedwithout your knowledge, by children, forexample.
The safety lock will remain activatedfollowing an interruption to the powersupply, if previously switched on.
– Deactivating the safety lock tem-porarily
Touch the display.
appears.
Touch for approx. 6 seconds.
You can now select further settings(temperature, additional functions, etc.).When the appliance door is closedagain the safety lock is switched backon.
– Deactivating the safety lock
Touch the display.
appears.
Touch for approx. 6 seconds.
The start screen will appear.
Touch .
Select .
lights up orange.
Touch .
appears in the display. The safetylock is deactivated.
Switching the appliance off
The whole appliance can be switchedoff with this function.
The temperature display goes outand lights up.
The refrigerator section interior lightingwill go out and the cooling process willbe switched off.
will go out after approx. 10 minutesand the display is dark (Energy-savingmode).

Selecting further settings
39
Switching Sabbath mode on/off
The appliance offers a Sabbath pro-gramme for the purposes of religiousobservance.
The following are switched off:
– the interior lighting when the door isopened,
– all audible and visual signals,
– the temperature display,
– the DynaCool, Super cool, Superfreeze, Party mode or Holiday modefunctions (if previously selected),
– the minute minder (if previouslyswitched on).
Furthermore you cannot select any set-tings in Settings mode .
The Sabbath mode function will switchitself off automatically after approx.120 hours.
Ensure that the doors are properlyclosed, as visual and audible alarmsare switched off.
Any interruption to the power supplyduring this time is not shown in thedisplay. After an interruption to thepower supply, the appliance will re-start in Sabbath mode, if it was previ-ously switched on.
– Switching on Sabbath mode
Touch .
lights up orange.
Then lights up white in the display.
Sabbath mode display
will go out after approx. 3 secondsand the display will go dark.
– Switching off Sabbath mode early
Touch the display.
will appear.
Touch .
lights up orange.
Touch .
lights up white. The function isswitched off.

Selecting further settings
40
Setting the duration before the dooralarm sounds
The appliance has a door alarm. If adoor is open for a longer period of timean alarm will sound (if this has not beenswitched off; see "Setting the volume /Switching off alarms and audibletones") and will light up in the dis-play (see "Temperature and door alarm- Door alarm").
You can set the duration before thedoor alarm sounds with the seg-ment bar: The duration can be set in 30 secondincrements, starting with 30 seconds(Level 1 = 1 filled-in segment) to a max-imum of 3 minutes 30 seconds (Level 7= 7 filled-in segments).
Switching the sensor tone on /off
Every time a selectable field is toucheda sensor tone sounds. You can switchthis on or off .
Setting the volume / Switching offalarms and audible tones
You can set the volume of the alarmand audible tones in the segment bar:If all segments are filled in, the max-imum volume is set. If no segments are filled in, the alarmand audible tones are switched off. will appear.
You will hear the volume change as it isadjusted.
Alarms and audible tones for temper-ature alarms, fault messages, interrup-tions to the power supply or a setminute minder cannot be switched off.
Selecting further settings
41
Setting the display brightness
You can set the display brightness inthe segment bar:If all segments are filled in, the max-imum brightness is selected.
You will see the brightness change as itis being adjusted.
Setting the temperature unit °C/°F
You can choose between degreesCelsius °C and degrees Fahrenheit °Ffor the temperature display.
Switching off Demo mode
Demo mode allows the appliance tobe presented in the showroom withoutthe cooling system being switched on.Do not activate this setting for do-mestic use!
If Demo mode has been switched on asa default setting, will show in the dis-play. The function can be switched offhere.
If Demo mode has been switched off itcannot be switched on again via Set-tings mode .
Resetting to the factory default set-tings
All appliance settings are reset to thefactory default and the appliance isswitched off.
Accessing Information
Appliance data (model number andserial number) is shown in the display.
Tip: This data is important when report-ing an appliance fault to Miele Service.
Confirm with OK to leave the informa-tion screen.
– Displaying licence agreements
Licences used can be displayed via ©.

Selecting further settings
42
Replace charcoal filter reminder
This appliance is not supplied withcharcoal filters with a KKF-FF (ActiveAirClean) holder. These are availableas optional accessories (see "Ac-cessories - Optional accessories").
If the Replace charcoal filter reminder isactivated, you will be reminded to re-place the filters after approx. 6 months(see "Cleaning and Care - Replacing thecharcoal filters"). will then appear in the start screen inthe refrigerator section temperature dis-play and an audible tone will sound (ifswitched on).
Touch the symbol to confirm the mes-sage. This resets the counter and thedisplay changes back to the startscreen.
Storing food in the refrigerator section
43
Danger of explosion.Do not store explosive materials inthe appliance or any products con-taining propellants (e.g. spray cans).
If storing food which contains alot of fat or oil in the appliance or theappliance door, make sure that itdoes not come into contact withplastic components as this couldcause stress cracks or break theplastic.
Different storage zonesDue to natural air circulation there aredifferent temperature zones in the refri-gerator section.
Cold, heavy air sinks to the lowest sec-tion of the appliance. Make use of thedifferent temperature zones when pla-cing food in the appliance.
To allow air to circulate efficiently, donot pack food too closely together inthe refrigerator.
Do not cover the fan in the rear wall ofthe refrigerator, as this is essential forkeeping the appliance cool.
Food must not touch the back of therefrigerator section as it may freeze tothe back wall.
This appliance has Dynamic cooling,which helps to keep an even temper-ature when the fan is running, makingthe difference between the variouszones less pronounced.
Warmest area
The warmest area in the refrigeratorsection is at the top in the front areaand in the door. Use this for storing but-ter and cheese.
Coldest area
The coldest area is directly above thefruit and vegetable drawer(s) and at theback of the appliance.
Use this for all delicate and highly per-ishable food, e.g.
– fish, meat, poultry,
– sausage products, ready meals,
– dishes or baked goods containingeggs or cream,
– fresh dough, cake mixtures, pizza orquiche dough,
– soft cheese and other dairy products,
– pre-packed vegetables and otherfresh food with a label stating itshould be kept at a temperature ofapprox. 4 °C.

Storing food in the refrigerator section
44
Food which is not suitable forstorage in the refrigerator sec-tionNot all food is suitable for refrigerationat temperatures below 5°C as somefood is sensitive to cold. The appear-ance, consistency, taste and / or the vit-amin content of certain types of foodcan be adversely affected by beingstored in too cold a place.
Food which does not tolerate cold tem-peratures includes:
– Pineapples, avocados, bananas,pomegranates, mangoes, melons,papayas, passion fruit, citrus fruits(such as lemons, oranges, mandar-ins, grapefruit),
– Fruit which is not yet ripe
– Aubergines/eggplant, cucumbers,potatoes, peppers/capsicum, toma-toes, courgettes/zucchini,
– Some hard cheeses, e.g. Parmesan.
When shopping for foodThe freshness of food when first placedin the appliance is the most importantfactor in determining how long it staysfresh, and how long it can be kept in theappliance.Always observe the use-by date andthe recommended storage temperature.Time out of the refrigerator should bekept to a minimum, for example, whentransporting food in a hot car.
Tip: Take a cool bag with you whenshopping and on return place food intothe appliance immediately.
Storing food correctlyFood should generally be storedcovered or packaged in the refriger-ator section. This will prevent foodsmells from affecting other food, foodfrom drying out, and also any cross-contamination of bacteria. This is espe-cially important for storing protein-based food such as meat or fish.The growth of bacteria, such as sal-monella, can be avoided by setting thecorrect temperature and maintaininggood standards of hygiene.
Fruit and vegetables
Fruit and vegetables can be storedloose in the fruit and vegetabledrawer(s).
Protein rich food
Please note that food rich in protein de-teriorates faster than other types offood. Shellfish, for example, deterior-ates faster than fish, and fish deterior-ates faster than meat.
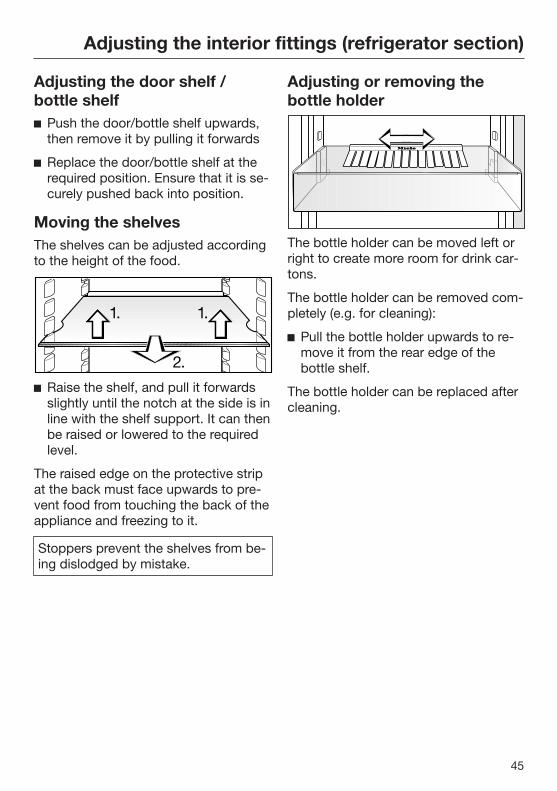
Adjusting the interior fittings (refrigerator section)
45
Adjusting the door shelf /bottle shelf Push the door/bottle shelf upwards,
then remove it by pulling it forwards
Replace the door/bottle shelf at therequired position. Ensure that it is se-curely pushed back into position.
Moving the shelvesThe shelves can be adjusted accordingto the height of the food.
Raise the shelf, and pull it forwardsslightly until the notch at the side is inline with the shelf support. It can thenbe raised or lowered to the requiredlevel.
The raised edge on the protective stripat the back must face upwards to pre-vent food from touching the back of theappliance and freezing to it.
Stoppers prevent the shelves from be-ing dislodged by mistake.
Adjusting or removing thebottle holder
The bottle holder can be moved left orright to create more room for drink car-tons.
The bottle holder can be removed com-pletely (e.g. for cleaning):
Pull the bottle holder upwards to re-move it from the rear edge of thebottle shelf.
The bottle holder can be replaced aftercleaning.

Adjusting the interior fittings (refrigerator section)
46
Adjusting the bottle rack
The bottle rack is available as an op-tional accessory (see "Accessories -optional accessories").
The bottle rack can be placed at differ-ent positions in the appliance.
Raise the bottle rack slightly at thefront, and pull it forwards a little untilthe notch at the side is in line with theshelf support. It can then be raised orlowered to the required level.
The rear rail must face upwards to pre-vent bottles from touching the back ofthe appliance.
Stoppers prevent the bottle rack frombeing dislodged by mistake.
Moving the charcoal filters
Charcoal filters and a KKF-FF (ActiveAirClean) holder are available as op-tional accessories (see "Accessories -optional accessories").
With very strong smelling food (e.g. veryripe cheese):
– Place the holder with the charcoal fil-ters on the shelf where this food iskept.
– Change the charcoal filters earlier ifnecessary.
– Use more charcoal filters (with hold-ers) in the appliance (see "Accessor-ies - Optional accessories").
The holder for the charcoal filters sitson the protective strip at the back of theshelf.
To move the charcoal filters, pull theholder upwards to remove it from theprotective strip.
Refit it on the protective strip of theshelf you wish to use it on.

Freezing and storing food
47
Maximum freezing capacityTo ensure that fresh food placed in thefreezer freezes through to the core asquickly as possible, the maximumfreezing capacity must not be ex-ceeded. The maximum freezing capa-city for freezing within a 24-hour periodis given on the data plate: "Freezing ca-pacity ....kg/24 hrs".
The maximum freezing capacity givenon the data plate has been calculatedaccording to DIN EN ISO 15502 Stand-ard.
Freezing fresh foodFresh food should be frozen as quicklyas possible. This way the nutritionalvalue of the food, its vitamin content,appearance and taste are not impaired.
Food which takes a long time to freezewill lose more water from its cells,which then shrink. During the defrostingprocess, only some of this water is re-absorbed by the cells; the rest collectsaround the food.
If food is frozen quickly, the cells haveless time to lose moisture, so theyshrink less. As there is not so muchmoisture loss, it is easier for the food toreabsorb it during the defrosting pro-cess, and very little water collectsaround the defrosted food.
Storing frozen foodWhen buying frozen food to store inyour freezer, check
– that the packaging is not damaged,
– the use-by date,
– the temperature at which the frozenfood is being stored in the shop. Thelength of time it can be kept is re-duced if it has been stored at a tem-perature warmer than -18 °C.
Buy frozen food once you have fin-ished the rest of your shopping, andwrap it in newspaper or use a coolbag or cool box to transport it.
Store it in the freezer section as soonas possible.
Never re-freeze partially or fully de-frosted food. Consume defrostedfood as soon as possible as it willlose its nutritional value and spoil ifleft for too long. Defrosted food mayonly be re-frozen after it has beencooked.

Freezing and storing food
48
Home freezing
Only freeze fresh food which is in agood condition.
Hints on home freezing
– The following types of food are suit-able for freezing:Fresh meat, poultry, game, fish, ve-getables, herbs, fresh fruit, dairyproducts, cakes, leftovers, egg yolks,egg whites and a range of pre-cooked meals.
– The following types of food are notsuitable for freezing:Grapes, lettuce, radishes, sourcream, mayonnaise, eggs in theirshells, onions, whole raw apples andpears.
– To retain colour, taste, aroma and vit-amin C, vegetables should beblanched after they have beentrimmed and washed. To blanch:bring a large saucepan of water tothe boil, immerse the vegetables inthe fast boiling water for 2 - 3 minutes, depending on variety. Re-move, and plunge into ice-cold waterto cool quickly. Drain and pack readyfor freezing.
– Lean meat freezes better than fattymeat, and can be stored for consid-erably longer.
– To prevent chops, steaks, cutlets orrolled meat from freezing together insolid blocks when packed, separatewith a sheet of plastic freezer film.
– Do not season fresh foods orblanched vegetables before freezing.Only season cooked food lightly be-
fore freezing, but care should betaken as the taste of some spices al-ters when frozen.
– Placing hot foods or drinks in thefreezer causes food that is alreadyfrozen to partially thaw and increasesenergy consumption. Allow hot foodsand drinks to cool down before pla-cing them in the freezer.
Packaging
Freeze food in portions.
Suitable packing material
– plastic freezer film
– freezer bags
– aluminium foil
– freezer containers
Unsuitable packing material
– wrapping paper
– grease-proof paper
– cellophane
– bin bags
– plastic carrier bags
Expel as much air as possible fromthe packaging.
Close the packaging tightly with
– rubber bands
– plastic clips
– string or bag ties
– freezer tape.
Tip: Freezer bags may also be sealedusing home heat sealing kits.

Freezing and storing food
49
Make a note of the contents and thedate of freezing on the packaging.
Before placing food in the freezersection
When freezing more than 2 kg offresh food, switch on the Superfreeze function for some time beforeplacing the food in the freezer (see"Using Super cool and Super freeze -Super freeze function").
This helps food which is already storedin the freezer to stay frozen.
Placing food in the freezer section
The following maximum loadingweights must not be exceeded: – freezer drawer = 25 kg– glass cold plate = 35 kg
Unfrozen food should not touchfrozen food as this will cause frozenfood to begin to thaw.
Make sure that the packaging andcontainers are dry to prevent themsticking together when frozen.
- Freezing small amounts of food
Place the food in the upper freezerdrawers.
Place the food flat in the bottom ofthe freezer drawer so that it freezesthrough to the core as quickly as pos-sible.
- Freezing the maximum amount (seedata plate)
Ensure ventilation slots at the backof the freezer section are always freefrom obstruction.If the ventilation slots are blocked thecooling performance will decreaseand energy consumption will in-crease.Place food on the glass plate in sucha way that the ventilation slots arenot blocked.
Please note that when removing thedrawers, the lowest freezer drawermust always remain in the freezer.
Remove the upper freezer drawers.
Place the food flat on the upper glasscold plates so that it freezes throughto the core as quickly as possible.
Once frozen:
Place the frozen food in the freezerdrawer and push it back in.
Freezing and storing food
50
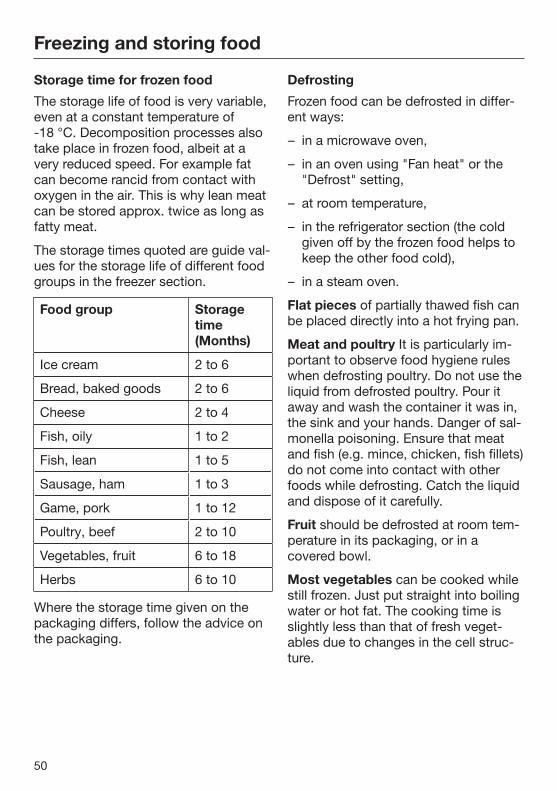
Storage time for frozen food
The storage life of food is very variable,even at a constant temperature of-18 °C. Decomposition processes alsotake place in frozen food, albeit at avery reduced speed. For example fatcan become rancid from contact withoxygen in the air. This is why lean meatcan be stored approx. twice as long asfatty meat.
The storage times quoted are guide val-ues for the storage life of different foodgroups in the freezer section.
Food group Storagetime(Months)
Ice cream 2 to 6
Bread, baked goods 2 to 6
Cheese 2 to 4
Fish, oily 1 to 2
Fish, lean 1 to 5
Sausage, ham 1 to 3
Game, pork 1 to 12
Poultry, beef 2 to 10
Vegetables, fruit 6 to 18
Herbs 6 to 10
Where the storage time given on thepackaging differs, follow the advice onthe packaging.
Defrosting
Frozen food can be defrosted in differ-ent ways:
– in a microwave oven,
– in an oven using "Fan heat" or the"Defrost" setting,
– at room temperature,
– in the refrigerator section (the coldgiven off by the frozen food helps tokeep the other food cold),
– in a steam oven.
Flat pieces of partially thawed fish canbe placed directly into a hot frying pan.
Meat and poultry It is particularly im-portant to observe food hygiene ruleswhen defrosting poultry. Do not use theliquid from defrosted poultry. Pour itaway and wash the container it was in,the sink and your hands. Danger of sal-monella poisoning. Ensure that meatand fish (e.g. mince, chicken, fish fillets)do not come into contact with otherfoods while defrosting. Catch the liquidand dispose of it carefully.
Fruit should be defrosted at room tem-perature in its packaging, or in acovered bowl.
Most vegetables can be cooked whilestill frozen. Just put straight into boilingwater or hot fat. The cooking time isslightly less than that of fresh veget-ables due to changes in the cell struc-ture.

Freezing and storing food
51
Never re-freeze partially or fully de-frosted food. Consume defrostedfood as soon as possible as it willlose its nutritional value and spoil ifleft for too long. Defrosted food mayonly be re-frozen after it has beencooked.
Cooling drinks quickly
To cool drinks quickly in the refrigeratorsection, switch on the Super cool func-tion.
If you want to cool a large amount ofdrinks, or if you want to cool drinks inthe freezer section, select the Partymode function in Settings mode .
When cooling drinks quickly in thefreezer, make sure bottles are not left infor more than one hour; otherwisethey could burst.
Tip: To avoid forgetting about bottlesplaced in the freezer you can set theminute minder (QuickCool timer ) inSettings mode.
Using accessories
Ice cubes
Fill the ice cube tray three quartersfull of water and place it on the bot-tom of one of the freezer drawers.
Once frozen, use a blunt instrument,for example a spoon handle, to re-move the ice tray from the freezer if itis stuck.
Tip: Ice cubes can be removed easilyfrom the tray by twisting the tray gentlyor by holding it under cold running wa-ter for a short time.
Adjusting the interior fittings
Removing the drawers and glassplates from the freezer section
The drawers can be removed for filling,emptying or cleaning purposes.
You can also use the space in thefreezer section more flexibly. If you wishto freeze large items such as a turkey orgame, the glass cold plates betweenthe drawers can be removed.
Pull out the drawers as far as they willgo, and then lift them up and out.
Lift the glass plate slightly, pull it for-wards and out.

Defrosting
52
Refrigerator sectionThe refrigerator section defrosts auto-matically.
Condensate and frost can build up onthe back wall of the refrigerator sectionwhilst the compressor is running. Youdo not need to remove this, as it will de-frost and evaporate automatically withthe warmth generated by the com-pressor.
The condensate is drained awaythrough a channel and drain hole, thenfed into an evaporation system at theback of the appliance.
Condensate must be able todrain away unhindered at all times.Keep the condensate channel anddrain hole clean to enable this.
Freezer sectionThe appliance is equipped with a "Frostfree" system. The freezer defrosts auto-matically.
The moisture generated in the appli-ance collects on the condenser and isautomatically defrosted and dissipatedfrom time to time.
This automatic defrosting system en-ables the freezer to remain permanentlyice-free, however, the food stored in thefreezer will not defrost.

Cleaning and care
53
Do not let water get into theelectronic unit or the lighting.
Steam from a steam cleaning ap-pliance could reach the electricalcomponents and cause a short cir-cuit.Do not use a steam cleaning appli-ance to clean the appliance.
Cleaning water must not get into thedrain hole.
The data plate located inside the ap-pliance must not be removed. It con-tains information which is required inthe event of a service call.
Cleaning agents
Cleaning and conditioning agentsused inside the appliance must befood safe.
To avoid damaging all the surfaces ofyour appliance, do not use:
– cleaning agents containing soda, am-monia, acids or chlorides
– cleaning agents containing descalingagents
– abrasive cleaning agents, e.g.powder cleaners and cream cleaners
– solvent-based cleaning agents
– stainless steel cleaning agents
– dishwasher cleaner
– oven sprays
– glass cleaning agents
– hard, abrasive sponges and brushes,e.g. pot scourers
– melamine eraser blocks
– sharp metal scrapers
We recommend using a clean sponge,lukewarm water with a little washing-upliquid to clean surfaces of the appli-ance.
The following pages contain importantinformation on cleaning.
Cleaning and care
54
Preparing the appliance forcleaning Switch the appliance off.
appears in the display and cooling isswitched off.
Disconnect it from the mains.
Take any food out of the applianceand store it in a cool place.
Remove the shelves and bottle shelffrom the door.
Take out the freezer drawers andglass plates.
Take out all other removable parts forcleaning.
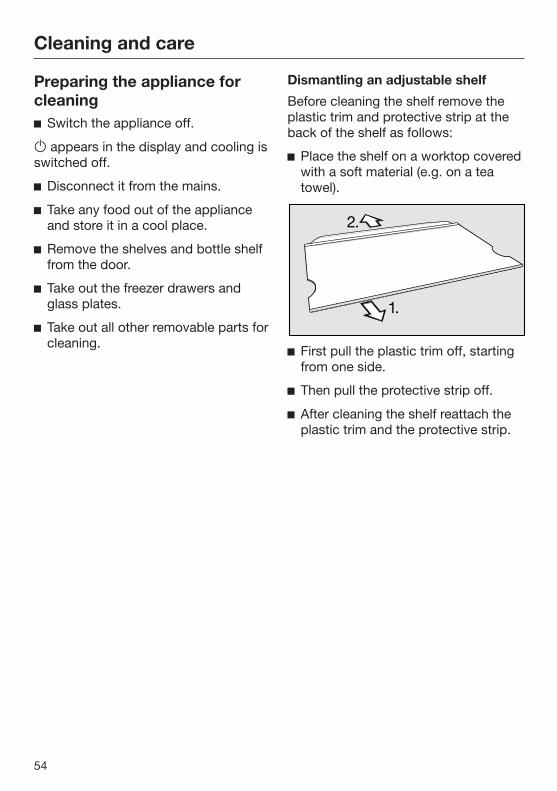
Dismantling an adjustable shelf
Before cleaning the shelf remove theplastic trim and protective strip at theback of the shelf as follows:
Place the shelf on a worktop coveredwith a soft material (e.g. on a teatowel).
First pull the plastic trim off, startingfrom one side.
Then pull the protective strip off.
After cleaning the shelf reattach theplastic trim and the protective strip.

Cleaning and care
55
Cleaning the interior and ac-cessories
Clean the appliance at least once amonth.
Remove soiling immediately to preventit from drying on.
Clean the interior with a cleansponge, lukewarm water and a littlewashing-up liquid.
After cleaning, wipe with clean waterand dry with a soft cloth.
The plastic trim on the bottle anddoor shelves and on the adjustableshelves is not suitable for cleaning ina dishwasher.Remove the trim before cleaning thedoor shelves and adjustable shelvesin a dishwasher.
The following parts cannot be cleanedin a dishwasher:
– the plastic trim
– all drawers and the compartment lid(depending on model)
– the bottle rack
These accessories should all be handwashed.

Cleaning and care
56
The following parts are suitable forcleaning in a dishwasher:
The maximum temperature of thedishwashing programme selectedmust not exceed 55 °C.
Contact with natural dyes e.g. fromcarrots, tomatoes and ketchup maydiscolour the plastic parts in thedishwasher. This discolouration doesnot affect the stability of the parts.
– the bottle holder, ice cube tray(depending on model)
– the shelves and bottle shelf in thedoor (with plastic trim removed)
– the adjustable shelves (with the trim/strips removed and without the print-ing)
Clean the condensate channel anddrain hole frequently so that con-densate can drain away unhindered.Use a straw or similar to clear thedrain if necessary.
Leave the doors open to air the appli-ance for a short while and to preventodours building up.
Cleaning appliance doors andside panels
If soiling is left on for any length oftime, it may become impossible toremove.Surfaces may suffer discolouration ordamage.Therefore it is best to remove soilingfrom appliance doors and side pan-els immediately.
All surfaces are susceptible toscratching. Contact with unsuitablecleaning agents can alter or discol-our the surfaces.See "Cleaning agents" at the begin-ning of this section.
The surfaces should be cleaned usinga solution of hot water and a littlewashing-up liquid applied with a softsponge. They can also be cleanedwith a damp microfibre cloth (withoutusing any cleaning agent).
After cleaning, wipe with clean waterand dry with a soft cloth.
Cleaning the ventilation gaps
A build-up of dust will increase the en-ergy consumption of the appliance.
The ventilation gaps should becleaned on a regular basis with abrush or vacuum cleaner (e.g. use thedusting brush for Miele vacuumcleaners)
Cleaning and care
57
Cleaning the compressor andmetal grille at the back of theappliance
When cleaning the compressorand the grille, make sure that thepipework and other components donot get broken or damaged in anyway.
The compressor and metal grille at theback of the appliance (heat exchanger)should be dusted at least once a year. Abuild-up of dust will increase the energyconsumption of the appliance.
Cleaning the door seals
If a door seal is damaged or if ithas come out of the groove, the doorwill not close properly and coolingperformance will be reduced.Condensate will build up in the in-terior and this can cause a build-upof ice.Do not damage door seals and en-sure that they do not come out oftheir groove.
Do not use any grease or oil on doorseals as these will cause them to de-teriorate and become porous overtime.
Door seals should be cleaned regu-larly with clean water, and then wipeddry with a soft cloth.

Cleaning and care
58
After cleaning Replace all shelves and accessories
in the appliance.
Reconnect to the mains and switchthe appliance back on.
Switch on the Super freeze functionfor a while so that the freezer sectioncan cool down quickly.
Switch on the Super cool function fora while so that the refrigerator sectioncan cool down quickly.
Place food in the refrigerator sectionand close the door.
Place the freezer drawers with thefrozen food back in the freezer sec-tion and close the door.
When the temperature in the freezersection is a constant -18 °C or colderpress the Super freeze button toswitch the Super freeze function off.
Replacing the charcoal filters
Charcoal filters with a KKF-FF (ActiveAirClean) holder are available as op-tional accessories (see "Accessories -Optional accessories").
Replace the charcoal filters in theholder every 6 months.
If you would like to be reminded auto-matically every 6 months, switch on theReplace charcoal filter reminder (see"Selecting further settings - Replacecharcoal filter reminder").
Replacement KKF-RF charcoal filterscan be obtained from your Mieledealer, Miele or via the internet atwww.miele-shop.com.
Pull the charcoal filter holder upwardsto remove it from the shelf.
When in position the charcoal filtersmust not touch the back wall of theappliance as the moisture couldcause them to stick to the back wall.Insert the new charcoal filters intothe holder so that they do not pro-trude over the edge of the holder.

Cleaning and care
59
Remove both charcoal filters andplace the new filters with the raisededge pointing downwards in theholder.
Place the holder in the middle of theraised edge at the back of the shelf,so that it clicks into position.
Touch to confirm that the filtershave been replaced.
The Replace charcoal filter reminder willgo out in the display and the counterwill be reset.

Problem solving guide
60
Some minor problems can be corrected without contacting Miele.If, having followed the suggestions below, you still cannot resolve the problem,please contact Miele.
To prevent unnecessary loss of temperature it is advisable not to open the doorswhile waiting for the appliance to be serviced.
Unauthorised installation, maintenance and repairs can cause considerabledanger for the user.Installation, maintenance and repairs must only be carried out by a Miele au-thorised technician.
Problem Cause and remedy
The appliance is notgetting cold and the in-terior lighting does notcome on when the dooris opened.
The appliance has not been switched on. Switch the appliance on.
The plug is not inserted in the socket correctly. Insert the plug into the socket correctly and switch
on.Check whether the mains fuse has tripped. Therecould be a fault with the appliance, the householdelectrical wiring or another electrical appliance. Contact a qualified electrician or Miele.
The compressor runscontinuously.
This is not a fault. To save energy, the compressorruns at a lower speed, but for longer, when less cool-ing is required.
The compressor isswitching on more fre-quently and for longerperiods of time, so thetemperature in the ap-pliance is dropping.
The ventilation gaps have been covered or becometoo dusty. Do not block the ventilation gaps. Dust the ventilation gaps regularly.
The doors have been opened too frequently, or alarge amount of fresh food has been placed insideand/or frozen at the same time. Only open the doors when necessary and for as
short a time as possible.
The required temperature will re-establish itself after awhile.

Problem solving guide
61
Problem Cause and remedy
The compressor isswitching on more fre-quently and for longerperiods of time, so thetemperature in the ap-pliance is dropping.
The doors are not properly closed. A thick layer of icemay have formed in the freezer. Close the appliance doors.
The required temperature will re-establish itself after awhile.
If a thick layer of ice has formed, it will reduce effi-ciency and increase the energy consumption. Defrost the appliance and clean it.
The ambient temperature is too high. The higher theroom temperature, the longer the compressor will runfor. See "Installation - Location".
The temperature setting is too low. Adjust the temperature.
A large amount of food is being frozen at once. See "Freezing and storing food".
The Super cool function is still switched on. You can switch off the Super cool function earlier
to save energy.The Super freeze function is still switched on. You can switch off the Super freeze function earlier
to save energy.
The compressor comeson less and less oftenand for shorter periodsof time. The temperat-ure in the appliancerises.
This is not a fault. The set temperature is too high. Adjust the temperature. Check the temperature again after 24 hours.
The food begins to defrost. The room temperature is lower than the ambient tem-perature for which the appliance is designed.Operating in a room which is too cold will cause thecompressor to switch off for too long, causing thefreezer to become too warm. See "Installation - Location". Increase the temperature of the room.
The door seal is dam-aged and needs to bereplaced.
No tools are required to change the door seal. Change the door seal. These are available from
Miele.

Problem solving guide
62
Problem Cause and remedy
Ice or condensation hasbuilt up inside the appli-ance.
The door seal has come out of its groove. Check that the door seal is correctly seated in the
groove.The door seal is damaged. Check whether the door seal is damaged.

Problem solving guide
63
Display warnings
Message Cause and remedy
lights up in the dis-play, the appliance doesnot get cold, althoughthe controls and the in-terior lighting are work-ing.
Demo mode is activated. Switch off Demo mode (see "Selecting further set-
tings - Switching off Demo mode").
The display is com-pletely dark.
Energy saving mode is switched on. If the appliancehas not been operated for a while (approx.10 minutes) the display is switched off. Touch the display.
The last display will appear.Sabbath mode is switched on: the interior lighting isswitched off and the appliance is cooling down. Touch the display.
will then light up white in the display (see "Selectingfurther settings - Switching Sabbath mode on/off").
is lit up in the displayand the appliance can-not be used.
The safety lock has been activated. Deactivate the safety lock temporarily or switch it
off completely (see "Selecting settings - Activatingor deactivating the safety lock").
lights up in the refri-gerator section temper-ature display and anaudible tone sounds.
The Replace charcoal filter reminder setting hasbeen activated. This is the reminder to change theActive AirClean charcoal filters. Confirm that the filters have been replaced by
touching in the display and replace the charcoalfilters in the holder (see ("Cleaning and care - Re-placing the charcoal filters").
is lit up yellow in thetemperature display forthe refrigerator sectionand/or the freezer sec-tion and an alarm isalso sounding.
The door alarm has been activated (also see "Tem-perature and door alarm"). Touch in the display.
The alarm message is confirmed and the alarm stops. The current temperature will appear in the temperat-ure display again. Close the relevant appliance door.
The alarm will stop.
Problem solving guide
64
Message Cause and remedy
lights up red in thefreezer section temper-ature display and analarm also sounds.
The temperature alarm has been activated (see"Temperature and door alarm"). The temperature inthe freezer section has risen higher or fallen lowerthan the temperature set.This could be due to:
– the freezer door being opened too often, or beingleft open.
– a large quantity of fresh food being placed in thefreezer at once without switching on the Superfreeze function.
– an interruption to the power supply.
– a fault with the appliance.
Touch in the display.
The alarm message is confirmed: goes out andthe alarm stops.
The start screen appears in the display: the warmesttemperature recorded in the freezer section will flashfor about 1 minute in the display. Then the temperat-ure display will change to the current temperature inthe freezer section.
You can exit from the flashing temperature displayearly: Touch the temperature display for the freezer sec-
tion.
The warmest temperature display will go out. The dis-play will then revert to showing the current temperat-ure in the freezer section. Rectify the cause of the alarm. Depending on the temperature displayed, you
should check the condition of food in the freezer. Ifit has defrosted or started to defrost, check that itis still safe to use and, if so, use it as soon as pos-sible. Defrosted food may only be re-frozen after ithas been cooked.

Problem solving guide
65
Message Cause and remedy lights up red in thedisplay and an alarmalso sounds.
Indication of an interruption to the power supply:the temperature in the appliance over the last fewdays or hours has risen too high because of a powercut or interruption to the power supply. Touch in the display.
The fault message is confirmed: goes out and the alarm will stop.
The start screen appears in the display: the warmesttemperature recorded in the freezer section will flashfor about 1 minute in the display. Then the temperat-ure display will change to the current temperature inthe freezer section.
You can exit from the flashing temperature displayearly: Touch the temperature display for the freezer sec-
tion.
The warmest temperature display will go out. The dis-play will then revert to showing the current temperat-ure in the freezer section. The appliance will thenwork at the lower temperature setting. Rectify the cause of the alarm. Depending on the temperature displayed, you
should check the condition of food in the freezer. Ifit has defrosted or started to defrost, check that itis still safe to use and, if so, use it as soon as pos-sible. Defrosted food may only be re-frozen after ithas been cooked.
Problem solving guide
66
Message Cause and remedy
lights up red in thedisplay, a fault code Fwith numbers appearsand an alarm alsosounds.
There is a fault. To switch the alarm off touch in the display. Contact Miele.
To report the fault you need the fault code and alsothe model number and serial number of your appli-ance. You can access these in the display. To do this touch in the display.
The appliance data required will be shown in the dis-play.
Confirm with OK to exit the information display andthe fault code will be shown again in the display.
The appliance can be switched off directly from thefault code display. Touch .
There is an appliance fault: this display always haspriority over any settings which have just been selec-ted.An appliance fault has priority over any current doorand/or temperature alarms displayed.

Problem solving guide
67
The interior lighting is not working.
Problem Cause and remedy
The interior lighting isnot working.
The appliance has not been switched on. Switch the appliance on.
Sabbath mode is switched on: the display is darkand the appliance is cooling. Touch the display.
will then light up white in the display (see "Selectingfurther settings - Switching Sabbath mode on/off").To avoid overheating, the lighting switches itself offautomatically after approx. 15 minutes if the door isleft open. If this is not the case, then there is a fault.
Danger of electric shock.There are live electrical components under thelighting cover.The LED lighting may only be repaired or replacedby a Miele authorised service technician.
Danger of injury from LED lighting. Light in-tensity corresponds to laser beam class 1/1M.The lighting covers must not be removed or dam-aged, or be removed due to damage. This couldcause injury to your eyes.Do not look into the LED lighting (laser beam class1M) with optical instruments (e.g. magnifying glassor similar).
Contact Miele.

Problem solving guide
68
Other problems
Problem Cause and remedy
The door to the freezersection will not openbecause it has beenopened and closed toomany times in succes-sion.
This is not a fault. The suction caused by openingand closing the door is preventing the door fromopening. Wait approx. 1 minute and then try again. Itshould now open without force.
Food has frozen to-gether.
The food packaging was not dry when placed in thefreezer. Use a blunt instrument, e.g. a spoon handle or
plastic scraper, to prise it apart carefully.
The external walls ofthe appliance feelwarm.
This is not a fault. The warmth created by the evapor-ator is used to prevent condensation.
There is no audiblealarm although the doorhas been open for along time.
This is not a fault. The alarm has been switched off inSettings mode (see "Selecting further settings - Set-ting the volume - Switching off alarms and audibletones ").

Noises
69
Normal noises What causes them
Brrrrr ... A humming noise is made by the motor (compressor). Thisnoise can get louder for brief periods when the motor switcheson.
Blubb, blubb ... A gurgling noise can be heard when coolant is circulatingthrough the pipes.
Click ... Clicking sounds are made when the thermostat switches themotor on and off.
Sssrrrrr ... On multi-zone or frost-free appliances you can sometimes justhear the sound of the fan inside the appliance.
Crack ... A cracking sound can be heard when materials expand insidethe appliance.
Remember that the noise of the compressor and the coolant circulating in thesystem is unavoidable.
Noises thatyou can easilyrectify
Cause and remedy
Rattling, vibrat-ing
The appliance is uneven.
Realign the appliance using a spirit level, by raising or loweringthe screw feet underneath the appliance.
The appliance is touching another appliance or piece of fur-niture.
Move it away.
Drawers, baskets or shelves are unstable or sticking.
Check all removable items and refit them correctly.
Bottles or containers are touching each other.
Separate them.
The transport cable clips are hanging loose at the back of theappliance.
Remove the cable clips.

After Sales / Guarantee
70
After sales serviceIn the event of any faults which youcannot easily remedy, please contact
– your Miele Dealer, or
– the Miele Service Department.
See end of this booklet for contact de-tails.
When contacting your Dealer or Miele,please quote the model and serial num-ber of your appliance.
Please note that telephone calls maybe monitored and recorded for trainingpurposes.
N.B. A call-out charge will be applied toservice visits where the problem couldhave been resolved as described inthese instructions.
Displaying appliance informa-tionThis can be found in Settings mode un-der Information (see "Selecting furthersettings - Accessing information") or onthe data plate inside the appliance.
– Displaying licence agreements
Licences used can be displayed via ©.
Guarantee: U.K.In the U.K. the appliance is guaranteedfor 2 years from the date of purchase.However, you must activate your coverby calling 0330 160 6640 or registeringonline at www.miele.co.uk.
Guarantee: Other countries
For information on the appliance guar-antee specific to your country pleasecontact Miele.
See end of this booklet for contact de-tails.

Information for test institutes
71
All tests must be carried out accordingto relevant standards and directives.
In addition, the following informationprovided by the manufacturer must beobserved:
– Loading instructions,
– Information contained in the Operat-ing and installation instructions.

Electrical connection
72
The appliance is supplied with a powercable and moulded plug ready for con-nection to an AC 230 V 50 Hz supply.
The fuse rating must be at least 10 A(13 A in the UK).
This appliance must be connected to asuitable switched socket which is easilyaccessible. The electrical connectionmust comply with current local and na-tional safety regulations (BS 7671 in theUK).
The accessibility of the plug must al-ways be ensured in order to be able toquickly separate the appliance from themains.
If the mains socket is not accessibleafter the appliance has been built in, aseparator for each terminal must bepresent. There must be an all-pole con-tact gap of at least 3 mm in the switch(including switch, fuses and relays ac-cording to EN 60335).
The plug and mains connection cablemust not come into contact with theback of the appliance as vibrations cancause damage to these components.This, in turn, could result in a short cir-cuit.
Do not plug in other appliances behindthis appliance.
Do not connect the appliance to themains electricity supply by an extensionlead. Extension leads do not guaranteethe required safety of the appliance(e.g. danger of overheating).
Do not connect the appliance to an in-verter such as those used with anautonomous energy source e.g. solarpower. When switched on, peak loadsin the system can cause the safetyswitch-off mechanism to be triggered.This can damage the electronic unit. The appliance must not be used withso-called energy-saving deviceseither. These reduce the amount of en-ergy supplied to the appliance, causingit to overheat.
If the mains cable needs to be replacedthis must be done by a suitably quali-fied person.

Installation
73
Do not place any appliancewhich gives off heat, such as atoaster, mini-oven or double burnerhob, on top of this appliance There isthe danger of these catching fire.
This appliance must not be installeddirectly next to another refrigerator orfreezer. It does not have side-wallheating, so installation next to anotherrefrigerator or freezer could cause abuild-up of condensation betweenthem. Further information is availablefrom your dealer
LocationThis appliance should not be installedwhere it is exposed to direct sunlight ordirectly adjacent to a heat-producingappliance such as an oven or a radiator.The room temperature should not goabove or below the climate range forwhich the appliance is designed. Thehigher the ambient temperature of theroom, the more energy the appliancerequires to operate. The applianceshould be installed in a dry, well ventil-ated room.
When installing the appliance, pleasebe aware:
– The socket must be easily accessiblein an emergency, not concealed be-hind the appliance.
– The plug and cable must not touchthe rear of the appliance as theycould be damaged by vibrations fromthe appliance.
– Do not plug in other appliances be-hind this appliance.
In environments with high hu-midity condensation can build up onthe external appliance panels.This can lead to corrosion of thepanels.For prevention, it is advisable to in-stall the appliance with sufficientventilation in a dry and/or air condi-tioned room.Please ensure that the appliancedoors close properly, the ventilationgaps are not covered over and theappliance is installed in accordancewith these instructions.

Installation
74
Climate rangeThe appliance is designed for use withina certain climate range (ambient tem-peratures) and should not be used out-side this range. The climate range of theappliance is stated on the data plate in-side the appliance.
Climate range Ambient roomtemperature
SN +10 to +32 °C
N +16 to +32 °C
ST +16 to +38 °C
T +16 to +43 °C
Operating in a room which is too coldwill cause the compressor to switch offfor too long, causing the internal tem-perature in the appliance to rise with therisk of food deteriorating and going off.
VentilationAir at the back of the appliance getswarm.
To ensure efficient ventilation theventilation gaps must not be coveredor blocked in any way. They shouldbe dusted on a regular basis.
Fitting wall spacers supplied
The wall spacers supplied must beused in order to achieve declared en-ergy consumption values and to pre-vent the build-up of condensation athigh ambient temperatures. Appliancedepth is increased by approx. 35 mmwith the wall spacers fitted. If the wallspacers are not used the functionalityof the appliance is not affected. En-ergy consumption is only slightly in-creased with less distance betweenthe appliance and the wall.
Fit the wall spacers onto the back ofthe appliance on the top left andright.
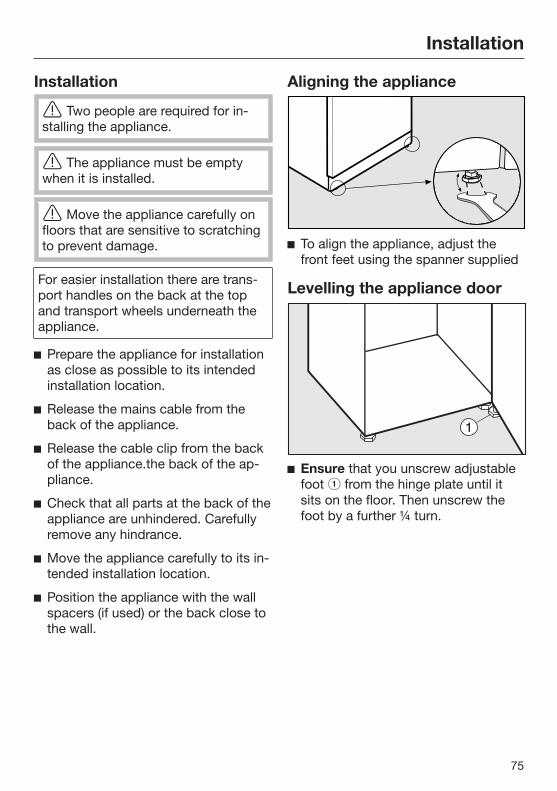
Installation
75
Installation
Two people are required for in-stalling the appliance.
The appliance must be emptywhen it is installed.
Move the appliance carefully onfloors that are sensitive to scratchingto prevent damage.
For easier installation there are trans-port handles on the back at the topand transport wheels underneath theappliance.
Prepare the appliance for installationas close as possible to its intendedinstallation location.
Release the mains cable from theback of the appliance.
Release the cable clip from the backof the appliance.the back of the ap-pliance.
Check that all parts at the back of theappliance are unhindered. Carefullyremove any hindrance.
Move the appliance carefully to its in-tended installation location.
Position the appliance with the wallspacers (if used) or the back close tothe wall.
Aligning the appliance
To align the appliance, adjust thefront feet using the spanner supplied
Levelling the appliance door
Ensure that you unscrew adjustablefoot from the hinge plate until itsits on the floor. Then unscrew thefoot by a further ¼ turn.

Installation
76
Building the appliance into akitchen run
If the ventilation gaps given arenot observed, the compressor willrun more frequently and for longerperiods.This will result in increased energyconsumption and a higher operatingtemperature for the compressor. Thismay, in turn, cause damage to thecompressor.It is essential to observe the ventila-tion gaps given.
a Top box
b Appliance
c Housing unit
d Wall
* The appliance depth is increased byapprox. 35 mm for appliances withwall spacers fitted.
The appliance can be built into a kit-chen run and installed directly next to akitchen furniture housing unit. The ap-pliance door must protrude in front offurniture fronts by at least 65 mm. Thisenables the doors to be opened andshut without being obstructed. Tomatch the height of the rest of the kit-chen, the appliance can be fitted with asuitable top box .
When installed next to a wall a dis-tance of approx. 40 mm must be main-tained on the hinge side between thewall and the appliance , so that thedoors and the handles have sufficientspace for opening.
The larger the ventilation gap, themore economically the compressorwill work.
– A ventilation gap of at least 50 mmdepth must be provided behind thewhole width of the top box for air tocirculate.
– The cross-section of the air inlet andoutlet under the ceiling must be atleast 300 cm2 to ensure that air cancirculate without obstruction.
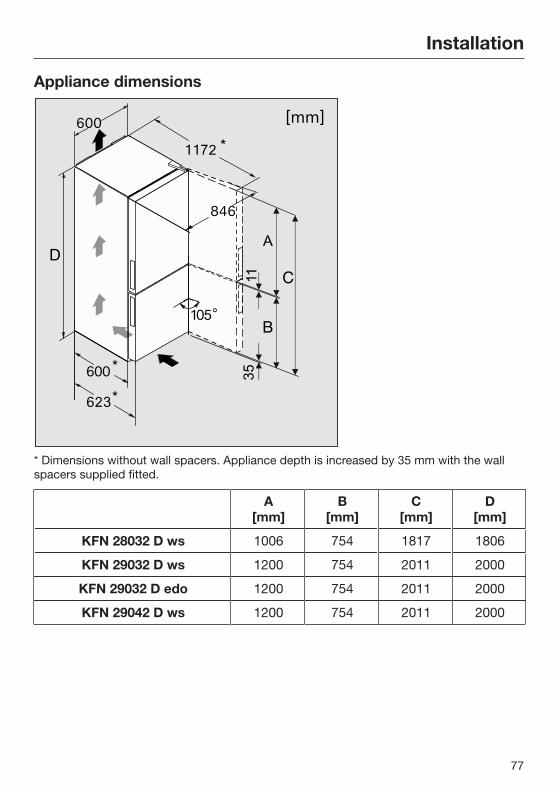
Installation
77
Appliance dimensions
* Dimensions without wall spacers. Appliance depth is increased by 35 mm with the wallspacers supplied fitted.
A[mm]
B[mm]
C[mm]
D[mm]
KFN 28032 D ws 1006 754 1817 1806
KFN 29032 D ws 1200 754 2011 2000
KFN 29032 D edo 1200 754 2011 2000
KFN 29042 D ws 1200 754 2011 2000
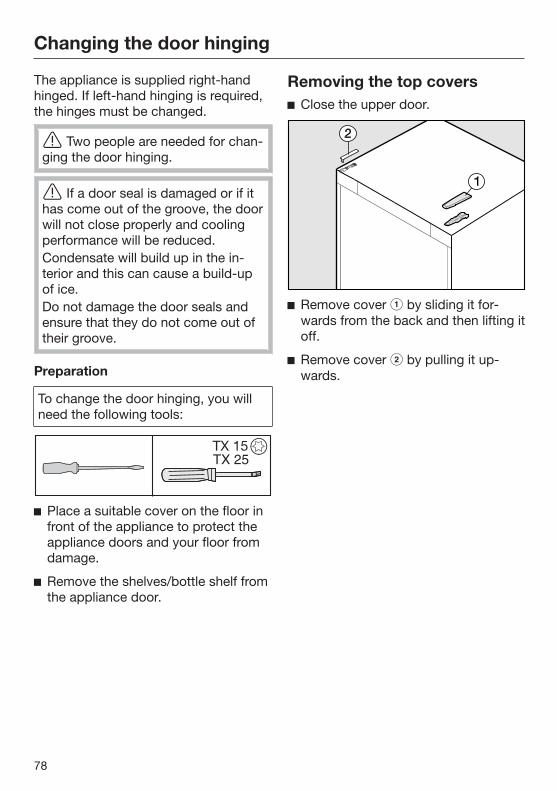
Changing the door hinging
78
The appliance is supplied right-handhinged. If left-hand hinging is required,the hinges must be changed.
Two people are needed for chan-ging the door hinging.
If a door seal is damaged or if ithas come out of the groove, the doorwill not close properly and coolingperformance will be reduced.Condensate will build up in the in-terior and this can cause a build-upof ice.Do not damage the door seals andensure that they do not come out oftheir groove.
Preparation
To change the door hinging, you willneed the following tools:
Place a suitable cover on the floor infront of the appliance to protect theappliance doors and your floor fromdamage.
Remove the shelves/bottle shelf fromthe appliance door.
Removing the top covers Close the upper door.
Remove cover by sliding it for-wards from the back and then lifting itoff.
Remove cover by pulling it up-wards.

Changing the door hinging
79
Removing the upper door
Danger of injury when removingthe upper door.The upper door is not secure assoon as the upper hinge plate is re-moved.The door must be held by a secondperson.
Loosen screws in upper hingeplate and pull it upwards and off.
Danger of injury when removingthe upper door.As soon as the hinge pin is located inthe upper door rather than in themiddle hinge plate, the lower door isnot secured and could fall off.Ensure that the hinge pin remainslocated in the middle hinge plate andin the lower door.
Lift the upper door off and place itcarefully to one side.
Removing the lower door
Danger of injury when removingthe lower door.As soon as the hinge pins are re-moved from the lower door in the fol-lowing instructions, the door is nolonger secured.The door must be held by a secondperson.
Close the lower door.
Remove hinge pin from the bear-ing bush in lower door .
Tip: Please note that the grey plasticcover on the middle hinge plate canfall off when the door is being removed.

Changing the door hinging
80
Lift lower door off and place itcarefully to one side.
Changing the lower hinge plateover
Pull hinge pin complete withwasher and adjusting foot upwards toremove.
Unscrew hinge plate .
Remove stopper from the hingeplate.
Slightly loosen screw of door clos-ing aid on hinge plate .
Turn door closing aid 90° clock-wise to the opposite locating hole inthe hinge plate.
Then tighten screw up again.
Insert stopper into the other hole.
Remove cover and refit on the op-posite side.
Secure hinge plate into position onthe opposite side with screws us-ing the two outer long slots only. Donot use centre screw . The doorcan only be aligned at a later pointusing the outer long slots holes if thecentre screw is not replaced.
Insert hinge pin complete withwasher and adjusting foot.
Important. The lug on the hinge pinmust point to the back again.

Changing the door hinging
81
Changing the middle hingeplate over
Pull off cover .
Unscrew hinge plate with the pro-tective film underneath.
Turn hinge plate through 180° andscrew it with the protective film intoposition on the opposite side.
The protective film protects the appli-ance housing from damage.
Turn grey plastic cover through180° and refit it in hinge plate .
Tip: Plastic cover fits over the pro-truding bearing bush so that this iscovered from underneath and from theside.
Turn cover through 180° and refit iton the opposite side.
Preparing the doorsTip: Spread a suitable cover over astable surface to protect the appliancedoor from damage. Place the door on itwith the outside facing down.
Carry out the following steps on bothdoors.
Changing over the bearing bushstopper
Pull the stopper out of door bearingbush and replace it on the oppos-ite side.

Changing the door hinging
82
Changing over the spring clip
Replace spring clip (keeper) on theopposite side:
Press the lug downwards and pushspring clip to the side out of theguide.
Push spring clip into the guide onthe opposite side until it clicks intoplace.
Refitting the lower door
Place door onto hinge pin fromabove.
Close appliance door .
Insert middle hinge pin throughmiddle hinge plate into the bearingbush.
Important. The lug on the hinge pinmust point backwards again and mustbe guided into the groove on the hingeplate.

Changing the door hinging
83
Refitting the upper door
Place upper door onto middlehinge pin .
Close the upper door.
Inserting the upper hinge plate
Fit hinge plate on the oppositeside and secure it with screws . Ifnecessary drill pilot holes for thescrews or use a battery operatedscrewdriver.
Replace covers and on the op-posite side.
Align the door with the appliancehousing using the long slots in thelower hinge plate. Then tighten thescrews.
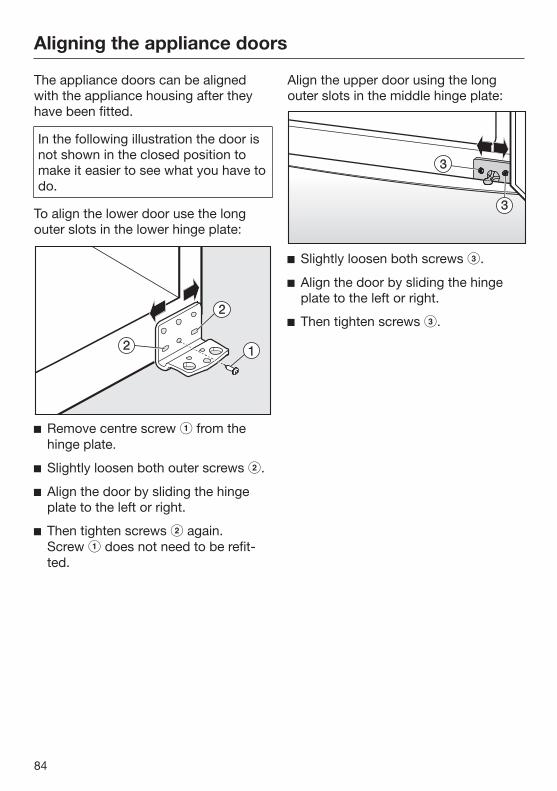
Aligning the appliance doors
84
The appliance doors can be alignedwith the appliance housing after theyhave been fitted.
In the following illustration the door isnot shown in the closed position tomake it easier to see what you have todo.
To align the lower door use the longouter slots in the lower hinge plate:
Remove centre screw from thehinge plate.
Slightly loosen both outer screws .
Align the door by sliding the hingeplate to the left or right.
Then tighten screws again.Screw does not need to be refit-ted.
Align the upper door using the longouter slots in the middle hinge plate:
Slightly loosen both screws .
Align the door by sliding the hingeplate to the left or right.
Then tighten screws .


United KingdomMiele Co. Ltd.Fairacres, Marcham RoadAbingdon, Oxon, OX14 1TWCustomer Contact Centre Tel: 0330 160 6600E-mail: [email protected]: www.miele.co.uk
AustraliaMiele Australia Pty. Ltd.ACN 005 635 398ABN 96 005 635 3981 Gilbert Park Drive, Knoxfield, VIC 3180Tel: 1300 464 353Internet: www.miele.com.au
Miele (Shanghai) Trading Ltd.1-3 Floor, No. 82 Shi Men Yi RoadJing' an District200040 Shanghai, PRCTel: +86 21 6157 3500, Fax: +86 21 6157 3511E-mail: [email protected], Internet: www.miele.cn
China
41/F - 4101, Manhattan Place23 Wang Tai RoadKowloon Bay, Hong KongTel: (852) 2610 1331, Fax: (852)2610 1013Email: [email protected]
Miele (Hong Kong) Limited
Miele India Pvt. Ltd.Ground Floor, Copia Corporate SuitesPlot No. 9, JasolaNew Delhi - 110025Tel: 011-46 900 000, Fax: 011-46 900 001E-mail: [email protected], Internet: www.miele.in
India
Miele Ireland Ltd.2024 Bianconi AvenueCitywest Business Campus, Dublin 24Tel: (01) 461 07 10, Fax: (01) 461 07 97E-Mail: [email protected], Internet: www.miele.ie
Ireland
MalaysiaMiele Sdn BhdSuite 12-2, Level 12Menara Sapura Kencana PetroleumSolaris Dutamas No. 1, Jalan Dutamas 150480 Kuala Lumpur, MalaysiaPhone: +603-6209-0288Fax: +603-6205-3768
Miele New Zealand LimitedIRD 98 463 631Level 2, 10 College HillFreemans Bay, Auckland 1011, NZTel: 0800 464 353Internet: www.miele.co.nz
New Zealand
Miele Pte. Ltd.163 Penang Road# 04 - 03 Winsland House IISingapore 238463Tel: +65 6735 1191, Fax: +65 6735 1161E-Mail: [email protected]: www.miele.sg
Singapore
Miele (Pty) Ltd63 Peter Place, Bryanston 2194P.O. Box 69434, Bryanston 2021Tel: (011) 875 9000, Fax: (011) 875 9035E-mail: [email protected]: www.miele.co.za
South Africa
Miele Appliances Ltd.P.O. Box 11 47 82Gold & Diamond Park, Sheikh Zayed RoadBuilding 6 / Offices Nos. 6-214 to 6-220DubaiTel: +971-4-341 84 44Fax: +971-4-341 88 52E-Mail: [email protected]: www.miele.ae
United Arab Emirates
Carl-Miele-Straße 29, 33332 Gütersloh, GermanyManufacturer: Miele & Cie. KG

M.-Nr. 10 360 590 / 00en-GB
KFN 28032 D ws, KFN 29042 D ws, KFN 29032 D ws, KFN 29032 Dedo