open enrollment user guide - adam · email open enrollment messages ... the open enrollment user...
TRANSCRIPT
July 2013
Open Enrollment
User Guide
Enrollment
Page | 2 OE UG | July 29, 2013
© 2013 Ebix, Inc.
Table of Contents
Introduction
Overview .................................................................................................................................... 4
Getting Started........................................................................................................................... 5
Passive Open Enrollment
Passive Open Enrollment .......................................................................................................... 7
Making Changes to Benefits during Passive Enrollment .......................................................... 8
Enrollment Wizard ..................................................................................................................... 8
Positive Open Enrollment
Positive Open Enrollment ........................................................................................................ 13
Enrollment Wizard ................................................................................................................... 13
Email Open Enrollment Messages
Email Open Enrollment Messages .......................................................................................... 26
Creating Email Messages ........................................................................................................ 26
View Enrollment Emails ........................................................................................................... 28
Understanding & Navigating the Enrollment Message Report ................................................ 31
Enrollment Message Report – Excel example ........................................................................ 32
Print Confirmations
Print Confirmations .................................................................................................................. 34

Enrollment Page | 3
© 2013 Ebix, Inc.
Introduction

Page | 4 OE UG | July 29, 2013
© 2013 Ebix, Inc.
Overview Welcome to Enrollment, a complete system to manage and streamline benefit enrollments in an electronic and paperless process. The Open Enrollment User Guide is intended to provide tools for an effective and efficient open enrollment. Some or all of these features are available based on the company’s setup.
Passive open enrollment does not require employees to log into the company’s Benergy portal. All of the employee’s benefits from the previous year are carried over. The employee only needs to log into the system to make changes.
Positive or active open enrollment requires the employee to log into the company’s Benergy portal to elect or waive benefits for the upcoming year.
Email Open Enrollment Messages is designed to distribute customized emails, announcements, and reminders to employees regarding Open Enrollment (OE), Life Events, and Year Round Enrollment.
Print Confirmations functionality generates confirmation statements for all employees who are either marked as “Active” or “Retired” and have at least one benefit that falls between the plan start and end dates. Confirmation statements are usually distributed prior to open enrollment so that employees have a record of their current elections. These statements can also be provided once open enrollment has closed to confirm elections, reiterate payroll deductions, and offer any last minute changes.
Enrollment Page | 5
© 2013 Ebix, Inc.
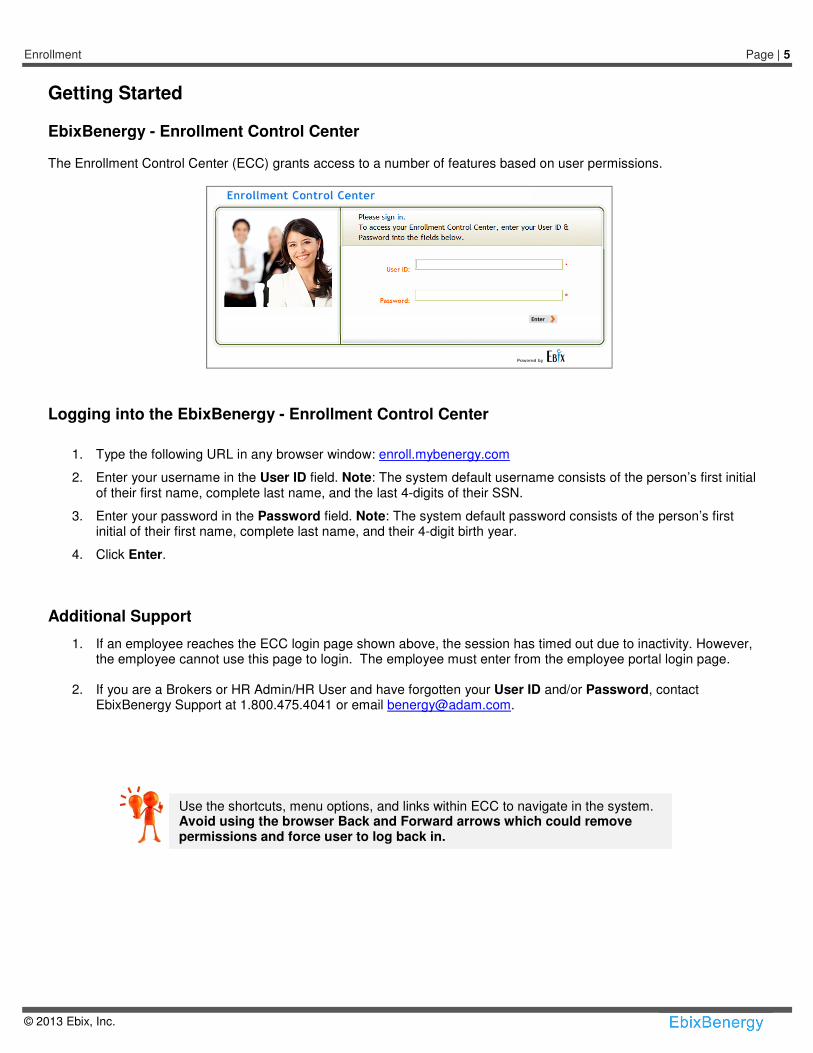
Getting Started EbixBenergy - Enrollment Control Center The Enrollment Control Center (ECC) grants access to a number of features based on user permissions.
Logging into the EbixBenergy - Enrollment Control Center
1. Type the following URL in any browser window: enroll.mybenergy.com
2. Enter your username in the User ID field. Note: The system default username consists of the person’s first initial of their first name, complete last name, and the last 4-digits of their SSN.
3. Enter your password in the Password field. Note: The system default password consists of the person’s first initial of their first name, complete last name, and their 4-digit birth year.
4. Click Enter.
Additional Support
1. If an employee reaches the ECC login page shown above, the session has timed out due to inactivity. However, the employee cannot use this page to login. The employee must enter from the employee portal login page.
2. If you are a Brokers or HR Admin/HR User and have forgotten your User ID and/or Password, contact EbixBenergy Support at 1.800.475.4041 or email [email protected].
Use the shortcuts, menu options, and links within ECC to navigate in the system. Avoid using the browser Back and Forward arrows which could remove permissions and force user to log back in.
Page | 6 OE UG | July 29, 2013
© 2013 Ebix, Inc.
Passive Open Enrollment
Enrollment Page | 7
© 2013 Ebix, Inc.
Passive Open Enrollment
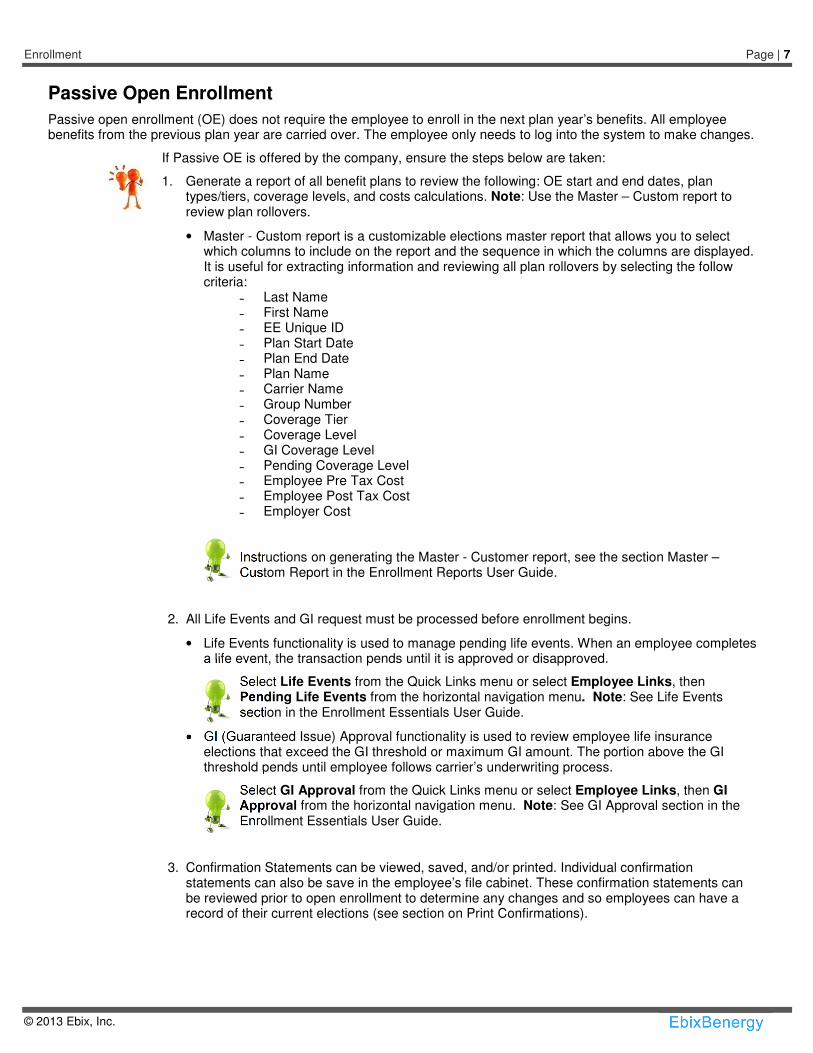
Passive open enrollment (OE) does not require the employee to enroll in the next plan year’s benefits. All employee benefits from the previous plan year are carried over. The employee only needs to log into the system to make changes.
If Passive OE is offered by the company, ensure the steps below are taken:
1. Generate a report of all benefit plans to review the following: OE start and end dates, plan types/tiers, coverage levels, and costs calculations. Note: Use the Master – Custom report to review plan rollovers.
• Master - Custom report is a customizable elections master report that allows you to select which columns to include on the report and the sequence in which the columns are displayed. It is useful for extracting information and reviewing all plan rollovers by selecting the follow criteria:
˗ Last Name ˗ First Name ˗ EE Unique ID ˗ Plan Start Date ˗ Plan End Date ˗ Plan Name ˗ Carrier Name ˗ Group Number ˗ Coverage Tier ˗ Coverage Level ˗ GI Coverage Level ˗ Pending Coverage Level ˗ Employee Pre Tax Cost ˗ Employee Post Tax Cost ˗ Employer Cost
Instructions on generating the Master - Customer report, see the section Master – Custom Report in the Enrollment Reports User Guide.
2. All Life Events and GI request must be processed before enrollment begins.
• Life Events functionality is used to manage pending life events. When an employee completes a life event, the transaction pends until it is approved or disapproved.
Select Life Events from the Quick Links menu or select Employee Links, then Pending Life Events from the horizontal navigation menu. Note: See Life Events section in the Enrollment Essentials User Guide.
• GI (Guaranteed Issue) Approval functionality is used to review employee life insurance elections that exceed the GI threshold or maximum GI amount. The portion above the GI threshold pends until employee follows carrier’s underwriting process.
Select GI Approval from the Quick Links menu or select Employee Links, then GI Approval from the horizontal navigation menu. Note: See GI Approval section in the Enrollment Essentials User Guide.
3. Confirmation Statements can be viewed, saved, and/or printed. Individual confirmation statements can also be save in the employee’s file cabinet. These confirmation statements can be reviewed prior to open enrollment to determine any changes and so employees can have a record of their current elections (see section on Print Confirmations).
Page | 8 OE UG | July 29, 2013
© 2013 Ebix, Inc.
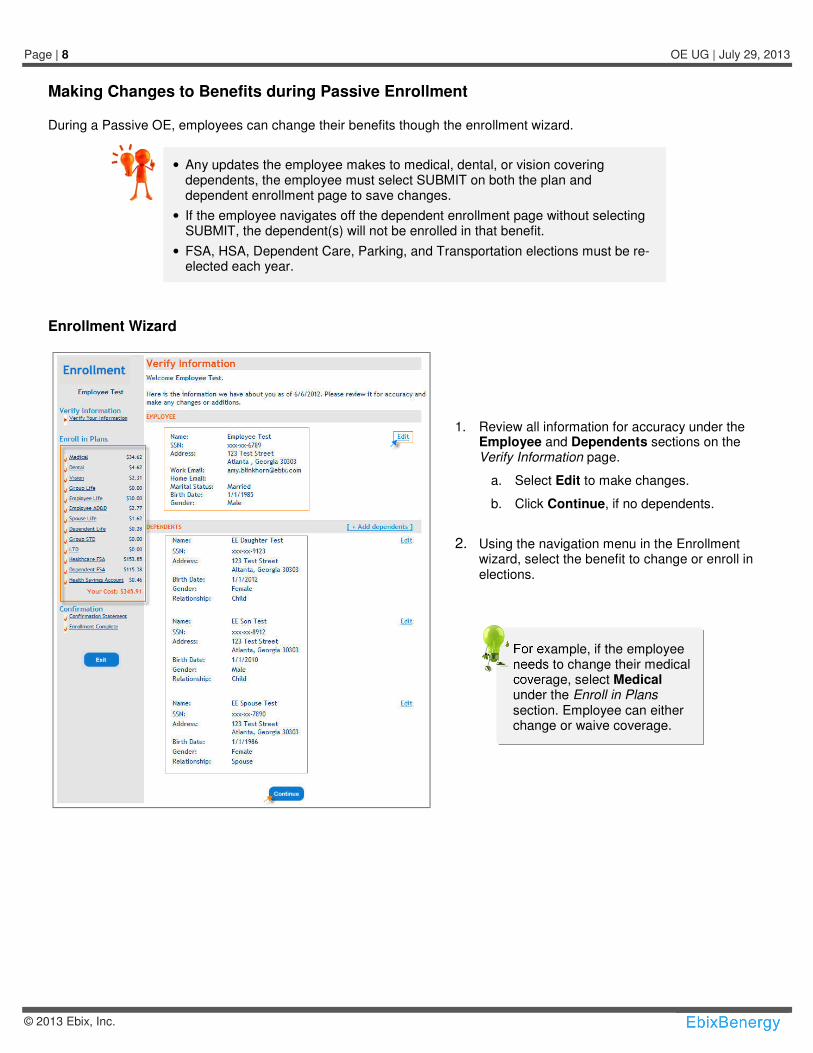
Making Changes to Benefits during Passive Enrollment During a Passive OE, employees can change their benefits though the enrollment wizard.
Enrollment Wizard
1. Review all information for accuracy under the Employee and Dependents sections on the Verify Information page.
a. Select Edit to make changes.
b. Click Continue, if no dependents.
2. Using the navigation menu in the Enrollment wizard, select the benefit to change or enroll in elections.
• Any updates the employee makes to medical, dental, or vision covering dependents, the employee must select SUBMIT on both the plan and dependent enrollment page to save changes.
• If the employee navigates off the dependent enrollment page without selecting SUBMIT, the dependent(s) will not be enrolled in that benefit.
• FSA, HSA, Dependent Care, Parking, and Transportation elections must be re-elected each year.
For example, if the employee needs to change their medical coverage, select Medical under the Enroll in Plans section. Employee can either change or waive coverage.

Enrollment Page | 9
© 2013 Ebix, Inc.
3. Select the medical plan and coverage tier or
waive coverage (if coverage is no longer desired) from the Medical Enrollment page, then click Submit.
4. Review the medical plan and coverage tier and review the dependents to be covered in medical benefits, then click Submit.
Note: The dental and vision are changed using the same steps.
Note: Deselect dependents to remove coverage for that dependent, then click Submit.
Dependents cannot be deleted if removed from coverage impacts coverage tier.

Page | 10 OE UG | July 29, 2013
© 2013 Ebix, Inc.
5. Select reason for waiving coverage (if applicable) from the Waiver of Coverage page, then click Waive And Continue.
The wavier of coverage page can be configured to display when an EE waives coverage for any benefit.
Enrollment Page | 11
© 2013 Ebix, Inc.
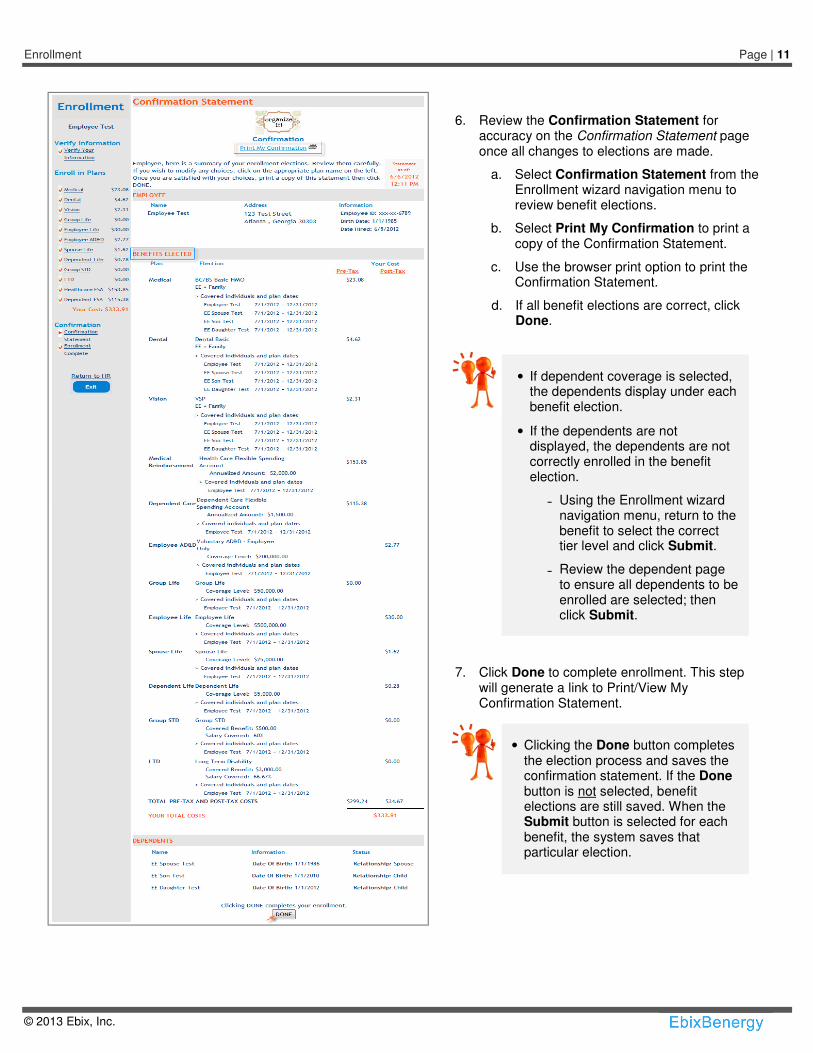
6. Review the Confirmation Statement for
accuracy on the Confirmation Statement page once all changes to elections are made.
a. Select Confirmation Statement from the Enrollment wizard navigation menu to review benefit elections.
b. Select Print My Confirmation to print a copy of the Confirmation Statement.
c. Use the browser print option to print the Confirmation Statement.
d. If all benefit elections are correct, click Done.
7. Click Done to complete enrollment. This step will generate a link to Print/View My Confirmation Statement.
• Clicking the Done button completes
the election process and saves the confirmation statement. If the Done button is not selected, benefit elections are still saved. When the Submit button is selected for each benefit, the system saves that particular election.
• If dependent coverage is selected, the dependents display under each benefit election.
• If the dependents are not displayed, the dependents are not correctly enrolled in the benefit election.
˗ Using the Enrollment wizard navigation menu, return to the benefit to select the correct tier level and click Submit.
˗ Review the dependent page to ensure all dependents to be enrolled are selected; then click Submit.

Page | 12 OE UG | July 29, 2013
© 2013 Ebix, Inc.
Positive Open Enrollment
Enrollment Page | 13
© 2013 Ebix, Inc.
Positive Open Enrollment
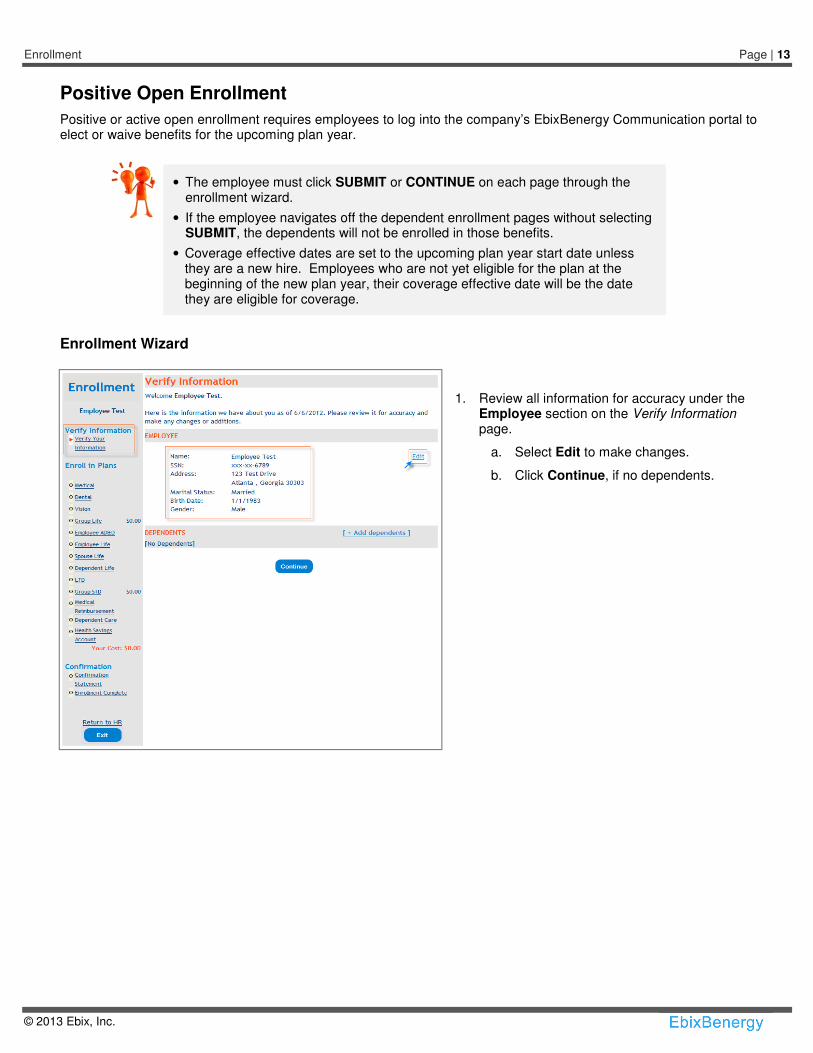
Positive or active open enrollment requires employees to log into the company’s EbixBenergy Communication portal to elect or waive benefits for the upcoming plan year.
Enrollment Wizard
1. Review all information for accuracy under the Employee section on the Verify Information page.
a. Select Edit to make changes.
b. Click Continue, if no dependents.
• The employee must click SUBMIT or CONTINUE on each page through the enrollment wizard.
• If the employee navigates off the dependent enrollment pages without selecting SUBMIT, the dependents will not be enrolled in those benefits.
• Coverage effective dates are set to the upcoming plan year start date unless they are a new hire. Employees who are not yet eligible for the plan at the beginning of the new plan year, their coverage effective date will be the date they are eligible for coverage.
Page | 14 OE UG | July 29, 2013
© 2013 Ebix, Inc.
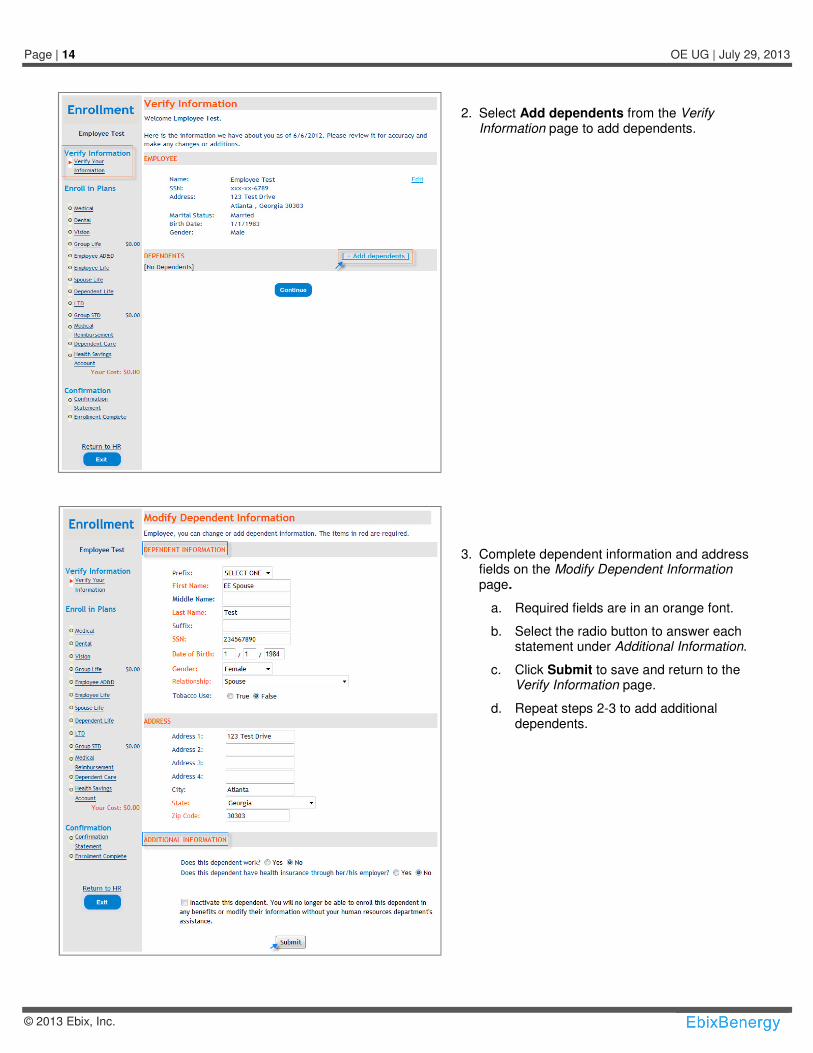
2. Select Add dependents from the Verify Information page to add dependents.
3. Complete dependent information and address fields on the Modify Dependent Information page.
a. Required fields are in an orange font.
b. Select the radio button to answer each statement under Additional Information.
c. Click Submit to save and return to the Verify Information page.
d. Repeat steps 2-3 to add additional dependents.
Enrollment Page | 15
© 2013 Ebix, Inc.
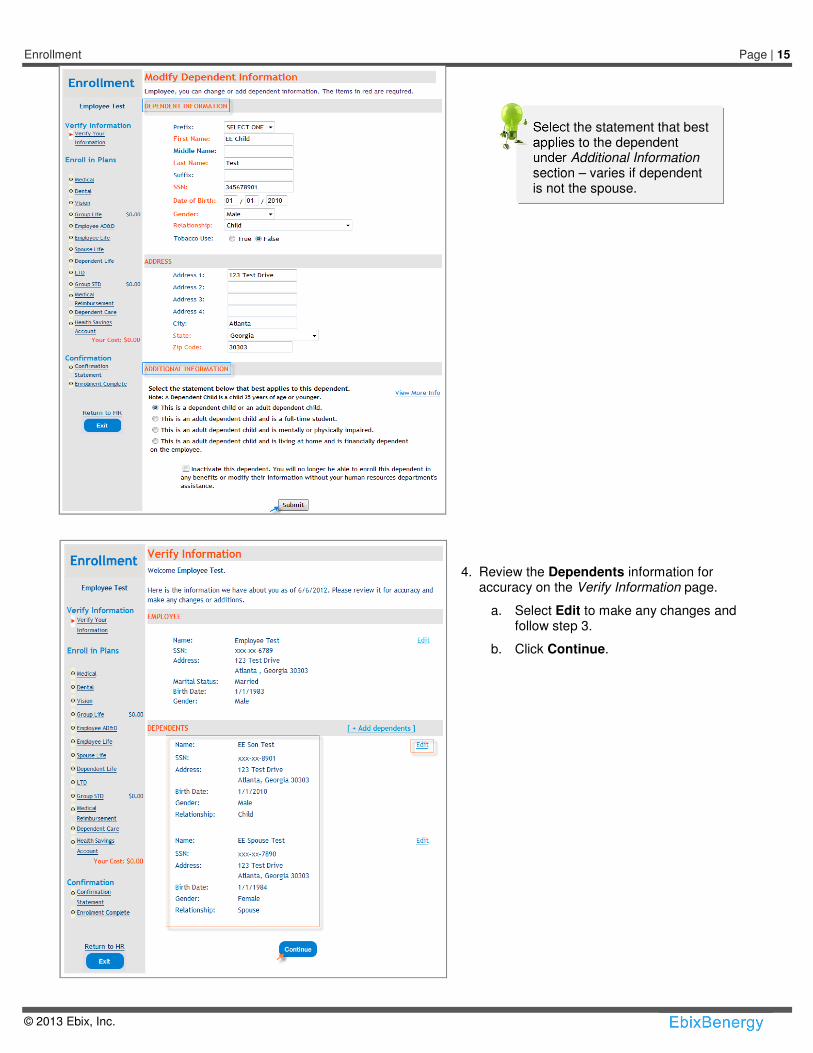
4. Review the Dependents information for accuracy on the Verify Information page.
a. Select Edit to make any changes and follow step 3.
b. Click Continue.
Select the statement that best applies to the dependent under Additional Information section – varies if dependent is not the spouse.
Page | 16 OE UG | July 29, 2013
© 2013 Ebix, Inc.
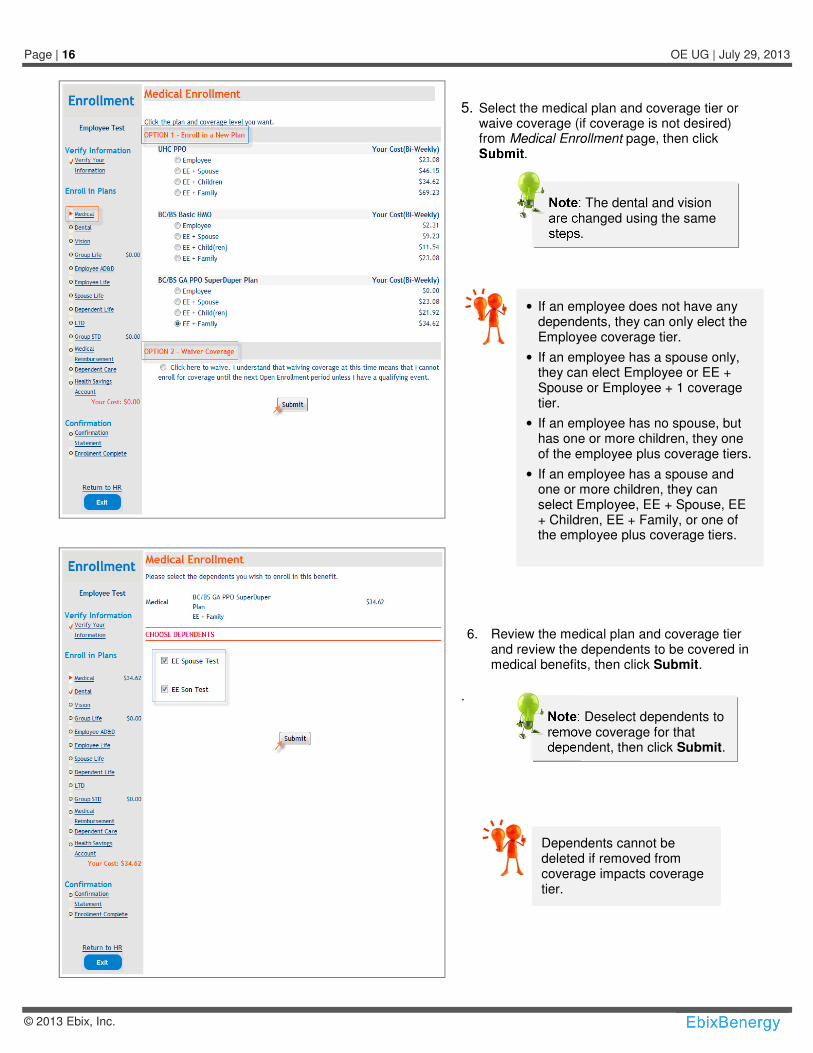
5. Select the medical plan and coverage tier or
waive coverage (if coverage is not desired) from Medical Enrollment page, then click Submit.
6. Review the medical plan and coverage tier and review the dependents to be covered in medical benefits, then click Submit.
.
• If an employee does not have any dependents, they can only elect the Employee coverage tier.
• If an employee has a spouse only, they can elect Employee or EE + Spouse or Employee + 1 coverage tier.
• If an employee has no spouse, but has one or more children, they one of the employee plus coverage tiers.
• If an employee has a spouse and one or more children, they can select Employee, EE + Spouse, EE + Children, EE + Family, or one of the employee plus coverage tiers.
Note: The dental and vision are changed using the same steps.
Note: Deselect dependents to remove coverage for that dependent, then click Submit.
Dependents cannot be deleted if removed from coverage impacts coverage tier.

Enrollment Page | 17
© 2013 Ebix, Inc.
7. Select reason for waiving coverage (if applicable) from the Waiver of Coverage page, then click Waive And Continue.
8. Review the Group Life coverage on the
Group Life Enrollment page, then click Continue.
The wavier of coverage page can be configured to display when an EE waives coverage for any benefit.
Note: If other is selected, provide the reason for waiving coverage.
Page | 18 OE UG | July 29, 2013
© 2013 Ebix, Inc.
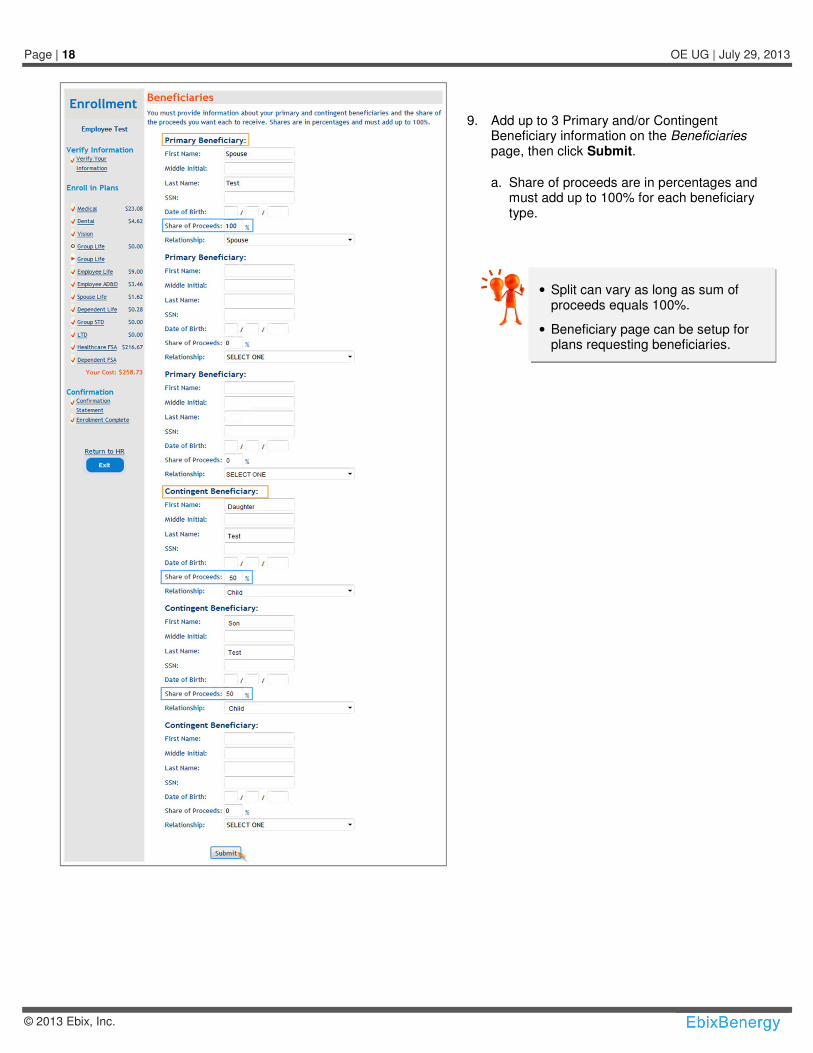
9. Add up to 3 Primary and/or Contingent Beneficiary information on the Beneficiaries page, then click Submit.
a. Share of proceeds are in percentages and must add up to 100% for each beneficiary type.
• Split can vary as long as sum of proceeds equals 100%.
• Beneficiary page can be setup for plans requesting beneficiaries.
Enrollment Page | 19
© 2013 Ebix, Inc.
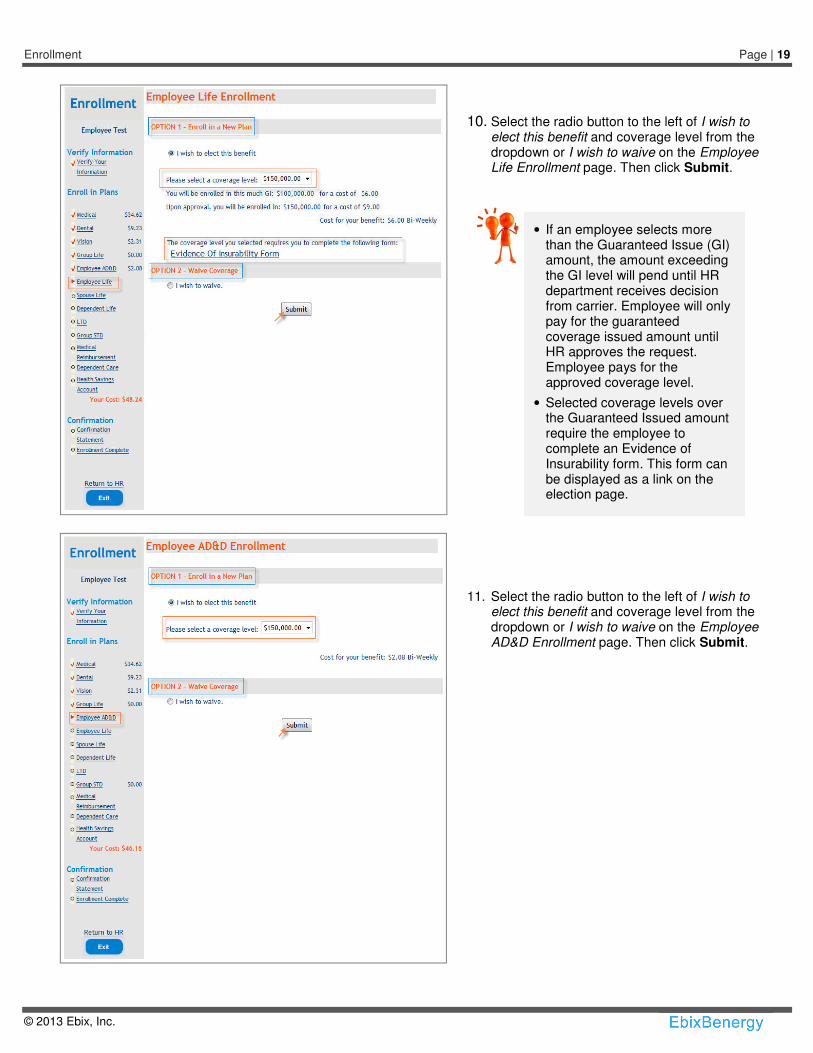
10. Select the radio button to the left of I wish to elect this benefit and coverage level from the dropdown or I wish to waive on the Employee Life Enrollment page. Then click Submit.
11. Select the radio button to the left of I wish to elect this benefit and coverage level from the dropdown or I wish to waive on the Employee AD&D Enrollment page. Then click Submit.
• If an employee selects more than the Guaranteed Issue (GI) amount, the amount exceeding the GI level will pend until HR department receives decision from carrier. Employee will only pay for the guaranteed coverage issued amount until HR approves the request. Employee pays for the approved coverage level.
• Selected coverage levels over the Guaranteed Issued amount require the employee to complete an Evidence of Insurability form. This form can be displayed as a link on the election page.
Page | 20 OE UG | July 29, 2013
© 2013 Ebix, Inc.
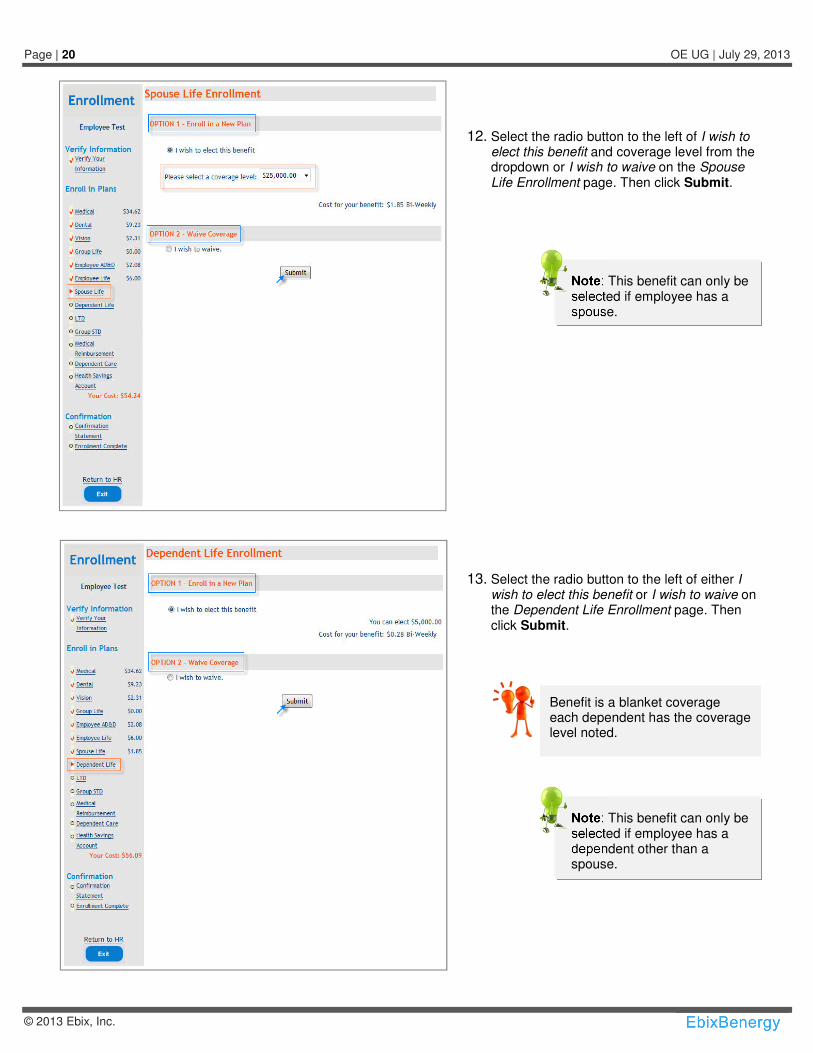
12. Select the radio button to the left of I wish to elect this benefit and coverage level from the dropdown or I wish to waive on the Spouse Life Enrollment page. Then click Submit.
13. Select the radio button to the left of either I wish to elect this benefit or I wish to waive on the Dependent Life Enrollment page. Then click Submit.
Benefit is a blanket coverage each dependent has the coverage level noted.
Note: This benefit can only be selected if employee has a spouse.
Note: This benefit can only be selected if employee has a dependent other than a spouse.
Enrollment Page | 21
© 2013 Ebix, Inc.
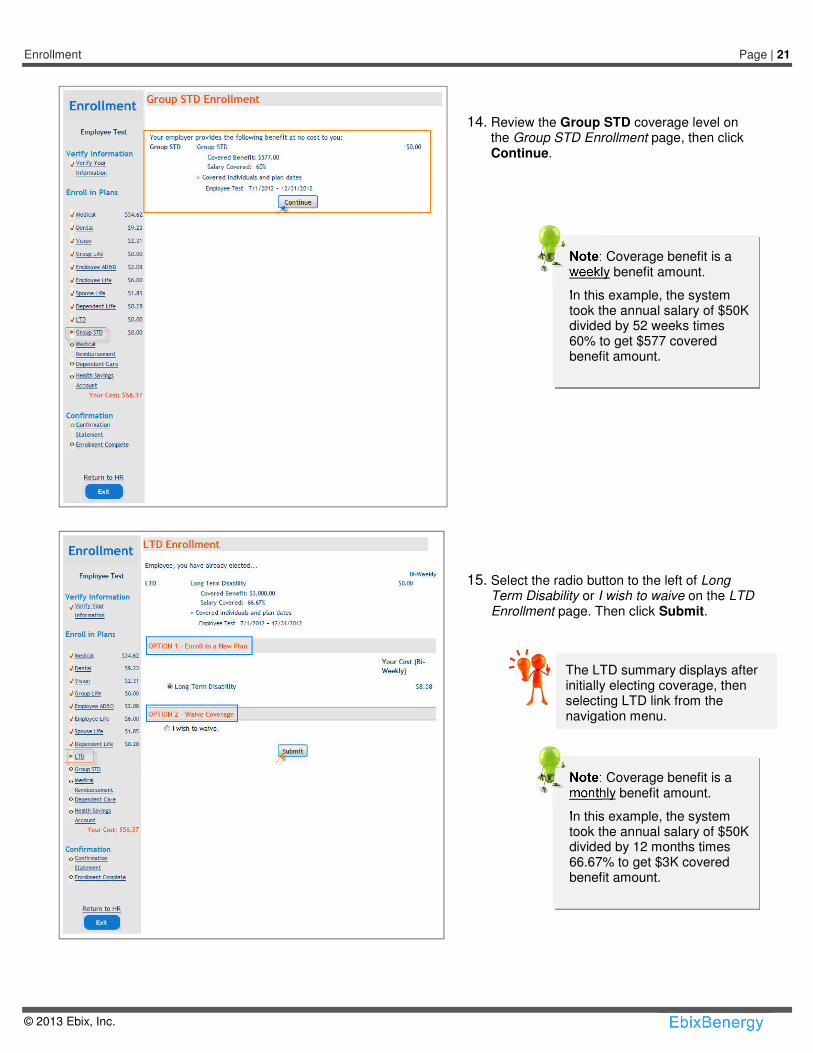
14. Review the Group STD coverage level on the Group STD Enrollment page, then click Continue.
15. Select the radio button to the left of Long Term Disability or I wish to waive on the LTD Enrollment page. Then click Submit.
Note: Coverage benefit is a weekly benefit amount.
In this example, the system took the annual salary of $50K divided by 52 weeks times 60% to get $577 covered benefit amount.
Note: Coverage benefit is a monthly benefit amount.
In this example, the system took the annual salary of $50K divided by 12 months times 66.67% to get $3K covered benefit amount.
The LTD summary displays after initially electing coverage, then selecting LTD link from the navigation menu.

Page | 22 OE UG | July 29, 2013
© 2013 Ebix, Inc.
16. Enter the annual medical FSA contribution amount or select I wish to decline healthcare reimbursement account participation, if not participating in the medical reimbursement program on the Medical Reimbursement Enrollment page. Then click Submit.
17. Enter the annual dependent care FSA contribution amount or select I wish to decline healthcare reimbursement account participation, if not participating in the medical reimbursement program on the Dependent Care Enrollment page. Then click Submit.
Employee cannot exceed organization annual limits.
Employee cannot exceed federal annual limits.
Enrollment Page | 23
© 2013 Ebix, Inc.
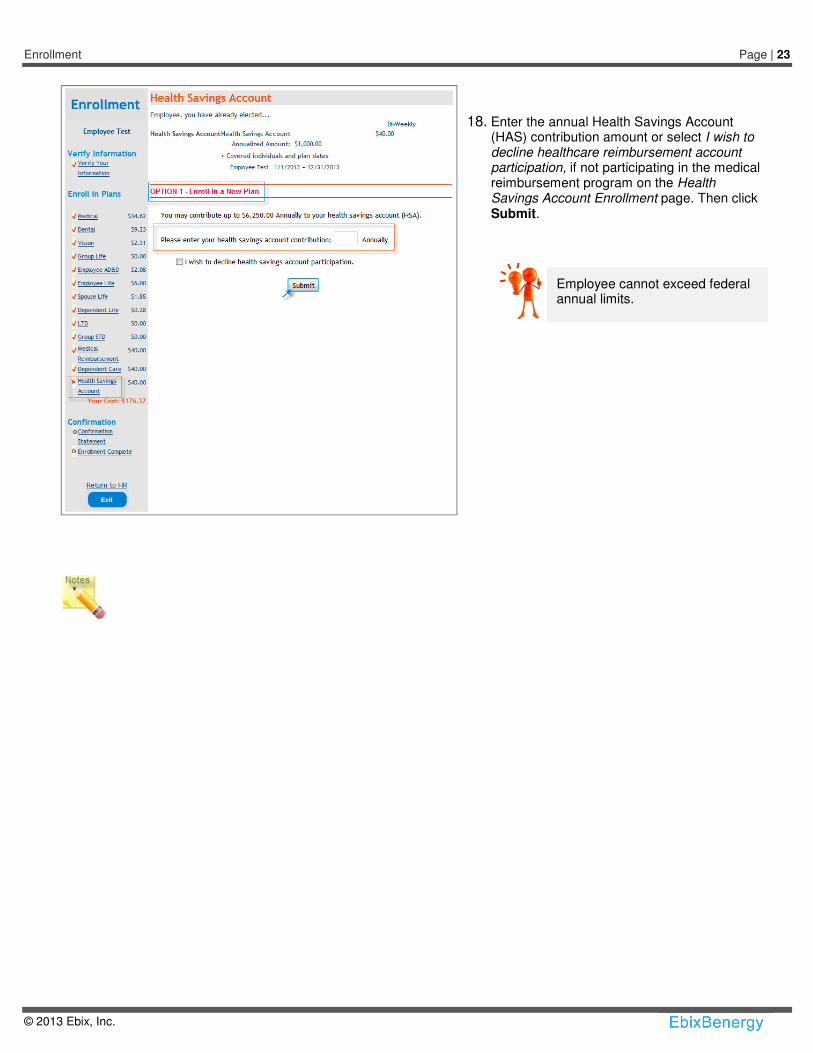
18. Enter the annual Health Savings Account (HAS) contribution amount or select I wish to decline healthcare reimbursement account participation, if not participating in the medical reimbursement program on the Health Savings Account Enrollment page. Then click Submit.
Employee cannot exceed federal annual limits.

Page | 24 OE UG | July 29, 2013
© 2013 Ebix, Inc.
19. Review the Confirmation Statement for accuracy on the Confirmation Statement page. If all benefit elections are correct, click Done.
20. Click Done to complete enrollment. This step
will generate a link to Print/View My Confirmation Statement.
Note: Done must be selected to complete enrollment.
• If dependent coverage is selected, the dependents display under each benefit election.
• If the dependents are not displayed, the dependents are not correctly enrolled in the benefit election.
˗ Using the Enrollment wizard navigation menu, return to the benefit to select the correct tier level and click Submit.
˗ Review the dependent page to ensure all dependents to be enrolled are selected; then click Submit.
• Clicking the Done button completes the election process and saves the confirmation statement. If the Done button is not selected, benefit elections are still saved. When the Submit button is selected for each benefit, the system saves that particular election
• Select Print My Confirmation to print a copy.
• Use the browser print option to print the Confirmation Statement.

Enrollment Page | 25
© 2013 Ebix, Inc.
Email Open Enrollment Messages
Page | 26 OE UG | July 29, 2013
© 2013 Ebix, Inc.
Email Open Enrollment Messages Create Open Enrollment Messages allows you to send reminder emails to employees who have not completed Open Enrollment, Employees are identified by the Employees Who Did Not Complete Enrollment – Open Enrollment, Life Events, and Year Round Enrollment report.
Creating Email Messages
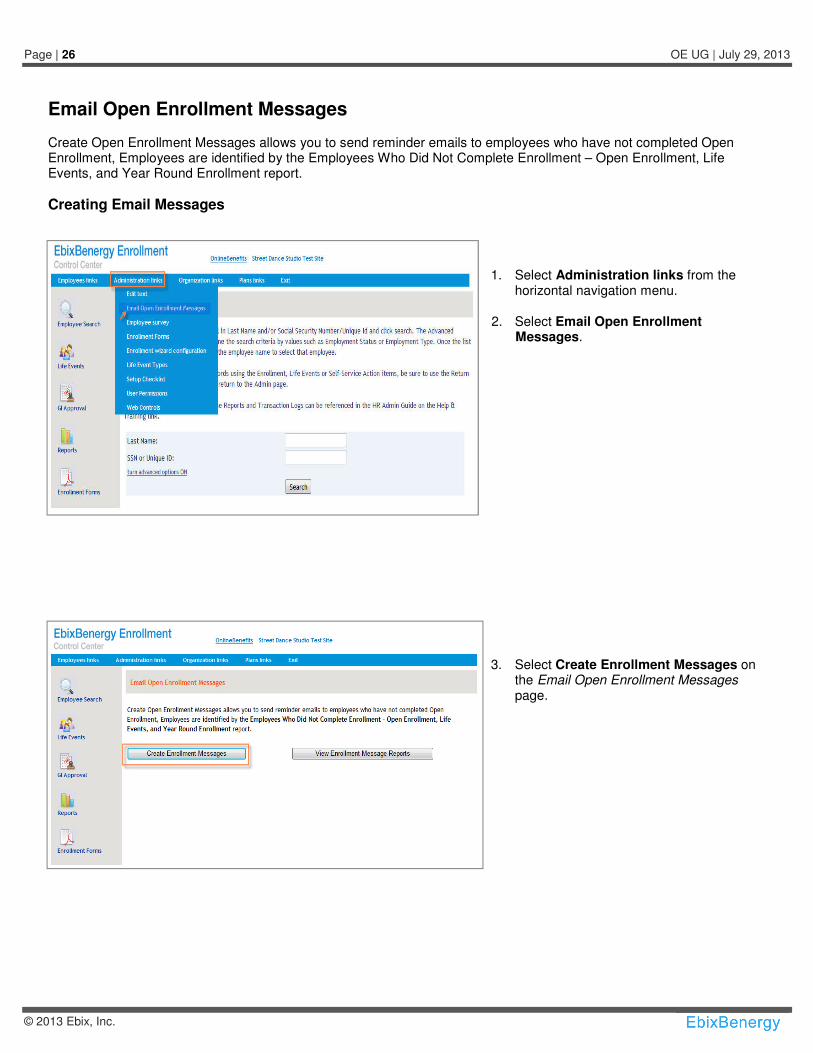
1. Select Administration links from the horizontal navigation menu.
2. Select Email Open Enrollment Messages.
3. Select Create Enrollment Messages on the Email Open Enrollment Messages page.
Enrollment Page | 27
© 2013 Ebix, Inc.
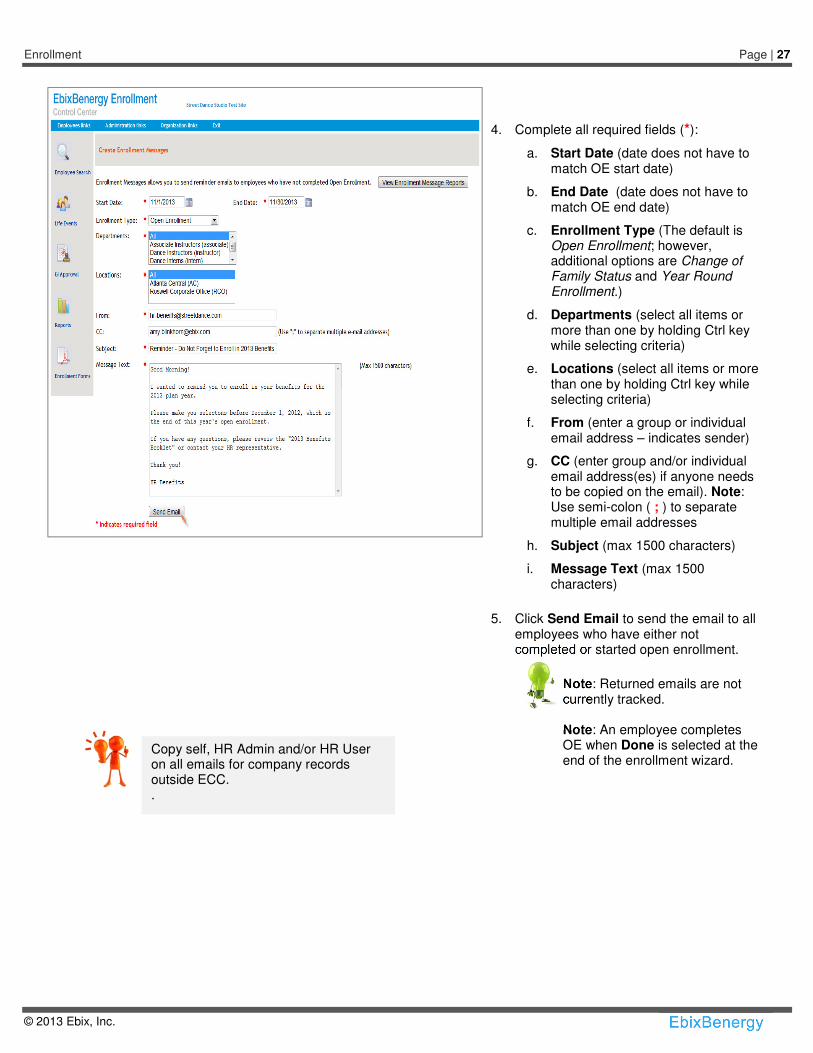
4. Complete all required fields (*):
a. Start Date (date does not have to match OE start date)
b. End Date (date does not have to match OE end date)
c. Enrollment Type (The default is Open Enrollment; however, additional options are Change of Family Status and Year Round Enrollment.)
d. Departments (select all items or more than one by holding Ctrl key while selecting criteria)
e. Locations (select all items or more than one by holding Ctrl key while selecting criteria)
f. From (enter a group or individual email address – indicates sender)
g. CC (enter group and/or individual email address(es) if anyone needs to be copied on the email). Note: Use semi-colon ( ; ) to separate multiple email addresses
h. Subject (max 1500 characters)
i. Message Text (max 1500 characters)
5. Click Send Email to send the email to all employees who have either not completed or started open enrollment.
Note: Returned emails are not currently tracked. Note: An employee completes OE when Done is selected at the end of the enrollment wizard.
Copy self, HR Admin and/or HR User on all emails for company records outside ECC. .
Page | 28 OE UG | July 29, 2013
© 2013 Ebix, Inc.
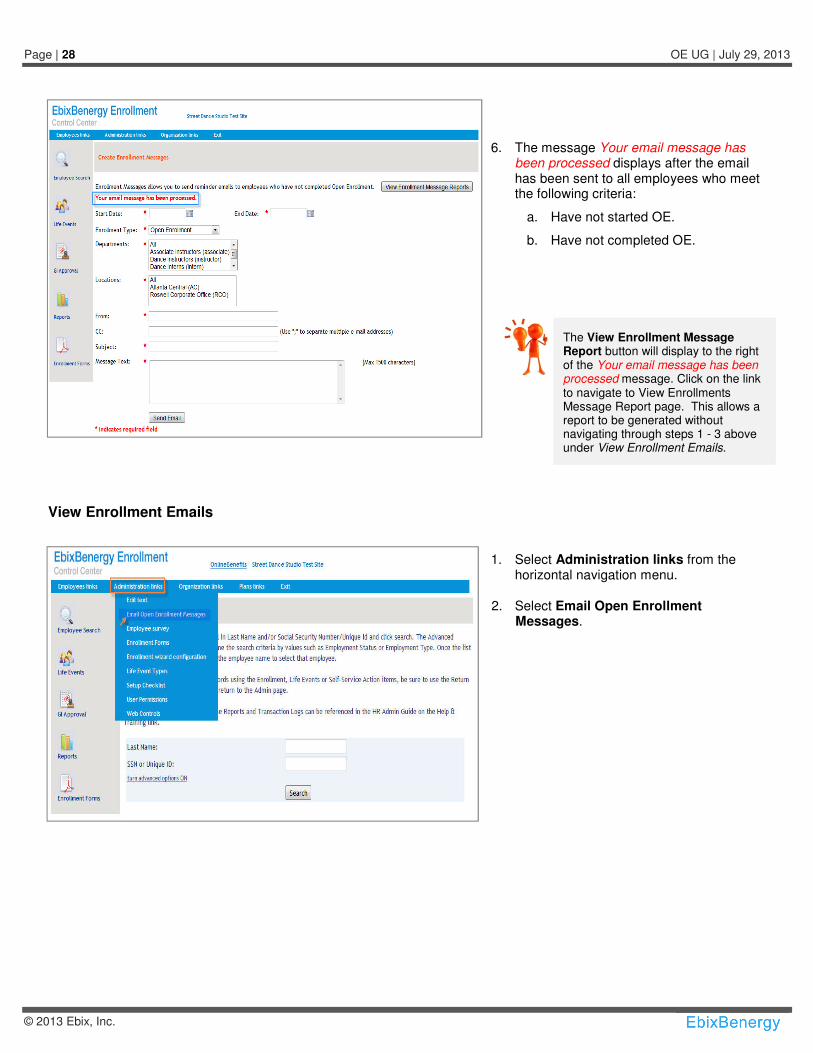
6. The message Your email message has been processed displays after the email has been sent to all employees who meet the following criteria:
a. Have not started OE.
b. Have not completed OE.
i.
View Enrollment Emails
1. Select Administration links from the horizontal navigation menu.
2. Select Email Open Enrollment Messages.
The View Enrollment Message Report button will display to the right of the Your email message has been processed message. Click on the link to navigate to View Enrollments Message Report page. This allows a report to be generated without navigating through steps 1 - 3 above under View Enrollment Emails.
Enrollment Page | 29
© 2013 Ebix, Inc.
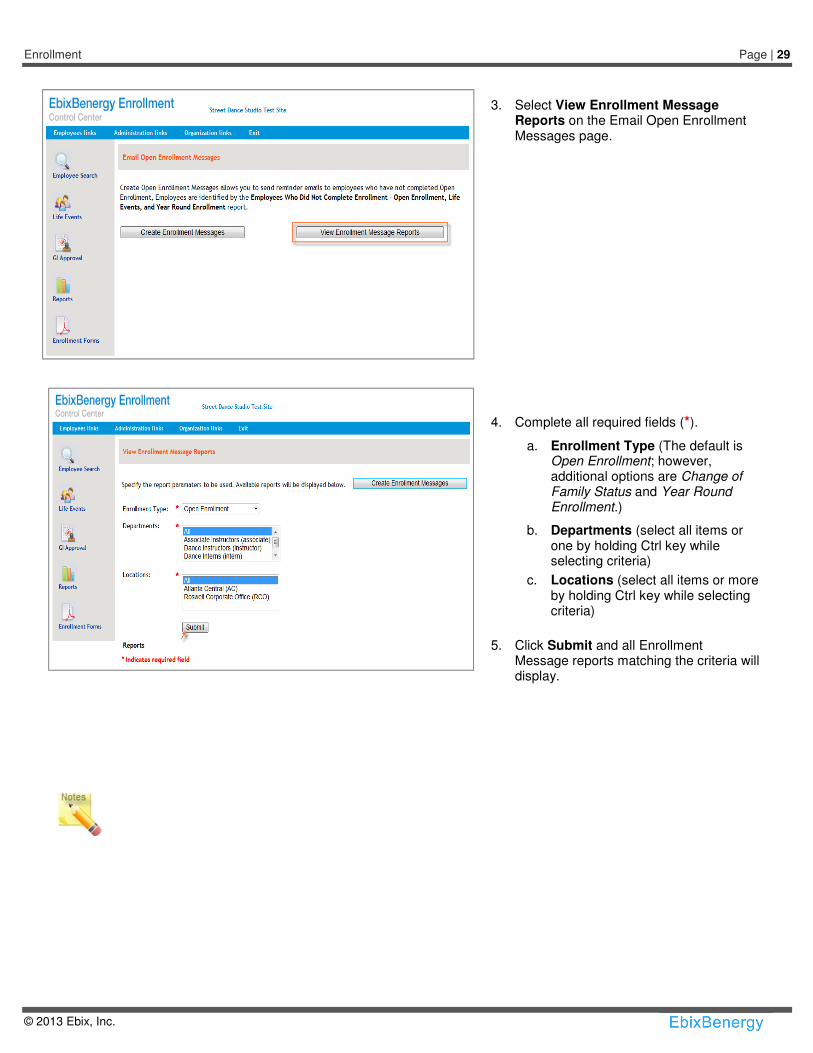
3. Select View Enrollment Message
Reports on the Email Open Enrollment Messages page.
4. Complete all required fields (*).
a. Enrollment Type (The default is Open Enrollment; however, additional options are Change of Family Status and Year Round Enrollment.)
b. Departments (select all items or one by holding Ctrl key while selecting criteria)
c. Locations (select all items or more by holding Ctrl key while selecting criteria)
5. Click Submit and all Enrollment
Message reports matching the criteria will display.

Page | 30 OE UG | July 29, 2013
© 2013 Ebix, Inc.
6. Select the desired Enrollment Message
link for a report.
Click Delete to remove the report Enrollment Message report from the EEC.
Note: Each enrollment email message indicates date and time email was sent to applicable employees.
Enrollment Page | 31
© 2013 Ebix, Inc.
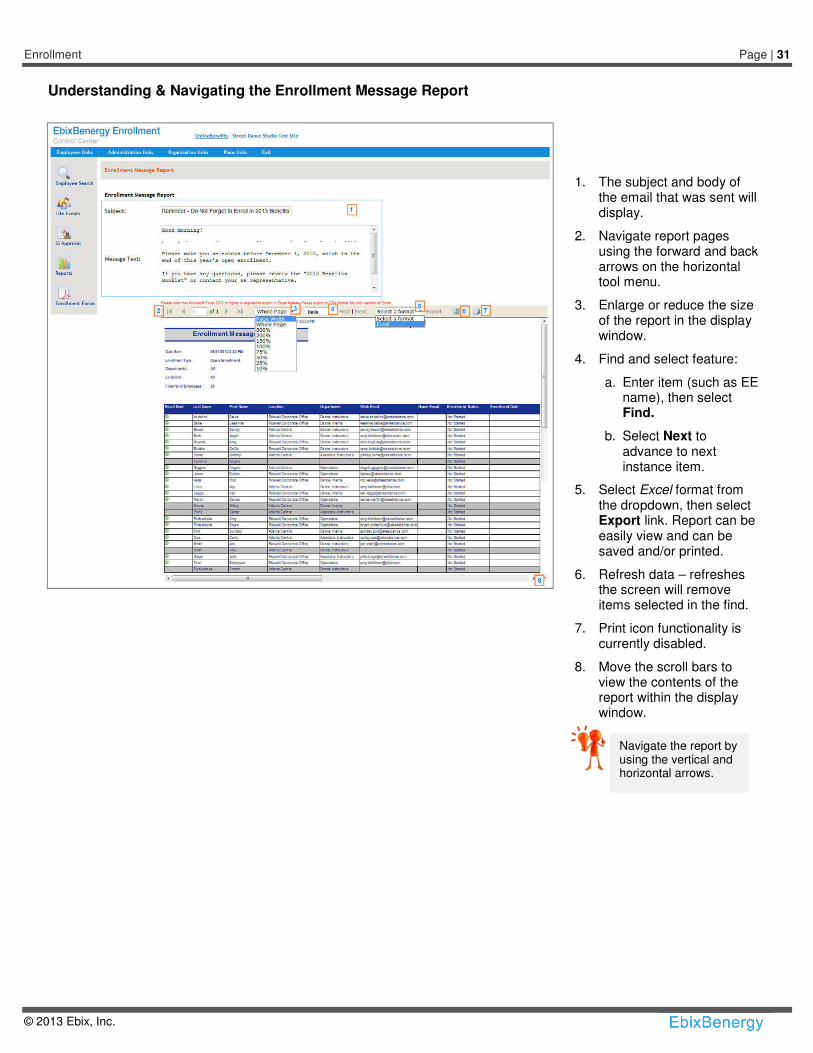
Understanding & Navigating the Enrollment Message Report
1. The subject and body of the email that was sent will display.
2. Navigate report pages using the forward and back arrows on the horizontal tool menu.
3. Enlarge or reduce the size of the report in the display window.
4. Find and select feature:
a. Enter item (such as EE name), then select Find.
b. Select Next to advance to next instance item.
5. Select Excel format from the dropdown, then select Export link. Report can be easily view and can be saved and/or printed.
6. Refresh data – refreshes the screen will remove items selected in the find.
7. Print icon functionality is currently disabled.
8. Move the scroll bars to view the contents of the report within the display window.
Navigate the report by using the vertical and horizontal arrows.

Page | 32 OE UG | July 29, 2013
© 2013 Ebix, Inc.
Enrollment Message Report – Excel example
� Employees who received the email will have a white check mark in a green circle under the Email Sent column.
� If an employee has both a work and home email address listed, an email was sent to both email addresses.
� Employees who do not have a work or home email configured in the ECC will not receive an email.
� Employees who have not started open enrollment will have a Not Started Enrollment Status.
� Employee who have started, but have not completed open enrollment will have a Not Completed Enrollment Status.
� Returned emails are not currently tracked.

Enrollment Page | 33
© 2013 Ebix, Inc.
Print Confirmation
Page | 34 OE UG | July 29, 2013
© 2013 Ebix, Inc.
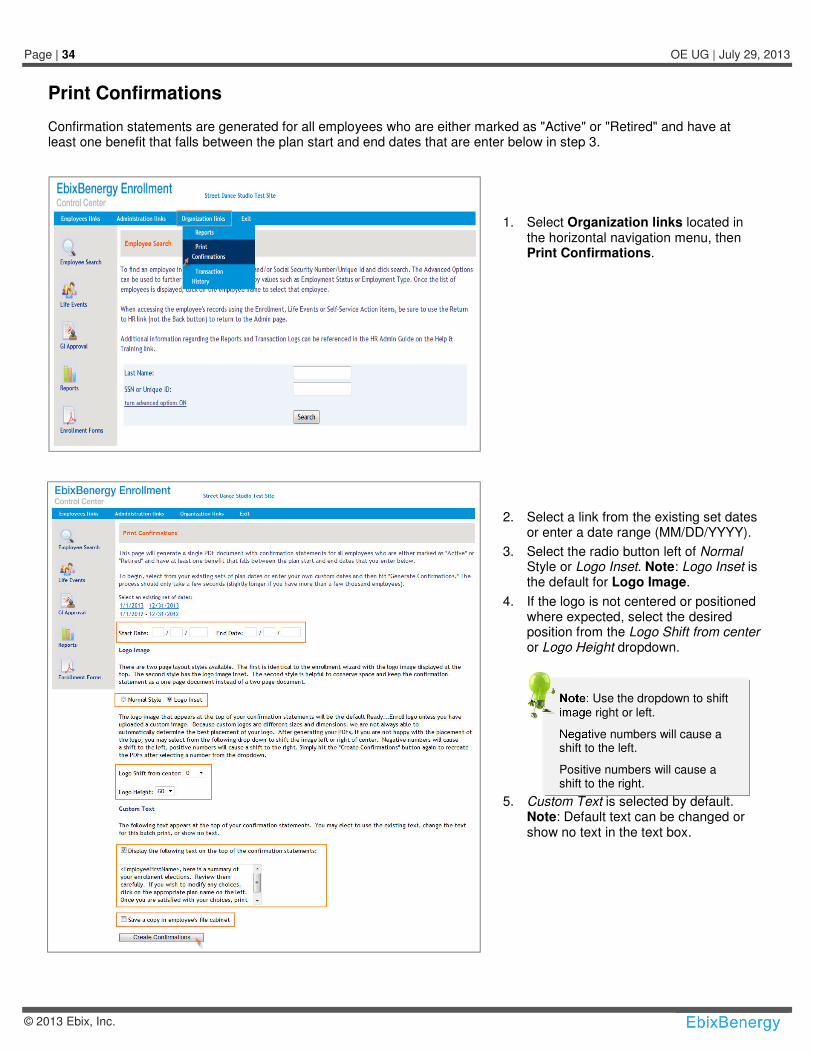
Print Confirmations
Confirmation statements are generated for all employees who are either marked as "Active" or "Retired" and have at least one benefit that falls between the plan start and end dates that are enter below in step 3.
1. Select Organization links located in the horizontal navigation menu, then Print Confirmations.
2. Select a link from the existing set dates or enter a date range (MM/DD/YYYY).
3. Select the radio button left of Normal Style or Logo Inset. Note: Logo Inset is the default for Logo Image.
4. If the logo is not centered or positioned where expected, select the desired position from the Logo Shift from center or Logo Height dropdown.
5. Custom Text is selected by default. Note: Default text can be changed or show no text in the text box.
Note: Use the dropdown to shift image right or left.
Negative numbers will cause a shift to the left.
Positive numbers will cause a shift to the right.
Enrollment Page | 35
© 2013 Ebix, Inc.
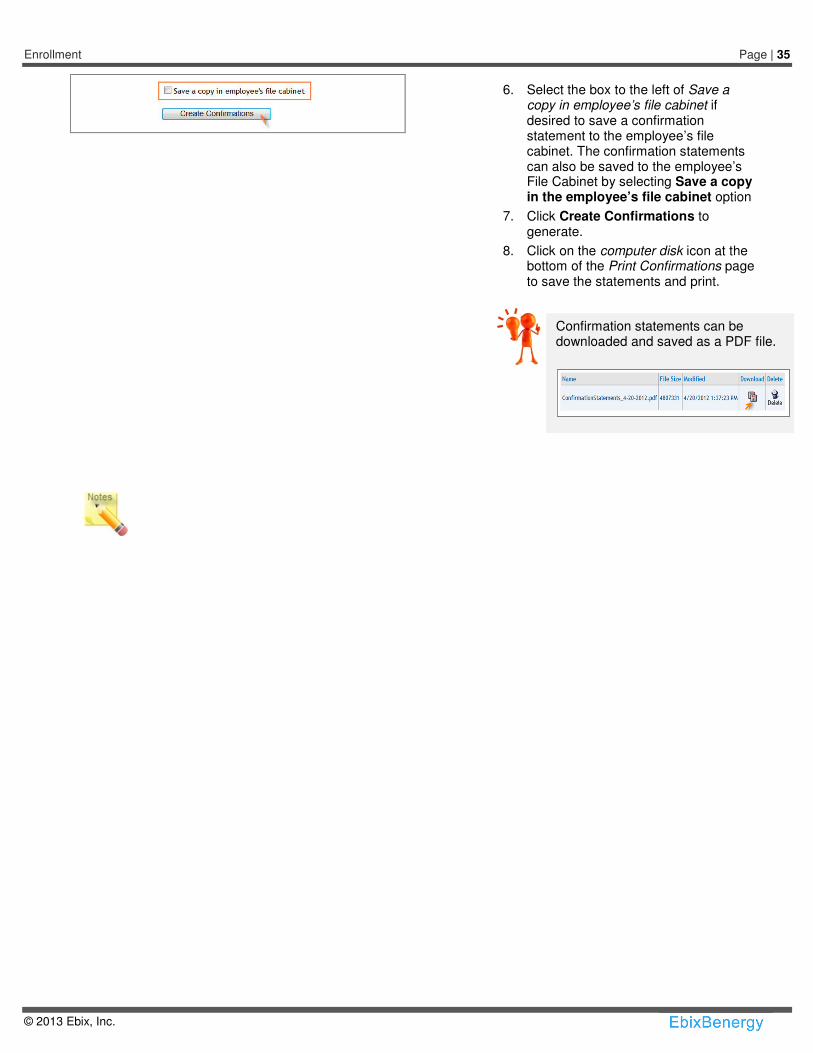
6. Select the box to the left of Save a copy in employee’s file cabinet if desired to save a confirmation statement to the employee’s file cabinet. The confirmation statements can also be saved to the employee’s File Cabinet by selecting Save a copy in the employee’s file cabinet option
7. Click Create Confirmations to generate.
8. Click on the computer disk icon at the bottom of the Print Confirmations page to save the statements and print.
Confirmation statements can be downloaded and saved as a PDF file.