opc server for pro-server ex reference · pdf fileopc server for pro-server ex reference...
TRANSCRIPT

OPC Server for Pro-Server EXReference Manual


OPC Server for Pro-Server EX Reference Manual 1
PREFACE
Thank you for choosing 'OPC Server for Pro-Server EX' by Digital Electronics Corporation.
Please read this manual and the reference manuals thoroughly before use to understand how to operate this
product safely and correctly.
Please be sure to keep the manuals handy at all times.

OPC Server for Pro-Server EX Reference Manual 2
NOTE
(1) The copyrights to all programs and manuals included in the 'OPC Server for Pro-Server EX' (referred to as
"this product") are reserved by the Digital Electronics Corporation. Digital grants the use of this product to its
users as described in the "Software Operating and License Conditions" section. Any actions violating the
above-mentioned conditions are prohibited by both Japanese and foreign regulations.
(2) The contents of this manual have been thoroughly checked. However, if you should find any errors or omis-
sions in this manual, please contact your local representative and inform them of your findings.
(3) Please be aware that Digital Electronics Corporation shall not be held liable by the user for any damages,
losses, or third party claims arising from the use of this product.
(4) Differences may occur between the descriptions found in this manual and the actual functioning of this prod-
uct. The latest information about this product is provided in the accompanying data files (i.e. Readme.txt
files, etc.) and/or separate documents. Please consult these sources prior to use as well as this manual prior to
use.
(5) Even though the information contained in and displayed by this product may be related to intangible or intel-
lectual properties of the Digital Electronics Corporation or third parties, the Digital Electronics Corporation
shall not warrant or grant the use of said properties to any users and/or other third parties. In addition, the
Digital Electronics Corporation shall not be liable for any problems related to the rights of the third party,
including intellectual property rights, arising from use or misuse of information recorded or displayed in this
product.
(C) Copyright 2009 Digital Electronics Corporation. All rights reserved.
November, 2009 Digital Electronics Corporation
Contents
OPC Server for Pro-Server EX Reference Manual 3
OPC Server for Pro-Server EXReference Manual
Contents
1 OPC DA1 OPC DA ....................................................................................................................................1-21.1 Functions and Features of OPC DA Specification ....................................................................1-3
1.1.1 Overview..................................................................................................................1-31.1.2 Access Method ........................................................................................................1-51.1.3 Process Data ...........................................................................................................1-6
1.2 Operating Environment .............................................................................................................1-71.3 System Configuration and System Required ............................................................................1-81.4 Features of the OPC Server .....................................................................................................1-91.5 Feature Configuration of the OPC Server...............................................................................1-11
1.5.1 Software Configuration of the OPC Server ............................................................1-111.5.2 Correspondence of ItemID and Node, Device/PLC, Symbol .................................1-121.5.3 Item Data Configuration .........................................................................................1-131.5.4 Performance Adjustment Function.........................................................................1-141.5.5 Simulation Function ...............................................................................................1-151.5.6 Configuration Information of the OPC Server ........................................................1-161.5.7 Interfaces Supported by the OPC Server ..............................................................1-17
2 Configuring the OPC Server2.1 Configuration Workflow.............................................................................................................2-22.2 Precautions when Configuring the OPC Server........................................................................2-42.3 Starting the Configuration Tool .................................................................................................2-5
2.3.1 Screen Configuration ...............................................................................................2-62.3.2 Menu Bar .................................................................................................................2-9
2.4 Registering a Tag....................................................................................................................2-102.4.1 Tag Registering a Symbol......................................................................................2-102.4.2 Tag Registering a Device Address ........................................................................2-122.4.3 Registering Detailed Tag Parameters....................................................................2-15
2.5 Confirming the Detailed Specification .....................................................................................2-172.5.1 Detailed Tag Parameters .......................................................................................2-172.5.2 Signal Condition.....................................................................................................2-182.5.3 Lower Input-Range Limit and Upper Input-Range Limit.........................................2-192.5.4 Item Property ID.....................................................................................................2-21
2.6 Environment Setting When Operating OPC Server and OPC Client on Different PCs...........2-232.6.1 Changing the "Local Security Policy".....................................................................2-232.6.2 Setting Windows Firewall.......................................................................................2-26

Contents
OPC Server for Pro-Server EX Reference Manual 4
2.6.3 Setting DCOM on a PC with the OPC Server Running..........................................2-302.6.4 Setting DCOM on a PC with the OPC Client Running ...........................................2-35
2.7 Operating the OPC Server as a Service .................................................................................2-392.7.1 Environment Settings When Operating the OPC Server as a Service ..................2-392.7.2 Using 'Pro-Server EX' for Setting...........................................................................2-422.7.3 Using 'OPC Server for Pro-Server EX' for Setting .................................................2-432.7.4 Connecting 'OPC Client for Pro-Server EX' to 'OPC Server for Pro-Server EX'....2-442.7.5 Notes on Operating the OPC Server as a Service.................................................2-44
3 Operating the OPC DA Client3 Operating the OPC DA Client ...................................................................................................3-23.1 Starting the OPC Client.............................................................................................................3-2
3.1.1 Screen Configuration ...............................................................................................3-33.1.2 Menu Bar .................................................................................................................3-4
3.2 Connecting to and Disconnecting from the OPC Server...........................................................3-53.2.1 Connecting to the OPC Server ................................................................................3-53.2.2 Disconnecting from the OPC Server........................................................................3-63.2.3 Checking the OPC Server Status ............................................................................3-7
3.3 Synchronously Reading/Writing Item Data ...............................................................................3-83.3.1 Synchronously Reading Item Data ..........................................................................3-83.3.2 Synchronously Writing Item Data...........................................................................3-12
3.4 Asynchronously Reading/Writing Item Data ...........................................................................3-173.4.1 Generating the Subscription (Group and Item Registration)..................................3-173.4.2 Editing Subscription ...............................................................................................3-213.4.3 Deleting Subscription .............................................................................................3-223.4.4 Adding Items..........................................................................................................3-233.4.5 Editing Items ..........................................................................................................3-26
3.5 Canceling and Restarting the Subscription Data Distribution .................................................3-283.5.1 Using the Active/Inactive Group Setting ................................................................3-283.5.2 Using Asynchronous I/O Object.............................................................................3-29
3.6 Editing and Deleting Items......................................................................................................3-303.6.1 Editing Items ..........................................................................................................3-303.6.2 Deleting Items........................................................................................................3-313.6.3 Activating Items......................................................................................................3-31
3.7 Asynchronously Reading/Writing Item Data in the Group.......................................................3-323.7.1 Asynchronously Reading Item Data in the Group..................................................3-323.7.2 Asynchronously Writing Item Data in the Group ....................................................3-343.7.3 Refreshing Items....................................................................................................3-38
3.8 Synchronous Processing Group Items ...................................................................................3-393.8.1 Synchronously Reading Data from Group Items ...................................................3-393.8.2 Synchronously Writing Data into Group Items.......................................................3-41
3.9 Browsing OPC Server Items ...................................................................................................3-44
Contents
OPC Server for Pro-Server EX Reference Manual 5
4 Menu Configuration of the Configuration Tool4 Menu Configuration of the Configuration Tool ..........................................................................4-24.1 Menu Configuration of the Configuration Tool ..........................................................................4-2
4.1.1 File Menu .................................................................................................................4-24.1.2 Edit Menu.................................................................................................................4-44.1.3 Display Menu ...........................................................................................................4-84.1.4 OPC Server Menu....................................................................................................4-84.1.5 Tool Menu..............................................................................................................4-114.1.6 Help Menu..............................................................................................................4-13
5 Error Information5 Error Information .......................................................................................................................5-15.1 Error Information .......................................................................................................................5-2
5.1.1 OPC Server Error Information..................................................................................5-25.1.2 Configuration Tool Error Information........................................................................5-6
6 Inquiry6.1 Inquiry .......................................................................................................................................6-2
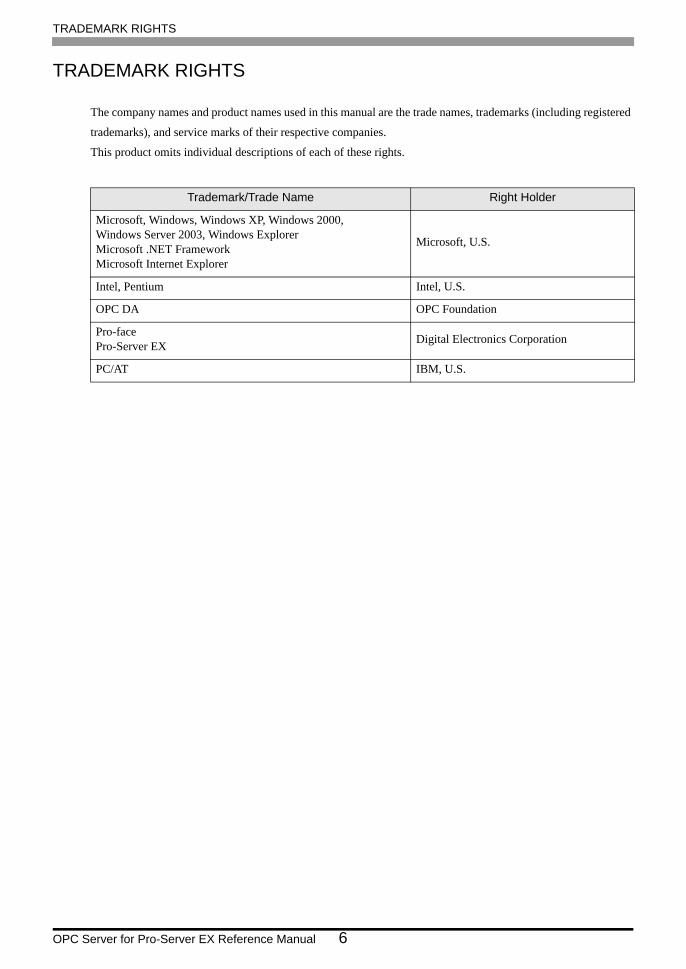
TRADEMARK RIGHTS
OPC Server for Pro-Server EX Reference Manual 6
TRADEMARK RIGHTS
The company names and product names used in this manual are the trade names, trademarks (including registered
trademarks), and service marks of their respective companies.
This product omits individual descriptions of each of these rights.
Trademark/Trade Name Right Holder
Microsoft, Windows, Windows XP, Windows 2000, Windows Server 2003, Windows Explorer Microsoft .NET Framework Microsoft Internet Explorer
Microsoft, U.S.
Intel, Pentium Intel, U.S.
OPC DA OPC Foundation
Pro-face Pro-Server EX Digital Electronics Corporation
PC/AT IBM, U.S.

DESCRIPTION RULES
OPC Server for Pro-Server EX Reference Manual 7
DESCRIPTION RULES
Safety Symbols and TermsThis manual uses the following symbols and terms for precautions on how to operate 'OPC Server for Pro-Server
EX' correctly. The following precautions represent important safety information. For those symbols and
descriptions, see the table below.
Disk HandlingTo prevent errors and/or disk damage, follow the instructions below.
• DO NOT touch the recording side of the CD-ROM.
• DO NOT remove the CD-ROM while the disk drive light is ON.
• DO NOT store the disk in an area exposed to the extreme high or low temperatures and/or high levels of
moisture or dust.
DO NOT turn off the main power to the PC while the program is running.
How to Read the ManualManual Configuration
This manual describes how to operate "OPC Server for Pro-Server EX".
Please also refer to the related manual (Pro-Server EX Reference Manual).
Display Description
Incorrect operation resulting from negligence of this instruction may result in serious injury or death.
Incorrect operation resulting from negligence of this instruction may cause injury or property damage.
Indicates instructions/procedures that MUST be performed to ensure correct product use.
Indicates actions/procedures that should NOT be performed.
Failure to follow the description/instructions accompanied by this symbol may result in malfunction of the equipment or disappearance of data.
1-1
1 OPC DA
1 OPC DA ........................................................................................................................1-2
1.1 Functions and Features of OPC DA Specification ........................................................1-3
1.2 Operating Environment .................................................................................................1-7
1.3 System Configuration and System Required ................................................................1-8
1.4 Features of the OPC Server..........................................................................................1-9
1.5 Feature Configuration of the OPC Server ................................................................... 1-11

OPC Server for Pro-Server EX Reference Manual 1-2
1 OPC DA
OPC DA (Data Access) is one of OPC specifications and was first defined and used more often than other OPC
specifications. As shown in the table below, three major versions have been released. (as of Dec., 2006)
The purpose of OPC DA is to standardize the process data (Refer to "1.1.3 Process Data" for more details)
handled in manufacturing fields when exchanging data.
Before OPC appeared, drivers were created according to the vendor-specific interface specification, which
prevented smooth interconnection across multiple vendors. As a solution, OPC-F (OPC Foundation) released
OPC DA, and the interface became standardized.
At present, the interoperability of OPC has been recognized, and it has become the de facto standard of interface
for interconnection across multiple vendors.
'OPC Server for Pro-Server EX' complies with OPC DA 3.0 and OPC DA 2.05A specifications.
Released date Version Description
Aug., 1996 DA 1.0 Released
May, 1997 DA 1.0A Minor update
Nov., 1998 DA 2.0 Release (revision of asynchronous)
Jul., 1999 DA 2.03 Minor update
Sep., 2000 DA 2.04 Minor update
Jan., 2002 DA 2.05 Minor update
Jun., 2002 DA 2.05A Minor update
Mar., 2003 DA 3.0 Released
• Each major version above differs in the interface that is defined in the server, as well as the group object. Note that it is recommended that the functions in lower versions should be implemented for the server.As to the specific differences, the asynchronous access method has been changed from DA 1.0 to
DA 2.0. Therefore, IOPCAsyncIO of the asynchronous interface defined in DA 1.0 has become
optional in DA 2.0, and IOPCAsyncIO2 has been defined as the fundamental interface in its place.
DA 3.0 has changed substantially, including compliance with XML-DA specification. Along with
the function addition, seven interfaces have been added. Support descriptions have also been
reviewed, and interfaces implemented less frequently within the optional interfaces have not been
defined.

Functions and Features of OPC DA Specification
OPC Server for Pro-Server EX Reference Manual 1-3
1.1 Functions and Features of OPC DA Specification
1.1.1 Overview
Server and group are defined as objects in OPC DA. Following this, the interfaces are defined for these objects.
In addition, there are the item, cache, and device as abstract concepts required for regulating server operation. The
OPC DA functions include reading and writing of process data (Refer to "1.1.3 Process Data" for more details).
There are also auxiliary functions to browse the items, and save/load the configuration information of the OPC
DA server.
A concept model for the OPC DA specification is shown below.
One feature of OPC DA is that it has data cache on the OPC DA server and that it defines the synchronous/
asynchronous access methods in data reading and writing.
The data cache is intended to prevent responses from decreasing by accessing a low-speed lower device, and to
implement the Subscription. Servers without the cache need to access a lower device for every client request.
With synchronous reading, the server access time when connecting to a lower device is included in the response
time, which means longer response time due to the resulting slower access speed.
OPC DA Server
Server object
Group object
Item
Item
Item
CacheClient
Client
Group object
Server object
Device

Functions and Features of OPC DA Specification
OPC Server for Pro-Server EX Reference Manual 1-4
Adopting the cache can counter decrease in the response performance. In terms of synchronous reading, the cache
or device can be specified as the destination for the acquired data. By adopting the cache, the OPC DA Server
cache is regularly updated according to the update rate specified by the OPC DA Client. If the server detects a
change in data in updating the cache, the OPC DA Server performs a callback to the OPC DA Client as
Subscription. This function enables the OPC DA Client to always acquire the latest data without actually
accessing the data.
In Subscription, you can also specify DeadBand which can disable a constant width of change for the data with
minute changes expected.
'OPC Server for Pro-Server EX' uses the cache to improve the data access response.

Functions and Features of OPC DA Specification
OPC Server for Pro-Server EX Reference Manual 1-5
1.1.2 Access Method
OPC DA can access the process data (Refer to "1.1.3 Process Data" for more details) synchronously or
asynchronously. When the OPC DA Client calls on the synchronous method, the processing on the OPC DA
Client is blocked until processing on the OPC DA Server is complete.
With the asynchronous method, on the other hand, the OPC DA Server receives the request and returns it to the
OPC DA Client. Following this, the OPC DA Server processes the received request, and when it is complete, the
OPC DA Server performs the callback to the OPC DA Client.
This enables the OPC DA Client to perform different processing (ex. response by a user operation)
simultaneously as the OPC DA Server is processing the request, which can improve the application operability
and response.
Such functions are intended to consider various OPC DA Server configurations, or OPC DA Client applications.
Particularly, the asynchronous method and Subscription are expected to be used under SCADA (Supervisory
Control And Data Acquisition) or HMI (Human Machine Interface). Using the asynchronous method enables
performance of both data access and user operation. This can provide the improved response to the users.
In addition, if you use Refresh (request the data of active items in a group, without item specification) or
Subscription, you can decrease the overhead accompanied with the method call.
Synchronous method
Client
Server
Asynchronous method
Client
Server
callback
Subscription
Client
Server
callbackcallback
Cache updating cycle
Functions and Features of OPC DA Specification
OPC Server for Pro-Server EX Reference Manual 1-6
1.1.3 Process Data
The OPC DA data is comprised of the Value, Quality Flag and Time Stamp as shown below.
ValueShows the current value of the specified item. The VARIANT type is used for the Value to handle all data type
safely. The VARIANT type is a union which enables handling of the basic data type, as well as its alignment
or character string. The OPC DA Client can request the type conversion from the data type of a specified item
to the different data type.
Quality FlagsThese flags show the value quality in three states: Good/Bad/Uncertain. For example, when the OPC DA
Server, which has just started, does not access a lower devise, the Quality Flags shows "Uncertain". When a
lower device shows some errors, it is flagged as "Bad". The Quality Flags can show more detailed messages.
Time StampShows the time you acquired the value. When you specify the cache for reading, you can check the time point
of the value acquisition.
Operating Environment
OPC Server for Pro-Server EX Reference Manual 1-7
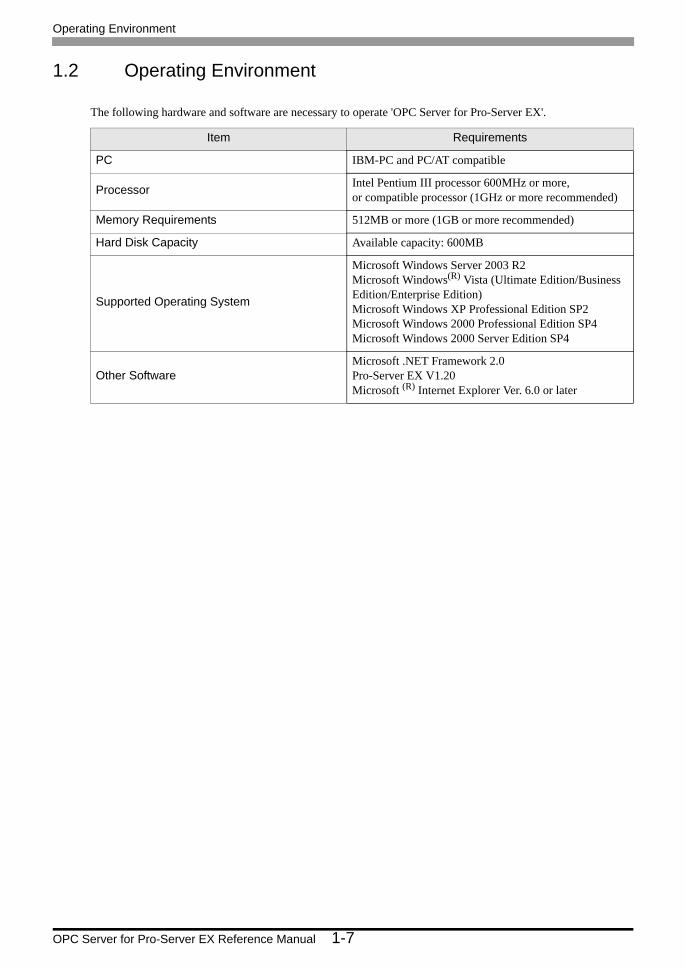
1.2 Operating Environment
The following hardware and software are necessary to operate 'OPC Server for Pro-Server EX'.
Item Requirements
PC IBM-PC and PC/AT compatible
Processor Intel Pentium III processor 600MHz or more,or compatible processor (1GHz or more recommended)
Memory Requirements 512MB or more (1GB or more recommended)
Hard Disk Capacity Available capacity: 600MB
Supported Operating System
Microsoft Windows Server 2003 R2Microsoft Windows(R) Vista (Ultimate Edition/Business Edition/Enterprise Edition)Microsoft Windows XP Professional Edition SP2 Microsoft Windows 2000 Professional Edition SP4 Microsoft Windows 2000 Server Edition SP4
Other SoftwareMicrosoft .NET Framework 2.0Pro-Server EX V1.20Microsoft (R) Internet Explorer Ver. 6.0 or later
System Configuration and System Required
OPC Server for Pro-Server EX Reference Manual 1-8
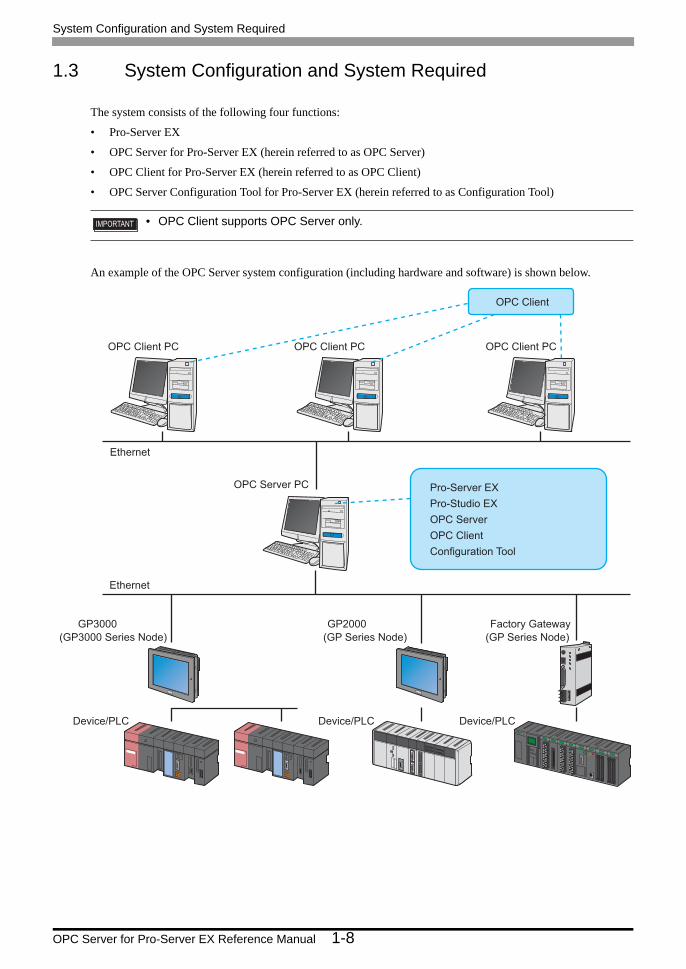
1.3 System Configuration and System Required
The system consists of the following four functions:
• Pro-Server EX
• OPC Server for Pro-Server EX (herein referred to as OPC Server)
• OPC Client for Pro-Server EX (herein referred to as OPC Client)
• OPC Server Configuration Tool for Pro-Server EX (herein referred to as Configuration Tool)
An example of the OPC Server system configuration (including hardware and software) is shown below.
• OPC Client supports OPC Server only.
Ethernet
Ethernet
OPC Server PC
OPC Client PC OPC Client PC OPC Client PC
GP3000
(GP3000 Series Node)
GP2000
(GP Series Node)
Factory Gateway
(GP Series Node)
Device/PLC Device/PLC Device/PLC
Pro-Server EX
Pro-Studio EX
OPC Server
OPC Client
Configuration Tool
OPC Client
Features of the OPC Server
OPC Server for Pro-Server EX Reference Manual 1-9
1.4 Features of the OPC Server
The OPC Server consists of the OPC DA Server of OPC DA (Data Access) version 3.0 or 2.05A specification, the
Configuration Tool which creates the tag information controlled by the OPC Server, and the OPC Client which
can read or write the item data of the OPC Server.
I/O Signal Condition Conversion and Scale Conversion are AvailableIf a tag-registered item is included in the Pro-Server EX data type shown in the table below, you can specify the
signal conditions to perform the range conversion. To perform scale conversion with signal conditions, set the
input range, instrument range, and decimal point position.
Simulation Function IncludedThe OPC Server can change the data by generating simulation data even when an actual device is not connected.
To generate the simulation data, you can select either of the following methods: by specifying a function (ex.
random number, trigonometric function) for each tag name, or by generating the data closest to the actual data by
reading it from a CSV file.
Configuration Tool ProvidedThe OPC Server discloses all the symbols and device information controlled by 'Pro-Server EX' to the OPC
Client, attaching conditions. The OPC Server attaches the Tag Names to the information for control, and discloses
the tagged information as ItemIDs to the OPC Client. The OPC Client uses these ItemIDs to access the OPC
Server.
The Configuration Tool is used to provide the following files for the OPC DA Server:
• Tag configuration files that show tagged information of the symbols managed by 'Pro-Server EX'.
• Configuration files that show the location and other information of tag configuration files.
Item IDs created by the Configuration Tool use the nodes or symbols specified in NPX created by 'Pro-Studio
EX'.
• The OPC Server is created on the basis of OPC DA 3.0 specification. The OPC Server also supports the interfaces of OPC DA 2.05A specification to maintain compatibility.
16-bit (Signed) 32-bit (Signed) Single-precision floating point
16-bit (Unsigned) 32-bit (Unsigned) Double-precision floating point
16-bit (HEX) 32-bit (HEX) -
16-bit (BCD) 32-bit (BCD) -
Features of the OPC Server
OPC Server for Pro-Server EX Reference Manual 1-10
OPC Client Included as StandardThe OPC Client can specify an ItemID of the OPC Server to monitor or change the data. Even users without the
OPC Server knowledge can use the OPC Server functions through the OPC Client.
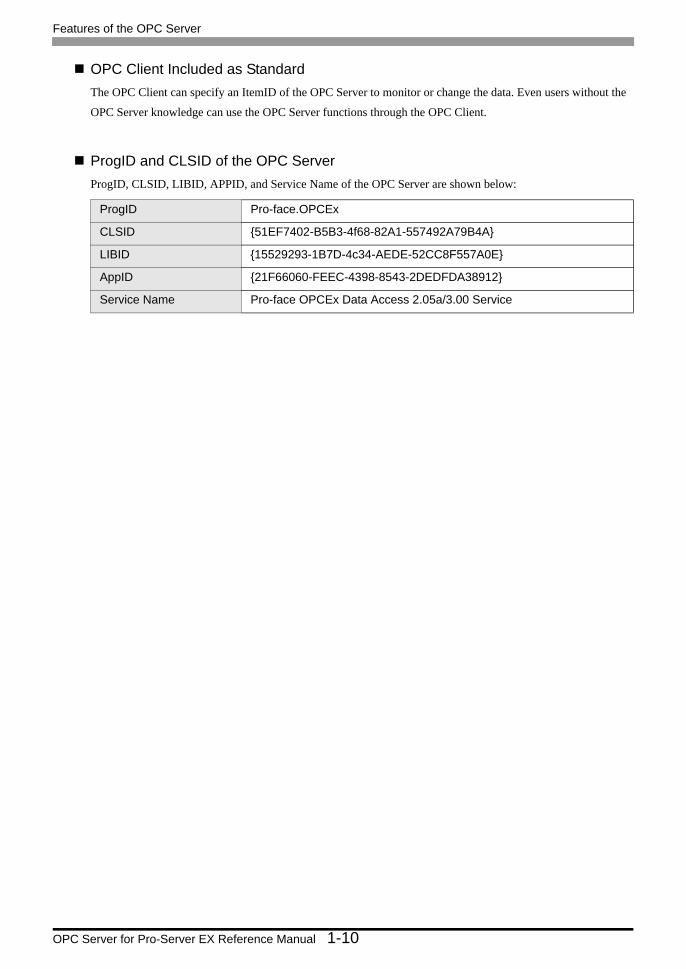
ProgID and CLSID of the OPC ServerProgID, CLSID, LIBID, APPID, and Service Name of the OPC Server are shown below:
ProgID Pro-face.OPCEx
CLSID {51EF7402-B5B3-4f68-82A1-557492A79B4A}
LIBID {15529293-1B7D-4c34-AEDE-52CC8F557A0E}
AppID {21F66060-FEEC-4398-8543-2DEDFDA38912}
Service Name Pro-face OPCEx Data Access 2.05a/3.00 Service

Feature Configuration of the OPC Server
OPC Server for Pro-Server EX Reference Manual 1-11
1.5 Feature Configuration of the OPC Server
1.5.1 Software Configuration of the OPC Server
The OPC Server is the multithreading data access server located between the OPC Client and 'Pro-Server EX'
which controls the device data including nodes (Pro-Server EX, WinGP, GP3000 Series, GP Series) /connecting
devices (ex. PLC).
Software configuration of the OPC Server is shown below:
OPC Client PC
OPC Client OPC DA ClientApplication
OPC DA Client
Local/Remote Connection
OPC Server PC
OPC Server
Data Access
Pro-Server EX API
NPX
(Network Project File)
Pro-Server EX
NPX
(Network Project File)
Pro-Studio EX
Configuration Tool

Feature Configuration of the OPC Server
OPC Server for Pro-Server EX Reference Manual 1-12
1.5.2 Correspondence of ItemID and Node, Device/PLC, Symbol
The OPC Server discloses an ID, called ItemID, uniquely defined on the OPC Server. The OPC Client uses this
ItemID to read or write the actual device data.
You can register the same symbol name on the different sheets in 'Pro-Server EX', and the path through the node
to the symbol is required to uniquely specify the symbol. Note that the sheet name is unnecessary when you
directly attach the device address as a tag.
For this reason, ItemIDs on the OPC Server show the combination of each name from the node name to the
symbol name using the dot '.', as well as the Device/PLC name for the cache registration in 'Pro-Studio EX'.
Therefore, you can easily understand by the ItemID which actual device on the configuration is shown from its
format.
For example, the ItemID to enable the OPC Client to access the symbol data of "Temperature1" defined on Sheet
1, in PLC1 of AGP1, is "AGP1.PLC1.Sheet1.Temperature1".
ItemID
• AGP1. PLC1. Sheet1. Temperature1
Temperature1
• AGP1. PLC2. Sheet3. Temperature2
• GP1. PLC1. Sheet4. Valve 1
OPC Client
OPC Server
Pro-Server EX
AGP1
(GP3000 Series Node)
PLC1 PLC2
Sheet1 Sheet2 Sheet3
Symbol
Temperature2
Valve 1
• Temperature1
Symbol
• Temperature2
• Valve 1
GP1
(GP Series Node)
PLC1
Sheet4
• Temperature1
Symbol
• Temperature2
• Valve 1•••
Feature Configuration of the OPC Server
OPC Server for Pro-Server EX Reference Manual 1-13
1.5.3 Item Data Configuration
The Item Data consists of three data: Value, Quality, and Time Stamp.
ValueThe OPC Server specifies the signal conditions and scale on the device data specified as the Item to provide the
data converted to the engineering unit value.
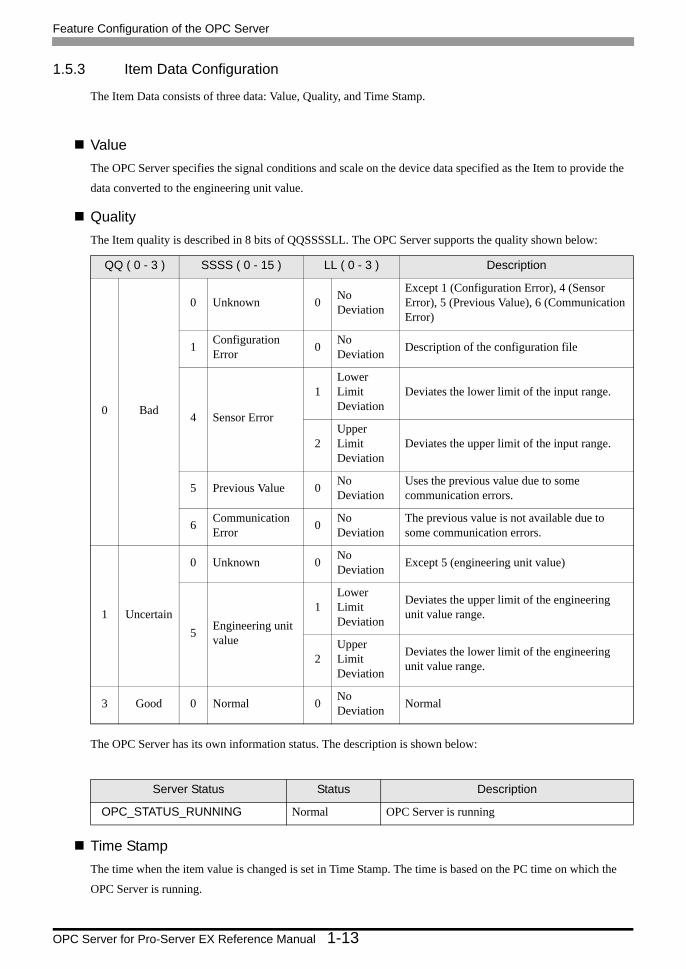
QualityThe Item quality is described in 8 bits of QQSSSSLL. The OPC Server supports the quality shown below:
The OPC Server has its own information status. The description is shown below:
Time StampThe time when the item value is changed is set in Time Stamp. The time is based on the PC time on which the
OPC Server is running.
QQ ( 0 - 3 ) SSSS ( 0 - 15 ) LL ( 0 - 3 ) Description
0 Bad
0 Unknown 0 No Deviation
Except 1 (Configuration Error), 4 (Sensor Error), 5 (Previous Value), 6 (Communication Error)
1 Configuration Error 0 No
Deviation Description of the configuration file
4 Sensor Error
1Lower Limit Deviation
Deviates the lower limit of the input range.
2Upper Limit Deviation
Deviates the upper limit of the input range.
5 Previous Value 0 No Deviation
Uses the previous value due to some communication errors.
6 Communication Error 0 No
DeviationThe previous value is not available due to some communication errors.
1 Uncertain
0 Unknown 0 No Deviation Except 5 (engineering unit value)
5 Engineering unit value
1Lower Limit Deviation
Deviates the upper limit of the engineering unit value range.
2Upper Limit Deviation
Deviates the lower limit of the engineering unit value range.
3 Good 0 Normal 0 No Deviation Normal
Server Status Status Description
OPC_STATUS_RUNNING Normal OPC Server is running
Feature Configuration of the OPC Server
OPC Server for Pro-Server EX Reference Manual 1-14
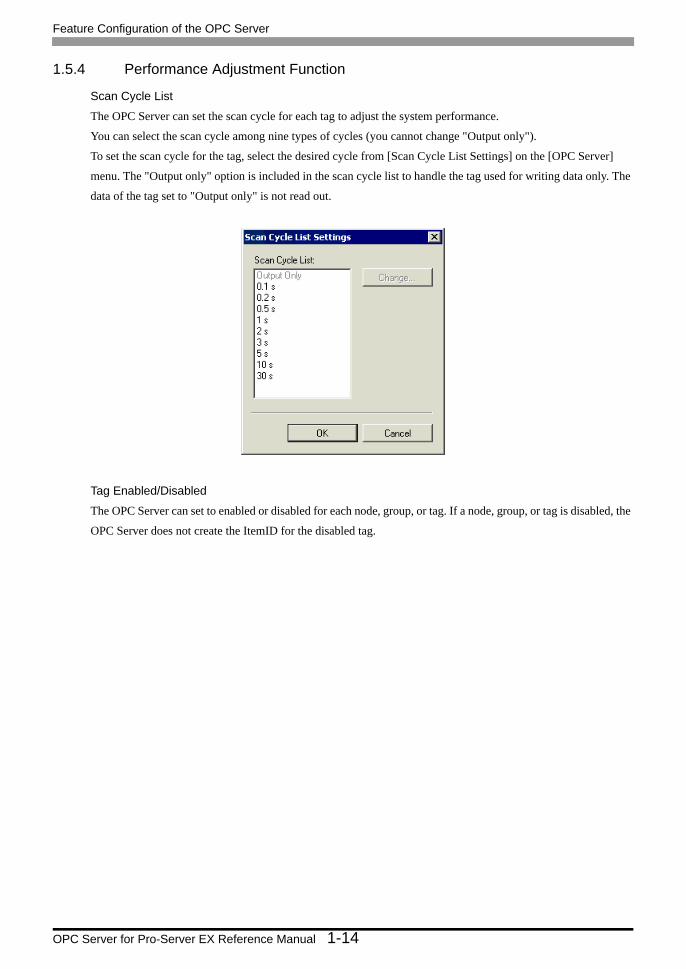
1.5.4 Performance Adjustment Function
Scan Cycle List
The OPC Server can set the scan cycle for each tag to adjust the system performance.
You can select the scan cycle among nine types of cycles (you cannot change "Output only").
To set the scan cycle for the tag, select the desired cycle from [Scan Cycle List Settings] on the [OPC Server]
menu. The "Output only" option is included in the scan cycle list to handle the tag used for writing data only. The
data of the tag set to "Output only" is not read out.
Tag Enabled/Disabled
The OPC Server can set to enabled or disabled for each node, group, or tag. If a node, group, or tag is disabled, the
OPC Server does not create the ItemID for the disabled tag.
Feature Configuration of the OPC Server
OPC Server for Pro-Server EX Reference Manual 1-15
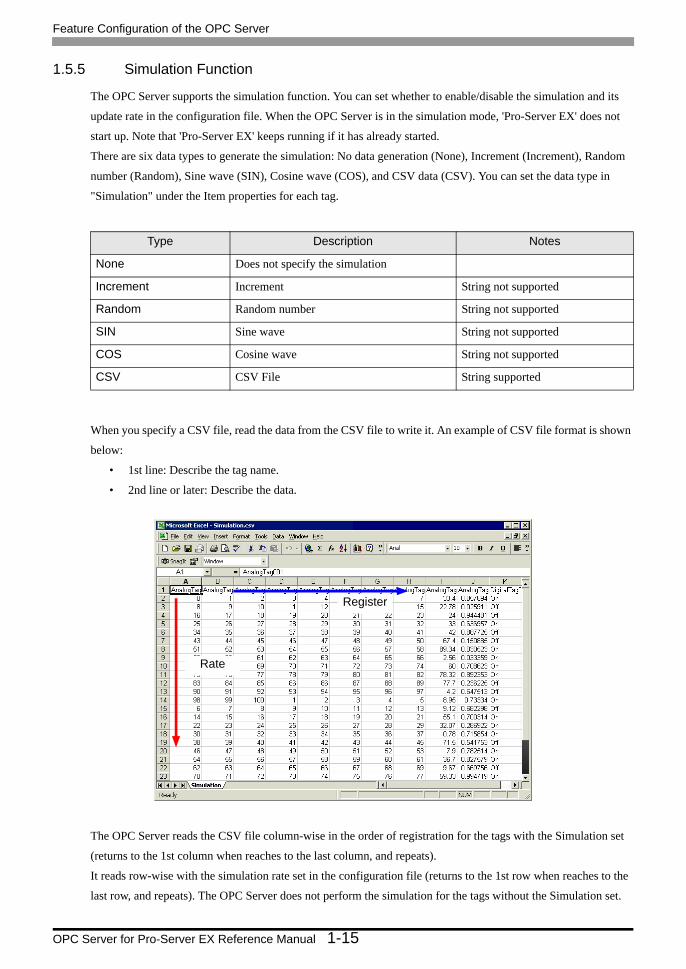
1.5.5 Simulation Function
The OPC Server supports the simulation function. You can set whether to enable/disable the simulation and its
update rate in the configuration file. When the OPC Server is in the simulation mode, 'Pro-Server EX' does not
start up. Note that 'Pro-Server EX' keeps running if it has already started.
There are six data types to generate the simulation: No data generation (None), Increment (Increment), Random
number (Random), Sine wave (SIN), Cosine wave (COS), and CSV data (CSV). You can set the data type in
"Simulation" under the Item properties for each tag.
When you specify a CSV file, read the data from the CSV file to write it. An example of CSV file format is shown
below:
• 1st line: Describe the tag name.
• 2nd line or later: Describe the data.
The OPC Server reads the CSV file column-wise in the order of registration for the tags with the Simulation set
(returns to the 1st column when reaches to the last column, and repeats).
It reads row-wise with the simulation rate set in the configuration file (returns to the 1st row when reaches to the
last row, and repeats). The OPC Server does not perform the simulation for the tags without the Simulation set.
Type Description Notes
None Does not specify the simulation
Increment Increment String not supported
Random Random number String not supported
SIN Sine wave String not supported
COS Cosine wave String not supported
CSV CSV File String supported
Register
Rate

Feature Configuration of the OPC Server
OPC Server for Pro-Server EX Reference Manual 1-16
1.5.6 Configuration Information of the OPC Server
The OPC Server consists of the configuration file (OpcConfigration.xml) created with the Configuration Tool and
the tag configuration file (TagConfigration.xml).
Follow the steps below to create the configuration file.
1 Start the Configuration Tool.
2 Select [OPC Server Configuration Settings] from the [OPC Server] menu.
3 In the [OPC Server Configuration Settings] dialog box, set the configuration file, output log and simulation. Click
[OK] to create the configuration file.
• You can also create the tag configuration file using the Configuration Tool. For more details on how to create the configuration information, refer to "2 Configuring the OPC Server".
Feature Configuration of the OPC Server
OPC Server for Pro-Server EX Reference Manual 1-17
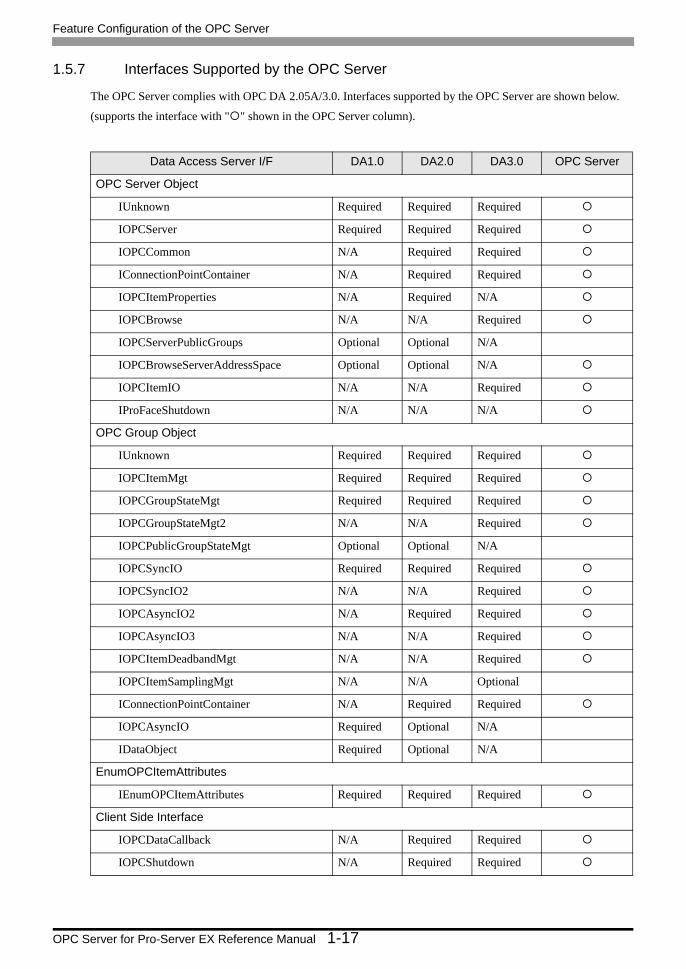
1.5.7 Interfaces Supported by the OPC Server
The OPC Server complies with OPC DA 2.05A/3.0. Interfaces supported by the OPC Server are shown below.
(supports the interface with " " shown in the OPC Server column).
Data Access Server I/F DA1.0 DA2.0 DA3.0 OPC Server
OPC Server Object
IUnknown Required Required Required
IOPCServer Required Required Required
IOPCCommon N/A Required Required
IConnectionPointContainer N/A Required Required
IOPCItemProperties N/A Required N/A
IOPCBrowse N/A N/A Required
IOPCServerPublicGroups Optional Optional N/A
IOPCBrowseServerAddressSpace Optional Optional N/A
IOPCItemIO N/A N/A Required
IProFaceShutdown N/A N/A N/A
OPC Group Object
IUnknown Required Required Required
IOPCItemMgt Required Required Required
IOPCGroupStateMgt Required Required Required
IOPCGroupStateMgt2 N/A N/A Required
IOPCPublicGroupStateMgt Optional Optional N/A
IOPCSyncIO Required Required Required
IOPCSyncIO2 N/A N/A Required
IOPCAsyncIO2 N/A Required Required
IOPCAsyncIO3 N/A N/A Required
IOPCItemDeadbandMgt N/A N/A Required
IOPCItemSamplingMgt N/A N/A Optional
IConnectionPointContainer N/A Required Required
IOPCAsyncIO Required Optional N/A
IDataObject Required Optional N/A
EnumOPCItemAttributes
IEnumOPCItemAttributes Required Required Required
Client Side Interface
IOPCDataCallback N/A Required Required
IOPCShutdown N/A Required Required

Feature Configuration of the OPC Server
OPC Server for Pro-Server EX Reference Manual 1-18

2-1
2 Configuring the OPC Server
2 Configuring the OPC Server .........................................................................................2-2
2.1 Configuration Workflow .................................................................................................2-2
2.2 Precautions when Configuring the OPC Server............................................................2-4
2.3 Starting the Configuration Tool ......................................................................................2-5
2.4 Registering a Tag ........................................................................................................2-10
2.5 Confirming the Detailed Specification .........................................................................2-17
2.6 Environment Setting When Operating OPC Server and OPC Client on Different PCs ......2-23
2.7 Operating the OPC Server as a Service.............................................................................2-39

Configuration Workflow
OPC Server for Pro-Server EX Reference Manual 2-2
2 Configuring the OPC Server
2.1 Configuration Workflow
Use the Configuration Tool to set the OPC Server. This section shows the work description with the Configuration
Tool and the workflow of the OPC Server configuration.
• If you operate the OPC Server and OPC Client on different PCs, you need to set up the environments for each PC. Refer to "2.6 Environment Setting When Operating OPC Server and OPC Client on Different PCs" for more details.
• You can operate the OPC Server as Windows service. For more details, refer to "2.7 Operating the OPC Server as a Service".
• While connected to the OPC Server, do not perform a reload using 'Pro-Server EX'. To change the network project, shut down all connections to the OPC Server before performing a reload.
2. Start the Configuration Tool.
"2.2 Starting the Configuration Tool"
3. Read an existing tag configuration file
4. Register tag information (Add, Change, Delete)
5. Save in the tag configuration file
7.
8.
6.
1.
"Pro-Server EX Reference Manual"
Create NPX with 'Pro-Studio EX' and load it on 'Pro-Server EX'.
Operation with the Configuration Operation with the Configuration Toolool
OPC Server Configuration Settings
Shutdown of the OPC Server
Start the OPC Server from the OPC client
" 3.2 Connecting to and Disconnecting from the OPC Server "
Configuration Workflow
OPC Server for Pro-Server EX Reference Manual 2-3
Outline of Steps(1) Create NPX with 'Pro-Studio EX' and load it using 'Pro-Server EX'.
(2) The Configuration Tool reads the registration information related to the nodes and Device/PLCs from NPX of
'Pro-Server EX', and displays their device configurations.
(3) When the existing configuration files need to be displayed or edited, the Configuration Tool reads the tag
configuration file, and compares it with the node or Device/PLC information that has been read in step (2). It
then displays the simple configuration to show the relationship between each Device/PLC and the tag.
(4) Using the import function or each editing function including adding, editing or deleting the tag, register the tag
corresponding to the symbol or device address.
(5) Save the edited tag information as the tag configuration file.
(6) To apply the saved tag configuration file on the OPC Server, specify the created tag configuration file as a
configuration file in the OPC Server configuration.
(7) To apply the configuration information onto the OPC Server, shut it down.
(8) When the OPC Client connects to the OPC Server, the OPC Server restarts. Then, the tag configuration
information on the OPC Server is updated to the tag configuration information shown in the configuration file.

Precautions when Configuring the OPC Server
OPC Server for Pro-Server EX Reference Manual 2-4
2.2 Precautions when Configuring the OPC Server
This section describes precautions to take when configuring the OPC Server.
■ When using the OPC Server with a GP3000 Series node, LT3000 node, or WinGP nodeIn the following cases, it may take time for the OPC Server process to end.
• Many items are registered for many GP3000 Series nodes, LT3000 nodes, or WinGP nodes.
• The OPC server cannot communicate with some nodes from which items are read because those nodes are not
turned on, or are physically disconnected from the network.
To avoid the above problems, perform the following steps.
1 Start 'Pro-Studio EX'.
2 Select [Network Setup] in the [Setting] menu of 'Pro-Studio EX'.
3 Click [Pro-ServerEX/GP3000 Series/WinGP/LT3000 Node Setting].
4 Set the smaller values in [Timeout Period] and [Retry Time] under [Default Setting].
5 After completing the settings, transfer the network project to all nodes.
• If you know which node cannot be connected in advance, specify the connection between that node and the Pro-Server EX node, where the OPC Server is running, under [Timeout period for slow line between nodes]. Also, set the time out period and retry frequency individually.
Starting the Configuration Tool
OPC Server for Pro-Server EX Reference Manual 2-5
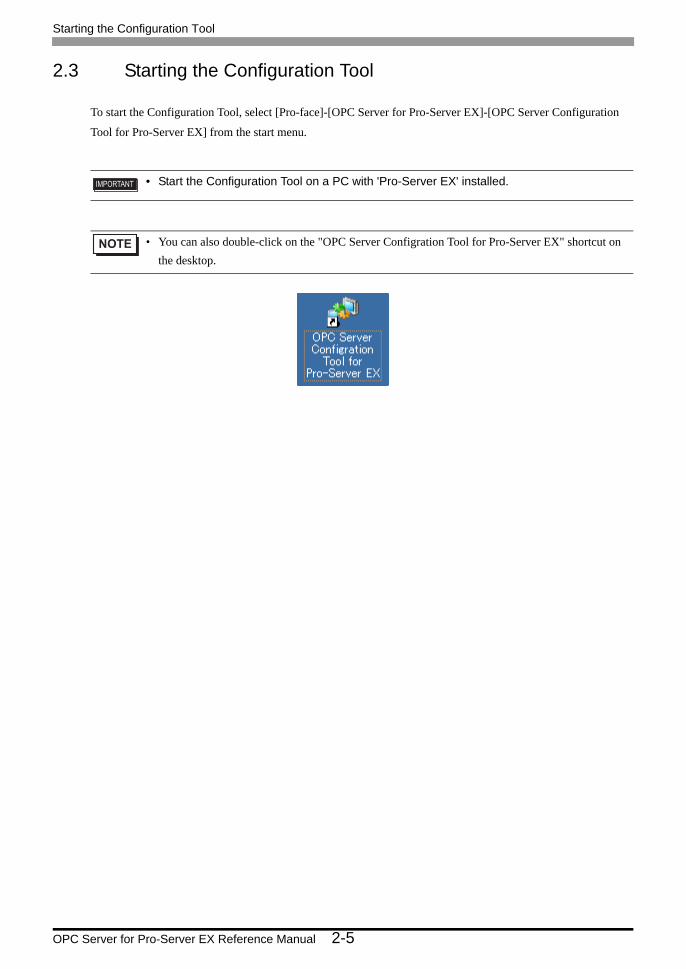
2.3 Starting the Configuration Tool
To start the Configuration Tool, select [Pro-face]-[OPC Server for Pro-Server EX]-[OPC Server Configuration
Tool for Pro-Server EX] from the start menu.
• Start the Configuration Tool on a PC with 'Pro-Server EX' installed.
• You can also double-click on the "OPC Server Configration Tool for Pro-Server EX" shortcut on the desktop.

Starting the Configuration Tool
OPC Server for Pro-Server EX Reference Manual 2-6
2.3.1 Screen Configuration
The Configuration Tool screen is comprised of the following five panes.
1) Station Explorer
2) ItemID View
3) Tag Parameter View
4) Error List
5) Tag Search Result
Tag Search ResultError List
Tag Parameter View Station ExplorerItemID View
Menu BarTool Bar

Starting the Configuration Tool
OPC Server for Pro-Server EX Reference Manual 2-7
6 Station Explorer
Displays the nodes, Device/PLCs, and tag names in a hierarchical tree structure. Shown below are the icons
displayed and their meaning.
7 ItemID View
The ItemID View displays in a tree how the registered tags are shown as the ItemID on the OPC Server. The
nodes, Device/PLCs, and tag groups are displayed as branches.
Icon Meaning Description
Tag Group Displays the grouped tags.Up to two levels of groups can be registered.Symbol Tag Group
Numeric TagDisplays the tag in which the data type is the symbol including 16-bit (Signed), 32-bit (Hex), single precision floating point, or the device address.
Bit Tag Displays the tag in which the data type is the bit symbol, or the device address.
Character String Tag Displays the tag in which the data type is the character string symbol, or the device address.
• A tag with an error is displayed with the -attached icon on the Station Explorer.

Starting the Configuration Tool
OPC Server for Pro-Server EX Reference Manual 2-8
8 Display of Disabled Tags
A disabled tag is displayed with the -attached icon on the Station Explorer. The disabled tags are not
displayed on the ItemID View.
9 Tag Parameter View
The tag parameter is displayed in the tag parameter view. Displayed contents depend on the item selected on the
Station Explorer or ItemID View.
In addition, only the following parameters that are common among each data type of Numeric, Bit, and Character
String are displayed.
The parameters depending on the data type including the signal condition or open label are not displayed.
10 Error List
Displays the list of tags with errors. Double-click a tag on the list to move to the corresponding tag on the Station
Explorer.
11 Tag Search Result
Displays a list of tags hit in the tag search. Double-click a tag on the list to move to the corresponding tag on the
Station Explorer.
Selected Item Displayed Contents
Device/PLC Displays the parameters of the tag registered directly under the Device/PLC.The tag group or tag under the group is not displayed.
Tag Group Displays the parameters of the tag under the selected tag group.
Tag Displays the parameters of the selected tag.
Others Displays none.
Parameters Description
ItemID Displays the tag as the ItemID on the OPC Server
Tag Tag name for the symbol or device address
Device Address Symbol name or device address
Data Type
Data type of the symbol or device address 16-bit (Signed, Unsigned, HEX, BCD) 32-bit (Signed, Unsigned, HEX, BCD)Bit, Single precision floating point, Double precision floating point, Character string
Description Tag description
Starting the Configuration Tool
OPC Server for Pro-Server EX Reference Manual 2-9
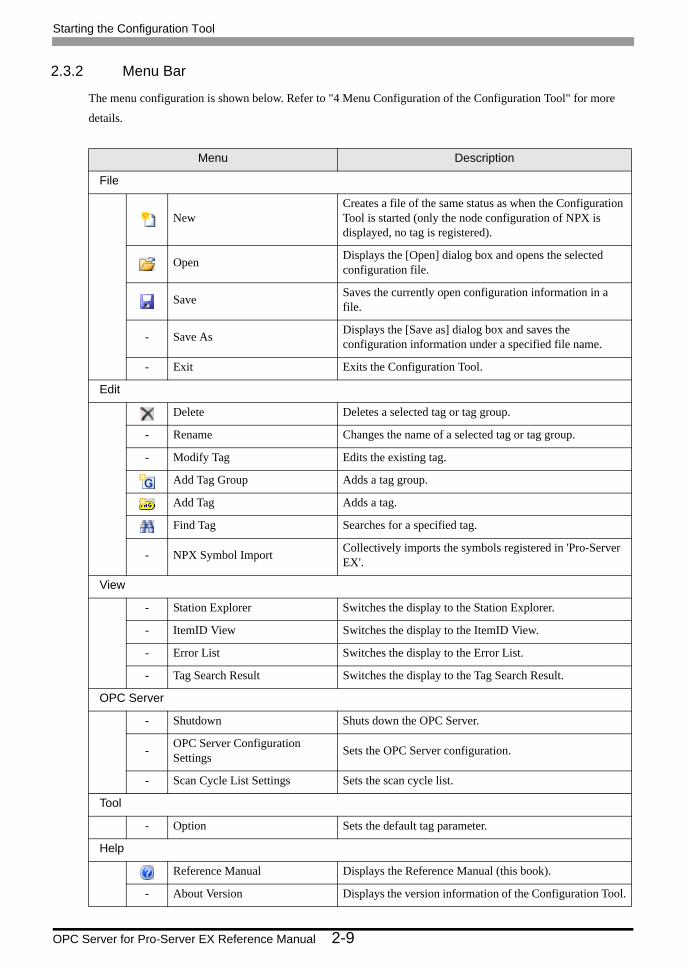
2.3.2 Menu Bar
The menu configuration is shown below. Refer to "4 Menu Configuration of the Configuration Tool" for more
details.
Menu Description
File
NewCreates a file of the same status as when the Configuration Tool is started (only the node configuration of NPX is displayed, no tag is registered).
Open Displays the [Open] dialog box and opens the selected configuration file.
Save Saves the currently open configuration information in a file.
- Save As Displays the [Save as] dialog box and saves the configuration information under a specified file name.
- Exit Exits the Configuration Tool.
Edit
Delete Deletes a selected tag or tag group.
- Rename Changes the name of a selected tag or tag group.
- Modify Tag Edits the existing tag.
Add Tag Group Adds a tag group.
Add Tag Adds a tag.
Find Tag Searches for a specified tag.
- NPX Symbol Import Collectively imports the symbols registered in 'Pro-Server EX'.
View
- Station Explorer Switches the display to the Station Explorer.
- ItemID View Switches the display to the ItemID View.
- Error List Switches the display to the Error List.
- Tag Search Result Switches the display to the Tag Search Result.
OPC Server
- Shutdown Shuts down the OPC Server.
- OPC Server Configuration Settings Sets the OPC Server configuration.
- Scan Cycle List Settings Sets the scan cycle list.
Tool
- Option Sets the default tag parameter.
Help
Reference Manual Displays the Reference Manual (this book).
- About Version Displays the version information of the Configuration Tool.

Registering a Tag
OPC Server for Pro-Server EX Reference Manual 2-10
2.4 Registering a Tag
Register the symbol variables or Device/PLCs registered in 'Pro-Server EX' as the tags.
To register the symbol → "2.4.1 Tag Registering a Symbol"
To register the Device/PLC → "2.4.2 Tag Registering a Device Address"
2.4.1 Tag Registering a Symbol
1 On the Station Explorer, select the symbol sheet in which the symbol you want to tag is registered, and select
[Add Tag] from the [Edit] menu.
• You can also use the [Add Tag] icon on the Tool Bar.
Registering a Tag
OPC Server for Pro-Server EX Reference Manual 2-11
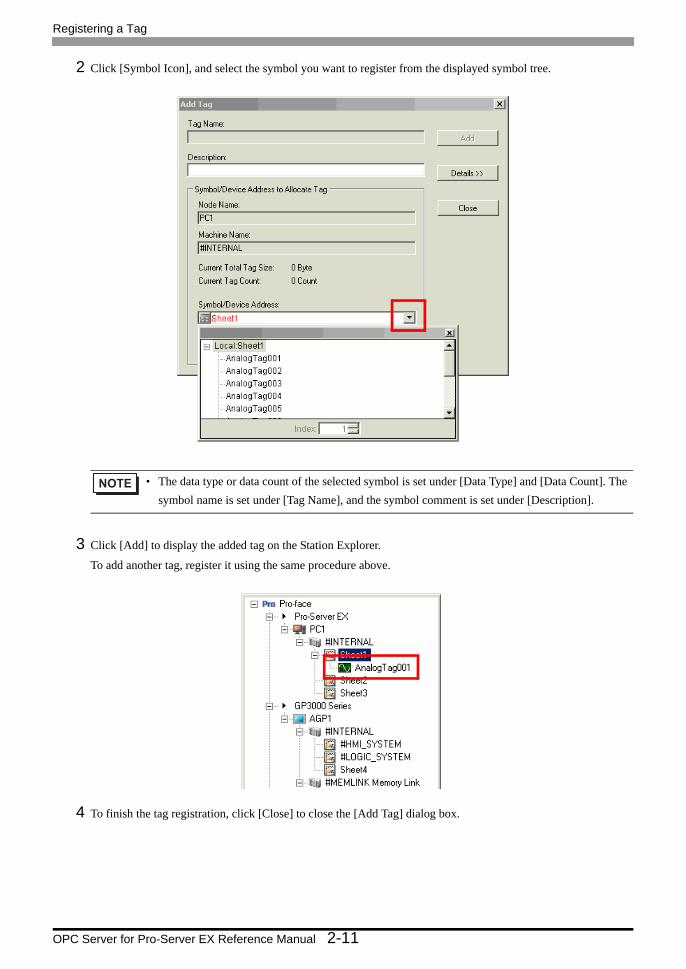
2 Click [Symbol Icon], and select the symbol you want to register from the displayed symbol tree.
3 Click [Add] to display the added tag on the Station Explorer.
To add another tag, register it using the same procedure above.
4 To finish the tag registration, click [Close] to close the [Add Tag] dialog box.
• The data type or data count of the selected symbol is set under [Data Type] and [Data Count]. The symbol name is set under [Tag Name], and the symbol comment is set under [Description].

Registering a Tag
OPC Server for Pro-Server EX Reference Manual 2-12
2.4.2 Tag Registering a Device Address
1 On the Station Explorer, select the Device/PLC with the device address you want to tag, and select [Add Tag]
from the [Edit] menu.
2 Directly enter the device address to register under [Symbol/Device Address].
• You can also use the [Add Tag] icon on the Tool Bar.

Registering a Tag
OPC Server for Pro-Server EX Reference Manual 2-13
3 Set the device data type under [Data Type] and the device data count under [Device Count].
4 Enter the device tag name under [Tag Name] and the additional tag description under [Description], and then click
[Add].

Registering a Tag
OPC Server for Pro-Server EX Reference Manual 2-14
5 The additional tag is displayed on the Station Explorer.
To add another tag, register it using the same procedure above.
6 To finish the tag registration, click [Close] to close the [Add Tag] dialog box.

Registering a Tag
OPC Server for Pro-Server EX Reference Manual 2-15
2.4.3 Registering Detailed Tag Parameters
1 Click the [Details <<] button to display the detailed tag parameters.
• The detailed parameter items depend on the contents set in [Data Type]. Refer to "2.5.1 Detailed Tag Parameters" for more details.
• The default detailed parameters are the values set under [Option] in the [Tool] menu.

Registering a Tag
OPC Server for Pro-Server EX Reference Manual 2-16
2 You can change the corresponding parameter contents.
• To set [Scan Cycle], click the parameter area and select from the dropdown list.
Confirming the Detailed Specification
OPC Server for Pro-Server EX Reference Manual 2-17
2.5 Confirming the Detailed Specification
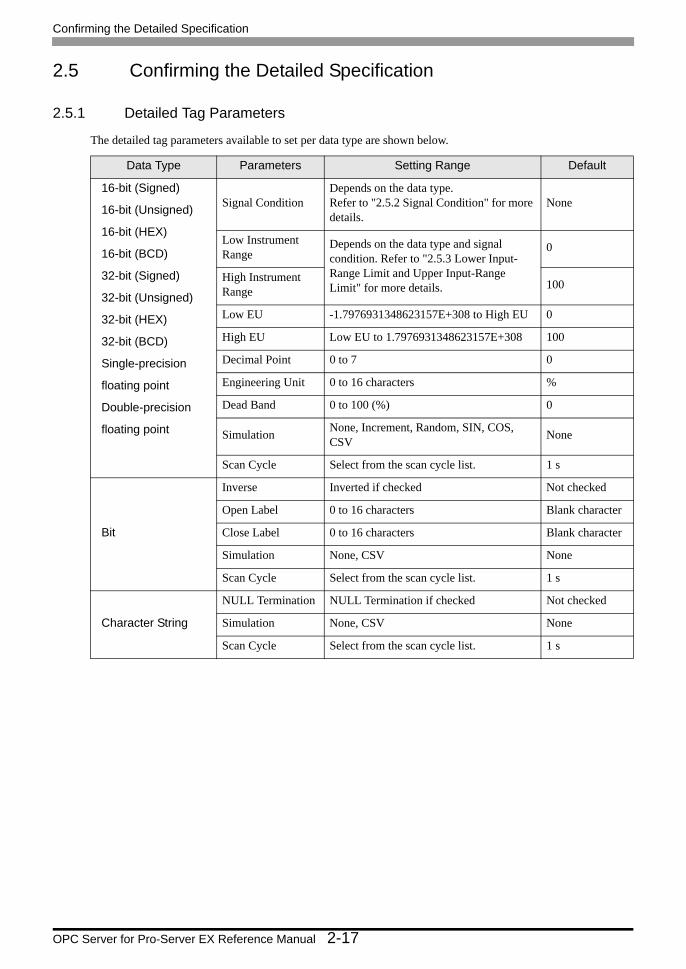
2.5.1 Detailed Tag Parameters
The detailed tag parameters available to set per data type are shown below.
Data Type Parameters Setting Range Default
16-bit (Signed)
16-bit (Unsigned)
16-bit (HEX)
16-bit (BCD)
32-bit (Signed)
32-bit (Unsigned)
32-bit (HEX)
32-bit (BCD)
Single-precision
floating point
Double-precision
floating point
Signal ConditionDepends on the data type.Refer to "2.5.2 Signal Condition" for more details.
None
Low Instrument Range
Depends on the data type and signal condition. Refer to "2.5.3 Lower Input-Range Limit and Upper Input-Range Limit" for more details.
0
High Instrument Range 100
Low EU -1.7976931348623157E+308 to High EU 0
High EU Low EU to 1.7976931348623157E+308 100
Decimal Point 0 to 7 0
Engineering Unit 0 to 16 characters %
Dead Band 0 to 100 (%) 0
Simulation None, Increment, Random, SIN, COS, CSV None
Scan Cycle Select from the scan cycle list. 1 s
Bit
Inverse Inverted if checked Not checked
Open Label 0 to 16 characters Blank character
Close Label 0 to 16 characters Blank character
Simulation None, CSV None
Scan Cycle Select from the scan cycle list. 1 s
Character String
NULL Termination NULL Termination if checked Not checked
Simulation None, CSV None
Scan Cycle Select from the scan cycle list. 1 s
Confirming the Detailed Specification
OPC Server for Pro-Server EX Reference Manual 2-18
2.5.2 Signal Condition
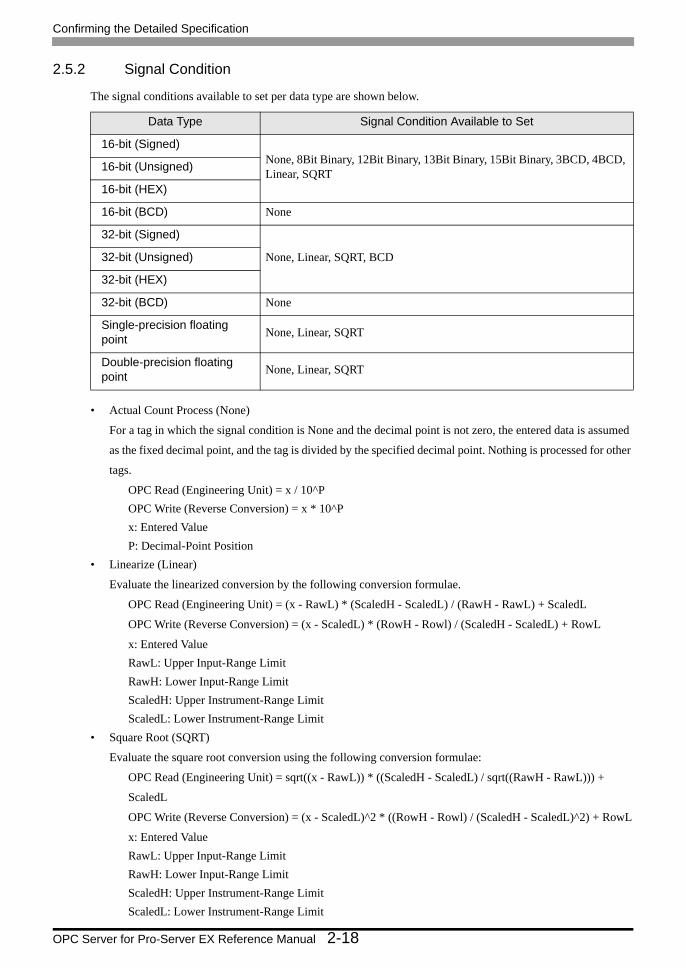
The signal conditions available to set per data type are shown below.
• Actual Count Process (None)
For a tag in which the signal condition is None and the decimal point is not zero, the entered data is assumed
as the fixed decimal point, and the tag is divided by the specified decimal point. Nothing is processed for other
tags.
OPC Read (Engineering Unit) = x / 10^POPC Write (Reverse Conversion) = x * 10^Px: Entered ValueP: Decimal-Point Position
• Linearize (Linear)
Evaluate the linearized conversion by the following conversion formulae.
OPC Read (Engineering Unit) = (x - RawL) * (ScaledH - ScaledL) / (RawH - RawL) + ScaledL
OPC Write (Reverse Conversion) = (x - ScaledL) * (RowH - Rowl) / (ScaledH - ScaledL) + RowL
x: Entered ValueRawL: Upper Input-Range LimitRawH: Lower Input-Range LimitScaledH: Upper Instrument-Range LimitScaledL: Lower Instrument-Range Limit
• Square Root (SQRT)
Evaluate the square root conversion using the following conversion formulae:
OPC Read (Engineering Unit) = sqrt((x - RawL)) * ((ScaledH - ScaledL) / sqrt((RawH - RawL))) +
ScaledL
OPC Write (Reverse Conversion) = (x - ScaledL)^2 * ((RowH - Rowl) / (ScaledH - ScaledL)^2) + RowL
x: Entered ValueRawL: Upper Input-Range LimitRawH: Lower Input-Range LimitScaledH: Upper Instrument-Range LimitScaledL: Lower Instrument-Range Limit
Data Type Signal Condition Available to Set
16-bit (Signed)None, 8Bit Binary, 12Bit Binary, 13Bit Binary, 15Bit Binary, 3BCD, 4BCD, Linear, SQRT16-bit (Unsigned)
16-bit (HEX)
16-bit (BCD) None
32-bit (Signed)
None, Linear, SQRT, BCD32-bit (Unsigned)
32-bit (HEX)
32-bit (BCD) None
Single-precision floating point None, Linear, SQRT
Double-precision floating point None, Linear, SQRT
Confirming the Detailed Specification
OPC Server for Pro-Server EX Reference Manual 2-19
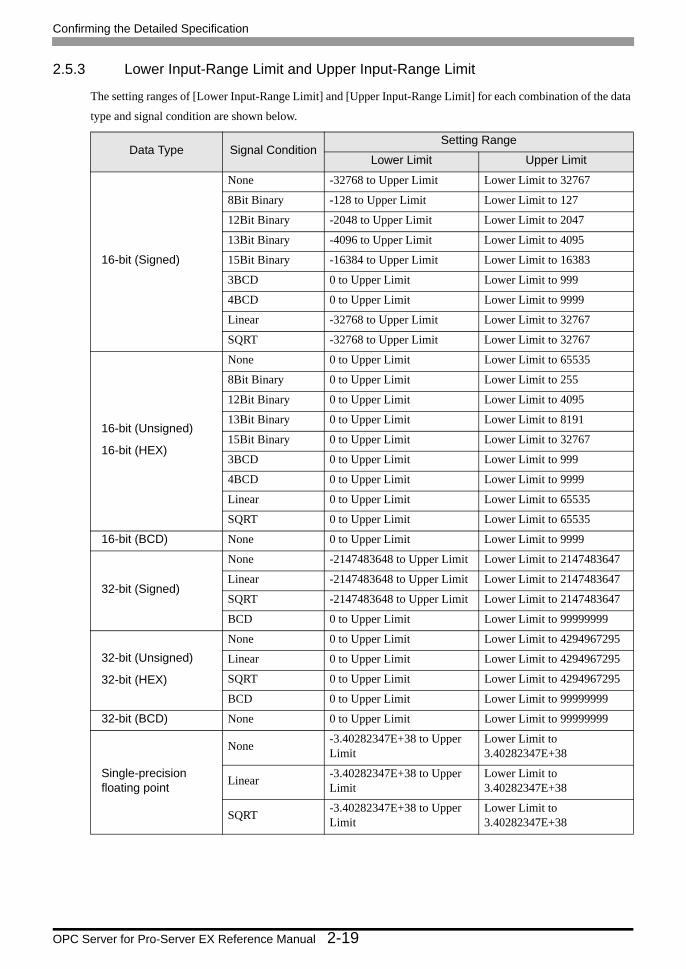
2.5.3 Lower Input-Range Limit and Upper Input-Range Limit
The setting ranges of [Lower Input-Range Limit] and [Upper Input-Range Limit] for each combination of the data
type and signal condition are shown below.
Data Type Signal ConditionSetting Range
Lower Limit Upper Limit
16-bit (Signed)
None -32768 to Upper Limit Lower Limit to 32767
8Bit Binary -128 to Upper Limit Lower Limit to 127
12Bit Binary -2048 to Upper Limit Lower Limit to 2047
13Bit Binary -4096 to Upper Limit Lower Limit to 4095
15Bit Binary -16384 to Upper Limit Lower Limit to 16383
3BCD 0 to Upper Limit Lower Limit to 999
4BCD 0 to Upper Limit Lower Limit to 9999
Linear -32768 to Upper Limit Lower Limit to 32767
SQRT -32768 to Upper Limit Lower Limit to 32767
16-bit (Unsigned)
16-bit (HEX)
None 0 to Upper Limit Lower Limit to 65535
8Bit Binary 0 to Upper Limit Lower Limit to 255
12Bit Binary 0 to Upper Limit Lower Limit to 4095
13Bit Binary 0 to Upper Limit Lower Limit to 8191
15Bit Binary 0 to Upper Limit Lower Limit to 32767
3BCD 0 to Upper Limit Lower Limit to 999
4BCD 0 to Upper Limit Lower Limit to 9999
Linear 0 to Upper Limit Lower Limit to 65535
SQRT 0 to Upper Limit Lower Limit to 65535
16-bit (BCD) None 0 to Upper Limit Lower Limit to 9999
32-bit (Signed)
None -2147483648 to Upper Limit Lower Limit to 2147483647
Linear -2147483648 to Upper Limit Lower Limit to 2147483647
SQRT -2147483648 to Upper Limit Lower Limit to 2147483647
BCD 0 to Upper Limit Lower Limit to 99999999
32-bit (Unsigned)
32-bit (HEX)
None 0 to Upper Limit Lower Limit to 4294967295
Linear 0 to Upper Limit Lower Limit to 4294967295
SQRT 0 to Upper Limit Lower Limit to 4294967295
BCD 0 to Upper Limit Lower Limit to 99999999
32-bit (BCD) None 0 to Upper Limit Lower Limit to 99999999
Single-precision floating point
None -3.40282347E+38 to Upper Limit
Lower Limit to 3.40282347E+38
Linear -3.40282347E+38 to Upper Limit
Lower Limit to 3.40282347E+38
SQRT -3.40282347E+38 to Upper Limit
Lower Limit to 3.40282347E+38

Confirming the Detailed Specification
OPC Server for Pro-Server EX Reference Manual 2-20
Double-precision floating point
None -1.7976931348623157E+308 to Upper Limit
Lower Limit to 1.7976931348623157E+308
Linear -1.7976931348623157E+308 to Upper Limit
Lower Limit to 1.7976931348623157E+308
SQRT -1.7976931348623157E+308 to Upper Limit
Lower Limit to 1.7976931348623157E+308
Data Type Signal ConditionSetting Range
Lower Limit Upper Limit
Confirming the Detailed Specification
OPC Server for Pro-Server EX Reference Manual 2-21
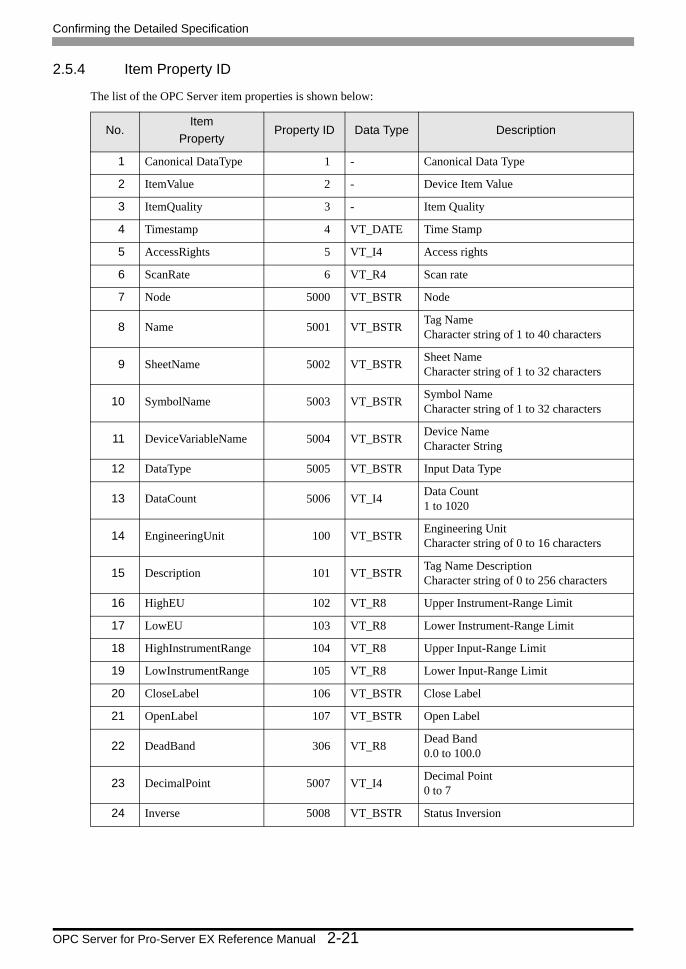
2.5.4 Item Property ID
The list of the OPC Server item properties is shown below:
No.Item
PropertyProperty ID Data Type Description
1 Canonical DataType 1 - Canonical Data Type
2 ItemValue 2 - Device Item Value
3 ItemQuality 3 - Item Quality
4 Timestamp 4 VT_DATE Time Stamp
5 AccessRights 5 VT_I4 Access rights
6 ScanRate 6 VT_R4 Scan rate
7 Node 5000 VT_BSTR Node
8 Name 5001 VT_BSTR Tag NameCharacter string of 1 to 40 characters
9 SheetName 5002 VT_BSTR Sheet NameCharacter string of 1 to 32 characters
10 SymbolName 5003 VT_BSTR Symbol NameCharacter string of 1 to 32 characters
11 DeviceVariableName 5004 VT_BSTR Device NameCharacter String
12 DataType 5005 VT_BSTR Input Data Type
13 DataCount 5006 VT_I4 Data Count1 to 1020
14 EngineeringUnit 100 VT_BSTR Engineering UnitCharacter string of 0 to 16 characters
15 Description 101 VT_BSTR Tag Name DescriptionCharacter string of 0 to 256 characters
16 HighEU 102 VT_R8 Upper Instrument-Range Limit
17 LowEU 103 VT_R8 Lower Instrument-Range Limit
18 HighInstrumentRange 104 VT_R8 Upper Input-Range Limit
19 LowInstrumentRange 105 VT_R8 Lower Input-Range Limit
20 CloseLabel 106 VT_BSTR Close Label
21 OpenLabel 107 VT_BSTR Open Label
22 DeadBand 306 VT_R8 Dead Band0.0 to 100.0
23 DecimalPoint 5007 VT_I4 Decimal Point0 to 7
24 Inverse 5008 VT_BSTR Status Inversion

Confirming the Detailed Specification
OPC Server for Pro-Server EX Reference Manual 2-22
25 SignalCondition 5009 VT_BSTR
All Data Types None
16-bit
8Bit Binary, 12Bit Binary, 13Bit Binary, 15Bit Binary, Linear, SQRT, 3BCD, 4BCD
32-bit Linear, SQRT, BCD
26 NullTermination 5010 VT_BOOL NULL Termination
27 Simulation 5011 VT_BSTR None, Increment, Random, SIN, COS, CSV
No.Item
PropertyProperty ID Data Type Description

Environment Setting When Operating OPC Server and OPC Client on Different PCs
OPC Server for Pro-Server EX Reference Manual 2-23
2.6 Environment Setting When Operating OPC Server and OPC Client on Different PCs
In Windows XP Professional (herein referred to as Windows XP) or Windows Server 2003, "DCOM Setting" is
required to remotely connect to the OPC Server or OPC Client.
For this reason, you need to change the security settings for DCOM on a PC with the OPC Server or the OPC
Client already running.
2.6.1 Changing the "Local Security Policy"
1 Open [Administrative Tools] under [Control Panel], and run [Local Security Policy].
• To change the security settings, log on as a user with "Administrator's rights".

Environment Setting When Operating OPC Server and OPC Client on Different PCs
OPC Server for Pro-Server EX Reference Manual 2-24
2 Select [Security Options] under [Local Policies], and double-click [Accounts: Limit local account use of blank
passwords to console logon only].
3 Select [Disabled] and click [OK].
4 Similarly, double-click [Network access: Sharing and security model for local accounts].
Environment Setting When Operating OPC Server and OPC Client on Different PCs
OPC Server for Pro-Server EX Reference Manual 2-25
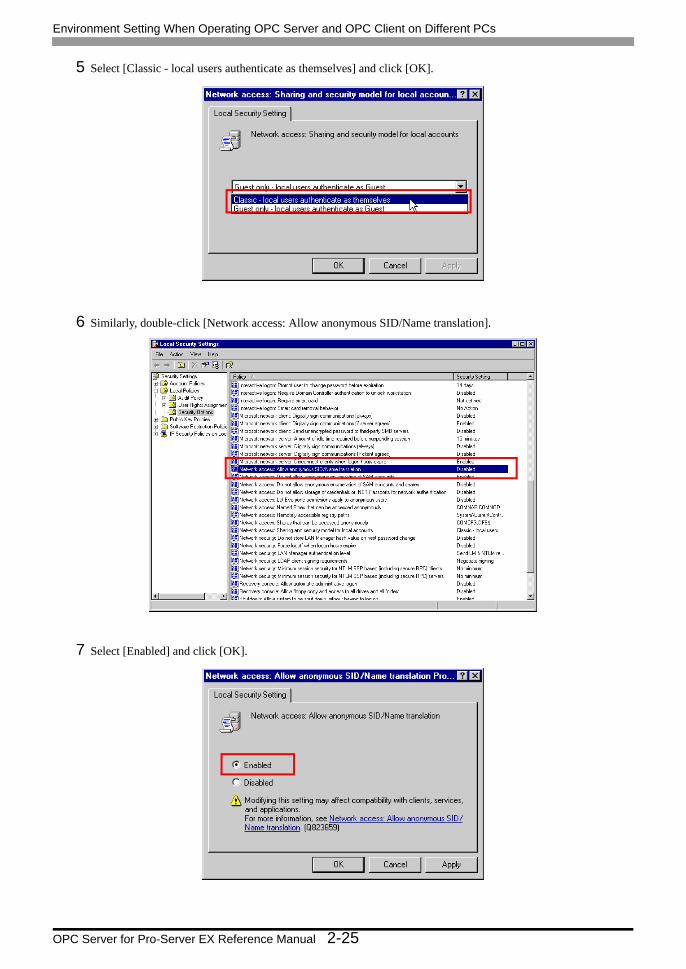
5 Select [Classic - local users authenticate as themselves] and click [OK].
6 Similarly, double-click [Network access: Allow anonymous SID/Name translation].
7 Select [Enabled] and click [OK].
Environment Setting When Operating OPC Server and OPC Client on Different PCs
OPC Server for Pro-Server EX Reference Manual 2-26
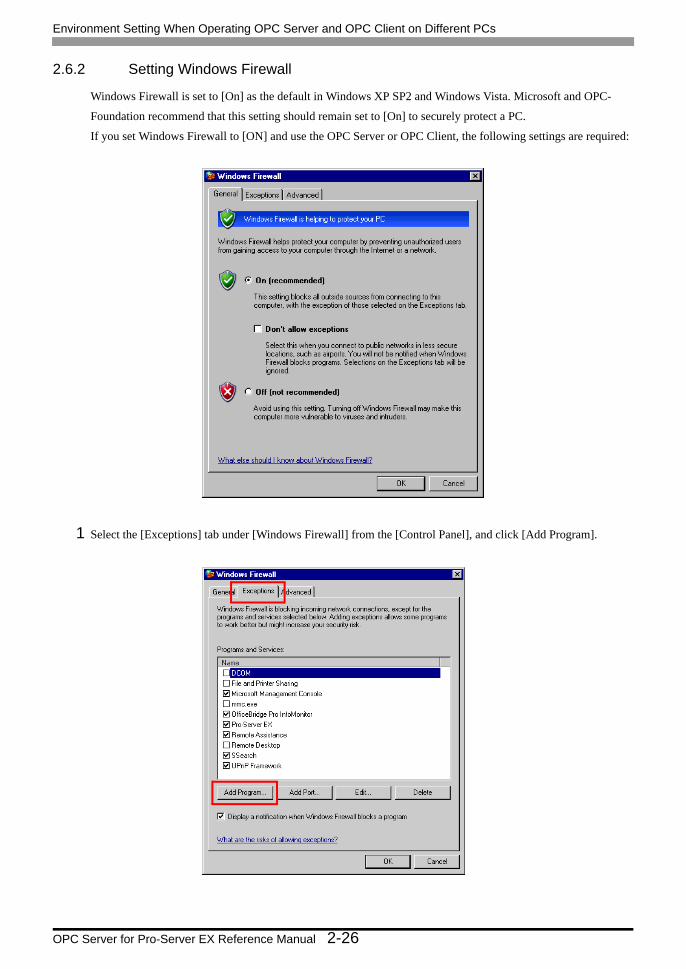
2.6.2 Setting Windows Firewall
Windows Firewall is set to [On] as the default in Windows XP SP2 and Windows Vista. Microsoft and OPC-
Foundation recommend that this setting should remain set to [On] to securely protect a PC.
If you set Windows Firewall to [ON] and use the OPC Server or OPC Client, the following settings are required:
1 Select the [Exceptions] tab under [Windows Firewall] from the [Control Panel], and click [Add Program].

Environment Setting When Operating OPC Server and OPC Client on Different PCs
OPC Server for Pro-Server EX Reference Manual 2-27
• When using Windows Vista, perform the following procedures. (1)Click [Windows Firewall] under [Control Panel]. (2)Click [Allow a program through Windows Firewall].
(3)Click [Add program].

Environment Setting When Operating OPC Server and OPC Client on Different PCs
OPC Server for Pro-Server EX Reference Manual 2-28
2 Click [Browse] and add the programs. The programs to be added differ between the server and the clients' PCs.
Refer to the following and add the appropriate programs, respectively.
• Server PC
• C:\Windows\System32\mmc.exe
• C:\Windows\System32\OpcEnum.exe
• C:\Program Files\Pro-face\OPC Server for Pro-Server EX\OPC DA ProServer.exe (On Windows Vista,
"C:\Pro-face\OPC Server for Pro-Server EX\OPC DA ProServer.exe")
• Client PC
• C:\Windows\System32\mmc.exe
• C:\Windows\System32\OpcEnum.exe
• C:\Program Files\Pro-face\OPC Server for Pro-Server EX\Pro-faceOpcDaClient.exe (On Windows Vista,
"C:\Pro-face\OPC Server for Pro-Server EX\Pro-faceOpcDaClient.exe")

Environment Setting When Operating OPC Server and OPC Client on Different PCs
OPC Server for Pro-Server EX Reference Manual 2-29
3 Next check the following options.
• File and Printer Sharing
• Network Search (Only when using Windows Vista)
4 In the [Add a Port] dialog box, enter as "Name: DCOM", "Port Number: 135", and check "TCP".
Environment Setting When Operating OPC Server and OPC Client on Different PCs
OPC Server for Pro-Server EX Reference Manual 2-30
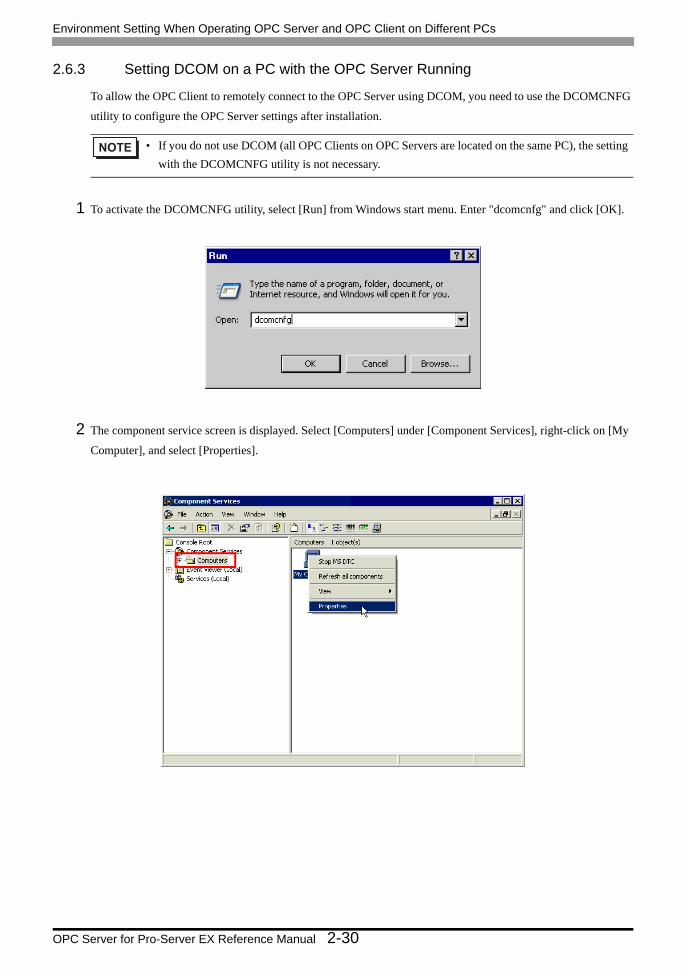
2.6.3 Setting DCOM on a PC with the OPC Server Running
To allow the OPC Client to remotely connect to the OPC Server using DCOM, you need to use the DCOMCNFG
utility to configure the OPC Server settings after installation.
1 To activate the DCOMCNFG utility, select [Run] from Windows start menu. Enter "dcomcnfg" and click [OK].
2 The component service screen is displayed. Select [Computers] under [Component Services], right-click on [My
Computer], and select [Properties].
• If you do not use DCOM (all OPC Clients on OPC Servers are located on the same PC), the setting with the DCOMCNFG utility is not necessary.

Environment Setting When Operating OPC Server and OPC Client on Different PCs
OPC Server for Pro-Server EX Reference Manual 2-31
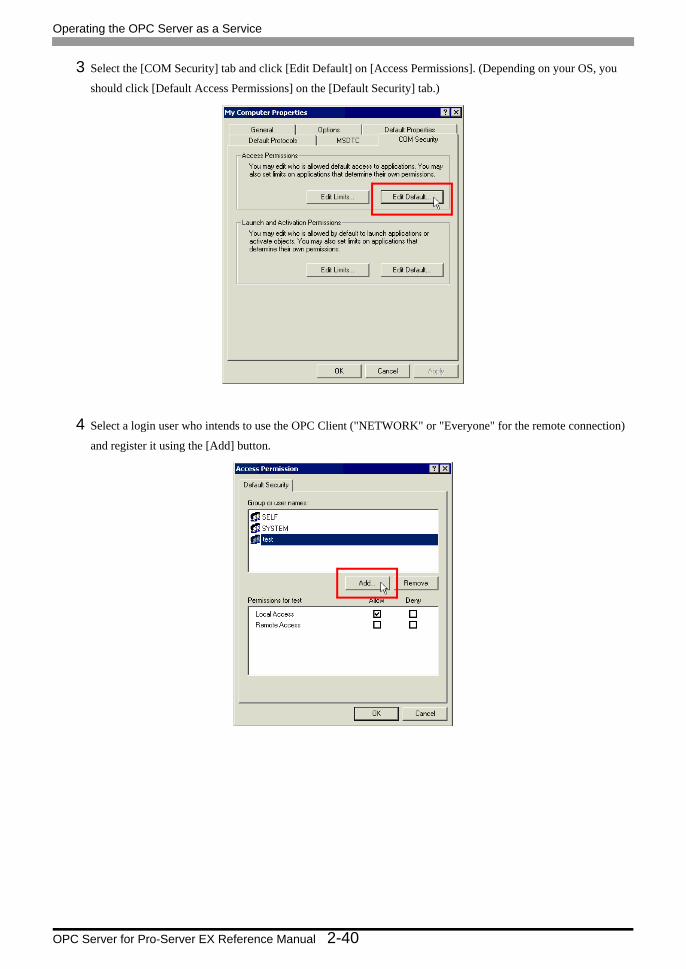
3 The properties screen of "My Computer" is displayed. Select the [COM Security] tab and click [Edit Limits] on
[Access Permissions].
4 The setting [Remote Access] should be denied for [ANONYMOUS LOGON] users. Also the setting [Remote
Access] should be allowed for [Everyone] users.

Environment Setting When Operating OPC Server and OPC Client on Different PCs
OPC Server for Pro-Server EX Reference Manual 2-32
5 Click [Edit Default] on [Access Permissions], and set [Remote Access] to [Allow] for [Everyone] users.
6 Click [Edit Limits] on [Launch and Activation Permissions], and set [Remote Launch] and [Remote Activation]
to [Allow] for [Administrators] and [Everyone] users.
• Depending on your system environment, "Everyone" may not be displayed. In this case, follow these steps to add "Everyone" users:
(1) Click [Add] on the [Access Permission] screen. The [Select Users or Groups] screen appears.(2) Click [Object Types]. The [Object Types] screen appears.(3) Make sure that "Built-in security principals" is checked, and then click [OK]. If it is not
checked, click to add a checkmark. Clicking [OK] returns you to the [Select Users or Groups] screen.
(4) Click [Advanced]. The [Select Users or Groups] screen appears.(5) Type "Everyone" in the [Common Queries] entry field.(6) Click [Find Now]. "Everyone" appears in the lower part of the screen.(7) Select "Everyone" in the lower part of the screen, and then click [OK]. This returns you to the
[Select Users or Groups] screen.(8) Click [OK] to add "Everyone" to the [Access Permission] screen.

Environment Setting When Operating OPC Server and OPC Client on Different PCs
OPC Server for Pro-Server EX Reference Manual 2-33
7 Click [Edit Default] on [Launch and Activation Permissions], and set [Remote Launch] and [Remote Activation]
to [Allow] for [Everyone] users.
8 Select [DCOM Config] under [My Computer].
Environment Setting When Operating OPC Server and OPC Client on Different PCs
OPC Server for Pro-Server EX Reference Manual 2-34
9 Right-click on [Pro-face OPCEx Data Access 2.05a/3.00 Service], and select the properties.
10 Click the [Identity] tab, select [The interactive user], and click [OK].
Environment Setting When Operating OPC Server and OPC Client on Different PCs
OPC Server for Pro-Server EX Reference Manual 2-35
2.6.4 Setting DCOM on a PC with the OPC Client Running
To activate the Subscription (OnDataChange) for calling the OPC Client from the OPC Server, the DCOM setting
is also required on a PC with the OPC Client already running.
1 To activate the DCOMCNFG utility, select [Run] from Windows start menu. Enter "dcomcnfg" and click [OK].
2 The component service screen is displayed. Select [Computers] under [Component Services], right-click on [My
Computer], and select [Properties].
Environment Setting When Operating OPC Server and OPC Client on Different PCs
OPC Server for Pro-Server EX Reference Manual 2-36
3 The properties screen of "My Computer" is displayed. Select the [COM Security] tab and click [Edit Limits] on
[Access Permissions].
4 Set [Remote Access] to [Allow] for [ANONYMOUS LOGON] and [Everyone] users.
• Depending on your system environment, "Everyone" may not be displayed. In this case, follow these steps to add "Everyone" users:
(1) Click [Add] on the [Access Permission] screen. The [Select Users or Groups] screen appears.(2) Click [Object Types]. The [Object Types] screen appears.(3) Make sure that "Built-in security principals" is checked, and then click [OK]. If it is not
checked, click to add a checkmark. Clicking [OK] returns you to the [Select Users or Groups] screen.
(4) Click [Advanced]. The [Select Users or Groups] screen appears.(5) Type "Everyone" in the [Common Queries] entry field.(6) Click [Find Now]. "Everyone" appears in the lower part of the screen.(7) Select "Everyone" in the lower part of the screen, and then click [OK]. This returns you to the
[Select Users or Groups] screen.(8) Click [OK] to add "Everyone" to the [Access Permission] screen.

Environment Setting When Operating OPC Server and OPC Client on Different PCs
OPC Server for Pro-Server EX Reference Manual 2-37
5 Click [Edit Default] on [Access Permissions]. The setting [Remote Access] should not be allowed for [SELF] and
[SYSTEM] users. Also, the setting [Remote Access] should be allowed for [NETWORK] users.
6 Click [Edit Limits] on [Launch and Activation Permissions], and set [Remote Launch] and [Remote Activation]
to [Allow] for [Administrators] and [Everyone] users.
Environment Setting When Operating OPC Server and OPC Client on Different PCs
OPC Server for Pro-Server EX Reference Manual 2-38
7 Click [Edit Default] on [Launch and Activation Permissions], and set [Remote Launch] and [Remote Activation]
to [Allow] for [Everyone] and [Administrators] users.
Also, the setting [Remote Access] and [Remote Activation] should not be allowed for [INTERACTIVE] or
[SYSTEM] users.

Operating the OPC Server as a Service
OPC Server for Pro-Server EX Reference Manual 2-39
2.7 Operating the OPC Server as a Service
2.7.1 Environment Settings When Operating the OPC Server as a Service
Configure the following settings before operating the OPC Server as Windows Service. Otherwise, you cannot
connect from the OPC Client to the OPC Server.
1 From the [Start] menu, select [Control Panel]-[Administrative Tools]-[Component Services] and open the
following dialog box.
2 Right-click on [My Computer] and select [Properties].
• When installing 'OPC Server for Pro-Server EX', you need to check the option for "Install OPC Server for Pro-Server EX as a service".
Operating the OPC Server as a Service
OPC Server for Pro-Server EX Reference Manual 2-40
3 Select the [COM Security] tab and click [Edit Default] on [Access Permissions]. (Depending on your OS, you
should click [Default Access Permissions] on the [Default Security] tab.)
4 Select a login user who intends to use the OPC Client ("NETWORK" or "Everyone" for the remote connection)
and register it using the [Add] button.

Operating the OPC Server as a Service
OPC Server for Pro-Server EX Reference Manual 2-41
5 Check [Allow] for [Local Access] and click the [OK] button. (Depending on your OS, specify [Allow Default
Access Permission] for [Type of Access].)
Operating the OPC Server as a Service
OPC Server for Pro-Server EX Reference Manual 2-42
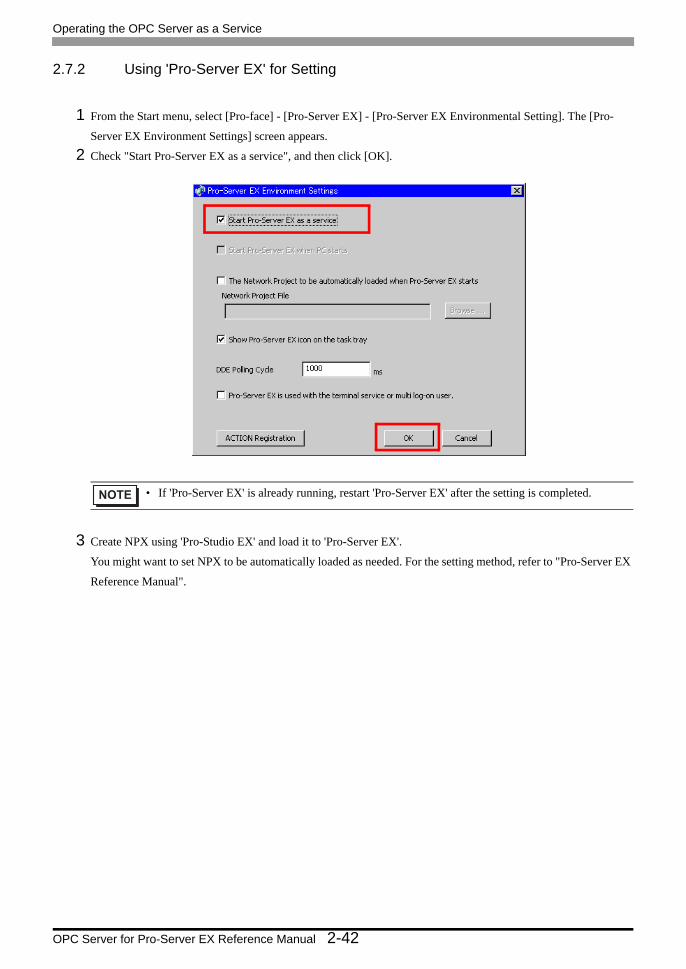
2.7.2 Using 'Pro-Server EX' for Setting
1 From the Start menu, select [Pro-face] - [Pro-Server EX] - [Pro-Server EX Environmental Setting]. The [Pro-
Server EX Environment Settings] screen appears.
2 Check "Start Pro-Server EX as a service", and then click [OK].
3 Create NPX using 'Pro-Studio EX' and load it to 'Pro-Server EX'.
You might want to set NPX to be automatically loaded as needed. For the setting method, refer to "Pro-Server EX
Reference Manual".
• If 'Pro-Server EX' is already running, restart 'Pro-Server EX' after the setting is completed.

Operating the OPC Server as a Service
OPC Server for Pro-Server EX Reference Manual 2-43
2.7.3 Using 'OPC Server for Pro-Server EX' for Setting
1 From the Start menu, select [Pro-face] - [OPC Server for Pro-Server EX] - [OPC Server Configuration Tool for
Pro-Server EX] to start the Configuration Tool.
Here, you register a tag. For the registration method, refer to "2.4 Registering a Tag".
2 Click the [Save] icon to save the result as a tag configuration file.
3 Select [OPC Server Configuration Settings] from the [OPC Server] menu, and apply the saved tag configuration
file to the OPC Server.
4 Click [...], select the tag configuration file saved in step 2, and then click [OK].
5 From the [OPC Server] menu, select [Shut Down] to shut down the OPC Server. The configuration information is
applied to the OPC Server. (When the OPC Client connects to the OPC Server, the OPC Server restarts.)

Operating the OPC Server as a Service
OPC Server for Pro-Server EX Reference Manual 2-44
2.7.4 Connecting 'OPC Client for Pro-Server EX' to 'OPC Server for Pro-Server EX'
1 From the Start menu, select [Pro-face] - [OPC Server for Pro-Server EX] - [OPC Client for Pro-Server EX] to
start the OPC Client.
2 From the [Server] selection drop-down list, select "opcda://localhost/Pro-face.OPCEx.1" to specify 'OPC Server
for Pro-Server EX' on the local PC.
2.7.5 Notes on Operating the OPC Server as a Service
Note the following when operating the OPC Server as a server:
• To operate the OPC Server as a service, you need to specify the appropriate setting during installation. If
'OPC Server for Pro-Server EX' is already installed without "Install OPC Server for Pro-Server EX as a ser-
vice" checked, reinstall it.
• 'OPC Server for Pro-Server EX' does not start automatically during Windows startup, even after it is installed.
To make 'OPC Server for Pro-Server EX' start automatically during Windows startup, select [Control Panel] -
[Administrative Tools] - [Services] - "Pro-face OPCEx DataAccess 2.05a/3.00 Service", and then specify
"Automatic" for [Startup type].
• If you set 'OPC Server for Pro-Server EX' to start automatically during Windows startup, set it as well to
automatically load a network project file to 'Pro-Server EX'. Check "The Network Project to be automatically
loaded when Pro-Server EX starts" on the [Pro-Server EX Environment Settings] screen, and select the
network project file you want to load.
3-1
3 Operating the OPC DA Client
3 Operating the OPC DA Client .......................................................................................3-2
3.1 Starting the OPC Client .................................................................................................3-2
3.2 Connecting to and Disconnecting from the OPC Server...............................................3-5
3.3 Synchronously Reading/Writing Item Data ...................................................................3-8
3.4 Asynchronously Reading/Writing Item Data................................................................3-17
3.5 Canceling and Restarting the Subscription Data Distribution .....................................3-28
3.6 Editing and Deleting Items ..........................................................................................3-30
3.7 Asynchronously Reading/Writing Item Data in the Group...........................................3-32
3.8 Synchronous Processing Group Items........................................................................3-39
3.9 Browsing OPC Server Items .......................................................................................3-44
Starting the OPC Client
OPC Server for Pro-Server EX Reference Manual 3-2
3 Operating the OPC DA Client
3.1 Starting the OPC Client
The OPC Client accesses the OPC Server to read or write the item data on the OPC Server based on the OPC DA
specifications.
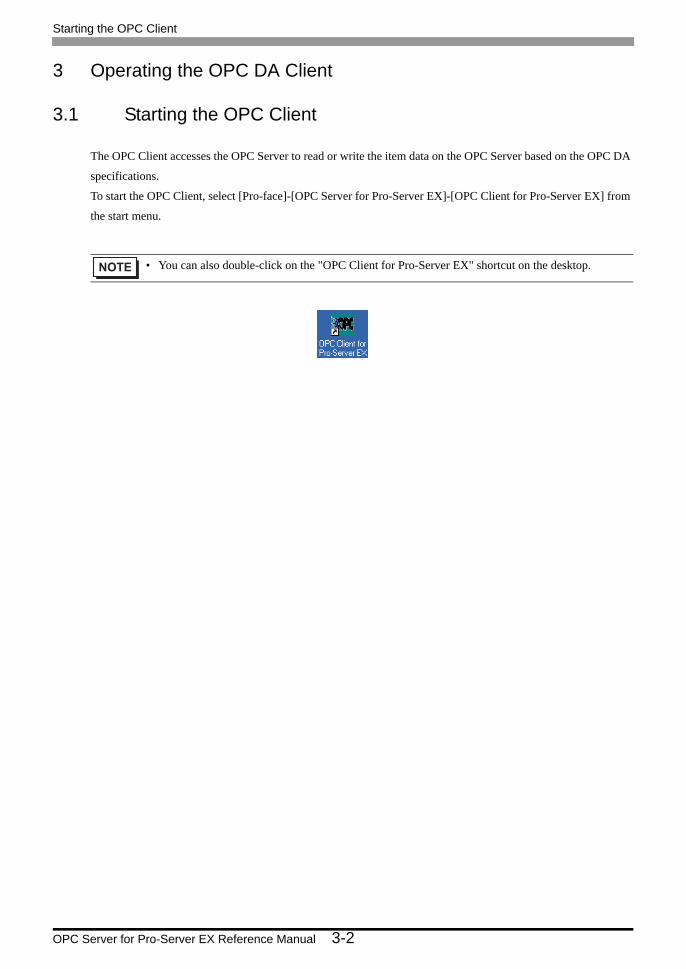
To start the OPC Client, select [Pro-face]-[OPC Server for Pro-Server EX]-[OPC Client for Pro-Server EX] from
the start menu.
• You can also double-click on the "OPC Client for Pro-Server EX" shortcut on the desktop.
Starting the OPC Client
OPC Server for Pro-Server EX Reference Manual 3-3
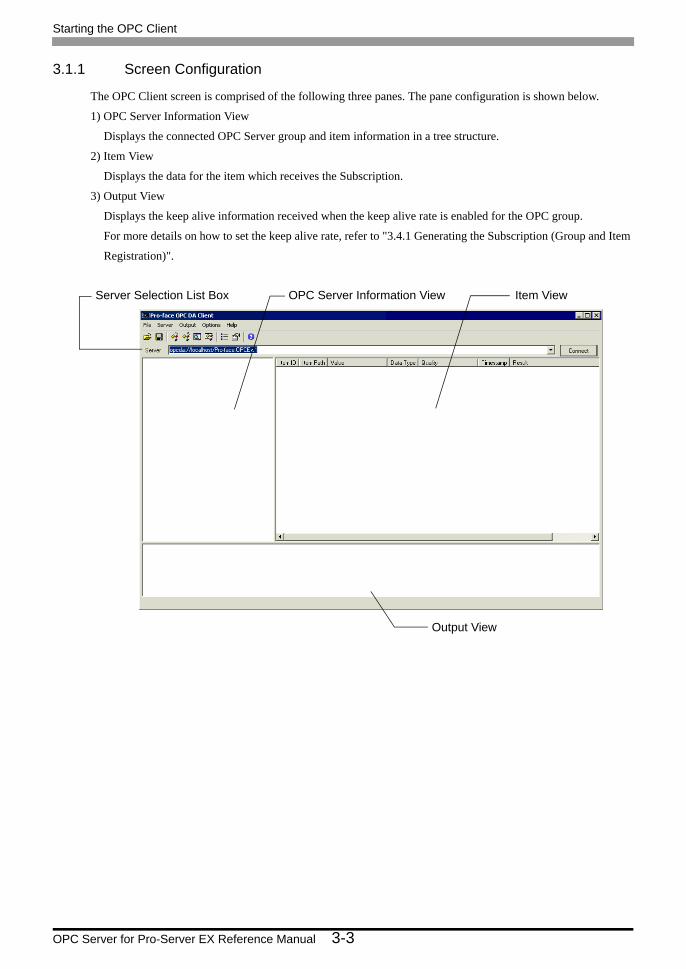
3.1.1 Screen Configuration
The OPC Client screen is comprised of the following three panes. The pane configuration is shown below.
1) OPC Server Information View
Displays the connected OPC Server group and item information in a tree structure.
2) Item View
Displays the data for the item which receives the Subscription.
3) Output View
Displays the keep alive information received when the keep alive rate is enabled for the OPC group.
For more details on how to set the keep alive rate, refer to "3.4.1 Generating the Subscription (Group and Item
Registration)".
Server Selection List Box OPC Server Information View Item View
Output View
Starting the OPC Client
OPC Server for Pro-Server EX Reference Manual 3-4
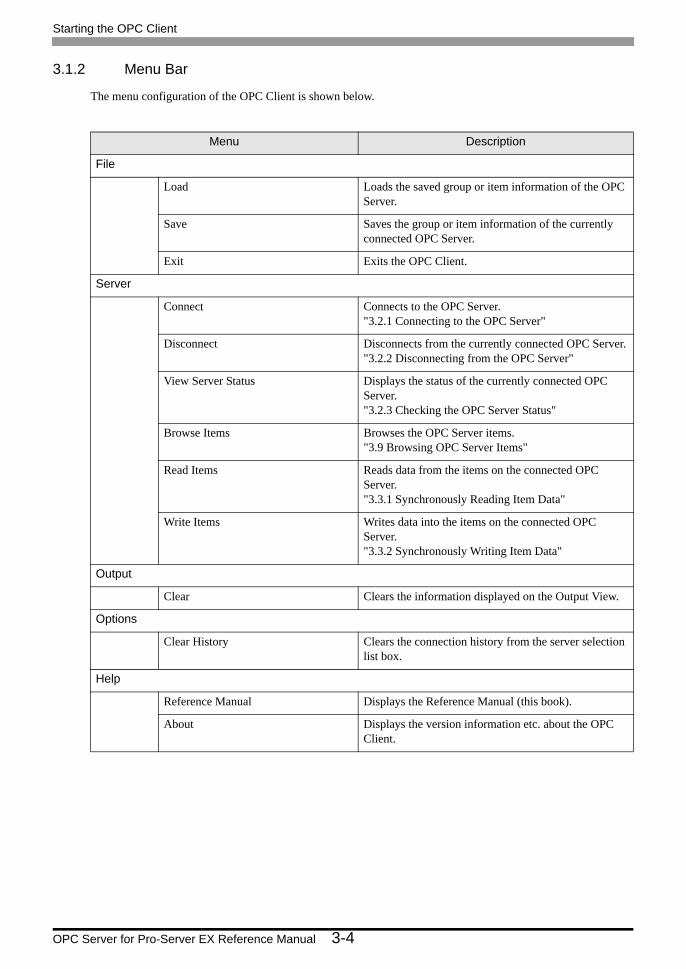
3.1.2 Menu Bar
The menu configuration of the OPC Client is shown below.
Menu Description
File
Load Loads the saved group or item information of the OPC Server.
Save Saves the group or item information of the currently connected OPC Server.
Exit Exits the OPC Client.
Server
Connect Connects to the OPC Server."3.2.1 Connecting to the OPC Server"
Disconnect Disconnects from the currently connected OPC Server."3.2.2 Disconnecting from the OPC Server"
View Server Status Displays the status of the currently connected OPC Server."3.2.3 Checking the OPC Server Status"
Browse Items Browses the OPC Server items."3.9 Browsing OPC Server Items"
Read Items Reads data from the items on the connected OPC Server."3.3.1 Synchronously Reading Item Data"
Write Items Writes data into the items on the connected OPC Server."3.3.2 Synchronously Writing Item Data"
Output
Clear Clears the information displayed on the Output View.
Options
Clear History Clears the connection history from the server selection list box.
Help
Reference Manual Displays the Reference Manual (this book).
About Displays the version information etc. about the OPC Client.

Connecting to and Disconnecting from the OPC Server
OPC Server for Pro-Server EX Reference Manual 3-5
3.2 Connecting to and Disconnecting from the OPC Server
3.2.1 Connecting to the OPC Server
To allow the OPC Client to connect to the OPC Server, select the target OPC Server from the [Server] selection
list box ("OPC Server" is selected as default).
If there is no OPC Server in the [Server] selection list box, select "<Browse...>" from the [Server] selection list
box. You can select the OPC Server from the [Select Server] dialog box.
When selecting the OPC Server, you can select the OPC specification (version specification) as well ("Data Access
3.00" is the default specification).
• To allow the OPC Client to remotely access the OPC Server, the security and DCOM settings are required to be adjusted in Windows. Refer to "2.6 Environment Setting When Operating OPC Server and OPC Client on Different PCs" for more details.
• While connected to the OPC Server, do not perform a reload using 'Pro-Server EX'. To change the network project, shut down all connections to the OPC Server before performing a reload.
• For more details about the security and DCOM settings in Windows, also refer to the following documents issued by OPC-Foundation:
- Using OPC via DCOM with Windows XP Service Pack2

Connecting to and Disconnecting from the OPC Server
OPC Server for Pro-Server EX Reference Manual 3-6
3.2.2 Disconnecting from the OPC Server
To disconnect from the OPC Server, select [Disconnect] from the [Server] menu. Or right-click on the connected
OPC Server in the tree view to display the pop-up menu, and select [Disconnect].

Connecting to and Disconnecting from the OPC Server
OPC Server for Pro-Server EX Reference Manual 3-7
3.2.3 Checking the OPC Server Status
To display the OPC Server status, select [View Server Status] from the [Server] menu. Or right-click on the
connected OPC Server in the tree view to display the pop-up menu, and select [View Server Status].
• The last update time indicates the Time Stamp when the OPC Server data changes.
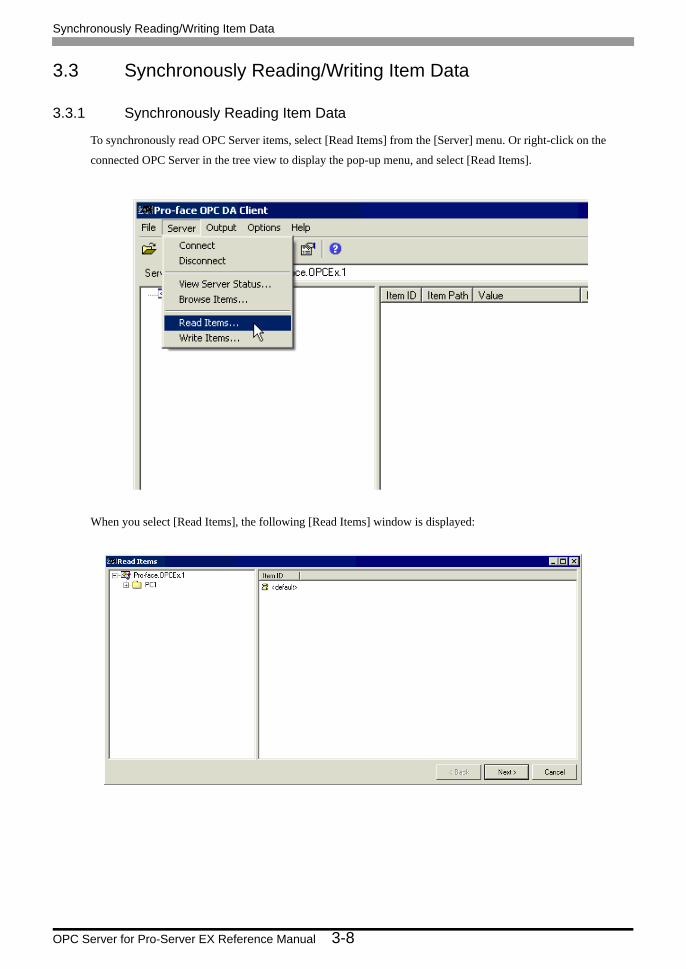
Synchronously Reading/Writing Item Data
OPC Server for Pro-Server EX Reference Manual 3-8
3.3 Synchronously Reading/Writing Item Data
3.3.1 Synchronously Reading Item Data
To synchronously read OPC Server items, select [Read Items] from the [Server] menu. Or right-click on the
connected OPC Server in the tree view to display the pop-up menu, and select [Read Items].
When you select [Read Items], the following [Read Items] window is displayed:
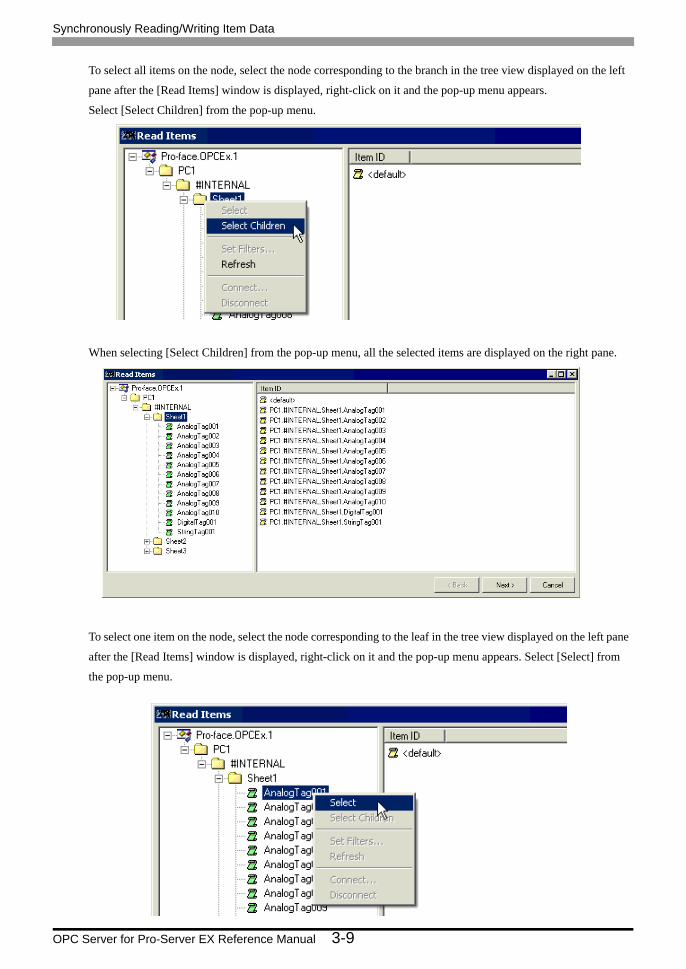
Synchronously Reading/Writing Item Data
OPC Server for Pro-Server EX Reference Manual 3-9
To select all items on the node, select the node corresponding to the branch in the tree view displayed on the left
pane after the [Read Items] window is displayed, right-click on it and the pop-up menu appears.
Select [Select Children] from the pop-up menu.
When selecting [Select Children] from the pop-up menu, all the selected items are displayed on the right pane.
To select one item on the node, select the node corresponding to the leaf in the tree view displayed on the left pane
after the [Read Items] window is displayed, right-click on it and the pop-up menu appears. Select [Select] from
the pop-up menu.

Synchronously Reading/Writing Item Data
OPC Server for Pro-Server EX Reference Manual 3-10
When selecting [Select] from the pop-up menu, the selected item is displayed on the right pane as shown below.
When you finish selecting the items you want to read, click [Next]. The results are displayed.
Finally, click [Done] to close the [Read Items] window. Reading is complete.
To browse the alignment item data you have read, right-click on the item displayed in the [Read Items] window to
display the pop-up menu, and select [View].
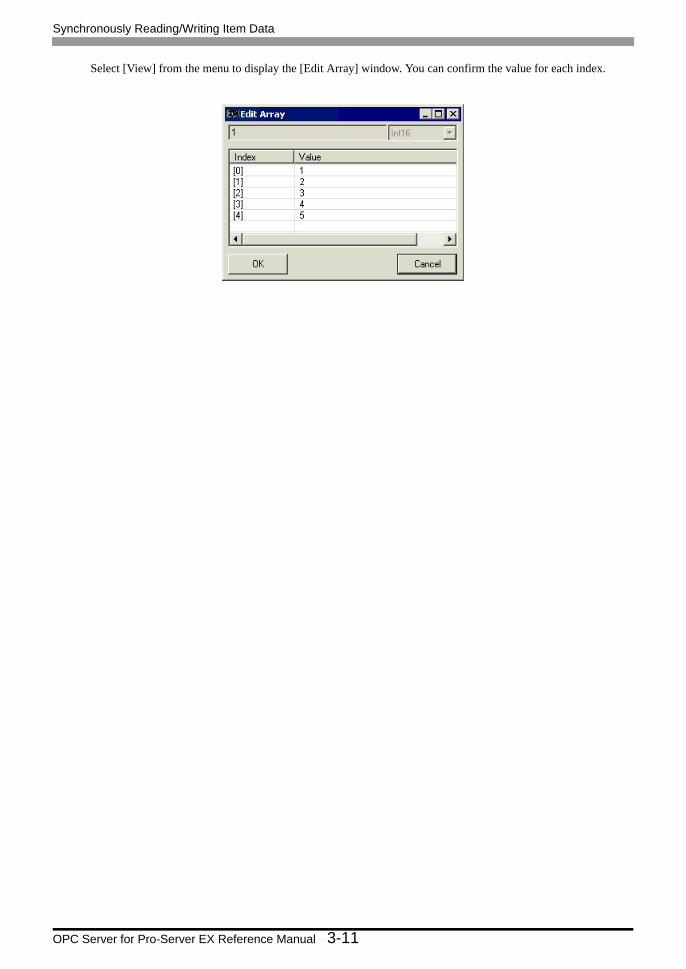
Synchronously Reading/Writing Item Data
OPC Server for Pro-Server EX Reference Manual 3-11
Select [View] from the menu to display the [Edit Array] window. You can confirm the value for each index.

Synchronously Reading/Writing Item Data
OPC Server for Pro-Server EX Reference Manual 3-12
3.3.2 Synchronously Writing Item Data
To synchronously write OPC Server items, select [Write Items] from the [Server] menu. Or right-click on the
connected OPC Server on the tree view to display the pop-up menu, and select [Write Items].
When you select [Write Items], the following [Write Items] window is displayed:

Synchronously Reading/Writing Item Data
OPC Server for Pro-Server EX Reference Manual 3-13
To select all items on the node, select the node corresponding to the branch in the tree view displayed on the left
pane after the [Write Items] window is displayed, right-click on it and the pop-up menu appears.
Select [Select Children] from the pop-up menu.
When selecting [Select Children] from the pop-up menu, all the selected items are displayed on the right pane.

Synchronously Reading/Writing Item Data
OPC Server for Pro-Server EX Reference Manual 3-14
To select one item on the node, select the node corresponding to the leaf in the tree view displayed on the left pane
after the [Write Items] window is displayed, right-click on it and the pop-up menu appears.
Select [Select] from the pop-up menu.
When selecting [Select] from the pop-up menu, the selected item is displayed on the right pane as shown below.
After selecting the item you want to write in, right-click on it in the right pane, and select [Edit] from the resulting
menu to display the [Edit Item Values] window.

Synchronously Reading/Writing Item Data
OPC Server for Pro-Server EX Reference Manual 3-15
Specify the value to write and the data type in the [Edit Item Values] window.
When you finish setting, click [OK].
The value you set in the [Edit Item Values] window is displayed in the [Write Items] window.
When you finish setting the items, click [Next]. The data is written onto the OPC Server.
• You can also set the Quality and Time Stamp for the OPC DA Server with DA 3.0 specification.
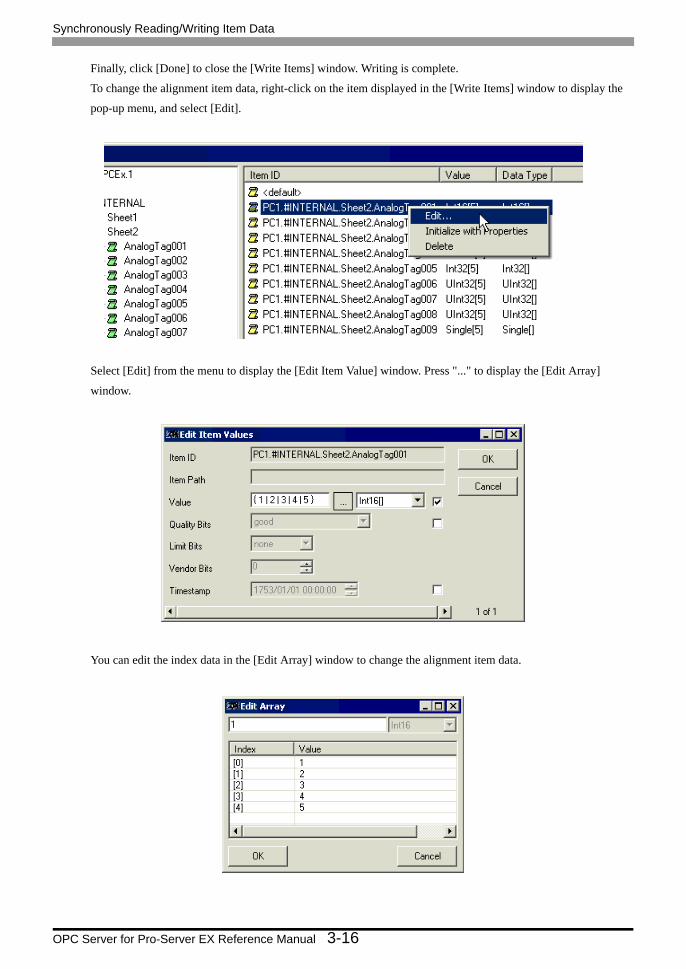
Synchronously Reading/Writing Item Data
OPC Server for Pro-Server EX Reference Manual 3-16
Finally, click [Done] to close the [Write Items] window. Writing is complete.
To change the alignment item data, right-click on the item displayed in the [Write Items] window to display the
pop-up menu, and select [Edit].
Select [Edit] from the menu to display the [Edit Item Value] window. Press "..." to display the [Edit Array]
window.
You can edit the index data in the [Edit Array] window to change the alignment item data.
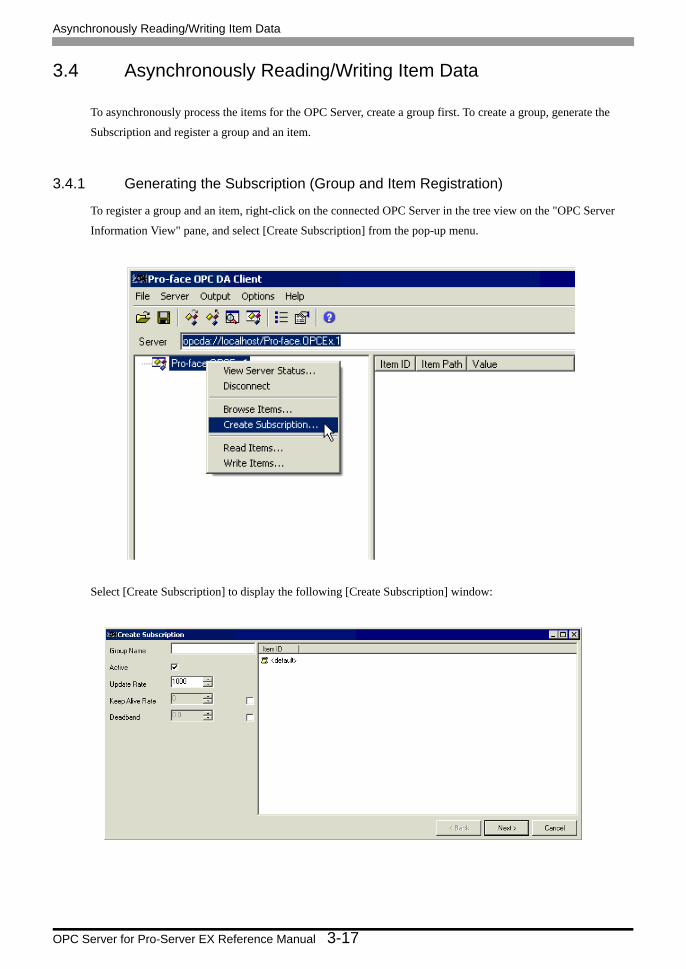
Asynchronously Reading/Writing Item Data
OPC Server for Pro-Server EX Reference Manual 3-17
3.4 Asynchronously Reading/Writing Item Data
To asynchronously process the items for the OPC Server, create a group first. To create a group, generate the
Subscription and register a group and an item.
3.4.1 Generating the Subscription (Group and Item Registration)
To register a group and an item, right-click on the connected OPC Server in the tree view on the "OPC Server
Information View" pane, and select [Create Subscription] from the pop-up menu.
Select [Create Subscription] to display the following [Create Subscription] window:
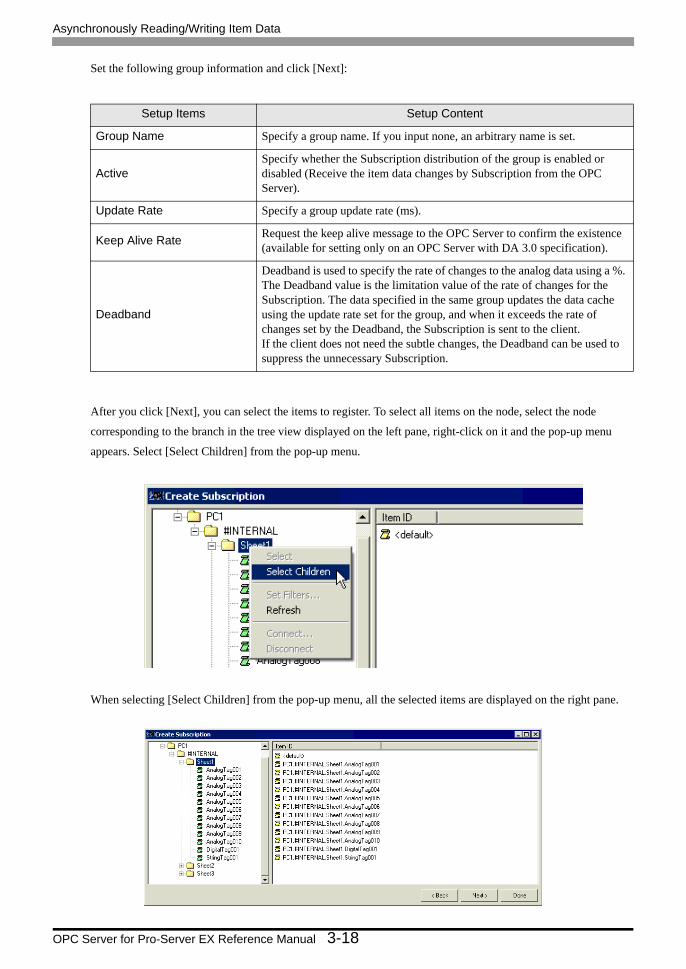
Asynchronously Reading/Writing Item Data
OPC Server for Pro-Server EX Reference Manual 3-18
Set the following group information and click [Next]:
After you click [Next], you can select the items to register. To select all items on the node, select the node
corresponding to the branch in the tree view displayed on the left pane, right-click on it and the pop-up menu
appears. Select [Select Children] from the pop-up menu.
When selecting [Select Children] from the pop-up menu, all the selected items are displayed on the right pane.
Setup Items Setup Content
Group Name Specify a group name. If you input none, an arbitrary name is set.
ActiveSpecify whether the Subscription distribution of the group is enabled or disabled (Receive the item data changes by Subscription from the OPC Server).
Update Rate Specify a group update rate (ms).
Keep Alive Rate Request the keep alive message to the OPC Server to confirm the existence (available for setting only on an OPC Server with DA 3.0 specification).
Deadband
Deadband is used to specify the rate of changes to the analog data using a %. The Deadband value is the limitation value of the rate of changes for the Subscription. The data specified in the same group updates the data cache using the update rate set for the group, and when it exceeds the rate of changes set by the Deadband, the Subscription is sent to the client.If the client does not need the subtle changes, the Deadband can be used to suppress the unnecessary Subscription.
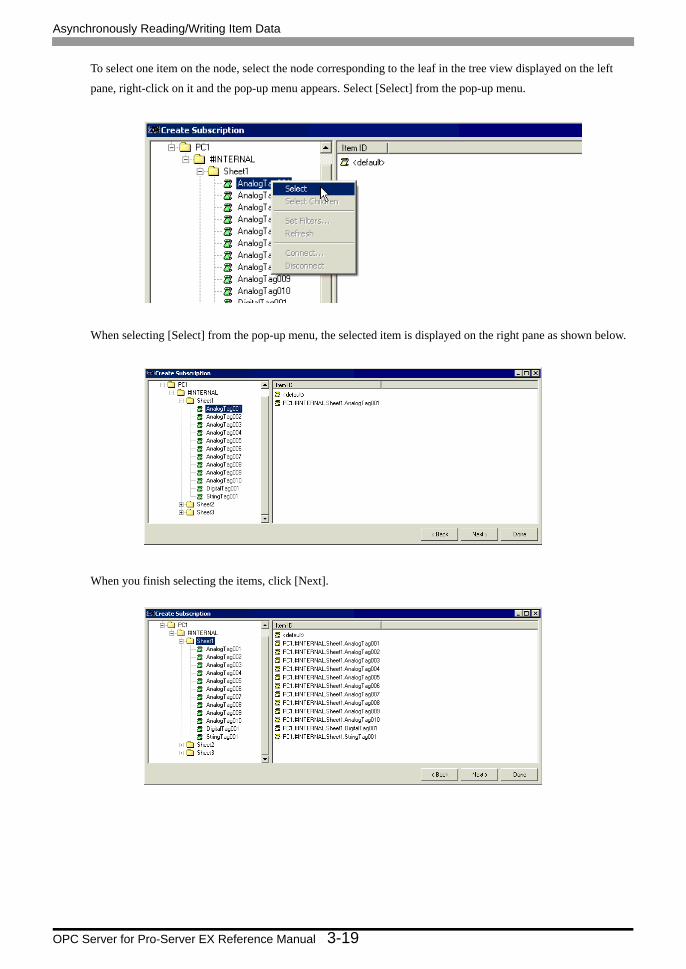
Asynchronously Reading/Writing Item Data
OPC Server for Pro-Server EX Reference Manual 3-19
To select one item on the node, select the node corresponding to the leaf in the tree view displayed on the left
pane, right-click on it and the pop-up menu appears. Select [Select] from the pop-up menu.
When selecting [Select] from the pop-up menu, the selected item is displayed on the right pane as shown below.
When you finish selecting the items, click [Next].
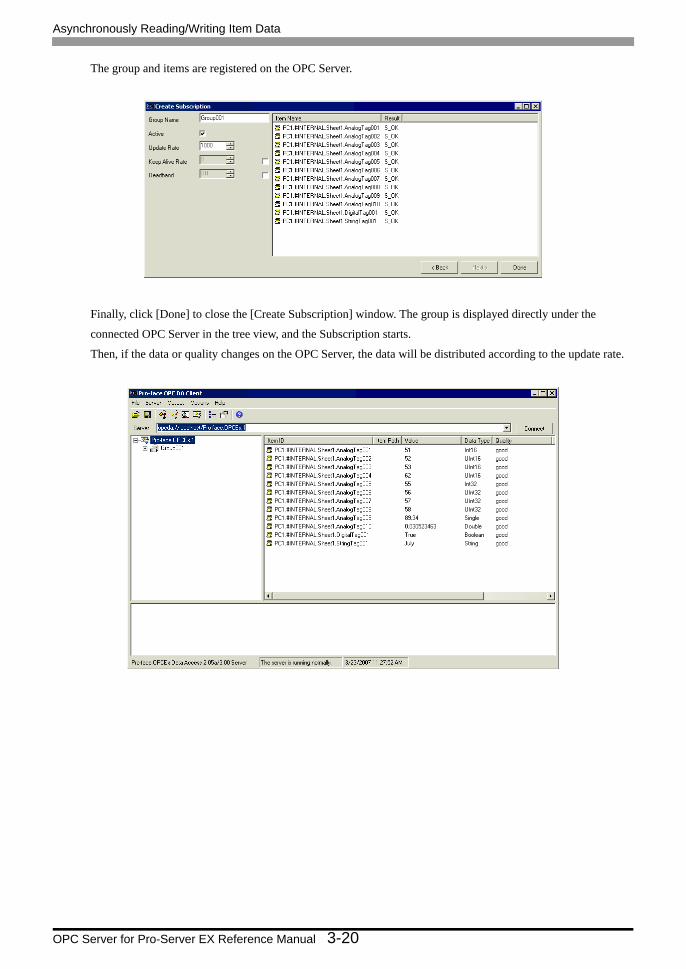
Asynchronously Reading/Writing Item Data
OPC Server for Pro-Server EX Reference Manual 3-20
The group and items are registered on the OPC Server.
Finally, click [Done] to close the [Create Subscription] window. The group is displayed directly under the
connected OPC Server in the tree view, and the Subscription starts.
Then, if the data or quality changes on the OPC Server, the data will be distributed according to the update rate.

Asynchronously Reading/Writing Item Data
OPC Server for Pro-Server EX Reference Manual 3-21
3.4.2 Editing Subscription
After the group and item registration is complete, the group is displayed directly under the connected OPC Server
in the tree view. You can edit the group information for the group.
To edit the group information, right-click on the group and select [Edit Subscription] from the pop-up menu.
Select [Edit Subscription] to display the following [Edit Subscription] window:

Asynchronously Reading/Writing Item Data
OPC Server for Pro-Server EX Reference Manual 3-22
You can set the following items in the [Edit Subscription] window:
When you finish setting the group information, click [OK] to close the [Edit Subscription] window.
3.4.3 Deleting Subscription
After the group and item registration is complete, the group is displayed directly under the connected OPC Server
in the tree view. You can delete the displayed group.
To delete the group, right-click on it and select [Delete Subscription] from the pop-up menu.
Setup Items Setup Content
Group Name Specify a group name. If you enter none, an arbitrary name is set.
ActiveSpecify whether the Subscription distribution of the group is enabled or disabled (Receive the item data changes by Subscription from the OPC Server).
Update Rate Specify a group update rate (ms).
Keep Alive Rate Request the keep alive message to the OPC Server to confirm the existence (available for setting only on an OPC Server with DA 3.0 specification).
Deadband
Deadband is used to specify the rate of changes to the analog data using a %. The Deadband value is the limitation value of the rate of changes for the Subscription. The data specified in the same group updates the data cache using the update rate set for the group, and when it exceeds the rate of changes set by the Deadband, the Subscription is sent to the client.If the client does not need the subtle changes, the Deadband can be used to suppress the unnecessary Subscription.
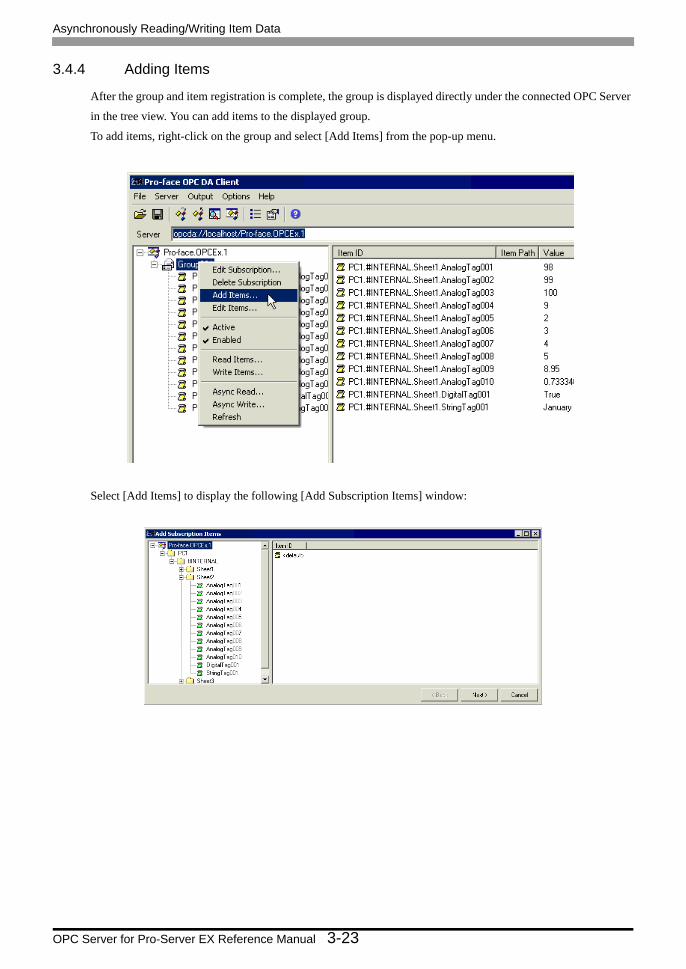
Asynchronously Reading/Writing Item Data
OPC Server for Pro-Server EX Reference Manual 3-23
3.4.4 Adding Items
After the group and item registration is complete, the group is displayed directly under the connected OPC Server
in the tree view. You can add items to the displayed group.
To add items, right-click on the group and select [Add Items] from the pop-up menu.
Select [Add Items] to display the following [Add Subscription Items] window:

Asynchronously Reading/Writing Item Data
OPC Server for Pro-Server EX Reference Manual 3-24
When the [Add Subscription Items] window is displayed, you can select the desired items. To select all items on
the node, select the node corresponding to the branch in the tree view displayed on the left pane, right-click on it
and the pop-up menu appears.
Select [Select Children] from the pop-up menu.
When selecting [Select Children] from the pop-up menu, all the selected items are displayed on the right pane.
To select one item on the node, select the node corresponding to the leaf in the tree view displayed on the left
pane, right-click on it and the pop-up menu appears.
Select [Select] from the pop-up menu.

Asynchronously Reading/Writing Item Data
OPC Server for Pro-Server EX Reference Manual 3-25
When selecting [Select] from the pop-up menu, the selected item is displayed on the right pane as shown below.
When you finish selecting the desired items and click [Next], the items are added.
Finally, click [Done] to close the [Add Subscription Items] window. The Subscription starts.

Asynchronously Reading/Writing Item Data
OPC Server for Pro-Server EX Reference Manual 3-26
3.4.5 Editing Items
After the group and item registration is complete, the group is displayed directly under the connected OPC Server
in the tree view. You can edit the items in the displayed group.
To edit the items, right-click on the group and select [Edit Items] from the pop-up menu. Then, you can edit the
item information for all items in the group.
Select [Edit Items] to display the following [Edit Items] window:

Asynchronously Reading/Writing Item Data
OPC Server for Pro-Server EX Reference Manual 3-27
You can set the following items for each item in the [Edit Items] window. You can move the horizontal scroll bar
on the [Edit Items] window to edit the next item.
• Requested Type (conversion of cannonical (server) data type)
• Active
• Deadband
• Sampling Rate (ms) (available for setting only on an OPC Server with DA 3.0 specification)
• Enable Buffering (available for setting only on an OPC Server with DA 3.0 specification)
When you finish setting the item information, click [OK] to close the [Edit Items] window. To edit the items
individually, refer to "3.6.1 Editing Items".

Canceling and Restarting the Subscription Data Distribution
OPC Server for Pro-Server EX Reference Manual 3-28
3.5 Canceling and Restarting the Subscription Data Distribution
You can cancel or restart the Subscription data distribution using the two methods shown below.
3.5.1 Using the Active/Inactive Group Setting
After the group and item registration is complete, the group is displayed directly under the connected OPC Server
in the tree view. You can set Active/Inactive for the displayed group.
To set Active/Inactive for the group, right-click on the group and select [Active] from the pop-up menu.
On the pop-up menu, selecting [Active] with a checkmark ( ) to its left changes the setting to Inactive.
Selecting [Active] without a checkmark to its left changes the setting to Active, which restarts the Subscription
data distribution.
The Active/Inactive Group Setting is performed by the SetState method of IOPCGroupStateMgt interface.
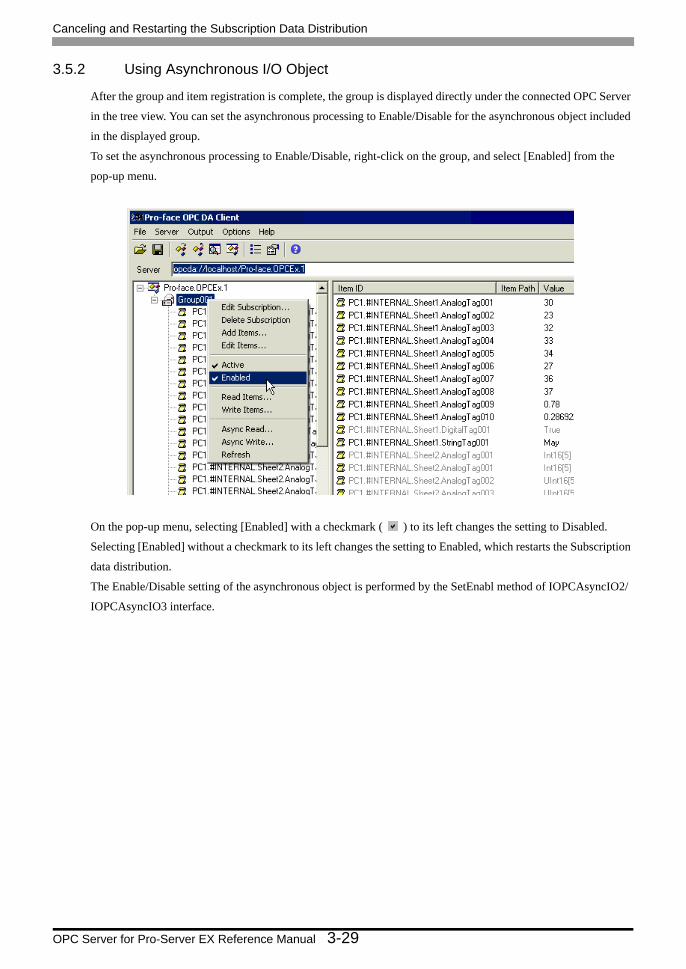
Canceling and Restarting the Subscription Data Distribution
OPC Server for Pro-Server EX Reference Manual 3-29
3.5.2 Using Asynchronous I/O Object
After the group and item registration is complete, the group is displayed directly under the connected OPC Server
in the tree view. You can set the asynchronous processing to Enable/Disable for the asynchronous object included
in the displayed group.
To set the asynchronous processing to Enable/Disable, right-click on the group, and select [Enabled] from the
pop-up menu.
On the pop-up menu, selecting [Enabled] with a checkmark ( ) to its left changes the setting to Disabled.
Selecting [Enabled] without a checkmark to its left changes the setting to Enabled, which restarts the Subscription
data distribution.
The Enable/Disable setting of the asynchronous object is performed by the SetEnabl method of IOPCAsyncIO2/
IOPCAsyncIO3 interface.
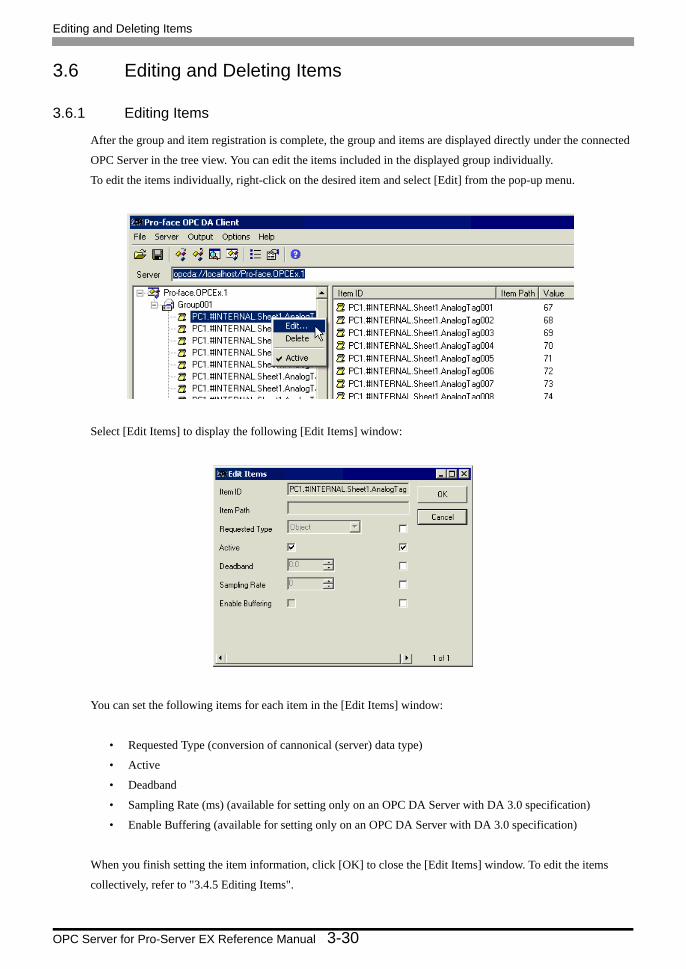
Editing and Deleting Items
OPC Server for Pro-Server EX Reference Manual 3-30
3.6 Editing and Deleting Items
3.6.1 Editing Items
After the group and item registration is complete, the group and items are displayed directly under the connected
OPC Server in the tree view. You can edit the items included in the displayed group individually.
To edit the items individually, right-click on the desired item and select [Edit] from the pop-up menu.
Select [Edit Items] to display the following [Edit Items] window:
You can set the following items for each item in the [Edit Items] window:
• Requested Type (conversion of cannonical (server) data type)
• Active
• Deadband
• Sampling Rate (ms) (available for setting only on an OPC DA Server with DA 3.0 specification)
• Enable Buffering (available for setting only on an OPC DA Server with DA 3.0 specification)
When you finish setting the item information, click [OK] to close the [Edit Items] window. To edit the items
collectively, refer to "3.4.5 Editing Items".

Editing and Deleting Items
OPC Server for Pro-Server EX Reference Manual 3-31
3.6.2 Deleting Items
After the group and item registration is complete, the group and items are displayed directly under the connected
OPC Server in the tree view. You can delete items included in the displayed group.
To delete an item, right-click on it and select [Delete] from the pop-up menu.
3.6.3 Activating Items
In "3.5 Canceling and Restarting the Subscription Data Distribution", the data distribution for all items in the
group is canceled. You can, however, set Active or Inactive for an individual item.
After the group and item registration is complete, the group and items are displayed directly under the connected
OPC Server in the tree view. You can set Active or Inactive for the items included in the displayed group.
To set Active/Inactive, right-click on the desired item and select [Active] from the pop-up menu.
On the pop-up menu, selecting [Active] with a checkmark ( ) to its left changes the setting to Inactive.
Selecting [Active] without a checkmark to its left changes the setting to Active, which restarts the Subscription
data distribution.

Asynchronously Reading/Writing Item Data in the Group
OPC Server for Pro-Server EX Reference Manual 3-32
3.7 Asynchronously Reading/Writing Item Data in the Group
3.7.1 Asynchronously Reading Item Data in the Group
After the group and item registration is complete, the group is displayed directly under the connected OPC Server
in the tree view. You can asynchronously read the items in the displayed group.
To asynchronously read the items, right-click on the group and select [Async Read] from the pop-up menu.
Select [Async Read] to display the following [Read Items] window:
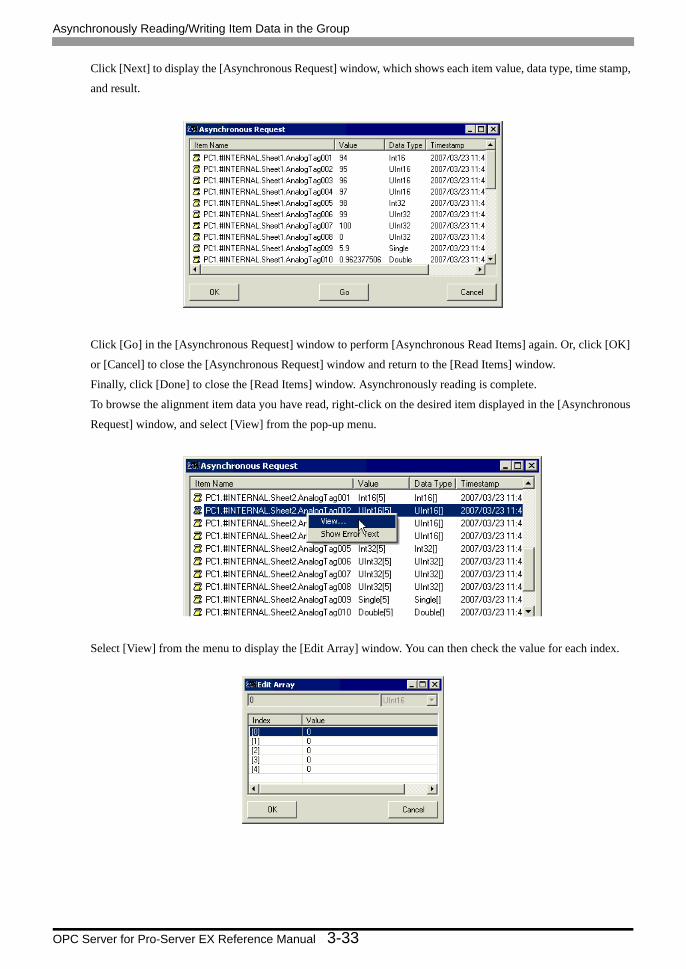
Asynchronously Reading/Writing Item Data in the Group
OPC Server for Pro-Server EX Reference Manual 3-33
Click [Next] to display the [Asynchronous Request] window, which shows each item value, data type, time stamp,
and result.
Click [Go] in the [Asynchronous Request] window to perform [Asynchronous Read Items] again. Or, click [OK]
or [Cancel] to close the [Asynchronous Request] window and return to the [Read Items] window.
Finally, click [Done] to close the [Read Items] window. Asynchronously reading is complete.
To browse the alignment item data you have read, right-click on the desired item displayed in the [Asynchronous
Request] window, and select [View] from the pop-up menu.
Select [View] from the menu to display the [Edit Array] window. You can then check the value for each index.

Asynchronously Reading/Writing Item Data in the Group
OPC Server for Pro-Server EX Reference Manual 3-34
3.7.2 Asynchronously Writing Item Data in the Group
After the group and item registration is complete, the group is displayed directly under the connected OPC Server
in the tree view. You can asynchronously write the items in the displayed group.
To asynchronously write the items, right-click on the group and select [Async Write] from the pop-up menu.
Select [Async Write] to display the following [Write Items] window. Right-click on the desired item in the right
pane to display the [Edit Item Values] window.
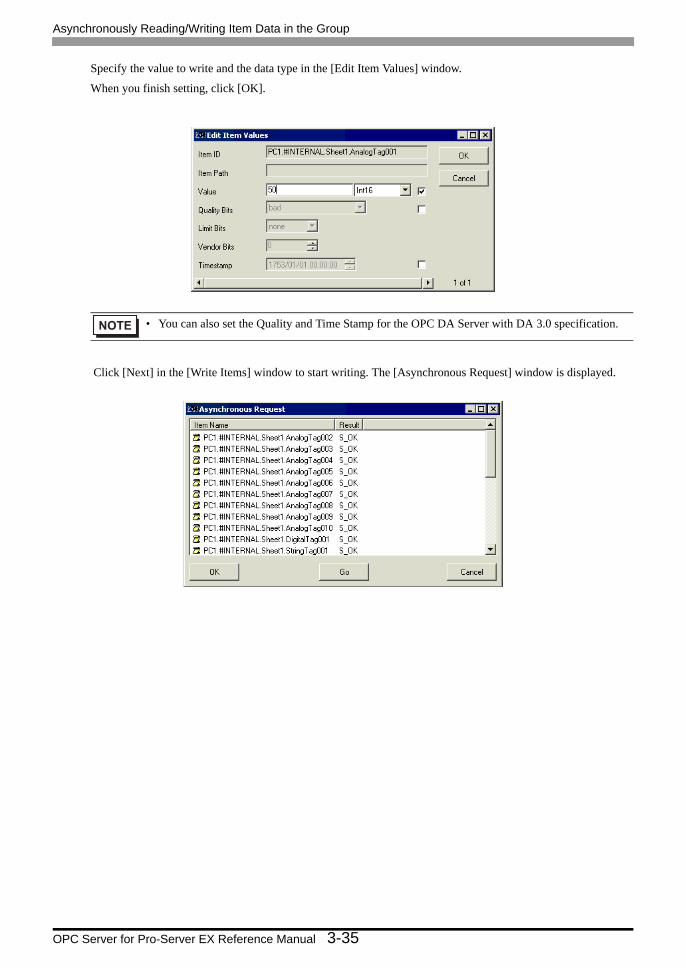
Asynchronously Reading/Writing Item Data in the Group
OPC Server for Pro-Server EX Reference Manual 3-35
Specify the value to write and the data type in the [Edit Item Values] window.
When you finish setting, click [OK].
Click [Next] in the [Write Items] window to start writing. The [Asynchronous Request] window is displayed.
• You can also set the Quality and Time Stamp for the OPC DA Server with DA 3.0 specification.
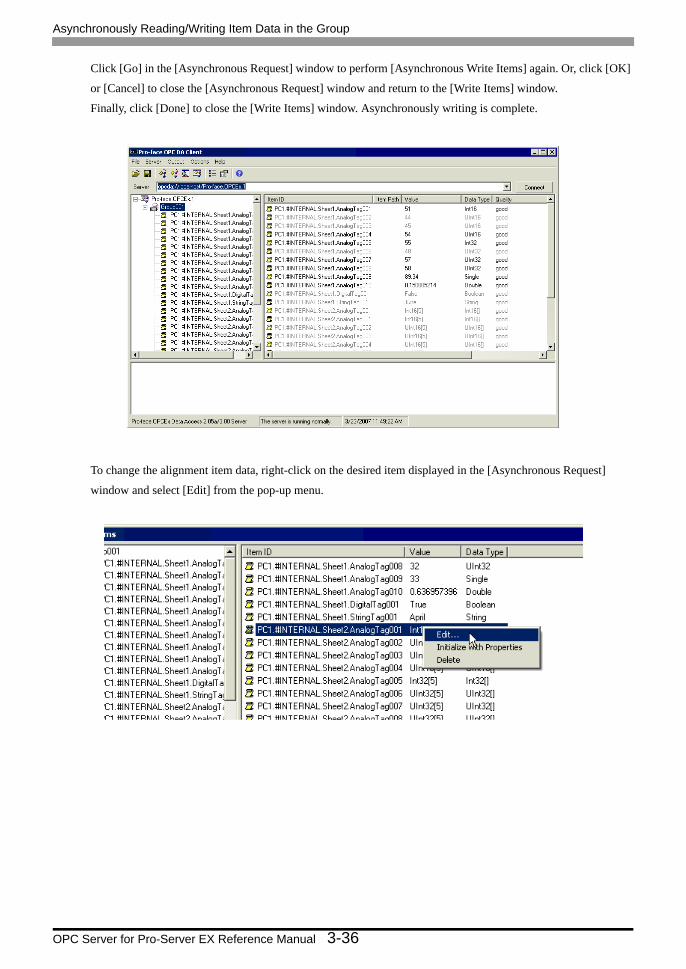
Asynchronously Reading/Writing Item Data in the Group
OPC Server for Pro-Server EX Reference Manual 3-36
Click [Go] in the [Asynchronous Request] window to perform [Asynchronous Write Items] again. Or, click [OK]
or [Cancel] to close the [Asynchronous Request] window and return to the [Write Items] window.
Finally, click [Done] to close the [Write Items] window. Asynchronously writing is complete.
To change the alignment item data, right-click on the desired item displayed in the [Asynchronous Request]
window and select [Edit] from the pop-up menu.

Asynchronously Reading/Writing Item Data in the Group
OPC Server for Pro-Server EX Reference Manual 3-37
Select [Edit] from the menu to display the [Edit Item Values] window. Press "..." to display the [Edit Array]
window.
You can edit the index data in the [Edit Array] window to change the alignment item data.

Asynchronously Reading/Writing Item Data in the Group
OPC Server for Pro-Server EX Reference Manual 3-38
3.7.3 Refreshing Items
Refreshing is used to check that writing onto the OPC Server is performed, and can be seen on the Item View.
After the group and item registration is complete, the group is displayed directly under the connected OPC Server
in the tree view. You can refresh the items in the displayed group.
To refresh the items, right-click on the group and select [Refresh] from the pop-up menu.
Item View

Synchronous Processing Group Items
OPC Server for Pro-Server EX Reference Manual 3-39
3.8 Synchronous Processing Group Items
To synchronously process the items for the OPC Server, you need to perform "Group and Item Registration"
described in "3.4.1 Generating the Subscription (Group and Item Registration)".
3.8.1 Synchronously Reading Data from Group Items
After the group and item registration is complete, the group is displayed directly under the connected OPC Server
in the tree view. You can synchronously read the items in the displayed group. To synchronously read the items,
right-click on the group and select [Read Items] from the pop-up menu.
Select [Read Items] to display the following [Read Items] window:

Synchronous Processing Group Items
OPC Server for Pro-Server EX Reference Manual 3-40
Click [Next] to display each item value, data type, time stamp, and result.
Finally, click [Done] to close the [Read Items] window. Synchronously reading is complete.
To browse the alignment item data you have read, right-click on the desired item displayed in the [Read Items]
window to display the pop-up menu, and select [View].
Select [View] from the menu to display the [Edit Array] window. You can then check the value for each index.
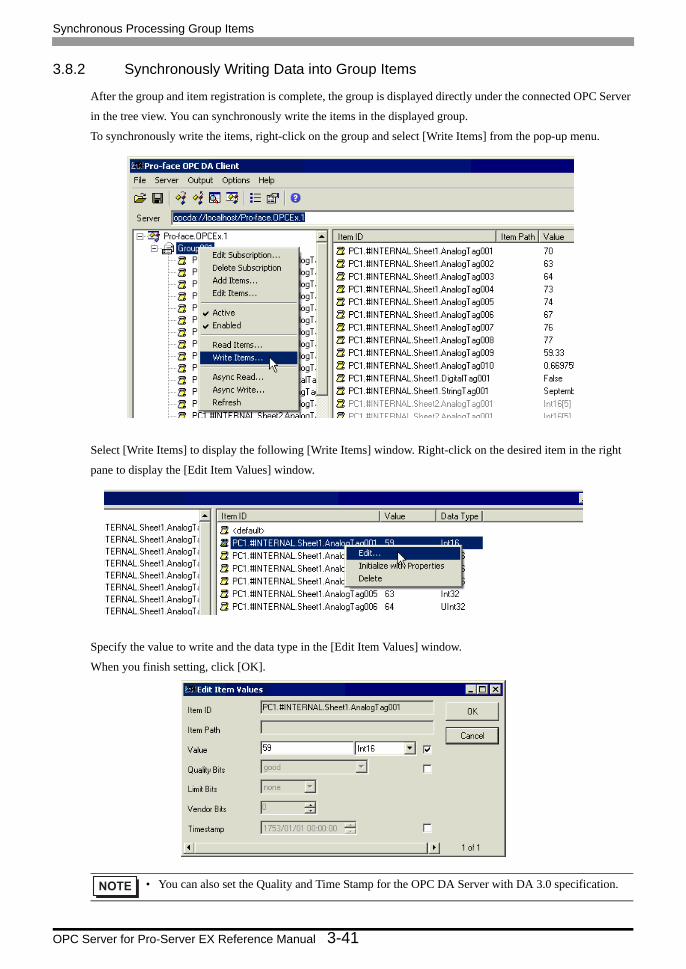
Synchronous Processing Group Items
OPC Server for Pro-Server EX Reference Manual 3-41
3.8.2 Synchronously Writing Data into Group Items
After the group and item registration is complete, the group is displayed directly under the connected OPC Server
in the tree view. You can synchronously write the items in the displayed group.
To synchronously write the items, right-click on the group and select [Write Items] from the pop-up menu.
Select [Write Items] to display the following [Write Items] window. Right-click on the desired item in the right
pane to display the [Edit Item Values] window.
Specify the value to write and the data type in the [Edit Item Values] window.
When you finish setting, click [OK].
• You can also set the Quality and Time Stamp for the OPC DA Server with DA 3.0 specification.

Synchronous Processing Group Items
OPC Server for Pro-Server EX Reference Manual 3-42
Click [OK] in the [Edit Item Values] window. Then, click [Next] in the [Write Items] window to perform
[Synchronous Write Items].
Finally, click [Done] to close the [Write Items] window. Synchronously writing is complete.
To change the alignment item data, right-click on the item displayed in the [Write Items] window to display the
pop-up menu and select [Edit].
Select [Edit] from the menu to display the [Edit Item Values] window. Press "..." to display the [Edit Array]
window.

Synchronous Processing Group Items
OPC Server for Pro-Server EX Reference Manual 3-43
You can edit the index data in the [Edit Array] window to change the alignment item data.
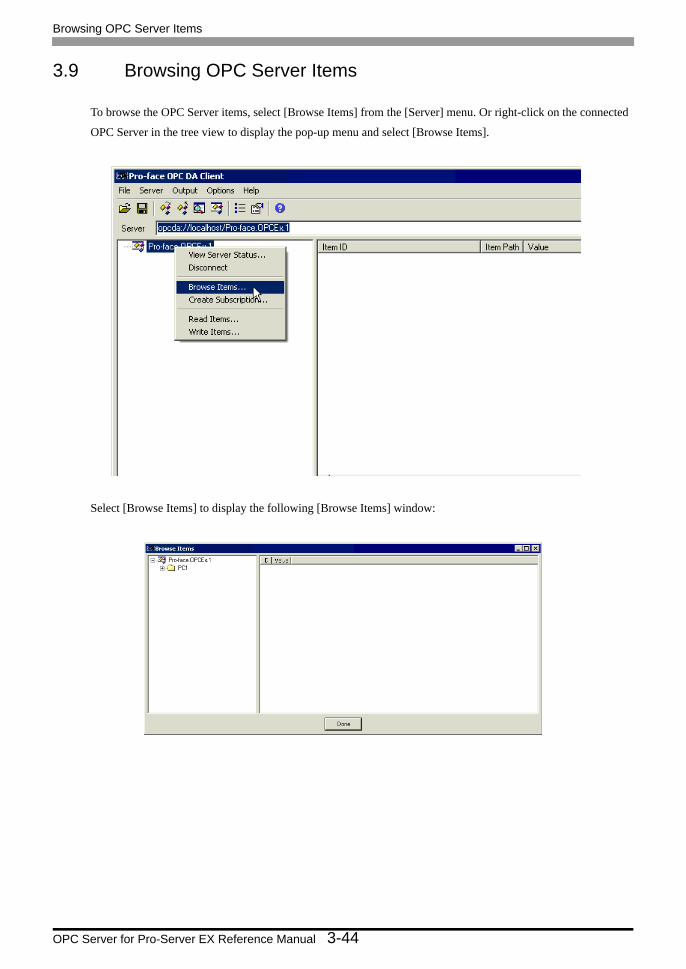
Browsing OPC Server Items
OPC Server for Pro-Server EX Reference Manual 3-44
3.9 Browsing OPC Server Items
To browse the OPC Server items, select [Browse Items] from the [Server] menu. Or right-click on the connected
OPC Server in the tree view to display the pop-up menu and select [Browse Items].
Select [Browse Items] to display the following [Browse Items] window:
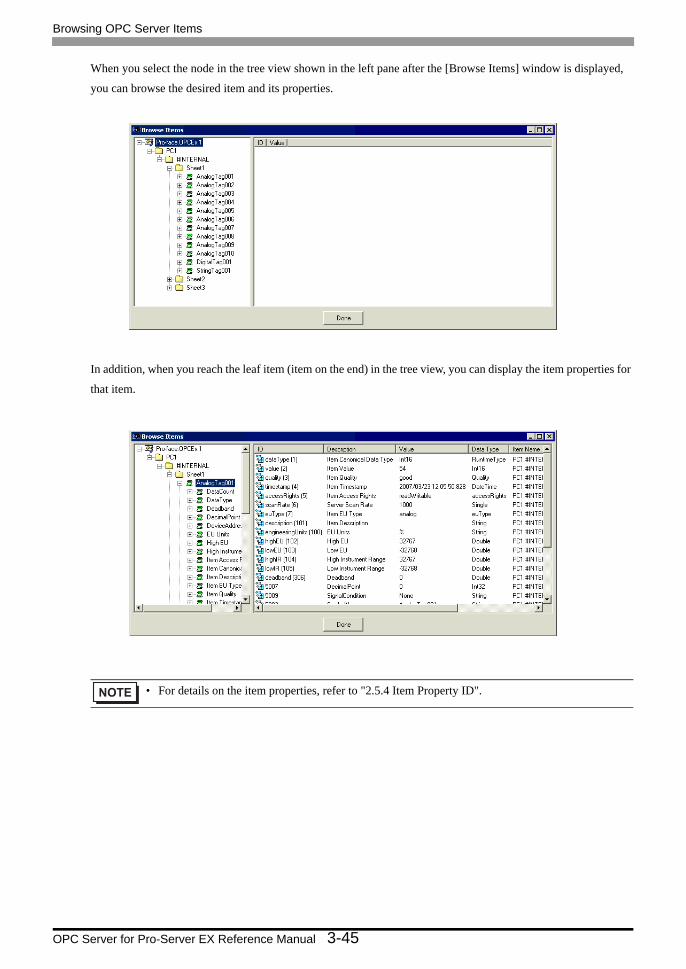
Browsing OPC Server Items
OPC Server for Pro-Server EX Reference Manual 3-45
When you select the node in the tree view shown in the left pane after the [Browse Items] window is displayed,
you can browse the desired item and its properties.
In addition, when you reach the leaf item (item on the end) in the tree view, you can display the item properties for
that item.
• For details on the item properties, refer to "2.5.4 Item Property ID".

Browsing OPC Server Items
OPC Server for Pro-Server EX Reference Manual 3-46

4-1
4 Menu Configuration of the Configuration Tool
4 Menu Configuration of the Configuration Tool...............................................................4-2
4.1 Menu Configuration of the Configuration Tool...............................................................4-2

Menu Configuration of the Configuration Tool
OPC Server for Pro-Server EX Reference Manual 4-2
4 Menu Configuration of the Configuration Tool
4.1 Menu Configuration of the Configuration Tool
4.1.1 File Menu
New
If the current changed contents are not saved, a file of the same status is created as when the Configuration Tool is
started (only the NPX node configuration is displayed, and no tag is registered) after the processing shown in the
following "Tag Configuration Unsave Check".
Open
If the current changed contents are not saved, the tag configuration file selected in the "Open" dialog box is read
after the processing shown in the following "Tag Configuration Unsave Check". At this time, check the
consistency with NPX as shown in "Tag Configuration Consistency with NPX in 'Pro-Server EX'" to display the
results.
Save
Save the relationship between the tag and symbol/device address as well as the tag-related parameters in the tag
configuration file. If the changed tag information is included in the current tag configuration file, save that file. If
a file is newly created (file name is not set), perform the same save operation using "Save As" to set the file name.
Save As
Save the relationship between the tag and symbol/device address as well as the tag-related parameters as the file
name specified in the "Save As" dialog box in the tag configuration file. When a file which already exists is
selected in this dialog box, the message to confirm whether to overwrite it is displayed. Only when "Yes" is
selected for this message, save the file. When "No" is selected, the "Save As" dialog box remains displayed.
Exit
If the current changed contents are not saved, exit the Configuration Tool after the processing shown in the
following "Tag Configuration Unsave Check".
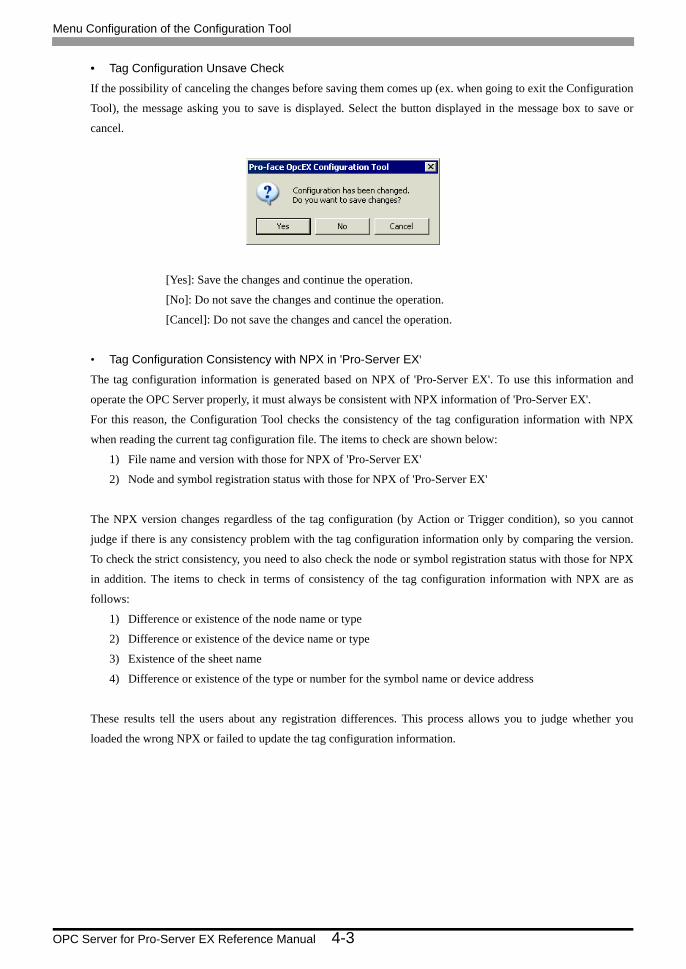
Menu Configuration of the Configuration Tool
OPC Server for Pro-Server EX Reference Manual 4-3
• Tag Configuration Unsave Check
If the possibility of canceling the changes before saving them comes up (ex. when going to exit the Configuration
Tool), the message asking you to save is displayed. Select the button displayed in the message box to save or
cancel.
[Yes]: Save the changes and continue the operation.
[No]: Do not save the changes and continue the operation.
[Cancel]: Do not save the changes and cancel the operation.
• Tag Configuration Consistency with NPX in 'Pro-Server EX'
The tag configuration information is generated based on NPX of 'Pro-Server EX'. To use this information and
operate the OPC Server properly, it must always be consistent with NPX information of 'Pro-Server EX'.
For this reason, the Configuration Tool checks the consistency of the tag configuration information with NPX
when reading the current tag configuration file. The items to check are shown below:
1) File name and version with those for NPX of 'Pro-Server EX'
2) Node and symbol registration status with those for NPX of 'Pro-Server EX'
The NPX version changes regardless of the tag configuration (by Action or Trigger condition), so you cannot
judge if there is any consistency problem with the tag configuration information only by comparing the version.
To check the strict consistency, you need to also check the node or symbol registration status with those for NPX
in addition. The items to check in terms of consistency of the tag configuration information with NPX are as
follows:
1) Difference or existence of the node name or type
2) Difference or existence of the device name or type
3) Existence of the sheet name
4) Difference or existence of the type or number for the symbol name or device address
These results tell the users about any registration differences. This process allows you to judge whether you
loaded the wrong NPX or failed to update the tag configuration information.
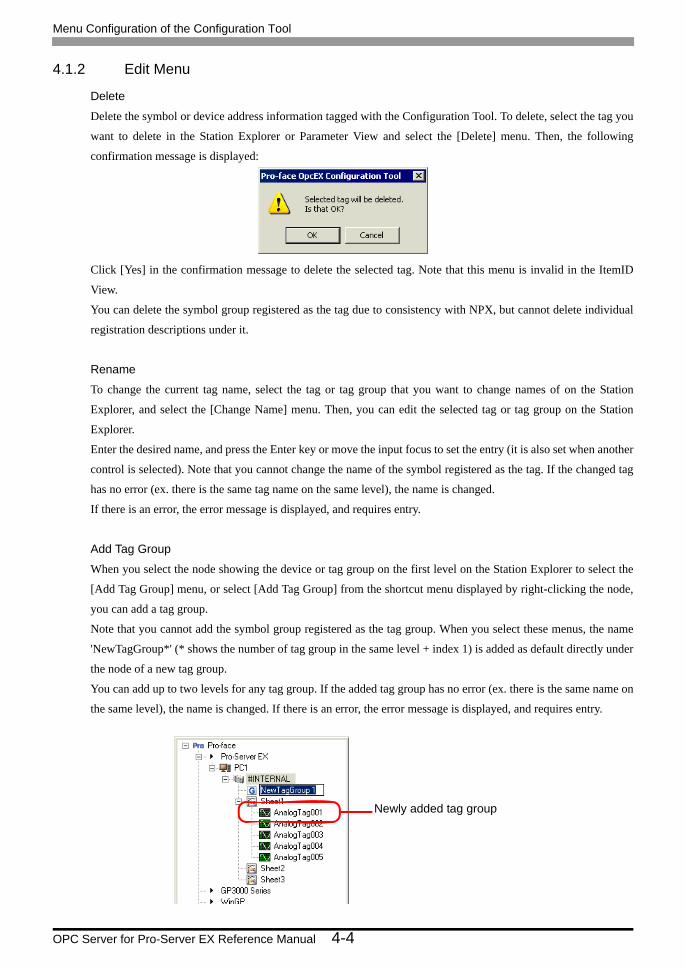
Newly added tag group
Menu Configuration of the Configuration Tool
OPC Server for Pro-Server EX Reference Manual 4-4
4.1.2 Edit Menu
Delete
Delete the symbol or device address information tagged with the Configuration Tool. To delete, select the tag you
want to delete in the Station Explorer or Parameter View and select the [Delete] menu. Then, the following
confirmation message is displayed:
Click [Yes] in the confirmation message to delete the selected tag. Note that this menu is invalid in the ItemID
View.
You can delete the symbol group registered as the tag due to consistency with NPX, but cannot delete individual
registration descriptions under it.
Rename
To change the current tag name, select the tag or tag group that you want to change names of on the Station
Explorer, and select the [Change Name] menu. Then, you can edit the selected tag or tag group on the Station
Explorer.
Enter the desired name, and press the Enter key or move the input focus to set the entry (it is also set when another
control is selected). Note that you cannot change the name of the symbol registered as the tag. If the changed tag
has no error (ex. there is the same tag name on the same level), the name is changed.
If there is an error, the error message is displayed, and requires entry.
Add Tag Group
When you select the node showing the device or tag group on the first level on the Station Explorer to select the
[Add Tag Group] menu, or select [Add Tag Group] from the shortcut menu displayed by right-clicking the node,
you can add a tag group.
Note that you cannot add the symbol group registered as the tag group. When you select these menus, the name
'NewTagGroup*' (* shows the number of tag group in the same level + index 1) is added as default directly under
the node of a new tag group.
You can add up to two levels for any tag group. If the added tag group has no error (ex. there is the same name on
the same level), the name is changed. If there is an error, the error message is displayed, and requires entry.

Menu Configuration of the Configuration Tool
OPC Server for Pro-Server EX Reference Manual 4-5
Add Tag
Add a new tag in the level of the device or tag group selected in the Station Explorer. When you select the [Add
Tag] menu, the following dialog box is displayed to allow you to set a new tag name and the symbol or device
address to tag.
The name 'NewTag*' (* shows the number of tag in the same level + index 1) is set in the [Tag] item as default. In
the [Device Address] item, you can enter the symbol or device address to unite the tag name shown in the [Tag]
item manually using the calculator icon (data type icon) or symbol icon.
When you tag the symbol, the symbol name is registered as a tag name as it is. Therefore, you cannot change the
tag name at the point of confirming the symbol name entry, and the tag name is displayed in gray.
In addition, set the comment you set in the symbol registration in 'Pro-Studio EX' as default in the [Description]
item.
If the added tag has no error (ex. there is the same name on the same level), the tag is added with its name. If there
is an error, the error message is displayed, and requires entry (Your entry is confirmed when the focus moves from
the device address). You can add a tag using the dialog box, so you do not need to open or close the dialog box
every time you add a tag. You can click [Add] on the dialog box to add a new tag without closing the dialog box.
• Since 'Pro-Server EX' has the limitation that one cache buffer is available per device, you cannot add a tag of which the cache size exceeds 10K bytes (10x1024 bytes). Set the total number of tags in a device to be 1000 or less.

Menu Configuration of the Configuration Tool
OPC Server for Pro-Server EX Reference Manual 4-6
Find Tag
Search the tags registered on the tag configuration and display the result on the tag search results. When you select
the node, device, the level node of the tag group of which you want to search any tags on the Station Explorer and
operate the [Find Tag] menu, the following tag search dialog box is displayed:
Set the tag you want to search for using the character string under [Search Tag]. You can include the wildcard
character '*' or arbitrary character '?' in the search character string, so you can search all tags including the
corresponding parts, even if you know only a part of the name. In addition, you can select the search character
string from the history because the latest 20 history can be recorded.
The level node selected on the Station Explorer is set in [Search Location]. You can change the search location
without closing the [Tag Search] dialog box.
As shown below, such levels as displayed on the Station Explorer are also displayed.

Menu Configuration of the Configuration Tool
OPC Server for Pro-Server EX Reference Manual 4-7
NPX Symbol Import
You can automatically register several thousands or tens of thousands of symbols registered in the current NPX as
the tags, without registering them by one as described in the [Add Tag] section.
When you select the node or device displayed on the Station Explorer, and operate the [NPX Symbol Import]
menu, the following [NPX Symbol Import] dialog box is displayed, listing the [Name] items and [Description]
items:
You can select multiple items on the list and sort the [Name] items in ascending order to select the import source
freely. Select the desired [Name] item and click [OK] to import the symbols from NPX and start the tag
registration.
In [NPX Symbol Import], all NPX symbols are not set as target unconditionally, but the importing source targets
are set depending on the node selected on the Station Explorer.
The relationship between the node selected on the Station Explorer and the importing source is shown below:
If the same tag is registered on the Configuration Tool, a symbol is not imported, but skipped.
Selected node on the Station Explorer
NPX importing target
Node type (ex. 'Pro-Server EX' node) All nodes registered under it
Node (ex. AGP1) All devices registered under it
Device (ex. PLC1) All sheets registered under it
Sheet (ex. Sheet1) All symbols or symbol groups registered under it
Tag Group Not available
Tag Not available

Menu Configuration of the Configuration Tool
OPC Server for Pro-Server EX Reference Manual 4-8
4.1.3 Display Menu
Station Explorer
Switches the currently displayed tree area to the Station Explorer.
ItemID View
Switches the currently displayed tree area to the ItemID View.
Error List
Makes the [Error List] tag selected and displays the error list at the front.
Tag Search Result
Makes the [Tag Search List] tag selected and displays the tag search result at the front.
4.1.4 OPC Server Menu
Shutdown
Notifies the shutdown request to the OPC Server when the OPC Server is running. To shut down the running OPC
Server, this menu displays the following message to warn the users just before notifying the OPC Server to shut
down. When you select [Yes], the shutdown is notified to the OPC server is shut down.

Menu Configuration of the Configuration Tool
OPC Server for Pro-Server EX Reference Manual 4-9
OPC Server Configuration Settings
Configures the settings related to the OPC Server operation or environmental configuration. The configured
information is saved as a configuration file in a folder in which the OPC Server is installed. The configuration file
name is "OpcConfiguration.xml". The changed contents are enabled when restarting the OPC Server.
The OPC Server configuration item description is shown below.
• Tag Configuration File Name
Specify the current tag configuration file applied to the OPC Server with a full path. You can also select the
[...] button on the right of the [Tag Configuration File Name] text box to specify the tag configuration file
from the file selection dialog box.
• Disable Output Log
The OPC Server records the operation status in the log viewer of 'Pro-Server EX'. If you check the "Disable
Output Log" option, it cancels recording.
This function is enabled when operating the OPC Server on Windows XP embedded system equipped with
auxiliary storage devices that have write limitations, including CF card.
• Enable Simulation
Set whether to enable the OPC Server simulation function. Check the box to enable the simulation function.
The simulation function works for the targets with the simulation setting corresponding to each data type
except None in the tag parameter settings.
When the simulation is enabled, you can set the items of "Cycle" and "File Name" items.
• Cycle
Set the simulation rate in 100ms. The setting range is the same as that of the "Pro-Server EX Cache Buffer
Collection Rate".
• File Name
The OPC Server can generate simulation data from a CSV format file. You can press the [...] button on the
right of the [File Name] text box to specify a CSV format file name from the file selection dialog box.

Menu Configuration of the Configuration Tool
OPC Server for Pro-Server EX Reference Manual 4-10
Scan Cycle List Settings
You can set the scan cycle to collect the tag data. To set the scan cycle, select from the scan cycle list. The
scan cycle list consists of the [Output only] option and nine types of changeable cycles.
The setting contents of the scan cycle list are described as below:
• Output Only
You cannot change the [Output Only] option. Specify this option for the write tag of which you do not need to
collect the data.
• Scan Cycle Changes
You can change the contents of the scan cycle list. When you select the value you want to change and click
[OK], the [Scan Cycle Changes] dialog box is displayed.
You can directly enter the desired rate in the [Scan Cycle] text box, or click the spin button to change the scan
rate.
The scan cycle is changeable between 100 ms and 6553.5 s in 100 ms. When you finish setting, click [OK].
You can also change the multiple scan cycle lists simultaneously.
• Confirming the Changed Scan Cycle
When you change the scan cycle, the scan cycle you have set is displayed in the changed list position.
When you click [OK], the following confirmation message is displayed. Click [OK] in this confirmation
message box to change the scan cycle.

Menu Configuration of the Configuration Tool
OPC Server for Pro-Server EX Reference Manual 4-11
4.1.5 Tool Menu
Option
Set the default detailed tag parameters used in the [Add Tag] dialog box or [NPX Import Symbol]. You can set the
default value for each data type of the tags to register.
Registering Default
1 Select [Option] from the [Tool] menu to display the [Option] dialog box.
2 Select the data type from the tree display on the left of the screen.
• The displayed parameters and setting range depend on the data type. Refer to "2.5.1 Detailed Tag Parameters" for more details.

Menu Configuration of the Configuration Tool
OPC Server for Pro-Server EX Reference Manual 4-12
3 Double-click the parameter from the grid display on the right of the screen to prepare for entry.
4 Enter the setting value, and press the [Enter] key to confirm the entry.
Set other parameters using the same procedure.
5 Click [OK] to finish setting.
• You can press the button to display the parameter list.
• Your entry from the list is confirmed when you click the item.• Your entry in the checkbox is confirmed when you click the box.
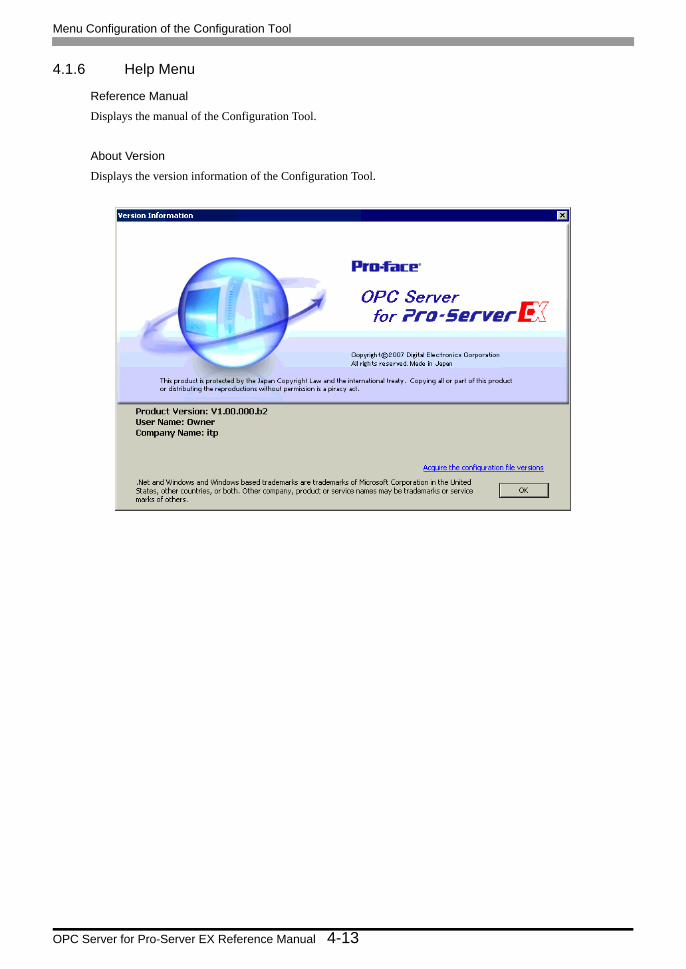
Menu Configuration of the Configuration Tool
OPC Server for Pro-Server EX Reference Manual 4-13
4.1.6 Help Menu
Reference Manual
Displays the manual of the Configuration Tool.
About Version
Displays the version information of the Configuration Tool.

Menu Configuration of the Configuration Tool
OPC Server for Pro-Server EX Reference Manual 4-14

5-1
5 Error Information
5.1 Error Information ...........................................................................................................5-2
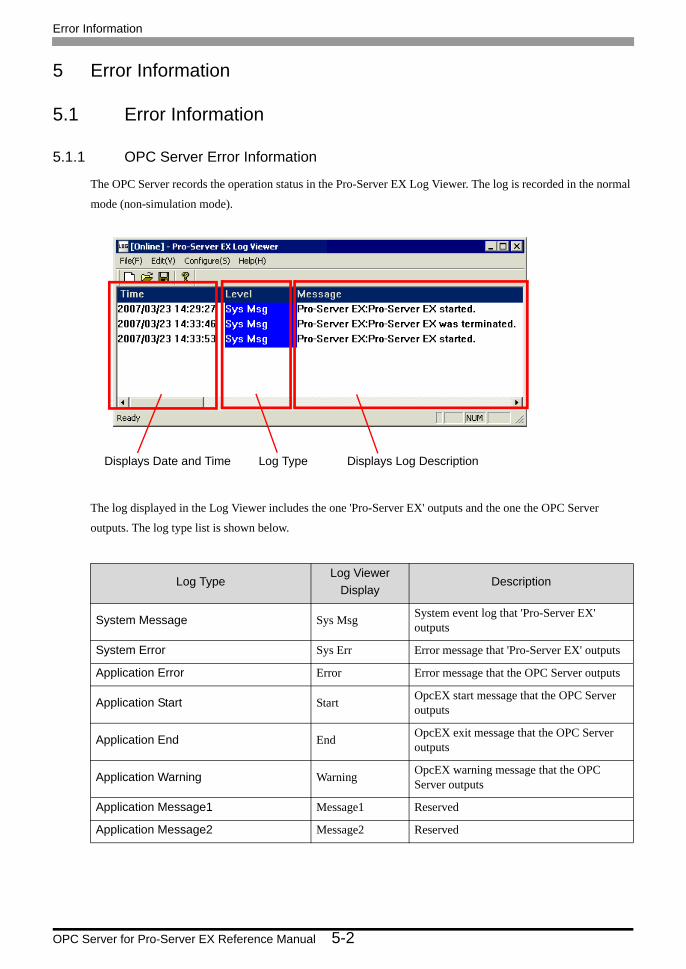
Error Information
OPC Server for Pro-Server EX Reference Manual 5-2
5 Error Information
5.1 Error Information
5.1.1 OPC Server Error Information
The OPC Server records the operation status in the Pro-Server EX Log Viewer. The log is recorded in the normal
mode (non-simulation mode).
The log displayed in the Log Viewer includes the one 'Pro-Server EX' outputs and the one the OPC Server
outputs. The log type list is shown below.
Log TypeLog Viewer
DisplayDescription
System Message Sys Msg System event log that 'Pro-Server EX' outputs
System Error Sys Err Error message that 'Pro-Server EX' outputs
Application Error Error Error message that the OPC Server outputs
Application Start Start OpcEX start message that the OPC Server outputs
Application End End OpcEX exit message that the OPC Server outputs
Application Warning Warning OpcEX warning message that the OPC Server outputs
Application Message1 Message1 Reserved
Application Message2 Message2 Reserved
Displays Log DescriptionLog TypeDisplays Date and Time

Error Information
OPC Server for Pro-Server EX Reference Manual 5-3
You can restrict the log displayed in the Log Viewer in the "Log Property" dialog box.
To display the OPC Server error log, check the following items.
The [Application Start] and [Application End] are displayed once when the OPC Server starts and exits
respectively.
When an error or warning occurs on the OPC Server after startup, the [Application Error] and [Application
Warning] show the description.
In addition, if an error occurs during the startup process when the OPC Server loads the tag configuration file and
generates the device item, the OPC Server outputs the detailed error causes to the error log file (Error.log). The
file save location, file name, and output description are shown below.
File Save Location In the folder "ErrorLog" where the OPC Server is installed
File Name Error.log
Creating Method Add
Output Description
Day/Time
OLE Error Code
Function
Device Cache Name
ItemID
Property
Message

Error Information
OPC Server for Pro-Server EX Reference Manual 5-4
The output file example is shown below.
The error description specific to the OPC Server is shown below.
Error Code Error Message Cause and Troubleshooting
0xC0B00731 Failed to read the OPC-configuration file properly.
The configuration file does not exist, or the XML syntax includes an error.Start the Configuration Tool and select [OPC Server Configuration] from the [OPC Server]. Then, create the configuration file from the "OPC Server Configuration" dialog box. If it does not solve the problem, please install 'OPC Server for Pro-Server EX' again.
0xC0B00732 Error exists in the OPC-configuration file.
The configuration file contains an error description.Start the Configuration Tool and select [OPC Server Configuration] from the [OPC Server]. Then, create the configuration file from the "OPC Server Configuration" dialog box. If it does not solve the problem, please install 'OPC Server for Pro-Server EX' again.
0xC0B00733 Failed to read the tag-configuration file properly.
The tag configuration file does not exist, or the XML syntax includes an error.Start the Configuration Tool and select [OPC Server Configuration] from the [OPC Server]. Then, specify the tag configuration file from the "OPC Server Configuration" dialog box, and click [OK].If this does not solve the problem, start the Configuration Tool, select [Open] from the [File] menu. Specify the tag configuration file to use, and check if the file has no errors. If an error occurs, correct it on the Configuration Tool, or create a new tag configuration file.
0xC0B00734
NPX information loaded by Pro-Server EX does not match that (NPX-file name or build number) in the tag-configuration file.
The NPX loaded by 'Pro-Server EX' does not match NPX information described in the tag configuration file.Start the Configuration Tool, select [Open] from the [File] menu, and specify the tag configuration file to use. If the NPX file name is different, change the tag configuration file to use, or change NPX loaded by 'Pro-Server EX'. If the build number is different, save the tag configuration file using the Configuration Tool.

Error Information
OPC Server for Pro-Server EX Reference Manual 5-5
0xC0B00735 Simulation CSV file could not be imported correctly.
There is no simulation CSV file in the simulation mode.Start the Configuration Tool, and select [OPC Server Configuration] from the [OPC Server]. Then, specify the simulation file name from the "OPC Server Configuration" dialog box, and click [OK].
0xC0B00736 Tag in the tag-configuration file is incorrect.
The tag configuration file contains an error description.Start the Configuration Tool, select [Open] from the [File] menu, and specify the tag configuration file to use.If an error is displayed, correct it. If an error is not displayed, create a new tag configuration file with the Configuration Tool.
0xC0B00737 Same tag already exists.
The tag configuration file contains tags with the same ItemID.Start the Configuration Tool, select [Open] from the [File] menu, and specify the tag configuration file to use. If an error is displayed, correct it. If an error is not displayed, create a new tag configuration file with the Configuration Tool.
0xC0B00738 Failed to generate device cache. Restart 'Pro-Server EX'. If it does not solve the problem, please install 'OPC Server for Pro-Server EX' again.
0xC0B00739 Attribute in the tag-configuration file is incorrect.
An attribute in the tag configuration file has an error.Start the Configuration Tool, select [Open] from the [File] menu, and specify the tag configuration file to use. If an error is displayed, correct it. If an error is not displayed, create a new tag configuration file with the Configuration Tool.
0xC0B0073A Failed to get the handle of ProServer.
Failed to get the Pro-Server EX handle.Restart the OPC Server and 'Pro-Server EX'. If it does not solve the problem, please install 'OPC Server for Pro-Server EX' again.
0xC0B0073D Failed to get message from message DLL.
Failed to get any message from the message DLL. Please install 'OPC Server for Pro-Server EX' again.
Error Code Error Message Cause and Troubleshooting

Error Information
OPC Server for Pro-Server EX Reference Manual 5-6
5.1.2 Configuration Tool Error Information
The error description specific to the Configuration Tool is shown below.
Error Code Error Message Cause and Troubleshooting
0xC0B00751SAAM081-10622056153232761681
Does not match the Node type in NPX.
The node type registered in the tag configuration is different from that in NPX. Check the node registration in NPX.
0xC0B00752SAAM082-10622056143232761682
No Node registered in NPX. The node name registered in the tag configuration is not registered in NPX. Check the node registration in NPX.
0xC0B00753SAAM083-10622056133232761683
No device registered in NPX. The device registered in the tag configuration is not registered in NPX. Check the device registration in NPX.
0xC0B00754SAAM084-10622056123232761684
No symbol sheet registered in NPX.
The symbol sheet registered in the tag configuration is not registered in NPX. Check the symbol sheet registration in NPX.
0xC0B00755SAAM085-10622056113232761685
No symbol registered in NPX. The symbol name registered in the tag configuration is not registered in NPX. Check the symbol registration in NPX.
0xC0B00756SAAM086-10622056103232761686
Device address does not match NPX symbol registration.
The device address of the symbol registered in the tag configuration does not match that in NPX. Check the symbol registration in NPX.
0xC0B00757SAAM087-10622056093232761687
Invalid device address. Set the tag symbol or device address again.
0xC0B00758SAAM088-10622056083232761688
Tag name and symbol name do not agree. Set the tag name and symbol name to the same name.
0xC0B00759SAAM089-10622056073232761689
Does not match the symbol data type registered in NPX.
Set the tagged symbol in the tag configuration and the NPX symbol to the same data type.
0xC0B0075ASAAM090-10622056063232761690
Does not match the symbol data count registered in NPX.
Set the tagged symbol in the tag configuration and the NPX symbol to the same data count.
0xC0B0075CSAAM092-10622056043232761692
Tag name is same as a symbol-sheet name in NPX.
Set the tag name of the device address registered in the tag configuration not to be same as the NPX symbol sheet name.
0xC0B0075DSAAM093-10622056033232761693
Registered as a group array in NPX.
The tag group of the symbol registered in the tag configuration is registered as an array in NPX.

Error Information
OPC Server for Pro-Server EX Reference Manual 5-7
0xC0B0075ESAAM094-10622056023232761694
Exceeded the maximum number of tags registered in a device (1000).
Set the total number of tags in a device to be 1000 or less.
0xC0B0075FSAAM095-10622056013232761695
Exceeded the maximum total size of tags registered in a device (10240bytes).
Set the total byte of tags in a device to be 10240 bytes or less.
0xC0B00771SAAM113-10622055833232761713
{0:s} value '{1:s}' is invalid. Invalid value is set. Set a valid value.
0xC0B00772SAAM114-10622055823232761714
{0:s} value '{1:s}' is out of range. Not listed. Set within the listed value range.
0xC0B00773SAAM115-10622055813232761715
{0:s} value '{1:s}' is invalid as a numeric value. Set a valid value as a numeric value.
0xC0B00774SAAM116-10622055803232761716
{0:s}Set a numeric value from {1:s} to {2:s}. Set a numeric value within the setting range.
0xC0B00775SAAM117-10622055793232761717
{0:s}Set a character count from {1:s} to {2:s}. Set the number of characters within the setting range.
0xC0B00776SAAM118-10622055783232761718
{0:s} Prohibited character {1:s} contained. Do not use the prohibited characters.
0xC0B00777SAAM119-10622055773232761719
Value '**' is invalid as a numeric value. Set a numeric value within the setting range.
0xC0B00781SAAM129-10622055673232761729
Cannot add. Exceeded the maximum number of tags registered in a device (1000).
Set the total number of tags in a device to be 1000 or less.
0xC0B00782SAAM130-10622055663232761730
Cannot add. Exceeded the maximum total size of tags registered in a device (10240bytes).
Set the total byte of tags in a device to be 10240 bytes or less.
0xC0B00784SAAM132-10622055643232761732
'**' already exists. Cannot add or change.(**: Tag name to add or change)
Set as a different name.
0xC0B00785SAAM133-10622055633232761733
'**' contains a group array. Cannot add.(**: Symbol Name)
You cannot add a group array.
Error Code Error Message Cause and Troubleshooting

Error Information
OPC Server for Pro-Server EX Reference Manual 5-8
0xC0B00786SAAM134-10622055623232761734
Cannot import symbols. Item type does not match. Set so that the item type is same in the tag configuration and NPX.
0xC0B00787SAAM135-10622055613232761735
OPC server not installed. Please reinstall.
0xC0B00788SAAM136-10622055603232761736
Failed to connect to OPC server.***(***: Cause to fail)
Please reinstall.
0xC0B00789SAAM137-10622055593232761737
Shutdown request failed.***(***: Cause to fail)
Check if 'OPC Server for Pro-Server EX' shuts down with the task manager.If it does not shut down, force quit 'OPC Server for Pro-Server EX' from the task manager.
0xC0B0078ASAAM138-10622055583232761738
File '**' not found. Please check if the ** file exists. If it is not the tag configuration file, reinstall.
0xC0B0078BSAAM139-10622055573232761739
I/O error.***(***: Cause of error)
Solve the cause of error, such as disk capacity shortage or improper disk preparation, and perform again.
0xC0B0078CSAAM140-10622055563232761740
Security error.***(***: Cause of error)
Check the cause of error, following the message directions.
0xC0B0078DSAAM141-10622055553232761741
Access error.***(***: Cause of error)
Check if you have the right to access, or the file is read only.
0xC0B0078ESAAM142-10622055543232761742
Schema validation error.***(***: Cause of error)
Check the cause of error, following the message directions.
0xC0B0078FSAAM143-10622055533232761743
Invalid XML document.***(***: Cause of error)
Check the cause of error, following the message directions.
0xC0B00790SAAM144-10622055523232761744
Cannot save the tag configuration because the empty NPX is loaded in Pro-Server EX. Load NPX which is not empty in 'Pro-Server EX', and save.
Load NPX which is not empty in 'Pro-Server EX'.
Error Code Error Message Cause and Troubleshooting

6-1
6 Inquiry
6.1 Inquiry ...........................................................................................................................6-2

Inquiry
OPC Server for Pro-Server EX Reference Manual 6-2
6.1 Inquiry
Do you have any questions about difficulties with OPC Server for Pro-Server EX?
Before contacting us
Introducing "Otasuke Pro!" which is the site that offers support for Pro-Server EX products
"Otasuke Pro!" is loaded with contents to support your questions and requests.Please access our site anytime that
you need help with a solution.
http://www.proface.com/otasuke/