op4073 adsl modem install guidedownloads.optusnet.com.au/helpdesk/siemens_ss4200_guide.pdf · call...
TRANSCRIPT
SingTel Optus Pty Limited ABN 90 052 833 208
1273975 01/06
Siemens SpeedStream® 4200 ADSL Modem
Install Guide.

Account Number
Username
Password
Your Optus Broadband ServiceMake a note of your details here

Introduction 2
Using the self-installation CD for your PC 3
Install line filters 4
Connecting your SpeedStream® 4200 ADSL Modem 5
Windows configuration procedures 6
Macintosh configuration procedures 9
Configure your modem 11
Troubleshooting 14
System requirements 15
Security 16
Managing your Optus DSL account 18
Glossary 19
Contents

The self-installation CD contains simple step by step instructions for installing your modem.
It also installs and configures all the software you will need to connect to your Optus DSL
Broadband service.
Note: The self-installation CD is not compatible with Macintosh software. Macintosh users
should refer to Section 6 on how to configure their Macintosh to run with Optus DSL.
The software that will be installed includes:
■ A USB modem driver customised for use on the Optus DSL Broadband service■ The Optus DSL Desktop Service Centre■ The latest Optus customised Internet Explorer web browser■ Outlook Express set up as your primary Optus email account■ A customised desktop icon for instant browsing■ A Connection Guide for troubleshooting■ An uninstall wizard
To install and configure your modem using the self-installation CD
1. Quit all other open applications.
2. Insert the Optus DSL Broadband self-installation CD into your computer’s CD ROM drive.
3. When the Main Menu appears select DSL Installation and follow the simple step by
step instructions.
4. If your PC has sound, ensure it is turned up.
When the CD is finished you will automatically be connected to the Optus DSL Broadband service.
It is also possible (though not recommended) to manually configure your modem. This can
be done using a web browser to access the management software imbedded in the modem.
If you have followed the instructions on the self-installation CD and have connected the
line filters, (refer to section 3) you will already be connected to the Optus DSL Broadband
service and can start surfing the Net. The rest of the information in this booklet is for your
reference only.
Congratulations on selecting the Optus DSL Service.
The Siemens SpeedStream® 4200 ADSL modem supplied by Optus has been customised by
Siemens for optimal performance on the Optus DSL Broadband service. Throughout this
guide the name Optus DSL will be used to refer to both Optus DSL and Optus DSL Direct
Broadband services.
The simplest way to install and configure your modem for the Optus DSL Broadband service
is to follow the step by step instructions on the self-installation CD.
Note: It is important to note that you should not connect your modem before running the
self-installation CD.
This booklet supports the Optus self-installation CD which will have your new service up
and running in minutes.
1.1 Before you beginCheck you have received the following items with your Optus DSL Starter Kit:
1. Introduction
2 INTRODUCTION USING THE SELF-INSTALLATION CD FOR YOUR PC 3
2. Using the self-installation CD for your PC
Optus CD-ROM SpeedStream® 4200 ADSL Modem Power supply
2 x line filters USB cable RJ-45 Straight-through Ethernet cable
RJ-11 DSL cable

4 INSTALL LINE FILTERS CONNECTING YOUR SPEEDSTREAM® 4200 ADSL MODEM 5
Devices such as fax machines, caller ID boxes or phones that share the same phone line as
your DSL account require a line filter, which prevents noise from disrupting the DSL signal on
the phone line. For your convenience, Optus has provided you with two line filters.
A filter must be installed on each of the telephony devices that share the same telephone
line as your Optus DSL Broadband service. These include:■ Telephones■ Fax machines■ Dial-up modems■ Answering machines■ Any other device connected to your DSL-enabled telephone line such as Foxtel,
Optus TV featuring FOXTEL Digital, or Austar.
Place the filter on your telephone line by:■ Unplugging the cord from your telephone■ Connecting the filter between the phone and the telephone wall socket as illustrated below.
If you have a home monitoring service (Back to Base) that uses the same phone line as your
DSL service, it is your responsibility to arrange for a central filter to be installed in your
premises. If you do not do this, you will experience problems with your DSL connection and
your monitoring service. If you require further information about central filters we would
encourage you to contact an Austel approved technician in your area. Alternatively, please
call Optus Customer Support who can provide you with a list of organisations that can
install one.
3. Install line filters
The SpeedStream® 4200 ADSL Modem may be connected to either an existing USB port or
an Ethernet port on your computer. If you choose to attach it via the Ethernet interface, it is
only necessary to complete the steps in section 4.1. Otherwise, proceed directly to section
4.2 for USB installations.
4.1 Ethernet installation methodYou will need to install an Ethernet adapter if your computer does not already have one
installed. Refer to your Ethernet adapter manufacturer’s documentation for complete
installation instructions.
1. Connect the Ethernet cable (RJ-45) to the Ethernet port on the SpeedStream® 4200
ADSL Modem (yellow port).
2. Connect the other end of the Ethernet cable to the Ethernet port on your computer.
3. Plug the DSL cable (RJ-11) into the DSL port on the SpeedStream® 4200 ADSL Modem
(grey port).
4. Plug the other end of the DSL cable into the phone socket.
5. Plug the power adapter into the power outlet and connect it to the SpeedStream®
4200 ADSL Modem (black port).
6. Ensure your SpeedStream® 4200 ADSL Modem is powered on (power switch located on
right side of back panel).
4. Connecting your SpeedStream® 4200 ADSL Modem
6 CONNECTING YOUR SPEEDSTREAM® 4200 ADSL MODEM WINDOWS CONFIGURATION PROCEDURES 7
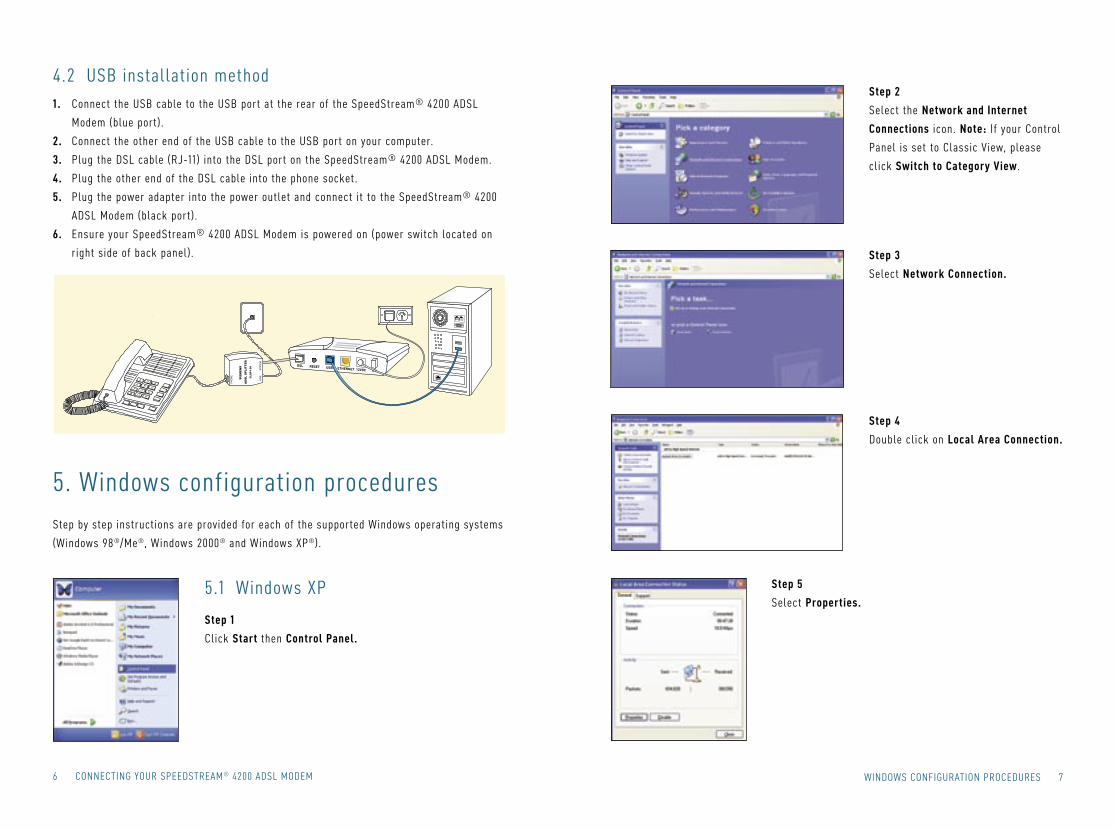
4.2 USB installation method1. Connect the USB cable to the USB port at the rear of the SpeedStream® 4200 ADSL
Modem (blue port).
2. Connect the other end of the USB cable to the USB port on your computer.
3. Plug the DSL cable (RJ-11) into the DSL port on the SpeedStream® 4200 ADSL Modem.
4. Plug the other end of the DSL cable into the phone socket.
5. Plug the power adapter into the power outlet and connect it to the SpeedStream® 4200
ADSL Modem (black port).
6. Ensure your SpeedStream® 4200 ADSL Modem is powered on (power switch located on
right side of back panel).
5.1 Windows XP
Step 1
Click Start then Control Panel.
Step 2
Select the Network and Internet
Connections icon. Note: If your Control
Panel is set to Classic View, please
click Switch to Category View.
Step 4
Double click on Local Area Connection.
Step 3
Select Network Connection.
Step by step instructions are provided for each of the supported Windows operating systems
(Windows 98®/Me®, Windows 2000® and Windows XP®).
5. Windows configuration procedures
Step 5
Select Properties.

8 WINDOWS CONFIGURATION PROCEDURES MACINTOSH CONFIGURATION PROCEDURES 9
5.2 Windows 2000Step 1 Click Start then select Settings then Network and Dial-up Connections.
Step 2 Right click on Local Area Connection, then select Properties.
Step 3 Select Internet Protocol (TCP/IP), then select Properties.
Step 4 Select Obtain an IP address automatically.
Select Obtain DNS server address automatically.
Click OK and exit out of the Control Panel.
Step 5 Select Yes to restart your computer.
5.3 Windows 98/MeStep 1 Click Start select Settings then click Control Panel.
Step 2 Double click on the Networks icon.
Step 3 Select TCP/IP and click on Properties.
Step 4 Select the IP Address tab.
Select Obtain an IP address automatically radio button and click OK.
Click OK and close all open windows.
Step 5 Select Yes to restart your computer.
6. Macintosh configuration procedures – Ethernet only
Step 2
Select the Network icon under the
Internet & Network section.
Please ensure that you are running OS9 or above before commencing. Macintosh users must
set up their initial Internet connection via Ethernet.
If you wish to connect via a USB connection you will need to download the relevant USB
drivers from http://www.optusnet.com.au/drivers/mac/siemens_4200/
Note: These instructions are provided as a guide only. Optus currently does not support
Macintosh software and is unable to assist Macintosh users with their broadband installation.
6.1 Macintosh OSX
Step 6
Select Internet Protocol (TCP/IP) and
click on Properties.
Step 7
Select Obtain an IP address automatically.
Select Obtain DNS server address automatically.
Click OK and close all open windows.
Step 1
Click Apple then select
System Preferences.

10 SELECTIVE CALL FEATURES SELECTIVE CALL FEATURES 1110 MACINTOSH CONFIGURATION PROCEDURES CONFIGURE YOUR MODEM 11
Step 3 Select the following from the Show drop-down menu:■ Built–in Ethernet
Step 4 Select Using DHCP Server from the Configure IPv4 drop-down menu.
Step 5 Click Apply Now and exit out of System Preferences window.
6.2 Macintosh OS9
Step 1 Click Apple and then select Control Panels and then TCP/IP.
Step 2 Select the following from the Connect via drop-down menu:■ Ethernet or Ethernet built–in
Step 3 Select Using DHCP Server from the Configure drop-down menu.
Step 4 Close window and save changes.
7. Configure your modem To configure your modem settings you must now access the configuration manager using
your web browser. This is done by entering the IP address in the address bar of the browser
window as follows.
■ Replace the default username ([email protected]) with the username Optus
provided you.
■ In the password field replace the default password with the password Optus provided you.
Note: You will find your Optus username and password on the letter you received with
your self-installation kit. ■ Save these details by clicking the Save Settings button.
Step 2
On the left side of the webpage
click Setup.
An expanded set of options will
be displayed. Click PPP from the
available options.
Step 1
Enter http://10.1.1.1 (Default IP
address of the Optus Supplied
Siemens SpeedStream 4200) to
access the modem configuration
software. You may wish to add this
page to your Favorites for easy
access later. The modem System
Summary screen will appear.

12 CONFIGURE YOUR MODEM CONFIGURE YOUR MODEM 13
■ Click Mode from the available options.■ Confirm that Optus Bridge is the selected operation mode.■ If Optus Bridge is not selected click the radio button next to Optus Bridge to select it.
■ Click Apply.
Click the Disconnect button
to disconnect the modem.
The text on the button will
change to Connect.
Click the Connect button to
reconnect the modem to the
Optus DSL service.
Step 3
You will be prompted to disconnect
and reconnect the Optus DSL service.
Once you have clicked on the link,
you will return to the system
summary page.
Step 5
Click Reboot to restart the modem
using your saved settings.
Step 4
On the left side of the webpage,
click Setup again.
Step 6
Once the modem has rebooted
and the ADSL connection has
been successfully established
the DSL LED indicator light will
remain green. Your modem is now
connected to the Optus DSL service.

If you are experiencing connection problems, switch your modem off then on again.
If this fails to fix the problem see the below table for possible reasons.
8. Troubleshooting
LED Off Green Blinking Green
RedBlinking Red/Green
Power • Power not
applied
Normal system
operation N/A
Self-test failure
if red for more
than 30 seconds
Flash write in
progress
Ethernet
• Power not
applied
• Ethernet link
not connected
Ethernet link
connected
Ethernet traffic
flowing in either
direction
N/A N/A
DSL
• Power not
applied
• DSL signal
not detected
DSL line has
established
a connection
and is ready to
receive data
The modem is
establishing the
best possible
speed on
the line
N/A N/A
USB
• Power not
applied
• No USB
connection
USB connected
USB user traffic
flowing in either
direction
N/A N/A
Activity
• Power not
applied
• No PPP
connection
PPPoE session
established
Establishing
PPPoE sessionN/A N/A
Your computer will need to have a CD-ROM drive and meet the basic system
requirements below.
9. System requirements
Operating System* CPU RAM Free Disk Space** Network Device
Windows XP® Pentium 233MHz,
equivalent or higher64MB 500MB
Available USB or
Ethernet port
Windows 2000®,
Me® and 98®
Pentium, equivalent
or higher32MB 125MB
Available USB or
Ethernet port
*Operating Systems must be English language versions.
**Disk space must be on the primary disk drive only
Note ■ Windows 95®, NT®, Windows 2000 Server® and Apple Macintosh® operating systems are
not supported by the self-installation CD or by Optus DSL Customer Service. You may
configure these operating systems manually to use the Optus DSL service; however Optus
DSL cannot offer any technical assistance with set-up or troubleshooting.
■ Optus DSL runs on your standard phone line and normally requires no special cabling in
your premises (some telephone products and services are incompatible with DSL, such
as: Priority Assistance, Auxiliary Numbers associated with FaxStream Duet and EasyCall
Multiple Number services, ISDN, and some answering and fax machine models. A full list
can be found at www.optus.com.au/optusnetdsl
■ Your DSL modem and telephone filters must be Optus Network approved.
The list of approved modems and filter specifications can be found at
www.optus.com.au/optusnetdsl
■ An SVGA 800x600x256 or higher display is required.
14 TROUBLESHOOTING SYSTEM REQUIREMENTS 15

Why security mattersThe Internet is your gateway to the world and while security issues shouldn’t stop you
enjoying your Internet experience, you need to ensure that you take precautions to protect
your computer and your information.
What to watch out forIt’s important that you remain aware of the ways ‘hackers’ try to access computers.
These can include:
Non-genuine websites
These authentic looking websites appear to offer legitimate goods and services (also known
as ‘phishing’). However, these sites are designed to obtain information, with no intention of
providing you with the goods or services you paid for.
Hoax emails
Hoax emails appear to come from legitimate companies using a variety of false reasons.
In most cases, you will be asked to confirm your account details, passwords or credit card
details by either return email or via a web page. It is highly unlikely that the company would
ever need you to confirm your confidential information. However if you are unsure, you
should contact the company directly.
SPAM
SPAM is electronic junk email and in most cases is just annoying, time consuming, often
offensive and wastes your data allowance. You should never reply to SPAM, even if the
message offers you an opt-out link.
Worms and other viruses
Viruses are software applications that infect computers. Worms are viruses that spread
themselves across a network. Once installed, a Worm usually uses the addresses in your
email Contacts list to spread itself to your friends’ computers.
Trojans and Spyware
A Trojan is a piece of software that usually hides within a legitimate-looking application or
utility to gain entry into your computer and provide hackers with a means of easy access to
your computer. Spyware is similar to a Trojan, although usually less damaging.
10. Security How to protect yourselfOptus offers all its Internet customers a free Optus email SPAM filter. There are also a range
of Internet security software packages available.
Install firewall software
A firewall will help protect your computer from hackers, Trojans, Spyware, usage theft and
other threats. Popular firewall brands that you may like to consider include McAfee Personal
Firewall Plus, Norton’s/Symantec, Zone Alarm Pro, or Windows Firewall.
Install anti-virus software
Anti-virus software also provides added protection for your computer against Trojans,
Spyware and other threats. There are several popular brands around, including Norton
Internet Security and Panda Antivirus.
16 SECURITY SECURITY 17

Desktop Service CentreThe Desktop Service Centre, which can be accessed via the Optus DSL icon located on
your desktop, allows you to manage your Optus DSL Internet experience from one central
location. Its functions include connecting and disconnecting from the Internet, changing your
password and performing diagnostic tests. Plus, it provides shortcuts to the most frequently
used areas of the Optus portal including:■ My Usage ■ My Account ■ Member Services ■ Service Status ■ Help
The Internet Usage Meter – My UsageThe Internet Usage Meter helps you to monitor your usage of your Optus DSL Service.
It allows you to view, how many Megabytes (MB) of data you have used relative to your plan’s
monthly Data Allowance.
Our systems update the Internet Usage Meter at regular intervals (at least every 15 minutes).
It can be located at https://memberservices.optusnet.com.au/myusage/ or via the Desktop
Service Centre.
Why should you use the Internet Usage Meter?Your Optus Broadband plan allows you a set amount of data per month (your Data Allowance).
If you use in excess of 100% of your data allowance your service speed will be reduced
applicable to your plan. The Internet Usage Meter will help you evaluate your usage of the
service and will let you know how much data you have left at any given time.
Changing your passwordYou can change your password at any time by selecting the Change Password link
in the Desktop Service Centre or by visiting Change Password at
https://dsl-myaccount.optusnet.com.au/user_management/change.html
11. Managing your Optus DSL account ADSL The most widely available form of DSL Internet, ‘A’ is for asymmetrical, ‘DSL’ is for digital subscriber line.
Browse To move around the Internet between websites.
Cookie A small text file created on your computer when you visit some websites. A cookie identifies your computer to the website and lets the site know that you have been there before.
Data The information that is collected, stored or transmitted between a computer and the Internet. Some examples of data that is downloaded to a user’s computer when they use the Internet are: webpages, emails, digital photos, audio files, audio streams, online videos etc. Data is measured in Megabytes (MB) and Gigabytes (GB).
Download The process of viewing and receiving files from the Internet to your computer, eg. Browsing webpages, receiving emails or downloading music video files.
Download allowance/download limit The amount of data you can download from the Internet without incurring additional charges or being speed limited (throttled).
Download speed The speed at which you download or receive information from the Internet.
Drop out To lose your Internet connection due to a problem on your phone line.
Email Electronic mail – the transmission of messages in electronic form.
Excess usage Excess usage is where your ISP charges a fee when you exceed your download limit.
Firewall A piece of software (or hardware) that blocks unauthorised traffic between your computer and the Internet.
ISP Internet Service Provider – any organisation that supplies an Internet service.
kbps Kilo-bits per second (1000 bits per second). A measure of the speed at which data travels.
12. Glossary
18 MANAGING YOUR OPTUS DSL ACCOUNT GLOSSARY 19

Mbps Mega-bits per second (1 million bits per second). A measure of the speed at which data travels.
Megabytes (MB) A measure of data, used to indicate file size etc. 1000MB = approximately 1GB (gigabyte) or 1 million bytes.
Online To be connected to the Internet.
Online gaming To participate in playing games in real time with others via the Internet.
PPPoE (Point-to-Point Protocol over Ethernet) A specification for connecting users on an Ethernet network to the Internet by using a broadband.
SPAM Unsolicited junk email on the Internet that is usually unwanted.
Throttling Throttling is where the ISP reduces the connection speed once a plan’s data limit is reached, rather than charging customers for excess usage. In most cases speed is reduced to speeds equivalent to a dial-up Internet connection.
Traffic Data transmitted across an Internet connection or computer network.
Upload The process of sending files from your computer to another computer over an Internet connection, eg. sending email.
URL Universal Resource Locator – an address on the world wide web.
USB port Universal Serial Bus port – an external interface for connecting devices to your computer eg. scanners, printers etc.
Virus A program that performs some undesired action on your computer and generally propagates itself to other computers.
Virus scanner A program that scans your computer for known viruses.
WebMail An email service that allows you to view, receive and reply to your email from any Internet
connected computer anywhere in the world.
20 GLOSSARY