online treasury manager ach user manual standard entry class (sec) code for each batch • format...
TRANSCRIPT

ONLINE TREASURY MANAGER
ACH
USER MANUAL

www.suntrust.com
The information contained in this manual is the property of SunTrust Bank, Inc. Reproduction, manipulation, adjustment or transfer transmission, either in part of in whole, is prohibited without prior written permission from SunTrust Banks, Inc. Member FDIC. /© 2002 SunTrust Bank, Inc. SunTrust is a federally registered service mark of SunTrust Banks, Inc. Rev. 02/03
SunTrust Online Treasury Manager

Table of Contents This manual contains user instructions for ACH
CHAPTER 1 – INTRODUCTION......................................................................................................................... 1-1
OVERVIEW ............................................................................................................................................................. 1-1 BEFORE YOU LOG IN.............................................................................................................................................. 1-1 ACCESSING THE SYSTEM ........................................................................................................................................ 1-1 ENCRYPTION .......................................................................................................................................................... 1-1 SUPPORTED BROWSER VERSIONS........................................................................................................................... 1-1 FIREWALLS AND NETWORK SECURITY ................................................................................................................... 1-2 IDS AND PASSWORDS ............................................................................................................................................. 1-2 LOGIN/LOGOUT PROCEDURES ................................................................................................................................ 1-2 TIME OUT............................................................................................................................................................... 1-3 YOUR RESPONSIBILITY FOR MAINTAINING SECURITY............................................................................................ 1-3 PERMISSIONS.......................................................................................................................................................... 1-3 ACH OVERVIEW .................................................................................................................................................... 1-4
CHAPTER 2 – BATCH CREATION .................................................................................................................... 2-1
OVERVIEW ............................................................................................................................................................. 2-1 BATCHES SELECTION PAGE .................................................................................................................................... 2-2 ADD BATCHES PAGE .............................................................................................................................................. 2-4 CHANGE BATCHES PAGE........................................................................................................................................ 2-6 DELETE BATCHES PAGE ......................................................................................................................................... 2-9 DISPLAY BATCHES PAGE...................................................................................................................................... 2-11 COPY BATCHES PAGE........................................................................................................................................... 2-13 ADD ENTRIES PAGE.............................................................................................................................................. 2-15 UPDATE AMOUNTS ONLY PAGE ........................................................................................................................... 2-20 ADDENDA INPUT PAGE......................................................................................................................................... 2-23
CHAPTER 3 – PARTICIPANT MAINTENANCE.............................................................................................. 3-1
OVERVIEW ............................................................................................................................................................. 3-1 PARTICIPANTS SELECTION PAGE ............................................................................................................................ 3-2 PARTICIPANTS DATA ENTRY PAGE......................................................................................................................... 3-3
CHAPTER 4 – BATCH ACTIVATION................................................................................................................ 4-1
OVERVIEW ............................................................................................................................................................. 4-1 AVAILABLE BATCHES PAGE................................................................................................................................... 4-2 UPDATE ENTRIES PAGE .......................................................................................................................................... 4-4 ADDENDA INPUT PAGE........................................................................................................................................... 4-8 POSSIBLE DUPLICATE BATCHES PAGE.................................................................................................................... 4-9 ACTIVATION CONFIRMATION SUMMARY PAGE .................................................................................................... 4-11
CHAPTER 5 – BATCH APPROVAL ................................................................................................................... 5-1
OVERVIEW ............................................................................................................................................................. 5-1 APPROVAL SELECTION PAGE.................................................................................................................................. 5-2 BATCH DETAIL PAGE ............................................................................................................................................. 5-4 BATCH DELETE CONFIRMATION PAGE ................................................................................................................... 5-6 APPROVAL CONFIRMATION SUMMARY PAGE......................................................................................................... 5-7
CHAPTER 6 – ACH REPORT .............................................................................................................................. 6-1
OVERVIEW ............................................................................................................................................................. 6-1 ACH REPORT SELECTION PAGE............................................................................................................................. 6-2 ACH SUMMARY REPORT PAGE.............................................................................................................................. 6-4 ACH DETAIL REPORT PAGE................................................................................................................................... 6-6
CHAPTER 7 – ACH IMPORT .............................................................................................................................. 7-1
OVERVIEW ............................................................................................................................................................. 7-1 ACH IMPORT SELECTION PAGE ............................................................................................................................. 7-2

IMPORT REVIEW REPORT PAGE .............................................................................................................................. 7-4 ACH IMPORT REVIEW DETAIL REPORT PAGE........................................................................................................ 7-6 ACH IMPORT CONFIRMATION SUMMARY PAGE..................................................................................................... 7-8
CHAPTER 8 – ACH REVERSAL ......................................................................................................................... 8-1
OVERVIEW ............................................................................................................................................................. 8-1 BATCH REVERSAL NOTIFICATION PAGE................................................................................................................. 8-1 TRANSACTION REVERSAL NOTIFICATION PAGE ..................................................................................................... 8-3 ACH REVERSALS E-MAIL CONFIRMATION............................................................................................................. 8-5

Introduction
Rev. 02/03 ACH User Manual 1-1
Chapter 1 – Introduction
Overview This manual will explore ACH, the user’s functions and explain the necessary steps in creating reports that are tailored to fit your needs.
Before You Log In When using the system, please do not use your browser’s “Refresh” button. In some cases, this could cause a form to be submitted twice to the system. Please do not use the “Back” button unless specifically instructed to do so in the user manual. Clicking the “Back” button will return you to the previous page. It will not reverse any transactions performed prior to clicking the “Back” button.
Accessing the System To access the system, enter https://onlinetreasurymanager.suntrust.com in the address field of your web browser.
Encryption As soon as you arrive at the SunTrust Online Treasury Manager Web site, a prompt notifies you of its required secure connection and requests your acknowledgement. From this point forward, all communications, including the entry of all required IDs and passwords, are encrypted using Secure Sockets Layer (SSL v3.0). For maximum protection, encryption strength of 128-bit is required to access the system. We suggest that you upgrade your browser to the recommended version before you log into the system. If your encryption strength is lower than 128-bit, our system will automatically upgrade your software to 128-bit before you are allowed to proceed. However, if the attempt to upgrade your encryption strength is unsuccessful, it may be because your current browser version is too low.
Supported Browser Versions We maintain a link in Online Treasury Manager, which lists the recommended and supported versions of the most commonly used browsers, as well as those browser versions we do not support. To view the most current information, select Manuals from the Online Treasury Manager toolbar on any screen, and click Supported Browser Versions.

Introduction
Rev. 02/03 ACH User Manual 1-2
Browser Upgrades Please exercise caution when considering an upgrade to a higher browser version, especially if it is a beta version. Developers of Internet browsers are expected to continue to introduce revised versions over time to provide higher levels of capabilities. In some cases, browser versions may not be immediately compatible with Online Treasury Manager, or they may not be downward compatible. In these cases, the time and resources for the bank to certify compatibility with the new browser version can be extensive. SunTrust will notify you of any changes to the currently supported versions of Internet browsers through the Bulletins page in Online Treasury Manager.
Firewalls and Network Security Firewalls, routers and special computer systems provide state-of-the-art network security that effectively prevents unauthorized access from both inside and outside SunTrust. You never have direct access to any SunTrust computer system that contains non-public information. Secure application servers have exclusive access to the SunTrust host computer systems through secure virtual tunnels.
IDs and Passwords A combination of four elements (Company ID, Company Password, User ID and User Password) is required to access Online Treasury Manager. This service requires users to create a new password when they access the system for the first time. Passwords must consist of at least six characters, which must contain at least one alpha and one numeric character. Users must change their passwords every 30 days. Online Treasury Manager prohibits reuse of the previous six twelve passwords. The wire transfer module requires an incremental combination of a User ID and personal identification number (PIN) to process wire transfers. The multiple ID and password authentication for Online Treasury Manager, combined with the tertiary ID and PIN authentication for wire, provide an additional level of security for wire transfer initiation.
Login/Logout Procedures After accessing the web page for Online Treasury Manager, the login screen will require your Customer ID and password as well as your User ID and password. The bank will provide the IDs and passwords. After entering your User ID and password, click on the Login button or tab to Login button and press enter. To exit the system you must click Logout at the top of the screen.

Introduction
Rev. 02/03 ACH User Manual 1-3
Time Out Once you log into Online Treasury Manager, it becomes your responsibility to ensure the termination of your session. Once you have completed any processing and/or transmission of any transactions, you must log out. The system will time out, suspending access, if your session is idle for more than 15 minutes. However, during a timeout period, your browser remains connected to Online Treasury Manager. Access can be regained by re-entering your user password. Nevertheless, allowing a browser to stay connected to Online Treasury Manager after a password has timed out represents a security risk. If you are not available to reenter your password and log out properly, you should contact someone in your company to close your browser. Once the browser is closed, the connection to Online Treasury Manager is terminated.
Your Responsibility for Maintaining Security Although authentication through use of multiple IDs and passwords is an effective method of protecting your privacy, it is your responsibility to keep these elements confidential. It is vitally important that you never record passwords and IDs where others may view them nor disclose your security log-on to others. If another individual obtains these essential elements, they can see and do the same things you can see and do with your company’s accounts and transactions. If you discover or suspect a breach of security, report it to your company’s Security Administrator(s) immediately. If you are unable to reach that individual(s) or someone else in authority at your company, call SunTrust Treasury Management Technical Services at 877-785-6925, Option 1. Representatives are available from 7:00 a.m. ET to 6:00 p.m. ET Monday through Friday on bank business days.
Permissions Any user who has the applicable permissions can perform the functions discussed in this manual. For control and security reasons, you may not have access to all the functions. Your company has a Security Administrator. If you need access to additional functions, please contact your Security Administrator.

Introduction
Rev. 02/03 ACH User Manual 1-4
ACH Overview This topic provides an overview of the Online Treasury Manager's Automated Clearing House (ACH) product and a general description of the ACH services. Introduction to ACH The ACH product allows corporate customers to easily build ACH files that conform with the supported ACH file record formats, which conform with the National Automated Clearing House Association (NACHA) rules and standards. After Online Treasury Manager builds the ACH files, SunTrust takes the ACH files and process them through the ACH origination system. Supported SEC Codes The ACH product supports the following NACHA standard entry class (SEC) codes:
• CCD - Cash Concentration or Disbursement (includes federal and state tax payments) • CTX - Corporate Trade Exchange (pass-thru only) • PPD - Direct Deposit and Preauthorized Bill Payment • TEL – Telephone Initiated Entry • WEB - Internet-Initiated Entry
Cutoff Times For each business day of the week, the cutoff times indicate the exact times during the day that Online Treasury Manager processes approved batches and builds ACH files. The cutoff times at SunTrust are 10:30 AM, 2:30 PM, 5:30 PM, and 7:30 PM Eastern. At the last cutoff time for the day, Online Treasury Manager runs the cutoff process and sets the current processing date to the next business day.
Security Options The ACH product supports the following security options, which provide additional control for ACH activity: ACH companies, transaction type codes, approvals, and limits. ACH Companies ACH companies allow the Security Administrator to separate work responsibilities and selectively permit corporate users to specific transaction type codes. Transaction Type Codes Transaction type codes are unique codes that Online Treasury Manager delivers with the ACH product and uses to identify the
• Standard Entry Class (SEC) code for each batch • format of the entries or transactions in the batch • type of transactions in the batch.

Introduction
Rev. 02/03 ACH User Manual 1-5
Approvals Online Treasury Manager uses approvals to add an additional layer of security to ACH activity, based on your configuration needs. For each ACH company, you specify whether approval is required to process an activated batch. You can require
• no approval for activated batches • the same person who activated the batch must approve the batch • a person, other than the person who activated the batch, must approve the batch • a person, including the person who activated the batch, must approve the batch.
Limits The Security Administrator sets limits for a corporate user's maintenance, activation, and approval activity for each transaction type code. These limits control the maximum amount the user can
• manage (add, change, or delete) for each entry in a batch and for each batch • activate for each entry in a batch and for all batches per day • approve for each entry in a batch and for all batches per day.
When the corporate user activates or approves a batch, Online Treasury Manager
• verifies that none of the entries in the batch exceed the item limit • verifies the batch amount (total amount for all entries in the batch) does not exceed the
user's batch limit for the transaction type code • adds the batch amount to the user's accumulated activation or approval total to verify the
amount does not exceed the user's daily batch limit • increases the user's accumulated activation or approval total by the batch amount.
Batch Templates Corporate customers use the Batches service to add batch templates for each ACH company. Batch templates contain all the necessary information to build an active batch that you include in an ACH file. These templates serve as models for the entries or transactions you can activate. When you activate a batch, Online Treasury Manager makes an exact copy of the batch template. Before you complete the activation, you can change entry information for that specific activation, such as amounts or addenda information.
Import Files You can use the ACH Import service to import NACHA formatted files into the ACH product, which will
• add a new batch template and add entries to the new template (NACHA only)
Proactive Bulletins Users with activated batches that require approval receive a proactive bulletin when they log on to Online Treasury Manager. This bulletin contains a link that users can select to display an approval bulletin. The approval bulletin lists

Introduction
Rev. 02/03 ACH User Manual 1-6
• the number of activated batches requiring approval • a button that displays the Batch Approval Selection page, which users use to approve
batches.
Pass-Thru Files Pass-thru files are ACH files that are built outside Online Treasury Manager and loaded for validation and processing. Loading external ACH files into the Online Treasury Manager assures you that all ACH files you pass to the bank for processing come from the same location and are consistently validated to meet the same NACHA standards.
ACH Services The following table describes the ACH services: Name Service ID Description
Permissions ACHUserPerm Allows security administrators to
add and manage permissions to ACH companies and transaction type codes for security administrators and corporate users
set the ACH limits for corporate administrators and corporate users.
Batches ACHBatch To add and manage batch templates.
Participants ACHPartMnt To manage batch entry information for participants.
ACH Import ACHImport To import NACHA formatted, delimited, and fixed files into the ACH product from an outside source.
ACH Batch Activation
ACHActivate To activate batches.
ACH Batch Approval
ACHApprove To approve activated batches.
ACH Report ACHRpt To display summary and detail information for batches.
ACH Reversal ACHReversal To submit a request to the bank to reverse a batch entry that was previously sent in an ACH file.
ACH Pass-Thru ACHPassThru To load ACH files that are built outside the ACH product into the ACH product for validation and processing.
ACH PT Report ACHPTReport To display summary information for the pass-thru ACH files loaded into the ACH product.
ACH Setup Tasks The following setup tasks must complete before using the ACH product:
• The security administrator must use the Permissions service to • permit corporate users access to ACH companies for ACH activity • select the corporate user's permitted transaction type codes for each ACH company • set the maintenance, activation, and approval limits for the user's permitted
transaction type codes in the ACH companies.
• The security administrator or the corporate users use the Batches service to • add the batch templates for each ACH company.

Batch Creation
Rev. 02/03 ACH User Manual 2-1
Chapter 2 – Batch Creation
Overview This chapter describes the features of the Batches function. The Batches function allows authorized users to establish ACH batches, which contain the individual transactions in a defined format. With an ACH file, one segment of the file is a batch. Within the Batches function, a user can define a batch, add entries to a batch, and delete batches. To access this function, select ACH Initiation from the Select a Group drop-down menu and click the ACH Batches tab. The Batches service contains the following sections:
• Batches Selection • Add Batches • Change Batches • Delete Batches • Display Batches • Copy Batches • Add Entries • Update Amounts Only • Addenda Input
You will use the Batches Selection Page, Add Batches Page, and Add Entries Page when creating batches.
• First, enter a code (a unique ID assigned to the batch) and name on the Batch Selection Page and then click Add. The Add Batches Page will appear and you will enter data as detailed on page 2-3 of this chapter.
• After you enter the data click, Add Batch, to return to the Batches Selection Page. Click Find/Refresh; select the batch; and click Add Entries.
• Click Display Entries, enter data in the New Entry Section as shown on page 2-8; and click Add Entry.
• Continue adding entries until all participants have been entered. Click the ACH Batches tab to return to the Batches Selection Page.

Batch Creation
Rev. 02/03 ACH User Manual 2-2
Batches Selection Page Use this page to select the batch to which you want to change, delete, display, or add entries.
Batch Selection
Batches Selection Page Fields
This field... Contains this... Use it like this... ACH Batches List of existing ACH batches defined for the
ACH company. Select the batch for which you want to change, delete, display, or add entries.
Code Code identifying the ACH batch to view. Enter all or part of the code to search for an existing batch, or enter a new code to add a batch.
Companies ACH companies permitted to the user. Select the ACH company for which you want to view existing batches or add batches.
Name Name of the ACH batch to view. Enter all or part of the name to search for an existing batch, or enter a new name to add a batch.

Batch Creation
Rev. 02/03 ACH User Manual 2-3
Batches Selection Page Buttons
This button... Does this when clicked... Add Displays the Add Batches page where the user can define a new batch.
Change Displays the Change Batches page.
Delete Displays the Delete Batches page.
Display Displays the Display Batches page.
Copy Displays the Copy Batches page
Add Entries Displays the Add Entries page.
Update Amounts Only
Displays the Update Amounts Only page.
Find/Refresh Displays a list of all ACH batches from which the user can select.

Batch Creation
Rev. 02/03 ACH User Manual 2-4
Add Batches Page Use this page to add a new batch to the ACH system.
Add Batches
Add Batches Page Fields
This field... Contains this... Use it like this... Batch Code Unique code identifying the batch within the
ACH company. Enter a new batch code if it was not entered from the Batch Selection page. Required field.
Batch Name A descriptive name to identify the batch within the ACH company.
Enter a new batch name if it was not entered from the Batch Selection page. Required field.
Company Discretionary Data
Information regarding the batch to be used internally in the company. This description will appear in the Batch Header Type 5 record.
Enter this information in 20 characters or less.
Company Entry Description
Description entered by the corporate user to describe the batch. This description will appear in the Batch Header Type 5 record.
Enter the information in 10 characters or less. Required field.
Create Prenote Check box to denote if a prenote should be created for the first time the batch is activated.
Check the box to create a prenote. Leave the box blank if no prenote is necessary.
Lender’s EIN The lender’s Employee Identification number. This field is required only for transaction type SBACO E t th L d ’ EIN t lid t th t

Batch Creation
Rev. 02/03 ACH User Manual 2-5
SBACO. Enter the Lender’s EIN to validate that they are the company making the payment.
Offset Account A list of offset accounts you can associate with the batch template.
Please disregard. The settlement transaction is automatically created by SunTrust’s ACH system.
Transaction Drop-down list containing all of the transaction types permitted to the ACH company.
Select a transaction type from the drop-down list. Required field. (Transaction types, p. 2-5)
Add Batches Page Buttons
This button... Does this when clicked... Add Batch Adds the information entered into the appropriate ACH table to create the new batch.
Reset Resets the fields on the page to their last saved value.

Batch Creation
Rev. 02/03 ACH User Manual 2-6
Change Batches Page Use this page to make changes to an existing batch.
Figure 2-3
Change Batches Page Fields
This field... Contains this... Use it like this... Batch code Unique code identifying the batch within the
ACH company. This code cannot be changed on this page.
Batch Name Descriptive name established when the batch was entered.
Change this field if necessary.
Company Entry Description
Description of the batch established when the batch was entered.
Change this field if necessary.
Company Discretionary Data
Data entered by the company for their use in tracking the batch.
Change this field if necessary.
Disable Batch Check box to indicate the batch should be disabled. Imported batches will automatically check this field. It must be unchecked to allow activation.
Click the check box if you do not want other users to access or activate this batch template.

Batch Creation
Rev. 02/03 ACH User Manual 2-7
Offset Account A list of offset accounts you can associate with the batch template.
Please disregard. The settlement transaction is automatically created by SunTrust’s ACH system.
Prenotes in Batch The number of prenotes currently defined in the batch.
This field cannot be changed.
Total Credits Total number of credits, in parentheses, followed by the total dollar amount.
This field cannot be changed.
Total Debits Total number of debits, in parentheses, followed by the total debit amount.
This field cannot be changed.
Total Frozen Total number of frozen entries in parentheses followed by the total amount of entries within the batch that have been frozen. Frozen transactions are not written to the ACH file.
This field cannot be changed.
Transaction Type Transaction type established when this batch was added.
This field cannot be changed on this page.
Change Batches Page Buttons This button... Does this when clicked... Change Batch Changes the data in the batch to the appropriate ACH table.
Reset Resets the fields on the page to their last saved value.

Batch Creation
Rev. 02/03 ACH User Manual 2-8
ACH Glossary Debits reduce the balance of the participant’s or receiver’s deposit account. Credits increase the balance of the participant’s or receiver’s deposit account. CCDs (Cash Concentration and Disbursement) are used to debit or credit a corporate or business account. PPDs (Prearranged Payment and Deposit Entry) are used to debit or credit a consumer account. RCK (Re-presented Check Entry) is used to re-present returned consumer checks through the ACH
network. TEL (Telephone Initiated Entry) is used to perform telephone-authorized transactions. WEB (Internet Initiated Entry) is used to perform Internet transactions. Transaction Type Codes The Transaction Type codes are unique to Online Treasury Manager. The following table provides a description of each code: Transaction Type Descriptions Transaction Type Code
Addenda Description
CCD+CD Yes Cash Concentration or Disbursement, mixed credits and debits
CCD+CO Yes Cash Concentration or Disbursement, credits only (tax payments included)
CCD+DO Yes Cash Concentration or Disbursement, debits only
CCDCD No Cash Concentration or Disbursement, mixed credits and debits
CCDCO No Cash Concentration or Disbursement, credits only
CCDDO No Cash Concentration or Disbursement, debits only
PPD+CD Yes Pre-arranged Payment and Deposit, mixed credits and debits
PPD+CO Yes Pre-arranged Payment and Deposit, credits only
PPD+DO Yes Pre-arranged Payment and Deposit, debits only
PPDCD No Pre-arranged Payment and Deposit, mixed credits and debits
PPDCO No Pre-arranged Payment and Deposit, credits only
PPDDO No Pre-arranged Payment and Deposit, debits only
RCK No Re-presented Check Entry, debits only
TELCO No Telephone Initiated Entry, credits only
TELDO Yes Telephone Initiated Entry, debits only
WEB+DO Yes Internet Initiated Entry with addenda, debits only

Batch Creation
Rev. 02/03 ACH User Manual 2-9
Delete Batches Page Use this page to delete an existing batch. Click Delete to delete the selected batch and all associated transactions.
Figure 2-4
Delete Batches Page Fields
This field... Contains this... Use it like this... Batch Code Unique code identifying the batch within the
ACH company. This field cannot be changed.
Batch Description Description entered by the corporate user to describe the batch. This description will appear in the Batch header Type 5 record.
This field cannot be changed.
Batch Name A descriptive name to identify the batch within the ACH company.
This field cannot be changed.
Company Discretionary Data
Data entered by the company for their use in tracking the batch.
This field cannot be changed.
Prenotes in Batch The number of prenotes defined in the batch. This field cannot be changed.
Status Status of the batch; this field will denote that the batch is either prenote, frozen, or active.
This field cannot be changed.

Batch Creation
Rev. 02/03 ACH User Manual 2-10
Total Credits Total number of credits, in parentheses followed by the total dollar amount.
This field cannot be changed.
Total Debits Total number of debits in parentheses followed by the total debit amount.
This field cannot be changed.
Total Frozen Total number of frozen accounts in parentheses followed by the total amount of entries within the batch that have been frozen. Frozen transactions are not written to the ACH file.
This field cannot be changed.
Transaction Type Transaction Type established when this batch was added.
This field cannot be changed.

Batch Creation
Rev. 02/03 ACH User Manual 2-11
Display Batches Page Displays batches.
Figure 2-5
Display Batches Page Fields
This field... Contains this... Use it like this... Batch Code Unique code identifying the batch within the
ACH company. This field cannot be changed.
Batch Description Description entered by the corporate user to describe the batch. This description will appear in the Batch header Type 5 record.
This field cannot be changed.
Batch Name A descriptive name to identify the batch within the ACH company.
This field cannot be changed.
Company Discretionary Data
Data entered by the company for their use in tracking the batch.
This field cannot be changed.
Prenotes in Batch The number of prenotes defined in the batch. This field cannot be changed.
Status Status of the batch; this field will denote that the b t h i ith t f ti
This field cannot be changed.

Batch Creation
Rev. 02/03 ACH User Manual 2-12
batch is either prenote, frozen, or active.
Total Credits Total number of credits, in parentheses followed by the total dollar amount.
This field cannot be changed.
Total Debits Total number of debits in parentheses followed by the total debit amount.
This field cannot be changed.
Total Frozen Total number of frozen accounts in parentheses followed by the total amount of entries within the batch that have been frozen. Frozen transactions are not written to the ACH file.
This field cannot be changed.
Transaction Type Transaction Type established when this batch was added.
This field cannot be changed.

Batch Creation
Rev. 02/03 ACH User Manual 2-13
Copy Batches Page Use this page to make changes to an existing batch.
Copy Batches
Copy Batches Page Fields
This field... Contains this... Use it like this... Batch code Unique code identifying the batch within the
ACH company. Enter a new batch code. Required field.
Batch Name Descriptive name established when the batch was entered.
Change this field if necessary.
Company Entry Description
Description of the batch established when the batch was entered.
Change this field if necessary.
Company Discretionary Data
Data entered by the company for their use in tracking the batch.
Change this field if necessary.
Create Prenote Check box to denote if a prenote should be created for the first time the batch is activated.
Check the box to create a prenote. Leave the box blank if no prenote is necessary.
Offset Account A list of offset accounts you can associate with the batch template.
Please disregard. The settlement transaction is automatically created by SunTrust’s ACH system.
Prenotes in Batch The number of prenotes currently defined in th b t h
This field cannot be changed.

Batch Creation
Rev. 02/03 ACH User Manual 2-14
the batch.
Total Credits Total number of credits, in parentheses, followed by the total dollar amount.
This field cannot be changed.
Total Debits Total number of debits, in parentheses, followed by the total debit amount.
This field cannot be changed.
Total Frozen Total number of frozen entries in parentheses followed by the total amount of entries within the batch that have been frozen. Frozen transactions are not written to the ACH file.
This field cannot be changed.
Transaction Type Transaction type established when this batch was added.
This field cannot be changed on this page.
Copy Batches Page Buttons This button... Does this when clicked... Copy Batch Copy the batch data to the appropriate ACH table to create the new batch.
Reset Resets the fields on the page to their last saved value.

Batch Creation
Rev. 02/03 ACH User Manual 2-15
Add Entries Page Use the Add Entries page to add entries to an existing batch, modify existing entries, or delete entries. The existing entries section at the bottom of the page displays transactions currently defined for the batch. You can change or delete items from this section as well.
Figure 2-6
Add Entries Page Fields
This field... Contains this... Use it like this...
New Entry Section
Account Number Blank field to allow the user to enter the account number for this entry.
Enter the Account Number for this new account number for this new entry. Required field.
Account Type Drop-down list containing four types of account type for accounts:
Checking - for a demand deposit account (formerly DDA)
Gen Ledger – for a general ledger account
Note: Please be advised that SunTrust originates GL ACH transactions but does not
Choose the appropriate account type for the new entry. Required field.

Batch Creation
Rev. 02/03 ACH User Manual 2-16
This field... Contains this... Use it like this... accept them at this time. Be sure to confirm that these transactions can be accepted by the receiving depository financial institution.
Loan – for a loan account (for credit entries only)
Savings – for a savings account (formerly SAV) General Ledger and Loan values do not appear in the list for the WEB+DO transaction type code.
Addenda Input Screen
A list of available addenda forms.
If the transaction type code is: • CCD+CO, federal state, the value No
Addenda, and industry addenda forms appear in this list
• CCD+DO, only industry addenda forms and the value No Addenda appear in this list
• Any other transaction type code that supports addenda, this field contains the values No Addenda and Industry – Free Form.
This field appears only if the transaction type code supports addenda.
Select a form from the list and click Add Addenda to open the Addenda Input page, which you use to add addenda for the entry.
Default is Select Addenda Input Screen.
Addendum Additional information for the entry such as state or tax information. This field displays only if the transaction type of the entry specifies “with addenda.” Appears in the ACH addenda record 7.
Displays only for transactions types that support addenda. To add addenda information, click Add Addenda.
Amount Amount of the entry being debited or credited. Enter this value. If a decimal point is entered, two numbers must follow the decimal point. If no decimal point is entered, the system assumes the value is in dollars and automatically adds a decimal point and two zeros.
Bank ABA Blank field to allow the user to enter the bank routing/transit number for this entry.
Enter the Bank ABA for this new entry. Required field.
Batch Batch number and name. This field cannot be changed
Create Prenote Check box indicating if a prenote should be created for this item on the first activation. Once the prenote is created, this field becomes blank so the system will not create another prenote.
Click the box to have a prenote created. Note: If the Create Prenote check box was selected on the Add Batches page, this box will already be selected.
Disc. Data Blank field to allow the user to enter company discretionary data for this entry.
Enter the discretionary data. This field is two characters long.
ID Number Blank field to allow the user to enter an ID number for a new entry.
Enter new ID number. Required field.
Name Blank field for you to enter a name for a new entry.
Enter the Name for a new entry. Required field.
Payment Type Applicable to transaction type WEB+DO only. Payment type for batch entry. Options are: • Recurring • Single
Select the payment type for transaction type WEB+DO
Type Radio button indicating either credit or debit t ti if thi i i d t ti t If
Select the transaction type if the radio button

Batch Creation
Rev. 02/03 ACH User Manual 2-17
This field... Contains this... Use it like this... transaction if this is a mixed transaction type. If the transaction type associated with this batch is credit or debit only, the appropriate transaction type will display.
appears.
Filter Section
Filter Drop-down list containing the following filter options: • No Filter • Participant Name • Participant ID • Bank ABA • Account Number • Amount • Disc. Data • State
Choose the type of filter you wish to apply to the entry display below.
From Blank field to allow the user to identify a beginning value to limit the field specified in Filter.
Enter the beginning filter value.
Report display Drop-down list containing the following display options: • All entries per page • 10 entries per page • 25 entries per page • 50 entries per page • 100 entries per page • 500 entries per page
Choose the number of entries you want to display on the screen.
Report sort Drop-down list containing the following sort options: • No Filter • Participant Name • Participant I.D. • Bank ABA • Account Number • Amount • Disc. Data • State
Choose the option by which you want the entries to be sorted for the display.
Save Radio button indicating whether the filter settings should be saved for this entry.
Select Yes to save the settings for the corporate user for this batch or check No to use the filter criteria one time only.
To Blank field to allow the user to identify an ending value to limit the field specified in the Filter drop down list.
Enter the ending filter value.
Existing Entry Section
Account Account number as entered in the New Entry section.
Edit the account number if necessary.
Addendum Additional information for the entry Display only. To change the addenda information, click the Edit Addenda.
If you select No Addenda on the input screen, text on the bottom displays "no addenda" and

Batch Creation
Rev. 02/03 ACH User Manual 2-18
This field... Contains this... Use it like this... the button is disabled.
Amount Amount of the transaction as entered in the New Entry section.
Edit the amount if necessary.
Bank Bank ABA number as entered in the New Entry section.
Edit the number if necessary.
Credit/Debit Drop-down list containing CR for credit or DR for debit and is determined by the type of transaction entered in the New Entry section.
Choose another value if necessary.
Delete Check box to identify which transactions you want to delete.
Select the check box next to all transactions you want to delete. The transactions will be deleted when Submit Changes is clicked.
Disc. Discretionary Data value as entered in the New Entry section.
Edit the value if necessary.
Entry Number assigned by the system for each entry in the batch.
This field cannot be changed
ID Number ID Number entered in the New Entry section. Edit the number if necessary.
Name Name assigned to the batch in the New Entry section.
Edit the name if necessary.
Payment Type Drop down list of payment type for the batch entry. Appears for the transaction type WEB+DO only.
Choose from one of the following options: • Recurring • Single (one-time payment)
State Drop-down list displaying the state that was defined in the New Entry section.
Edit the state if necessary by choosing from one of the following options: • Prenote • Frozen • Active
Type Drop-down list containing the same options as listed for Account Type in the New Entry section.
Choose another account type if necessary.
Add Entries Batches Page Buttons This button... Does this when clicked... New Entry Section
Add Addenda Opens the Addenda Input page. Use this page to add addenda information for the entry. This button appears only if the transaction type code supports addenda.
Add Entry Adds the newly entered data to the batch record and displays the new entry in the Existing Entry Section.
Reset Resets the values of the fields to their last saved values.
Filter Section
Display Entries Displays the entry items in the Existing Entry section by the fields defined in the Filter section.
Existing Entry Section
Delete Batch (name) Deletes the batch specified and all associated transactions (entries).
Edit Addenda Opens the Addenda Input page and displays the addenda information for the selected entry. This button appears only if the transaction type code supports addenda.
Reset Resets the values of the fields to their last saved values.

Batch Creation
Rev. 02/03 ACH User Manual 2-19
Submit Changes Updates the data entered on the page; deletes any transactions where the Delete box was checked
Note: Some batches may contain a large number of entries. When working with large groups of entries, it is necessary to click Submit Changes at frequent intervals to prohibit the system from timing out. The system only senses activity if you click the following buttons on the Add Entries page: Add Entry, Display Entry, and Submit Changes. To avoid having the system time out, you may want to choose either 25 Entries per Page or 10 Entries per Page from the Report Display field in the Filter section. Click on Submit Changes after completing each group of entries in the report.

Batch Creation
Rev. 02/03 ACH User Manual 2-20
Update Amounts Only Page Use this page when you want to update the transaction amounts only.
Figure 2-7
Update Amounts Only Page Fields
This field... Contains this... Use it like this...
Filter Section
Filter Drop-down list containing the following filter options: • No Filter • Participant Name • Participant ID • Bank ABA • Account Number • Amount • Disc. Data • State
Choose the type of filter you wish to apply to the entry display below.

Batch Creation
Rev. 02/03 ACH User Manual 2-21
This field... Contains this... Use it like this... From Blank field to allow the user to identify a
beginning value to limit the field specified in Filter.
Enter the beginning filter value.
Report display Drop-down list containing the following display options: • All entries per page • 10 entries per page • 25 entries per page • 50 entries per page • 100 entries per page • 500 entries per page
Choose the number of entries you want to display on the screen.
Report sort Drop-down list containing the following sort options: • No Filter • Participant Name • Participant I.D. • Bank ABA • Account Number • Amount • Disc. Data • State
Choose the option by which you want the entries to be sorted for the display.
Save Radio button indicating whether the filter settings should be saved for this entry.
Select Yes to save the settings for the corporate user for this batch or check No to use the filter criteria one time only.
To Blank field to allow the user to identify an ending value to limit the field specified in the Filter drop down list.
Enter the ending filter value.
Existing Entry Section
Account Account number This field is display only.
Amount Amount of the transaction Edit the amount if necessary.
Bank Bank ABA number This field is display only.
Credit/Debit Determined by the type of transaction: CR for credit or DR for debit.
This field is display only.
Disc. Discretionary Data value. This field is display only.
Entry Number assigned by the system for each entry in the batch.
This field is display only.
ID Number ID Number This field is display only.
Name Name assigned to the batch. This field is display only.
State State that to the entry. Values are prenote, frozen, or active.
This field is display only.
Update Amounts Only Page Buttons This button... Does this when clicked... Display Entries Displays the entries using the settings you entered in the Filter section.
Reset Resets the values of the fields to their last saved values.

Batch Creation
Rev. 02/03 ACH User Manual 2-22
Submit Changes Updates the data entered on the page; deletes any transactions where the Delete box was checked
Delete Batch Deletes the batch and all associated entries. When you click this button, a confirmation message appears. Click OK to delete the batch.
Note: The button displays the batch name

Batch Creation
Rev. 02/03 ACH User Manual 2-23
Addenda Input Page The addenda form selected for the batch entry in the Addenda Input Screen field on the Batch Entries page controls the fields that appear on the Addenda Input page. Types of Forms There are three types of addenda forms in the ACH product: Industry, Federal, and State. For each form type, there are multiple forms. For the Industry form type, Online Treasury Manager supports the following industry forms:
• Free Form • Miscellaneous Child Support • Note/Special Instruction • Reference Identification • Remittance Advice • Trace
For the State form type, Online Treasury Manager supports one form for each tax entity. Transaction Type Code The transaction type code selected for the batch template controls whether the Addenda Input Screen field appears on the page and which forms are listed in the field. If the transaction type code:
• Does not support addenda, the Addenda Input Screen field does not appear • Is CCD+DO, industry type forms and the value No Addenda appear in this field • Is CCD+CO, all supported industry, federal, and state forms appear in this field. This field also
contains the value No Addenda. Select this value to add a CCD+CO batch entry without addenda information

Notes
Rev. 02/03 ACH User Manual 2-24

Participant Maintenance
Rev. 06/02 ACH User Manual 3-1
Chapter 3 – Participant Maintenance
Overview This function allows authorized users to change data associated with ACH Participants or delete a participant’s record, which in turn applies the change to the participant’s record in all batches containing that participant. ACH Participants are established in the system through the Batches function and represent the individual entries in a batch. The Participants function allows the Administrator to maintain participant data only. To access this function, select ACH Initiation from the Select a Group drop-down menu and click the Participants tab. The Participants function contains the following sections:
• Participants Selection • Participants Data Entry • Addenda Input
When you change or delete an entry, Online Treasury Manager reflects changes in the batch template. It does not effect entries in previously activated or approved batches.

Participant Maintenance
Rev. 06/02 ACH User Manual 3-2
Participants Selection Page Use this page to select a participant’s record to edit or delete. Click Find/Refresh to search for ACH Participants. Note: a participant entry will only occur once in the dropdown list. When you select a participant, Online Treasury Manager will then display each entry of every batch that the participant occurs.
Figure 3-1 Participant Selection Page Fields This field... Contains this... Use it like this... ACH Participants ACH Participants associated with the selected
company. Select the participant for whom you want to display or change the data.
Code Code of the ACH Participant. Enter all or part of the code on which you want to search.
Companies Companies of the corporate customer. Select the company for which you want to display the ACH Participants.
Name Name of the ACH Participant. Enter all or part of the name on which you want to search.

Participant Maintenance
Rev. 06/02 ACH User Manual 3-3
Participants Data Entry Page The Participants Data Entry page displays when you select a participant from the ACH Participants box. Use this page to edit the participant’s record or delete the record. This will affect all existing entries for the participant.
Figure 3-2
Participants Data Entry Page Fields This field... Contains this... Use it like this... Account Account number associated with the
participant. Change the account number if necessary.
Amount Amount of the ACH transaction. Change the amount if necessary.
Bank Transaction/Routing number assigned through the Batches service.
Change the Bank number as necessary.
CR/DR C if the transaction was entered into the batch as a credit or D if the transaction was entered as a debit.
This field cannot be changed.
Delete Check box to indicate the transaction should be deleted.
Click the check box to delete the participant and all entries. The entry in the batch will also be deleted. The check box is processed when Submit Changes is selected.

Participant Maintenance
Rev. 06/02 ACH User Manual 3-4
Disc Discretionary data established for the detail ACH transaction. This field does not appear if the transaction type code is WEB+DO.
Change the discretionary data if necessary.
Entry The number of the entry. This field cannot be changed.
ID Number ID number of the entry assigned through the Batches service.
Change the ID number if necessary.
Last Active The last date the transaction in the associated batch was processed.
This date cannot be changed.
Name Name of the entry assigned through the Batches service.
Change the name if necessary.
State Drop-down field displaying either Prenote, Frozen or Active to define the state of the transaction.
Change the state if necessary.
Type Drop-down list containing four types of account type for accounts:
Checking - for a demand deposit account (formerly DDA)
Gen Ledger – for a general ledger account
Note: Please be advised that SunTrust originates GL ACH transactions but does not accept them at this time. Be sure to confirm that these transactions can be accepted by the receiving depository financial institution.
Loan – for a loan account (for credit entries only)
Savings – for a savings account (formerly SAV) General Ledger and Loan values do not appear in the list for the WEB+DO transaction type code.
Change the account type if necessary.
Participants Data Entry Page Buttons This button... Does this when clicked... Delete Participants and all Entries
Deletes, without a second warning, the participant and all related entries.
Reset Resets the values in the fields to their last saved values.
Submit changes Updates the changes made to the fields.

Batch Activation
Rev. 06/02 ACH User Manual 4-1
Chapter 4 – Batch Activation
Overview This chapter discusses the first step in ACH initiation, Batch Activation. Batch Activation allows the modification of ACH batches, which contain individual debits or credits to participants’ accounts. The Activation function tab can be found in the ACH Initiation service from the main drop-down menu. The Activation service contains the following pages:
• Available Batches Page • Batch Review Page • Update Entries Page • Addenda Input Page • Possible Duplicate Batches Page • Activation Confirmation Summary Page
Batch templates and participant records cannot be created in the Batch Activation function. A user with the applicable permissions creates batch templates in the Batches function within the ACH Initiation menu. A participant’s account or bank information cannot be changed within the Batch Activation function. Only the amounts, addenda information, and the status of a transaction can be changed using the Batch Activation function. If other information needs to be modified, changes may be made in the Batches function within the ACH Admin menu. The Available Batches page is used to select one or more batches to activate for the selected ACH companies, display detail information for a batch, and to change entry information for a batch. You must select an ACH Company first. An ACH Company is an account or subsidiary assigned by SunTrust. The ACH Company represents the offset account for the transactions within a batch. After choosing the ACH Company and a displaying one or more batches, you may click on activate all or activate only the selected batches in the list. If the amounts or a participant’s status need to be changed before activation, the Review/Update arrow may be selected. The Batch Review page is used to display detail information for a batch. You can use this page to open the Update Entries page. If the amounts are the only changes needed, the Update Amounts button may be chosen. After a batch is activated, approval is required before sending the batch to SunTrust. The Approval function will be discussed in the next section.

Batch Activation
Rev. 06/02 ACH User Manual 4-2
Available Batches Page Use the Available Batches page to select the ACH Company and the batch or batches being activated. You have the opportunity to review detailed information about the batch. From this page, you may select one or more batches to activate for the selected ACH companies, activate all batches for the selected ACH Company, or access the Batch Review page to display detail information for a batch.
Figure 4-1
Available Batches Page Fields
This field... Contains this... Use it like this... ACH Batches A list of ACH batches defined for the ACH
Company selected. Select the batch you want to activate.
Batch Name The batch name established for this batch within Batches function.
This field cannot be changed within the Activation function.
Company The name for the ACH company. This field cannot be changed within the Activation function.
Descriptive Date Date used by the company internally. This can be helpful for the participant to identify the transaction.
Enter the date in the MMDDYY format. This field is optional. This value will be written to the Descriptive Date field of ACH Batch Header Type 5 record.

Batch Activation
Rev. 06/02 ACH User Manual 4-3
This field... Contains this... Use it like this... Effective Entry Date Effective date for the batch. This is the date
the transactions will be posted to the participant’s account.
Enter the effective date for the batch in MM/DD/YYYY or YY format. If you do not enter the effective date, the date will default to the date as defined in the Transaction Types function. The date cannot be prior to the current date and cannot exceed the number of days in the future as defined in the Future Date Default field in the ACH Settings service. This is a required field. The value will be written to the Effective Entry Date field of ACH Batch Header Type 5 record.
Prenotes in Batch The number of prenotes defined within this batch.
This field cannot be changed within the Activation function.
Review/Update A red arrow icon. Click the icon to open the Batch Review page. Use this page to view detail information or change information for the batch.
Select An option that indicates you want to activate the batch.
Select the check box to mark the batch for activation.
Status The status for the batch. This field cannot be changed.
Total Credits The total number of credits, in parentheses, followed by the total dollar amount of the credits within the batch.
This is a calculated field and cannot be changed.
Total Debits The total number of debits, in parentheses, followed by the total dollar amount of the debits within the batch.
This is a calculated field and cannot be changed.
Transaction Type The transaction type assigned for this batch in the Batches function.
This field cannot be changed within the Activation function.
Available Batches Buttons
This button… Does this when clicked… Activate All Activates all of the batches on the list.
Activate Selections Activates only the selected batches in the list.
Cancel Closes the Available Batch Templates page and opens the ACH Company Selection page.
Reset Restores the information in all fields to the previously saved settings.

Batch Activation
Rev. 06/02 ACH User Manual 4-4
Update Entries Page Use the Update Entries page to modify transaction data before the batch is activated. These changes will apply to this activation of the batch only. Any change made on this page does not modify the original data entered in the batch template through the Batches service. When working with batches that contain many entries, it is recommended that you limit your display to 10 or 25 entries per page and frequently click submit changes to save your work.
Figure 4-2
Update Entries Page Fields
This field… Contains this… Use it like this… Filter Section
Filter Drop-down list containing the following to apply filter options: • No Filter • Participant Name • Participant ID • Bank ABA • Account Number • Amount • Data • State •
This feature allows you to view or modify a range of entries without viewing the entire batch of entries.
Choose the type of filter you wish to view.

Batch Activation
Rev. 06/02 ACH User Manual 4-5
This field… Contains this… Use it like this… From Blank field to allow the user to identify a beginning
value to limit the field specified in the Filter drop-down list
Enter the beginning filter value. For example, If you would like to view the participants with the Participant Names starting with ‘M’ through ‘Z’; type ‘M’ in this field
To Blank field to allow the user to identify an ending value to limit the field specified in the Filter drop-down list.
Enter the ending filter value. For example, If you would like to view the participants with the Participant Names starting with ‘M’ through ‘Z’; type ‘Z’ in this field.
Report Display Drop-down list containing the following options: • All entries per page • 10 entries per page • 25 entries per page • 50 entries per page • 100 entries per page • 500 entries per page
Choose the number of entries you want to display on the screen.
Report Sort Drop-down list containing the following sort options: • Participant Name • Participant I.D. • Bank ABA • Account Number • Amount • Disc. Data • State
Choose the option by which you want the entries to sort.
The default is by sort is by Participant ID.
Note: the sort selection also effects how the entries are displayed in the ACH Detail Report.
Save Radio button indicating whether the current filter settings should be saved for this user ID only.
Check Yes to save the settings for the corporate user for this batch or check No to use the filter criteria one time only.
Entry Section
Account Account number for this entry as entered in the Batches service.
This field cannot be changed within the Activation function.
Addendum Additional information for the entry. Field only appears if the transaction type code for the batch supports addenda.
This field cannot be changed within the Activation function.
Amount Amount of the entry being debited or credited through ACH as entered in the Add Entries section. This value will be written to the ACH Detail Type 6 Record.
Edit the amount as necessary.
Bank Bank ABA number associated with this entry as entered in the Batches service. This value will be written to the ACH Detail Type 6 Record.
This field cannot be changed within the Activation function.
Cr/Db C or D appears if the transaction type associated with this batch is a credit or debit only. If the transaction type is mixed debits and credits, a drop down box appears with the option to choose CR or DR. This value will be written to the ACH Detail Type 6 Record.
This field cannot be changed if the transaction type is credit or debit only. For transaction types that are mixed debits and credits, you must choose one of the options from the drop-down list.
Disc Discretionary Data as entered in the Batches service. This field does not appear if the transaction type code is WEB+DO.
This field cannot be changed within the Activation function.
Entry Ascending number beginning with 1 for the first entry in the batch.
This field cannot be changed.
ID Number ID number of the entry as entered in the Batches service. This value will be written to the ACH Detail Type 6 Record.
This field cannot be changed within the Activation function.

Batch Activation
Rev. 06/02 ACH User Manual 4-6
This field… Contains this… Use it like this… Name Name of the individual or company to whom this
entry is being paid as entered in the Batches service. This value will be written to the ACH Detail Type 6 Record.
This field cannot be changed within the Activation function.
Payment Type The current payment type for the batch entry, recurring or single (one-time payment). This value will be written to the ACH Detail Type 6 Record. Field appears only if the transaction type code is WEB+DO.
Select a payment type.
State (ACH Transaction Status)
Drop-down list showing the status of the entry determined by the system. The options for State are:
Prenote: This entry is a prenote. The system assigns the prenote transaction code and fills the amount field with a value of $0.00.
Active: This entry is a live dollar item and will be created as such.
Frozen: This entry should be ignored by the backend cutoff processing and not written to any ACH files created Zero Dollar: This entry is a zero dollar item. The system assigns the zero dollar transaction code and fills the amount field with a value of $0.00. Zero dollar does not appear in the list for the WEB+DO transaction type code.
Edit the state as necessary. Note: The Zero Dollar option under the State field will appear for transaction types that support addenda only (excluding PPD+). This includes: CCD+CD, CCD+CO, or CCD+DO. This option is provided to allow the corporate customer to send information through the batch processing without creating a monetary transaction. Amounts of $0.00 will only be processed if Zero Dollar or Prenote is selected in the State field.
Type Drop-down list containing four types of account type for accounts:
Checking - for a demand deposit account (formerly DDA)
Gen Ledger – for a general ledger account
Note: Please be advised that SunTrust originates GL ACH transactions but does not accept them at this time. Be sure to confirm that these transactions can be accepted by the receiving depository financial institution.
Loan – for a loan account (for credit entries only)
Savings – for a savings account (formerly SAV)
General Ledger and Loan values do not appear in the list for the transaction type code WEB+DO.
This field cannot be changed within the Activation function.
Update Entries Page Buttons This button... Does this... Batch Review Page Closes the Batch Entry Update page, opens the Batch Review page, and displays
information for the selected batch.
If you saved changes on the Batch Entry Update page before you clicked Batch Review Page, a message appears and asks if you want to keep the updated batch. Click OK to keep the changes.
Display Entries Displays the entries that meet the criteria entered for the filter.
Edit Opens the Edit SBA Addenda Record page. Use this page to add addenda information for the batch entry. This button appears only if the transaction type code is SBACO.

Batch Activation
Rev. 06/02 ACH User Manual 4-7
Edit Addenda Opens the Addenda Input page and displays the addenda information for the selected entry. Use this page to change addenda information.
Next Page Displays the next group of entries.
No addenda This button is disabled.
Previous Page Displays the previous group of entries.
Reset Resets the fields to their last saved values.
Submit Changes Updates the data entered on the Update Entries page and opens the Available Batch Templates page.

Batch Activation
Rev. 06/02 ACH User Manual 4-8
Addenda Input Page The addenda form selected for the batch entry in the Addenda Input Screen field on the Batch Entries page controls the fields that appear on the Addenda Input page. Types of Forms There are three types of addenda forms in the ACH product: Industry, Federal, and State. For each form type, there are multiple forms. For the Industry form type, Online Treasury Manager supports the following industry forms:
• Free Form • Miscellaneous Child Support • Note/Special Instruction • Reference Identification • Remittance Advice • Trace
For the State form type, Online Treasury Manager supports one form for each tax entity. Transaction Type Code The transaction type code selected for the batch template controls whether the Addenda Input Screen field appears on the page and which forms are listed in the field. If the transaction type code:
• Does not support addenda, the Addenda Input Screen field does not appear • Is CCD+DO, industry type forms and the value No Addenda appear in this field • Is CCD+CO, all supported industry, federal, and state forms appear in this field. This
field also contains the value No Addenda. Select this value to add a CCD+CO batch entry without addenda information.

Batch Activation
Rev. 06/02 ACH User Manual 4-9
Possible Duplicate Batches Page This page allows you to determine if the duplication is intentional or accidental so that you can choose to either cancel or continue the batch activation.
Figure 4-3
The Possible Duplicate Batches page is displayed when the ACH system identifies a potential duplicate batch. The system displays this page when the same batch was previously activated
1. With the same effective entry date A batch that was previously activated matches an effective entry date. The heading of the page will read: Possible Duplicate Batches Encountered-Effective Date Match.
2. On the same day. The same batch was previously activated the same day. The heading of the page will read: Duplicate Batches Encountered-Activation Date Match.
Fields This field... Displays this... Activation Date The date and time the batch was activated.
Batch ID The ACH batch code assigned to the batch when it was created.
Batch Name The batch name assigned to the batch when it was created.
Company The ACH company or account that owns this batch.
CustCode The ACH Customer Code that owns this batch.

Batch Activation
Rev. 06/02 ACH User Manual 4-10
Effective Entry Date The Effective Entry Date assigned to this batch.
Entry User The Customer Code and User Code of the activator of the batch.
TraceNum The ACH Trace Number assigned to all activated batches.
Select An option that indicates whether you want to cancel the activation request. Select the check box and click Cancel Selected to cancel the activation request.
Buttons This button... Does this... Cancel All Cancels the activation request for all batches with possible duplicates and displays the ACH
Activation Confirmation Summary page.
Cancel Selected Cancels the activation request for the selected batches, activates any remaining batches, and displays the ACH Activation Confirmation Summary page.
Continue Activates the batches and displays the ACH Activation Confirmation Summary page.

Batch Activation
Rev. 06/02 ACH User Manual 4-11
Activation Confirmation Summary Page The Activation Confirmation page allows you to review activated and cancelled batches. After receiving the confirmation page, a designated user must approve the batch through the Approval function. Executing the Approval function will release the batch for transmission to SunTrust. This page is divided into the following sections: • Activation requests that require approval • Activation requests that do not require approval • Cancelled activation requests
Figure 4-4
Activation Confirmation Summary Page Fields
This field... Displays this... Company The ACH Company or account that owns the batch.
Customer Code / Customer Name
The code and name for the corporate customer who activated the batches.
User Code / User Name
The code and name for the corporate user who activated the batches.
Activation Date / Time Date and time the batch was activated.
Cust Trace # Trace number assigned at the time the batch is activated. This is a four-digit sequentially assigned number.

Batch Activation
Rev. 06/02 ACH User Manual 4-12
This field... Displays this... Effective Entry Date The effective entry date assigned to this batch.
Frozen The total number of frozen entries, in parentheses, followed by the total dollar amount of the frozen entries within the batch.
# Prenotes Number of prenotes in the batch.
# Zero Dollar Number of Zero Dollar entries in the batch.
Bank Trace # Trace number assigned to the approved batch.
Batch Name Name for the batch.
Total Credits The total number of credits, in parentheses, followed by the total dollar amount of the credits within the batch.
Total Debits The total number of debits, in parentheses, followed by the total dollar amount of the debits within the batch.
Detail Records Total number of detail (Type 6) records in this batch.

Batch Approval
Rev. 06/02 ACH User Manual 5-1
Chapter 5 – Batch Approval
Overview The Approval function allows a designated user to approve batches that have been activated and are ready for approval. Your company may choose to allow the user who activated the batch also approve it. Or, the company may require a different user to approve the batch for internal control purposes. The Approval function tab can be found in the ACH Initiation service from the main drop-down menu. The Approval service contains the following pages:
• Approval Selection Page • Batch Detail Page • Batch Delete Confirmation Page • Approval Confirmation Summary Page
Through this function, the user can review a batch that is ready for approval, delete the batch if necessary, or approve a batch which is then released for transmission to SunTrust. Approved batches are transmitted to the bank’s ACH processing system at intervals throughout the day. If you wish to delete a batch after it has been approved through this function, please refer to Chapter 8, ACH Reversal. Please refer to the ACH Support Services Information Package for information about restrictions, authorizations and deadlines.

Batch Approval
Rev. 06/02 ACH User Manual 5-2
Approval Selection Page Use the Approval Selection page to choose the batch you want to approve or delete. Only the batches that qualify for approval by the User ID that requested the service will be displayed.
Figure 5-1
• To approve all batches displayed, press Approve All. • To approve one or more batches, select the check box under the “Select” column next to
the desired batch, and press Approve Selections. • To delete a batch, select the icon under the “Delete” column next to the desired batch. • To review batch detail information, select the icon under the “Review” column next to
the desired batch.
Approval Selection Page Fields
This field... Displays this... Activated Date / Time Date and time the batch was activated.
Batch Name The name assigned to the batch when it was created.
Company The ACH company that owns this batch.
Total Credits The total credit amount contained on detail transactions within the batch.
Total Debits The total debit amount contained on detail transactions with the batch.

Batch Approval
Rev. 06/02 ACH User Manual 5-3
Effective Entry Date Effective entry date for this batch.
CustTrace No The ACH Customer Trace Number assigned to all activated batches. Approval Selection Page Buttons
This button... Does this... Approve All Submits all valid batches for approval and opens the ACH Approval
Confirmation Summary page.
Approve Selections Submits the selected batches for approval and opens the ACH Approval Confirmation Summary page.
Reset Restores the information in the Select check box to the default value.
Select Allows you to mark the batch for approval.
Review Opens the Batch Detail page, which displays detail information for the selected batch associated with the red arrow.
Delete Deletes the batch associated with the red arrow.

Batch Approval
Rev. 06/02 ACH User Manual 5-4
Batch Detail Page Use the Batch Detail page to view the details of the batch you selected from the Batch Selection page. You can approve the batch from this page, or, if you choose not to approve it, click the Skip/Unlock button so that other users may access the batch. Note: If the delete option was selected from the previous page, the user will see a delete batch button in place of the Approve Batch button.
Figure 5-2 Batch Detail Page Fields
This field... Contains this...
Batch Information
Batch The batch code and name assigned to the batch when it was created. Identifies the specific batch being approved.
Batch Description The description of the batch entered at the time it was created
Company The identifier and name for the ACH company.
Company Discretionary Data
The Disc. Data field entered for this batch when it was created.
Descriptive Date The descriptive date assigned to the batch when it was activated.

Batch Approval
Rev. 06/02 ACH User Manual 5-5
This field... Contains this... Effective Entry Date The effective entry date assigned to the batch when it was activated.
Prenotes in Batch The number of prenotes defined for this batch.
Total Credits The total number of credits, in parentheses, followed by the total credit amount of the entries within the batch template.
Total Debits The total number of debits, in parentheses, followed by the total debit amount of the entries within the batch template.
Total Frozen The total number of frozen transactions, in parentheses, followed by the total amount of frozen transactions within the batch template.
Detail Information
Account Account number for this entry as entered in the Add Entries section. This value will be written to the ACH Detail Type 6 Record.
Addendum Additional information for the entry, such as state or local tax information.
Amount Amount of the entry being debited or credited through ACH as entered in the Add Entries section. This value will be written to the ACH Detail Type 6 Record.
Bank Bank ABA number associated with this entry as entered in the Add Entries section. This value will be written to the ACH Detail Type 6 Record.
Credit/Debit C or D appears if the transaction type associated with this batch when it is a credit or debit batch only. If the transaction type is mixed debits and credits, a drop-down box appears with the option to choose CR or DR. This value will be written to the ACH Detail Type 6 Record.
Disc. Discretionary Data as entered in the Add Entries section. This value will be written to the ACH Detail Type 6 Record.
This field does not appear if the transaction type code is WEB+DO.
Entry Ascending number beginning with “1” for the first entry in the batch.
ID Number I.D. number of the entry as entered in the Add Entries section. This value will be written to the ACH Detail Type 6 Record.
Name Name of the individual or company to whom this entry is being paid as entered in the Add Entries section. This value will be written to the ACH Detail Type 6 Record.
Payment Type The payment type for the batch entry – recurring or single (one-time payment). This field appears only if the transaction type cod is WEB+DO.
State Drop-down list showing the status of the entry determined by the system. The options for State are: • Prenote • Active • Frozen
Batch Detail Page Buttons
This button... Does this... Delete Batch Deletes the second batch and opens the Batch Delete Confirmation page, which confirms the
delete.
This button appears only if you click the Delete icon on the Batch Approval Selection page.
Skip/Unlock Releases the batch so that another user can access it, opens the Batch Approval Selection page. Does not approve the batch.

Batch Approval
Rev. 06/02 ACH User Manual 5-6
Batch Delete Confirmation Page Use the Batch Delete Confirmation page to confirm a deleted batch. This page appears when you click Delete Batch on the Batch Detail page and displays the customer trace number for the deleted batch. This page may be printed and stored for your records.
Figure 5-3

Batch Approval
Rev. 06/02 ACH User Manual 5-7
Approval Confirmation Summary Page Use the Approval Confirmation Summary page to review the confirmation information for approved batch. This page may be printed and stored for your records.
Figure 5-4 Approval Confirmation Summary Page Fields
This field... Displays this... Activate Date/ Time Date and time the batch was activated.
Approval Date Date the batches were approved.
Approval Time Time the batches were approved.
Bank Trace # Trace number assigned at the time the batch is approved. This number is the Julian date followed by a four-digit sequentially assigned number.
Batch Name Name for the batch.
ACH Company The ACH Company that owns this batch.
Cust Trace # Trace number assigned at the time the batch is activated. This is a four-digit sequentially assigned number.
Customer Code/ Customer Name
The code and name for the customer who approved the batches.
Detail Records Total number of entries, or transactions, in the batch.

Batch Approval
Rev. 06/02 ACH User Manual 5-8
This field... Displays this... Effective Entry Date The effective entry date for the approved batches.
Frozen The total number of frozen entries, in parentheses, followed by the total dollar amount of the frozen entries within the batch.
Number of Prenotes Number of prenotes in this batch.
Number of Zero Dollar
Number of Zero Dollar entries in the batch.
Total Credits The total number of credits, in parentheses, followed by the total dollar amount of the credits within the batch.
Total Debits The total number of debits, in parentheses, followed by the total dollar amount of the debits within the batch.
User Code/ User Name
The code and name for the corporate user who approved the batches.
Approval Confirmation Summary Page Button Click Continue to return to the Approval Selection page.

ACH Report
Rev. 06/02 ACH User Manual 6-1
Chapter 6 – ACH Report
Overview The ACH Report service allows you to view current and historical ACH data. Within the ACH Report function, you can query batches in activation status, approval status, processing, or by effective entry dates. The ACH Report function tab can be found in the ACH Initiation service from the main drop-down menu. The ACH Report function contains the following pages:
• ACH Report Selection Page • ACH Summary Report Page • ACH Detail Report Page
The data can be viewed at summary and detail information levels. The ACH reports will reflect batches submitted for activation, and will not show actual account activity, reversals, or deleted batches.

ACH Report
Rev. 06/02 ACH User Manual 6-2
ACH Report Selection Page Use the ACH Report Selection page to define the query and report display for ACH batches created for your company. You may limit the report by entering a bank trace number range, one or all batches, a customer trace number range, a date range, query or status. Reports can go as far back as 186 calendar days.
Figure 6-1
ACH Report Selection Page Fields
This field... Contains this... Use it like this... Bank Trace No. From/To
Trace number assigned at the time the batch is approved. This number is the Julian date followed by a four-digit number sequentially assigned.
Enter the beginning range number in the From box and the ending range number in the To box to limit the report to a specific group of Bank Trace Numbers.
Batches List of all batches created by the company listed above the box.
Select the batch you want to view on the report, or select All Batches.
Customer Trace No. From/To
Trace number assigned at the time the batch is activated. This is a four-digit sequentially assigned number.
Enter the beginning range number in the From box and the ending range number in the To box to limit the report to a specific group of Customer Trace Numbers.
From Date The beginning query date. Enter the date in MM/DD/YYYY format or click the calendar icon to choose a date.

ACH Report
Rev. 06/02 ACH User Manual 6-3
This field... Contains this... Use it like this... Query Drop-down list with the following types of
queries: • Activation (Batches Activated and
needing Approval) • Approval (Batches approved that have
not been processed) • File Creation (The processing date that
the bank initiates the transactions. Typically a day prior to the Effective Entry Date)
• Effective entry (The date the transactions will post to the bank accounts. You can query future dates as well for this option.)
Choose the type of query you want to run for a particular date or date range. The default is activation.
Report Sort Drop-down list with the following options for sorting the report:
• Bank trace number • Customer trace number • Company ID
Select the option to determine how the
Report is sorted.
Status Drop-down list with the following status types to query:
• All status • Activated (batches Activated and needs
Approval) • Approved (batches approved that have
not been processed) • File Created (the bank has processed
the transactions) • Locked (a user is in the process of
Approving the batch)
Select the option to determine how the report will query.
To Date Date field to enter the ending query date. Enter the date in MM/DD/YYYY format or click the calendar icon to choose a date.
ACH Report Selection Page Buttons This button... Does this... Clear Resets the values to their original settings.
Submit Processes the data entered and displays the ACH Summary Report page.

ACH Report
Rev. 06/02 ACH User Manual 6-4
ACH Summary Report Page Use the ACH Summary Report page to view batch information according to the query criteria specified on the ACH Report Selection page. By clicking on the magnifying glass, you will be able to review the ACH Detail Report Page.
Figure 6-2
ACH Summary Report Page Fields This field... Contains this... Activation Date The date the batch was activated.
This field appears only if you select Activation in the Query field on the ACH Report Selection page.
Approval Date The date the batch was approved.
This field appears only if you select Approval in the Query field on the ACH Report Selection page.
Bank Tr. No Trace number assigned at the time the batch is approved. This number is the Julian date followed by a four-digit number sequentially assigned.
Company ID and name of the company that owns the batch.
Credit The total credit amount of the detail transactions contained in the batch, followed by the number of items in parentheses.

ACH Report
Rev. 06/02 ACH User Manual 6-5
Cust Tr. No Trace number assigned at the time the batch is activated. This is a four-digit sequentially assigned number.
Debit The total debit amount of the detail transactions contained in the batch, followed by the number of items in parentheses.
Details Magnifying glass icon, which is a link to the ACH Detail Report page.
Effective Entry Date The effective entry date assigned to this batch during activation.
Entries The total number of entries (transactions) contained within the batch.
File Creation Date The date the ACH file was built.
This field appears only if you select File Creation in the Query field on the ACH Report Selection page.
Status The status of the batch. This field will contain one of the following options: approved, activated, file created, or locked.
User Batch Code/Name
The batch code and name assigned to the batch when it was created.

ACH Report
Rev. 06/02 ACH User Manual 6-6
ACH Detail Report Page Use the ACH Detail Report page to view information about the detail transactions defined within the selected batch. Note: The order of the batch entries is based on the sort characteristics defined in ACH Activation. To sort order, see the Update Entries page of the Batch Activation function.
Figure 6-3
ACH Detail Report Page Fields
This field... Contains this... Account Account number established for the detail ACH transaction.
Activation Date Date and time the batch was activated.
Activator Company name and user name of the person who activated the batch.
Addendum Data that will be written to the ACH Addenda Type 7 record. This field appears only for transaction types that include addenda.
Amount Amount established for the detail transaction.
Approval Date Date and time the batch was approved.
Approver Company name and user name of the person who approved the batch.
Bank Bank routing/transit number established for the detail transaction.
Bank Trace Number Trace number assigned at the time the batch is approved. This number is the Julian date followed by a four-digit number sequentially assigned.

ACH Report
Rev. 06/02 ACH User Manual 6-7
This field... Contains this... Company The name and ID number of the ACH company that owns the batch.
Credit/Debit Credit (C) or Debit (D) indicator for the detail transaction.
Customer Trace Number
Trace number assigned at the time the batch is activated. This is a four-digit sequentially assigned number.
Disc. Discretionary Data established for the detail transaction.
This field does not appear if the transaction type code is WEB+DO.
Effective Entry Date Effective entry date assigned to this batch during activation.
ID Number ID number established for the detail ACH transaction.
Name Name established for the detail ACH transaction.
State Identifies the “state” for this transaction within the system.
This field will contain one of the following options: Active, Frozen, Prenote, or Zero Dollar.
Transaction Type Transaction Type for the batch.
Type The type of account for the batch entry. This field will contain one of the following options:
Checking - for a demand deposit account (formerly DDA)
Gen Ledger – for a general ledger account
Note: Please be advised that SunTrust originates GL ACH transactions but does not accept them at this time. Be sure to confirm that these transactions can be accepted by the receiving depository financial institution.
Loan – for a loan account (for credit entries only)
Savings – for a savings account (formerly SAV)
General Ledger and Loan values do not appear for the WEB+DO transaction type code.
User Batch Code/Name User Batch Code and Name assigned to the batch when it was created.
ACH Detail Report Page Button Click Finished to return to the ACH Summary Report.

Notes
Rev. 06/02 ACH User Manual 6-8

ACH Import
Rev. 06/02 ACH User Manual 7-1
Chapter 7 – ACH Import
Overview The ACH Import function allows a designated user to import a NACHA (National Automated Clearing House Association) formatted file from an outside source (local PC) to create batch templates within SunTrust Online Treasury Manager. The Import function does not allow you to add (append) transactions or participants to a batch; or modify data in an existing batches. The ACH Import function only allows you to create batch templates. The ACH Import service contains the following pages:
• ACH Import Selection Page • Import Review Report Page • ACH Import Review Detail Report Page • ACH Import Confirmation Summary Page
To import the file, you are prompted to select a file to import and a standard NACHA map type on the ACH Import Selection page. Then click Import File. Once the file is imported, you will be able to create a batch template by assigning a batch name and code from the Import Review Report Page. After the batch template is created, you will be able to edit the batch within the Batches or Activation Functions.

ACH Import
Rev. 06/02 ACH User Manual 7-2
ACH Import Selection Page Use this screen to browse for and retrieve the ACH file you want to import. Select a standard NACHA map to associate with the import file. Note: The file imported must be a NACHA formatted file.
Figure 7-1 ACH Import Selection Page Fields This field... Contains this... Use it like this... File Path and Name File path and name of the file you want to
import. Enter the file path and name or click Browse to select the file.
ACH Maps A list of ACH maps for the company.
The following information displays for each map in the list:
• Map Code • Map Name • Map Format • Map Type
Select a map in the list to use with the import file.
Code The code for the ACH map. Enter all or part of the code and click Find/Refresh to list all maps that match

ACH Import
Rev. 06/02 ACH User Manual 7-3
This field... Contains this... Use it like this... the search criteria.
Format A list of ACH map formats: • All – displays all map formats in the
list • Standard – displays the two NACHA
maps delivered with the ACH product
Enter all of part of the name and click Find/Refresh to list all maps that match the search criteria.
Name The name for the ACH map. Enter all or part of the name and click Find/Refresh to list all maps that match the search criteria.
ACH Import Selection Page Buttons This button... Does this when clicked... Browse Allows the user to search the system for ACH Import files. (ex.: C:\My documents\ . . .)
Clear Clears the text entered in the File Path and Name field.
Find/Refresh Displays a list of ACH maps. If no criteria are specified, all maps are displayed in the list.
Import File Retrieves the file to be imported.
Import Review Displays the Import Review Report page and displays import requests that require your review.
Note: Outside ACH files cannot be imported until an ACH company has been assigned by SunTrust. The Company ID field of the batch’s ACH Type 5 record must be named the exact same 10 digit value that is defined as the ACH company.

ACH Import
Rev. 06/02 ACH User Manual 7-4
Import Review Report Page From the Import Review Report page you can choose to review (Rev) or delete (Del) the imported file. If you select review, you will continue to the ACH Import Review Detail Report Page. If you select delete, there is no warning or intermediary screen and the file will be deleted. If the file is deleted unintentionally, the file will need to be imported again.
Figure 7-2
Import Review Report Page Fields This field... Displays... Batch ID The value from the Company Entry Description field on the batch header
record. If Online Treasury Manager is in the process of validating the import file format, the message Import in Progress – File is being Loaded appears in this field.
File Name The name of the imported file.
Import Date / Time Date and time the file was imported.
Imported By The corporate user that imported the file.
Map Code The code for the ACH map associated with the import file.
Pending No. The pending number is a number assigned by the system to each ACH Import file.
Process Mode The processing mode selected for the import file. This field displays the value Create Only.
Status The validation status for the import file. The values are: • Failed – Online Treasury Manager was unable to validate the
import file format and issued one or more errors • Loading – Online Treasury Manager is in the process of validating

ACH Import
Rev. 06/02 ACH User Manual 7-5
the import file format • OK – Online Treasury Manager successfully validated the import
file format • OK with Warnings – Online Treasury Manager successfully
validated the import file format but issued one or more warnings Use the ACH Import Review Detail Report page to view warning and error messages.
Import Review Report Page Buttons This button... Does this when clicked... Del Deletes the associated file. There is no warning or intermediary
screen; clicking the red arrow in the Del column automatically deletes the file.
Refresh Refreshes the information on the page.
Rev Displays the ACH Import Review Detail Report. Click the red arrow in the Rev column to access this report. Use this page to accept, unlock, or delete the selected batch.

ACH Import
Rev. 06/02 ACH User Manual 7-6
ACH Import Review Detail Report Page Use this page to review the information in the import file, including warning and error messages, before deciding to accept, unlock, or delete the batch. You must add the batch code and batch name before the file can be accepted as a batch template. The Accept button appears on this page only if the import file status is OK or OK w/Warnings. Once the file is accepted, the batch code and name you assigned will be the name of the template in the system. When selecting any option on the ACH Import Review Detail Report, you should review the status field to verify the action has been performed.
Figure 7-3
ACH Import Review Detail Report Page Fields This field... Displays this... File Level Section
File The name of the file that was imported.
Imported By The user code (User ID) of the person who imported this file.
Imported On The date and time the file was imported.
Map Code The code for the ACH map associated with the import file.
Map Format The format for the ACH map associated with the import file.
Pending No. The pending number assigned by the system to the ACH imported file.
Process Mode The processing mode selected for the import file. This field displays the value Create Only.
Reported Credits The total credit amount for the file to be imported.
Reported Debits The total debit amount for the file to be imported.

ACH Import
Rev. 06/02 ACH User Manual 7-7
This field... Displays this... Batch Level Section
Application Standard Entry Class field from the Batch Header Type 5 record from the imported file.
Batch Code The batch code to be assigned to this batch within the SunTrust Online Treasury Manager ACH system, if the batch is accepted.
Batch Name The batch name to be assigned to this batch within the SunTrust Online Treasury Manager ACH system, if the batch is accepted.
Bypassed Item Count
The number of entries in the file that were bypassed by the import process.
Company I.D. Company ID from the ACH Type 5 record for the batch file being imported.
Desc. The Company Entry Description from the ACH Batch Header Type 5 record from the imported file for this batch.
Imported Credit Amt The total credit amount for all added and updated batch entries in the imported batch.
Imported Debit Amt The total debit amount for all added and updated batch entries in the imported batch.
Imported Item Count The total number of batch entries in the imported batch that Online Treasury Manager successfully validated.
Status The validation status for the import file. The values are: • Failed – Online Treasury Manager was unable to validate the import file format and issued
one or more errors • OK – Online Treasury Manager successfully validated the import file format • OK with Warnings – Online Treasury Manager successfully validated the import file format
but issued one or more warnings Status: Locked by: The user code of the user currently reviewing the page. The system locks the imported file while it
is being reviewed to prevent multiple users from trying to accept the same batches.
Click Unlock to unlock the imported batch template from your user ID, which allows another user to access the imported batch template.
Tran. Type The transaction type that will be assigned to this batch in the ACH application upon acceptance.
Messages Section
Message Description The number that identifies the error or warning message and the message text.
Record # A number that indicates the location of the record in the file.
Type The type of message. The values that can appear in this field are Error and Warning.
ACH Import Review Detail Report Page Buttons This button... Does this when clicked... Accept Adds the batch template under the Company ID defined in the system. The Batch Code and
Batch Name fields must be completed before this button is selected.
Delete Deletes the associated batch, leaving any remaining batches to create batch templates.
Import Review Returns the user to the Import Review Report page to select another file or the same file.
Unlock Allows the user currently reviewing the report to unlock the file for others to review, closes the ACH Import Review Detail Report page, and opens the Import Review Report page. Warning: This will allow other users to create batch templates using the imported file, which could cause duplicate batch templates.

ACH Import
Rev. 06/02 ACH User Manual 7-8
ACH Import Confirmation Summary Page Use this page to review the confirmation information for accepted imported batch templates and review any import error or warning messages. This page appears when you click Accept on the ACH Import Review Detail Report page.
Figure 7-4
ACH Import Confirmation Summary Page Fields This field... Displays this... Header Section
Batch Code The code for the batch template.
Batch Name The name for the batch template.
File The name of the file that was imported.
Imported By The user code (User ID) of the person who imported this file.
Imported On The date and time the file was imported.
Pending No. The pending number assigned by the system to the ACH imported file.
Messages Section
Action The action Online Treasury Manager took when it processed the records in the file. Values are: • Added • Bypassed • Updated
Amount The amount for the batch entry.
D/C A code that indicates whether the batch entry is a: • C, credit

ACH Import
Rev. 06/02 ACH User Manual 7-9
This field... Displays this... • D, debit
ID # The participant identifier for the batch entry.
Message Description The number that identifies the error or warning message and the message text.
Name The participant name for the batch entry
Record # A number that indicates the location of the record in the file.
Type The type of message. The values that can appear in this field are Error and Warning.
Summary Totals Section
Records Added The total number of credit and debit entries added to the batch template and the total dollar amount for the credit and debit entries.
Records Bypassed The total number of credit and debit entries Online Treasury Manager bypassed in the file because of an error condition and the total dollar amount for the credit and debit entries.
Records Updated The total number of credit and debit entries changed or deleted in the batch template and the total dollar amount for the credit and debit entries.
This field appears blank with the standard NACHA map.
ACH Import Review Detail Report Page Button The Import Review button closes the ACH Import Confirmation Summary page and opens the Import Review Report page.

Notes
Rev. 06/02 ACH User Manual 7-10

ACH Reversal
Rev. 02/03 ACH User Manual 8-1
Chapter 8 – ACH Reversal
Overview The ACH Reversals service allows the corporate user to submit a request to reverse an entire batch or a single transaction already submitted on an ACH file to the bank. An e-mail message is created and forwarded to SunTrust through the Batch Reversal Notification or Transaction Reversal Notification page.
• Batch Reversal Notification Page • Transaction Reversal Notification Page • ACH Reversals E-mail Confirmation Page
Batch Reversal Notification Page Use the Batch Reversal Notification page to enter information on the batch you want the bank to reverse. When you click Submit, an e-mail message is sent to SunTrust to process the reversal request.
Batch Reversal Notification
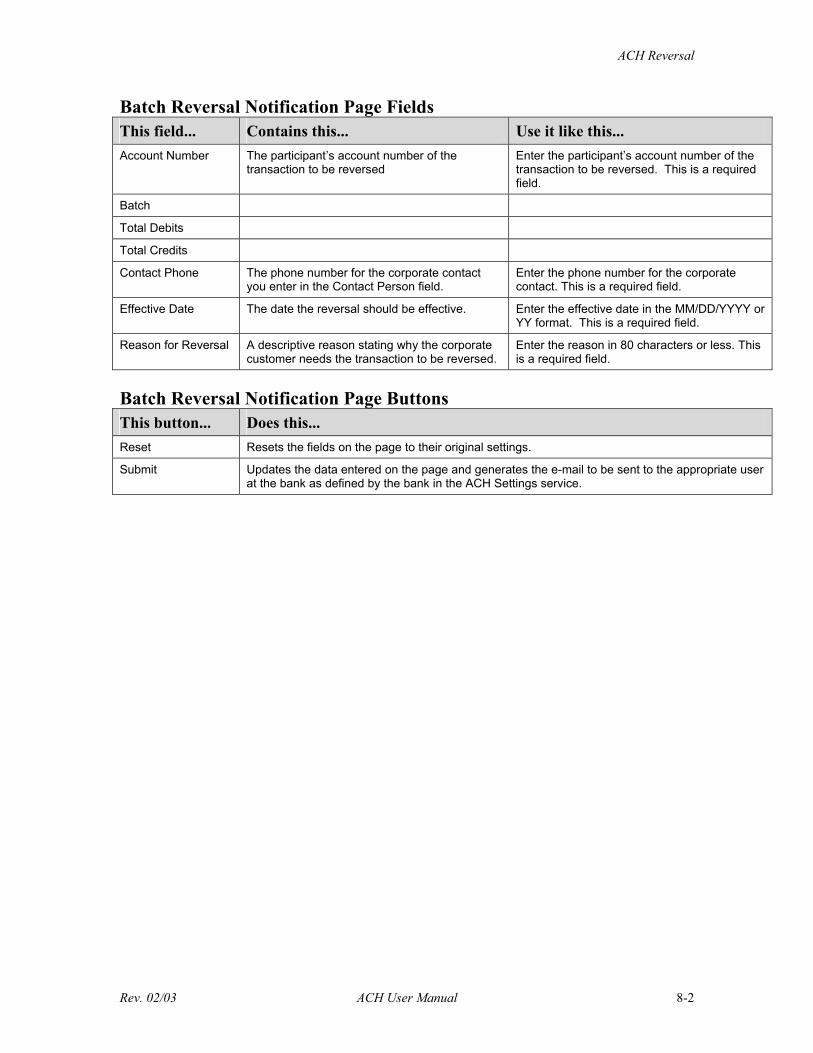
ACH Reversal
Rev. 02/03 ACH User Manual 8-2
Batch Reversal Notification Page Fields This field... Contains this... Use it like this... Account Number The participant’s account number of the
transaction to be reversed Enter the participant’s account number of the transaction to be reversed. This is a required field.
Batch
Total Debits
Total Credits
Contact Phone The phone number for the corporate contact you enter in the Contact Person field.
Enter the phone number for the corporate contact. This is a required field.
Effective Date The date the reversal should be effective. Enter the effective date in the MM/DD/YYYY or YY format. This is a required field.
Reason for Reversal A descriptive reason stating why the corporate customer needs the transaction to be reversed.
Enter the reason in 80 characters or less. This is a required field.
Batch Reversal Notification Page Buttons This button... Does this... Reset Resets the fields on the page to their original settings.
Submit Updates the data entered on the page and generates the e-mail to be sent to the appropriate user at the bank as defined by the bank in the ACH Settings service.

ACH Reversal
Rev. 02/03 ACH User Manual 8-3
Transaction Reversal Notification Page Use the Transaction Reversal Notification page to enter information on the item you want the bank to reverse. When you click Submit, an e-mail message is sent to SunTrust to process the reversal request.
Transaction Reversal Notification
Transaction Reversal Notification Page Fields This field... Contains this... Use it like this... Reversal Type Reversal message template Select Transaction Reversal from the drop-
down box to display this page.
Account Number The participant’s account number of the transaction to be reversed
Enter the participant’s account number of the transaction to be reversed. This is a required field.
Amount The amount of the transaction to be reversed. Enter the amount of the transaction to be reversed. This is a required field.
Company Name The name of the company who is sending the e-mail to the bank.
Enter the name of the sender of the e-mail. This is a required field.
Contact Person The name you need SunTrust to contact if there are any questions or issues.
Enter the name of the corporate contact. This is a required field.
Contact Phone The phone number for the corporate contact you enter in the Contact Person field.
Enter the phone number for the corporate contact. This is a required field.
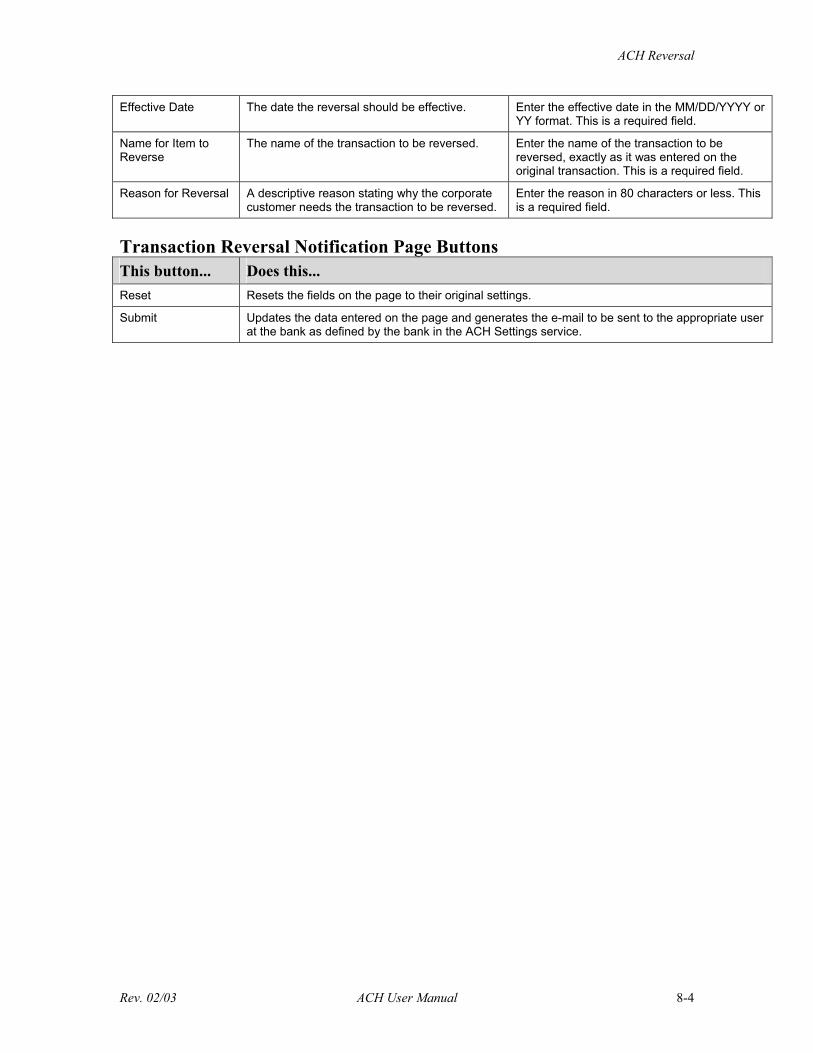
ACH Reversal
Rev. 02/03 ACH User Manual 8-4
Effective Date The date the reversal should be effective. Enter the effective date in the MM/DD/YYYY or YY format. This is a required field.
Name for Item to Reverse
The name of the transaction to be reversed. Enter the name of the transaction to be reversed, exactly as it was entered on the original transaction. This is a required field.
Reason for Reversal A descriptive reason stating why the corporate customer needs the transaction to be reversed.
Enter the reason in 80 characters or less. This is a required field.
Transaction Reversal Notification Page Buttons This button... Does this... Reset Resets the fields on the page to their original settings.
Submit Updates the data entered on the page and generates the e-mail to be sent to the appropriate user at the bank as defined by the bank in the ACH Settings service.

ACH Reversal
Rev. 02/03 ACH User Manual 8-5
ACH Reversals E-mail Confirmation The ACH Reversals E-mail Confirmation page is displayed when you click Submit on the Transaction Reversals Notification page. The confirmation allows you to see whom the email was sent, and to review the information entered on the Transaction Reversals Notification page. Print the confirmation and maintain it in your records.
Batch Reversal E-mail Confirmation

ACH Reversal
Rev. 02/03 ACH User Manual 8-6
Transaction Reversal E-mail Confirmation
ACH Reversals E-mail Confirmation Fields This field... Displays this... Reverse e-mail message sent to
The e-mail address of the contact person at the bank who will receive the ACH transaction reversal information.
Sent by Company name and user name of the person sending the e-mail.
Sent on The date and time the reversal request was sent.
Company Name Name of the corporate customer submitting the reversal request.
Contact Person The name of the person at the corporation that the bank may contact with questions regarding this reversal.
Contact Phone The phone number of the contact person at the corporation.
Effective Date The effective entry date associated with the batch.
Reason for Reversal A descriptive reason for the reversal request.
Batch Reversals
Batch Name A descriptive name to identify the batch to be reversed within the ACH company.
Company Name ID and name of company that owns the batch to be reversed.
Total Credits The total credit amount of the detail transactions contained in the batch to be reversed.

ACH Reversal
Rev. 02/03 ACH User Manual 8-7
Total Debits The total debit amount of the detail transactions contained in the batch to be reversed.
File Creation Date Company name and user name of the person sending the e-mail.
Transaction Reversal
Name for item to reverse
The name of the transaction to be reversed.
Account Number Account number of the transaction to be reversed.
Amount The amount of the transaction to be reversed.
Account Number Account number of the transaction to be reversed.
Amount The amount of the transaction to be reversed.
Company Name Name of the corporate customer submitting the reversal request.
Contact Person The name of the person at the corporation that the bank may contact with questions regarding this reversal.
Contact Phone The phone number of the contact person at the corporation.
Effective Date The date the reversal should be effective.
Name for item to reverse
The name of the transaction to be reversed.
Reason for Reversal A descriptive reason for the reversal request.
Reverse e-mail message sent to
The e-mail address of the contact person at the bank who will receive the ACH transaction reversal information.
Sent by Company name and user name of the person sending the e-mail.
Sent on The date and time the reversal request was sent.

Notes
Rev. 02/03 ACH User Manual 8-8