online training manual - apras · penndot’s single-trip permit application submittal process. ......
TRANSCRIPT
1
Online Training Manual
Volume 2 - Using APRAS
(Applying for Single-trip Permits and other Features)
Commonwealth of Pennsylvania
Department of Transportation
Central Permit Office
February 2010 Publication 393, Volume 2

2
Acknowledgments
BearingPoint
PENNDOT
NOTICE
If you are unable to access the APRAS Home Page or enter applications, you should
first check the status of APRAS:
(1) by visiting the PENNDOT Home page (www.dot.state.pa.us) under “Doing
Business with PENNDOT”, click on APRAS and reading the “red” status
message and/or
(2) by calling our voice message box (877-807-7605 – toll free within PA) or
(717-705-1416 – outside PA) and/or
(3) by checking your E-mail (if you have provided the Central Permit Office with
your correct E-mail address).
(4) Also, attempt to access another favorite web site (to verify you currently have
access to other sites).
If the nature of the problem and estimated repair time is known, this information will
be posted at one or more of the above three locations. This protocol was established
to allow for efficient notification to all users whenever problems arise. Please refrain
from calling PENNDOT until after you have checked all four options above.

3
APRAS for Windows 98/NT 4.0/2000/XP
Who should use this training manual?
Motor Carriers and Permit Services who have established an Account with
PENNDOT’s Central Permit Office and who are involved in one of the areas listed
below:
Creating and submitting single-trip applications for special hauling permits to
PENNDOT
Searching for existing PENNDOT special hauling permit applications
Prerequisites
A working knowledge of:
Your PC operating system. These skills are outlined in the applicable Microsoft
introduction manual: Windows 98 Introduction, Windows 2000 Introduction,
Windows NT 4.0 Workstation Introduction, or Windows XP Introduction.
The Internet.
PENNDOT’s single-trip permit application submittal process.
An Account Number for obtaining PA permits by wire and executed copies of the
following Registration forms (which are available on PENNDOT’s WEB Page under
Special Interest Areas, then Permits, then Hauling Permits):
M-936B Surety Bond
M-936RA Registration Agreement for Special Hauling Permits
M936RAS - APRAS Supplemental Registration
Each student may access this Online Training Manual via download, to view or print in
its entirety.

4
Getting Directions
If you have not supplied the following information on your M-936RAS
Form, then YOU MUST IMMEDIATELY notify the Central Permit
Office via e-mail at:
[email protected] to activate your account with the
following information:
1. Company Name
2. Company Account Number
3. APRAS Administrator’s name, phone number, fax number
and e-mail address
4. E-mail address for e-mailing permits
5. E-mail address for accounts payable department (Who
should received your monthly billing invoices?)
6. Contact person’s name, phone and e-mail address (if other
than the Administrator).
5
Table Of Contents
MILE MARKER 6: GETTING TO KNOW THE APPLICATION
PROCESS.......................................................................................................7
Defining Important APRAS Terms • Outlining the Permit
Application Process • Defining Application and Permit Status Types
• Logging On to APRAS • Identifying Helpful APRAS Tools
MILE MARKER 7: CREATING AND FILLING OUT A PERMIT
APPLICATION ............................................................................................20
Logging On to APRAS • Creating a New Permit Application •
Exploring the Main Tab • Using the Carrier Tab • Using the Loading
Tab • Using the Weight Tab • Using the Route Tab • Finalizing the
Route • Using the Application Tab
MILE MARKER 8: SEARCHING FOR AND SUBMITTING AN
APPLICATION ............................................................................................65
Searching for Existing Applications • Reviewing the New
Application Page Buttons • Removing Permit Applications from
APRAS • Finalizing the Application Process • Submitting
Applications • Receiving a Permit
MILE MARKER 9: MANAGING PERMIT APPLICATIONS ................75
Re-Sending Permits and Denial Letters • Reviewing the View
Application Page Buttons • Cloning an Application • Requesting a
Supplement for a Permit
MILE MARKER 10: EXPLORING ADDITIONAL TABS ......................82
Exploring Additional Application Tabs • Using the Comments Tab •
Using the Documents Tab • Using the Parts Removed Tab • Using
the Emergency Tab • Using the Counties Traversed Tab • Using the
Permit Restrictions Tab • Using the Permit Tab
MILE MARKER 11: EXPLORING PENNDOT’S WEB SITE ................93
Using PENNDOT’s Web Site • Logging On to PENNDOT Web Site
INDEX .......................................................................................................100

6
Benefits of Using APRAS
Ordinary permit processes require mounds of paperwork, hours of human intervention, and endless
data entry. APRAS transitions the permit process from ordinary to extraordinary by offering the
following benefits:
Safer movements. APRAS analyses the entire route, including every bridge along the route,
using various PENNDOT databases that contain the most current information available on PA
highways and bridges. The APRAS analysis process protects all Commonwealth highway
users. APRAS also protects the Commonwealth’s highways and bridges from premature
deterioration!
Faster permit approval times. APRAS automatically processes a wide variety of
oversize/overweight permit applications authorized by the General Assembly. APRAS
eliminates the need for human intervention on most applications, which results in faster turn-
around times, even during evenings, weekends and holidays. Approximately 80% of all
applications are automatically processed by APRAS, in about one minute, on average! The
remaining 20% of applications requiring manual review can be quickly processed by
PENNDOT Permit and Bridge staffs, in about one hour, on average.
Less cost to Industry. Since “time is money,” APRAS saves the motor carrier industry money
by processing Permit applications significantly faster than any other method available. Also,
the motor carrier industry can choose to have their PA permits emailed at no additional cost
(thereby avoiding fax transmission fees)! Industry can also choose to receive their monthly
invoices via email and to pay for their permits by credit card.
Less data entry for everyone. APRAS automatically enters certain data into various fields of a
permit application and provides convenient drop-down menus for many other fields. Similar
applications can be “cloned”, further streamlining the data entry process for both motor carriers
and PENNDOT staff! APRAS even provides a “Route Generator” feature for permit
applicants who require routing assistance.
Flexible work hours. APRAS is “open for business” 20 hours a day, seven days a week; so
the motor carrier industry can apply for and receive most of their permits (and review the status
of pending applications and their account) during evenings, weekends and even holidays!

7
Mile Marker 6
Getting to Know the Application Process
Objectives
Successful completion of this chapter will enable you to:
Define important APRAS terms.
Outline the permit application process.
Identify application and permit status types.
Identify helpful APRAS tools.

8
Defining Important APRAS Terms
Creating and submitting an application for a single-trip permit to
PENNDOT for review via APRAS requires an understanding of several
key terms. The following list includes terms that are explored in more
detail throughout this text. Please familiarize yourself with these terms.
Application
The term application refers to an applicant’s request for a single-trip
Oversize/Overweight Special Hauling Permit.
APRAS
APRAS is an acronym for PENNDOT’s Automated Permit Routing
Analysis System.
BMS
BMS is an acronym for PENNDOT’s Bridge Management System.
BMS is an inventory of Pennsylvania State owned bridges. APRAS
uses PENNDOT’s BMS data when analyzing bridges on a route or
checking structure clearances.
CARATS
CARATS (Commonwealth Automated Registration and Titling
System) contain the Pennsylvania vehicle registration database.
APRAS extracts vehicle records from CARATS so vehicle legal
weight and tag information can be verified.
Clone
To clone an application is to make a near-duplicate copy of an
application already in APRAS.
Defaults
APRAS automatically enters certain application data for the user.
This process saves data entry time.
Denial Letter
The term denial letter refers to the letter used to notify an applicant
that their application has been denied. This letter identifies the
denial reasons that need to be addressed before resubmitting the
application.

9
Filter
A filter is a time saving mechanism that reduces the number of
available items from which to select. Filters are used consistently
throughout APRAS to help users save time when making a choice
from a drop-down list.
Permit
The term permit refers to an approved application for a single-trip
Oversize/Overweight Special Hauling Permit. A permit will often
contain conditions, which must be closely followed by the driver.
RMS
RMS is PENNDOT’s Roadway Management System. This system is
an inventory of the State Roads (SR) throughout Pennsylvania.
Local road intersections are also listed in the inventory if the local
road intersects with a state owned road. APRAS users use
information downloaded from this database when identifying
proposed routes.
Point of Interest
A point of interest is a common point of origin or destination on a
State Route. A point of interest represents commonly known names
and is typically a private driveway. Points of interest are listed in
PENNDOT’s RMS database by the PENNDOT District RMS
coordinator.
o You can request to have a frequently used starting or ending
point added as a point of interest to the RMS database by
completing the form located after the Index and submitting it to
the affected District Permit Office. The point of interest you
wish to add to the RMS database must be located on a State
Route.
SR
SR is an acronym for State Route. Every State Route is assigned a
four-digit number.
Supplement
The term supplement refers to an amendment to an existing permit.
10
Outlining the Permit Application Process
Outlined below is the process you will follow to create and submit a
permit application using APRAS. This text takes you through this step-
by-step process.
1. Access APRAS via the Internet.
2. Log on to APRAS.
3. Create a new permit application.
4. Enter all required information using fill-in fields and drop-down
lists.
5. Validate the application.
6. Fix any errors APRAS found during the validation process.
7. Submit the completed application.
8. APRAS then conducts an automatic review of the application. This
automatic review may require PENNDOT personnel to manually
review the application.
9. Once an application has been approved or denied, APRAS
automatically e-mails a permit or a denial letter to the applicant,
provided the applicant has made arrangements with the Central
Permit Office to use the various e-mail features (otherwise
documents are faxed).

11
Defining Application and Permit Status Types
Before we begin the process of creating and showing the steps to submit
an application, we need to define the various status types of a permit
application.
Because a permit application progresses through many different status
types before it is approved or denied, you will see the status of your
permit application change throughout its lifecycle. Therefore, it is
useful to know where each status falls in the review process.
Below is a diagram of the life cycle of a permit application. Each status
type is defined in a bulleted list below the diagram. Please read the
definition of each status type as you follow the diagram.
Permit Application Status Types
2. New A new application has not been submitted by a user.
Applications that have a new status for thirty days will be purged.
Users may also delete an application that has a new status.
3. Under Analysis While an application is under analysis, APRAS is
examining the proposed route to determine if it can accommodate
the vehicle/load’s weights and sizes.
4. Submitted An application is in submitted status when it successfully
passes all of the initial validation edits and route analysis is
complete. If your application needs to be manually reviewed by
one or more District Permit or Bridge Offices, it will remain in
"Submitted" status until the Department makes a final decision
on the application. It is counterproductive to make inquiries
regarding applications that are in "Submitted" status because
applications are processed in order. Applications in submitted status
can be withdrawn from APRAS.
5. Pending Approval An application is pending approval while it is being
reviewed by APRAS.
12
6. Denied A submitted application may be denied after it has been
thoroughly reviewed by PENNDOT.
7. Withdrawn A user may withdraw an application. Upon withdrawal, all
application analysis processes are stopped. Withdrawing an
application does not immediately delete it from APRAS. Therefore,
withdrawn applications can be cloned.
8. Approved A submitted application may be approved after it has been
thoroughly reviewed by PENNDOT. In the approved status, the permit
is in the process of being wired to the location identified on the
Application Tab.
9. Issued An issued permit has been successfully wired from PENNDOT.
It is sometimes necessary to "resend" an issued permit that was not
received.
13
Logging On to APRAS
The first step in creating a new permit application is to access APRAS
via the Internet using Internet Explorer 6.0.
The APRAS Web site will display a log on screen where you need to
enter your user ID and current password.
Your organization’s APRAS Administrator must create your permanent
user ID and initial password.
Q: Do you have an APRAS user ID and password? If so, document
the user ID and password and keep them in a secure location.
If you do not have a user ID and password, please contact your APRAS
Administrator. If your organization does not have an APRAS
Administrator, please read Mile Marker 5 in Volume 1, Obtaining and
Exploring Your APRAS Account.
To Log on to APRAS:
1. Access the APRAS Logon page using your Logon bookmark. If
you don’t have a Logon bookmark set up, please read Mile Marker 4
in Volume 1, Configuring Internet Explorer to Use APRAS.
2. Click in the User Id field.
3. Type your user ID.
4. Click in the Password field.
5. Type your current password.
6. Click Logon.

14
Identifying Helpful APRAS Tools
Before we begin to create a new permit application, we need to identify
some helpful APRAS tools that keep you updated on temporary road
and bridge restrictions as well as system messages. These tools come in
the form of Administrative Messages.
Exploring the
Administrative
Messages Page
The Administrative Message page is automatically displayed when you
log on to APRAS. This page displays active administrative messages
entered by PENNDOT’s permit staff. Listed on this page are:
Restrictions and detours, which result from construction activity on
State Routes.
Messages about APRAS system activities such as new releases and
tips on use.
Active Administrative Messages are displayed in the order in which they
are entered into the system, with the most recent messages being
displayed at the top of the initial list display.
Accessing Inactive Administrative Messages
Inactive administrative messages may be displayed when requested.
To Display the Administrative Messages:
1. Access the Administrative Messages page.
2. Click Inactive Messages button at the bottom of the Recent
Administrative Messages page.
3. Enter the start dates for the inactive messages you want to view.
4. Click Search.
Printing the Administrative Messages Page
Active messages may typically be viewed for a period of ten days.
Therefore, it is a good idea to print messages weekly to retain a
historical reference.

15
To Print the Administrative Messages:
1. Display the Administrative Messages page.
2. Click File, Print.
3. Click a printer from the list.
4. Click OK.
16
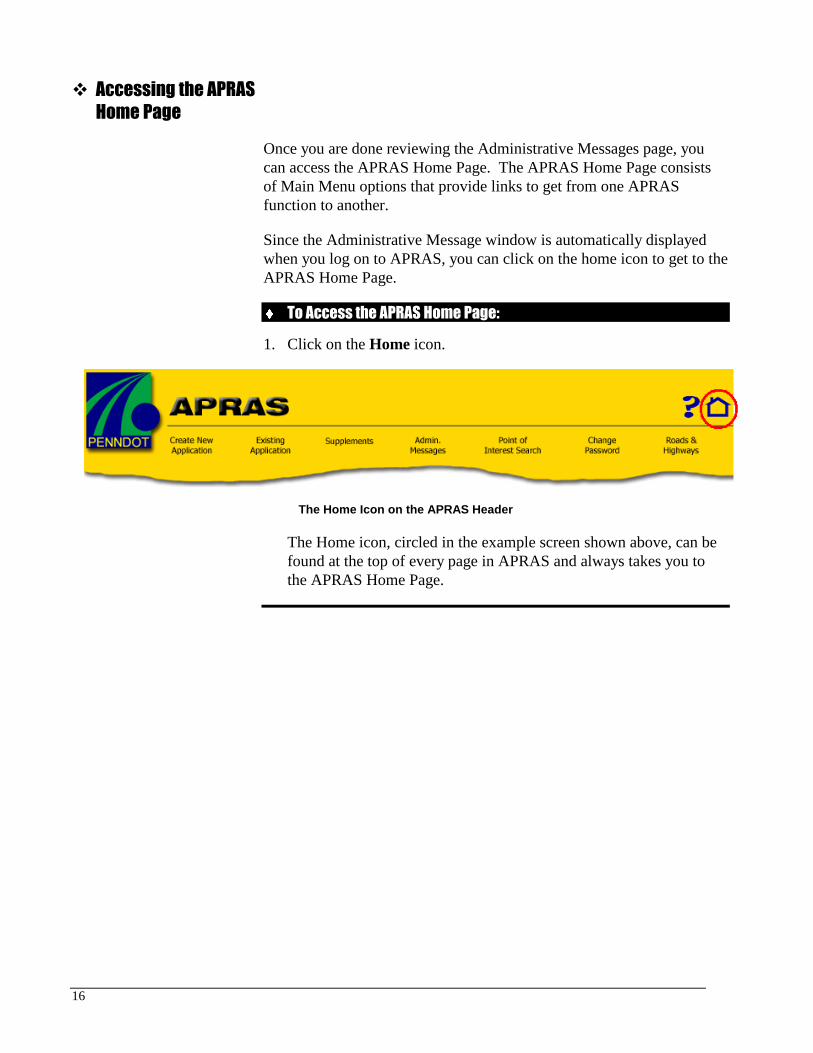
Accessing the APRAS
Home Page
Once you are done reviewing the Administrative Messages page, you
can access the APRAS Home Page. The APRAS Home Page consists
of Main Menu options that provide links to get from one APRAS
function to another.
Since the Administrative Message window is automatically displayed
when you log on to APRAS, you can click on the home icon to get to the
APRAS Home Page.
To Access the APRAS Home Page:
1. Click on the Home icon.
The Home Icon on the APRAS Header
The Home icon, circled in the example screen shown above, can be
found at the top of every page in APRAS and always takes you to
the APRAS Home Page.

17
Exploring the APRAS
Home Page
The following table describes the major Main Menu links that may be
found on the APRAS Home Page. Only those links that you have
permission to access are displayed. Most of these Main Menu links are
covered throughout this text. (The APRAS site is continually being
improved and updated. Therefore, you may see new links or changes to
the ones described here.)
Menu Element Description
New Application Displays pages used to create, validate, and
submit a new permit application.
Existing Application Displays pages to search for existing permit
applications. Existing applications can be
withdrawn, deleted, updated, or cloned.
Supplements Displays pages used to enter a request for a
supplement for an existing permit.
Admin. Messages Displays restrictions and detours resulting from
State Route construction activity as well as
messages that display system activities.
Point of Interest Search Displays a page to search for specific Points of
Interest.
Change Password Displays a page to change your current APRAS
password.
Fax Vendor Report
(Available only to Fax
Vendor
administrators)
Prints reports for Fax Vendors detailing permits
that have been faxed through their accounts.
Accounting Info. Displays account transaction reports.
User Accounts Displays pages used to administer APRAS user
accounts. The log on provided must have
administrator permissions.
Roads and Highways Displays PENNDOT’s general information web
site (www.dot.state.pa.us).
Help Displays help information about APRAS.
Information Displays SuperLoad Application Forms, Online
Training Manuals, State Holidays, PENNDOT
Travel Restriction Dates, and District Office
Information

18
Quick Launch
The Quick Launch function allows you to perform common functions in
APRAS quickly if you know the application id.
To Use Quick Launch:
1. Go to the APRAS Home page.
2. Type in the application id in the Quick Launch text box under Enter
Application Id found on the left side of your screen.
3. Choose a function from the list.

19
Identifying APRAS
Enhancements
Stemming from feedback from all users, PENNDOT makes periodic
enhancements to APRAS. These enhancements are documented as
builds.
Identifying the Build Number
The APRAS build number reflects the current version of APRAS you
are using. The APRAS build is updated automatically and is reflected in
the build number. The build number is located on the APRAS log on
page.
To Identify the Current Build Number:
1. Access the Logon Page.
The build number appears below the Logon button.
20
Mile Marker 7
Creating and Filling Out a Permit
Application
Objectives
Successful completion of this chapter will enable you to:
Identify important fields that exist on the Main Tab.
Use the Carrier Tab to change or create an address.
Specify characteristics of a load using the Loading Tab.
Establish load weight information on the Weight Tab.
Specify the starting and ending locations of a route.
Establish a route manually and using route generation.
Identify components of the Application Tab.

21
Logging On to APRAS
The first step in creating a new permit application is to access APRAS
via the Internet, using Internet Explorer.
The APRAS web site will display a logon screen where you need to
enter your user ID and current password. Your organization’s APRAS
Administrator must create the user ID and initial password.
Q: Do you have an APRAS user ID and password? If so, document
the user ID and password and keep them in a secure location.
If you do not have a user ID and password, please contact your APRAS
Administrator. If your organization does not have an APRAS
Administrator, please read Mile Marker 5 in Volume 1, Obtaining and
Exploring Your APRAS Account.
To Log On to APRAS:
1. Access the APRAS Log On page using your APRAS bookmark. If
you don’t have a bookmark setup, please read Mile Marker 4 in
Volume 1, Configuring Internet Explorer to Use APRAS.
2. Click in the User Id field.
3. Type your user ID.
4. Click in the Password field.
5. Type your current password.
6. Click Logon.

22
Creating a New Permit Application
The APRAS header has a series of links that allow you to access the
many functions that can be performed in APRAS.
The Create New Application link brings up a new application form. On
the left is a list of the various tabs on the application and provides
“quick move” buttons to the tab title’s corresponding fields. On the top
and bottom are buttons that allow you to validate and finalize the
application process. This is one place the clone feature can be activated.
Test Drive Scenario: As an example ONLY, you will be creating a
permit application for an oversize/overweight move. The move
involves hauling a crane on a flatbed trailer from York, Pennsylvania
to a selected point of interest. CAUTION: DO NOT SUBMIT THIS
EXAMPLE APPLICATION. IF YOU SUBMIT THIS
EXAMPLE APPLICATION, YOU WILL BE CHARGED FOR
THE PERMIT!
To Access the New Permit Application Page:
1. Log on to APRAS.
2. Click on the Create New Application link on the APRAS header or
the New Application link on the menu.
New Application Page

23
Q: How do you know which tab is currently active? You control
which tab is active by placing your cursor on a tab and clicking on the
left mouse button!
Defining the Buttons
on the New
Application Page
The top and bottom of the new application page contains buttons that
allow you to finalize the new application process and to perform actions
with existing applications. We will be using these buttons in a later
mile.
Button Description
Save Saves the application and recalculates the hold date.
Validate Initiates a validation process that checks the application for
errors. Any errors that are listed need to be corrected
before the application can be submitted.
Submit Initiates a validation process that checks the application for
missing or inconsistent information. If no errors are
detected, the application will be submitted for route review.
DO NOT USE THE SUBMIT BUTTON UNLESS YOU
WANT TO SUBMIT THE APPLICATION.
Clone Creates a near duplicate copy of the current application. A
new application with a different Application ID will appear
on the window.
Delete Deletes a NEW application from the database.
Cancel Exit the new application page without saving any changes.
The buttons on the left side of the new application page are quick move
buttons: Main, Carrier, Loading, Weight, Route, Comments,
Application, Parts Removed, Super Load Notes, Escort, Emergency and
Errors. Use these buttons to move directly to a tab.

24
It is extremely important to document every application’s ID
number. You will need these application ID numbers to do searches
for existing permits.
The ID number can be found in the first field on the Main Tab. If you
currently do not have a process of recording application ID numbers,
start now by immediately entering all application ID numbers into a
logbook or other retrievable format.
A Note about Saving
Using the Save Button is optional after completing each tab. You can
use the Save button for the following purposes:
To solidify the creation of an application.
To solidify a database search (for example, when choosing a
different Carrier address).
To solidify the load type and description.
To save vehicle and weight data.
To reset your APRAS session to 30 minutes.

25
Exploring the Main Tab
The Main Tab is the first tab displayed when the Create New
Application link is accessed. The Main Tab contains general
information about the application.
Defining the Fields in
the Main Tab
Use the Main Tab fields to identify information about your new
application.
Field Name Description
Application
ID
Displays the unique alphanumeric identifier generated by
the system for each new application.
Account Displays the account ID associated with the log on.
Account
Name
Displays the account name associated with the log on.
Office Displays the District Permit Office to which the application
will be assigned. This district is where the route originates;
therefore, the data for this field will not be displayed until
the application has been submitted.
Cloned ID Displays the application number of the application that was
cloned, where applicable.
Status Displays the application’s current status. Status types
include new, under analysis, submitted, pending approval,
approved, issued, denied, or withdrawn.
Application
Date
Displays the date the application was submitted. This field
will not populate until the application has been submitted to
PENNDOT for review.
Hold Date Displays the date the application will be purged from the
system. The hold date is calculated by adding thirty days to
the date the application was last saved.
Permit Type The selected Permit type will determine what type of data is
required on other tabs and what other tabs need to be
completed.
Bill Code Displays the payment type associated with the account.
26
Using the Carrier Tab
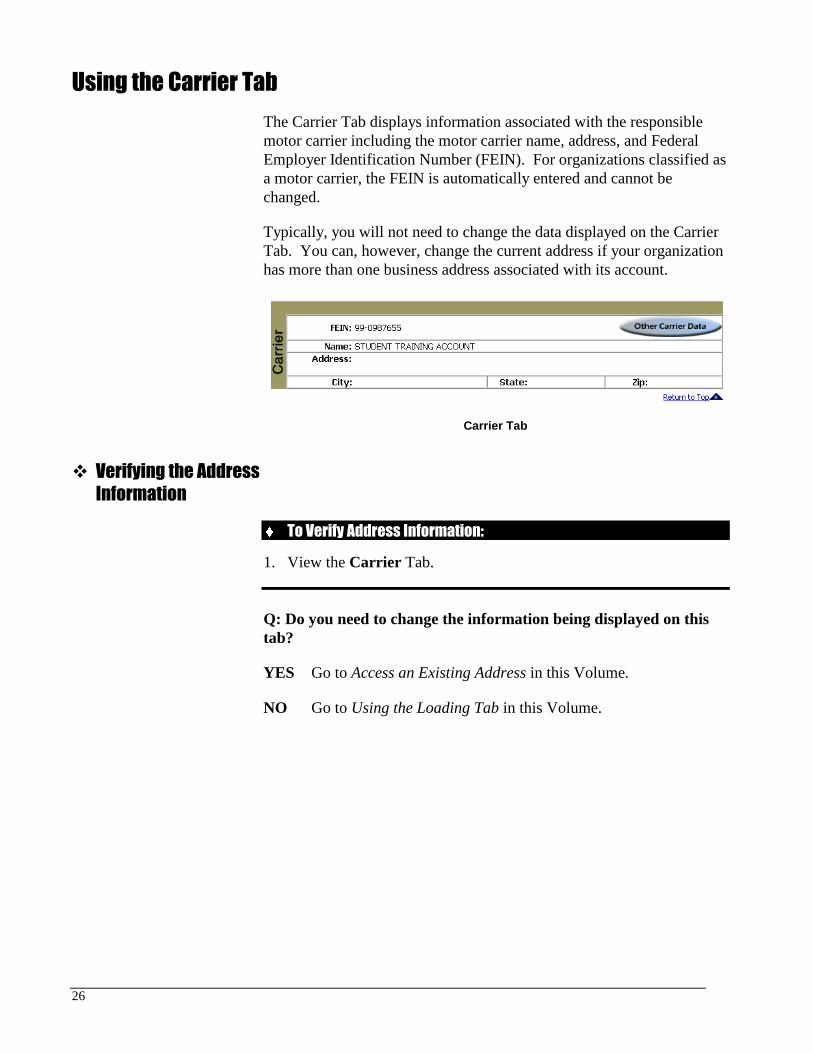
The Carrier Tab displays information associated with the responsible
motor carrier including the motor carrier name, address, and Federal
Employer Identification Number (FEIN). For organizations classified as
a motor carrier, the FEIN is automatically entered and cannot be
changed.
Typically, you will not need to change the data displayed on the Carrier
Tab. You can, however, change the current address if your organization
has more than one business address associated with its account.
Carrier Tab
Verifying the Address
Information
To Verify Address Information:
1. View the Carrier Tab.
Q: Do you need to change the information being displayed on this
tab?
YES Go to Access an Existing Address in this Volume.
NO Go to Using the Loading Tab in this Volume.
27
Accessing an Existing
Address
If the wrong address is displayed on the Carrier Tab, use the Edit FEIN
Address button to change the address. The address you wish to use
must be linked to your account and must currently reside in the APRAS
database.
To Access an Existing Address:
1. Click Edit FEIN Address.
2. Click on the FEIN Name adjacent to the address you want to use.
Q: Does the address you are looking for appear on the search page?
YES You do not need to create a new address. Go to Using the
Loading Tab.
NO You need to create a new address by doing the following steps:

28
Creating a New
Address
An address is added to the APRAS database once it is created, so it only
needs to be added once (assuming all information is accurate).
To Create a New Address:
1. Permit Service Users will need to complete the FEIN Field.
On the FEIN Address page, click New.
The FEIN and the FEIN Name will be in the fields.
2. Enter address and review for accuracy.
Enter data into each field of the new address page. The only
field that may be blank is the second line of the Address.
Leaving any of the other fields blank will generate AN ERROR
when you attempt to save the entry.
3. Click Select and your newly added information will be inserted.
4. Click Save.
5. The address you created is added to the list of FEIN addresses on the
FEIN Address page.
6. Click on the FEIN Name adjacent to the address you just created.
29
Using the Loading Tab
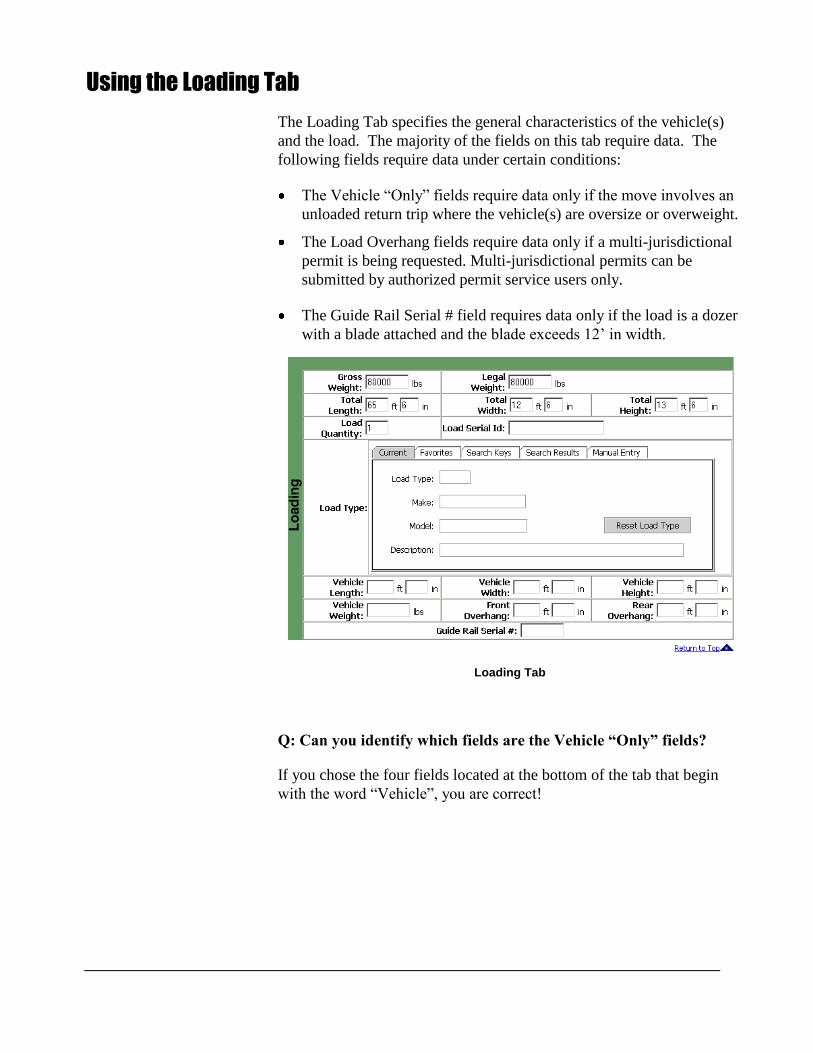
The Loading Tab specifies the general characteristics of the vehicle(s)
and the load. The majority of the fields on this tab require data. The
following fields require data under certain conditions:
The Vehicle “Only” fields require data only if the move involves an
unloaded return trip where the vehicle(s) are oversize or overweight.
The Load Overhang fields require data only if a multi-jurisdictional
permit is being requested. Multi-jurisdictional permits can be
submitted by authorized permit service users only.
The Guide Rail Serial # field requires data only if the load is a dozer
with a blade attached and the blade exceeds 12’ in width.
Loading Tab
Q: Can you identify which fields are the Vehicle “Only” fields?
If you chose the four fields located at the bottom of the tab that begin
with the word “Vehicle”, you are correct!
30
Entering Weights and
Sizes
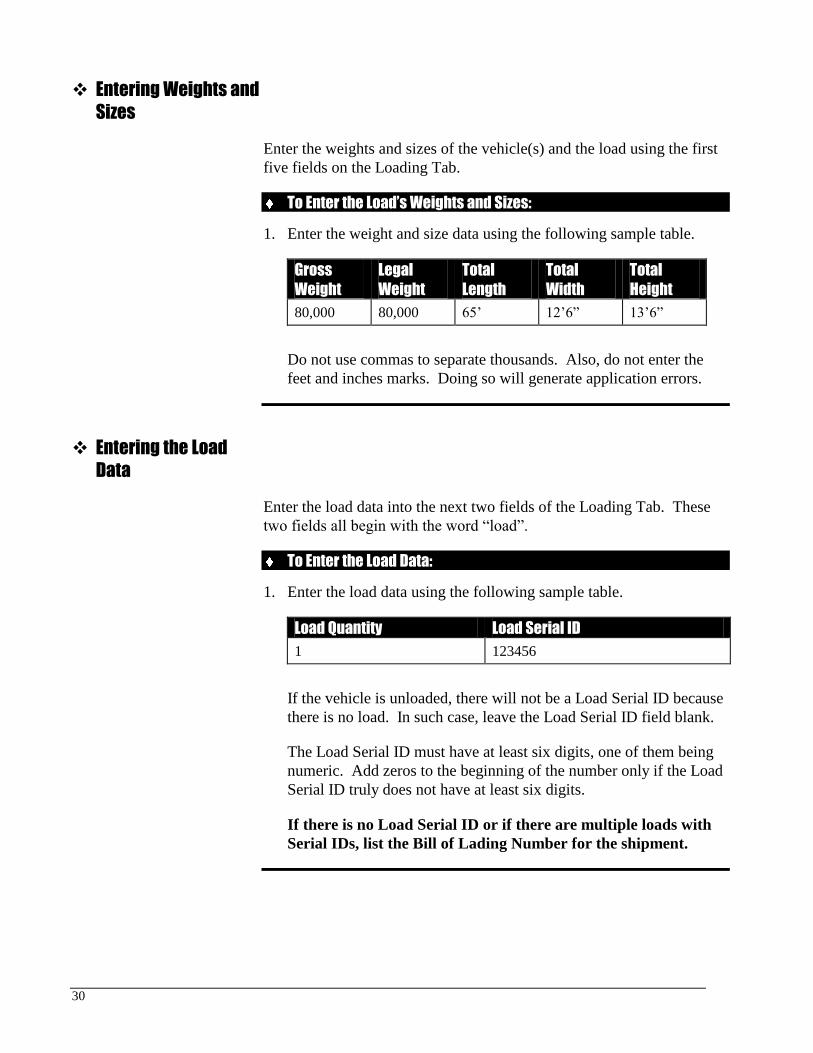
Enter the weights and sizes of the vehicle(s) and the load using the first
five fields on the Loading Tab.
To Enter the Load’s Weights and Sizes:
1. Enter the weight and size data using the following sample table.
Gross
Weight
Legal
Weight
Total
Length
Total
Width
Total
Height
80,000 80,000 65’ 12’6” 13’6”
Do not use commas to separate thousands. Also, do not enter the
feet and inches marks. Doing so will generate application errors.
Entering the Load
Data
Enter the load data into the next two fields of the Loading Tab. These
two fields all begin with the word “load”.
To Enter the Load Data:
1. Enter the load data using the following sample table.
Load Quantity Load Serial ID
1 123456
If the vehicle is unloaded, there will not be a Load Serial ID because
there is no load. In such case, leave the Load Serial ID field blank.
The Load Serial ID must have at least six digits, one of them being
numeric. Add zeros to the beginning of the number only if the Load
Serial ID truly does not have at least six digits.
If there is no Load Serial ID or if there are multiple loads with
Serial IDs, list the Bill of Lading Number for the shipment.

31
Selecting a Load
Type
The load type you select affects many of the edits APRAS performs
during the validation of the application. For this reason, be sure that you
are selecting a Load Type that corresponds to your move.
If you have trouble with selecting a load type, contact the District Permit
Office responsible for issuing the permit and/or refer to the codes listed
on previously approved permits.

32
Selecting a Load
Description
You will select a load description from PENNDOT’s Load Description
database. The load description you select is linked to the Removable
Parts Tab and is used to further define the description of the load.
Almost all load descriptions have already been added to this database
and – with patience – can be found using the convenient search feature.
If an appropriate load description cannot be found in PENNDOT’s Load
Description database, you must submit a request for additions to the
load description list by faxing the form Error! Reference source not
found. located near the back of the manual to your originating district or
to the Central Permit Office to have it entered in the database. You may
not enter a manual load description for most load types. However,
when you are able to manually enter a load description, your application
will be flagged for manual review. Any type of manual review requires
human intervention and will slow down the processing of that
application.
Please enter as much criteria as possible in each field. Select the search
parameters that you want APRAS to follow when scanning the Load
Description database if you do not know all the criteria for a particular
field.
To Select a Load Description from the Database:
1. Click on Search Keys in the Load Type section of the Loading tab.
Search Keys on the Loading Tab
Select the load type as described in the following sample table.
Make Model Description Load Type
GROVE AT400 CRANE 67B
2. Select 67B – Combination – Crane (nondivisible) from the Load
Type drop down list box.
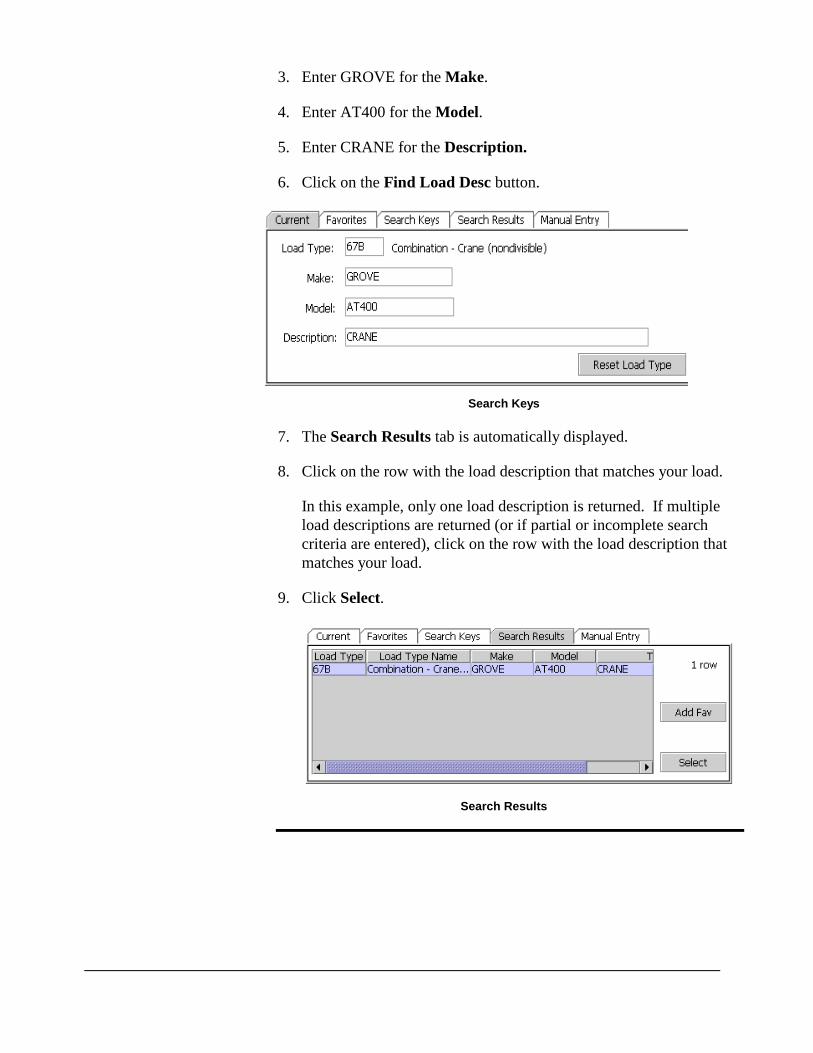
33
3. Enter GROVE for the Make.
4. Enter AT400 for the Model.
5. Enter CRANE for the Description.
6. Click on the Find Load Desc button.
Search Keys
7. The Search Results tab is automatically displayed.
8. Click on the row with the load description that matches your load.
In this example, only one load description is returned. If multiple
load descriptions are returned (or if partial or incomplete search
criteria are entered), click on the row with the load description that
matches your load.
9. Click Select.
Search Results

34
Adding a Load to the Load Favorites List
To simplify the process, you should create your own unique load
favorites list to record load descriptions that you use frequently.
To Create a Load Favorites List:
1. Click on Search Keys in the Load Type section of the Loading tab.
Enter the fields on the Load Description Search with the data found
in the following sample table.
Make Model Description Load Type
GROVE CRANE 67B
2. Select 67B – Combination – Crane (nondivisible) from the Load
Type drop down list box.
3. Enter GROVE for the Make.
4. Click on the Find Load Desc button.
Search Keys
5. The Search Results tab is automatically displayed.
6. Select all of your favorite loads by clicking on the row(s).
7. Click the Add Fav button.

35
Add Favorite Button on the Search Results
36
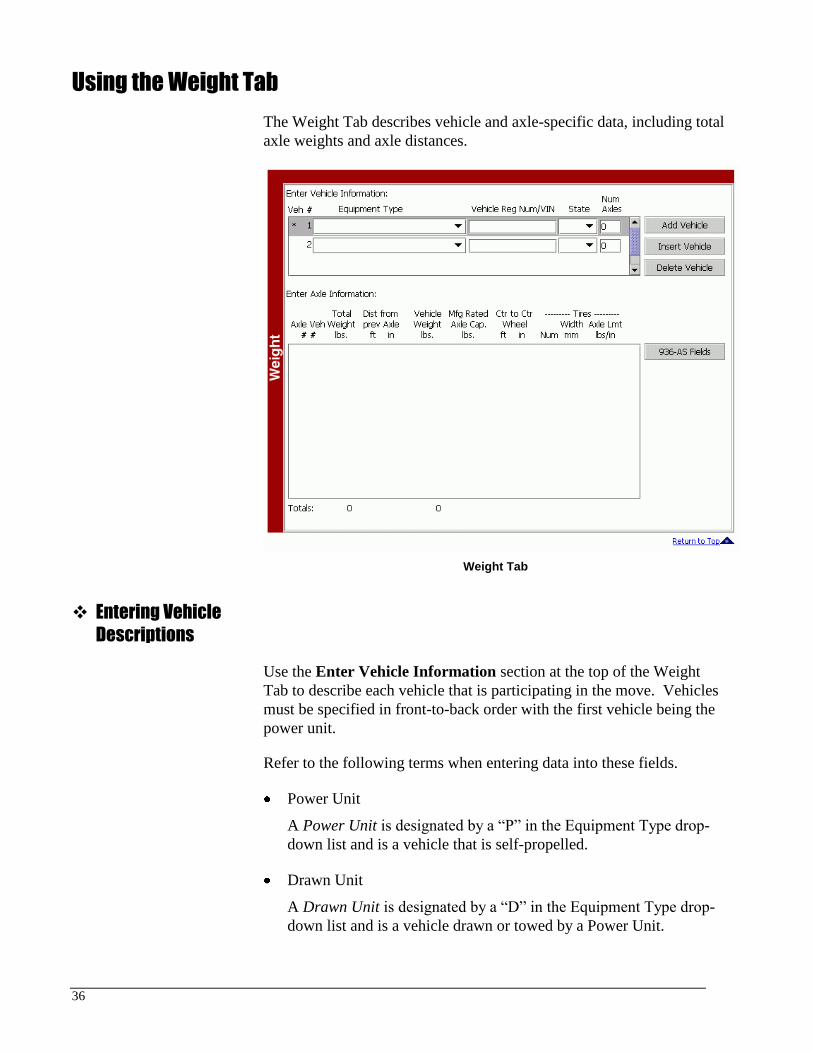
Using the Weight Tab
The Weight Tab describes vehicle and axle-specific data, including total
axle weights and axle distances.
Weight Tab
Entering Vehicle
Descriptions
Use the Enter Vehicle Information section at the top of the Weight
Tab to describe each vehicle that is participating in the move. Vehicles
must be specified in front-to-back order with the first vehicle being the
power unit.
Refer to the following terms when entering data into these fields.
Power Unit
A Power Unit is designated by a “P” in the Equipment Type drop-
down list and is a vehicle that is self-propelled.
Drawn Unit
A Drawn Unit is designated by a “D” in the Equipment Type drop-
down list and is a vehicle drawn or towed by a Power Unit.

37
To Enter Vehicle Information:
1. Enter the vehicle description data using the following sample table.
Vehicle # Equipment Type Vehicle
Registration
Number/VIN
Stat
e
Num
Axles
1 P - Truck Tractor DE12345 DE 3
2 D - Semi Trailer TT33758 PA 2
2. Click in the drop down list box under the Equipment Type heading.
Type the letter “P” or “D” on your keyboard to access the equipment
type drop-down list. Select P – Truck Tractor for the first vehicle.
3. In the box under the Vehicle Reg Num/VIN heading, type the
Vehicle Registration Number (or the Vehicle Identification Number
if the vehicle is not registered or is oversize).
4. Click in the drop down list box under the State heading and select
the state. For an unregistered vehicle using the Special Mobile
Equipment (SME) equipment type, enter N/A in the “State” field.
5. In the box under the Num Axles heading, enter the number of axles
for that vehicle.
6. Enter vehicle 2 the same way as above.
Entering Vehicles on the Weight Tab
7. Click on the Add Vehicle button when you need to add rows to the
bottom of the list for additional vehicles.
8. Click on the Insert Vehicle button to add rows in the middle of the
list for an additional vehicle. This button will add a row above the
selected (highlighted) row and renumber all the vehicles
automatically.
38
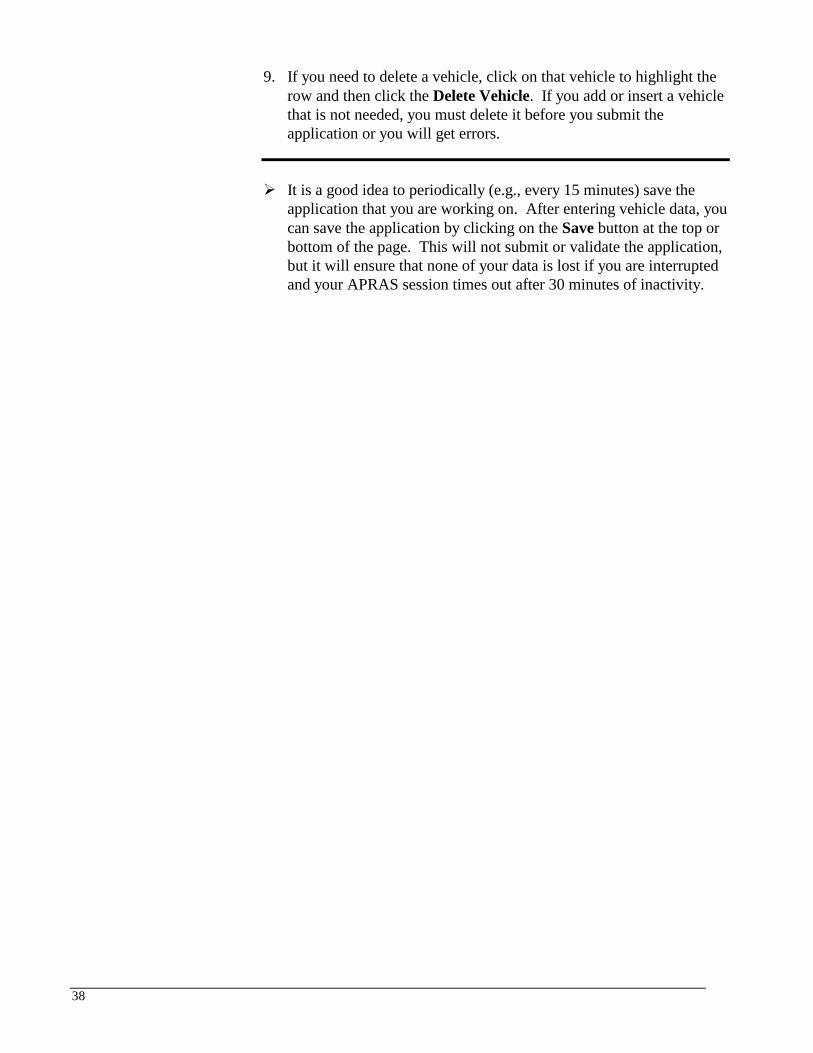
9. If you need to delete a vehicle, click on that vehicle to highlight the
row and then click the Delete Vehicle. If you add or insert a vehicle
that is not needed, you must delete it before you submit the
application or you will get errors.
It is a good idea to periodically (e.g., every 15 minutes) save the
application that you are working on. After entering vehicle data, you
can save the application by clicking on the Save button at the top or
bottom of the page. This will not submit or validate the application,
but it will ensure that none of your data is lost if you are interrupted
and your APRAS session times out after 30 minutes of inactivity.

39
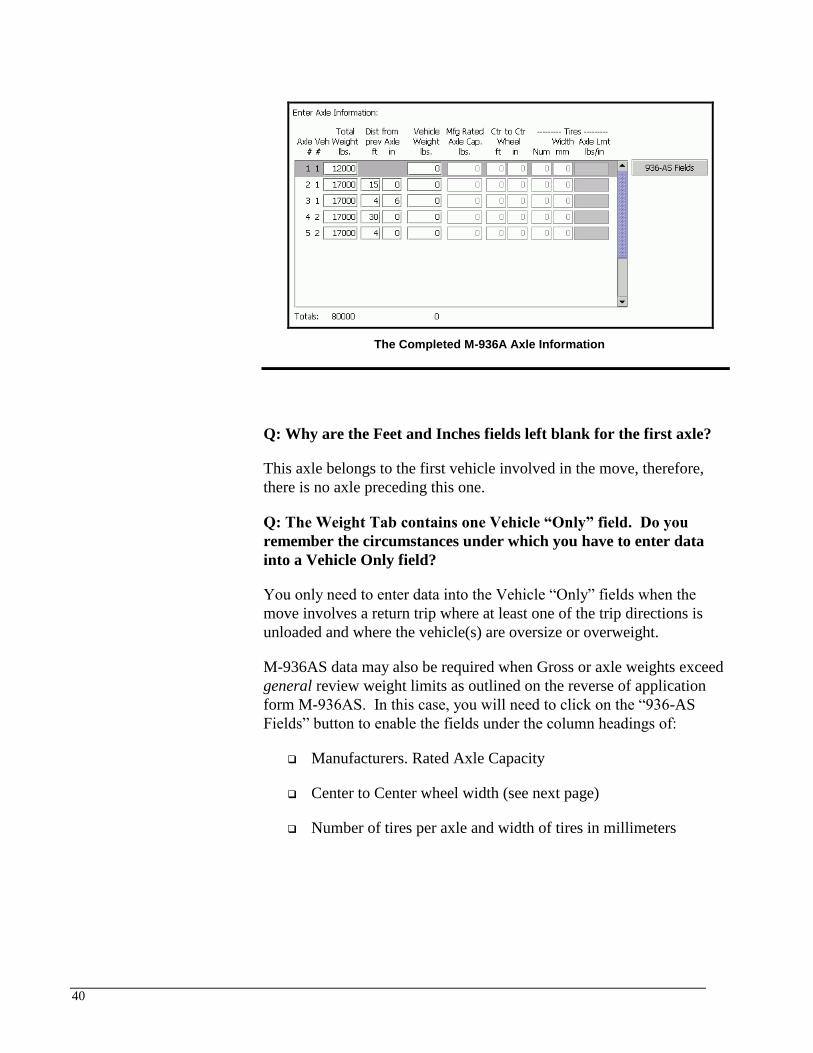
Entering Total Axle
Weights and Axle
Distances
As vehicles are entered, APRAS automatically creates rows in the Enter
Axle Information section for all the axles for each vehicle. You can
only enter axle information after you have completed filling out the
vehicle information.
For most permit applications, only the first four columns on the Weight
Tab require data. The other columns on this tab will be explored in
another mile.
To Enter Total Axle Weights and Axle Distances:
1. Enter the total axle weight and distance data using the following
sample table.
Do not enter commas or the feet and inches marks. Doing so will
generate application errors.
Axle # Vehicle # Total Weight
Distance Previous
Axle
1 1 12,000 Leave Blank
2 1 17,000 15’
3 1 17,000 4’6”
4 2 17,000 30’
5 2 17,000 4’
2. In the box under the Total Weight lbs heading, type the total weight
on that axle.
3. In the boxes under the Dist from prev Axle heading, type the feet
and inches from the previous axle.
The feet and inches fields will be defaulted blank for the first axle
because there is never a vehicle preceding this axle.
4. Enter the rest of the axles the same way as above.
Tip: Use the standard Windows conventions (ctrl-C to copy) (ctrl-V to
paste) to quickly enter identical data into multiple fields.
Tip: You may maneuver horizontally or vertically in this tab, based
on your personal preferences.
40
The Completed M-936A Axle Information
Q: Why are the Feet and Inches fields left blank for the first axle?
This axle belongs to the first vehicle involved in the move, therefore,
there is no axle preceding this one.
Q: The Weight Tab contains one Vehicle “Only” field. Do you
remember the circumstances under which you have to enter data
into a Vehicle Only field?
You only need to enter data into the Vehicle “Only” fields when the
move involves a return trip where at least one of the trip directions is
unloaded and where the vehicle(s) are oversize or overweight.
M-936AS data may also be required when Gross or axle weights exceed
general review weight limits as outlined on the reverse of application
form M-936AS. In this case, you will need to click on the “936-AS
Fields” button to enable the fields under the column headings of:
Manufacturers. Rated Axle Capacity
Center to Center wheel width (see next page)
Number of tires per axle and width of tires in millimeters

41
How to determine the Center to Center wheel distance

42
Adding a Vehicle to the Vehicle Favorites List
Effective June 2003, APRAS allows users to store their permit vehicle
fleet for easy retrieval when creating new applications. To simplify data
entry and reduce errors, you can create your own unique “vehicle
favorites” list to strore vehicles that you use frequently.
It is recommended that applications be cloned based on the routing
details and then modified by using the Load Favorites and Vehicle
Favorites lists.
To Create a Vehicle Favorites List:
1. Enter all of the vehicle information and axle information in the
weight tab.
2. Click on the vehicle you want to add, and then click on Add To
Favorite.
3. Name your new Favorite (i.e., company’s name or equipment
number for vehicle, etc.) in the Favorite’s Name field (required).

43
4. Click on Save.
- OR –
1. Click on the Favorites List tab or Favorite tab.
2. Click on New.
3. Name your new Favorite (i.e., company’s name or equipment number,
for vehicle) in the Favorite’s Name field (required).
4. Select the Equipment Type from the drop-down menu.
5. Type in the Vehicle Reg Num/Vin, select the State.
6. Type the number of axles.
7. Enter all the axle information.
8. Click on Save.
*HINT: ONLY THE FAVORITE’S NAME FIELD IS REQUIRED TO AFFORD
FLEXIBILITY, FOR EXAMPLE, IF YOUR AXLE WEIGHTS CHANGE WITH EACH
MOVE, YOU CAN CREATE A FAVORITE WITH BLANK AXLE WEIGHTS!*
Selecting a Vehicle in the Vehicle Favorites List:
Once all of the frequently used vehicles have been saved, instead of
typing in all of the vehicle and axle information on a new application,
simply choose the vehicle listed in the Favorites List tab by doing the
following:
1. Click on the Favorites List tab.
2. Select the vehicle to be added to the application.

44
3. Click Add To Application or double click the selection.
If you want to add a favorite vehicle between two other vehicles already
listed on the weight tab, go to the weight tab, click on Insert Vehicle (a
blank line will be entered where the new vehicle is to go). Then
simply select a vehicle in the Vehicle Favorites list. If you do not insert
a blank line first, the new vehicle will be placed at the first blank line.
Copying a Vehicle in the Vehicle Favorites List:
If you have vehicles with the same axle information but different
Vehicle Registrations/VIN, simply do the following:
1. Click on the Favorites List tab.
2. Select the vehicle to be copied.
3. Click Copy.
4. Name your new Favorite (i.e., company’s name or equipment
number for vehicle) in the Favorite’s Name field.

45
5. Change the Vehicle Reg Num/Vin.
6. Click Save.
Editing a Vehicle in the Vehicle Favorites List:
If information has changed with a vehicle favorite, you can edit the
information by simply doing the following:
1. Go to the Favorites List.
2. Select the vehicle to be changed.
3. Click on View/Edit.
4. Change the information.
5. Click Save.
**MAKE SURE YOU SAVE BEFORE YOU LEAVE THE WEIGHT
TAB WHILE YOU ARE CREATING/MODIFYING YOUR
FAVORITE OR YOU WILL LOSE ANY WORK THAT WAS
NOT SAVED.**
46
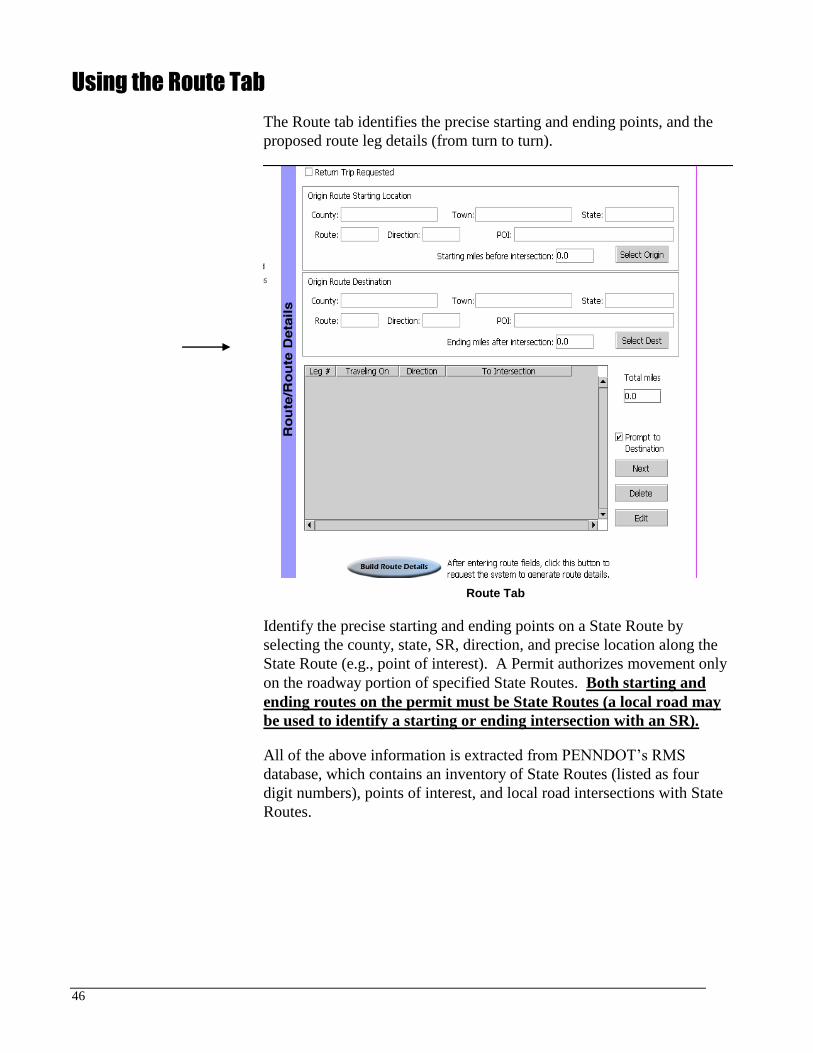
Using the Route Tab
The Route tab identifies the precise starting and ending points, and the
proposed route leg details (from turn to turn).
Route Tab
Identify the precise starting and ending points on a State Route by
selecting the county, state, SR, direction, and precise location along the
State Route (e.g., point of interest). A Permit authorizes movement only
on the roadway portion of specified State Routes. Both starting and
ending routes on the permit must be State Routes (a local road may
be used to identify a starting or ending intersection with an SR).
All of the above information is extracted from PENNDOT’s RMS
database, which contains an inventory of State Routes (listed as four
digit numbers), points of interest, and local road intersections with State
Routes.

47
Q: What is a point of interest?
A point of interest is a common point of origin or destination on a State
Route. A point of interest is given a commonly known name and is
typically a private driveway.
If you would like to have a frequently used starting or ending point
along a State Route added as a point of interest, please fill out the
Request to Add Point of Interest to APRAS form located at the back of
this Volume and submit it to the affected District Permit Office.
48
Establishing the
Move’s Origin and
Destination
The first step in planning any trip is to establish precisely where the
move will begin and where the move will end. The process is similar to
what you would do when you give someone driving directions to your
home; you need to know both the starting and ending points and how
best to travel between these two points, with all turns noted in the
driving directions.
To define the origin and destination, specify the actual county, state, SR,
direction, and precise location along the State Route (e.g., point of
interest). Both start and end points must be identified as accurately as
possible (i.e., within one tenth of a mile).
It is not necessary to enter data into the Town field. Use the Town field
as a “filter” ONLY if you are certain the move actually begins/ends
within the town’s official boundaries. By using this filter, you may
accidentally eliminate the State Route from the filtered drop-down list.
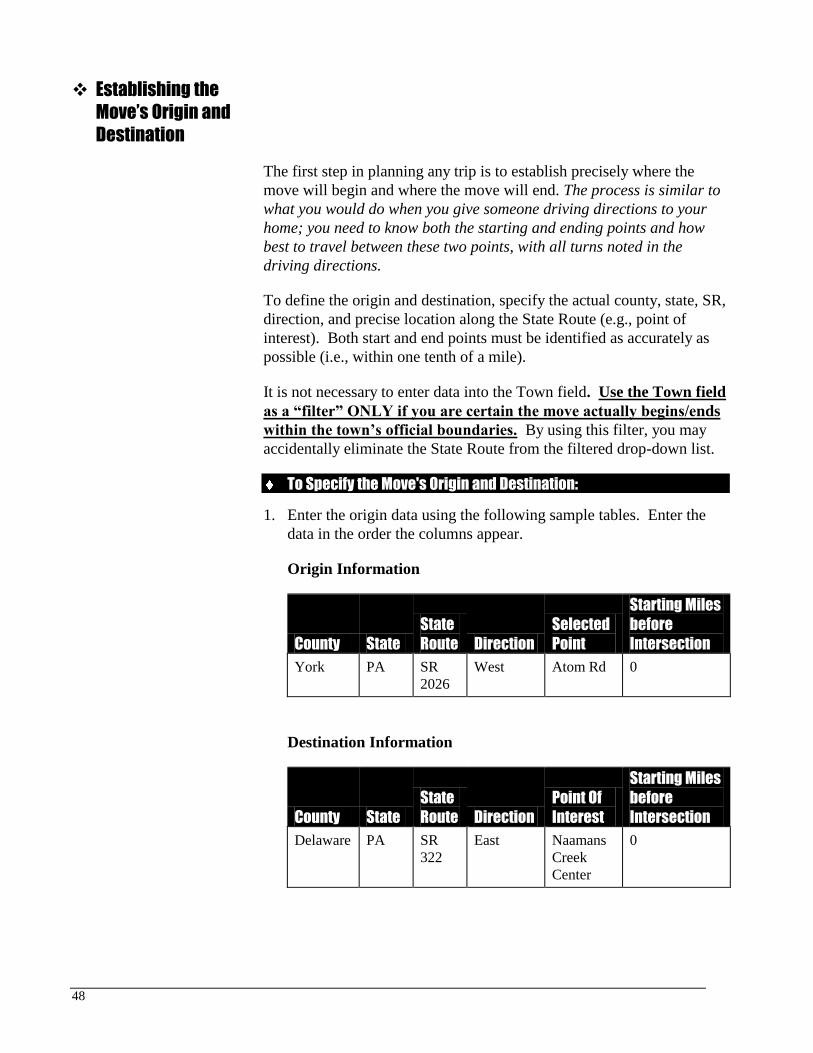
To Specify the Move's Origin and Destination:
1. Enter the origin data using the following sample tables. Enter the
data in the order the columns appear.
Origin Information
County State
State
Route Direction
Selected
Point
Starting Miles
before
Intersection
York PA SR
2026
West Atom Rd 0
Destination Information
County State
State
Route Direction
Point Of
Interest
Starting Miles
before
Intersection
Delaware PA SR
322
East Naamans
Creek
Center
0
49
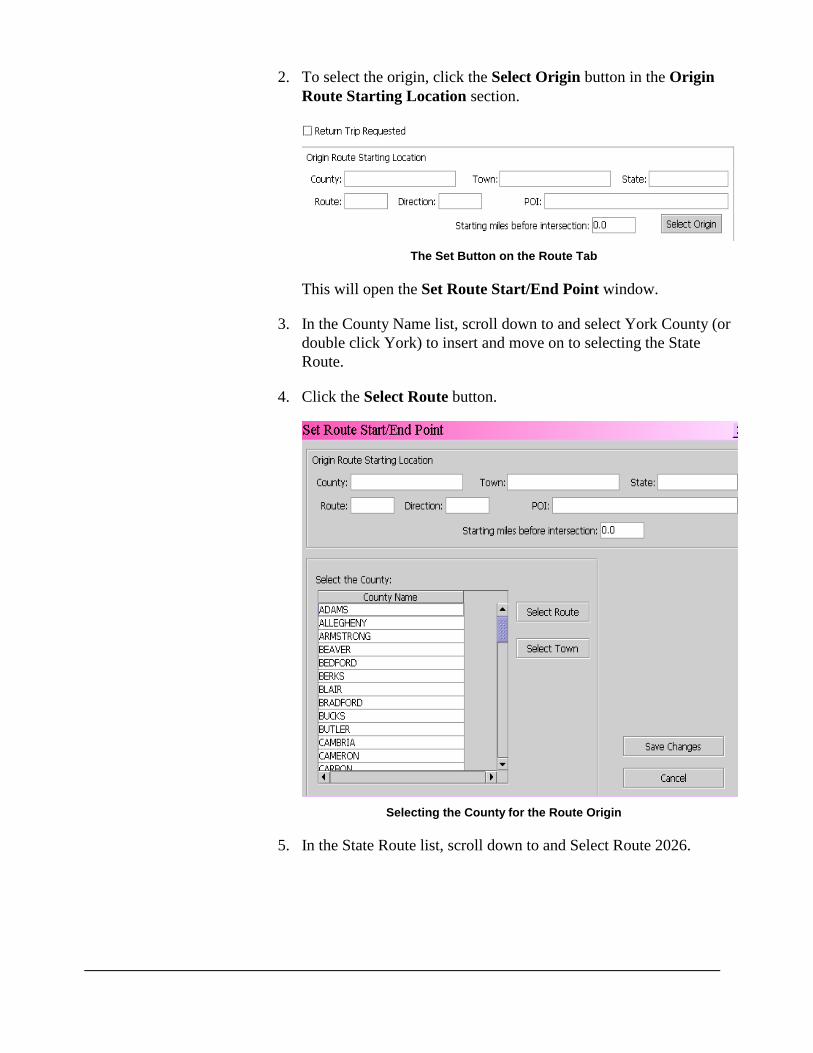
2. To select the origin, click the Select Origin button in the Origin
Route Starting Location section.
The Set Button on the Route Tab
This will open the Set Route Start/End Point window.
3. In the County Name list, scroll down to and select York County (or
double click York) to insert and move on to selecting the State
Route.
4. Click the Select Route button.
Selecting the County for the Route Origin
5. In the State Route list, scroll down to and Select Route 2026.

50
6. Click Select to set the Route or double click route 2026 to insert and
move on to selecting the direction.
Setting the Route for the Route Origin
7. In the direction list, select West for the direction of travel along
route 2026.
8. Click the Select button or double click on West.
Selecting the Direction of Travel for the Route Origin
51
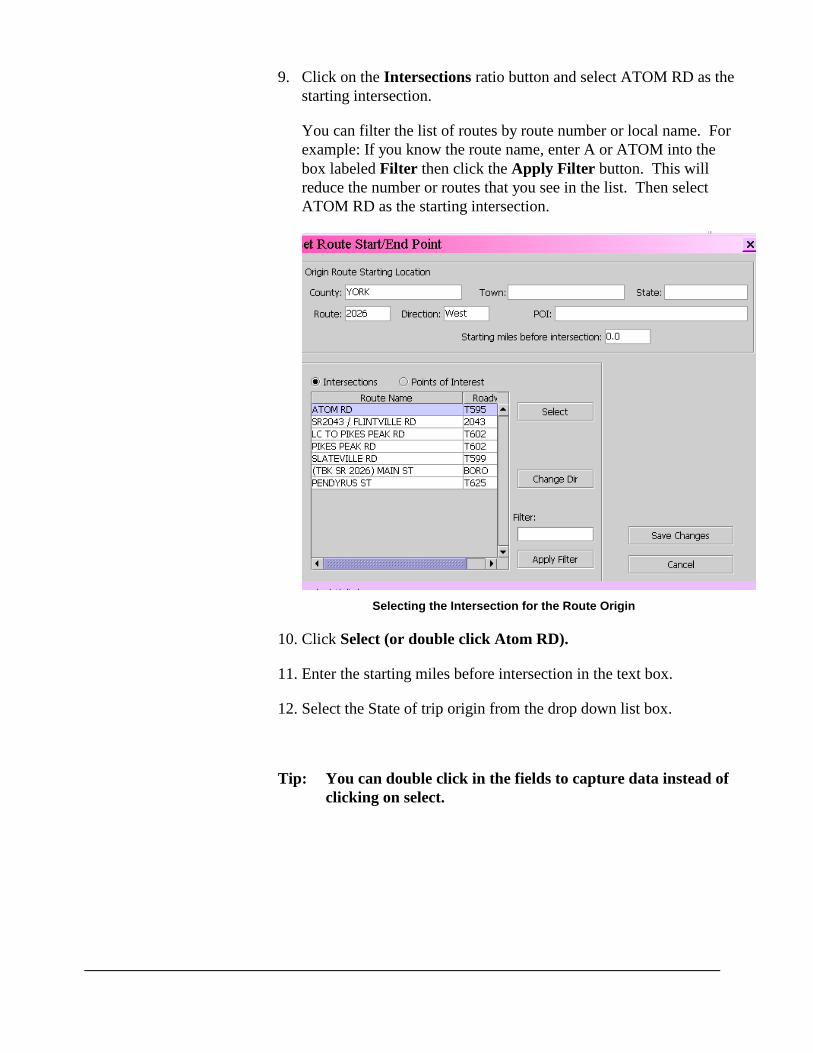
9. Click on the Intersections ratio button and select ATOM RD as the
starting intersection.
You can filter the list of routes by route number or local name. For
example: If you know the route name, enter A or ATOM into the
box labeled Filter then click the Apply Filter button. This will
reduce the number or routes that you see in the list. Then select
ATOM RD as the starting intersection.
Selecting the Intersection for the Route Origin
10. Click Select (or double click Atom RD).
11. Enter the starting miles before intersection in the text box.
12. Select the State of trip origin from the drop down list box.
Tip: You can double click in the fields to capture data instead of
clicking on select.

52
13. Click on Save Changes.
Saving the Route Origin
14. The Origin Route Starting Location section of the Route Tab is
now filled in with the selections that you made.
The Completed Route Origin
15. Enter the destination the same way as above.
NOTE: Duplicate entries exist for routes in the RMS database if any of
the following conditions exists:
There is a break in the route where it is not state owned.
If the route has more than one local name (there is a change in road
signs).
If the route travels in more that one direction.

53
If the route you are traveling on carries more than one State Route name
(called a coincident route), use the lower route number to establish
that route component. For example, if you are traveling on 22/322, filter
on 0022.
The Miles From Intersection field requires a number if your
origin/destination is an intersection. If your origin/destination is a point
of interest, leave the Miles From Intersection field blank.
If your origin/destination is a point of interest, leave both the Miles
From Intersection and Direction From Intersection fields blank.
When selecting a beginning and/or ending State Route, be sure to
choose the first/last State Route you will actually travel along.
Please be careful when selecting an origin/destination intersection point,
because the permit will not authorized actual travel on any intersecting
route. The intersecting route is a reference point only, that is used to
determine where a move begins/ends along the first/last State Route.
On the sample below, the permit would authorize travel on I-81 to the
intersecting point of Exit 52A on SR 11 only, but not along SR 11.
Typically, the beginning/ending State Route is not an Interstate highway
unless there is a state border, a construction site, or a cited vehicle.
Route Origin and Destination

54
Is There a Return Trip
Involved In the Move?
If you want to make a return trip under the same permit, you must
request this on the Route Tab by clicking on the box in front of Return
Trip Requested. Checking the Return Trip Requested box allows
you to enter a return route (Destination to Origin).
The move for our test drive does not require a return trip; however,
below is an example of how a return trip is entered onto the Route Tab.
You need to click on the “radio button” circle in front of Destination to
Origin to fill out the route details for the return trip.
Return Route Start and Destination
The Return Route Starting Location and Return Route Destination
are automatically completed for you when you click on the Destination
to Origin radio button.
Entering Route
Details
The route details section is designed to specify the exact route over
which the vehicle(s) propose to travel.
You must identify the route origin and destination before you enter the
route details because the route details use the origin and destination
information to ensure full route connectivity from beginning to end.
Specify your proposed route of travel by selecting road segments, in
driving sequence, from a list of available turning opportunities compiled
from PENNDOT’s RMS database. Each road segment represents the
start of a new route component. A component is a portion of an SR that
is traveled in a single direction between two intersections.

55
There are two kinds of route components: State Routes and local routes.
State Route components are PA roads that are owned by the State.
Local route components are PA roads that are not owned by the State.
The RMS database supports travel from a State Route to a local road
intersection and from a local road intersection to a State Route, but not
along a local road or from a local road to a local road. As a result, when
you travel from a State Route onto local roads and back onto a State
Route, you need to manually enter these interim local route components.
This feature allows the driver to have a list of routes that connect, but
PENNDOT’s permit does not authorize travel on local roads, which are
listed in brackets on the permit. See PENNDOT Regulation 179.10(5),
which appears on Department Form M-938.
To Enter the Route Details:
1. Click on the Route Tab and go to the route details section. The start
of Leg 1 will already be filled in from your Origin Route Starting
Location.
Route Details
2. Click on the Next button to enter the information for Leg 1.

56
The Select Next Intersection dialog box opens with a list of
intersections. Choose the next intersection from the filtered list of
available Route Names.
The Select Next Intersection Dialog Box
3. Click on SR2043.
If duplicate rows are listed for the route, it does not matter which
duplicate row you select.
Duplicate rows exist in the RMS database if:
There is a break in the route where it is not state owned.
The route has more than one local name (there is a change in
road signs).
The route travels in more that one direction.
4. Click Select.
57
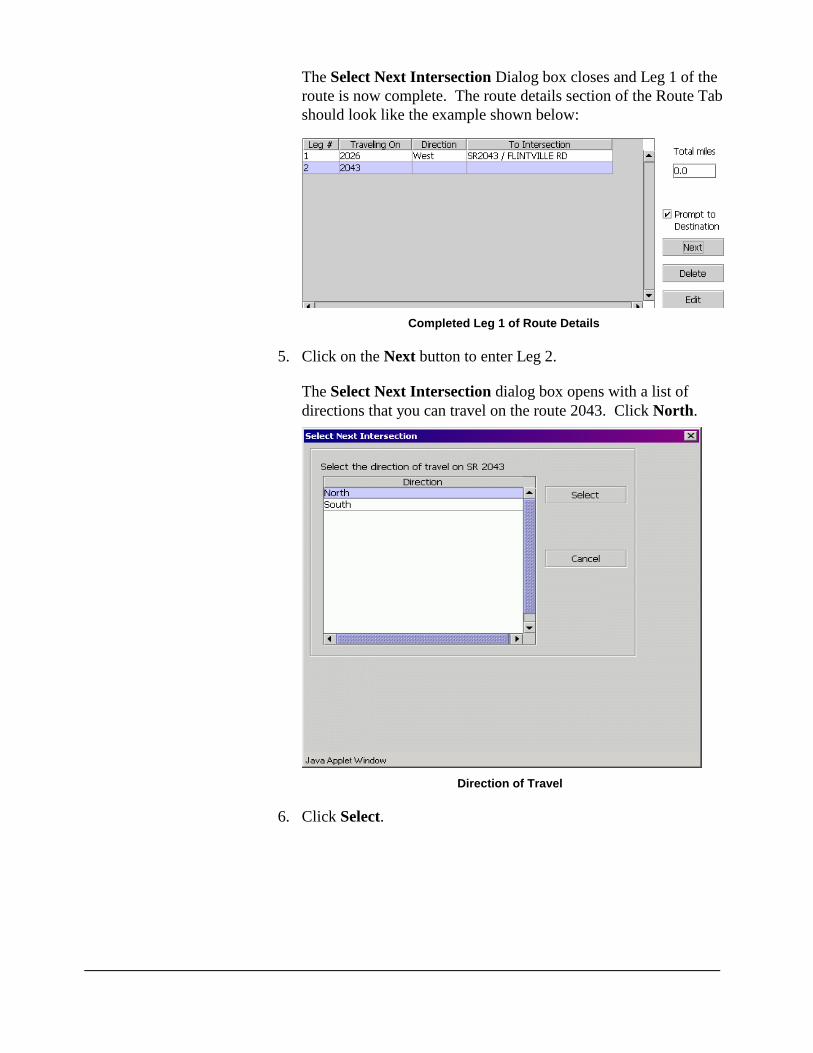
The Select Next Intersection Dialog box closes and Leg 1 of the
route is now complete. The route details section of the Route Tab
should look like the example shown below:
Completed Leg 1 of Route Details
5. Click on the Next button to enter Leg 2.
The Select Next Intersection dialog box opens with a list of
directions that you can travel on the route 2043. Click North.
Direction of Travel
6. Click Select.
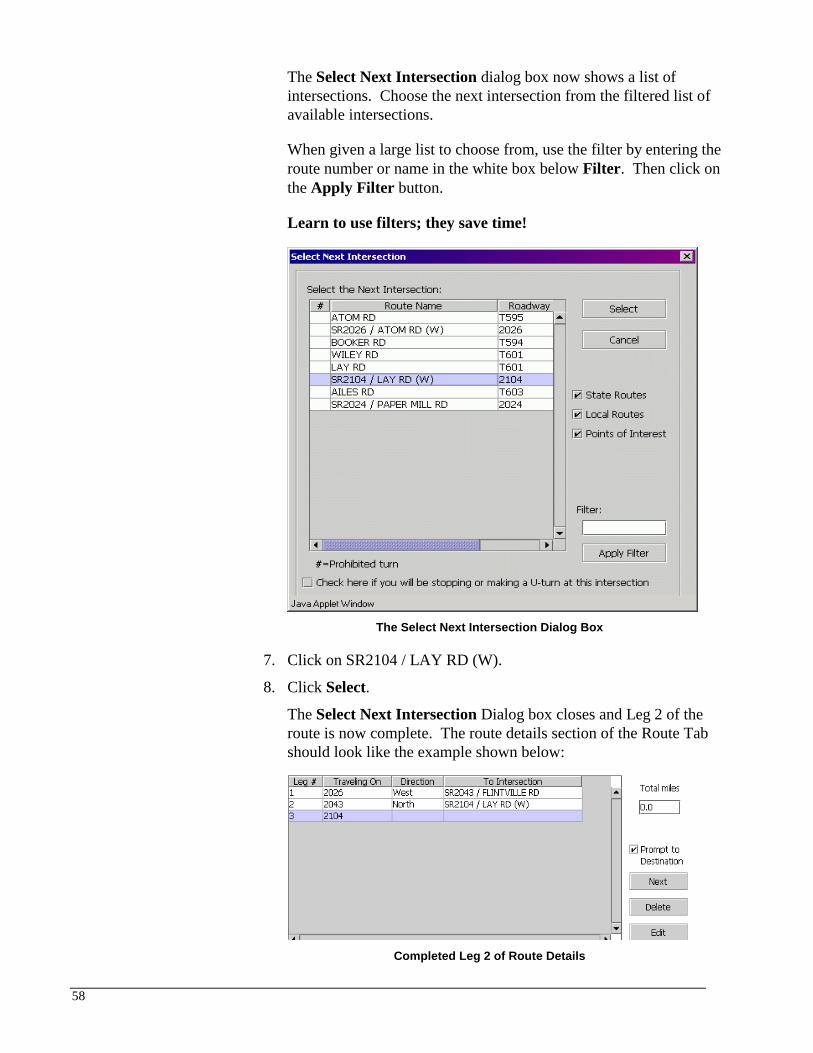
58
The Select Next Intersection dialog box now shows a list of
intersections. Choose the next intersection from the filtered list of
available intersections.
When given a large list to choose from, use the filter by entering the
route number or name in the white box below Filter. Then click on
the Apply Filter button.
Learn to use filters; they save time!
The Select Next Intersection Dialog Box
7. Click on SR2104 / LAY RD (W).
8. Click Select.
The Select Next Intersection Dialog box closes and Leg 2 of the
route is now complete. The route details section of the Route Tab
should look like the example shown below:
Completed Leg 2 of Route Details

59
You have completed Leg 2. Now, complete the remainder of the
route details using the information in the sample table below.
Leg # Component Direction Intersection
1 2026 West 2043N
2 2043 North 2104W
3 2104 West 2045N
4 2045 North 74N
5 74 North 372E (Tip: To find 372 quicker,
use the filter.)
6 372 East 272S (Tip: To Find 272 quicker,
use the filter.)
7 272 South 1N (Tip: To find SR 1 quicker, use
the filter.)
8 1 North 322E (Tip: To find 322 quicker,
use the filter.)
9 322 East Naamans Creek Center (Tip: Only
check the box in front of Point Of
Interest. Uncheck the boxes for
state and local roads.)
When you have connected the route’s origin to its destination, the
Next button is disabled (grayed out) and you are no longer prompted
to enter additional components.
Q: If the route you are traveling on carries more than one State
Route name, for example 11/15, which route do you establish as the
component? If you answered 11, you’re correct! Remember to always
use the lower route number when traveling on a coincident route.
Using the Route
Generation Function
The route generation function allows APRAS to create a route that
connects the origin and destination points you specified on the Route
Tab. The route generation function only provides connectivity between
the origin and destination – it does not verify that the components of the
resulting route can accommodate the vehicle(s) and their load. (Actual
detailed route analysis occurs after the application is submitted).
Tip: Fill in the Move Begins Date on the Application Tab before
using the route generation function. Temporary roadway restrictions
will be taken into consideration if the move begins date has been entered
before route generation begins.

60
When requested to generate a route, APRAS puts your request into a
queue and notifies you of your position in the queue. APRAS will
generate one route at a time (it takes approximately two minutes to
generate a route).
There are some advantages and disadvantages to using the route-
generating feature. One disadvantage is that while you are waiting for
APRAS to generate the route, you can’t work on any other tab in that
permit application (although you may close the application by clicking
on home and resume work in a new or another existing application).
When APRAS generates a route for you, it will not use local roads and
the built route of travel could result in additional mileage. However,
you can edit a route that APRAS generates.
If you are having trouble linking your origin and destination points, the
route-generation feature is a great tool to establish connectivity. From
there, you can edit the route to your specifications by editing or adding
components.
Q: Do you know where to access the route generation feature? If
you said the Build Route Details button on the Route Tab, you’re
correct!
Editing an Existing
Route
You can edit or delete the components of an existing route using the
Route Tab. Since route components are connected through prompting,
when one or more components must be deleted, all of the components
below the selected component are also deleted.
To delete a route component, select the Leg # of the component(s) to be
deleted (by clicking on it) and then click on the Delete button.
To edit a route component, select the Leg # of the component(s) to be
changed (by clicking on it) and then click on the Edit button.
The Edit Route Details dialog box verifies that the starting and ending
points for the components being edited have been reconnected. APRAS
will not allow you to save any edits made on this page until you have
reconnected the components.

61
Finalizing the Route
Next, enter a total mileage estimate on the Route Tab.
To Enter a Total Mileage:
1. Go to the Route Tab.
2. Enter an estimate of the route’s total miles in the Total Miles field.
Entering the Total Miles Estimate on the Route Tab
This Total Miles field is the applicant’s estimated mileage. APRAS
calculates the actual total miles (as shown on the Permit Tab).
For this test drive, do not enter any Total Miles, to cause an edit error when you validate this
application, as discussed in Mile Marker 8, Searching for and Submitting an Application. This will
keep this sample application from being submitted, which would result in a permit being issued and
fees being assessed.
62
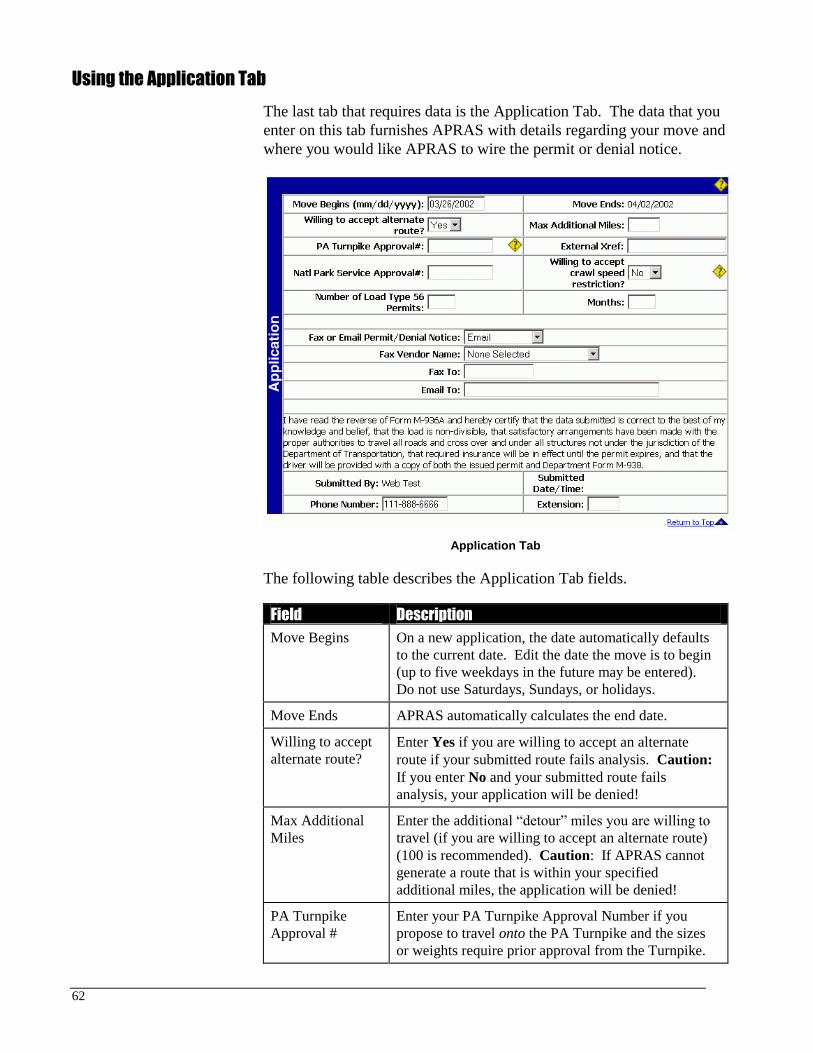
Using the Application Tab
The last tab that requires data is the Application Tab. The data that you
enter on this tab furnishes APRAS with details regarding your move and
where you would like APRAS to wire the permit or denial notice.
Application Tab
The following table describes the Application Tab fields.
Field Description
Move Begins On a new application, the date automatically defaults
to the current date. Edit the date the move is to begin
(up to five weekdays in the future may be entered).
Do not use Saturdays, Sundays, or holidays.
Move Ends APRAS automatically calculates the end date.
Willing to accept
alternate route?
Enter Yes if you are willing to accept an alternate
route if your submitted route fails analysis. Caution:
If you enter No and your submitted route fails
analysis, your application will be denied!
Max Additional
Miles
Enter the additional “detour” miles you are willing to
travel (if you are willing to accept an alternate route)
(100 is recommended). Caution: If APRAS cannot
generate a route that is within your specified
additional miles, the application will be denied!
PA Turnpike
Approval #
Enter your PA Turnpike Approval Number if you
propose to travel onto the PA Turnpike and the sizes
or weights require prior approval from the Turnpike.

63
Field Description
External Xref This field is provided as a service for APRAS users.
Nat’l Park Service
Approval #
Enter the National Park Service Approval Number if
you propose to travel through the Park on TR 209.
Willing to accept
crawl speed
restriction?
Enter Yes to verify your willingness to obey crawl
speed restriction over bridges. Caution: If movement
cannot be approved at highway speeds and you entered
No in this field, movement over affected bridges will
not be authorized and the application may be denied!
Fax or Email
Permit/Denial
Notice
Choose your option from the drop down list. If you
have made arrangements to receive your permits via
email, then this field will default to email.
Fax Vendor Name Select the Fax Vendor you are using to submit your
permit or denial notice. The chosen Fax Vendor must
have fax privileges in the District of origin.
Fax To Enter the fax number APRAS should use to send the
permit or denial notice. Contact the Central Permit
Office if you want to have a default number appear for
your account (717-787-5367).
Email To Enter the email address APRAS should use to send the
permit or denial notice. Your default email address
will appear for your account. You may change this
default address if desired. Your administrator can
assign a separate default email address for each motor
carrier user.
Submitted By Displays the name of the user associated with the user
ID.
Submitted
Date/Time
The date and time the application was submitted for
review will be assigned by APRAS.
Phone Number Enter your phone number. Contact the Central Permit
Office if you want to have a default number appear for
your account (717-787-5367).
Extension Extension number is optional. Contact the Central
Permit Office if you want to have a default extension
number appear for your account (717-787-5367).

64
Finalizing the
Application
Before you submit the application, ensure that all of the fields on the
Application Tab contain the appropriate data.
To Finalize the Application:
1. Click on the Application Tab, if necessary.
2. Verify the Move Begins date.
3. Verify you are willing to accept an alternate route up to 100
additional miles.
4. Select Email as the option for receipt if necessary.
5. Change the Email To your email address if necessary.
6. Enter your phone number (at the bottom of the Application Tab) if
a default number does not appear.
7. Click Save (Note: Do not click “Submit” on the sample
application, to avoid having a permit issued and fees being
assessed).

65
Mile Marker 8
Searching for and Submitting an
Application
Objectives
Successful completion of this chapter will enable you to:
Define the components of the search page.
Search for an existing application
Validate a new application.
Fix errors found during the validation process.
Submit a new application for review.

66
Searching for Existing Applications
The APRAS search function feature provides users the ability to search
for applications that have been entered into the system -- under their
account number. This search tool is important when you need to search
for an existing application to:
Check on its status.
Submit it.
Withdraw it from route analysis.
Clone it.
It is important to clone recent permits to reduce the likelihood of
transferring data that is not current (e.g., due to changes in PENNDOT’s
RMS and BMS databases).
It is extremely important to document every application’s ID
number initially. You will need these application ID numbers to do
quick searches for existing applications and permits.
The ID number can be found in the first field on the Main Tab. If you
currently do not have a process of recording application ID numbers,
start now by entering all application ID numbers into a logbook or other
retrievable format.
What is the ID number of the application you created in the
previous mile? You will need it to continue traveling on this mile.
If you did not cover the material in Mile Marker 7, Creating and
Filling Out A Permit Application, please do a U-turn and complete
that mile before returning to this one.
67
Accessing the Search
Page
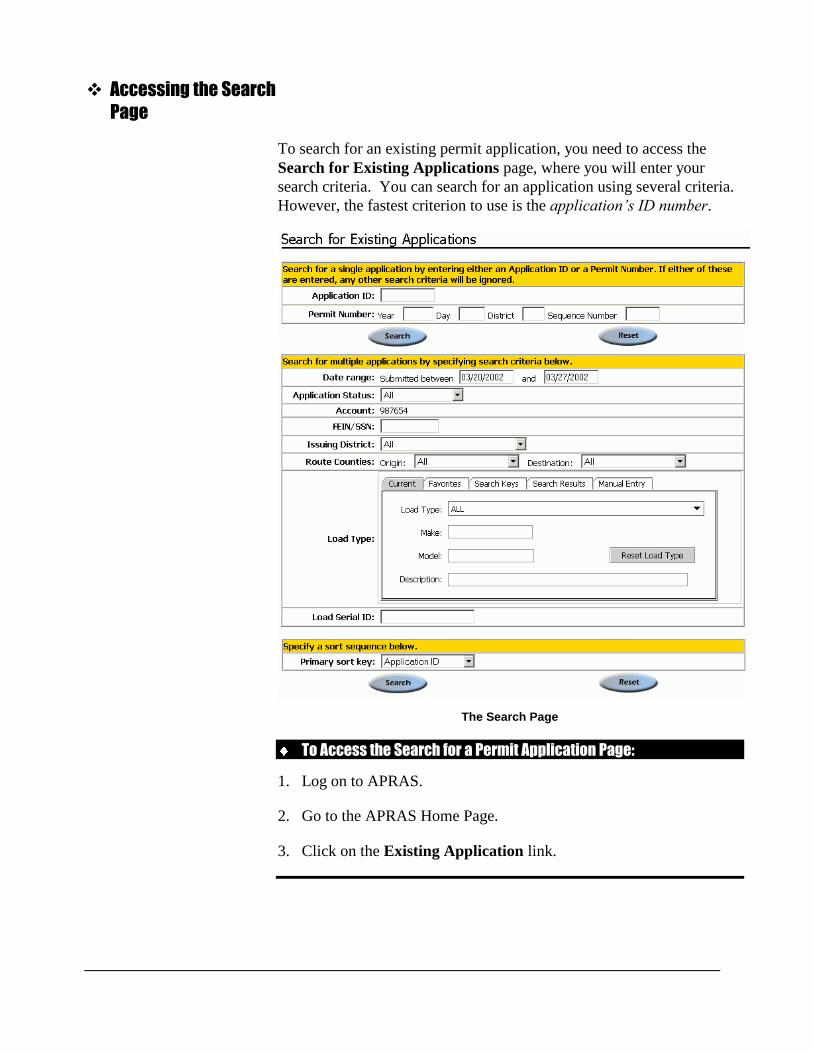
To search for an existing permit application, you need to access the
Search for Existing Applications page, where you will enter your
search criteria. You can search for an application using several criteria.
However, the fastest criterion to use is the application’s ID number.
The Search Page
To Access the Search for a Permit Application Page:
1. Log on to APRAS.
2. Go to the APRAS Home Page.
3. Click on the Existing Application link.

68
Searching for the
Application
You can use any combination of fields to filter the search criteria on this
search page. Again, it is best to use the application’s ID.
To Search for the Permit Application:
1. Enter the Application ID number for the application you created in
the previous mile.
You do not have to enter the first letter and numeral. Start with the
first number that follows the set of leading zeros.
2. Click Search.
Displaying the
Application
The Applications Search Results page is displayed when you choose
Search from the Search for Existing Application page. On the Search
Results page, APRAS lists the applications that meet the criteria you
established on the Search for Existing Application page.
The Search Results Page
To Display the Application:
1. Click on the application ID number of the application you created in
the previous mile.
When you click on an application from the Search Results page, APRAS
opens that application in the New Application or View Application
page.

69
Reviewing the New Application Page Buttons
On the top and bottom of the New Application page are sets of blue
buttons that function to finalize the permit application process.
Buttons on the New Application Page
Let’s review each of the blue buttons using the table below. We will be
exploring the uses of these blue buttons throughout the rest of this mile.
Button Description
Save Saves the application and recalculates the hold date.
Validate Initiates a validation process that checks the application for
data errors. Any errors that are identified by APRAS must
be corrected before you can submit the application.
Submit Initiates a validation process that checks the application for
data errors. CAUTION: If no errors are detected, the
application will undergo the route review process.
Clone Creates a nearly duplicate copy of the current application.
This copy will open with a new application ID.
Delete Deletes a new application from the system.
Cancel Exits from this page without saving any changes you have
made.

70
Removing Permit Applications from APRAS
If you no longer need a permit that you have submitted an application
for, promptly remove that permit’s application from the system to avoid
being assessed Permit Issuance Fees. Note: approximately 80% of all
applications are auto-issued in about one minute, on average.
APRAS allows you to create an application without completely
finishing the application process. If you choose to never complete the
application process (by submitting the application), it will retain a status
of new for a period of 30 days beyond the day you last worked with the
application. The application is then automatically purged from APRAS.
Deleting a New
Application If you no longer need an application, and it has a status of new, you can
delete that application manually.
Follow the next set of steps to delete an application.
To Delete the Application:
1. Create a new application and save it. Then display this application.
You may need to search for this application using its ID number.
2. From the Search Results page, click on the Application ID and open
the application.
3. As long as the application is in a new status, there will be a “delete”
button at the top and bottom of the page. Click the Delete button.

71
Finalizing the Application Process
Finalizing the application process involves checking the application for
errors or omissions, correcting any errors or omissions that are found,
and submitting the application to PENNDOT for review.
Validating Your
Application
Validating is the first step in finalizing the application process.
Validate your application to identify data errors or omissions. If there
are any errors or omissions identified, APRAS lists the Tab and Field
where the error(s) or omission(s) exist. The validating function is an
efficient component of APRAS because it identifies errors or omissions
and notifies you before you submit your application to PENNDOT.
This validation process significantly reduces the number of applications
that would otherwise be denied, because it ensures errors or omissions
are corrected before you submit an application for detailed route
analysis.
Validating your application does not submit it to PENNDOT.
To Validate Your Application:
1. Click Validate.
Identifying
Application Errors
When you validate, APRAS reviews your application for accuracy. If
no errors or omissions are identified, APRAS will display the Main Tab
of the New Application page.
However, if errors or omissions are present, APRAS displays the Errors
Tab. On the Errors Tab, APRAS lists the errors or omissions and the
Tab and Field where it occurred in your application. APRAS also gives
a brief description of each error or omission.
You will need to address each error or omission individually by going to
the appropriate Tab and entering correct information.
72
Correcting Errors
Use the Errors Tab to identify application errors or omissions.
To Correct the Errors in the Application:
1. Identify the first error or group of errors on the Errors Tab.
2. Click on the tab where the first error appears and correct the data in
the specified field(s).
3. Validate the application to verify the error has been corrected.
4. Identify the next error or group of errors.
5. Click on the tab where the next error appears and correct the data in
the specified field(s).
6. Validate the application to verify the error has been corrected.
7. Continue to identify and fix the errors listed on the Errors Tab.
Tip: If there are numerous errors, print the Errors Tab so you do not
have to return to the Tab to identify each error.
Tip: It is not necessary to validate the application after every error is
corrected.
73
Submitting Applications
After you validate your application and resolve the errors, you are ready
to submit your permit application to PENNDOT for review.
CAUTION: DO NOT SUBMIT THE SAMPLE APPLICATION IN
THIS VOLUME (to avoid having permit fees assessed)!
Submitting a New
Application
Click on Submit.
After receiving the confirmation that your application was successfully
submitted, proceed with one of the following options:
Return to Home Page
Return to Application
Clone Application
When you submit a “new” application to PENNDOT, APRAS goes
through the validation process again. If errors are detected, APRAS
automatically displays the Errors Tab so you can promptly fix the errors.
If your application is free of errors, APRAS begins the route review
process and the application moves into “under analysis” status.
While an application is “under analysis”, APRAS examines the route to
determine if the roads and structures can accommodate the vehicle’s
weights and sizes during the time period specified in the application.
Submitting an application will hold you accountable for fees that
are incurred by the Department in reviewing the application and
processing and issuing the Permit!

74
Receiving a Permit
APRAS will wire a permit or denial notice by fax or email to the
location specified on the Application Tab of the permit application.
APRAS attempts to wire a permit or denial notice a total of five times.
After five unsuccessful attempts, APRAS sends a notification to the
permit’s owning District Office to notify the permit staff that a wire
transmittal failed. At that point, the permit staff will verify the location
specified on the Application Tab and attempt to re-wire the document
manually.
If a permit or denial notice does not configure properly for e-mail,
notification will be sent to the permit’s owning District office.
APRAS will attempt to e-mail a permit or denial notice. After an
unsuccessful attempt to deliver an e-mail, APRAS will send a
notification to the Central Permit Office e-mail server address and the
permit staff will attempt to verify the e-mail address specified in the
account’s default e-mail address and will resend the document.
If you would like to have your permits or denial notices e-mailed, you
must contact the Central Permit Office at:
717-787-5367
to set up your e-mail capabilities and set a default e-mail address. You
must also supply an e-mail address for your company’s contact person.

75
Mile Marker 9
Managing Permit Applications
Objectives
Successful completion of this chapter will enable you to:
Re-send a permit or denial notice from the search window.
Familiarize yourself with the four selection buttons
available when viewing a submitted application.
o Withdraw a submitted application.
o Clone an existing application.
o Request a supplement for an issued permit.
76
Re-Sending Permits and Denial Letters
If you do not receive your permit or denial notice, you can request that
the document be re-sent to you using the re-send function in APRAS.
You can request that a document be re-sent up to three times. Keep in
mind that each time you request a document to be re-sent, APRAS will
attempt to fax the document five times or e-mail one time. If you have
trouble receiving the document initially, first check the accuracy of the
fax number or e-mail address specified on the Application Tab of the
permit application before you request the document to be re-sent. If the
default fax number is incorrect, contact the Central Permit Office to
have it corrected. If the default e-mail address is incorrect, correct the e-
mail address associated with your account or name.
To request a document be re-sent, search for the permit using the
Existing Application link off the APRAS Home Page.
To Resend a Document:
1. Display the APRAS Home Page.
2. Click on the Existing Application icon.
3. Enter Application ID of a permit in issued status.
4. Click Search.
Choosing the Resend button will initiate the re-send process.
Click the Fax History button to display PENNDOT’s attempts to
fax permits in issued status.
77
Reviewing the View Applications Page Buttons
Let’s review the set of blue buttons on the top and bottom of a submitted
or issued application using the table below. We will be exploring the
uses of these buttons throughout the rest of this mile.
The blue buttons on the top of the View Application page will vary
based on the status of the application you are viewing and other factors,
such as whether it was “Web Created”.
Below is the example of the blue buttons found on the View Application
page for a submitted application. This example shows the Withdraw
and Clone buttons.
Buttons for a Submitted Application
Below is the example of the blue buttons found on the View Application
page for an issued permit that is not a preliminary Super Load. This
example shows the Supplement and Clone buttons.
Buttons for an Issued Permit
78
Below is the example of the buttons found on the View Application
page for an issued preliminary Super Load application (See Volume 3).
This example shows the Final SL and Clone buttons.
Buttons for an Issued Preliminary Super Load Application
Button Description
Withdraw Withdraws an application that has a
submitted status.
Clone Creates a nearly duplicate copy of the current
application. This copy will open with a new
application ID.
Supplement Allows you to request certain changes to an
issued permit.
Final SL “Clones” an approved preliminary Super
Load application to be submitted as a final
Super Load (See Volume 3).
79
Withdrawing a Submitted Application
An application’s status changes to under analysis when you submit it for
review. While in under analysis status, APRAS notifies any
PENNDOT staff that need to be involved in the review process.
When APRAS and/or PENNDOT staff begin to review the submitted
route, the application enters a submitted status. If you determine that
you no longer need the permit, and the application has moved to
submitted status, you must promptly withdraw the application. The time
available to withdraw an application may be less than one minute when
an application does not require manual review.
Withdrawing an application from APRAS stops the route analysis
process. You will not be held accountable for any permit fees associated
with a non-Super Load application that is withdrawn BEFORE it is
approved.
To Withdraw an Application:
1. Display an application that has not been auto-issued (because you
have entered a comment). You may need to perform a search for a
submitted application using the application ID number.
2. Click the Withdraw button.
When withdrawn, the application is not deleted from APRAS.
Therefore, you can clone the application, make changes to it, and
resubmit it.
Q: Do you know where you would go to withdraw an application
that has a submitted status? You withdraw an application by clicking
the Withdraw button on the View Application page showing the opened
application.
80
Cloning an Application
Cloning an application is a valuable, timesaving method of creating a
near duplicate copy of an existing application. When an existing
application is cloned, a new application is created based on that existing
application.
The new application is assigned a different Application ID. Data that
typically changes is intentionally not copied (e.g., Load Serial ID,
Registration Numbers, Move Begin Date and submitter).
The cloning feature was designed to save data entry time. Use the
cloning feature when you submit an application for a route, vehicle, or
load that resembles a previous move.
Q: Where can you find the clone button? From several locations:
From the top or bottom of the View Application page for an
opened application.
From the Search Results page.
From the Quick Launch menu on the home page.
Tip: If you accidentally clone an application, simply delete it.

81
Requesting a Supplement for a Permit
When you need an unforeseeable, unavoidable change to an issued
permit, you can submit a request for a permit supplement.
Changes that can be requested with a permit supplement include a
request for a permit date extension or a change in a vehicle involved in
the move, due to equipment breakdown.
Supplements are NOT issued to correct errors in submitted weights,
dimensions, load details or other data that was certified as being correct
on the application.
See Department Regulation 179.9(g) for additional information.
Q: How do you request a supplement? Request a supplement for an
issued permit via the Supplement button on the View Application page,
from the Search Results page, or from the Home Page.
82
Mile Marker 10
Exploring Additional Tabs
Objectives
Successful completion of this chapter will enable you to:
Enter comments regarding your permit application.
Attach documents to your permit application.
Specify a vehicle or load’s removable parts.
Apply for an emergency permit.
View the list of counties a route travels through.
Display permit restrictions.

83
Exploring Additional Application Tabs
First, let’s be briefly introduced to the seven tabs. The following table
describes these tabs.
Tab Description
Comments Enter comments regarding the application.
Parts Removed Specify the removable parts of a vehicle or load.
Emergency Describe the nature and location of an emergency.
Counties Traversed View the counties that are traveled through on the
requested route.
Permit Restrictions View the restrictions associated with the permit
Permit View permit related data.
Supplements View any supplement that maybe issued to amend a
particular permit.
Before we begin to examine these remaining tabs, we need to create
a new application so we have something to work with.
Create a new application by accessing the APRAS Home Page and
clicking on the Create New Application Link.
Remember how important it is to document the Application ID?
Document this Application’s ID now.
Tip: You do not need to include the letter and first set of zeros when
using an Application ID.

84
Using the Comments Tab
Use the Comments Tab only to enter relevant and necessary remarks
about the application. When you enter information onto the Comments
Tab of an application, the application is automatically flagged for
manual review by PENNDOT permit staff.
Manual review of your application will increase its processing time.
However, you may sometimes need to add additional information that
needs to be considered by PENNDOT permit staff.
Comments may be entered only when the application has a new status
(i.e., before the application is submitted for review).
Comments Tab
Here are some example situations in which you should enter comments:
If a permit application was denied and you have additional
justification that you want the Department to consider. In such a
case, you would clone the denied application, add remarks to the
Comments Tab, and submit the new application.
Documenting third-party permission was obtained to use a bonded
road (e.g., a coal company that holds a bond for a road has given you
permission to utilize that road under their bond).
Documenting third-party permission was obtained to travel through
a construction zone (e.g., the contractor has given you their written
permission).
Documenting third-party permission was obtained to use another
firm’s traffic protector guide rail device (e.g., the firm has given you
their written permission).

85
Using the Parts Removed Tab
The Parts Removed Tab is used to specify whether there are removable
parts that you have or will remove from the excessively overweight
vehicle or load you propose to move on State Routes. Removable parts
are linked to the Load Description you choose on the Loading Tab.
Therefore, complete the Loading Tab before the Parts Removed Tab.
Parts Removed Tab
To View the Parts Removed Tab:
1. Click on the Parts Removed quick move link on the left of the New
Application page.
When identifying which parts have or will be removed (on the Parts
Removed Tab), choose the part(s) from the list provided. If any part to
be removed is not listed (and the part weighs at least 500 pounds), type
the part and its weight in the text box fields. Then, click on the Add
button to add this part to the list of removable parts at the bottom on the
tab. APRAS will edit the weight of the removed part when that part is
selected from the drop-down list.
If you do not find a removable part in the drop-down list, please
complete and submit the form located near the back of this Volume
(Request for Additions to the Parts Removed List), to help streamline
future processing of your applications.

86
Using the Emergency Tab
Unless an emergency permit is issued via APRAS, PENNDOT or the
PA State Police must grant permission prior to any emergency move.
See PENNDOT Regulation 179.12 and the Emergency Movement
Authorization section at the PENNDOT/Permits Web site.
When an emergency permit is being requested, the data on the
Emergency Tab must be completed to describe the nature and location
of the emergency.
Emergency Tab
The fields on the Emergency Tab are activated only when the “Permit
Type” is selected as “Emergency”.
To Change the Permit Type:
1. Click on the Main quick move link on the left of the New
Application page.
2. Select Emergency from the Permit Type drop-down list.

87
To View the Emergency Tab:
1. Click on the Emergency quick move link on the left of the New
Application page.
The following table describes the fields on the Emergency Tab:
Field Description
Emergency
Type
Select a predetermined type of emergency. Provide
additional justification for the use of “other”.
Emergency
Description
Describe the emergency situation in sufficient detail.
Emergency
First Occurred
Enter the Emergency Date and Emergency Time of the
emergency and the date and time the Pennsylvania State
Police (PSP) were notified, if applicable. The State
Police must be contacted in the event of an emergency
move after normal business hours unless an emergency
permit is issued via APRAS.
Emergency Site
Property
Owner
Enter the Name of the person or organization that owns
the property where the emergency arose. Enter the
Phone number of the person or organization.
Location of
Emergency
Enter the Address, City, State, and Zip Code of the
property where the emergency arose.
Justification Identify the person and organization that requested the
emergency move and how the “public safety or
convenience” will be adversely affected if the
emergency move (a) does occur, and (b) does not occur.

88
Using the Documents Tab
The Documents Tab is available on Single Trip, Preliminary and Final applications
for additional pertinent information. For example, to attach a Construction Notification
(M-936A CN) or a Traffic Control Plan (M-936A TCP1 or TCP2 or a Route Survey M-
936A RS).
To Complete the Documents Tab:
1. You must first scan the completed document you want to attach.
Make sure you save the document in one of the following approved
document types: Bitmap (BMP), Word Document (DOC), Gif
Format, JPEG (JPG), Adobe (PDF), or TIF Format on your
computer.
2. Click on the Documents Tab, click on Add to attach a document.
3. Select the Document Type from the drop-down list provided.
4. Type in the document description in the blank field.
5. Click on Browse to choose the document file that you saved on your
computer.
6. Click on Save. You can then attach more documents by following
steps 1-6.
7. Once all the attachments are successfully attached, click on Cancel
to return to the Document Tab.

89
Viewing the Counties Traversed Tab
The Counties Traversed Tab displays all counties that are traveled
through a prompted route. The counties are listed in the order in which
they are traveled.
Counties are listed each time the route crosses a county line; therefore,
duplicate counties may be displayed in the list.
Counties Traversed Tab
The counties traversed are determined by APRAS during the route
analysis process. As a result, this tab does not display data until an
application has been submitted and route analysis of a prompted route is
complete.
To View the Counties Traversed Tab:
1. Click on the Counties Traversed quick move link.

90
Viewing the Permit Restrictions Tab
Permit Restrictions Tab
The Permit Restrictions Tab displays restrictions that are grouped into
three general categories:
Permit Restrictions
Permit restrictions apply to the overall application (e.g., no
movement is permitted during Thanksgiving Holiday). Application
restriction data is first displayed for applications in submitted status.
Route Restrictions
Route restrictions appear under the heading Origin to Destination
Route Restrictions for the outgoing route or Destination to Origin
Route Restrictions for the return route, if there is one. Restrictions
which have no Leg # apply to the entire route.
Route component restrictions apply to a specific portion of the route
and are listed by each component by Leg #.
Route restriction data is first displayed for applications in approved
status.

91
Bridge Restrictions
Bridge restrictions apply to a specific structure on the route (e.g., the
vehicle must be in the left lane when traveling over the bridge).
Bridge restrictions appear under the heading Origin to Destination
Bridge Restrictions for the outgoing route or Destination to Origin
Bridge Restrictions for the return route, if there is one.
Bridge restriction data is first displayed for applications in approved
status.
Caution: All restrictions will be included on the issued permit and
must be reviewed by the driver(s) as part of the pre-trip inspection.
Caution: Some restrictions require affected persons (e.g., utilities,
municipalities, contractors, toll authorities) to be contacted 24 hours or
more prior to movement.

92
Viewing the Permit Tab
Use the Permit Tab to display permit-related data once an application
has been approved for a permit. If the permit has not yet been approved,
not all information will be displayed.
Permit Tab
The Permit Tab is used for viewing purposes only; no data entry is
required on this tab.
Viewing the Supplements Tab
Use the Supplements Tab to display supplement data once a supplement
request has been approved for an issued permit. If there is no
supplement data, the field will be blank.
Supplements Tab

93
Mile Marker 11
Exploring PENNDOT’s Web Site
Objectives
Successful completion of this chapter will enable you to:
Identify important sources of information located on
PENNDOT’s web site.
Access District Permit staff information.
Obtain road and highway condition information.

94
Using PENNDOT’s Web Site
The PENNDOT Home Page contains numerous links that address major
issues concerning PENNDOT and you, as illustrated below.
PENNDOT’s Home Page
If you are having problems filling out a permit application, have
questions about your account, or need information about the District
responsible for your permit application, the PENNDOT web site
supplies important information.
The PENNDOT web site can also provide you with valuable
information you can use to plan your route of travel. This information
includes road, highway, and traffic conditions.
Information published on PENNDOT’s web site is dynamic, which
means it is constantly being updated
In this landmark, you will be introduced to the three links on
PENNDOT’s Home Page that will benefit you the most – Doing
Business With PENNDOT, Traveler Information and Special Interest
Areas. First, you need to log on to PENNDOT’s web site.

95
Logging On to PENNDOT Web Site
To Access PENNDOT’s Web Site:
1. Open Internet Explorer (or another Web browser).
2. Type www.dot.state.pa.us in your Web browser’s Address or
Location toolbar.
3. Press Enter.
The Doing Business
With PENNDOT Link
The Doing Business With PENNDOT page displays a message (in red)
when there is a known problem with the wide area network
infrastructure relating to APRAS. This message will provide
information on the nature of the problem and will eliminate the need to
call the Department for this information.
Click on Doing Business with PENNDOT, then APRAS.
Tip: Additional contact information is also available at the bottom of
the APRAS Web Home Page, but since this Page may not be accessible
when there is a problem, you need to print a copy of the Home Page
NOW for future use.
The APRAS Web Home Page

96
The Regional
Information Link
The Regional Information page displays a map of all the Engineering
Districts.
The PENNDOT Engineering Districts Map allows you to access
information about any of PENNDOT’s Engineering Districts. Clicking
on an area of the map provides you with that District Office’s address,
phone numbers, counties listing, construction projects, news releases,
contacts, and frequently asked questions.
To Access PENNDOT’s Regional Information Page:
1. Click on Regional Information, then the District.
The Regional Information Page

97
The Traveler
Information Link
The Traveler Information page provides links to bridge information,
traffic and road conditions, maps, and construction information.
To Access PENNDOT’s Traveler Information Page:
1. Click on the Back button on your Web browser’s toolbar to go back
to PENNDOT’s Home Page.
2. Click on Traveler Information.
The Traveler Information Page
The following bulleted list describes some of the pertinent links off the
Traveler Information page.
Bridge Information
The Bridge Information page contains links that allow you to
download PENNDOT’s monthly listing of closed/posted bridges.
Construction
The Construction page takes you to current and future construction
projects.
Maps (Cartography)

98
The Maps (Cartography) link takes you to the Bureau of Planning
and Research site where you can order maps.
Roadway Weather Information System
The Roadway Weather Information System page displays a map of
Pennsylvania’s interstate highway roads and the condition of each
road. Conditions include closed, icy, under construction, wet with
icy spots, clear, or snowy.
Traffic Information
The Traffic Information link takes you to www.smartraveler.com
where you can get the latest information on Philadelphia traffic
conditions.
The Special Interest
Areas Link
The Special Interest Areas link provides links to Aviation, statistics,
Municipal Services, PERMITS, Research, Traffic Information.
The Special Interest Areas Link

99
Permits
The Permits page contains the following three links:
Hauling Permits, which allows you to download the various “M-
936A series” permit application forms in pdf file format. This link
also gives access to bond/registration forms used to obtain an
Account Number, various How-to guides, special hauling
regulations, urbanized area maps, multi-state permitting, emergency
movement authorization information and PA State highway holiday
travel restrictions.
Occupancy Permits, which includes occupancy applications,
publications, highway regulations and contact information.
Credit Card Authorization Form, which you can use when paying
for your permit monthly invoices by credit card.
Special Interest Areas
Click on the Back button on your Web browser’s toolbar to go back to
PENNDOT’s Home Page.
Click on Special Interest Areas.
Getting Directions
Be sure to use the APRAS database forms following the Index relating
to:
Adding a Point of Interest
Adding a Load Description
Adding a Removable Part

100
Index
A
Administrative Messages Page · 14
Application
cloning · 80
correcting errors · 72
definition · 8
deleting · 70
finalizing · 64, 71
new · 22
process · 10
requesting a supplement · 81
resending · 76
saving · 24
searching for · 66, 67
submitting · 73
validating · 71
withdrawing · 79
Application Tab · 62
APRAS
build number · 19
logging on · 13, 21
viewing enhancements · 19
APRAS definitions · 8
APRAS Home Page · 16
Axle data · 39
B
BMS · 8
Bridge Management System · 8
Build number · 19
C
CARATS · 8
Carrier Tab · 26
Cloning
definition · 8
Cloning an application · 80
Comments Tab · 84
Copying Vehicle Favorites · 44
Counties Traversed Tab · 89
Creating Vehicle Favorites · 42
D
Defaults · 8
Deleting an application · 70
Denial letter
definition · 8
resending · 76
Destination information · 48
Documents Tab · 88
E
Editing Vehicle Favorites · 45
Emergency Tab · 86, 87
Errors
correcting · 72
identifying · 71
F
FEIN Address
accessing an existing · 27
creating · 28
verifying · 26
Filter
definition · 9
L
Load data · 30
Load description · 32
Load favorites · 34
Load type · 31
Loading Tab · 29
Logging on to APRAS · 13
M
Main Tab
fields · 25
overview · 25
Mileage, entering · 61
Move origin and destination · 48

101
N
New Application Page
buttons · 23, 69
O
Origin information · 48
P
Parts Removed Tab · 85
viewing · 85
PENNDOT Web Site · 95
Permit
application process · 10
changing type · 86
definition · 9
receiving · 74
requesting a supplement · 81
resending · 76
status types · 11
Permit Restrictions Tab · 90
Permit Tab · 92
Point of interest · 9, 47
Q
Quick Launch · 18
R
Regional Information Link · 96
Resending a document · 76
Return trip · 54
RMS · 9
Roadway Management System · 9
Route Building function · 59
Route Details, entering · 54, 55
Route Tab · 46
Route, editing · 60
Route, finalizing · 61
S
Saving an application · 24
Search Page · 67
Searching for an application · 66, 68
Selecting Vehicle Favorites · 43
SR · 9
State Route · 9
Status types, permit · 11
Submitting an application · 73
Supplement
definition · 9
requesting · 81
Supplements Tab · 92
T
Traveler Information Link · 97
Type of permit, changing · 86
V
Validating your application · 71
Vehicle descriptions · 36
W
Weight Tab · 36
Weights, entering · 30
Withdrawing an application · 79

102
PENNDOT M-937POI (6/03)
REQUEST TO ADD POINT OF INTEREST
(e.g., PRIVATE DRIVEWAY) TO APRAS
District ____ -0
County
State Route
Segment Number (if known)
Nearest Intersecting Street Name
Distance From This Intersection
Direction From This Intersection N S E W (circle one)
Name of Applicant
Contact Person
Phone Number ( ) -
APPLICANT: COMPLETE ALL INFORMATION BEFORE SUBMITTING THIS REQUEST TO THE
AFFECTED DISTRICT PERMIT OFFICE.
FOR DEPARTMENT USE ONLY
ATTENTION DISTRICT PERMIT OFFICE PLEASE FORWARD THIS REQUEST TO YOUR RMS COORDINATOR. NOTIFY APPLICANT WHEN COMPLETED.
ATTENTION DISTRICT RMS COORDINATOR PLEASE INVESTIGATE AND ADD POI TO RMS IF APPROPRIATE. RETURN TO DISTRICT PERMIT OFFICE WHEN COMPLETED.

103
PENNDOT
M-937 RLD (10/23/03)
Reproduce Locally
Request for Addition(s) to the Load Description List
TO: DIST. _____ / CPO (CIRCLE)
COMPANY: DATE: E-MAIL:
CONTACT PERSON: PHONE: FAX:
Please complete ALL information requested and fax once to the appropriate number below. DO NOT submit multiple requests for the same Load Description on the same day.
LOAD TYPE
MAKE MODEL DESCRIPTION APPLICATION ID#
Example: 61
Komatsu D85 Dozer H501000000
Example: 67G
Ford R20 Truck H501000000
FOR MOVES BEGINNING IN DISTRICT 1, FAX TO: 814-678-7034 FOR MOVES BEGINNING IN DISTRICT 8, FAX TO: 717-783-4405
FOR MOVES BEGINNING IN DISTRICT 2, FAX TO: 814-765-0594 FOR MOVES BEGINNING IN DISTRICT 9, FAX TO: 814-696-7284
FOR MOVES BEGINNING IN DISTRICT 3, FAX TO: 570-368-4342 FOR MOVES BEGINNING IN DISTRICT 10, FAX TO: 724-357-2667
FOR MOVES BEGINNING IN DISTRICT 4, FAX TO: 570-963-3325 FOR MOVES BEGINNING IN DISTRICT 11, FAX TO: 412-429-5015
FOR MOVES BEGINNING IN DISTRICT 5, FAX TO: 610-798-4168 FOR MOVES BEGINNING IN DISTRICT 12, FAX TO: 724-439-7318
FOR MOVES BEGINNING IN DISTRICT 6, FAX TO: 610-205-6916

104
FOR SUPER LOADS FAX TO CENTRAL PERMIT OFFICE: 717-705-4102 OR 717-705-5525

105
PENNDOT
M-937RAP (6/03)
REQUEST FOR ADDITIONS TO THE
PARTS REMOVED LIST
To: CPO From: Date:
Vehicle
Type
Vehicle
Make
Vehicle
Model
Part Description Part’s Actual
Weight
Application
Number Example: Crane American 5510 Outrigger Box 2000 555453
Example: Crane American 5510 Boom 7500 555453
Contact Person:
Phone #:
Please Fax to (717) 705-5525 or (717) 705-4102
Please submit this request when a Removable Part is not available for selection from the drop-down list is inaccurate or is missing information.

106
APRAS FAQ’s
Frequently Asked Questions
Q. My application status is “submitted”, where is it?
A. If your application status is “submitted”, it means that the routes are being analyzed and
identified problems are being investigated prior to issuance. Phone calls inquiring about
pending applications are counter productive. Calls will not expedite the application review
because applications will be processed in the order they were submitted, and are subject to
additional review as sizes, weights or proposed miles increase.
Q. Who can help me with my routes?
A. You should always call the affected District Permit Office during normal business hours for
help in routing questions and in routing connectivity. Do not call the Central Permit Office
with questions regarding routing (including specific construction projects that have travel
restrictions).
Q. My routes aren’t the same that I asked for, why?
A. APRAS will not modify routes unless, on the application, you agreed that you were willing to
accept alternate routes. If your original requested routes are not acceptable, APRAS will then
try to re-route you. It is ultimately your responsibility to ensure the vehicle and any load can
safely traverse the routes on your permit (including turning movements, grades, and horizontal
and vertical curves).
Q. Why can’t I connect to the APRAS web site?
A. Please refer to Page 2 of this Training Manual or the bottom of the APRAS Web Home Page.
This page gives you directions when you are unable to connect to APRAS. Only after you
have checked the available locations to determine if there is a known problem with APRAS
should you contact the Central Permit Office during normal business hours.
Q. When should I call the Central Permit Office?
A. Call the Central Permit Office with procedural non-routing questions regarding Web
applications during normal business hours. Call the Central Permit Office for account
information. Call the Central Permit Office if you need information regarding a specific
section of the Regulations or Vehicle Code.
107
Q. When should I call the District Permit Office?
A. Call the District Permit Office if you have questions regarding an issued permit during normal
business hours. Call the District Permit Office if you need information about travel
restrictions. Call the District Permit Office if you have questions about construction areas.
Call the District Permit Office if you need information about route clearances or any other
route related issues.
Q. I want a location added as a point of interest, how do I do that?
A. Complete the form provided after the Index, and submit it to the affected District Permit
Office.
Q. Can I receive notification of downtimes, problems, and helpful hints via e-mail?
A. If you have supplied the APRAS Ombudsman with your correct e-mail address, you will
already be receiving e-mail notifications. If you gave an incorrect e-mail address or your e-
mail address has changed, you must contact your firm’s APRAS Administrator. If you have an
e-mail address and would like to be notified, you need to let the Ombudsman know.

108
APRAS POINTS OF CONTACT
The following individuals may be contacted, during normal business hours, for questions about
the APRAS system, registration for APRAS Web, Account Maintenance, and Super Loads:
CENTRAL PERMIT OFFICE
Mailing Address: Overnight Delivery Address:
Central Permit Office Central Permit Office
PA Department of Transportation PA Department of Transportation
PO Box 2671 Commonwealth Keystone Building
Harrisburg, PA 17105-2671 400 North Street, 6th
Floor
Harrisburg, PA 17120-0041
Phone: (717) 787-4680
Fax: (717) 787-9890
Kimberly Davis Acting CPO
Administrator
(717) 787-4680 [email protected]
Terry Blount Super Loads & Billing (717) 787-5368 [email protected]
Kimberly Davis Hauling & Super Loads (717) 787-4680 [email protected]
Cathy Greco Super Loads (717) 787-7269 [email protected]
Shonnea Thomas APRAS Ombudsman &
Registration
(717) 787-5367 [email protected]
The following individuals may be contacted, during normal business hours, for questions about
route related issues and for assistance in completing an application:
DISTRICT PERMIT OFFICES
H. Becky Kelley APRAS Coordinator - District 1-0 (814) 678-7075 [email protected]
Jackie Braniff APRAS Coordinator - District 2-0 (814) 765-0512 [email protected]
Marge Kranz APRAS Coordinator - District 3-0 (570) 368-4276 [email protected]
Stephanie Marek APRAS Coordinator - District 4-0 (570) 963-3505 [email protected]
Elsie Isaac APRAS Coordinator - District 5-0 (610) 871-4169 [email protected]
Daniel Wehner APRAS Coordinator - District 6-0 (610) 205-6787 [email protected]
Emily Brownawell APRAS Coordinator - District 8-0 (717) 787-5918 [email protected]
Michele Scalia APRAS Coordinator - District 9-0 (814) 696-7261 [email protected]
Michele Stiles APRAS Coordinator - District 10-0 (724) 357-2832 [email protected]
Sandy Kerr APRAS Coordinator - District 11-0 (412) 429-4807 [email protected]
Darlene Micozzi APRAS Coordinator - District 12-0 (724) 439-7344 [email protected]