online manual · 2015. 12. 17. · mx470 series online manual read me first useful functions...
TRANSCRIPT

MX470 series
Online Manual
Read Me FirstUseful Functions Available on the Machine
Overview of the MachinePrintingCopying
ScanningFaxing
Troubleshooting
English

ContentsRead Me First. . . . . . . . . . . . . . . . . . . . . . . . . . . . . . . . . . . . . . . . . . . . . . . . . . . 15
Symbols Used in This Document. . . . . . . . . . . . . . . . . . . . . . . . . . . . . . . . . . . . 16
Trademarks and Licenses. . . . . . . . . . . . . . . . . . . . . . . . . . . . . . . . . . . . . . . . . . 17
Search Tips. . . . . . . . . . . . . . . . . . . . . . . . . . . . . . . . . . . . . . . . . . . . . . . . . . . . . 18
Notes on Operation Explanations. . . . . . . . . . . . . . . . . . . . . . . . . . . . . . . . . . . . 20
Useful Functions Available on the Machine. . . . . . . . . . . . . . . . . . . . . . . . . . . . . 21
Useful Functions Available from Applications and the Main Unit. . . . . . . . . . . . . . . . . . . . 22
Helpful Functions Available Through the Network. . . . . . . . . . . . . . . . . . . . . . . . 25
Online Storage Integration Function. . . . . . . . . . . . . . . . . . . . . . . . . . . . . . . . . . . . . . . . . . 27
Printing with Google Cloud Print. . . . . . . . . . . . . . . . . . . . . . . . . . . . . . . . . . . . . . . . . . . . . 28
Preparations for Printing with Google Cloud Print. . . . . . . . . . . . . . . . . . . . . . . . . . . . . . . . . . . . . . . . . . 29
Printing from Computer or Smartphone with Google Cloud Print. . . . . . . . . . . . . . . . . . . . . . . . . . . . . . 32
Using Remote UI. . . . . . . . . . . . . . . . . . . . . . . . . . . . . . . . . . . . . . . . . . . . . . . . . . . . . . . . 34
Printing from AirPrint Compliant Device. . . . . . . . . . . . . . . . . . . . . . . . . . . . . . . . . . . . . . . 37
List of Function for Each Model. . . . . . . . . . . . . . . . . . . . . . . . . . . . . . . . . . . . . . . . . . . . . 42
Overview of the Machine. . . . . . . . . . . . . . . . . . . . . . . . . . . . . . . . . . . . . . . . . . . 44
Safety Guide. . . . . . . . . . . . . . . . . . . . . . . . . . . . . . . . . . . . . . . . . . . . . . . . . . . . . . . . . . . . 45
Safety Precautions. . . . . . . . . . . . . . . . . . . . . . . . . . . . . . . . . . . . . . . . . . . . . . . . . . . . . . . . . . . . . . . . . . 46
Regulatory and Safety Information. . . . . . . . . . . . . . . . . . . . . . . . . . . . . . . . . . . . . . . . . . . . . . . . . . . . . 47
Main Components and Basic Operations. . . . . . . . . . . . . . . . . . . . . . . . . . . . . . . . . . . . . . 53
Main Components. . . . . . . . . . . . . . . . . . . . . . . . . . . . . . . . . . . . . . . . . . . . . . . . . . . . . . . . . . . . . . . . . . 54
Front View. . . . . . . . . . . . . . . . . . . . . . . . . . . . . . . . . . . . . . . . . . . . . . . . . . . . . . . . . . . . . . . . . . . . 55
Rear View. . . . . . . . . . . . . . . . . . . . . . . . . . . . . . . . . . . . . . . . . . . . . . . . . . . . . . . . . . . . . . . . . . . . 57
Inside View. . . . . . . . . . . . . . . . . . . . . . . . . . . . . . . . . . . . . . . . . . . . . . . . . . . . . . . . . . . . . . . . . . . 58
Operation Panel. . . . . . . . . . . . . . . . . . . . . . . . . . . . . . . . . . . . . . . . . . . . . . . . . . . . . . . . . . . . . . . . 60
About the Power Supply of the Machine. . . . . . . . . . . . . . . . . . . . . . . . . . . . . . . . . . . . . . . . . . . . . . . . . 62
Confirming that the Power Is On. . . . . . . . . . . . . . . . . . . . . . . . . . . . . . . . . . . . . . . . . . . . . . . . . . . 63
Turning the Machine On and Off. . . . . . . . . . . . . . . . . . . . . . . . . . . . . . . . . . . . . . . . . . . . . . . . . . . 64
Notice for the Power Plug/Power Cord. . . . . . . . . . . . . . . . . . . . . . . . . . . . . . . . . . . . . . . . . . . . . . 65
Notice for Unplugging the Power Cord. . . . . . . . . . . . . . . . . . . . . . . . . . . . . . . . . . . . . . . . . . . . . . 66
LCD and Operation Panel. . . . . . . . . . . . . . . . . . . . . . . . . . . . . . . . . . . . . . . . . . . . . . . . . . . . . . . . . . . . 67
Entering Numbers, Letters, and Symbols. . . . . . . . . . . . . . . . . . . . . . . . . . . . . . . . . . . . . . . . . . . . . . . . 68

Loading Paper / Originals. . . . . . . . . . . . . . . . . . . . . . . . . . . . . . . . . . . . . . . . . . . . . . . . . . 70
Loading Paper. . . . . . . . . . . . . . . . . . . . . . . . . . . . . . . . . . . . . . . . . . . . . . . . . . . . . . . . . . . . . . . . . . . . . 71
Loading Plain Paper / Photo Paper. . . . . . . . . . . . . . . . . . . . . . . . . . . . . . . . . . . . . . . . . . . . . . . . . 72
Loading Envelopes. . . . . . . . . . . . . . . . . . . . . . . . . . . . . . . . . . . . . . . . . . . . . . . . . . . . . . . . . . . . . 76
Media Types You Can Use. . . . . . . . . . . . . . . . . . . . . . . . . . . . . . . . . . . . . . . . . . . . . . . . . . . . . . . 80
Paper Load Limit. . . . . . . . . . . . . . . . . . . . . . . . . . . . . . . . . . . . . . . . . . . . . . . . . . . . . . . . . . . 82
Media Type Settings on the Operation Panel. . . . . . . . . . . . . . . . . . . . . . . . . . . . . . . . . . . . . 84
Media Types You Cannot Use. . . . . . . . . . . . . . . . . . . . . . . . . . . . . . . . . . . . . . . . . . . . . . . . . . . . . 85
Printing Area. . . . . . . . . . . . . . . . . . . . . . . . . . . . . . . . . . . . . . . . . . . . . . . . . . . . . . . . . . . . . . . . . . 86
Printing Area. . . . . . . . . . . . . . . . . . . . . . . . . . . . . . . . . . . . . . . . . . . . . . . . . . . . . . . . . . . . . . 87
Other Sizes than Letter, Legal, Envelopes. . . . . . . . . . . . . . . . . . . . . . . . . . . . . . . . . . . . . . . 88
Letter, Legal. . . . . . . . . . . . . . . . . . . . . . . . . . . . . . . . . . . . . . . . . . . . . . . . . . . . . . . . . . . . . . . 89
Envelopes. . . . . . . . . . . . . . . . . . . . . . . . . . . . . . . . . . . . . . . . . . . . . . . . . . . . . . . . . . . . . . . . 90
Loading Originals. . . . . . . . . . . . . . . . . . . . . . . . . . . . . . . . . . . . . . . . . . . . . . . . . . . . . . . . . . . . . . . . . . . 91
Position to Load Originals. . . . . . . . . . . . . . . . . . . . . . . . . . . . . . . . . . . . . . . . . . . . . . . . . . . . . . . . 92
Loading Originals on the Platen Glass. . . . . . . . . . . . . . . . . . . . . . . . . . . . . . . . . . . . . . . . . . . . . . 93
Loading Documents in the ADF (Auto Document Feeder). . . . . . . . . . . . . . . . . . . . . . . . . . . . . . . 95
How to Load Originals for Each Function. . . . . . . . . . . . . . . . . . . . . . . . . . . . . . . . . . . . . . . . . . . . 97
Originals You Can Load. . . . . . . . . . . . . . . . . . . . . . . . . . . . . . . . . . . . . . . . . . . . . . . . . . . . . . . . . . 99
Replacing a FINE Cartridge. . . . . . . . . . . . . . . . . . . . . . . . . . . . . . . . . . . . . . . . . . . . . . . 101
Replacing a FINE Cartridge. . . . . . . . . . . . . . . . . . . . . . . . . . . . . . . . . . . . . . . . . . . . . . . . . . . . . . . . . . 102
Checking the Ink Status. . . . . . . . . . . . . . . . . . . . . . . . . . . . . . . . . . . . . . . . . . . . . . . . . . . . . . . . . . . . . 108
Checking the Ink Status with the LCD on the Machine. . . . . . . . . . . . . . . . . . . . . . . . . . . . . . . . . 109
Maintenance. . . . . . . . . . . . . . . . . . . . . . . . . . . . . . . . . . . . . . . . . . . . . . . . . . . . . . . . . . . 110
When Printing Becomes Faint or Colors Are Incorrect. . . . . . . . . . . . . . . . . . . . . . . . . . . . . . . . . . . . . 111
Maintenance Procedure. . . . . . . . . . . . . . . . . . . . . . . . . . . . . . . . . . . . . . . . . . . . . . . . . . . . . . . . . 112
Printing the Nozzle Check Pattern. . . . . . . . . . . . . . . . . . . . . . . . . . . . . . . . . . . . . . . . . . . . . . . . . 114
Examining the Nozzle Check Pattern. . . . . . . . . . . . . . . . . . . . . . . . . . . . . . . . . . . . . . . . . . . . . . 115
Cleaning the Print Head. . . . . . . . . . . . . . . . . . . . . . . . . . . . . . . . . . . . . . . . . . . . . . . . . . . . . . . . . 116
Cleaning the Print Head Deeply. . . . . . . . . . . . . . . . . . . . . . . . . . . . . . . . . . . . . . . . . . . . . . . . . . 117
Aligning the Print Head. . . . . . . . . . . . . . . . . . . . . . . . . . . . . . . . . . . . . . . . . . . . . . . . . . . . . . . . . 118
Performing Maintenance from a Computer. . . . . . . . . . . . . . . . . . . . . . . . . . . . . . . . . . . . . . . . . . . . . . 121
Cleaning the Print Heads from Your Computer. . . . . . . . . . . . . . . . . . . . . . . . . . . . . . . . . . . . . . . 122
Cleaning Inside the Machine. . . . . . . . . . . . . . . . . . . . . . . . . . . . . . . . . . . . . . . . . . . . . . . . . . . . . 124
Cleaning the Paper Feed Rollers from Your Computer. . . . . . . . . . . . . . . . . . . . . . . . . . . . . . . . . 125
Use Your Computer to Print a Nozzle Check Pattern. . . . . . . . . . . . . . . . . . . . . . . . . . . . . . . . . . 126
Aligning the Print Head. . . . . . . . . . . . . . . . . . . . . . . . . . . . . . . . . . . . . . . . . . . . . . . . . . . . . . . . . 127

Aligning the Print Head Position from Your Computer. . . . . . . . . . . . . . . . . . . . . . . . . . . . . . . . . . 128
Aligning the Print Head Position Automatically from Your Computer. . . . . . . . . . . . . . . . . . . . . . 132
Cleaning the Machine. . . . . . . . . . . . . . . . . . . . . . . . . . . . . . . . . . . . . . . . . . . . . . . . . . . . . . . . . . . . . . 133
Cleaning the Exterior of the Machine. . . . . . . . . . . . . . . . . . . . . . . . . . . . . . . . . . . . . . . . . . . . . . . 134
Cleaning the Platen Glass and Document Cover. . . . . . . . . . . . . . . . . . . . . . . . . . . . . . . . . . . . . 135
Cleaning the ADF (Auto Document Feeder). . . . . . . . . . . . . . . . . . . . . . . . . . . . . . . . . . . . . . . . . 136
Cleaning the Paper Feed Roller. . . . . . . . . . . . . . . . . . . . . . . . . . . . . . . . . . . . . . . . . . . . . . . . . . 138
Cleaning the Inside of the Machine (Bottom Plate Cleaning). . . . . . . . . . . . . . . . . . . . . . . . . . . . 139
Changing the Machine Settings. . . . . . . . . . . . . . . . . . . . . . . . . . . . . . . . . . . . . . . . . . . . 141
Changing Machine Settings from Your Computer. . . . . . . . . . . . . . . . . . . . . . . . . . . . . . . . . . . . . . . . . 142
Checking the Ink Status from Your Computer. . . . . . . . . . . . . . . . . . . . . . . . . . . . . . . . . . . . . . . . 143
Registering a Changed Printing Profile. . . . . . . . . . . . . . . . . . . . . . . . . . . . . . . . . . . . . . . . . . . . . 144
Setting the Ink Cartridge to be Used. . . . . . . . . . . . . . . . . . . . . . . . . . . . . . . . . . . . . . . . . . . . . . . 146
Managing the Machine Power. . . . . . . . . . . . . . . . . . . . . . . . . . . . . . . . . . . . . . . . . . . . . . . . . . . . 147
Reducing the Machine Noise. . . . . . . . . . . . . . . . . . . . . . . . . . . . . . . . . . . . . . . . . . . . . . . . . . . . . 148
Changing the Machine Operation Mode. . . . . . . . . . . . . . . . . . . . . . . . . . . . . . . . . . . . . . . . . . . . 150
Changing the Machine Settings on the LCD. . . . . . . . . . . . . . . . . . . . . . . . . . . . . . . . . . . . . . . . . . . . . 152
Changing the Machine Settings on the LCD. . . . . . . . . . . . . . . . . . . . . . . . . . . . . . . . . . . . . . . . . 153
Fax settings. . . . . . . . . . . . . . . . . . . . . . . . . . . . . . . . . . . . . . . . . . . . . . . . . . . . . . . . . . . . . . . . . . 154
Output settings. . . . . . . . . . . . . . . . . . . . . . . . . . . . . . . . . . . . . . . . . . . . . . . . . . . . . . . . . . . . . . . . 158
LAN settings. . . . . . . . . . . . . . . . . . . . . . . . . . . . . . . . . . . . . . . . . . . . . . . . . . . . . . . . . . . . . . . . . 159
Dev. user settings. . . . . . . . . . . . . . . . . . . . . . . . . . . . . . . . . . . . . . . . . . . . . . . . . . . . . . . . . . . . . 161
Firmware update. . . . . . . . . . . . . . . . . . . . . . . . . . . . . . . . . . . . . . . . . . . . . . . . . . . . . . . . . . . . . . 163
Reset setting. . . . . . . . . . . . . . . . . . . . . . . . . . . . . . . . . . . . . . . . . . . . . . . . . . . . . . . . . . . . . . . . . 164
About Quiet setting. . . . . . . . . . . . . . . . . . . . . . . . . . . . . . . . . . . . . . . . . . . . . . . . . . . . . . . . . . . . 165
Before Using the Machine with the Access Point Mode. . . . . . . . . . . . . . . . . . . . . . . . . . . . . . . . 166
Updating the Firmware of the Machine. . . . . . . . . . . . . . . . . . . . . . . . . . . . . . . . . . . . . . . . . . . . . . . . . 168
Information about Network Connection. . . . . . . . . . . . . . . . . . . . . . . . . . . . . . . . . . . . . . 170
Useful Information about Network Connection. . . . . . . . . . . . . . . . . . . . . . . . . . . . . . . . . . . . . . . . . . . 171
Initial Values Set at Factory (Network). . . . . . . . . . . . . . . . . . . . . . . . . . . . . . . . . . . . . . . . . . . . . 172
Connecting the Machine to the Computer Using a USB Cable. . . . . . . . . . . . . . . . . . . . . . . . . . . 173
When Detecting the Printers Have the Same Name. . . . . . . . . . . . . . . . . . . . . . . . . . . . . . . . . . . 174
Connecting to Other Computer with LAN/Changing the Connection Method from USB to LAN. . 175
Printing Out Network Setting Information. . . . . . . . . . . . . . . . . . . . . . . . . . . . . . . . . . . . . . . . . . . 176
About Network Communication. . . . . . . . . . . . . . . . . . . . . . . . . . . . . . . . . . . . . . . . . . . . 178
Changing and Confirming Network Settings. . . . . . . . . . . . . . . . . . . . . . . . . . . . . . . . . . . . . . . . . . . . . 179
IJ Network Tool. . . . . . . . . . . . . . . . . . . . . . . . . . . . . . . . . . . . . . . . . . . . . . . . . . . . . . . . . . . . . . . 180

Canon IJ Network Tool Screen. . . . . . . . . . . . . . . . . . . . . . . . . . . . . . . . . . . . . . . . . . . . . . . . . . . 181
Canon IJ Network Tool Menus. . . . . . . . . . . . . . . . . . . . . . . . . . . . . . . . . . . . . . . . . . . . . . . . . . . 183
Changing the Settings in the Wireless LAN Sheet. . . . . . . . . . . . . . . . . . . . . . . . . . . . . . . . . . . . 184
Changing the WEP Detailed Settings. . . . . . . . . . . . . . . . . . . . . . . . . . . . . . . . . . . . . . . . . . . . . . 188
Changing the WPA or WPA2 Detailed Settings. . . . . . . . . . . . . . . . . . . . . . . . . . . . . . . . . . . . . . . 190
Changing the Settings in the Wired LAN Sheet. . . . . . . . . . . . . . . . . . . . . . . . . . . . . . . . . . . . . . . 192
Changing the Settings in the Admin Password Sheet. . . . . . . . . . . . . . . . . . . . . . . . . . . . . . . . . . 193
Monitoring Wireless Network Status. . . . . . . . . . . . . . . . . . . . . . . . . . . . . . . . . . . . . . . . . . . . . . . 195
Initializing the Network Settings of the Machine. . . . . . . . . . . . . . . . . . . . . . . . . . . . . . . . . . . . . . 197
Viewing the Modified Settings. . . . . . . . . . . . . . . . . . . . . . . . . . . . . . . . . . . . . . . . . . . . . . . . . . . . 198
Appendix for Network Communication. . . . . . . . . . . . . . . . . . . . . . . . . . . . . . . . . . . . . . . . . . . . . . . . . . 199
Using the Card Slot over a Network. . . . . . . . . . . . . . . . . . . . . . . . . . . . . . . . . . . . . . . . . . . . . . . 200
About Technical Terms. . . . . . . . . . . . . . . . . . . . . . . . . . . . . . . . . . . . . . . . . . . . . . . . . . . . . . . . . 202
Restrictions. . . . . . . . . . . . . . . . . . . . . . . . . . . . . . . . . . . . . . . . . . . . . . . . . . . . . . . . . . . . . . . . . . 209
Tips for Ensuring Optimal Printing Quality. . . . . . . . . . . . . . . . . . . . . . . . . . . . . . . . . . . . 210
Useful Information about Ink. . . . . . . . . . . . . . . . . . . . . . . . . . . . . . . . . . . . . . . . . . . . . . . . . . . . . . . . . 211
Key Points to Successful Printing. . . . . . . . . . . . . . . . . . . . . . . . . . . . . . . . . . . . . . . . . . . . . . . . . . . . . 212
Be Sure to Make Paper Settings after Loading Paper. . . . . . . . . . . . . . . . . . . . . . . . . . . . . . . . . . . . . . 213
Canceling a Print Job. . . . . . . . . . . . . . . . . . . . . . . . . . . . . . . . . . . . . . . . . . . . . . . . . . . . . . . . . . . . . . . 214
Key to Enjoying Consistent Printing Quality. . . . . . . . . . . . . . . . . . . . . . . . . . . . . . . . . . . . . . . . . . . . . . 215
Precautions for Safe Transport of the Machine. . . . . . . . . . . . . . . . . . . . . . . . . . . . . . . . . . . . . . . . . . . 216
Legal Limitations on Use of Your Product and Use of Images. . . . . . . . . . . . . . . . . . . . . 217
Specifications. . . . . . . . . . . . . . . . . . . . . . . . . . . . . . . . . . . . . . . . . . . . . . . . . . . . . . . . . . 218
Printing. . . . . . . . . . . . . . . . . . . . . . . . . . . . . . . . . . . . . . . . . . . . . . . . . . . . . . . 223
Printing from a Computer. . . . . . . . . . . . . . . . . . . . . . . . . . . . . . . . . . . . . . . . . . . . . . . . . 224
Printing with Application Software that You are Using (Printer Driver). . . . . . . . . . . . . . . . . . . . . . . . . 225
Printing with Easy Setup. . . . . . . . . . . . . . . . . . . . . . . . . . . . . . . . . . . . . . . . . . . . . . . . . . . . . . . . 226
Setting the Media Type with the Printer Driver. . . . . . . . . . . . . . . . . . . . . . . . . . . . . . . . . . . 230
Various Printing Methods. . . . . . . . . . . . . . . . . . . . . . . . . . . . . . . . . . . . . . . . . . . . . . . . . . . . . . . . 231
Setting the Number of Copies and Printing Order. . . . . . . . . . . . . . . . . . . . . . . . . . . . . . . . . 232
Setting the Stapling Margin. . . . . . . . . . . . . . . . . . . . . . . . . . . . . . . . . . . . . . . . . . . . . . . . . . 234
Execute Borderless Printing. . . . . . . . . . . . . . . . . . . . . . . . . . . . . . . . . . . . . . . . . . . . . . . . . 235
Scaling the Printing to Fit the Paper Size. . . . . . . . . . . . . . . . . . . . . . . . . . . . . . . . . . . . . . . 238
Scaled Printing. . . . . . . . . . . . . . . . . . . . . . . . . . . . . . . . . . . . . . . . . . . . . . . . . . . . . . . . . . . . 240
Page Layout Printing. . . . . . . . . . . . . . . . . . . . . . . . . . . . . . . . . . . . . . . . . . . . . . . . . . . . . . . 241
Printing on Postcards. . . . . . . . . . . . . . . . . . . . . . . . . . . . . . . . . . . . . . . . . . . . . . . . . . . . . . . 243
Displaying the Print Results before Printing. . . . . . . . . . . . . . . . . . . . . . . . . . . . . . . . . . . . . 244

Setting Paper Dimensions (Custom Size). . . . . . . . . . . . . . . . . . . . . . . . . . . . . . . . . . . . . . . 245
Changing the Print Quality and Correcting Image Data. . . . . . . . . . . . . . . . . . . . . . . . . . . . . . . . . 246
Setting the Print Quality Level (Custom). . . . . . . . . . . . . . . . . . . . . . . . . . . . . . . . . . . . . . . . 247
Printing a Color Document in Monochrome. . . . . . . . . . . . . . . . . . . . . . . . . . . . . . . . . . . . . . 248
Specifying Color Correction. . . . . . . . . . . . . . . . . . . . . . . . . . . . . . . . . . . . . . . . . . . . . . . . . . 249
Optimal Photo Printing of Image Data. . . . . . . . . . . . . . . . . . . . . . . . . . . . . . . . . . . . . . . . . . 251
Adjusting Colors with the Printer Driver. . . . . . . . . . . . . . . . . . . . . . . . . . . . . . . . . . . . . . . . . 252
Printing with ICC Profiles (Specifying an ICC Profile from the Application Software). . . . . . 253
Printing with ICC Profiles (Specifying an ICC Profile from the Printer Driver). . . . . . . . . . . . 255
Adjusting Color Balance. . . . . . . . . . . . . . . . . . . . . . . . . . . . . . . . . . . . . . . . . . . . . . . . . . . . 256
Adjusting Brightness. . . . . . . . . . . . . . . . . . . . . . . . . . . . . . . . . . . . . . . . . . . . . . . . . . . . . . . 258
Adjusting Intensity. . . . . . . . . . . . . . . . . . . . . . . . . . . . . . . . . . . . . . . . . . . . . . . . . . . . . . . . . 260
Adjusting Contrast. . . . . . . . . . . . . . . . . . . . . . . . . . . . . . . . . . . . . . . . . . . . . . . . . . . . . . . . . 262
Overview of the Printer Driver. . . . . . . . . . . . . . . . . . . . . . . . . . . . . . . . . . . . . . . . . . . . . . . . . . . . 264
Canon IJ Printer Driver. . . . . . . . . . . . . . . . . . . . . . . . . . . . . . . . . . . . . . . . . . . . . . . . . . . . . 265
How to Open the Printer Driver Setup Window. . . . . . . . . . . . . . . . . . . . . . . . . . . . . . . . . . . 266
Page Setup Dialog. . . . . . . . . . . . . . . . . . . . . . . . . . . . . . . . . . . . . . . . . . . . . . . . . . . . . . . . . 267
Print Dialog. . . . . . . . . . . . . . . . . . . . . . . . . . . . . . . . . . . . . . . . . . . . . . . . . . . . . . . . . . . . . . 268
Quality & Media. . . . . . . . . . . . . . . . . . . . . . . . . . . . . . . . . . . . . . . . . . . . . . . . . . . . . . . . . . . 270
Color Options. . . . . . . . . . . . . . . . . . . . . . . . . . . . . . . . . . . . . . . . . . . . . . . . . . . . . . . . . . . . . 272
Borderless Printing. . . . . . . . . . . . . . . . . . . . . . . . . . . . . . . . . . . . . . . . . . . . . . . . . . . . . . . . 274
Margin. . . . . . . . . . . . . . . . . . . . . . . . . . . . . . . . . . . . . . . . . . . . . . . . . . . . . . . . . . . . . . . . . . 275
Canon IJ Printer Utility. . . . . . . . . . . . . . . . . . . . . . . . . . . . . . . . . . . . . . . . . . . . . . . . . . . . . . 276
Opening the Canon IJ Printer Utility. . . . . . . . . . . . . . . . . . . . . . . . . . . . . . . . . . . . . . . . . . . 278
Maintenance of this Machine. . . . . . . . . . . . . . . . . . . . . . . . . . . . . . . . . . . . . . . . . . . . . . . . . 279
Display the Printing Status Screen. . . . . . . . . . . . . . . . . . . . . . . . . . . . . . . . . . . . . . . . . . . . 280
Deleting the Undesired Print Job. . . . . . . . . . . . . . . . . . . . . . . . . . . . . . . . . . . . . . . . . . . . . . 282
Instructions for Use (Printer Driver). . . . . . . . . . . . . . . . . . . . . . . . . . . . . . . . . . . . . . . . . . . . 283
Updating the Printer Driver. . . . . . . . . . . . . . . . . . . . . . . . . . . . . . . . . . . . . . . . . . . . . . . . . . . . . . 284
Obtaining the Latest Printer Driver. . . . . . . . . . . . . . . . . . . . . . . . . . . . . . . . . . . . . . . . . . . . 285
Delete the Unnecessary Canon IJ Printer from the Printer List. . . . . . . . . . . . . . . . . . . . . . . 286
Before Installing the Printer Driver. . . . . . . . . . . . . . . . . . . . . . . . . . . . . . . . . . . . . . . . . . . . . 287
Installing the Printer Driver. . . . . . . . . . . . . . . . . . . . . . . . . . . . . . . . . . . . . . . . . . . . . . . . . . 288
Printing Using the Operation Panel of the Machine. . . . . . . . . . . . . . . . . . . . . . . . . . . . . 289
Printing Template Forms Such As Lined Paper or Graph Paper. . . . . . . . . . . . . . . . . . . . . . . . . . . . . . 290
Printing with the Access Point Mode. . . . . . . . . . . . . . . . . . . . . . . . . . . . . . . . . . . . . . . . 293
Copying. . . . . . . . . . . . . . . . . . . . . . . . . . . . . . . . . . . . . . . . . . . . . . . . . . . . . . . 295

Making Copies. . . . . . . . . . . . . . . . . . . . . . . . . . . . . . . . . . . . . . . . . . . . . . . . . . . . . . . . . 296
Setting Items for Copying. . . . . . . . . . . . . . . . . . . . . . . . . . . . . . . . . . . . . . . . . . . . . . . . . 298
Reducing or Enlarging a Copy. . . . . . . . . . . . . . . . . . . . . . . . . . . . . . . . . . . . . . . . . . . . . 300
About Special copy Menu. . . . . . . . . . . . . . . . . . . . . . . . . . . . . . . . . . . . . . . . . . . . . . . . . 301
Copying Two Pages to Fit onto a Single Page. . . . . . . . . . . . . . . . . . . . . . . . . . . . . . . . . 302
Copying Four Pages to Fit onto a Single Page. . . . . . . . . . . . . . . . . . . . . . . . . . . . . . . . . 304
Copying Thick Originals Such as Books. . . . . . . . . . . . . . . . . . . . . . . . . . . . . . . . . . . . . . 306
Copying without Borders. . . . . . . . . . . . . . . . . . . . . . . . . . . . . . . . . . . . . . . . . . . . . . . . . . 307
Collated Copying. . . . . . . . . . . . . . . . . . . . . . . . . . . . . . . . . . . . . . . . . . . . . . . . . . . . . . . 309
Scanning. . . . . . . . . . . . . . . . . . . . . . . . . . . . . . . . . . . . . . . . . . . . . . . . . . . . . . 310
Scanning from a Computer. . . . . . . . . . . . . . . . . . . . . . . . . . . . . . . . . . . . . . . . . . . . . . . . 311
Scanning with IJ Scan Utility. . . . . . . . . . . . . . . . . . . . . . . . . . . . . . . . . . . . . . . . . . . . . . . . . . . . . . . . . 312
What Is IJ Scan Utility (Scanner Software)?. . . . . . . . . . . . . . . . . . . . . . . . . . . . . . . . . . . . . . . . . 313
Starting IJ Scan Utility. . . . . . . . . . . . . . . . . . . . . . . . . . . . . . . . . . . . . . . . . . . . . . . . . . . . . . . . . . 315
Easy Scanning with Auto Scan. . . . . . . . . . . . . . . . . . . . . . . . . . . . . . . . . . . . . . . . . . . . . . . . . . . 316
Scanning Photos. . . . . . . . . . . . . . . . . . . . . . . . . . . . . . . . . . . . . . . . . . . . . . . . . . . . . . . . . . . . . . 317
Scanning Documents. . . . . . . . . . . . . . . . . . . . . . . . . . . . . . . . . . . . . . . . . . . . . . . . . . . . . . . . . . . 318
Scanning with Favorite Settings. . . . . . . . . . . . . . . . . . . . . . . . . . . . . . . . . . . . . . . . . . . . . . . . . . 319
Scanning Items Larger than the Platen (Image Stitch). . . . . . . . . . . . . . . . . . . . . . . . . . . . . . . . . 320
Scanning Multiple Items at One Time. . . . . . . . . . . . . . . . . . . . . . . . . . . . . . . . . . . . . . . . . . . . . . 324
Scanning Multiple Documents at One Time from the ADF (Auto Document Feeder). . . . . . . . . . 327
Saving after Checking Scan Results. . . . . . . . . . . . . . . . . . . . . . . . . . . . . . . . . . . . . . . . . . . . . . . 332
Sending Scanned Images via E-mail. . . . . . . . . . . . . . . . . . . . . . . . . . . . . . . . . . . . . . . . . . . . . . . 335
Extracting Text from Scanned Images (OCR). . . . . . . . . . . . . . . . . . . . . . . . . . . . . . . . . . . . . . . . 338
IJ Scan Utility Screens. . . . . . . . . . . . . . . . . . . . . . . . . . . . . . . . . . . . . . . . . . . . . . . . . . . . . . . . . . 341
IJ Scan Utility Main Screen. . . . . . . . . . . . . . . . . . . . . . . . . . . . . . . . . . . . . . . . . . . . . . . . . . 342
Settings Dialog. . . . . . . . . . . . . . . . . . . . . . . . . . . . . . . . . . . . . . . . . . . . . . . . . . . . . . . . . . . . 344
Network Selection Screen. . . . . . . . . . . . . . . . . . . . . . . . . . . . . . . . . . . . . . . . . . . . . . . . . . . 382
Data Format Settings Dialog. . . . . . . . . . . . . . . . . . . . . . . . . . . . . . . . . . . . . . . . . . . . . . . . . 384
Save Settings Dialog. . . . . . . . . . . . . . . . . . . . . . . . . . . . . . . . . . . . . . . . . . . . . . . . . . . . . . . 386
Image Stitch Window. . . . . . . . . . . . . . . . . . . . . . . . . . . . . . . . . . . . . . . . . . . . . . . . . . . . . . . 388
Scanning with Scanner Driver. . . . . . . . . . . . . . . . . . . . . . . . . . . . . . . . . . . . . . . . . . . . . . . . . . . . . . . . 392
Image Corrections and Color Adjustments. . . . . . . . . . . . . . . . . . . . . . . . . . . . . . . . . . . . . . . . . . 393
General Notes (Scanner Driver). . . . . . . . . . . . . . . . . . . . . . . . . . . . . . . . . . . . . . . . . . . . . . . . . . 397
Updating the Scanner Driver. . . . . . . . . . . . . . . . . . . . . . . . . . . . . . . . . . . . . . . . . . . . . . . . . . . . . 398
Obtaining the Latest Scanner Driver. . . . . . . . . . . . . . . . . . . . . . . . . . . . . . . . . . . . . . . . . . . 399
Before Installing the Scanner Driver. . . . . . . . . . . . . . . . . . . . . . . . . . . . . . . . . . . . . . . . . . . 400

Installing the Scanner Driver. . . . . . . . . . . . . . . . . . . . . . . . . . . . . . . . . . . . . . . . . . . . . . . . . 401
Useful Information on Scanning. . . . . . . . . . . . . . . . . . . . . . . . . . . . . . . . . . . . . . . . . . . . . . . . . . . . . . . 402
Adjusting Cropping Frames in the Image Stitch Window. . . . . . . . . . . . . . . . . . . . . . . . . . . . . . . . 403
Resolution. . . . . . . . . . . . . . . . . . . . . . . . . . . . . . . . . . . . . . . . . . . . . . . . . . . . . . . . . . . . . . . . . . . 404
Data Formats. . . . . . . . . . . . . . . . . . . . . . . . . . . . . . . . . . . . . . . . . . . . . . . . . . . . . . . . . . . . . . . . . 406
Placing Items (When Scanning from a Computer). . . . . . . . . . . . . . . . . . . . . . . . . . . . . . . . . . . . . . . . . 407
Scanning from the Operation Panel of the Machine. . . . . . . . . . . . . . . . . . . . . . . . . . . . . 410
Forwarding Scanned Data to the Computer Using the Operation Panel of the Machine. . . . . . . . . . . 411
Setting Items for Scanning Using the Operation Panel of the Machine. . . . . . . . . . . . . . . . . . . . . . . . . 415
Network Scan Settings. . . . . . . . . . . . . . . . . . . . . . . . . . . . . . . . . . . . . . . . . . . . . . . . . . . . . . . . . . . . . . 417
Selecting a Response to Commands from the Operation Panel Using IJ Scan Utility. . . . . . . . . . . . . 419
Scanning with the Access Point Mode. . . . . . . . . . . . . . . . . . . . . . . . . . . . . . . . . . . . . . . 422
Faxing. . . . . . . . . . . . . . . . . . . . . . . . . . . . . . . . . . . . . . . . . . . . . . . . . . . . . . . . 424
Preparing for Faxing. . . . . . . . . . . . . . . . . . . . . . . . . . . . . . . . . . . . . . . . . . . . . . . . . . . . . 425
Connecting the Telephone Line. . . . . . . . . . . . . . . . . . . . . . . . . . . . . . . . . . . . . . . . . . . . . . . . . . . . . . . 426
Setting the Telephone Line Type. . . . . . . . . . . . . . . . . . . . . . . . . . . . . . . . . . . . . . . . . . . . . . . . . . . . . . 429
Setting the Receive Mode. . . . . . . . . . . . . . . . . . . . . . . . . . . . . . . . . . . . . . . . . . . . . . . . . . . . . . . . . . . 430
Setting the Sender Information. . . . . . . . . . . . . . . . . . . . . . . . . . . . . . . . . . . . . . . . . . . . . . . . . . . . . . . 434
Sending Faxes Using the Operation Panel of the Machine. . . . . . . . . . . . . . . . . . . . . . . 438
Sending Faxes with the Numeric Buttons. . . . . . . . . . . . . . . . . . . . . . . . . . . . . . . . . . . . . . . . . . . . . . . 439
Resending Faxes (Redialing a Busy Number). . . . . . . . . . . . . . . . . . . . . . . . . . . . . . . . . . . . . . . . . . . . 442
Sending Faxes Using Useful Functions. . . . . . . . . . . . . . . . . . . . . . . . . . . . . . . . . . . . . . . . . . . . . . . . . 444
Sending a Fax after Speaking on Telephone. . . . . . . . . . . . . . . . . . . . . . . . . . . . . . . . . . . . . . . . 445
Sending a Fax Using the Memory Dialing Feature. . . . . . . . . . . . . . . . . . . . . . . . . . . . . . . . . . . . 447
Searching a Registered Recipient by Name. . . . . . . . . . . . . . . . . . . . . . . . . . . . . . . . . . . . . . . . . 449
Sending the Same Document to Several Recipients (Sequential Broadcasting). . . . . . . . . . . . . 451
Preventing Mistransmission of Faxes. . . . . . . . . . . . . . . . . . . . . . . . . . . . . . . . . . . . . . . . . . . . . . 453
Using the On Hook Dial Function. . . . . . . . . . . . . . . . . . . . . . . . . . . . . . . . . . . . . . . . . . . . . . . . . 455
Registering Recipients. . . . . . . . . . . . . . . . . . . . . . . . . . . . . . . . . . . . . . . . . . . . . . . . . . . 457
Registering Recipients Using the Operation Panel of the Machine. . . . . . . . . . . . . . . . . . . . . . . . . . . . 458
Registering Recipients to Coded Memory Dial. . . . . . . . . . . . . . . . . . . . . . . . . . . . . . . . . . . . . . . 459
Registering Recipients for Group Dial. . . . . . . . . . . . . . . . . . . . . . . . . . . . . . . . . . . . . . . . . . . . . . 462
Changing Registered Information. . . . . . . . . . . . . . . . . . . . . . . . . . . . . . . . . . . . . . . . . . . . . . . . . 464
Deleting Registered Information. . . . . . . . . . . . . . . . . . . . . . . . . . . . . . . . . . . . . . . . . . . . . . . . . . 466
Printing a List of the Registered Destinations. . . . . . . . . . . . . . . . . . . . . . . . . . . . . . . . . . . . . . . . 467
Registering Recipients Using Speed Dial Utility. . . . . . . . . . . . . . . . . . . . . . . . . . . . . . . . . . . . . . . . . . 468

Starting Up Speed Dial Utility. . . . . . . . . . . . . . . . . . . . . . . . . . . . . . . . . . . . . . . . . . . . . . . . . . . . 469
Speed Dial Utility Dialog. . . . . . . . . . . . . . . . . . . . . . . . . . . . . . . . . . . . . . . . . . . . . . . . . . . . . . . . 470
Saving Registered Information on the Machine to Your Computer. . . . . . . . . . . . . . . . . . . . . . . . 472
Registering a Fax/telephone Number Using Speed Dial Utility. . . . . . . . . . . . . . . . . . . . . . . . . . . 473
Changing a Fax/telephone Number Using Speed Dial Utility. . . . . . . . . . . . . . . . . . . . . . . . . . . . 475
Deleting a Fax/telephone Number Using Speed Dial Utility. . . . . . . . . . . . . . . . . . . . . . . . . . . . . 477
Changing Sender Information Using Speed Dial Utility. . . . . . . . . . . . . . . . . . . . . . . . . . . . . . . . . 478
Registering/Changing Rejected Number Using Speed Dial Utility. . . . . . . . . . . . . . . . . . . . . . . . . 479
Calling the Registered Information Up from Your Computer and Registering the Information to theMachine. . . . . . . . . . . . . . . . . . . . . . . . . . . . . . . . . . . . . . . . . . . . . . . . . . . . . . . . . . . . . . . . . . . . . 480
Uninstalling Speed Dial Utility. . . . . . . . . . . . . . . . . . . . . . . . . . . . . . . . . . . . . . . . . . . . . . . . . . . . 481
Receiving Faxes. . . . . . . . . . . . . . . . . . . . . . . . . . . . . . . . . . . . . . . . . . . . . . . . . . . . . . . . 482
Receiving Faxes. . . . . . . . . . . . . . . . . . . . . . . . . . . . . . . . . . . . . . . . . . . . . . . . . . . . . . . . . . . . . . . . . . 483
Changing the Paper Settings. . . . . . . . . . . . . . . . . . . . . . . . . . . . . . . . . . . . . . . . . . . . . . . . . . . . . . . . . 487
Memory Reception. . . . . . . . . . . . . . . . . . . . . . . . . . . . . . . . . . . . . . . . . . . . . . . . . . . . . . . . . . . . . . . . . 489
Receiving Faxes Using Useful Functions. . . . . . . . . . . . . . . . . . . . . . . . . . . . . . . . . . . . . . . . . . . . . . . 491
Remote Reception. . . . . . . . . . . . . . . . . . . . . . . . . . . . . . . . . . . . . . . . . . . . . . . . . . . . . . . . . . . . . 492
Rejecting Fax Reception. . . . . . . . . . . . . . . . . . . . . . . . . . . . . . . . . . . . . . . . . . . . . . . . . . . . . . . . 493
Using the Caller ID Service to Reject Calls. . . . . . . . . . . . . . . . . . . . . . . . . . . . . . . . . . . . . . . . . . 496
Other Useful Fax Functions. . . . . . . . . . . . . . . . . . . . . . . . . . . . . . . . . . . . . . . . . . . . . . . 497
Using the Information Services. . . . . . . . . . . . . . . . . . . . . . . . . . . . . . . . . . . . . . . . . . . . . . . . . . . . . . . 498
Transmission/Reception of Faxes Using ECM. . . . . . . . . . . . . . . . . . . . . . . . . . . . . . . . . . . . . . . . . . . 500
Document Stored in Machine's Memory. . . . . . . . . . . . . . . . . . . . . . . . . . . . . . . . . . . . . . . . . . . . . . . . 501
Printing a Document in Machine's Memory. . . . . . . . . . . . . . . . . . . . . . . . . . . . . . . . . . . . . . . . . . 502
Deleting a Document in Machine's Memory. . . . . . . . . . . . . . . . . . . . . . . . . . . . . . . . . . . . . . . . . 504
Summary of Reports and Lists. . . . . . . . . . . . . . . . . . . . . . . . . . . . . . . . . . . . . . . . . . . . . . . . . . . . . . . . 506
Troubleshooting. . . . . . . . . . . . . . . . . . . . . . . . . . . . . . . . . . . . . . . . . . . . . . . . . 511
Problems with Network Communication. . . . . . . . . . . . . . . . . . . . . . . . . . . . . . . . . . . . . . 512
Problems with the Machine While Using with Network. . . . . . . . . . . . . . . . . . . . . . . . . . . . . . . . . . . . . 513
The Machine Stopped Working Suddenly. . . . . . . . . . . . . . . . . . . . . . . . . . . . . . . . . . . . . . . . . . . 514
Printing Speed Is Slow. . . . . . . . . . . . . . . . . . . . . . . . . . . . . . . . . . . . . . . . . . . . . . . . . . . . . . . . . . 516
Cannot Use the Machine on Replacing an Access Point or Changing Its settings. . . . . . . . . . . . 517
Cannot Detect a Machine on a Network. . . . . . . . . . . . . . . . . . . . . . . . . . . . . . . . . . . . . . . . . . . . . . . . 518
Cannot Detect the Machine When Setting up Network Communication. . . . . . . . . . . . . . . . . . . . 519
Cannot Detect the Machine during Wireless LAN Setup: Check 1. . . . . . . . . . . . . . . . . . . . 520
Cannot Detect the Machine during Wireless LAN Setup: Check 2. . . . . . . . . . . . . . . . . . . . 521
Cannot Detect the Machine during Wireless LAN Setup: Check 3. . . . . . . . . . . . . . . . . . . . 522

The Machine Cannot Be Detected in the Wireless LAN. . . . . . . . . . . . . . . . . . . . . . . . . . . . . . . . 523
Other Problems with Network. . . . . . . . . . . . . . . . . . . . . . . . . . . . . . . . . . . . . . . . . . . . . . . . . . . . . . . . 525
Forgot an Access Point Name, SSID, or a Network Key. . . . . . . . . . . . . . . . . . . . . . . . . . . . . . . . 526
The Message Is Displayed on the Computer Screen During Setup. . . . . . . . . . . . . . . . . . . . . . . 528
The Admin Password Set to the Machine Was Forgotten. . . . . . . . . . . . . . . . . . . . . . . . . . . . . . . 529
Checking Information about the Network. . . . . . . . . . . . . . . . . . . . . . . . . . . . . . . . . . . . . . . . . . . . 530
How to Restore the Machine's Network Settings to Factory Default. . . . . . . . . . . . . . . . . . . . . . . 532
Problems with Printing. . . . . . . . . . . . . . . . . . . . . . . . . . . . . . . . . . . . . . . . . . . . . . . . . . . 533
Printing Does Not Start. . . . . . . . . . . . . . . . . . . . . . . . . . . . . . . . . . . . . . . . . . . . . . . . . . . . . . . . . . . . . 534
Paper Jams. . . . . . . . . . . . . . . . . . . . . . . . . . . . . . . . . . . . . . . . . . . . . . . . . . . . . . . . . . . . . . . . . . . . . . 535
Paper Does Not Feed Properly/"No Paper" Error Occurs. . . . . . . . . . . . . . . . . . . . . . . . . . . . . . . . . . . 536
Copying/Printing Stops Before It Is Completed. . . . . . . . . . . . . . . . . . . . . . . . . . . . . . . . . . . . . . . . . . . 538
Problems with Printing Quality. . . . . . . . . . . . . . . . . . . . . . . . . . . . . . . . . . . . . . . . . . . . . 539
Print Results Not Satisfactory. . . . . . . . . . . . . . . . . . . . . . . . . . . . . . . . . . . . . . . . . . . . . . . . . . . . . . . . 540
Cannot Print to End of Job. . . . . . . . . . . . . . . . . . . . . . . . . . . . . . . . . . . . . . . . . . . . . . . . . . . . . . . 541
No Printing Results/Printing Is Blurred/Colors Are Wrong/White Streaks. . . . . . . . . . . . . . . . . . . 542
Colors Are Unclear. . . . . . . . . . . . . . . . . . . . . . . . . . . . . . . . . . . . . . . . . . . . . . . . . . . . . . . . . . . . 545
Lines Are Misaligned. . . . . . . . . . . . . . . . . . . . . . . . . . . . . . . . . . . . . . . . . . . . . . . . . . . . . . . . . . . 546
Printed Paper Curls or Has Ink Blots. . . . . . . . . . . . . . . . . . . . . . . . . . . . . . . . . . . . . . . . . . . . . . . 547
Paper Is Smudged/Printed Surface Is Scratched. . . . . . . . . . . . . . . . . . . . . . . . . . . . . . . . . . . . . 548
Back of the Paper Is Smudged. . . . . . . . . . . . . . . . . . . . . . . . . . . . . . . . . . . . . . . . . . . . . . . . . . . 552
Vertical Lines Are Printed on the Sides of the Printout. . . . . . . . . . . . . . . . . . . . . . . . . . . . . . . . . 553
Colors Are Uneven or Streaked. . . . . . . . . . . . . . . . . . . . . . . . . . . . . . . . . . . . . . . . . . . . . . . . . . . 554
Ink Is Not Ejected. . . . . . . . . . . . . . . . . . . . . . . . . . . . . . . . . . . . . . . . . . . . . . . . . . . . . . . . . . . . . . . . . . 556
Problems with Faxing. . . . . . . . . . . . . . . . . . . . . . . . . . . . . . . . . . . . . . . . . . . . . . . . . . . . 557
Problems Sending Faxes. . . . . . . . . . . . . . . . . . . . . . . . . . . . . . . . . . . . . . . . . . . . . . . . . . . . . . . . . . . . 558
Problems Receiving Faxes. . . . . . . . . . . . . . . . . . . . . . . . . . . . . . . . . . . . . . . . . . . . . . . . . . . . . . . . . . 561
Cannot Send a Fax Clearly. . . . . . . . . . . . . . . . . . . . . . . . . . . . . . . . . . . . . . . . . . . . . . . . . . . . . . . . . . 565
Telephone Problems. . . . . . . . . . . . . . . . . . . . . . . . . . . . . . . . . . . . . . . . . . . . . . . . . . . . . . . . . . . . . . . 566
Problems with Scanning. . . . . . . . . . . . . . . . . . . . . . . . . . . . . . . . . . . . . . . . . . . . . . . . . . 567
Problems with Scanning. . . . . . . . . . . . . . . . . . . . . . . . . . . . . . . . . . . . . . . . . . . . . . . . . . . . . . . . . . . . 568
Scanner Does Not Work. . . . . . . . . . . . . . . . . . . . . . . . . . . . . . . . . . . . . . . . . . . . . . . . . . . . . . . . 569
Scanner Driver Does Not Start. . . . . . . . . . . . . . . . . . . . . . . . . . . . . . . . . . . . . . . . . . . . . . . . . . . 570
Error Message Appears and the Scanner Driver Screen Does Not Appear. . . . . . . . . . . . . . . . . 571
Cannot Scan Multiple Items at One Time. . . . . . . . . . . . . . . . . . . . . . . . . . . . . . . . . . . . . . . . . . . 572
Cannot Scan Properly with Auto Scan. . . . . . . . . . . . . . . . . . . . . . . . . . . . . . . . . . . . . . . . . . . . . . 573
Slow Scanning Speed. . . . . . . . . . . . . . . . . . . . . . . . . . . . . . . . . . . . . . . . . . . . . . . . . . . . . . . . . . 574

"There is not enough memory." Message Is Displayed. . . . . . . . . . . . . . . . . . . . . . . . . . . . . . . . . 575
Computer Stops Operating during Scanning. . . . . . . . . . . . . . . . . . . . . . . . . . . . . . . . . . . . . . . . . 576
Scanned Image Does Not Open. . . . . . . . . . . . . . . . . . . . . . . . . . . . . . . . . . . . . . . . . . . . . . . . . . 577
Scan Results Not Satisfactory. . . . . . . . . . . . . . . . . . . . . . . . . . . . . . . . . . . . . . . . . . . . . . . . . . . . . . . . 578
Scan Quality (Image Displayed on the Monitor) Is Poor. . . . . . . . . . . . . . . . . . . . . . . . . . . . . . . . 579
Scanned Image Is Surrounded by Extra White Areas. . . . . . . . . . . . . . . . . . . . . . . . . . . . . . . . . . 580
Cannot Scan at the Correct Size. . . . . . . . . . . . . . . . . . . . . . . . . . . . . . . . . . . . . . . . . . . . . . . . . . 581
Position or Size of the Image Cannot be Detected Correctly When Scanning from the OperationPanel. . . . . . . . . . . . . . . . . . . . . . . . . . . . . . . . . . . . . . . . . . . . . . . . . . . . . . . . . . . . . . . . . . . . . . . 582
Item Is Placed Correctly, but the Scanned Image Is Slanted. . . . . . . . . . . . . . . . . . . . . . . . . . . . 583
Scanned Image Is Enlarged (Reduced) on the Computer Monitor. . . . . . . . . . . . . . . . . . . . . . . . 584
Problems with the Machine. . . . . . . . . . . . . . . . . . . . . . . . . . . . . . . . . . . . . . . . . . . . . . . . 585
The Machine Cannot Be Powered On. . . . . . . . . . . . . . . . . . . . . . . . . . . . . . . . . . . . . . . . . . . . . . . . . . 586
Cannot Connect to Computer with a USB Cable Properly. . . . . . . . . . . . . . . . . . . . . . . . . . . . . . . . . . . 587
Cannot Communicate with the Machine with USB Connection. . . . . . . . . . . . . . . . . . . . . . . . . . . . . . . 588
LCD Cannot Be Seen At All. . . . . . . . . . . . . . . . . . . . . . . . . . . . . . . . . . . . . . . . . . . . . . . . . . . . . . . . . . 589
An Unintended Language Is Displayed on the LCD. . . . . . . . . . . . . . . . . . . . . . . . . . . . . . . . . . . . . . . 590
Problems with Installation/Downloading. . . . . . . . . . . . . . . . . . . . . . . . . . . . . . . . . . . . . . 591
Cannot Install the MP Drivers. . . . . . . . . . . . . . . . . . . . . . . . . . . . . . . . . . . . . . . . . . . . . . . . . . . . . . . . 592
Uninstalling IJ Network Tool. . . . . . . . . . . . . . . . . . . . . . . . . . . . . . . . . . . . . . . . . . . . . . . . . . . . . . . . . 593
About Errors/Messages Displayed. . . . . . . . . . . . . . . . . . . . . . . . . . . . . . . . . . . . . . . . . . 594
If an Error Occurs. . . . . . . . . . . . . . . . . . . . . . . . . . . . . . . . . . . . . . . . . . . . . . . . . . . . . . . . . . . . . . . . . . 595
A Message for Faxing Is Displayed on the LCD. . . . . . . . . . . . . . . . . . . . . . . . . . . . . . . . . . . . . . . . . . 596
A Message Is Displayed. . . . . . . . . . . . . . . . . . . . . . . . . . . . . . . . . . . . . . . . . . . . . . . . . . . . . . . . . . . . 599
If You Cannot Resolve the Problem. . . . . . . . . . . . . . . . . . . . . . . . . . . . . . . . . . . . . . . . . 602
Support Code List. . . . . . . . . . . . . . . . . . . . . . . . . . . . . . . . . . . . . . . . . . . . . . . 603
Support Code List (When Paper Is Jammed). . . . . . . . . . . . . . . . . . . . . . . . . . . . . . . . . . 605
1300. . . . . . . . . . . . . . . . . . . . . . . . . . . . . . . . . . . . . . . . . . . . . . . . . . . . . . . . . . . . . . . . . . . . . . . . . . . . 606
1303. . . . . . . . . . . . . . . . . . . . . . . . . . . . . . . . . . . . . . . . . . . . . . . . . . . . . . . . . . . . . . . . . . . . . . . . . . . . 608
2801. . . . . . . . . . . . . . . . . . . . . . . . . . . . . . . . . . . . . . . . . . . . . . . . . . . . . . . . . . . . . . . . . . . . . . . . . . . . 611
Paper Is Jammed inside the Machine. . . . . . . . . . . . . . . . . . . . . . . . . . . . . . . . . . . . . . . . . . . . . . . . . . 613
In Other Cases. . . . . . . . . . . . . . . . . . . . . . . . . . . . . . . . . . . . . . . . . . . . . . . . . . . . . . . . . . . . . . . . . . . . 616
1003. . . . . . . . . . . . . . . . . . . . . . . . . . . . . . . . . . . . . . . . . . . . . . . . . . . . . . . . . . . . . . . . . 617
1200. . . . . . . . . . . . . . . . . . . . . . . . . . . . . . . . . . . . . . . . . . . . . . . . . . . . . . . . . . . . . . . . . 618
1202. . . . . . . . . . . . . . . . . . . . . . . . . . . . . . . . . . . . . . . . . . . . . . . . . . . . . . . . . . . . . . . . . 619
1250. . . . . . . . . . . . . . . . . . . . . . . . . . . . . . . . . . . . . . . . . . . . . . . . . . . . . . . . . . . . . . . . . 620

1401. . . . . . . . . . . . . . . . . . . . . . . . . . . . . . . . . . . . . . . . . . . . . . . . . . . . . . . . . . . . . . . . . 621
1403. . . . . . . . . . . . . . . . . . . . . . . . . . . . . . . . . . . . . . . . . . . . . . . . . . . . . . . . . . . . . . . . . 622
1485. . . . . . . . . . . . . . . . . . . . . . . . . . . . . . . . . . . . . . . . . . . . . . . . . . . . . . . . . . . . . . . . . 623
1486. . . . . . . . . . . . . . . . . . . . . . . . . . . . . . . . . . . . . . . . . . . . . . . . . . . . . . . . . . . . . . . . . 624
1487. . . . . . . . . . . . . . . . . . . . . . . . . . . . . . . . . . . . . . . . . . . . . . . . . . . . . . . . . . . . . . . . . 625
1682. . . . . . . . . . . . . . . . . . . . . . . . . . . . . . . . . . . . . . . . . . . . . . . . . . . . . . . . . . . . . . . . . 626
1684. . . . . . . . . . . . . . . . . . . . . . . . . . . . . . . . . . . . . . . . . . . . . . . . . . . . . . . . . . . . . . . . . 627
1686. . . . . . . . . . . . . . . . . . . . . . . . . . . . . . . . . . . . . . . . . . . . . . . . . . . . . . . . . . . . . . . . . 628
1687. . . . . . . . . . . . . . . . . . . . . . . . . . . . . . . . . . . . . . . . . . . . . . . . . . . . . . . . . . . . . . . . . 629
1688. . . . . . . . . . . . . . . . . . . . . . . . . . . . . . . . . . . . . . . . . . . . . . . . . . . . . . . . . . . . . . . . . 630
1702. . . . . . . . . . . . . . . . . . . . . . . . . . . . . . . . . . . . . . . . . . . . . . . . . . . . . . . . . . . . . . . . . 631
1703. . . . . . . . . . . . . . . . . . . . . . . . . . . . . . . . . . . . . . . . . . . . . . . . . . . . . . . . . . . . . . . . . 632
1704. . . . . . . . . . . . . . . . . . . . . . . . . . . . . . . . . . . . . . . . . . . . . . . . . . . . . . . . . . . . . . . . . 633
1705. . . . . . . . . . . . . . . . . . . . . . . . . . . . . . . . . . . . . . . . . . . . . . . . . . . . . . . . . . . . . . . . . 634
1712. . . . . . . . . . . . . . . . . . . . . . . . . . . . . . . . . . . . . . . . . . . . . . . . . . . . . . . . . . . . . . . . . 635
1713. . . . . . . . . . . . . . . . . . . . . . . . . . . . . . . . . . . . . . . . . . . . . . . . . . . . . . . . . . . . . . . . . 636
1714. . . . . . . . . . . . . . . . . . . . . . . . . . . . . . . . . . . . . . . . . . . . . . . . . . . . . . . . . . . . . . . . . 637
1715. . . . . . . . . . . . . . . . . . . . . . . . . . . . . . . . . . . . . . . . . . . . . . . . . . . . . . . . . . . . . . . . . 638
1890. . . . . . . . . . . . . . . . . . . . . . . . . . . . . . . . . . . . . . . . . . . . . . . . . . . . . . . . . . . . . . . . . 639
2100. . . . . . . . . . . . . . . . . . . . . . . . . . . . . . . . . . . . . . . . . . . . . . . . . . . . . . . . . . . . . . . . . 640
2101. . . . . . . . . . . . . . . . . . . . . . . . . . . . . . . . . . . . . . . . . . . . . . . . . . . . . . . . . . . . . . . . . 641
2102. . . . . . . . . . . . . . . . . . . . . . . . . . . . . . . . . . . . . . . . . . . . . . . . . . . . . . . . . . . . . . . . . 642
2103. . . . . . . . . . . . . . . . . . . . . . . . . . . . . . . . . . . . . . . . . . . . . . . . . . . . . . . . . . . . . . . . . 643
2700. . . . . . . . . . . . . . . . . . . . . . . . . . . . . . . . . . . . . . . . . . . . . . . . . . . . . . . . . . . . . . . . . 644
2802. . . . . . . . . . . . . . . . . . . . . . . . . . . . . . . . . . . . . . . . . . . . . . . . . . . . . . . . . . . . . . . . . 645
2803. . . . . . . . . . . . . . . . . . . . . . . . . . . . . . . . . . . . . . . . . . . . . . . . . . . . . . . . . . . . . . . . . 646
2900. . . . . . . . . . . . . . . . . . . . . . . . . . . . . . . . . . . . . . . . . . . . . . . . . . . . . . . . . . . . . . . . . 648
2901. . . . . . . . . . . . . . . . . . . . . . . . . . . . . . . . . . . . . . . . . . . . . . . . . . . . . . . . . . . . . . . . . 649
4100. . . . . . . . . . . . . . . . . . . . . . . . . . . . . . . . . . . . . . . . . . . . . . . . . . . . . . . . . . . . . . . . . 650
4103. . . . . . . . . . . . . . . . . . . . . . . . . . . . . . . . . . . . . . . . . . . . . . . . . . . . . . . . . . . . . . . . . 651
5011. . . . . . . . . . . . . . . . . . . . . . . . . . . . . . . . . . . . . . . . . . . . . . . . . . . . . . . . . . . . . . . . . 652
5012. . . . . . . . . . . . . . . . . . . . . . . . . . . . . . . . . . . . . . . . . . . . . . . . . . . . . . . . . . . . . . . . . 653
5040. . . . . . . . . . . . . . . . . . . . . . . . . . . . . . . . . . . . . . . . . . . . . . . . . . . . . . . . . . . . . . . . . 654
5100. . . . . . . . . . . . . . . . . . . . . . . . . . . . . . . . . . . . . . . . . . . . . . . . . . . . . . . . . . . . . . . . . 655

5200. . . . . . . . . . . . . . . . . . . . . . . . . . . . . . . . . . . . . . . . . . . . . . . . . . . . . . . . . . . . . . . . . 656
5400. . . . . . . . . . . . . . . . . . . . . . . . . . . . . . . . . . . . . . . . . . . . . . . . . . . . . . . . . . . . . . . . . 657
5B02. . . . . . . . . . . . . . . . . . . . . . . . . . . . . . . . . . . . . . . . . . . . . . . . . . . . . . . . . . . . . . . . . 658
5B03. . . . . . . . . . . . . . . . . . . . . . . . . . . . . . . . . . . . . . . . . . . . . . . . . . . . . . . . . . . . . . . . . 659
5B04. . . . . . . . . . . . . . . . . . . . . . . . . . . . . . . . . . . . . . . . . . . . . . . . . . . . . . . . . . . . . . . . . 660
5B05. . . . . . . . . . . . . . . . . . . . . . . . . . . . . . . . . . . . . . . . . . . . . . . . . . . . . . . . . . . . . . . . . 661
5B12. . . . . . . . . . . . . . . . . . . . . . . . . . . . . . . . . . . . . . . . . . . . . . . . . . . . . . . . . . . . . . . . . 662
5B13. . . . . . . . . . . . . . . . . . . . . . . . . . . . . . . . . . . . . . . . . . . . . . . . . . . . . . . . . . . . . . . . . 663
5B14. . . . . . . . . . . . . . . . . . . . . . . . . . . . . . . . . . . . . . . . . . . . . . . . . . . . . . . . . . . . . . . . . 664
5B15. . . . . . . . . . . . . . . . . . . . . . . . . . . . . . . . . . . . . . . . . . . . . . . . . . . . . . . . . . . . . . . . . 665
6000. . . . . . . . . . . . . . . . . . . . . . . . . . . . . . . . . . . . . . . . . . . . . . . . . . . . . . . . . . . . . . . . . 666
6500. . . . . . . . . . . . . . . . . . . . . . . . . . . . . . . . . . . . . . . . . . . . . . . . . . . . . . . . . . . . . . . . . 667
6800. . . . . . . . . . . . . . . . . . . . . . . . . . . . . . . . . . . . . . . . . . . . . . . . . . . . . . . . . . . . . . . . . 668
6801. . . . . . . . . . . . . . . . . . . . . . . . . . . . . . . . . . . . . . . . . . . . . . . . . . . . . . . . . . . . . . . . . 669
6900. . . . . . . . . . . . . . . . . . . . . . . . . . . . . . . . . . . . . . . . . . . . . . . . . . . . . . . . . . . . . . . . . 670
6901. . . . . . . . . . . . . . . . . . . . . . . . . . . . . . . . . . . . . . . . . . . . . . . . . . . . . . . . . . . . . . . . . 671
6902. . . . . . . . . . . . . . . . . . . . . . . . . . . . . . . . . . . . . . . . . . . . . . . . . . . . . . . . . . . . . . . . . 672
6910. . . . . . . . . . . . . . . . . . . . . . . . . . . . . . . . . . . . . . . . . . . . . . . . . . . . . . . . . . . . . . . . . 673
6911. . . . . . . . . . . . . . . . . . . . . . . . . . . . . . . . . . . . . . . . . . . . . . . . . . . . . . . . . . . . . . . . . 674
6930. . . . . . . . . . . . . . . . . . . . . . . . . . . . . . . . . . . . . . . . . . . . . . . . . . . . . . . . . . . . . . . . . 675
6931. . . . . . . . . . . . . . . . . . . . . . . . . . . . . . . . . . . . . . . . . . . . . . . . . . . . . . . . . . . . . . . . . 676
6932. . . . . . . . . . . . . . . . . . . . . . . . . . . . . . . . . . . . . . . . . . . . . . . . . . . . . . . . . . . . . . . . . 677
6933. . . . . . . . . . . . . . . . . . . . . . . . . . . . . . . . . . . . . . . . . . . . . . . . . . . . . . . . . . . . . . . . . 678
6936. . . . . . . . . . . . . . . . . . . . . . . . . . . . . . . . . . . . . . . . . . . . . . . . . . . . . . . . . . . . . . . . . 679
6937. . . . . . . . . . . . . . . . . . . . . . . . . . . . . . . . . . . . . . . . . . . . . . . . . . . . . . . . . . . . . . . . . 680
6938. . . . . . . . . . . . . . . . . . . . . . . . . . . . . . . . . . . . . . . . . . . . . . . . . . . . . . . . . . . . . . . . . 681
6939. . . . . . . . . . . . . . . . . . . . . . . . . . . . . . . . . . . . . . . . . . . . . . . . . . . . . . . . . . . . . . . . . 682
693A. . . . . . . . . . . . . . . . . . . . . . . . . . . . . . . . . . . . . . . . . . . . . . . . . . . . . . . . . . . . . . . . . 683
6940. . . . . . . . . . . . . . . . . . . . . . . . . . . . . . . . . . . . . . . . . . . . . . . . . . . . . . . . . . . . . . . . . 684
6941. . . . . . . . . . . . . . . . . . . . . . . . . . . . . . . . . . . . . . . . . . . . . . . . . . . . . . . . . . . . . . . . . 685
6942. . . . . . . . . . . . . . . . . . . . . . . . . . . . . . . . . . . . . . . . . . . . . . . . . . . . . . . . . . . . . . . . . 686
6943. . . . . . . . . . . . . . . . . . . . . . . . . . . . . . . . . . . . . . . . . . . . . . . . . . . . . . . . . . . . . . . . . 687
6944. . . . . . . . . . . . . . . . . . . . . . . . . . . . . . . . . . . . . . . . . . . . . . . . . . . . . . . . . . . . . . . . . 688
6945. . . . . . . . . . . . . . . . . . . . . . . . . . . . . . . . . . . . . . . . . . . . . . . . . . . . . . . . . . . . . . . . . 689

6946. . . . . . . . . . . . . . . . . . . . . . . . . . . . . . . . . . . . . . . . . . . . . . . . . . . . . . . . . . . . . . . . . 690
9500. . . . . . . . . . . . . . . . . . . . . . . . . . . . . . . . . . . . . . . . . . . . . . . . . . . . . . . . . . . . . . . . . 691
B200. . . . . . . . . . . . . . . . . . . . . . . . . . . . . . . . . . . . . . . . . . . . . . . . . . . . . . . . . . . . . . . . . 692
B201. . . . . . . . . . . . . . . . . . . . . . . . . . . . . . . . . . . . . . . . . . . . . . . . . . . . . . . . . . . . . . . . . 693

Read Me First
Notes on Online Manual UsageHow to Print
Notes on Online Manual Usage
• Reproduction, diversion or copying of any text, photo or image published in the Online Manual(hereinafter referred to as "this guide"), in whole or in part, is prohibited.
• In principle, Canon shall change or delete the contents of this guide without prior notice to customers.In addition, Canon may suspend or stop the disclosure of this guide due to unavoidable reasons.Canon shall not be liable for any damage suffered by customers as a result of changes in or deletionof information in this guide, or suspension/stoppage of disclosure of this guide.
• Although the contents of this guide have been prepared with utmost care, please contact the servicecenter if you find any incorrect or missing information.
• In principle, the descriptions in this guide are based on the product at the time of its initial sale.• This guide does not disclose the manuals of all the products sold by Canon. See the manual supplied
with the product when using a product that is not described in this guide.
How to Print
Use the print function of your Web browser to print this guide.
To print background colors and images, follow the steps below to display the Print dialog options, thenselect the Print backgrounds checkbox.
1. Click Print... from the File menu.
2. Click Show Details or (Down Arrow).3. Select Safari from the pop-up menu.
15

Symbols Used in This Document
WarningInstructions that, if ignored, could result in death or serious personal injury caused by incorrectoperation of the equipment. These must be observed for safe operation.
CautionInstructions that, if ignored, could result in personal injury or material damage caused by incorrectoperation of the equipment. These must be observed for safe operation.
ImportantInstructions including important information. To avoid damage and injury or improper use of theproduct, be sure to read these indications.
NoteInstructions including notes for operation and additional explanations.
Basic
Instructions explaining basic operations of your product.
Note• Icons may vary depending on your product.
16

Trademarks and Licenses
• Microsoft is a registered trademark of Microsoft Corporation.• Windows is a trademark or registered trademark of Microsoft Corporation in the U.S. and/or other
countries.• Windows Vista is a trademark or registered trademark of Microsoft Corporation in the U.S. and/or other
countries.• Internet Explorer is a trademark or registered trademark of Microsoft Corporation in the U.S. and/or
other countries.• Mac, Mac OS, AirPort, Safari, Bonjour, iPad, iPhone and iPod touch are trademarks of Apple Inc.,
registered in the U.S. and other countries. AirPrint and the AirPrint logo are trademarks of Apple Inc.• IOS is a trademark or registered trademark of Cisco in the U.S. and other countries and is used under
license.• Google Cloud Print, Google Chrome, Android, Google Play and Picasa are either registered trademarks
or trademarks of Google Inc.• Adobe, Photoshop, Photoshop Elements, Lightroom, Adobe RGB and Adobe RGB (1998) are either
registered trademarks or trademarks of Adobe Systems Incorporated in the United States and/or othercountries.
• Photo Rag is a trademark of Hahnemühle FineArt GmbH.• Bluetooth is a trademark of Bluetooth SIG, Inc., U.S.A. and licensed to Canon Inc.
Note• The formal name of Windows Vista is Microsoft Windows Vista operating system.
17

Enter keywords in the search window and click (Search).
You can search for target pages in this guide.
Entry example: "(your product's model name) load paper", "(your product's model name) 1000"
Search Tips
You can search for target pages by entering keywords in the search window.
Note• The displayed screen may vary.
• Searching for Functions
Enter your product's model name and a keyword for the function you want to learn about
Example: When you want to learn how to load paperEnter "(your product's model name) load paper" in the search window and perform a search
• Troubleshooting Errors
Enter your product's model name and a support code
Example: When the following error screen appearsEnter "(your product's model name) 1000" in the search window and perform a search
18

Note• The displayed screen varies depending on your product.
• Searching for Application Functions
Enter your application's name and a keyword for the function you want to learn about
Example: When you want to learn how to print collages with My Image GardenEnter "My Image Garden collage" in the search window and perform a search
• Searching for Reference Pages
Enter your model name and a reference page title** You can find reference pages more easily by entering the function name as well.
Example: When you want to browse the page referred to by the following sentence on a scanningprocedure pageRefer to "Color Settings Tab" for your model from Home of the Online Manual for details. Enter "(your product's model name) scan Color Settings Tab" in the search window and perform asearch
19

Notes on Operation Explanations
In this guide, most of the operations are described based on the windows displayed when Mac OS X v10.8is used.
20

Useful Functions Available on the Machine
The following useful functions are available on the machine.Enjoy pleasant photography experience by utilizing various functions.
Helpful Functions Available Through the Network
You can print more conveniently through integration with smartphones andother devices or with services on the web.
Useful Functions Available from Applications and the Main Unit
You can create items such as collages easily or download delightfulprinting materials, and print them.
21

Useful Functions Available from Applications and the Main Unit
On the machine, the following useful functions are available from applications and the main unit.
• Print Photos Easily• Connect Wirelessly with Ease• Download Content Materials
Print Photos Easily Using an Application
Organize Images Easily
In My Image Garden, you can register the names of people and events to photos.You can organize photos easily as you can display them not only by folder but also by calendar, event,and person. This also allows you to find the target photos easily when you search for them later on.
<Calendar View>
<People View>
Display Recommended Items in Slide Shows
Based on the information registered to photos, Quick Menu automatically selects the photos on yourcomputer and creates recommended items such as collages and cards. The created items appear inslide shows.
22

If there is an item you like, you can easily print it in just two steps.
1. In Image Display of Quick Menu, select the item you want to print.2. Print the item with My Image Garden.
Place Photos Automatically
Delightful items are created easily as the selected photos are placed automatically according to thetheme.
Other Various Functions
My Image Garden has many other useful functions.
Refer to "What You Can Do with My Image Garden" for details.
Connect Wirelessly with Ease in "Access Point Mode"
The machine supports "access point mode" in which you can connect to the machine wirelessly from acomputer or smartphone even in an environment without an access point or wireless LAN router.Switch to "access point mode" with simple steps to enjoy scanning and printing wirelessly.
23

When you use the machine with the access point mode, be sure to specify the access point name of themachine and the security setting in advance.
Before Using the Machine with the Access Point Mode
For details on printing or scanning with the access point mode:
Printing with the Access Point ModeScanning with the Access Point Mode
Download a Variety of Content Materials
CREATIVE PARK
A "printing materials site" where you can download all the printing materials for free.Various types of content such as seasonal cards and paper crafts that can be made by assemblingpaper parts are provided.It is easily accessible from Quick Menu.
CREATIVE PARK PREMIUM
A service where customers using models that support PREMIUM Contents can download exclusiveprinting materials.PREMIUM Contents can be downloaded easily via My Image Garden. Downloaded PREMIUMContents can be printed directly with My Image Garden.To download PREMIUM Contents, make sure that genuine Canon ink tanks/ink cartridges are installedfor all colors on a supported printer.
Note• The designs of PREMIUM Contents provided in this page are subject to change without prior
notice.
24

Helpful Functions Available Through the Network
The following useful functions are available on the machine.
Enjoy even more pleasant photography experience by utilizing various functions.
Important• Some functions may not be available in certain countries or regions.
Upload scanned images to the webPrint by using Google Cloud PrintPrint directly from your iPad, iPhone, or iPod touchManage Your Printer from a Remote Location by Using Remote UIPrint easily from your smartphone by using PIXMA Printing SolutionsPrinting with Windows RT
Upload Scanned Images Easily to the Web
If you use Evernote or Dropbox on your computer, you can easily upload scanned images to the web.Uploaded images can be utilized from other computers, smartphones, etc.
Refer to "Online Storage Integration Function" for details.
Print in Various Environments with Google Cloud Print
The machine is compatible with Google Cloud Print (Google Cloud Print is a service provided by GoogleInc.).
By using Google Cloud Print, you can print from anywhere with applications or services supporting GoogleCloud Print.
Refer to "Printing with Google Cloud Print" for details.
Print Directly from iPad, iPhone, or iPod touch with Apple AirPrint
The machine is compatible with the AirPrint function of Apple iOS devices.
25

You can directly print e-mails, photos, web pages, etc. from iPad, iPhone, or iPod touch to the machineover wireless LAN.
Refer to "Printing from AirPrint Compliant Device" for details.
Manage Your Printer from a Remote Location by Using Remote UI
By using Remote UI, you can set up this machine, check the machine status, and even performmaintenance from your computer or smartphone.
Because you can use this service from a remote location through the network, you can check printerinformation even when you're out away from the printer.
Refer to "Using Remote UI" for details.
Print Easily from a Smartphone with PIXMA Printing Solutions
Use PIXMA Printing Solutions to easily print photos saved on a smartphone wirelessly.
You can also receive scanned data (PDF or JPEG) directly on a smartphone without using a computer.
PIXMA Printing Solutions can be downloaded from App Store and Google Play.
Printing with Windows RT
When you use Windows RT, printing is easy because you simply connect this machine to the network.
For information about connecting to the network, see the setup URL (http://www.canon.com/ijsetup) forusing this product from your computer, smartphone, or tablet device.
When the connection is complete, the Canon Inkjet Print Utility software, which allows you to specifydetailed print settings, is downloaded automatically.By using Canon Inkjet Print Utility, you can check the printer status and specify detailed print settings.(The available functions will differ depending on your usage environment and connection method.)
26

Online Storage Integration Function
The machine can integrate with online storage services such as Evernote.
Integration with Online Notetaking Service "Evernote"
If an Evernote client application is installed on your computer, you can import scanned images into theapplication and upload them to the Evernote server.
The uploaded images can be browsed from other computers, smartphones, etc.
To use Evernote, you need to create an account. See the "CREATE ACCOUNT" page of Evernote foraccount creation.
• Settings
In the Settings Dialog of IJ Scan Utility, select the item you want to set, then select Evernote for Send toan application in Application Settings.Refer to "Settings Dialog" for your model from Home of the Online Manual for details.
Important• The Evernote service features are subject to change or termination without prior notice.
27

Printing with Google Cloud Print
The machine is compatible with Google Cloud Print™ (Google Cloud Print is a service provided by GoogleInc.).
By using Google Cloud Print, you can print from anywhere with applications or services supporting GoogleCloud Print.
1. Preparations for Printing with Google Cloud Print
2. Printing from Computer or Smartphone with Google Cloud Print
Important• LAN connection with the machine and Internet connection are required to register the machine and to
print with Google Cloud Print. Internet connection fees apply.• This function may not be available depending on the country or region you live in.
28

Preparations for Printing with Google Cloud Print
To print with Google Cloud Print, you need to get Google account and register the machine with GoogleCloud Print in advance.
Getting Google Account
If you already have Google account, register the machine.
Registering the Machine with Google Cloud Print
Getting Google Account
First, get your Google account in order to register the machine with Google Cloud Print.
Access to Google Cloud Print with the web browser on the computer or the mobile device, then registerthe required information.
* The screen above may change without prior notice.
Registering the Machine with Google Cloud Print
Register the machine with Google Cloud Print.
The authentication procedure using the web browser on the computer or the mobile device is required inthe process of registering. Because the authentication URL is printed from machine when theauthentication process is performed, prepare A4 or Letter-sized plain paper.
Important• LAN connection with the machine and Internet connection are required to register the machine and to
print with Google Cloud Print. Internet connection fees apply.• If the machine's owner changes, delete the machine from Google Cloud Print.
1. Make sure that the machine is turned on.
If your printer has a LCD monitor
2. Display the Home screen.
29

3. Select Setup.
4. Select Web service setup -> Web service connection setup -> GoogleCloud Print setup -> Register with Google Cloud Print.
Note• If you have already registered the machine with Google Cloud Print, the confirmation
message to re-register the machine is displayed.
5. When the confirmation screen to register the machine is displayed, select Yes.
6. Select a display language on the print setting screen of Google Cloud Print.
The confirmation message to print the authentication URL is displayed.
7. Load A4 or Letter-sized plain paper, then select OK.
The authentication URL is printed.
8. Ensure that the authentication URL is printed, select Yes.
9. Perform the authentication process using the web browser on the computer or themobile device.
Access to the URL using the web browser on the computer or the mobile device and perform theauthentication process following the on-screen instructions.
Note• Perform the authentication process with your Google account which you have gotten in
advance.
10. When the message that the registration is complete is displayed on the LCD of themachine, select OK.
When authentication process is complete properly, the registration items are displayed. Whenauthentication process is complete, you can print the data with Google Cloud Print.When authentication process is not complete properly and the error message is displayed, selectOK. When the confirmation message to print the authentication URL is displayed, print theauthentication URL, then perform the authentication process on the computer again.
If your printer does not have a LCD monitor
2. Remote UI startup
3. Select Google Cloud Print setup -> Register with Google Cloud Print
30

Note• If you have already registered the machine with Google Cloud Print, the confirmation
message to re-register the machine is displayed.
4. When the confirmation screen to register the machine is displayed, select Yes.
5. In the print setup for Google Cloud Print, select the display language, and then selectAuthentication.
6. When the registration completion message appears, select OK.
Deleting the Machine from Google Cloud Print
If the machine's owner changes or if you want to re-register the machine, delete the machine from GoogleCloud Print by following the steps below.
1. Make sure that the machine is turned on.
If your printer has a LCD monitor
2. Display the Home screen.
3. Select Setup.
4. Select Web service setup -> Web service connection setup -> GoogleCloud Print setup -> Delete from Google Cloud Print.
5. When the confirmation screen to delete the machine is displayed, select Yes.
If your printer does not have a LCD monitor
2. Remote UI startup
3. Select Google Cloud Print setup -> Delete from Google Cloud Print.
4. When the confirmation screen to delete the machine is displayed, select Yes.
31

Printing from Computer or Smartphone with Google Cloud Print
When you send print data with Google Cloud Print, the machine receives the print data and prints itautomatically if the machine is turned on.
When printing from a computer, smartphone, or other external device with Google Cloud Print, load paperinto the machine in advance.
Sending the Print Data with Google Cloud Print
1. Make sure that the machine is turned on.
Note• If you want to send the print data from an outside location, turn on the machine in advance.
2. Print from the computer or smartphone.
The figure below is an example of when printing from the web browser corresponding with GoogleCloud Print. The screen differs depending on the applications or services supporting Google CloudPrint.
When the preparation for printing with Google Cloud Print is complete and when the machine is turnedon, the machine receives the print data and prints it automatically.
Note• Depending on the communication status, it may take a while to print the print data or the machine
may not receive the print data.• While printing with Google Cloud Print, the printing may be canceled depending on the machine's
status, such as when the machine is being operated or an error has occurred. To resume printing,check the machine's status, then print with Google Cloud Print again.
• For print settings:
• If you select the media type other than plain paper or if you select the paper size other than A4/Letter/B5/A5-size, the print data is printed in single-sided even when you select the duplex printsetting. (* The paper size differs depending on the model of your printer. For information aboutthe supported paper sizes, go to the Online Manual home page, and refer to the "Cannot PrintProperly with Automatic Duplex Printing" for your model.)
32

• If you select plain paper as media type or if you select B5/A5-size as paper size, the print data isprinted with border even when you select the borderless print setting.
• The print results may differ from the print image depending on the print data.• Depending on the device sending the print data, you may not select the print settings when
sending the print data with Google Cloud Print.
When you want to print from Google Cloud Print immediately
When the machine cannot receive the print data, or you want to start printing immediately, you can checkwhether there is a print job on the Google Cloud Print and start printing manually.
Follow the steps below.
Important• Depending on your printer model, this function may not be available.
1. Make sure that the machine is turned on.
2. Display the Home screen.
3. Select Setup.
4. Select Web service inquiry.
Note• If you have not registered the machine with Google Cloud Print, Web service inquiry is not
displayed.Register the machine with Google Cloud Print.
5. Select Print from Google Cloud Print.
The confirmation screen to check is displayed.
6. Select Yes.
If there is the print data, the machine receives the print data and prints it.
33

Using Remote UI
This service allows you to check printer information and execute utility functions from your computer orsmartphone.
You can also use the convenient web services presented by Canon.
Checking the printer IP address
To use this service, first check the IP address of this machine from the operation panel of the machine.
Important• Before you check the IP address of this machine or use the Remote UI, make sure that the machine
is connected to the LAN and the LAN environment is connected to the Internet. Note that thecustomer is responsible for paying all Internet connection fees.
1. Check that the machine has been turned on
If your LCD monitor is a color model
2. From the home window, select Setup -> Device settings -> LANsettings -> Confirm LAN settings -> WLAN setting list or LAN setting list. Thenfrom the displayed window, check the IP address.
Note• To print the IP address, load one sheet of A4 size or Letter size plain paper. Then from the
home window, select Setup -> Device settings -> LAN settings -> ConfirmLAN settings -> Print LAN details, in sequence.
34

If your LCD monitor is a monochrome model
2. Load one sheet of A4 size or Letter size plain paper
3. On the printer operation panel, select the Setup button, and then select Devicesettings -> LAN settings -> Print LAN details
IP address printing starts.
If your printer does not have a LCD monitor
2. Load one sheet of A4 size or Letter size plain paper
3. Hold down the Stop button until the Alarm lamp flashes 15 times
4. Release the button
Printing of the network setup information starts.
Remote UI startup
In the Web browser, directly enter the IPv4 address that you checked from the LCD monitor of themachine. The Remote UI starts.
1. From your computer, smartphone, or tablet device, open the Web browser, and enter thefollowing URL:
http:// <Printer IP address>
For "<Printer IP address>" enter the IP address that you checked in "Checking the printer IP address."
2. Entering Username and Administrator's Password
From the authentication screen, enter the Username and Password.
Username: ADMINPassword: See "About the Administrator Password."
Note• The Username display may differ depending on your browser.
3. Remote UI startup
The Remote UI starts and the top window is displayed.
35

Printer statusThis function displays printer information such as the remaining ink amount, the status, anddetailed error information.You can also connect to the ink purchase site or support page, and use Web Services.
UtilitiesThis function allows you to set and execute the machine utility functions such as cleaning.
AirPrint settingsThis function allows you to specify the Apple AirPrint settings, such as position information.
Google Cloud Print setupThis function allows you to register this machine to Google Cloud Print or delete the machine.
Firmware updateThis function allows you to update the firmware and check version information.
Manual (Online)This function displays the Online Manual.
Network ConfigurationThis function displays the network settings.
36

Printing from AirPrint Compliant Device
This document explains how to use AirPrint to print wirelessly from your iPad, iPhone and iPod touch to aCanon printer.
AirPrint enables you to print photos, email, Web pages and documents from your Apple device directly toyour printer without installing a driver.
Checking Your Environment
First, check your environment.
• AirPrint Operation Environment
To use AirPrint, you will need one of the following Apple devices running the latest version of iOS:
◦ iPad (all models)◦ iPhone (3GS or later)◦ iPod touch (3rd generation or later)
• Network Environment
The Apple device (iPad, iPhone, or iPod touch) and this machine must be connected to the same Wi-Fi network.
Note• If your iPad, iPhone or iPod touch is running the latest version of iOS, you do not need to download
and install any drivers or additional software.
Printing with AirPrint
1. Check that this machine is turned on and is connected to the LAN.
2. From the app of your Apple device, tap the operation icon to display the menu options.
37

3. From the menu options, tap Print.
4. From Printer Options, select the model that you are using.
Important• Because some app does not support AirPrint, Printer Options may not be displayed. If an app
does not let you use printer options, you cannot print from that app.
Note• The printer options differ depending on the app and model you are using. Normally, when you
tap Print and select a model name, the displayed printer options will include up to the followingfour options:
• Printer: Select a model that can be used in your wireless LAN.
38

• Copies: Select the number of print copies.• Duplex Printing: If the model supports duplex printing, you can select On or Off.• Range: The page range can be used only with specific app and file types (such as PDF
files).
5. For 1 Copy, click + or - to set the number of required copies.
6. For Duplex Printing, click On to enable duplex printing or click Off to disable thefunction.
7. When printing a file type that has multiple pages, such as a PDF file, click Range andthen click All Pages or select the range of pages to be printed.
8. Tap the Print.
When you execute printing, the printer prints according to the specified settings.
Paper Size
With AirPrint, the paper size is selected automatically according to the app being used on the Appledevice and the region in which AirPrint is used.
When Apple's photo app is used, the default paper size is L size in Japan, and 4"x6" or KG in othercountries and regions.
When documents are printed from Apple's Safari app, the default paper size is letter size in the U.S.region, and A4 in Japan and Europe.
Important• Your app may support different paper sizes.
Checking the Print Status
During printing, a Print icon is displayed in the list of recently used app, and you can use it to check theprint progress.
To display the list of latest used app, press the Home button on the Apple device twice. The Print icon isdisplayed at the bottom of the Home screen.
39

Deleting a Print Job
To delete a print job with AirPrint, use one of the following two methods:
• From the machine: If your printer has a LCD monitor, use the operation panel to cancel the print job.If you printer does not have a LCD monitor, press the Stop button on the machine to cancel the printjob.
• From an Apple device: Press the Home button on the Apple device twice. Tap the Print icon anddisplay the print job list. Tap the print job to be canceled, and then tap Cancel Print.
AirPrint Troubleshooting
If the document does not print, check the following:
1. Check that the machine power is on. If the machine power is on, turn it off and then backon again, and check whether the issue is resolved.
2. Check that the machine is connected by LAN to the same network subnet as the deviceon which iOS is installed.
3. Check that the machine has enough paper and ink.
4. If your printer has a LCD monitor, check that no error message is displayed on the LCDmonitor.
If the problem persists, use the printer driver on your computer to execute printing and check whetherthe document can be printed normally on the machine.
If the document cannot be printed, refer to the Online Manual for your model.
40

Note• After you turn on the machine, it may take few minutes before the machine can communicate through
a wireless LAN connection. Confirm that the machine is connected to the wireless LAN, and then tryprinting.
• If Bonjour on the machine is disabled, AirPrint cannot be used. Check the LAN settings on themachine, and enable Bonjour.
Note• The windows used in the explanations may differ from those displayed by your Apple product or app.
41

List of Function for Each Model
MG seriesMX seriesE seriesP seriesiP seriesiX series
MG series
Model name Print from E-mail Google Cloud Print Canon Inkjet Cloud Printing Center
MG7100 ✓ ✓ ✓
MG6500 ✓ ✓ ✓
MG6400 ✓ ✓ ✓
MG5500 ✓ ✓ ✓
MG3500 – ✓ –
MG2500 – – –
MG2400 – – –
MX series
Model name Print from E-mail Google Cloud Print Canon Inkjet Cloud Printing Center
MX920 ✓ ✓ –
MX720 ✓ ✓ –
MX530 – ✓ ✓
MX520 – ✓ –
MX470 – ✓ –
MX450 – – –
MX390 – – –
E series
Model name Print from E-mail Google Cloud Print Canon Inkjet Cloud Printing Center
E610 – – –
E560 – ✓ –
E400 – – –
P series
Model name Print from E-mail Google Cloud Print Canon Inkjet Cloud Printing Center
P200 – – –
42

iP series
Model name Print from E-mail Google Cloud Print Canon Inkjet Cloud Printing Center
iP8700 – ✓ –
iP2800 – – –
iX series
Model name Print from E-mail Google Cloud Print Canon Inkjet Cloud Printing Center
iX6800 – ✓ –
iX6700 – – –
43

Overview of the Machine
Safety GuideSafety PrecautionsRegulatory and Safety Information
Main Components and Basic OperationsMain ComponentsAbout the Power Supply of the MachineLCD and Operation PanelEntering Numbers, Letters, and Symbols
Loading Paper / OriginalsLoading PaperLoading Originals
Replacing a FINE CartridgeReplacing a FINE CartridgeChecking the Ink Status
MaintenanceWhen Printing Becomes Faint or Colors Are IncorrectPerforming Maintenance from a ComputerCleaning the Machine
Changing the Machine SettingsChanging Machine Settings from Your ComputerChanging the Machine Settings on the LCDUpdating the Firmware of the Machine
Information about Network ConnectionUseful Information about Network Connection
About Network CommunicationChanging and Confirming Network SettingsAppendix for Network Communication
Tips for Ensuring Optimal Printing QualityUseful Information about InkKey Points to Successful PrintingBe Sure to Make Paper Settings after Loading PaperCanceling a Print JobKey to Enjoying Consistent Printing QualityPrecautions for Safe Transport of the Machine
Legal Limitations on Use of Your Product and Use of Images
Specifications
44

Safety Guide
Safety Precautions
Regulatory and Safety Information
45

Safety Precautions
Choosing a location
• Do not install the machine in a location that is unstable or subject to excessive vibration.• Do not install the machine in locations that are very humid or dusty, in direct sunlight, outdoors, or
close to a heating source.To avoid the risk of fire or electric shocks, use the machine under the operating environment specifiedin the On-screen Manual.
• Do not place the machine on a thick rug or carpet.• Do not place the machine with its back attached to the wall.
Power supply
• Ensure that the area around the power outlet is kept clear at all times so you can easily unplug thepower cord if necessary.
• Never remove the plug by pulling on the cord.Pulling the cord may damage the power cord, leading to possible fire or electrical shock.
• Do not use an extension lead/cord.
Working around the machine
• Never put your hands or fingers in the machine while it is printing.• When moving the machine, carry the machine at both ends. In case the machine weighs more than
14 kg, it is recommended to have two people lifting the machine. Accidental dropping of the machinecauses injury. For the machine's weight, refer to the On-screen Manual.
• Do not place any object on the machine. Especially do not place metal objects (paper clips, staples,etc.) or containers of flammable solvents (alcohol, thinners, etc.) on top of the machine.
• Do not transport or use the machine on a slant, vertically or upside-down, as the ink may leak anddamage the machine.
Working around the machine (For the multifunction printer)
• When loading a thick book on the Platen Glass, do not press hard on the Document Cover. ThePlaten Glass may break and cause injury.
Print Heads/ink tanks and FINE Cartridges
• Keep ink tanks out of the reach of children. In case ink* is accidentally licked or swallowed, rinse outmouth or give one or two glasses of water to drink. If irritation or discomfort occurs, obtain medicaladvice immediately.* Clear Ink contains nitrate salts (For models containing Clear Ink).
• In case ink gets in contact with eyes, rinse with water immediately. In case ink gets in contact withskin, wash with soap and water immediately. If irritation to eyes or skin persists, obtain medical adviceimmediately.
• Never touch the electrical contacts on a Print Head or FINE Cartridges after printing.The metal parts may be very hot and could cause burns.
• Do not throw ink tanks and FINE Cartridges into fire.• Do not attempt to disassemble or modify the Print Head, ink tanks, and FINE Cartridges.
46

Regulatory and Safety Information
About the disposal of the battery (For models containing lithium battery)
Dispose of used batteries according to the local regulations.
IMPORTANT SAFETY INSTRUCTIONS
SAVE THESE INSTRUCTIONS
When using your telephone equipment, basic safety precautions should always be followed to reduce therisk of fire, electric shock and injury to persons, including the following:
1. Do not use this product near water, for example, near a bath tub, wash bowl, kitchen sink or laundrytub, in a wet basement or near a swimming pool.
2. Avoid using this product during an electrical storm. There may be a remote risk of electric shock fromlightning.
3. Do not use this product to report a gas leak in the vicinity of the leak.
"CAUTION - To reduce the risk of fire, use only No. 26 AWG or larger telecommunication line cord."
IMPORTANTES MESURES DE SÉCURITÉ
CONSERVER CES INSTRUCTIONS
Certaines mesures de sécurité doivent être prises pendant l'utilisation de matérial téléphonique afin deréduire les risques d'incendie, de choc électrique et de blessures.
En voice quelquesunes :
1. Ne pas utiliser l'appareil près de l'eau, p.ex., près d'une baignoire, d'un lavabo, d'un évier de cuisine,d'un bac à laver, dans un sous-sol humide ou près d'une piscine.
2. Éviter d'utiliser l'appareil pendant un orage électrique. Ceci peut présenter un risque de chocélectrique causé par la foudre.
3. Ne pas utiliser l'appareil pour signaler une fuite de gaz s'il est situé près de la fuite.
"ATTENTION - Pour réduire les risques d'incendie, utiliser uniquement des conducteurs detélécommunications 26 AWG au de section supérleure."
Users in the U.S.A.
FCC Notice (U.S.A. Only)For 120V, 60Hz modelModel Number: K10400 (Contains FCC ID: AZDK30357)
This device complies with Part 15 of the FCC Rules. Operation is subject to the following two conditions:(1) This device may not cause harmful interference, and (2) this device must accept any interferencereceived, including interference that may cause undesired operation.
Note: This equipment has been tested and found to comply with the limits for a Class B digital device,pursuant to Part 15 of the FCC Rules. These limits are designed to provide reasonable protection againstharmful interference in a residential installation. This equipment generates, uses and can radiate radiofrequency energy and, if not installed and used in accordance with the instructions, may cause harmfulinterference to radio communications.However, there is no guarantee that interference will not occur in a particular installation. If this equipmentdoes cause harmful interference to radio or television reception, which can be determined by turning the
47

equipment off and on, the user is encouraged to try to correct the interference by one or more of thefollowing measures:
• Reorient or relocate the receiving antenna.• Increase the separation between the equipment and receiver.• Connect the equipment into an outlet on a circuit different from that to which the receiver is
connected.• Consult the dealer or an experienced radio/TV technician for help.
Use of a shielded cable is required to comply with Class B limits in Subpart B of Part 15 of the FCC Rules.
Do not make any changes or modifications to the equipment unless otherwise specified in the manual. Ifsuch changes or modifications should be made, you could be required to stop operation of the equipment.
FCC ID:AZDK30357
Changes or modifications not expressly approved by the party responsible for compliance could void theuser's authority to operate equipment.
This transmitter must not be co-located or operating in conjunction with any other antenna or transmitter.
The equipment complies with FCC radiation exposure limits for at uncontrolled equipment. Thisequipment should be installed and operated with minimum distance at least 20cm between the radiatorand persons body (excluding extremities: hands, wrists, feet and ankles) and must not be colocated oroperated with any other antenna or transmitter.
Canon U.S.A., Inc.One Canon ParkMelville, New York 117471-800-652-2666
Pre-Installation Requirements
Order Information
When ordering service from the telephone company for this equipment, the following may be required.
Universal Service Order Code (USOC): RJ11C
The Facility Interface Code (FIC): 02LS2
Service Order Code (SOC): 9.0F
Connection of the Equipment
This equipment complies with Part 68 of the FCC rules and the requirements adopted by the ACTA.
On the bottom of this equipment is a label that contains, among other information, a product identifier inthe format US:AAAEQ##TXXXX. If requested, this number must be provided to the telephone company.
The REN is used to determine the number of devices that may be connected to a telephone line.
Excessive RENs on a telephone line may result in the devices not ringing in response to an incoming call.In most but not all areas, the sum of RENs should not exceed five (5.0). To be certain of the number ofdevices that may be connected to a line, as determined by the total RENs, contact the local telephonecompany. The REN for this product is part of the product identifier that has the formatUS:AAAEQ##TXXXX. The digits represented by ## are the REN without a decimal point (e.g., 03 is aREN of 0.3).
48

A plug and jack used to connect this equipment to the premises wiring and telephone network mustcomply with the applicable FCC Part 68 rules and requirements adopted by the ACTA. A complianttelephone cord and modular plug is provided with this product. It is designed to be connected to acompatible modular jack that is also compliant. See installation instructions for details.
Connection to party lines is subjected to state tariffs. Contact the state public utility commission, publicservice commission or corporation commission for information.
If your home has specially wired alarm equipment connected to the telephone line, ensure the installationof this equipment does not disable your alarm equipment. If you have questions about what will disablealarm equipment, consult your telephone company or a qualified installer.
In Case of Equipment Malfunction
Should any malfunction occur which cannot be corrected by the procedures described in the OnlineManual, disconnect the equipment from the telephone line cable, turn off the power and disconnect thepower cord. The telephone line cable should not be reconnected or the main power switch turned ON untilthe problem is completely resolved. Users should contact their local authorized Canon Facsimile ServiceDealer for the servicing of equipment.
Information regarding Authorized Service Facility locations can be obtained by calling the CanonCustomer Center.
Rights of the Telephone Company
If this equipment causes harm to the telephone network, the telephone company may temporarilydisconnect service. The telephone company also retains the right to make changes in facilities andservices that may affect the operation of this equipment. When such changes are necessary, thetelephone company is required to give adequate prior notice to the user. However, if advance notice is notpossible, the telephone company will notify the customer as soon as possible. Also, the customer will beadvised of his/her right to file a compliant with the FCC if he/she believes it is necessary.
Warning
The Telephone Consumer Protection Act of 1991 makes it unlawful for any person to use a computer orother electronic device to send any message via a telephone FAX machine unless such message clearlycontains in a margin at the top or bottom of each transmitted page, or on the first page of thetransmission, the date and time it is sent and an identification of the business or other entity, or otherindividual sending the message and the telephone number of the sending machine or such business,other entity, or individual.
In order to program this information into your FAX machine, you should complete the procedure to registeryour name, unit's telephone number, time, and date. Refer to the Online Manual.
Users in Canada
This device complies with Industry Canada license-exempt RSS standard(s). Operation is subject to thefollowing two conditions:
(1) this device may not cause interference, and (2) this device must accept any interference, includinginterference that may cause undesired operation of the device.
This equipment complies with IC radiation exposure limits set forth for an uncontrolled environment andmeets RSS-102 of the IC radio frequency (RF) Exposure rules. This equipment should be installed and
49

operated keeping the radiator at least 20cm or more away from person's body (excluding extremities:hands, wrists, feet and ankles).
Pre-Installation Requirements
Notice
This equipment meets the applicable Industry Canada technical specifications.
The Ringer Equivalence Number is an indication of the maximum number of devices allowed to beconnected to a telephone interface. The termination on an interface may consist of any combination ofdevices subject only to the requirement that the sum of the RENs of all the devices does not exceed five.
Pour les usagers résidant au Canada
Le présent appareil est conforme aux CNR d'Industrie Canada applicables aux appareils radio exemptsde licence. L'exploitation est autorisée aux deux conditions suivantes :
(1) l'appareil ne doit pas produire de brouillage, et (2) l'utilisateur de l'appareil doit accepter tout brouillageradioélectrique subi, même si le brouillage est susceptible d'en compromettre le fonctionnement.
Cet équipement est conforme aux limites d'exposition aux rayonnements énoncées pour unenvironnement non contrôlé et respecte les règles d'exposition aux fréquences radioélectriques (RF)CNR-102 de l'IC. Cet équipement doit être installé et utilisé en gardant une distance de 20 cm ou plusentre le dispositif rayonnant et le corps (à l'exception des extrémités : mains, poignets, pieds et chevilles).
Conditions de pré-installation
Avis
Le présent matériel est conforme aux spécifications techniques applicables d'Industrie Canada.
L'indice d'équivalence de la sonnerie (IES) sert à indiquer le nombre maximal de terminaux qui peuventêtre raccordés à une interface téléphonique. La terminaison d'une interface peut consister en unecombinaison quelconque de dispositifs, à la seule condition que la somme d'indices d'équivalence de lasonnerie de tous les dispositifs n'excède pas 5.
Users in New Zealand
The grant of a Telepermit for any item of terminal equipment indicates only that Telecom has acceptedthat the item complies with minimum conditions for connection to its network. It indicates no endorsementof the product by Telecom, nor does it provide any sort of warranty. Above all, it provides no assurancethat any item will work correctly in all respects with another item of Telepermitted equipment of a differentmake or model, nor does it imply that any product is compatible with all of Telecom's network services.
This equipment is not capable, under all operating conditions, of correct operation at the higher speeds forwhich it is designed.
Telecom will accept no responsibility should difficulties arise in such circumstances.
This condition typically to 56 kbit/s modems and V34 facsimile machines.
Please note when you connect an extension phone to this device, if you use an extension phone whichhas features such as "last number redial", redial memory numbers may be lost.
This equipment should not be used under any circumstances that may constitute a nuisance to otherTelecom customers.
50

Telepermitted equipment only may be connected to the auxiliary telephone port. The auxiliary telephoneport is not specifically designed for 3-wire connected equipment that may not respond to incoming ringingwhen attached to this port.
Users in Jordan
This printer contains WLAN Module approved by TRC/LPD/2013/130
Name of WLAN Module : K30357
European Union (and EEA) only.
This symbol indicates that this product is not to be disposed of with your household waste, according tothe WEEE Directive (2002/96/EC) and your national law. This product should be handed over to adesignated collection point, e.g., on an authorized one-for-one basis when you buy a new similar productor to an authorized collection site for recycling waste electrical and electronic equipment (EEE). Improperhandling of this type of waste could have a possible negative impact on the environment and humanhealth due to potentially hazardous substances that are generally associated with EEE. At the same time,your cooperation in the correct disposal of this product will contribute to the effective usage of naturalresources. For more information about where you can drop off your waste equipment for recycling, pleasecontact your local city office, waste authority, approved WEEE scheme or your household waste disposalservice. For more information regarding return and recycling of WEEE products, please visit www.canon-europe.com/environment.
(EEA: Norway, Iceland and Liechtenstein)
India only.
This product is not to be disposed of with your household waste, according to the e-waste (Managementand Handling) Rules, 2011.
This product should be handed over to a designated collection point, e.g., to an authorized collection sitefor recycling waste electrical and electronic equipment (EEE). Improper handling of this type of wastecould have a possible negative impact on the environment and human health due to potentially hazardoussubstances that are generally associated with EEE. At the same time, your cooperation in the correctdisposal of this product will contribute to the effective usage of natural resources. For more informationregarding return and recycling of WEEE products, please visit http://www.canon.co.in/environment/.
Also, this product complies with the "India E-waste Rule 2011" and prohibits use of lead, mercury,hexavalent chromium, polybrominated biphenyls or polybrominated diphenyl ethers in concentrationsexceeding 0.1 % by weight and 0.01 % by weight for Cadmium, except for the exemptions set in ScheduleII of the Rule.
Environmental Information
Reducing your environmental impact while saving money
51

Power Consumption and Activation Time
The amount of electricity a device consumes depends on the way the device is used. This product isdesigned and set in a way to allow you to reduce your electricity costs. After the last print it switches toReady Mode. In this mode it can print again immediately if required. If the product is not used for a time,the device switches to its Power Save Mode. The devices consume less power (Watt) in these modes.If you wish to set a longer Activation Time or would like to completely deactivate the Power Save Mode,please consider that this device may then only switch to a lower energy level after a longer period oftime or not at all.Canon does not recommend extending the Activation Times from the optimum ones set as default.
Energy Star®
The Energy Star® programme is a voluntary scheme to promote the development and purchase ofenergy efficient models, which help to minimise environmental impact.Products which meet the stringent requirements of the Energy Star® programme for both environmentalbenefits and the amount of energy consumption will carry the Energy Star® logo accordingly.
Paper types
This product can be used to print on both recycled and virgin paper (certified to an environmentalstewardship scheme), which complies with EN12281 or a similar quality standard. In addition it cansupport printing on media down to a weight of 64g/m2, lighter paper means less resources used and alower environmental footprint for your printing needs.
52

Main Components and Basic Operations
Main Components
About the Power Supply of the Machine
LCD and Operation Panel
Entering Numbers, Letters, and Symbols
53

Main Components
Front View
Rear View
Inside View
Operation Panel
54

Front View
(1) operation panelUse to change the settings of the machine or to operate it.
Operation Panel
(2) ADF (Auto Document Feeder)Load a document here. The documents loaded in the document tray are scanned automatically onesheet at a time.
Loading Documents in the ADF (Auto Document Feeder)
(3) document feeder coverOpen when clearing jammed documents.
(4) document guidesAdjust these guides to match the width of document in the ADF.
(5) document trayOpen to load a document in the ADF. You can load two or more sheets of document of the same sizeand thickness. Load the document with the side you want to scan facing up.
(6) document output slotDocuments scanned from the ADF are delivered here.
(7) document coverOpen to load an original on the platen glass.
(8) Wi-Fi lampLights or flashes blue to indicate the wireless LAN status.
Lights:Wireless LAN active is selected.
55

Flashes:Printing or scanning over wireless LAN. Also flashes while configuring the wireless LANconnection.
(9) paper output coverOpen to replace the FINE cartridge or remove jammed paper inside the machine.
(10) paper guidesAlign with both sides of the paper stack.
(11) front trayLoad paper here. Two or more sheets of the same size and type of paper can be loaded at the sametime, and fed automatically one sheet at a time.
Loading Plain Paper / Photo PaperLoading Envelopes
(12) front coverOpen to load paper in the front tray.
(13) paper supportExtend to load paper in the front tray.
(14) output tray extensionOpen to support ejected paper.
(15) paper output supportExtend to support ejected paper.
(16) paper output trayPrinted paper is ejected.
(17) platen glassLoad an original here.
56

Rear View
(1) transport unitOpen to remove jammed paper.
(2) power cord connectorPlug in the supplied power cord.
(3) telephone line jackConnect the telephone line.
(4) external device jackConnect an external device such as telephone or answering machine.
(5) USB portPlug in the USB cable to connect the machine with a computer.
Important• Do not touch the metal casing.• Do not plug in or unplug the USB cable while the machine is printing or scanning originals with the
computer.
57

Inside View
(1) ink cartridge lock leverLocks the FINE cartridge into place.
(2) FINE cartridge (ink cartridges)A replaceable cartridge that integrates print head and ink tank.
(3) FINE cartridge holderInstall the FINE cartridge.
The color FINE cartridge should be installed into the left slot and the black FINE cartridge should beinstalled into the right slot.
(4) head coverOpens to enable replacement of the FINE cartridge. The head cover will open automatically when youopen the paper output cover.
Note• For details on replacing a FINE cartridge, see Replacing a FINE Cartridge.
Important• The area around the parts (A) may be splattered with ink. This does not affect the performance of the
machine.• Do not touch the parts (A) or the electrical contacts (B) behind them. The machine may not print
properly if you touch them.
58

59

Operation Panel
* All lamps on the operation panel are shown lit in the figure below for explanatory purposes.
(1) ON button (POWER lamp)Turns the power on or off. Lights or flashes green to indicate the power status. Before turning on thepower, make sure that the document cover is closed.
Turning the Machine On and Off
(2) COPY buttonSwitches the machine to the copy mode.
(3) FAX buttonSwitches the machine to the fax mode.
(4) LCD (Liquid Crystal Display)Displays messages, menu items, and the operational status.
(5) Numeric buttonsUsed to enter numerical values such as the number of copies, as well as fax/telephone numbers andcharacters.
(6) Black buttonStarts black & white copying, scanning, faxing, etc.
(7) Color buttonStarts color copying, scanning, faxing, etc.
(8) Stop buttonCancels operation when print, copy, scan, or fax transmission/reception job is in progress.
(9) Alarm lampLights or flashes orange when an error occurs.
(10) Tone buttonSwitches to tone dialing temporarily if your machine is connected to a rotary pulse line. This button isalso used to enter characters.
(11) OK buttonFinalizes the selection of a menu or setting item. This button is also used to resolve an error or ejectsdocuments in the ADF (Auto Document Feeder).
(12) and buttonsUsed to increase/decrease a setting value such as the number of copies, and select a menu or settingitem. The or button is also used when entering characters.
LCD and Operation Panel
60

(13) Back buttonReturns the LCD to the previous screen. This button is also used to delete a character under the cursorwhen entering characters, such as when entering a name for registration.
(14) Setup buttonDisplays the Setup menu screen. With this menu, you can perform machine maintenance and changemachine settings.
(15) SCAN buttonSwitches the machine to the scan mode.
(16) FAX Memory lampLights when there are received or unsent documents stored in the machine's memory.
(17) Menu buttonDisplays the Copy menu, Scan menu, or FAX menu screen.
Note• The machine makes the beep sound when pressing buttons on the operation panel. The sound volume
can be adjusted in Sound control of Dev. user settings.
Dev. user settings
61

About the Power Supply of the Machine
Confirming that the Power Is On
Turning the Machine On and Off
Notice for the Power Plug/Power Cord
Notice for Unplugging the Power Cord
62

Confirming that the Power Is On
The POWER lamp is lit green when the machine is turned on.
Even if the LCD is off, if the POWER lamp is lit, the machine is on.
Note• It may take a while for the machine to start printing immediately after you turn on the machine.• The LCD will turn off if the machine is not operated for about 5 minutes. To restore the display, press
any button except the ON button or perform the print operation. The display will be also restored whenreceiving faxes. You cannot change the wait time before the LCD turns off.
63

Turning the Machine On and Off
Turning on the machine
1. Press the ON button to turn on the machine.
The POWER lamp flashes and then remains lit green.
Confirming that the Power Is On
Note• It may take a while for the machine to start printing immediately after you turn on the machine.• If the Alarm lamp lights up or flashes orange and an error message is displayed on the LCD,
see A Message Is Displayed.
Turning off the machine
1. Press the ON button to turn off the machine.
When the POWER lamp stops flashing, the machine is turned off.
Important• When you unplug the power cord after turning off the machine, be sure to confirm that the
POWER lamp is off.
Note• The machine cannot send or receive faxes when the power is turned off.• The power cannot be turned off while the machine is sending or receiving a fax, or when unsent
faxes are stored in the machine's memory.
64

Notice for the Power Plug/Power Cord
Check the power plug/power cord once a month to confirm that it does not have anything unusual describedbelow.
• The power plug/power cord is hot.• The power plug/power cord is rusty.• The power plug/power cord is bent.• The power plug/power cord is worn.• The power plug/power cord is split.
Caution• If you find anything unusual with the power plug/power cord described above, unplug the power cord
and call for service. Using the machine with one of the unusual conditions above may cause a fire or anelectric shock.
65

Notice for Unplugging the Power Cord
To unplug the power cord, follow the procedure below.
Important• When you unplug the power cord, press the ON button, then confirm that the POWER lamp is off.
Unplugging the power cord before the POWER lamp is turned off may cause drying or clogging of theprint head and print quality may be reduced.
• If the power cord is unplugged, the date/time settings will be reset and all documents stored in themachine's memory will be lost. Send or print a necessary document before unplugging the power cord.
1. Press the ON button to turn the machine off.
2. Confirm that the POWER lamp is off.
3. Unplug the power cord.
The specification of the power cord differs depending on the country or region of use.
66

LCD and Operation Panel
The mode button (A) on the operation panel allows you to switch between the copy mode, scan mode, faxmode, or setup menu screen.
Pressing the Menu button (B) in the respective modes shows the menu screen to select various functions orsettings.
Selecting a Menu or Setting Item
On the menu screen or settings screen, use the or button (C) to select an item or option, then pressthe OK button (D) to proceed with the procedure.
To return to the previous screen, press the Back button (E).
Example: Changing the scan contrast for faxing.
Press the Menu button in the Fax standby screen.
Press the or button (C) to select FAX TX settings.
Press the OK button (D).
Select Scan contrast, press the OK button (D).
Use the or button to change the contrast, then press the OK button (D).
67

Entering Numbers, Letters, and Symbols
The machine allows you to enter characters using the Numeric buttons when entering information, such asunit name, a recipient's name for memory dial, etc.
Switching the Input Mode
Each time the Tone button is pressed, the input mode is switched in the following order: lowercase mode(:a), uppercase mode (:A), then numeric mode (:1).
The current input mode appears at the upper right corner of the LCD.
Entering Numbers, Letters, and Symbols
Press the Tone button to switch the input mode.
Use the Numeric buttons to enter the desired characters.
• To insert a space
Press the button three times.
• To delete the last entered character
Press the Back button.
Editing Entered Numbers, Letters, and Symbols
Press the or button to move the cursor under the position you want to edit.
• To insert a space
Press the button three times.
• To insert a character
Move the cursor under the character to the right of the insertion position, then enter the character. Thecharacter on the cursor will move to the right and the new character will be inserted.
• To delete a character
Move the cursor under the character, then press the Back button.
List of Characters Assigned to Each Numeric Button
ButtonLowercase mode
(:a)Uppercase mode
(:A)Numeric mode
(:1)Fax/Telephone
no.
1 1
68

abcåäáàãâæç ABCÅÄÁÀÃÂÆÇ 2 2
defëéèê DEFËÉÈÊ 3 3
gh i ï í ì î GH I Ï Í Ì Î 4 4
jkl JKL 5 5
mnoñøöóòõô MNOÑØÖÓÒÕÔ 6 6
pqrsþ PQRSÞ 7 7
tuvüúùû TUVÜÚÙÛ 8 8
wxyzý WXYZÝ 9 9
0 0
- . SP*1 # ! " , ; : ^ ` _ = / | ' ? $ @ % & + ( ) [ ] { } < > \*2 ~*2 #
Switch the input mode.
*1 "SP" indicates a space.
*2 Displayed only when entering characters in the LAN settings.
69

Loading Paper / Originals
Loading Paper
Loading Originals
70

Loading Paper
Loading Plain Paper / Photo Paper
Loading Envelopes
Media Types You Can Use
Media Types You Cannot Use
Printing Area
71

Loading Plain Paper / Photo Paper
You can load plain paper or photo paper.
Important• If you cut plain paper into small size such as 4" x 6" (10 x 15 cm) or 5" x 7" (13 x 18 cm) to perform trial
print, it can cause paper jams.
Note• We recommend Canon genuine photo paper for printing photos.
For details on the Canon genuine paper, see Media Types You Can Use.
• You can use general copy paper.
For the page size and paper weight you can use for this machine, see Media Types You Can Use.
1. Prepare paper.
Align the edges of paper. If paper is curled, flatten it.
Note• Align the edges of paper neatly before loading. Loading paper without aligning the edges may
cause paper jams.• If paper is curled, hold the curled corners and gently bend them in the opposite direction until the
paper becomes completely flat.
For details on how to flatten curled paper, see "Load the paper after correcting its curl." in Paper IsSmudged/Printed Surface Is Scratched.
• When using Photo Paper Plus Semi-gloss SG-201, even if the sheet is curled, load one sheet at atime as it is. If you roll up this paper to flatten, this may cause cracks on the surface of the paperand reduce the print quality.
2. Load paper.
1. Open the front cover gently, and extend the paper support.
72

2. Use the right paper guide (A) to slide both paper guides all the way out.
3. Load the paper in the center of the front tray WITH THE PRINT SIDE FACING DOWN.
Push the paper stack all the way to the back of the front tray.
4. Slide the right paper guide (A) to align the paper guides with both sides of the paper stack.
Do not slide the paper guides too hard against the paper. The paper may not be fed properly.
Important• Always load paper in the portrait orientation (B). Loading paper in the landscape orientation (C) can
cause paper jams.
73

Note• Do not overload paper by stacking until the top of the stack touches the paper guides.• Load small size paper, such as 4" x 6" (10 x 15 cm), by pushing it in all the way to the back of the
front tray.
5. Open the output tray extension.
3. Open the paper output tray.
1. Open the paper output tray gently, and extend the paper output support.
74

Important• Be sure to open the paper output tray when printing. If not open, the machine cannot start printing.
Note• After loading paper, select the size and type of the loaded paper on the print settings screen of the
operation panel or printer driver.
75

Loading Envelopes
You can load Envelope DL and Envelope Com 10.
The address is automatically rotated and printed according to the envelope's direction by specifying with theprinter driver properly.
Important• Printing of envelopes from the operation panel is not supported.• Do not use the following envelopes. They could jam in the machine or cause the machine to
malfunction.
• Envelopes with an embossed or treated surface• Envelopes with a double flap• Envelopes whose gummed flaps are already moistened and adhesive
1. Prepare envelopes.
• Press down on all four corners and edges of the envelopes to flatten them.
• If the envelopes are curled, hold the opposite corners and gently twist them in the oppositedirection.
• If the corner of the envelope flap is folded, flatten it.• Use a pen to press the leading edge in the inserting direction flat and sharpen the crease.
The figures above show a side view of the leading edge of the envelope.
Important• The envelopes may jam in the machine if they are not flat or the edges are not aligned. Make sure
that no curl or puff exceeds 0.1 inch (3 mm).
2. Load envelopes.
1. Open the front cover gently, and extend the paper support.
76

2. Use the right paper guide (A) to slide both paper guides all the way out.
3. Load the envelopes in the center of the front tray WITH THE ADDRESS SIDE FACINGDOWN.
The folded flap of the envelope will be faced up on the left side.
(B) Rear side(C) Address side
Push the envelopes all the way to the back of the front tray.
Up to 5 envelopes can be loaded at once.
4. Slide the right paper guide (A) to align the paper guides with both sides of the envelopes.
Do not slide the paper guides too hard against the envelopes. The envelopes may not be fed properly.
77

Note• Do not overload envelopes by stacking until the top of the stack touches the paper guides.
5. Open the output tray extension.
3. Open the paper output tray.
1. Open the paper output tray gently, and extend the paper output support.
Important• Be sure to open the paper output tray when printing. If not open, the machine cannot start printing.
78

Note• After loading envelopes, select the size and type of the loaded envelopes on the print settings screen of
the printer driver.
79

Media Types You Can Use
Choose paper suitable for printing, for the best print results. Canon provides you various types of paper toenhance the fun of printing, such as stickers as well as papers for photo or document. We recommend theuse of Canon genuine paper for printing your important photos.
Media Types
Commercially available papers
• Plain Paper (including recycled paper)*1• Envelopes*2
Canon genuine papers
The Model Number of Canon genuine paper is shown in brackets. Refer to the instruction manualsupplied with the paper for detailed information on the printable side and notes on handling paper. Forinformation on the page sizes available for each Canon genuine paper, access our website.
Note• You may not be able to purchase some Canon genuine papers depending on the country or region
of purchase. Paper is not sold in the US by Model Number. Purchase paper by name.
Paper for printing photos:
• Photo Paper Pro Platinum <PT-101>• Glossy Photo Paper "Everyday Use" <GP-501/GP-601>• Photo Paper Glossy <GP-601>• Photo Paper Plus Glossy II <PP-201>• Photo Paper Pro Luster <LU-101>• Photo Paper Plus Semi-gloss <SG-201>• Matte Photo Paper <MP-101>
Paper for printing business documents:
• High Resolution Paper <HR-101N>*2
Paper for creating your own prints:
• T-Shirt Transfers <TR-301>*2• Photo Stickers <PS-101>
*1 100% recycled paper can be used.*2 Printing to this paper from the operation panel is not supported.
Paper Load LimitMedia Type Settings on the Operation PanelSetting the Media Type with the Printer Driver
Page Sizes
You can use the following page sizes.
80

Note• Printing of envelopes from the operation panel is not supported.
Standard sizes:
• Letter• Legal• A5• A4• B5• 4" x 6" (10 x 15 cm)• 5" x 7" (13 x 18 cm)• 8" x 10" (20 x 25 cm)• Envelope DL• Envelope Com 10
Non-standard sizes:
You can print on non-standard size paper within the following ranges.
• Minimum size: 3.50 x 5.00 inches (89.0 x 127.0 mm)• Maximum size: 8.50 x 26.61 inches (215.9 x 676.0 mm)
Paper Weight
You can use paper in the following weight range.
• 17 to 28 lb (64 to 105 g /m2) (except for Canon genuine paper)
Do not use heavier or lighter paper (except for Canon genuine paper), as it could jam in the machine.
Notes on Storing Paper
• Take out only the necessary number of paper from the package, just before printing.• To avoid curling, when you do not print, put unused paper back into the package and keep it on a
level surface. And also, store it avoiding heat, humidity, and direct sunlight.
81

Paper Load Limit
Commercially Available Papers
Media Name Front Tray Paper Output Tray
Plain Paper (including recycled paper)*1 Approx. 100 sheets Approx. 50 sheets
Envelopes 5 envelopes *2
Canon Genuine Papers
Note• We recommend that you remove the previously printed sheet from the paper output tray before
continuously printing to avoid blurs and discoloration (except for High Resolution Paper <HR-101N>).
Paper for printing photos:
Media Name <Model No.> Front Tray
Photo Paper Pro Platinum <PT-101>*3 10 sheets: A4, Letter, and 8" x 10" (20 x 25 cm)
20 sheets: 4" x 6" (10 x 15 cm)
Glossy Photo Paper "Everyday Use" <GP-501/GP-601>*3 10 sheets: A4 and Letter
20 sheets: 4" x 6" (10 x 15 cm)
Photo Paper Glossy <GP-601>*3 10 sheets: A4 and Letter
20 sheets: 4" x 6" (10 x 15 cm)
Photo Paper Plus Glossy II <PP-201>*3 10 sheets: A4, Letter, 5" x 7" (13 x 18 cm), and 8" x 10"(20 x 25 cm)
20 sheets: 4" x 6" (10 x 15 cm)
Photo Paper Pro Luster <LU-101>*3 10 sheets: A4 and Letter
Photo Paper Plus Semi-gloss <SG-201>*3 10 sheets: A4, Letter, 5" x 7" (13 x 18 cm), and 8" x 10"(20 x 25 cm)
20 sheets: 4" x 6" (10 x 15 cm)
Matte Photo Paper <MP-101> 10 sheets: A4 and Letter
20 sheets: 4" x 6" (10 x 15 cm)
Paper for printing business documents:
Media Name <Model No.> Front Tray Paper Output Tray
High Resolution Paper <HR-101N> 80 sheets 50 sheets
Paper for creating your own prints:
Media Name <Model No.> Front Tray
T-Shirt Transfers <TR-301> 1 sheet
Photo Stickers <PS-101> 1 sheet
82

*1 Proper feeding of paper may not be possible at the maximum capacity depending on the type of paperor environmental conditions (either very high or low temperature or humidity). In such cases, reduce thenumber of paper you load at a time to less than half.*2 We recommend that you remove the previously printed envelope from the paper output tray beforecontinuously printing to avoid blurs and discoloration.*3 When loading paper in stacks, the print side may become marked as it is fed or paper may not feedproperly. In this case, load one sheet at a time.
83

Media Type Settings on the Operation Panel
Commercially Available Papers
Media Name Settings in Media type
Plain Paper (including recycled paper) Plain paper
Canon Genuine Papers
Paper for printing photos:
Media Name <Model No.> Settings in Media type
Photo Paper Pro Platinum <PT-101> Pro Platinum
Glossy Photo Paper "Everyday Use" <GP-501/GP-601> Glossy
Photo Paper Glossy <GP-601> Glossy
Photo Paper Plus Glossy II <PP-201> Plus Glossy II
Photo Paper Pro Luster <LU-101> Plus Semi-gloss
Photo Paper Plus Semi-gloss <SG-201> Plus Semi-gloss
Matte Photo Paper <MP-101> Matte
84

Media Types You Cannot Use
Do not use the following types of paper. Using such paper will cause not only unsatisfactory results, but alsothe machine to jam or malfunction.
• Folded, curled, or wrinkled paper• Damp paper• Paper that is too thin (weighing less than 17 lb (64 g /m2))• Paper that is too thick (weighing more than 28 lb (105 g /m2), except for Canon genuine paper)• Paper thinner than a postcard, including plain paper or notepad paper cut to a small size (when printing
on paper smaller than A5)• Picture postcards• Postcards affixed with photos or stickers• Envelopes with a double flap• Envelopes with an embossed or treated surface• Envelopes whose gummed flaps are already moistened and adhesive• Any type of paper with holes• Paper that is not rectangular• Paper bound with staples or glue• Paper with adhesives• Paper decorated with glitter, etc.
85

Printing Area
Printing Area
Other Sizes than Letter, Legal, Envelopes
Letter, Legal
Envelopes
86

Printing Area
To ensure the best print quality, the machine allows a margin along each edge of media. The actualprintable area will be the area inside these margins.
Recommended printing area : Canon recommends that you print within this area.
Printable area : The area where it is possible to print. However, printing in this area can affect the printquality or the paper feed precision.
Note• When performing borderless copying or borderless printing from a printed photo, you can specify the
amount of images that extends off the paper by Extended copy amt. in Output settings.
Output settings
• By selecting Borderless Printing option, you can make prints with no margins.• When performing Borderless Printing, slight cropping may occur at the edges since the printed image is
enlarged to fill the whole page.• For Borderless Printing, use the following paper:
• Photo Paper Pro Platinum <PT-101>• Glossy Photo Paper "Everyday Use" <GP-501/GP-601>• Photo Paper Glossy <GP-601>• Photo Paper Plus Glossy II <PP-201>• Photo Paper Pro Luster <LU-101>• Photo Paper Plus Semi-gloss <SG-201>• Matte Photo Paper <MP-101>
Performing Borderless Printing on any other type of paper may substantially reduce printing qualityand/or result in printouts with altered color hues.
Borderless Printing on plain paper may result in printouts with reduced quality. Use them only for testprinting. Borderless Printing onto plain paper from the operation panel is not supported.
• Borderless Printing is not available for legal, A5, or B5 sized paper, or envelopes.• Depending on the type of paper, Borderless Printing may reduce the print quality at the top and bottom
edges of the paper or cause these parts to become smudged.
87

Other Sizes than Letter, Legal, Envelopes
Size Printable Area (width x height)
A5 5.56 x 7.95 inches (141.2 x 202.0 mm)
A4 8.00 x 11.38 inches (203.2 x 289.0 mm)
B5 6.90 x 9.80 inches (175.2 x 249.0 mm)
4" x 6" (10 x 15 cm) 3.73 x 5.69 inches (94.8 x 144.4 mm)
5" x 7" (13 x 18 cm) 4.73 x 6.69 inches (120.2 x 169.8 mm)
8" x 10" (20 x 25 cm) 7.73 x 9.69 inches (196.4 x 246.0 mm)
Recommended printing area
(A) 1.28 inches (32.5 mm)(B) 1.32 inches (33.5 mm)
Printable area
(C) 0.12 inch (3.0 mm)(D) 0.20 inch (5.0 mm)(E) 0.13 inch (3.4 mm)(F) 0.13 inch (3.4 mm)
88

Letter, Legal
Size Printable Area (width x height)
Letter 8.00 x 10.69 inches (203.2 x 271.4 mm)
Legal 8.00 x 13.69 inches (203.2 x 347.6 mm)
Recommended printing area
(A) 1.28 inches (32.5 mm)(B) 1.32 inches (33.5 mm)
Printable area
(C) 0.12 inch (3.0 mm)(D) 0.20 inch (5.0 mm)(E) 0.25 inch (6.4 mm)(F) 0.25 inch (6.3 mm)
89

Envelopes
Size Recommended Printing Area (width x height)
Envelope DL 3.88 x 7.06 inches (98.8 x 179.5 mm)
Envelope Com 10 3.68 x 7.90 inches (93.5 x 200.8 mm)
Recommended printing area
(A) 0.31 inch (8.0 mm)(B) 1.28 inches (32.5 mm)(C) 0.22 inch (5.6 mm)(D) 0.22 inch (5.6 mm)
90

Loading Originals
Position to Load Originals
Loading Originals on the Platen Glass
Loading Documents in the ADF (Auto Document Feeder)
How to Load Originals for Each Function
Originals You Can Load
91

Position to Load Originals
The machine has two positions to load originals: platen glass and ADF (Auto Document Feeder).
Select the position to load the original according to the size, type, or usage.
Originals You Can Load
Loading Documents, Photos, or Book on the platen glass
Loading Two or More Sheets of Document of the Same Size and Thicknessin the ADF
You can also load a sheet of document in the ADF.
Note• To scan the original at optimum quality, load it on the platen glass.
92

Loading Originals on the Platen Glass
1. Load an original on the platen glass.
1. Open the document cover.
Important• When opening or closing the document cover, do not touch the buttons and LCD on the operation
panel. Doing so may result in an unexpected operation.
2. Load the original WITH THE SIDE TO SCAN FACING DOWN on the platen glass.
Originals You Can LoadHow to Load Originals for Each Function
Important• Be sure to observe the following when loading the original on the platen glass.
• Do not place any objects weighing 4.4 lb (2.0 kg) or more on the platen glass.• Do not put any pressure of 4.4 lb (2.0 kg) or more on the platen glass, such as pressing down
the original.
Failure to observe the above may cause the scanner to malfunction or the platen glass to break.
2. Close the document cover gently.
93

Important• After loading the original on the platen glass, be sure to close the document cover before starting to
copy, fax, or scan.
94

Loading Documents in the ADF (Auto Document Feeder)
Note• To scan a document at optimum quality, load it on the platen glass.
1. Make sure that any original has been removed from the platen glass.
2. Load a document in the ADF.
1. Open the document tray.
2. Insert the document in the document tray until you hear a beep sound.
Load the document WITH THE SIDE TO SCAN FACING UP in the document tray.
Originals You Can Load
Note• When you set the alarm to be silent in Sound control of Dev. user settings, the alarm will not beep
even if the document is inserted in the document tray.
Dev. user settings
3. Adjust the document guides to match the width of the document.
Do not slide the document guides too hard against the document. The document may not be fed properly.
95

96

How to Load Originals for Each Function
Load the original in the correct position according to the function to use. If you do not load the originalcorrectly, it may not be scanned properly.
Loading the Original to Be Aligned with the alignment mark
• Load originals to copy or fax• In the scan mode,
◦ select Auto scan for Document type to scan text documents, magazines, or newspapers◦ select Document or Photo for Document type and specify a standard size (A4, Letter, etc.) for
Scan size to scan originals
• With a software application on a computer,
◦ scan text documents, magazines, or newspapers◦ select a standard size (A4, Letter, etc.) to scan originals
Place the original WITH THE SIDE TO SCAN FACING DOWN on the platen glass and align it with the
alignment mark . Portions placed on the diagonally striped area cannot be scanned.
Important• The machine cannot scan the striped area (A) (0.04 inch (1 mm) from the edges of the platen glass).
Loading Only One Original in the Center of the platen glass
• In the scan mode,
◦ select Auto scan for Document type to scan one printed photo, postcard, business card, or disc
97

◦ select Photo for Document type and specify Auto scan(A) -Singl for Scan size to scan oneoriginal
• Scan one printed photo, postcard, business card, or disc with a software application on a computer
Place the original WITH THE SIDE TO SCAN FACING DOWN, with 0.4 inch (1 cm) or more spacebetween the edges (diagonally striped area) of the platen glass. Portions placed on the diagonally stripedarea cannot be scanned.
Loading Two or More Originals on the platen glass
• In the scan mode,
◦ select Auto scan for Document type to scan two or more printed photos, postcards, or businesscards
◦ select Photo for Document type and specify Auto scan(A) -Multi for Scan size to scan two ormore originals
• Scan two or more printed photos, postcards, or business cards with a software application on acomputer
Place the originals WITH THE SIDE TO SCAN FACING DOWN. Allow 0.4 inch (1 cm) or more spacebetween the edges (diagonally striped area) of the platen glass and the originals, and between theoriginals. Portions placed on the diagonally striped area cannot be scanned.
(A) More than 0.4 inch (1 cm)
Note• The Skew Correction function automatically compensates for the originals placed at an angle of up to
approximately 10 degrees. Slanted photos with a long edge of 7.1 inches (180 mm) or more cannotbe corrected.
• Non-rectangular or irregular shaped photos (such as cut out photos) may not be scanned properly.
98

Originals You Can Load
platen glass
Item Details
Types of originals - Text document, magazine, or newspaper
- Printed photo, postcard, business card, or disc (BD/DVD/CD, etc.)
- Documents that are not suitable for the ADF
Size (width x height) Max. 8.5 x 11.7 inches (216 x 297 mm)
Quantity 1 sheet or multiple sheets*
Thickness Max. 0.39 inch (10 mm)
* Two or more originals can be loaded on the platen glass depending on the selected function.
How to Load Originals for Each Function
ADF
Item Details
Types of originals Multipage plain-paper documents of the same size, thickness, and weight
Size (width x height) - Max. 8.5 x 14.0 inches (216 x 356 mm)
- Min. 5.8 x 5.8 inches (148 x 148 mm)
Only A4 or Letter-sized documents for 2-on-1 copy and 4-on-1 copy
Quantity - A4 or Letter size: Max. 30 sheets (20 lb (75 g /m2) paper), up to 0.12inch (3 mm) in height
- Legal size: Max. 5 sheets (20 lb (75 g /m2) paper), up to 0.02 inch (0.5mm) in height
- Other sizes: 1 sheet
Thickness 0.002 to 0.005 inch (0.06 to 0.13 mm)
Weight 13 to 24 lb (50 to 90 g /m2)
Note• Make sure any glue, ink, correction fluid, or the like on the document is completely dry before loading
it on the platen glass or in the ADF.
However, do not load glued documents in the ADF even if the glue is dry, as this may cause paperjams.
• Remove all staples, paper clips, and the like before feeding the document.• Load Legal-sized documents in the ADF.• Do not load the following types of documents in the ADF. They will jam.
• Wrinkled or creased paper• Curled paper• Torn paper• Paper with holes• Glued paper• Paper with sticky notes
99

• Carbon paper or carbon-backed paper• Surface treated paper• Onion skin or thin paper• Photo or thick paper
100

Replacing a FINE Cartridge
Replacing a FINE Cartridge
Checking the Ink Status
101

Replacing a FINE Cartridge
When remaining ink cautions or errors occur, the message will appear on the LCD to inform you of the error.Take appropriate action according to the message.
A Message Is Displayed
Note• For information on the compatible FINE cartridge, refer to the printed manual: Safety and Important
Information.
Replacing Procedure
When you need to replace a FINE cartridge, follow the procedure below.
Important• Do not touch the electrical contacts (A) or print head nozzle (B) on a FINE cartridge. The machine
may not print properly if you touch them.
• If you remove a FINE cartridge, replace it immediately. Do not leave the machine with the FINEcartridge removed.
• Use a new FINE cartridge for replacement. Installing a used FINE cartridge may cause the nozzles toclog.
Furthermore, with such a FINE cartridge, the machine will not be able to inform you when to replacethe FINE cartridge properly.
• Once a FINE cartridge has been installed, do not remove it from the machine and leave it out in theopen. This will cause the FINE cartridge to dry out, and the machine may not operate properly when itis reinstalled. To maintain optimal printing quality, use a FINE cartridge within six months of first use.
Note• If a FINE cartridge runs out of ink, you can print with either color or black FINE cartridge, in whichever
ink remains, only for a while. However the print quality may be reduced compared to when printingwith both cartridges. We recommend to use a new FINE cartridge in order to obtain optimumqualities.
Even when printing with one ink only, print with leaving the empty FINE cartridge installed. If either ofthe color FINE cartridge or black FINE cartridge is not installed, an error occurs and the machinecannot print.
For information on how to configure this setting, see Setting the Ink Cartridge to be Used.
• Color ink may be consumed even when printing a black-and-white document or when black-and-white printing is specified.
102

Both color ink and black ink are also consumed in the standard cleaning and deep cleaning of theprint head, which may be necessary to maintain the performance of the machine. When ink runs out,replace the FINE cartridge immediately with a new one.
Useful Information about Ink
1. Make sure that the power is turned on, open the front cover (C), then open the paperoutput tray (D).
2. Open the paper output cover (E).
When the FINE cartridge holder moves to the replacement position, the head cover (F) OPENSAUTOMATICALLY.
Caution• Do not hold the FINE cartridge holder to stop or move it forcibly. Do not touch the FINE
cartridge holder until it stops completely.
Important• The head cover will open automatically after you open the paper output cover.
If you have closed the head cover while replacing a FINE cartridge, close the paper outputcover, then open it again.
Trying to force open the head cover with your hand may cause the machine to malfunction.
• Do not touch the metallic parts or other parts inside the machine.
103

• If the paper output cover is left open for more than 10 minutes, the FINE cartridge holder movesto the far right and the Alarm lamp lights. In this case, close the paper output cover, then openit again.
3. Remove the empty FINE cartridge.
1. Push down the ink cartridge lock lever until it clicks.
2. Remove the FINE cartridge.
Important• Handle the FINE cartridge carefully to avoid staining of clothing or the surrounding area.• Discard the empty FINE cartridge according to the local laws and regulations regarding disposal
of consumables.
4. Prepare a new FINE cartridge.
1. Take a new FINE cartridge out of its package and remove the protective tape (G) gently.
104

Important• If you shake a FINE cartridge, ink may spill out and stain your hands and the surrounding area.
Handle a FINE cartridge carefully.• Be careful not to stain your hands and the surrounding area with ink on the removed protective
tape.• Do not reattach the protective tape once you have removed it. Discard it according to the local
laws and regulations regarding disposal of consumables.• Do not touch the electrical contacts or print head nozzle on a FINE cartridge. The machine may
not print properly if you touch them.
5. Install the FINE cartridge.
1. Insert the new FINE cartridge straight into the FINE cartridge holder all the way until ittouches the back.
The color FINE cartridge should be installed into the left slot and the black FINE cartridge should beinstalled into the right slot.
Important• Insert the FINE cartridge gently so that it does not hit the electrical contacts on the FINE cartridge
holder.
105

2. Push up the ink cartridge lock lever to lock the FINE cartridge into place.
The FINE cartridge is locked into place when the ink cartridge lock lever clicks.
Important• Check if the FINE cartridge is installed correctly.
• The machine cannot print unless both the color FINE cartridge and black FINE cartridge areinstalled. Be sure to install both cartridges.
6. Close the paper output cover (H).
106

Note• If the error message appears after the paper output cover is closed, take appropriate action.
A Message Is Displayed
• When you start printing after replacing the FINE cartridge, the machine starts cleaning the printhead automatically. Do not perform any other operations until the machine completes thecleaning of the print head.
• If the print head is out of alignment, as indicated by misaligned printed ruled lines or similarsymptoms, align the print head.
• The machine may make noise during operation.
107

Checking the Ink Status
Checking the Ink Status with the LCD on the Machine
You can also check the ink status on the computer screen.
Checking the Ink Status from Your Computer
108

Checking the Ink Status with the LCD on the Machine
Note• The ink level detector is mounted on the machine to detect the remaining ink level. The machine
considers as ink is full when a new FINE cartridge is installed, and then starts to detect a remaining inklevel. If you install a used FINE cartridge, the indicated ink level of it may not be correct. In such case,refer to the ink level information only as a guide.
• When remaining ink cautions or errors occur, the message will appear to inform you of the error. Takeappropriate action according to the message.
A Message Is Displayed
1. Make sure that the power is turned on, and press the Setup button.
The Setup menu screen will appear.
2. Use the or button to select Ink information, then press the OK button.
LCD and Operation Panel
3. Use the or button to select Remaining ink, then press the OK button.
Remaining ink is shown in the area (A).
Example:
The ink is running low. Prepare a new ink cartridge.
Note• To print the model number of the FINE cartridge, select Ink information from Setup menu, then
select Print ink number.• You can also check the ink status on the LCD when you press the COPY, FAX, SCAN, or Setup
button. The current remaining ink level will be displayed on the LCD for a few seconds.• You can also check the ink status on the computer screen.
Checking the Ink Status from Your Computer
109

Maintenance
When Printing Becomes Faint or Colors Are Incorrect
Performing Maintenance from a Computer
Cleaning the Machine
110

When Printing Becomes Faint or Colors Are Incorrect
Maintenance Procedure
Printing the Nozzle Check Pattern
Examining the Nozzle Check Pattern
Cleaning the Print Head
Cleaning the Print Head Deeply
Aligning the Print Head
111

Maintenance Procedure
If print results are blurred, colors are not printed correctly, or print results are unsatisfactory (e.g. misalignedprinted ruled lines), perform the maintenance procedure below.
Important• Do not rinse or wipe the FINE cartridge. This can cause trouble with the FINE cartridge.
Note• Check if ink remains in the FINE cartridge.
Checking the Ink Status with the LCD on the Machine
• Check if the FINE cartridge is installed correctly.
Replacing Procedure
Also check if the protective tape on the bottom of the FINE cartridge is removed.
• If an error message appears on the LCD, see A Message Is Displayed.• Increasing the print quality in the printer driver settings may improve the print result.
Changing the Print Quality and Correcting Image Data
When the Print Results Are Blurred or Uneven:
Step1 Print the nozzle check pattern.
From the machine
Printing the Nozzle Check Pattern
From the computer
Use Your Computer to Print a Nozzle Check Pattern
Step2 Examine the nozzle check pattern.
If there are missing lines or horizontal white streaks in the pattern:
Step3 Clean the print head.
From the machine
Cleaning the Print Head
From the computer
112

Cleaning the Print Heads from Your Computer
After cleaning the print head, print and examine the nozzle check pattern: Step1
If the problem is not resolved after cleaning the print head twice:
Step4 Clean the print head deeply.
From the machine
Cleaning the Print Head Deeply
From the computer
Cleaning the Print Heads from Your Computer
If the problem is not resolved, turn off the power and clean the print head deeply again after 24 hours. Do notunplug the power cord when turning off the power.
If the problem is still not resolved:
Step5 Replace a FINE cartridge.
Note• If the problem is still not resolved after replacing the FINE cartridge, contact the service center.
When the Print Results Are Not Even such as the Ruled Lines AreMisaligned:
Step Align the print head.
From the machine
Aligning the Print Head
From the computer
Aligning the Print Head Position Automatically from Your Computer
113

Printing the Nozzle Check Pattern
Print the nozzle check pattern to determine whether the ink ejects properly from the print head nozzle.
Note• If the remaining ink level is low, the nozzle check pattern will not be printed correctly. Replace the FINE
cartridge whose ink is low.
You need to prepare: a sheet of A4 or Letter-sized plain paper
1. Make sure that the power is turned on.
2. Load a sheet of A4 or Letter-sized plain paper in the front tray.
3. Open the output tray extension, open the paper output tray, then extend the paper outputsupport.
4. Print the nozzle check pattern.
1. Press the Setup button.
The Setup menu screen will appear.
2. Use the or button to select Maintenance, then press the OK button.
LCD and Operation Panel
3. Use the or button to select Nozzle check, then press the OK button.
The nozzle check pattern will be printed.
5. Examine the nozzle check pattern.
114

Examining the Nozzle Check Pattern
Examine the nozzle check pattern, and clean the print head if necessary.
1. Check if there are missing lines in the pattern (A) or horizontal white streaks in the pattern(B).
(C) Number of sheets printed so far
If there are missing lines in the pattern (A):
Cleaning the print head is required.
(D) Good(E) Bad (lines are missing)
If there are horizontal white streaks in the pattern (B):
Cleaning the print head is required.
(F) Good(G) Bad (horizontal white streaks are present)
Note• The total number of sheets printed so far is shown in increments of 50 sheets on the printout of the
nozzle check pattern.
115

Cleaning the Print Head
Clean the print head if lines are missing or if horizontal white streaks are present in the printed nozzle checkpattern. Cleaning unclogs the nozzles and restores the print head condition. Cleaning the print headconsumes ink, so clean the print head only when necessary.
1. Make sure that the power is turned on.
2. Clean the print head.
1. Press the Setup button.
The Setup menu screen will appear.
2. Use the or button to select Maintenance, then press the OK button.
LCD and Operation Panel
3. Use the or button to select Cleaning, then press the OK button.
The machine starts cleaning the print head.
Do not perform any other operations until the machine completes the cleaning of the print head. This takesabout 1 to 2 minutes.
3. Check the print head condition.
To check the print head condition, print the nozzle check pattern.
Note• If the problem is not resolved after cleaning the print head twice, clean the print head deeply.
116

Cleaning the Print Head Deeply
If print quality does not improve by the standard cleaning of the print head, clean the print head deeply.Cleaning the print head deeply consumes more ink than the standard cleaning of the print head, so cleanthe print head deeply only when necessary.
1. Make sure that the power is turned on.
2. Clean the print head deeply.
1. Press the Setup button.
The Setup menu screen will appear.
2. Use the or button to select Maintenance, then press the OK button.
LCD and Operation Panel
3. Use the or button to select Deep cleaning, then press the OK button.
The machine starts cleaning the print head deeply.
Do not perform any other operations until the machine completes the deep cleaning of the print head. Thistakes about 1 to 2 minutes.
3. Check the print head condition.
To check the print head condition, print the nozzle check pattern.
If the problem is not resolved, turn off the power and clean the print head deeply again after 24 hours. Donot unplug the power cord when turning off the power.
If the problem is still not resolved, replace the FINE cartridge with a new one.
If the problem is still not resolved after replacing the FINE cartridge, contact the service center.
117

Aligning the Print Head
If printed ruled lines are misaligned or print results are otherwise unsatisfactory, adjust the print headposition.
Note• If the remaining ink level is low, the print head alignment sheet will not be printed correctly.
Replace the FINE cartridge whose ink is low.
You need to prepare: a sheet of A4 or Letter-sized plain paper (including recycled paper)*
* Be sure to use paper that is white and clean on both sides.
1. Make sure that the power is turned on.
2. Load a sheet of A4 or Letter-sized plain paper in the front tray.
3. Open the output tray extension, open the paper output tray, then extend the paper outputsupport.
4. Print the print head alignment sheet.
1. Press the Setup button.
The Setup menu screen will appear.
2. Use the or button to select Maintenance, then press the OK button.
LCD and Operation Panel
3. Use the or button to select Head alignment, then press the OK button.
The print head alignment sheet will be printed.
118

Important• Do not touch any printed part on the print head alignment sheet. If the sheet is stained or wrinkled, it
may not be scanned properly.• If the print head alignment sheet was not printed correctly, press the Stop button, then redo this
procedure from the beginning.
5. Scan the print head alignment sheet to adjust the print head position.
1. Confirm the message, then load the print head alignment sheet on the platen glass.
Load the print head alignment sheet WITH THE PRINTED SIDE FACING DOWN and align the mark on
the bottom right corner of the sheet with the alignment mark .
119

Note• The print head alignment sheet cannot be scanned if it is loaded in the ADF (Auto Document
Feeder).
2. Close the document cover gently, then press the Color or Black button.
The machine starts scanning the print head alignment sheet, and the print head position will be adjustedautomatically.
When adjusting the print head position is complete, remove the print head alignment sheet on the platenglass.
Important• Do not open the document cover or move the print head alignment sheet on the platen glass until
adjusting the print head position is complete.• If the error message appears on the LCD, press the OK button to release the error, then take
appropriate action.
A Message Is Displayed
Note• If the print results are still not satisfactory after adjusting the print head position as described above,
adjust the print head position manually from the computer.
Aligning the Print Head Position from Your Computer
• To print and check the current head position adjustment values, select Print align value from theMaintenance menu.
120

Performing Maintenance from a Computer
Cleaning the Print Heads from Your ComputerCleaning Inside the MachineCleaning the Paper Feed Rollers from Your ComputerUse Your Computer to Print a Nozzle Check PatternAligning the Print HeadAligning the Print Head Position Automatically from Your ComputerAligning the Print Head Position from Your ComputerChecking the Ink Status from Your Computer
121

Cleaning the Print Heads from Your Computer
The print head cleaning function allows you to clear up clogged print head nozzle. Perform print headcleaning if printing is faint or a specific color fails to print, even though there is enough ink.
The procedure for cleaning the print head is as follows:
Cleaning
1. Select Cleaning from the pop-up menu on the Canon IJ Printer Utility
2. Click the Cleaning icon
When the dialog opens, select the ink group for which cleaning is to be performed.
Click to display the items you need to check before performing cleaning.
3. Execute cleaning
Make sure that the machine is on and then click OK.
Print head cleaning starts.
4. Complete cleaning
The Nozzle Check dialog opens after the confirmation message.
5. Check the results
To check whether the print quality has improved, click Print Check Pattern. To cancel the checkprocess, click Cancel.
If cleaning the head once does not resolve the print head problem, clean it once more.
Important• Cleaning consumes a small amount of ink.
Cleaning the print head frequently will rapidly deplete your printer's ink supply. Consequently, performcleaning only when necessary.
Deep Cleaning
Deep Cleaning is more thorough than cleaning. Perform deep cleaning when two Cleaning attempts donot resolve the print head problem.
1. Select Cleaning from the pop-up menu on the Canon IJ Printer Utility
2. Click the Deep Cleaning icon
122

When the dialog opens, select the ink group for which deep cleaning is to be performed.
Click to display the items you need to check before performing deep cleaning.
3. Execute deep cleaning
Make sure that the machine is on and then click OK.Click OK when the confirmation message appears.
Print head deep cleaning starts.
4. Complete deep cleaning
The Nozzle Check dialog opens after the confirmation message.
5. Check the results
To check whether the print quality has improved, click Print Check Pattern. To cancel the checkprocess, click Cancel.
Important• Deep Cleaning consumes a larger amount of ink than Cleaning.
Cleaning the print head frequently will rapidly deplete your printer's ink supply. Consequently, performcleaning only when necessary.
Note• If there is no sign of improvement after Deep Cleaning, switch off the machine, wait 24 hours, and then
perform Deep Cleaning again. If there is still no sign of improvement, see "Ink Is Not Ejected."
Related Topic
Use Your Computer to Print a Nozzle Check Pattern
123

Cleaning Inside the Machine
To prevent smudges on the back side of the paper, perform bottom plate cleaning.Also perform bottom plate cleaning if ink smudges caused by something other than print data appear on theprinted page.
The procedure for performing bottom plate cleaning is as follows:
Bottom Plate Cleaning
1. Select Cleaning from the pop-up menu on the Canon IJ Printer Utility
2. Click the Bottom Plate Cleaning icon
The dialog opens.
3. Load paper in the machine
As instructed in the dialog, fold the A4 size or Letter size plain paper in half horizontally, and thenunfold the sheet.Fold one side of the paper in another half, aligning the edge with the center crease, then unfold thepaper.With the ridges of the creases facing up, load the paper into the front tray, so that the edge of the halfwith no crease faces away from you.
4. Perform the bottom plate cleaning
Make sure that the machine is on and then click OK.Bottom plate cleaning starts.
124

Cleaning the Paper Feed Rollers from Your Computer
Cleans the paper feed rollers. Perform feed roller cleaning when there are paper particles sticking to thepaper feed rollers and paper is not fed properly.
The procedure for performing the feed roller cleaning is as follows:
Roller Cleaning
1. Prepare the machine
Remove all sheets of paper from the front tray.
2. Select Cleaning from the pop-up menu on the Canon IJ Printer Utility
3. Click the Roller Cleaning icon
The confirmation message appears.
4. Execute paper feed roller cleaning
Make sure that the machine is on and then click OK.Paper feed roller cleaning starts.
5. Complete paper feed roller cleaning
After the rollers have stopped, follow the message instructions and load one sheet of plain paper or acleaning sheet available on the market into the front tray. Then click OK.
Paper will be ejected and feed roller cleaning will be completed.
125

Use Your Computer to Print a Nozzle Check Pattern
The nozzle check function allows you to check whether the print head is working properly by printing anozzle check pattern. Print the pattern if printing becomes faint, or if a specific color fails to print.
The procedure for printing a nozzle check pattern is as follows:
Nozzle Check
1. Select Test Print from the pop-up menu on the Canon IJ Printer Utility
2. Click the Nozzle Check icon
The confirmation message appears.
Click to display the items that you need to check before printing the nozzle check pattern.
3. Load paper in the machine
Load one sheet of A4 size or Letter size plain paper into the front tray.
4. Print a nozzle check pattern
Make sure that the machine is on and click Print Check Pattern.Printing of the nozzle check pattern begins.
5. Check the print result
When the dialog opens, check the print result. If the print result is normal, click Quit.
If the print result is smudged or if there are any unprinted sections, click Cleaning to clean the printhead.
Related Topic
Cleaning the Print Heads from Your Computer
126

Aligning the Print Head
When you perform head position adjustment, errors in the print head adjustment position are corrected andconditions such as color and line streaking are improved.If the print results appear uneven because of line shifts or other conditions, adjust the position of the printhead.
On this machine, you can adjust the print head either automatically or manually.
127

Aligning the Print Head Position from Your Computer
Print head alignment corrects the installation positions of the print head and improves deviated colors andlines.
This machine supports two head alignment methods: automatic head alignment and manual headalignment.
The procedure for performing manual print head alignment is as follows:
Print Head Alignment
1. Select Custom Settings from the pop-up menu on the Canon IJ Printer Utility
2. Switch head alignment to manual
Check the Align heads manually check box.
3. Apply the settings
Click Apply and when the confirmation message appears, click OK.
4. Select Test Print from the pop-up menu on the Canon IJ Printer Utility
5. Click the Print Head Alignment icon
A message is displayed.
6. Load paper in the machine
Load three sheets of A4 size or Letter size plain paper into the front tray.
7. Execute head alignment
Make sure that the machine is on and click Align Print Head.The first pattern is printed.
8. Check the printed pattern
Enter the numbers of the patterns with the least amount of streaks in the associated boxes, and clickOK.
128

Note• If it is difficult to pick the best pattern, pick the setting that produces the least noticeable vertical
streaks.
(A) Least noticeable vertical streaks(B) Most noticeable vertical streaks
• If it is difficult to pick the best pattern, pick the setting that produces the least noticeablehorizontal streaks.
(A) Least noticeable horizontal streaks(B) Most noticeable horizontal streaks
9. Confirm the displayed message and click OK
The second pattern is printed.
10. Check the printed pattern
Enter the numbers of the patterns with the least amount of streaks in the associated boxes, and clickOK.
129

Note• If it is difficult to pick the best pattern, pick the setting that produces the least noticeable vertical
streaks.
(A) Least noticeable vertical streaks(B) Most noticeable vertical streaks
11. Confirm the displayed message and click OK
The third pattern is printed.
12. Check the printed pattern
Enter the numbers of the patterns with the least noticeable horizontal stripes in the associated boxes,and click OK.
130

Note• If it is difficult to pick the best pattern, pick the setting that produces the least noticeable
horizontal stripes.
(A) Least noticeable horizontal stripes(B) Most noticeable horizontal stripes
Note• After head alignment is completed, you can print and check the current setting. To do so, click the
Print Head Alignment icon and when the message is displayed, click Print Alignment Value.
131

Aligning the Print Head Position Automatically from YourComputer
Print head alignment corrects the installation positions of the print head and improves deviated colors andlines.
This machine supports two head alignment methods: automatic head alignment and manual headalignment. Normally, the machine is set for automatic head alignment. If the printing results of automaticprint head alignment are not satisfactory, perform manual head alignment.
The procedure for performing automatic print head alignment is as follows:
Print Head Alignment
1. Select Test Print from the pop-up menu on the Canon IJ Printer Utility
2. Click the Print Head Alignment icon
A message is displayed.
3. Load paper in the machine
Load one sheet of A4 size or Letter size plain paper into the front tray.
Note• The number of sheets to be used differs when you select the manual head alignment.
4. Print head alignment pattern printing
Make sure that the machine is on and click Align Print Head.The adjustment pattern is printed.
Important• Do not open the paper output cover while printing is in progress.
5. Adjustment pattern scanning
After the adjustment pattern is printed, a message is displayed.Load the adjustment pattern onto the platen, and press the Start button on the machine.Print head alignment starts.
Note• After head alignment is completed, you can print and check the current setting. To do so, click the
Print Head Alignment icon and when the message is displayed, click Print Alignment Value.
132

Cleaning the Machine
Cleaning the Exterior of the Machine
Cleaning the Platen Glass and Document Cover
Cleaning the ADF (Auto Document Feeder)
Cleaning the Paper Feed Roller
Cleaning the Inside of the Machine (Bottom Plate Cleaning)
133

Cleaning the Exterior of the Machine
Be sure to use a soft and dry cloth such as eyeglasses cleaning cloth and wipe off dirt on the surface gently.Smooth out wrinkles on the cloth if necessary before cleaning.
Important• Be sure to turn off the power and unplug the power cord before cleaning the machine.
• The power cannot be turned off while the machine is sending or receiving a fax, or when unsentfaxes are stored in the machine's memory. Make sure if the machine completed sending orreceiving all the faxes before unplugging the power cord.
• The machine cannot send or receive faxes when the power is turned off.• If the power plug is unplugged, the date/time settings will be reset and all documents stored in the
machine's memory will be lost. Send or print a necessary document before unplugging the powercord.
• Do not use tissue paper, paper towels, rough-textured cloth, or similar materials for cleaning so as notto scratch the surface.
• Never use volatile liquids such as thinners, benzene, acetone, or any other chemical cleaner to cleanthe machine, as this may cause a malfunction or damage the surface of the machine.
134

Cleaning the Platen Glass and Document Cover
Important• Be sure to turn off the power and unplug the power cord before cleaning the machine.
• The power cannot be turned off while the machine is sending or receiving a fax, or when unsentfaxes are stored in the machine's memory. Make sure if the machine completed sending orreceiving all the faxes before unplugging the power cord.
• The machine cannot send or receive faxes when the power is turned off.• If the power cord is unplugged, the date/time settings will be reset and all documents stored in the
machine's memory will be lost. Send or print a necessary document before unplugging the powercord.
• Do not use tissue paper, paper towels, rough-textured cloth, or similar materials for cleaning so as notto scratch the surface.
• Never use volatile liquids such as thinners, benzene, acetone, or any other chemical cleaner to cleanthe machine, as this may cause a malfunction or damage the surface of the machine.
With a soft, clean, lint-free and dry cloth, wipe the platen glass (A), the inner side of the document cover(white sheet) (B), the glass of the ADF (Auto Document Feeder) (C), and the inner side of the ADF (whitearea) (D) gently. Make sure not to leave any residue, especially on the glass surface.
Important• The inner side of the document cover (white sheet) (B) is easily damaged, so wipe it gently.• If any foreign substances such as glue, ink or correction fluid are adhered to the glass of the ADF (C)
as shown in the figure above, some black streaks will appear on the scanned image. In this case, wipethe dirt off gently.
135

Cleaning the ADF (Auto Document Feeder)
Be sure to use a soft, clean, lint-free and dry cloth to clean the ADF (Auto Document Feeder).
Important• Be sure to turn off the power and unplug the power cord before cleaning the machine.
• The power cannot be turned off while the machine is sending or receiving a fax, or when unsentfaxes are stored in the machine's memory. Make sure if the machine completed sending orreceiving all the faxes before unplugging the power cord.
• The machine cannot send or receive faxes when the power is turned off.• If the power cord is unplugged, the date/time settings will be reset and all documents stored in the
machine's memory will be lost. Send or print a necessary document before unplugging the powercord.
• Do not use tissue paper, paper towels, rough-textured cloth, or similar materials for cleaning so as notto scratch the surface.
• Never use volatile liquids such as thinners, benzene, acetone, or any other chemical cleaner to cleanthe machine, as this may cause a malfunction or damage the surface of the machine.
1. Open the document tray.
2. Open the document feeder cover.
136

3. With the prepared cloth, wipe off any paper dust from the inside of the document feedercover (A).
4. After wiping, close the document feeder cover by pushing it until it clicks into place.
5. Close the document tray.
137

Cleaning the Paper Feed Roller
If the paper feed roller is dirty or paper powder is attached to it, paper may not be fed properly.
In this case, clean the paper feed roller. Cleaning will wear out the paper feed roller, so perform this onlywhen necessary.
You need to prepare: a sheet of A4 or Letter-sized plain paper or cleaning sheet available on themarket
1. Make sure that the power is turned on and remove any paper from the front tray.
2. Open the paper output tray.
3. Clean the paper feed roller without paper.
1. Press the Setup button.
The Setup menu screen will appear.
2. Use the or button to select Maintenance, then press the OK button.
LCD and Operation Panel
3. Use the or button to select Roller cleaning, then press the OK button.
The paper feed roller will rotate as it is cleaned.
4. Clean the paper feed roller with paper.
1. Make sure that the paper feed roller has stopped rotating, close the paper output tray, thenload a sheet of A4 or Letter-sized plain paper or cleaning sheet available on the market in thefront tray.
2. Open the output tray extension, open the paper output tray, then extend the paper outputsupport.
3. Make sure that Roller cleaning is selected, then press the OK button.
The machine starts cleaning. The cleaning will be complete when the paper is ejected.
If the problem is not resolved after cleaning the paper feed roller, contact the service center.
138

Cleaning the Inside of the Machine (Bottom Plate Cleaning)
Remove stains from the inside of the machine. If the inside of the machine becomes dirty, printed paper mayget dirty, so we recommend performing cleaning regularly.
You need to prepare: a sheet of A4 or Letter-sized plain paper*
* Be sure to use a new piece of paper.
1. Make sure that the power is turned on and remove any paper from the front tray.
2. Prepare paper.
1. Fold a single sheet of A4 or Letter-sized plain paper in half widthwise, then unfold the paper.
2. Fold one side of the opened paper in another half, aligning the edge with the center crease,then unfold the paper.
3. Load only this sheet of paper in the front tray with the ridges of the creases facing up and theedge of the half with no crease facing away from you.
3. Open the output tray extension, open the paper output tray, then extend the paper outputsupport.
4. Clean the inside of the machine.
1. Press the Setup button.
The Setup menu screen will appear.
2. Use the or button to select Maintenance, then press the OK button.
139

LCD and Operation Panel
3. Use the or button to select Bottom cleaning, then press the OK button.
The paper cleans the inside of the machine as it feeds through the machine.
Check the folded parts of the ejected paper. If they are smudged with ink, perform Bottom Plate Cleaningagain.
Note• When performing Bottom Plate Cleaning again, be sure to use a new piece of paper.
If the problem is not resolved after performing cleaning again, the protrusions inside the machine may bestained. Wipe off any ink from the protrusions using a cotton swab or the like.
Important• Be sure to turn off the power and unplug the power cord before cleaning the machine.
• The power cannot be turned off while the machine is sending or receiving a fax, or when unsentfaxes are stored in the machine's memory. Make sure if the machine completed sending orreceiving all the faxes before unplugging the power cord.
• The machine cannot send or receive faxes when the power is turned off.• If the power cord is unplugged, the date/time settings will be reset and all documents stored in the
machine's memory will be lost. Send or print a necessary document before unplugging the powercord.
140

Changing the Machine Settings
Changing Machine Settings from Your Computer
Changing the Machine Settings on the LCD
Updating the Firmware of the Machine
141

Changing Machine Settings from Your Computer
Checking the Ink Status from Your Computer
Registering a Changed Printing Profile
Setting the Ink Cartridge to be Used
Managing the Machine Power
Reducing the Machine Noise
Changing the Machine Operation Mode
142

Checking the Ink Status from Your Computer
You can check the remaining ink level and the FINE cartridge types for your model.
1. Select Ink Level Information from the pop-up menu on the Canon IJ Printer Utility
An illustration of the ink types and their status is displayed.If a warning or error related to the remaining ink level occurs, the printer driver displays an icon to let youknow.
2. If necessary, click Ink Details
You can check the ink-related information.
Note• Ink Details is displayed when the ink level is low.
• Click to check which FINE cartridge your model uses.• Click Update to display the current remaining ink level.
143

Registering a Changed Printing Profile
You can name and register the printing profile you made in the Print Dialog. The registered printing profilecan be called up from Presets to be used. You can also delete the unnecessary printing profile.
The procedure for registering a printing profile is as follows:
Registering a Printing Profile
1. In the Print dialog, set the necessary items
2. Select Save Current Settings as Preset... (Save As...) from the Presets
3. Save the settings
In the displayed dialog, enter a name in Preset Name, and if necessary, set Preset Available For.Then click OK.
Important• There are also print settings that cannot be saved to preset.
Using Registered Printing Profile
1. On Presets in the Print dialog, select the name of printing profile you want to use
Printing profile in the Print dialog will be updated to the called profile.
144

Deleting Unnecessary Printing Profile
1. Select the printing profile to be deleted
• If you are using Mac OS X v10.8 or Mac OS X v10.7
In the print dialog, select Show Presets... in the Presets section. Then in the dialog thatappears, select the name of the printing profile to be deleted.
• If you are using Mac OS X v10.6.8
On Presets in the Print dialog, select the name of printing profile you want to delete.
2. Delete the printing profile
• If you are using Mac OS X v10.8 or Mac OS X v10.7
Click Delete, and click OK. The selected printing profiles will be deleted from Presets.• If you are using Mac OS X v10.6.8
On Presets in the Print dialog, click Delete. The selected printing profiles will be deleted fromPresets.
145

Setting the Ink Cartridge to be Used
This feature enables you to specify the most appropriate FINE cartridge among installed cartridgesaccording to an intended use.When one of the FINE cartridges becomes empty and cannot be replaced immediately by a new one, youcan specify the other FINE cartridge that still has ink and continue printing.
The procedure for specifying the FINE cartridge is as follows:
1. Select Ink Cartridge Settings from the pop-up menu on the Canon IJ Printer Utility
2. Select the FINE cartridge to be used
Select the FINE cartridge you use for printing, and click Apply.
3. Complete the setup
Click OK when the confirmation message appears.The specified FINE cartridge will be used from the next printing.
Important• When the following settings are specified, Black Only does not function because the machine uses the
color FINE cartridge to print documents.• A paper type other than Plain Paper, Envelope, Hagaki A, or Hagaki is selected from the Media
Type of the Quality & Media on the pop-up menu in the Print dialog.• "XXX (borderless)" is selected from the Paper Size pop-up menu in the Print dialog.
• Do not detach the FINE cartridge that is not in use. Printing cannot be performed while either FINEcartridge is detached.
146

Managing the Machine Power
This function allows you to manage the machine power from the printer driver.
The procedure for managing the machine power is as follows:
Power Off
The Power Off function turns off the machine. When you use this function, you will not be able to turn themachine on from the printer driver.
1. Select Power Settings from the pop-up menu on the Canon IJ Printer Utility
2. Execute power off
Click Power Off, and when the confirmation message appears, click OK.The machine power switches off.
Important• You cannot receive faxes when the machine is switched off.
147

Reducing the Machine Noise
The silent function allows you to reduce the operating noise of this machine. Select when you wish to reducethe operating noise of the printer at night, etc.Using this function may lower the print speed.
The procedure for using the quiet mode is as follows:
1. Select Quiet Settings from the pop-up menu on the Canon IJ Printer Utility
Note• If the computer is unable to communicate with the machine, a message may be displayed
because the computer cannot access the function information that was set on the machine. If thishappens, click Cancel to display the most recent settings specified on your computer.
2. Set the quiet mode
If necessary, specify one of the following items:
Do not use quiet modeSelect this option when you wish to use the machine with volume of normal operating noise.
Always use quiet modeSelect this option when you wish to reduce the operating noise of the machine.
Use quiet mode during specified hoursSelect this option when you wish to reduce the operating noise of the machine during a specifiedperiod of time.Set the Start time and the End time of the quiet mode you wish to be activated. If both are set tothe same time, the quiet mode will not function.
Important• You can set the quiet mode from the operation panel of the machine or the printer driver.
No matter how you use to set the quiet mode, the mode is applied when you performoperations from the operation panel of the machine or printing and scaning from the computer.
3. Apply the settings
148

Make sure that the machine is on and click Apply.Click OK when the confirmation message appears.
The settings are enabled hereafter.
Note• The effects of the quiet mode may be less depending on the print quality settings.
149

Changing the Machine Operation Mode
If necessary, switch between various modes of machine operation.
The procedure for configuring Custom Settings is as follows:
1. Make sure that the machine is on, and then select Custom Settings from the pop-up menuon the Canon IJ Printer Utility
Note• If the computer is unable to communicate with the machine, a message may be displayed
because the computer cannot access the function information that was set on the machine.If this happens, click Cancel to display the most recent settings specified on your computer.
2. If necessary, complete the following settings:
Ink Drying Wait TimeYou can set the length of the machine rest time until printing of the next page begins. Moving theslider to the right increases the pause time, and moving the slider to the left decreases the time.If the paper gets stained because the next page is ejected before the ink on the printed page dries,increase the ink drying wait time.Reducing the ink drying wait time speeds up printing.
Display Guide MessageDisplays a guide when you perform operations in which the paper setting procedure is complicated.Hagaki Printing
Displays the guide message before the machine begins hagaki printing.To hide the guide messages, select the Do not show again check box in the displayed dialog.To display the guide messages again, display the Canon IJ Printer Utility pop-up menu, selectCustom Settings, and then check the Hagaki Printing check box.
How to load paperDisplays the guide message before the machine begins printing other than plain paper printingand hagaki printing.To hide the guide messages, select the Do not show again check box in the displayed dialog.To display the guide messages again, display the Canon IJ Printer Utility pop-up menu, selectCustom Settings, and then check the How to load paper check box.
Important• With Mac OS X v10.8 or Mac OS X v10.7, you cannot use Display Guide Message.
Therefore, if you check the Do not show again check box when a guide message is displayedbefore printing starts, this will stop any more guide messages from being displayed.
Prevent paper abrasionThe machine can increase the gap between the print head and the paper during high-densityprinting to prevent paper abrasion.Check this check box to prevent paper abrasion.
Prevent paper double-feedSelect this check box only if the machine is feeding multiple sheets of plain paper at the same time.
Important• Using this function slows down the print speed.
150

Align heads manuallyUsually, the Print Head Alignment function of Test Print on the pop-up menu in the Canon IJPrinter Utility is set to automatic head alignment, but you can change it to manual head alignment.If the printing results are unsatisfactory even after you execute automatic head alignment, executemanual head alignment.Check this check box to perform the manual head alignment. Uncheck this check box to perform theautomatic head alignment.
Detect the paper width when printing from computerWhen you print from the computer, this function identifies the paper that was loaded into thismachine.When the paper width detected by the machine differs from the width of the paper specified inPaper Size on the Print dialog, a message is displayed.To use paper width detection when printing from the computer, select the check box.
Important• When you use a custom page size, correctly set the size of the paper loaded in the machine in
the Custom Paper Sizes dialog.If an error message is displayed even though paper of the same size that was specified isloaded, uncheck the Detect the paper width when printing from computer check box.
3. Apply the settings
Click Apply and when the confirmation message appears, click OK.
The machine operates with the modified settings hereafter.
151

Changing the Machine Settings on the LCD
Changing the Machine Settings on the LCD
Fax settings
Output settings
LAN settings
Dev. user settings
Firmware update
Reset setting
About Quiet setting
Before Using the Machine with the Access Point Mode
152

Changing the Machine Settings on the LCD
This section describes the procedure to change the settings in the Device settings screen, taking the stepsto specify Extended copy amt. as an example.
Note• The * (asterisk) on the LCD indicates the current setting.
1. Make sure that the machine is turned on.
2. Press the Setup button.
The Setup menu screen is displayed.
3. Use the button to select Device settings, then press the OK button.
When you change the fax settings, press the Setup button, then select Fax settings.
4. Use the button to select Output settings, then press the OK button.
5. Use the button to select Extended copy amt., then press the OK button.
6. Use the button to select a setting item, then press the OK button.
For details on each setting item:
Fax settings
Output settings
LAN settings
Dev. user settings
Firmware update
Reset setting
Note• You can reduce the operating noise when printing at night.
About Quiet setting
153

Fax settings
This section describes the setting items in Fax settings.
Easy setup
TEL no. registration
FAX user settings
Adv. FAX settings
Auto print settings
Security control
Note• Before changing the settings, you can confirm the current settings by printing USER'S DATA LIST.
Summary of Reports and Lists
Easy setup
The machine must be set up depending on your telephone line and use of the faxing function. Follow theprocedure according to the instructions on the LCD.
Note• You can specify the setup setting individually or the advanced setting.
For details on how to specify the setting:
Preparing for Faxing
TEL no. registration
You can register the recipient's fax/telephone number to the machine.
Registering Recipients Using the Operation Panel of the Machine
FAX user settings
• Unit TEL no. registr.
Registers your fax/telephone number printed on sent faxes.
Registering User Information
• Unit name registr.
Registers your name printed on sent faxes.
Registering User Information
• Telephone line type
Selects the telephone line type setting for the machine.
Setting the Telephone Line Type
154

Note• This setting may not be available depending on the country or region of purchase.
Adv. FAX settings
• Auto redial
Enables/disables automatic redialing.
If you select ON, you can specify the maximum number of redial attempts and the length of time themachine waits between redial attempts.
• Dial tone detect
Avoids mistransmission when reception and transmission occur at the same time.
If you select ON, the machine transmits the fax after confirming the dial tone.
Note• This setting may not be available depending on the country or region of purchase.
• Pause time settings
Sets the length of pause time for each when you enter "P" (pause).
• TTI position
Selects the position of the sender information (outside or inside the image area).
• Remote RX
Enables/disables remote reception.
If you select ON, you can specify the remote reception ID.
Remote Reception
• Color transmission
When faxing color documents using the ADF, selects whether to convert them into black & white dataif the recipient's fax machine does not support color faxing.
If you select If incompatible, end, the machine does not send color documents when the recipient'sfax machine does not support color faxing.
• RX image reduction
Enables/disables automatic reduction of incoming faxes so that they fit in the selected paper.
If you select ON, you can select the image reduction direction.
• Adv. communication
◦ ECM TX
Selects whether to send faxes in Error Correction Mode (ECM).
Transmission/Reception of Faxes Using ECM
◦ ECM RX
Selects whether to receive faxes in Error Correction Mode (ECM).
155
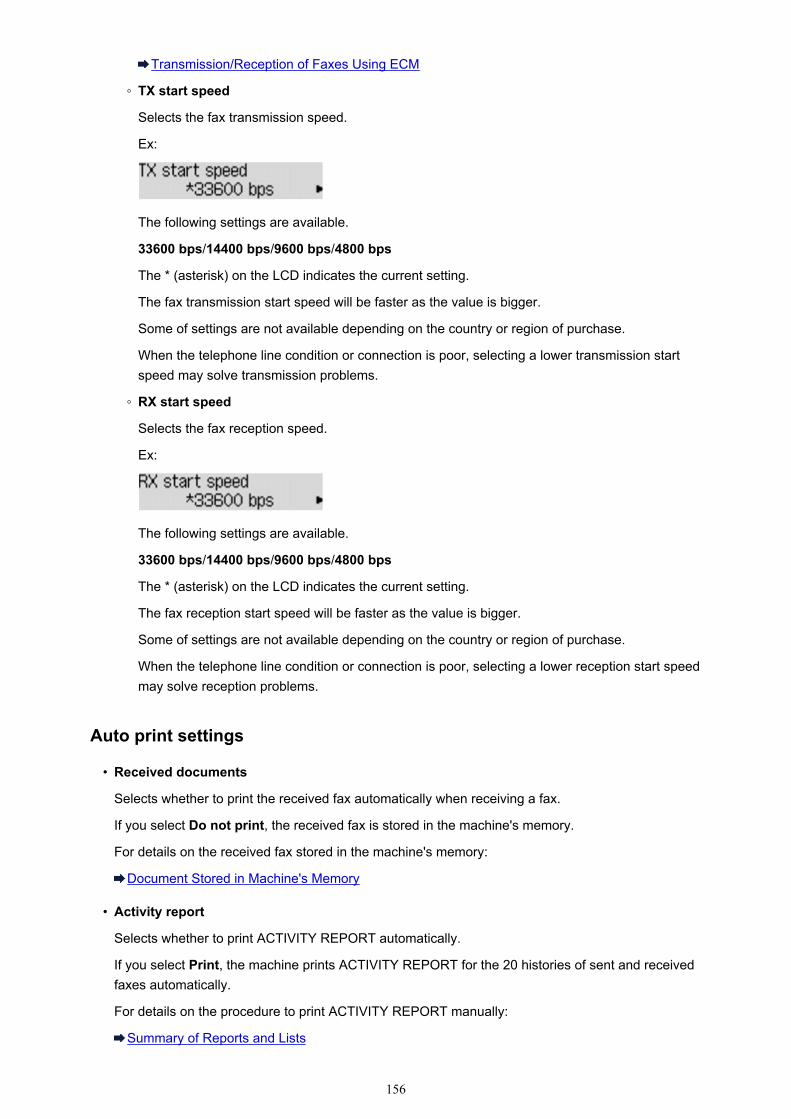
Transmission/Reception of Faxes Using ECM
◦ TX start speed
Selects the fax transmission speed.
Ex:
The following settings are available.
33600 bps/14400 bps/9600 bps/4800 bps
The * (asterisk) on the LCD indicates the current setting.
The fax transmission start speed will be faster as the value is bigger.
Some of settings are not available depending on the country or region of purchase.
When the telephone line condition or connection is poor, selecting a lower transmission startspeed may solve transmission problems.
◦ RX start speed
Selects the fax reception speed.
Ex:
The following settings are available.
33600 bps/14400 bps/9600 bps/4800 bps
The * (asterisk) on the LCD indicates the current setting.
The fax reception start speed will be faster as the value is bigger.
Some of settings are not available depending on the country or region of purchase.
When the telephone line condition or connection is poor, selecting a lower reception start speedmay solve reception problems.
Auto print settings
• Received documents
Selects whether to print the received fax automatically when receiving a fax.
If you select Do not print, the received fax is stored in the machine's memory.
For details on the received fax stored in the machine's memory:
Document Stored in Machine's Memory
• Activity report
Selects whether to print ACTIVITY REPORT automatically.
If you select Print, the machine prints ACTIVITY REPORT for the 20 histories of sent and receivedfaxes automatically.
For details on the procedure to print ACTIVITY REPORT manually:
Summary of Reports and Lists
156

• TX report
Selects whether to print TX REPORT/ERROR TX REPORT automatically after sending a fax.
If you print the report, select Print error only or Print for each TX.
If you select Print error only or Print for each TX, you can specify the print setting that the first pageof the fax is printed along with the report.
• RX report
Selects whether to print RX REPORT automatically after receiving a fax.
If you print RX REPORT, select Print error only or Print for each RX.
• Print when no ink
Sets whether to continue printing the received fax without storing it in the machine's memory when theink has run out.
However, part or all of the fax may not be printed since the ink has run out.
Security control
• FAX no. re-entry
If you select ON, you can set the machine to send faxes after using the Numeric buttons to enter thenumber twice. By using this setting, you can avoid the mistransmission of faxes.
• Check RX FAX info
If you select ON, the machine checks whether the recipient's fax machine information matches thedialed number. If it matches the number, the machine starts to send faxes.
Preventing Mistransmission of Faxes
• On-hook setting
If you select Enable, you can use the on hook function.
• FAX RX reject
If you select ON, the machine rejects the reception of faxes with no sender information or faxes fromspecific senders.
Rejecting Fax Reception
• Caller rejection
If you subscribe to the Caller ID service, the machine detects the sender's Caller ID. If the sender's IDmatches the condition specified in this setting, the machine rejects the phone call or fax receptionfrom the sender.
If you select Subscribed, you can specify the settings of rejection.
Using the Caller ID Service to Reject Calls
Note• This setting may not be supported depending on the country or region of purchase. Contact your
telephone company to confirm whether it provides this service.
157

Output settings
• Prevent abrasion
Use this setting only if the print surface becomes smudged.
Important• Be sure to set this back to OFF after printing since it may result in lower printing speed or lower
print quality.
• Extended copy amt.
Selects the amount of image that extends off the paper when copying in Borderless (full).
Slight cropping may occur at the edges since the copied image is enlarged to fill the whole page. Youcan change the width to be cropped from the borders of the original image as needed.
Cropped area will be larger if Amount: Large is selected.
Note• If printouts contain margins even though you are copying in Borderless, specifying Amount: Large
for this setting may help solve the problem.
• Prevent double-feed
Select ON to prevent double-feed of plain paper.
Important• Select ON only when double-feed of plain paper occurs.
• Detect paper width
When you print from the machine with ON selected, the machine detects the paper width. If the size ofloaded paper does not match with that specified with the machine, a message is displayed on the LCD.
158

LAN settings
• WLAN activ./inactiv.
Activates/deactivates wireless LAN.
• Wireless LAN setup
If your access point is compatible with WPS, set up wireless LAN following the on-screen instructions. Ifnot, select one of the setup methods below.
◦ Standard setup
Select when you perform settings for wireless LAN manually using the operation panel of themachine.
◦ WPS
Select when you perform settings for wireless LAN using Wi-Fi Protected Setup (WPS). Select Pushbutton method or PIN code method according to the method your access point supports, thenfollow the on-screen instructions.
◦ Other setup
Select Manual setup if you perform settings by entering the access point's settings directly on themachine. Select Cableless setup if you specify the settings of the access point information to themachine directly from a device (such as a smartphone) without operating the access point. Followthe on-screen instructions of the connecting device for the setup procedure.
• AP mode settings
When you use the machine as an access point, specify the access point name and the security setting.
Before Using the Machine with the Access Point Mode
• Print LAN details
You can print out the network settings of the machine such as its IP address and SSID.
For more information on the machine's network setting is printed out, refer to Printing Out NetworkSetting Information.
Important• This printout contains valuable information about your computer. Handle it with care.
• Other settings
◦ Set printer name
Specifies the printer name. You can use up to 15 characters for the name.
Note• You cannot use the same printer name as that already used for other LAN connected devices.
• You cannot use a hyphen for the initial or last character of the printer name.
◦ TCP/IP settings
Performs IPv4 or IPv6 setting.
◦ WSD setting
159

Setting items when you use WSD (one of the network protocols supported in Windows 8, Windows7, and Windows Vista).
Enable/disable WSDSelects whether WSD is enabled or disabled.
Note• When this setting is activated, the printer icon is displayed on the Network Explorer in Windows
8, Windows 7 and Windows Vista.
WSD scan from dev.Selecting Active allows you to transfer the scanned data to the computer using WSD.
Timeout settingSpecifies the timeout length.
◦ Bonjour settings
Setting items for LAN using Bonjour for Mac OS.
Enab./disab. BonjourSelecting Active allows you to use Bonjour to perform the network settings.
Enter service nameSpecifies the Bonjour service name. You can use up to 48 characters for the name.
Note• You cannot use the same service name as that already used for other LAN connected devices.
◦ LPR setting
Activates/deactivates the LPR setting.
◦ DRX setting
Selecting Active allows you to activate discontinuous reception when using wireless LAN. It allowsyou to save electricity.
Note• Depending on the access point you are using, discontinuous reception may not be activated
even though Active is selected.
• Discontinuous reception is activated only while the machine is on standby. (The LCD is in thescreen saver mode.)
160

Dev. user settings
• Date/time setting
Sets the current date and time.
Setting the Sender Information
• Date display format
Sets the format of dates displayed on the LCD and printed on sent faxes.
• DST setting
Some countries adopt the daylight saving time (summer time) system that shifts the clock time forwardat certain periods of the year.
You can set your machine to automatically change the time by registering the date and time that daylightsaving time (summer time) begins and ends.
Setting the Sender Information
Note• This setting may not be available depending on the country or region of purchase.
• Sound control
Selects the volume.
◦ Keypad volume
Selects the beep volume when pressing the buttons on the operation panel.
◦ Alarm volume
Selects the alarm volume.
◦ Line monitor volume
Selects the line monitor volume.
◦ Offhook alarm
Selects the alarm volume when the phone receiver is not put on the hook properly.
• Country or region
Selects the country or region where you are using the machine.
Note• This setting may not be available depending on the country or region of purchase.
• Language selection
Changes the language for LCD messages and menus.
Japanese / English / German / French / Italian / Spanish / Dutch / Portuguese / Norwegian / Swedish /Danish / Finnish / Russian / Ukrainian / Polish / Czech / Slovak / Hungarian / Slovene / Croatian /Romanian / Bulgarian / Turkish / Greek / Estonian / Latvian / Lithuanian / Simplified Chinese / TraditionalChinese / Korean / Indonesian
161

• Key repeat
Enables/Disables continuous input by pressing and holding down the button when setting thenumber of copies, the zoom ratio, etc.
• Device info sending
Selects whether you will send the printer usage information to Canon server. The information sent toCanon will be utilized to develop better products. Select ON to send the printer usage information toCanon server.
162

Firmware update
You can update the firmware of the machine, check the firmware version, or perform settings of anotification screen, a DNS server and a proxy server.
Note• Only Current version is available when WLAN inactive is selected for WLAN activ./inactiv. in LAN
settings.
• Install update
Performs the firmware update of the machine.
Updating the Firmware of the Machine
• Current version
You can check the current firmware version.
• Update notification
When ON is selected and the firmware update is available, the screen to inform you of the firmwareupdate is displayed on the LCD.
• DNS server setup
Performs settings for a DNS server. Select Auto setup or Manual setup. If you select Manual setup,follow the display on the LCD to perform settings.
• Proxy server setup
Performs settings for a proxy server. Follow the display on the LCD to perform settings.
163

Reset setting
Reverts all settings you made to the machine back to default. However, some data may not be changed,depending on the current usage state of your machine.
• Web service setup
Reverts the Web service settings back to the default.
• LAN settings
Reverts the LAN settings back to the default.
• Telephone no. data
Reverts the telephone/fax number settings to default.
• Setting data
Reverts the settings such as the paper size, media type, or other setting items back to the default. TheLAN settings and the telephone/fax number are not reverted.
• Device info sending
Reverts only the device information sending settings.
• All data
Reverts all settings you made to the machine back to default.
Note• You cannot change the following setting items back to the default:
• The language displayed on the LCD
• The current position of the print head
• The country or region selected for Country or region
• The registered user's telephone number
• The registered user's name
You can delete the registered telephone number or user's name following the procedure below.
1. Display the Unit TEL no. registr. or Unit name registr. screen.
Setting the Sender Information
2. Press the Back button repeatedly to delete the numbers or characters.
3. Press the OK button when you finished deleting all numbers or characters.
164

About Quiet setting
Enables this function on the machine if you want to reduce the operating noise, such as when printing atnight. In addition, you can specify the time range to reduce the operating noise.
Important• Set the current date and time in advance.
Setting the Sender Information
Follow the procedure below to perform setting.
1. Make sure that the machine is turned on.
2. Press the Setup button.
The Setup menu screen is displayed.
3. Use the button to select Quiet setting, then press the OK button.
4. Use the button to select ON or Use in specified hrs, then press the OK button.
• When ON is selected:
You can reduce the operating noise while printing is in progress.
• When Use in specified hrs is selected:
The screen to specify starting/ending time is displayed. Use the button to move the cursorunder the desired position, use the Numeric buttons to enter the time, then press the OK button.
You can reduce the operating noise during the specified time.
Important• Operating speed may be reduced compared to when OFF is selected.
• This function may not be so effective depending on the machine's setting. Furthermore, certainnoise, such as when the machine is preparing for printing, is not reduced.
Note• You can set the quiet mode from the operation panel of the machine or the printer driver. No
matter how you use to set the quiet mode, the mode is applied when you perform operations fromthe operation panel of the machine or printing and scanning from the computer.
165

Before Using the Machine with the Access Point Mode
When you use the machine with the access point mode, be sure to specify the access point name of themachine and the security setting in advance.
Setting Procedure When Using the Machine with the Access Point Mode
1. Make sure that the machine is turned on.
2. Press the Setup button.
The Setup menu screen is displayed.
3. Use the button to select Device settings, then press the OK button.
4. Use the button to select LAN settings, then press the OK button.
5. Use the button to select AP mode settings, then press the OK button.
The screen to enter the access point name (SSID) is displayed.
6. Enter the access point name (up to 32 characters).
Enter the access point name when you use the machine as an access point.
7. Press the OK button to finish entering the name.
The screen to select the security setting is displayed.
8. Use the button to select the security setting, then press the OK button.
WPA2-PSK (AES)Specifies the security setting applying WPA2-PSK (AES). Proceed to the next step when thescreen to specify the passphrase is displayed.
DisableFinishes the access point settings without specifying the security setting.
9. Enter the passphrase (8 to 10 characters).
10. Press the OK button to finish entering the passphrase.
For details on printing or scanning with the access point mode:
Printing with the Access Point Mode
Scanning with the Access Point Mode
Restrictions on Using the Access Point Mode
When you use the machine with the access point mode, note the following.
• Up to 5 external devices (ex: smartphone) can be connected to the machine.
166

• While you are using the machine with the access point mode, you cannot perform the operationsbelow.
-Operations using the operation panel of the machine (ex: copying, scanning, or sending a fax)
-Operations necessary to connect the machine to the Internet
-Changing the network settings of the machine or displaying the network settings
• If the machine receives a fax in the access point mode, the machine cancels the access point modeautomatically after a certain time, then the machine switches to the fax mode.
167

Updating the Firmware of the Machine
You can update the firmware of the machine via Internet.
Important• When you use this function, it is necessary that the machine be connected to the LAN and the Internet
connection is available.
• If the firmware update is carried out, all faxes stored in the machine's memory are deleted.
1. Make sure that the machine is turned on.
2. Press the Setup button.
The Setup menu screen is displayed.
3. Use the button to select Device settings, then press the OK button.
4. Use the button to select Firmware update, then press the OK button.
5. Use the button to select Install update, then press the OK button.
The machine starts searching for the latest firmware on the server.
Note• You cannot update the firmware under the following conditions:
• While the machine is sending or receiving a fax
• While the machine is storing the unprinted fax in machine's memory (memory reception)
• When the unsent faxes are stored in the machine's memory
6. Check the status of the firmware on the server.
If the latest firmware is on the server, The latest firmware is on the server is displayed on the LCD.Press the OK button to proceed to the next procedure.
If the current firmware on the machine is the latest one, Your firmware is the latest version; update isnot required is displayed on the LCD. Press the OK button to finish the procedure.
Note• If Cannot connect to the server; try again is displayed on the LCD, press the OK button, then
try again after a while.
7. Check the firmware version that is displayed, then press the OK button.
8. Use the button to select Yes, then press the OK button.
9. Check the message that is displayed, then press the OK button.
The machine starts the firmware update.
168

Important• Do not turn the machine off until the firmware update is complete. In addition, the machine turns
off automatically and turn on again while the firmware update is in progress.
• While the firmware update is in progress, do not change the network settings such as an accesspoint or a router settings.
Note• If faxes are stored in machine's memory, the screen to confirm if you delete the stored faxes is
displayed. If you press the OK button, all the stored faxes are deleted and the machine starts thefirmware update.
10. Check the message that is displayed, then press the OK button.
The firmware update has been complete and the copy standby screen is displayed.
Note• If the firmware update is not complete, check the network settings such as an access point or a
router settings.
169

Information about Network Connection
Useful Information about Network Connection
170

Useful Information about Network Connection
Initial Values Set at Factory (Network)
Connecting the Machine to the Computer Using a USB Cable
When Detecting the Printers Have the Same Name
Connecting to Other Computer with LAN/Changing the Connection Methodfrom USB to LAN
Printing Out Network Setting Information
171

Initial Values Set at Factory (Network)
Item Initial Values
WLAN activ./inactiv. WLAN inactive
SSID BJNPSETUP
Communication mode Infrastructure
Wireless LAN security Disable
IP address (IPv4) Auto setup
IP address (IPv6) Auto setup
Set printer name XXXXXX000000
Enable/disable IPv6 Active
Enable/disable WSD Active
Timeout setting 1 minute
Enab./disab. Bonjour Active
Service name (Bonjour settings) Canon MX470 series
LPR setting Active
DRX setting Active
("XXXXXX" is the last six digits of MAC address.)
172

Connecting the Machine to the Computer Using a USB Cable
Connect the machine and the computer using a USB cable as the illustration below. The USB port is locatedon the rear of the machine.
173

When Detecting the Printers Have the Same Name
When the printer is detected, you may see multiple printers of the same name on the detection resultscreen. The MAC address or the printer name specified by Bonjour is displayed at the end of the printername on the detection result screen.
Select a printer with checking the MAC address or the printer name specified by Bonjour set to the printeragainst the printer name on detection result screen.
To check the MAC address of the printer, print out the network setting information using the operation panelof the printer.
Printing Out Network Setting Information
174

Connecting to Other Computer with LAN/Changing the ConnectionMethod from USB to LAN
To add the computer connecting the machine with LAN or to change the connection method between themachine and the computer from USB to LAN, perform setup according to the instructions on our website.
Connecting to Other Computer with LAN
To add the computer connecting the machine with LAN, perform setup according to the instructions on ourwebsite.
Changing the Connection Method from USB to LAN
To change the connection method between the machine and the computer from USB to LAN, performsetup according to the instructions on our website.
To change the connection method to LAN while you are using the machine with USB connection, performsetup again according to the instructions on our website and select Change Connection Method.
175

Printing Out Network Setting Information
You can print out the network settings of the machine such as its IP address and SSID.
Important• This print out contains valuable information about your computer. Handle it with care.
1. Make sure that the machine is turned on.
2. Load a sheet of A4 or Letter-sized plain paper.
3. Press the Setup button.
The Setup menu screen is displayed.
4. Use the button to select Device settings, then press the OK button.
5. Use the button to select LAN settings, then press the OK button.
6. Use the button to select Print LAN details, then press the OK button.
The machine starts printing the network setting information.
The following information on the machine's network setting is printed out.
Item Explanations of the item Setting
Wireless LAN Wireless LAN Enable/Disable
Connection Status of the Wireless LAN Active/Inactive
MAC Address MAC Address XX:XX:XX:XX:XX:XX
SSID SSID SSID of the wireless LAN
Communication Mode Communication Mode Infrastructure
Channel Channel XX (1 to 13)
Encryption Method of the Encryption none/WEP/TKIP/AES
WEP Key Length WEP Key Length Inactive/128/64
Authentication Method of the Authentication none/auto/open/shared/WPA-PSK/WPA2-PSK
Signal Strength Signal Strength 0 to 100 [%]
TCP/IP Version TCP/IP Version IPv4 & IPv6/IPv4
IPv4 IP Address Selected IP Address (IPv4) XXX.XXX.XXX.XXX
IPv4 Default Gateway Default Gateway (IPv4) XXX.XXX.XXX.XXX
Subnet Mask Subnet Mask XXX.XXX.XXX.XXX
176

IPv6 IP Address *1 Selected IP Address (IPv6) XXXX:XXXX:XXXX:XXXXXXXX:XXXX:XXXX:XXXX
IPv6 Default Gateway *1 Default Gateway (IPv6) XXXX:XXXX:XXXX:XXXXXXXX:XXXX:XXXX:XXXX
Subnet Prefix Length*1 Subnet Prefix Length XXX
IPsec*2 IPsec setting Active
Security Protocol*2 Method of the Security Protocol ESP/ESP & AH/AH
Wireless LAN DRX Discontinuous reception (wirelessLAN)
Enable/Disable
Other Settings Other settings -
Printer Name Printer name Printer name (Up to 15 characters)
WSD WSD setting Enable/Disable
WSD Timeout Timeout 1/5/10/15/20 [min]
LPR Protocol LPR protocol setting Enable/Disable
Bonjour Bonjour setting Enable/Disable
Bonjour Service Name Bonjour service name Bonjour service name (Up to 52 characters)
DNS Server Getting DNS Server automatically Auto/Manual
Primary Server Primary server address XXX.XXX.XXX.XXX
Secondary Server Secondary server address XXX.XXX.XXX.XXX
Proxy Server Proxy Server setting Enable/Disable
Proxy Port Specifying Proxy Port 1 to 65535
Proxy Address Proxy Address XXXXXXXXXXXXXXXXXXXX
IP Address Filtering IP Address Filtering Enable/Disable
("XX" represents alphanumeric characters.)
*1 Only when IPv6 is activated, the status of the network is printed.
*2 Only IPv6 and the IPsec setting are activated, the status of the network is printed.
177

About Network Communication
Changing and Confirming Network Settings
Appendix for Network Communication
178

Changing and Confirming Network Settings
IJ Network Tool
Canon IJ Network Tool Screen
Canon IJ Network Tool Menus
Changing the Settings in the Wireless LAN Sheet
Changing the WEP Detailed Settings
Changing the WPA or WPA2 Detailed Settings
Changing the Settings in the Wired LAN Sheet
Changing the Settings in the Admin Password Sheet
Monitoring Wireless Network Status
Initializing the Network Settings of the Machine
Viewing the Modified Settings
179

IJ Network Tool
IJ Network Tool is a utility that enables you to display and modify the machine network settings. It is installedwhen the machine is set up.
Important• To use the machine over LAN, make sure you have the equipment necessary for the connection type,
such as an access point or a LAN cable.
• Do not start up IJ Network Tool while printing.
• Do not print when IJ Network Tool is running.
• If the firewall function of your security software is turned on, a message may appear warning thatCanon software is attempting to access the network. If the warning message appears, set the securitysoftware to always allow access.
Starting up IJ Network Tool
1. Select Applications from the Go menu of Finder, double-click Canon Utilities > IJNetwork Tool, and double-click the Canon IJ Network Tool icon.
Note
• You can also start up IJ Network Tool by clicking Network Settings from DeviceSettings & Maintenance on Quick Menu.
180

Canon IJ Network Tool Screen
This section describes the items displayed on the Canon IJ Network Tool screen.
1. Utilities
Modifies the settings of the machine.
Select to change the network name (SSID) settings.
SetupSets up the machine.
If you setup the machine from scratch, connect your computer and the machine with a USB cable.
2. Printers:
Printer name, type, and connection destination are displayed.
The selected printer can be set up or be modified.
3. Update
Performs printer detection again. Click this button if the target printer is not displayed.
Important• To change the printer's network settings using IJ Network Tool, it must be connected via a LAN.
• If the printer on a network is not detected, make sure that the printer is turned on, then clickUpdate. It may take several minutes to detect printers. If the printer is not yet detected, connectthe machine and the computer with a USB cable, then click Update.
• If the printer is being used from another computer, a screen is displayed informing you of thiscondition.
Note• This item has the same function as Refresh in the View menu.
181

4. Configuration...
Enabled when Utilities is selected. Click to display the Configuration screen to configure settings of theselected printer.
Note• This item has the same function as Configuration... in the Settings menu.
182

Canon IJ Network Tool Menus
This section describes the menus in Canon IJ Network Tool.
1. Canon IJ Network Tool menu
About Canon IJ Network ToolDisplays the version of this application.
Quit Canon IJ Network ToolExits IJ Network Tool.
2. View menu
StatusDisplays the Status screen to confirm the printer connection status and wireless communicationstatus.
RefreshUpdates and displays the contents of Printers: to the latest information.
Important• To change the printer's network settings using IJ Network Tool, it must be connected via a LAN.
• If the printer on a network is not detected, make sure that the printer is turned on, then selectRefresh. It may take several minutes to detect printers. If the printer is not yet detected, connect themachine and the computer with a USB cable, then select Refresh.
• If the printer is being used from another computer, a screen is displayed informing you of thiscondition.
Note• This item has the same function as Update in the Canon IJ Network Tool screen.
Network InformationDisplays the Network Information screen to confirm the network settings of the printer.
3. Settings menu
Configuration...Displays the Configuration screen to configure settings of the selected printer.
Note• This item has the same function as Configuration... in the Canon IJ Network Tool screen.
Maintenance...Displays the Maintenance screen to revert the network settings of the printer to factory default.
4. Help menu
InstructionsDisplays this guide.
183

Changing the Settings in the Wireless LAN Sheet
To change the wireless network settings of the printer, connect the printer and the computer with a USBcable temporarily. If you modify the wireless network settings of the computer over wireless connectionwithout USB connection, your computer may not be able to communicate with the machine after modifyingthe settings.
Note• This screen is not available depending on the printer you are using.
• Activate the wireless LAN setting of the printer to change the settings in the Wireless LAN sheet.
1. Start up IJ Network Tool.
2. Select the printer in Printers:.
When the printer is connected to the computer with a USB cable temporarily, select the printer with USBappearing in the Connected to column.
3. Click the Configuration... button.
4. Click the Wireless LAN button.
5. Change the settings or confirm.
Click OK after changing configuration. A screen is displayed asking you for confirmation before thesettings are sent to the printer. If you click OK, the settings are sent to the printer and the TransmittedSettings screen is displayed.
1. Network Type:
AirPort Network (Infra)Connects the printer to the wireless LAN with an access point.
2. Network (SSID):
184

The network name (SSID) of the wireless LAN is displayed.
Note• Enter the same SSID that the access point is configured to use. The SSID is case-sensitive.
3. Search...
The Access Points screen is displayed to select an access point to connect to.
Access Points Screen
Note• When IJ Network Tool runs over a LAN, the button is grayed out and cannot be selected.
Connect the printer and the computer with a USB cable temporarily to change the settings.
4. Encryption Method:
Select the encryption method used over the wireless LAN.
Important• If all encryption types of the access point, printer, or computer do not match, the printer
cannot communicate with the computer. If the printer cannot communicate with the computerafter the encryption type of the printer was switched, make sure that encryption types for thecomputer and the access point match that set to the printer.
• If you connect to a network that is not protected with security measures, there is a risk ofdisclosing data such as your personal information to a third party.
Do Not UseSelect to disable encryption.
Use Password (WEP)Transmission is encrypted using a WEP key you specified.
If a network password (WEP) has not been set, the WEP Details screen is displayedautomatically. To change WEP settings set before, click Configuration... to display thescreen.
Changing the WEP Detailed Settings
Use WPA/Use WPA2Transmission is encrypted using a network key you specified.
The security has been strengthened more than WEP.
If a network key has not been set, the Authentication Type Confirmation screen isdisplayed automatically. To change network key settings before, click Configuration... todisplay the WPA Details screen or WPA2 Details screen.
Changing the WPA or WPA2 Detailed Settings
5. Configuration...
The detailed settings screen is displayed. The network password (WEP) or the WPA/WPA2 keyselected in Encryption Method: can be confirmed and changed.
For details on WEP setting:Changing the WEP Detailed Settings
For details on WPA or WPA2 setting:Changing the WPA or WPA2 Detailed Settings
185

6. TCP/IP Setting:
Sets the IP address of the printer to be used over the LAN. Specify a value appropriate for yournetwork environment.
Get IP address automaticallySelect this option to use an IP address automatically assigned by a DHCP server. DHCPserver functionality must be enabled on your wireless LAN router or access point.
Use following IP addressIf no DHCP server functionality is available in your setup where you use the printer or youwant to use a particular IP address, select this option to use a fixed IP address.
• Access Points Screen
1. Detected Access Points:
The signal strength from the access point, encryption type, name of access point, and the radiochannel can be confirmed.
Important• If you connect to a network that is not protected with security measures, there is a risk of
disclosing data such as your personal information to a third party.
Note• Signal strength is displayed as follows.
: Good
: Fair
: Poor
• Type of encryption is displayed as follows.
Blank: No encryption
WEP: WEP is set
WPA: WPA is set
WPA2: WPA2 is set
186

2. Refresh
Click to update the list of access points when your target access point is not detected.
If the target access point is set to a closed network (the stealth mode), click Cancel to return to theprevious screen and enter the network name (SSID) in Network (SSID).
Note• Make sure that the access point is turned on.
3. Set
Click to set the network name (SSID) in Network (SSID): on the Wireless LAN sheet.
Note• The WEP Details screen, the WPA Details screen, or the WPA2 Details screen appears if
the selected access point is encrypted. In this case, configure the details to use the sameencryption settings set to the access point.
• Access points that cannot be used by this machine (including those configured to use differentencryption methods) are displayed grayed out and cannot be configured.
187

Changing the WEP Detailed Settings
Note• This screen is not available depending on the printer you are using.
To change the wireless network settings of the printer, connect the printer and the computer with a USBcable temporarily. If you modify the wireless network settings of the computer over wireless connectionwithout USB connection, your computer may not be able to communicate with the machine after modifyingthe settings.
1. Start up IJ Network Tool.
2. Select the printer in Printers:.
When the printer is connected to the computer with a USB cable temporarily, select the printer with USBappearing in the Connected to column.
3. Click the Configuration... button.
4. Click the Wireless LAN button.
5. Select Use Password (WEP) in Encryption Method: and click Configuration....
The WEP Details screen is displayed.
6. Change the settings or confirm.
When changing the password (WEP key), the same change must be made to the password (WEP key)of the access point.
1. Password (WEP Key):
Enter the same key as the one set to the access point.
The number of characters and character type that can be entered differ depending on thecombination of the key length and key format.
Key Length
64 bit 128 bit
Key Format ASCII 5 characters 13 characters
188

Hexadecimal (Hex) 10 digits 26 digits
2. Key Length:
Select either 64 bit or 128 bit.
3. Key Format:
Select either ASCII or Hex.
4. Key ID:
Select the Key ID (index) set to the access point.
Note• When the printer is connected to an AirPort Base Station via a LAN:
When the printer is connected to an AirPort Base Station via a LAN, confirm the settings inWireless Security of AirPort Utility.
• Select 64 bit if WEP 40 bit is selected for the key length in the AirPort Base Station.
• Select 1 for Key ID:. Otherwise your computer will not be able to communicate with theprinter via the access point.
5. Authentication:
Select the authentication method to authenticate the printer's access to the access point.
Normally, select Auto. If you want to specify the method manually, select Open System orShared Key according to the setting of the access point.
7. Click OK.
Important• If the printer cannot communicate with the computer after the encryption type of the printer was
switched, make sure that encryption types for the computer and the access point match that set tothe printer.
189

Changing the WPA or WPA2 Detailed Settings
Note• This screen is not available depending on the printer you are using.
To change the wireless network settings of the printer, connect the printer and the computer with a USBcable temporarily. If you modify the wireless network settings of the computer over wireless connectionwithout USB connection, your computer may not be able to communicate with the machine after modifyingthe settings.
The example screenshots in this section refer to the WPA detailed settings.
1. Start up IJ Network Tool.
2. Select the printer in Printers:.
When the printer is connected to the computer with a USB cable temporarily, select the printer with USBappearing in the Connected to column.
3. Click the Configuration... button.
4. Click the Wireless LAN button.
5. Select Use WPA or Use WPA2 in Encryption Method: and click Configuration....
6. Enter the passphrase, confirm the type of dynamic encryption and click OK.
1. Passphrase:
Enter the passphrase set to the access point. The passphrase should be a string of 8 to 63alphanumeric characters or a 64-digit hexadecimal value.
If you do not know the access point passphrase, refer to the instruction manual provided with theaccess point or contact its manufacturer.
2. Dynamic Encryption Type:
Select the dynamic encryption method from either TKIP (Basic Encryption), or AES (SecureEncryption).
Important• If the printer cannot communicate with the computer after the encryption type of the printer was
switched, make sure that encryption types for the computer and the access point match that set tothe printer.
190

Note• This machine supports WPA-PSK (WPA-Personal) and WPA2-PSK (WPA2-Personal).
191

Changing the Settings in the Wired LAN Sheet
Note• This screen is not available depending on the printer you are using.
• Activate the wired LAN setting of the printer to change the settings in the Wired LAN sheet.
1. Start up IJ Network Tool.
2. Select the printer in Printers:.
3. Click the Configuration... button.
4. Click the Wired LAN button.
5. Change the settings or confirm.
Click OK after changing configuration. A screen is displayed asking you for confirmation before thesettings are sent to the printer. If you click OK, the settings are sent to the printer and the TransmittedSettings screen is displayed.
1. TCP/IP Setting:
Sets the IP address of the printer to be used over the LAN. Specify a value appropriate for yournetwork environment.
Get IP address automaticallySelect this option to use an IP address automatically assigned by a DHCP server. DHCPserver functionality must be enabled on your router.
Use following IP addressIf no DHCP server functionality is available in your setup where you use the printer or youwant to use a particular IP address, select this option to use a fixed IP address.
192

Changing the Settings in the Admin Password Sheet
1. Start up IJ Network Tool.
2. Select the printer in Printers:.
3. Click the Configuration... button.
4. Click the Admin Password button.
The Admin Password sheet is displayed.
5. Change the settings or confirm.
1. Use admin password
Set a password for the administrator with privileges to set up and change detailed options. To usethis feature, select this check box and enter a password.
Important• The password should consist of alphanumeric characters and be no longer than 32
characters. The password is case-sensitive. Do not forget the password you set.
2. Password:
Enter the password to set.
3. Password Confirmation:
Enter the password again for confirmation.
6. Click OK.
A screen is displayed asking you for confirmation before the settings are sent to the printer. If you clickOK, the settings are sent to the printer and the Transmitted Settings screen is displayed.
193

Enter Password Screen
The following screen is displayed if an administrator password is set to the printer.
• Admin Password
Enter the admin password that was set. For security purposes, your password is not displayed as youtype it.
• OK
Click this item after you enter the admin password.
• Cancel
This item returns you to list of detected printers. If you do not enter the correct admin password, youcannot operate the printer.
194

Monitoring Wireless Network Status
Note• This screen is not available depending on the printer you are using.
• When using the machine over the wired LAN, you cannot monitor network status.
1. Start up IJ Network Tool.
2. Select the printer in Printers:.
3. Select Status from the View menu.
The Status screen is displayed and you can check the printer status and connection performance.
1. Signal Level:
Indicates the strength of the signal received by the printer, ranging from 0% to 100%.
2. Link Quality:
Indicates the signal quality excluding the noise while communicating, ranging from 0% to 100%.
Important• If the indicated value is low, move your printer closer to the wireless network device.
3. Advanced Measurement...
Click to examine the connection performance between the printer and the access point. Follow theinstructions on the screen to start measuring and display the status. Measurement takes a fewminutes.
When is displayed in Connection performance between the printer and the access point:,the printer can communicate with the access point. Otherwise, refer to displayed comments andHelp for improving the status of communication link, and click Remeasurement.
• Check that the printer and the access point are located within the wireless connectivity rangewith no obstacles between them.
• Check if the distance between the printer and the access point is not too far.
If they are too far, move them closer together (within 164 ft./50 m).
• Check that there is no barrier or obstacle between the printer and the access point.
In general, connection performance decreases for communications through walls or betweendifferent floors. Adjust the locations to avoid such situations.
• Check that there are no sources of radio interference near the printer and the access point.
195

The wireless connection may use the same frequency band as microwave ovens and othersources of radio interference. Try to keep the printer and the access point away from suchsources.
• Check if the radio channel of the access point is close to that of other access points nearby.
If the radio channel of the access point is close to that of other access points nearby, theconnection performance may become unstable. Be sure to use a radio channel that does notinterfere with other access points.
• Check that the printer and the access point face each other.
Connection performance may depend on the orientations of the wireless devices. Replace theaccess point and the printer in another direction to achieve the best performance.
• Check whether other computers are not accessing the printer.
If appears in the result of the measurement, check whether other computers are notaccessing the printer.
If still appears even if you have tried the above, finish the measurement, then restart the IJNetwork Tool to start over the measurement.
Note• If any messages appear on Overall Network Performance:, move the machine and access
point as instructed to improve the performance.
196

Initializing the Network Settings of the Machine
Important• Note that initialization erases all network settings on the machine, and printing or scanning operation
from a computer over network may become impossible. To use the machine over network, performsetup according to the instructions on our website.
1. Start up IJ Network Tool.
2. Select the printer in Printers:.
3. Select Maintenance... from the Settings menu.
1. Setting Initialization
InitializeReverts all the network settings of the printer to factory default.
4. Click Initialize.
The Setting Initialization screen is displayed.
Click OK to initialize the network settings of the printer. Do not turn off the printer during initialization.
Click OK when initialization is complete.
Performing initialization when connected over wireless LAN will break the connection, so perform setupaccording to the instructions on our website.
Note• You can change the network settings of the printer using IJ Network Tool with USB connection after
initializing the LAN settings. To change the network settings using Canon IJ Network Tool, activatewireless LAN in advance.
197

Viewing the Modified Settings
The Confirmation screen is displayed when you modified the printer settings on the Configuration screen.When you click OK on the Confirmation screen, the following screen is displayed for confirming themodified settings.
1. Settings:
A list of changes made in the Configuration screen is displayed.
198

Appendix for Network Communication
Using the Card Slot over a Network
About Technical Terms
Restrictions
199

Using the Card Slot over a Network
Note• This screen is not available depending on the printer you are using.
Mounting the Card Slot as the Network Drive
Restrictions on Card Slot Use over a Network
Mounting the Card Slot as the Network Drive
The card slot must be mounted to use it over a network.
To mount the card slot as the network drive, follow the procedure below.
1. Insert a memory card into the card slot of the machine.
2. Check the current printer name.
You can check the current printer name on the LCD of the printer.
3. On Finder, click the Go menu and Connect to Server.
4. Input "smb://xxxxxxxxxxxx/canon_memory/", then click Connect.
For example, if the current printer name is "123ABC000000", then input "smb://123ABC000000/canon_memory/".
5. Make sure that the card slot is mounted.
When the card slot is mounted, the following icon appears on the desktop or in the Computer windowon the Go menu of Finder.
Note• The authentication screen may appear. If it appears, you do not need to input the password.
• If you cannot mount the card slot with the method above, input the IP address of the machineinstead of the current printer name, and try again. For example, "smb://192.168.1.1/canon_memory/". If you mount the card slot with the IP address, you have to remount itwhenever the machine's IP address changes.
Restrictions on Card Slot Use over a Network
• You cannot write data to a memory card in the card slot over a network. You can only read data froma memory card.
200

• The card slot can be shared by multiple computers, if the machine is connected to a network. Multiplecomputers can read files from a memory card in the card slot at the same time.
• If your computer joins a domain, the card slot may not be mounted as the network drive.
• If you use the memory card stored the large size files or many files, a large amount of card accessmay be generated. In this case, the operation in the memory card may be impossible or slow. Operateafter the Access lamp of the machine is lit.
• When you access the network drive for the card slot over the network, file names consisting of eightor less lowercase letters (not including its extension) may be shown in uppercase.
For example, a file name such as "abcdefg.doc" will be "ABCDEFG.DOC", while a name such as"AbcdeFG.doc" will appear the same.
The file is not actually renamed, but merely appears to be changed.
• Disable the function to write files to a memory card from a computer to read files from a memory cardover a network.
201

About Technical Terms
In this section, technical terms used in the manual are explained.
A
B
C
D
F
I
K
L
M
N
P
R
S
T
U
W
A
• Access Point
A wireless transceiver or base station that receives information from wireless clients/the machine andrebroadcasts it. Required in an infrastructure network.
• Ad-hoc
Client computer and machine setting where wireless communication occurs on a peer-to-peer basis,i.e., all clients in with the same SSID/network name communicate directly with each other. No accesspoint is required. This machine does not support ad-hoc communication.
• Admin Password
Administration password in IJ Network Tool to restrict access to network users. It must be entered toaccess the printer and change printer settings.
When the printer's network settings are factory default, the admin password does not have to beenentered.
• AES
An encryption method. It is optional for WPA. Strong cryptographic algorithm adopted within U.S.government organizations for information processing.
• AirPort Network (Infra)
Client computer and machine setup where all wireless communications pass through an access point.
202

• Authentication Method
The method that an access point uses to authenticate a printer through a wireless LAN. The methodsare agreeable each other.
When using WEP as an encryption method, the authentication method is able to fix to Open Systemor Shared Key.
For WPA/WPA2, authentication method is PSK.
◦ Auto
The printer automatically changes its authentication method to match the access point.
◦ Open System
In this authentication method, the communication partner is authenticated without using WEP keyeven if Use Password (WEP) is selected.
◦ Shared Key
In this authentication method, the communication partner is authenticated using the WEP key thatwas set for encryption.
B
• Bonjour
A service built into Mac OS X operating system to detect the connectable devices on a networkautomatically.
C
• Channel
Frequency channel for wireless communication. In the infrastructure mode, the channel isautomatically adjusted to match that set to the access point. This machine supports channels 1 to 13.Note that the number of channels that can be used for your wireless LAN varies depending on theregion or country.
D
• DHCP server functionality
The router or the access point assigns an IP address automatically whenever the printer or thepersonal computer on a network starts up.
• DNS server
A server that converts device names into IP addresses. When specifying IP addresses manually,specify the addresses of both a primary and a secondary server.
203

F
• Firewall
It is a system that prevents an unlawful computer access in the network. To prevent, you can use thefirewall function of a broadband router, the security software installed in the computer, or operationsystem for computer.
I
• IEEE 802.11b
International standard for wireless LAN using the 2.4 GHz frequency range with a throughput of up to11 Mbps.
• IEEE 802.11g
International standard for wireless LAN using the 2.4 GHz frequency range with a throughput of up to54 Mbps. Compatible with 802.11b.
• IEEE 802.11n
International standard for wireless LAN using the 2.4 GHz and 5 GHz frequency ranges. Even whenusing two or more antennas simultaneously or obtaining a bigger transfer rate than before by usingmultiple communication channels at the same time, the transmission speed may be influenced by theconnected apparatus.
At the maximum transfer rate of 600 Mbps, it is possible to communicate with multiple computerterminals within a dozen or so metre radius.
Compatible with 802.11b and 802.11g.
• IP Address
A unique number with four parts separated by dots. Every network device that is connected to theInternet has an IP address. Example: 192.168.0.1
An IP address is usually assigned by an access point or a DHCP server of the router automatically.
• IPv4/IPv6
They are internetwork-layer protocol used on the internet. IPv4 uses 32-bit addresses and IPv6 uses128-bit addresses.
K
• Key Format
Select either ASCII or Hex as the Password (WEP) key format. The character that can be used for theWEP key differs depending on the selected key formats.
◦ ASCII
Specify with a 5 or 13-character string that can include alphanumeric and underscore "_"characters. It is case-sensitive.
◦ Hex
Specify a 10-digit or 26-digit string that can contain hexadecimal (0 to 9, A to F, and a to f).
204

• Key Length
Length of the WEP key. Select either 64 bits or 128 bits. Longer key length allows you to set a morecomplex WEP key.
L
• Link Quality
The status of connection between the access point and the printer excluding noise (interference) isindicated with a value from 0 to 100%.
• LPR
A platform-independent printing protocol used in TCP/IP networks. It is not supported bidirectionalcommunication.
M
• MAC Address (AirPort ID)
Also known as the physical address. A unique and permanent hardware identifier that is assigned tonetwork devices by its manufacturer. MAC addresses are 48 bits long and are written as ahexadecimal number separated by colons, i.e., 11:22:33:44:55:66.
N
• Network (SSID)
Unique label for wireless LAN. It is often represented such as a network name or a access pointname.
SSID distinguishes one wireless LAN from another to prevent interference.
The printer and all clients on a wireless LAN must use the same SSID in order to communicate witheach other. The SSID can be up to 32 characters long, and is made up of alphanumeric characters.The SSID may also be referred to by its network name.
P
• Password (WEP)/Password (WEP Key)
An encryption method employed by IEEE 802.11. Shared security key used to encrypt and decryptdata sent over wireless networks. This printer supports key length of 64 bits or 128 bits, key format ofASCII code or Hexadecimal, and key number of 1 to 4.
• Performance
Indicates the status on whether the printer can be used.
• Proxy server
A server that links a LAN-connected computer to the Internet. When using a proxy server, specify theaddress and the port number of the proxy server.
205

• PSK
An encryption method employed by WPA/WPA2.
R
• Router
A relay device to connect to another network.
S
• Signal Level
The strength of the signal received by the printer from the access point is indicated with a value from0 to 100%.
• SSID
Unique label for wireless LAN. It is often represented such as a network name or an access pointname.
SSID distinguishes one wireless LAN from another to prevent interference.
The printer and all clients on a wireless LAN must use the same SSID in order to communicate witheach other. The SSID can be up to 32 characters long, and is made up of alphanumeric characters.The SSID may also be referred to by its network name.
• Stealth
In the stealth mode, an access point hides itself by not broadcasting its SSID. The client must specifythe SSID set to the access point to detect it.
The stealth mode is called a "closed network".
• Subnet Mask Address
IP address has two components, the network address and the host address. Subnet Mask used tocalculate the Subnet Mask address from the IP address. A Subnet Mask is usually assigned by anaccess point or a DHCP server of the router automatically.
Example:
IP Address: 192.168.127.123
Subnet Mask: 255.255.255.0
Subnet Mask Address: 192.168.127.0
T
• TCP/IP
Suite of communications protocols used to connect hosts on the Internet or the LAN. This protocolallows different terminals to communicate with each other.
• TKIP
An encryption protocol employed by WPA/WPA2.
206

U
• USB
Serial interface designed to enable you to "hot-swap" devices, i.e., by plugging and unplugging themwithout turning off the power.
W
• WEP/WEP Key
An encryption method employed by IEEE 802.11. Shared security key used to encrypt and decryptdata sent over wireless networks. This printer supports key length of 64 bits or 128 bits, key format ofASCII code or Hexadecimal, and key number of 1 to 4.
• Wi-Fi
International association that certifies interoperability of wireless LAN products based on the IEEE802.11 specification.
This machine is a Wi-Fi authorized product.
• Wireless LAN
A network that, instead of being connected by physical wires, is connected by a wireless technology,such as Wi-Fi.
• WPA
Security framework announced by the Wi-Fi Alliance in October 2002. The security has beenstrengthened more than WEP.
◦ Authentication
WPA defines the following authentication methods: WPA Personal that can be used without anauthentication server, plus WPA Enterprise that do require an authentication server.
This machine supports WPA Personal.
◦ Passphrase
This encrypted key is used to perform WPA Personal authentication.
The passphrase should be a string of 8 to 63 alphanumeric characters or a 64-digit hexadecimalvalue.
• WPA2
Security framework released by the Wi-Fi Alliance in September 2004 as a later version of WPA.Provides a stronger encryption mechanism through Advanced Encryption Standard (AES).
◦ Authentication
WPA2 defines the following authentication methods: WPA2 Personal that can be used without anauthentication server, plus WPA2 Enterprise that do require an authentication server.
This machine supports WPA2 Personal.
◦ Passphrase
This encrypted key is used to perform WPA2 Personal authentication.
The passphrase should be a string of 8 to 63 alphanumeric characters or a 64-digit hexadecimalvalue.
207

• WPS (Wi-Fi Protected Setup)
WPS is a standard for easy and secure establishment of a wireless network.
There are 2 primary methods used in the Wi-Fi Protected Setup:
PIN entry: a mandatory method of setup for all WPS certified devices
Push button configuration (PBC): an actual push button on the hardware or through a simulated pushbutton in the software.
208

Restrictions
If you use a printer over the wireless LAN, the printer may recognize nearby wireless systems, you shouldset a network key (WEP, WPA, or WPA2) to the access point to encrypt wireless transmission. Wirelesscommunication with a product that does not comply with the Wi-Fi standard cannot be guaranteed.
Connecting with too many computers may affect the printer performance, such as printing speed.
209

Tips for Ensuring Optimal Printing Quality
Useful Information about Ink
Key Points to Successful Printing
Be Sure to Make Paper Settings after Loading Paper
Canceling a Print Job
Key to Enjoying Consistent Printing Quality
Precautions for Safe Transport of the Machine
210

Useful Information about Ink
How is ink used for various purposes other than printing?
Ink may be used for purposes other than printing. Ink is not only used for printing, but also for cleaning theprint head to maintain the optimal printing quality.
The machine has the function to automatically clean the ink jet nozzles to prevent clogging. In thecleaning procedure, ink is pumped out from the nozzles. Used ink for nozzle cleaning is limited to a smallamount.
Does black-and-white printing use color ink?
Black-and-white printing may use ink other than black ink depending on the type of printing paper or thesettings of the printer driver. So, color ink is consumed even when printing in black-and-white.
211

Key Points to Successful Printing
Check the machine status before printing!
• Is the print head OK?
If a print head nozzle is clogged, print will be faint and papers will be wasted. Print the nozzle checkpattern to check the print head.
Maintenance Procedure
• Is the inside of the machine smeared with ink?
After printing large quantities of paper or performing borderless printing, the area where papers gothrough may get smeared with ink. Clean the inside of your machine with Bottom Plate Cleaning.
Check how to load the paper correctly!
• Is the paper loaded in the correct orientation?
To load paper in the front tray, load paper WITH THE PRINTING SIDE FACING DOWN.
Loading Paper
• Is the paper curled?
The curled paper causes paper jam. Flatten the curled paper, then reload it.
"Load the paper after correcting its curl." in Paper Is Smudged/Printed Surface Is Scratched
212

Be Sure to Make Paper Settings after Loading Paper
If the media type setting is not the one for the loaded paper, printing results may not be satisfactory. Afterloading paper, be sure to select the appropriate media type setting for the loaded paper.
Print Results Not Satisfactory
There are various types of paper: paper with special coating on the surface for printing photos with optimalquality and paper suitable for documents.
Each media type has specific preset settings, such as how ink is used and sprayed, distance from nozzles,etc., so that you can print on that type with optimal image quality.
This allows you to print with the settings best suited for the loaded media type just by selecting that mediatype.
213

Canceling a Print Job
Never press the ON button!
If you press the ON button while printing is in progress, the print data sent from the computer queues inthe machine and you may not be able to continue to print.
Press the Stop button to cancel printing.
214

Key to Enjoying Consistent Printing Quality
The key to printing with the optimal printing quality is to prevent the print head from drying or clogging.Always observe the following rules for optimal printing quality.
Never unplug the power cord until the power is turned off!
If you press the ON button to turn off the power, the machine caps the print head (nozzles) automaticallyto prevent from drying. If you unplug the power cord from the wall outlet while the POWER lamp is lit orflashing, the print head will not be capped properly and this will cause drying or clogging.
When unplugging the power cord, make sure that the POWER lamp is not lit.
Important• If the power cord is unplugged, the date/time settings will be reset and all documents stored in the
machine's memory will be lost. Send or print a necessary document before unplugging the powercord.
Print periodically!
Just as the tip of a felt pen becomes dry and unusable if it has not been used for a long time, even if it iscapped, the print head too, may become dried or clogged if the machine has not been used for a longtime.
We recommend you to use the machine at least once a month.
Note• Depending on the type of paper, ink may blur if you trace the printed area with a highlight pen or
paint-stick, or bleed if water or sweat comes in contact with the printed area.
215

Precautions for Safe Transport of the Machine
When relocating the machine, make sure of the following.
Important• Pack the machine in a sturdy box so that it is placed with its bottom facing down, using sufficient
protective material to ensure safe transport.• With the FINE cartridge left installed in the machine, press the ON button to turn off the power. This
allows the machine to automatically cap the print head, thus preventing it from drying.• After packing, do not tilt the box containing the machine or turn it on its side or upside down. Doing so
may cause the ink to leak during transport and cause damage to the machine.• When a shipping agent is handling transport of the machine, have its box marked "THIS SIDE UP" to
keep the machine with its bottom facing down. Mark also with "FRAGILE" or "HANDLE WITH CARE".
1. Turn the machine off.
2. Confirm that the POWER lamp is off and unplug the power cord.
Important• Do not unplug the machine while the POWER lamp is lit or flashing, as it may cause malfunction
or damage to the machine, making the machine unable to print.
3. Retract the paper output support, then close the paper output tray. Retract the papersupport with the output tray extension closed.
4. Close the front cover.
5. Unplug the printer cable from the computer and from the machine, then unplug the powercord from the machine.
6. Use adhesive tape to secure all the covers on the machine to keep them from openingduring transportation. Then pack the machine in the plastic bag.
7. Attach the protective material to the machine when packing the machine in the box.
216

Legal Limitations on Use of Your Product and Use of Images
It may be unlawful to make copies of, scan, print, or use reproductions of the following documents.
The list provided is non-exhaustive. When in doubt, check with a legal representative in your jurisdiction.
• Paper money• Money orders• Certificates of deposit• Postage stamps (canceled or uncanceled)• Identifying badges or insignias• Selective service or draft papers• Checks or drafts issued by governmental agencies• Motor vehicle licenses and certificates of title• Traveler's checks• Food stamps• Passports• Immigration papers• Internal revenue stamps (canceled or uncanceled)• Bonds or other certificates of indebtedness• Stock certificates• Copyrighted works/works of art without permission of copyright owner
217

Specifications
General Specifications
Printing resolution (dpi) 4800* (horizontal) x 1200 (vertical)
* Ink droplets can be placed with a pitch of 1/4800 inch at minimum.
Interface USB Port:
Hi-Speed USB *1
LAN Port:
Wireless LAN: IEEE802.11n / IEEE802.11g / IEEE802.11b *2
*1 A computer that complies with Hi-Speed USB standard is required. Sincethe Hi-Speed USB interface is fully upwardly compatible with USB 1.1, it canbe used at USB 1.1.
*2 Setup possible through Standard setup, WPS (Wi-Fi Protected Setup), WCN(Windows Connect Now) or Cableless setup.
Print width 8 inches/203.2 mm
(for Borderless Printing: 8.5 inches/216 mm)
Operating environment Temperature: 41 to 95 °F (5 to 35 °C)
Humidity: 10 to 90 % RH (no condensation)
* The performance of the printer may be reduced under certain temperatureand humidity conditions.
Recommended conditions:
Temperature: 59 to 86 °F (15 to 30 °C)
Humidity: 10 to 80 % RH (no condensation)
* For the temperature and humidity conditions of papers such as photo paper,refer to the paper's packaging or the supplied instructions.
Storage environment Temperature: 32 to 104 °F (0 to 40 °C)
Humidity: 5 to 95 % RH (no condensation)
Power supply AC 100-240 V, 50/60 Hz
Power consumption Printing (Copy): Approx. 18 W
Standby (minimum): Approx. 1.0 W *1*2
OFF: Approx. 0.3 W *1
*1 USB connection to PC
*2 The wait time for standby cannot be changed.
External dimensions Approx. 18.1 (W) x 15.2 (D) x 7.9 (H) inches
Approx. 458 (W) x 385 (D) x 200 (H) mm
* With the Front Cover retracted.
Weight Approx. 18.4 lb (Approx. 8.4 kg)
* With the FINE Cartridges installed.
Canon FINE Cartridge Total 1792 nozzles (BK 640 nozzles, C/M/Y each 384 nozzles)
218

ADF capacity A4 or Letter size: max. 30 sheets (20 lb/75 g /m2 paper), up to 0.12 inch/3 mmin height
Legal size: max. 5 sheets (20 lb/75 g /m2 paper), up to 0.02 inch/0.5 mm inheight
Other sizes: 1 sheet
Copy Specifications
Multiple copy max. 99 pages
Intensity adjustment 9 positions, Auto intensity (AE copy)
Reduction / Enlargement 25 % - 400 % (1 % unit)
Scan Specifications
Scanner driver Windows: TWAIN 1.9 Specification, WIA
Mac OS: ICA
Maximum scanning size Platen Glass: A4/Letter, 8.5" x 11.7"/216 x 297 mm
ADF: A4/Letter/Legal, 8.5" x 14.0"/216 x 356 mm
Scanning resolution Optical resolution (horizontal x vertical) max: 1200 x 2400 dpi *1
Interpolated resolution max: 19200 x 19200 dpi *2
*1 Optical Resolution represents the maximum sampling rate based on ISO14473.
*2 Increasing the scanning resolution will limit the maximum possible scanningarea.
Gradation (Input / Output) Gray: 16 bit/8 bit
Color: 48 bit/24 bit (RGB each 16 bit/8 bit)
Fax Specifications
Applicable line Public Switched Telephone Network (PSTN)
Communication mode Super G3, G3
Data compressing system Black: MH, MR, MMR
Color: JPEG
Modem speed max. 33.6 kbps
(Automatic fallback)
Transmission speed Black: Approx. 3 seconds/page at 33.6 kbps
(Based on ITU-T No.1 chart for US specifications and Canon FAX Standardchart No.1 for others, both in standard mode.)
Color: Approx. 1 minute/page at 33.6 kbps
(Based on Canon COLOR FAX TEST SHEET.)
219

Gradation Black: 256 levels
Color: 24 bit Full Color (RGB each 8 bit)
Density adjustment 3 levels
Memory Transmission/reception: approx. 50 pages
(Based on ITU-T No.1 chart for US specifications and Canon FAX Standardchart No.1 for others, both in standard mode.)
Fax resolution Black Standard: 203 pels/inch x 98 lines/inch (8 pels/mm x 3.85 lines/mm)
Black Fine, Photo: 203 pels/inch x 196 lines/inch (8 pels/mm x 7.70 lines/mm)
Black Extra fine: 300 x 300 dpi
Color: 200 x 200 dpi
Dialing Automatic dialing
- Memory dial (max. 20 destinations)
- Group dial (max. 19 destinations)
Regular dialing (with Numeric buttons)
Automatic redialing
Manual redialing (max. 10 destinations)
Others Activity report (after every 20 transactions)
Sequential broadcasting (max. 21 destinations)
Rejected numbers (max. 10 destinations)
Network Specifications
Communication protocol TCP/IP
Wireless LAN Supported Standards: IEEE802.11n / IEEE802.11g / IEEE802.11b
Frequency bandwidth: 2.4 GHz
Channel: 1-11 or 1-13
* Frequency bandwidth and available channels differ depending on country orregion.
Communication distance: Indoors 164 feet/50 m
* Effective range varies depending on the installation environment and location.
Security:
WEP (64/128 bits)
WPA-PSK (TKIP/AES)
WPA2-PSK (TKIP/AES)
Setup:
Standard setup
WPS (Push button configuration/PIN code method)
WCN (WCN-NET)
Cableless setup
Other Features: Administration password
220

Minimum System Requirements
Conform to the operating system's requirements when higher than those given here.
Windows
Operating System Windows 8, Windows 8.1
Windows 7, Windows 7 SP1
Windows Vista SP1, Windows Vista SP2
Windows XP SP3 32-bit only
Browser Internet Explorer 8 or later
Hard Disk Space 3 GB
Note: For bundled software installation.
The necessary amount of hard disk space may be changed without notice.
Display XGA 1024 x 768
Mac OS
Operating System Mac OS X v10.6.8 or later
Browser Safari 5 or later
Hard Disk Space 1.5 GB
Note: For bundled software installation.
The necessary amount of hard disk space may be changed without notice.
Display XGA 1024 x 768
Other Supported OS
Some functions may not be available with each OS. Refer to the manual or the Canon web site for details onoperation with iOS, Android, and Windows RT.
Mobile Printing Capability
Apple AirPrint
Google Cloud Print
• An internet connection is required to view the Online Manual.• Windows: Operation can only be guaranteed on a computer with Windows 8.1, Windows 8,
Windows 7, Windows Vista or Windows XP pre-installed.• Windows: A CD-ROM Drive or internet connection is required during software installation.• Windows: Internet Explorer 8, 9 or 10 is required to install Easy-WebPrint EX.
Easy-WebPrint EX for Internet Explorer 9 or 10 can be downloaded from the Canon web site.
• Windows: Some functions may not be available with Windows Media Center.• Windows: .NET Framework 4 or 4.5 must be installed to use the Windows software.• Windows: XPS Essentials Pack is required to print on Windows XP.
221

• Windows: The TWAIN driver (ScanGear) is based on the TWAIN 1.9 Specification and requires theData Source Manager bundled with the operating system.
• Mac OS: Hard Disk must be formatted as Mac OS Extended (Journaled) or Mac OS Extended.• Mac OS: For Mac OS, an internet connection is required during software installation.
Specifications are subject to change without notice.
222

Printing
Printing from a ComputerPrinting with Application Software that You are Using (Printer Driver)
Printing Using the Operation Panel of the MachinePrinting Template Forms Such As Lined Paper or Graph Paper
Printing with the Access Point Mode
223

Printing from a Computer
Printing with Application Software that You are Using (Printer Driver)
224

Printing with Application Software that You are Using (PrinterDriver)
Printing with Easy Setup BasicVarious Printing MethodsChanging the Print Quality and Correcting Image DataOverview of the Printer DriverUpdating the Printer Driver
225

Printing with Easy Setup
The simple setup procedure for carrying out appropriate printing on this machine is as follows:
1. Check that the machine is turned on
2. Load paper on the machine
3. Select the printer
Select your model from the Printer list in the Print Dialog.
Note• Click Show Details ( (the disclosure triangle)) to switch the Setup window to the detailed
display.
4. Select the paper size
For Paper Size, select the paper size to be used.If necessary, set the number of copies, the pages to be printed, and the orientation.
226

5. Select Quality & Media from the pop-up menu
6. Select the media type
For Media Type, select the same paper type loaded in the machine.
227

7. Select the print quality
For Print Quality, select High, Standard, or Draft according to your purpose.
Important• The print quality settings that can be selected may differ depending on a printing profile.
8. Complete the setup
Click Print.When you execute print, the document will be printed in accordance with the type and size of the media.
228

Important• In the Presets section, click Save Current Settings as Preset... (Save As...) to register the specified
settings.
229

Setting the Media Type with the Printer Driver
When you use this machine, selecting a media type that matches the print purpose will help you achieve thebest print results.You can use the following media types on this machine.
Commercially available papers
Media name Media Type in the printer driver
Plain Paper (including recycled paper) Plain Paper
Envelopes Envelope
Canon genuine papers (Photo Printing)
Media name <Model No.> Media Type in the printer driver
Photo Paper Plus Glossy II <PP-201> Photo Paper Plus Glossy II
Photo Paper Pro Platinum <PT-101> Photo Paper Pro Platinum
Photo Paper Pro Luster <LU-101> Photo Paper Pro Luster
Photo Paper Plus Semi-gloss <SG-201> Photo Paper Plus Semi-gloss
Photo Paper Glossy <GP-501/GP-601> Glossy Photo Paper
Matte Photo Paper <MP-101> Matte Photo Paper
Canon genuine papers (Business Letter Printing)
Media name <Model No.> Media Type in the printer driver
High Resolution Paper <HR-101N> High Resolution Paper
Canon genuine papers (Original Products)
Media name <Model No.> Media Type in the printer driver
T-Shirt Transfers <TR-301> T-Shirt Transfers
Photo Stickers <PS-101> Photo Paper Plus Glossy II
230

Various Printing Methods
Setting the Number of Copies and Printing OrderSetting the Stapling MarginExecute Borderless PrintingScaling the Printing to Fit the Paper SizeScaled PrintingPage Layout PrintingPrinting on PostcardsDisplaying the Print Results before PrintingSetting Paper Dimensions (Custom Size)
231

Setting the Number of Copies and Printing Order
Collate pages + Reverse Collate pages + Normal Reverse
The procedure for specifying the number of copies and printing order is as follows:
1. Specify the number of copies to be printed
Specify the number of copies to print from the Copies in the Print Dialog.
2. Select Paper Handling from the pop-up menu
3. Check the Collate pages check box when you are specifying multiple copies in the Copiesbox
Check the Collate pages check box to print all the pages of a single copy together.Uncheck this check box to print all pages with the same page number together.
4. Specify the print order
Check Page Order.
When you select Automatic or Reverse, printing starts from the last page.When you select Normal, printing starts from the first page.
232

5. Complete the setup
Click Print.When you execute print, the specified number of copies will be printed with the specified printing order.
Important• When the application software that you used to create the document has the same function, specify the
settings on the printer driver. However, if the print results are not acceptable, specify the functionsettings on the application software. When you specify the number of copies and the printing order withboth the application software and this printer driver, the number of copies may be multiplied numbers ofthe two settings or the specified printing order may not be enabled.
233

Setting the Stapling Margin
The procedure for setting the margin width and the staple side is as follows:
1. Select Margin from the pop-up menu on the Print Dialog
2. Set the margin width and the staple side
If necessary, set the Margin width, and select a stapling position from the Stapling Side list.
Note• The printer automatically reduces the print area depending on the staple position margin.
3. Complete the setup
Click Print.When you execute print, the data is printed with the specified margin width and staple side.
Important• When borderless printing is enabled, Margin and Stapling Side appear grayed out and are
unavailable.
234

Execute Borderless Printing
The borderless printing function allows you to print data without any margin by enlarging the data so that itextends slightly off the paper. In standard printing, margins are created around the document area.However, in borderless printing function, these margins are not created. When you want to print data suchas a photo without providing any margin around it, set borderless printing.
The procedure for performing borderless printing is as follows:
Setting Borderless Printing
1. Select the size of the paper for borderless printing
Select "XXX (borderless)" from the Paper Size in the Print Dialog.
2. Select Borderless Printing from the pop-up menu
3. Adjust the amount of extension from the paper
If necessary, adjust the amount of extension using the Amount of Extension slider.Moving the slider to the right increases the amount extending off the paper, and moving the slider tothe left decreases the amount.It is recommended to set the slider at the second position from the right for most cases.
235

Important• When the Amount of Extension slider is set to the rightmost position, the back side of the
paper may become smudged.
4. Complete the setup
Click Print.When you execute print, the data is printed without any margins on the paper.
Important• Borderless printing only supports specific paper sizes. Make sure to select a paper size with the
wording "(borderless)" from the Paper Size.• When borderless printing is enabled, Envelope, High Resolution Paper, and T-Shirt Transfers
appear grayed out and are unavailable in Media Type list of Quality & Media of the pop-up menu inthe Print dialog.
• Print quality may deteriorate or the sheet may be stained at the top and bottom depending on thetype of paper used.
• When the ratio of the height to the width differs from the image data, a portion of the image may notbe printed depending on the size of the media used.In this case, crop the image data with an application software according to the paper size.
• When scaled printing or page layout printing is enabled, you cannot perform borderless printing.
Note• When Plain Paper is selected from the Media Type menu of the Quality & Media, borderless
printing is not recommended.
Expanding the Range of the Document to Print
Setting a large amount of extension allows you to perform borderless printing with no problems. However,the portion of the document extending off the paper range will not be printed and for this reason, thesubjects around the perimeter of a photo may not be printed.
When you are not satisfied with the result of borderless printing, reduce the amount of extension. Theextension amount decreases as the Amount of Extension slider is moved to the left.
236

Important• When the amount of extension is decreased, an unexpected margin may be produced on the print,
depending on the size of the paper.
Note• When the Amount of Extension slider is set to the leftmost position, image data will be printed in the
full size. If you set this when printing the address side of a postcard, the postal code of the sender isprinted in the correct position.
237

Scaling the Printing to Fit the Paper Size
The procedure for printing a document that is automatically enlarged or reduced to fit the page size to beused is as follows:
1. Check the paper size
Check that the Paper Size in the Print Dialog is the same as the paper size that you set in theapplication software.
2. Select Paper Handling from the pop-up menu
3. Set the print paper size
Check the Scale to fit paper size check box. Then from the Destination Paper Size pop-up menu,select the paper size that is actually loaded in the machine.
4. If necessary, check the Scale down only check box
When you check this check box, the document will be reduced to fit to the paper size when thedocument size is larger than the page size. The document will be printed in the original size when thedocument size is smaller than the page size.
5. Complete the setup
238

Click Print.When you execute print, the document will be enlarged or reduced to fit to the page size.
239

Scaled Printing
The procedure for printing a document with pages enlarged or reduced is as follows:
1. Select the printer
In the Page Setup Dialog, select your model name from the Format For list.
2. Set scaled printing
Specify the scaling factor in the Scale box, and click OK.
Note• If you are using Mac OS X v10.8 or Mac OS X v10.7, you can set the Scale rate to a value in the
range from 1 to 999%.If you are using Mac OS X v10.6.8, set a value in the range from 1 to 10000%. If you enter anyother value, an error message will be displayed.
3. Complete the setup
On the Print Dialog, click Print.When you execute print, the document will be printed with the specified scale.
Important• When the application software which you used to create the original has the scaled printing function,
configure the settings on your application software. You do not need to configure the same setting inthe Page Setup dialog.
240

Page Layout Printing
The page layout printing function allows you to print more than one page image on a single sheet of paper.
The procedure for performing page layout printing is as follows:
1. Select Layout from the pop-up menu in the Print Dialog
2. Set the number of original you print on one page
In Pages per Sheet, specify the number of page you print on one page.
3. If necessary, set the following items
Layout DirectionTo change the page placement order, select an icon from the list.
BorderTo print a page border around each document page, select a type of page border.
Reverse page orientationSelect this check box to change the paper orientation.
Flip horizontallySelect this check box to reverse left and right of the document.
241

4. Complete the setup
Click Print.When you execute print, the specified number of pages will be arranged on each sheet of paper in thespecified order.
242

Printing on Postcards
This section describes the procedure for postcard printing.
1. Load postcard on the machine
2. Select paper size in the Print Dialog
Select Postcard or Postcard Double from the Paper Size menu.
Important• Return postcards can be used only when you print them from the computer.• When printing a return postcard, always set the paper size to Postcard Double from your
application software or the printer driver.• Do not fold the return postcard. If a crease is formed, the machine will not be able to feed the
postcard properly, and this condition will cause line shifts or a paper jam.• With return postcards, borderless printing cannot be used.
3. Select Quality & Media from the pop-up menu
4. Select the media type
For Media Type, select the same paper type loaded in the machine.
Important• This machine cannot print on postcards that have photos or stickers attached.• When printing on each side of a postcard separately, you will get cleaner printing if you print the
message side first and then print the address side.
5. Complete the setup
Click Print.
When you execute printing, the data will be printed onto the postcard.
243

Displaying the Print Results before Printing
If you are using Mac OS X v10.6.8, you can display and check the print result before printing.
To display the print result before printing, click Preview on the Print Dialog.
Note• When you click (the disclosure triangle) in the Print dialog and switch to the detailed display,
Preview is not displayed.For detailed display, a preview is displayed on the left side of the Print dialog.
244

Setting Paper Dimensions (Custom Size)
You can specify any height and width of paper when that particular size cannot be selected from the PaperSize menu. Such a paper size is called "custom size."
The procedure for specifying a custom size is as follows:
1. Creating a new custom paper size
In the Print Dialog, select Manage Custom Sizes... from Paper Size.In the Custom Paper Sizes dialog, click +.
Untitled will be added to the list.
2. Setting details about the custom paper size
Double-click Untitled, enter the name of the paper size you want to register, and specify the Width andHeight of the paper for Paper Size.Select User Defined or your model for Non-Printable Area, and enter the margins.
3. Registering the custom paper size
Click OK.The custom size is registered.
Important• If the application software that created the document has a function for specifying height and width
values, use the application software to set the values. If the application software does not have such afunction or if the document does not print correctly, perform the above procedure from the printer driverto set the values.
Note• To duplicate the registered paper size, select the paper size that you want to duplicate from the
Custom Paper Sizes list, and click Duplicate.• To delete a registered paper size, select the paper size that you want to delete from the Custom Paper
Sizes list, and click -.
245

Changing the Print Quality and Correcting Image Data
Setting the Print Quality Level (Custom)Printing a Color Document in MonochromeSpecifying Color CorrectionOptimal Photo Printing of Image DataAdjusting Colors with the Printer DriverPrinting with ICC Profiles (Specifying an ICC Profile from the Application Software)Printing with ICC Profiles (Specifying an ICC Profile from the Printer Driver)Adjusting Color BalanceAdjusting BrightnessAdjusting IntensityAdjusting Contrast
246

Setting the Print Quality Level (Custom)
The print quality level can be set in the Custom.
The procedure for setting the print quality level is as follows:
1. Select Quality & Media from the pop-up menu on the Print Dialog
2. Select the print quality
Select Custom for Print Quality.
3. Setting the print quality level
Move the Quality slider to select the print quality level.
4. Complete the setup
Click Print.When you execute print, the image data is printed with the selected print quality level.
Important• Certain print quality levels cannot be selected depending on the settings of Media Type.
Related Topics
Specifying Color CorrectionAdjusting Color BalanceAdjusting BrightnessAdjusting IntensityAdjusting Contrast
247

Printing a Color Document in Monochrome
The procedure for printing a color document in monochrome is as follows:
1. Select Quality & Media from the pop-up menu on the Print Dialog
2. Set grayscale printing
Check the Grayscale Printing check box.
3. Complete the setup
Click Print.When you execute print, the document is converted to grayscale data. It allows you to print the colordocument in monochrome.
Note• During Grayscale Printing, inks other than black ink may be used as well.
248

Specifying Color Correction
You can specify the color correction method suited to the type of document to be printed.Normally, the printer driver adjusts the colors by using Canon Digital Photo Color so that data is printed withcolor tints that most people prefer.
When you want to print by using the color space (Adobe RGB or sRGB) of the image data effectively or byspecifying a printing ICC profile from your application software, select ColorSync. When you want to printby having the printer driver correct the colors, select Canon Color Matching.
The procedure for specifying color correction is as follows:
1. Select Color Matching from the pop-up menu of the Print Dialog
2. Select color correction
Select the item below that matches your purpose.
ColorSyncPerform color correction using ColorSync.
Canon Color MatchingWith Canon Digital Photo Color, you can print with color tints that most people prefer.
3. Complete the setup
Click Print.When you execute print, the document data is printed with the specified color correction.
Important• Depending on the application software, when a printing ICC profile is specified from that application
software, Canon Color Matching cannot be selected because ColorSync is selected automatically.• The Quality & Media setting is necessary even when ColorSync or Canon Color Matching is
selected.
Related Topics
Optimal Photo Printing of Image DataAdjusting Colors with the Printer Driver
249

Printing with ICC Profiles (Specifying an ICC Profile from the Application Software)Printing with ICC Profiles (Specifying an ICC Profile from the Printer Driver)
250

Optimal Photo Printing of Image Data
When people print images taken with digital cameras, they sometimes feel that the printed color tones differfrom those of actual image or those displayed on the monitor.To get the print results as close as possible to the desired color tones, you must select a printing methodthat is best suited to the application software used or to your purpose.
Color Management
Devices such as digital cameras, scanners, monitors, and printers handle color differently. Colormanagement (color matching) is a method that manages device-dependent "colors" as a common colorspace.
For Mac OS, a color management system called "ColorSync" is built into the operating system.Adobe RGB and sRGB are popularly used as common color spaces. Adobe RGB has a wider color spacethan sRGB.
ICC profiles convert device-dependent "colors" into a common color space. By using an ICC profile andcarrying out color management, you can draw out the color space of the image data within the colorreproduction area that the printer can express.
Selecting a Printing Method Suited to the Image Data
The recommended printing method depends on the color space (Adobe RGB or sRGB) of the image dataor the application software to be used.
There are two typical printing methods.Check the color space (Adobe RGB or sRGB) of the image data and the application software to be used,and then select the printing method suited to your purpose.
Adjusting Colors with the Printer DriverDescribes the procedure for printing by using the color correction function of the printer driver.
• To print using Canon Digital Photo Color
The printer prints data with color tints that most people prefer, reproducing colors of the originalimage data and producing three-dimensional effects and high, sharp contrasts.
• To print by directly applying editing and touch-up results of an application software
When printing the data, the printer brings out subtle color difference between dark and lightareas, while leaving the darkest and lightest areas intact.When printing the data, the printer applies fine adjustment results, such as brightnessadjustments made with an application software.
Printing with ICC Profiles (Specifying an ICC Profile from the Application Software)Describes the procedure for printing by using the color space of Adobe RGB or sRGB effectively.You can print with a common color space by setting up the application software and the printer driverso that the color management matches the input ICC profile of the image data.The method for setting up the printer driver differs depending on the application software to be used.
251

Adjusting Colors with the Printer Driver
You can specify the color correction function of the printer driver to print with color tints that most peopleprefer through the use of Canon Digital Photo Color.When printing from an application software that can identify ICC profiles and allows you to specify them, usea printing ICC profile in the application software, and select settings for color management.
The procedure for adjusting colors with the printer driver is as follows:
1. Select Color Matching from the pop-up menu of the Print Dialog
2. Select color correction
Select Canon Color Matching.
3. Set the other items
From the pop-up menu, select Color Options. If necessary, adjust the color balance (Cyan, Magenta,Yellow) and adjust Brightness, Intensity, and Contrast settings.
4. Complete the setup
Click Print.When you execute print, the printer driver adjusts the colors when printing the data.
Related Topics
Setting the Print Quality Level (Custom)Specifying Color CorrectionAdjusting Color BalanceAdjusting BrightnessAdjusting IntensityAdjusting Contrast
252

Printing with ICC Profiles (Specifying an ICC Profile from theApplication Software)
When you print from Adobe Photoshop, Canon Digital Photo Professional, or any application software thatcan identify input ICC profiles and allows you to specify such profiles, printer uses the color managementsystem (ColorSync) built-into Mac OS when printing. The printer prints the editing and touch-up results ofthe application software and effectively uses the color space of the input ICC profile specified in the imagedata.
To use this printing method, use your application software to select color management items and specify aninput ICC profile and a printing ICC profile in the image data.Even if you print using a printing ICC profile that you created yourself from your application software, besure to select color management items from your application software.For instructions, refer to the manual of the application software you are using.
1. Select Color Matching from the pop-up menu of the Print Dialog
2. Select color correction
Select ColorSync.You can leave Profile set to Automatic.
Important• Depending on the application software you use, you may not be able to select setting items other
than ColorSync.• If you choose a Profile setting other than Automatic, the machine will not be able to print with the
correct colors.
3. Complete the setup
Click Print.When you execute print, the machine uses the color space of the image data.
Related Topics
Setting the Print Quality Level (Custom)Specifying Color Correction
253

Adjusting Color BalanceAdjusting BrightnessAdjusting IntensityAdjusting Contrast
254

Printing with ICC Profiles (Specifying an ICC Profile from thePrinter Driver)
Print from an application software that cannot identify or specify input ICC profiles by using the color spaceof the input ICC profile (sRGB) found in the data.
1. Select Color Matching from the pop-up menu of the Print Dialog
2. Select color correction
Select ColorSync.You can leave Profile set to Automatic.
Important• If you choose a Profile setting other than Automatic, the machine will not be able to print with the
correct colors.
3. Complete the setup
Click Print.When you execute print, the machine uses the color space of the image data.
Important• You cannot specify an input ICC profile from the printer driver.
Related Topics
Setting the Print Quality Level (Custom)Specifying Color CorrectionAdjusting Color BalanceAdjusting BrightnessAdjusting IntensityAdjusting Contrast
255

Adjusting Color Balance
You can adjust the color tints when printing.Since this function adjusts color balance of the output by changing the ink ratios of each color, it changesthe total color balance of the document. Use the application software when you want to change the colorbalance significantly. Use the printer driver only when you want to adjust the color balance slightly.The following sample shows the case when color balance is used to intensify cyan and to diminish yellow sothat the overall colors are more uniform.
No adjustment Adjust color balance
The procedure for adjusting color balance is as follows:
1. Select Color Options from the pop-up menu of the Print Dialog
2. Adjust color balance
There are individual sliders for Cyan, Magenta, and Yellow. Each color becomes stronger when thecorresponding slider is moved to the right, and becomes weaker when the corresponding slider is movedto the left. For example, when cyan becomes weaker, the color red becomes stronger.You can also directly enter a value linked to the slider. Enter a value in the range from -50 to 50. Thecurrent settings are displayed in the settings preview on the left side of the printer driver.
256

Important• Adjust the slider gradually.
3. Complete the setup
Click Print.When you execute print, the document is printed with the adjusted color balance.
Important• When the Grayscale Printing check box is checked for Quality & Media, the color balance (Cyan,
Magenta, Yellow) appear grayed out and are unavailable.• If you select ColorSync for Color Matching, then the color balance (Cyan, Magenta, Yellow) appear
grayed out and are unavailable.
Related Topics
Setting the Print Quality Level (Custom)Specifying Color CorrectionAdjusting BrightnessAdjusting IntensityAdjusting Contrast
257

Adjusting Brightness
You can change the brightness of the overall image data during printing.This function does not change pure white or pure black but it changes the brightness of the intermediatecolors.The following sample shows the print result when the brightness setting is changed.
Light is selected Normal is selected Dark is selected
The procedure for adjusting brightness is as follows:
1. Select Color Options from the pop-up menu of the Print Dialog
2. Specify the brightness
Select Light, Normal, or Dark for Brightness. The current settings are displayed in the settings previewon the left side of the printer driver.
3. Complete the setup
Click Print.When you execute print, the data is printed at the specified brightness.
Important• If you select ColorSync for Color Matching, then the Brightness appears grayed out and is
unavailable.
258

Related Topics
Setting the Print Quality Level (Custom)Specifying Color CorrectionAdjusting Color BalanceAdjusting IntensityAdjusting Contrast
259

Adjusting Intensity
You can dilute (brighten) or intensify (darken) the colors of the overall image data during printing.The following sample shows the case when the intensity is increased so that all colors become more intensewhen the image data is printed.
No adjustment Higher intensity
The procedure for adjusting intensity is as follows:
1. Select Color Options from the pop-up menu of the Print Dialog
2. Adjust intensity
Moving the Intensity slider to the right intensifies (darkens) the colors, and moving the slider to the leftdilutes (brightens) the colors.You can also directly enter a value linked to the slider. Enter a value in the range from -50 to 50. Thecurrent settings are displayed in the settings preview on the left side of the printer driver.
Important• Adjust the slider gradually.
3. Complete the setup
Click Print.When you execute print, the image data is printed with the adjusted intensity.
260

Important• If you select ColorSync for Color Matching, then the Intensity appears grayed out and is unavailable.
Related Topics
Setting the Print Quality Level (Custom)Specifying Color CorrectionAdjusting Color BalanceAdjusting BrightnessAdjusting Contrast
261
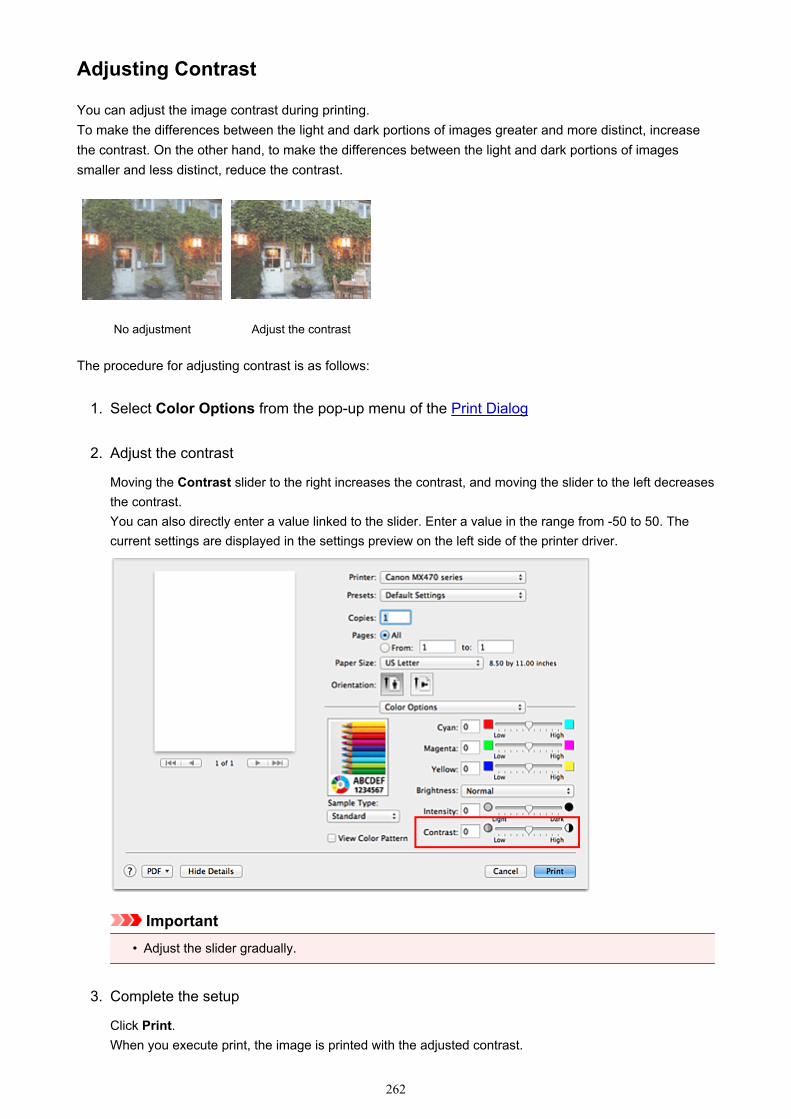
Adjusting Contrast
You can adjust the image contrast during printing.To make the differences between the light and dark portions of images greater and more distinct, increasethe contrast. On the other hand, to make the differences between the light and dark portions of imagessmaller and less distinct, reduce the contrast.
No adjustment Adjust the contrast
The procedure for adjusting contrast is as follows:
1. Select Color Options from the pop-up menu of the Print Dialog
2. Adjust the contrast
Moving the Contrast slider to the right increases the contrast, and moving the slider to the left decreasesthe contrast.You can also directly enter a value linked to the slider. Enter a value in the range from -50 to 50. Thecurrent settings are displayed in the settings preview on the left side of the printer driver.
Important• Adjust the slider gradually.
3. Complete the setup
Click Print.When you execute print, the image is printed with the adjusted contrast.
262

Important• If you select ColorSync for Color Matching, then the Contrast appears grayed out and is unavailable.
Related Topics
Setting the Print Quality Level (Custom)Specifying Color CorrectionAdjusting Color BalanceAdjusting BrightnessAdjusting Intensity
263

Overview of the Printer Driver
Canon IJ Printer DriverHow to Open the Printer Driver Setup WindowPage Setup DialogPrint DialogQuality & MediaColor OptionsBorderless PrintingMarginCanon IJ Printer UtilityOpening the Canon IJ Printer UtilityMaintenance of this MachineDisplay the Printing Status ScreenDeleting the Undesired Print JobInstructions for Use (Printer Driver)
264

Canon IJ Printer Driver
The Canon IJ printer driver (called printer driver below) is a software that is installed on your computer forprinting data with this machine.
The printer driver converts the print data created by your application software into data that your printer canunderstand, and sends the converted data to the printer.
Because different models support different print data formats, you need a printer driver for the specificmodel you are using.
Using Help of the Printer Driver
You can display Help function from the Print Dialog.
Select a setup item from the pop-up menu in the Print dialog. Then click at the bottom left of thescreen to display an explanation of the item.
Help for the printer driver is displayed when the following pop-up menu item is selected:
• Quality & Media• Color Options• Borderless Printing• Margin
265

How to Open the Printer Driver Setup Window
You can display the printer driver setup window from the application software you are using.
Opening the Page Setup Dialog
Use this procedure to set the page (paper) settings before printing.
1. Select Page Setup... from the File menu of the application software
The Page Setup Dialog opens.
Opening the Print Dialog
Use this procedure to set the print settings before printing.
1. Select Print... from the File menu of the application software
The Print Dialog opens.
266

Page Setup Dialog
In the Page Setup dialog, you configure the basic print settings such as the size of paper loaded in themachine or the scaling ratio.
To open the Page Setup dialog, you typically select Page Setup... from the File menu of your applicationsoftware.
SettingsClick the pop-up menu, and then select the following items:Page Attributes
Set the paper size or scaled printing.
Save as DefaultYou can save the attributes of the displayed page as the default settings.
Format ForSelect the model to be used for printing.
Paper SizeSelect the size of the paper to be used for printing.To set a non-standard size, select Manage Custom Sizes....
OrientationSelect the print orientation.
ScaleSet the scaling percentage.You can expand or reduce the size of the document when printing.
267

Print Dialog
In the Print dialog, you can set paper type and print quality to start printing.
To open the Print dialog, you typically select Print... from the File menu of your application software.
PrinterSelect the model to be used for printing.When you click Add Printer..., a dialog for specifying the printer opens.
PresetsYou can save or delete the settings of the Print dialog.
Note• If you are using Mac OS X v10.8 or Mac OS X v10.7, you can select Show Presets... to check the
print settings that are set in the Print dialog.
CopiesYou can set the number of copies to be printed.
Note• If you are using Mac OS X v10.6.8, you can also set collate printing.• If you are using Mac OS X v10.8 or Mac OS X v10.7, you can set collated printing by choosing
Paper Handling from the pop-up menu.
PagesYou can set the range of pages to be printed.
Paper SizeSelect the size of the paper to be used for printing.To set a non-standard size, select Manage Custom Sizes....
OrientationSelect the print orientation.
Pop-up MenuYou can switch between pages in the Print dialog by the pop-up menu. The first menu to appear differsdepending on the application software that opened the Print dialog.You can choose one of the following items from the pop-up menu.
268

LayoutYou can set page layout printing.Use Reverse page orientation to change the paper orientation, and use Flip horizontally to printa mirror image of the document.
Color MatchingYou can select the color correction method.
Paper HandlingYou can set the pages to be printed on paper and the print order.
Cover PageYou can output cover pages both before and after a document.
SchedulerYou can set the print start time and print priorities.
Quality & MediaYou can set basic print settings that match the machine.
Color OptionsYou can adjust the print colors as you desire.
Borderless PrintingYou can adjust the amount of document that extends off the paper when performing borderlessprinting.
MarginYou can set the stapling side and the stapling margin.
Supply LevelsA rough indication of the remaining ink level is displayed.
SummaryThe selected items in the Print dialog are displayed.
Important• If you are using Mac OS X v10.8 or Mac OS X v10.7, you cannot use Scheduler and Summary.
PDFYou can save a document in PDF (Portable Document Format) format.
PreviewIf you are using Mac OS X v10.6.8, when you click (the disclosure triangle) on the side of Printerand switch to the simple display, Preview is displayed.This button allows you to check the print results on the screen before printing.
269

Quality & Media
This dialog allows you to create a basic print setup in accordance with the paper type. Unless specialprinting is required, normal printing can be performed just by setting the items in this dialog.
Media TypeSelect the type of media to be used.You must select the type of media actually loaded in the machine. This selection enables the printer tocarry out printing properly for the material of the media used.
Paper SourceShows the source from which paper is supplied.
Print QualitySelect the one that is closest to the original document type and the purpose.When one of the radio buttons is selected, the appropriate quality will be set automatically.High
Gives priority to print quality over printing speed.
StandardPrints with average speed and quality.
DraftThis setting is appropriate for test printing.
CustomSelect this radio button to specify a quality.Quality
When you select Custom in Print Quality, you can use the slider bar to adjust the print qualitylevel.
Grayscale PrintingSet grayscale printing. Grayscale printing refers to the function of converting your document tograyscale data in the printer to print it in monochrome.When you check the check box, both monochrome and color documents will be printed in monochrome.When printing a color document, be sure to uncheck the check box.
270

Related Topics
Setting the Print Quality Level (Custom)Printing a Color Document in Monochrome
271

Color Options
This dialog allows you to adjust the print color as you like. If the color of the printed image is not asexpected, adjust the properties in the dialog and retry printing.
The adjustments made here do not affect the colors of the original print data unlike application softwarededicated to image processing. Use this dialog just to make fine adjustments.
PreviewShows the effect of color adjustment.As you adjust each item, the effects are reflected in the color and brightness. You can check the coloradjustment status easily.
Sample TypeSelect an image that you want to display as a sample.If necessary, select one from Standard, Portrait, Landscape, or Graphics, whichever is most similarto the print results.
View Color PatternDisplays a pattern for checking color changes produced by color adjustment.When you want to display the sample image with a color pattern, check this check box.When you want to display the sample image with one that you selected with Sample Type, uncheckthis check box.
Note• When the Grayscale Printing check box is checked in the Quality & Media, the graphic is
displayed in monochrome.
Color balance (Cyan, Magenta, Yellow)If necessary, adjust the strength of each color. To strengthen a color, drag the slider to the right. Toweaken a color, drag the slider to the left.You can also directly enter a value linked to the slider. Enter a value in the range from -50 to 50.Adjusting the color balance will result in variations in the balance among the volumes of the individualcolor inks and hence in the hues of the document as a whole.
272

Use the printer driver only when adjusting the color balance slightly. To change the color balancesignificantly, use the application software.
BrightnessSelect the brightness of printed images.You cannot change the levels of pure white and black. You can change the contrast of the colorsbetween white and black.
IntensitySelect this method to adjust the overall density of your print.To increase the overall intensity, drag the slider to the right. To decrease the overall intensity, drag theslider to the left.You can also directly enter a value linked to the slider. Enter a value in the range from -50 to 50.
ContrastThe Contrast function changes the differences between light and dark in images during printing.To make the differences between the light and dark portions of images greater and more distinct,increase the contrast. On the other hand, to make the differences between the light and dark portions ofimages smaller and less distinct, reduce the contrast.You can also directly enter a value linked to the slider. Enter a value in the range from -50 to 50.
Important• When the Grayscale Printing check box is checked for Quality & Media, the color balance (Cyan,
Magenta, Yellow) appear grayed out and are unavailable.• If you select ColorSync for Color Matching, then the color balance (Cyan, Magenta, Yellow),
Brightness, Intensity, and Contrast appear grayed out and are unavailable.
Related Topics
Specifying Color CorrectionAdjusting Color BalanceAdjusting BrightnessAdjusting IntensityAdjusting Contrast
273

Borderless Printing
This dialog allows you to adjust the amount of the document that extends off the paper when borderlessprinting is performed.
Amount of ExtensionUse the Amount of Extension slider to adjust the amount of the document that extends off the paper.Moving the slider to the right makes the amount larger and moving the slider to the left makes theamount smaller.
Related Topic
Execute Borderless Printing
274

Margin
This dialog allows you to set the stapling side and amount of margin for stapling multiple sheets of paper.
MarginSpecify the amount of margin space for stapling the paper. Enter a value between 0 inches (0 mm) to1.2 inches (30 mm).
Stapling SideSpecify the stapling side.Long-side stapling (Left) / Long-side stapling (Right)
Select this option to staple the long side of the paper.Choose left or right.
Short-side stapling (Top) / Short-side stapling (Bottom)Select this option to staple the short side of the paper.Choose top or bottom.
Related Topic
Setting the Stapling Margin
275

Canon IJ Printer Utility
The Canon IJ Printer Utility allows you to perform machine maintenance or change the settings of themachine.
What You Can Do with the Canon IJ Printer Utility
You can switch between pages in Canon IJ Printer Utility by the pop-up menu. You can choose one of thefollowing items from the pop-up menu.
CleaningClean the printer to prevent print smudges and clear up clogged print head nozzle.
Test PrintExecute a test print to check the condition of the print head nozzle and to adjust the print headposition.
Power SettingsOperate the power of this machine from the printer driver.
Ink Level InformationCheck the remaining ink levels.
Ink Cartridge SettingsSelects the FINE cartridge you use for printing.
Quiet SettingsYou can reduce the operating noise of the machine.
Custom SettingsChange the settings of this machine.
Note• To operate the Canon IJ Printer Utility, you must first turn on the machine.• Depending on the items selected, the computer communicates with the machine to obtain
information. If the computer is unable to communicate with the machine, an error message may bedisplayed.If this happens, click Cancel to display the most recent settings specified on your computer.
276

Related Topics
Cleaning the Print Heads from Your ComputerCleaning Inside the MachineCleaning the Paper Feed Rollers from Your ComputerUse Your Computer to Print a Nozzle Check PatternAligning the Print Head Position from Your ComputerChecking the Ink Status from Your ComputerSetting the Ink Cartridge to be UsedManaging the Machine PowerReducing the Machine NoiseChanging the Machine Operation Mode
277

Opening the Canon IJ Printer Utility
To open the Canon IJ Printer Utility, follow the steps below.
1. Open System Preferences, and select Print & Scan (Print & Fax)
2. Start the Canon IJ Printer Utility
Select your model from the printer list, and click Options & Supplies....
Click Open Printer Utility in Utility tab.
Canon IJ Printer Utility is launched.
278

Maintenance of this Machine
Cleaning the Print Heads from Your ComputerCleaning Inside the MachineCleaning the Paper Feed Rollers from Your ComputerUse Your Computer to Print a Nozzle Check PatternAligning the Print Head Position from Your ComputerChecking the Ink Status from Your ComputerSetting the Ink Cartridge to be UsedManaging the Machine PowerReducing the Machine NoiseChanging the Machine Operation Mode
279

Display the Printing Status Screen
Check the print progress according to the following procedure:
1. Launch the printing status screen
• If the print data has been sent to the machine
The printing status screen opens automatically. To display the printing status screen, click the (the printer icon) displayed on the Dock.
• If the print data has not been sent to the machine
Open System Preferences, and select Print & Scan (Print & Fax).To display the printing status screen, select the name of your printer model from the printer list,and then click Open Print Queue....
2. Checking the printing status
You can check the name of the file being printed or ready for being printed.
• If you are using Mac OS X v10.8
Deletes the specified print job.
Stops printing the specified document.
Resumes printing the specified document.
Stops printing all documents.
Displayed only when printing of all documents is being stopped, and resumes printing all documents.
• If you are using Mac OS X v10.7 or Mac OS X v10.6.8
280

Deletes the specified print job.
Stops printing the specified document.
Resumes printing the specified document.
Displays the print job information.
Stops printing all documents.
Displayed only when printing of all documents is being stopped, and resumes printing all documents.
281

Deleting the Undesired Print Job
If the printer does not start printing, canceled or failed print job data may be remaining.Delete unnecessary print jobs from the print status check screen.
1. Open System Preferences, and select Print & Scan (Print & Fax)
2. Select your model, and then click Open Print Queue...
The print status check screen appears.
3. Select the unnecessary print job and click ( Delete)
The selected print jobs will be deleted.
282

Instructions for Use (Printer Driver)
This printer driver is subject to the following restrictions. Keep the following points in mind when using theprinter driver.
Restrictions on the Printer Driver
• When you set up the Page Setup dialog, be sure to begin by selecting the model you are using fromthe Format For list. If you select another printer, printing may not be performed properly.
• If the Canon IJ Printer Utility does not display the remaining ink level in the Ink Level Information,check whether the FINE cartridge is properly installed.
• When the Canon IJ Printer Utility displays the Ink Level Information, close the paper output cover ofthe machine.
• The following functions cannot be used in Mac OS, though they can be used in Windows computers.◦ Duplex Printing◦ Booklet Printing◦ Tiling/Poster Printing
• Depending on the application software that you are using, a preview may not be displayed on the leftside of the Print dialog.
• Do not start up the Canon IJ Network Tool while printing.• Do not print when the Canon IJ Network Tool is running.• If you connect this machine and AirPort with a USB cable and print, you must install the latest AirPort
firmware.
Notes on Adding a Printer
• If you will be installing the Canon printer driver on Mac OS X and using the printer through a networkconnection, you can select Bonjour or Canon IJ Network in the Add (Add Printer) dialog.Canon recommends you to use Canon IJ Network for printing.If Bonjour is selected, remaining ink level messages may differ from those indicated by Canon IJNetwork.
283

Updating the Printer Driver
Obtaining the Latest Printer DriverDelete the Unnecessary Canon IJ Printer from the Printer ListBefore Installing the Printer DriverInstalling the Printer Driver
284

Obtaining the Latest Printer Driver
By updating the printer driver to the latest version of the printer driver, unresolved problems may be solved.
You can access our website and download the latest printer driver for your model.
Important• You can download the printer driver for free, but any Internet access charges incurred are your
responsibility.
Related Topics
Before Installing the Printer DriverInstalling the Printer Driver
285

Delete the Unnecessary Canon IJ Printer from the Printer List
A Canon IJ Printer that you no longer use can be deleted from the printer list.Before deleting the Canon IJ Printer, disconnect the cable that connects the machine to the computer.
The procedure to delete the unnecessary Canon IJ Printer from the printer list is as follows:
You cannot delete the Canon IJ Printer unless you are logged in as a user with the administrative right. Forinformation about an administrative user, refer to the user's manual for the Mac OS.
1. Open System Preferences, and select Print & Scan (Print & Fax)
2. Delete the Canon IJ Printer from the printer list
From the printer list, select the Canon IJ Printer to be deleted, and then click -.
Note• Even if a Canon IJ Printer is deleted from the printer list, you can re-register it automatically by
connecting the machine to your computer.
286

Before Installing the Printer Driver
This section describes the items that you should check before installing the printer driver. You should alsorefer to this section if the printer driver cannot be installed.
Checking the Personal Computer Settings
• Terminate all running applications.• Log on as the computer administrator. The installer will prompt you to enter the name and password
of the administrative user. When multiple users are using Mac OS X, log on with the account of theadministrator who registered first.
Important• When you upgrade from Mac OS X v10.7 to Mac OS X v10.8 or from Mac OS X v10.6.8 to Mac OS X
v10.7, all printer drivers that were installed will be deleted.If you plan to continue using this machine, re-install the latest printer driver.
Related Topics
Obtaining the Latest Printer DriverInstalling the Printer Driver
287

Installing the Printer Driver
You can access our web site through the Internet and download the latest printer driver for your model.
The procedure for installing the downloaded printer driver is as follows:
1. Mount the disk
Double-click the disk image file you have downloaded.The file is unpacked, and then the disk is mounted.
2. Start the installer
Double-click "PrinterDriver_XXX_YYY.pkg" (where "XXX" is your model name, and "YYY" is version)contained in the disk.
3. Start the installation
Install the printer driver according to the messages on the screen.
When the Software License Agreement is displayed, check the contents, and click Continue. If you donot agree to the terms of the Software License Agreement, you cannot install this software.
4. Selecting the install destination
If necessary, select where you want to install the printer driver, and then click Continue.
5. Executing the installation
Click Install.When the authentication screen is displayed, enter the name and password of the administrator, andthen click Install Software (OK).
6. Complete the installation
When the completion message appears, click Close.
The printer driver is installed successfully.
Important• If the Installer does not operate properly, select Quit Installer from the Installer menu of the Finder to
quit the Installer. Then start the Installer again.• You can download the printer driver for free, but you are responsible for paying any connection fees to
the Internet.
Related Topics
Obtaining the Latest Printer DriverDelete the Unnecessary Canon IJ Printer from the Printer ListBefore Installing the Printer Driver
288

Printing Using the Operation Panel of the Machine
Printing Template Forms Such As Lined Paper or Graph Paper
289

Printing Template Forms Such As Lined Paper or Graph Paper
You can print a template form such as lined paper, graph paper, or checklist, etc. on A4, B5, or Letter-sizedplain paper.
Printable template forms
Printing template forms
Printable template forms
The following templates are available:
• Notebook paper
You can select three line spacing formats.
Setting on the LCD:
◦ Notebook paper 1: 8 mm spacing
◦ Notebook paper 2: 7 mm spacing
◦ Notebook paper 3: 6 mm spacing
Note• You cannot print Notebook paper on B5 sized paper.
• Graph paper
You can select two square sizes.
Setting on the LCD:
◦ Graph paper 1: Graph 5 mm
◦ Graph paper 2: Graph 3 mm
Note• You cannot print Graph paper on B5 sized paper.
• Checklist
You can print a notepad with checkboxes.
Setting on the LCD:
Checklist
290

• Staff paper
You can print staff paper with 10 or 12 staves.
Setting on the LCD:
◦ Staff paper 1: 10 staves
◦ Staff paper 2: 12 staves
• Handwriting paper
You can print handwriting paper.
Setting on the LCD:
Handwriting paper
• Weekly schedule
You can print a weekly schedule form.
Setting on the LCD:
Weekly schedule
• Monthly schedule
You can print a monthly schedule form.
Setting on the LCD:
Monthly schedule
Printing template forms
Print template form following the procedure below.
1. Make sure that the machine is turned on.
2. Load A4, B5, or Letter-sized plain paper.
3. Press the Setup button.
The Setup menu screen is displayed.
4. Use the button to select Template print, then press the OK button.
5. Use the button to select the template you want to print, then press the OK button.
291

Printable template forms
6. Use the button to specify the paper size, then press the OK button.
Note• The * (asterisk) on the LCD indicates the current setting.
7. Make sure that Plain paper is selected, then press the OK button.
Note• If any media type other than Plain paper is selected on the LCD, select Plain paper using the
button.
8. Use the (-) (+) button or the Numeric buttons to specify the number of copies.
9. Press the OK button to start printing.
Note• You can also press the Color button or Black button to start printing.
292
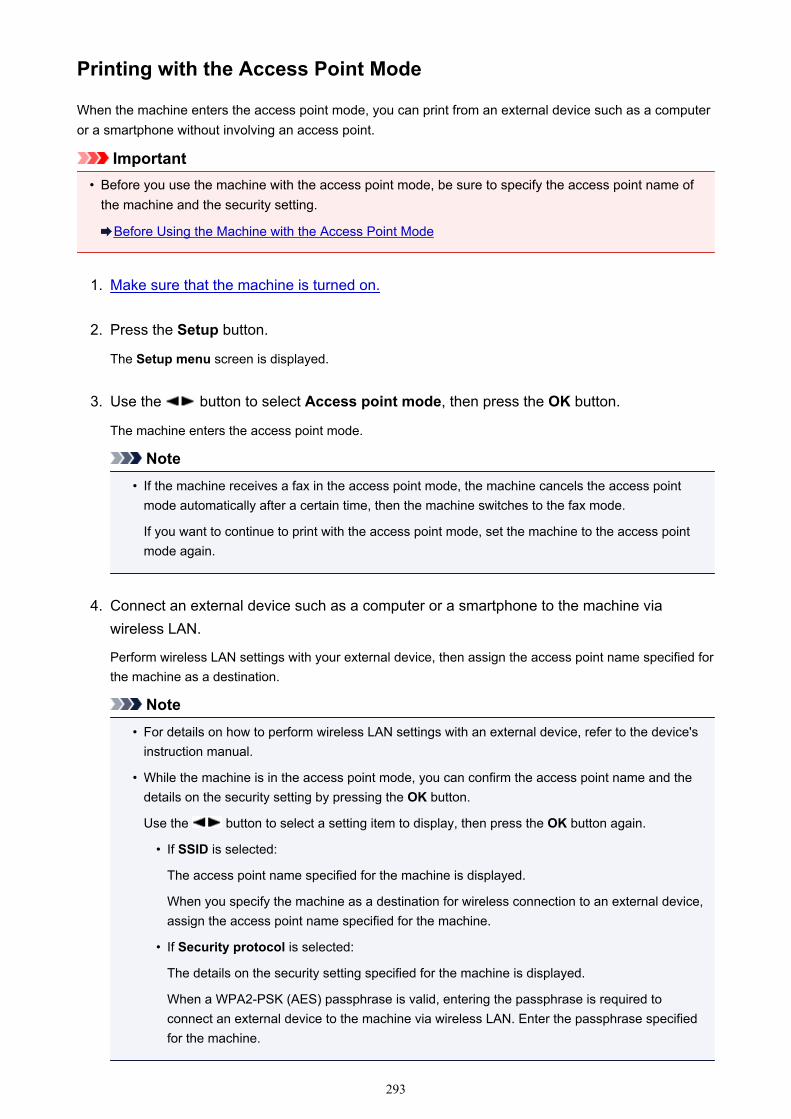
Printing with the Access Point Mode
When the machine enters the access point mode, you can print from an external device such as a computeror a smartphone without involving an access point.
Important• Before you use the machine with the access point mode, be sure to specify the access point name of
the machine and the security setting.
Before Using the Machine with the Access Point Mode
1. Make sure that the machine is turned on.
2. Press the Setup button.
The Setup menu screen is displayed.
3. Use the button to select Access point mode, then press the OK button.
The machine enters the access point mode.
Note• If the machine receives a fax in the access point mode, the machine cancels the access point
mode automatically after a certain time, then the machine switches to the fax mode.
If you want to continue to print with the access point mode, set the machine to the access pointmode again.
4. Connect an external device such as a computer or a smartphone to the machine viawireless LAN.
Perform wireless LAN settings with your external device, then assign the access point name specified forthe machine as a destination.
Note• For details on how to perform wireless LAN settings with an external device, refer to the device's
instruction manual.
• While the machine is in the access point mode, you can confirm the access point name and thedetails on the security setting by pressing the OK button.
Use the button to select a setting item to display, then press the OK button again.
• If SSID is selected:
The access point name specified for the machine is displayed.
When you specify the machine as a destination for wireless connection to an external device,assign the access point name specified for the machine.
• If Security protocol is selected:
The details on the security setting specified for the machine is displayed.
When a WPA2-PSK (AES) passphrase is valid, entering the passphrase is required toconnect an external device to the machine via wireless LAN. Enter the passphrase specifiedfor the machine.
293

5. Load paper on the machine.
6. Start printing from an external device such as a computer or a smartphone.
Perform printing from the external device and specify the machine as a printer you use.
Note• For details on how to print from an external device such as a computer or a smartphone via
wireless LAN, refer to the device's or application's instruction manual.
• You can also print using PIXMA Printing Solutions.
7. Press the Stop button when printing is completed.
The machine exits from the access point mode.
294

Copying
Making Copies Basic
Setting Items for Copying
Reducing or Enlarging a Copy
About Special copy Menu
Copying Two Pages to Fit onto a Single Page
Copying Four Pages to Fit onto a Single Page
Copying Thick Originals Such as Books
Copying without Borders
Collated Copying
295

Making Copies
This section describes the basic procedure to perform standard copying.
1. Make sure that the machine is turned on.
2. Load paper.
3. Press the COPY button.
The Copy standby screen is displayed.
4. Load the original document on the platen glass or in the ADF.
5. Confirm the page size and magnification.
1. Magnification
2. Page size
Note• To change or confirm the page size, magnification, or other settings, press the Menu button, then
use the button to display the desired setting item.
Setting Items for Copying
• Press the COPY button to reset the magnification to 100%.
6. Use the (-) (+) button or the Numeric buttons to specify the number of copies.
7. Press the Color button for color copying, or the Black button for black & white copying.
The machine starts copying.
Remove the original on the platen glass or from the document output slot after copying is complete.
Important• If you load the original on the platen glass, do not open the document cover or remove the original
while Scanning... is displayed on the screen.
• If you load the original in the ADF, do not move the original until copying is complete.
Note• To cancel copying, press the Stop button.
• If you load the original on the platen glass, you can add the copying job while printing.
296

Adding the Copying Job (Reserve copy)
Adding the Copying Job (Reserve copy)
If you load the original on the platen glass, you can add the copying job while printing (Reserve copy).
The screen below is displayed when you can reserve copy.
Load the original on the platen glass and press the same button (the Color button or the Black button) asthe one which you previously pressed.
Important• When you load the original on the platen glass, move the document cover gently.
Note• When Image quality is set High, or you load the original in the ADF, you cannot add the copying job.
• When you add the copying job, the number of copies or the settings such as the page size or mediatype cannot be changed.
• If you press the Stop button while reserve copying is in progress, the screen to select the method tocancel copying is displayed. If you select Cancel all reserv. then press the OK button, you cancancel copying all scanned data. If you select Cancel last reserv., then press the OK button, youcan cancel the last copying job.
• If you set a document of too many pages to reserve copy, Memory is full may appears on the LCD.Press the OK button and wait a while, then try copying again.
• If Try again appears on the LCD when scanning, press the OK button, then press the Stop button tocancel copying. After that, copy the documents that have not been finished copying.
297

Setting Items for Copying
You can change the copy settings such as the page size, media type, and intensity.
Press the Menu button, use the button to select a setting item, then press the OK button.
Use the button to adjust each setting item, then press the OK button. The next setting item isdisplayed.
The LCD returns to the Copy standby screen when all the settings are complete.
Note• The * (asterisk) on the LCD indicates the current setting.
• Some settings cannot be specified in combination with the setting of other setting items or the copymenu.
• The settings of the page size, media type, etc. are retained even if the machine is turned off.
• Enlarge/Reduce
Select the reduction/enlargement method.
Reducing or Enlarging a Copy
Ex:
Note• This setting item is displayed under the following conditions.
• When standard copying is selected
• When Borderless copy is selected for Special copy
• Copy intensity
Change the intensity.
Ex:
Note• If you select Auto adjust, load the original on the platen glass.
• If you select Manual adjust, use the button to decrease the intensity or the button toincrease it.
• Page size
Select the page size of the loaded paper.
Ex:
298

• Media type
Select the media type of the loaded paper.
Ex:
• Image quality
Select the image quality according to the original.
Ex:
Note• If you use Draft with the media type set to Plain paper and the quality is not as good as expected,
select Standard or High and try copying again.
• Select High to copy in grayscale. Grayscale renders tones in a range of grays instead of black orwhite.
• 4-on-1 layout
Select the layout when copying four original pages onto a single sheet of paper by reducing each image.Four different layouts are available.
Ex:
Note• This setting item is displayed only when 4-on-1 copy is selected for Special copy.
Copying Four Pages to Fit onto a Single Page
• Collate
Select whether to obtain sorted printouts when making multiple copies of a multi-paged original.
Ex:
Note• This setting item is displayed when standard copying is selected.
299

Reducing or Enlarging a Copy
You can specify the magnification optionally or select the preset-ratio copying or fit-to-page copying.
In the copy mode, press the Menu button, use the button to select Enlarge/Reduce, then press theOK button.
Use the button to select the reduction/enlargement method, then press the OK button.
Ex:
Note• Some of the reduction/enlargement methods are not available depending on the copy menu.
• Preset ratio
You can select one of the preset ratios to reduce or enlarge copies.
Use the button to select a preset ratio to match the size of your original document and printingpaper, then press the OK button.
• Magnification
You can specify the copy ratio as a percentage to reduce or enlarge copies.
Use the (-) (+) button or the Numeric buttons to specify the reduction or enlargement ratio (25 -400%), then press the OK button.
Note• Press and hold the (-) (+) button to quickly advance through the ratios. For details, see Key
repeat.
• Fit to page
The machine automatically reduces or enlarges the image to fit the page size.
Note• When you select Fit to page, the document size may not be detected correctly depending on the
original. In this case, select Preset ratio or Magnification.
• When Fit to page is selected, load the document on the platen glass.
300

About Special copy Menu
The following menus are selectable in the Special copy menu.
• Frame erase copy
When copying thick originals such as books, you can make a copy without black margins around theimage and gutter shadows.
Copying Thick Originals Such as Books
• Borderless copy
You can copy images so that they fill the entire page without borders.
Copying without Borders
• 2-on-1 copy
You can copy two original pages onto a single sheet of paper by reducing each image.
Copying Two Pages to Fit onto a Single Page
• 4-on-1 copy
You can copy four original pages onto a single sheet of paper by reducing each image.
Copying Four Pages to Fit onto a Single Page
Note• In addition to the copying method in the Special copy menu, the methods below are available.
• You can specify the magnification optionally or select the preset-ratio copying or fit-to-pagecopying.
Reducing or Enlarging a Copy
• You can obtain sorted printouts when making multiple copies of a multi-paged original.
Collated Copying
301

Copying Two Pages to Fit onto a Single Page
You can copy two original pages or a two sided page onto a single sheet of paper by reducing each image.
1. Make sure that the machine is turned on.
2. Load paper.
3. Press the COPY button.
The Copy standby screen is displayed.
4. Press the Menu button.
The Copy menu screen is displayed.
5. Use the button to select Special copy, then press the OK button.
6. Use the button to select 2-on-1 copy, then press the OK button.
If a page size setting or a media type setting that cannot be used in 2-on-1 copying is selected, the LCDdisplays the following message.
1. Use the button to select the page size, then press the OK button.
2. Use the button to select the media type, then press the OK button.
7. Load the original document on the platen glass or in the ADF.
8. Use the (-) (+) button or the Numeric buttons to specify the number of copies.
Change the print settings as necessary.
Setting Items for Copying
9. Press the Color button for color copying, or the Black button for black & white copying.
• When the document has been loaded on the platen glass:
When the machine finishes scanning the first page, the message below is displayed.
302

If you have the next page to scan, load it on the platen glass and press the OK button. Themachine starts copying.
If you do not need more scanning, press the tone button to start copying. The machine startscopying.
Note• You can add the copying job while printing.
Adding the Copying Job (Reserve copy)
• When the document has been loaded in the ADF:
The machine starts scanning the next sheet of document automatically after one sheet ofdocument finishes being scanned.
Note• If Memory is full appears on the LCD when scanning, set the image quality to Standard or reduce the
number of sheets of documents, then try copying again. If the problem is not resolved, set the imagequality to Draft and try copying again.
303

Copying Four Pages to Fit onto a Single Page
You can copy four original pages onto a single sheet of paper by reducing each image. Four differentlayouts are available.
• When Layout 1 is selected for 4-on-1 layout:
• When Layout 2 is selected for 4-on-1 layout:
• When Layout 3 is selected for 4-on-1 layout:
• When Layout 4 is selected for 4-on-1 layout:
1. Make sure that the machine is turned on.
2. Load paper.
3. Press the COPY button.
The Copy standby screen is displayed.
4. Press the Menu button.
The Copy menu screen is displayed.
5. Use the button to select Special copy, then press the OK button.
6. Use the button to select 4-on-1 copy, then press the OK button.
304

If a page size setting or a media type setting that cannot be used in 4-on-1 copying is selected, the LCDdisplays the following message.
1. Use the button to select the page size, then press the OK button.
2. Use the button to select the media type, then press the OK button.
7. Specify the print settings and the layout.
Press the Menu button, then use the button to select a setting item.
Select 4-on-1 layout, press the OK button, then select the layout.
Setting Items for Copying
Note• The * (asterisk) on the LCD indicates the current setting.
8. Load the original document on the platen glass or in the ADF.
9. Use the (-) (+) button or the Numeric buttons to specify the number of copies.
10. Press the Color button for color copying, or the Black button for black & white copying.
• When the document has been loaded on the platen glass:
When the machine finishes scanning the first to the third page, the message below is displayed.
If you have the next page to scan, load it on the platen glass and press the OK button. Themachine starts copying.
If you do not need more scanning, press the tone button to start copying. The machine startscopying.
Note• You can add the copying job while printing.
Adding the Copying Job (Reserve copy)
• When the document has been loaded in the ADF:
The machine starts scanning the next page automatically after a page finishes being scanned.
Note• If Memory is full appears on the LCD when scanning, set the image quality to Standard or reduce the
number of sheets of documents, then try copying again. If the problem is not resolved, set the imagequality to Draft and try copying again.
305

Copying Thick Originals Such as Books
When copying thick originals such as books, you can make a copy without black margins around the imageand gutter shadows. Using this function, you can reduce unnecessary ink consumption.
1. Make sure that the machine is turned on.
2. Load paper.
3. Press the COPY button.
The Copy standby screen is displayed.
4. Press the Menu button.
The Copy menu screen is displayed.
5. Use the button to select Special copy, then press the OK button.
6. Use the button to select Frame erase copy, then press the OK button.
7. Load the original document on the platen glass.
Note• When you use this function, load the original on the platen glass.
8. Use the (-) (+) button or the Numeric buttons to specify the number of copies.
Change the print settings as necessary.
Setting Items for Copying
9. Press the Color button for color copying, or the Black button for black & white copying.
The machine starts copying.
Note• Close the document cover.
• There may be a narrow black margin that appears around the image. This function removes the darkmargins only. If a scanned book is too thin or when the machine is used near a window or in a brightenvironment, a faint black frame may remain. Also, if the color of an original is dark, the machine cannotdistinguish the document color from the shadow and this may cause slight cropping or a shadow on thecrease.
306

Copying without Borders
You can copy images so that they fill the entire page without borders.
1. Make sure that the machine is turned on.
2. Load the photo paper.
3. Press the COPY button.
The Copy standby screen is displayed.
4. Press the Menu button.
The Copy menu screen is displayed.
5. Use the button to select Special copy, then press the OK button.
6. Use the button to select Borderless copy, then press the OK button.
If a page size setting or a media type setting that cannot be used in borderless copying is selected, theLCD displays the following message.
1. Use the button to select the page size, then press the OK button.
2. Use the button to select the media type, then press the OK button.
7. Load the original document on the platen glass.
Note• When you use this function, load the original on the platen glass.
8. Use the (-) (+) button or the Numeric buttons to specify the number of copies.
Change the print settings as necessary.
Setting Items for Copying
9. Press the Color button for color copying, or the Black button for black & white copying.
The machine starts borderless copying.
307

Note• Slight cropping may occur at the edges since the copied image is enlarged to fill the whole page. You
can change the width to be cropped from the borders of the original image as needed. However, thecropped area will be larger if the extension amount is large.
For details:
Extended copy amt.
• For details on the paper size and the media type available for borderless copying:
Printing Area
308

Collated Copying
When you select ON for Collate on Copy menu, you can obtain sorted printouts when making multiplecopies of a multi-paged original.
• When ON is selected:
• When OFF is selected:
Note• When you use this function, load the original in the ADF.
• The number of pages the machine can read varies with the document. If Memory is full appears on theLCD when scanning, reduce the number of document pages to scan and try copying again.
309

Scanning
Scanning from a ComputerScanning with IJ Scan UtilityScanning with Scanner DriverUseful Information on ScanningPlacing Items (When Scanning from a Computer)
Scanning from the Operation Panel of the MachineForwarding Scanned Data to the Computer Using the Operation Panel of the Machine BasicSetting Items for Scanning Using the Operation Panel of the MachineNetwork Scan SettingsSelecting a Response to Commands from the Operation Panel Using IJ Scan Utility
Scanning with the Access Point Mode
310

Scanning from a Computer
Scanning with IJ Scan Utility
Scanning with Scanner Driver
Useful Information on Scanning
Placing Items (When Scanning from a Computer)
311

Scanning with IJ Scan Utility
What Is IJ Scan Utility (Scanner Software)?
Starting IJ Scan Utility
Easy Scanning with Auto Scan Basic
Scanning Photos
Scanning Documents
Scanning with Favorite Settings
Scanning Items Larger than the Platen (Image Stitch)
Scanning Multiple Items at One Time
Scanning Multiple Documents at One Time from the ADF (Auto DocumentFeeder)
Saving after Checking Scan Results
Sending Scanned Images via E-mail
Extracting Text from Scanned Images (OCR)
IJ Scan Utility Screens
312

What Is IJ Scan Utility (Scanner Software)?
IJ Scan Utility is an application that allows you to easily scan photos, documents, etc.
You can complete from scanning to saving at one time by simply clicking the corresponding icon in the IJScan Utility main screen.
What You Can Do with IJ Scan Utility
Scan Easily according to Purposes
You can scan by simply clicking an icon such as Auto to scan easily, Photo to scan with settingssuitable for photos, or Document to sharpen text in a document or magazine for better readability,according to the item type or your purpose.
Note• Refer to "IJ Scan Utility Main Screen" for details on the IJ Scan Utility main screen.
Save Scanned Images Automatically
Scanned images are automatically saved in a preset folder. You can change the folder as required.
Note• The default save folder is the Pictures folder.• Refer to "Settings Dialog" for how to specify a folder.
Integrate with Applications
You can utilize scanned images through integration with other applications; display scanned images inyour favorite application, attach them to e-mails, extract text from images, and more.
313

Important• Some functions are available only when My Image Garden is installed.
Note• Refer to "Settings Dialog" for how to set the applications to integrate with.
314

Starting IJ Scan Utility
Note• If you have more than one scanner or have changed the connection from USB connection to network
connection, set up the network environment from IJ Scan Utility.
Network Scan Settings
From the Go menu of Finder, select Applications, then double-click the Canon Utilities folder, IJ ScanUtility folder, and then Canon IJ Scan Utility2 icon to start IJ Scan Utility.
315

Easy Scanning with Auto Scan
You can scan easily by automatically detecting the item type.
Important• The following types of items may not be scanned correctly. In that case, adjust the cropping frames
(selection boxes; scan areas) in the screen displayed by clicking Driver in the IJ Scan Utility mainscreen and scan again.
• Photos that have a whitish background• Items printed on white paper, hand-written documents, business cards, etc.• Thin items• Thick items
• When scanning two or more documents from the ADF (Auto Document Feeder), place documents ofthe same size.
1. Make sure that your scanner or printer is turned on.
2. Place items on the platen or ADF of your scanner or printer.
Placing Items (When Scanning from a Computer)
3. Start IJ Scan Utility.
4. Click Auto.
Scanning starts.
Note• Click Cancel to cancel the scan.• To apply suitable corrections based on the item type, click Settings..., then select the Apply
recommended image correction checkbox in the Settings (Auto Scan) dialog.• Scanned images are saved in the folder set for Save in in the Settings (Auto Scan) dialog displayed
by clicking Settings.... In the Settings (Auto Scan) dialog, you can also make advanced scan settings.• Refer to the following pages to scan by specifying the item type.
Scanning PhotosScanning DocumentsScanning with Favorite SettingsScanning Multiple Documents at One Time from the ADF (Auto Document Feeder)
316

Scanning Photos
You can scan photos placed on the platen with settings suitable for photos.
1. Place the photo on the platen.
Placing Items (When Scanning from a Computer)
2. Start IJ Scan Utility.
3. Click Settings..., then set the paper size, resolution, etc. in the Settings (Photo Scan)dialog as required.
When setting is completed, click OK.
4. Click Photo.
Scanning starts.
Note• Click Cancel to cancel the scan.• Scanned images are saved in the folder set for Save in in the Settings (Photo Scan) dialog displayed
by clicking Settings.... In the Settings (Photo Scan) dialog, you can also make advanced scansettings.
317

Scanning Documents
You can scan items placed on the platen with settings suitable for documents.
1. Place the item on the platen.
Placing Items (When Scanning from a Computer)
2. Start IJ Scan Utility.
3. Click Settings..., then set the paper size, resolution, etc. in the Settings (Document Scan)dialog as required.
When setting is completed, click OK.
4. Click Document.
Scanning starts.
Note• Click Cancel to cancel the scan.• Scanned images are saved in the folder set for Save in in the Settings (Document Scan) dialog
displayed by clicking Settings.... In the Settings (Document Scan) dialog, you can also makeadvanced scan settings.
318

Scanning with Favorite Settings
You can scan items placed on the platen with your favorite settings saved beforehand.
This is convenient for saving frequently used settings or when specifying scan settings in detail.
1. Start IJ Scan Utility.
2. Click Settings..., then set the item type, resolution, etc. in the Settings (Custom Scan)dialog as required.
When setting is completed, click OK.
Note• Once the settings are made, you can scan with the same settings from the next time.
3. Place the item on the platen.
Placing Items (When Scanning from a Computer)
4. Click Custom.
Scanning starts.
Note• Click Cancel to cancel the scan.• Scanned images are saved in the folder set for Save in in the Settings (Custom Scan) dialog
displayed by clicking Settings.... In the Settings (Custom Scan) dialog, you can also make advancedscan settings.
319

Scanning Items Larger than the Platen (Image Stitch)
You can scan the left and right halves of an item larger than the platen and combine them back into oneimage. Items up to approximately twice as large as the platen are supported.
Note• The following explains how to scan from the item to be placed on the left side.
1. Start IJ Scan Utility.
2. Click Settings..., then set the item type, resolution, etc. in the Settings (Scan and Stitch)dialog as required.
When setting is completed, click OK.
3. Click Stitch.
The Image Stitch window appears.
4. In Select Output Size, select an output size according to the paper size.
5. Make sure that Scan from Left is selected in Scan Direction.
320

6. Place the item that is to be displayed on the left side of the screen face-down on the platen.
7. Click Start Scanning Image 1.
The first item is scanned and appears in 1.
Note• Click Cancel to cancel the scan.
8. Place the item that is to be displayed on the right side of the screen face-down on theplaten.
321

9. Click Start Scanning Image 2.
The second item is scanned and appears in 2.
Note• Click Cancel to cancel the scan.
10. Adjust the scanned images as required.
Use the Toolbar to rotate or zoom in/out, or drag the images to adjust their positions.
Note• Select the Adjust cropping frames checkbox to specify the area to be saved.
322

Adjusting Cropping Frames in the Image Stitch Window
• To scan an item again, select the image in the Preview area or the thumbnail at the top of the
screen, then click (Delete). The selected image is deleted, allowing you to scan the itemagain.
11. Click Save.
The combined image is saved.
Note• Refer to "Image Stitch Window" for details on the Image Stitch window.• You can make advanced scan settings in the Settings (Scan and Stitch) dialog displayed by clicking
Settings....
323

Scanning Multiple Items at One Time
You can scan two or more photos (small items) placed on the platen at one time and save each imageindividually.
Important• The following types of items may not be scanned correctly. In that case, adjust the cropping frames
(selection boxes; scan areas) in the screen displayed by clicking Driver in the IJ Scan Utility mainscreen and scan again.
• Photos that have a whitish background• Items printed on white paper, hand-written documents, business cards, etc.• Thin items• Thick items
Using Auto Scan
Whether there are multiple items or not is detected automatically. Click Auto and scan.
Easy Scanning with Auto Scan
Not Using Auto Scan
In the Settings dialog, set Paper Size to Auto scan and scan.
Note• The screens for scanning with favorite settings are used as examples in the following descriptions.
1. Place the items on the platen.
Placing Items (When Scanning from a Computer)
2. Start IJ Scan Utility.
3. Click Settings....
The Settings dialog appears.
4. Click Custom Scan.
324

5. Select Select Source according to the items to be scanned.
6. Select Auto scan for Paper Size, then click OK.
325

The IJ Scan Utility main screen appears.
Note• Refer to the following pages for details on the setting items in the Settings dialog.
Settings (Photo Scan) DialogSettings (Document Scan) DialogSettings (Custom Scan) Dialog
7. Click Custom.
Multiple items are scanned at one time.
Note• Click Cancel to cancel the scan.• Scanned images are saved in the folder set for Save in in the corresponding Settings dialog displayed
by clicking Settings.... In each Settings dialog, you can also make advanced scan settings.
326

Scanning Multiple Documents at One Time from the ADF (AutoDocument Feeder)
Place multiple documents on the ADF (Auto Document Feeder) and scan at one time.
Note• You can scan multiple documents at one time from the ADF when scanning via Auto, Document,
Custom, or Driver. Refer to "Scanning with Scanner Driver" for how to scan using the scanner driver.
Using Auto Scan
The item type is detected automatically. Click Auto and scan.
Easy Scanning with Auto Scan
Not Using Auto Scan
In the Settings dialog, set Select Source to ADF or Auto, and scan.
Note• The screens for scanning documents are used as examples in the following descriptions.
1. Place the documents on the ADF.
Placing Documents (ADF (Auto Document Feeder))
2. Start IJ Scan Utility.
3. Click Settings....
The Settings dialog appears.
4. Click Document Scan.
327

5. Select Select Source according to the documents to be scanned.
To scan only the front side of each document, select Document (ADF/Platen) or Document (ADFSimplex).
To scan the front side then the back side of each document, select Document (ADF Manual Duplex).
6. Set the color mode, document size, and scanning resolution as required.
328

Click Document Scan Orientation Settings... to specify the orientation of the documents to bescanned. In the displayed dialog, you can specify the Orientation and Binding Side. How to place thedocuments when scanning the back sides depends on the Binding Side.
When setting is completed, click OK.
The IJ Scan Utility main screen appears.
Note• Refer to the following pages for details on the setting items in the Settings dialog.
Settings (Document Scan) DialogSettings (Custom Scan) Dialog
7. Click Document.
Scanning starts.
Note• Click Cancel to cancel the scan.
When Document (ADF Manual Duplex) is selected for Select Source, proceed to Step 8.
8. Follow the on-screen instructions to place the documents.
329

Note• The screens for scanning with Orientation set to Portrait are used as examples in the following
descriptions.
When Long edge is Selected for Binding Side in Document Scan Orientation Settings...:
Place the documents after rotating the output documents 180 degrees.
When Short edge is Selected for Binding Side in Document Scan Orientation Settings...:
Place the documents without changing the orientation of the output documents.
9. Click OK.
Scanning starts.
Note• Click Cancel to cancel the scan.
330

• Scanned images are saved in the folder set for Save in in the corresponding Settings dialogdisplayed by clicking Settings.... In each Settings dialog, you can also make advanced scan settings.
331

Saving after Checking Scan Results
You can check the scan results, then save the images to a computer.
Important• You cannot check the scan results before saving when scanned using Auto scan or the operation
panel.
Note• The screens for scanning photos are used as examples in the following descriptions.
1. Start IJ Scan Utility.
2. Click Settings....
The Settings dialog appears.
3. Click Photo Scan.
4. Select the Check scan results checkbox, then click OK.
332

The IJ Scan Utility main screen appears.
Note• Refer to the following pages for details on the setting items in the Settings dialog.
Settings (Photo Scan) DialogSettings (Document Scan) DialogSettings (Custom Scan) DialogSettings (Scan and Stitch) DialogSettings (Driver) Dialog
5. Click Photo.
Scanning starts.
When scanning is completed, the Save Settings dialog appears.
Note• Click Cancel to cancel the scan.
6. Change the image order or file save options as required.
You can change the image order or file save options in the Save Settings dialog.
333

Note• The default save folder is the Pictures folder.
7. Click OK.
Scanned images are saved according to the settings.
334

Sending Scanned Images via E-mail
You can send scanned images via e-mail.
Note• The screens for scanning photos are used as examples in the following descriptions.
1. Start IJ Scan Utility.
2. Click Settings....
The Settings dialog appears.
3. Click Photo Scan.
4. Select Attach to e-mail in Application Settings, then select an e-mail client.
335

Note• You can add e-mail clients to use for attachments from the pop-up menu.• If None (Attach Manually) is selected, manually attach scanned and saved images to e-mail.
5. Click OK.
The IJ Scan Utility main screen appears.
Note• Refer to the following pages for details on the setting items in the Settings dialog.
336

Settings (Auto Scan) DialogSettings (Photo Scan) DialogSettings (Document Scan) DialogSettings (Custom Scan) DialogSettings (Driver) Dialog
6. Click Photo.
Scanning starts.
When scanning is completed, the specified e-mail client starts and the images will be attached to a newmessage.
Note• Click Cancel to cancel the scan.• The scanned images are saved according to the settings made in the Settings dialog.• When the Check scan results checkbox is selected in the Settings dialog, the Save Settings
dialog appears. After you set the save options and click OK, the scanned images are saved andautomatically attached to a new message of the specified e-mail client.
7. Specify the recipient, enter the subject and message, then send e-mail.
Refer to the manual of your e-mail client for e-mail settings.
337

Extracting Text from Scanned Images (OCR)
Scan text in scanned magazines and newspapers and display it in TextEdit (included with Mac OS).
Note• You can extract text when scanning via Document, Custom, or Driver.• The screens for scanning documents are used as examples in the following descriptions.
1. Start IJ Scan Utility.
2. Click Settings....
The Settings dialog appears.
3. Click Document Scan.
Note• For Resolution, only 300 dpi or 400 dpi can be set when Start OCR is selected in Application
Settings.
4. Select Start OCR for Application Settings, then select the application in which you wantto display the result.
338

Note• When My Image Garden is specified, after the image is scanned, the text in the image is extracted
and appears in TextEdit (included with Mac OS).
5. Click OK.
The IJ Scan Utility main screen appears.
Note• Refer to the following pages for details on the setting items in the Settings dialog.
339

Settings (Document Scan) DialogSettings (Custom Scan) DialogSettings (Driver) Dialog
6. Click Document.
Scanning starts.
When scanning is completed, the scanned images are saved according to the settings, and the extractedtext appears in the specified application.
Note• Click Cancel to cancel the scan.• Text displayed in TextEdit (included with Mac OS) is for guidance only. Text in the image of the
following types of documents may not be detected correctly.
• Documents containing text with font size outside the range of 8 points to 40 points (at 300 dpi)• Slanted documents• Documents placed upside down or documents with text in the wrong orientation (rotated
characters)• Documents containing special fonts, effects, italics, or hand-written text• Documents with narrow line spacing• Documents with colors in the background of text• Documents containing multiple languages
340

IJ Scan Utility Screens
IJ Scan Utility Main Screen
Settings Dialog
Settings (Auto Scan) DialogSettings (Photo Scan) DialogSettings (Document Scan) DialogSettings (Custom Scan) DialogSettings (Scan and Stitch) DialogSettings (Driver) DialogSettings (Save to PC (Auto)) DialogSettings (Save to PC (Photo)) DialogSettings (Save to PC (Document)) DialogSettings (General Settings) Dialog
Network Selection Screen
Data Format Settings Dialog
Save Settings Dialog
Image Stitch Window
341

IJ Scan Utility Main Screen
From the Go menu of Finder, select Applications, then double-click the Canon Utilities folder, IJ ScanUtility folder, and then Canon IJ Scan Utility2 icon to start IJ Scan Utility.
You can complete from scanning to saving at one time by simply clicking the corresponding icon.
Product NameDisplays the name of the product that IJ Scan Utility is currently set to use.
If the displayed product is not the one you want to use, select the desired product from the list.
In addition, for network connection, select one with "Network" after the product name.
Note• Refer to "Network Scan Settings" for how to set up a network environment.
AutoDetects the item type automatically and saves them to a computer. The data format for saving will alsobe set automatically.
Save settings and the response after scanning can be specified in the Settings (Auto Scan) dialog.
PhotoScans items as photos and saves them to a computer.
Scan/save settings and the response after scanning can be specified in the Settings (Photo Scan)dialog.
DocumentScans items as documents and saves them to a computer.
Scan/save settings and the response after scanning can be specified in the Settings (Document Scan)dialog.
CustomScans items with your favorite settings and saves the images to a computer. The item type can beautomatically detected.
Scan/save settings and the response after scanning can be specified in the Settings (Custom Scan)dialog.
StitchDisplays the Image Stitch window in which you can scan the left and right halves of an item larger thanthe platen and combine the scanned images back into one image.
Scan/save settings and the response after scanning can be specified in the Settings (Scan and Stitch)dialog.
DriverAllows you to make image corrections and color adjustments when scanning.
Scan/save settings and the response after scanning can be specified in the Settings (Driver) dialog.
342

InstructionsOpens this guide.
Settings...Displays the Settings dialog in which you can specify the scan/save settings and the response afterscanning.
343

Settings Dialog
There are three tabs in the Settings dialog: (Scanning from a Computer), (Scanning from the
Operation Panel), and (General Settings). When you click a tab, the view in the red frame switches andyou can make advanced settings to functions on each tab.
(Scanning from a Computer) Tab
You can specify how to respond when scanning from IJ Scan Utility or My Image Garden.
Settings (Auto Scan) DialogSettings (Photo Scan) DialogSettings (Document Scan) DialogSettings (Custom Scan) DialogSettings (Scan and Stitch) DialogSettings (Driver) Dialog
(Scanning from the Operation Panel) Tab
You can specify how to respond when scanning from the operation panel.
Settings (Save to PC (Auto)) DialogSettings (Save to PC (Photo)) DialogSettings (Save to PC (Document)) Dialog
344

Important
• When the Settings dialog is displayed from My Image Garden, the (Scanning from the OperationPanel) tab does not appear.
• When using your scanner or printer with network connection, the Settings (Save to PC (Auto))dialog does not appear.
(General Settings) Tab
You can set the product to use, file size restriction on e-mail attachment, language to detect text inimages, and folder in which to save images temporarily.
Settings (General Settings) Dialog
345

Settings (Auto Scan) Dialog
Click Auto Scan on the (Scanning from a Computer) tab to display the Settings (Auto Scan) dialog.
In the Settings (Auto Scan) dialog, you can make advanced scan settings to scan by automaticallydetecting the item type.
(1) Scan Options Area(2) Save Settings Area(3) Application Settings Area
Important• When the Settings dialog is displayed from My Image Garden, the setting items for Application
Settings do not appear.
Supported Items
Photos, postcards, business cards, magazines, newspapers, documents, and BD/DVD/CD.
Important• To scan the following types of items, specify the item type and size in the Settings (Photo Scan)
dialog, Settings (Document Scan) dialog, or Settings (Custom Scan) dialog, then click Photo,Document, or Custom in the IJ Scan Utility main screen. You cannot scan correctly with Auto.
• A4 size photos• Text documents smaller than 2L (5 inches x 7 inches) (127 mm x 178 mm), such as paperback
pages with the spine cut off• Items printed on thin white paper• Long narrow items such as panoramic photos
• Reflective disc labels may not be scanned as expected.• Place items to be scanned on the platen correctly. Otherwise, items may not be scanned correctly.
346

Refer to "Placing Items (When Scanning from a Computer)" for how to place items.
• When scanning two or more documents from the ADF (Auto Document Feeder), place documents ofthe same size.
Note• To reduce moire in scans, set Select Source to Magazine in the Settings (Document Scan) dialog or
Settings (Custom Scan) dialog, then click Document or Custom in the IJ Scan Utility main screen.
(1) Scan Options Area
Apply recommended image correctionApplies suitable corrections automatically based on the item type.
Important• The color tone may differ from the source image due to corrections. In that case, deselect the
checkbox and scan.
Note• Scanning takes longer than usual when you enable this function.
(2) Save Settings Area
File NameEnter the file name of the image to be saved. When you save a file, the date and four digits areappended to the set file name in the "_20XX0101_0001" format.
Data FormatAuto is selected. The following data formats are automatically applied according to the item typewhen saving.
• Photos, postcards, BD/DVD/CD, and business cards: JPEG• Magazines, newspapers, and documents: PDF
Important• The save format may differ depending on how you place the item.
Placing Items (When Scanning from a Computer)
Note• You can change the data format from Settings....
Settings...Click to display the Data Format Settings dialog in which you can set the quality of the images to besaved, keyword search of PDF files and their compression type, and the data format in which to saveimages scanned with Auto Scan.
Save inDisplays the folder in which to save the scanned images. To change the folder, specify thedestination folder in the dialog displayed by selecting Add... from the pop-up menu.
The default save folder is the Pictures folder.
347

Important• When the Settings dialog is displayed from My Image Garden, this option does not appear.
(3) Application Settings Area
Open with an applicationSelect this when you want to enhance or correct the scanned images.
You can specify the application from the pop-up menu.
Send to an applicationSelect this when you want to use the scanned images as they are in an application that allows you tobrowse or organize images.
You can specify the application from the pop-up menu.
Send to a folderSelect this when you also want to save the scanned images to a folder other than the one specified inSave in.
You can specify the folder from the pop-up menu.
Attach to e-mailSelect this when you want to send e-mails with the scanned images attached.
You can specify the e-mail client you want to start from the pop-up menu.
Do not start any applicationSaves to the folder specified in Save in.
Note• Specify the application or folder in the dialog displayed by selecting Add... from the pop-up menu.
InstructionsOpens this guide.
DefaultsYou can restore the settings in the displayed screen to the default settings.
348

Settings (Photo Scan) Dialog
Click Photo Scan on the (Scanning from a Computer) tab to display the Settings (Photo Scan) dialog.
In the Settings (Photo Scan) dialog, you can make advanced scan settings to scan items as photos.
(1) Scan Options Area(2) Save Settings Area(3) Application Settings Area
Important• When the Settings dialog is displayed from My Image Garden, the setting items for Application
Settings do not appear.
(1) Scan Options Area
Select SourcePhoto is selected.
Color ModeSelect the color mode in which to scan the item.
Important• To select Black and White, deselect the Compress scanned images upon transfer checkbox.
Paper SizeSelect the size of the item to be scanned.
349

When you select Custom, a screen in which you can specify the paper size appears. Select a Unit,then enter the Width and Height, and then click OK.
Note• Click Defaults to restore the specified settings to the default settings.
ResolutionSelect the resolution of the item to be scanned.
The higher the resolution (value), the more detail in your image.
Resolution
Compress scanned images upon transferCompresses scanned images when transferring them to a computer. This is useful when yourscanner or printer and computer are connected with a slow interface such as USB1.1 or a network.
Image Processing SettingsClick (Right Arrow) to set the following.
Important• When Color Mode is Black and White, Image Processing Settings is not available.
Sharpen outlineEmphasizes the outline of the subjects to sharpen the image.
(2) Save Settings Area
File NameEnter the file name of the image to be saved. When you save a file, the date and four digits areappended to the set file name in the "_20XX0101_0001" format.
Data FormatSelect the data format in which to save the scanned images.
You can select JPEG/Exif, TIFF, or PNG.
Important• You cannot select JPEG/Exif when Color Mode is Black and White.
Settings...Click to display the Data Format Settings dialog in which you can set the quality of the images to besaved, keyword search of PDF files and their compression type, and the data format in which to saveimages scanned with Auto Scan.
Save inDisplays the folder in which to save the scanned images. To change the folder, specify thedestination folder in the dialog displayed by selecting Add... from the pop-up menu.
The default save folder is the Pictures folder.
350

Important• When the Settings dialog is displayed from My Image Garden, this option does not appear.
Check scan resultsDisplays the Save Settings dialog after scanning.
Important• When the Settings dialog is displayed from My Image Garden, this option does not appear.
(3) Application Settings Area
Open with an applicationSelect this when you want to enhance or correct the scanned images.
You can specify the application from the pop-up menu.
Send to an applicationSelect this when you want to use the scanned images as they are in an application that allows you tobrowse or organize images.
You can specify the application from the pop-up menu.
Send to a folderSelect this when you also want to save the scanned images to a folder other than the one specified inSave in.
You can specify the folder from the pop-up menu.
Attach to e-mailSelect this when you want to send e-mails with the scanned images attached.
You can specify the e-mail client you want to start from the pop-up menu.
Do not start any applicationSaves to the folder specified in Save in.
Note• Specify the application or folder in the dialog displayed by selecting Add... from the pop-up menu.
InstructionsOpens this guide.
DefaultsYou can restore the settings in the displayed screen to the default settings.
351

Settings (Document Scan) Dialog
Click Document Scan on the (Scanning from a Computer) tab to display the Settings (DocumentScan) dialog.
In the Settings (Document Scan) dialog, you can make advanced scan settings to scan items asdocuments.
(1) Scan Options Area(2) Save Settings Area(3) Application Settings Area
Important• When the Settings dialog is displayed from the Scan screen of My Image Garden, the setting items for
Application Settings do not appear.
(1) Scan Options Area
Select SourceSelect the type of item to be scanned.
• Scanning documents: Document or Document (ADF/Platen)• Scanning magazines: Magazine• Scanning documents from the ADF (Auto Document Feeder): Document (ADF Simplex),
Document (ADF Manual Duplex), or Document (ADF/Platen)
352

Note• When Document (ADF/Platen) is selected and documents are placed both on the platen and
ADF, those placed on the ADF will be scanned.
Color ModeSelect the color mode in which to scan the item.
Important• To select Black and White, deselect the Compress scanned images upon transfer checkbox.
Paper SizeSelect the size of the item to be scanned.
When you select Custom, a screen in which you can specify the paper size appears. Select a Unit,then enter the Width and Height, and then click OK.
Important• Custom cannot be selected depending on the Select Source setting.
Note• Click Defaults to restore the specified settings to the default settings.
ResolutionSelect the resolution of the item to be scanned.
The higher the resolution (value), the more detail in your image.
Resolution
Note• Only 300 dpi or 400 dpi can be set when Start OCR is selected in Application Settings.
Document Scan Orientation Settings...This appears when you select ADF for Select Source.
Click to display the Document Scan Orientation Settings dialog in which you can set the orientationand binding side of the documents to be scanned from the ADF.
353

Important• Binding Side cannot be specified when scanning only the front side of each document.
Compress scanned images upon transferCompresses scanned images when transferring them to a computer. This is useful when yourscanner or printer and computer are connected with a slow interface such as USB1.1 or a network.
Image Processing SettingsClick (Right Arrow) to set the following.
Note• The displayed items vary by Select Source and Color Mode.
Apply Auto Document FixSelect this checkbox to sharpen text in a document or magazine for better readability.
Important• Available only when the Compress scanned images upon transfer checkbox is not
selected.• The color tone may differ from the source image due to corrections. In that case, deselect
the checkbox and scan.
Note• Scanning takes longer than usual when you enable this function.
Sharpen outlineEmphasizes the outline of the subjects to sharpen the image.
Reduce show-throughSharpens text in an item or reduces show-through in newspapers, etc.
Reduce moireReduces moire patterns.
Printed materials are displayed as a collection of fine dots. "Moire" is a phenomenon whereuneven gradation or a stripe pattern appears when such photos or pictures printed with fine dotsare scanned.
Note• Scanning takes longer than usual when you enable Reduce moire.
354

Reduce gutter shadow/Reduce gutter shadow (platen)Reduces gutter shadows that appear between pages when scanning open booklets.
Important• This function is available only when scanning from the platen.• Available only when the Compress scanned images upon transfer checkbox is not
selected.
Note• Click Driver in the IJ Scan Utility main screen and scan to correct gutter shadows when
scanning non-standard size items or specified areas. Refer to "Gutter Correction" for details.
Correct slanted text documentDetects the scanned text and corrects the angle (within -0.1 to -10 degrees or +0.1 to +10degrees) of the document.
Important• The following types of documents may not be corrected properly since the text cannot be
detected correctly.
• Documents in which the text lines are inclined more than 10 degrees or the angles varyby line
• Documents containing both vertical and horizontal text• Documents with extremely large or small fonts• Documents with small amount of text• Documents containing figures/images• Hand-written text• Documents containing both vertical and horizontal lines (tables)
Note• Scanning takes longer than usual when you enable Correct slanted text document.
Detect the orientation of text document and rotate imageAutomatically rotates the image to the correct orientation by detecting the orientation of text inthe scanned document.
Important• Only text documents written in languages that can be selected from Document Language
in the Settings (General Settings) dialog are supported.• The orientation may not be detected for the following types of settings or documents since
the text cannot be detected correctly.
• Resolution is outside the range of 300 dpi to 600 dpi• Font size is outside the range of 8 points to 48 points• Documents containing special fonts, effects, italics, or hand-written text• Documents with patterned backgrounds
In that case, select the Check scan results checkbox and rotate the image in the SaveSettings dialog.
355

(2) Save Settings Area
File NameEnter the file name of the image to be saved. When you save a file, the date and four digits areappended to the set file name in the "_20XX0101_0001" format.
Data FormatSelect the data format in which to save the scanned images.
You can select JPEG/Exif, TIFF, PNG, PDF, or PDF (Multiple Pages).
Important• You cannot select JPEG/Exif when Color Mode is Black and White.• When Start OCR is selected in Application Settings, you cannot select PDF or PDF (Multiple
Pages).
Settings...Click to display the Data Format Settings dialog in which you can set the quality of the images to besaved, keyword search of PDF files and their compression type, and the data format in which to saveimages scanned with Auto Scan.
Save inDisplays the folder in which to save the scanned images. To change the folder, specify thedestination folder in the dialog displayed by selecting Add... from the pop-up menu.
The default save folder is the Pictures folder.
Important• When the Settings dialog is displayed from My Image Garden, this option does not appear.
Check scan resultsDisplays the Save Settings dialog after scanning.
Important• When the Settings dialog is displayed from My Image Garden, this option does not appear.
(3) Application Settings Area
Open with an applicationSelect this when you want to enhance or correct the scanned images.
You can specify the application from the pop-up menu.
Send to an applicationSelect this when you want to use the scanned images as they are in an application that allows you tobrowse or organize images.
You can specify the application from the pop-up menu.
Send to a folderSelect this when you also want to save the scanned images to a folder other than the one specified inSave in.
You can specify the folder from the pop-up menu.
Attach to e-mailSelect this when you want to send e-mails with the scanned images attached.
You can specify the e-mail client you want to start from the pop-up menu.
356

Start OCRSelect this when you want to convert text in the image into text data using specified OCR software.
You can specify the application from the pop-up menu.
Do not start any applicationSaves to the folder specified in Save in.
Note• Specify the application or folder in the dialog displayed by selecting Add... from the pop-up menu.
InstructionsOpens this guide.
DefaultsYou can restore the settings in the displayed screen to the default settings.
357

Settings (Custom Scan) Dialog
Click Custom Scan on the (Scanning from a Computer) tab to display the Settings (Custom Scan)dialog.
In the Settings (Custom Scan) dialog, you can make advanced scan settings to scan according to yourpreference.
(1) Scan Options Area(2) Save Settings Area(3) Application Settings Area
Important• When the Settings dialog is displayed from the Scan screen of My Image Garden, the setting items for
Application Settings do not appear.
(1) Scan Options Area
Select SourceSelect the type of item to be scanned. When Auto is selected, the item type is automaticallydetected.
Color Mode, Paper Size, and Resolution are automatically set as well.
Important• Item types supported by Auto are photos, postcards, business cards, magazines, newspapers,
documents, and BD/DVD/CD.
358

• To scan the following types of items, specify the item type or size. You cannot scan correctly withAuto.
• A4 size photos• Text documents smaller than 2L (5 inches x 7 inches) (127 mm x 178 mm), such as
paperback pages with the spine cut off• Items printed on thin white paper• Long narrow items such as panoramic photos
• Reflective disc labels may not be scanned as expected.• Place items correctly according to the type of item to be scanned. Otherwise, items may not be
scanned correctly.
Refer to "Placing Items (When Scanning from a Computer)" for how to place items.
• When scanning two or more documents from the ADF (Auto Document Feeder), placedocuments of the same size even if Auto is set.
Note• To convert text in the image into text data after scanning, specify Select Source instead of
selecting Auto.• To reduce moire, set Select Source to Magazine.
Color ModeSelect the color mode in which to scan the item.
Important• To select Black and White, deselect the Compress scanned images upon transfer checkbox.
Note• Only Color is available when Select Source is Auto.
Paper SizeSelect the size of the item to be scanned.
When you select Custom, a screen in which you can specify the paper size appears. Select a Unit,then enter the Width and Height, and then click OK.
Note• Only Auto is available when Select Source is Auto.• Click Defaults in the screen in which you can specify the paper size to restore the specified
settings to the default settings.
ResolutionSelect the resolution of the item to be scanned.
The higher the resolution (value), the more detail in your image.
Resolution
359

Note• Only Auto is available when Select Source is Auto.• Only 300 dpi or 400 dpi can be set when Start OCR is selected in Application Settings.
Document Scan Orientation Settings...This appears when you select ADF or Auto for Select Source.
Click to display the Document Scan Orientation Settings dialog in which you can set the orientationand binding side of the documents to be scanned from the ADF.
Important• Binding Side cannot be specified when scanning only the front side of each document.
Compress scanned images upon transferCompresses scanned images when transferring them to a computer. This is useful when yourscanner or printer and computer are connected with a slow interface such as USB1.1 or a network.
Important• This does not appear when Select Source is Auto.
Image Processing SettingsClick (Right Arrow) to set the following. Available setting items vary by Select Source.
• When Select Source is Auto:
Apply recommended image correctionApplies suitable corrections automatically based on the item type.
Important• The color tone may differ from the source image due to corrections. In that case,
deselect the checkbox and scan.
Note• Scanning takes longer than usual when you enable this function.
• When Select Source is Photo:
Important• When Color Mode is Black and White, Image Processing Settings is not available.
Sharpen outlineEmphasizes the outline of the subjects to sharpen the image.
360

• When Select Source is Magazine or Document:
Note• The displayed items vary by Select Source and Color Mode.
Apply Auto Document FixSelect this checkbox to sharpen text in a document or magazine for better readability.
Important• Available only when the Compress scanned images upon transfer checkbox is not
selected.• The color tone may differ from the source image due to corrections. In that case,
deselect the checkbox and scan.
Note• Scanning takes longer than usual when you enable this function.
Sharpen outlineEmphasizes the outline of the subjects to sharpen the image.
Reduce show-throughSharpens text in an item or reduces show-through in newspapers, etc.
Reduce moireReduces moire patterns.
Printed materials are displayed as a collection of fine dots. "Moire" is a phenomenon whereuneven gradation or a stripe pattern appears when such photos or pictures printed with finedots are scanned.
Note• Scanning takes longer than usual when you enable Reduce moire.
Reduce gutter shadowReduces gutter shadows that appear between pages when scanning open booklets.
Important• This function is available only when scanning from the platen.• Available only when the Compress scanned images upon transfer checkbox is not
selected.
Note• Click Driver in the IJ Scan Utility main screen and scan to correct gutter shadows when
scanning non-standard size items or specified areas. Refer to "Gutter Correction" for details.
Correct slanted text documentDetects the scanned text and corrects the angle (within -0.1 to -10 degrees or +0.1 to +10degrees) of the document.
Important• The following types of documents may not be corrected properly since the text cannot
be detected correctly.
361

• Documents in which the text lines are inclined more than 10 degrees or the anglesvary by line
• Documents containing both vertical and horizontal text• Documents with extremely large or small fonts• Documents with small amount of text• Documents containing figures/images• Hand-written text• Documents containing both vertical and horizontal lines (tables)
Note• Scanning takes longer than usual when you enable Correct slanted text document.
Detect the orientation of text document and rotate imageAutomatically rotates the image to the correct orientation by detecting the orientation of textin the scanned document.
Important• Only text documents written in languages that can be selected from Document
Language in the Settings (General Settings) dialog are supported.• The orientation may not be detected for the following types of settings or documents
since the text cannot be detected correctly.
• Resolution is outside the range of 300 dpi to 600 dpi• Font size is outside the range of 8 points to 48 points• Documents containing special fonts, effects, italics, or hand-written text• Documents with patterned backgrounds
In that case, select the Check scan results checkbox and rotate the image in the SaveSettings dialog.
(2) Save Settings Area
File NameEnter the file name of the image to be saved. When you save a file, the date and four digits areappended to the set file name in the "_20XX0101_0001" format.
Data FormatSelect the data format in which to save the scanned images.
You can select JPEG/Exif, TIFF, PNG, PDF, PDF (Multiple Pages), or Auto.
Important• When Auto is selected, the save format may differ depending on how you place the item.
Placing Items (When Scanning from a Computer)
• You cannot select JPEG/Exif when Color Mode is Black and White.• When Start OCR is selected in Application Settings, you cannot select PDF, PDF (Multiple
Pages), or Auto.
Note• Auto appears only when Auto is selected for Select Source.
362

Settings...Click to display the Data Format Settings dialog in which you can set the quality of the images to besaved, keyword search of PDF files and their compression type, and the data format in which to saveimages scanned with Auto Scan.
Save inDisplays the folder in which to save the scanned images. To change the folder, specify thedestination folder in the dialog displayed by selecting Add... from the pop-up menu.
The default save folder is the Pictures folder.
Important• When the Settings dialog is displayed from My Image Garden, this option does not appear.
Check scan resultsDisplays the Save Settings dialog after scanning.
Important• This does not appear when Select Source is Auto.• When the Settings dialog is displayed from My Image Garden, this option does not appear.
(3) Application Settings Area
Open with an applicationSelect this when you want to enhance or correct the scanned images.
You can specify the application from the pop-up menu.
Send to an applicationSelect this when you want to use the scanned images as they are in an application that allows you tobrowse or organize images.
You can specify the application from the pop-up menu.
Send to a folderSelect this when you also want to save the scanned images to a folder other than the one specified inSave in.
You can specify the folder from the pop-up menu.
Attach to e-mailSelect this when you want to send e-mails with the scanned images attached.
You can specify the e-mail client you want to start from the pop-up menu.
Start OCRSelect this when you want to convert text in the image into text data using specified OCR software.
You can specify the application from the pop-up menu.
Do not start any applicationSaves to the folder specified in Save in.
Note• Specify the application or folder in the dialog displayed by selecting Add... from the pop-up menu.
InstructionsOpens this guide.
363

DefaultsYou can restore the settings in the displayed screen to the default settings.
364

Settings (Scan and Stitch) Dialog
Click Scan and Stitch on the (Scanning from a Computer) tab to display the Settings (Scan andStitch) dialog.
In the Settings (Scan and Stitch) dialog, you can make advanced scan settings for scanning items largerthan the platen.
(1) Scan Options Area(2) Save Settings Area(3) Application Settings Area
Important• When the Settings dialog is displayed from the Scan screen of My Image Garden, the setting items for
Application Settings do not appear.
(1) Scan Options Area
Select SourceSelect the type of item to be scanned.
• Scanning photos: Photo• Scanning documents: Document• Scanning magazines: Magazine
Note• To reduce moire, set Select Source to Magazine.
Color ModeSelect the color mode in which to scan the item.
365

ResolutionSelect the resolution of the item to be scanned.
The higher the resolution (value), the more detail in your image.
Resolution
Image Processing SettingsClick (Right Arrow) to set the following. Available setting items vary by Select Source.
Important• When Color Mode is Black and White, Image Processing Settings is not available.
• When Select Source is Photo:
Sharpen outlineEmphasizes the outline of the subjects to sharpen the image.
• When Select Source is Magazine or Document:
Sharpen outlineEmphasizes the outline of the subjects to sharpen the image.
Reduce show-throughSharpens text in an item or reduces show-through in newspapers, etc.
Reduce moireReduces moire patterns.
Printed materials are displayed as a collection of fine dots. "Moire" is a phenomenon whereuneven gradation or a stripe pattern appears when such photos or pictures printed with finedots are scanned.
Note• Scanning takes longer than usual when you enable Reduce moire.
(2) Save Settings Area
File NameEnter the file name of the image to be saved. When you save a file, the date and four digits areappended to the set file name in the "_20XX0101_0001" format.
Data FormatSelect the data format in which to save the scanned images.
You can select JPEG/Exif, TIFF, PNG, PDF, or PDF (Multiple Pages).
Important• You cannot select JPEG/Exif when Color Mode is Black and White.
Settings...Click to display the Data Format Settings dialog in which you can set the quality of the images to besaved, keyword search of PDF files and their compression type, and the data format in which to saveimages scanned with Auto Scan.
Save inDisplays the folder in which to save the scanned images. To change the folder, specify thedestination folder in the dialog displayed by selecting Add... from the pop-up menu.
366

The default save folder is the Pictures folder.
Important• When the Settings dialog is displayed from My Image Garden, this option does not appear.
Check scan resultsDisplays the Save Settings dialog after scanning.
Important• When the Settings dialog is displayed from My Image Garden, this option does not appear.
(3) Application Settings Area
Open with an applicationSelect this when you want to enhance or correct the scanned images.
You can specify the application from the pop-up menu.
Send to an applicationSelect this when you want to use the scanned images as they are in an application that allows you tobrowse or organize images.
You can specify the application from the pop-up menu.
Send to a folderSelect this when you also want to save the scanned images to a folder other than the one specified inSave in.
You can specify the folder from the pop-up menu.
Do not start any applicationSaves to the folder specified in Save in.
Note• Specify the application or folder in the dialog displayed by selecting Add... from the pop-up menu.
InstructionsOpens this guide.
DefaultsYou can restore the settings in the displayed screen to the default settings.
367

Settings (Driver) Dialog
Click Driver on the (Scanning from a Computer) tab to display the Settings (Driver) dialog.
In the Settings (Driver) dialog, you can specify how to save images when scanning items by starting thescanner driver from IJ Scan Utility and how to respond after saving them.
(1) Save Settings Area(2) Application Settings Area
Important• When the Settings dialog is displayed from My Image Garden, the setting items for Application
Settings do not appear.
(1) Save Settings Area
File NameEnter the file name of the image to be saved. When you save a file, the date and four digits areappended to the set file name in the "_20XX0101_0001" format.
Data FormatSelect the data format in which to save the scanned images.
You can select JPEG/Exif, TIFF, PNG, PDF, or PDF (Multiple Pages).
Note• When PDF or PDF (Multiple Pages) is selected, images up to 9600 pixels x 9600 pixels can be
scanned.• When the Enable large image scans checkbox is selected in Save Settings, or when Start
OCR is selected in Application Settings, you can select JPEG/Exif, TIFF, or PNG.
368

Settings...Click to display the Data Format Settings dialog in which you can set the quality of the images to besaved, keyword search of PDF files and their compression type, and the data format in which to saveimages scanned with Auto Scan.
Save inDisplays the folder in which to save the scanned images. To change the folder, specify thedestination folder in the dialog displayed by selecting Add... from the pop-up menu.
The default save folder is the Pictures folder.
Important• When the Settings dialog is displayed from My Image Garden, this option does not appear.
Enable large image scansSelect this checkbox to scan images up to 21000 pixels x 30000 pixels and 1.8 GB.
Important• When this checkbox is selected, you cannot select Send to an application, Send to a folder,
Attach to e-mail, or Start OCR.• When the Settings dialog is displayed from My Image Garden, this option does not appear.
Note• When this checkbox is not selected, images up to 10208 pixels x 14032 pixels can be scanned.
Check scan resultsDisplays the Save Settings dialog after scanning.
Important• When the Settings dialog is displayed from My Image Garden, this option does not appear.
(2) Application Settings Area
Open with an applicationSelect this when you want to enhance or correct the scanned images.
You can specify the application from the pop-up menu.
Send to an applicationSelect this when you want to use the scanned images as they are in an application that allows you tobrowse or organize images.
You can specify the application from the pop-up menu.
Send to a folderSelect this when you also want to save the scanned images to a folder other than the one specified inSave in.
You can specify the folder from the pop-up menu.
Attach to e-mailSelect this when you want to send e-mails with the scanned images attached.
You can specify the e-mail client you want to start from the pop-up menu.
Start OCRSelect this when you want to convert text in the image into text data using specified OCR software.
369

You can specify the application from the pop-up menu.
Do not start any applicationSaves to the folder specified in Save in.
Note• Specify the application or folder in the dialog displayed by selecting Add... from the pop-up menu.
InstructionsOpens this guide.
DefaultsYou can restore the settings in the displayed screen to the default settings.
370

Settings (Save to PC (Auto)) Dialog
Click Save to PC (Auto) on the (Scanning from the Operation Panel) tab to display the Settings (Saveto PC (Auto)) dialog.
In the Settings (Save to PC (Auto)) dialog, you can specify how to respond when saving images to acomputer after scanning them from the operation panel by automatically detecting the item type.
(1) Scan Options Area(2) Save Settings Area(3) Application Settings Area
(1) Scan Options Area
Paper SizeAuto is selected.
ResolutionAuto is selected.
Document Scan Orientation Settings...Click to display the Document Scan Orientation Settings dialog in which you can set the orientationof the documents to be scanned from the ADF.
Image Processing SettingsClick (Right Arrow) to set the following.
371

Apply recommended image correctionApplies suitable corrections automatically based on the item type.
Important• The color tone may differ from the source image due to corrections. In that case, deselect
the checkbox and scan.
Note• Scanning takes longer than usual when you enable this function.
(2) Save Settings Area
File NameEnter the file name of the image to be saved. When you save a file, the date and four digits areappended to the set file name in the "_20XX0101_0001" format.
Data FormatAuto is selected. The following data formats are automatically applied according to the item typewhen saving.
• Photos, postcards, BD/DVD/CD, and business cards: JPEG• Magazines, newspapers, and documents: PDF
Important• The save format may differ depending on how you place the item.
Refer to "Placing Items (When Scanning from a Computer)" for how to place items.
Note• You can change the data format from Settings....
Settings...Click to display the Data Format Settings dialog in which you can set the quality of the images to besaved, keyword search of PDF files and their compression type, and the data format in which to saveimages scanned with Auto Scan.
Save inDisplays the folder in which to save the scanned images. To change the folder, specify thedestination folder in the dialog displayed by selecting Add... from the pop-up menu.
The default save folder is the Pictures folder.
(3) Application Settings Area
Open with an applicationSelect this when you want to enhance or correct the scanned images.
You can specify the application from the pop-up menu.
Send to an applicationSelect this when you want to use the scanned images as they are in an application that allows you tobrowse or organize images.
You can specify the application from the pop-up menu.
372

Send to a folderSelect this when you also want to save the scanned images to a folder other than the one specified inSave in.
You can specify the folder from the pop-up menu.
Do not start any applicationSaves to the folder specified in Save in.
Note• Specify the application or folder in the dialog displayed by selecting Add... from the pop-up menu.
InstructionsOpens this guide.
DefaultsYou can restore the settings in the displayed screen to the default settings.
373

Settings (Save to PC (Photo)) Dialog
Click Save to PC (Photo) on the (Scanning from the Operation Panel) tab to display the Settings(Save to PC (Photo)) dialog.
In the Settings (Save to PC (Photo)) dialog, you can specify how to respond when saving images to acomputer as photos after scanning them from the operation panel.
(1) Scan Options Area(2) Save Settings Area(3) Application Settings Area
(1) Scan Options Area
Paper SizeSet from the operation panel.
ResolutionSet from the operation panel.
Compress scanned images upon transferCompresses scanned images when transferring them to a computer. This is useful when yourscanner or printer and computer are connected with a slow interface such as USB1.1 or a network.
Image Processing SettingsClick (Right Arrow) to set the following.
Sharpen outlineEmphasizes the outline of the subjects to sharpen the image.
374

(2) Save Settings Area
File NameEnter the file name of the image to be saved. When you save a file, the date and four digits areappended to the set file name in the "_20XX0101_0001" format.
Data FormatSet from the operation panel.
Settings...Click to display the Data Format Settings dialog in which you can set the quality of the images to besaved, keyword search of PDF files, and the data format in which to save images scanned with AutoScan.
Save inDisplays the folder in which to save the scanned images. To change the folder, specify thedestination folder in the dialog displayed by selecting Add... from the pop-up menu.
The default save folder is the Pictures folder.
(3) Application Settings Area
Open with an applicationSelect this when you want to enhance or correct the scanned images.
You can specify the application from the pop-up menu.
Send to an applicationSelect this when you want to use the scanned images as they are in an application that allows you tobrowse or organize images.
You can specify the application from the pop-up menu.
Send to a folderSelect this when you also want to save the scanned images to a folder other than the one specified inSave in.
You can specify the folder from the pop-up menu.
Do not start any applicationSaves to the folder specified in Save in.
Note• Specify the application or folder in the dialog displayed by selecting Add... from the pop-up menu.
InstructionsOpens this guide.
DefaultsYou can restore the settings in the displayed screen to the default settings.
375

Settings (Save to PC (Document)) Dialog
Click Save to PC (Document) on the (Scanning from the Operation Panel) tab to display the Settings(Save to PC (Document)) dialog.
In the Settings (Save to PC (Document)) dialog, you can specify how to respond when saving images to acomputer as documents after scanning them from the operation panel.
(1) Scan Options Area(2) Save Settings Area(3) Application Settings Area
(1) Scan Options Area
Paper SizeSet from the operation panel.
ResolutionSet from the operation panel.
Document Scan Orientation Settings...Click to display the Document Scan Orientation Settings dialog in which you can set the orientationof the documents to be scanned from the ADF.
376

Compress scanned images upon transferCompresses scanned images when transferring them to a computer. This is useful when yourscanner or printer and computer are connected with a slow interface such as USB1.1 or a network.
Image Processing SettingsClick (Right Arrow) to set the following.
Apply Auto Document FixSelect this checkbox to sharpen text in a document or magazine for better readability.
Important• Available only when the Compress scanned images upon transfer checkbox is not
selected.• The color tone may differ from the source image due to corrections. In that case, deselect
the checkbox and scan.
Note• Scanning takes longer than usual when you enable this function.
Sharpen outlineEmphasizes the outline of the subjects to sharpen the image.
Reduce show-throughSharpens text in an item or reduces show-through in newspapers, etc.
Reduce moireReduces moire patterns.
Printed materials are displayed as a collection of fine dots. "Moire" is a phenomenon whereuneven gradation or a stripe pattern appears when such photos or pictures printed with fine dotsare scanned.
Note• Scanning takes longer than usual when you enable Reduce moire.
Reduce gutter shadow (platen)Reduces gutter shadows that appear between pages when scanning open booklets.
Important• This function is available only when scanning from the platen.• Available only when the Compress scanned images upon transfer checkbox is not
selected.
Correct slanted text documentDetects the scanned text and corrects the angle (within -0.1 to -10 degrees or +0.1 to +10degrees) of the document.
Important• The following types of documents may not be corrected properly since the text cannot be
detected correctly.
• Documents in which the text lines are inclined more than 10 degrees or the angles varyby line
• Documents containing both vertical and horizontal text• Documents with extremely large or small fonts
377

• Documents with small amount of text• Documents containing figures/images• Hand-written text• Documents containing both vertical and horizontal lines (tables)
Note• Scanning takes longer than usual when you enable Correct slanted text document.
Detect the orientation of text document and rotate imageAutomatically rotates the image to the correct orientation by detecting the orientation of text inthe scanned document.
Important• Only text documents written in languages that can be selected from Document Language
in the Settings (General Settings) dialog are supported.• The orientation may not be detected for the following types of settings or documents since
the text cannot be detected correctly.
• Resolution is outside the range of 300 dpi to 600 dpi• Font size is outside the range of 8 points to 48 points• Documents containing special fonts, effects, italics, or hand-written text• Documents with patterned backgrounds
(2) Save Settings Area
File NameEnter the file name of the image to be saved. When you save a file, the date and four digits areappended to the set file name in the "_20XX0101_0001" format.
Data FormatSet from the operation panel.
Settings...Click to display the Data Format Settings dialog in which you can set the quality of the images to besaved, keyword search of PDF files, and the data format in which to save images scanned with AutoScan.
Save inDisplays the folder in which to save the scanned images. To change the folder, specify thedestination folder in the dialog displayed by selecting Add... from the pop-up menu.
The default save folder is the Pictures folder.
(3) Application Settings Area
Open with an applicationSelect this when you want to enhance or correct the scanned images.
You can specify the application from the pop-up menu.
Send to an applicationSelect this when you want to use the scanned images as they are in an application that allows you tobrowse or organize images.
You can specify the application from the pop-up menu.
378

Send to a folderSelect this when you also want to save the scanned images to a folder other than the one specified inSave in.
You can specify the folder from the pop-up menu.
Do not start any applicationSaves to the folder specified in Save in.
Note• Specify the application or folder in the dialog displayed by selecting Add... from the pop-up menu.
InstructionsOpens this guide.
DefaultsYou can restore the settings in the displayed screen to the default settings.
379

Settings (General Settings) Dialog
Click the (General Settings) tab to display the Settings (General Settings) dialog.
In the Settings (General Settings) dialog, you can set the product to use, file size restriction on e-mailattachment, language to detect text in images, and folder in which to save images temporarily.
Product NameDisplays the name of the product that IJ Scan Utility is currently set to use.
If the displayed product is not the one you want to use, select the desired product from the list.
In addition, for network connection, select one with "Network" after the product name.
Note• With network connection, Select appears on the right side of the product name. Click Select to
display the network selection screen in which you can change the scanner to use. Refer to"Network Scan Settings" for the setting procedure.
E-mail Attachment SizeYou can restrict the size of scanned images to be attached to an e-mail.
You can select Small (Suitable for 640 x 480 Windows), Medium (Suitable for 800 x 600 Windows),Large (Suitable for 1024 x 768 Windows), or No Change.
Important• When the Settings dialog is displayed from My Image Garden, this option does not appear.
Document LanguageSelect the language for detecting text in images.
Folder to Save Temporary FilesDisplays the folder in which to save images temporarily. Click Browse... to specify the destinationfolder.
380

InstructionsOpens this guide.
DefaultsYou can restore the settings in the displayed screen to the default settings.
381

Network Selection Screen
You can select the scanners or printers to be used for scanning or printing over a network from yourcomputer or the operation panel.
Network Selection Screen
In Product Name in the Settings (General Settings) dialog, select an item with "Network" after theproduct name from the list, then click Select that appears to the right of the product name to display thenetwork selection screen.
ScannersThe Bonjour service names of the scanners or printers that can be used over the network aredisplayed.
You can select one scanner or printer per model. Selecting a scanner or printer automatically enablesscanning from the operation panel.
Important• You cannot use over the network if Bonjour is disabled. Enable Bonjour on your scanner or
printer.• If you have changed the Bonjour service name after selecting your scanner or printer by Bonjour
service name, reopen the network selection screen and select the new Bonjour service namefrom Scanners.
InstructionsOpens this guide.
Scan-from-Operation-Panel SettingsThe Scan-from-Operation-Panel Settings screen appears. You can select up to three scanners andprinters in total for scanning from the operation panel. You can scan items using the operation panelof the selected scanner or printer, and send the scanned images to your computer over a network.
Important• When using a model with which you cannot scan over a network from the operation panel, that
model does not appear in Scanners and the setting is not available.
Scan-from-Operation-Panel Settings Screen
Click Scan-from-Operation-Panel Settings in the network selection screen to display the Scan-from-Operation-Panel Settings screen.
ScannersThe Bonjour service names of the scanners or printers that can be used over the network aredisplayed. You can select up to three scanners and printers in total at the same time.
Important• You cannot use over the network if Bonjour is disabled. Enable Bonjour on your scanner or
printer.
382

• If you have changed the Bonjour service name after selecting your scanner or printer by Bonjourservice name, reopen the network selection screen and select the new Bonjour service namefrom Scanners.
Note• If the Bonjour service name of your scanner or printer does not appear or cannot be selected, check the
following, click OK to close the screen, then reopen it and try selecting again.
• The scanner driver is installed• Network settings of your scanner or printer is completed after installing the scanner driver• Network communication between your scanner or printer and computer is enabled
If your scanner or printer still does not appear, refer to "Problems with Network Communication" foryour model from Home of the Online Manual.
383

Data Format Settings Dialog
Display the Data Format Settings dialog by one of the following operations.
• Click Settings... of Save Settings on each tab of the Settings dialog• Click Settings... of Save Settings in the Save Settings dialog that appears after scanning with the
Check scan results checkbox selected in the Settings dialog
In the Data Format Settings dialog, you can set the quality of the images to be saved, keyword search ofPDF files and their compression type, and the data format in which to save images scanned with Auto Scan.
JPEG Image QualityYou can specify the image quality of JPEG files.
Important• Available only when the Compress scanned images upon transfer checkbox is not selected in
Scan Options of the Settings dialog.
Create a PDF file that supports keyword searchSelect this checkbox to convert text in images into text data and create PDF files that support keywordsearch.
Note
• PDF files that are searchable in the language selected in Document Language on the (General Settings) tab of the Settings dialog are created.
PDF CompressionSelect the compression type for saving PDF files.
StandardIt is recommended that you normally select this setting.
HighCompresses the file size when saving, allowing you to reduce the load on your network/server.
Important
• This option does not appear when Data Format on the (Scanning from the Operation Panel)tab of the Settings dialog is Use Device Setting.
Note
• When Black and White is set for Color Mode on the (Scanning from a Computer) tab of theSettings dialog, PDF files will be saved in Standard even if High is set.
384

Format for Item Detected as Document in Auto ScanYou can specify the data format for automatically saving items detected as documents in Auto Scan.
Format for Item Detected as Photo in Auto ScanYou can specify the data format for automatically saving items detected as photos in Auto Scan.
DefaultsYou can restore the settings in the displayed screen to the default settings.
385

Save Settings Dialog
Select the Check scan results checkbox in Save Settings of the Settings dialog to display the SaveSettings dialog after scanning.
You can specify the data format and destination while viewing the thumbnails of scan results.
Important• After scanning from My Image Garden or the operation panel, the Save Settings dialog does not
appear.
(1) Preview Operation Buttons(2) Scan Results Area(3) Save Settings Area
(1) Preview Operation Buttons
/ (Rotate Left 90°)/(Rotate Right 90°)Rotates scanned images 90 degrees counter-clockwise or clockwise.
Select the image you want to rotate, then click (Rotate Left 90°) or (Rotate Right 90°).
Important• The preview operation buttons do not appear when the Enable large image scans checkbox is
selected in the Settings (Driver) dialog.
(2) Scan Results Area
Displays the thumbnails of the scanned images. You can change the save order of images via drag-and-drop. The file names for saving appear below the thumbnails.
386

(3) Save Settings Area
File NameEnter the file name of the image to be saved. When you save a file, the date and four digits areappended to the set file name in the "_20XX0101_0001" format.
Data FormatSelect the data format in which to save the scanned images.
You can select JPEG/Exif, TIFF, PNG, PDF, or PDF (Multiple Pages).
Important• You cannot select PDF or PDF (Multiple Pages) in the following cases.
• When scanned by clicking Photo in the IJ Scan Utility main screen• The Enable large image scans checkbox is selected in Save Settings of the Settings
(Driver) dialog• Start OCR is selected in Application Settings of the Settings (Document Scan), Settings
(Custom Scan), or Settings (Driver) dialog
• You cannot select JPEG/Exif when Color Mode is Black and White.
Settings...Click to display the Data Format Settings dialog in which you can set the quality of the images to besaved, keyword search of PDF files and their compression type, and the data format in which to saveimages scanned with Auto Scan.
Save inDisplays the folder in which to save the scanned images. To change the folder, specify thedestination folder in the dialog displayed by selecting Add... from the pop-up menu.
The default save folder is the Pictures folder.
387

Image Stitch Window
Click Stitch in the IJ Scan Utility main screen to display the Image Stitch window.
You can scan the left and right halves of an item larger than the platen and combine them back into oneimage. You can scan items up to approximately twice as large as the platen.
(1) Settings and Operation Buttons(2) Toolbar(3) Thumbnail View Area(4) Preview Area
Note• The displayed items vary depending on the select source and view.
(1) Settings and Operation Buttons
Select Output SizeB4 (B5 x 2)
Scans the left and right halves of a B4 size item separately.
A3 (A4 x 2)Scans the left and right halves of an A3 size item separately.
11 x 17 (Letter x 2)Scans the left and right halves of an item twice as large as Letter size separately.
Full Platen x 2Scans the left and right halves of an item twice as large as the platen separately.
Scan DirectionScan from Left
Displays the first scanned image on the left side.
Scan from RightDisplays the first scanned image on the right side.
388

Scan Image 1Start Scanning Image 1
Scans the first item.
Scan Image 2Start Scanning Image 2
Scans the second item.
Adjust cropping framesYou can adjust the scan area in preview.
If no area is specified, the image of the size selected in Select Output Size will be saved. If an areais specified, only the image in the cropping frame will be scanned and saved.
Adjusting Cropping Frames in the Image Stitch Window
SaveSave
Saves the two scanned images as one image.
389

CancelCancels Stitch scan.
(2) Toolbar
You can delete the scanned images or adjust the previewed images.
(Delete)Deletes the scanned image.
(Enlarge/Reduce)Allows you to enlarge or reduce the preview image.
Left-clicking the Preview area enlarges the displayed image.
Control-clicking the Preview area reduces the displayed image.
(Rotate Left)Rotates the preview image 90 degrees counter-clockwise.
(Invert Vertically)Rotates the preview image 180 degrees.
(Rotate Right)Rotates the preview image 90 degrees clockwise.
(Open Guide)Opens this page.
(3) Thumbnail View Area
Displays the thumbnails of the scanned images. Appears blank if none has been scanned.
(4) Preview Area
Displays the scanned images. You can adjust the layout by dragging the scanned image or check theresults of the settings made in "(1) Settings and Operation Buttons."
390

When no image has been scanned:
After scanning the first item by clicking Start Scanning Image 1:
The image is scanned in the direction specified in Scan Direction, and 2 appears next to it.
After scanning the second item by clicking Start Scanning Image 2:
The two scanned images appear.
Related Topic
Scanning Items Larger than the Platen (Image Stitch)
391

Scanning with Scanner Driver
You can scan by starting the scanner driver from various applications.
Refer to Help of Mac OS for how to scan.
Important• When scanning with the scanner driver in Mac OS X v10.6.8, select JPEG or TIFF in Format. Scanned
images are saved in the format set in Data Format in the Settings (Driver) dialog of IJ Scan Utility.
Note• Refer to "Image Corrections and Color Adjustments" for details on the setting procedures for image
correction and color adjustment.• Refer to "General Notes (Scanner Driver)" for the scanner driver.• Refer to "Updating the Scanner Driver" for the scanner driver.• In the Settings (Driver) dialog of IJ Scan Utility, you can also make advanced settings for scanning
with the scanner driver.
392

Image Corrections and Color Adjustments
You can correct images and adjust colors using the scanner driver.
Important• When image correction or color adjustment is applied to items without moire, dust/scratches, or faded
colors, the color tone may be adversely affected.• Image correction results are not reflected in the trial scan screen.
Note• Screens may vary depending on the application.• Selectable settings depend on Kind settings.• Scanning may take longer than usual when image correction or color adjustment is applied.
Image AdjustmentWhen Image Adjustment is set, the brightness of the specified portion of the image is optimized. Imagescan be adjusted according to the automatically detected item type or the specified item type. The resultof the adjustment will be reflected in the entire image.
NoneImage Adjustment will not be applied.
AutoApplies Image Adjustment by automatically detecting the item type. It is recommended that younormally select this setting.
PhotoApplies Image Adjustment suitable for photos.
MagazineApplies Image Adjustment suitable for magazines.
DocumentApplies Image Adjustment suitable for text documents.
393

Note• If the image is not adjusted properly with Auto, specify the item type.• The color tone may change from the source image due to the Image Adjustment. In that case, set
Image Adjustment to None.
Reduce DustScanned photos may contain white dots caused by dust or scratches. Use this function to reduce suchnoise.
NoneDust and scratches will not be reduced.
LowSelect this to reduce small dust particles and scratches. Large ones may remain.
MediumIt is recommended that you normally select this setting.
HighSelect this to reduce large dust particles and scratches; however, evidence of the reductionprocess may remain or delicate parts of the image may be removed.
Important• This function may not be effective for some types of photos.
Note• It is recommended that you select None when scanning printed materials.
Fading CorrectionUse this function to correct photos that have faded with time or have a colorcast. "Colorcast" is aphenomenon where a specific color affects the entire picture due to the weather or ambient strongcolors.
NoneFading Correction will not be applied.
LowSelect this to correct a small amount of fading and colorcast.
MediumIt is recommended that you normally select this setting.
HighSelect this to correct a large amount of fading and colorcast. This can affect the tone of the image.
Important• Correction may not be applied properly if the scan area is too small.• Not effective if Color is not selected for Kind.
Grain CorrectionUse this function to reduce graininess (roughness) in photos taken with high-speed or sensitized film,etc.
NoneGraininess will not be reduced.
394

LowSelect this when the photo is slightly grainy.
MediumIt is recommended that you normally select this setting.
HighSelect this when the photo is very grainy. This can affect the gradation and sharpness of theimage.
Important• Correction may not be applied properly if the scan area is too small.
Gutter CorrectionUse this function to correct shadows that appear between pages when scanning open booklets.
Unclear or blurred text/lines caused by curved pages are not corrected.
NoneGutter shadow will not be corrected.
LowSelect this when the effect level is too strong with the medium setting.
MediumIt is recommended that you normally select this setting.
HighSelect this when the effect level is too weak with the medium setting.
Important• Do not place objects that weigh 4.4 lbs (2.0 kg) or more on the platen. In addition, do not press on
the item with a force exceeding 4.4 lbs (2.0 kg). If you press heavily, the scanner may not workcorrectly or you might break the glass.
• Align the item with the edge of the platen. If placed slanted, correction will not be applied properly.
• Correction may not be applied properly depending on the item. If the page background is not white,shadows may not be detected correctly or may not be detected at all.
• While scanning, press down on the spine with the same amount of pressure you used to previewthe scan. If the binding part is not even, correction will not be applied properly.
395

• How to place the item depends on your model and the item to be scanned.
Unsharp MaskEmphasizes the outline of the subjects to sharpen the image.
DescreenReduces moire patterns.
Printed materials are displayed as a collection of fine dots. "Moire" is a phenomenon where unevengradation or a stripe pattern appears when such photos or pictures printed with fine dots are scanned.
Important• When enabling Descreen, disable Unsharp Mask. If Unsharp Mask is enabled, some moire
effects may remain.
Note• Scanning takes longer than usual when you enable Descreen.
Reduce Show-throughUse this function to reduce show-through in duplex documents or lighten the base color in recycledpaper and other colored paper when scanning documents.
Important• Reduce Show-through is effective only when Document or Magazine is selected for Image
Adjustment.
Calibrate before each scanCalibrates the scanner every time before trial scanning and scanning, to reproduce correct color tonesin scanned images.
Note• Calibration may take time depending on your computer.
396

General Notes (Scanner Driver)
The scanner driver is subject to the following restrictions. Keep these points in mind when using the scannerdriver.
Scanner Driver Restrictions
• If the computer is shared among multiple users or when you have logged out and back on, a messageindicating that the scanner driver is in use may appear. In that case, disconnect the USB cable fromthe computer, then reconnect it.
• Scanning may fail if the computer has resumed from sleep state with the scanner driver active. In thatcase, follow these steps and scan again.
1. Turn off the machine.2. Exit the scanner driver, then disconnect the USB cable from the computer and reconnect it.3. Turn on the machine.
• Do not connect two or more scanners or multifunction printers with scanner function to the samecomputer simultaneously. If multiple scanning devices are connected, you cannot scan from theoperation panel of the machine and also may experience errors while accessing the devices.
• When using a network compatible model by connecting to a network, the machine cannot beaccessed from multiple computers at the same time.
• When using a network compatible model by connecting to a network, scanning takes longer thanusual.
• Make sure that you have adequate disk space available when scanning large images at highresolutions. For example, at least 300 MB of free space is required to scan an A4 document at 600dpi in full-color.
• Do not enter the computer into sleep or hibernate state during scanning.
397

Updating the Scanner Driver
Obtaining the Latest Scanner Driver
Before Installing the Scanner Driver
Installing the Scanner Driver
398

Obtaining the Latest Scanner Driver
Upgrading your current scanner driver to the latest scanner driver may solve some problems you haveexperienced.
To obtain the scanner driver, access our website and download the scanner driver for your model.
Important• Scanner driver can be downloaded for free; however, Internet connection fees apply.
Related Topic
Before Installing the Scanner DriverInstalling the Scanner Driver
399

Before Installing the Scanner Driver
Check the following points before installing the scanner driver. Check these also when you cannot install thescanner driver.
Machine Status
• If the machine and computer are connected with a USB cable, disconnect the USB cable from thecomputer.
Computer Settings
• Close all running applications.• Log in as the administrator of the computer. You will be required to enter the name and password of the
user with administrator privileges. If you have multiple user accounts on Mac OS X, log in with the firstadministrator account created.
Important• If you install an older version of the scanner driver after installing a newer one, the scanner driver may
not operate properly. In that case, reinstall the newer scanner driver.
Note• When installing multiple versions of the scanner driver, install the older scanner driver first.
Related Topic
Obtaining the Latest Scanner DriverInstalling the Scanner Driver
400

Installing the Scanner Driver
Access our website via the Internet to download the latest scanner driver.
Follow these steps to install the downloaded scanner driver.
1. Mount the disk.
Double-click the downloaded disk image file.
The file is decompressed and the disk is mounted.
2. Start the installer.
Double-click the ".pkg" file in the decompressed disk.
Installation starts.
3. Install the driver.
Follow the prompts to install.
When the license agreement screen appears, read the terms and click Continue. If you do not acceptthe license agreement, you cannot install this software.
If an authentication screen appears, enter the administrator's name and password, then click InstallSoftware.
4. Complete the installation.
The scanner driver is installed.
Set up the network environment if you have more than one scanner or have a network compatible modeland changed the connection from USB connection to network connection.
Refer to "Network Scan Settings" for the setting procedure.
Important• Installation may fail if you click Go Back during the process. In that case, select Quit Installer from the
Installer menu to exit the installer, then start over the installation.• Scanner driver can be downloaded for free; however, Internet connection fees apply.
Related Topic
Obtaining the Latest Scanner DriverBefore Installing the Scanner Driver
401

Useful Information on Scanning
Adjusting Cropping Frames in the Image Stitch Window
Resolution
Data Formats
402

Adjusting Cropping Frames in the Image Stitch Window
"Cropping" is the act of selecting the area you want to keep in an image and discarding the rest whenscanning it.
In the Image Stitch window, you can specify a cropping frame on the image displayed in the Preview area.
Note• Refer to Help of Image Capture for how to adjust the cropping frames (selection boxes) in the screen
displayed by clicking Driver in the IJ Scan Utility main screen.
Initial Cropping Frame
No cropping frame is specified. When you select the Adjust cropping frames checkbox, an activecropping frame is automatically specified around the image in the Preview area. You can drag thecropping frame to specify the area.
When you perform a scan, the image in the area specified with the cropping frame will be scanned.
Adjusting a Cropping Frame
The cursor will change into (Arrow) when it is positioned over a cropping frame. Click and dragthe mouse to expand or contract the cropping frame.
The cursor will change into (Hand) when it is positioned within a cropping frame. Click and drag themouse to move the entire cropping frame.
Deleting Cropping Frames
To delete the cropping frame, deselect the Adjust cropping frames checkbox.
403

Resolution
The data in the image you have scanned is a collection of dots carrying information about brightness andcolor. The density of these dots is called "resolution", and resolution will determine the amount of detail yourimage contains. The unit of resolution is dots per inch (dpi). Dpi is the number of dots per inch (2.5 cm).
The higher the resolution (value), the more detail in your image; the lower the resolution (value), the lessdetail.
How to Set the Resolution
You can set the resolution in Resolution on the (Scanning from a Computer) tab of the Settingsdialog.
Appropriate Resolution Settings
Set the resolution according to the use of the scanned image.
Item Type Use Color ModeAppropriateResolution
Color photo
Copying(Printing)
Color 300 dpi
Creating a postcard Color 300 dpi
Saving to a computer Color 300 dpi
Using on a website or attachingto e-mail
Color 150 dpi
Black and white photo
Saving to a computer Grayscale 300 dpi
Using on a website or attachingto e-mail
Grayscale 150 dpi
Text document (document ormagazine)
CopyingColor, Grayscale, orBlack and White
300 dpi
Attaching to e-mailColor, Grayscale, orBlack and White
150 dpi
Scanning text using OCR Color or Grayscale 300 dpi
Important• If you double the resolution, the data size of the scanned image quadruples. If the file is too large, the
processing speed will slow down significantly, and you will experience inconvenience such as lack ofmemory. Set the minimum required resolution according to the use of the image.
404

Note• When you will be printing the scanned image by enlarging it, scan by setting a higher resolution than
the recommended one above.
405

Data Formats
You can select a data format when saving scanned images. You should specify the most suitable dataformat according to how you want to use the image on which application.
Available data formats vary by application and operating system (Windows or Mac OS).
See below for the characteristics of each image data format.
PNG (Standard File Extension: .png)
A data format often used on websites.
PNG is suitable for editing saved images.
JPEG (Standard File Extension: .jpg)
A data format often used on websites and for digital camera images.
JPEG features high compression rates. JPEG images slightly degrade every time they are saved, andcannot be returned to their original state.
JPEG is not available for black and white images.
TIFF (Standard File Extension: .tif)
A data format featuring a relatively high compatibility between various computers and applications.
TIFF is suitable for editing saved images.
Note• Some TIFF files are incompatible.• IJ Scan Utility supports the following TIFF file formats.
• Uncompressed, black and white binary• Uncompressed, RGB (8 bits per channel)• Uncompressed, Grayscale
PDF (Standard File Extension: .pdf)
A data format for electronic documents, developed by Adobe Systems Incorporated.
It can be used on various computers and operating systems, and fonts can be embedded as well; therefore,people in different environments can exchange the files without being aware of the differences.
406

Placing Items (When Scanning from a Computer)
Learn how to place items on the platen or ADF (Auto Document Feeder) of your scanner or printer. Placeitems correctly according to the type of item to be scanned. Otherwise, items may not be scanned correctly.
Important• Do not place objects on the document cover. When you open the document cover, the objects may fall
into your scanner or printer, resulting in malfunction.• Close the document cover when scanning.• Do not touch the operation panel buttons or LCD (Liquid Crystal Display) monitor when opening/closing
the document cover. May result in unintended operation.
Placing Items (Platen)Placing Documents (ADF (Auto Document Feeder))
Placing Items (Platen)
Place items as described below to scan by detecting the item type or size automatically.
Important• When scanning by specifying the paper size in IJ Scan Utility or the scanner driver, align an upper
corner of the item with the corner at the arrow (alignment mark) of the platen.• Photos that have been cut to various shapes and items smaller than 1.2 inches (3 cm) square cannot
be cropped accurately when scanning.• Reflective disc labels may not be scanned as expected.• When scanned using the scanner driver, the response may differ. In that case, adjust the cropping
frame (selection box) manually.
For Photos, Postcards, Business Cards, or BD/DVD/CD For Magazines, Newspapers, or Documents
Placing a Single Item:
Place the item face-down on the platen, with 0.4 inch (1cm) or more space between the edges (diagonally stripedarea) of the platen and the item. Portions placed on thediagonally striped area cannot be scanned.
Place the item face-down on the platen and align anupper corner of the item with the corner at the arrow(alignment mark) of the platen. Portions placed on thediagonally striped area cannot be scanned.
407

Important• Large items (such as A4 size photos) that cannot be
placed away from the edges/arrow (alignment mark) ofthe platen may be saved as PDF files. To save in aformat other than PDF, scan by specifying the dataformat.
Placing Multiple Items:
Allow 0.4 inch (1 cm) or more space between the edges(diagonally striped area) of the platen and items, andbetween items. Portions placed on the diagonally stripedarea cannot be scanned.
more than 0.4 inch (1 cm)
Note• In IJ Scan Utility, you can place up to 12 items.• You can place up to four items when the Compress
scanned images upon transfer checkbox is selectedin the Settings dialog of IJ Scan Utility.
• Positions of slanted items (10 degrees or less) arecorrected automatically.
Important• Refer to "Loading Originals" for your model from
Home of the Online Manual for details on theportions in which items cannot be scanned.
Placing Documents (ADF (Auto Document Feeder))
Important• Do not leave thick items on the platen when scanning from the ADF. May result in paper jam.• Place and align documents of the same size when scanning two or more documents.• Refer to "Originals You Can Load" for your model from Home of the Online Manual for details on
supported document sizes when scanning from the ADF.
1. Open the document tray.
408

2. Place the documents on the ADF, then adjust the document guides to the width of thedocuments.
Insert the documents face-up until a beep sounds.
409

Scanning from the Operation Panel of the Machine
Forwarding Scanned Data to the Computer Using the Operation Panel of theMachine Basic
Setting Items for Scanning Using the Operation Panel of the Machine
Network Scan Settings
Selecting a Response to Commands from the Operation Panel Using IJ ScanUtility
410

Forwarding Scanned Data to the Computer Using the OperationPanel of the Machine
Before forwarding scanned data to the computer, confirm the following:
• The scanner driver is installed.
If the scanner driver is not yet installed, install the scanner driver from our website.
• The machine is connected to a computer correctly.
Make sure that the machine is connected to the computer correctly.
Do not plug in or unplug the USB cable while the machine is in operation, or when the computer is in thesleep or standby mode.
If you perform scanning via a network connection, make sure that all the required settings have beenspecified.
Network Scan Settings
• The destination and the file name are specified in Canon IJ Scan Utility.
You can specify the destination and the file name in Canon IJ Scan Utility. For details on settings ofCanon IJ Scan Utility:
Settings Dialog
Follow the procedure below to forward scanned data to the computer.
1. Make sure that the machine is turned on.
2. Press the SCAN button.
If you forward the scanned data to a USB-connected or LAN connected computer for the first time, theScan menu screen is displayed. Go to step 3.
If you have forwarded the scanned data to a computer, the Scan standby screen is displayed.
* The Scan standby screen for USB-connected computer
If you change the destination or scan settings, press the Menu button, then go to step 3.
Go to step 8 if you do not change the destination or scan settings.
3. Use the button to select Save to, then press the OK button.
4. Use the button to select the computer to forward the scanned data, then press the OKbutton.
If you forward the data to the USB-connected computer, select Local (USB).
If you forward the data to the LAN-connected computer, select a name of the computer to forward thescanned data.
411

Note• If you select Search again and press the OK button, the machine starts searching for the
connected computers again.
• When you forward the scanned data to the computer using WSD (one of the network protocolssupported in Windows 8, Windows 7, and Windows Vista), select Active for WSD scan from dev.on WSD setting on Other settings in LAN settings under Device settings.
5. Make sure that Document type is selected, then press the OK button.
6. Use the button to select the document type, then press the OK button.
Note• When you forward the scanned data to the computer searched using WSD, you cannot select the
document type.
• The * (asterisk) on the LCD indicates the current setting.
Auto scanThis item is available only when the machine is connected to the computer using a USB cable.
The machine detects the type of the originals automatically and the image is forwarded in theoptimized size, resolution and data format.
Important• You can select Auto scan only when you forward the scanned data to the USB-connected
computer.
• Load originals properly according to their type; otherwise, some originals may not be scannedproperly.
For details on how to load the original:
Loading Originals
• The following items can be scanned:
Photos, postcards, visiting cards, magazines, newspapers, documents, BD/DVD/CDs
• The following items cannot be scanned properly.
• A4 sized photos
• Documents smaller than 5 inches x 7 inches (127 mm x 178 mm) such as a paperback with itsbackbone cut off
• Originals on thin white paper
• Long and narrow originals such as panoramic photographs
• When you scan originals from the ADF, it may take longer to scan the first page.
DocumentScans the original on the platen glass or in the ADF applying the optimized settings for scanning adocument.
PhotoScans the original on the platen glass as a photo data applying the optimized settings for scanning aphoto.
412

7. Specify the scan settings.
Specify each scan setting in order.
Note• For details on each setting item:
Setting Items for Scanning Using the Operation Panel of the Machine
• Go to step 8 when Auto scan is selected for Document type.
1. Make sure that Scan size is selected, then press the OK button.
2. Use the button to select the scan size, then press the OK button.
3. Make sure that Data format is selected, then press the OK button.
4. Use the button to select the data format, then press the OK button.
5. Make sure that Scan resolution is selected, then press the OK button.
6. Use the button to select the scan resolution, then press the OK button.
The Scan standby screen is displayed after all the settings have been specified.
8. Load the original document on the platen glass or in the ADF.
9. Press the Color button for color scanning, or the Black button for black & white scanning.
Note• When you forward the scanned data to the computer using WSD, press the Color button.
• If the original is not loaded properly, a message is displayed on the LCD. Load the original on theplaten glass or in the ADF according to the scan settings.
• If you load the original in the ADF:
The machine starts scanning and scanned data is forwarded to the computer.
• If you load the original on the platen glass:
◦ When you select JPEG or TIFF for Data format, the machine starts scanning and scanneddata is forwarded to the computer.
◦ When you select PDF or Compact PDF for Data format, the confirmation screen asking you ifyou continue scanning is displayed after scanning is complete.
Selecting Yes and pressing the OK button allow you to scan the originals continuously. Loadthe next document on the platen glass and start scanning.
By selecting No and pressing the OK button, scanning is complete and the data is forwardedto the computer in one PDF file.
Scanned data is forwarded to the computer according to the settings specified in Canon IJ Scan Utility.
Remove the original on the platen glass or from the document output slot after scanning is complete.
413

Important• If the scanning result with Auto scan is not satisfactory, select Document or Photo according to
the original in step 6, then specify the scan size or other setting items in step 7.
If you want to scan originals with advanced settings, or if you want to editor print the scanned images:
If you scan originals from a computer using My Image Garden, My Image Garden enables you to edit thescanned images, such as optimizing or trimming.
In addition, you can edit or print the scanned images using the compatible application software to makebetter use of them.
Scanning Photos and Documents
414

Setting Items for Scanning Using the Operation Panel of theMachine
You can change the scan settings such as the scan size, resolution, or data format.
Use the button to select a setting item, then press the OK button.
Use the button to adjust each setting item, then press the OK button. The next setting item isdisplayed.
Note• The * (asterisk) on the LCD indicates the current setting.
• The scan setting cannot be specified under the following conditions:
• When Auto scan is selected for Document type to forward the scanned data to the computer
• When you forward the scanned data to the computer using WSD (one of the network protocolssupported in Windows 8, Windows 7, and Windows Vista)
• Some setting items cannot be specified in combination with other setting items, the document type, orthe destination to save the data.
• The settings of the scan size, resolution, and data format are retained even if the machine is turned off.
• When you forward the scanned data to the computer, you can specify the destination and file nameusing Canon IJ Scan Utility.
Settings Dialog
• If you scan originals from the computer, you can scan with advanced settings. For details on scanningfrom the computer:
Scanning Photos and Documents
• Scan size
Select the size of the original.
Ex:
If you select Auto scan(A) -Singl, the machine detects the page size automatically and starts scanning.
If you select Auto scan(A) -Multi to save to the computer, you can scan several originals at a time.
Note• When Legal is selected, load the original in the ADF.
• When 4"x6", 10x15, 5"x7", 13x18, or Auto scan(A) -Singl is selected, load the original on theplaten glass.
• Some of setting items are not available depending on the country or region of purchase.
• Data format
Select the data format of the scanned data.
Ex:
415

• Scan resolution
Select the resolution for scanning.
Ex:
416

Network Scan Settings
You can connect your scanner or printer to a network to share it among multiple computers or scan imagesinto a specified computer.
Important• Multiple users cannot scan at the same time.• To scan over a network, enable Bonjour on your scanner or printer.
Note• Complete the network settings of your scanner or printer beforehand by following the instructions on the
web page.• With network connection, scanning takes longer than USB connection.
Setting for Scanning with IJ Scan Utility
In the IJ Scan Utility main screen, select your scanner or printer that is connected to a network.
1. Start IJ Scan Utility.
2. Select "Canon XXX series Network" (where "XXX" is the model name) for ProductName.
You can scan via a network connection.
Note• If you cannot scan, check that your scanner or printer is selected in the network selection
screen.• For USB connection, select "Canon XXX series" (where "XXX" is the model name) for Product
Name.
Setting for Scanning from the Operation Panel
You can make the setting for scanning from the operation panel.
1. Start IJ Scan Utility.
2. Click Settings....
The Settings dialog appears.
3. Click the (General Settings) tab.
417

The Settings (General Settings) dialog appears.
4. In Product Name, select an item with "Network" after the product name, then click Selectthat appears to its right.
The network selection screen appears.
5. Click Scan-from-Operation-Panel Settings.
The Scan-from-Operation-Panel Settings screen appears.
6. Select your scanner or printer from Scanners and click OK.
7. Return to the network selection screen, then click OK.
The IJ Scan Utility main screen reappears. You can scan from the operation panel.
Note• If the Bonjour service name of your scanner or printer does not appear or cannot be selected, check the
following, click OK to close the screen, then reopen it and try selecting again.
• The scanner driver is installed• Network settings of your scanner or printer is completed after installing the scanner driver• Network communication between your scanner or printer and computer is enabled
If your scanner or printer still does not appear, refer to "Problems with Network Communication" foryour model from Home of the Online Manual.
418

Selecting a Response to Commands from the Operation PanelUsing IJ Scan Utility
IJ Scan Utility allows you to specify how to respond when scanning from the operation panel.
Note• The screens for specifying the responses when performing Auto Scan from the operation panel are
used as examples in the following descriptions.
1. Start IJ Scan Utility.
2. Click Settings....
The Settings dialog appears.
3. Select a scan mode on the (Scanning from the Operation Panel) tab.
Note• Refer to the following for details.
Settings (Save to PC (Auto)) DialogSettings (Save to PC (Photo)) Dialog
419

Settings (Save to PC (Document)) Dialog
4. Specify image corrections in Scan Options.
5. Specify the file name and other settings in Save Settings.
6. Select the application you want to start after scanning in Application Settings.
420

7. Click OK.
The responses will be executed according to the specified settings when you start scanning from theoperation panel.
421

Scanning with the Access Point Mode
When the machine enters the access point mode, you can scan from an external device such as a computeror a smartphone without involving an access point.
Important• Before you use the machine with the access point mode, be sure to specify the access point name of
the machine and the security setting.
Before Using the Machine with the Access Point Mode
1. Make sure that the machine is turned on.
2. Press the Setup button.
The Setup menu screen is displayed.
3. Use the button to select Access point mode, then press the OK button.
The machine enters the access point mode.
Note• If the machine receives a fax in the access point mode, the machine cancels the access point
mode automatically after a certain time, then the machine switches to the fax mode.
If you want to continue to scan with the access point mode, set the machine to the access pointmode again.
4. Connect an external device such as a computer or a smartphone to the machine viawireless LAN.
Perform wireless LAN settings with your external device, then assign the access point name specified forthe machine as a destination.
Note• For details on how to perform wireless LAN settings with an external device, refer to the device's
instruction manual.
• While the machine is in the access point mode, you can confirm the access point name and thedetails on the security setting by pressing the OK button.
Use the button to select a setting item to display, then press the OK button again.
• If SSID is selected:
The access point name specified for the machine is displayed.
When you specify the machine as a destination for wireless connection to an external device,assign the access point name specified for the machine.
• If Security protocol is selected:
The details on the security setting specified for the machine is displayed.
When a WPA2-PSK (AES) passphrase is valid, entering the passphrase is required toconnect an external device to the machine via wireless LAN. Enter the passphrase specifiedfor the machine.
422

5. Load the original document on the platen glass or in the ADF.
6. Start scanning from an external device such as a computer or a smartphone.
Perform scanning operations from the external device and specify the machine as a scanner you use.
Note• For details on how to scan from an external device such as a computer or a smartphone via
wireless LAN, refer to the device's or application's instruction manual.
• You can also scan using PIXMA Printing Solutions.
7. Press the Stop button when scanning is completed.
The machine exits from the access point mode.
423

Faxing
Preparing for FaxingConnecting the Telephone LineSetting the Telephone Line TypeSetting the Receive ModeSetting the Sender Information
Sending Faxes Using the Operation Panel of the MachineSending Faxes with the Numeric Buttons BasicResending Faxes (Redialing a Busy Number)Sending Faxes Using Useful Functions
Registering RecipientsRegistering Recipients Using the Operation Panel of the MachineRegistering Recipients Using Speed Dial Utility
Receiving FaxesReceiving FaxesChanging the Paper SettingsMemory ReceptionReceiving Faxes Using Useful Functions
Other Useful Fax FunctionsUsing the Information ServicesTransmission/Reception of Faxes Using ECMDocument Stored in Machine's MemorySummary of Reports and Lists
424

Preparing for Faxing
Connect the machine to the telephone line and set up the machine before using the faxing functions. Thenspecify the basic setting such as sender information, date/time, and daylight saving time.
Important• If the Power Disconnects Unexpectedly:
If there is a power failure or if you accidentally disconnect the power plug, the date/time settings will bereset.
• The settings for user information, coded memory dial, group dial, and rejected numbers will beretained.
• All faxes stored in the machine's memory, such as unsent and received faxes, will be lost.
If the power disconnects, the following will apply:
• You will not be able to send or receive faxes, make copies, or scan originals.
• When you are connecting the telephone, whether or not you can use it depends upon yourtelephone line or telephone.
Setting Up the Machine
The machine must be set up depending on your telephone line and use of the faxing function. Follow theprocedure below to set up the machine.
1. Connecting the Telephone Line
Connect the machine to your telephone line.
2. Setting the Telephone Line Type
Set the correct telephone line type for your telephone line.
3. Setting the Receive Mode
Set the receiving operation (receiving mode).
Note• You can set the fax setting according to the instruction on the LCD.
Easy setup
If you set up according to the instruction on the LCD, the receive mode is set to TEL priority modeor Fax only mode. To receive faxes with DRPD or Network switch, change the receive mode.
Setting the Receive Mode
Specifying the Basic Settings for Faxing
You can specify the basic setting such as sender information, date/time, and daylight saving time.
Setting the Sender Information
425

Connecting the Telephone Line
The connection method differs depending on your telephone line.
• If you connect the machine to wall telephone line directly/If you connect the machine with the xDSLsplitter:
Basic Connection
• If you connect the machine to another line such as an xDSL:
Connecting Various Lines
If the connection is incorrect, the machine cannot send/receive faxes. Connect the machine correctly.
Important• Do not connect fax machines and/or telephones in parallel (US and Canada only).
If two or more fax machines and/or telephones are connected in parallel, the following problems mayoccur and the machine may not operate properly.
• If you pick up the handset of the telephone that is connected in parallel during fax transmission orreception, the fax image may be corrupted or a communication error may occur.
• Such services as Caller ID, etc. may not operate properly on the telephone.
If you cannot avoid parallel connections, set the receive mode to TEL priority mode, understandingthat the above problems may occur. You will only be able to receive faxes manually.
Basic Connection
Make sure that the machine is turned off, connect one end of supplied telephone line cable to thetelephone line jack near the "LINE" mark of the machine, then connect the other end to the telephone linejack on the wall or to the telephone line jack of the xDSL splitter.
When you connect the telephone to the machine, make sure that the machine is turned off, connect oneend of the modular cable to the external device jack near the "EXT." mark of the machine, then connectthe other end to the telephone line jack of the telephone.
426

Important• Be sure to connect the telephone line before the machine is turned on.
If you connect the telephone line when the machine is turned on, turn the machine off and disconnectthe power plug. Wait for 1 minute then connect the telephone line and power plug.
Note• Refer to Rear View for the position of the telephone line jack and the external device jack.
• Before connecting a telephone or answering machine, remove the Telephone connector cap.
• For users in the UK:
If the connector of the external device cannot be connected to the jack on the machine, you will needto purchase a B.T. adapter to connect as follows:
Attach the B.T. adapter to the modular cable connecting the external device, then connect the B.T.adapter to the external device jack.
Connecting Various Lines
This section introduces how to connect various lines.
These are examples and could not be guaranteed to suit every connecting condition. For details, refer tothe instruction manual supplied with the network device (control devices such as an xDSL (DigitalSubscriber Line) modem or terminal adapter) you are connecting to this machine.
Note• xDSL is the generic term for the high speed digital communication technology with telephone line
such as ADSL/HDSL/SDSL/VDSL.
• Connecting to an Internet Telephone
A. Digital Subscriber Line
B. xDSL modem (splitter may not be built-in to the modem)
C. Broadband router compatible with Internet Telephone
D. Computer
E. Telephone or answering machine
F. WAN (Wide Area Network) port
G. LAN (Local Area Network) port
H. TEL port
I. LINE port
* Port configurations and names may vary depending on the product.
427

Note• When connecting to the xDSL line, select the same line type as you are subscribing to in
Telephone line type.
Setting the Telephone Line Type
• Connecting to an xDSL
A. Analog Subscriber Line
B. xDSL modem (splitter may not be built-in to the modem)
C. Computer
D. Telephone or answering machine
Important• When the splitter is not built-in to the modem, do not branch the telephone line before the splitter
(wall side). And also, do not connect splitters in parallel. The machine may not be able to operateproperly.
Note• When connecting to the xDSL line, select the same line type as you are subscribing to in
Telephone line type.
Setting the Telephone Line Type
• Connecting to an ISDN Line
For details on ISDN (Integrated Service Digital Network) connection and settings, refer to the manualssupplied with your terminal adapter or dial-up router.
428

Setting the Telephone Line Type
Before using your machine, make sure you set the correct telephone line type for your telephone line. If youare unsure of your telephone line type, contact your telephone company. For xDSL or ISDN connections,contact the telephone company or service provider to confirm your line type.
Note• Telephone line type will not appear in countries or regions where Rotary pulse is not supported.
• You can print USER'S DATA LIST to check the current setting.
Summary of Reports and Lists
1. Make sure that the machine is turned on.
2. Press the Setup button.
The Setup menu screen is displayed.
3. Use the button to select Fax settings, then press the OK button.
4. Use the button to select FAX user settings, then press the OK button.
5. Use the button to select Telephone line type, then press the OK button.
6. Use the button to select a telephone line type, then press the OK button.
Rotary pulseSelect when your telephone line type is pulse dialing.
Touch toneSelect when your telephone line type is tone dialing.
Note• The * (asterisk) on the LCD indicates the current setting.
7. Press the FAX button to return to the Fax standby screen.
429

Setting the Receive Mode
Set the receiving operation (receiving mode).
For details on how to set the receive mode:
Setting the Receive Mode
You can select the appropriate mode.
For details on the selectable receive mode:
About the Receive Mode
For details on the advanced settings of the receive mode:
Advanced Settings of Receive Mode
Note• The receiving operation procedure varies depending on the selected receive mode.
For details on receiving method depending on each receive mode:
Receiving Faxes
• If you want to use a single telephone line for faxes and voice calls, you need to connect a telephone oran answering machine to the external device jack of this machine.
For details on how to connect the telephone or the answering machine to the machine:
Basic Connection
Setting the Receive Mode
This section describes the procedure to select the receive mode.
1. Make sure that the machine is turned on.
2. Press the FAX button.
The Fax standby screen is displayed.
3. Press the Menu button.
The FAX menu screen is displayed.
4. Use the button to select Receive mode set., then press the OK button.
5. Use the button to select the receive mode, then press the OK button.
The confirmation screen asking whether to make advanced settings is displayed.
If you select Yes and press the OK button, you can specify the advanced settings of each receivemode.
Advanced Settings of Receive Mode
Note• The * (asterisk) on the LCD indicates the current setting.
• For details on the receive mode:
430

About the Receive Mode
• DRPD is available only in the US and Canada.
• Network switch may not be available depending on the country or region of purchase.
• Refer to Receiving Faxes for information on receiving faxes or the procedure for each receivemode.
About the Receive Mode
You can select the receive mode suitable for your fax use conditions: whether you use a dedicated line forfax, etc.
Receivemode
Your fax use condition Receiving operation
TEL prioritymode
When mainly receiving voicecalls (with a telephone oranswering machineconnected to the machine):
When a call incomes, the telephone will ring.
Pick up the handset.
If the call is a voice call, talk on the telephone.
If the call is a fax, hang up the handset after the machine startsreceiving the fax.
Note• The telephone may not ring when a call incomes even if it is
connected to the machine, depending on the type or settings ofthe telephone.
DRPD orNetworkswitch
When receiving voice calls(with a telephone oranswering machineconnected to the machine)and subscribing to a ringpattern detection serviceprovided by your telephonecompany:
When a call incomes, the telephone will ring. The machine detects afax call by the fax ring pattern.
If the call is a fax, the machine will receive the fax automatically.
If the machine does not detect the fax ring pattern, the telephone willcontinue ringing.
Note• The telephone may not ring when a call incomes even if it is
connected to the machine, depending on the type or settings ofthe telephone.
Fax onlymode
When not receiving voicecalls:
When a fax incomes, the machine will receive the fax automatically.
Advanced Settings of Receive Mode
You can specify the advanced settings of each receive mode.
Note• The * (asterisk) on the LCD indicates the current setting.
• Advanced setting in TEL priority mode
You can specify the following setting items.
431

◦ Manual/auto switch
If you select ON, the machine automatically receives faxes after the external device rang aspecified length of time.
You can specify the length of time until automatic reception is started.
◦ User-friendly RX
If you select ON, the machine automatically switches from telephone calling to fax reception bydetecting the fax signal (CNG signal) when you lift the handset of the telephone or the answeringmachine answers. When you have an answering machine connected to the machine, select ON toswitch to fax reception automatically after the answering machine answers.
If you select OFF, the machine does not switch from telephone calling to fax receptionautomatically even if the machine detects the fax signal (CNG signal). Select OFF if you want themachine not to switch automatically during a call.
Note• If you subscribe to Duplex Ringing service in Hong Kong, the number of times the external device
rings specified with Incoming ring in Fax only mode is available in TEL priority mode.
If you want to specify the number of times the external device rings in TEL priority mode, selectFax only mode for Receive mode set. under FAX menu, specify the number of times theexternal device rings with Incoming ring, then switch to TEL priority mode for Receive modeset..
• If you subscribe to Duplex Ringing service in Hong Kong, we recommend that Manual/autoswitch be set to OFF.
• Advanced setting in Fax only mode
You can specify the following setting item.
◦ Incoming ring
You can specify the number of times the external device rings when incoming.
• Advanced setting in DRPD
You can specify the following setting items.
◦ DRPD: FAX ring pat.
Sets the distinctive ring pattern of a call that the machine assumes is a fax call.
If you subscribe to a DRPD service, set the ring pattern to match the pattern assigned by yourtelephone company.
Setting the DRPD Ring Pattern (US and Canada only)
◦ Incoming ring
You can specify the number of times the external device rings when incoming.
• Advanced setting in Network switch
You can specify the following setting item.
◦ Incoming ring
You can specify the number of times the external device rings when incoming.
432

Setting the DRPD Ring Pattern (US and Canada only)
If you have subscribed to a Distinctive Ring Pattern Detection (DRPD) service provided by your telephonecompany, your telephone company will assign two or more telephone numbers with distinctive ringpatterns to your single telephone line, allowing you to have different numbers for fax calls and voice callsusing only one telephone line. Your machine will automatically monitor the ring pattern, and willautomatically receive the fax if the ring pattern is a fax call.
To use DRPD, follow the procedure below to set the fax ring pattern that matches the pattern assigned byyour telephone company.
Note• Contact your local telephone company for detailed information on this service.
1. Make sure that the machine is turned on.
2. Press the FAX button.
The Fax standby screen is displayed.
3. Press the Menu button.
The FAX menu screen is displayed.
4. Use the button to select Receive mode set., then press the OK button.
5. Use the button to select DRPD, then press the OK button.
The confirmation screen asking whether to make advanced settings is displayed.
6. Use the button to select Yes, then press the OK button.
7. Use the button to select DRPD: FAX ring pat., then press the OK button.
The DRPD: FAX ring pat. screen is displayed.
8. Use the button to select the ring pattern that your telephone company assigned toyour fax number, then press the OK button.
Select from Normal ring, Double ring, Short-short-long, or Short-long-short.
Note• The * (asterisk) on the LCD indicates the current setting.
9. Press the FAX button to return to the Fax standby screen.
433

Setting the Sender Information
You can set the sender information such as date/time, unit name, and unit fax/telephone number.
About the Sender Information
Setting the Date and Time
Setting Daylight Saving Time (Summer Time)
Registering User Information
About the Sender Information
If the unit name and unit fax/telephone number are registered, they are printed with date and time assender information on the recipient's fax.
A. Date and time of transmission
B. Unit fax/telephone number
C. Unit name
D. The registered recipient's name is printed when sending faxes with the coded memory dial.
E. Page number
Note• You can print USER'S DATA LIST to confirm the sender information you have registered.
Summary of Reports and Lists
• When sending faxes in black & white, you can select whether to print the sender information inside oroutside the image area.
Specify the setting on TTI position in Adv. FAX settings under Fax settings.
Adv. FAX settings
• You can select the date print format from three formats: YYYY/MM/DD, MM/DD/YYYY, and DD/MM/YYYY.
Select the date print format on Date display format under Dev. user settings.
Dev. user settings
Setting the Date and Time
This section describes the procedure to set the date and time.
434

1. Make sure that the machine is turned on.
2. Press the Setup button.
The Setup menu screen is displayed.
3. Use the button to select Device settings, then press the OK button.
4. Use the button to select Dev. user settings, then press the OK button.
5. Use the button to select Date/time setting, then press the OK button.
6. Set the date and time.
Use the button to move the cursor under the desired position, then use the Numeric buttons toenter the date and time.
Enter the date and time in 24-hour format.
Enter only the last two digits of the year.
7. Press the OK button.
8. Press the FAX button to return to the Fax standby screen.
Setting Daylight Saving Time (Summer Time)
Some countries adopt the daylight saving time (summer time) system that shifts the clock time forward atcertain periods of the year.
You can set your machine to automatically change the time by registering the date and time that daylightsaving time (summer time) begins and ends.
Important• Not all the latest information of all countries or regions is applied for DST setting by default. You
need to change the default setting according to the latest information of your country or region.
Note• This setting may not be available depending on the country or region of purchase.
1. Make sure that the machine is turned on.
2. Press the Setup button.
The Setup menu screen is displayed.
3. Use the button to select Device settings, then press the OK button.
435

4. Use the button to select Dev. user settings, then press the OK button.
5. Use the button to select DST setting, then press the OK button.
6. Use the button to select ON, then press the OK button.
To disable summer time, select OFF.
7. Set the date and time when summer time starts.
1. Use the button to select Start date/time, then press the OK button.
2. Make sure that Set month is selected, then press the OK button.
3. Use the button to select the month when summer time starts, then press the OK button.
4. Make sure that Set week is selected, then press the OK button.
5. Use the button to select the week when summer time starts, then press the OK button.
6. Make sure that Set day of week is selected, then press the OK button.
7. Use the button to select the day of the week when summer time starts, then press the OKbutton.
8. Make sure that Set shift time is selected, then press the OK button.
9. Use the button to move the cursor under the desired position, use the Numeric buttons toenter the time (in 24-hour format) when summer time starts, then press the OK button.
Precede single digits with a zero.
8. Set the date and time when summer time ends.
1. Use the button to select End date/time, then press the OK button.
2. Make sure that Set month is selected, then press the OK button.
3. Use the button to select the month when summer time ends, then press the OK button.
4. Make sure that Set week is selected, then press the OK button.
5. Use the button to select the week when summer time ends, then press the OK button.
6. Make sure that Set day of week is selected, then press the OK button.
7. Use the button to select the day of the week when summer time ends, then press the OKbutton.
8. Make sure that Set shift time is selected, then press the OK button.
9. Use the button to move the cursor under the desired position, use the Numeric buttons toenter the time (in 24-hour format) when summer time ends, then press the OK button.
Precede single digits with a zero.
9. Press the FAX button to return to the Fax standby screen.
436

Registering User Information
This section describes the procedure to register the user information.
Note• Before sending a fax, be sure to enter your name and fax/telephone number in Unit TEL no. registr.
and Unit name registr. on the FAX user settings screen (for US only).
1. Make sure that the machine is turned on.
2. Press the Setup button.
The Setup menu screen is displayed.
3. Use the button to select Fax settings, then press the OK button.
4. Use the button to select FAX user settings, then press the OK button.
5. Enter the unit fax/telephone number.
1. Make sure that Unit TEL no. registr. is selected, then press the OK button.
2. Use the Numeric buttons to enter the unit fax/telephone number.
3. Press the OK button.
Note• You can enter the fax/telephone number up to 20 digits, including spaces.
• For details on how to enter or delete characters:
Entering Numbers, Letters, and Symbols
6. Enter the unit name.
1. Make sure that Unit name registr. is selected, then press the OK button.
2. Use the Numeric buttons to enter the unit name.
3. Press the OK button.
Note• You can enter the name up to 24 characters, including spaces.
• For details on how to enter or delete characters:
Entering Numbers, Letters, and Symbols
7. Press the FAX button to return to the Fax standby screen.
437

Sending Faxes Using the Operation Panel of the Machine
Sending Faxes with the Numeric Buttons Basic
Resending Faxes (Redialing a Busy Number)
Sending Faxes Using Useful Functions
438

Sending Faxes with the Numeric Buttons
This section describes dialing and sending faxes directly using the Numeric buttons.
Important• It may be possible that faxes will reach unintended recipients due to the misdialing or incorrect
registration of fax/telephone numbers. When you send important documents, it is recommended thatyou send them after speaking on the telephone.
Sending a Fax after Speaking on Telephone
1. Make sure that the machine is turned on.
2. Press the FAX button.
The Fax standby screen is displayed.
3. Load documents on the platen glass or in the ADF.
Important• When sending a double-sided document, load the document on the platen glass. Double-sided
documents cannot be automatically scanned and sent from the ADF.
Note• For details on the types, conditions of document, and how to load the document:
Loading Originals
4. Adjust the scan contrast and resolution as necessary.
Adjust the scan contrast and resolution following the procedure below.
1. Press the Menu button.
The FAX menu screen is displayed.
2. Use the button to select FAX TX settings, then press the OK button.
3. Use the button to select Scan contrast, then press the OK button.
The Scan contrast screen is displayed.
4. Use the button to select the scan contrast, then press the OK button.
The button decreases the scan contrast, and the button increases the scan contrast.
By pressing the OK button, the LCD returns to the FAX TX settings screen.
5. Use the button to select Scan resolution, then press the OK button.
The Scan resolution screen is displayed.
439

6. Use the button to select the scan resolution, then press the OK button.
By pressing the OK button, the LCD returns to the Fax standby screen.
The following settings are selectable on Scan resolution.
StandardSuitable for text-only documents.
FineSuitable for fine-print documents.
Extra fineSuitable for detailed illustration or fine-print quality documents.
If the recipient's fax machine is not compatible with Extra fine (300 x 300 dpi), the fax will besent in the Standard or Fine resolution.
PhotoSuitable for photographs.
Note• The * (asterisk) on the LCD indicates the current setting.
• When sending a color fax, documents are always scanned in the same resolution (200 x 200dpi). The image quality (compression rate) is determined by which scan resolution is selected,except that Extra fine and Photo provide the same image quality.
5. Use the Numeric buttons to dial the recipient's fax/telephone number.
Use the following buttons to dial the recipient's fax/telephone number.
Numeric buttons:Enters the number.
button:Enters a space.
button:Deletes the last character you entered.
button:By pressing this button once, "#" is entered. By pressing this button one more time, "P" is entered.
6. Press the Color button for color transmission, or the Black button for black & whitetransmission.
The machine starts scanning the document.
Important• Color transmission is available only when the recipient's fax machine supports color faxing.
• Do not open the document cover until scanning is completed.
440

7. Start sending.
• If you load the document in the ADF:
The machine scans the document automatically and starts sending the fax.
Note• To cancel a fax transmission, press the Stop button. To cancel a fax transmission while it is in
progress, press the Stop button, then follow the instructions on the LCD.
• If documents remain in the ADF after the Stop button is pressed while scanning is in progress,Close the feeder cover [OK]Eject the document is displayed on the LCD. By pressing theOK button, the remaining documents are automatically ejected.
• If you load the document on the platen glass:
After scanning the document, the confirmation screen asking you if you load the next document isdisplayed.
To send the scanned document, press the OK button to start sending it.
Note• To send two or more pages, follow the message to load the next page, and press the Color or
Black button. After scanning all pages, press the OK button to start sending.
• To cancel sending the fax, press the Stop button.
Note• When your machine is connected to a PBX (Private Branch Exchange) system, refer to the operating
instructions of the system for details on dialing the recipient's fax/telephone number.
• In case the machine was not able to send a fax, such as when the recipient's line was busy, it has thefunction to automatically redial the number after a specified interval. Automatic redialing is enabled bydefault.
Automatic Redialing
• Unsent documents, such as those pending redial, are stored in the machine's memory. They are notstored in the case of a sending error.
Document Stored in Machine's Memory
• Do not disconnect the power plug until all documents are sent. If you disconnect the power plug, allunsent documents stored in the machine's memory are lost.
441

Resending Faxes (Redialing a Busy Number)
There are two methods of redialing: Automatic redialing and Manual redialing.
• Automatic Redialing
If you send a document and the recipient's line is busy, the machine will redial the number after aspecified interval.
Automatic Redialing
• Manual Redialing
You can redial to the recipients dialed using the Numeric buttons.
Manual Redialing
Important• It may be possible that faxes will reach unintended recipients due to the misdialing or incorrect
registration of fax/telephone numbers. When you send important documents, it is recommended thatyou send them after speaking on the telephone.
Sending a Fax after Speaking on Telephone
Note• Automatic redialing is enabled by default.
• For details on the basic sending operations:
Sending Faxes with the Numeric Buttons
Automatic Redialing
You can enable or disable automatic redialing. If you enable automatic redialing, you can specify themaximum number of redial attempts and the length of time the machine waits between redial attempts.
Enable and specify the automatic redialing setting on Auto redial in Adv. FAX settings under Faxsettings.
Adv. FAX settings
Important• While automatic redialing, the unsent fax is stored in the machine's memory temporarily until the
sending fax is complete. If a power failure occurs or you unplug the power cord before automaticredialing is complete, all faxes stored in the machine's memory are deleted and not sent.
Note• To cancel automatic redialing, wait until the machine starts redialing, then press the Stop button.
• To cancel automatic redialing, delete the unsent fax from the machine's memory while the machine ison-standby for a redial operation. For details, see Deleting a Document in Machine's Memory.
Manual Redialing
Follow the procedure below for manual redialing.
442

1. Make sure that the machine is turned on.
2. Press the FAX button.
The Fax standby screen is displayed.
3. Load documents on the platen glass or in the ADF.
4. Adjust the scan contrast and resolution as necessary.
Note• For details on how to adjust the scan contrast and resolution, see Sending Faxes with the
Numeric Buttons.
5. Press the Menu button.
The FAX menu screen is displayed.
6. Use the button to select Redial, then press the OK button.
The Redial screen is displayed.
7. Use the button to select the recipient's number to redial, then press the OK button.
8. Press the Color button for color transmission, or the Black button for black & whitetransmission.
Important• Color transmission is available only when the recipient's fax machine supports color faxing.
Note• For manual redialing, the machine memorizes up to 10 recent recipients dialed using the Numeric
buttons. Note that the machine does not memorize any recipients dialed using the memory dialing orthe manual redialing.
• To cancel manual redialing, press the Stop button. To cancel a fax transmission while it is inprogress, press the Stop button, then follow the instructions on the LCD.
• If documents remain in the ADF after the Stop button is pressed while scanning is in progress, Closethe feeder cover [OK]Eject the document is displayed on the LCD. By pressing the OK button, theremaining documents are automatically ejected.
443

Sending Faxes Using Useful Functions
Sending a Fax after Speaking on Telephone
Sending a Fax Using the Memory Dialing Feature
Searching a Registered Dial Code Number by Name
Sending the Same Document to Several Recipients (Sequential Broadcasting)
Preventing Mistransmission of Faxes
Using the On Hook Dial Function
444

Sending a Fax after Speaking on Telephone
If you want to speak to the recipient before sending a fax, or if the recipient does not have a fax machinethat can receive faxes automatically, send a fax manually after speaking to the recipient on the telephone tocheck whether the recipient can receive faxes.
Important• It may be possible that faxes will reach unintended recipients due to the misdialing or incorrect
registration of fax/telephone numbers. When you send important documents, it is recommended thatyou send them after speaking on the telephone. See below for the procedure to send a fax manually.
• With manual transmission, you cannot use the platen glass to load documents. Load the documents inthe ADF.
When loading document on the platen glass, send a fax with automatic transmission.
Sending Faxes with the Numeric Buttons
• To speak to the recipient before sending a fax, you need to connect a telephone to the machine.
For details on how to connect the telephone to the machine:
Basic Connection
Note• For details on the basic sending operations:
Sending Faxes with the Numeric Buttons
1. Make sure that the machine is turned on.
2. Press the FAX button.
The Fax standby screen is displayed.
3. Load documents in the ADF.
4. Adjust the scan contrast and resolution as necessary.
Note• For details on how to adjust the scan contrast and resolution, see Sending Faxes with the
Numeric Buttons.
5. Lift the handset of the telephone connected to the machine.
6. Use the telephone to dial the recipient's fax/telephone number.
7. Speak to the recipient.
When you hear a high-pitched signal instead of the recipient's voice, you cannot check whether therecipient can receive faxes. If you want to stop sending the fax, replace the handset. If you want to sendthe fax, go to step 9.
445

8. Ask the recipient to set the recipient's fax machine to receive faxes.
9. When you hear a high-pitched signal, press the Color button or the Black button.
Press the Color button for color transmission, or the Black button for black & white transmission.
Important• Color transmission is available only when the recipient's fax machine supports color faxing.
10. Hang up the handset.
Note• To cancel a fax transmission, press the Stop button. To cancel a fax transmission while it is in
progress, press the Stop button, then follow the instructions on the LCD.
• If documents remain in the ADF after the Stop button is pressed while scanning is in progress,Close the feeder cover [OK]Eject the document is displayed on the LCD. By pressing the OKbutton, the remaining documents are automatically ejected.
446

Sending a Fax Using the Memory Dialing Feature
Registering recipient's fax/telephone number and name for coded memory dial or group dial enables you tosend faxes easily.
Important• It may be possible that faxes will reach unintended recipients due to the misdialing or incorrect
registration of fax/telephone numbers. When you send important documents, it is recommended thatyou send them after speaking on the telephone.
Sending a Fax after Speaking on Telephone
Note• For details on the basic sending operations:
Sending Faxes with the Numeric Buttons
1. Make sure that the machine is turned on.
2. Press the FAX button.
The Fax standby screen is displayed.
3. Load documents on the platen glass or in the ADF.
4. Adjust the scan contrast and resolution as necessary.
Note• For details on how to adjust the scan contrast and resolution, see Sending Faxes with the
Numeric Buttons.
5. Press the Menu button.
The FAX menu screen is displayed.
6. Use the button to select Memory dial, then press the OK button.
The screen to select a coded memory dial code or a group dial code is displayed.
Note• When Enter first letter is displayed on the LCD, you can search the recipient's name by sorting in
alphabetical order and send the fax.
Searching a Registered Recipient by Name
To return to the screen to select the coded memory dial code or the group dial code, press the
button.
447

7. Select a coded memory dial code or a group dial code.
1. Use the button or the Numeric buttons to select a coded memory dial code or a group dialcode.
2. Press the OK button.
8. Press the Color button for color transmission, or the Black button for black & whitetransmission.
Important• Color transmission is available only when the recipient's fax machine supports color faxing.
Note• To cancel a fax transmission, press the Stop button. To cancel a fax transmission while it is in
progress, press the Stop button, then follow the instructions on the LCD.
• If documents remain in the ADF after the Stop button is pressed while scanning is in progress, Closethe feeder cover [OK]Eject the document is displayed on the LCD. By pressing the OK button, theremaining documents are automatically ejected.
• In case the machine was not able to send a fax, such as when the recipient's line was busy, it has thefunction to automatically redial the number after a specified interval. Automatic redialing is enabled bydefault.
Automatic Redialing
To cancel automatic redialing, wait until the machine starts redialing, then press the Stop button.
448

Searching a Registered Recipient by Name
You can search a registered recipient by sorting in alphabetical order and send the fax.
Important• It may be possible that faxes will reach unintended recipients due to the misdialing or incorrect
registration of fax/telephone numbers. When you send important documents, it is recommended thatyou send them after speaking on the telephone.
Sending a Fax after Speaking on Telephone
Note• For details on the basic sending operations:
Sending Faxes with the Numeric Buttons
1. Make sure that the machine is turned on.
2. Press the FAX button.
The Fax standby screen is displayed.
3. Load documents on the platen glass or in the ADF.
4. Adjust the scan contrast and resolution as necessary.
Note• For details on how to adjust the scan contrast and resolution, see Sending Faxes with the
Numeric Buttons.
5. Press the Menu button.
The FAX menu screen is displayed.
6. Use the button to select Memory dial, then press the OK button.
The screen to select a coded memory dial code or a group dial code is displayed.
Note• If Enter first letter is displayed on the LCD, go to step 8.
7. Press the button.
The screen to enter the first letter of the registered recipient's name or of the group name is displayed.
449

Note• To return to the screen to select the coded memory dial code or the group dial code, press the
button.
8. Use the Numeric buttons to enter the first letter of the recipient's name you want to searchor of the group name you want to search.
The recipients' names and the group names are sorted in alphabetical order.
Note• For details on how to enter or delete characters:
Entering Numbers, Letters, and Symbols
• You can enter the following characters using the Numeric buttons.
A, D, G, J, M, P, T, W
• If the entered character does not match the first character of any of the recipients' name or thegroup name, names beginning with the character closest to that entered are displayed.
9. Use the button to select the recipient's name or the group name, then press the OKbutton.
10. Press the Color button for color transmission, or the Black button for black & whitetransmission.
Important• Color transmission is available only when the recipient's fax machine supports color faxing.
Note• To cancel a fax transmission, press the Stop button. To cancel a fax transmission while it is in
progress, press the Stop button, then follow the instructions on the LCD.
• If documents remain in the ADF after the Stop button is pressed while scanning is in progress, Closethe feeder cover [OK]Eject the document is displayed on the LCD. By pressing the OK button, theremaining documents are automatically ejected.
• In case the machine was not able to send a fax, such as when the recipient's line was busy, it has thefunction to automatically redial the number after a specified interval. Automatic redialing is enabled bydefault.
Automatic Redialing
To cancel automatic redialing, wait until the machine starts redialing, then press the Stop button.
450

Sending the Same Document to Several Recipients (SequentialBroadcasting)
This machine allows you to prepare for sending the same document to a maximum of 21 recipients in oneoperation. The recipients can be specified with the Numeric buttons, coded memory dial, and group dial incombination.
The following number of recipients can be specified in combination.
• The recipient registered to the machine:
Up to 20 (total of coded memory dial and group dial)
• Dialing using the Numeric buttons or redialing:
1
Important• It may be possible that faxes will reach unintended recipients due to the misdialing or incorrect
registration of fax/telephone numbers. When you send important documents, it is recommended thatyou send them one by one after speaking on the telephone.
Sending a Fax after Speaking on Telephone
Note• If you frequently send documents to the same group of recipients, you can group these numbers for
group dialing. This will allow you to send documents to all the recipients in the group by simply pressinga few buttons.
Registering Recipients for Group Dial
• For details on the basic sending operations:
Sending Faxes with the Numeric Buttons
1. Make sure that the machine is turned on.
2. Press the FAX button.
The Fax standby screen is displayed.
3. Load documents on the platen glass or in the ADF.
4. Adjust the scan contrast and resolution as necessary.
Note• For details on how to adjust the scan contrast and resolution, see Sending Faxes with the
Numeric Buttons.
5. Specify all recipients' fax/telephone numbers one by one.
Before finishing specifying all recipients' fax/telephone numbers, do not press the Color button or theBlack button.
• By specifying with the recipient registered to the machine (coded memory dial or group dial):
451

Press the Menu button, use the button to select Memory dial, then press the OK button.Next, select a recipient, then press the OK button.
Sending a Fax Using the Memory Dialing Feature
Searching a Registered Recipient by Name
• By dialing using the Numeric buttons:
Use the Numeric buttons to enter the recipient's fax/telephone number, then press the OK button.
Note• If FAX no. re-entry in Security control under Fax settings is set to ON, use the Numeric
buttons again to enter the number, then press the OK button.
Security control
• By redialing:
Press the Menu button, use the button to select Redial, then press the OK button. Next, usethe button to select the number you want to dial, then press the OK button.
Broadcasting is displayed after specifying the multiple recipients.
Note• When Broadcasting is displayed, you can review the numbers you have entered by pressing the
button.
• Pressing the Back button allows you to delete the recipient's number you entered last.
6. Press the Color button for color transmission, or the Black button for black & whitetransmission.
Important• Color transmission is available only when the recipient's fax machine supports color faxing.
Note• To cancel sequential broadcasting, press the Stop button. To cancel a fax transmission while it is in
progress, press the Stop button, then follow the instructions on the LCD.
• If documents remain in the ADF after the Stop button is pressed while scanning is in progress, Closethe feeder cover [OK]Eject the document is displayed on the LCD. By pressing the OK button, theremaining documents are automatically ejected.
• When you press the Stop button, fax transmission to all the recipients specified will be canceled. Youcannot cancel a fax transmission to only one recipient.
452

Preventing Mistransmission of Faxes
This machine has two functions for preventing the mistransmission of faxes.
• Sending faxes after entering the fax/telephone number twice
This function requires you to re-enter the fax/telephone number after entering the number using theNumeric buttons, so that the machine prevents you from misdialing.
Sending Faxes after Dialing Twice (Fax Number Re-entry)
• Sending faxes after the machine checks the recipient's fax machine information
Before sending a fax, the machine checks whether the recipient's fax machine information matches thedialed number.
Sending Faxes after Checking Information (Checking the Recipient's Information)
Sending Faxes after Dialing Twice (Fax Number Re-entry)
Set FAX no. re-entry to ON following the procedure below.
1. Make sure that the machine is turned on.
2. Press the Setup button.
The Setup menu screen is displayed.
3. Use the button to select Fax settings, then press the OK button.
4. Use the button to select Security control, then press the OK button.
5. Use the button to select FAX no. re-entry, then press the OK button.
6. Use the button to select ON, then press the OK button.
If you send a fax with this function, the following screen is displayed after entering the recipient's fax/telephone number using the Numeric buttons.
Enter the recipient's fax/telephone number using the Numeric buttons again.
Note• If the number is not identical with the number entered first, the Fax standby screen is displayed.
Sending Faxes after Checking Information (Checking the Recipient'sInformation)
Set Check RX FAX info to ON following the procedure below.
Important• This function is not available when you send a fax manually.
453

Sending a Fax after Speaking on Telephone
1. Make sure that the machine is turned on.
2. Press the Setup button.
The Setup menu screen is displayed.
3. Use the button to select Fax settings, then press the OK button.
4. Use the button to select Security control, then press the OK button.
5. Use the button to select Check RX FAX info, then press the OK button.
6. Use the button to select ON, then press the OK button.
Important• Transmission will be canceled if the machine fails to receive the recipient's fax information or if
the received information does not match the fax/telephone number.
454

Using the On Hook Dial Function
Follow the procedure below to send faxes with the on hook dial function.
Important• It may be possible that faxes will reach unintended recipients due to the misdialing or incorrect
registration of fax/telephone numbers. When you send important documents, it is recommended thatyou send them after speaking on the telephone.
Sending a Fax after Speaking on Telephone
• With manual transmission, you cannot use the platen glass to load documents. Load the documents inthe ADF.
When loading document on the platen glass, send a fax with automatic transmission.
Sending Faxes with the Numeric Buttons
Note• You can use the on hook dial function only when On-hook setting in Security control under Fax
settings is set to Enable.
Security control
• For details on the basic sending operations:
Sending Faxes with the Numeric Buttons
1. Make sure that the machine is turned on.
2. Press the FAX button.
The Fax standby screen is displayed.
3. Load documents in the ADF.
4. Adjust the scan contrast and resolution as necessary.
Note• For details on how to adjust the scan contrast and resolution, see Sending Faxes with the
Numeric Buttons.
5. Press the Color button or the Black button.
6. Use the Numeric buttons to dial the recipient's fax/telephone number.
Note• You can also dial using memory dialing or manual redialing.
Sending a Fax Using the Memory Dialing Feature
Resending Faxes (Redialing a Busy Number)
455

7. When you hear a high-pitched signal, press the Color button or the Black button.
Press the Color button for color transmission, or the Black button for black & white transmission.
Important• Color transmission is available only when the recipient's fax machine supports color faxing.
Note• To cancel a fax transmission, press the Stop button. To cancel a fax transmission while it is in
progress, press the Stop button, then follow the instructions on the LCD.
• If documents remain in the ADF after the Stop button is pressed while scanning is in progress,Close the feeder cover [OK]Eject the document is displayed on the LCD. By pressing the OKbutton, the remaining documents are automatically ejected.
456

Registering Recipients
Registering Recipients Using the Operation Panel of the Machine
Registering Recipients Using Speed Dial Utility
457

Registering Recipients Using the Operation Panel of the Machine
Memory dialing allows you to dial fax/telephone numbers by simply pressing a few buttons.
The following memory dialing methods are available:
• Coded Memory Dialing
Registering the recipient's fax/telephone number and name to the coded memory dial allows you to senda fax by entering the coded memory dial code assigned to that number or using the button toselect the coded memory dial code after selecting Memory dial on the FAX menu screen.
Registering Recipients to Coded Memory Dial
• Group Dialing
Register two or more registered coded memory dial codes as a group in advance. You can send thesame document to all the registered recipients in the group.
Registering Recipients for Group Dial
You can register up to 20 recipients in total of coded memory dial code and group dial code.
Note• To change information registered to the coded memory dial or the group dial, see Changing Registered
Information.
• To delete information registered to the coded memory dial or the group dial, see Deleting RegisteredInformation.
• To print a list of the recipient's fax/telephone numbers and names registered, see Printing a List of theRegistered Destinations.
• You can register, change, or delete information registered to the coded memory dial or the group dialusing Speed Dial Utility.
Registering Recipients Using Speed Dial Utility
458

Registering Recipients to Coded Memory Dial
Before you can use the coded memory dialing feature, you need to register the recipients' fax/telephonenumbers. Follow the procedure below to register the recipients' fax/telephone numbers.
1. Make sure that the machine is turned on.
2. Press the Setup button.
The Setup menu screen is displayed.
3. Use the button to select Fax settings, then press the OK button.
4. Use the button to select TEL no. registration, then press the OK button.
5. Use the button to select Memory dial, then press the OK button.
The screen to select a coded memory dial code is displayed.
6. Use the button or the Numeric buttons to select an unoccupied coded memory dialcode, then press the OK button.
Note• If you select a code already used as a coded memory dial, the fax/telephone number is displayed.
If you select a code already used as a group dial, (Not available) is displayed.
7. Use the button to select a registration method, then press the OK button.
8. Register the recipients' fax/telephone number.
Register the recipients' fax/telephone number depending on the registration method selected.
• From call log (OUT)
When you select this registration method, the screen to select the fax/telephone number from theoutgoing call logs is displayed.
1. Use the button to select a fax/telephone number, then press the OK button.
The fax/telephone number selected from the outgoing call logs is displayed.
2. Check the fax/telephone number, then press the OK button.
The fax/telephone number is registered to the machine and the screen to enter the recipient'sname is displayed. Go to next step.
• From call log (IN)
459

When you select this registration method, the screen to select the fax/telephone number or thename from the incoming call logs is displayed.
1. Use the button to select a fax/telephone number or a name, then press the OK button.
The fax/telephone number selected from the incoming call logs is displayed.
2. Check the fax/telephone number, then press the OK button.
The fax/telephone number is registered to the machine and the screen to enter the recipient'sname is displayed. Go to next step.
Note• This registration method may not be available depending on the country or region of purchase.
• Direct entry
When you select this registration method, the screen to enter the fax/telephone number isdisplayed.
1. Use the Numeric buttons to enter the fax/telephone number you want to register.
2. Press the OK button.
The fax/telephone number is registered to the machine and the screen to enter the recipient'sname is displayed. Go to next step.
Note• You can enter the fax/telephone number up to 60 digits (40 digits for the US, Canada,
Korea and some regions of Latin America), including spaces.
• For details on how to enter or delete characters:
Entering Numbers, Letters, and Symbols
• Press the button twice to enter a pause.
• When Telephone line type in FAX user settings under Fax settings is set to Rotarypulse, you can enter a tone ("T") by pressing the Tone button.
9. Use the Numeric buttons to enter the recipient's name.
If you select a name on From call log (IN) in step 8, the name may be already entered. If you do notchange the name, go to step 10.
Note• You can enter the name up to 16 characters, including spaces.
• For details on how to enter or delete characters:
460

Entering Numbers, Letters, and Symbols
10. Press the OK button to finalize registration.
Note• To register another recipient's number and name to a coded memory dial, select an unoccupied
coded memory dial code and operate in the same procedure when you register.
• To return to the Fax standby screen, press the FAX button.
• You can check the recipient's numbers and names you have registered by printing MEMORYDIAL TELEPHONE NO. LIST.
Printing a List of the Registered Destinations
461

Registering Recipients for Group Dial
If you register two or more registered coded memory dial codes to a group dial, you can send the samedocument successively to all recipients registered to the group dial.
1. Make sure that the machine is turned on.
2. Press the Setup button.
The Setup menu screen is displayed.
3. Use the button to select Fax settings, then press the OK button.
4. Use the button to select TEL no. registration, then press the OK button.
5. Use the button to select Group dial, then press the OK button.
The screen to select a group dial code is displayed.
6. Use the button or the Numeric buttons to select an unoccupied coded memory dialcode, then press the OK button.
Note• If you select a code already used as a coded memory dial, (Not available) is displayed. If you
select a code already used as a group dial, the registered group name is displayed.
The Group member screen is displayed.
7. Register the members.
1. Press the Menu button.
2. Choose a member to register.
You can choose a member with the two methods. The method can be switched by pressing the
button.
• When Add to group is displayed on the LCD:
Use the button to select a coded memory dial code to register to the group dial.
• When Enter first letter is displayed on the LCD:
462

After you use the Numeric buttons to enter the first letter of the recipient's name you want tosearch, the coded memory dial code is displayed in alphabetical order.
Use the button to select a coded memory dial code to register to the group dial.
3. Press the OK button.
The coded memory dial code is registered to the group dial.
4. Press the Menu button to display the screen to select a coded memory dial code, then addanother member.
Repeat this step to register the other coded memory dial codes to the same group dial.
Note• You can check the coded memory dial code and the recipient's name registered to the group
dial by using the button.
• To delete the registered coded memory dial code from the group dial, press the Tone button.
8. Press the OK button after finishing registering the member you want to register to the groupdial.
The screen to enter the group name is displayed.
9. Use the Numeric buttons to enter the group name.
Note• You can enter the name up to 16 characters, including spaces.
• For details on how to enter or delete characters:
Entering Numbers, Letters, and Symbols
10. Press the OK button to finalize registration.
Note• To register another group dial code to the machine, select an unoccupied coded memory dial
code and operate in the same procedure when you register.
• To return to the Fax standby screen, press the FAX button.
• You can check the recipients you have registered to the group dial by printing GROUP DIALTELEPHONE NO. LIST.
Printing a List of the Registered Destinations
463

Changing Registered Information
To change information registered for coded memory dial and group dial, follow the procedure below.
1. Make sure that the machine is turned on.
2. Press the Setup button.
The Setup menu screen is displayed.
3. Use the button to select Fax settings, then press the OK button.
4. Use the button to select TEL no. registration, then press the OK button.
5. Change the registered information.
• To change a coded memory dial code:
1. Use the button to select Memory dial, then press the OK button.
2. Use the button or the Numeric buttons to select a coded memory dial code to change,then press the OK button.
3. Use the button to select Edit, then press the OK button.
The screen to select a registration method is displayed as well as you register the fax/telephone number to the coded memory dial.
4. Use the button to select a registration method, then press the OK button.
5. Change the recipient's fax/telephone number, then press the OK button.
◦ From call log (OUT) is selected as the registration method:
The screen to select the fax/telephone number from the outgoing call logs is displayed.After you use the button to select a fax/telephone number and press the OK button,the editing screen is displayed. Change the recipient's fax/telephone number, then pressthe OK button.
◦ From call log (IN) is selected as the registration method:
The screen to select the fax/telephone number or the name from the incoming call logs isdisplayed. After you use the button to select a fax/telephone number or a name andpress the OK button, the editing screen is displayed. Change the recipient's fax/telephonenumber, then press the OK button.
Note• This registration method may not be available depending on the country or region of
purchase.
◦ Direct entry is selected as the registration method:
the editing screen is displayed. Change the recipient's fax/telephone number, then pressthe OK button.
After editing the recipient's fax/telephone number is complete, the screen to edit the recipient'sname is displayed.
464

Note• You can enter the fax/telephone number up to 60 digits (40 digits for the US, Canada,
Korea and some regions of Latin America), including spaces.
• For details on how to enter or delete characters:
Entering Numbers, Letters, and Symbols
• Press the button twice to enter a pause.
• When Telephone line type in FAX user settings under Fax settings is set to Rotarypulse, you can enter a tone ("T") by pressing the Tone button.
6. Change the recipient's name, then press the OK button.
Note• You can enter the name up to 16 characters, including spaces.
• For details on how to enter or delete characters:
Entering Numbers, Letters, and Symbols
• To change a group dial code:
1. Use the button to select Group dial, then press the OK button.
2. Use the button or the Numeric buttons to select a group dial code to change, then pressthe OK button.
3. Use the button to select Edit, then press the OK button.
4. Edit the member of the group dial.
Add the member or delete as well as you register the coded memory dial code to the groupdial, then press the OK button.
Change the group name, as well as you register the coded memory dial code to the group dial,then press the OK button.
5. Change the group name, then press the OK button.
Note• You can enter the name up to 16 characters, including spaces.
• For details on how to enter or delete characters:
Entering Numbers, Letters, and Symbols
Note• To return to the Fax standby screen, press the FAX button.
465

Deleting Registered Information
To delete information registered for coded memory dial and group dial, follow the procedure below.
1. Make sure that the machine is turned on.
2. Press the Setup button.
The Setup menu screen is displayed.
3. Use the button to select Fax settings, then press the OK button.
4. Use the button to select TEL no. registration, then press the OK button.
5. Delete the registered information.
• To delete a coded memory dial code:
1. Use the button to select Memory dial, then press the OK button.
2. Use the button or the Numeric buttons to select a coded memory dial code to delete,then press the OK button.
3. Use the button to select Delete, then press the OK button.
4. Use the button to select Yes, then press the OK button.
• To delete a group dial code:
1. Use the button to select Group dial, then press the OK button.
2. Use the button or the Numeric buttons to select a group dial code to delete, then pressthe OK button.
3. Use the button to select Delete, then press the OK button.
4. Use the button to select Yes, then press the OK button.
Note• To return to the Fax standby screen, press the FAX button.
466

Printing a List of the Registered Destinations
You can print a list of the recipients registered for memory dialing and can keep it near the machine to referto when dialing.
1. Make sure that the machine is turned on.
2. Load paper.
3. Press the FAX button.
The Fax standby screen is displayed.
4. Press the Menu button.
The FAX menu screen is displayed.
5. Use the button to select Print reports/lists, then press the OK button.
6. Use the button to select TEL number list, then press the OK button.
Note• When Change the paper A4/LTR/LGL Plain paper is displayed on the LCD, the paper settings
are incorrect.
In FAX paper settings, set Page size to A4, Letter, LTR, or Legal. Set Media type to Plainpaper.
* Some of page sizes are not available depending on the country or region of purchase.
7. Use the button to select a memory dialing menu to print, then press the OK button.
• If you selected Memory dial:
Use the button to select whether to print the list in alphabetical order of the registered names,or in numerical order of the coded memory codes, then press the OK button.
If you select Yes, MEMORY DIAL TELEPHONE NO. LIST is printed with the destination names inalphabetical order.
If you select No, MEMORY DIAL TELEPHONE NO. LIST is printed with the registered entries innumerical order.
• If you selected Group dial:
GROUP DIAL TELEPHONE NO. LIST is printed.
467

Registering Recipients Using Speed Dial Utility
About Speed Dial Utility
Speed Dial Utility is a utility for forwarding the fax/telephone numbers registered on the machine to acomputer and registering/changing them on the computer. In addition, you can register the fax/telephonenumber, user's name, user's fax/telephone number, and rejected numbers edited on the computer to themachine. You can also save them on the computer as a backup.
For safety reasons, it is recommended that you backup the registered data on the computer using SpeedDial Utility.
Starting Up Speed Dial Utility
Speed Dial Utility Dialog
Saving Registered Information on the Machine to Your Computer
Registering a Fax/telephone Number Using Speed Dial Utility
Changing a Fax/telephone Number Using Speed Dial Utility
Deleting a Fax/telephone Number Using Speed Dial Utility
Changing Sender Information Using Speed Dial Utility
Registering/Changing Rejected Number Using Speed Dial Utility
Calling the Registered Information Up from Your Computer and Registering the Information to theMachine
Uninstalling Speed Dial Utility
468

Starting Up Speed Dial Utility
Before starting up Speed Dial Utility, confirm the following:
• The necessary application software (printer driver and Speed Dial Utility) is installed.
If the printer driver or Speed Dial Utility is not yet installed, install them from our website.
• The machine is connected to a computer correctly.
Make sure that the machine is connected to the computer correctly.
Do not plug in or unplug any cables while the machine is in operation, or when the computer is in sleepor standby mode.
If your machine is compatible with LAN connection, make sure that the machine is connected to thecomputer with LAN connection to use Speed Dial Utility via LAN connection.
Follow the procedure below to start up Speed Dial Utility.
1. Make sure that the machine is turned on.
2. Select Applications on the Go menu of Finder.
3. Double-click the Canon Utilities folder.
4. Double-click the Speed Dial Utility folder.
5. Double-click Speed Dial Utility.
Speed Dial Utility starts up.
Note
• You can also start up the Speed Dial Utility by clicking Speed Dial Settings from DeviceSettings & Maintenance on Quick Menu.
469

Speed Dial Utility Dialog
The following items are on the Speed Dial Utility dialog.
1. Printer Name:
Selects the machine for editing the registered information using Speed Dial Utility.
2. Display Printer Settings
Loads the registered information on the machine selected for Printer Name: into Speed Dial Utility.
3. Setting Item List:
Selects the registered information for editing. Choose one item from TEL Number Registration, UserInformation Setting, and Rejected Number Setting.
4. Registered information list
Displays the registered information selected for Setting Item List:.
5. Edit.../Select All/Delete
Edits/deletes the registered information or selects all the registered information selected for Setting ItemList:.
When multiple items on the registered information list are selected, you cannot use the Edit... button.
6. Load from PC...
Displays the registered information saved on the computer.
470

7. Instructions
Displays this guide.
8. Exit
Quits Speed Dial Utility. Information registered or edited using Speed Dial Utility is neither saved on thecomputer nor registered on the machine.
9. Save to PC...
Saves information edited using Speed Dial Utility on the computer.
10. Register to Printer
Registers information edited using Speed Dial Utility to the machine.
471

Saving Registered Information on the Machine to Your Computer
Follow the procedure below to save the speed dial (or memory dial)/group dial numbers, user's name, fax/telephone number, or rejected numbers on the machine to the computer.
1. Start up Speed Dial Utility.
2. Select the machine from the Printer Name: list box, then click Display Printer Settings.
3. Click Save to PC....
4. Enter the file name on the displayed screen, then click Save.
472

Registering a Fax/telephone Number Using Speed Dial Utility
Follow the procedure below to register fax/telephone numbers.
Note• Before you register fax/telephone numbers using Speed Dial Utility, make sure that no fax operations
are in progress.
1. Start up Speed Dial Utility.
2. Select the machine from the Printer Name: list box, then click Display Printer Settings.
3. Click TEL Number Registration from Setting Item List:.
The list of registered fax/telephone numbers is displayed.
4. Select an unoccupied code from the list, then click Edit....
The Individual or Group Selection dialog is displayed.
5. Click Register individual TEL number or Register group dial, then click Next....
• If Register individual TEL number is selected:
1. Enter the name.
2. Enter the fax/telephone number.
• If Register group dial is selected:
1. Enter the group name.
2. Select the code you want to add to the group dial, then click Add >>.
473

Note• You can only enter numbers that have already been registered.
6. Click OK.
To continue registering fax/telephone numbers or a group dial, repeat steps 4 to 6.
• To save the registered information on the computer.
1. Click Save to PC....
2. Enter the file name on the displayed screen, then click Save.
• To register the registered information to the machine:
1. Click Register to Printer.
2. Confirm the message on the display, then click OK.
The information is registered to the machine.
474

Changing a Fax/telephone Number Using Speed Dial Utility
Follow the procedure below to change fax/telephone numbers.
Note• Before you change fax/telephone numbers using Speed Dial Utility, make sure that no fax operations
are in progress.
1. Start up Speed Dial Utility.
2. Select the machine from the Printer Name: list box, then click Display Printer Settings.
3. Click TEL Number Registration from Setting Item List:.
The list of registered fax/telephone numbers is displayed.
4. Select a code to change from the list, then click Edit....
• If an individual fax/telephone number is selected:
1. Enter the new name.
2. Enter the new fax/telephone number.
• If a group dial is selected:
1. Enter the new group name.
2. Add or delete a member to/from the group dial.
To add a member:Select the code to add to the group dial, then click Add >>.
To delete a member:Select the code to delete from the group dial, then click << Delete.
475

5. Click OK.
To continue changing fax/telephone numbers or group dials, repeat steps 4 and 5.
• To save the edited information on the computer.
1. Click Save to PC....
2. Enter the file name on the displayed screen, then click Save.
• To register the edited information to the machine:
1. Click Register to Printer.
2. Confirm the message on the display, then click OK.
The information is registered to the machine.
476

Deleting a Fax/telephone Number Using Speed Dial Utility
Follow the procedure below to delete fax/telephone numbers.
Note• Before you delete fax/telephone numbers using Speed Dial Utility, make sure that no fax operations are
in progress.
1. Start up Speed Dial Utility.
2. Select the machine from the Printer Name: list box, then click Display Printer Settings.
3. Click TEL Number Registration from Setting Item List:.
The list of registered fax/telephone numbers is displayed.
4. Select a code to delete from the list, then click Delete.
The selected fax/telephone number is deleted.
To continue deleting fax/telephone numbers, repeat step 4.
Note• To delete all fax/telephone numbers on the list, click Select All, then Delete.
• To save the edited information on the computer.
1. Click Save to PC....
2. Enter the file name on the displayed screen, then click Save.
• To register the edited information to the machine:
1. Click Register to Printer.
2. Confirm the message on the display, then click OK.
The information is registered to the machine.
477

Changing Sender Information Using Speed Dial Utility
Follow the procedure below to change the user's name or fax/telephone number.
1. Start up Speed Dial Utility.
2. Select the machine from the Printer Name: list box, then click Display Printer Settings.
3. Click User Information Setting from Setting Item List:.
The user's information is displayed.
4. Select an item to change, then click Edit....
The User Information dialog is displayed.
5. Enter the new user's name on User Name and new fax/telephone number in TEL Number,then click OK.
• To save the edited information on the computer:
1. Click Save to PC....
2. Enter the file name on the displayed screen, then click Save.
• To register the edited information to the machine:
1. Click Register to Printer.
2. Confirm the message on the display, then click OK.
The information is registered to the machine.
478

Registering/Changing Rejected Number Using Speed Dial Utility
Follow the procedure below to register, change, or delete rejected numbers.
1. Start up Speed Dial Utility.
2. Select the machine from the Printer Name: list box, then click Display Printer Settings.
3. Click Rejected Number Setting from Setting Item List:.
The list of rejected numbers is displayed.
• To register a rejected number:
1. Select an unoccupied code from the list, then click Edit....
2. Enter the fax/telephone number in the Rejected Number dialog, then click OK.
• To change a rejected number:
1. Select a code to change from the list, then click Edit....
2. Enter the fax/telephone number in the Rejected Number dialog, then click OK.
• To delete a rejected number:
1. Select a code to delete from the list, then click Delete.
The selected fax/telephone number is deleted.
Note• To delete all fax/telephone numbers on the list, click Select All, then Delete.
479

Calling the Registered Information Up from Your Computer andRegistering the Information to the Machine
You can register the fax/telephone numbers, user's name, user's fax/telephone number, and rejectednumbers saved on the computer to the machine.
1. Start up Speed Dial Utility.
2. Select the machine from the Printer Name: list box, then click Display Printer Settings.
3. Click Load from PC....
4. Select the RSD file (*.rsd) to register to the machine.
5. Click Open on the dialog.
6. Click Register to Printer.
The registered information on the computer is registered to the machine.
480

Uninstalling Speed Dial Utility
Follow the procedure below to uninstall Speed Dial Utility.
1. Select Applications from the Go menu of Finder, double-click Canon Utilities > SpeedDial Utility, then drag the Speed Dial Utility icon into the trash.
Note• To reinstall Speed Dial Utility, uninstall Speed Dial Utility, then install it again from our website.
481

Receiving Faxes
Receiving Faxes
Changing the Paper Settings
Memory Reception
Receiving Faxes Using Useful Functions
482

Receiving Faxes
This section describes the preparation necessary for receiving a fax and how to receive a fax.
Preparing for Receiving a Fax
Prepare for receiving a fax according to the following procedure.
1. Make sure that the machine is turned on.
2. Press the FAX button.
The Fax standby screen is displayed.
3. Make sure of the receive mode setting.
Make sure of the receive mode setting displayed on the Fax standby screen.
Note• For details on how to change the receive mode:
Setting the Receive Mode
4. Load paper.
Load the sheets of plain paper.
5. Specify the paper settings as necessary.
Changing the Paper Settings
This completes the preparation for receiving fax.
When a fax is received, it is printed on the loaded paper automatically.
Receiving a Fax
Depending on the selected receive mode, the receive operation varies.
Note• For details on the receive mode:
Setting the Receive Mode
• You can specify the advanced settings of each receive mode.
For details on the advanced settings of the receive mode:
Advanced Settings of Receive Mode
• If the machine was not able to print a received fax, the machine stores the unprinted fax temporarilyin its memory (memory receiving).
Memory Reception
483

When TEL priority mode is selected:
• When the call is a fax:
The telephone will ring when a call incomes.
Pick up the handset. If you hear the fax tone, wait for at least 5 seconds after it stops, then hang upthe handset.
The machine will receive the fax.
Note• If the machine will not switch to fax reception, press the FAX button, then the Color or Black
button to receive the fax.
• To receive a fax without picking up the handset, set Manual/auto switch of the advancedsetting to ON. RX start time allows you to specify the number of seconds until the machineswitches to fax reception.
• If you have subscribed to Duplex Ringing service in Hong Kong, the telephone will ring aspecified number of times when there is an incoming call with a fax distinctive ring pattern.Then, the machine will switch to fax reception automatically without the handset being pickedup.
The number of times to ring the telephone until switching to fax reception can be changed.
• Set the machine to enable you to initiate fax reception from a connected telephone (remotereception).
Remote Reception
• When the answering machine is connected to the machine:
• If the answering machine is set to the answering mode, set User-friendly RX of theadvanced setting to ON. If the call is a fax, the machine will receive the fax automatically.
• If the answering mode is turned off on the answering machine, pick up the handset. If youhear the fax tone, wait for at least 5 seconds after it stops, then hang up the handset.
• If Manual/auto switch of the advanced setting is set to ON, set RX start time to longerthan the time before the answering machine starts playing the answering message. Aftermaking this setting, we recommend that you call the answering machine using a mobilephone, etc. to confirm that messages are recorded successfully in the answering machine.
• Set your answering machine to answering mode and adjust it as follows:
484

- The entire message should be no longer than 15 seconds.
- In the message, tell your callers how to send a fax.
• When the call is a voice call:
The telephone will ring when a call incomes.
Pick up the handset, and talk on the telephone.
Note• If the machine unexpectedly switches to fax reception during telephone calls, set User-friendly
RX of the advanced setting to OFF.
• If Manual/auto switch of the advanced setting is set to ON, you must answer an incoming callby picking up the handset within the time specified in RX start time. Otherwise the machinewill switch to fax reception.
When Fax only mode is selected:
• When the call is a fax:
The machine will receive the fax automatically.
Note• If a telephone is connected to the machine, the telephone will ring when a call incomes.
• You can change the number of times to ring the telephone with Incoming ring of the advancedsetting.
When DRPD or Network switch is selected:
• When the call is a fax:
The telephone will ring when a call incomes.
485

The machine will receive the fax automatically when the fax ring pattern is detected.
Note• You can change the number of times to ring the telephone.
Advanced Settings of Receive Mode
• When the call is a voice call:
The telephone will ring when a call incomes.
When the machine does not detect the fax ring pattern, the telephone will continue ringing.
Pick up the handset, and talk on the telephone.
Note• To use this feature, you need to subscribe to a compatible service provided by your telephone
company.
• For DRPD
You need to select the appropriate ring pattern on the machine.
Setting the DRPD Ring Pattern (US and Canada only)
• For Network switch
The name of this service varies depending on the country or region of purchase. This settingmay not be also available depending on the country or region of purchase.
486

Changing the Paper Settings
This machine prints received faxes to paper loaded in the machine beforehand. You can use the operationpanel to change the paper settings for printing faxes. Make sure that the settings are appropriate for theloaded paper.
Important• If the size of loaded paper is different from that specified in the paper size setting, the received faxes
are stored in the machine's memory and Check page size and Press [OK] are displayed on the LCD.In this case, load the same size of paper as that specified in the paper size setting, then press the OKbutton.
You can also press the Stop button to close the message and print the stored documents in themachine's memory later.
Printing a Document in Machine's Memory
• If no paper is loaded, or paper has run out while printing is in progress, the received faxes are stored inthe machine's memory and Load paper and Load paper and press [OK] are displayed on the LCD. Inthis case, load paper and press the OK button.
You can also press the Stop button to close the message and print the stored documents in themachine's memory later.
Printing a Document in Machine's Memory
Note• If the sender sends a document that is larger than Letter-size or Legal-size, such as 11 x 17 inches, the
sender's machine may send the fax automatically reduced in size or divided, or send only a part of theoriginal.
1. Make sure that the machine is turned on.
2. Press the FAX button.
The Fax standby screen is displayed.
3. Press the Menu button.
The FAX menu screen is displayed.
4. Use the button to select FAX paper settings, then press the OK button.
5. Use the button to select a setting item, then press the OK button.
6. Specify the settings.
Use the button to adjust each setting item, then press the OK button. The next setting item isdisplayed.
The LCD returns to the Fax standby screen when all the settings are complete or when pressing theFAX button.
487

Note• The * (asterisk) on the LCD indicates the current setting.
• Page size
Select the page size from A4, Letter, LTR, or Legal.
Note• Some of page sizes are not available depending on the country or region of purchase.
• Media type
Make sure that Plain paper is selected.
If any media type other than Plain paper is selected, select Plain paper using the button.
488

Memory Reception
If the machine was not able to print the received fax, the received fax is stored in the machine's memory.The FAX Memory lamp is lit and Received in memory is displayed on the LCD.
Important• If the power plug is disconnected, all faxes stored in the machine's memory are deleted. The next time
you turn the machine on, press the OK button after a confirmation screen is displayed. The list of thefaxes deleted from the machine's memory (MEMORY CLEAR REPORT) will be printed.
If the machine receives a fax under one of the following conditions, the received fax will be automaticallystored in the machine's memory.
• The machine is set to store received faxes in its memory:
When Do not print is selected for Received documents in Auto print settings under Fax settings,the received faxes are stored in the machine's memory.
You can print the faxes stored in the machine's memory from the Memory reference screen under FAXmenu.
Printing a Document in Machine's Memory
Note• To print the received faxes automatically, select Print for Received documents in Auto print
settings under Fax settings.
Auto print settings
• An error has occurred on the machine:
If you select Print for Received documents in Auto print settings under Fax settings, a received faxwill be printed automatically. However, if any of the following errors occurs, the received fax will not beprinted. It will instead be stored in the machine's memory.
When the error is resolved, the fax stored in the machine's memory is printed automatically.
◦ The amount of remaining ink is insufficient to print a fax:
Replace the FINE cartridge.
Replacing a FINE Cartridge
Note• You can set the machine to forcibly print a received fax even if the ink has run out.
Set Print when no ink in Auto print settings under Fax settings to Print.
However, part or all of the fax may not be printed since the ink has run out.
Also, the contents of the fax will not be stored in the machine's memory.
If the ink has already run out, we recommend that Do not print be selected for Receiveddocuments in Auto print settings under Fax settings to store the received fax in themachine's memory. After you replace the FINE cartridge and select Print for Receiveddocuments in Auto print settings, the fax stored in the machine's memory will be printedautomatically.
Auto print settings
489

◦ Paper has run out:
Load the paper and press the OK button.
◦ A different size of paper from that specified by Page size is loaded:
Load the same size of paper as that specified by Page size, then press the OK button.
◦ Page size is set to other than A4, Letter, LTR, or Legal:
Set Page size to A4, Letter, LTR, or Legal.
Changing the Paper Settings
Note• Some of page sizes are not available depending on the country or region of purchase.
◦ Media type is set to other than Plain paper:
Set Media type to Plain paper.
Changing the Paper Settings
• You pressed the Stop button to cancel printing of a fax:
Press the FAX button to resume printing of the fax.
Note• The machine can store up to max. 50 pages* (max. 20 documents) of faxes in the machine's memory.
* When using ITU-T No.1 chart (Standard mode)
• If the machine's memory becomes full during memory reception, only pages which already have beenreceived are stored in the memory. Print the received faxes stored in the machine's memory, deletethem from the machine's memory, and have the sender resend the faxes.
Document Stored in Machine's Memory
490

Receiving Faxes Using Useful Functions
Remote Reception
Rejecting Fax Reception
Using the Caller ID Service to Reject Calls
491

Remote Reception
If the machine is located away from the telephone, pick up the handset of the telephone connected to themachine and dial 25 (the remote reception ID) to receive faxes (remote reception).
• If you use a rotary pulse line, temporarily switch your telephone to tone dialing. For details on how toswitch to tone dialing, refer to your telephone's instruction manual.
• If you have an answering machine connected to the machine that can carry out remote controloperations, the security code for this function may be the same as the remote reception ID. In this case,change the remote reception ID in Remote RX ID in Remote RX in Adv. FAX settings under Faxsettings.
Adv. FAX settings
Remote reception can be disabled.
492

Rejecting Fax Reception
You can set the machine to reject faxes with no sender information or those from specific senders.
Select one of the following conditions to reject faxes.
• Faxes with no caller identification.
• Faxes from senders not registered to the coded memory dial codes.
• Faxes from senders registered in the machine as rejected numbers.
Select a fax rejection condition following the procedure below.
1. Make sure that the machine is turned on.
2. Press the Setup button.
The Setup menu screen is displayed.
3. Use the button to select Fax settings, then press the OK button.
4. Use the button to select Security control, then press the OK button.
5. Use the button to select FAX RX reject, then press the OK button.
6. Use the button to select ON, then press the OK button.
7. Use the button to select the fax rejection condition, then press the OK button.
No sender info.Rejects faxes with no caller identification.
Memory dial unsetRejects faxes from the senders not registered to coded memory dial codes.
Rejected numbersRejects faxes from the senders registered in the machine as rejected numbers.
For details on how to register the rejected number, see Registering the Rejected Number.
Note• The * (asterisk) on the LCD indicates the current setting.
• When the machine rejects reception, Reception rejected is displayed on the LCD.
• Faxes with no caller identification are also rejected when the setting other than No sender info. isselected.
Registering the Rejected Number
Register the rejected number following the procedure below.
1. When the confirmation screen to register the rejected number is displayed, use the button to select Yes, then press the OK button.
493

2. Use the button to select the dial code to register, then press the OK button.
3. Use the button to select a registration method, then press the OK button.
Register the rejected number depending on the registration method.
• From call log (OUT)
When you select this registration method, the screen to select the fax/telephone number fromthe outgoing call logs is displayed.
1. Use the button to select a fax/telephone number, then press the OK button.
2. Press the OK button again.
• From call log (IN)
When you select this registration method, the screen to select the fax/telephone number or thename from the incoming call logs is displayed.
1. Use the button to select a fax/telephone number or a name, then press the OK button.
2. Press the OK button again.
Note• This registration method may not be available depending on the country or region of
purchase.
• Direct entry
When you select this registration method, the screen to register the fax/telephone number isdisplayed.
Use the Numeric buttons to enter the fax/telephone number you want to register, then press theOK button.
Note• To register another rejected number, use the button to select another dial code, then register
the rejected number.
You can register up to 10 rejected numbers.
• To return to the Fax standby screen, press the FAX button.
• You can print the list of rejected numbers (REJECTED NUMBER LIST).
Summary of Reports and Lists
• To change the registered rejected number, display the screen to register the fax/telephone number inthe same operation, change rejected number, then press the OK button.
• To delete the registered rejected number, display the screen to register the fax/telephone number inthe same operation, press the Back button repeatedly to delete the rejected number, then press theOK button.
494

• You can register the rejected number in Rejected numbers in TEL no. registration under Faxsettings.
495

Using the Caller ID Service to Reject Calls
If you subscribe to the Caller ID service, the machine detects the sender's Caller ID. If the sender's IDmatches the condition specified in this setting, the machine rejects the phone call or fax reception from thesender.
Note• This setting may not be supported depending on the country or region of purchase.
Contact your telephone company to confirm whether it provides this service.
Specify the setting following the procedure below.
1. Make sure that the machine is turned on.
2. Press the Setup button.
The Setup menu screen is displayed.
3. Use the button to select Fax settings, then press the OK button.
4. Use the button to select Security control, then press the OK button.
5. Use the button to select Caller rejection, then press the OK button.
6. Use the button to select Subscribed, then press the OK button.
You can now perform settings for Caller rejection.
7. Use the button to select whether to reject a phone call or fax reception from ananonymous number, then press the OK button.
8. Use the button to select whether to reject a phone call or fax reception out of thesubscribed service area, then press the OK button.
9. Use the button to select whether to reject a phone call or fax reception from thespecified numbers, then press the OK button.
If you select Reject, you can register the fax/telephone number to reject.
When Register rejected no.? is displayed on the LCD, use the button to select Yes, then registerthe fax/telephone number to reject.
For details on how to register the rejected number, see Registering the Rejected Number.
Note• Even if you select Reject, the machine rings once.
(The machine may not ring depending on the country or region of purchase.)
496

Other Useful Fax Functions
Using the Information Services
Transmission/Reception of Faxes Using ECM
Document Stored in Machine's Memory
Summary of Reports and Lists
497

Using the Information Services
You can use various information services such as provided by banks, and make airline reservations or hotelreservations. Since these services require tone dialing to use their services, you need to temporarily switchto tone dialing if your machine is connected to a rotary pulse line.
Using the Touch Tone Line
Using the Rotary Pulse Line
Important• You may need to contract with the service providers for some information services. For details, contact
the service providers.
Using the Touch Tone Line
• Dialing by Using the On Hook Dial Function
Note• You can use the on hook dial function only when On-hook setting in Security control under
Fax settings is set to Enable.
Security control
1. Make sure that the machine is turned on.
2. Press the FAX button.
The Fax standby screen is displayed.
3. Press the Color button or the Black button.
4. Use the Numeric buttons to dial the number of the information service.
5. When the recorded message for the information service answers, use the Numeric buttons topress the numbers in accordance with the message.
6. Press the Stop button to finish using the service.
• Dialing by Using the Telephone Connected to the Machine
1. Make sure that the machine is turned on.
2. Press the FAX button.
The Fax standby screen is displayed.
3. Lift the handset of the telephone.
4. Use the telephone to dial the number of the information service.
5. When the recorded message for the information service answers, use the telephone to press thenumbers in accordance with the message.
6. Hang up the handset to finish using the service.
498

Using the Rotary Pulse Line
• Dialing by Using the On Hook Dial Function
Note• You can use the on hook dial function only when On-hook setting in Security control under
Fax settings is set to Enable.
Security control
1. Make sure that the machine is turned on.
2. Press the FAX button.
The Fax standby screen is displayed.
3. Press the Color button or the Black button.
4. Use the Numeric buttons to dial the number of the information service.
5. When the recorded message for the information service answers, press the Tone button toswitch to tone dialing.
6. Use the Numeric buttons to press the numbers in accordance with the message.
7. Press the Stop button to finish using the service.
• Dialing by Using the Telephone Connected to the Machine
1. Make sure that the machine is turned on.
2. Press the FAX button.
The Fax standby screen is displayed.
3. Lift the handset of the telephone.
4. Use the telephone to dial the number of the information service.
5. When the recorded message for the information service answers, use the telephone to switch totone dialing.
When you dial the number of the information service using the telephone connected to themachine, you cannot use the machine to switch to tone dialing. For instructions on how to switchto tone dialing, refer to your telephone's instruction manual.
6. Use the telephone to press the numbers in accordance with the message.
7. Hang up the handset to finish using the service.
499

Transmission/Reception of Faxes Using ECM
This machine is set to send/receive faxes in Error Correction Mode (ECM). If the recipient's fax machine iscompatible with ECM, ECM automatically corrects errors and resends the fax.
Note• If the sender's or recipient's fax machine is not compatible with ECM, the fax will be sent/received
without automatic error correction.
• To receive color faxes, make sure that ECM RX in Adv. communication in Adv. FAX settings underFax settings is set to ON.
Adv. FAX settings
To disable ECM transmission/reception, set ECM TX and ECM RX in Adv. communication to OFF.
• Transmission may take longer when ECM is enabled.
500

Document Stored in Machine's Memory
If the sending faxes is not complete or the machine was not able to print the received faxes, these faxes arestored in the machine's memory.
If an error occurred during a fax transmission, the document is not stored in the machine's memory.
In the following cases, the machine is not able to print the received fax and will automatically store the fax inits memory.
• The amount of remaining ink is insufficient to print a fax.
• Paper has run out.
• A different size of paper from that specified by Page size is loaded.
• Page size is set to other than A4, Letter, LTR, or Legal.
Note• Some of page sizes are not available depending on the country or region of purchase.
• Media type is set to other than Plain paper.
• Do not print is selected for Received documents in Auto print settings under Fax settings.
• You pressed the Stop button to cancel printing of a received fax.
Important• If you unplug the power cord of the machine, all faxes stored in the machine's memory are deleted.
For details on how to unplug the power cord, refer to Notice for Unplugging the Power Cord.
You can print or delete the faxes stored in the machine's memory.
• To print a document in the machine's memory:
Printing a Document in Machine's Memory
• To delete a document in the machine's memory:
Deleting a Document in Machine's Memory
Note• When confirming, printing, or deleting a document stored in the machine's memory, you specify it by its
transaction number. If you do not know the transaction number for your target document, print the list ofdocuments (MEMORY LIST) first.
For details on how to print MEMORY LIST, see Printing a Document in Machine's Memory.
501

Printing a Document in Machine's Memory
You can print a specified document in the machine's memory or print all the documents in its memory at atime.
When printing a specified document, you specify it by its transaction number. If you do not know thetransaction number for your target document, print the list of documents (MEMORY LIST) first.
1. Make sure that the machine is turned on.
2. Load paper.
3. Press the FAX button.
The Fax standby screen is displayed.
4. Press the Menu button.
The FAX menu screen is displayed.
5. Use the button to select Memory reference, then press the OK button.
Note• If no document is stored in the machine's memory, No documents in memory is displayed on the
LCD.
6. Use the button to select a print menu, then press the OK button.
Note• When Change the paper A4/LTR/LGL Plain paper is displayed on the LCD, the paper settings
are incorrect.
In FAX paper settings, set Page size to A4, Letter, LTR, or Legal. Set Media type to Plainpaper.
* Some of page sizes are not available depending on the country or region of purchase.
You can select the following print menus.
• Print memory list
You can print a list of the documents in the machine's memory (MEMORY LIST).
MEMORY LIST shows the transaction number of the unsent or unprinted fax (TX/RX NO.),transaction mode, recipient's number, and the date and time of the transaction.
A transaction number from "0001" to "4999" on MEMORY LIST indicates a document being sent. Atransaction number from "5001" to "9999" on MEMORY LIST indicates a document being received.
• Print specified doc.
You can specify the document and print it.
If you select this menu, the document selection screen is displayed.
502

Note• A transaction number from "0001" to "4999" indicates a document being sent. A transaction
number from "5001" to "9999" indicates a document being received.
• Each mark before the transaction number indicates the following:
No mark: Indicates a black and white document.
: Indicates a color document.
: Indicates the document during transmission.
: Indicates the document sent with sequential broadcasting.
• By pressing the button or the Tone button, the transaction number displayed on the LCDis switched to transaction time or fax/telephone number.
Specify the document and print it following the procedure below.
1. Use the button to select the transaction number (TX/RX no.) of the document you wantto print, then press the OK button.
2. Use the button to select whether to print only the first page of the document, then pressthe OK button.
◦ If you select Yes:
Only the first page of the document will be printed.
The document is still stored in the machine's memory.
◦ If you select No:
All pages of the document will be printed.
The screen to confirm whether to delete the printed document in the machine's memory isdisplayed.
If you select Yes using the button and press the OK button, the printed document inthe machine's memory is deleted.
Note• If there is not the specified document in the machine's memory, No document is
displayed, and the machine returns to the previous screen.
• To return to the Fax standby screen, press the Stop button.
• Print all RX docs
You can print all the received documents in the machine's memory.
If you select this menu, the confirmation screen is displayed.
If you select Yes using the button and press the OK button, all the documents in themachine's memory will be printed.
Each time a document is printed, the screen to confirm whether to delete the printed document inthe machine's memory is displayed.
If you select Yes using the button and press the OK button, the printed document in themachine's memory is deleted.
503

Deleting a Document in Machine's Memory
You can delete a specified document in the machine's memory or delete all the documents in its memory ata time.
Note• When deleting a specified document, you specify it by its transaction number. If you do not know the
transaction number for your target document, print the list of documents (MEMORY LIST) first.
Printing a Document in Machine's Memory
1. Make sure that the machine is turned on.
2. Press the FAX button.
The Fax standby screen is displayed.
3. Press the Menu button.
The FAX menu screen is displayed.
4. Use the button to select Memory reference, then press the OK button.
Note• If no document is stored in the machine's memory, No documents in memory is displayed on the
LCD.
5. Use the button to select a delete menu, then press the OK button.
You can select the following delete menus.
• Del. specified doc.
You can specify the document and delete it.
If you select this menu, the document selection screen is displayed.
Note• A transaction number from "0001" to "4999" indicates a document being sent. A transaction
number from "5001" to "9999" indicates a document being received.
• Each mark before the transaction number indicates the following:
No mark: Indicates a black and white document.
: Indicates a color document.
: Indicates the document during transmission.
: Indicates the document sent with sequential broadcasting.
• By pressing the button or the Tone button, the transaction number displayed on the LCDis switched to transaction time or fax/telephone number.
504

Specify the document and delete it following the procedure below.
1. Use the button to select the transaction number (TX/RX no.) of the document you wantto delete, then press the OK button.
The confirmation screen is displayed.
2. Use the button to select the transaction number of the document you want to delete,then press the OK button.
The specified document will be deleted from machine's memory.
Note• If there is not the specified document in the machine's memory, No document is
displayed, and the machine returns to the previous screen.
• To return to the Fax standby screen, press the Stop button.
• Delete all docs
You can delete all the documents in the machine's memory.
If you select this menu, the confirmation screen is displayed.
If you select Yes using the button and press the OK button, all the documents in themachine's memory will be deleted.
505

Summary of Reports and Lists
The machine prints the report of sending or receiving a fax automatically. You can print the list of the fax/telephone number or the current settings.
Type of Reports and Lists
Printing Report or List
Type of Reports and Lists
Report or List Description
ACTIVITY REPORT Shows recent fax transactions at sight.
• You can print ACTIVITY REPORT manually.
For details on the procedure to print, see Printing Report or List.
• The * (asterisk) is appended to the history already printed on ACTIVITY REPORT.
• If you select Print for Activity report in Auto print settings under Fax settings, themachine prints ACTIVITY REPORT for the 20 histories of sent and received faxesautomatically.
Auto print settings
Telephone number list
• MEMORY DIALTELEPHONE NO.LIST
• GROUP DIALTELEPHONE NO.LIST
Lists the numbers and names registered.
You can print the list for coded memory dial and group dial.
For details on the procedure to print, see Printing Report or List.
USER'S DATA LIST Lists the current settings of the machine and the registered sender information.
For details on the procedure to print, see Printing Report or List.
MEMORY LIST Lists the documents currently stored in the machine's memory.
For details on the procedure to print, see Printing Report or List.
Note• You can print MEMORY LIST by selecting Print memory list in Memory reference
under FAX menu.
Printing a Document in Machine's Memory
REJECTED NUMBERLIST
Lists the rejected numbers.
For details on the procedure to print, see Printing Report or List.
CALLER HISTORY Lists the caller history.
This list is available when Caller ID service is subscribed.
For details on the procedure to print, see Printing Report or List.
This list may not be supported depending on the country or region of purchase.
TX REPORT/ERRORTX REPORT
Either of these reports is printed after each fax transmission.
506

• At the time of purchase, ERROR TX REPORT is set to be printed only when atransmission error occurred.
You can set the machine to print TX REPORT each time it sends a document, ordisable printing of the report by selecting TX report in Auto print settings under Faxsettings.
You can also specify the print setting so that the first page of the fax is printed alongwith the report.
Auto print settings
Note• The first page of the fax is not printed in color transmission.
• MULTI TRANSMISSION REPORT is printed after sequential broadcasting of adocument.
• If an error occurs when you send a fax, the error number is printed on ERROR TXREPORT (there are some errors for which the cause is also printed).
For details on the error number, see Errors When You Send a Fax.
MULTITRANSMISSIONREPORT
This report is printed after sequential broadcasting of a document.
Confirms whether the transmission to all the recipients has been completed successfully.
The procedure to print and the error number is same as TX REPORT.
RX REPORT This report is printed after each fax reception.
• At the time of purchase, the machine is set so that RX REPORT is not printed at all.
You can set the machine to print RX REPORT each time it receives a document, oronly when an error occurs by selecting RX report in Auto print settings under Faxsettings.
Auto print settings
• If an error occurs when you receive a fax, the error number is printed on RX REPORT(there are some errors for which the cause is also printed).
For details on the error number, see Errors When You Receive a Fax.
MEMORY CLEARREPORT
Lists the deleted faxes in the machine's memory if the faxes stored in the machine'smemory are deleted by a power failure or unplugging the power cord.
When the machine is turned on, Data error and Press [OK] are displayed on the LCD.MEMORY CLEAR REPORT is printed by pressing the OK button.
Printing Report or List
This section describes the procedure to print the report or the list manually.
Print the following report or list manually.
• ACTIVITY REPORT
• Telephone number list (MEMORY DIAL TELEPHONE NO. LIST/GROUP DIAL TELEPHONE NO.LIST)
• USER'S DATA LIST
• MEMORY LIST
• REJECTED NUMBER LIST
507

• CALLER HISTORY
Note• CALLER HISTORY may not be supported depending on the country or region of purchase.
1. Make sure that the machine is turned on.
2. Load paper.
3. Press the FAX button.
The Fax standby screen is displayed.
4. Press the Menu button.
The FAX menu screen is displayed.
5. Use the button to select Print reports/lists, then press the OK button.
6. Use the button to select the report or list you want to print, then press the OK button.
• When you select TEL number list:
Use the button to select Memory dial or Group dial, then press the OK button.
If you select Memory dial, select whether to print MEMORY DIAL TELEPHONE NO. LIST inalphabetical order of the registered names, then press the OK button. If you select Yes, themachine prints MEMORY DIAL TELEPHONE NO. LIST with the destination names inalphabetical order. If you select No, the machine prints MEMORY DIAL TELEPHONE NO. LISTwith the registered entries in numerical order.
If you select Group dial, the machine prints GROUP DIAL TELEPHONE NO. LIST.
• When you select an item other than TEL number list:
Press the OK button.
The machine prints the selected report or list.
Note• When Change the paper A4/LTR/LGL Plain paper is displayed on the LCD, the paper settings
are incorrect.
In FAX paper settings, set Page size to A4, Letter, LTR, or Legal. Set Media type to Plainpaper.
* Some of page sizes are not available depending on the country or region of purchase.
Errors When You Send a Fax
If an error occurs when you send a fax, the error number is printed on ERROR TX REPORT (there aresome errors for which the cause is also printed).
The causes corresponding to the error numbers are as follows.
No. Cause Action
508

#001 Document is jammed inthe ADF.
The document is jammed in the ADF.
When the error is cleared, redo the operation.
#003 Document is too long. You attempted to send a document longer than 15.75 inches / 400 mm.
You cannot send a document longer than 15.75 inches / 400 mm from the ADF.
"#003" is also printed if it takes time to send a page. Divide the document or setthe image quality (Fax resolution) to a lower setting, then resend it.
#005 No answer. The recipient's fax machine does not respond.
Contact the recipient and have the recipient check that the telephone line isconnected correctly.
#012 Try again. There is no paper in the recipient's fax machine.
Contact the recipient and have the recipient load paper.
#017 No tone is detected. The machine could not detect the dial tone.
Dial tone detect in Adv. FAX settings under Fax settings is set to ON. Set toOFF.
Adv. FAX settings
#018 Line was busy. The fax/telephone number you dialed is busy.
Try dialing again after waiting for a moment.
#022 Number is deleted. The fax/telephone number registered to the memory dial is incorrect.
Check the recipient's fax/telephone number, correct the fax/telephone numberregistered to the memory dial code, then send the document again.
Changing Registered Information
#037 Memory is full. The machine could not send a fax because its memory is full.
Delete contents in memory, then send a fax again.
Document Stored in Machine's Memory
#059 Transmission has beencanceled due to a faxinformation mismatch.
Transmission has been canceled because the machine could not detect therecipient's fax machine information or the information did not match the dialednumber. This message is displayed when Check RX FAX info in Securitycontrol under Fax settings is set to ON.
For details, see Sending Faxes after Checking Information (Checking theRecipient's Information).
#085 Try again in black & whitetransmission.
The recipient's fax machine is not color-compatible.
Resend the document in black & white.
#099 The Stop button waspressed duringtransmission.
The Stop button was pressed to cancel transmission of the document. Resend itif necessary.
#412 The fax could not be sentfrom the computer.
The fax could not be sent from the computer (Windows only). Ensure that themachine is connected with the computer correctly and redo operation.
509

Errors When You Receive a Fax
If an error occurs when you receive a fax, the error number is printed on RX REPORT (there are someerrors for which the cause is also printed).
The causes corresponding to the error numbers are as follows.
No. Cause Action
#003 It takes too long toreceive a page.
Contact the sender and have the sender divide the fax or set the image quality(Fax resolution) to a lower setting and resend it.
#005 No answer. When receiving a fax manually, the machine could not detect the signals from thesender's fax machine.
Contact the sender and have the sender resend it, or set the machine to receivethe fax automatically.
#037 Memory is full. The machine could not receive a fax because its memory is full.
Delete contents in memory, then ask the sender to resend the fax. See DocumentStored in Machine's Memory.
#046 Reception has beenrejected due to thespecified fax rejectioncondition.
Reception has been rejected because the fax matches the fax rejection conditionspecified by FAX RX reject in Security control under Fax settings.
For details, see Rejecting Fax Reception.
#099 The Stop button waspressed during reception.
The Stop button was pressed to cancel reception of the fax. Contact the senderand have the sender resend it if necessary.
510

Troubleshooting
The Machine Cannot Be Powered On
Printing Does Not Start
Paper Does Not Feed Properly/"No Paper" Error Occurs
Print Results Not Satisfactory
Ink Is Not Ejected
Paper Jams
If an Error Occurs
Problems Sending Faxes
Problems Receiving Faxes
Search Each Function
Problems with Network Communication
Problems with Printing
Problems with Printing Quality
Problems with Faxing
Problems with Scanning
Problems with the Machine
Problems with Installation/Downloading
About Errors/Messages Displayed
If You Cannot Resolve the Problem
511

Problems with Network Communication
Problems with the Machine While Using with Network
Cannot Detect a Machine on a Network
Other Problems with Network
512

Problems with the Machine While Using with Network
The Machine Stopped Working Suddenly
Printing Speed Is Slow
Cannot Use the Machine on Replacing an Access Point or Changing Its settings
513

The Machine Stopped Working Suddenly
Cannot Communicate with the Machine over the Wireless LAN
Cannot Print or Scan from a Computer Connected to the Network
Cannot Communicate with the Machine over the Wireless LAN
Check1 Make sure that the machine is turned on.
Check2 Make sure that the network settings in the machine are identical with those ofthe access point.
Refer to the instruction manual provided with the access point or contact its manufacturer to check the accesspoint settings, and then modify the machine settings.
How to Set a WEP/WPA/WPA2 Key
Check3 Make sure that the machine is not place as far away from the access point.
The access point is located indoors within the effective range for wireless communication. Locate the machinewithin 164 ft. / 50 m from the access point.
Check4 Make sure that there is no obstruction.
Wireless communication between different rooms or floors is generally poor. Adjust the location of the devices.
Check5 Make sure that there is no source of radio wave interference in your vicinity.
If a device (e.g. microwave oven) using the same frequency bandwidth as the wireless station is placednearby, the device may cause interference. Place the wireless station as far away from the interference sourceas possible.
Check6 Make sure that the network settings of the computer are correct.
For the procedures to connect a network device to the computer and set them up, refer to the instructionmanual of your network device or contact its manufacturer.
Check7 Make sure that the radio status is good and adjust the installation positionswhile monitoring the radio status with IJ Network Tool.
Monitoring Wireless Network Status
Check8 Make sure that the valid wireless channel is used.
The wireless channel to be used may be limited depending on wireless network devices installed in thecomputer. Refer to the instruction manual provided with your computer or your wireless network device tospecify the valid wireless channel.
Check9 Make sure that the channel set to the access point is valid to communicatewith the computer, confirmed in Check 8.
If not, change the channel set to the access point.
Check10 Make sure that the firewall of the security software is disabled.
514

If the firewall function of your security software is turned on, a message may appear warning that Canonsoftware is attempting to access the network. If the warning message appears, set the security software toalways allow access.
If using any programs that switch the network environment, check their settings. Some programs will enable afirewall by default.
Check11 When using a router, connect the machine and computer to the LAN side(same network segment).
Check12 When the machine is connected to an AirPort Base Station via a LAN, usealphanumeric characters for the name of the network (SSID).
If the problem is not resolved, perform setup according to the instructions on our website.
• For placement:
Make sure that there is no barrier or obstacle between the access point and the machine.
Cannot Print or Scan from a Computer Connected to the Network
Check1 Make sure that the network settings of the computer are correct.
For the procedures to set up the computer, refer to the instruction manual of your computer or contact itsmanufacturer.
Check2 If the MP Drivers are not installed, install them.
Install the MP Drivers from our website.
Check3 Make sure that access control is not set to the access point.
For the procedures to connect an access point and set it up, refer to the instruction manual of your accesspoint or contact its manufacturer.
Note• To check the MAC address or the IP address of the computer, see Checking the IP Address or the MAC
Address of the Computer.
515

Printing Speed Is Slow
Check1 The machine may be printing out a large job issued from another computer.
Check2 Make sure that the radio status is good and adjust the installation positionswhile monitoring the radio status with IJ Network Tool.
Monitoring Wireless Network Status
Make sure that there is no barrier or obstacle between the access point and the machine. Wirelesscommunication between different rooms or floors is generally poor. The metal, concrete, or timber including themetallic material, mud wall, or insulator may interrupt a wireless communication. If the machine cannotcommunicate with the computer over a wireless LAN for the wall material, place the machine and the computerin the same room or floor.
Check3 Make sure that there is no source of interference in your vicinity.
If a device (e.g. microwave oven) using the same frequency bandwidth as the wireless station is placed nearby,the device may cause interference. Place the wireless station as far away from the interference source aspossible.
516

Cannot Use the Machine on Replacing an Access Point orChanging Its settings
When you replace an access point, perform network setup of the machine again.
Perform network setup again according to the instructions on our website.
If the problem is not resolved, see below.
Cannot Communicate with the Machine After Applying MAC/IP Address Filtering or Entering a WEP/WPA/WPA2 Key to the Access Point
When Encryption Is Enabled, Cannot Communicate With the Machine After the Encryption Type WasSwitched on the Access Point
Cannot Communicate with the Machine After Applying MAC/IP AddressFiltering or Entering a WEP/WPA/WPA2 Key to the Access Point
Check1 Confirm the access point setting.
Refer to the instruction manual provided with the access point or contact its manufacturer to confirm theaccess point setting. Make sure that the computer and the access point can communicate with each otherunder this setting.
Check2 If you are performing MAC address filtering or IP address filtering at theaccess point, confirm that the MAC address or IP address for both the computer or thenetwork device and the machine are registered.
Check3 If you are using a WEP/WPA/WPA2 key, make sure that the key for thecomputer or the network device and the machine matches that set to the access point.
Besides the WEP key itself, the key length, key format, the key ID to use, and the authentication method mustmatch among the machine, the access point, and the computer.
Normally, select Auto for the authentication method. If you want to specify the method manually, select OpenSystem or Shared Key according to the setting of the access point.
How to Set a WEP/WPA/WPA2 Key
When Encryption Is Enabled, Cannot Communicate With the Machine Afterthe Encryption Type Was Switched on the Access Point
If the machine cannot communicate with the computer after the encryption type of the machine wasswitched, make sure that encryption types for the computer and the access point matches that set to themachine.
Cannot Communicate with the Machine After Applying MAC/IP Address Filtering or Entering aWEP/WPA/WPA2 Key to the Access Point
517

Cannot Detect a Machine on a Network
Cannot Detect the Machine When Setting up Network Communication
The Machine Cannot Be Detected in the Wireless LAN
518

Cannot Detect the Machine When Setting up NetworkCommunication
If the machine could not be detected on the network when setting up the network communication, confirmthe network settings before redetecting the machine.
Cannot Detect the Machine during Wireless LAN Setup: Check 1
519

Cannot Detect the Machine during Wireless LAN Setup: Check 1
Are the computer and network device (router, access point, etc.) configuredand can the computer connect to the network?
Make sure that you can view web pages on your computer.
If you cannot view any web pages:
Configure the computer and network device.
For the procedures, refer to the instruction manuals supplied with the computer and network device, orcontact their manufacturers.
If you can view web pages after configuring the computer and network device, try to set up the networkcommunication from the beginning.
If you can view web pages:
Go to check 2.
Cannot Detect the Machine during Wireless LAN Setup: Check 2
520

Cannot Detect the Machine during Wireless LAN Setup: Check 2
Does the firewall function of your security software or operation system forcomputer interfere with setting up the network communication?
The firewall function of your security software or operation system for computer may limit communicationsbetween the machine and your computer. Confirm the setting of firewall function of your security softwareor operation system or the message appearing on your computer.
If the firewall function interferes with setting up:
• When the message appears on your computer:
If the message warning that Canon software is attempting to access the network appears on thecomputer, set the security software to allow access.
• When the message does not appear on your computer:
Cancel to set up, then set the security software to allow Canon software* to access the network.
* Set the security software to allow Setup.app, Canon IJ Network Tool.app,canonijnetwork.bundle, CIJScannerRegister.app, Canon IJ Scan Utility2.app, andCIJSUAgent.app to access the network.
After setting the security software, try to set up the network communication from the beginning.
Note• For the operation system firewall settings or the security software firewall settings, refer to the
instruction manual of the computer or software, or contact its manufacturer.
If there is no problem with the firewall settings:
Go to check 3.
Cannot Detect the Machine during Wireless LAN Setup: Check 3
521

Cannot Detect the Machine during Wireless LAN Setup: Check 3
Check the settings of the access point.
Check the settings of the access point for the network connection such as IP address filtering, MACaddress filtering, or DHCP function.
For details on how to check the settings of the access point, refer to the instruction manual supplied withthe access point or contact its manufacturer.
522

The Machine Cannot Be Detected in the Wireless LAN
Check1 Make sure that the machine is turned on.
Check2 Is WLAN activ./inactiv. in LAN settings under Device settings set to WLANinactive?
Check3 When the machine is connected to the computer temporarily using a USBcable, make sure that the USB cable is connected properly.
When you set up the wireless LAN connection using a USB cable or change the wireless LAN settings using IJNetwork Tool, connect the machine and the computer securely.
Connecting the Machine to the Computer Using a USB Cable
Check4 Make sure that the machine setup is completed.
If not, perform setup according to the instructions on our website.
Check5 When using IJ Network Tool, click Update to search for the machine again.
Canon IJ Network Tool Screen
Check6 Make sure that the network settings in the machine are identical with those ofthe access point.
Refer to the instruction manual provided with the access point or contact its manufacturer to check the accesspoint settings, and then modify the machine settings.
How to Set a WEP/WPA/WPA2 Key
Check7 Make sure that there is no obstruction.
Wireless communication between different rooms or floors is generally poor. Adjust the location of the devices.
Check8 Make sure that the machine is not place as far away from the access point.
The access point is located indoors within the effective range for wireless communication. Locate the machinewithin 164 ft. / 50 m from the access point.
Check9 Make sure that there is no source of radio wave interference in your vicinity.
If a device (e.g. microwave oven) using the same frequency bandwidth as the wireless station is placed nearby,the device may cause interference. Place the wireless station as far away from the interference source aspossible.
Check10 Make sure that the network settings of the computer are correct.
Make sure that the computer can communicate with the machine and the access point over the wireless LAN.
Check11 Make sure that the firewall of the security software is disabled.
If the firewall function of your security software is turned on, a message may appear warning that Canonsoftware is attempting to access the network. If the warning message appears, set the security software toalways allow access.
523

If using any programs that switch the network environment, check their settings. Some programs will enable afirewall by default.
Check12 When using a router, connect the machine and computer to the LAN side(same network segment).
Check13 When the machine is connected to an AirPort Base Station via a LAN, usealphanumeric characters for the name of the network (SSID).
If the problem is not resolved, perform setup according to the instructions on our website.
524

Other Problems with Network
Forgot an Access Point Name, SSID, or a Network Key
The Message Is Displayed on the Computer Screen During Setup
The Admin Password Set to the Machine Was Forgotten
Checking Information about the Network
How to Restore the Machine's Network Settings to Factory Default
525

Forgot an Access Point Name, SSID, or a Network Key
Cannot Connect with an Access Point to Which a WEP/WPA/WPA2 Key Is Set (You Forgot theWEP/WPA/WPA2 Key)
How to Set a WEP/WPA/WPA2 Key
Cannot Connect with an Access Point to Which a WEP/WPA/WPA2 Key IsSet (You Forgot the WEP/WPA/WPA2 Key)
For information on how to set up the access point, refer to the instruction manual provided with the accesspoint or contact its manufacturer. Make sure that the computer and the access point can communicatewith each other.
After that, set up the machine to match the settings of the access point using IJ Network Tool.
How to Set a WEP/WPA/WPA2 Key
For information on how to set up the access point, refer to the instruction manual provided with the accesspoint or contact its manufacturer. Make sure that the computer and the access point can communicatewith each other.
After that, set up the machine to match the settings of the access point using IJ Network Tool.
• When using WEP
The key length, key format, the key to use (one of 1 to 4), and the authentication method must matchamong the access point, the machine, and the computer.
In order to communicate with an access point that uses automatically generated WEP keys, you mustconfigure the machine to use the key generated by the access point by entering it in hexadecimalformat.
Normally, select Auto for the authentication method. Otherwise, select Open System or Shared Keyaccording to the setting of the access point.
When the WEP Details screen appears after clicking Set on the Access Points screen, follow theon-screen instructions and set the key length, the key format, the key number, and the authenticationto enter a WEP key.
For details, see Changing the WEP Detailed Settings.
Note• When the machine is connected to an AirPort Base Station via a LAN:
When the machine is connected to an AirPort Base Station via a LAN, confirm the settings inWireless Security of AirPort Utility.
• Select 64 bit if WEP 40 bit is selected for the key length in the AirPort Base Station.
• Select 1 for Key ID:. Otherwise your computer will not be able to communicate with themachine via the access point.
• When using WPA or WPA2
The authentication method, passphrase, and dynamic encryption type must match on the accesspoint, the machine, and the computer.
526

Enter the passphrase configured on the access point (a sequence of between 8 and 63 alphanumericcharacters, or a 64-character hexadecimal number).
Select either TKIP (Basic Encryption) or AES (Secure Encryption) for the dynamic encryptionmethod.
For details, see Changing the WPA or WPA2 Detailed Settings.
Note• This machine supports WPA-PSK (WPA-Personal) and WPA2-PSK (WPA2-Personal).
527

The Message Is Displayed on the Computer Screen During Setup
The Enter Password Screen Is Displayed During Setup
The Screen for Setting the Encryption Is Displayed After Selecting the Access Point in the Access PointsScreen
"You are connecting the machine to the non encrypted wireless network" Is Displayed
The Enter Password Screen Is Displayed During Setup
The following screen is displayed if an administrator password is set to the machine which has alreadybeen set up.
Enter the administrator password you have set.
Changing the Settings in the Admin Password Sheet
The Screen for Setting the Encryption Is Displayed After Selecting theAccess Point in the Access Points Screen
This screen is displayed automatically if the selected access point is encrypted. In this case, configure thedetails to use the same encryption settings set to the access point.
For information on the encryption settings, see Changing the Settings in the Wireless LAN Sheet.
"You are connecting the machine to the non encrypted wireless network" IsDisplayed
Security is not configured on the access point. The machine can still be used, so continue the setupprocedure to complete it.
Important• If you connect to a network that is not protected with security measures, there is a risk of disclosing
data such as your personal information to a third party.
528

The Admin Password Set to the Machine Was Forgotten
Initialize the LAN settings.
How to Restore the Machine's Network Settings to Factory Default
After initializing the LAN settings, perform setup according to the instructions on our website.
529

Checking Information about the Network
Checking the IP Address or the MAC Address of the Machine
Checking the IP Address or the MAC Address of the Computer
Checking If the Computer and the Machine, or Computer and the Access Point Can Communicate
Checking the Network Setting Information
Checking the IP Address or the MAC Address of the Machine
To check the IP address or the MAC address of the machine, print out the network setting informationusing the operation panel of the machine.
Printing Out Network Setting Information
To display the network setting information using IJ Network Tool, select Network Information on theView menu.
Canon IJ Network Tool Menus
Checking the IP Address or the MAC Address of the Computer
To check the IP address or MAC address assigned to the computer, follow the procedure below.
1. Select System Preferences from the Apple menu, then click Network.
2. Make sure that the network interface you are using on your computer is selected, thenclick Advanced.
• In Mac OS X v10.8 or Mac OS X v10.7:
Make sure that Wi-Fi is selected as the network interface.
• In Mac OS X v10.6.8:
Make sure that AirMac is selected as the network interface.
3. Confirm the IP address or MAC address.
• In Mac OS X v10.8 or Mac OS X v10.7:
Click TCP/IP to confirm the IP address.
Click Hardware to confirm the MAC address.
• In Mac OS X v10.6.8:
Click TCP/IP to confirm the IP address.
Click Ethernet, then see Ethernet ID to confirm the MAC address.
Checking If the Computer and the Machine, or Computer and the AccessPoint Can Communicate
To check that communication is available, perform the ping test.
1. Open the Utilities folder in the Applications folder.
530

2. Start Network Utility.
3. Click the Ping button.
4. Make sure that Send only XX pings (XX are numbers) is selected.
5. Enter the IP address of the target machine or the target access point in Enter thenetwork address to ping..
6. Click Ping.
"XXX.XXX.XXX.XXX" is the IP address of the target device.
A message such as the following is displayed.
64 bytes from XXX.XXX.XXX.XXX: icmp_seq=0 ttl=64 time=3.394 ms
64 bytes from XXX.XXX.XXX.XXX: icmp_seq=1 ttl=64 time=1.786 ms
64 bytes from XXX.XXX.XXX.XXX: icmp_seq=2 ttl=64 time=1.739 ms
--- XXX.XXX.XXX.XXX ping statistics ---
3 packets transmitted, 3 packets received, 0% packet loss
If the packet loss is 100%, the communication is not available. Otherwise, the computer iscommunicating with the target device.
Checking the Network Setting Information
To check the IP address or the MAC address of the machine, print out the network setting informationusing the operation panel of the machine.
Printing Out Network Setting Information
531

How to Restore the Machine's Network Settings to Factory Default
Important• Note that initialization erases all network settings on the machine, and printing operation from a
computer over network may become impossible. To use the machine over network, perform setupaccording to the instructions on our website.
Initialize the network setting using the operation panel of the machine.
Reset setting
532

Problems with Printing
Printing Does Not Start
Paper Jams
Paper Does Not Feed Properly/"No Paper" Error Occurs
Copying/Printing Stops Before It Is Completed
533

Printing Does Not Start
Check1 Make sure that the power plug is securely plugged in, then press the ON buttonto turn the machine on.
While the POWER lamp is flashing, the machine is initializing. Wait until the POWER lamp stops flashing andremains lit.
Note• When printing large data such as a photo or graphics, it may take longer to start printing. While the
POWER lamp is flashing green, the computer is processing data and sending it to the machine. Wait untilprinting starts.
Check2 Make sure that the machine is connected to your computer properly.
When the machine is connected to your computer with a USB cable, make sure that the USB cable is securelyplugged in to the machine and the computer, then check the followings:
• If you are using a relay device such as a USB hub, disconnect it, connect the machine directly to thecomputer, and try printing again. If printing starts normally, there is a problem with the relay device. Consultthe reseller of the relay device for details.
• There could also be a problem with the USB cable. Replace the USB cable and try printing again.
When you use the machine over LAN, make sure that the machine is set up to be used over network correctly.
Check3 Make sure that the front tray is open.
Check4 If you are printing from the computer and there are any unnecessary print jobs,delete them.
Deleting the Undesired Print Job
Check5 Make sure that your machine's name is selected in the Print dialog.
The machine will not print properly if you are using a printer driver for a different printer.
Make sure that your machine's name is selected in Printer in the Print dialog.
Note• To make the machine the one selected by default, select the machine for Default printer.
Check6 Restart your computer if you are printing from the computer.
534

Paper Jams
When paper is jammed, a troubleshooting message is displayed automatically. Take the appropriate actiondescribed in the message.
Watch the movie
• When a Support Code and a message are displayed on the computer screen:
* The screen differs depending on the OS you are using.
• When a Support Code and a message are displayed on the LCD:
For details on how to remove the jammed paper, refer to Support Code List (When Paper Is Jammed).
Note• You can confirm the actions against errors with Support Codes on your computer or on the LCD by
searching a Support Code.
Click Here to Search
535

Paper Does Not Feed Properly/"No Paper" Error Occurs
Check1 Make sure that paper is loaded.
Loading Paper
Check2 Make sure of the following when you load paper.
• When loading two or more sheets of paper, flip through the paper before loading.
• When loading two or more sheets of paper, align the edges of the sheets before loading.
• When loading two or more sheets of paper, make sure that the paper stack does not exceed the paper loadlimit.
However, proper feeding of paper may not be possible at this maximum capacity depending on the type ofpaper or environmental conditions (either very high or low temperature and humidity). In such cases, reducethe sheets of paper you load at a time to less than half of the paper load limit.
• Always load the paper in portrait orientation, regardless of the printing orientation.
• When you load the paper, load the paper with the print side facing DOWN and slide the paper guides toalign with the both sides of the paper.
Loading Paper
• When you load the paper, insert the paper stack until the leading edge touches the far end of the front tray.
Check3 Check to see if the paper you are printing on is not too thick or curled.
Media Types You Cannot Use
Check4 Make sure of the following when you load Hagakis or envelopes.
• If a Hagaki is curled, it may not feed properly even though the paper stack does not exceed the paper loadlimit.
• When printing on envelopes, refer to Loading Paper, and prepare the envelopes before printing.
Once you have prepared the envelopes, load them in portrait orientation. If the envelopes are placed inlandscape orientation, they will not feed properly.
Check5 Confirm that the media type and the paper size settings correspond with theloaded paper.
Check6 If multiple sheets of plain paper is fed from the machine, select the setting forpreventing double-feed of plain paper.
If multiple sheets of plain paper is fed from the machine, select the setting for preventing double-feed of plainpaper using the operation panel or your computer.
* After printing is finished, disable the setting for preventing double-feed of plain paper; otherwise, the setting isapplied from the next time.
536

• To set by using the operation panel
Press the Setup button, select Device settings and Output settings in this order, and then set Preventdouble-feed to ON.
Changing the Machine Settings on the LCD
• To set by using your computer
In the Canon IJ Printer Utility, select Custom Settings in the pop-up menu, select the Prevent paperdouble-feed check box, and then click Apply.
To open the Canon IJ Printer Utility, see Opening the Canon IJ Printer Utility.
Note• Printing speed will be reduced if Prevent paper double-feed function is enabled.
Check7 Clean the paper feed roller.
Cleaning the Paper Feed Roller
Note• Cleaning the paper feed roller will wear the roller, so perform this procedure only when necessary.
537

Copying/Printing Stops Before It Is Completed
Check1 Is the paper loaded?
Make sure that paper is loaded.
If the machine has run out of paper, load paper.
Check2 Do the printing documents have lots of photographs or illustrations?
As printing large data such as photos or graphics takes time for the machine and the computer to process, themachine may appear to have stopped operating.
In addition, when printing data that uses a large amount of ink continuously on plain paper, the machine maypause temporarily. In either case, wait until the process is complete.
Note• If you are printing a document with a large printing area or printing multiple copies of a document, printing
may pause to allow the ink to dry.
Check3 Has the machine been printing continuously for a long period?
If the machine has been printing continuously for a long time, the print head or other parts around it mayoverheat. The machine may stop printing at a line break for a period of time and then resume printing.
In this case, wait for a while without operation. If the printing still does not resume, interrupt your print session ata convenient time and turn the machine off for at least 15 minutes.
Caution• The print head and the surrounding area can become extremely hot inside the machine. Never touch the
print head or nearby components.
538

Problems with Printing Quality
Print Results Not Satisfactory
Ink Is Not Ejected
539

Print Results Not Satisfactory
If the print result is not satisfactory due to white streaks, misaligned lines, or uneven colors, confirm thepaper and print quality settings first.
Check1 Do the page size and media type settings match the size and type of the loadedpaper?
When these settings are incorrect, you cannot obtain a proper print result.
If you are printing a photograph or an illustration, incorrect paper type settings may reduce the quality of theprintout color.
Also, if you print with an incorrect paper type setting, the printed surface may be scratched.
In borderless printing, uneven coloring may occur depending on the combination of the paper type setting andthe loaded paper.
The method of confirming the paper and print quality settings differs depending on what you do with yourmachine.
To copy by operating the machine Confirm by using the operation panel on the machine.
Setting Items for Copying
To print from a computer Confirm by using the printer driver.
Printing with Easy Setup
Check2 Make sure that the appropriate print quality is selected referring to the table inCheck 1.
Select a print quality option suitable for the paper and image for printing. If you notice blurs or uneven colors,increase the print quality setting and try printing again.
Check3 If the problem is not resolved, there may be other causes.
See also the sections below:
Cannot Print to End of Job
No Printing Results/Printing Is Blurred/Colors Are Wrong/White Streaks
Colors Are Unclear
Lines Are Misaligned
Printed Paper Curls or Has Ink Blots
Paper Is Smudged/Printed Surface Is Scratched
Back of the Paper Is Smudged
Vertical Lines Are Printed on the Sides of the Printout
Colors Are Uneven or Streaked
540

Cannot Print to End of Job
Check Is the space of your computer's hard disk sufficient?
Delete unnecessary files to free disk space.
541

No Printing Results/Printing Is Blurred/Colors Are Wrong/WhiteStreaks
No Printing Results
Printing Is Blurred
Colors Are Wrong
White Streaks
Watch the movie
542

Check1 Did you confirm the paper and print quality settings?
Print Results Not Satisfactory
Check2 Print the Nozzle Check Pattern and perform any necessary maintenanceoperations such as Print Head Cleaning.
Print the Nozzle Check Pattern to determine whether the ink ejects properly from the print head nozzles.
Refer to When Printing Becomes Faint or Colors Are Incorrect for the Nozzle Check Pattern printing, Print HeadCleaning, and Print Head Deep Cleaning.
• If the Nozzle Check Pattern is not printed correctly:
After performing the Print Head Cleaning, print the Nozzle Check Pattern and examine the pattern.
• If the problem is not resolved after performing the Print Head Cleaning twice:
Perform the Print Head Deep Cleaning.
If the problem is not resolved after performing the Print Head Deep Cleaning, turn off the machine andperform another Print Head Deep Cleaning after 24 hours. When you turn the machine off, do not unplug itfrom the power supply.
• If the problem is not resolved after performing the Print Head Deep Cleaning twice:
Ink may have run out. Replace the FINE cartridge.
Check3 When a FINE cartridge runs out of ink, replace it with a new one.
Check4 When using paper with one printable surface, make sure that the paper isloaded with the printable side facing down.
Printing on the wrong side of such paper may cause unclear prints or prints with reduced quality.
Load paper with the printable side facing down.
Refer to the instruction manual supplied with the paper for detailed information on the printable side.
Check5 Is the FINE cartridge installed properly?
If the FINE cartridge is not installed securely, ink may not be ejected correctly.
Open the paper output cover, then the head cover opens.
Push up the ink cartridge lock lever to confirm that the FINE cartridge is installed properly.
After confirming that the FINE cartridge is installed properly, close the paper output cover.
If the problem is not resolved, remove the FINE cartridges, then install them again.
Refer to Replacing a FINE Cartridge for how to install the FINE cartridges.
543

• When copying, see also the sections below:
Check6 Is the platen glass or the glass of ADF dirty?
Clean the platen glass or the glass of ADF.
Cleaning the Platen Glass and Document Cover
Note• If the glass of ADF is dirty, black streaks appear on the paper as shown below.
Check7 Check that the original is loaded correctly on the platen glass or in the ADF.
Loading Originals
Check8 Is the original document is loaded with the proper side facing up/down?
When loading the original on the platen glass, the side to be copied should be face down. When loading theoriginal in the ADF, the side to be copied should be face up.
Check9 Did you copy a printout done by this machine?
If you use a printout done by this machine as the original, print quality may be reduced depending on thecondition of the original.
Print from the machine directly, or reprint from the computer if you can reprint from it.
544

Colors Are Unclear
Watch the movie
Check1 Is the Nozzle Check Pattern printed properly?
Print the Nozzle Check Pattern to determine whether the ink ejects properly from the print head nozzles.
Refer to When Printing Becomes Faint or Colors Are Incorrect for the Nozzle Check Pattern printing, Print HeadCleaning, and Print Head Deep Cleaning.
• If the Nozzle Check Pattern is not printed correctly:
After performing the Print Head Cleaning, print the Nozzle Check Pattern and examine the pattern.
• If the problem is not resolved after performing the Print Head Cleaning twice:
Perform the Print Head Deep Cleaning.
If the problem is not resolved after performing the Print Head Deep Cleaning, turn off the machine andperform another Print Head Deep Cleaning after 24 hours. When you turn the machine off, do not unplug itfrom the power supply.
• If the problem is not resolved after performing the Print Head Deep Cleaning twice:
Ink may have run out. Replace the FINE cartridge.
Check2 When a FINE cartridge runs out of ink, replace it with a new one.
Check3 Is the FINE cartridge installed properly?
If the FINE cartridge is not installed securely, ink may not be ejected correctly.
Open the paper output cover, then the head cover opens.
Push up the ink cartridge lock lever to confirm that the FINE cartridge is installed properly.
After confirming that the FINE cartridge is installed properly, close the paper output cover.
If the problem is not resolved, remove the FINE cartridges, then install them again.
Refer to Replacing a FINE Cartridge for how to install the FINE cartridges.
Note• Printed colors may not match screen colors due to basic differences in the methods used to produce
colors. Color control settings and environmental differences can also affect how colors appear on thescreen. Therefore, colors of printing results may be different from those on the screen.
545

Lines Are Misaligned
Check1 Did you confirm the paper and print quality settings?
Print Results Not Satisfactory
Check2 Perform Print Head Alignment.
If printed lines are misaligned or print results are otherwise unsatisfactory, adjust the print head position.
Aligning the Print Head
Note• If the problem is not resolved after performing the Print Head Alignment, perform Print Head Alignment
manually referring to Aligning the Print Head Position from Your Computer.
Check3 Increase the print quality and try printing again.
Increasing the print quality on the operation panel of the machine or in the printer driver may improve the printresult.
546

Printed Paper Curls or Has Ink Blots
Printed Paper Has Ink Blots
Printed Paper Curls
Check1 Did you confirm the paper and print quality settings?
Print Results Not Satisfactory
Check2 If the intensity is set high, reduce the intensity setting and try printing again.
If you are using plain paper to print images with high intensity, the paper may absorb too much ink and becomewavy, causing paper abrasion.
• When printing from your computer
You can confirm the intensity using the printer driver.
Adjusting Intensity
• When copying
Setting Items for Copying
Check3 Is Photo Paper used for printing photographs?
When printing data with high color saturation such as photographs or images in deep color, we recommendusing Photo Paper Plus Glossy II or other Canon speciality paper.
Media Types You Can Use
547

Paper Is Smudged/Printed Surface Is Scratched
Paper Is Smudged
The Edges of Paper Are Smudged Printed Surface Is Smudged
Printed Surface Is Scratched
Check1 Did you confirm the paper and print quality settings?
Print Results Not Satisfactory
Check2 Is the appropriate type of paper used? Check the followings:
• Check to see if the paper you are printing on is suitable for your printing purpose.
Media Types You Can Use
• When performing Borderless Printing, make sure that the paper you are using is suitable for BorderlessPrinting.
If the paper you are using is not suitable for Borderless Printing, the print quality may be reduced at the topand bottom edges of the paper.
Printing Area
Check3 Load the paper after correcting its curl.
When using Photo Paper Plus Semi-gloss, even if the sheet is curled, load one sheet at a time as it is. If you rollup this paper to flatten, this may cause cracks on the surface of the paper and reduce the print quality.
We recommend putting unused paper back into the package and keeping it on a level surface.
• For Plain Paper
Turn the paper over and reload it to print on the other side.
Leaving the paper loaded on the front tray for a long time may cause the paper to curl. In this case, load thepaper with the other side facing up. It may resolve the problem.
• For Other Paper
If the curl on the four corners of the paper is more than 0.1 inch / 3 mm (A) in height, the paper may besmudged or may not be fed properly. In such cases, follow the procedure described below to correct thepaper curl.
548

1. Roll up the paper in the opposite direction to the paper curl as shown below.
2. Check that the paper is now flat.
We recommend printing curl-corrected paper one sheet at a time.
Note• Depending on the media type, the paper may be smudged or may not be fed properly even if it is not
curled inward. In such cases, follow the procedure described below to curl the paper outward within 0.1inch / 3 mm (B) in height before printing. This may improve the print result.
(C) Printing side
We recommend printing paper that has been curled outward one sheet at a time.
Check4 Adjust the setting to prevent paper abrasion.
Adjusting the setting to prevent paper abrasion will widen the clearance between the print head and the loadedpaper. If you notice abrasion even with the media type set correctly to match the loaded paper, set the machineto prevent paper abrasion by using the operation panel or the computer.
Print speed may be reduced if you apply the setting to prevent paper abrasion setting.
* Readjust the setting not to prevent paper abrasion once printing is complete. If not, this setting remainsenabled for all subsequent print jobs.
• To set by using the operation panel
Press the Setup button, then select Device settings and Output settings in this order, then set Preventabrasion to ON.
Changing the Machine Settings on the LCD
• To set by using your computer
In the Canon IJ Printer Utility, select Custom Settings in the pop-up menu, select the Prevent paperabrasion check box, and then click Apply.
To open the Canon IJ Printer Utility, see Opening the Canon IJ Printer Utility.
Check5 If the intensity is set high, reduce the intensity setting and try printing again.
549

If you are using plain paper to print images with high intensity, the paper may absorb too much ink and becomewavy, causing paper abrasion.
• When printing from your computer
Reduce the intensity setting in the printer driver and try printing again.
1. Open the Print dialog.
How to Open the Printer Driver Setup Window
2. Select Color Options in the pop-up menu.
3. Drag the Intensity slide bar to set the intensity.
• When copying
Setting Items for Copying
Check6 Is printing performed beyond the recommended printing area?
If you are printing beyond the recommended printing area of your printing paper, the lower edge of the papermay become stained with ink.
Resize your original document in your application software.
Printing Area
Check7 Is the platen glass or the glass of ADF dirty?
Clean the platen glass or the glass of ADF.
Cleaning the Platen Glass and Document Cover
Note• If the glass of ADF is dirty, black streaks appear on the paper as shown below.
Check8 Is the paper feed roller dirty?
Clean the paper feed roller.
Cleaning the Paper Feed Roller
Note• Cleaning the paper feed roller will wear the roller, so perform this procedure only when necessary.
Check9 Is the inside of the machine dirty?
When performing duplex printing, the inside of the machine may become stained with ink, causing the printout tobecome smudged.
Perform the Bottom Plate Cleaning to clean the inside of the machine.
Cleaning the Inside of the Machine (Bottom Plate Cleaning)
550

Note• To prevent the inside of the machine from stains, set the paper size correctly.
Check10 Set the time to dry the printed surface longer.
Doing so gives the printed surface enough time to dry so that paper smudged and scratched are prevented.
1. Make sure that the machine is turned on.
2. Open the Canon IJ Printer Utility.
Opening the Canon IJ Printer Utility
3. Select Custom Settings in the pop-up menu.
4. Drag the Ink Drying Wait Time: slide bar to set the wait time, and then click Apply.
5. Confirm the message and click OK.
551

Back of the Paper Is Smudged
Check1 Did you confirm the paper and print quality settings?
Print Results Not Satisfactory
Check2 Perform the Bottom Plate Cleaning to clean the inside of the machine.
Cleaning the Inside of the Machine (Bottom Plate Cleaning)
Note• When performing borderless printing, duplex printing, or too much printing, the inside may become stained
with ink.
552

Vertical Lines Are Printed on the Sides of the Printout
Check Is the size of the loaded paper correct?
The vertical lines may be printed in the margin if the size of the loaded paper is larger than that you havespecified.
Set the paper size correctly according to the paper you loaded.
Print Results Not Satisfactory
Note• The direction of the vertical line pattern may vary depending on the image data or the print setting.
• This machine performs automatic cleaning when necessary to keep printouts clean. A small amount of inkis ejected for cleaning.
Although ink is usually ejected on the ink absorber, it may be ejected on the paper if you load paper largerthan that you have specified.
553

Colors Are Uneven or Streaked
Colors Are Uneven
Colors Are Streaked
Watch the movie
Check1 Did you confirm the paper and print quality settings?
Print Results Not Satisfactory
Check2 Print the Nozzle Check Pattern and perform any necessary maintenanceoperations such as Print Head Cleaning.
Print the Nozzle Check Pattern to determine whether the ink ejects properly from the print head nozzles.
Refer to When Printing Becomes Faint or Colors Are Incorrect for the Nozzle Check Pattern printing, Print HeadCleaning, and Print Head Deep Cleaning.
• If the Nozzle Check Pattern is not printed correctly:
After performing the Print Head Cleaning, print the Nozzle Check Pattern and examine the pattern.
• If the problem is not resolved after performing the Print Head Cleaning twice:
Perform the Print Head Deep Cleaning.
If the problem is not resolved after performing the Print Head Deep Cleaning, turn off the machine andperform another Print Head Deep Cleaning after 24 hours. When you turn the machine off, do not unplug itfrom the power supply.
• If the problem is not resolved after performing the Print Head Deep Cleaning twice:
554

Ink may have run out. Replace the FINE cartridge.
Check3 Perform Print Head Alignment.
Aligning the Print Head
Note• If the problem is not resolved after performing the Print Head Alignment, perform Print Head Alignment
manually referring to Aligning the Print Head Position from Your Computer.
555

Ink Is Not Ejected
Check1 When a FINE cartridge runs out of ink, replace it with a new one.
Check2 Is the FINE cartridge installed properly?
If the FINE cartridge is not installed securely, ink may not be ejected correctly.
Open the paper output cover, then the head cover opens.
Push up the ink cartridge lock lever to confirm that the FINE cartridge is installed properly.
After confirming that the FINE cartridge is installed properly, close the paper output cover.
If the problem is not resolved, remove the FINE cartridges, then install them again.
Refer to Replacing a FINE Cartridge for how to install the FINE cartridges.
Check3 Are the print head nozzles clogged?
Print the Nozzle Check Pattern to determine whether the ink ejects properly from the print head nozzles.
Refer to When Printing Becomes Faint or Colors Are Incorrect for the Nozzle Check Pattern printing, Print HeadCleaning, and Print Head Deep Cleaning.
• If the Nozzle Check Pattern is not printed correctly:
After performing the Print Head Cleaning, print the Nozzle Check Pattern and examine the pattern.
• If the problem is not resolved after performing the Print Head Cleaning twice:
Perform the Print Head Deep Cleaning.
If the problem is not resolved after performing the Print Head Deep Cleaning, turn off the machine andperform another Print Head Deep Cleaning after 24 hours. When you turn the machine off, do not unplug itfrom the power supply.
• If the problem is not resolved after performing the Print Head Deep Cleaning twice:
Ink may have run out. Replace the FINE cartridge.
556

Problems with Faxing
Problems Sending Faxes
Problems Receiving Faxes
Cannot Send a Fax Clearly
Telephone Problems
557

Problems Sending Faxes
Cannot Send a Fax
Cannot Perform Sequential Broadcasting by Redialing, or Cannot Dial Using the Numeric Buttons
Errors Often Occur When You Send a Fax
Cannot Send a Fax
Check1 Is the power turned on?
• You cannot send faxes if the power is turned off. Press the ON button to turn the power on.
• If you unplugged the power cord without turning off the power (the POWER lamp is lit), reconnecting itturns on the power automatically.
• If you unplugged the power cord after pressing the ON button to turn off the power (the POWER lamp isoff), reconnect it, then press the ON button to turn on the power.
• If the power was turned off due to power failure, etc., the power is automatically turned on when thepower failure is resolved.
Important• Confirm that the POWER lamp is off before unplugging the power cord, then unplug the power cord.
If a power failure occurs or you unplug the power cord, all faxes stored in the machine's memory aredeleted.
For details on how to unplug the power cord, refer to Notice for Unplugging the Power Cord.
Note• If the faxes stored in the machine's memory are deleted by a power failure or unplugging the power cord,
the list of the faxes deleted from the machine's memory (MEMORY CLEAR REPORT) will be printedafter turning the machine on.
For details, see Summary of Reports and Lists.
Check2 Is the document being sent from memory or the fax being received intomemory?
When the message for the transmission/reception is displayed on the LCD, a fax is being sent from/receivedinto machine's memory. Wait until the transmission/reception is complete.
Check3 Is the machine's memory full?
Delete contents in memory, then send a fax again.
Document Stored in Machine's Memory
Check4 Is the telephone line type set correctly?
Check the telephone line type setting and change it as necessary.
Setting the Telephone Line Type
Check5 Is On-hook setting set to Disable?
558

When you send a fax manually, dial the number with Enable selected for On-hook setting in Securitycontrol under Fax settings, or dial the number using the telephone connected to the machine.
Security control
Check6 Is Dial tone detect set to ON?
Resend the fax after a while.
If you still cannot send the fax, select OFF for Dial tone detect in Adv. FAX settings under Fax settings.
Adv. FAX settings
Check7 Is the fax number registered correctly for memory dialing?
Check the recipient's fax/telephone number, correct the fax/telephone number registered to the memory dialcode, then send the document again.
Changing Registered Information
Note• You can check the information for memory dialing by printing MEMORY DIAL TELEPHONE NO. LIST.
Summary of Reports and Lists
Check8 Does an error occur during transmission?
• Ensure that a message is displayed on the LCD. When a message is displayed on the LCD, check thecause.
A Message for Faxing Is Displayed on the LCD
• Print ACTIVITY REPORT and check for an error.
Summary of Reports and Lists
Check9 Is the document loaded properly?
Remove the document, then reload it on the platen glass or in the ADF.
Loading Originals
Check10 Does a printer error occur?
Ensure that an error message is displayed on the LCD. When an error message is displayed on the LCD,check the cause.
When the error message with the support code is displayed, refer to Support Code List.
When the error message without the support code is displayed, refer to A Message Is Displayed.
If you are in a hurry, press the Stop button to close the message, then send the fax.
Check11 Is the telephone line connected correctly?
Reconnect the telephone line cable to the telephone line jack.
Basic Connection
If the telephone line is connected correctly, there is a problem with your telephone line. Contact your telephonecompany and the manufacturer of your terminal adapter or telephone adapter.
559

Cannot Perform Sequential Broadcasting by Redialing, or Cannot DialUsing the Numeric Buttons
Check Have you already selected the recipient from the redial history, or alreadydialed a number by using the Numeric buttons?
You can dial one recipient by selecting from the redial history or by using the Numeric buttons as the recipientof sequential broadcasting.
If you already have dialed by selecting from the redial history or by using the Numeric button, select therecipient from the coded memory dial.
Errors Often Occur When You Send a Fax
Check Check the telephone line condition or the connection.
If the telephone line or connection is poor, reducing the transmission start speed may correct the error.
Reduce the transmission start speed on TX start speed in Adv. communication in Adv. FAX settings underFax settings.
Adv. FAX settings
560

Problems Receiving Faxes
Cannot Receive a Fax, Cannot Print a Fax
Machine Does Not Switch Automatically between Voice and Fax Calls
Quality of Received Fax is Poor
Cannot Receive a Color Fax
Errors Often Occur When You Receive a Fax
Cannot Receive a Fax, Cannot Print a Fax
Check1 Is the power turned on?
• You cannot receive faxes if the power is turned off. Press the ON button to turn the power on.
• If you unplugged the power cord without turning off the power (the POWER lamp is lit), reconnecting itturns on the power automatically.
• If you unplugged the power cord after pressing the ON button to turn off the power (the POWER lamp isoff), reconnect it, then press the ON button to turn on the power.
• If the power was turned off due to power failure, etc., the power is automatically turned on when thepower failure is resolved.
Important• Confirm that the POWER lamp is off before unplugging the power cord, then unplug the power cord.
If a power failure occurs or you unplug the power cord, all faxes stored in the machine's memory aredeleted.
For details on how to unplug the power cord, refer to Notice for Unplugging the Power Cord.
Note• If the faxes stored in the machine's memory are deleted by a power failure or unplugging the power cord,
the list of the faxes deleted from the machine's memory (MEMORY CLEAR REPORT) will be printedafter turning the machine on.
For details, see Summary of Reports and Lists.
Check2 Is the machine's memory full?
Print the received faxes stored in the machine's memory, delete them from the machine's memory, and havethe sender resend the faxes.
Document Stored in Machine's Memory
Check3 Does an error occur during reception?
• Ensure that a message is displayed on the LCD. When a message is displayed on the LCD, check thecause.
A Message for Faxing Is Displayed on the LCD
• Print ACTIVITY REPORT and check for an error.
Summary of Reports and Lists
Check4 Is the telephone line cable connected to the external device jack?
561

Reconnect it to the telephone line jack.
Basic Connection
Check5 Is a different size of paper from that specified by Page size loaded?
If a different size of paper from that specified by Page size is loaded for printing faxes, the received faxes willnot be printed and will be stored in the machine's memory (Memory Reception). Load the same size of paperas that specified by Page size, then press the OK button on the machine.
Check6 Is Page size set to other than A4, Letter, LTR, or Legal?
If Page size is set to other than A4, Letter, LTR, or Legal, the received fax will not be printed and will bestored in the machine's memory (Memory Reception). Set Page size to A4, Letter, LTR, or Legal.
Changing the Paper Settings
Note• Some of page sizes are not available depending on the country or region of purchase.
Check7 Is Media type set to other than Plain paper?
If Media type is set to other than Plain paper, the received fax will not be printed and will be stored in themachine's memory (Memory Reception). Set Media type to Plain paper.
Changing the Paper Settings
Check8 Is paper loaded?
If paper is not loaded, received faxes will be stored in the machine's memory without being printed (MemoryReception). Load paper, then press the OK button.
Check9 Is the amount of remaining ink sufficient to print a fax?
If the amount of remaining ink is insufficient to print, received faxes will be stored in the machine's memorywithout being printed (Memory Reception). Replace the FINE cartridge, then print the faxes in the machine'smemory.
Document Stored in Machine's Memory
Note• If the machine was receiving faxes in the fax mode, printing will start automatically after the FINE
cartridge is replaced.
Replacing a FINE Cartridge
• You can set the machine to forcibly print a received fax even if the ink has run out.
Set Print when no ink in Auto print settings under Fax settings to Print.
However, part or all of the fax may not be printed since the ink has run out.
Also, the contents of the fax will not be stored in the machine's memory.
If the ink has already run out, we recommend that Do not print be selected for Received documents inAuto print settings under Fax settings to store the received fax in the machine's memory. After youreplace the FINE cartridge and select Print for Received documents in Auto print settings, the faxstored in the machine's memory will be printed automatically.
Auto print settings
562

Check10 Is the machine set to the appropriate receive mode?
Check the receive mode setting and change it to a mode suited to your connection if necessary.
Setting the Receive Mode
Check11 Is FAX RX reject set to ON?
Select OFF for FAX RX reject in Security control under Fax settings.
For details on how to set, see Rejecting Fax Reception.
Check12 Are there setting items set Reject in Caller rejection?
If you select Reject for any setting items in Caller rejection in Security control under Fax settings, themachine rejects calls for setting item selected Reject.
For details on how to set, see Using the Caller ID Service to Reject Calls.
Machine Does Not Switch Automatically between Voice and Fax Calls
Check Is the receive mode set to Fax only mode?
If Fax only mode is selected for Receive mode set. under FAX menu, there will be no automatic switchingbetween voice and fax calls.
Set the receive mode to TEL priority mode, DRPD*1, or Network switch*2.
If the receive mode is TEL priority mode and an answering machine is connected to the machine, checkwhether a proper message is played back when the answering machine answers.
Setting the Receive Mode
*1 This setting is available only in the US and Canada.
*2 This setting may not be available depending on the country or region of purchase.
Quality of Received Fax is Poor
Check1 Check the scan settings of the sender's fax machine.
Ask the sender to adjust the scan settings of the fax machine.
Check2 Is ECM RX set to OFF?
Select ON for ECM RX in Adv. communication in Adv. FAX settings under Fax settings.
If ECM RX is enabled, the sender's fax machine resends the fax after correcting errors automatically.
Adv. FAX settings
Check3 Is the sender's original document or scanning area of the sender's faxmachine dirty?
The image quality of the fax is mainly determined by the sender's fax machine. Contact the sender and ask thesender to check whether the scanning area of the fax machine is dirty.
Check4 Is ECM transmission/reception enabled although the line/connection is poor,or is the sender's fax machine compatible with ECM?
• Select ON for ECM RX in Adv. communication in Adv. FAX settings under Fax settings.
563

Adv. FAX settings
• Contact the sender and ask the sender to check whether the machine is set to enable ECM transmission.
If the sender's or recipient's fax machine is not compatible with ECM, the fax will be sent/received withoutautomatic error correction.
• Reduce the reception start speed on RX start speed in Adv. communication in Adv. FAX settingsunder Fax settings.
Adv. FAX settings
Check5 Did you confirm the paper and print quality settings?
Print Results Not Satisfactory
Cannot Receive a Color Fax
Check Is ECM RX set to OFF?
If OFF is select for ECM RX in Adv. communication in Adv. FAX settings under Fax settings, the machinecannot receive color faxes. The machine will disconnect the telephone line or receive color faxes in black &white according to the setting of the sender's fax machine.
Set ECM RX to ON.
Adv. FAX settings
Errors Often Occur When You Receive a Fax
Check1 Check the telephone line condition or the connection.
If the telephone line or connection is poor, reducing the reception start speed may correct the error.
Reduce the reception start speed on RX start speed in Adv. communication in Adv. FAX settings underFax settings.
Adv. FAX settings
Check2 Is the sender's fax machine operating normally?
Contact the sender and ask the sender to check whether the fax machine is operating normally.
564

Cannot Send a Fax Clearly
Check1 Is the document loaded correctly?
Remove the document, then reload it on the platen glass or in the ADF.
Loading Originals
Check2 Is the platen glass and/or the inner side of the document cover and/or the glassof ADF dirty?
Clean the platen glass and/or the inner side of the document cover and/or the glass of ADF, then reload thedocument.
Cleaning the Platen Glass and Document Cover
Note• If the glass of ADF is dirty, black streaks appear on the paper as shown below.
Check3 Is the image quality setting or the scan contrast setting suitable for thedocument?
On the LCD, select an image quality setting and a scan contrast setting that are suitable for the document.
Sending Faxes with the Numeric Buttons
Check4 Is the original document loaded with the wrong side facing upwards ordownwards?
When loading a document on the platen glass, the side to be scanned should be face down.
When loading a document in the ADF, the side to be scanned should be face up.
Check5 Are you scanning thick or curled documents?
Thick or curled documents may not be sent as good quality faxes, because of a shadow or distortion causedwhen such documents are scanned.
When loading a document on the platen glass, press on the document cover with your hand when scanning.
565

Telephone Problems
Cannot Dial
Telephone Disconnects During a Call
Cannot Dial
Check1 Is the telephone line cable connected correctly?
Check that the telephone line cable is connected correctly.
Basic Connection
Check2 Is the telephone line type of the machine or the external device set correctly?
Check the telephone line type setting and change it as necessary.
Setting the Telephone Line Type
Telephone Disconnects During a Call
Check Is the telephone line cable or the telephone (or a peripheral device such as anexternal telephone, an answering machine, or a computer modem) connected correctly?
Check that the telephone line cable and the telephone (or a peripheral device such as an external telephone,an answering machine, or a computer modem) are connected correctly.
Connecting the Telephone Line
566

Problems with Scanning
Problems with Scanning
Scan Results Not Satisfactory
567

Problems with Scanning
Scanner Does Not Work
Scanner Driver Does Not Start
Error Message Appears and the Scanner Driver Screen Does Not Appear
Cannot Scan Multiple Items at One Time
Cannot Scan Properly with Auto Scan
Slow Scanning Speed
"There is not enough memory." Message Is Displayed
Computer Stops Operating during Scanning
Scanned Image Does Not Open
568

Scanner Does Not Work
Check 1 Make sure that your scanner or printer is turned on.
Check 2 Connect the USB cable to a different USB port on the computer.
Check 3 If the USB cable is connected to a USB hub, remove it from the USB hub andconnect it to a USB port on the computer.
Check 4 Restart the computer.
569

Scanner Driver Does Not Start
Check 1 Make sure that the scanner driver is installed.
If not installed, install the scanner driver from the web page.
Check 2 Select your scanner or printer on the application's menu.
Note• The operation may differ depending on the application.
Check 3 Make sure that the application supports the ICA (Image Capture Architecture)driver.
You cannot start the scanner driver from applications not supporting the ICA driver.
Check 4 Scan and save images with IJ Scan Utility and open the files in yourapplication.
570

Error Message Appears and the Scanner Driver Screen Does NotAppear
Check 1 Make sure that your scanner or printer is turned on.
Check 2 Turn off your scanner or printer, then reconnect the USB cable and replug thepower cord.
Check 3 Connect the USB cable to a different USB port on the computer.
Check 4 If the USB cable is connected to a USB hub, remove it from the USB hub andconnect it to a USB port on the computer.
Check 5 Make sure that the scanner driver is installed.
If not installed, install the scanner driver from the web page.
Check 6 Select your scanner or printer on the application's menu.
Note• The operation may differ depending on the application.
Check 7 Make sure that the application supports the ICA driver.
You cannot start the scanner driver from applications not supporting the ICA driver.
Check 8 Exit the scanner driver if it is running on another application.
571

Cannot Scan Multiple Items at One Time
Check 1 Make sure that the items are placed correctly.
Placing Items (When Scanning from a Computer)
Check 2 Check if you can properly scan one item.
Some applications do not support multiple image scanning. In that case, scan each item individually.
572

Cannot Scan Properly with Auto Scan
Check 1 Make sure that the items are placed correctly.
Placing Items (When Scanning from a Computer)
Check 2 Multiple items scanning may not be supported.
Some applications do not support multiple image scanning. In that case, scan each item individually.
573

Slow Scanning Speed
Check 1 To view the image on a monitor, set the output resolution to around 150 dpi. Toprint, set it to around 300 dpi.
Resolution
Check 2 Set Fading Correction, Grain Correction, etc. to None.
Refer to "Image Corrections and Color Adjustments" for details.
Check 3 In IJ Scan Utility, deselect the Correct slanted text document / Detect theorientation of text document and rotate image checkbox and scan again.
Settings (Document Scan) DialogSettings (Custom Scan) Dialog
574

"There is not enough memory." Message Is Displayed
Check 1 Exit other applications and try again.
Check 2 Reduce the resolution or output size and scan again.
Resolution
575

Computer Stops Operating during Scanning
Check 1 Restart the computer, reduce the output resolution and scan again.
Resolution
Check 2 Delete unnecessary files to obtain sufficient free hard disk space, then scanagain.
Error message may appear if there is not enough hard disk space to scan and save, when the image size is toolarge (such as when scanning a large item at high resolution).
Check 3 In Folder to Save Temporary Files of IJ Scan Utility, specify a folder on adrive with sufficient free space.
Settings (General Settings) Dialog
Check 4 Multiple devices may be connected to USB ports.
Disconnect devices other than your scanner or printer.
576

Scanned Image Does Not Open
Check If the data format is not supported by the application, scan the image again andselect a popular data format such as JPEG when saving it.
Refer to the application's manual for details. If you have any questions, contact the manufacturer of theapplication.
577

Scan Results Not Satisfactory
Scan Quality (Image Displayed on the Monitor) Is Poor
Scanned Image Is Surrounded by Extra White Areas
Cannot Scan at the Correct Size
Position or Size of the Image Cannot be Detected Correctly When Scanningfrom the Operation Panel
Item Is Placed Correctly, but the Scanned Image Is Slanted
Scanned Image Is Enlarged (Reduced) on the Computer Monitor
578

Scan Quality (Image Displayed on the Monitor) Is Poor
Check 1 Increase the scanning resolution if the image is jagged.
Resolution
Check 2 Set the display size to 100 %.
Some applications do not display images clearly if the display size is too small.
Check 3 If moire (stripe pattern) appears, take the following measures and scan again.
• Set one of the following settings in the Settings (Document Scan) dialog, Settings (Custom Scan) dialog,or Settings (Scan and Stitch) dialog of IJ Scan Utility, then scan from the IJ Scan Utility main screen.
◦ Set Select Source to Magazine and set Color Mode to Color◦ Select the Reduce moire checkbox in Image Processing Settings
Settings (Document Scan) DialogSettings (Custom Scan) DialogSettings (Scan and Stitch) Dialog
• Click Driver in the IJ Scan Utility main screen, then set one of the following settings.
◦ Select Magazine for Image Adjustment◦ Select the Descreen checkbox
Refer to "Image Corrections and Color Adjustments" for details.
Note• If moire appears when you scan a digital print photo, take the above measures and scan again.
Check 4 Clean the platen and document cover.
Check 5 If the item is in poor condition (dirty, faded, etc.), click Driver in the IJ ScanUtility main screen, then set Reduce Dust, Fading Correction, Grain Correction, etc.
Refer to "Image Corrections and Color Adjustments" for details.
Check 6 If the color tone of images is different from the original document, take thefollowing measures and scan again.
Click Driver in the IJ Scan Utility main screen, then set Image Adjustment to None.
Refer to "Image Corrections and Color Adjustments" for details.
579

Scanned Image Is Surrounded by Extra White Areas
Check Specify the scan area.
Manually specify the scan area when there are white margins or unwanted areas along the edges of the scannedimages in the Image Stitch window.
Adjusting Cropping Frames in the Image Stitch Window
580

Cannot Scan at the Correct Size
Check Make sure that the items are placed correctly.
Placing Items (When Scanning from a Computer)
581

Position or Size of the Image Cannot be Detected Correctly WhenScanning from the Operation Panel
Check 1 Make sure that the items are placed correctly.
Placing Items (When Scanning from a Computer)
Check 2 Check that the settings match the item to be scanned.
If you cannot scan properly by automatically detecting the item type, specify the item type and size.
When Scanning from the Operation Panel:
Refer to "Setting Items for Scanning Using the Operation Panel of the Machine" for your model from Home of theOnline Manual for details on the setting items when scanning from the operation panel.
When Scanning with IJ Scan Utility:
Scanning PhotosScanning DocumentsScanning with Favorite Settings
582

Item Is Placed Correctly, but the Scanned Image Is Slanted
Check When Document or Magazine is selected for Select Source, deselect theCorrect slanted text document checkbox and scan the item again.
Settings (Document Scan) DialogSettings (Custom Scan) Dialog
583

Scanned Image Is Enlarged (Reduced) on the Computer Monitor
Check 1 Change the display setting in the application.
Refer to the application's manual for details. If you have any questions, contact the manufacturer of theapplication.
Check 2 Click Driver in the IJ Scan Utility main screen, then change the resolutionsetting and scan again.
The higher the resolution, the larger the resulting image will be.
Resolution
584

Problems with the Machine
The Machine Cannot Be Powered On
Cannot Connect to Computer with a USB Cable Properly
Cannot Communicate with the Machine with USB Connection
LCD Cannot Be Seen At All
An Unintended Language Is Displayed on the LCD
585

The Machine Cannot Be Powered On
Check1 Press the ON button.
Check2 Make sure that the power plug is securely plugged into the power cordconnector of the machine, then turn it back on.
Check3 Unplug the machine from the power supply, then plug the machine back in andturn the machine back on after leaving it for at least 3 minutes.
If the problem is not resolved, contact the service center.
586

Cannot Connect to Computer with a USB Cable Properly
Printing or Scanning Speed Is Slow/Hi-Speed USB Connection Does NotWork
If your system environment is not fully compatible with Hi-Speed USB, the machine will operate at a lowerspeed provided under USB 1.1. In this case, the machine operates properly but printing or scanningspeed may slow down due to communication speed.
Check Check the following to make sure that your system environment supports Hi-Speed USB connection.
• Does the USB port on your computer support Hi-Speed USB connection?
• Does the USB cable or the USB hub support Hi-Speed USB connection?
Be sure to use a certified Hi-Speed USB cable. We recommend that the cable is no longer than around10 feet / 3 meters.
• Does the operating system of your computer support Hi-Speed USB connection?
Obtain and install the latest update for your computer.
• Does the Hi-Speed USB driver operate properly?
Obtain the latest version of the Hi-Speed USB driver compatible with your hardware and reinstall it onyour computer.
Important• For details on Hi-Speed USB of your system environment, contact the manufacturer of your computer,
USB cable, or USB hub.
587

Cannot Communicate with the Machine with USB Connection
Check1 Make sure that the machine is turned on.
Check2 Make sure that the USB cable is connected properly.
See Connecting the Machine to the Computer Using a USB Cable to connect the USB cable properly.
Check3 Do not start up IJ Network Tool while printing.
Check4 Do not print while IJ Network Tool is running.
588

LCD Cannot Be Seen At All
• If the POWER lamp is off:
The machine is not powered on. Connect the power cord and press the ON button.
• If the POWER lamp is lit:
The LCD may be in the screen-saver mode. Press a button other than the ON button on the operationpanel.
589

An Unintended Language Is Displayed on the LCD
Select the language you want to be displayed according to the following procedure.
1. Press the Setup button, then wait for about 5 seconds.
2. Press the button twice, then press the OK button.
3. Press the button twice, then press the OK button.
4. Press the button repeatedly to select the rightmost menu.
5. Press the button twice, then press the OK button.
6. Use the button to select the language for the LCD, then press the OK button.
The desired language is displayed on the LCD.
7. Press the Stop button.
590

Problems with Installation/Downloading
Cannot Install the MP Drivers
Uninstalling IJ Network Tool
591

Cannot Install the MP Drivers
Download the MP Drivers again with the Setup CD-ROM, or download the necessary applications (e.g.printer driver or scanner driver) from our website, then reinstall.
592

Uninstalling IJ Network Tool
Follow the procedure below to uninstall IJ Network Tool from your computer.
Important• Even if IJ Network Tool is uninstalled, you can print over network or scan from the computer. However,
you cannot change the network settings over network.
1. Select Applications from the Go menu of Finder, double-click Canon Utilities > IJNetwork Tool, drag the Canon IJ Network Tool icon into the Trash.
2. Restart the computer.
Empty the Trash and restart your computer.
Note• To reinstall IJ Network Tool, uninstall IJ Network Tool, then install it again from our website.
593

About Errors/Messages Displayed
If an Error Occurs
A Message for Faxing Is Displayed on the LCD
A Message Is Displayed
594

If an Error Occurs
When an error occurs in printing such as the machine is out of paper or paper is jammed, a troubleshootingmessage is displayed automatically. Take the appropriate action described in the message.
When an error occurs, a Support Code (error number) is displayed on the computer screen or the LCD.
• When a Support Code and a message are displayed on the computer screen:
* The screen differs depending on the OS you are using.
• When a Support Code and a message are displayed on the LCD:
Note• You can confirm the actions against errors with Support Codes on your computer by searching a
Support Code.
Click Here to Search
For details on how to resolve errors without Support Codes, see A Message Is Displayed.
595

A Message for Faxing Is Displayed on the LCD
If a message is displayed on the Fax standby screen, take the corresponding action described below.
Message Action
Auto redial The machine is waiting to redial the recipient's number because the line was busy or the recipient didnot answer when you tried to send a document. Wait for the machine to automatically redial thenumber. If you want to cancel automatic redialing, wait until the machine starts dialing the number, thenpress the Stop button. You can also delete the document from machine's memory to cancel automaticredialing.
Resending Faxes (Redialing a Busy Number)
Hang upphone
The handset is not placed in the handset cradle correctly.
Replace the handset correctly.
Try again inB&W
The recipient's fax machine is not color-compatible.
Press the Black button to resend the fax.
Alternatively, you select If incompat., B&W for Color transmission in Adv. FAX settings under Faxsettings. The machine converts color documents into black & white data if the recipient's fax machinedoes not support color faxing.
Adv. FAX settings
No tonedetected
The telephone line cable with a modular plug may not be plugged in properly.
Make sure that the cable is plugged in properly, and resend the fax after a while. If you still cannot sendthe fax, select OFF for Dial tone detect in Adv. FAX settings under Fax settings.
Adv. FAX settings
Received inmemory
If the machine receives a fax under one of the following conditions, the machine will not be able to printthe received fax and will store it in the machine's memory. When the problem is resolved as described,the fax stored in the machine's memory is printed automatically.
• The amount of remaining ink is insufficient to print a fax:
Replace the FINE cartridge.
Replacing a FINE Cartridge
Note• You can set the machine to forcibly print a received fax even if the ink has run out.
Set Print when no ink in Auto print settings under Fax settings to Print.
However, part or all of the fax may not be printed since the ink has run out.
Also, the contents of the fax will not be stored in the machine's memory.
If the ink has already run out, we recommend that Do not print be selected for Receiveddocuments in Auto print settings under Fax settings to store the received fax in themachine's memory. After you replace the FINE cartridge and select Print for Receiveddocuments in Auto print settings, the fax stored in the machine's memory will be printedautomatically.
Auto print settings
• Paper has run out:
Load the paper and press the OK button.
• A different size of paper from that specified by Page size is loaded:
596

Load the same size of paper as that specified by Page size, then press the OK button.
• Page size is set to other than A4, Letter, LTR, or Legal:
Set Page size to A4, Letter, LTR, or Legal.
Changing the Paper Settings
Note• Some of page sizes are not available depending on the country or region of purchase.
• Media type is set to other than Plain paper:
Set Media type to Plain paper.
Changing the Paper Settings
• You pressed the Stop button to cancel printing of a fax:
Press the FAX button to resume printing of the fax.
• Do not print is selected for Received documents in Auto print settings under Fax settings:
You can print the faxes stored in the machine's memory from the Memory reference screen underFAX menu.
Printing a Document in Machine's Memory
Note• To print the received faxes automatically, select Print for Received documents in Auto print
settings under Fax settings.
Auto print settings
• If you did not print the fax stored in the machine's memory (e.g., if you did not resolve the problemby pressing the Stop button), you can delete or print the fax stored in the machine's memory later.
Document Stored in Machine's Memory
Busy/nosignal
• The recipient's number you dialed is busy.
Try dialing again after waiting for a moment.
Resending Faxes (Redialing a Busy Number)
• The fax/telephone number dialed is incorrect.
Check the fax/telephone number and dial again.
• The recipient's fax machine did not respond (after all automatic redialing attempts).
Contact the recipient and have the recipient check the fax machine. For an overseas call, addpauses to the registered number.
• The recipient is not using a G3 machine.
The machine cannot send or receive documents to/from a fax machine that is incompatible with theG3 standard. Contact the recipient and ask the recipient to check whether the fax machine is G3compatible.
• The touch tone/rotary pulse setting on the machine is incorrect.
Set the machine to match the telephone line you are using.
Setting the Telephone Line Type
Memory isfull
The machine's memory is full because it has sent/received too many documents, or a detaileddocument.
Print the faxes stored in the machine's memory and delete them from the machine's memory.
Document Stored in Machine's Memory
597

When sending a fax, resend it. If this message still appears, delete the faxes stored in the machine'smemory, divide the faxes for sending, and send them again.
When receiving a fax, have the sender resend the faxes.
Change thepaper
A4/LTR/LGLPlain paper
The paper settings are incorrect. Set Page size to A4, Letter, LTR, or Legal and Media type to Plainpaper to print received faxes.
Changing the Paper Settings
Note• Some of page sizes are not available depending on the country or region of purchase.
FAX infodoes notmatch
Transmission has been canceled because the machine could not detect the recipient's fax machineinformation or the information did not match the dialed number. This message is displayed whenCheck RX FAX info in Security control under Fax settings is set to ON.
For details, see Sending Faxes after Checking Information (Checking the Recipient's Information).
Receptionrejected
Reception has been rejected because the fax matches the fax rejection condition specified by FAX RXreject in Security control under Fax settings.
For details, see Rejecting Fax Reception.
Waiting forreport
If the machine receives a fax under one of the following conditions, the machine will not be able to printthe reports. When the problem is resolved as described, the reports are printed automatically.
• The amount of remaining ink is insufficient to print a report:
Replace the FINE cartridge.
Replacing a FINE Cartridge
• Paper has run out:
Load the paper and press the OK button.
• A different size of paper from that specified by Page size is loaded:
Load the same size of paper as that specified by Page size, then press the OK button.
• Page size is set to other than A4, Letter, LTR, or Legal:
Set Page size to A4, Letter, LTR, or Legal.
Changing the Paper Settings
Note• Some of page sizes are not available depending on the country or region of purchase.
• Media type is set to other than Plain paper:
Set Media type to Plain paper.
Changing the Paper Settings
• You pressed the Stop button to cancel printing of a report:
Press the FAX button to resume printing of the report.
598

A Message Is Displayed
This section describes some of the errors or messages.
Note• A Support Code (error number) is displayed on the computer or on the LCD for some error or message.
For details on errors with Support Codes, refer to Support Code List.
If a message is displayed on the LCD, see below.
• A Message Is Displayed on the LCD
If a message is displayed on the computer, see below.
• The Inkjet Printer/Scanner/Fax Extended Survey Program Icon Appears
A Message Is Displayed on the LCD
Confirm the message and take an appropriate action.
• Check page size Press [OK]
The size of the loaded paper is different from that specified in the paper size setting.
Load the same size of paper as that specified in the paper size setting, then press the OK button.
• Data error Press [OK]
A power failure has occurred or the power cord has been unplugged when the faxes are stored in themachine's memory.
Important• If a power failure occurs or you unplug the power cord, all faxes stored in the machine's memory
are deleted.
• For details on how to unplug the power cord, see Notice for Unplugging the Power Cord.
Press the OK button.
After pressing the OK button, the list of the faxes deleted from the machine's memory (MEMORYCLEAR REPORT) will be printed.
For details, refer to Summary of Reports and Lists.
• Cannot connect to the server; try again
You cannot connect to the server due to some communication error. When you have tried to access aphoto sharing site, it is possible that your photos have been deleted.
Press the OK button to dismiss the error, then try again after a while.
The Inkjet Printer/Scanner/Fax Extended Survey Program Icon Appears
If the Inkjet Printer/Scanner/Fax Extended Survey Program is installed, the printer and applicationsoftware usage information is scheduled to be sent every month for about ten years. The Inkjet Printer/Scanner/Fax Extended Survey Program icon appears in the Dock when it is time to send the printerusage information.
Read the instructions on the screen after clicking the icon, then follow the procedure below.
599

• If you agree to participate in the survey program:
Click Agree, then follow the on-screen instructions. The printer usage information will be sent via theInternet. If you have followed the on-screen instructions, the information will be sent automaticallyfrom the second time onward and the confirmation screen will not be displayed again.
Note• If you deselect the Send automatically from the next time check box, the information will not
be sent automatically from the second time onward and the Inkjet Printer/Scanner/FaxExtended Survey Program icon will appear in the Dock at the time of the next survey.
• If you do not agree to participate in the survey program:
Click Do not agree. The confirmation screen will be closed, and the survey at that time is skipped.The confirmation screen will be displayed again one month later.
• To stop sending the information:
Click Turn off. The Inkjet Printer/Scanner/Fax Extended Survey Program is stopped, and theinformation will not be sent. To resume the survey, see Changing the setting:.
• To uninstall the Inkjet Printer/Scanner/Fax Extended Survey Program:
1. Stop the Inkjet Printer/Scanner/Fax Extended Survey Program.
Changing the setting:
2. Select Applications from the Go menu of Finder, and double-click the Canon Utilities folder,then the Inkjet Extended Survey Program folder.
600

3. Place the Canon Inkjet Printer/Scanner/Fax Extended Survey Program.app file into theTrash.
4. Restart the computer.
Empty the Trash and restart your computer.
• Changing the setting:
To display the confirmation screen every time the printer usage information is sent or to resumesurveying, follow the procedure below.
1. Select Applications from the Go menu of Finder, and double-click the Canon Utilities folder,then the Inkjet Extended Survey Program folder.
2. Double-click the Canon Inkjet Printer/Scanner/Fax Extended Survey Program icon.
◦ Do not display the confirmation screen when information is sent:
If the check box is selected, the information will be sent automatically.
If the check box is not selected, the Inkjet Printer/Scanner/Fax Extended Survey Programicon will appear in the Dock at the time of the next survey. Click the icon, then follow the on-screen instructions.
◦ Turn off/Turn on button:
Click the Turn off button to stop the Inkjet Printer/Scanner/Fax Extended Survey Program.
Click the Turn on button to restart the Inkjet Printer/Scanner/Fax Extended Survey Program.
601

If You Cannot Resolve the Problem
If you cannot resolve the problem with any of the workarounds in this chapter, please contact the seller ofthe machine or the service center.
Canon support staff are trained to be able to provide technical support to satisfy customers.
Caution• If the machine emits any unusual sound, smoke, or odor, turn it off immediately. Unplug the power cord
from the outlet and contact the seller or the service center. Never attempt to repair or disassemble themachine yourself.
• Attempts by customers to repair or take apart the machine will invalidate any warranty regardless ofwhether the warranty has expired.
Before contacting the service center, confirm the following:
• Product name:
* Your machine's name is located on the front cover of the setup manual.
• Serial number: please refer to the setup manual
• Details of the problem
• What you tried to solve the problem, and what happened
602

Support Code List
The support code appears on the LCD and the computer screen when an error occurs.
"Support Code" means the error number and appears with an error message.
When an error occurs, check the support code displayed on the LCD or the computer screen and take theappropriate action.
Support Code Appears on the LCD and the Computer Screen
• 1000 to 1ZZZ
1003 1200 1202 1250 1300 1303
1401 1403 1485 1486 1487 1682
1684 1686 1687 1688 1702 1703
1704 1705 1712 1713 1714 1715
1890
• 2000 to 2ZZZ
2100 2101 2102 2103 2700 2801
2802 2803 2900 2901
• 4000 to 4ZZZ
4100 4103
• 5000 to 5ZZZ
5011 5012 5040 5100 5200 5400
5B02 5B03 5B04 5B05 5B12 5B13
5B14 5B15
• 6000 to 6ZZZ
6000 6500 6800 6801 6900 6901
6902 6910 6911 6930 6931 6932
6933 6936 6937 6938 6939 693A
6940 6941 6942 6943 6944 6945
6946
603

• 9000 to 9ZZZ
9500
• A000 to ZZZZ
B200 B201
About the support code for paper jam, you can also refer to Support Code List (When Paper Is Jammed).
604

Support Code List (When Paper Is Jammed)
If the paper is jammed, remove it following the procedure appropriate for each case.
Watch the movie (Windows)
Watch the movie (Mac)
• If you can see the jammed paper at the paper output slot:
1300
• If you can see the jammed paper at the front tray/If you cannot see the jammed paper either at thepaper output slot or at the front tray:
1303
• If the paper tears and you cannot remove it from the paper output slot or from the transport unit:
Paper Is Jammed inside the Machine
• If the document is jammed in the ADF:
2801
• Cases other than above:
In Other Cases
605

1300
Cause
Paper is jammed in the paper output slot.
Action
If you can see the jammed paper at the paper output slot, remove the paper following the procedurebelow.
Watch the movie (Windows)
Watch the movie (Mac)
Important• The power cannot be turned off while the machine is sending or receiving a fax, or when the received
fax or the unsent fax are stored in the machine's memory.
Make sure if the machine completed sending or receiving all the faxes before disconnecting thepower cord.
If you unplug the power cord, all the faxes stored in the machine's memory are deleted.
Note• If you need to turn off the machine to remove jammed paper during printing, press the Stop button to
cancel print jobs before turning off the machine.
1. Pull the paper out slowly.
Hold the paper with your hands, then pull the paper out slowly not to tear it.
Important• Do not pull the paper out from the front tray even though you can see the jammed paper at the
front tray. Pulling the paper out forcibly from the front tray may damage the machine.
Note• If you cannot pull the paper out, turn the machine off and turn it back on. The paper may be
ejected automatically.
• If you cannot pull the paper out from the paper output slot, try to pull the paper out from thetransport unit.
606

1303
• If the paper tears and you cannot remove the jammed paper from the paper output slot, removethe paper from inside the machine.
Paper Is Jammed inside the Machine
2. Reload the paper, and press the machine's OK button.
If you turned off the machine in step 1, all print jobs in the queue are canceled. Reprint if necessary.
Note• When reloading the paper, confirm that you are using the paper suited for printing and are
loading it correctly.
• We recommend you use paper other than A5 sized one to print documents with photos orgraphics; otherwise, the printout may curl and cause paper exit jams.
If you cannot remove the paper or the paper tears inside the machine, or if the paper jam error continuesafter removing the paper, contact the service center.
607

1303
Cause
Paper is jammed inside the machine at the transport unit.
Action
If you can see the jammed paper at the front tray, or you cannot see the paper either at the paper outputslot or at the front tray, remove the paper from the transport unit.
Remove the paper following the procedure below.
Watch the movie (Windows)
Watch the movie (Mac)
Important• The power cannot be turned off while the machine is sending or receiving a fax, or when the received
fax or the unsent fax are stored in the machine's memory.
Make sure if the machine completed sending or receiving all the faxes before disconnecting thepower cord.
If you unplug the power cord, all the faxes stored in the machine's memory are deleted.
Note• If you need to turn off the machine to remove jammed paper during printing, press the Stop button to
cancel print jobs before turning off the machine.
1. Turn the machine off, then unplug the power cord.
2. Open the document tray, then open the document cover.
3. Stand the machine with the right side facing down.
If you can see the jammed paper at the front tray, stand the machine with the front tray open.
Important• Stand the machine on a wide and flat surface such as a desk.
• When you stand the machine, hold it securely and be careful not to hit it on a hard object.
4. Push the open lever to open the transport unit.
When you open the transport unit, support the machine with your hand so that it does not fall down.
608

5. Pull out the jammed paper slowly.
When you pull the jammed paper, support the machine with your hand so that it does not fall down.
Note• If the paper is rolled up and it is difficult to remove, grasp the edges of the paper, then remove
the jammed paper.
• If you cannot remove the jammed paper from the transport unit, close the transport unit, takeback the machine in original position, then remove the paper from inside the machine.
Paper Is Jammed inside the Machine
6. Close the transport unit.
609

Note• After you close the transport unit, take back the machine in original position at once.
7. Plug the machine back in and turn the machine back on.
8. Reload the paper.
All print jobs in the queue are canceled. Reprint if necessary.
If you cannot remove the paper or the paper tears inside the machine, or if the paper jam error continuesafter removing the paper, contact the service center.
610

2801
Cause
The document is jammed in the ADF.
Action
Remove the document following the procedure below.
Important• The power cannot be turned off while the machine is sending or receiving a fax, or when the received
fax or the unsent fax are stored in the machine's memory.
Make sure if the machine completed sending or receiving all the faxes before disconnecting thepower cord.
If you unplug the power cord, all the faxes stored in the machine's memory are deleted.
• If the original remains in the ADF by pressing the Stop button while the machine is scanningthe document:
If you press the Stop button during scanning then the document remained in the ADF, the messageabout the paper remained in the ADF appears on the LCD. Press the OK button so that the remainingdocument is automatically fed out.
• If the original is jammed in the ADF:
Remove the document following the procedure below.
1. If printing is in progress, press the Stop button.
2. Turn off the machine.
3. If a multi-page document is loaded, remove any pages other than the jammed page from theADF, then open the document feeder cover.
4. Pull out the jammed document from the ADF.
611

5. Close the document feeder cover, then turn on the machine.
When rescanning the document after clearing the error, rescan it from the first page.
If you cannot remove the document or the document tears inside the machine, or if the document jamerror continues after removing the document, contact the service center.
Note• The document may not feed properly depending on the media type, or your environment, such as
when the temperature and humidity are either too high or too low.
In this case, reduce the number of document pages to approximately half of the loading capacity.
If the document still jams, use the platen glass instead.
• If the original is jammed in the ADF (from the paper feed side):
If the document is jammed in the document output slot, close the document tray as shown in thefigure below and pull out the document.
When rescanning the document after clearing the error, rescan it from the first page.
If you cannot remove the document or the document tears inside the machine, or if the document jamerror continues after removing the document, contact the service center.
612
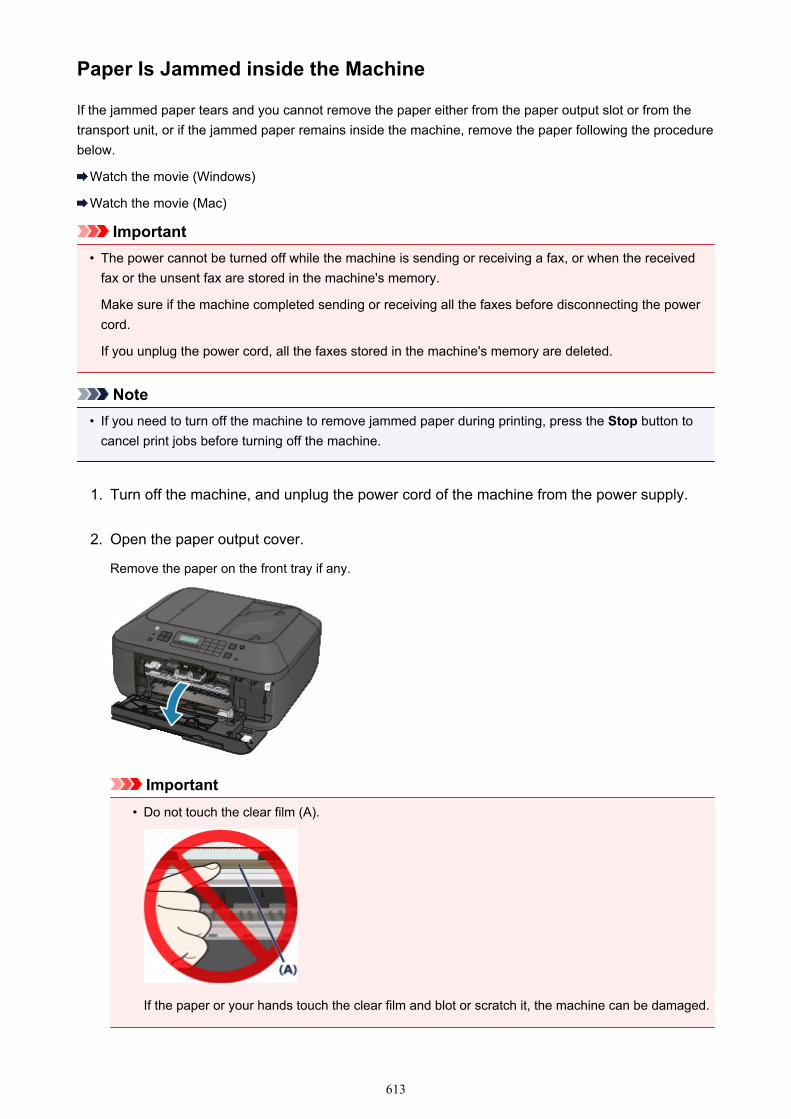
Paper Is Jammed inside the Machine
If the jammed paper tears and you cannot remove the paper either from the paper output slot or from thetransport unit, or if the jammed paper remains inside the machine, remove the paper following the procedurebelow.
Watch the movie (Windows)
Watch the movie (Mac)
Important• The power cannot be turned off while the machine is sending or receiving a fax, or when the received
fax or the unsent fax are stored in the machine's memory.
Make sure if the machine completed sending or receiving all the faxes before disconnecting the powercord.
If you unplug the power cord, all the faxes stored in the machine's memory are deleted.
Note• If you need to turn off the machine to remove jammed paper during printing, press the Stop button to
cancel print jobs before turning off the machine.
1. Turn off the machine, and unplug the power cord of the machine from the power supply.
2. Open the paper output cover.
Remove the paper on the front tray if any.
Important• Do not touch the clear film (A).
If the paper or your hands touch the clear film and blot or scratch it, the machine can be damaged.
613

3. Make sure that the jammed paper is not under the FINE cartridge holder.
If the jammed paper is under the FINE cartridge holder, move the FINE cartridge holder to the right edgeor the left edge whichever is easier to remove the paper.
When you move the FINE cartridge holder, hold the FINE cartridge holder and slide it slowly to the rightedge or the left edge.
4. Hold the jammed paper with your hands.
If the paper is rolled up, pull it out.
5. Pull the paper slowly not to tear it, then pull the paper out.
614

6. Make sure that all the jammed paper is removed.
If the paper is torn, a piece of paper may remain inside the machine. Check the following and remove thepiece of paper if it remains.
• Does the piece of paper remain under the FINE cartridge holder?
• Does the little piece of paper remain inside the machine?
• Does the piece of paper remain in the right side or the left side space (B) inside the machine?
7. Close the paper output cover, then reload the paper.
All print jobs in the queue are canceled. Reprint if necessary.
Note• When reloading the paper, confirm that you are using the paper suited for printing and are loading
it correctly. If the message about paper jam is displayed on the LCD of the machine or on thecomputer screen when you resume printing after removing all the jammed paper, a piece of papermay remain inside the machine. In this case, confirm that no piece of paper remains inside themachine.
If you cannot remove the paper or the paper tears inside the machine, or if the paper jam error continuesafter removing the paper, contact the service center.
615

In Other Cases
Make sure of the following:
Check1 Are there any foreign objects around the paper output slot?
Check2 Is the paper curled?
Load the paper after correcting its curl.
616

1003
Cause
The machine is out of paper, or paper does not feed.
Action
Reload the paper and press the machine's OK button.
When you load the paper, insert the paper stack until the leading edge touches the far end of the fronttray.
617

1200
Cause
The paper output cover is open.
Action
Close the paper output cover and wait for a while.
Do not close it while you are replacing a FINE cartridge.
618

1202
Cause
The paper output cover is open.
Action
Close the paper output cover.
619

1250
Cause
The paper output tray is closed.
Action
Open the paper output tray to resume printing.
620

1401
Cause
The FINE cartridge is not installed.
Action
Install the FINE cartridge.
If the error is not resolved, the FINE cartridge may be damaged. Contact the service center.
621

1403
Cause
The FINE cartridge cannot be recognized.
Action
Replace the FINE cartridge.
If the error is not resolved, the FINE cartridge may be damaged. Contact the service center.
622

1485
Cause
Appropriate ink cartridge is not installed.
Action
Printing cannot be executed because the ink cartridge is not compatible with this machine.
Install the appropriate ink cartridge.
If you want to cancel printing, press the machine's Stop button.
623

1486
Cause
The FINE cartridge is not installed in the correct position.
Action
Make sure that each FINE cartridge is installed in the correct position.
624

1487
Cause
The FINE cartridge is not installed in the correct position.
Action
Make sure that each FINE cartridge is installed in the correct position.
625

1682
Cause
The FINE cartridge cannot be recognized.
Action
Replace the FINE cartridge.
If the error is not resolved, the FINE cartridge may be damaged. Contact the service center.
626

1684
Cause
The ink cartridge cannot be recognized.
Action
Printing cannot be executed because the ink cartridge may not be installed properly or may not becompatible with this machine.
Install the appropriate ink cartridge.
If you want to cancel printing, press the machine's Stop button.
627

1686
Cause
The ink may have run out.
Action
The function for detecting the remaining ink level will be disabled since the ink level cannot be correctlydetected.
If you want to continue printing without this function, press the machine's Stop button for at least 5seconds.
Canon recommends to use new genuine Canon cartridges in order to obtain optimum qualities.
Please be advised that Canon shall not be liable for any malfunction or trouble caused by continuation ofprinting under the ink out condition.
Note• If the function for detecting the remaining ink level is disabled, is displayed on the LCD.
• Since the information contained in the fax may be lost if it is printed in this condition, the received faxwill not be printed and will be stored in the machine's memory until the ink cartridge is replaced. Youmust manually print out faxes that were stored in the memory. You can change the setting so that thereceived fax is forcibly printed out instead of being stored in the memory, but all or part of the faxinformation may not be printed because of the ink out condition.
628

1687
Cause
The FINE cartridge is not installed properly.
Action
Open the paper output cover. When the head cover opens, push up the ink cartridge lock lever to confirmthat the FINE cartridges are installed properly. After that, close the paper output cover.
If the error is not resolved, remove the FINE cartridges, then install them again.
629

1688
Cause
The ink has run out.
Action
Replace the ink cartridge and close the paper output cover.
If printing is in progress and you want to continue printing, press the machine's Stop button for at least 5seconds with the ink cartridge installed. Then printing can continue under the ink out condition.
The function for detecting the remaining ink level will be disabled.
Replace the empty ink cartridge immediately after the printing. The resulting print quality is notsatisfactory, if printing is continued under the ink out condition.
Note• If the function for detecting the remaining ink level is disabled, is displayed on the LCD.
• Since the information contained in the fax may be lost if it is printed in this condition, the received faxwill not be printed and will be stored in the machine's memory until the ink cartridge is replaced. Youmust manually print out faxes that were stored in the memory. You can change the setting so that thereceived fax is forcibly printed out instead of being stored in the memory, but all or part of the faxinformation may not be printed because of the ink out condition.
630

1702
Cause
The ink absorber is almost full.
Action
Press the machine's OK button to continue printing. Contact the service center.
631

1703
Cause
The ink absorber is almost full.
Action
Press the machine's OK button to continue printing. Contact the service center.
632

1704
Cause
The ink absorber is almost full.
Action
Press the machine's OK button to continue printing. Contact the service center.
633

1705
Cause
The ink absorber is almost full.
Action
Press the machine's OK button to continue printing. Contact the service center.
634

1712
Cause
The ink absorber is almost full.
Action
Press the machine's OK button to continue printing. Contact the service center.
635

1713
Cause
The ink absorber is almost full.
Action
Press the machine's OK button to continue printing. Contact the service center.
636

1714
Cause
The ink absorber is almost full.
Action
Press the machine's OK button to continue printing. Contact the service center.
637

1715
Cause
The ink absorber is almost full.
Action
Press the machine's OK button to continue printing. Contact the service center.
638

1890
Cause
The protective material for the FINE cartridge holder or the tape may remain attached to the holder.
Action
Open the paper output cover, then confirm that the protective material or the tape does not remainattached to the FINE cartridge holder.
If you find the protective material or the tape remains attached, remove it, then close the paper outputcover.
If the problem is not resolved, contact the service center.
639

2100
Cause
Paper larger than the paper size in the print settings is loaded.
Action
Check the size of the loaded paper, then press the machine's OK button.
The screen to select a processing method is displayed on the LCD.
Reload paper as necessary, use the button to select a processing method, then press the OKbutton.
Important• When Print with fed paper is selected, the machine does not detect the paper width for the current
print job.
To disable the machine to detect the paper width for all subsequent print jobs, set the machine not todetect the paper width by using the operation panel, the printer driver, or Remote UI.
640

2101
Cause
Paper smaller than the paper size in the print settings is loaded.
Action
Check the size of the loaded paper, then press the machine's OK button.
The screen to select a processing method is displayed on the LCD.
Reload paper as necessary, use the button to select a processing method, then press the OKbutton.
641

2102
Cause
The machine has detected that the paper has been fed aligned to one side.
Action
Load the paper into the center of the front tray, then slide the paper guides to align with the both edges ofthe paper stack.
Press the machine's OK button to dismiss the error.
642

2103
Cause
The machine cannot detect the paper size.
Action
Press the machine's Stop button to dismiss the error, then try to print again.
If this error still occurs even after printing again, set the machine not to detect the paper width by using theoperation panel, the printer driver, or Remote UI.
Note• Depending on the type of paper, the machine may not detect the paper width.
Additionally, if the paper output cover is opened while printing is in progress, the machine may notdetect the paper width.
643

2700
Cause
Possible causes include the following.
• Some errors occurred while copying and a certain time passed.
• Document is remained in the ADF.
• Some errors occurred while scanning and the document is remained in the ADF.
Action
Take the corresponding actions below.
• When you copy, press the OK button to dismiss the error, and try to copy again.
• When the document is remained in the ADF, press the OK button to feed out the document.
• When you scan, press the Stop button to cancel the scanning, and try to scan again.
644

2802
Cause
No document in the ADF.
Action
Press the OK button to resolve the error, then operate again after loading documents.
645

2803
Cause
The document is too long or is jammed in the ADF.
Action
Press the OK button to dismiss the error. Then make sure that the document you are loading meets themachine's requirements before redoing the operation.
If the document is jammed, remove the jammed document following the procedure below.
• If the original is jammed in the ADF:
Remove the document following the procedure below.
1. If printing is in progress, press the Stop button.
2. Turn off the machine.
3. If a multi-page document is loaded, remove any pages other than the jammed page from theADF, then open the document feeder cover.
4. Pull out the jammed document from the ADF.
5. Close the document feeder cover, then turn on the machine.
When rescanning the document after clearing the error, rescan it from the first page.
If you cannot remove the document or the document tears inside the machine, or if the document jamerror continues after removing the document, contact the service center.
646

Note• The document may not feed properly depending on the media type, or your environment, such as
when the temperature and humidity are either too high or too low.
In this case, reduce the number of document pages to approximately half of the loading capacity.
If the document still jams, use the platen glass instead.
• If the original is jammed in the ADF (from the paper feed side):
If the document is jammed in the document output slot, close the document tray as shown in thefigure below and pull out the document.
When rescanning the document after clearing the error, rescan it from the first page.
If you cannot remove the document or the document tears inside the machine, or if the document jamerror continues after removing the document, contact the service center.
647

2900
Cause
Scanning the print head alignment sheet has failed.
Action
Press the OK button to dismiss the error, then take the actions described below.
• Make sure that the print head alignment sheet is set in the correct position and orientation on theplaten glass.
• Make sure the platen glass and the print head alignment sheet are not dirty.
• Make sure the type and size of loaded paper is suitable for Automatic Print Head Alignment.
For Automatic Print Head Alignment, always load one sheet of A4 or Letter-sized plain paper.
• Make sure if print head nozzles are clogged.
Print the nozzle check pattern to check the status of the print head.
If the error is not resolved, perform Manual Print Head Alignment.
648

2901
Cause
Printing of the print head alignment pattern is complete and the machine is in waiting for scanning thesheet.
Action
Proceed to scan the printed alignment pattern.
1. Load the print head alignment sheet on the platen glass.
Load the print head alignment sheet with the printed side facing down and align the mark on the
upper left corner of the sheet with the alignment mark .
2. Close the document cover gently, then press the machine's Black or Color button.
The machine starts scanning the print head alignment sheet, and the print head position will beadjusted automatically.
649

4100
Cause
The specified data cannot be printed.
Action
When you print the contents on CREATIVE PARK PREMIUM, confirm the message on the computerscreen, make sure that genuine Canon FINE cartridges are all installed properly, then start printing again.
650

4103
Cause
Cannot perform printing with the current print settings.
Action
Press the machine's Stop button, to cancel printing.
Then, change the print settings and print again.
651

5011
Cause
Printer error has occurred.
Action
Turn off the machine, and unplug the power cord of the machine from the power supply.
Plug the machine back in and turn the machine back on.
If the problem is not resolved, contact the service center.
Important• If you disconnect the power plug, all the faxes stored in the machine's memory are deleted.
652

5012
Cause
Printer error has occurred.
Action
Turn off the machine, and unplug the power cord of the machine from the power supply.
Plug the machine back in and turn the machine back on.
If the problem is not resolved, contact the service center.
Important• If you disconnect the power plug, all the faxes stored in the machine's memory are deleted.
653

5040
Cause
Printer error has occurred.
Action
Turn off the machine, and unplug the power cord of the machine from the power supply.
Plug the machine back in and turn the machine back on.
If the problem is not resolved, contact the service center.
Important• If you disconnect the power plug, all the faxes stored in the machine's memory are deleted.
654

5100
Cause
Printer error has occurred.
Action
Cancel printing, turn off the machine. Then clear the jammed paper or protective material that ispreventing the FINE cartridge holder from moving, and turn on the machine again.
If the problem is not resolved, contact the service center.
Important• When you clear the jammed paper or protective material that is preventing the FINE cartridge holder
from moving, be careful not to touch the components inside the machine. The machine may not printout properly if you touch it.
• If you disconnect the power plug, all the faxes stored in the machine's memory are deleted.
655

5200
Cause
Printer error has occurred.
Action
Turn off the machine, and unplug the power cord of the machine from the power supply.
Plug the machine back in and turn the machine back on.
If the problem is not resolved, contact the service center.
Important• If you disconnect the power plug, all the faxes stored in the machine's memory are deleted.
656

5400
Cause
Printer error has occurred.
Action
Turn off the machine, and unplug the power cord of the machine from the power supply.
Plug the machine back in and turn the machine back on.
If the problem is not resolved, contact the service center.
Important• If you disconnect the power plug, all the faxes stored in the machine's memory are deleted.
657

5B02
Cause
Printer error has occurred.
Action
Contact the service center.
658

5B03
Cause
Printer error has occurred.
Action
Contact the service center.
659

5B04
Cause
Printer error has occurred.
Action
Contact the service center.
660

5B05
Cause
Printer error has occurred.
Action
Contact the service center.
661

5B12
Cause
Printer error has occurred.
Action
Contact the service center.
662

5B13
Cause
Printer error has occurred.
Action
Contact the service center.
663

5B14
Cause
Printer error has occurred.
Action
Contact the service center.
664

5B15
Cause
Printer error has occurred.
Action
Contact the service center.
665

6000
Cause
Printer error has occurred.
Action
Turn off the machine, and unplug the power cord of the machine from the power supply.
Plug the machine back in and turn the machine back on.
If the problem is not resolved, contact the service center.
Important• If you disconnect the power plug, all the faxes stored in the machine's memory are deleted.
666

6500
Cause
Printer error has occurred.
Action
Turn off the machine, and unplug the power cord of the machine from the power supply.
Plug the machine back in and turn the machine back on.
If the problem is not resolved, contact the service center.
Important• If you disconnect the power plug, all the faxes stored in the machine's memory are deleted.
667

6800
Cause
Printer error has occurred.
Action
Turn off the machine, and unplug the power cord of the machine from the power supply.
Plug the machine back in and turn the machine back on.
If the problem is not resolved, contact the service center.
Important• If you disconnect the power plug, all the faxes stored in the machine's memory are deleted.
668

6801
Cause
Printer error has occurred.
Action
Turn off the machine, and unplug the power cord of the machine from the power supply.
Plug the machine back in and turn the machine back on.
If the problem is not resolved, contact the service center.
Important• If you disconnect the power plug, all the faxes stored in the machine's memory are deleted.
669

6900
Cause
Printer error has occurred.
Action
Turn off the machine, and unplug the power cord of the machine from the power supply.
Plug the machine back in and turn the machine back on.
If the problem is not resolved, contact the service center.
Important• If you disconnect the power plug, all the faxes stored in the machine's memory are deleted.
670

6901
Cause
Printer error has occurred.
Action
Turn off the machine, and unplug the power cord of the machine from the power supply.
Plug the machine back in and turn the machine back on.
If the problem is not resolved, contact the service center.
Important• If you disconnect the power plug, all the faxes stored in the machine's memory are deleted.
671

6902
Cause
Printer error has occurred.
Action
Turn off the machine, and unplug the power cord of the machine from the power supply.
Plug the machine back in and turn the machine back on.
If the problem is not resolved, contact the service center.
Important• If you disconnect the power plug, all the faxes stored in the machine's memory are deleted.
672

6910
Cause
Printer error has occurred.
Action
Turn off the machine, and unplug the power cord of the machine from the power supply.
Plug the machine back in and turn the machine back on.
If the problem is not resolved, contact the service center.
Important• If you disconnect the power plug, all the faxes stored in the machine's memory are deleted.
673

6911
Cause
Printer error has occurred.
Action
Turn off the machine, and unplug the power cord of the machine from the power supply.
Plug the machine back in and turn the machine back on.
If the problem is not resolved, contact the service center.
Important• If you disconnect the power plug, all the faxes stored in the machine's memory are deleted.
674

6930
Cause
Printer error has occurred.
Action
Turn off the machine, and unplug the power cord of the machine from the power supply.
Plug the machine back in and turn the machine back on.
If the problem is not resolved, contact the service center.
Important• If you disconnect the power plug, all the faxes stored in the machine's memory are deleted.
675

6931
Cause
Printer error has occurred.
Action
Turn off the machine, and unplug the power cord of the machine from the power supply.
Plug the machine back in and turn the machine back on.
If the problem is not resolved, contact the service center.
Important• If you disconnect the power plug, all the faxes stored in the machine's memory are deleted.
676

6932
Cause
Printer error has occurred.
Action
Turn off the machine, and unplug the power cord of the machine from the power supply.
Plug the machine back in and turn the machine back on.
If the problem is not resolved, contact the service center.
Important• If you disconnect the power plug, all the faxes stored in the machine's memory are deleted.
677
6933
Cause
Printer error has occurred.
Action
Turn off the machine, and unplug the power cord of the machine from the power supply.
Plug the machine back in and turn the machine back on.
If the problem is not resolved, contact the service center.
Important• If you disconnect the power plug, all the faxes stored in the machine's memory are deleted.
678

6936
Cause
Printer error has occurred.
Action
Turn off the machine, and unplug the power cord of the machine from the power supply.
Plug the machine back in and turn the machine back on.
If the problem is not resolved, contact the service center.
Important• If you disconnect the power plug, all the faxes stored in the machine's memory are deleted.
679

6937
Cause
Printer error has occurred.
Action
Turn off the machine, and unplug the power cord of the machine from the power supply.
Plug the machine back in and turn the machine back on.
If the problem is not resolved, contact the service center.
Important• If you disconnect the power plug, all the faxes stored in the machine's memory are deleted.
680

6938
Cause
Printer error has occurred.
Action
Turn off the machine, and unplug the power cord of the machine from the power supply.
Plug the machine back in and turn the machine back on.
If the problem is not resolved, contact the service center.
Important• If you disconnect the power plug, all the faxes stored in the machine's memory are deleted.
681

6939
Cause
Printer error has occurred.
Action
Turn off the machine, and unplug the power cord of the machine from the power supply.
Plug the machine back in and turn the machine back on.
If the problem is not resolved, contact the service center.
Important• If you disconnect the power plug, all the faxes stored in the machine's memory are deleted.
682

693A
Cause
Printer error has occurred.
Action
Turn off the machine, and unplug the power cord of the machine from the power supply.
Plug the machine back in and turn the machine back on.
If the problem is not resolved, contact the service center.
Important• If you disconnect the power plug, all the faxes stored in the machine's memory are deleted.
683

6940
Cause
Printer error has occurred.
Action
Turn off the machine, and unplug the power cord of the machine from the power supply.
Plug the machine back in and turn the machine back on.
If the problem is not resolved, contact the service center.
Important• If you disconnect the power plug, all the faxes stored in the machine's memory are deleted.
684

6941
Cause
Printer error has occurred.
Action
Turn off the machine, and unplug the power cord of the machine from the power supply.
Plug the machine back in and turn the machine back on.
If the problem is not resolved, contact the service center.
Important• If you disconnect the power plug, all the faxes stored in the machine's memory are deleted.
685

6942
Cause
Printer error has occurred.
Action
Turn off the machine, and unplug the power cord of the machine from the power supply.
Plug the machine back in and turn the machine back on.
If the problem is not resolved, contact the service center.
Important• If you disconnect the power plug, all the faxes stored in the machine's memory are deleted.
686

6943
Cause
Printer error has occurred.
Action
Turn off the machine, and unplug the power cord of the machine from the power supply.
Plug the machine back in and turn the machine back on.
If the problem is not resolved, contact the service center.
Important• If you disconnect the power plug, all the faxes stored in the machine's memory are deleted.
687

6944
Cause
Printer error has occurred.
Action
Turn off the machine, and unplug the power cord of the machine from the power supply.
Plug the machine back in and turn the machine back on.
If the problem is not resolved, contact the service center.
Important• If you disconnect the power plug, all the faxes stored in the machine's memory are deleted.
688

6945
Cause
Printer error has occurred.
Action
Turn off the machine, and unplug the power cord of the machine from the power supply.
Plug the machine back in and turn the machine back on.
If the problem is not resolved, contact the service center.
Important• If you disconnect the power plug, all the faxes stored in the machine's memory are deleted.
689

6946
Cause
Printer error has occurred.
Action
Turn off the machine, and unplug the power cord of the machine from the power supply.
Plug the machine back in and turn the machine back on.
If the problem is not resolved, contact the service center.
Important• If you disconnect the power plug, all the faxes stored in the machine's memory are deleted.
690

9500
Cause
Printer error has occurred.
Action
Turn off the machine, and unplug the power cord of the machine from the power supply.
Plug the machine back in and turn the machine back on.
If the problem is not resolved, contact the service center.
Important• If you disconnect the power plug, all the faxes stored in the machine's memory are deleted.
691

B200
Cause
An error requiring you to contact the service center has occurred.
Action
Turn off the machine, and unplug the power cord of the machine from the power supply.
Contact the service center.
Important• If you disconnect the power plug, all the faxes stored in the machine's memory are deleted.
692

B201
Cause
An error requiring you to contact the service center has occurred.
Action
Turn off the machine, and unplug the power cord of the machine from the power supply.
Contact the service center.
Important• If you disconnect the power plug, all the faxes stored in the machine's memory are deleted.
693