online cesr/cegpr application user guide · 2020. 5. 15. · cgs egyptian medical syndicate 2018...
TRANSCRIPT

Online CESR/CEGPR Application – User Guide
Contents
Contents
Introduction ................................................................................................................. 2
Electronic evidence ................................................................................................... 2
What can I upload? ................................................................................................... 3
Handy hints for your CESR/CEGPR application ............................................................ 4
Evidence statuses ..................................................................................................... 5
Documentary evidence .............................................................................................. 6
The online application: a step-by-step guide ................................................................ 12
First steps .............................................................................................................. 12
Completing the online application ............................................................................ 17
Step 1 – specialty details ...................................................................................... 17
Step 2 – qualification details and professional experience ....................................... 18
Step 3 – adding details of your referees ................................................................ 20
Step 4 – registration and licensing history ............................................................. 21
Step 5 – your evidence summary .......................................................................... 22
Step 6 – adding details of your verifiers ................................................................ 28
Step 7 – Final declaration and payment ................................................................ 29
Submitting additional evidence ................................................................................ 31
Step 1 – viewing the Adviser’s comments .............................................................. 31
Step 2 – submitting additional evidence ................................................................ 33
Review applications .................................................................................................... 36
Making a Review application .................................................................................... 36
Step 1 – applying for a Review via GMC Online ...................................................... 36

2
Step 2 – submitting electronic evidence ................................................................ 38
Step 3 – completing the remainder of the online application ................................... 42
Review applications: providing additional evidence .................................................... 46
Step 1 – viewing the Adviser’s comments .............................................................. 46
Step 2 – submitting additional evidence ................................................................ 49
Contacting us ......................................................................................................... 52
Annex 1 – Troubleshooting ...................................................................................... 53
Index – useful links ................................................................................................. 56
Introduction
This guide has been produced to aide applicants applying for the Certificate of Eligibility
for Specialist or GP Registration (CESR/CEGPR) via GMC Online.
Electronic evidence
Electronic evidence can be uploaded for each of the different evidence sections of the
CESR/CEGPR application. The online application remains open for 12 months, meaning
that it can be used as a portfolio to gather evidence against each of the different sections.
The online application allows Applications Advisers to share guidance with you
electronically through GMC Online, making the application process faster and more secure.

3
What can I upload?
It’s important that you provide the evidence requested for each area of the CESR/CEGPR
application.
Through the online application, you can upload the following electronic files:
✓ .doc
✓ .ppt
✓ .xls
All documents that you upload will be stored in a read only format. Once you upload a
document it won’t be possible to update it unless you remove the whole document and re-
upload it.
We ask that you don’t provide file types other than those listed above as the
quality in other file types isn’t as good, therefore we’re unlikely to be able to
accept them.

4
Handy hints for your CESR/CEGPR application
Our website contains lots of guidance to help you with your CESR/CEGPR application – a
list of useful links can be found in the index.
Our Applications Advisers have produced a list of their top tips for CESR/CEGPR applicants:
1 Group your evidence – you don’t need to upload every document
separately and should group this according to the table below – you
shouldn’t provide more than 150 uploads in your application (around 1000
pages of evidence)
2 Describe your documents – ensure your documents have a title that
matches your evidence pro-forma and provide a concise and accurate
description for each upload – if your evidence isn’t clear it will be returned
to you
3 Don’t duplicate – don’t provide the same piece of evidence more than
once as it will take us longer to process your application – you can cross-
reference evidence in the summary of evidence you’re providing for a
section in your application
4 Verification of evidence – it’s important that your evidence meets these
requirements. If it hasn’t been verified, it won’t be seen by the Royal
College or Faculty. Further guidance on verification can be found here
5 Ensure you submit evidence of your eligibility – this should be either
a specialist medical qualification or an employment letter detailing the
specialist medical training that makes you eligible
6 Familiarise yourself with the curriculum – this is what your
application will be assessed against; it’s vital that you can demonstrate your
equivalence to this in full
7 Read the specialty specific guidance (SSG) for the specialty you’re
applying in – the online application gives a brief overview of what’s required
for each area of the application; the SSG goes into much more detail
8 Make sure your evidence is anonymised – any evidence that doesn’t
meet anonymisation requirements won’t be seen by the Royal College or
Faculty

5
9 Make sure your CV meets our guidance; and your employment history
matches your CV
10 Listen to your adviser – they are experts in processing these
applications
Evidence statuses
Not started – this is the default status and indicates that you have not yet
started an evidence section
In progress – whilst you collate the evidence for your application, you can
select this status. This allows you to keep track of which sections of the
application you’ll need to revisit
Evidence uploaded – if you’re providing electronic evidence for a particular
section, you should select this status. If you’re providing a mixture of
hardcopy and electronic evidence for a particular section, select this status
and tick the box to confirm that additional hardcopy evidence will be provided
Not submitting evidence – if you’re not providing any evidence for a
particular section, you should select this status and provide details of why you
aren’t providing evidence
Hardcopy evidence only – if you’re only providing hardcopy evidence for a
particular section, select this status

6
Documentary evidence
Below you’ll find a table outlining which types of evidence you can upload electronically
and an example of the description you could provide for each evidence type. You need to
provide a clear and concise description for each document that you’re uploading.
You should group evidence together as noted below before uploading your evidence
rather than uploading each piece of evidence individually. You cannot submit
documents from different hospitals/institutions in one attachment. Where you
have the same type of document, you can group these but will need to group them in to
separate hospital/institution and upload as separate attachments.
Ensure that documents which have multiple pages are fully anonymised before you upload
them. If one page in an uploaded document has not been anonymised the whole
document including the data will be deleted from your application and need to be
resubmitted.
Do not upload blank pages within your documents.
You should also refer to the Specialty Specific Guidance for information on any further
specific requirements on presentation of your evidence for the specialty you are applying
in which may not be listed below.
All evidence which needs translating will need to be submitted as hard copy in line with
our guidance.
Document title
You must give an appropriate title to each document you upload electronically. The title of
the document must list (unless otherwise suggested below):
The type of document it is
The date of the document, or dates the document covers
The institution the document is from
It’s really important you use the naming conventions and evidence groupings suggested
below for evidence you’re uploading electronically – this will help us process your
application more quickly.
Note: The name of the file you’re uploading cannot be the same for different attachments
or include any of the following characters:

7
\ / : * ? “< > |
If you upload a document with one of the above characters in the title of the
document, we will not be able to view this in your application. Please ensure none
of the file names of your documents include the above before uploading these in the
application.
Type of evidence I am
submitting
How can I upload
this evidence?
Can I submit this
evidence online?
Example of what
document should
be called
Primary Medical
Qualification (PMQ) –
application with full
registration only
N/A As this evidence
needs authenticating
this must be
submitted as a hard
copy
MB BCh Oxford
University 1982
Specialist Medical
Qualification (SMQ)
Upload each
qualification you are
providing as a separate
document
Yes, however if your
SMQ is from outside
the UK this will need
authenticating and
must be submitted
as a hard copy
MRCP 2012
Curriculum or syllabus Upload each curriculum
you are providing as a
separate document
Yes, however if your
curriculum is from
training outside the
UK this will need
authenticating and
must be submitted
as a hard copy
Clinical Radiology
Specialty Curriculum
–Mumbai University
Hospitals - 2007
Specialist registration
outside the UK
N/A As this evidence
needs authenticating
this must be
submitted as a hard
copy
CGS Egyptian
Medical Syndicate
2018
Honours and prizes Group evidence in this
section as one bundle
Yes Honours and prizes
2015-2018

8
Other relevant
qualifications and
certificates
Group evidence in this
section as one bundle
Yes Other relevant
qualifications 2015-
2018
Appraisals Group by hospital /
institution
Yes Appraisals 2016 -
2019 Stepping Hill
Hospital
Assessments / SLEs /
WPBAs
Group by hospital /
institution
Also refer to your SSG
to see if there are any
other requirements.
Yes DOPS – Stepping
Hill Hospital - 2015-
2016
Ritas, ARCPs and
training assessments
Group evidence in this
section by year of
training
Yes ARCP outcome 1
ST3
360 and multisource
feedback
Group evidence in this
section as one bundle
Yes 360 feedback 2015-
2018
Personal development
plan (PDP)
Group by hospital /
institution
Yes PDP 2015-2018
Stepping Hill
Hospital
Logbooks Group by hospital /
institution
We suggest you divide
these by year
Yes Logbook
01/01/2017-
07/07/2017
Stepping Hill
Hospital
Consolidation,
cumulative data sheets
and statistics
Group by hospital /
institution
Yes Total procedures
2015-2017 –
Stepping Hill
Hospital
Medical reports Group by procedure /
competence covered
and institution
Yes Medical reports for
acute presentations
– Stepping Hill
Hospital 2015-2017
Case histories Group by procedure /
competence covered
and institution
Yes Case histories for
acute presentations

9
– Stepping Hill
Hospital 2015-2017
Referral letters Group by procedure /
competence covered
and institution
Yes Referral letters for
surgical opinion –
Stepping Hill
Hospital 2015-2017
Patient lists Group by hospital /
institution
Yes Outpatient clinics list
2015-2016 –
Stepping Hill
Hospital
Departmental (or
trust) workload
statistics
Group by hospital /
institution
Yes Department
statistics – Stepping
Hill Hospital – 2016-
2017
Rotas, timetables and
job plans
Group by hospital /
institution
Yes On call rotas –
Stepping Hill
Hospital 2017-2019
Courses relevant to the
curriculum
Group your evidence in
this section as one
bundle
Yes Courses relevant to
the curriculum –
2015-2017
Employment letters,
job descriptions and
job plans
Group by hospital /
institution
Yes Employment letter,
contract and job
plan – Stepping Hill
Hospital 2013-2014
Research publications
and presentations
Group by hospital /
institution
Yes Presentations –
Stepping Hill
Hospital – 2015-
2016
CPD Group evidence in this
section as one bundle
Yes CPD diary and
certificates 2015-
2018
Membership of
professional bodies
and organisations
Group evidence in this
section as one bundle
Yes Membership details
2015-2017

10
Teaching and training Group by hospital /
institution
Yes Rota, lecture slides
and feedback –
Stepping Hill – 2017
Audit Group evidence relating
to each audit
Yes ‘Audit and re-audit
on clinical outcomes
2015-2016’ –
Stepping Hill
Hospital
Reflective diaries Group all this evidence
in one document
Yes Reflective diaries
2014-2019
Service improvement
and clinical
governance
Group by hospital /
institution
Yes MDT attendance
and minutes –
Stepping Hill
Hospital - 2017
Health and Safety Group evidence in one
bundle
Yes Mandatory training
2016-2019
Communication Group by hospital /
institution
Yes Communication
evidence – Stepping
Hill Hospital 2015-
2016
Working in
Multidisciplinary teams
Group by hospital /
institution
Yes MDT attendance
and minutes –
Stepping Hill
Hospital - 2017
Management and
leadership experience
Group by hospital /
institution
Yes Rota management –
Stepping Hill
Hospital 2016-2017
Chairing meetings and
leading projects
Group by hospital /
institution
Yes Review of
medications
prescribed –
Stepping Hill
Hospital 2015-2016
Testimonials from
colleagues
Group by hospital /
institution
Yes Testimonials from
colleagues at

11
Stepping Hill
Hospital 2015-2018
Thank you letters Group evidence in this
section as one bundle
Yes Thank you letters
2015-2018
Complaints Group by hospital /
institution
Yes Complaints –
Stepping Hill
Hospital 2018

12
The online application: a step-by-step guide
First steps
Before you can begin your CESR/CEGPR application, you must have a GMC Online
account. You can register for a GMC Online account through the GMC website.
If you already have a GMC Online account, you will need to log on to this. If you do not
have a GMC Online account, please follow the guidance below.
I’m already registered with the GMC
If you already hold GMC registration, you will need to follow the below steps in order to
begin your CESR/CEGPR application:
a Once on your GMC Online homepage, click the ‘My Registration’ tab on the left
side of the screen.
This will bring up a list of three options – you’ll need to select ‘My Applications’

13
b The ‘My Applications’ page will bring up a list of your past and present applications
with the GMC. To open a new application (e.g. CESR/CEGPR) click the ‘Apply’
button
c You will be prompted to read important information and guidance – once you have
done this, select ‘Continue with application’
d You’ll be asked a series of questions regarding your GMC registration. You should
review these carefully, selecting the relevant answer. You’ll then be asked if you
have an EC right – you should read the EC rights factsheet if you’re unsure about
this
e You’ll then be asked if you want to apply for entry onto the Specialist or GP Register
– you’ll need to select ‘Yes’ for this
f Following this, you’ll be asked a series of questions regarding your eligibility for
CESR/CEGPR – you should select the relevant answer. If you’re unsure about your
eligibility, please review our guidance
g If you meet the eligibility requirements, you’ll then be given the option to apply for
either:
▪ Entry onto the Specialist Register with a CESR
▪ Entry onto the GP Register with a CEGPR

14
h Select ‘Apply’ for the relevant application
i You’ll now need to follow the guidance on completing the online CESR/CEGPR
application.

15
I am not registered with the GMC If you do not hold GMC registration, you will need to follow the below steps in order to
begin our CESR/CEGPR application:
a Once on your GMC Online homepage, click the ‘My Registration’ tab on the left
side of the screen. This will bring up a list of three options – you’ll need to select
‘My Applications’
b The ‘My Applications’ page will bring up a list of your past and present applications
with the GMC. To open a new application (e.g. CESR/CEGPR) click the ‘Apply’
button
c You will be prompted to read important information and guidance – once you have
done this, select ‘Continue with application’

16
d You’ll then be asked if you have an EC right – you should read the EC rights
factsheet if you’re unsure about this
e If you selected ‘No’ to the above, you’ll be asked if you want to apply for entry onto
the Specialist or GP Register – you’ll need to select ‘Yes’ for this
f Following this, you’ll be asked a series of questions regarding you eligibility for
CESR/CEGPR. You should select the relevant answer. If you’re unsure about your
eligibility for CESR/CEGPR, please review our guidance
g If you meet the eligibility requirements, you’ll then be given the option to apply for
either:
▪ Full registration and entry onto the Specialist Register with a CESR
▪ Full registration and entry onto the GP Register with a CEGPR
h Select ‘Apply’ for the relevant application
i You’ll now need to follow the guidance on completing the online CESR/CEGPR
application.

17
Completing the online application
The below steps will guide you through each section of the CESR/CEGPR online
application.
Step 1 – specialty details
a You will need to select the relevant CCT specialty* that you’re applying in from
the drop down list. If you’re applying in a non-CCT specialty, you’ll need to record
the details in the specified box.
If you’re unsure whether your specialty is an approved CCT specialty, please refer to
the GMC approved CCT curricula list.
b Once you have added the specialty, you will be asked to confirm that the specialty
details are correct.
Note: once confirmed, it will not be possible to change your specialty without
withdrawing the whole application and starting again
* Please refer to our guidance on CCT specialties and non-CCT specialties
If you’re applying for a CESR/CEGPR with full GMC registration you will
need to complete the following additional steps:
You’ll be asked to confirm your name details
If your name is different to the one on your PMQ, you should
select ‘Yes’ – you will then need to provide further details

18
Step 2 – qualification details and professional experience
You’ll need to record all of your relevant qualifications – this should include:
Primary medical qualification (PMQ)
Postgraduate specialist medical qualifications (SMQ)
Other relevant qualifications
For each qualification that you list, you must include:
Full title of the qualification
University or awarding body, including country
Award date
a To add a qualification, select the ‘Add Qualification’ button as highlighted below
b This will take you to a screen where you’ll need to enter the details of each
qualification.
Note: each field on this screen must be completed

19
c After adding the qualification details, click ‘Save’. This will then take you back to the
previous screen where you can continue to record additional qualifications
d Once you have added all your qualifications, click ‘Next’
e You’ll need to enter the details of your work history (professional experience). You
should provide details of all the posts you’ve held since you were awarded your
PMQ.
Note: you should start with the most recent and work backwards. You’ll also need
to account for any periods where you were unemployed or not engaged in medical
practice. Further guidance on listing your professional experience can be found here.
f To add details of your work history, you’ll need to click ‘Add Experience’, as
highlighted below

20
g This will then take you to a screen where you’ll need to enter the details of each of
the individual posts you have undertaken. Each field on this screen must be
completed
h After adding the post details, click ‘Save’. This will then take you back to the
previous screen where you can continue to record your professional experience
i If you want to edit an entry after recording it, select the ‘View/Edit’ option next to
each entry
j Once you have added your work history, click ‘Next’
Step 3 – adding details of your referees
As part of your CESR/CEGPR application, you must nominate a minimum of four referees.
For advice on selecting your referees, you should refer to our guidance.
a To add a referee, select ‘Add referee’

21
b This will take you to a screen where you’ll need to enter the details of each of your
nominated referees. Each field on this screen must be completed
Note: You must select whether the referee is your primary referee – for further help
refer to our guidance. If your referee has GMC registration, you must provide their
GMC reference number
c After adding the referee details, click ‘Save’ – this will then take you back to the
previous screen where you can continue to add your nominated referees
d If you want to edit an entry after recording it, select the ‘View/Edit’ option next to
each entry
e Once you have added your nominated referees, click ‘Next’
Step 4 – registration and licensing history
You’ll need to add the details of all medical regulatory authorities that you’ve held
registration with in the last five years

22
a To add the details of your registration and licensing, click the ‘Add registration…’
button
b This will take you to a screen where you’ll need to enter the details of your
registration / licensing history. Each field on this screen must be completed
Note: you do not need to include your registration with the GMC
Step 5 – your evidence summary
The new online application for CESR/CEGPR will allow you to upload your evidence
electronically.
The evidence summary page contains a table which outlines:
1 The areas of competence you need to demonstrate
2 A summary of what you need to demonstrate
3 Evidence we recommend you provide

23
These three columns mirror the Specialty Specific Guidance (SSG) for your chosen
specialty.
The table on the evidence summary page will also display the details of the documents
you’re providing for each area of the CESR/CEGPR application, and a status for each
section.
In order to progress your application, you must ensure that you’ve selected a relevant
status for each evidence section. A full list and description of the evidence statuses can be
found at the start of this guide.
You must also ensure that you’ve provided an appropriate description for each document
you’ve uploaded. Please refer to the table above for further guidance.
You cannot progress the application until all sections have been completed. If a section of
the evidence summary remains incomplete you’ll receive a specific error message – further
information on error messages / troubleshooting can be found in Annex 1.
To add your documentary evidence electronically, follow the below steps:
a Click ‘Edit details of what I’m providing’ in the relevant evidence section, as
outlined below

24
b This will then take you to the description of evidence page. This page provides
details on what you need to show for this section, the evidence we recommend you
provide, and also a description of the statuses for this section
c You’ll need to enter a description of the evidence you’re providing for this section in
the text box. You should add a clear and concise description as noted above
d Once you’ve entered a description, you’ll need to select the relevant evidence status
from the dropdown list
e Once you’ve provided a description and selected the relevant status, you’ll need to
click ‘Save’. This will take you back to the main evidence summary page
If you’re providing any hard copy evidence for a section,
you must ensure that you tick the ‘Additional hardcopy
evidence…’ box
If you intend to only supply hardcopy evidence for a particular
section, you must ensure that the status reflects this

25
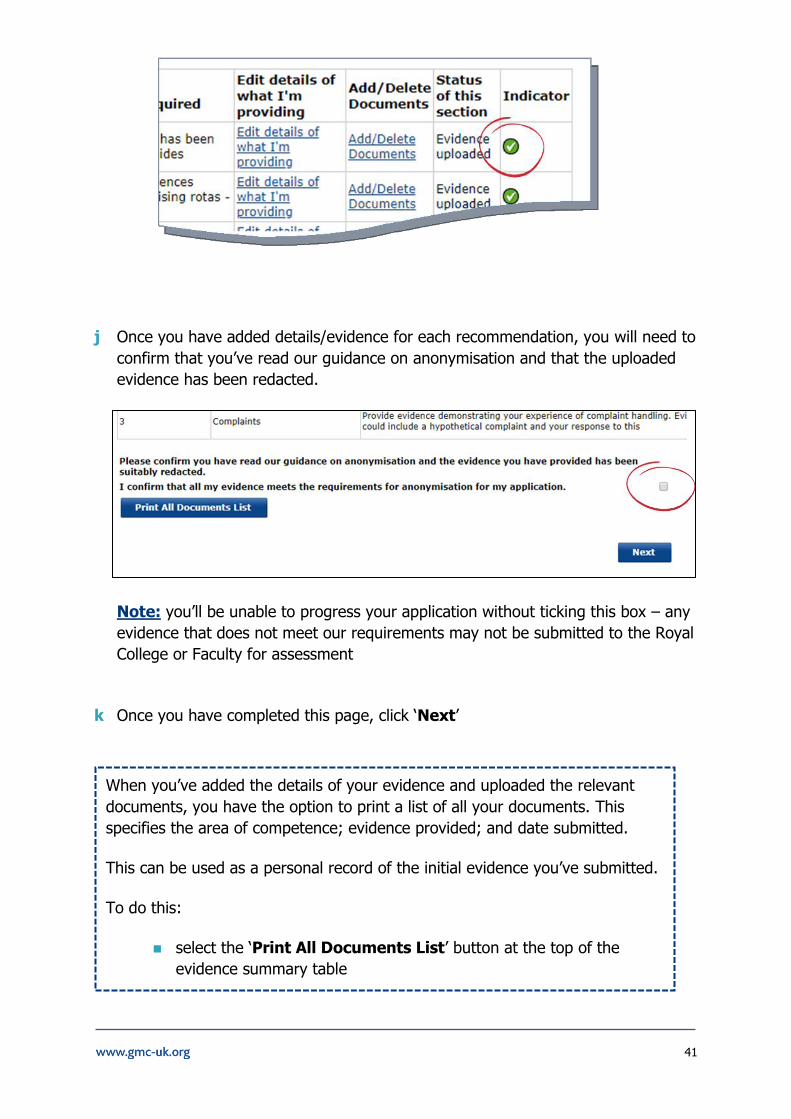
f You’ll note that the indicator tab for the evidence section you’ve provided details for
will show a red cross.
To complete this evidence section, follow the remaining steps below…
g To upload the electronic evidence, select the ‘Add/Delete Documents’ option for
the relevant evidence section on the table
h This will take you to the document upload page. This page provides guidance on
uploading evidence, plus what you’re required to show for the particular evidence
section and the evidence we recommend you provide

26
i To add your electronic evidence, select the ‘Add Document’ button
j This will take you to a page where you can upload the relevant document. You’ll
need to select the ‘Choose file / Browse’ button and add a brief description of the
document you’re uploading
Note: There’s the option to remove a document before submitting the overall
application. You should ensure that you’ve uploaded the correct documents before
submitting your application.
Important: You must not upload any documents which are password protected
k You can add as many documents as necessary for each section. Once you’ve
finished uploading documents for a particular section, click ‘Done’

27
l This will take you to the evidence summary page. You’ll note that the indicator tab
for the evidence section you’ve uploaded evidence for will now show a green tick
m Once you have added details/evidence for each section, you will need to confirm
that you’ve read our guidance on anonymisation and that the uploaded evidence has
been redacted.
Note: you’ll be unable to progress your application without ticking this box – any
evidence that does not meet our requirements may not be submitted to the Royal
College or Faculty for assessment
n Once you’ve completed this page, click ‘Next’
Complete the rest of the evidence sections following the above points
When you’ve added the details of your evidence and uploaded the relevant
documents, you have the option to print a list of all your documents. This
specifies the area of competence; evidence provided; and date submitted.
This can be used as a personal record of the initial evidence you’ve submitted.
To do this:
select the ‘Print All Documents List’ button at the top of the
evidence summary table

28
Step 6 – adding details of your verifiers
You must provide the details of a verifier for each hospital or institution that you are
providing evidence from.
For further details on verifying your evidence and selecting verifiers, please refer to our
guidance.
a To add a verifier, select ‘Add verifier’
b This will take you to a screen where you will need to enter the details of your
nominated verifier. Please note that each field on this screen must be completed.

29
Note: if your verifier has GMC registration, you must provide their GMC reference
number
c After adding the verifier details, click ‘Save’ – this will then take you back to the
previous screen where you can continue to add the details of your verifiers.
d If you want to edit an entry after recording it, select the ‘View/Edit’ option next to
each entry
e Once you have added the details of all of your nominate verifiers, you must confirm
that you have provided the details of a verifier for all institutions that you are
providing evidence from. You can do this by ticking the declaration box as shown
below
f Once you have added the details of your verifiers, click ‘Next’
Step 7 – Final declaration and payment
a Once you have completed all sections of the application, you’ll be asked to agree to
a final declaration, confirming that the information provided in your application is
true and correct.
b In order to proceed to payment, you will need to check the tick box
c To make the payment for your CESR/CEGPR application, follow the instructions on
the payment pages. Further information regarding specialist/GP application fees can
be found here

30
d Upon receipt of the payment, you’ll be taken to a page setting out the next steps for
processing your application; you will receive further confirmation via email

31
Submitting additional evidence
Once an Adviser on the Specialist Applications Team has reviewed your initial
documentary evidence, they will provide you with information on:
What evidence they’ve accepted
What evidence they’re unable to accept (including the reasons for this)
Advice and guidance on how your application could be strengthened
You’ll have up to 60 days to provide additional documentary evidence in support of your
CESR/CEGPR application†.
Step 1 – viewing the Adviser’s comments
To view the comments that the Applications Adviser has made on your documentary
evidence, please follow the below steps
a You’ll receive an email (to your GMC registered email address) informing you that
the review of your initial CESR/CEGPR evidence has been completed. This will invite
you to log on to your GMC Online account to view the comments
b On your GMC Online account homepage there will be a ‘View application
documents’ button. Clicking on to this will allow you to see the Adviser’s comments
on the ‘My Documents Summary’ page
† If you’ve submitted a Review application, you’ll have 30 days to provide additional evidence

32
c Once on the ‘My Documents Summary’ page, the Adviser’s comments will be listed
by:
▪ Area of competence – evidence not accepted
▪ Area of competence – evidence accepted
Note: the comments provided by the Adviser are read only; you will not be able to edit
the Adviser comments.
You can also view the Adviser’s comments by
Clicking onto the ‘My Registration’ tab on the left side of your
GMC Online homepage
This will bring up a list of further options, including ‘My
Documents’
Clicking this will allow you to see the Adviser’s comments on the
‘My Documents Summary’ page

33
d The Adviser will select a relevant status for each area of the application:
▪ Accepted – all evidence submitted for this area has been accepted‡
▪ Further information required – the Adviser has suggested ways that
this area could be strengthened
▪ Not accepted – evidence in this area has not been accepted§
e To view the Adviser’s comments for each individual document in more detail, click
onto the ‘Add/Delete Documents’ for each section that has been listed under the
‘Not Accepted’ table
f You have the option to remove documents with the status of ‘Not Accepted’. For
example, if the Adviser suggests that the document isn’t relevant (i.e. it’s too old)
you can remove it from your application
g If you want to respond to the Adviser’s comments you will need to go back to ‘My
Documents Summary’ and click ‘Edit details of what I’m providing’ for those
sections with a status of ‘Not Accepted’. You should also use this area to detail the
additional or amended evidence that you’re providing for this section.
Step 2 – submitting additional evidence
Once the Adviser has reviewed your initial evidence – and you have reviewed their
comments – you have the option to submit additional evidence to support your
application. To do this, you should follow the below steps:
h You can submit additional evidence via the ‘My Documents Summary’ page of
your application (refer to step 1, points a-b on how to access this)
‡ Subject to meeting the required verification checks – please see our verification guidance for further
information § This evidence may not meet the GMC’s evidence requirements – e.g. anonymisation / verification
Any evidence that has not been adequately anonymised and contains
patient information will be removed from the online application by the Adviser.
They will notify you of this in their comments; you will need to take action by
redacting the information and resubmitting the document.

34
Note: you can only submit additional electronic evidence for the areas of
competence that have not been accepted
i To submit a new electronic document, click the ‘Add/Delete Documents’ button
next to the relevant area of competence
j This will take you to the document upload page, which lists all accepted and not
accepted documents
To add a new document, click ‘Add Document’
k This will take you to a page where you can upload the relevant document. You’ll
need to select the ‘Choose file / Browse’ button and add a brief description of the
document you’re uploading
35
l There’s the option to remove a document before submitting the overall application.
You should ensure that you’ve uploaded the correct documents before submitting
your application.
m You can add as many documents as necessary for each section. Once you’ve
finished uploading documents for a particular section, click ‘Done’
n This will take you to the ‘My Documents Summary’ page where you can continue to
add further electronic documents
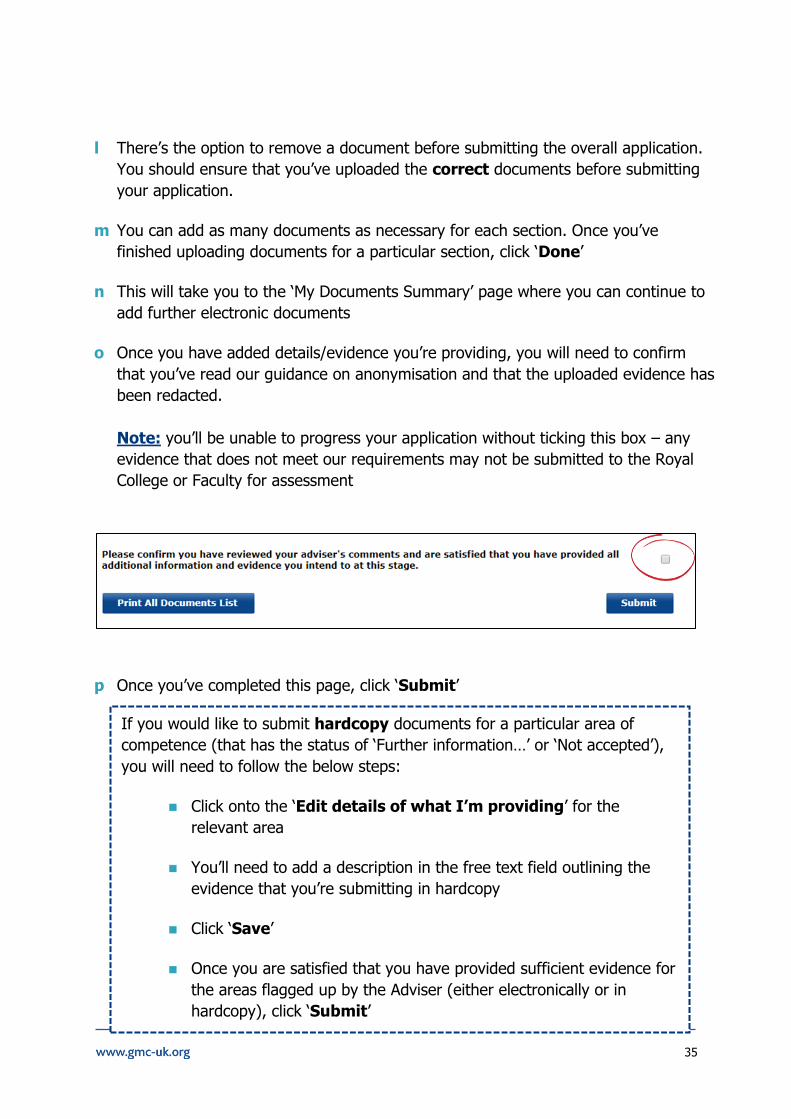
o Once you have added details/evidence you’re providing, you will need to confirm
that you’ve read our guidance on anonymisation and that the uploaded evidence has
been redacted.
Note: you’ll be unable to progress your application without ticking this box – any
evidence that does not meet our requirements may not be submitted to the Royal
College or Faculty for assessment
p Once you’ve completed this page, click ‘Submit’
If you would like to submit hardcopy documents for a particular area of
competence (that has the status of ‘Further information…’ or ‘Not accepted’),
you will need to follow the below steps:
Click onto the ‘Edit details of what I’m providing’ for the
relevant area
You’ll need to add a description in the free text field outlining the
evidence that you’re submitting in hardcopy
Click ‘Save’
Once you are satisfied that you have provided sufficient evidence for
the areas flagged up by the Adviser (either electronically or in
hardcopy), click ‘Submit’

36
Review applications
If you have recently received an unsuccessful decision for your CESR/CEGPR application,
you will have the option to apply for a Review.
For this application you are only required to provide evidence to demonstrate that you’ve
met the recommendations provided by the Royal College or Faculty in your initial
CESR/CEGPR evaluation form. Further information on applying for a review can be found
here.
Making a Review application
Step 1 – applying for a Review via GMC Online
a To apply for a Review, you’ll need to log on to your GMC Online account and
navigate to the ‘My Registration’ tab on the left side of the screen. This will bring
up a list of three options; you’ll need to select ‘My Applications’

37
b This will bring up a list of all of your previous applications – you’ll need to select the
‘Apply’ button at the top of the list
c You’ll be prompted to read important information and guidance before opening an
application; once you’ve read this click the ‘Continue with application’ button
d You will then be asked whether you want to apply for a review of the GMC’s decision
regarding your entry onto the Specialist or GP Register (with a CESR/CEGPR
application). you should select ‘Yes’
e This will take you to a page outlining the applications you can make; this should
provide you with one option: Review of your application for Specialist or GP
Registration.

38
Step 2 – submitting electronic evidence
You’ll then be taken to the Recommendations page. This outlines the recommendations
from your unsuccessful CESR/CEGPR application and provides you with the opportunity to
upload electronic evidence to support these recommendations.
Your CV and evidence pro-formas should be uploaded in Recommendation 1
Click ‘Edit details of what I’m providing’ for the recommendation. This will outline the
recommendation; you’ll need to provide a brief description of the evidence you’re
providing in the free text field

39
Note: there’s the option to provide any additional comments regarding the
recommendation in the free text field below – for example, if you feel there has been a
procedural error on our part
a Once you have entered a description, you will need to select the relevant evidence
status from the dropdown list. Please refer to the information at the start of this
guide
You must also ensure that you’ve provided an appropriate description for each
document you’ve uploaded. Please refer to the table above for further guidance.
b Once you have provided a description and selected the relevant status, you will need
to click ‘Save’. This will take you back to the main evidence summary page
c You will note that the indicator tab for the evidence section you’ve provided details
for will show a red cross. To complete this evidence section, follow the remaining
steps below
If you’re any hardcopy evidence for a particular section, you
must ensure that you tick the ‘Additional hardcopy
evidence…’ box
If you intend to only supply hardcopy evidence for a particular
section, you must ensure that the status reflects this

40
d To upload the electronic evidence select the ‘Add/Delete Documents’ option for
the relevant recommendation
e This will take you to the ‘document upload’ page – this page provides guidance on
uploading evidence, plus what you are required to show for the particular
recommendation.
f Click ‘Add Document’
g You will need to select the ‘Choose file / Browse’ button and add a brief
description of the document you’re uploading
Note: There’s the option to remove a document before submitting the overall
application. You should ensure that you’ve uploaded the correct documents before
submitting your application.
Important: You must not upload any documents which are password protected
h You can add as many documents as necessary for each section. Once you’ve
finished uploading documents for a particular section, click ‘Done’
i This will take you to the main recommendation page. You will note that the indicator
tab for the recommendation you’ve uploaded evidence for will now show a green
tick
41
j Once you have added details/evidence for each recommendation, you will need to
confirm that you’ve read our guidance on anonymisation and that the uploaded
evidence has been redacted.
Note: you’ll be unable to progress your application without ticking this box – any
evidence that does not meet our requirements may not be submitted to the Royal
College or Faculty for assessment
k Once you have completed this page, click ‘Next’
When you’ve added the details of your evidence and uploaded the relevant
documents, you have the option to print a list of all your documents. This
specifies the area of competence; evidence provided; and date submitted.
This can be used as a personal record of the initial evidence you’ve submitted.
To do this:
select the ‘Print All Documents List’ button at the top of the
evidence summary table

42
Step 3 – completing the remainder of the online application
a After uploading your documentary evidence in support of your Review application,
you have the option to provide any additional comments. If you do not wish to make
any further comments, select the tick box as highlighted below - Click ‘Next’
b You will need to enter the details of your work history (professional experience).
You should provide details of all posts you’ve held since your last application
c To add details of your work history, you will need to click ‘Add Experience’, as
highlighted below

43
d This will then take you to a screen where you will need to enter the details of each
individual post you have undertaken. Please note that each field on this screen
must be completed
After adding the post details, click ‘Save’ – this will then take you back to the
previous screen where you can continue to record your professional experience.
If you want to edit an entry after recording it, select the ‘View/Edit’ option next to
each entry
e Once you have added your work history, click ‘Next’
f You will need to add the details of all medical regulatory authorities that you have
held registration with in the last five years

44
g To add details of your registration and licensing history, click the ‘Add
registration…’ button.
This will take you to a screen where you will need to enter the details of your
registration/licensing history. Please note that each field on this screen must be
completed.
Note: if you have not held registration or a licence with another medical regulatory
authority since your last application, you do not need to provide any information.
You should click the hyperlink as highlighted above
h By clicking ‘Next’, you’ll be taken to the qualification details screen – you only need
to add the details of any relevant qualifications you have obtained since your last
application.
If you have not obtained any relevant qualifications in the last 12 months, you
should check the tick box.

45
i Once you have completed all sections of the application, you will be asked to agree
to a final declaration, confirming that the information provided in your application is
true and correct. In order to proceed to payment, you will need to check the tick box
j To make the payment for your CESR/CEGPR application, follow the instructions on
the payment pages. Further information regarding specialist/GP application fees can
be found here
Upon receipt of the payment, you’ll be taken to a page setting out the next steps for processing your application; you will receive further confirmation via email

46
Review applications: providing additional evidence
Once an Adviser on the Specialist Applications Team has reviewed your initial
documentary evidence, they will provide you with information on:
What evidence they’ve accepted
What evidence they’re unable to accept (including the reasons for this)
Advice and guidance on how your application could be strengthened
You’ll have up to 30 days to provide additional documentary evidence in support of your
CESR/CEGPR application.
Step 1 – viewing the Adviser’s comments
To view the comments that the Applications Adviser has made on your documentary
evidence, please follow the below steps
a You’ll receive an email (to your GMC registered email address) informing you that
the review of your initial CESR/CEGPR evidence has been completed. This will invite
you to log on to your GMC Online account to view the comments
b On your GMC Online account homepage there will be a ‘View application
documents’ button. Clicking on to this will allow you to see the Adviser’s comments
on the ‘My Documents Summary’ page

47
c Once on the ‘My Documents Summary’ page, the Adviser’s comments will be listed
by:
▪ Not Accepted Recommendations
▪ Accepted Recommendations
d Next to each area of the application a relevant status will be visible
Note: the comments provided by the Adviser are read only; you will not be able to
edit the Adviser comments.
You can also view the Adviser’s comments by
Clicking onto the ‘My Registration’ tab on the left side of your
GMC Online homepage
This will bring up a list of further options, including ‘My
Documents’
Clicking this will allow you to see the Adviser’s comments on the
‘My Documents Summary’ page

48
The adviser will select a relevant status for each area of the application:
▪ Accepted – all evidence submitted for this area has been accepted**
▪ Further information required – the Adviser has suggested ways that
this area could be strengthened
▪ Not accepted – evidence in this area has not been accepted††
e To view the Adviser’s comments for each individual document in more detail, click
onto the ‘Add/Delete Documents’ for each section that has been listed under the
‘Not Accepted’ table
f You have the option to remove documents with the status of ‘Not Accepted’. For
example, if the Adviser suggests that the document isn’t relevant (i.e. it’s too old)
you can remove it from your application
g If you want to respond to the Adviser’s comments you will need to go back to ‘My
Documents Summary’ and click ‘Edit details of what I’m providing’ for those
sections with a status of ‘Not Accepted’. You should also use this area to detail the
additional or amended evidence that you’re providing for this section
h To respond to the Adviser’s comments, go back to ‘My Documents Summary’ and
click ‘Edit details of what I’m providing’ for each section which hasn’t been
accepted
i On this page you have the option to respond to the Adviser’s comments and list any
additional evidence you’re submitting
** Subject to meeting the required verification checks – please see our verification guidance for further
information †† This evidence may not meet the GMC’s evidence requirements – e.g. anonymisation / verification

49
Note: you must add something into the free text field; even if you’re not submitting
additional evidence
Step 2 – submitting additional evidence
Once the Adviser has reviewed your evidence – and you have reviewed their comments –
you have the option to submit additional evidence to support your application. To do this,
you should follow the below steps:
a You can submit additional evidence via the ‘My Documents Summary’ page of
your application (refer to step 1, points a-b on how to access this)
Note: you can only submit additional electronic evidence for the areas of
competence that have not been accepted
b To submit a new electronic document, click the ‘Add/Delete Documents’ button
next to the relevant area of competence
c This will take you to the document upload page, which lists all accepted and not
accepted documents.
To add a new document, click ‘Add Document’

50
d This will take you to a page where you can upload the relevant document. You’ll
need to select the ‘Choose file / Browse’ button and add a brief description of the
document you’re uploading
Important: You must not upload any documents which are password protected
e There’s the option to remove a document before submitting the overall application.
You should ensure that you’ve uploaded the correct documents before submitting
your application.
f You can add as many documents as necessary for each recommendation. Once
you’ve finished uploading documents for a particular section, click ‘Done’
g This will take you to the ‘My Documents Summary’ page where you can continue to
add further electronic documents
h Once you have added details/evidence you’re providing, you will need to confirm
that you’ve read our guidance on anonymisation and that the uploaded evidence has
been redacted.
Note: you’ll be unable to progress your application without ticking this box – any
evidence that does not meet our requirements may not be submitted to the Royal
College or Faculty for assessment
i Once you’ve completed this page, click ‘Submit’

51
If you would like to submit hardcopy documents for a particular area of
competence (that has the status of ‘Further information…’ or ‘Not accepted’),
you will need to follow the below steps:
Click onto the ‘Edit details of what I’m providing’ for the
relevant area
You’ll need to add a description in the free text field outlining the
evidence that you’re submitting in hardcopy
Click ‘Save’
Once you are satisfied that you have provided sufficient evidence for
the areas flagged up by the Adviser (either electronically or in
hardcopy), click ‘Submit’

52
Contacting us
We’re happy to help guide you through the online application or provide further advice on
the requirements for CESR/CEGPR applications
You can contact us by
Phone
0161 923 6602

53
Annex 1 – Troubleshooting
We understand that from time to time, online applications can be tricky to navigate and
errors sometimes occur.
We’ve put together a useful guide to help you if you encounter any errors when you’re
completing your online application.
Referee details page
“Please add at least one referee or tick the option stating you do not wish to provide
referees”
You must enter the details of at least one nominated referee in order to
progress your application
Evidence summary page
“You are unable to submit your application until you have completed all sections, including
the overall status of each section. Please review the sections with a red indicator to ensure
all sections are completed in full”
This will show up if one or more sections of the evidence summary table
haven’t been completed
“You are unable to submit your application until you have read and confirmed the
declaration. Please confirm the declaration and submit your application”
You will receive this message if you haven’t ticked the declaration box at the
bottom of the evidence summary page
Description of evidence page
“Please enter a description for the evidence you are providing for this section”
This message will appear if you’ve not entered a description in the free text
field. To progress the application, you’ll need to add an appropriate

54
description.
“You are unable to continue to the next stage of your application as you have not entered
a reason to confirm why you are not providing evidence for this section. Please enter a
reason to continue with your application”
You’ll receive this message if you’ve selected the ‘not submitting evidence’
status and have ticked the hardcopy evidence box. You’ll need to check that
the statuses are correct for this section and provide a description in the free
text field
Document upload page
“You must specify a file to upload and add a description”
This message will occur if you haven’t uploaded a file, but have pressed the
‘upload’ button – or – if no description has been added for the document
“This file isn’t supported”
You’ll receive this message if you’ve uploaded a file that isn’t supported
Verifier details page
“Please confirm that you have entered details of a verifier for all institutions you are
providing evidence from”
At least one verifier needs to be added when the ‘next’ button is pressed
“You are unable to submit your application until you have provided details of at least one
verifier. Please add verifiers using the instructions below”
At least one verifier needs to be added when the ‘next’ button is pressed and
the declaration boxed has been ticked
“Please enter the title of your verifier”
You must complete all mandatory fields, including your verifier’s title

55
“The email address you have entered is incorrect. Please ensure you enter a valid email
address”
You must enter a valid email address for each verifier
Resubmitting evidence
“You are unable to submit your application until you have completed all sections, including
the overall status of each section. Please review the sections with a red indicator to ensure
all sections are completed in full”
This message will appear if one or more sections haven’t been completed
“You are unable to submit your application until you have read and confirmed the
declaration. Please confirm the declaration and submit your application”
You’ll receive this message if you haven’t ticked the declaration box
Resubmitting evidence – description of evidence page
“Please confirm that you have reviewed your adviser’s comments and are satisfied that
you have provided all additional information and evidence you intend to at this stage”
You’ll need to enter a brief description in the free text field, even if you do not
wish to provide any further evidence

56
Index – useful links
GMC website – www.gmc-uk.org
CESR/CEGPR application – https://www.gmc-uk.org/registration-and-
licensing/join-the-register/registration-applications/cesr-cegpr-application-
process
Specialty curricula – https://www.gmc-uk.org/education/standards-
guidance-and-curricula/curricula
Specialty specific guidance – http://www.gmc-
uk.org/doctors/registration_applications/ssg.asp