online admission user manual -...
TRANSCRIPT

MograSIS
Online Admission User Manual

Document Properties
Copyright Mograsys Pvt. Ltd. Office number 535, Amanora Office Chember, Amanora Town Park, Pune, India.
Owner Lakshmi
Name of the Document Online Admission Portal
Last Updated 19-02-17
Version Version 2.0.1.3
Please send comments, suggestions, or requests for this user guide to [email protected]. Your feedback is appreciated.

Online Admission Index
1. Introduction
2. Login
3. New admission
a. Application Detail
b. Student’s Family Information
c. Student’s Academic information
d. Declaration
4. View Admission

Introduction Use MograSIS Help to learn the MograSIS School Information System (SIS) and to serve as a reference for your daily work. However, before you can begin using MograSIS, the MograSIS administrator at your school must set up the system and import the data from your previous system. Once those steps are complete, you can start using MograSIS. Use MograSIS Help to assist you in navigating in MograSIS. MograSIS Help is updated as MograSIS is updated. Not all versions of MograSIS Help are available in a printable guide. For the most up-to-date information, every application will have Help section on the left side of any page in MograSIS. There are user guides available that include the same information as MograSIS Help for each major release of MograSIS. These user guides include instructions for certain user roles, though these roles will vary depending on your school circumstances. For the most recent version of the printable guides, visit the MograSIS Web site: http://www.mograsys.com/support/documentation/psusersguide.html. This URL is case-sensitive. You are encouraged to read each section of the help that pertains to you. While the introductory sections build a foundation of knowledge that you will use every time you log on to MograSIS, the remaining sections are independent of each other and can be read in any order. However, if you have never used MograSIS before, it will be most helpful if you start with the section Introduction to MograSIS. Whenever you read this guide, keep the following points in mind: • The actions you can perform in MograSIS depend on your job responsibilities and subsequently on your level of
access to MograSIS. Some users only have viewing rights to some pages. Others can view or edit any page. Still other users can view or edit any page, and create new ones as well. Finally, some pages are view-only for everyone. This guide outlines viewing, editing, and creating options for most pages. Depending on your needs and your level of access, only certain options will be applicable and available to you. If you find that your work requires a greater level of access, contact the system administrator at your school.
• Almost all of the activities described in this guide begin by selecting the appropriate student or group; thus, it is
imperative that you understand how to search for and select a student. For detailed instructions on how to do this, refer to the section Search and Select.
• The school and student records used in this guide differ from those displayed on your page as you work. You will
work with real data based on student records at your school. The graphics in this guide are only examples. • In MograSIS, different pages provide some of the same information because you view the same data from a different place each time. If you add, change, or delete data on one page, it will be added, changed, or deleted on other pages that contain the same field(s) of data.
• The reporting features described in this guide are some of the most important you will use in the system. A
MograSIS report is a statement of student or staff records that is produced for viewing or printing and can include
information text in addition to the report listings. MograSIS reports include report cards, lists of class schedules,
lunch balance sheets, lists of current staff members, and attendance records. • Use MograSIS to create numerous types of reports that pull selected data quickly and easily. Select from a list of
pre-configured reports that have preset parameters or create a custom report to include parameters needed for a
specific task. You should read the sections Custom Reports and Pre-Configured Reports before creating a report.
Audience
This Manual is intended as a guide for staff, students and Parents involved, either directly or indirectly, Online Admission Process. It also provides guidance into the error free use of online admission process. It provides procedures and information for specific form, as well as other relevant information.

Login
1. Go to School Online Admission Form website:
http://oa.mograsys.com/School name/OnlineAdmission.html#/Login
2. Navigate to Home page. Use your login credentials
D
3. If User is Logging In for the first time SIGN UP. User can create a new Log IN Id by filling details in the form
provided for SIGN UP.
4. Once clicked on Sign Up after filling authentic data a message flashes if the data is correct
5. Enter data on ‘Access Your Account’. User has to write login credentials and enter the Home page.
New Admission
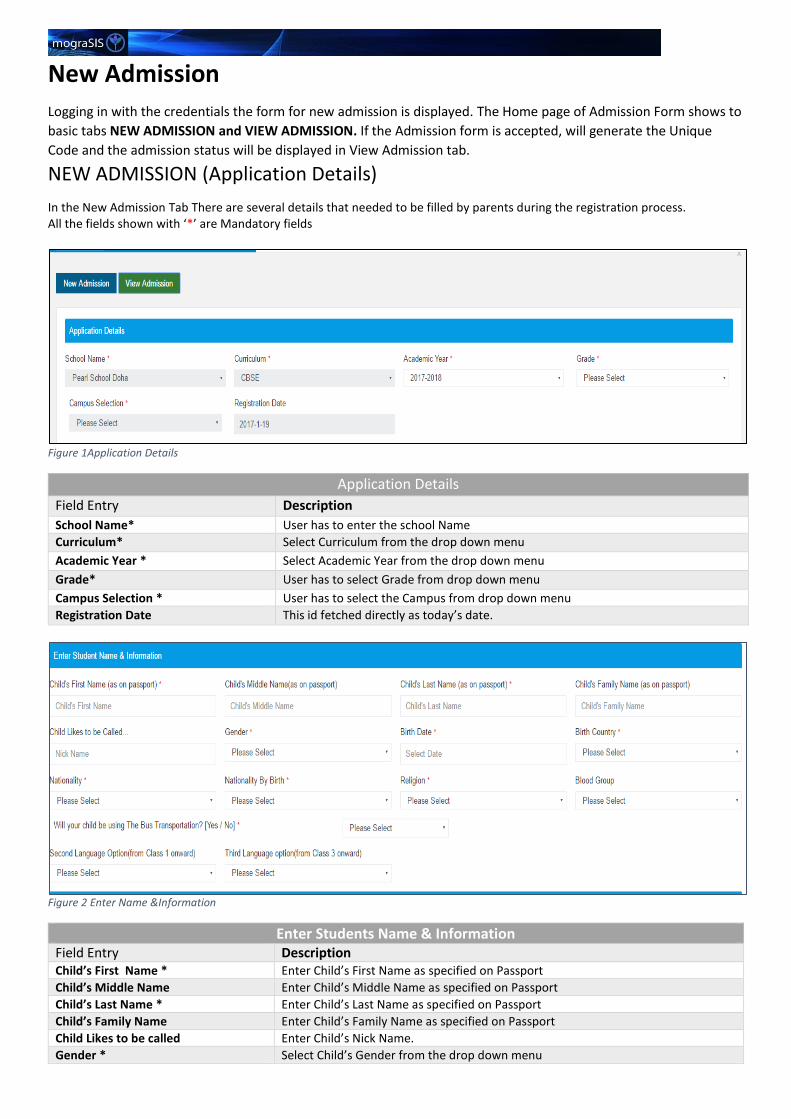
Logging in with the credentials the form for new admission is displayed. The Home page of Admission Form shows to
basic tabs NEW ADMISSION and VIEW ADMISSION. If the Admission form is accepted, will generate the Unique
Code and the admission status will be displayed in View Admission tab.
NEW ADMISSION (Application Details)
In the New Admission Tab There are several details that needed to be filled by parents during the registration process. All the fields shown with ‘*’ are Mandatory fields
Figure 1Application Details
Application Details
Field Entry Description
School Name* User has to enter the school Name
Curriculum* Select Curriculum from the drop down menu
Academic Year * Select Academic Year from the drop down menu
Grade* User has to select Grade from drop down menu
Campus Selection * User has to select the Campus from drop down menu
Registration Date This id fetched directly as today’s date.
Figure 2 Enter Name &Information
Enter Students Name & Information Field Entry Description Child’s First Name * Enter Child’s First Name as specified on Passport
Child’s Middle Name Enter Child’s Middle Name as specified on Passport
Child’s Last Name * Enter Child’s Last Name as specified on Passport
Child’s Family Name Enter Child’s Family Name as specified on Passport
Child Likes to be called Enter Child’s Nick Name.
Gender * Select Child’s Gender from the drop down menu
Birth Date* Enter Child’s Date Of Birth
Birth Country* Select Child’s Birth Country from the drop down menu.
Nationality * Select Child’s Nationality from the drop down menu
Nationality By Birth* Select Child’s Nationality By Birth from the dropdown menu.
Religion* Select Child’s Religion from the dropdown menu
Blood Group Select Child’s blood group from the dropdown menu
Whether availing Transport Service* Select Yes or No accordingly if Transport Service is required.
Second Language Option User can select Second Language option only for students from Class 1 Onwards from the dropdown menu
Third Language Option User can select Second Language option only for students from Class 3 Onwards from the dropdown menu
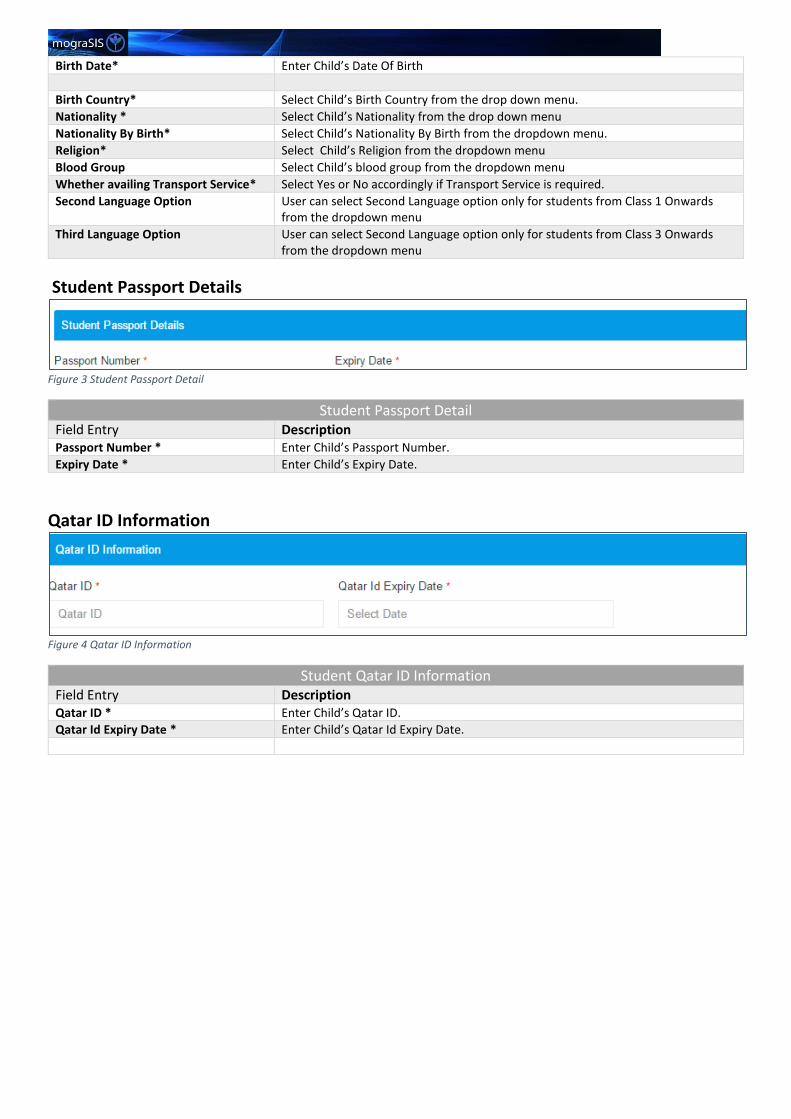
Student Passport Details
Figure 3 Student Passport Detail
Student Passport Detail Field Entry Description Passport Number * Enter Child’s Passport Number.
Expiry Date * Enter Child’s Expiry Date.
Qatar ID Information
Figure 4 Qatar ID Information
Student Qatar ID Information Field Entry Description Qatar ID * Enter Child’s Qatar ID.
Qatar Id Expiry Date * Enter Child’s Qatar Id Expiry Date.
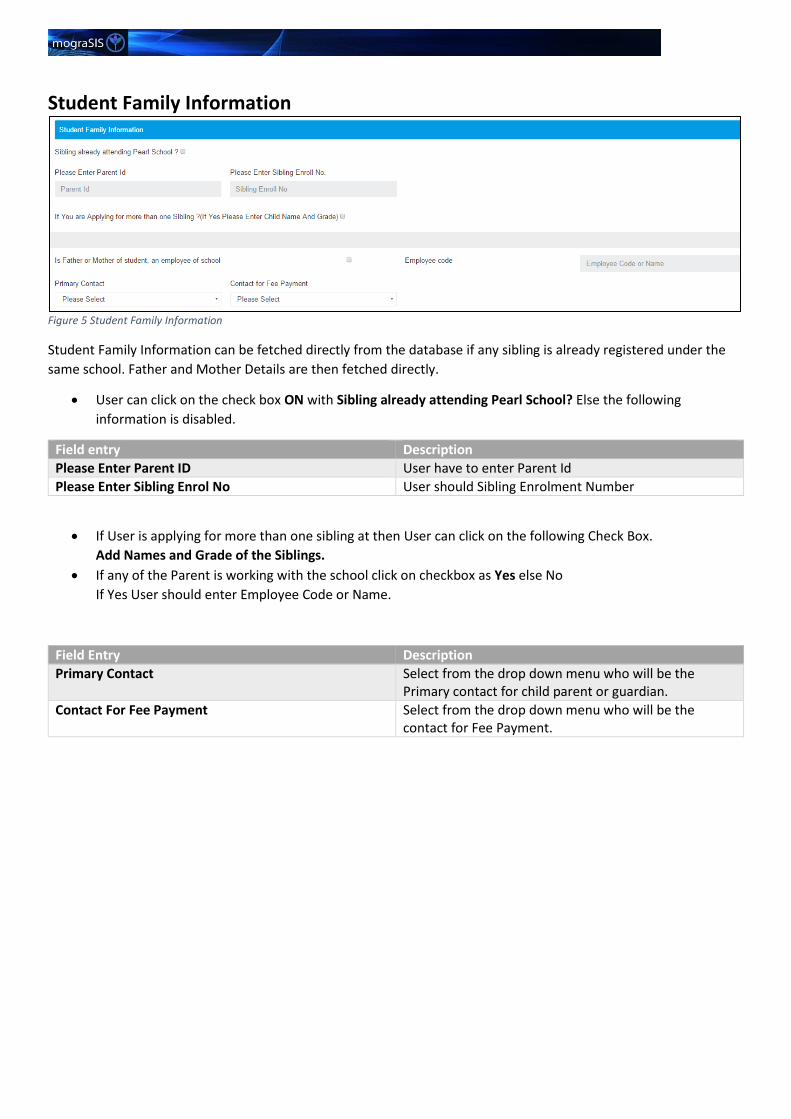
Student Family Information
Figure 5 Student Family Information
Student Family Information can be fetched directly from the database if any sibling is already registered under the
same school. Father and Mother Details are then fetched directly.
User can click on the check box ON with Sibling already attending Pearl School? Else the following
information is disabled.
Field entry Description
Please Enter Parent ID User have to enter Parent Id
Please Enter Sibling Enrol No User should Sibling Enrolment Number
If User is applying for more than one sibling at then User can click on the following Check Box.
Add Names and Grade of the Siblings.
If any of the Parent is working with the school click on checkbox as Yes else No
If Yes User should enter Employee Code or Name.
Field Entry Description
Primary Contact Select from the drop down menu who will be the Primary contact for child parent or guardian.
Contact For Fee Payment Select from the drop down menu who will be the contact for Fee Payment.

Father’s Detail If any sibling is not already studying in the same school. User has to enter Parent details. Enter all the following details about Father.
Figure 6 Father's detail information
Enter Students Name & Information Field Entry Description
In which sphere of school life you can volunteer to help??
User should select what volunteer help will father provide during school life
Salutation* Select the salutation accordingly from the drop down menu First Name * Enter First Name as specified on Passport
Middle Name Enter Father’s Middle Name as specified on Passport
Last Name Enter Father’s Last Name as specified on Passport
Nationality* Select Father’s Nationality from the drop down menu
Qatar Id* Enter Father’s Qatar Id
Apartment Enter Address details (Apartment)
Building Enter Address details (Building)
Street Enter Address details (Street)
Area Enter Address details (Area)
City Enter Address details (city)
State Enter Address details (State)
Country Enter Address details (Country)
P.O.Box Enter Address details (P.O.Box)
Permanent Address Enter Permanent Address in the space provided
Home Tel No Enter Home Tel No.
Mobile Number * Enter Father’s Mobile Number
Fax Enter Fax Number
Personal Email* Enter Father’s Personal Email
Qualification* Enter Father’s Qualification
Designation * Enter Father’s Designation
Company Name* Enter Father’s Company name
Profession/ Occupation Select profession or occupation
Work email Enter work email
Office Tel No Enter Office Tel No.

Enter Mother’s Detail
Figure 7 Mother's Detail
Enter Students Name & Information Field Entry Description
In which sphere of school life you can volunteer to help??
User should select what volunteer help will Mother provide during school life
Salutation* Select the salutation accordingly from the drop down menu First Name * Enter First Name as specified on Passport
Middle Name Enter Mother’s Middle Name as specified on Passport
Last Name Enter Mother’s Last Name as specified on Passport
Nationality * Select Mother’s Nationality from the drop down menu
Qatar Id* Enter Mother’s Qatar Id
Select Address from Father’s Detail If Yes click the check box else enter the following details
Apartment Enter Address details (Apartment)
Building Enter Address details (Building)
Street Enter Address details (Street)
Area Enter Address details (Area)
City Enter Address details (city)
State Enter Address details (State)
Country Enter Address details (Country)
P.O.Box Enter Address details (P.O.Box)
Permanent Address Enter Permanent Address in the space provided
Home Tel No Enter Home Tel No.
Mobile Number * Enter Mother’s Mobile Number
Fax Enter Fax Number
Personal Email* Enter Mother’s Personal Email
Qualification* Enter Mother’s Qualification
Designation * Enter Mother’s Designation
Company Name* Enter Mother’s Company name
Profession/ Occupation Select profession or occupation
Work email Enter work email
Office Tel No Enter Office Tel No.

Emergency Information User should enter a data of the contact person for emergency. This person can be parents or anybody else.
Figure 8 Emergency Information
Emergency Information
Field Entry Description
Contact Person Name* Enter Contact name of a person to be contacted in emergency condition
Family name and the title* Enter the family Name or Title of the person
Relationship to child * Specify the relationship of that person with child
Home Tel Number Enter home telephone number of the person
Mobile Number* Enter the mobile number of the person to be contacted in emergency.

Academic Information User should provide academic information about the child. This will be helpful to school for child’s further development.
Figure 9Academic Information
Academic Information
Field Entry Description
Describe your child in the following areas
Mother Tongue Select the mother tongue from the drop down menu
Has your child won prizes in any activity/competition? If yes, make the check box on and write in detail in the space provided.
Has your child been assessed and/or is currently receiving any kind of learning or behaviour support ?(Please provide reports if checked)
If yes, make the check box on and write in detail in the space provided.
Does your child experience any learning difficulties? If yes, make the check box on and write in detail in the space provided.
Any Medical Conditions (Allergies etc.) If yes, make the check box on and write in detail in the space provided.
Precious School/Additional Information
Figure 10 Previous School/ Additional Information
Previous School/ Additional Information
Field Entry Description
School Name Enter Previous School Name
Grade Enter the Grade of previous school
Curriculum Enter The curriculum of previous school
Country Enter Country
Address Enter Address of the previous school
Will the transfer certificate indicate Year or Group has been Completed
Select Yes or No accordingly
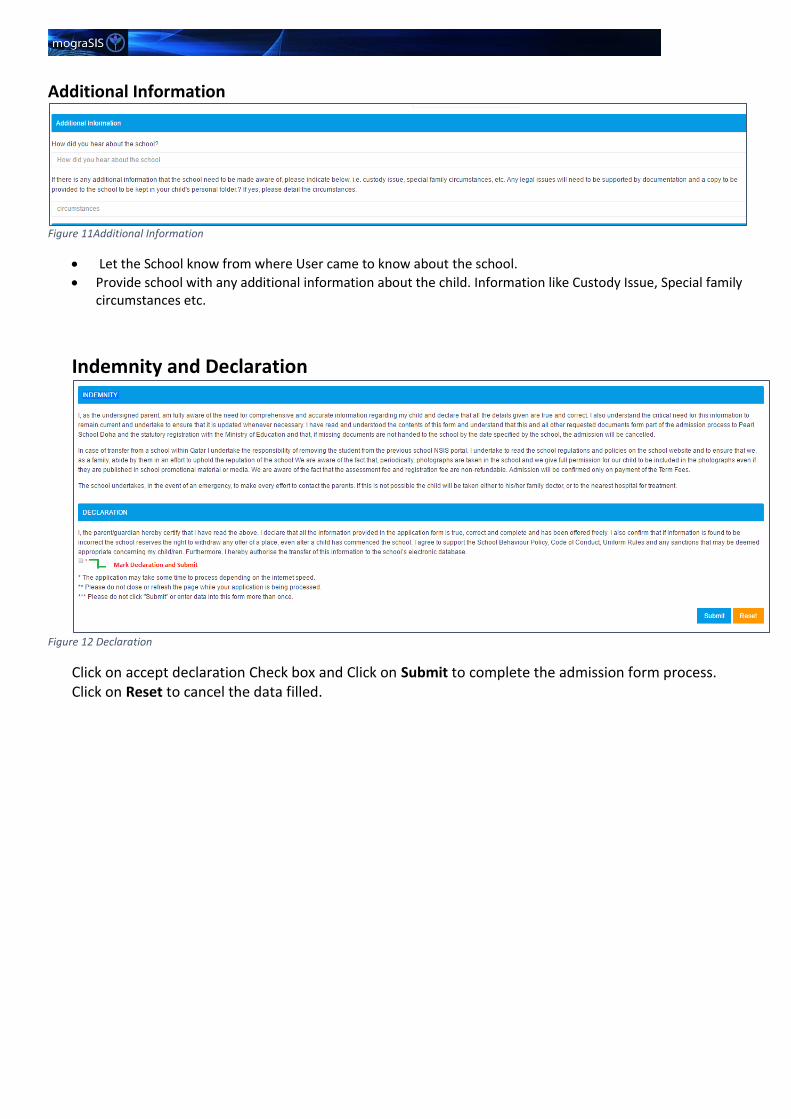
Additional Information
Figure 11Additional Information
Let the School know from where User came to know about the school.
Provide school with any additional information about the child. Information like Custody Issue, Special family circumstances etc.
Indemnity and Declaration
Figure 12 Declaration
Click on accept declaration Check box and Click on Submit to complete the admission form process. Click on Reset to cancel the data filled.

View Admission
Figure 13 View Admission Click On View Admission. If the admission process is completed, software generates a unique code to every student. View admission page shows brief data of the student admitted. User can Edit the data, can print the form, or User can also print registration confirmation letter from this page
Here all the data related to admitted student is visible in brief.
Unique code: User can view a unique code that is generated during admission process.
Name : Students full name is displayed
Grade: shows for which Grade of the student is admitted.
Admission process stage: shows the status of admission, whether the admission is confirmed or in waiting stage.
Admissions under same Login ID If more than one child is enrolled by the same user under same login ID, child along with siblings Id in brief can be viewed in this page. All the siblings’ data can be viewed at the same time from this page.
Figure 14 All Admissions under One Login ID