one-x portal user guide with outlook plug-in & … portal user guide with outlook plug-in &...
TRANSCRIPT

One-X Portal User Guide with Outlook Plug-In & Mobile App
Service: 604-856-9155 Email: [email protected]
Page 1 of 9
Service: 604 -856- 9155
Email: [email protected]
Table of Contents Using Avaya one-X Portal ................................................................................................................................................................... 2
Logging In to One-X Portal ................................................................................................................................................. 2
Portal Outline ..................................................................................................................................................................... 2
Button Inquiry .................................................................................................................................................................... 2
Making a Call...................................................................................................................................................................... 3
Call Handling ...................................................................................................................................................................... 3
Parking a Call for an Employee .......................................................................................................................................... 3
Transferring Calls ............................................................................................................................................................... 3
Redial/Caller ID .................................................................................................................................................................. 4
Conference Calling ............................................................................................................................................................. 4
Making a call from your Directory ..................................................................................................................................... 4
Adding/Changing/Deleting a Contact ................................................................................................................................ 4
Avaya Voicemail Configuration ....................................................................................................................................................... 5
Listening to Messages:....................................................................................................................................................... 5
Calling Sender: ................................................................................................................................................................... 5
Recording Personalized Greetings ..................................................................................................................................... 5
Activating Profiles: ............................................................................................................................................................ 5
Adding or Editing a Profile: ................................................................................................................................................ 6
For More User Guides ........................................................................................................................................................ 6
Avaya Outlook Plug In ......................................................................................................................................................................... 7
Installing Outlook Plug In ................................................................................................................................................... 7
Connecting Plug In to your Network ................................................................................................................................. 7
For User Guides ................................................................................................................................................................. 7
Avaya Mobile App ................................................................................................................................................................................. 8
Installing Outlook Plug In ................................................................................................................................................... 8
Making a Call...................................................................................................................................................................... 8
Conference Calling ............................................................................................................................................................. 8
Setting/Changing your Locations ....................................................................................................................................... 9
Instant Messaging .............................................................................................................................................................. 9
Listening to Voicemails ...................................................................................................................................................... 9
Page 2 of 9
Service: 604 -856- 9155
Email: [email protected]
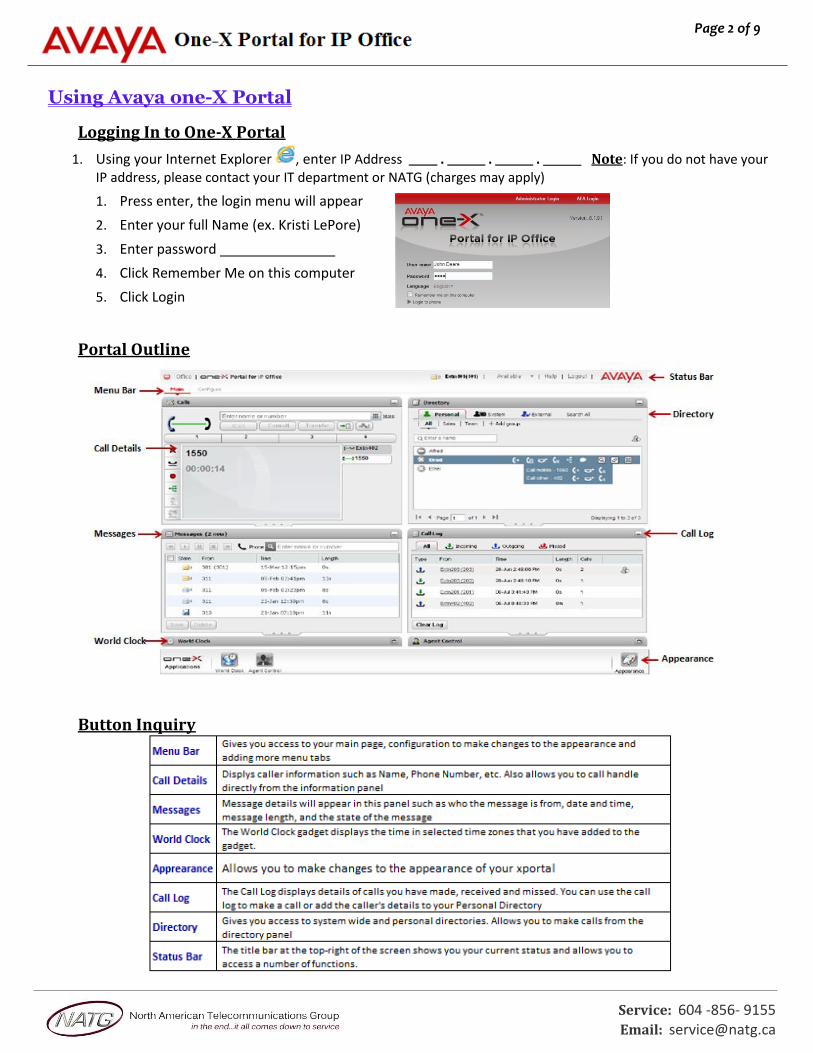
Using Avaya one-X Portal
Logging In to One-X Portal
1. Using your Internet Explorer , enter IP Address . . . Note: If you do not have your IP address, please contact your IT department or NATG (charges may apply)
1. Press enter, the login menu will appear
2. Enter your full Name (ex. Kristi LePore)
3. Enter password
4. Click Remember Me on this computer
5. Click Login
Portal Outline
Button Inquiry

Page 3 of 9
Service: 604 -856- 9155
Email: [email protected]
Making a Call
From your Calls panel… 1. Enter the extension number or 9 + the phone number 2. Click or Enter(on keyboard) to complete call Note: While on a call, enter another number in the call panel and click call, this will automatically place you current call on hold and complete the second call
Call Handling
a. On an incomng call, Click or lift handset Click to ignore caller and send to voicemail
b. With an active call, Click to place caller on hold Click to retrieve held call
c. Click to record call into your voicemail d. Click to Mute call e. Click to coference held calls together
Parking a Call for an Employee
With an active call… 1. Click on an available Park (1 to 3), call will then move on to
park key, key will flash on all phones 2. Call or page employee to pick up designate park
To retreive parked call: Click desired park key Note: When you place a call on park, the park key on your phone will flash green, on all other phones it will flash red
Transferring Calls
There are a couple places you can tranfer a call. With an active call… a) From your Calls panel;
1. Enter the extension number OR 2. Enter 9 + the phone number OR 3. Enter the contacts full name (contact must be
stored in your directory)
Click transfer , then Hang up
b) From you directory panel; 1. Choose the directory you’d like to search, Person,
System, External or All directories 2. Enter name or hunt goup ex. Parts or scroll through
all contacts 3. Hover over the contact you’d like to transfer to 4. Click transfer , then hang up

Page 4 of 9
Service: 604 -856- 9155
Email: [email protected]
Redial/Caller ID
From your Call Log… ▪ Click All to view all calls to your extension
▪ Click to view incoming calls
▪ Click to view outgoing calls
▪ Click to view missed calls To Call: click the call you would like to call
Note: Click if you would like to add number to your personl directory
Conference Calling
1. If you have 2 or more calls on hold, press to join calls into a conference OR 2. Make or Receive first call(internal or external), click Hold (caller is placed on hold) 3. Make/Receive second call, click 4. Make/Receive third call (optional), click
5. When ready to complete conference, click to connect all parties Note: You will be assigned a conf # (usually starting at 100). Internal staff can join the conference by dialing that conf number from their phone. An outside caller can also be transferred to the conference number Note: To add another caller to the conference, from you calls panel, make call (your connection to the conference is put on hold and does not affect the
conf). Once connected, click to join caller or click to cancel, and then
click on to rejoin the conference.
Making a call from your Directory
1. In the directory panel, choose the directory youd like to search (person, System, External or All)
2. Enter the name of the contact you’d like to call or scroll through all names
3. Highlight the contact you’d like to call, then click or if there are multiple number associated with that
contact, click , then click to connect Note: While on an active call, click to transfer the call to the highlight contact
Adding/Changing/Deleting a Contact
From Personal directory panel… a. To ADD: Click , Fill in desired information, and then Click
b. To EDIT: Choose the contact you’d like to Edit, click , Make changes, and then Click c. To DELETE: Choose the contact you’d like to Delete, and then click
Note: Click , enter group name, click . To add members to the group follow the “To Add “ instructions above
Page 5 of 9
Service: 604 -856- 9155
Email: [email protected]
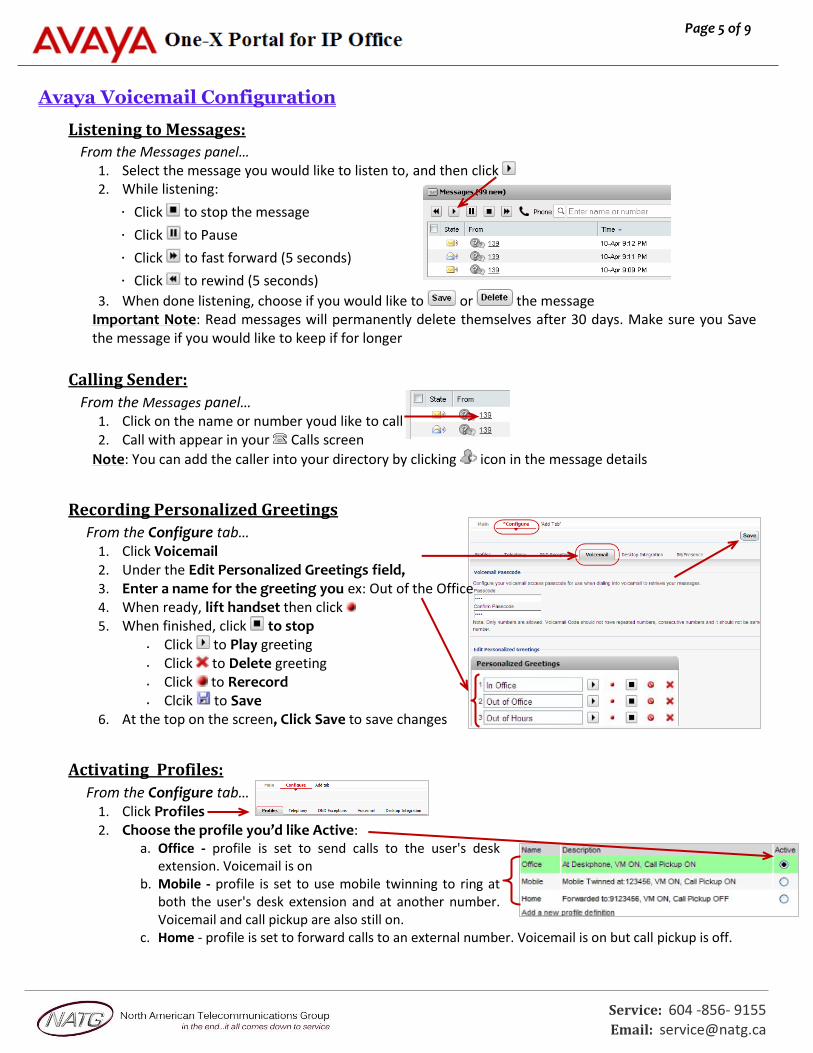
Avaya Voicemail Configuration
Listening to Messages: From the Messages panel…
1. Select the message you would like to listen to, and then click 2. While listening:
Click to stop the message
Click to Pause
Click to fast forward (5 seconds)
Click to rewind (5 seconds)
3. When done listening, choose if you would like to or the message
Important Note: Read messages will permanently delete themselves after 30 days. Make sure you Save the message if you would like to keep if for longer
Calling Sender:
From the Messages panel… 1. Click on the name or number youd like to call 2. Call with appear in your Calls screen
Note: You can add the caller into your directory by clicking icon in the message details
Recording Personalized Greetings
From the Configure tab…
1. Click Voicemail 2. Under the Edit Personalized Greetings field, 3. Enter a name for the greeting you ex: Out of the Office 4. When ready, lift handset then click
5. When finished, click to stop ▪ Click to Play greeting ▪ Click to Delete greeting ▪ Click to Rerecord ▪ Clcik to Save
6. At the top on the screen, Click Save to save changes
Activating Profiles:
From the Configure tab…
1. Click Profiles 2. Choose the profile you’d like Active:
a. Office - profile is set to send calls to the user's desk extension. Voicemail is on
b. Mobile - profile is set to use mobile twinning to ring at both the user's desk extension and at another number. Voicemail and call pickup are also still on.
c. Home - profile is set to forward calls to an external number. Voicemail is on but call pickup is off.

Page 6 of 9
Service: 604 -856- 9155
Email: [email protected]
Adding or Editing a Profile:
▪ To Add a New Profile:
1. From your Profile tab, Click Add a new profile
2. Enter the name of the profile ex. In a Meeting
3. Choose whether you would like to enable call pickup – this allows other users your pick up your extension when this profile is active
4. Select the Mobility Setting for this profile
Use Default Deskphone – your calls simply ring at the IP Office extension which you are using. This mode has no additional mobility settings.
Forward – Lets you choose to forward your calls Unconditionally, On No Answer or On Busy to another internal or external number. Also can choose if you would like mobile twinning active (rings both your extension an mobile at the same time)
5. Select the greeting you want to play while this profile is active (Note: if you would like a special greeting to play when this profile is selected, first record the greeting using the Recording Personalized Greetings instructions of page 5)
6. Select Voicemail if you would like voicemail to pick up for this profile
7. Select Voicemail Email if you would like voicemails to be sent to your email when this greeting is active
▪ To Edit an Existing Profile:
1. From your Profile tab, Click Edit next to the profile you’d like to Edit
2. Make Changes, and then Click Ok
Note: You cannot delete or edit the default profiles, only the profiles you’ve created yourself.
For More User Guides
From your one-X Portal, click Help 1. Click Help 2. Choose the guide you’re looking for
Page 7 of 9
Service: 604 -856- 9155
Email: [email protected]
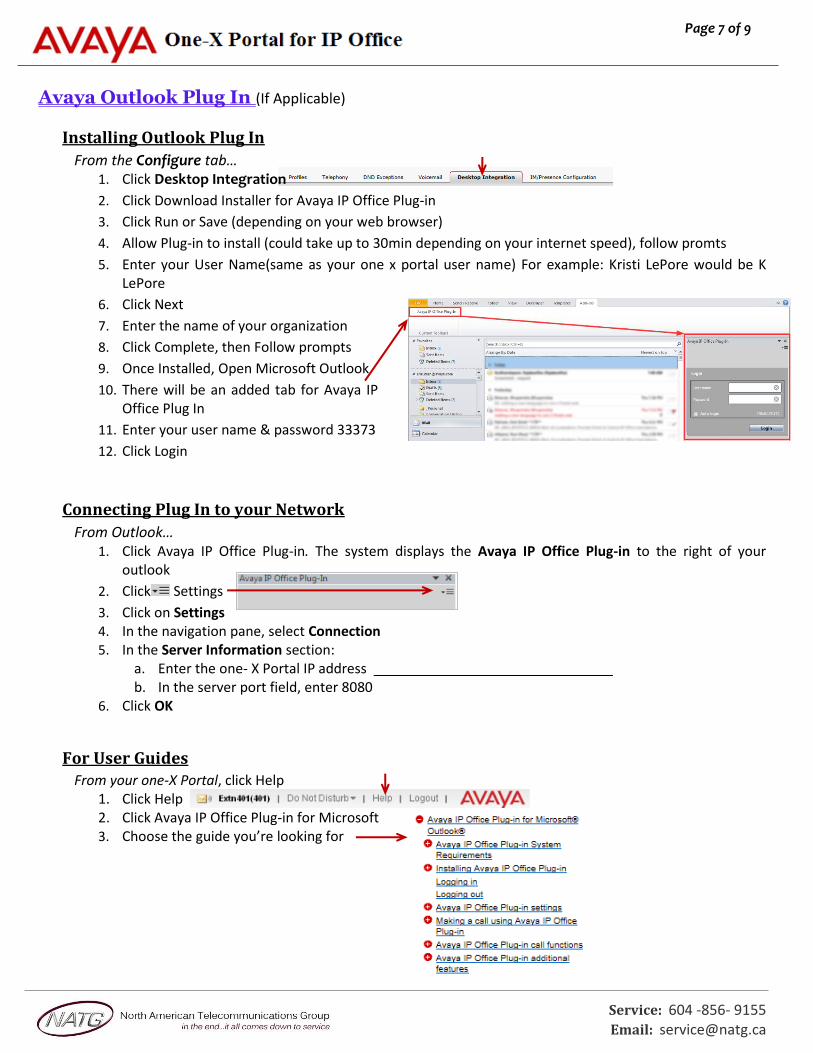
Avaya Outlook Plug In (If Applicable)
Installing Outlook Plug In
From the Configure tab…
1. Click Desktop Integration
2. Click Download Installer for Avaya IP Office Plug-in
3. Click Run or Save (depending on your web browser)
4. Allow Plug-in to install (could take up to 30min depending on your internet speed), follow promts
5. Enter your User Name(same as your one x portal user name) For example: Kristi LePore would be K LePore
6. Click Next
7. Enter the name of your organization
8. Click Complete, then Follow prompts
9. Once Installed, Open Microsoft Outlook
10. There will be an added tab for Avaya IP Office Plug In
11. Enter your user name & password 33373
12. Click Login
Connecting Plug In to your Network
From Outlook…
1. Click Avaya IP Office Plug-in. The system displays the Avaya IP Office Plug-in to the right of your outlook
2. Click Settings
3. Click on Settings 4. In the navigation pane, select Connection 5. In the Server Information section:
a. Enter the one- X Portal IP address b. In the server port field, enter 8080
6. Click OK
For User Guides
From your one-X Portal, click Help 1. Click Help 2. Click Avaya IP Office Plug-in for Microsoft 3. Choose the guide you’re looking for
Page 8 of 9
Service: 604 -856- 9155
Email: [email protected]
Avaya Mobile App (If Applicable)
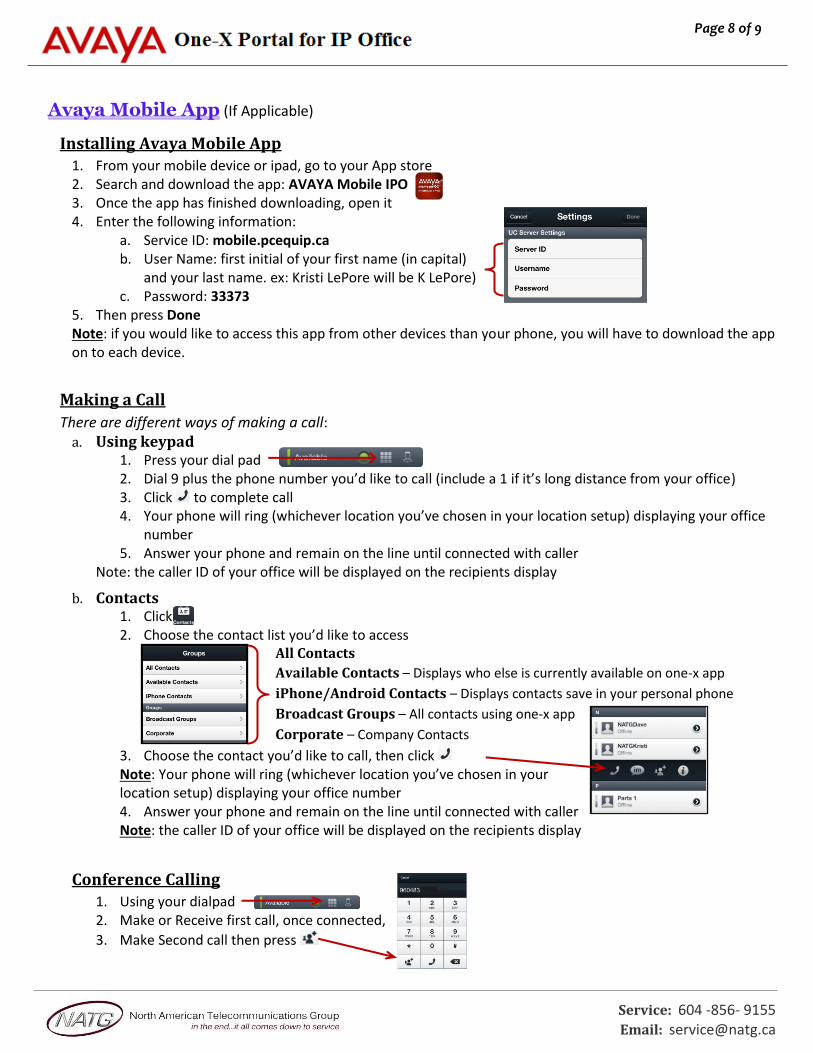
Installing Avaya Mobile App 1. From your mobile device or ipad, go to your App store 2. Search and download the app: AVAYA Mobile IPO 3. Once the app has finished downloading, open it 4. Enter the following information:
a. Service ID: mobile.pcequip.ca b. User Name: first initial of your first name (in capital)
and your last name. ex: Kristi LePore will be K LePore) c. Password: 33373
5. Then press Done Note: if you would like to access this app from other devices than your phone, you will have to download the app on to each device.
Making a Call
There are different ways of making a call: a. Using keypad
1. Press your dial pad 2. Dial 9 plus the phone number you’d like to call (include a 1 if it’s long distance from your office) 3. Click to complete call 4. Your phone will ring (whichever location you’ve chosen in your location setup) displaying your office
number 5. Answer your phone and remain on the line until connected with caller
Note: the caller ID of your office will be displayed on the recipients display
b. Contacts 1. Click 2. Choose the contact list you’d like to access
All Contacts
Available Contacts – Displays who else is currently available on one-x app
iPhone/Android Contacts – Displays contacts save in your personal phone
Broadcast Groups – All contacts using one-x app
Corporate – Company Contacts
3. Choose the contact you’d like to call, then click Note: Your phone will ring (whichever location you’ve chosen in your location setup) displaying your office number 4. Answer your phone and remain on the line until connected with caller Note: the caller ID of your office will be displayed on the recipients display
Conference Calling
1. Using your dialpad 2. Make or Receive first call, once connected,
3. Make Second call then press
Page 9 of 9
Service: 604 -856- 9155
Email: [email protected]
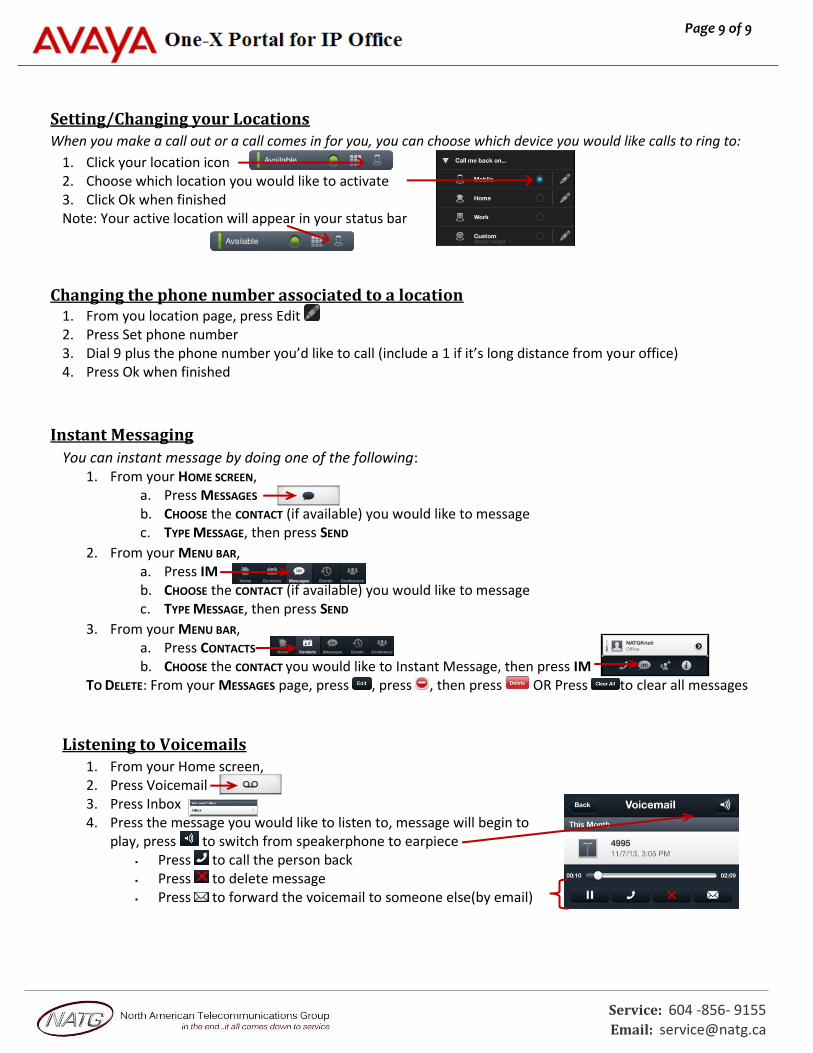
Setting/Changing your Locations When you make a call out or a call comes in for you, you can choose which device you would like calls to ring to:
1. Click your location icon 2. Choose which location you would like to activate 3. Click Ok when finished Note: Your active location will appear in your status bar
Changing the phone number associated to a location
1. From you location page, press Edit 2. Press Set phone number 3. Dial 9 plus the phone number you’d like to call (include a 1 if it’s long distance from your office) 4. Press Ok when finished
Instant Messaging
You can instant message by doing one of the following: 1. From your HOME SCREEN,
a. Press MESSAGES b. CHOOSE the CONTACT (if available) you would like to message c. TYPE MESSAGE, then press SEND
2. From your MENU BAR, a. Press IM b. CHOOSE the CONTACT (if available) you would like to message c. TYPE MESSAGE, then press SEND
3. From your MENU BAR, a. Press CONTACTS b. CHOOSE the CONTACT you would like to Instant Message, then press IM
TO DELETE: From your MESSAGES page, press , press , then press OR Press to clear all messages
Listening to Voicemails
1. From your Home screen, 2. Press Voicemail 3. Press Inbox 4. Press the message you would like to listen to, message will begin to
play, press to switch from speakerphone to earpiece ▪ Press to call the person back ▪ Press to delete message ▪ Press to forward the voicemail to someone else(by email)