one sentence summary
TRANSCRIPT
1
One Sentence Summary
The One Sentence Summary (OSS) challenges students to answer the questions “who does what to whom, when, where, how, and why?” about a given topic, and then to synthesize those answers into a single summary sentence.
Procedure for Creating the OSS
1. Select an important class topic or work that you expect student to learn to summarize. 2. Quickly answer “who did/does what to whom, when, where, how, and why?” Note how long it took you to answer. 3. Turn that answer into a sentence. Note how long it took you to write the sentence. 4. Allow your students twice as much time as it took you to carry out the task and give them clear directions on the One-
Sentence Summary technique before you announce the topic.
Pros & Cons
Pros • Quick and easy way to assess student’s ability to summarize a topic. • Good technique for helping students grasp complex processes and explain them in nontechnical language. • Requires students to organize the information within a useful, memorable framework making it easier to recall.
Cons • Some material cannot easily be summarized because some questions will have more than one answer. • Some instructors and students may feel that putting lesson material into one sentence oversimplifies the material.
Making Data Actionable
The easiest way to organize the data from OSS is to draw lines between the focus elements, separating the questions of who? Did/does? Etc. You can have students do this to make analysis faster. As you separate the components of the sentence, evaluate

2
the quality of each by writing a zero, a check mark, or a plus above the element. Zero indicates an inadequate or incorrect element; the check means adequate; and the plus sign indicates a more than adequate answer.
You can then make a simple matrix to represent the whole class’s responses, with the questions as column heading and the three marks (zero, check, plus) as row heading. When you have totaled the responses, insert the totals in the cells of the matrix and look for patterns of strength and weakness in the responses. For example, the totals can tell you whether your students are better at answering who and what questions than how and why questions.
Adapting & Expanding the OSS
• After the original sentences are discussed, ask students to turn the one sentence summaries into concise, informative two or three-sentence summaries. Ask students to share summaries in pairs or groups.
• Give students time to work in pairs or small group to critique and improve each other’s summaries, either before handing them in or after getting them back.
• Use the OSS multiple times to summarize different chapters of the same book or different facets of the same subject. Then ask students to summarize the entire book or subject in one paragraph by rewriting and linking their individual single-sentence summaries.
Tips for the OSS • Don’t ask students to write a OSS unless you have first determined that you can coherently summarize the topic in one
sentence. • Limit the topic so that the summary task will deal with a manageable part of the topic. For example, if there are several main
characters and actions in a chapter to be summarized, limit the OSS to a specific character. • Encourage students to make their sentences grammatical, factually accurate, complete, and original. But tell them not to be
disappointed if the sentences aren’t elegant!
3
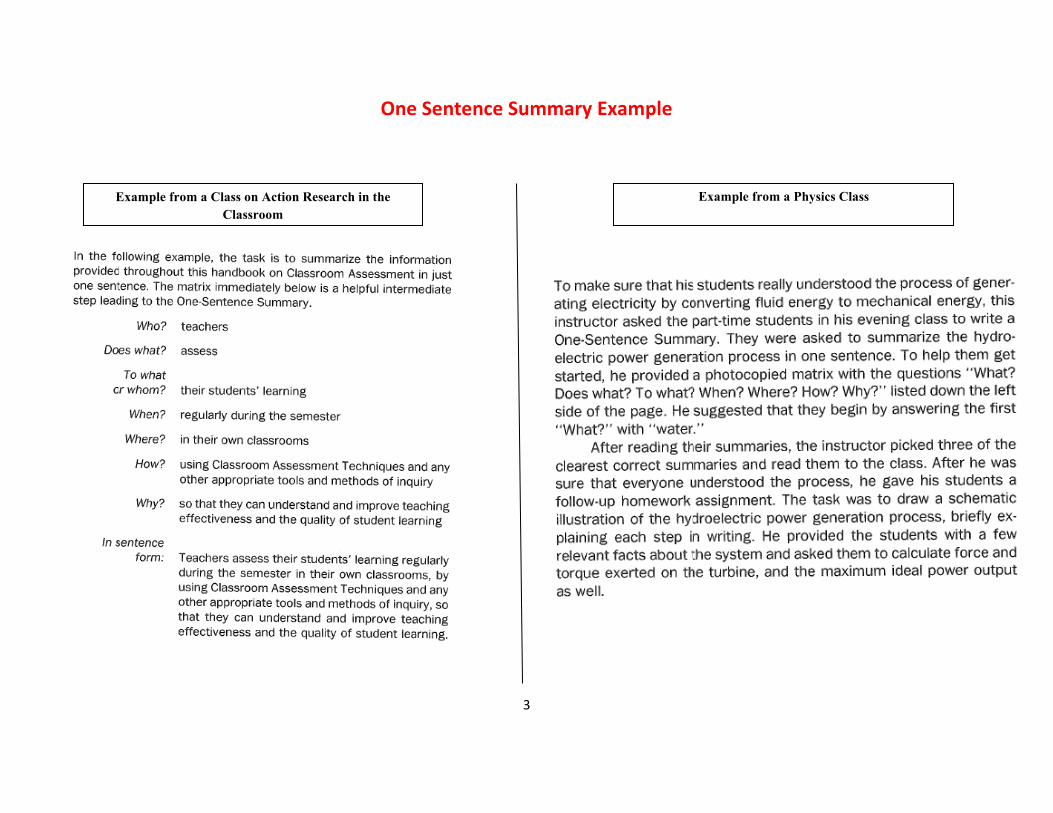
One Sentence Summary Example
Example from a Class on Action Research in the Classroom
Example from a Physics Class
4
Defining Features Matrix
The Defining Features Matrix (DFM) asks students to categorize concept according to the presence (+) or absence (-) of important defining features. This provides data on student’s analytic reading and thinking skills. The DFM assesses students’ skills at categorizing important information according to a given set of critical defining features. Faculty can quickly see how well students can distinguish between similar concepts, and it helps learners identify and make explicit the critical distinctions between such concepts.
Procedure for Creating the DFM 1. Focus the matrix on two or three important concepts that are similar enough to confuse your students. 2. Determine which features of these concepts are most critical for the students to recognize. 3. Make a list of defining features that each concept either clearly does or does not possess. After creating that list, consider
adding a limited number of shared features. 4. Sketch out a matrix with features listed down the left side and concepts across the top (or vice versa). 5. Check to see that each cell in the matrix can be reasonably responded to with a plus or a minus sign (or a yes or no). If you
cannot give either/or responses to the cell, that feature should be removed. 6. Draw up a finished matrix and give copies to your students, or if it is simple, have them copy it from a slide or the board. 7. Clearly explain the purpose of the matrix and the directions for filling it in, as well as a time limit for completing it.
Pros & Cons
Pros • Quick way to check students’ skills at distinguishing between concepts that are easily confused and to pinpoint areas of
confusion. • Helps students and instructors break down (analyze) complex comparisons into manageable component parts.
Cons • Requires careful and thoughtful preparation and may be time consuming.

5
• Can become a low-level assessment of recall skills if students do not understand that the purpose is to help them see patterns.
Making Data Actionable
It’s relatively easy to compare the students’ matrices with your master copy. You can scan them one by one, indicating incorrect responses on each students’ matrix with an X and keep a running tally of incorrect responses on a larger copy of the matrix with empty cells. Or, more simply, you can just count all of the plusses and minuses for each cell and tally them on an oversized copy.
Look for those cells where several students made the wrong choice and see whether there are patterns in the errors. Are students paying more attention to certain features than to others? Are they failing to notice defining differences of specific kinds that would be obvious to an expert?
Adapting & Expanding the DFM
• Present students with sample DFM on a familiar course-related topic. Then ask them to create their own matrices to define concepts or items related to different important topics covered in the course.
• Work up to matrices that allow for more than simply binary responses in the cells. For example, for certain topics, the features might be more appropriately categorized as “always present,” “often present,” rarely present,” and “never present.”
Tips for the DFM
• Try to keep the features in the matrix parallel in kind or in level of importance. • Avoid overload by not including more than two or three concepts or seven to ten defining features in a matrix, at least in the
first few applications of this technique.

6
Defining Features Matrix Example
Example from a class on action research indicating the differences in classroom and institutional assessment. This shows how a matrix can be set up.
Example from a course on the history and development of the romance languages.
Example from an introductory Psychology course.

7
Misconception/Preconception Check
The Misconception/Preconception Check (MPC) assesses student’s prior knowledge, focusing on uncovering prior knowledge or beliefs that may hinder or block further learning. This CAT can uncover specific instances of incorrect or incomplete knowledge, attitudes, or values that represent barriers to new learning.
Procedure for Creating the MPC 1. Identify some of the most troublesome common misconceptions or preconceptions students bring to your course.
Brainstorming this question with colleagues can be effective. 2. Select a handful of these ideas and beliefs – ones you feel are likely to interfere most with learning in your course – and focus
the MPC on those ideas and beliefs. 3. Create a simple questionnaire to elicit information about students’ ideas and beliefs in these areas. You can use multiple
choice or short answer formats. Short answer can uncover more useful information, but compromise anonymity. Multiple choice is safer and easier to analyze.
4. Have another faculty member read your questions and make sure they do not seem patronizing, threatening, or obvious. 5. Before giving the questionnaire, think through how you will respond to several likely outcomes. Strike any questions or topics
you do not feel prepared to deal with. 6. Explain your reasons for using this CAT to students, make sure the anonymity of their responses is ensured, and announce
when and how you plan to use their feedback. Pros & Cons
Pros • Gives instructors a quick way to uncover likely barriers to learning and thus to prepare to meet and overcome them. • Anonymity means students are likely to reveal their own ideas and beliefs. • Students may be relieved to learn that they are not alone is being mistaken or unclear about a topic. Feedback can provide
reassurance. • Collecting this CAT can be useful for making program changes. If you see the same misconceptions, you can start
conversations in your department about prior learning in prerequisites.

8
Cons • No one likes having his or her certainties questioned; this can be uncomfortable for students.
Making Data Actionable
Analyzing feedback from this CAT can answer one or more of the following questions: what misconceptions or preconceptions do students have about course material that might interfere with their learning? How many of the students have them? How deeply embedded are these ideas or beliefs?
To answer the first two questions, you can quickly organize the responses into rough categories by type of misconception or preconception, and then tally them. You can best answer the third question by collecting information on the students’ degree of certainty or strength of beliefs. As you rally responses, look for patters within and across items. For example, watch for questions or topics on which the students’ responses are clearly divided.
Adapting & Expanding the MPC
• To encourage candid responses, begin by asking students to identify common misconceptions and preconceptions they think other people have about the topic or field
• Have students work in teams to come up with “reasonable” explanations or justifications for the misconceptions uncovered through the assessment
• Give the same questionnaire later I the term – after your instruction – to see what, if anything, has changed and how.
Tips for the MPC
• You must tread lightly when dealing with potentially sensitive issues if you want students to open up enough to risk having their assumptions challenged.
• Do not use this technique to focus on issues that students may find personally threating until a climate of trust and civility has been established in the class.

9
Misconception/Preconception Check Example
Confidence and True/False Statements
Open-Ended Questions
10
What’s the Principle?
What’s the Principle (WTP) assess students’ ability to associate specific problems with the general principles used to solve them. Responses to this CAT tell faculty whether students understand how to apply basic principles of the discipline. It also helps students organize the general types of problems they can solve with particular principles, rather than merely learning how to solve individual problems.
Procedure for Creating the WTP 1. Identify the basic principles that you expect students to learn in your course. Make sure to focus only on those that students
have been taught. 2. Find or create sample problems or short examples that illustrate each of these principles. Each example should illustrate
only one principle. 3. Create a WTP form that includes a listing of the relevant principles and specific examples or problems for students to match
to those principles. 4. Try out your assessment on a graduate student or colleague to make sure it is not too difficult or time consuming.
Pros & Cons
Pros • Simple and quick way to get useful information on the complex skill of recognizing general principles embodied in or violated
by specific examples. • Provides students with quick feedback on their level of skills at moving between the general and the specific.
Cons • Students may see this as a simple matching assignment unless they understand that the point is to develop skill at deciding
what principles to apply in dealing with new and unfamiliar problems. • Skill in identifying principles and problems does not translate directly into actually solving the problem.

11
Making Data Actionable
The WTP form is easy to score. Simply tally the number of right and wrong answers and note patterns in the specific wrong answers given. If you find lots of wrong answers and no sensible patters, students are probably guessing!
Adapting & Expanding the WTP
• Provide students with only the principles and ask them to come up with good and bad examples of applications. • Give students only the examples, and assess their ability to recall important principles, as well as to apply them. • Follow up by asking students to justify each of their choices of principles in a sentence or two.
Tips for the WTP
• This is not a great CAT for beginners, because they haven’t seen enough examples and worked enough problems to
generalize effectively. It works best with intermediate students. • Students are not typically taught that connecting principles with problems is a skill and you may have to teach it before you
can assess it.

12
What’s the Principle? Example
Example from Principles of Financial Accounting Class

13
Minute Paper
The Minute Paper (MP) provides a quick and easy way to collect written feedback on student learning. The MP provides manageable amounts of timely and useful feedback with a minimal investment of instructor or class time. The MP can provide feedback on two basic questions – “What was the most important thing you learned during this class?” and “What important question remains unanswered?”
Procedure for Creating the MP
1. MPs work well at the beginning or end of class, serving as warm-up or wrap-up activities. Determine your focus so you know when to administer the MP. If you want to focus on understanding of the for a particular class session, give the paper at the end of class. If you want to focus on student understanding of a homework assignment, give the paper at the start of class session during which students are expected to turn in their homework.
2. Starting with the two basic questions (“What was the most important thing you learned during this class?” and “What important question remains unanswered?”), write prompts that fit your course.
3. Plan to set aside five to ten minutes for the MP. 4. Display the questions on a board or projector. You could pre-print the questions onto half sheets. You can also have students
submit responses electronically in Blackboard/Canvas before or after class.
Pros & Cons Pros
• Immediate course feedback that allow for a quick response to students. • Analyzing the responses is quick. • Demonstrate faculty interest in student work, which is evident to the student.
Cons • If overused or poorly used, students will not see value in the CAT.

14
• It is more difficult than it may seem to prepare questions that can be immediately and clearly comprehended and quickly answered.
Making Data Actionable
Tabulating the responses and making note of useful comments is often all you need to do with the MP. Consider saving these to compare responses from midterm and final. Comparing over time can allow you to see changes and development in the clarity of students writing and thoughtfulness of answers.
Adapting & Expanding the MP
• Use only half of the paper – only ask for the most important point or for their questions. When you ask for only their questions, you are doing a new CAT called a Muddiest Point.
• Allow students to compare and discuss their responses with classmates in pairs or small groups.
Tips for the MP
• This technique is flexible but not universally applicable. Don’t overuse it! • Responding to MP may take longer than planned. Set limits on how much time you will spend on feedback. • Let students know that you may not comment on everything they write.

15
Minute Paper Example
Intrigued by a demonstration of the Minute Paper during a faculty development workshop at his college, this mathematics instructor decided to adapt the technique for use in his intensive Introductory Statistics course. He decided to ask students to come up with several significant points instead of one. A few minutes before the end of each lecture, he asked students to list the five most important questions they had. He then collected the responses and quickly read them after class, making a list of the “important points” and questions and tallying how often each item was repeated.
At first, the variety of points that students listed as important astounded the instructor. He found that, as a group, his 35 students came up with as many as 20 different important points from the same lecture. Many of the points they listed were ones he considered details; others were distortions of things he had said; still others were points he was sure he had never mentioned at all! The bewildering variety of responses to the Minute Papers from the first few classes convinced him of the need to teach students how to tell the “wheat from the chaff.”
He began by listing the 10 or 12 most common responses on the board before class. He then took the first five to ten minutes of class to explain the relative importance of these points and their relationship to one another. He also let students know which points were definitely not related. In the course of these feedback sessions, he could often weave in responses to two or three commonly asked questions as well. The Minute Paper responses convinced him that his students needed a more explicit road map than he had been providing. Therefore, in addition to the list of responses to the preceding lecture, he wrote his own list of most important points for that day. With both lists on the board, he could make connections between one class and the next graphically clear.
After a month of giving the Minute Paper at the end of one class with a feedback session at the beginning of the next class, the average total number of different “important points” had dropped from nearly 20 to eight or nine. That was a level of variation he could live with. Repeated use of the Minute Paper helped his students learn to listen more carefully and focus more effectively during lectures. The CAT helped the instructor realize the importance of being explicit in teaching statistics to student with very little or no previous knowledge of the subject.
16
Directed Paraphrasing
Directed Paraphrasing (DP) helps students develop the skill of summarizing specialized information into general language. This CAT provides feedback to students on their ability to summarize and restate important information or concepts in their own words. It allows faculty to assess students’ understanding of important concepts that they will later be expected to explain to others.
Procedure for Creating the DP 1. Select an important theory, concept, or argument that students have studied in some depth. This should be a topic with
some implications outside the classroom. 2. Determine who would be a realistic yet challenging audience for a paraphrase on this topic, what the purpose of such a
paraphrase should be, and how long (in number or words or amount of speaking time) the DP should be. 3. Try responding to the paraphrase yourself, to see how realistic the assignment is. Can you write an effective paraphrase
within the limits given? 4. Direct students to prepare a paraphrase on the chosen topic. Tell them who the intended audience is, what the purpose is,
and what the limits are on speaking time or number of words or sentences.
Pros & Cons Pros
• Builds on and builds up students’ skills in actively and purposefully comprehending and communicating information learned. • Allows instructors to find out quickly and in detail how well students have understood a given lesson, lecture, or segment of
the course. This provides direction for instruction and syllabus revision. • Encourages instructors and students to consider the wider relevance of the subject being studied and the importance of
considering the needs and interests of the audience being addressed.
Cons • Unless strict length limits are enforced, DP can take considerable time and effort to assess adequately. • Can be difficult to establish criteria for a good paraphrase.

17
Making Data Actionable
Begin by separating the responses into four piles (e.g. confused, minimal, adequate, excellent). Assess the responses by comparing them within and across categories. Pay particular attention to three characteristics of the response: the accuracy of the paraphrase, suitability for the intended audience, and effectives in fulfilling the purpose.
You can also circle the clearest and muddiest points in each paraphrase, using different colored pens, and then look for common patters of clarify and confusion. Consider giving students a checklist of the strong and weak points of her or his response.
Adapting & Expanding the DP
• Direct students to paraphrase the same topic for two very different audiences, and then to explain in detail the differences between the two paraphrases.
• Ask students to keep a journal of paraphrases as a summary of important topics in the course. • Have different students paraphrase different reading assignments or lectures and then ask them to share those with other
members of the class.
Tips for the DP
• To be effective the DP must be well planned. The choice of audience and purpose are particularly important. • You’ll need to use this CAT more than once during a course if students are to learn from the process.

18
Directed Paraphrasing Example
Example from Nursing Class
Example from Computer Science Class
Example from Secondary Science for Teachers Class