onbase guide – scheduled dip/drip
TRANSCRIPT

OnBase Guide – Scheduled DIP/DRIP
Goal: To create schedule DIP/DRIP processes.
Complexity Level: Departmental Administrative Users
4/9/2020

2
Table of Contents Prerequisites .............................................................................................................. 3
Install the OnBase Thick client and Oracle client ....................................................... 3
Set Up OnBase Service ............................................................................................. 3
Start the Windows Service & Set Recovery Options ................................................. 8
Set up Schedule for DIP/DRIP Service .................................................................... 10
Note about Resetting the Service ............................................................................ 12
Scheduling Commit of Batches ................................................................................ 12

3
Prerequisites • You must have full local administrator access to the machine to perform this
installation. If you do not have this access, please ask your local IT staff for
support.
• The account running the Windows Service (see page 6) must also be set up
to have the “Log on as a Service” right attached to it for the computer the
service is running on. You can see how to modify the account to have that
permission by following the steps here.
• You must know how to create/configure a DIP (Document Import Processor),
DRIP (Directory Import Processor) or COLD import.
o Configure the DIP or DRIP process in Configuration.
o Once that is complete and the process is working as desired, you can
use this service to automate the import.
Refer to the DIP or DRIP MRGs for additional information if needed. Contact
[email protected] for assistance.
Install the OnBase Thick client and Oracle client Refer to the Client guides for installation instructions.
Set Up OnBase Service Launch the OnBase Thick Client as Admin by right-clicking on the shortcut and choosing Run as administrator. This is necessary in order create the Windows service.

4
In the menu, go to Admin > Utilities > Windows Services.
Type the name of your new service, and click the Create button.

5
Fill out the Service Configuration – Service Settings fields with the appropriate data.
• Service Description: Scheduled Import
• Executable Path: C:\Program Files (x86)\Hyland\OnBase Client\obclnt32.exe (or your Thick Client’s program file (.exe) if it’s different from this)
• Start Type: Automatic
• User Name*: [your OnBase user name / Operator ID]
• Password*: [your OnBase password]
• Encrypt Password: [leave unmarked]
• Additional Arguments*: -ODBC=”DMOPRD” –SCHED
*NOTES*:
• It is strongly recommended that you use a service account instead of an actual user account. This can make it easier to audit any actions related to this action and ensure continuity as staffing changes. OnBase service accounts for this purpose should:
o Follow the established naming convention, ex: S_B-ADM-DIP, S_B-FA-SWEEP
o Be in the following user groups: ▪ Functional – DIP/DRIP/COLD ▪ Functional – Lvl 2 – Standard Users ▪ The “User Group” group(s) needed for create access to the
document type(s)
• Be careful if you copy and paste the Additional Arguments above to verify the quotes are correct.
• Be sure to enter the correct environment name in Additional Arguments.
The completed “Service Settings” tab configuration should look like this:

6
7
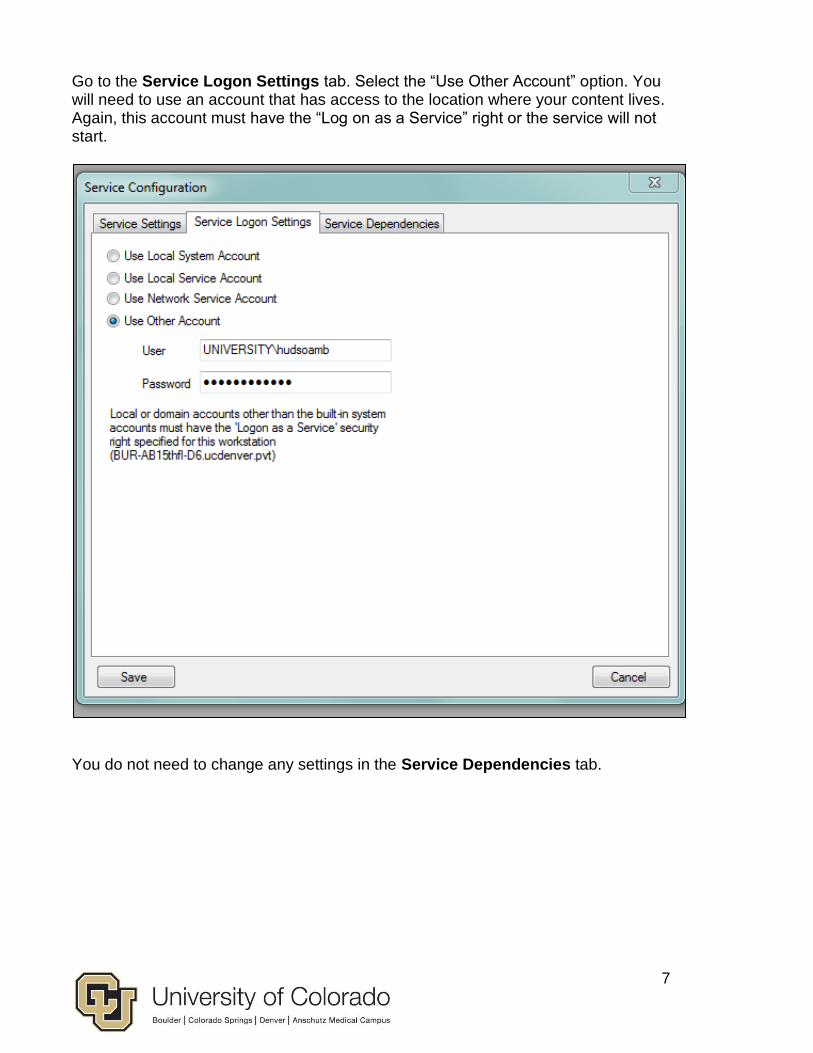
Go to the Service Logon Settings tab. Select the “Use Other Account” option. You will need to use an account that has access to the location where your content lives. Again, this account must have the “Log on as a Service” right or the service will not start.
You do not need to change any settings in the Service Dependencies tab.

8
Start the Windows Service & Set Recovery Options Open the “Run” dialogue by pressing the Windows Key ( ) + R. Then type “services.msc” and press Enter or click OK.
Scroll through the list and find the service with the same name as the OnBase
service you just set up. Click it, and click Start in “Start the Service.”
Right click the service name and choose Properties. Go to the Recovery tab and
choose “Restart the Service” for First failure and Second failure. Set the Reset fail
count after option to 1 day.

9
You may close the services window.

10
Set up Schedule for DIP/DRIP Service In the Thick client, choose the Processing menu option, then either DIP or
Directory Import Processor (DRIP).
Right-click the desired import process in the list, and select Schedule Format from
the menu that appears.

11
In the Schedule Configuration tab, set up your schedule (what days you want to
have the process run and how often you want it to run). Do not change the Name or
field. The Processing Workstation should be the name of the machine running the
service.
Click on the Processing Options tab. Within the Processing Precondition, select
the “None” option, unless there is a specific need to choose “Files Idle for at least 1
minute.” Select any other desired options.
Click Apply.
NOTE: If you enable the “Files Idle For at Least 1 Minute” option, ensure you also do
NOT have the “Once per Day” Processing Frequency option selected. These two
options conflict with each other and your sweep may not perform correctly. You will

12
want to select the “Once Every Minutes” option on the Schedule Configuration
tab.
Note about Resetting the Service To avoid any issues with your service running and production maintenance windows,
we suggest setting up a scheduled task to restart the service every night. You may
contact your campus OIT if you need help setting that up.
Scheduling Commit of Batches Batches created through this process will still need to be committed. This can be done manually in the Thick client: Processing > DIP/DRIP > Awaiting Commit > right click on batch > Commit Selected
Or it can be scheduled. Processing > DIP > DIP Format > right click on Process Format > Schedule Commit -or- Processing > DRIP > DRIP Formats > right click on Process Format > Schedule Commit From here the steps are basically the same as described above for scheduling the import. You’ll choose the appropriate schedule and processing workstation then save. You’ll want to schedule the commit for after you expect the import process to complete. For example, if your import is scheduled for 7am each weekday, you could schedule the commit for 8am each weekday.