olf68 202 ganci-a
TRANSCRIPT
Tips, Tricks, and Techniques for Rapid e-Learning Development December 10 & 11, 2009
Page 1Session 202 – Great Tips & Tricks for Developing e-Learning with Adobe Captivate® 4 - Joseph Ganci, Dazzle Technologies Corp.
Copyright 2009 Free tips - Send subject join to: [email protected] Ganci, Dazzle Technologies Corp., www.dazzletech.com [email protected] [email protected]
Captivate Killer Tips
Joseph GanciDazzle Technologies Corp.
Member, Adobe Captivate Advisory Board
Member, Adobe e-Learning Advisory Board
Copyright 2009 Free tips - Send subject join to: [email protected] Ganci, Dazzle Technologies Corp., www.dazzletech.com [email protected] [email protected]
ObjectivesIn this session, we can cover
• How to record narration correctly
• How to easily deliver in multiple languages
• How to use slidelets for increased productivity and elegance
• How to use the gallery folder to full effect
• How to use variables and actions
• How to use widgets
• How to use the branching view to full effect

Tips, Tricks, and Techniques for Rapid e-Learning Development December 10 & 11, 2009
Page 2Session 202 – Great Tips & Tricks for Developing e-Learning with Adobe Captivate® 4 - Joseph Ganci, Dazzle Technologies Corp.
Copyright 2009 Free tips - Send subject join to: [email protected] Ganci, Dazzle Technologies Corp., www.dazzletech.com [email protected] [email protected]
Time for some Polls!Let’s make sure this session addresses your needs!
• POLL 1 • POLL 2• POLL 3
Copyright 2009 Free tips - Send subject join to: [email protected] Ganci, Dazzle Technologies Corp., www.dazzletech.com [email protected] [email protected]
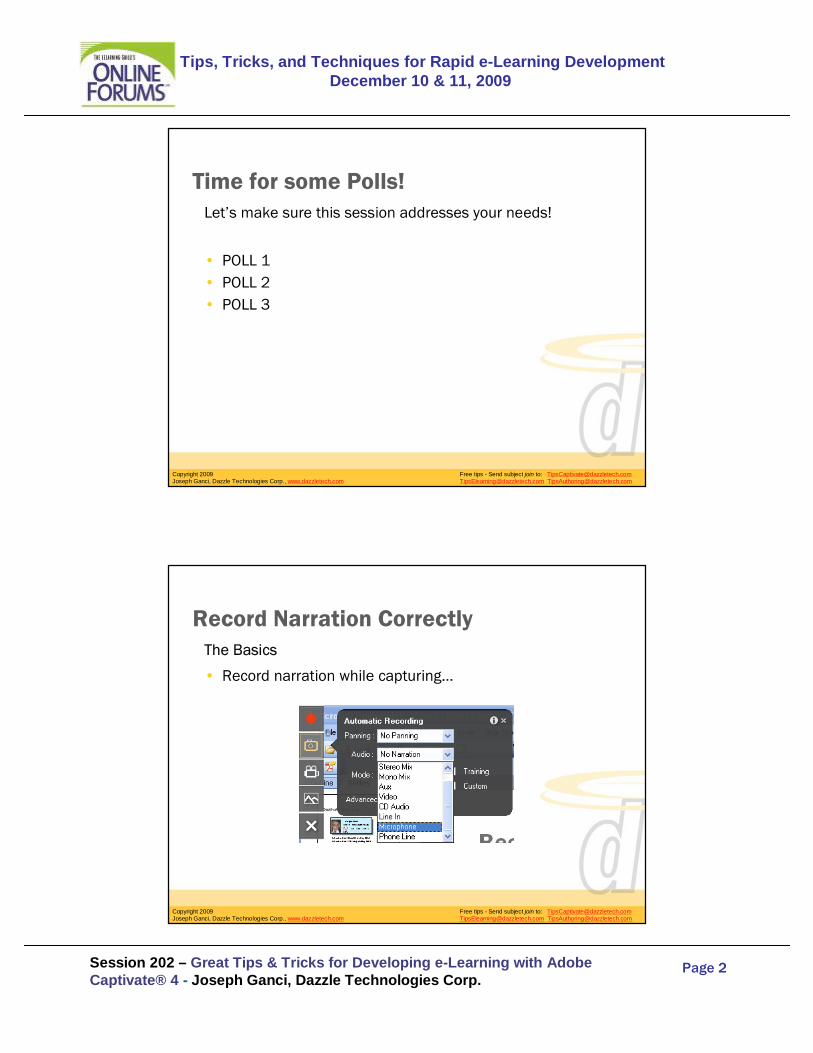
Record Narration CorrectlyThe Basics
• Record narration while capturing…
Tips, Tricks, and Techniques for Rapid e-Learning Development December 10 & 11, 2009
Page 3Session 202 – Great Tips & Tricks for Developing e-Learning with Adobe Captivate® 4 - Joseph Ganci, Dazzle Technologies Corp.
Copyright 2009 Free tips - Send subject join to: [email protected] Ganci, Dazzle Technologies Corp., www.dazzletech.com [email protected] [email protected]
Record Narration CorrectlyThe Basics
• Captivate contains a basic audio editor.
Copyright 2009 Free tips - Send subject join to: [email protected] Ganci, Dazzle Technologies Corp., www.dazzletech.com [email protected] [email protected]
Record Narration CorrectlyThe Basics
• You can import and export audio recordings.
Tips, Tricks, and Techniques for Rapid e-Learning Development December 10 & 11, 2009
Page 4Session 202 – Great Tips & Tricks for Developing e-Learning with Adobe Captivate® 4 - Joseph Ganci, Dazzle Technologies Corp.
Copyright 2009 Free tips - Send subject join to: [email protected] Ganci, Dazzle Technologies Corp., www.dazzletech.com [email protected] [email protected]
Record Narration CorrectlyThe Basics
• You can edit how the audio is timed between slides when importing audio.
Copyright 2009 Free tips - Send subject join to: [email protected] Ganci, Dazzle Technologies Corp., www.dazzletech.com [email protected] [email protected]
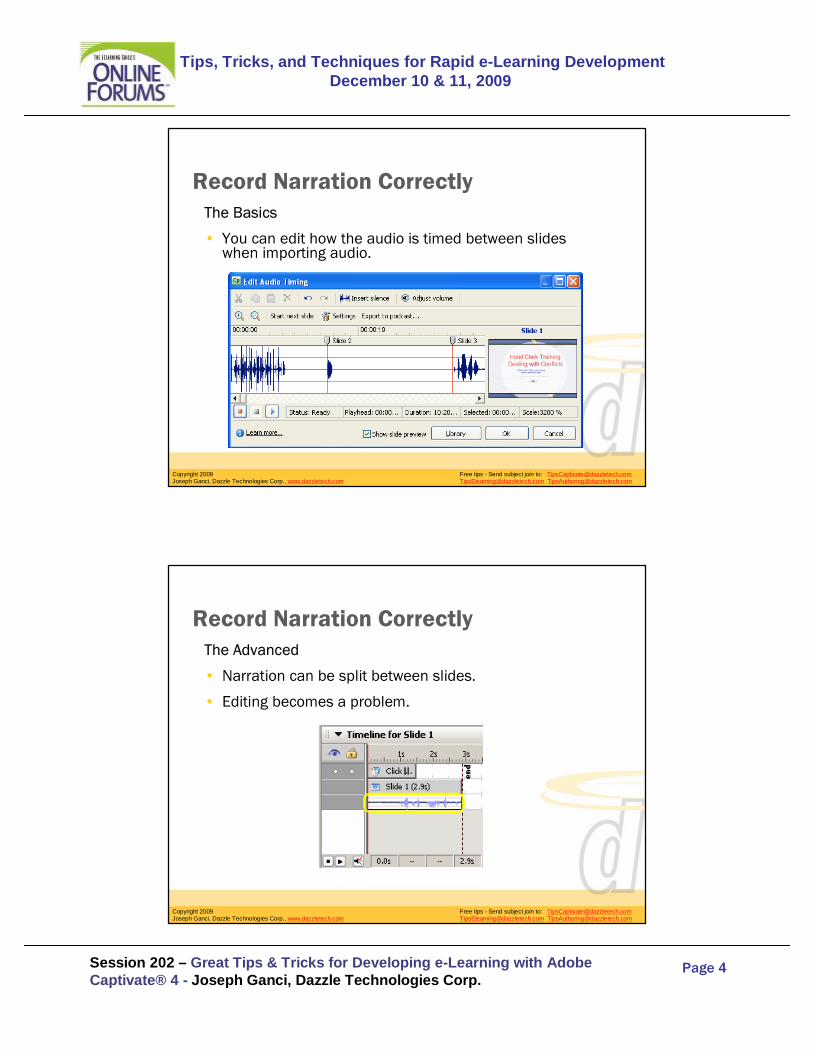
Record Narration CorrectlyThe Advanced
• Narration can be split between slides.
• Editing becomes a problem.
Tips, Tricks, and Techniques for Rapid e-Learning Development December 10 & 11, 2009
Page 5Session 202 – Great Tips & Tricks for Developing e-Learning with Adobe Captivate® 4 - Joseph Ganci, Dazzle Technologies Corp.
Copyright 2009 Free tips - Send subject join to: [email protected] Ganci, Dazzle Technologies Corp., www.dazzletech.com [email protected] [email protected]
Record Narration CorrectlyThe Advanced
• Click then speak. Rinse. Repeat.
Copyright 2009 Free tips - Send subject join to: [email protected] Ganci, Dazzle Technologies Corp., www.dazzletech.com [email protected] [email protected]
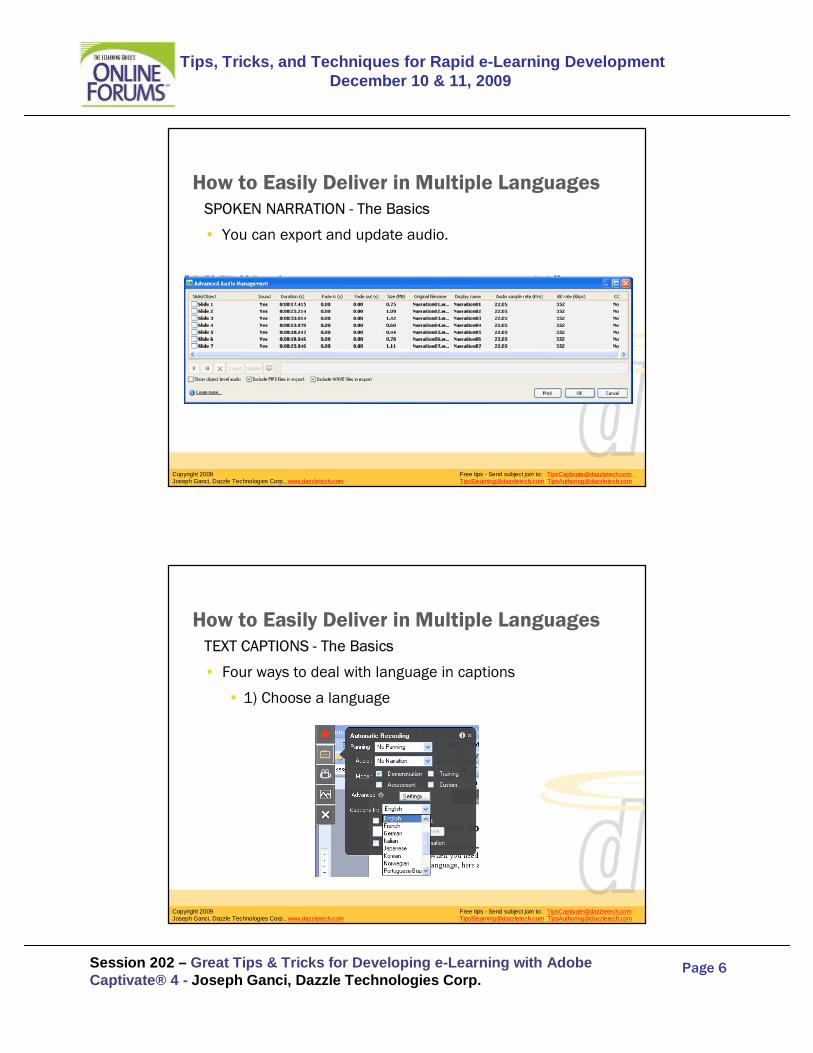
How to Easily Deliver in Multiple LanguagesThe Basics
• There are five areas where languagecomes into play:
• Spoken Narration
• Text Captions
• Closed Captions
• Slide Accessibility Text
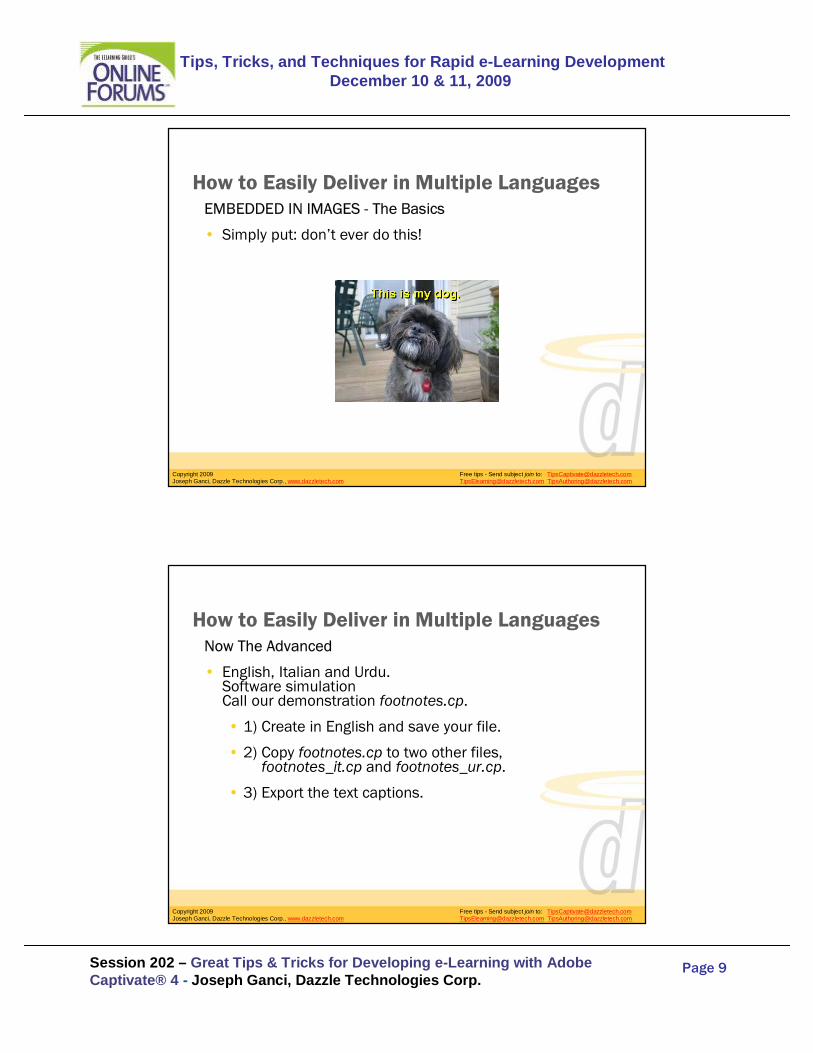
• Embedded in Images

Tips, Tricks, and Techniques for Rapid e-Learning Development December 10 & 11, 2009
Page 11Session 202 – Great Tips & Tricks for Developing e-Learning with Adobe Captivate® 4 - Joseph Ganci, Dazzle Technologies Corp.
Copyright 2009 Free tips - Send subject join to: [email protected] Ganci, Dazzle Technologies Corp., www.dazzletech.com [email protected] [email protected]
How to Easily Deliver in Multiple LanguagesNow The Advanced
• 10) Rerecord and copy over each of the audio files in each audio language folder.
• 11) Close the English Captivate file and open theItalian Captivate file.
• 12) Import the captions you saved in footnotes_it.doc.
Copyright 2009 Free tips - Send subject join to: [email protected] Ganci, Dazzle Technologies Corp., www.dazzletech.com [email protected] [email protected]
How to Easily Deliver in Multiple LanguagesNow The Advanced
• 13) Open the Advanced Audio editor and update each of the audio files to the ones in the Italian folder.
• 14) Repeat the process for the Urdu version.
• 15) You’re done!

Tips, Tricks, and Techniques for Rapid e-Learning Development December 10 & 11, 2009
Page 12Session 202 – Great Tips & Tricks for Developing e-Learning with Adobe Captivate® 4 - Joseph Ganci, Dazzle Technologies Corp.
Copyright 2009 Free tips - Send subject join to: [email protected] Ganci, Dazzle Technologies Corp., www.dazzletech.com [email protected] [email protected]
How to Easily Deliver in Multiple LanguagesThe Advanced
Copyright 2009 Free tips - Send subject join to: [email protected] Ganci, Dazzle Technologies Corp., www.dazzletech.com [email protected] [email protected]
How to Use Slidelets for Increased Productivity and Elegance
The Basics
• Place a mini-slide on the current slide.
• Cut down on the need to navigate to other slides.
• More elegant and productive as a result.
Tips, Tricks, and Techniques for Rapid e-Learning Development December 10 & 11, 2009
Page 13Session 202 – Great Tips & Tricks for Developing e-Learning with Adobe Captivate® 4 - Joseph Ganci, Dazzle Technologies Corp.
Copyright 2009 Free tips - Send subject join to: [email protected] Ganci, Dazzle Technologies Corp., www.dazzletech.com [email protected] [email protected]
How to Use Slidelets for Increased Productivity and Elegance
The Basics
• Take a look atthis screen.
• By rolling over the coworker
• This image and text caption will appear and audio will play.
Copyright 2009 Free tips - Send subject join to: [email protected] Ganci, Dazzle Technologies Corp., www.dazzletech.com [email protected] [email protected]
How to Use Slidelets for Increased Productivity and Elegance
The Basics
• Each slidelet has its own separate timeline!
• Slidelets can contain any objects except for:
• The three interaction types
•Text entry box
•Click box
•Button
• Another slidelet (because it can navigate)
• Mouse movements

Tips, Tricks, and Techniques for Rapid e-Learning Development December 10 & 11, 2009
Page 14Session 202 – Great Tips & Tricks for Developing e-Learning with Adobe Captivate® 4 - Joseph Ganci, Dazzle Technologies Corp.
Copyright 2009 Free tips - Send subject join to: [email protected] Ganci, Dazzle Technologies Corp., www.dazzletech.com [email protected] [email protected]
How to Use Slidelets for Increased Productivity and Elegance
The Basics
• Rollover areas appear rectangular.
• You can make the rollover shape anything you wish with slidelets!
• Let’s take a look.
Copyright 2009 Free tips - Send subject join to: [email protected] Ganci, Dazzle Technologies Corp., www.dazzletech.com [email protected] [email protected]
How to Use Slidelets for Increased Productivity and Elegance
Advanced
• Insert a new slidelet by choosing Insert → Rollover Slidelet.
• Place the slidelet objects here.
• This rollover area will trigger the slidelet.
• Press Ctrl-Alt-W or right-click and choose Redraw Shape or choose Edit → Redraw Shape.
Tips, Tricks, and Techniques for Rapid e-Learning Development December 10 & 11, 2009
Page 15Session 202 – Great Tips & Tricks for Developing e-Learning with Adobe Captivate® 4 - Joseph Ganci, Dazzle Technologies Corp.
Copyright 2009 Free tips - Send subject join to: [email protected] Ganci, Dazzle Technologies Corp., www.dazzletech.com [email protected] [email protected]
How to Use Slidelets for Increased Productivity and Elegance
Advanced
• Now create any shape you like. Click once to create each new segment. Double-click to finish your rollover area.
• Note that the light blue polygon represents the area that will trigger the slidelet to appear.
Copyright 2009 Free tips - Send subject join to: [email protected] Ganci, Dazzle Technologies Corp., www.dazzletech.com [email protected] [email protected]
How to Use Slidelets for Increased Productivity and Elegance
Advanced
• Create a rollover the same size and shape of region of Calabria, Italy.
• When someone rolls over this area, you can show information of the region, play music and show images.
Tips, Tricks, and Techniques for Rapid e-Learning Development December 10 & 11, 2009
Page 16Session 202 – Great Tips & Tricks for Developing e-Learning with Adobe Captivate® 4 - Joseph Ganci, Dazzle Technologies Corp.
Copyright 2009 Free tips - Send subject join to: [email protected] Ganci, Dazzle Technologies Corp., www.dazzletech.com [email protected] [email protected]
How to Use Slidelets for Increased Productivity and Elegance
The Advanced
Copyright 2009 Free tips - Send subject join to: [email protected] Ganci, Dazzle Technologies Corp., www.dazzletech.com [email protected] [email protected]
How to Use Slidelets for Increased Productivity and Elegance
Advanced
• Another useful item – the Stick Slidelet option.
• Normally, when the user rolls off the rollover area, the slidelet will disappear.
• Using the Stick Slidelet option, the slidelet will stay up untilits timeline runs out.

Tips, Tricks, and Techniques for Rapid e-Learning Development December 10 & 11, 2009
Page 17Session 202 – Great Tips & Tricks for Developing e-Learning with Adobe Captivate® 4 - Joseph Ganci, Dazzle Technologies Corp.
Copyright 2009 Free tips - Send subject join to: [email protected] Ganci, Dazzle Technologies Corp., www.dazzletech.com [email protected] [email protected]
How to Use Slidelets for Increased Productivity and Elegance
The Advanced
Copyright 2009 Free tips - Send subject join to: [email protected] Ganci, Dazzle Technologies Corp., www.dazzletech.com [email protected] [email protected]
How to Add Accessibility with No PainThe Basics
• Accessibility allows people with disabilities access to your learning.
• Three main places:
• 508 compliance
• Closed captioning
• Accessibility text

Tips, Tricks, and Techniques for Rapid e-Learning Development December 10 & 11, 2009
Page 18Session 202 – Great Tips & Tricks for Developing e-Learning with Adobe Captivate® 4 - Joseph Ganci, Dazzle Technologies Corp.
Copyright 2009 Free tips - Send subject join to: [email protected] Ganci, Dazzle Technologies Corp., www.dazzletech.com [email protected] [email protected]
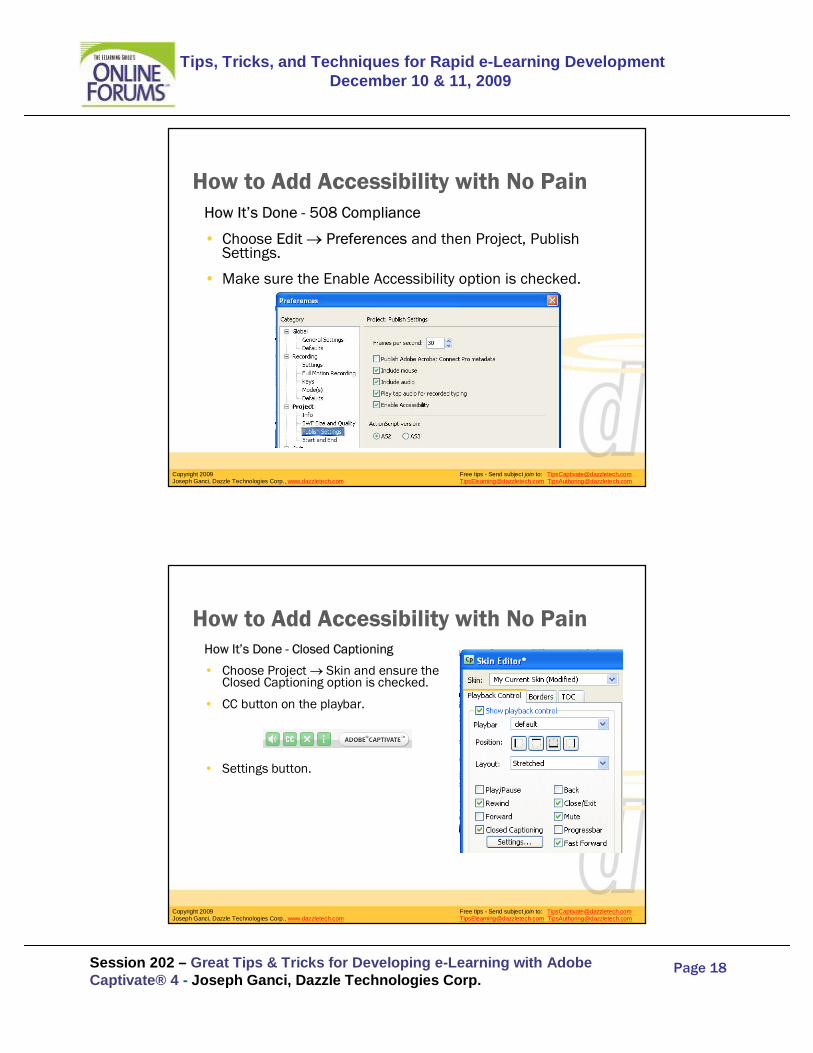
How to Add Accessibility with No PainHow It’s Done - 508 Compliance
• Choose Edit → Preferences and then Project, Publish Settings.
• Make sure the Enable Accessibility option is checked.
Copyright 2009 Free tips - Send subject join to: [email protected] Ganci, Dazzle Technologies Corp., www.dazzletech.com [email protected] [email protected]
How to Add Accessibility with No PainHow It’s Done - Closed Captioning
• Choose Project → Skin and ensure the Closed Captioning option is checked.
• CC button on the playbar.
• Settings button.

Tips, Tricks, and Techniques for Rapid e-Learning Development December 10 & 11, 2009
Page 19Session 202 – Great Tips & Tricks for Developing e-Learning with Adobe Captivate® 4 - Joseph Ganci, Dazzle Technologies Corp.
Copyright 2009 Free tips - Send subject join to: [email protected] Ganci, Dazzle Technologies Corp., www.dazzletech.com [email protected] [email protected]
How to Add Accessibility with No PainHow It’s Done - Closed Captioning
• Choose Audio → Audio Management
• Choose a slide that has sound on it and then click the button.
Copyright 2009 Free tips - Send subject join to: [email protected] Ganci, Dazzle Technologies Corp., www.dazzletech.com [email protected] [email protected]
How to Add Accessibility with No PainHow It’s Done - Closed Captioning
• Add closed captioning text and synchronize it with the audio.
Tips, Tricks, and Techniques for Rapid e-Learning Development December 10 & 11, 2009
Page 20Session 202 – Great Tips & Tricks for Developing e-Learning with Adobe Captivate® 4 - Joseph Ganci, Dazzle Technologies Corp.
Copyright 2009 Free tips - Send subject join to: [email protected] Ganci, Dazzle Technologies Corp., www.dazzletech.com [email protected] [email protected]
How to Add Accessibility with No PainHow It’s Done – Accessibility
Text
• Choose a slide and then Slide → Properties.
• Click the Accessibility button.
Copyright 2009 Free tips - Send subject join to: [email protected] Ganci, Dazzle Technologies Corp., www.dazzletech.com [email protected] [email protected]
How to Add Accessibility with No PainHow It’s Done – Accessibility Text
• Add screen-readable text here.
• Copy text from text captions on the slide, from closed captions or from slide notes.

Tips, Tricks, and Techniques for Rapid e-Learning Development December 10 & 11, 2009
Page 21Session 202 – Great Tips & Tricks for Developing e-Learning with Adobe Captivate® 4 - Joseph Ganci, Dazzle Technologies Corp.
Copyright 2009 Free tips - Send subject join to: [email protected] Ganci, Dazzle Technologies Corp., www.dazzletech.com [email protected] [email protected]
How to Add Accessibility with No Pain
Copyright 2009 Free tips - Send subject join to: [email protected] Ganci, Dazzle Technologies Corp., www.dazzletech.com [email protected] [email protected]
How to Use the Gallery Folder to Full EffectThe Way It Works
• The Gallery is a series of folders found where you have installed Captivate, all found under the folder called Gallery.
Tips, Tricks, and Techniques for Rapid e-Learning Development December 10 & 11, 2009
Page 22Session 202 – Great Tips & Tricks for Developing e-Learning with Adobe Captivate® 4 - Joseph Ganci, Dazzle Technologies Corp.
Copyright 2009 Free tips - Send subject join to: [email protected] Ganci, Dazzle Technologies Corp., www.dazzletech.com [email protected] [email protected]
How to Use the Gallery Folder to Full EffectThe Way It Works
• Add more buttons to use for button images by putting three image files in the folder.
• That button will then be available to you in Captivate.
Copyright 2009 Free tips - Send subject join to: [email protected] Ganci, Dazzle Technologies Corp., www.dazzletech.com [email protected] [email protected]
How to Use the Gallery Folder to Full EffectThe Way It Works
• The Captions folder.
• The Hotspots folder.
• The Mouse folder.

Tips, Tricks, and Techniques for Rapid e-Learning Development December 10 & 11, 2009
Page 23Session 202 – Great Tips & Tricks for Developing e-Learning with Adobe Captivate® 4 - Joseph Ganci, Dazzle Technologies Corp.
Copyright 2009 Free tips - Send subject join to: [email protected] Ganci, Dazzle Technologies Corp., www.dazzletech.com [email protected] [email protected]
How to Use the Gallery Folder to Full EffectThe Way It Works
• PlaybackControls
• Preloaders
• PrintOutPut
• Lesson
• Step by Step
• Storyboard
Copyright 2009 Free tips - Send subject join to: [email protected] Ganci, Dazzle Technologies Corp., www.dazzletech.com [email protected] [email protected]
How to Use the Gallery Folder to Full EffectThe Way It Works
• Sound
• SoundEffects
• SWF Animation
• TextAnimations
• Textures
• Themes

Tips, Tricks, and Techniques for Rapid e-Learning Development December 10 & 11, 2009
Page 24Session 202 – Great Tips & Tricks for Developing e-Learning with Adobe Captivate® 4 - Joseph Ganci, Dazzle Technologies Corp.
Copyright 2009 Free tips - Send subject join to: [email protected] Ganci, Dazzle Technologies Corp., www.dazzletech.com [email protected] [email protected]
How to Use the Gallery Folder to Full Effect
Copyright 2009 Free tips - Send subject join to: [email protected] Ganci, Dazzle Technologies Corp., www.dazzletech.com [email protected] [email protected]
Development Techniques for Increased Maintainability
Some Tips - Libraries
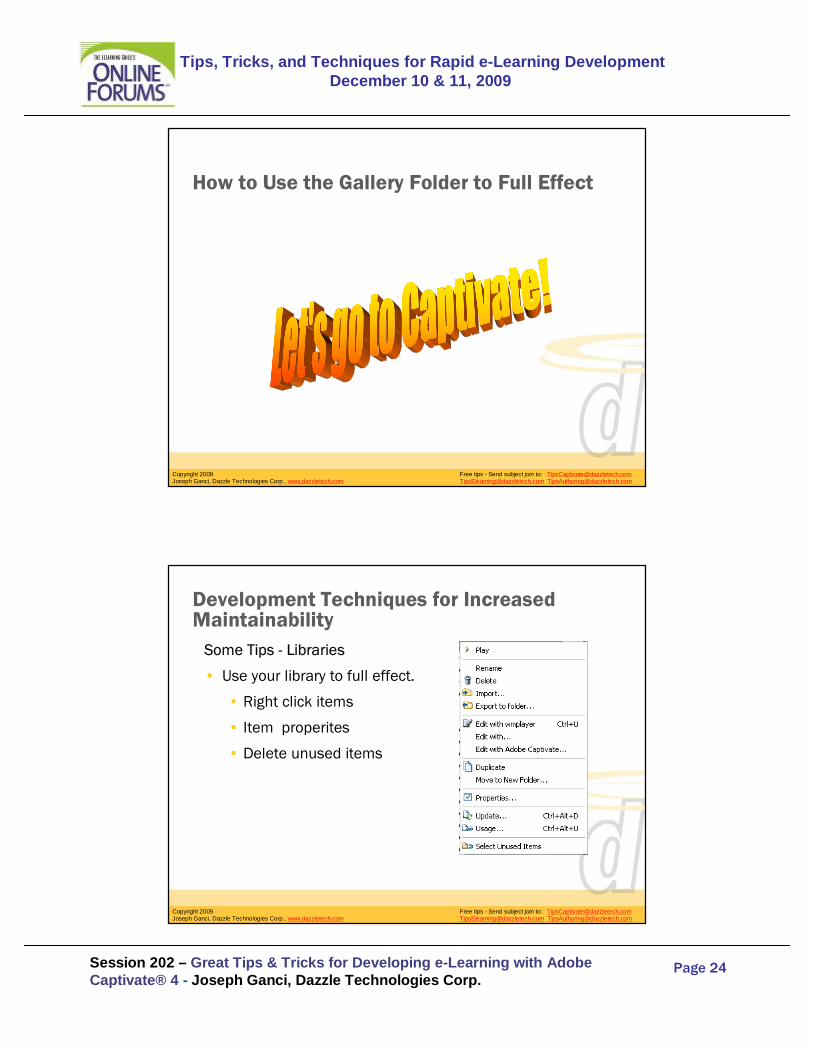
• Use your library to full effect.
• Right click items
• Item properites
• Delete unused items

Tips, Tricks, and Techniques for Rapid e-Learning Development December 10 & 11, 2009
Page 25Session 202 – Great Tips & Tricks for Developing e-Learning with Adobe Captivate® 4 - Joseph Ganci, Dazzle Technologies Corp.
Copyright 2009 Free tips - Send subject join to: [email protected] Ganci, Dazzle Technologies Corp., www.dazzletech.com [email protected] [email protected]
Development Techniques for Increased Maintainability
Some Tips - Narration
• Record amateur narration first.
• Record final audio using a professional.
Copyright 2009 Free tips - Send subject join to: [email protected] Ganci, Dazzle Technologies Corp., www.dazzletech.com [email protected] [email protected]
Development Techniques for Increased Maintainability
Some Tips – External Files
• Keep track of all of all image and sound files.
• If worse comes to worst, you can export images and audio from within your Captivate files, but that’s extra work.

Tips, Tricks, and Techniques for Rapid e-Learning Development December 10 & 11, 2009
Page 26Session 202 – Great Tips & Tricks for Developing e-Learning with Adobe Captivate® 4 - Joseph Ganci, Dazzle Technologies Corp.
Copyright 2009 Free tips - Send subject join to: [email protected] Ganci, Dazzle Technologies Corp., www.dazzletech.com [email protected] [email protected]
Development Techniques for Increased Maintainability
Some Tips – Locking Slides and Objects
• Why lock timeline objects.
Copyright 2009 Free tips - Send subject join to: [email protected] Ganci, Dazzle Technologies Corp., www.dazzletech.com [email protected] [email protected]
Development Techniques for Increased Maintainability
Some Tips – Locking Slides and Objects
• Why lock slides.
• Not password-protected.

Tips, Tricks, and Techniques for Rapid e-Learning Development December 10 & 11, 2009
Page 27Session 202 – Great Tips & Tricks for Developing e-Learning with Adobe Captivate® 4 - Joseph Ganci, Dazzle Technologies Corp.
Copyright 2009 Free tips - Send subject join to: [email protected] Ganci, Dazzle Technologies Corp., www.dazzletech.com [email protected] [email protected]
Development Techniques for Increased Maintainability
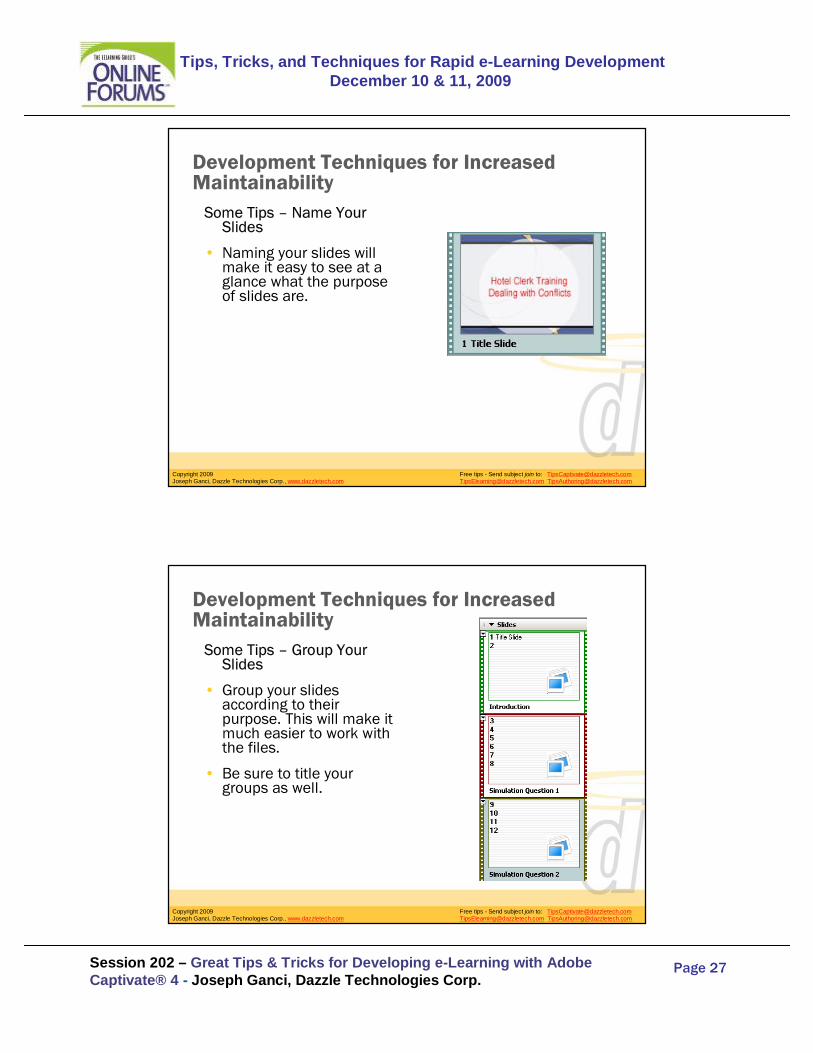
Some Tips – Name Your Slides
• Naming your slides will make it easy to see at a glance what the purpose of slides are.
Copyright 2009 Free tips - Send subject join to: [email protected] Ganci, Dazzle Technologies Corp., www.dazzletech.com [email protected] [email protected]
Development Techniques for Increased Maintainability
Some Tips – Group Your Slides
• Group your slides according to their purpose. This will make it much easier to work with the files.
• Be sure to title your groups as well.
Tips, Tricks, and Techniques for Rapid e-Learning Development December 10 & 11, 2009
Page 28Session 202 – Great Tips & Tricks for Developing e-Learning with Adobe Captivate® 4 - Joseph Ganci, Dazzle Technologies Corp.
Copyright 2009 Free tips - Send subject join to: [email protected] Ganci, Dazzle Technologies Corp., www.dazzletech.com [email protected] [email protected]
Development Techniques for Increased Maintainability
Some Tips – Add Notes to Your Slides
• Notes are a good way of keeping yourself and others informed of the history and any issues related to the slide.
Copyright 2009 Free tips - Send subject join to: [email protected] Ganci, Dazzle Technologies Corp., www.dazzletech.com [email protected] [email protected]
Development Techniques for Increased Maintainability

Tips, Tricks, and Techniques for Rapid e-Learning Development December 10 & 11, 2009
Page 29Session 202 – Great Tips & Tricks for Developing e-Learning with Adobe Captivate® 4 - Joseph Ganci, Dazzle Technologies Corp.
Copyright 2009 Free tips - Send subject join to: [email protected] Ganci, Dazzle Technologies Corp., www.dazzletech.com [email protected] [email protected]
How to Use the Branching View to Full EffectBranching
• The Branching View is like a snapshot.
Copyright 2009 Free tips - Send subject join to: [email protected] Ganci, Dazzle Technologies Corp., www.dazzletech.com [email protected] [email protected]
How to Use the Branching View to Full EffectBranching
• How slides relate and navigate.
• Change navigation and reporting.
• Ungroup slides that are grouped.
• Zoom in and out.

Tips, Tricks, and Techniques for Rapid e-Learning Development December 10 & 11, 2009
Page 30Session 202 – Great Tips & Tricks for Developing e-Learning with Adobe Captivate® 4 - Joseph Ganci, Dazzle Technologies Corp.
Copyright 2009 Free tips - Send subject join to: [email protected] Ganci, Dazzle Technologies Corp., www.dazzletech.com [email protected] [email protected]
How to Use the Branching View to Full Effect
Copyright 2009 Free tips - Send subject join to: [email protected] Ganci, Dazzle Technologies Corp., www.dazzletech.com [email protected] [email protected]
Using Variables and Advanced Actions
Variables
• A variable is simply a repository for data you want to remember.
• Store a name, a custom score or anything else you wish.
• You assign and retrieve values from variables.
• There are system variables and user variables.
Tips, Tricks, and Techniques for Rapid e-Learning Development December 10 & 11, 2009
Page 31Session 202 – Great Tips & Tricks for Developing e-Learning with Adobe Captivate® 4 - Joseph Ganci, Dazzle Technologies Corp.
Copyright 2009 Free tips - Send subject join to: [email protected] Ganci, Dazzle Technologies Corp., www.dazzletech.com [email protected] [email protected]
Using Variables and Advanced Actions
Advanced Actions
• Actions are “do”-ers
• They do things for you
• You are already familiar with some actions, such as Jump to Slide
• You can create your own advanced actions, which can be combinations of actions, conditional statements and variable assignments.
• We will demonstrate the power of actions now.
Copyright 2009 Free tips - Send subject join to: [email protected] Ganci, Dazzle Technologies Corp., www.dazzletech.com [email protected] [email protected]
Using Variables and Advanced Actions

Tips, Tricks, and Techniques for Rapid e-Learning Development December 10 & 11, 2009
Page 32Session 202 – Great Tips & Tricks for Developing e-Learning with Adobe Captivate® 4 - Joseph Ganci, Dazzle Technologies Corp.
Copyright 2009 Free tips - Send subject join to: [email protected] Ganci, Dazzle Technologies Corp., www.dazzletech.com [email protected] [email protected]
Using WidgetsWidgets
• Widgets extend the power of Captivate
• Flash developers can create Captivate widgets
• Several widgets are included with Captivate
• We will now review widgets and see how they work with variables too.
Copyright 2009 Free tips - Send subject join to: [email protected] Ganci, Dazzle Technologies Corp., www.dazzletech.com [email protected] [email protected]
Using Widgets

Tips, Tricks, and Techniques for Rapid e-Learning Development December 10 & 11, 2009
Page 33Session 202 – Great Tips & Tricks for Developing e-Learning with Adobe Captivate® 4 - Joseph Ganci, Dazzle Technologies Corp.
Copyright 2009 Free tips - Send subject join to: [email protected] Ganci, Dazzle Technologies Corp., www.dazzletech.com [email protected] [email protected]
Questions and AnswersTo receive occasional free tips, send the subject join to:
Captivate tips:[email protected]
E-Learning tips:[email protected]
Authoring Tools tips:[email protected]
Copyright 2009 Free tips - Send subject join to: [email protected] Ganci, Dazzle Technologies Corp., www.dazzletech.com [email protected] [email protected]
Thank You!
• If you would like to contact Joe Ganci:
www.dazzletech.com
• To discuss working with Joe, call him at 703-435-9961 x303.
To receive occasional free tips, send the subject join to:
Captivate tips:[email protected]
E-Learning tips:[email protected]
Authoring Tools tips:[email protected]
Tips, Tricks, and Techniques for Rapid e-Learning Development
December 10 & 11, 2009
Session 202 – Great Tips & Tricks for Developing e-Learning with Adobe Captivate® 4 – Joseph Ganci, Dazzle Technologies Corp.
Killer Tips for Creating Superb e-Learning Using
Adobe Captivate 4
Joseph Ganci
Dazzle Technologies Corp.
December 2009
Member, Adobe Captivate Advisory Board
Member, Adobe e-Learning Advisory Board
Join our free lists!
Captivate tips: email with subject line join to [email protected]
Authoring Tools tips: email with subject line join to [email protected]
e-Learning tips: email with subject line join to [email protected]
Dazzle Technologies Corp. For all your custom creative
e-learning needs!

Tips, Tricks, and Techniques for Rapid e-Learning Development
December 10 & 11, 2009
Session 202 – Great Tips & Tricks for Developing e-Learning with Adobe Captivate® 4 – Joseph Ganci, Dazzle Technologies Corp.
Table of Contents Redraw the Rollover Slidelet Shape.................................................................................1 Tab around the Campfire .................................................................................................3 Deliver your simulations in more than one language........................................................4
First Steps ...................................................................................................................4 Saving Your File .........................................................................................................5 Exporting the Captions ................................................................................................5 Changing the Captions.................................................................................................6 Importing the Captions ................................................................................................6 Changing the Audio Narration.....................................................................................6 Wrapping up................................................................................................................7
Format Captions after Exporting Them to Word..............................................................8 Force a Pause ..................................................................................................................9 Create a Replay Button – Replaying the Same Slide ......................................................10 Zoom Quickly with the Mouse Wheel ...........................................................................12 Use the Grid for Better Control......................................................................................13 Name Your Slides .........................................................................................................13 Add Notes to Your Slides ..............................................................................................13 Add Accessibility to Your Slides...................................................................................14 Take Advantage of How Captivate Captures Events ......................................................18
The Problem..............................................................................................................18 The Solution..............................................................................................................19
Record voice-over narration in a way that makes it easier to change and update ............20 The Problem..............................................................................................................20 The Solution..............................................................................................................20
Modify the timing of your simulation ............................................................................21 Setting the Default Duration for Blank Slides ............................................................21 Using the Timeline ....................................................................................................21 Determining Caption Timing .....................................................................................22
Set up your progress tracking options the way you need ................................................22 Publish your files in the best way possible for your situation .........................................24 Assigning a User Variable .............................................................................................25
Creating our user variable..........................................................................................25 Assigning a value to our user variable........................................................................26

Session 202 – Great Tips & Tricks for Developing e-Learning with Adobe Captivate® 4 – Joseph Ganci, Dazzle Technologies Corp.
Page 1
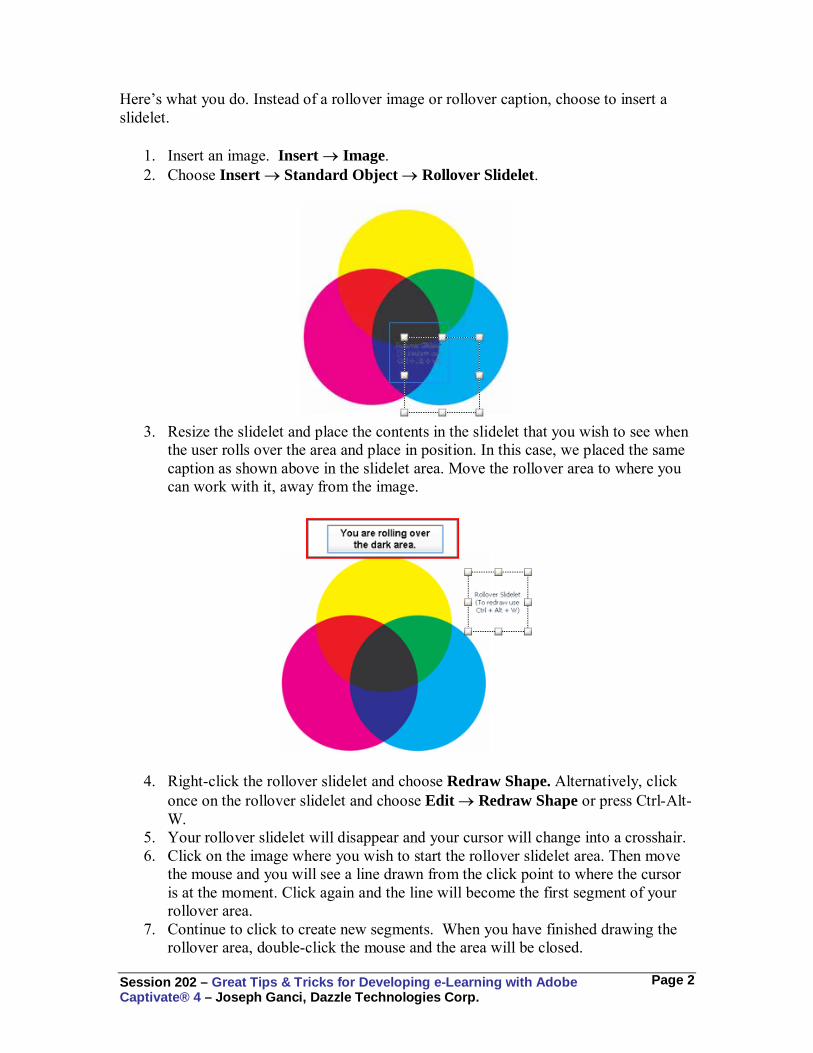
Redraw the Rollover Slidelet Shape One cool feature of rollover slidelets is the ability to make the rollover area any shape you wish. This is especially useful when you have a photo, diagram or other image which has interlocking areas, any or all of which could serve as a rollover area. For example, look at the following image.
If you would like users to roll over each of the colors above, it would be difficult to use rectangular areas, even if you only wish to show a caption or an image when rolling over an area. For example, rolling over the dark area in the middle of the image requires a rollover area the same shape as the dark area, not a rectangular one. If you use a rectangle, such as is required by a rollover caption or rollover image, and the cursor is where you see it in the image below during playback, it would still trigger the caption or image.
Rollover slidelets allow for nonrectangular rollover areas. Even if you only wish to show a caption or an image when a user rolls over an area, you can use a rollover slidelet. (Of course, with a rollover slidelet you can show much more than an image or caption.)

Session 202 – Great Tips & Tricks for Developing e-Learning with Adobe Captivate® 4 – Joseph Ganci, Dazzle Technologies Corp.
Page 2
Here’s what you do. Instead of a rollover image or rollover caption, choose to insert a slidelet.
1. Insert an image. Insert → Image. 2. Choose Insert → Standard Object → Rollover Slidelet.
3. Resize the slidelet and place the contents in the slidelet that you wish to see when
the user rolls over the area and place in position. In this case, we placed the same caption as shown above in the slidelet area. Move the rollover area to where you can work with it, away from the image.
4. Right-click the rollover slidelet and choose Redraw Shape. Alternatively, click once on the rollover slidelet and choose Edit → Redraw Shape or press Ctrl-Alt-W.
5. Your rollover slidelet will disappear and your cursor will change into a crosshair. 6. Click on the image where you wish to start the rollover slidelet area. Then move
the mouse and you will see a line drawn from the click point to where the cursor is at the moment. Click again and the line will become the first segment of your rollover area.
7. Continue to click to create new segments. When you have finished drawing the rollover area, double-click the mouse and the area will be closed.

Session 202 – Great Tips & Tricks for Developing e-Learning with Adobe Captivate® 4 – Joseph Ganci, Dazzle Technologies Corp.
Page 3
8. While you still see a rectangle with handles around it, notice the internal blue lines that represent the true rollover area. When played back, the slidelet will be activated only when the cursor falls within the blue-lined area.
Tab around the Campfire Sometimes when you try to work with objects on the stage, an image behind the object or overlapping the object can make it difficult to choose the object. Here’s a quick way to get what you want. Press the Tab key as many times as necessary to highlight your object. Each time you press Tab, it will choose the next object on the stage.

Session 202 – Great Tips & Tricks for Developing e-Learning with Adobe Captivate® 4 – Joseph Ganci, Dazzle Technologies Corp.
Page 4
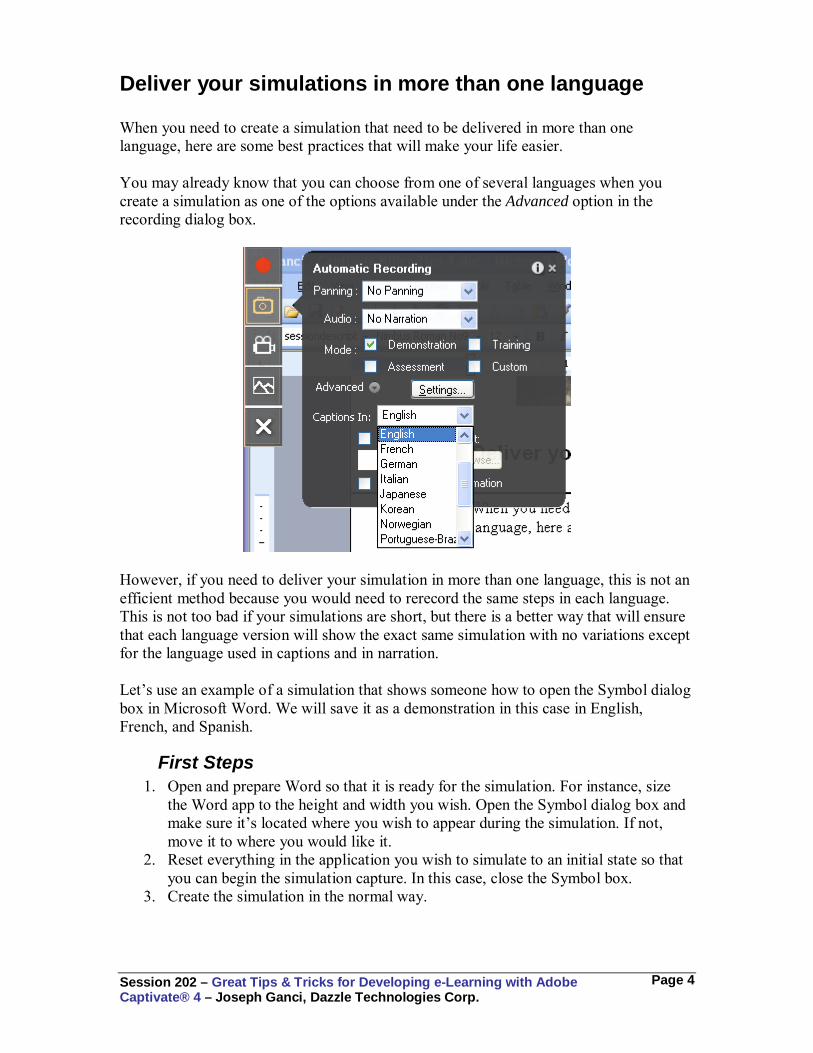
Deliver your simulations in more than one language When you need to create a simulation that need to be delivered in more than one language, here are some best practices that will make your life easier. You may already know that you can choose from one of several languages when you create a simulation as one of the options available under the Advanced option in the recording dialog box.
However, if you need to deliver your simulation in more than one language, this is not an efficient method because you would need to rerecord the same steps in each language. This is not too bad if your simulations are short, but there is a better way that will ensure that each language version will show the exact same simulation with no variations except for the language used in captions and in narration. Let’s use an example of a simulation that shows someone how to open the Symbol dialog box in Microsoft Word. We will save it as a demonstration in this case in English, French, and Spanish.
First Steps 1. Open and prepare Word so that it is ready for the simulation. For instance, size
the Word app to the height and width you wish. Open the Symbol dialog box and make sure it’s located where you wish to appear during the simulation. If not, move it to where you would like it.
2. Reset everything in the application you wish to simulate to an initial state so that you can begin the simulation capture. In this case, close the Symbol box.
3. Create the simulation in the normal way.

Session 202 – Great Tips & Tricks for Developing e-Learning with Adobe Captivate® 4 – Joseph Ganci, Dazzle Technologies Corp.
Page 5
Saving Your File 4. Save the Captivate movie, for instance to a file named wordSymbol.cp. 5. Now copy the Captivate movie for each of the languages you wish, naming each
one appropriately, for instance wordSymbol_English.cp, wordSymbol_Spanish.cp and wordSymbol_French.cp.
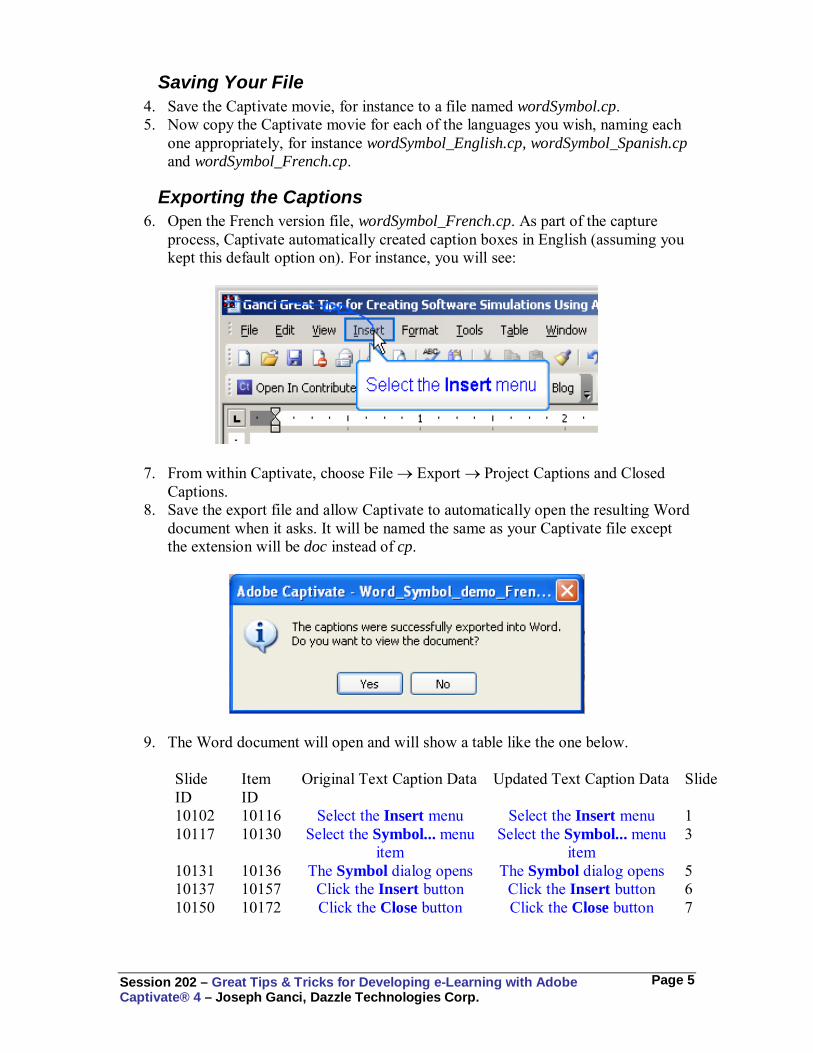
Exporting the Captions 6. Open the French version file, wordSymbol_French.cp. As part of the capture
process, Captivate automatically created caption boxes in English (assuming you kept this default option on). For instance, you will see:
7. From within Captivate, choose File → Export → Project Captions and Closed Captions.
8. Save the export file and allow Captivate to automatically open the resulting Word document when it asks. It will be named the same as your Captivate file except the extension will be doc instead of cp.
9. The Word document will open and will show a table like the one below.
Slide ID
Item ID
Original Text Caption Data Updated Text Caption Data Slide
10102 10116 Select the Insert menu Select the Insert menu 1 10117 10130 Select the Symbol... menu
item Select the Symbol... menu
item 3
10131 10136 The Symbol dialog opens The Symbol dialog opens 5 10137 10157 Click the Insert button Click the Insert button 6 10150 10172 Click the Close button Click the Close button 7
Session 202 – Great Tips & Tricks for Developing e-Learning with Adobe Captivate® 4 – Joseph Ganci, Dazzle Technologies Corp.
Page 6
Changing the Captions 10. Be sure not to make any changes in any column except the one with the header
Updated Text Caption Data. In that column, change the text to the French version. This is a Word document, so use any and all tools available to you to make life as simple as possible, for instance copy and paste, search and replace, etc. Here’s the same Word table after we’ve made changes to the fourth column.
Slide ID
Item ID
Original Text Caption Data Updated Text Caption Data Slide
10102 10116 Select the Insert menu Sélectionnez le menu Insert
1
10117 10130 Select the Symbol... menu item
Sélectionnez le menu Symbol...
3
10131 10136 The Symbol dialog opens La boîte de dialogue Symbol s'ouvre
5
10137 10157 Click the Insert button Cliquez sur le bouton Insert
6
10150 10172 Click the Close button Cliquez sur le bouton Close
7
11. Note that only text can be entered in these cells. If you include images, for
instance, they will be ignored when this file is imported into Captivate. 12. Save the caption Word document and return to your Captivate source file.
Importing the Captions 13. Choose File → Import → Project Captions and Closed Captions and import the
Word document you just saved. 14. All the captions will change to reflect the changes you made in the Word
document. Save your Captivate file. 15. Do the same now for the Spanish version and for any other languages you wish.
Changing the Audio Narration 16. There are basically two ways to create slide narrations when preparing software
simulations. The first is to record yourself at the computer while running through the capture process. The second is to import audio files, one for each slide, after the capture process is complete.
17. Let’s assume that for this example we have recorded narration during the capture process and that there are seven slides in our movie. We are now working in the English version of the movie.
18. Choose Audio → Audio Management and you will see this dialog box. Note that Captivate has automatically called our narration audio clips Narration01 through Narration07.

Session 202 – Great Tips & Tricks for Developing e-Learning with Adobe Captivate® 4 – Joseph Ganci, Dazzle Technologies Corp.
Page 7
19. Open the Library and you will see the same list there.
20. Save your file and open the next language file, wordSymbol_French.cp. Be in the Edit tab and make sure you can see the Library (View → Show Library).
21. Click on the Library option Open Library above the library objects list. Choose the English version cp file.
22. A separate window will open, showing the library for the English version cp file, as in the figure above.
23. Shift-click the narration audio files so that you select all of them (or as many as you wish) and drag them to the library for the current file. Place them under the Audio category to keep things neat. Save your file.
24. Choose all the audio objects that you just imported in the library and choose the Export option, either by right-clicking and choosing Export to Folder or by choosing the Export icon above the list.
25. Save the audio files to a folder. Open each in a separate audio editor or edit it directly in Captivate’s audio editor and record the correct narration in French.
26. Save your file. 27. Repeat this process for other language version files.
Wrapping up 28. You now have a separate file for each language that looks exactly the same.
Session 202 – Great Tips & Tricks for Developing e-Learning with Adobe Captivate® 4 – Joseph Ganci, Dazzle Technologies Corp.
Page 8
29. Each file has caption and narration in its proper language
Format Captions after Exporting Them to Word You can take advantage of Captivate’s ability to export captions to Word to make certain changes faster and more easily. Especially because all captions are placed in a table column, you can choose the column and make a change to all the captions at the same time, very quickly.
1. Using the same process as in Tip 3, output captions to a Word document.
Slide ID
Item ID
Original Text Caption Data Updated Text Caption Data Slide
10102 10116 Select the Insert menu Select the Insert menu 1 10117 10130 Select the Symbol... menu
item Select the Symbol... menu
item 3
10131 10136 The Symbol dialog opens The Symbol dialog opens 5 10137 10157 Click the Insert button Click the Insert button 6 10150 10172 Click the Close button Click the Close button 7
2. This time, you won’t change the text content, only the formatting. 3. You can change individual caption formatting, or change all the captions at once.
Let’s do the latter. Choose the column in Word.
Slide ID
Item ID
Original Text Caption Data Updated Text Caption Data Slide
10102 10116 Select the Insert menu Select the Insert menu 1 10117 10130 Select the Symbol... menu
item Select the Symbol... menu
item 3
10131 10136 The Symbol dialog opens The Symbol dialog opens 5 10137 10157 Click the Insert button Click the Insert button 6 10150 10172 Click the Close button Click the Close button 7
4. You may change several attributes of the text:
a. The font b. The foreground color c. The background color d. The justification (right, left, center)
5. You can also perform other tasks: a. Number the captions as you would a list. b. Add bullets to each caption all at once. c. Add a table within each cell. d. Perform any other tasks that affect the text.
6. Here’s an example of changes we’ve made to our text. We’ve changed several attributes and added tables. These are all preserved.
Slide ID
Item ID
Original Text Caption Data Updated Text Caption Data Slide
Session 202 – Great Tips & Tricks for Developing e-Learning with Adobe Captivate® 4 – Joseph Ganci, Dazzle Technologies Corp.
Page 9
10102 10116 Select the Insert menu Do Re Mi Fa So La Ti
The above are music notes.
1
10117 10130 Select the Symbol... menu item
1. Select the Symbol... menu item
3
10131 10136 The Symbol dialog opens 2. The Symbol dialog opens
5
10137 10157 Click the Insert button 3. Click the Insert button
6
10150 10172 Click the Close button 4. Click the Close button 7
7. Note that if you insert images or other non-text objects in the cells, they will not be imported.
Force a Pause
When nothing else on a timeline will cause a slide to pause, you can create a very small transparent button and put it on the screen to force a pause.
1. Choose Insert → Standard Object → Button. 2. Set the button to Transparent and make sure that the frame width is set to 0.
3. Set the position to 0,0 (or any other unobtrusive place) and the pixel width and height to 4 pixels, the minimum allowed.
4. If you wish, you can attach a shortcut key to the button so that the user can proceed by pressing the key. Make sure you tell the user in a text caption which

Session 202 – Great Tips & Tricks for Developing e-Learning with Adobe Captivate® 4 – Joseph Ganci, Dazzle Technologies Corp.
Page 10
key can be pressed.
Create a Replay Button – Replaying the Same Slide
The playback bar in Captivate gives users control. If you keep the options available, you can have them rewind an entire movie, go back or forward a slide, and perform other actions. However, there are times when you will not want a playback bar but may still wish to give the learner the ability to replay the current slide from the start. This is especially true if you have played audio or an animation on the slide. You may even want to do this with a slide that contains video if you do not wish to give the learner the standard video controls.
Slide 2 only shows the background image and is set to a very short amount of time. When the learner is watching the resulting movie, Slide 1 moves through Slide 2 and to Slide 3 in one fluid motion. Slide 2 is not noticeable.
On Slide 3 the user is asked to click each of three buttons in turn. After this, the user has the option of continuing to the next slide or replaying the screen by clicking one of two buttons.

Session 202 – Great Tips & Tricks for Developing e-Learning with Adobe Captivate® 4 – Joseph Ganci, Dazzle Technologies Corp.
Page 11
The Replay button should replay the current slide. However, when setting the navigation destination when the user clicks the Replay button, you’ll see there is no option for replaying the current slide.
If you try to use the Jump to Slide option in the menu above, you will not see the current slide as a choice, in this case Slide 3.

Session 202 – Great Tips & Tricks for Developing e-Learning with Adobe Captivate® 4 – Joseph Ganci, Dazzle Technologies Corp.
Page 12
The trick then is to return to the previous slide. Remember, Slide 2 is set to a very short time period. Therefore, when going to the previous slide, the effect is to replay the current slide.
Zoom Quickly with the Mouse Wheel
When you hold down the Ctrl key and scroll the mouse wheel, you can zoom in and out of the current view.
When in the Edit view, performing this action will zoom in and out of the stage area. Besides this method, there are three other ways to zoom while in the Edit view:
• Use the zoom drop down above the stage.
• Use the zoom and magnification options under the View drop down menu.
• Use the keyboard shortcuts seen in the drop down menu above. Hold down Ctrl and then press = to zoom in, - to zoom out, 1 to zoom to 100%, 2 to zoom to 200%, 3 to zoom to 300%, 4 to zoom to 400% and 0 to zoom to a best fit.
When in the Branching view, you can also zoom in and out. Besides this method, there are three other ways to zoom while in the Branching view:
• Use the trackbar in the upper right of the screen.
• Use the magnifying glass tools on the toolbar.

Session 202 – Great Tips & Tricks for Developing e-Learning with Adobe Captivate® 4 – Joseph Ganci, Dazzle Technologies Corp.
Page 13
• Use the keyboard shortcuts Ctrl = to zoom in and Ctrl – to zoom in.
Use the Grid for Better Control
Captivate contains robust alignment tools (Edit → Align) but these are used to line objects up after you’ve placed them on the screen. Using the Captivate grid can save you time by allowing you to line objects up as you place them on the screen.
For instance, in the image below, we show the Grid by choosing View → Show Grid, after which we choose View → Snap to Grid so that as we place objects on the screen and move them, they snap to the grid dots, making it much easier to line the buttons and captions up correctly.
Name Your Slides
Things become much easier if you take the time to title your slides. For instance, when you are choosing a slide to which to navigate, such as in the image below, it is much easier to choose the right slide if you’ve named the slide to state its purpose. In this case, slides 1, 2 and 3 are much easier to identify.
Add Notes to Your Slides
You may add notes to any Captivate slide by choosing Slide → Properties and then choosing the Notes button on the Properties dialog box.

Session 202 – Great Tips & Tricks for Developing e-Learning with Adobe Captivate® 4 – Joseph Ganci, Dazzle Technologies Corp.
Page 14
The notes you type in the notes section of a slide are not seen by learners after the file is published. However, notes can be used for a variety of reasons:
• They can be used to trade instructions with colleagues or even remind yourself of remaining tasks you have to design and develop on the slide.
• They can be used to keep a history list of decisions that were made regarding the slide.
• They can be very helpful in reminding you later of why you included features or developed the slide the way you did.
• Notes can also be used as a means of setting up closed captioning if your notes are written so they can serve in that capacity; read aloud for those with vision impairments after the file has been published. See the next tip.
Add Accessibility to Your Slides
Accessibility refers to adding elements for individuals with mobility, hearing or vision impairments. You can ensure that your movies can be accessed by a larger audience using the Accessibility options built into Captivate.
1. Closed Captioning a. If you provide closed captioning, users will be able to access it by clicking
the CC button on the playback controls. Closed captioning is used to show those with hearing impairments the text that is being narrated in an audio file.
b. You can add Closed Captioning, choose Audio → Audio Management.

Session 202 – Great Tips & Tricks for Developing e-Learning with Adobe Captivate® 4 – Joseph Ganci, Dazzle Technologies Corp.
Page 15
c. Choose a slide that has sound on it and then click the button. You will see the following dialog

Session 202 – Great Tips & Tricks for Developing e-Learning with Adobe Captivate® 4 – Joseph Ganci, Dazzle Technologies Corp.
Page 16
d. You can play the sound, stopping whenever you wish so that you may see
which part of the sound is narrating the words you wish to type in a closed caption.
e. Click on the waveform and then click the green + button and a dotted vertical line with a numbered tab will be inserted on the waveform. You can then type in the caption for that portion of the waveform. Do the same for other parts of the audio waveform until you have synchronized the text with the audio, section by section.
f. When you have completed adding closed captions and closed all dialog boxes, choose Project → Skin
g. In the Skin editor, you’ll see the Closed Captioning checkbox. When checked, a CC button will appear on the playback bar to the user. Clicking it will show a transparent overlay with closed captioning text, synchronized to the audio the way you had prepared it.
h. Immediately below the checkbox is the Settings button. Click Settings and you’ll be shown the following options.

Session 202 – Great Tips & Tricks for Developing e-Learning with Adobe Captivate® 4 – Joseph Ganci, Dazzle Technologies Corp.
Page 17
i. The Count line shows how many lines of closed captioning text will be shown on the screen. You can also change the font type, size and color and the color and transparency behind the closed captioning text.
j. Note that the default is Verdana 8, which may be too small to properly see on the screen. You can change the size to a higher number to make it easier to see.
2. Text to Read Aloud
a. For those with vision impairments, Captivate allows for text to be read aloud so that screen text can be heard.
b. Choose Slide → Properties and then click the Accessibility button on the Properties dialog box.

Session 202 – Great Tips & Tricks for Developing e-Learning with Adobe Captivate® 4 – Joseph Ganci, Dazzle Technologies Corp.
Page 18
c. Here you can choose to: i. Insert the text that is on the stage. ii. Insert your slide notes. iii. Insert text you have included in closed captioning. iv. Simply type different text.
d. Remember, any text that appears here will be read by a screen reader if a user has one installed and running.
3. 508 Compliance
a. Choose Edit → Preferences and then Project Settings. One of the options you will see is 508 Compliance.
b. Choosing this option allows several elements to become accessible. See the Captivate help section for a full list of those elements and warnings regarding their use.
Take Advantage of How Captivate Captures Events
The Problem 1. When an application is running in Windows and something happens in the file, for
instance the user clicks a menu item, the application will generate what is called an event. The event contains a good deal of information about what just happened.
2. When Captivate is recording a simulation, it is listening for events to be generated

Session 202 – Great Tips & Tricks for Developing e-Learning with Adobe Captivate® 4 – Joseph Ganci, Dazzle Technologies Corp.
Page 19
by the application being simulated. It captures each event’s information. 3. When constructing the Captivate file, it then uses all of this information to build
text captions that somehow know what was clicked, or what the user typed, or whatever else may have happened.
4. However, not everything that happens in an application is deemed worthy of an event generation. For instance, if you are working in an application and drop down a menu, then move your mouse down to the menu item you wish, you will usually see each menu item that you pass over highlight. The highlight disappears as you leave that menu option and move down to the next.
5. Because of this, these highlights are not captured by Captivate automatically. The same is true for other uneventful events!
The Solution 1. While you are capturing the simulation, whenever you generate an event, you will
hear a camera shutter sound, assuming you haven’t turned off this option or are recording narration. This is a clue that an event has been captured.
2. If you don’t hear the camera shutter sound when you expect to hear it, for instance, when a highlight occurs, hit the PrtScr button on your keyboard. You will hear the shutter sound and Captivate will capture the changed screen.
3. When you have finished capturing your simulation, you will see that a slide was created for each of the times you hit PrtScr.
4. Each of those slides will likely be set to 3.0 seconds. This may be too slow for such scenes as moving down a pull down menu.
5. You may select all the slides that are affected this way (Shift or Ctrl-click) and then right-click on one and choose Properties.
6. Change the timing in the Properties dialog and it will change on all the selected slides.
7. Note that if your shutter sound is turned off, you will need to have practiced in advance to determine when events are not generated. When in doubt, hit PrtScr. It’s much easier to delete a slide later than to insert new ones and make them look seamless.

Session 202 – Great Tips & Tricks for Developing e-Learning with Adobe Captivate® 4 – Joseph Ganci, Dazzle Technologies Corp.
Page 20
Record voice-over narration in a way that makes it easier to change and update
The Problem 1. When you are creating a simulation and narrating the steps as you are recording
the Captivate file, you may find that the narration may cause a problem when you are editing your slides later.
2. The principal reason for this is that we are talking through the clicks and other interactive elements while recording.
3. For instance, if once again we are demonstrating how to open the Symbol dialog box in Microsoft Word and we show the seven steps as demonstrated in the last section, we may narrate the steps at the same time that we record them. Image that we are performing the steps on the left as we perform the narration on the right, synchronized as seen. This is what normally happens if you simply talk during the steps as you capture them.
The step as shown in the caption Our narrative
Select the Insert menu The first thing you should do is to pull Select the Symbol... menu item down the Insert menu and choose the The Symbol dialog opens Symbol option. At that point, the Click the Insert button Symbol dialog box will open. Choose Click the Close button Insert, then Close. That’s it!
4. If you save and run the movie file immediately, everything will run smoothly, just
as you captured it. 5. The problem occurs after the fact if you wish to change the timing of any of the
steps above, by adding additional text captions or interactive elements. Now there will be a long pause between the word pull in the first step and down in the second step, making for a halting audio playback.
6. You may even find that the playback of a word is cut in the middle and a pause occurs in the middle of the word!
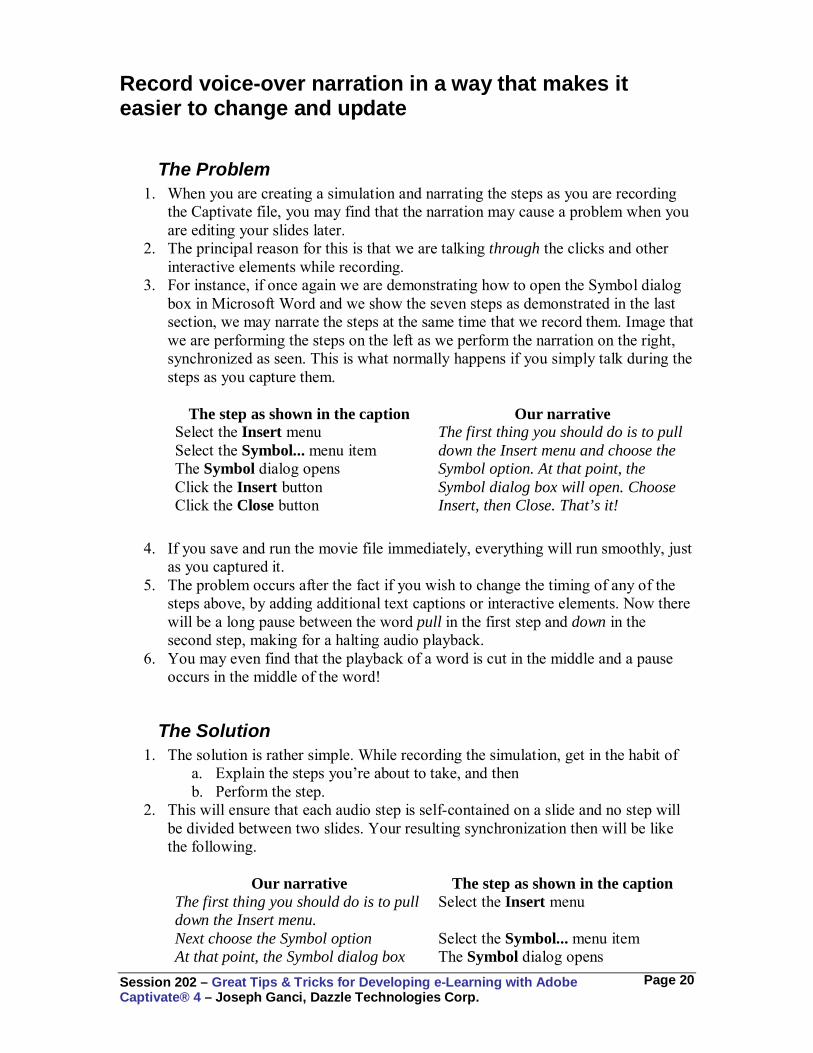
The Solution 1. The solution is rather simple. While recording the simulation, get in the habit of
a. Explain the steps you’re about to take, and then b. Perform the step.
2. This will ensure that each audio step is self-contained on a slide and no step will be divided between two slides. Your resulting synchronization then will be like the following.
Our narrative The step as shown in the caption
The first thing you should do is to pull down the Insert menu.
Select the Insert menu
Next choose the Symbol option Select the Symbol... menu item At that point, the Symbol dialog box The Symbol dialog opens

Session 202 – Great Tips & Tricks for Developing e-Learning with Adobe Captivate® 4 – Joseph Ganci, Dazzle Technologies Corp.
Page 21
will open. Choose Insert Click the Insert button Now choose Close. That’s it! Click the Close button
3. You may now edit each slide and be assured that no audio anomalies will occur.
Modify the timing of your simulation
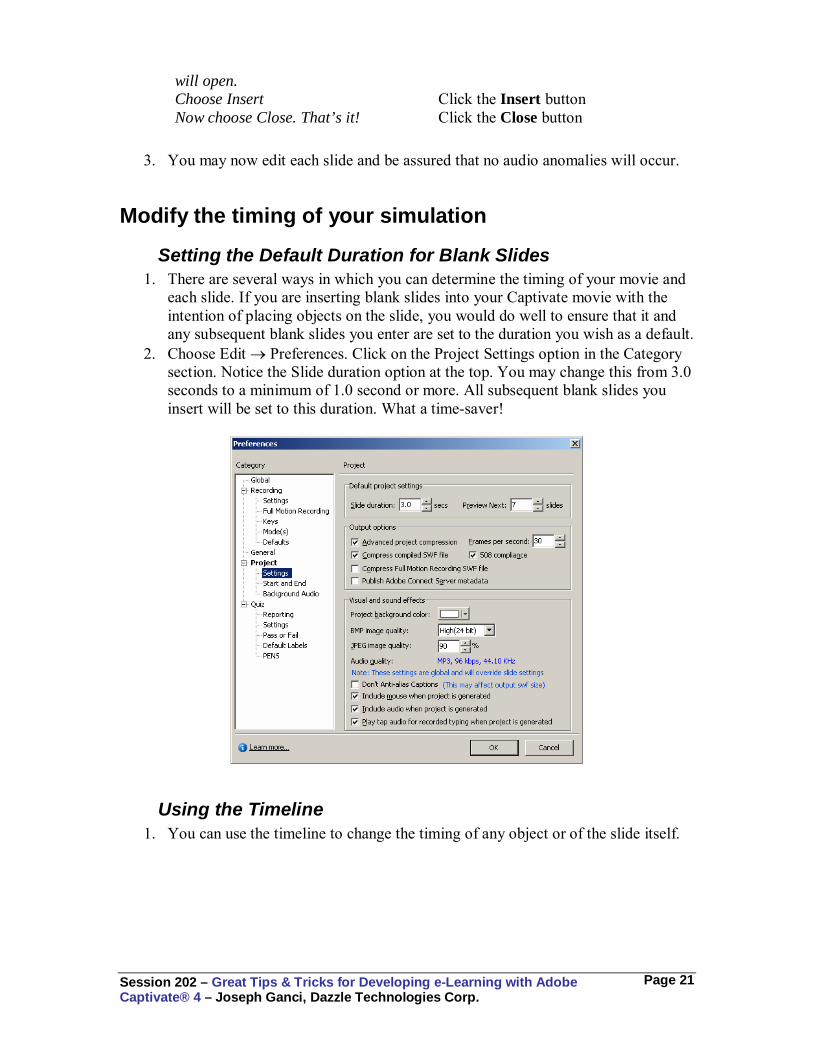
Setting the Default Duration for Blank Slides 1. There are several ways in which you can determine the timing of your movie and
each slide. If you are inserting blank slides into your Captivate movie with the intention of placing objects on the slide, you would do well to ensure that it and any subsequent blank slides you enter are set to the duration you wish as a default.
2. Choose Edit → Preferences. Click on the Project Settings option in the Category section. Notice the Slide duration option at the top. You may change this from 3.0 seconds to a minimum of 1.0 second or more. All subsequent blank slides you insert will be set to this duration. What a time-saver!
Using the Timeline 1. You can use the timeline to change the timing of any object or of the slide itself.

Session 202 – Great Tips & Tricks for Developing e-Learning with Adobe Captivate® 4 – Joseph Ganci, Dazzle Technologies Corp.
Page 22
2. You may change the timing of when the object first appears, when it disappears, and as a consequence its duration.
3. You may change the amount of time the whole slide appears but it cannot be any less than the duration of any individual object on the slide.
Determining Caption Timing 1. When creating captions in Captivate, you can have Captivate automatically
calculate the amount of time the caption stays on the screen by choosing Edit → Preferences, then choosing the Defaults option under the Global settings.
2. The timing will be determined by the length of the text in the caption.
Set up your progress tracking options the way you need 1. Most who use Captivate understand that its built in quizzes will track a user’s
progress. Many do not realize that it is also possible to track a user’s progress on any of the three types of interactions built into Captivate: Text Entry Box, Click Box, and Button, no matter where they appear in your file.
2. When you have an interaction on the screen, either automatically created during a simulation capture or one you have inserted manually, note that as part of its properties there is a Reporting tab.

Session 202 – Great Tips & Tricks for Developing e-Learning with Adobe Captivate® 4 – Joseph Ganci, Dazzle Technologies Corp.
Page 23
3. Normally the Include in Quiz option is turned off. However, by turning it on, you will allow Captivate to include this interaction in its final progress tracking results, no matter where it appears in your file, even outside an official “Quiz” area.
4. You may change the Objective and Interaction IDs and the weight of the question (points).
5. Be sure to thoroughly check the Quiz Preferences by choosing Quiz → Quiz Preferences. There is a wealth of options here that should be considered before creating quiz questions and interactions.
Session 202 – Great Tips & Tricks for Developing e-Learning with Adobe Captivate® 4 – Joseph Ganci, Dazzle Technologies Corp.
Page 24
Publish your files in the best way possible for your situation
1. One feature of Captivate that is not well-known is the wealth of options available to you when you open the Publish settings.
2. There are two primary outputs from Captivate: Flash SWF files and Word documents. There are also other files that may be generated.
3. For instance, when choosing the Flash (SWF) option, you may also choose to generate the HTML file which can be used to launch your SWF file.
a. If you then run the HTML file, your Captivate file will run in the dimensions you originally chose and will work with the skin you chose, meaning the playback bar and other screen elements that you have chosen.
b. If you run the SWF file directly in the Flash player instead, you will not see the skin and your movie will be resizable like other Flash movies.
4. Note the blue options on the right hand side. Each of those may be clicked and options therein changed for the published file. This is a nice shortcut.
5. Be sure to set the Flash Player option correctly to ensure the file will play back correctly for your audience.
6. The Adobe Connect option also generates a SWF and other necessary files to run on an Adobe Connect server, going as far as uploading the files to the server for you if you provide the server information.
7. The Email option generates a SWF file and attaches it to an email which you can then send.
8. The FTP option will generate a SWF file and any other files needed and upload those to your FTP server, using information you provide.
9. The Print option gives you several different Word document outputs, Handout, Lesson, Step-by-Step Instructions, and Storyboard. In each case, you will have several options from which you can choose on the right hand side of the dialog.
Session 202 – Great Tips & Tricks for Developing e-Learning with Adobe Captivate® 4 – Joseph Ganci, Dazzle Technologies Corp.
Page 25
Assigning a User Variable The latest version of Adobe Captivate allows for much more flexibility than prior versions. Part of this new capability involves the use of advanced actions and variables. This tip will show you how to set up a new user variable and assign it. There is a link at the end of the tip to a Captivate movie that will walk you through all the steps. A variable is simply a repository for data you want to remember. Let’s say that we will determine how well the learner does by comparing the number of questions answered correctly to the total number of questions. It would be convenient to store the number of questions in a variable at the start of our Captivate lesson so that if we ever need add or remove questions from our file, we need to change this information only once in our file.
Creating our user variable We start by choosing Project → Actions to open the Actions Dialog.

Session 202 – Great Tips & Tricks for Developing e-Learning with Adobe Captivate® 4 – Joseph Ganci, Dazzle Technologies Corp.
Page 26
The first tab is Variables. Choose User from the Type dropdown list and click the Add New button. Once you’ve done that, type the new variable name in the Name field. Let’s call it NumQuestions. Once you’ve typed the name, the Add New button becomes Save. Click it and now you can use the variable.
Assigning a value to our user variable Now that you’ve created your variables, let’s assign our NumQuestions variable to the number of questions in our file. On our first slide, we choose Properties and then change what happens on Slide Enter.

Session 202 – Great Tips & Tricks for Developing e-Learning with Adobe Captivate® 4 – Joseph Ganci, Dazzle Technologies Corp.
Page 27
As you can see, we chose Assign from the On slide enter drop down menu and then chose our NumQuestions example from the Assign drop down. Finally, we typed the value we wish to have NumQuestions hold in the with field, 3. We can now use NumQuestions whenever we want to create an action that needs to determine what to do next based at least in part with how many questions are in our file. This is an age-old technique for making your file much easier to maintain because if there are several places in your file where you need to remember this information, you need only change one place in your file (the dialog above) when you need to modify the number of questions in your file.