office 365 single sign-on - onthehub · pdf filethis document provides instructions for...
TRANSCRIPT
Office 365 Single Sign-On Customer Implementation Guide
2017-11-15 Version 2.2

Shibboleth User Verification: Customer Implementation Guide | 2017-11-15 | 1
TABLE OF CONTENTS
Introduction.................................................................................................................................................... 1
Purpose ............................................................................................................................................... 1
Requirements ...................................................................................................................................... 1
Terms and Definitions ......................................................................................................................... 1
Overview ....................................................................................................................................................... 2
What is Office 365 SSO? .................................................................................................................... 2
Pros and Cons .................................................................................................................................... 2
Office 365 SSO Implementation.................................................................................................................... 3
Configuring Groups in Office 365 ....................................................................................................... 3
Requesting Office 365 SSO ................................................................................................................ 6
Adding Office 365 SSO to your WebStore .......................................................................................... 7
Office 365 SSO Sign-In Workflow ............................................................................................................... 11
Support ........................................................................................................................................................ 11

Office 365 Single Sign-On: Customer Implementation Guide | 2017-11-15 | 1
Introduction
PURPOSE
This document provides instructions for configuring Office 365 Single Sign-On (SSO) user verification on
your ELMS WebStore. It is intended for WebStore administrators who are responsible for managing user
verification in ELMS.
REQUIREMENTS
The following resources are required to perform the tasks described in this document.
An active ELMS WebStore
An active Office 365 account for your school
TERMS AND DEFINITIONS
Commonly used terms from this document are listed and defined in the table below.
Table 1: Terms and Definitions
Term Definition
ELMS Electronic License Management System. This term encompasses your WebStore and the ELMS Administration site through which you manage and customize your WebStore.
WebStore The front-facing component of ELMS through which eligible users browse and order products.
Subscription Membership in a program that entitles an organization to distribute software to its members. ELMS WebStores can support campus-wide subscriptions (i.e. subscriptions that apply to an entire campus or school), departmental subscriptions (i.e. subscriptions that apply only to a specific department of a school), or a combination of both.
User Verification The means by which a user gains access to a WebStore and the process by which ELMS determines a user’s eligibility based on information that is passed during sign-in.
SSO Single Sign-On. A type of user verification wherein users gain access to a number of related sites and systems through a single sign-in portal using a single set of sign-in credentials. SSO verification methods streamline WebStore management, promote security, and combat password fatigue.

Office 365 Single Sign-On: Customer Implementation Guide | 2017-11-15 | 2
Office 365 SSO See What is Office 365 SSO?
Overview
This section describes Office 365 SSO and identifies the advantages and disadvantages to using it.
WHAT IS OFFICE 365 SSO?
Office 365 SSO is an SSO user verification method that integrates your organization’s WebStore with
your organization’s Office 365 account through the OpenID Connect protocol.
With Office 365 SSO configured, your students, faculty and staff gain access to the WebStore through
your organization’s Office 365 sign-in page. User information is taken directly from Office 365 to
determine eligibility on the WebStore.
PROS AND CONS
The table below lists advantages and disadvantages of the Office 365 SSO verification method.
Table 2: Pros and Cons of Office 365 SSO
Pros Cons
Quick and easy to implement
No technical expertise required
Employs the Office 365 interface you are familiar with
Your school must have an Office 365 account configured
Supports only three user groups to define user eligibility (Students, Faculty and Staff)

Office 365 Single Sign-On: Customer Implementation Guide | 2017-11-15 | 3
Office 365 SSO Implementation
Office 356 SSO implementation consists of three general steps.
1. Configure groups in Office 365
2. Request Office 365 SSO
3. Adding the Office 365 SSO verification method to your WebStore
CONFIGURING GROUPS IN OFFICE 365
If your school manages multiple campuses, or if any departments at your school have their own
subscription on your WebStore, then you will need to configure certain groups in Office 365 before Office
365 SSO can be added to your WebStore. These groups are used to establish which subscription(s) their
members are eligible under when they sign in to the WebStore.
To configure groups in Office 365:
1. Sign in to your school’s Office 365 account.
2. Click Admin.
Figure 1: Office 365 – Home Page

Office 365 Single Sign-On: Customer Implementation Guide | 2017-11-15 | 4
3. Click Groups on the left side-menu.
Figure 2: Office 365 – Groups Page
4. Click Add a group to configure the necessary groups in Office 365 (if required).
The groups you need to configure depends on what type of program(s) your WebStore supports
and how many campuses your school manages as described below.
o For single-campus schools with only a campus-wide subscription: No groups need
to be configured in ELMS.
o For multi-campus schools with campus-wide subscriptions: Create a group
representing each subscription-holding campus. Choose the group type: “Security group”.
Name each group: “Kivuto_org_[CampusName]”.
o For schools with departmental subscriptions: Create a separate group representing
each subscription-holding department. Choose the group type: “Security group”. Name
each group: “Kivuto_org_[DepartmentName]”.
Important: If your school manages multiple campuses, and your WebStore supports both campus-wide and departmental subscriptions, you will need to configure a group for each subscription-holding campus and a group for each subscription-holding department.
Departmental groups do not need to be configured in Office 365 if each subscription-holding department will use a distinct email domain to sign in to the WebStore.
If your school allows students to keep their school email addresses after graduation: Be sure to remove users from groups or deactivate their accounts as they graduate so they do not continue to have access to products for which they are no longer eligible.

Office 365 Single Sign-On: Customer Implementation Guide | 2017-11-15 | 5
Figure 3: Office 365 – Add Group
5. Add the necessary members to each group you configure as follows.
i. Click on the group’s name.
ii. Click the Edit button next to “Members” (Figure 4).
iii. Click Add members (Figure 5).
iv. Select each user and group you wish to add to the group, and then click Save (Figure 6).
Add the following members to each group you have configured.
o To Kivuto_org_[CampusName] – Add all users from the subscription-holding
campus and all departmental groups you have configured for that campus.
o To Kivuto_org_[DepartmentName] – Add all users from the corresponding
department to each group of this type.
Figure 4: Office 365 – Edit Group Members
Figure 5: Office 365 – Add Members
Figure 6: Office 365 – Select Group Members

Office 365 Single Sign-On: Customer Implementation Guide | 2017-11-15 | 6
REQUESTING OFFICE 365 SSO
Contact your [email protected] if you wish to apply Office 365 SSO to your WebStore or learn more
about the verification method.
You will be asked to provide the following.
A list of all email domains configured under your Office 365 tenant that might be used to sign in to
your WebStore
A list of all groups configured in Office 365.
Additionally, you must provide consent for a single sign-on mechanism to be established between your
organization’s WebStore and Office 365 and for Kivuto to access user profile information from Office 365.
To provide consent:
1. Navigate to the following URL:
https://login.microsoftonline.com/common/oauth2/authorize?client_id=51f3b60b-0bfc-49a8-8e59-
fb7aeb64ce19&response_type=code&scope=openid%20https%3A%2F%2Fgraph.microsoft.com
%2Fuser.read&prompt=admin_consent&redirect_uri=https%3A%2F%2Fe5.onthehub.com.
2. Sign in to Office 365 using your institution Office 365 credentials (not a personal Microsoft
account). An administrative Office 365 account is required.
Figure 7: Microsoft Office 365 Sign-In Page
3. Click Accept when prompted to confirm that Kivuto has your consent to access information from
your Office 365 tenant.

Office 365 Single Sign-On: Customer Implementation Guide | 2017-11-15 | 7
Figure 8: Consent Message
ADDING OFFICE 365 SSO TO YOUR WEBSTORE
Once your WebStore has been configured and you have provided the necessary consent, you can add
the Office 365 SSO verification method to your WebStore.
To add the Office 365 SSO verification method to your WebStore:
1. Sign in to the ELMS Administration site.
Figure 9: The ELMS Administration Sign-In Page
Office 365 Single Sign-On: Customer Implementation Guide | 2017-11-15 | 8
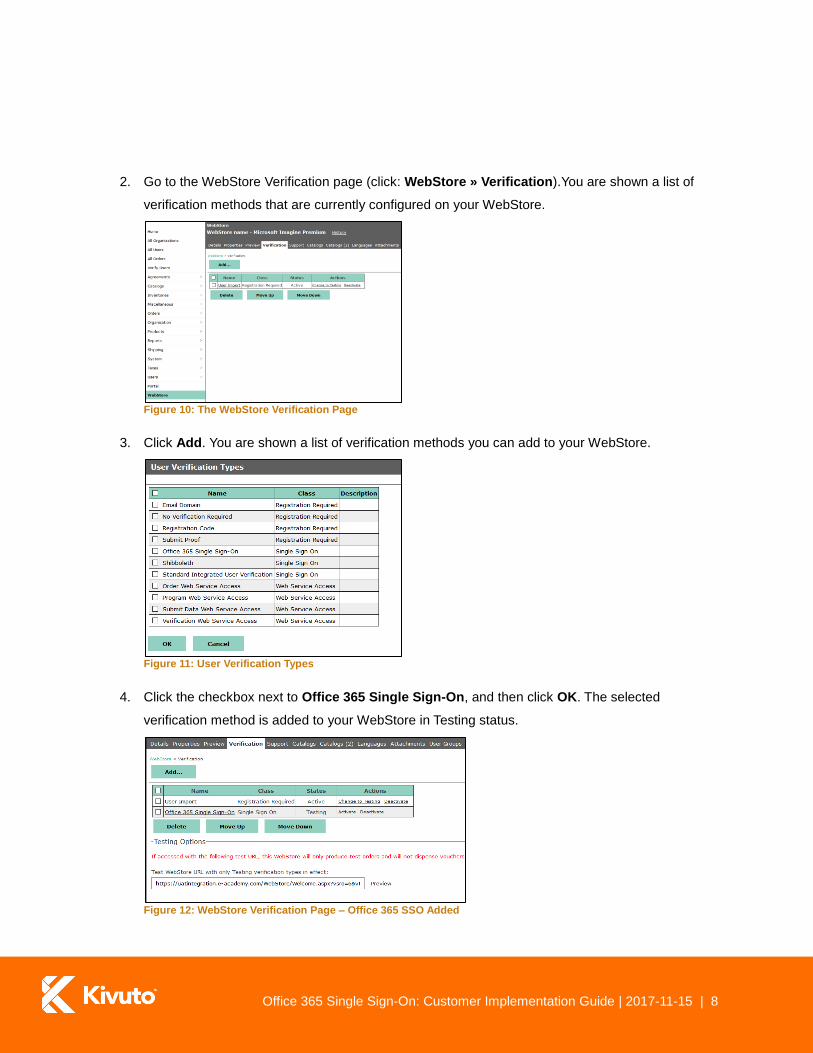
2. Go to the WebStore Verification page (click: WebStore » Verification).You are shown a list of
verification methods that are currently configured on your WebStore.
Figure 10: The WebStore Verification Page
3. Click Add. You are shown a list of verification methods you can add to your WebStore.
Figure 11: User Verification Types
4. Click the checkbox next to Office 365 Single Sign-On, and then click OK. The selected
verification method is added to your WebStore in Testing status.
Figure 12: WebStore Verification Page – Office 365 SSO Added

Office 365 Single Sign-On: Customer Implementation Guide | 2017-11-15 | 9
5. Configure Office 365 SSO settings as follows.
i. Click the Office 365 Single Sign-On link on the WebStore Verification page.
ii. Go to the Settings tab.
iii. Enter the email address of the Office 365 contact for your organization in the SSO
Administrator Email Address Field.
iv. Select the Enable Diagnostics Mode checkbox.
Note: Enabling diagnostics allows you to view information about recent sign-in activity, which can help with integration troubleshooting. Diagnostic information can be viewed on the Diagnostics tab.
v. Click OK.
Figure 13: SSO Administrator Email Address
6. Do the following for each department that holds its own subscription on your WebStore.
i. While signed in to the department’s account in ELMS, click Organization on the left side-
menu. You are directed to the department’s Organization Details page.
ii. In the External Organization Code field, type the “[DepartmentName]” value from the
department’s group name in Office 365. (e.g. If the department’s group in Office 365 is
called: “Kivuto_org_ComputerScience,” enter: “ComputerScience” in the External
Organization Code field.)
iii. Click Save.
Note: Step 6 is not necessary if your WebStore does not support any departmental subscriptions or if each subscription-holding department at your school will use a distinct email domain to sign in to the WebStore. Otherwise, this procedure must be performed for every subscription-holding department that uses your WebStore.
7. Test the verification method as follows.
i. Copy the URL found under the heading “Testing Options,” and paste it into a new browser
tab/window. A demo version of your WebStore opens in a new browser tab or window.
ii. Attempt to sign in to the demo version of your WebStore. See Office 365 SSO Sign-In

Office 365 Single Sign-On: Customer Implementation Guide | 2017-11-15 | 10
Workflow for a description of how the sign-in process should work.
Figure 14: User Verification Types
8. On the WebStore Verification page, click the Activate link next to Office 365 Single Sign-On to
change the verification method’s status from Testing to Active.
Note: Only one verification method of the class Single Sign-On can be active on your WebStore at a time. If you already have an active SSO verification method configured (e.g. Shibboleth or Integrated User Verification), that verification method will be deactivated when you activate Office 365 SSO.

Office 365 Single Sign-On: Customer Implementation Guide | 2017-11-15 | 11
Office 365 SSO Sign-In Workflow
This section describes the end-user experience of signing in to a WebStore that uses Office 365 SSO.
To sign in to a WebStore with Office 365 SSO verification:
1. Navigate to the WebStore.
2. Click the Sign In link in the top-right corner of the page. You are directed to the Office 365 sign-in
page.
Note: If your WebStore does not support unauthenticated browsing, you will be automatically directed to the Office 365 sign-in page when you navigate to the WebStore.
3. Sign in to Office 365 using your institution credentials (not a personal Microsoft account). User
information associated with your account is passed to ELMS to determine your eligibility on the
WebStore.
4. You are directed back to the WebStore as a verified, signed-in user, and you can start placing
orders.
Support
For technical assistance with Office 365 SSO, please contact [email protected].
To have your WebStore configured to support Office 365 SSO, please contact your Account Manager at
Kivuto.