office 365: forms for excel - towson.edu · office 365: forms for excel . 4 . 5. in a new browser...
TRANSCRIPT

Office 365: Forms for Excel Reference Guide
Office 365: Forms for Excel
OTS Publication: Doc O365-14 • Doc Date 5/14/2018 • [email protected] • Office of Technology Services © 2018 Towson University This work is licensed under the Creative Commons Attribution-NonCommercial-NoDerivs License.
Details available at http://www.towson.edu/OTStraining
Table of Contents
INTRODUCTION ..................................................................................................................................................... 3
CREATING A NEW FORM ........................................................................................................................................ 3
ADDING A TITLE ............................................................................................................................................................. 4 ADDING QUESTIONS ....................................................................................................................................................... 5 GENERAL FIELDS AND SETTINGS ........................................................................................................................................ 5
TYPES OF QUESTIONS ............................................................................................................................................ 7
CHOICE ........................................................................................................................................................................ 7 TEXT ............................................................................................................................................................................ 9 RATING ...................................................................................................................................................................... 10 DATE ......................................................................................................................................................................... 11
Answering a Date Question ................................................................................................................................ 12 RANKING .................................................................................................................................................................... 13
Answering a Ranking Question ........................................................................................................................... 13 LIKERT ........................................................................................................................................................................ 13
Answering Likert Questions................................................................................................................................. 16
MANAGING QUESTIONS ...................................................................................................................................... 17
COPYING A QUESTION ................................................................................................................................................... 17 DELETING A QUESTION .................................................................................................................................................. 17 REORDERING QUESTIONS ............................................................................................................................................... 18
EDITING A FORM ................................................................................................................................................. 18
PREVIEWING YOUR FORM ................................................................................................................................... 18
BRANCHING ......................................................................................................................................................... 19
SETTINGS ............................................................................................................................................................. 20
ACCESSING SETTINGS .................................................................................................................................................... 20 WHO CAN FILL OUT THIS FORM ....................................................................................................................................... 21 OPTIONS FOR RESPONSES ............................................................................................................................................... 21
SHARING .............................................................................................................................................................. 22
PERMISSIONS .............................................................................................................................................................. 22 SHARING METHODS ...................................................................................................................................................... 22 OTHER SHARING OPTIONS ............................................................................................................................................. 24
Share as a Template ............................................................................................................................................ 24 Share to Collaborate ........................................................................................................................................... 25
VIEWING RESPONSES ........................................................................................................................................... 26
VIEWING RESPONSES IN OFFICE 365 FORMS ..................................................................................................................... 26 Responses Tab Options ....................................................................................................................................... 28
VIEWING RESPONSES IN EXCEL ONLINE ............................................................................................................................. 29
DELETING A FORM ............................................................................................................................................... 29
Office 365: Forms for Excel
3
Introduction Office 365 gives Towson University faculty, staff, and students the ability to access Forms for Excel through their OneDrive for business account. This allows users to create an online form that, when submitted, will add the information to an Excel spreadsheet saved in their OneDrive. Individuals who respond to the form will not be able to see what others have entered. Only the owner of the form will be able to see the results. Note: Be aware that personal identifiable information (PII) cannot be collected using an Excel form. This PII includes social security numbers, driver’s license numbers and the like. For more information on PII, please refer to the video titled Handling Confidential Data.
Creating a New Form These steps will show users how to create a new form. A new form must be created from the users Towson University’s OneDrive for Business. 1. Log into your Towson University Office 365 account (office.towson.edu) and click on the OneDrive
tile.
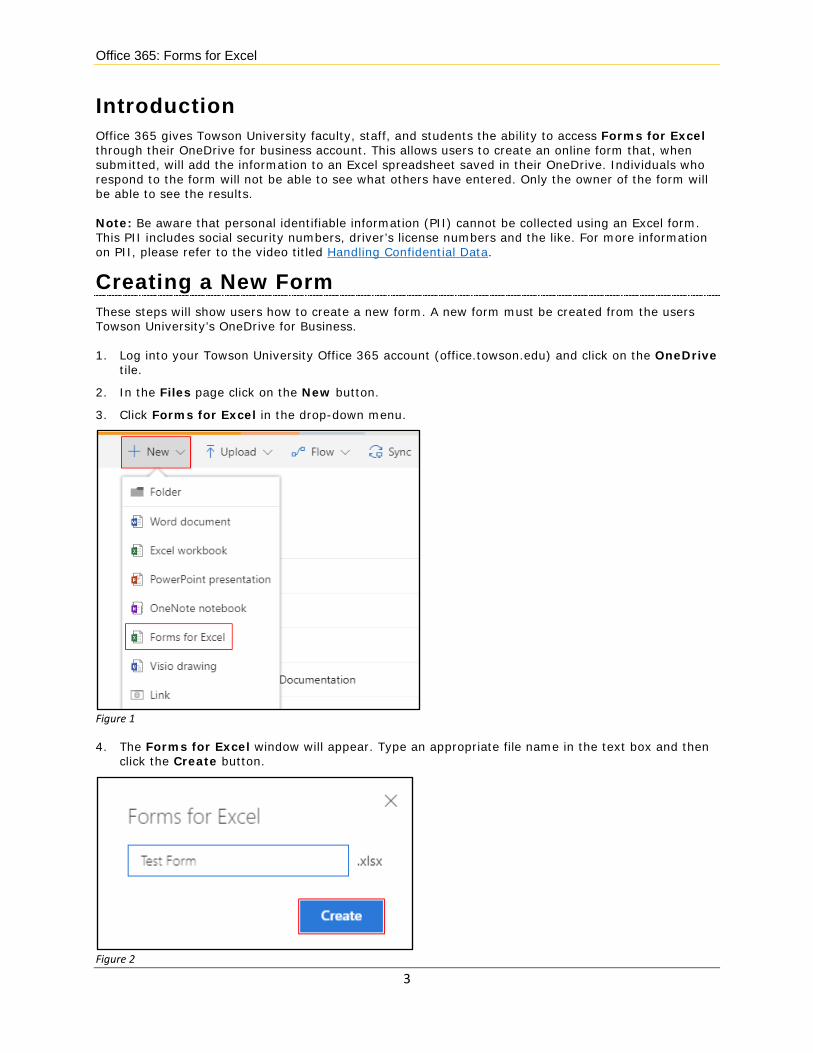
2. In the Files page click on the New button.
3. Click Forms for Excel in the drop-down menu.
Figure 1
4. The Forms for Excel window will appear. Type an appropriate file name in the text box and then click the Create button.
Figure 2

Office 365: Forms for Excel
4
5. In a new browser tab, the Forms app will open.
Figure 3
Adding a Title In the Questions tab, a title along with an optional subtitle and image can be added. 1. Click on the form title and then type a title and description in the corresponding fields. You also
have the option to add an image to the title area of your form by clicking on the Insert Image button.
Figure 4
Figure 5

Office 365: Forms for Excel
5
Adding Questions The Questions tab in the Forms screen enables you to add questions to your form. 1. Click the Add question button.
Figure 6
2. Click on one of the six question types available. The fifth and sixth question types can be found by clicking the more (…) button.
Figure 7
3. The six question types are:
• Choice – for questions that require an answer from a pre-selected set of answers.
• Text – for questions that require a text answer.
• Rating – enables a rating from one to five or one to ten in either stars or numbers.
• Date – for questions requiring a date answer.
• Ranking – enables the order of predefined options to be rearranged.
• Likert – for questions that offer a range of answer options.
4. After you have added a question, click the Add question button again to add additional questions.
General Fields and Settings There are some general fields and settings that exist for every question.
• Question: This is where the question is entered. Note that this will be the header of a column in your Excel spreadsheet. Left click in the Question text box and type your question.
Figure 8

Office 365: Forms for Excel
6
• Question Subtitle: This is any additional information pertaining to the question. For example, specific instruction(s). The subtitle field is enabled by clicking the More options button at the bottom right corner of the question and then clicking on Subtitle.
Figure 9
• Insert Media: Beside the Question text field is an Insert media button. This button will appear when you click in the Question text field. Click on this button to open the Insert media pane.
Figure 10
• Required: Beside the More options button is a Required toggle. Enabling the Required option will require the person filling in the form to answer the question. If answers are not provided for the questions that are required, the form’s Submit button will be disabled.
Figure 11

Office 365: Forms for Excel
7
Types of Questions Forms for Excel lets you customize your questions based on the type of response you desire. When the question type is selected, the fields on the question will change accordingly. The types of questions and their descriptions are listed below.
Choice To have participants select an answer from a list of options, select the Choice question type. This will add options beneath the question text box. To add a Choice question, follow the steps below. Note: The Choice question type must have at least two options. 1. After clicking the Add Question button, choose Choice.
Figure 12
2. Click in the Question text box and type your question.
If you would like to add a subtitle to the question, click the More options button and select Subtitle. Type your subtitle in the text field that appears beneath the question.
Figure 13
3. If you would like to insert an image or video, click the Insert media button. The Insert media pane will open.
Figure 14
4. Beside the More options button is a Required toggle. Enabling the Required option will require the person filling in the form to answer the question. If answers are not provided for the questions that are required, the form’s Submit button will be disabled.
Figure 15
5. Click in the Option 1 text box and type a possible choice.
Office 365: Forms for Excel
8
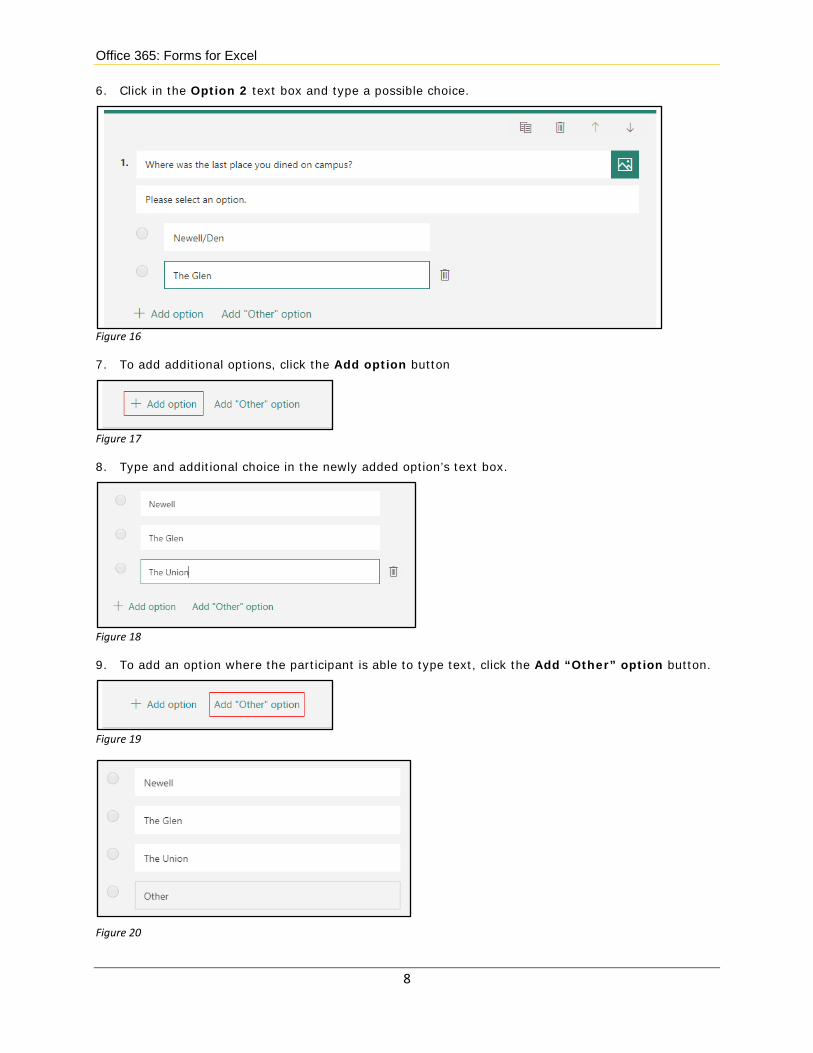
6. Click in the Option 2 text box and type a possible choice.
Figure 16
7. To add additional options, click the Add option button
Figure 17
8. Type and additional choice in the newly added option’s text box.
Figure 18
9. To add an option where the participant is able to type text, click the Add “Other” option button.
Figure 19
Figure 20

Office 365: Forms for Excel
9
10. To allow participants to select multiple choices, click the Multiple answers toggle.
Figure 21
11. To randomly rearrange the choices for participants, click the More options button at the bottom right corner and select Suffle options.
Figure 22
Text The Text question type allows participants to type an answer in response to the question. The answer can be text or restricted to a number. 1. After clicking the Add Question button, choose Text.
Figure 23
2. Click in the Question text box and type your question.
3. After typing your question, you have the option to click the Long answer toggle to display a larger text box.
Figure 24

Office 365: Forms for Excel
10
4. To enable Restrictions on your participants’ answer, click the More options button at the bottom right corner and select Restrictions. The Restrictions force the participant to answer with a number.
Figure 25
5. Once Restictions is enabled, a drop-down menu appears beneath the answer box. This drop-down menu can be used to restrict the range of numbers or number that can be entered by the participant.
Figure 26
Rating The Rating question type enables the participant to provide a rating in number or stars. The rating scale can be changed from five to ten. Adjust the question’s settings using the following steps. 1. After clicking the Add Question button, choose Rating.
Figure 27
2. Click in the Question text box and type your question.

Office 365: Forms for Excel
11
3. To change the rating scale from five to ten, click the drop-down menu beside Levels and select your preference from the menu.
Figure 28
4. You may change the type of rating to Star or Number by clicking the drop-down menu beside Symbol.
Figure 29
Date The Date question type restricts the participant’s answer to a date. When the participant is answering the question, they will receive a calendar pop-up where they can select the appropriate date.
Figure 30
Office 365: Forms for Excel
12
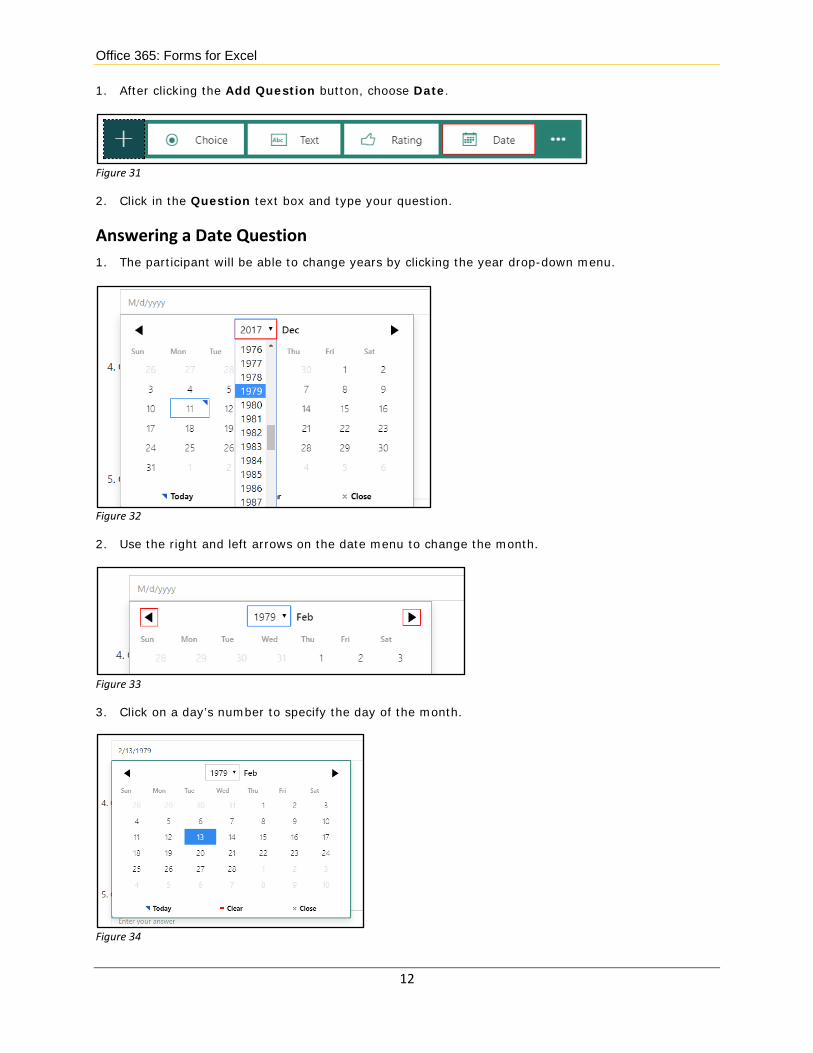
1. After clicking the Add Question button, choose Date.
Figure 31
2. Click in the Question text box and type your question.
Answering a Date Question 1. The participant will be able to change years by clicking the year drop-down menu.
Figure 32
2. Use the right and left arrows on the date menu to change the month.
Figure 33
3. Click on a day’s number to specify the day of the month.
Figure 34
Office 365: Forms for Excel
13
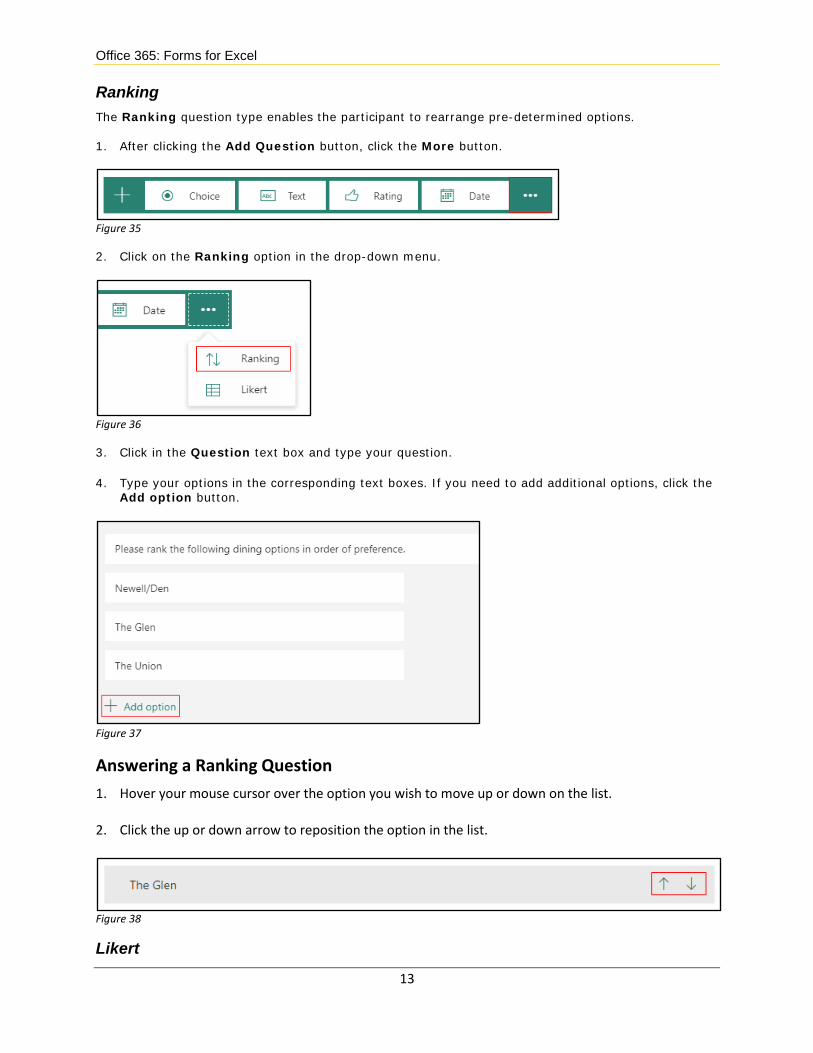
Ranking The Ranking question type enables the participant to rearrange pre-determined options. 1. After clicking the Add Question button, click the More button.
Figure 35
2. Click on the Ranking option in the drop-down menu.
Figure 36
3. Click in the Question text box and type your question.
4. Type your options in the corresponding text boxes. If you need to add additional options, click the Add option button.
Figure 37
Answering a Ranking Question 1. Hover your mouse cursor over the option you wish to move up or down on the list.
2. Click the up or down arrow to reposition the option in the list.
Figure 38
Likert

Office 365: Forms for Excel
14
The Likert question type enables you to ask questions that require a custom rating scale. This question type is frequently used in survey research. Responders will be able to select a rating or view from a set of pre-determined options provided for statements.
1. After clicking the Add Question button, click the More button.
Figure 39
2. Click on the Likert option in the drop-down menu.
Figure 40
3. Click in the Question text box and type your question or directions for this portion of the form.
4. Click on Statement 1 and type a statement in the text box that appears.
Figure 41
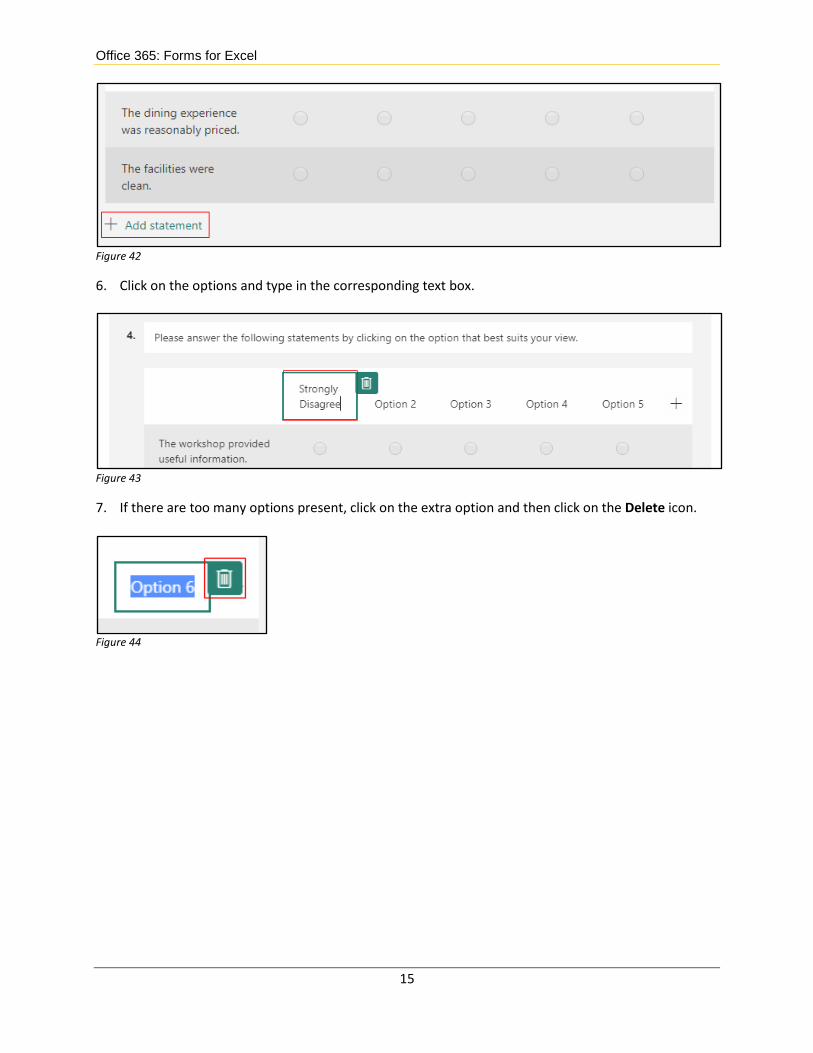
5. Repeat step four for any additional statements. If you wish to add a statement, click the Add
statement button.
Office 365: Forms for Excel
15
Figure 42
6. Click on the options and type in the corresponding text box.
Figure 43
7. If there are too many options present, click on the extra option and then click on the Delete icon.
Figure 44

Office 365: Forms for Excel
16
Answering Likert Questions 1. Click the radio button corresponding to the appropriate answer column for the statements.
Figure 45

Office 365: Forms for Excel
17
Managing Questions In Forms for Excel, you can copy, delete and reorder your questions.
Copying a Question 1. In the Questions tab, click on the question you wish to copy. A small menu will appear above the
question on the right side.
2. Click on the Copy question icon in the menu. The question will be duplicated above the current question.
Figure 46
Figure 47
Deleting a Question 1. In the Questions tab, click on the question you wish to delete. A small menu will appear above the
question on the right side.
2. Click on the Delete question icon in the menu. The question will be deleted.
Figure 48

Office 365: Forms for Excel
18
Reordering Questions 1. In the Questions tab, click on the question you wish to reorder. A small menu will appear above
the question on the right side.
2. Click the Move question up or Move question down arrows to rearrange the order.
Figure 49
Editing a Form If at any time you need to edit a form, you can do so from the Forms app in Office 365 by clicking on the appropriate form. The form will open in the edit view.
Previewing your Form You may want to see what the form will look like to your recipients. In the form’s Preview, you are able to fill out and submit your answers. 1. Click the Preview button in the navigation bar.
Figure 50
2. To switch between Computer and Mobile previews, click the corresponding button in the upper-right corner of the form’s preview screen.
Figure 51
3. To return to the form’s edit screen, click the Back button in the upper-left corner of the preview screen.
Figure 52

Office 365: Forms for Excel
19
Branching Branching enables the form to change depending on responses to questions. Branching works best with the Choice question type. 1. In the upper-right corner of the screen, click the More options button.
Figure 53
2. Click Branching in the drop-down menu. The Branching options screen will appear.
Figure 54
3. To enable an answer to branch, click the Go to drop-down menu corresponding to the answer.
Figure 55
4. Select the destination from the drop-down menu.
Figure 56
Office 365: Forms for Excel
20
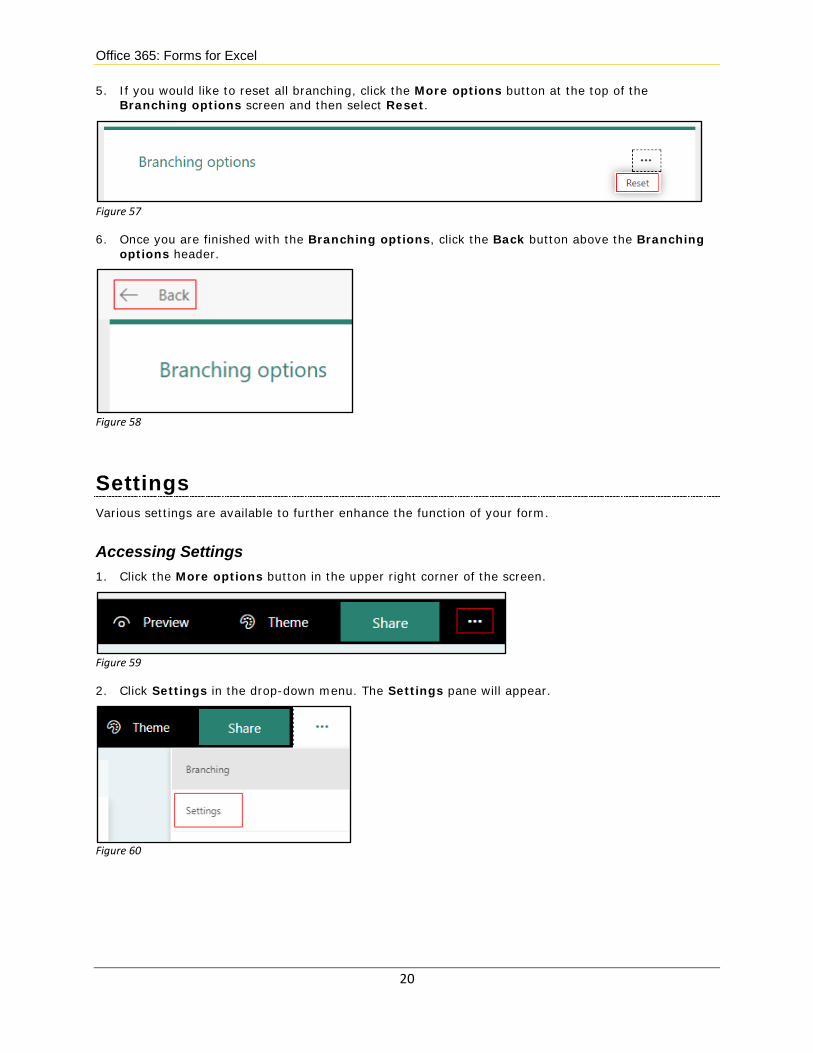
5. If you would like to reset all branching, click the More options button at the top of the Branching options screen and then select Reset.
Figure 57
6. Once you are finished with the Branching options, click the Back button above the Branching options header.
Figure 58
Settings Various settings are available to further enhance the function of your form.
Accessing Settings 1. Click the More options button in the upper right corner of the screen.
Figure 59
2. Click Settings in the drop-down menu. The Settings pane will appear.
Figure 60

Office 365: Forms for Excel
21
Who can fill out this form The two main options in this Settings section are Anyone with the link can respond and Only people in my organization can respond. These options are covered in the Sharing section of this document. The two sub-options for Only people in my organization can respond are unique to this menu. 1. Click the box beside Record name to add a columns to the responses Excel spreadsheet
containing the respondents’ email address and name. Leaving this box unchecked will make the form submissions anonymous.
2. Click the One response per person to limit a respondent to one form submission.
Figure 61
Options for responses There are five options in this Settings section. Each option can be enabled or disabled by adding or removing the check mark in the box beside the option. 1. When Accept responses is enabled, participants can submit their answers.
2. Enabling Start date will allow you to select a specific date and time to start allowing access to the form. Select the date and time from the corresponding drop-down menus.
Figure 62
3. Enabling End date will allow you to select a date and time to end access to the form. Select the date and time from the corresponding drop-down menus.
Figure 63
4. Selecting Shuffle questions will randomly rearrange the order of your questions for each participant.
5. The Email notification of each response will send you an email when a participant submits their form.
Office 365: Forms for Excel
22
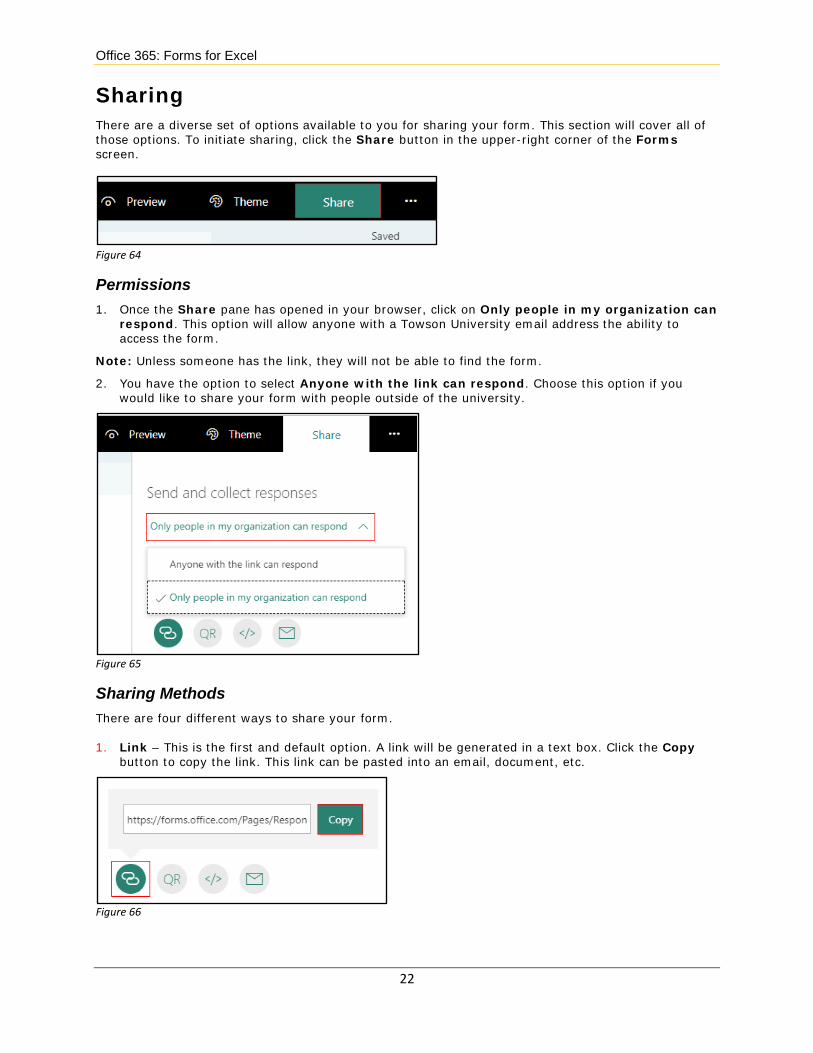
Sharing There are a diverse set of options available to you for sharing your form. This section will cover all of those options. To initiate sharing, click the Share button in the upper-right corner of the Forms screen.
Figure 64
Permissions 1. Once the Share pane has opened in your browser, click on Only people in my organization can
respond. This option will allow anyone with a Towson University email address the ability to access the form.
Note: Unless someone has the link, they will not be able to find the form.
2. You have the option to select Anyone with the link can respond. Choose this option if you would like to share your form with people outside of the university.
Figure 65
Sharing Methods There are four different ways to share your form. 1. Link – This is the first and default option. A link will be generated in a text box. Click the Copy
button to copy the link. This link can be pasted into an email, document, etc.
Figure 66

Office 365: Forms for Excel
23
2. QR – When selecting the QR sharing option, a QR code is generated. The QR code enable someone to scan the code with their smartphone or tablet to access the form. Click the Download button to save the code to your computer. This option works best when utilized on signage or other printed material.
Figure 67
3. Embed – The Embed sharing option generates an embed code that can be copied and pasted into a website. Click the Copy button to copy the generated embed code.
Note: Use this option only if you are familiar with HTML code or your website service.
Figure 68
4. Email – Click the Email button to automatically open a new email in Outlook containing the form’s link. Add your recipients’ email addresses and click the Send button.
Figure 69

Office 365: Forms for Excel
24
Other Sharing Options There are two additional sharing options. These options are used for form building and collaboration.
Share as a Template The link generated from this option will share a duplicate of the current form, but not the responses. The recipients of this link will be able to click the link to add a copy of the form to their Office 365 account. 1. Beneath the Share as a template heading, click Get a link to duplicate.
Figure 70
2. Click the Copy button and paste the link in a message or email.
Figure 71
3. To delete the link, click the Delete button. This will disable the link.
Figure 72
4. After clicking the Delete button, a confirmation will appear. Click the Remove link button.
Figure 73
Note: If you wish to Share as a template again, you must generate a new link.

Office 365: Forms for Excel
25
Share to Collaborate The link generated from this option will enable the recipient to have access to edit your form. It is advised that this link be disabled once the form is distributed to disable any accidental changes. 1. Beneath the Share to collaborate heading, click Get a link to view and edit.
Figure 74
2. Click the Copy button and paste the link in a message or email.
Figure 75
3. To delete the link, click the Delete button. This will disable the link.
Figure 76
4. After clicking the Delete button, a confirmation will appear. Click the Remove link button.
Figure 77
Note: If you wish to Share to collaborate again, you must generate a new link.

Office 365: Forms for Excel
26
Viewing Responses There are two ways to view responses for a form created in Excel. The most basic way is to view the responses through Office 365 forms. For a more in depth view, you can open the Excel workbook that Forms for Excel creates when you create your form.
Viewing Responses in Office 365 Forms 1. Open the Forms app in Office 365 and then open the appropriate form.
2. Click the Responses tab for your form.
Figure 78
3. In the Responses section, scroll down to view response details for each question. Click the More Details link beneath the corresponding question to view a list of responses by participant for that question.
Figure 79
4. Click the Close button to exit the More Details view.
Figure 80

Office 365: Forms for Excel
27
5. To view results by participant, click the View Results button.
Figure 81
6. In the View results screen, you can view the answers by participant. To switch to another participant’s responses by either using the left or right arrow buttons or the Responder drop-down menu.
Figure 82
7. The Options button enables you to Print or Delete a participant’s responses from the Options menu.
Figure 83

Office 365: Forms for Excel
28
8. To return to the Responses tab, click the Back button above the View Results header.
Figure 84
Responses Tab Options There are three options in the Responses Tab Options menu. To access this menu, click the Options button.
Figure 85
1. The Delete all responses option will delete all responses in the Responses tab, but will not delete the responses in the linked Excel workbook.
2. By clicking the Print summary option, you can print the summary view that appears in the Responses tab.
3. When utilizing the Create a summary link option, a link to the summary will appear. Click the Copy button and paste it wherever you like.
Figure 86
4. To disable the summary link click the Remove link trashcan icon and then click the Remove link button. This will disable the link.

Office 365: Forms for Excel
29
Viewing Responses in Excel Online When creating a form in Forms for Excel, an Excel workbook with a spreadsheet linked to the form will automatically be created in your OneDrive. You are able to open this workbook directly from OneDrive. If you are already in Forms, you can open it from there following these steps: 1. Click the Responses tab.
Figure 87
2. Click on the Open in Excel button. The linked workbook will open in Excel Online.
Figure 88
Deleting a Form There may be a time that you desire to delete your form. This will not delete the data that you have collected, but will permanently delete the form as well as permanently disable the form’s link. 1. From the main Office 365 page, click on Forms.
2. In the online Forms app, click the More options button corresponding to the form you would like to delete.
Figure 89

Office 365: Forms for Excel
30
3. In the More options menu, click the Delete icon.
Figure 90
4. A confirmation message will appear. Click the Delete button.
Figure 91
5. Your form is now permanently deleted.