office 365 for it pros - amazon s3 · office 365 for it pros ... you must enable directory...
TRANSCRIPT

Office 365 for IT Pros
Fourth edition
Configuring Directory Synchronization with Azure
AD Connect
Published by Tony Redmond, Paul Cunningham, Michael Van Horenbeeck, and Ståle Hansen.
© Copyright 2015-2017 by Tony Redmond, Paul Cunningham, Michael Van Horenbeeck, and Ståle Hansen.
All rights reserved. No part of this book may be reproduced or transmitted in any form or by any means
without the written permission of the authors.
The example companies, organizations, products, domain names, email addresses, logos, people, places and
event depicted herein are fictitious. No association with any real company, organization, people, domain
name, email address, logo, person, place, or event is intended or should be inferred. The book expresses the
views and opinions of the authors. The information presented in the book is provided without any express,
statutory, or implied warranties. The authors cannot be held liable for any damages caused or alleged to be
caused either directly or indirectly by this book.
Although the authors are members of Microsoft’s Most Valuable Professional (MVP) program, the content of this
book solely represents their views and opinions about Office 365 and any other technologies mentioned in the
text and is not endorsed in any way by Microsoft Corporation.
Please be respectful of the rights of the authors and do not make copies of this eBook available to
others.
This information supplements the content presented Office 365 for IT Pros, available from
https://practical365.com/ebooks/office-365-for-it-pros.

Contents Introduction .................................................................................................................................................................................................... 1
Enabling Directory Synchronization ...................................................................................................................................................... 1
Installing Azure AD Connect .................................................................................................................................................................... 2
Step-by-Step: Express Installation ..................................................................................................................................................... 2
Step-by-Step: Custom Installation .................................................................................................................................................... 6

Page: 1
Introduction In order to synchronize identities from your on-premises directory with Office 365, you must enable directory
synchronization in the Office 365 tenant and install the appropriate directory synchronization tool.
More information about the synchronization process in general, its various features, the supported
synchronization tools, and how to manage the synchronization process can be found in Chapter 3. Read
through the chapter to familiarize yourself with the core concepts before following the steps outlined below.
Enabling Directory Synchronization Before installing and configuring the synchronization tool (Azure AD Connect), you first need to allow
directory synchronizations. Follow the steps below to enable directory synchronization for your tenant
through the Office 365 Portal:
Log in to the Office 365 admin portal (Figure A-1) and navigate to Settings and then Services & add-ins (1). On
the Services & add-ins page, click Directory Synchronization (2). Finally, click on the link to Go to the DirSync
management on the Directory Synchronization widget (3):
Figure A-1: Setting up Active Directory synchronization
As part of the DirSync readiness wizard, a series of steps will be presented to you. These include:
1. Determine if directory synchronization is the right solution for you. This step is based on an arbitrary
number of users to synchronize. For organizations below 50 users, Microsoft recommends not to
use directory synchronization. The administrator can choose to override Microsoft's
recommendation and still implement directory synchronization.
2. Preparing for directory synchronization - This involves checking that you can meet the pre-requisites
for directory synchronization in your environment. The full set of pre-requisites is available online
and can change over time, so make sure you refer to the latest information published here.
3. Verify domains - This involves adding your domain names to Office 365 and verifying them
successfully. This task is covered in the “Preparing for a Cutover or Staged Migration” section of
Chapter 4 of this book.
4. Install and run the IdFix DirSync Error Remediation tool to remediate any potential synchronization
conflicts.
5. Download, and install the latest version of Azure AD Connect, and then perform a synchronization.
6. After the synchronization completed, activate users (assign licenses).
Page: 2
Installing Azure AD Connect As explained in Chapter 3, Azure AD Connect can be installed in one of two ways: An express installation with
default settings or a customized installation with custom settings. What follows is a guided walk through of
both options.
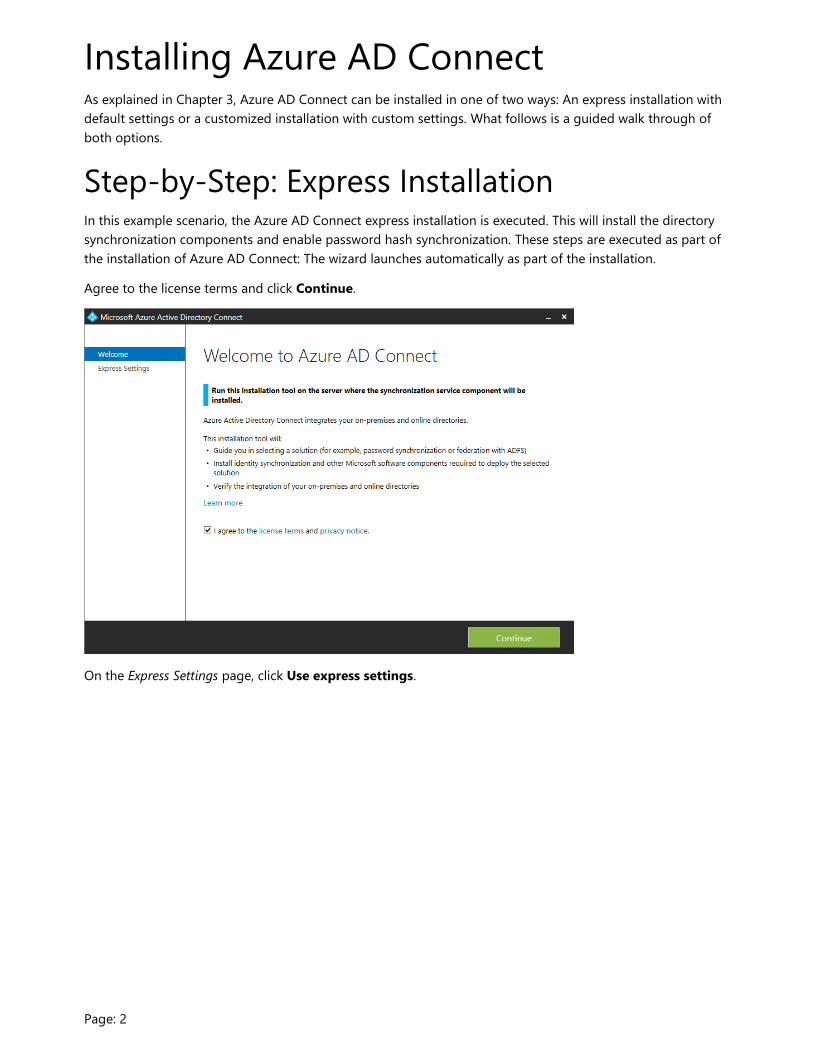
Step-by-Step: Express Installation In this example scenario, the Azure AD Connect express installation is executed. This will install the directory
synchronization components and enable password hash synchronization. These steps are executed as part of
the installation of Azure AD Connect: The wizard launches automatically as part of the installation.
Agree to the license terms and click Continue.
On the Express Settings page, click Use express settings.

Page: 3
On the next page, enter Office 365 Global Administrator account credentials, and click Next.
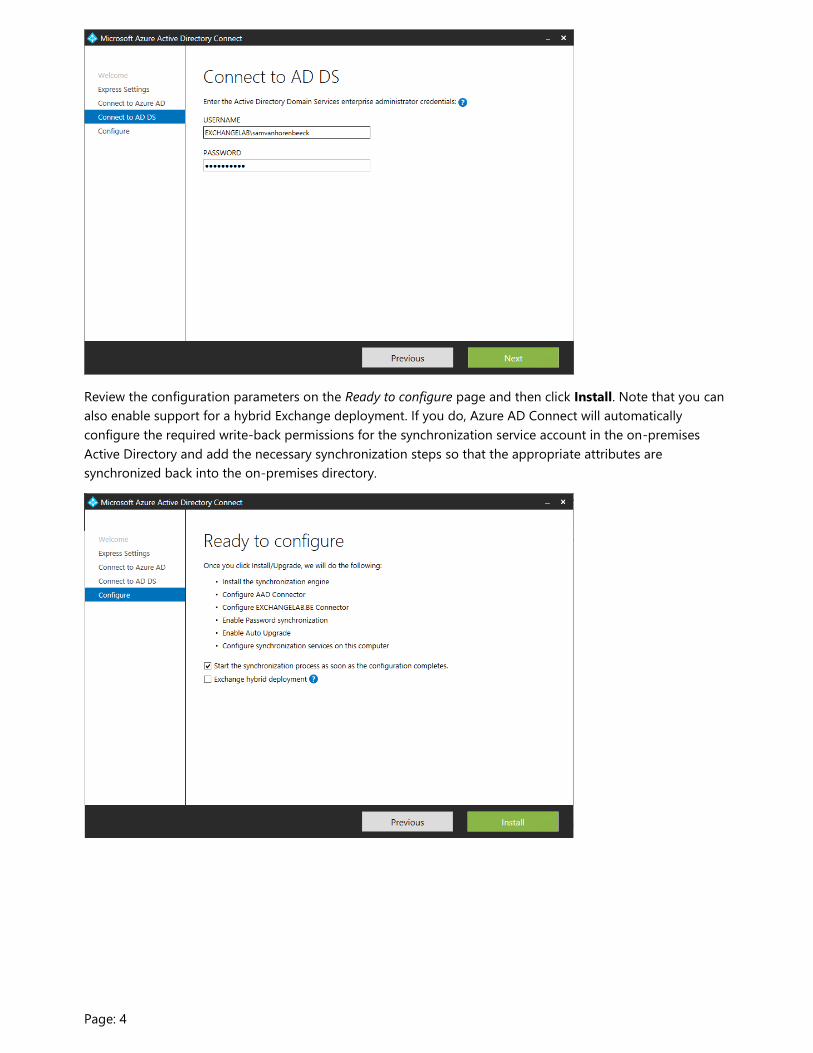
On the Connect to AD DS page, enter credentials for an account which has Enterprise Administrator
permissions in the on-premises directory, and then click Next.
Page: 4
Review the configuration parameters on the Ready to configure page and then click Install. Note that you can
also enable support for a hybrid Exchange deployment. If you do, Azure AD Connect will automatically
configure the required write-back permissions for the synchronization service account in the on-premises
Active Directory and add the necessary synchronization steps so that the appropriate attributes are
synchronized back into the on-premises directory.

Page: 5
Once the tool has been configured successfully, click Exit.
If you have selected to immediately start the synchronization process after the configuration completes, you
can now continue to open the Synchronization Service Manager (miisclient.exe) and review the
synchronization process.
Note: Before you can administer Azure AD Connect you will need to log off the Windows server and log
back on so that your new membership in the ADSyncAdmins group can take effect.

Page: 6
Step-by-Step: Custom Installation The express settings installation only covers the most basic configuration of the synchronization engine and
does not allow for a lot of customization. In the following example, we will configure another common Azure
AD Connect deployment by connecting it to a SQL database, specifying a custom service account, and
enabling support for a hybrid configuration.
On the first page of the configuration wizard, agree to the license terms and click Continue.
On the Express Settings page, click Customize.

Page: 7
Next, select the installation parameters you would like to modify. In this scenario, select Use an existing SQL
Server and Use an existing service account. Fill in the required information (SQL Server and service account
credentials) and then click Install.
Once the necessary components have been configured by the installer, the wizard continues. On the User
sign-in page, you can specify what authentication method you would like to configure. If you would like,
Azure AD Connect can install and configure AD FS and Web Application Proxy servers for you. However for
sake of this demo, only select Password Synchronization and click Next.

Page: 8
On the Connect to Azure AD page, enter Office 365 Global Administrator credentials. These credentials are
used to automatically create a synchronization service account in Office 365. Then click Next.
On the next page, enter credentials for the on-premises directory. It is important that you use a service
account that has been granted the required permissions beforehand. Unlike the Express installation, you
should not use credentials for an account that has Enterprise Administrator permissions as this account will be
used to execute the synchronizations. After you have entered the credentials, click Add Directory and then
Next.
Page: 9
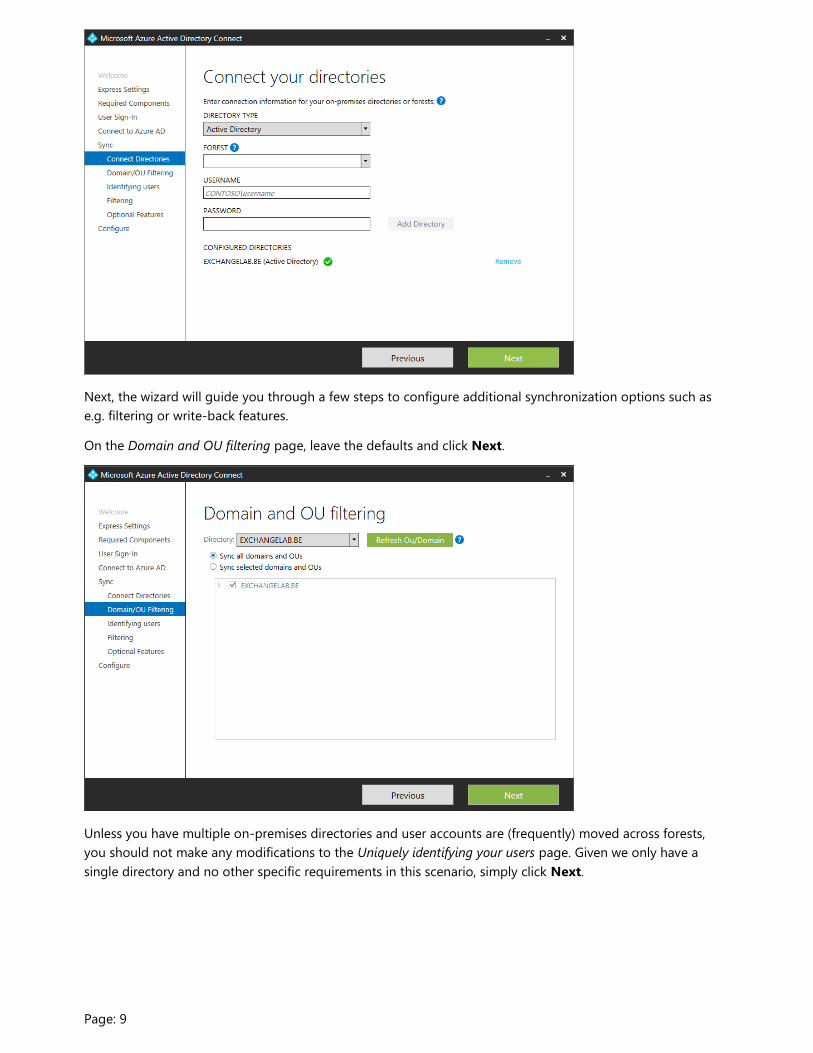
Next, the wizard will guide you through a few steps to configure additional synchronization options such as
e.g. filtering or write-back features.
On the Domain and OU filtering page, leave the defaults and click Next.
Unless you have multiple on-premises directories and user accounts are (frequently) moved across forests,
you should not make any modifications to the Uniquely identifying your users page. Given we only have a
single directory and no other specific requirements in this scenario, simply click Next.

Page: 10
On the Filter users and devices page, click Next too.
Lastly, on the Optional features page, enable the following features and then click Next.
• Exchange hybrid deployment
• Password hash synchronization
• Password writeback
• Group writeback

Page: 11
The Group writeback feature requires additional configuration and will ask you the destination OU where
group objects should be written into. Select the appropriate OU and then click Next.
Once all configuration parameters have been selected, review the settings and click Install. On this page, you
can optionally choose to start the synchronization process immediately after the configuration or you can
choose to enable staging mode. More information on Staging Mode can be found in Chapter 3.
Once the installation completes, you can close the wizard and continue to other tasks like e.g. verifying the
synchronization process. How to do so is outlined in Chapter 3 as well.