odyssey file & serve™ html5 - tyler...
TRANSCRIPT
OFS-FS-200-3860 v.1 January 2017
Odyssey File & Serve™ HTML5Firm User Guide – Release 3.16

COPYRIGHT AND CONFIDENTIALITY
Copyright © 2017 Tyler Technologies, Inc. All rights reservedUse of these materials is governed by the applicable Tyler Technologies, Inc. license agreement.This notification constitutes part of the documentation and must not be removed.
PUBLISHING HISTORY
Document PublicationNumber
Revision Date Changes Made
OFS-FS-200-3860 v.1 Initial January 2017 Document Creation
ii January 2017 OFS-FS-200-3860 v.1

Contents
CONTENTS
COPYRIGHT AND CONFIDENTIALITY ........................................................................................................ IIPUBLISHING HISTORY........................................................................................................................ IILIST OF FIGURES ............................................................................................................................. VCHAPTER 1 SYSTEM OVERVIEW ........................................................................................................1
RELEASE 3.16 NEW FEATURES ....................................................................................................1BEFORE YOU BEGIN ..................................................................................................................3
SYSTEM REQUIREMENTS ......................................................................................................4PAGE NAVIGATION ..............................................................................................................4ERROR MESSAGES .............................................................................................................5ORIENTATION.....................................................................................................................6
CHAPTER 2 E-FILING OVERVIEW.....................................................................................................12FILING QUEUE STATUS .............................................................................................................12
CHAPTER 3 HOME PAGE...............................................................................................................15REGISTERING AS A FIRM USER ...................................................................................................16RESETTING YOUR PASSWORD ....................................................................................................20
CHAPTER 4 SIGN IN AND SIGN OUT .................................................................................................24SIGNING IN............................................................................................................................24SIGNING OUT.........................................................................................................................25
CHAPTER 5 PROFILE PREFERENCES.................................................................................................26CHANGING THE USER PASSWORD................................................................................................26CHANGING THE SECURITY QUESTION............................................................................................27MANAGING NOTIFICATIONS.........................................................................................................29
CHAPTER 6 FILER DASHBOARD.......................................................................................................30DASHBOARD FILING CATEGORY DESCRIPTIONS................................................................................30
CHAPTER 7 PAYMENTACCOUNTS ....................................................................................................32UNAVAILABLE PAYMENTACCOUNTS ..............................................................................................32DRAW DOWN ACCOUNT USER INTERFACE......................................................................................33
CHAPTER 8 TEMPLATES ................................................................................................................35CREATING A TEMPLATE .............................................................................................................35EDITING A TEMPLATE................................................................................................................47USING A NEW CASE TEMPLATE...................................................................................................48USING AN EXISTING CASE TEMPLATE............................................................................................48VIEWING TEMPLATE DETAILS ......................................................................................................51DELETING A TEMPLATE .............................................................................................................51
CHAPTER 9 CASE INITIATION ..........................................................................................................53FILING A NEW CASE ................................................................................................................53ENTERING PARTY DETAILS.........................................................................................................54DISPLAY “PRO SE” FOR PARTY NAME...........................................................................................58ENTERING FILING DETAILS .........................................................................................................59COURT FEES FOR ADDITIONAL CASE PARTIES.................................................................................69SUBMISSION AGREEMENTS ........................................................................................................69VIEWING THE ENVELOPE SUMMARY..............................................................................................70
CHAPTER 10 FILE INTO AN EXISTING CASE ........................................................................................72FILING INTO AN EXISTING CASE FROM THE FILING HISTORY PAGE .........................................................72FILING INTO AN EXISTING CASE FROM THE BOOKMARKS PAGE .............................................................83FILING INTO AN EXISTING CASE FROM THE FILER DASHBOARD PAGE......................................................94CREATING A SERVICE ONLY FILING ............................................................................................ 105FILING AN APPEAL TO AN EXISTING CASE..................................................................................... 107
CHAPTER 11 SERVICE CONTACTS.................................................................................................. 109ADDING SERVICE CONTACTS TO THE FIRM ................................................................................... 109ADDING SERVICE CONTACTS TO A CASE...................................................................................... 111REPLACING A FIRM SERVICE CONTACT........................................................................................ 113DEFAULT STATE OF SERVICE CONTACTS ...................................................................................... 117PUBLIC SERVICE CONTACTS..................................................................................................... 117
OFS-FS-200-3860 v.1 January 2017 iii

Odyssey File & Serve™ HTML5
ADDING FIRM SERVICE CONTACTS FROM A PUBLIC LIST................................................................... 118CREATE NEW SERVICE CONTACTS DURING A FILING....................................................................... 122
CREATING FIRM SERVICE CONTACTS FROM THE FILING HISTORY PAGE.......................................... 123CREATING FIRM SERVICE CONTACTS DURING A CASE SEARCH (FILE INTO EXISTING CASE)................ 126CREATING FIRM SERVICE CONTACTS DURING ENVELOPE CREATION ............................................. 128
SELECTING THE SERVICE METHOD FOR SERVICE CONTACTS ............................................................. 129VIEWING ATTACHED CASE LIST OF FIRM SERVICE CONTACTS ............................................................ 132LINKING A SERVICE CONTACT TO ANOTHER PARTY ......................................................................... 133SEARCH AND PAGING CAPABILITY FOR FIRM SERVICE CONTACTS........................................................ 135REMOVING A SERVICE CONTACT FROM A CASE.............................................................................. 136DELETING A SERVICE CONTACT FROM THE FIRM ............................................................................ 137
CHAPTER 12 FILINGS................................................................................................................. 140FILTERING THE FILINGS QUEUE ................................................................................................. 141COPYING THE ENVELOPE......................................................................................................... 144VIEWING THE ENVELOPE DETAILS .............................................................................................. 146RESUMING THE FILING PROCESS ............................................................................................... 148CANCELING A FILING .............................................................................................................. 148
CHAPTER 13 BOOKMARKS........................................................................................................... 150CHAPTER 14 REPORTS............................................................................................................... 152
CREATING A FINANCIAL RECONCILIATION REPORT........................................................................... 152CREATING A FILINGS REPORT ................................................................................................... 154
CHAPTER 15 TYLER TECHNOLOGIES TECHNICAL SUPPORT CONTACT INFORMATION ..................................... 158
iv January 2017 OFS-FS-200-3860 v.1

LIST OF FIGURES
FIGURE 1.1 – FILING HISTORY PAGE WITH THE CANCEL ICON...........................................................................2FIGURE 1.2 – PARTY INFORMATION SECTION WITH THE DATE OF BIRTH FIELD .......................................................3FIGURE 1.3 – KEYBOARD SHORTCUTS WINDOW ...........................................................................................5FIGURE 1.4 – ACTIONS DROP-DOWN LIST..................................................................................................5FIGURE 1.5 – FILER DASHBOARD PAGE .....................................................................................................6FIGURE 1.6 – ACTIONS DROP-DOWN LIST..................................................................................................6FIGURE 1.7 – FILE INTO EXISTING CASE PAGE WITH TOOLTIP DISPLAYED ............................................................7FIGURE 1.8 – FILING HISTORY PAGE WITH TOOLTIP DISPLAYED ........................................................................8FIGURE 1.9 – TEMPLATES PAGE ..............................................................................................................9FIGURE 1.10 – BOOKMARKS PAGE ...........................................................................................................10FIGURE 1.11 – REPORTS PAGE............................................................................................................... 11FIGURE 2.1 – THE E-FILING PROCESS ....................................................................................................12FIGURE 3.1 – FILE & SERVE HOME PAGE ................................................................................................15FIGURE 3.2 – EXAMPLE OF FIRM USER INVITATION EMAIL .............................................................................16FIGURE 3.3 – REGISTER PAGE FOR FIRM USER .........................................................................................17FIGURE 3.4 – REGISTER PAGE WITH FIRM INFORMATION ...............................................................................18FIGURE 3.5 – REGISTER PAGE WITH USAGE AGREEMENT .............................................................................19FIGURE 3.6 – REGISTER PAGE WITH CONFIRMATION ....................................................................................20FIGURE 3.7 – VERIFICATION EMAIL .........................................................................................................20FIGURE 3.8 – SIGN IN PAGE .................................................................................................................21FIGURE 3.9 – CHANGE PASSWORD PAGE .................................................................................................21FIGURE 3.10 – PASSWORD RESET PAGE – CHECK BOX CLEARED ....................................................................22FIGURE 3.11 – PASSWORD RESET PAGE – CHECK BOX SELECTED...................................................................22FIGURE 4.1 – SIGN IN PAGE .................................................................................................................24FIGURE 4.2 – SIGN OUT OPTION ON PROFILE DROP-DOWN LIST....................................................................25FIGURE 4.3 – SIGN OUT PAGE..............................................................................................................25FIGURE 5.1 – PROFILE DROP-DOWN LIST ................................................................................................26FIGURE 5.2 – MANAGE SECURITY PAGE...................................................................................................27FIGURE 5.3 – PROFILE DROP-DOWN LIST ................................................................................................28FIGURE 5.4 – MANAGE SECURITY PAGE...................................................................................................28FIGURE 5.5 – MANAGE NOTIFICATIONS PAGE.............................................................................................29FIGURE 6.1 – FILER DASHBOARD PAGE ...................................................................................................30FIGURE 7.1 – ERROR MESSAGE REGARDING PAYMENTACCOUNTS ..................................................................32FIGURE 7.2 – UNAVAILABLE PAYMENTACCOUNTS WINDOW............................................................................33FIGURE 7.3 – DRAW DOWN ACCOUNT WITH PARENT-CHILD RELATIONSHIP OF COURTS .........................................34FIGURE 8.1 – TEMPLATES PAGE ............................................................................................................35FIGURE 8.2 – NEW TEMPLATE PAGE .......................................................................................................36FIGURE 8.3 – TEMPLATE INFORMATION SECTION WITH NEW CASE OPTION SELECTED...........................................36FIGURE 8.4 – TEMPLATE INFORMATION SECTION WITH EXISTING CASE OPTION SELECTED......................................37FIGURE 8.5 – REFINE LOCATION DROP-DOWN LIST IN THE CASE INFORMATION SECTION .......................................37FIGURE 8.6 – PARTY INFORMATION SECTION .............................................................................................38FIGURE 8.7 – FILINGS SECTION .............................................................................................................39FIGURE 8.8 – FILING CODE DROP-DOWN LIST ..........................................................................................40FIGURE 8.9 – FILING CODE FIELD WITH FEE DISPLAYED ...............................................................................40FIGURE 8.10 – DUE DATE CALENDAR .......................................................................................................41FIGURE 8.11 – FILING ON BEHALF OF FIELD IN THE FILINGS SECTION.................................................................41FIGURE 8.12 – LEAD DOCUMENT AND ATTACHMENTS FIELDS IN THE FILINGS SECTION ............................................42FIGURE 8.13 – SECURITY DROP-DOWN LIST IN THE LEAD DOCUMENT SECTION ...................................................42FIGURE 8.14 – OPTIONAL SERVICES AND FEES SECTION................................................................................43FIGURE 8.15 – OPTIONAL SERVICES AND FEES FIELD IN THE OPTIONAL SERVICES AND FEES SECTION .......................43FIGURE 8.16 – OPTIONAL SERVICES AND FEES DROP-DOWN LIST....................................................................43FIGURE 8.17 – OPTIONAL SERVICES AND FEES SECTION WITH SERVICES SELECTED..............................................44FIGURE 8.18 – OPTIONAL SERVICE ACTIONS DROP-DOWN LIST.......................................................................44FIGURE 8.19 – OPTIONAL SERVICES AND FEES SECTION WITH OPTIONAL SERVICES SAVED .....................................44
OFS-FS-200-3860 v.1 January 2017 v
Odyssey File & Serve™ HTML5
FIGURE 8.20 – FEES SECTION ................................................................................................................45FIGURE 8.21 – FILER TYPE DROP-DOWN LIST ............................................................................................46FIGURE 8.22 – CONFIRM TEMPLATE DETAILS PAGE.......................................................................................46FIGURE 8.23 – TEMPLATES PAGE ............................................................................................................47FIGURE 8.24 – TEMPLATES PAGE ............................................................................................................48FIGURE 8.25 – FILING HISTORY PAGE.......................................................................................................49FIGURE 8.26 – FILE INTO CASE WITH TEMPLATE PAGE .................................................................................50FIGURE 8.27 – ACTIONS DROP-DOWN LIST FOR EXISTING CASE TEMPLATES.......................................................50FIGURE 8.28 – TEMPLATES PAGE ............................................................................................................51FIGURE 8.29 – TEMPLATES PAGE ............................................................................................................52FIGURE 9.1 – FILER DASHBOARD PAGE ...................................................................................................53FIGURE 9.2 – REFINE LOCATION DROP-DOWN LIST IN THE CASE INFORMATION SECTION .......................................54FIGURE 9.3 – PARTY INFORMATION SECTION .............................................................................................55FIGURE 9.4 – COUNTRY DROP-DOWN LIST...............................................................................................56FIGURE 9.5 – ADD ATTORNEYS DIALOG BOX.............................................................................................57FIGURE 9.6 – LEAD ATTORNEY AND ADDITIONAL ATTORNEYS FIELDS................................................................57FIGURE 9.7 – PARTY INFORMATION SECTION WITH LEAD ATTORNEYS DISPLAYED .................................................58FIGURE 9.8 – PARTY INFORMATION SECTION ON CASE FILING SCREEN .............................................................58FIGURE 9.9 – ENVELOPE PAGE DISPLAYING FILING DETAILS ..........................................................................59FIGURE 9.10 – FILINGS SECTION .............................................................................................................60FIGURE 9.11 – FILING CODE DROP-DOWN LIST ..........................................................................................61FIGURE 9.12 – FILING CODE DROP-DOWN LIST WITH THE FEE DISPLAYED..........................................................61FIGURE 9.13 – DUE DATE CALENDAR .......................................................................................................62FIGURE 9.14 – FILING ON BEHALF OF FIELD IN THE FILINGS SECTION.................................................................62FIGURE 9.15 – LEAD DOCUMENT AND ATTACHMENTS FIELDS IN THE FILINGS SECTION ............................................63FIGURE 9.16 – SECURITY DROP-DOWN LIST IN THE LEAD DOCUMENT SECTION ...................................................63FIGURE 9.17 – OPTIONAL SERVICES AND FEES SECTION................................................................................64FIGURE 9.18 – OPTIONAL SERVICES AND FEES FIELD IN THE OPTIONAL SERVICES AND FEES SECTION .......................64FIGURE 9.19 – OPTIONAL SERVICES AND FEES DROP-DOWN LIST....................................................................64FIGURE 9.20 – OPTIONAL SERVICES AND FEES SECTION WITH SERVICES SELECTED..............................................65FIGURE 9.21 – OPTIONAL SERVICE ACTIONS DROP-DOWN LIST.......................................................................65FIGURE 9.22 – OPTIONAL SERVICES AND FEES SECTION WITH OPTIONAL SERVICES SAVED .....................................65FIGURE 9.23 – FEES SECTION ................................................................................................................66FIGURE 9.24 – FILER TYPE DROP-DOWN LIST ............................................................................................67FIGURE 9.25 – SUBMISSION AGREEMENTS SECTION......................................................................................67FIGURE 9.26 – SUMMARY PAGE ..............................................................................................................68FIGURE 9.27 – FEES SECTION WITH PARTY FEES DISPLAYED ..........................................................................69FIGURE 9.28 – SUBMISSION AGREEMENTS DIALOG BOX.................................................................................70FIGURE 9.29 – ENVELOPE SUMMARY PAGE ................................................................................................71FIGURE 10.1 – FILING HISTORY PAGE.......................................................................................................73FIGURE 10.2 – ACTIONS DROP-DOWN LIST................................................................................................73FIGURE 10.3 – PARTY INFORMATION SECTION EXPANDED FOR EXISTING CASES....................................................74FIGURE 10.4 – CASE INFORMATION AND PARTY INFORMATION SECTIONS.............................................................74FIGURE 10.5 – FILINGS SECTION .............................................................................................................75FIGURE 10.6 – FILING TYPE DROP-DOWN LIST ...........................................................................................76FIGURE 10.7 – FILING CODE DROP-DOWN LIST ..........................................................................................76FIGURE 10.8 – FILING CODE FIELD WITH THE FEE DISPLAYED..........................................................................76FIGURE 10.9 – DUE DATE CALENDAR .......................................................................................................77FIGURE 10.10 –FILING ON BEHALF OF FIELD IN THE FILINGS SECTION.................................................................78FIGURE 10.11 – LEAD DOCUMENT AND ATTACHMENTS FIELDS IN THE FILINGS SECTION ............................................79FIGURE 10.12 –SECURITY DROP-DOWN LIST IN THE LEAD DOCUMENT SECTION ...................................................79FIGURE 10.13 –OPTIONAL SERVICES AND FEES SECTION................................................................................80FIGURE 10.14 –OPTIONAL SERVICES AND FEES FIELD IN THE OPTIONAL SERVICES AND FEES SECTION .......................80FIGURE 10.15 –OPTIONAL SERVICES AND FEES DROP-DOWN LIST....................................................................80FIGURE 10.16 –OPTIONAL SERVICES AND FEES SECTION WITH SERVICES SELECTED..............................................81FIGURE 10.17 –OPTIONAL SERVICE ACTIONS DROP-DOWN LIST.......................................................................81FIGURE 10.18 –OPTIONAL SERVICES AND FEES SECTION WITH OPTIONAL SERVICES SAVED .....................................81FIGURE 10.19 –FEES SECTION ................................................................................................................82FIGURE 10.20 –FILER TYPE DROP-DOWN LIST ............................................................................................83
vi January 2017 OFS-FS-200-3860 v.1

Publishing History
FIGURE 10.21 –BOOKMARKS PAGE ...........................................................................................................84FIGURE 10.22 –ACTIONS DROP-DOWN LIST................................................................................................84FIGURE 10.23 –CASE INFORMATION AND PARTY INFORMATION SECTIONS.............................................................85FIGURE 10.24 –FILINGS SECTION .............................................................................................................86FIGURE 10.25 –FILING TYPE DROP-DOWN LIST ...........................................................................................87FIGURE 10.26 –FILING CODE DROP-DOWN LIST ..........................................................................................87FIGURE 10.27 –FILING CODE FIELD WITH THE FEE DISPLAYED..........................................................................87FIGURE 10.28 –DUE DATE CALENDAR .......................................................................................................88FIGURE 10.29 –FILING ON BEHALF OF FIELD IN THE FILINGS SECTION.................................................................89FIGURE 10.30 –LEAD DOCUMENT AND ATTACHMENTS FIELDS IN THE FILINGS SECTION ............................................90FIGURE 10.31 –SECURITY DROP-DOWN LIST IN THE LEAD DOCUMENT SECTION ...................................................90FIGURE 10.32 –OPTIONAL SERVICES AND FEES SECTION................................................................................91FIGURE 10.33 –OPTIONAL SERVICES AND FEES FIELD IN THE OPTIONAL SERVICES AND FEES SECTION .......................91FIGURE 10.34 –OPTIONAL SERVICES AND FEES DROP-DOWN LIST....................................................................91FIGURE 10.35 –OPTIONAL SERVICES AND FEES SECTION WITH SERVICES SELECTED..............................................92FIGURE 10.36 –OPTIONAL SERVICE ACTIONS DROP-DOWN LIST.......................................................................92FIGURE 10.37 –OPTIONAL SERVICES AND FEES SECTION WITH OPTIONAL SERVICES SAVED .....................................92FIGURE 10.38 –FEES SECTION ................................................................................................................93FIGURE 10.39 –FILER TYPE DROP-DOWN LIST ............................................................................................94FIGURE 10.40 –FILE INTO EXISTING CASE PAGE ..........................................................................................95FIGURE 10.41 –ACTIONS DROP-DOWN LIST................................................................................................95FIGURE 10.42 –PARTY INFORMATION SECTION EXPANDED FOR EXISTING CASES....................................................96FIGURE 10.43 –CASE INFORMATION AND PARTY INFORMATION SECTIONS.............................................................96FIGURE 10.44 –FILINGS SECTION .............................................................................................................97FIGURE 10.45 –FILING TYPE DROP-DOWN LIST ...........................................................................................98FIGURE 10.46 –FILING CODE DROP-DOWN LIST ..........................................................................................98FIGURE 10.47 –FILING CODE FIELD WITH THE FEE DISPLAYED..........................................................................98FIGURE 10.48 –DUE DATE CALENDAR .......................................................................................................99FIGURE 10.49 –FILING ON BEHALF OF FIELD IN THE FILINGS SECTION............................................................... 100FIGURE 10.50 –LEAD DOCUMENT AND ATTACHMENTS FIELDS IN THE FILINGS SECTION .......................................... 101FIGURE 10.51 –SECURITY DROP-DOWN LIST IN THE LEAD DOCUMENT SECTION ................................................. 101FIGURE 10.52 –OPTIONAL SERVICES AND FEES SECTION.............................................................................. 102FIGURE 10.53 –OPTIONAL SERVICES AND FEES FIELD IN THE OPTIONAL SERVICES AND FEES SECTION ..................... 102FIGURE 10.54 –OPTIONAL SERVICES AND FEES DROP-DOWN LIST.................................................................. 102FIGURE 10.55 –OPTIONAL SERVICES AND FEES SECTION WITH SERVICES SELECTED............................................ 103FIGURE 10.56 –OPTIONAL SERVICE ACTIONS DROP-DOWN LIST..................................................................... 103FIGURE 10.57 –OPTIONAL SERVICES AND FEES SECTION WITH OPTIONAL SERVICES SAVED ................................... 103FIGURE 10.58 –FEES SECTION .............................................................................................................. 104FIGURE 10.59 –FILER TYPE DROP-DOWN LIST .......................................................................................... 105FIGURE 10.60 –CASE PAGE.................................................................................................................. 106FIGURE 10.61 –APPELLATE SELECTIONS IN THE CASE INFORMATION SECTION ..................................................... 108FIGURE 11.1 – ACTIONS DROP-DOWN LIST.............................................................................................. 109FIGURE 11.2 – FIRM SERVICE CONTACTS PAGE......................................................................................... 110FIGURE 11.3 – FIRM SERVICE CONTACTS PAGE FOR ADDING A NEW CONTACT .................................................. 111FIGURE 11.4 – ACTIONS DROP-DOWN LIST.............................................................................................. 112FIGURE 11.5 – SERVICE CONTACTS PAGE................................................................................................ 112FIGURE 11.6 – SERVICE CONTACTS ACTIONS DROP-DOWN LIST .................................................................... 112FIGURE 11.7 – ADD FROM FIRM SERVICE CONTACTS DIALOG BOX ................................................................. 113FIGURE 11.8 – FIRM SERVICE CONTACTS PAGE......................................................................................... 114FIGURE 11.9 – SERVICE CONTACTS ACTIONS DROP-DOWN LIST .................................................................... 114FIGURE 11.10 – REPLACE SERVICE CONTACT DIALOG BOX............................................................................ 115FIGURE 11.11 – REPLACE SERVICE CONTACT DIALOG BOX WITH EXISTING SERVICE CONTACTS DROP-DOWN
LIST ........................................................................................................................... 115FIGURE 11.12 – REPLACE SERVICE CONTACT DIALOG BOX FOR ADDING NEW SERVICE CONTACT ............................ 116FIGURE 11.13 – SERVICE CONTACTS SELECTED BY DEFAULT (WITH ONE CONTACT DESELECTED)............................ 117FIGURE 11.14 – SERVICE CONTACTS PAGE................................................................................................ 118FIGURE 11.15 – ACTIONS DROP-DOWN LIST.............................................................................................. 118FIGURE 11.16 – SERVICE CONTACTS PAGE................................................................................................ 119FIGURE 11.17 – SERVICE CONTACTS ACTIONS DROP-DOWN LIST .................................................................... 119
OFS-FS-200-3860 v.1 January 2017 vii

Odyssey File & Serve™ HTML5
FIGURE 11.18 – ADD SERVICE CONTACT FROM PUBLIC LIST DIALOG BOX .......................................................... 120FIGURE 11.19 – ADD SERVICE CONTACT FROM PUBLIC LIST PAGE ................................................................... 121FIGURE 11.20 – OTHER SERVICE CONTACTS SECTION (WITH NEW CONTACT ADDED) ............................................ 122FIGURE 11.21 – FIRM SERVICE CONTACTS PAGE......................................................................................... 123FIGURE 11.22 – FILING HISTORY PAGE..................................................................................................... 124FIGURE 11.23 – ACTIONS DROP-DOWN LIST.............................................................................................. 124FIGURE 11.24 – SERVICE CONTACTS PAGE................................................................................................ 125FIGURE 11.25 – SERVICE CONTACTS ACTIONS DROP-DOWN LIST .................................................................... 125FIGURE 11.26 – SAVE CONTACT TO FIRM SERVICE CONTACTS CHECK BOX ........................................................ 126FIGURE 11.27 – FILER DASHBOARD PAGE ................................................................................................. 126FIGURE 11.28 – FILE INTO EXISTING CASE PAGE ........................................................................................ 127FIGURE 11.29 – ACTIONS DROP-DOWN LIST.............................................................................................. 127FIGURE 11.30 – SERVICE CONTACTS ACTIONS DROP-DOWN LIST .................................................................... 128FIGURE 11.31 – SAVE CONTACT TO FIRM SERVICE CONTACTS CHECK BOX ........................................................ 128FIGURE 11.32 – FILER DASHBOARD PAGE ................................................................................................. 128FIGURE 11.33 – SERVICE CONTACTS ACTIONS DROP-DOWN LIST .................................................................... 129FIGURE 11.34 – SAVE CONTACT TO FIRM SERVICE CONTACTS CHECK BOX ........................................................ 129FIGURE 11.35 – SERVICE CONTACTS ACTIONS DROP-DOWN LIST .................................................................... 130FIGURE 11.36 – ADD FROM FIRM SERVICE CONTACTS DIALOG BOX ................................................................. 130FIGURE 11.37 – SERVICE CONTACTS SECTION............................................................................................ 130FIGURE 11.38 – SERVICE METHOD FIELD IN SERVICE CONTACTS SECTION ......................................................... 131FIGURE 11.39 – SERVICE METHOD DROP-DOWN LIST .................................................................................. 131FIGURE 11.40 – FIRM SERVICE CONTACTS PAGE......................................................................................... 132FIGURE 11.41 – SERVICE CONTACTS ACTIONS DROP-DOWN LIST .................................................................... 133FIGURE 11.42 – ATTACHED CASES PAGE .................................................................................................. 133FIGURE 11.43 – ACTIONS DROP-DOWN LIST.............................................................................................. 134FIGURE 11.44 – SERVICE CONTACTS PAGE................................................................................................ 134FIGURE 11.45 – LINK PARTIES WITH CONTACT DROP-DOWN LIST ON THE SERVICE CONTACTS PAGE ......................... 135FIGURE 11.46 – LINK PARTIES DIALOG BOX............................................................................................... 135FIGURE 11.47 – FIRM SERVICE CONTACTS PAGE WITH PAGING FEATURE ........................................................... 136FIGURE 11.48 – FIRM SERVICE CONTACTS SEARCH PAGE ............................................................................. 136FIGURE 11.49 – SERVICE CONTACTS PAGE................................................................................................ 137FIGURE 11.50 – SERVICE CONTACTS ACTIONS DROP-DOWN LIST .................................................................... 137FIGURE 11.51 – FIRM SERVICE CONTACTS PAGE......................................................................................... 138FIGURE 11.52 – FIRM SERVICE CONTACTS ACTIONS DROP-DOWN LIST............................................................. 138FIGURE 11.53 – DELETE SERVICE CONTACT DIALOG BOX.............................................................................. 139FIGURE 12.1 – FILING HISTORY PAGE..................................................................................................... 141FIGURE 12.2 – FILING HISTORY PAGE..................................................................................................... 142FIGURE 12.3 – FILING HISTORY PAGE FOR FILTERING A SEARCH .................................................................... 143FIGURE 12.4 – FILTER BY DROP-DOWN LIST ............................................................................................ 143FIGURE 12.5 – ALL STATUSES DROP-DOWN LIST....................................................................................... 144FIGURE 12.6 – FILTER DATE CALENDAR .................................................................................................. 144FIGURE 12.7 – FILING HISTORY PAGE..................................................................................................... 145FIGURE 12.8 – ACTIONS DROP-DOWN LIST.............................................................................................. 145FIGURE 12.9 – FILING HISTORY PAGE..................................................................................................... 146FIGURE 12.10 –ENVELOPE PAGE ........................................................................................................... 147FIGURE 12.11 – FILING HISTORY PAGE..................................................................................................... 148FIGURE 12.12 –FILING HISTORY PAGE – CANCELING A FILING........................................................................ 149FIGURE 13.1 – BOOKMARKS PAGE ......................................................................................................... 150FIGURE 13.2 – BOOKMARKS ACTIONS DROP-DOWN LIST ............................................................................. 151FIGURE 14.1 – REPORTS PAGE............................................................................................................. 152FIGURE 14.2 – REPORT PARAMETERS PANEL OF REPORTS PAGE FOR FINANCIAL RECONCILIATION REPORT................ 153FIGURE 14.3 – FILTER DATE CALENDAR .................................................................................................. 154FIGURE 14.4 – STATUS FIELD DROP-DOWN LIST ....................................................................................... 154FIGURE 14.5 – REPORTS PAGE............................................................................................................. 155FIGURE 14.6 – REPORT PARAMETERS PANEL OF REPORTS PAGE FOR FILINGS REPORT........................................ 156FIGURE 14.7 – FILTER DATE CALENDAR .................................................................................................. 157FIGURE 14.8 – STATUS FIELD DROP-DOWN LIST ....................................................................................... 157
viii January 2017 OFS-FS-200-3860 v.1
CHAPTER 1 SYSTEM OVERVIEW
TOPICS COVERED IN THIS CHAPTER
♦ RELEASE 3.16 NEW FEATURES♦ BEFORE YOU BEGIN
The File & Serve system enables registered users to file documents with the court anytime, anywhere, 24hours a day, seven days a week. This highly automated, scalable system provides customers theopportunity to transition from an inefficient, paper-based process to a streamlined, technology-basedelectronic filing (e-filing) system.
RELEASE 3.16 NEW FEATURESThis section lists the new features for Release 3.15.Note: Features vary based on your system configuration.
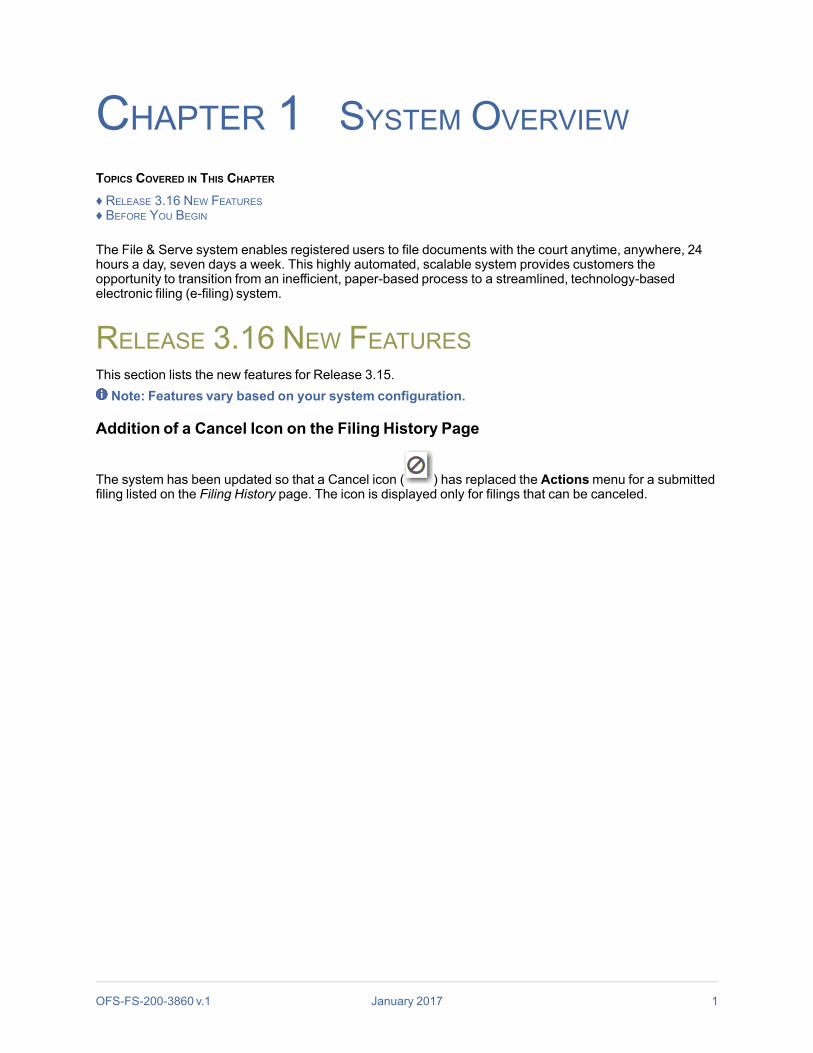
Addition of a Cancel Icon on the Filing History Page
The system has been updated so that a Cancel icon ( ) has replaced the Actionsmenu for a submittedfiling listed on the Filing History page. The icon is displayed only for filings that can be canceled.
OFS-FS-200-3860 v.1 January 2017 1

Odyssey File & Serve™ HTML5
Figure 1.1 – Filing History Page with the Cancel Icon
Add Ability to Collect Date of Birth for PartiesThe system has been updated to include the Date of Birth field in the Party Information section of a filing.A calendar is included in the Date of Birth field, so the filer has the option of typing the party’s date of birthin the field or selecting the date from the calendar.
Note: The Date of Birth field is configured by Tyler and may not be available on your system.Note: The Date of Birth field is displayed only when filers are adding a new party.
2 January 2017 OFS-FS-200-3860 v.1

Figure 1.2 – Party Information Section with the Date of Birth Field
BEFORE YOU BEGINThis guide is intended for firm users.
Firm UserOnly Firm Administrators can add and manage firm users. Please contact your Firm Administrator torequest any changes.
Payment AccountsOnly Firm Administrators can add and manage payment accounts. Please contact your Firm Administratorto request any changes.
AttorneysOnly Firm Administrators can add and manage firm attorneys. Please contact your Firm Administrator torequest any changes.
OFS-FS-200-3860 v.1 January 2017 3
Before You Begin

Odyssey File & Serve™ HTML5
SetupBefore you begin, review this information to successfully operate the software.
Note: Depending on your setup, all featuresmay not be available. As a result, your screen mayvary from what is shown in this document.
SYSTEM REQUIREMENTSThis section describes the recommended requirements to successfully use the system:
• Browser Requirements – The system supports Internet Explorer® 10 or 11; Chrome™; Mozilla®Firefox®; or Safari® application programs. If your browser does not meet these minimumrequirements, please contact your network administrator.
Note: Safari on iOS is not supported.• Operating Systems – The system supports Microsoft® Windows®, Linux®, Chrome OS™,
Android™, and OS X® desktop class operating system software.
Note: iOS is not supported.• MinimumHardware Requirements – The system supports the following hardware:
– Intel® Core™ Duo processors or AMD processors manufactured in 2012 or later
– 2 GB of RAM
– 1366 x 768 resolution screens for desktop computers, or 1280 x 720 resolution screens formobile devices
• Recommended Hardware Requirements – Tyler recommends the following hardware:
– Intel® Core™ i3 or AMD A6 processors with at least a 2.0 GHz clock speed
– 4 GB of RAM
– 1920 x 1080 resolution for both desktop computers and mobile devices
• Connection Requirements – A high-speed Internet connection is recommended.
• Document Format – The Adobe® PDF format is the only format allowed for attaching documents inOdyssey File & Serve HTML5.
PAGE NAVIGATIONThe following sections describe how to navigate the system and populate data fields throughout the filingprocess.
Keyboard ShortcutsAt any time while you are in the File & Serve system, you can use keyboard shortcuts for assistance. PressSHIFT+? to display the following window.
4 January 2017 OFS-FS-200-3860 v.1
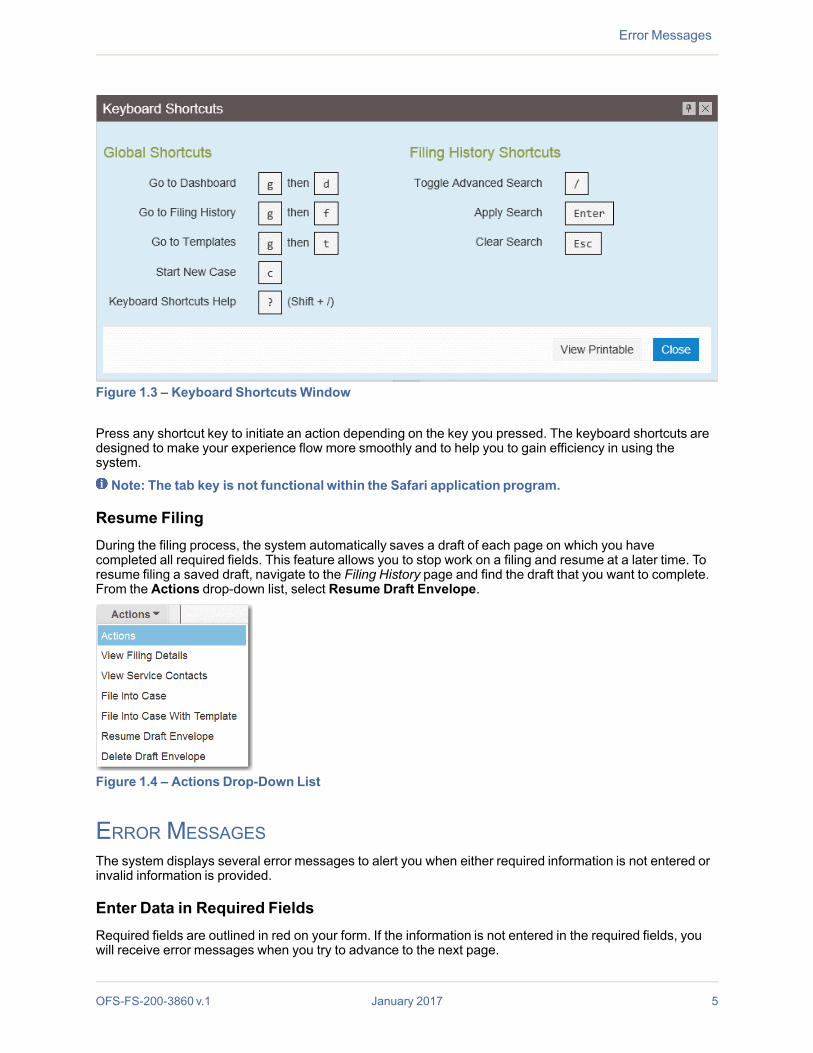
Figure 1.3 – Keyboard ShortcutsWindow
Press any shortcut key to initiate an action depending on the key you pressed. The keyboard shortcuts aredesigned to make your experience flow more smoothly and to help you to gain efficiency in using thesystem.
Note: The tab key is not functional within the Safari application program.
Resume FilingDuring the filing process, the system automatically saves a draft of each page on which you havecompleted all required fields. This feature allows you to stop work on a filing and resume at a later time. Toresume filing a saved draft, navigate to the Filing History page and find the draft that you want to complete.From the Actions drop-down list, select Resume Draft Envelope.
Figure 1.4 – Actions Drop-Down List
ERROR MESSAGESThe system displays several error messages to alert you when either required information is not entered orinvalid information is provided.
Enter Data in Required FieldsRequired fields are outlined in red on your form. If the information is not entered in the required fields, youwill receive error messages when you try to advance to the next page.
OFS-FS-200-3860 v.1 January 2017 5
Error Messages

Odyssey File & Serve™ HTML5
Note: Required fields may vary in different sections.
ORIENTATIONWhen you sign in to File & Serve, the Filer Dashboard page is displayed. From here, drop-down listsprovide various filing options.
Filer Dashboard and Actions Drop-Down ListStart a new case or add a filing to an existing case, using one of two methods:
• From the Filer Dashboard page
Figure 1.5 – Filer Dashboard Page
From the Actions drop-down list
Figure 1.6 – Actions Drop-Down List
The Actions drop-down list can also be used for other case actions.
Click the home icon ( ) from any page in the system to return to the Filer Dashboard page.
6 January 2017 OFS-FS-200-3860 v.1

Start a New CaseClick Start a New Case to open a new case and enter the required information. You can also select Start aNew Case from the Actions drop-down list.
File Into Existing CaseClick File into Existing Case to locate an existing case and add a filing to the case. You can also selectFile Into Existing Case from the Actions drop-down list.The File Into Existing Case page includes tooltips. Pause on the case type to view the tooltip associatedwith that case type.
Figure 1.7 – File Into Existing Case Page with Tooltip Displayed
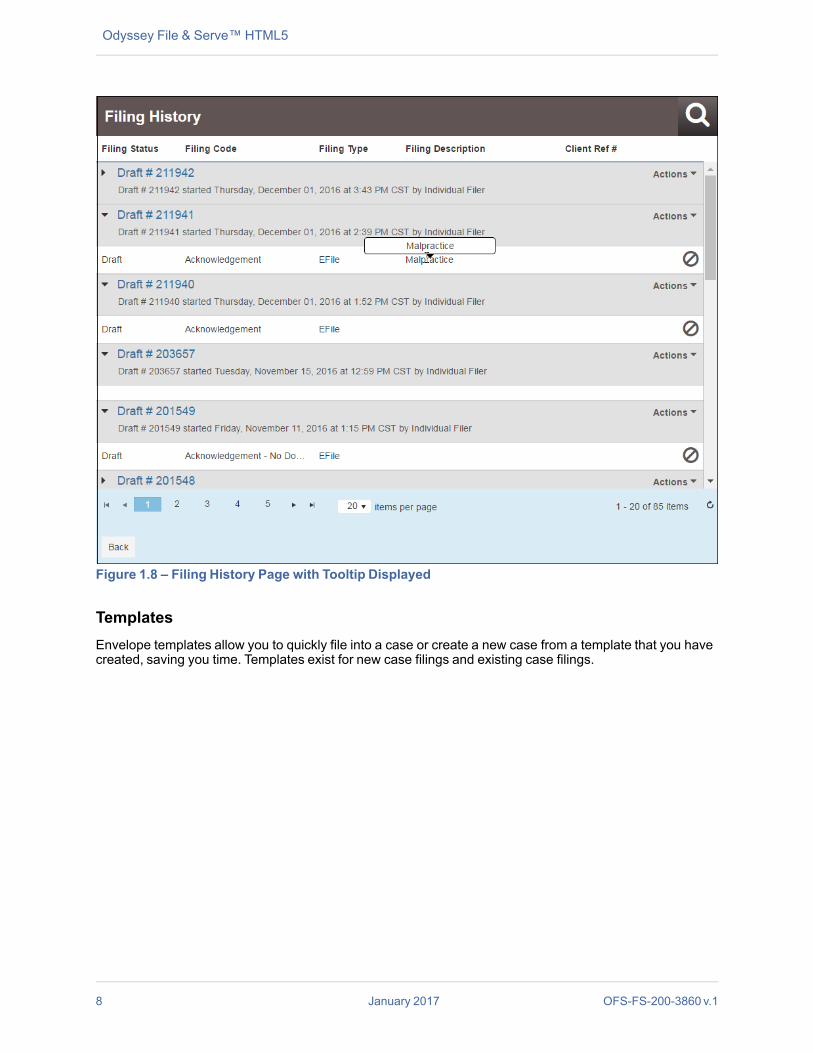
Filing HistoryAfter uploading and submitting your filing, it is displayed on the Filing History page. From here, you can viewthe status of your filing, check the filing type, get a document description, see the number assigned to yourcase, review the details of the case, and cancel a filing. You can also pause on a filing description to see thetooltip associated with that description.
OFS-FS-200-3860 v.1 January 2017 7
Orientation
Odyssey File & Serve™ HTML5
Figure 1.8 – Filing History Page with Tooltip Displayed
TemplatesEnvelope templates allow you to quickly file into a case or create a new case from a template that you havecreated, saving you time. Templates exist for new case filings and existing case filings.
8 January 2017 OFS-FS-200-3860 v.1

Figure 1.9 – Templates Page
Firm Service ContactsThe Firm Service Contacts feature displays all of the service contacts associated with your firm. Firmservice contacts can also be deleted from a firm.
BookmarksThe Bookmarks page displays a list of case numbers, locations, and descriptions for the cases that youhave bookmarked. Only you and your firm (depending on the firm setup) can see this information. Neitherthe public nor any other firm can see your case list.
OFS-FS-200-3860 v.1 January 2017 9
Orientation

Odyssey File & Serve™ HTML5
Figure 1.10 – Bookmarks Page
ReportsYou can create reports on your filing activity and export the reports into an easily accessible Microsoft®Excel® file.The Financial Reconciliation Report contains a report at the Envelope level that is designed to help youreconcile your filing fees to your credit card statements.The Filings Report is a detailed look into every filing, filing status, and fee associated with the filings thatyour or your firm performed.
10 January 2017 OFS-FS-200-3860 v.1

Figure 1.11 – Reports Page
HelpSelect Help from the Actions drop-down list to view additional training materials, contact information, andSelf-Service Support.
OFS-FS-200-3860 v.1 January 2017 11
Orientation

CHAPTER 2 E-FILING OVERVIEW
TOPICS COVERED IN THIS CHAPTER
♦ FILING QUEUE STATUS
This section describes the e-filing process.
Figure 2.1 – The E-Filing Process
Once a user has registered to use Odyssey File & Serve™, a filer can electronically file documents to thecourt. When the filing is submitted, the filing is electronically delivered to the clerk's inbox. The clerk thenreviews the filing and either accepts, rejects, or returns the filing.If the clerk accepts the filing, the case is docketed and set to appear in the clerk’s case managementsystem. An email is sent to the filer with the case status along with any pertinent information regarding thecase. If the option for service was selected during the filing, service is electronically sent to the contacts onthe case.If the filing is returned or rejected, the envelope is sent back to the filer with a reason for rejection, and thefiler is given a time line in which to make the correction and resubmit the filing.If the filer has questions regarding the filing or case, it is recommended that the filer contact the local court.
FILING QUEUE STATUSThe filing queue status lets you know where you are in the e-filing process. The key represents the statuslisted for your filing.The following filing status key table describes the status associated with each filing type.
Note: EFO – EFile Only; EFS – EfileAndServe; SO – Service Only
12 January 2017 OFS-FS-200-3860 v.1

Status Filing Type Definition
Draft EFO, EFS, SO The filer has entered full or partialfiling data, but has not yetsubmitted the filing.
Submitting EFO, EFS, SO The filer has submitted the filing,but the document file format andpayment information have notbeen verified on the back end.
Submitted EFO, EFS, SO The document file format andpayment information have beenverified and accepted, but thefiling has not yet entered theReview Queue/WorkflowProcess.
Court Processing EFO, EFS, SO Some additional action needs tobe taken by the court.
Under Review EFO, EFS A clerk reviewer has selected afiling from a queue.
Note: Once a filing reachesthe Under Review status, itcannot return to the Submittedstatus. Selecting the EndReview retains the UnderReview status and returns thefiling to the queue.
Receipted EFO, EFS The filing has beenacknowledged by the court asreceived, but it is not beingtransmitted to the casemanagement system to becomepart of the court record. The filingmay or may not be part of theproposed order work flow.
Accepted EFO, EFS The reviewer has reviewed thefiling and accepted it.
Rejected EFO, EFS The reviewer has reviewed thefiling and rejected it.
Returned EFO, EFS The reviewer has reviewed andreturned the filing as additionalaction must be taken by the filer.
Note: The filer can cancel orcopy a filing in the Returnedstatus.
Served SO Service Only filings arecompleted.
Service Incomplete (Service Onlyfilings)
SO One or more servings failed; theservice was incomplete.Example: The email or domainwas rejected.
OFS-FS-200-3860 v.1 January 2017 13
Filing Queue Status
Odyssey File & Serve™ HTML5
Status Filing Type Definition
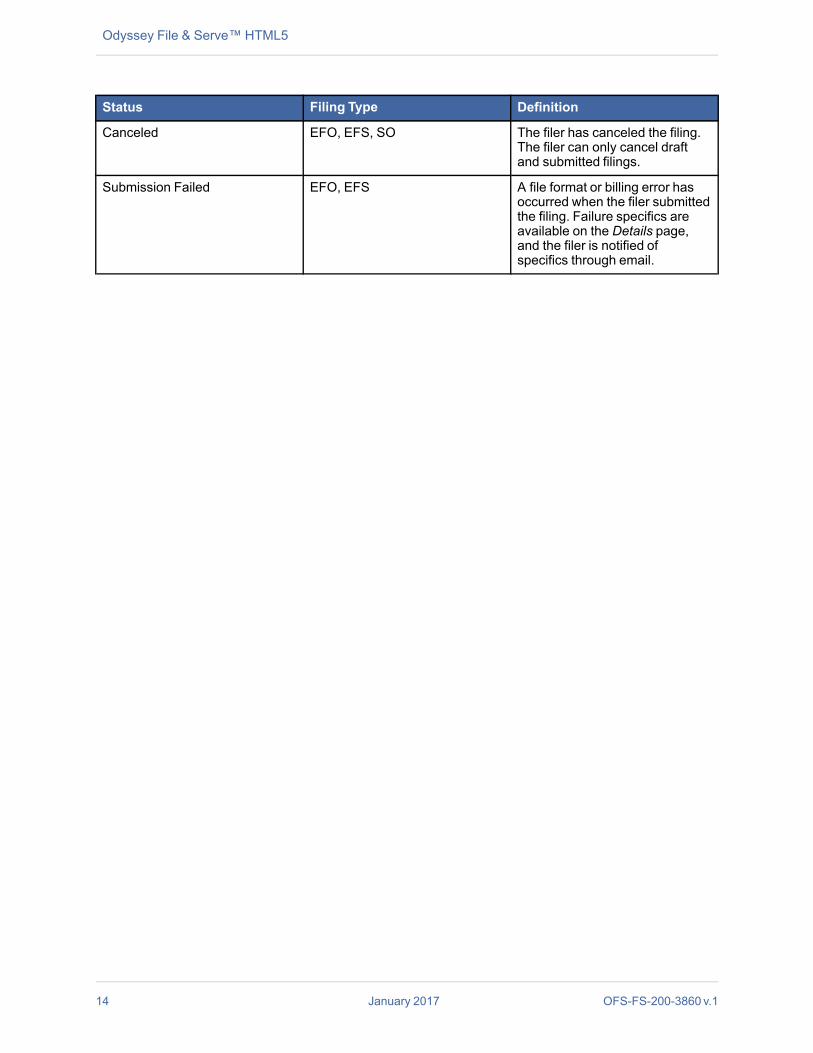
Canceled EFO, EFS, SO The filer has canceled the filing.The filer can only cancel draftand submitted filings.
Submission Failed EFO, EFS A file format or billing error hasoccurred when the filer submittedthe filing. Failure specifics areavailable on the Details page,and the filer is notified ofspecifics through email.
14 January 2017 OFS-FS-200-3860 v.1
CHAPTER 3 HOME PAGETOPICS COVERED IN THIS CHAPTER
♦ REGISTERING AS A FIRM USER♦ RESETTING YOUR PASSWORD
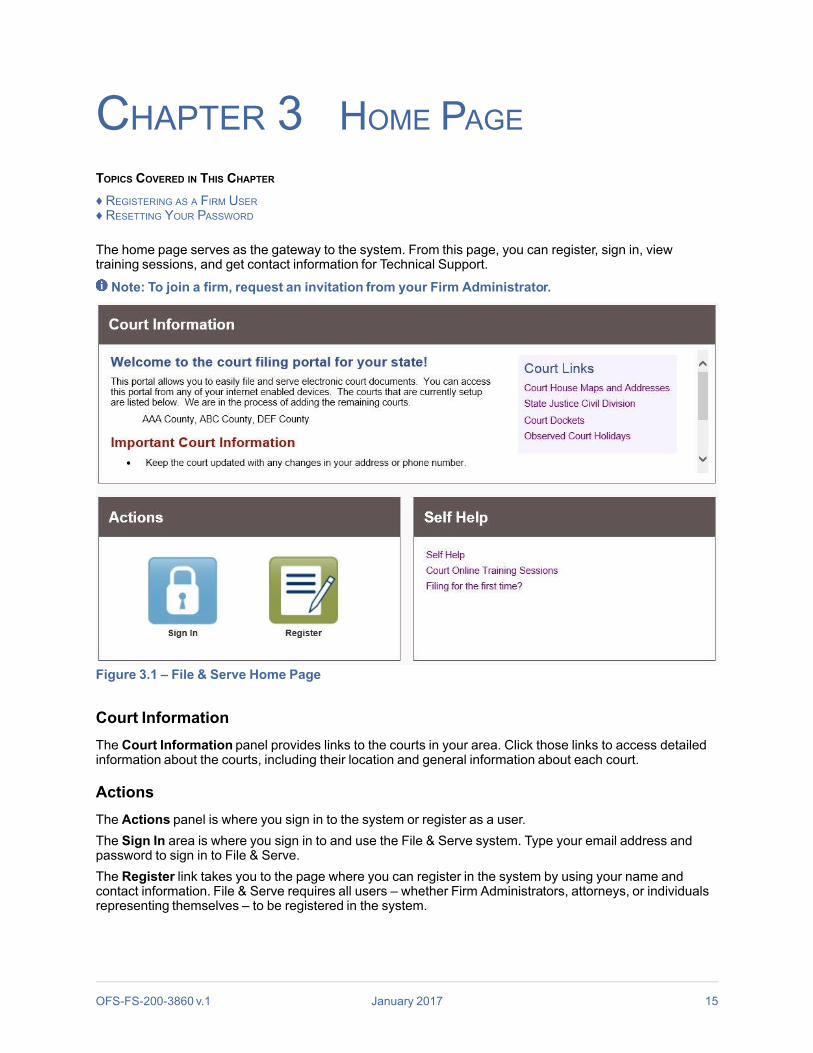
The home page serves as the gateway to the system. From this page, you can register, sign in, viewtraining sessions, and get contact information for Technical Support.
Note: To join a firm, request an invitation from your Firm Administrator.
Figure 3.1 – File & Serve Home Page
Court InformationThe Court Information panel provides links to the courts in your area. Click those links to access detailedinformation about the courts, including their location and general information about each court.
ActionsThe Actions panel is where you sign in to the system or register as a user.The Sign In area is where you sign in to and use the File & Serve system. Type your email address andpassword to sign in to File & Serve.The Register link takes you to the page where you can register in the system by using your name andcontact information. File & Serve requires all users – whether Firm Administrators, attorneys, or individualsrepresenting themselves – to be registered in the system.
OFS-FS-200-3860 v.1 January 2017 15

Odyssey File & Serve™ HTML5
Self HelpThe Self Help panel contains links to online training sessions, answers to questions regarding e-filing, anduser documentation.The following types of documents are available to help you answer many of your day-to-day operationquestions:
• The Individual Filer User Guide provides step-by-step instructions on using the system. The userguide covers activities such as signing into the system, searching for existing cases, selecting the e-file and serve options, performing an e-file and serve, and changing user settings and passwords.
• The Firm Administrator Guide is specifically for the Firm Administrator. This guide coversadministrative functions such as registering the firm, managing firm users, payments, and attorneyaccounts, as well as creating and editing the firm’s service contact lists.
• The Firm User Guide is specifically for the firm users who are not Firm Administrators. This guidecovers activities such as signing into the system, searching for existing cases, selecting the e-fileand serve options, performing an e-file and serve, and changing user settings and passwords.
• The Quick Reference Guide (QRG) provides only the steps needed to complete common tasks suchas registering for an account, initiating a new case, and filing into an existing case.
REGISTERING AS A FIRM USERYou can create an account with a firm and register as a firm user after being invited to join the firm.
Note: If you would like to have an account with the File & Serve system, please contact your FirmAdministrator. Your Firm Administrator can invite you to join the firm through email. Follow the linkprovided in the email, and you can join the firm in the File & Serve system.To register as a firm user, perform the following steps:
1. Click the link in the invitation email to join a firm.
Figure 3.2 – Example of Firm User Invitation Email
Note: If you do not have an invitation email, request one from your Firm Administrator.
Note: There is no fee to sign up for e-filing.
After you click the link, the Register page is displayed.2. Complete the required fields outlined in red font: First Name, Last Name, Email Address, Password,
Security Question, and Security Answer.
16 January 2017 OFS-FS-200-3860 v.1

Figure 3.3 – Register Page for Firm User
3. Click .
The next page is displayed, showing the firm you were invited to join.
OFS-FS-200-3860 v.1 January 2017 17
Registering as a Firm User

Odyssey File & Serve™ HTML5
Figure 3.4 – Register Page with Firm Information
4. Click to continue with your registration, or click to return to the previous page.5. If you choose to continue with your registration, the Register page is displayed. Read the agreement
before proceeding.
18 January 2017 OFS-FS-200-3860 v.1

Figure 3.5 – Register Page with Usage Agreement
6. Select to accept and agree to the terms listed on your page. If you do not
want to continue with your registration, click to return to the previous page.7. If you continue with your registration, a confirmation page is displayed, and a verification email is sent to
the email address you provided.
OFS-FS-200-3860 v.1 January 2017 19
Registering as a Firm User

Odyssey File & Serve™ HTML5
Figure 3.6 – Register Page with Confirmation
Note: You must verify your email address to complete the registration process. A verificationemail (from File & Serve) will be sent to you. Open the email and click the link to confirm youremail address. If you do not see the email in your inbox, check your junk mail folder for the email.
Figure 3.7 – Verification Email
Your registration is complete. Navigate to the home page to log on.
RESETTING YOUR PASSWORDTo reset your password, perform the following steps:
1. On the File & Serve home page, click .2. Type your email address in the User ID field.
20 January 2017 OFS-FS-200-3860 v.1

Figure 3.8 – Sign In Page
3. Click .
A page is displayed with a message requesting that you type your email address.
Figure 3.9 – Change Password Page
4. Type the email address that you provided during the registration process in the Email Address field.
5. Click .6. On the next screen, you are asked to confirm that you are a human and not a machine. Select the I’m
not a robot check box.
Note: The size of the screen that is displayedmay vary, depending on where you are in thesystem when you request a password reset.
OFS-FS-200-3860 v.1 January 2017 21
Resetting Your Password

Odyssey File & Serve™ HTML5
Figure 3.10 – Password Reset Page – Check Box Cleared
Note: A screen might be displayed from which you must select specified images. If so,continue with the next step. If not, continue with Step 8.
7. Click the requested images, and then click .
If you selected the proper images during the verification process, the first screen is displayed again, andthe I’m not a robot check box is now selected.
Note: The size of the screen that is displayedmay vary, depending on where you are in thesystem when you request a password reset.
Figure 3.11 – Password Reset Page – Check Box Selected
8. Click .
When you have successfully selected the correct images (if you were asked to do so), the systemdisplays this message: A password reset link has been sent to the email address
22 January 2017 OFS-FS-200-3860 v.1

associated with your account. If you do not see the password reset email in yourInbox, please check to see if it was delivered to your spam folder.
9. Check your email inbox.10.Locate the email from File & Serve.11. Click the link that is labeled click here to reset your password.
You are prompted to create a new password.12.Type a new password in the New Password field.13.Retype your new password in the Repeat New Password field.14.Click Change Password.
A confirmation page displays the following message: Your password has been changedsuccessfully.
OFS-FS-200-3860 v.1 January 2017 23
Resetting Your Password
CHAPTER 4 SIGN IN AND SIGN OUT
TOPICS COVERED IN THIS CHAPTER
♦ SIGNING IN♦ SIGNING OUT
All users are required to sign in to e-file and serve a document or to check the status of an existing filing. It isalso a best practice for users to sign out after they have completed their transactions.
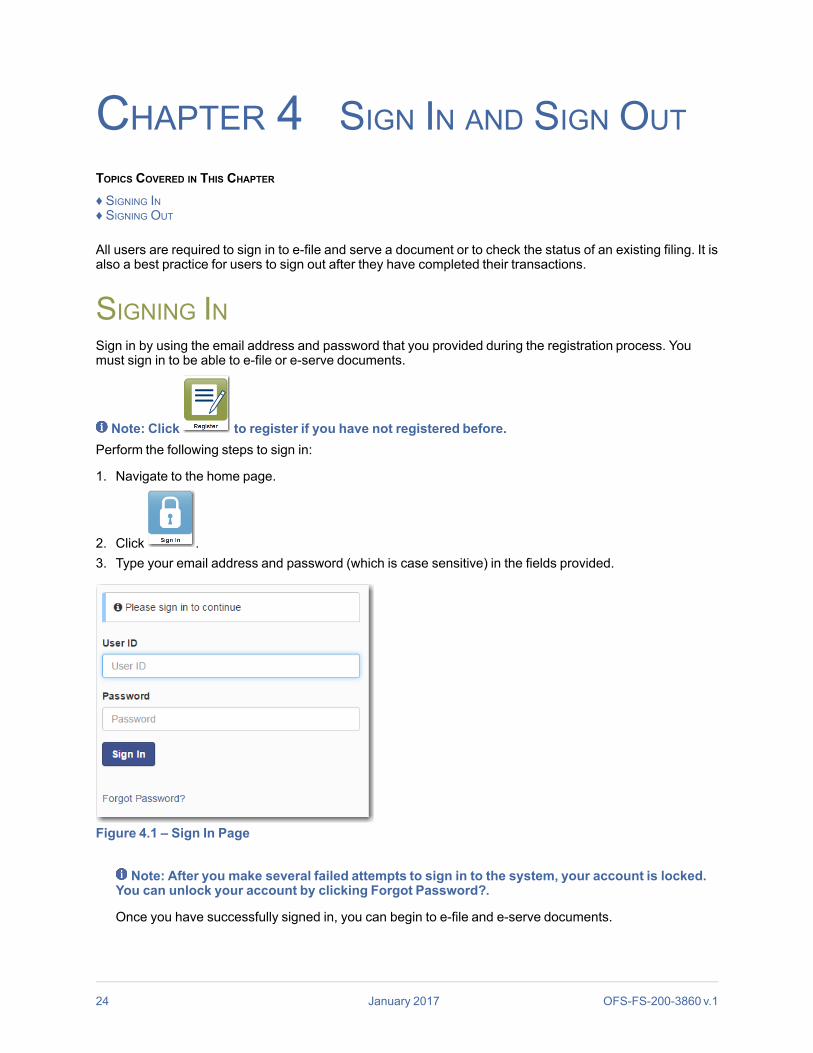
SIGNING INSign in by using the email address and password that you provided during the registration process. Youmust sign in to be able to e-file or e-serve documents.
Note: Click to register if you have not registered before.Perform the following steps to sign in:
1. Navigate to the home page.
2. Click .3. Type your email address and password (which is case sensitive) in the fields provided.
Figure 4.1 – Sign In Page
Note: After you make several failed attempts to sign in to the system, your account is locked.You can unlock your account by clicking Forgot Password?.
Once you have successfully signed in, you can begin to e-file and e-serve documents.
24 January 2017 OFS-FS-200-3860 v.1

SIGNING OUTThis section describes how to sign out of File & Serve.Perform the following steps to sign out:
1. From the profile drop-down list on the page, click Sign Out.
Figure 4.2 – Sign Out Option on Profile Drop-Down List
The Sign Out page is displayed.
Figure 4.3 – Sign Out Page
2. Return to the home page to sign in to the system.
OFS-FS-200-3860 v.1 January 2017 25
Signing Out

CHAPTER 5 PROFILE PREFERENCES
TOPICS COVERED IN THIS CHAPTER
♦ CHANGING THE USER PASSWORD♦ CHANGING THE SECURITY QUESTION♦ MANAGING NOTIFICATIONS
The profile drop-down list provides options for changing your password and managing your notifications.
CHANGING THE USER PASSWORDChange your password from theManage Security page.To change the user password, perform the following steps:
1. From the profile drop-down list, selectManage Security.
Figure 5.1 – Profile Drop-Down List
TheManage Security page is displayed.
26 January 2017 OFS-FS-200-3860 v.1
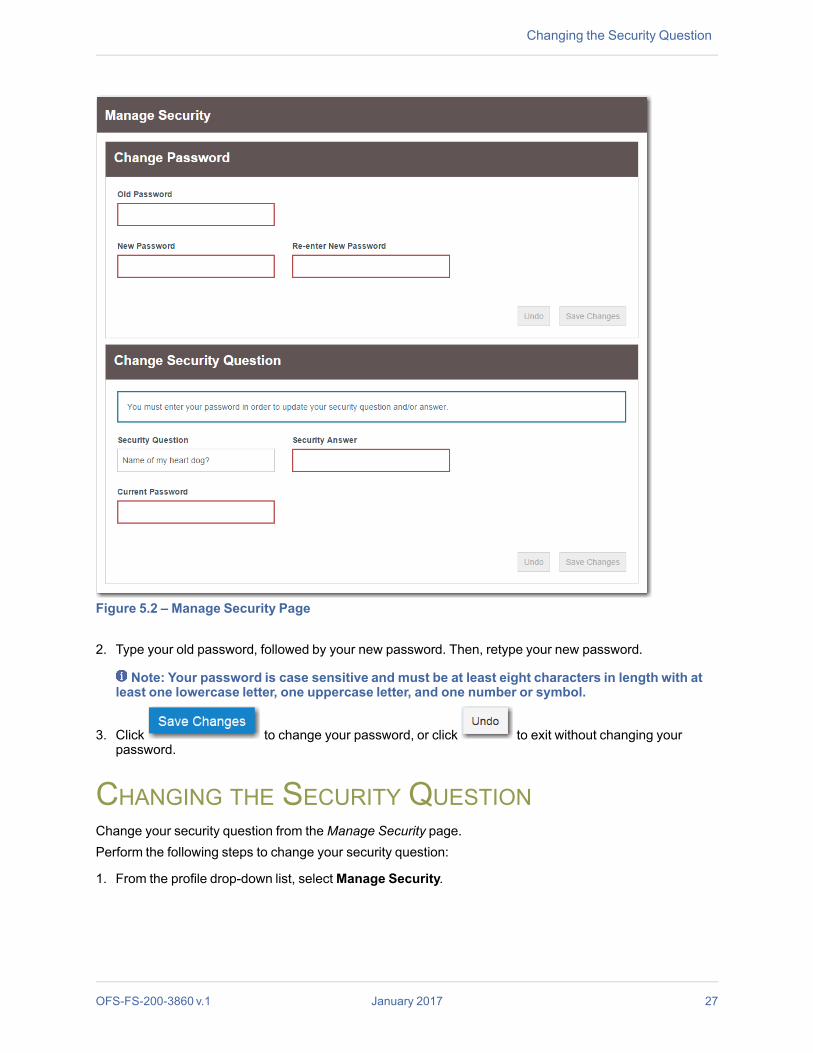
Figure 5.2 – Manage Security Page
2. Type your old password, followed by your new password. Then, retype your new password.
Note: Your password is case sensitive and must be at least eight characters in length with atleast one lowercase letter, one uppercase letter, and one number or symbol.
3. Click to change your password, or click to exit without changing yourpassword.
CHANGING THE SECURITY QUESTIONChange your security question from theManage Security page.Perform the following steps to change your security question:
1. From the profile drop-down list, selectManage Security.
OFS-FS-200-3860 v.1 January 2017 27
Changing the Security Question

Odyssey File & Serve™ HTML5
Figure 5.3 – Profile Drop-Down List
TheManage Security page is displayed.
Figure 5.4 – Manage Security Page
2. Change your security question and answer by typing your new information in the Security Questionand Security Answer fields. Then, type your current password in the Current Password field.
3. Click to change your security information, or click to exit without changingyour security information.
28 January 2017 OFS-FS-200-3860 v.1

MANAGING NOTIFICATIONSYou can set your notification preferences for receiving filing information.Perform the following steps to set your email notifications:
1. From the profile drop-down list, selectManage Notifications.
TheManage Notifications page is displayed.
Figure 5.5 – Manage Notifications Page
2. Select the check boxes that correspond to the methods by which you want to be notified of filinginformation. The options that you can select include Filing Accepted, Filing Rejected, FilingSubmitted,Service Undeliverable, Filing Submission Failed, and Filing Receipted.
3. Click to save your notification selection, or click to exit without changingyour notification information.
OFS-FS-200-3860 v.1 January 2017 29
Managing Notifications

CHAPTER 6 FILER DASHBOARD
TOPICS COVERED IN THIS CHAPTER
♦ DASHBOARD FILING CATEGORY DESCRIPTIONS
The Filer Dashboard page is the starting page for all filings. From here, you can start a new case, file into anexisting case, and check the status of all filings that have been made.The number counter by each status indicates there are filings that have been recently done or added. Thenumber counter resets after a filer checks the activity.
Figure 6.1 – Filer Dashboard Page
The home icon ( ) next to the Actions drop-down list can be clicked from any page in the system toreturn to the Filer Dashboard page.
DASHBOARD FILING CATEGORY DESCRIPTIONSThe status of all filings can be found in theMy Filing Activity pane on the Filer Dashboard page.The following table lists the status categories and their descriptions.
Filing Category Description
Pending Click to view envelopes that have been submitted and arebeing processed.Envelopes with a Pending status remain pending untilthere is some action from the court.
Accepted Click to view envelopes that have been accepted by thecourt and are filed.
Returned Click to view envelopes that have been returned from thecourt to be corrected.
30 January 2017 OFS-FS-200-3860 v.1
Filing Category Description
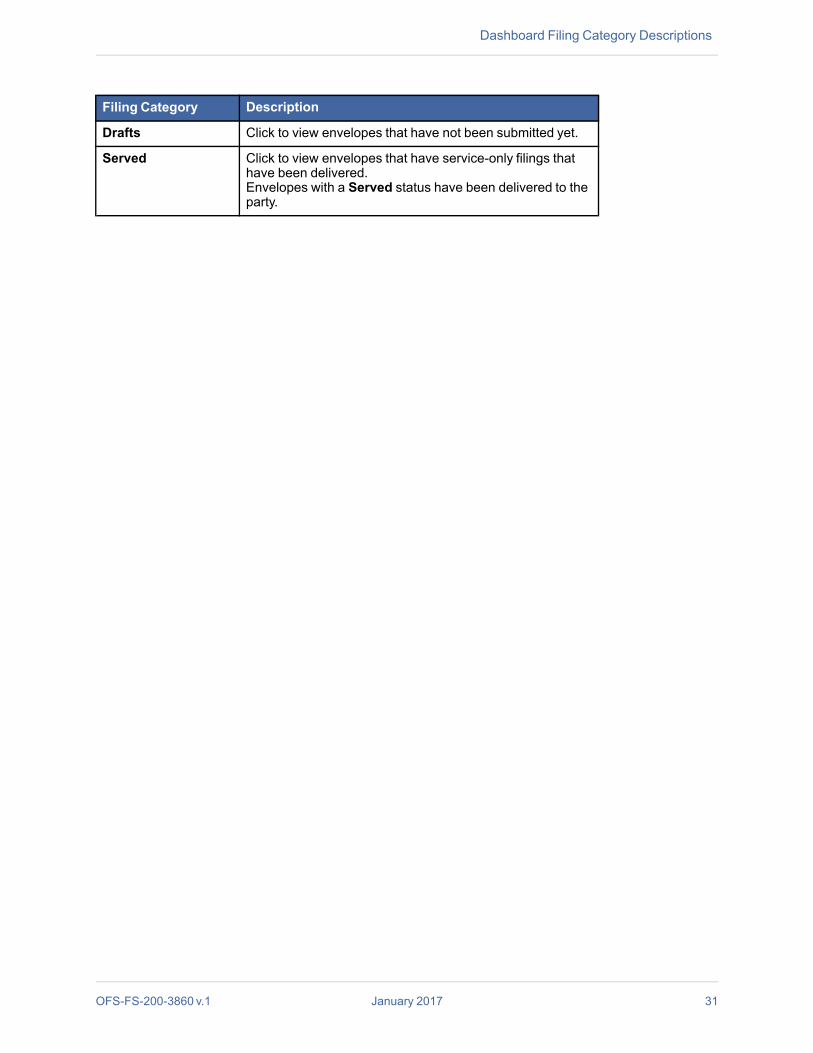
Drafts Click to view envelopes that have not been submitted yet.
Served Click to view envelopes that have service-only filings thathave been delivered.Envelopes with a Served status have been delivered to theparty.
OFS-FS-200-3860 v.1 January 2017 31
Dashboard Filing Category Descriptions

CHAPTER 7 PAYMENTACCOUNTS
TOPICS COVERED IN THIS CHAPTER
♦ UNAVAILABLE PAYMENTACCOUNTS♦ DRAW DOWN ACCOUNT USER INTERFACE
UNAVAILABLE PAYMENTACCOUNTSDuring a filing, if any payment account is unavailable, the system notifies you that you are trying to use aninvalid account.A blue link is displayed after the Payment Account field. The link contains the following phrase: ViewUnavailable Payment Accounts.
Figure 7.1 – Error Message Regarding Payment Accounts
When you click the link, a window is displayed showing both the unavailable payment account and thereason that the payment account is unavailable.
32 January 2017 OFS-FS-200-3860 v.1

Figure 7.2 – Unavailable Payment AccountsWindow
You cannot continue with your filing until you enter the correct information.
DRAW DOWN ACCOUNT USER INTERFACEThe locations of existing draw down accounts can be edited.
Note: Draw down accounts are configured by Tyler and may not be available on your system.A tree view of the draw down accounts shows the parent-child relationship of the courts, which means thatyou can easily see and select the courts that you want to file into.
OFS-FS-200-3860 v.1 January 2017 33
Draw Down Account User Interface

Odyssey File & Serve™ HTML5
Figure 7.3 – Draw Down Account with Parent-Child Relationship of Courts
34 January 2017 OFS-FS-200-3860 v.1

CHAPTER 8 TEMPLATESTOPICS COVERED IN THIS CHAPTER
♦ CREATING A TEMPLATE♦ EDITING A TEMPLATE♦ USING A NEW CASE TEMPLATE♦ USING AN EXISTING CASE TEMPLATE♦ VIEWING TEMPLATE DETAILS♦ DELETING A TEMPLATE
CREATING A TEMPLATEEnvelope templates allow you to quickly file into a case or create a new case from a template that you havecreated, which saves you time.To create a new template, perform the following steps:
1. From the Actions drop-down list on the Filer Dashboard page, select Templates.
The Templates page is displayed.
Figure 8.1 – Templates Page
2. Click .
The New Template page is displayed.
OFS-FS-200-3860 v.1 January 2017 35

Odyssey File & Serve™ HTML5
Figure 8.2 – New Template Page
3. To create a new template, type a name for the template in the Template Name field. Then, select one ofthe following options:
• Click the New Case option when creating a template for a new case.
Figure 8.3 – Template Information Section with New Case Option Selected
• Click the Existing Case option when creating a template for an existing case (i.e. subsequentfiling).
36 January 2017 OFS-FS-200-3860 v.1

Figure 8.4 – Template Information Section with Existing Case Option Selected
4. Click to save your changes, or click to cancel the action.
Note: Only the template name is required. You can enter as little or as much information on atemplate as you want.
5. Complete the fields in the Case Information section:
a. Select your court location from the Location drop-down list.
Note: The court location is generally the county or district court where you will be doing thefiling.
b. Select the specific court from the Refine Location drop-down list.
Note: The location filtering feature is configured by Tyler and may not be available on yoursystem.
Note: The items in this list are limited to only the courts in the county or district that youpreviously selected.
Figure 8.5 – Refine Location Drop-Down List in the Case Information Section
c. Select the category from the Category drop-down list.
Note: The items in this list are determined by the location you selected.d. Select the case type from the Case Type drop-down list.
Note: The items in this list are determined by the category you selected.
The fee associated with the case type is displayed.
OFS-FS-200-3860 v.1 January 2017 37
Creating a Template

Odyssey File & Serve™ HTML5
6. Click to save your changes, or click to cancel the action.7. Complete the fields in the Party Information section.
Figure 8.6 – Party Information Section
8. Complete the information in the Filings section.
38 January 2017 OFS-FS-200-3860 v.1
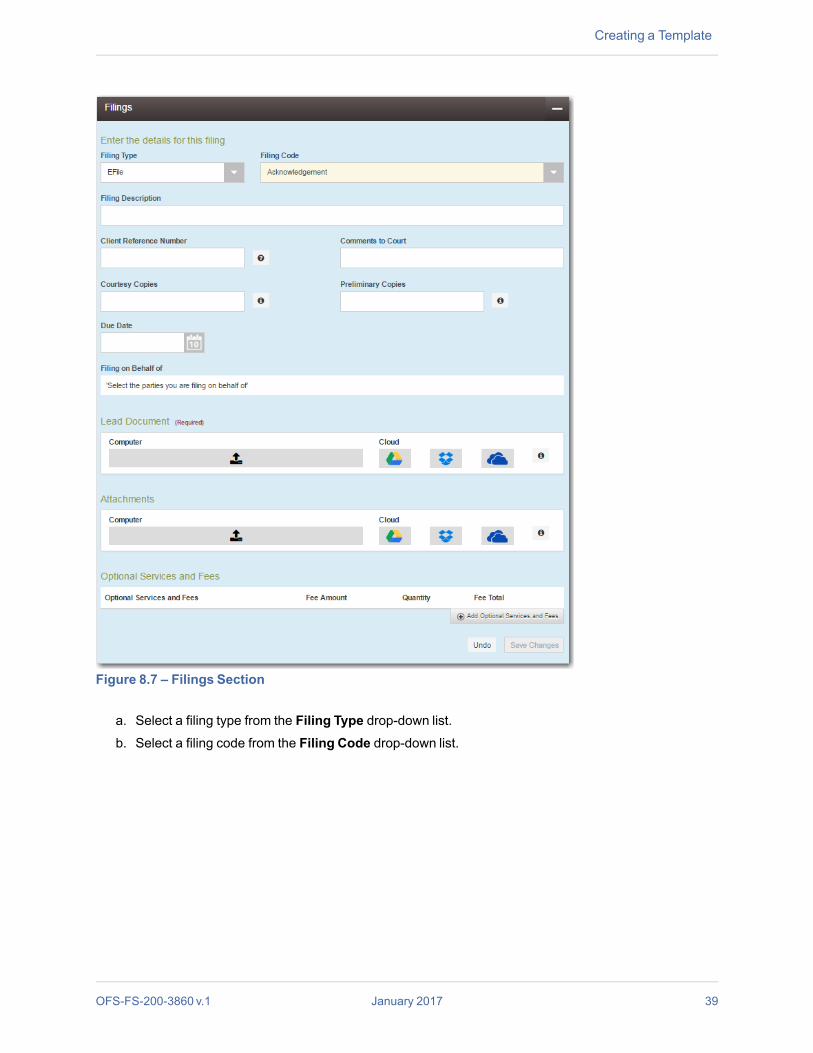
Figure 8.7 – Filings Section
a. Select a filing type from the Filing Type drop-down list.b. Select a filing code from the Filing Code drop-down list.
OFS-FS-200-3860 v.1 January 2017 39
Creating a Template

Odyssey File & Serve™ HTML5
Figure 8.8 – Filing Code Drop-Down List
After you select the filing code, the fee associated with the filing code is displayed.
Figure 8.9 – Filing Code Field with Fee Displayed
c. Type a description of the filing in the Filing Description field.d. Type a client reference number in the Client Reference Number field.
Note: A client reference number is a customer-created number for internal purposes only.Most courts do not see or refer to the Client Reference Number field for the filing. This is anoptional field.
e. Type any relevant comments in the Comments to Court field.f. If you want to send courtesy copies of the filing to another party, type the recipient’s email address in
the Courtesy Copies field.g. Enter the date the filing is due in the Due Date field by clicking the calendar icon.
Note: The Due Date field is configured by Tyler and may not be available on your system.
A calendar is displayed from which you can select the specified date.
40 January 2017 OFS-FS-200-3860 v.1
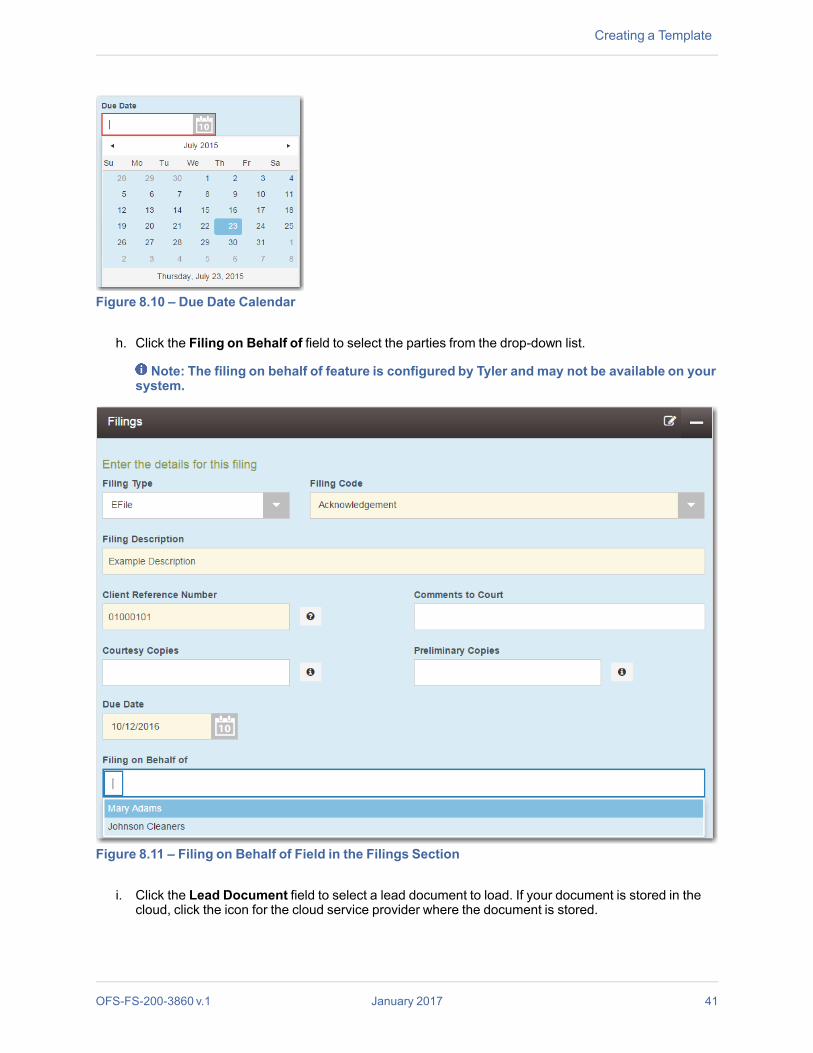
Figure 8.10 – Due Date Calendar
h. Click the Filing on Behalf of field to select the parties from the drop-down list.
Note: The filing on behalf of feature is configured by Tyler and may not be available on yoursystem.
Figure 8.11 – Filing on Behalf of Field in the Filings Section
i. Click the Lead Document field to select a lead document to load. If your document is stored in thecloud, click the icon for the cloud service provider where the document is stored.
OFS-FS-200-3860 v.1 January 2017 41
Creating a Template

Odyssey File & Serve™ HTML5
Note: Cloud services are configured by Tyler and may not be available on your system. Ifyour system is configured for cloud services, you can upload documents from the followingcloud storage providers: Google Drive™ online storage service, Dropbox®, and Microsoft®OneDrive®.
Note: The Lead Document field is required. Only one document can be uploaded as a leaddocument.
Figure 8.12 – Lead Document and Attachments Fields in the Filings Section
j. Type a name for the lead document in the Description field.
Note: A maximum length for the document name can be configured by Tyler at thecustomer’s request. When configured, if a user assigns a name to a document that exceedsthe maximum character length, a warning message is displayed. If you see this type ofwarningmessage, you must assign a new name to the document before you can continuewith the upload.
k. Click the Security drop-down list to select the level of security to attach to the document.
Figure 8.13 – Security Drop-Down List in the Lead Document Section
l. If you have attachments to load, click the Attachments field to select the documents to load. If theattachments are stored in the cloud, click the icon for the cloud service provider where theattachments are stored.
42 January 2017 OFS-FS-200-3860 v.1

Note: Not all court locations accept attachments. If your court does not acceptattachments, create the lead document and attachment as one document, and upload thedocument in the Lead Document field.
The Optional Services and Fees section is displayed.
Figure 8.14 – Optional Services and Fees Section
m. If you want to add an optional service to the filing, click .
The Optional Services and Fees field is displayed.
Figure 8.15 – Optional Services and Fees Field in the Optional Services and Fees Section
n. Select a service from the Optional Services and Fees drop-down list.
Figure 8.16 – Optional Services and Fees Drop-Down List
The fee associated with the optional service is displayed.
OFS-FS-200-3860 v.1 January 2017 43
Creating a Template

Odyssey File & Serve™ HTML5
o. When you select the service for certified copies, type the number of copies that you want in the Enternumber of certified copies desired field.
Figure 8.17 – Optional Services and Fees Section with Services Selected
p. Add more optional services if you want.
Note: If you try to add the same service twice, a warningmessage is displayed.
Note: If you want to remove an optional service before you save your changes, selectRemove optional service from the Optional Service Actions drop-down list.
Figure 8.18 – Optional Service Actions Drop-Down List
q. When you are done adding optional services, click .
Figure 8.19 – Optional Services and Fees Section with Optional Services Saved
Note: After you have added an optional service and saved the changes, you cannot editthat service. You must remove the service and then re-add it.
r. Verify that the service contacts are correct. If you want to add another service contact, select anoption from the Actions drop-down list in the Service Contacts section.
44 January 2017 OFS-FS-200-3860 v.1

s. Click to save your changes, or click to cancel the action.
9. Complete the fields in the Fees section.
Note: Your credit card is authorized when submitted. However, the transaction fees are notposted to the credit card account until the court accepts the filing. Once the filing is accepted,the total filing fee to be submitted for the filing is displayed.
Figure 8.20 – Fees Section
a. Select the payment account from the Payment Account drop-down list.
Note: If you enter incorrect payment information in the Payment Account field, you willreceive an error message stating that the account information you entered is invalid. Youmust correct the payment information before you can continue with your filing.
b. Select the party that is responsible for paying the fees in the Party Responsible for Fees drop-downlist.
c. Select the filing attorney from the Filing Attorney drop-down list.d. Select the filer type from the Filer Type drop-down list.
OFS-FS-200-3860 v.1 January 2017 45
Creating a Template

Odyssey File & Serve™ HTML5
Figure 8.21 – Filer Type Drop-Down List
e. Click to save your changes, or click to cancel the action.
10.Click to continue creating the template, or click to cancel the template creation.
When you click , the Confirm Template Details page is displayed.
Figure 8.22 – Confirm Template Details Page
11. Review the template details and click to save the template, or click to goback to the previous page.
46 January 2017 OFS-FS-200-3860 v.1

12.To designate a template as a favorite, click in the Favorite column on the Templates page.
The color of the star fills in, indicating this template is a favorite ( ).
Note: Favorite templates are displayed first on the Templates page.
EDITING A TEMPLATEYou can edit an existing template if you need to make changes to it.To edit a template, perform the following steps:
1. From the Actions drop-down list, select Templates.
The Templates page is displayed.
Figure 8.23 – Templates Page
2. Locate the template that you want to change. From the Actions drop-down list for the specifiedtemplate, select Edit Template.
The template is displayed.3. Make any necessary changes.
4. When you are done modifying the template, click .
The Confirm Template Details page is displayed.
5. If you are satisfied with your changes to the template, click .
OFS-FS-200-3860 v.1 January 2017 47
Editing a Template
Odyssey File & Serve™ HTML5
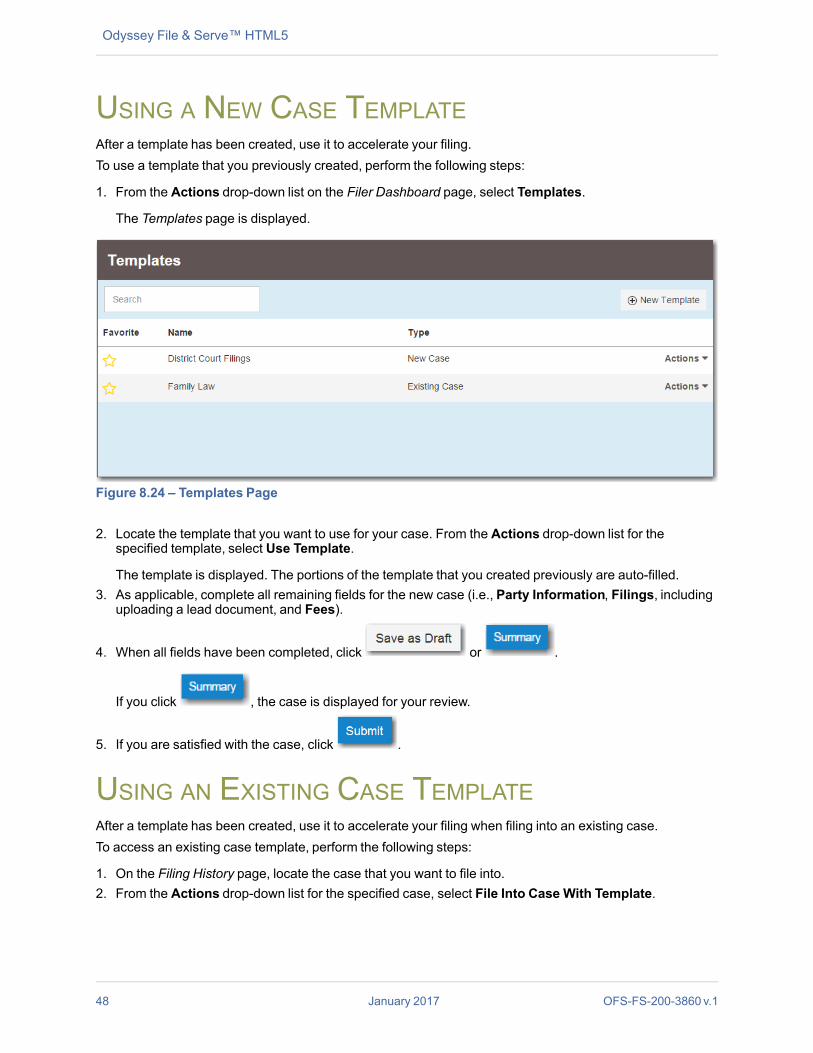
USING A NEW CASE TEMPLATEAfter a template has been created, use it to accelerate your filing.To use a template that you previously created, perform the following steps:
1. From the Actions drop-down list on the Filer Dashboard page, select Templates.
The Templates page is displayed.
Figure 8.24 – Templates Page
2. Locate the template that you want to use for your case. From the Actions drop-down list for thespecified template, select Use Template.
The template is displayed. The portions of the template that you created previously are auto-filled.3. As applicable, complete all remaining fields for the new case (i.e., Party Information, Filings, including
uploading a lead document, and Fees).
4. When all fields have been completed, click or .
If you click , the case is displayed for your review.
5. If you are satisfied with the case, click .
USING AN EXISTING CASE TEMPLATEAfter a template has been created, use it to accelerate your filing when filing into an existing case.To access an existing case template, perform the following steps:
1. On the Filing History page, locate the case that you want to file into.2. From the Actions drop-down list for the specified case, select File Into Case With Template.
48 January 2017 OFS-FS-200-3860 v.1
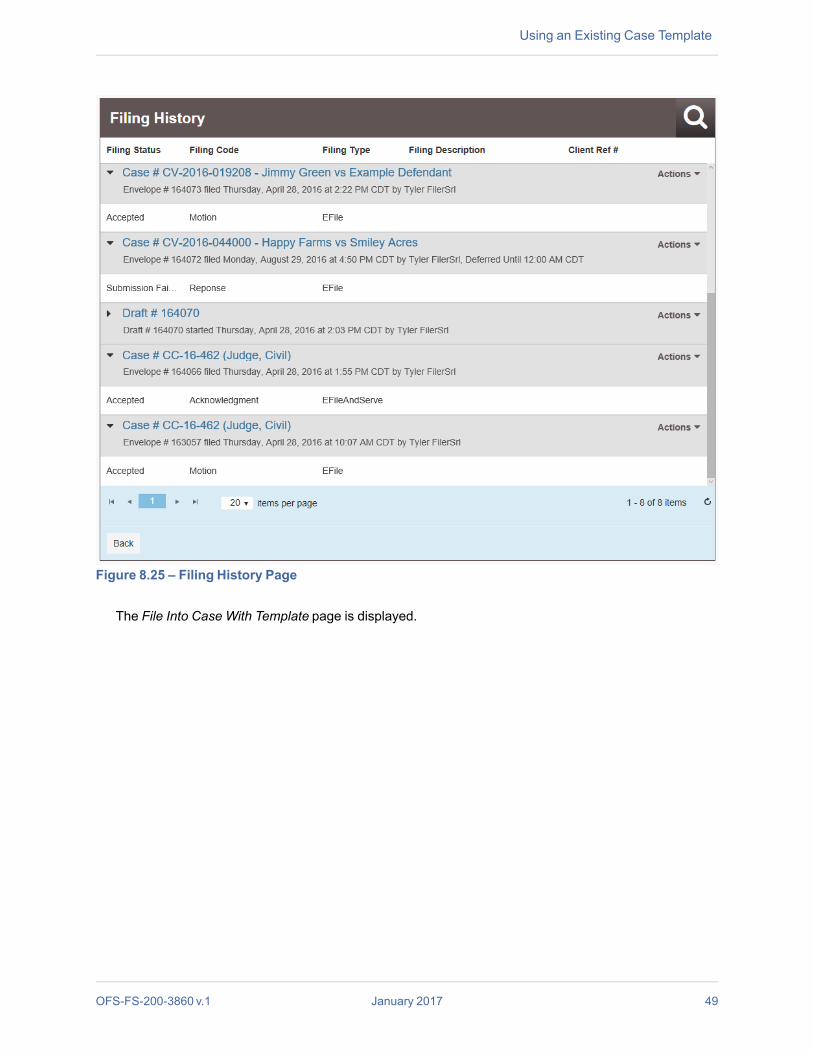
Figure 8.25 – Filing History Page
The File Into Case With Template page is displayed.
OFS-FS-200-3860 v.1 January 2017 49
Using an Existing Case Template

Odyssey File & Serve™ HTML5
Figure 8.26 – File Into Case With Template Page
3. Locate the template that you want to use for the case you are filing into. From the Actions drop-downlist for the specified template, select Use Template.
Figure 8.27 – Actions Drop-Down List for Existing Case Templates
The template that you selected is displayed. The Case Information and Party Information fields arealready populated since this is an existing case. You can add additional parties.
4. Complete the filing details in the Filings section.5. Complete the fields in the Fees section.
6. Click either or .
Note: If you save the draft, you can stop working on the filing and resume work at a later time.To resume filing a saved draft, navigate to the Filing History page. From the Actions drop-downlist for the specified draft, select Resume Draft Envelope to continue your filing.
50 January 2017 OFS-FS-200-3860 v.1
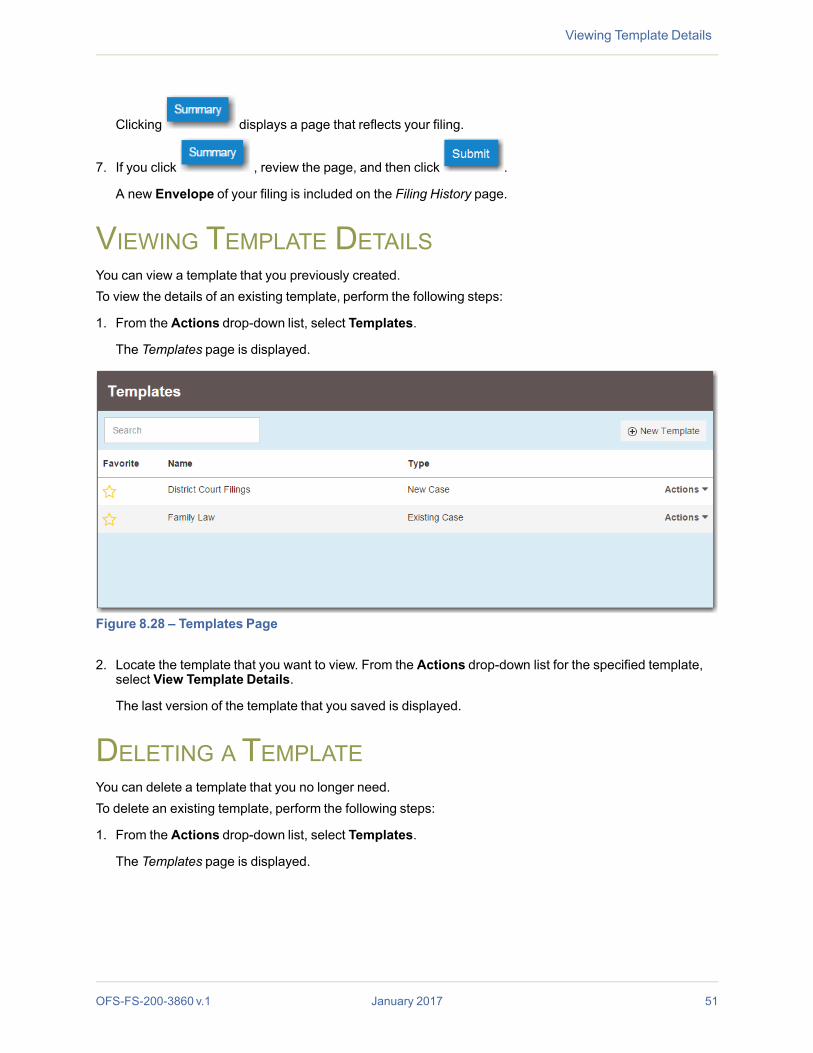
Clicking displays a page that reflects your filing.
7. If you click , review the page, and then click .
A new Envelope of your filing is included on the Filing History page.
VIEWING TEMPLATE DETAILSYou can view a template that you previously created.To view the details of an existing template, perform the following steps:
1. From the Actions drop-down list, select Templates.
The Templates page is displayed.
Figure 8.28 – Templates Page
2. Locate the template that you want to view. From the Actions drop-down list for the specified template,select View Template Details.
The last version of the template that you saved is displayed.
DELETING A TEMPLATEYou can delete a template that you no longer need.To delete an existing template, perform the following steps:
1. From the Actions drop-down list, select Templates.
The Templates page is displayed.
OFS-FS-200-3860 v.1 January 2017 51
Viewing Template Details

Odyssey File & Serve™ HTML5
Figure 8.29 – Templates Page
2. Locate the template that you want to delete. From the Actions drop-down list for the specified template,select Delete Template.
The template is immediately deleted.
52 January 2017 OFS-FS-200-3860 v.1

CHAPTER 9 CASE INITIATIONTOPICS COVERED IN THIS CHAPTER
♦ FILING A NEW CASE♦ ENTERING PARTY DETAILS♦ DISPLAY “PRO SE” FOR PARTY NAME♦ ENTERING FILING DETAILS♦ COURT FEES FOR ADDITIONAL CASE PARTIES♦ SUBMISSION AGREEMENTS♦ VIEWING THE ENVELOPE SUMMARY
You can initiate a case from the Actions drop-down list on the Filer Dashboard page or from the New Filingsection on the Filer Dashboard page.
Figure 9.1 – Filer Dashboard Page
FILING A NEW CASEYou can file a new case in a couple of ways.To file a new case, perform the following steps:
1. From the Actions drop-down list on the Filer Dashboard page, select Start a New Case.
Note: You can also click Start a New Case on the Filer Dashboard in the New Filing section.
The Start a New Case page is displayed.2. Complete the details for the new case by using the drop-down lists in the required fields in the Case
Information section:
Note: A red box around the field indicates that it is required.
a. Select your court location from the Location drop-down list.
OFS-FS-200-3860 v.1 January 2017 53

Odyssey File & Serve™ HTML5
Note: The court location is generally the county or district court where you will be doing thefiling.
b. Select the specific court from the Refine Location drop-down list.
Note: The location filtering feature is configured by Tyler and may not be available on yoursystem.
Note: The items in this list are limited to only the courts in the county or district that youpreviously selected.
Figure 9.2 – Refine Location Drop-Down List in the Case Information Section
c. Select the category from the Category drop-down list.
Note: The items in this list are determined by the location you selected.d. Select the case type from the Case Type drop-down list.
Note: The items in this list are determined by the category you selected.
The fee associated with the case type is displayed.
3. After completing the required fields, click .
Note: If you decide to save the draft, you can stop working on the filing and resume work at a latertime. To resume filing a saved draft, navigate to the Filing History page. From the Actions drop-downlist for the specified draft, select Resume Draft Envelope to continue with your filing.
ENTERING PARTY DETAILSEach case requires a party type.To enter the details for the parties involved in the case, perform the following steps:
1. In the Party Information section, enter the information for the first party on the case. Indicate whetherthe party is a business or agency by selecting the Party is a Business/Agency check box.
54 January 2017 OFS-FS-200-3860 v.1
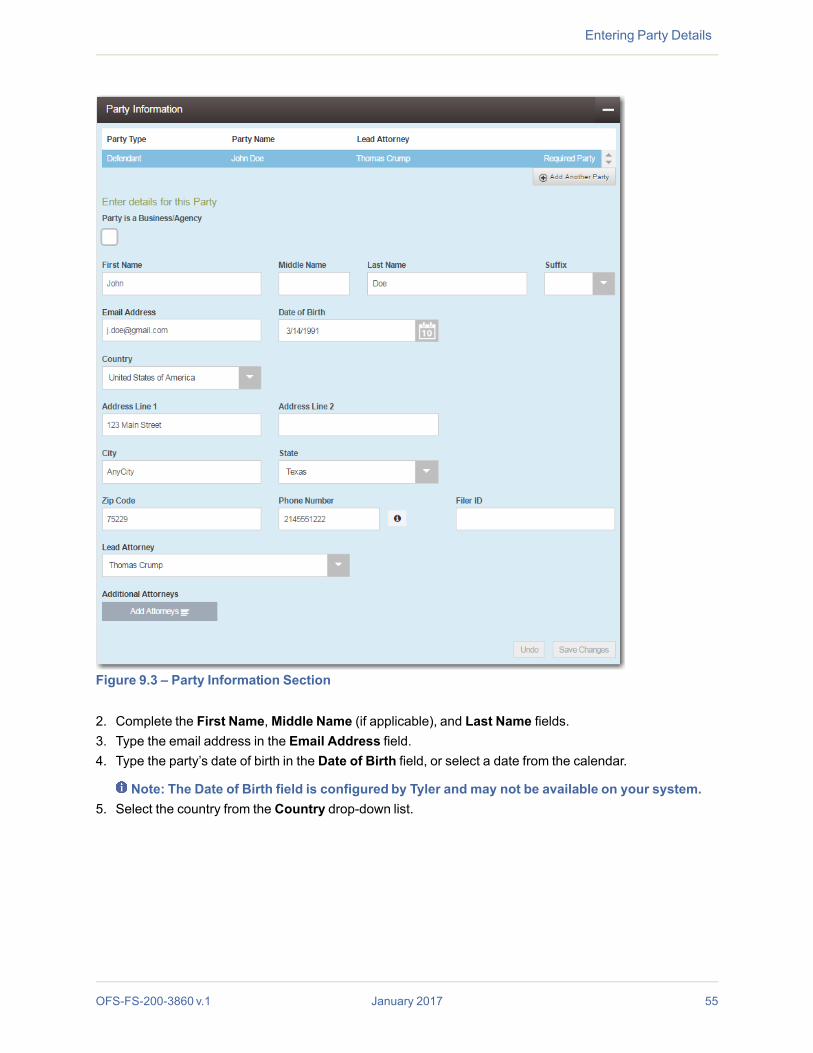
Figure 9.3 – Party Information Section
2. Complete the First Name,Middle Name (if applicable), and Last Name fields.3. Type the email address in the Email Address field.4. Type the party’s date of birth in the Date of Birth field, or select a date from the calendar.
Note: The Date of Birth field is configured by Tyler and may not be available on your system.5. Select the country from the Country drop-down list.
OFS-FS-200-3860 v.1 January 2017 55
Entering Party Details
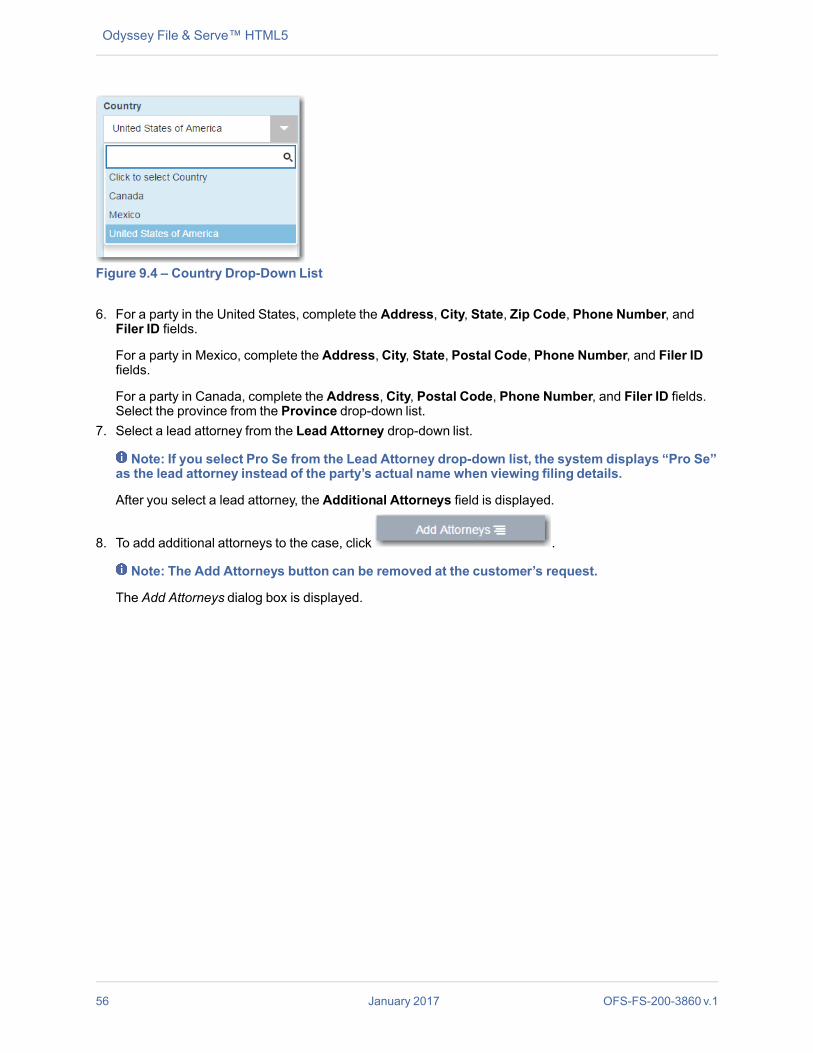
Odyssey File & Serve™ HTML5
Figure 9.4 – Country Drop-Down List
6. For a party in the United States, complete the Address,City, State, Zip Code, Phone Number, andFiler ID fields.
For a party in Mexico, complete the Address,City, State, Postal Code, Phone Number, and Filer IDfields.
For a party in Canada, complete the Address,City, Postal Code, Phone Number, and Filer ID fields.Select the province from the Province drop-down list.
7. Select a lead attorney from the Lead Attorney drop-down list.
Note: If you select Pro Se from the Lead Attorney drop-down list, the system displays “Pro Se”as the lead attorney instead of the party’s actual name when viewing filing details.
After you select a lead attorney, the Additional Attorneys field is displayed.
8. To add additional attorneys to the case, click .
Note: The Add Attorneys button can be removed at the customer’s request.
The Add Attorneys dialog box is displayed.
56 January 2017 OFS-FS-200-3860 v.1

Figure 9.5 – Add Attorneys Dialog Box
9. Select the check boxes for each attorney that you want to add to the case. When you are finished, click
.
The additional attorneys that you selected are displayed in the Additional Attorneys field.
Figure 9.6 – Lead Attorney and Additional Attorneys Fields
10. If you want to add another party to the filing, click , and then enter the partyinformation for the second party.
Note: After all attorneys for both parties have been selected, the lead attorney’s name isdisplayed next to the specified party, along with the number of additional attorneys that are alsoassociated with the party.
OFS-FS-200-3860 v.1 January 2017 57
Entering Party Details

Odyssey File & Serve™ HTML5
Figure 9.7 – Party Information Section with Lead Attorneys Displayed
11. After completing the fields for all parties, click .
Note: If you decide to save the draft, you can stop working on the filing and resume work at a latertime. To resume filing a saved draft, navigate to the Filing History page. From the Actions drop-downlist for the specified draft, select Resume Draft Envelope to continue with your filing.
DISPLAY “PRO SE” FOR PARTY NAMEYou can select Pro Se in the Lead Attorney field when filing a case, filing into an existing case, or filing acase using a template.Pro Se is displayed for the specified party in place of the party’s actual name in the following places in thesystem:
• On case filing screens, including when using templates
Figure 9.8 – Party Information Section on Case Filing Screen
• When viewing envelope details
58 January 2017 OFS-FS-200-3860 v.1

Figure 9.9 – Envelope Page Displaying Filing Details
ENTERING FILING DETAILSThe Filings section allows you to enter the filing details and calculate the fees associated with the filing.
OFS-FS-200-3860 v.1 January 2017 59
Entering Filing Details

Odyssey File & Serve™ HTML5
Figure 9.10 – Filings Section
To enter the filing details, perform the following steps:
1. Enter the filing details for the case in the Filings section:
a. Select a filing type from the Filing Type drop-down list.b. Select a filing code from the Filing Code drop-down list.
60 January 2017 OFS-FS-200-3860 v.1

Figure 9.11 – Filing Code Drop-Down List
Note: Depending on your system configuration, some filing codes cause the Due Date fieldto be enabled.
After you select the filing code, the fee associated with the filing code is displayed.
Figure 9.12 – Filing Code Drop-Down List with the Fee Displayed
c. Type a description of the filing in the Filing Description field.d. Type a client reference number in the Client Reference Number field.
Note: A client reference number is a customer-created number for internal purposes only.Most courts do not see or refer to the Client Reference Number field for the filing. This is anoptional field.
e. Type any relevant comments in the Comments to Court field.f. If you want to send courtesy copies of the filing to another party, type the recipient’s email address in
the Courtesy Copies field.g. Enter the date the filing is due in the Due Date field by clicking the calendar icon.
Note: The Due Date field is configured by Tyler and may not be available on your system.
A calendar is displayed from which you can select the specified date.
OFS-FS-200-3860 v.1 January 2017 61
Entering Filing Details
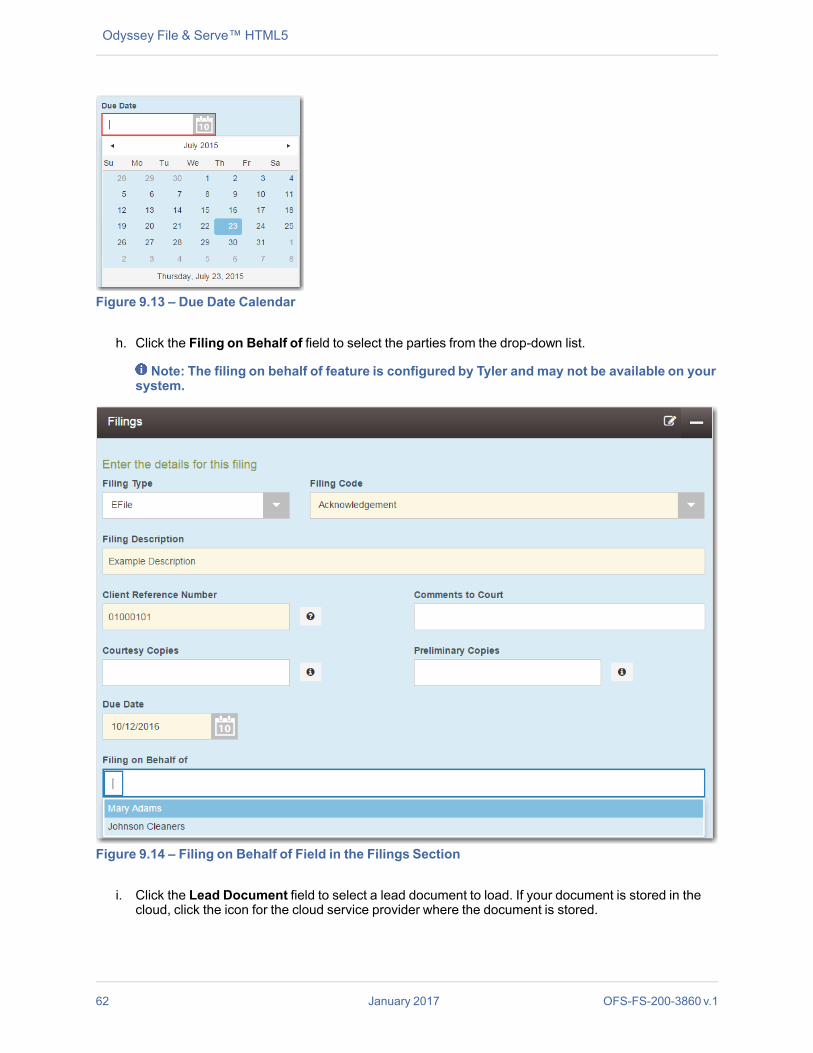
Odyssey File & Serve™ HTML5
Figure 9.13 – Due Date Calendar
h. Click the Filing on Behalf of field to select the parties from the drop-down list.
Note: The filing on behalf of feature is configured by Tyler and may not be available on yoursystem.
Figure 9.14 – Filing on Behalf of Field in the Filings Section
i. Click the Lead Document field to select a lead document to load. If your document is stored in thecloud, click the icon for the cloud service provider where the document is stored.
62 January 2017 OFS-FS-200-3860 v.1
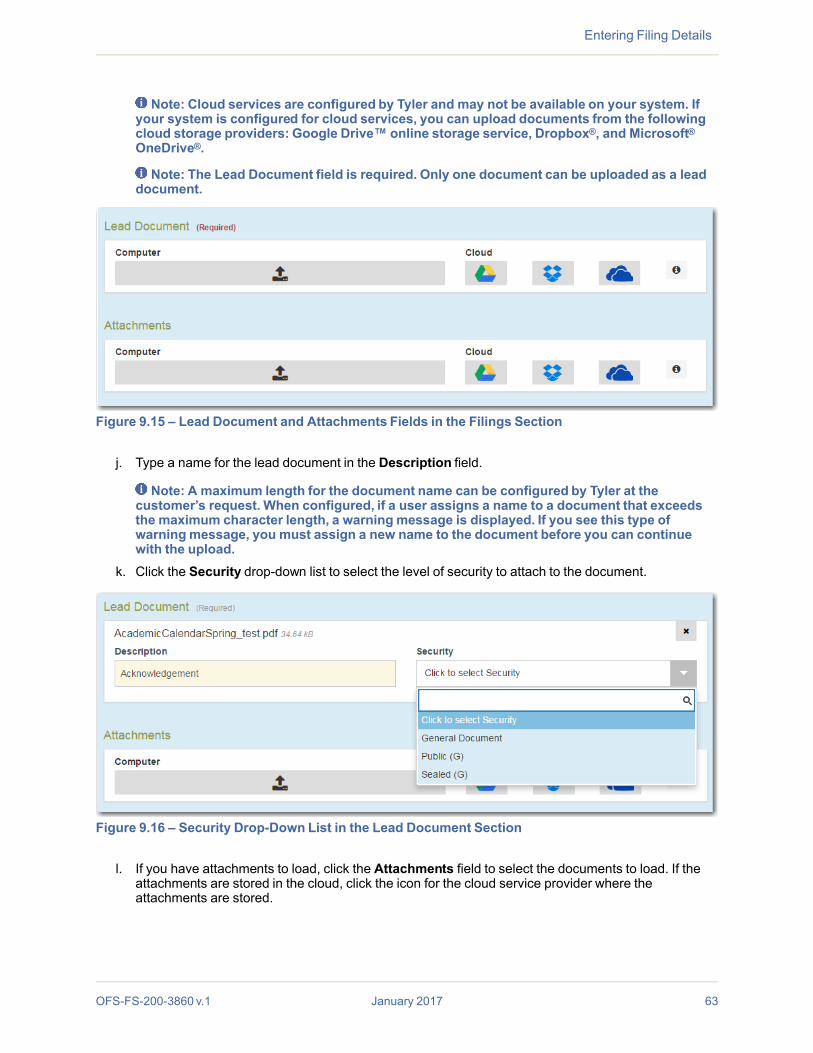
Note: Cloud services are configured by Tyler and may not be available on your system. Ifyour system is configured for cloud services, you can upload documents from the followingcloud storage providers: Google Drive™ online storage service, Dropbox®, and Microsoft®OneDrive®.
Note: The Lead Document field is required. Only one document can be uploaded as a leaddocument.
Figure 9.15 – Lead Document and Attachments Fields in the Filings Section
j. Type a name for the lead document in the Description field.
Note: A maximum length for the document name can be configured by Tyler at thecustomer’s request. When configured, if a user assigns a name to a document that exceedsthe maximum character length, a warning message is displayed. If you see this type ofwarningmessage, you must assign a new name to the document before you can continuewith the upload.
k. Click the Security drop-down list to select the level of security to attach to the document.
Figure 9.16 – Security Drop-Down List in the Lead Document Section
l. If you have attachments to load, click the Attachments field to select the documents to load. If theattachments are stored in the cloud, click the icon for the cloud service provider where theattachments are stored.
OFS-FS-200-3860 v.1 January 2017 63
Entering Filing Details
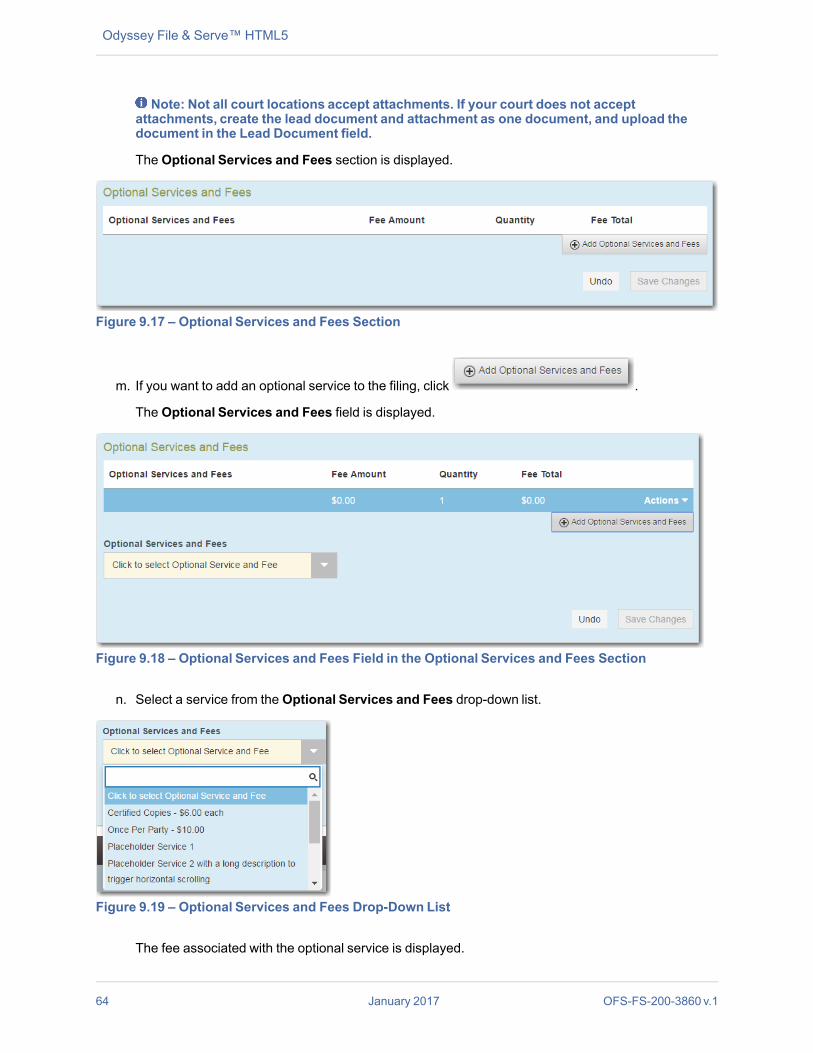
Odyssey File & Serve™ HTML5
Note: Not all court locations accept attachments. If your court does not acceptattachments, create the lead document and attachment as one document, and upload thedocument in the Lead Document field.
The Optional Services and Fees section is displayed.
Figure 9.17 – Optional Services and Fees Section
m. If you want to add an optional service to the filing, click .
The Optional Services and Fees field is displayed.
Figure 9.18 – Optional Services and Fees Field in the Optional Services and Fees Section
n. Select a service from the Optional Services and Fees drop-down list.
Figure 9.19 – Optional Services and Fees Drop-Down List
The fee associated with the optional service is displayed.
64 January 2017 OFS-FS-200-3860 v.1

o. When you select the service for certified copies, type the number of copies that you want in the Enternumber of certified copies desired field.
Figure 9.20 – Optional Services and Fees Section with Services Selected
p. Add more optional services if you want.
Note: If you try to add the same service twice, a warningmessage is displayed.
Note: If you want to remove an optional service before you save your changes, selectRemove optional service from the Optional Service Actions drop-down list.
Figure 9.21 – Optional Service Actions Drop-Down List
q. When you are done adding optional services, click .
Figure 9.22 – Optional Services and Fees Section with Optional Services Saved
Note: After you have added an optional service and saved the changes, you cannot editthat service. You must remove the service and then re-add it.
r. Verify that the service contacts are correct. If you want to add another service contact, select anoption from the Actions drop-down list in the Service Contacts section.
OFS-FS-200-3860 v.1 January 2017 65
Entering Filing Details

Odyssey File & Serve™ HTML5
s. Click to save your changes, or click to cancel the action.
2. Complete the fields in the Fees section.
Note: Your credit card is authorized when submitted. However, the transaction fees are notposted to the credit card account until the court accepts the filing. Once the filing is accepted,the total filing fee to be submitted for the filing is displayed.
Figure 9.23 – Fees Section
a. Select the payment account from the Payment Account drop-down list.
Note: If you enter incorrect payment information in the Payment Account field, you willreceive an error message stating that the account information you entered is invalid. Youmust correct the payment information before you can continue with your filing.
b. Select the party that is responsible for paying the fees from the Party Responsible for Fees drop-down list.
c. Select the filing attorney from the Filing Attorney drop-down list.d. Select the filer type from the Filer Type drop-down list.
66 January 2017 OFS-FS-200-3860 v.1

Figure 9.24 – Filer Type Drop-Down List
e. Click to save your changes, or click to cancel the action.
3. In the Submission Agreements section, select the check box for the appropriate submissionagreement.
Note: Submission agreements are configured by Tyler and may not be available on yoursystem.
Figure 9.25 – Submission Agreements Section
4. After completing the fields in all of the sections on the page, perform one of the following actions:
• Click to stop working on your filing and resume work at a later time. Note: Toresume filing a saved draft, navigate to the Filing History page. From the Actions drop-down list for the specified draft, select Resume Draft Envelope to continue with yourfiling.
• Click to review a summary of your filing.
OFS-FS-200-3860 v.1 January 2017 67
Entering Filing Details
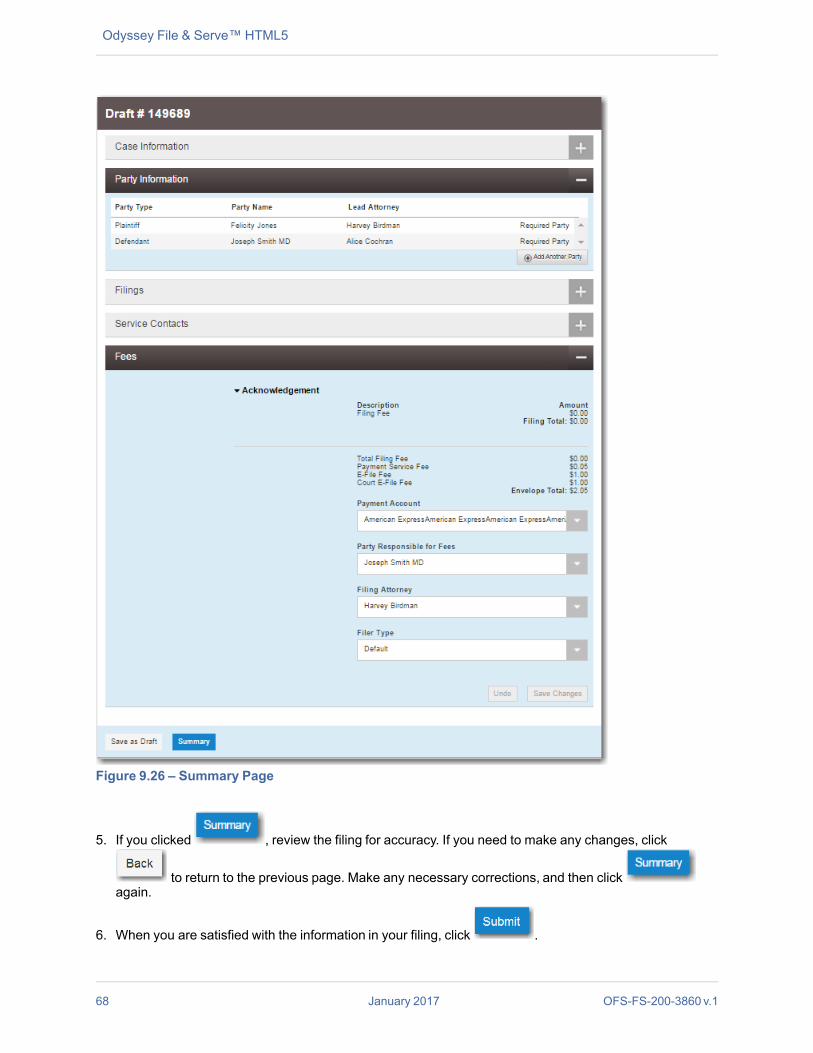
Odyssey File & Serve™ HTML5
Figure 9.26 – Summary Page
5. If you clicked , review the filing for accuracy. If you need to make any changes, click
to return to the previous page. Make any necessary corrections, and then clickagain.
6. When you are satisfied with the information in your filing, click .
68 January 2017 OFS-FS-200-3860 v.1

A new Envelope of your filing is included on the Filing History page.
COURT FEES FOR ADDITIONAL CASE PARTIESThe system supports the ability to configure court fees that are to be applied to a party type.
Note: The ability to collect court fees is configured by Tyler and may not be available on yoursystem.When a specific combination of node, case type, and party type matches the configured rule, a court fee isassessed for additional parties that are added to a case. The configuration is customer-specific. Forexample, a fee may not be assessed for the first defendant, but a fee may be charged for each additionaldefendant.
Figure 9.27 – Fees Section with Party Fees Displayed
SUBMISSION AGREEMENTSThe court may elect to have a submission agreement that is specific to the terms of the e-filing rules. In thiscase, a dialog box is displayed in which you must select a check box before continuing with your filing.
Note: Submission agreements are configured by Tyler and may not be available on your system.
OFS-FS-200-3860 v.1 January 2017 69
Court Fees for Additional Case Parties

Odyssey File & Serve™ HTML5
Figure 9.28 – Submission Agreements Dialog Box
VIEWING THE ENVELOPE SUMMARYThe envelope summary provides a summary of case information, such as the location of the filing, theparties involved in the case, filing details, fees, and payments for the case. The date and time that the filingwas submitted are also displayed. The time stamp corresponds to the time zone in which the filing occurred.The party, filings, and fees informationmust be complete before you can view the envelope summary. Apayment account must be assigned to the case to complete the filing process.To view the envelope summary, perform the following steps:
1. Complete the required information in the Case Information, Party Information,Filings, and Feessections.
2. After you have completed the fields in each section, click .
The Envelope Summary page is displayed.
70 January 2017 OFS-FS-200-3860 v.1

Figure 9.29 – Envelope Summary Page
3. Review the page. After you are satisfied with the information in your filing, click .
OFS-FS-200-3860 v.1 January 2017 71
Viewing the Envelope Summary
CHAPTER 10 FILE INTO AN EXISTINGCASE
TOPICS COVERED IN THIS CHAPTER
♦ FILING INTO AN EXISTING CASE FROM THE FILING HISTORY PAGE♦ FILING INTO AN EXISTING CASE FROM THE BOOKMARKS PAGE♦ FILING INTO AN EXISTING CASE FROM THE FILER DASHBOARD PAGE♦ CREATING A SERVICE ONLY FILING♦ FILING AN APPEAL TO AN EXISTING CASE
Once a new case has been created by the courts, you can file into the existing case.Use one of the following methods to file into a case:
• On the Filing History page, locate the case that you want to file into. From the Actions drop-downlist for the specified case, select File Into Case.
• On the Bookmarks page, locate the case that you want to file into. From the Actions drop-down listfor the specified case, select File Into Case.
• On the Filer Dashboard page, click File into Existing Case.• On the Filer Dashboard page, from the Actions drop-down list, select File Into Existing Case.
FILING INTO AN EXISTING CASE FROM THE FILINGHISTORY PAGETo file into an existing case from the Filing History page, perform the following steps:
1. On the Filer Dashboard page, from the Actions drop-down list, click Filing History.
The Filing History page is displayed.
72 January 2017 OFS-FS-200-3860 v.1

Figure 10.1 – Filing History Page
2. Locate the case that you want to file into.3. From the Actions drop-down list for the specified case, select File Into Case.
Figure 10.2 – Actions Drop-Down List
The Case Information and Party Information fields are already populated since this is an existingcase. You can immediately view the parties associated with the case.
OFS-FS-200-3860 v.1 January 2017 73
Filing into an Existing Case from the Filing History Page

Odyssey File & Serve™ HTML5
Figure 10.3 – Party Information Section Expanded for Existing Cases
When more than 100 parties are on a case, only the first party of each required type is displayed, alongwith a message that additional parties could not be displayed due to system constraints. Add additionalparties to the case if you want.
Figure 10.4 – Case Information and Party Information Sections
4. Complete the filing details in the Filings section.
74 January 2017 OFS-FS-200-3860 v.1

Figure 10.5 – Filings Section
a. Select a filing type from the Filing Type drop-down list.
A default filing type can be configured for existing case filings. The default filing type can be set toEFileAndServe or just EFile.
Note: Serve is not a default option.
OFS-FS-200-3860 v.1 January 2017 75
Filing into an Existing Case from the Filing History Page

Odyssey File & Serve™ HTML5
Figure 10.6 – Filing Type Drop-Down List
b. Select a filing code from the Filing Code drop-down list.
Figure 10.7 – Filing Code Drop-Down List
After you select the filing code, the fee associated with the filing code is displayed.
Figure 10.8 – Filing Code Field with the Fee Displayed
c. Type a description of the filing in the Filing Description field.d. Type a client reference number in the Client Reference Number field.
Note: A client reference number is a customer-created number for internal purposes only.Most courts do not see or refer to the Client Reference Number field for the filing. This is anoptional field.
76 January 2017 OFS-FS-200-3860 v.1
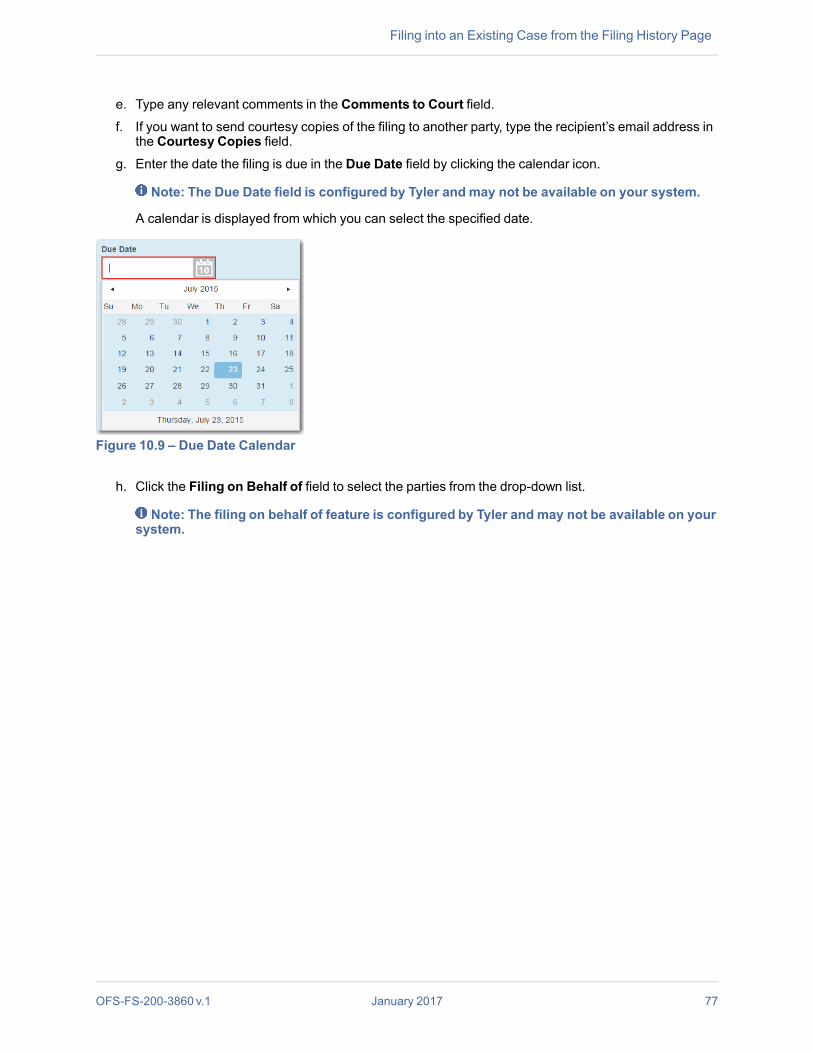
e. Type any relevant comments in the Comments to Court field.f. If you want to send courtesy copies of the filing to another party, type the recipient’s email address in
the Courtesy Copies field.g. Enter the date the filing is due in the Due Date field by clicking the calendar icon.
Note: The Due Date field is configured by Tyler and may not be available on your system.
A calendar is displayed from which you can select the specified date.
Figure 10.9 – Due Date Calendar
h. Click the Filing on Behalf of field to select the parties from the drop-down list.
Note: The filing on behalf of feature is configured by Tyler and may not be available on yoursystem.
OFS-FS-200-3860 v.1 January 2017 77
Filing into an Existing Case from the Filing History Page

Odyssey File & Serve™ HTML5
Figure 10.10 – Filing on Behalf of Field in the Filings Section
i. Click the Lead Document field to select a lead document to load. If your document is stored in thecloud, click the icon for the cloud service provider where the document is stored.
Note: Cloud services are configured by Tyler and may not be available on your system. Ifyour system is configured for cloud services, you can upload documents from the followingcloud storage providers: Google Drive™ online storage service, Dropbox®, and Microsoft®OneDrive®.
Note: The Lead Document field is required. Only one document can be uploaded as a leaddocument.
78 January 2017 OFS-FS-200-3860 v.1

Figure 10.11 – Lead Document and Attachments Fields in the Filings Section
j. Type a name for the lead document in the Description field.
Note: A maximum length for the document name can be configured by Tyler at thecustomer’s request. When configured, if a user assigns a name to a document that exceedsthe maximum character length, a warning message is displayed. If you see this type ofwarningmessage, you must assign a new name to the document before you can continuewith the upload.
k. Click the Security drop-down list to select the level of security to attach to the document.
Figure 10.12 – Security Drop-Down List in the Lead Document Section
l. If you have attachments to load, click the Attachments field to select the documents to load. If theattachments are stored in the cloud, click the icon for the cloud service provider where theattachments are stored.
Note: Not all court locations accept attachments. If your court does not acceptattachments, create the lead document and attachment as one document, and upload thedocument in the Lead Document field.
The Optional Services and Fees section is displayed.
OFS-FS-200-3860 v.1 January 2017 79
Filing into an Existing Case from the Filing History Page

Odyssey File & Serve™ HTML5
Figure 10.13 – Optional Services and Fees Section
m. If you want to add an optional service to the filing, click .
The Optional Services and Fees field is displayed.
Figure 10.14 – Optional Services and Fees Field in the Optional Services and Fees Section
n. Select a service from the Optional Services and Fees drop-down list.
Figure 10.15 – Optional Services and Fees Drop-Down List
The fee associated with the optional service is displayed.
o. When you select the service for certified copies, type the number of copies that you want in the Enternumber of certified copies desired field.
80 January 2017 OFS-FS-200-3860 v.1
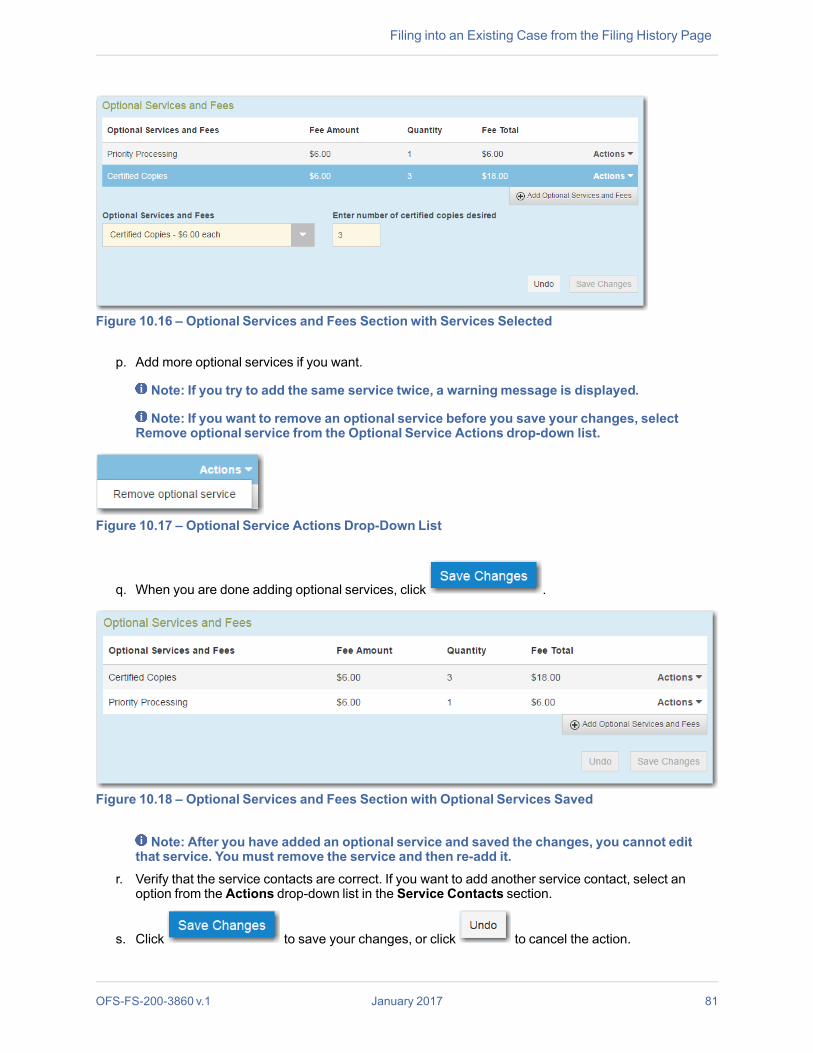
Figure 10.16 – Optional Services and Fees Section with Services Selected
p. Add more optional services if you want.
Note: If you try to add the same service twice, a warningmessage is displayed.
Note: If you want to remove an optional service before you save your changes, selectRemove optional service from the Optional Service Actions drop-down list.
Figure 10.17 – Optional Service Actions Drop-Down List
q. When you are done adding optional services, click .
Figure 10.18 – Optional Services and Fees Section with Optional Services Saved
Note: After you have added an optional service and saved the changes, you cannot editthat service. You must remove the service and then re-add it.
r. Verify that the service contacts are correct. If you want to add another service contact, select anoption from the Actions drop-down list in the Service Contacts section.
s. Click to save your changes, or click to cancel the action.
OFS-FS-200-3860 v.1 January 2017 81
Filing into an Existing Case from the Filing History Page

Odyssey File & Serve™ HTML5
5. Complete the fields in the Fees section.
Note: Your credit card is authorized when submitted. However, the transaction fees are notposted to the credit card account until the court accepts the filing. Once the filing is accepted,the total filing fee to be submitted for the filing is displayed.
Figure 10.19 – Fees Section
a. Select a payment account from the Payment Account drop-down list.
Note: If you enter incorrect payment information in the Payment Account field, you willreceive an error message stating that the account information you entered is invalid. Youmust correct the payment information before you can continue with your filing.
b. Select the party that is responsible for paying the fees from the Party Responsible for Fees drop-down list.
c. Select the filing attorney from the Filing Attorney drop-down list.d. Select the filer type from the Filer Type drop-down list.
82 January 2017 OFS-FS-200-3860 v.1

Figure 10.20 – Filer Type Drop-Down List
e. Click to save your changes, or click to cancel the action.
6. After completing the fields in all of the sections on the page, perform one of the following actions:
• Click to stop working on your filing and resume work at a later time. Note: Toresume filing a saved draft, navigate to the Filing History page. From the Actions drop-down list for the specified draft, select Resume Draft Envelope to continue with yourfiling.
• Click to review a summary of your filing.
7. If you clicked , review the filing for accuracy. If you need to make any changes, click
to return to the previous page. Make any necessary corrections, and then clickagain.
8. When you are satisfied with the information in your filing, click .
A new Envelope of your filing is included on the Filing History page.
FILING INTO AN EXISTING CASE FROM THEBOOKMARKS PAGETo file into an existing case from the Bookmarks page, perform the following steps:
1. On the Filer Dashboard page, from the Actions drop-down list, click Bookmarks.
The Bookmarks page is displayed.
OFS-FS-200-3860 v.1 January 2017 83
Filing into an Existing Case from the Bookmarks Page

Odyssey File & Serve™ HTML5
Figure 10.21 – Bookmarks Page
2. Locate the case that you want to file into.3. From the Actions drop-down list for the specified case, select File Into Case.
Figure 10.22 – Actions Drop-Down List
The Case Information and Party Information fields are already populated since this is an existingcase. You can immediately view the parties associated with the case.
84 January 2017 OFS-FS-200-3860 v.1
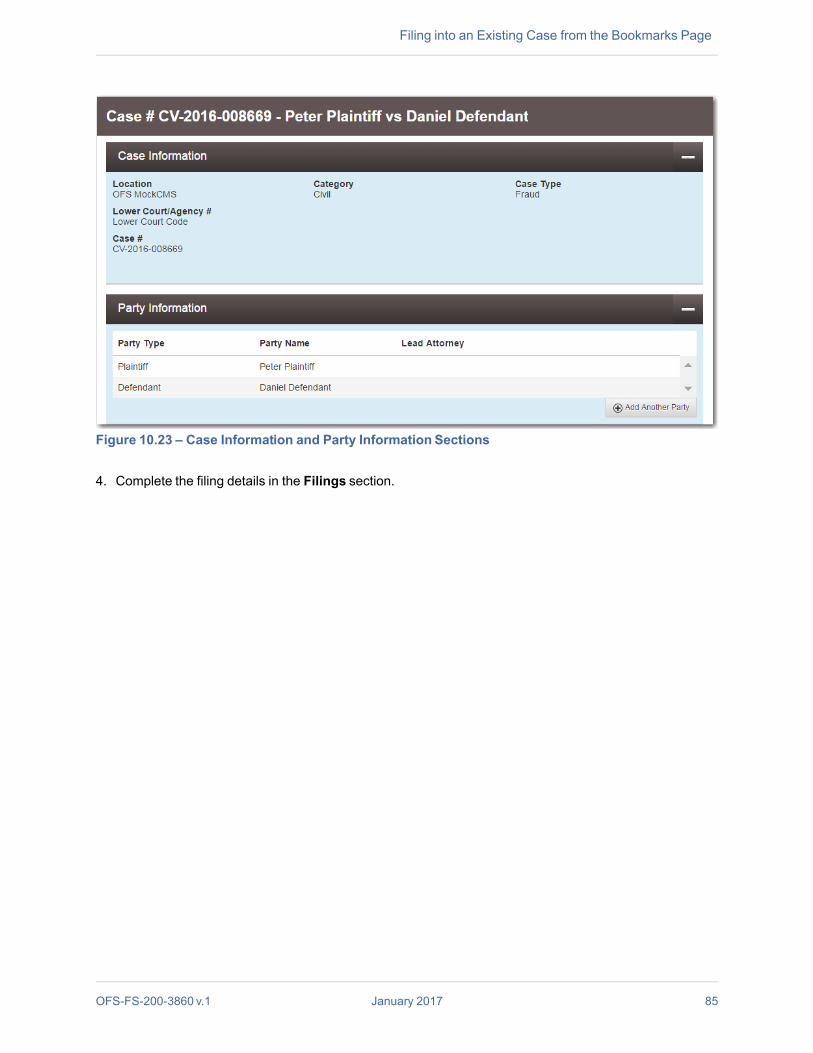
Figure 10.23 – Case Information and Party Information Sections
4. Complete the filing details in the Filings section.
OFS-FS-200-3860 v.1 January 2017 85
Filing into an Existing Case from the Bookmarks Page

Odyssey File & Serve™ HTML5
Figure 10.24 – Filings Section
a. Select a filing type from the Filing Type drop-down list.
A default filing type can be configured for existing case filings. The default filing type can be set toEFileAndServe or just EFile.
Note: Serve is not a default option.
86 January 2017 OFS-FS-200-3860 v.1
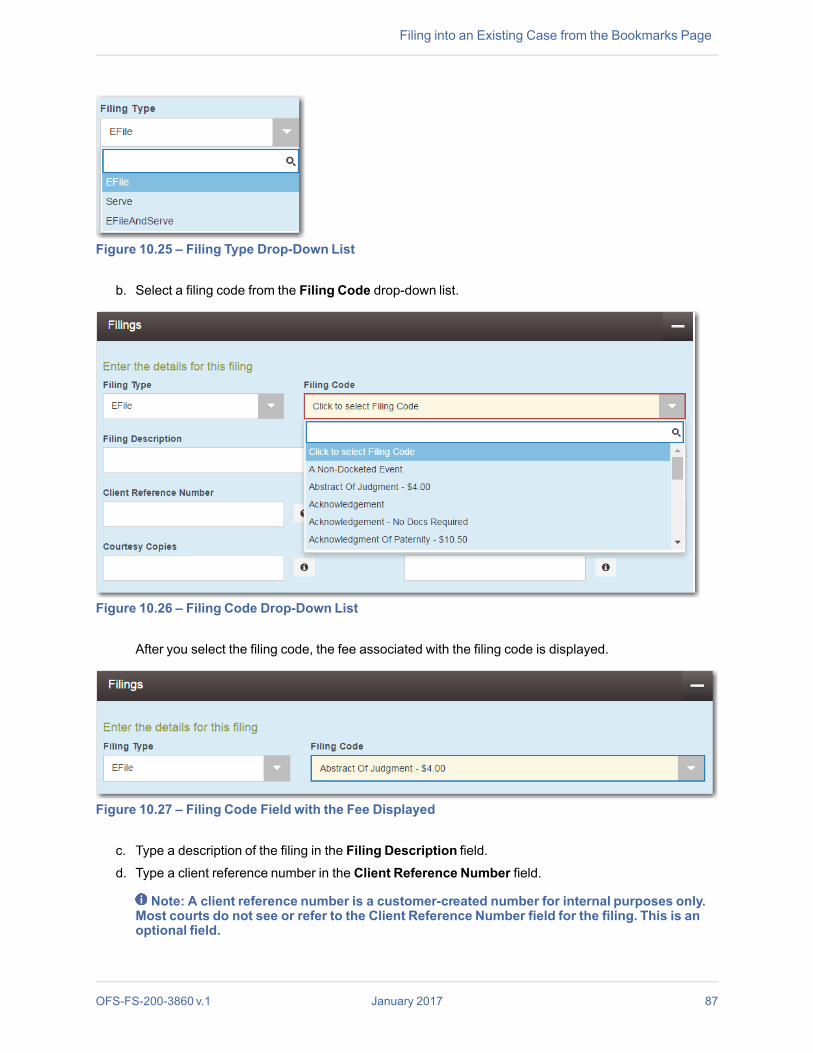
Figure 10.25 – Filing Type Drop-Down List
b. Select a filing code from the Filing Code drop-down list.
Figure 10.26 – Filing Code Drop-Down List
After you select the filing code, the fee associated with the filing code is displayed.
Figure 10.27 – Filing Code Field with the Fee Displayed
c. Type a description of the filing in the Filing Description field.d. Type a client reference number in the Client Reference Number field.
Note: A client reference number is a customer-created number for internal purposes only.Most courts do not see or refer to the Client Reference Number field for the filing. This is anoptional field.
OFS-FS-200-3860 v.1 January 2017 87
Filing into an Existing Case from the Bookmarks Page

Odyssey File & Serve™ HTML5
e. Type any relevant comments in the Comments to Court field.f. If you want to send courtesy copies of the filing to another party, type the recipient’s email address in
the Courtesy Copies field.g. Enter the date the filing is due in the Due Date field by clicking the calendar icon.
Note: The Due Date field is configured by Tyler and may not be available on your system.
A calendar is displayed from which you can select the specified date.
Figure 10.28 – Due Date Calendar
h. Click the Filing on Behalf of field to select the parties from the drop-down list.
Note: The filing on behalf of feature is configured by Tyler and may not be available on yoursystem.
88 January 2017 OFS-FS-200-3860 v.1

Figure 10.29 – Filing on Behalf of Field in the Filings Section
i. Click the Lead Document field to select a lead document to load. If your document is stored in thecloud, click the icon for the cloud service provider where the document is stored.
Note: Cloud services are configured by Tyler and may not be available on your system. Ifyour system is configured for cloud services, you can upload documents from the followingcloud storage providers: Google Drive™ online storage service, Dropbox®, and Microsoft®OneDrive®.
Note: The Lead Document field is required. Only one document can be uploaded as a leaddocument.
OFS-FS-200-3860 v.1 January 2017 89
Filing into an Existing Case from the Bookmarks Page

Odyssey File & Serve™ HTML5
Figure 10.30 – Lead Document and Attachments Fields in the Filings Section
j. Type a name for the lead document in the Description field.
Note: A maximum length for the document name can be configured by Tyler at thecustomer’s request. When configured, if a user assigns a name to a document that exceedsthe maximum character length, a warning message is displayed. If you see this type ofwarningmessage, you must assign a new name to the document before you can continuewith the upload.
k. Click the Security drop-down list to select the level of security to attach to the document.
Figure 10.31 – Security Drop-Down List in the Lead Document Section
l. If you have attachments to load, click the Attachments field to select the documents to load. If theattachments are stored in the cloud, click the icon for the cloud service provider where theattachments are stored.
Note: Not all court locations accept attachments. If your court does not acceptattachments, create the lead document and attachment as one document, and upload thedocument in the Lead Document field.
The Optional Services and Fees section is displayed.
90 January 2017 OFS-FS-200-3860 v.1

Figure 10.32 – Optional Services and Fees Section
m. If you want to add an optional service to the filing, click .
The Optional Services and Fees field is displayed.
Figure 10.33 – Optional Services and Fees Field in the Optional Services and Fees Section
n. Select a service from the Optional Services and Fees drop-down list.
Figure 10.34 – Optional Services and Fees Drop-Down List
The fee associated with the optional service is displayed.
o. When you select the service for certified copies, type the number of copies that you want in the Enternumber of certified copies desired field.
OFS-FS-200-3860 v.1 January 2017 91
Filing into an Existing Case from the Bookmarks Page

Odyssey File & Serve™ HTML5
Figure 10.35 – Optional Services and Fees Section with Services Selected
p. Add more optional services if you want.
Note: If you try to add the same service twice, a warningmessage is displayed.
Note: If you want to remove an optional service before you save your changes, selectRemove optional service from the Optional Service Actions drop-down list.
Figure 10.36 – Optional Service Actions Drop-Down List
q. When you are done adding optional services, click .
Figure 10.37 – Optional Services and Fees Section with Optional Services Saved
Note: After you have added an optional service and saved the changes, you cannot editthat service. You must remove the service and then re-add it.
r. Verify that the service contacts are correct. If you want to add another service contact, select anoption from the Actions drop-down list in the Service Contacts section.
s. Click to save your changes, or click to cancel the action.
92 January 2017 OFS-FS-200-3860 v.1

5. Complete the fields in the Fees section.
Note: Your credit card is authorized when submitted. However, the transaction fees are notposted to the credit card account until the court accepts the filing. Once the filing is accepted,the total filing fee to be submitted for the filing is displayed.
Figure 10.38 – Fees Section
a. Select a payment account from the Payment Account drop-down list.
Note: If you enter incorrect payment information in the Payment Account field, you willreceive an error message stating that the account information you entered is invalid. Youmust correct the payment information before you can continue with your filing.
b. Select the party that is responsible for paying the fees from the Party Responsible for Fees drop-down list.
c. Select the filing attorney from the Filing Attorney drop-down list.d. Select the filer type from the Filer Type drop-down list.
OFS-FS-200-3860 v.1 January 2017 93
Filing into an Existing Case from the Bookmarks Page

Odyssey File & Serve™ HTML5
Figure 10.39 – Filer Type Drop-Down List
e. Click to save your changes, or click to cancel the action.
6. After completing the fields in all of the sections on the page, perform one of the following actions:
• Click to stop working on your filing and resume work at a later time. Note: Toresume filing a saved draft, navigate to the Filing History page. From the Actions drop-down list for the specified draft, select Resume Draft Envelope to continue with yourfiling.
• Click to review a summary of your filing.
7. If you clicked , review the filing for accuracy. If you need to make any changes, click
to return to the previous page. Make any necessary corrections, and then clickagain.
8. When you are satisfied with the information in your filing, click .
A new Envelope of your filing is included on the Filing History page.
FILING INTO AN EXISTING CASE FROM THE FILERDASHBOARD PAGETo file into an existing case from the Filer Dashboard page, perform the following steps:
1. On the Filer Dashboard page, click File into Existing Case.
Note: You could also click File Into Existing Case from the Actions drop-down list on the FilerDashboard page.
The File Into Existing Case page is displayed.
94 January 2017 OFS-FS-200-3860 v.1
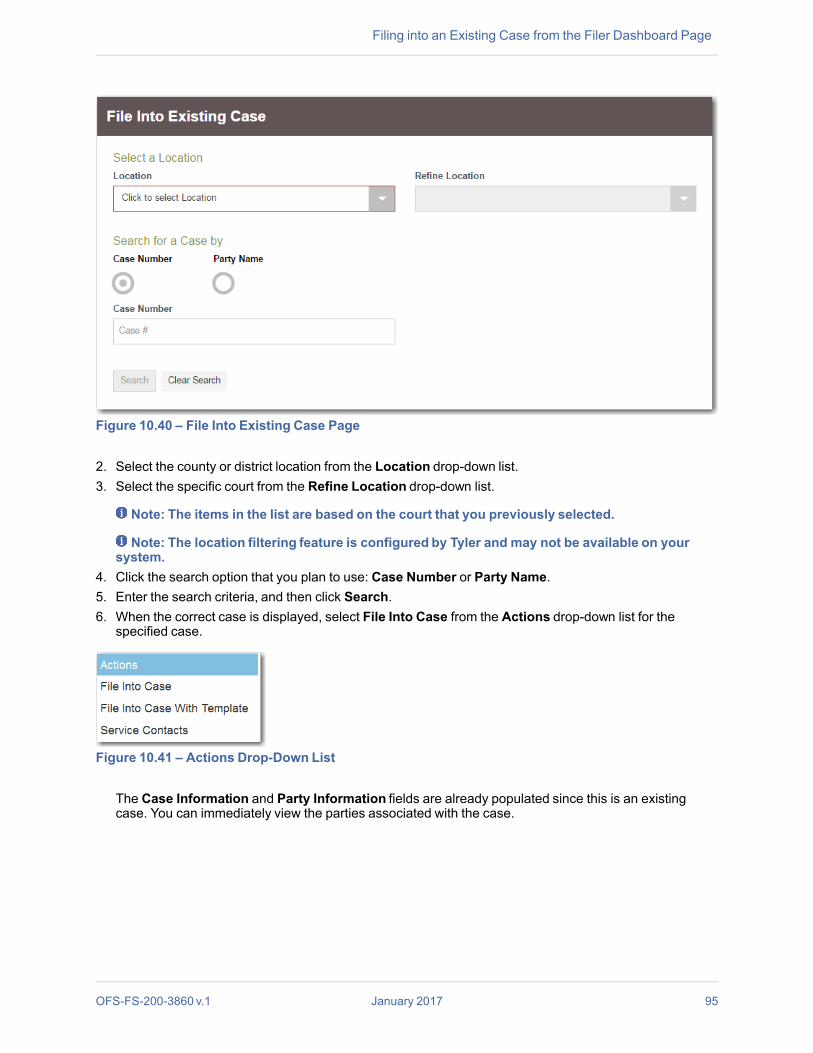
Figure 10.40 – File Into Existing Case Page
2. Select the county or district location from the Location drop-down list.3. Select the specific court from the Refine Location drop-down list.
Note: The items in the list are based on the court that you previously selected.
Note: The location filtering feature is configured by Tyler and may not be available on yoursystem.
4. Click the search option that you plan to use: Case Number or Party Name.5. Enter the search criteria, and then click Search.6. When the correct case is displayed, select File Into Case from the Actions drop-down list for the
specified case.
Figure 10.41 – Actions Drop-Down List
The Case Information and Party Information fields are already populated since this is an existingcase. You can immediately view the parties associated with the case.
OFS-FS-200-3860 v.1 January 2017 95
Filing into an Existing Case from the Filer Dashboard Page

Odyssey File & Serve™ HTML5
Figure 10.42 – Party Information Section Expanded for Existing Cases
When more than 100 parties are on a case, only the first party of each required type is displayed, alongwith a message that additional parties could not be displayed due to system constraints. Add additionalparties to the case if you want.
Figure 10.43 – Case Information and Party Information Sections
7. Complete the filing details in the Filings section.
96 January 2017 OFS-FS-200-3860 v.1

Figure 10.44 – Filings Section
a. Select a filing type from the Filing Type drop-down list.
A default filing type can be configured for existing case filings. The default filing type can be set toEFileAndServe or just EFile.
Note: Serve is not a default option.
OFS-FS-200-3860 v.1 January 2017 97
Filing into an Existing Case from the Filer Dashboard Page

Odyssey File & Serve™ HTML5
Figure 10.45 – Filing Type Drop-Down List
b. Select a filing code from the Filing Code drop-down list.
Figure 10.46 – Filing Code Drop-Down List
After you select the filing code, the fee associated with the filing code is displayed.
Figure 10.47 – Filing Code Field with the Fee Displayed
c. Type a description of the filing in the Filing Description field.d. Type a client reference number in the Client Reference Number field.
Note: A client reference number is a customer-created number for internal purposes only.Most courts do not see or refer to the Client Reference Number field for the filing. This is anoptional field.
98 January 2017 OFS-FS-200-3860 v.1

e. Type any relevant comments in the Comments to Court field.f. If you want to send courtesy copies of the filing to another party, type the recipient’s email address in
the Courtesy Copies field.g. Enter the date the filing is due in the Due Date field by clicking the calendar icon.
Note: The Due Date field is configured by Tyler and may not be available on your system.
A calendar is displayed from which you can select the specified date.
Figure 10.48 – Due Date Calendar
h. Click the Filing on Behalf of field to select the parties from the drop-down list.
Note: The filing on behalf of feature is configured by Tyler and may not be available on yoursystem.
OFS-FS-200-3860 v.1 January 2017 99
Filing into an Existing Case from the Filer Dashboard Page

Odyssey File & Serve™ HTML5
Figure 10.49 – Filing on Behalf of Field in the Filings Section
i. Click the Lead Document field to select a lead document to load. If your document is stored in thecloud, click the icon for the cloud service provider where the document is stored.
Note: Cloud services are configured by Tyler and may not be available on your system. Ifyour system is configured for cloud services, you can upload documents from the followingcloud storage providers: Google Drive™ online storage service, Dropbox®, and Microsoft®OneDrive®.
Note: The Lead Document field is required. Only one document can be uploaded as a leaddocument.
100 January 2017 OFS-FS-200-3860 v.1

Figure 10.50 – Lead Document and Attachments Fields in the Filings Section
j. Type a name for the lead document in the Description field.
Note: A maximum length for the document name can be configured by Tyler at thecustomer’s request. When configured, if a user assigns a name to a document that exceedsthe maximum character length, a warning message is displayed. If you see this type ofwarningmessage, you must assign a new name to the document before you can continuewith the upload.
k. Click the Security drop-down list to select the level of security to attach to the document.
Figure 10.51 – Security Drop-Down List in the Lead Document Section
l. If you have attachments to load, click the Attachments field to select the documents to load. If theattachments are stored in the cloud, click the icon for the cloud service provider where theattachments are stored.
Note: Not all court locations accept attachments. If your court does not acceptattachments, create the lead document and attachment as one document, and upload thedocument in the Lead Document field.
The Optional Services and Fees section is displayed.
OFS-FS-200-3860 v.1 January 2017 101
Filing into an Existing Case from the Filer Dashboard Page

Odyssey File & Serve™ HTML5
Figure 10.52 – Optional Services and Fees Section
m. If you want to add an optional service to the filing, click .
The Optional Services and Fees field is displayed.
Figure 10.53 – Optional Services and Fees Field in the Optional Services and Fees Section
n. Select a service from the Optional Services and Fees drop-down list.
Figure 10.54 – Optional Services and Fees Drop-Down List
The fee associated with the optional service is displayed.
o. When you select the service for certified copies, type the number of copies that you want in the Enternumber of certified copies desired field.
102 January 2017 OFS-FS-200-3860 v.1

Figure 10.55 – Optional Services and Fees Section with Services Selected
p. Add more optional services if you want.
Note: If you try to add the same service twice, a warningmessage is displayed.
Note: If you want to remove an optional service before you save your changes, selectRemove optional service from the Optional Service Actions drop-down list.
Figure 10.56 – Optional Service Actions Drop-Down List
q. When you are done adding optional services, click .
Figure 10.57 – Optional Services and Fees Section with Optional Services Saved
Note: After you have added an optional service and saved the changes, you cannot editthat service. You must remove the service and then re-add it.
r. Verify that the service contacts are correct. If you want to add another service contact, select anoption from the Actions drop-down list in the Service Contacts section.
s. Click to save your changes, or click to cancel the action.
OFS-FS-200-3860 v.1 January 2017 103
Filing into an Existing Case from the Filer Dashboard Page

Odyssey File & Serve™ HTML5
8. Complete the fields in the Fees section.
Note: Your credit card is authorized when submitted. However, the transaction fees are notposted to the credit card account until the court accepts the filing. Once the filing is accepted,the total filing fee to be submitted for the filing is displayed.
Figure 10.58 – Fees Section
a. Select a payment account from the Payment Account drop-down list.
Note: If you enter incorrect payment information in the Payment Account field, you willreceive an error message stating that the account information you entered is invalid. Youmust correct the payment information before you can continue with your filing.
b. Select the party that is responsible for paying the fees from the Party Responsible for Fees drop-down list.
c. Select the filing attorney from the Filing Attorney drop-down list.d. Select the filer type from the Filer Type drop-down list.
104 January 2017 OFS-FS-200-3860 v.1

Figure 10.59 – Filer Type Drop-Down List
e. Click to save your changes, or click to cancel the action.
9. After completing the fields in all of the sections on the page, perform one of the following actions:
• Click to stop working on your filing and resume work at a later time. Note: Toresume filing a saved draft, navigate to the Filing History page. From the Actions drop-down list for the specified draft, select Resume Draft Envelope to continue with yourfiling.
• Click to review a summary of your filing.
10. If you clicked , review the filing for accuracy. If you need to make any changes, click
to return to the previous page. Make any necessary corrections, and then clickagain.
11.When you are satisfied with the information in your filing, click .
A new Envelope of your filing is included on the Filing History page.
CREATING A SERVICE ONLY FILINGTo create a Service Only filing, perform the following steps:
1. Select an existing case that you want to file into.2. Follow one of the methods for filing into an existing case (i.e., from the Filing History page, from the
Bookmarks page, by clicking File into Existing Case in the New Filing section on the Filer Dashboardpage, or from the Actions drop-down list on the Filer Dashboard page).
Note: The Case Information and Party Information fields are already populated since this is anexisting case.
3. Navigate to the Filings section. Select Serve in the Filing Type field.
OFS-FS-200-3860 v.1 January 2017 105
Creating a Service Only Filing

Odyssey File & Serve™ HTML5
Figure 10.60 – Case Page
4. Click the Service Document field to select a service document to load. If your document is stored in thecloud, click the icon for the cloud service provider where the document is stored.
Note: Cloud services are configured by Tyler and may not be available on your system. If yoursystem is configured for cloud services, you can upload documents from the following cloudstorage providers: Google Drive™ online storage service, Dropbox®, and Microsoft® OneDrive®.
Note: The Service Document field is required.
106 January 2017 OFS-FS-200-3860 v.1

5. Click .6. Add the service contacts that you want to receive a Service Only filing in the Service Contacts section.7. If applicable, select the payment account from the Payment Account drop-down list.8. If applicable, select the party that is responsible for paying the fees from the Party Responsible for
Fees drop-down list.9. Select the filing attorney from the Filing Attorney drop-down list.10.Select the filer type from the Filer Type drop-down list.11. Select the check box for the appropriate submission agreement in the Submission Agreements
section.
Note: Submission agreements are configured by Tyler and may not be available on yoursystem.
12.Click to stop working on your filing and resume work at a later time, or clickto review a summary of your filing.
FILING AN APPEAL TO AN EXISTING CASENote: The Appellate option is configured by Tyler and may not be available on your system.
Perform the following steps to file an appeal to an existing case using the Appellate option:
1. From the Actions drop-down list on the Filer Dashboard page, select Start a New Case.
Note: You can also click Start a New Case on the Filer Dashboard in the New Filing section.
The Start a New Case page is displayed.2. Complete the details for the appeal by using the drop-down lists in the required fields in the Case
Information section:
Note: A red box around a field indicates that it is required.
OFS-FS-200-3860 v.1 January 2017 107
Filing an Appeal to an Existing Case

Odyssey File & Serve™ HTML5
Figure 10.61 – Appellate Selections in the Case Information Section
a. Select your court location from the Location drop-down list.
Note: The court location is generally the county or district court where you will be doing thefiling.
b. Select the specific court from the Refine Location drop-down list.
Note: The location filtering feature is configured by Tyler and may not be available on yoursystem.
Note: The items in this list are limited to only the courts in the county or district that youpreviously selected.
c. Select Appellate Case from the Category drop-down list.d. Select the case type from the Case Type drop-down list.e. Type the original case number in the Lower Court Case Number field.f. Type the name of the lower court in the Lower Court Name field.g. Type the name of the lower court case judge in the Lower Court Case Judge field.h. Type a description of the original case in the Lower Court Case Description field.
3. After completing the required fields, click .
Note: If you decide to save the draft, you can stop working on the filing and resume work at a latertime. To resume filing a saved draft, navigate to the Filing History page. From the Actions drop-downlist for the specified draft, select Resume Draft Envelope to continue with your filing.
108 January 2017 OFS-FS-200-3860 v.1

CHAPTER 11 SERVICE CONTACTS
TOPICS COVERED IN THIS CHAPTER
♦ ADDING SERVICE CONTACTS TO THE FIRM♦ ADDING SERVICE CONTACTS TO A CASE♦ REPLACING A FIRM SERVICE CONTACT♦ DEFAULT STATE OF SERVICE CONTACTS♦ PUBLIC SERVICE CONTACTS♦ ADDING FIRM SERVICE CONTACTS FROM A PUBLIC LIST♦ CREATE NEW SERVICE CONTACTS DURING A FILING♦ SELECTING THE SERVICE METHOD FOR SERVICE CONTACTS♦ VIEWING ATTACHED CASE LIST OF FIRM SERVICE CONTACTS♦ LINKING A SERVICE CONTACT TO ANOTHER PARTY♦ SEARCH AND PAGING CAPABILITY FOR FIRM SERVICE CONTACTS♦ REMOVING A SERVICE CONTACT FROM A CASE♦ DELETING A SERVICE CONTACT FROM THE FIRM
You can view the current service contacts and add service contacts to your firm.
ADDING SERVICE CONTACTS TO THE FIRMYou can add service contacts to the list of contacts associated with your firm.To add a service contact to your firm, perform the following steps:
1. From the Actions drop-down list on the Filer Dashboard page, click Firm Service Contacts.
Figure 11.1 – Actions Drop-Down List
The Firm Service Contacts page is displayed.
OFS-FS-200-3860 v.1 January 2017 109
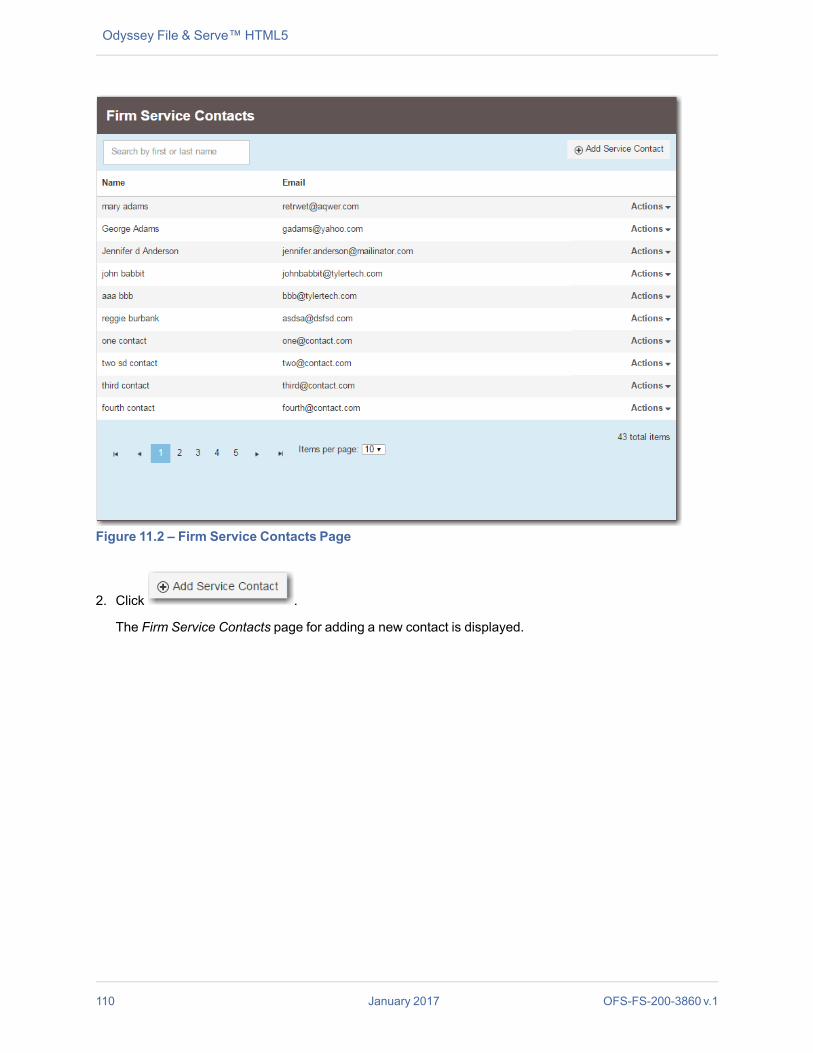
Odyssey File & Serve™ HTML5
Figure 11.2 – Firm Service Contacts Page
2. Click .
The Firm Service Contacts page for adding a new contact is displayed.
110 January 2017 OFS-FS-200-3860 v.1

Figure 11.3 – Firm Service Contacts Page for Adding a New Contact
3. Complete the required fields to add the new service contact: First Name, Last Name, and Email.4. If you want to make the contact available to any filer, select theMake This Contact Public check box.
5. Click to save the contact, or click to cancel the action.
If you click , the new contact information is displayed in the Firm Service Contactslist.
ADDING SERVICE CONTACTS TO A CASETo add a service contact to a case, perform the following steps:
1. From the Filing History page, locate the case to which you want to add a service contact. From theActions drop-down list for the specified case, select View Service Contacts.
OFS-FS-200-3860 v.1 January 2017 111
Adding Service Contacts to a Case

Odyssey File & Serve™ HTML5
Figure 11.4 – Actions Drop-Down List
The Service Contacts page is displayed.
Figure 11.5 – Service Contacts Page
2. Locate the party to which you want to add a service contact. From the Actions drop-down list for thespecified party, select Add From Firm Service Contacts.
Figure 11.6 – Service Contacts Actions Drop-Down List
The Add From Firm Service Contacts dialog box is displayed.
112 January 2017 OFS-FS-200-3860 v.1

Figure 11.7 – Add From Firm Service Contacts Dialog Box
3. Select the check box next to the service contacts that you want to add to the case.
4. After selecting the new service contacts, click .
The new service contacts are now displayed on the Service Contacts page under the party to which theservice contact has been added.
5. Click to return to the Filing History page.
REPLACING A FIRM SERVICE CONTACTTo replace a service contact, perform the following steps:
1. From the Actions drop-down list on the Filer Dashboard page, select Firm Service Contacts.
The Firm Service Contacts page is displayed.
OFS-FS-200-3860 v.1 January 2017 113
Replacing a Firm Service Contact
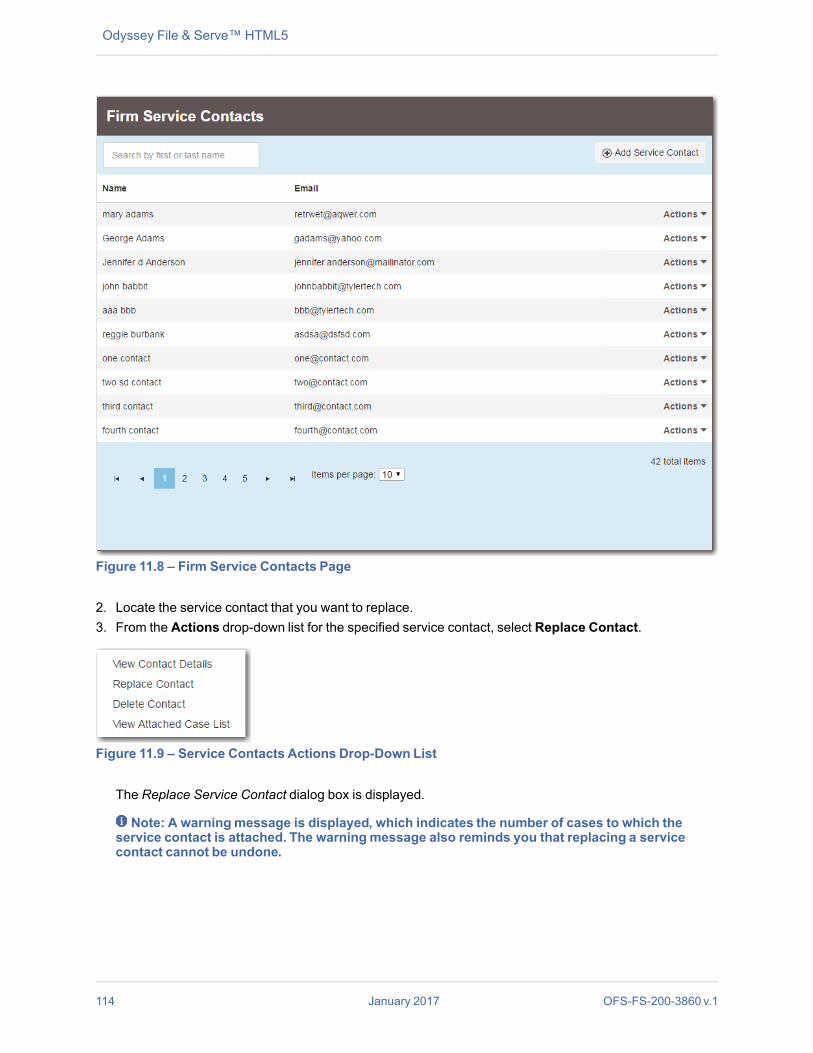
Odyssey File & Serve™ HTML5
Figure 11.8 – Firm Service Contacts Page
2. Locate the service contact that you want to replace.3. From the Actions drop-down list for the specified service contact, select Replace Contact.
Figure 11.9 – Service Contacts Actions Drop-Down List
The Replace Service Contact dialog box is displayed.
Note: A warningmessage is displayed, which indicates the number of cases to which theservice contact is attached. The warningmessage also reminds you that replacing a servicecontact cannot be undone.
114 January 2017 OFS-FS-200-3860 v.1

Figure 11.10 – Replace Service Contact Dialog Box
4. If you want to continue to replace the specified service contact, select one of the following methods toreplace the service contact.
• To replace the service contact with an existing contact, select the Replace with an ExistingService Contact option. Then select a replacement service contact from the Existing Service
Contacts drop-down list. Click .
Figure 11.11 – Replace Service Contact Dialog Box with Existing Service Contacts Drop-Down List
• To replace the service contact with a new contact, select the Replace with a New ServiceContact option. The dialog box expands with fields to complete for the new contact. Complete
the fields, and click .
OFS-FS-200-3860 v.1 January 2017 115
Replacing a Firm Service Contact
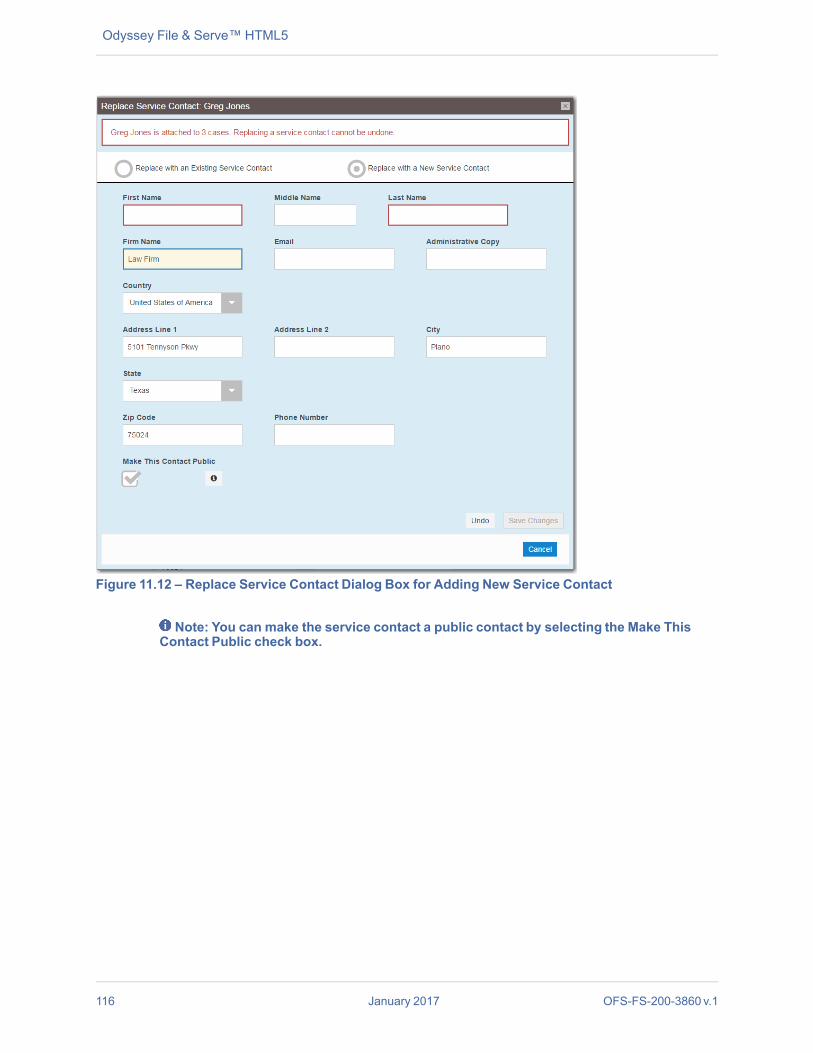
Odyssey File & Serve™ HTML5
Figure 11.12 – Replace Service Contact Dialog Box for Adding New Service Contact
Note: You can make the service contact a public contact by selecting the Make ThisContact Public check box.
116 January 2017 OFS-FS-200-3860 v.1

DEFAULT STATE OF SERVICE CONTACTSDuring filing creation, the system default is for all service contacts to be selected for Service Only andEFileAndServe filings. You can deselect the service contacts that are not needed for that filing. This featureshortens your filing time, especially if you have dozens of service contacts associated with a case.
Figure 11.13 – Service Contacts Selected by Default (With One Contact Deselected)
PUBLIC SERVICE CONTACTSWhen a service contact is created and associated with a case, it can be designated as a public servicecontact. When specified as public, the service contact can then be used by anyone outside your firm.
Note: The public service contacts feature is configured by Tyler and may not be available on yoursystem.In addition, you can add service contacts from a public list to a case that you are starting or filing into.
OFS-FS-200-3860 v.1 January 2017 117
Default State of Service Contacts

Odyssey File & Serve™ HTML5
Figure 11.14 – Service Contacts Page
ADDING FIRM SERVICE CONTACTS FROM A PUBLICLISTNote: The public service contacts feature is configured by Tyler and may not be available on your
system.To add a firm service contact from a public list, perform the following steps:
1. From the Filing History page, locate the case to which you want to add a public service contact. Fromthe Actions drop-down list for the specified case, select View Service Contacts.
Figure 11.15 – Actions Drop-Down List
The Service Contacts page for the specified case is displayed.
118 January 2017 OFS-FS-200-3860 v.1

Figure 11.16 – Service Contacts Page
2. Locate the party to which you want to add a public service contact. From the Actions drop-down list forthe specified party, select Add From Public List.
Figure 11.17 – Service Contacts Actions Drop-Down List
The Add Service Contact from Public List dialog box is displayed.
OFS-FS-200-3860 v.1 January 2017 119
Adding Firm Service Contacts from a Public List
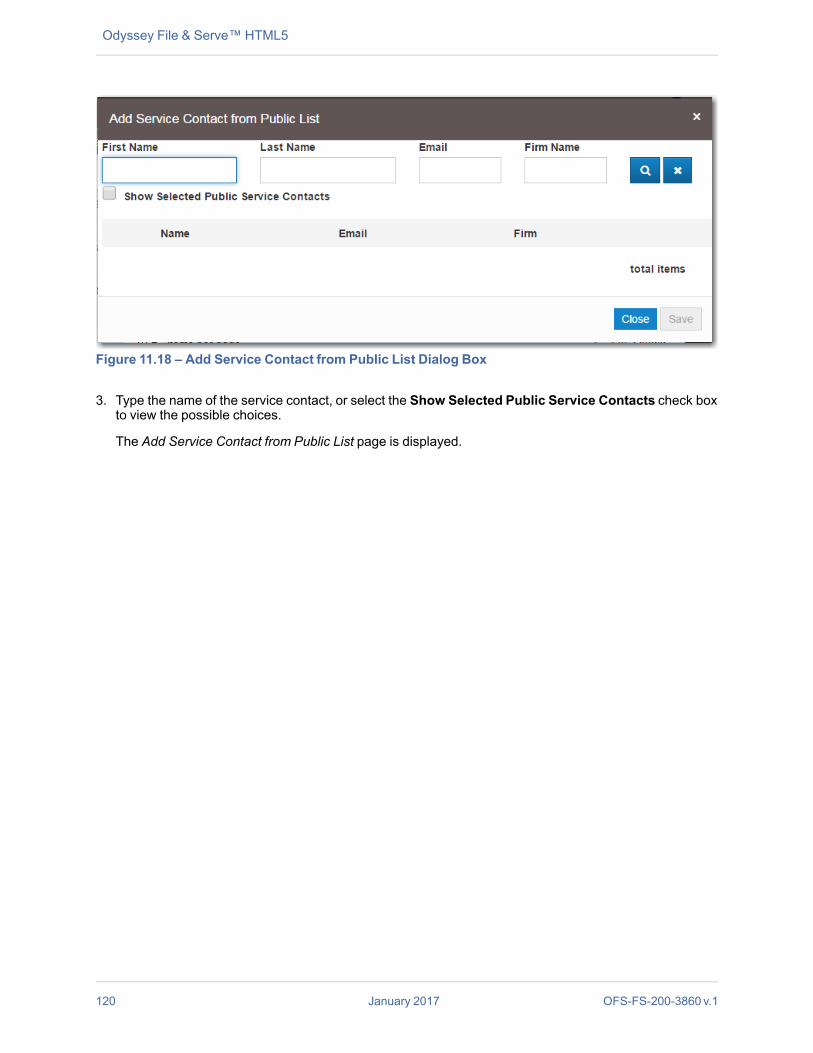
Odyssey File & Serve™ HTML5
Figure 11.18 – Add Service Contact from Public List Dialog Box
3. Type the name of the service contact, or select the Show Selected Public Service Contacts check boxto view the possible choices.
The Add Service Contact from Public List page is displayed.
120 January 2017 OFS-FS-200-3860 v.1

Figure 11.19 – Add Service Contact from Public List Page
4. Click the names of the public service contacts that you want to add to the case.
5. After selecting the public service contacts, click .
The public service contacts are now displayed on the Service Contacts page under the party to whichthe public service contact has been added.
6. Click to return to the Filing History page.
OFS-FS-200-3860 v.1 January 2017 121
Adding Firm Service Contacts from a Public List

Odyssey File & Serve™ HTML5
CREATE NEW SERVICE CONTACTS DURING A FILINGYou can add service contacts while filing a case without first adding the service contacts to the Firm ServiceContacts list.Note: This feature is configured by Tyler and may not be available on your system.
Service contacts can be created from the following locations:
• The Filing History page
• When selecting File Into Existing Case from the Filer Dashboard page or the Actions drop-downlist (i.e., performing a case search)
• When creating a new filing (in the Service Contacts section)
Figure 11.20 – Other Service Contacts Section (with New Contact Added)
After you add the new service contact, it is added to the Firm Service Contacts page.
122 January 2017 OFS-FS-200-3860 v.1

Figure 11.21 – Firm Service Contacts Page
CREATING FIRM SERVICE CONTACTS FROM THE FILING HISTORYPAGEYou can add service contacts to the Firm Service Contacts list for an existing case from the Filing Historypage.To create a service contact from the Filing History page, perform the following steps:
1. From the Actions drop-down list, select Filing History.
The Filing History page is displayed.
OFS-FS-200-3860 v.1 January 2017 123
Creating Firm Service Contacts from the Filing History Page

Odyssey File & Serve™ HTML5
Figure 11.22 – Filing History Page
2. Locate a case for which you want to add a service contact. From the Actions drop-down list for thespecified case, select View Service Contacts.
Figure 11.23 – Actions Drop-Down List
The Service Contacts page for the specified case is displayed.
124 January 2017 OFS-FS-200-3860 v.1
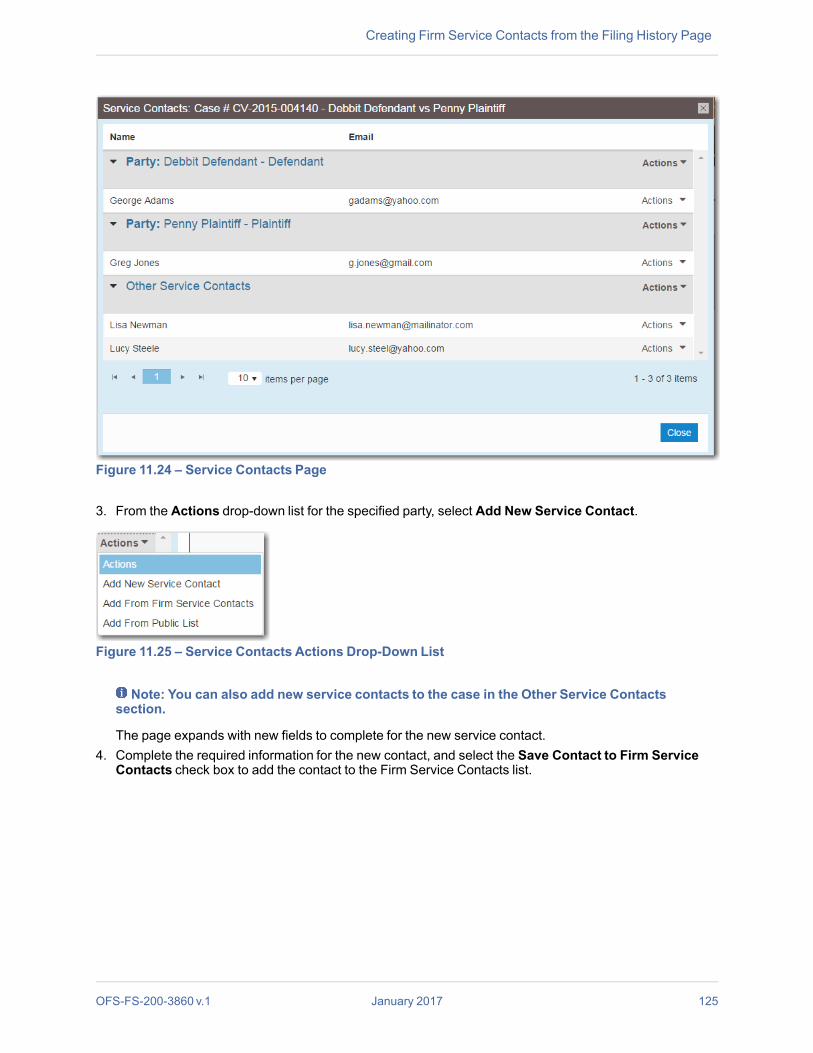
Figure 11.24 – Service Contacts Page
3. From the Actions drop-down list for the specified party, select Add New Service Contact.
Figure 11.25 – Service Contacts Actions Drop-Down List
Note: You can also add new service contacts to the case in the Other Service Contactssection.
The page expands with new fields to complete for the new service contact.4. Complete the required information for the new contact, and select the Save Contact to Firm Service
Contacts check box to add the contact to the Firm Service Contacts list.
OFS-FS-200-3860 v.1 January 2017 125
Creating Firm Service Contacts from the Filing History Page

Odyssey File & Serve™ HTML5
Figure 11.26 – Save Contact to Firm Service Contacts Check Box
CREATING FIRM SERVICE CONTACTS DURING A CASE SEARCH (FILEINTO EXISTING CASE)To create a firm service contact during a case search, perform the following steps:
1. From the Actions drop-down list on the Filer Dashboard page, select File Into Existing Case.
Note: You can also click File into Existing Case on the Filer Dashboard in the New Filingsection.
Figure 11.27 – Filer Dashboard Page
The File Into Existing Case page is displayed.
126 January 2017 OFS-FS-200-3860 v.1
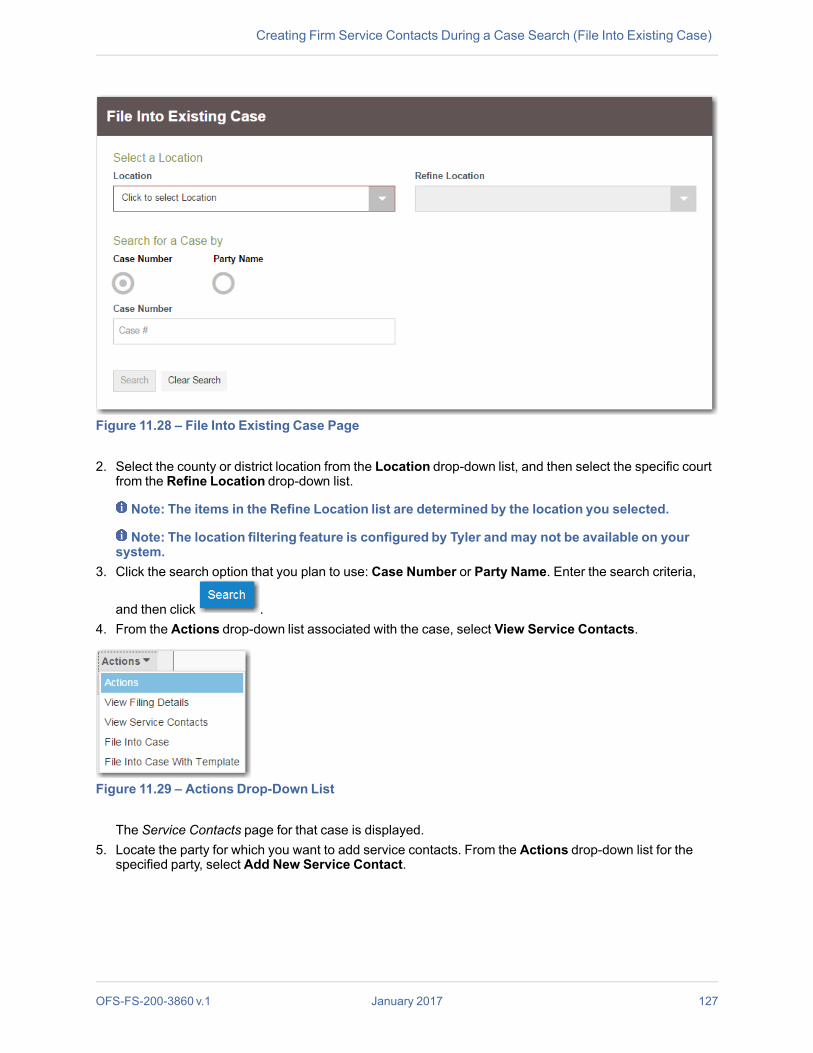
Figure 11.28 – File Into Existing Case Page
2. Select the county or district location from the Location drop-down list, and then select the specific courtfrom the Refine Location drop-down list.
Note: The items in the Refine Location list are determined by the location you selected.
Note: The location filtering feature is configured by Tyler and may not be available on yoursystem.
3. Click the search option that you plan to use: Case Number or Party Name. Enter the search criteria,
and then click .4. From the Actions drop-down list associated with the case, select View Service Contacts.
Figure 11.29 – Actions Drop-Down List
The Service Contacts page for that case is displayed.5. Locate the party for which you want to add service contacts. From the Actions drop-down list for the
specified party, select Add New Service Contact.
OFS-FS-200-3860 v.1 January 2017 127
Creating Firm Service Contacts During a Case Search (File Into Existing Case)

Odyssey File & Serve™ HTML5
Figure 11.30 – Service Contacts Actions Drop-Down List
The page expands with new fields to complete for the new service contact.6. Complete the required information for the new contact, and select the Save Contact to Firm Service
Contacts check box to add the contact to the Firm Service Contacts list.
Figure 11.31 – Save Contact to Firm Service Contacts Check Box
7. Click .
CREATING FIRM SERVICE CONTACTS DURING ENVELOPE CREATIONTo create service contacts during envelope creation, perform the following steps:
1. From the Filer Dashboard page or the Actions drop-down list, select Start a New Case.
Figure 11.32 – Filer Dashboard Page
2. Complete the required fields in the Case Information, Party Information, and Filings sections.3. Navigate to the Service Contacts section. Locate the party to which you want to add a service contact.4. Select Add New Service Contact from the Actions drop-down list for the specified party.
128 January 2017 OFS-FS-200-3860 v.1

Figure 11.33 – Service Contacts Actions Drop-Down List
5. Complete the required fields for the new contact.
Note: The Save Contact to Firm Service Contacts check box is selected by default. You canclear the check box if you do not want to add the service contact to the Firm Service Contactslist.
Figure 11.34 – Save Contact to Firm Service Contacts Check Box
6. Click , and then continue with the rest of the filing creation.
SELECTING THE SERVICE METHOD FOR SERVICECONTACTSYou can select the service method for a service contact when you start a new case or when you add aservice contact to an existing case.To select the service method for a service contact when starting a new case, perform the following steps:
1. From the Actions drop-down list on the Filer Dashboard page, select Start a New Case.
Note: You can also click Start a New Case on the Filer Dashboard in the New Filing section.
The Start a New Case page is displayed.2. Complete the details for the new case by using the drop-down lists in the required fields in the Case
Information section:
Note: A red box around the field indicates that it is required.3. Complete the fields in the Party Information section.4. Enter the filing details for the case in the Filings section.5. In the Service Contacts section, locate the party to which you want to add a service contact. From the
Actions drop-down list for the specified party, select Add From Firm Service Contacts.
OFS-FS-200-3860 v.1 January 2017 129
Selecting the Service Method for Service Contacts

Odyssey File & Serve™ HTML5
Figure 11.35 – Service Contacts Actions Drop-Down List
The Add From Firm Service Contacts dialog box is displayed.
Figure 11.36 – Add From Firm Service Contacts Dialog Box
6. Select the check box next to the service contacts that you want to add to the case.
7. After selecting the new service contacts, click .
The new service contacts are now displayed in the Service Contacts section under the party to whichthe service contact has been added.
Figure 11.37 – Service Contacts Section
8. In the Service Contacts section, click the name of the new service contact that you added to select aservice method.
The Service Method field is displayed, along with the rest of the service contact’s information.
130 January 2017 OFS-FS-200-3860 v.1
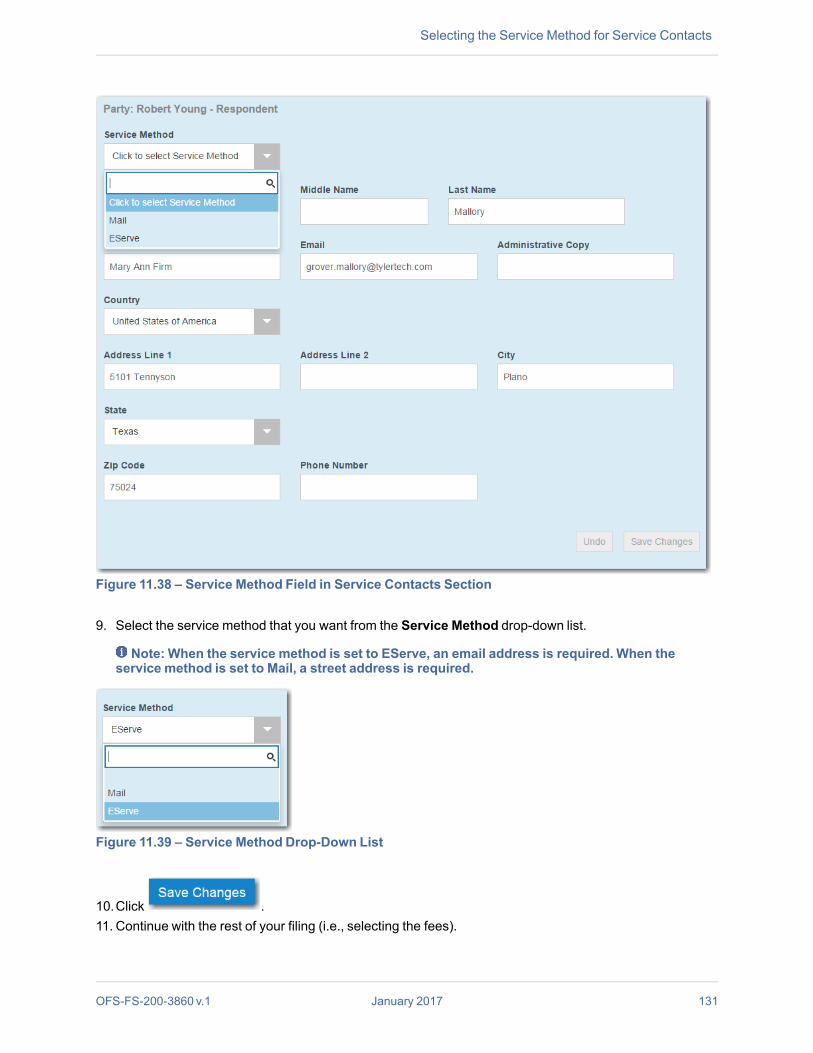
Figure 11.38 – Service Method Field in Service Contacts Section
9. Select the service method that you want from the Service Method drop-down list.
Note: When the service method is set to EServe, an email address is required. When theservice method is set to Mail, a street address is required.
Figure 11.39 – Service Method Drop-Down List
10.Click .11. Continue with the rest of your filing (i.e., selecting the fees).
OFS-FS-200-3860 v.1 January 2017 131
Selecting the Service Method for Service Contacts
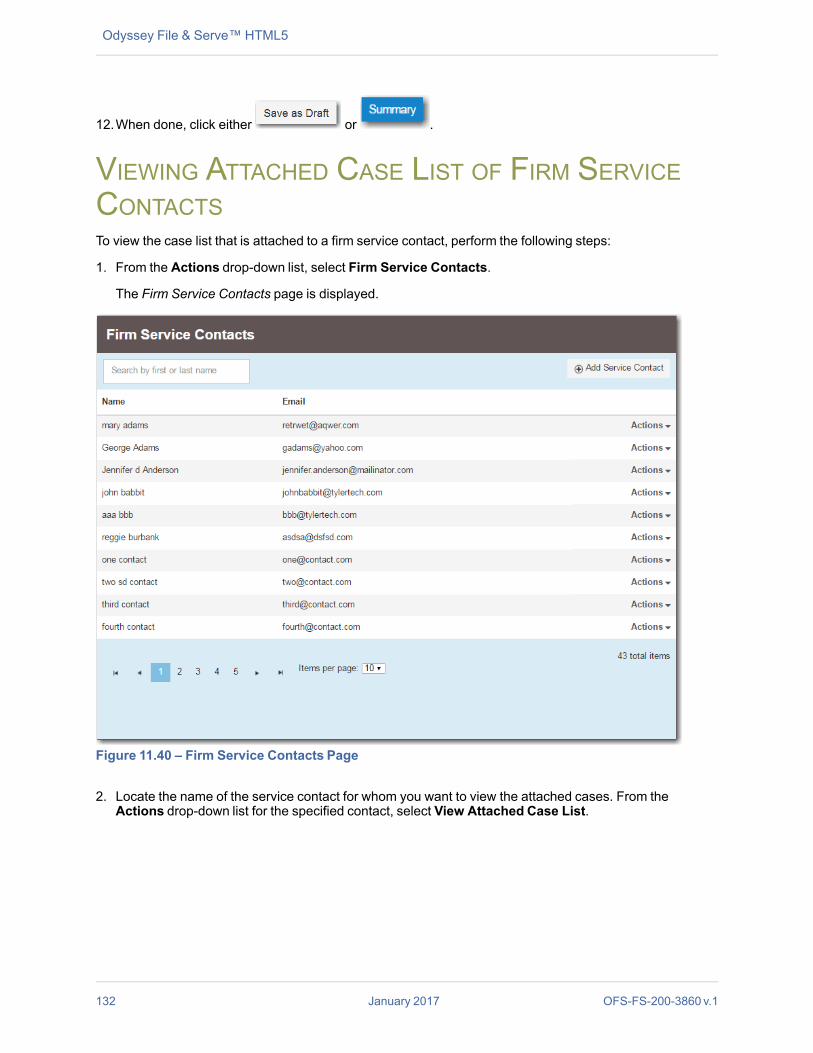
Odyssey File & Serve™ HTML5
12.When done, click either or .
VIEWING ATTACHED CASE LIST OF FIRM SERVICECONTACTSTo view the case list that is attached to a firm service contact, perform the following steps:
1. From the Actions drop-down list, select Firm Service Contacts.
The Firm Service Contacts page is displayed.
Figure 11.40 – Firm Service Contacts Page
2. Locate the name of the service contact for whom you want to view the attached cases. From theActions drop-down list for the specified contact, select View Attached Case List.
132 January 2017 OFS-FS-200-3860 v.1

Figure 11.41 – Service Contacts Actions Drop-Down List
The attached case list is displayed.
Figure 11.42 – Attached Cases Page
LINKING A SERVICE CONTACT TO ANOTHER PARTYYou can link a service contact associated to a party on a case to another party on the same case.To link a service contact to another party, perform the following steps:
1. From the Filing History page, locate the case for which you want to modify the service contacts. Fromthe Actions drop-down list for the specified case, select View Service Contacts.
OFS-FS-200-3860 v.1 January 2017 133
Linking a Service Contact to Another Party

Odyssey File & Serve™ HTML5
Figure 11.43 – Actions Drop-Down List
The Service Contacts page for the specified case is displayed.
Figure 11.44 – Service Contacts Page
2. From the Actions drop-down list for the specified party, select Link Parties with Contact.
134 January 2017 OFS-FS-200-3860 v.1

Figure 11.45 – Link Parties with Contact Drop-Down List on the Service Contacts Page
The Link Parties dialog box is displayed. You can link or unlink service contacts to parties on the case byselecting or clearing the check box associated with the party.
Figure 11.46 – Link Parties Dialog Box
3. Click to return to the Service Contacts page for the specified case.
SEARCH AND PAGING CAPABILITY FOR FIRMSERVICE CONTACTSFirm service contacts can be displayed on multiple pages to allow for searching among the contacts.The paging is activated when more than 10 service contacts exist in the system. You can select the numberof items per page to be displayed: 10, 25, or 50.
OFS-FS-200-3860 v.1 January 2017 135
Search and Paging Capability for Firm Service Contacts

Odyssey File & Serve™ HTML5
Figure 11.47 – Firm Service Contacts Page with Paging Feature
Also, you can search for a specific service contact by typing part of or the entire contact’s name in the textbox on the Firm Service Contacts search page.
Figure 11.48 – Firm Service Contacts Search Page
REMOVING A SERVICE CONTACT FROM A CASEYou can remove a service contact that was previously added to a case.
Note: You can remove a service contact from a case only if you or your firm created that servicecontact or added that service contact to the case.To remove a service contact from a case, perform the following steps:
1. From the Filing History page, locate the case from which you want to remove a service contact. Fromthe Actions drop-down list for the specified case, select View Service Contacts.
The Service Contacts page for the specified case is displayed.
136 January 2017 OFS-FS-200-3860 v.1

Figure 11.49 – Service Contacts Page
2. Locate the service contact that you want to remove. From the Actions drop-down list for the specifiedcontact, select Remove Contact.
Figure 11.50 – Service Contacts Actions Drop-Down List
The contact is removed from the case.
Note: A notification is sent to service contacts that are being removed from a case.
Note: If the contact is a public service contact, it remains on the public service contacts listand can only be removed from the public list by a member of the firm that originally added theservice contact.
DELETING A SERVICE CONTACT FROM THE FIRMYou can delete a service contact associated with your firm.To delete a service contact from your firm, perform the following steps:
1. From the Actions drop-down list on the Filer Dashboard page, select Firm Service Contacts.
The Firm Service Contacts page is displayed.
OFS-FS-200-3860 v.1 January 2017 137
Deleting a Service Contact from the Firm
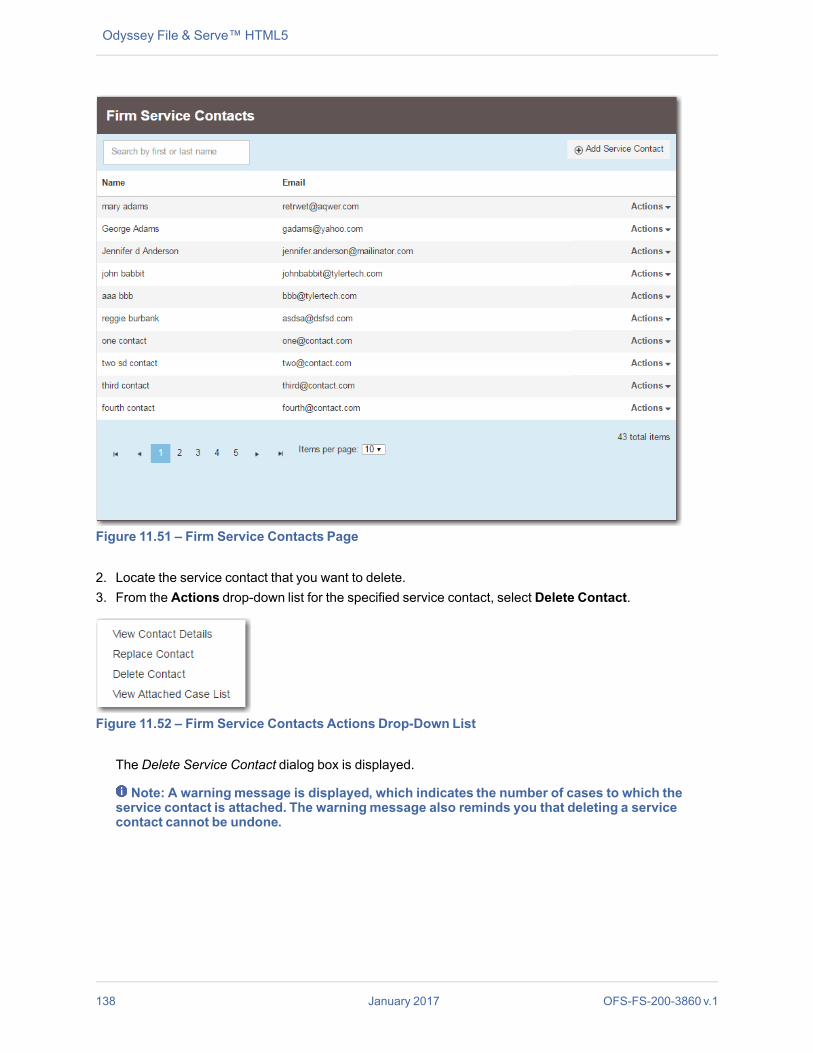
Odyssey File & Serve™ HTML5
Figure 11.51 – Firm Service Contacts Page
2. Locate the service contact that you want to delete.3. From the Actions drop-down list for the specified service contact, select Delete Contact.
Figure 11.52 – Firm Service Contacts Actions Drop-Down List
The Delete Service Contact dialog box is displayed.
Note: A warningmessage is displayed, which indicates the number of cases to which theservice contact is attached. The warningmessage also reminds you that deleting a servicecontact cannot be undone.
138 January 2017 OFS-FS-200-3860 v.1
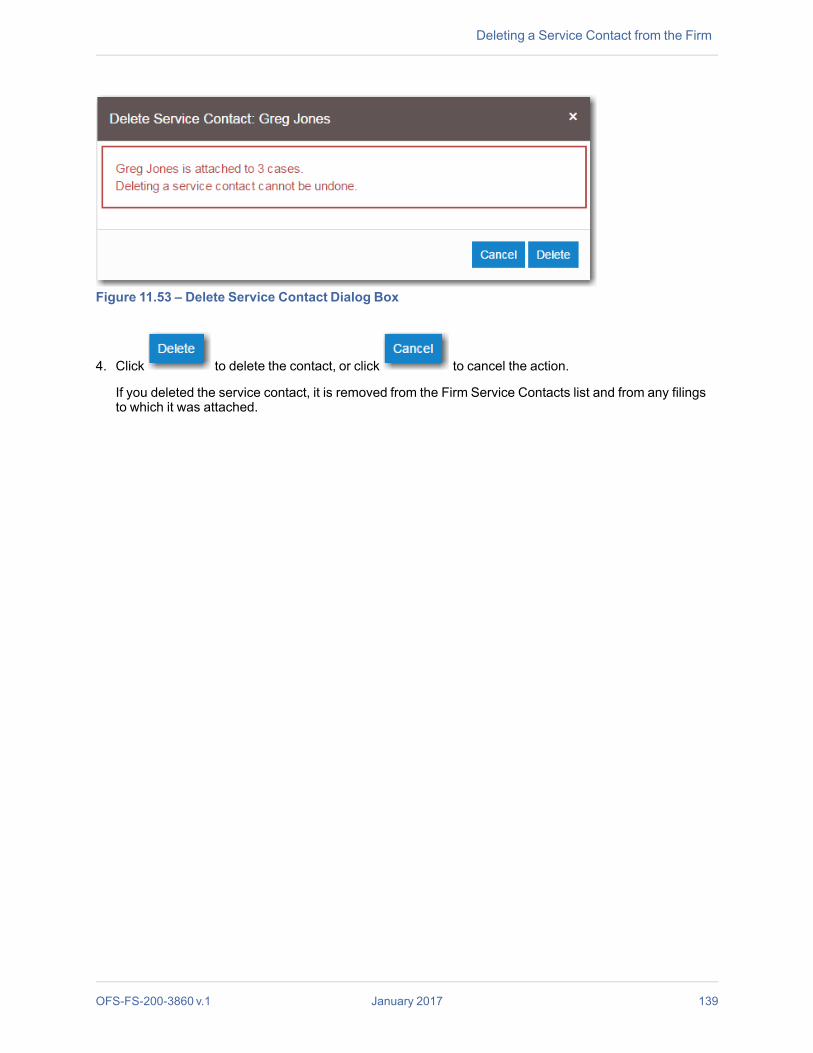
Figure 11.53 – Delete Service Contact Dialog Box
4. Click to delete the contact, or click to cancel the action.
If you deleted the service contact, it is removed from the Firm Service Contacts list and from any filingsto which it was attached.
OFS-FS-200-3860 v.1 January 2017 139
Deleting a Service Contact from the Firm

CHAPTER 12 FILINGSTOPICS COVERED IN THIS CHAPTER
♦ FILTERING THE FILINGS QUEUE♦ COPYING THE ENVELOPE♦ VIEWING THE ENVELOPE DETAILS♦ RESUMING THE FILING PROCESS♦ CANCELING A FILING
After you have uploaded and submitted your filing, the filing is displayed on the Filing History page. Fromthis page, you can view the status of your filing, check the filing type, get a document description, see thenumber assigned to your case, review the details of the case, and cancel a filing. You can also view the timeand date that the filing was submitted. The time stamp corresponds to the time zone in which the filingoccurred.
View FilingsYou can view the details of a case after starting a new case or filing into an existing case by using the FilingHistory page.Use the Filing History page to performmany of the tasks associated with e-filing. From the Filing Historypage, you can manage your firm’s service contacts on a case, view the details of the case, add existingcase filings to a case, resume (continue) the filing process of a case saved as a draft, and cancel a filing.
140 January 2017 OFS-FS-200-3860 v.1

Figure 12.1 – Filing History Page
FILTERING THE FILINGS QUEUEThe Filing History page displays the status of each filing. The status information is located in the FilingStatus column.Note: You can see the status for only the filings that you have submitted, not for all filings related
to a case.To filter information in the filings queue, perform the following steps:
1. Select Filing History from the Actions drop-down list on the Filer Dashboard page.
All relevant information concerning your filings is displayed on the Filing History page.
OFS-FS-200-3860 v.1 January 2017 141
Filtering the Filings Queue
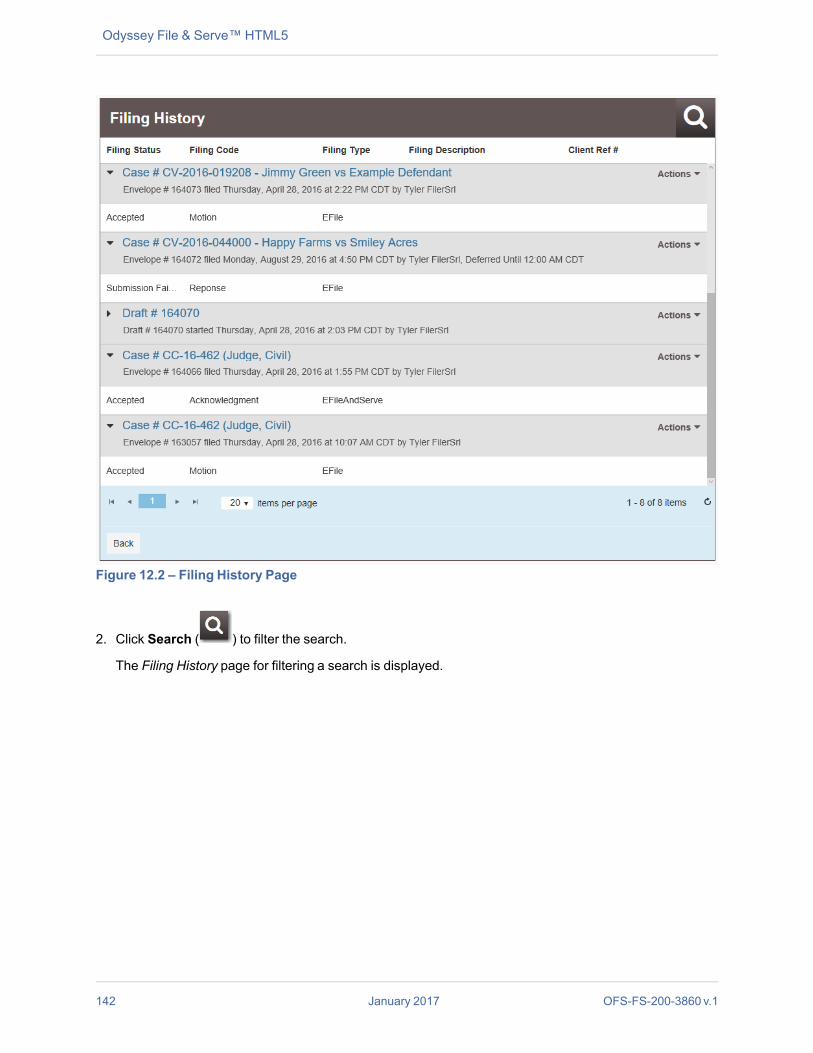
Odyssey File & Serve™ HTML5
Figure 12.2 – Filing History Page
2. Click Search ( ) to filter the search.
The Filing History page for filtering a search is displayed.
142 January 2017 OFS-FS-200-3860 v.1

Figure 12.3 – Filing History Page for Filtering a Search
Note: To clear the filter, click .3. Enter more criteria to refine your search.
a. In the Filter by field, select an option from the drop-down list.
Figure 12.4 – Filter by Drop-Down List
b. Select the status from the All Statuses drop-down list.
OFS-FS-200-3860 v.1 January 2017 143
Filtering the Filings Queue

Odyssey File & Serve™ HTML5
Figure 12.5 – All Statuses Drop-Down List
c. Select the location from the All Locations drop-down list.d. If known, type the envelope or case number in the Envelope or Case # field.
e. In the Date Range field, select the dates for your search. For the From or the To date, click toselect dates from a calendar. Or, type the dates manually (for example, 7/15/2015).
Figure 12.6 – Filter Date Calendar
4. Click
A list of cases meeting your search criteria is displayed.
COPYING THE ENVELOPEYou can copy an envelope to create a new envelope to resubmit to the courts if all filings on the envelopehave been canceled or rejected.
Note: After you copy your envelope with a rejected filing, note that the first filing in the filing tableis selected.Note: This feature requires special configurationby Tyler. The feature can be configured two
different ways. One way is to display the Copy Envelope option only one time. If the system isconfigured in this manner, you can copy the envelope only once. You cannot copy it again. Thesecond configuration is to display the Copy Envelope option at all times. If the system is configuredin this manner, you can copy the envelope multiple times.
144 January 2017 OFS-FS-200-3860 v.1

To copy an envelope, perform the following steps:
1. From the Actions drop-down list, select Filing History.
The Filing History page is displayed.
Figure 12.7 – Filing History Page
2. Locate your envelope on the Filing History page.3. From the envelope Actions drop-down list, select Copy Envelope.
Figure 12.8 – Actions Drop-Down List
The Envelope page is displayed.4. Continue with your filing.
OFS-FS-200-3860 v.1 January 2017 145
Copying the Envelope

Odyssey File & Serve™ HTML5
VIEWING THE ENVELOPE DETAILSFrom the Filing History page, you can see the information entered for the envelope, the filing details, andthe documents submitted.To view the envelope details, perform the following steps:
1. From the Actions drop-down list on the Filer Dashboard page, select Filing History.
The Filing History page is displayed.
Note: The time stamp indicates the time and date that the filing was submitted. The time stampcorresponds to the time zone in which the filing occurred.
Figure 12.9 – Filing History Page
2. Locate your case on the Filing History page.3. From the envelope Actions drop-down list, select View Filing Details.
The Envelope page is displayed.
Note: Only fields that contain values are displayed in the filing details. Fields that contain nodata are not displayed.
146 January 2017 OFS-FS-200-3860 v.1

Figure 12.10 – Envelope Page
4. To return to the Filing History page, either select Filing History from the Actions drop-down list, or click
.
OFS-FS-200-3860 v.1 January 2017 147
Viewing the Envelope Details

Odyssey File & Serve™ HTML5
RESUMING THE FILING PROCESSYou can resume drafts after logging off from the system or exiting the filing process by accessing your caseon the Filing History page.
Figure 12.11 – Filing History Page
To resume the filing process on the case, perform the following steps:
1. Select the draft on the Filing History page for which you want to resume a filing.2. From the Actions drop-down list for the specified draft, select Resume Draft Envelope.
The envelope is displayed at the location where you left off.3. Continue completing the fields for this filing.
CANCELING A FILINGYou can cancel a filing that you submitted before it has been reviewed by the court.To cancel the filing, perform the following steps:
1. On the Filing History page, locate the filing that you want to cancel.
Note: The filingmust be in the Submitted state to be canceled.
148 January 2017 OFS-FS-200-3860 v.1

2. Pause the cursor over the Cancel icon ( ), and click the icon.
Note: Ensure that you want to cancel the filing before you click the icon. Once you click theicon, the filing is canceled immediately, and you cannot undo the action.
Figure 12.12 – Filing History Page – Canceling a Filing
OFS-FS-200-3860 v.1 January 2017 149
Canceling a Filing

CHAPTER 13 BOOKMARKSThe Bookmarks page displays a list of case numbers, locations, and descriptions for the cases that youhave bookmarked. Only you and your firm (depending on the firm setup) can see this information. Neitherthe public nor any other firm can see your case list.
Figure 13.1 – Bookmarks Page
View Bookmarked CasesYou can view a list of your bookmarked cases, file into an existing case, remove the bookmarked case fromthe case list, and add service contacts to the case using the Bookmarks page.
Filing into an Existing CaseTo file into an existing case, select File Into Case from the Actions drop-down list on the Bookmarks page.
150 January 2017 OFS-FS-200-3860 v.1

Figure 13.2 – Bookmarks Actions Drop-Down List
Removing a Case from the Bookmark ListYou can remove a case from the bookmarked case list by selecting Unbookmark this case from theActions drop-down list on the Bookmarks page.
Add Service Contact to the CaseYou can add service contacts to the selected case by selecting Service Contacts from the Actions drop-down list on the Bookmarks page. The Service Contacts dialog box for the specified case is displayed.From here, you can add a service contact from the firm’s service contact list, add a service contact from thepublic list, or create a new service contact.
OFS-FS-200-3860 v.1 January 2017 151
Bookmarks

CHAPTER 14 REPORTS
TOPICS COVERED IN THIS CHAPTER
♦ CREATING A FINANCIAL RECONCILIATION REPORT♦ CREATING A FILINGS REPORT
CREATING A FINANCIAL RECONCILIATION REPORTThe Financial Reconciliation Report contains a report at the Envelope level that is designed to help filersreconcile their filing fees to their credit card statements.To run a financial reconciliation report, perform the following steps:
1. From the Actions drop-down list, select Reports.
The Reports page is displayed.
Figure 14.1 – Reports Page
2. In the Financial Reconciliation Report panel, click .
152 January 2017 OFS-FS-200-3860 v.1

Figure 14.2 – Report Parameters Panel of Reports Page for Financial Reconciliation Report
3. In the Report Parameters panel, enter the report information in the fields provided:
a. From the Filings Submitted By drop-down list, select eitherMe orMy Firm.
b. In the From and To date fields, click to select the report date range from a calendar. Or, typethe dates manually (for example, 7/31/2015).
OFS-FS-200-3860 v.1 January 2017 153
Creating a Financial Reconciliation Report

Odyssey File & Serve™ HTML5
Figure 14.3 – Filter Date Calendar
c. In the Locations field, select All (default), or select one or multiple locations from the list.
d. In the Status field, select All (default), or select one or multiple statuses from the list.
Figure 14.4 – Status Field Drop-Down List
4. Click to run the report, or click to cancel the action.5. Open the report in Microsoft Excel, or save the report to another location.
CREATING A FILINGS REPORTThe Filings Report is a detailed look into every filing, filing status, and fee associated with the filings you oryour firm performed.To create the Filings Report, perform the following steps:
1. From the Actions drop-down list, select Reports.
The Reports page is displayed.
154 January 2017 OFS-FS-200-3860 v.1
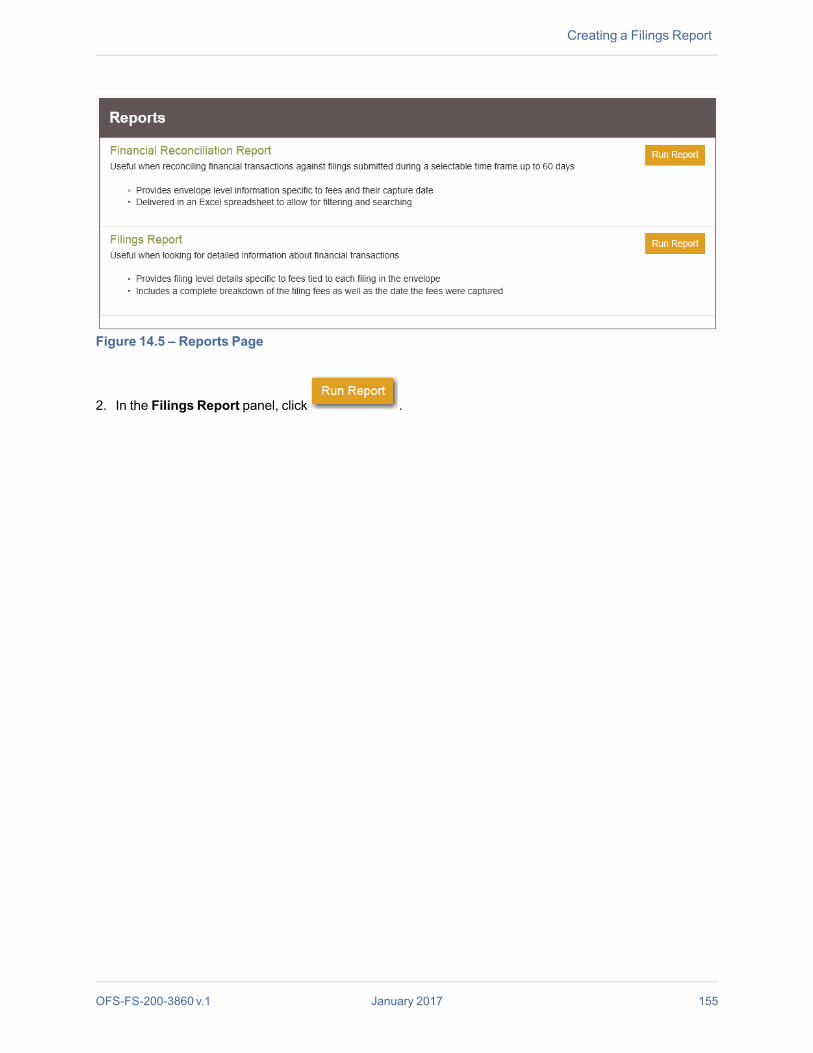
Figure 14.5 – Reports Page
2. In the Filings Report panel, click .
OFS-FS-200-3860 v.1 January 2017 155
Creating a Filings Report

Odyssey File & Serve™ HTML5
Figure 14.6 – Report Parameters Panel of Reports Page for Filings Report
3. In the Report Parameters panel, enter the report information in the fields provided:
a. From the Filings Submitted By drop-down list, select eitherMe orMy Firm.
b. In the From and To date fields, click to select the report date range from a calendar. Or, typethe dates manually (for example, 7/31/2015).
156 January 2017 OFS-FS-200-3860 v.1

Figure 14.7 – Filter Date Calendar
c. In the Locations field, select All (default), or select one or multiple locations from the list.
d. In the Status field, select All (default), or select one or multiple statuses from the list.
Figure 14.8 – Status Field Drop-Down List
4. Click to run the report, or click to cancel the action.5. Open the report in Microsoft Excel, or save the report to another location.
OFS-FS-200-3860 v.1 January 2017 157
Creating a Filings Report

CHAPTER 15 TYLER TECHNOLOGIESTECHNICAL SUPPORT CONTACTINFORMATIONFor assistance, contact Tyler Technologies through the following resources.
Resource Contact InformationOdyssey File & Serve Support Hours 7 am to 9 pm (CT), Monday through Friday
Odyssey File & Serve Support Chat Assistance is also available online through Support Chat.
Odyssey File & Serve Email [email protected]
Odyssey File & Serve Telephone 800.297.5377
GoTo Assist (Support) Support may ask to assist you by sharing your screenusing GoToAssist.
158 January 2017 OFS-FS-200-3860 v.1